sas it resource management 2.7: user's guide...titles for sas it resource management. course...
TRANSCRIPT

SAS® IT Resource Management 2.7User’s Guide

The correct bibliographic citation for this manual is as follows: SAS Institute Inc. 2004.SAS ® IT Resource Management 2.7: User’s Guide. Cary, NC: SAS Institute Inc.
SAS® IT Resource Management 2.7: User’s GuideCopyright © 2004, SAS Institute Inc., Cary, NC, USAAll rights reserved. Produced in the United States of America. No part of this publicationmay be reproduced, stored in a retrieval system, or transmitted, in any form or by anymeans, electronic, mechanical, photocopying, or otherwise, without the prior writtenpermission of the publisher, SAS Institute Inc.U.S. Government Restricted Rights Notice. Use, duplication, or disclosure of thissoftware and related documentation by the U.S. government is subject to the Agreementwith SAS Institute and the restrictions set forth in FAR 52.227–19 Commercial ComputerSoftware-Restricted Rights (June 1987).SAS Institute Inc., SAS Campus Drive, Cary, North Carolina 27513.1st printing, July 20042nd printing, May 2006SAS Publishing provides a complete selection of books and electronic products to helpcustomers use SAS software to its fullest potential. For more information about oure-books, e-learning products, CDs, and hard-copy books, visit the SAS Publishing Web siteat support.sas.com/pubs or call 1-800-727-3228.SAS® and all other SAS Institute Inc. product or service names are registered trademarksor trademarks of SAS Institute Inc. in the USA and other countries. ® indicates USAregistration.Other brand and product names are registered trademarks or trademarks of theirrespective companies.

Contents
P A R T 1 General 1
Chapter 1 � Introduction to SAS IT Resource Management 3Introduction to SAS IT Resource Management 3
Chapter 2 � Getting Started 17Getting Started with SAS IT Resource Management 18
Working with the Interface for Batch Mode 18
Working with the z/OS GUI 19
Working with the UNIX and Windows GUI 21
Working with the Web Galleries 23
Appendixes to Getting Started 24
SAS IT Resource Management Tabs 30
P A R T 2 Setup 35
Chapter 3 � Setup: Introduction 37Setup: Overview 37
Setting Up the Server 38
Setting Up the Client 43
Setting Up the Web Browser 43
Setup: Related Topics 44
Chapter 4 � Setup Case 1 53Setup Case 1 53
Chapter 5 � Setup Case 2 65Setup Case 2 65
Chapter 6 � Setup Case 3 81Setup Case 3 81
Chapter 7 � Setup Case 4 99Setup Case 4 99
Chapter 8 � Setup Case 5 119Setup Case 5 119
Chapter 9 � The MIB to Dictionary Compiler 129The MIB to Dictionary Compiler 129
Chapter 10 � MXG-Based Tables (CMAPP2) 133Using MXG-Based Tables (CMAPP2) 133

iv
Chapter 11 � Generic Collector Facility 157Generic Collector Facility: Overview 158
Generic Collector Facility: The Steps 161
Generic Collector Facility: Additional Information 168
Generic Collector Facility: Appendices 176
Generic Collector Facility: Examples 204
Chapter 12 � Migration 243Migrating Your SAS IT Resource Management Environment from SAS Version 6 to SASVersion 8 243
P A R T 3 Administration 259
Chapter 13 � Administration: Concepts and Tools 261Overview of Administration 261
Chapter 14 � Administration: Working with Site Libraries 269Working with Site Libraries: Main Topics 270
Working with Site Libraries: Properties 283
Chapter 15 � Administration: Working with Whole PDBs 295Working with Whole PDBs: Main Topics 296
Working with Whole PDBs: Properties 326
Chapter 16 � Administration: Working with Levels 337Working with Levels: Main Topics 337
Working with Levels: Related Topics 348
Chapter 17 � Administration: Working with Tables 353Working with Tables: Main Topics 353
Working with Tables: Related Topics 371
Chapter 18 � Administration: Working with Variables 377Working with Variables: Main Topics 378
Working with Variables: Related Topics 407
Chapter 19 � Administration: Working with Data 409Working with Data: Main Topics 409
Working with Data: Related Topics 421
Chapter 20 � Administration: Extensions to SAS IT Resource Management 425Extensions to SAS IT Resource Management Including Duplicate-Data Checking 425
Collector Support Packages 426
Using Process Exits 442
P A R T 4 Reporting 463
Chapter 21 � Report Concepts and Tools 465
v
Report Concepts and Tools 465
Chapter 22 � Reporting: Working with Report Definition Folders 471Working with Report Definition Folders 471
Chapter 23 � Reporting: Working with Report Definitions 479Working with Report Definitions: Main Topics 480
Working with Report Definitions: Related Topics 491
Appendices for z/OS 502
Appendices for UNIX and Windows 505
Chapter 24 � Reporting: Working with Reports 511Working with Reports: Main Topics 511
Chapter 25 � Reporting: Working with Palette Definition Folders 517Working with Palette Definition Folders 517
Chapter 26 � Reporting: Working with Palette Definitions 525Working with Palette Definitions: Main Topics 525
Chapter 27 � Reporting: Working with Rule Definition Folders 531Working with Rule Definition Folders: Main Topics 531
Chapter 28 � Reporting: Working with Rule Definitions 535Working with Rule Definitions: Main Topics 535
Chapter 29 � Reporting: Working with Galleries 551Working with Galleries: Main Topics 551
Chapter 30 � Reporting: Working with Remote Server Profiles 571Working with Remote Server Profiles: Main Topics 571
Appendix 1 � Recommended Reading 579
Glossary 581
Index 597

vi

1
P A R T1
General
Chapter 1. . . . . . . . . .Introduction to SAS IT Resource Management 3
Chapter 2. . . . . . . . . .Getting Started 17

2

3
C H A P T E R
1Introduction to SAS IT ResourceManagement
Introduction to SAS IT Resource Management 3Overview of SAS IT Resource Management 3
What Is the Work Flow? 5
What Are the Interfaces? 6
Batch Interface 6
Server Interfaces (GUIs) 6Client Interface (GUI) 6
Web Interface (Galleries) 6
What Is a PDB? 7
Tables, Variables, and Definitions in a PDB 8
Summarizing Data into Libraries in the PDB 9
How Long Is Data Stored in the PDB? 10Locating Help 11
Getting Started with SAS IT Resource Management 12
QuickStart Wizard 12
General-Purpose Server Setup Documentation 12
Collector-Specific Setup Documentation 12Client Setup Documentation 12
Window Help 13
Usage Documentation and Reference Documentation 13
The GENERATE SOURCE Control Statement 13
The Generic Collector Facility 13Demonstration PDBs, Sample Code, and QuickStart Examples 13
SAS IT Resource Management Web Site 13
SAS IT Resource Management Listserv 14
SAS IT Security Management Documentation 14
SAS IT Charge Management Documentation 14
SAS IT Service Level Management Documentation 14Additional SAS Documentation 14
Suggested Reading 14
SAS Technical Support 16
Introduction to SAS IT Resource Management
Overview of SAS IT Resource Management
SAS IT Resource Management is a performance evaluation solution that enables youto analyze your IT resources more effectively, by enabling you to access, manage, and

4 Overview of SAS IT Resource Management � Chapter 1
analyze large quantities of performance data. SAS IT Resource Management can assistyou in areas such as troubleshooting, performance measurement and tuning, planningfor growth, benchmarking, and discovery. SAS IT Resource Management enables you tosummarize large volumes of data into a common format and then quickly and easilyanalyze and report on the data.
The SAS IT Resource Management documents are available in several locations.
� The Web site http://support.sas.com/documentation/online/itsv has all thedocumentation except the course notes. Documents are published to this Web siteat SAS IT Resource Management releases and can be published between releasesif there is a significant update. You can view and/or print the documents from thisWeb site.
Note: In the SAS IT Resource Management Server Setup Guide, you can printa file’s worth at a time. In the others, you can print the whole document (or anypart of it) at one time. �
� The course notes are available on the from the SAS Bookstore’s Web site: http://www.sas.com/apps/pubscat/welcome.jsp. Select Complete Catalog and then,under Browse Titles by Category, select Course Notes. Scroll to the coursetitles for SAS IT Resource Management. Course notes are published approximatelyevery other release. You can order the course notes from this Web site.
Note: When you enroll in the courses, you do not need to order the course notesseparately. You will get the course notes in class (along with what’s new in themost recent release, if the course notes are not for the most recent release). �
� Some of the documents are also accessible in other locations. For example, theSAS IT Resource Management User’s Guide and Macro Reference documents areavailable in SAS System Help. You can access SAS System Help by displaying aSAS window, such as the SAS Program Editor window, and selecting Help.
Within the SAS IT Resource Management client GUI, another way to accessSAS System Help and these documents is to select OnlineHelp � SAS ITResource Management Help � (on UNIX only) All Topics � SAS Products� IT Resource Management
The copies of the documents in SAS System Help are not typically updatedbetween releases.
Note: SAS IT Resource Management is the new name for IT Service Vision. Youmight see references in our older documentation to its former name. �
Using SAS IT Resource Management, you can read and process data from almost anydata source. This is because SAS IT Resource Management not only supports manypopular network and systems management tools and data sources on z/OS, UNIX, andMicrosoft Windows, but also enables you to read and analyze data from any time-baseddata source.
You can also customize many aspects of the SAS IT Resource Management software.You can use or modify tables and reports that are supplied with this solution, or youcan create new (custom) tables and reports.
SAS IT Resource Management also provides interactive and batch facilities throughwhich you can access, manage, analyze, and present your performance data. The SASIT Resource Management batch macros enable you to perform in batch mode the tasksthat you can perform within the SAS IT Resource Management graphical user interfaces(GUIs). You can either code a macro call outside the GUI or, in many cases, select atask within the GUI and save its macro call in a file. You can then submit the macrocalls in a batch job, file, or script and submitting the job/file/script to a batch processing

Introduction to SAS IT Resource Management � What Is the Work Flow? 5
facility on your system. For information about how to perform tasks in batch mode withmacro calls, see the SAS IT Resource Management macro reference documentation .
For addition introductory information, see the following topics:
� “What Is the Work Flow?” on page 5
� “What Are the Interfaces?” on page 6
� “What Is a PDB?” on page 7
� “Locating Help” on page 11.
What Is the Work Flow?
The routine tasks that you perform to process data and view reports can besummarized as follows:
1 Set up your data collector to work with SAS IT Resource Management. You canuse the QuickStart Wizard to create your PDB and create batch jobs that can beused to process data, reduce data, and create reports based on your data. If youuse the QuickStart Wizard, the process, reduce, and reporting tasks that arementioned in the following steps can be performed through daily jobs that arecreated when you run the QuickStart Wizard.
Based on the source of the data you select in the wizard, the wizard alsoprovides an instruction file to assist you in setting up your collector with SAS ITResource Management. For information about customizing and running theQuickStart jobs, follow the instructions that are provided with the wizard or referto “Using the QuickStart Wizard” in the Getting Started with SAS IT ResourceManagement document.
For more information about setup, refer to “General-Purpose Server SetupDocumentation” on page 12 or “Overview of Setup” on page 37.
2 Stage the IT data that you want to analyze. You can stage data by using suppliedstaging code or by using custom staging code that you write for a specific datasource.
3 Process raw data into the detail level of the tables in your PDB. (For informationabout how to process data, see “Processing Data” on page 413.) You can create adaily job (which typically runs each night) to read and process the data, or you canuse the process-and-reduce job (which typically runs each night) that is createdwhen you run the QuickStart Wizard. When detail-level data reaches an age limitthat you specify, it is automatically deleted from the PDB. For more informationabout age limits, see “How Long Is Data Stored in the PDB?” on page 10.
4 Reduce the detail level data into one or more summary levels in the PDB: day,week, month, or year. You can set up a daily job (which typically runs each night)to reduce the data, or you can use the job (which typically runs each night) that iscreated when you run the QuickStart Wizard. (For more information about how toreduce data, see “Reducing Data” on page 416.)
5 Run the supplied report definitions or create and/or run your own custom reportdefinitions to help analyze your data and identify performance issues. You cangenerate reports that use data from any level of the PDB. (For information abouthow to run supplied report definitions and how to create and run custom reportdefinitions, see “Using the Manage Report Definitions Tool” on page 468. For otherinformation about supplied report definitions, see “Exploring Supplied ReportDefinitions (UNIX, Windows)” on page 488.

6 What Are the Interfaces? � Chapter 1
What Are the Interfaces?SAS IT Resource Management has one batch interface, several GUIs, and a Web
interface.Typically, the batch interface is used for production work and the GUIs are used for
ad hoc work. The production work can be prepared directly for the batch interface byusing an editor, or it can be prepared and tested in the GUIs and then saved in theformat that is used for production.
The Web interface is an optional, additional way to make available the reports thatare generated in batch mode or in interactive mode.
Batch InterfaceTo use the batch interface, you create and run one or more jobs (z/OS), scripts (UNIX),
or batch files (Windows) in batch mode. The jobs/scripts/files invoke SAS software.Within SAS software, the jobs/scripts/files set the SAS IT Resource Management globalmacro variables and invoke the SAS IT Resource Management macros. (You can alsoinclude SAS DATA step code and SAS procedures in the jobs/scripts/files.)
The batch interface is described in the document SAS IT Resource Management:Macro Reference.
Server Interfaces (GUIs)There are two server interfaces: one for z/OS, and one for UNIX and Windows. The
primary focus of the server interfaces is administration. (The client interface has someinteractive functionality for administration, but the full interactive functionality foradministration is in the server interfaces.) Typically the server interface is located on adifferent host from the client interfaces. But on Windows and UNIX, it is possible forthe server host to have both a server license and a client license, and in that case thefunctionality is additive.
The server interfaces are described in “Part 2: Setup” and “Part 3: Administration”of the document SAS IT Resource Management: User’s Guide. In cases where additionalinformation is provided in the macro reference documentation, there are pointers in theUser’s Guide to the relevant sections of the Macro Reference documentation.
Client Interface (GUI)The primary focus of the client interface is reporting. (The server interfaces have
some interactive functionality for reporting, but the full interactive functionality forreporting is in the client interface.) Typically, the client interface is located on a hostthat does not have a server license. But on Windows and UNIX, it is possible for theserver host to have both a server license and a client license, and in that case thefunctionality is additive.
The client interface is described in “Part 4: Reporting” of the document SAS ITResource Management: User’s Guide. In cases where additional information is providedin the macro reference documentation, there are pointers in the User’s Guide to therelevant sections of the Macro Reference documentation.
Web Interface (Galleries)The primary focus of the Web interface is reporting. The Web interface is optional. It
consists of one or more galleries that display Web-enabled reports that typically weregenerated by the client interface and/or the batch interface. The reports that use Javaapplets or ActiveX components generate additional reports interactively as you drilldown. You use a Web browser to view and navigate through the galleries.

Introduction to SAS IT Resource Management � What Is a PDB? 7
The Web interface is described in “Part 4: Reporting” of the document SAS ITResource Management: User’s Guide. Most of the information that is Web related is in
� the topic “Directing a Report to the Web” in the chapter “Working with ReportDefinitions”
� the chapter “Working with Galleries.”
In cases where additional information is provided in the macro referencedocumentation, there are pointers in the User’s Guide to the relevant sections of theMacro Reference documentation.
What Is a PDB?
A performance data database (also referred to as a performance data warehouse or aPDB) is a group of SAS libraries that contains the data that SAS IT ResourceManagement uses. You use a collector to record data from your IT systems, and thenextract, load, and transform that data and store it in a PDB.
The PDB consists of an integrated set of nine libraries that contain data, metadata,workspace, and so on.
Your site can have one or more PDBs, depending on how you want to collect and storeyour data. You can use one PDB for each data source, such as Windows servers, UNIXservers, and phone switches. You might want to do this because the data uses differentvariables, the PDBs might be managed by different groups, or for other reasons.
You can also choose to combine data from multiple data sources in the same PDB. Or,if you want to investigate specific performance problems or use a specific PDB fortesting, then you might want to create a test PDB. You can organize your data andPDBs to meet your site’s needs.
SAS IT Resource Management provides many supplied table and variable definitions.These definitions are the default specifications of how to create that table or variable.When you create a PDB at your site, you can
� copy the supplied table and variable definitions and use them in your new PDB
� copy the supplied table and variable definitions to your new PDB and modify themfor your specific needs
� create new table and variable definitions in your PDB.
For example, if you add or copy a supplied table or variable definition to your PDB,you might want to change defaults such as the age limits of data in each data level, thesettings that specify which data is kept at the detail level, and the settings that specifywhich statistics are calculated at each summary level. You might also want to createnew variables to calculate specific statistics or delete variables that you do not want touse.
The software that you use to gather observations about your IT services is referred toas a collector. SAS IT Resource Management supports many popular collectors and hastables in which to store the input data. However, you can also create your own tables,and SAS IT Resource Management can process that data into your tables.
SAS IT Resource Management reads raw data (metrics) in the format in which theyare logged by your collector or systems management tool. SAS IT ResourceManagement can minimize the volume of data that you keep by summarizing thedetailed performance data into smaller groups or levels in the PDB. You can accept thedefault statistics or you can select the statistics that you want to be calculated at eachsummary level. After the statistics are calculated and the data is reduced into thesummary levels in the PDB, you can analyze information over different time periods byproducing reports on summarized data.

8 What Is a PDB? � Chapter 1
You can also customize many aspects of SAS IT Resource Management. You can useor modify tables and reports that are supplied with this solution, or you can create newtables and reports.
The SAS IT Resource Management administrator is also responsible for managingfuture modifications to the PDB and making backup copies of the PDB. For moreinformation about setting up your PDB, refer to “General-Purpose Server SetupDocumentation” on page 12, or see your SAS IT Resource Management administrator.
Tables, Variables, and Definitions in a PDBA table is a group of data and its metadata that are stored in a PDB. Each table
contains data that is related to a specific performance area, such as a specific type ofnetwork activity. The metadata includes the table definition and the information aboutthe status of the data in the table.
A table’s definition includes properties such as
� the table’s name and description� the name of the collector that is used to gather the data and the name of the tool
that is used to stage the data
� the type of table: interval or event� the age limits of the data in each data level.
A table’s status information includes
� the number of observations at each level� the minimum and maximum datetime stamps on the observations at each level.
A variable’s definition includes properties such as
� the name and description of the variable� the data type, which defines whether the variable is numeric or character� the statistics to be calculated for the variable at each summary level in the PDB
� the variable’s format, for external display� the variable’s maximum length, for internal storage
� the interpretation type, which is used to determine the default statistics, defaultformat, and default length.
The table and the variables within the table are created when you use a GUI to addthe table or when you create the table definition in batch mode by using the%CPDDUTL macro.
You can also create formula variables and derived variables. Formula variables arevariables whose values are calculated from the data that you collect. These variablesare calculated dynamically and displayed when you access the data; however, the valuesof these variables are not stored in the PDB. Derived variables are variables that do notexist in your raw data, but are computed based on your data. After they are computed,the values of the derived variables are stored with your data in the PDB.
Within a table, data is stored in five physical libraries (also known as levels within atable): DETAIL, DAY, WEEK, MONTH, and YEAR. The data in the detail level is verysimilar to the data as it was recorded by your collector. The other four levels, known assummary levels or reduction levels, contain your summarized (reduced) data. The daylevel contains data that is summarized by the day, the week level contains data that issummarized by week, and so on. For example, a table for TCP protocol statistics mightcontain summarized TCP protocol data in the detail level and also summarized data ineach of the four summary levels (day, week, month, and year).
When you display the data from one level of a table, this “picture” of the data isreferred to as a view. A view is named by using a combination of the level name and

Introduction to SAS IT Resource Management � What Is a PDB? 9
the table name in the form of level.table. For example, the view for the detail level in atable named HN2IFT would be DETAIL.HN2IFT. The view for the day level of thesame table would be DAY.HN2IFT. When you report on your data, the reports are basedon the views.
In the UNIX/Windows GUI, you can view a list of tables in a specific PDB, byselecting Manage Tables from the Administration tab in the main window. To see alist of variables for one of the tables, select a table from the list and select Locals �List Variables
In the z/OS GUI, you can view the list of tables by selecting PDB Admin � ConfigActive PDB Dictionary
in the main menu. To see a list of variables for one of the tables, select a table fromthe list and select ItemActions � List Variables
Summarizing Data into Libraries in the PDBWithin a table, data is stored physically in five data libraries that are known
logically as levels. When your data is first copied into the PDB from your raw data file,this is known as processing your data into the PDB, or the process task. This processeddata is stored in the DETAIL library. The data in the detail level is very similar to theoriginal data that you collected, with only simple transformations (when applicable),such as converting continuously ascending counters into rates per second or adjusting acounter that has exceeded its maximum and restarted at zero.
After the data has been processed into the detail level of the PDB, you thensummarize, or reduce, the data into the other levels of the PDB. These other four levelsare called summary, or reduction, levels, and they are day, week, month, and year.
DETAIL libraryThe DETAIL library contains your data after you process it into the PDB. Eachobservation in a data set represents an event or an interval. The data in the detaillevel is very similar to your data records in the raw data file.
DAY libraryThe DAY library contains daily statistics that are summarized by grouping (class)variables, such as MACHINE, HOUR, and DAY. These statistics are calculatedfrom the data in the detail level. For example, this library might contain statisticsfor a given machine for a given hour of the day for a given day.
WEEK libraryThe WEEK library contains weekly statistics summarized by grouping (class)variables. The statistics are calculated from the table’s data in the detail level.For example, each observation in a data set in this library might contain thestatistics for a given machine for a given hour of the day for a given week.
MONTH libraryThe MONTH library contains monthly statistics that are summarized by grouping(class) variables. The statistics are calculated from the table’s data in the detaillevel. For example, each observation in a data set in this library might contain thestatistics for a given machine for a given hour of the day for a given month.
YEAR libraryThe YEAR library contains yearly statistics that are summarized by grouping(class) variables. The statistics are calculated from the table’s data in the detaillevel. For example, each observation in a data set in this library might contain thestatistics for a given machine for a given hour of the day for a given year.
When numeric data is summarized (also known as “reduced”), it is read from thedetail level, included in a calculation of one or more statistics, and then the updatedvalue of the statistics are written to (or updated in) an observation in the summary
10 What Is a PDB? � Chapter 1
level. The observation in the summary level contains the requested statistics for all thedata in the detail level that has the same values of the grouping variables. Characterdata is not summarized, but it can be in the summary levels (as data for the groupingvariables). You select which statistics you want to be calculated for each summary level.You can use the default statistics that are provided with a new PDB, or you cancustomize the list of statistics.
In addition to the data libraries that are described above, the PDB contains severalother libraries that are related to the data in a specific PDB. These libraries must bepresent in a PDB, even if they are empty.
ADMIN libraryThe ADMIN library can be made available to all users, and therefore, it can be aconvenient place to store graph and text reports, report palettes, logs, and so on,within a PDB. If you specify that data is to be checked for duplicates duringprocessing, then this library might also contain files that are used for duplicatedata checking.
COLLECT libraryThe COLLECT library is used for temporary data storage as your data is processedinto the PDB. For example, you can use the COLLECT library to store any stagingdata sets that you create for use by the generic collector software. This librarymight also contain information or libraries that are used with MXG software.
DICTLIB libraryEach PDB contains a data dictionary. The data dictionary is stored in theDICTLIB library. The PDB’s data dictionary contains general PDB properties aswell as information about the data that you stored in each level of the PDB. Forexample, the DICTLIB library contains specifications about which data to keep inthe PDB and a count of the number of observations in each level of the PDB.
PDBWORK libraryThe PDBWORK library is used by the reduction step for intermediate data andalso can be used by the processing step. The PDBWORK library (which ispermanent) is used instead of the SASWORK library (which is temporary) so thatreduction can be restarted from a checkpoint if necessary.
Depending on your host, additional items can be stored in other libraries:� On UNIX and Windows hosts, additional software can be stored in an auxiliary
library named CPSYSLIB.� If your site uses MXG, items such as MXG formats can be stored in an auxiliary
library, which is named MXG.MXG.FORMATS in the MXG documentation.� If more than one release level of SAS IT Resource Management is installed, you
will have a separate version of the PGMLIB library for each release.� If you choose to Archive data, additional archive libraries are created. Their
names begin with Z.� When you run the QuickStart Wizard, programs are stored in additional libraries
whose default location is “under” the PDB that is created by the wizard.
How Long Is Data Stored in the PDB?The DETAIL library can easily become very large, because this library typically
contains the data as it is logged by your collector or system management software.Additionally, as you process new data into the PDB and reduce the data into thesummary levels, you will need to decide how long to keep data at each level in the PDB.
To reduce the space that is required for the DETAIL library and the other libraries,your site can set age limits on the data at each level. When data is reduced from the

Introduction to SAS IT Resource Management � Locating Help 11
detail level into the summary levels, you might not need to keep the detail-level data,or you might want to keep only a few days of data at that level. For the other summarylevels, you can choose a time limit, such as 3 days, 10 days, 1 month, and so on, anddata will be deleted from each level when the level’s age limit is reached. Using each ofthe summary levels, you can still analyze and report on long-term trends for your ITsystems, but you do so by using summarized data instead of large quantities of detaildata.
When you create a new table, the following default age limits are assigned to thelevels in the table:
� detail - 10 days� day - 45 days� week - 15 weeks� month - 18 months� year - 5 years.
In the UNIX/Windows GUI, you can view the current age limits (and change the agelimits if you have write access to the PDB) by following this path from theAdministration tab in the SAS IT Resource Management main window: ManageTables � select a table � File � Properties
From the Table Properties window, select the Table Status tab to review or edit theage limit settings. In the z/OS GUI, you can view the current age limits (and changethe age limits if you have write access to the PDB) by following this path from the mainmenu: PDB Admin � Config Active PDB Dictionary
Select the table whose age limits you want to change. Then select ItemActions �Edit Definition or Browse Definition
The age limits are displayed in the lower-right corner of the window.
Locating HelpThe following resources and documentation are available to assist you in setting up
and using SAS IT Resource Management. Select one of the following items to find outhow to access documentation or assistance for the selected topic:
� “Getting Started with SAS IT Resource Management” on page 12� “QuickStart Wizard” on page 12� “General-Purpose Server Setup Documentation” on page 12� “Collector-Specific Setup Documentation” on page 12� “Client Setup Documentation” on page 12� “Window Help” on page 13� “Usage Documentation and Reference Documentation” on page 13� “The GENERATE SOURCE Control Statement” on page 13� “The Generic Collector Facility” on page 13� “Demonstration PDBs, Sample Code, and QuickStart Examples” on page 13� “SAS IT Resource Management Web Site” on page 13� “SAS IT Resource Management Listserv” on page 14� “SAS IT Security Management Documentation” on page 14� “SAS IT Charge Management Documentation” on page 14� “SAS IT Service Level Management Documentation” on page 14� “Additional SAS Documentation” on page 14� “Suggested Reading” on page 14

12 Locating Help � Chapter 1
� “SAS Technical Support” on page 16.
Getting Started with SAS IT Resource ManagementThe document Getting Started with SAS IT Resource Management provides
step-by-step instructions for using the QuickStart Wizard (to create the PDB) and theProcess/Reduce Wizard (to process and reduce data into the PDB). The documentationalso provides an overview of the SAS IT Resource Management report tools. Thisdocument can be ordered from SAS book sales at 1-800-727-3228.
It is also available on the Web. See “SAS IT Resource Management Web Site” onpage 13.
QuickStart WizardThe QuickStart Wizard provides a quick and easy way for you to start using SAS IT
Resource Management. The QuickStart Wizard is available within the server GUIs forSAS IT Resource Management.
Information about the wizard is available in the document Getting Started with SASIT Resource Management document. Information is also available in the document SASIT Resource Management: User’s Guide, in “Using the QuickStart Wizard” on page 50,and in “Overview of Setup Case 1” on page 53. For information about customizing theQuickStart reports, see topics in the “Overview of Galleries” on page 551.
General-Purpose Server Setup DocumentationThe general-purpose documentation for setting up a SAS IT Resource Management
server is in the process of moving from one location to another. First look here: “SettingUp the Server, with Setup Cases” on page 38.
If you do not find what you are looking for, then look in the SAS IT ResourceManagement Server Setup Guide. You can access the SAS IT Resource ManagementServer Setup Guide from the SAS IT Resource Management client GUI or the SAS ITResource Management server GUI for UNIX and Windows. Follow this path from themain window: OnlineHelp � Other ITRM Documentation � Server Setup Guide
Or, you can look in the general-purpose setup documentation on the Web. See “SASIT Resource Management Web Site” on page 13.
Collector-Specific Setup DocumentationThe general-purpose documentation for setting up a SAS IT Resource Management
server refers you to specific information in the SAS IT Resource Management ServerSetup Guide. You can access the SAS IT Resource Management Server Setup Guidefrom the SAS IT Resource Management client GUI or the SAS IT ResourceManagement server GUI for UNIX and Windows. Follow this path from the mainwindow: OnlineHelp � Other ITRM Documentation � Server Setup Guide
Or, you can look in the collector-specific setup documentation on the Web. See “SASIT Resource Management Web Site” on page 13.
For information about what you have to customize in MXG and SAS IT ResourceManagement in order for MXG-based tables to work, see “Using MXG-Based Tables(CMAPP2): Introduction” on page 133.
Client Setup DocumentationFor information about how to set up the SAS IT Resource Management client, see
“Setting Up the Client” on page 43.

Introduction to SAS IT Resource Management � Locating Help 13
Window HelpThe window-specific help is available from the window’s Help button or, in some
cases, by selecting OnlineHelp � Help for this Window
Usage Documentation and Reference DocumentationYou can access the user’s guide and the macro reference document on the Web and in
SAS IT Resource Management GUIs. See “Overview of SAS IT Resource Management”on page 3.
The GENERATE SOURCE Control StatementThe GENERATE SOURCE control statement enables you to make a preliminary
draft of the table and variable definitions. You would typically use this statement fordata from a collector for which SAS IT Resource Management does not supply table andvariable definitions. The GENERATE SOURCE control statement is used with the%CPDDUTL macro.
For more information about the GENERATE SOURCE control statement, see “Usingthe GENERATE SOURCE Control Statement” on page 48. For more information aboutthe %CPDDUTL macro, see “Chapter 4: Data Dictionary Macro and ControlStatements” in the macro reference documentation.
The Generic Collector FacilityThe Generic Collector Facility is available in the %CMPROCES, %CPPROCES,
%CSPROCES, and %CWPROCES macros. The Generic Collector Facility enables you toprocess data into tables that you created (typically with the GENERATE SOURCEcontrol statement).
For more information about the Generic Collector Facility, see “Using the GenericCollector Facility” on page 158.
For more information about the context of using the Generic Collector Facility, see“Overview of Setup Case 3” on page 81 and “Overview of Setup Case 4” on page 99.
Demonstration PDBs, Sample Code, and QuickStart ExamplesHere is information about sample code, QuickStart examples and demonstration
PDBs.
� The MISC directory (UNIX), SASMISC directory (Windows), and CPMISC PDS (z/OS) are installed with SAS IT Resource Management. These directories and datasets contain many examples of programs and scripts that will assist you in settingup and running SAS IT Resource Management.
� Demonstration PDBs are available within SAS IT Resource Management.
� To access the QuickStart Examples, follow this path from the main window in theSAS IT Resource Management GUI for UNIX and Windows: OnlineHelp �Other ITRM Documentation � QuickStart Examples
If the examples are zipped, unzip them.
SAS IT Resource Management Web SiteInformation that is related to SAS IT Resource Management is available on the Web
page at http://support.sas.com/documentation/onlinedoc/itsv.

14 Locating Help � Chapter 1
SAS IT Resource Management ListservA listserv is available for customers to exchange information and participate in
discussions about SAS IT Resource Management and other solutions in the SAS ITManagement Solutions family of solutions. To subscribe to the listserv, send e-mail [email protected] with the message
SUBSCRIBE ITMS-L yourfirstname yourlastname
To unsubscribe from the listserv, send e-mail to [email protected] with themessage
UNSUBSCRIBE ITMS-L yourfirstname yourlastname
To post messages to the listserv, send e-mail to [email protected]. You can sendmessages to the listserv only if you have subscribed to the listserv.
SAS IT Security Management DocumentationIf your site has purchased IT Security Management, see the document Getting
Started with SAS IT Security Management. You can access the document on thefollowing Web site: http://support.sas.com/documentation/onlinedoc/itsecurity. Also, helpis available within SAS IT Security Management by selecting Help in a window.
SAS IT Charge Management DocumentationIf your site has purchased SAS IT Charge Management, which is used with SAS IT
Resource Management, then see the document SAS IT Charge Management: User’sGuide. You can access the document on the following Web site: http://support.sas.com/documentation/onlinedoc/chargemanager. Also, help is available within SAS IT ChargeManagement by selecting Help in a window.
SAS IT Service Level Management DocumentationIf your site has purchased SAS IT Service Level Management, which is used with
SAS IT Resource Management, then see the documents Getting Started with SAS ITService Level Management and SAS IT Service Level Management: User’s Guide. Youcan access the documents on the following Web site: http://support.sas.com/documentation/onlinedoc/itslm. Also, help is available within SAS IT Service LevelManagement by selecting Help in a window.
Additional SAS DocumentationThe SAS System includes many software products and solutions in addition to SAS
IT Resource Management, SAS IT Security Management, SAS IT Service LevelManagement, and SAS IT Charge Management. Some SAS documentation is shippedwith your software, and other books can be ordered from SAS Book Sales.
Additional information about SAS documentation is available in the SASPublications Catalog or by contacting Book Sales (1-800-727-3228).
Also, you can access help on SAS from the Help menu in any SAS window. Theinformation in these help topics is broad. It includes help on SAS windows, other SASproducts and solutions, and many SAS procedures and language statements that areused by SAS IT Resource Management.
Suggested ReadingIf you are new to performance evaluation and want to do some background reading,
we suggest the following books:

Introduction to SAS IT Resource Management � Locating Help 15
� Operating System Concepts, Sixth Edition, by Abraham Silberschatz et al, WileyText Books, 2002, ISBN 0471250600. Or Operating Systems Concepts with Java,Sixth Edition, by Abraham Silberschatz et al, Wiley Text Books, 2003, ISBN0471489050.
These books are a good introduction to the purposes and internals of operatingsystems in general.
� Merrill’s Expanded Guide to Computer Performance Evaluation Using the SASSystem. By H. W. "Barry" Merrill. SAS Institute Inc. 1984. ISBN 0-917382-54-4.
This book focuses on concepts, relationships, and analysis techniques. SeeChapters 1, 2, and 7–30.
You might also want to read the following papers. They are platform specific butgeneral enough to show some of the concepts in use. They are in materials from thefollowing organization:
Computer Measurement Group (CMG), Inc.http://www.cmg.org
� "Distributed System Analysis Case Study." By Barbara H. Pendergrass and RobertN. Bonham. CMG 95 Proceedings. Volume 2.
� "Getting Started in Performance Tuning and Capacity Planning." By Neil Ervin.CMG 94 Proceedings. Volume 2.
� "Introduction to Performance Management: What to Measure, What to Report."By Stephen Samson. CMG 94 Proceedings. Volume 1.
� "An Introduction to Time Series Forecasting for CPE." By Brian Bennett. CMGTransactions. Summer 1994.
� "Network Analysis Case Study." By Barbara Pendergrass and Robert N. Bonham.CMG 94 Proceedings. Volume 2.
If you want to learn more about the SAS software and language, read these books:
� The Little SAS Book: A Primer, by Lora D. Delwiche and Susan J. Slaughter, Cary,NC: SAS Institute Inc., 1995, ISBN 1-55544-215-3.
� SAS Language and Procedures: Introduction, Version 6, First Edition, Cary, NC:SAS Publishing, 1990, ISBN 1-55544-410-5.
The following works provide additional information about the SAS data sourcesoutput by MXG Software.
� Chapters 32–33 of Merrill’s Expanded Guide to Computer Performance EvaluationUsing the SAS System. By H. W. "Barry" Merrill. 1984. SAS Institute Inc. ISBN0-917382-54-4.
� Merrill’s Expanded Guide Supplement. By H. W. "Barry" Merrill. 1987. SASInstitute Inc. ISBN 1-55544-067-3.
For more information about performance tuning and evaluation of the z/OS operatingsystem, read the following IBM subsystem manuals and the manuals for z/OS itself.(Also consult your source of IBM manuals to locate other manuals of this type.)
� z/OS Initialization and Tuning Guide.
� z/OS Initialization and Tuning Reference.
For advanced MVS applications and ideas, including resource management and tuning,read Cheryl Watson’s TUNING Letter. You can subscribe to the letter from
Watson & Walker Inc.www.watsonwalker.com

16 Locating Help � Chapter 1
For more information about performance tuning and evaluation of UNIX andWindows operating systems, consult the documentation of your collector software forterminology and other suggested reading.
SAS Technical SupportTechnical Support is available to all sites that license software from SAS Institute. A
printed “Overview of Technical Support Services” is provided with your softwareshipment. For information about how to contact Technical Support, see http://support.sas.com/techsup/contact/

17
C H A P T E R
2Getting Started
Getting Started with SAS IT Resource Management 18Overview of Getting Started 18
Working with the Interface for Batch Mode 18
Working with the Interface for Batch Mode 18
Submitting a SAS Program through the SAS GUI 18
Submitting a SAS Program in Batch Mode 19Working with the z/OS GUI 19
Working with the z/OS GUI 19
Starting the z/OS GUI 19
Using the z/OS GUI 21
Exiting from the z/OS GUI 21
Working with the UNIX and Windows GUI 21Working with the UNIX and Windows GUI 21
Starting the UNIX and Windows GUI 21
Using the UNIX and Windows GUI 22
Exiting from the UNIX and Windows GUI 23
Working with the Web Galleries 23Working with the Web Galleries 23
Appendixes to Getting Started 24
Using SAS Windows 24
Using Menus 25
Using Menus (z/OS) 25Using Menus (UNIX, Windows) 25
Using Pop-up Menus (z/OS, UNIX, Windows) 26
Using Commands 26
Using Commands (z/OS) 27
Using Commands (UNIX, Windows) 27
Using the Toolbar and Command Line 27Resizing and Moving Windows 28
Manipulating Text and Objects 28
Selecting Options in Dialog Boxes 29
SAS IT Resource Management Tabs 30
The Administration Tab 30The Reporting Tab 30
The Applications Tab 32
18 Getting Started with SAS IT Resource Management � Chapter 2
Getting Started with SAS IT Resource Management
Overview of Getting StartedTo get started with the batch interface, see this topic:
� “Working with the Interface for Batch Mode” on page 18.
To get started with the server interface on z/OS, see these topics:
� “Starting the z/OS GUI” on page 19
� “Using the z/OS GUI” on page 21
� “Exiting from the z/OS GUI” on page 21.
To get started with the server interface and client interface on UNIX or Windows, seethese topics:
� “Starting the UNIX and Windows GUI” on page 21
� “Using the UNIX and Windows GUI” on page 22
� “Exiting from the UNIX and Windows GUI” on page 23.
To get started with the Web interface, see this topic:
� “Working with the Web Galleries” on page 23.
For additional information about getting started, see the following documentation:
� Getting Started with SAS IT Resource Management
� Getting Started with SAS IT Security Management.
Note: You can access the interfaces after SAS IT Resource Management is installed.But you cannot do much real work until SAS IT Resource Management is set up. Formore information about setup, see “Overview of Setup” on page 37. �
Working with the Interface for Batch Mode
Working with the Interface for Batch ModeYou can submit a SAS program or SAS code
� through the SAS GUI (by using the SAS Enhanced Editor window or the SASProgram Editor window)
� in batch mode.
Submitting a SAS Program through the SAS GUIHow you submit the SAS program (or code) depends on what the program contains
and what else is running.
� If you want to submit a SAS program that calls SAS IT Resource Managementmacros and if the SAS IT Resource Management GUI is running, then exit from theSAS IT Resource Management GUI to the SAS GUI before you submit the program.
1 To exit from the SAS IT Resource Management GUI to its underlying SASGUI:

Getting Started � Working with the z/OS GUI 19
� In the SAS IT Resource Management GUI for UNIX and Windows,select Exit � Exit SAS IT Resource Management Only � OK
� In the SAS IT Resource Management GUI for z/OS, select Exit � ExitSAS IT Resource Management Only
2 In the SAS (Enhanced) Editor window or the SAS Program Editor window inthe SAS GUI, you can enter a new SAS program by typing it into the body ofthe window. Or you can open an existing SAS program by selecting File �Open
To submit the program, select Run � Submit
Note: For more information about using either of these windows, selectthe window and then select Help � Using This Window �
3 When the SAS program finishes, you can invoke the SAS IT ResourceManagement GUI again by submitting this SAS program:
%CPSTART();
This is a call to the macro that starts SAS IT Resource Management.� If you want to submit a SAS program that does not call SAS IT Resource
Management macros and if the SAS IT Resource Management GUI is running,then you can submit the program (through the SAS Enhanced Editor window orSAS Program Editor window) without first exiting from the SAS IT ResourceManagement GUI.
� If the SAS IT Resource Management GUI is not running, then you can submit aSAS program (through the SAS Enhanced Editor or SAS Program Editor window)whether or not the program calls SAS IT Resource Management macros.
Submitting a SAS Program in Batch Mode
� How to submit the program (or code) in batch mode depends on the operatingsystem. For information and examples relevant to your operating system (UNIX,Windows, or z/OS), see “Chapter 1: Introduction” of the SAS IT ResourceManagement macro reference documentation.
Note: For more information about batch mode, see the SAS IT ResourceManagement macro reference documentation . �
Working with the z/OS GUI
Working with the z/OS GUI
Starting the z/OS GUISAS IT Resource Management runs in a SAS session. You can start the SAS IT
Resource Management GUI for z/OS� by using a CLIST.
At the TSO READY prompt, invoke the CMCPE CLIST. The CMCPE CLISTinvokes SAS and, from within that SAS session, invokes SAS IT ResourceManagement.

20 Working with the z/OS GUI � Chapter 2
� by doing the invocations yourself.
At the TSO READY prompt, invoke SAS. Then, from within that SAS session,invoke SAS IT Resource Management. To invoke SAS IT Resource Management
� if you have a command line, type ITRM or ITSVat the command prompt andthen press ENTER or RETURN.
� if you have pull-down menus, select Globals � Command � Command
Type ITRM in the command field and then select OK.
To invoke SAS IT Resource Management with write access to the active site library,use the following instructions.
� If the command line is not displayed, follow this path from the pull-down menus:Globals � Command � Command
� Type itrm siteacc=old at the command prompt and then press ENTER or RETURN.
SAS IT Resource Management will now be restarted with write access to the active sitelibrary.
Note: If you are the only user of the SAS IT Resource Management server or if youhave your own CLIST, then you can set the SITEACC=OLD parameter in the%CPSTART macro in the CMAUTOEX member of the CPMISC PDS. You can use a texteditor (for instance, ISPF Edit) to edit this member. Add the SITEACC=OLD parameterat any place in the list of %CPSTART parameters, checking for commas and closingparentheses.
If, in other tasks, you want to invoke SAS IT Resource Management withparameters, then use the PDB= parameter to specify the PDB name, the DISP=OLDparameter for write access to the PDB, and the SITEACC=OLD parameter for writeaccess to the active site library. Here is an example:
� By issuing the following command you can invoke the SAS IT ResourceManagement server with your.test.pdb as the active PDB, read access to the PDB,and write access to the active site library:
itrm pdb=’your.test.pdb’ siteacc=old
� By issuing the following command you can invoke the SAS IT ResourceManagement server with your.test.pdb as the active PDB, write access to the PDB,and read access to the active site library:
itrm pdb=’your.test.pdb’ disp=old siteacc=shr
� By issuing the following command you can invoke the SAS IT ResourceManagement server with your.test.pdb as the active PDB, write access to the PDB,and write access to the active site library:
itrm pdb=’your.test.pdb’ disp=old siteacc=old
� If this command does not fit on your command line, then you can obtain the sameresults by modifying the CMAUTOEX member of the CPMISC PDS (and changingit back later if necessary). Or you can invoke the SAS IT Resource Managementserver by typing these lines, starting at the first line in the body of the SASProgram Editor window:
%cpstart(pdb=’your.test.pdb’,disp=old,siteacc=old);
Then, from your SAS Program Editor window, select Run � Submit
�

Getting Started � Working with the UNIX and Windows GUI 21
Using the z/OS GUIThe SAS IT Resource Management window (which is a SAS window) overlays the
other SAS windows.Because SAS IT Resource Management runs within a SAS session, you have access
to both SAS IT Resource Management windows and SAS windows. You can cycle amongthe windows by issuing the NEXT command, which is assigned to the F8 key or theSHIFT+F8 key combination by default. For more information about SAS windows, see
� “Using SAS Windows” on page 24� “Using Menus” on page 25� “Using Commands” on page 26� the SAS Companion documentation for your current version of SAS.
The main menu of SAS IT Resource Management has buttons. The top row ofbuttons corresponds to administrative tasks. The middle row of buttons corresponds toreporting tasks. The bottom row of buttons corresponds to tasks that are useful for bothadministration and reporting. For example, the bottom row contains a Help button.
Exiting from the z/OS GUIIf you want to exit from SAS IT Resource Management and then from SAS, on the
main menu select Exit � Exit SAS and SAS IT Resource Management You returnto the TSO READY prompt.
If you want to exit from SAS IT Resource Management in order to work in SAS (andperhaps to reinvoke SAS IT Resource Management later within the same SAS session),then on the main menu select Exit � Exit SAS IT Resource Management onlyAfter you work in the SAS windows,
� if you want to return to SAS IT Resource Management from SAS, then do one ofthe following steps:
� in the body of the SAS Program Editor window, type
%CPSTART();
and select Run � Submit� at the SAS command line, type ITRM and press RETURN or ENTER.
� if you want to exit from SAS, do one of the following steps:� in the body of the SAS Program Editor window, type
endsas ;
Then select Submit (from the menu), or type SUBMIT (on the command line)and press ENTER or RETURN.
� at the SAS command line, type BYE and press RETURN or ENTER.
Working with the UNIX and Windows GUI
Working with the UNIX and Windows GUI
Starting the UNIX and Windows GUISAS IT Resource Management runs in a SAS session. You can start the SAS IT
Resource Management GUI for UNIX and Windows

22 Working with the UNIX and Windows GUI � Chapter 2
� by running a script or batch file. The script/file is provided with the installation ofSAS IT Resource Management.
� On UNIX, the installation puts the script named itsv.sh in the SASMISCdirectory. Then, you can customize that script, and you can save it to alocation that is appropriate at your site.
� On Windows, the installation puts the batch file itsv.bat in the SASMISCfolder. Then, you must customize that script, and you can save it to a locationthat is appropriate at your site.
� by doing the invocations yourself. Invoke SAS and then, from within that SASsession, invoke SAS IT Resource Management by typing itrm or itsv in the SAScommand field and pressing ENTER or RETURN.
To invoke SAS with write access to the active site library, use the followinginstructions:
� From the SAS IT Resource Management main window, select Administrationtab � Site Options � General tab � Sitelib Access � WRITE � OK
Note: Both the ITSV command and the %CPSTART macro invoke SAS ITResource Management. �
If, in other tasks, you want to invoke SAS IT Resource Management withparameters, then create a file that contains the %CPSTART macro with the desiredparameters and start SAS by pointing to the file as follows (see SAS Systemdocumentation for more information about using the -AUTOEXEC option):
sas -autoexec mypgm.sas
Or start SAS and type the statements in the SAS Program Editor window. Examples ofthese statements follow:
� This statement invokes the SAS IT Resource Management server with a PDBnamed pdb-test as the active PDB, read access to the PDB, and write access to theactive site library:
%CPSTART( pdb=’/tmp/pdb-test’, siteacc=write );
� This statement invokes the SAS IT Resource Management server with a PDBnamed pdb-test as the active PDB, write access to the PDB, and read access to theactive site library:
%CPSTART( pdb=’/tmp/pdb-test’, access=write,siteacc=readonly );
� This statement invokes the SAS IT Resource Management server with a PDBnamed pdb-test as the active PDB, write access to the PDB, and write access tothe active site library:
%CPSTART( pdb=’/tmp/pdb-test’, access=write, siteacc=write );
� If this command does not fit on your command line, then you can obtain the sameresults by typing these lines, starting at the first line in the body of the SASProgram Editor window:
%CPSTART( pdb=’/tmp/pdb-test’,access=write,siteacc=write );
Then, from your SAS Program Editor window, select Run � Submit
Using the UNIX and Windows GUITypically, the SAS IT Resource Management window (which is a SAS window) is
open and the other SAS windows are iconized.

Getting Started � Working with the Web Galleries 23
For more information about SAS windows, see
� “Using SAS Windows” on page 24
� the SAS Companion documentation for your current version of SAS software
� “Using Menus” on page 25
� “Using Commands” on page 26
� “Using the Toolbar and Command Line” on page 27
� “Resizing and Moving Windows” on page 28
� “Manipulating Text and Objects” on page 28
� “Selecting Options in Dialog Boxes” on page 29.
The main window of SAS IT Resource Management has several tabs. TheAdministration tab corresponds to administrative tasks (tasks that typically involvewrite access and relate to creating and working with your PDB, tables, and variables).The Reporting tab corresponds to reporting tasks (tasks that typically involve readaccess and relate to creating and working with report definitions, palette definitions,and rule definitions). The Applications tab corresponds to other user-, PDB-, andsite-specific applications, if you have any. For more information, see
� “The Administration Tab” on page 30
� “The Applications Tab” on page 32
� “The Reporting Tab” on page 30.
Exiting from the UNIX and Windows GUI
To exit from SAS IT Resource Management, follow these steps:
1 Select the Exit icon on the toolbar or select this menu path from the SAS ITResource Management main window: File � End The Exit window opens.
2 Select Exit SAS IT Resource Management Only or Exit SAS IT ResourceManagement and SAS.
3 If you are currently connected to a remote server, then you have the option toautomatically sign off the remote server. To do so, select the server sign-off checkbox.
4 Select OK to perform the selected task or tasks.
Working with the Web Galleries
Working with the Web GalleriesPoint your Web browser to the welcome.htm file in the directory where the report
galleries are located.Typically, Web galleries are created by running a batch job (for example, an
xreport.sas job that is created by using the QuickStart Wizard). For information aboutmodifying the structure and contents of the Web galleries, see “Overview of Galleries”on page 551.
24 Appendixes to Getting Started � Chapter 2
Appendixes to Getting Started
Using SAS WindowsDepending on the way that you invoke SAS and SAS IT Resource Management, your
default SAS windows can be one or more of the windows in this list:
Enhanced Editoris an ASCII editor that uses visual aids such as color coding and code sections tohelp you write and debug your SAS programs while retaining some familiar SASProgram Editor features.
Explorerprovides a central access point to data such as catalogs, tables, libraries, and hostfiles. It enables you to perform basic SAS tasks such as:
creating new libraries, new library members, catalog entries, and file shortcuts
opening and editing SAS files.
Note: For details, see the SAS Online Help by selecting the Help button in aSAS window. �
Graphdisplays the output for programs that generate graphics output, when you specifythe Graph window as your graphics output device. To close this window, selectFile � End By specifying the appropriate device driver, you can direct output tothe Graph window, a SAS catalog GRSEG entry, various printing devices, or anexternal graphics stream file. You can also use the GDEVICE procedure to list theavailable device drivers for your system.
For more information about PROC GDEVICE or device drivers, refer to SAS/GRAPH software reference documentation for your current version of SAS.
Logcontains a log of your SAS IT Resource Management session and also displaysanything that you explicitly print to the Log window, such as table and variabledefinitions. This window records notes, warnings, and error messages about yourjob. If you are running a job in batch, then by default on UNIX and Windows thelog file is saved as jobname.log, and on z/OS the log file is printed with the rest ofthe output from the job (unless the job’s output is held, in which case look in thejob’s output for the section with the log’s DDname, which is SASLOG by default).
Outputis the default destination for any text output or reports that you generate by usingSAS IT Resource Management. This window cannot display graphics. If you arerunning a job in batch, then by default on UNIX and Windows, the Output file issaved as jobname.lst.
Program Editor [or Editor]lets you perform the following tasks:
entering and editing text (including program statements)
submitting program statements to the SAS System for execution
saving and recalling source files.
To submit code from this window, type the code in the SAS Program Editor (orSAS Editor) window and select Run � Submit

Getting Started � Using Menus 25
Note: For more details about how to write and submit SAS programs, you canalso view the SAS Online documentation. �
Resultslists the procedure output that is produced by the SAS System. You can use thiswindow to locate and manage SAS output. Open this window by using theODSRESULTS command or by selecting View � Results
Note: For more detailed descriptions of these and other SAS windows, see the SASCompanion for the current version of your operating system and release of SASsoftware. �
Using MenusThe menus differ depending on the operating system that you are using. The menus
also differ depending on the window that you are viewing.
Using Menus (z/OS)The following menus frequently appear on the menu bar in the SAS IT Resource
Management GUI for z/OS:
File contains actions that relate to copying or retrieving the contents ofthe window to or from an external medium like disk or paper, suchas Print, Save, Copy, or Open. This menu usually contains the Endor Cancel actions if they are appropriate to the window.
Edit contains window-specific tasks such as Undo, Clear Text, and Find.
ItemActions lists actions that can be performed on items on the list that isdisplayed in the primary portion of the window. If you choose one ofthe actions on the ItemActions list, then the action is applied to allselected (highlighted) items. This menu includes actions such asRun (for example, to run one or more report definitions that youhave selected), Delete, and Browse.
Actions lists actions that are not directly related to a specific selection in thelist. This menu includes actions such as Set Collector, Set PDBOptions, and Set Rawdata.
Globals lists global SAS items such as Log (to move to the Log window) orOutput (to move to the Output window) that relate to the SASSystem as a whole.
Help provides help on using the window.
Typically, a window has either pull-down menus or a command line. If your windowhas a command line and you would prefer to use pull-down menus, then issue thePMENU command, which is associated with F9 or SHIFT+F9 by default.
To return to a command line, again select F9 or SHIFT+F9.
Using Menus (UNIX, Windows)The following menus frequently appear on the menu bar in the SAS IT Resource
Management GUI for UNIX and Windows:
File contains actions that relate to copying or retrieving the contents ofthe window to or from an external medium like disk or paper, suchas Print, Save, Copy, or Open. This menu usually contains the Endor Cancel actions if they are appropriate to the window.
26 Using Commands � Chapter 2
Edit contains window-specific tasks such as Undo, Clear text, and Find.
Locals contains window-specific tasks, such as Select Palette or SelectTable.
Tools contains tools that apply to the active window, such as filter items ina list.
Globals lists global SAS items such as Log (to move to the LOG window) orOutput (to move to the OUTPUT window) that relate to the SASSystem as a whole.
Window lists the active windows. Select a window name from this menu toactivate that window.
OnlineHelp enables you to access the SAS IT Resource Management online Helpsystem and the SAS System help. For more information, see“Locating Help” on page 11.
Using Pop-up Menus (z/OS, UNIX, Windows)Frequently used menu items (for example, Cut, Copy, Delete, and other tasks specific
to the active window) are available on the main menus in each window and might alsobe available on the pop-up menu. To display the pop-up menu follow these steps.
1 Position your mouse pointer in the window where you want to perform a task or atthe location in a window where you want the action to occur.
2 Click the right mouse button.
3 Choose a command from the list.
The commands on the pop-up menu vary based on your active window and the taskthat you perform.
Using CommandsBelow are a few basic commands that you can use in SAS windows to move around
and search for information in SAS windows. You can also use the horizontal andvertical scroll bars or the PAGE UP and PAGE DOWN keys to scroll through theinformation that is displayed in the window.
BACKWARD scrolls backward in the window.
BOTTOM moves to the bottom of the window.
CLEAR TEXT clears the text in the body of the window.
END closes the active window. The END command cannot be used toclose the LOG and OUTPUT windows.
FIND or RFIND finds a text string or repeats the previously specified find.
FORWARD scrolls forward in the window.
KEYS views or changes the settings of function keys. To change a keysetting, type over the command that is listed beside the key name.
NEXT moves to the next SAS window.
PMENU orCOMMAND
toggles between pull-down menus and command lines. PMENUturns off pull-down menus for all windows in the system.COMMAND turns off pull-down menus only for the window where

Getting Started � Using the Toolbar and Command Line 27
you issue the command. Use the same command to restorepull-down menus.
RECALL recalls the last program in the SAS Program Editor window.
Most SAS commands are the same regardless of the operating system that you areusing. The location for issuing the command differs depending on the operating systemthat you are using. If the SAS command line is turned on or if you have access to thecommand field, then you can use commands to perform tasks.
Using Commands (z/OS)
Typically, a window has either pull-down menus or a command line. If you havepull-down menus and would prefer to issue commands, issue the PMENU command,which is associated with F9 or SHIFT+F9 by default.
To return to pull-down menus, again select F9 or SHIFT+F9.
Using Commands (UNIX, Windows)
On UNIX and Windows, you can issue commands through the command field. Toissue a command, type it in the command field and then press ENTER or RETURN.
Using the Toolbar and Command Line
The toolbar or toolbox is a group of buttons that you can select or click with yourmouse to execute commands. The tasks available from the toolbar are also availablefrom the menus on the menu bar. If you point to an item on the toolbar but do not clickthe item with the mouse pointer, then a small window called a ToolTip opens. A ToolTipdescribes the task that is performed in your active window when you select that button.
The tasks available from the toolbar are specific to the active window; therefore, theavailable buttons change as you select tasks from the SAS IT Resource Managementmain window and open new windows or dialog boxes. To activate the appropriatetoolbar for your active window, click inside the window. The toolbar changes to displaytasks that can be performed in the active window. Some windows or dialog boxescontain buttons for all tasks that can be performed in that window or dialog box. Thesewindows do not have specific SAS IT Resource Management toolbar items or menus andwill display the default SAS toolbar and menu structure. For information about usingSAS windows or the SAS GUI, refer to the SAS Companion documentation for yourcurrent version of SAS software.
The Command text box is available in the toolbox or to the left of the toolbar,depending on your platform. To execute commands from the command text box, typethe command in the box and press ENTER.
Note: If you are using the SAS IT Resource Management server on a UNIX platformand if you are accessing that platform through an X-windows emulator such as Exceed,then the SAS toolbar frequently steals the cursor focus from other SAS windows. If youare not accessing UNIX using an emulator, then you will not see this behavior. To avoidthis behavior, you can iconize the SAS toolbar or change the focus policy for your mouse.
To change the focus policy, start Exceed and select the “running” icon with your rightmouse button. Then make the following selections: Tools � Configuration � WindowMode
Change the Focus Policy from Click to Pointer. For more information, refer tothe documentation for your emulation software. �
28 Resizing and Moving Windows � Chapter 2
Resizing and Moving Windows
To resize a window, place your mouse pointer on the side or corner of the windowuntil the pointer changes to a double arrow. Click on the window frame and drag theframe to resize the window.
To move a window, place your mouse pointer on the title bar of the window and,while selecting the title bar, drag the window to the new location.
If you change the font that is used to display your SAS windows, then this changeaffects your SAS IT Resource Management windows, and you might experienceproblems with displaying them. For example, if you receive a message similar to
WARNING: Client could not be resized to fitclient area; client will be hidden.
then specifying a larger font for your SAS windows can correct the problem.To display the active font and/or select a new font, use the DLGFONT command in
the SAS toolbox or on the command line.
Manipulating Text and Objects
The following terms describe common methods of manipulating text and windowswithin SAS IT Resource Management. For more information about standard SAScommands for working within a SAS window, see “Using SAS Windows” on page 24 orthe SAS Companion for your operating environment. (See “Additional SASDocumentation” on page 14.)
ActivateSelect an item and make it the active item, such as bringing a window to theforeground, displaying a menu, or making a PDB active. For example, the PDBthat you are currently using is the active PDB, or when you are working withmultiple windows, the window that you are currently working in is the activewindow.
ClickPlace the tip of the mouse pointer on an item and press the left mouse button once.
DeactivateUn-select a document, window, or menu, by pressing the ESC key or clickingoutside the selected area.
Double-clickPlace the tip of the mouse pointer on an item and press the left mouse button twice.
DragPlace the tip of the mouse pointer on an item. Hold down the left mouse button asyou move the mouse pointer over the text or object. Dragging selects one or moreitems, text characters, or graphics so that you can move an item or simultaneouslyperform an action on multiple items.
SelectHighlight or click on a section of text, graphic, menu name, command, or otherobject with the keyboard or mouse. Selecting something performs a task such asopening a menu from the menu bar or activating a window so that you can use thewindow.

Getting Started � Selecting Options in Dialog Boxes 29
Selecting Options in Dialog BoxesDialog boxes enable you to set options for many tasks, such as report options, site
options, printing options, and more. Dialog boxes open when you select a menu itemthat is followed by ellipsis points (...), such as the File � Open... menu item, or whenyou select certain buttons on the toolbar, such as Print.
You can set options in dialog boxes by performing actions such as clicking a button,selecting an option from a list, or typing information in a box. When several items orselections are related, they are grouped together in a group box within the dialog box.You may be enabled to select multiple items from a group box or you may be required toselect only a single item, depending on the option you are setting. The methods forsetting options in dialog boxes are described here:
Check Box a square box that is toggled on or off by clicking the box. Whenseveral check boxes are grouped together, you can select multiplecheck boxes in a group.
Option Button a button or box that turns an option on or off. In most dialog boxes,you can select only one option button in a group. Selecting one valueun-selects all other values. In dialog boxes for some standard SASwindows, each selection is independent of the others so that you canselect multiple options at the same time.
Command buttons that perform an action in a dialog box or a command thatyou type in the command box (in a SAS window).
� Help - provides information about how to complete the dialogbox.
� OK - closes a dialog box and saves or executes your selections.
� CANCEL - closes the dialog box without saving or executingyour selections.
� RUN - executes the program in the active window.
� SAVE - saves the text, code, or options set in the window ordialog box.
� RESULTS - enables you to look at the source or the output ofthis program.
� CUSTOMIZE - displays windows that aid in changingdescriptive information such as titles, footnotes, and keywordsassociated with the active program.
� CANCEL or GOBACK - ignores changes made to this windowand returns to the window that invoked this window.
� ADVANCED - displays advanced options for your active task orselection.
List Box a box that contains a list of items or selections. You can select anitem or option from the list to activate the option or to perform anaction on the item, such as modifying, viewing, deleting an item.
Text Box a box in which you type information. In some cases, the box alsoprovides arrows, which you can use to increase or decrease values,such as date or time values.
Icon Button a push button that displays a list of possible values when you selectthe button. You can select one or more items from the list.

30 SAS IT Resource Management Tabs � Chapter 2
SAS IT Resource Management Tabs
The Administration TabThe Administration tab in the main window of the SAS IT Resource Management
GUI for UNIX and Windows provides the following icons (tasks)� QuickStart Wizard� Create PDB Wizard� Process/Reduce Wizard� Manage PDBs� Manage Tables� Examine PDB Data� Site Options� Define Work Shifts� Define Holidays� Explore Tables/Variables.
In the main menu of the SAS IT Resource Management GUI for z/OS, the buttonsapproximately correspond to the icons on the Administration tab.
Many of these tasks enable you to process and reduce your data and to set up andmanage your PDB and its components on the SAS IT Resource Management server.These tasks require you to have write access to a PDB. (For more information, see“Actions and Access Rights Required” on page 44.) You must perform many of thesetasks on the host where the SAS IT Resource Management server license is installed.
If you are accessing the PDB from a client host, you can access the PDB, view thetables and variables in a PDB, and create and manage the remote profiles for yourPDBs.
All tasks available on the Administration tab can also be performed in batch modeby using SAS IT Resource Management macros. (For more information about the use ofmacros, see the SAS IT Resource Management macro reference documentation .)
For more information about the task that is associated with each icon, select the iconand refer to the Help available in the window that opens. Also, information about thesetasks is available in Part 3 of the SAS IT Resource Management User’s Guide.
The Reporting Tab
The Reporting tab in the main window of the SAS IT Resource Management GUIfor UNIX and Windows and the SAS IT Resource Manager client GUI contains severalunique tools that you can use to explore and analyze your IT resources. In the mainmenu of the SAS IT Resource Management GUI for z/OS, the buttons approximatelycorrespond to the icons on the Administration tab.
There are report tools that enable you to perform ad hoc analysis and to drill down,create high-quality graphs that use patterns, colors, and symbols to represent differentvariables and trends in your data, and create reports that you can run, save, and rerunagainst your production data, interactively or in batch mode.
You can create basic analysis reports with one or more variables, reports that groupyour analysis variables based on a specific variable, spectrum reports that use color todisplay trends in your data, and exception reports that identify anomalies in your databased on exception criteria.
Getting Started � The Reporting Tab 31
To access the reporting tools, start the SAS IT Resource Management client andselect the Reporting tab from the SAS IT Resource Management main window. TheReporting tab displays a list of tasks that include the following:
Manage Report Definitionsopens the Manage Report Definitions window, from which you can create, modify,run, and save the interactive form of report definitions. You can also save reportdefinitions as macro calls that you can run in batch mode. For more informationabout report definitions, see “Using the Manage Report Definitions Tool” on page468.
Explore Supplied Reportsopens the Explore Supplied Reports window, from which you can browse a list ofsupplied report definitions. (For more information about supplied reportdefinitions, see “Exploring Supplied Report Definitions (UNIX, Windows)” on page488.)
Perform Exception Analysisopens the Exception Reporting window, from which you can create exception rulesand run them against your data. (For more information about rule definitions, see“Using the Perform Exception Analysis Tool” on page 468.) You can identifyexception conditions in your performance data without visually scanning manygraphs or long tabular reports. For example, you can create an exception rule thatwill automatically identify any disk that is more than 99% full. Exceptionreporting applies a set of binary (true/false) rules to specific data. Users canmodify the sample rules and can add new rules for site-specific conditions.
Graph Dataopens the Graph Data (Graph-N-Go) window, from which you can do simple ad hocexamination of the data in your PDB by using graphs, charts, and drill-downtechniques. For more information about graph data, see “Using the Graph DataTool” on page 467.
Data Visualizationopens the Data Visualization system, which enables you to interactively exploreyour data through a variety of sophisticated plots and charts. For more informationabout data visualization, see “Using the Data Visualization Tool” on page 466.
Use the following table to match your reporting needs with the tool that will bestmatch them.
If you need... Consider using...
Broad, ad hoc data exploration that uses avariety of existing report styles
Graph Data or Data Visualization
Production reports that you can runinteractively or in batch mode
Custom Reports that you can design, run, andsave for use interactively or in batch mode
Reports that you can distribute via the Web
Explore Supplied Reports or Manage ReportDefinitions
Automated production reports that identify erroror exception conditions
Perform Exception Analysis

32 The Applications Tab � Chapter 2
Note: For more information, see “Overview of Report Concepts and Tools” on page465. �
The Applications TabThe Applications tab in the main window of the SAS IT Resource Management
GUI for UNIX and Windows and the SAS IT Resource Management client GUI lists thenames of three work areas. You can use these work areas to store custom applications:
� User Applications - applications that you create for your own use� PDB Applications - applications that you and others create for use with the active
PDB� Site Applications - applications that you or others at your site create for use by
anyone at your site.
If you select one of these items on the Applications tab, then a window or workarea opens. Initially these custom work areas are empty. However, you can createcustom applications by adding a command icon, assigning a command to the icon, andsaving the icon in one of the work areas.
The supplied application icons are stored in the toolbox. To open the toolbox, selectthe toolbox icon on the toolbar. The supplied icons in the toolbox work area include aneditor, viewer, and a SAS/AF template.
Using the Viewer template, you can create a command to view a specific table in aPDB. Using the Editor template, you can create a command to start a specific editorthat you frequently use. Using the AF Template, you can run any SAS command linecommand, including any arbitrary SCL code. Examples for using the templates areavailable in Application Tab Examples, later in this document.
Items that you or others store in the work areas on the Applications tab are savedin the locations listed below. Items that are stored in these areas are not removed oraltered with future updates to SAS IT Resource Management.
� User Applications - your SASUSER directory.On UNIX, the SASUSER library is associated with your user ID or login.On z/OS, by default, the TSO CLIST that is supplied by SAS allocates
SASUSER to a library that is unique to each user ID.On a Windows host, the SASUSER directory is not individual to the user, but is
used for anyone who accesses SAS or SAS IT Resource Management on that host.On Windows, SASUSER is by default a directory that is stored in the locationwhere SAS is installed.
� PDB Applications - the ADMIN library in the active PDB. You must have write orupdate access to the PDB in order to save or modify items in this work area. (Formore information about access to the active PDB, see “Actions and Access RightsRequired” on page 44 and “Viewing/Editing Your Active PDB’s Access Mode” onpage 325.)
� Site Applications - the active site library. To save or modify items in this workarea, you must have write or update access to SITELIB, which is the active sitelibrary. (For more information about access to the active site library, see “Actionsand Access Rights Required” on page 44 and “Viewing/Editing Your Active SiteLibrary’s Access Mode” on page 281.)
To create a new command button follow these steps:1 Select the Applications tab in the SAS IT Resource Management main window.
2 Select the toolbox icon on the toolbar to open the SAS IT Resource Managementtoolbox.

Getting Started � The Applications Tab 33
3 Open the work area where you want to store the new command: UserApplications, PDB Applications, Site Applications.
4 Copy one of the items/templates from the toolbox to your work area. To copy anitem, simultaneously press the CTRL key and select from the toolbox the item tocopy. For example, you might select the AF Command Template item from thetoolbox. While selecting the item, drag it to your work area.
5 In your work area (not the toolbox), select the new item with your right mousebutton, and from the pop-up menu select Attributes.
6 In the Attributes window, type the command that you want to execute when youselect this item, and type a label or name for the item.
7 Select Save to save the items in the new workspace and close the workspace folder.
8 Select the new item in your work area to execute the command as necessary.
Application Tab ExamplesThe templates on the Applications tab enable you to create custom templates to
quickly execute commands or SAS source code. The Editor and Viewer templates canbe used to quickly open an editor or viewer that you frequently use. These are just afew examples of using the templates to run SAS commands.
The AF Template enables you to run any SAS command-line command, includingSCL code. You can directly assign a command to the template/icon, such as
runeis appl=command
which will run the specified report object, or
submit "%cprunrpt(report,folder=libref.myrpts);"
which will run the specified report in the specified report folder.
Note: To invoke an AF application from the AF Template, you must use the AFAcommand rather than the AF command, since there is already an AF application inprogress (namely, SAS IT Resource Management). �
To run a report definition from the AF command template, create an ASCII file thatcontains the macro and the report that you want to run. For example, you could createa file that contains
%cprunrpt(report,folder=libref.myrpts);
Open your copy of the AF template in your work area and type
pgm;include "c:\temp\example.sas";submit;
To use the AF template to query a table or to combine tables, copy the AF template toyour user work area. Open the template and in the command box type
Query
Save the template, and when you access this template in the future it will execute thiscommand to open the SQL Query Tables window. For more information about SQL,select Help in the SQL window.
To use the SAS procedure GREPLAY, which replays or displays existing graphicsoutput in a specific catalog, copy the AF template to your user work area. Open thetemplate in your work area and type
proc greplay igout=my.catalog; run;
To start the GREPLAY procedure without pointing to a specific folder, select the AF iconand type
proc greplay; run;

34

35
P A R T2
Setup
Chapter 3. . . . . . . . . .Setup: Introduction 37
Chapter 4. . . . . . . . . .Setup Case 1 53
Chapter 5. . . . . . . . . .Setup Case 2 65
Chapter 6. . . . . . . . . .Setup Case 3 81
Chapter 7. . . . . . . . . .Setup Case 4 99
Chapter 8. . . . . . . . . .Setup Case 5 119
Chapter 9. . . . . . . . . .The MIB to Dictionary Compiler 129
Chapter 10. . . . . . . . .MXG-Based Tables (CMAPP2) 133
Chapter 11. . . . . . . . .Generic Collector Facility 157
Chapter 12. . . . . . . . .Migration 243

36
37
C H A P T E R
3Setup: Introduction
Setup: Overview 37Overview of Setup 37
Setting Up the Server 38
Setting Up the Server, with Setup Cases 38
Setting Up the Client 43
Setting Up the Client 43Setting Up the Web Browser 43
Setting Up Your Default Web Browser 43
Setup: Related Topics 44
Actions and Access Rights Required 44
Administration 44
Users (and Administrator) 45Grouping Reports in a Web Gallery 46
Troubleshooting Batch Jobs That Fail 48
Using the GENERATE SOURCE Control Statement 48
Using the QuickStart Wizard 50
Setup: Overview
Overview of SetupNote: You must install SAS IT Resource Management before you set it up to work
with data from your collector(s). For more information about installation, in theInstallation Guide for SAS see the section on SAS IT Resource Management. �
If you are setting up for the first time, here are the setup steps:1 For each collector that you want to work with, find which setup case includes that
collector and then follow the instructions for that setup case. After you finishsetting up the server, adjust the access privileges to the objects that you created sothat you and other users have the appropriate access.
2 Then, set up one or more clients.3 Finally, you and every other user need to set up your default Web browser.
For additional information about setup, see the following topics:� “Setting Up the Server, with Setup Cases” on page 38� “Setting Up the Client” on page 43� “Setting Up Your Default Web Browser” on page 43.
Note: After you set up SAS IT Resource Management to work with your collectors,occasionally the instructions accompanying a new release of SAS IT Resource

38 Setting Up the Server � Chapter 3
Management recommend a change to your setup. For example, a collector might havenew fields for which it now collects data, and you might want to use that new data inSAS IT Resource Management. In that case, the installation instructions for the releasewill describe how to modify your setup to match the new release of SAS IT ResourceManagement. Similarly, a new release of SAS might require a change to SAS ITResource Management. For example, the structure of SAS libraries changed in SASVersion 8. In that case, too, the installation instructions for the release describe how tomigrate your setup to the new SAS release.
For information about the change instructions that were used in the past, see“Migrating Your SAS IT Resource Management Environment from SAS Version 6 toSAS Version 8” on page 243. �
Setting Up the Server
Setting Up the Server, with Setup CasesThe main goals for server setup are as follows:
� Create a PDB in which the data will be located. Add or create tables for the data.
Also customize the PDB and the site library, as necessary.
� Create a program to process and reduce the day’s data into the tables.
Also customize the program, as necessary, and test.
� Create a report structure for displaying Web-accessible reports about the data.
If the report structure is based on PDSs, also create and run a program thatFTPs the report structure to directories.
� Create a program that produces Web-accessible reports about the data and writesthem to the report structure.
If the report structure is based on PDSs, also run the FTP program in order toFTP the reports to the directories.
Additionally, customize the program(s), as necessary, and test.
� Schedule the process-and-reduce program and report generation program to run,typically one time each night.
If the report structure is based on PDSs, also schedule the FTP-reports programto run, typically one time each night.
There are five setup cases. The setup cases contain instructions for setting up SASIT Resource Management servers.
Note: The information in the setup cases takes precedence over the information inthe SAS IT Resource Management Server Setup Guide. However, the setup cases canrefer you to some collector-specific information that is found only in the SAS ITResource Management Server Setup Guide. �
You can tell which setup case applies to your data by consulting the following list.Consider the setup cases in order, and take the first setup case that applies to yourdata. After you know which setup case applies to your data, you can see theinstructions for that setup case at the end of the list.
Note: In setup cases 1, 2, and 5, the term “data collected on” refers to the data thatcan be collected on at least one of the operating systems that SAS IT ResourceManagement runs on. For example, “data collected on UNIX” means that the data can

Setup: Introduction � Setting Up the Server, with Setup Cases 39
be collected on at least one of the UNIX operating systems that SAS IT ResourceManagement runs on, such as HP-UX. �
� Setup Case 1: This case covers setup for data for which SAS IT ResourceManagement supplies one or more table definitions and has a path in theQuickStart Wizard.
Here are the data collectors and data sources to which this case applies:� For a PDB on UNIX:
� HP OpenView Performance Agent (formerly known as HP VantagePointPerformance Agent, HP MeasureWare, and HP Performance CollectionSoftware) server data collected on UNIX or Windows
� HP OpenView Reporter data from an Oracle database� Enhanced support NTSMF exchange data and/or server data collected
on Windows (for NTSMF objects for which SAS IT ResourceManagement supplies table definitions; otherwise, see Setup Case 5)
� SMF server data, storage data, and/or workload data collected on z/OS� SAP R/3 workload data collected by the SAS IT Management Adapter
for SAP� SAP R/3 statistics file’s workload data collected on UNIX or Windows� SAP R/3 API’s workload data collected on UNIX or Windows� sar command’s data collected on UNIX� Web log data in common log format (CLF) collected on UNIX or
elsewhere� Web log data in extended log format (ELF) collected on UNIX or
elsewhere� Web log data in Microsoft IIS original format collected on UNIX or
elsewhere� Web log data in user-defined format collected on UNIX or elsewhere.
� For a PDB on Windows:� HP OpenView Performance Agent (formerly known as HP VantagePoint
Performance Agent, HP MeasureWare, and HP Performance CollectionSoftware) server data collected on UNIX or Windows or by HPOpenView Reporter
� HP OpenView Reporter data from an Oracle database� Enhanced support NTSMF exchange data and/or server data collected
on Windows (for NTSMF objects for which SAS IT ResourceManagement supplies table definitions; otherwise, see Setup Case 5)
� SMF server data, storage data, and/or workload data collected on z/OS� SAP R/3 workload data collected by the SAS IT Management Adapter
for SAP� SAP R/3 statistics file’s workload data collected on Windows or UNIX� SAP R/3 API’s workload data collected on Windows or UNIX� sar command’s data collected on UNIX� Web log data in common log format (CLF) collected on Windows or
elsewhere� Web log data in extended log format (ELF) collected on Windows or
elsewhere� Web log data in Microsoft IIS original format collected on Windows or
elsewhere

40 Setting Up the Server, with Setup Cases � Chapter 3
� Web log data in user-defined format collected on Windows or elsewhere.
� For a PDB on z/OS:
� HP OpenView Reporter data from an Oracle database
� Enhanced support NTSMF exchange data and/or server data collectedon Windows (for NTSMF objects for which SAS IT ResourceManagement supplies table definitions; otherwise, see Setup Case 5)
� SAP R/3 workload data collected by the SAS IT Management Adapterfor SAP
� SAP R/3 statistics file’s workload data collected on UNIX or Windows
� SAP R/3 API’s workload data collected on UNIX or Windows
� sar command’s data collected on UNIX
� SMF server data, storage data, and/or workload data collected on z/OS
� Web log data in common log format (CLF) collected on z/OS or elsewhere
� Web log data in extended log format (ELF) collected on z/OS or elsewhere
� Web log data in Microsoft IIS original format collected on z/OS orelsewhere
� Web log data in user-defined format collected on z/OS or elsewhere.
� Setup Case 2: This case covers setup for data for which SAS IT ResourceManagement supplies one or more table definitions but for which SAS IT ResourceManagement does not have a path in the QuickStart Wizard.
Here are the data collectors and data sources to which this case applies:
� For a PDB on UNIX:
� accton command’s data collected on UNIX
� Aprisma (formerly Cabletron) SPECTRUM data collected on UNIX (forone or more model types for which SAS IT Resource Managementsupplies table definitions; otherwise, see setup case 5)
� BMC Software PATROL data collected on UNIX or Windows (in one ormore classes for which SAS IT Resource Management supplies tabledefinitions; otherwise, see setup case 5)
� BMC Software Visualizer workload data collected on UNIX or Windows
� Cisco NetFlow FlowCollector network data collected on UNIX
� HP OpenView Network Node Manager data collected on UNIX orWindows (in one or more MIBs for which SAS IT Resource Managementsupplies table definitions; otherwise, see setup case 5)
� Landmark Systems Performance Works data about Oracle collected onUNIX
� PROBE/Net data collected on UNIX
� ROLM PBX (CBX) data collected on UNIX or elsewhere
� SiteScope data collected on UNIX and Windows
� SunNet Manager or Sun Enterprise Manager data collected on UNIX(from one or more schema files for which SAS IT Resource Managementsupplies table definitions; otherwise, see setup case 5)
� Concord TRAKKER data collected on UNIX.
� For a PDB on Windows:
� accton command’s data collected on UNIX
Setup: Introduction � Setting Up the Server, with Setup Cases 41
� BMC Software PATROL data collected on Windows or UNIX (in one ormore classes for which SAS IT Resource Management supplies tabledefinitions; otherwise, see setup case 5)
� BMC Software Visualizer workload data collected on UNIX or Windows� Cisco NetFlow FlowCollector network data collected on UNIX� HP OpenView Network Node Manager data collected on Windows or
UNIX (in one or more MIBs for which SAS IT Resource Managementsupplies table definitions; otherwise see setup case 5)
� Landmark Systems Performance Works data about Oracle collected onWindows
� ROLM PBX (CBX) data collected on Windows or elsewhere� SiteScope data collected on Windows and UNIX.
� For a PDB on z/OS:� accton command’s data collected on UNIX� BMC Software PATROL data collected on UNIX or Windows (in one or
more classes for which SAS IT Resource Management supplies tabledefinitions; otherwise, see setup case 5)
� BMC Software Visualizer workload data collected on UNIX or Windows
� Cisco NetFlow FlowCollector network data collected on UNIX� IBM DCOLLECT data collected on z/OS
� IBM EREP data collected on z/OS� Candle ETEWATCH data collected on z/OS� Boole and Babbage (BMC Software) IMS Measurement Facility (IMF)
data collected on z/OS
� ROLM PBX (CBX) data collected on z/OS or elsewhere� IBM SMF data collected on z/OS� IBM Transaction Processing Facility data collected on z/OS
� The Monitor for CICS from Landmark version 8.0 data collected on z/OS;� The Monitor for CICS from Landmark version 1.3 data collected on z/OS� The Monitor for CICS from Landmark version 2 or later data collected
on z/OS
� The Monitor for DB2 from Landmark data collected on z/OS� Computer Associates Tape Management System data collected on z/OS� IBM VM Monitor data collected on z/OS
� Setup Case 3: This case covers setup for data, in a character-delimited file, forwhich SAS IT Resource Management does not supply a table definition or have apath in the QuickStart Wizard.
Additional criteria for this case are as follows:
� Your data collector or data source writes raw data to a character-delimitedfile. Or you or a consultant can reformat the raw data as acharacter-delimited file.
� The format of the raw data fits the requirements that are described in“Appendix 9: Using Character-Delimited Data,” which is in “Using theGeneric Collector Facility” on page 158.
� The format of the raw data fits (or can be temporarily modified to fit) therequirements that are described in “Appendix 13: Character-Delimited
42 Setting Up the Server, with Setup Cases � Chapter 3
Support in GENERATE SOURCE,” which is in “Using the Generic CollectorFacility” on page 158.
For supplementary information for this case, see “Using the Generic CollectorFacility” on page 158.
� Setup Case 4: This case covers setup for data, in a SAS data set, for which SAS ITResource Management does not supply a table definition or have a path in theQuickStart Wizard.
The additional criterion for this case is as follows:� You have one or more SAS programs (provided with MXG, written by you, or
written by consultants) that read the raw data, optionally clean andtransform the data in some way, and write the data to one or more SAS datasets or views.
Among others, the AS/400 data falls into this setup case.For supplementary information for this case, see “Using the Generic Collector
Facility” on page 158.� Setup Case 5: This case covers setup for data in any of the following categories, for
which SAS IT Resource Management does not supply a table definition:� a new OpenView/Tivoli NetView MIB� a new NTSMF object� a new DSI class� a new PATROL class� a new Aprisma SPECTRUM model type� a new SunNet Manager or Enterprise Manager schema file.
The criteria for this case are as follows:� You used setup case 1 or 2 for the data collector or data source, and some of
the data in the data collector or data source was not covered by setup case 1or 2.
� The SAS IT Resource Management Server Setup Guide covers the datacollector or data source. For more information about the Server Setup Guide,see “Collector-Specific Setup Documentation” on page 12.
Here are the data collectors or data sources to which this case applies:� For a PDB on UNIX:
� Aprisma (formerly Cabletron) SPECTRUM data collected on UNIX (for amodel type for which table definitions are not supplied; otherwise, seesetup case 2)
� Enhanced support NTSMF data collected on Windows (in an object forwhich a table definition is not supplied; otherwise, see setup case 1)
� HP OpenView Network Node Manager data collected on UNIX orWindows (in a MIB for which a table definition is not supplied;otherwise, see setup case 2)
� HP OpenView Performance Agent data collected on UNIX or Windowsby means of DSI (in a class for which a table definition is not supplied;otherwise, see setup case 1)
� BMC Software PATROL data collected on UNIX or Windows (in a classfor which a table definition is not supplied; otherwise, see setup case 2)
� SunNet Manager or Enterprise Manager data collected on UNIX (from aschema file for which a table definition is not supplied; otherwise, seesetup case 2).

Setup: Introduction � Setting Up Your Default Web Browser 43
� For a PDB on Windows:� Enhanced support NTSMF data collected on Windows (in an object for
which a table definition is not supplied; otherwise, see setup case 1)� HP OpenView Network Node Manager data collected on Windows or
UNIX (in a MIB for which a table definition is not supplied; otherwise,see setup case 2)
� HP OpenView Performance Agent data collected on Windows or UNIXby means of DSI (in a class for which a table definition is not supplied;otherwise, see setup case 1)
� BMC Software PATROL data collected on Windows or UNIX (in a classfor which a table definition is not supplied; otherwise, see setup case 2).
� For a PDB on z/OS:� Enhanced support NTSMF data collected on Windows (in an object for
which a table definition is not supplied; otherwise, see setup case 1)� BMC Software PATROL data collected on Windows or UNIX (in a class
for which a table definition is not supplied; otherwise, see setup case 2).
For the instructions for each setup case, see� “Overview of Setup Case 1” on page 53� “Overview of Setup Case 2” on page 65� “Overview of Setup Case 3” on page 81� “Overview of Setup Case 4” on page 99� “Overview of Setup Case 5” on page 119.
Setting Up the Client
Setting Up the ClientAfter you have installed and set up the server(s) and installed your SAS IT Resource
Management client software, you can set up the client by following these steps.1 Start SAS IT Resource Management on your client platform. For more
information, see “Starting the z/OS GUI” on page 19 or “Starting the UNIX andWindows GUI” on page 21.
2 Set up a remote server profile for each remote server that you will use to access aremote PDB. (For more information, see “Overview of Remote Server Profiles” onpage 571.)
3 If you did not select a default Web browser during installation, you should specifythe Web browser that you want to use by default with SAS IT ResourceManagement. For more information, see “Setting Up Your Default Web Browser”on page 43.
Setting Up the Web Browser
Setting Up Your Default Web BrowserThe SAS System and SAS IT Resource Management provide information and enable
you to create reports that can be displayed by using a Web browser.

44 Setup: Related Topics � Chapter 3
Your current default Web browser might not be the one that you prefer.On Windows, to change the default Web browser you can follow these steps.1 Right-click the Internet Explorer desktop icon and select Internet Options.2 On the Programs tab, check the box at the bottom of the window that is labeled
"Internet Explorer should check to see whether it is default browser."3 When you open your next web site, you will be asked this question and you can
change your default browser.
On UNIX, to change the default Web browser you can specify the value of the Xresource SAS.webBrowser. You can specify this in your Xresources file or by using the-xrm option when you start SAS. For example, to point to a locally installed copy ofNetscape, you could issue your SAS command with the following option:
-xrm ’SAS.webBrowser:/usr/local/bin/netscape’
Setup: Related Topics
Actions and Access Rights Required
AdministrationLogon host: where the PDB resides or will resideLicense: the logon host has a server license
� PDB AdministrationRead/write required: PDBRead-only OK: SITELIB and PGMLIB
� create a PDB� add/edit/create tables and regular variables� create/edit PDB-specific formats� create/edit PDB-specific formula variables� edit PDB-specific work shift� run process� run process with user exits� run process with data-duplication macros� run reduce� run reduce with external "detail"� save/modify PDB-specific report definitions in ADMIN� save PDB-specific graph or text reports in ADMIN� write PDB-specific data to downloadable file� maintain the PDB’s data dictionary from the master data
dictionary.
� SITELIB AdministrationRead/write required: SITELIBRead-only OK: PDB and PGMLIB
� copy the shipped SITELIB to make a writable SITELIB
Setup: Introduction � Actions and Access Rights Required 45
� create/edit site-specific work shift and holiday schedules� create/edit site-specific formats� create/edit site-specific report definitions.
� PGMLIB Administration
Read/write required: PGMLIBRead-only OK: Neither PDB nor SITELIB requires read access
� initial install of SAS IT Resource Management� install of SAS IT Resource Management updates (maintenance and
release)� install of table definitions from the PDB’s data dictionary to the
master data dictionary.
Users (and Administrator)Logon host: the host on which the PDB of interest is accessible by means of the local
file systemLicense: the logon host must have a client license and/or server license (data
visualization and DeskTop Reporter require at least a client license)
orLogon host: the host on which the PDB of interest is accessible by means of a remote
serverLicense: the logon host must have a client license (and can also have a server license,
though that is not required for these tasks)� General User: Use data and supplied, PDB-specific, and site-specific report
and rule definitions
� Read/write required: -NONE-� Read-only OK: PDB and SITELIB and PGMLIB
� display and perhaps print PDB-specific and site-specific graph andtext reports by using the interactive interface
� perform data visualization� run supplied and PDB-specific and site-specific report definitions,
and display and perhaps print graph and text reports by means ofthe interactive interface.
� put PDB-specific graph or text reports onto a Web
Note: These do not require read access to PDB or SITELIB orPGMLIB: �
� browse PDB-specific and site-specific graph and text reports byusing a Web browser (this does require read access to theWeb-enabled reports)
� Power User: Modify/Create user-specific report definitionsRead/write requiredRead-only OK: PDB and SITELIB and PGMLIB
� display and perhaps print tables, variables, and statistics� modify and run supplied and PDB-specific and site-specific report
definitions, and display and perhaps print graph and text reportsby means of the interactive interface

46 Grouping Reports in a Web Gallery � Chapter 3
� create and run user-specific definitions, and display and perhapsprint graph and text reports in the interactive interface
� modify (but do not save)/use PDB-specific and site-specific formats
� save/edit report definitions in SASUSER
� save graph and text reports in SASUSER
� create/save user-specific formats in SASUSER.
Note: Read/write access to SASUSER is assumed in all cases, otherthan batch operations on z/OS (where it is optional). �
Note: Using your site’s security system, verify (and adjust if necessary) access rightsfor SAS IT Resource Management structures:
Table 3.1 Access Rights Table
Structures — Access Rights —
Administrator User
MXG.MXG.FORMATS READ READ
MXG.MXG.SOURCLIB READ READ
MXG.USERID.SOURCLIB READ/WRITE READ
On UNIX: misc/cpe READ
On WNT: cpe\sasmisc READ
�
Grouping Reports in a Web Gallery1 Report groupings usually make a particular report easier to find. Also, report
groupings usually make a particular report easier to interpret, by comparing itwith related reports in the same group.
Before you decide how to group your own reports, look at how reports aregrouped in the QuickStart Examples.
a From the main window in in the SAS IT Resource Management server GUIfor UNIX and Windows environments or in the SAS IT ResourceManagement client GUI, select OnlineHelp � Other ITRMDocumentation � QuickStart Examples
If the examples are zipped, unzip them.b To see the groupings for UNIX Server Reports, for example, select UNIX
Server Reports. There are five level 0 groupings: Overview, Utilization,Service, Forecasts, and Exceptions.
c To the left of Overview is a folder with no symbol on it. This icon indicatesthat you have reached the end of a path. Click on Overview. You can accessall of the report groups at this location by selecting the down arrow next tothe Report Group field, and selecting one of the report groups from the list.In this case, there is only one report group, so to the right you are seeing allthe reports at that location.
d To the left of Utilization is a folder with a plus sign (+) on it. This iconindicates that you have not reached the end of a path. Click on Utilization.There are two level 1 groupings: Top Systems and Critical Systems.
Setup: Introduction � Grouping Reports in a Web Gallery 47
To the left of Top Systems is a folder with a plus sign (+) on it. You havestill not reached the end of a path. Click on Top Systems. There are fourlevel 2 groupings: Processor, Memory, Storage, and Network.
To the left of Network is a folder with no symbol on it. You have reachedthe end of a path. Select Network. You can access all of the report groups atthis location by selecting the down arrow next to the Report Group field.(You may need to drag frame borders aside to get to the field and its downarrow). A list displays with this location’s three report groups: All SystemsNetwork I/O, All Systems NFS Call Rate, and Top Systems NetworkI/O Analysis.
Select Top Systems Network I/O Analysis. The reports that aredisplayed to the right are the ones that are in this report group.
e Select Return to return to the highest-level menu.2 Decide on report groupings for your data source.
When you plan the groupings of supplied reports for your data source, there areseveral rules to keep in mind:
� Paths can be of any length, but 10 levels is a sensible limit and fewer isusually better.
� Reports are available only at the end of a path. At that location, there can beone or more report groups.
� A report group can be used for graphic reports or text reports but not both. Ifthe report group is used for graphic reports, it can have any number ofreports. If the report group is used for text reports, it can have only onereport.
Note: To see a sample text report in the QuickStart Examples, from thehighest-level menu follow this path: SAP R/3 Workload Reports �Utilization � Tabular Reports � CPU
The output is one report. The width of the report varies depending on thewidth of the values on that page. �
You do not need to create any entities at this point. They will be created for youlater.
3 Decide on names for the report groupings and their locations. You do not need tocreate any entities at this point. They will be created for you later.
� For each of your report groups: Choose a name (40 characters or less). Thisname will appear in the list that displays when you or another user selectsthe down arrow on the Report Group field. You will use this name later, inthe %CPRUNRPT macro.
In the QuickStart Examples, Top Systems network I/O Analysis is thename of a report group.
� For each end-of-path: Choose a name for its physical location (a directory fora PDB that is located in a UNIX or Windows environment; a PDS for a PDBthat is located in a z/OS environment). The reports for all of its report groupswill be in this location. You will use this name later, in the %CPHTREEmacro.
In the QuickStart Examples, the reports for the All Systems Network I/O report group, the All Systems NFS Call Rate report group, and the TopSystems Network I/O Analysis report group are in a directory namedpservtn.
� Choose the level names for your paths. The names can be of any length.Shorter is usually better so that the user does not need to move one or moreframe boundaries to see the right ends of the names.
48 Troubleshooting Batch Jobs That Fail � Chapter 3
In the QuickStart Examples, the level names on the paths are Overview,Utilization, Top Systems, Processor, Memory, Storage, Network,Critical Systems, and so on.
� For the data source: Choose a name for its physical location (a directory for aPDB that is located in a UNIX or Windows environment; a PDS for a PDBthat is located in a z/OS environment). All the end-of-path locations willreside “under” this location. This is called the “sub” location.
In the QuickStart Examples, the “sub” location for the UNIX serverreports is the pserv directory.
� For the data source: Choose a menu name.In the QuickStart Examples, the menu name for the UNIX server reports
is UNIX Server Reports (from HPOVPA Data).� Choose the name for a “super” location “under” which all the report groups
for any data sources will reside. (You have only one data source now, butmight have additional ones later.)
� For a UNIX or Windows PDB: You need to decide on the full path andname for a directory. For example, you might name the location\abc\itsvrpts (for Windows) or /abc/itsvrpts (for UNIX).
� For a z/OS PDB: You need to decide on the fully qualified name for aPDS. For example, you might name the location ABC.ITSVRPTS.
In the QuickStart Examples, as installed, the “super” location is .../cpe/itsvdocs/qs/web or ...\cpe\itsvdocs\qs\web.
4 Read about how report structures are described to SAS IT Resource Management.
See “The Contents of the Catalog Entry” and “The Layout of a Line in theOutline” in the information about the CAT= parameter in the %CPHTREE macro,which can be found in the SAS IT Resource Management macro referencedocumentation.
Note: In your outline, you will ignore the fourth and fifth fields. �
Troubleshooting Batch Jobs That FailFor information about troubleshooting batch jobs, see the topic “Troubleshooting
Batch Jobs That Fail” in "Appendix 1: Recovery Procedures" in the Macro Reference.
Using the GENERATE SOURCE Control StatementThe GENERATE SOURCE control statement enables you to make a preliminary
draft of the table and variable definitions for data from a collector for which SAS ITResource Management does not supply table and variable definitions. The GENERATESOURCE control statement is used with the %CPDDUTL macro.
For more information about the GENERATE SOURCE control statement, see thetopic GENERATE SOURCE in “Chapter 4: Data Dictionary Macro and ControlStatements” in the SAS IT Resource Management macro reference documentation. Formore information about the %CPDDUTL macro, see “Chapter 4: Data Dictionary Macroand Control Statements,” in the SAS IT Resource Management macro referencedocumentation.
You can create your own table and variable definitions from the following sources ofinformation:
� from an existing SAS data set
Setup: Introduction � Using the GENERATE SOURCE Control Statement 49
� from an existing table in a PDB
� from a recognized file format (for example, a Class Specification File for HPMeasureWare’s Data Source Integration).
Use the GENERATE SOURCE statement of the %CPDDUTL macro to build a firstdraft of the CREATE TABLE, UPDATE TABLE, and CREATE VARIABLE controlstatements needed to define the table. The generated source statements can be storedin either a SAS catalog member of type .SOURCE or in an external flat file.
Typically, you would use GENERATE SOURCE when setting up to use the GenericCollector Facility, in order to aid in defining the table in the PDB. As such, the data setused for staging the data for the Generic Collector Facility would serve as theDATASET= parameter for the GENERATE SOURCE statement.
If you are required to use a staged data set as input to %CxPROCES (where x=M, P,S, or W) you must ensure that it conforms to the following rules:
� A variable called DATETIME must exist in the input data set. For type Eventtables, DATETIME represents the date and time when the event occurred. Fortype Interval tables, datetime is usually the start of an interval. If you want touse an alternative datetime variable that is not named DATETIME, then use theDATETIME= parameter to identify that variable.
� If the table being created is a type Interval table, a variable called DURATIONmust exist in the input data set. DURATION is the total time (length) of theinterval. If you want to use an alternative duration variable that is not namedDURATION, then use the DURATION= parameter to identify that variable.
Review the generated source statements before executing them. While GENERATESOURCE is as accurate as possible, it is not infallible. Examine the generateddefinitions to verify (and modify if necessary) the following things in particular:
� On the CREATE TABLE statement, the default age limit for each of the levelsshould be reviewed and, if necessary, modified.
� A CREATE VARIABLE control statement is built for each variable in the table.For examples of CREATE VARIABLE control statements, see “Examples” in thetopic CREATE VARIABLE in the SAS IT Resource Management macro referencedocumentation. Examine each CREATE VARIABLE statement to ensure that
� the correct interpretation type is being set by the INTERPRET= parameter.The GENERATE SOURCE control statement builds all of its CREATEVARIABLE control statements in such a way that the statistics that arespecified when a table is installed in the PDB (as indicated by the ISTATS=parameter) are set according to the interpretation type that is chosen for thevariable. To see how the GENERATE SOURCE control statement determineswhat is specified as the interpretation type in the preliminary draft, refer to“Appendix 8: Algorithm Used by GENERATE SOURCE” on page 188. Formore information about selecting appropriate variable interpretation types,see “Appendix 7: Variable Interpretations and Default Statistics” on page 187.
� the name of the variable is easy to understand. If not, use a more meaningfulvariable name. For more information about the CREATE VARIABLE controlstatement, see the topic CREATE VARIABLE in the SAS IT ResourceManagement macro reference documentation.
For more information about the context for using the GENERATE SOURCE controlstatement, see the following topics:
� “Overview of Setup Case 3” on page 81
� “Overview of Setup Case 4” on page 99.

50 Using the QuickStart Wizard � Chapter 3
Using the QuickStart WizardThe QuickStart Wizard is available on the Administration tab in the SAS IT
Resource Management GUI for UNIX and Windows, and provides a quick and easy wayfor you to get started using SAS IT Resource Management. The Wizard assists you insetting up your data with SAS IT Resource Management by guiding you through theprocess of creating a new performance data base (PDB), identifying the type of datathat you want to store in the PDB, creating a structure in which your Web-enabledreports will be located, and creating SAS jobs that you can run when you exit theWizard. For more information, see setup case 1 in “Setting Up the Server, with SetupCases” on page 38.
Using the QuickStart Wizard you can� create a new PDB� specify the collector that you are using to gather data� specify which type of that collector’s data you will store in the PDB� create the report structure in which your Web-enabled reports will be located. The
QuickStart Wizard runs the job that creates the report structure and also savesthat job so that you can see it if you want to modify the structure later.
� create SAS jobs that you can use to add tables to your PDB, process yourperformance data, reduce the data, and create reports based on that data.
� if you are running on z/OS and not using the z/OS UNIX File System area for yourreport structure, the QuickStart Wizard will also create a batch job that you canuse to FTP your report files from the report structure to a UNIX or Windowssystem for viewing by using a Web browser.
If your data source is not currently supported in the QuickStart Wizard, you mightwant to run the Wizard with any data source and then use, as examples, the programsand reports that are created by the Wizard. By reviewing those programs and thedocumentation for the macros that are used in those programs, you can modify orcreate your own programs that perform the same tasks as the QuickStart Wizardprocess and reduction program and report program. For more information, see setupcases 2, 3, 4, and 5 in “Setting Up the Server, with Setup Cases” on page 38.
The Getting Started with SAS IT Resource Management book, which is shippedwith SAS IT Resource Management, contains additional information about using theQuickStart Wizard. Also, as the Wizard guides you through the process, help isprovided for each window. The following resources provide additional information aboutusing the Wizard, running the jobs that are created by the Wizard, and modifying thereports that are created by the Wizard:
� Sample output from QuickStart report jobs is available by following this path fromthe main window of the SAS IT Resource Management client GUI: OnlineHelp �Other ITRM Documentation � QuickStart Examples
� The SAS IT Resource Management macro reference documentation lists the SASIT Resource Management macros, some of which are used with the QuickStartWizard. This documentation can assist you in creating your own QuickStart typeof programs or in modifying the QuickStart programs. For more information aboutthe macros, see “ SAS IT Resource Management Macros Grouped by Task” in“Chapter 1: Using SAS IT Resource Management Macros” in the SAS IT ResourceManagement macro reference documentation.
� You can also work with galleries and their contents to change the regular reports,exception reports, help, notes, and so on that are created by your QuickStartreport program. For more information, see “Overview of Galleries” on page 551.
� When you run the QuickStart Wizard, information and help files for your datasource and reports are created within the qs directory (on UNIX or Windows or z/

Setup: Introduction � Using the QuickStart Wizard 51
OS) or .QS PDS (on z/OS) in the location where SAS IT Resource Management isinstalled. The information in these files will assist you in setting up your datacollector or data source with SAS IT Resource Management.

52

53
C H A P T E R
4Setup Case 1
Setup Case 1 53Overview of Setup Case 1 53
The QuickStart Wizard 54
The Raw Data 55
The PDB and Site Library 55
The Tables and Variables 55The Process-and-Reduce Program 56
The Report Structure 56
The Report Program(s) 57
The Job Schedule 58
Your Notes 59
Optional Customization 60Additional Data 63
Setup Case 1
Overview of Setup Case 1For general information about setting up the server, see “Setting Up the Server, with
Setup Cases” on page 38. That topic also identifies which setup case applies to yoursituation.
Below are the instructions for setup case 1. For each step, there is an overview of thestep and, after that, the actual directions for the step. Typically, UNIX and Windowshave one or two sets of directions and z/OS has one or two sets of directions. The stepsare in the following order.
1 “The QuickStart Wizard” on page 542 “The Raw Data” on page 553 “The PDB and Site Library” on page 554 “The Tables and Variables” on page 555 “The Process-and-Reduce Program” on page 566 “The Report Structure” on page 567 “The Report Program(s)” on page 578 “The Job Schedule” on page 589 “Your Notes” on page 5910 “Optional Customization” on page 6011 “Additional Data” on page 63.
54 The QuickStart Wizard � Chapter 4
The QuickStart WizardRun the QuickStart Wizard for your data collector or data source.The wizard creates a PDB, creates a program that processes and reduces the data,
creates a report structure (and saves the program with which it created the structure,and also creates (if necessary) a program for FTPing the structure and its reports), andcreates a program that reports on the data.
� In the SAS IT Resource Management server GUI for UNIX or Windows: On themain window’s Administration tab, select QuickStart Wizard. Follow yourdata collector or data source’s path through the wizard.
The path creates a PDB (without any tables at this point) and a report structure.
Also, the path creates a qs directory and, under that, creates a cntl subdirectorythat has a readme.txt file, an xrptstr.sas file, an xprocess.sas file, and an xreport.sasfile, where the value of x indicates the data collector or data source for which theprograms were generated. Additionally, the path generates other instructions andother directories and files.
Note: In the path through the wizard, you are asked to supply the location of thefile that contains the raw data for the data collector or data source. If you do notalready have the file, you will create the file in the next step. In the wizard,supply the filename of the existing file or the filename that you intend to use. (Ifyou decide later to use a different name, you can edit the filename in thexprocess.sas file.) �
� In the SAS IT Resource Management server GUI for z/OS: In the main menu,select the PDB Admin button and, from the menu it opens, select QuickStartWizard. Follow your data collector or data source’s path through the wizard.
The path creates a PDB (without any tables at this point).
The path also creates a report structure. The location of the report structuredepends on how you specified the parent location for the Web reports.
� If you specified a directory in the z/OS UNIX File System as the parentlocation, the report structure consists of directories in the z/OS UNIX FileSystem. This choice is called z/OS with a directory-based report structure.
� If you specified a PDS as the parent location, the report structure consists ofPDSs. This choice is called z/OS with a PDS-based report structure. In orderto be able to view the reports with a Web browser, you will also create acorresponding directory-based report structure on a UNIX or Windowssystem. After you do that, this choice is called z/OS with a PDS-based reportstructure (and a corresponding directory-based report structure on a UNIX orWindows system).
Also, the path creates a .QS.CNTL PDS that has a $$README member, a$xINSTR member, an xRPTSTR member, an xPROCESS member, and anxREPORT member (and depending on your selections, can create an xFTPHTMLmember), where the value of x indicates the data collector or data source for whichthe programs were generated. Additionally, the path generates other instructionsand other members, PDSs, and data sets. For example, the path can create otherPDSs with .QS as a high-level qualifier and/or directories with /qs in the directorypath.
Note: In the path through the wizard, you are asked to supply the location of thedata set that contains the raw data for the data collector or data source. If you donot already have the data set, you will create that data set in the next step. So inthe wizard, supply the name of the existing data set or the data set that you
Setup Case 1 � The Tables and Variables 55
intend to use. (If you decide later to use a different name, you can edit the dataset name in the xPROCESS member.) �
Note: All new PDSs are created in a location that is based on the SAS systemoption named FILEDEV. Check with the person who installed SAS at your site todetermine whether FILEDEV points to a set of temporary volumes. If FILEDEVdoes point to a set of temporary volumes, then you must move the PDSs to apermanent location. �
For more information about the QuickStart Wizard, see “QuickStart Wizard” on page12.
The Raw DataStart to collect raw data, if you do not already collect raw data.Several steps ahead, you will need at least a day’s worth (preferably a few days’
worth) of raw data from your data collector or data source. By starting to collect datanow, you will not need to wait for it later.
� For UNIX or Windows: To obtain raw data from the data collector or data source,follow the instructions in the readme.txt file that the QuickStart Wizard generated.(Direct the raw data to the file whose name you supplied to the wizard, above.)
� For z/OS: To obtain raw data from the data collector or data source, follow theinstructions in the $$README member that the QuickStart Wizard generated.(Direct the raw data to the data set whose name you supplied to the wizard, above.)
For more information about your data, see the documentation from the vendor ofyour data collector or data source.
The PDB and Site LibraryThe QuickStart Wizard already created the PDB. The site library was created at the
time that SAS IT Resource Management was installed. Customize the PDB and sitelibrary, as necessary.
Depending on your operating system, the QuickStart Wizard created a PDB that islocated in a UNIX, Windows, or z/OS environment.
� For UNIX or Windows: In the readme.txt file that the QuickStart Wizardgenerated, follow the instructions for the PDB and site library.
� For z/OS: In the $$README member and $xINSTR member that the QuickStartWizard generated, follow the instructions for the PDB and site library.
For more information about PDB properties, see “Overview of Whole PDBs” on page296. For more information about site library properties, see “Overview of SiteLibraries” on page 270.
The Tables and VariablesYour PDB does not have tables yet. The tables will be added automatically in the
next step, when you run the process-and-reduce job that the QuickStart Wizard created.For more information about tables, see “Overview of Tables” on page 353. For more
information about variables, see “Overview of Variables” on page 378.

56 The Process-and-Reduce Program � Chapter 4
The Process-and-Reduce ProgramThe QuickStart Wizard already created a program to process and reduce data.
Customize the process-and-reduce program, as necessary, and run it.1 Customize the process-and-reduce program.
� For UNIX or Windows: Follow the instructions in the comments in thexprocess.sas file that the QuickStart Wizard generated.
� For z/OS: Follow the instructions in the comments in the xPROCESSmember that the QuickStart Wizard generated.
2 To the program, add a step that backs up the whole PDB.In the long run, it does not matter much whether the backup step runs before
or after the process and reduce steps. For now, however, put the backup step afterthe process and reduce steps, so that there will be some data in the PDB by thetime that the PDB is backed up.
For information, recommendations, and examples related to PDB backup, see“Backing Up a PDB” on page 303.
Note: Backing up the whole PDB is not the same as archiving incoming data. Youneed to back up the whole PDB regardless of the decision that you made aboutarchiving. For more information about archiving, see “Archiving Incoming Data”on page 411. �
3 When at least a day’s worth of raw data has been collected, run the program thatprocesses, reduces, and backs up the data.
� For UNIX or Windows: In batch mode (because that is how you will run thenightly jobs), submit the xprocess.sas file (which is a SAS program) to SAS.
� For z/OS: Create a program that invokes SAS and passes to SAS thexPROCESS member (which is a SAS program). Then, submit that job inbatch mode (because that is how you will run the nightly jobs).
The first time that you run the program (that is, this time), the PDB has notables and so the program adds the appropriate table definitions (and theirvariable definitions) to the PDB before processing and reducing the data. In thefuture, when you run the program, the PDB already has the table (and variable)definitions, so the program immediately processes and reduces the data into thosetables.
For more information about submitting a SAS program, see “Working with theInterface for Batch Mode” on page 18. For more information about processingdata, see “Processing Data” on page 413. For more information about reducingdata, see “Reducing Data” on page 416.
4 The data in the PDB corresponds to the raw data.If you want to browse the data in the PDB, see “Viewing Data Values” on page
420.5 The PDB backup has been created.
The Report StructureThe QuickStart Wizard already created a report structure. For z/OS with a
PDS-based report structure, FTP the report structure to a UNIX or Windows system.� For UNIX or Windows: The report structure that the QuickStart Wizard created is
the only one that you need.
Setup Case 1 � The Report Program(s) 57
� For z/OS with a directory-based report structure (in the z/OS UNIX File System):The report structure that the QuickStart Wizard created is the only one that youneed.
� For z/OS with a PDS-based report structure: You will need an additional reportstructure on a UNIX or Windows system. By FTPing the PDS-based reportstructure to a UNIX or Windows system, you will create a correspondingdirectory-based report structure.
If you decide to FTP the report structure now, the primary benefit is having thework already taken care of instead of leaving it for later. If you decide to FTP thereport structure in a later step, the primary benefit is a one-time saving of thetime it takes for the program to construct FTP commands.
The QuickStart Wizard already created a program to FTP the report structureto another system. If you want to FTP the report structure now, look at thexFTPHTML member that the QuickStart Wizard created. It contains calls to the%CPSTART macro and the %CMFTPSND macro. Follow the instructions in thecomments in the program and then run the program.
For more information about the %CMFTPSND macro, see the %CMFTPSNDtopic in the SAS IT Resource Management macro reference documentation. The%CMFTPSND macro can be used, as it is being used here, to FTP a PDS-basedreport structure in order to create a directory-based report structure. (The%CMFTPSND macro can also be used, as it will be used after the reports havebeen generated, to FTP anything not already FTP’d, such as the reports, to thedirectory-based report structure.)
For more information about submitting a SAS program, see “Working with theInterface for Batch Mode” on page 18.
The Report Program(s)The QuickStart Wizard already created the program for generating reports on the
data. Customize the reporting program, as necessary, and test.1 Customize the program.
� For UNIX or Windows: Follow the instructions in the comments of thexreport.sas file that the QuickStart Wizard generated.
� For z/OS: Follow the instructions in the comments of the xREPORT memberthat the QuickStart Wizard generated.
For more information about the macros in the reporting programs, see the“Macros Used for Analyzing Data” topic in Chapter 3, “Report Macros,” in themacro reference documentation.
2 Run the program in order to generate reports.
� For UNIX or Windows: In batch mode (because that is how you will run thenightly programs), submit the xreport.sas file (which is a SAS program) toSAS.
Reports are generated to the directory-based report structure that wascreated by the QuickStart Wizard.
To view the reports, point your Web browser to the welcome.htm file in thesubdirectory named web in the location in which you created the reportstructure.
� For z/OS with a directory-based report structure: In batch mode (becausethat is how you will run the nightly programs), submit the job in thexREPORT member (which contains a SAS program).

58 The Job Schedule � Chapter 4
Reports are generated to the directory-based report structure that wascreated by the QuickStart Wizard.
To view the reports, point your Web browser to the welcome.htm file in thesubdirectory named web in the location in which you created thedirectory-based report structure.
� For z/OS with a PDS-based report structure (and a correspondingdirectory-based report structure on a UNIX or Windows system): In batchmode (because that is how you will run the nightly programs), submit the jobin the xREPORT member (which contains a SAS program). Then, follow theinstructions in the xFTPHTML member if you did not do the earlier FTPstep, and submit the customized job in the xFTPHTML member. This time,%CMFTPSND will FTP the reports to the additional report structure.
As a result, reports are generated to the PDS-based report structure thatwas created by the QuickStart Wizard and then are transferred to thedirectory-based report structure that was created by the FTP program.
Note: If you omitted the earlier FTP step, this step will FTP the reportstructure as well as the reports.) �
To view the reports, point your Web browser to the welcome.htm file in thesubdirectory named web in the location to which you FTP’d the reportstructure.
For more information about submitting a SAS program, see “Working with theInterface for Batch Mode” on page 18.
3 The data in the reports corresponds to the data in the PDB.
When you navigate through the report structure in the left frame, one or morereports are displayed in the right frame when you reach the end of a navigationalpath.
Graph reports are displayed as “thumbnail” sketches. To view a full-size versionof a graph report, click on its thumbnail sketch. To return the report to thumbnailsize, select Shrink.
For more information about examining the data in the PDB, see “Viewing DataValues” on page 420.
4 Confirm that “read” access to the reports (or execute access, if appropriate to thereport mechanisms) is available to you and to anyone else who needs to view them.
For more information about access rights, see “Actions and Access RightsRequired” on page 44.
The Job ScheduleSchedule the nightly jobs. Typically the jobs run one time a day, at night. However,
you can schedule them to run more or less often than one time a day, and at whatevertime(s) work best for your site.
� For UNIX: Schedule xprocess.sas and xreport.sas to run (in that order) nightly.
For more information, refer to your cron and crontab man pages.
� For Windows: Schedule xprocess.sas and xreport.sas to run (in that order) nightly.
For more information, refer to the documentation for your task scheduler.
� For z/OS with a directory-based report structure: Schedule xPROCESS andxREPORT to run (in that order) nightly.
For more information, refer to your scheduling system’s documentation.
Setup Case 1 � Your Notes 59
� For z/OS with a PDS-based report structure (and a corresponding directory-basedreport structure on a UNIX or Windows system): Schedule xPROCESS,xREPORT, and xFTPHTML to run (in that order) nightly.
For more information, refer to your scheduling system’s documentation.
Your NotesMake notes in your own schedule.
� The first day after scheduling, confirm that the programs ran as scheduled.
� The first day after scheduling, confirm that the backup of the PDB was createdand that it is identical to (or can be used to regenerate a structure that is identicalto) the PDB.
Unless you have a strong preference for leaving the backup step after theprocess and reduce steps, in the process, reduce, and backup job move the backupstep in front of the process and reduce steps.
� Every day, check the logs from the nightly jobs for error messages, if any. Youmight also want to check for warning messages.
If you need to restart a nightly job:
� For UNIX or Windows: See the restart.txt file that the QuickStart Wizardgenerated. Also see “Appendix 1: Recovery Procedures” in the SAS ITResource Management macro reference documentation.
� For z/OS: See the $RESTART member that the QuickStart Wizard generated.Also see “Appendix 1: Recovery Procedures” in the SAS IT ResourceManagement macro reference documentation.
� In a step above, you updated the site library’s list of holidays so that it is correctfor your site through some date in the future. When that date is reached, SAS ITResource Management will write a reminder to the log during theprocess-and-reduce run. But in case you miss seeing that reminder, you mightwant to add an item to your own schedule to update the list again before that lastdate.
For more information about the holiday list, see “Viewing/Editing Your ActiveSite Library’s List of Holidays” on page 286.
� In a step above, you set the workshift schedule in the PDB. If your site hasseasonal shift changes (for example, summer hours), you might want to add anitem to your own schedule to update the workshift schedule when the seasonchanges.
For more information about the workshift schedule, see “Viewing/Editing YourActive PDB’s Work Shift Schedule” on page 334.
� You might want to schedule a periodic check of table and variable usage. If data isbeing kept for any variables or tables that are not being used for reporting, youmight want to set the variables’ or tables’ Kept status to No so that you can savespace in the PDB and time during processing and reduction.
� You might want to schedule a periodic check of space usage.
For more information about space usage, see “Space Usage at a Level in aTable” on page 349.
� If you have any formats that are based on changeable information (for example,formats related to network configuration or storage devices), you might want toschedule a periodic review of the formats.
For more information about formats, see SAS online help.

60 Optional Customization � Chapter 4
� At some sites, copies of the demonstration PDBs are used for practice or testing:for example, testing what a new report would look like, before a production PDBhas enough data for a report.
At some sites, a demonstration PDB is used when the active PDB must be someother PDB than the one that is to be used. (Some operations cannot run on theactive PDB.)
At other sites, one or more of the demonstration PDBs are never used.You can delete one or more of the demonstration PDBs if you have no need for
them. Remember, though, that at least one PDB (demonstration PDB orsite-created PDB) is required to start SAS IT Resource Management. For moreinformation, see “Deleting a PDB” on page 315.
Optional CustomizationAfter enough data has been collected to fully populate most of the reports (that is,
they have data over the full time-span of the report), you might or might not want tomake other customizations for your site.
� You might want to adjust the report definitions and rule definitions.For example, you might want to add, change, or delete definitions.
For more information about report definitions, see “Using the Manage ReportDefinitions Tool” on page 468. For more information about rule definitions, see“Using the Perform Exception Analysis Tool” on page 468.
� You might want to adjust static files in the report structure(s).
A report gallery’s static files are the files that are not cleared when the reportsin the gallery are cleared by %CPWEBINI, %CPMANRPT, or the WEBCLR=parameter.
For information about customizing these files, see “Customizing a ReportGallery’s Static Files” on page 562.
� You might want to age out old reports instead of deleting them.
Where you want to age out old reports, replace the calls to the %CPWEBINImacro with calls to the %CPMANRPT macro, and make the corresponding changesto the OUTLOC= parameter values in the macro calls that generate reports.
For more information about %CPWEBINI, see the topic %CPWEBINI in theSAS IT Resource Management macro reference documentation. For moreinformation about %CPMANRPT, see the topic %CPMANRPT in the SAS ITResource Management macro reference documentation.
� You might want to customize the report structure.Typically, the report structure is not customized. However,
� you can add new paths in the report structure. If you add new paths, be verycareful to specify end-of-path locations that either do not currently exist or, ifthey exist, are empty and not used for any other purpose.
� where you use %CPWEBINI to clear reports, you can remove or revise theexisting paths in the report structure.
� where you use %CPMANRPT to age out reports, you can adjust a few aspectsof the report structure: change the titles, and change the text (but notdirectory names) that is displayed on existing paths. You cannot remove orrevise existing paths in the report structure (unless you are willing to risklosing all the reports on those paths).
Setup Case 1 � Optional Customization 61
To customize the report structure:� For UNIX or Windows: Edit the xrptstr.sas file, which contains the program
that the QuickStart Wizard used to generate the report structure. You mightalso need to edit the catalog entry/ies that the program calls. (For moreinformation about editing catalog entries, see the Note below.)
Next, where you are using %CPWEBINI to clear reports, you can deletethose paths in the report structure if you want to remove the paths or if youintend to revise them; otherwise, do not delete the existing paths in thereport structure. Submit the xrptstr.sas program.
Finally, revise the xreport.sas program to generate reports to theappropriate destinations in the revised report structure, as necessary.
� For z/OS with a directory-based report structure: Edit the xRPTSTR job,which contains the program that the QuickStart Wizard used to generate thereport structure. You might also need to edit the catalog entry/ies that theprogram calls. (For more information about editing catalog entries, see theNote below.)
Next, where you are using %CPWEBINI to clear reports, you can deletethose paths in the report structure if you want to remove the paths or if youintend to revise them; otherwise, do not delete the existing paths in thereport structure. Submit the xRPTSTR job.
Finally, revise the xREPORT job to generate reports to the appropriatedestinations in the directory-based report structure, as necessary.
� For z/OS with a PDS-based report structure (and a correspondingdirectory-based report structure on a UNIX or Windows system): Edit thexRPTSTR job, which contains the program that the QuickStart Wizard usedto generate the report structure. You might also need to edit the catalogentry/ies that the program calls. (For more information about editing catalogentries, see the Note below.) Then, make the corresponding edits in thexFTPHTML job, as necessary.)
Next, where you are using %CPWEBINI to clear reports, you can deletethose paths in the report structures if you want to remove the paths or if youintend to revise them; otherwise, do not delete the existing paths in thereport structures. Submit the xRPTSTR job and then the xFTPHTML job.
Finally, revise the xREPORT job to generate reports to the appropriatedestinations in the PDS-based revised report structure, as necessary. (Thenightly xFTPHTML job will FTP the reports to the directory-based reportstructure.)
Note: To edit an entry in a SAS catalog, you can use the SAS Program Editorwindow. For example, suppose that you want to copy the entry inPGMLIB.JSWIZCAT.JNEXNGTR.SOURCE, edit it, and then save it toADMIN.JSWIZCAT.JNEXNGTR.SOURCE, which is in the ADMIN library in youractive PDB. Here are the steps:
1 Open the SAS Program Editor window.2 In the command field, type the following command and press ENTER:
copy pgmlib.jswizcat.jnexngtr.source
3 The entry appears. Edit the entry.4 It is recommended that you not save the program back to PGMLIB, even if
you have write access to PGMLIB, because your new version will disappearwhen PGMLIB is replaced at the next release.
You can save the entry to any library that exists and has a libref that isdefined with write access. (If the library exists and a libref is not currently

62 Optional Customization � Chapter 4
defined or is defined with read-only access, you can define a libref by usingthe SAS LIBNAME statement.)
The library (in the active PDB) that the ADMIN libref points to is aconvenient one, and the libref is already defined if SAS IT ResourceManagement has been invoked in the current SAS session.
In order to write to ADMIN, if the PDB is activated with read-only access,then activate it with write access.
In the command field, type the following command and press ENTER:
save admin.jswizcat.jnexngtr.source
If the PDB was activated initially with read-only access, activate it againwith read-only access.
5 Close or iconize the SAS Program Editor window.6 Save the original report structure program under a different name.7 Then, edit the report structure program to refer to the entry in ADMIN
instead of the entry in PGMLIB.
�
For more information about grouping reports in the tree, see the section“Grouping Reports in a Web Gallery” in the chapter “Setup: Introduction” in theSAS IT Resource Management User’s Guide. For more information about the%CPHTREE macro, which is called in xrptstr.sas and xRPTSTR, see the%CPHTREE topic in the SAS IT Resource Management macro referencedocumentation. For more information about the %CPENTCPY macro, which iscalled in xrptstr.sas and xRPTSTR, see the %CPENTCPY topic in the SAS ITResource Management macro reference documentation. For more informationabout submitting a SAS program, see “Working with the Interface for Batch Mode”on page 18.
� You might want to adjust the table definitions and the variable definitions.For more information about tables, see “Overview of Tables” on page 353. For
more information about variables, see “Overview of Variables” on page 378.� You might want to adjust the PDB properties and site library properties.
For more information about PDBs, see “Overview of Whole PDBs” on page 296.For more information about site libraries, see “Overview of Site Libraries” on page270.
� You might want to review how checking for duplicate data is handled.For more information about checking for duplicate data, see “Appendix 4:
Working with Duplicate Data” in the SAS IT Resource Management macroreference documentation.
� If you want to change some aspect of the process step and you do not see anysupplied way of making that change, you might want to read about process exits.
For more information about process exits, see “Overview of Using Process Exits”on page 442.
� You might want to combine or split PDBs.For information about combining PDBs, see “Combining PDBs” on page 304.
For information about splitting PDBs, see “Splitting One PDB into Two PDBs” onpage 320.
� If your users will use the SAS IT Resource Management client GUI to report ondata in a PDB on a SAS IT Resource Management server host, make a list of theanswers that the users will need in order to create a remote server profile for thathost.

Setup Case 1 � Additional Data 63
For more information, see “Creating a Remote Server Profile” on page 574.
Additional DataIf you have additional data in an object that is not covered by setup case 1, see
“Overview of Setup Case 5” on page 119.

64

65
C H A P T E R
5Setup Case 2
Setup Case 2 65Overview of Setup Case 2 65
The QuickStart Wizard 66
The Raw Data 67
The PDB and Site Library 67
The Tables and Variables 68The Process-and-Reduce Program 69
The Report Structure 71
The Report Program(s) 74
The Job Schedule 76
Your Notes 76
Optional Customization 78Additional Data and Cleanup 80
Setup Case 2
Overview of Setup Case 2For general information about setting up the server, see “Setting Up the Server, with
Setup Cases” on page 38. That topic also identifies which setup case applies to yoursituation.
Following are the instructions for setup case 2. For each step, there is an overview ofthe step and, after that, the specific directions for the step. Typically, UNIX andWindows have one or two sets of directions and z/OS has one or two sets of directions.The steps are in the following order.
1 “The QuickStart Wizard” on page 662 “The Raw Data” on page 673 “The PDB and Site Library” on page 674 “The Tables and Variables” on page 685 “The Process-and-Reduce Program” on page 696 “The Report Structure” on page 717 “The Report Program(s)” on page 748 “The Job Schedule” on page 769 “Your Notes” on page 7610 “Optional Customization” on page 7811 “Additional Data and Cleanup” on page 80.

66 The QuickStart Wizard � Chapter 5
The QuickStart WizardRun the QuickStart Wizard.The QuickStart Wizard does not have a path for your data collector or data source.
However, the QuickStart Wizard generates objects that contain, among other things,documentation. In this setup case, you run the QuickStart Wizard only to acquire thatdocumentation, which will be useful when you work with your own data collector ordata source.
To select the path to use in the wizard, follow these instructions:1 Access information about any process macro; for example, the %CPPROCES
macro. See the topic %CPPROCES in the SAS IT Resource Management macroreference documentation.
2 In the description of the %CPPROCES macro’s COLLECTR= parameter, see theCollector/Toolname table and find the line for your data collector or data source. Onthat line, under the collector name, find which %CxPROCES macro(s) is availablefor use by data from your data collector or data source, where x = M, P, S, or W.
3 If the %CPPROCES macro is available for your data collector or data source, takethe NTSMF path through the QuickStart Wizard. If the %CPPROCES macro isnot available, and if the %CSPROCES macro or %CWPROCES macro is available,take the HP OVPA path through the QuickStart Wizard. If the %CPPROCESmacro is not available, and if the %CMPROCES macro is available, take the SMFpath through the QuickStart Wizard.
The wizard creates a PDB, creates a program that processes and reduces the data,creates a report structure (and saves the program with which it created the structure,and also creates (if necessary) a program for FTPing the structure and its reports), andcreates a program that reports on the data. In later steps in this setup case, you willgenerate similar (but not identical) structures and programs for your own data collectoror data source.
� In the SAS IT Resource Management server GUI for UNIX or Windows: On themain window’s Administration tab, select QuickStart Wizard. Follow the pathof the data collector or data source that you selected earlier in this step (by lookingin the Collector/Toolname table). As the wizard asks for names and locations,invent names and locations that are appropriate for that path’s data collector ordata source, not your data collector or data source. (For example, when you areasked to supply the location of the file that contains the raw data for the path’sdata collector or data source, type a location that would be legitimate on youroperating system. The file does not need to exist.)
The path creates a PDB (without any tables at this point) and a report structure.Also, the path creates a qs directory and, under that, creates a cntl subdirectory
that has a readme.txt file, an xrptstr.sas file, an xprocess.sas file, and an xreport.sasfile, where the value of x indicates the data collector or data source for which theprograms were generated. Additionally, the path generates other instructions andother directories and files.
� In the SAS IT Resource Management server GUI for z/OS: In the main menu,select the PDB Admin button and, from the menu it opens, select QuickStartWizard. Follow the path of the data collector or data source that you selectedearlier in this step (by looking in the Collector/Toolname table). As the wizardasks for names and locations, with one exception invent names and locations thatare appropriate for that path’s data collector or data source, not your data collectoror data source. The exception is that, at one point in the path, the wizard askswhere you want the parent location for the Web reports to be. Answer in the waythat you want to set up for your data collector or data source.

Setup Case 2 � The PDB and Site Library 67
The path creates a PDB (without any tables at this point).
The path also creates a report structure. The location of the report structuredepends on how you specified the parent location for the Web reports.
� If you specified a directory in the z/OS UNIX File System as the parentlocation, the report structure consists of directories in the z/OS UNIX FileSystem. This choice is called z/OS with a directory-based report structure.
� If you specified a PDS as the parent location, the report structure consists ofPDSs. This choice is called z/OS with a PDS-based report structure. In orderto be able to view the reports with a Web browser, you will also create acorresponding directory-based report structure on a UNIX or Windowssystem. After you do that, this choice is called z/OS with a PDS-based reportstructure (and a corresponding directory-based report structure on a UNIX orWindows system).
Also, the path creates a .QS.CNTL PDS that has a $$README member, a$xINSTR member, an xRPTSTR member, an xPROCESS member, an xREPORTmember, and an xFTPHTML member, where the value of x indicates the datacollector or data source for which the programs were generated. Additionally, thepath generates other instructions and other members, PDSs, and data sets. Forexample, the path can create other PDSs with .QS as a high-level qualifier and/ordirectories with /qs in the directory path.
Note: All new PDSs are created in a location that is based on the SAS systemoption named FILEDEV. Check with the person who installed SAS at your site todetermine whether FILEDEV points to a set of temporary volumes. If FILEDEVdoes point to a set of temporary volumes, then you must move the PDSs to apermanent location. �
The Raw DataStart to collect raw data, if you do not already collect raw data.Several steps ahead, you will need at least a day’s worth (preferably a few days’
worth) of raw data from your data collector or data source. By starting to collect datanow, you will not need to wait for it later.
For more information, see the instructions about the data collector or data source inthe SAS IT Resource Management Server Setup Guide. (For more information about theServer Setup Guide, see “Collector-Specific Setup Documentation” on page 12.) Also, seethe documentation from the vendor of the data collector or data source.
The PDB and Site LibraryCreate a PDB for your data collector or data source. The site library was created at
the time that SAS IT Resource Management was installed. Customize the PDB and sitelibrary, as necessary.
1 Create a PDB.
� In the SAS IT Resource Management GUI for UNIX or Windows: On themain window’s Administration tab, select Create PDB Wizard. Follow thepath through this wizard, including selection of the supplied table definitionsthat you want to be added to the new PDB. When the wizard asks if youwant the new PDB to become the active PDB, answer Yes.
The result is a PDB with table definitions. Also, the new PDB becomes theactive PDB.

68 The Tables and Variables � Chapter 5
� In z/OS: You can use interactive mode only, or you can use a combination ofbatch mode and interactive mode.
� Using interactive mode only: In the SAS IT Resource Managementserver GUI for z/OS, on the main menu select PDB Admin � DefineNew PDB
Follow the path through this wizard, including allocation of space andselection of the table definitions that you want to be added to the newPDB. (For good values to use for space allocation, see the ALLOC jobstep in the CMQSTART member in the SAS IT Resource ManagementCPMISC PDS.)
The result is a PDB with table definitions.� Using a combination of batch mode and interactive mode: In batch
mode, make a copy of the CMQSTART member that is in the SAS ITResource Management CPMISC PDS. In the copy of CMQSTART, deletethe call to the %CPSTART macro and replace it with a copy of the call to%CPSTART that is in the CMAUTOEX member in CPMISC and, in itsPDB= parameter, specify the PDB that you created for your datacollector or data source. In the copy of CMQSTART, also deleteeverything after the ALLOC job step. Follow the instructions in thecomments that apply to the job steps that remain. Submit the copy as abatch job. At this point, the result is a PDB without table definitions.For more information about the %CPSTART macro, see the topic%CPSTART in the SAS IT Resource Management macro referencedocumentation. For more information about submitting a SAS program,see “Working with the Interface for Batch Mode” on page 18.
Then, in the SAS IT Resource Management server GUI for z/OS, fromthe main menu select PDB Admin � Config Active PDB Dictionary� Collector List � Add Table
Select the value that is appropriate for your data collector or datasource, if it is not already selected, and select OK. The Select Tableswindow opens and displays a list of the supplied table definitions thatare available for your data collector or data source. Select the tabledefinitions that you want to use, and then select OK � File � End �OK
The table definitions are added to the PDB, and SAS IT ResourceManagement returns you to the main menu. The result is a PDB withtable definitions.
For more information about PDBs, see “Overview of Whole PDBs” on page 296.For more information about tables, see “Overview of Tables” on page 353.
2 Customize the PDB and site library, as necessary.� For UNIX or Windows: In the readme.txt file that the QuickStart Wizard
generated, follow the instructions for the PDB and site library.� For z/OS: In the $$README member and $xINSTR member that the
QuickStart Wizard generated, follow the instructions for the PDB and sitelibrary.
For more information about PDB properties, see “Overview of Whole PDBs” onpage 296. For more information about site library properties, see “Overview of SiteLibraries” on page 270.
The Tables and VariablesYou already added tables to the PDB.
Setup Case 2 � The Process-and-Reduce Program 69
If you want to see the tables:� In the SAS IT Resource Management GUI for UNIX or Windows: From the main
window’s Administration tab, select Manage Tables. The Manage Tables windowopens and lists the tables in the PDB.
� In the SAS IT Resource Management GUI for z/OS: From the main menu, selectPDB Admin � Config Active PDB Dictionary
The Dictionary Tables window opens and lists the tables in the PDB.
The Process-and-Reduce ProgramCreate a program to process and reduce data.1 After you have at least one day’s worth of raw data from your data collector or
data source, process and reduce the data.� In the SAS IT Resource Management server GUI for UNIX or Windows: On
the main window’s Administration tab, select Process/Reduce Wizard.The first part of the wizard’s path enables you to process the data
interactively. (Also, in the first part of the wizard’s path, before processingthe data, when you see the Save button in the process part of the wizard,select the button, specify a location, and save. The result is a file thatcontains the batch equivalent of processing the data interactively. You willuse this file in a later step.)
Then, continuing in the wizard, the second part of the wizard’s pathenables you to reduce the data interactively. (Also, in the second part of thewizard’s path, before reducing the data, when you see the Save button in thereduce part of the wizard, select the button, specify the same location thatyou specified in the process part of the wizard, save, and append. The resultis that the above file now also contains the batch equivalent of reducing thedata interactively. You will use this file in a later step.)
� In z/OS:
a Make a copy of the CMQSTART member that is in the SAS IT ResourceManagement CPMISC PDS. (This is an additional copy, if you alreadymade a copy in a previous step.)
b In the copy of CMQSTART, delete the call to the %CPSTART macro andreplace it with a copy of the call to the %CPSTART macro that is in theCMAUTOEX member in CPMISC.
c In the copy of CMQSTART, also delete the CLEANUP job step, deletethe ALLOC job step, and, in the LOAD job step, delete everything afterthe %PUT statement that is associated with the call to the%CPREDUCE macro.
d Access information about any process macro; for example, the%CPPROCES macro. See the topic %CPPROCES in the SAS ITResource Management macro reference documentation.
e In the description of the %CPPROCES macro’s COLLECTR= parameter,see the Collector/Toolname table and find the line for your data collectoror data source. On that line, under the collector name, find which%CxPROCES macro(s) are available for use by data from your datacollector or data source, where x = M, P, S, or W.
f If the %CMPROCES macro is available for your data collector or datasource, replace the existing table list with a list of the tables that youselected for your data source, and replace the existing values for theCOLLECTR= parameter and TOOLNM= parameter with the values,from the Collector/Toolname table, for your data collector or data source.

70 The Process-and-Reduce Program � Chapter 5
If the %CMPROCES macro is not available for your data collector ordata source, replace “%CMPROCES(,” with “%CPPROCES(“, replace theexisting table list with a list of the tables that you selected for your datacollector or data source, replace the existing values for the COLLECTR=parameter and TOOLNM= parameter with the values, from theCollector/Toolname table, for your data collector or data source, anddelete “WKCMPRES=NO,”.
g Follow the instructions in the comments that apply to the job steps thatremain.
h Submit this copy as a batch job (because the nightly jobs will run inbatch mode).
For more information about processing data, see “Processing Data” on page413. For more information about reducing data, see “Reducing Data” on page416. For more information about the %CMPROCES macro, see the topic%CMPROCES in the SAS IT Resource Management macro referencedocumentation. For more information about the %CPPROCES macro, see thetopic %CPPROCES in the SAS IT Resource Management macro referencedocumentation. For more information about the %CPREDUCE macro, seethe topic %CPREDUCE in the SAS IT Resource Management macroreference documentation. For more information about submitting a SASprogram, see “Working with the Interface for Batch Mode” on page 18.
Note: Theoretically, it is possible to process and reduce the data interactively.In practice, if you process a large amount of data interactively, your TSOtransaction is so long that its priority drops severely during the process step.Usually, it is much faster to process and reduce the data in batch mode. �
2 The data in the supplied tables corresponds to the raw data.If you want to examine the data in the PDB, see “Viewing Data Values” on page
420.3 Create the program that runs nightly to process and reduce the data.
This SAS program calls (in this order) the %CPSTART macro (to invoke SAS ITResource Management), one of the %CxPROCES macros (to process data), and the%CPREDUCE macro (to reduce data).
For more information about the %CPSTART macro, see the %CPSTART topic inthe SAS IT Resource Management macro reference documentation. For moreinformation about the %CMPROCES macro, see the %CMPROCES topic in theSAS IT Resource Management macro reference documentation. For moreinformation about the %CPPROCES macro, see the %CPPROCES topic in the SASIT Resource Management macro reference documentation. For more informationabout the %CSPROCES macro, see the %CSPROCES topic in the SAS IT ResourceManagement macro reference documentation. For more information about the%CWPROCES macro, see the %CWPROCES topic in the SAS IT ResourceManagement macro reference documentation. For more information about the%CPREDUCE macro, see the %CPREDUCE macro in the SAS IT ResourceManagement macro reference documentation.
� For UNIX or Windows: Above, you created a file by using the Save buttonduring processing and reduction in the Process/Reduce Wizard. You can usethis file as the nightly process-and-reduce program.
You might want to rename the file to indicate its data collector or datasource and role (to process and reduce the data). For example, if the file is forACCTON command data, you might rename the file acctprrd.sas.
Note: This file corresponds to the xprocess.sas file that the QuickStartWizard created for the other data collector or data source. You might want to

Setup Case 2 � The Report Structure 71
look at that program and see if there are any other comments or featuresthat you want to use in your program. �
� For z/OS: Above, you created a job that processed and reduced data. You canuse this job as the nightly process-and-reduce program.
You might want to rename the job to indicate its data collector or datasource and role (to process and reduce the data). For example, if the job is forACCTON command data, you might rename the copy ACCTPRRD.
Note: This job corresponds to the xPROCESS member that the QuickStartWizard created for the other data collector or data source. You might want tolook at that job to see if there are any other comments or features that youwant to use in your job. �
4 To accompany the nightly process-and-reduce program, write a program that backsup the whole PDB.
For information, recommendations, and examples about PDB backup, see“Backing Up a PDB” on page 303.
Note: Backing up the whole PDB is not the same as archiving incoming data. Youneed to back up the whole PDB regardless of the decision that you made aboutarchiving. For more information about archiving, see “Archiving Incoming Data”on page 411. �
5 Run the backup program.
6 The PDB backup was created and is identical to (or can be used to regenerate astructure that is identical to) the PDB.
7 Add the backup step to the nightly process-and-reduce program.Unless you have a strong preference for putting the backup step after the
process and reduce steps, put the backup step in front of the process and reducesteps.
Note: You are building in the backup step as part of the nightlyprocess-and-reduce program, rather than leaving it as a separate program, so thatthe backup step is sure to run nightly. �
The Report StructureNote: If there are supplied report definitions, follow the instructions in this step;
otherwise, follow the instructions for reporting in “6. The Report Structure” in setupcase 4. �
Create a report structure. In one case (with a PDS-based report structure), also FTPthe report structure to another system. Check the report structure(s).
1 Run the supplied report definitions for your data collector or data source.� In the SAS IT Resource Management server GUI for UNIX or Windows: On
the main window’s Reporting tab select Manage Report Definitions. Inthe Folders list, select the folder PGMLIB.ITSVRPT if it is not alreadyselected. Current PDB Reports displays a list of the supplied reportdefinitions that refer to the tables in your PDB. Select the name of one of thesupplied report definitions, and then select Run.
You might want to print the report for your convenience in checking andfor your use in a later step.
Repeat for some or all of the other supplied report definitions for your datacollector or data source.

72 The Report Structure � Chapter 5
� In the SAS IT Resource Management server GUI for z/OS: From the mainmenu select Reports � Supplied Reports
The Supplied Reports for Datasets in PDB window opens and displays alist of the supplied report definitions that refer to the tables in your PDB.Select the name of one of the supplied report definitions for your datacollector or data source, and then select ItemActions � Run Report
You might want to print the report for your convenience in checking andfor your use in a later step.
Repeat for some or all of the other supplied report definitions for your datacollector or data source.
For information about report definitions in the SAS IT Resource Managementclient GUI, see “Using the Manage Report Definitions Tool” on page 468.
Note: In a later step, you will need the names of the supplied report definitionsthat you want to use. (You can use some or all of the supplied report definitionsthat are available for your data collector or data source.) The names are availablein two places: in the list in the GUI, and in the lower-left corner of each report. �
2 Decide on report groupings for the supplied reports for your data collector or datasource.
Report groupings usually make a particular report easier to find. Also, reportgroupings usually make a particular report easier to interpret, by making it easyto compare it with related reports in the same group.
For more information about report groupings, see the section “Grouping Reportsin a Web Gallery” in the chapter “Setup: Introduction” in the SAS IT ResourceManagement User’s Guide.
3 Create a SAS program.
The program creates a report structure that implements the paths andend-of-path directories that you decided on for your report groupings. The programshould call the %CPSTART macro (to invoke SAS IT Resource Management), the%CPCAT macro (to read the description of the report structure), the %CPCATmacro again (to store a description of the report structure temporarily), and the%CPHTREE macro (to read the stored description and create the structure).
For more information about the %CPCAT macro, see the topic %CPCAT in theSAS IT Resource Management macro reference documentation.
For more information about the %CPHTREE macro, see the %CPHTREE topicin the SAS IT Resource Management macro reference documentation. In the%CPHTREE topic, focus especially on the outline and on Example 6. In theoutline, as described in the documentation of the CAT= parameter, you can ignorethe fourth and fifth fields for now. In Example 6, you can ignore sections 4, 5, 6,and 7 for now.
� For UNIX: In the outline, specify directory locations in the local UNIX filesystem. The directories do not need to exist. In a later step, you will run theprogram and it will create the directories.
Note: This file corresponds to the xrptstr.sas file that the QuickStart Wizardcreated for the other data collector or data source. You might want to look atthat program to see if there are any other comments or features that youwant to make use of in your program. �
� For Windows: In the outline, specify directory locations on a disk that isattached to your PC or on a disk that is available to your PC through aservice such as Network Neighborhood, NFS, AFS, or DFS. The directories do
Setup Case 2 � The Report Structure 73
not need to exist. In a later step, you will run the program and it will createthe directories.
Note: This file corresponds to the xrptstr.sas file that the QuickStart Wizardcreated for the other data collector or source. You might want to look at thatprogram to see if there are any other comments or features that you want tomake use of in your program. �
� For z/OS with a directory-based report structure: In the outline, specifydirectory locations in a local z/OS UNIX File System area. The directories donot need to exist. In a later step, you will run the program and it will createthe directories.
Note: This program corresponds to the xRPTSTR member that theQuickStart Wizard created for the other data collector or data source. Youmight want to look at that job to see if there are any other comments orfeatures that you want to use in your job. �
� For z/OS with a PDS-based report structure (and a correspondingdirectory-based report structure on a UNIX or Windows system): In theoutline, specify PDS locations. The PDSs do not need to exist. In a later step,you will run the program and it will create PDSs.
Note: This program corresponds to the xRPTSTR member that theQuickStart Wizard created for the other data collector or data source. Youmight want to look at that job and see if there are any other comments orfeatures that you want to use in your job. �
You might want to name the program to indicate its data collector or datasource and its role (to produce a report structure). For example, if you are workingwith data from the ACCTON command, you might call the program acctrpts.sas(for UNIX or Windows) or ACCTRPTS (for z/OS).
4 For z/OS with a PDS-based report structure (and a corresponding directory-basedreport structure on a UNIX or Windows system): create an additional SASprogram.
You will use this program to FTP the report structure from its PDS-basedlocation on z/OS to a directory-based location on a UNIX or Windows system. Thisprogram should call the %CPSTART macro (to invoke SAS IT ResourceManagement) and the %CMFTPSND macro (to FTP the report structure to theother system).
For more information about the %CMFTPSND macro, see the %CMFTPSNDtopic in the SAS IT Resource Management macro reference documentation.
For more information about %CMFTPSND, also see the %CPHTREE topic inthe SAS IT Resource Management macro reference documentation. In the%CPHTREE topic, focus on Example 6. You can ignore sections 2, 3, 4, 5, and 7 fornow. In section 6, you can ignore the NEXNG PDSs for now.
� Create the program. The directories do not need to exist. In the next step,you will run the program and it will create the directories.
Note: This program corresponds to the xFTPHTML member that theQuickStart Wizard created for the other data source. You might want to lookat that job to see if there are any other comments or features that you wantto use in your job. �
You might want to name the program to indicate its data source and its role (toFTP the report structure). For example, if you are working with data from theACCTON command, you might call the program ACCTFTP.
5 Run the SAS program(s).

74 The Report Program(s) � Chapter 5
� For UNIX or Windows: Run the program that creates the directory-based reportstructure.
� For z/OS with a directory-based report structure: Run the program that createsthe directory-based report structure.
� For z/OS with a PDS-based report structure (and a correspondingdirectory-based report structure on a UNIX or Windows system): Run theprogram that creates the PDS-based report structure. Then run the programthat FTPs the report structure to a UNIX or Windows system.
For more information about submitting a SAS program, see “Working with theInterface for Batch Mode” on page 18.
6 Check the report structure(s).Notice that the report structure is, physically, relatively flat.� For UNIX or Windows: Check that the directories have been created in the
location and with the names that you specified.Also, point your Web browser to the welcome.htm file in the “super”
directory, and check that the left frame works as you intended. (At this point,no reports are available in the right frame.)
� For z/OS with a directory-based report structure: Check that the directorieshave been created in the location and with the names that you specified.
Also, point your Web browser to the welcome.htm file in the “super”directory, and check that the left frame works as you intended. (At this point,no reports are available in the right frame.)
� For z/OS with a PDS-based report structure (and a correspondingdirectory-based report structure on a UNIX or Windows system): Check thatthe PDSs have been created in the location and with the names that youspecified. Also check that the corresponding directories have been created inthe location and with the names that you specified.
Also, point your Web browser to the welcome.htm file in the “super”directory, and check that the left frame works as you intended. (At this point,no reports are available in the right frame.)
The Report Program(s)Create the program that runs nightly to generate reports to the report structure, and
test the program.1 Create the program.
This SAS program should contain a call to the %CPSTART macro (to invokeSAS IT Resource Management). Also, for each end-of-path location in the reportstructure (that is, for each location that contains report groups), the programshould contain one call to the %CPWEBINI macro (to clear old reports) and one ormore calls to the %CPRUNRPT macro (to generate the reports for the one or morereport groups at that location). Here is an example:
%CPWEBINI (cat=work.grweb_gr,dir=end-of-path-1) ;
%CPRUNRPT (srd1 srd2 srd3 srd4,folder=pgmlib.itsvrpt,outloc=work.grweb_gr,outmode=web,outdesc=Report Group A,htmldir=end-of-path-1,

Setup Case 2 � The Report Program(s) 75
webstyle=gallery2) ;%CPRUNRPT (srd5 srd6,
folder=pgmlib.itsvrpt,outloc=work.grweb_gr,outmode=web,outdesc=Report Group B,htmldir=end-of-path-1,webstyle=gallery2) ;
This code clears reports from the catalog WORK.GRWEB_GR and itscorresponding directory end-of-path-1. Next, the code runs supplied reportdefinitions srd1, srd2, srd3, and srd4 from the folder PGMLIB.ITSVRPT, andgenerates their reports first to the catalog WORK.GRWEB_GR and from there tothe directory end-of-path-1, as reports in Report Group A. Then, the code runssupplied report definitions srd5 and srd6 from the folder PGMLIB.ITSVRPT, andgenerates their reports first to the catalog WORK.GRWEB_GR and from there tothe directory end-of-path-1, as reports in Report Group B.
For more information about the %CPWEBINI macro, see the topic %CPWEBINIin the SAS IT Resource Management macro reference documentation.
For more information about the %CPRUNRPT macro, see the topic%CPRUNRPT in the SAS IT Resource Management macro referencedocumentation. For additional information about %CPRUNRPT, see the topic%CPHTREE in the SAS IT Resource Management macro reference documentation.Focus especially on Example 7. In Example 7, for now you can ignore section 3,section 4’s GLBWHERE= parameter, and section 5.
� For UNIX or Windows: For each report group, specify that the destination ofthe reports is the appropriate one of the end-of-path directories that youcreated in your directory-based report structure.
Note: This program corresponds to the xreport.sas file that the QuickStartWizard created for the other data collector or data source. You might want tolook at that program and see if there are any other comments or featuresthat you want to use in your program. �
� For z/OS with a directory-based report structure: For each report group,specify that the destination of the reports is the appropriate one of theend-of-path directories that you created in your z/OS UNIX File Systembased report structure.
Note: This program corresponds to the xreport.sas member that theQuickStart Wizard created for the other data collector or data source. Youmight want to look at that job and see if there are any other comments orfeatures that you want to use in your job. �
� For z/OS with a PDS-based report structure (and a correspondingdirectory-based report structure on a UNIX or Windows system): For eachreport group, specify that the destination of the reports is the appropriate oneof the end-of-path PDSs that you created in your PDS-based report structure.
Note: This program corresponds to the xREPORT member that theQuickStart Wizard created for the other data collector or data source. Youmight want to look at that job and see if there are any other comments orfeatures that you want to use in your job. �
2 For z/OS with a PDS-based report structure (and a corresponding directory-basedreport structure on a UNIX or Windows system): You do not need to createanother FTP program to FTP reports from the PDS-based report structure to thedirectory-based report structure.

76 The Job Schedule � Chapter 5
You can use the same program that you created to FTP the report structure.3 Run the program(s).
� For UNIX or Windows: Run the program that generates the reports (andsome dynamic files) to the report structure.
� For z/OS with a directory-based report structure: Run the program thatgenerates the reports (and some dynamic files) to the z/OS UNIX File Systembased report structure.
� For z/OS with a PDS-based report structure (and a correspondingdirectory-based report structure on a UNIX or Windows system): Run theprogram that generates the reports (and some dynamic members) to thePDS-based report structure.
Then run the FTP program that you created earlier. The %CMFTPSNDmacro reuses directories and files that already exist and creates thedirectories and files that did not already exist.
4 Check the reports.Point your Web browser to the welcome.htm file in the “super” directory. Check
that the report groups are at the end-of-path locations that you intended, and thatthe reports are in the report groups that you intended.
Graphic reports display as “thumbnail” sketches. To view a full-size version of areport, click on its thumbnail sketch. To return the report to thumbnail size, selectShrink.
5 Set permissions so that read-only access to the directory-based report structure (orexecute access, if appropriate to the report mechanisms) is available to you and toanyone else who needs to view the reports.
For more information about access rights, see “Actions and Access RightsRequired” on page 44.
The Job ScheduleSchedule the nightly jobs. Typically the jobs run once a day, at night. However, you
can schedule them to run more or less often than once a day, and at whatever time(s)works best for your site.
� For UNIX: Schedule the process-and-reduce program and the report-generationprogram to run (in that order) nightly.
For more information, refer to the cron and crontab manpage in your UNIXdocumentation.
� For Windows: Schedule the process-and-reduce program and the report-generationprogram to run (in that order) nightly.
For more information, refer to the documentation for your task scheduler.� For z/OS with a directory-based report structure: Schedule the process-and-reduce
program and the report-generation program to run (in that order) nightly.For more information, refer to your scheduling system’s documentation.
� For z/OS with a PDS-based report structure (and a corresponding directory-basedreport structure on a UNIX or Windows system): Schedule the process-and-reduceprogram, the report-generation program, and the FTP program to run (in thatorder) nightly.
For more information, refer to your scheduling system’s documentation.
Your NotesMake notes in your own schedule.

Setup Case 2 � Your Notes 77
� The first day after scheduling, confirm that the programs ran as scheduled.� The first day after scheduling, confirm that the backup of the PDB was created
and that it is identical to (or can be used to regenerate a structure that is identicalto) the PDB.
Unless you have a strong preference for leaving the backup step after theprocess and reduce steps, in the process, reduce, and backup job move the backupstep to precede the process and reduce steps.
� Every day, check the logs from the nightly jobs for error messages, if any. Youmight also want to check for warning messages.
If you need to restart a nightly job,� For UNIX or Windows: See the restart.txt file that the QuickStart Wizard
generated. Also see “Appendix 1: Recovery Procedures” in the SAS ITResource Management macro reference documentation.
� For z/OS: See the $RESTART member that the QuickStart Wizard generated.Also see “Appendix 1: Recovery Procedures” in the SAS IT ResourceManagement macro reference documentation.
� In a step above, you updated the site library’s list of holidays so that it is correctfor your site through some date in the future. When that date is reached, SAS ITResource Management will write a reminder to the log during theprocess-and-reduce run. But in case you miss seeing that reminder, you mightwant to add an item to your own schedule to update the list again before that lastdate.
For more information about the holiday list, see “Viewing/Editing Your ActiveSite Library’s List of Holidays” on page 286.
� In a step above, you set the workshift schedule in the PDB. If your site hasseasonal shift changes (for example, summer hours), you might want to add anitem to your own schedule to update the workshift schedule when the seasonchanges.
For more information about the workshift schedule, see “Viewing/Editing YourActive PDB’s Work Shift Schedule” on page 334.
� You might want to schedule a periodic check of table and variable usage. If data isbeing kept for any variables or tables that are not being used for reporting, youmight want to set the variables’ or tables’ Kept status to No so that you can savespace in the PDB and time during processing and reduction.
� You might want to schedule a periodic check of space usage.For more information about space usage, see “Space Usage at a Level in a
Table” on page 349.� If you have any formats that are based on changeable information (for example,
formats related to network configuration or storage devices), you might want toschedule a periodic review of the formats.
For more information about formats, see SAS online help.� At some sites, copies of the demonstration PDBs are used for practice or testing:
for example, testing what a new report would look like, before a production PDBhas enough data to generate a report.
At some sites, a demonstration PDB is used when the active PDB must be someother PDB than the one that is to be used. (Some operations cannot run on theactive PDB.)
At other sites, one or more of the demonstration PDBs are never used.You can delete one or more of the demonstration PDBs if you have no need for
them. Remember, though, that at least one PDB (demonstration PDB or
78 Optional Customization � Chapter 5
site-created PDB) is required to start SAS IT Resource Management. For moreinformation, see “Deleting a PDB” on page 315.
Optional CustomizationAfter enough data has been collected that most of the reports are fully populated
(that is, they have data over the time span of the report), you might or might not wantto make other customizations for your site.
� You might want to adjust the report definitions and rule definitions.For example, you might want to add, change, or delete definitions.For more information about report definitions, see “Using the Manage Report
Definitions Tool” on page 468. For more information about rule definitions, see“Using the Perform Exception Analysis Tool” on page 468.
� You might want to adjust static files in the report structure(s).A report gallery’s static files are the files that are not cleared when the reports
in the gallery are cleared by %CPWEBINI, %CPMANRPT, or the WEBCLR=parameter.
For information about customizing these files, see “Customizing a ReportGallery’s Static Files” on page 562.
� You might want to age out old reports instead of deleting old reports.Where you want to age out old reports, replace the calls to the %CPWEBINI
macro with calls to the %CPMANRPT macro, and make the corresponding changesto the OUTLOC= parameter values in the macro calls that generate reports.
For more information about %CPWEBINI, see the topic %CPWEBINI in theSAS IT Resource Management macro reference documentation. For moreinformation about %CPMANRPT, see the topic %CPMANRPT in the SAS ITResource Management macro reference documentation.
� You might want to customize the report structure.Typically, the report structure is not customized. However,� you can add new paths in the report structure. If you add new paths, be very
careful to specify end-of-path locations that either do not currently exist or, ifthey exist, are empty and not used for any other purpose.
� where you use %CPWEBINI to clear reports, you can remove or revise theexisting paths in the report structure.
� where you use %CPMANRPT to age out reports, you can adjust a few aspectsof the report structure: change the titles, and change the text (but notdirectory names) that is displayed on existing paths. You cannot remove orrevise existing paths in the report structure (unless you are willing to risklosing all the reports on those paths).
To customize the report structure:� For UNIX or Windows: Edit the program that you used to create the report
structure.Next, where you are using %CPWEBINI to clear reports, you can delete
those paths in the report structure if you want to remove the paths or if youintend to revise them; otherwise, do not delete the existing paths in thereport structure. Submit the revised structure-creation program to SAS.
Finally, revise the report-generation program to generate reports to theappropriate destinations in the report structure, as necessary.

Setup Case 2 � Optional Customization 79
� For z/OS with a directory-based report structure: Edit the job that you usedto create the report structure based on the z/OS UNIX File System.
Next, where you are using %CPWEBINI to clear reports, you can deletethose paths in the report structure if you want to remove the paths or if youintend to revise them; otherwise, do not delete the existing paths in thereport structure. Submit the revised structure-creation job.
Finally, revise the report-generation program to generate reports to theappropriate destinations in the revised report structure, as necessary.
� For z/OS with a PDS-based report structure (and a correspondingdirectory-based report structure on a UNIX or Windows system): Edit the jobthat you used to create the PDS-based report structure. Also, edit the FTPjob, as necessary.
Next, where you are using %CPWEBINI to clear reports, you can deletethose paths in the report structures if you want to remove the paths or if youintend to revise them; otherwise, do not delete the existing paths in thereport structures. Submit the revised structure-creation job. Then, run therevised FTP job.
Finally, revise the report-generation program to generate reports to theappropriate destinations in the PDS-based report structure, as necessary.(The nightly FTP job will make the corresponding changes to thedirectory-based revised report structure.)
Note: To edit an entry in a SAS catalog, you can use the SAS Program Editorwindow. For example, suppose you want to copy the entry inADMIN.catalog-name.entry-name.entry-type, edit it, and then save it toADMIN.catalog-name.entry-name.entry-type, which is in the ADMIN library inyour active PDB. Here are the steps:
1 Open the SAS Program Editor window.2 In the command field, type the following command and press ENTER:
copy ADMIN.catalog-name.entry-name.entry-type
3 The entry appears.4 Save the original version under a different name, in case you want to refer to
it later.You can save the entry to any library that exists and has a libref that is
defined with write access. (If the library exists and a libref is not currentlydefined or is defined with read-only access, you can define a libref by usingthe SAS LIBNAME statement.)
In order to write to ADMIN, if the PDB is activated with readonly access,then activate it with write access.
In the command field, type a command like the following one and pressENTER:
save ADMIN.catalog-name.another-entry-name.entry-type
where another-entry-name is an existing entry or an entry that is to becreated by this command.
5 Edit the entry.6 Save the edited entry.
In the command field, type the following command and press ENTER:
save ADMIN.catalog-name.entry-name.entry-type
If the PDB was activated initially with read-only access, activate it againwith read-only access.

80 Additional Data and Cleanup � Chapter 5
7 Close or iconize the SAS Program Editor window.
�
For more information about grouping reports in the tree, see the section“Grouping Reports in a Web Gallery” in the chapter “Setup: Introduction” in theSAS IT Resource Management User’s Guide. For more information about the%CPHTREE macro, see the topic %CPHTREE in the SAS IT ResourceManagement macro reference documentation. For more information about the%CMFTPSND macro, see the topic %CMFTPSND in the SAS IT ResourceManagement macro reference documentation. For more information aboutsubmitting a SAS program, see “Working with the Interface for Batch Mode” onpage 18.
� You might want to adjust the table definitions and the variable definitions.
For more information about tables, see “Overview of Tables” on page 353. Formore information about variables, see “Overview of Variables” on page 378.
� You might want to adjust the PDB properties and site library properties.
For more information about PDBs, see “Overview of Whole PDBs” on page 296.For more information about site libraries, see “Overview of Site Libraries” on page270.
� You might want to review how checking for duplicate data is handled.
For more information about checking for duplicate data, see “Appendix 4:Working with Duplicate Data” in the SAS IT Resource Management macroreference documentation.
� If you want to change some aspect of the process step and you do not see anysupplied way of making that change, you might want to read about process exits.
For more information about process exits, see “Overview of Using Process Exits”on page 442.
� You might want to combine or split PDBs.
For information about combining PDBs, see “Combining PDBs” on page 304.For information about splitting PDBs, see “Splitting One PDB into Two PDBs” onpage 320.
� If your users will use the SAS IT Resource Management client GUI to report ondata in a PDB on a SAS IT Resource Management server host, make a list of theinformation that the users will need in order to create a remote server profile forthat host.
For more information, see “Creating a Remote Server Profile” on page 574.
Additional Data and CleanupIf you have data in a MIB, class, model type, or schema file that is not covered by
setup case 2, see “Overview of Setup Case 5” on page 119. Otherwise, delete the PDBand related structures that the QuickStart Wizard created.
� For the QuickStart Wizard PDB located in a UNIX or Windows environment:Delete the QuickStart Wizard’s PDB, including the qs directory (and itssubdirectories) that is related to the QuickStart Wizard’s PDB.
� For the QuickStart Wizard PDB located in a z/OS environment: Delete theQuickStart Wizard’s PDB, including any PDSs with .QS as a high-level qualifierand any directories with /qs in the directory path that are related to theQuickStart Wizard’s PDB.

81
C H A P T E R
6Setup Case 3
Setup Case 3 81Overview of Setup Case 3 81
The QuickStart Wizard 82
The Raw Data 83
The PDB and Site Library 83
The Tables and Variables 84The Process-and-Reduce Program 87
The Report Structure 89
The Report Program(s) 92
The Job Schedule 94
Your Notes 94
Optional Customization 95Cleanup 98
Optional Package 98
Setup Case 3
Overview of Setup Case 3For general information about setting up the server, see “Setting Up the Server, with
Setup Cases” on page 38. That topic also identifies which setup case applies to yoursituation.
Following are the instructions for setup case 3. For each step, there is an overview ofthe step and, after that, the specific directions for the step. Typically, UNIX andWindows have one or two sets of directions and z/OS has one or two sets of directions.The steps are in the following order.
1 “The QuickStart Wizard” on page 822 “The Raw Data” on page 833 “The PDB and Site Library” on page 83
4 “The Tables and Variables” on page 845 “The Process-and-Reduce Program” on page 876 “The Report Structure” on page 897 “The Report Program(s)” on page 928 “The Job Schedule” on page 94
9 “Your Notes” on page 9410 “Optional Customization” on page 95

82 The QuickStart Wizard � Chapter 6
11 “Cleanup” on page 9812 “Optional Package” on page 98.
The QuickStart WizardRun the QuickStart Wizard and follow its path for NTSMF data.The QuickStart Wizard does not have a path for your data collector or data source.
However, the QuickStart Wizard generates objects that contain, among other things,documentation. In this setup case, you run the QuickStart Wizard only to acquire thatdocumentation, which will be useful when you work with your own data collector ordata source.
The wizard creates a PDB, creates a program that processes and reduces the data,creates a report structure (and saves the program with which it created the structure,and also creates (if necessary) a program for FTPing the structure and its reports), andcreates a program that reports on the data. In later steps in this setup case, you willgenerate similar (but not identical) structures and programs for your own data collectoror data source.
� In the SAS IT Resource Management server GUI for UNIX or Windows: On themain window’s Administration tab, select QuickStart Wizard. Follow theNTSMF path through the wizard. As the wizard asks for names and locations,invent names and locations that are appropriate for the path’s data collector ordata source, not your data collector or data source. (For example, when you areasked to supply the location of the file that contains the raw data for the path’sdata collector or data source, type a location that would be legitimate on youroperating system. The file does not need to exist.)
The path creates a PDB (without any tables at this point) and a report structure.Also, the path creates a qs directory and, under that, creates a cntl subdirectory
that has a readme.txt file, an xrptstr.sas file, an xprocess.sas file, and an xreport.sasfile, where the value of x indicates the data collector or data source for which theprograms were generated. Additionally, the path generates other instructions andother directories and files.
� In the SAS IT Resource Management server GUI for z/OS: In the main menu,select the PDB Admin button and, from the menu it opens, select QuickStartWizard. Follow the NTSMF path through the wizard. As the wizard asks fornames and locations, with one exception invent names and locations that areappropriate for the path’s data collector or data source, not your data collector ordata source. (For example, when you are asked to supply the location of the dataset that contains the raw data for the path’s data collector or data source, type alocation that would be legitimate on your operating system. The data set does notneed to exist.) The exception is that, at one point in the path, the wizard askswhere you want the parent location for the Web reports to be. Answer in the waythat you want to set up for your data collector or data source.
The path creates a PDB (without any tables at this point).The path also creates a report structure. The location of the report structure
depends on how you specified the parent location for the Web reports.� If you specified a directory in the z/OS UNIX File System as the parent
location, the report structure consists of directories in the z/OS UNIX FileSystem. This choice is called z/OS with a directory-based report structure.
� If you specified a PDS as the parent location, the report structure consists ofPDSs. This choice is called z/OS with a PDS-based report structure. In orderto be able to view the reports with a Web browser, you will also create acorresponding directory-based report structure on a UNIX or Windows

Setup Case 3 � The PDB and Site Library 83
system. After you do that, this choice is called z/OS with a PDS-based reportstructure (and a corresponding directory-based report structure on a UNIX orWindows system).
Also, the path creates a .QS PDS and creates a .QS.CNTL PDS that has a$$README member, a $xINSTR member, an xRPTSTR member, an xPROCESSmember, an xREPORT member, and an xFTPHTML member, where the value of xindicates the data collector or data source for which the programs were generated.Additionally, the path generates other instructions and other members, PDSs, anddata sets. For example, the path can create other PDSs with .QS as a high-levelqualifier and/or directories with /qs in the directory path.
Note: All new PDSs are created in a location that is based on the SAS systemoption FILEDEV. Check with the person who installed SAS at your site todetermine whether FILEDEV points to a set of temporary volumes. If FILEDEVdoes point to a set of temporary volumes, then you must move the PDSs to apermanent location. �
The Raw DataStart to collect raw data, if you do not already collect raw data.Several steps ahead, you will need at least one day’s worth (preferably a few days’
worth) of raw data from the data collector or data source. By starting to collect datanow, you will not need to wait for it later.
For more information, see the documentation from the vendor of the data collector ordata source.
The PDB and Site LibraryCreate a PDB for your data collector or data source. The site library was created at
the time that SAS IT Resource Management was installed. Customize the PDB and sitelibrary, as necessary.
1 Create a PDB.� In the SAS IT Resource Management GUI for UNIX or Windows: On the
main window’s Administration tab, select Create PDB Wizard. Follow thepath through this wizard, but ignore table selection. When the wizard asks ifyou want the new PDB to become the active PDB, answer Yes.
The result is a PDB without table definitions. Also, the new PDB becomesthe active PDB.
� In z/OS: You can use interactive mode, or you can use batch mode.� Using interactive mode: In the SAS IT Resource Management server
GUI for z/OS, from the main menu select PDB Admin � Define NewPDB
Follow the path through this wizard, including allocation of space, butignore table selection. (For good values to use for space allocation, seethe ALLOC job step in the CMQSTART member in the SAS IT ResourceManagement CPMISC PDS.)
The result is a PDB without table definitions.
� Using batch mode: In batch mode, make a copy of the CMQSTARTmember that is in the SAS IT Resource Management CPMISC PDS. Inthe copy of CMQSTART, delete the call to the %CPSTART macro andreplace it with a copy of the call to %CPSTART that is in the

84 The Tables and Variables � Chapter 6
CMAUTOEX member in CPMISC and, in its PDB= parameter, specifythe PDB that you created for your data collector or data source. In thecopy of CMQSTART, also delete everything after the ALLOC job step.Follow the instructions in the comments that apply to the job steps thatremain. Submit the copy as a batch job. The result is a PDB withouttable definitions.
For more information about the %CPSTART macro, see the topic%CPSTART in the SAS IT Resource Management macro referencedocumentation. For more information about submitting a SAS program,see “Working with the Interface for Batch Mode” on page 18.
For more information about PDBs, see “Overview of Whole PDBs” on page 296.2 Customize the PDB and site library, as necessary.
� For UNIX or Windows: In the readme.txt file that the QuickStart Wizardgenerated, follow the instructions for the PDB and site library.
� For z/OS: In the $$README member and $xINSTR member that theQuickStart Wizard generated, follow the instructions for the PDB and sitelibrary.
For more information about PDB properties, see “Overview of Whole PDBs” onpage 296. For more information about site library properties, see “Overview of SiteLibraries” on page 270.
The Tables and VariablesIn the PDB for your data collector or data source, create a table for the data from the
character-delimited file, and check the table and variable definitions.1 Create a program.
This SAS program calls (in this order) the %CPSTART macro (to invoke SAS ITResource Management), the %CPCAT macro (to read a control statement), the%CPCAT macro again (to store the control statement temporarily), and the%CPDDUTL macro (to run the stored control statement).
� For the call to the %CPSTART macro, specify the following code:� For UNIX or Windows: Copy the call to the %CPSTART macro from the
xprocess.sas program that the QuickStart Wizard generated.In the PDB= parameter, replace the reference to the wizard’s PDB
with a reference to the PDB that you created for your data collector ordata source.
� For z/OS: Copy the call to the %CPSTART macro from the xPROCESSmember that the QuickStart Wizard generated.
In the PDB= parameter, replace the reference to the wizard’s PDBwith a reference to the PDB that you created for your data collector ordata source.
For more information about the %CPSTART macro, see the topic%CPSTART in the SAS IT Resource Management macro referencedocumentation.
� For the first call to the %CPCAT macro, specify the following code:
%cpcat;cards4;generate source
infile=’rawdata-location’

Setup Case 3 � The Tables and Variables 85
intype=cdcdelim=’delim-chars’filename=’output-location’name=utable-nametype=table-type ;
;;;;
where you specify appropriate values for the INFILE=, DELIM=,FILENAME=, NAME=, and TYPE= parameters, and the ’;;;;’ must start atthe beginning of the line.
For more information about the GENERATE SOURCE controlstatement, see the topic GENERATE SOURCE in the SAS IT ResourceManagement macro reference documentation. For more information aboutthe %CPCAT macro, see the topic %CPCAT in the SAS IT ResourceManagement macro reference documentation.
� For the second call to the %CPCAT macro, specify the following code:
%cpcat(cat=work.temp.temp.source) ;
� For the call to the %CPDDUTL macro, specify the following code:
%cpddutl(entrynam=work.temp.temp.source) ;
For more information about the %CPDDUTL macro, see “Chapter 4: DataDictionary Macro and Control Statements” in the SAS IT ResourceManagement macro reference documentation.
For an example of this program, see “Appendix 13: Character-Delimited Supportin GENERATE SOURCE” in “Using the Generic Collector Facility” on page 158.
2 Run the program.Submit the program to SAS. Based on the information in the header records in
the character-delimited file, the program will write to the output file a block ofcontrol statements to create the definitions for the corresponding table and itsvariables.
For more information about submitting a SAS program, see “Working with theInterface for Batch Mode” on page 18.
3 In the location that was specified by the FILENAME= parameter in theGENERATE SOURCE control statement, review the table definition and itsvariable definitions.
Then, in a text editor, modify the original statements, as necessary, and add anyCREATE DERIVED or CREATE FORMULA control statements, as necessary. Inparticular, here are some changes to consider making:
� In the CREATE TABLE control statement, you might want to change thetable’s label and/or description. Also review the other parameters.
For more information about the CREATE TABLE control statement, seethe topic CREATE TABLE in the SAS IT Resource Management macroreference documentation.
� In the CREATE VARIABLE control statements, you might want to changethe variables’ names, labels, and/or descriptions. Also review the otherparameters.
For more information about the CREATE VARIABLE control statement,see the topic CREATE VARIABLE in the SAS IT Resource Managementmacro reference documentation.
� After the CREATE VARIABLE control statements, add a CREATE DERIVEDcontrol statement for each derived variable that you want to have in the

86 The Tables and Variables � Chapter 6
table, if any. The CREATE DERIVED control statements can be in any order,but alphabetical order is convenient.
For more information about the CREATE DERIVED control statement,see the topic CREATE DERIVED in the SAS IT Resource Management macroreference documentation.
� In the UPDATE TABLE control statement, you might want to revise thetable’s age limits. Also review the other parameters.
Note: If you are considering revisions to the BY and CLASS lists for thisdata collector or data source, see “Restrictions on Modifications of BYVariables Lists” on page 348. �
For more information about the UPDATE TABLE control statement, seethe topic UPDATE TABLE in the SAS IT Resource Management macroreference documentation.
� After the UPDATE TABLE control statement, add a CREATE FORMULAcontrol statement for each formula variable that you want to associate withthe table. The CREATE FORMULA control statements can be in any order,but alphabetical order is convenient.
For more information about the CREATE FORMULA control statement,see the topic CREATE FORMULA in the SAS IT Resource Managementmacro reference documentation.
Note: If a derived variable depends on another derived variable and/or if aformula variable depends on another formula variable, be sure to read theinformation about dependencies in the documentation for the CREATE DERIVEDand/or CREATE FORMULA control statements. �
4 Create another program.
This SAS program calls (in this order) the %CPSTART macro (to invoke SAS ITResource Management), and the %CPDDUTL macro (to run the control statementsthat define the table and its variables).
� For the call to the %CPSTART macro, copy the call that you used earlier inthis step.
� For the call to the %CPDDUTL macro, specify the following code:
%cpddutl(filename=’location-of-control-statements’) ;
where the value of the FILENAME= parameter is the name of the file thatcontains the table and variable control statements that you reviewed (andperhaps edited).
For more information about the %CPDDUTL macro, see “Chapter 4:Data Dictionary Macro and Control Statements” in the SAS IT ResourceManagement macro reference documentation.
5 Run the program.
Submit the program to SAS.
For more information about submitting a SAS program, see “Working with theInterface for Batch Mode” on page 18.
6 The table and its variables now exist in the active PDB.
If you want to browse them, you can. For more information about viewing atable definition, see “Viewing/Editing a Table” on page 364. For more informationabout viewing the definition of a regular variable, see “Creating/Editing/Viewing aRegular Variable” on page 394. For more information about viewing the definitionof a derived variable, see “Creating/Editing/Viewing a Derived Variable” on page

Setup Case 3 � The Process-and-Reduce Program 87
381. For more information about viewing the definition of a formula variable, see“Creating/Editing/Viewing a Formula Variable” on page 388.
The Process-and-Reduce ProgramCreate a program to process and reduce data, and test the program.
1 Create a program.
This SAS program calls the %CPSTART macro (to invoke SAS IT ResourceManagement), sets macro variables as appropriate, calls the %CPPROCES macro(to process the data), and calls the %CPREDUCE macro (to reduce the data).
� For UNIX or Windows: Use a copy of the %CPSTART call that you usedabove.
For the appropriate macro variables and how to set them, see “Appendix9: Using Character-Delimited Data” in “Using the Generic Collector Facility”on page 158.
For the call to the %CPPROCES macro, use the following code:
%cpproces(RAWDATA=rawdata-location,COLLECTR=GENERIC,TOOLNM=CHARDELIM,DELIM=’delim_chars’ );
where the values of the RAWDATA= and DELIM= parameters must beappropriate for your data collector or data source. (With these settings, the%CPPROCES macro can find supplied staging code for staging data from acharacter-delimited file, and will run the staging code before continuing withthe rest of the process step.)
For the call to the %CPREDUCE macro, use the following code:
%cpreduce ;
� For z/OS: Make a copy of the CMQSTART member that is in the SAS ITResource Management CPMISC PDS.
In this copy of CMQSTART, delete the call to the %CPSTART macro andreplace it with a copy of the call to the %CPSTART macro that is in theCMAUTOEX member in CPMISC. In this copy of CMQSTART, delete thecode after the call to %CPSTART and replace that other code with a call tothe %CPPROCES macro and a call to the %CPREDUCE macro.
For the appropriate macro variables and how to set them, see “Appendix9: Using Character-Delimited Data” in “Using the Generic Collector Facility”on page 158.
For the call to the %CPPROCES macro, use the following code:
%cpproces( RAWDATA=rawdata-location,COLLECTR=GENERIC,TOOLNM=CHARDELIMDELIM=’delim_chars’ );
where the values of the RAWDATA= and DELIM= parameters must beappropriate for your data collector or data source. (With these settings, the%CPPROCES macro can find supplied staging code for staging data from thecharacter-delimited file, and will run the staging code before continuing withthe rest of the process step.)
For the call to the %CPREDUCE macro, use the following code:

88 The Process-and-Reduce Program � Chapter 6
%cpreduce ;
For an example of this program, see “Generic Collector Appendix 2: UsingCharacter-Delimited Data” in “Setting Up the Server, with Setup Cases” on page38.
For more information about processing data, see “Processing Data” on page 413.For more information about reducing data, see “Reducing Data” on page 416. Formore information about the %CPPROCES macro, see the topic %CPPROCES inthe SAS IT Resource Management macro reference documentation. For moreinformation about the %CPREDUCE macro, see the topic %CPREDUCE in theSAS IT Resource Management macro reference documentation. For moreinformation about submitting a SAS program, see “Working with the Interface forBatch Mode” on page 18.
2 To the program, add a step that backs up the PDB.In the long run, it does not matter much whether the backup step runs before
or after the process and reduce steps. For now, however, put the backup step afterthe process and reduce steps, so that there will be some data in the PDB by thetime that the PDB is backed up.
For information, recommendations, and examples about PDB backup, see“Backing Up a PDB” on page 303.
Note: Backing up the whole PDB is not the same as archiving incoming data. Youneed to back up the whole PDB regardless of the decision that you made aboutarchiving. For more information about archiving, see “Archiving Incoming Data”on page 411. �
3 When you have at least a day’s worth of raw data from your data collector or datasource, run the program as a batch job.
For more information about submitting a SAS program, see “Working with theInterface for Batch Mode” on page 18.
4 The data in the new table corresponds to the raw data.If you want to browse the data in the PDB, see “Viewing Data Values” on page
420.5 The PDB backup was created and is identical to (or can be used to regenerate a
structure that is identical to) the PDB.6 Unless you have a strong preference for leaving the backup step after the process
and reduce steps, move the backup step to precede the process and reduce steps.7 Create the program that runs nightly to process and reduce the data.
This SAS program (in this order) calls the backup step (to back up the PDB),calls the %CPSTART macro (to invoke SAS IT Resource Management), sets theappropriate macro variables, calls the %CPPROCES macro (to process data), andcalls the %CPREDUCE macro (to reduce data).
For more information about the backup step, see “Backing Up a PDB” on page303. For more information about the %CPSTART macro, see the topic %CPSTARTin the SAS IT Resource Management macro reference documentation. For moreinformation about the macro variables, see “Appendix 9: UsingCharacter-Delimited Data” in “Using the Generic Collector Facility” on page 158.For more information about the %CPPROCES macro, see the topic %CPPROCESin the SAS IT Resource Management macro reference documentation. For moreinformation about the %CPREDUCE macro, see the topic %CPREDUCE in theSAS IT Resource Management macro reference documentation.
� For UNIX or Windows: Above, you created a file that backed up the PDB andprocessed and reduced data. You can use this program as the nightlyprocess-and-reduce program.

Setup Case 3 � The Report Structure 89
You might want to rename the file to indicate its data collector or datasource and its role (to process and reduce the data). For example, if the file isfor xxxx data, you might rename the file xxxxprrd.sas.
Note: This file corresponds to the xprocess.sas file that the QuickStartWizard created for the other data collector or data source. You might want tolook at that program and see if there are any other comments or featuresthat you want to use in your program. �
� For z/OS: Above, you created a job that backed up the PDB and processed andreduced data. You can use this job as the nightly process-and-reduce program.
You might want to rename the job to indicate its data collector or datasource and its role (to process and reduce the data). For example, if the job isfor xxxx data, you might rename the copy xxxxPRRD.
Note: This job corresponds to the xPROCESS member that the QuickStartWizard created for the other data collector or data source. You might want tolook at that job and see if there are any other comments or features that youwant to use in your job. �
The Report StructureCreate a report structure. For z/OS with a PDS-based report structure, also FTP the
report structure to another system. Check the report structure(s).1 Create, run, and save report definitions for your data collector or data source.
� In the SAS IT Resource Management server GUI for UNIX or Windows: Onthe main window’s Reporting tab select Manage Report Definitions �File � New Report Definition
Using the right side of the window, create a report definition for the datain the table that you created above. Select Run to generate a report that isbased on the report definition. In the report that is generated, the datacorresponds to the data in the PDB. (For more information about creatingand running a report definition, see “Using the Manage Report DefinitionsTool” on page 468. If you want to browse the data in the PDB, see “ViewingData Values” on page 420.)
Next, select File � Save Report Definition and complete that path tosave the report definition in its interactive form.
Optionally, create and save other report definitions for the table that youcreated above.
� In the SAS IT Resource Management server GUI for z/OS: From the mainmenu, select Report � DesignGraphRpt
From the menu that opens, select the type of report that you want to create(at this point, select only from the six types at the top of the list). The type’smain report definition window opens. Select the level that you want to use,select the icon in the upper-left corner to select the table that you want to use,and specify all other parameters that you want to use. Then select Actions� Run Report In the report that is generated, the data corresponds to thedata in the PDB. (For more information about creating and running a reportdefinition, in the type’s main report definition window, select Help. If youwant to browse the data in the PDB, see “Viewing Data Values” on page 420.)
Next, in the main window for the report definition select File � SaveDefinition and complete the path to save the report definition in itsinteractive form. Then select File � Quit to return to the list of customreport definitions.

90 The Report Structure � Chapter 6
Optionally, create and save other report definitions for the data in thecreated table.
For information about report definitions in the SAS IT Resource Managementclient GUI, see “Using the Manage Report Definitions Tool” on page 468.
Note: In a later step, you will need the names of the supplied report definitionsthat you want to use. (You can use some or all of the supplied report definitions foryour data collector or data source.) Notice that the names are available in twoplaces: in the list in the GUI, and in the lower-right corner of each report. �
2 Decide on report groupings for the custom reports for your data collector or datasource.
Report groupings usually make a particular report easier to find. Also, reportgroupings usually make a particular report easier to interpret, by making it easyto compare it with related reports in the same group.
For more information about report groupings, see the section “Grouping Reportsin a Web Gallery” in the chapter “Setup: Introduction” in the SAS IT ResourceManagement User’s Guide.
3 Create a SAS program.
The program creates a report structure that implements the paths andend-of-path directories that you decided on for your report groupings. The programshould call the %CPSTART macro (to invoke SAS IT Resource Management), the%CPCAT macro (to read the description of the report structure), the %CPCATmacro again (to store a description of the report structure temporarily), and the%CPHTREE macro (to read the stored description and create the structure).
For more information about the %CPCAT macro, see the topic %CPCAT in theSAS IT Resource Management macro reference documentation.
For more information about the %CPHTREE macro, see the topic %CPHTREEin the SAS IT Resource Management macro reference documentation. In the%CPHTREE topic, focus especially on the outline and on Example 6. In theoutline as described in the documentation of the CAT= parameter, you can ignorethe fourth and fifth fields for now. In Example 6, you can ignore sections 4, 5, 6,and 7 for now.
� For UNIX: In the outline, specify directory locations in the local UNIX filesystem. The directories do not need to exist. In a later step, you will run theprogram and it will create the directories.
Note: This file corresponds to the xrptstr.sas file that the QuickStart Wizardcreated for the other data collector or data source. You might want to look atthat program to see if there are any other comments or features that youwant to use in your program. �
� For Windows: In the outline, specify directory locations on a disk that isattached to your PC or on a disk that is available to your PC through aservice such as Network Neighborhood, NFS, AFS, or DFS. The directories donot need to exist. In a later step, you will run the program and it will createthe directories.
Note: This file corresponds to the xrptstr.sas file that the QuickStart Wizardcreated for the other data collector or data source. You might want to look atthat program to see if there are any other comments or features that youwant to use in your program. �
� For z/OS with a directory-based report structure: In the outline, specifydirectory locations in a local z/OS UNIX File System area. The directories do

Setup Case 3 � The Report Structure 91
not need to exist. In a later step, you will run the program and it will createthe directories.
Note: This program corresponds to the xRPTSTR member that theQuickStart Wizard created for the other data collector or data source. Youmight want to look at that job to see if there are any other comments orfeatures that you want to use in your job. �
� For z/OS with a PDS-based report structure (and a correspondingdirectory-based report structure on a UNIX or Windows system): In theoutline, specify PDS locations. The PDSs do not need to exist. In a later step,you will run the program and it will create PDSs.
Note: This program corresponds to the xRPTSTR member that theQuickStart Wizard created for the other data collector or data source. Youmight want to look at that job and see if there are any other comments orfeatures that you want to use in your job. �
You might want to name the program to indicate its data collector or datasource and its role (to produce a report structure). For example, if you are workingwith data from xxxx, you might call the program xxxxrpts.sas (for UNIX orWindows) or xxxxRPTS (for z/OS).
4 For z/OS with a PDS-based report structure (and a corresponding directory-basedreport structure on a UNIX or Windows system): Create an additional SASprogram.
You will use this program to FTP the report structure from its PDS-basedlocation on z/OS to a directory-based location on a UNIX or Windows system. Thisprogram should call the %CPSTART macro (to invoke SAS IT ResourceManagement) and the %CMFTPSND macro (to FTP the report structure to theother system).
For more information about the %CMFTPSND macro, see the %CMFTPSNDtopic in the SAS IT Resource Management macro reference documentation.
For more information about %CMFTPSND, also see the %CPHTREE topic inthe SAS IT Resource Management macro reference documentation. In the%CPHTREE topic, focus on Example 6. You can ignore sections 2, 3, 4, 5, and 7 fornow. In section 6, you can ignore the NEXNG PDSs for now.
� Create the program. The directories do not need to exist. In the next step,you will run the program and it will create the directories.
Note: This program corresponds to the xFTPHTML member that theQuickStart Wizard created for the other data collector or data source. Youmight want to look at that job to see if there are any other comments orfeatures that you want to use in your job. �
You might want to name the program to indicate its data collector or datasource and its role (to FTP the report structure). For example, if you are workingwith data from xxxx, you might call the program xxxxFTP.
5 Run the SAS program(s).� For UNIX or Windows: Run the program that creates the directory-based
report structure.� For z/OS with a directory-based report structure: Run the program that
creates the directory-based report structure.� For z/OS with a PDS-based report structure (and a corresponding
directory-based report structure on a UNIX or Windows system): Run theprogram that creates the PDS-based report structure. Then run the programthat FTPs the report structure to a UNIX or Windows system.

92 The Report Program(s) � Chapter 6
For more information about submitting a SAS program, see “Working with theInterface for Batch Mode” on page 18.
6 Check the report structure(s).
Notice that the report structure is, physically, relatively flat.
� For UNIX or Windows: Check that the directories have been created in thelocation and with the names that you specified.
Also, point your Web browser to the file welcome.htm in the “super”directory, and check that the left frame works as you intended. (At this point,no reports are available in the right frame.)
� For z/OS with a directory-based report structure: Check that the directorieshave been created in the location and with the names that you specified.
Also, point your Web browser to the file welcome.htm in the “super”directory, and check that the left frame works as you intended. (At this point,no reports are visible in the right frame.)
� For z/OS with a PDS-based report structure (and a correspondingdirectory-based report structure on a UNIX or Windows system): Check thatthe PDSs have been created in the location and with the names that youspecified. Also check that the corresponding directories have been created inthe location and with the names that you specified.
Also, point your Web browser to the file welcome.htm in the “super”directory, and check that the left frame works as you intended. (At this point,no reports are available in the right frame.)
The Report Program(s)Create the program that runs nightly to generate reports to the report structure, and
test the program.
1 Create the program.
This SAS program should contain a call to the %CPSTART macro (to invokeSAS IT Resource Management). Also, for each end-of-path location in the reportstructure (that is, for each location that contains report groups), the programshould contain one call to the %CPWEBINI macro (to clear old reports) and one ormore calls to the %CPRUNRPT macro (to generate the reports for the one or morereport groups at that location). Here is an example:
%CPWEBINI (cat=work.grweb_gr,dir=end-of-path-1) ;
%CPRUNRPT (srd1 srd2 srd3 srd4,folder=pgmlib.itsvrpt,outloc=work.grweb_gr,outmode=web,outdesc=Report Group A,htmldir=end-of-path-1,webstyle=gallery2) ;
%CPRUNRPT (srd5 srd6,folder=pgmlib.itsvrpt,outloc=work.grweb_gr,outmode=web,outdesc=Report Group B,htmldir=end-of-path-1,webstyle=gallery2) ;

Setup Case 3 � The Report Program(s) 93
This code clears reports from the catalog WORK.GRWEB_GR and itscorresponding directory end-of-path-1. Next, the code runs supplied reportdefinitions SRD1, SRD2, SRD3, and SRD4 from the folder PGMLIB.ITSVRPT,and generates their reports first to the catalog WORK.GRWEB_GR and from thereto the directory end-of-path-1, as reports for Report Group A. Then, the code runssupplied report definitions SRD5 and SRD6 from the folder PGMLIB.ITSVRPT,and generates their reports first to the catalog WORK.GRWEB_GR and from thereto the directory end-of-path-1, as reports for Report Group B.
For more information about the %CPWEBINI macro, see the topic %CPWEBINIin the SAS IT Resource Management macro reference documentation.
For more information about the %CPRUNRPT macro, see the topic%CPRUNRPT in the SAS IT Resource Management macro referencedocumentation. For additional information about %CPRUNRPT, also see the%CPHTREE topic in the SAS IT Resource Management macro referencedocumentation. In the %CPHTREE topic, focus especially on Example 7. InExample 7, for now you can ignore section 3, section 4’s GLBWHERE= parameter,and section 5.
� For UNIX or Windows: For each report group, specify that the destination ofthe reports is the appropriate one of the end-of-path directories that youcreated in your directory-based report structure.
Note: This program corresponds to the file xreport.sas that the QuickStartWizard created for the other data collector or data source. You might want tolook at that program and see if there are any other comments or featuresthat you want to use in your program. �
� For z/OS with a directory-based report structure: For each report group,specify that the destination of the reports is the appropriate one of theend-of-path directories that you created in your z/OS UNIX File Systembased report structure.
Note: This program corresponds to the member xREPORT that theQuickStart Wizard created for the other data source. You might want to lookat that job and see if there are any other comments or features that you wantto use in your job. �
� For z/OS with a PDS-based report structure (and a correspondingdirectory-based report structure on a UNIX or Windows system): For eachreport group, specify that the destination of the reports is the appropriate oneof the end-of-path PDSs that you created in your PDS-based report structure.
Note: This program corresponds to the member xREPORT that theQuickStart Wizard created for the other data collector or data source. Youmight want to look at that job and see if there are any other comments orfeatures that you want to use in your job. �
2 For z/OS with a PDS-based report structure (and a corresponding directory-basedreport structure on a UNIX or Windows system): You do not need to createanother FTP program to FTP reports from the PDS-based report structure to thedirectory-based report structure. You can use the same program that you createdto FTP the report structure.
3 Run the program(s).� For UNIX or Windows: Run the program that generates the reports (and
some dynamic files) to the report structure.� For z/OS with a directory-based report structure: Run the program that
generates the reports (and some dynamic files) to the report structure that isbased on a z/OS UNIX File System.

94 The Job Schedule � Chapter 6
� For z/OS with a PDS-based report structure (and a correspondingdirectory-based report structure on a UNIX or Windows system): Run theprogram that generates the reports (and some dynamic members) to thePDS-based report structure.
Then run the FTP program that you created earlier. The %CMFTPSNDmacro reuses directories and files that already exist and creates thedirectories and files that did not already exist.
4 Check the reports.Point your Web browser to the file welcome.htm in the “super” directory. Check
that the report groups are at the end-of-paths that you intended, and that thereports are in the report groups that you intended.
Graphic reports display as “thumbnail” sketches. To view a full-size version of areport, click on its thumbnail sketch. To return the report to thumbnail size, selectShrink.
5 Set permissions so that “readonly” access to the directory-based report structure(or execute access, if appropriate to the report mechanisms) is available to you andto anyone else who needs to view the reports.
For more information about access rights, see “Actions and Access RightsRequired” on page 44.
The Job ScheduleSchedule the nightly jobs. Typically the jobs run once a day, at night. However, you
can schedule them to run more or less often than once a day, and at whatever time(s)work best for your site.
� For UNIX: Schedule the process-and-reduce program and the report-generationprogram to run (in that order) nightly.
For more information, refer to your cron and crontab man pages.� For Windows: Schedule the process-and-reduce program and the report-generation
program to run (in that order) nightly.For more information, refer to the documentation for your task scheduler.
� For z/OS with a directory-based report structure: Schedule the process-and-reduceprogram and the report-generation program to run (in that order) nightly.
For more information, refer to your scheduling system’s documentation.� For z/OS with a PDS-based report structure (and a corresponding directory-based
report structure on a UNIX or Windows system): Schedule the process-and-reduceprogram, the report-generation program, and the FTP program to run (in thatorder) nightly.
For more information, refer to your scheduling system’s documentation.
Your NotesMake notes in your own schedule.� The first day after scheduling, confirm that the programs ran as scheduled.� The first day after scheduling, confirm that the backup of the PDB was created
and that it is identical to (or can be used to regenerate a structure that is identicalto) the PDB.
Unless you have a strong preference for leaving the backup step after theprocess and reduce steps, in the process, reduce, and backup job move the backupstep to precede the process and reduce steps.

Setup Case 3 � Optional Customization 95
� Every day, check the logs from the nightly jobs for error messages, if any. Youmight also want to check for warning messages.
If you need to restart a nightly job:� For UNIX or Windows: See the restart.txt file that the QuickStart Wizard
generated. Also see “Appendix 1: Recovery Procedures” in the SAS ITResource Management macro reference documentation.
� For z/OS: See the $RESTART member that the QuickStart Wizard generated.Also see “Appendix 1: Recovery Procedures” in the SAS IT ResourceManagement macro reference documentation.
� In a step above, you updated the site library’s list of holidays so that it is correctfor your site through some date in the future. When that date is reached, SAS ITResource Management will write a reminder to the log during theprocess-and-reduce run. But in case you miss seeing that reminder, you mightwant to add an item to your own schedule to update the list again before that lastdate.
For more information about the holiday list, see “Viewing/Editing Your ActiveSite Library’s List of Holidays” on page 286.
� In a step above, you set the workshift schedule in the PDB. If your site hasseasonal shift changes (for example, summer hours), you might want to add anitem to your own schedule to update the workshift schedule at the seasonalchanges.
For more information about the workshift schedule, see “Viewing/Editing YourActive PDB’s Work Shift Schedule” on page 334.
� You might want to schedule a periodic check of table and variable usage. If data isbeing kept for any variables or tables that are not being used for reporting, youmight want to set the variables’ or tables’ Kept status to No so that you can savespace in the PDB and time during processing and reduction.
� You might want to schedule a periodic check of space usage.For more information about space usage, see “Space Usage at a Level in a
Table” on page 349.� If you have any formats that are based on changeable information (for example,
formats that relate to network configuration or storage devices), you might want toschedule a periodic review of the formats.
For more information about formats, see SAS online help.� At some sites, copies of the demonstration PDBs are used for practice or testing:
for example, testing what a new report would look like, before a production PDBhas enough data to generate a report.
At some sites, a demonstration PDB is used when the active PDB must be someother PDB than the one that is to be used. (Some operations cannot run on theactive PDB.)
At other sites, one or more of the demonstration PDBs are never used.You can delete one or more of the demonstration PDBs if you have no need for
them. Remember, though, that at least one PDB (demonstration PDB orsite-created PDB) is required to start SAS IT Resource Management. For moreinformation, see “Deleting a PDB” on page 315.
Optional CustomizationAfter enough data has been collected that most of the reports are fully populated
(that is, they have data over the time span of the report), you might or might not wantto make other customizations for your site.

96 Optional Customization � Chapter 6
� You might want to adjust the report definitions and rule definitions.For example, you might want to add, change, or delete definitions.For more information about report definitions, see “Using the Manage Report
Definitions Tool” on page 468. For more information about rule definitions, see“Using the Perform Exception Analysis Tool” on page 468.
� You might want to adjust static files in the report structure(s).A report gallery’s static files are the files that are not cleared when the reports
in the gallery are cleared by %CPWEBINI, %CPMANRPT, or the WEBCLR=parameter.
For information about customizing these files, see “Customizing a ReportGallery’s Static Files” on page 562.
� You might want to age out old reports instead of deleting old reports.Where you want to age out old reports, replace the calls to the %CPWEBINI
macro with calls to the %CPMANRPT macro, and make the corresponding changesto the OUTLOC= parameter values in the macro calls that generate reports.
For more information about %CPWEBINI, see the topic %CPWEBINI in theSAS IT Resource Management macro reference documentation. For moreinformation about %CPMANRPT, see the topic %CPMANRPT in the SAS ITResource Management macro reference documentation.
� You might want to modify the report structure.Typically, the report structure is not customized. However,
� you can add new paths in the report structure. If you add new paths, be verycareful to specify end-of-path locations that either do not currently exist or, ifthey exist, are empty and not used for any other purpose.
� where you use %CPWEBINI to clear reports, you can remove or revise theexisting paths in the report structure.
� where you use %CPMANRPT to age out reports, you can adjust a few aspectsof the report structure: change the titles, and change the text (but notdirectory names) that is displayed on existing paths. You cannot remove orrevise existing paths in the report structure (unless you are willing to risklosing all the reports on those paths).
To customize the report structure:� For UNIX or Windows: Edit the program that you used to create the report
structure.Next, where you are using %CPWEBINI to clear reports, you can delete
those paths in the report structure if you want to remove the paths or if youintend to revise them; otherwise, do not delete the existing paths in thereport structure. Submit the revised structure-creation program to SAS.
Finally, revise the report-generation program to generate reports to theappropriate destinations in the report structure, as necessary.
� For z/OS with a directory-based report structure: Edit the job that you usedto create the report structure that is based on a z/OS UNIX File System.
Next, where you are using %CPWEBINI to clear reports, you can deletethose paths in the report structure if you want to remove the paths or if youintend to revise them; otherwise, do not delete the existing paths in thereport structures. Submit the revised structure-creation job.
Finally, revise the report-generation program to generate reports to theappropriate destinations in the revised report structure, as necessary.

Setup Case 3 � Optional Customization 97
� For z/OS with a PDS-based report structure (and a correspondingdirectory-based report structure on a UNIX or Windows system): Edit the jobthat you used to create the PDS-based report structure. Also, edit the FTPjob, as necessary.
Next, where you are using %CPWEBINI to clear reports, you can deletethose paths in the report structures if you want to remove the paths or if youintend to revise them; otherwise, do not delete the existing paths in thereport structure. Submit the revised structure-creation job. Then, run therevised FTP job.
Finally, revise the report-generation program to generate reports to theappropriate destinations in the PDS-based report structure, as necessary.(The nightly FTP job will make the corresponding changes to thedirectory-based revised report structure.)
Note: To edit an entry in a SAS catalog, you can use the SAS Program Editorwindow. For example, suppose that you want to copy the entry inADMIN.catalog-name.entry-name.entry-type, edit it, and then save it toADMIN.catalog-name.entry-name.entry-type, which is in the ADMIN library inyour active PDB. Here are the steps:
1 Open the SAS Program Editor window.
2 In the command field, type the following command and press ENTER:
copy ADMIN.catalog-name.entry-name.entry-type
3 The entry appears.
4 Save the original version under a different name, in case you want to refer toit later.
You can save the entry to any library that exists and has a libref that isdefined with write access. (If the library exists and a libref is not currentlydefined or is defined with read-only access, you can define a libref by usingthe SAS LIBNAME statement.)
In order to write to ADMIN, if the PDB is activated with read-only access,then activate it with write access.
In the command field, type a command like the following one and pressENTER:
save ADMIN.catalog-name.another-entry-name.entry-type
where another-entry-name is an existing entry or an entry that is to becreated by this command.
5 Edit the entry.6 Save the edited entry.
In the command field, type the following command and press ENTER:
save ADMIN.catalog-name.entry-name.entry-type
If the PDB was activated initially with read-only access, activate it againwith read-only access.
7 Close or iconize the SAS Program Editor window.
�
For more information about grouping reports in the tree, see the section“Grouping Reports in a Web Gallery” in the chapter “Setup: Introduction” in theSAS IT Resource Management User’s Guide. For more information about the%CPHTREE macro, see the %CPHTREE topic in the SAS IT Resource

98 Cleanup � Chapter 6
Management macro reference documentation. For more information about the%CMFTPSND macro, see the topic %CMFTPSND in the SAS IT ResourceManagement macro reference documentation. For more information aboutsubmitting a SAS program, see “Working with the Interface for Batch Mode” onpage 18.
� You might want to adjust the table definitions and the variable definitions.
For more information about tables, see “Overview of Tables” on page 353. Formore information about variables, see “Overview of Variables” on page 378.
� You might want to adjust the PDB properties and site library properties.
For more information about PDBs, see “Overview of Whole PDBs” on page 296.For more information about site libraries, see “Overview of Site Libraries” on page270.
� You might want to review how checking for duplicate data is handled.
For more information about checking for duplicate data, see “Appendix 4:Working with Duplicate Data” in the SAS IT Resource Management macroreference documentation.
� If you want to change some aspect of the process step and you do not see anysupplied way of making that change, you might want to read about process exits.
For more information about process exits, see “Overview of Using Process Exits”on page 442.
� You might want to combine or split PDBs.
For information about combining PDBs, see “Combining PDBs” on page 304.For information about splitting PDBs, see “Splitting One PDB into Two PDBs” onpage 320.
� If your users will use the SAS IT Resource Management client GUI to report ondata in a PDB on a SAS IT Resource Management server host, make a list of theinformation that the users will need in order to create a remote server profile forthat host.
For more information, see “Creating a Remote Server Profile” on page 574.
CleanupDelete the PDB and related structures that the QuickStart Wizard created.
� For the QuickStart Wizard PDB located in a UNIX or Windows environment:Delete the QuickStart Wizard’s PDB, including the qs directory (and itssubdirectories) that is related to the QuickStart Wizard’s PDB.
� For the QuickStart Wizard PDB based on z/OS: Delete the QuickStart Wizard’sPDB, including any PDSs with .QS as a high-level qualifier and any directorieswith /qs in the directory path that are related to the QuickStart Wizard’s PDB.
Optional PackageIf you want to package and install the collector-support that you have created, see
“Creating and Installing a Collector Support Package” on page 426 and these macros:the topic %CPPKGCOL in the SAS IT Resource Management macro referencedocumentation, the topic %CPRPTPKG in the SAS IT Resource Management macroreference documentation, and the topic %CPINSPKG in the SAS IT ResourceManagement macro reference documentation.

99
C H A P T E R
7Setup Case 4
Setup Case 4 99Overview of Setup Case 4 99
The QuickStart Wizard 100
The Raw Data 101
The PDB and Site Library 101
The Tables and Variables 102Reduce Program 105
The Report Structure 107
The Report Program(s) 111
The Job Schedule 113
Your Notes 113
Optional Customization 114Cleanup 117
Optional Package 117
Setup Case 4
Overview of Setup Case 4For general information about setting up the server, see “Setting Up the Server, with
Setup Cases” on page 38. That topic also identifies which setup case applies to yoursituation.
Below are the instructions for setup case 4. For each step, there is an overview of thestep and, after that, the specific directions for the step. Typically, UNIX and Windowshave one or two sets of directions and z/OS has one or two sets of directions. The stepsare in the following order.
1 “The QuickStart Wizard” on page 1002 “The Raw Data” on page 1013 “The PDB and Site Library” on page 101
4 “The Tables and Variables” on page 1025 “Reduce Program” on page 1056 “The Report Structure” on page 1077 “The Report Program(s)” on page 1118 “The Job Schedule” on page 113
9 “Your Notes” on page 11310 “Optional Customization” on page 114

100 The QuickStart Wizard � Chapter 7
11 “Cleanup” on page 11712 “Optional Package” on page 117.
The QuickStart WizardRun the QuickStart Wizard and follow its path for NTSMF data.The QuickStart Wizard does not have a path for your data collector or data source.
However, the QuickStart Wizard generates objects that contain, among other things,documentation. In this setup case, you run the QuickStart Wizard only to acquire thatdocumentation, which will be useful when you work with your own data collector ordata source.
The wizard creates a PDB, creates a program that processes and reduces the data,creates a report structure (and saves the program with which it created the structure,and also creates (if necessary) a program for FTPing the structure and its reports), andcreates a program that reports on the data. In later steps in this setup case, you willgenerate similar (but not identical) structures and programs for your own data collectoror data source.
� In the SAS IT Resource Management server GUI for UNIX or Windows: On themain window’s Administration tab, select QuickStart Wizard. Follow theNTSMF path through the wizard. As you are asked for names and locations,invent names and locations that are appropriate for the wizard’s data collector ordata source, not your data collector or data source. (For example, when you areasked to supply the location of the file that contains the raw data for the path’sdata collector or data source, type a location that would be legitimate on youroperating system. The file does not need to exist.)
The path creates a PDB (without any tables at this point) and a report structure.Also, the path creates a qs directory and, under that, creates a cntl subdirectory
that has a readme.txt file, an xrptstr.sas file, an xprocess.sas file, and an xreport.sasfile, where the value of x indicates the data collector or data source for which theprograms were generated. Additionally, the path generates other instructions andother directories and files.
� In the SAS IT Resource Management server GUI for z/OS: From the main menu,select the PDB Admin button and, from the menu it opens, select QuickStartWizard. Follow the NTSMF path through the wizard. As you are asked for namesand locations, with one exception invent names and locations that are appropriatefor the wizard’s data collector or data source, not your data collector or datasource. (For example, when you are asked to supply the location of the data setthat contains the raw data for the path’s data collector or data source, type alocation that would be legitimate on your operating system. The data set does notneed to exist.) The exception is that, at one point in the path, the wizard askswhere you want to have the parent location for the Web reports. Answer in theway that you want to set up for your data collector or data source.
The path also creates a report structure. The location of the report structuredepends on how you specified the parent location for the Web reports.
� If you specified a directory in the z/OS UNIX File System as the parentlocation, the report structure consists of directories in the z/OS UNIX FileSystem. This choice is called z/OS with a directory-based report structure.
� If you specified a PDS as the parent location, the report structure consists ofPDSs. This choice is called z/OS with a PDS-based report structure. In orderto be able to view the reports with a Web browser, you will also create acorresponding directory-based report structure on a UNIX or Windowssystem. After you do that, this choice is called z/OS with a PDS-based report

Setup Case 4 � The PDB and Site Library 101
structure (and a corresponding directory-based report structure on a UNIX orWindows system).
The path creates a PDB (without any tables at this point).Also, the path creates a .QS PDS and creates a .QS.CNTL PDS that has a
$$README member, a $xINSTR member, an xRPTSTR member, an xPROCESSmember, an xREPORT member, and an xFTPHTML member, where the value of xindicates the data collector or data source for which the programs were generated.Additionally, the path generates other instructions and other members, PDSs, anddata sets. For example, the path can create other PDSs with .QS as a high-levelqualifier and/or directories with /qs in the directory path.
Note: All new PDSs are created in a location that is based on the SAS systemoption FILEDEV. Check with the person who installed SAS at your site todetermine whether FILEDEV points to a set of temporary volumes. If FILEDEVdoes point to a set of temporary volumes, then you must move the PDSs to apermanent location. �
The Raw DataStart to collect raw data, if you do not already collect raw data.Several steps ahead, you will need at least one day’s worth (preferably a few days’
worth) of raw data from the data collector or data source. By starting to collect datanow, you will not need to wait for it later.
For more information, see the documentation from the vendor of your data collectoror data source.
The PDB and Site LibraryCreate a PDB for your data collector or data source. The site library was created at
the time that SAS IT Resource Management was installed. Customize the PDB and sitelibrary, as necessary.
1 Create a PDB.� In the SAS IT Resource Management GUI for UNIX or Windows: On the
main window’s Administration tab, select Create PDB Wizard. Follow thepath through this wizard, but ignore table selection. When the wizard asks ifyou want the new PDB to become the active PDB, answer Yes.
The result is a PDB without table definitions. Also, the new PDB becomesthe active PDB.
� In z/OS: You can use interactive mode, or you can use batch mode.� Using interactive mode: In the SAS IT Resource Management server
GUI for z/OS: From the main menu select PDB Admin � Define NewPDB
Follow the path through this wizard, including allocation of space, butignore table selection. (For good values to use for space allocation, seethe ALLOC job step in the CMQSTART member in the SAS IT ResourceManagement CPMISC PDS.)
The result is a PDB without table definitions.� Using batch mode: In batch mode, make a copy of the CMQSTART
member that is in the SAS IT Resource Management CPMISC PDS. Inthe copy of CMQSTART, delete the call to the %CPSTART macro andreplace it with a copy of the call to %CPSTART that is in the
102 The Tables and Variables � Chapter 7
CMAUTOEX member in CPMISC and, in its PDB= parameter, specifythe PDB that you created for your data collector or data source. In thecopy of CMQSTART, also delete everything after the ALLOC job step.Follow the instructions in the comments that apply to the job steps thatremain. Submit the copy as a batch job. The result is a PDB withouttable definitions.
For more information about the %CPSTART macro, see the topic%CPSTART in the SAS IT Resource Management macro referencedocumentation. For more information about submitting a SAS program,see “Working with the Interface for Batch Mode” on page 18.
For more information about PDBs, see “Overview of Whole PDBs” on page 296.2 Customize the PDB and site library, as necessary.
� For UNIX or Windows: In the readme.txt file that the QuickStart Wizardgenerated, follow the instructions for the PDB and site library.
� For z/OS: In the $$README member and $xINSTR member that theQuickStart Wizard generated, follow the instructions for the PDB and sitelibrary.
For more information about PDB properties, see “Overview of Whole PDBs” onpage 296. For more information about site library properties, see “Overview of SiteLibraries” on page 270.
The Tables and VariablesIn the PDB for your data collector or data source, create one table for each SAS data
set of incoming data, and check the table and variable definitions.1 Run the MXG program(s) or your program(s) that reads the raw data and write it
to one or more SAS data sets.Confirm that the SAS data sets are now created.
Note: The amount of raw data does not matter at this point. The following step isbased on the data set and column attributes, not on values in the columns. �
2 Create a program.This SAS program calls (in this order) the %CPSTART macro (to invoke SAS IT
Resource Management), the %CPCAT macro (to read a control statement), the%CPCAT macro (to store the control statement temporarily), and the %CPDDUTLmacro (to run the stored control statement).
� For the call to the %CPSTART macro, specify the following code:� For UNIX or Windows: Copy the call to the %CPSTART macro from the
xprocess.sas program that the QuickStart Wizard generated.In the PDB= parameter, replace the reference to the wizard’s PDB
with a reference to the PDB that you created for your data collector ordata source.
� For z/OS: Copy the call to the %CPSTART macro from the xPROCESSmember that the QuickStart Wizard generated.
In the PDB= parameter, replace the reference to the wizard’s PDBwith a reference to the PDB that you created for your data collector ordata source.
For more information about the %CPSTART macro, see the topic%CPSTART in the SAS IT Resource Management macro referencedocumentation.
Setup Case 4 � The Tables and Variables 103
� For the first call to the %CPCAT macro, specify the following code:
%cpcat;cards4;generate source
dataset=’libref-1.name-1’filename=’output-location’ REPLACEname=utable-name-1type=table-type-1 ;
generate sourcedataset=’libref-2.name-2’filename=’output-location’ APPENDname=utable-name-2type=table-type-2 ;
.
.
.generate source
dataset=’libref-n.name-n’filename=’output-location’ APPENDname=utable-name-ntype=table-type-n ;
;;;;
In this code each GENERATE SOURCE control statement corresponds to oneof the SAS data sets that is created by a program that reads the raw data,and the ’;;;;’ must start at the beginning of the line. Within each GENERATESOURCE control statement, you must specify a consistent set of values forthe DATASET=, FILENAME=, NAME=, and TYPE= parameters. That is, forthe SAS data set that is specified in the DATASET= parameter, a tabledefinition is created (in the location that is specified by the FILENAME=parameter) for the table that is specified in the NAME= parameter, and thattable’s type will be as specified in the TYPE= parameter.
Preceding the first call to %CPCAT, put one or more LIBNAMEstatements that define the libref(s) that is used in the %CPCAT call.
For more information about the GENERATE SOURCE controlstatement, see the topic GENERATE SOURCE in the SAS IT ResourceManagement macro reference documentation. For more information aboutthe %CPCAT macro, see the topic %CPCAT in the SAS IT ResourceManagement macro reference documentation. For more information aboutthe SAS LIBNAME statement, see SAS help.
� For the second call to the %CPCAT macro, specify the following code:
%cpcat(cat=work.temp.temp.source) ;
� For the call to the %CPDDUTL macro, specify the following code:
%cpddutl(entrynam=work.temp.temp.source) ;
For more information about the %CPDDUTL macro, see the %CPDDUTLmacro in the SAS IT Resource Management macro reference documentation.
3 Run the program.Submit the program to SAS. For each data set and its columns, the program
will write to the output file a block of definitions for the corresponding table andits variables.
For more information about submitting a SAS program, see “Working with theInterface for Batch Mode” on page 18.

104 The Tables and Variables � Chapter 7
4 In the location that was specified by the FILENAME= parameter on theGENERATE SOURCE control statements, review the blocks of definitions. EachGENERATE SOURCE control statement generated a block of definitions for a SASdata set. A block of definitions corresponds to a table. In each block there is aCREATE TABLE control statement, CREATE VARIABLE control statements, andan UPDATE TABLE control statement.
In a text editor, modify the control statements in the blocks, as necessary, andadd any CREATE DERIVED or CREATE FORMULA control statements to theremaining blocks, as necessary. In any given block, consider the following:
� In the CREATE TABLE control statement, you might want to change thetable’s name, label, and/or description. Also review the other parameters.
For more information about the CREATE TABLE control statement, seethe topic CREATE TABLE in the SAS IT Resource Management macroreference documentation.
� In the CREATE VARIABLE control statements, you might want to changethe variables’ names, labels, and/or descriptions. Also review the otherparameters.
For more information about the CREATE VARIABLE control statement,see the topic CREATE VARIABLE in the SAS IT Resource Managementmacro reference documentation.
� After the CREATE VARIABLE control statements, add a CREATE DERIVEDcontrol statement for each derived variable that you want to have in thetable, if any. The CREATE DERIVED control statements can be in any order,but alphabetical order is convenient.
For more information about the CREATE DERIVED control statement,see the topic CREATE DERIVED in the SAS IT Resource Management macroreference documentation.
� In the UPDATE TABLE control statement, change the table’s name (if youchanged the name in the CREATE TABLE control statement). You mightwant to revise the table’s age limits. Also review other parameters.
Note: If you are considering revisions to the table’s BY variables list, see“Restrictions on Modifications of BY Variables Lists” on page 348. �
For more information about the UPDATE TABLE control statement, seethe topic UPDATE TABLE in the SAS IT Resource Management macroreference documentation.
� After the UPDATE TABLE control statement, add a CREATE FORMULAcontrol statement for each formula variable that you want to associate withthe table. The CREATE FORMULA control statements can be in any order,but alphabetical order is convenient.
For more information about the CREATE FORMULA control statement,see the topic CREATE FORMULA in the SAS IT Resource Managementmacro reference documentation.
Note: If a derived variable depends on another derived variable and/or if aformula variable depends on another formula variable, be sure to read theinformation about dependencies in the documentation for the CREATE DERIVEDand/or CREATE FORMULA control statements. �
5 Create another program.This SAS program calls (in this order) the %CPSTART macro (to invoke SAS IT
Resource Management) and the %CPDDUTL macro (to run the control statementsthat define the tables and their variables).

Setup Case 4 � Reduce Program 105
� For the call to the %CPSTART macro, copy the call that you used earlier inthis step.
� For the call to the %CPDDUTL macro, specify the following code:
%cpddutl(filename=’location-of-control-statements’) ;
where the value of the FILENAME= parameter is the path and name of thefile that contains the table and variable control statements that you reviewed(and perhaps edited).
For more information about the %CPDDUTL macro, see the topic%CPDDUTL in the SAS IT Resource Management macro referencedocumentation.
6 Run the program.
Submit the program to SAS. The program creates the tables and their variablesin the active PDB.
For more information about submitting a SAS program, see “Working with theInterface for Batch Mode” on page 18.
7 The PDB’s new table definitions and the tables’ variable definitions have beencreated.
If you want to browse them, you can. For more information about viewing tabledefinitions, see “Viewing/Editing a Table” on page 364. For more information aboutviewing the definition for a regular variable, see “Creating/Editing/Viewing aRegular Variable” on page 394. For more information about viewing the definitionfor a derived variable, see “Creating/Editing/Viewing a Derived Variable” on page381. For more information about viewing the definition for a formula variable, see“Creating/Editing/Viewing a Formula Variable” on page 388.
Reduce ProgramCreate a program to process and reduce data, and test the program.
1 Create a program.
This SAS program calls the %CPSTART macro (to invoke SAS IT ResourceManagement), runs the code that creates the SAS data set(s), calls the%CPPROCES or %CMPROCES macro (to process the data), and calls the%CPREDUCE macro (to reduce the data). Use the %CMPROCES macro if anMXG program writes the data to the SAS data set(s). If any other program writesthe data to the SAS data set(s), use the %CPPROCES macro.
� For UNIX or Windows: Use a copy of the %CPSTART call that you usedabove.
The code that creates the SAS data set(s) can run before the call to%CPSTART, but in any case must run before the call to %CPPROCES.
For the call to the %CPPROCES macro, use the following code:
%cpproces (GENLIB=libref,COLLECTR=GENERIC,TOOLNM=SASDS );
where the values of the GENLIB=, RAWDATA=, and DELIM=parameters must be appropriate for your data collector or data source.
For the call to the %CPREDUCE macro, use the following code:
%cpreduce ;

106 Reduce Program � Chapter 7
� For z/OS: Make a copy of the CMQSTART member that is in the SAS ITResource Management CPMISC PDS.
In this copy of CMQSTART, delete the call to the %CPSTART macro andreplace the call with a copy of the call to the %CPSTART macro that is in theCMAUTOEX member in CPMISC.
The code that creates the SAS data set(s) can run before the call to%CPSTART, but in any case must run before the call to %CPPROCES.
For the call to the %CPPROCES or %CMPROCES macro, use thefollowing code:
%cpproces (GENLIB=libref,COLLECTR=GENERIC,TOOLNM=SASDS ) ;
or
%cmproces (GENLIB=libref,COLLECTR=GENERIC,TOOLNM=SASDS ) ;
where the values of the GENLIB=, RAWDATA=, and DELIM=parameters must be appropriate for your data collector or data source.
For the call to the %CPREDUCE macro, use the following code:
%cpreduce ;
For an example of this program, see “Appendix 6: Fax: Sample DailyProcess-and-Reduce Job” on page 185.
For more information about processing data, see “Processing Data” on page 413.For more information about reducing data, see “Reducing Data” on page 416. Formore information about the %CPPROCES macro, see the topic %CPPROCES inthe SAS IT Resource Management macro reference documentation. For moreinformation about the %CMPROCES macro, see the topic %CMPROCES in theSAS IT Resource Management macro reference documentation. For moreinformation about the %CPREDUCE macro, see the topic %CPREDUCE in theSAS IT Resource Management macro reference documentation. For moreinformation about submitting a SAS program, see “Working with the Interface forBatch Mode” on page 18.
2 To the program, add a step that backs up the PDB.
In the long term, it does not matter much whether the backup step runs beforeor after the process and reduce steps. For now, however, put the backup step afterthe process and reduce steps, so that there will be some data in the PDB by thetime that the PDB is backed up.
For information, recommendations, and examples about PDB backup, see“Backing Up a PDB” on page 303.
Note: Backing up the whole PDB is not the same as archiving incoming data. Youneed to back up the whole PDB regardless of your decision about archiving. (Formore information about archiving, see “Archiving Incoming Data” on page 411.) �
3 When you have at least one day’s worth of raw data from your data collector ordata source, run the program as a batch job.
For more information about submitting a SAS program, see “Working with theInterface for Batch Mode” on page 18.
4 The data in the new tables corresponds to the data in the SAS data sets.
Setup Case 4 � The Report Structure 107
If you want to browse the data in the PDB, see “Viewing Data Values” on page420.
5 The PDB backup was created and is identical to (or can be used to regenerate astructure that is identical to) the PDB.
6 Unless you have a strong preference for leaving the backup step after the processand reduce steps, in the program move the backup step to precede the process andreduce steps.
7 Create the program that runs nightly to process and reduce the data.This SAS program (in this order) calls the backup step (to back up the PDB),
the %CPSTART macro (to invoke SAS IT Resource Management), the code thatcreates the SAS data set(s), and the %CPPROCES or %CMPROCES macro (toprocess data), and it calls the %CPREDUCE macro (to reduce data).
For more information about the backup step, see “Backing Up a PDB” on page303. For more information about the %CPSTART macro, see the topic %CPSTARTin the SAS IT Resource Management macro reference documentation. For moreinformation about the %CPPROCES macro, see the topic %CPPROCES in the SASIT Resource Management macro reference documentation. For more informationabout the %CMPROCES macro, see the topic %CMPROCES in the SAS ITResource Management macro reference documentation. For more informationabout the %CPREDUCE macro, see the topic %CPREDUCE in the SAS ITResource Management macro reference documentation.
� For UNIX or Windows: Above, you created a file that backed up the PDB andprocessed and reduced data. You can use this program as the nightlyprocess-and-reduce program.
You might want to rename the file to indicate its data collector or datasource and its role (to process and reduce data). For example, if the file is forxxxx data, you might rename the file xxxxprrd.sas.
Note: This file corresponds to the xprocess.sas file that the QuickStartWizard created for the other data collector or data source. You might want tolook at that program and see if there are any other comments or featuresthat you want to use in your program. �
� For z/OS: Above, you created a job that backed up the PDB and processed andreduced data. You can use this job as the nightly process-and-reduce program.
You might want to rename the job to indicate its data collector or datasource and its role (to process and reduce data). For example, if the job is forxxxx data, you might rename the job xxxxPRRD.
Note: This job corresponds to the xPROCESS member that the QuickStartWizard created for the other data collector or data source. You might want tolook at that job and see if there are any other comments or features that youwant to use in your job. �
The Report StructureCreate a report structure. For z/OS with a PDS-based report structure, also FTP the
report structure to another system. Check the report structure(s).1 Create, run, and save report definitions for your data collector or data source.
� In the SAS IT Resource Management server GUI for UNIX or Windows: Onthe main window’s Reporting tab, select Manage Report Definitions �File � New Report Definition
Using the right side of the window, create a report definition for the datain the table that you created above. Select Run to generate a report based on

108 The Report Structure � Chapter 7
the report definition. In the report, the data corresponds to the data in thePDB. (For more information about creating and running a report definition,see “Using the Manage Report Definitions Tool” on page 468. If you want tobrowse the data in the PDB, see “Viewing Data Values” on page 420.)
Next, select File � Save Report Definition and complete that path tosave the report definition in its interactive form.
Optionally, create and save other report definitions for the data in thetable(s) that you created above.
� In the SAS IT Resource Management GUI for z/OS: From the main menu,select Reports � DesignGraphRpt
Select the type of report that you want to create (at this point, select onlyfrom the six types at the top of the list). The type’s main report definitionwindow opens. Select the level that you want to use, select the icon in theupper-left corner to select the table that you want to use, and specify allother parameters that you want to use. Then, select Actions � Run Report
In the report that is generated, the data corresponds to the data in thePDB. (For more information about creating and running a report definition,in the type’s main report-definition window, select Help. If you want tobrowse the data in the PDB, see “Viewing Data Values” on page 420.)
Next, from the main window for the report definition, select File � SaveDefinition and complete the path to save the report definition in itsinteractive form. Then select File � Quit to return to the list of customreport definitions.
Optionally, create and save other report definitions for the data in thecreated table.
For more information about report definitions, see “Using the Manage ReportDefinitions Tool” on page 468.
Note: In a later step, you will need the names of the supplied report definitionsthat you want to use. (You can use some or all of the supplied report definitions foryour data collector or data source.) Notice that the names are available in twoplaces: in the list in the GUI, and in the lower-right corner of each report. �
2 Decide on report groupings for the custom reports for your data collector or datasource.
Report groupings usually make a particular report easier to find. Also, reportgroupings usually make a particular report easier to interpret, by making it easyto compare with related reports in the same group.
For more information about report groupings, see the section “Grouping Reportsin a Web Gallery” in the chapter “Setup: Introduction” in the SAS IT ResourceManagement User’s Guide.
3 Create a SAS program.The program creates a report structure that implements the paths and
end-of-path directories that you decided on for your report groupings. The programshould call the %CPSTART macro (to invoke SAS IT Resource Management), the%CPCAT macro (to read a description of the report structure), the %CPCAT macroagain (to store the description of the report structure temporarily), and the%CPHTREE macro (to read the stored description and create the structure).
For more information about the %CPCAT macro, see the topic %CPCAT in theSAS IT Resource Management macro reference documentation.
For more information about the %CPHTREE macro, see the topic %CPHTREEin the SAS IT Resource Management macro reference documentation. In the

Setup Case 4 � The Report Structure 109
%CPHTREE topic, focus especially on the outline and on Example 6. In theoutline as described in the documentation of the CAT= parameter, you can ignorethe fourth and fifth fields for now. In Example 6, you can ignore sections 4, 5, 6,and 7 for now.
� For UNIX: In the outline, specify directory locations in the local UNIX filesystem. The directories do not need to exist. In a later step, you will run theprogram and it will create the directories (and will create some static files inthe directories).
Note: This file corresponds to the file xrptstr.sas that the QuickStart Wizardcreated for the other data collector or data source. You might want to look atthat program to see if there are any other comments or features that youwant to use in your program. �
� For Windows: In the outline, specify directory locations on a disk that isattached to your PC or on a disk that is available to your PC through aservice such as Network Neighborhood, NFS, AFS, or DFS. The directories donot need to exist. In a later step, you will run the program and it will createthe directories (and will create some static files in the directories).
Note: This file corresponds to the file xrptstr.sas that the QuickStart Wizardcreated for the other data collector or data source. You might want to look atthat program to see if there are any other comments or features that youwant to use in your program. �
� For z/OS with a directory-based report structure: In the outline, specifydirectory locations in a local z/OS UNIX File System area. The directories donot need to exist. In a later step, you will run the program and it will createthe directories (and will create some static files in the directories).
Note: This program corresponds to the member xRPTSTR that theQuickStart Wizard created for the other data collector or data source. Youmight want to look at that job to see if there are any other comments orfeatures that you want to use in your job. �
� For z/OS with a PDS-based report structure (and a correspondingdirectory-based report structure on a UNIX or Windows system): In theoutline, specify PDS locations. The PDSs do not need to exist. In a later step,you will run the program and it will create PDSs (and will create some staticmembers in the PDSs).
Note: This program corresponds to the member xRPTSTR that theQuickStart Wizard created for the other data collector or data source. Youmight want to look at that job and see if there are any other comments orfeatures that you want to use in your job. �
You might want to name the program to indicate its data collector or datasource and its role (to produce a report structure). For example, if you are workingwith data from xxxx, you might call the program xxxxrpts.sas (for UNIX orWindows) or xxxxRPTS (for z/OS).
4 For z/OS with a PDS-based report structure (and a corresponding directory-basedreport structure on a UNIX or Windows system): Create an additional SASprogram.
You will use this program to FTP the report structure from its PDS-basedlocation on z/OS to a directory-based location on a UNIX or Windows system. Thisprogram should call the %CPSTART macro (to invoke SAS IT ResourceManagement) and the %CMFTPSND macro (to FTP the report structure to theother system).

110 The Report Structure � Chapter 7
For more information about the %CMFTPSND macro, see the %CMFTPSNDtopic in the SAS IT Resource Management macro reference documentation.
For more information about %CMFTPSND, also see the %CPHTREE topic inthe SAS IT Resource Management macro reference documentation. In the%CPHTREE topic, focus on Example 6. You can ignore sections 2, 3, 4, 5, and 7 fornow. In section 6, you can ignore the NEXNG PDSs for now.
� Create the program. The directories do not need to exist. In the next step,you will run the program and it will create the directories (and will createsome static files in the directories).
Note: This program corresponds to the xFTPHTML member that theQuickStart Wizard created for the other data collector or data source. Youmight want to look at that job to see if there are any other comments orfeatures that you want to use in your job. �
You might want to name the program to indicate its data collector or datasource and its role (to FTP the report structure). For example, if you are workingwith data from xxxx, you might call the program xxxxFTP.
5 Run the SAS program(s).
� For UNIX or Windows: Run the program that creates the directory-basedreport structure.
� For z/OS with a directory-based report structure: Run the program thatcreates the directory-based report structure.
� For z/OS with a PDS-based report structure (and a correspondingdirectory-based report structure on a UNIX or Windows system): Run theprogram that creates the PDS-based report structure. Then run the programthat FTPs the report structure to UNIX or Windows.
For more information about submitting a SAS program, see “Working with theInterface for Batch Mode” on page 18.
6 Check the report structure(s).
Notice that the report structure is, physically, relatively flat.
� For UNIX or Windows: Check that the directories have been created in thelocation and with the names that you specified.
Also, point your Web browser to the file welcome.htm in the “super”directory, and check that the left frame works as you intended. (At this point,no reports are available in the right frame.)
� For z/OS with a directory-based report structure: Check that the directorieshave been created in the location and with the names that you specified.
Also, point your Web browser to the file welcome.htm in the “super”directory, and check that the left frame works as you intended. (At this point,no reports are available in the right frame.)
� For z/OS with a PDS-based report structure (and a correspondingdirectory-based report structure on a UNIX or Windows system): Check thatthe PDSs have been created in the location and with the names that youspecified.
Also check that the corresponding directories have been created in thelocation and with the names that you specified.
Also, point your Web browser to the file welcome.htm in the “super”directory, and check that the left frame works as you intended. (At this point,no reports are available in the right frame.)

Setup Case 4 � The Report Program(s) 111
The Report Program(s)Create the program that runs nightly to generate reports to the report structure, and
test the program.
1 Create the program.
This SAS program should contain a call to the %CPSTART macro (to invokeSAS IT Resource Management). Also, for each end-of-path location in the reportstructure (that is, for each location that contains report groups), the programshould contain one call to the %CPWEBINI macro (to clear old reports) and one ormore calls to the %CPRUNRPT macro (to generate the reports for the one or morereport groups at that location). Here is an example:
%CPWEBINI (cat=work.grweb_gr,dir=end-of-path-1) ;
%CPRUNRPT (srd1 srd2 srd3 srd4,folder=pgmlib.itsvrpt,outloc=work.grweb_gr,outmode=web,outdesc=Report Group A,htmldir=end-of-path-1,webstyle=gallery2) ;
%CPRUNRPT (srd5 srd6,folder=pgmlib.itsvrpt,outloc=work.grweb_gr,outmode=web,outdesc=Report Group B,htmldir=end-of-path-1,webstyle=gallery2) ;
This code clears reports from the catalog WORK.GRWEB_GR and itscorresponding directory end-of-path-1. Next, the code runs supplied reportdefinitions SRD1, SRD2, SRD3, and SRD4 from the folder PGMLIB.ITSVRPT,and generates their reports first to the catalog WORK.GRWEB_GR and from thereto the directory end-of-path-1, as reports for Report Group A. Then the code runssupplied report definitions SRD5 and SRD6 from the folder PGMLIB.ITSVRPT,and generates their reports first to the catalog WORK.GRWEB_GR and from thereto the directory end-of-path-1, as reports for Report Group B.
For more information about the %CPWEBINI macro, see the topic %CPWEBINIin the SAS IT Resource Management macro reference documentation.
For more information about the %CPRUNRPT macro, see the topic%CPRUNRPT in the SAS IT Resource Management macro referencedocumentation. For additional information about %CPRUNRPT, see the%CPHTREE topic in the SAS IT Resource Management macro referencedocumentation. Focus especially on Example 7. In Example 7, for now you canignore section 3, section 4’s GLBWHERE= parameter, and section 5.
� For UNIX or Windows: For each report group, specify that the destination ofthe reports is the appropriate one of the end-of-path directories that youcreated in your directory-based report structure.
Note: This program corresponds to the xreport.sas file that the QuickStartWizard created for the other data collector or data source. You might want tolook at that program and see if there are any other comments or featuresthat you want to use in your program. �

112 The Report Program(s) � Chapter 7
� For z/OS with a directory-based report structure: For each report group,specify that the destination of the reports is the appropriate one of theend-of-path directories that you created in your report structure based on a z/OS UNIX File System.
Note: This program corresponds to the xREPORT member that theQuickStart Wizard created for the other data collector or data source. Youmight want to look at that job and see if there are any other comments orfeatures that you want to use in your job. �
� For z/OS with a PDS-based report structure (and a correspondingdirectory-based report structure on a UNIX or Windows system): For eachreport group, specify that the destination of the reports is the appropriate oneof the end-of-path PDSs that you created in your PDS-based report structure.
Note: This program corresponds to the xREPORT member that theQuickStart Wizard created for the other data collector or data source. Youmight want to look at that job and see if there are any other comments orfeatures that you want to use in your job. �
2 For z/OS with a PDS-based report structure (and a corresponding directory-basedreport structure on a UNIX or Windows system): You do not need to createanother FTP program to FTP reports from the PDS-based report structure to thedirectory-based report structure. You can use the same program that you createdto FTP the report structure.
3 Run the program(s).� For UNIX of Windows: Run the program that generates the reports (and
some dynamic files) to the report structure.� For z/OS with a directory-based report structure: Run the program that
generates the reports (and some dynamic files) to the report structure basedon a z/OS UNIX File System.
� For z/OS with a PDS-based report structure (and a correspondingdirectory-based report structure on a UNIX or Windows system): Run theprogram that generates the reports (and some dynamic members) to thePDS-based report structure.
Then run the FTP program that you created earlier. The %CMFTPSNDmacro reuses directories and files that already exist and adds the directoriesand files that did not already exist.
4 Check the reports.Point your Web browser to the welcome.htm file in the “super” directory. Check
that the report groups are at the end-of-path locations that you intended, and thatthe reports are in the report groups that you intended.
Graphic reports display as “thumbnail” sketches. To view a full-size version of areport, click on its thumbnail sketch. To return the report to thumbnail size, selectShrink.
5 Set permissions so that “readonly” access to the directory-based report structure(or execute access, if appropriate for the report mechanisms) is available to youand to anyone else who needs to view the reports.
For more information about access rights, see “Actions and Access RightsRequired” on page 44.

Setup Case 4 � Your Notes 113
The Job ScheduleSchedule the nightly jobs. Typically the jobs run one time a day, at night. However,
you can schedule them to run more or less often than one time a day, and at whatevertime(s) work best for your site.
� For UNIX: Schedule the process-and-reduce program and the report-generationprogram to run (in that order) nightly.
For more information, refer to your cron and crontab man pages.� For Windows: Schedule the process-and-reduce program and the report-generation
program to run (in that order) nightly.For more information, refer to the documentation for your task scheduler.
� For z/OS with a directory-based report structure: Schedule the process-and-reduceprogram and the report-generation program to run (in that order) nightly.
For more information, refer to your scheduling system’s documentation.� For z/OS with a PDS-based report structure (and a corresponding directory-based
report structure on a UNIX or Windows system): Schedule the process-and-reduceprogram, the report-generation program, and the FTP program to run (in thatorder) nightly.
For more information, refer to your scheduling system’s documentation.
Your NotesMake notes in your own schedule.� The first day after scheduling, confirm that the programs ran as scheduled.� The first day after scheduling, confirm that the backup of the PDB was created
and that it is identical to (or can be used to regenerate a structure that is identicalto) the PDB.
Unless you have a strong preference for leaving the backup step after theprocess and reduce steps, in the process, reduce, and backup job move the backupstep to precede the process and reduce steps.
� Every day, check the logs from the nightly jobs for error messages, if any. Youmight also want to check for warning messages.
If you need to restart a nightly job,� For UNIX or Windows: See the restart.txt file that the QuickStart Wizard
generated. Also see “Appendix 1: Recovery Procedures” in the SAS ITResource Management macro reference documentation.
� For z/OS: See the $RESTART member that the QuickStart Wizard generated.Also see “Appendix 1: Recovery Procedures” in the SAS IT ResourceManagement macro reference documentation.
� In a step above, you updated the site library’s list of holidays so that it is correctfor your site through some date in the future. When that date is reached, SAS ITResource Management will write a reminder to the log during theprocess-and-reduce run. But in case you miss seeing that reminder, you mightwant to add an item to your own schedule to update the list again before that lastdate.
For more information about the holiday list, see “Viewing/Editing Your ActiveSite Library’s List of Holidays” on page 286.
� In a step above, you set the workshift schedule in the PDB. If your site hasseasonal shift changes (for example, summer hours), you might want to add an
114 Optional Customization � Chapter 7
item to your own schedule to update the workshift schedule at the seasonalchanges.
For more information about the workshift schedule, see “Viewing/Editing YourActive PDB’s Work Shift Schedule” on page 334.
� You might want to schedule a periodic check of table and variable usage. If data isbeing kept for any variables or tables that are not being used for reporting, youmight want to set the variables’ or tables’ Kept status to No so that you can savespace in the PDB and time during processing and reduction.
� You might want to schedule a periodic check of space usage.For more information about space usage, see “Space Usage at a Level in a
Table” on page 349.
� If you have any formats that are based on changeable information (for example,formats related to network configuration or storage devices), you might want toschedule a periodic review of the formats.
For more information about SAS formats, see SAS help.� At some sites, copies of the demonstration PDBs are used for practice or testing —
for example, testing what a new report would look like, before a production PDBhas enough data to generate a report.
At some sites, a demonstration PDB is used when the active PDB must be someother PDB than the one that is to be used. (Some operations cannot run on theactive PDB.)
At other sites, one or more of the demonstration PDBs are never used.
You can delete one or more of the demonstration PDBs if you have no need forthem. Remember, though, that at least one PDB (demonstration PDB orsite-created PDB) is required to start SAS IT Resource Management. For moreinformation, see “Deleting a PDB” on page 315.
Optional CustomizationAfter enough data has been collected that most of the reports are fully populated
(that is, they have data over the time span of the report), you might or might not wantto make other customizations for your site.
� You might want to adjust the report definitions and rule definitions.
For example, you might want to add, change, or delete definitions.For more information about report definitions, see “Using the Manage Report
Definitions Tool” on page 468. For more information about rule definitions, see“Using the Perform Exception Analysis Tool” on page 468.
� You might want to adjust static files in the report structure(s).
A report gallery’s static files are the files that are not cleared when the reportsin the gallery are cleared by %CPWEBINI, %CPMANRPT, or the WEBCLR=parameter.
For information about customizing these files, see “Customizing a ReportGallery’s Static Files” on page 562.
� You might want to age out old reports instead of deleting old reports.Where you want to age out old reports, replace the calls to the %CPWEBINI
macro with calls to the %CPMANRPT macro, and make the corresponding changesto the OUTLOC= parameter values in the macro calls that generate reports.
For more information about %CPWEBINI, see the topic %CPWEBINI in theSAS IT Resource Management macro reference documentation. For more

Setup Case 4 � Optional Customization 115
information about %CPMANRPT, see the topic %CPMANRPT in the SAS ITResource Management macro reference documentation.
� You might want to modify the report structure.Typically, the report structure is not customized. However,� you can add new paths in the report structure. If you add new paths, be very
careful to specify end-of-path locations that either do not currently exist or, ifthey exist, are empty and not used for any other purpose.
� where you use %CPWEBINI to clear reports, you can remove or revise theexisting paths in the report structure.
� where you use %CPMANRPT to age out reports, you can adjust a few aspectsof the report structure: change the titles, and change the text (but notdirectory names) that is displayed on existing paths. You cannot remove orrevise existing paths in the report structure (unless you are willing to risklosing all the reports on those paths).
To customize the report structure:� For UNIX or Windows: Edit the program that you used to create the report
structure.Next, where you are using %CPWEBINI to clear reports, you can delete
those paths in the report structure if you want to remove the paths or if youintend to revise them; otherwise, do not delete the existing paths in thereport structure. Submit the revised structure-creation program to SAS.
Finally, revise the report-generation program to generate reports to theappropriate destinations in the report structure, as necessary.
� For z/OS with a directory-based report structure: Edit the job that you usedto create the report structure based on a z/OS UNIX File System.
Next, where you are using %CPWEBINI to clear reports, you can deletethose paths in the report structure if you want to remove the paths or if youintend to revise them; otherwise, do not delete the existing paths in thereport structure. Submit the revised structure-creation job.
Finally, revise the report-generation program to generate reports to theappropriate destinations in the revised report structure, as necessary.
� For z/OS with a PDS-based report structure (and a correspondingdirectory-based report structure on a UNIX or Windows system): Edit the jobthat you used to create the PDS-based report structure. Also, edit the FTPjob, as necessary.
Next, where you are using %CPWEBINI to clear reports, you can deletethose paths in the report structures if you want to remove the paths or if youintend to revise them; otherwise, do not delete the existing paths in thereport structures. Submit the revised structure-creation job. Then, run therevised FTP job.
Finally, revise the report-generation program to generate reports to theappropriate destinations in the PDS-based report structure, as necessary.(The nightly FTP job will make the corresponding changes to thedirectory-based revised report structure.)
Note: To edit an entry in a SAS catalog, you can use the SAS Program Editorwindow. For example, suppose that you want to copy the entry inADMIN.catalog-name.entry-name.entry-type, edit it, and then save it toADMIN.catalog-name.entry-name.entry-type, which is in the ADMIN library inyour active PDB. Here are the steps:

116 Optional Customization � Chapter 7
1 Open the SAS Program Editor window.2 In the command field, type the following command and press ENTER:
copy ADMIN.catalog-name.entry-name.entry-type
3 The entry appears.4 Save the original version under a different name, in case you want to refer to
it later.You can save the entry to any library that exists and has a libref that is
defined with write access. (If the library exists and a libref is not currentlydefined or is defined with readonly access, you can define a libref by using theSAS LIBNAME statement.)
In order to write to ADMIN, if the PDB is activated with read-only access,then activate it with write access.
In the command field, type a command like the following one and pressENTER:
save ADMIN.catalog-name.another-entry-name.entry-type
where another-entry-name is an existing entry or an entry that is to becreated by this command.
5 Edit the entry.6 Save the edited entry.
In the command field, type the following command and press ENTER:
save ADMIN.catalog-name.entry-name.entry-type
If the PDB was activated initially with read-only access, activate it againwith read-only access.
7 Close or iconize the SAS Program Editor window.
�
For more information about grouping reports in the tree, see the section“Grouping Reports in a Web Gallery” in the chapter “Setup: Introduction” in theSAS IT Resource Management User’s Guide. For more information about the%CPHTREE macro, see the %CPHTREE topic in the SAS IT ResourceManagement macro reference documentation. For more information about the%CMFTPSND macro, see the topic %CMFTPSND in the SAS IT ResourceManagement macro reference documentation. For more information aboutsubmitting a SAS program, see “Working with the Interface for Batch Mode” onpage 18.
� You might want to adjust the table definitions and the variable definitions.For more information about tables, see “Overview of Tables” on page 353. For
more information about variables, see “Overview of Variables” on page 378.� You might want to adjust the PDB properties and site library properties.
For more information about PDBs, see “Overview of Whole PDBs” on page 296.For more information about site libraries, see “Overview of Site Libraries” on page270.
� You might want to review how checking for duplicate data is handled.For more information about checking for duplicate data, see “Appendix 4:
Working with Duplicate Data” in the SAS IT Resource Management macroreference documentation.
� If you want to change some aspect of the process step and you do not see anysupplied way of making that change, you might want to read about process exits.

Setup Case 4 � Optional Package 117
For more information about process exits, see “Overview of Using Process Exits”on page 442.
� You might want to combine or split PDBs.For information about combining PDBs, see “Combining PDBs” on page 304.
For information about splitting PDBs, see “Splitting One PDB into Two PDBs” onpage 320.
� If your users will use the SAS IT Resource Management client GUI to report ondata in a PDB on a SAS IT Resource Management server host, make a list of theinformation that the users will need in order to create a remote server profile forthat host.
For more information, see “Creating a Remote Server Profile” on page 574.
CleanupDelete the PDB and related structures that the QuickStart Wizard created.� For the UNIX or Windows QuickStart Wizard PDB: Delete the QuickStart
Wizard’s PDB, including the qs directory (and its subdirectories) that is related tothe QuickStart Wizard’s PDB.
� For the QuickStart Wizard PDB that is located in a z/OS environment: Delete theQuickStart Wizard’s PDB, including any PDSs with .QS as a high-level qualifierand any directories with /qs in the directory path that are related to theQuickStart Wizard’s PDB.
Optional PackageIf you want to package and install the collector-support that you have created, see
“Creating and Installing a Collector Support Package” on page 426. Also see the topic%CPPKGCOL in the SAS IT Resource Management macro reference documentation,the topic %CPRPTPKG in the SAS IT Resource Management macro referencedocumentation, and the topic %CPINSPKG in the SAS IT Resource Management macroreference documentation.

118
119
C H A P T E R
8Setup Case 5
Setup Case 5 119Overview of Setup Case 5 119
The QuickStart Wizard 120
The Raw Data 120
The PDB and Site Library 120
The Tables and Variables 120The Process-and-Reduce Program 122
The Report Structure 123
The Report Program(s) 125
The Job Schedule 126
Your Notes 126
Optional Customization 126Cleanup 128
Setup Case 5
Overview of Setup Case 5For general information about setting up the server, see “Setting Up the Server, with
Setup Cases” on page 38. That topic also identifies which setup case applies to yoursituation.
Below are the instructions for setup case 5. For each step, there is an overview of thestep and, after that, the specific directions for the step. Typically, UNIX and Windowshave one or two sets of directions and z/OS has one or two sets of directions. The stepsare in the following order:
1 “The QuickStart Wizard” on page 1202 “The Raw Data” on page 1203 “The PDB and Site Library” on page 1204 “The Tables and Variables” on page 1205 “The Process-and-Reduce Program” on page 1226 “The Report Structure” on page 1237 “The Report Program(s)” on page 1258 “The Job Schedule” on page 1269 “Your Notes” on page 12610 “Optional Customization” on page 12611 “Cleanup” on page 128.

120 The QuickStart Wizard � Chapter 8
The QuickStart WizardIt is assumed that you already worked through setup case 1 or 2 for the part of the
data to which setup case 1 or 2 is applicable.In setup case 5, you will modify the structures and programs from setup case 1 or 2
so they also cover the remaining data.
The Raw DataStart to collect raw data, if you do not already collect raw data.If you are not already collecting raw data from the additional MIB, object, class,
model type, or schema file, start collecting the data now.For more information, see “Collector-Specific Setup Documentation” on page 12. Also,
see the documentation from the vendor of your data collector or data source.
The PDB and Site LibraryYou already have a PDB from setup case 1 or 2. In setup case 1 or 2, you already
customized the PDB and site library.
The Tables and VariablesIn the PDB from setup case 1 or 2, create one or more additional tables for the data
from the additional MIB, object, class, model type, or schema file, and check thedefinitions.
1 Generate a file that contains table and variable definitions.To generate the file, see the following instructions in the SAS IT Resource
Management Server Setup Guide. (For more information about the Server SetupGuide, see “Collector-Specific Setup Documentation” on page 12.)
� For Aprisma SPECTRUM: In the SAS IT Resource Management Server SetupGuide, see “Aprisma SPECTRUM Appendix 4: Defining SAS IT ResourceManagement Tables for SPECTRUM Data."
� For DSI: In the SAS IT Resource Management Server Setup Guide, seeSection 1, Task 3: Action 1 “Create Your Test PDB," and select Supplied �UNIX � MWA DSI
� For HP OpenView Network Node Manager: See “Using the MIB to DictionaryCompiler” on page 129.
� For NTSMF: In the SAS IT Resource Management Server Setup Guide, see“NTSMF Appendix 2: Using GENERATE SOURCE to Construct PATROLand NTSMF Tables."
� For PATROL: In the SAS IT Resource Management Server Setup Guide, see“PATROL Appendix 2: Using GENERATE SOURCE to Construct PATROLand NTSMF Tables."
� For SunNet Manager or Enterprise Manager: In the SAS IT ResourceManagement Server Setup Guide, see “SunNet Manager and EnterpriseManager Appendix 2: Defining Tables from Your Own Schema Files."
2 In the generated file, review and adjust the one or more blocks of definitions.A block of definitions corresponds to a table. In each block, there is a CREATE
TABLE control statement, CREATE VARIABLE control statements, and anUPDATE TABLE control statement.
Setup Case 5 � The Tables and Variables 121
If the block corresponds to an existing table, delete the block. (If the block’sCREATE TABLE control statement has a value for its EXTNAME= parameterthat matches the value for the External Name of a table in your PDB, the blockcorresponds to that table. For more information about viewing the value ofExternal Name in a table in your PDB, see “Viewing/Editing a Table” on page 364.)
If the block does not correspond to an existing table, review the controlstatements. In a text editor modify the control statements as necessary, and addany CREATE DERIVED or CREATE FORMULA control statements to the block,as necessary. In any given block, consider the following:
� In the CREATE TABLE control statement, you might want to change thetable’s name, label, and/or description. Also review the other parameters.
For more information about the CREATE TABLE control statement, seethe topic CREATE TABLE in the SAS IT Resource Management macroreference documentation.
� In the CREATE VARIABLE control statements, you might want to changethe variables’ names, labels, and/or descriptions. Also review the otherparameters.
For more information about the CREATE VARIABLE control statement,see the topic CREATE VARIABLE in the SAS IT Resource Managementmacro reference documentation.
� After the CREATE VARIABLE control statements, add a CREATE DERIVEDcontrol statement for each derived variable that you want to have in thetable, if any. The CREATE DERIVED control statements can be in any order,but alphabetical order is convenient.
For more information about the CREATE DERIVED control statement,see the topic CREATE DERIVED in the SAS IT Resource Management macroreference documentation.
� In the UPDATE TABLE control statement, change the table’s name (if youchanged it in the CREATE TABLE control statement). You might want torevise the table’s age limits. Also review other parameters.
For more information about the UPDATE TABLE control statement, seethe topic UPDATE TABLE in the SAS IT Resource Management macroreference documentation.
Note: If you are considering revisions to the BY and CLASS lists for thisdata collector or data source, first see “Restrictions on Modifications of BYVariables Lists” on page 348. �
� After the UPDATE TABLE control statement, add a CREATE FORMULAcontrol statement for each formula variable that you want to associate withthe table. The CREATE FORMULA control statements can be in any order,but alphabetical order is convenient.
For more information about the CREATE FORMULA control statement,see the topic CREATE FORMULA in the SAS IT Resource Managementmacro reference documentation.
Note: If a derived variable depends on another derived variable and/or if aformula variable depends on another formula variable, be sure to read theinformation about dependencies in the documentation for the CREATE DERIVEDand/or CREATE FORMULA control statements. �
3 Create a program.This SAS program calls (in this order) the %CPSTART macro (to invoke SAS IT
Resource Management) and the %CPDDUTL macro (to run the control statementsthat define the tables and their variables.)

122 The Process-and-Reduce Program � Chapter 8
� Copy the call to the %CPSTART macro from one of the production programsthat you scheduled in setup case 1 or 2.
For more information about the %CPSTART macro, see the topic%CPSTART in the SAS IT Resource Management macro referencedocumentation.
� In the call to the %CPDDUTL macro,
%cpddutl(filename=’location-of-control-statements’);
specify the name of the file containing the table and variable controlstatements. %CPDDUTL applies the control statements in the file to theactive PDB.
For more information about the %CPDDUTL macro, see “Chapter 4:Data Dictionary Macro and Control Statements” in the SAS IT ResourceManagement macro reference documentation.
4 Run the program.
Submit the program to SAS.
For more information about submitting a SAS program, see “Working with theInterface for Batch Mode” on page 18.
5 The PDB’s new table and variable definitions now exist.
If you want to browse them, you can. For more information about viewing thedefinition of a table, see “Viewing/Editing a Table” on page 364. For moreinformation about viewing the definition of a regular variable, see “Creating/Editing/Viewing a Regular Variable” on page 394. For more information aboutviewing the definition of a derived variable, see “Creating/Editing/Viewing aDerived Variable” on page 381. For more information about viewing the definitionof a formula variable, see “Creating/Editing/Viewing a Formula Variable” on page388.
The Process-and-Reduce ProgramModify the nightly process-and-reduce program that you created in setup case 1 or 2,
and test the program.
1 Modify the program.
In the table list in the call to the %CxPROCES macro (where x = M, P, S, or W),comment out the names of the supplied tables from setup case 1 or 2 and add thenames of the tables that you created in the step above. (To comment somethingout, insert comment delimiters, /* before it and */ after it.)
2 When you have collected at least one day’s worth of raw data for the tables thatyou created in this setup case, run the program.
3 The data in the created tables corresponds to the raw data for this setup case.
If you want to browse the data in the PDB, see “Viewing Data Values” on page420.
4 Modify the program again.
Remove the comment delimiters from the names of the supplied tables fromsetup case 2. As a result, the table list should have the names of the suppliedtables from setup case 1 or 2 and should have the names of the tables that werecreated in this setup case.

Setup Case 5 � The Report Structure 123
The Report StructureModify the report structure that you created in setup case 1 or 2.1 Create new report definitions for the data in the table(s) that you created in this
setup case, and run those report definitions.� In the SAS IT Resource Management server GUI for UNIX or Windows: On
the main window’s Reporting tab, select Manage Report Definitions �File � New Report Definition
On the right side of the window, create a report definition for the data inthe table(s) that you created above. Select Run to generate a report based onthe report definition. In the report, the data corresponds to the data in thePDB. (For more information about creating and running a report definition,see “Using the Manage Report Definitions Tool” on page 468. If you want tobrowse the data in the PDB, see “Viewing Data Values” on page 420.)
Next, select File � Save Report Definition and complete that path tosave the report definition in its interactive form.
Optionally, create and save other report definitions for the data in thetable that you created.
� For z/OS: In the SAS IT Resource Management server GUI for z/OS, from themain menu select Reports � Custom Rpts � Design Repts
Select the type of report that you want to create (at this point, select onlyfrom the seven types at the top of the list). The type’s main report definitionwindow opens. Select the level that you want to use, select the icon in theupper-left corner to select the table that you want to use, and specify allother parameters that you want to use. Then select Actions � Run Report
In the report that is generated, the data corresponds to the data in thePDB. (For more information about creating and running a report definition,in the type’s main report-definition window, select Help. If you want tobrowse the data in the PDB, see “Viewing Data Values” on page 420.)
Next, in the main window for the report definition, select File � SaveDefinition and complete the path to save the report definition in itsinteractive form.
Optionally, create and save other report definitions for the data in thecreated table(s).
For information about report definitions in the SAS IT Resource Managementclient GUI, see “Using the Manage Report Definitions Tool” on page 468.
In a later step, you will need the names of the report definitions that you wantto use. Notice that the names are available in two places: in the list in the GUI,and in the lower-left corner of each report.
2 Decide on report groupings for the new reports.Report groupings usually make a particular report easier to find. Also, report
groupings usually make a particular report easier to interpret, by making it easyto compare it with related reports in the same group.
For more information about report groupings, see the section “Grouping Reportsin a Web Gallery” in the chapter “Setup: Introduction” in the SAS IT ResourceManagement User’s Guide.
Note: You can decide to generate the new reports to the existing report groupingsthat are provided from setup case 1 or 2 or to new report groupings, and to theexisting end-of-path directories from setup case 1 or 2 or to new end-of-pathdirectories. �

124 The Report Structure � Chapter 8
3 Unless you decided to use only the existing end-of-path directories, revise theprogram that created the report structure in setup case 1 or 2. (At the end ofsetup case 1 or 2, you might have modified this program. Start from the mostrecent version of the program.)
� For UNIX or Windows: Edit the file to add any new paths that you decided touse for this setup case. Be careful not to change the end-of-path directoriesfor existing paths. Also be careful, for any new end-of-path locations, tospecify directories that do not exist or directories that exist but are not in usefor any other purpose.
� For z/OS with a directory-based report structure: Edit the job to add any newpaths that you decided to use for this setup case. Be careful not to change theend-of-path directories for existing paths. Also be careful, for any newend-of-path locations, to specify directories that do not exist or directoriesthat exist but are not in use for any other purpose.
� For z/OS with a PDS-based report structure (and a correspondingdirectory-based report structure on a UNIX or Windows system): Edit the jobto add any new paths that you decided to use for this setup case. Be carefulnot to change the end-of-path PDSs for existing paths. Also be careful, forany new end-of-path locations, to specify PDSs that do not exist or PDSs thatexist but are not in use for any other purpose.
Make the corresponding edits, if any, to the FTP job.
The file or job calls the %CPHTREE macro and %CPENTCPY macro, and cancall the %CMFTPSND macro. For more information about the %CPHTREE macro,see the topic %CPHTREE in the SAS IT Resource Management macro referencedocumentation. For more information about the %CPENTCPY macro, see the topic%CPENTCPY in the SAS IT Resource Management macro referencedocumentation. For more information about the %CMFTPSND macro, see thetopic %CMFTPSND in the SAS IT Resource Management macro referencedocumentation.
4 Run the program.� For UNIX or Windows: Run the program that creates the directory-based
report structure.� For z/OS with a directory-based report structure: Run the program that
creates the directory-based report structure.� For z/OS with a PDS-based report structure (and a corresponding
directory-based report structure on a UNIX or Windows system): Run theprogram that creates the PDS-based report structure. Then, optionally runthe program that FTPs the report structure to a UNIX or Windows system.
For more information about submitting a SAS program, see “Working with theInterface for Batch Mode” on page 18.
5 Check the report structure.Notice that the report structure is, physically, relatively flat.� For UNIX or Windows: Check that the directories have been created or added
in the location and with the names that you specified.Also, point your Web browser to the file welcome.htm in the “super”
directory, and check that the left frame works as you intended. (At this point,no new reports are available in the right frame.)
� For z/OS with a directory-based report structure: Check that the directorieshave been created in the location and with the names that you specified.
Also, point your Web browser to the file welcome.htm in the “super”directory, and check that the left frame works as you intended. (At this point,no reports are available in the right frame.)

Setup Case 5 � The Report Program(s) 125
� For z/OS with a PDS-based report structure (and a correspondingdirectory-based report structure on a UNIX or Windows system): Check thatthe PDSs have been created in the location and with the names that youspecified.
Also check that the corresponding directories have been created in thelocation and with the names that you specified.
Also, point your Web browser to the file welcome.htm in the “super”directory, and check that the left frame works as you intended. (At this point,no reports are available in the right frame.)
The Report Program(s)Revise the nightly report-generation program from setup case 1 or 2, and test the
program.1 Modify the program.
Use calls to the %CPRUNRPT macro to generate the new reports to theappropriate report groups and end-of-path locations in the revised report structure.
Remember to call the %CPWEBINI macro (if the program uses %CPWEBINI)and/or the %CPMANRPT macro (if the program uses %CPMANRPT) to clear thereports at a given end-of-path location before making one or more calls to%CPRUNRPT to generate reports for report groups at that end-of-path location.
For more information about the %CPWEBINI macro, see the topic %CPWEBINIin the SAS IT Resource Management macro reference documentation. For moreinformation about the %CPMANRPT macro, see the topic %CPMANRPT in theSAS IT Resource Management macro reference documentation. For moreinformation about the %CPRUNRPT macro, see the topic %CPRUNRPT in theSAS IT Resource Management macro reference documentation.
2 Run the program.� For UNIX or Windows: Run the modified report-generation program.
This program generates reports (and some dynamic files) to thedirectory-based report structure.
� For z/OS with a directory-based report structure: Run the modifiedreport-generation program.
This program generates reports (and some dynamic files) to the reportstructure based on a z/OS UNIX File System.
� For z/OS with a PDS-based report structure (and a correspondingdirectory-based report structure on a UNIX or Windows system): Run themodified report-generation program.
This program generates reports (and some dynamic files) to the PDS-basedreport structure.
Then run the modified FTP program.This program FTPs the reports from the PDS-based report structure on z/
OS to a directory-based report structure on a UNIX or Windows system.
3 Check the reports.Point your Web browser to the file welcome.htm in the “super” directory. Check
that the reports from setup case 1 or 2 and the reports from this setup case are inthe report groups and the end-of-path locations that you intended.
Graphic reports display as “thumbnail” sketches. To view a full-size version of areport, click on its thumbnail sketch. To return the report to thumbnail size, selectShrink.

126 The Job Schedule � Chapter 8
4 Set permissions so that “readonly” access to the modified directory-based reportstructure (or execute access, if appropriate for the report mechanisms) is availableto you and to anyone else who needs to view the reports.
For more information about access rights, see “Actions and Access RightsRequired” on page 44.
The Job ScheduleThe nightly programs are already scheduled. (Typically the jobs run once a day, at
night. However, you can schedule them to run more or less often than once a day, andat whatever time(s) work best for your site.) Now the nightly programs have beenmodified to cover both setup case 1 or 2, and this setup case.
Your NotesMake notes in your own schedule.
� The first day after the revisions, confirm that the scheduled programs ran asexpected.
Optional CustomizationAfter enough data has been collected that most of the reports are fully populated
(that is, they have data over the time span of the report), you might or might not wantto make other customizations for your site.
� You might want to adjust the report definitions and rule definitions.
For example, you might want to add, change, or delete definitions.
For more information about report definitions, see “Using the Manage ReportDefinitions Tool” on page 468. For more information about rule definitions, see“Using the Perform Exception Analysis Tool” on page 468.
� You might want to adjust static files in the report structure(s).
A report gallery’s static files are the files that are not cleared when the reportsin the gallery are cleared by %CPWEBINI, %CPMANRPT, or the WEBCLR=parameter.
For information about customizing these files, see “Customizing a ReportGallery’s Static Files” on page 562.
� You might want to age out old reports instead of deleting old reports.
Where you want to age out old reports, replace the calls to the %CPWEBINImacro with calls to the %CPMANRPT macro, and make the corresponding changesto the OUTLOC= parameter values in the macro calls that generate reports.
For more information about %CPWEBINI, see the topic %CPWEBINI in theSAS IT Resource Management macro reference documentation. For moreinformation about %CPMANRPT, see the topic %CPMANRPT in the SAS ITResource Management macro reference documentation.
� You might want to modify the report structure.
Typically, the report structure is not customized. However,
� you can add new paths in the report structure. If you add new paths, be verycareful to specify end-of-path locations that either do not currently exist or, ifthey exist, are empty and not used for any other purpose.

Setup Case 5 � Optional Customization 127
� where you use %CPWEBINI to clear reports, you can remove or revise theexisting paths in the report structure.
� where you use %CPMANRPT to age out reports, you can adjust a few aspectsof the report structure: change the titles, and change the text (but notdirectory names) that is displayed on existing paths. You cannot remove orrevise existing paths in the report structure (unless you are willing to risklosing all the reports on those paths).
To customize the report structure:
� For UNIX or Windows: Edit the most recent version of the program thatcreates the report structure.
Next, where you are using %CPWEBINI to clear reports, you can deletethose paths in the report structure if you want to remove the paths or if youintend to revise them; otherwise, do not delete the existing paths in thereport structure. Submit the revised structure-creation program to SAS.
Finally, revise the report-generation program to generate reports to theappropriate destinations in the revised report structure, as necessary.
� For z/OS with a directory-based report structure: Edit the most recentversion of the program that creates the report structure.
Next, where you are using %CPWEBINI to clear reports, you can deletethose paths in the report structure if you want to remove the paths or if youintend to revise them; otherwise, do not delete the existing paths in thereport structure. Submit the xRPTSTR job in order to create the new reportstructure.
Finally, revise the xREPORT job to generate reports to the appropriatedestinations in the revised report structure based on a z/OS UNIX FileSystem or based on a PDS, as necessary.
� For z/OS with a PDS-based report structure (and a correspondingdirectory-based report structure on a UNIX or Windows system): Edit themost recent version of the program that creates the report structure. Thenmake the corresponding edits in the FTP program, as necessary.
Next, where you are using %CPWEBINI to clear reports, you can deletethose paths in the report structures if you want to remove the paths or if youintend to revise them; otherwise, do not delete the existing paths in thereport structures. Submit the xRPTSTR job and then the xFTPHTML job, inorder to create the new report structures.
Finally, revise the xREPORT job to generate reports to the appropriatedestinations in the PDS-based revised report structure, as necessary. (Thenightly xFTPHTML job will FTP the reports to the directory-based reportstructure.)
Note: To edit an entry in a SAS catalog, you can use the SAS Program Editorwindow. For example, suppose you want to copy the entry inADMIN.catalog-name.entry-name.entry-type, edit it, and then save it toADMIN.catalog-name.entry-name.entry-type, which is in the ADMIN library inyour active PDB. Here are the steps:
1 Open the SAS Program Editor window.
2 In the command field, type the following command and press ENTER:
copy ADMIN.catalog-name.entry-name.entry-type
3 The entry appears.

128 Cleanup � Chapter 8
4 Save the original version under a different name, in case you want to refer toit later.
You can save the entry to any library that exists and has a libref that isdefined with write access. (If the library exists and a libref is not currentlydefined or is defined with read-only access, you can define a libref by usingthe SAS LIBNAME statement.)
In order to write to ADMIN, if the PDB is activated with read-only access,then activate it with write access.
In the command field, type a command like the following one and pressENTER:
save ADMIN.catalog-name.another-entry-name.entry-type
where another-entry-name is an existing entry or an entry that is to becreated by this command.
5 Edit the entry.6 Save the edited entry.
In the command field, type the following command and press ENTER:
save ADMIN.catalog-name.entry-name.entry-type
If the PDB was activated initially with read-only access, activate it againwith read-only access.
7 Close or iconize the SAS Program Editor window.
�
For more information about grouping reports in the tree, see the section“Grouping Reports in a Web Gallery” in the chapter “Setup: Introduction” in theSAS IT Resource Management User’s Guide. For more information about the%CPHTREE macro, see the %CPHTREE topic in the SAS IT ResourceManagement macro reference documentation. For more information aboutsubmitting a SAS program, see “Working with the Interface for Batch Mode” onpage 18.
� You might want to adjust the table definitions and the variable definitions.For more information about tables, see “Overview of Tables” on page 353. For
more information about variables, see “Overview of Variables” on page 378.� You might want to adjust the PDB properties and site library properties.
For more information about PDBs, see “Overview of Whole PDBs” on page 296.For more information about site libraries, see “Overview of Site Libraries” on page270.
� You might want to review how checking for duplicate data is handled.For more information about checking for duplicate data, see “Appendix 4:
Working with Duplicate Data” in the SAS IT Resource Management macroreference documentation.
CleanupDelete the PDB and related structures that the QuickStart Wizard created.� For the QuickStart Wizard PDB that is located in a UNIX or Windows
environment: Delete the QuickStart Wizard’s PDB, including the qs directory (andits subdirectories) that is related to the QuickStart Wizard’s PDB.
� For the QuickStart Wizard PDB that is located in a z/OS environment: Delete theQuickStart Wizard’s PDB, including any PDSs with .QS as a high-level qualifierand any directories with /qs in the directory path that are related to theQuickStart Wizard’s PDB.

129
C H A P T E R
9The MIB to Dictionary Compiler
The MIB to Dictionary Compiler 129Using the MIB to Dictionary Compiler 129
Introduction 129
Prerequisites 130
Actions 130
The MIB to Dictionary Compiler
Using the MIB to Dictionary Compiler
IntroductionIn the master data dictionary, SAS IT Resource Management supplies table and
variable definitions for the data from many collectors. For that data, you can use thesupplied table and variable definitions (after adding them from the master datadictionary to your PDB). For other data, you can create the table and variabledefinitions in your PDB by running the SAS IT Resource Management %CPDDUTLmacro with %CPDDUTL control statements that define the tables and variables.
You can write the %CPDDUTL control statements yourself. But for SNMP data (allof which is described with a MIB), there is an easier way to generate the necessarycontrol statements that add the MIB tables and variables to your PDB. The SAS ITResource Management mib2dict compiler takes as input any SNMP V1 or V2 MIB andproduces as output %CPDDUTL control statements that can be read directly by the%CPDDUTL macro to define SAS IT Resource Management tables and variables. Themib2dict compiler can optionally produce SAS statements for input to the SASFORMAT procedure so that you can add formats for MIB enumeration types.
As an example, this chapter walks you through the steps that are needed to createtable and variable definitions for MIB-II data. The same steps apply to any MIB. Weuse MIB-II as an example because of its simplicity and familiarity. If you want to useMIB-II tables in your PDB, you do not actually need to use mib2dict because all theMIB-II tables are included in the master data dictionary that is shipped with SAS ITResource Management. (MIB-II table names begin with the character M.)
Note: For more information about the %CPDDUTL macro, see the macro referencedocumentation for SAS IT Resource Management. �
Note: If you need to know more about the MIB for one of your hardware devices,check the hardware documentation or call the manufacturer of the device. There areproprietary MIBs and public domain, Internet-standard MIBs.

130 Using the MIB to Dictionary Compiler � Chapter 9
If the MIB is a proprietary MIB, the hardware installation procedure probably copiedit to a directory at your site and/or you can probably find a copy on the manufacturer’sWeb page. �
For information about the context of using the MIB to Dictionary Compiler, see“Overview of Setup Case 5” on page 119.
Prerequisites
� The SAS IT Resource Management server must be installed on your SAS hostmachine.
� The SAS IT Resource Management server software must be running, and the PDBto which you want to add the tables must be the active PDB.
� You must be familiar with the mib2dict man page.To view the man page, execute the following on UNIX (assuming that SAS has
been installed in /usr/local/sas):
cd /usr/local/sas/utilities/man/man1nroff -man mib2dict.1 | more
� The MIB that you want to compile must conform to SNMPv1 or SNMPv2standards.
In this example, we will use rfc1213.mib, which is a file that contains thedefinition of MIB-II. If you have installed SAS and the SAS IT ResourceManagement server in /usr/local/sas, you can find a copy of rfc1213.mib in!sasroot/saspgm/cpe/mibs/ on UNIX, or !sasroot\cpe\mibs on Windows.
Actions
1 Compile the MIB.In this action, we will compile rfc1213.mib and produce two output files:
rfc1213.ddu and rfc1213.sas. The .ddu file will contain the %CPDDUTLcontrol statements that are needed by the %CPDDUTL macro. The .sas file willcontain the PROC FORMAT statements that are needed to create the formats forenumeration types.
To compile the MIB, execute the following command.
Note: This code assumes that SAS has been installed in !sasroot and thatyour PATH includes !sasroot/sas/utilities/bin/. �
On UNIX:
mib2dict -i rfc1213.mib -o rfc1213.ddu -f rfc1213.sas -c hp-ov
On Windows:
mib2dict.exe -i rfc1213.mib -o rfc1213.ddu -f rfc1213.sas -c hp-ov
where� the -i option specifies rfc1213.mib as the input file to be compiled. If you
do not specify -i, then mib2dict will expect input from stdin.� the -o option specifies rfc1213.ddu as the output file to which %CPDDUTL
control statements are printed. If you do not specify -o, %CPDDUTL controlstatements will print to stdout.
The MIB to Dictionary Compiler � Using the MIB to Dictionary Compiler 131
� the -f option specifies that rfc1213.sas is to receive the SAS statements forPROC FORMAT. If you do not specify -f, then no PROC FORMATstatements are written to rfc1213.sas.
Note: When you specify the -f option, any %CPDDUTL CREATEVARIABLE control statements that are generated by mib2dict have aFORMAT= parameter that is set to the proper SAS format, as defined inrfc1213.sas. In a later action, you will execute rfc1213.sas. If you do notexecute rfc1213.sas, the formats will not exist and you will receive formaterrors when a value that uses the nonexistent format is to be displayed. �
� the -c option specifies that HP-OV is the collector to use. If you do notspecify -c, the collector will be set to an empty string.
Note: When you specify the -c option, any %CPDDUTL CREATE TABLEcontrol statements that are generated by mib2dict will have aCOLLECTOR= parameter that is set to HP-OV. In this example, we usehp-ov because we plan to use HP OpenView Network Node Manager or IBMTivoli NetView for AIX to collect the SNMP data. You can use any collectorsupported by SAS IT Resource Management that can collect SNMP data. Or,if you are logging SNMP data in an unsupported format, you can use -cgeneric and use the SAS IT Resource Management Generic CollectorFacility to read the raw data. �
2 Review, and revise if necessary, the resulting %CPDDUTL control statements.
Although mib2dict is designed to create %CPDDUTL control statements thatcan be directly processed by the %CPDDUTL macro, there are circumstances inwhich you might want to edit the control statements before you use them:
� There might be tables or variables that were in the MIB but that you do notwant to add to your PDB.
If this is the case, prior to executing the %CPDDUTL macro you cansimply delete the %CPDDUTL control statements that define the tables orvariables that you do not want.
To delete an entire table, look for the CREATE TABLE statement anddelete everything up to the next CREATE TABLE statement.
To delete a variable from a table, simply delete everything from CREATEVARIABLE up to and including the semicolon that ends the statement.
If you delete a variable from a table but you do not delete the entiretable, be sure that the variable that you deleted is not in the table’s BYVARSor CLASSVARS lists. In particular, do not delete MACHINE, HOUR, orSHIFT because these variables are always on the BYVARS and CLASSVARSlists. For more information about the BY and CLASS variables lists, see“Specifying BY or CLASS Variables for a Level in a Table” on page 339.
� There might be some SAS IT Resource Management table or variable namesthat you want to change.
Although mib2dict can squeeze long MIB table and variable namesdown to six-character names for the PDB tables and seven-character namesfor the PDB variables, the resulting names do not always look mnemonic.
So that users of your PDB can read the names more easily, you canmodify the PDB table and variable names in the file to which the%CPDDUTL control statements were written. For the naming conventions ofuser-defined tables and variables, see “Naming Conventions for UNIX andWindows Tables and Variables” on page 374.
3 Optionally, create formats for MIB enumeration types.

132 Using the MIB to Dictionary Compiler � Chapter 9
If you used the -f rfc1213.sas option when you ran mib2dict, then you needto execute rfc1213.sas. This SAS program executes the SAS FORMATprocedure, which creates the new formats and installs them in the active PDB’sDICTLIB.CPFMTS catalog.
If your SAS Program Editor window has pull-down menus, select File � Open� locate rfc1213.sas � Open
Otherwise, type include rfc1213.sas on the command line and press ENTERor RETURN. Then, select Locals � Submit
Otherwise, type SUBMIT on the command line and press ENTER or RETURN.4 Run the %CPDDUTL macro to create the table and variable definitions in your
PDB.In the body of the SAS Program Editor window, type
%cpddutl(filename=’rfc1213.ddu’);
Then if your SAS Program Editor window has pull-down menus, select Locals� Submit
Otherwise, type SUBMIT on the command line and press ENTER or RETURN.%CPDDUTL creates the table and variable definitions in your PDB.
5 You are now ready to process raw data into your new PDB.In our example, we used the mib2dict -c hp-ov option to specify HP-OV as the
collector. Thus, to process data (for example, for ifTable in the newly builtUIFTBL table), you could submit the following from the SAS Program Editorwindow:
%csproces (/usr/OV/databases/snmpCollect/,UIFTBL,collector=HP-OV);

133
C H A P T E R
10MXG-Based Tables (CMAPP2)
Using MXG-Based Tables (CMAPP2) 133Using MXG-Based Tables (CMAPP2): Introduction 133
Incorporating a Data Source into Your PDB 133
Change Variable KEPT Status 134
Customization Instructions for Each Data Source 135
SMF Data Sources - All Operating Environments 135Non-SMF Data Sources - z/OS Operating Environment 153
Using MXG-Based Tables (CMAPP2)
Using MXG-Based Tables (CMAPP2): IntroductionThis document details any special SAS IT Resource Management or MXG actions
that must be taken when you activate new tables in a PDB. It contains these topics:� “Incorporating a Data Source into Your PDB” on page 133� “Change Variable KEPT Status” on page 134� “Customization Instructions for Each Data Source” on page 135� “SMF Data Sources - All Operating Environments” on page 135� “Non-SMF Data Sources - z/OS Operating Environment” on page 153.
Incorporating a Data Source into Your PDBThe following general instructions can be used to incorporate a data source into your
PDB.1 From the main menu of the SAS IT Resource Management GUI for z/OS, select
Explore � Explore Supplied Tables to see what tables and variables areavailable for the data source and to decide which tables you want to use in thePDB.
2 Customize any necessary IMAC and/or EX members in your MXG SOURCLIBPDS as documented in this chapter and in comments at the beginning of eachmember. The most common customization will be to put the SMF record numberthat you have assigned to the data source into the IMAC member.
It is best to perform the customization of MXG SOURCLIB members bymodifying a copy of the member in MXG.USERID.SOURCLIB and then to ensurethat your %CPSTART macro specifies MXGSRC= to point to bothMXG.USERID.SOURCLIB and MXG.MXG.SOURCLIB. For more information, see

134 Using MXG-Based Tables (CMAPP2): Introduction � Chapter 10
the %CPSTART topic in the SAS IT Resource Management macro referencedocumentation.
3 Select the appropriate tables into your PDB.4 If you are familiar with the data source, set retention period and class variables as
appropriate for each table and begin process and reduction runs.5 If you are not familiar with the data source, process some of the data, probably no
more than one day’s worth, into your PDB and then explore the resulting detaildata sets using the browse, view, or graph options from the Item Actionspull-down menu on the Query PDB data window. You can also use the DesignReports subsystem for this purpose.
Examining the data for potential class variables will help you decide whetherthe data is suitable for reduction, and if so, which variables to specify for classvariables. In general, the default class variable specifications that are shippedwith SAS IT Resource Management represent our best guess based onexamination of sample data or the variable definitions for the table.
The WHERE clause builder, available under “local where” from any DesignReports window, gives you a quick way to examine all the values of a potentialclass variable. Click on VARNAME to select the variable of interest. Then click onthe VALUE(S) button to see the list of values that are found in the data for thatvariable.
Note: Do not use the ampersand (&) to mean AND in WHERE expressions. �Examining the data might also show variables whose content is simply missing
values. Variables like this waste space in the PDB, so you might want to definethem as KEPT=NO. You might also notice other variables whose contents are notof any particular interest or use to you. These also can be set to KEPT=NO. Ofcourse, if a variable becomes relevant later, you can always reset it to KEPT=YES.
Change Variable KEPT StatusSometimes you might be asked to change the status of one or more variables in a
table from KEPT=NO to KEPT=YES or vice versa. This can be done either by using theSAS IT Resource Management GUI for z/OS or through the batch data dictionary utility%CPDDUTL (see the SAS IT Resource Management macro reference documentation fordetails). Input statements to the dictionary utility can reside either in a SAS catalogsource entry or in an OS data set. The following is an example of how to use the batchutility with OS data set input.
Here are the assumptions for the example:� SAS IT Resource Management software root is SAS.ITRM.� PDB to be updated is NEW.PDB.� OS data set containing card-image input for the dictionary utility is
DDUTL.CARDS.� Variables VAR1 and VAR2 are to be set to KEPT=YES in table TABLEA.
These steps are necessary to change the status of a variable:1 Edit DDUTL.CARDS to contain the following lines:
set table name=TABLEA;update variable name=VAR1 kept=YES;update variable name=VAR2 kept=YES;build views name=TABLEA;
Note: Do not include sequence numbers in the data set. �2 Submit the following JCL fragment as part of a SAS batch job:

MXG-Based Tables (CMAPP2) � SMF Data Sources - All Operating Environments 135
//S1 EXEC SAS,%cpstart(system=MVS,mode=BATCH,root=SAS.ITRM,pdb=NEW.PDB,disp=OLD);%cpddutl(filename=’DDUTL.CARDS’);
//
Customization Instructions for Each Data SourceThe format of this section is as follows:
TABLEA - TABLEBData Source: Vendor product that produces these SMF record(s).SAS IT Resource Management status:
� tested - we have tested SAS IT Resource Management with this data� not tested - dictionary entries have been defined for this data, but we have
not used them to process data.
MXG customization: MXG customization necessary to use this data source.MXG Documentation member: none - there is no documentation for this data source
in the MXG SOURCLIB.ADOCxxxx - indicates that documentation can be found in this member in the
SOURCLIB PDB. These ADOC members can be accessed from the main menu inthe SAS IT Resource Management GUI for z/OS by selecting Help � MXGOnline Doc
SAS IT Resource Management customization: Any additional SAS IT ResourceManagement considerations for using this data source.
Note: SMF tables in the range XTY0 through XTY99 that are associated withstandard IBM SMF records that require no MXG or SAS IT Resource Managementcustomization or special considerations will not be listed. MXG documentation forthese SMF records can be found in members ADOCnn, where "nn" is the SMFrecord number.
As to the testing status of these standard SMF tables, the following tables havebeen tested; all others have not:
Table 10.1 SMF Tables That Have Been Tested
XTY26J2 XTY50 XTY73PC
XTY30_V XTY6 XTY74
XTY30_1 XTY70 XTY75
XTY30_4 XTY71 XTY76
XTY30_5 XTY72 XTY8
XTY30OM XTY73 XTY78IO
�
SMF Data Sources - All Operating Environments
XACFAR - XACFVRData Source: CA-ACF2 security system from Computer Associates

136 SMF Data Sources - All Operating Environments � Chapter 10
SAS IT Resource Management status: not testedMXG customization:
IMACACF2 - Specify the SMF record numberMXG Documentation member: noneSAS IT Resource Management customization: none
XBETA0 - XBETA42Data Source: BETA93 report distribution and print management.SAS IT Resource Management status: not testedMXG customization:
IMACBETA - Specify the SMF record numberMXG Documentation member: noneSAS IT Resource Management customization: none
XB1ONCP - XB1ONPGData Source: BGS Best/1 I/O monitorSAS IT Resource Management status: not testedMXG customization:
IMACBGSI - Specify the SMF record numberMXG Documentation member: noneSAS IT Resource Management customization: none
XCAPAG - XCA90Data Source: IBM RMF (TM) Cache ReporterSAS IT Resource Management status: Table XCATY has been tested; the others have
notMXG customization:
IMACACHE - Specify the SMF record number(s)MXG Documentation member: ADOCACHE (3990 records only)SAS IT Resource Management customization: none
XCIACCT - XCIYSTMData Source: CICS (TM) Monitor Facility type 110 SMF record. XCITRAN (CICS
transaction) also contains support for additional variables available throughOMEGAMON (R) for CICS from Candle Corporation. Also, includes support fordata collected by Boole and Babbage’s CICS Manager.
SAS IT Resource Management status: Standard type 110 records have been tested.OMEGAMON CICS extensions and Boole and Babbage extensions have not beentested.
MXG customization:� IMACKEEP - Add the following lines: MACRO _KCICTRN _XKCICTR %
MACRO _LCICTRN WORK.CICSTRAN %
You can add them anywhere between the following statements:%INCLUDE SOURCLIB(IMACOLDV);
and&MACKEEP ;
MXG-Based Tables (CMAPP2) � SMF Data Sources - All Operating Environments 137
� IMACPTF - Read instructions in IMACPTF. This member accommodateschanges to Monitor record format that were introduced by PTFs to olderversions of CICS.
� IMACEXCL - You need to modify this member only if you have made anycustomization to the CICS Monitor record. See instructions in IMACEXCL.
� ANALDB2C and ASUMUOW - SAS IT Resource Management now supportsboth the ANALDB2C and its preferred form, ASUMUOW, in the forms of twotables named XCICDB2 and XUOW. If you have customized ANALDB2C orASUMUOW to create extra variables compared to the MXG default members,please ensure that you have the associated SAS IT Resource Managementvariables marked KEPT=YES in the appropriate data dictionary tables. Toprocess XUOW, you must also modify the IMACUOW MXG member asfollows. Comment out or delete the first definition of the two macros,_NOOBS and _YESOBS, and remove the comment delimiters from the seconddefinition, so that the macros are defined as follows:
MACRO _NOOBS %MACRO _YESOBS %
You need to look at the following members only if you (or another programproduct) make use of user segments in the monitor record.
� IMACICDA - Controls sequence of decoding user segments in the CICSMonitor record. Controls which of the following members are invoked and inwhat order.
� IMACICDL - DL/I counters.� IMACICDU - User counters.� IMACICDB - Optional DBCTL counters in CICS 3.1 and later.� IMACICOB - Optional OMEGAMON DB2 data segment.� IMACICOC - Optional OMEGAMON basic data segment.� IMACICOL - Optional OMEGAMON DL/I data segment.� IMACICUS - Additional User Data decoding and Hogan data decoding.
MXG Documentation member: ADOC110SAS IT Resource Management customization:
XCITRANThe variables with each of the optional segments mentioned above are set
in table XCITRAN as KEPT=NO. Therefore, if you want to keep any of thesevariables, you will need to set the variables of interest to KEPT=YES. Thevariables that are associated with each segment are listed below.
Table 10.2 IMACICDB - Optional DBCTL Counters in CICS 3.1 and Later
STTBFWT STATGN STTTLOC
STTCTM1 STATGNP STTTMIO
STTDATN STATGU STTTOTC
STTDATS STTINTC STTTSDQ
STTDBIO STTISRT STTUENQ
STTDECL STTMSCL STTUOWC
STTDERD STTNPSB STTUPDQ
STTDLET STTOVFN STTUSSN

138 SMF Data Sources - All Operating Environments � Chapter 10
STTEXDQ STTPOOL STTWEXQ
STATGHN STTREPL STTWTEQ
STTGHNP STTSCHT STTWUEQ
STATGHU STTTENQ
Table 10.3 IMACICDL - DL/I Counters
DBALLCN DLIGN IWAITTM
DBALLTM DLIGNP PSACTCN
DLDELET DLIGU PSACTTM
DLIGHN DLNSERT PSSCHCN
DLIGHNP DLREPLC PSCHTM
DLIGHU IWAITCN
Table 10.4 IMACICOB - Optional OMEGAMON DB2 Data Segment
OBCLOCN OBFETTM OBPRECN
OBCLOTM OBINSCN OBPRETM
OBDELCN OBINSTM OBSELCN
OBDELTM OBMISCN OBSELTM
OBEXICN OBMISTM OBUPDCN
OBEXITM OBOPNCN OBUPDTM
OBFETCN OBOPNTM
Table 10.5 IMACICOC - Optional OMEGAMON Basic Data Segment
OADABRQ OMFLAG3 OSUPRTM
OADABTM OMGLAG4 OUMBPTC
ODCOMRQ OGMTOFF OUMBUSR
ODCOMTM OIDMSRQ OUSRWRK
ODEXFIL OIDMSTM OMVRSN
ODEXTYP OSUPRRQ
Table 10.6 IMACICOL - Optional OMEGAMON DL/I Data Segment
OIDELCN OIGHUTM OISCHCN
OIDELTM OIINSCN OISCHTM
OIGHNCN OIINSTM OITERCN

MXG-Based Tables (CMAPP2) � SMF Data Sources - All Operating Environments 139
OIGHNTM OIREPCN OITERTM
OIGHUCN OIREPTM
Table 10.7 IMACICUS - Optional Hogan Data
FPSACTN FPSSCRN TCTPLD
FPSFUNC FPSTYPCD TCBFUNC
FPSOPTN PLDVERS
XCICDB2 and XUOW: If you customize the ANALDB2C or ASUMUOW MXGSOURCLIB members to keep more variables from either CICSTRAN orDB2ACCT, you must ensure that these extra variables are markedKEPT=YES in the SAS IT Resource Management data dictionary. To processXUOW, you must also modify the IMACUOW MXG member as follows.Comment out or delete the first definition of the two macros, _NOOBS and_YESOBS, and remove the comment delimiter from the second definition, sothat the macros are defined as follows:MACRO _NOOBS %MACRO _YESOBS %
XCMASMQ - XCM29CO
Data Source: Boole and Babbage, Inc. CMFSAS IT Resource Management status: not testedMXG customization:
IMACCMF - Specify the SMF record number by following the instructionswithin the member.
MXG Documentation member: noneSAS IT Resource Management customization: none
XCOTROL
Data Source: 4th Dimension Software Inc., Control-DSAS IT Resource Management status: not tested
MXG customization:IMACCTLD - Specify the SMF record number by following the instructions
within the member.MXG Documentation member: none
SAS IT Resource Management customization: none
XCOUCKP - XCOUTRM
Data Source: Software AG COM-PLETESAS IT Resource Management status: not testedMXG customization:
IMACCOMP - Specify the SMF record number by following the instructionswithin the member.
MXG Documentation member: noneSAS IT Resource Management customization: none
140 SMF Data Sources - All Operating Environments � Chapter 10
XDBACCT - XDBTATS
Data Source: DB2 SMF record types 100 and 101SAS IT Resource Management status: testedMXG customization:
IMACKEEP1 Add the following lines:
MACRO _KDB2ACC _XKDB2AC %MACRO _KDB2ACP _XKDB2AP %MACRO _KDB2ACB _XKDB2AB %MACRO _KDB2ACG _XKDB2AG %MACRO _KDB2PAT _XKDB2GA %MACRO _KDB2PST _XKDB2GS %MACRO _KDB2ST0 _XKDB2S0 %MACRO _KDB2ST1 _XKDB2S1 %MACRO _KDB2ST2 _XKDB2S2 %MACRO _KDB2STS _XKDB2SS %MACRO _KDB2STB _XKDB2SB %MACRO _KDB2STR _XKDB2SR %
You can add them anywhere between the following statements:%INCLUDE SOURCLIB(IMACOLDV);
and&MACKEEP ;
2 Examine the instructions and code for the _DB2CORR macro that iscontained in the VMAC110 member. This macro establishes correlationname and number. If you find it necessary to modify the definition, copythe macro definition to the IMACKEEP member and modify it there. Thechange you will most likely have to make is to specify the names for yourCICS and/or IMS jobs or started tasks.
EXDB2ACB - If you want data to be written to table XDBCCTB (MXG data setDB2ACCTB), then modify this member and remove the comment block aroundthe OUTPUT statement. You can also add IF-THEN style logic to the statementif required. Read the comments therein for further information.
MXG Documentation members: ADOCDB2, ADOCDB2RSAS IT Resource Management customization: none
XDSNREC
See XTMS
XDMNDSN - XDMNVOL
Data Source: LEGENT Corporation ASTEX SMF record (formerly known asDASDMON)
SAS IT Resource Management status: not testedMXG customization:
IMACDMON - Specify the SMF record number by following the instructionswithin the member.
MXG Documentation member: noneSAS IT Resource Management customization: none

MXG-Based Tables (CMAPP2) � SMF Data Sources - All Operating Environments 141
XEDSARE - XEDSVRE
Data Source: DFSMSrmm (IBM Corporation) SMF recordsSAS IT Resource Management status: not testedMXG customization: IMACEDGS
1 Specify the SMF record number for the DFSMSrmm audit record.2 Specify the SMF record number for the DFSMSrmm security record.
MXG Documentation member: noneSAS IT Resource Management customization: none
XEPMVEP - XEPVEPIData Source: Candle Corporation EPILOG/MVS recordSAS IT Resource Management status: not testedMXG customization:
IMACEPMV - Specify the SMF record number by following the instructionswithin the member.
MXG Documentation member: noneSAS IT Resource Management customization: none
XFOUSMS
Data Source: Information Builders FOCUS multi-session option accounting recordSAS IT Resource Management status: not testedMXG customization:
IMACFOCU - Specify the SMF record number by following the instructionswithin the member.
MXG Documentation member: noneSAS IT Resource Management customization: none
XFTP01X - XFTP51XData Source: NETVIEW File Transfer Program User SMF RecordSAS IT Resource Management status: not testedMXG customization:
IMACFTP - Specify the SMF record number by following the instructions withinthe member.
MXG Documentation member: noneSAS IT Resource Management customization: none
XHIRSAM - XHIRVSBData Source: Empact Hipercache user SMF record.SAS IT Resource Management status: not testedMXG customization:
IMACHIPR - Specify the SMF record number by following the instructionswithin the member.
MXG Documentation member: noneSAS IT Resource Management customization: none

142 SMF Data Sources - All Operating Environments � Chapter 10
XHSDSRF - XHSWVOL
Data Source: IBM DFHSM user SMF recordSAS IT Resource Management status: not testedMXG customization:
IMACHSM - Specify the SMF record number by following the instructionswithin the member.
EXHSMFST - If you want data to be written to table XHSFSRT (MXG data setHSMFSRTP), then modify this member and remove the comment blockaround the OUTPUT statement. You can also add IF-THEN style logic to thestatement if required. Read the comments therein for further information.
EXHSMWWV - If you want data to be written to table XHSWVOL (MXG dataset HSMWWVOL), then modify this member and remove the comment blockaround the OUTPUT statement. You can also add IF-THEN style logic to thestatement if required. Read the comments therein for further information.
MXG Documentation member: ADOCHSMSAS IT Resource Management customization: none
XICBRGC - XICB2RGD
Data Source: STK Iceberg IXFP SMF recordsSAS IT Resource Management status: not testedMXG customization:
IMACICE - Specify the SMF record number by following the instructions withinthe member.
MXG Documentation member: ADOCICESAS IT Resource Management customization: none
XIDSARA - XIDSYPE
Data Source: Computer Associates International, Inc. CA-IDMS PerformanceMonitor SMF record.
SAS IT Resource Management status: not testedMXG customization:
IMACIDMS - Specify the SMF record number by following the instructionswithin the member.
MXG Documentation member: noneSAS IT Resource Management customization: none
XILAT20 - XILVTRTData Source: Interlink user SMF records.SAS IT Resource Management status: not testedMXG customization:
IMACILKA - Specify the SMF record number for the Interlink SNS/TCPACCESS SMF record.
IMACILKG - Specify the SMF record number for the Interlink SNS/SNAGateway SMF record.
IMACILKV - Specify the SMF record number for the Interlink SNS/TCPVTSMF record.

MXG-Based Tables (CMAPP2) � SMF Data Sources - All Operating Environments 143
MXG Documentation member: noneSAS IT Resource Management customization: none
XIPAC01 - XIPAC05
Data Source: INFOPAC Report Distribution System
SAS IT Resource Management status: not testedMXG customization:
IMACIPAC - Specify the SMF record number by following the instructionswithin the member.
MXG Documentation member: ADOCIPACSAS IT Resource Management customization: none
XJM5FSE - XJM5WTD
Data Source: IBM JES3 Measurement Facility type 84 SMF record
SAS IT Resource Management status: not testedMXG customization: none
MXG Documentation member: none
SAS IT Resource Management customization: none
XJOBS, XPRINT, XSTEPS, XSPNJOB, XNJPURG, XSMFINT
Data Source: MXG consolidation of several SMF job accounting and utilization tables.SAS IT Resource Management status: tested
MXG customization:
IMACSPIN - Specify the number of processing cycles for which incomplete jobswill be retained in SPIN data sets. The default is zero. See thedocumentation in IMACSPIN and, more importantly, paragraph (4) of theINSTALL member in your MXG.MXG.SOURCLIB. The latter containsimportant information regarding the consequences of setting spin count.
Note: In SAS IT Resource Management, SPIN data sets are kept in theCOLLECT library of the PDB. �
IMACSHFT - Copy the member into your MXG user library and delete all linesexcept the length statement for shift and the label statement for shift. If youwant to use your own code for calculating SHIFT, this is where it should beplaced. You can use the value of DATETIME in the calculation of SHIFT, butDO NOT change the value of DATETIME.
Note: For XPRINT, XSTEPS, and XSPNJOB: Changes to MXG 15.15 andSAS IT Resource Management 2.1 mean that no code changes are necessaryto collect these tables. Moreover, any customizations performed as a result ofhaving read these instructions in previous releases must be removed. Thisincludes the DATA step to create a copy of the STEPS file as KEEPSTPS. �
Note: For XSMFINT: Support for the XSMFINT (SMFINTRV) tablebecame available in TS45001 of SAS/CPE. To enable the collection of thisdata, you must first ensure that your system is capable of cutting the SMFinterval accounting records. The z/OS system data set,SYS1.PARMLIB(SMFPRMxx), is where you tell SMF not only what recordsyou want cutting, but also if you want interval accounting enabled. Contactyour systems programming team for information regarding this change.

144 SMF Data Sources - All Operating Environments � Chapter 10
Even with the above change in place, you must also modify the IMACINTVMXG SOURCLIB member. MXG’s default is that no TYPE30_V (SMFinterval accounting) records are output to the SAS data sets. So, you mustcopy IMACINTV from MXG.MXG.SOURCLIB into yourMXG.USERID.SOURCLIB and remove the comments from around theOUTPUT statement, as detailed in the comments within the member. �
Note: In addition, you can be selective about how many observations/records are written, by coding IF-THEN type statements. See the commentsfor details. �
MXG Documentation members: ADOC26J2, ADOC26J3, ADOC30, ADOC6SAS IT Resource Management customization: none
XLMADOW - XLMUNLDData Source: Memorex Tape Library Management System (LMS) Performance
Monitor SMF record.SAS IT Resource Management status: not testedMXG customization: IMACLMS - Specify the SMF record number by following the
instructions within the member.MXG Documentation member: ADOCLMSSAS IT Resource Management customization: none
XMITAPEData Source: LEGENT Multi-Image Manager (MIM) tape statistics SMF record.SAS IT Resource Management status: not testedMXG customization:
IMACMIM - Specify the SMF record number by following the instructionswithin the member.
MXG Documentation member: noneSAS IT Resource Management customization: none
XMQMACCT - XMQMSGDData Source: IBM Corporation MQSeries (formerly MQM) SMF record.SAS IT Resource Management status: not testedMXG customization: noneMXG Documentation member: noneSAS IT Resource Management customization: none
XM2LOGO - XM2SINCData Source: Computer Corporation of America MODEL 204 LOGOFF and SINCE
SMF records.SAS IT Resource Management status: not testedMXG customization:
IMACM2041 Specify the SMF record numbers for the MODEL 204 LOGOFF and
SINCE SMF records.2 Specify the release number of your MODEL 204 system.
MXG Documentation member: none
MXG-Based Tables (CMAPP2) � SMF Data Sources - All Operating Environments 145
SAS IT Resource Management customization: none
XNAENTA - XNAVOGNData Source: Candle Network Accounting Facility (NAF) SMF record. NAF records
are produced by Candle products CL/SUPERSESSION, CL/GATEWAY, andVTAMPLUS.
SAS IT Resource Management status: not testedMXG customization:
IMACACCT - Creates account code variables. Follow the instructions within themember header.
IMACNAF - Specify the SMF record number by following the instructionswithin the member.
MXG Documentation member: noneSAS IT Resource Management customization: none
XNDMAE - XNDMWOData Source: Sterling Software’s Network Data Mover (NDM) SMF record.SAS IT Resource Management status: not testedMXG customization:
IMACNDM - Specify the SMF record number by following the instructionswithin the member.
MXG Documentation member: noneSAS IT Resource Management customization: none
XNPANAT - XNPWDWDData Source: IBM Network Performance Management (NPM) type 28 SMF record.SAS IT Resource Management status: not testedMXG customization: noneMXG Documentation member: ADOC28SAS IT Resource Management customization: none
XNSACCT - XNSVTAMData Source: LEGENT NetSpy and LanSpy SMF recordSAS IT Resource Management status: NetSpy has been tested. LanSpy has not.MXG customization:
IMACNSPY - Specify the SMF record number by following the instructionswithin the member.
MXG Documentation member: noneSAS IT Resource Management customization: none
XNTPACTData Source: Software AG NATURAL Process Accounting SMF recordSAS IT Resource Management status: not testedMXG customization:
IMACNATP - Specify the SMF record number by following the instructionswithin the member.

146 SMF Data Sources - All Operating Environments � Chapter 10
MXG Documentation member: noneSAS IT Resource Management customization: none
XOCADA - XOCVVSAData Source: Candle OMEGAMON for CICS SMF record.SAS IT Resource Management status: not tested.MXG customization:
IMACOMCI - Specify the SMF record number by following the instructionswithin the member.
MXG Documentation member: noneSAS IT Resource Management customization: none
XOMMSDE - XOMMSJOData Source: Candle OMEGAMON II for SMS SMF recordSAS IT Resource Management status: not testedMXG customization:
IMACOMSM - Specify the SMF record number by following the instructionswithin the member.
MXG Documentation member: noneSAS IT Resource Management customization: none
XORACLEData Source: ORACLE dbms SMF record.SAS IT Resource Management status: not tested.MXG customization:
IMACORAC - Specify the SMF record number by following the instructionswithin the member.
MXG Documentation member: noneSAS IT Resource Management customization: none
XOVEXCE - XOVTVR
Data Source: Candle OMEGAMON for VTAM (R) SMF record.SAS IT Resource Management status: not tested.MXG customization:
IMACOMVT - Specify the SMF record number by following the instructionswithin the member.
MXG Documentation member: noneSAS IT Resource Management customization: none
XPRINT
See XJOBS.
XPRSHLP - XPRSXIOData Source: Softworks Performance Solutions SMF recordSAS IT Resource Management status: not tested

MXG-Based Tables (CMAPP2) � SMF Data Sources - All Operating Environments 147
MXG customization:IMACPRFS - Specify the SMF record number by following the instructions
within the member.MXG Documentation member: ADOCPRFSSAS IT Resource Management customization: none
XRMFINT
Data Source: Consolidation of several RMF tables into a single tableSAS IT Resource Management status: testedMXG customization:
IMACWORK: defines which performance groups (or service classes for those ingoal mode) make up which workloads at your site. Copy IMACWORK fromMXG.MXG.SOURCLIB to MXG.USERID.SOURCLIB. Edit this copy ofIMACWORK according to the instructions (comments) within it. It alsocontains important notes regarding the use of service class with reportingclass (in goal mode) and control performance groups with report performancegroups (not in goal mode). A good job of customizing this member ensuresuseful information in the XRMFINT table.
Instead of copying the EXRMFINT member from MXG.MXG.SOURCLIBto MXG.USERID.SOURCLIB and changing the labels in the copy, change theOTH0-OTH9 "Other" workloads labels for variables in the SAS IT ResourceManagement table XRMFINT.
MXG Documentation member: See the ADOC7x members that are associated withthe underlying RMF data sets.
SAS IT Resource Management customization: none
XSASRQUData Source: Legent’s Sysout Archival and Retrieval (SAR) SMF recordSAS IT Resource Management status: not testedMXG customization:
IMACSAR - Specify the SMF record number by following the instructionswithin the member.
MXG Documentation member: ADOCSARSAS IT Resource Management customization: none
XSPSCED - XSPSEXTData Source: Amdahl Storage Product Management Services (SPMS) SMF record for
the AMDAHL 6100 DASD controllerSAS IT Resource Management status: not testedMXG customization:
IMACSPMS - Specify the SMF record number by following the instructionswithin the member.
MXG Documentation member: ADOCSPMSSAS IT Resource Management customization: none
XSTBLOS - XSTVARYData Source: STC 4400 Tape Silo SMF record

148 SMF Data Sources - All Operating Environments � Chapter 10
SAS IT Resource Management status: not testedMXG customization:
IMACSTC - Specify the SMF record number by following the instructions withinthe member.
MXG Documentation member: noneSAS IT Resource Management customization: none
XSTEPS
See XJOBS.
XSXCNOF - XSXSARTData Source: LEGENT STX (multi-session product) SMF recordSAS IT Resource Management status: not testedMXG customization:
IMACSTX - Specify the SMF record number by following the instructions withinthe member.
MXG Documentation member: noneSAS IT Resource Management customization: none
XSYCSORData Source: SyncSort SMF recordSAS IT Resource Management status: not testedMXG customization:
IMACSYNC - Specify the SMF record number by following the instructionswithin the member.
MXG Documentation member: noneSAS IT Resource Management customization: none
XTEEAPP - XTEETERData Source: Computer Associates Teleview SMF recordSAS IT Resource Management status: not testedMXG customization:
IMACTELE - Specify the SMF record number for the Teleview SMF record.EXTPXINT - Insert the following line before the OUTPUT statement:
IF DIFFTPX=1 THEN STARTIME=SMFTIME-DELTATM;
MXG Documentation member: noneSAS IT Resource Management customization: none
XTPECRD - XTPTARTData Source: LEGENT TPX (multi-session product) SMF recordSAS IT Resource Management status: not testedMXG customization:
IMACTPX - Specify the SMF record number by following the instructions withinthe member.
EXTPXINT - Insert the following line before the OUTPUT statement:
MXG-Based Tables (CMAPP2) � SMF Data Sources - All Operating Environments 149
IF DIFFTPX=1 THEN STARTIME=SMFTIME-DELTATM;
MXG Documentation member: none
SAS IT Resource Management customization: none
XTSCALL - XTSSYST
Data Source: LEGENT TSO/MON SMF recordsSAS IT Resource Management status: tested
MXG customization:IMACTSOM - Specify the SMF record number by following the instructions
within the member.
MXG Documentation member: none
SAS IT Resource Management customization: none
XTYDLMN
Data Source: Candle Corporation’s Deltamon SMF record
SAS IT Resource Management status: not testedMXG customization:
IMACDLMN - Specify the SMF record number by following the instructionswithin the member.
MXG Documentation member: noneSAS IT Resource Management customization: none
XTYHMFB - XTYHMF9
Data Source: Network System’s Host Monitoring Facility (HMF)SAS IT Resource Management status: not tested
MXG customization:
IMACHMF - Specify the SMF record number by following the instructionswithin the member.
MXG Documentation member: none
SAS IT Resource Management customization: none
XTYIAM
Data Source: Innovation Processing’s IAM SMF record
SAS IT Resource Management status: not tested
MXG customization:IMACIAM - Specify the SMF record number by following the instructions
within the member.
MXG Documentation member: noneSAS IT Resource Management customization: none
XTYMDF
Data Source: AMDAHL MDFTRACK SMF record
SAS IT Resource Management status: not testedMXG customization:

150 SMF Data Sources - All Operating Environments � Chapter 10
IMACMDF - Specify the SMF record number by following the instructionswithin the member.
MXG Documentation member: noneSAS IT Resource Management customization: none
XTYRMDSData Source: IBM Report Management and Distribution System SMF recordSAS IT Resource Management status: not testedMXG customization:
IMACRMDS1 Specify the SMF record number by following the instructions within the
member.2 Specify the RMDS version number in macro _RMDSVER, if necessary, by
coding
MACRO _RMDSVER 3 %
MXG Documentation member: noneSAS IT Resource Management customization: none
XTYSASU
Data Source: SAS SMF record that can be optionally written at PROC and DATAstep boundaries.
SAS IT Resource Management status: not testedMXG customization:
IMACSASU - Specify the SAS 5 and SAS 6 SMF record numbers.MXG Documentation member: noneSAS IT Resource Management customization: none
XTYSIMData Source: SIMWARE SIM/XFER VTAM SMF record.SAS IT Resource Management status: not testedMXG customization:
IMACSIM - Specify the SMF record number by following the instructions withinthe member.
MXG Documentation member: ADOCSIMSAS IT Resource Management customization: none
XTPALOC, XTYMNTS, XTYTALO, XTYTMNT, XTYTSWPData Source: MXG Tape Mount Monitor SMF recordSAS IT Resource Management status: not testedMXG customization:
ASMTMNT - See this member for installation and usage instructions.IMACTMNT - Specify the SMF record number by following the instructions
within the member.MXG Documentation member: ADOCTMNTSAS IT Resource Management customization: none
MXG-Based Tables (CMAPP2) � SMF Data Sources - All Operating Environments 151
XTYTAOData Source: Fischer Totally Automated Office (TAO) SMF recordSAS IT Resource Management status: not tested.MXG customization:
IMACTAO - Specify the SMF record number by following the instructionswithin the member.
MXG Documentation member: noneSAS IT Resource Management customization: none
XTYTCPA - XTYTCPTData Source: IBM TCP/IP SMF recordSAS IT Resource Management status: not testedMXG customization:
IMACTCP� For TCP/IP releases earlier than 2.1.1 and for 2.1.1 without APAR
PN40511, specify the SMF record numbers for TELNET and FTP.� If you are running TCP/IP 2.1.1 with APAR PN40511 or later, then do
not modify IMACTCP. At the newer levels, TCP/IP will always use SMFrecord number 118.
MXG Documentation member: ADOCTCPSAS IT Resource Management customization: none
XTYTPMF - XTYTPMVData Source: MVS Solutions Inc. Thruput Manager SMF recordSAS IT Resource Management status: not testedMXG customization:
IMACTPM - Specify the SMF record number by following the instructionswithin the member.
MXG Documentation member: noneSAS IT Resource Management customization: none
XTYX37Data Source: EMPACT Software STOPX37 SMF recordSAS IT Resource Management status: not testedMXG customization:
IMACX37 - Specify the SMF record number by following the instructions withinthe member.
MXG Documentation member: noneSAS IT Resource Management customization: none
XTY23Data Source: SMF interval statisticsSAS IT Resource Management status: not testedMXG customization: noneMXG Documentation member: ADOC23
152 SMF Data Sources - All Operating Environments � Chapter 10
SAS IT Resource Management customization: none
XTY24Data Source: JES2 Spool Offload SMF recordSAS IT Resource Management status: not testedMXG customization: noneMXG Documentation member: ADOC24SAS IT Resource Management customization: none
XTY50Data Source: VTAM Tuning Statistics SMF recordSAS IT Resource Management status: testedMXG customization: noneMXG Documentation member: ADOC50SAS IT Resource Management customization: Set the retention period to zero in all
PDB levels except DETAIL. This is interval data, but the data cannot be reducedbecause there is no duration value for the interval.
XTY7204Data Source: IBM RMF subtype 04 SMF recordSAS IT Resource Management status: not testedMXG customization: noneMXG Documentation member: noneSAS IT Resource Management customization: none
XTY78PA - XTY78SPData Source: IBM RMF monitor job SMF recordsSAS IT Resource Management status: not testedMXG customization: noneMXG Documentation member: noneSAS IT Resource Management customization: none
XTY89Data Source: IBM Measured Usage Interval SMF recordSAS IT Resource Management status: not testedMXG customization: noneMXG Documentation member: noneSAS IT Resource Management customization: none
XTY94Data Source: IBM Tape Library Data Server SMF recordSAS IT Resource Management status: not testedMXG customization: noneMXG Documentation member: noneSAS IT Resource Management customization: none

MXG-Based Tables (CMAPP2) � Non-SMF Data Sources - z/OS Operating Environment 153
XWSACCT - XWSFERD
Data Source: RSD’s WSF SMF record
SAS IT Resource Management status: not tested
MXG customization:
IMACWSF - Specify the SMF record number by following the instructionswithin the member.
MXG Documentation member: ADOCWSFSAS IT Resource Management customization: none
XXCMDAT
Data Source: XCOM File Transfer Facility SMF record
SAS IT Resource Management status: not tested
MXG customization:
IMACXCOM - Specify the SMF record number by following the instructionswithin the member.
MXG Documentation member: ADOCXCOM
SAS IT Resource Management customization: none
Non-SMF Data Sources - z/OS Operating Environment
VAPLEDT - VUSETRE
Data Source: VM Monitor data
SAS IT Resource Management status: not tested
MXG customization: none
MXG Documentation member: ADOCVMXA
SAS IT Resource Management customization: Tailor member CMVMLD in yourprefix.CPMISC data set. This member is the daily job that you will run to processand reduce the log data into your VMMON PDB.
XDCBKUP - XDCVOLS
Data Source: DCOLLECT dataSAS IT Resource Management status: tested
MXG customization: none
MXG Documentation member: none
SAS IT Resource Management customization: Tailor member CMDCOLLD in yourprefix.CPMISC data set. This member is the daily job that you will run to processand reduce DCOLLECT log data into your PDB.
XERPCRW - XERPTIM
Data Source: EREP data
SAS IT Resource Management status: testedMXG customization: none
MXG Documentation member: ADOCEREP

154 Non-SMF Data Sources - z/OS Operating Environment � Chapter 10
SAS IT Resource Management customization: Tailor member CMEREPLD in yourprefix.CPMISC data set. This member is the daily job that you will run to processand reduce the EREP data into your PDB.
XIMBMPS - XIMTRANData Source: IMS log records.SAS IT Resource Management status: testedMXG customization:
ASMIMSLG - Tailor and run ASMIMSLG following the instructions within themember.
IMACKEEP - Add the following lines:MACRO _LIMSBMP IMSDATA.BMPS %MACRO _LSAPIBA IMSDATA.SAPIMSBA %MACRO _LSAPION IMSDATA.SAPIMSON %MACRO _LSAPISP IMSDATA.SAPIMSSP %
You can add them anywhere between the following statements:%INCLUDE SOURCLIB(IMACOLDV);
and&MACKEEP ;
MXG Documentation member: noneSAS IT Resource Management customization: Tailor member CMIMSLD in your
prefix.CPMISC data set. This member is the daily job that you will run to processand reduce IMS log data into your PDB.
XIMDBDS - XIMPROGData Source: Boole and Babbage IMS Measurement Facility (IMF) (formerly Control/
IMS)SAS IT Resource Management status: not testedMXG customization: noneMXG Documentation member: noneSAS IT Resource Management customization: Tailor member CMIMFLD in your
prefix.CPMISC data set. This member is the daily job that you will run to processand reduce IMF log data into your PDB.
XQAAPPN - XQAX25Data Source: OS/400 performance/accounting dataSAS IT Resource Management status: not testedMXG customization:
IMACQAPM - Add the variable DTETIM to the _KQAPCON macro.EXQAPCON - Insert the following line before the OUTPUT statement:
RETAIN DTETIM "&SYSDATE:&SYSTIME"DT;
MXG Documentation member: ADOCQAPMSAS IT Resource Management customization: Tailor member CMAS4LD in your
prefix.CPMISC data set. This member is the daily job that you will run to processand reduce the log data into your AS400 PDB.
XTC2CMX - XTC2XMC

MXG-Based Tables (CMAPP2) � Non-SMF Data Sources - z/OS Operating Environment 155
Data Source: TMON for CICS/ESA 2.0 from LandmarkSAS IT Resource Management status: not testedMXG customization:
EXITMON6 - If you are using compressed TMON data, then tailor and runEXITMON6 following the instructions within EXITMON6.
IMACMONI - Tailor IMACMONI following the instructions within the member.MXG Documentation member: noneSAS IT Resource Management customization: Tailor member CMTMC2LD in your
prefix.CPMISC data set. This member is the daily job that you will run to processand reduce the log data into your PDB.
XTCCDBD - XTCUSERData Source: TMON/CICS from LandmarkSAS IT Resource Management status: not testedMXG Documentation member: noneSAS IT Resource Management customization:
For TMON/CICS versions 8.0, 9.0, 1.0, and 1.1, tailor member CMTMCLD inyour prefix.CPMISC data set. This member is the daily job that you will runto process and reduce the log data into your PDB.
For TMON/CICS ESA version 1.3 and later, tailor member CMTMCCLD in yourprefix.CPMISC data set. This member is the daily job that you will run toprocess and reduce the log data into your PDB.
MXG customization:(for TMON/CICS versions 8.0, 9.0, 1.0, and 1.1):
EXITMON6 - If you are using compressed TMON data, then tailor and runEXITMON6 following the instructions within EXITMON6.
IMACMONI - Tailor IMACMONI following the instructions within themember.
(for TMON/CICS ESA version 1.3 and later):EXITMON6 - If you are using compressed TMON data, then tailor and run
EXITMON6 following the instructions within EXITMON6.IMACTMON - Tailor IMACTMON following the instructions within the
member.
XTMDBA - XTMDDWData Source: Landmark’s The Monitor for DB2SAS IT Resource Management status: not testedMXG customization: noneMXG Documentation member: noneSAS IT Resource Management customization:
For TMON/DB2 version 1, tailor member CMTMDBLD in your prefix.CPMISCdata set. This member is the daily job that you will run to process and reducethe log data into your TMON/DB2 (V1) PDB.
For TMON/DB2 version 2 and later, tailor member CMTMD2LD in yourprefix.CPMISC data set. This member is the daily job that you will run toprocess and reduce the log data into your TMON/DB2 (V2+) PDB.

156 Non-SMF Data Sources - z/OS Operating Environment � Chapter 10
XTMS and XDSNREC
Data Source: Computer Associates’ Tape Management SystemSAS IT Resource Management status: not testedMXG customization:
IMACTMS5 - Add the variable DATETIME to the _KTMSTMS and _KTMSDSNmacros.
EXTMSDSN - Insert the following line before the OUTPUT statement:RETAIN DATETIME "&SYSDATE:&SYSTIME"DT;
MXG Documentation member: ADOCTMS5SAS IT Resource Management customization: Tailor member CMTMSLD in your
prefix.CPMISC data set. This member is the daily job that you will run to processand reduce the log data into your TMS PDB.
XTPFDA - XTPFTT
Data Source: TPF dataSAS IT Resource Management status: not testedMXG customization: noneMXG Documentation member: ADOCTPFSAS IT Resource Management customization: Tailor member CMTPFLD in your
prefix.CPMISC data set. This member is the daily job that you will run to processand reduce TPF data into your job.

157
C H A P T E R
11Generic Collector Facility
Generic Collector Facility: Overview 158Using the Generic Collector Facility 158
Getting Started with the Generic Collector Facility 159
Types of Data Collector Support 159
Support by Means of the Generic Collector Facility 159
Example Used in This Document: Data from a Fax Log 160Generic Collector Facility: The Steps 161
The Steps 161
Step 1 - Staging the Data 162
Analyzing the Raw Data 162
Table-Specific Considerations 163
Variable-Specific Considerations 163Step 2 - Creating the Table and Variable Definitions 164
Step 3 - Customizing the Table and Variable Definitions 165
Review the Generated Control Statements and Build the Update Control Statements 165
Step 4 - Setting Up for Production Use 167
Setting Up the Batch Job 167Adding Report Definitions 168
Generic Collector Facility: Additional Information 168
Other Considerations 168
Verifying That the Logging and Collector Software Is Installed Appropriately 168
Installing Table Definitions in the Master Data Dictionary (Optional) 169User-Defined Formats (Optional) 170
What to Do with the Staging Code (Optional) 171
Handling Duplicate Data 173
Using the C2RATE and D2RATE Interpretation Types (Optional) 173
Advanced Concepts Related to Staging Data 174
Case 1: Data Already in a SAS Data Set 174Case 2: Data Already in an External DBMS 175
Case 3: Using a SAS DATA Step View instead of a SAS Data Set 175
Case 4: Reading a Report (“Screen Scraping”) 176
Case 5: Multiple Tables from a Single Input Source 176
Case 6: Character-Delimited Data 176Generic Collector Facility: Appendices 176
Appendix 1: Fax: Sample Log 176
Appendix 2: Fax: Sample Code for Staging the Data 177
Notes 178
Appendix 3: Fax: Sample Code for Generating the Definitions 179Notes 179
Appendix 4: Fax: Sample Table and Variable Definitions 180
Appendix 5: Fax: Sample Code for Updating the Definitions 185
158 Generic Collector Facility: Overview � Chapter 11
Appendix 6: Fax: Sample Daily Process-and-Reduce Job 185z/OS Sample Code 186
UNIX/Windows Code Sample 187
Appendix 7: Variable Interpretations and Default Statistics 187
Appendix 8: Algorithm Used by GENERATE SOURCE 188
Appendix 9: Using Character-Delimited Data 190Purpose 190
Data Format 190
Controlling the Behavior of the Character-Delimited Collector 191
Appendix 10: Defining Tables and Variables without Using GENERATE SOURCE 193
Appendix 11: Support by Means of Supplied Table Definitions 193
Overview 193Brief Description 193
Appendix 12: The %CPPROCES Macro with the Generic Collector Facility 194
Purpose 194
Syntax 194
%CPPROCES Parameters 194%CPPROCES Example 196
Appendix 13: Character-Delimited Support in GENERATE SOURCE 196
Introduction 196
Requirements 196
Example 196Generic Collector Facility: Examples 204
CSVMSDDU: VMSTAT DDUTL 204
CSVMSCOL: UNIX Shell Script 233
Generic Collector Facility: Overview
Using the Generic Collector FacilityThe Generic Collector Facility enables you to process data from data collectors or
data sources for which SAS IT Resource Management does not supply table definitions.� “Getting Started with the Generic Collector Facility” on page 159� “The Steps” on page 161� “Appendix 1: Fax: Sample Log” on page 176� “Appendix 2: Fax: Sample Code for Staging the Data” on page 177� “Appendix 3: Fax: Sample Code for Generating the Definitions” on page 179� “Appendix 4: Fax: Sample Table and Variable Definitions” on page 180� “Appendix 5: Fax: Sample Code for Updating the Definitions” on page 185� “Appendix 6: Fax: Sample Daily Process-and-Reduce Job” on page 185� “Appendix 7: Variable Interpretations and Default Statistics” on page 187� “Appendix 8: Algorithm Used by GENERATE SOURCE” on page 188� “Appendix 9: Using Character-Delimited Data” on page 190� “Appendix 10: Defining Tables and Variables without Using GENERATE
SOURCE” on page 193� “Appendix 11: Support by Means of Supplied Table Definitions” on page 193� “Appendix 12: The %CPPROCES Macro with the Generic Collector Facility” on
page 194

Generic Collector Facility � Getting Started with the Generic Collector Facility 159
� “Appendix 13: Character-Delimited Support in GENERATE SOURCE” on page196.
Getting Started with the Generic Collector Facility
Types of Data Collector SupportData collectors write logs. SAS IT Resource Management provides two techniques for
processing the data from those logs into tables in your PDB. The technique that youchoose depends on whether your data is in a user-defined table or in a table whosedefinition is supplied with SAS IT Resource Management.
The technique that is described in this document works with user-defined tables.The other technique works with tables whose definition is supplied with SAS IT
Resource Management. For a short description of that technique, see “Appendix 11:Support by Means of Supplied Table Definitions” on page 193.
Support by Means of the Generic Collector FacilitySAS IT Resource Management supports many data collectors or data sources by
means of the Generic Collector Facility. One example of such a data source is a log filethat is generated by a user-written application. For each of these data collectors or datasources, SAS IT Resource Management provides
� support for running code that provides staged data (as staging data sets or DATAstep views)
� support for creating one or more user-generated table definitions and support forcreating the table(s) in your PDB
� a macro that invokes SAS IT Resource Management� a macro that processes the staged data into the tables in your PDB� a macro that reduces the data in the PDB� macros that report on the data in the PDB.
Some of these components are unique for each of the data collector or data sourcesand some are the same for all data collectors or data sources.
You can use the Generic Collector Facility with data from almost any time-baseddata source.
This document describes how to use the Generic Collector Facility. It also includes anexample of using the Generic Collector Facility for fax data. The example includes
� fax data� SAS code that stages the fax data� code that generates fax table and variable definitions� a fax table definition and its variable definitions that were created interactively or
by running the SAS IT Resource Management data dictionary utility against thestaging data set, and updates to these definitions
� a daily job that invokes SAS IT Resource Management, runs the SAS code toprovide staged fax data, processes the staged fax data into the table in the PDB,and reduces the fax data. (For examples of macros that report on the data in thePDB, see the other Getting Started documents and/or the documentation for yourrelease of SAS.)
Before proceeding, you should do the following:� Locate the documentation for the data collector or data source that logs the data.
Your collector software probably has the same name and might be the same

160 Getting Started with the Generic Collector Facility � Chapter 11
package as your logging software. The documentation should be supplied by thevendor of the data collector or data source.
� Read “Overview of Setup Case 3” on page 81 (setup case 3 is forcharacter-delimited data) or “Overview of Setup Case 4” on page 99 (setup case 4is for data that is not character-delimited).
� Obtain write access to an existing PDB that you want to use for this data or createa new PDB and give yourself write access. (You can use the default space estimatefor now.)
� You need to be running SAS IT Resource Management 2.3 or later.
Example Used in This Document: Data from a Fax LogThe best way to understand how to create a table for use with the Generic Collector
Facility is to walk through an actual example, as if you were doing it for your site.Although each collector is unique, the same basic steps are involved.
For the fax example, consider an environment in which there are several faxmachines, each of which records its activity in an ASCII text log file. Your task is totake the combined daily log for all of the fax machines and load the log’s data into thePDB. Assume that the fax log for each machine consists of a single-line message foreach fax send attempt and a single-line message for each fax receive attempt. The fieldsin the log file are separated by blanks, and the fields also start in specific columns, as inthe following table.
Table 11.1 Layout of the Fax Log
Columns Description Name
1-8 Name of fax machine MACHINE
10 Send (S) or Receive (R) attempt TYPE
12-14 Country code (blank unless international) COUNTRY
16-18 Area code ACODE
20-27 Phone number (xxx-yyyy) PHNUM
29-30 Pages sent or received (99 page max) PAGES
32-39 Date fax send/receive began (MM/DD/YY) DATE
41-48 Time fax send/receive began (HH:MM:SS) TIME
50-51 Pages re-sent (99 max) RESENT
53-60 Total (elapsed) time of send/receive (HH:MM:SS) CONNECT
62 Final Status Code:
Aborted Due to Errors (A)
Receiver Was Busy (B)
Completed Successfully (C)
STATUS
Note: The Name column in this table is simply a list of the variable names that willbe used later in examples. �
For an example of the log file, see “Appendix 1: Fax: Sample Log” on page 176.
Generic Collector Facility � The Steps 161
Generic Collector Facility: The Steps
The StepsThe creation of a table for use with the Generic Collector Facility requires the
following four basic steps, which are described in more detail after this overview.1 Staging the Data
In this step you prepare the raw data. Typically, preparation involves writingSAS DATA step code to stage the data (as a SAS data set or SAS DATA step view).By doing the staging first, you can use the staged data as a model for building thetable and variable definitions.
2 Creating the Table and Variable DefinitionsOne component of a PDB is its data dictionary. The data dictionary contains
table and variable definitions, also known as metadata. The metadata for the datasource is one or more table definitions and the variable definitions that areassociated with the table definition(s). There are several ways to define a tableand variables to the PDB. Each way is described.
3 Customizing (Updating) the Table and Variable DefinitionsDepending on how you create the table and variable definitions, you might find
it necessary to apply additional specifications. This is usually the case when stageddata is used as a model for building the table and variable definitions. Althoughtools are provided with SAS IT Resource Management to aid in constructing tableand variable definitions, the algorithm that is used will not always yield exactlywhat you want. Therefore, you might want to customize such things as the BYand CLASS variables used, the default age limits for each level of the PDB, whatinterpretation (type of data) is used for each variable, and what statistics are kept.
These customizations can be performed as a series of update statements thatfollow the statements that you generated in the previous step.
4 Setting Up for Production UseAfter you define the table and variables to the PDB, you set up the
process-and-reduce job to populate the table with data.You might find these topics useful:� “Step 1 - Staging the Data” on page 162� “Step 2 - Creating the Table and Variable Definitions” on page 164� “Step 3 - Customizing the Table and Variable Definitions” on page 165� “Step 4 - Setting Up for Production Use” on page 167� “Other Considerations” on page 168
� “Installing Table Definitions in the Master Data Dictionary (Optional)”on page 169
� “User-Defined Formats (Optional)” on page 170� “What to Do with the Staging Code (Optional)” on page 171� “Handling Duplicate Data” on page 173� “Using the C2RATE and D2RATE Interpretation Types (Optional)” on
page 173
� “Advanced Concepts Related to Staging Data” on page 174� “Case 1: Data Already in a SAS Data Set” on page 174� “Case 2: Data Already in an External DBMS” on page 175
162 Step 1 - Staging the Data � Chapter 11
� “Case 3: Using a SAS DATA Step View instead of a SAS Data Set” onpage 175
� “Case 4: Reading a Report (“Screen Scraping”)” on page 176
� “Case 5: Multiple Tables from a Single Input Source” on page 176
� “Case 6: Character-Delimited Data” on page 176
� “Creating and Installing a Collector Support Package” on page 426.
Step 1 - Staging the DataStaging the data means to transform the raw log file into a SAS data set or view, from
which data can then be loaded into the PDB. In most cases, the creation of the data setor view is easily accomplished by a simple SAS DATA step. Usually, only rudimentarySAS DATA step programming skills are required. For more information about managingthe staging code, see “What to Do with the Staging Code (Optional)” on page 171. Foran example, see “Appendix 2: Fax: Sample Code for Staging the Data” on page 177.
Note: In some cases, you are not required to stage the data. In these cases, youmust be using character-delimited data and specific formatting criteria. For moreinformation about this kind of data, see “Appendix 9: Using Character-Delimited Data”on page 190. �
Before writing the code to stage the data, it is important to understand the raw data,as well as general table-specific and variable-specific concepts and requirements.
Analyzing the Raw DataYou should have a basic understanding of what each field in the raw data means. For
example, you should be able to answer these questions:
� Does the information break down into distinct types, such as incoming andoutgoing, or system and user?
� What information exists for providing a datetime stamp?
� Does each data item report about a discrete time interval or about anasynchronous (event) activity?
� Can you identify any metrics in the data and how they are to be interpreted?
� Are there any useful metrics that could be calculated from the raw data?
� Can you identify what fields would be useful for categorizing and grouping thedata for reporting purposes?
In the case of the data in Table 11.1 on page 160, all of these questions can beanswered. (To view the data, see “Appendix 1: Fax: Sample Log” on page 176.)
� The information breaks down neatly into faxes that are sent and faxes that arereceived.
� The fields DATE and TIME provide a means of creating a datetime stamp calledTIMESTMP.
� Because each record corresponds to the sending or receiving of a fax, the recordsrepresent events rather than intervals.
� We see that we have counts of pages sent and received, as well as pages re-sent.Additionally, we have data for the elapsed time of each fax, as well as the fax’sfinal status.
� We can use the count of pages that were re-sent and divide it by the total numberof pages to arrive at a percentage of efficiency.

Generic Collector Facility � Step 1 - Staging the Data 163
� Last, we can categorize the data by MACHINE, TYPE, COUNTRY CODE, AREACODE, and TIMESTMP.
Table-Specific ConsiderationsSAS IT Resource Management organizes data into tables within the PDB. Typically,
each table corresponds to a specific type of record from a data collector or data source.� DATETIME Variable
Each table must have a variable called DATETIME, whose value is thedatetime of the record.
� For type Interval tables, DATETIME is typically set to the start of theinterval, for ease of reporting and for convenience when merging multipledata sources.
� For type Even tables, DATETIME is usually the datetime stamp of the event.In our example, the TIMESTMP that we create from the DATE and TIMEfields will be used as the DATETIME variable.
Although it is easier in the staged data to name the datetime stampDATETIME in order to avoid confusion, you might find a situation in which youare forced to use existing names (for example, if your data already exists in SASdata sets to which you have only read access). Therefore, the variable used forDATETIME is not required to be called DATETIME in the staged data.
� DURATION Variable
Additionally, type Interval tables must have a variable called DURATION andthe variable must contain the elapsed time of the intervals that are beingrecorded. Like DATETIME, this variable is not required to be called DURATIONin the staged data.
In the situation where the log does not already contain values for DURATION,the values can be calculated by using the DIF() function or similar techniques onthe datetime stamps of adjacent records.
� AttributesEach table definition consists of attribute information about the table itself and
about the type of record to which it corresponds. For instance, the table definitionspecifies whether the table is type Interval or type Event.
Table attribute information includes the descriptive label for the table, how longto keep data (called the age limits) at each of the PDB levels, and how data is to besorted (at the detail level) and classified (at the day, week, month, and year levels).
Another important table attribute is the external name, which is the name ofthe staged data set or view that corresponds to the table. A table name in a PDBis limited to seven characters, but the table’s external name can contain eightcharacters. To prevent name collisions with supplied table definitions, user-definedPDB (internal) table names should begin with the letter U.
Variable-Specific ConsiderationsThe variable definitions that are associated with a table definition contain
information that corresponds to the fields in the record.� Attributes
Variables in SAS IT Resource Management tables also have attributes. Forexample, the variable definition specifies whether the variable’s data type isCharacter or Numeric and specifies a descriptive label.

164 Step 2 - Creating the Table and Variable Definitions � Chapter 11
Also, each variable is assigned a specific interpretation type. The interpretationtype fine-tunes the data type and determines default characteristics for severalother attributes, such as how a variable is to be displayed, what summarystatistics to collect for it, and how these summary statistics are to be calculated.
� For more information about interpretation types, see “Appendix 5: VariableInterpretation Types” in the SAS IT Resource Management macro referencedocumentation and “Appendix 8: Algorithm Used by GENERATE SOURCE”on page 188.
� It is important to understand the interpretation types as implemented by SASIT Resource Management so that you can check the default interpretationtypes for the variables in your table and edit (or update) the interpretationtypes, if necessary. Also, it is important to understand the summary statisticsthat are available within SAS IT Resource Management so that you cancheck, for each variable, which summary statistics are to be calculated bydefault and modify (update) the summary statistics specification, if necessary.
Another important variable attribute is the external name, which is the name ofthe corresponding field in the staged data. Variable names in SAS IT ResourceManagement tables are limited to 7 characters, but a variable’s external name canbe up to 32 characters.
Step 2 - Creating the Table and Variable DefinitionsBefore data can be processed into the PDB, appropriate table and variable definitions
must be generated that define the data source to the PDB and that create one or moretables in the PDB for storing the data.
Typically, you will use the %CPDDUTL utility macro to run a GENERATE SOURCEcontrol statement against the model data set or view in order to automatically generateCREATE TABLE and CREATE VARIABLE control statements. In Step 3, you willreview the control statements, write UPDATE statements to change the defaults, ifnecessary, and apply the CREATE and UPDATE statements to the PDB to create thetable and its variables into which you can process the staged data.
Note: In some cases, you are not required to stage the data. In those cases, you haveno model data set or view to run against. However, you can use the Character DelimitedCollector support function in GENERATE SOURCE. For more information, see“Appendix 13: Character-Delimited Support in GENERATE SOURCE” on page 196. �
The automatic technique is strongly recommended for most work. In this technique,the DATASET= parameter on the GENERATE SOURCE statement points to the modeldata set (in this case, the model of the staged data). Other parameters of theGENERATE SOURCE control statement provide information such as
NAME= the name of the table we want to create
TYPE= whether the table is type Interval or type Event
ENTRYNAME= entry in SAS catalog .SOURCE that points to where the generatedstatements are to be stored
DATETIME= what variable to use for the DATETIME variable
DURATION= what variable to use for the DURATION variable
For more information about the GENERATE SOURCE control statement, see“Chapter 4: Data Dictionary Macro and Control Statements” in the SAS IT ResourceManagement macro reference documentation.
For the fax example, see the SAS code in “Appendix 3: Fax: Sample Code forGenerating the Definitions” on page 179. This code runs after the code (described in step
Generic Collector Facility � Step 3 - Customizing the Table and Variable Definitions 165
1) that created the staging data set and creates the PDB table and variable definitionsshown in “Appendix 4: Fax: Sample Table and Variable Definitions” on page 180.
Step 3 - Customizing the Table and Variable DefinitionsAfter GENERATE SOURCE has built the table and variable definitions, you should
review the generated definitions, because it is quite likely that further customization isrequired. The recommended procedure for updating the table and variable definitions is
1 Review the generated control statements, and build a set of update controlstatements that correct any undesired table and/or variable characteristics.
2 Use the %CPDDUTL macro to apply the generated table and variable definitionsto the PDB (and thus create the table).
3 Use the %CPDDUTL macro to apply the update statements to the table andvariable definitions in the PDB (and thus edit the table).
Review the Generated Control Statements and Build the Update ControlStatements
It is important that you review the generated control statements in order to checkthat the following characteristics are set appropriately for your data source:
Variable’s Interpretation TypeAs previously discussed, the interpretation type that is chosen for a variable is
critical in guiding the summarization and display of the data. You should reviewthe generated control statements, paying attention to the value of theINTERPRET= parameter on each of the CREATE VARIABLE control statements.You might find that the algorithm used by GENERATE SOURCE did not specifythe interpretation type that is most appropriate. In such a case, you should usethe UPDATE VARIABLE control statement to specify the correct value for theINTERPRET= parameter. For information about how to use this parameter, see“Appendix 5: Variable Interpretation Types” in the SAS IT Resource Managementmacro reference documentation.
For more information about the GENERATE SOURCE control statement, referto the %CPDDUTL GENERATE SOURCE control statement in “Chapter 4: DataDictionary Macro and Control Statements” in the SAS IT Resource Managementmacro reference documentation.
Variable’s FormatThe variable format (specified by the FORMAT= parameter of the CREATE
VARIABLE control statement) specifies the SAS display format to be used whendisplaying the data. By default, this is set according to the interpretation typeselected by GENERATE SOURCE. If you change the interpretation type, youmight also want to change the display format. In such a case, you should use theUPDATE VARIABLE control statement to specify the appropriate value for theFORMAT= parameter. For more information about SAS display formats, see theSAS Language Reference documentation for your release of SAS.
StatisticsEach variable definition includes a list of requested statistics. You should
review this list to make sure that any statistics that you want will be calculated.Likewise, if statistics have been requested that you do not need, you can modifythe list to specify that the statistics not be calculated.
If no summary statistics are selected for a given reduction level of the PDB (day,week, month, or year), then no data will be reduced for the table at that reductionlevel.

166 Step 3 - Customizing the Table and Variable Definitions � Chapter 11
KEPT=YES/NOBy default, all variables are marked with a KEPT status of YES so that the
PDB detail level keeps data for the variable. However, you might not have anyneed for the data that supports some of the variables in the staged data. In suchcases, you can save disk space by marking the variable(s) as KEPT=NO instead ofthe default KEPT=YES. This allows the definition of the variable to be stored inthe data dictionary, without storing the data for this particular variable.
Derived Variables and Formula Variables
In the fax example you create some new variables that do not exist in the rawdata. Such data variables are called derived variables, in that they are derivedfrom existing variables. Derived variables store real data in the PDB, just asnormal variables do. Therefore, you can use a derived variable as a BY or CLASSvariable. You can also request that statistics be calculated automatically for aderived variable.
In contrast, a formula variable can be defined in a table at one or more levels ofthe PDB. SAS IT Resource Management uses views to access the data in eachtable. Formula variables are included in the view definition and thus arecalculated dynamically. This means that formula variables cannot be used as BYor CLASS variables, nor can statistics be calculated for them. Formula variablesare, however, sometimes preferable to derived variables because formula variablesdo not require any disk space for data storage.
BY Variables
The BY variables list designates the sort order for detail-level data for thistable. The BY variables list can also be used for detecting data with duplicatevalues (of the variables in the set of BY variables). For more information aboutduplicate-data checking, see “Appendix 4: Working with Duplicate Data” in the ITService Version macro reference documentation.
The BY variables list is also important for reporting purposes. The generatedsource control statements use the sort order of the model data set (only if SASknows about the sort order because SAS sorted it) to determine the BY variableslist for the detail level. The list can be specified in the UPDATE TABLE controlstatement. If the model data set is not sorted (or, to be more precise, not sorted asknown by SAS), the default BY variables list is DATETIME HOUR SHIFT.
To change the BY variables list, use the UPDATE TABLE control statement. Besure that DATETIME is in the updated BY variables list.
Class Variables
The CLASS variables lists are used� to designate the sort order for data in the summary levels of this table (week,
month, day, and year) in the PDB� to control the granularity of the summary levels� to accumulate statistics for distinct classes of data, based upon the unique
values of the CLASS variables.
The CLASS variables lists are also useful for reporting purposes. By default,the generated control statements specify, for each summary level, a CLASSvariables list that is identical to the sort order (as known to SAS) of the modeldata set. If the model data set is not sorted (or, to be more precise, not sortedusing a method that is known by SAS), the default CLASS variables lists isDATETIME HOUR SHIFT. The CLASS variables lists are not required to matcheach other, nor are they required to match the BY list for the detail level; however,the reduction step (%CPREDUCE) runs fastest when the BY variables list and allCLASS variables lists are the same.

Generic Collector Facility � Step 4 - Setting Up for Production Use 167
To change the CLASS variables lists, use the UPDATE TABLE controlstatement. Be sure that DATETIME is in each updated CLASS variables list.
Age Limits
By default, when SAS IT Resource Management creates a table, it uses the agelimits in the following table to determine how much data to store at each PDBlevel.
Table 11.2 Default PDB Age Limits
PDB Level Default Age Limit of Data to Keep
detail 10 days
day 45 days
week 15 weeks
month 18 months
year 5 years
If you prefer to change the age limit for any or all of the levels, use theUPDATE TABLE control statement with the AGELIMIT= parameter to specifyyour preferred age limits. For an example of some updates for the generateddefinitions in the fax example, see “Appendix 5: Fax: Sample Code for Updatingthe Definitions” on page 185.
For information about setting age limits for your data, see “Specifying the AgeLimit for a Level in a Table” on page 346.
For more information about using %CPDDUTL to store and applying controlstatements, see “Appendix 3: Fax: Sample Code for Generating the Definitions” onpage 179. You can also refer to “Chapter 4: Data Dictionary Macro and ControlStatements” in the SAS IT Resource Management macro reference documentation.
Step 4 - Setting Up for Production UsePrior to this step, you have run, within the same SAS session, the code from step 1
and the control statements from steps 2 and 3. The PDB now has one or more "empty"tables (without data but with descriptors) for the data from this data source. You cannow process data through the staging data sets or views to the table(s) in the PDB and,after that, you can reduce the data in the table(s).
Setting Up the Batch JobYou probably already have a batch job that processes and reduces data each day.
This job can also run report definitions. This production job (which typically runs eachnight) probably has at least the following three steps:
1 The %CPSTART macro is invoked, which starts the SAS IT Resource Managementserver software. This macro specifies the active PDB and also requests writeaccess to that PDB.
2 The %CPPROCES macro is invoked to process the new data into the detail level ofthe PDB. In time, this fully populates the detail level of the tables involved.
3 The %CPREDUCE macro is invoked to reduce the new data. In time, this fullypopulates the day, week, month, and year levels of the tables involved.

168 Generic Collector Facility: Additional Information � Chapter 11
For more information about setting up the daily production job, see “Overview ofSetup Case 3” on page 81 (if your data is character delimited) or “Overview of SetupCase 4” on page 99 (if your data is not character delimited).
The daily production job should be modified as follows:� The staging code should run after the last %CMPROCES, %CPPROCES,
%CSPROCES, or %CWPROCES macro that currently is in the daily productionjob. (For information about this, see “Appendix 2: Fax: Sample Code for Stagingthe Data” on page 177.)
� Following that code, the %CPPROCES macro should be invoked to process thestaged data into the detail level of the PDB. (For more information about the%CPPROCES macro, see the topic %CPPROCES in the SAS IT ResourceManagement macro reference documentation
� You do not need to add another invocation of the %CPREDUCE macro. Theexisting invocation of %CPREDUCE can be used to reduce data for all tables inthe PDB.
Alternatively, you can set up a separate daily production job for the new data source.For an example of a separate daily production job for the fax data, see “Appendix 6:
Fax: Sample Daily Process-and-Reduce Job” on page 185.
Adding Report DefinitionsIn addition to the report definitions that are already in the daily production job, you
would typically add to the daily job some report definitions for reporting on the faxdata. You would create new report definitions or modify existing report definitions togenerate the reports that you want.
Because creation and modification of report definitions is the same whether or notthe Generic Collector Facility is used, this document does not discuss report definitions.For more about report definitions, refer to the definitions that are already in your dailyproduction job. For additional information, see “Using the Manage Report DefinitionsTool” on page 468.
Generic Collector Facility: Additional Information
Other Considerations
Verifying That the Logging and Collector Software Is Installed AppropriatelyBefore you start your data collection software, ensure that the installation is correct
for your operating system.
z/OS� Preferably, use one host for collecting data.
If more than one host logs data, then typically, tapes of the logs are brought to asingle host for consolidation, whether in SMF-style records or not. Similarly, muchof the data is preprocessed by MXG into a single database of staging data, whetherthe data was in SMF-style records or not. SAS IT Resource Management treats alldata that MXG puts in this data base as if the data had been written onSMF-style records and collected by SMF.
� If you have massive amounts of data, for space or time reasons, you might not beable to collect the data on one host.

Generic Collector Facility � Other Considerations 169
If you have data on CICS or DB2 transactions, on multiple hosts or even asingle host, you might not want to collect it (for space or time reasons). In thatcase, you can process the data directly from the logs to the summary levels of oneor more PDBs by using views.
You can also reduce the data directly from the logs to the summary levels of oneor more PDBs. This is described in the %CMEXTDET section of the macroreference documentation.
UNIX
� Preferably, do not use your workstation as the collector host.
Typically, the collector host is a different machine from your workstation forperformance reasons.
� If the collector host is a different machine from your workstation, verify that
� the collector host is network-accessible to your workstation� X Windows software is installed and running on your workstation
� the display is redirected from the collector host to your workstation.
Windows
� Preferably, do not use your workstation as the collector host.
Typically, the collector host is a different machine from your workstation forperformance reasons.
� If the collector host is a different machine from your workstation, verify that thecollector host is network-accessible to your workstation.
Installing Table Definitions in the Master Data Dictionary (Optional)Note: The Package Collector enables the collector-support developer to package all
the entities for a data collector or data source and install them into PGMLIB or otherlocations, so that the functionality can be shared or treated as if it were supplied withSAS IT Resource Management. For more information, see “Creating and Installing aCollector Support Package” on page 426. �
Other users at your site might want to use the same table definition(s) in theirPDBs. You can use %CPDDUTL to apply an INSTALL TABLE control statement thatcopies the table and variable definitions from the data dictionary in this PDB into thesupplied (master) data dictionary. (For more information about the INSTALL TABLEstatement, see “Chapter 4: Data Dictionary Macros and Control Statements” in the SASIT Resource Management macro reference documentation.) In order for the INSTALLTABLE control statement to work, you must have a SAS libref named PGMLIBW. Thelibref must be established with write access and must point to the same physicallocation that the PGMLIB libref points to.
For our example, the following SAS statements, which can be submitted from theSAS Program Editor window or in batch, use the %CPCAT macro to store the INSTALLTABLE control statement and then use the %CPDDUTL macro to run the INSTALLTABLE statement. This example assumes that the SAS IT Resource Managementserver software is in SAS.ITRM.PGMLIB. It also assumes that the active PDB wasspecified earlier in the job (by a %CPSTART invocation).
Figure 1 Invocation of INSTALL TABLE in Order to Copy Table and VariableDefinitions into the Master Data Dictionary
libname pgmlibw ’SAS.ITRM.PGMLIB’ ;%cpcat;
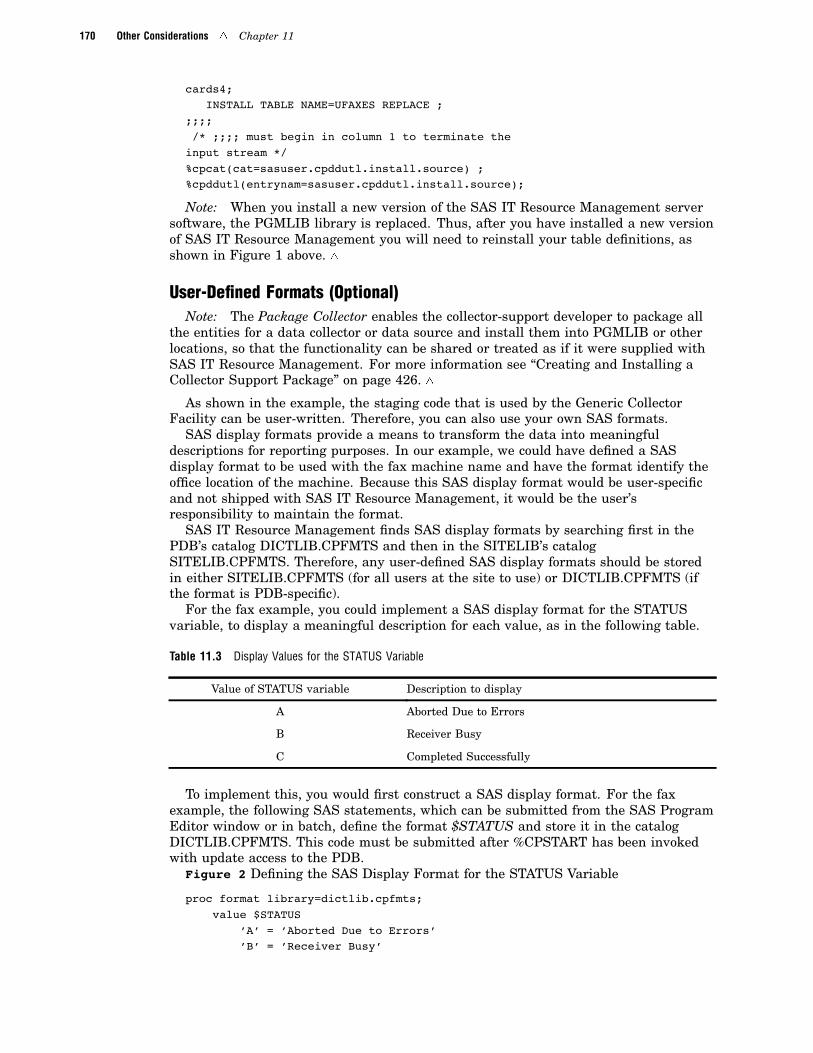
170 Other Considerations � Chapter 11
cards4;INSTALL TABLE NAME=UFAXES REPLACE ;
;;;;/* ;;;; must begin in column 1 to terminate theinput stream */%cpcat(cat=sasuser.cpddutl.install.source) ;%cpddutl(entrynam=sasuser.cpddutl.install.source);
Note: When you install a new version of the SAS IT Resource Management serversoftware, the PGMLIB library is replaced. Thus, after you have installed a new versionof SAS IT Resource Management you will need to reinstall your table definitions, asshown in Figure 1 above. �
User-Defined Formats (Optional)Note: The Package Collector enables the collector-support developer to package all
the entities for a data collector or data source and install them into PGMLIB or otherlocations, so that the functionality can be shared or treated as if it were supplied withSAS IT Resource Management. For more information see “Creating and Installing aCollector Support Package” on page 426. �
As shown in the example, the staging code that is used by the Generic CollectorFacility can be user-written. Therefore, you can also use your own SAS formats.
SAS display formats provide a means to transform the data into meaningfuldescriptions for reporting purposes. In our example, we could have defined a SASdisplay format to be used with the fax machine name and have the format identify theoffice location of the machine. Because this SAS display format would be user-specificand not shipped with SAS IT Resource Management, it would be the user’sresponsibility to maintain the format.
SAS IT Resource Management finds SAS display formats by searching first in thePDB’s catalog DICTLIB.CPFMTS and then in the SITELIB’s catalogSITELIB.CPFMTS. Therefore, any user-defined SAS display formats should be storedin either SITELIB.CPFMTS (for all users at the site to use) or DICTLIB.CPFMTS (ifthe format is PDB-specific).
For the fax example, you could implement a SAS display format for the STATUSvariable, to display a meaningful description for each value, as in the following table.
Table 11.3 Display Values for the STATUS Variable
Value of STATUS variable Description to display
A Aborted Due to Errors
B Receiver Busy
C Completed Successfully
To implement this, you would first construct a SAS display format. For the faxexample, the following SAS statements, which can be submitted from the SAS ProgramEditor window or in batch, define the format $STATUS and store it in the catalogDICTLIB.CPFMTS. This code must be submitted after %CPSTART has been invokedwith update access to the PDB.
Figure 2 Defining the SAS Display Format for the STATUS Variable
proc format library=dictlib.cpfmts;value $STATUS
’A’ = ’Aborted Due to Errors’’B’ = ’Receiver Busy’
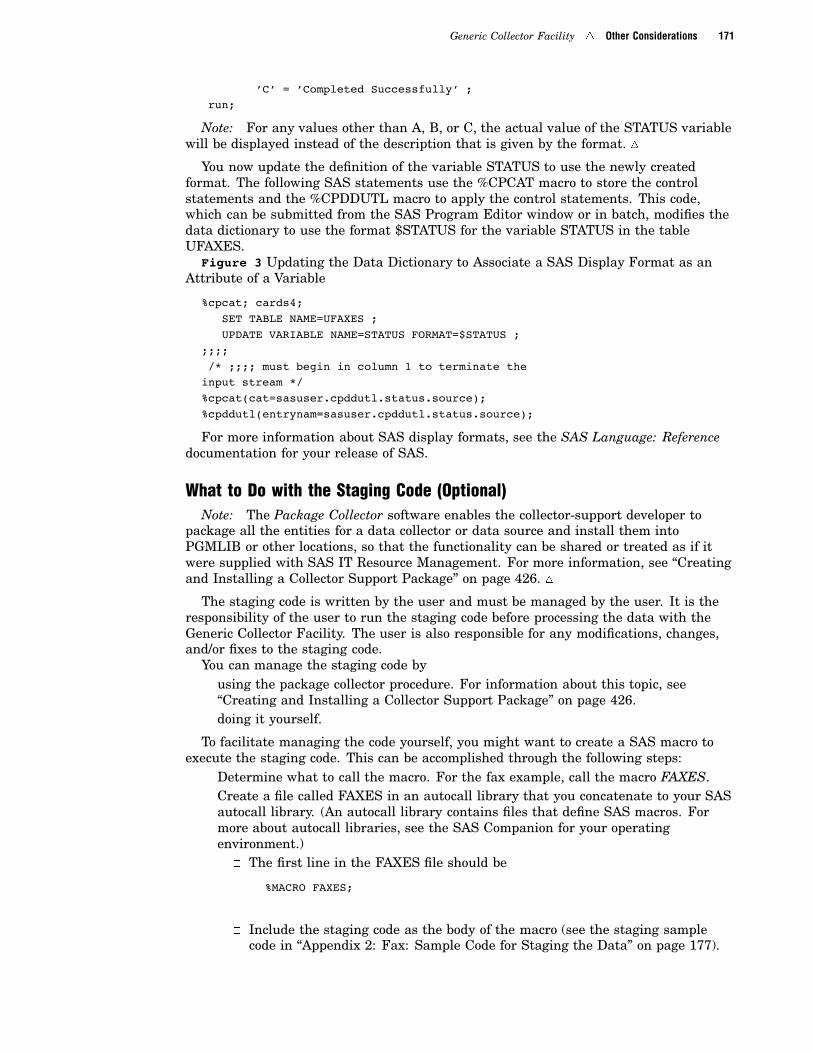
Generic Collector Facility � Other Considerations 171
’C’ = ’Completed Successfully’ ;run;
Note: For any values other than A, B, or C, the actual value of the STATUS variablewill be displayed instead of the description that is given by the format. �
You now update the definition of the variable STATUS to use the newly createdformat. The following SAS statements use the %CPCAT macro to store the controlstatements and the %CPDDUTL macro to apply the control statements. This code,which can be submitted from the SAS Program Editor window or in batch, modifies thedata dictionary to use the format $STATUS for the variable STATUS in the tableUFAXES.
Figure 3 Updating the Data Dictionary to Associate a SAS Display Format as anAttribute of a Variable
%cpcat; cards4;SET TABLE NAME=UFAXES ;UPDATE VARIABLE NAME=STATUS FORMAT=$STATUS ;
;;;;/* ;;;; must begin in column 1 to terminate theinput stream */%cpcat(cat=sasuser.cpddutl.status.source);%cpddutl(entrynam=sasuser.cpddutl.status.source);
For more information about SAS display formats, see the SAS Language: Referencedocumentation for your release of SAS.
What to Do with the Staging Code (Optional)Note: The Package Collector software enables the collector-support developer to
package all the entities for a data collector or data source and install them intoPGMLIB or other locations, so that the functionality can be shared or treated as if itwere supplied with SAS IT Resource Management. For more information, see “Creatingand Installing a Collector Support Package” on page 426. �
The staging code is written by the user and must be managed by the user. It is theresponsibility of the user to run the staging code before processing the data with theGeneric Collector Facility. The user is also responsible for any modifications, changes,and/or fixes to the staging code.
You can manage the staging code by� using the package collector procedure. For information about this topic, see
“Creating and Installing a Collector Support Package” on page 426.� doing it yourself.
To facilitate managing the code yourself, you might want to create a SAS macro toexecute the staging code. This can be accomplished through the following steps:
� Determine what to call the macro. For the fax example, call the macro FAXES.� Create a file called FAXES in an autocall library that you concatenate to your SAS
autocall library. (An autocall library contains files that define SAS macros. Formore about autocall libraries, see the SAS Companion for your operatingenvironment.)
� The first line in the FAXES file should be
%MACRO FAXES;
� Include the staging code as the body of the macro (see the staging samplecode in “Appendix 2: Fax: Sample Code for Staging the Data” on page 177).

172 Other Considerations � Chapter 11
� The last line should be
%MEND FAXES;
You can now simply invoke the %FAXES macro to run the staging code.To process the staged data into the PDB by using the %FAXES macro, submit the
following code:
%INCLUDE FAXES.SAS;%FAXES;RUN;
%CPPROCES(COLLECTR=GENERIC,TOOLNM=SASDS,GENLIB=WORK,_RC=CPPRRC);
%PUT CPPROCES return code is &CPPRRC;
Note: For more information about submitting SAS programs and code, see “Workingwith the Interface for Batch Mode” on page 18. �
For more detailed samples of code that uses the %FAXES macro to process stageddata into the PDB, see “Appendix 6: Fax: Sample Daily Process-and-Reduce Job” onpage 185.
The following topics describe more about handling staging code yourself:
� Include MXG Staging Code in Your Batch Job
The staging code must be executed in the same batch job as the %CPSTARTmacro and the %CMPROCES or %CPPROCES macro. The MXG code that stagesthe data must be executed after the %CPSTART macro and before the%CMPROCES or %CPPROCES macro. The name of the MXG member that youneed to include usually begins with the letters TYPE, but this might vary, basedon your data collector or data source. For example, if you use IBM DCOLLECTdata, then your reference to the MXG staging code would look like this:
%INCLUDE SOURCLIB(TYPEDCOL);RUN;
The RUN statement in this example must be placed immediately after theINCLUDE statement. These statements execute the MXG staging code, includingyour changes to the IMACDCOL member and to either the IHDRDCOL or theEXDCO members, and write the staging data sets to the WORK library. When the%CMPROCES or %CPPROCES macro executes with the COLLECTR=GENERICparameter, your data is processed into the detail level of the PDB.
Note: Remember to specify the GENLIB= parameter on %CxPROCES macro inorder to indicate the libref of the library in which the staged data is stored. InMXG staging code, typically the staged data is stored in the WORK library. �
� Include Non-MXG Staging Code in Your Batch Job
The staging code must be executed in the same batch job as the %CPSTARTmacro and the %CMPROCES, %CPPROCES, %CSPROCES, or %CWPROCESmacro. The staging code should be inserted after the call to the %CPSTART macroand before the call to the %CMPROCES, %CPPROCES, %CSPROCES, or%CWPROCES macro. This is because the %CPDUPCHK macro writes thetemporary control data set to the WORK library and the data set is subsequentlyused by the %CPDUPUPD macro. The control data would be lost if %CPSTARTexecuted in a different SAS session, because the WORK library is deleted bydefault at the end of a SAS session.
If you run on z/OS and you store your staging code inMXG.USERID.SOURCLIB so that your staging code and MXG code are in one

Generic Collector Facility � Other Considerations 173
location, then you can use the following example to include the SAS code(assuming that your code is in a member that is named stage):
%INCLUDE SOURCLIB(stage);RUN;
If you run in a UNIX or Windows environment, then you can use one of thefollowing pairs of statements to include the staging code. The first example appliesto UNIX and the second applies to Windows environments.
%INCLUDE ’fully-qualified-directory/stage.sas’;RUN;
%INCLUDE ’fully-qualified-directory\stage.sas’;RUN;
If a RUN command appears at the end of your staging code, then the RUNcommand that is shown immediately after the %INCLUDE statement in thisexample is not required.
This %INCLUDE statement executes your staging code and executes yourchanges to implement the duplicate-data-checking macros. When you call the%CxPROCES macro with the COLLECTR=GENERIC parameter, your data isprocessed into the detail level of the PDB from the staging data set where it waswritten by your staging code.
Note: Remember to specify the GENLIB= parameter on the call to %CxPROCESin order to indicate the libref of the library to which the staging code writes thestaged data. �
Handling Duplicate DataNote: The Package Collector enables the collector-support developer to package all
the entities for a data collector or data source and install them into PGMLIB or otherlocations, so that the functionality can be shared or treated as if it were supplied withSAS IT Resource Management. For more information, see “Creating and Installing aCollector Support Package” on page 426. �
Note: Depending on the data collector or data source from which you obtain thedata, you might (or might not) need to implement support for handling duplicate data. �
For more information about duplicate-data checking, see “Appendix 4: Working withDuplicate Data” in the SAS IT Resource Management macro reference documentation.Also see “Overview of Using Process Exits” on page 442.
Using the C2RATE and D2RATE Interpretation Types (Optional)The C2RATE and D2RATE interpretation types are often the most difficult to
understand and use. An example will clarify the distinction between these two.Consider a situation where a data collector or data source regularly collects data every15 minutes. Each collected record describes the entire 15-minute interval that was justcompleted. If a metric exists as some sort of accumulated count, you might want to seeit as a rate in the detail level. An example of this would be the number of pages that afax machine sends during the recorded interval. Intuitively, you might consider thismetric to be a COUNT. However, because you know that this count will be converted toa rate in the reduction levels, you might want to work with it as a RATE in the detaillevel as well. Therefore, you could choose to assign the C2RATE or D2RATEinterpretation type to this metric. (For more information about weighting, see
174 Advanced Concepts Related to Staging Data � Chapter 11
“Appendix 5: Variable Interpretation Types” in the SAS IT Resource Managementmacro reference documentation.)
The C2RATE interpretation type should be used in situations where the datacollector or data source reports a metric in each interval as a counter that was not resetat the start of the interval. For example, suppose that in the first interval the metricreports a value of 50, and in the second interval the metric reports a value of 75. Thetrue value for the count that was reported by the metric is 50 for the first interval(because the first interval is assumed to start from 0) and 25 for the second interval(because the second interval starts where the first interval ends).
The D2RATE interpretation type should be used in situations where the datacollector or data source reports a metric (in each interval) as a counter that was reset atthe start of the interval. Using the same example, the metric that was recorded in thefirst interval would report a value of 50, and in the second interval it would report avalue of 25.
%C2RATE processing divides the event count by the value of the variableDURATION in order to determine the rate. As such, the C2RATE and D2RATEinterpretation types are meaningful only for type Interval tables, because only typeInterval tables have a DURATION variable.
For more information about the C2RATE and D2RATE interpretation types, see“Appendix 5: Variable Interpretation Types” in the SAS IT Resource Managementmacro reference documentation.
Advanced Concepts Related to Staging DataAt this point the fax example is complete. The fax example was fairly
straightforward with regard to staging the data. This section discusses otherdata-staging situations that you might encounter. Each of these cases requires moreexperience with writing SAS DATA step code for step 1. In most cases, you would stillperform steps 2, 3, and 4 as previously discussed.
Case 1: Data Already in a SAS Data SetYou might find that the raw data that you want to use is already in a SAS data set.
If so, you can immediately use GENERATE SOURCE to build your table and variabledefinitions. You will need to be sure that you have a variable that can serve as yourDATETIME variable. If you are creating a type Interval table, you will also need avariable to serve as your DURATION variable. Again, these variables do not need to benamed DATETIME and DURATION, respectively, in the staged data; by using theDATETIME= and DURATION= parameters on the GENERATE SOURCE statement,you can identify the names that are used in the staged data.
You might find that you need to construct the DATETIME and/or DURATIONvariables. In such a case, you might find it easier to create a SAS DATA step view inwhich you build the DATETIME and DURATION variables. In %CPPROCES, youwould use the data view in place of the data set in the first parameter.
For more information about the use of SAS DATA step views, refer to thedocumentation for your release of SAS.
Regardless of whether you have the data already in a SAS data set or whether youuse a SAS DATA step view, one consequence is that you do not need to run any stagingcode, because the existing data set or view is essentially already the staged data set orview.

Generic Collector Facility � Advanced Concepts Related to Staging Data 175
Case 2: Data Already in an External DBMSYou might also encounter a situation in which the data that you want to stage is
stored in an external database management system (DBMS). You can use SAS/ACCESSto create a SAS/ACCESS view descriptor, which can be used just like a SAS data set orview. SAS/ACCESS can read data from the following relational databases:
� DB2 under z/OS
� DB2 under VM
� DB2 under UNIX or PC
� CA-OpenIngres
� Informix
� ODBC
� OLE DB
� ORACLE
� Oracle Rdb
� SYBASE
� MS SQL Server
� Teradata
SAS/ACCESS can also read data from the following non-relational databases andother data sources:
� SAS/ACCESS Interface to ADABAS
� SAS/ACCESS Interface to CA-DATACOM/DB
� SAS/ACCESS Interface to CA-IDMS
� SAS/ACCESS Interface to IMS-DL/I
� SAS/ACCESS Interface to PC File Formats
� SAS/ACCESS Interface to SYSTEM 2000 software
And you can access Enterprise Resource Planning (ERP) systems by using:
� SAS/ACCESS Interface to Baan
� SAS/ACCESS Interface to PeopleSoft
� SAS/ACCESS Interface to R/3
� SAS/ACCESS Interface to SAP BW
� SAS Solution Adapters for SAP
For more information about SAS/ACCESS, contact your SAS Sales Representative.
Case 3: Using a SAS DATA Step View instead of a SAS Data SetIn situations where you are staging data for one table from one external data source
(as in the fax example), you might find it advantageous to define a SAS DATA step viewinstead of a SAS data set. In essence, your staging code defines the view. Thistechnique works only in situations where the entire staging process can beaccomplished in one DATA step (that is, no extra steps, such as sorts, are required).The advantage of using a view is that only one pass through the data isrequired—when the data is processed into the PDB. In the flow that is shown in the faxexample, two passes through the data are required: one pass to run the staging code,and one pass when processing the staged data into the PDB.
For more information about the use of SAS DATA step views, refer to thedocumentation for your release of SAS.

176 Generic Collector Facility: Appendices � Chapter 11
Note: Suppose you have data for multiple tables (such as CICS tables) and supposethe amount of data for one particular table (such as CICS transaction data) isextremely large. To avoid one pass of the large amount of data, you can stage the largeamount of data as a view and stage the rest of the data as data sets. To make this work,in the invocation of the process macro, you must explicitly list the tables (in the tablistparameter) and the first table must be the one whose data is staged with a view. �
Case 4: Reading a Report (“Screen Scraping”)Sometimes the data that you want to read is not in a simple log or data file. Instead,
the data is actually part of a report. Staging the data essentially becomes an exercise inparsing the report to extract the data values. There is no standard method for doingthis. An advanced knowledge of SAS DATA step programming might be required insuch cases. If these skills do not exist at your site, you might want to contact your SASSales Representative to arrange for consulting services.
Case 5: Multiple Tables from a Single Input SourceIn our example, a simple log file was used to populate a single table. However, two
tables could have been created: one for faxes sent, and another for faxes received. Thedecision whether to create multiple tables from a data source depends upon the natureand intended use of the data.
If you decide to stage data for multiple tables from one data source, you need to runthe staging code only once per daily production job. And you need to invoke the%CPPROCES macro only once to process the staged data into the multiple tables.
Case 6: Character-Delimited DataSome data collectors and data sources provide the ability to store the raw data in a
character-delimited flat file. Quite often the delimiter is the comma character, spacecharacter, and/or tab “character.” SAS IT Resource Management supports the use ofcharacter-delimited data as input for processing data with the Generic CollectorFacility. Note that in order to use this feature, you can omit the staging code but youmust still define the table and variables into which the data is to be processed. In thecase of character-delimited data, you can use the INTYPE=CDC parameter with theGENERATE SOURCE control statement to build the necessary table and variabledefinitions from the raw character delimited data. For further information, see“Appendix 13: Character-Delimited Support in GENERATE SOURCE” on page 196.
Support for character-delimited data is available on all hosts, by using the%CPPROCES macro. For more information, see “Appendix 9: UsingCharacter-Delimited Data” on page 190.
Generic Collector Facility: Appendices
Appendix 1: Fax: Sample LogThis is an example of what the fax log looks like. The column ruler indicates the
location of the data, as shown in Table 11.1 on page 160.
Column 1 2 3 4 5 6Ruler 12345678901234567890123456789012345678901234567890123456789012

Generic Collector Facility � Appendix 2: Fax: Sample Code for Staging the Data 177
larry S 502 677-4444 5 10/12/96 13:14:23 0 00:01:45 Ccurly R 502 677-4444 5 10/13/96 01:01:12 2 00:05:14 Cmoe S 052 014 752-1234 5 10/14/96 01:01:12 2 00:05:14 C
Appendix 2: Fax: Sample Code for Staging the DataThis is the SAS code used to stage the data from the fax log. When you want to run
this code, you can submit it from the SAS Program Editor window or in batch.
Note: Before you submit it, be sure that you have appended the code for generatingthe definitions. For information about this, see “Appendix 3: Fax: Sample Code forGenerating the Definitions” on page 179. �
filename faxlog ’fax.log’ ;
data work.faxes(drop=date time label=’Fax Activity’);
attrib machine label=’Machine name’ length=$8;attrib type label=’Fax Type: (S)end or (R)eceive’ length=$1;attrib country label=’Country Code’ length=$3;attrib acode label=’Area Code’ length=$3;attrib phnum label=’Phone Number’ length=$8;attrib pages label=’Pages Sent or Received’;attrib timestmp label=’Datetime stamp of fax’ format=datetime21.2;attrib resent label=’Pages Resent’;attrib connect label=’Total connect time’ format=time12.2;attrib pctrtry label=’Percent retries’ format=percent7.2;attrib status label=’Final Status Code’ length=$1;
infile faxlog;
input @1 machine @10 type @12 country@16 acode @20 phnum @29 pages@32 date : mmddyy8. @41 time : time8. @50 resent@53 connect : time8. @62 status;
status = upcase(status);if status not in(’A’,’B’,’C’) then do;
put ’Invalid status code found in record ’ _n_ ;put ’This record will not be included in the staged data’;put machine= type= country= acode= phnum= pages= date= time=
resent= connect= status=;delete;
end;
timestmp=dhms(date,hour(time),minute(time),second(time));
if pages = 0 then pctrtry = .;else pctrtry = resent / pages ;run;
178 Appendix 2: Fax: Sample Code for Staging the Data � Chapter 11
Notes� The FILENAME statement assigns a fileref, which is a temporary name within
the current SAS session, to a file. In this case, the fileref FAXLOG is assigned tothe file FAX.LOG.
� The DATA statement creates a SAS data set and specifies characteristics of thedata set. The data set is to be created in the SAS library named WORK, have thename FAXES, and have the descriptive label FAX ACTIVITY. (WORK is apredefined SAS library that is automatically created at the beginning of a SASsession and automatically deleted at the end of a SAS session.)
� The DATA statement also begins a DATA step, which in this case ends with aRUN statement. Within the DATA step, there is an implied loop. In this case, onepass through the loop reads one record’s worth of data from the input file to abuffer, modifies the data as described in the DATA step, and writes the data(except for the dropped variables DATE and TIME) from the buffer as a row in thedata set. (The data set has rows that correspond to records in the input file andcolumns that correspond to fields on the records.)
� The ATTRIB statements specify some of the attributes of the data. Thesestatements are associated with the INPUT statement later in the step. For moreabout attributes that help to simplify later steps, see “Appendix 5: VariableInterpretation Types” in the SAS IT Resource Management macro referencedocumentation and see “Appendix 8: Algorithm Used by GENERATE SOURCE”on page 188.
� The INFILE statement specifies the fileref of the file that supplies the inputrecords. In this case, the file to which FAXLOG points supplies the input records.
� The INPUT statement specifies the location of each field of interest on an inputrecord and assigns a name to the data in that field. In this case, the locations arespecified by the beginning column symbol, @. This statement also causes onerecord’s worth of data to be read into the buffer.
� The value of the fax’s final transmission status is checked. If the status is notvalid, the DATA step puts (writes) an error message in the SAS log and deletes thedata from the buffer.
� The DATE and TIME variables are used to create the TIMESTMP variable.� A variable (PCTRTRY), for percent retries, is created to monitor the efficiency of
the transfer. Both TIMESTMP and PCTRTRY are derived variables. A derivedvariable is one that does not exist in the raw data, but is derived from it in thestaged data. You could instead create a formula variable in the SAS IT ResourceManagement table, but formula variables cannot be used as BY or CLASSvariables, nor can statistics be calculated automatically for formula variables.
� Preceding the RUN statement, the contents of the buffer, if any, are written to thestaged data (as a row in the staged data).
� The RUN statement specifies that SAS is to run the previous statements now. Asa consequence, looping begins in the DATA step. The loop automaticallyterminates when the end-of-file is encountered in the input file. Thus, when theprocessing that was triggered by the RUN is completed, a FAXES data set existsin the (temporary) WORK library. In this example, the data set would have threeobservations, corresponding to the three records in the input file.
� In this document, you will use these statements in two ways. First, you will addthem to a one-time job (or SAS session) that creates an empty staged data set,reads the staged data set to create PDB table and variable definitions, applies thedefinitions to the PDB, and deletes the empty staged data set. Later, you willplace them in a macro and put that macro in the daily production job. In the dailyproduction job, one SAS session will start SAS IT Resource Management, stage the

Generic Collector Facility � Appendix 3: Fax: Sample Code for Generating the Definitions 179
data (by means of this macro), process the staged data into the PDB, reduce thedata, (optionally) report on the data, and delete the staged data set.
� For more about the implied loop and the statements in the DATA step, see thedocumentation for your release of SAS.
Appendix 3: Fax: Sample Code for Generating the DefinitionsBecause the GENERATE SOURCE control statement runs against the
WORK.FAXES data set, and the WORK library is deleted at the end of the active SASsession (or, in batch, SAS procedure), you must submit this code after the staging codein the same SAS session or procedure. Thus, if you submit the staging code from theSAS Program Editor window, you would follow by submitting this code from the SASProgram Editor window during the same SAS session. Alternatively, you can place bothsets of code in the same SAS procedure in a batch job.
Here is the code for generating the table and variable definitions for the fax data:
%cpcat; cards4;GENERATE SOURCE NAME=ufaxes
TYPE=eventDATETIME=timestmpENTRYNAME=’sasuser.cpddutl.faxes.source’DATASET=’work.faxes’REPLACE ;
;;;; /* ;;;; must begin in column 1 to terminatethe input stream */
%cpcat(cat=sasuser.cpddutl.generate.source);%cpddutl(entrynam=
sasuser.cpddutl.generate.source);
Notes� For purposes of constructing the table and variable definitions, the model data set
can be created by running the staging code with a null input file. This results in amodel data set that is empty of data but has the needed data descriptors.
� The first invocation of the SAS IT Resource Management %CPCAT utility macrocopies instream text to a buffer. The SAS language CARDS4 statement indicatesthe beginning of the instream text. The four semicolons, starting in column 1,indicate the end of the instream text. In this case, the instream text consists of aGENERATE SOURCE control statement.
� The second invocation of the %CPCAT macro finds the stream of cards in thebuffer and stores them in the indicated SAS catalog .SOURCE entry. In this case,it stores them in your SASUSER library, in the CPDDUTL catalog, in theGENERATE entry, which is of type SOURCE. (The SASUSER library is predefinedand is not deleted when the SAS session ends.) For more information about the%CPCAT utility macro, see the topic %CPCAT in the SAS IT ResourceManagement macro reference documentation.
� The invocation of the SAS IT Resource Management %CPDDUTL macro finds the%CPDDUTL control statements in the specified SAS catalog entry and runs them.In this case, it reads the SASUSER.CPDDUTL.GENERATE.SOURCE entry andruns the GENERATE SOURCE control statement that it finds there. TheGENERATE SOURCE statement specifies that the WORK.FAXES data set is to beread, and that the corresponding table and variable definitions are to be generatedand written to the SAS catalog entry that is named

180 Appendix 4: Fax: Sample Table and Variable Definitions � Chapter 11
SASUSER.CPDDUTL.FAXES.SOURCE. The GENERATE SOURCE statementalso specifies that the definitions are to replace whatever is in that entry (ifanything is in that entry), that the definitions are to name the table UFAXES,that the table is to be specified as type Event, and that the staged data set’s nameof the variable that contains date and time is TIMESTMP.
� At any point, if you want to see the contents of a SAS catalog entry, you can definethe libref for that library (if it is not already defined) and then use the COPYcommand to display the entry in your SAS Program Editor window. The librefSASUSER is already defined, so in this case, you only need to issue the command
copy sasuser.cpddutl.faxes.source
� For more information about the %CPDDUTL macro, see “Chapter 4: DataDictionary Macros and Control Statements” in the SAS IT Resource Managementmacro reference documentation.
To see the CREATE TABLE and CREATE VARIABLE control statements that aregenerated, see “Appendix 4: Fax: Sample Table and Variable Definitions” on page 180.
The generated control statements include attribute information such as the variableinterpretation type, the format to use for displaying the data, the default statistics tocollect, and the BY and CLASS variables. For more information about how theGENERATE SOURCE control statement determines what information to use, see“Appendix 8: Algorithm Used by GENERATE SOURCE” on page 188.
Appendix 4: Fax: Sample Table and Variable DefinitionsThe following source statements are generated by running the code in Appendix 2
and Appendix 3. For more information about these topics, see “Appendix 2: Fax:Sample Code for Staging the Data” on page 177 and “Appendix 3: Fax: Sample Code forGenerating the Definitions” on page 179.
/*--------------------------------------------------------------*| Table definition statements generated on| 27NOV96:15:12:58.92| For PDB table....: UFAXES| Table type.......: EVENT| Now sorted by....: MACHINE TYPE COUNTRY| ACODE TIMESTMP| From SAS data set: WORK.FAXES| Data set type....: DATA| Will be sorted by: MACHINE TYPE COUNTRY| ACODE DATETIME HOUR| SHIFT*--------------------------------------------------------------*/
DELETE TABLE NAME=UFAXES NOERROR ;
CREATE TABLE NAME=UFAXESCOLLECTOR=GENERIC TOOLNAME=SASDS TYPE=EVENTKEPT=YESEXTNAME=FAXESLABEL=’Fax Activity’DESCRIPTION=’Fax Activity’DETAIL=(agelimit=10 )DAY=(agelimit=45 )WEEK=(agelimit=15 )

Generic Collector Facility � Appendix 4: Fax: Sample Table and Variable Definitions 181
MONTH=(agelimit=18 )YEAR=(agelimit=5 ) ;
/*----------------------------------------------------------*| Variable definitions for table: UFAXES*----------------------------------------------------------*/
CREATE VARIABLE NAME=MACHINE EXTNAME=MACHINESUBJECT=’N/A’ LABEL=’Machine name’DESCRIPTION=’Machine name’FORMAT=.TYPE=CHARACTER LENGTH=8 INTERPRET=STRINGKEPT=YES;
CREATE VARIABLE NAME=TYPE EXTNAME=TYPESUBJECT=’N/A’ LABEL=
’Fax Type: (S)end or (R)eceive’DESCRIPTION=’Fax Type: (S)end or (R)eceive’FORMAT=.TYPE=CHARACTER LENGTH=1 INTERPRET=STRINGKEPT=YES;
CREATE VARIABLE NAME=COUNTRY EXTNAME=COUNTRYSUBJECT=’N/A’ LABEL=’Country Code’DESCRIPTION=’Country Code’FORMAT=.TYPE=CHARACTER LENGTH=3 INTERPRET=STRINGKEPT=YES;
CREATE VARIABLE NAME=ACODE EXTNAME=ACODESUBJECT=’N/A’ LABEL=’Area Code’DESCRIPTION=’Area Code’FORMAT=.TYPE=CHARACTER LENGTH=3 INTERPRET=STRINGKEPT=YES;
CREATE VARIABLE NAME=PHNUM EXTNAME=PHNUMSUBJECT=’N/A’ LABEL=’Phone Number’DESCRIPTION=’Phone Number’FORMAT=.TYPE=CHARACTER LENGTH=8 INTERPRET=STRINGKEPT=YES;CREATE VARIABLE NAME=PAGES EXTNAME=PAGESSUBJECT=’N/A’ LABEL=’Pages Sent or Received’DESCRIPTION=’Pages Sent or Received’FORMAT=BEST12.TYPE=NUMERIC LENGTH=8 INTERPRET=COUNTKEPT=YESISTATS =(

182 Appendix 4: Fax: Sample Table and Variable Definitions � Chapter 11
NOCOUNT SUM AVERAGE NOMAXIMUM NOMINIMUMNOUSS NOCV NORANGE NOVARIANCENOSTD NONMISS)
DAY =(NOCOUNT SUM AVERAGE NOMAXIMUM NOMINIMUMNOUSS NOCV NORANGE NOVARIANCENOSTD NONMISS)
WEEK =(NOCOUNT SUM AVERAGE NOMAXIMUM NOMINIMUMNOUSS NOCV NORANGE NOVARIANCENOSTD NONMISS)
MONTH =(NOCOUNT SUM AVERAGE NOMAXIMUM NOMINIMUMNOUSS NOCV NORANGE NOVARIANCENOSTD NONMISS)
YEAR =(NOCOUNT SUM AVERAGE NOMAXIMUM NOMINIMUMNOUSS NOCV NORANGE NOVARIANCENOSTD NONMISS)
;UPDATE VARIABLE NAME=DATETIME
EXTNAME=TIMESTMPSUBJECT=’N/A’ LABEL=’Datetime stamp of fax’DESCRIPTION=’Datetime stamp of fax’FORMAT=DATETIME21.2;
CREATE VARIABLE NAME=RESENT EXTNAME=RESENTSUBJECT=’N/A’ LABEL=’Pages Resent’DESCRIPTION=’Pages Resent’FORMAT=BEST12.TYPE=NUMERIC LENGTH=8 INTERPRET=COUNTKEPT=YESISTATS =(
NOCOUNT SUM AVERAGE NOMAXIMUM NOMINIMUMNOUSS NOCV NORANGE NOVARIANCENOSTD NONMISS)
DAY =(NOCOUNT SUM AVERAGE NOMAXIMUM NOMINIMUMNOUSS NOCV NORANGE NOVARIANCENOSTD NONMISS)
WEEK =(NOCOUNT SUM AVERAGE NOMAXIMUM NOMINIMUMNOUSS NOCV NORANGE NOVARIANCENOSTD NONMISS)
MONTH =(
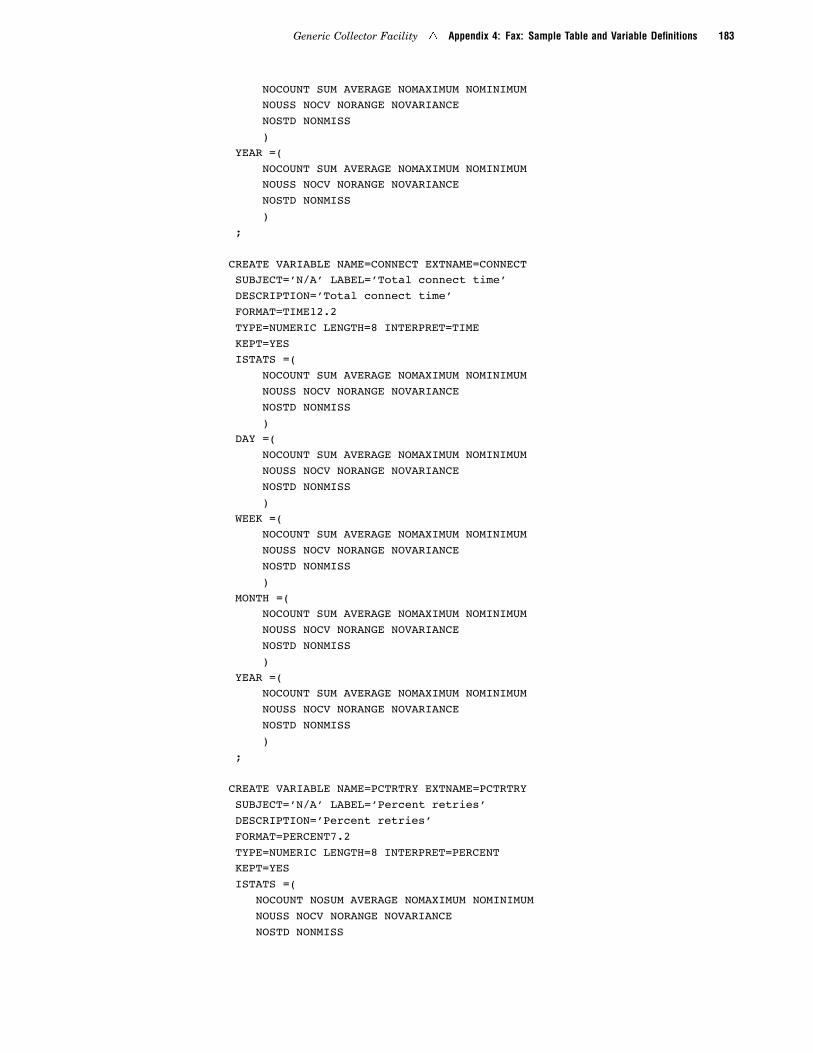
Generic Collector Facility � Appendix 4: Fax: Sample Table and Variable Definitions 183
NOCOUNT SUM AVERAGE NOMAXIMUM NOMINIMUMNOUSS NOCV NORANGE NOVARIANCENOSTD NONMISS)
YEAR =(NOCOUNT SUM AVERAGE NOMAXIMUM NOMINIMUMNOUSS NOCV NORANGE NOVARIANCENOSTD NONMISS)
;
CREATE VARIABLE NAME=CONNECT EXTNAME=CONNECTSUBJECT=’N/A’ LABEL=’Total connect time’DESCRIPTION=’Total connect time’FORMAT=TIME12.2TYPE=NUMERIC LENGTH=8 INTERPRET=TIMEKEPT=YESISTATS =(
NOCOUNT SUM AVERAGE NOMAXIMUM NOMINIMUMNOUSS NOCV NORANGE NOVARIANCENOSTD NONMISS)
DAY =(NOCOUNT SUM AVERAGE NOMAXIMUM NOMINIMUMNOUSS NOCV NORANGE NOVARIANCENOSTD NONMISS)
WEEK =(NOCOUNT SUM AVERAGE NOMAXIMUM NOMINIMUMNOUSS NOCV NORANGE NOVARIANCENOSTD NONMISS)
MONTH =(NOCOUNT SUM AVERAGE NOMAXIMUM NOMINIMUMNOUSS NOCV NORANGE NOVARIANCENOSTD NONMISS)
YEAR =(NOCOUNT SUM AVERAGE NOMAXIMUM NOMINIMUMNOUSS NOCV NORANGE NOVARIANCENOSTD NONMISS)
;
CREATE VARIABLE NAME=PCTRTRY EXTNAME=PCTRTRYSUBJECT=’N/A’ LABEL=’Percent retries’DESCRIPTION=’Percent retries’FORMAT=PERCENT7.2TYPE=NUMERIC LENGTH=8 INTERPRET=PERCENTKEPT=YESISTATS =(
NOCOUNT NOSUM AVERAGE NOMAXIMUM NOMINIMUMNOUSS NOCV NORANGE NOVARIANCENOSTD NONMISS

184 Appendix 4: Fax: Sample Table and Variable Definitions � Chapter 11
)DAY =(
NOCOUNT NOSUM AVERAGE NOMAXIMUM NOMINIMUMNOUSS NOCV NORANGE NOVARIANCENOSTD NONMISS)
WEEK =(NOCOUNT NOSUM AVERAGE NOMAXIMUM NOMINIMUMNOUSS NOCV NORANGE NOVARIANCENOSTD NONMISS)
MONTH =(NOCOUNT NOSUM AVERAGE NOMAXIMUM NOMINIMUMNOUSS NOCV NORANGE NOVARIANCENOSTD NONMISS)
YEAR =(NOCOUNT NOSUM AVERAGE NOMAXIMUM NOMINIMUMNOUSS NOCV NORANGE NOVARIANCENOSTD NONMISS)
;
CREATE VARIABLE NAME=STATUS EXTNAME=STATUSSUBJECT=’N/A’ LABEL=’Final Status Code’DESCRIPTION=’Final Status Code’FORMAT=.TYPE=CHARACTER LENGTH=1 INTERPRET=STRINGKEPT=YES;
CREATE VARIABLE NAME= HOUREXTNAME=’HOUR’LABEL=’Hour of day’DESCRIPTION=’Hour_of_day’KEPT=YES VALIDITY=. INTERPRET=INTTYPE=NUMERICLENGTH=4 FORMAT=2. INFORMAT=. IDNUM=.OID= . SUBJECT=’N/A’
;
CREATE VARIABLE NAME= SHIFTEXTNAME=’SHIFT’LABEL=’Operations shift’DESCRIPTION=’Operations_shift’KEPT=YES VALIDITY=. INTERPRET=STRINGTYPE=CHARACTERLENGTH=1 FORMAT=. INFORMAT=. IDNUM=.OID= . SUBJECT=’N/A’
;
/*----------------------------------------------------------*| Default table ordered using DATETIME HOUR and| SHIFT.

Generic Collector Facility � Appendix 6: Fax: Sample Daily Process-and-Reduce Job 185
*----------------------------------------------------------*/UPDATE TABLE NAME=UFAXESDETAIL=(byvars=’DATETIME HOUR SHIFT ’ )DAY=(classvars=’DATETIME HOUR SHIFT ’ )WEEK=(classvars=’DATETIME HOUR SHIFT ’ )MONTH=(classvars=’DATETIME HOUR SHIFT ’ )YEAR=(classvars=’DATETIME HOUR SHIFT ’ )
;
Appendix 5: Fax: Sample Code for Updating the DefinitionsYou could apply the following %CPDDUTL control statement to the PDB after
applying the generated control statements. For information about this topic, see“Appendix 4: Fax: Sample Table and Variable Definitions” on page 180. This UPDATETABLE control statement modifies the lists of BY and CLASS variables for this table,thus adding further categorization information.
UPDATE TABLE NAME=UFAXESDETAIL=(byvars=’MACHINE TYPE COUNTRY ACODE
DATETIME HOUR SHIFT ’ )DAY=(classvars=’MACHINE TYPE COUNTRY ACODE
DATETIME HOUR SHIFT ’ )WEEK=(classvars=’MACHINE TYPE COUNTRY ACODE
DATETIME HOUR SHIFT ’ )MONTH=(classvars=’MACHINE TYPE COUNTRY ACODE
DATETIME HOUR SHIFT ’ )YEAR=(classvars=’MACHINE TYPE COUNTRY ACODE
DATETIME HOUR SHIFT ’ );
Additionally, you could update variable attributes. A good example of such an updatewould include updating a variable’s display format, as shown in Figure 3, “Updatingthe Data Dictionary to Associate a SAS Display Format as an Attribute of a Variable.”(To see this figure, refer to “User-Defined Formats (Optional)” on page 170.)
For more information about applying (that is, running) a control statement, see“Appendix 3: Fax: Sample Code for Generating the Definitions” on page 179. For moreinformation about the %CPDDUTL macro and its control statements, see “Chapter 4:Data Dictionary Macros and Control Statements” in the SAS IT Resource Managementmacro reference documentation.
Appendix 6: Fax: Sample Daily Process-and-Reduce JobIn a typical daily process-and-reduce job, four main actions occur:
� %CPSTART starts SAS IT Resource Management.
� %FAXES, the user-created macro, stages the raw data into the WORK library.
� %CPPROCES processes the staged data into the PDB.
� %CPREDUCE summarizes the data from the detail level into the summary levels.
The following examples illustrate what a daily production job (which typically runsat night) would look like, using the sample fax data. This code would typically besubmitted each night by an automated job submission facility (such as cron on UNIX orOPC/ESA on z/OS).

186 Appendix 6: Fax: Sample Daily Process-and-Reduce Job � Chapter 11
z/OS Sample Code
%CPSTART(MODE=BATCH,ROOT=’your.itrm.’,SITELIB=’your.itrm.sitelib’,PDB=’your.fax.pdb.’,DISP=OLD,MXGSRC=(’mxg.userid.sourclib’ ’mxg.mxg.sourclib’),MXGLIB=mxg.mxg.formats,_RC=CPSTRC);
%PUT CPSTART return code is &CPSTRC;%INCLUDE FAXES.SAS;%FAXES;RUN;
%CPPROCES(COLLECTR=GENERIC,TOOLNM=SASDS,GENLIB=WORK,_RC=CPPRRC);
%PUT CPPROCES return code is &CPPRRC;
Note: The call to the %CPSTART macro starts SAS IT Resource Management andspecifies the PDB for fax data. The PDB= parameter is set to the name(high-level-qualifiers) that you used for the new PDB. The MXGSRC= parameter andthe MXGLIB= parameter are optional for this job, because your data is not from SMF.For more information about %CPSTART, including parameter values, see the topic%CPSTART in the SAS IT Resource Management macro reference documentation. �
Note: The line
%PUT CPSTART return code is &CPSTRC;
prints the value of the %CPSTART macro’s return code, stored in CPSTRC. �
Note: The code for staging the fax data is invoked next. In this example, the code isavailable in the %FAXES macro. �
Note: The %CPPROCES macro processes the generic collector’s staged data into thedetail level of the PDB. In this example, the macro processes data to the UFAXES tablefrom the FAXES data set (named as the UFAXES table’s external name) in the WORKlibrary. (By default, the COLLECTR= parameter is set to GENERIC in the%CPPROCES macro.) The COLLECTOR=GENERIC and TOOLNM= SASDSparameters are not required because these are the default values for the %CPPROCESmacro. For more about the %CPPROCES macro and its parameters, see the topic%CPPROCES in the SAS IT Resource Management macro reference documentation
This execution of the %CPPROCES macro processes data into all tables in youractive PDB that are associated with the generic collector and have a Kept status of Yes.If you want to limit this execution to fax tables only, then code the table namesspecifically as a parameter of %CPPROCES. Here is an example:
%CPPROCESS (UFAXES, COLLECTOR=GENERIC,TOOLNM=SASDS, GENLIB=WORK, _RC=CPPRRC);
�
Note: The final line of code prints the value of the %CPPROCES return code, storedin CPPRRC. �

Generic Collector Facility � Appendix 7: Variable Interpretations and Default Statistics 187
Note: You might want to add report macro invocations that create a standard set ofreports each day (typically at night), saving the output into SAS catalogs or externalfiles. �
UNIX/Windows Code Sample
%CPSTART(MODE=BATCH,ROOT=’your/itrm’,SITELIB=’your/itrm/sitelib’,PDB=’your/fax/pdb.’,ACCESS=write,_RC=CPSTRC);
%PUT CPSTART return code is %CPSTRC;%INCLUDE FAXES.SAS;%FAXES;RUN;
%CPPROCES(COLLECTR=GENERIC,TOOLNM=SASDS,GENLIB=WORK,_RC=CPPRRC);
%PUT CPPROCES return code is %CPPRRC;
Note: The %CPSTART macro starts SAS IT Resource Management and specifies thePDB for FAX data. The PDB= parameter is set to the name (high-level-qualifiers) thatyou used for the new PDB. �
Note: The line
%PUT CPSTART return code is &CPSTRC;
prints the value of the %CPSTART macro’s return code, stored in CPSTRC. �
Note: The code for staging the fax data is invoked next. In this example, the code isavailable in the %FAXES macro. �
Note: The %CPPROCES macro processes the generic collector’s staged data into thedetail level of the PDB. In this example, the macro processes data to the UFAXES tablefrom the FAXES data set (named as the UFAXES table’s external name) in the WORKlibrary. (By default, the COLLECTR= parameter is set to GENERIC in the%CPPROCES macro.) The COLLECTOR=GENERIC and TOOLNM= SASDSparameters are not required because these are the default values for the %CPPROCESmacro. For more information about the %CPPROCES macro and its parameters, seethe topic %CPPROCES in the SAS IT Resource Management macro referencedocumentation. �
Note: The final line of code prints the value of the %CPPROCES macro’s returncode, stored in CPPRRC. �
Note: You might want to add report macro invocations that create a standard set ofreports each day (typically at night), saving the output into SAS catalogs or externalfiles. �
Appendix 7: Variable Interpretations and Default StatisticsFor information about variable interpretation types, see “Appendix 5: Variable
Interpretation Types” in the SAS IT Resource Management the macro referencedocumentation.

188 Appendix 8: Algorithm Used by GENERATE SOURCE � Chapter 11
Appendix 8: Algorithm Used by GENERATE SOURCEThe control statement GENERATE SOURCE uses model data as the basis for the
table and variable definitions that it generates. As the table and variable statementsare constructed, certain assumptions are made by the rules that are embedded in theGENERATE SOURCE logic. By understanding the algorithm that GENERATESOURCE uses and by building your model data set to take advantage of the algorithm,you can decrease the amount of work that you must do to customize the table andvariable characteristics that are assigned by default.
The algorithm determines the specific interpretation type for each variable. Thisinterpretation type determines how a variable is to be displayed, what summarystatistics to collect, and how these summary statistics are to be calculated. For moreinformation about interpretation types, see “Appendix 5: Variable Interpretation Types”in the SAS IT Resource Management macro reference documentation.
The determination of the interpretation type is performed in a cascading series ofIF-THEN/ELSE... tests, until an assignment is made. Therefore it is important to payattention to the order in which the tests operate, as follows:
1 Character-type data: the algorithm handles the simple case of character-type data,as follows:
if the variable’s SAS display format contains the string "HEX"
then set the interpretation type to HEXFLAGS
else set the interpretation type to STRING
2 Numeric-type data: For numeric-type data, the algorithm is far more complicated.Remember that the IF-THEN/ELSE... tests start at the beginning of these listsand go to the end of these lists. For example, any match that is found in a testlate in the lists has already been a non-match in all the tests above it in the lists.
The variable’s SAS display format is examined to try to set the interpretationtype, as follows:
Table 11.4 Set Interpretation Type by Examining Variable’s Format
IF the variable format contains the string: THEN set the interpretation type to:
"DATE" DATE
"DATETIME" DATETIME
"TIME" TIME
"PERCENT" PERCENT
If this does not yield a match, the algorithm then begins to examine thevariable’s label. It scans the label for distinct words that match those in thefollowing list. If no match is found, then it searches the label again for a characterstring that matches those in the following list. The complete algorithm for thisstage is shown in the following table (where each common right-column valueindicates a new ELSE IF).

Generic Collector Facility � Appendix 8: Algorithm Used by GENERATE SOURCE 189
Table 11.5 Set Interpretation Type by Examining Variable’s Label
IF the variable label contains the string: THEN set the interpretation type to:
" PERCENT" PERCENT100
"%" PERCENT100
"UTILIZ" PERCENT100
"UTILIS" PERCENT100
"PERCENT" PERCENT100
"PCT" PERCENT100
"PERCENT" PERCENT100
"PCT" PERCENT100
"RATE" RATE
"PER" RATE
"/HR" RATE
"/HOUR" RATE
"/MIN" RATE
"/SEC" RATE
"PEAK" MAXIMUM
"MAX" MAXIMUM
"HWM" MAXIMUM
"MAXIMUM" MAXIMUM
"HIGHEST" MAXIMUM
"MIN" MINIMUM
"LWM" MINIMUM
"MINIMUM" MINIMUM
"LOWEST" MINIMUM
"RATIO" PERCENT
"CURRENT" GAUGE
"SIZE" GAUGE
"GAUGE" GAUGE
"SUM" SUM
"DATETIME" DATETIME
"DATE" DATE
"TIME" TIME
"AVERAGE" AVERAGE
"MEAN" AVERAGE
"AVG" AVERAGE
"AVE" AVERAGE
"TOTAL" COUNT
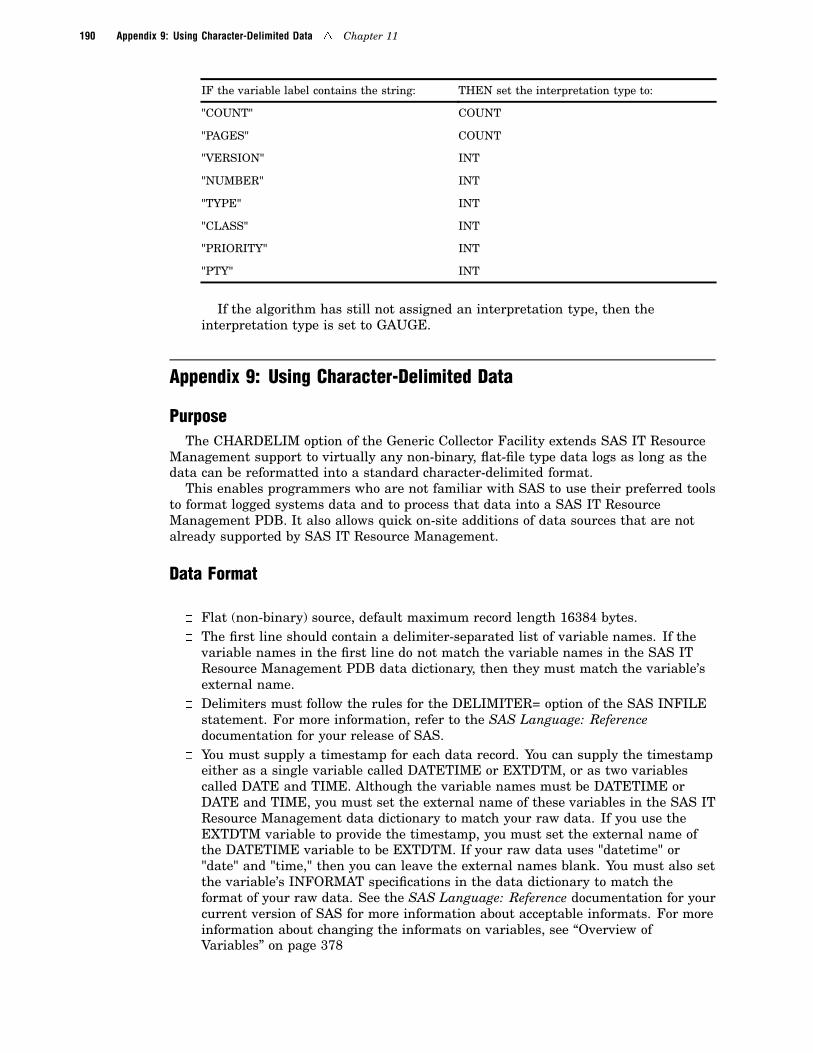
190 Appendix 9: Using Character-Delimited Data � Chapter 11
IF the variable label contains the string: THEN set the interpretation type to:
"COUNT" COUNT
"PAGES" COUNT
"VERSION" INT
"NUMBER" INT
"TYPE" INT
"CLASS" INT
"PRIORITY" INT
"PTY" INT
If the algorithm has still not assigned an interpretation type, then theinterpretation type is set to GAUGE.
Appendix 9: Using Character-Delimited Data
PurposeThe CHARDELIM option of the Generic Collector Facility extends SAS IT Resource
Management support to virtually any non-binary, flat-file type data logs as long as thedata can be reformatted into a standard character-delimited format.
This enables programmers who are not familiar with SAS to use their preferred toolsto format logged systems data and to process that data into a SAS IT ResourceManagement PDB. It also allows quick on-site additions of data sources that are notalready supported by SAS IT Resource Management.
Data Format
� Flat (non-binary) source, default maximum record length 16384 bytes.� The first line should contain a delimiter-separated list of variable names. If the
variable names in the first line do not match the variable names in the SAS ITResource Management PDB data dictionary, then they must match the variable’sexternal name.
� Delimiters must follow the rules for the DELIMITER= option of the SAS INFILEstatement. For more information, refer to the SAS Language: Referencedocumentation for your release of SAS.
� You must supply a timestamp for each data record. You can supply the timestampeither as a single variable called DATETIME or EXTDTM, or as two variablescalled DATE and TIME. Although the variable names must be DATETIME orDATE and TIME, you must set the external name of these variables in the SAS ITResource Management data dictionary to match your raw data. If you use theEXTDTM variable to provide the timestamp, you must set the external name ofthe DATETIME variable to be EXTDTM. If your raw data uses "datetime" or"date" and "time," then you can leave the external names blank. You must also setthe variable’s INFORMAT specifications in the data dictionary to match theformat of your raw data. See the SAS Language: Reference documentation for yourcurrent version of SAS for more information about acceptable informats. For moreinformation about changing the informats on variables, see “Overview ofVariables” on page 378

Generic Collector Facility � Appendix 9: Using Character-Delimited Data 191
� If your raw data is formatted as something other than simple numeric or stringsvalues, then you must set the variable’s INFORMAT in the data dictionary. Forexample, if your raw data specifies a cpu busy value as 75.6%, then you will needto set INFORMAT to "PERCENT".
� If a string variable contains a delimiter character, then the string must be includedin double quotes ("). Otherwise, enclosing strings in double quotes is optional.
� The presence of two consecutive delimiter characters indicates a missing value.� If your table contains interval data (as opposed to event data), you might want to
include a variable called DURATION in order to indicate the length of theinterval. (If you do not supply a value for DURATION, it will be calculated for youby using successive DATETIME values only if you have at least one variable withan interpretation type of C2RATE or D2RATE.)
Controlling the Behavior of the Character-Delimited CollectorYou can control the behavior of the character-delimited collector by using� Macro Variables
By default, the first line of the file should contain the field names, and the datashould follow on the second line. The logical record length should not exceed 16384bytes (16K). However, in some situations there might be extra non-data linesbefore or after the header, or the record length might exceed 16384 bytes. If youset specific macro variables prior to running %CPPROCES, the character-delimitedcollector can read this data. The macro variables are shown in the following table.
Table 11.6 Table of Macro Variables
Variable Name Default Value Description
CDCLRECL 16384 Record Length
CDCHSKIP 0 Number of lines to skip in order to read theheader record.
CDCDSKIP 0 Number of lines to skip AFTER the headerrecord, in order to read the first line of data.
CDCIFLDS _blank_ Space-separated list of variables that arecontained in the input file in the order in whichthey appear in the input data.
CSDELIM _blank_ The character or characters that delimit theincoming data. This variable is used inconjunction with the user exits to override thevalue that is supplied on the %CPPROCESmacro invocation.
CDCFOBS 0 Number of the first line of input data. Thisvariable is used with the macro variableCDCIFLDS for the special case when the inputdata does not contain a header.

192 Appendix 9: Using Character-Delimited Data � Chapter 11
Variable Name Default Value Description
CPUSEVEW _blank_ Set to NO to force %CPPROCES to stage thedata into a SAS data set instead of using a SASdata set view.
CDCDTFMT _blank_ The informat that is used when reading in thedatetime value from the input data. The value ofthis macro variable overrides the informat that isassigned in the SAS IT Resource Managementdata dictionary.
� ExitsYou can use several exit points with character-delimited data.The first exit point is invoked prior to the DATA step that is used to stage the
incoming data. This exit can be used to parse the headers of the input files and toset any macro variables necessary such as CDCIFLDS. This exit must contain astand-alone SAS DATA step code.
The code for the exit should be stored in a SAS catalog entry calledlibname.collector.CDCINIT.SOURCE, where libname is either ADMIN or SITELIB,and collector is the value that is specified for the COLLECTR= parameter on the%CPPROCES macro invocation. The exit should be stored in the ADMIN library ifit is intended to be used only for this PDB; the exit should be stored in theSITELIB library if it is intended to be used for all PDBs that use the sameSITELIB.
The second exit point is invoked in the DATA statement of the generated DATAstep program. This exit point can be used to add additional data sets to the datastatement so that multiple data sets can be staged from a single pass of the inputdata. A corresponding output statement should be added to the CDCINPUT exitpoint in order to populate this data set. The contents of this exit is the name of aSAS data set, including any applicable data set options such as a keep list. Thecode for the exit should be stored in a SAS catalog entry calledlibname.collector.CDC020.SOURCE.
The next exit point is invoked prior to the input statement of the DATA stepbefore any variables have been read. This exit point can be used to parse thefilename that is being processed in order to set the value of any variables that areencoded in the filenames and are not contained in the data file. The name of thefile that is being processed is captured in the variable _FNAME. The contents ofthe exit are any valid SAS DATA step statements. The code for the exit should bestored in a SAS catalog entry called libname.collector.CDC025.SOURCE.
You can also use an exit point that is invoked immediately after each line ofdata has been read from the input file. This exit can be used to perform datamanipulation, such as adjusting the value of DATETIME for handling differenttime zones. The contents of the exit are any valid SAS DATA step statements. Thecode for the exit should be stored in a SAS catalog entry calledlibname.collector.CDCINPUT.SOURCE.
� Invoking the Process Macro� Use the %CPPROCES macro for all SAS IT Resource Management platforms.� Setting COLLECTR=GENERIC is required.� Setting TOOLNM=CHARDELIM is required.� Setting DELIM=’delim_chars’ is optional. If you specify DELIM=, then
delim_chars must be enclosed in single quotation marks. If you do not specifydelimiter characters, then a comma is used as the default delimiter.

Generic Collector Facility � Appendix 11: Support by Means of Supplied Table Definitions 193
A typical macro invocation might look like this:
%LET CDCLRECL=4096; * record are only 4K;%LET CDCHSKIP=1; * skip one line to read
the header;%LET CDCDSKIP=2; * two blank lines between
header and data;%CPPROCES(tablename, rawdata=/u/sasabc/rawdata,
collectr=generic,toolnm=chardelim, delim=’|’);
Note: To help you get started with processing character-delimited data, you can referto the VMSTAT examples. For details about these VMSTAT examples, see “CSVMSCOL:UNIX Shell Script” on page 233 and “CSVMSDDU: VMSTAT DDUTL” on page 204. �
Appendix 10: Defining Tables and Variables without Using GENERATESOURCE
For creating tables, see “Overview of Tables” on page 353 and “Creating a Table” onpage 357.
For creating variables, see “Overview of Variables” on page 378 and “Creating/Editing/Viewing a Derived Variable” on page 381, “Creating/Editing/Viewing a FormulaVariable” on page 388, and “Creating/Editing/Viewing a Regular Variable” on page 394.
Appendix 11: Support by Means of Supplied Table Definitions
OverviewIn the technique described in this appendix, you use a predefined, supplied table
definition to add (to your PDB) a table to hold data from a specific data collector or datasource. Then, you use the COLLECTR= parameter on your processing macro to runpredefined, supplied SAS code that specifically stages (pre-processes) the data from thatcollector and points the processing macro to the staged data, which is then processed.You can use the table and software stream "as is," or you can modify them. Forupdating the table, there are both interactive and batch techniques. For modifying thesoftware stream, there are exits in your processing macro that enable you to runuser-written (in SAS code) exit routines.
Brief DescriptionFor many data sources, SAS IT Resource Management supplies specific table
definitions and staging software for using the data with SAS IT Resource Management.For each of the data collectors or data sources for which SAS IT Resource Managementsupplies collector support, SAS IT Resource Management provides
� SAS code that stages the data (as staging data sets or DATA step views)
� one or more table definitions that you can add to your performance datawarehouse (PDB) and several ways to add the table definition(s) to your PDB
� a macro that invokes SAS IT Resource Management
� a macro that processes the staged data into the tables in your PDB
� a macro that reduces the data in the PDB
� macros that report on the data in the PDB.

194 Appendix 12: The %CPPROCES Macro with the Generic Collector Facility � Chapter 11
Some of these components are unique for each of the collectors and some are thesame for all of the collectors.
For a complete list of the supplied collector support and the platforms on which itruns, refer to COLLECTR= parameter on the topic %CMPROCES in the SAS ITResource Management macro reference documentation, the topic %CPPROCES in theSAS IT Resource Management macro reference documentation, the topic %CSPROCESin the SAS IT Resource Management macro reference documentation, or the topic%CWPROCES in the SAS IT Resource Management macro reference documentation.
SAS IT Resource Management includes table and variable definitions for the metrics(data) collected by these collectors.
Appendix 12: The %CPPROCES Macro with the Generic CollectorFacility
Note: This appendix discusses the use of the %CPPROCES macro only with theGeneric Collector Facility. For a more complete description of these parameters and ofthe many different collectors that are available with the %CPPROCES macro, see thedescription of the COLLECTR= parameter on the the topic %CPPROCES in the SAS ITResource Management macro reference documentation. �
PurposeThe %CPPROCES macro is used to process data into a SAS IT Resource
Management performance data warehouse (PDB). This macro should be used only whenyou are processing data with the Generic Collector Facility.
If TOOLNM=SASDS, before using this macro, you must convert your data into one ormore SAS data sets or views; you can then use the %CPPROCES macro to process thedata from the SAS data sets or views to the detail level of the PDB.
Syntax%CPPROCES(
<table-list>,COLLECTR=GENERIC,DUPMODE=DISCARD | INACTIVE | FORCE | TERMINATE,EXITSRC=exit-source,GENLIB=libref,<RAWDATA=filename>,<TOOLNM=SASDS | CHARDELIM>,_RC=macro-var-name) ;
%CPPROCES Parameterstable-list
lists the tables into which the logged data should be processed. This positionalparameter is not required but, if specified, it must be specified in the first position.Use blanks to separate the tables in the list. If you omit this parameter, you mustspecify a comma as a placeholder. Additionally, if you do not specify a table or listof tables, the PDB is read and data is processed for the tables that meet thefollowing three criteria:
� COLLECTOR=GENERIC� TOOLNM=SASDS or TOOLNM=CHARDELIM� KEPT=YES.

Generic Collector Facility � Appendix 12: The %CPPROCES Macro with the Generic Collector Facility 195
COLLECTR=GENERIC
specifies the name of the collector (or type of collector) that created the log filedata. The value for the Generic Collector Facility is GENERIC. If you do notspecify a value for this parameter, the default value is GENERIC.
DUPMODE=DISCARD | INACTIVE | FORCE | TERMINATE
specifies whether or not to allow duplicate data to be processed into the activePDB. Duplicate-data checking involves comparing the timestamp information forincoming data to the timestamp information for existing data, and recording thetimestamp information for new, non-duplicate data. The default value isINACTIVE. Valid values for the %CPPROCES macro as follows:
DISCARD reviews the incoming data and rejects (discards) duplicate data,but allows processing to continue. The filtering report that isprinted in the SAS log provides information about the datathat were processed and/or discarded.
INACTIVE does not review the incoming data and, therefore, allowsduplicate data to be processed into the active PDB.
FORCE reviews the incoming data and allows duplicate data into thePDB.
TERMINATE reviews the incoming data and stops processing if duplicatedata is encountered.
Note: Before you can use duplicate-data checking, you must implement it asdescribed in “Appendix 4: Working with Duplicate Data” in the SAS IT ResourceManagement macro reference documentation. �
EXITSRC=exit-source
specifies the location where exit source programs for this application are stored.The value of this parameter can be the name of a SAS catalog that is specified inthe form of libref.catalog-name or a specified location on your host system. ForUNIX and Windows, this would be the complete pathname of a directory, and for z/OS this would be the fully qualified name of a partitioned data set. If you specify aSAS catalog name, use a SAS LIBNAME statement to associate the libref with theSAS library that contains the catalog. If you want to process your data withoutusing any process exits, do not specify this parameter.
For more information about exit processing, see the “Overview of Using ProcessExits” on page 442.
GENLIB=libref
(use with TOOLNM=SASDS only) specifies the libref for the SAS library thatcontains the staged data to be processed into the PDB. The staged data has beencreated by user-provided software and is to be processed into a PDB by usingCOLLECTR=GENERIC. The data can be a SAS data set, a SAS DATA step view, aSAS SQL view, or a SAS/ACCESS view. Use this parameter to specify the inputdata set for the SAS IT Resource Management process macro that you are using toprocess your data, only if you specify COLLECTR=GENERIC andTOOLNM=SASDS.
RAWDATA=filename
(use with TOOLNM=CHARDELIM only) specifies the full path and filename ofthe raw data file that you want to process (UNIX and Windows) or the fullyqualified data set name for a sequential data set or the fully qualified PDSmember name (z/OS).
TOOLNM=SASDS | CHARDELIM

196 Appendix 13: Character-Delimited Support in GENERATE SOURCE � Chapter 11
is an optional parameter. If you do not specify this parameter, the default value,SASDS, is used.
_RC=macro-var-nameidentifies a macro variable that will contain the return code from this macro.
For example, you might specify the variable name retcode to show the return codevalue from this macro. Values that can be returned are 0 and nonzero. A value of0 indicates that the macro was successful. A nonzero value indicates that themacro failed. Check the explanatory message in the SAS log. The macro variablevalue that is set by this parameter should be used only in batch.
%CPPROCES ExampleThis example processes data for a table named TABABC into the detail level of the
PDB. The data has already been staged into the SAS library named WORK.
%cpproces(TABABC,genlib=WORK) ;
Appendix 13: Character-Delimited Support in GENERATE SOURCE
IntroductionThe GENERATE SOURCE functionality of the %CPDDUTL macro has been
enhanced to enable customers to generate a "first cut" of table and variable definitionsfor data sources directly from the raw data.
Note: GENERATE SOURCE is more strict than %CxPROCES (where x=M, P, S, orW) in terms of how the character-delimited data is presented to it; however, this shouldnot be a problem because generating table and variable definitions is, typically, not adaily event, and the data can be manipulated to meet the requirements. �
Requirements� The data must contain one header record. The header record must contain
delimited values that describe the data that follows.� It is recommended that you include about 10 lines of data after the header record,
so that this data can be processed in order to assist in determining characteristicsof the data.
� If the raw data does not follow the rules in the preceding two points, then the datashould be modified so that it follows those rules.
� Although specifying the DELIM= parameter is not necessary, it is recommended.GENERATE SOURCE will try to decide on the delimiter automatically; however,this is not always possible, because of the format of the data.
� Only one table will be constructed per run of GENERATE SOURCE when theINTYPE=CDC option is specified.
� The NAME= option can be used to specify the name of the table that you want tocreate. If it is not specified, then UCDCTAB is the default name.
ExampleThe following is an example of how this facility can be used. For more information
about the parameters to use with the GENERATE SOURCE control statement, see“Chapter 4: Data Dictionary Macros and Control Statements” in the SAS IT ResourceManagement macro reference documentation.

Generic Collector Facility � Appendix 13: Character-Delimited Support in GENERATE SOURCE 197
Here is the data:
DATA FIELDS:machine,date,time,cpu utilization,value pct,i/o per sec,device name,average val,max val,min val,
DATA RECORDS:tom,01JAN2000,01:00:00,0.5,20,6,devHarry,5,7,2,tom,01JAN2000,01:05:00,0.6,21,7,devHarry,6,8,5,tom,01JAN2000,01:10:00,0.7,22,8,devHarry,7,8,8,tom,01JAN2000,01:15:00,0.8,23,9,devHarry,8,9,8,tom,01JAN2000,01:20:00,0.9,24,10,devHarry,9,3,6,tom,01JAN2000,01:25:00,0.0,25,11,devHarry,10,7,4,
Note: The data above is intended only to illustrate the CDC support of GENERATESOURCE. �
Start SAS IT Resource Management and submit the following code from the SASProgram Editor window:
%cpcat;cards4;generate sourceinfile=’c:\rawdata\cdctest.data’intype=cdctype=intervaldelim=’ ’name=utestfilename=’c:\temp\ddutl.txt’;;;;; /* ;;;; must begin in col 1 to terminate
the input stream. */%cpcat(cat=work.temp.temp.source);%cpddutl(entrynam=work.temp.temp.source);
The output of the above code is a file in c:\temp called ddutl.txt that contains tableand variable definitions that will enable you to process the CDC data. The table andvariable definitions that are created should be reviewed, and modified if necessary.
For more information about interpretation type, refer to “Appendix 5: VariableInterpretation Types” in the SAS IT Resource Management macro referencedocumentation.
/*-----------------------------------------------------*| Table definition statements generated on| 24MAR2000:16:32:13.25| For PDB table.....: UTEST| Table type........: INTERVAL| Now sorted by.....:| Will be sorted by.:*-------------------------------------------------------*/DELETE TABLE NAME=UTEST NOERROR ;CREATE TABLE NAME=UTESTCOLLECTOR=’GENERIC’TOOLNAME=CHARDELIMTYPE=INTERVALKEPT=YESEXTNAME=’CDCTABLE’ IDNUM=0

198 Appendix 13: Character-Delimited Support in GENERATE SOURCE � Chapter 11
LABEL=’CDC Table’ ARCHIVE=NODESCRIPTION=’CDC Table’DETAIL=(agelimit=10 )DAY=(agelimit=45)WEEK=(agelimit=15 )MONTH=(agelimit=18 )YEAR=(agelimit=5 ) ;
/*-------------------------------------------------*| Variable definitions for table: UTEST*----------------------------------------------------*/
CREATE VARIABLE NAME=MACHINEEXTNAME=’machine’SUBJECT=’N/A’ LABEL=’machine’DESCRIPTION=’machine’FORMAT=. OID=. IDNUM=.INTERPRET=STRING LENGTH=32TYPE=CHARACTER KEPT=YES;
CREATE VARIABLE NAME=DATEEXTNAME=’date’SUBJECT=’N/A’ LABEL=’date’DESCRIPTION=’date’FORMAT=DATE9. OID=. IDNUM=.INTERPRET=DATE LENGTH=8TYPE=NUMERIC KEPT=YESINFORMAT=DATE9.;
CREATE VARIABLE NAME=TIMEEXTNAME=’time’SUBJECT=’N/A’ LABEL=’time’DESCRIPTION=’time’FORMAT=TIME12.2 OID=. IDNUM=.INTERPRET=TIME LENGTH=8TYPE=NUMERIC KEPT=YESINFORMAT=TIME8.ISTATS =(NOCOUNT SUM AVERAGE NOMAXIMUMNOMINIMUM NOUSS NOCV NORANGENOVARIANCE NOSTD NONMISS)DAY =(NOCOUNT SUM AVERAGE NOMAXIMUMNOMINIMUM NOUSS NOCV NORANGENOVARIANCE NOSTD NONMISS)WEEK =(NOCOUNT SUM AVERAGE NOMAXIMUMNOMINIMUM NOUSS NOCV NORANGENOVARIANCE NOSTD NONMISS)
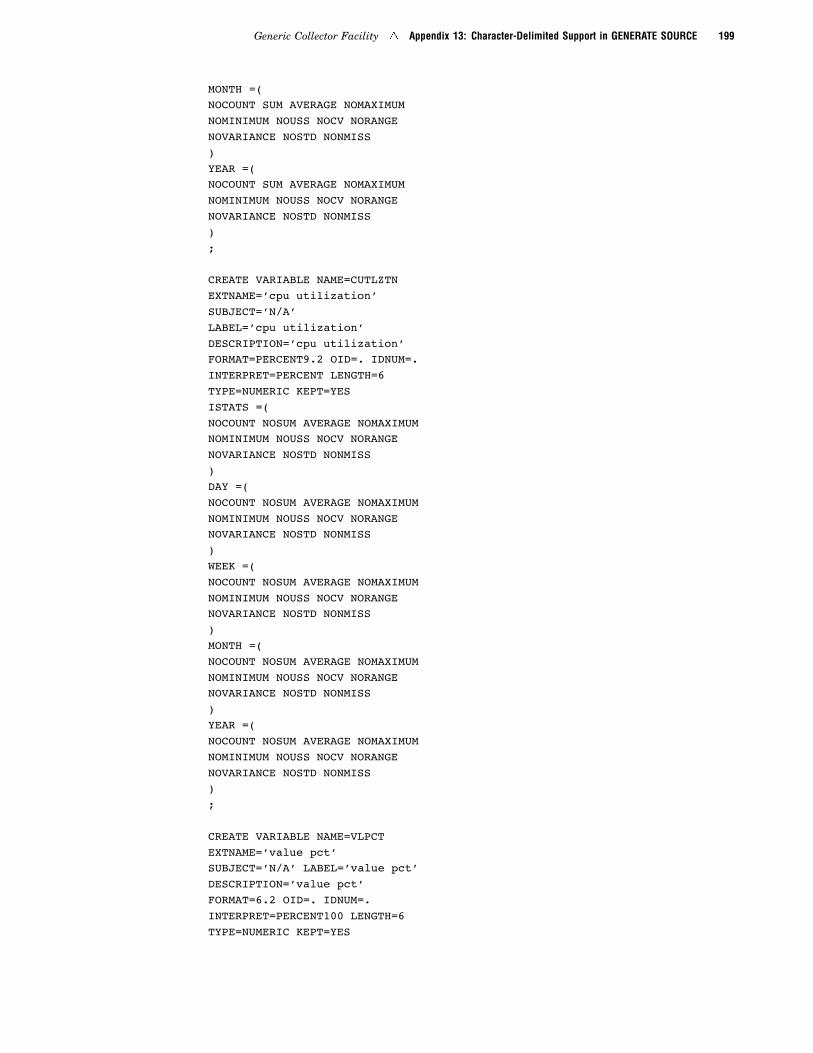
Generic Collector Facility � Appendix 13: Character-Delimited Support in GENERATE SOURCE 199
MONTH =(NOCOUNT SUM AVERAGE NOMAXIMUMNOMINIMUM NOUSS NOCV NORANGENOVARIANCE NOSTD NONMISS)YEAR =(NOCOUNT SUM AVERAGE NOMAXIMUMNOMINIMUM NOUSS NOCV NORANGENOVARIANCE NOSTD NONMISS);
CREATE VARIABLE NAME=CUTLZTNEXTNAME=’cpu utilization’SUBJECT=’N/A’LABEL=’cpu utilization’DESCRIPTION=’cpu utilization’FORMAT=PERCENT9.2 OID=. IDNUM=.INTERPRET=PERCENT LENGTH=6TYPE=NUMERIC KEPT=YESISTATS =(NOCOUNT NOSUM AVERAGE NOMAXIMUMNOMINIMUM NOUSS NOCV NORANGENOVARIANCE NOSTD NONMISS)DAY =(NOCOUNT NOSUM AVERAGE NOMAXIMUMNOMINIMUM NOUSS NOCV NORANGENOVARIANCE NOSTD NONMISS)WEEK =(NOCOUNT NOSUM AVERAGE NOMAXIMUMNOMINIMUM NOUSS NOCV NORANGENOVARIANCE NOSTD NONMISS)MONTH =(NOCOUNT NOSUM AVERAGE NOMAXIMUMNOMINIMUM NOUSS NOCV NORANGENOVARIANCE NOSTD NONMISS)YEAR =(NOCOUNT NOSUM AVERAGE NOMAXIMUMNOMINIMUM NOUSS NOCV NORANGENOVARIANCE NOSTD NONMISS);
CREATE VARIABLE NAME=VLPCTEXTNAME=’value pct’SUBJECT=’N/A’ LABEL=’value pct’DESCRIPTION=’value pct’FORMAT=6.2 OID=. IDNUM=.INTERPRET=PERCENT100 LENGTH=6TYPE=NUMERIC KEPT=YES

200 Appendix 13: Character-Delimited Support in GENERATE SOURCE � Chapter 11
ISTATS =(NOCOUNT NOSUM AVERAGE NOMAXIMUMNOMINIMUM NOUSS NOCV NORANGENOVARIANCE NOSTD NONMISS)DAY =(NOCOUNT NOSUM AVERAGE NOMAXIMUMNOMINIMUM NOUSS NOCV NORANGENOVARIANCE NOSTD NONMISS)WEEK =(NOCOUNT NOSUM AVERAGE NOMAXIMUMNOMINIMUM NOUSS NOCV NORANGENOVARIANCE NOSTD NONMISS)MONTH =(NOCOUNT NOSUM AVERAGE NOMAXIMUMNOMINIMUM NOUSS NOCV NORANGENOVARIANCE NOSTD NONMISS)YEAR =(NOCOUNT NOSUM AVERAGE NOMAXIMUMNOMINIMUM NOUSS NOCV NORANGENOVARIANCE NOSTD NONMISS);
CREATE VARIABLE NAME=IOPRSECEXTNAME=’i/o per sec’SUBJECT=’N/A’ LABEL=’i/o per sec’DESCRIPTION=’i/o per sec’FORMAT=BEST12.2 OID=. IDNUM=.INTERPRET=RATE LENGTH=8TYPE=NUMERIC KEPT=YESISTATS =(NOCOUNT NOSUM AVERAGE NOMAXIMUMNOMINIMUM NOUSS NOCV NORANGENOVARIANCE NOSTD NONMISS)DAY =(NOCOUNT NOSUM AVERAGE NOMAXIMUMNOMINIMUM NOUSS NOCV NORANGENOVARIANCE NOSTD NONMISS)WEEK =(NOCOUNT NOSUM AVERAGE NOMAXIMUMNOMINIMUM NOUSS NOCV NORANGENOVARIANCE NOSTD NONMISS)MONTH =(NOCOUNT NOSUM AVERAGE NOMAXIMUMNOMINIMUM NOUSS NOCV NORANGENOVARIANCE NOSTD NONMISS)
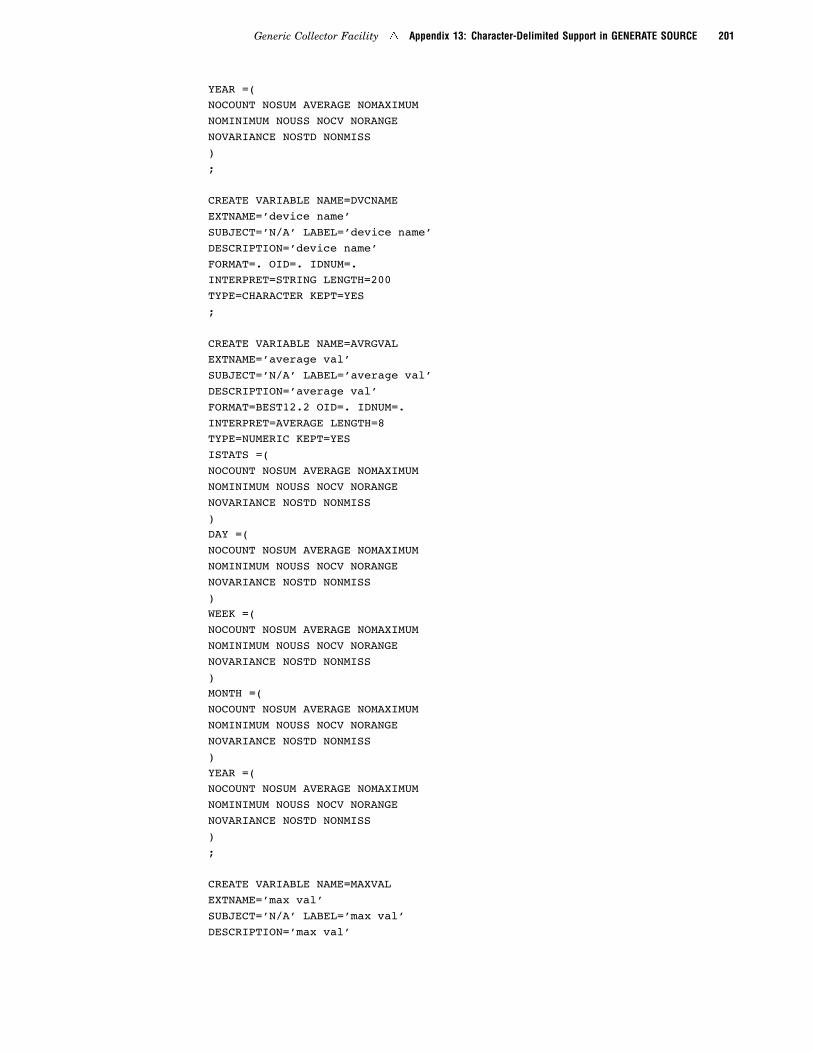
Generic Collector Facility � Appendix 13: Character-Delimited Support in GENERATE SOURCE 201
YEAR =(NOCOUNT NOSUM AVERAGE NOMAXIMUMNOMINIMUM NOUSS NOCV NORANGENOVARIANCE NOSTD NONMISS);
CREATE VARIABLE NAME=DVCNAMEEXTNAME=’device name’SUBJECT=’N/A’ LABEL=’device name’DESCRIPTION=’device name’FORMAT=. OID=. IDNUM=.INTERPRET=STRING LENGTH=200TYPE=CHARACTER KEPT=YES;
CREATE VARIABLE NAME=AVRGVALEXTNAME=’average val’SUBJECT=’N/A’ LABEL=’average val’DESCRIPTION=’average val’FORMAT=BEST12.2 OID=. IDNUM=.INTERPRET=AVERAGE LENGTH=8TYPE=NUMERIC KEPT=YESISTATS =(NOCOUNT NOSUM AVERAGE NOMAXIMUMNOMINIMUM NOUSS NOCV NORANGENOVARIANCE NOSTD NONMISS)DAY =(NOCOUNT NOSUM AVERAGE NOMAXIMUMNOMINIMUM NOUSS NOCV NORANGENOVARIANCE NOSTD NONMISS)WEEK =(NOCOUNT NOSUM AVERAGE NOMAXIMUMNOMINIMUM NOUSS NOCV NORANGENOVARIANCE NOSTD NONMISS)MONTH =(NOCOUNT NOSUM AVERAGE NOMAXIMUMNOMINIMUM NOUSS NOCV NORANGENOVARIANCE NOSTD NONMISS)YEAR =(NOCOUNT NOSUM AVERAGE NOMAXIMUMNOMINIMUM NOUSS NOCV NORANGENOVARIANCE NOSTD NONMISS);
CREATE VARIABLE NAME=MAXVALEXTNAME=’max val’SUBJECT=’N/A’ LABEL=’max val’DESCRIPTION=’max val’
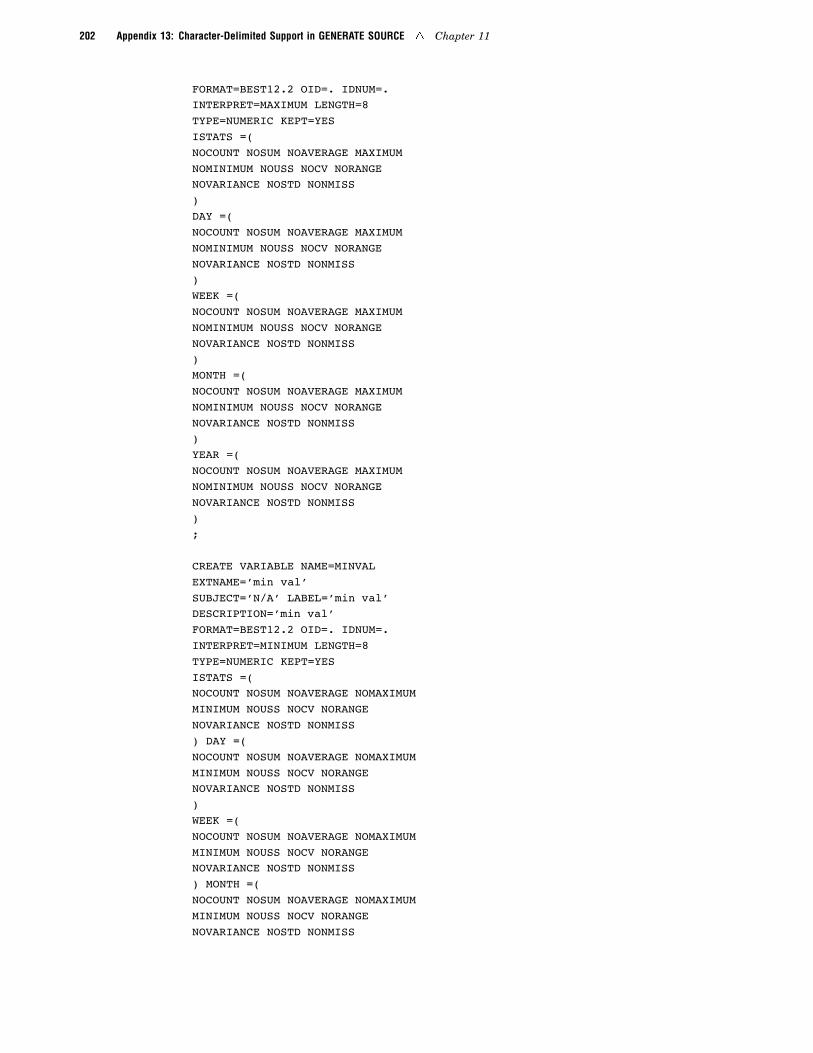
202 Appendix 13: Character-Delimited Support in GENERATE SOURCE � Chapter 11
FORMAT=BEST12.2 OID=. IDNUM=.INTERPRET=MAXIMUM LENGTH=8TYPE=NUMERIC KEPT=YESISTATS =(NOCOUNT NOSUM NOAVERAGE MAXIMUMNOMINIMUM NOUSS NOCV NORANGENOVARIANCE NOSTD NONMISS)DAY =(NOCOUNT NOSUM NOAVERAGE MAXIMUMNOMINIMUM NOUSS NOCV NORANGENOVARIANCE NOSTD NONMISS)WEEK =(NOCOUNT NOSUM NOAVERAGE MAXIMUMNOMINIMUM NOUSS NOCV NORANGENOVARIANCE NOSTD NONMISS)MONTH =(NOCOUNT NOSUM NOAVERAGE MAXIMUMNOMINIMUM NOUSS NOCV NORANGENOVARIANCE NOSTD NONMISS)YEAR =(NOCOUNT NOSUM NOAVERAGE MAXIMUMNOMINIMUM NOUSS NOCV NORANGENOVARIANCE NOSTD NONMISS);
CREATE VARIABLE NAME=MINVALEXTNAME=’min val’SUBJECT=’N/A’ LABEL=’min val’DESCRIPTION=’min val’FORMAT=BEST12.2 OID=. IDNUM=.INTERPRET=MINIMUM LENGTH=8TYPE=NUMERIC KEPT=YESISTATS =(NOCOUNT NOSUM NOAVERAGE NOMAXIMUMMINIMUM NOUSS NOCV NORANGENOVARIANCE NOSTD NONMISS) DAY =(NOCOUNT NOSUM NOAVERAGE NOMAXIMUMMINIMUM NOUSS NOCV NORANGENOVARIANCE NOSTD NONMISS)WEEK =(NOCOUNT NOSUM NOAVERAGE NOMAXIMUMMINIMUM NOUSS NOCV NORANGENOVARIANCE NOSTD NONMISS) MONTH =(NOCOUNT NOSUM NOAVERAGE NOMAXIMUMMINIMUM NOUSS NOCV NORANGENOVARIANCE NOSTD NONMISS
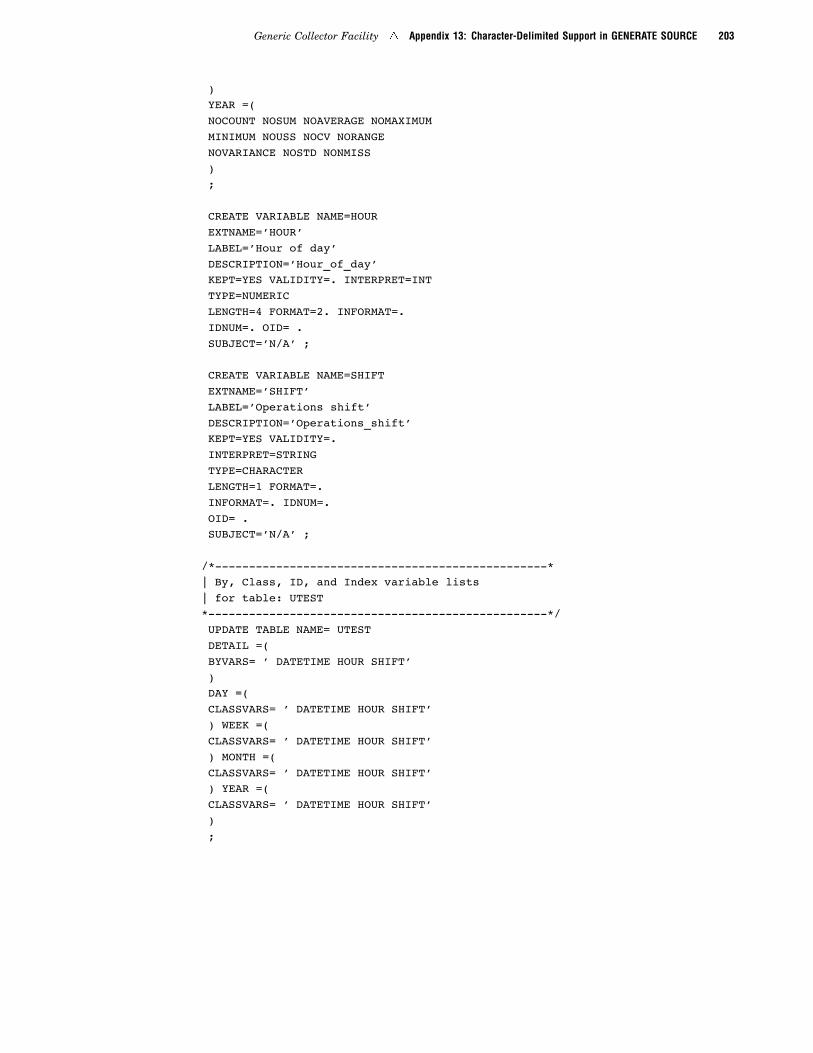
Generic Collector Facility � Appendix 13: Character-Delimited Support in GENERATE SOURCE 203
)YEAR =(NOCOUNT NOSUM NOAVERAGE NOMAXIMUMMINIMUM NOUSS NOCV NORANGENOVARIANCE NOSTD NONMISS);
CREATE VARIABLE NAME=HOUREXTNAME=’HOUR’LABEL=’Hour of day’DESCRIPTION=’Hour_of_day’KEPT=YES VALIDITY=. INTERPRET=INTTYPE=NUMERICLENGTH=4 FORMAT=2. INFORMAT=.IDNUM=. OID= .SUBJECT=’N/A’ ;
CREATE VARIABLE NAME=SHIFTEXTNAME=’SHIFT’LABEL=’Operations shift’DESCRIPTION=’Operations_shift’KEPT=YES VALIDITY=.INTERPRET=STRINGTYPE=CHARACTERLENGTH=1 FORMAT=.INFORMAT=. IDNUM=.OID= .SUBJECT=’N/A’ ;
/*-------------------------------------------------*| By, Class, ID, and Index variable lists| for table: UTEST*--------------------------------------------------*/UPDATE TABLE NAME= UTESTDETAIL =(BYVARS= ’ DATETIME HOUR SHIFT’)DAY =(CLASSVARS= ’ DATETIME HOUR SHIFT’) WEEK =(CLASSVARS= ’ DATETIME HOUR SHIFT’) MONTH =(CLASSVARS= ’ DATETIME HOUR SHIFT’) YEAR =(CLASSVARS= ’ DATETIME HOUR SHIFT’);

204 Generic Collector Facility: Examples � Chapter 11
Generic Collector Facility: Examples
CSVMSDDU: VMSTAT DDUTL
/************************************************ VMSTAT DDUTL************************************************//*=============================================== Begin MIB Module: VMSTAT===============================================*//*------------------------------------------------- TABLE: UVMSTT (vmstat)- MODULE: VMSTAT-----------------------------------------------*/DELETE TABLE NAME=UVMSTT NOERROR;CREATE TABLE NAME=UVMSTT
EXTNAME=’vmstat’LABEL=’VMSTAT.vmstat’TOOLNAME=’CHARDELIM’COLLECTOR=’GENERIC’TYPE=INTERVALKEPT=YESIDNUM=0DETAIL=(AGELIMIT=10)DAY=(AGELIMIT=60)WEEK=(AGELIMIT=12)MONTH=(AGELIMIT=24)YEAR=(AGELIMIT=0)DESCRIPTION= ’VMSTAT.vmstat: Group’
;/*----------------------------------------------- VARIABLE: PRCRUNQ (prcRunQ)- TABLE: UVMSTT (vmstat)-----------------------------------------------*/CREATE VARIABLE NAME=PRCRUNQ
EXTNAME=’prcRunQ’LABEL=’prcRunQ’KEPT=YESLENGTH=8INTERPRET=RATETYPE=NUMERICFORMAT=BEST12.INFORMAT=.DAY=(AVERAGE)WEEK=(AVERAGE)MONTH=(AVERAGE)YEAR=(AVERAGE)ISTATS=(AVERAGE)DESCRIPTION= ’prcRunQ: The number of
processes per secondplaced on the run queue

Generic Collector Facility � CSVMSDDU: VMSTAT DDUTL 205
during the sample interval.’;/*------------------------------------------------ VARIABLE: UNAME (uname)- TABLE: UVMSTT (vmstat)-----------------------------------------------*/CREATE VARIABLE NAME=UNAMEEXTNAME=’uname’LABEL=’uname’KEPT=YESLENGTH=10INTERPRET=STRINGTYPE=CHARACTERFORMAT=$CHAR.INFORMAT=.DAY=(NOAVERAGE)WEEK=(NOAVERAGE)MONTH=(NOAVERAGE)YEAR=(NOAVERAGE)ISTATS=(NOAVERAGE)DESCRIPTION= ’Output from the unix ‘uname‘
command’;/*------------------------------------------------ VARIABLE: PRCBLKD (prcBlkd)- TABLE: UVMSTT (vmstat)-----------------------------------------------*/CREATE VARIABLE NAME=PRCBLKDEXTNAME=’prcBlkd’LABEL=’prcBlkd’KEPT=YESLENGTH=8INTERPRET=RATETYPE=NUMERICFORMAT=BEST12.INFORMAT=.DAY=(AVERAGE)WEEK=(AVERAGE)MONTH=(AVERAGE)YEAR=(AVERAGE)ISTATS=(AVERAGE)DESCRIPTION= ’prcBlkd: The number of processes
per second blocked for resourcesduring the sample interval.’;
/*---------------------------------------------- VARIABLE: PRCSWPD (prcSwpd)- TABLE: UVMSTT (vmstat)------------------------------------------------*/CREATE VARIABLE NAME=PRCSWPDEXTNAME=’prcSwpd’LABEL=’prcSwpd’KEPT=YESLENGTH=8

206 CSVMSDDU: VMSTAT DDUTL � Chapter 11
INTERPRET=RATETYPE=NUMERICFORMAT=BEST12.INFORMAT=.DAY=(AVERAGE)WEEK=(AVERAGE)MONTH=(AVERAGE)YEAR=(AVERAGE)ISTATS=(AVERAGE)DESCRIPTION= ’prcSwpd: The number of processes
per second runnable but swappedduring the sample interval.’
;/*----------------------------------------------- VARIABLE: MAVVLPS (memActvVrtlPgs)- TABLE: UVMSTT (vmstat)-----------------------------------------------*/CREATE VARIABLE NAME=MAVVLPS
EXTNAME=’memActvVrtlPgs’LABEL=’memActvVrtlPgs’KEPT=YESLENGTH=8INTERPRET=GAUGETYPE=NUMERICFORMAT=BEST12.2INFORMAT=10.DAY=(AVERAGE)WEEK=(AVERAGE)MONTH=(AVERAGE)YEAR=(AVERAGE)ISTATS=(AVERAGE)DESCRIPTION= ’memActvVrtlPgs: The number of
active virtual memory pages atthe time of the interval sample.’
;/*----------------------------------------------- VARIABLE: MALSPSC (memAvlSwpSpc)- TABLE: UVMSTT (vmstat)----------------------------------------------*/CREATE VARIABLE NAME=MALSPSC
EXTNAME=’memAvlSwpSpc’LABEL=’memAvlSwpSpc’KEPT=YESLENGTH=8INTERPRET=GAUGETYPE=NUMERICFORMAT=BEST12.2INFORMAT=10.DAY=(AVERAGE)WEEK=(AVERAGE)MONTH=(AVERAGE)YEAR=(AVERAGE)ISTATS=(AVERAGE)DESCRIPTION= ’memAvlSwpSpc: The number of

Generic Collector Facility � CSVMSDDU: VMSTAT DDUTL 207
pages of swap space available atthe time of the interval sample.’
;/*------------------------------------------------ VARIABLE: MFRLTPS (memFreLstPgs)- TABLE: UVMSTT (vmstat)-----------------------------------------------*/CREATE VARIABLE NAME=MFRLTPSEXTNAME=’memFreLstPgs’LABEL=’memFreLstPgs’KEPT=YESLENGTH=8INTERPRET=GAUGETYPE=NUMERICFORMAT=BEST12.2INFORMAT=10.DAY=(AVERAGE)WEEK=(AVERAGE)MONTH=(AVERAGE)YEAR=(AVERAGE)ISTATS=(AVERAGE)DESCRIPTION= ’memFreLstPgs: The number of
real memory pages on the freelist at the time of the intervalsample.’
;/*---------------------------------------------- VARIABLE: PGRCLMS (pagRclms)- TABLE: UVMSTT (vmstat)-----------------------------------------------*/CREATE VARIABLE NAME=PGRCLMSEXTNAME=’pagRclms’LABEL=’pagRclms’KEPT=YESLENGTH=8INTERPRET=RATETYPE=NUMERICFORMAT=BEST12.INFORMAT=.DAY=(AVERAGE)WEEK=(AVERAGE)MONTH=(AVERAGE)YEAR=(AVERAGE)ISTATS=(AVERAGE)DESCRIPTION= ’pagRclms: page reclaims’
;/*----------------------------------------------- VARIABLE: PARTNFS (pagAdrTrnFlts)- TABLE: UVMSTT (vmstat) ------------------------------------------------*/CREATE VARIABLE NAME=PARTNFSEXTNAME=’pagAdrTrnFlts’LABEL=’pagAdrTrnFlts’KEPT=YES

208 CSVMSDDU: VMSTAT DDUTL � Chapter 11
LENGTH=8INTERPRET=RATETYPE=NUMERICFORMAT=BEST12.INFORMAT=.DAY=(AVERAGE)WEEK=(AVERAGE)MONTH=(AVERAGE)YEAR=(AVERAGE)ISTATS=(AVERAGE)DESCRIPTION= ’pagAdrTrnFlts: address
translation faults’;/*----------------------------------------------- VARIABLE: PGMRFLS (pagMinorFlts)- TABLE: UVMSTT (vmstat)-----------------------------------------------*/CREATE VARIABLE NAME=PGMRFLSEXTNAME=’pagMinorFlts’LABEL=’pagMinorFlts’KEPT=YESLENGTH=8INTERPRET=RATETYPE=NUMERICFORMAT=BEST12.INFORMAT=.DAY=(AVERAGE)WEEK=(AVERAGE)MONTH=(AVERAGE)YEAR=(AVERAGE)ISTATS=(AVERAGE)DESCRIPTION= ’pagMinorFlts: minor faults’
;/*----------------------------------------------- VARIABLE: PGPGINS (pagPageIns)- TABLE: UVMSTT (vmstat)------------------------------------------------*/CREATE VARIABLE NAME=PGPGINS
EXTNAME=’pagPageIns’LABEL=’pagPageIns’KEPT=YESLENGTH=8INTERPRET=RATETYPE=NUMERICFORMAT=BEST12.INFORMAT=.DAY=(AVERAGE)WEEK=(AVERAGE)MONTH=(AVERAGE)YEAR=(AVERAGE)ISTATS=(AVERAGE)DESCRIPTION= ’pagPageIns: pages paged in’
;/*----------------------------------------------

Generic Collector Facility � CSVMSDDU: VMSTAT DDUTL 209
- VARIABLE: PGPGOTS (pagPageOuts)- TABLE: UVMSTT (vmstat)-----------------------------------------------*/CREATE VARIABLE NAME=PGPGOTSEXTNAME=’pagPageOuts’LABEL=’pagPageOuts’KEPT=YESLENGTH=8INTERPRET=RATETYPE=NUMERICFORMAT=BEST12.INFORMAT=.DAY=(AVERAGE)WEEK=(AVERAGE)MONTH=(AVERAGE)YEAR=(AVERAGE)ISTATS=(AVERAGE)DESCRIPTION= ’pagPageOuts: pages paged out’
;/*------------------------------------------------ VARIABLE: PGPSFRD (pagPgsFrd)- TABLE: UVMSTT (vmstat)-----------------------------------------------*/CREATE VARIABLE NAME=PGPSFRDEXTNAME=’pagPgsFrd’LABEL=’pagPgsFrd’KEPT=YESLENGTH=8INTERPRET=RATETYPE=NUMERICFORMAT=BEST12.INFORMAT=.DAY=(AVERAGE)WEEK=(AVERAGE)MONTH=(AVERAGE)YEAR=(AVERAGE)ISTATS=(AVERAGE)DESCRIPTION= ’pagPgsFrd: pages freed’
;/*---------------------------------------------- VARIABLE: PGATMSL (pagAntMemShrtfl)- TABLE: UVMSTT (vmstat)-----------------------------------------------*/CREATE VARIABLE NAME=PGATMSLEXTNAME=’pagAntMemShrtfl’LABEL=’pagAntMemShrtfl’KEPT=YESLENGTH=8INTERPRET=GAUGETYPE=NUMERICFORMAT=BEST12.2INFORMAT=10.DAY=(AVERAGE)WEEK=(AVERAGE)

210 CSVMSDDU: VMSTAT DDUTL � Chapter 11
MONTH=(AVERAGE)YEAR=(AVERAGE)ISTATS=(AVERAGE)DESCRIPTION= ’pagAntMemShrtfl: anticipated
short term memory shortfall’;/*---------------------------------------------- VARIABLE: PCKSDPS (pagClkScndPgs)- TABLE: UVMSTT (vmstat)-----------------------------------------------*/CREATE VARIABLE NAME=PCKSDPS
EXTNAME=’pagClkScndPgs’LABEL=’pagClkScndPgs’KEPT=YESLENGTH=8INTERPRET=RATETYPE=NUMERICFORMAT=BEST12.INFORMAT=.DAY=(AVERAGE)WEEK=(AVERAGE)MONTH=(AVERAGE) YEAR=(AVERAGE)ISTATS=(AVERAGE)DESCRIPTION= ’pagClkScndPgs: pages scanned
by clock algorithm’;/*------------------------------------------------ VARIABLE: PGCKRVS (pagClkRevs)- TABLE: UVMSTT (vmstat)-----------------------------------------------*/CREATE VARIABLE NAME=PGCKRVS
EXTNAME=’pagClkRevs’LABEL=’pagClkRevs’KEPT=YESLENGTH=8INTERPRET=RATETYPE=NUMERICFORMAT=BEST12.INFORMAT=.DAY=(AVERAGE)WEEK=(AVERAGE)MONTH=(AVERAGE)YEAR=(AVERAGE)ISTATS=(AVERAGE)DESCRIPTION= ’pagClkRevs: clock revolutions
observed’;/*---------------------------------------------- VARIABLE: FTDVINS (fltDevInts)- TABLE: UVMSTT (vmstat)----------------------------------------------*/CREATE VARIABLE NAME=FTDVINS
EXTNAME=’fltDevInts’LABEL=’fltDevInts’

Generic Collector Facility � CSVMSDDU: VMSTAT DDUTL 211
KEPT=YESLENGTH=8INTERPRET=RATETYPE=NUMERICFORMAT=BEST12.INFORMAT=.DAY=(AVERAGE)WEEK=(AVERAGE)MONTH=(AVERAGE)YEAR=(AVERAGE)ISTATS=(AVERAGE)DESCRIPTION= ’fltDevInts: (non-clock) device
interrupts’;/*----------------------------------------------- VARIABLE: FLTSCLS (fltSysCls)- TABLE: UVMSTT (vmstat)-----------------------------------------------*/CREATE VARIABLE NAME=FLTSCLSEXTNAME=’fltSysCls’LABEL=’fltSysCls’KEPT=YESLENGTH=8INTERPRET=RATETYPE=NUMERICFORMAT=BEST12.INFORMAT=.DAY=(AVERAGE)WEEK=(AVERAGE)MONTH=(AVERAGE)YEAR=(AVERAGE)ISTATS=(AVERAGE)DESCRIPTION= ’fltSysCls: system calls’
;/*------------------------------------------------ VARIABLE: FTCXSWH (fltCntxSwtch)- TABLE: UVMSTT (vmstat)-----------------------------------------------*/CREATE VARIABLE NAME=FTCXSWHEXTNAME=’fltCntxSwtch’LABEL=’fltCntxSwtch’KEPT=YESLENGTH=8INTERPRET=RATETYPE=NUMERICFORMAT=BEST12.INFORMAT=.DAY=(AVERAGE)WEEK=(AVERAGE)MONTH=(AVERAGE)YEAR=(AVERAGE)ISTATS=(AVERAGE)DESCRIPTION= ’fltCntxSwtch: cpu context
switches’

212 CSVMSDDU: VMSTAT DDUTL � Chapter 11
;/*------------------------------------------------ VARIABLE: CPUUSER (cpuUser)- TABLE: UVMSTT (vmstat)-----------------------------------------------*/CREATE VARIABLE NAME=CPUUSER
EXTNAME=’cpuUser’LABEL=’cpuUser’KEPT=YESLENGTH=8INTERPRET=GAUGETYPE=NUMERICFORMAT=BEST12.2INFORMAT=10.DAY=(AVERAGE)WEEK=(AVERAGE)MONTH=(AVERAGE)YEAR=(AVERAGE)ISTATS=(AVERAGE)DESCRIPTION= ’cpuUser: cpu user time’
;/*------------------------------------------------ VARIABLE: CPUSYS (cpuSys)- TABLE: UVMSTT (vmstat)-----------------------------------------------*/CREATE VARIABLE NAME=CPUSYS
EXTNAME=’cpuSys’LABEL=’cpuSys’KEPT=YESLENGTH=8INTERPRET=RATETYPE=NUMERICFORMAT=BEST12.INFORMAT=.DAY=(AVERAGE)WEEK=(AVERAGE)MONTH=(AVERAGE)YEAR=(AVERAGE)ISTATS=(AVERAGE)DESCRIPTION= ’cpuSys: cpu system time’
;/*------------------------------------------------ VARIABLE: CPUIDLE (cpuIdle)- TABLE: UVMSTT (vmstat)-----------------------------------------------*/CREATE VARIABLE NAME=CPUIDLE
EXTNAME=’cpuIdle’LABEL=’cpuIdle’KEPT=YESLENGTH=8INTERPRET=RATETYPE=NUMERICFORMAT=BEST12.INFORMAT=.

Generic Collector Facility � CSVMSDDU: VMSTAT DDUTL 213
DAY=(AVERAGE)WEEK=(AVERAGE)MONTH=(AVERAGE)YEAR=(AVERAGE)ISTATS=(AVERAGE)DESCRIPTION= ’cpuIdle: cpu idle time’
;/*---------------------------------------------- VARIABLE: CPUWAIT (cpuWait)- TABLE: UVMSTT (vmstat)------------------------------------------------*/CREATE VARIABLE NAME=CPUWAITEXTNAME=’cpuWait’LABEL=’cpuWait’KEPT=YESLENGTH=8INTERPRET=RATETYPE=NUMERICFORMAT=BEST12.INFORMAT=.DAY=(AVERAGE)WEEK=(AVERAGE)MONTH=(AVERAGE)YEAR=(AVERAGE)ISTATS=(AVERAGE)DESCRIPTION= ’cpuWait: cpu idle but had
outstanding i/o’;/*------------------------------------------------- VARIABLE: DSK1 (dsk1)- TABLE: UVMSTT (vmstat)------------------------------------------------*// CREATE VARIABLE NAME=DSK1EXTNAME=’dsk1’LABEL=’dsk1’KEPT=YESLENGTH=8INTERPRET=RATETYPE=NUMERICFORMAT=BEST12.INFORMAT=.DAY=(AVERAGE)WEEK=(AVERAGE)MONTH=(AVERAGE)YEAR=(AVERAGE)ISTATS=(AVERAGE)DESCRIPTION= ’dsk1: disk 1 transfers’
;/*---------------------------------------------- VARIABLE: DSK2 (dsk2)- TABLE: UVMSTT (vmstat)-----------------------------------------------*/CREATE VARIABLE NAME=DSK2EXTNAME=’dsk2’

214 CSVMSDDU: VMSTAT DDUTL � Chapter 11
LABEL=’dsk2’KEPT=YESLENGTH=8INTERPRET=RATETYPE=NUMERICFORMAT=BEST12.INFORMAT=.DAY=(AVERAGE)WEEK=(AVERAGE)MONTH=(AVERAGE)YEAR=(AVERAGE)ISTATS=(AVERAGE)DESCRIPTION= ’dsk2: disk 2 transfers’
;/*------------------------------------------------ VARIABLE: DSK3 (dsk3)- TABLE: UVMSTT (vmstat)------------------------------------------------*/CREATE VARIABLE NAME=DSK3
EXTNAME=’dsk3’LABEL=’dsk3’KEPT=YESLENGTH=8INTERPRET=RATETYPE=NUMERICFORMAT=BEST12.INFORMAT=.DAY=(AVERAGE)WEEK=(AVERAGE)MONTH=(AVERAGE)YEAR=(AVERAGE)ISTATS=(AVERAGE)DESCRIPTION= ’dsk3: disk 3 transfers’
;/*------------------------------------------------- VARIABLE: DSK4 (dsk4)- TABLE: UVMSTT (vmstat)------------------------------------------------*/CREATE VARIABLE NAME=DSK4
EXTNAME=’dsk4’LABEL=’dsk4’KEPT=YESLENGTH=8INTERPRET=RATETYPE=NUMERICFORMAT=BEST12.INFORMAT=.DAY=(AVERAGE)WEEK=(AVERAGE)MONTH=(AVERAGE)YEAR=(AVERAGE)ISTATS=(AVERAGE)DESCRIPTION= ’dsk4: disk 4 transfers’
;
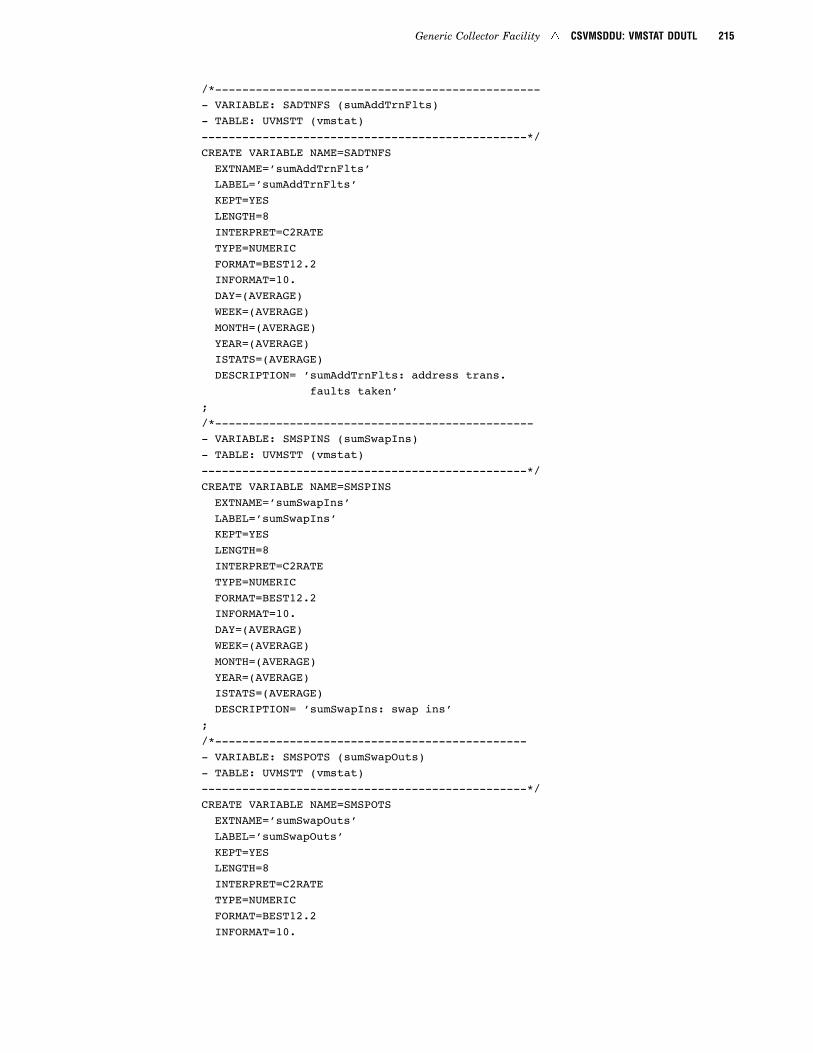
Generic Collector Facility � CSVMSDDU: VMSTAT DDUTL 215
/*------------------------------------------------- VARIABLE: SADTNFS (sumAddTrnFlts)- TABLE: UVMSTT (vmstat)------------------------------------------------*/CREATE VARIABLE NAME=SADTNFSEXTNAME=’sumAddTrnFlts’LABEL=’sumAddTrnFlts’KEPT=YESLENGTH=8INTERPRET=C2RATETYPE=NUMERICFORMAT=BEST12.2INFORMAT=10.DAY=(AVERAGE)WEEK=(AVERAGE)MONTH=(AVERAGE)YEAR=(AVERAGE)ISTATS=(AVERAGE)DESCRIPTION= ’sumAddTrnFlts: address trans.
faults taken’;/*------------------------------------------------ VARIABLE: SMSPINS (sumSwapIns)- TABLE: UVMSTT (vmstat)------------------------------------------------*/CREATE VARIABLE NAME=SMSPINSEXTNAME=’sumSwapIns’LABEL=’sumSwapIns’KEPT=YESLENGTH=8INTERPRET=C2RATETYPE=NUMERICFORMAT=BEST12.2INFORMAT=10.DAY=(AVERAGE)WEEK=(AVERAGE)MONTH=(AVERAGE)YEAR=(AVERAGE)ISTATS=(AVERAGE)DESCRIPTION= ’sumSwapIns: swap ins’
;/*----------------------------------------------- VARIABLE: SMSPOTS (sumSwapOuts)- TABLE: UVMSTT (vmstat)------------------------------------------------*/CREATE VARIABLE NAME=SMSPOTSEXTNAME=’sumSwapOuts’LABEL=’sumSwapOuts’KEPT=YESLENGTH=8INTERPRET=C2RATETYPE=NUMERICFORMAT=BEST12.2INFORMAT=10.

216 CSVMSDDU: VMSTAT DDUTL � Chapter 11
DAY=(AVERAGE)WEEK=(AVERAGE)MONTH=(AVERAGE)YEAR=(AVERAGE)ISTATS=(AVERAGE)DESCRIPTION= ’sumSwapOuts: swap outs’
;/*------------------------------------------------- VARIABLE: SPSSDIN (sumPgsSwpdIn)- TABLE: UVMSTT (vmstat)------------------------------------------------*/CREATE VARIABLE NAME=SPSSDIN
EXTNAME=’sumPgsSwpdIn’LABEL=’sumPgsSwpdIn’KEPT=YESLENGTH=8INTERPRET=C2RATETYPE=NUMERICFORMAT=BEST12.2INFORMAT=10.DAY=(AVERAGE)WEEK=(AVERAGE)MONTH=(AVERAGE)YEAR=(AVERAGE)ISTATS=(AVERAGE)DESCRIPTION= ’sumPgsSwpdIn: pages swapped in’
;/*------------------------------------------------- VARIABLE: SPSSDOT (sumPgsSwpdOut)- TABLE: UVMSTT (vmstat)------------------------------------------------*/CREATE VARIABLE NAME=SPSSDOT
EXTNAME=’sumPgsSwpdOut’LABEL=’sumPgsSwpdOut’KEPT=YESLENGTH=8INTERPRET=C2RATETYPE=NUMERICFORMAT=BEST12.2INFORMAT=10.DAY=(AVERAGE)WEEK=(AVERAGE)MONTH=(AVERAGE)YEAR=(AVERAGE)ISTATS=(AVERAGE)DESCRIPTION= ’sumPgsSwpdOut: pages swapped out’
;/*--------------------------------------------------- VARIABLE: SMPGINS (sumPgIns)- TABLE: UVMSTT (vmstat)------------------------------------------------*/CREATE VARIABLE NAME=SMPGINS
EXTNAME=’sumPgIns’LABEL=’sumPgIns’

Generic Collector Facility � CSVMSDDU: VMSTAT DDUTL 217
KEPT=YESLENGTH=8INTERPRET=C2RATETYPE=NUMERICFORMAT=BEST12.2INFORMAT=10.DAY=(AVERAGE)WEEK=(AVERAGE)MONTH=(AVERAGE)YEAR=(AVERAGE)ISTATS=(AVERAGE)DESCRIPTION= ’sumPgIns: page outs’
;/*------------------------------------------------- VARIABLE: SPSPDIN (sumPgsPgdIn)- TABLE: UVMSTT (vmstat)-----------------------------------------------*/CREATE VARIABLE NAME=SPSPDINEXTNAME=’sumPgsPgdIn’LABEL=’sumPgsPgdIn’KEPT=YESLENGTH=8INTERPRET=C2RATETYPE=NUMERICFORMAT=BEST12.2INFORMAT=10.DAY=(AVERAGE)WEEK=(AVERAGE)MONTH=(AVERAGE)YEAR=(AVERAGE)ISTATS=(AVERAGE)DESCRIPTION= ’sumPgsPgdIn: pages paged in’
;/*------------------------------------------------ VARIABLE: SPSPDIA (sumPgsPgdIn)- TABLE: UVMSTT (vmstat)------------------------------------------------*/CREATE VARIABLE NAME=SPSPDIAEXTNAME=’sumPgsPgdIn’LABEL=’sumPgsPgdIn’KEPT=YESLENGTH=8INTERPRET=C2RATETYPE=NUMERICFORMAT=BEST12.2INFORMAT=10.DAY=(AVERAGE)WEEK=(AVERAGE)MONTH=(AVERAGE)YEAR=(AVERAGE)ISTATS=(AVERAGE)DESCRIPTION= ’sumPgsPgdIn: pages paged in’
;/*------------------------------------------------

218 CSVMSDDU: VMSTAT DDUTL � Chapter 11
- VARIABLE: SPSPDOT (sumPgsPgdOut)- TABLE: UVMSTT (vmstat)------------------------------------------------*/CREATE VARIABLE NAME=SPSPDOT
EXTNAME=’sumPgsPgdOut’LABEL=’sumPgsPgdOut’KEPT=YESLENGTH=8INTERPRET=C2RATETYPE=NUMERICFORMAT=BEST12.2INFORMAT=10.DAY=(AVERAGE)WEEK=(AVERAGE)MONTH=(AVERAGE)YEAR=(AVERAGE)ISTATS=(AVERAGE)DESCRIPTION= ’sumPgsPgdOut: pages paged out’
;/*------------------------------------------------ VARIABLE: SFRLTRS (sumFreLstReclms)- TABLE: UVMSTT (vmstat)------------------------------------------------*/CREATE VARIABLE NAME=SFRLTRS
EXTNAME=’sumFreLstReclms’LABEL=’sumFreLstReclms’KEPT=YESLENGTH=8INTERPRET=C2RATETYPE=NUMERICFORMAT=BEST12.2INFORMAT=10.DAY=(AVERAGE)WEEK=(AVERAGE)MONTH=(AVERAGE)YEAR=(AVERAGE)ISTATS=(AVERAGE)DESCRIPTION= ’sumFreLstReclms: reclaims from free list’
;/*------------------------------------------------- VARIABLE: SMPGRCS (sumPgReclms)- TABLE: UVMSTT (vmstat)------------------------------------------------*/CREATE VARIABLE NAME=SMPGRCS
EXTNAME=’sumPgReclms’LABEL=’sumPgReclms’KEPT=YESLENGTH=8INTERPRET=C2RATETYPE=NUMERICFORMAT=BEST12.2INFORMAT=10.DAY=(AVERAGE)WEEK=(AVERAGE)

Generic Collector Facility � CSVMSDDU: VMSTAT DDUTL 219
MONTH=(AVERAGE)YEAR=(AVERAGE)ISTATS=(AVERAGE)DESCRIPTION= ’sumPgReclms: page reclaims’
;/*------------------------------------------------ VARIABLE: SIBPGFS (sumInstBlkPgFlts)- TABLE: UVMSTT (vmstat)-----------------------------------------------*/CREATE VARIABLE NAME=SIBPGFSEXTNAME=’sumInstBlkPgFlts’LABEL=’sumInstBlkPgFlts’KEPT=YESLENGTH=8INTERPRET=C2RATETYPE=NUMERICFORMAT=BEST12.2INFORMAT=10.DAY=(AVERAGE)WEEK=(AVERAGE)MONTH=(AVERAGE)YEAR=(AVERAGE)ISTATS=(AVERAGE)DESCRIPTION= ’sumInstBlkPgFlts: intransit blocking page
faults’;/*------------------------------------------------- VARIABLE: SIBPGFA (sumInstBlkPgFlts)- TABLE: UVMSTT (vmstat)------------------------------------------------*/CREATE VARIABLE NAME=SIBPGFAEXTNAME=’sumInstBlkPgFlts’LABEL=’sumInstBlkPgFlts’KEPT=YESLENGTH=8INTERPRET=C2RATETYPE=NUMERICFORMAT=BEST12.2INFORMAT=10.DAY=(AVERAGE)WEEK=(AVERAGE)MONTH=(AVERAGE)YEAR=(AVERAGE)ISTATS=(AVERAGE)DESCRIPTION= ’sumInstBlkPgFlts: intransit blocking page
faults’;/*------------------------------------------------ VARIABLE: SZFPSCD (sumZroFilPgsCrtd)- TABLE: UVMSTT (vmstat)----------------------------------------------------------*/CREATE VARIABLE NAME=SZFPSCDEXTNAME=’sumZroFilPgsCrtd’LABEL=’sumZroFilPgsCrtd’
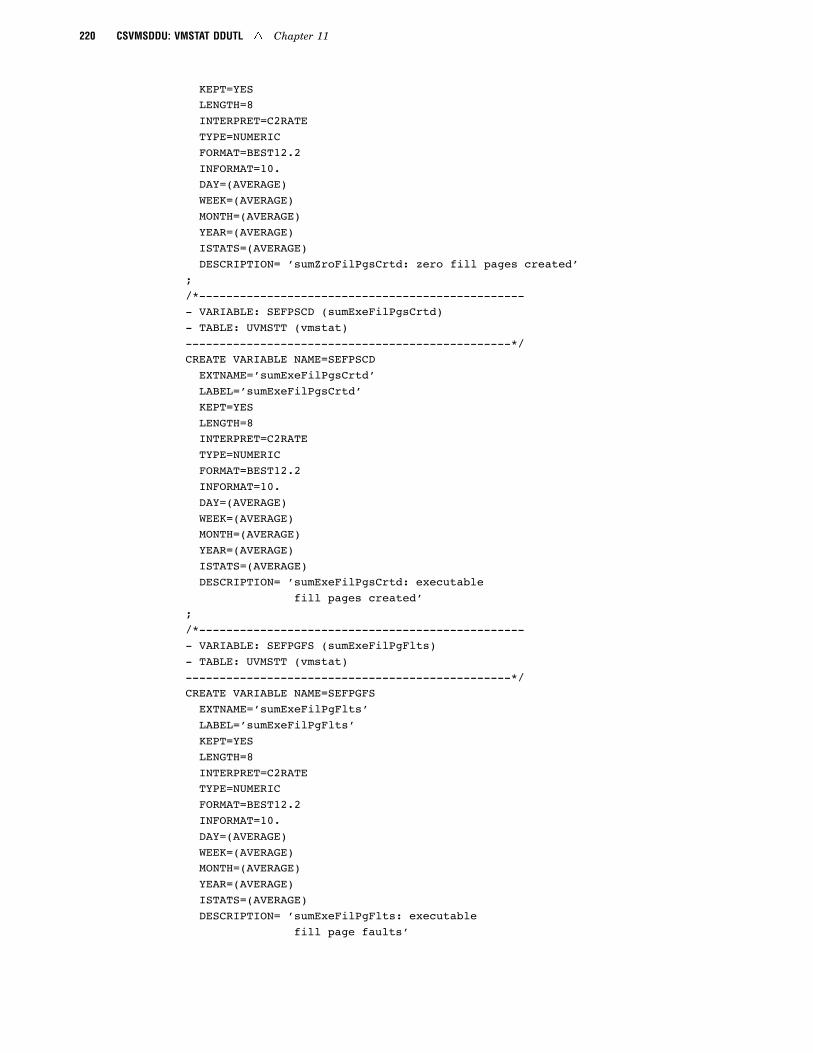
220 CSVMSDDU: VMSTAT DDUTL � Chapter 11
KEPT=YESLENGTH=8INTERPRET=C2RATETYPE=NUMERICFORMAT=BEST12.2INFORMAT=10.DAY=(AVERAGE)WEEK=(AVERAGE)MONTH=(AVERAGE)YEAR=(AVERAGE)ISTATS=(AVERAGE)DESCRIPTION= ’sumZroFilPgsCrtd: zero fill pages created’
;/*------------------------------------------------- VARIABLE: SEFPSCD (sumExeFilPgsCrtd)- TABLE: UVMSTT (vmstat)------------------------------------------------*/CREATE VARIABLE NAME=SEFPSCD
EXTNAME=’sumExeFilPgsCrtd’LABEL=’sumExeFilPgsCrtd’KEPT=YESLENGTH=8INTERPRET=C2RATETYPE=NUMERICFORMAT=BEST12.2INFORMAT=10.DAY=(AVERAGE)WEEK=(AVERAGE)MONTH=(AVERAGE)YEAR=(AVERAGE)ISTATS=(AVERAGE)DESCRIPTION= ’sumExeFilPgsCrtd: executable
fill pages created’;/*------------------------------------------------- VARIABLE: SEFPGFS (sumExeFilPgFlts)- TABLE: UVMSTT (vmstat)------------------------------------------------*/CREATE VARIABLE NAME=SEFPGFS
EXTNAME=’sumExeFilPgFlts’LABEL=’sumExeFilPgFlts’KEPT=YESLENGTH=8INTERPRET=C2RATETYPE=NUMERICFORMAT=BEST12.2INFORMAT=10.DAY=(AVERAGE)WEEK=(AVERAGE)MONTH=(AVERAGE)YEAR=(AVERAGE)ISTATS=(AVERAGE)DESCRIPTION= ’sumExeFilPgFlts: executable
fill page faults’
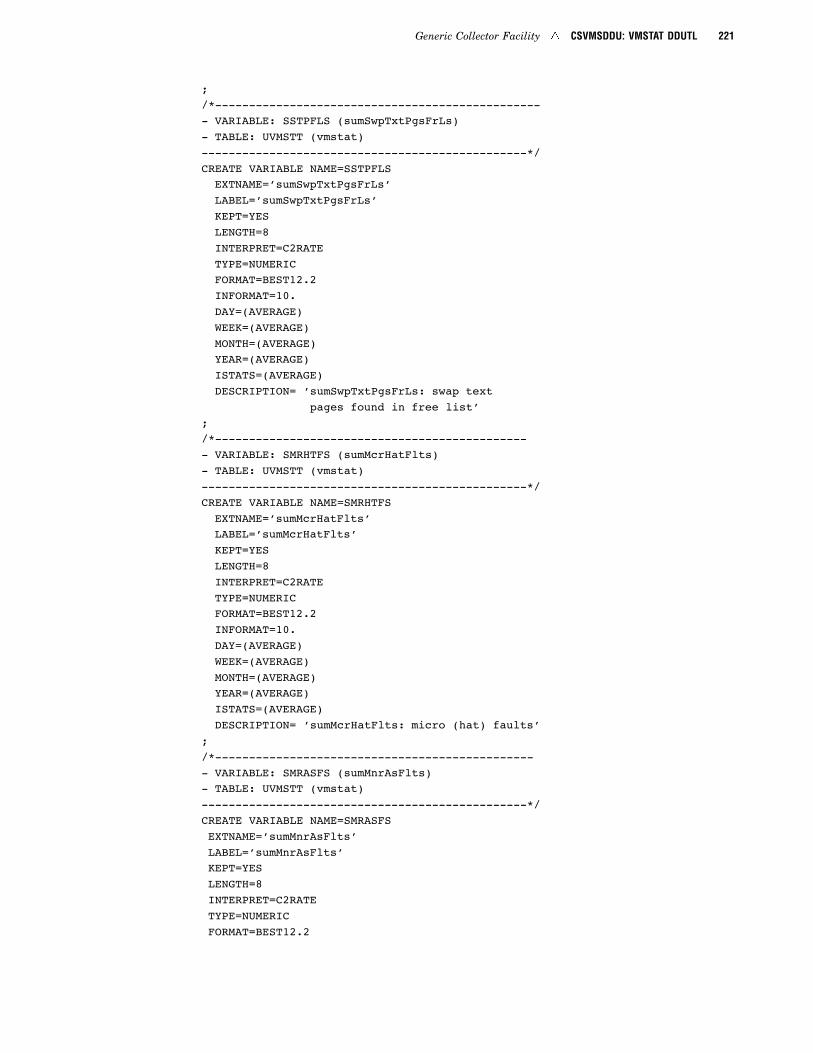
Generic Collector Facility � CSVMSDDU: VMSTAT DDUTL 221
;/*------------------------------------------------- VARIABLE: SSTPFLS (sumSwpTxtPgsFrLs)- TABLE: UVMSTT (vmstat)------------------------------------------------*/CREATE VARIABLE NAME=SSTPFLSEXTNAME=’sumSwpTxtPgsFrLs’LABEL=’sumSwpTxtPgsFrLs’KEPT=YESLENGTH=8INTERPRET=C2RATETYPE=NUMERICFORMAT=BEST12.2INFORMAT=10.DAY=(AVERAGE)WEEK=(AVERAGE)MONTH=(AVERAGE)YEAR=(AVERAGE)ISTATS=(AVERAGE)DESCRIPTION= ’sumSwpTxtPgsFrLs: swap text
pages found in free list’;/*----------------------------------------------- VARIABLE: SMRHTFS (sumMcrHatFlts)- TABLE: UVMSTT (vmstat)------------------------------------------------*/CREATE VARIABLE NAME=SMRHTFSEXTNAME=’sumMcrHatFlts’LABEL=’sumMcrHatFlts’KEPT=YESLENGTH=8INTERPRET=C2RATETYPE=NUMERICFORMAT=BEST12.2INFORMAT=10.DAY=(AVERAGE)WEEK=(AVERAGE)MONTH=(AVERAGE)YEAR=(AVERAGE)ISTATS=(AVERAGE)DESCRIPTION= ’sumMcrHatFlts: micro (hat) faults’
;/*------------------------------------------------ VARIABLE: SMRASFS (sumMnrAsFlts)- TABLE: UVMSTT (vmstat)------------------------------------------------*/CREATE VARIABLE NAME=SMRASFSEXTNAME=’sumMnrAsFlts’LABEL=’sumMnrAsFlts’KEPT=YESLENGTH=8INTERPRET=C2RATETYPE=NUMERICFORMAT=BEST12.2

222 CSVMSDDU: VMSTAT DDUTL � Chapter 11
INFORMAT=10.DAY=(AVERAGE)WEEK=(AVERAGE)MONTH=(AVERAGE)YEAR=(AVERAGE)ISTATS=(AVERAGE)DESCRIPTION= ’sumMnrAsFlts: minor (as) faults’;/*------------------------------------------------- VARIABLE: SMMRFLS (sumMajorFlts)- TABLE: UVMSTT (vmstat)------------------------------------------------*/CREATE VARIABLE NAME=SMMRFLS
EXTNAME=’sumMajorFlts’LABEL=’sumMajorFlts’KEPT=YESLENGTH=8INTERPRET=C2RATETYPE=NUMERICFORMAT=BEST12.2INFORMAT=10.DAY=(AVERAGE)WEEK=(AVERAGE)MONTH=(AVERAGE)YEAR=(AVERAGE)ISTATS=(AVERAGE)DESCRIPTION= ’sumMajorFlts: major faults’
;/*------------------------------------------------- VARIABLE: SCOWTFS (sumCpyOnWrtFlts)- TABLE: UVMSTT (vmstat)------------------------------------------------*/CREATE VARIABLE NAME=SCOWTFS
EXTNAME=’sumCpyOnWrtFlts’LABEL=’sumCpyOnWrtFlts’KEPT=YESLENGTH=8INTERPRET=C2RATETYPE=NUMERICFORMAT=BEST12.2INFORMAT=10.DAY=(AVERAGE)WEEK=(AVERAGE)MONTH=(AVERAGE)YEAR=(AVERAGE)ISTATS=(AVERAGE)DESCRIPTION= ’sumCpyOnWrtFlts: copy-on-write
faults’;/*------------------------------------------------- VARIABLE: SITPFLS (sumIndTxtPgsFrLs)- TABLE: UVMSTT (vmstat)------------------------------------------------*/CREATE VARIABLE NAME=SITPFLS

Generic Collector Facility � CSVMSDDU: VMSTAT DDUTL 223
EXTNAME=’sumIndTxtPgsFrLs’LABEL=’sumIndTxtPgsFrLs’KEPT=YESLENGTH=8INTERPRET=C2RATETYPE=NUMERICFORMAT=BEST12.2INFORMAT=10.DAY=(AVERAGE)WEEK=(AVERAGE)MONTH=(AVERAGE)YEAR=(AVERAGE)ISTATS=(AVERAGE)DESCRIPTION= ’sumIndTxtPgsFrLs: inode text
pages found in free list’;/*------------------------------------------------- VARIABLE: SCKHDRS (sumClkHndRevs)- TABLE: UVMSTT (vmstat)------------------------------------------------*/CREATE VARIABLE NAME=SCKHDRSEXTNAME=’sumClkHndRevs’LABEL=’sumClkHndRevs’KEPT=YESLENGTH=8INTERPRET=C2RATETYPE=NUMERICFORMAT=BEST12.2INFORMAT=10.DAY=(AVERAGE)WEEK=(AVERAGE)MONTH=(AVERAGE)YEAR=(AVERAGE)ISTATS=(AVERAGE)DESCRIPTION= ’sumClkHndRevs: revolutions of
the clock hand’;/*------------------------------------------------ VARIABLE: SCKEDPS (sumClkExmdPgs)- TABLE: UVMSTT (vmstat)------------------------------------------------*/CREATE VARIABLE NAME=SCKEDPSEXTNAME=’sumClkExmdPgs’LABEL=’sumClkExmdPgs’KEPT=YESLENGTH=8INTERPRET=C2RATETYPE=NUMERICFORMAT=BEST12.2INFORMAT=10.DAY=(AVERAGE)WEEK=(AVERAGE)MONTH=(AVERAGE)YEAR=(AVERAGE)

224 CSVMSDDU: VMSTAT DDUTL � Chapter 11
ISTATS=(AVERAGE)DESCRIPTION= ’sumClkExmdPgs: pages examined
by clock’;/*------------------------------------------------ VARIABLE: SCKFDPS (sumClkFrdPgs)- TABLE: UVMSTT (vmstat)------------------------------------------------*/CREATE VARIABLE NAME=SCKFDPS
EXTNAME=’sumClkFrdPgs’LABEL=’sumClkFrdPgs’KEPT=YESLENGTH=8INTERPRET=C2RATETYPE=NUMERICFORMAT=BEST12.2INFORMAT=10.DAY=(AVERAGE)WEEK=(AVERAGE)MONTH=(AVERAGE)YEAR=(AVERAGE)ISTATS=(AVERAGE)DESCRIPTION= ’sumClkFrdPgs: pages freed by
the clock daemon’;/*------------------------------------------------- VARIABLE: SMFORKS (sumForks)- TABLE: UVMSTT (vmstat)------------------------------------------------*/CREATE VARIABLE NAME=SMFORKS
EXTNAME=’sumForks’LABEL=’sumForks’KEPT=YESLENGTH=8INTERPRET=C2RATETYPE=NUMERICFORMAT=BEST12.2INFORMAT=10.DAY=(AVERAGE)WEEK=(AVERAGE)MONTH=(AVERAGE)YEAR=(AVERAGE)ISTATS=(AVERAGE)DESCRIPTION= ’sumForks: forks’
;/*------------------------------------------------ VARIABLE: SMVFRKS (sumVforks)- TABLE: UVMSTT (vmstat)------------------------------------------------*/CREATE VARIABLE NAME=SMVFRKS
EXTNAME=’sumVforks’LABEL=’sumVforks’KEPT=YESLENGTH=8

Generic Collector Facility � CSVMSDDU: VMSTAT DDUTL 225
INTERPRET=C2RATETYPE=NUMERICFORMAT=BEST12.2INFORMAT=10.DAY=(AVERAGE)WEEK=(AVERAGE)MONTH=(AVERAGE)YEAR=(AVERAGE)ISTATS=(AVERAGE)DESCRIPTION= ’sumVforks: vforks’
;/*------------------------------------------------ VARIABLE: SCPCXSH (sumCpuCntxSwtch)- TABLE: UVMSTT (vmstat)------------------------------------------------*/CREATE VARIABLE NAME=SCPCXSHEXTNAME=’sumCpuCntxSwtch’LABEL=’sumCpuCntxSwtch’KEPT=YESLENGTH=8INTERPRET=C2RATETYPE=NUMERICFORMAT=BEST12.2INFORMAT=10.DAY=(AVERAGE)WEEK=(AVERAGE)MONTH=(AVERAGE)YEAR=(AVERAGE)ISTATS=(AVERAGE)DESCRIPTION= ’sumCpuCntxSwtch: cpu context
switches’;/*------------------------------------------------ VARIABLE: SMDVINS (sumDevIntrpts)- TABLE: UVMSTT (vmstat)------------------------------------------------*/CREATE VARIABLE NAME=SMDVINSEXTNAME=’sumDevIntrpts’LABEL=’sumDevIntrpts’KEPT=YESLENGTH=8INTERPRET=C2RATETYPE=NUMERICFORMAT=BEST12.2INFORMAT=10.DAY=(AVERAGE)WEEK=(AVERAGE)MONTH=(AVERAGE)YEAR=(AVERAGE)ISTATS=(AVERAGE)DESCRIPTION= ’sumDevIntrpts: device interrupts’
;/*------------------------------------------------ VARIABLE: SMTRAPS (sumTraps)

226 CSVMSDDU: VMSTAT DDUTL � Chapter 11
- TABLE: UVMSTT (vmstat)------------------------------------------------*/CREATE VARIABLE NAME=SMTRAPS
EXTNAME=’sumTraps’LABEL=’sumTraps’KEPT=YESLENGTH=8INTERPRET=C2RATETYPE=NUMERICFORMAT=BEST12.2INFORMAT=10.DAY=(AVERAGE)WEEK=(AVERAGE)MONTH=(AVERAGE)YEAR=(AVERAGE)ISTATS=(AVERAGE)DESCRIPTION= ’sumTraps: traps’
;/*----------------------------------------------- VARIABLE: SMSCLLS (sumSysCalls)- TABLE: UVMSTT (vmstat)------------------------------------------------*/CREATE VARIABLE NAME=SMSCLLS
EXTNAME=’sumSysCalls’LABEL=’sumSysCalls’KEPT=YESLENGTH=8INTERPRET=C2RATETYPE=NUMERICFORMAT=BEST12.2INFORMAT=10.DAY=(AVERAGE)WEEK=(AVERAGE)MONTH=(AVERAGE)YEAR=(AVERAGE)ISTATS=(AVERAGE)DESCRIPTION= ’sumSysCalls: system calls’
;/*------------------------------------------------- VARIABLE: SMEXECS (sumExecs)- TABLE: UVMSTT (vmstat)------------------------------------------------*/CREATE VARIABLE NAME=SMEXECS
EXTNAME=’sumExecs’LABEL=’sumExecs’KEPT=YESLENGTH=8INTERPRET=C2RATETYPE=NUMERICFORMAT=BEST12.2INFORMAT=10.DAY=(AVERAGE)WEEK=(AVERAGE)MONTH=(AVERAGE)

Generic Collector Facility � CSVMSDDU: VMSTAT DDUTL 227
YEAR=(AVERAGE)ISTATS=(AVERAGE)DESCRIPTION= ’sumExecs: execs’
;/*------------------------------------------------ VARIABLE: SMBCKKS (sumBcktrcks)- TABLE: UVMSTT (vmstat)------------------------------------------------*/CREATE VARIABLE NAME=SMBCKKSEXTNAME=’sumBcktrcks’LABEL=’sumBcktrcks’KEPT=YESLENGTH=8INTERPRET=C2RATETYPE=NUMERICFORMAT=BEST12.2INFORMAT=10.DAY=(AVERAGE)WEEK=(AVERAGE)MONTH=(AVERAGE)YEAR=(AVERAGE)ISTATS=(AVERAGE)DESCRIPTION= ’sumBcktrcks: backtracks’
;/*------------------------------------------------ VARIABLE: SMLCKMS (sumLockMisses)- TABLE: UVMSTT (vmstat)-----------------------------------------------*/CREATE VARIABLE NAME=SMLCKMSEXTNAME=’sumLockMisses’LABEL=’sumLockMisses’KEPT=YESLENGTH=8INTERPRET=C2RATETYPE=NUMERICFORMAT=BEST12.2INFORMAT=10.DAY=(AVERAGE)WEEK=(AVERAGE)MONTH=(AVERAGE)YEAR=(AVERAGE)ISTATS=(AVERAGE)DESCRIPTION= ’sumLockMisses: lock misses’
;/*------------------------------------------------- VARIABLE: SFRFMWS (sumFreFrmWaits)- TABLE: UVMSTT (vmstat)------------------------------------------------*/CREATE VARIABLE NAME=SFRFMWSEXTNAME=’sumFreFrmWaits’LABEL=’sumFreFrmWaits’KEPT=YESLENGTH=8INTERPRET=C2RATE

228 CSVMSDDU: VMSTAT DDUTL � Chapter 11
TYPE=NUMERICFORMAT=BEST12.2INFORMAT=10.DAY=(AVERAGE)WEEK=(AVERAGE)MONTH=(AVERAGE)YEAR=(AVERAGE)ISTATS=(AVERAGE)DESCRIPTION= ’sumFreFrmWaits: free frame waits’
;/*------------------------------------------------- VARIABLE: SETXTWS (sumExtXPTWaits)- TABLE: UVMSTT (vmstat)------------------------------------------------*/CREATE VARIABLE NAME=SETXTWS
EXTNAME=’sumExtXPTWaits’LABEL=’sumExtXPTWaits’KEPT=YESLENGTH=8INTERPRET=C2RATETYPE=NUMERICFORMAT=BEST12.2INFORMAT=10.DAY=(AVERAGE)WEEK=(AVERAGE)MONTH=(AVERAGE)YEAR=(AVERAGE)ISTATS=(AVERAGE)DESCRIPTION= ’sumExtXPTWaits: extend XPT waits’
;/*----------------------------------------------- VARIABLE: SMPGIWS (sumPndgIOWaits)- TABLE: UVMSTT (vmstat)-----------------------------------------------*/CREATE VARIABLE NAME=SMPGIWS
EXTNAME=’sumPndgIOWaits’LABEL=’sumPndgIOWaits’KEPT=YESLENGTH=8INTERPRET=C2RATETYPE=NUMERICFORMAT=BEST12.2INFORMAT=10.DAY=(AVERAGE)WEEK=(AVERAGE)MONTH=(AVERAGE)YEAR=(AVERAGE)ISTATS=(AVERAGE)DESCRIPTION= ’sumPndgIOWaits: pending I/O waits’
;/*------------------------------------------------ VARIABLE: SMSTIOS (sumStrtIOs)- TABLE: UVMSTT (vmstat)------------------------------------------------*/

Generic Collector Facility � CSVMSDDU: VMSTAT DDUTL 229
CREATE VARIABLE NAME=SMSTIOSEXTNAME=’sumStrtIOs’LABEL=’sumStrtIOs’KEPT=YESLENGTH=8INTERPRET=C2RATETYPE=NUMERICFORMAT=BEST12.2INFORMAT=10.DAY=(AVERAGE)WEEK=(AVERAGE)MONTH=(AVERAGE)YEAR=(AVERAGE)ISTATS=(AVERAGE)DESCRIPTION= ’sumStrtIOs: start I/Os’
;/*------------------------------------------------ VARIABLE: SMIDNES (sumIoDones)- TABLE: UVMSTT (vmstat)------------------------------------------------*/CREATE VARIABLE NAME=SMIDNESEXTNAME=’sumIoDones’LABEL=’sumIoDones’KEPT=YESLENGTH=8INTERPRET=C2RATETYPE=NUMERICFORMAT=BEST12.2INFORMAT=10.DAY=(AVERAGE)WEEK=(AVERAGE)MONTH=(AVERAGE)YEAR=(AVERAGE)ISTATS=(AVERAGE)DESCRIPTION= ’sumIoDones: iodones’
;/*------------------------------------------------- VARIABLE: SMSRINS (sumSftwrInts)- TABLE: UVMSTT (vmstat)------------------------------------------------*/CREATE VARIABLE NAME=SMSRINSEXTNAME=’sumSftwrInts’LABEL=’sumSftwrInts’KEPT=YESLENGTH=8INTERPRET=C2RATETYPE=NUMERICFORMAT=BEST12.2INFORMAT=10.DAY=(AVERAGE)WEEK=(AVERAGE)MONTH=(AVERAGE)YEAR=(AVERAGE)ISTATS=(AVERAGE)
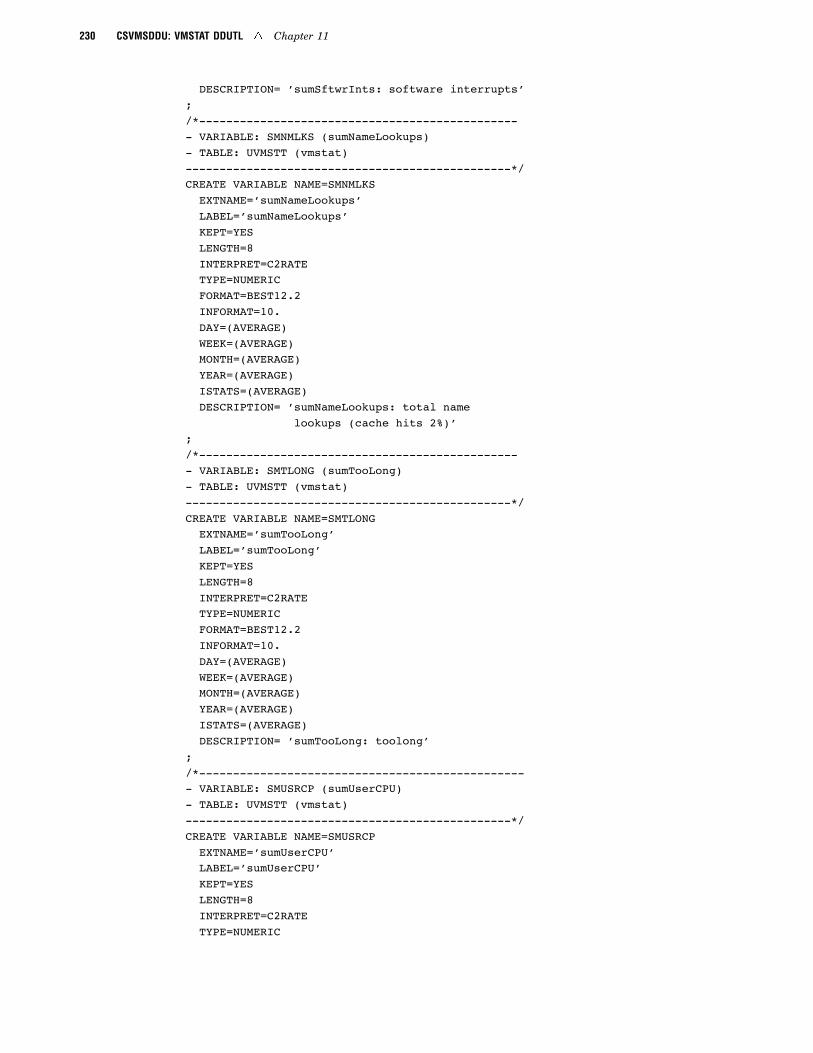
230 CSVMSDDU: VMSTAT DDUTL � Chapter 11
DESCRIPTION= ’sumSftwrInts: software interrupts’;/*------------------------------------------------ VARIABLE: SMNMLKS (sumNameLookups)- TABLE: UVMSTT (vmstat)------------------------------------------------*/CREATE VARIABLE NAME=SMNMLKS
EXTNAME=’sumNameLookups’LABEL=’sumNameLookups’KEPT=YESLENGTH=8INTERPRET=C2RATETYPE=NUMERICFORMAT=BEST12.2INFORMAT=10.DAY=(AVERAGE)WEEK=(AVERAGE)MONTH=(AVERAGE)YEAR=(AVERAGE)ISTATS=(AVERAGE)DESCRIPTION= ’sumNameLookups: total name
lookups (cache hits 2%)’;/*------------------------------------------------ VARIABLE: SMTLONG (sumTooLong)- TABLE: UVMSTT (vmstat)------------------------------------------------*/CREATE VARIABLE NAME=SMTLONG
EXTNAME=’sumTooLong’LABEL=’sumTooLong’KEPT=YESLENGTH=8INTERPRET=C2RATETYPE=NUMERICFORMAT=BEST12.2INFORMAT=10.DAY=(AVERAGE)WEEK=(AVERAGE)MONTH=(AVERAGE)YEAR=(AVERAGE)ISTATS=(AVERAGE)DESCRIPTION= ’sumTooLong: toolong’
;/*------------------------------------------------- VARIABLE: SMUSRCP (sumUserCPU)- TABLE: UVMSTT (vmstat)------------------------------------------------*/CREATE VARIABLE NAME=SMUSRCP
EXTNAME=’sumUserCPU’LABEL=’sumUserCPU’KEPT=YESLENGTH=8INTERPRET=C2RATETYPE=NUMERIC
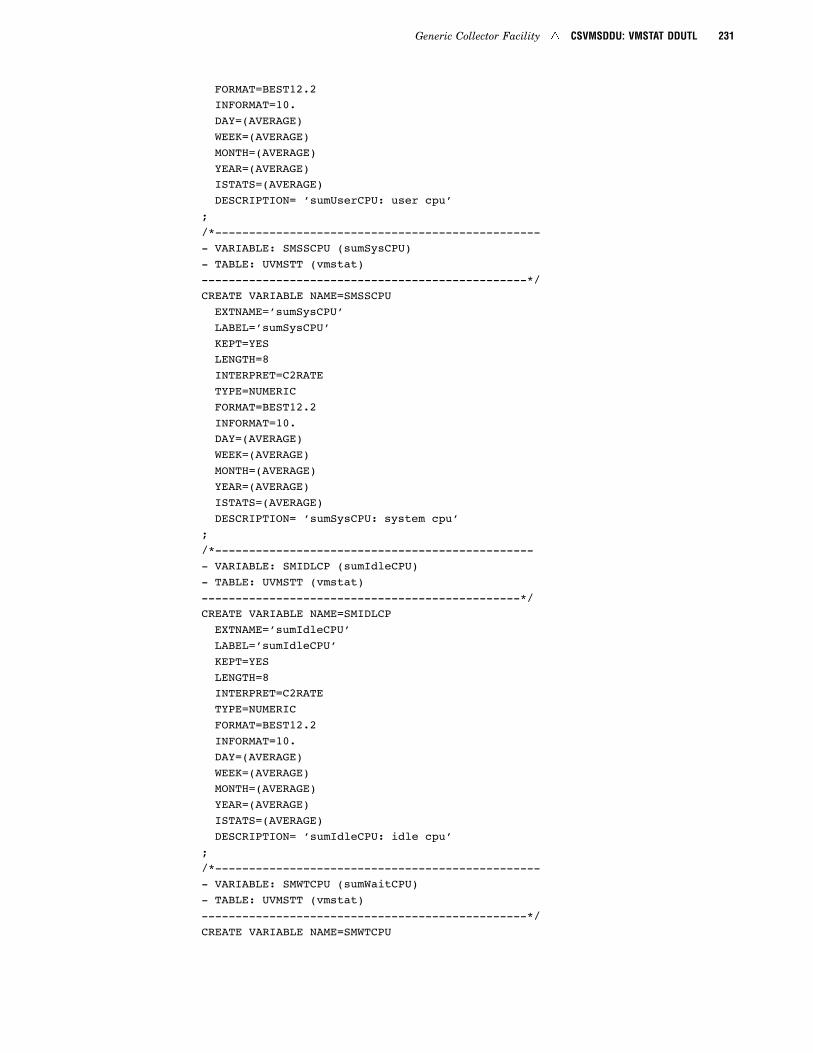
Generic Collector Facility � CSVMSDDU: VMSTAT DDUTL 231
FORMAT=BEST12.2INFORMAT=10.DAY=(AVERAGE)WEEK=(AVERAGE)MONTH=(AVERAGE)YEAR=(AVERAGE)ISTATS=(AVERAGE)DESCRIPTION= ’sumUserCPU: user cpu’
;/*------------------------------------------------- VARIABLE: SMSSCPU (sumSysCPU)- TABLE: UVMSTT (vmstat)------------------------------------------------*/CREATE VARIABLE NAME=SMSSCPUEXTNAME=’sumSysCPU’LABEL=’sumSysCPU’KEPT=YESLENGTH=8INTERPRET=C2RATETYPE=NUMERICFORMAT=BEST12.2INFORMAT=10.DAY=(AVERAGE)WEEK=(AVERAGE)MONTH=(AVERAGE)YEAR=(AVERAGE)ISTATS=(AVERAGE)DESCRIPTION= ’sumSysCPU: system cpu’
;/*------------------------------------------------ VARIABLE: SMIDLCP (sumIdleCPU)- TABLE: UVMSTT (vmstat)-----------------------------------------------*/CREATE VARIABLE NAME=SMIDLCPEXTNAME=’sumIdleCPU’LABEL=’sumIdleCPU’KEPT=YESLENGTH=8INTERPRET=C2RATETYPE=NUMERICFORMAT=BEST12.2INFORMAT=10.DAY=(AVERAGE)WEEK=(AVERAGE)MONTH=(AVERAGE)YEAR=(AVERAGE)ISTATS=(AVERAGE)DESCRIPTION= ’sumIdleCPU: idle cpu’
;/*------------------------------------------------- VARIABLE: SMWTCPU (sumWaitCPU)- TABLE: UVMSTT (vmstat)------------------------------------------------*/CREATE VARIABLE NAME=SMWTCPU

232 CSVMSDDU: VMSTAT DDUTL � Chapter 11
EXTNAME=’sumWaitCPU’LABEL=’sumWaitCPU’KEPT=YESLENGTH=8INTERPRET=C2RATETYPE=NUMERICFORMAT=BEST12.2INFORMAT=10.DAY=(AVERAGE)WEEK=(AVERAGE)MONTH=(AVERAGE)YEAR=(AVERAGE)ISTATS=(AVERAGE)DESCRIPTION= ’sumWaitCPU: wait cpu’
;/*------------------------------------------------ VARIABLE: HOUR ()- TABLE: UVMSTT (vmstat)------------------------------------------------*/CREATE VARIABLE NAME=HOUR
EXTNAME=’’LABEL=’HOUR’KEPT=YESLENGTH=3INTERPRET=INTTYPE=NUMERICFORMAT=BEST12.INFORMAT=.DAY=(NOAVERAGE)WEEK=(NOAVERAGE)MONTH=(NOAVERAGE)YEAR=(NOAVERAGE)ISTATS=(NOAVERAGE)DESCRIPTION= ’HOUR is a default variable.’
; /*------------------------------------------------- VARIABLE: MACHINE ()- TABLE: UVMSTT (vmstat)------------------------------------------------*/CREATE VARIABLE NAME=MACHINE
EXTNAME=’machine’LABEL=’MACHINE’KEPT=YESLENGTH=32INTERPRET=STRINGTYPE=CHARACTERFORMAT=$CHAR.INFORMAT=.DAY=(NOAVERAGE)WEEK=(NOAVERAGE)MONTH=(NOAVERAGE)YEAR=(NOAVERAGE)ISTATS=(NOAVERAGE)DESCRIPTION= ’MACHINE is a default variable.’

Generic Collector Facility � CSVMSCOL: UNIX Shell Script 233
;/*------------------------------------------------- VARIABLE: SHIFT ()- TABLE: UVMSTT (vmstat)------------------------------------------------*/CREATE VARIABLE NAME=SHIFTEXTNAME=’’LABEL=’SHIFT’KEPT=YESLENGTH=1INTERPRET=STRINGTYPE=CHARACTERFORMAT=$CHAR.INFORMAT=.DAY=(NOAVERAGE)WEEK=(NOAVERAGE)MONTH=(NOAVERAGE)YEAR=(NOAVERAGE)ISTATS=(NOAVERAGE)DESCRIPTION= ’SHIFT is a default variable.’
; /*-------------------------------------------------- UPDATE TABLE with BY and CLASS Variables- TABLE: UVMSTT (vmstat)
------------------------------------------------*/UPDATE TABLE NAME=UVMSTTDETAIL=(BYVARS=’MACHINE DATETIME HOUR SHIFT’)DAY =(CLASSVARS=’MACHINE DATETIME HOUR
SHIFT’)WEEK =(CLASSVARS=’MACHINE DATETIME HOUR
SHIFT’)MONTH =(CLASSVARS=’MACHINE DATETIME HOUR
SHIFT’)YEAR =(CLASSVARS=’MACHINE DATETIME HOUR
SHIFT’);/*================================================ End VMSTAT================================================*/
CSVMSCOL: UNIX Shell Script
#!/usr/local/bin/perl########################################################### Program: csvmscol# Purpose: Executes vmstat command, time-stamping# and logging output.# Support: none## Usage: csvmscol [ -o file ] [ -i interval ]# [ -d delim ] [ -h ]

234 CSVMSCOL: UNIX Shell Script � Chapter 11
# Where:# file is where collected data is# written;# file is appended with a dot ’.’# followed by the day of year# (default output is to stdout)## interval is seconds between polling;# interval must be >= 5# (default interval is 5 seconds)## delim is the string used to separate# data values in output# (default delim is a comma ’,’)## -h prints this usage## This script is Intended to be run# continuously in background (from# inittab# perhaps) to collect system performance# data. As each new day begins the# previous day’s log file can# be processed without# interrupting the program.## Output: Formatted vmstat output is written to# STDOUT unless an output file is# specified with -o option.# If an output file is specified then# the day of year (julian date)# is appended to the file name. Data# values are separated by a delimiter# character(s). The first line of the# output is a delimiter-separated# list of variable names.### As each new day is entered (on the# sample interval boundry) the file# from the previous day is closed and a# new file with the current day of year# is opened for output.## If the output file already exists# then data is appended to it.# This is so that if the program is# restarted within a single day,# the day’s previous data won’t be lost.# The header is written only once.## When the script is first started,# its pid is written to stderr.# You can capture this pid to a file

Generic Collector Facility � CSVMSCOL: UNIX Shell Script 235
# to make it easier to kill.### Portability:# This script has been test on AIX 3.2,# SunOS 5.4 and HP-UX 9.05. It expects# the data to be printed in a certain# order, which is different for each os.# Check the %vars array below for data# ordering expectations.## Change History:# Date Who Description# ----------------------------------------------# 20May96 Don Koch Created####################################################################################################### Start of User Configuration Constants ###################################################### If perl complains that it can’t find# "getopts.pl" then put its# path here $PERL_LIBS="/usr/lib/perl/";# Define commands we use.# These may depend on os.$CMD_VMSTAT ="/usr/bin/vmstat";$CMD_HOSTNAME ="/bin/hostname";$CMD_UNAME ="/bin/uname";$CMD_BASENAME ="/bin/basename";# Define options for vmstat.$OPT_VMSTAT{"AIX"} = "";$OPT_VMSTAT{"HP-UX"} = "";$OPT_VMSTAT{"SunOS"} = "";##################################################### End of User Configuration Constants ###################################################### USAGE USAGE USAGE USAGE$thisProg = ‘$CMD_BASENAME $0‘;chop($thisProg);$USAGE = "Usage: $thisProg [ -o file ] [ -i interval ]
[ -d delim ] [ -h ]Where: file is where collected data
is written;file is appended with adot ’.’ followed bythe day of year (defaultoutput is to stdout)
interval is seconds betweenpolling;interval must be >= 5(default interval is5 seconds)

236 CSVMSCOL: UNIX Shell Script � Chapter 11
delim is the string used toseparate datavalues in output(default delim is acomma ’,’)
-h prints this usage";# Grab command line argumentspush(@INC,$PERL_LIBS);require ’getopts.pl’;if (&Getopts(’o:i:d:h’)) {$outFile = $opt_o;$interval = $opt_i;$delim = $opt_d;$help = $opt_h;}else {print STDERR $USAGE;exit 1;}# Just needs a little helpif ($help) {print STDERR $USAGE;exit 0; }# Print my pid to stderr (catch it & you’ll know# what to kill)print STDERR "$$\n";# If no delim specified then set default to comma$delim = "," if ($delim eq "");# Check for proper interval or set to default# valueif ($interval eq "") {$interval = 5;}else {$interval !~ /^[0-9]+$/ && die "Interval must be
an integer : ";} if ($interval < 5)
{ die "Interval must be >= 5 : " };# Find out our hostname and os$hostname = ‘$CMD_HOSTNAME‘;chop($hostname);$uname = ‘$CMD_UNAME‘;chop($uname);
# Build variable name array.# The "keys" are the variable names.# The "values" are space-separated lists# of positions. The positions are the order# in which each os’s vmstat command prints# that variable.# A 00 indicates the os doesn’t support# that variable.# For %oss: key = uname output,

Generic Collector Facility � CSVMSCOL: UNIX Shell Script 237
# value = os’s position in the values of %vars$oss{"HP-UX"} = 0;$oss{"AIX"} = 1;$oss{"SunOS"} = 2;# vmstat output position for "HP,AIX,SUN"$vars{"prcRunQ"} = "01,01,01";
# procs in run queue: rate$vars{"prcBlkd"} = "02,02,02";
# procs blocked for resources: rate$vars{"prcSwpd"} = "03,00,03";
# procs runnable but swapped: rate$vars{"memActvVrtlPgs"} = "04,03,00";
# active virtual pages: gauge$vars{"memAvlSwpSpc"} = "00,00,04";
# amount of swapspace available: gauge$vars{"memFreLstPgs"} = "05,04,05";
# size of free list: gauge$vars{"pagRclms"} = "06,05,06";
# page reclaims: rate$vars{"pagAdrTrnFlts"} = "07,00,00";
# address translation faults: rate$vars{"pagMinorFlts"} = "00,00,07";
# minor faults: rate$vars{"pagPageIns"} = "08,06,08";
# pages paged in: rate$vars{"pagPageOuts"} = "09,07,09";
# pages paged out: rate$vars{"pagPgsFrd"} = "10,08,10";
# pages freed: rate$vars{"pagAntMemShrtfl"} = "11,00,11";
# anticipated short term# memory shortfall: gauge
$vars{"pagClkScndPgs"} = "12,09,12";# pages scanned by clock algorithm: rate
$vars{"dsk1"} = "00,00,13";# disk 1 transfers: rate
$vars{"dsk2"} = "00,00,14";# disk 2 transfers: rate
$vars{"dsk3"} = "00,00,15";# disk 3 transfers: rate
$vars{"dsk4"} = "00,00,16";# disk 4 transfers: rate
$vars{"pagClkRevs"} = "00,10,00";# clock revolutions observed: rate
$vars{"fltDevInts"} = "13,11,17";# (non-clock) device interrupts: rate
$vars{"fltSysCls"} = "14,12,18";# system calls: rate
$vars{"fltCntxSwtch"} = "15,13,19";# cpu context switches: rate
$vars{"cpuUser"} = "16,14,20";# cpu user time: percent
$vars{"cpuSys"} = "17,15,21";# cpu system time: percent

238 CSVMSCOL: UNIX Shell Script � Chapter 11
$vars{"cpuIdle"} = "18,16,22";# cpu idle time: percent
$vars{"cpuWait"} = "00,17,00";# cpu idle but had# outstanding i/o: percent
# The following variables are output from# "vmstat -s".# These numbers should pick up where# the above numbers left off.$vars{"sumAddTrnFlts"} = "23,18,27";
# address trans. faults# taken: counter
$vars{"sumSwapIns"} = "19,00,23";# swap ins: counter
$vars{"sumSwapOuts"} = "20,00,24";# swap outs: counter
$vars{"sumPgsSwpdIn"} = "21,00,25";# pages swapped in: counter
$vars{"sumPgsSwpdOut"} = "22,00,26";# pages swapped out: counter
$vars{"sumPgIns"} = "24,19,28";# page ins: counter
$vars{"sumPgOuts"} = "25,20,29";# page outs: counter
$vars{"sumPgsPgdIn"} = "26,21,30";# pages paged in : counter
$vars{"sumPgsPgdOut"} = "27,22,31";# pages paged out : counter
$vars{"sumFreLstReclms"} = "28,00,33";# reclaims from free list:# counter
$vars{"sumPgReclms"} = "29,23,32";# page reclaims: counter
$vars{"sumInstBlkPgFlts"} = "30,00,00";# intransit blocking page# faults: counter
$vars{"sumZroFilPgsCrtd"} = "31,00,00";# zero fill pages created:# counter
$vars{"sumMcrHatFlts"} = "00,00,34";# micro (hat) faults: counter
$vars{"sumMnrAsFlts"} = "00,00,35";# minor (as) faults: counter
$vars{"sumMajorFlts"} = "00,00,36";# major faults: counter
$vars{"sumCpyOnWrtFlts"} = "00,00,37";# copy-on-write faults:# counter
$vars{"sumZroFilPgFlts"} = "32,24,38";# zero fill page faults:# counter
$vars{"sumExeFilPgsCrtd"} = "33,00,00";# executable fill pages# created: counter
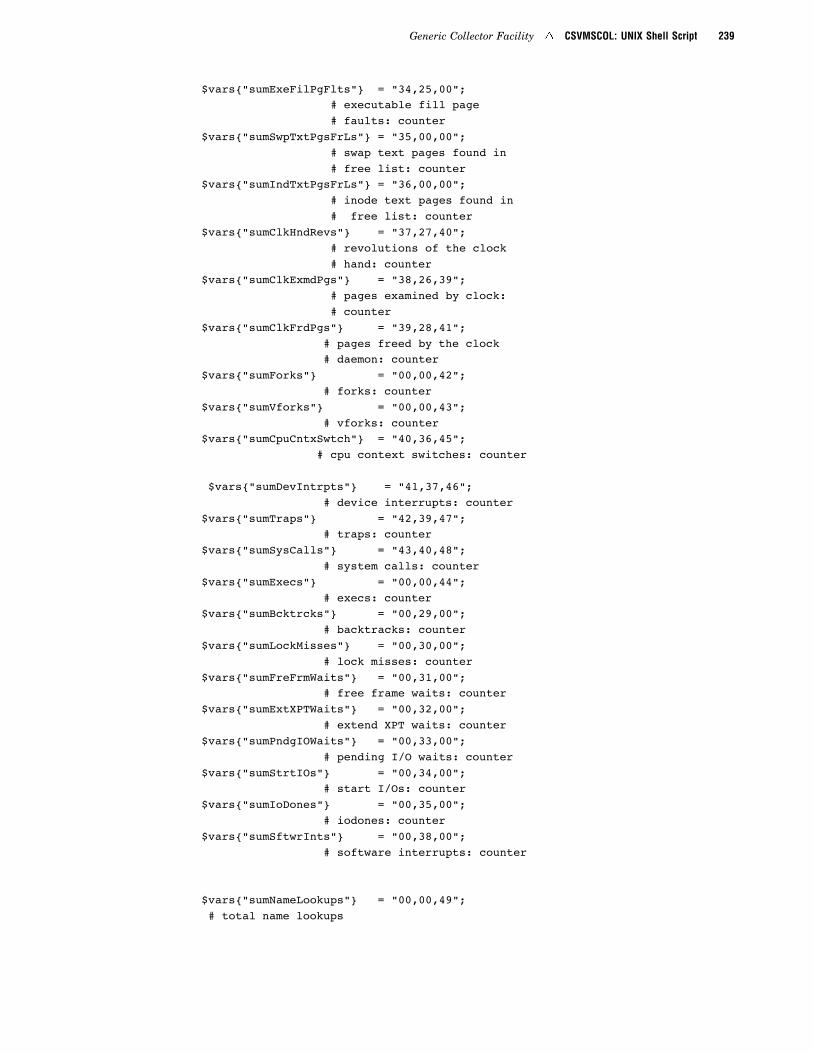
Generic Collector Facility � CSVMSCOL: UNIX Shell Script 239
$vars{"sumExeFilPgFlts"} = "34,25,00";# executable fill page# faults: counter
$vars{"sumSwpTxtPgsFrLs"} = "35,00,00";# swap text pages found in# free list: counter
$vars{"sumIndTxtPgsFrLs"} = "36,00,00";# inode text pages found in# free list: counter
$vars{"sumClkHndRevs"} = "37,27,40";# revolutions of the clock# hand: counter
$vars{"sumClkExmdPgs"} = "38,26,39";# pages examined by clock:# counter
$vars{"sumClkFrdPgs"} = "39,28,41";# pages freed by the clock# daemon: counter
$vars{"sumForks"} = "00,00,42";# forks: counter
$vars{"sumVforks"} = "00,00,43";# vforks: counter
$vars{"sumCpuCntxSwtch"} = "40,36,45";# cpu context switches: counter
$vars{"sumDevIntrpts"} = "41,37,46";# device interrupts: counter
$vars{"sumTraps"} = "42,39,47";# traps: counter
$vars{"sumSysCalls"} = "43,40,48";# system calls: counter
$vars{"sumExecs"} = "00,00,44";# execs: counter
$vars{"sumBcktrcks"} = "00,29,00";# backtracks: counter
$vars{"sumLockMisses"} = "00,30,00";# lock misses: counter
$vars{"sumFreFrmWaits"} = "00,31,00";# free frame waits: counter
$vars{"sumExtXPTWaits"} = "00,32,00";# extend XPT waits: counter
$vars{"sumPndgIOWaits"} = "00,33,00";# pending I/O waits: counter
$vars{"sumStrtIOs"} = "00,34,00";# start I/Os: counter
$vars{"sumIoDones"} = "00,35,00";# iodones: counter
$vars{"sumSftwrInts"} = "00,38,00";# software interrupts: counter
$vars{"sumNameLookups"} = "00,00,49";# total name lookups

240 CSVMSCOL: UNIX Shell Script � Chapter 11
# (cache hits 2%): counter$vars{"sumTooLong"} = "00,00,50";# toolong: counter$vars{"sumUserCPU"} = "00,00,51";# user cpu: counter$vars{"sumSysCPU"} = "00,00,52";
# system cpu: counter$vars{"sumIdleCPU"} = "00,00,53";
# idle cpu: counter$vars{"sumWaitCPU"} = "00,00,54";
# wait cpu: counter# Which number in the os array are we$osNum = -1;foreach $os (keys %oss) {
if ($os eq $uname) {$osNum = $oss{$os};
}}die "I am not programmed for your operating
system : " if ($osNum < 0);# Build an ordered array of the variable names# for this osforeach $var (keys %vars) {
# turn comma-separated list of numbers# into an array@headerNum = split(/,/,$vars{$var});# if this os supports the variable then# store var name in header arrayif ($headerNum[$osNum] != 0) {
$headerVars[$headerNum[$osNum]] = $var;}
}# Collect data until interrupted.while (1) {
# Get day of year (add 1 since Jan 1 is day 0)$doy = (localtime)[7] + 1;# Set header printing flag to print$printHeader = 1;# Open output file or redirect stdout if# none specifiedif ($outFile ne "") {# Build new file name$newFile = $outFile . "." . $doy;# If new file exists then program was# restarted during same day Check first line# to see if header was written so we don’t# write a another one in the middle of the# data.if (open(NEW,"<$newFile")) {
$_ = <NEW>;$printHeader = 0 if
(/^datetime.+machine.+uname/)}# Open for append in case of restart during

Generic Collector Facility � CSVMSCOL: UNIX Shell Script 241
# same day.open (OUT,">>$newFile") ||
die "Can’t open $newFile for output : ";# Force flush after every writeselect OUT;$| = 1;}else {
# Dup OUT to stdoutopen (OUT,">&STDOUT") ||
die "Can’t dup STDOUT : ";}# Print the header if it needs oneif ($printHeader == 1) {
print OUT "datetime" . $delim . "machine" .$delim . "uname";
for ($i = 1; $i <= $#headerVars; $i++) {print OUT $delim . $headerVars[$i];
}print OUT "\n";
}# Open vmstat command pipeopen (VMSTAT,"$CMD_VMSTAT $OPT_VMSTAT{$uname}
$interval |") ||die "Can’t run $CMD_VMSTAT $interval : ";
# Since we are starting a new vmstat process# at this point we must skip the non-data# header output AND the first data line which# contains stats# summary statistics since system boot.$_ = <VMSTAT>;while (/[a-zA-Z\-]+/) {
$_ = ;}# Collect real data until interruptedwhile ($intervalRecord = ) {# Record time stamp for active data$ts = ×tamp
# We have vmstat interval data from in# $intervalRecord.# Additionally we get vmstat summary stats from# which is stored in $summaryRecord for later# processing.open (VMSTAT_S,"$CMD_VMSTAT -s |");$k = 0;while () {
$summaryRecord[$k++] = $_;}close (VMSTAT_S);# If we have entered a new day, exit "while# ($intervalRecord = )". The current log file# (previous day) will be closed and a new log# file (current day) will be opened.

242 CSVMSCOL: UNIX Shell Script � Chapter 11
# The data records we just read will be lost.last if ($doy != (localtime)[7] + 1);# Skip over non-data header output from# and store the next data record.while ($intervalRecord =~ /[a-zA-Z]+/) {
$intervalRecord = ;}chop($intervalRecord);
# Convert space-separated interval data to a# $delim-separated string and print to log.# Note: forced space on split string so# $intervalRecord# will lead with a delim after join.$intervalRecord = " ".$intervalRecord;split(/[\ \t\n]+/,$intervalRecord);$intervalRecord = join("$delim",@_);print OUT $ts . $delim . $hostname . $delim .
$uname . $intervalRecord;
# Parse and convert array of output to# $delim-separated record
for ($k=0; $k<=$#summaryRecord; $k++) {$summaryRecord[$k] =~ /^\s*([0-9]+).*/;print OUT $delim . $1;
}print OUT "\n";}# Close I/O to start a new dayclose(OUT);close(VMSTAT); }# Subroutine to give us a nicely formatted# timestampsub timestamp {
@months = ("","Jan","Feb","Mar","Apr","May","Jun","Jul","Aug","Sep","Oct","Nov","Dec");
($hour,$min,$sec,$mon,$day,$year) =(localtime)[2,1,0,4,3,5];
sprintf ("%2.2d%s%2.2d:%2.2d:%2.2d:%2.2d",$day,$months[++$mon],$year+1900,$hour,$min,$sec);
}# Subroutine to print a timestamp to stderr# for debugging# Usage: xtime("comment") will print# "12:31:02 - comment"sub xtime {
($hour,$min,$sec) = (localtime)[2,1,0];print STDERR "$hour:$min:$sec - @_\n";
}

243
C H A P T E R
12Migration
Migrating Your SAS IT Resource Management Environment from SAS Version 6 to SAS Version 8 243Migrating Your SAS IT Resource Management Environment from SAS Version 6 to SAS Version
8 243
Introduction 243
Your SASUSER Library 244
Your Site Library/Libraries for SAS IT Resource Management 246Your PDBs 248
MXG 252
Other Libraries Related to SAS IT Resource Management 252
Your DeskTop Reporter 252
Remote Profiles 253
PDB Properties 253Your List of Known PDBs 253
Your Batch Jobs (Scripts and CLISTs) 253
Your PGMLIB 254
Verifying 254
Additional Tasks to Consider for DeskTop Reporter 255Special Considerations for the AIX Platform 256
Migrating Your SAS IT Resource Management Environment from SAS 8 to SAS 9 257
Migrating Your SAS IT Resource Management Environment from SASVersion 6 to SAS Version 8
Migrating Your SAS IT Resource Management Environment from SASVersion 6 to SAS Version 8
IntroductionThis document is for sites at which SAS IT Resource Management currently runs
under SAS Version 6 (V6) but is migrating to run under SAS Version 8 (V8). You do notneed this document if you are installing SAS IT Resource Management for the firsttime or if you already migrated your SAS IT Resource Management environment to V8.
Introductory Notes� The AIX Platform
If you are migrating from V6 to V8 on the AIX platform, see “SpecialConsiderations for the AIX Platform” on page 256 (at the end of this document)before continuing.

244 Migrating Your SAS IT Resource Management Environment from SAS Version 6 to SAS Version 8 � Chapter 12
� Difference between Production Work and Non-Production Work
SAS V6 and V8 have different structures for objects. The objects need to beconverted. In this document, “convert” means to create a V8 object thatcorresponds to a V6 object.
Before you use SAS IT Resource Management software for production workunder V8, you need to convert SAS IT Resource Management objects to V8. Youcan use V6 objects for V8 non-production work as long as you useACCESS=READONLY (for UNIX/Windows) or DISP=SHR (for z/OS) for V6objects; however, we do not recommend reading V6 PDBs from V8.
� Supplied Software and Objects
Before you follow the rest of the instructions in this document, install SAS ITResource Management on V8. This installs the supplied software and suppliedobjects (already in their converted form). For more details, see the installationinstructions.
� Site-Specific (Customized) Software and Objects
Now, the objects that are specific (customized) to you or your site (yourSASUSER library, your site library/libraries, your PDBs, and so on) need to beconverted.
Note: Convert the objects in the order in which they are presented below. �
Your SASUSER LibraryThe first time that you use V8, it creates a V8 SASUSER library. The new library is
empty.Your V6 SASUSER library probably contains information that you want to continue
to use. The V6 library might contain information that is related to SAS settings. Itmight also contain information that is related to SAS IT Resource Managementsettings, your list of known PDBs, your remote profiles, and perhaps your custom reportdefinitions, custom rule definitions, custom palette definitions, and so on. Additionally,it might contain similar information about other SAS products.
Following are the instructions to copy the contents of the V6 library to the V8 libraryso that the V8 SASUSER library contains the V6 contents that have been structuredcorrectly for V8. In the instructions, you have two decisions to make:
1 Decision 1: You can copy the contents by using the SAS Program Editor window inthe V8 GUI or by running the equivalent SAS batch job under V8. One of thesemethods might be more convenient than the other at your site.
2 Decision 2: You can copy the contents by using the EXCLUDE or SELECTstatement.
� Using the EXCLUDE statement to copy the contents is recommended if youare using the V8 SASUSER library for the first time. You might copy moreitems than you need and thus be required to delete some items later, but youwill be assured of copying all the items that you need.
� Using the SELECT statement to copy the contents is recommended if youhave already used your V8 SASUSER library. You might not copy all theitems that you need and thus be required to copy more items later, but youwill not overwrite any items already in the V8 SASUSER library.
Read through all the instructions before acting on them, because the choices mightmake an important difference at your site.
1 Determine the location of your V6 SASUSER library and the names of the items init. The easiest way to do this is to bring up SAS IT Resource Management under

Migration � Migrating Your SAS IT Resource Management Environment from SAS Version 6 to SAS Version 8 245
V6 in your usual way, and submit the following statements from the SAS ProgramEditor window:
Note: You can also submit this code in a V6 SAS batch job. �
OPTIONS SOURCE NOTES ;LIBNAME SASUSER LIST ;PROC DATASETS DD=SASUSER ;RUN ;QUIT ;
In the SAS log window, the location of your V6 SASUSER library is identifiedby the label Physical Name, and the items in your V6 SASUSER library are listedin the Name column.
2 Using a method that does not also invoke SAS IT Resource Management (or thatinvokes SAS IT Resource Management and then exits to SAS), invoke the V8 GUI.SAS defines the SASUSER libref to point to your V8 SASUSER library (andcreates the library if this is your first use of V8).
3 In the SAS Program Editor window of the V8 GUI, type the following code, editthe location of your V6 SASUSER library, and submit the edited code. Or else youcan do the same thing in a SAS batch job under V8.
At this point, choose whether you will copy with either the EXCLUDEstatement instructions or the SELECT statement instructions.
� To copy your library by using the EXCLUDE statement (which copieseverything except the item(s) listed in the EXCLUDE statement):
� For z/OS:
LIBNAME olduser ’old_library_name’DISP=SHR ;PROC COPY IN=olduser OUT=sasuser ;EXCLUDE profile;RUN ;
where ’old_library_name’ is the location of your V6 SASUSER library.
� For UNIX or Windows:
LIBNAME olduser ’old_library_name’ ACCESS=READONLY ;PROC COPY IN=olduser OUT=sasuser ;EXCLUDE profile;RUN ;
where old_library_name is the location of your V6 SASUSER library.
Note: The profile that is being excluded is your Base SAS profile. �
Note: If you use your V8 SASUSER library with other products orapplications, some of the items that you copied might be associated with theother products and applications. Verify the correct operation of thoseproducts or applications after you copy the contents of the library. �
� To copy your library by using the SELECT statement (which copies only theitem(s) listed in the SELECT statement):
� For z/OS:
LIBNAME olduser ’old_library_name’ DISP=SHR ;PROC COPY IN=olduser OUT=sasuser ;SELECT cpusropt cpver itsv workarea tskinfo

246 Migrating Your SAS IT Resource Management Environment from SAS Version 6 to SAS Version 8 � Chapter 12
cpupgms cpuout cpulog cpugseg cpusrc;RUN ;
where ’old_library_name’ is the location of your V6 SASUSER library.
� For UNIX or Windows:
LIBNAME olduser ’old_library_name’ ACCESS=READONLY ;PROC COPY IN=olduser OUT=sasuser ;SELECT cpusropt cpver itsv workarea tskinfo
cpupgms cpuout cpulog cpugseg cpusrc;RUN ;
where old_library_name is the location of your V6 SASUSER library.
Note: The select list above contains the names of the items that SAS ITResource Management might have created in the V6 SASUSER library. Addto the select list the names of any objects that you created (report definitionfolders, rule definition folders, palette definition folders, data sets, views,catalogs, and so on) in the V6 SASUSER library and that you want tocontinue to use under V8. For example, if you have report definitions inSASUSER.MYDEFS, then add MYDEFS to the list. However, do not addyour SAS base profile (PROFILE) to the list. �
Note: Some of the items in the select list above might not be present inyour V6 SASUSER library. Missing items are not a problem. You can omitthem from the list or leave them in the list. �
Note: If you use your V8 SASUSER library with other products orapplications, then verify that those products or applications work properlyafter you finish copying. You might need to copy some of the items that areassociated with those products and applications. �
Your Site Library/Libraries for SAS IT Resource ManagementNote: The instructions in this section offer some choices. Read through the entire
section before acting on the instructions, so that your choices are consistent and areappropriate for your site. �
When you install a new version or release of SAS IT Resource Management, a newV8 site library is created. We strongly recommend that, at that point, you runCPSITEUP to merge the contents of your V6 production site library with the new V8site library. CPSITEUP ensures that your existing production site library informationwill be retained; it also makes any updates in the new V8 site library available. If youhave already run CPSITEUP, then you can skip the rest of this section. If you have notyet run CPSITEUP, then please review the following two sets of instructions thatdescribe the different methods by which you might copy or merge your site libraries.We strongly recommend the use of CPSITEUP, but whichever method you choose, followthat method’s instructions only.
If you have not run CPSITEUP but want to do so, then follow these instructions:
1 Locate and read the CPSITEUP member. You can find it
� on z/OS, in the CPSITEUP member in the SAS IT Resource ManagementPDS named CPMISC
� on Windows, in the file named cpsiteup in the directory named!SASROOT\cpe\sasmisc
� on UNIX, in the file named cpsiteup in the directory named !SASROOT/misc/cpe.

Migration � Migrating Your SAS IT Resource Management Environment from SAS Version 6 to SAS Version 8 247
2
Note: For customers who are running SAS IT Resource Management 2.3 or 2.4:The CPSITEUP that ships with SAS IT Resource Management 2.5 has a code
change that you must make yourself if you are using the 2.3 or 2.4 version ofCPSITEUP. So, if you are running 2.3 or 2.4, then locate CPSITEUP as describedabove and follow these instructions:
� In CPSITEUP, locate lines 273 and 274. In 2.3 and 2.4, those lines are
%else%do;
� Expand those lines to be
%else %if %quote(&PRODSITE) ne %quote(&NEWSITE)and
%quote(&PRODSITE) ne %quote(&OLDSITE)%then
%do;
�
3 Execute the CPSITEUP code according to the instructions within it.4 If you require multiple V8 libraries:
� on z/OS, allocate space for the additional site library (using the same valuesfor the DSORG=, RECFM=, LRECL=, BLKSIZE=, and SPACE= parametersas the new V8 site library users). Then use the SAS COPY procedure (PROCCOPY) to copy the contents of the new V8 site library to the additional sitelibrary.
� on Windows, create an additional folder, and copy the contents of the new V8site library’s folder to the additional folder.
� on UNIX, create an additional directory, and copy the contents of the new V8site library’s directory to the additional directory.
If you have not run CPSITEUP and do not want to, then follow these instructions:These instructions show how to copy the contents of a production V6 site library into
the new V8 site library (or into a copy of the new V8 site library) so that the contentsare structured correctly for V8. You can copy the contents by using the SAS V8 GUI orby running the equivalent SAS batch job under SAS V8. Because you are not usingCPSITEUP, you will not be merging your production site library with any updates thatmight have been available in the new V8 site library.
1 Determine the location of your V6 site library. You can do this by invoking theSAS IT Resource Management GUI under SAS V6, and using the Site Optionsbutton on the Administration tab in the UNIX/Windows GUI. You can also findthe location by following this path in the z/OS GUI:
From the main menu, select Options and Site SAS Options. Then select SiteLocation.
If in doubt, check with the SAS IT Resource Management administrator at yoursite.
Then determine the location of your SAS V8 site library (or the location of acopy of the new SAS V8 site library). You can do this by invoking the SAS ITResource Management GUI under SAS V8, and using the method that is describedin the previous paragraph. If in doubt, consult the SAS IT Resource Managementadministrator at your site or the person who installed SAS IT ResourceManagement.
2 Only for z/OS: Run IEFBR14 or use ISPF 3.2 to allocate space for a SAS V8 sitelibrary if the installation of SAS IT Resource Management did not already do this.

248 Migrating Your SAS IT Resource Management Environment from SAS Version 6 to SAS Version 8 � Chapter 12
Except for using the DSN= and perhaps adding more space if the SAS V6 sitelibrary was running out of space, you can use the same amount of space and thesame DCB= as for the SAS V6 site library.
3 Using a method that does not also invoke SAS IT Resource Management, invokethe SAS V8 GUI. Or invoke SAS IT Resource Management and exit to SAS. Orusing a method that does not also invoke SAS IT Resource Management, constructa batch job that invokes SAS V8.
4 Type the following code in the SAS Program Editor window, edit the location ofyour SAS V6 and SAS V8 site library for SAS IT Resource Management, andsubmit the edited code. Or add the following code to the SAS job, edit the locationsof your SAS V6 and SAS V8 site library for SAS IT Resource Management, andsubmit the batch job with the edited code.
� For z/OS:
LIBNAME OLDSITE ’old_library_name’ DISP=SHR ;LIBNAME SITELIB ’new_library_name’DISP=OLD ;PROC COPY IN=oldsite OUT=sitelib ;RUN ;
where old_library_name is the location of your SAS V6 site library for theearlier release of SAS IT Resource Management, and new_library_name isthe location of your SAS V8 site library for SAS IT Resource Management.
� For UNIX or Windows:
LIBNAME oldsite ’old_library_name’ ACCESS=READONLY ;LIBNAME sitelib ’new_library_name’ ;PROC COPY IN=oldsite OUT=sitelib ;RUN ;
where old_library_name is the location of your SAS V6 site library for theearlier release of SAS IT Resource Management, and new_library_name isthe location of your SAS V8 site library for SAS IT Resource Management.
5 If you require multiple SAS V8 site libraries:� on z/OS, allocate space for the additional site library (using the same values
for the DSORG=, RECFM=, LRECL=, BLKSIZE=, and SPACE= parametersas the new SAS V8 site library uses). Then use the SAS COPY procedure(PROC COPY) to copy the contents of the new SAS V8 site library to theadditional site library.
� on Windows, create an additional folder, and copy the contents of the newSAS V8 site library’s folder to the additional folder.
� on UNIX, create an additional directory, and copy the contents of the newSAS V8 site library’s directory to the additional directory.
Note: You might need to edit some of the values in the SAS V8 site library, but donot edit until you finish converting the other objects. Instructions for editing appearlater in this document. �
Your PDBsYou will need to make a new SAS IT Resource Management PDB for use with V8 and
then copy to it the contents of the V6 PDB. (If you have more than one SAS IT ResourceManagement PDB, then you will need to do this one time for each PDB. However, youdo not need to convert the demonstration PDBs. When SAS IT Resource Managementis installed, already-converted demonstration PDBs are available.)
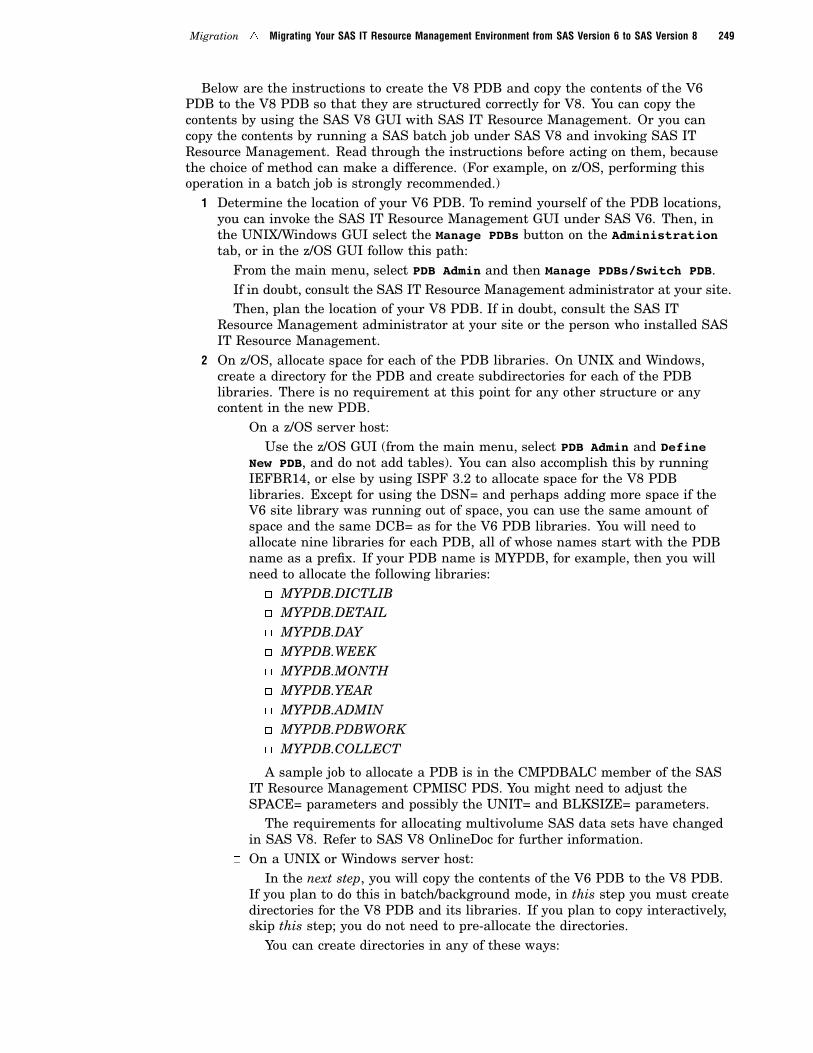
Migration � Migrating Your SAS IT Resource Management Environment from SAS Version 6 to SAS Version 8 249
Below are the instructions to create the V8 PDB and copy the contents of the V6PDB to the V8 PDB so that they are structured correctly for V8. You can copy thecontents by using the SAS V8 GUI with SAS IT Resource Management. Or you cancopy the contents by running a SAS batch job under SAS V8 and invoking SAS ITResource Management. Read through the instructions before acting on them, becausethe choice of method can make a difference. (For example, on z/OS, performing thisoperation in a batch job is strongly recommended.)
1 Determine the location of your V6 PDB. To remind yourself of the PDB locations,you can invoke the SAS IT Resource Management GUI under SAS V6. Then, inthe UNIX/Windows GUI select the Manage PDBs button on the Administrationtab, or in the z/OS GUI follow this path:
From the main menu, select PDB Admin and then Manage PDBs/Switch PDB.If in doubt, consult the SAS IT Resource Management administrator at your site.Then, plan the location of your V8 PDB. If in doubt, consult the SAS IT
Resource Management administrator at your site or the person who installed SASIT Resource Management.
2 On z/OS, allocate space for each of the PDB libraries. On UNIX and Windows,create a directory for the PDB and create subdirectories for each of the PDBlibraries. There is no requirement at this point for any other structure or anycontent in the new PDB.
� On a z/OS server host:Use the z/OS GUI (from the main menu, select PDB Admin and Define
New PDB, and do not add tables). You can also accomplish this by runningIEFBR14, or else by using ISPF 3.2 to allocate space for the V8 PDBlibraries. Except for using the DSN= and perhaps adding more space if theV6 site library was running out of space, you can use the same amount ofspace and the same DCB= as for the V6 PDB libraries. You will need toallocate nine libraries for each PDB, all of whose names start with the PDBname as a prefix. If your PDB name is MYPDB, for example, then you willneed to allocate the following libraries:
� MYPDB.DICTLIB� MYPDB.DETAIL� MYPDB.DAY� MYPDB.WEEK� MYPDB.MONTH� MYPDB.YEAR� MYPDB.ADMIN� MYPDB.PDBWORK� MYPDB.COLLECT
A sample job to allocate a PDB is in the CMPDBALC member of the SASIT Resource Management CPMISC PDS. You might need to adjust theSPACE= parameters and possibly the UNIT= and BLKSIZE= parameters.
The requirements for allocating multivolume SAS data sets have changedin SAS V8. Refer to SAS V8 OnlineDoc for further information.
� On a UNIX or Windows server host:In the next step, you will copy the contents of the V6 PDB to the V8 PDB.
If you plan to do this in batch/background mode, in this step you must createdirectories for the V8 PDB and its libraries. If you plan to copy interactively,skip this step; you do not need to pre-allocate the directories.
You can create directories in any of these ways:

250 Migrating Your SAS IT Resource Management Environment from SAS Version 6 to SAS Version 8 � Chapter 12
� use the UNIX/Windows GUI (from the main window, select theQuickStart Wizard or the Create PDB Wizard)
� use the SAS IT Resource Management %CPSTART macro in a SASbatch job
� use the mkdir command at the operating system prompt.
If you want your PDB to have a name like /my/pdb (on UNIX) orc:\My\Pdb (on Windows), for example, then you will need to create thefollowing directories:
� /my/pdb or c:\My\Pdb� /my/pdb/dictlib or c:\My\Pdb\Dictlib� /my/pdb/detail or c:\My\Pdb\Detail� /my/pdb/day or c:\My\Pdb\Day� /my/pdb/week or c:\My\Pdb\Week� /my/pdb/month or c:\My\Pdb\Month� /my/pdb/year or c:\My\Pdb\Year� /my/pdb/admin or c:\My\Pdb\Admin� /my/pdb/pdbwork or c:\My\Pdb\Pdbwork� /my/pdb/collect or c:\My\Pdb\Collect
3 Copy the contents of the V6 PDB to the V8 PDB.� Using the GUI:
If the V8 GUI is not already invoked, invoke it. Then, invoke SAS ITResource Management software with one of the SAS V8 demonstration PDBsas the active PDB.
� If the PDB to be converted is on a z/OS server:Follow this path from the main menu: Select PDB Admin and
then selectManage PDBs/Switch PDBs. Select the name of the V6 PDBfrom the ItemActions menu and then select Copy PDB. Type or selectthe location of the V8 PDB and select Run.
When the confirmation dialog box appears, select OK. When thecopying is finished, select Goback to return to the PDB Admin window.From the list of known PDBs, select the name of the V6 PDB. From theItemActions menu, select Remove PDB Entry.
Note: The batch method of copying the PDB is preferred, becausecopying the PDB in a TSO session can take a very long time. �
� If the PDB to be converted is on a UNIX or Windows server:From the Administration tab, select Manage PDBs. From the
list of known PDBs, select the name of the V6 PDB. Then, from theFile menu, select Copy. In the To field, type or select the name of theV8 PDB and select OK. When the copying is finished, from the list ofknown PDBs, select the name of the V6 PDB. From the File menu,select Remove PDB Entry.
Note: The above z/OS and UNIX/Windows paragraphs assume thatyou retained the original name and location for the V6 PDB and used anew name and location for the V8 PDB. If instead you renamed andmoved the V6 PDB and if you used the original name and location for theV8 PDB, then you do not need to remove the original name from your V8list of known PDBs. However, you might want to change the name of theV6 PDB in your V6 list of known PDBs, V6 remote profiles, and so on. �

Migration � Migrating Your SAS IT Resource Management Environment from SAS Version 6 to SAS Version 8 251
� Using a batch job:If a batch job that invokes SAS V8 has not already been constructed,
construct one now. (On UNIX and Windows, be sure that the invocation usesyour V8 SASUSER library.) Then, add a call to the %CPSTART macro toinvoke SAS IT Resource Management software with one of the V8demonstration PDBs as the active PDB. Add a call to the %CPDBCOPYmacro to copy the contents of the V6 PDB to the V8 PDB, and add a call tothe %CPSTART macro to activate the V8 PDB.
Note that in the first call to the %CPSTART macro, you need to specifythe ROOT= parameter so that it can point to the location of the SAS ITResource Management software. Here are two examples:
� If the PDB to be converted is on a z/OS server:
%cpstart(mode=batch,root=location-of-IT-Service-Vision,pdb=location-of-SASV8-demonstration-PDB,disp=shr) ;
%cpdbcopy(location-of-SASV6-PDB,location-of-SASV8-PDB);%cpstart(mode=batch,
root=location-of-IT-Service-Vision,pdb=location-of-SASV8-PDB,disp=old);
� If the PDB to be converted is on a UNIX or Windows server:
Note: For Windows: Before running the following code, check thatyou do not have the PDB directory or its subdirectories locked. That is,make sure that the cd command (or Windows Explorer or My Computer)is not set to the PDB directory or to any of its subdirectories. �
%cpstart(mode=batch,root=location-of-IT-Service-Vision,pdb=location-of-SASV8-demonstration-PDB,access=readonly);
%cpdbcopy(location-of-SASV6-PDB,location-of-SASV8-PDB);%cpstart(mode=batch,
root=location-of-IT-Service-Vision,pdb=location-of-SASV8-PDB,access=write);
If you use the SAS IT Resource Management GUI, check that your V8list of known PDBs has the appropriate names and locations, and update anythat need to be changed. You might want to do the same for your V6 list ofknown PDBs. Access and, if necessary, edit your list of known PDBs asdescribed above. (In the section "Your PDBs," see step 3.) For moreinformation about calling these macros, see the SAS IT ResourceManagement macro reference documentation.
4 Your site might have a .QS PDS or /qs directory "under" your PDB. That PDS ordirectory is not a SAS object and its related PDSs and subdirectories are not SASobjects. If you want to make a copy of them "under" the V8 PDB, then you can usean operating system command, such as the following:
� On z/OS, you can use ISPF 3.3 or IEBCOPY in batch or you can use a similarutility. There are multiple PDSs with a QS qualifier. Make sure that youcopy each of them.
� On Windows, you can use Windows Explorer or you can use XCOPY or asimilar command.

252 Migrating Your SAS IT Resource Management Environment from SAS Version 6 to SAS Version 8 � Chapter 12
� On UNIX, you can use
cp -R location-of-SASV6-PDB/qs location-of-SASV8-PDB/qs
Also, if you want to use the QuickStart jobs with the V8 PDB, then you willneed to edit the xREPORT, xPROCESS, and possibly xFTPHTML files in thelocation-of-SASV8-PDB/qs/cntl or location-of-SASV8-PDB\qs\cntl directory or inthe location-of-SASV8-PDB.QS.CNTL PDS, and change the values of the PDB=and ROOT= parameters that are contained in those files.
5 Your site might have an archive "under" or associated with your PDB. An archiveis used only in read mode and thus its archive libraries do not require conversion.(If you need to restore data from these archive libraries later, then you will need toremember their original names and locations.)
MXGIf you install a new version of MXG, then part of the installation procedure is to run
a job that creates and populates a SAS library of formats for use with MXG. When yourun the job under SAS V8, a V8 library will be the result.
If you want to continue to use your existing (SAS V6) format library until you installthe next version of MXG, then you can convert the existing format library from V6 toV8. First, allocate space for the new library, as described in the section “Your SiteLibrary/Libraries for SAS IT Resource Management” on page 246. Then, to copy thecatalog that contains the formats, submit SAS code like this through the SAS ProgramEditor window or by using a SAS batch job:
LIBNAME SASV6LIB ’location-of-SASV6-format-library-for-MXG’DISP=SHR ;
LIBNAME SASV8LIB ’location-of-SASV8-format-library-for-MXG’DISP=OLD ;
PROC CATALOG CAT=SASV6LIB.FORMATS ;COPY OUT=SASV8LIB.FORMATS ;RUN ;QUIT ;
Other Libraries Related to SAS IT Resource ManagementYou might have other V6 libraries that are related to SAS IT Resource Management,
such as one or more libraries for custom report definitions, custom rule definitions,custom palette definitions, and source code for exits.
Convert each of these libraries in the same way that you converted the site library.However, for clarity you might want to use different librefs. For example, instead ofoldsite you might want to use oldlib, and instead of sitelib you might want to usenewlib. And the locations that you edit are the locations of the old and new customlibrary, not the old and new site library.
Your DeskTop ReporterThe DeskTop Reporter, as shipped with SAS IT Resource Management, is already
converted.If the only customization or modification that you have made to your reports is to use
your own data, then you need to convert the job that contains the call to the%CPEISSUM macro. To convert the job, follow the instructions below, in “Your BatchJobs (Scripts and CLISTs)” on page 253.
If you have added new reports or modified existing reports by using SAS/EISsoftware, then follow the instructions in the section “Additional Tasks to Consider forDeskTop Reporter” on page 255 to convert.

Migration � Migrating Your SAS IT Resource Management Environment from SAS Version 6 to SAS Version 8 253
Remote ProfilesIf you use any remote profiles, then edit the locations in them to refer to the V8
objects. To do this, you can follow these steps:1 From the Administration tab, select Manage PDBs � Locals � Remote
Profile.2 Then, for each profile that you use, select the profile name and then select File �
Open.3 Review the contents of all fields on all of the tabs, and edit the values for any
software or objects whose location has changed.4 Then select OK � OK � Close.
Note: These instructions assume that the original names and locations wereretained for the V6 objects and that new names and locations were used for the V8objects. If instead the V6 objects were renamed and moved and the V8 objects used theoriginal names and locations, then you do not need to edit your V8 remote profiles.However, you might want to edit the V6 remote profiles. �
PDB PropertiesIf you have a PDB that has an archive, then decide whether you want the V8 PDB to
use the same archive as the V6 PDB or to use a new archive. (Either location isacceptable.) Then, edit those properties of the V8 PDB that refer to the location of thearchive. (If nothing was specified, then the location of the archive is probably changing,because the default location is "under the PDB" and the location of the PDB is probablychanging.)
� To edit in batch:Call the %CPSTART macro to activate that PDB. Then, call the %CPPDBOPT
macro to specify the values of its archive parameters.� To edit by using the z/OS GUI:
Activate that PDB and then, on the main menu, select PDB Admin � SetActive PDB Options. Then, edit the values of the archive parameters and selectOK.
� To edit by using the UNIX/Windows GUI:From the Applications tab, select Manage PDBs. Activate the PDB if it is not
already activated, and then select Properties and the Archive tab. Then, editthe values of the archive parameters, and select OK and then Close.
Your List of Known PDBsIf you use the SAS IT Resource Management GUI, then edit your list of known PDBs
if you are on a client host. For instructions, see step 3 in the section “Your PDBs” onpage 248.
Your Batch Jobs (Scripts and CLISTs)If you have one or more batch jobs, then save a V6 version of the job and edit one of
the copies to refer to the locations of the SAS IT Resource Management software andthe V8 versions of the objects. Also make the following changes where you invoke SAS:
� On z/OS:� In SAS V6, where you used the CONFIG file in
CPMISC(CMCONFIG)

254 Migrating Your SAS IT Resource Management Environment from SAS Version 6 to SAS Version 8 � Chapter 12
for SAS V8, instead use the one in
CPMISC(CMCONFI8)
� In SAS V6, where you used, in your own custom SAS code,
ERRORABEND
for SAS V8, because SAS stops on more conditions, you might instead want touse
NOERRORABEND
� On UNIX:� In SAS V6, where you used the options
-dmsbatch, -batch,-terminal, and -fsdevice ascii.vt100
for SAS V8, remove those options and instead add the option
-noterminal
� On Windows:� In SAS V6, where you used the option
-dmsbatch
for SAS V8, remove that option and instead add the option
-noterminal
Similarly, save and then edit one of the copies of scripts, CLISTs, and any other suchfiles that refer to locations of the software and objects.
Your PGMLIBNote: The following paragraphs describe the same operation that you perform with
every new PGMLIB if you have an installed user-written table in the earlier PGMLIB.The operation is not related to the conversion from V6 to V8. �
SAS IT Resource Management includes a V8 PGMLIB. If you installed a user-writtentable definition in your V6 PGMLIB, then you might want to install that tabledefinition in your V8 PGMLIB.
To do so, write a batch job that does all of the following:� invokes SAS V8� calls the %CPSTART macro to start SAS IT Resource Management and to activate
a PDB that contains the table� then calls the %CPDDUTL macro to apply the INSTALL TABLE control
statement. (For more information about using the %CPDDUTL macro and aboutthe %CPDDUTL control statement INSTALL TABLE, see “Chapter 4: Using the%CPDDUTL Macro” in the SAS IT Resource Management macro referencedocumentation.)
VerifyingIdeally, run both the V6 and V8 systems in parallel for two weeks and compare the
results each day. If you have a very large site, running in parallel might not bepossible, but you should at least run parallel test systems before converting theproduction system to V8.
At minimum, compare the process summary table and reduce summary table in theV6 and V8 logs.

Migration � Migrating Your SAS IT Resource Management Environment from SAS Version 6 to SAS Version 8 255
Additional Tasks to Consider for DeskTop ReporterThe following instructions describe how to update your DeskTop Reporter if you have
added or modified reports (other than modifying reports to use your own data).� Data Conversion
Data can be converted from V6 to V8 by using the SAS COPY procedure (PROCCOPY) with the appropriate library engines. You can submit the following SAScode:
� For z/OS:
LIBNAME SASV6Data SASV6 ’SASV6 path’ DISP=SHR ;LIBNAME SASV8Data SASV8 ’SASV8 path’ DISP=OLD ;PROC COPY IN=SASV6Data OUT=SASV8Data
MEMTYPE=(DATA MDDB VIEW) ;RUN ;
� For UNIX and Windows:
LIBNAME SASV6Data SASV6 ’SASV6 path’ ACCESS=READONLY ;LIBNAME SASV8Data SASV8 ’SASV8 path’ ;PROC COPY IN=SASV6Data OUT=SASV8Data
MEMTYPE=(DATA MDDB VIEW) ;RUN ;
Note: Views do not need to be re-created from the source code. The VIEWmember can be copied by using PROC COPY. It is recommended that you keep thesource code in any case. �
� SAS V8 RepositoriesIn V8, metadata is stored in repositories, not in libraries. When you are
migrating the metabase, the repository name in V8 should be the same as themetabase libname in V6. If they are not the same, then the applications that usethe metabase definitions will be unable to find them, and most of the attributeswill need to be set up again.
Note: Repository names are case sensitive. Always use uppercase for repositorynames that are the target of V6 conversions. �
To Create a Repository
1 Type REPOSMGR on the command line and select Enter or Return.2 Select the Repository Registration.3 Select the New button.4 Type the repository name (in uppercase for V6 conversions), path, and
description.
Note: Repositories will be created for you for each V6 metabase during MetabaseConversion. �
� Metabase ConversionThis section covers only non-HOLAP entries in the metabase. The metabase
libraries can be converted from the V6 libraries to the V8 repository paths by usingthe SAS COPY procedure (PROC COPY). You can submit the following SAS code:
� For z/OS:
LIBNAME SASV6MetLib SASV6 ’SASV6 path’ DISP=SHR ;LIBNAME SASV8RepLib SASV8 ’SASV8 path’ DISP=OLD ;PROC COPY IN=SASV6metlib OUT=SASV8RepLib ;SELECT metabase1 metabase2 . . . sasmbc sasmbi ;

256 Migrating Your SAS IT Resource Management Environment from SAS Version 6 to SAS Version 8 � Chapter 12
RUN ;
� For UNIX and Windows:
LIBNAME SASV6MetLib SASV6 ’SASV6 path’ ACCESS=READONLY ;LIBNAME SASV8RepLib SASV8 ’SASV8 path’ ;PROC COPY IN=SASV6metlib OUT=SASV8RepLib ;SELECT metabase1 metabase2 . . . sasmbc sasmbi ;RUN ;
The metabase is now in V8 file format, but the internal structure of themetabase needs to be converted to a repository structure.
To convert the metadata:1 Open the Metabase window in SAS/EIS.2 Select Edit � Convert.3 From the list, select the repository path to which you copied your V6
metabase.4 Add your metabases to the selected list.5 Select OK to perform the conversion.
� Application ConversionApplications can be converted by using the SAS COPY procedure (PROC
COPY). You can submit the following SAS code:� For z/OS:
LIBNAME SASV6AppLib SASV6 ’SASV6 Path’ DISP=SHR ;LIBNAME SASV8AppLib SASV8 ’SASV8 Path’ DISP=OLD ;PROC COPY IN=SASV6AppLib OUT=SASV8AppLib ;SELECT SASV6ApplDB ;RUN ;
� For UNIX and Windows:
LIBNAME SASV6AppLib SASV6 ’SASV6 Path’ ACCESS=READONLY ;LIBNAME SASV8AppLib SASV8 ’SASV8 Path’ ;PROC COPY IN=SASV6AppLib OUT=SASV8AppLib ;SELECT SASV6ApplDB ;RUN ;
Individual applications will work if the libname that is used in V8 is notthe same as the libname that is used in V6. However, application windowswill be unable to find the applications unless they are referenced by the samelibref as they were in V6. Therefore, always keep the libref the same.
� Mixing V6 and V8 ObjectsBoth SAS V6 applications that are ported to V8 and native V8 objects
can be mixed on the same application window.
Special Considerations for the AIX PlatformYou cannot use the SAS COPY procedure (PROC COPY) to copy SAS V6 catalogs on
AIX to SAS V8 catalogs. Thus, as you follow the procedures that are outlined in thisdocument, you might see error messages similar to the following:
ERROR: File format version 6 catalogs are not supported by this release.
ERROR: File TDICTLIB.CPFMTS.CATALOG has not been saved because copy couldnot be completed.

Migration � Migrating Your SAS IT Resource Management Environment from SAS 8 to SAS 9 257
You might also see these error messages when running %CPDBCOPY, because thismacro also uses the SAS COPY procedure.
If, based on the information in this migration document, you decide that it isnecessary to migrate the catalog(s), or if the instructions state that the catalog(s) mustbe migrated, then you must do the following:
� Use the SAS CPORT procedure (PROC CPORT) on SAS V6 to convert thecatalog(s) into transport file format.
� Then, use the SAS CIMPORT procedure (PROC CIMPORT) on SAS V8 to add thecatalog(s) to a SAS V8 library.
� For example, first edit the following code and submit it on your SAS V6 system tocreate a transport file that contains the necessary catalogs. (The example belowadds two SAS catalogs, CPFMTS and CPVER, to the transport file. You caninclude additional catalogs in the SELECT statement as necessary.)
LIBNAME SASV6LIB ’SASV6_library’ ;PROC CPORT LIB=SASV6LIB FILE=’location-of-external-file’ ;SELECT CPFMTS CPVER ;QUIT ;
In this example, SASV6_library is the location of the SAS V6 library that containsthe catalogs to be ported.
� Next, if you need to FTP the transport file, then you should ensure that it istransferred in binary mode.
� Finally, you need to import the catalogs in the transport file to your SAS V8system. Edit the following code and submit it on your SAS V8 system:
LIBNAME SASV8LIB ’SASV8_library_name’ ;PROC CPORT LIB=SASV8LIB INFILE=’location-of-external-file’ ;QUIT ;
where SASV8_library_name is the location of the SAS V8 library to contain catalogs.
Note: For further information about the SAS CPORT and SAS CIMPORTprocedures, refer to your SAS System documentation. �
Migrating Your SAS IT Resource Management Environment from SAS 8to SAS 9
This document is for sites at which SAS IT Resource Management currently runsunder SAS 8 but is migrating to run under SAS 9. You do not need this document if youare installing SAS IT Resource Management for the first time or if you alreadymigrated your SAS IT Resource Management environment to SAS 9.
You can view and/or print the document from this Web site: http://support.sas.com/documentation/onlinedoc/itsv.

258
259
P A R T3
Administration
Chapter 13. . . . . . . . .Administration: Concepts and Tools 261
Chapter 14. . . . . . . . .Administration: Working with Site Libraries 269
Chapter 15. . . . . . . . .Administration: Working with Whole PDBs 295
Chapter 16. . . . . . . . .Administration: Working with Levels 337
Chapter 17. . . . . . . . .Administration: Working with Tables 353
Chapter 18. . . . . . . . .Administration: Working with Variables 377
Chapter 19. . . . . . . . .Administration: Working with Data 409
Chapter 20. . . . . . . . .Administration: Extensions to SAS IT ResourceManagement 425

260

261
C H A P T E R
13Administration: Concepts andTools
Overview of Administration 261Overview of Administration Concepts and Tools 261
SAS IT Resource Management Software Components 263
Program Library 263
Site Library 264
Performance Data Base and Its Libraries 264SASUSER Library 264
MISC Directory (UNIX) and SASMISC Directory (Windows) 265
CPMISC PDS (z/OS) 265
SAS IT Resource Management Macros 265
SCHEMA Directory (UNIX) and MIBS Directory (UNIX and Windows) 266
MXG Software 266
Overview of Administration
Overview of Administration Concepts and Tools
After SAS IT Resource Management is installed:1 Set up one or more SAS IT Resource Management servers with one or more data
collectors. As a result of setting up the server(s) and collectors,� the data from your collectors can be extracted, transformed, and loaded into
one or more SAS IT Resource Management PDBs� batch jobs are scheduled (typically, one time each night) to process the data,
summarize the data, and analyze and report on the data.
Note: The server interfaces have some interactive functionality for reporting, butthe full interactive functionality for reporting is in the client interface. �
2 Set up one or more SAS IT Resource Management clients. As a result of setting upthe client(s),
� you and other users can use interactive tools for ad hoc data investigation,analysis, and reporting
� you and other users can use interactive tools to create and save reportdefinitions and rule definitions. Saved report and rule definitions can be runinteractively and/or run (typically, each night) from the batch job thatanalyzes and reports on the data.
3 Set up your Web browser (and others set up their Web browsers) to view thereports that are generated interactively or in batch mode.

262 Overview of Administration Concepts and Tools � Chapter 13
After setup, you might want to use SAS IT Resource Management
� without administrative changes between releases.
� with simple administrative changes that you can make through the GUIs or inbatch mode. For example, you might want to change which data is kept and howlong it is kept, and you might want to change which summary statistics arecalculated on the data.
� with more substantial changes that you can make by using the SAS IT ResourceManagement extensions. For example, you might want to change whether there ischecking for duplicate data and how the checking is done, and you might want touse process exits to remove data about test systems.
The main objects that you work with when you do administrative work are
� one or more site libraries. The main uses of a site library are
� to contain site-wide defaults that are copied to a PDB when the PDB iscreated
� to contain site-wide information (such as the list of site holidays) that is usedwhen data is processed into a PDB.
� one or more PDBs. The main uses of a PDB are
� to contain data that is extracted, transformed, and loaded from one or morecollectors
� to contain summarized data
� to provide data for analysis and reporting.
Logically, a PDB contains detailed and summarized data, as well as information(metadata) that is needed for managing the data. Physically, each PDB consists ofa coordinated set of nine SAS libraries that contain data and metadata.
Within a PDB, data is grouped by one or more levels and one or more tables. Agroup is named level-name.table-name.
� Level-name groups data with a common amount of summarization.Unsummarized data is in the detail level. Summarized data is in the daylevel (which is summarized at least by day), week level (which is summarizedat least by week), month level (which is summarized at least by month), andyear level (which is summarized at least by year).
Level is a logical term, and is represented physically by a SAS librarywithin the PDB. Thus, detail-level data is in the PDB’s DETAIL library,day-level data is in the PDB’s DAY library, and so on.
� Table-name groups data about a common topic.
Here is a brief summary about PDBs:
� A PDB has properties and contains tables. A PDB corresponds to one (ormore) collectors.
� A table has properties and contains variables. A table corresponds to one (ormore) topics.
� A variable has properties and contains values. A variable corresponds to one(or more) metrics.
For each measurement in the detail level, you can choose to have zero,one, or more statistics calculated at a summary level. For example, you canchoose mean, minimum, maximum, range, and so on.
� For information about less commonly encountered administration objects, see “SAS IT Resource Management Software Components” on page 263.

Administration: Concepts and Tools � SAS IT Resource Management Software Components 263
For more information about the main administration tasks and objects, see thefollowing topics:
� “Overview of Setup” on page 37� “Overview of Site Libraries” on page 270� “Overview of Whole PDBs” on page 296� “Overview of Levels” on page 337� “Overview of Tables” on page 353� “Overview of Variables” on page 378� “Overview of Data” on page 409� “Overview of Extensions” on page 425.
SAS IT Resource Management Software ComponentsBefore you use SAS IT Resource Management to collect, analyze, or report on data,
you might want to become familiar with the structure of the software. You will be usingthe following libraries and software components. (If an item is specific to an operatingenvironment, the operating environment is indicated.)
� “Program Library” on page 263� “Site Library” on page 264� “Performance Data Base and Its Libraries” on page 264� “SASUSER Library” on page 264� “MISC Directory (UNIX) and SASMISC Directory (Windows)” on page 265� “CPMISC PDS (z/OS)” on page 265� “ SAS IT Resource Management Macros” on page 265� “SCHEMA Directory (UNIX) and MIBS Directory (UNIX and Windows)” on page
266� “MXG Software” on page 266.
These libraries and components are described in the following sections.
Program LibraryThe SAS IT Resource Management program library (whose SAS libref is PGMLIB) is
the SAS data library that contains the SAS IT Resource Management software for yourcurrent host. It contains the master data dictionary (supplied table and variabledefinitions), the supplied report and rule definitions, and the SAS IT ResourceManagement client or server software programs for your current host.
When SAS IT Resource Management is updated, the libraries and information inPGMLIB are updated. You must have write access to add or modify any of the items inPGMLIB. However, you do not need to have write access to PGMLIB in order to view,search, or copy from the list of supplied table definitions, supplied variable definitions(regular, derived, and formula), supplied report definitions, and supplied rule definitions.
If you have more than one release of SAS IT Resource Management installed, thenyou will have a separate version of the program library for each release.
Note: On some hosts, additional software for the SAS IT Resource ManagementGUI is installed in the CPSYSLIB library. �
The PGMLIB library is created when you install SAS IT Resource Management.� On z/OS, the location is
the.location.where.you.installed.sas.at.your.site.itrm.pgmlib

264 SAS IT Resource Management Software Components � Chapter 13
.� On UNIX, the location is
.../saspgm/cpe/pgmlib
� On Windows, the location is
...\cpe\pgmlib
Site LibraryThe site library contains your site-related information, such as the list of site
holidays, the default work-shift schedules, the default start-of-week setting, and otherdefaults. When you or others at your site create a new PDB, the default properties forthat PDB are copied from the site library. Then, you can customize the settings for thatPDB.
If you are processing data for multiple sites or groups within your organization, thenyou can have a separate site library for each site or group so that you can customize thedefault settings for each group.
The locations of the default site library are as follows:� On z/OS, the location is
the.location.where.you.installed.sas.at.your.site.itrm.sitelib
.� On UNIX, the location is
.../saspgm/cpe/sitelib
� On Windows, the location is
...\cpe\sitelib
To modify settings or add items to your site library, you must have write access tothis library. However, you can read and copy items from the active site library if youhave read access to the library.
For more information about accessing your site library or setting site-specific valuessuch as holidays, the shift code for holidays, and PDB defaults, see “Overview of SiteLibraries” on page 270.
Note: If your site processes data for multiple sites, then you might have a separatesite library for each site. �
Performance Data Base and Its LibrariesFor more information, see “What Is a PDB?” on page 7 and “Overview of Whole
PDBs” on page 296.
SASUSER Library
The SASUSER library is a SAS library that is used by your interactive SAS sessionfor storing user-specific information, such as the locations of PDBs that you have usedand any customizations that you specify for SAS options.
When you start the SAS System, a SASUSER library is automatically created foryou, if one does not already exist. When you customize keys, menus, or other itemswithin SAS IT Resource Management, these modifications are automatically saved inyour SASUSER library. By default, any source, log, or report files that you save aresaved in this library.
Administration: Concepts and Tools � SAS IT Resource Management Software Components 265
Note: By default, this library is not used in batch mode on z/OS and is used in batchmode on UNIX and Windows. For information about the SASUSER library that isspecific to your operating environment, refer to the SAS Companion documentation foryour operating environment and your current version of SAS. �
MISC Directory (UNIX) and SASMISC Directory (Windows)The MISC directory in UNIX and the SASMISC directory in Windows contain the
following information: examples for running SAS IT Resource Management, theautoexec file, and the itsv command for starting SAS and SAS IT ResourceManagement. By default, this library is located in the directory where SAS is installed.
� The default location for UNIX is
.../misc/cpe
� The default location for Windows is
...\cpe\sasmisc
If you need to modify a file in the MISC or SASMISC directories, copy the file fromthis directory to another location and modify the copy.
On z/OS, CPMISC PDS is used for a similar purpose. For more information aboutCPMISC, see the next topic.
CPMISC PDS (z/OS)The CPMISC data set is a standard z/OS partitioned data set (PDS).� The default location for z/OS is
the.location.where.you.installed.sas.at.your.site.itrm.cpmisc
.
CPMISC contains information such as� JCL examples for processing, reducing, and reporting on supported data collectors
in batch.� CMAUTOEX, which is the SAS autoexec that contains start-up parameters for
SAS IT Resource Management.� CMCPE CLIST, which is the default name for the CLIST with which you start
SAS and automatically invoke the SAS IT Resource Management server on z/OS.
A list of all of the members in this PDS and a short description of each member’scontent are in the $README member.
If you or the SAS IT Resource Management administrator at your site needs to modifya member from CPMISC, copy the member to another location and modify the copy.
On UNIX the MISC directory is used for a similar purpose, and on Windows theSASMISC directory is used for a similar purpose. For more information about MISCand SASMISC, see the previous topic.
SAS IT Resource Management MacrosSAS IT Resource Management provides macros that can run in batch mode. Macros
that require write access to the PDB, such as %CPPROCES and %CPREDUCE, or anymacros that update the data dictionary must run on one of the SAS IT ResourceManagement server hosts. Reporting macros can run on a SAS IT ResourceManagement server host or client host.
The SAS IT Resource Management GUI is based on these macros. When you selecttasks within the GUI, the macros are executed to perform the tasks. If you want to runjobs in batch mode, you can also write batch jobs that include calls to these macros.

266 SAS IT Resource Management Software Components � Chapter 13
� On z/OS, the macros are located in
the.location.where.you.installed.sas.at.your.site.autolib
.
� On UNIX, the macros are located in the SAS autocall library in
.../sasautos
� On Windows, the macros are located in the directory
...\cpe\sasmacro
For more information about SAS IT Resource Management macros, see the SAS ITResource Management macro reference documentation .
SCHEMA Directory (UNIX) and MIBS Directory (UNIX and Windows)On UNIX, the schema directory contains schema files and the MIBS directory
contains MIB files. These are copies of the files that are used by various network andsystems management platforms.
� On UNIX, MIB files are in the directory
!sasroot/saspgm/cpe/mibs
and schema files are in the directory
!sasroot/saspgm/cpe/schema
� On Windows, MIB files are in the directory
...\cpe\mibs
There are no schema files on Windows.
� There are no MIB or schema files on z/OS.
MXG SoftwareWhen you are running the SAS IT Resource Management server on z/OS, MXG
software is available with SAS IT Resource Management.Your site can customize the MXG code and also utilize the SAS formats that are
provided by MXG so that the data values are formatted as they are read in and writtento the data sets.
MXG software consists of three libraries, which have the following names in MXGdocumentation:
� MXG.MXG.SOURCLIB: This library contains the SAS macro code that is used tobuild the staging SAS data set for each table. This is a standard z/OS PDS(partitioned data set), and it is created when MXG is installed.
� MXG.USERID.SOURCLIB: This library contains any modified versions (forexample, to make use of exits) of the members in MXG.MXG.SOURCLIB. This is astandard z/OS PDS, just like MXG.MXG.SOURCLIB, but it is created by yoursite’s SAS IT Resource Management and/or MXG administrator.
� MXG.MXG.FORMATS: This library contains the SAS formats and informats thatare used by MXG. When MXG is installed, this SAS library is created by runningthe JCLINSTL job in MXG.MXG.SOURCLIB.
Note: MXG uses the DDname SOURCLIB for the concatenation of SOURCLIBlibraries. The order of the concatenation is important. For any given member name,MXG uses the first member that it encounters in the concatenation. Thus, the intended

Administration: Concepts and Tools � SAS IT Resource Management Software Components 267
order is MXG.USERID.SOURCLIB and then MXG.MXG.SOURCLIB. MXG and SAS ITResource Management use the DDname LIBRARY for the SAS library namedMXG.MXG.FORMATS. �
For more information about setting up MXG and SAS IT Resource Management toprocess data into MXG-based tables, see “Using MXG-Based Tables (CMAPP2):Introduction” on page 133.

268

269
C H A P T E R
14Administration: Working withSite Libraries
Working with Site Libraries: Main Topics 270Overview of Site Libraries 270
Activating a Site Library 272
Activating a Site Library (z/OS) 272
Activating a Site Library (UNIX, Windows) 272
Backing Up a Site Library 273Copying a PDB’s Options to a Site Library 273
Copying a PDB’s Options to a Site Library (UNIX, Windows) 273
Copying a Site Library’s Options from PGMLIB 274
Copying a Site Library’s Options from PGMLIB (UNIX, Windows) 274
Copying a Site Library’s Options to a PDB 274
Copying a Site Library’s Options to a PDB (UNIX, Windows) 275Creating a Site Library 275
Creating a Site Library (z/OS) 275
Creating a Site Library (UNIX) 276
Creating a Site Library (Windows) 276
Deleting a Site Library 276Releasing the Lock on the Active Site Library 277
Storing a Custom Format in Your Active Site Library 277
Storing a Custom Format in Your Active Site Library (z/OS, UNIX, Windows) 278
Viewing the Name of Your Active Site Library 279
Viewing the Name of Your Active Site Library (z/OS) 279Viewing the Name of Your Active Site Library (UNIX, Windows) 279
Viewing Your Active Site Library’s File System and Profile 279
Viewing Your Active Site Library’s File System and Profile (UNIX, Windows) 280
Viewing/Editing the Value of Default Site Library 280
Viewing the Value of Default Site Library (z/OS, UNIX, Windows) 280
Editing the Value of Default Site Library (z/OS, UNIX, Windows) 280Viewing/Editing Your Active Site Library’s Access Mode 281
Viewing/Editing Your Active Site Library’s Access Mode (z/OS) 282
Viewing/Editing Your Active Site Library’s Access Mode (UNIX, Windows) 283
Working with Site Libraries: Properties 283
Viewing/Editing Your Active Site Library’s Active Collector 283Viewing/Editing Your Active Site Library’s Archive Information 284
Viewing/Editing Your Active Site Library’s DST Definition 284
Viewing/Editing Your Active Site Library’s DST Definition (UNIX, Windows) 285
Viewing/Editing Your Active Site Library’s GMT Deviation 285
Viewing/Editing Your Active Site Library’s GMT Deviation (UNIX, Windows) 286Viewing/Editing Your Active Site Library’s List of Holidays 286
Viewing/Editing Your Active Site Library’s List of Holidays (z/OS) 286
Viewing/Editing Your Active Site Library’s List of Holidays (UNIX, Windows) 287
270 Working with Site Libraries: Main Topics � Chapter 14
Viewing/Editing Your Active Site Library’s MXG Views Property 288Viewing/Editing Your Active Site Library’s Shift Code for Holidays and Its Description 288
Viewing/Editing Your Active Site Library’s Shift Code for Holidays and Its Description(UNIX, Windows) 289
Viewing/Editing Your Active Site Library’s Start of Week 290
Viewing/Editing Your Active Site Library’s Start of Week (UNIX, Windows) 290Viewing/Editing Your Active Site Library’s Shift Descriptions 291
Viewing/Editing Your Active Site Library’s Descriptions of Work-Shift Codes (z/OS) 291
Viewing/Editing Your Active Site Library’s Descriptions of Work-Shift Codes (UNIX,Windows) 292
Viewing/Editing Your Active Site Library’s Work-Shift Schedule 292
Viewing/Editing Your Active Site Library’s Work-Shift Schedule (z/OS) 293Viewing/Editing Your Active Site Library’s Work-Shift Schedule (UNIX, Windows) 294
Working with Site Libraries: Main Topics
Overview of Site LibrariesAn SAS IT Resource Management site library is a SAS library that contains
site-specific information for use with SAS IT Resource Management. A site librarycontains some site-wide information and also contains some site-wide defaults for PDBproperties.
� The side-wide information consists of the list of holidays and the shift code forholidays.
� The defaults for PDB properties are the default archive device, the default archivepath, the default archive parameters, the default archive engine, the default activecollector, the default Daylight Saving Time (DST) definition, the default GreenwichMean Time (GMT) deviation, the default description of the shift code for holidays,the default for the start of a week, the defaults for the descriptions of work-shiftcodes, and the default work-shift schedule.
On z/OS, the default MXG views property is an additional default.
Note: The site-wide information and the defaults for PDBs are called site libraryproperties (also known as site library options). �
If you are a SAS IT Resource Management administrator, you might want to havemore than one site library on a server host. For example, you might want to
� have more than one set of defaults for PDBs� process data from subsidiaries or divisions that have different lists of holidays� have, for analysts, both a “read-only” site library (with information that you
provide) and a “write” site library (that enables users to upload palettes, reportdefinitions, report definition folders, and exception rules folders to make themavailable for site-wide use).
If you are using the SAS IT Resource Management client, you have a site library on theclient host.
When you specify to SAS IT Resource Management which site library you want touse, SAS IT Resource Management assigns a SAS libref of SITELIB to the site library.If you later change to a different site library as your active site library, SAS ITResource Management assigns SITELIB to that site library. Thus, at any one time, onlyone site library can be designated as your active site library in your SAS IT ResourceManagement session, and it is known as SITELIB.
Administration: Working with Site Libraries � Overview of Site Libraries 271
The values of the defaults for PDB properties are obtained, changed, and used asfollows:
� When a site library is first used (and, to be used, it must at that time be the activesite library) SAS IT Resource Management automatically copies the values of thedefaults from PGMLIB to the site library. You can then modify the values in thesite library if you prefer other values.
� When a PDB is created, SAS IT Resource Management automatically copies thevalues of the defaults from the active site library to the PDB. You can then modifythe values in the PDB if you prefer other values.
A site library might contain formats, report definition folders, palette folders,exception rule folders, and any other information of site-wide interest.
� An administrator can use a site library to store formats, to create folders for reportdefinitions, palettes, and exception rules, and to store any other information thatneeds to be available for site-wide use.
� Similarly, an analyst can use a site library to store formats and palettes, reportdefinitions, report definition folders, exception rule folders, and any otherinformation that the analyst wants to make available for site-wide use.
Note: An administrator might not want to give analysts “write” access to themain site library. In that case, the administrator can provide an alternate,writable site library (or any other SAS library) for this purpose. �
The details for working with a site library are described in the topics below, inalphabetical order. For additional information, select Help in the windows that aredescribed in the topics.
Note: You can specify which site library to use as the active site library while youstart or restart SAS IT Resource Management. You can also specify which site libraryto use as the active site library while you are running SAS IT Resource Management.(For more information about specifying the site library, see “Activating a Site Library”on page 272.) If you do not specify which site library to use, for a given task SAS ITResource Management uses the default site library for the host on which that task willrun. (For more information about the default site library, see “Viewing/Editing theValue of Default Site Library” on page 280.) �
When you access a site library, you access it in “read-only” mode or “write” mode.The mode places a lock of one kind or another on the site library. The lock can preventanother person from accessing the site library, so it is good to release the lock as soonas you finish using the site library. You can release the lock on a particular site libraryby activating a different site library or by exiting from SAS IT Resource Managementand SAS.
The following topics about site libraries are in alphabetical order. In the topics,assume that SAS IT Resource Management is already started in batch mode or ininteractive mode:
� “Activating a PDB” on page 299� “Backing Up a Site Library” on page 273� “Copying a PDB’s Options to a Site Library” on page 273� “Copying a Site Library’s Options from PGMLIB” on page 274� “Copying a Site Library’s Options to a PDB” on page 274� “Creating a Site Library” on page 275� “Deleting a Site Library” on page 276� “Releasing the Lock on the Active Site Library” on page 277� “Storing a Custom Format in Your Active Site Library” on page 277
272 Activating a Site Library � Chapter 14
� “Viewing the Name of Your Active Site Library” on page 279� “Viewing Your Active Site Library’s File System and Profile” on page 279� “Viewing/Editing the Value of Default Site Library” on page 280
� “Viewing/Editing Your Active Site Library’s Access Mode” on page 281.
Activating a Site LibraryYou can activate a site library
� by using the %CPSTART macro in batch mode. For more information about the%CPSTART macro, see the SAS IT Resource Management macro referencedocumentation .
� by using the SAS IT Resource Management GUI for z/OS.� by using the SAS IT Resource Management GUI for UNIX and Windows.
Activating a Site Library (z/OS)In the SAS IT Resource Management GUI for z/OS, you can activate a site library by
following these steps:1 From the main menu, select Exit. A menu opens. From the menu, select Exit
SAS IT Resource Management only.
2 If the SAS Program Editor window is not visible, issue the NEXT commandrepeatedly to cycle through the windows until the Program Editor window isvisible.
Note that, by default, the NEXT command is mapped to the F8 key orSHIFT+F8 key.
3 Do one of the following actions:� If the SAS Program Editor window has pull-down menus, in the body of the
Program Editor window, type
%CPSTART(SITELIB=name.of.site.library.that.you.want.to.use,SITEACC=access.mode.that.you.want.to.use) ;
where the name is fully qualified and the access mode is SHR or OLD.
Select Run. A menu opens. From the menu, select Submit.� If the SAS Program Editor window has a command prompt, type the
command
ITRM SITELIB=name.of.site.library.that.you.want.to.useSITEACC=access.mode.that.you.want.to.use
where the name is fully qualified and the access mode is SHR or OLD.Press RETURN or ENTER.
4 Issue the NEXT command repeatedly to cycle through the windows until the SASIT Resource Management window is visible.
Activating a Site Library (UNIX, Windows)In the SAS IT Resource Management GUI for UNIX and Windows, you can activate a
site library by following these steps:
1 On the main window’s Administration tab, select Site Options. The SetSite-wide Options window opens.
Administration: Working with Site Libraries � Copying a PDB’s Options to a Site Library 273
2 In the upper-left corner of the window, select the Change Sitelib icon.3 In the Path field, edit the value so that it has the name of the site library that you
want to activate.4 In the Access field, select the access mode that you want to use.
5 In the Location field, select the file system on which the site library is located.6 To return to the Set Site-wide Options window, select OK.
7 To return to the main window, select Close.
Backing Up a Site LibraryTo back up a site library:
� On z/OS, a site library is a single z/OS data set. Back up the site library as youwould back up any operating system data set.
Note: Do not reblock the library. �� On Windows, a site library is a folder. Back up the site library as you would back
up any folder.
� On UNIX, a site library is a directory. Back up the site library as you would backup any directory.
Copying a PDB’s Options to a Site LibraryYou can copy one or more of a PDB’s properties to a site library’s same-named
properties in order to make them the default values of the PDB properties for the site
� by using the %CPPDBOPT macro in batch mode. For more information about the%CPPDBOPT macro, see the topic %CPPDBOPT in the SAS IT ResourceManagement macro reference documentation.
� by using the SAS IT Resource Management GUI for UNIX and Windows.
Copying a PDB’s Options to a Site Library (UNIX, Windows)In the SAS IT Resource Management GUI for UNIX and Windows, you can copy one
or more of the options from the active PDB to the active site library by following thesesteps:
1 If your active PDB is not the one that you want to use, change your active PDB.For more information about specifying the active PDB, see “Activating a PDB” onpage 299.
2 If your active site library is not the one that you want to use, change your activesite library. Change your access mode to “write” if you do not have already havewrite access to your active site library. For more information about changing yoursite library and/or changing your access mode to the active site library, see“Activating a Site Library” on page 272 or “Viewing/Editing Your Active SiteLibrary’s Access Mode” on page 281.
3 On the main window’s Administration tab, select Site Options. The SetSite-wide Options window opens. The Copy button is in the lower-left corner of thewindow.
4 Select Copy. The Copy Options window opens.
5 In the Copy From field, select PDB Options.6 In the Copy To field, select Site Options.

274 Copying a Site Library’s Options from PGMLIB � Chapter 14
7 In the Copy Selected Options field, select the option(s) that you want to copyand deselect the options that you do not want to copy.
Note: Not all PDB options are available in this field. For others, use the%CPPDBOPT macro in batch mode. For more information about the%CPPDBOPT macro, see the topic %CPPDBOPT in the SAS IT ResourceManagement macro reference documentation. �
8 To return to the Set Site-wide Options window, select OK.
9 To return to the main window, select OK.
Copying a Site Library’s Options from PGMLIBYou can restore the original values of one or more of a site library’s site properties to
the original (as shipped) value(s) from PGMLIB
� by using the %CPPDBOPT macro in batch mode. For more information about the%CPPDBOPT macro, see the topic %CPPDBOPT in the SAS IT ResourceManagement macro reference documentation.
� by using the SAS IT Resource Management GUI for UNIX and Windows.
Copying a Site Library’s Options from PGMLIB (UNIX, Windows)From the SAS IT Resource Management GUI for UNIX and Windows, you can copy
one or more options from PGMLIB to the active site library by following these steps:1 If your active site library is not the one that you want to use, change your active
site library. Change your access mode to “write” if you do not already have writeaccess to your active site library. For more information about specifying the activesite library and/or changing your access mode to the active site library, see“Activating a Site Library” on page 272 or “Viewing/Editing Your Active SiteLibrary’s Access Mode” on page 281.
2 On the main window’s Administration tab, select Site Options. The SetSite-wide Options window opens. The Copy button is in the lower-left corner of thewindow.
3 Select Copy. The Copy Options window opens.
4 In the Copy From field, select Supplied Default.5 In the Copy To field, select Site Options.
6 In the Copy Selected Options field, select the option(s) that you want to restoreand deselect the ones that you do not want to restore.
Note: Not all site library options are available in this field. For others, use the%CPPDBOPT macro in batch mode. For more information about the%CPPDBOPT macro, see the topic %CPPDBOPT in the SAS IT ResourceManagement macro reference documentation. �
7 To return to the Set Site-wide Options window, select OK.
8 To return to the main window, select OK.
Copying a Site Library’s Options to a PDBWhen a PDB is created, SAS IT Resource Management automatically copies the
values of the site options in the active site library to the same-named PDB options inthe new PDB. Thus, you do not need to copy options to a new PDB.

Administration: Working with Site Libraries � Creating a Site Library 275
If you want to copy one or more of the site library’s site options (default values forPDB options) to an existing PDB, you can do so
� by using the %CPPDBOPT macro in batch mode. For more information about the%CPPDBOPT macro, see the topic %CPPDBOPT in the SAS IT ResourceManagement macro reference documentation.
� by using the SAS IT Resource Management GUI for UNIX and Windows.
You do not need to exit from SAS IT Resource Management after this operation forthe changes to take effect in the PDB.
Note: The PDB’s PDB options are in the PDB’s DICTLIB. �
Copying a Site Library’s Options to a PDB (UNIX, Windows)In the SAS IT Resource Management GUI for UNIX and Windows, you can copy one
or more options from the active site library to the active PDB by following these steps:1 If your active site library is not the one that you want to use, change your active
site library. Change your access mode to “write” if you do not have already havewrite access to your active site library. For more information about changingwhich site library is active and/or changing your access mode to the active sitelibrary, see “Activating a Site Library” on page 272 or “Viewing/Editing YourActive Site Library’s Access Mode” on page 281.
2 If your active PDB is not the PDB that you want to use, change your active PDB.Change your access mode to “write” if you do not have already have write access toyour active PDB. For more information about changing which PDB is active and/orchanging your access mode to the active PDB, see “Activating a PDB” on page 299.
3 On the main window’s Administration tab, select Site Options. The SetSite-wide Options window opens. The Copy button is in the lower-left corner of thewindow.
4 Select Copy. The Copy Options window opens.5 In the Copy From field, select Site Options.6 In the Copy To field, select PDB Options.7 In the Copy Selected Options field, select the option(s) that you want to copy
and deselect the ones that you do not want to copy.Note: Not all PDB options are available in this field. For others, use the
%CPPDBOPT macro in batch mode. For more information about the%CPPDBOPT macro, see the topic %CPPDBOPT in the SAS IT ResourceManagement macro reference documentation. �
8 To return to the Set Site-wide Options window, select OK.9 To return to the main window, select OK.
Creating a Site LibraryYou can create a site library� by allocating a new z/OS data set (on z/OS).� by creating a new folder (on Windows).� by creating a new directory (on UNIX).
Creating a Site Library (z/OS)1 Allocate an empty data set to be used as a new site library:

276 Deleting a Site Library � Chapter 14
� DSN=high_level_qualifiers.xxxx, where high_level_qualifiers specifies alocation and xxxx is the name of the site library. A site library can have anyname and be on any accessible disk. Typically, one of the site libraries hasthe same value for high_level_qualifiers as the SAS IT Resource Managementsoftware and has the site library name SITELIB.
� DSORG=PS� RECFM=FS� LRECL=6144� BLKSIZE=6144� SPACE=(CYL,(1,1))
Note: You do not need directory blocks. This is not a PDS. �2 Submit a SAS program that copies the default values for PDB options from
PGMLIB to the site library:
%CPSTART(..., SITELIB=location.of.site.library, SITEACC=OLD, ... ) ;
%CPPDBOPT(TYPE=SITELIB, COPY=PGMLIB) ;
For more information about submitting a SAS program, see “Using SAS Windows”on page 24 and “Working with the Interface for Batch Mode” on page 18.
Note: When a new PDB is created, if the active site library does not have thedefault values for PDB options, the values for the PDB’s options are automaticallycopied from PGMLIB. �
Creating a Site Library (UNIX)Create a directory to be used as a new site library. Name the folder full_path_name/
xxxx, where xxxx is the name of the site library (directory). A site library can have anyname and be on any accessible disk, including those that are accessed by means of NFS,AFS, or DFS. Typically, one of the site libraries has the same value for full_path_nameas the SAS IT Resource Management software and has the site library name sitelib.
Note: The first time that the site library is used, SAS IT Resource Managementautomatically populates the site library with default (as shipped) settings fromPGMLIB. �
Creating a Site Library (Windows)Create a folder to be used as a new site library. Name the folder
full_path_name\xxxx, where xxxx is the name of the site library (folder). A site librarycan have any name and be on any accessible disk, including those that are accessed bymeans of Network Neighborhood. Typically, one of the site libraries has the same valuefor full_path_name as the SAS IT Resource Management software and has the sitelibrary name sitelib.
Note: The first time that the site library is used, SAS IT Resource Managementautomatically populates the site library with default (as shipped) settings fromPGMLIB. �
Deleting a Site LibraryTo delete a site library, follow these steps:

Administration: Working with Site Libraries � Storing a Custom Format in Your Active Site Library 277
1 Notify the users of the site library that you intend to delete the site library. Also,recommend another site library for them to use.
2 (Optional) Make a backup of the site library. For more information about backingup a site library, see “Backing Up a Site Library” on page 273.
3 Display the value of Default Site Library. For more information about displayingwhich site library is the default, see “Viewing/Editing the Value of Default SiteLibrary” on page 280.
4 If your active default site library is the site library that you want to delete, changethe value of default site library to a different site library. For more informationabout changing which site library is the default, see “Viewing/Editing the Value ofDefault Site Library” on page 280.
5 Delete the site library. Use an operating-system command to delete� the z/OS data set (on z/OS)� the folder (on Windows)� the directory (on UNIX).
6 Check batch jobs, commands, CLISTs, and so on, for references to the deleted sitelibrary and change them to a site library that exists.
Releasing the Lock on the Active Site LibraryWhen a site library PDB is activated, it is activated in the mode (“write” or
“read-only”) that you specified. The mode causes a lock of one kind or another to beplaced on the site library. As soon as you finish using the site library, remember torelease the lock.
You can release the lock on the active site library by doing one of the following:� activating a different site library. For more information, see “Activating a Site
Library” on page 272.� exiting from SAS IT Resource Management and SAS.
Storing a Custom Format in Your Active Site LibraryYou can store a format for site-wide use in SITELIB.CPFMTS by using the SAS
FORMAT procedure in batch mode.
Note: The formats that you store in SITELIB.CPFMTS might not be the onlyformats in that catalog. For example, if you run the %CSCSIFMT macro in batch modeto create formats for Aprisma SPECTRUM data, those formats are also stored inSITELIB.CPFMTS. For more information about the %CSCSIFMT macro, see the topic%CSCSIFMT in the SAS IT Resource Management macro reference documentation. �
Note: The format search path is as follows� If you have not specified a format search path in SAS, the format search path that
is used in SAS IT Resource Management is
WORK.FORMATS (first)LIBRARY.FORMATSDICTLIB.CPFMTSSITELIB.CPFMTSPGMLIB.CPFMTS (last)
� If you have specified a format search path in SAS, catalogs are appended to itwithin SAS IT Resource Management, and the format search path that is used inSAS IT Resource Management is

278 Storing a Custom Format in Your Active Site Library � Chapter 14
existing format search path (first)DICTLIB.CPFMTSSITELIB.CPFMTSPGMLIB.CPFMTS (last)
�
Note: If there are multiple formats with the same name, the first one that is foundin the search order is used. �
Note: For more about formats, see “The FORMAT Procedure” in the Base SASProcedures Guide for your release of SAS software. �
Note: For more information about specifying search paths and the SASFMTSEARCH option, see the documentation for your release of SAS or see SASTechnical Report P-222, “Changes and Enhancements to Base SAS Software, Release6.07.” �
Note: Typically, PDB-specific formats are stored in the appropriate PDB’sDICTLIB.CPFMTS library, not in a site library. �
Storing a Custom Format in Your Active Site Library (z/OS, UNIX, Windows)You can store a custom format in a site library by following these steps:
1 If your active site library is not the one that you want to use, change your activesite library. If you do not already have write access to your active site library,change to “write” access mode. For more information about changing your activesite library and/or changing your access mode to the active site library, see“Activating a Site Library” on page 272 or “Viewing/Editing Your Active SiteLibrary’s Access Mode” on page 281.
2 To check that the name that you want to use for the format is available:
� In the SAS IT Resource Management GUI for UNIX and Windows, selectGlobals � Access � Display Libraries
The Libname window opens. In the Name column, double-click on Sitelib.The list of the contents in the library whose libref is SITELIB is displayed.Double-click on Cpfmts. The list of the contents in SITELIB.CPFMTS isdisplayed.
Select X to close the window.
� In the SAS IT Resource Management GUI for z/OS, issue the NEXTcommand to cycle to a SAS window (for example, the Output window). (Bydefault, the NEXT command is mapped to the F8 key or SHIFT+F8 keycombination.) If the SAS window has a command line, type LIBNAME andpress RETURN or ENTER; if the window has pull-down menus, select Tools� Options � Command and then type LIBNAME and select OK. FindSitelib in the Name column. Preceding Sitelib, type S and then pressRETURN or ENTER. The list of the contents of SITELIB is displayed. FindCPFMTS in the Name column. Preceding CPFMTS, type S and then pressRETURN or ENTER. The list of contents of SITELIB.CPFMTS is displayed.
Issue the NEXT command repeatedly until you return to the SAS ITResource Management window.
3 Submit a SAS program that is similar to the following one. (For more informationabout submitting a SAS program, see the topic “Use SAS Windows” in the onlinehelp that is delivered with this product and “Working with the Interface for BatchMode” on page 18.)

Administration: Working with Site Libraries � Viewing Your Active Site Library’s File System and Profile 279
proc format library=sitelib.cpfmts;...the name and the definition of the format...
run;
The format name and definition are saved to the CPFMTS catalog in the activesite library. If the CPFMTS catalog does not exist, it is created. If a format withthe same name exists, the new version replaces the previous version.
Viewing the Name of Your Active Site LibraryYour active site library is the site library with which you are currently working.You can view the name of your active site library� by using the SAS IT Resource Management GUI for z/OS� by using the SAS IT Resource Management GUI for UNIX and Windows.
Viewing the Name of Your Active Site Library (z/OS)In the SAS IT Resource Management GUI for z/OS, you can display the name of your
active site library by following these steps:1 From the main menu, issue the NEXT command to cycle to a SAS window (for
example, the Output window). (By default, the NEXT command is mapped to theF8 key or SHIFT+F8 key combination.)
2 If the SAS window has a command line, type LIBNAME and press RETURN orENTER. If the SAS window has pull-down menus, select Tools � Options �Command and then type LIBNAME and select OK.
3 On the line that has Sitelib in the Name column, the full name of the active sitelibrary is displayed in the Host Path Name column.
4 To return to the main menu, issue the NEXT command repeatedly until youreturn to the SAS IT Resource Management window.
Viewing the Name of Your Active Site Library (UNIX, Windows)In the SAS IT Resource Management GUI for UNIX and Windows, you can display
the name of your active site library by following these steps:1 On the main window’s Administration tab, select Site Options. The Set
Site-wide Options window opens. The name of the active site library is displayedat the top of the window.
2 To return to the main window, select Close.
Viewing Your Active Site Library’s File System and ProfileOn z/OS, your active site library can be on only the local file system.On UNIX and Windows with a SAS IT Resource Management client license, your
active site library can be on the local file system or on a remote file system. You canview whether your active site library is on the local file system or a remote file system
280 Viewing/Editing the Value of Default Site Library � Chapter 14
� by using the SAS IT Resource Management GUI for UNIX and Windows.
Viewing Your Active Site Library’s File System and Profile (UNIX, Windows)On the SAS IT Resource Management GUI for UNIX and Windows, you can view
your active site library’s file system and remote profile, if any, by following these steps:1 On the main window’s Administration tab, select Site Options. The Set
Site-wide Options window opens. There is a Change Sitelib icon in theupper-left corner of the window.
2 Select the Change Sitelib icon. The Change Site Library window opens.3 If the value in the Location field is Local, the site library is on the local file
system.If the value in the Location field is Remote Server xxxx, the site library is on a
remote file system and the connection to that file system uses the remote serverprofile named xxxx.
For more information about remote server profiles, see “Overview of RemoteServer Profiles” on page 571.
4 To return to the Set Site-wide Options window, select OK.5 To return to the main window, select Close.
Viewing/Editing the Value of Default Site LibraryThe default site library is the site library that is used when you or anyone else starts
SAS IT Resource Management without specifying an active site library. The value forthe default site library is stored in PGMLIB.
You can� display the value of the default site library by submitting a SAS program� edit the value of the default site library by submitting a SAS program.
Viewing the Value of Default Site Library (z/OS, UNIX, Windows)You can view the value of the default site library by submitting this SAS program:
PROC PRINT DATA=PGMLIB.CPSITE ;RUN;
(For more information about submitting a SAS program, see “Using SAS Windows” onpage 24 and “Working with the Interface for Batch Mode” on page 18.)
Editing the Value of Default Site Library (z/OS, UNIX, Windows)The original default site library is� high_level_qualifiers.SITELIB on z/OS, where high_level_qualifiers is the location
of the SAS IT Resource Management software� full_path_name\sitelib on Windows, where full_path_name is the location of the
SAS IT Resource Management software� full_path_name/sitelib on UNIX, where full_path_name is the location of the SAS
IT Resource Management software.
Before another site library is designated as the default site library, that other sitelibrary should already exist.
To edit the value of default site library:

Administration: Working with Site Libraries � Viewing/Editing Your Active Site Library’s Access Mode 281
1 You must know the location of the site library that you want to designate as thedefault site library. That is, obtain the complete name, including the high-levelqualifiers of its data set (z/OS), the path name of its folder (Windows), or the pathname of its directory (UNIX).
2 You must know the location of the program library that SAS IT ResourceManagement uses (and refers to as PGMLIB). That is, obtain the complete name,including the high-level qualifiers of its data set (z/OS), the path name of its folder(Windows), or the path name of its directory (UNIX). (If you do not already knowthis information, you can find it in your site’s CLIST that invokes SAS ITResource Management or in your site’s command for starting SAS IT ResourceManagement, or, while SAS IT Resource Management is running, by submittingthis SAS program through the SAS Program Editor window:
LIBNAME PGMLIB LIST ;
A RUN statement is not necessary after the LIBNAME statement.) For moreinformation about submitting a SAS program, see “Using SAS Windows” on page24 and “Working with the Interface for Batch Mode” on page 18.)
3 Because you will need exclusive access in the next step,
a check that no one is running SAS IT Resource Management.b invoke the appropriate SAS IT Resource Management server GUI (the one for
z/OS or the one for UNIX and Windows). For more information about startingSAS IT Resource Management, see “Starting the z/OS GUI” on page 19 or“Starting the UNIX and Windows GUI” on page 21.
c on the main menu or main window, follow this path: Exit � Exit from SASIT Resource Management Only
4 For z/OS, submit the following SAS program:
LIBNAME PGMLIB CLEAR ;LIBNAME PGMLIB "location-for-PGMLIB" DISP=OLD ;DATA PGMLIB.CPSITE ;
CPSITE = "location-for-default-site-library" ;RUN ;
LIBNAME PGMLIB CLEAR ;
A RUN statement is not necessary after the final LIBNAME statement.For UNIX and Windows, submit the following SAS program:
LIBNAME PGMLIB CLEAR ;LIBNAME PGMLIB "location-for-PGMLIB";DATA PGMLIB.CPSITE ;
CPSITE = "location-for-default-site-library" ;RUN ;
LIBNAME PGMLIB CLEAR ;
A RUN statement is not necessary after the final LIBNAME statement.
Note: To run this program successfully, you must have your file system’s writepermission for PGMLIB. It is recommended that you request “write” permission onlyduring the time that you need it, so that you do not accidentally write to PGMLIB atany other time. �
Viewing/Editing Your Active Site Library’s Access ModeBy starting or restarting SAS IT Resource Management, you can specify your active
site library and your active site library’s access mode for your SAS IT Resource

282 Viewing/Editing Your Active Site Library’s Access Mode � Chapter 14
Management session. For more information about starting or restarting SAS ITResource Management, see “Starting the z/OS GUI” on page 19 or “Starting the UNIXand Windows GUI” on page 21.
Within a SAS IT Resource Management session, you can view and/or edit the valueof your active site library and the value of your active site library access mode by using
� the SAS IT Resource Management GUI for z/OS� the SAS IT Resource Management GUI for UNIX and Windows.
Note: Prior to specifying your active site library’s access mode in SAS IT ResourceManagement, you must arrange for permission from your site’s security administratoror security system to have that level of access to the library. �
Viewing/Editing Your Active Site Library’s Access Mode (z/OS)In the SAS IT Resource Management GUI for z/OS, you can view and/or edit the
name of your active site library and the value of your active site library’s access modeby following these steps:
1 From the main menu, select EXIT. A menu opens. From the menu, select ExitSAS IT Resource Management only. You return to SAS (but the librefs that SASIT Resource Management defined are still defined).
2 If the SAS Program Editor window has a command-line prompt (Command ==>),type COMMAND and press ENTER or RETURN. If you later want to restore thecommand-line prompt, follow this selection path at a Program Editor window thathas menus: Tools � Options � Turn Menus Off
3 Select Tools. A menu opens. From the menu, select Options. A menu opens.Select Command. A dialog box opens.
4 At the Command ==> prompt, type FNAME and then select OK. The SAS FNAMEwindow opens.
5 Page down or scroll down in the window to the line that has SITELIB in theDDname column. On that line, the Data Set Name column lists the name of theactive site library and the Status column lists the access mode of the active sitelibrary.
6 Select File. A menu opens. From the menu, select Close.7 In the body of the Program Editor window, type
%CPSTART();
if you want to invoke SAS IT Resource Management again with the same sitelibrary and the same access mode to the site library
%CPSTART(siteacc=OLD);
or
%CPSTART(siteacc=SHR);
if you want to invoke SAS IT Resource Management again with the same sitelibrary but a different access mode (OLD or SHR) to the site library
%CPSTART(sitelib=name-of-another-site-library, siteacc=OLD);
or
%CPSTART(sitelib=name-of-another-site-library, siteacc=SHR);
if you want to invoke SAS IT Resource Management again with a different sitelibrary (whose name replaces name-of-another-site-library).

Administration: Working with Site Libraries � Viewing/Editing Your Active Site Library’s Active Collector 283
8 Select Run. A menu opens. From the menu, select Submit. SAS IT ResourceManagement opens the main menu.
Viewing/Editing Your Active Site Library’s Access Mode (UNIX, Windows)In the SAS IT Resource Management GUI for UNIX and Windows, you can view and/
or edit the name of your active site library and the value of your active site library’saccess mode by following these steps:
1 On the main window’s Administration tab, select Site Options. The SetSite-wide Options window opens. The name of your active site library and youraccess mode to it are displayed at the top of the window.
2 If your active site library is not the one that you want to use, and if the sitelibrary that you want to use is on a remote host, begin by activating a PDB thatuses a remote profile that specifies that remote host and that site library on theremote host. (For more information about activating a PDB that uses a remoteprofile, see “Activating a PDB” on page 299 and “Overview of Remote ServerProfiles” on page 571.)
3 Next, regardless of the location of the site library that you want to use, on themain window’s Administration tab, select Site Options. The Set Site-wideOptions window opens. The name of your active site library and your active accessmode to it are displayed at the top of the window.
4 If your active site library is not the one that you want to use or if you want to edityour access mode to it, select the icon in the upper-left corner of the window.
5 To change to a different site library, type over the name of the site library in thePath field.
6 In the Access field, select the access mode that you want to use.
7 Select the location of the site library in the Location field. (If you select Remote,the remote profile that is used is the one that you selected above when activating aPDB on that remote host.)
8 Select OK.
9 To return to the main menu, select OK.
Working with Site Libraries: Properties
Viewing/Editing Your Active Site Library’s Active CollectorThe active collector designates the collector that is used if you do not specify a
collector when you perform an operation (such as the process task) that involves acollector.
The default value for the active collector is stored as a site option. SAS IT ResourceManagement automatically copies the value in the site option to a new PDB’ssame-named option when you create the PDB. You can change the value in the PDB ifyou prefer another.
The original value in the site option comes from PGMLIB’s same-named option whenyou create the site library. You can change the value in the site option if you preferanother. (For more information about creating a site library, see “Creating a SiteLibrary” on page 275.)
You can view and/or edit a site library’s option for active collector

284 Viewing/Editing Your Active Site Library’s Archive Information � Chapter 14
� by using the %CPPDBOPT macro in batch mode. For more information about the%CPPDBOPT macro, see the topic %CPPDBOPT in the SAS IT ResourceManagement macro reference documentation.
Viewing/Editing Your Active Site Library’s Archive Information
If one or more tables have archiving turned on (in their table properties), then thereis an archive.
An archive is a set of archive libraries. Each archive library is the result of oneexecution of the processing task. Each archive library contains a copy of the incomingdata to the detail level of the tables for which archiving is turned on.
The default values for archive information are stored as site options. SAS ITResource Management automatically copies the values in the site options to a newPDB’s same-named options when you create the PDB. You can change the values in thePDB if you prefer others.
The original values in the site options come from PGMLIB’s same-named optionswhen you create the site library. You can change the values in the site options if youprefer others. (For more information about creating a site library, see “Creating a SiteLibrary” on page 275.)
You can view and/or edit a site library’s archiving information
� by using the %CPPDBOPT macro in batch mode. For more information about the%CPPDBOPT macro, see the topic %CPPDBOPT in the SAS IT ResourceManagement macro reference documentation.
Viewing/Editing Your Active Site Library’s DST Definition
The Daylight Saving Time (DST) definition describes the Daylight Saving Timeperiod. Some collectors log data by using DST timestamps during the DST period. SASIT Resource Management can change those timestamps to standard time by using theDaylight Saving Time definition. (The only supplied collector that uses the DaylightSaving Time definition is the one for SunNet Manager data, and the Generic CollectorFacility does not access the Daylight Saving Time definition.)
The default value for the Daylight Saving Time definition is stored as a site option.SAS IT Resource Management automatically copies the value in the site option to anew PDB’s same-named option when you create the PDB. You can change the value inthe PDB if you prefer another.
The original value in the site option comes from PGMLIB’s same-named option whenyou create the site library. You can change the value in the site option if you preferanother. (For more information about creating a site library, see “Creating a SiteLibrary” on page 275.)
You can view and/or edit a site library’s default value for the Daylight Saving Timedefinition
� by using the %CPPDBOPT macro in batch mode. For more information about the%CPPDBOPT macro, see the topic %CPPDBOPT in the SAS IT ResourceManagement macro reference documentation.
� by using the SAS IT Resource Management GUI for UNIX and Windows.
Note: There are two ways to express the definition: as a concatenation of ranges(one each for next year, this year, last year, and the year before) and as a formula thattakes the system’s year into account. Both forms of the definition work correctly. Theadvantage of the formula is that it does not require periodic updates. �

Administration: Working with Site Libraries � Viewing/Editing Your Active Site Library’s GMT Deviation 285
Viewing/Editing Your Active Site Library’s DST Definition (UNIX, Windows)
In the SAS IT Resource Management GUI for UNIX and Windows, you can view theactive site library’s option for the Daylight Saving Time definition by following thesesteps:
1 If your active site library is not the site library that you want to use, change youractive site library. If your access mode to your active site library is not “write” andif there is a possibility that you will change the option’s value, change your accessmode to “write.” For more information about changing your active site library and/or your access mode to it, see “Activating a Site Library” on page 272 or “Viewing/Editing Your Active Site Library’s Access Mode” on page 281.
2 On the main window’s Administration tab, select Site Options. The SetSite-wide Options window opens.
3 Select the Time Zone tab. The second field on the tab is the Daylight SavingTime definition.
4 If you want to change the Daylight Saving Time definition, you can use any one ofthese methods:
� Type over the value and then select OK.
� Copy the value from a PDB. For more information about copying from a PDB,see “Copying a PDB’s Options to a Site Library” on page 273.
� You can copy the original (as shipped) value from PGMLIB. For moreinformation about copying from PGMLIB, see “Copying a Site Library’sOptions from PGMLIB” on page 274.
Viewing/Editing Your Active Site Library’s GMT DeviationThe Greenwich Mean Time (GMT) deviation describes the number of hours’
difference between the time where the data was logged and the time in Greenwich, UK(Coordinated Universal Time). Some collectors log data by using GMT timestamps (thetime in Greenwich, not the local time). SAS IT Resource Management can change thesetimestamps to local time by using the GMT deviation.
Note: The only supplied collector that uses the Greenwich Mean Time deviation isthe one for SunNet Manager data, and the Generic Collector Facility does not accessthe Greenwich Mean Time deviation. �
The default value for the Greenwich Mean Time deviation is stored as a site option.SAS IT Resource Management automatically copies the value in the site option to anew PDB’s same-named option when you create the PDB. You can change the value inthe PDB if you prefer another.
The original value in the site option comes from PGMLIB’s same-named option whenyou create the site library. You can change the value in the site option if you preferanother. (For more information about creating a site library, see “Creating a SiteLibrary” on page 275.)
You can view and/or edit a site library’s default value for the Greenwich Mean Time(GMT) deviation
� by using the %CPPDBOPT macro in batch mode. For more information about the%CPPDBOPT macro, see the topic %CPPDBOPT in the SAS IT ResourceManagement macro reference documentation.
� by using the SAS IT Resource Management GUI for UNIX and Windows.
286 Viewing/Editing Your Active Site Library’s List of Holidays � Chapter 14
Viewing/Editing Your Active Site Library’s GMT Deviation (UNIX, Windows)In the SAS IT Resource Management GUI for UNIX and Windows, you can view and/
or edit the active site library’s option for the Greenwich Mean Time (GMT) deviation byfollowing these steps:
1 If your active site library is not the site library that you want to use, change youractive site library. If your access mode to your active site library is not “write” andif there is a possibility that you will want to change the option’s value, changeyour access mode to “write.” For more information about changing your active sitelibrary and/or your access mode to it, see “Activating a Site Library” on page 272or “Viewing/Editing Your Active Site Library’s Access Mode” on page 281.
2 From the main window’s Administration tab, select Site Options. The SetSite-wide Options window opens.
3 Select the Time Zone tab. The first field on the tab is the Greenwich Mean Timedeviation.
4 If you want to change the Greenwich Mean Time deviation, you can use any one ofthese methods:
� Type over the value and then select OK.
Note: Remember to use a minus sign, if needed. �
� Copy the value from a PDB. For more information about copying from a PDB,see “Copying a PDB’s Options to a Site Library” on page 273.
� Copy the original (as shipped) value from PGMLIB. For more informationabout copying from PGMLIB, see “Copying a Site Library’s Options fromPGMLIB” on page 274.
Viewing/Editing Your Active Site Library’s List of HolidaysThe list of holidays is a list of the inactive and active holidays at the site. SAS IT
Resource Management ignores the holidays that are marked “inactive” and uses theholidays that are marked “active.” The “active” holidays are used in the following ways:
� If an observation has a datetime stamp whose date is an “active” holiday and if, bythe time that the data is ready to be processed into the PDB, the value of the shiftcode in the observation is blank, then the value of the shift code in the observationis set equal to the value of the shift code for holidays.
� If an observation has a datetime stamp whose date is an “active” holiday and if, bythe time that the data is ready to be processed into the PDB, the value of the shiftcode in the observation is non-blank, then the value of the shift code in theobservation is not changed.
At run time, the active PDB uses the list of holidays in the active site library.In a site library, the original list of holidays is from PGMLIB. You can change the list
in the active site library to match the holidays at your site.You can view and/or edit the list of holidays in the active site library� by using the %CPHDAY macro in batch mode. For more information about the
%CPHDAY macro, see the topic %CPHDAY in the SAS IT Resource Managementmacro reference documentation.
� by using the SAS IT Resource Management GUI for z/OS.� by using the SAS IT Resource Management GUI for UNIX and Windows.
Viewing/Editing Your Active Site Library’s List of Holidays (z/OS)In the SAS IT Resource Management GUI for z/OS, you can view and/or edit the
active site library’s list of holidays by following these steps:

Administration: Working with Site Libraries � Viewing/Editing Your Active Site Library’s List of Holidays 287
1 If your active site library is not the site library that you want to use, change youractive site library. If your access mode to your active site library is not “write” andif there is a possibility that you will want to change one or more holidays, changeyour access mode to “write.” For more information about changing your active sitelibrary and/or your access mode to it, see “Activating a Site Library” on page 272or “Viewing/Editing Your Active Site Library’s Access Mode” on page 281.
2 From the main menu, select PDB Admin. A menu opens. From the menu, selectDefine Work Shifts. The Define Work Shifts window opens.
3 Select Site Defaults. (This selection is not necessary for displaying or editingthe list of holidays or the shift code for holidays. However, if you edit thedescription of the shift code that is assigned to holidays, you will need this settingto adjust the description.)
4 Select Define Holidays. The Holidays Definition window opens and displays thelist of holidays.
5 Holidays with a status of “active” are used by SAS IT Resource Management..Holidays with a status of “inactive” are ignored by SAS IT Resource Management.
� To change the status of a holiday, follow this path: select the holiday �ItemActions � Edit Holiday � select the status that you want to use �OK
� To add a holiday, follow this path: Actions � Add holiday � click in theDate field � specify the date � check that the status is “active” �click in the Description field � type the Description � optionally,click in the Comment field and type a comment � OK
� To delete a holiday, follow this path: select the holiday � ItemActions �Delete Holiday � OK
Note: You can make multiple selections in the list before activating one ofthe item actions: Edit Holiday or Delete Holiday. �
6 To return to the Define Work Shifts window, select File. A menu opens. From themenu, select End.
7 To return to the main menu, select OK if you edited the list of holidays and want tosave your changes; otherwise, select Cancel.
Viewing/Editing Your Active Site Library’s List of Holidays (UNIX, Windows)In the SAS IT Resource Management GUI for UNIX and Windows, you can view and/
or edit the active site library’s list of holidays by following these steps:
1 If your active site library is not the one that you want to use, change your activesite library. If your access mode to your active site library is not “write” and ifthere is a possibility that you will want to change one or more values, change youraccess mode to “write.” For more information about changing your active sitelibrary and/or your access mode to it, see “Activating a Site Library” on page 272or “Viewing/Editing Your Active Site Library’s Access Mode” on page 281.
2 On the main window’s Administration tab, select Define Work Shifts. TheDefine Work Shifts window opens.
3 Select Site Defaults. (This selection is not necessary for displaying or editingthe list of holidays. However, if you go on to edit the shift code for holidays andthe description of the shift code for holidays, you will need this setting to adjustthe description.)
4 Select Define Holidays. The Define Holidays window opens and displays the listof holidays.
288 Viewing/Editing Your Active Site Library’s MXG Views Property � Chapter 14
5 Holidays with a status of “active” are used by SAS IT Resource Management.Holidays with a status of “inactive” are ignored by SAS IT Resource Management.
� To change the status of a holiday, follow this path: select the holiday �File � Edit Holiday � select the status � OK
� To add a holiday, follow this path: File � Add holiday � specify the date� select the status � type the description � OK
� To delete a holiday, follow this path: select the holiday � File � DeleteHoliday � Yes � OK
6 To return to the Define Work Shifts window, select Close.
7 To return to the main window, select OK.
Viewing/Editing Your Active Site Library’s MXG Views PropertyIn SAS IT Resource Management software for z/OS, MXG views of a PDB enable you
to run report programs that are written in SAS that use the MXG names for tables andvariables. This can be useful if you have old MXG report programs that you want torun against one or more SAS IT Resource Management PDBs. Note that the MXGviews are provided in addition to the SAS IT Resource Management views. If yourequest no MXG views, you still have the SAS IT Resource Management views to usewith the SAS IT Resource Management reporting facilities.
The default value for the MXG Views property is stored as a site option. SAS ITResource Management automatically copies the value in the site option to a new PDB’ssame-named option when you create the PDB. You can change the value in the PDB ifyou prefer another.
The original value in the site option comes from PGMLIB’s same-named option whenyou create the site library. You can change the value in the site option if you preferanother. (For more information about creating a site library, see “Creating a SiteLibrary” on page 275.)
You can view and/or edit the status of the MXG views site option
� by using the %CPPDBOPT macro in batch mode. For more information about the%CPPDBOPT macro, see the topic %CPPDBOPT in the SAS IT ResourceManagement macro reference documentation.
Note: By default, MXG views are requested. �
Viewing/Editing Your Active Site Library’s Shift Code for Holidays andIts Description
The list of holidays is a list of inactive and active holidays at the site. SAS ITResource Management ignores the holidays that are marked “inactive” and uses theholidays that are marked “active.” The “active” holidays are used in the following ways:
� If an observation has a datetime stamp whose date is an “active” holiday and if, bythe time that the data is ready to be processed into the PDB, the value of the shiftcode in the data is blank, then the value of the shift code in the observation is setequal to the value of the shift code for holidays.
� If an observation has a datetime stamp whose date is an “active” holiday and if, bythe time that the data is ready to be processed into the PDB, the value of the shiftcode in the data is non-blank, then the value of the shift code in the observation isnot changed.
Administration: Working with Site Libraries � Viewing/Editing Your Active Site Library’s Shift Code for Holidays 289
The description that is used for the shift code for holidays is the shift description that isassociated with the value that is used as the shift code for holidays. For example, if theshift code for holidays is “0”, then the description of the shift code for holidays is thedescription that is associated with the shift code of “0”. (For more information aboutshift descriptions, see “Viewing/Editing Your Active Site Library’s Shift Descriptions” onpage 291.)
At run time, the active PDB accesses the shift code for holidays in the active sitelibrary.
When a site library is created, it obtains its value of the shift code for holidays andits description of the shift code for holidays from PGMLIB. By default, the shift code forholidays is “0”. By default, the description for the shift code of “0” is “HOLIDAY.” Youcan change the values in the active site library if you prefer others.
You can view and/or edit the active site library’s shift code for holidays and defaultdescription of the shift code for holidays
� by using the %CPHDAY and %CPPDBOPT macros in batch mode. For moreinformation about the %CPHDAY macro, see the topic %CPHDAY in the SAS ITResource Management macro reference documentation. For more informationabout the %CPPDBOPT macro, see the topic %CPPDBOPT in the SAS ITResource Management macro reference documentation.
� by using the SAS IT Resource Management GUI for UNIX and Windows.
Note: The shift code for holidays and the default description of the shift code forholidays are stored as site options (properties).
Viewing/Editing Your Active Site Library’s Shift Code for Holidays and ItsDescription (UNIX, Windows)
In the SAS IT Resource Management GUI for UNIX and Windows, you can view and/or edit the active site library’s shift code for holidays and the active site library’sdefault description of the shift code for holidays by following these steps:
1 If your active site library is not the one that you want to use, change your activesite library. If your access mode to your active site library is not “write” and if thereis a possibility that you will want to change one or more of the options’ values,change your access mode to “write.” For more information about changing youractive site library and/or your access mode to it, see “Activating a Site Library” onpage 272 or “Viewing/Editing Your Active Site Library’s Access Mode” on page 281.
2 On the main window’s Administration tab, select Define Work Shifts. TheDefine Work Shifts window opens.
3 At the question Define at which level?, select Site Defaults. (This selectionis not necessary if you want to change the shift code for holidays or the list ofholidays. However, this selection is necessary if you later want to adjust thedefault description of the shift code for holidays.)
4 Select Define Holidays. The Define Holidays window opens and displays, at thetop of the window, the value of the shift code for holidays.
5 If you want to change the value, select File. A menu opens. From the menu,select Modify Holiday Shift. The Define Holiday Shift window opens.
6 Type over the old value with the new value that you want to assign to data ondays that are active holidays.
7 To return to the Holiday Definition window, select OK.
8 To return to the Define Work Shifts window, select Close. If you changed thevalue, also select OK.
9 Select Shift Descriptions. The Modify Shift Descriptions window opens.
290 Viewing/Editing Your Active Site Library’s Start of Week � Chapter 14
10 For each value of shift code there is a description. If you did not change the valueof the shift code for holidays, then the description next to its value is still thedescription of the shift code for holidays. If you did change the value of the shiftcode for holidays, make the appropriate adjustments so that the values of thedescriptions are now appropriate. For example, if the shift code “4” is for holidaysand is not used in the work-shift schedule, you might want to change thedescription for “0” to blank and the description for “4” to “HOLIDAY.” Or if “2” isnow the shift code for holidays and is also used for weekends in the work schedule,you might want to change the description for “0” to blank and the description for“2” to “WEEKEND OR HOLIDAY.”
11 To return to the Define Work Shifts window, select OK if you made changes andwant to save them; otherwise, select Cancel.
12 To return to the main window, select OK if you made changes and want to savethem; otherwise, select Cancel.
Viewing/Editing Your Active Site Library’s Start of WeekStart of week defines the beginning of a week for the week level. Some sites consider
a week to be Sunday through Saturday; some sites consider a week to be Mondaythrough Sunday; and so on.
The default value for Start of Week is stored as a site option. SAS IT ResourceManagement automatically copies the value in the site option to a new PDB’ssame-named option when you create the PDB. You can change the value in the PDB ifyou prefer another.
The original value in the site option comes from PGMLIB’s same-named option whenyou create the site library. You can change the value in the site option if you preferanother. (For more information about creating a site library, see “Creating a SiteLibrary” on page 275.)
You can view and/or edit a site library’s option for the start of week� by using the %CPPDBOPT macro in batch mode. For more information about the
%CPPDBOPT macro, see the topic %CPPDBOPT in the SAS IT ResourceManagement macro reference documentation.
� by using the SAS IT Resource Management GUI for UNIX and Windows.
Note: The default value for Start of Week is Sunday. �
Viewing/Editing Your Active Site Library’s Start of Week (UNIX, Windows)In the SAS IT Resource Management GUI for UNIX and Windows, you can view and/
or edit the active site library’s value Start of Week by following these steps:1 If your active site library is not the one that you want to use, change your active
site library. If your access mode to your active site library is not “write” and ifthere is a possibility that you will want to change the option’s value, change youraccess mode to “write.” For more information about changing your active sitelibrary and/or your access mode to it, see “Activating a Site Library” on page 272or “Viewing/Editing Your Active Site Library’s Access Mode” on page 281.
2 On the main window’s Administration tab, select Site Options. The SetSite-wide Options window opens.
3 Select the Start-of-Week tab. The tab displays the active value of Start of Week.4 To change the site library’s option for start of week, you can use any one of these
methods:� You can follow this path: select the down arrow � select the day that
you want to use � OK

Administration: Working with Site Libraries � Viewing/Editing Your Active Site Library’s Shift Descriptions 291
� You can copy the value from a PDB. For more information about copying froma PDB, see “Copying a PDB’s Options to a Site Library” on page 273.
� You can copy the original (as shipped) value from PGMLIB. For moreinformation about copying from PGMLIB, see “Copying a Site Library’sOptions from PGMLIB” on page 274.
5 To return to the main window, select OK.
Viewing/Editing Your Active Site Library’s Shift DescriptionsThe work-shift schedule is defined by using work-shift codes. (For more information
about the work-shift schedule, see “Viewing/Editing Your Active Site Library’sWork-Shift Schedule” on page 292.) The descriptions of the codes assign meaning to thecodes. By default,
� for shift code 0, the description is “HOLIDAY”
� for shift code 1, the description is “WEEKDAY”
� for shift code 2, the description is “WEEKNIGHT”
� for shift code 3, the description is “WEEKEND”
� for shift code 4, the description is “Undefined”
� for shift code 5, the description is “Undefined”
� for shift code 6, the description is “Undefined”
� for all other shift codes, the descriptions are blank.
The default values for the descriptions are stored as site options. SAS IT ResourceManagement automatically copies the values in the site options to a new PDB’ssame-named options when you create the PDB. You can change the values in the PDB ifyou prefer other values.
The original values in the site options come from PGMLIB’s same-named optionswhen you create the site library. You can change the values of the shift descriptions ifyou prefer others. (For more information about creating a site library, see “Creating aSite Library” on page 275.)
You can view and/or edit a site library’s options for descriptions
� by using the %CPPDBOPT macro in batch mode. For more information about the%CPPDBOPT macro, see the topic %CPPDBOPT in the SAS IT ResourceManagement macro reference documentation.
� by using the SAS IT Resource Management GUI for z/OS.
� by using the SAS IT Resource Management GUI for UNIX and Windows.
Viewing/Editing Your Active Site Library’s Descriptions of Work-Shift Codes(z/OS)
In the SAS IT Resource Management GUI for z/OS, you can view and/or edit theactive site library’s descriptions for the work-shift codes by following these steps:
1 If your active site library is not the one that you want to use, change your activesite library. If your access mode to your active site library is not “write” (that is,“OLD”) and if there is a possibility that you will want to change one or more of theoptions’ values, change your access mode to “write” (OLD). For more informationabout changing your active site library and/or your access mode to it, see“Activating a Site Library” on page 272 or “Viewing/Editing Your Active SiteLibrary’s Access Mode” on page 281.

292 Viewing/Editing Your Active Site Library’s Work-Shift Schedule � Chapter 14
2 On the main menu, select PDB Admin. A menu opens. From the menu, selectDefine Work Shifts. The Define Work Shifts window opens.
3 In the Define at Which Level? field, select Site Defaults.4 The descriptions of the work-shift codes appear in the frame in the lower-left
corner of the window.5 If the codes and descriptions do not provide the distinctions that you want to make
among shifts, in the Shift Descriptions frame add or remove codes and typeover the existing descriptions with the descriptions that you prefer.
6 To exit to the main menu, select OK.
Viewing/Editing Your Active Site Library’s Descriptions of Work-Shift Codes(UNIX, Windows)
In the SAS IT Resource Management GUI for UNIX and Windows, you can view and/or edit the active site library’s descriptions for the work-shift codes by following thesesteps:
1 If your active site library is not the one that you want to use, change your activesite library. If your access mode to your active site library is not “write” and if thereis a possibility that you will want to change one or more of the options’ values,change your access mode to “write.” For more information about changing youractive site library and/or your access mode to it, see “Activating a Site Library” onpage 272 or “Viewing/Editing Your Active Site Library’s Access Mode” on page 281.
2 On the main window’s Administration tab, select Define Work Shifts. TheDefine Work Shifts window opens.
3 In the Define at Which Level? field, select Site Defaults.4 To display and/or edit the descriptions of the work-shift codes, select Shift
Descriptions.5 If the codes and descriptions do not provide the distinctions that you want to make
among shifts, add or remove codes and type over the existing descriptions with thedescriptions that you prefer, and then select OK.
6 To return to the main window, select OK. A dialog box opens. Select OK.
Viewing/Editing Your Active Site Library’s Work-Shift ScheduleThe work-shift schedule has 24 rows (one for each hour of the day) and 7 columns (on
for each day of the week). SAS IT Resource Management uses the work-shift schedulein the logic for assigning a shift code to each observation:
� If the observation already has a non-blank value for the shift code, no change ismade to the value of the shift code in the observation;
� otherwise, if the date in the observation’s date time stamp is an active holiday, thevalue of the shift code for holidays is used in the observation;
� otherwise, the date in the observation’s datetime stamp is converted into itsday-of-week and the time in the observation’s datetime stamp is converted into itshour, and the shift code for that day-of-week and hour is obtained from thework-shift schedule and used in the observation.
For more information about the active holidays, see “Viewing/Editing Your Active SiteLibrary’s List of Holidays” on page 286. For more information about the shift code forholidays, see “Viewing/Editing Your Active Site Library’s Shift Code for Holidays andIts Description” on page 288.
The default work-shift schedule is as follows:
Administration: Working with Site Libraries � Viewing/Editing Your Active Site Library’s Work-Shift Schedule 293
� shift code “1” is assigned to data that has a datetime stamp whose date is aMonday, Tuesday, Wednesday, Thursday, or Friday, and whose time is in the rangefrom 8 a.m. through 4:59 p.m. (08:00 through 16:59)
� shift code “2” is assigned to data that has a datetime stamp whose date is aMonday, Tuesday, Wednesday, Thursday, or Friday and whose time is in the rangefrom midnight through 7:59 a.m. (00:00 through 07:59) or in the range from 5 p.m.to 11:59 p.m. (17:00 through 23:59)
� shift code “3” is assigned to data that has a datetime stamp whose date is aSaturday or Sunday.
The work-shift schedule is composed of seven site options (the schedule for Sunday,the schedule for Monday, and so on, through the schedule for Saturday). SAS ITResource Management automatically copies the values in the site options to a newPDB’s same-named options when you create the PDB. You can change the values in thePDB if you prefer others.
The original values in the site options come from PGMLIB’s same-named optionswhen you create the site library. You can change one or more of the values if you preferothers. (For more information about creating a site library, see “Creating a SiteLibrary” on page 275.)
You can view and/or edit a site library’s options for the work-shift schedule� by using the %CPPDBOPT macro in batch mode. For more information about the
%CPPDBOPT macro, see the topic %CPPDBOPT in the SAS IT ResourceManagement macro reference documentation.
� by using the SAS IT Resource Management GUI for z/OS.� by using the SAS IT Resource Management GUI for UNIX and Windows.
Viewing/Editing Your Active Site Library’s Work-Shift Schedule (z/OS)In the SAS IT Resource Management GUI for z/OS, you can view and/or edit the
active site library’s work-shift schedule by following these steps:1 If your active site library is not the one that you want to use, change your active
site library. If your access mode to your active site library is not “write” and ifthere is a possibility that you will want to change the schedule, change your accessmode to “write.” For more information about changing your active site library and/or your access mode to it, see “Activating a Site Library” on page 272 or “Viewing/Editing Your Active Site Library’s Access Mode” on page 281.
2 On the main menu, select PDB Admin. A menu opens. From the menu, selectDefine Work Shifts. The Define Work Shifts window opens.
3 Select Site Defaults.4 The work-shift schedule is displayed in the frame in the upper-left corner of the
window. To see other hours, use the scroll bar on the right of the frame. To seeother days, select an arrow at the bottom of the frame.
Note that the hours are displayed in terms of the 24-hour clock (0:00 to 23:00).Each hour, n:00, represents the range n:00:00 to n:59:59. For example, 08:00represents 08:00:00 to 08:59:59.
Remember to check (and change if necessary) the shift codes for every day of theweek.
5 To edit the work-shift schedule, you can use any one of these methods:� Type over the active shift code(s) with the shift code(s) that you want to use,
and then select OK.� Copy the value(s) from a PDB. For more information about copying from a
PDB, see “Copying a PDB’s Options to a Site Library” on page 273.

294 Viewing/Editing Your Active Site Library’s Work-Shift Schedule � Chapter 14
� Copy the original (as shipped) values from PGMLIB. For more informationabout copying from PGMLIB, see “Copying a Site Library’s Options fromPGMLIB” on page 274.
Viewing/Editing Your Active Site Library’s Work-Shift Schedule (UNIX,Windows)
In the SAS IT Resource Management GUI for UNIX and Windows, you can view and/or edit the active site library’s work-shift schedule by following these steps:
1 If your active site library is not the one that you want to use, change your activesite library. If your access mode to your active site library is not “write” and ifthere is a possibility that you will want to change the schedule, change your accessmode to “write.” For more information about changing your active site library and/or your access mode to it, see “Activating a Site Library” on page 272 or “Viewing/Editing Your Active Site Library’s Access Mode” on page 281.
2 On the main window’s Administration tab, select Define Work Shifts. TheDefine Work Shifts window opens.
3 Select Site Defaults.4 The work-shift schedule displays in the frame in the left of the window. To see
other hours, use the scroll bar on the right of the frame. To see other days, selectan arrow at the bottom of the frame.
Note that the hours are displayed in terms of the 24-hour clock (0:00 to 23:00).Each hour, n:00, represents the range n:00:00 to n:59:59. For example, 08:00represents 08:00:00 to 08:59:59.
Remember to check (and change if necessary) the shift codes for every day of theweek.
5 To edit the work-shift schedule, you can use any one of these methods:� Type over the schedule with the value(s) that you want to use and then select
OK.� Copy the value(s) from a PDB. For more information about copying from a
PDB, see “Copying a PDB’s Options to a Site Library” on page 273.� Copy the original (as shipped) value(s) from PGMLIB. For more information
about copying from PGMLIB, see “Copying a Site Library’s Options fromPGMLIB” on page 274.
6 To return to the main window, select OK. A dialog box opens. Select OK.

295
C H A P T E R
15Administration: Working withWhole PDBs
Working with Whole PDBs: Main Topics 296Overview of Whole PDBs 296
Activating a PDB 299
Activating a PDB (z/OS) 300
Activating a PDB (UNIX, Windows) 300
Adding a PDB to Your List of Known PDBs 301Adding a PDB to Your List of Known PDBs (z/OS) 301
Adding a PDB to Your List of Known PDBs (UNIX, Windows) 302
Associating a Remote-Server Profile with a PDB 302
Backing Up a PDB 303
Backing Up a PDB (z/OS) 303
Backing Up a PDB (UNIX) 303Backing Up a PDB (Windows) 304
Building Views 304
Combining PDBs 304
Combining PDBs (z/OS) 305
Combining PDBs (UNIX, Windows) 306Copying a PDB within the Local File System 306
Copying a PDB within the Local File System (z/OS) 307
Copying a PDB within the Local File System (UNIX, Windows) 307
Copying a PDB’s Properties to a Site Library 308
Copying a Site Library’s Properties to a PDB 308Creating a PDB 308
Creating a PDB (z/OS) 309
Copying a Test PDB (z/OS) 311
Creating a PDB (UNIX, Windows) 313
Copying a Test PDB (UNIX/Windows) 315
Deleting a PDB 315Deleting a PDB (z/OS) 315
Deleting a PDB (UNIX, Windows) 316
Disassociating a Remote-Server Profile from a PDB 316
Exporting a PDB 316
Exporting a PDB (z/OS) 316Exporting a PDB (UNIX, Windows) 317
Importing a PDB 318
Importing a PDB (z/OS) 318
Importing a PDB (UNIX, Windows) 318
Releasing the Lock on the Active PDB 319Removing a PDB from Your List of Known PDBs 319
Removing a PDB from Your List of Known PDBs (z/OS) 319
Removing a PDB from Your List of Known PDBs (UNIX, Windows) 320

296 Working with Whole PDBs: Main Topics � Chapter 15
Splitting One PDB into Two PDBs 320Splitting One PDB into Two PDBs (z/OS) 320
Splitting One PDB into Two PDBs (UNIX, Windows) 321
Transporting a PDB outside the Local File System 322
Verifying/Correcting the Active PDB’s Data Dictionary 322
Checking the Structure 323Correcting the Structure 323
Viewing the Name of Your Active PDB 323
Viewing the Name of Your Active PDB (z/OS) 323
Viewing the Name of Your Active PDB (UNIX, Windows) 323
Viewing Your Active PDB’s File System and Profile 323
Viewing Your Active PDB’s File System and Profile (UNIX, Windows) 324Viewing Your List of Known PDBs 324
Viewing Your List of Known PDBs (z/OS) 324
Viewing Your List of Known PDBs (UNIX, Windows) 325
Viewing/Editing Your Active PDB’s Access Mode 325
Viewing/Editing Your Active PDB’s Access Mode (z/OS) 325Viewing/Editing Your Active PDB’s Access Mode (UNIX, Windows) 326
Working with Whole PDBs: Properties 326
Viewing/Editing Your Active PDB’s Archive Information 326
Viewing/Editing Your Active PDB’s Archive Information (z/OS) 327
Viewing/Editing Your Active PDB’s Archive Information (UNIX, Windows) 327Viewing/Editing Your Active PDB’s DST Definition 327
Viewing/Editing Your Active PDB’s DST Definition (UNIX, Windows) 328
Viewing/Editing Your Active PDB’s GMT Deviation 328
Viewing/Editing Your Active PDB’s GMT Deviation (UNIX, Windows) 329
Viewing/Editing Your Active PDB’s Holiday Shift Code 329
Viewing/Editing Your Active PDB’s Holiday Shift Code Description (UNIX, Windows) 329Viewing/Editing Your Active PDB’s MXG Views Property 330
Viewing/Editing Your Active PDB’s MXG Views Property (z/OS) 331
Checking for the Existence of MXG Views (Batch Mode) 331
Forcing the Existence of MXG Views (Batch Mode) 331
Viewing/Editing Your Active PDB’s Shift Descriptions 332Viewing/Editing Your Active PDB’s Shift Descriptions (z/OS) 332
Viewing/Editing Your Active PDB’s Shift Descriptions (UNIX, Windows) 333
Viewing/Editing Your Active PDB’s Start of Week 333
Viewing/Editing Your Active PDB’s Start of Week (z/OS) 334
Viewing/Editing Your Active PDB’s Start of Week (UNIX, Windows) 334Viewing/Editing Your Active PDB’s Work Shift Schedule 334
Viewing/Editing Your Active PDB’s Work Shift Schedule (z/OS) 335
Viewing/Editing Your Active PDB’s Work Shift Schedule (UNIX, Windows) 335
Viewing/Editing Your Active PDB’s Holiday List 335
Working with Whole PDBs: Main Topics
Overview of Whole PDBsLogically, a PDB is a performance data warehouse (formerly a performance database)
that contains performance data that is related to one or more data sources. Physically,a PDB is a coordinated set of nine SAS libraries. This overview and the topics that areassociated with it correspond to a PDB that is being treated as a whole structure.
The main operations with respect to a whole PDB are as follows:

Administration: Working with Whole PDBs � Overview of Whole PDBs 297
� creating a PDB, backing up a PDB, and deleting a PDB.Typically, a site has one PDB for each data source. But your site can have data
from multiple data sources in the same PDB and/or have data from one datasource in multiple PDBs.
� creating a remote-server profile, displaying and editing a remote-server profile,and deleting a remote-server profile.
If a PDB that you want to access is not local to your host, you need a profile forthe remote server host on which the PDB is located.
� adding the name of a PDB to your list of known PDBs, displaying and editing yourlist of known PDBs, and removing the name of a PDB from your list of knownPDBs.
Remote PDBs on your list of known PDBs need an appropriate remote-serverprofile to be associated with them.
� making a PDB your active PDB, and displaying the name of your active PDB andyour access mode for it (“write” or “readonly”).
Your active PDB is whichever PDB you are creating or working with at themoment. Making a PDB your active PDB is also known as activating the PDB.
� acquiring PDB properties (also known as PDB options) by default, displaying andediting PDB properties, resetting PDB properties, uploading PDB properties to asite library; displaying and editing defaults for all table definitions and all regular,derived, and formula variable definitions, and rebuilding views for all tables.
Some properties, settings, and operations apply to all of the data and/or all ofthe components within the PDB.
� The Holiday List and Holiday Shift Code that the PDB uses are obtainedfrom the site library that is current at the time of use.
� The active site library at the time that the PDB is created automaticallyprovides these defaults for PDB properties: the default archive device, thedefault archive path, the default archive parameters, the default archiveengine, the default active collector, the default Daylight Saving Time (DST)definition, the default Greenwich Mean Time (GMT) deviation, the defaultdescription of the shift code for holidays, the default for the start of a week,the descriptions of work-shift codes, and the work-shift schedule. The valuesin the PDB can be displayed and edited, and if necessary they can be reset tothe values that are provided by the site library. If you prefer, some or all ofthe values in the PDB can also be uploaded to the site library.
� The PDB stores data in tables and the tables hold data in variables. Forsome tables and their variables, the table definition (and the definitions of itsvariables) is added from the master data dictionary and a few attributesacquire values by default. For other tables and their variables, the tabledefinition (and the definitions of its variables) is defined by the user andattributes whose values are not specified acquire values by default.
In either case, you can specify the default values that take effect duringthe addition or creation of table definitions (and the definitions of theirvariables).
� For performance reasons, the tables use multiple data sets to hold the data.So that the existence of these data sets is transparent to the user, views areprovided that access the data sets and make the data appear to be together.If you edit the table definitions or variable definitions, the views are removedand are rebuilt automatically before any additional data is processed into thetables or summarized for the tables. If you want to report on the data in thetables before the views are automatically rebuilt, you can “manually” requestthat the views be rebuilt.

298 Overview of Whole PDBs � Chapter 15
Note: These views ( SAS IT Resource Management views) are not the sameas MXG views. SAS IT Resource Management views enable SAS IT ResourceManagement report definitions (and other SAS IT Resource Managementsoftware) to access the data in the SAS IT Resource Management PDB. MXGviews are optional, supplementary views. MXG views enable old MXG reportdefinitions to access the data in the SAS IT Resource Management PDB as ifthe PDB were an MXG PDB. �
Other operations that affect the whole PDB are as follows:
� copying a PDB within a local file system, and exporting, transferring, andimporting a PDB.
You might want to make a copy of a PDB and its contents. If the copy does nottake place within the local file system, you need to package the PDB for transfer(export it), do the transfer, and then un-package the PDB (import it).
� combining two PDBs into one, and splitting one PDB into two.
If you have two PDBs, each with tables of data from its own data source, youcan combine the PDB into one with tables from both data sources, and vice versa.You can also combine and split PDBs for other reasons and for more than two datasources.
The combining is done by copying tables (including the data in the tables) fromone PDB to another. The split is done in the same way.
� converting a PDB from the SAS IT Resource Management 1 structure to the SASIT Resource Management 2 structure; migrating a PDB from SAS Version 6 toSAS Version 8.
If you have an existing PDB that has an old structure, you can update the PDBto a new structure. That is, if you acquire a new version of SAS IT ResourceManagement and/or SAS software, you can update your PDB(s) to match.
Note: To convert a PDB from ITRM2 to ITRM1, see the %CPUNCVT topic in“Chapter 2: Administrative Macros” in the macro reference documentation. �
� verifying and/or correcting the PDB’s data dictionary.Because a PDB is a coordinated set of SAS libraries, it is important to do any
editing through SAS IT Resource Management rather than by using SAS softwareor operating system software to edit the libraries independently. If, however, SASIT Resource Management fails because of a power outage, out-of-space condition,or similar circumstance, the coordination might be lost and thus might damage thePDB.
If something has potentially damaged the PDB, you can check for damages and,in some cases, repair the damages automatically. If the damages cannot berepaired automatically, there are also instructions for “manual” recovery; theinstructions depend on what was running when the failure occurred. Or you canretrieve the backup copy of the PDB and rerun the job that was interrupted by thefailure.
� releasing the lock on a PDB.When you access a PDB, you access it in “readonly” mode or “write” mode. The
mode places a lock of one kind or another on the PDB. The lock can preventanother person from accessing the PDB, so it is good to release the lock as soon asyou finish using the PDB. You can release the lock on a particular PDB byactivating a different PDB or exiting from SAS IT Resource Management and SAS.
For additional information about whole PDBs, see the following topics:� “Activating a PDB” on page 299
Administration: Working with Whole PDBs � Activating a PDB 299
� “Adding a PDB to Your List of Known PDBs” on page 301
� “Associating a Remote-Server Profile with a PDB” on page 302
� “Backing Up a PDB” on page 303
� “Building Views” on page 304
� “Combining PDBs” on page 304
� “Copying a PDB within the Local File System” on page 306
� “Copying a PDB’s Properties to a Site Library” on page 308
� “Copying a Site Library’s Properties to a PDB” on page 308
� “Creating a PDB” on page 308
� “Deleting a PDB” on page 315
� “Disassociating a Remote-Server Profile from a PDB” on page 316
� “Exporting a PDB” on page 316
� “Importing a PDB” on page 318
� “Releasing the Lock on the Active PDB” on page 319
� “Removing a PDB from Your List of Known PDBs” on page 319
� “Splitting One PDB into Two PDBs” on page 320
� “Transporting a PDB outside the Local File System” on page 322
� “Verifying/Correcting the Active PDB’s Data Dictionary” on page 322
� “Viewing the Name of Your Active PDB” on page 323
� “Viewing Your Active PDB’s File System and Profile” on page 323
� “Viewing Your List of Known PDBs” on page 324
� “Viewing/Editing Your Active PDB’s Access Mode” on page 325.
Activating a PDBYour active PDB is the PDB that you are creating or working with at the moment.
Each time that you start SAS IT Resource Management (after your initial use), bydefault SAS IT Resource Management activates the PDB that you were using when youmost recently exited from SAS IT Resource Management.
You can activate another PDB (that is, make another PDB your active PDB, orswitch from using one PDB to using another)
� by using the %CPSTART macro (in batch mode). For more information about the%CPSTART macro, see the topic %CPSTART in the SAS IT Resource Managementmacro reference documentation.
� by using the SAS IT Resource Management GUI for z/OS
� by using the SAS IT Resource Management GUI for UNIX and Windows.
Note: Activating a PDB causes a lock of one kind or another to be placed on thePDB, and that lock can prevent others from working with the PDB. Thus, as soon asyou finish using the PDB, remember to release the lock. For more information, see“Releasing the Lock on the Active PDB” on page 319. �
Note: To activate a PDB on a remote host, you must use the SAS IT ResourceManagement client software. When you activate a remote PDB, the client softwaremakes a connection to the remote server that is specified by the associated profile.When you deactivate that remote PDB (by activating a local PDB), typically you agreeto disconnect from the remote server on which the remote PDB is located. �

300 Activating a PDB � Chapter 15
Activating a PDB (z/OS)In the SAS IT Resource Management GUI for z/OS, you can activate a PDB by
following these steps:
1 From the main menu, select the PDB Admin button. A menu opens. From themenu, select Manage PDB/Switch PDB. The Performance Database Operationswindow opens.
2 If the name of the PDB that you want to use is not on the PDB list, add the nameto the list. For information about adding a name, see “Adding a PDB to Your Listof Known PDBs” on page 301
3 From the PDB list, select the name of the PDB that you want to make your activePDB. The PDB must be on your local file system.
Note: You do not specify a remote-server profile. If you are using the z/OS GUI,you are using the SAS IT Resource Management server software, which cannotaccess a remote PDB. To access a remote PDB, use the SAS IT ResourceManagement client software. �
4 Select the ItemActions menu. From the menu, select Activate. The PDB AccessMode window opens.
5 Select the level of access that you want to have for the PDB and then select OK toreturn to the Performance Database Operations window. The PDB that youselected is activated, and the active PDB’s name is listed at the top of the window.(Farther down the window, its name is also in the list of all PDBs.)
6 To exit from the window, select the File menu. From the menu, select End.
Activating a PDB (UNIX, Windows)In the SAS IT Resource Management GUI for UNIX and Windows, you can activate a
PDB by following these steps:
1 From the main window’s Administration tab, select Manage PDBs. The ManagePDBs window opens.
2 If the name of the PDB that you want to use is not on the Other PDBs list, add itto the list. For information about adding a name, see “Adding a PDB to Your Listof Known PDBs” on page 301.
3 In the Other PDBs list, select the name of the PDB that you want to make youractive PDB.
4 Select Activate. The Activating PDB Confirmation window opens.
5 In the Access Mode box, select the level of access that you want to have to thatPDB. You can access a local PDB in “Readonly” or “Write” mode. You can access aremote PDB in “Readonly” mode.
Note: A local PDB is a PDB that you access from one or more disk drives that areattached to the local host or from one or more disk drives whose contents areaccessible through a service such as Network Neighborhood, NFS, AFS, or DFS.Thus, if a PDB satisfies the definition of a local PDB, you can access the PDBwithout connecting to a remote server. �
Note: A remote PDB is a PDB that you access by connecting to a remote host thathas the PDB available as a local PDB. Thus, if a PDB does not satisfy thedefinition of a local PDB, you must connect to a remote server if you want toaccess the PDB. �
6 In the Filesystem box, select the kind of access that you want to use for that PDB.

Administration: Working with Whole PDBs � Adding a PDB to Your List of Known PDBs 301
7 If the PDB is remote, the Remote Profile box displays the name of the remoteserver profile that is associated with the PDB. If no profile is associated with thePDB or you want to change which profile is associated with the PDB,
a select the right arrow. The Remote Server Connection Profiles window opensand lists the names of the sample profiles and any profiles that you havecreated.
b If the appropriate remote-server profile is on the list, select it.If there is no appropriate remote-server profile, you can create one from
this window and then select that profile. For more information about creatinga remote-server profile, see “Creating a Remote Server Profile” on page 574.
c Select OK in the Remote Server Connection Profiles window.8 Select OK in the Activating PDB Confirmation window. If you selected Remote in
the Filesystem box, SAS IT Resource Management prompts you for your user IDand password, and uses them to connect to the remote server (and gain access tothe PDB and to any other objects that are specified in the remote profile).
When the activation is completed, the name of the active PDB is in the ActivePDB field at the top of the Manage PDBswindow, and the name of the active PDBis no longer in the Other PDBs list.
9 To exit from the window, select Close. The name of the active PDB is in the bar atthe top of the window.
Note: You now have a lock on the libraries in the PDB. Remember to release thelock when you finish using the PDB. For more information, see “Releasing the Lock onthe Active PDB” on page 319. �
Note: If the PDB is on a remote server, you are now connected to that server. Whenyou finish using the PDB, remember to deactivate the PDB (by activating a local PDBand agreeing to disconnect from that server). For more information about connectionand disconnection, see “Overview of Remote Server Profiles” on page 571. �
Adding a PDB to Your List of Known PDBsIn order to access a PDB, you must have that PDB’s name on your list of known
PDBs.When you are a new SAS IT Resource Management user, the names of the
demonstration PDBs that are local to your host are automatically added to your list ofknown PDBs. When you make a PDB interactively, its name is automatically added toyour list of known PDBs. If you make or activate a PDB in batch mode and yourSASUSER library is allocated by the job, the PDB’s name is automatically added toyour list of known PDBs. When another person makes a PDB, you might want to addthe name of the PDB to your list of known PDBs.
You can add a PDB’s name to your list of known PDBs� by using the SAS IT Resource Management GUI for z/OS� by using the SAS IT Resource Management GUI for UNIX and Windows.
Note: To add the name of a PDB that is on a remote server, use SAS IT ResourceManagement on a host that has a client license.
Note: For information about the PDBs that are automatically on your list, see“Viewing Your List of Known PDBs” on page 324.
Adding a PDB to Your List of Known PDBs (z/OS)In the SAS IT Resource Management GUI for z/OS, you can add a PDB’s name to
your list of known PDBs by following these steps:

302 Associating a Remote-Server Profile with a PDB � Chapter 15
1 From the main menu, select PDB Admin. A menu opens. From the menu, selectManage PDBs/Switch PDB. The Performance Database Operations window opensand displays your list of known PDBs in the center of this window.
2 To add a PDB to your list, select Actions. A menu opens. From the menu, selectCreate/Add. The Specify PDB Location window opens.
3 In the Enter PDB Prefix field, type the fully qualified name of the PDB. (ThePDB must already exist.) The trailing period (.) is optional.
Note that you do not specify a remote profile. If you are using the z/OS GUI,you are using the SAS IT Resource Management server software, which cannotaccess a remote PDB. To access a remote PDB, use the SAS IT ResourceManagement client software.
4 To return to the Performance Database Operations window, select OK. The PDBname that you typed is now on your list.
5 To return to the main menu, select File. A menu opens. From the menu, selectEnd.
Adding a PDB to Your List of Known PDBs (UNIX, Windows)In the SAS IT Resource Management GUI for UNIX and Windows, you can add a
PDB’s Name to your list of known PDBs by following these steps:1 From the main window’s Administration tab, select Manage PDBs. The Manage
PDBs window opens. Your list of known PDBs consists of the active PDB (which islisted at the top of the window) and the PDBs that are in the Other PDBs list (inthe center of the window).
2 Select File. A menu opens. From the menu, select Add PDB Entry. The Add PDBEntry window opens.
3 In the Location of Existing PDB field, type the full path and name of the PDB.(The PDB must already exist.) The trailing slash (/) if the PDB is on a UNIXserver, trailing backslash (\) if the PDB is on a Windows server, or trailing period(.) if the PDB is on a z/OS server is optional.
4 A local PDB is a PDB that you access from one or more disk drives that areattached to the local host or from one or more disk drives whose contents areaccessible through a service such as Network Neighborhood, NFS, AFS, or DFS.Thus, if a PDB satisfies the definition of a local PDB, you can access the PDBwithout connecting to a remote server.
If the PDB whose name you want to add is not local,
a select the right arrow on the Remote Server Profile field. The RemoteServer Connection Profiles window opens, and lists the names of the sampleprofiles and any profiles that you have created.
b If the appropriate remote-server profile is on the list, select it.If there is no appropriate remote-server profile, you can create one from
this window and then select that profile. For more information about creatinga remote-server profile, see “Creating a Remote Server Profile” on page 574.
c Select OK in the Remote Server Connection Profiles window.5 To return to the Manage PDBs window, select OK in the Add PDB Entry window.
The name that you added is on the Other PDBs list.6 To return to the main window, select Close.
Associating a Remote-Server Profile with a PDBIf the PDB is remote, you can associate the PDB with a remote-server profile at the
same time that you add the name of the PDB to your list of known PDBs. For more

Administration: Working with Whole PDBs � Backing Up a PDB 303
information about adding the name of the PDB, see “Adding a PDB to Your List ofKnown PDBs” on page 301.
Note: A local PDB is a PDB that you access from one or more disk drives that areattached to the local host or from one or more disk drives whose contents are accessiblethrough a service such as Network Neighborhood, NFS, AFS, or DFS. Thus, if a PDBsatisfies the definition of a local PDB, you can access the PDB without connecting to aremote server. �
Note: A remote PDB is a PDB that you access by connecting to a remote host thathas the PDB available as a local PDB. Thus, if a PDB does not satisfy the definition ofa local PDB, you must connect to a remote server if you want to access the PDB. �
Backing Up a PDBThe fastest way to back up a PDB is to use an operating system utility. You can back
up a PDB� by using a z/OS utility (on z/OS)� by using a UNIX utility (on UNIX)� by using a Windows utility (on Windows).
Backing Up a PDB (z/OS)There is no preferred z/OS utility. Here is an example for z/OS:
//BACKUP EXEC PGM=ADRDSSU #1//TAPE DD DSN=your.itrm.pdb,DISP=(OLD,KEEP), #2// UNIT=cart,RETPD=30//SYSPRINT DD SYSOUT=A//SYSIN DD *DUMP DATASET(INCLUDE(your.itrm.pdb.*)) #3
OUTDD(TAPE) - SHARE COMPRESS//
Notes:1 This example uses the IBM DFDSS program. You might prefer to use the backup
procedure that is commonly used at your site.2 You might want to change characteristics on the TAPE allocation according to your
needs or according to site-specific rules.3 You can use the DFDSS DUMP command to back up volumes and data sets, and
you can then use the RESTORE command to recover them. You can also makeincremental backups of your data sets by doing a data set DUMP with RESETspecified and filtering on the data set–changed flag. For more information aboutthis facility, refer to the IBM manual Data Facility Data Set Services: ReferenceV2R5 (SC26-4389-08). You might want to change the DUMP command accordingto your needs or according to site-specific rules.
Backing Up a PDB (UNIX)There is no preferred UNIX utility. Here is an example for UNIX:� To make the backup for a PDB named “mypdb” to a file “/u/sasabc/mypdb.tar.Z”,
you can use these commands
cd <parent-dir-of-mypdb>tar cf - mypdb | compress > /u/sasabc/mypdb.tar.Z
304 Building Views � Chapter 15
where� <parent-dir-of-mypdb> is the full pathname of the PDB (that is, it contains
nine subdirectories: DETAIL, DAY, etc.)� mypdb is the PDB name (without the path)� /u/sasabc/mypdb.tar.Z is an arbitrary file name, in which the .Z indicates
that it is compressed and the .tar indicates that the tar utility was used toconvert a directory structure to a flat file.
� To restore the above PDB from the above tar file, you can use these commands:
cd <parent-dir-of-mypdb>uncompress -c /u/sasabc/mypdb.tar.Z | tar xf -
Backing Up a PDB (Windows)There is no preferred Windows utility. On Windows, you can use your site’s standard
backup utility.
Building ViewsThe PDB’s data is made available through views. If the PDB’s views do not exist or if
one or more table or variable definitions changed after the views were built, SAS ITResource Management automatically builds views at the process step or reduce step.
If you make changes to the table definitions and/or variable definitions and you wantto use the views (for example, for reporting) before the next time that you run processor reduce, you can force a build of the views
� by using the %CPSTART macro and the %CPDDUTL macro (with the BUILDVIEWS control statement) in batch mode.
For more information about the %CPSTART macro, see the topic %CPSTART inthe SAS IT Resource Management macro reference documentation . For moreinformation about the %CPDDUTL macro, see the topic %CPDDUTL in the SASIT Resource Management macro reference documentation . For more informationabout the %CPDDUTL control statement BUILD VIEWS, see the BUILD VIEWStopic in the SAS IT Resource Management macro reference documentation.
Note: If you use the GUI to make one or more changes to a table definition orvariable definition, the views are automatically rebuilt for you at that time. �
Combining PDBsA PDB has properties and stores its data in tables, with one or more tables for each
data source.There are advantages to having data from different data sources in the same PDB:� If you want to generate a report on data in more than one table, it is convenient to
have the tables in the same PDB.� If you want to generate reports interactively, you do not need to change the active
PDB for each report.
You can combine PDBs (that is, copy their tables to the same PDB)� by using the SAS IT Resource Management GUI for z/OS� by using the SAS IT Resource Management GUI for UNIX and Windows.
Note: If you would prefer to have the copy delete the properties and tables in the“To PDB” before copying PDB properties and tables from the “From PDB,” use the Copy

Administration: Working with Whole PDBs � Combining PDBs 305
PDBs operation. For more information about copying PDBs, see “Copying a PDB withinthe Local File System” on page 306. �
Note: 1. The PDB’s properties apply to all of the data in the PDB. Thus, combinedata only if the PDB properties are appropriate for all of the data.
2. You can copy tables (including the data in the tables) into a combined PDB at anytime that using the same PDB would be convenient. You can also copy tables intoseparate PDBs (that is, split a PDB) at any time that using different PDBs would beconvenient. For information about splitting a PDB, see “Splitting One PDB into TwoPDBs” on page 320.
3. To combine PDBs, you must be using SAS IT Resource Management on a hostwith a server license, and the PDBs must be local. �
Combining PDBs (z/OS)In the SAS IT Resource Management GUI for z/OS, you can combine PDBs by
following these steps:1 Display your list of known PDBs. For information about displaying your list of
known PDBs, see “Viewing Your List of Known PDBs” on page 324.2 Decide which PDB to use as the combined PDB.
If you do not want to use a PDB that is already on your list of known PDBs,create a new PDB. For information about creating a PDB, see “Creating a PDB” onpage 308. You can skip the step of adding tables when you create a PDB for thispurpose.
3 If the PDB that you decided to use for the combined PDB is the active PDB,activate a different PDB (for example, a demonstration PDB). For informationabout activating a PDB, see “Activating a PDB” on page 299.
4 From the main menu, select PDB Admin. A menu opens. From the menu, selectManage PDBs/Switch PDB. The Performance Database Operations window opens.
5 Select Actions. A menu opens. From the menu, select Combine PDBs. TheCombine Selected Tables to Other PDB window opens.
6 Select the down arrow that is associated with the From field. The Combine FromPDB window opens. Select the name of the PDB from which you want to copytables.
7 Select the down arrow that is associated with the To field. The Combine To PDBwindow opens. Select the name of the PDB to which you want to copy tables (thatis, the PDB that you want to use as the combined PDB).
Note: The tables already in the “To PDB” will not be affected by your copyingadditional tables to the “To PDB” as long as the names of the tables are different.Similarly, the PDB properties in the “To PDB” will not be affected by your copyingadditional tables to the “To PDB.” �
8 In the lower-left corner of the window, a list is displayed of all the tables in the“From PDB” that do not already exist in the “To PDB.” Select each of the tablesthat you want to copy.
In the lower-right corner of the window, a list is displayed of each of the tablesthat you select.
9 When you finish selecting tables, select Run. A busy symbol is displayed in theSAS message area at the bottom of the window.
10 When the busy symbol disappears from the message area, select Goback to returnto the Performance Database Operations window.
11 To return to the main menu, select File. A menu opens. From the menu, selectEnd.

306 Copying a PDB within the Local File System � Chapter 15
Reminder: The tables were copied, not moved. You might want to delete the tablesfrom the “From PDB.”
Reminder: You might want to change your batch job(s) to use the combined PDB.
Combining PDBs (UNIX, Windows)In the SAS IT Resource Management GUI for UNIX and Windows, you can combine
tables into one PDB:
1 Display your list of known PDBs. For information about displaying your list ofknown PDBs, see “Viewing Your List of Known PDBs” on page 324.
2 Decide which PDB to use as the combined PDB.
If you do not want to use a PDB that is already on your list of known PDBs,create a new PDB. For information about creating a PDB, see “Creating a PDB” onpage 308. You can skip the step of adding tables when you are creating a PDB forthis purpose.
3 If the PDB that you decided to use for the combined PDB is the active PDB,activate a different PDB (for example, a demonstration PDB). For informationabout activating a PDB, see “Activating a PDB” on page 299.
4 On the main window’s Administration tab, select Manage PDBs. The ManagePDBs window opens.
5 From your list of known PDBs, select the “To PDB” (the PDB that you want to useas the combined PDB).
Note: The tables already in the “To PDB” will not be affected by your copingadditional tables to the “To PDB” as long as the table names are different.Similarly, the PDB properties in the “To PDB” will not be affected by your copyingadditional tables to the “To PDB”. �
6 Select File. A menu opens. From the menu, select Combine PDBs. The CombinePDB window opens.
7 Select the down arrow that is associated with the From field. The Combine FromPDB window opens. Select the name of the PDB from which you want to copytables.
8 In the lower-left corner of the window, a list is displayed of all the tables in the“From PDB” that do not already exist in the “To PDB.” Select each of the tablesthat you want to copy.
In the lower-right corner of the window, a list is displayed of each of the tablesthat you select.
9 When you finish selecting tables, select OK.
When SAS IT Resource Management finishes copying the selected table(s), thefollowing message is displayed in the SAS message area (at the bottom of thewindow): “PDB <name-of-“To-PDB”> combined.”
10 To return to the main window, select Close.
Reminder: The tables were copied, not moved. You might want to delete the tablesfrom the “From PDB.”
Reminder: You might want to change your batch job(s) to use the combined PDB.
Copying a PDB within the Local File SystemA PDB has properties and stores its data in tables, with one or more table for each
data source.

Administration: Working with Whole PDBs � Copying a PDB within the Local File System 307
Within the local file system, you can copy a PDB to another PDB (that is, copy onePDB’s properties, tables, and data to another PDB)
� by using the %CPSTART macro and the %CPDBCOPY macro (in batch mode). Formore information about the %CPSTART macro, see the topic %CPSTART in theSAS IT Resource Management macro reference documentation . For moreinformation about the %CPDBCOPY macro, see the %CPDBCOPY topic in theSAS IT Resource Management macro reference documentation.
� by using the SAS IT Resource Management GUI for z/OS.� by using the SAS IT Resource Management GUI for UNIX and Windows.
CAUTION:The PDB properties and tables in the “To PDB” are deleted before the copying begins. Ifyou do not want to lose existing properties and tables in the “To PDB,” use a newPDB as the “To PDB” or use the combine PDBs operation. For more informationabout combining PDBs, see “Combining PDBs” on page 304. �
To copy a PDB to a remote location, see “Exporting a PDB” on page 316, “Transportinga PDB outside the Local File System” on page 322, and “Importing a PDB” on page 318.
Copying a PDB within the Local File System (z/OS)In the SAS IT Resource Management GUI for z/OS, you can copy a PDB within the
local file system by following these steps:1 Display your list of known PDBs. For more information about displaying your list,
see “Viewing Your List of Known PDBs” on page 324.2 If the “To PDB” does not already exist, create a PDB to use as the “To PDB.” For
more information about creating a PDB, see “Creating a PDB” on page 308.
CAUTION:In the “To PDB,” the existing PDB properties and all existing tables and data will bedeleted before the copying begins. Thus, if you do not want to lose the existingproperties or existing tables from an existing PDB, make a new PDB to use asthe “To PDB.” �
3 If the “To PDB” is the active PDB, make a different PDB active (for example,activate a demonstration PDB). For more information about activating a PDB, see“Activating a PDB” on page 299.
4 From the Performance Database Operations window, select Actions. A menuopens. From the menu, select Copy PDB. The Copy an Entire PDB to Another PDBwindow opens.
5 Select the down arrow that is associated with the From field. The Copy From PDBwindow opens. Select the “From PDB.”
6 Select the down arrow that is associated with the To field. The Copy to PDBwindow opens. Select the “To PDB.”
7 Select Run. The Confirmation window opens as a reminder that all tables in the“To PDB” will be deleted before the copying begins. Select OK. A busy symbol isdisplayed in the SAS message area (at the bottom of the window).
8 When the busy symbol disappears, the copying is complete. Select Goback toreturn to the Performance Database Operations window.
9 To return to the main menu, select File. A menu opens. From the menu, selectEnd.
Copying a PDB within the Local File System (UNIX, Windows)In the SAS IT Resource Management GUI for UNIX and Windows, you can copy a
PDB within the local file system by following these steps:
308 Copying a PDB’s Properties to a Site Library � Chapter 15
1 Display your list of known PDBs. For more information about displaying your list,see “Viewing Your List of Known PDBs” on page 324.
2 If the “To PDB” does not already exist, create a PDB to use as the “To PDB.” Formore information about creating a PDB, see “Creating a PDB” on page 308.
CAUTION:In the “To PDB,” before the copying begins, the existing PDB properties are removedand all existing tables are deleted. Thus, if you do not want to lose the existingproperties or existing tables from an existing PDB, make a new PDB to use asthe “To PDB.” �
3 If the “To PDB” is the active PDB, make a different PDB active (for example,activate a demonstration PDB). For more information about activating a PDB, see“Activating a PDB” on page 299.
4 From the Manage PDBs window, in the Other PDBs list select the “From PDB.”
5 From the Manage PDBs window, select File. A menu opens. From the menu,select Copy PDB. The Copy PDB window opens.
6 Select the down arrow that is associated with the To field. The Select windowopens. Select the “From PDB.” When the name of the “From PDB” is in theFolder field, select OK.
7 Select OK. A confirmation window reminds you that all properties and tables in the“To PDB” will be deleted before the copying begins. Select Yes.
8 When the copying is finished, another confirmation window states that the “FromPDB” was copied to the “To PDB.” Select OK. SAS IT Resource Managementreturns you to the Manage PDBs window.
9 To return to the main window, select Close.
Copying a PDB’s Properties to a Site LibraryA PDB’s default properties are acquired automatically from the active site library at
the time that the PDB is created. Typically, the PDB’s properties are used “as is” oredited slightly. If, however, the PDB’s properties are greatly changed and would beuseful for other PDBs created in the future, you can copy the PDB’s properties back tothe site library. For more information about such a copy, see “Copying a PDB’s Optionsto a Site Library” on page 273.
Reminder: PDB options is another name for PDB properties.
Copying a Site Library’s Properties to a PDBA PDB’s default properties are acquired automatically from the active site library at
the time that the PDB is created. Typically, the PDB’s properties are used “as is” oredited slightly. If, however, the PDB’s properties are greatly changed and you want torestore them to the default values, you can re-copy the PDB’s default properties fromthe site library. For more information about such a copy, see “Copying a Site Library’sOptions to a PDB” on page 274.
Reminder: PDB options is another name for PDB properties.
Creating a PDBYou can create a PDB

Administration: Working with Whole PDBs � Creating a PDB 309
� by using the %CPSTART macro in batch mode. For more information about the%CPSTART macro, see the topic %CPSTART in the SAS IT Resource Managementmacro reference documentation.
� by using the SAS IT Resource Management GUI for z/OS.
� by using the SAS IT Resource Management GUI for UNIX and Windows.
For information about the size of the PDB, see “Guidelines for Allocating Space inthe PDB” in “Appendix 1: Recovery Procedures” in the macro reference documentationand “Guidelines for Revising Space Allocations in the PDB” in “Appendix 1: RecoveryProcedures” in the macro reference documentation . For information about the size ofthe archive, which might or might not be in the same location as the PDB, see“Guidelines for Allocating Space in the Archive” in “Appendix 1: Recovery Procedures”in the macro reference documentation and “Guidelines for Revising Space Allocations inthe Archive” in “Appendix 1: Recovery Procedures” in the macro referencedocumentation .
Note: In order to create a PDB, you must be using SAS IT Resource Managementon a host that has a server license. �
Creating a PDB (z/OS)In the SAS IT Resource Management GUI for z/OS, you can create a PDB in two
ways: by using the QuickStart Wizard, or by using the Define New PDB Wizard. TheQuickStart Wizard does more for you than the Define New PDB Wizard does, so checkthe QuickStart Wizard first.
1 From the main menu, select PDB Admin. A menu opens. From the menu, selectQuickStart Wizard. The Welcome to the QuickStart Wizard window opens.
2 Select the down arrow that is associated with the Collector field. A menu opens.The items in the menu describe types of logs that collectors generate and that SASIT Resource Management staging code reads.
If the data that you intend to process into the new PDB matches any of theselog formats, select the format and proceed through the wizard (for example, selectNext at the bottom of this window). The wizard will generate a PDB for you, and(so that you can direct reports to the Web) the wizard will create a reportstructure for you. The wizard will also generate one or more jobs to process datainto the PDB, reduce the data, and report on the data.
3 If the data that you intend to process into the new PDB does not match any ofthese log formats, select Cancel at the bottom of the window to return to the mainmenu (in order to select a different path).
If the QuickStart Wizard does not handle your type of data, use the Define New PDBWizard instead.
1 On the main menu, select PDB Admin. A menu opens. From the menu, selectDefine New PDB. The Define New PDB window opens.
2 Select Location. The Specify PDB Location window opens. In the Enter PDBprefix field, type the fully qualified name of the PDB that you want to create. Thetrailing period (.) is optional.
3 Select OK to continue. The Confirmation window opens. Select OK to continue. ThePDB Allocation window opens.
4 Select the down arrow that is associated with the Unit field. A menu opens. Fromthe menu, select the appropriate value. SAS IT Resource Management returns youto an updated version of the PDB Allocation window.
5 If you want to specify a particular volume, fill in the Volser field.

310 Creating a PDB � Chapter 15
If you want to specify a particular expiration date, fill in the Expiration Dayfield.
Check the other fields and make any changes that are appropriate for the PDBthat you want to allocate.
6 Select Run. SAS IT Resource Management allocates the PDB and returns you toan updated version of the PDB Allocation window.
7 Select Goback to continue. The Display/Modify PDB Options window opens.8 For each PDB option (property) that you want to specify, there is a field with that
name. Select or provide the appropriate value for that field.� PDB Access Mode field:
You can change the default values in this window. You will need writeaccess to do that. Also, you are likely to want to add table definitions to thePDB in the next step. You will need write access to do that.
For more information about a PDB’s access mode, see “Viewing/EditingYour Active PDB’s Access Mode” on page 325.
� Provide MXG PDB Views field:Views of the SAS IT Resource Management PDB are automatically built
for you. If you have existing MXG reporting programs that refer to views bytheir names in the MXG PDB, and if you want to continue to use thoseprograms without changing the view names to the names to the names of theviews of the SAS IT Resource Management PDB, select Yes.
For more information about MXG views, see “Viewing/Editing Your ActivePDB’s MXG Views Property” on page 330.
� SAS/SHARE Server Name field:If you will manage multi-user access to the PDB by using a SAS/SHARE
server, type the name of the server in this field. For more information aboutthe SAS/SHARE server, see the SAS/SHARE documentation for your versionof SAS.
� Start of Week field:The week level of the PDB does a grouping by week. If your enterprise has
a convention about the day that is considered to be the start of the week,select Change Start of Week and then select that day. If your enterprisehas no convention about the start of week, select Change Start of Weekand select Sunday, if Sunday is not already selected. (Sunday is the defaultvalue.) For more information about Start of Week, see “Viewing/Editing YourActive PDB’s Start of Week” on page 333.
� Archive fields:Archiving the data that is coming into the PDB is optional. If you want an
archive (that is, a set of archive libraries), do the following:� Archive Type field:
Select whether you want the archive libraries to be on DASD orTape.
� Archive Root field:The name of an archive library is a concatenation of the high-level
qualifiers that you specify for archive root and of the qualifier.Znnnnnnn (where nnnnnnn is 00000001, 0000002, etc.).
By default, the high-level qualifiers that are used for archive rootare identical to the PDB’s name.
� Archive Unit field:

Administration: Working with Whole PDBs � Creating a PDB 311
Type in the value that you want to use for the UNIT= parameteron the archive libraries. For example, you might want to specify 3380 orSYSDA.
� Archive Library Allocation Parameter String field:Provide any other parameters that you want to use when an
archive library is generated. For example, if the archive is on tape, youmight want to specify LABEL=(1,SL,,,RETPD=365).
Note that you are providing the archive information in case data isactually archived. Whether data is archived depends on the setting of oneproperty of a PDB table. For more information about archiving, see “Viewing/Editing Your Active PDB’s Archive Information” on page 326 and “Appendix2: Archiving Data” in the SAS IT Resource Management macro referencedocumentation.
9 Select OK to continue. SAS IT Resource Management returns you to the DefineNew PDB window.
10 Unless you want an empty PDB, select Add Table(s). The Collector list opens.Select the collector that generates the logs that contain the data that you want inthe PDB. SAS IT Resource Management displays an asterisk next to your selection.
11 Select OK to continue. The Select Table(s) from List window opens.12 Select all of the tables whose definitions you want in the PDB. SAS IT Resource
Management highlights the tables that you select.13 After you have selected all of the tables, select OK to continue. SAS IT Resource
Management displays a busy symbol in the SAS message area (at the bottom ofthe window).
14 After all the table definitions have been added for all the selected tables, SAS ITResource Management returns you to the Define New PDBs window. The tablesthat are listed have definitions in the PDB.
Note: If you select Add Table(s) a second time, the previous selection is not lost.You can add additional tables from the same collector or a different collector. �
15 Select Goback to return to the main menu.
Copying a Test PDB (z/OS)If you create a test PDB and then want to copy the structure, settings, and data to
your production PDB, follow these steps:1 Create an empty production PDB. You can do this interactively or in batch.
� Interactively:
a From the main window, select PDB Admin � Manage PDBs/Switch PDB� Actions � Create/Add
b Type the name of the (high-level qualifiers of the) production PDB and thenselect OK on the next two windows. The PDB Allocation window opens.
c Enter your space estimates and make any other required changes.d Select Run to allocate your production PDB.e Select Goback. The new PDB is now included in the list of known PDBs.f Select the following to activate the new PDB: ItemActions � Activate �
WRITE access � OK� Batch:
Review the ALLOC job step in the following code:
//CMQSTART JOB (accounting info),’ITRM Quick Start’, #1// MSGLEVEL=(1,1),TIME=20,REGION=32M,NOTIFY=

312 Creating a PDB � Chapter 15
.
. #2
.//*******************************************************************//* **//* Delete the old PDB data libraries, to make this job able to be **//* rerun. **//* **//*******************************************************************//CLEANUP EXEC PGM=IDCAMS #3//SYSPRINT DD SYSOUT=*//SYSIN DD DATA,DLM=’$$’DELETE ’YOUR.NEWPDB.*’SET MAXCC=0
$$//*******************************************************************//* **//* Allocate SAS IT Resource Management for z/OS Performance **//* Database data libraries. **//* **//*******************************************************************//ALLOC EXEC PGM=IEFBR14 #4//DETAIL DD DSN=YOUR.NEWPDB.DETAIL,DISP=(NEW,CATLG,DELETE),// SPACE=(CYL,(120,20)),UNIT=SYSDA #5//DAY DD DSN=YOUR.NEWPDB.DAY,DISP=(NEW,CATLG,DELETE),// SPACE=(CYL,(99,25)),UNIT=SYSDA//WEEK DD DSN=YOUR.NEWPDB.WEEK,DISP=(NEW,CATLG,DELETE),// SPACE=(CYL,(30,25)),UNIT=SYSDA//MONTH DD DSN=YOUR.NEWPDB.MONTH,DISP=(NEW,CATLG,DELETE),// SPACE=(CYL,(99,10)),UNIT=SYSDA//YEAR DD DSN=YOUR.NEWPDB.YEAR,DISP=(NEW,CATLG,DELETE),// SPACE=(CYL,(20,5)),UNIT=SYSDA//ADMIN DD DSN=YOUR.NEWPDB.ADMIN,DISP=(NEW,CATLG,DELETE),// SPACE=(TRK,(15,10)),UNIT=SYSDA//COLLECT DD DSN=YOUR.NEWPDB.COLLECT,DISP=(NEW,CATLG,DELETE),// SPACE=(CYL,(9,9)),UNIT=SYSDA//PDBWORK DD DSN=YOUR.NEWPDB.PDBWORK,DISP=(NEW,CATLG,DELETE),// SPACE=(CYL,(180,80)),UNIT=SYSDA//DICTLIB DD DSN=YOUR.NEWPDB.DICTLIB,DISP=(NEW,CATLG,DELETE),// SPACE=(CYL,(4,1)),UNIT=SYSDA,// DCB=(LRECL=6144,BLKSIZE=6144,RECFM=PS)
Note: 1. The JCL job card needs to be changed to make it be appropriate foryour site.
2. Comments that explain the job and listing the customization instructionsare omitted here for the sake of brevity.
3. The CLEANUP job step invokes IDCAMS to delete the data sets for thePDB that you will allocate. If you need to rerun the job, this job step makescertain that the previous PDB is out of the way before you allocate a new onewith the same name.
Be certain that the PDB names in the CLEANUP job step and ALLOC jobstep match.
Warning: This will delete all data sets that start with this prefix, so be surethat you have no other data sets that begin with the same qualifiers!
Administration: Working with Whole PDBs � Creating a PDB 313
4. The ALLOC job step invokes IEFBR14 to allocate the data sets for thePDB.
5. You might need to adjust the SPACE= parameter and/or the UNIT=parameter for the PDB data sets. �
2 Copy your test PDB’s structure, setting, and data to your production PDB.Set up and submit a batch job with a SAS job step (using JCL like that used in
the LOAD job step in the CMQSTART job, except that you can remove thedefinition of the SMF ddname). In the job step, include the following macro calls:
%CPSTART(MODE=BATCH SYSTEM=MVS,ROOT=’itrm.prefix.’,PDB=’your.test.pdb’,DISP=OLD,SHARE=N/A,MXGSRC=(’MXG.USERID.SOURCLIB’ ’MXG.MXG.SOURCLIB’),MXGLIB=MXG.MXG.FORMATS);
%CPDBCOPY(your.test.pdb, your.production.pdb);
Creating a PDB (UNIX, Windows)In the SAS IT Resource Management GUI for UNIX and Windows, you can create a
PDB in two ways: by using the QuickStart Wizard or by using the Create PDB Wizard.The QuickStart Wizard does more for you than the Create PDB Wizard does, so checkthe QuickStart Wizard first.
1 On the main window’s Administration tab, select QuickStart Wizard. TheWelcome to the QuickStart Wizard window opens.
2 Select the down arrow that is associated with the Collector field. A menu opens.The items in the menu describe types of logs that collectors generate and that SASIT Resource Management staging code reads.
3 If the data that you intend to process into the new PDB matches any of these logformats, select the format and proceed through the wizard (for example, selectNext at the bottom of this window). The wizard will generate a PDB for you. Thewizard will also generate one or more jobs to process data into the PDB, reducethe data, and report on the data. The wizard directs you to files that tell you howto set the PDB’s properties (options).
4 If the data that you intend to process into the new PDB does not match any ofthese log formats, select Cancel to return to the main menu.
If the QuickStart Wizard does not handle your type of data, use the Create PDBWizard instead.
1 On the main window’s Administration tab, select Create PDB Wizard. The PDBWizard window opens. Follow the instructions on this window and proceedthrough the wizard (for example, select Next at the bottom of this window). Thewizard will create a PDB for you.
2 On the main window’s Administration tab, select Manage PDBs. The ManagePDBs window opens. Select Properties. The PDB Options window opens.Review, and adjust if necessary, the values of the PDB properties (options).
� Access Mode:On the Access tab, you can select whether you want “Write” or “Readonly”
access to the PDB. You can change your access mode to the PDB at any time.This setting is in effect until the next time that you change it. To change anyof the other properties of the PDB, the Access Mode setting must be “Write.”
314 Creating a PDB � Chapter 15
For more information about a PDB’s access mode, see “Viewing/EditingYour Active PDB’s Access Mode” on page 325.
� Greenwich Mean Time (GMT) Deviation:On the Time Zone tab, you can specify the number of hours’ difference
between GMT and local time at the site where the data is logged. For somedata sources, this information is needed to convert data logged with GMTdatetime stamps to data logged with local datetime stamps.
For more information about the GMT deviation, see “Viewing/Editing YourActive PDB’s GMT Deviation” on page 328.
� Daylight Saving Time (DST) Expression:On the Time Zone tab, you can specify the period during which Daylight
Saving Time is in effect. For some data sources, this information is needed toconvert data logged with DST datetime stamps to data logged with standarddatetime stamps.
For more information about the DST expression, see “Viewing/Editing YourActive PDB’s DST Definition” on page 327.
� Start of Week:The week level of the PDB does a grouping by week. If your enterprise has
a convention about the day that is considered to be the start of the week,select the down arrow and that day. If your enterprise has no conventionabout the start of week, select the down arrow and select Sunday, if Sundayis not already selected. (Sunday is the default start of week.)
For more information about the Start of Week, see “Viewing/Editing YourActive PDB’s Start of Week” on page 333.
� Archive fields:Archiving the incoming data to SAS IT Resource Management is optional.
If you do want an archive (that is, a set of archive libraries), do the following:� Archive Type field:
Select whether you want the archive libraries to be on Disk orTape.
� Archive Device field:Type the name of the device where the archive libraries are to be
written. For example, this could be c:. By default, the value that is usedfor archive device is the name of the device where the PDB is located.
� Archive Root field:
The name of an archive library is a concatenation (with slash orbackslash, as appropriate) of the values that you supply for ArchiveDevice, Archive Root, and Znnnnnnn (where nnnnnnn is 00000001,0000002, etc.). By default, the value that is used for archive root is thename of the PDB.
By default, the high-level qualifiers that are used for the archive’sroot are identical to the PDB’s name.
� Archive Library Allocation Parameter String field:Provide any parameters that you want to use when a SAS
LIBNAME statement is used to reference an archive library.
Note that you are providing the archive information in case data isactually archived. Whether data is archived depends on the setting of oneproperty of a PDB table. For more information about archiving, see “Viewing/Editing Your Active PDB’s Archive Information” on page 326 and “Appendix

Administration: Working with Whole PDBs � Deleting a PDB 315
2: Archiving Data” in the SAS IT Resource Management macro referencedocumentation.
3 Select OK to continue.
4 To return to the main window, select Close.
Copying a Test PDB (UNIX/Windows)If you create a test PDB and then want to copy the structure, settings, and data to
your production PDB, use these steps.
1 Create an empty production PDB.
a On the main window’s Administration tab, select Create PDB Wizard.b Name the new PDB. and select Next.c On each subsequent window, select Next without making any additional
changes until the wizard’s final window is displayed.d Select Finish in the wizard’s final window to activate the new, empty PDB.
2 Copy your test PDB’s structure, settings, and data to your production PDB.
a On the main window’s Administration tab, select Manage PDBs.b Select the PDB that you want to copy. Then select File � Copy PDB The Copy
PDB window is displayed.c In the Copy To window, scroll to the name of your test PDB and select it.d Select OK. The following message is displayed: “PDB your_new_pdb already
exists. Do you want to overwrite it?”e Verify that you have selected the correct PDB, and select Yes. This message is
displayed: “Copied your_test_pdb to your_new_pdb.”f Select OK. The list of known PDBs is updated to reflect the new PDB.g Select Close to return to the main window.
Deleting a PDBYou can delete a PDB
� by using the SAS IT Resource Management GUI for z/OS
� by using the SAS IT Resource Management GUI for UNIX and Windows.
Note: 1. In order to delete a PDB, you must be using SAS IT Resource Managementon a host that has a server license, and the PDB must be local.
2. After this operation, the PDB is not only removed from your list of known PDBs.It is also removed from the local file system. If you think that you might need the PDBlater, you must back it up before you delete it. �
Deleting a PDB (z/OS)In the SAS IT Resource Management GUI for z/OS, you can delete a PDB by
following these steps:
1 If the PDB that you want to delete is the active PDB, activate a different PDB. Formore about activating a PDB, see “Activating a PDB” on page 299.
2 From the main menu, select PDB Admin. A menu opens. From the menu, selectManage PDBs/Switch PDB. The Performance Database Operations window opens.
3 Select the PDB that you want to delete. Then select ItemActions. A menu opens.From the menu, select Delete PDB.
4 The Confirmation window opens. Select OK.

316 Disassociating a Remote-Server Profile from a PDB � Chapter 15
5 To return to the main menu, select File. A menu opens. From the menu, selectEnd.
Deleting a PDB (UNIX, Windows)In the SAS IT Resource Management GUI for UNIX and Windows, you can delete a
PDB by following these steps:1 If the PDB that you want to delete is the active PDB, activate a different PDB. For
information about activating a PDB, see “Activating a PDB” on page 299.2 From the main window’s Administration tab, select Manage PDBs. The Manage
PDBs window opens.3 From the Other PDBs list, select the name of the PDB that you want to delete.4 Select File � Delete PDB � Yes5 After you get a message that the PDB has been deleted, select OK.6 To return to the main window, select Close.
Disassociating a Remote-Server Profile from a PDBIf you activated a remote PDB and specified a remote-server profile, you might need
to make one of these corrections later:� specify a different remote-server profile for that (remote) PDB� specify that the PDB is not remote but local.
To make either of these changes, activate the PDB again and, during the activation,do one of these actions:
� specify a different remote-server profile for that (remote) PDB.� specify that the PDB is local.
For more information about activating a PDB, see “Activating a PDB” on page 299.
Note: The SAS IT Resource Management GUI does not permit you to reactivate thecurrently active PDB. If the PDB for which you want to make these changes is theactive PDB, activate another PDB and then reactivate the PDB for which you want tomake these changes. �
Exporting a PDBExporting a PDB reads a normally formatted PDB as input and writes a
transport-formatted PDB as output. (The transport-formatted PDB does not overwritethe normally formatted PDB.) Thus, exporting a PDB is equivalent to packaging it inpreparation for transporting it (copying it) outside of the local file system.
You can export a PDB� by using the SAS IT Resource Management GUI for z/OS� by using the SAS IT Resource Management GUI for UNIX and Windows.
For more information about transporting a transport-formatted PDB to another filesystem, see “Transporting a PDB outside the Local File System” on page 322. For moreinformation about importing (that is, un-packaging) the transported PDB on that otherfile system, see “Importing a PDB” on page 318.
Exporting a PDB (z/OS)In the SAS IT Resource Management GUI for z/OS, you can export a PDB by
following these steps:

Administration: Working with Whole PDBs � Exporting a PDB 317
1 Allocate two data sets whose names are identical except for the lowest-levelqualifier:
a YOURID.YOURPDB.TRANFILE, where
� TRANFILE is any name except TRANBUFF and the higher qualifierscould be any legal values at all (that is, they do not need to be YOURIDor YOURPDB or even two levels)
� LRECL=80
� BLKSIZE=6160
� DSORG=PS
� RECFM=FB
� The amount of space that is needed is somewhat difficult to predict. Ifyou allocate a file that is four times the size of the PDB, that is probablymore than enough space.
b YOURID.YOURPDB.TRANBUFF, where
� the TRANBUFF qualifier must literally be TRANBUFF. The other levelsmust be identical to the ones for TRANFILE.
� LRECL, BLKSIZE, ORG, and RECFM are the same as for TRANFILE.
� Again, the amount of space needed is difficult to predict. If you allocate afile that is four times the size of the largest library in the PDB, that isprobably more than enough space.
2 If the PDB that you want to export is the active PDB, activate a different PDB.For more information about activating a PDB, see “Activating a PDB” on page 299.
3 From the main menu, select PDB Admin. A menu opens. From the menu, selectManage PDBs/Switch PDB. The Performance Database Operations window opens.
4 Select the PDB that you want to export.
5 Select ItemActions. A menu opens. Select Export PDB. The Export All Tables ina PDB to a Transportable File window opens.
6 In the Enter Output File Name window, type the name that you gave toYOURID.YOURPDB.TRANFILE.
7 Select OK.
8 After the PDB is exported, you can delete YOURID.YOURPDB.TRANBUFF, whichwas only a work space.
Exporting a PDB (UNIX, Windows)In the SAS IT Resource Management GUI for UNIX and Windows, you can export a
PDB by following these steps:
1 On the main window’s Administration tab, select Manage PDBs. The ManagePDBs window opens.
2 If the PDB that you want to export is the active PDB, activate a different PDB.For more information about activating a PDB, see “Activating a PDB” on page 299.
3 From the Other PDBs list, select the PDB that you want to export.
4 Select File. A menu opens. Select Export PDB. The Export window opens.
5 In the Enter Output File Name field, type the full path and name of the file thatwill contain the transport-format PDB.
6 Select OK.
7 Select Close to return to the main window.

318 Importing a PDB � Chapter 15
Note: This operation generates a work file that is in the same directory as the filethat contains the transport-format PDB. The work file has the name TRANBUFF. Afterthe file that contains the transport-format PDB is generated, the TRANBUFF file isautomatically deleted. �
Importing a PDBImporting a PDB reads a transport-formatted PDB as input and writes a normally
formatted PDB as output. (The normally formatted PDB does not overwrite thetransport-formatted PDB.) Thus, importing a PDB is equivalent to un-packaging it aftertransporting it (copying it) from somewhere outside of the local file system.
You can import a PDB� by using the SAS IT Resource Management GUI for z/OS� by using the SAS IT Resource Management GUI for UNIX and Windows.
Note: 1.For the import function to work, the transport-formatted PDB must havebeen generated by the SAS IT Resource Management export function. For moreinformation about exporting a PDB, see “Exporting a PDB” on page 316. For moreinformation about transporting a PDB outside of the local file system, see “Transportinga PDB outside the Local File System” on page 322.
2. Before you import a PDB whose data involves the use of MXG, you will need toinstall MXG on the host where the PDB will be located. �
Importing a PDB (z/OS)In the SAS IT Resource Management GUI for z/OS, you can import a PDB by
following these steps:1 Create a new PDB, without adding tables. (For more information about creating a
PDB, see “Creating a PDB” on page 308.) You should be able to estimate theamount of space needed by looking at the PDB on the host from which it wasexported.
2 If the new PDB is the active PDB, activate a different PDB. For more informationabout activating a PDB, see “Activating a PDB” on page 299.
3 From the main menu, select PDB Admin. A menu opens. From the menu, selectManage PDBs/Switch PDB. The Performance Database Operations window opens.
4 Select the PDB that you created without tables.5 Select ItemActions. A menu opens. From the menu, select Import PDB. The
Transportable File window opens.6 Type the name that you gave the transport-formatted PDB when you transported
it to this host.7 Select OK.8 After the PDB is imported, you can delete the transport-format version of the PDB
from this host and from the host where it was generated.9 If you want to generate reports on data in this PDB before the next process task or
reduce tasks runs against this PDB, rebuild the views of the data. (If this PDB isintended to be used only as a copy of the PDB that is in everyday use, do notprocess data into it or reduce data in it.) For more information about rebuildingviews, see “Building Views” on page 304.
Importing a PDB (UNIX, Windows)In the SAS IT Resource Management GUI for UNIX and Windows, you can import a
PDB by following these steps:

Administration: Working with Whole PDBs � Removing a PDB from Your List of Known PDBs 319
1 Create a new PDB, without adding tables. For more information about creating aPDB, see “Creating a PDB” on page 308.
2 If the new PDB is the active PDB, activate a different PDB. For more informationabout activating a PDB, see “Activating a PDB” on page 299.
3 On the main window’s Administration tab, Manage PDBs. The Manage PDBswindow opens.
4 Select the PDB that you created without tables.5 Select File. A menu opens. From the menu, select Import PDB. The
Transportable File window opens.6 Type in the name that you gave the transport-formatted PDB when you
transported it to this host.7 Select OK.8 After the PDB is imported, you can delete the transport-format version of the PDB
from this host and from the host where it was generated.9 If you want to generate reports on data in this PDB before the next process task or
reduce task runs against this PDB, rebuild the views of the data. (If this PDB isintended to be used only as a copy of the PDB that is in everyday use, do notprocess data into it or reduce data in it.) For more information about rebuildingviews, see “Building Views” on page 304.
Releasing the Lock on the Active PDBWhen a PDB is activated, it is activated in the mode that you specified (“write” or
“readonly” (for UNIX and Windows), OLD or SHR (for z/OS)). The mode causes a lock ofone kind or another to be placed on the PDB. As soon as you finish using the PDB,remember to release the lock.
You can release the lock on the active PDB by doing one of the following:� activating a different PDB. (If the PDB that you are deactivating is remote, agree
to disconnect when SAS IT Resource Management prompts you to disconnect fromthe remote server.)
� exiting from SAS IT Resource Management and SAS. All remote connections closeautomatically.
Removing a PDB from Your List of Known PDBsYou can delete a PDB’s name from your list of known PDBs� by using the SAS IT Resource Management GUI for z/OS� by using the SAS IT Resource Management GUI for UNIX and Windows.
Note: The PDB’s name is removed from your list of known PDBs, but the PDBcontinues to exist on its file system. �
Removing a PDB from Your List of Known PDBs (z/OS)In the SAS IT Resource Management GUI for z/OS, you can remove a PDB’s name
from your list of known PDBs by following these steps:1 If the PDB whose name you want to remove is the active PDB, activate a different
PDB. For more about activating a PDB, see “Activating a PDB” on page 299.
2 From the main menu, select PDB Admin. A menu opens. From the menu, selectManage PDBs/Switch PDB. The Performance Database Operations window opens.

320 Splitting One PDB into Two PDBs � Chapter 15
3 Select the name of the PDB that you want to remove from your list of known PDBs.4 Select ItemActions. A menu opens. From the menu, select Remove PDB Entry.
The Confirmation window opens.5 Select OK.6 To return to the main menu, select File. A menu opens. From that menu, select
End.
Removing a PDB from Your List of Known PDBs (UNIX, Windows)In the SAS IT Resource Management GUI for UNIX and Windows, you can remove a
PDB’s name from your list of known PDBs by following these steps:1 If the PDB whose name you want to remove is the active PDB, activate a different
PDB. For more about activating a PDB, see “Activating a PDB” on page 299.2 On the main window’s Administration tab, select Manage PDB. The Manage
PDBs window opens.3 Select the PDB whose name you want to remove from your list of known PDBs.4 Select File. A menu opens. From the menu, select Remove PDB Entry.5 To return to the main window, select Close.
Splitting One PDB into Two PDBsA PDB stores its data in tables, with one or more tables for each data source.There are advantages to having data from different sources in different PDBs:� You can back up, process, reduce, and report on the data in parallel.� You are less likely to run into file size problems (UNIX has a file size limitation of
2 gigabytes).� It might be easier to handle sites with different time zones.� It might be easier to handle multiple users that need update access at the same
time.
You can split a PDB into two PDBs� by using the SAS IT Resource Management GUI for z/OS� by using the SAS IT Resource Management GUI for UNIX and Windows.
Note: You can copy some tables into another PDBs (that is, split a PDB) at any timethat using different PDBs would be convenient. You can also copy tables into acombined PDB at any time that using the same PDB would be convenient. Forinformation about combining PDBs, see “Combining PDBs” on page 304. �
Note: To split a PDB, you must be using SAS IT Resource Management on a hostwith a server license, and the PDBs must be local. �
Splitting One PDB into Two PDBs (z/OS)In the SAS IT Resource Management GUI for z/OS, you can split a PDB into two by
following these steps:1 Create a new PDB. For information about creating a PDB, see “Creating a PDB”
on page 308. (You do not need to add any tables during creation when creating aPDB for this purpose.)
2 If the new PDB is the active PDB, activate some other PDB (for example, ademonstration PDB). For information about activating a PDB, see “Activating aPDB” on page 299.

Administration: Working with Whole PDBs � Splitting One PDB into Two PDBs 321
3 From the main menu, select PDB Admin. A menu opens. From the menu, selectManage PDBs/Switch PDB. The Performance Database Operations window opens.
4 Select Actions. A menu opens. From the menu, select Combine PDBs. TheCombine Selected Tables to Other PDB window opens.
5 Select the down arrow that is associated with the From field. The Combine FromPDB window opens. Select the name of the PDB that you want to copy tables from(that is, select the name of the PDB that you are splitting).
6 Select the down arrow that is associated with the To field. The Combine To PDBwindow opens. Select the name of the PDB that you want to copy tables to (thatis, select the name of the new PDB).
Note: The tables already in the “To PDB” will not be affected by the copy ofadditional tables to the “To PDB” as long as the names of the tables are different.Similarly, the PDB properties in the “To PDB” will not be affected by the copy ofadditional tables to the “To PDB.” �
7 In the lower-left corner of the window, a list is displayed of all the tables in the“From PDB” that do not already exist in the “To PDB.” Select each of the tablesthat you want to copy.
In the lower-right corner of the window, a list is displayed of each of the tablesthat you select.
8 When you finish selecting tables, select Run. A busy symbol is displayed in theSAS message area at the bottom of the window.
9 When the busy symbol disappears from the message area, select Goback to returnto the Performance Database Operations window.
10 To return to the main menu, select File. A menu opens. From the menu, selectEnd.
Reminder: The tables were copied, not moved. You might want to delete the tablesfrom the “From PDB.”
Reminder: You might want to duplicate and edit your set of batch jobs, so that oneset of jobs uses one of the PDBs and the other set of jobs uses the other PDB.
Splitting One PDB into Two PDBs (UNIX, Windows)In the SAS IT Resource Management GUI for UNIX and Windows, you can split a
PDB into two by following these steps:
1 Create a new PDB. For information about creating a PDB, see “Creating a PDB”on page 308. (You do not need to add any tables during creation when creating aPDB for this purpose.)
2 If the new PDB is the active PDB, activate some other PDB (for example, ademonstration PDB). For information about activating a PDB, see “Activating aPDB” on page 299.
3 On the main window’s Administration tab, select Manage PDBs. The ManagePDBs window opens.
4 On your list of known PDBs, select the “To PDB” (that is, select the new PDB).
Note: If there are already tables in the “To PDB,” they will not be affected by thecopy of additional tables to the “To PDB” as long as the table names are different.Similarly, the PDB properties in the “To PDB” will not be affected by the copy ofadditional tables to the “To PDB.” �
5 Select File. A menu opens. From the menu, select Combine PDBs. The CombinePDB window opens.
322 Transporting a PDB outside the Local File System � Chapter 15
6 Select the down arrow that is associated with the From field. The Combine FromPDB window opens. Select the name of the PDB that you want to copy tables from(that is, select the name of the PDB that you want to split).
7 In the lower-left corner of the window, a list is displayed of all the tables in the“From PDB” that do not already exist in the “To PDB.” Select each of the tablesthat you want to copy.
In the lower-right corner of the window, a list is displayed of each of the tablesthat you select.
8 When you finish selecting tables, select OK.When SAS IT Resource Management finishes copying the selected table(s), the
following message is displayed in the SAS message area (at the bottom of thewindow): “PDB <name-of-“To-PDB”> combined.”
9 To return to the main window, select Close.
Reminder: The tables were copied, not moved. You might want to delete the tablesfrom the “From PDB.”
Reminder: You might want to duplicate and edit your set of batch jobs, so that oneset of jobs uses one of the PDBs and the other set of jobs uses the other PDB.
Transporting a PDB outside the Local File SystemAn exported (also known as transport-formatted) PDB must be copied by using a
bit-protecting cross-operating-environment mechanism such as binary FTP. (See yoursystem administrator for more information about a binary FTP that is available on yoursystem.) Also, the transport mechanism must not change the logical record length ofthe file that is being transported.
Note: Before the cross-operating-environment copying takes place, the PDB must beexported on the “from operating environment” (that is, the PDB in the format of the“from operating environment” must be copied to transport format). For moreinformation about exporting, see “Exporting a PDB” on page 316. �
Note: After the cross-operating-environment copying takes place, the PDB must beimported on the “to operating environment” (that is, the PDB in transport format mustbe copied to a PDB in the format of the “to operating environment”). For moreinformation about importing, see “Importing a PDB” on page 318. �
Verifying/Correcting the Active PDB’s Data DictionaryYou can check the structural integrity of the active PDB’s data dictionary. If there
are errors, you might be able to correct them automatically. To do both of theseoperations, use the %CPSTART macro and the %CPDDUTL macro in batch mode. Formore information about the %CPSTART macro, see the %CPSTART topic in the SAS ITResource Management macro reference documentation . For more information aboutthe %CPDDUTL macro, see the %CPDDUTL topic in the SAS IT Resource Managementmacro reference documentation , and
� to check the structural integrity, use the VERIFY DICTIONARY control statement(in batch mode).
� to correct the structural integrity, use the SYNCHRONIZE DICTIONARY controlstatement (in batch mode).
CAUTION:If the SYNCHRONIZE DICTIONARY control statement does not succeed in correcting theproblem, restore the PDB from the backup copy and rerun whatever is necessary to bring itup to date. �
Administration: Working with Whole PDBs � Viewing Your Active PDB’s File System and Profile 323
Checking the StructureTo check the structure, run the %CPDDUTL macro with a file or with a SAS catalog
entry. The file/entry should contain the VERIFY DICTIONARY control statement. Formore information about this control statement, see the VERIFY DICTIONARY topic inthe SAS IT Resource Management macro reference documentation.
Correcting the StructureTo correct the structure, run the %CPDDUTL macro with a file or with a SAS catalog
entry. The file/entry should contain the SYNCHRONIZE DICTIONARY controlstatement. For more information about this control statement, see the SYNCHRONIZEDICTIONARY topic in the SAS IT Resource Management macro referencedocumentation.
Viewing the Name of Your Active PDBYour active PDB is the PDB with which you are currently working.You can view the name of your active PDB
� by using the SAS IT Resource Management GUI for z/OS
� by using the SAS IT Resource Management GUI for UNIX and the PDBenvironments.
Viewing the Name of Your Active PDB (z/OS)In the SAS IT Resource Management GUI for z/OS, you can display the name of your
active PDB by following these steps:1 From the main menu, select PDB Admin. A menu opens. From the menu, select
Manage PDBs/Switch PDB. The Performance Database Operations window opens.The name of your active PDB is displayed at the top of this window.
2 To return to the main menu, select File. A menu opens. From the menu, selectEnd.
Viewing the Name of Your Active PDB (UNIX, Windows)In the SAS IT Resource Management GUI for UNIX and Windows, you can display
the name of your active PDB by following these steps:
1 From the main window’s Administration tab, select Manage PDBs. The ManagePDBs window opens. The name of your active PDB is displayed at the top of thiswindow.
2 To return to the main window, select Close.
Viewing Your Active PDB’s File System and ProfileOn z/OS, your active PDB is on the local file system, and no remote-server profile is
associated with it.On UNIX and Windows hosts without a SAS IT Resource Management client license,
your active PDB is on the local file system, and no remote-server profile is associatedwith it.
On UNIX and Windows hosts with a SAS IT Resource Management client license,your active PDB can be on the local file system or on a remote file system. If it is on a

324 Viewing Your List of Known PDBs � Chapter 15
remote file system, a remote-server profile is associated with it. You can view the typeof system (and name of the remote-server profile, if any)
� by using the SAS IT Resource Management GUI for UNIX and Windows.
Viewing Your Active PDB’s File System and Profile (UNIX, Windows)On the SAS IT Resource Management GUI for UNIX and Windows, you can view
your active PDB’s file system (and the name of the remote-server profile that isassociated with it, if any) by following these steps:
1 On the main window’s Administration tab, select Manage PDBs. The ManagePDBs window opens.
2 Select Properties. The Set Active PDB Options window opens. The currentsetting of File System is displayed on the Access tab. If the setting is Remote, thenthe Remote Profile field displays the name of the remote server profile that isassociated with the PDB.
3 Select OK.
4 To return to the main window, select Close.
Viewing Your List of Known PDBsYour list of known PDBs automatically contains
� the names of the demonstration PDBs on your local file system
� any PDB that you create interactively
� any PDB that you create in batch mode, if you allocate your SASUSER library inthe batch job that does the creation
� any PDB that you activate in batch mode, if you allocate your SASUSER library inthe batch job that does the activation.
You can also add or remove the names of PDBs that other people create. For moreinformation about adding a PDB’s name to your list of known PDBs, see “Adding a PDBto Your List of Known PDBs” on page 301. For more information about removing aPDB’s name from your list of known PDBs, see “Removing a PDB from Your List ofKnown PDBs” on page 319.
You can display your list of known PDBs
� by using the SAS IT Resource Management GUI for z/OS
� by using the SAS IT Resource Management GUI for UNIX and Windows.
Note: The PDBs in your list are the ones that are known to you. They are in the listfor selection convenience. Other PDBs might exist, but you cannot select theminteractively until you add them to this list. �
Viewing Your List of Known PDBs (z/OS)In the SAS IT Resource Management GUI for z/OS, you can display your list of
known PDBs by following these steps:
1 From the main menu, select PDB Admin. A menu opens. From the menu, selectManage PDBs/Switch PDBs. The Performance Database Operations windowopens.
2 Your list of known PDBs is displayed at the center of this window.
3 To return to the main menu, select File. A menu opens. Select End.

Administration: Working with Whole PDBs � Viewing/Editing Your Active PDB’s Access Mode 325
Viewing Your List of Known PDBs (UNIX, Windows)In the SAS IT Resource Management GUI for UNIX and Windows, you can display
your list of known PDBs by following these steps:1 On the main window’s Administration tab, select Manage PDBs. The Manage
PDBs window opens.2 Your list of known PDBs consists of the active PDB (which is displayed at the top
of the window) and the PDBs that are in the Other PDBs list (which is displayedat the center of the window).
3 To return to the main window, select Close.
Viewing/Editing Your Active PDB’s Access ModeThere are several factors that jointly affect the access mode that you can have to a
PDB.1 Operating system permissions: If you want to have read access to a PDB, you
must make arrangements with the system or security administrator where thePDB is located for read permission to that PDB and its objects. Similarly, if youwant to have update (read/write) access to a PDB, you must make arrangementswith the system or security administrator where the PDB is located for update(read/write) permission to that PDB and its objects.
Note: If you use SAS/CONNECT (or SAS/SHARE), your own user ID is requiredto access the SAS/CONNECT (or SAS/SHARE) server. You get permission toaccess the PDB by invoking your user ID for the SAS/CONNECT (or SAS/SHARE)server. �
2 SAS IT Resource Management software: The SAS IT Resource Managementserver software permits you to have read access or update (read/write) access toPDBs on its local file system. The SAS IT Resource Management client softwarepermits you to have read access but not update (read/write) access to PDBs on itslocal file system and to remote PDBs.
Note: If the client software is installed on the same host where the serversoftware is installed, the access rights are additive. You can have read/write accessto a local or remote PDB. �
If you need update (read/write) access to a PDB and it is not available becauseanother user has read/write access to that PDB, wait several minutes and tryagain. It is recommended that you request update (read/write) permission onlyduring the time that you need it.
You can display and edit your access to a PDB that is currently your active PDB� by using the SAS IT Resource Management GUI for z/OS� by using the SAS IT Resource Management GUI for UNIX and Windows.
You can display and set your access to a PDB that is not currently your active PDBwhen you activate that PDB. For more information about activating a PDB, see“Activating a PDB” on page 299.
Viewing/Editing Your Active PDB’s Access Mode (z/OS)In the SAS IT Resource Management GUI for z/OS, you can display and/or edit the
access mode of your active PDB by following these steps:1 From the main menu, select PDB Admin. A menu opens. From the menu, select
Set Active PDB Options. The Display/Modify PDB Options window opens. Thecurrent setting of access mode is displayed under PDB Access Mode.

326 Working with Whole PDBs: Properties � Chapter 15
2 Under PDB Access Mode, select Readonly or Write.
3 To return to the main menu, select OK.
Viewing/Editing Your Active PDB’s Access Mode (UNIX, Windows)In the SAS IT Resource Management GUI for UNIX and Windows, you can display
and/or edit the access mode of your active PDB by following these steps:
1 On the main window’s Administration tab, select Manage PDBs. The ManagePDBs window opens.
2 Select Properties. The Set Active PDB Options window opens. The currentsetting of Access Mode is displayed on the Access tab.
3 On the Access tab, under Access Mode select Readonly or Write. Then select OK.
Note: You cannot select WRITE access for a remote PDB.) �
4 To return to the main window, select Close.
Working with Whole PDBs: Properties
Viewing/Editing Your Active PDB’s Archive InformationIf one or more tables have archiving turned on (in their table properties), then there
is an archive.An archive is a set of archive libraries. Each archive library is the result of one run
of the processing step. Each archive library contains the incoming data to the detaillevel of the tables for which archiving is turned on.
The archiving information describes what the archive is to be like. You can displayand edit your active PDB’s archiving information
� by using the %CPPDBOPT macro in batch mode. For more information about the%CPPDBOPT macro, see the topic %CPPDBOPT in the SAS IT ResourceManagement macro reference documentation.
� by using the SAS IT Resource Management GUI for z/OS.
� by using the SAS IT Resource Management GUI for UNIX and Windows.
Note: 1. Except for the archive location, all of the archiving information is inheritedfrom the active site library when the PDB is created. The default location for thearchive is the PDB. That is, by default the archive libraries are “under” the PDB(UNIX, Windows) or have the same high-level-qualifiers as the PDB (z/OS).
2. For some supplied collector support (for example, the collector support for Webdata), the detail level is bypassed. In that case, there is no incoming data to the detaillevel. Thus, archiving is not relevant. �
For more information about archiving, see the topic “Archiving Overview” in“Appendix 2: Archiving Data” in the macro reference documentation.
If you decide to edit your active PDB’s properties, you might later want to copy thenew values to your active site library. From there, the values will be copiedautomatically to new PDBs and can be copied to existing PDBs. This takes less timethan editing the values in each of your PDBs. (For more information about copying thevalues from the PDB to the site library, see “Copying a PDB’s Options to a Site Library”on page 273. For more information about copying of values from the site library to newor existing PDBs, see “Copying a Site Library’s Options to a PDB” on page 274.)

Administration: Working with Whole PDBs � Viewing/Editing Your Active PDB’s DST Definition 327
Viewing/Editing Your Active PDB’s Archive Information (z/OS)In the SAS IT Resource Management GUI for z/OS, you can display and/or edit your
active PDB’s archiving information by following these steps:1 From the main menu, select PDB Admin. A menu opens. From the menu, select
Set Active PDB Options. The Display/Modify PDB Options window opens.2 In the Archive Type field, select DASD or Tape.3 In the Archive Unit field, type the value that you want to use for each archive
library’s UNIT= parameter.4 In the Archive Root field, overwrite the location (that is, name) of the archive if
you do not want to use the default value.5 In the Archive Library Allocation Parameter String field, type any
additional specifications. For example, if the archive is on tape, you might want tospecify LABEL=(1,SL,,,RETPD=365).
6 To return to the main menu, select OK.
Viewing/Editing Your Active PDB’s Archive Information (UNIX, Windows)In the SAS IT Resource Management GUI for UNIX and Windows, you can display
and/or edit your active PDB’s archiving information by following these steps:1 On the main window’s Administration tab, select Manage PDBs. The Manage
PDBs window opens. The PDB that is active is listed at the top of the window.2 Select Properties. The Set Active PDB Options window opens.3 Select the Archive tab. The fields on the tab display the archiving information.4 To change the value in the Archive Type field, select Disk or Tape.5 To change the archive device, in the Archive Device field edit the name of the
device. For example, type c: for Windows or /usr for UNIX.6 To change the archive root, in the Archive Root field edit the name of the
archive. For example, type \temp\newpdb for Windows or /temp/newpdb forUNIX. The value of archive path will be the concatenation of the value of archivedevice and the value of archive root. So in this case, the archive path will bec:\temp\newpdb on Windows and /usr/temp/newpdb on UNIX.
7 SAS IT Resource Management uses the SAS LIBNAME statement when it createsan archive library. For example, if &ARCPARM represents the value of theArchive Library Allocation Parameter String field, then an archive libraryis allocated by using the SAS LIBNAME statement as follows:
LIBNAME libref ’library-location’ &ARCPARM ;
(The value of library-location is the archive path, concatenated with /Znnnnnnn,where nnnnnnn is 0000001, 0000002, 0000003, etc.)
To change the string, edit the Archive Library Allocation ParameterString field.
8 Select OK to return to the Manage PDBs window.9 Select Close to return to the main window.
Viewing/Editing Your Active PDB’s DST DefinitionThe Daylight Saving Time (DST) definition describes the Daylight Saving Time
period. Some collectors log data by using DST timestamps during the DST period. SASIT Resource Management can change those timestamps to standard time by using theDST definition. (The only supplied collector support that uses the DST definition is for

328 Viewing/Editing Your Active PDB’s GMT Deviation � Chapter 15
SunNet Manager data, and the Generic Collector Facility does not access the DSTdefinition.)
There are two ways to express the definition: as a concatenation of ranges (one eachfor next year, this year, last year, and the year before) and as a formula that takes thesystem’s year into account. Both forms of the definition work correctly. The advantageof the formula is that it does not require periodic updates.
You can display and edit your active PDB’s value for the DST definition� by using the %CPPDBOPT macro in batch mode. For more information about the
%CPPDBOPT macro, see the topic %CPPDBOPT in the SAS IT ResourceManagement macro reference documentation.
� by using the SAS IT Resource Management GUI for UNIX and Windows.
Note: 1. The default value of the DST definition is inherited from the active sitelibrary when the PDB is created.
2. If you decide to edit your active PDB’s properties, you might later want to copy thenew values to your active site library. From there, the values will be copiedautomatically to new PDBs and can be copied to existing PDBs. This takes less timethan editing the values in each of your PDBs. (For more information about copying thevalues from the PDB to the site library, see “Copying a PDB’s Options to a Site Library”on page 273. For more information about copying of values from the site library to newor existing PDBs, see “Copying a Site Library’s Options to a PDB” on page 274.) �
Viewing/Editing Your Active PDB’s DST Definition (UNIX, Windows)In the SAS IT Resource Management GUI for UNIX and Windows, you can display
and/or edit your active PDB’s DST definition by following these steps:1 On the main window’s Administration tab, select Manage PDBs. The Manage
PDBs window opens. The PDB that is active is listed at the top of the window.2 Select Properties. The Set Active PDB Options window opens.3 Select the Time Zone tab. One of the fields on the tab displays the DST definition.4 To make changes in the DST definition, edit the field.5 Select OK to return to the Manage PDBs window.6 Select Close to return to the main window.
Viewing/Editing Your Active PDB’s GMT DeviationThe Greenwich Mean Time (GMT) deviation describes the number of hours’
difference between the time where the data was logged and the time in Greenwich, UK(Coordinated Universal Time). Some collectors log data by using GMT timestamps (thetime in Greenwich, not the local time). SAS IT Resource Management can change thesetimestamps to local time by using the GMT deviation. (Note: The only suppliedcollector support that uses the GMT deviation is for SunNet Manager data, and theGeneric Collector Facility does not access the GMT deviation.)
You can display and edit your active PDB’s value for the GMT deviation� by using the %CPPDBOPT macro in batch mode. For more information about the
%CPPDBOPT macro, see the topic %CPPDBOPT in the SAS IT ResourceManagement macro reference documentation.
� by using the SAS IT Resource Management GUI for UNIX and Windows.
Note:
� The default value of the DST definition is inherited from the active site librarywhen the PDB is created.

Administration: Working with Whole PDBs � Viewing/Editing Your Active PDB’s Holiday Shift Code 329
� HP OpenView Performance Agent records data in Greenwich Mean Time. For thisdata, however, SAS IT Resource Management does not use the constant above.Instead, it uses the constant that is provided in the data log (in a header).
� If you decide to edit your active PDB’s properties, you might later want to copy thenew values to your active site library. From there, the values will be copiedautomatically to new PDBs and can be copied to existing PDBs. This takes lesstime than editing the values in each of your PDBs. (For more information aboutcopying the values from the PDB to the site library, see “Copying a PDB’s Optionsto a Site Library” on page 273. For more information about copying of values fromthe site library to new or existing PDBs, see “Copying a Site Library’s Options to aPDB” on page 274.)
�
Viewing/Editing Your Active PDB’s GMT Deviation (UNIX, Windows)In the SAS IT Resource Management GUI for UNIX and Windows, you can display
and/or edit your active PDB’s GMT deviation by following these steps:1 On the main window’s Administration tab, select Manage PDBs. The Manage
PDBs window opens. The PDB that is active is listed at the top of the window.2 Select Properties. The Set Active PDB Options window opens.3 Select the Time Zone tab. One of the fields on the tab displays the GMT deviation.4 To make changes in the GMT deviation, edit the field.5 Select OK to return to the Manage PDBs window.6 Select Close to return to the main window.
Viewing/Editing Your Active PDB’s Holiday Shift CodeThe holiday shift code that your active PDB uses is not in the PDB. It is in the active
site library. You can see and change the shift code that is used for holidays by� changing the holiday shift code in the active site library. For more information
about the holiday shift code, see “Viewing/Editing Your Active Site Library’s ShiftCode for Holidays and Its Description” on page 288.
The holiday shift code description that your active PDB uses is in the PDB.You can display and edit your active PDB’s value for the description of the holiday
shift code� by using the %CPPDBOPT macro in batch mode. For more information about the
%CPPDBOPT macro, see the topic %CPPDBOPT in the SAS IT ResourceManagement macro reference documentation
� by using the SAS IT Resource Management GUI for UNIX and Windows.
Note: If you decide to edit your active PDB’s properties, you might later want tocopy the new values to your active site library. From there, the values will be copiedautomatically to new PDBs and can be copied to existing PDBs. This takes less timethan editing the values in each of your PDBs. (For more information about copying thevalues from the PDB to the site library, see “Copying a PDB’s Options to a Site Library”on page 273. For more information about copying of values from the site library to newor existing PDBs, see “Copying a Site Library’s Options to a PDB” on page 274.) �
Viewing/Editing Your Active PDB’s Holiday Shift Code Description (UNIX,Windows)
In the SAS IT Resource Management GUI for UNIX and Windows, you can displayand/or edit your active PDB’s holiday shift code and description by following these steps:

330 Viewing/Editing Your Active PDB’s MXG Views Property � Chapter 15
1 On the main window’s Administration tab, select Define Work Shifts. TheDefine Work Shifts window opens.
2 At the question Define at which level?, select Site Defaults. (This selectionis not necessary if you want to change the holiday shift code or holiday list.However, this selection is necessary if you want to adjust the holiday shift code’sdescription.)
3 Select Shift Descriptions. The Modify Shift Descriptions window opens.
4 For each shift code there is a description. If you did not change the value of theholiday shift code, then the description next to the value is still current. If you didchange the value of the holiday shift code, make the appropriate adjustments sothat the values of the descriptions are now appropriate. For example, if shift code“4” is for holidays and is not used in the work schedule, you might want to changethe description for the old value to blank and the description for “4” to“HOLIDAYS”. Or if shift code “2” is now for holidays and is also used for weekendsin the work schedule, you might want to change the description for the old valueto blank and the description for “2” to “WEEKENDS AND HOLIDAYS”.
5 To return to the Define Work Shifts window, select OK if you made changes andwant to use them; otherwise, select Cancel.
6 To return to the main window, select OK if you made changes and want to usethem; otherwise, select Cancel.
Viewing/Editing Your Active PDB’s MXG Views PropertyIn SAS IT Resource Management software for z/OS, MXG views of a PDB enable you
to run report programs that are written in SAS that use the MXG names for tables andvariables. This can be useful if you have old MXG report programs that you want torun against one or more SAS IT Resource Management PDBs. Note that the MXGviews are in addition to the SAS IT Resource Management views. If you request noMXG views, you still have the SAS IT Resource Management views for use with theSAS IT Resource Management reporting facilities.
You can display and edit your active PDB’s MXG Views property
� by using the %CPPDBOPT macro in batch mode. For more information about the%CPPDBOPT macro, see the topic %CPPDBOPT in the SAS IT ResourceManagement macro reference documentation.
� by using the SAS IT Resource Management GUI for z/OS.
In addition, you can
� check for the existence, now, of MXG views
� force the existence, now, of MXG views.
Note: The setting of the MXG Views property is inherited from the active sitelibrary when the PDB is created. You can change the setting. �
If you decide to edit your active PDB’s properties, you might later want to copy thenew values to your active site library. From there, the values will be copiedautomatically to new PDBs and can be copied to existing PDBs. This takes less timethan editing the values in each of your PDBs.
For more information about copying the values from the PDB to the site library, see“Copying a PDB’s Options to a Site Library” on page 273. For more information aboutcopying of values from the site library to new or existing PDBs, see “Copying a SiteLibrary’s Options to a PDB” on page 274.

Administration: Working with Whole PDBs � Viewing/Editing Your Active PDB’s MXG Views Property 331
Viewing/Editing Your Active PDB’s MXG Views Property (z/OS)In the SAS IT Resource Management GUI for UNIX and Windows, you can display
and/or edit your active PDB’s MXG Views property by following these steps:1 From the main menu, select PDB Admin. A menu opens. From the menu, select
Set Active PDB Options. The Display/Modify PDB Options window opens.2 The Provide MXG PDB Views field indicates the current setting of the option (Yes
or No).
3 To change the setting, select the other value.4 To return to the main menu, select OK.
The setting takes effect when views are checked. (Views are checked, and rebuilt ifnecessary, by the process step, by the reduce step, and by the %CPDDUTL controlstatement BUILD VIEWS.)
Checking for the Existence of MXG Views (Batch Mode)To find out whether the MXG views are not only requested but also exist now, submit
this SAS program:
LIBNAME PDB LIST ;RUN ;
For more information about submitting a SAS program, see “Using SAS Windows” onpage 24 and “Working with the Interface for Batch Mode” on page 18. If the PDB librefis assigned, then submit this SAS program:
PROC DATASETS DD=PDB ;RUN ;
In the list that this program generates, if you see any views whose names start withthe characters TYPE, then MXG views exist.
Note: You can run the programs in a batch job or submit the programs from theSAS Program Editor window.
� If you run the program in a batch job: in the step’s JCL change the location towhich the ddname PDB points
� from: the MXG PDB� to: the DETAIL library of the appropriate SAS IT Resource Management
PDB.
� If you submit the program from the Program Editor window: first start the SAS ITResource Management GUI for z/OS and activate the appropriate SAS IT ResourceManagement PDB. The activation will point the libref named PDB to the DETAILlibrary of the active PDB. Then submit the program through the SAS ProgramEditor window.
�
Forcing the Existence of MXG Views (Batch Mode)If MXG Views do not exist now and if you want to run old report programs before the
next process or reduce step, you can force the MXG views to be built now by followingthese steps:
1 Start SAS IT Resource Management with the access mode that you want to use forthe PDB. For more information about starting SAS IT Resource Management, see“Starting the z/OS GUI” on page 19.

332 Viewing/Editing Your Active PDB’s Shift Descriptions � Chapter 15
2 To set the value of the global macro variable CPXPDBNM, submit one of thefollowing two SAS programs.
(For more information about submitting a SAS program, see “Using SASWindows” on page 24 and “Working with the Interface for Batch Mode” on page 18.
� To change the status of MXG views to not requested:
%let cpxpdbnm = ;run;
� To change the status of MXG views to requested:
%let cpxpdbnm = PDB ;run;
3 Create a file (of any name). In the file, put this %CPDDUTL control statement:
BUILD VIEWS NAME=_ALL_ ;
4 To apply the control statement to the active PDB, submit this program:
%CPDDUTL(filename=’name-of-the-file-that-you-just-created’);RUN;
For more information about the %CPDDUTL macro, see the topic %CPDDUTLin the SAS IT Resource Management macro reference documentation. For moreinformation about the %CPDDUTL control statement BUILD VIEWS, see thetopic BUILD VIEWS in the SAS IT Resource Management macro referencedocumentation.
Viewing/Editing Your Active PDB’s Shift DescriptionsThe work shift schedule is defined by using work shift codes. (For more information
about the work shift schedule, see “Viewing/Editing Your Active PDB’s Work ShiftSchedule” on page 334.) The descriptions of the codes assign meaning to the codes.
You can display and edit the descriptions of your active PDB’s work shift codes
� by using the %CPPDBOPT macro in batch mode. For more information about the%CPPDBOPT macro, see the topic %CPPDBOPT in the SAS IT ResourceManagement macro reference documentation.
� by using the SAS IT Resource Management GUI for z/OS.
� by using the SAS IT Resource Management GUI for UNIX and Windows.
Note: The descriptions are inherited from the active site library when the PDB iscreated. You can change the descriptions if you prefer others. �
If you decide to edit your active PDB’s properties, you might later want to copy thenew values to your active site library. From there, the values will be copiedautomatically to new PDBs and can be copied to existing PDBs. This takes less timethan editing the values in each of your PDBs.
For more information about copying the values from the PDB to the site library, see“Copying a PDB’s Options to a Site Library” on page 273. For more information aboutcopying of values from the site library to new or existing PDBs, see “Copying a SiteLibrary’s Options to a PDB” on page 274.
Viewing/Editing Your Active PDB’s Shift Descriptions (z/OS)In the SAS IT Resource Management GUI for z/OS, you can display and/or edit your
active PDB’s descriptions of the work shift codes by following these steps:

Administration: Working with Whole PDBs � Viewing/Editing Your Active PDB’s Start of Week 333
1 From the main menu, select PDB Admin. A menu opens. From the menu, selectDefine Work Shifts. The Define Work Shifts window opens.
2 In the Define at Which Level? field, select Active PDB if it is not alreadyselected.
3 The descriptions of the work shift codes display in the frame in the lower-leftcorner of the window.
4 If the codes and descriptions do not provide the distinctions that you want to makeamong shifts, in the Shift Descriptions frame add or remove codes and typeover the existing descriptions with the descriptions that you prefer. The changeswill take effect at the next process step. (The changes affect only incoming data;they do not affect the data that is already in the PDB.)
5 To return to the main menu, select OK.
Viewing/Editing Your Active PDB’s Shift Descriptions (UNIX, Windows)In the SAS IT Resource Management GUI for UNIX and Windows, you can display
and/or edit your active PDB’s descriptions of the work shift codes by following thesesteps:
1 On the main window’s Administration tab, select Define Work Shifts. TheDefine Work Shifts window opens.
2 In the Define at Which Level? field, select Active PDB if it is not alreadyselected.
3 To display and/or edit the descriptions of the work shift codes, select ShiftDescriptions.
4 If the codes and descriptions do not provide the distinctions that you want to makeamong shifts, add or remove codes and type over the existing descriptions with thedescriptions that you prefer, and then select OK. The changes will take effect at thenext process step. (The changes affect only incoming data; they do not affect thedata that is already in the PDB.
5 To return to the main window, select OK. A dialog box opens. Select OK.
Viewing/Editing Your Active PDB’s Start of WeekStart of week defines the beginning of a week for the week level. (Some sites consider
a week to be Sunday through Saturday; other sites consider a week to be Mondaythrough Sunday.) The default start of week is Sunday.
You can display and edit your active PDB’s Start of Week setting� by using the %CPPDBOPT macro in batch mode. For more information about the
%CPPDBOPT macro, see the topic %CPPDBOPT in the SAS IT ResourceManagement macro reference documentation.
� by using the SAS IT Resource Management GUI for UNIX and Windows.
Note: The default value of Start of Week is inherited from the active site librarywhen the PDB is created. �
If you decide to edit your active PDB’s properties, you might later want to copy thenew values to your active site library. From there, the values will be copiedautomatically to new PDBs and can be copied to existing PDBs. This takes less timethan editing the values in each of your PDBs.
For more information about copying the values from the PDB to the site library, see“Copying a PDB’s Options to a Site Library” on page 273. For more information aboutcopying of values from the site library to new or existing PDBs, see “Copying a SiteLibrary’s Options to a PDB” on page 274.

334 Viewing/Editing Your Active PDB’s Work Shift Schedule � Chapter 15
Viewing/Editing Your Active PDB’s Start of Week (z/OS)In the SAS IT Resource Management GUI for z/OS, you can display and/or edit your
active PDB’s Start of Week by following these steps:1 From the main menu, select PDB Admin. A menu opens. From the menu, select
Set Active PDB Options. The Display/Modify PDB Options window opens. Thecurrent setting of Start of Week is displayed at the center of the window. (A valueof blank is interpreted as Sunday.)
2 To use a different day, select Change-Start-of-Week. A menu opens. Select theday that you want to use.
3 To return to the main menu, select OK.
Viewing/Editing Your Active PDB’s Start of Week (UNIX, Windows)In the SAS IT Resource Management GUI for UNIX and Windows, you can display
and/or edit your active PDB’s Start of Week by following these steps:1 On the main window’s Administration tab, select Site Options. The Set
Site-wide Options window opens.2 Select the Start-of-Week tab. The current setting of Start of Week is displayed
on that tab.3 To change the setting, select the down arrow to the right of the Start of Week
field. A menu opens. From the menu, select the day that you want to use.4 Select OK to return to the main window.
Viewing/Editing Your Active PDB’s Work Shift ScheduleThe work shift schedule is a matrix of 24 hours by 7 days. Unless a non-blank value
for the shift code is already included in the data that is processed into the PDB, theshift code is set in the data to the appropriate value from the work shift schedule, basedon the datetime stamp of the data. (For data that is logged on active holidays, the workshift schedule is not used; instead the shift code for holidays is assigned. For moreinformation about the shift code for holidays, see “Viewing/Editing Your Active SiteLibrary’s Shift Code for Holidays and Its Description” on page 288.) Work shiftschedule is composed of seven site options (the schedule for Sunday, the schedule forMonday, ..., and the schedule for Saturday).
You can display and edit your active PDB’s work shift schedule� by using the %CPPDBOPT macro in batch mode. For more information about the
%CPPDBOPT macro, see the topic %CPPDBOPT in the SAS IT ResourceManagement macro reference documentation.
� by using the SAS IT Resource Management GUI for z/OS.� by using the SAS IT Resource Management GUI for UNIX and Windows.
Note: The work shift schedule in the PDB is inherited from the active site librarywhen the PDB is created. You can change the PDB’s schedule if you prefer another. �
If you decide to edit your active PDB’s properties, you might later want to copy thenew values to your active site library. From there, the values will be copiedautomatically to new PDBs and can be copied to existing PDBs. This takes less timethan editing the values in each of your PDBs.
(For more information about copying the values from the PDB to the site library, see“Copying a PDB’s Options to a Site Library” on page 273. For more information aboutcopying of values from the site library to new or existing PDBs, see “Copying a SiteLibrary’s Options to a PDB” on page 274.)
Administration: Working with Whole PDBs � Viewing/Editing Your Active PDB’s Holiday List 335
Viewing/Editing Your Active PDB’s Work Shift Schedule (z/OS)In the SAS IT Resource Management GUI for z/OS, you can display and/or edit your
active PDB’s work shift schedule by following these steps:
1 From the main menu, select PDB Admin. A menu opens. From the menu, selectDefine Work Shifts. The Define Work Shifts window opens.
2 In the Define at Which Level? field, select Active PDB if it is not alreadyselected.
3 The work shift schedule displays in the frame in the upper-left corner of thewindow. To see other hours, use the scroll bar that is on the right of the frame. Tosee other days, select an arrow at the bottom of the frame.
Note that the hours are displayed in terms of the 24-hour clock (0:00 to 23:00).Each hour, n:00, represents the range n:00:00 to n:59:59. For example, 08:00represents 08:00:00 to 08:59:59.
Remember to check (and change if necessary) the shift codes for every day of theweek.
4 You can type over the current shift code(s) with the shift code(s) that you want touse.
5 To return to the main menu, select OK. The changes will take effect at the nextprocess step. (The changes affect only incoming data; they do not affect theexisting data in the PDB.)
Viewing/Editing Your Active PDB’s Work Shift Schedule (UNIX, Windows)In the SAS IT Resource Management GUI for UNIX and Windows, you can display
and/or edit your active PDB’s work shift schedule by following these steps:
1 On the main window’s Administration tab, select Define Work Shifts. TheDefine Work Shifts window opens.
2 In the Define at Which Level? field, select Active PDB.
3 The work shift schedule displays in the frame on the left side of the window. Tosee other hours, use the scroll bar on the right of the frame. To see other days,select an arrow at the bottom of the frame.
Note that the hours are displayed in terms of the 24-hour clock (0:00 to 23:00).Each hour, n:00, represents the range n:00:00 to n59:59. For example, 08:00represents 08:00:00 to 08:59:59.
Remember to check (and change if necessary) the shift codes for every day of theweek.
4 To edit the work shift schedule, you can type over the schedule with the value(s)that you want to use.
5 To return to the main window, select OK. A dialog box opens. Select OK. Thechanges will take effect at the next process step. (The changes affect onlyincoming data; they do not affect the existing data in the PDB.)
Viewing/Editing Your Active PDB’s Holiday ListThe list of holidays that your active PDB uses is not in the PDB. It is in the active
site library. You can see and change the holiday list by
� changing the holiday list in the active site library. For more information about theholiday list, see “Viewing/Editing Your Active Site Library’s List of Holidays” onpage 286.

336

337
C H A P T E R
16Administration: Working withLevels
Working with Levels: Main Topics 337Overview of Levels 337
Specifying a Variable’s Presence at a Level in a Table 338
Specifying BY or CLASS Variables for a Level in a Table 339
Specifying BY or CLASS Variables for a Level in a Table (z/OS) 340
Specifying BY or CLASS Variables for a Level in a Table (UNIX, Windows) 341Specifying ID Variables for a Level in a Table 342
Specifying ID Variables for a Level in a Table (z/OS) 342
Specifying ID Variables for a Level in a Table (UNIX, Windows) 343
Specifying Index Variables for a Level in a Table 344
Specifying Index Variables for a Level in a Table (z/OS) 344
Specifying Index Variables for a Level in a Table (UNIX, Windows) 345Specifying Statistics at a Level in a Table 346
Specifying the Age Limit for a Level in a Table 346
Specifying the Age Limit for a Level in a Table (z/OS) 347
Specifying the Age Limit for a Level in a Table (UNIX, Windows) 348
Working with Levels: Related Topics 348The _LEVEL_ Variable 348
Restrictions on Modifications of BY Variables Lists 348
Space Usage at a Level in a Table 349
Variable Indicating Datetime, Day, Week, Month, Year 350
Time Range in a Level of a Table 351
Working with Levels: Main Topics
Overview of LevelsEach table in a PDB has data in one or more levels. Each level corresponds to the
extent of summarization of the data. Typically,� in the detail level, observations are not summarized� in the day level, observations have summary statistics at least by day� in the week level, observations have summary statistics at least by week� in the month level, observations have summary statistics at least by month� in the year level, observations have summary statistics at least by year.
For example, suppose the detail level of a table contains observations about a certaintype of hardware and the observations are logged at 10-minute intervals. And supposethat the week level of a table contains observations that are grouped by machine, week,and hour.
338 Specifying a Variable’s Presence at a Level in a Table � Chapter 16
� At detail level, a day is represented by 144 observations (6 per hour multiplied by24 hours) for each piece of hardware for which data is collected. On eachobservation are the measurements collected over 10 minutes about that piece ofhardware.
� At week level, a week is represented by 24 observations (1 per hour) for each pieceof hardware for which data is collected. On each observation are statistics (forexample, count, sum, maximum, minimum, etc.) that are based on the 42detail-level observations (6 per hour multiplied by 7 days) for that machine andhour during the week.
The detail-level observations on which the week-level observations are basedmight or might not be in the detail level. (They might have aged out of the detaillevel.)
The following topics about levels are listed in alphabetical order:
� “Specifying a Variable’s Presence at a Level in a Table” on page 338� “Specifying BY or CLASS Variables for a Level in a Table” on page 339
� “Specifying ID Variables for a Level in a Table” on page 342� “Specifying Index Variables for a Level in a Table” on page 344
� “Specifying Statistics at a Level in a Table” on page 346
� “Specifying the Age Limit for a Level in a Table” on page 346.
Specifying a Variable’s Presence at a Level in a TableVariable properties control the values of regular variables, derived variables, and
formula variables at each level.
� Regular variables are variables whose detail-level values are in the logged data.For more information about how to specify a regular variable at detail level (and,at day, week, month, or year level, how to specify which statistics, if any, are to becalculated for the variable), see “Creating/Editing/Viewing a Regular Variable” onpage 394.
The values of regular variables (and their statistics) can be kept in the PDB.� Derived variables are variables whose detail-level values are built from the values
of regular variables, other derived variables, and/or constants. For moreinformation about how to specify a derived variable at detail level (and, at day,week, month, or year level, how to specify which statistics, if any, are to becalculated for the variable), see “Creating/Editing/Viewing a Derived Variable” onpage 381.
The values of derived variables (and their statistics) can be kept in the PDB.
� Formula variables are variables whose detail-, day-, week-, month-, and year-levelvalues are built from the values of regular variables, derived variables, otherformula variables, constants, and/or the _LEVEL_ variable. For more informationabout how to specify a formula variable at detail, day, week, month, or year level,see “Creating/Editing/Viewing a Formula Variable” on page 388.
The values of formula variables are calculated when requested, and are not keptin the PDB.
Table properties control which regular or derived variables are used as BY or CLASSvariables, ID variables, or INDEX variables at each level. (Formula variables are notavailable for these purposes.)
� The BY and CLASS variables provide information about how to group the data inthe tables. For more information about how to specify one or more variables as BY

Administration: Working with Levels � Specifying BY or CLASS Variables for a Level in a Table 339
variables at the detail level or CLASS variables at the day, week, month, or yearlevels, see “Specifying BY or CLASS Variables for a Level in a Table” on page 339.
� The ID variables provide alternate ways of identifying the data in the CLASSvariables. For more information about how to specify one or more variables as IDvariables at the day, week, month, or year level, see “Specifying ID Variables for aLevel in a Table” on page 342.
� The INDEX variables often provide faster access to data during reporting. Formore information about how to specify one or more variables as INDEX variablesat the detail, day, week, month, or year levels, see “Specifying Index Variables fora Level in a Table” on page 344.
Table properties also control whether and how long the variable’s data stays in eachlevel of the PDB.
� The table’s Kept status controls whether the table is to be used or ignored. Formore information about how to specify the table’s Kept status, see “Viewing/Editing a Table” on page 364.
� The age limits at detail, day, week, month, and year provide information abouthow long the data for that table’s variables is in the PDB (if the Kept status isYes). For more information about how to specify the age limits, see “Specifying theAge Limit for a Level in a Table” on page 346.
Specifying BY or CLASS Variables for a Level in a TableA table has BY and CLASS variables that are used to group observations within each
level.The BY variables list groups observations for the detail level of the table. The kept
status of the variables in the BY variables list must be Yes, and the DATETIMEvariable must be on the BY variables list. To the right of DATETIME on the list, useonly HOUR and/or SHIFT. To the left of DATETIME on the list, you can use anyvariables as long as they are of type Character, are not formula variables, and satisfythe restrictions in “Restrictions on Modifications of BY Variables Lists” on page 348.The purpose of the BY variables list is to sort the observations in the detail level tomatch the sort order of the observations that are incoming during the processing stepand to detect observations that have duplicate values in the BY variables. Undernormal circumstances, you do not need to modify the BY variables list, but you canmodify the BY variables list if you need to. For example, if you add a variable in aprocess exit, you can add that variable to the BY variables list.
For some data sources, there are restrictions on the variables and the order of thevariables in BY variables lists. For more information about the restrictions, see“Restrictions on Modifications of BY Variables Lists” on page 348.
The CLASS variables lists group observations for the summary levels of the table sothat the same values of all CLASS variables are together for the summary step. Foreach of the summary levels of a table (i.e., day, week, month, and year), there is a list ofCLASS variables that groups observations for that level. The lists also ensure that datais in the proper sort order for reporting on the summary levels. By default, the CLASSvariable lists contain the same variables in the same order as the BY variables list.However, the CLASS variables list for a summary level can be different from the BYvariables list and can be different from all other CLASS variables lists. Like the BYvariables list, the CLASS variables list must contain the DATETIME variable.
If you want character string metrics like MACHINE and JOB to be carried intosummary levels for reporting, add them to the CLASS variables lists immediately to theleft of the DATETIME variable (or add them to the ID variables lists if equivalentvariables are already in the CLASS variables list). Use of a string variable as a CLASSor ID variable requires that the Kept status of the string variable be Yes. A string

340 Specifying BY or CLASS Variables for a Level in a Table � Chapter 16
variable that is not on a level’s CLASS variables list or ID variables list is dropped fromthe summary level, regardless of its Kept status.
Note: These lists apply to table definitions and are used to process and summarizedata. This BY variables list is independent of the BY variables that you can select for areport definition. �
You can specify one or more grouping variables that are to be used for theobservations in a particular level of a table
� by using the %CPSTART macro and the %CPDDUTL macro (with the SET TABLEcontrol statement and the UPDATE TABLE control statement) in batch mode.
For more information about the %CPSTART macro, see the topic %CPSTART inthe SAS IT Resource Management macro reference documentation. For moreinformation about the %CPDDUTL macro, see “Chapter 4: Data Dictionary Macroand Control Statements” in the SAS IT Resource Management macro referencedocumentation. For more information about the %CPDDUTL SET TABLE controlstatement, see the topic “SET TABLE” in the SAS IT Resource Management macroreference documentation. For more information about the %CPDDUTL “UPDATETABLE” statement, see the topic “UPDATE TABLE” in the SAS IT ResourceManagement macro reference documentation.
� by using the SAS IT Resource Management GUI for z/OS.� by using the SAS IT Resource Management GUI for UNIX and Windows.
Specifying BY or CLASS Variables for a Level in a Table (z/OS)In the SAS IT Resource Management GUI for z/OS, you can specify the BY or CLASS
variables list for a particular level of a table by following these steps:
1 From the main menu, select PDB Admin. A menu opens. From the menu, selectSet Active PDB Options. The Display/Modify PDB Options window opens.
2 In the PDB Access Mode field, select Write if it is not already selected.3 Select OK to return to the main menu.
4 From the main menu, select PDB Admin. A menu opens. From the menu, selectConfig Active PDB Dictionary. The Dictionary Tables window opens. Thewindow displays a list of the tables in the active PDB.
5 Select the name of the table for which you want to change a level’s BY or CLASSvariables list.
6 Select ItemActions. A menu opens. From the menu, select Edit Definition.The Edit Table window opens.
7 In the Constructional Variables to Display field, select By/class if it is notalready selected.
8 In the Level column, select the button with the name of the level that you want tochange. If you select Detail, the Edit By Variable Order window opens. If youselect the Day, Week, Month, or Year button, the Edit Class Variable Order windowopens.
Both windows have the same format. In the upper part of the window is anordered list of the active variables on the table’s BY or CLASS variables list forthe level. In the lower part of the window is a list of the table’s other variablesthat are eligible to be on the list of BY or CLASS variables for the level.
9 To move a variable from the upper list to the lower list, select the variable. Tomove a variable from the lower list to the upper list, select the variable.
Note: You can undo all the moves by selecting Cancel. �

Administration: Working with Levels � Specifying BY or CLASS Variables for a Level in a Table 341
10 When you have modified the upper list so that it has the variables that you wantin the order that you want, select OK. SAS IT Resource Management returns youto the Edit Table window.
11 Select OK. SAS IT Resource Management returns you to the Dictionary Tableswindow.
12 Select File. A menu opens. Select End. The Confirm Table View Rebuild windowopens.
13 Select OK. SAS IT Resource Management returns you to the main menu.
Note: The above steps update a BY or CLASS variables list in the table definition.If you want additional information about the table definition, see “Overview of Tables”on page 353. �
Specifying BY or CLASS Variables for a Level in a Table (UNIX, Windows)In the SAS IT Resource Management GUI for UNIX and Windows, you can specify
the BY or CLASS variables list for a particular level of a table by following these steps:
1 From the main window’s Administration tab, select Manage PDBs. The ManagePDBs window opens.
2 Select Properties. The Set Active PDB Options window opens.
3 From the Access tab, select Write if it is not already selected.
4 Select OK. SAS IT Resource Management returns you to the Manage PDBs window.
5 Select Close. SAS IT Resource Management returns you to the main window.
6 From the main window’s Administration tab, select Manage Tables. TheManage Tables window opens. The window displays a list of the tables in theactive PDB.
7 Select the name of the table for which you want to change a level’s BY or CLASSvariables list.
8 Select File. A menu opens. From the menu, select Properties. The TableProperties window opens.
9 Select the Structure Variables tab.
10 Select the By/Class option if it is not already selected.
11 Select the button with the name of the level that you want to change.
If you select Detail, the Edit BY Variable Order window opens. If you select theDay, Week, Month, or Year button, the Edit CLASS Variable Order window opens.
Both windows have the same format. In the upper part of the window is anordered list of the active variables on the table’s BY or CLASS variables list forthe level. In the lower part of the window is a list of the table’s other variablesthat are eligible to be on the list of BY or CLASS variables for the level.
12 To move a variable from the upper list to the lower list, select the variable andthen select the down arrow. To move a variable from the lower list to the upperlist, select the variable and then select the up arrow.
Note: You can undo all the moves by selecting Cancel. �
13 When you have modified the upper list so that it has the variables that you wantin the order that you want, select OK to return to the Table Properties window.
14 Select OK to return to the Manage Tables window.
15 Select Close. A confirmation dialog box opens.
16 Select OK to return to the main window.

342 Specifying ID Variables for a Level in a Table � Chapter 16
Note: The preceding steps update a BY and CLASS variables list in the tabledefinition. If you want additional information about the table definition, see “Overviewof Tables” on page 353. �
Note: For additional information about frequently used variables, from theAdministration tab of the SAS IT Resource Management GUI for UNIX and Windows,select OnlineHelp � Other ITRM Documentation � Server Setup Guide
Click on Section 2, Task 2: Customize and Verify Your Test PDB. Thenscroll down to item 2 of the Prerequisites topic and click Supplied. On the next page,click on UNIX or Windows. The next page contains a topic entitled “More aboutfrequently used variables.” �
Specifying ID Variables for a Level in a TableID variables provide alternate ways of identifying the data in the CLASS variables.
ID variables are non-changing or slowly changing variables whose values you want tohave available for reporting at one or more summary levels.
You can specify one or more ID variables that are to be used for the observations in aparticular level of a table
� by using the %CPSTART macro and the %CPDDUTL macro (with the SET TABLEcontrol statement and the UPDATE TABLE control statement) in batch mode.
For more information about the %CPSTART macro, see the topic %CPSTART inthe SAS IT Resource Management macro reference documentation . For moreinformation about the %CPDDUTL macro, see “Chapter 4: Data Dictionary Macroand Control Statements” in the SAS IT Resource Management macro referencedocumentation. For more information about the %CPDDUTL SET TABLE controlstatement, see the topic “SET TABLE” in the SAS IT Resource Management macroreference documentation. For more information about the %CPDDUTL UPDATETABLE statement, see the topic “UPDATE TABLE” in the SAS IT ResourceManagement macro reference documentation.
� by using the SAS IT Resource Management GUI for z/OS.
� by using the SAS IT Resource Management GUI for UNIX and Windows.
Specifying ID Variables for a Level in a Table (z/OS)In the SAS IT Resource Management GUI for z/OS, you can specify the ID variables
list for a particular level of a table by following these steps:
1 From the main menu, select PDB Admin. A menu opens. From the menu, selectSet Active PDB Options. The Display/Modify PDB Options window opens.
2 In the PDB Access Mode field, select Write if it is not already selected.
3 Select OK to return to the main menu.
4 From the main menu, select PDB Admin. A menu opens. From the menu, selectConfig Active PDB Dictionary. The Dictionary Tables window opens. Thewindow displays a list of the tables in the active PDB.
5 Select the name of the table for which you want to change a level’s ID variables list.
6 Select ItemActions. A menu opens. From the menu, select Edit Definition.The Edit Table window opens.
7 In the Constructional Variables to Display field, select ID.
8 In the Level column, select the button with the name of the level that you want tochange. The Edit ID Variable List window opens.
Administration: Working with Levels � Specifying ID Variables for a Level in a Table 343
In the upper part of the window is a list of the active variables on the table’s IDvariables list for the level. In the lower part of the window is a list of the table’sother variables that are eligible to be on the list of ID variables for the level.
9 To move a variable from the upper list to the lower list, select the variable. Tomove a variable from the lower list to the upper list, select the variable.
Note: You can undo all the moves by selecting Cancel. �
10 When you have modified the upper list so that it has the variables that you want,select OK to return to the Edit Table window.
11 Select OK to return to the Dictionary Tables window.12 Select File. A menu opens. Select End. The Confirm Table View Rebuild window
opens.13 Select OK to return to the main menu.
Note: The preceding steps update an ID variables list in the table definition. If youwant additional information about the table definition, see “Overview of Tables” on page353. �
Specifying ID Variables for a Level in a Table (UNIX, Windows)In the SAS IT Resource Management GUI for UNIX and Windows, you can specify
the ID variables list for a particular level of a table by following these steps:1 From the main window’s Administration tab, select Manage PDBs. The Manage
PDBs window opens.2 Select Properties. The Set Active PDB Options window opens.3 From the Access tab, select Write if it is not already selected.4 Select OK to return to the Manage PDBs window.5 Select Close to return to the main window.6 From the main window’s Administration tab, select Manage Tables. The
Manage Tables window opens. The window displays a list of the tables in theactive PDB.
7 Select the name of the table for which you want to change a level’s ID variables list.8 Select File. A menu opens. From the menu, select Properties. The Table
Properties window opens.9 Select the Structure Variables tab.10 Select the ID option.11 Select the button with the name of the level that you want to change. The Edit ID
Variable window opens.In the upper part of the window is a list of the active variables, if any, on the
table’s ID variables list for the level. In the lower part of the window is a list ofthe table’s other variables, if any, that are eligible to be on the list of ID variablesfor the level.
12 To move a variable from the upper list to the lower list, select the variable andthen select the down arrow. To move a variable from the lower list to the upperlist, select the variable and then select the up arrow.
Note: You can undo all the moves by selecting Cancel. �
13 When you have modified the upper list so that it has the variables that you wantin the order that you want, select OK to return to the Table Properties window.
14 Select OK. SAS IT Resource Management returns you to the Manage Tableswindow.

344 Specifying Index Variables for a Level in a Table � Chapter 16
15 Select Close. A confirmation dialog box opens.16 Select OK to return to the main window.
Note: The preceding steps update an ID variables list in the table definition. If youwant additional information about the table definition, see “Overview of Tables” on page353. �
Specifying Index Variables for a Level in a TableIndex variables are variables whose values you want to index at one or more levels.
The Index variables provide faster access to data during reporting. Each index variablecauses a simple index (single variable index) to be created.
You can specify one or more index variables that are to be used for the observationsin a particular level of a table
� by using the %CPSTART macro and the %CPDDUTL macro (with the SET TABLEcontrol statement and the UPDATE TABLE control statement) in batch mode.
For more information about the %CPSTART macro, see the topic %CPSTART inthe SAS IT Resource Management macro reference documentation . For moreinformation about the %CPDDUTL macro, see “Chapter 4: Data Dictionary Macroand Control Statements” in the SAS IT Resource Management macro referencedocumentation. For more information about the %CPDDUTL SET TABLE controlstatement, see the topic “SET TABLE” in the SAS IT Resource Management macroreference documentation. For more information about the %CPDDUTL UPDATETABLE statement, see the topic “UPDATE TABLE” in the SAS IT ResourceManagement macro reference documentation.
� by using the SAS IT Resource Management GUI for z/OS.
� by using the SAS IT Resource Management GUI for UNIX and Windows.
Specifying Index Variables for a Level in a Table (z/OS)In the SAS IT Resource Management GUI for z/OS, you can specify the index
variables list for a particular level of a table by following these steps:
1 From the main menu, select PDB Admin. A menu opens. From the menu, selectSet Active PDB Options. The Display/Modify PDB Options window opens.
2 In the PDB Access Mode field, select Write if it is not already selected.
3 Select OK to return to the main menu.4 From the main menu, select PDB Admin. A menu opens. From the menu, select
Config Active PDB Dictionary. The Dictionary Tables window opens. Thewindow displays a list of the tables in the active PDB.
5 Select the name of the table for which you want to change a level’s Index variableslist.
6 Select ItemActions. A menu opens. From the menu, select Edit Definition.The Edit Table window opens.
7 In the Constructional Variables to Display field, select Index.
8 In the Level column, select the level that you want to change. The Edit IndexVariable List window opens.
In the upper part of the window is a list of the active variables on the table’sIndex variables list for the level. In the lower part of the window is a list of thetable’s other variables that are eligible to be on the list of Index variables for thelevel.
Administration: Working with Levels � Specifying Index Variables for a Level in a Table 345
9 To move a variable from the upper list to the lower list, select the variable. Tomove a variable from the lower list to the upper list, select the variable.
Note: You can undo all the moves by selecting Cancel. �
10 When you have modified the upper list so that it has the variables that you want,select OK to return to the Edit Table window.
11 Select OK to return to the Dictionary Tables window.
12 Select File. A menu opens. Select End. The Confirm Table View Rebuild windowopens.
13 Select OK to return to the main menu.
Note: The preceding steps update an index variables list in the table definition. Ifyou want additional information about the table definition, see“Overview of Tables” onpage 353. �
Specifying Index Variables for a Level in a Table (UNIX, Windows)In the SAS IT Resource Management GUI for UNIX and Windows, you can specify
the index variables list for a particular level of a table by following these steps:
1 On the main window’s Administration tab, select Manage PDBs. The ManagePDBs window opens.
2 Select Properties. The Set Active PDB Options window opens.
3 On the Accesss tab, select WRITE if it is not already selected.
4 Select OK to return to the Manage PDBs window.
5 Select Close to return to the main window.
6 On the main window’s Administration tab, select Manage Tables. The ManageTables window opens. The window displays a list of the tables in the active PDB.
7 Select the name of the table for which you want to change a level’s Index variableslist.
8 Select File. A menu opens. From the menu, select Properties. The TableProperties window opens.
9 Select the Structure Variables tab.
10 Select the Index option.
11 Select the button with the name of the level that you want to change. The EditIndex Variable window opens.
In the upper part of the window is a list of the active variables, if any, on thetable’s Index variables list for the level. In the lower part of the window is a list ofthe table’s other variables, if any, that are eligible to be on the list of Indexvariables for the level.
12 To move a variable from the upper list to the lower list, select the variable andthen select the down arrow. To move a variable from the lower list to the upperlist, select the variable and then select the up arrow.
Note: You can undo all the moves by selecting Cancel. �
13 When you have modified the upper list so that it has the variables that you wantin the order that you want, select OK to return to the Table Properties window.
14 Select OK to return to the Manage Tables window.
15 Select Close. A confirmation dialog box opens.
16 Select OK to return to the main window.
346 Specifying Statistics at a Level in a Table � Chapter 16
Note: The preceding steps update an index variables list in the table definition. Ifyou want additional information about the table definition, see“Overview of Tables” onpage 353. �
Specifying Statistics at a Level in a TableStatistics are properties of a variable. See “Specifying a Variable’s Presence at a
Level in a Table” on page 338.
Specifying the Age Limit for a Level in a TableBy default, SAS IT Resource Management keeps 10 days of data at the detail level,
but the age limit in your tables can be different. If you want your reports on the detaillevel to be able to cover a different number of days (for example, 14 days), overwrite thecurrent value with the new value (in this case, 14).
Note: If you do not want to generate reports on detail-level data in this table, butyou do want to generate reports on other levels, you can set the age limit for detail level0. �
The process step deletes existing data in the detail level that is beyond the age limitfor the detail level, but the process step keeps incoming data (and adds it to existingdata in the detail level) regardless of the dates in the incoming data. When the age limitat the detail level is 0, the process step behaves just as it always does: it deletes existingdetail-level data whose age is greater than the age limit (thus, in this case, it deletes allof the existing detail-level data), and it keeps the incoming data in the detail level.
The reduce step ages out data in summary levels that are beyond the age limits forthose levels and uses the existing data in the detail level to update the summary levels.If the age limit at the detail level is 0, the reduce step also deletes the existing data inthe detail level. If the age limit is 0, the existing data in the detail level would becleared anyway (at the time of the next processing step) because the data by now isexisting data and exceeds the age limit for the detail level. The purpose of thisexception (the reduce step touching the detail level) is to remove the existing data inthe detail level many hours sooner. This is useful when there is a tremendous volumeof detail-level data, and the data can be safely discarded after the day, week, month,and year levels have been updated. The discard frees extra disk space betweenproduction jobs when the data will not be used again.
There is one caution: if you have a failure (for instance, a power outage) during thereduce step, and any age limits at detail level are zero, and any age limits at non-detaillevels are nonzero, make sure that you resubmit the reduce step before you proceed;otherwise, the next day’s production job will remove the detail data before it can besummarized in the other levels.
By default, the PDB keeps summary-level data as follows:
� Day: 45 days
� Week: 15 weeks
� Month: 18 months
� Year: 5 years.
If you want your reports on these levels to be able to cover a different number ofdays, weeks, months, or years, or if you want to keep less data in order to save diskspace and shorten processing time, then overwrite the current value with a new value.
You can specify the age limit that is to be used for the observations in a particularlevel of a table in the active PDB
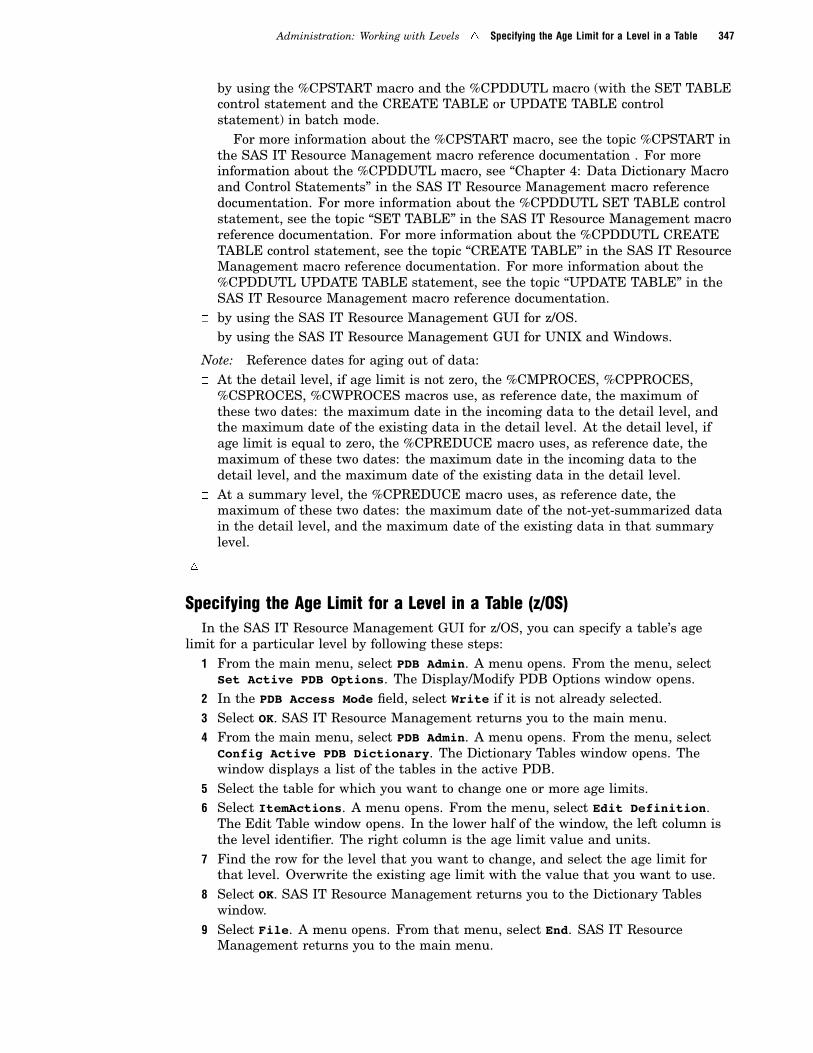
Administration: Working with Levels � Specifying the Age Limit for a Level in a Table 347
� by using the %CPSTART macro and the %CPDDUTL macro (with the SET TABLEcontrol statement and the CREATE TABLE or UPDATE TABLE controlstatement) in batch mode.
For more information about the %CPSTART macro, see the topic %CPSTART inthe SAS IT Resource Management macro reference documentation . For moreinformation about the %CPDDUTL macro, see “Chapter 4: Data Dictionary Macroand Control Statements” in the SAS IT Resource Management macro referencedocumentation. For more information about the %CPDDUTL SET TABLE controlstatement, see the topic “SET TABLE” in the SAS IT Resource Management macroreference documentation. For more information about the %CPDDUTL CREATETABLE control statement, see the topic “CREATE TABLE” in the SAS IT ResourceManagement macro reference documentation. For more information about the%CPDDUTL UPDATE TABLE statement, see the topic “UPDATE TABLE” in theSAS IT Resource Management macro reference documentation.
� by using the SAS IT Resource Management GUI for z/OS.� by using the SAS IT Resource Management GUI for UNIX and Windows.
Note: Reference dates for aging out of data:� At the detail level, if age limit is not zero, the %CMPROCES, %CPPROCES,
%CSPROCES, %CWPROCES macros use, as reference date, the maximum ofthese two dates: the maximum date in the incoming data to the detail level, andthe maximum date of the existing data in the detail level. At the detail level, ifage limit is equal to zero, the %CPREDUCE macro uses, as reference date, themaximum of these two dates: the maximum date in the incoming data to thedetail level, and the maximum date of the existing data in the detail level.
� At a summary level, the %CPREDUCE macro uses, as reference date, themaximum of these two dates: the maximum date of the not-yet-summarized datain the detail level, and the maximum date of the existing data in that summarylevel.
�
Specifying the Age Limit for a Level in a Table (z/OS)In the SAS IT Resource Management GUI for z/OS, you can specify a table’s age
limit for a particular level by following these steps:1 From the main menu, select PDB Admin. A menu opens. From the menu, select
Set Active PDB Options. The Display/Modify PDB Options window opens.2 In the PDB Access Mode field, select Write if it is not already selected.3 Select OK. SAS IT Resource Management returns you to the main menu.4 From the main menu, select PDB Admin. A menu opens. From the menu, select
Config Active PDB Dictionary. The Dictionary Tables window opens. Thewindow displays a list of the tables in the active PDB.
5 Select the table for which you want to change one or more age limits.6 Select ItemActions. A menu opens. From the menu, select Edit Definition.
The Edit Table window opens. In the lower half of the window, the left column isthe level identifier. The right column is the age limit value and units.
7 Find the row for the level that you want to change, and select the age limit forthat level. Overwrite the existing age limit with the value that you want to use.
8 Select OK. SAS IT Resource Management returns you to the Dictionary Tableswindow.
9 Select File. A menu opens. From that menu, select End. SAS IT ResourceManagement returns you to the main menu.
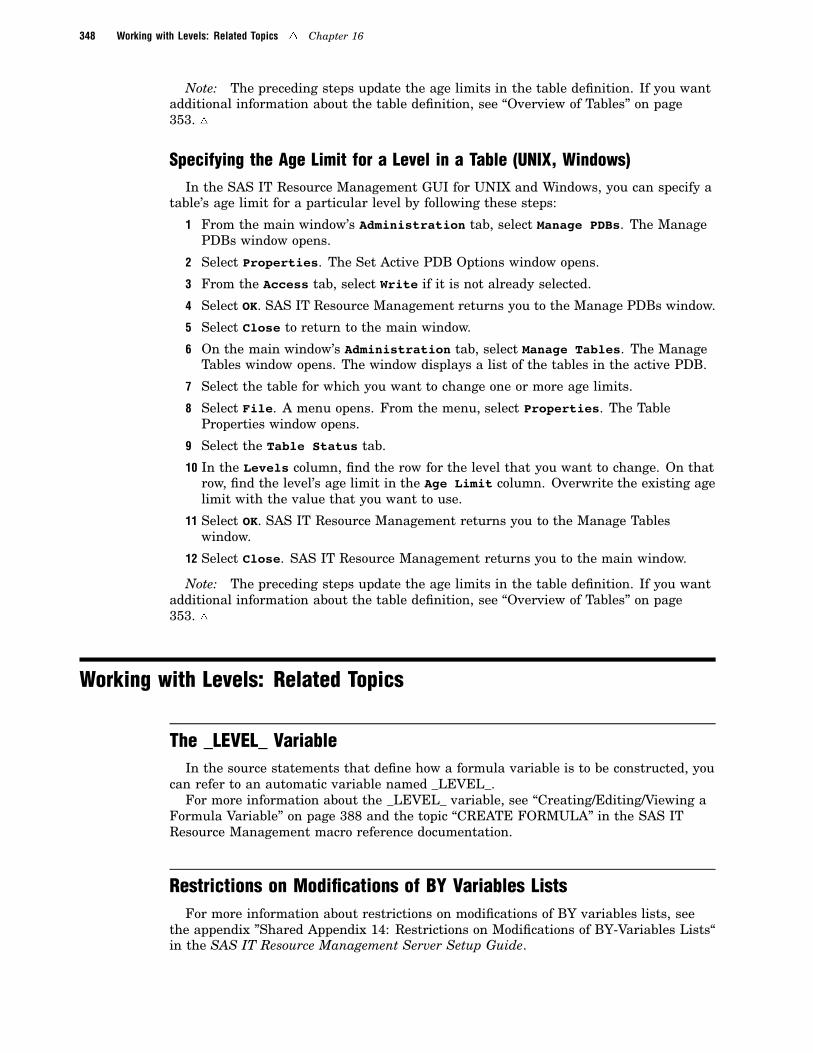
348 Working with Levels: Related Topics � Chapter 16
Note: The preceding steps update the age limits in the table definition. If you wantadditional information about the table definition, see “Overview of Tables” on page353. �
Specifying the Age Limit for a Level in a Table (UNIX, Windows)In the SAS IT Resource Management GUI for UNIX and Windows, you can specify a
table’s age limit for a particular level by following these steps:
1 From the main window’s Administration tab, select Manage PDBs. The ManagePDBs window opens.
2 Select Properties. The Set Active PDB Options window opens.
3 From the Access tab, select Write if it is not already selected.
4 Select OK. SAS IT Resource Management returns you to the Manage PDBs window.
5 Select Close to return to the main window.
6 On the main window’s Administration tab, select Manage Tables. The ManageTables window opens. The window displays a list of the tables in the active PDB.
7 Select the table for which you want to change one or more age limits.
8 Select File. A menu opens. From the menu, select Properties. The TableProperties window opens.
9 Select the Table Status tab.
10 In the Levels column, find the row for the level that you want to change. On thatrow, find the level’s age limit in the Age Limit column. Overwrite the existing agelimit with the value that you want to use.
11 Select OK. SAS IT Resource Management returns you to the Manage Tableswindow.
12 Select Close. SAS IT Resource Management returns you to the main window.
Note: The preceding steps update the age limits in the table definition. If you wantadditional information about the table definition, see “Overview of Tables” on page353. �
Working with Levels: Related Topics
The _LEVEL_ VariableIn the source statements that define how a formula variable is to be constructed, you
can refer to an automatic variable named _LEVEL_.For more information about the _LEVEL_ variable, see “Creating/Editing/Viewing a
Formula Variable” on page 388 and the topic “CREATE FORMULA” in the SAS ITResource Management macro reference documentation.
Restrictions on Modifications of BY Variables ListsFor more information about restrictions on modifications of BY variables lists, see
the appendix ”Shared Appendix 14: Restrictions on Modifications of BY-Variables Lists“in the SAS IT Resource Management Server Setup Guide.

Administration: Working with Levels � Space Usage at a Level in a Table 349
Space Usage at a Level in a TableIf a table is “fully populated” (that is, every level is as full as its age limit allows),
then the amount of data (in the data set, not the view) in a given level of the table iscontrolled by the length of the observations at that level of the table and by the numberof observations at that level of the table. (Also, if any variables are indexed at a givenlevel, the index for that level consumes some space.)
The length of observations at each level depends on the variables and their lengthsat each level.
� At detail level, the observations have a DATETIME variable, have a DURATIONvariable if the table is of type Interval, have one variable for each BY variable thatwas specified for the table, and have one variable for each regular and derivedvariable that has a Kept status of Yes.
� At day level, the observations have a DATETIME variable, have a DURATIONvariable if the table is if type Interval, have one variable for each CLASS variablethat was specified at the day level for the table, have one variable for each IDvariable that was specified at the day level for the table, have one variable foreach statistic that was requested on a regular or derived variable (that has a Keptstatus of Yes) for the day level of this table, and have any variables (not alreadypresent) that underlie formula variables that are requested for the day level ofthis table.
� At week level, the observations have a DATETIME variable, have a DURATIONvariable if the table is of type Interval, have one variable for each CLASS variablethat was specified at the week level for the table, have one variable for each IDvariable that was specified at the week level for this table, have one variable foreach statistic that was requested on a regular or derived variable (that has a Keptstatus of Yes) for the week level of this table, and have any variables (not alreadypresent) that underlie formula variables that are requested for the week level ofthis table.
� At month level, the observations have a DATETIME variable, have a DURATIONvariable if the table is of type Interval, have one variable for each CLASS variablethat was specified at the month level for the table, have one variable for each IDvariable that was specified at the month level for this table, have one variable foreach statistic that was requested on a regular or derived variable (that has a Keptstatus of Yes) for the month level of this table, and have any variables (not alreadypresent) that underlie formula variables that are requested for the month level ofthis table.
� At year level, the observations have a DATETIME variable, have a DURATIONvariable if the table is of type Interval, have one variable for each CLASS variablethat was specified at the year level for the table, have one variable for each IDvariable that was specified at the year level for this table, have one variable foreach statistic that was requested on a regular or derived variable (that has a Keptstatus of Yes) for the year level of this table, and have any variables (not alreadypresent) that underlie formula variables that are requested for the year level ofthis table.
The number of observations at a given level of the table depends on the level.� At detail level, typically the number of observations matches the number of records
that were logged during the days specified by the table’s age limit for detail level.However, if the data source generates a huge volume of data, the data can be
pre-summarized. If the data is pre-summarized, it can be merged into the detaillevel. In that case, typically there is one observation for each unique combinationof values of the table’s detail-level BY variables. For example, if the BY variables

350 Variable Indicating Datetime, Day, Week, Month, Year � Chapter 16
are DATETIME, HOUR, and SHIFT, and there is one value of shift for each hour(the shift value might differ from hour to hour) and 24 values of hour, there are 24observations (24 hours multiplied by 1 shift) per day. The number of days iscontrolled by the table’s age limit for detail level.
� At day level, there is one observation for each unique combination of values of theday-level CLASS variables for that table. For example, if the table’s day-levelCLASS variables are DATETIME, HOUR, and SHIFT, and there is one value ofshift for each hour (the shift value might differ from hour to hour) and 24 values ofhour, there are 24 observations (24 hours multiplied by 1 shift) per day. Thenumber of days is controlled by the table’s age limit for day level.
� At week level, there is one observation for each unique combination of values ofthe week-level CLASS variables for that table. For example, if the table’sweek-level CLASS variables are DATETIME, HOUR, and SHIFT, and there is onevalue of shift for each hour (the shift value might differ from hour to hour) and 24values of hour, there are 24 observations (24 hours multiplied by 1 shift) per week.The number of weeks is controlled by the table’s age limit for week level.
� At month level, there is one observation for each unique combination of values ofthe month-level CLASS variables for that table. For example, if the table’smonth-level CLASS variables are DATETIME, HOUR, and SHIFT, and there isone value of shift for each hour (the shift value might differ from hour to hour) and24 values of hour, there are 24 observations (24 hours multiplied by 1 shift) permonth. The number of months is controlled by the table’s age limit for month level.
� At year level, there is one observation for each unique combination of values of theyear-level CLASS variables for that table. For example, if the table’s year-levelCLASS variables are DATETIME, HOUR, and SHIFT, and there is one value ofshift for each hour (the shift value might differ from hour to hour) and 24 values ofhour, there are 24 observations (24 hours multiplied by 1 shift) per year. Thenumber of years is controlled by the table’s age limit for year level.
For additional information about space usage, see “Guidelines for Allocating Space inthe PDB,” “Guidelines for Revising Space Allocation in the PDB,” “Guidelines forAllocating Space in the Archive,” and “Guidelines for Revising Space Allocation in theArchive” in “Appendix 1: Recovery Procedures” in the SAS IT Resource Managementmacro reference documentation.
Variable Indicating Datetime, Day, Week, Month, YearThe same variable (DATETIME) is used on the observations at each level, but the
contents of the variable are different at each level.The date in DATETIME operates as follows:
� In the detail level: For event data, the date in the DATETIME variable representsthe date of the event. For interval data, the date in the DATETIME variabletypically represents the date of the beginning of the interval.
If the data source generates large numbers of observations about transactions,the data can be pre-summarized. If the data is pre-summarized, it might or mightnot be merged into the detail level. For more information about the form of thepre-summarized data if it is merged into the detail level, see “Overview of Data”on page 409.
� In the day level: The date in the DATETIME variable is the date of the day that isrepresented by the summary statistics on the observation.
� In the week level: The date in the DATETIME variable is the date of the first dayof the week that is represented by the summary statistics on the observation. (For

Administration: Working with Levels � Time Range in a Level of a Table 351
more information about Start of Week, see “Viewing/Editing Your Active PDB’sStart of Week” on page 333.)
� In the month level: The date in the DATETIME variable is the date of the firstday of the month that is represented by the summary statistics on the observation.
� In the year level: The date in the DATETIME variable is the date of the first dayof the year that is represented by the summary statistics on the observation.
The time in DATETIME is as follows:� In the detail level: The time in the variable DATETIME is the time at which the
data was logged. (And the value in the variable HOUR is the same as the hourpart of DATETIME. For example, if the time in DATETIME is 17:35:15, thenHOUR has the value 17.)
If the data source generates large numbers of observations about transactions,the data can be pre-summarized. If the data is pre-summarized, it might or mightnot be merged into the detail level. For more information about the form of thepre-summarized data if it is merged into the detail level, see “Overview of Data”on page 409.
� In the day, week, month, and year levels: The time in the variable DATETIME isequivalent to the time in the variable HOUR. For example, if HOUR has the value17, then the time in DATETIME has the value 17:00:00. (The “official” value ofhour is the one in HOUR, but when the observations need to be sorted by DATEand HOUR, then the sort is faster if there is a “copy” of the HOUR value next tothe DATE value.)
Time Range in a Level of a TableIf a table is “fully populated” (that is, every level is as full as its age limit allows),
then the time range of the data in each level of the table is controlled by the age limit ofeach level in the table. For example, if the table’s age limits are the ones that areprovided by default, then the time range of the data in each level is
� 10 days at detail level (default age limit at detail level is 10 days)� 45 days at day level (default age limit at day level is 45 days)� 15 weeks at week level (default age limit at week level is 15 weeks)� 18 months at month level (default age limit at month level is 18 months)� 5 years at year level (default age limit at year level is 5 years).
For more exact information about the effect of the age limits, see “Specifying the AgeLimit for a Level in a Table” on page 346.
For more information about viewing the time range of the data in a table, whether ornot the table is “fully populated”, see “Viewing Amount of and Datetime Range of Data”on page 419

352

353
C H A P T E R
17Administration: Working withTables
Working with Tables: Main Topics 353Overview of Tables 353
Adding a Table 355
Adding a Table (z/OS) 355
Adding a Table (UNIX, Windows) 356
Creating a Table 357Creating a Table (z/OS) 357
Creating a Table (UNIX, Windows) 359
Deleting a Table 361
Deleting a Table (z/OS) 361
Deleting a Table (UNIX, Windows) 361
Exploring Supplied Table Definitions 362Exploring Supplied Table Definitions (z/OS) 362
Exploring Supplied Table Definitions (UNIX and Windows) 362
Viewing a Table’s Status Information 363
Viewing a Table’s Status Information (z/OS) 363
Viewing a Table’s Status Information (UNIX, Windows) 364Viewing/Editing a Table 364
Viewing/Editing a Table (z/OS) 364
Viewing/Updating a Table (UNIX, Windows) 367
Viewing/Editing Defaults for Table Definitions 371
Working with Tables: Related Topics 371Naming Conventions for z/OS Tables and Variables 371
Naming Conventions for Supplied Tables and Variables 371
Naming Conventions for User-Defined Tables and Variables 373
Naming Conventions for UNIX and Windows Tables and Variables 374
Naming Conventions for Supplied Tables 374
Naming Conventions for User-Defined Tables and Variables 375
Working with Tables: Main Topics
Overview of TablesWithin a PDB, performance data is grouped into one or more tables.
� Logically, a table is a grouping of data about a particular topic. For example, aPDB with phone data could have one table for console data, one table for voicemail data, one table for trunk group data, and so on.
A table has data at one or more levels:
354 Overview of Tables � Chapter 17
� detail level� day level� week level� month level� year level.
You access the data in each level by using the name of the corresponding view:level_name.table-name. For example, if a PDB with phone data has the consoleinformation in a table named CONSOLE, then you would specifyDETAIL.CONSOLE to access the detail-level data in that table.
A table has metadata in the PDB’s data dictionary.� One part of the metadata consists of the table’s definition (also known as the
table’s properties) and the definitions/properties of its variables.For example, the settings of the flag that indicate whether the table is
to be used, the type of observations that are to be in the table, the age limitsthat are to be applied to the data at each level, and so on, are tableproperties. The settings of the flag that indicate whether the variable is to beused, the data type, the display format, and so on, are variable properties.
� The other part of the metadata consists of the status information about thetable’s data.
For example, the current number of observations at each level, thecurrent oldest observation date at each level, and the current newestobservation date at each level are status information.
� Physically, a table is a set of data sets that have data about a particular topic.A table has data sets in one or more libraries:� detail-level data is in the DETAIL library (except for availability tables; for
more about availability tables, see the topic %CPAVAIL in the SAS ITResource Management macro reference documentation).
� day-level data is in the DAY library� week-level data is in the WEEK library� month-level data is in the MONTH library� year-level data is in the YEAR library.
Also, while data is being staged, processed, and reduced, it might temporarilybe located in other PDB libraries such as COLLECT and PDBWORK.
Within the WEEK, MONTH, and YEAR libraries, the data is split data intomultiple data sets. The split is for a performance reason: to decrease the size ofthe data set that is most likely to be active. The data set whose name ends with aP (which stands for partial) contains the data from the current week, month, oryear. The data set whose name ends with a D contains the data from the previousweeks, months, or years. The split in no way affects the logical functioning of thetable. Use the view to ensure that you have access to all of the data. Do not accessthe data sets directly.
A table has metadata in the PDB’s DICTLIB library. Access the metadata onlythrough a SAS IT Resource Management GUI or through the SAS IT ResourceManagement macros, such as the %CPDDUTL macro. Do not access the DICTLIBlibrary directly.
For the more popular data sources, table definitions (including the definitions of thevariables in these tables) are supplied with SAS IT Resource Management. If you wantto use one of these table definitions, you can add it to your active PDB’s data dictionaryfrom the master data dictionary. For more details, see the topic “Adding a Table” below.

Administration: Working with Tables � Adding a Table 355
For the other data sources, you can create table definitions (and the definitions of thevariables in those tables) in your active PDB’s data dictionary. For more informationabout creating table and variable definitions “from scratch,” see the “Creating a Table”topic below. For more information about creating table and variable definitions bytaking advantage of programs, control statements, and so on that shorten the task, seeSetup Case 3, Setup Case 4, and Setup Case 5 in the “Setup the Server” topic in the“Administration: Setup” section of this user’s guide.
For additional information about tables, see the following list of topics, which is inalphabetical order.
Note: If you are working with tables that are related to MXG, also see “UsingMXG-Based Tables (CMAPP2): Introduction” on page 133 �
� “Adding a Table” on page 355� “Creating a Table” on page 357� “Deleting a Table” on page 361� “Exploring Supplied Table Definitions” on page 362� “Viewing a Table’s Status Information” on page 363� “Viewing/Editing a Table” on page 364� “Viewing/Editing Defaults for Table Definitions” on page 371.
Adding a TableWhen you add a table to the active PDB, the table definition is “copied” from the
master data dictionary to the PDB’s data dictionary, and then the data sets that thetable consists of are created in the PDB. Until data is processed into the PDB and/orreduced in the PDB, the data sets have no data.
You can add a table� by using the %CPSTART macro and the %CPDDUTL macro (with the ADD
TABLE control statement) in batch mode.For more information about the %CPSTART macro, see the topic %CPSTART in
the SAS IT Resource Management macro reference documentation . For moreinformation about the %CPDDUTL macro, see “Chapter 4: Data Dictionary Macroand Control Statements” in the SAS IT Resource Management macro referencedocumentation. For more information about the %CPDDUTL ADD TABLE controlstatement, see the topic ADD TABLE in the SAS IT Resource Management macroreference documentation.
� by using the SAS IT Resource Management GUI for z/OS.� by using the SAS IT Resource Management GUI for UNIX and Windows.
Adding a Table (z/OS)In the SAS IT Resource Management GUI for z/OS, you can add a table to the active
PDB by following these steps:1 From the main menu, select PDB Admin. A menu opens. From the menu, select
Set Active PDB Options. The Display/Modify PDB Options window opens.2 In the PDB Access Mode field, select Write if it is not already selected.3 Select OK. SAS IT Resource Management returns you to the main menu.4 From the main menu, select PDB Admin. A menu opens. From the menu, select
Config Active PDB Dictionary. The Dictionary Tables window opens.5 Select Actions. A menu opens. From the menu, select Add Table. The Collector
List window opens.
356 Adding a Table � Chapter 17
6 Page down to the description that represents your data. If that line is not alreadyselected (marked with an asterisk), select the line.
7 Select OK. The Select Tables window opens.
8 Page down to the description that represents the table that you want to add.Select the line.
9 Select OK. SAS IT Resource Management adds the table and returns you to theDictionary Tables window. The table that you added is now in the list of tables inthe active PDB.
10 Select File � End � OK
11 You might want to edit the table definition. For example, you might want tooverride the default value of the Archive field or to override the default age limitat one or more levels.
For information about editing the table definition, see “Viewing/Editing a Table”on page 364.
Adding a Table (UNIX, Windows)In the SAS IT Resource Management GUI for UNIX and Windows, you can add a
table to the active PDB by following these steps:
1 On the main window’s Administration tab, select Manage PDBs. The ManagePDBs window opens.
2 Select Properties. The Set Active PDB Options window opens.
3 On the Access tab, select WRITE if it is not already selected.
4 Select OK. SAS IT Resource Management returns you to the Manage PDBs window.
5 Select Close. SAS IT Resource Management returns you to the main window.
6 On the main window’s Administration tab, select Manage Tables. The ManageTables window opens. The window lists the tables in the active PDB.
7 Select File. A menu opens. From the menu, select Add Table Definition. TheSelect Tables window opens.
8 In the Collector field, select Selected. The Select Collector window opens.
9 Select the line with the description of the data collector or data source for whichyou want to add the table. Select OK.
10 In the Scope field, select All Supplied if it is not already selected.
11 Select OK. The Explore Tables/Variables window opens. The window lists all of thetable definitions for the data collector or data source that are in the master datadictionary.
12 Scroll to the definition that you want to add and select it.
13 Select Add. The Dictionary Utility in Progress window opens and SAS IT ResourceManagement adds the table definition to the active PDB.
14 To close the Dictionary Utility in Progress window, select Close. SAS IT ResourceManagement returns you to the Manage Tables window. The table that you addedis now on the list of tables in the active PDB.
15 Select Close. SAS IT Resource Management returns you to the main window.
16 You might want to edit the table definition. For example, you might want tooverride the default value of the Archive field or to override the default age limitat one or more levels.
For information about editing the table definition, see “Viewing/Editing a Table”on page 364.
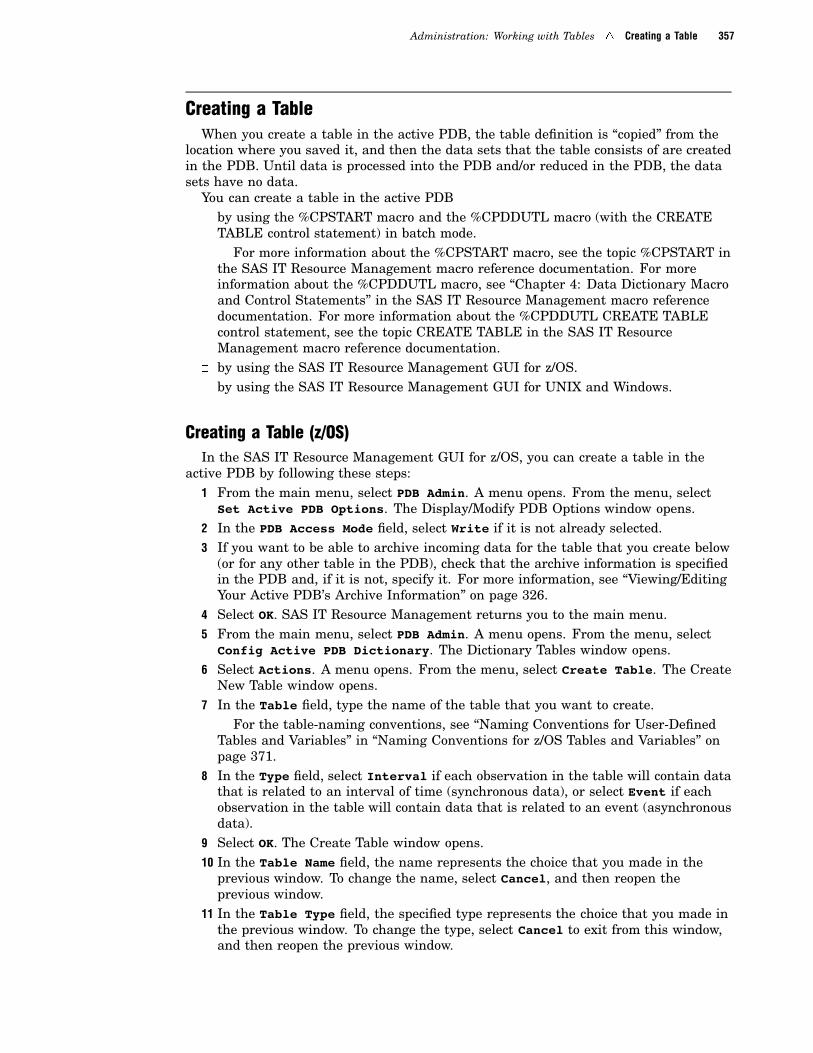
Administration: Working with Tables � Creating a Table 357
Creating a TableWhen you create a table in the active PDB, the table definition is “copied” from the
location where you saved it, and then the data sets that the table consists of are createdin the PDB. Until data is processed into the PDB and/or reduced in the PDB, the datasets have no data.
You can create a table in the active PDB� by using the %CPSTART macro and the %CPDDUTL macro (with the CREATE
TABLE control statement) in batch mode.For more information about the %CPSTART macro, see the topic %CPSTART in
the SAS IT Resource Management macro reference documentation. For moreinformation about the %CPDDUTL macro, see “Chapter 4: Data Dictionary Macroand Control Statements” in the SAS IT Resource Management macro referencedocumentation. For more information about the %CPDDUTL CREATE TABLEcontrol statement, see the topic CREATE TABLE in the SAS IT ResourceManagement macro reference documentation.
� by using the SAS IT Resource Management GUI for z/OS.� by using the SAS IT Resource Management GUI for UNIX and Windows.
Creating a Table (z/OS)In the SAS IT Resource Management GUI for z/OS, you can create a table in the
active PDB by following these steps:1 From the main menu, select PDB Admin. A menu opens. From the menu, select
Set Active PDB Options. The Display/Modify PDB Options window opens.2 In the PDB Access Mode field, select Write if it is not already selected.3 If you want to be able to archive incoming data for the table that you create below
(or for any other table in the PDB), check that the archive information is specifiedin the PDB and, if it is not, specify it. For more information, see “Viewing/EditingYour Active PDB’s Archive Information” on page 326.
4 Select OK. SAS IT Resource Management returns you to the main menu.5 From the main menu, select PDB Admin. A menu opens. From the menu, select
Config Active PDB Dictionary. The Dictionary Tables window opens.6 Select Actions. A menu opens. From the menu, select Create Table. The Create
New Table window opens.7 In the Table field, type the name of the table that you want to create.
For the table-naming conventions, see “Naming Conventions for User-DefinedTables and Variables” in “Naming Conventions for z/OS Tables and Variables” onpage 371.
8 In the Type field, select Interval if each observation in the table will contain datathat is related to an interval of time (synchronous data), or select Event if eachobservation in the table will contain data that is related to an event (asynchronousdata).
9 Select OK. The Create Table window opens.10 In the Table Name field, the name represents the choice that you made in the
previous window. To change the name, select Cancel, and then reopen theprevious window.
11 In the Table Type field, the specified type represents the choice that you made inthe previous window. To change the type, select Cancel to exit from this window,and then reopen the previous window.

358 Creating a Table � Chapter 17
12 The Table Kept field specifies whether the table’s definition is to be used orignored by SAS IT Resource Management.
If the value is Yes, the table’s definition will be saved (when you select OK) andused. If the value is No, the table’s definition will be saved (when you select OK)and ignored (except for being available for viewing and, optionally, for using later).
Note: If you are already processing data for one or more other tables, youmight want to specify No for Table Kept when you are first working on this tabledefinition. That way, if you are interrupted before you finish the table definitionand its variable’s definitions, you can save the definition(s) and SAS IT ResourceManagement will not attempt to use the table and its variables for processing.
Later, you can edit the definition(s) to continue working on them.When the table definition and its variable’s definitions are finished, you can
specify Yes for Table Kept, and save the definition. Then, SAS IT ResourceManagement will use the definitions for processing. �
To specify the other value, select its radio button.13 The Collector field has a default value of GENERIC.
For now, leave the value set to GENERIC.
14 The Process Tool field has a default value of SASDS.For now, leave the value set to SASDS.
15 The External Name field has a default value of the table name.
For now, leave the value set to the table name.16 In the Archive field, if you want incoming data to the table to be archived, select
On if it is not already selected; otherwise, select Off. (For more information aboutarchiving, see “Archiving Incoming Data” on page 411.)
17 Select Description. The Edit Description window opens.
a The default label is the table name. In the Label field, type a briefdescription of the data that is to be in the table. The label is used by the GUIand data dictionary to provide a short description of the table.
b The default description is the table name. In the Description field, type along description of the data that is to be in the table. The description is usedby the GUI and data dictionary to provide a long description of the table.
c Select OK. SAS IT Resource Management returns you to the Dictionary Tableswindow.
18 The age limit that is to be used for each level is specified under the Durationheader. The values that you see are the default values. If you do not want to usethe default values, change them by overwriting them with the values that youprefer.
19 Select OK. SAS IT Resource Management saves the table definition and returnsyou to the Dictionary Tables window.
The new table is on the list of tables in the active PDB.20 Select File � End � OK
SAS IT Resource Management builds views based on the table definitions andthe variable definitions for DATETIME, LSTPDATE (and, for tables of typeInterval, DURATION), and returns you to the main menu.
21 Create variable definitions for any regular, derived, and formula variables that youwant in the table.
For information about creating variables, see “Overview of Variables” on page378.
22 Edit the table definition. Make at least these changes:

Administration: Working with Tables � Creating a Table 359
� Specify the BY, CLASS, ID, and/or INDEX variables for the table.� If your data is character-delimited, specify a tool name of CHARDELIM for
the table.Make a corresponding change to the table’s external name, if necessary.
� If you intend to package the collector-support entities for installation later,� change the value of the Collector field from GENERIC to the collector
name that you intend to use when you package and install thecollector-support entities
� change the value of the Process Tool field, if necessary, to the toolname that you intend to use when you package and install thecollector-support entities. Make a corresponding change to the table’sexternal name, if necessary.
For more information about editing a table definition, see “Viewing/Editing aTable” on page 364.
Creating a Table (UNIX, Windows)In the SAS IT Resource Management GUI for UNIX and Windows, you can create a
table in the active PDB by following these steps:1 On the main window’s Administration tab, select Manage PDBs. The Manage
PDBs window opens.2 Select Properties. The Set Active PDB Options window opens.3 On the Access tab, select WRITE if it is not already selected.4 If you want to be able to archive incoming data for the table that you create below
(or for any other table in the PDB), check that the archive information is specifiedin the PDB and, if it is not, specify it. For more information, see “Viewing/EditingYour Active PDB’s Archive Information” on page 326.
5 Select OK. SAS IT Resource Management returns you to the Manage PDBs window.6 Select Close. SAS IT Resource Management returns you to the main window.7 From the main window, select Manage Tables. The Manage Tables window opens.8 Select File. A menu opens. From the menu, select New Table Definition . The
Create New Table window opens.9 In the Enter New Table Name field, type the name of the table that you want to
create.For the table-naming conventions, see “Naming Conventions for User-Defined
Tables and Variables” in “Naming Conventions for UNIX and Windows Tables andVariables” on page 374.
10 Select OK. The Create Table Properties window opens.11 In the Table Name field, the name represents the choice that you made in the
previous window. If you want to change the name, select Cancel to exit from thiswindow, and then reopen the previous window.
12 In the Table Type field, select Interval if each observation contains data that isrelated to an interval of time, or select Event if each observation contains datathat is related to an event.
13 The Table Kept field specifies whether the table’s definition is to be used orignored by SAS IT Resource Management.
If the value is Yes, the table’s definition will be saved (when you select OK) andused. If the value is No, the table’s definition will be saved (when you select OK)and ignored (except for being available for viewing and, optionally, for using later).

360 Creating a Table � Chapter 17
Note: If you are already processing data for one or more other tables, youmight want to specify No for Table Kept when you are first working on this tabledefinition. That way, if you are interrupted before you finish the table definitionand its variable’s definitions, you can save the definition(s) and SAS IT ResourceManagement will not attempt to use the table and its variables for processing.
Later, you can edit the definition(s) to continue working on them.When the table definition and its variable’s definitions are finished, you can
specify Yes for Table Kept, and save the definition. Then, SAS IT ResourceManagement will use the definitions for processing. �
To specify the other value, select its radio button.14 The Collector field has a default value of GENERIC.
For now, leave the value set to GENERIC.15 The Process Tool field has a default value of SASDS.
For now, leave the value set to SASDS.16 The External Name field has a default value of the table name.
For now, leave the value set to the table name.17 Select the Advanced tab. In the Archive field, if you want incoming data to the
table to be archived, select Yes if it is not already selected; otherwise, select No.(For more information about archiving, see “Archiving Incoming Data” on page411.)
18 Select the General tab. In the Description field, type a more completedescription of the data that is to be in the table
19 Select the Table Status tab. The age limit that is to be used for each level isspecified under the Age Limit header. The values that you see are the defaultvalues. If you do not want to use the default values, change them by overwritingthem with the values that you prefer.
20 Select OK � OK SAS IT Resource Management saves your changes to the tabledefinition and returns you to the Manage Tables window.
21 Select Close � OK SAS IT Resource Management builds views based on the tabledefinitions and on the variable definitions for DATETIME, LSTPDATE (and, fortables of type Interval, DURATION), and returns you to the main menu.
22 Create variable definitions for any regular, derived, and formula variables that youwant in the table.
For information about creating variables, see “Overview of Variables” on page378.
23 Edit the table definition. Make at least these changes:� Specify the BY, CLASS, ID, and/or INDEX variables for the table.� If your data is character-delimited, specify a tool name of CHARDELIM for
the table.Make a corresponding change to the table’s external name, if necessary.
� If you intend to package the collector-support entities for installation later,� change the value of the Collector field from GENERIC to the collector
name that you intend to use when you package and install thecollector-support entities
� change the value of the Process Tool field, if necessary, to the toolname that you intend to use when you package and install thecollector-support entities. Make a corresponding change to the table’sexternal name, if necessary.
For information about editing a table definition, see “Viewing/Editing a Table”on page 364.

Administration: Working with Tables � Deleting a Table 361
Deleting a TableWhen you delete a table, the table’s data, data sets, definition, and other metadata
are deleted.You can delete a table from your active PDB� by using the %CPSTART macro and the %CPDDUTL macro (with the DELETE
TABLE control statement) in batch mode.For more information about the %CPSTART macro, see the topic %CPSTART in
the SAS IT Resource Management macro reference documentation . For moreinformation about the %CPDDUTL macro, see “Chapter 4: Data Dictionary Macroand Control Statements” in the SAS IT Resource Management macro referencedocumentation. For more information about the %CPDDUTL DELETE TABLEcontrol statement, see the topic DELETE TABLE in the SAS IT ResourceManagement macro reference documentation.
� by using the SAS IT Resource Management GUI for z/OS.� by using the SAS IT Resource Management GUI for UNIX and Windows.
To delete the data in the table without deleting the table definition, see “PurgingData” on page 415.
Deleting a Table (z/OS)In the SAS IT Resource Management GUI for z/OS, you can delete a table from the
active PDB by following these steps:1 From the main menu, select PDB Admin. A menu opens. From the menu, select
Set Active PDB Options. The Display/Modify PDB Options window opens.2 In the PDB Access Mode field, select Write if it is not already selected.3 Select OK. SAS IT Resource Management returns you to the main menu.4 From the main menu, select PDB Admin. A menu opens. From the menu, select
Config Active PDB Dictionary. The Dictionary Tables window opens.5 Select the table that you want to delete.6 Select ItemActions. A menu opens. From the menu, select Delete Table. The
Delete Table window opens.7 Select Delete Table: Delete data and dictionary entries.
Note: For information about the other choice, see “Purging Data” on page415. �
8 Select OK. The table definition (and the table’s other metadata, data, and datasets) are deleted from the active PDB. SAS IT Resource Management returns youto the Dictionary Tables window. The table that you deleted is no longer in the listof tables in the active PDB.
9 Select File � End
Deleting a Table (UNIX, Windows)1 On the main window’s Administration tab, select Manage PDBs. The Manage
PDBs window opens.2 Select Properties. The Set Active PDB Options window opens.3 On the Access tab, select WRITE if it is not already selected.4 Select OK. SAS IT Resource Management returns you to the Manage PDBs window.5 Select Close. SAS IT Resource Management returns you to the main window.

362 Exploring Supplied Table Definitions � Chapter 17
6 On the main window’s Administration tab, select Manage Tables. The ManageTables window opens. The window lists the tables in the active PDB.
7 Select the table whose definition you want to delete.8 Select File. A menu opens. From the menu, select Delete Table Definition.
The Delete Table window opens.9 Select Delete all data + definition.
Note: For information about the other choice, see “Purging Data” on page415. �
10 Select OK. SAS IT Resource Management deletes the table definition (and thetable’s other metadata, data, and data sets) and displays a “task done” window.
11 Select OK. SAS IT Resource Management returns you to the Manage Tableswindow. The table that you deleted is no longer in the list of tables in the activePDB.
12 Select Close. SAS IT Resource Management returns you to the main window.
Exploring Supplied Table Definitions
You can explore supplied table definitions in the active PDB� by using the SAS IT Resource Management GUI for z/OS� by using the SAS IT Resource Management GUI for UNIX and Windows.
Write access or update access to the PDB is not required for you to view or search thelist of supplied table definitions.
For more information about table definitions, see “Overview of Tables” on page 353.
Exploring Supplied Table Definitions (z/OS)In the SAS IT Resource Management GUI for z/OS, you can explore supplied table
definitions in the active PDB by following these steps:1 Select Explore from the SAS IT Resource Management main menu. A menu
opens.2 Select All Supplied Tables. The Supplied Tables window opens and displays a
list of the supplied tables.3 Select Edit � Find
Next, in the Search field type the name of the table definition that you want toexplore, and select the other search characteristics. Then, select OK.
SAS IT Resource Management searches the table description fields, highlightsthe table or tables whose descriptions contain the string that you entered in theSearch field, and scrolls to the first highlighted table. (If there is more than onetable, you might need to scroll to find the others.)
4 Select the table that you want to know more about, and then select ItemActions� Browse Definition or ItemActions � List Variables
Exploring Supplied Table Definitions (UNIX and Windows)In the SAS IT Resource Management GUI for UNIX and Windows, you can explore
supplied table definitions in the active PDB by following these steps:1 On the main window’s Administration tab, select Explore Tables/Variables.
The Select Tables and Variables window opens.
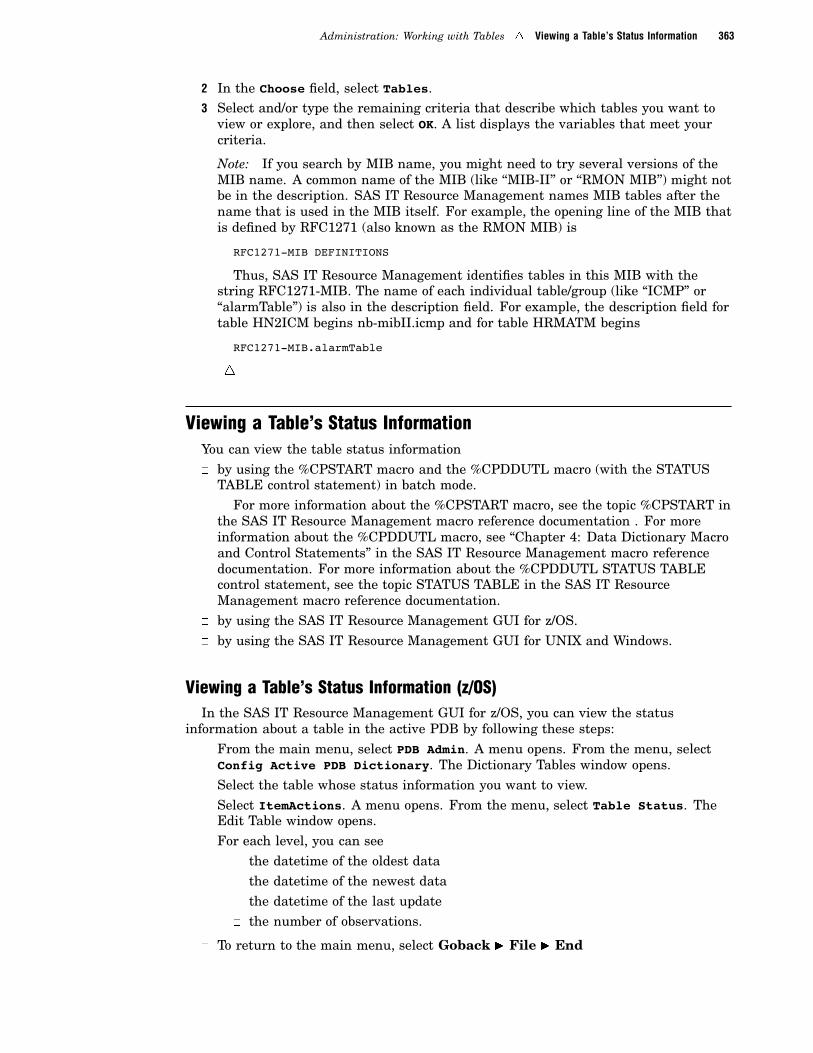
Administration: Working with Tables � Viewing a Table’s Status Information 363
2 In the Choose field, select Tables.3 Select and/or type the remaining criteria that describe which tables you want to
view or explore, and then select OK. A list displays the variables that meet yourcriteria.
Note: If you search by MIB name, you might need to try several versions of theMIB name. A common name of the MIB (like ‘‘MIB-II’’ or ‘‘RMON MIB’’) might notbe in the description. SAS IT Resource Management names MIB tables after thename that is used in the MIB itself. For example, the opening line of the MIB thatis defined by RFC1271 (also known as the RMON MIB) is
RFC1271-MIB DEFINITIONS
Thus, SAS IT Resource Management identifies tables in this MIB with thestring RFC1271-MIB. The name of each individual table/group (like “ICMP” or“alarmTable”) is also in the description field. For example, the description field fortable HN2ICM begins nb-mibII.icmp and for table HRMATM begins
RFC1271-MIB.alarmTable
�
Viewing a Table’s Status InformationYou can view the table status information� by using the %CPSTART macro and the %CPDDUTL macro (with the STATUS
TABLE control statement) in batch mode.For more information about the %CPSTART macro, see the topic %CPSTART in
the SAS IT Resource Management macro reference documentation . For moreinformation about the %CPDDUTL macro, see “Chapter 4: Data Dictionary Macroand Control Statements” in the SAS IT Resource Management macro referencedocumentation. For more information about the %CPDDUTL STATUS TABLEcontrol statement, see the topic STATUS TABLE in the SAS IT ResourceManagement macro reference documentation.
� by using the SAS IT Resource Management GUI for z/OS.� by using the SAS IT Resource Management GUI for UNIX and Windows.
Viewing a Table’s Status Information (z/OS)In the SAS IT Resource Management GUI for z/OS, you can view the status
information about a table in the active PDB by following these steps:� From the main menu, select PDB Admin. A menu opens. From the menu, select
Config Active PDB Dictionary. The Dictionary Tables window opens.� Select the table whose status information you want to view.� Select ItemActions. A menu opens. From the menu, select Table Status. The
Edit Table window opens.� For each level, you can see
� the datetime of the oldest data� the datetime of the newest data� the datetime of the last update� the number of observations.
� To return to the main menu, select Goback � File � End
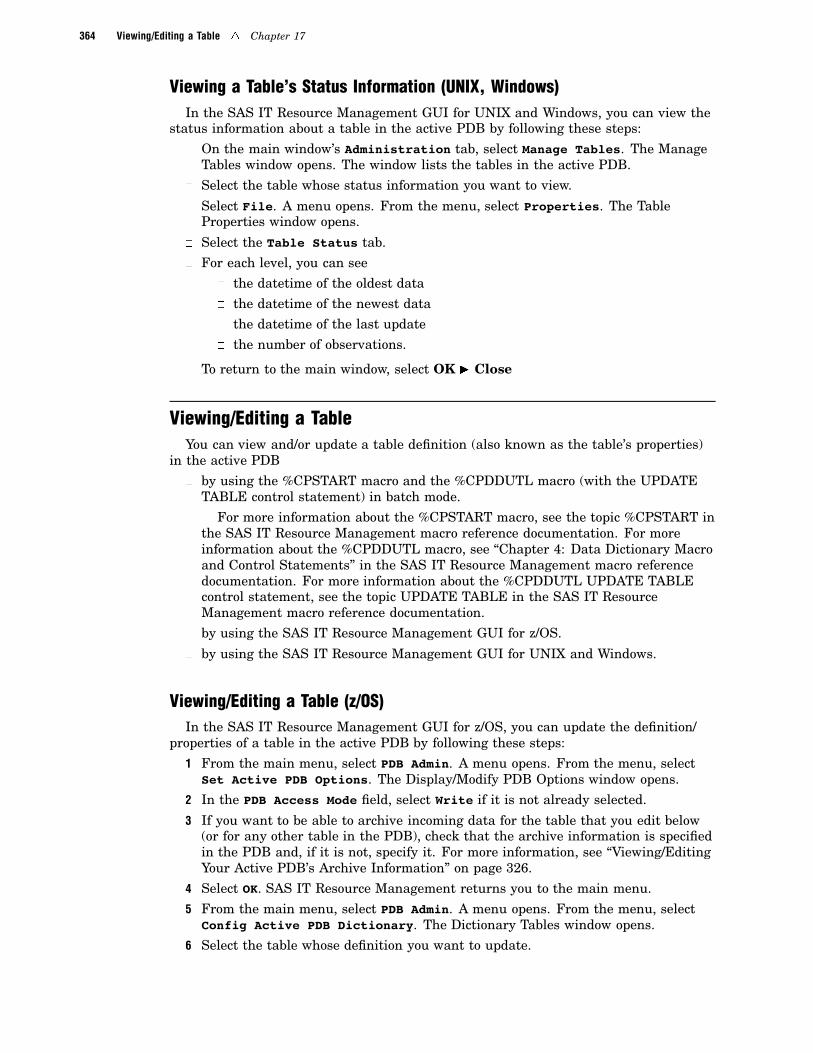
364 Viewing/Editing a Table � Chapter 17
Viewing a Table’s Status Information (UNIX, Windows)In the SAS IT Resource Management GUI for UNIX and Windows, you can view the
status information about a table in the active PDB by following these steps:
� On the main window’s Administration tab, select Manage Tables. The ManageTables window opens. The window lists the tables in the active PDB.
� Select the table whose status information you want to view.
� Select File. A menu opens. From the menu, select Properties. The TableProperties window opens.
� Select the Table Status tab.
� For each level, you can see
� the datetime of the oldest data
� the datetime of the newest data
� the datetime of the last update
� the number of observations.
� To return to the main window, select OK � Close
Viewing/Editing a TableYou can view and/or update a table definition (also known as the table’s properties)
in the active PDB
� by using the %CPSTART macro and the %CPDDUTL macro (with the UPDATETABLE control statement) in batch mode.
For more information about the %CPSTART macro, see the topic %CPSTART inthe SAS IT Resource Management macro reference documentation. For moreinformation about the %CPDDUTL macro, see “Chapter 4: Data Dictionary Macroand Control Statements” in the SAS IT Resource Management macro referencedocumentation. For more information about the %CPDDUTL UPDATE TABLEcontrol statement, see the topic UPDATE TABLE in the SAS IT ResourceManagement macro reference documentation.
� by using the SAS IT Resource Management GUI for z/OS.
� by using the SAS IT Resource Management GUI for UNIX and Windows.
Viewing/Editing a Table (z/OS)In the SAS IT Resource Management GUI for z/OS, you can update the definition/
properties of a table in the active PDB by following these steps:
1 From the main menu, select PDB Admin. A menu opens. From the menu, selectSet Active PDB Options. The Display/Modify PDB Options window opens.
2 In the PDB Access Mode field, select Write if it is not already selected.
3 If you want to be able to archive incoming data for the table that you edit below(or for any other table in the PDB), check that the archive information is specifiedin the PDB and, if it is not, specify it. For more information, see “Viewing/EditingYour Active PDB’s Archive Information” on page 326.
4 Select OK. SAS IT Resource Management returns you to the main menu.
5 From the main menu, select PDB Admin. A menu opens. From the menu, selectConfig Active PDB Dictionary. The Dictionary Tables window opens.
6 Select the table whose definition you want to update.
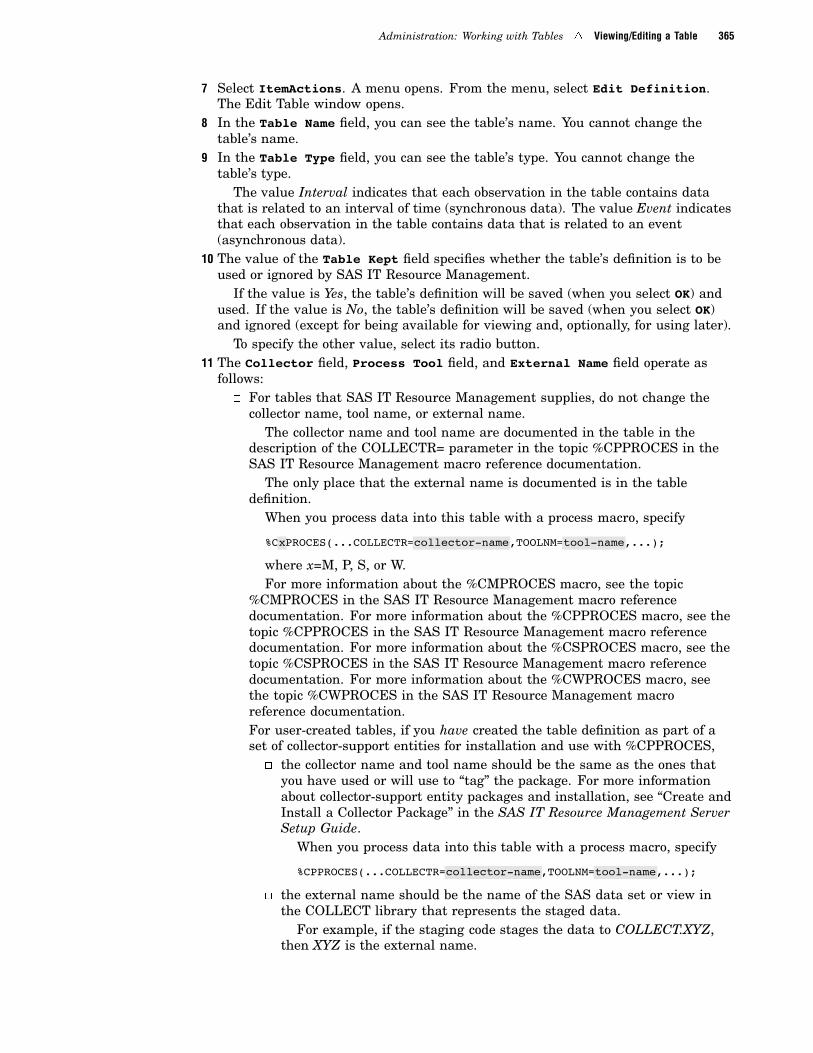
Administration: Working with Tables � Viewing/Editing a Table 365
7 Select ItemActions. A menu opens. From the menu, select Edit Definition.The Edit Table window opens.
8 In the Table Name field, you can see the table’s name. You cannot change thetable’s name.
9 In the Table Type field, you can see the table’s type. You cannot change thetable’s type.
The value Interval indicates that each observation in the table contains datathat is related to an interval of time (synchronous data). The value Event indicatesthat each observation in the table contains data that is related to an event(asynchronous data).
10 The value of the Table Kept field specifies whether the table’s definition is to beused or ignored by SAS IT Resource Management.
If the value is Yes, the table’s definition will be saved (when you select OK) andused. If the value is No, the table’s definition will be saved (when you select OK)and ignored (except for being available for viewing and, optionally, for using later).
To specify the other value, select its radio button.11 The Collector field, Process Tool field, and External Name field operate as
follows:� For tables that SAS IT Resource Management supplies, do not change the
collector name, tool name, or external name.The collector name and tool name are documented in the table in the
description of the COLLECTR= parameter in the topic %CPPROCES in theSAS IT Resource Management macro reference documentation.
The only place that the external name is documented is in the tabledefinition.
When you process data into this table with a process macro, specify
%CxPROCES(...COLLECTR=collector-name,TOOLNM=tool-name,...);
where x=M, P, S, or W.For more information about the %CMPROCES macro, see the topic
%CMPROCES in the SAS IT Resource Management macro referencedocumentation. For more information about the %CPPROCES macro, see thetopic %CPPROCES in the SAS IT Resource Management macro referencedocumentation. For more information about the %CSPROCES macro, see thetopic %CSPROCES in the SAS IT Resource Management macro referencedocumentation. For more information about the %CWPROCES macro, seethe topic %CWPROCES in the SAS IT Resource Management macroreference documentation.
� For user-created tables, if you have created the table definition as part of aset of collector-support entities for installation and use with %CPPROCES,
� the collector name and tool name should be the same as the ones thatyou have used or will use to “tag” the package. For more informationabout collector-support entity packages and installation, see “Create andInstall a Collector Package” in the SAS IT Resource Management ServerSetup Guide.
When you process data into this table with a process macro, specify
%CPPROCES(...COLLECTR=collector-name,TOOLNM=tool-name,...);
� the external name should be the name of the SAS data set or view inthe COLLECT library that represents the staged data.
For example, if the staging code stages the data to COLLECT.XYZ,then XYZ is the external name.

366 Viewing/Editing a Table � Chapter 17
� For user-created tables, if you have not created the table definition as part ofa set of collector-support entities for installation and use with %CPPROCES,
� use GENERIC as the collector name, and use SASDS or CHARDELIMas the tool name. (If you want to use the supplied staging code forcharacter-delimited data, specify CHARDELIM. Otherwise, specifySASDS.)
When you process data into this table with a process macro, specify
%CxPROCES(...COLLECTR=GENERIC,TOOLNM=tool-name,...)
where x=M, P, S, or W.� the external name should be the name of the SAS data set or view (in
the COLLECT library) that represents the staged data.For example, if the staging code stages the data to COLLECT.XYZ,
then XYZ is the external name.
To change the value in the Collector field, overwrite the existing value withthe new value.
To change the value in the Process Tool field, overwrite the existing valuewith the new value.
To change the value in the External Table Name field, select the Advancedtable and overwrite the existing value with the new value.
12 The Archive field specifies whether you want incoming data to the table to bearchived.
If you want to change the value, select the other radio button.13 Select Description. The Edit Description window opens. The value in the Label
field is a brief description of the data that is in the table. The value in theDescription field is a long description of the data that is in the table.
If you want to update the value in the Label field, type over it. If you want toupdate the value in the Description field, type over it.
Select OK. SAS IT Resource Management returns you to the Dictionary Tableswindow.
14 The age limit that is to be used for each level is specified under the Durationheader. The values that you see are the default values. If you do not want to usethe default values, change them by overwriting them with the values that youprefer.
15 Review the variables in your table to verify that their Kept status and thestatistics to be calculated are appropriate for your site. Within your tables, thevariables that are generally most useful for analysis are the ones whose defaultvalue for the Kept status is Yes. If you at first decide on a Kept status of Yes, youcan change it to No later. If you change the Kept status to No, the existing valuesare deleted and new values are not processed into the detail level from that timeforward. Similarly, if you decide on a Kept status of No, you can decide later tochange it to Yes, in which case values are processed into the detail level from thattime forward.
16 You can create, delete, edit, and view the table’s variables by selecting VariableList. The Variables window opens and displays a list of the variables in the table.
For information about creating, deleting, editing and viewing variables, see“Overview of Variables” on page 378.
To return to the main table definition window, select File � End17 If you want to view the list of BY or CLASS variables for each level in the table, in
the Constructional Variables to Display field, select By/Class. The list of
Administration: Working with Tables � Viewing/Editing a Table 367
BY/CLASS variables for each level is displayed under the By/Class Variablesheading.
� If you want to edit the list for the detail level, select Detail. The EditBy-Variable Order window opens and displays the list of the table’s BYvariables for the detail level (with numbers indicating order), followed by alist of all other variables in the detail level that are eligible to be BY variables.
To add a variable to the BY variables list, select that variable in thelower list. To remove a variable from the BY variables list, select thatvariable in the upper list.
When you finish specifying the list of BY variables (in which the lastthree variables are typically DATETIME HOUR SHIFT), select OK. SAS ITResource Management returns you to the Edit Table window and displays thenew list.
� If you want to edit the list for the day level, select Day. The EditClass-Variable Order window opens and displays the list of the table’s CLASSvariables for the day level (with numbers indicating order), followed by a listof all other variables in the day level that are eligible to be CLASS variables.
To add a variable to the CLASS variables list, select that variable. Toremove a variable from the CLASS variables list, select that variable.
When you finish specifying the list of the CLASS variables for the daylevel (in which the last three variables are typically DATETIME HOURSHIFT), select OK. SAS IT Resource Management returns you to the EditTable window and displays the new list.
� If you want to edit the value for the week level, select Week and specify thetable’s CLASS variables list for the week level. Use the technique that isdescribed above for day level.
� If you want to edit the value for the month level, select Month and specify thetable’s CLASS variables list for the month level. Use the technique that isdescribed above for day level.
� If you want to edit the value for the year level, select Year and specify thetable’s CLASS variables list for the year level. Use the technique that isdescribed above for day level.
18 If you want to view the list of ID variables for each level in the table (except detaillevel, which does not have a list of ID variables), in the ConstructionalVariables to Display field, select ID. The list of ID variables for each leveldisplays under the ID Variables heading.
If you want to edit the list for any level, use the technique that is describedabove for editing the BY/CLASS variables lists.
19 If you want to view the list of Index variables for each level in the table, in theConstructional Variables to Display field, select Index. The list of Indexvariables for each level displays under the Index Variables heading.
If you want to edit the list for any level, use the techniques that is describedabove for editing the BY/CLASS variables lists.
Note that there is no order to the index variables because each index is simple(that is, each index variable defines a different index).
20 Select OK � File � End � OK
Viewing/Updating a Table (UNIX, Windows)In the SAS IT Resource Management GUI for UNIX and Windows, you can update
the definition/properties of a table in the active PDB by following these steps:

368 Viewing/Editing a Table � Chapter 17
1 On the main window’s Administration tab, select Manage PDBs. The ManagePDBs window opens.
2 Select Properties. The Set Active PDB Options window opens.3 On the Access tab, select WRITE if it is not already selected.4 If you want to be able to archive incoming data for the table that you edit below
(or for any other table in the PDB), check that the archive information is specifiedin the PDB and, if it is not, specify it. For more information, see “Viewing/EditingYour Active PDB’s Archive Information” on page 326.
5 Select OK. SAS IT Resource Management returns you to the Manage PDBs window.6 Select Close. SAS IT Resource Management returns you to the main window.7 On the main window’s Administration tab, select Manage Tables. The Manage
Tables window opens. The window lists the tables in the active PDB.8 Select the table whose definition you want to edit.9 Select File. A menu opens. From the menu, select Properties. The Table
Properties window opens.10 In the Table Name field, you can see the table’s name. You cannot change the
table’s name.11 In the Table Type field, you can see the table’s type. You cannot change the
table’s type.The value Interval indicates that each observation in the table contains data
related to an interval of time (synchronous data). The value Event indicates thateach observation in the table contains data related to an event (asynchronous data)
12 The value of the Table Kept field specifies whether the table’s definition is to beused or ignored by SAS IT Resource Management.
If the value is Yes, the table’s definition will be saved (when you select OK) andused. If the value is No, the table’s definition will be saved (when you select OK)and ignored (except for being available for viewing and, optionally, for using later).
To specify the other value, select its radio button.13 The Collector field and Process Tool field are on the General tab. The
External Table Name field is on the Advanced tab. The Collector field,Process Tool field, and External Name field operate as follows:
� For tables that SAS IT Resource Management supplies, do not change thecollector name, tool name, or external name.
The collector name and tool name are documented in the table in thedescription of the COLLECTR= parameter in the topic %CPPROCES in theSAS IT Resource Management macro reference documentation.
The only place that the external name is documented is in the tabledefinition.
When you process data into this table with a process macro, specify
%CxPROCES(...COLLECTR=collector-name,TOOLNM=tool-name,...);
where x=M, P, S, or W.For more information about the %CMPROCES macro, see the topic
%CMPROCES in the SAS IT Resource Management macro referencedocumentation. For more information about the %CPPROCES macro, see thetopic %CPPROCES in the SAS IT Resource Management macro referencedocumentation. For more information about the %CSPROCES macro, see thetopic %CSPROCES in the SAS IT Resource Management macro referencedocumentation. For more information about the %CWPROCES macro, seethe topic %CWPROCES in the SAS IT Resource Management macroreference documentation.

Administration: Working with Tables � Viewing/Editing a Table 369
� For user-created tables, if you have created the table definition as part of aset of collector-support entities for installation and use with %CPPROCES,
� the collector name and tool name should be the same as the ones thatyou have used or will use to “tag” the package. For more informationabout collector-support packages and installation, see “Creating andInstalling a Collector Support Package” on page 426.
When you process data into this table with a process macro, specify
%CPPROCES(...COLLECTR=collector-name,TOOLNM=tool-name,...);
� the external name should be the name of the SAS data set or view inthe COLLECT library that represents the staged data.
For example, if the staging code stages the data to COLLECT.XYZ,then XYZ is the external name.
� For user-created tables, if you have not created the table definition as part ofa set of collector-support entities for installation and use with %CPPROCES,
� use GENERIC as the collector name, and use SASDS or CHARDELIMas the tool name. (If you want to use the supplied staging code forcharacter-delimited data, specify CHARDELIM. Otherwise, specifySASDS.)
When you process data into this table with a process macro, specify
%CxPROCES(...COLLECTR=GENERIC,TOOLNM=tool-name,...)
where x=M, P, S, or W.� the external name should be the name of the SAS data set or view (in
the COLLECT library) that represents the staged data.For example, if the staging code stages the data to COLLECT.XYZ,
then XYZ is the external name.
To change the value in the Collector field, overwrite the existing value withthe new value.
To change the value in the Process Tool field, overwrite the existing valuewith the new value.
To change the value in the External Table Name field, select the Advanced taband overwrite the existing value with the new value.
14 Select the Advanced tab, if it is not already selected. The Archive field specifieswhether you want incoming data to the table to be archived.
If you want to change the value, select the other radio button.15 Select the General tab. In the Description field, type a long description of the
data that is to be in the table.16 Select the General tab. The value in the Label field is a brief description of the
data that is in the table. The value in the Description field is a long descriptionof the data that is in the table.
If you want to update the value in the Label field, type over it. If you want toupdate the value in the Description field, type over it.
17 Select the Table Status tab. The age limit that is to be used for each level isspecified under the Age Limit header.
If you want to change any of the existing values, overwrite them with thevalues that you prefer.
18 Review the variables in your table to verify that their Kept status and thestatistics to be calculated are appropriate for your site. Within your tables, the

370 Viewing/Editing a Table � Chapter 17
variables that are generally most useful for analysis are the ones whose defaultvalue for the Kept status is Yes. If you at first decide on a Kept status of Yes, youcan to change it to No later. If you change the Kept status to No, the existingvalues are deleted and new values are not processed into the detail level from thattime forward. Similarly, if you decide on a Kept status of No, you can decide laterto change it to Yes, in which case values are processed into the detail level fromthat time forward.
Note: If in the SAS log you received messages similar to
NOTE: CSIIPDI not initialized
while running %CSPROCES on the exported data, then some of the variables thatare defined in the table definition for this device are not being logged. To enablelogging of these attributes, see “Cabletron Spectrum Appendix 5: Editing ModelTypes for SPECTRUM” in the SAS IT Resource Management Server SetupGuide. �
19 From the General tab, you can create, delete, edit, and view the table’s variablesby selecting Variables. The View Variables window opens and displays a list ofthe variables in the table. Select Close to return to the main window for tableproperties.
For information about creating, deleting, editing and viewing variables, see“Overview of Variables” on page 378
20 Select the Structure Variables tab. If you want to view the list of BY or CLASSvariables for each level in the table, select By/Class. The list of BY/CLASSvariables for each level is displayed under the Variables heading.
� If you want to edit the list for the detail level, select Detail. The EditBy-Variable Order window opens and displays the list of the table’s BYvariables for the detail level (with numbers indicating order), followed by alist of all other variables in the detail level that are eligible to be BY variables.
To add a variable to the BY variables list, select that variable from thelower list and select the up arrow. To remove a variable from the BY variableslist, select that variable from the upper list and select the down arrow.
When you finish specifying the list of BY variables (in which the lastthree variables are typically DATETIME HOUR SHIFT), select OK. The tabdisplays the new list.
� If you want to edit the list for the day level, select Day. The Edit ClassVariable Order window opens and displays the list of the table’s CLASSvariables for the day level (with numbers indicating order), followed by a listof all other variables in the day level that are eligible to be CLASS variables.
To add a variable to the CLASS variables list, select that variable fromthe lower list and select the up arrow. To remove a variable from the CLASSvariables list, select that variable from the upper list and select the downarrow.
When you finish specifying the list of the CLASS variables for the daylevel (in which the last three variables are typically DATETIME HOURSHIFT), select OK. The tab displays the new list.
� If you want to edit the value for the week level, select Week and specify thetable’s CLASS variables list for the week level. Use the technique that isdescribed above for day level.
� If you want to edit the value for the month level, select Month and specify thetable’s CLASS variables list for the month level. Use the technique that isdescribed above for day level.

Administration: Working with Tables � Naming Conventions for z/OS Tables and Variables 371
� If you want to edit the value for the year level, select Year and specify thetable’s CLASS variables list for the year level. Use the technique that isdescribed above for day level.
21 If you want to view the list of ID variables for each level in the table (except detaillevel, which does not have a list of ID variables), select ID. The list of ID variablesfor each level is displayed under the Variables heading.
If you want to edit the list for any level, use the technique that is describedabove for editing the BY/CLASS variables lists.
22 If you want to view the list of Index variables for each level in the table, selectIndex. The list of Index variables for each level is displayed under the Variablesheading.
If you want to edit the list for any level, use the techniques that is describedabove for editing the BY/CLASS variables lists.
Note that there is no order to the index variables because each index is simple(that is, each index variable defines a different index).
23 Select OK � Close
Viewing/Editing Defaults for Table DefinitionsYou can create one or more table definitions in batch mode by using the %CPDDUTL
macro. Any table properties that you do not specify are defined by default values. Youcan edit those default values if you want to use values that are different from thebuilt-in values.
You can display and edit the defaults for table definitions� by using the %CPSTART macro and the %CPDDUTL macro (with the SET
DEFAULTS control statement) in batch mode.For more information about the %CPSTART macro, see the topic %CPSTART in
the SAS IT Resource Management macro reference documentation. For moreinformation about the %CPDDUTL macro, see “Chapter 4: Data Dictionary Macroand Control Statements” in the SAS IT Resource Management macro referencedocumentation. For more information about the %CPDDUTL SET DEFAULTScontrol statement, see the topic SET DEFAULTS in the SAS IT ResourceManagement macro reference documentation.
Note: The values that you define expire at the end of the current SAS IT ResourceManagement session. �
Working with Tables: Related Topics
Naming Conventions for z/OS Tables and Variables
Naming Conventions for Supplied Tables and VariablesOne set of supplied tables is for MXG data from the SMF collector. Those tables are
named according to one of the following alterations of the corresponding MXG name.
XTYttss where tt is the type and ss is the subtype, if any, of the data. This isused for SMF data that is assigned to specific SMF record types. Forexample, SMF type 70 records are stored in table XTY70, and SMFtype 30 subtype 5 records are stored in table XTY30_5.

372 Naming Conventions for z/OS Tables and Variables � Chapter 17
Xffllll where ff is the first two characters of the MXG name and llll is thelast four characters of the MXG name. If the MXG name is less thanseven characters long, then ffllll is the MXG name padded withblanks on the right.
Variables supplied by SAS IT Resource Management are named according to thefollowing scheme:
� If the MXG name is one to seven characters long, the SAS IT ResourceManagement name at detail level is the same as the MXG name.
At the summary levels, a statistic suffix (for example, S for sum) is added to thename as the eighth character. If the name at the detail level contains less thanseven characters, underscores supply padding so that the statistic suffix is theeighth character.
For example, if the MXG name is ABCDE, the SAS IT Resource Managementname at the detail level is ABCDE, and the name of the sum for ABCDE at thesummary levels is ABCDE__S.
� If the MXG name is eight characters long, the SAS IT Resource Managementname at the detail level is the MXG name without the third character of the MXGname (or with some other change if necessary to make the SAS IT ResourceManagement variable name unique).
At the summary levels, a statistic suffix (for example, S for sum) is added to thename as the eighth character.
For example, if the MXG name is ABCDEFGH, the SAS IT ResourceManagement name at detail level is ABDEFGH, and the name of the sum forABDEFGH at the summary levels is ABDEFGHS.
For more information about the statistic suffix, see “Appendix 5: Variable InterpretationTypes” in the SAS IT Resource Management macro reference documentation.
Another set of supplied tables uses a different naming convention:� ACC (for UNIX accton command data)� ETE (for End-to-End Watch by Candle)� NTx (for NTSMF data)� NWC (for NetFlow FlowCollector data from Cisco)� PCS (for HP OpenView Performance Agent and HP OpenView Reporter data)� PTx (PATROL data from BMC software)� Rxx (for Rolm PBX data)� SAP (for SAP R/3 data)� SAR (for UNIX sar command data)� SS (SiteScope data from Mercury Interactive software)� VZ (for BMC Visualizer data)� XDC (for IBM DCOLLECT data)� XER (for IBM EREP data)� XIM (for Boole and Babbage / BMC Software IMS Measurement Facility (IMF)
data)� XQA (for IBM AS/400 data)� XTC2 (for The Monitor for CICS from Landmark version 2 or later)� XTCC (for The Monitor for CICS from Landmark version 1.3 data)� XTCnon-2-or-C (for The Monitor for CICS from Landmark version 8.0 data)� XTMD (for The Monitor for DB2 from Landmark data)� XTMS and XDSNREC (for Computer Associates Tape Management System data)

Administration: Working with Tables � Naming Conventions for z/OS Tables and Variables 373
� XTPF (for IBM Transaction Processing Facility data)� WEB (for Web log data).
Naming Conventions for User-Defined Tables and VariablesThe name of a user-defined table� must start with a letter. The letter U is strongly recommended for user-defined
tables.� has a maximum length of seven characters (U plus zero to six letters, numbers,
and/or underscores).The name is not case sensitive; thus, NAME=utable1 and NAME=UTABLE1 are
equivalent.� must be unique within the PDB.
In case you want to use the same table in another PDB later, you might alsowant the name to be unique within all the PDBs at your site.
Similarly, in case you want to install the table in the master data dictionarylater, you might also want the name not to match the name of any supplied table.
� must avoid the name space of any other table within the PDB. The name space ofa table consists of the name itself, the name with D appended, and the name withP appended.
For example, if the table name is CPU, then the table uses the names CPU,CPUD, and CPUP. Thus, all three of these names need to be avoided in choosingthe name for a new table.
For the reasons that are mentioned above, you might also want to avoid thename space of tables in other PDBs at your site and the name space of suppliedtables.
For more information about the table name with D and P appended, see“Overview of Tables” on page 353.
For user-defined variables in supplied tables or user-defined tables:
� A table must have a variable named DATETIME. For more information about thevariable DATETIME, see “Variable Indicating Datetime, Day, Week, Month, Year”on page 350.
� A table must have a variable named DURATION, if the table type is Interval.DURATION is the length of the interval, in seconds.
� The name of a user-defined variable
� must start with a letter.� has a maximum length of seven characters (letters and numbers only; do not
use underscores).The name is not case sensitive; thus, NAME=var1 and NAME=VAR1 are
equivalent.
Note: Underscores are not allowed in names of user-defined variables;however, they might be added automatically, as padding (so that the statisticsuffix is in the eighth character) in the variable names that are generated foryou when you request predefined statistics at the day, week, month, and yearlevels on the user-defined variables. �
� must be unique within the table.
In case you want to use the same variable in another table later, you mightalso want the name to be unique within all tables in the PDB.

374 Naming Conventions for UNIX and Windows Tables and Variables � Chapter 17
Similarly, in case you want to install the table in the master datadictionary later, you might also want the name not to match the name of anysupplied variable.
� must not be COUNT or TYPE.
Naming Conventions for UNIX and Windows Tables and Variables
Naming Conventions for Supplied TablesTables supplied by SAS IT Resource Management are named according to the
following scheme: CCCnnn, or cmmnnn, where the following definitions apply:CCC is the three-character Collector, which is defined as follows:
ACC UNIX accounting enhanced (ACCUNX) based on the UNIXaccton command
ETE End-to-End Watch by Candle
LSx Landmark Performance Works
NTx NTSMF
NWC Network Conversation tables (NetFlow FlowCollector by CiscoSystems)
PCS OpenView Performance Collection Software and MeasureWareby HP
PRX Probe/X by Landmark Systems
PTx BMC Patrol
Rxx Rolm PBX
SAP SAP R/3
SAR Based on the UNIX sar command
SNM SunNet Mgr RPC-Agents by Sun/Connect
SS SiteScope by Mercury Interactive
TKR TRAKKER by Concord Communication
TMN Landmark TMON for UNIX
XTYttss or Xfflll SMF data staged by MXG. For more details, see “NamingConventions for z/OS Tables and Variables” on page 371.
WEB Web Log Serverc is the one-character Collector, which is defined as follows:
C SPECTRUM by Aprisma, Inc.
H HP OpenView Node Mgr or IBM Tivoli NetView for AIX
S SunNet Manager by Sun/Connect
M MIB-based Data
mm is the two-character Creator. Examples for coding this field are as follows:
N2 is the abbreviation to use for NB MIB-II
Administration: Working with Tables � Naming Conventions for UNIX and Windows Tables and Variables 375
VZ is the abbreviation to use for BMC Visualizer
WF is the abbreviation to use for Wellfleet MIB
nnn is the three-character Name, which is an abbreviation for the group of metrics inthis table. It is defined as follows:
ICM nb-mibII.icmp
NIX nb-mibII.non-indexed metrics.
Naming Conventions for User-Defined Tables and VariablesThe name of a user-defined table� must start with a letter. The letter U is strongly recommended for user-defined
tables.� has a maximum length of seven characters (U plus no more than six letters,
numbers, and/or underscores).The name is not case sensitive; thus, NAME=utable1 and NAME=UTABLE1 are
equivalent.� must be unique within the PDB.
In case you want to use the same table in another PDB later, you might alsowant the name to be unique within all the PDBs at your site.
Similarly, in case you want to install the table in the master data dictionarylater, you might also want the name not to match the name of any supplied table.
� must avoid the name space of any table within the PDB. The name space of atable consists of the name itself, the name with D appended, and the name with Pappended. For example, if a table name is CPU, then the table uses the namesCPU, CPUD, and CPUP. Thus, all three of these names need to be avoided inchoosing the name for a new table.
For the reasons that are mentioned above, you might also want to avoid thename space of tables in other PDBs at your site and the name space of suppliedtables.
For more information about the table name with D and P appended, see“Overview of Tables” on page 353.
For user-defined variables in supplied tables or user-defined tables:� A table must have a variable named DATETIME. For more information about the
variable DATETIME, see “Variable Indicating Datetime, Day, Week, Month, Year”on page 350.
� A table must have a variable named DURATION, if the table type is Interval.DURATION is the length of the interval, in seconds.
� The name of a user-defined variable� must start with a letter.� has a maximum length of seven characters (letters and numbers only; do not
use underscores).The name is not case sensitive; thus, NAME=var1 and NAME=VAR1 are
equivalent.
Note: Underscores are not allowed in names of user-defined variables;however, they might be added automatically, as padding (so that the statisticsuffix is in the eighth character) in the variable names that are generated foryou when you request predefined statistics at the day, week, month, and yearlevels on the user-defined variables. �

376 Naming Conventions for UNIX and Windows Tables and Variables � Chapter 17
� must be unique within the table.In case you want to use the same variable in another table later, you might
also want the name to be unique within all tables in the PDB.Similarly, in case you want to install the table in the master data
dictionary later, you might also want the name not to match the name of anysupplied variable.
� must not be COUNT or TYPE.
377
C H A P T E R
18Administration: Working withVariables
Working with Variables: Main Topics 378Overview of Variables 378
Copying a Regular Variable 380
Copying a Regular Variable (z/OS) 380
Copying a Regular Variable (UNIX, Windows) 380
Creating/Editing/Viewing a Derived Variable 381Creating/Editing/Viewing a Derived Variable (z/OS) 382
Creating/Editing/Viewing a Derived Variable (UNIX, Windows) 385
Creating/Editing/Viewing a Formula Variable 388
Creating/Editing/Viewing a Formula Variable (z/OS) 388
Creating/Editing/Viewing a Formula Variable (UNIX, Windows) 391
Creating/Editing/Viewing a Regular Variable 394Creating/Editing/Viewing a Regular Variable (z/OS) 394
Creating/Editing/Viewing a Regular Variable (UNIX, Windows) 397
Deleting a Derived Variable 400
Deleting a Derived Variable (z/OS) 400
Deleting a Derived Variable (UNIX, Windows) 401Deleting a Formula Variable 401
Deleting a Formula Variable (z/OS) 402
Deleting a Formula Variable (UNIX, Windows) 402
Deleting a Regular Variable 403
Deleting a Regular Variable (z/OS) 403Deleting a Regular Variable (UNIX, Windows) 404
Exploring Supplied Variable Definitions 404
Exploring Supplied Variable Definitions (z/OS) 405
Exploring Supplied Variable Definitions (UNIX and Windows) 405
Listing Derived Variables 405
Listing Formula Variables 406Listing Regular Variables 406
Viewing/Editing Defaults for Variable Definitions 406
Working with Variables: Related Topics 407
How to Define Derived and Formula Variables 407
Variable Interpretation Types 408

378 Working with Variables: Main Topics � Chapter 18
Working with Variables: Main Topics
Overview of VariablesWithin a table and level, performance data exists as columns and rows. A variable is
equivalent to a column. An observation is equivalent to a row.There are three kinds of variables: regular, derived, and formula.
� Regular variables are variables whose values are obtained from the raw data (orcalculated by the staging code; for example, the value of SHIFT is calculated bythe staging code if the value is not provided in the raw data).
� Derived variables are variables whose values are calculated, during processing,from the values of constants, regular variables, and any derived variables thatoccur earlier in the ascending alphanumeric sequence of derived variables.
� Formula variables are variables whose values are calculated (when a view isrequested) in ascending alphanumeric order from the values of regular variables,derived variables, constants, any formula variables that occur earlier in theascending alphanumeric sequence of formula variables, and/or the _LEVEL_variable.
At the detail level of the table in which the variable is located, typically there is oneobservation for each record in the raw data. In the detail-level observation,
� the values of regular variables are stored in the observation in the data set andaccessible by means of the view of the data set.
If the view is requested, no time is required to calculate the value. But in themeantime, space is required to store the value in the data set in case the view isrequested.
� the values of derived variables are stored in the observations in the data set andaccessible by means of the view of the data set.
If the view is requested, no time is required to calculate the value. But in themeantime, space is required to store the value in the data set in case the view isrequested.
� the values of formula variables are not stored (that is, are not physically present)in the observations in the data set, but are accessible (logically present) by meansof the view of the data set.
If the view is requested, run time is required to calculate the value. But in themeantime, space is not required to store the value in the data set in case the viewis requested.
At the summary levels of the table in which the variable is located, there is oneobservation for each unique combination of class variables. For example, suppose thetable’s week level has DATETIME and HOUR as the class variables. Then, there is oneobservation for each hour of each week. On a week-level observation, as seen in theWEEK.table-name view,
� the values of class variables are available (regular and/or derived variables can beclass variables). Also, the values of ID variables, if any, are available (regular and/or derived variables can be ID variables).
The names of the class variables on the summary-level observation are thesame as their names in the detail-level observations. Also, the names of the IDvariables, if any, in the summary-level observation are the same as their names inthe detail-level observations.

Administration: Working with Variables � Overview of Variables 379
Thus, in the preceding example, a week-level observation has a value forDATETIME (whose contents at week level specify the week) and a value forHOUR (whose contents at week level specify the hour).
� the values of requested statistics for regular and/or derived variables are available.For example, suppose that R is a regular variable, D is a derived variable, and
the sum, count, and average are to be calculated for each of them at month level.Then, in the week-level observation, as seen in the view, there is a value for R’ssum statistic, a value for R’s count statistic, a value for R’s average statistic, avalue for D’s sum statistic, a value for D’s count statistic, and a value for D’saverage statistic. Notice that averages are formulas (average=sum/count), so theview does have R’s average statistic and D’s average statistic, but the data set onwhich the view is based does not have R’s average statistic and D’s averagestatistic.
The names of the statistics in a summary-level observation are constructed fromthe names in the detail-level observations. For example, R’s sum statistic is calledR______S, R’s count statistic is called R______N, and R’s average statistic is calledR. D’s sum statistic is called D______S, D’s count statistic is called D______N, andD’s average statistic is called D. (Note that the ______A is dropped from the namesof the average statistics.) For more about the names of statistic variables, see“Appendix 5: Variable Interpretation Types” in the SAS IT Resource Managementmacro reference documentation.
� the values of formula variables are available.For example, suppose that F is a formula variable that has been defined at week
level as the ratio of the average statistic of R and the average statistic of D. Thatis, F=R/D. The week-level observation, as seen in the view, does contain the valueof F, but the data set on which the view is based does not contain the value of F.
In addition to values, a variable also has properties (together the properties arecalled the variable’s definition or the variable’s attributes). The properties consist ofdata type (numeric or character), internal storage length, external presentation format,and so on. The variable’s properties are stored in the data dictionary, along with theproperties of the table in which the variable is located.
When you add a supplied table definition from the master data dictionary to theactive PDB’s data dictionary, the variable definitions for that table are also added.When you create a new table definition in the active PDB, you must also create itsvariable definitions, then or later. In both cases (added table definitions and createdtable definitions), you can edit the variable definitions, delete variable definitions, copyvariable definitions, and so on, at a later time. Also, in both cases (added tabledefinitions and created table definitions), you can edit the table definitions, delete tabledefinitions, and so on, at a later time.
The following are additional topics (in alphabetical order) that are related tovariables:
� “Copying a Regular Variable” on page 380� “Creating/Editing/Viewing a Derived Variable” on page 381� “Creating/Editing/Viewing a Formula Variable” on page 388� “Creating/Editing/Viewing a Regular Variable” on page 394� “Deleting a Derived Variable” on page 400� “Deleting a Formula Variable” on page 401� “Deleting a Regular Variable” on page 403� “Exploring Supplied Variable Definitions” on page 404� “Listing Derived Variables” on page 405� “Listing Formula Variables” on page 406

380 Copying a Regular Variable � Chapter 18
� “Listing Regular Variables” on page 406� “Viewing/Editing Defaults for Variable Definitions” on page 406.
Copying a Regular VariableYou can create a regular variable that has the same attributes as an existing
variable in the master data dictionary and/or an existing variable in the active PDB� by using the %CPSTART macro and the %CPDDUTL macro (with the SET TABLE
and CREATE VARIABLE control statements) in batch mode.For more information about the %CPSTART macro, see the topic %CPSTART in
the SAS IT Resource Management macro reference documentation. For moreinformation about the %CPDDUTL macro, see “Chapter 4: Data Dictionary Macroand Control Statements” in the SAS IT Resource Management macro referencedocumentation. For more information about the %CPDDUTL SET TABLE controlstatement, see the topic SET TABLE in the SAS IT Resource Management macroreference documentation. For more information about the LIKE= parameter onthe %CPDDUTL CREATE VARIABLE control statement, see the topic CREATEVARIABLE in the SAS IT Resource Management macro reference documentation.
� by using the SAS IT Resource Management GUI for z/OS.� by using the SAS IT Resource Management GUI for UNIX and Windows.
Copying a Regular Variable (z/OS)In the SAS IT Resource Management GUI for z/OS, you can copy the properties of a
regular variable in order to create a new regular variable with the same properties (andsame name) in the active table in the active PDB by following these steps:
1 From the main menu, select PDB Admin. A menu opens. From the menu, selectSet Active PDB Options. The Display/Modify PDB Options window opens.
2 In the PDB Access Mode field, select Write if it is not already selected.3 Select OK. SAS IT Resource Management returns you to the main menu.4 From the main menu, select PDB Admin. A menu opens. From the menu, select
Config Active PDB Dictionary. The Dictionary Tables window opens.5 Select the table in which you want to create the new variable. Then, select
ItemActions. A menu opens. From the menu, select Edit Definition. The EditTable window opens.
6 Select Variable List. The Variables window opens and displays a list of thevariables in the table.
7 Select Actions. A menu opens. From the menu, select Copy Variables. TheCopy Variables from Supplied Definitions window opens.
8 In the Collector field, leave the value at All or select the right arrow to specifythe collector whose variable you want to copy.
9 In the Select Table(s) field, select the right arrow to specify the table thatcontains the variable that you want to copy.
10 In the Select Variable(s) field, select the variable that you want to copy andthen select OK.
11 To return to the main menu, select File � End � File � End � OK
Copying a Regular Variable (UNIX, Windows)In the SAS IT Resource Management GUI for UNIX and Windows, you can copy the
properties of a regular variable in order to create a new regular variable with the same

Administration: Working with Variables � Creating/Editing/Viewing a Derived Variable 381
properties (and same name) in the active table in the active PDB by following thesesteps:
1 On the main window’s Administration tab, select Manage PDBs. The ManagePDBs window opens.
2 Select Properties. The Set Active PDB Options window opens.
3 On the Access tab, select WRITE if it is not already selected.
4 Select OK. SAS IT Resource Management returns you to the Manage PDBs window.
5 Select Close. SAS IT Resource Management returns you to the main window.
6 On the main window’s Administration tab, select Manage Tables. The ManageTables window opens.
7 Select the name of the table in which you want to create the new regular variable.Then select File and, from the menu that opens, select Properties. The TableProperties window opens.
8 Select Variables. The View Variables window opens.
9 Select Tools and, from the menu that opens, select Copy Variable.
10 In the Collector field, specify whether you want to search for the variable (whoseproperties you want to copy) in the tables for a selected collector or in all tables.
11 In the Scope field, specify whether you want to search in the master datadictionary (All Supplied) or in the active PDB (In active PDB).
12 In the Choose field, select Variables, if it is not already selected.
13 Select OK and Yes. The Explore Tables/Variables window opens.
14 Select the variable whose properties you want to copy. Then select Add and Close.The View Variables window shows the new variable on its list of variables in thetable.
15 To return to the main window, select Close � OK � Close � OK
Creating/Editing/Viewing a Derived VariableYou can create, edit, and/or view a derived variable
� by using the %CPSTART macro and the %CPDDUTL macro (with the SET TABLEcontrol statement and the CREATE DERIVED, UPDATE DERIVED, and/orPRINT TABLE control statement) in batch mode.
For more information about the %CPSTART macro, see the topic %CPSTART inthe SAS IT Resource Management macro reference documentation. For moreinformation about the %CPDDUTL macro, see “Chapter 4: Data Dictionary Macroand Control Statements” in the SAS IT Resource Management macro referencedocumentation. For more information about the %CPDDUTL SET TABLE controlstatement, see the topic SET TABLE in the SAS IT Resource Management macroreference documentation. For more information about the %CPDDUTL CREATEDERIVED control statement, see the topic CREATE DERIVED in the SAS ITResource Management macro reference documentation. For more informationabout the %CPDDUTL UPDATE DERIVED control statement, see the topicUPDATE DERIVED in the SAS IT Resource Management macro referencedocumentation. For more information about the %CPDDUTL PRINT TABLEcontrol statement, see the topic PRINT TABLE in the SAS IT ResourceManagement macro reference documentation.
� by using the SAS IT Resource Management GUI for z/OS.
� by using the SAS IT Resource Management GUI for UNIX and Windows.

382 Creating/Editing/Viewing a Derived Variable � Chapter 18
Creating/Editing/Viewing a Derived Variable (z/OS)In the SAS IT Resource Management GUI for z/OS, you can create, edit, and/or view
a derived variable in a table in the active PDB by following these steps:
1 From the main menu, select PDB Admin. A menu opens. From the menu, selectSet Active PDB Options. The Display/Modify PDB Options window opens.
2 In the PDB Access Mode field, select Write if it is not already selected and youwant to create or edit a derived variable.
3 Select OK. SAS IT Resource Management returns you to the main menu.
4 From the main menu, select PDB Admin. A menu opens. From the menu, selectConfig Active PDB Dictionary. The Dictionary Tables window opens anddisplays a list of the tables in the active PDB.
5 Select the name of the table in which you want to create, update, or view a derivedvariable.
6 Select ItemActions. A menu opens. From the menu, select
� Edit Definition, if you want to create or edit a derived variable. The EditTable window opens.
� Browse Definition, if you want to view a derived variable. The BrowseTable window opens.
7 Select Variable List. The Variables or Browse Variables window opens and liststhe existing variables in the table.
8 Choose one of the following steps, depending on your purpose:
� If you want to create a derived variable, select Actions. A menu opens. Fromthe menu, select Create Derived Variable. The Create Derived windowopens. In the New Variable field, type the name that you want the newderived variable to have. (For information about variable-namingconventions, see “Naming Conventions for User-Defined Tables andVariables“ in “Naming Conventions for z/OS Tables and Variables” on page371.) Select OK. The Create Derived Variable window opens.
� If you want to edit a derived variable, select the variable that you want toedit. Then select ItemActions. A menu opens. From the menu, select EditDefinition. The Edit Derived Variable window opens.
� If you want to view an existing derived variable, select the variable that youwant to view. Then select ItemActions. A menu opens. From the menu,select Browse Definition. The Browse Variable window opens.
Note: There are only two differences in the content and functionality of theCreate Derived Variable window and the Edit Derived Variable window:
� In the Create Derived Variable window, the values are the defaults. In theEdit Derived Variable window, the values are the ones that were specifiedwhen the variable was created or most recently edited.
� In the Create Derived Variable window, the name of the variable and thedata type (value of the Stored As field) of the variable can be changed. Inthe Edit Derived Variable window, the name and data type of the variablecannot be changed.
�
The Browse Variable window has the same information as the Edit DerivedVariable window, but does not have write access.
9 The value of the Keep in PDB field specifies whether the variable’s definition isused or ignored by SAS IT Resource Management.

Administration: Working with Variables � Creating/Editing/Viewing a Derived Variable 383
If the value is Yes, the variable’s definition will be saved (when you select OK)and used. If the value is No, the variable’s definition will be saved (when youselect OK) and ignored (except for being available for viewing and, optionally, forusing later).
To specify the other value, select its radio button.
Note: If you have no current use for the variable, but do anticipate future use,you might want to set the variable’s Kept status to No. When the variable’s Keptstatus is set to No, the variable’s definition is retained but ignored, and thevariable’s values, if any, are discarded. (There will be missing values in allexisting observations for the variables that had their Kept status changed from Yesto No.) �
10 The value of the Stored as field represents the variable’s data type.If you are creating the variable’s definition, you can specify the other data type
by selecting it. If you are editing the variable’s definition, you cannot change thedata type.
11 The value of the Interpretation field represents a “fine-tuning” of the data type.To use a different interpretation type, select Interpretation. SAS IT Resource
Management displays a list of the interpretation types that are consistent with thedata type. Use the scroll bar on the right of the list to scroll to the interpretationtype that you want to use, and select that interpretation type. SAS IT ResourceManagement returns you to the variable’s main definition window.
For more about interpretation type, see “Appendix 5: Variable InterpretationTypes” in the SAS IT Resource Management macro reference documentation.
12 The setting of the Length field represents the maximum length in bytes that isrequired to store a value of the variable.
If you want to specify a different length, overwrite the length.13 The setting of the Format field represents the format that is to be used to display
a value of the variable.If you want to use a different format, overwrite the format with any valid SAS
format that is appropriate for the data type.For more information about formats, which are a feature of the SAS language,
see “Additional SAS Documentation” on page 14 .14 The setting of the Informat field represents the informat that is to be used to
acquire a value of the variable.If you want to use a different informat, overwrite the informat with any valid
SAS informat that is appropriate for the data type.For more information about informats, which are a feature of the SAS language,
see “Additional SAS Documentation” on page 14.15 The value of the Label field is a brief description of the variable. The label is used
in reports to identify the variable.If you want to use a different label, overwrite the label.
16 The value of the Description field is a long description of the variable. Thedescription is used within the SAS IT Resource Management GUI and underlyingdata dictionary to provide a more complete description of the variable.
If you want to use a different description, overwrite the description.17 The Subject field is not used.18 The value of the Source Code field is the set of SAS DATA step statements that
define how the value of the derived variable is to be built from constants, regularvariables, and/or derived variables that are earlier in the alphanumeric order ofderived variables.

384 Creating/Editing/Viewing a Derived Variable � Chapter 18
Select Source Code. SAS IT Resource Management opens the BUILD window.To create or edit the source code, type or edit one or more SAS DATA stepstatements. (For more information about SAS statements, which are a feature ofthe SAS language, see “Additional SAS Documentation” on page 14.) For example,if the derived variable C is to be the sum of the regular variables A and B, thenyou could write a statement like this one:
C = SUM(A,B) ;
When you finish creating, editing, or viewing the statement(s), select File. Amenu opens. From the menu, select Close. (You can do a separate save, but theclose also does a save.) SAS IT Resource Management saves the statements andthen returns you to the variable’s main definition window.
Note: For more information about how to define a derived variable, see “How toDefine Derived and Formula Variables” on page 407. �
19 If the variable’s data type is numeric, the value of the Weight Variable fielddisplays the name of the alternate weight variable. Specifying an alternate weightvariable is optional. The regular weight variable is DURATION for tables of typeInterval; there is no regular weight variable for tables of type Event. If the nameof the alternate weight variable is specified, the alternate weight variableoverrides the regular weight variable.
To specify an alternate weight variable, select Weight Variable. SAS ITResource Management displays a list of the other variables in the table that havea data type of Numeric. Page down to the one that you want to use and select it.Then select OK. SAS IT Resource Management returns you to the variable’s maindefinition window.
If you later decide not to specify an alternate weight variable, select WeightVariable and then OK. By not specifying a choice, you indicate to SAS IT ResourceManagement that you want to use the default weight variable (DURATION). SASIT Resource Management returns you to the variable’s main definition windowand displays -NONE- to the right of the button.
20 If the variable’s data type is Numeric, select Statistics. The Edit VariableStatistics window opens and displays the status of the “automatic” statistics (thatis, statistics whose calculation mechanism is already defined by SAS IT ResourceManagement) at day, week, month, and year levels.
An intersection of a statistic row and level column represents that statistic forthat level. If you see an X at an intersection, that statistic is selected at that level(that is, that statistic is requested at that level, or to say it still another way, thecalculation status of that statistic at that level is Yes). If you see an empty box atan intersection, that statistic is not selected at that level.
The statistics that are selected by default are a set that is based on the datatype and interpretation type of the variable and the table type of the table. If youwant to change the status of a statistic for a given level, click on the intersectionof the statistic’s row and the level’s column.
Some selections imply others. For example, if you select Average, then Countand Sum are (implicitly) selected. Thus, if you select Average, you do not need toselect Count and Sum unless you want to display their values in the view. (Formore information about the implied selections, see “Appendix 5: VariableInterpretation Types” in the SAS IT Resource Management macro referencedocumentation.)
When you finish selecting the statistics that you want, select OK. SAS ITResource Management returns you to the variable’s main definition window.
21 (The specification of age limits for the variable’s data and the use of the variablein BY, CLASS, ID, and/or Index variables lists are parts of the table’s definition,

Administration: Working with Variables � Creating/Editing/Viewing a Derived Variable 385
not parts of the variable’s definition. For more information, see “Overview ofLevels” on page 337.)
22 Select OK � File � End � OK � File � End � OK
Creating/Editing/Viewing a Derived Variable (UNIX, Windows)In the SAS IT Resource Management GUI for UNIX and Windows, you can create,
edit, and/or view a derived variable in a table in the active PDB by following these steps:1 On the main window’s Administration tab, select Manage PDBs. The Manage
PDBs window opens.2 Select Properties. The Set Active PDB Options window opens.3 On the Access tab, select WRITE if it is not already selected and if you want to
create or edit a derived variable.4 Select OK. SAS IT Resource Management returns you to the Manage PDBs window.5 Select Close. SAS IT Resource Management returns you to the main window.6 On the main window’s Administration tab, select Manage Tables. The Manage
Tables window opens. The window lists the tables in the active PDB.7 Select the name of the table in which you want to create, update, or view a derived
variable.8 Select File. A menu opens. From the menu, select Properties. The Table
Properties window opens.9 On the General tab, select Variables. The View Variables window opens. The
window lists the variables in the table.10 Choose one of the following steps, depending on your purpose:
� If you want to create a derived variable, select Tools. A menu opens. Fromthe menu, select Create Derived Variable. The Create New DerivedVariable window opens. Type the name that you want to give to the newderived variable. (For information about variable-naming conventions, see“Naming Conventions for User-Defined Tables and Variables“ in “NamingConventions for UNIX and Windows Tables and Variables” on page 374.)Select OK. The Variable Properties window opens.
� If you want to edit an existing derived variable, select the variable that youwant to edit. Then select File. A menu opens. From the menu, selectProperties. The Variable Properties window opens.
� If you want to view an existing derived variable, select the variable that youwant to view. Then select File. A menu opens. From the menu, selectProperties. The Variable Properties window opens.
Note: There are only two differences in the content and functionality of theVariable Properties window between create and edit/view:
� For create, the values are the defaults. For edit/view, the values are the onesthat were specified when the variable was created or most recently edited.
� For create, the name of the variable and the data type (value of the StoredAs field) of the variable can be changed. For edit/view, the name and datatype of the variable cannot be changed.
�
11 Select the General tab if it is not already selected.12 The value of the Kept in PDB field specifies whether the variable’s definition is to
be used or ignored by SAS IT Resource Management.If the value is Yes, the variable’s definition will be saved (when you select OK)
and used. If the value is No, the variable’s definition will be saved (when you

386 Creating/Editing/Viewing a Derived Variable � Chapter 18
select OK) and ignored (except for being available for viewing and, optionally, forusing later). Also, if the Kept status was Yes and changes to No, any values of thevariable are discarded. (There will be missing values in all existing observationsfor the variables that had their Kept status changed from Yes to No.)
To specify the other value, select its radio button.13 The value of the Stored as field represents the variable’s data type.
If you are creating the variable, you can use the other data type by selecting it.If you are editing the variable, you cannot change the data type.
14 The value of the Interpretation field represents a “fine-tuning” of the data type.To use a different interpretation type, select the arrow to the right of the
Interpretation field. SAS IT Resource Management displays a list of theinterpretation types that are consistent with the data type. Select theinterpretation type that you want to use, and then select OK. SAS IT ResourceManagement returns you to the variable’s main definition window.
For more about interpretation type, see “Appendix 5: Variable InterpretationTypes” in the SAS IT Resource Management macro reference documentation.
15 The setting of the Length field represents the maximum length in bytes that isrequired to store a value of the variable.
If you want to specify a different length, overwrite the length.16 Select the Advanced tab.17 The setting of the Format field represents the format that is to be used to display
a value of the variable.If you want to use a different format, select the arrow to the right of the Format
field. SAS IT Resource Management lists formats that are consistent with thedata type. If one of those formats is what you want or similar to what you want,select it and select OK; otherwise, select Cancel. If necessary, overwrite the valuewith any valid SAS format that is appropriate for the data type.
For more information about formats, which are a feature of the SAS language,see “Additional SAS Documentation” on page 14.
18 The setting of the Informat field represents the information that is to be used toacquire a value of the variable.
If you want to use a different informat, select the arrow that is to the right of theInformat field. SAS IT Resource Management lists informats that are consistentwith the data type. If one of those informats is what you want or similar to whatyou want, select it and select OK; otherwise, select Cancel. If necessary, overwritethe value with any valid SAS informat that is appropriate for the data type.
For more information about informats, which are a feature of the SAS language,see “Additional SAS Documentation” on page 14
19 Select the General tab.20 The value of the Label field is a brief description of the variable. The label is used
in reports to identify the variable.If you want to use a different label, overwrite the label.
21 The value of the Description field is a long description of the variable. Thedescription is used within the SAS IT Resource Management GUI and underlyingdata dictionary to provide a more complete description of the variable.
If you want to use a different description, overwrite the description.22 Select the Advanced tab.23 The Subject field is not used.24 The value of the Source Code field is the set of SAS DATA step statements that
define how the value of the derived variable is to be built from the values of one or
Administration: Working with Variables � Creating/Editing/Viewing a Derived Variable 387
more constants, regular variables and/or derived variables that are earlier in thealphanumeric order of derived variables.
If you want to create or edit the code, type or edit one or more SAS DATA stepstatements. (For more information about SAS statements, which are a feature ofthe SAS language, see “Additional SAS Documentation” on page 14.) For example,if the derived variable C is to be the sum of the regular variables A and B, thenyou could write a statement like this one:
C = SUM (A,B);
Note: For more information about how to define a derived variable, see “Howto Define Derived and Formula Variables” on page 407. �
25 Select Check Code. If the message
NOTE: Formula has no syntax errors
is displayed in the SAS message area at the bottom of the SAS IT ResourceManagement window, go to the next field. Otherwise, adjust the statement(s) untilit passes the code check.
26 If the variable’s data type is numeric, the value of the Weight By field displaysthe name of the alternate weight variable. Specifying an alternate weight variableis optional. The regular weight variable is DURATION for tables of type Interval;there is no regular weight variable for tables of type Event. The regular weightvariable is overridden by the alternate weight variable, if any.
To specify an alternate weight variable, select the arrow to the right of theWeight By field. SAS IT Resource Management displays a list of the othervariables in the table that have a data type of Numeric. Select the one that youwant to use. Then select OK. SAS IT Resource Management returns you to thevariable’s main definition window.
If you later decide not to specify an alternate weight variable, delete thecharacters in the Weight By field.
27 If the variable’s data type is Numeric, select the Statistics tab. The tab displaysthe status of the “automatic” statistics (that is, statistics whose calculationmechanism is already defined by SAS IT Resource Management) at day, week,month, and year levels.
An intersection of a statistic row and level column represents that statistic forthat level. If you see a check in the box at an intersection, that statistic is selectedat that level (that is, that statistic is requested at that level, or in other words, thecalculation status of that statistic at that level is Yes). If you see an empty box atan intersection, that statistic is not selected at that level.
The statistics that are selected by default are a set that is based on the datatype and interpretation type of the variable and the table type of the table. If youwant to change the status of a statistic for a given level, click on the intersectionof the statistic’s row and the level’s column.
Some selections imply others. For example, if you select Average, then Countand Sum are (implicitly) selected. Thus, if you select Average, you do not need toselect Count and Sum unless you want to display their values in the view. (Formore information about the implied selections and about the suffix that identifiesevery statistic, see “Appendix 5: Variable Interpretation Types” in the SAS ITResource Management macro reference documentation.)
28 (The specification of age limits for the variable’s data and the use of the variablein BY, CLASS, ID, and/or Index variables lists are parts of the table’s definition,not parts of the variable’s definition. For more information, see “Overview ofLevels” on page 337.)

388 Creating/Editing/Viewing a Formula Variable � Chapter 18
29 Select OK � Close � OK � Close � OK
Creating/Editing/Viewing a Formula VariableYou can create, edit, and/or view a formula variable� by using the %CPSTART macro and the %CPDDUTL macro (with the SET TABLE
control statement and the CREATE FORMULA, UPDATE FORMULA, and/orPRINT TABLE control statement) in batch mode.
For more information about the %CPSTART macro, see the topic %CPSTART inthe SAS IT Resource Management macro reference documentation. For moreinformation about the %CPDDUTL macro, see “Chapter 4: Data Dictionary Macroand Control Statements” in the SAS IT Resource Management macro referencedocumentation. For more information about the %CPDDUTL control statementSET TABLE, see the topic SET TABLE in the SAS IT Resource Managementmacro reference documentation. For more information about the %CPDDUTLCREATE FORMULA control statement, see the topic CREATE FORMULA in theSAS IT Resource Management macro reference documentation. For moreinformation about the %CPDDUTL UPDATE FORMULA control statement, seethe topic UPDATE FORMULA in the SAS IT Resource Management macroreference documentation. For more information about the %CPDDUTL PRINTTABLE control statement, see the topic PRINT TABLE in the SAS IT ResourceManagement macro reference documentation.
� by using the SAS IT Resource Management GUI for z/OS.� by using the SAS IT Resource Management GUI for UNIX and Windows.
Note: If the table that you are working with has DATETIME but does not haveDATE and TIME, you can add DATE and TIME as formula variables if you think thatthey would be useful in reporting.
� The properties for DATE are: Level (Detail, Day, Week, Month, Year), Length (6),Type (Numeric), Kept (Yes), Label (Date), Description (Date), Formula(date=datepart(datetime);), Format (DATE9.).
� The properties for TIME are: Level (Detail, Day, Week, Month, Year), Length (6),Type (Numeric), Kept (Yes), Label (Time), Description (Time), Formula(time=timepart(datetime);), Format (TIME.).
�
Creating/Editing/Viewing a Formula Variable (z/OS)In the SAS IT Resource Management GUI for z/OS, you can create, edit, and/or view
the definition of a formula variable in a table in the active PDB by following these steps:1 From the main menu, select PDB Admin. A menu opens. From the menu, select
Set Active PDB Options. The Display/Modify PDB Options window opens.2 In the PDB Access Mode field, select Write if it is not already selected and you
want to create or update a formula variable.3 Select OK. SAS IT Resource Management returns you to the main menu.4 From the main menu, select PDB Admin. A menu opens. From the menu, select
Config Active PDB Dictionary. The Dictionary Tables window opens. Thewindow displays a list of the tables in the active PDB.
5 Select the name of the table in which you want to create, update, or view aformula variable.
6 Select ItemActions. A menu opens. From the menu, select

Administration: Working with Variables � Creating/Editing/Viewing a Formula Variable 389
� Edit Definition, if you want to create or edit a formula variable. The EditTable window opens.
� Browse Definition, if you want to view a formula variable. The BrowseTable window opens.
7 Select Variable List. The Variables window opens and lists the existingvariables in the table.
8 Choose one of the following steps, depending on your purpose:� If you want to create a formula variable, select Actions. A menu opens.
From the menu, select Create Formula Variable. The Create Formulawindow opens. In the New Variable field, type the name that you want togive to the new derived variable. (For information about variable-namingconventions, see “Naming Conventions for User-Defined Tables andVariables“ in “Naming Conventions for z/OS Tables and Variables” on page371.) Select OK. The Make Formula Variable window opens.
� If you want to edit an existing formula variable, select the variable that youwant to edit. Then select ItemActions. A menu opens. From the menu,select Edit Definition. The Edit Formula Variable window opens.
� If you want to view an existing formula variable, select the variable that youwant to view. Then select ItemActions. A menu opens. From the menu,select Browse Definition. The Browse Formula Variable window opens.
Note: There are only two differences in the content and functionality of the MakeFormula Variable window and the Edit Formula Variable window:
� In the Make Formula Variable window, the values are the defaults. In theEdit Formula Variable window, the values are the ones that were specifiedwhen the variable was created or most recently edited.
� In the Make Formula Variable window, the name of the variable and the datatype (value of the Type field) can be changed. In the Edit Formula Variablewindow, the name and data type of the variable cannot be changed.
�
The browse window has the same information as the edit window, but does nothave write access.
9 The value of the Keep in PDB field specifies whether the variable’s definition isused or ignored by SAS IT Resource Management.
If the value is Yes, the variable’s definition will be saved (when you select OK)and used. If the value is No, the variable’s definition will be saved (when youselect OK) and ignored (except for being available for viewing and, optionally, forusing later).
To specify the other value, select its radio button.
Note: If you have no current use for the variable, but do anticipate future use,you might want to set the variable’s Kept status to No. When the variable’s Keptstatus is set to No, the variable’s definition is retained but ignored, and thevariable’s values, if any, are discarded. (There will be missing values in allexisting observations for the variables that had their Kept status changed from Yesto No.) �
10 The value of the Type field represents the variable’s data type.If you are creating the variable, you can use the other data type by selecting it.
11 There is no Interpretation field for formula variables. As a result, double-checkwhether the values in the Length field and Format field are appropriate for thevariable.

390 Creating/Editing/Viewing a Formula Variable � Chapter 18
12 The setting of the Length field represents the maximum length in bytes that isrequired to store a value of the variable.
If you want to specify a different length, overwrite the length.13 The setting of the Format field represents the format that is to be used to display
a value of the variable.If you want to use a different format, overwrite the format with any valid SAS
format that is appropriate for the data type. For more information about formats,which are a feature of the SAS language, see “Additional SAS Documentation” onpage 14.
14 The value of the Label field is a brief description of the variable. The label is usedin reports to identify the variable.
If you want to use a different label, overwrite the label.15 The value of the Description field is a long description of the variable. The
description is used within the SAS IT Resource Management GUI and underlyingdata dictionary to provide a more complete description of the variable.
If you want to use a different description, overwrite the description.16 The Subject field is not used.17 The value of the Edit Formula Source Code field is the set of SAS DATA step
statements that define how the value of the formula variable is to be built fromthe values of one or more regular variables, derived variables, constants, formulavariables earlier in the alphanumeric order of formula variables, and/or the_LEVEL_ variable.
Note: The _LEVEL_ variable exists automatically in the context of a formulavariable, but it does not appear on the list of variables. You can test the _LEVEL_variable to provide specific formulas for specific levels. The valid values for the_LEVEL_ variable are DETAIL, DAY, WEEK, MONTH, and YEAR.
For example, you can use a statement similar to this in your source code for theformula:
IF _LEVEL_ = ’MONTH’ ... ;
�
Select Edit Formula Source Code or Browse Formula Source Code. SAS ITResource Management opens the BUILD window. To create or edit the sourcecode, type or edit one or more SAS DATA step statements. (For more informationabout SAS statements, which are a feature of the SAS language, see “AdditionalSAS Documentation” on page 14.) For example, if the formula variable C is to bethe sum of a regular variable A and a derived variable B, then you could write astatement like this:
C = SUM(A,B) ;
When you finish creating, editing, or viewing the statement(s), select File. Amenu opens. From the menu, select Close. (You can save separately, but whenyou close, the work that you did is saved automatically.) SAS IT ResourceManagement saves the statements and then returns you to the variable’s maindefinition window.
If you created or edited the formula variable, select Test Syntax. If themessage “NOTE: Formula has no syntax errors.” is displayed at the top of thewindow, go to the next field; otherwise, edit the source code statements so they areacceptable to the syntax tester.
Note: For more information about how to define a formula variable, see “How toDefine Derived and Formula Variables” on page 407. �

Administration: Working with Variables � Creating/Editing/Viewing a Formula Variable 391
18 The Apply to Level field specifies the level or levels at which the values of theformula are to be available (by calculation, if requested by a report). An Xpreceding a level indicates that values are to be available at that level (in otherwords, the calculation status at that level is Yes). An empty box preceding a levelindicates that values are not to be calculated at that level.
Note that the values of the formula variable at the detail, day, week, month, oryear level are based on the values of its underlying variables at that same level.For example, if the formula variable C is to be the sum of the regular variables Aand B, then you could write a statement like this one:
C = SUM(A,B) ;
In this case, here are examples of the meaning of the formula:� at detail level, A is the name of the value of variable A on the detail-level
observation, B is the name of the value of variable B on that samedetail-level observation, and thus C for that observation is the sum of thevalue of variable A on that observation and the value of variable B on thatobservation.
� at day level, A is the name of the average statistic of variable A on theday-level observation, B is the name of the average statistic of variable B onthat day-level observation, and C for that observation is the sum of theaverage statistic of variable A and the average statistic of variable B on thatobservation.
For more information about the suffix that identifies each statistic, see“Appendix 5: Variable Types” in the SAS IT Resource Management macroreference documentation.
19 Select OK � File � End � OK � File � End � OK
Creating/Editing/Viewing a Formula Variable (UNIX, Windows)In the SAS IT Resource Management GUI for UNIX and Windows, you can create,
edit, and/or view the definition of a formula variable in a table in the active PDB byfollowing these steps:
1 On the main window’s Administration tab, select Manage PDBs. The ManagePDBs window opens.
2 Select Properties. The Set Active PDB Options window opens.3 On the Access tab, select WRITE if it is not already selected and if you want to
create or update a formula variable.4 Select OK. SAS IT Resource Management returns you to the Manage PDBs window.5 Select Close. SAS IT Resource Management returns you to the main window.6 On the main window’s Administration tab, select Manage Tables. The Manage
Tables window opens. The window lists the tables in the active PDB.7 Select the name of the table in which you want to create, update, or view a
formula variable.8 Select File. A menu opens. From the menu, select Properties. The Table
Properties window opens.9 On the General tab, select Variables. The View Variables window opens. The
window lists the variables in the table.10 Choose one of the following steps, depending on your purpose:
� If you want to create a formula variable, select Tools. A menu opens. Fromthe menu, select Create Formula Variable. The Create New FormulaVariable window opens. Type the name that you want to give to the new

392 Creating/Editing/Viewing a Formula Variable � Chapter 18
formula variable. (For information about variable-naming conventions, see“Naming Conventions for User-Defined Tables and Variables“ in “NamingConventions for UNIX and Windows Tables and Variables” on page 374.)Select OK. The Make/Edit Formula window opens.
� If you want to edit an existing formula variable, select the variable that youwant to edit. Then select File. A menu opens. From the menu, selectProperties. The Make/Edit Formula window opens.
� If you want to view an existing formula variable, select the variable that youwant to view. Then select File. A menu opens. From the menu, selectProperties. The Make/Edit Formula window opens.
Note: There are only two differences in the content and functionality betweencreate and edit/view:
� For create, the values are the defaults. For edit/view, the values are the onesthat were specified when the variable was created or most recently edited.
� For create, the name of the variable and the data type (value of the Typefield) of the variable can be changed. For edit/view, the name and data typeof the variable cannot be changed.
�
11 Select the General tab if it is not already selected.12 The value of the Kept in PDB field specifies whether the variable’s definition is to
be used or ignored by SAS IT Resource Management.If the value is Yes, the variable’s definition will be saved (when you select OK)
and used (that is, values will be calculated when requested). If the value is No,the variable’s definition will be saved (when you select OK) and ignored (except forbeing available for viewing and, optionally, for using later).
To specify the other value, select its radio button.13 The value of the Type field represents the variable’s data type.
If you are creating the variable, you can use the other data type by selecting it.If you are editing the variable, you cannot change the data type.
14 There is no Interpretation field for formula variables. (The interpretation typefor formula variables is Formula.) As a result, double-check whether the values inthe Length field and Format field are appropriate for the variable.
15 The setting of the Length field represents the maximum length in bytes that isrequired to store a value of the variable.
If you want to specify a different length, overwrite the length.16 Select the Advanced tab.17 The setting of the Format field represents the format that is to be used to display
a value of the variable.If you want to use a different format, select the arrow to the right of the Format
field. SAS IT Resource Management lists some formats that are appropriate forthe data type. If one of those formats is what you want or similar to what youwant, select it and select OK; otherwise, select Cancel. If necessary, overwrite theformat with any valid SAS format that is appropriate for the data type.
For more information about formats, which are a feature of the SAS language,see “Additional SAS Documentation” on page 14.
18 Select the General tab.19 The value of the Label field is a brief description of the variable. The label is used
in reports to identify the variable.If you want to use a different label, overwrite the label.
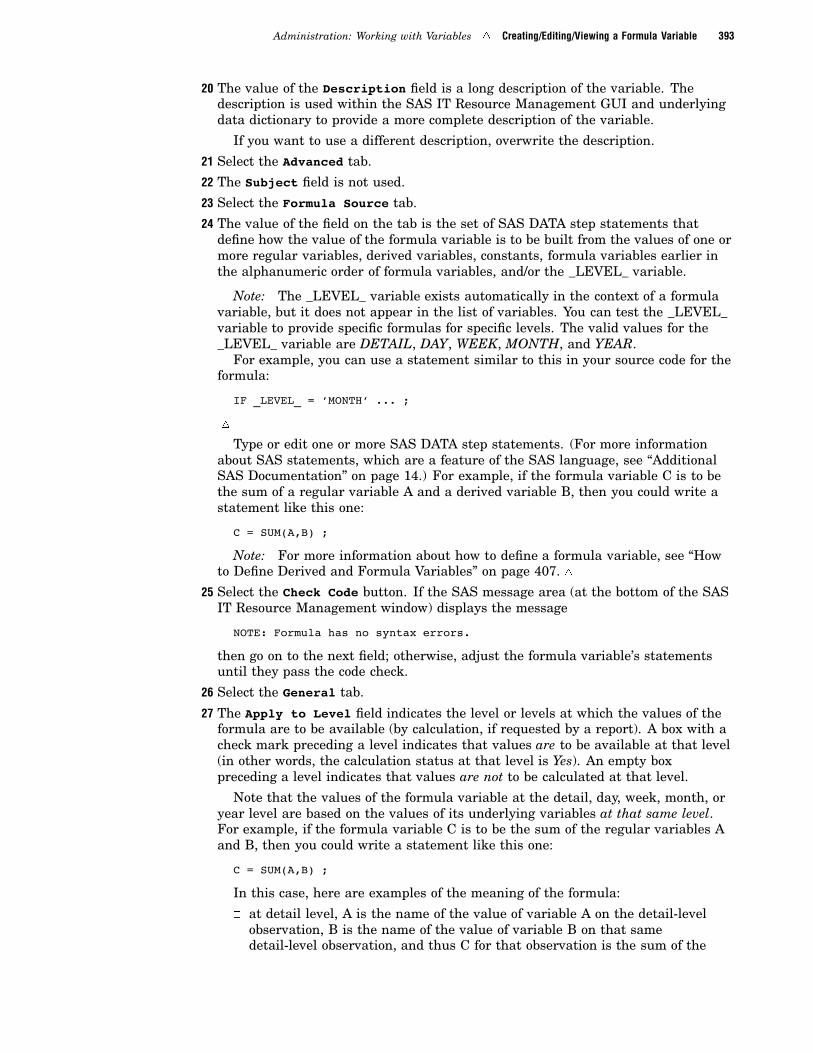
Administration: Working with Variables � Creating/Editing/Viewing a Formula Variable 393
20 The value of the Description field is a long description of the variable. Thedescription is used within the SAS IT Resource Management GUI and underlyingdata dictionary to provide a more complete description of the variable.
If you want to use a different description, overwrite the description.
21 Select the Advanced tab.
22 The Subject field is not used.
23 Select the Formula Source tab.
24 The value of the field on the tab is the set of SAS DATA step statements thatdefine how the value of the formula variable is to be built from the values of one ormore regular variables, derived variables, constants, formula variables earlier inthe alphanumeric order of formula variables, and/or the _LEVEL_ variable.
Note: The _LEVEL_ variable exists automatically in the context of a formulavariable, but it does not appear in the list of variables. You can test the _LEVEL_variable to provide specific formulas for specific levels. The valid values for the_LEVEL_ variable are DETAIL, DAY, WEEK, MONTH, and YEAR.
For example, you can use a statement similar to this in your source code for theformula:
IF _LEVEL_ = ’MONTH’ ... ;
�
Type or edit one or more SAS DATA step statements. (For more informationabout SAS statements, which are a feature of the SAS language, see “AdditionalSAS Documentation” on page 14.) For example, if the formula variable C is to bethe sum of a regular variable A and a derived variable B, then you could write astatement like this one:
C = SUM(A,B) ;
Note: For more information about how to define a formula variable, see “Howto Define Derived and Formula Variables” on page 407. �
25 Select the Check Code button. If the SAS message area (at the bottom of the SASIT Resource Management window) displays the message
NOTE: Formula has no syntax errors.
then go on to the next field; otherwise, adjust the formula variable’s statementsuntil they pass the code check.
26 Select the General tab.
27 The Apply to Level field indicates the level or levels at which the values of theformula are to be available (by calculation, if requested by a report). A box with acheck mark preceding a level indicates that values are to be available at that level(in other words, the calculation status at that level is Yes). An empty boxpreceding a level indicates that values are not to be calculated at that level.
Note that the values of the formula variable at the detail, day, week, month, oryear level are based on the values of its underlying variables at that same level.For example, if the formula variable C is to be the sum of the regular variables Aand B, then you could write a statement like this one:
C = SUM(A,B) ;
In this case, here are examples of the meaning of the formula:
� at detail level, A is the name of the value of variable A on the detail-levelobservation, B is the name of the value of variable B on that samedetail-level observation, and thus C for that observation is the sum of the
394 Creating/Editing/Viewing a Regular Variable � Chapter 18
value of variable A on that observation and the value of variable B on thatobservation.
� at day level, A is the name of the average statistic of variable A on theday-level observation, B is the name of the average statistic of variable B onthat day-level observation, and C for that observation is the sum of theaverage statistic of variable A and the average statistic of variable B on thatobservation.
For more information about the suffix that identifies each statistic, see“Appendix 5: Variable Types” in the SAS IT Resource Management macroreference documentation.
28 Select OK � Close � OK � Close � OK
Creating/Editing/Viewing a Regular VariableYou can create, edit, and/or view the definition of a regular variable� by using the %CPSTART macro and the %CPDDUTL macro (with the SET TABLE
control statement and the CREATE VARIABLE, UPDATE VARIABLE, and/orPRINT TABLE control statement) in batch mode.
For more information about the %CPSTART macro, see the topic %CPSTART inthe SAS IT Resource Management macro reference documentation. For moreinformation about the %CPDDUTL macro, see “Chapter 4: Data Dictionary Macroand Control Statements” in the SAS IT Resource Management macro referencedocumentation. For more information about the %CPDDUTL SET TABLE controlstatement, see the topic SET TABLE in the SAS IT Resource Management macroreference documentation. For more information about the %CPDDUTL CREATEVARIABLE control statement, see the topic CREATE VARIABLE in the SAS ITResource Management macro reference documentation. For more informationabout the %CPDDUTL UPDATE VARIABLE control statement, see the topicUPDATE VARIABLE in the SAS IT Resource Management macro referencedocumentation. For more information about the %CPDDUTL PRINT TABLEcontrol statement, see the topic PRINT TABLE in the SAS IT ResourceManagement macro reference documentation.
� by using the SAS IT Resource Management GUI for z/OS.� by using the SAS IT Resource Management GUI for UNIX and Windows.
Creating/Editing/Viewing a Regular Variable (z/OS)In the SAS IT Resource Management GUI for z/OS, you can create, edit, and/or view
the definition of a regular variable in a table in the active PDB by following these steps:1 From the main menu, select PDB Admin. A menu opens. From the menu, select
Set Active PDB Options. The Display/Modify PDB Options window opens.2 In the PDB Access Mode field, select Write if it is not already selected and if you
want to create or update a regular variable.3 Select OK. SAS IT Resource Management returns you to the main menu.4 From the main menu, select PDB Admin. A menu opens. From the menu, select
Config Active PDB Dictionary. The Dictionary Tables window opens. Thewindow displays a list of the tables in the active PDB.
5 Select the name of the table in which you want to create, update, or view a regularvariable.
6 Select ItemActions. A menu opens. From the menu, select
Administration: Working with Variables � Creating/Editing/Viewing a Regular Variable 395
� Edit Definition, if you want to create or edit a regular variable. The EditTable window opens.
� Browse Definition, if you want to view a regular variable. The BrowseTable window opens.
7 Select Variable List. The Variables window opens. The window lists theexisting variables in the table.
8 Choose one of the following steps, depending on your purpose:� If you want to create a regular variable, select Actions. A menu opens. From
the menu, select Create Variable. The preliminary Create Variable windowopens. In the New Variable field, type the name that you want to give to thenew regular variable. (For information about variable-naming conventions,see “Naming Conventions for User-Defined Tables and Variables” in “NamingConventions for z/OS Tables and Variables” on page 371.) Select OK. TheCreate Variable window opens.
� If you want to edit an existing regular variable, select the variable that youwant to edit. Then select ItemActions. A menu opens. From the menu,select Edit Definition. The Edit Variable window opens.
� If you want to view an existing regular variable, select the variable that youwant to view. Then select ItemActions. A menu opens. From the menu,select Browse Definition. The Browse Variable window opens.
Note: There are only two differences in the content and functionality of theCreate Variable window and the Edit Variable window:
� In the Create Variable window, the values are the defaults. In the EditVariable window, the values are the ones that were specified when thevariable was created or most recently edited.
� In the Create Variable window, the name of the variable and the data type(value of the Stored As field) of the variable can be changed. In the EditVariable window, the name and data type of the variable cannot be changed.
�
The Browse Variable window has the same information as the Edit Variablewindow, but it does not have write access.
9 The value of the Keep in PDB field specifies whether the variable’s definition isused or ignored by SAS IT Resource Management.
If the value is Yes, the variable’s definition will be saved (when you select OK)and used. If the value is No, the variable’s definition will be saved (when youselect OK) and ignored (except for being available for viewing and, optionally, forusing later).
To specify the other value, select its radio button.10 The value of the Stored as field represents the variable’s data type.
If you are creating the variable, you can use the other data type by selecting it.If you are editing the variable, you cannot change the data type.
11 The value of the Interpretation field represents the “fine-tuning” of the datatype.
To use a different interpretation type, select Interpretation. SAS IT ResourceManagement displays a list of the interpretation types that are consistent with thedata type. Use the scroll bar to the right of the list to scroll to the interpretationtype that you want to use, and select that interpretation type. SAS IT ResourceManagement returns you to the variable’s main definition window.
For more about interpretation type, see “Appendix 5: Variable InterpretationTypes” in the SAS IT Resource Management macro reference documentation.

396 Creating/Editing/Viewing a Regular Variable � Chapter 18
12 The setting of the Length field represents the maximum length in bytes that isrequired to store a value of the variable.
If you want to specify a different length, overwrite the length.13 The setting of the Format field represents the format that is to be used to display
a value of the variable.If you want to use a different format, overwrite the value with any valid SAS
format that is appropriate for the data type.
For more information about formats, which are a feature of the SAS language,see “Additional SAS Documentation” on page 14.
14 The setting of the Informat field represents the informat that is to be used toacquire a value of the variable.
If you want to use a different informat, overwrite the informat with any validSAS informat that is appropriate for the data type.
For more information about informats, which are a feature of the SAS language,see “Additional SAS Documentation” on page 14.
15 The value of the Label field is a brief description of the variable. The label is usedin reports to identify the variable.
If you want to use a different label, overwrite the label.16 The value of the Description field is a long description of the variable. The
description is used within the SAS IT Resource Management GUI and underlyingdata dictionary to provide a more complete description of the variable.
If you want to use a different description, overwrite the description.
17 The Subject field is not used.18 If the variable’s data type is numeric, the value of the Weight Variable field
displays the name of the alternate weight variable. Specifying an alternate weightvariable is optional. The regular weight variable is DURATION for tables of typeInterval; there is no regular weight variable for tables of type Event. If the nameof the alternate weight variable is specified, the alternate weight variableoverrides the regular weight variable.
To specify an alternate weight variable, select Weight Variable. SAS ITResource Management displays a list of the other variables in the table that havea data type of Numeric. Page down to the one that you want to use and select it.Then select OK. SAS IT Resource Management returns you to the variable’s maindefinition window.
If you later decide not to specify an alternate weight variable, select WeightVariable and then OK. By not specifying a choice, you indicate to SAS IT ResourceManagement that you want to use the default weight variable (DURATION). SASIT Resource Management returns you to the variable’s main definition windowand displays -NONE- to the right of the button.
19 If the variable’s data type is numeric, select Statistics. The Edit VariableStatistics window opens and displays the status of the “automatic” statistics (thatis, statistics whose calculation mechanism is already defined by SAS IT ResourceManagement) at day, week, month, and year levels.
An intersection of a statistic row and level column represents that statistic forthat level. If you see an X at an intersection, that statistic is selected at that level(that is, that statistic is requested at that level, or in other words, the calculationstatus of that statistic at that level is Yes). If you see an empty box at anintersection, that statistic is not selected at that level.
The statistics that are selected by default are a set that is based on the datatype and interpretation type of the variable and the table type of the table. If you

Administration: Working with Variables � Creating/Editing/Viewing a Regular Variable 397
want to change the status of a statistic for a given level, click on the intersectionof the statistic’s row and the level’s column.
Some selections imply others. For example, if you select Average, then Countand Sum are (implicitly) selected. Thus, in this case you do not need to selectCount and Sum unless you want to display their values in the view. (For moreinformation about the implied selections, see “Appendix 5: Variable InterpretationTypes” in the SAS IT Resource Management macro reference documentation.)
When you finish selecting the statistics that you want, select OK. SAS ITResource Management returns you to the variable’s main definition window.
20 (The specification of age limits for the variable’s data and the use of the variablein BY, CLASS, ID, and/or Index variables lists are parts of the table’s definition,not parts of the variable’s definition. For more information, see “Overview ofLevels” on page 337.)
21 Select OK � File � End � OK � File � End � OK
Creating/Editing/Viewing a Regular Variable (UNIX, Windows)In the SAS IT Resource Management GUI for UNIX and Windows, you can create,
edit, and/or view the definition of a regular variable in a table in the active PDB byfollowing these steps:
1 On the main window’s Administration tab, select Manage PDBs. The ManagePDBs window opens.
2 Select Properties. The Set Active PDB Options window opens.3 On the Access tab, select WRITE if it is not already selected and if you want to
create or update a regular variable.4 Select OK. SAS IT Resource Management returns you to the Manage PDBs window.5 Select Close. SAS IT Resource Management returns you to the main window.6 On the main window’s Administration tab, select Manage Tables. The Manage
Tables window opens. The window lists the tables in the active PDB.7 Select the name of the table in which you want to create, update, or view a regular
variable.8 Select File. A menu opens. From the menu, select Properties. The Table
Properties window opens.9 Select Variables. The View Variables window opens. The window lists the
variables in the table.10 Choose one of the following steps, depending on your purpose:
� If you want to create a regular variable, select Tools. A menu opens. Fromthe menu, select Create Variable. The Create New Variable window opens.Type the name that you want to give to the new regular variable. (Forinformation about variable-naming conventions, see “Naming Conventions forUser-Defined Tables and Variables” in “Naming Conventions for UNIX andWindows Tables and Variables” on page 374.) Select OK. The VariableProperties window opens.
� If you want to edit an existing regular variable, select the variable that youwant to edit. Then select File. A menu opens. From the menu, selectProperties. The Variable Properties window opens.
� If you want to view an existing regular variable, select the variable that youwant to view. Then select File. A menu opens. From the menu, selectProperties. The Variable Properties window opens.
Note: There are only two differences in the content and functionality betweencreate and edit/view:

398 Creating/Editing/Viewing a Regular Variable � Chapter 18
� For create, the values are the defaults. For edit/view, the values are the onesthat were specified when the variable was created or most recently edited.
� For create, the name of the variable and the data type (value of the StoredAs field) of the variable can be changed. For edit/view, the name and datatype of the variable cannot be changed.
�
11 Select the General tab if it is not already selected.12 The value of the Kept in PDB field specifies whether the variable’s definition is to
be used or ignored by SAS IT Resource Management.If the value is Yes, the variable’s definition will be saved (when you select OK)
and used. If the value is No, the variable’s definition will be saved (when youselect OK) and ignored (except for being available for viewing and, optionally, forusing later). Also, if the Kept status was Yes and changes to No, any values of thevariable are discarded. (There will be missing values in all existing observationsfor the variables that had their Kept status changed from Yes to No. )
To specify the other value, select its radio button.
Note: If you have no current use for the variable, but do anticipate future use,you might want to set the variable’s Kept status to No. When the variable’s Keptstatus is set to No, the variable’s definition is retained but ignored, and thevariable’s values, if any, are discarded. (There will be missing values in allexisting observations for the variables that had their Kept status changed from Yesto No.) �
13 The External Var Name field represents the name of the variable (column) in thestaged data.
14 The value of the Stored as field represents the variable’s data type.If you are creating the variable, you can use the other data type by selecting it.
If you are editing the variable, you cannot change the data type.15 The value of the Interpretation field represents the “fine-tuning” of the data
type.To use a different interpretation type, select the arrow to the right of the
Interpretation field. SAS IT Resource Management displays a list of theinterpretation types that are consistent with the data type. Select theinterpretation type that you want to use, and then select OK. SAS IT ResourceManagement returns you to the variable’s main definition window.
For more about interpretation type, see “Appendix 5: Variable InterpretationTypes” in the SAS IT Resource Management macro reference documentation.
16 The setting of the Length field represents the maximum length in bytes that isrequired to store a value of the variable.
If you want to specify a different length, overwrite the length.17 Select the Advanced tab.18 The setting of the Format field represents the format that is to be used to display
a value of the variable.If you want to use a different format, select the arrow to the right of the Format
field. SAS IT Resource Management lists some formats that are appropriate forthe data type. If one of those formats is what you want or similar to what youwant, select it and select OK; otherwise, select Cancel. If necessary, overwrite thevalue with any valid SAS format that is appropriate for the data type.
For more information about formats, which are a feature of the SAS language,see “Additional SAS Documentation” on page 14.

Administration: Working with Variables � Creating/Editing/Viewing a Regular Variable 399
19 The setting of the Informat field represents the information that is to be used toacquire a value of the variable.
If you want to use a different informat, select the arrow to the right of theInformat field. SAS IT Resource Management lists informats that are consistentwith the data type. If one of those informats is what you want or similar to whatyou want, select it and select OK; otherwise, select Cancel. If necessary, overwritethe value with any valid SAS informat that is appropriate for the data type.
For more information about informats, which are a feature of the SAS language,see “Additional SAS Documentation” on page 14.
20 Select the General tab.21 The value of the Label field is a brief description of the variable. The label is used
in reports to identify the variable.If you want to use a different label, overwrite the label.
22 The value of the Description field is a long description of the variable. Thedescription is used within the SAS IT Resource Management GUI and underlyingdata dictionary to provide a more complete description of the variable.
If you want to use a different description, overwrite the description.23 Select the Advanced tab.24 The Varidnum field and Varoid field are collector-specific and are used by only a
few collectors. To see if these fields are used for the collector that collected thedata for this variable, see “Collector-Specific Setup Documentation” on page 12.
25 The Subject field is not used.26 If the variable’s data type is Numeric, the value of the Weight By field displays
the name of the alternate weight variable. Specifying an alternate weight variableis optional. The regular weight variable is DURATION for tables of type Interval;there is no regular weight variable for tables of type Event. The regular weightvariable is overridden by the alternate weight variable, if any.
To specify an alternate weight variable, select the arrow to the right of theWeight By field. SAS IT Resource Management displays a list of the othervariables in the table that have a data type of Numeric. Select the one that youwant to use. Then select OK. SAS IT Resource Management returns you to thevariable’s main definition window.
If you later decide not to specify an alternate weight variable, overwrite thename of the alternate weight variable with blanks.
27 If the variable’s data type is Numeric, select Statistics. The tab displays thestatus of the “automatic” statistics (that is, statistics whose calculation mechanismis already defined by SAS IT Resource Management) at day, week, month, andyear levels.
An intersection of a statistic row and level column represents that statistic forthat level. If you see a check in the box at an intersection, that statistic is selectedat that level (that is, that statistic is requested at that level, or in other words, thecalculation status of that statistic at that level is Yes). If you see an empty box atan intersection, that statistic is not selected at that level.
The statistics that are selected by default are a set that is based on the datatype and interpretation type of the variable and the table type of the table. If youwant to change the status of a statistic for a given level, click on the intersectionof the statistic’s row and the level’s column.
Some selections imply other selections. For example, if you select Average, thenCount and Sum are (implicitly) selected. Thus, in this case you do not need toselect Count and Sum unless you want to display their values in the view. (Formore information about the implied selections and about the suffix that identifies

400 Deleting a Derived Variable � Chapter 18
every statistic, see “Appendix 5: Variable Interpretation Types” in the SAS ITResource Management macro reference documentation.)
28 (The specification of age limits for the variable’s data and the use of the variablein BY, CLASS, ID, and/or Index variables lists are parts of the table’s definition,not parts of the variable’s definition. For more information, see “Overview ofLevels” on page 337.)
29 Select OK � Close � OK � Close � OK
Deleting a Derived VariableAfter you delete a derived variable, it is no longer available itself or for use as an
underlying variable for a another derived variable or a formula variable, no longeravailable as a variable to test in a WHERE clause, no longer available as a BY, CLASS,ID, or Index variable, and so on.
Note: If you have no current use for the variable, but do anticipate future use, youmight want not to delete the variable but instead to set the variable’s Kept status toNo. When the variable’s Kept status is set to No, the variable’s definition is retainedbut ignored, and the variables’ values are discarded. (There will be missing values forall existing observations for the variables that had their Kept status set to No.) Formore information about changing the variable’s Kept status, see “Creating/Editing/Viewing a Derived Variable” on page 381. �
You can delete the definition and data for a derived variable� by using the %CPSTART macro and the %CPDDUTL macro (with the SET TABLE
and DELETE DERIVED control statements) in batch mode.For more information about the %CPSTART macro, see the topic %CPSTART in
the SAS IT Resource Management macro reference documentation. For moreinformation about the %CPDDUTL macro, see “Chapter 4: Data Dictionary Macroand Control Statements” in the SAS IT Resource Management macro referencedocumentation. For more information about the %CPDDUTL SET TABLE controlstatement, see the topic SET TABLE in the SAS IT Resource Management macroreference documentation. For more information about the %CPDDUTL DELETEDERIVED control statement, see the topic DELETE DERIVED in the SAS ITResource Management macro reference documentation.
� by using the SAS IT Resource Management GUI for z/OS.� by using the SAS IT Resource Management GUI for UNIX and Windows.
Note: You cannot delete a derived variable if it is currently in use as a BY, CLASS,or weight variable. �
Note: To delete values (data) from a variable in a PDB but not delete the variable’sdefinition, see “Purging Data” on page 415. �
Deleting a Derived Variable (z/OS)In the SAS IT Resource Management GUI for z/OS, you can delete the definition and
data of a derived variable from a table in the active PDB by following these steps:1 From the main menu, select PDB Admin. A menu opens. From the menu, select
Set Active PDB Options. The Display/Modify PDB Options window opens.2 In the PDB Access Mode field, select Write if it is not already selected.3 Select OK. SAS IT Resource Management returns you to the main menu.4 From the main menu, select PDB Admin. A menu opens. From the menu, select
Config Active PDB Dictionary. The Dictionary Tables window opens anddisplays a list of the tables in the active PDB.

Administration: Working with Variables � Deleting a Formula Variable 401
5 Select the name of the table from which you want to delete the derived variable.6 Select ItemActions. A menu opens. From the menu, select Edit Definition.
The Edit Table window opens.7 Select Variable List. The Variables window opens and lists the existing
variables in the table.8 Select the name of the derived variable whose definition and data you want to
delete.9 Select ItemActions. A menu opens. From the menu, select Delete Definition.
The Delete Variable window opens.10 Select OK. SAS IT Resource Management returns you to the Variables window, and
the variable that you deleted is no longer on the list.11 Select File � End � OK � File � End � OK
Deleting a Derived Variable (UNIX, Windows)In the SAS IT Resource Management GUI for UNIX and Windows, you can delete
the definition and data of a derived variable from a table in the active PDB by followingthese steps:
1 On the main window’s Administration tab, select Manage PDBs. The ManagePDBs window opens.
2 Select Properties. The Set Active PDB Options window opens.3 On the Access tab, select WRITE if it is not already selected.4 Select OK. SAS IT Resource Management returns you to the Manage PDBs window.5 Select Close. SAS IT Resource Management returns you to the main window.6 On the main window’s Administration tab, select Manage Tables. The Manage
Tables window opens. The window lists the tables in the active PDB.7 Select the name of the table from which you want to delete the derived variable.8 Select File. A menu opens. From the menu, select Properties. The Table
Properties window opens.9 On the General tab, select Variables. The View Variables window opens. The
window lists the variables in the table.10 Select the derived variable whose definition and data you want to delete.11 Click your right mouse button. A menu opens. From the menu, select Delete. A
confirmation dialog box opens.12 Select Yes � OK SAS IT Resource Management returns you to the View Variables
window, and the variable that you deleted is no longer on the list.13 Select Close � OK � Close � OK
Deleting a Formula VariableAfter you delete a formula variable, it is no longer available itself or for use as an
underlying variable for another formula variable.
Note: If you have no current use for the variable, but do anticipate future use, youmight want not to delete the variable but instead to set the variable’s Kept (that is,calculated) status to No. When the variable’s Kept status is set to No, the variable’sdefinition is retained but ignored, and the values of the variable’s data are notcalculated. For more information about changing the variable’s Kept status, see“Creating/Editing/Viewing a Formula Variable” on page 388. �
You can delete the definition for a formula variable

402 Deleting a Formula Variable � Chapter 18
� by using the %CPSTART macro and the %CPDDUTL macro (with the SET TABLEand DELETE FORMULA control statements) in batch mode.
For more information about the %CPSTART macro, see the topic %CPSTART inthe SAS IT Resource Management macro reference documentation. For moreinformation about the %CPDDUTL macro, see “Chapter 4: Data Dictionary Macroand Control Statements” in the SAS IT Resource Management macro referencedocumentation. For more information about the %CPDDUTL SET TABLE controlstatement, see the topic SET TABLE in the SAS IT Resource Management macroreference documentation. For more information about the %CPDDUTL DELETEFORMULA control statement, see the topic DELETE FORMULA in the SAS ITResource Management macro reference documentation.
� by using the SAS IT Resource Management GUI for z/OS.
� by using the SAS IT Resource Management GUI for UNIX and Windows.
Note: You cannot delete a formula variable if it is referenced by another formulavariable. �
Deleting a Formula Variable (z/OS)In the SAS IT Resource Management GUI for z/OS, you can delete the definition of a
formula variable from a table in the active PDB by following these steps:1 From the main menu, select PDB Admin. A menu opens. From the menu, select
Set Active PDB Options. The Display/Modify PDB Options window opens.
2 In the PDB Access Mode field, select Write if it is not already selected.3 Select OK. SAS IT Resource Management returns you to the main menu.
4 From the main menu, select PDB Admin. A menu opens. From the menu, selectConfig Active PDB Dictionary. The Dictionary Tables window opens anddisplays a list of the tables in the active PDB.
5 Select the name of the table from which you want to delete the formula variable.
6 Select ItemActions. A menu opens. From the menu, select Edit Definition.The Edit Table window opens.
7 Select Variable List. The Variables window opens and lists the existingvariables in the table.
8 Select the name of the formula variable whose definition you want to delete.
9 Select ItemActions. A menu opens. From the menu, select Delete Definition.The Delete Variable window opens.
10 Select OK. SAS IT Resource Management returns you to the Variables window, andthe variable that you deleted is no longer on the list.
11 Select File � End � OK � File � End � OK
Deleting a Formula Variable (UNIX, Windows)In the SAS IT Resource Management GUI for UNIX and Windows, you can delete the
definition of a formula variable from a table in the active PDB by following these steps:
1 On the main window’s Administration tab, select Manage PDBs. The ManagePDBs window opens.
2 Select Properties. The Set Active PDB Options window opens.
3 On the Access tab, select WRITE if it is not already selected.
4 Select OK. SAS IT Resource Management returns you to the Manage PDBs window.5 Select Close. SAS IT Resource Management returns you to the main window.

Administration: Working with Variables � Deleting a Regular Variable 403
6 On the main window’s Administration tab, select Manage Tables. The ManageTables window opens. The window lists the tables in the active PDB.
7 Select the name of the table from which you want to delete the formula variable.8 Select File. A menu opens. From the menu, select Properties. The Table
Properties window opens.9 On the General tab, select Variables. The View Variables window opens. The
window lists the variables in the table.10 Select the formula variable whose definition you want to delete.11 Click your right mouse button. A menu opens. From the menu, select Delete. A
confirmation dialog box opens.12 Select Yes � OK SAS IT Resource Management returns you to the View Variables
window, and the variable that you deleted is no longer on the list.13 Select Close � OK � Close � OK
Deleting a Regular VariableAfter you delete a regular variable, it is no longer available itself or for use as an
underlying variable for a derived or formula variable, no longer available as a variableto test in a WHERE clause, no longer available as a BY, CLASS, ID, or Index variable,and so on.
Note: If you have no current use for the variable, but do anticipate future use, youmight want not to delete the variable but instead to set the variable’s Kept status toNo. When the variable’s Kept status is set to No, the variable’s definition is retainedbut ignored, and the variable’s values are discarded. (There will be missing values inall existing observations for the variables that had their Kept status changed from Yesto No.) For more information about changing the variable’s Kept status, see “Creating/Editing/Viewing a Regular Variable” on page 394. �
You can delete the definition and data for a regular variable� by using the %CPSTART macro and the %CPDDUTL macro (with the SET TABLE
and DELETE VARIABLE control statements) in batch mode.For more information about the %CPSTART macro, see the topic %CPSTART in
the SAS IT Resource Management macro reference documentation. For moreinformation about the %CPDDUTL macro, see “Chapter 4: Data Dictionary Macroand Control Statements” in the SAS IT Resource Management macro referencedocumentation. For more information about the %CPDDUTL SET TABLE controlstatements, see the topic SET TABLE in the SAS IT Resource Management macroreference documentation. For more information about the %CPDDUTL DELETEVARIABLE control statement, see the topic CREATE VARIABLE in the SAS ITResource Management macro reference documentation.
� by using the SAS IT Resource Management GUI for z/OS.� by using the SAS IT Resource Management GUI for UNIX and Windows.
Note: You cannot delete a regular variable if it is currently in use as a BY, CLASS,or weight variable. �
Note: To delete values (data) from a variable in a PDB but not delete the variable’sdefinition, see “Purging Data” on page 415. �
Deleting a Regular Variable (z/OS)In the SAS IT Resource Management GUI for z/OS, you can delete the definition and
data of a regular variable from a table in the active PDB by following these steps:

404 Exploring Supplied Variable Definitions � Chapter 18
1 From the main menu, select PDB Admin. A menu opens. From the menu, selectSet Active PDB Options. The Display/Modify PDB Options window opens.
2 In the PDB Access Mode field, select Write if it is not already selected.3 Select OK. SAS IT Resource Management returns you to the main menu.4 From the main menu, select PDB Admin. A menu opens. From the menu, select
Config Active PDB Dictionary. The Dictionary Tables window opens anddisplays a list of the tables in the active PDB.
5 Select the name of the table from which you want to delete the regular variable.6 Select ItemActions. A menu opens. From the menu, select Edit Definition.
The Edit Table window opens.7 Select Variable List. The Variables window opens and lists the existing
variables in the table.8 Select the name of the regular variable whose definition and data you want to
delete.9 Select ItemActions. A menu opens. From the menu, select Delete Definition.
The Delete Variable window opens.10 Select OK. SAS IT Resource Management returns you to the Variables window, and
the variable that you deleted is no longer on the list.11 Select File � End � OK � File � End � OK
Deleting a Regular Variable (UNIX, Windows)In the SAS IT Resource Management GUI for UNIX and Windows, you can delete
the definition and data of a regular variable from a table in the active PDB by followingthese steps:
1 On the main window’s Administration tab, select Manage PDBs. The ManagePDBs window opens.
2 Select Properties. The Set Active PDB Options window opens.3 On the Access tab, select WRITE if it is not already selected.4 Select OK. SAS IT Resource Management returns you to the Manage PDBs window.5 Select Close. SAS IT Resource Management returns you to the main window.6 On the main window’s Administration tab, select Manage Tables. The Manage
Tables window opens. The window lists the tables in the active PDB.7 Select the name of the table from which you want to delete the regular variable.8 Select File. A menu opens. From the menu, select Properties. The Table
Properties window opens.9 On the General tab, select Variables. The View Variables window opens. The
window lists the variables in the table.10 Select the regular variable whose definition and data you want to delete.11 Click your right mouse button. A menu opens. From the menu, select Delete. A
confirmation dialog box opens.12 Select Yes � OK
SAS IT Resource Management returns you to the View Variables window, andthe variable that you deleted is no longer on the list.
13 Select Close � OK � Close � OK
Exploring Supplied Variable DefinitionsYou can explore supplied variable definitions in the active PDB

Administration: Working with Variables � Listing Derived Variables 405
� by using the SAS IT Resource Management GUI for z/OS� by using the SAS IT Resource Management GUI for UNIX and Windows.
Write access or update access to the PDB is not required for you to view or search thelist of supplied variable definitions.
For more information about variable definitions, see “Overview of Variables” on page378.
Exploring Supplied Variable Definitions (z/OS)In the SAS IT Resource Management GUI for z/OS, you can explore supplied variable
definitions in the active PDB by following these steps:
1 Select Explore from the SAS IT Resource Management main menu. A menuopens.
2 Select All Supplied Variables. The Explore All Supplied Variables windowopens.
3 Select Edit � FindNext, in the Search field type the name of the variable definition that you want
to explore, and select the other search characteristics. Then, select OK.
SAS IT Resource Management searches the variable description fields,highlights the variables whose descriptions contain the string that you entered inthe Search field, and scrolls to the first highlighted variable. (If there is morethan one variable, you might need to scroll to find the others.)
4 Select the variable that you want to know more about, and then selectItemActions � Browse Variable Definition
Exploring Supplied Variable Definitions (UNIX and Windows)In the SAS IT Resource Management GUI for UNIX and Windows, you can explore
supplied variable definitions in the active PDB by following these steps:
1 On the main window’s Administration tab, select Explore Tables/Variables.The Select Tables and Variables window opens.
2 In the Choose field, select Variables.
3 Select and/or type the remaining criteria that describe which variables you wantto view or explore, and then select OK. A list displays the variables that matchyour criteria.
Listing Derived VariablesYou can list the names and labels of the derived variables in a given table� by using the %CPSTART macro and the %CPDDUTL macro (with the SET TABLE
and LIST DERIVEDS control statements) in batch mode.
For more information about the %CPSTART macro, see the topic %CPSTART inthe SAS IT Resource Management macro reference documentation. For moreinformation about the %CPDDUTL macro, see “Chapter 4: Data Dictionary Macroand Control Statements” in the SAS IT Resource Management macro referencedocumentation. For more information about the %CPDDUTL SET TABLE controlstatement, see the topic SET TABLE in the SAS IT Resource Management macroreference documentation. For more information about the %CPDDUTL LISTDERIVEDS control statement, see the topic LIST DERIVEDS in the SAS ITResource Management macro reference documentation.

406 Listing Formula Variables � Chapter 18
Note: If you want to list any other properties of the derived variables in a giventable, use the %CPDDUTL PRINT TABLE control statement instead of the LISTDERIVEDS control statement. For more information about the %CPDDUTL PRINTTABLE control statement, see the topic PRINT TABLE in the SAS IT ResourceManagement macro reference documentation. �
Listing Formula VariablesYou can list the names and labels of the formula variables in a given table� by using the %CPSTART macro and the %CPDDUTL macro (with the SET TABLE
and LIST FORMULA control statements) in batch mode.For more information about the %CPSTART macro, see the topic %CPSTART in
the SAS IT Resource Management macro reference documentation. For moreinformation about the %CPDDUTL macro, see “Chapter 4: Data Dictionary Macroand Control Statements” in the SAS IT Resource Management macro referencedocumentation. For more information about the %CPDDUTL SET TABLE controlstatement, see the topic SET TABLE in the SAS IT Resource Management macroreference documentation. For more information about the %CPDDUTL LISTFORMULAS control statement, see the topic LIST FORMULAS in the SAS ITResource Management macro reference documentation.
Note: If you want to list any other properties of the formula variables in a giventable, use the %CPDDUTL PRINT TABLE control statement instead of the LISTFORMULAS control statement. For more information about the %CPDDUTL PRINTTABLE control statement, see the topic PRINT TABLE in the SAS IT ResourceManagement macro reference documentation. �
Listing Regular VariablesYou can list the names and labels of the regular variables in a given table� by using the %CPSTART macro and the %CPDDUTL macro (with the SET TABLE
and LIST VARIABLES control statements) in batch mode.For more information about the %CPSTART macro, see the topic %CPSTART in
the SAS IT Resource Management macro reference documentation. For moreinformation about the %CPDDUTL macro, see “Chapter 4: Data Dictionary Macroand Control Statements” in the SAS IT Resource Management macro referencedocumentation. For more information about the %CPDDUTL SET TABLE controlstatement, see the topic SET TABLE in the SAS IT Resource Management macroreference documentation. For more information about the %CPDDUTL LISTVARIABLES control statement, see the topic LIST VARIABLES in the SAS ITResource Management macro reference documentation.
Note: If you want to list any other properties of the regular variables in a giventable, use the %CPDDUTL PRINT TABLE control statement instead of the LISTVARIABLES control statement. For more information about the %CPDDUTL PRINTTABLE control statement, see the topic PRINT TABLE in the SAS IT ResourceManagement macro reference documentation. �
Viewing/Editing Defaults for Variable DefinitionsYou can create one or more variable definitions in batch mode by using the
%CPDDUTL macro. Any variable properties that you do not specify are defined by

Administration: Working with Variables � How to Define Derived and Formula Variables 407
default values. You can edit those default values if you want to use values that aredifferent from the built-in values.
You can display and edit the defaults for variable definitions� by using the SET DEFAULTS control statement with the %CPDDUTL macro in
batch mode. For more information about the %CPDDUTL macro, see “Chapter 4:Data Dictionary Macro and Control Statements” in the SAS IT ResourceManagement macro reference documentation. For more information about the%CPDDUTL control statement SET DEFAULTS, see the topic SET DEFAULTS inthe SAS IT Resource Management macro reference documentation.
Note: The values that you define expire at the end of the current SAS IT ResourceManagement session. �
Working with Variables: Related Topics
How to Define Derived and Formula Variables
The order in which variables are calculated is significant because code that bases thecalculation of one variable on another variable that has not yet been created generateserrors. The order of creation is consistent across all variable types and within each typeand can be summarized as follows:
� The values of regular variables are assigned first, the values of derived variablesare calculated next, and the values of formula variables are calculated last.
� The values of derived and formula variables are always calculated inalphanumeric order.
1 Regular VariablesRegular variables are assigned values first when %CxPROCES executes (where
x=M, P, S, or W). Regular variables are assigned values before the values of anyother variables are calculated.
2 Derived VariablesDerived variables are assigned values after %Cx PROCES (where x=M, P, S, or
W) assigns values to the regular variables. The values of derived variables arecalculated in ascending alphanumeric order. A derived variable can be baseddirectly on the values of constants, regular variables, and any derived variablesthat are earlier than this derived variable in the ascending alphanumeric sequenceof derived variables.
Example:� Assume that A and B are regular variables and that C and D are derived
variables.� Assume that C = SUM(A,B).� Assume that D = A / SUM(A,B).
The calculation for D could also be coded as D = A/C for derived variables,because derived variables are defined in ascending alphanumeric order. At thetime that derived variable D is being calculated, derived variable C already has itsvalue.
3 Formula VariablesFormula variables are calculations in one or more views of a table and are
assigned values when the view for a table is read. Formula variables are

408 Variable Interpretation Types � Chapter 18
calculated in ascending alphanumeric order. A formula variable can be baseddirectly on the values of constants, regular variables, derived variables, anyformula variables that are earlier than this formula variable in the ascendingalphanumeric sequence of formula variables, and the _LEVEL_ variable.
Example:
� Assume that A and B are regular variables and that C and D are formulavariables.
� Assume that C = SUM(A,B).� Assume that D = A / SUM(A,B).
The calculation for D could also be coded as D = A/C for formula variables,because formula variables are defined in ascending alphanumeric order. At thetime that formula variable D is being calculated, formula variable C already hasits value.
SummaryThe calculations of specific derived and regular variables must be based on values
that are calculated before the specific variable is calculated.Example:
� Assume that X and Y are regular variables.� Assume that P and Q are derived variables.� Assume that G is a formula variable.
The calculation for P can be coded P = SUM(X,Y) because the regular variables, Xand Y, exist before any derived variables exist.
The calculation for Q can be coded Q = X/P for the following reasons: X, a regularvariable, exists before any derived variables exist; P, a derived variable, precedes Q inascending alphabetical order; therefore, the value of P exists before the value of Q iscalculated.
The calculation for G can be coded G = P+Q because all derived variables exist beforeany formula variables exist.
Variable Interpretation TypesFor more information about variable interpretation types, see “Appendix 5: Variable
Types” in the SAS IT Resource Management macro reference documentation.

409
C H A P T E R
19Administration: Working withData
Working with Data: Main Topics 409Overview of Data 409
Archiving Incoming Data 411
Archiving Incoming Data (z/OS) 411
Archiving Incoming Data (UNIX, Windows) 412
Checking for Duplicate Data 413Collecting Data 413
Processing Data 413
Processing Data (z/OS) 414
Processing Data (UNIX, Windows) 415
Purging Data 415
Purging Data (z/OS) 416Purging Data (UNIX, Windows) 416
Reducing Data 416
Reducing Data (z/OS) 418
Reducing Data (UNIX, Windows) 418
Retrieving Archived Data 418Staging Data 419
Viewing Amount of and Datetime Range of Data 419
Viewing Amount of and Datetime Range of Data (z/OS) 419
Viewing Amount of and Datetime Range of Data (UNIX, Windows) 419
Viewing Data Values 420Viewing Data Values (z/OS) 420
Viewing Data (UNIX, Windows) 420
Working with Data: Related Topics 421
Handling Time Stamps for Coordinated Universal Time 421
Changes to Daylight Saving Time Expression 421
Using the YEARCUTOFF SAS System Option 422
Working with Data: Main Topics
Overview of DataTypically the data flows through the following steps:
1 The data is logged.
That is, the software that collects the raw data writes it to a log. If necessary,the log is then transferred to a host where SAS IT Resource Management isinstalled.

410 Overview of Data � Chapter 19
2 The data is processed. Processing consists of the following phases:
a The data is staged.That is, the data is read from the log and written to one or more SAS data
sets. Or one or more SAS views are generated that make the data look as if itis in SAS data sets. Or in some other way the data is made available as if itis in SAS data sets.
b The data is pre-summarized (if the volume of data is large).That is, the SAS SUMMARY procedure (PROC SUMMARY) reads the
staged event data, does a preliminary summary (typically by HOUR andSHIFT), and writes the output as interval data to one or more SAS data sets.
In the staged observations, the time in the DATETIME variable indicatesthe time of the event. In the pre-summarized observations, the time in theDATETIME variable indicates the beginning of the interval that isrepresented by the summary statistics. For example, if the preliminarysummary is by HOUR and SHIFT, then the time in DATETIME (and thehour in HOUR) is set to the beginning of the hour that is represented by thesummary statistics. For example, if the time in DATETIME is 17:00:00, thenthe value of HOUR is 17.
For each staged variable whose values are pre-summarized, one or morepreliminary summary statistics are created. For each preliminary summarystatistic, its label indicates the content of the staged variable and the type ofstatistic (for example, Sum or Count). The variable name is seven or fewercharacters in length and does not have a suffix that indicates the type ofstatistic.
c The data is merged (if the volume of data is manageable).That is, the incoming data (in the staged or pre-summarized SAS data
sets) is merged with the existing data in the detail level of the PDB.On the same pass, a copy of the incoming data is placed in an archive, if
archiving has been requested.Also on the same pass, if any of the existing data in the detail level is older
than the SAS IT Resource Management administrator that is specified for thePDB, the older data is removed from the PDB.
3 The data is reduced.
That is, the data is read from detail level (or pre-summarized SAS data sets orstaged SAS data sets), statistics are calculated, and the output is assimilated intoone or more summary levels of the PDB.
Depending on the particular data source, the data goes through some or all of the abovesteps.
The following additional topics (in alphabetical order) are related to data:
� “Archiving Incoming Data” on page 411
� “Checking for Duplicate Data” on page 413
� “Collecting Data” on page 413
� “Processing Data” on page 413
� “Purging Data” on page 415
� “Reducing Data” on page 416
� “Retrieving Archived Data” on page 418
� “Staging Data” on page 419
� “Viewing Amount of and Datetime Range of Data” on page 419
� “Viewing Data Values” on page 420

Administration: Working with Data � Archiving Incoming Data 411
Archiving Incoming DataAn archive is a set of archive libraries.If archiving is activated, each time the process step runs, it generates an archive
library. In the archive library is a copy of the incoming data to the detail level of thetables in the PDB for which archiving is enabled. For an overview of archiving, see“Appendix 2: Archive Data” in the SAS IT Resource Management macro referencedocumentation.
You can specify whether to archive and how to archive the data that is incoming tothe detail level of the active PDB
� by using the %CPPDBOPT macro to specify the location and type of archive, andby using the %CPDDUTL macro with one or more %CPDDUTL UPDATE TABLEcontrol statements to activate archiving of incoming data for one or more tables inthe active PDB.
For more information about the %CPPDBOPT macro, see the topic%CPPDBOPT in the SAS IT Resource Management macro referencedocumentation. For more information about the %CPDDUTL macro, see the topic%CPDDUTL in the SAS IT Resource Management macro reference documentation.For more information about the UPDATE TABLE control statements, see the topicUPDATE TABLE in the SAS IT Resource Management macro referencedocumentation.
� by using the SAS IT Resource Management GUI for z/OS.� by using the SAS IT Resource Management GUI for UNIX and Windows.
The archiving takes place during the process step. For more information about theprocess step, see “Processing Data” on page 413.
For more information about archiving, see� “Viewing/Editing Your Active Site Library’s Archive Information” on page 284� “Viewing/Editing Your Active PDB’s Archive Information (z/OS)” on page 327� “Retrieving Archived Data” on page 418� “Creating a Table” on page 357 or “Viewing/Editing a Table” on page 364� the topic %CPARCRET in the SAS IT Resource Management macro reference
documentation.� the section “Guidelines for Allocating Space in the Archive” in the Archive topic in
“Appendix 1: Recovery Procedures” in the SAS IT Resource Management macroreference documentation and the section “Guidelines for Revising SpaceAllocations in the Archive” in “Appendix 1: Recovery Procedures” in the SAS ITResource Management macro reference documentation.
� the section “Archiving Overview” in “Chapter 2: Administrative Macros” in theSAS IT Resource Management macro reference documentation.
Archiving Incoming Data (z/OS)In the SAS IT Resource Management GUI for z/OS, you can specify whether to
archive and how to archive the data that is incoming to the detail level by followingthese steps:
1 Activate the PDB whose incoming data you want to archive, and request writeaccess to the PDB.
For more information about activating a PDB, see “Activating a PDB” on page299. For more information about changing your access to the active PDB, see“Viewing/Editing Your Active PDB’s Access Mode” on page 325.

412 Archiving Incoming Data � Chapter 19
2 From the main menu, select PDB Admin. A menu opens. From the menu, selectSet Active PDB Options. The Display/Modify PDB Options window opens.
3 In the Archive Type field, select whether you want a DASD archive or a Tapearchive.
4 In the Archive Unit field, type the value that you want to be used for eacharchive library’s UNIT= parameter.
5 In the Archive Root field, the high-level qualifiers that identify the PDB are thedefault location of the archive. That is, by default, the archive is “under” the PDB.If you want a different location, overwrite the current value with another location.
6 In the Archive Library Allocation Parameter String field, type anyadditional options that you want to be used when an archive library is allocated.For example, if you want your archives to be on tape and to be retained for oneyear, your parameter string would look like this: LABEL=(1,SL,,,RETPD=365).
7 Select OK. SAS IT Resource Management returns you to the main menu.8 Select PDB Admin. A menu opens. From the menu, select Config Active PDB
Dictionary. The Dictionary Tables window opens and displays a list of the tablesin the active PDB.
9 Select a table for which you want to enable archiving.10 Select ItemActions. A menu opens. From the menu, select Edit Definition.
The Edit Table window opens.11 In the Archive field, select On.12 Select OK. SAS IT Resource Management returns you to the list of tables.13 Repeat the steps to enable archiving (steps 9 through 12) for any other tables
whose incoming data you want to archive.14 When you are finished enabling the archiving, select File. A menu opens. From
the menu, select End. SAS IT Resource Management returns you to the mainmenu.
Archiving Incoming Data (UNIX, Windows)In the SAS IT Resource Management GUI for UNIX and Windows, you can specify
whether to archive and how to archive the data that is incoming to the detail level byfollowing these steps:
1 Activate the PDB whose incoming data you want to archive, and request writeaccess to the PDB.
For more information about activating a PDB, see “Activating a PDB” on page299. For more information about changing your access to the active PDB, see“Viewing/Editing Your Active PDB’s Access Mode” on page 325.
2 On the main window’s Administration tab, select Manage PDBs. The ManagePDBs window opens.
3 Select Properties. The Set Active PDB Options window opens.4 Select the Archive tab.5 In the Archive Type field, select whether you want a Disk archive or a Tape
archive.6 In the Archive Device field, type the device where you want the archive to
reside. For example, type c:.7 In the Archive Root field, type the directory that you want to use as the archive.
If you leave this field blank, the default value is the location of the PDB. That is,by default, the archive is “under” the PDB. If you want a different location,provide a different value for the field.

Administration: Working with Data � Processing Data 413
8 In the Archive Library Allocation Parameter String field, type anyadditional SAS LIBNAME options that you want to be used when an archivelibrary is allocated.
9 Select OK and then Close. SAS IT Resource Management returns you to the mainwindow.
10 On the main window’s Administration tab, select Manage Tables. The ManageTables window opens and displays a list of the tables in the active PDB.
11 Select a table for which you want to enable archiving.
12 Select File. A menu opens. From the menu, select Properties. The TableProperties window opens.
13 Select the Advanced tab.
14 In the Archive field, select Yes.15 Select OK. SAS IT Resource Management returns you to the list of tables.
16 Repeat the steps to enable archiving (steps 11 through 15) for any other tableswhose incoming data you want to archive.
17 When you are finished enabling the archiving, select Close. SAS IT ResourceManagement returns you to the main window.
Checking for Duplicate DataFor information about duplicate-data checking, see “Appendix 4: Working with
Duplicate Data” in the SAS IT Resource Management macro reference documentation.
Collecting DataThe performance data read by SAS IT Resource Management is collected by
performance data collectors. These data collectors gather data about your informationtechnology systems, such as phone systems, networks, Web servers, and more.
The collector’s data is read, processed into the SAS IT Resource Managementperformance data warehouse (PDB), and reduced into summary levels in the PDB(based on statistics that you select).
For more information about collectors and how they can be set up to work with SASIT Resource Management, see “Overview of Setup” on page 37 and especially “SettingUp the Server, with Setup Cases” on page 38.
Processing DataAfter your site collects data about your information systems, the data is passed from
the data collector to a PDB. You should not begin processing until you have logged datafor at least one day (preferably several days). Moving the data into a SAS IT ResourceManagement PDB is referred to as processing the data. When you process data into thePDB, it goes through the following stages:
1 The raw data is read into staging data sets.2 The data in the staging data sets is sorted based on your list of BY variables
(variables used for sorting) stored in the corresponding table definition in thePDB’s data dictionary. BY variables are defined when you create a table definitionin the PDB’s data dictionary. As new data is processed and reduced into the PDB,existing detail level observations are aged out or deleted if they are older than theage limit that is specified in the PDB’s data dictionary.

414 Processing Data � Chapter 19
3 The staged data sets are then merged with the data sets in the detail level of thePDB. (For information about this topic, see “Tables, Variables, and Definitions in aPDB” in “What Is a PDB?” on page 7.) The data set is referred to as the detail leveldata set because it contains all of the detailed information from your raw data.
4 At the end of the process task, a report is generated about the status of the detaillevel of the PDB.
The tasks of processing data into the PDB must be performed on the host where the SASIT Resource Management server license is installed. Also, you must have write accessto the PDB to perform this task. The tasks of processing and reducing data are usuallyperformed or automated by the SAS IT Resource Management administrator. Foradditional information, see “General-Purpose Server Setup Documentation” on page 12.
When you process data into the PDB, the YEARCUTOFF SAS system option isautomatically set to the year 1950. The YEARCUTOFF option is used to determine thecentury in which a two-digit year value belongs. By setting YEARCUTOFF to 1950, atwo-digit year from 50 to 99 will be assigned 19 as the century and a two-digit yearfrom 00 to 49 will be assigned 20 as the century. Additionally, the YEARCUTOFFoption enables SAS software to use and support both two- and four-digit date values.Therefore, you can specify and process a date that includes a year value of 2001 as 01or as 2001.
Note: For information about using CPFUTURE to process data with futuredatetimes, see “Global and Local Macro Variables” in Chapter 1 of the SAS IT ResourceManagement macro reference documentation. �
You can process data into the active PDB
� in batch mode by using the %CPPROCES macro or an older macro (%CMPROCESfor z/OS, %CSPROCES for UNIX, and %CWPROCES for Windows) in batch mode.
Note: For more information about using macros in batch mode, see Chapter 1 inthe SAS IT Resource Management macro reference documentation and “Workingwith the Interface for Batch Mode” on page 18. For more information about the%CPPROCES macro, see the topic %CPPROCES in the SAS IT ResourceManagement macro reference documentation. For more information about the%CMPROCES macro, see the topic %CMPROCES in the SAS IT ResourceManagement macro reference documentation. For more information about the%CSPROCES macro, see the topic %CSPROCES in the SAS IT ResourceManagement macro reference documentation. For more information about the%CWPROCES macro, see the topic %CWPROCES in the SAS IT ResourceManagement macro reference documentation. �
� interactively by using the Process/Reduce Wizard in the SAS IT ResourceManagement GUI for UNIX and Windows or by selecting PDB Data on the mainmenu of the SAS IT Resource Management GUI for z/OS. For more informationabout using the Process/Reduce Wizard, see the Getting Started with SAS ITResource Management documentation.
For medium to large volumes of data, the batch method is recommended.
Processing Data (z/OS)In the SAS IT Resource Management GUI for z/OS, you can process data by following
these steps:1 Activate the PDB into which you want to process data, and obtain write access to
the PDB. For more information about activating a PDB, see “Activating a PDB” onpage 299. For more information about obtaining access to the PDB, see “Viewing/Editing Your Active PDB’s Access Mode” on page 325.

Administration: Working with Data � Purging Data 415
2 From the main menu, select PDB Data. A menu opens. From the menu, selectProcess Raw Data. The Process Raw Files window opens.
3 Select Actions. A menu opens. Select Set Raw File. The Raw File windowopens.
4 Type the fully qualified name of the file that contains the data that is to beprocessed into the PDB.
5 Select OK.
6 Select Actions. A menu opens. Select Select Collector.
7 Select the name of the collector that acquired the data.
8 Select OK.
9 Select the name of the table or tables into which you want the data processed.
10 Select ItemActions. A menu opens. Select Run Process. The Migrate inProgress window opens. Select OK.
11 When processing is finished, select File. A menu opens. From the menu, selectEnd. SAS IT Resource Management returns you to the main menu.
Processing Data (UNIX, Windows)In the SAS IT Resource Management GUI for UNIX and Windows, you can process
data by following these steps:
1 Activate the PDB into which you want to process data, and obtain write access tothe PDB. For more information about activating a PDB, see “Activating a PDB” onpage 299. For more information about obtaining write access, see “Viewing/EditingYour Active PDB’s Access Mode” on page 325.
2 On the main window’s Administration tab, select Process/Reduce Wizard.
3 Select Process Data into PDB if it is not already selected, and then select Next.
4 Follow the directions in the wizard.
5 When processing is finished, select Close � Close � Return to Main
SAS IT Resource Management returns you to the main window.
Purging DataYou can delete the data from the detail level in all tables in the active PDB or delete
the data from the summary levels in all tables in the active PDB or both
� by using the %CPDBPURG macro in batch mode. For more information about the%CPDBPURG macro, see the topic %CPDBPURG in the SAS IT ResourceManagement macro reference documentation.
You can delete data from a specific table in the active PDB (but keep the table andits definition)
� by using the SAS IT Resource Management GUI for z/OS
� by using the SAS IT Resource Management GUI for UNIX and Windows.
Note: If you want to delete data and also delete the table definition and table thatcontains the data, see “Deleting a Table” on page 361. �
If you want to delete data and also delete the variable definition and variable thatcontains the data, see “Deleting a Regular Variable” on page 403 or “Deleting a DerivedVariable” on page 400.

416 Reducing Data � Chapter 19
Purging Data (z/OS)In the SAS IT Resource Management GUI for z/OS, you can purge data by following
these steps:1 Activate the PDB from which you want to purge data and obtain write access to
the PDB. For more information about activating a PDB, see “Activating a PDB” onpage 299. For more information about obtaining write (OLD) access, see “Viewing/Editing Your Active PDB’s Access Mode” on page 325.
2 From the main menu, select PDB Admin. A menu opens. From the menu, selectConfig Active PDB Dictionary. The Dictionary Tables window opens anddisplays a list of the tables in the active PDB.
3 Select the table from which you want to delete data.4 Select ItemActions. A menu opens. From the menu, select Delete Table. The
Delete Table window opens.5 Select Purge Table if it is not already selected.6 Select OK. SAS IT Resource Management deletes the data but not the table, and
returns you to the Dictionary Tables window.7 Select File. A menu opens. From the menu, select End. SAS IT Resource
Management returns you to the main menu.
Purging Data (UNIX, Windows)In the SAS IT Resource Management GUI for UNIX and Windows, you can purge
data by following these steps:1 Activate the PDB from which you want to delete data and obtain write access to
the PDB. For more information about activating a PDB, see “Activating a PDB” onpage 299. For more information about obtaining write access, see “Viewing/EditingYour Active PDB’s Access Mode” on page 325.
2 From the main menu, select Manage Tables. The Manage Tables window opensand displays a list of the tables in the active PDB.
3 Select the table whose data you want to delete (without removing the table itself).4 Select File. A menu opens. From the menu, select Delete Table Definition.
The Delete Table window opens.5 Select Delete Data in PDB Only if it is not already selected.6 Select OK. SAS IT Resource Management deletes the data without deleting the
table.7 SAS IT Resource Management displays a “data deleted” message. Select OK. SAS
IT Resource Management returns you to the Manage Tables window.8 Select Close. SAS IT Resource Management returns you to the main window.
Reducing DataTo reduce data means to read data from the detail level of the PDB, calculate
summary statistics, and write the summary statistics to the day, week, month, and yearlevels of the PDB. By reducing the data and providing summary statistics at each level,you can analyze your service information in different levels of summarization, overshort or long periods of time.
Data reduction is not only an effective way to view all of your data, but it also savesyou time and space. For example, suppose that the day level contains one observationper hour per disk drive. If one of the fields on that observation is the minimum amountof free space on that drive at that hour, the value for that one observation in the day
Administration: Working with Data � Reducing Data 417
level is based on the corresponding values for an hour’s worth of observations in thedetail level. If you want to use the minimum value in a report, it is faster to read itfrom one observation than to calculate it from many observations. Furthermore, afterthat value (and any other summary statistic) has been calculated and you do not haveany other use for the detail data, the detail data can be deleted.
When your data is reduced from the detail level to the summary levels (day, week,month, and year), it goes through the following stages:
1 For each table
a observations from the detail level are summarized into temporary files, basedon grouping or class variables
b summarized observations are incorporated into the day, week, month, andyear levels
c observations from the detail level and summarized reduction levels aredeleted if the age limit for the data in the detail level is zero days.
2 At the end of the reduce task, a report is generated that indicates the status of allof the levels of the PDB.
For more information, see “Tables, Variables, and Definitions in a PDB” in“What Is a PDB?” on page 7.
The task of reducing data in the PDB must be performed on the host where the SASIT Resource Management server license is installed. You also must have write access tothe PDB to perform this task. The tasks of processing and reducing data are usuallyperformed or automated by an administrator at your site. For additional informationabout setting up your PDB to process and reduce data for a specific collector, refer to“Setting Up the Server, with Setup Cases” on page 38.
You can reduce data into one or more summary levels in a PDB� interactively
� by selecting PDB Data on the main menu in the SAS IT ResourceManagement GUI for z/OS
� or by using the Process/Reduce Wizard in the SAS IT Resource ManagementGUI for UNIX and Windows.
Note: For more information about using the Process/Reduce Wizard, seethe Getting Started with SAS IT Resource Management documentation. �
� in batch mode� by using the %CMPROCES, %CPPROCES, %CSPROCES, or %CWPROCES
macro and the %CPREDUCE macro.
Note: If the data is staged by MXG and if you want to bypass the detaillevel, you need to use the %CMEXTDET macro in batch mode before you usethe %CPREDUCE macro in batch mode. For more information about the%CMEXTDET macro, see the topic %CMEXTDET in the SAS IT ResourceManagement macro reference documentation. �
Note: For more information about the %CPREDUCE macro, see the topic%CPREDUCE in the SAS IT Resource Management macro referencedocumentation. For more information about using macros in batch mode, seeChapter 1 of the SAS IT Resource Management macro referencedocumentation . �
For medium to large volumes of data, the batch method is recommended.If you have an extremely large volume of data, you can bypass processing and
reducing the data from the detail level of the PDB, and read the data directly into thesummary (reduction) levels. For more information, see the DETAIL= parameter on the

418 Retrieving Archived Data � Chapter 19
%CPREDUCE macro (and, for z/OS, see the %CMEXTDET macro). For moreinformation about the %CPREDUCE macro, see the topic %CPREDUCE in the SAS ITResource Management macro reference documentation . For more information aboutthe %CMEXTDET macro, see the topic %CMEXTDET in the SAS IT ResourceManagement macro reference documentation.
Reducing Data (z/OS)In the SAS IT Resource Management GUI for z/OS, you can reduce data by following
these steps:
1 Activate the PDB in which you want to reduce data, and obtain write (OLD)access. For more information about activating a PDB, see “Activating a PDB” onpage 299. For more information about obtaining access to the PDB, see “Viewing/Editing Your Active PDB’s Access Mode” on page 325.
2 From the main menu, select PDB Data. A menu opens. From the menu, selectReduce PDB Data. The Reduce PDB window opens and displays a list of thetables in the active PDB.
3 Select the table(s) whose data you want to reduce.
4 Select ItemActions. A menu opens. Select Run Reduce.
5 When reduction ends, select File. A menu opens. From the menu, select End.SAS IT Resource Management returns you to the main menu.
Reducing Data (UNIX, Windows)In the SAS IT Resource Management GUI for UNIX and Windows, you can reduce
data by following these steps:
1 Activate the PDB in which you want to reduce data, and obtain write access to thePDB. For more information about activating a PDB, see “Activating a PDB” onpage 299. For more information about obtaining write access, see “Viewing/EditingYour Active PDB’s Access Mode” on page 325.
2 On the main window’s Administration tab, select Process/Reduce Wizard.
3 Select Reduce PDB Data if it is not already selected, and then select Next.
4 Follow the directions in the wizard.
5 When reduction is complete, select Close. SAS IT Resource Management returnsyou to the main window.
Retrieving Archived DataYou can retrieve data that was archived for a PDB
� by using the %CPARCRET macro in batch mode.
Note: The %CPARCRET macro does not check for the possibility that some ofthe archive libraries are on tape and some are on disk. It assumes that all are onthe same media as currently defined in the dictionary of the ARCHPDB. �
Note: Archive libraries are retrieved in their entirety. That is, if you request atime span starting at noon, and the archive library starts at 8:00 a.m, the datafrom 8:00 a.m. until noon will also be retrieved. �
For more information about the %CPARCRET macro, see the topic %CPARCRETin the SAS IT Resource Management macro reference documentation.

Administration: Working with Data � Viewing Amount of and Datetime Range of Data 419
Staging DataFor many data sources, SAS IT Resource Management supplies code that stages the
data and supplies table (and variable) definitions that the detail level and summarylevels of the PDB use to store the data. If you want to use data from a source for whichstaging code and table definitions are not supplied, you can process the data into yourPDB by using the Generic Collector Facility.
For more information about the Generic Collector Facility, see “Using the GenericCollector Facility” on page 158. For additional information, see “Overview of Setup” onpage 37.
Viewing Amount of and Datetime Range of DataYou can view the amount of data and the datetime range of the data in the active PDB� by using the SAS IT Resource Management GUI for z/OS� by using the SAS IT Resource Management GUI for UNIX and Windows.
Viewing Amount of and Datetime Range of Data (z/OS)In the SAS IT Resource Management GUI for z/OS, you can view the amount of data
and the datetime range of the data by following these steps:1 From the main menu, select PDB Admin. A menu opens. From the menu, select
Config Active PDB Dictionary. The Dictionary Tables window opens anddisplays a list of the tables in the active PDB.
2 Select the table for which you want to know the amount of data and the datetimerange of the data.
3 Select ItemActions. A menu opens. From the menu, select Table Status. TheTable Status window opens.
4 The columns DateTime of Oldest Data and DateTime of Newest Data displaythe datetime range for the data in each level of the table. Each row displaysinformation for a different level. The column Number of Observations displaysthe amount of data in each level of the table.
5 To return to the Dictionary Tables window, select Goback.6 To return to the main menu, select File. A menu opens. From the menu, select
End.
Viewing Amount of and Datetime Range of Data (UNIX, Windows)In the SAS IT Resource Management GUI for UNIX and Windows, you can view the
amount of data and the datetime range of the data by following these steps:1 On the main window’s Administration tab, select Manage Tables. The Manage
Tables window opens and displays a list of the tables in the active PDB.2 Select the table for which you want to know the amount of data and the datetime
range of the data.3 Select File. A menu opens. From the menu, select Properties. The Table
Properties window opens.4 Select the Table Status tab.
5 The columns DateTime of Oldest Data and DateTime of Newest Data displaythe datetime range for the data in each level of the table. Each row displays

420 Viewing Data Values � Chapter 19
information for a different level. The column # of Obs (Number ofObservations) displays the amount of data in each level of the table.
6 To return to the Manage Tables window, select OK.7 To return to the main window, select Close.
Viewing Data ValuesYou can view the data in the active PDB� by using the SAS IT Resource Management GUI for z/OS� by using the SAS IT Resource Management GUI for UNIX and Windows.
Viewing Data Values (z/OS)In the SAS IT Resource Management GUI for z/OS, you can view the data by
following these steps:1 From the main menu, select PDB Data. A menu opens. From the menu, select
Examine PDB Data. The Query PDB Data window opens.2 Each row identifies a table/level pair, which represents a view named
level-name.table-name. The row also displays the number of observations in thatview and a description of the table for which this is a view.
3 Select the row whose data you want to view.4 Select ItemActions. A menu opens. From the menu, select View Data or Browse
Data.� If you select View Data, the Viewing Table window opens. Each row
represents an observation. (Use page down and page up to scroll throughthe observations). Each column represents a variable. (Issue the commandsright and left to scroll through the variables.)
� If you select Browse Data, the Browsing Table window opens. Eachsubsequent window represents one observation. The observation number is inthe upper-right corner of the window. For each variable, there is a labelfollowed by a value. (Issue the commands forward and back to scrollthrough the observations.)
5 When you are finished looking at the data, select File. A menu opens. From themenu, select Close. SAS IT Resource Management returns you to the Query PDBData window.
6 To return to the main menu, select File. A menu opens. From the menu, selectEnd.
Viewing Data (UNIX, Windows)In the SAS IT Resource Management GUI for UNIX and Windows, you can view the
data by following these steps:1 From the main window’s Administration tab, select Examine PDB Data. The
Examine Data window opens.2 On the left, select the PDB level that you want to view.3 On the right, select the view that you want to see. (For example, DAY.HN2IFT
will enable you to see day-level data in the HN2IFT table.)4 Select Locals. A menu opens. From that menu, select View Data. A window
displays the day data in the HN2IFT view. The rows represent observations

Administration: Working with Data � Handling Time Stamps for Coordinated Universal Time 421
(records). The columns represent variables. The intersection of a row and columnrepresents that row’s value of that variable.
Use the horizontal and vertical scroll bars to reach rows and columns that arenot initially visible.
5 When you are finished viewing the data, select Close. SAS IT ResourceManagement returns you to the Examine Data window.
6 To return to the main window, select Close.
Working with Data: Related Topics
Handling Time Stamps for Coordinated Universal Time
Some performance data contains time stamps expressed as Coordinated UniversalTime (Greenwich Mean Time) rather than local time values. Currently, the only datasources that are supported by SAS IT Resource Management data that use Universaltime in this way are SunNet Manager and Sun Enterprise Manager. The SAS ITResource Management version %CSPROCES macro translates the Universal timestamp to local time before storing the data in the PDB. %CSPROCES uses two PDBoptions to derive local time: the offset of the local time zone from Universal time, andthe Daylight Saving Time expression for the local time zone.
Both of these values can be set by following this path in the SAS IT ResourceManagement GUI for UNIX and Windows: Manage PDBs � select the PDB �
Properties � Time ZoneThe offset of the local time zone is expressed as the difference in hours of the local
time zone from Universal time. For example, Washington DC, USA, is +5; Sydney,Australia, is -10; Wellington, New Zealand, is -12; Calcutta, India, is -5.5; and London,England, is 0.
The calculation of local time is adjusted for Daylight Saving Time based on anexpression that is evaluated as true when Daylight Saving Time is in effect (between2:00 a.m. on the first Sunday in April and 2:00 a.m. on the last Sunday in October). IfDaylight Saving Time is not appropriate for your data, you should blank out theexpression that determines DST on the PDB Properties screen that is identified aboveand the calculation will not be adjusted.
Changes to Daylight Saving Time Expression
If you have PDBs that were created by using any release of SAS/CPE software orSAS IT Resource Management prior to SAS IT Resource Management 1, you shouldupdate the PDBs to contain the following expression to enable Daylight Saving Time(unlike previous expressions, this expression is not date dependent):
* Convert DST expression in a PDB to correct expression;
%CPSTART( pdb=/my/pdb, mode=batch, access=write );data dictlib.cppdbopt;modify dictlib.cppdbopt;if cpdstime^=’ ’ then do;
put ’Was:’ cpdstime;cpdstime=’dhms(mdy(4,8-weekday(mdy4,7,year(datepart
422 Using the YEARCUTOFF SAS System Option � Chapter 19
(datetime)))),year(datepart(datetime))),3,0,0)<datetime<dhms(mdy(10,32-weekday(mdy(10,31,year(datepart(datetime)))),year(datepart(datetime))),2,0,0)’;
put ’Is now:’ cpdstime;end;
run;
Using the YEARCUTOFF SAS System OptionWhen you process data with dates that use a two-digit year value, the value of the
YEARCUTOFF option is used to determine the century for the two-digit date value. Inother words, YEARCUTOFF is used to map the two-digit value to a four-digit value.For example, if you are using a date such as 120101 (MMDDYY), would this daterepresent December 1, 1901 or 2001? When you process data into the PDB, the value ofthe YEARCUTOFF option determines the century for that date value.
The YEARCUTOFF option defines the starting point for a 100-year time span and,therefore, enables SAS and SAS IT Resource Management to determine the appropriateyear for the two-digit value. For example, if YEARCUTOFF=1900, then a two-digit yearbetween 00 and 99 will be assigned 19 as the century because all 100 years fall withinthe 19th century. If YEARCUTOFF=1950, then a two-digit year between 50 and 99 isassigned 19 as the century and a two-digit year between 00 and 49 is assigned 20 asthe century. This is because the 100-year span starts with 1950, so a year of 00 in the100-year span beginning with 1950 would be the year 2000.
The following table provides examples of how three different two-digit year valuesare interpreted based on different YEARCUTOFF values.
Table 19.1 Century Interpretation Based on YEARCUTOFF Value
Incoming Date Value:120100 (mmddyy)
Incoming Date Value:120198 (mmddyy)
Incoming Date Value:120133 (mmddyy)
Year Cutoff Value is1900 (SAS 6 default)
Dec. 1, 1900 Dec. 1, 1998 Dec. 1, 1933
Year Cutoff Value is1920 (SAS 7 and SAS8 default)
Dec. 1, 2000 Dec. 1, 1998 Dec. 1, 1933
Year Cutoff Value is1950 ( SAS ITResource Managementdefault)
Dec. 1, 2000 Dec. 1, 1998 Dec. 1, 2033
When you process data into the PDB, SAS IT Resource Management checks thecurrent setting of the YEARCUTOFF SAS system option. The default value for theYEARCUTOFF SAS system option is 1900 for SAS Version 6, 1920 for SAS Version 7and SAS Version 8, and 1950 for SAS IT Resource Management. Your site can changethis default option within SAS, or you can override it when you process data into a SASIT Resource Management PDB. You can also change the default option within SAS.SAS IT Resource Management automatically changes the value of YEARCUTOFF whenyou process data into a SAS IT Resource Management PDB, in the following situations:
� If the %CMPROCES, %CPPROCES, %CSPROCES, or %CWPROCES macrodetermines that the current value of YEARCUTOFF is lower than the SAS ITResource Management default value of 1950, then SAS IT Resource Management
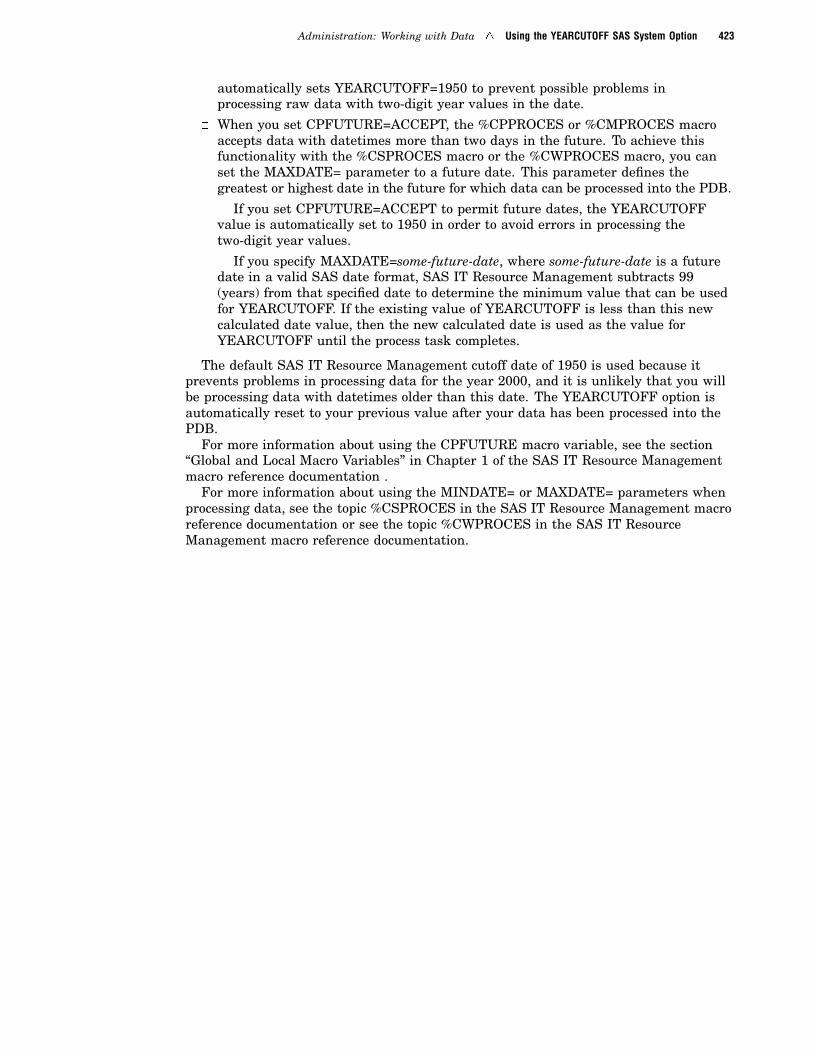
Administration: Working with Data � Using the YEARCUTOFF SAS System Option 423
automatically sets YEARCUTOFF=1950 to prevent possible problems inprocessing raw data with two-digit year values in the date.
� When you set CPFUTURE=ACCEPT, the %CPPROCES or %CMPROCES macroaccepts data with datetimes more than two days in the future. To achieve thisfunctionality with the %CSPROCES macro or the %CWPROCES macro, you canset the MAXDATE= parameter to a future date. This parameter defines thegreatest or highest date in the future for which data can be processed into the PDB.
If you set CPFUTURE=ACCEPT to permit future dates, the YEARCUTOFFvalue is automatically set to 1950 in order to avoid errors in processing thetwo-digit year values.
If you specify MAXDATE=some-future-date, where some-future-date is a futuredate in a valid SAS date format, SAS IT Resource Management subtracts 99(years) from that specified date to determine the minimum value that can be usedfor YEARCUTOFF. If the existing value of YEARCUTOFF is less than this newcalculated date value, then the new calculated date is used as the value forYEARCUTOFF until the process task completes.
The default SAS IT Resource Management cutoff date of 1950 is used because itprevents problems in processing data for the year 2000, and it is unlikely that you willbe processing data with datetimes older than this date. The YEARCUTOFF option isautomatically reset to your previous value after your data has been processed into thePDB.
For more information about using the CPFUTURE macro variable, see the section“Global and Local Macro Variables” in Chapter 1 of the SAS IT Resource Managementmacro reference documentation .
For more information about using the MINDATE= or MAXDATE= parameters whenprocessing data, see the topic %CSPROCES in the SAS IT Resource Management macroreference documentation or see the topic %CWPROCES in the SAS IT ResourceManagement macro reference documentation.

424

425
C H A P T E R
20Administration: Extensions toSAS IT Resource Management
Extensions to SAS IT Resource Management Including Duplicate-Data Checking 425Overview of Extensions 425
Checking for Duplicate Data 426
Collector Support Packages 426
Creating and Installing a Collector Support Package 426
Introduction 427Overview 427
Process Flow 427
Quick Reference to Packaging and Installing Collector-Support Entities 428
Details 432
Creating Your Collector-Support Entities 432
Packaging the Collector-Support Entities 434Checking the Contents of the Package 436
Installing the Package 436
Using Process Exits 442
Overview of Using Process Exits 442
General Information on Exit Points 442Overview 443
How Do I Tell SAS IT Resource Management to Use Process Exits? 443
Which Exit Points Should I Use? 443
How Do I Write My Exit Routines? 444
Are There Any Special Variables Available to My Exits? 445Are There Any Considerations That I Need to Be Aware Of? 446
Information about Specific Exit Points 446
Exit Points for %CPPROCES and %CMPROCES 447
Table of Process Exit Points 447
Specific Locations of Process Exit Points 452
Exit Points for %CSPROCES and %CWPROCES 457Old-Style Process Exits 457
New-Style Process Exits 459
Extensions to SAS IT Resource Management Including Duplicate-DataChecking
Overview of ExtensionsExtensions enable you to add optional capabilities within SAS IT Resource
Management. For example, you can use extensions to

426 Checking for Duplicate Data � Chapter 20
� specify how duplicate data is handled in your PDB(s).� package, distribute, and install user-developed collector support.� alter normal processing of raw data with exit points that pass control to
user-written code that filters or creates data or meets other custom requirements.
For more information about extensions to SAS IT Resource Management, see thefollowing topics:
� “Checking for Duplicate Data” on page 426� “Creating and Installing a Collector Support Package” on page 426� “Overview of Using Process Exits” on page 442.
Checking for Duplicate DataIf you want to understand and/or change how the process task handles duplicate
data, see Appendix 4: “Working with Duplicate Data” in the SAS IT ResourceManagement macro reference documentation.
Collector Support Packages
Creating and Installing a Collector Support PackageNote: This document describes the requirements and methods that are used to
package collector-support entities and then to install them in another SAS IT ResourceManagement location. Although it makes recommendations on how to create yourcollector-support entities, this document is not intended to explain the collector-supportwriting process. Where possible the reader will be directed to other SAS IT ResourceManagement documentation for more detailed information. �
For more information, see the following macros: the topic %CPPKGCOL in Chapter4, “Data Dictionary Macro and Control Statements” in the SAS IT ResourceManagement macro reference documentation, the topic %CPRPTPKG in Chapter 4,“Data Dictionary Macro and Control Statements” in the SAS IT Resource Managementmacro reference documentation, and the topic %CPINSPKG in Chapter 4, “DataDictionary Macro and Control Statements” in the SAS IT Resource Management macroreference documentation.
The following topics describe how to create and install a collector package:� “Introduction” on page 427� “Overview” on page 427
� Process Flow� Quick Reference to Packaging and Installing Collector-Support Entities
� Creating Your Collector-Support Entities� Packaging Your Collector-Support Entities� Listing Contents of the Package� Installing Your Collector-Support Entities.
� “Details” on page 432� Installing Your Collector-Support Entities
� Staging Code

Administration: Extensions to SAS IT Resource Management � Overview 427
� Defining Tables and Variables
� Formats
� Duplicate-Data Checking
� Reports
� Exception Rules
� Documentation
� User Exits.
� Packaging the Collector-Support Entities
� Package Example
� Checking on Contents of a Package
� Example of Reporting on a Package.
� Install Package
� Example of Installing a Package
� Installed Location of Collector-Support Entities
� Discussion of the REPLACE= Option on %CPINSPKG
� Installing to PGMLIB
� Installing to SITELIB
� Installing to ADMIN.
IntroductionSAS IT Resource Management has always provided the ability for users to write
their own support for data collectors or data sources when support is not supplied aspart of the product. Once written, these collector-support entities did not have the “feel”of being an integrated part of SAS IT Resource Management; also, it was difficult toshare or distribute them.
The package functionality enables users to package their collector-support entitiesand to install them into a SAS IT Resource Management location. This is beneficialbecause the collector-support entities will appear and behave like the supplied collectorsupport; this includes having the ability to use the Process/Reduce Wizard.
For more information about the macros that are mentioned here, see the SAS ITResource Management Software macro reference documentation .
OverviewThis section provides an overview of the packaging process from writing your own
collector-support entities through packaging and installing the collector-supportentities. The intention is that the overview will provide sufficient information for thoseusers who have experience in writing collector-support entities and have an in-depthknowledge of SAS IT Resource Management. For users new to this process, it providesa more concise version of the “Details” section that follows.
Process FlowThe following diagram briefly explains the process flow of generating a collector
package through to installation.

428 Overview � Chapter 20
Quick Reference to Packaging and Installing Collector-Support EntitiesThe following sections give a brief example of how the process works. The “Details”
section that follows provides more information about each stage.
Creating Your Collector-Support EntitiesFor detailed instructions about how to write support for your own collector, see theGeneric Collector Facility documentation in the “Setup the Server” topic of the“Administration: Setup” section of the online help for SAS IT ResourceManagement. If you already have collector support that you use with the GenericCollector Facility, then converting it to a package and installing it is a relativelyeasy process. The following table shows a list of SAS IT Resource Managemententities that are packaged as part of collector support. If the required field is setto Yes, then that SAS IT Resource Management entity must exist in order for avalid package to be constructed.
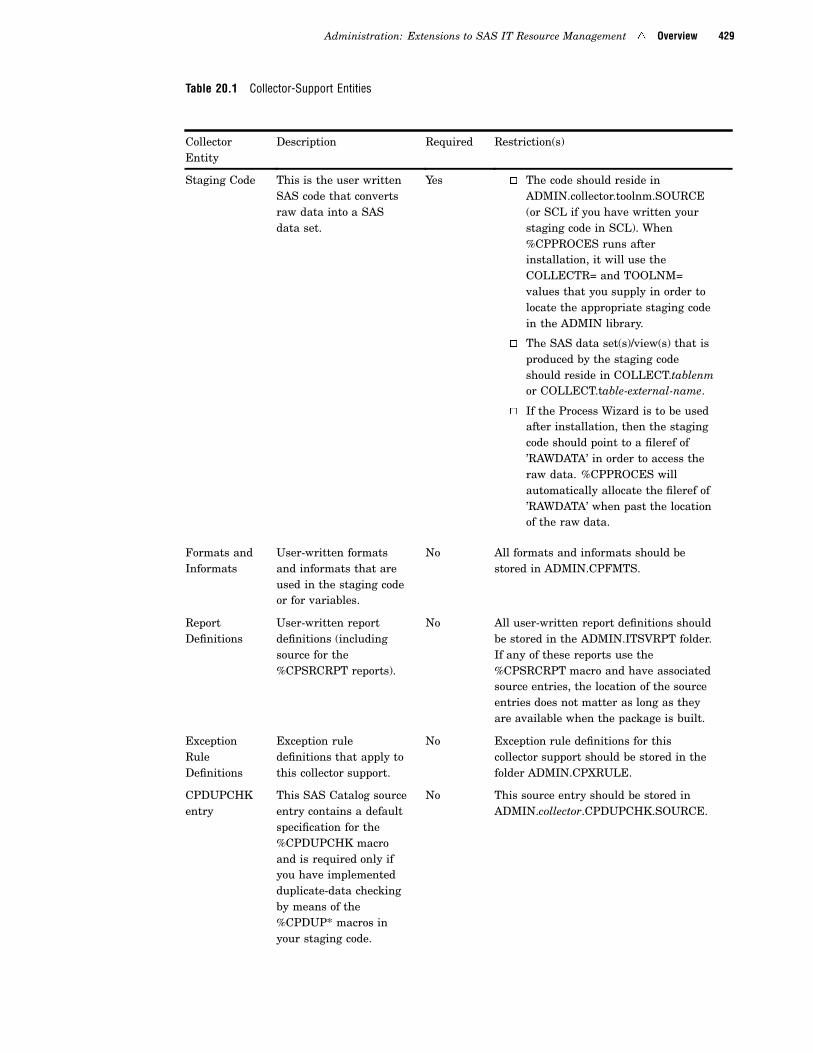
Administration: Extensions to SAS IT Resource Management � Overview 429
Table 20.1 Collector-Support Entities
CollectorEntity
Description Required Restriction(s)
Staging Code This is the user writtenSAS code that convertsraw data into a SASdata set.
Yes � The code should reside inADMIN.collector.toolnm.SOURCE(or SCL if you have written yourstaging code in SCL). When%CPPROCES runs afterinstallation, it will use theCOLLECTR= and TOOLNM=values that you supply in order tolocate the appropriate staging codein the ADMIN library.
� The SAS data set(s)/view(s) that isproduced by the staging codeshould reside in COLLECT.tablenmor COLLECT.table-external-name.
� If the Process Wizard is to be usedafter installation, then the stagingcode should point to a fileref of’RAWDATA’ in order to access theraw data. %CPPROCES willautomatically allocate the fileref of’RAWDATA’ when past the locationof the raw data.
Formats andInformats
User-written formatsand informats that areused in the staging codeor for variables.
No All formats and informats should bestored in ADMIN.CPFMTS.
ReportDefinitions
User-written reportdefinitions (includingsource for the%CPSRCRPT reports).
No All user-written report definitions shouldbe stored in the ADMIN.ITSVRPT folder.If any of these reports use the%CPSRCRPT macro and have associatedsource entries, the location of the sourceentries does not matter as long as theyare available when the package is built.
ExceptionRuleDefinitions
Exception ruledefinitions that apply tothis collector support.
No Exception rule definitions for thiscollector support should be stored in thefolder ADMIN.CPXRULE.
CPDUPCHKentry
This SAS Catalog sourceentry contains a defaultspecification for the%CPDUPCHK macroand is required only ifyou have implementedduplicate-data checkingby means of the%CPDUP* macros inyour staging code.
No This source entry should be stored inADMIN.collector.CPDUPCHK.SOURCE.
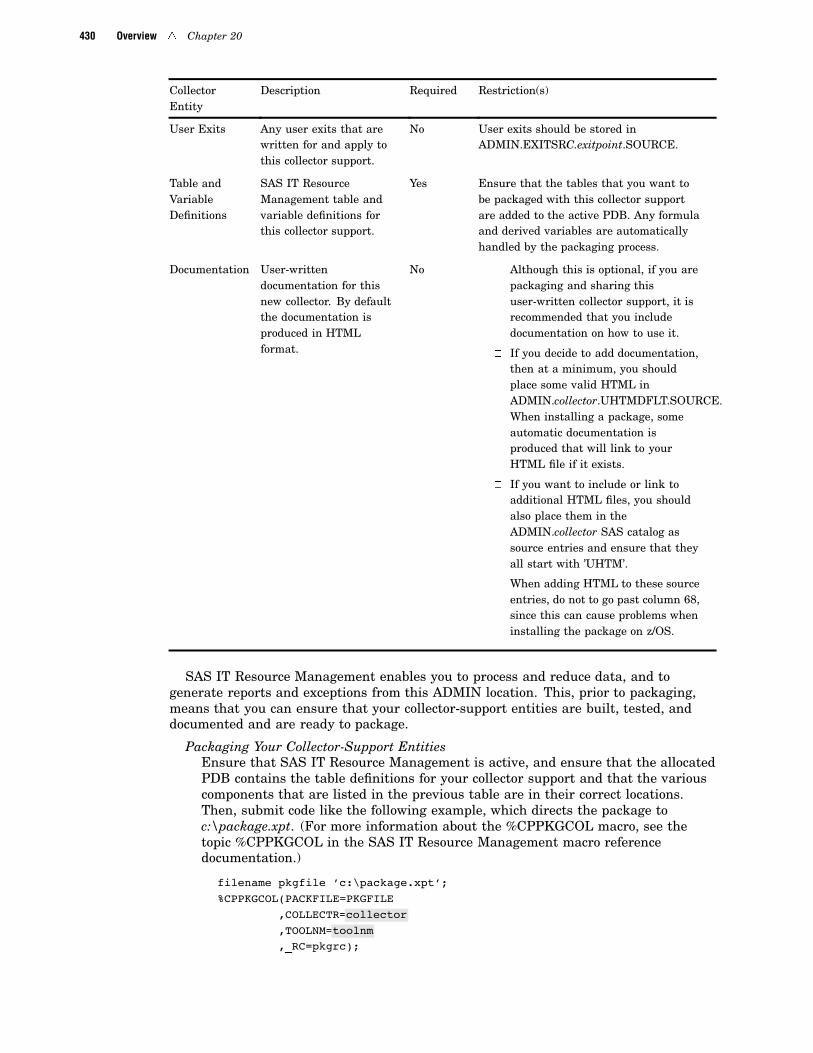
430 Overview � Chapter 20
CollectorEntity
Description Required Restriction(s)
User Exits Any user exits that arewritten for and apply tothis collector support.
No User exits should be stored inADMIN.EXITSRC.exitpoint.SOURCE.
Table andVariableDefinitions
SAS IT ResourceManagement table andvariable definitions forthis collector support.
Yes Ensure that the tables that you want tobe packaged with this collector supportare added to the active PDB. Any formulaand derived variables are automaticallyhandled by the packaging process.
Documentation User-writtendocumentation for thisnew collector. By defaultthe documentation isproduced in HTMLformat.
No � Although this is optional, if you arepackaging and sharing thisuser-written collector support, it isrecommended that you includedocumentation on how to use it.
� If you decide to add documentation,then at a minimum, you shouldplace some valid HTML inADMIN.collector.UHTMDFLT.SOURCE.When installing a package, someautomatic documentation isproduced that will link to yourHTML file if it exists.
� If you want to include or link toadditional HTML files, you shouldalso place them in theADMIN.collector SAS catalog assource entries and ensure that theyall start with ’UHTM’.
� When adding HTML to these sourceentries, do not to go past column 68,since this can cause problems wheninstalling the package on z/OS.
SAS IT Resource Management enables you to process and reduce data, and togenerate reports and exceptions from this ADMIN location. This, prior to packaging,means that you can ensure that your collector-support entities are built, tested, anddocumented and are ready to package.
Packaging Your Collector-Support EntitiesEnsure that SAS IT Resource Management is active, and ensure that the allocatedPDB contains the table definitions for your collector support and that the variouscomponents that are listed in the previous table are in their correct locations.Then, submit code like the following example, which directs the package toc:\package.xpt. (For more information about the %CPPKGCOL macro, see thetopic %CPPKGCOL in the SAS IT Resource Management macro referencedocumentation.)
filename pkgfile ’c:\package.xpt’;%CPPKGCOL(PACKFILE=PKGFILE
,COLLECTR=collector,TOOLNM=toolnm,_RC=pkgrc);

Administration: Extensions to SAS IT Resource Management � Overview 431
%put Return code is &pkgrcfilename pkgfile clear;
After this macro runs successfully, you will have a single package file that containsall the collector-support entities. This package can now be used to install yourcollector-support entities on either this SAS IT Resource Management installation oranother. If the SAS IT Resource Management installation is in a different operatingenvironment, then the package should be moved to that operating environment byusing binary FTP.
Listing Contents of the PackageTo list the contents of the package and see any documentation that has beenincluded, you should ensure that SAS IT Resource Management is active and thensubmit the %CPRPTPKG macro from the SAS Program Editor window. Here is anexample:
filename pkgfile ’c:\package.xpt’;
%CPRPTPKG(PACKFILE=PKGFILE,DOCLOC=output-location,_RC=pkgrc);
%put Return code is &pkgrc
filename pkgfile clear;
After this macro runs successfully, the output location will contain HTML files (seenote on z/OS, below) of which one is default.htm. Open this file in a browser. It willcontain information about the package, and it will also have a link to any userdocumentation that might have been included in the package.
For more information about the %CPRPTPKG macro, see the topic %CPRPTPKG inthe SAS IT Resource Management macro reference documentation.
Note: On z/OS, the HTML files can be written to the z/OS UNIX File System or to apartitioned data set. If the HTML files have been written to a partitioned data set, thenthey need to be FTP’d to an alternative location in order to be viewed by means of aWeb browser. �
Installing Your Collector-Support EntitiesNote: When you install a user-written collector, it is recommended that you
make a full backup of your SAS IT Resource Management installation,particularly the destination libref that is specified on the %CPINSPKG macro. �
This document assumes that you will install the package into PGMLIB.In order to perform the installation successfully, you should ensure that the
person who performs the installation has “write” authority to the destination librefthat is specified on the DEST= parameter and to the location that is specified inthe DOCLOC= parameter. Start SAS IT Resource Management interactively andthen choose to ’Exit SAS IT Resource Management Only.’ Then, you can run the%CPINSPKG macro from the SAS Program Editor window. (For more informationabout the %CPINSPKG macro, see the topic %CPINSPKG in the SAS IT ResourceManagement macro reference documentation.) Here is an example:
filename pkgfile ’c:\package.xpt’;%CPINSPKG(PACKFILE=PKGFILE
,DEST=PGMLIB,REPLACE=NOREPLACE,DOCLOC=output-location,_RC=pkgrc);

432 Details � Chapter 20
%put Return code is &pkgrcfilename pkgfile clear;
After this macro runs successfully, your collector-support entities will be installed tothe destination and ready for processing data and for reporting.
DetailsThere are four stages in generating and installing a collector package. The most
complicated task is actually writing and setting up the collector-support entities. Thedegree of difficulty depends on the features that the collector-support writer decides toimplement and the complexity of the data source format.
Creating Your Collector-Support EntitiesThe following describes the collector-support entities that can be packaged by the
%CPPKGCOL macro. Some of the entities are required; that is, they must exist beforethe package will be created. The others are optional. At the start of each entitydescription, a small summary discusses whether the entity is required and where itshould be stored in order to be packaged by the %CPPKGCOL macro.
Staging Code
� Required
� Location - ADMIN.collector.toolnm.SOURCE | SCL
For information about writing staging code, see the “Use the Generic CollectorFacility” topic of the “Administration: Extensions to SAS IT Resource Management”section of the online help for SAS IT Resource Management. Although that documentdiscusses writing a collector support that uses the Generic Collector Facility, theprocesses are almost identical. The following table lists the differences.
Table 20.2 Staging Code Differences
Staging CodeFeature
Collector Support Usingthe Generic CollectorFacility
Collector Support Not Using the GenericCollector Facility
Collector Value Restricted to GENERIC User defined, although must begin with a ’U’ andshould be no longer than 8 characters (lettersand numbers).
Tool Name Value SASDS User defined, although normally this is left asSASDS.
RawdataReference
The file reference to theraw data can be anythingbecause the user writesand controls thesubmission of this code.
%CPPROCES automatically sets the value of the&CPRAWDAT macro variable to the path andname of the external file as specified in theRAWDATA= parameter. This macro variable canbe used to obtain and set the RAWDATA fileref.
Location ofstaging code
No fixed location as long asit is executed prior to%CPPROCES.
Should be created inADMIN.collector.toolnm.SOURCE. %CPPROCESwill use the COLLECTR= and TOOLNM=parameters to locate the staging codeautomatically.

Administration: Extensions to SAS IT Resource Management � Details 433
Staging CodeFeature
Collector Support Usingthe Generic CollectorFacility
Collector Support Not Using the GenericCollector Facility
Execution ofstaging code
The staging code has to beincluded and run prior to%CPPROCES.
The staging code is automatically included by%CPPROCES by using the COLLECTR= andTOOLNM= parameters to locate the staging code.
Process WizardFunctionality
Restricted to using defaultfunctionality for GENERICcollectors.
When packaging user-written collector support,you can set which options are made available viathe Process Wizard for this COLLECTR/TOOLNM pair. When installed, thatfunctionality will be available in the ProcessWizard.
Defining Tables and Variables
� Required
� DICTLIB
For information about defining tables and variables, see the “Use the GenericCollector Facility” topic of the “Administration: Extensions to SAS IT ResourceManagement” section of the online help for SAS IT Resource Management.
Formats Optional
� Optional
� ADMIN.CPFMTS
User-written formats and informats that are used in either staging code, variabledefinitions, report definitions, etc., for this collector should be placed inADMIN.CPFMTS.
For information about creating user-defined formats and informats, see the “Use theGeneric Collector Facility” topic of the “Administration: Extensions to SAS IT ResourceManagement” section of the online help for SAS IT Resource Management.
Duplicate-Data Checking
� Optional� ADMIN.collector.CPDUPCHK.SOURCE
A good understanding of how duplicate-data checking works (as implemented by the%CPDUP* macros) in %CPPROCES is required. For information about this, see the“User-Generated Table Definitions and Non-MXG-Based Staging Code” topic in“Appendix 4: Working with Duplicate Data” in the macro reference.
There are two stages to implementing duplicate-data checking:1 Create an ADMIN.collector.CPDUPCHK.SOURCE SAS catalog source entry that
contains a %CPDUPCHK macro with your recommended default values.
2 Modify your staging code to incorporate the duplicate data macros andfunctionality. For detailed information about this, see “Using the Generic CollectorFacility” on page 158.
Reports
� Optional
� ADMIN.ITSVRPT report folder
Ensure that all report definitions that you write for this user-written collectorsupport are stored in the ADMIN.ITSVRPT report folder, because this is the locationthat will be searched when creating the package.

434 Details � Chapter 20
If you define any source reports, then store that source code in a SAS catalog sourceentry. It does not matter where these source entries are stored as long as they areavailable when generating the reports and running the %CPPKGCOL macro.
Exception Rules
� Optional
� ADMIN.CPXRULE report folder
Ensure that all exception rule definitions that you write for this user-writtencollector support are stored in the ADMIN.CPXRULE exception folder, because this isthe location that will be searched when creating the package.
Documentation
� Optional� ADMIN.collector.UHTMDFLT.SOURCE (and possibly other
UHTM*.SOURCE entries)
When the %CPRPTPKG or %CPINSPKG macros run, they automatically generateHTML documentation that provides information about the contents of the package. Inaddition, the authors who created the collector-support entities can optionally supplytheir own HTML documentation that will be packaged by the %CPPKGCOL macro andgenerated along with the automatic documentation.
If you decide to add documentation, then at a minimum you should place some validHTML in ADMIN.collector.UHTMDFLT.SOURCE. When the automatic documentationis generated, it will automatically link to this file. The contents of this UHTMDFLTHTML file are up to you. The only requirement is that they must contain valid HTML.If you want to add other HTML files that are linked to from this default location, thencreate them in ADMIN.collector.UHTMxxxx.SOURCE, where xxxx is any character validfor a SAS catalog source entry name. All the HTML files that are packaged will beplaced in a single directory by the %CPRPTPKG or %CPINSPKG macros.
User Exits
� Optional
� ADMIN.EXITSRC.exit.SOURCE
All user exit routines should be stored in ADMIN.EXITSRC.exitpoint.SOURCE. Formore information about process exits, see “Overview of Using Process Exits” on page442.
Packaging the Collector-Support EntitiesSAS IT Resource Management enables you to run and use the collector support that
you have written while it is in the ADMIN library. However, you might want topackage these collector-support entities in order to install them at other locations.Alternatively, you might want to install them into SITELIB or PGMLIB so that otherPDB’s can easily be created. Additionally, after installation by the %CPINSPKG macro,your collector support will be inserted into the Process Wizard functionality.
Before packaging the entities that you have written for this collector support, youshould test them in their ADMIN location to be certain that everything is working.
The packaging macro %CPPKGCOL knows where to look for the collector-supportentities that you have written. It will automatically package the staging code, formatsand informats, table and variable definitions (including formula and derived variables),exception rule and report definitions, and documentation and user exits. In addition tothis information, you can specify several other parameters that, after the package isinstalled, will dictate the options/functions that will be available by means of theProcess Wizard and also what operating environments the user-written collector

Administration: Extensions to SAS IT Resource Management � Details 435
support will run on. For more information about the %CPPKGCOL macro and itsparameters, see the topic %CPPKGCOL in the SAS IT Resource Management macroreference documentation.
Package Example
filename pkgfile ’c:\package.xpt’; (1)
%CPPKGCOL(PACKFILE=PKGFILE (2),COLLECTR=UMYDATA (3),TOOLNM=SASDS (4),OPSYS=WIN OSYS MVS (5),RAWDIR=YES (6),DUPMODE=OPTIONAL (7),_RC=pkgrc); (8)
%put Return code is &pkgrc
filename pkgfile clear; (9)
Explanation of the above lines of code:
1 This first statement allocates a file that will contain the package. Internally, thisfile will be a SAS transport file that is created by the PROC CPORT macro;however, it contains additional information and is constructed in a format that isused by the %CPINSPKG macro to install the collector-support entities in thespecified destination.
2 PACKFILE= refers to the fileref that is already allocated.
3 COLLECTR= specifies the value that you used for your collector support. Thisvalue, along with the value of the TOOLNM= parameter, assists in extracting theappropriate collector-support entities and inserting them into the package file.
4 TOOLNM= this is the value for tool name that you used for your collector support.This value, along with the value of the COLLECTR= parameter, assists inextracting the appropriate collector-support entities and inserting them into thepackage file.
5 OPSYS= is optional and provides the package with information regarding theoperating environments on which this collector support has been tested. In theexample shown, this user collector support has been written and tested to run onWindows operating environments, OSYS (UNIX operating environments), andMVS (z/OS mainframe). These three values are the only valid options. If notspecified, the default value that is passed to this parameter is based on theoperating system where the package was created. This means that the collectorsupport will run ONLY on that system.
6 RAWDIR= is one of several parameters that determine the behavior of the ProcessWizard for this user-written collector support. The RAWDIR= parameterdetermines whether the Process Wizard window that is used to point to the rawdata enables the user to point to a directory rather than an individual file. Bydefault, this option is set to NO, which means that the Process Wizard will allowonly an individual file to be specified. However, if the staging code has beenwritten in such a way that it can process multiple files from a directory, then thisoption should be set to YES.
7 DUPMODE=OPTIONAL also determines the behavior of the Process Wizard. Ifthe user-written collector support has been written to implement theduplicate-data-checking macros, then setting this value to OPTIONAL means thatthe Process Wizard will enable the user to set the DUPMODE= parameter.

436 Details � Chapter 20
8 _RC= enables the user to specify the name of a macro variable that will containthe value of the return code from this macro.
9 This final statement releases the fileref that was originally allocated for thepackage.
Note: After this macro has been run, the package file can be FTP’d in binary modeto any operating environment and installed. (See “Installing Package” below.) �
Checking the Contents of the PackageIf you are provided with a package file and you are not familiar with its contents,
then you can use the %CPRPTPKG macro to generate HTML documentation thatdescribes the contents of the package.
At a minimum, the package will produce a default.htm file that contains informationabout the contents of the package and when the package was created. This informationis generated automatically by the %CPRPTPKG macro. If the user who created thepackage also supplied documentation, that documentation is generated and is linked toautomatically from the default.htm page.
This macro does NOT install any of the collector-support entities. This macro merelyunloads the documentation from the package.
Example of Reporting on Package
filename pkgfile ’c:\package.xpt’; (1)
%CPRPTPKG(PACKFILE=PKGFILE (2),DOCLOC=C:\DOCLOC (3),_RC=rptrc); (4)
%put Return code is &rptrc
filename pkgfile clear; (5)
Explanation of the above lines of code:
1 This first statement allocates a file that will contains the package.
2 PACKFILE= refers to the fileref that is already allocated to the package file.
3 DOCLOC= points to an existing directory (UNIX, Windows, z/OS (the z/OS UNIXFile System)) or partitioned data set (z/OS) in which this macro will place theHTML documentation.
4 _RC= enables the user to specify the name of a macro variable that will containthe value of the return code from this macro.
5 This final statement releases the fileref that was originally allocated for thepackage.
Installing the PackageBefore installing any package to a SAS IT Resource Management installation, make
sure that you have a current backup of that installation that can be restored, in casethere are any problems. Also, you must have write access to the destination library.
One of the checks that are performed by the %CPINSPKG macro is to compare theSAS IT Resource Management software version and dictionary version on which thepackage was created with that of the target installation. If they differ, then the packagewill not be installed unless the appropriate FORCE= option is specified. A package thathas different software or dictionary version cannot be guaranteed to be installedcorrectly (or even work correctly, if installed).

Administration: Extensions to SAS IT Resource Management � Details 437
Prior to installing the package, you need to decide where in the SAS IT ResourceManagement installation you want the collector support to be installed. At present, youcan install to ADMIN, SITELIB, or PGMLIB. Each of these locations has its advantagesand disadvantages, which are covered later in this document.
Example of Installing a Package
filename pkgfile ’c:\package.xpt’; (1)
%CPINSPKG(PACKFILE=PKGFILE (2),DEST=PGMLIB (3),REPLACE=NOREPLACE (4),DOCLOC=output-location (5),_RC=pkgrc); (6)
%put Return code is &pkgrc
filename pkgfile clear; (7)
Explanation of the above lines of code:1 This first statement allocates a file that will contain the package. Internally, this
file is a SAS transport file that is created by the %CPPKGCOL macro. However, itcontains additional information and is constructed in a format that is used by the%CPINSPKG macro to install the collector-support entities to a destination.
2 PACKFILE= refers to the fileref that is already allocated to the package file.3 DEST= points to the destination libref into which the collector-support entities
will be installed.4 REPLACE= determines what should happen if any collector-support entity for this
collector support already exists. See the discussion of this option, below, for moreinformation.
5 DOCLOC= points to an existing directory or folder (on UNIX, Windows, or the z/OS UNIX File System) or a partitioned data set (on z/OS) in which this macro willplace the HTML documentation.
6 _RC= enables the user to specify the name of a macro variable that will containthe value of the return code from this macro.
7 This final statement releases the fileref that was originally allocated for thepackage.
Installed Location of Collector-Support EntitiesThe following table shows the source location of the collector-support entities; thatis, it shows the location in which they should be created. It also shows thedestination of the collector-support entities, when installed by the %CPINSPKGmacro, based on the different values of the DEST= parameter.

438 Details � Chapter 20
Table 20.3 Source Locations for Collector-Support Entities
Entity Source Destination
Staging Code ADMIN.collector.toolnm.SOURCE|SCL ADMIN:ADMIN.collector.toolnm.SOURCE|SCL
SITELIB:SITELIB.collector.toolnm.SOURCE|SCL
PGMLIB:PGMLIB.collector.toolnm.SOURCE|SCL
Duplicate-Data Checking ADMIN.collector.CPDUPCHK.SOURCE ADMIN:ADMIN.collector.CPDUPCHK.SOURCE
SITELIB:SITELIB.collector.CPDUPCHK.SOURCE|SCL
PGMLIB:SITELIB.collector.CPDUPCHK.SOURCE|SCL
Table Definitions DICTLIB.TABINFO ADMIN: DICTLIB.TABINFO
SITELIB: DICTLIB.TABINFO
PGMLIB: DICTLIB.TABINFOPGMLIB.TABINFO
Variable Definitions DICTLIB.VARINFO ADMIN: DICTLIB.VARINFO
SITELIB: DICTLIB.VARINFO
PGMLIB: DICTLIB.VARINFOPGMLIB.VARINFO
Formats and Informats ADMIN.CPFMTS ADMIN: ADMIN.CPFMTS
SITELIB: SITELIB.CPFMTS
PGMLIB: PGMLIB.CPFMTS
Reports ADMIN.ITSVRPT ADMIN: ADMIN.ITSVRPT
SITELIB: SITELIB.ITSVRPT
PGMLIB: PGMLIB.ITSVRPT
Exception Rules ADMIN.CPXRULE ADMIN: ADMIN.CPXRULE
SITELIB: SITELIB.CPXRULE
PGMLIB: PGMLIB.CPXRULE
User Process Exits ADMIN.EXITSRC ADMIN: ADMIN.EXITSRC
SITELIB.EXITSRC
PGMLIB: PGMLIB.EXITSRC
Discussion of the REPLACE= Option on %CPINSPKGThe REPLACE= option has four possible settings: REPLACE, NOREPLACE,APPEND, and MERGE. NOREPLACE is the default. The behavior of each of theREPLACE= options depends on the type of entity that is being installed to adestination. For example, a SAS data set type will be handled differently from aSAS catalog source entry. The REPLACE= options facilitate the ability to installcollector-support entities from a newer version of a package that might have beenupdated or to which additional entities might have been added.
The following table describes how each of the collector-support entities is affected bythe different REPLACE= options.

Administration: Extensions to SAS IT Resource Management � Details 439
Table 20.4 Effect of REPLACE= Option on Collector-Support Entities
Entity Entity Type REPLACE= Option Description of Behavior
NOREPLACE If the destination catalog sourceentry does not exist, then it iscreated. If the destination catalogsource entry already exists, thenthe %CPINSPKG macro stops anddoes not perform the installation.
REPLACE, MERGE If the destination catalog sourceentry already exists, it is removedand the new one from the packageis installed in its place.
Staging Code,CPDUPCHKSource Entry
SAS CatalogSource Entry
APPEND If the destination catalog sourceentry already exists, it is NOToverwritten, and the new one isNOT installed, but the installationcontinues.
NOREPLACE If the destination SAS data set doesnot exist, it is created. If thedestination SAS data set exists buthas no conflicting definitions, thenthe new definitions are appended.If there are conflicting definitions,then processing stops.
REPLACE If the destination SAS data setexists and already containsdefinitions that could conflict withthe package, then they are removedbefore the new definitions from thepackage are added.
APPEND If the destination SAS data setexists and already containsdefinitions that conflict with thosethat are coming from the package,only the non-conflicting ones areadded from the package.*
ReportDefinitions,Exception RuleDefinitions,PDB Table andVariableDefinitions
SAS Data Set
MERGE If the destination SAS data setexists and contains definitions thatconflict with those that are comingfrom the package, all newdefinitions are added, overwritingany existing ones if necessary.*
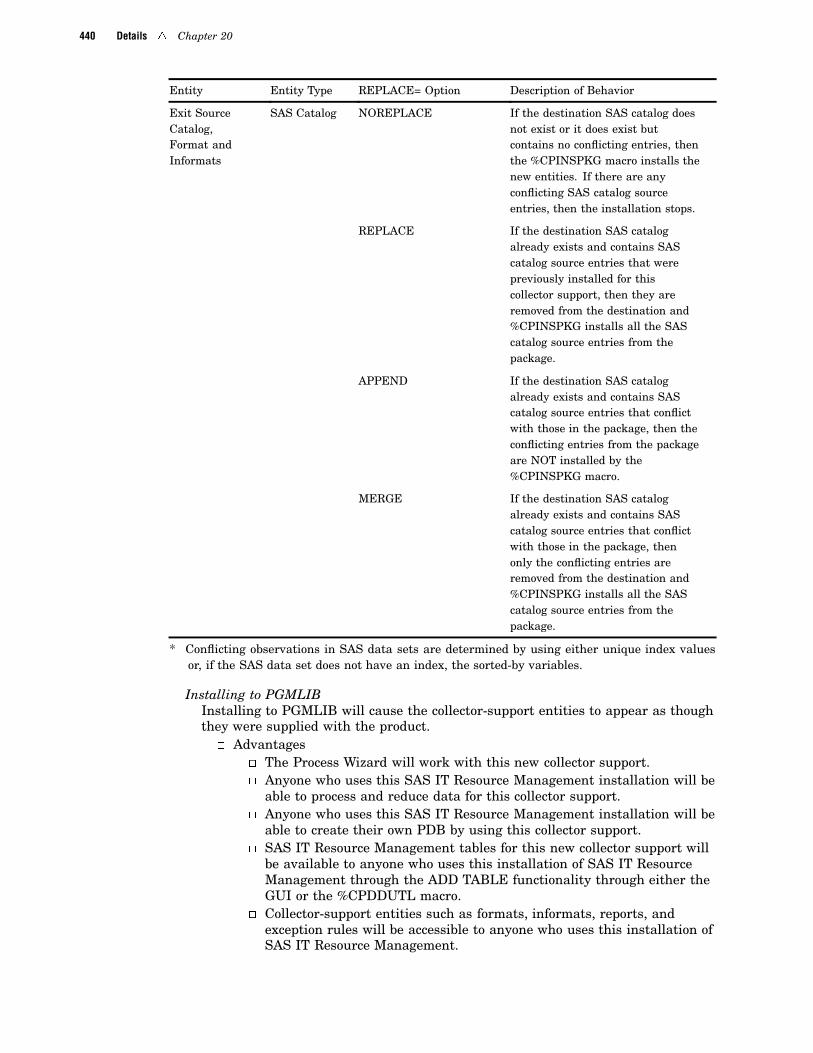
440 Details � Chapter 20
Entity Entity Type REPLACE= Option Description of Behavior
NOREPLACE If the destination SAS catalog doesnot exist or it does exist butcontains no conflicting entries, thenthe %CPINSPKG macro installs thenew entities. If there are anyconflicting SAS catalog sourceentries, then the installation stops.
REPLACE If the destination SAS catalogalready exists and contains SAScatalog source entries that werepreviously installed for thiscollector support, then they areremoved from the destination and%CPINSPKG installs all the SAScatalog source entries from thepackage.
APPEND If the destination SAS catalogalready exists and contains SAScatalog source entries that conflictwith those in the package, then theconflicting entries from the packageare NOT installed by the%CPINSPKG macro.
Exit SourceCatalog,Format andInformats
SAS Catalog
MERGE If the destination SAS catalogalready exists and contains SAScatalog source entries that conflictwith those in the package, thenonly the conflicting entries areremoved from the destination and%CPINSPKG installs all the SAScatalog source entries from thepackage.
* Conflicting observations in SAS data sets are determined by using either unique index valuesor, if the SAS data set does not have an index, the sorted-by variables.
Installing to PGMLIBInstalling to PGMLIB will cause the collector-support entities to appear as thoughthey were supplied with the product.
� Advantages� The Process Wizard will work with this new collector support.� Anyone who uses this SAS IT Resource Management installation will be
able to process and reduce data for this collector support.� Anyone who uses this SAS IT Resource Management installation will be
able to create their own PDB by using this collector support.� SAS IT Resource Management tables for this new collector support will
be available to anyone who uses this installation of SAS IT ResourceManagement through the ADD TABLE functionality through either theGUI or the %CPDDUTL macro.
� Collector-support entities such as formats, informats, reports, andexception rules will be accessible to anyone who uses this installation ofSAS IT Resource Management.
Administration: Extensions to SAS IT Resource Management � Details 441
� Read-only access to PGMLIB by users prevents the collector-supportentities from being modified.
� Disadvantages� When SAS IT Resource Management is reinstalled or upgraded, then
the package will have to be reapplied.� Modifying the collector-support entities after installation is more
difficult because they were placed in PGMLIB; however, if modificationsare likely, then PGMLIB is probably not the appropriate destination.
Installing to SITELIBInstalling to SITELIB will enable anyone with read access to this SITELIB to usethese collector-support entities.
� Advantages� The Process Wizard will work with this new collector support.� Anyone who uses this SAS IT Resource Management installation with
this SITELIB will be able to process and reduce data for this collectorsupport.
� Collector-support entities such as formats, informats, reports andexception rules will be accessible to anyone who uses this SITELIBwhen invoking SAS IT Resource Management.
� Read-only access to SITELIB by users prevents the collector-supportentities from being modified, although this can be changed by usersthrough the %CPSTART macro.
� Disadvantages� To construct other PDBs for data from this collector, you would have to
make a %CPDDUTL GENERATE SOURCE run to create the necessary%CPDDUTL control statements for the tables and variables. Thesecontrol statements could then be used to add the tables to other PDBs.These PDBs would have to use the same SITELIB in order to pick upthe other collector-support entities.
� SAS IT Resource Management tables for this new collector support willNOT be available through the ADD TABLE functionality through eitherthe GUI or the %CPDDUTL macro.
� When SAS IT Resource Management is reinstalled or upgraded, thenthe package will have to be reapplied (or the %CPSITEUP macro can beused to copy the entities from the old SITELIB).
Installing to ADMINInstalling to ADMIN will enable anyone with read access to this PDB to use thesecollector-support entities.
� Advantages� The Process Wizard will work with this new collector support.� ADMIN is useful when you are in the early stages of modifying or
upgrading the collector-support entities and repackaging.� When SAS IT Resource Management is reinstalled or upgraded, then
the package will NOT have to be reapplied.
� Disadvantages� To construct other PDBs for data from this collector, you would have run
the %CPINSPKG macro and install the collector-support entities to adifferent ADMIN, or to SITELIB or PGMLIB.

442 Using Process Exits � Chapter 20
� Only when this PDB is active will anyone be able to use this collector’ssupport entities.
� SAS IT Resource Management tables for this new collector support willNOT be available to anyone who uses this installation of SAS ITResource Management through the ADD TABLE functionality througheither the GUI or the %CPDDUTL macro.
Using Process Exits
Overview of Using Process ExitsThe %CMPROCES, %CPPROCES, %CSPROCES, and %CWPROCES macros have
exit points for which you can provide exit routines by using the EXITSRC= parameter.For more information, see the following topics:
� “General Information on Exit Points” on page 442
� “Exit Points for %CPPROCES and %CMPROCES” on page 447
� “Exit Points for %CSPROCES and %CWPROCES” on page 457.
General Information on Exit PointsThis section explains the exit points available during the process phase of SAS IT
Resource Management and guides you in selecting and coding exit points, if you want touse them.
Exit points (sometimes referred to as exits) are specific points, during the processingof data, at which control is transferred to a user-written routine, if a user-writtenroutine is available. The process subsystem used by SAS IT Resource Managementallows for "exit" processing. What this means is that during the processing of raw datainto the detail level of the PDB, there are specific points where control is given touser-written code. Users can use exit points to filter or create data or to meet othercustom requirements.
Process exits can be used to provide various types of functionality, such as
� to create additional data sets (such as accounting charges) on the same pass of thedata
� to add various reporting capabilities in the midst of the process run
� to extend the processing power of the installed software.
CAUTION:In any situation where you have the ability to affect and alter the intended flow andexecution of code, there is the possibility of error. As such, SAS Institute issues thefollowing warnings and disclaimers with regard to the use of exits with SAS IT ResourceManagement. �
Warnings and Disclaimers:
� The sample code shown in these "exit" files, while accurate, is subject to change.Any changes to this code that affect user exits will be reported to you by means ofthe normal usage notes that are packaged with maintenance.
� It is impossible for SAS IT Resource Management to anticipate or to beresponsible for the processing that occurs within an exit. As such, exit code that

Administration: Extensions to SAS IT Resource Management � General Information on Exit Points 443
you provide, if any, is simply included at the documented points. Any generation ofreports during the actual execution of the exits is left up to you.
� Additionally, it is possible to put code in exits that causes the data that will bestored in the SAS IT Resource Management PDB to be invalid. SAS cannot beresponsible for invalid PDB data that is caused by user-written exits.
Note: Use exits with great caution. �
OverviewBefore the details of the individual exit points are discussed, some general questions
will be addressed:
� “How Do I Tell SAS IT Resource Management to Use Process Exits?” on page 443
� “Which Exit Points Should I Use?” on page 443
� “How Do I Write My Exit Routines?” on page 444
� “Are There Any Special Variables Available to My Exits?” on page 445
� “Are There Any Considerations That I Need to Be Aware Of?” on page 446
� “Information about Specific Exit Points” on page 446.
Each of these topics will be explored, and then more detailed information about theindividual exit points will be presented.
How Do I Tell SAS IT Resource Management to Use Process Exits?� An optional parameter, EXITSRC=, is available on the %CMPROCES,
%CPPROCES, %CWPROCES, and %CWPROCES macros. The value to whichEXITSRC= is set is the location of the exit routine (source code). The location canbe either an external file/directory or the name of a SAS catalog.
� If EXITSRC= is not specified on the %CMPROCES, %CPPROCES, %CSPROCES,or %CWPROCES macro, then the process step is executed without regard to exitpoints.
� If EXITSRC= is specified on the %CMPROCES, %CPPROCES, %CSPROCES, or%CWPROCES macro, SAS IT Resource Management first checks to see if thespecified value is a valid external library (partitioned data set for z/OS; directoryfor UNIX and Windows). If not, it then checks to see if the specified value is a SAScatalog. If the specified value cannot be verified as either an external library or aSAS catalog, then the process macro terminates with an appropriate error message.
� The SAS IT Resource Management GUI enables you to specify the EXITSRC=parameter as an advanced feature of the Process/Reduce Wizard on UNIX andWindows, and in the Process Rawfiles window of the SAS IT ResourceManagement GUI for z/OS.
Which Exit Points Should I Use?This is not a simple question because the answer depends upon what you want to
accomplish. The best way to determine the exit points to use is to consult the table thatlists all of the exit points by name, includes a description of the locations in thesupplied code, and includes the purpose that the exit point could serve.
You should then also look at the relevant code example to make sure that youunderstand the context in which the exit point occurs, the purpose that you want toaccomplish, and any implications that this might have on the regular processing of datainto the PDB.

444 General Information on Exit Points � Chapter 20
How Do I Write My Exit Routines?� Exits exist as SAS source code, either in an external library member or as a
.SOURCE member in a SAS catalog. The naming convention is procnnn, wherennn is the exit point number (with leading zeros). For a complete list of portableexit names and descriptive information, see below. The exits are numbered by 5’sso that any future exit points that are added can still remain in numerical order.
Specific examples, based on the code for exit point proc005, are as follows:� SAS Catalog
Assume that the exits are stored in the catalog SASUSER.CPEXITS.Then the source for the first exit point is in the member:
SASUSER.CPEXITS.PROC005.SOURCE
In this case, the value for EXITSRC= is SASUSER.CPEXITS.� External Library
Clearly this is a host-specific issue. SAS IT Resource Managementhandles this in the following manner:
z/OS: The exits must reside in a PDS. Assuming that the exits arestored in USERID.CPE.EXITS, then the location of the source code forthe first exit point is USERID.CPE.EXITS(PROC005).
In this case, the value for EXITSRC= is USERID.CPE.EXITS.UNIX: The exits must reside as flat files in a directory. The filename
that is used for the SAS IT Resource Management exit source should beentirely in lowercase. Assuming that the exits are stored in/u/cpe/exits, then the location of the source code for the first exit pointis /u/cpe/exits/proc005.sas.
In this case, the value for EXITSRC= is /u/cpe/exits.Windows: The exits must reside as flat files in a directory. The
filename that is used for the SAS IT Resource Management exit sourceshould be entirely in lowercase. Assuming that the exits are stored inc:\cpe\exits, then the location of the source code for the first exit point isc:\cpe\exits\proc005.sas.
In this case, the value for EXITSRC= c:\cpe\exits.
� Inside the process step, SAS IT Resource Management verifies whether or not anexit exists in the location that is specified by EXITSRC=. If so, SAS IT ResourceManagement includes the code for the exit when the process code is built in thepreview buffer (and later submits the combined process code).
� The actual code within an exit is nothing more than SAS language statements, asappropriate to the context in which the exit source code is included. Thus for someexits, the only valid contents might be data set options. For other exits, almostany valid SAS statement is valid. Again, each exit point needs to be taken incontext to determine what is valid.
� It is important to remember that the exit routines are treated as source code thatis located and included for each exit point. SAS IT Resource Management does notkeep track of any activity with regard to the actual execution (or non-execution) ofthe exit.
� When the process step ends, a report is generated that lists the exit points thatwere included.
� It is strongly recommended that each exit be coded as a macro and that the macrobe given the same name as the exit point and then invoked. By doing so, it iseasier to determine where any errors may have occurred (for example, if there is a

Administration: Extensions to SAS IT Resource Management � General Information on Exit Points 445
syntax error in an exit). The following is a simple example of the recommendedway to code the proc005 exit point:
%macro proc005;/* actual exit-specific code goes here */
%mend;%proc005
CAUTION:Do not place a semicolon after the invocation of the macro (in this example, the%proc005 that follows the %mend;). �
� If an exit needs to test the value of a macro variable (using %IF) or otherwiseneeds to be conditionally invoked, it is the responsibility of the exit to handle thesematters. Again, the recommended way of doing this is to code the exit as a macrothat has the same name as the exit point and then to invoke the macroimmediately.
Here is an example that shows conditional invocation of the exit routine:
%macro proc005;%if &SYSENV=BACK %then %do;/* actual exit-specific code goes here */%end;
%mend;%proc005
CAUTION:Do not place a semicolon after the invocation of the macro (in this example, the%proc005 that follows the %mend;). �
Are There Any Special Variables Available to My Exits?
� The global macro variable CPTABLES is available to all of the exit points. Thevalue of CPTABLES is a list of the names of all of the tables that are beingprocessed in this invocation of the process macro. The table names are separatedby white space.
� CPARCTAB - a macro variable that contains a space-delimited list of all tableswhose data is to be archived in the process run.
� The global macro variable CPTABLE is available to each exit that occurs on aper-table or per-observation basis. The value of CPTABLE is the name of the tablewhose data is currently being processed.
� CPARCTB - as each table is being processed, the CPARCTB macro variable is setto Y (for Yes) or N (for No), depending upon whether or not this specific table is tobe archived.
� The global macro variable CPBYVAR is available to each exit that occurs on aper-table or per-observation basis. The value of CPBYVAR is the list of BYvariables for the table whose data is currently being processed. The BY-variablenames are separated by white space.
� The global macro variable CPCUTDT is available to exit points proc150 throughproc225. The value of CPCUTDT is the datetime constant that is used for theage-limit trimming of the detail-level data set. That is, the value of CPCUTDT isthe earliest date that is allowed for observations that remain in the detail-leveldata set.

446 General Information on Exit Points � Chapter 20
Are There Any Considerations That I Need to Be Aware Of?� If you want to delete observations in the final DATA step, it is recommended that
you use exit point proc040. If you perform this activity at a later point (such as atexit point proc200), you run the risk of corrupting the data dictionary becauseaccumulator values might have been incremented to include these (now deleted)observations.
� Any macro variables that are created in an exit point will be local macro variablesand will not be accessible to other exit points. If an exit needs to set a macrovariable for use in a later exit point, then it is your responsibility to declare themacro variable as GLOBAL (by using a %GLOBAL macro statement).
� The use of DATA step views has several important implications:� Whenever a DATA step view is defined, any additional data sets that are
created in the same data step are not actually built until the view isexecuted. Therefore, exit points proc010 through proc085 are not actuallyexecuted until the view is executed. For the Generic Collector Facility, thismeans that the view is actually executed when the staged data is sorted.
� As a side effect of this, if you were to create an additional output data set byusing proc020 in the cases that were outlined previously, the data set wouldnot exist at the time that exit point proc090 is encountered.
� For more information about working with DATA step views, see the sectionabout SAS DATA step views in the SAS: Language Reference: Concepts bookfor your release of SAS.
� The use of exit points proc035 and proc165 to add additional data sets for SETprocessing can have several subtle implications:
� For proc165, because the data sets in the SET statement are combined byusing the BY statement that follows, it is important that if you add anyadditional SET data sets, they should already be sorted by using thisBY-variables list. The BY list can be found in the macro variable CPBYVAR.
� For proc165, counts of total observations, counts of observations withduplicate BY variables, counts of old observations, and counts of newobservations, as well as the earliest and latest datetime values in the table,will be affected by the data in data sets that you might add to the SETstatement. If you do not want the additional data sets to affect the counts,use the exit points preceding these specific points in processing, along withthe IN= variables for the table and new (staged) data, to limit the scope tothe desired input data sets.
� For proc035 and proc165, the data that is written to the table will includeobservations from all data sets in the SET statement. If you add additionaldata sets to the SET statement and do not want the additional data to bewritten to the table, use the exit point immediately before the OUTPUTstatement to limit the scope to the desired input data sets.
Information about Specific Exit PointsGeneral information:The general flow of the generated code for process is as follows:
MACRO setupsection
Macro variables are defined as global, and macro variableassignments are performed for the SAS IT Resource Managementmacro variables shown at the beginning of the sample code.
DATA stepsection
To perform variable renames, to add variables SHIFT and HOUR,and to assign values to SHIFT, HOUR, and LSTPDATE. This could
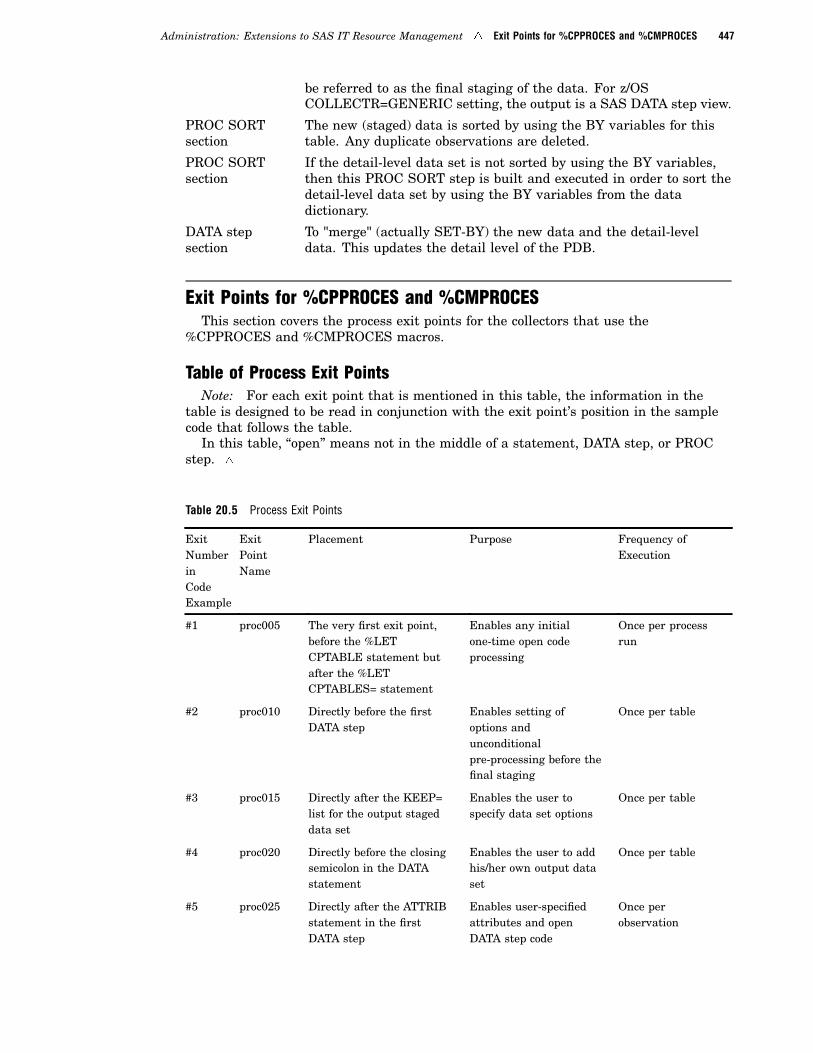
Administration: Extensions to SAS IT Resource Management � Exit Points for %CPPROCES and %CMPROCES 447
be referred to as the final staging of the data. For z/OSCOLLECTR=GENERIC setting, the output is a SAS DATA step view.
PROC SORTsection
The new (staged) data is sorted by using the BY variables for thistable. Any duplicate observations are deleted.
PROC SORTsection
If the detail-level data set is not sorted by using the BY variables,then this PROC SORT step is built and executed in order to sort thedetail-level data set by using the BY variables from the datadictionary.
DATA stepsection
To "merge" (actually SET-BY) the new data and the detail-leveldata. This updates the detail level of the PDB.
Exit Points for %CPPROCES and %CMPROCESThis section covers the process exit points for the collectors that use the
%CPPROCES and %CMPROCES macros.
Table of Process Exit PointsNote: For each exit point that is mentioned in this table, the information in the
table is designed to be read in conjunction with the exit point’s position in the samplecode that follows the table.
In this table, “open” means not in the middle of a statement, DATA step, or PROCstep. �
Table 20.5 Process Exit Points
ExitNumberinCodeExample
ExitPointName
Placement Purpose Frequency ofExecution
#1 proc005 The very first exit point,before the %LETCPTABLE statement butafter the %LETCPTABLES= statement
Enables any initialone-time open codeprocessing
Once per processrun
#2 proc010 Directly before the firstDATA step
Enables setting ofoptions andunconditionalpre-processing before thefinal staging
Once per table
#3 proc015 Directly after the KEEP=list for the output stageddata set
Enables the user tospecify data set options
Once per table
#4 proc020 Directly before the closingsemicolon in the DATAstatement
Enables the user to addhis/her own output dataset
Once per table
#5 proc025 Directly after the ATTRIBstatement in the firstDATA step
Enables user-specifiedattributes and openDATA step code
Once perobservation

448 Exit Points for %CPPROCES and %CMPROCES � Chapter 20
ExitNumberinCodeExample
ExitPointName
Placement Purpose Frequency ofExecution
#6 proc030 Directly before the closingparenthesis of the data setOPTIONS clause in theSET statement for thestaged data set
Enables user to overridedata set options
Once perobservation
#7 proc035 Directly after the closingparenthesis of the data setOPTIONS clause in theSET statement for thestaged data set
Enables the user tospecify additional datasets for SET processing
Once perobservation
#8 proc040 Directly after the SETstatement in the firstDATA step
Open DATA step codepoint for user
Once perobservation
#9 proc045 Directly before theDELETE statement forobservations that havemissing DATETIME valuesin the first DATA step
Enables user to handleobservations that havemissing DATETIMEvalues
Once perobservation thathas a missingDATETIME value
#10 proc050 Directly after the HOURvariable has been set in thefirst DATA step
Enables user to overridethe setting of HOUR
Once perobservation
#11 proc055 Directly after LSTPDATEhas been set to the currentdatetime stamp in the firstDATA step, if LSTPDATEis currently missing
Enables user to overridesetting of LSTPDATE
Once perobservation inwhich LSTPDATEhas a missingLSTPDATE value
#12 proc060 Directly before the SHIFTvariable calculations begin
Open DATA step codepoint for user
Once perobservation
#13 proc065 Directly after the SHIFTvariable has been set byusing the shift matrix,which happens only if theSHIFT variable is not setin the staged data set
Enables user to overridethe shift matrix
Once perobservation thathas a blankSHIFT variablevalue
#14 proc070 After the SHIFT variablevalue has been set,regardless of whether itwas set in the staged dataset; this occurs before theHoliday list
Enables user to overridethe SHIFT variablevalue, prior tocalculation that uses theHoliday list
Once perobservation
#15 proc075 After the SHIFT value hasbeen set, if the datematches an entry in theHoliday list
Enables user to SHIFTvariable value, if set bythe Holiday list
Once perobservation thathas been set byHoliday list
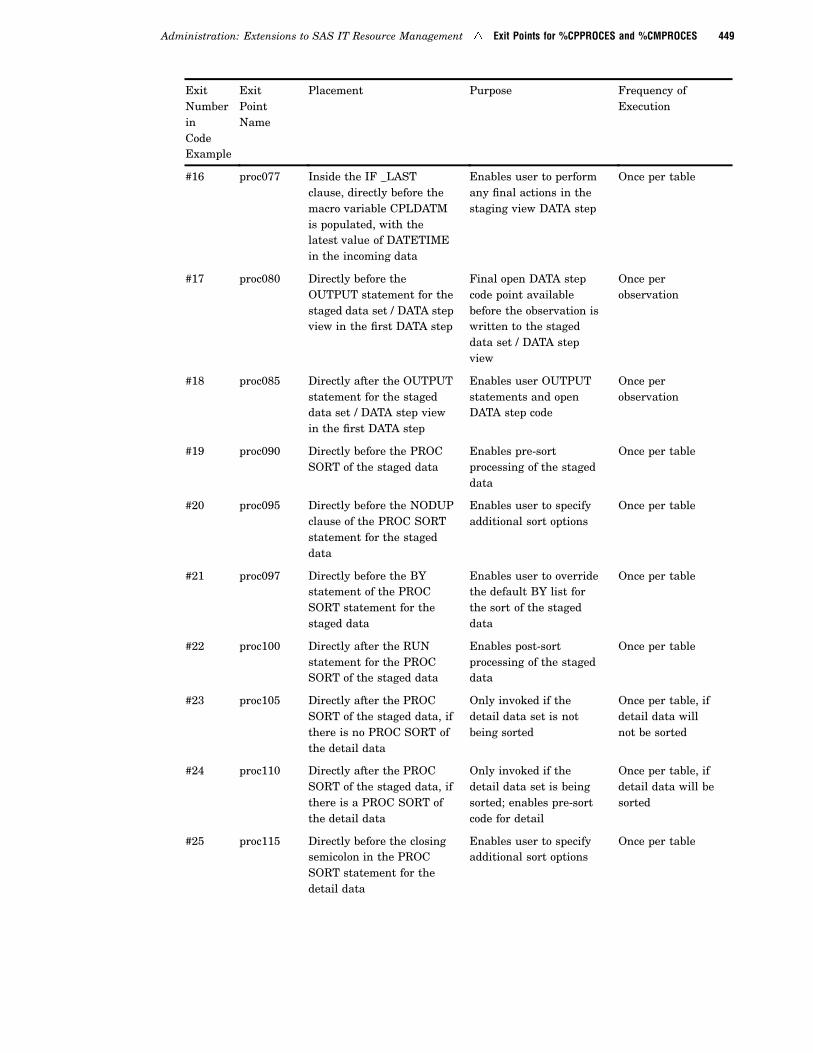
Administration: Extensions to SAS IT Resource Management � Exit Points for %CPPROCES and %CMPROCES 449
ExitNumberinCodeExample
ExitPointName
Placement Purpose Frequency ofExecution
#16 proc077 Inside the IF _LASTclause, directly before themacro variable CPLDATMis populated, with thelatest value of DATETIMEin the incoming data
Enables user to performany final actions in thestaging view DATA step
Once per table
#17 proc080 Directly before theOUTPUT statement for thestaged data set / DATA stepview in the first DATA step
Final open DATA stepcode point availablebefore the observation iswritten to the stageddata set / DATA stepview
Once perobservation
#18 proc085 Directly after the OUTPUTstatement for the stageddata set / DATA step viewin the first DATA step
Enables user OUTPUTstatements and openDATA step code
Once perobservation
#19 proc090 Directly before the PROCSORT of the staged data
Enables pre-sortprocessing of the stageddata
Once per table
#20 proc095 Directly before the NODUPclause of the PROC SORTstatement for the stageddata
Enables user to specifyadditional sort options
Once per table
#21 proc097 Directly before the BYstatement of the PROCSORT statement for thestaged data
Enables user to overridethe default BY list forthe sort of the stageddata
Once per table
#22 proc100 Directly after the RUNstatement for the PROCSORT of the staged data
Enables post-sortprocessing of the stageddata
Once per table
#23 proc105 Directly after the PROCSORT of the staged data, ifthere is no PROC SORT ofthe detail data
Only invoked if thedetail data set is notbeing sorted
Once per table, ifdetail data willnot be sorted
#24 proc110 Directly after the PROCSORT of the staged data, ifthere is a PROC SORT ofthe detail data
Only invoked if thedetail data set is beingsorted; enables pre-sortcode for detail
Once per table, ifdetail data will besorted
#25 proc115 Directly before the closingsemicolon in the PROCSORT statement for thedetail data
Enables user to specifyadditional sort options
Once per table

450 Exit Points for %CPPROCES and %CMPROCES � Chapter 20
ExitNumberinCodeExample
ExitPointName
Placement Purpose Frequency ofExecution
#26 proc120 Directly after the PROCSORT of the detail data, ifthere is a PROC SORT ofthe detail data
Invoked only if thedetail-level data set wassorted; enables post-sortcode for detail
Once per table, ifdetail data wassorted
#27 proc125 Directly before the "merge"DATA step
Enables setting ofoptions and open DATAstep code prior to themerge of the detail andstaged data
Once per table
#28 proc130 Directly before the closingparenthesis on the data setoptions for the detail dataset
Enables user to overridedata set options
Once per table
#29 proc135 Directly before the closingsemicolon in the DATAstatement
Enables the user to addhis/her own output dataset
Once per table
#30 proc140 Directly before the ENDstatement in the IF _N_=1block
Enables first-pass-onlycode
Once, during thefirst pass of theDATA step
#31 proc145 Directly after the lastATTRIB statement in the"merge" DATA step, andbefore the SET statementfor the detail and stageddata sets
Enables user-specifiedattributes and openDATA step code
Once perobservation
#32 proc150 Directly after the datetime(age-limit trimming) valuein the WHERE clause fordetail
Enables user to override/extend age-limittrimming
Once perobservation
#33 proc155 Directly before the closingparenthesis in the data setOPTIONS statement in theSET statement for thedetail data set
Enables user to overridedata set options
Once perobservation
#34 proc160 Directly before the closingparenthesis in the data setOPTIONS statement in theSET statement for thestaged data set
Enables user to overridedata set options
Once perobservation
#35 proc165 Directly after the SETclause for the staged data
Enables user to includehis/her own data set inthe SET data sets for BY(merge) processing
Once perobservation

Administration: Extensions to SAS IT Resource Management � Exit Points for %CPPROCES and %CMPROCES 451
ExitNumberinCodeExample
ExitPointName
Placement Purpose Frequency ofExecution
#36 proc170 Before the closingsemicolon in the SETstatement
Enables the user tooverride or add SEToptions
Once perobservation
#37 proc175 After the BY statement Open code point; this isthe recommended exitpoint to use for deletingobservations
Once perobservation
#38 proc180 Duplicate BY variableobservation encountered
Enables user to handleobservations that haveduplicate BY variablevalues
Once perobservationencountered withduplicate BYvariable values
#39 proc185 Earlier datetimeencountered
Enables user code to beexecuted each time anew (earliest) datetimestamp is found in theDATA step. (The earliestdatetime stamp value isstored in the variable_oet.)
Once perobservation thathas an earlierdatetime stampthan any previousobservations
#40 proc190 Later datetime encountered Enables user code to beexecuted each time anew (latest) datetimestamp is found in theDATA step. (The latestdatetime stamp value isstored in the variable_olt.)
Once perobservation thathas a laterdatetime stampthan any previousobservations
#41 proc195 When the observation isfound to have come fromthe detail-level data set
Enables the user code tobe executed each time anoutput observation isfound to have come fromthe detail data set. (Acount of theseobservations isaccumulated in thevariable _oldobs.)
Once perobservation readfrom thedetail-level dataset
#42 proc200 When the observation isfound to have come fromthe new (staged) data set
Enables user code to beexecuted each time anobservation is found tohave come from the new(staged) data set. (Acount of theseobservations isaccumulated in thevariable _addobs.)
Once perobservation readfrom the stageddata set

452 Exit Points for %CPPROCES and %CMPROCES � Chapter 20
ExitNumberinCodeExample
ExitPointName
Placement Purpose Frequency ofExecution
#43 proc205 Directly before theOUTPUT statement in the"merge" DATA step
Enables the user tomodify the observationbefore it is finallywritten to the detail level
Once perobservation
#44 proc210 Directly after the OUTPUTstatement in the "merge"DATA step
Enables the OUTPUTstatements for anyuser-created data sets
Once perobservation
#45 proc 215 After duplicate warningmessage has been issued
Enables user to performhis/her own end-of-tableduplicate reporting. Thisexit is called only whenobservations have beenfound that haveduplicate BY variablevalues.
Once per table, ifany observationshave beendetermined tohave duplicate BYvariable values
#46 proc220 After symbol values havebeen set for end-of-tablereporting
Enables the user toperform end-of-tablereporting
Once per table, onthe last pass ofthe DATA step
#47 proc225 After the RUN statementin the "merge" DATA step
Open DATA step codepoint to enable the userto work with the newmerged data, and/or anyuser data sets thatmight have been created.
Once per table
#48 proc230 After processing has beencompleted for all tables
Enables return-codesetting or other finaloperations
Once per run ofprocess
Specific Locations of Process Exit PointsThe following is an example of the code that is submitted by the process step when
the value of the COLLECTR= parameter on the %CxPROCES macro is set toGENERIC, where x=M, P, S, or W. The location of an exit point is indicated by #n,where n is the number of the item in the above table.
/* list of global macro variables that are needed */%GLOBAL CPCUTDT CPTABLES CPTABLE CPBYVAR CPVWNM;%GLOBAL CPARCTBS CPARCTB;%GLOBAL CPTOTOBS CPADDOBS CPOLDOBS CPDUPOBS CPEDATM CPLDATM ;%LET CPVWNM = WORK.EJLDPCV;/* unique name per process run */%LET CPTABLES = XDCVOLS XDCDSET ;%LET CPARCTBS = ;/* list of tables to archive while processed */#1/* name of table to process */%LET CPTABLE = XDCVOLS;

Administration: Extensions to SAS IT Resource Management � Exit Points for %CPPROCES and %CMPROCES 453
%LET CPARCTB = N; /* Archive this table? Y or N *//* list of BY variables for this table */%LET CPBYVAR = MACHINE DCVSGTC DCVVOLS DCVDVNU DATETIME ;#2/************************************************************//* DATA step view created from the staged data. This is *//* to add and set variables, such as SHIFT, HOUR, and *//* DATETIME, that will be needed for sorting. The *//* bizarre-looking name for the view is generated as a *//* unique name, to avoid any sort of namespace conflict. *//************************************************************/data WORK.EJLDPCV(keep=
DCUTMSTP. . .ZDATE
#3 )#4 /view=WORK.EJLDPCV;/* Output: TEMP View *//* Assign labels to the BY-variables. This forces the *//* variables used for sorting to the first part *//* of each observation for improved sort efficiency. */attrib MACHINE label=’Machine’;attrib DCVSGTC label=’Storage Class’;attrib DCVVOLS label=’Volume Label’;attrib DCVDVNU label=’Unit number’;attrib DATETIME label=’Datetime’;attrib shift length=$1
_odate format=date9._hshift length=$1_charval length=$10 ;
#5set GENLIB.DCOLVOLS(in=_new
rename=(DCUTMSTP = DATETIME. . .DCUSYSID = MACHINE
)#6)#7 end=_last;#8retain _odate _hshift ;
if datetime=. then do ;put ’WARNING: Invalid value for DATETIME on obs ’_n_ ’ ,obs deleted.’ ;put ’NOTE: Data for obs. ’_n_ ’ follows:’ ;put _all_;
#9if _last then _dellast = 1;else delete;end ;hour = hour(datetime) ;#10if lstpdate = . then do;
lstpdate = ’22MAR1999:13:42:22.15’dt ;

454 Exit Points for %CPPROCES and %CMPROCES � Chapter 20
#11end;
#12/* if shift not set in input data make it now */if shift = ’ ’ then do ;
_date = datepart(datetime) ;shift = substr("&cpshift",
((weekday(_date)-1)*24+hour(datetime)+1),1) ;
#13end ;#14if _odate ^= _date then do ;
_charval=put(_date,CPHDAY.) ;if _charval ^= ’ ’ then do;_hshift = put(0,CPHDAY.) ;end;else do;
_hshift = ’ ’ ;end;
end ;if _hshift ^= ’ ’ then do;
shift = _hshift ;#15end;_odate = _date;if datetime > _olt or _olt = . and not(_dellast)
then _olt = datetime;if _last
then do;#16call symput(’cpldatm’,put(_olt,best32.2));if _dellast then delete;end;#17output WORK.EJLDPCFV;#18run;/************************************************************//* PROC SORT of the staged data by the BY variables. This *//* prepares the data to be "merged" with the detail-level *//* data set. Here the view is sorted out into a real data *//* set in the WORK library; again the data set has a *//* unique name. *//************************************************************/#19proc sort
data=WORK.EJLDPCFV /* Input: VIEW DS */out=WORK.EJLDPCFC /* Output: WORK DS */
#20nodup ; /* eliminate duplicates from new data */#21by MACHINE DCVSGTC DCVVOLS DCVDVNU DATETIME ;run ;

Administration: Extensions to SAS IT Resource Management � Exit Points for %CPPROCES and %CMPROCES 455
/************************************************************//* If the BY-variable list has changed since the last *//* run of the process macro, then you would see a PROC *//* SORT of the detail-level data set onto itself, sorted *//* by the current list of BY variables. *//************************************************************/#22#23 /* only if there is no PROC SORT of detail level */#24 /* only if there is a PROC SORT of detail level *//************************************************************//* For illustration purposes, the sort of the DETAIL level *//* is shown. This code would be generated and submitted *//* only if the detail-level data set required sorting. *//************************************************************/proc sort
data=DETAIL.XDCVOLSD /* Input/Output: DETAIL DS */#25
;byMACHINE DCVSGTC DCVVOLS DCVDVNU DATETIME ;run ;
#26 /* only if there was a PROC SORT of detail level *//************************************************************//* DATA step that does a SET-BY ("merge") of the new data *//* with the active detail-level data set, storing the *//* output into the detail-level data set. SET statement *//* age limit trimming is performed only on the detail- *//* level data set, so that new data can be reduced before *//* the data is aged out of detail level. Also, *//* statistics are accumulated for the running of the *//* process macro on the data in this table. *//************************************************************/#27data DETAIL.XDCVOLSD /* Output: DETAIL */
(compress=yeskeep=DATETIME. . .ZDATE
sortedby=MACHINE DCVSGTC DCVVOLS DCVDVNU DATETIME
#28 )#29 ;/* Assign attributes to the BY variables. This forces the *//* variables used for merging to the first part of *//* each observation for efficiency in later reporting and *//* subsequent runs of process. */attrib MACHINE label=’Machine’ length = $8;format MACHINE; informat MACHINE;
. . .attrib DATETIME label=’Datetime’ length = 8
format=DATETIME21.2;informat DATETIME;

456 Exit Points for %CPPROCES and %CMPROCES � Chapter 20
retain _totobs 0 ;retain _oldobs 0 ;retain _addobs 0 ;retain _dups 0 ;retain _oet . _olt . _oest ._olst .;if _n_ = 1 then do ;
call symput(’cpsedatm’,’0’) ;call symput(’cpsldatm’,’0’) ;call symput(’cpedatm’,’0’) ;call symput(’cpldatm’,’0’) ;call symput(’cptotobs’,’0’) ;call symput(’cpoldobs’,’0’) ;call symput(’cpaddobs’,’0’) ;call symput(’cpdupobs’,’0’) ;
#30end ;#31/* Concatenate DETAIL and NEW and select DETAIL *//* data with dates newer than 12MAR1999:16:32:41.78 (Age= 10 days) */
%let CPCUTDT = ’12MAR1999:16:32:41.78’dt ;set DETAIL.XDCVOLSD (in=_detail
where=(datetime>’12MAR1999:16:32:41.78’dt#32)#33)
WORK.EJLDPCFC (in=_new#34)#35
end=_last#36 ;
byMACHINE DCVSGTC DCVVOLS DCVDVNU DATETIME ;
#37/* count and keep duplicate obs. */if not first.DATETIME then do;#38
_dups = _dups + 1 ;end;if _oet= . or datetime < _oet then do;#39
_oet = datetime ;end ;if _olt= . or datetime > _olt then do;#40
_olt = datetime ;end ;if _detail then do;#41
_oldobs = _oldobs + 1 ;end;else if _new then do;
#42_addobs = _addobs + 1 ;if _olst= . or datetime > _olst then do;_olst = datetime ;

Administration: Extensions to SAS IT Resource Management � Exit Points for %CSPROCES and %CWPROCES 457
end;if _oest= . or datetime < _oest then do;
_oest = datetime ;end;
end;
#43output DETAIL.XDCVOLSD;_totobs = _totobs + 1;#44if _last then do;
/* notify number of duplicates */if _dups > 0 then do;put ’WARNING: Table XDCVOLS has ’ _dups
’ duplicate observations by key.’ ;#45end;call symput(’cpldatm’,put(_olt,best32.2)) ;call symput(’cpedatm’,put(_oet,best32.2)) ;call symput(’cpsldatm’,put(_olst,best32.2)) ;call symput(’cpsedatm’,put(_oest,best32.2)) ;call symput(’cptotobs’,put(_totobs,best32.)) ;call symput(’cpdupobs’,put(_dups,best32.)) ;call symput(’cpaddobs’,put(_addobs,best32.)) ;call symput(’cpoldobs’,put(_oldobs,best32.)) ;
#46end ;run ;#47 /* per-table basis */data _null_;run; /* just to keep things clean */
#48 /* only once per-process run */data _null_;run; /* just to keep things clean */
Exit Points for %CSPROCES and %CWPROCESThis section covers the process exit points for the UNIX and Windows collectors that
use the %CSPROCES and %CWPROCES macros.Index to Topics in this File:� “Old-Style Process Exits” on page 457.� “New-Style Process Exits” on page 459
Old-Style Process ExitsThis topic contains information about the %CSPROCES and %CWPROCES
“old-style” exit facility.
Note: Although the functionality of the "old-style" exit points might be madeavailable in a future release by using the "new style" of exits points, the older form thatis described here will continue to be supported in SAS IT Resource Managementindefinitely. �

458 Exit Points for %CSPROCES and %CWPROCES � Chapter 20
� Overview of Old-Style Process Exits
Three exit points exist for processing data with %CSPROCES and%CWPROCES. These points allow the inclusion of user-developed SAS statementsat a point directly before an observation that is read from the raw input file isoutput to the staging data set (COLLECT.tablenm).
These exit points are included for compatibility with older releases of SAS ITResource Management and, though they will continue to be supported, should notbe preferred to the newer exit-point strategy that utilizes the EXITLIB=parameter on the %CSPROCES and %CWPROCES macros. For information aboutthe newer style exit points, see “New-Style Process Exits” on page 459.
At the old-style exit point for each of these collectors, catalog entries named
SITELIB.CSEXITS.CS.SOURCE then
DICTLIB.CSEXITS.CS.SOURCE
are included (if they exist) in the SAS code that is generated by %CSPROCES.If both entries exist, both are included. Any syntactical or semantic errors that areintroduced into %CSPROCES or %CWPROCES by the statements in these entriesare entirely the responsibility of the user, as is the upkeep and transport of theentries, if the PDB is copied.
� Usage of Old-Style Process Exits
The exits generally should be used to set data values in the observation frominformation available in that one observation (such as the value of a user-addedvariable). The data has not gone through standard %CSPROCES or %CWPROCESdata cleanup at this point. This has little effect for COLLECTOR=HP-OV, but forCOLLECTOR=SPECTRUM and COLLECTOR=SUNETMGR this means thatC2RATE variables have not been converted to rates and the value of DURATIONhas not been set. The exits should not be used to remove observations from theinput data. Rather, the SUBSET= parameter in the %CSPROCES or%CWPROCES macro should be used for that purpose.
� Future of Old-Style Process Exits
The function of this exit facility will be replaced in a future release by one thatincludes more exit points and the ability to specify a personal exit library. Thoughthe old-style exit points will continue to be supported, they will not be updated toexploit new functionality in SAS IT Resource Management.
� Example of Old-Style Process Exits
*******************************************************;* This example adds an exit for HP-OV data ;*******************************************************;* Define new PDB with added variable for department code;x "rm -r /usr/tmp/pdb-exit";%CPSTART( pdb=/usr/tmp/pdb-exit, mode=batch );%CPCAT; cards4;delete table name=hn2sys noerror;add table name=hn2sys ;create variable name=udept extname=DEPT type=character
interpret=string length=16kept=yes label=’Dept’ description=’Department’ ;
update table name=hn2sys/* Do not change BY list for HP-OV tables */
day =( classvars= ’udept machine datetime hour shift’ )week =( classvars= ’udept machine datetime hour shift’ )month =( classvars= ’udept machine datetime hour shift’ )

Administration: Extensions to SAS IT Resource Management � Exit Points for %CSPROCES and %CWPROCES 459
year =( classvars= ’udept machine datetime hour shift’ );;;;;
%CPCAT( cat=work.temp.exitdutl.source );%CPDDUTL( entrynam=work.temp.exitdutl.source, list=y );
* Save the exit statements in dictlib with the proper name;%CPCAT; cards4;
*-------------------------------------;* User exit to set UDEPT from MACHINE.;*-------------------------------------;retain _u_cnt_ 0; * This risks varname collision!;;select ;
when (scan(machine,1) in (’dali’ ’trinity’))udept = ’Personnel’;
when (machine =: ’R’ )udept = ’Research’;
when (machine = ’henry’)udept = ’Facilities’;
otherwise do;_u_cnt_ + 1; * Warn of unknown dept only 25 times;if _u_cnt_<=25
then put "WARNING: Unrecognized " machine=;udept = ’Unknown’;
end;end;*-------------------------------------;* End user exit code. ;*-------------------------------------;
;;;;%CPCAT( cat=dictlib.csexits.cshn2sys.source );
* Process HP-OV data;%let csdelcol=0; * Opt for debug: Suppress COLLECT cleanup;%let cp_nmsg=2; * Opt for debug: Show generated DATA step;%CSPROCES( <rawdata>,
hn2sys,collectr=HP-OV,subset=udept^="Unknown" );
%let csdelcol=2; * Reset to default;%let cp_nmsg=1; * Reset to default;
%CPREDUCE;
New-Style Process Exits

460 Exit Points for %CSPROCES and %CWPROCES � Chapter 20
Table 20.6 Location and Purpose of Process Exit Points
Exit PointName
Placement Purpose Frequency ofExecution
proc100 Directly after the RUNstatement for the PROCSORT of the staged data
Enables post-sort processing ofthe staged data
Once pertable
proc125 Directly before the ’merge’DATA step
Enables setting of options andopen DATA step code prior tothe merge of the detail leveland staged data
Once pertable
proc135 Directly before the closingsemicolon in the DATAstatement
Enables the user to add his/herown output data sets
Once pertable
proc180 Duplicate observation alreadyin detail
Enables user to prevent theautomatic deletion ofobservations that duplicatethose already in DETAIL.
(Set variable _delobs to 0 toprevent deletion of duplicateobservations. By default,_delobs is set to 1.)
Open datastep code andis run onceperobservation
proc200 When the observation is foundto have come from the new(staged) data set
Enables user code to beexecuted each time an outputobservation is found to havecome from the new (staged)data set. (A count of theseobservations is accumulated inthe variable _addobs.)
Once perobservationread from thestaged dataset
proc205 Directly before the OUTPUTstatement on the ’merge’DATA step
Enables the user to modify theobservation before it is finallywritten to the detail level
Once perobservation
proc230 After processing has beencompleted for all tables
Enables return code setting orother final operations
Once pertable
� Process Exits for UNIX and Windows
The following is an overview of the logic of %CSPROCES with the locations ofthe four exit points inserted. Exit points are indicated by <<< procnnn >>>, wherennn is the three-digit exit number.
Note: For %CSPROCES and %CWPROCES, SAS IT Resource Managementsupports exits 100, 125, 135, 200, 205, and 230 only. �
* Read raw data into staging data set;
FILENAME RAWDATA ... ;DATA COLLECT.<table>...;RUN ;
* Sort staged data to prepare for merge with DETAIL;

Administration: Extensions to SAS IT Resource Management � Exit Points for %CSPROCES and %CWPROCES 461
PROC SORT DATA=COLLECT.<table>D...;RUN ;<<< proc100 >>> * Exit 100 is after the sort ;<<< proc125 >>> * Exit 125 is before merge ;
* Merge DETAIL with COLLECT;
DATA DETAIL.<table>D (KEEP= <all vars to keep in the table>)<<< proc135 >>> /* Exit 135 is before end of DATA stmt */;SET COLLECT.<table>_ (IN=FROMNEW) ... ;...<<< proc180 >>> * Exit 180 allows duplicate obs to be kept;...IF FROMNEW THEN DO;<<< proc200 >>> * Exit 200 knows observation from COLLECT;END;...
<<< proc205 >>> * Exit 205 is directly before OUTPUT DETAIL;OUTPUT DETAIL.<table>D;...RUN;<<< proc230 >>> * Exit 230 is after all tables have
been processed ;
� Example (Proc200 Exit)
The following is an example of creating and invoking the proc200 exit:
/* list of global macro variables that are needed */%global CPTABLE;* This example converts metrics from an older versionof the performance data collector (HP PCS) into theirequivalent values in a newer version of the collector(HP OpenView Performance Agent);* Allocate the PDB;%CPSTART( pdb=/my/pdb, mode=batch, access=write );* Create exit code for PCSGLB that maps PCS metrics
to their HPOVA equivalents;%CPCAT ; cards4 ;* Define a macro to convert certain PCS global metrics
to HPOVA equivalent;%macro FIXPCS ;
%* Only do this for table PCSGLB;%if %UPCASE(&CPTABLE)=PCSGLB %then %do ;* Calculate the sum of these 6 metricsminus the (alleged) total;_d_i_f_f = abs( sum( GLBCSW, GLBINT, GLBSYS,
GLBRTIM, GLBNICE, GLBUSER )- GLBCPTO );
* This detects old-style data;if (_d_i_f_f<0.00001 or
(GLBCPTO=1 and _d_i_f_f<0.1)) andGLBSCUT=. and GLBNMUT=. thendo ;

462 Exit Points for %CSPROCES and %CWPROCES � Chapter 20
* Convert PCS metrics into their HPOVA form ;GLBSCUT=GLBSYS ;GLBNMUT=GLBUSER ;GLBSYS=GLBCSW + GLBINT + GLBSCUT ;GLBUSER=GLBRTIM + GLBNICE + GLBNMUT ;end ;
drop _d_i_f_f ;%end ;
%mend FIXPCS ;%FIXPCS ;
;;;;* Store the exit source in catalog WORK.PROCRED in
entry PROC200.SOURCE;%CPCAT( cat=work.procred.proc200.source ) ;* Process the data;%CSPROCES( /my/extracted/data,
*,exitsrc=work.procred,collectr=HP-OVPA );

463
P A R T4
Reporting
Chapter 21. . . . . . . . .Report Concepts and Tools 465
Chapter 22. . . . . . . . .Reporting: Working with Report Definition Folders 471
Chapter 23. . . . . . . . .Reporting: Working with Report Definitions 479
Chapter 24. . . . . . . . .Reporting: Working with Reports 511
Chapter 25. . . . . . . . .Reporting: Working with Palette Definition Folders 517
Chapter 26. . . . . . . . .Reporting: Working with Palette Definitions 525
Chapter 27. . . . . . . . .Reporting: Working with Rule Definition Folders 531
Chapter 28. . . . . . . . .Reporting: Working with Rule Definitions 535
Chapter 29. . . . . . . . .Reporting: Working with Galleries 551
Chapter 30. . . . . . . . .Reporting: Working with Remote Server Profiles 571
Appendix 1. . . . . . . . .Recommended Reading 579

464

465
C H A P T E R
21Report Concepts and Tools
Report Concepts and Tools 465Overview of Report Concepts and Tools 465
Using the Data Visualization Tool 466
Using the Graph Data Tool 467
Using the Perform Exception Analysis Tool 468
Using the Manage Report Definitions Tool 468
Report Concepts and Tools
Overview of Report Concepts and ToolsSAS IT Resource Management provides a variety of reporting tools on “The
Reporting Tab” on page 30 in the SAS IT Resource Management GUI for UNIX andWindows, as well as report macros that you can run in batch. (For information aboutusing report macros, see “Chapter 3: Report Macros” in the SAS IT ResourceManagement macro reference documentation.) Some of the report tools enable you tointeractively perform ad hoc analysis, drill down, and more, against a selected group ofdata. Other report tools are more suited for production reports because they enable youto create and save a report definition that you can run on a regular basis against yourproduction data. The actual report is created when you create and run the reportdefinition against data in your PDB.
A report definition identifies which data to use for your report, what variables tocalculate and display on the report, the type of report to produce (for example, a bar orpie chart or a plot), and many other report options.
You can create a report definition interactively, through the Manage ReportDefinitions window, or in batch using the report macros, which you write and submitthrough the Program Editor window or in batch mode. For information about the reportmacros, see “Chapter 3: Report Macros” in the SAS IT Resource Management macroreference documentation.
From the Manage Report Definitions window, you can create and run reportdefinitions several ways:
� Run the supplied report definitions that are provided with SAS IT ResourceManagement. You can run these on sample data or data that is collected at yoursite.
� Modify a supplied report definition and run it with a demonstration PDB or withyour data. You can also save the modified definition as a new custom reportdefinition.
� Create a new report definition by using the Manage Report Definitions window.

466 Using the Data Visualization Tool � Chapter 21
In batch, you can use SAS IT Resource Management macros to create and run reportdefinitions in the following ways:
� Specify parameters in a report macro and submit the macro to run in batch. (Forinformation about how to use report macros to analyze data, see “Chapter 3:Report Macros” in the SAS IT Resource Management macro referencedocumentation.)
� Create a report definition through the Manage Report Definitions window, save thedefinition in a folder, and run the definition in batch by using the %CPRUNRPTmacro. For information about using macros in batch, see the topic %CPRUNRPTin the SAS IT Resource Management macro reference documentation.
� Create a report definition by using the Manage Report Definitions window, savethe macro source for that definition, and run the macro source in batch.
For more information about using macros, see the SAS IT Resource Management macroreference documentation .
Note: Before you can run custom or supplied reports on your own data, you or theSAS IT Resource Management administrator at your site must set up the SAS ITResource Management client and server and your data collector. Your site administratorcan set up the collection, process, and reduction tasks for you and can also create anynecessary report definitions at your site. Contact your site administrator for detailsabout the data that you want to use in your report, such as the PDB name, the physicallocation of the data, and the names of relevant tables and variables. �
Here are several general topics that you might want to understand before youproceed to more specific topics:
� “Using the Data Visualization Tool” on page 466� “Using the Graph Data Tool” on page 467� “Using the Manage Report Definitions Tool” on page 468� “Using the Perform Exception Analysis Tool” on page 468.
Here are the more specific topics that are related to reporting from the client GUI:� “Overview of Galleries” on page 551� “Overview of Palette Definition Folders” on page 517� “Overview of Palette Definitions” on page 525� “Overview of Remote Server Profiles” on page 571� “Overview of Report Definition Folders” on page 471� “Overview of Report Definitions” on page 480� “Overview of Reports” on page 511� “Overview of Rule Definition Folders” on page 531� “Overview of Rule Definitions” on page 535� “Overview of Rule Results” on page 547.
Using the Data Visualization ToolThe Data Visualization tool enables you to explore and analyze data through
interactive plots and charts. Using its point-and-click interface, you can quicklyexamine relationships between performance metrics, perform trend analysis, andvisualize your performance data in one or more dimensions. You can analyze univariatedistributions, investigate multivariate distributions, and fit explanatory models byusing analysis of variance, regression, and the generalized linear model. This tool is

Report Concepts and Tools � Using the Graph Data Tool 467
integrated with SAS IT Resource Management’s dynamic graphics and advanced dataanalysis tools, providing a valuable addition to your performance analysis needs. Youcan use it to explore trends in your data, which you can analyze on a regular basis byusing reports that you create in the Manage Report Definitions window.
To start the data visualization utility from your SAS IT Resource Managementsession, select the Data Visualization item on the Reporting tab in the SAS ITResource Management main window. When prompted, select a table to use for thecurrent session. When the Data Visualization window opens, the number ofobservations and variables is displayed in the top-left corner of the table. The variablenames are displayed across the top of the table as column headings.
From this window you can also perform the following tasks:Switch PDBs - select the Activate PDB icon to open the Manage PDBs windowand activate a different PDB. The directory path or location of the active PDB isdisplayed next to the icon in the Data Visualization window.Options - enables you to record your actions or selections during this DataVisualization session so that you can use or replay the actions later.Start - starts your Data Visualization session and opens the data table that youselected.
When the Data Visualization window opens, you can perform the following tasks:1 Browse the list of available tables by selecting the arrow to the right of the Table
text box. Select a table from the list or type the name of the table that you want touse for this session.
2 Move around in the data table, find a record, sort the data, select variables, andmore, by selecting the arrow in the top-left corner of the data table to display amenu of choices.
3 Assign a plotting symbol to a specific group of observations by selecting a variablefrom one of the column headings. While the variable is highlighted, select a colorfrom the color palette, and then from the available list select the group of data toinclude.
4 Analyze the data with a graph or chart by selecting one of the items from theAnalyze menu.
Note: For more information, see the documentation for SAS/INSIGHT. �
Using the Graph Data ToolThe Graph Data tool offers a variety of exploratory data analysis graphs and charts.
This analysis tool is very useful for ad hoc exploration when you are analyzingunexpected trends, patterns, or extreme outliers in your IT service data. The graphsand charts can be used with data from your active PDB or with data from other SASdata sets.
To use the Graph Data tool,1 From the SAS IT Resource Management main window, select the Reporting tab.2 On the Reporting tab, select Graph Data. The Select Table for Graph-N-Go
Application window opens. (The Graph Data tool is based on the SAS Graph-N-GoApplication.)
3 Specify the table that you want to work with and also specify any subset of thedata that you want to focus on.
4 Select the Start button. The Graph-N-Go window opens.The Graph-N-Go window consists of two panes with icons along the left side of
the window.

468 Using the Perform Exception Analysis Tool � Chapter 21
� The upper pane enables you to specify the data that you want to model.The upper pane initially contains an icon for the data that you selected
in the earlier window.To add other data, select the upper icon next to the top pane. In the
Member Type field, select SQL/Data Step/DBI Views (VIEW), if it is notalready selected, and then select the data’s library name and view name. Orselect the lower icon next to the top pane to select data from amultidimensional database (MDDB). The data model icon for the data thatyou selected will appear in the upper pane.
Double-click on a data icon to view the properties of your data or tosubset the data further.
� The icons next to the lower pane represent viewers. To select a viewer, clickon its icon. (You can select bar charts, pie charts, and so on.) Drag and dropthe viewer to an empty part of the lower pane.
Next, drag and drop a data model from the upper pane onto the viewer.The data is displayed according to the defaults for that viewer. You canmodify the display by putting your mouse pointer over the graph,right-clicking, and choosing from the selection menu.
Multiple graphs and/or tables can be displayed in the lower pane.
You can save any report that you develop to SAS library for future editing (bydefault, the report will be saved in SASUSER._GNGMODEL_.ITSV.GFORM). And/oryou can export the report to other file types such as HTML (on the File pull-down menuwithin the Graph-N-Go application, see the export function).
For more information about this application, refer to the online help within theapplication.
Using the Perform Exception Analysis ToolThe Exception Analysis window enables you to create exception rules to evaluate
exception conditions in your data. For example, you might want to identify conditionswhen disk usage was high or when queue length or wait times were long.
You can create folders in which to store the exception rules, and you can evaluate asingle rule or all rules in a folder. When you evaluate all rules in a folder, the rules thatapply to tables in the active PDB are evaluated. Also, the rules are evaluated thatapply to other data for which the libref(s) has been defined in the current SAS session.When you evaluate the exception rules, you can view reports that summarize only thedata that meets your exception criteria.
To create an Exception Analysis report, follow these steps.Exception rules must be defined within the SAS IT Resource Management GUI for
UNIX and Windows, but can then be evaluated interactively, by using the interface, orin batch, by using the %CPEXCEPT macro. In batch, you can use the %CPXHTMLmacro to create exception reports that you can display by using a Web browser.
Using the Manage Report Definitions ToolFrom the Manage Report Definitions window, you can create, edit, view and run new
or existing report definitions (see “Creating/Editing/Viewing a Report Definition” onpage 481 and “Running a Report Definition” on page 488), as well as save a report (see“Saving a Report” on page 512) and save the report definition (see “Saving a ReportDefinition” on page 489). You can also access SAS IT Resource Management suppliedreport definitions (see “Exploring Supplied Report Definitions (UNIX, Windows)” onpage 488).

Report Concepts and Tools � Using the Manage Report Definitions Tool 469
To open the Manage Report Definitions window, start SAS IT Resource Managementand select the Reporting tab from the SAS IT Resource Management main window.On the Reporting tab, select Manage Report Definitions from the list of reportingtasks.
For more information about the Manage Report Definitions Tool, see the followingchapters:
� “Overview of Report Definition Folders” on page 471� “Overview of Report Definitions” on page 480� “Overview of Reports” on page 511
� “Overview of Palette Definition Folders” on page 517� “Overview of Palette Definitions” on page 525� “Overview of Rule Definition Folders” on page 531� “Overview of Rule Definitions” on page 535
� “Overview of Galleries” on page 551� “Overview of Remote Server Profiles” on page 571.

470
471
C H A P T E R
22Reporting: Working with ReportDefinition Folders
Working with Report Definition Folders 471Overview of Report Definition Folders 471
Adding a Report Definition Folder 472
Adding a Report Definition Folder (UNIX, Windows) 472
Creating a Report Definition Folder 473
Creating a Report Definition Folder (UNIX, Windows) 474Removing a Report Definition Folder 475
Removing a Report Definition Folder (UNIX, Windows) 475
Viewing the List of Report Definitions in a Report Definition Folder 475
Viewing the List of Report Definitions in a Report Definition Folder (UNIX, Windows) 476
Viewing Your List of Known Report Definition Folders 476
Viewing Your List of Known Report Definition Folders (UNIX, Windows) 477
Working with Report Definition Folders
Overview of Report Definition FoldersReport definition folders contain report definitions.You have a list of known report definition folders. Originally, your list contains the
names of the report definition folders that have the supplied report definitions.If you create one or more report definition folders, their names are automatically
added to your list. You can also add the names of report definition folders that otherpeople create.
Similarly, you can remove the names of report definition folders from your list. (Thenames of the folders are deleted from your list, but the actual folders are not deleted.)
The following report folders are typically available in your list of known reportdefinition folders. As you create additional folders and add additional folders, thosefolders will also be on the list.
SITELIB.ITSVRPTcontains report definitions that have been placed in your organization’s sitelibrary, which has a SAS libref of SITELIB. These report definitions can be usedby all users who have “readonly” or “read/write” access to this library.
PGMLIB.ITSVRPTcontains supplied report definitions that have been provided with SAS IT ResourceManagement.
SASUSER.ITSVRPTcontains report definitions that you have stored in your sasuser directory. Thesedefinitions are referred to as your custom report definitions, and they include

472 Adding a Report Definition Folder � Chapter 22
report definitions that you created by using the Manage Report Definitionswindow. To make your own custom reports available to others at your site, you canmove them to the site library.
ADMIN.ITSVRPTcontains report definitions that you and others have created and saved with theactive PDB.
The PGMLIB.CPRPTS and SASUSER.CPUPGMS folders might also appear in thefolders list. These folders contain supplied and custom reports from a previous versionof this product.
For more information about the list of report definition folders and subsets of the list,see “Viewing Your List of Known Report Definition Folders” on page 476.
For more information about report definition folders, see the following topics:� “Adding a Report Definition Folder” on page 472� “Creating a Report Definition Folder” on page 473� “Removing a Report Definition Folder” on page 475� “Viewing the List of Report Definitions in a Report Definition Folder” on page 475� “Viewing Your List of Known Report Definition Folders” on page 476.
Adding a Report Definition FolderYou can add the name of an existing report definition folder (for example, a report
definition folder that someone else created) to your list of known report definition folders� by using the SAS IT Resource Management GUI for UNIX and Windows.
Adding a Report Definition Folder (UNIX, Windows)In the SAS IT Resource Management GUI for UNIX and Windows, you can add the
name of an existing report definition folder to your list of known report definitionfolders by following these steps:
1 If you want to add the name of an existing report definition folder that is on aremote server, first activate a PDB on that server.
For more information about activating a PDB, see “Activating a PDB” on page299.
2 From the main window’s Reporting tab, select Manage Report Definitions.The Manage Report Definitions window opens. The Folders list displays thenames of all the folders for the current SAS session.
3 Select File. A menu opens. From the menu, select Add Report Folders. TheAdd Report Definition Folders window opens.
The Report Definition Folders list displays the names of your known reportdefinition folders.
4 Select the arrow to the right of the Library field. A menu opens. It contains a listof the libraries for which a libref has already been defined. Select the library thatcontains the report definition folder whose name you want to add.
If the library that you want to use is not on that list, select Define Library.The Define a SAS Library window opens.
a In the Libref field, type the libref that you want to use for the library. Thelibref should begin with an alphabetic character. The remaining characterscan be alphabetic or numeric.
b In the Path field, type the full path and name of the library’s directory(UNIX, Windows) or PDS (on z/OS).

Reporting: Working with Report Definition Folders � Creating a Report Definition Folder 473
c In the Access field, select the access mode that you want to use (assumingthat you have permission from the owner or security system to use thatmode).
d In the Location field, select Local or Remote. If you select Remote, theServer ID field opens. The value in that field defaults to the server ID of theserver to which you most recently connected.
e Select OK. The value in the Library field is the libref that you defined.5 In the Folder Name field, type the name of the folder.6 In the Description field, type a description of the folder.7 Select Apply � OK You are returned to the Manage Report Definitions window.
The folder whose name you added is now on your list of known report definitionfolders.
8 When you are ready to return to the main window of SAS IT ResourceManagement, in the Manage Report Definitions window select Close.
Note: 1. If you have a “write” lock on the library to which you added the folder, assoon as you finish using the folder for “write” purposes (for example, saving reportdefinitions to it), remember to free the library fully or partially so that other people andtasks can use it. One way to free the library is to exit from SAS IT ResourceManagement and SAS. Another way is to follow these steps:
� From the main window’s Reporting tab, select Manage Report Definitions.The Manage Report Definitions window opens.
� Select File. A menu opens. From the menu, select Add Report Folders. TheAdd Report Definition Folders window opens.
� Select Define Library. The Define a SAS Library window opens.1 In the Libref field, type the libref of the library to which you added the folder.2 If the libref was one that you created, leave the Path field blank (if you do
not intend to use that library again during your current SAS session). Thatwill entirely free the library.
If the libref was one that you did not create or one that you did create butnow can use in “read” mode, in the Access field select Readonly. That willpartially free the library; people will be able to use it for read access, but notfor write access.
3 Select OK.
Note: If you set a path to blank for a libref that you defined, the libref willbe de-assigned and (in the SAS message area at the bottom of the window)you will get a confirmation message that says it is now “not assigned.” (Thisis a NOTE message. Ignore the word ERROR.) �
� Select OK.
�
Note: 2. If the library to which you added the folder was remote, in addition tofreeing that library (see Note 1), you also need to release the lock on the PDB so thatother people and tasks (such as the process task and reduce task) can use it. For moreinformation about releasing the lock, see “Releasing the Lock on the Active PDB” onpage 319. �
Creating a Report Definition FolderYou can create a new report definition folder and automatically add its name to your
list of known report definition folders
474 Creating a Report Definition Folder � Chapter 22
� by using the SAS IT Resource Management GUI for UNIX and Windows.
Creating a Report Definition Folder (UNIX, Windows)In the SAS IT Resource Management GUI for UNIX and Windows, you can create a
new report definition folder and automatically add its name to your list of known reportdefinition folders by following these steps:
1 If you want to create the report definition folder on a remote server, first activate aPDB on that server. For more information about activating a PDB, see “Overviewof Whole PDBs” on page 296.
2 From the main window’s Reporting tab, select Manage Report Definitions.The Manage Report Definitions window opens.
3 Select File. A menu opens. From the menu, select Add Report Folders. TheAdd Report Definition Folders window opens.
The top of the window displays your list of known report definition folders.
4 Select the arrow to the right of the Library field. A menu opens. It contains a listof the libraries for which a libref has already been defined. Select the library inwhich you want to place your new report definition folder.
If the library that you want to use is not on that list, select Define Library.The Define a SAS Library window opens.
a In the Libref field, type the libref that you want to use for the library. Thelibref should begin with an alphabetic character. The remaining characterscan be alphabetic or numeric.
b In the Path field, type the full path and name of the library’s directory(UNIX, Windows) or PDS (on z/OS). On UNIX or Windows, the library will becreated if it does not exist; on z/OS, the library must already exist.
c In the Access field, select Write if it is not already selected.
Note: You must have prior permission from the owner of this library inorder to use “write” access. �
d In the Location field, select Local or Remote. If you select Remote, theServer ID field opens. The value in that field defaults to the server ID of theserver to which you most recently connected.
e Select OK. The value of the Library field is the libref that you defined.
5 In the Folder Name field, type the name of the folder.
6 In the Description field, type a description of the folder.
7 Select OK. You are returned to the Manage Report Definitions window. The folder’sname is on your list of known report definition folders.
Note: 1. If you have a “write” lock on the library to which you added the folder, assoon as you finish using the folder for “write” purposes (for example, saving reportdefinitions to it), remember to free the library fully or partially so that other people andtasks can use it. One way to free the library is to exit from SAS IT ResourceManagement and SAS. Another way is to follow these steps:
� From the main window’s Reporting tab, select Manage Report Definitions.The Manage Report Definitions window opens.
� Select File. A menu opens. From the menu, select Add Report Folders. TheAdd Report Definition Folders window opens.
� Select Define Library. The Define a SAS Library window opens.
1 In the Libref field, type the libref of the library to which you added the folder.

Reporting: Working with Report Definition Folders � Viewing the List of Report Definitions in a Report Definition Folder 475
2 If the libref was one that you created, leave the Path field blank (if you donot intend to use that library again during your current SAS session). Thatwill entirely free the library.
If the libref was one that you did not create or one that you did create butnow can use in “read” mode, in the Access field select Readonly. That willpartially free the library; people will be able to use it for read access, but notfor write access.
3 Select OK.
Note: If you set a path to blank for a libref that you defined, the libref willbe de-assigned and (in the SAS message area at the bottom of the window)you will get a confirmation message that says “not assigned.” (This is aNOTE message. Ignore the word ERROR.) �
� Select OK.
�
Note: 2. If the library to which you added the folder was remote, in addition tofreeing that library (see Note 1), you also need to release the lock on the PDB so thatother people and tasks (such as the process task and reduce task) can use it. For moreinformation about releasing the lock, see “Releasing the Lock on the Active PDB” onpage 319. �
Removing a Report Definition FolderYou can remove the name of a report definition folder from your list of known report
definition folders� by using the SAS IT Resource Management GUI for UNIX and Windows.
Note: Removing the name of the folder from the list does not delete the folder. Thefolder continues to exist. �
Removing a Report Definition Folder (UNIX, Windows)In the SAS IT Resource Management GUI for UNIX and Windows, you can remove
the name of a report definition folder from your list of known report definition foldersby following these steps:
1 From the main window’s Reporting tab, select Manage Report Definitions.The Manage Report Definitions window opens.
2 Select File. A menu opens. From the menu, select Remove Report Folders. TheRemove Report Definition Folders window opens. A list of the names of the reportdefinition folders is displayed at the top of the window.
3 Select the name of the report definition folder that you want to remove from yourlist.
4 Select Remove.5 Select OK.
Notice that the name of that report definition folder is no longer on the your listof known folders. (The report folder itself was not deleted; it still exists.)
6 When you are ready to return to the main window of SAS IT ResourceManagement, select Close in the Manage Report Definitions window.
Viewing the List of Report Definitions in a Report Definition FolderYou can view the names of the report definitions in a report definition folder

476 Viewing Your List of Known Report Definition Folders � Chapter 22
� by using the SAS IT Resource Management GUI for UNIX and Windows.
Viewing the List of Report Definitions in a Report Definition Folder (UNIX,Windows)
In the SAS IT Resource Management GUI for UNIX and Windows, you can view thelist of report definitions in a report definition folder by following these steps:
1 From the main window’s Reporting tab, select Manage Report Definitions.The Manage Report Definitions window opens. Your list of known report definitionfolders displays in Folders.
2 Select the name of the report definition folder whose contents you want to know.3 The list of the report definitions in that folder is displayed in Current PDB
Reports.Note: By default, the list includes the names of the report definitions that are
based on the tables in the active PDB and excludes the names of the reportdefinitions that are based on other tables.
� To change the filter so that all of the folder’s report definitions are displayed,regardless of the location of the tables on which they are based, select Tools� Filter Report Definitions � Show All Report Definitions � OK
� To restore the default, so that the list of report definitions displays only theones that are based on the tables in the active PDB, select Tools � FilterReport Definitions � Only Show Report Definitions Available for ThisPDB � OK
�
For more about report definitions, see “Overview of Report Definitions” on page 480.
Viewing Your List of Known Report Definition FoldersThere are three versions of your list of known report definition folders:� The complete list, which contains all of these sets of names:
� the names of report definition folders that SAS IT Resource Managementlooks for automatically
� the names of report definition folders that you created and have not deleted� the names of report definition folders that someone else created and that you
added and have not removed.
Notice that the complete list might contain the names of folders to which you donot currently have access. For example, the names might refer to folders that havelibrefs that are not currently defined. Or the names might refer to folders thathave librefs that are currently defined, but the librefs points to different librariesthan they pointed to earlier. (The library might be in a PDB that is not the activePDB, or a site library that is not the active site library, or the program library thatis not the active program library, or the remote program library that is not theactive remote program library.)
� The complete list’s subset for librefs that are currently defined with “write” access.Notice that this subset of the complete list might contain the names of folders to
which you do not currently have access, for the reasons that are described above.For example, suppose the folder named ADMIN.MYRDEFS is in this subset. TheADMIN libref is currently defined (the libref points to the active PDB’s ADMINlibrary). And if you are accessing the PDB with “write” access, you have “write”
Reporting: Working with Report Definition Folders � Viewing Your List of Known Report Definition Folders 477
access to the active PDB’s ADMIN library. But the folder might be in some otherPDB’s ADMIN library.
� The complete list’s subset to which you currently have access.These are the report definition folders for which the libref is currently defined.
A folder of that name is found in the library to which that libref currently points.
You can view your list of known report definition folders and the subsets of that list� by using the SAS IT Resource Management GUI for UNIX and Windows.
Viewing Your List of Known Report Definition Folders (UNIX, Windows)In the SAS IT Resource Management GUI for UNIX and Windows, you can view your
list of known report definition folders and the subsets of that list by following thesesteps:
1 From the main window’s Reporting tab, select Manage Report Definitions.The Manage Report Definitions window opens.
2 The complete list’s subset of folders to which you currently have access isdisplayed in Folders.
3 Select File � Add Report Folders or select File � Remove Report FoldersThe complete list is displayed in Report Definition Folders.
Select OK or Cancel to return to the Manage Report Definitions window.4 Select a report definition folder and select a report definition. Then select File �
Save Report Definition The complete list’s subset of folders with librefs that arecurrently defined with “write” access is displayed in Report Folders. (If youselect a folder that does not currently exist and you save a report definition to it,the folder will be created and then the report definition will be saved to it.)
Select OK or Cancel to return to the Manage Report Definitions window.5 When you are ready to return to the main window of SAS IT Resource
Management, select Close in the Manage Report Definitions window.

478
479
C H A P T E R
23Reporting: Working with ReportDefinitions
Working with Report Definitions: Main Topics 480Overview of Report Definitions 480
Copying a Report Definition 480
Copying a Report Definition 480
Creating/Editing/Viewing a Report Definition 481
Creating/Editing/Viewing a Report Definition (UNIX, Windows) 481Deleting a Report Definition 487
Deleting a Report Definition (UNIX, Windows) 487
Exploring Supplied Report Definitions (UNIX, Windows) 488
Exploring Supplied Report Definitions (UNIX, Windows) 488
Running a Report Definition 488
Running a Report Definition (UNIX, Windows) 488Saving a Report Definition 489
Saving a Report Definition (UNIX, Windows) 489
Selecting a Report Definition 491
Working with Report Definitions: Related Topics 491
Directing a Report to the Web 491Directing a Report to the Web (UNIX, Windows) 493
Naming Conventions for Report Definitions 498
Report Styles 499
Print Report 499
Plot Report 499Chart Report 500
Three-Dimensional Graph Report 500
Spectrum Report 500
Source Report 500
Tabular Report 501
Variable Types 501Appendices for z/OS 502
A Collection of Tips for z/OS 502
Tips for Reporting on z/OS 504
Tips for Subsetting Data on z/OS 504
Subsetting via DATETIME 504Subsetting by a Simple Local WHERE Expression 504
Subsetting by a Simple Global WHERE Expression 505
Appendices for UNIX and Windows 505
A Collection of Tips for UNIX and Windows 505
Tips for Reporting on UNIX and Windows 507Tips for Subsetting Data on UNIX and Windows 507
Subsetting via DATETIME 507
Subsetting by a Simple Local WHERE Expression 508

480 Working with Report Definitions: Main Topics � Chapter 23
Subsetting by a Simple Global WHERE Expression 508
Working with Report Definitions: Main Topics
Overview of Report DefinitionsA report definition contains the specification for a report. You run a report definition
to generate a report.For more information about report definitions, see the following topics:� “Copying a Report Definition” on page 480� “Creating/Editing/Viewing a Report Definition” on page 481� “Deleting a Report Definition” on page 487� “Exploring Supplied Report Definitions (UNIX, Windows)” on page 488� “Running a Report Definition” on page 488� “Saving a Report Definition” on page 489� “Selecting a Report Definition” on page 491.
Copying a Report DefinitionYou can copy a report definition to another report definition folder� by using the SAS IT Resource Management GUI for UNIX and Windows.
Copying a Report DefinitionIn the SAS IT Resource Management GUI for UNIX, you can copy a report definition
to another report definition folder by following these steps:1 Select (view) the report definition from the first folder.
For more information, see “Selecting a Report Definition” on page 491.2 Save the report definition with a new name in the same folder, or save the report
definition (with the same name or a new name) in a different folder. Notice thatyou must have “write” access to this folder.
For more information, see “Saving a Report Definition” on page 489.
However, if you have a large number of report definitions to copy, you might want todo the following:
1 On the main window’s Reporting tab, select Manage Report Definitions. TheManage Report Definitions window opens.
2 Select File � Copy Report Definitions The Copy Report Definitions windowopens.
3 To select the “From” folder, select the down arrow to the right of the From field andthen select the folder that you want to copy report definitions from.
If the folder that you want to copy from is not on that list, select the right arrowto the right of the From field and define the libref for the folder that you want tocopy from. For more information about defining a libref for a folder, see “Adding aReport Definition Folder” on page 472.
4 To select the “To” folder, select the down arrow to the right of the To field and thenselect the folder that you want to copy report definitions to. Notice that you musthave “write” access to this folder.

Reporting: Working with Report Definitions � Creating/Editing/Viewing a Report Definition 481
If the folder that you want to copy to is not on that list, select the right arrow tothe right of the To field and define the libref for the folder that you want to copyto. For more information about defining a libref for a folder, see “Adding a ReportDefinition Folder” on page 472.
5 If you want to copy all the report definitions in the From folder, make sure thatthere is a check in the box to the left of the Copy All Reports field. (To togglebetween checked and unchecked, click on “Copy All Reports.”)
If you want to copy some but not all of the report definition in the From folder,make sure that the check box to the left of the Copy All Reports field isunselected. (To toggle between checked and unchecked, click on “Copy AllReports.”) In the list below, select the report definitions that you want to copy. (Asingle click selects a single report definition. To select a range, hold down the Shiftkey while you are selecting. To select multiple reports but not a range, hold downthe Ctrl key while you are selecting.)
Note: When you use this method of copying, you cannot change the name ofreport definitions while you are copying them. �
6 Select OK. You return to the Manage Report Definitions window. The new reportdefinitions are listed in Current PDB Reports.
Note: If you do not see the new report definitions in that list, select Tools �Filter Report Definitions � Show All Report Definitions � OK �
7 When you are ready to return to the main window of SAS IT ResourceManagement, select Close in the Manage Report Definitions window.
Creating/Editing/Viewing a Report DefinitionSAS IT Resource Management provides supplied report definitions. You can use a
supplied report definition as-is, you can modify a supplied report definition and save itas a customized report definition, and/or you can create an entirely new reportdefinition.
You can create, edit, or view a report definition
� by using the SAS IT Resource Management GUI for UNIX and Windows.
Note: If your server is running in a z/OS operating environment and you are using asupplied report definition that is based on the XJOBS table, it is important that youunderstand the values in that table in order to correctly interpret your output. For anexplanation of the values in that table, refer to RMF Appendix 1 in the SAS ITResource Management Setup documentation. (See “General-Purpose Server SetupDocumentation” on page 12.) �
Creating/Editing/Viewing a Report Definition (UNIX, Windows)In the SAS IT Resource Management GUI for UNIX and Windows, you can create,
edit, or view a report definition by following these steps:
1 From the main window’s Reporting tab, select Manage Report Definitions.The Manage Report Definitions window opens.
2 The name of the active PDB is in the upper-right corner of the window. If the dataon which you want to base the report definition is in a different PDB, select theicon to the left of the PDB name and activate that PDB. For more information, see“Activating a PDB” on page 299.

482 Creating/Editing/Viewing a Report Definition � Chapter 23
Note: If you are unsure about the location of your data, check with your SASIT Resource Management site administrator and determine where the data foryour report is located (the server name, the PDB, and the level and tables in thePDB). �
3 If you want to create a new report definition, select File. A menu opens. Fromthe menu, select New Report Definition.
If you want to edit or view an existing report definition, list the existing reportdefinitions and select the one that you want to view or modify. For moreinformation, see “Viewing the List of Report Definitions in a Report DefinitionFolder” on page 475.
4 View (level and table): The Select Table field specifies the view (that is, the levelof the table) on which the report definition is based.
To see more about the view, modify the view, or specify the view:
a On the right side of the window, select the arrow to the right of the SelectTable field. The Select Table window opens.
b If the view that you want to use is in the active PDB, in the Levels fieldselect the level of the table and in the Level.Table list, select the view.
If the view that you want to use is not in the active PDB, in the Levelsfield select OTHERS. The SAS Data Library window opens. Select the libref ofthe library that contains the view that you want to use. In the Level.Tablelist, select the view.
c Select OK. You return to the Manage Report Definitions window. The viewthat you selected is listed in the Select Table field.
5 Image (report style and sub-style): In the lower-right corner of the window, theimage illustrates the report style and sub-style on which the report definition isbased.
Reports are grouped into two major categories: graph and text reports. Graphreports include a variety of styles, ranging from basic plots to more complexspectrograph or spectrum plot reports. Graphs are useful for reviewing trends overtime and relationships between variables. Text reports include styles such aslistings and tabular reports. These report styles are useful for gathering summarystatistics on your data.
If you have not selected a report style for your current report definition, themost recently selected style and sub-style are used.
To see more about the report style and sub-style (and advanced options), tomodify them, or to specify them:
a Select the image. The Report Style Selection window opens.b From the Report Style list, select the report style that you want to use. If the
report style has sub-styles, the sub-styles are displayed in the ReportSub-Style list. Select the sub-style that you want to use.
For more information about the report styles and sub-styles, select theHelp button.
c If the style or sub-style has advanced options, you can see or specify theadvanced options by selecting Advanced. The Advanced Options windowopens. View or change the values of the advanced options, and select OK.
For more information about the advanced options, select the Help buttonin the Advanced Options window.
d Select OK. The image below Current Report Style illustrates the reportstyle and sub-style that you selected.
For more information about choosing a report style, see “Report Styles” on page499.

Reporting: Working with Report Definitions � Creating/Editing/Viewing a Report Definition 483
6 Variables (roles and attributes): The Select Variables field specifies thevariables on which the report definition is based. (If more variables are selectedthan can fit in the field, some of the selected variables are not displayed.)
To view, modify, or specify the selected variables and their roles (types), labels,and formats:
a Select the arrow to the right of the Select Variables field. The SelectVariables window opens.
b In the Variable Types list select Show All. The selected variables, theirroles, and their descriptions are displayed in the All Selected Variableslist.
To see the attributes of the selected variables, select Attributes and thenselect the variable whose attribute you want to see. To return to the SelectVariables window, select OK.
Note: The Variable Type Statistics does not represent variables. Itrepresents one or more statistics that will be calculated for the variables thatare assigned to the Analysis role (type). (If you do not select a statistic, thedefault statistic is MEAN.) In graph reports (3D Graph, Chart, Plot, andSpectrum reports) if the Summary Period is not AS IS, the statistic is used totransform the Analysis variables, and the transformed Analysis variables aredisplayed in the report. In tabular reports, the statistic or statistics are usedto transform the Analysis variables, and the transformed Analysis variablesare displayed in the report. �
Note: For additional information about variable types see “VariableTypes” on page 501. �
c The unselected variables and their descriptions are displayed in theAvailable Variables list.
d To move a variable from the All Selected Variables list to the AvailableVariables list, select the variable in the All Selected Variables list,select its variable type in the Variable Types list, and then select<-Remove. The variable moves to the Available Variables list.
e To move a variable from the Available Variables list to a particular type’slist (which then is displayed in the All Selected Variables list when youselect Show All), select the variable in the Available Variables list, selectthe variable type to which you want to assign it in the Variables Types list,and then select Add->. The variable moves to the right column, whose titledepends on the variable type that you selected, and is assigned to the rolethat is specified by the selection in the Variable Types list.
Note: For some report styles, you can select multiple variables for a singlevariable type. �
Note: In the Variable Types list, variables are coded as Req (requiredfor the selected report style), Opt (optional for the selected report style), orN/A (not applicable for the selected report style). If you select a variable thatis marked N/A, the variable type will not be used for the current report, butthe variable and type information will be saved. If you later change yourreport style and this variable type is applicable to the new type, it will beused for that report. �
f To move a variable up or down in the list of selected variables, select thevariable that you want to move and then select Move Up or Move Down.
For analysis variables (Variable Type Analysis), the order in which thevariables are displayed in the Analysis Variables list and Show All list is theorder in which they are graphed or plotted on the report.

484 Creating/Editing/Viewing a Report Definition � Chapter 23
For statistics (Variable Type Statistics), the order that the statistics aredisplayed in the Statistics list and Show All list is the order that they will bedisplayed on your report. For example, this determines the order in whichthey would appear in columns or rows on a tabular report.
g To change the role (that is, the type) that is assigned to a selected variable,you must first remove the variable from the variable type that it is in andthen add it again as a different variable type.
h You can change a variable’s attributes while it is in the All SelectedVariables list. To change the attributes of a selected variable, selectAttributes. The Variable Attributes window opens. Select the variablewhose attributes you want to change. The Variable Label, VariableFormat, and Variable Description fields display the current values.Overwrite them with values that you prefer. Select OK to return to the SelectVariables window.
Note: If you change one or more attributes in this way, the change affectsthis report definition only. The change is saved with the report definition (ifthe report definition is saved), but the change is not saved in the datadictionary. To change the attributes in a way that affects all reportdefinitions, change the properties of the variable(s) in the data dictionary.For more information about changing the properties of variables in the datadictionary, see “Creating/Editing/Viewing a Derived Variable” on page 381,“Creating/Editing/Viewing a Formula Variable” on page 388, or “Creating/Editing/Viewing a Regular Variable” on page 394. �
i Select OK. You return to the Manage Report Definitions window. At least someof the variables that you selected are listed in the Select Variables field.
7 Subsetting (datetime and WHERE): You can subset data; that is, you can use aportion of your data that meets specified criteria. The criteria can be based on adatetime range or on a WHERE clause or on both.
To view, modify, or specify the subsetting criteria:
a Select the arrow to the right of the Subset Data field.b To see any subsetting that is based on a datetime range, select the Start/
End Dates/Times tab. The subsetting criteria are listed at the top of the tab.If the subsetting is for this report definition only, its criteria are in theOverride Default Values For This Report field. If the subsetting is forall report definitions, its criteria are in the Set Default Values For AllReports field. For more information about datetime ranges, select Help inthis window.
When a report is generated by a report definition that specifies subsetting"for this report definition only," any subsetting "for all report definitions" isignored in that report.
c To see any subsetting that is based on a WHERE clause, select the Query/Where Clause Builder tab. The subsetting criteria are listed at the top ofthe tab. If the subsetting is for this report definition only, its criteria are inthe Local Query/Where Clause For This Report field. If the subsettingis for all report definitions, its criteria are in the Global Query/WhereClause For All Reports field. If Instead of is selected, only the localversion is used. If And is selected, the data will satisfy both the local andglobal versions. For more information about WHERE clauses, select Help inthis window.
Note: In these WHERE fields, underscores are used to indicate lines andare interpreted as blanks. Thus, if you type an underscore, it will beinterpreted as a blank. �
Reporting: Working with Report Definitions � Creating/Editing/Viewing a Report Definition 485
Note: When the global WHERE expression is joined to the local WHEREexpression with AND, the WHERE expressions must be compatible for areport to be generated. For example, no report is generated if one WHEREexpression has MACHINE="Alpha" and the other WHERE expression hasMACHINE="Beta". (Joining these two expressions with AND does not resultin the condition True.) �
Note: Do not use the ampersand (&) to mean AND in WHEREexpressions. �
d If both datetime range criteria and WHERE criteria are specified, the datawill satisfy both the range criteria and the WHERE criteria.
To specify the criteria or to change the criteria:
a On the Start/End Dates/Times tab, you can specify values or changevalues for the ends of the ranges by selecting the arrow to the right of a field.A Select window opens. If you select Relative date, you can specify arelative date and time. If you select Absolute date, you can specify anabsolute date and time. For more information about specifying the ends ofthe ranges, select Help in the Select window.
Note: To remove a value, put your cursor in a field and delete thecharacters in its specification. �
b To see any subsetting that is based on a WHERE clause, select the Query/Where Clause Builder tab. The subsetting criteria are listed at the top ofthe tab. If the subsetting is for this report definition only, its criteria are inthe Local Query/Where Clause For This Report field. If the subsettingis for all report definition, its criteria are in the Global Query/WhereClause For All Reports field. If Instead of is selected, only the localversion is used. If And is selected, the data will satisfy both the local andglobal versions.
Note: To remove a value, select the Clear button to the right of thevalue. �
To return to the Manage Report Definitions window, select OK.
Note: The WHERE criteria are displayed in the Subset Data field. Thedatetime range criteria are not displayed in the Subset Data field. �
8 Summarization (ASIS and period): You can summarize the data. Summarizationis particularly useful when there is a large amount of data. The default is to haveno summarization, which is represented by a blank field or by ASIS.
If you want to collapse your data into groups based on the date and time valuefor each observation, you can do so by selecting a summary time period, such as 15Min, Hour, or 24 Hour. (When you select a summary time period, your data iscollapsed before the analysis statistic is applied.)
When you select a summary time period, the data in each summary group iscombined to form a single point on a plot, a bar on a chart, or a row or column in atable. For example, if you want to summarize your data at 15-minute intervals,you would select a summary time period of 15 MIN. The datetime value for eachobservation is modified to group the observations into 15-minute summary groupsand your report displays a point, bar, or row for data that is summarized every 15minutes.

486 Creating/Editing/Viewing a Report Definition � Chapter 23
To view, modify, or specify the summarization period:
a Select the arrow to the right of the Summary Time Period field. TheSummary Time Period window opens and displays a list of the periods thatyou can select.
b Select the period that you want to use. For more information about periods,select the Help button.
c Select OK to return to the Manage Report Definitions window.9 Palette definition (specific and default): You can specify the palette definition that
you want to use for the report. A palette definition is a stored set of SAS and SAS/GRAPH options, such as colors, patterns, symbols, legends, and axis definitions,that can be associated with one or more report definitions. If you do not specify aparticular palette definition, the default palette definition is used.
To view, modify, or select a palette definition, see “Creating/Editing/Viewing aPalette Definition” on page 527.
For more information about the default palette definition, see “Specifying/Editing/Viewing the Default Palette Definition” on page 529.
10 Titles and footnotes: You can specify the title and footnote that you want to usewith the report definition.
To view, modify, or specify the title and footnote:
a Select Locals. A menu opens. From the menu, select Set Titles andFootnotes. The Set Titles and Footnotes window opens.
b You can specify four lines in the title. The lines will be centered when theyare displayed in the report.
Note: If you later use the report definition in batch mode, you can have asmany as 10 lines in the title. �
c You can specify two lines in the footnote. The lines will be centered whenthey are displayed in the report.
Note: If you later use the report definition in batch mode, you can have asmany as 10 lines in the footnote. �
d Select OK (to accept changes, if any) or Cancel (to ignore changes, if any) toreturn to the Manage Report Definitions window.
In the title and footnote lines, to display the date that the report is produced,use %str(&SYSDATE) instead of &SYSDATE. You can also use other features ofthe SAS TITLE and FOOTNOTE statements, such as color, height, font, andjustification. Additionally, you can use macro functions. For example, suppose thatyour report definition has MACHINE as a BY variable and the title is
For Server #BYVAL(MACHINE) on %STR(%SYSDATE)
Then the current value of MACHINE and the current value of system datetimeare retried and inserted. (Also, the default BY line after the title is suppressed.)
11 Formatting and direction: You can direct where you want the report to be producedand format the report definition appropriately for that direction. One copy isavailable in the Results window. You can direct whether the other copy goes to thedefault window (Graph for graph reports, Output for text reports) or elsewhere.
To view, modify, or specify where you want the report to be generated:
a Select Locals. A menu opens. From the menu, select Report OutputOptions. The Report Output Options window opens.
b If SAS Window is selected, the report is formatted for and directed to a SASwindow (Graph for graph reports, Output for text reports).

Reporting: Working with Report Definitions � Deleting a Report Definition 487
c If SAS Catalog is selected, the report is formatted for and directed to a SAScatalog. To view the location, see the Current Settings list.
To modify or specify the location, select Set Attributes. The Output to aSAS Catalog window opens. To specify values, type them in. To modifyvalues, type over the current values. Select OK (to accept changes, if any) orCancel (to ignore changes, if any).
d If External File is selected, the report is formatted for and directed to anexternal file. To view the location, see the Current Settings list.
To modify or specify the location, select Set Attributes. The Output toan External File window opens. To specify values, type them in. To modifyvalues, type over the current values. Select OK (to accept changes, if any) orCancel (to ignore changes, if any).
e If Web is selected, the report is formatted for and directed to GIF files and/orHTML files. To view the location and other attributes, see the CurrentSettings list.
To modify or specify the location and other attributes, select SetAttributes. The Generate Web Output window opens. To specify values,type them in or make selections. To modify values, type over the currentvalues or change the selections. Select OK (to accept changes, if any) orCancel (to ignore changes, if any).
For more information, see “Directing a Report to the Web” on page 491.f Select OK (to accept changes, if any) or Cancel (to ignore changes, if any) and
return to the Manage Report Definitions window.If you make and accept changes and later save the report definition, the
changes are saved in the report definition.
For more information about directing reports (in batch mode or the GUI) to theabove destinations, see the topic “How the OUT*= Parameters Work Together” in“Chapter 3: Report Macros” in the SAS IT Resource Management macro referencedocumentation.
To run the report definition, see “Running a Report Definition” on page 488.To save the report definition, see “Saving a Report Definition” on page 489.
Deleting a Report DefinitionYou can delete a report definition� by using the SAS IT Resource Management GUI for UNIX and Windows.
Deleting a Report Definition (UNIX, Windows)In the SAS IT Resource Management GUI for UNIX and Windows, you can delete a
report definition by following these steps:1 From the main window’s Reporting tab, select Manage Report Definitions.
The Manage Report Definitions window opens.2 The name of the active PDB is in the upper-right corner of the window. If the
folder that contains the report definition that you want to delete is in a differentPDB, select the icon to the left of the PDB name and activate that PDB. For moreinformation, see “Activating a PDB” on page 299.
3 In the Folders list, select the folder that contains the report definition that youwant to delete. The report definitions that are in that folder are displayed in theCurrent PDB Reports list.
4 In the Current PDB Reports list, select the report definition that you want todelete.

488 Exploring Supplied Report Definitions (UNIX, Windows) � Chapter 23
5 Select File � Delete Report Definition � Yes6 When you want to return to the main window of SAS IT Resource Management,
select Close in the Manage Report Definitions window.
Exploring Supplied Report Definitions (UNIX, Windows)You can explore supplied report definitions� by using the SAS IT Resource Management GUI for UNIX and Windows.
Exploring Supplied Report Definitions (UNIX, Windows)In the SAS IT Resource Management GUI for UNIX and Windows, you can explore
supplied report definitions by following these steps:1 View the list of report definitions in the PGMLIB.ITSVRPT folder. For more
information, see “Viewing the List of Report Definitions in a Report DefinitionFolder” on page 475.
2 For each report definition that interests you, view the report definition. For moreinformation, see “Creating/Editing/Viewing a Report Definition” on page 481.
Note: If you do not see the supplied report definition that you are looking for,check the filter by selecting Tools � Filter Report Definition �
3 If the active PDB contains the table on which the report definition is based, youcan run the report definition and generate a report. For more information, see“Running a Report Definition” on page 488.
Running a Report DefinitionWhen you run a report definition, a report is generated.You can run a report definition� by using the %CPSTART macro (to invoke SAS IT Resource Management) and the
reporting macros.For more information about the %CPSTART macro, see the topic %CPSTART in
the SAS IT Resource Management macro reference documentation.For more information about the reporting macros, see “Chapter 3: Report
Macros” in the SAS IT Resource Management macro reference documentation.� by using the SAS IT Resource Management GUI for UNIX and Windows.
Running a Report Definition (UNIX, Windows)In the SAS IT Resource Management GUI for UNIX and Windows, you can run a
report definition by following these steps:1 From the main window’s Reporting tab, select Manage Report Definitions.
The Manage Report Definitions window opens.2 Create, edit, or view the report definition. For more information, see “Creating/
Editing/Viewing a Report Definition” on page 481.3 In the Manage Report Definitions window, select the Run button. (Or, if you have
several reports to run and want to run them all at the same time, select Locals �Run Multiple Reports Then select the report definitions that you want to run atthe same time, and select the Run button.)

Reporting: Working with Report Definitions � Saving a Report Definition 489
If the active PDB is remote, a menu opens after you select the Run button.From that menu, select Local if you want the data to be downloaded to the localhost and the report definition to run by using the CPU on the local host. Or, fromthat menu, select Remote if you want the report definition to run by using theCPU on the remote host and the report to be downloaded to the local host.(Typically, select Remote, because less network traffic is caused by downloadingthe report than by downloading the data. However, if you are directing the reportto the Web (by selecting, in the Manage Report Definitions window, Locals �Report Output Options � Web � Set attributes and providing the requestedinformation), then select Local, not Remote, if the remote host is running z/OS.)
If the active PDB contains the table on which the report definition is based, thereport definition runs and generates a report.
Note: If your report definition displays unexpected results, see “TroubleshootingReport Problems” on page 513. �
4 The report definition specifies where the report is to be directed.By default, graph reports are directed to the SAS GRAPH window, which opens
automatically and displays the report automatically when a report is directed to it.Remember that a report might have multiple parts. If so, scroll down in thewindow to see all the parts. When you are finished looking at the report, iconizethe window.
By default, text reports are directed to the SAS OUTPUT window, which doesnot open automatically when a report is directed to it. To open the SAS OUTPUTwindow, select Window. A menu opens. From the menu, select Output. The reportis displayed automatically. Remember that a report might have multiple parts. Ifso, scroll down in the window to see all the parts. When you are finished lookingat the report, iconize the window.
After you have directed more than one report to a SAS window, scrolling up anddown becomes complicated because you scroll not only through the parts of asingle report but through multiple reports. At that point, you might prefer to usethe other method of viewing the reports, whether or not the reports are directed toSAS windows: Open the SAS Results window, which is available in an iconizedform when you invoke SAS IT Resource Management. A list is displayed of thereports that were generated. Select the report that you want to view. When youare finished looking at the reports, iconize the window.
5 Select Close in the Manage Report Definitions window to return to the mainwindow of SAS IT Resource Management.
Saving a Report DefinitionYou can save a report definition� by using the SAS IT Resource Management GUI for UNIX and Windows.
Saving a Report Definition (UNIX, Windows)In the SAS IT Resource Management GUI for UNIX and Windows, you can save a
report definition by following these steps:1 Create, edit, view, or run the report definition.
For more information about creating, editing, or viewing a report definition, see“Creating/Editing/Viewing a Report Definition” on page 481.
For more information about running a report definition, see “Running a ReportDefinition” on page 488.

490 Saving a Report Definition � Chapter 23
2 You can save the report definition in interactive form or in batch form or in both.Notice that if you save it in interactive form, you can still run it in batch mode byusing the %CPRUNRPT macro. Thus, typically report definitions are saved ininteractive form.
To save the report definition in interactive form:
a With the Manage Report Definitions window as the active window, selectFile. A menu opens. From the menu, select Save Report Definition. TheSave Report Definition window opens.
b The Report Folders list displays the complete list’s subset of folders towhich you currently have write access.
If you want to save your report definition to one of these folders, select thename of the folder to which you want to save your report. The name that youselected is displayed in the Folder field. (If the folder does not currentlyexist, it will be created when you save the report.)
If you want to save your report definition to another folder, select AddReport Folder. You can then define a libref to point to the library in whichyou want to add the folder, or you can change an existing libref from“readonly” access to “write” access. For more information, see “Adding aReport Definition Folder” on page 472.
c In the Report Name field, type a new name or edit an existing name.The name can contain letters, numbers, and underscores. The name does
not need to begin with a letter. You might want to start the name of yourreport definition with U in order to identify that this is a user-defined reportdefinition.
The length of a report name must be between one and eight characters.
Note: If the name that you use is identical to a name that is already in thefolder, your report definition will overwrite the previous report definition thathad that name. �
Note: Do not specify OUTNAME= as a member of a z/OS PDS; that is, donot use the form OUTNAME=DATASET(MEMBER). �
d In the Description field, type a new description or edit an existingdescription.
e Select OK. SAS IT Resource Management returns you to the Manage ReportDefinition window. The report definition that you saved is now on the list ofreport definitions in the selected folder.
To save the batch form of the report definition:
a Select Locals. A menu opens. Select Preview Macro Source. ThePREVIEW window opens and displays the report definition in the form of acall to a reporting macro (plus SAS statements that specify features such asthe title and footnote, if needed).
Select File � Save as FileThe Save As window opens. Select the directory (UNIX) or folder
(Windows) in which you want to save the file. Type the name of the file inwhich you want to save the report definition, and select Save. If the file doesnot exist, it will be created.
Note: If you edit the statements in this window, they will affect what issaved (if you do a save), but they will not affect what runs interactively(because this is a copy of what runs interactively). �
b Select File � Close to return to the Manage Report Definitions window.3 When you want to return to the main window of SAS IT Resource Management,
select Close.

Reporting: Working with Report Definitions � Directing a Report to the Web 491
Selecting a Report DefinitionWhen you select a Report Definition, its values are displayed and you can view them.For more information about selecting (viewing) a report definition, see “Creating/
Editing/Viewing a Report Definition” on page 481.
Working with Report Definitions: Related Topics
Directing a Report to the Web
When you are working interactively, you can direct a report to the Web by specifyingvalues in one or more fields in a GUI. When you are working in batch mode, you candirect a report to the Web by specifying values for one or more parameters when youcall a report macro.
Each field is similar (but not identical) to a parameter. If you work in both modes(interactive and batch), you might find it helpful to know which fields correspondapproximately to which parameters. For that information, see the following table. Thetable is in three sections, one for each of the windows. (For more information about thewindows, see “Directing a Report to the Web (UNIX, Windows)” below.
Table 23.1 Approximate Correspondence of Fields and Parameters
Window: Report Output Options
Field (in GUI) Parameter (on macro call)
Web radio button OUTMODE=WEB
Window: Generate Web Output
Field (in GUI) Parameter (on macro call)
HTML Directory HTMLDIR=<value>
SAS Catalog
Libref
Catalog Name
OUTLOC=<libref.catalog_name>
Report Group OUTDESC=<description>
Use Interactive Graphics whenpossible
Java
ActiveX
LARGEDEV=JAVA
LARGEDEV=ACTIVEX
Clear Gallery WEBCLR=YES
or call %CPWEBINI
Window: Secondary Options for Web Output
Field (in GUI) Parameter (on macro call)
HTML URL HTMLURL=<value>
492 Directing a Report to the Web � Chapter 23
Image Directory IMAGEDIR=<value>
Image URL IMAGEURL=<value>
Web Style WEBSTYLE=<value>
Thumbnail Size SMALLDEV=<value>
Enlarged Size LARGEDEV=<value>
(not available, but there are defaultnames)
OUTNAME=<value>
You can direct a report to the Web� by using OUTMODE=WEB (and, optionally, other Web-related parameters) on
your call to the report macro in batch mode. For more information about “the bigpicture” related to OUTMODE=WEB, see the topic “How the OUT*= ParametersWork Together” in Chapter 3: Report Macros in the SAS IT Resource Managementmacro reference documentation.
� For more information about the OUTMODE= parameter, see the OUTMODE=parameter, which is in most of the macros in “Chapter 3: Report Macros” inthe SAS IT Resource Management macro reference documentation.
� For information about the HTMLDIR= parameter, see the HTMLDIR=parameter, which is in most of the macros in “Chapter 3: Report Macros” inthe SAS IT Resource Management macro reference documentation.
� For information about the HTMLURL= parameter, see HTMLURL=, which isin most of the macros in “Chapter 3: Report Macros” in the SAS IT ResourceManagement macro reference documentation .
� For information about the IMAGEDIR= parameter, see IMAGEDIR=, whichis in most of the macros in “Chapter 3: Report Macros” in the SAS ITResource Management macro reference documentation .
� For information about the IMAGEURL= parameter, see IMAGEURL=, whichis in most of the macros in “Chapter 3: Report Macros” in the SAS ITResource Management macro reference documentation .
� For information about the LARGEDEV= parameter, see LARGEDEV=, whichis in most of the macros in “Chapter 3: Report Macros” in the SAS ITResource Management macro reference documentation .
� For information about the OUTDESC= parameter, see OUTDESC=, which isin most of the macros in “Chapter 3: Report Macros” in the SAS IT ResourceManagement macro reference documentation .
� For information about the OUTLOC= parameter, see OUTLOC=, which is inmost of the macros in “Chapter 3: Report Macros” in the SAS IT ResourceManagement macro reference documentation .
� For information about the OUTNAME= parameter, see OUTNAME=, whichis in most of the macros in “Chapter 3: Report Macros” in the SAS ITResource Management macro reference documentation .
� For information about the SMALLDEV= parameter, see SMALLDEV=, whichis in most of the macros in “Chapter 3: Report Macros” in the SAS ITResource Management macro reference documentation
� For information about the WEBCLR= parameter, see WEBCLR=, which is inthe %CPRUNRPT and %CPXHTML macros in “Chapter 3: Report Macros” inthe SAS IT Resource Management macro reference documentation.
� For information about the WEBSTYLE= parameter, see WEBSTYLE=, whichis in most of the macros in “Chapter 3: Report Macros” in the SAS ITResource Management macro reference documentation .

Reporting: Working with Report Definitions � Directing a Report to the Web 493
� by using the SAS IT Resource Management GUI for UNIX and Windows.
Directing a Report to the Web (UNIX, Windows)In the SAS IT Resource Management GUI for UNIX and Windows, you can direct a
report to the Web by specifying fields in the Report Output Options window, GenerateWeb Output window, and Secondary Options for Web Output window. These windowsopen in sequence.
1 The Report Output Options window:
a On the Reporting tab, select Manage Report Definitions. The ManageReport Definitions window opens.
b From the Folders list, select the folder where the report definition is stored.c From the Current PDB Reports list, select the report definition that you
want to run.d Select Locals � Report Output Options The Report Output Options
window opens.e Select Web.
This selection indicates that you want the report to be directed to the Web.For the report to actually be directed to the Web, you must also specify
where the Web report is to be stored. You can specify that location in theHTML Directory field in the Generate Web Output window (and also,optionally, in the Image Directory field in the Secondary Options for WebOutput window).
2 The Generate Web Output window:a In the Report Output Options window, select Set Attributes. The Generate
Web Output window opens.b The following field is required.
� HTML Directory fieldIn this field, specify the directory or folder where you want to store
the HTML files that are created for your report (welcome.htm and itsassociated .htm files; an .htm file if the report is a graph report and youplan to use a Java applet or an ActiveX control for the enlarged image ofthe report; and an .htm file if the report is a text report). The directoryor folder must already exist and you must have write access to it. Whenyou want to browse the report, you can start by pointing your Webbrowser to the welcome.htm file in this directory or folder and openingthat file. To create Web output, a value is required in this field.
For example, to direct the Web output to a folder namedc:\reports\daily, type c:\reports\daily in the HTML Directory fieldand run the report definition.
Note: If you prefer to use a macro variable for the value, you can doso. For example, suppose that you want to make a macro variablenamed mydir and have its value be c:\reports\daily.
� In the body of the SAS Program Editor window, type the code
%let mydir=c:\reports\daily ;
Then select Run � Submit This creates the macro variable,names it, and assigns a value to it.
For more information about submitting SAS code, see“Submitting a SAS Program through the SAS GUI” on page 18.
� Type %str(&mydir) in the HTML directory field. (The & obtainsthe value of the macro variable, and the %str() is required so that
494 Directing a Report to the Web � Chapter 23
the macro variable is evaluated at the appropriate time during thereport production.)
� Then, run the report definition. When the report is sent to theWeb, the macro processor replaces %str(&mydir) with the valuec:\reports\daily.
�
The value of this field works with the value of the SAS Catalog Namefield to determine which reports you can view from one Web page. Foreach HTML directory, all reports that are stored in the same HTMLdirectory and that have the same SAS catalog name are accessible fromone welcome.htm Web page.
Note: If the value of Image Directory and the value of HTMLDirectory point to the same location, then you do not need to specifythe value of HTML URL or the value of Image URL, because everythingwill be stored in one directory. This is convenient and also enables youto easily move the directory as needed. �
Note: If you omit the values of Image Directory, Image URL, andHTML URL (for more information about these fields, see below), then allof the links in your HTML files are relative to the HTML directory. Thiscombination provides maximum portability. All of your HTML files andimage files will be stored together, and the HTML files will search forthe images in that same directory. �
c The following fields are optional:� SAS Catalog field (built from the Libref field and the Catalog Name
field)In this field, you can specify the name of the SAS catalog (in the
format libref.catalog_name) where the SAS IT Resource Managementreport is stored. This location is used as internal storage for the report.A report is then converted to one or more files that you can display onthe Web. You must have a separate HTML directory (and, optionally, aseparate image directory) for each catalog.
This value is not required. If you do not specify this value, then thedefault location is WORK.CPWEB_GR, which is temporary storagespace for your current SAS session. When you exit from your currentSAS session, all items in temporary storage are deleted.
� Report Group fieldIn this field, you can specify a string of text that describes the report
group. The string can be a maximum of 40 characters and should notcontain double quotation marks.
� If you have one or more graph reports in your HTML directory, thisvalue is optional but, if specified, adds a report groupingfunctionality to your Web page.
� If you have one text report in your HTML directory, this value isoptional, but is helpful if you are using this field for other reportson this Web page.
� If you have more than one text report in your HTML directory, thisvalue is required, and each text report must have a unique value,because text reports cannot be grouped.
When you display the welcome.htm page by using your Web browser,all reports that have the same description and the same SAS catalog
Reporting: Working with Report Definitions � Directing a Report to the Web 495
name are displayed in the same report group. The description is used asthe name of the report group.
� Use Interactive Graphics When Possible fieldFor a graph report, you can specify whether the report is to be static
or the report is to be interactive (if possible).� If this box is empty, the report is to be static. Both the “thumbnail”
and “enlarged” versions of the report will use GIF images, and thesize of the images will be based on the value of the ThumbnailSize field and the value of the Enlarged Size field, as specified(or defaulted) in the Secondary Options for Web Output window.
� If this box has an X in it, the report is to be interactive (if possible).The report is to use Java or ActiveX, as selected. The size of thesmall image will be based on the value of the Thumbnail Sizefield in the Secondary Options for Web Output window. Do notchange the value (Java or ActiveX) in the Enlarged Size field inthe Secondary Options for Web Output window. If possible, the“enlarged” version of the report will use a Java applet or ActiveXcontrol.
Note: Support for ActiveX is experimental. �
Note: “If possible” refers to the report style. Some report stylesand sub-styles cannot be interactive. For example, SpectrumGraphs cannot be interactive. �
� Clear Gallery buttonThis button opens the Clear Web Output window, through which you
can clear reports from the SAS catalog, HTML directory, and, if used,image directory.
Select Yes or No, and then select OK.
3 The Secondary Options for Web Output windowa In the Generate Web Output window, select Advanced Options. The
Secondary Options for Web Output window opens.b All the fields in this window are optional.
� HTML URL fieldIn this field, you can specify a relative URL (relative to the location of
welcome.htm) or an absolute URL. This value is not required.
The value that you specify is used as a prefix for all references toHTML files (welcome.htm and its associated .htm files). For example, ifyour reports are stored in the directory webrpts\reports on your c: drive(that is, the value of HTML directory is c:\webrpts\reports) on aWindows server named www.reporter.com, then you might specify http://www.reporter.com/reports as the URL for the HTML files, if webrpts isthe “root” for the server. (If you prefer to use a macro variable for thevalue, you can do so. See the HTML Directory field, above, for anexample.)
A URL is an Internet Web address that identifies where a file islocated. If you do not specify this value, then the links or file addressesin your HTML files are relative to the directory in which the HTML filesreside. In other words, when a URL is not coded in your HTML file,then the HTML file expects to find the linked file or image in the samedirectory where that HTML file is stored. When you store all yourimages and HTML files in one location, you do not need to specify the

496 Directing a Report to the Web � Chapter 23
HTML URL and you can easily move the entire directory withoutbreaking links.
If you specify this value, then the URL is hard-coded in your HTMLsource. You can use this value when you want to hard-code a URL inthe HTML files that others can access remotely. When this is the case,you must be careful when moving these files so that you do not breakany of the links. The HTML file will look for the linked files only in thelocation that is specified in this URL.
Typically, the value of HTML URL is not specified.� Image Directory field
In this field, you can specify the directory in which to store the GIFimage files for your report. If welcome.htm and its associated .htm filesuse icons, then the GIF files for the icons are also stored here. Thisvalue is not required. If you do not specify this value, then the value ofHTML Directory is used by default.
The directory must already exist and you must have write access to it.When a graph report is created, at least one GIF image (the
“thumbnail” image) is created. The other image (the “enlarged” image)may be a GIF image, a Java applet (with an extension of .htm), or anActiveX control (with an extension of .htm). The GIF images are storedin this directory.
If you are creating the report on UNIX or Windows and want to usethe image directory, the value of Image Directory must be thecomplete path and name of the directory or folder. For example, onWindows you might specify the value c:\webrpts\reports for ImageDirectory to store your images in the \webrpts\reports folder on yourc: drive. (If you prefer to use a macro variable for the value, you can doso. See the HTML Directory field, above, for an example.)
Typically, the value of the Image Directory field is not specified.� Image URL field
In this field, you can specify the location (URL address) that is usedin your HTML output to locate your report images. In welcome.htm andits associated .htm files, the value that you specify is used as a prefix forall references to GIF files. You can specify a relative URL (relative tothe location of welcome.htm) or an absolute URL.
This value is required if you do not specify the same value or locationfor the HTML Directory and the Image Directory. If you do notspecify this value, the HTML files look for the images in the directorywhere your HTML files are stored. If the value of Image Directoryand the value of HTML Directory are different, the HTML files cannotdisplay the images unless you provide the location of the images byspecifying the image URL.
A URL is an Internet Web address that identifies where a file islocated. If you do not specify this option, then the links or file addressesin your HTML files (that link to images) are relative to the directory inwhich the HTML files are placed. This option enables you to identify aspecific location or address where the images are stored.
For example, if your report images are stored in the folderwebrpts\reports on your c: drive (that is, the value of Image Directory isc:\webrpts\reports) on the Windows server named www.reporter.com,then you might specify IMAGEURL=http://www.reporter.com/reportsas the URL for the GIF files, if webrpts is the “root” for the server. (If

Reporting: Working with Report Definitions � Directing a Report to the Web 497
you prefer to use a macro variable for the value, you can do so. See theHTML Directory field, above, for an example.)
If the value of Image Directory is the same as the value of HTMLDirectory (that is, you store all report files in the same location), thenyou can easily move all files to a new location without breaking any ofthe “links” that are coded in the HTML files. If you store your HTMLfiles and IMAGE files in separate directories, your links from the HTMLto the image files might not work if you move the files.
Typically, the value of Image URL is not specified.� Web Style field
Select the arrow for this field. A list opens. From the list, you canselect the layout (style) for the gallery of reports. The Web style affectsthe type of frames, the location of titles, and the control options.
Valid values are GALLERY, GALLERY2, and DYNAMIC. The defaultvalue is GALLERY2.
� Thumbnail Size fieldSelect the arrow for this field. A list opens. From the list, you can
specify the name of the SAS/GRAPH device driver to use in order tocreate the small (“thumbnail”) GIF image of your report. The default isSMALLDEV=GIF160 when WEBSTYLE=GALLERY. The default valueis GIF260 when WEBSTYLE=GALLERY2 or WEBSTYLE=DYNAMIC.
GIF160 produces a GIF image of 160x120 pixels, and GIF260 producesan image whose size is 260x195 pixels. Other choices and image sizesinclude GIF373 (373x280), GIF570 (570x480), and GIF (800x600).
The selected device driver reads the report from the SAS catalog thatis specified by the SAS catalog name and writes the “thumbnail” imagefile of the report to the image directory.
� Enlarged Size fieldIf you selected Use Interactive Graphics When Possible, a value (Java
or ActiveX) is already specified in this field.Otherwise, you can select the arrow for this field. A list opens. From
the list, you can specify the name of the SAS/GRAPH device driver touse in order to create the enlarged version of your report. The defaultvalue is LARGEDEV=GIF733, which produces an image whose size is733x550 pixels.
Other choices (and their corresponding image sizes) include GIF160(160x120), GIF260 (260x195), GIF373 (373x280), GIF570 (570x480), andGIF (800x600).
If the Use Interactive Graphics When Possible field is notselected, then the “enlarged” report is not interactive. If the UseInteractive Graphics When Possible field is selected, then the“enlarged” report is interactive and, depending on whether Java orActiveX is selected, the mechanism for displaying the report uses aJava applet or ActiveX controls.
� If Java is selected, then when users click on the thumbnail reportin their Web browser, the enlarged report is displayed by using aJava applet. The applet provides some ability to dynamicallymanipulate the graph, including drill-down capability if the reportdefinition includes subgroups. (For additional customizationoptions, the user can access the shortcut menu by clicking the rightmouse button.)

498 Naming Conventions for Report Definitions � Chapter 23
For information that affects the user’s ability to display thereport by using a Java applet, see the note aboutLARGEDEV=JAVA in the description of the LARGEDEV=parameter, which is in most macros in “Chapter 3: Report Macros”in the SAS IT Resource Management macro referencedocumentation.
� If ActiveX is selected, then when users click on the thumbnailreport in the Web browser, the enlarged report is displayed byusing ActiveX controls. The ActiveX controls provide some abilityto dynamically manipulate the graph, if the report definitionincludes subgroups. (For additional customization options, the usercan access the shortcut menu by clicking the right mouse button.)
� Report NameIn the GUI, you cannot specify a value for report name.For a graph report, the report name is created automatically, as
follows:� if the enlarged report image is not generated by Java or ActiveX,
the following pair of report names is used: S000000n.gif (for thethumbnail image), and L000000n.gif (for the enlarged image).
� if the enlarged report image is generated by Java or ActiveX, thefollowing pair of report names is used: S000000n.gif (for thethumbnail image), and Ln.htm (for the enlarged image).
For a text report, the report name is created automatically, as follows:� if the report definition was saved, the report is given the name that
you specified for the report definition
� if the report definition was not saved, the report is given the namePRTRPTn.htm (for a print-style report) or TABRPTn.htm (for atabular-style report).
Note: If you specify one or more BY values in a print-style report oryou specified one or more PRINTBY= values in a tabular-style report,the report is broken into m small files. The characters _page1 through_pagem are appended to the names of the smaller files. �
4 To return to the Manage Report Definitions window, select OK � OK � OK
Naming Conventions for Report DefinitionsWhen you create and save a custom report definition, you must select the folder in
which to save the report definition, and you must provide a name for the reportdefinition.
The report definition name must follow SAS naming conventions. The name can bebetween one and eight characters long and can contain letters, numbers, and theunderscore (_) character. The name must begin with a letter and cannot contain blankspaces or any other special characters. There are no other rules that apply touser-defined reports or report definitions, but you might find it convenient to use anaming convention similar to the one that is used for some SAS IT ResourceManagement supplied report definitions.
Some SAS IT Resource Management supplied report definitions use a namingconvention that provides you with information about the report and the data that willbe used for the report. The supplied reports use a name format of pprrrtnn. The firstposition identifies the operating environment and the second position represents the

Reporting: Working with Report Definitions � Report Styles 499
data source, collector, and measurement source. The third, fourth, and fifth positions(rrr) identify the resource type. The sixth space (t) represents the type of report, andthe seventh and eighth positions (nn) represent a unique identifier, which can be anyalphanumeric combination.
Report Styles
1 The following report styles are available:
� “Print Report” on page 499
� “Plot Report” on page 499
� “Chart Report” on page 500
� “Three-Dimensional Graph Report” on page 500
� “Spectrum Report” on page 500
� “Source Report” on page 500
� “Tabular Report” on page 501.
2 To set additional style options such as the number of bars or slices of pie to displayon the report, select Advanced.
Other report options such as variables and colors can be selected from the ManageReport Definitions window.
Print ReportIf you want to print a basic report of your data file, select the Print report style in
the Report Style Selection window. This report style prints up to 15 selected variablesfrom your data file, in a simple columnar format.
Note: If you are running the %CPPRINT macro from batch, you can select up to 30variables to be printed. �
The report does not contain row or column lines and does not analyze the data in anyway unless you select summarization for each column of data. This style provides avery simple method of printing your data.
Plot ReportPlots are one of the most common forms of graphical analysis. With plots, you can
plot a continuous variable such as time (the DATETIME variable) on the horizontal orX axis and one or more analysis variables on the vertical or Y axis. You can alsocompare two analysis variables with different data ranges, using separate vertical (Y)axes, the left and right.
For Plot reports, you can select a maximum of 15 analysis (Y) variables.If a class variable or multiple analysis (Y) variables are selected, multiple lines are
drawn on the same graph, each of which represents either a specific class or a specificanalysis (Y) variable. If you select a class variable, you can select only one analysisvariable.
If you select one or more BY variables for a Plot report, one graph is generated foreach combination of values for the BY variables.

500 Report Styles � Chapter 23
Chart ReportCharts are very useful for displaying summary statistics on your data. You can select
a single analysis variable categorized by a single class variable, and each portion of thechart represents the sum or mean of the analysis variable in that category. You can alsoselect a maximum of 15 analysis variables to display each variable as a category orgroup of data. You can also select a Stack variable and produce a separate portion ofthe chart for each value of the stack variable.
If you select a single analysis variable, you can select a class variable, and for eachvalue of the class variable, a separate portion is produced on the chart.
If you select one or more BY variables for the report, one graph is generated for eachcombination of values for the BY variables.
When you select one or more analysis variable, you can further categorize thevariable(s) by a GROUP or SUBGROUP variable. If you select a GROUP variable, thechart displays groups of bars (for bar charts) or a separate chart (for pie or star charts)for each value of the group variable. If you select a SUBGROUP variable, each bar (orportion on the chart), which represents the analysis variable, is subdivided for eachvalue of the subgroup variable. You cannot select a subgroup variable if your chartsub-style is Pie or Star. You cannot select a stack variable and a subgroup variable inthe same report.
Three-Dimensional Graph ReportThe 3D Graph produces a three-dimensional scatter plot that displays
multidimensional trends or concentrations in data. This type of report plots one ormore variables against X and Y axis variables.
You can select a maximum of 15 analysis variables. If you select multiple analysisvariables, the variable names are displayed on the Y axis. The values of those variablesare displayed on the Z axis and the X variable is displayed on the X axis.
You can select a class variable that is represented by color to add a fourth dimensionto the plot. If you select a class variable, then you can select only one analysis variable.The class variable is displayed on the Y axis, the analysis variable is displayed on the Zaxis, and the X variable is displayed on the X axis.
Spectrum ReportThe Spectrum report generates a three-dimensional graph with colors that represent
the relationship among three variables on a two-dimensional surface. The surface istypically defined by DATETIME on the X axis and a class variable on the Y axis.
By default, the colors on the graph represent the value of the analysis (Z) variable ata given time, using a cool-to-hot color spectrum. The colors range from cool (blue) towarm (green, yellow, orange) to hot (red) when the variable’s value changes. Bluerepresents cool or low numbers and red represents hot or high numbers.
For this report style, you can specify a maximum of 15 analysis variables. If youspecify a class variable by which to group the analysis variable on the plot, then youcan specify only one analysis variable.
Source ReportThe Source report style enables you to create complex reports that can require
multiple steps to manipulate your data, while still using the global values of variablessuch as begin and end dates and WHERE expressions. You can use this report style torun an existing SAS program, such as an existing report definition, that reads andfurther summarizes a specified group of data.
When you select the report type of Source, you specify the location of the source thatyou want to run in this report definition. This can be any source code that you want to
Reporting: Working with Report Definitions � Variable Types 501
run, such as a sample report that you have saved as source or a report definition thatyou have created and saved as source code. You can then specify an existing data set toread into this report. For example, you might have an existing SAS data set that youwant to read and further summarize. When you select variables for your Source reportdefinition, those variables are used to further summarize the existing data. The newlysummarized data is saved in a new data set, then read by your existing program, andthat program is submitted to create your final report.
Tabular ReportThe Tabular report is displayed in a table the classification variables and a summary
of the data in each class. The variables are summarized based on your selectedstatistics and the table displays summary information about one of six table styles.This report is an interface to the TABULATE procedure in Base SAS software.
This report provides six sub-styles. The first sub-style summarizes a list of analysisvariables with selected statistics, by listing each variable on a separate row in the chart.Sub-styles two, three, and four place both the analysis variables and the statisticsacross the top of the table and have a class variable and its summary in separate tablerows. Sub-styles five and six place both analysis variables and statistics across thetable and have nested class summarization of multiple variables in table rows.
Variable TypesThe following variables are available for your reports.
Acrossspecifies the variables to use for column headings for tabular report types.
Analysisspecifies the variables that you want to analyze in your report. If you selectstatistics for your report, those are applied to this analysis variable. If you specifymultiple analysis variables, the unit of measure for all of the variables should bethe same and the range of values should be similar.
Byspecifies the variables in the order that you want them sorted for your report. Aseparate graph or chart is produced in the report, for each value of the By variableor for each combination of By variable values, if you have multiple By variables.For example, if you have four diskid variables on three machines and you selectthe variables machine and diskid as By variables, you will receive 12 reports, onefor each unique combination of the two variables. If you do not select a Byvariable, observations are sorted in the order that the variables are listed in theBy variable or Class variable list in your PDB.
Classspecifies a group or category variable on which calculations are performed. Foreach unique value of the class variable, a separate portion is created on the graph.For example, a portion might represent a portion of pie on a pie chart, but allvalues of the class variable are included in a single graph in the report.
Groupis the name of the variable that subsets the observations. If you select multipleanalysis variables, they are displayed in groups with one group for each value ofthe group variable. The presentation of the group depends on your report type andsubtype, such as a report style of chart and a sub-style of star. If you select a Groupvariable, you can select either a Stack variable or Subgroup variable, but not both.

502 Appendices for z/OS � Chapter 23
IDis the variable that, for the Print report style, can be used to replace observationnumbers. For example, if MACHINE and DATETIME are ID variables and yourun a Print report, the observations are identified by the values of MACHINE andDATETIME and not the observation number (1, 2, 3, ...).
Stackis the name of the variable by which your data is subdivided. A separate bar orblock is produced for each value of the Stack variable. Each bar (for a bar chart) isdivided into sections, one for each analysis variable.
Statisticsspecifies the statistic to use to summarize data. The available statistics varydepending on your report type.
Subgroupspecifies a variable by which to subdivide the groups of variables that are specifiedin the Group variable. Each subdivision of the Group variable becomes a portion ofthe graph, such as a section on a bar.
X Variablespecifies the variable to display on the X axis for report styles that use an X axis.
Weightis the variable by which to weight statistical calculations for Interval data. Thedefault weight variable is Duration (for tables that have a Type of Interval).
Appendices for z/OS
A Collection of Tips for z/OSHere are some tips that might be useful to you as you generate reports with SAS IT
Resource Management.� Test report definitions on a small subset of your data so that the testing proceeds
quickly.For details, see “Tips for Subsetting Data on z/OS” on page 504 in this appendix.
� If running your report does not seem to produce any results, be sure that you arelooking for the report in the correct window. The default window for graph reportsis the SAS/GRAPH window. The default window for text reports is the SASOUTPUT window. (For more about accessing windows, see “Using the z/OS GUI”on page 21.)
� If running your report definition produces unexpected results, examine the SASlog for messages.
� If you get the message
No observations were selected
check the following:� Does the SAS log display the report definition that you ran? Check to see
that you are running at the PDB level (REDLVL) at which you have data. Formore information about the SAS log, see “Using SAS Windows” on page 24.
� Check to see that you are running with the date range (BEGIN and END) inwhich you have data. For more about date range subsetting, see “Subsettingvia DATETIME” on page 504.

Reporting: Working with Report Definitions � A Collection of Tips for z/OS 503
� Check to see that you are running with a subsetting WHERE expression(local WHERE or global WHERE) for which you have data. If not, and if youare running a supplied report definition that requires setup, the lack of asubsetting WHERE expression could easily be the cause. Check theExplanation for the report definition.
For more about a subsetting WHERE expression, see “Subsetting by aSimple Local WHERE Expression” on page 504 and “Subsetting by a SimpleGlobal WHERE Expression” on page 505.
� Check to see that there really is data in the table at the level in that daterange for the variables in the report definition. From the main menu in theSAS IT Resource Management server GUI for z/OS, follow this path: PDBData � Examine PDB Data � select the table � ItemActions � BrowseData or View Data
Then, if you are looking for specific information, you might want to subsetthe data by using a WHERE expression. For instance, if you are looking forobservations on machine 41TS because a graph shows an outlier value forthat machine, you could follow this path from the FSBROWSE window:Search � Where � type machine=’41TS’ � OK
� If the data that you see in your table by using Browse Data or View Data isunexpected, check the table’s definition. From the SAS IT ResourceManagement main menu, follow this path: PDB Admin � Config ActivePDB Dictionary � select the table � ItemActions � Browse Definition
Check that the Kept status of the appropriate table is set to Yes and theappropriate levels are set to nonzero durations.
In the table definition window, select Variable List to check thevariables’ definitions. Check that the Kept status of the appropriate variablesis set to Yes. For the summary levels of regular and derived variables, checkthat the appropriate statistics are selected. For a formula variable, checkthat the variable is defined at the appropriate level and that the table andvariables on which it is based are defined appropriately. To check the levelsfor which it is defined, select the formula variable � ItemActions � EditDefinition
Note: A formula variable does not have selectable statistics. If you wantstatistics on a formula variable, you must define the statistics as formulavariables at the desired summary levels. �
� Check that the collector was configured correctly to provide the metrics.
� If you do not get the "No observations" window but you get no report, perhapsall data values are missing. That is, the observation might exist but thevalue on the observation might be set to a SAS missing-value code.
At detail level, this can occur if you have not set up data logging properly.At all levels, this can occur for a formula variable if the underlying variableshave a Kept status of No.
� For the type of report definition that you are running, select the report type fromthe pull-down menu under DesignGraphRpt or DesignTextRpt. Then read theonline documentation which contains tips on generating reports.
� The most probable cause of the message
ERROR: The left vertical axis labeled could not be fit as specified.
in a graph report is that you have more classes than will fit in the legend on thegraph. A solution to this problem is to increase the height of the GRAPH window.From the report’s main definition screen, select Output Options. Edit the
504 Tips for Reporting on z/OS � Chapter 23
GOptions field from DEVICE=value to DEVICE=value VPOS=100, whereVPOS=100 means a vertical height of 100 rows. Then rerun the report definition.
� Add formula variables (variables that are calculated only when accessed) tosimplify reporting. For details, see “Creating/Editing/Viewing a Formula Variable”on page 388.
Tips for Reporting on z/OSThe following topics are discussed in this document:� “A Collection of Tips for z/OS” on page 502� “Tips for Subsetting Data on z/OS” on page 504
� “Subsetting via DATETIME” on page 504� “Subsetting by a Simple Local WHERE Expression” on page 504� “Subsetting by a Simple Global WHERE Expression” on page 505.
Tips for Subsetting Data on z/OS
Subsetting via DATETIMEIf your report displays no observations (you get an empty report) or if your report
displays observations in only one part of the date range of the processed or reduceddata, you might need to reset the report definition’s datetime range.
Follow this path from the report’s main report definition window: DateTime Range� Reset from PDB � OK
SAS IT Resource Management looks in the PDB’s data dictionary to find the earliestand latest DATETIME values at the level that is specified on the main report definitionwindow.
If you want to use less of that range, you can type over the values in the Begin andEnd fields.
Note: The need to reset might occur when you are designing or modifying reportdefinitions and switch from one table to another or one level to another. The begin andend points of the range are global variables that retain their values until you changethem or switch the active PDB. �
Subsetting by a Simple Local WHERE ExpressionA local WHERE expression applies to a single report definition.If your report definition generates a report that includes observations in which you
are not interested, you can use the local WHERE to restrict the observations to the onesin which you are interested. For instance, suppose you have a report definition with aBY variables list that includes MACHINE, and you have many machines but you areonly interested in a few of them for this report definition. Rather than get dozens ofgraphs and ignore all but a few, you can generate just the ones that you want to see.
From the report’s main definition screen, select Local Where. Under Localsubsetting, follow this path: Varname � MACHINE � Operator � IN � Value(s)� select the machines on which you want to report � OK � OK
This method is not restricted to subsetting by MACHINE. You can subset by anyvariable that is in the specified level of the specified table. For instance, you can reporton only first shift data by using this WHERE expression:
SHIFT = ’1’
Reporting: Working with Report Definitions � A Collection of Tips for UNIX and Windows 505
If you want to subset by more than a few values, you might want to create a userformat.
Note: By default, if there is an expression in the local WHERE, it overrides theexpression, if any, in the global WHERE. If you want the report definition to use boththe local WHERE and the global WHERE, insert the words SAME AND in front of theWHERE expression in the local WHERE. �
Note: Do not use the ampersand (&) to mean AND in WHERE expressions. �
Subsetting by a Simple Global WHERE ExpressionA global WHERE expression applies to all report definitions.You might want to generate a number of reports with the same subsetting; for this,
use a global WHERE expression. For instance, you might be having trouble with a fewmachines and want to run a number of reports for just those machines. In this case,rather than changing the local WHERE for each report, you can set the global WHERE(on any report definition) and it will apply to all report definitions until you reset it toblank.
From the report’s main definition screen, select Global Where. Under Globalsubsetting, follow this path: Varname � MACHINE � Operator � IN � Value(s)� select the machines on which you want to report � OK � OK
This method is not restricted to subsetting by MACHINE. You can subset by anyvariable that is in the specified level of the specified table. For instance, you can reporton only first shift data by using this WHERE expression:
SHIFT = ’1’
If you want to subset by more than a few values, you might want to create a userformat.
Note: By default, if there is an expression in the local WHERE, the global WHEREis ignored (unless the local WHERE starts with the words SAME AND). �
Note: Do not use the ampersand (&) to mean AND in WHERE expressions. �
Appendices for UNIX and Windows
A Collection of Tips for UNIX and WindowsHere are some tips that might be useful to you as you generate reports with the SAS
IT Resource Management GUI.
� If running your report definition does not seem to produce any results, be surethat you are looking for the report in the correct window. The default window forgraph reports is the SAS/GRAPH window. The default window for text reports isthe SAS Output window. You can check your report setting by selecting Locals �Report Output Options
One of four output options is available:
� SAS Window
� SAS Catalog
� External File
� Web.
506 A Collection of Tips for UNIX and Windows � Chapter 23
� If running your report definition produces unexpected results, examine the SASlog for messages.
� Some SAS IT Resource Management supplied report definitions require setup torun properly.
To be certain that you have met all the setup requirements for a reportdefinition, follow this path from the SAS IT Resource Management main window:Reporting � Explore Supplied Reports � select the report definition �click right mouse button � Show Report Explanation
� If you get the message
No observations were selected
check the following:
� Does the SAS log display the report definition that you ran? Check to seethat you are running at the (REDLVL) at which you have data.
� Check to see that you are running with the date range (BEGIN and END) inwhich you have data. For more about date range subsetting, see “Subsettingvia DATETIME” on page 507 .
� Check to see that you are running with a subsetting WHERE expression(local WHERE or global WHERE) for which you have data. If not, and if youare running a supplied report definition that requires setup, the lack of asubsetting WHERE expression could easily be the cause. Check theExplanation for the report definition.
For more about a subsetting WHERE expression, see “Subsetting by aSimple Local WHERE Expression” on page 508 and “Subsetting by a SimpleGlobal WHERE Expression” on page 508 .
� Check to see that there really is data in that table at that level in that daterange for the variables in the report definition. From the SAS IT ResourceManagement Administration tab, follow this path: Examine PDB Data �select the level � select the table � click right mouse button � ViewData
Note: Use can also use %CPPRINT to browse the data. See the macroreference documentation for SAS IT Resource Management for moreinformation. �
� If the data that you see in your table by using Browse Data or View Data isunexpected, check the table’s definition. From the SAS IT ResourceManagement Administration tab, follow this path: Manage Tables � selectthe table � click right mouse button � Properties
Check that the Kept status of the table is set to Yes. Then select Variablesand check that the Kept status of the appropriate variables is set to Yes.
To check this, follow this path: select a variable � click right mousebutton � Properties
You should also check that the appropriate levels are set to nonzerodurations. For the summary levels, check that the appropriate statistics areselected. (For a formula variable, check that the formula is applied to theappropriate level and that the table and variables on which it is based aredefined appropriately.)
Note: A formula variable does not have selectable statistics. If you wantstatistics on a formula variable, you must define the statistics as formulavariables at the desired summary levels. �
� Check that the collector was configured correctly to provide the metrics.
Reporting: Working with Report Definitions � Tips for Subsetting Data on UNIX and Windows 507
� If you do not get the "No observations" window but you get no report, perhapsall data values are missing. That is, the observation might exist but thevalue on the observation is set to the missing value code.
At the detail level, this can occur if you have not set up data loggingproperly. At all levels, this can occur for a formula variable if the underlyingvariables have a Kept status of No.
Note: A formula variable does not have selectable statistics. If you wantstatistics on a formula variable, you must define the statistics as formulavariables at the desired summary levels. �
� Read the online documentation on Report Styles. From the Reporting tab select:Manage Report Definitions � select the Current Report Style image � Help
� The most probable cause of the message
ERROR: The left vertical axis labeled could not be fit as specified.
is that you have more classes than will fit in the legend on the graph.A solution to this problem is to increase the height of the Graph window. Type
the following statement in the body of the Program Editor window:
goptions device=value vpos=100 ;
where VPOS=100 means a vertical height of 100 rows. Then submit it andrerun the report definition.
� Test report definitions on a subset of your data so that the testing proceeds quickly.For details, see “Tips for Subsetting Data on UNIX and Windows” on page 507.
� If the data that you see in your table by using Browse Data or View Data areunexpected, check the table’s definition. From the SAS IT Resource ManagementAdministration tab, follow this path: Manage Tables � select the table � clickright mouse button � Properties
� Add formula variables (variables that are calculated only when accessed) tosimplify reporting. For more information, see “Creating/Editing/Viewing aFormula Variable” on page 388.
Tips for Reporting on UNIX and WindowsThe following topics are discussed in this document:� “A Collection of Tips for UNIX and Windows” on page 505� “Tips for Subsetting Data on UNIX and Windows” on page 507
� “Subsetting via DATETIME” on page 507� “Subsetting by a Simple Local WHERE Expression” on page 508� “Subsetting by a Simple Global WHERE Expression” on page 508.
Tips for Subsetting Data on UNIX and Windows
Subsetting via DATETIMEIf your report displays no observations (that is, you get an empty report) or if your
report displays observations in only one part of the date range of the processed orreduced data, you might need to reset the report definition’s datetime range.
To subset the data by datetime, from the Manage Report Definitions window, selectthe report that you want to work with. Then, select the arrow to the right of the

508 Tips for Subsetting Data on UNIX and Windows � Chapter 23
Subset Data field and the Start/End Dates/Time tab opens. You can select startdates and times and/or end dates and times for this report and for all reports. To selectdates and times, click the arrow to the right of the appropriate field.
You can choose either relative or absolute dates, by clicking the check box next to theRelative date or Absolute date field. Use the control arrows to adjust the dates andtimes that you require. The relative date section uses keywords like “number of daysbefore latest” or “number of weeks after earliest.” This enables you to limit the reporteddata to a moving window of time, relative to the latest or earliest date and time stampsin the actual data. For more information about this, select help in this window.
Note: The need to reset might occur when you are designing or modifying reportdefinitions and switch from one table to another or one level to another. The begin andend points of the range are global variables that retain their values until you changethem or switch the active PDB. �
Subsetting by a Simple Local WHERE ExpressionA local WHERE expression applies to a single report definition.If your report definition generates a report that includes observations in which you
are not interested, you can use the local WHERE to restrict the observations to the onesin which you are interested. For instance, suppose you have a report definition with aBY variables list that includes MACHINE, and you have many machines but you areonly interested in a few of them for this report definition. Rather than get dozens ofgraphs and ignore all but a few, you can generate just the ones that you want to see.
In the main Manage Report Definitions window, select a report from the list ofCurrent PDB Reports. Select the arrow to the right of the Subset Data field and thenselect Query/Where Clause Builder. For the local query, follow this path: Variable� select MACHINE � OK � Operator � select IN � OK � Value � select themachines on which you want to report � OK
This method is not restricted to subsetting by MACHINE. You can subset by anyvariable that is in the specified level of the specified table. For instance, you can reporton only first shift data by using this expression:
SHIFT = ’1’
Note: By default, if there is an expression in the local WHERE, it overrides theexpression, if any, in the global WHERE. If you want the report definition to use boththe local WHERE and the global WHERE, insert the words SAME AND in front of theexpression in the local WHERE. �
Subsetting by a Simple Global WHERE ExpressionA global WHERE expression applies to all report definitions.You might want to generate a number of reports with the same subsetting; for this,
use a global WHERE expression. For instance, you might be having trouble with a fewmachines and want to generate a number of reports for just those machines. In thiscase, rather than using the local WHERE for each report, you can set the globalWHERE (on any of the report definitions) and it will apply to all report definitions untilyou reset it to blank.
In the main Manage Report Definitions window, select a report from the list ofCurrent PDB Reports. Select the arrow to the right of the Subset Data field and thenselect Query/Where Clause Builder. For the global query, follow this path: Variable� select MACHINE � OK � Operator � select IN � OK � Value � select themachines on which you want to report � OK
This method is not restricted to subsetting by the variable MACHINE. You cansubset by any variable that is in the specified level of the specified table. For instance,you can report on only first shift data by using this expression:

Reporting: Working with Report Definitions � Tips for Subsetting Data on UNIX and Windows 509
SHIFT = ’1’
Note: By default, if there is an expression in the Local Query, the Global Query isignored (unless And is selected between the two queries). �

510
511
C H A P T E R
24Reporting: Working with Reports
Working with Reports: Main Topics 511Overview of Reports 511
Generating a Report 511
Printing a Report 511
Saving a Report 512
Saving a Report (UNIX, Windows) 512Deleting a Report 513
Troubleshooting Report Problems 513
Working with Reports: Main Topics
Overview of ReportsWhen a report definition runs, it generates a report.For more information about reports, see the following topics:� “Deleting a Report” on page 513� “Generating a Report” on page 511� “Printing a Report” on page 511� “Saving a Report” on page 512� “Troubleshooting Report Problems” on page 513.
Generating a ReportWhen a report definition runs, a report is generated. For more information, see
“Running a Report Definition” on page 488.
Note: In a drill-down report that is based on a graph applet, one way to back up froma drill-down operation is to press Ctrl + Shift while holding the left mouse button. �
Printing a ReportDirect your report to the SAS Graph or SAS Output window. From these windows,
you can print your report.1 If the Graph or Output window is not already the active window, make it the
active window by making the Manage Report Definitions window active andselecting Globals � Graph or Globals � Output

512 Saving a Report � Chapter 24
2 From the Graph window or Output window, select File � Print � OK
Saving a ReportYou can save a report� by using the SAS IT Resource Management GUI for UNIX and Windows.
Saving a Report (UNIX, Windows)In the SAS IT Resource Management GUI for UNIX and Windows, you can save a
report by following these steps:
1 First, generate the report to the default location (the Graph window, for graphreports, and the Output window, for text reports).
For more information, see “Generating a Report” on page 511.
2 If the report is in the Graph window, you can save it to a SAS catalog or to anexternal file.
� To save the report to a SAS catalog, select File � Save as ImageThe Save As window opens. In the left frame, double-click on the name of
the library that you want to use, and then select the catalog in which youwant to save the image. (If you do not want to use an existing catalog andwant to make a new catalog in that library, then right-click in the rightframe, and follow this path: New � Catalog � OK � type the name of thecatalog � OK
Then, select the new catalog.) The right frame displays the names of theimages that are in that catalog now. In the Entry Name field, type a name forthe new image, and then select Save.
To view the report later, from the Manage Report Definitions window,select Globals � Graph
The Graph window opens. Then select Tools � Image Editor � File �Open Image Entry
The Open window opens. In the left frame, double-click on the name of thelibrary that contains the catalog, and then double-click on the name of thecatalog. In the right frame, select the name of the report, and select Open.The Image Editor window opens and displays the report.
� To save the report to an external file, select File � Export as ImageThe Export window opens. In the Save In field, select the directory or
folder in which you want to save the image. In the File Name field, type aname for the new image. Select the arrow to the right of the Save as typefield. A menu opens. Select the format in which you want the image to besaved, and then select Save.
To view the image later, from the Manage Report Definitions window,select Globals � Graph The Graph window opens. Then select Tools �Image Editor � File � Open
The Import window opens. In the Look In field, select the directory thatcontains the file. In the Files of Type field, select the type of the file.Select the name of the file, and select Open. The Image Editor window opensand displays the report.
3 If the report is in the Output window, you can save the report to a SAS catalog orto an external file.

Reporting: Working with Reports � Troubleshooting Report Problems 513
� To save the report to a SAS catalog, select File � Save As ObjectThe Save As window opens. In the left frame, double-click on the name of
the library that you want to use, and then select the catalog in which youwant to save the image. (If you do not want to use an existing catalog andwant to make a new catalog in that library, right-click in the right frame, andselect New � Catalog � OK � type the name of the catalog � OK
Then, select the new catalog.) The right frame displays the names of thereports that are in that catalog now. In the Entry Name field, type a namefor the report. In the Entry Description field, type a description for thereport. Select the arrow to the right of the Entry Type field, and selectOUTPUT entry(OUTPUT). Then, select Save.
To view the report later, from the Manage Report Definitions window,select Globals � Output or double-click on the Output icon. The Outputwindow opens. Then select View � Explorer
The Explorer window opens. Double-click on the name of the library thatcontains the catalog. Double-click on the name of the catalog that containsthe report. In the right frame, double-click on the name of the report. TheBuild window opens and displays the report. If you do not want to see linenumbers, type numbers off in the command field in the SAS IT ResourceManagement window, and then press ENTER or Return.
� To save the report to an external file, select File � Save AsThe Save As window opens. In the Save In field, select the directory or
folder in which you want to save the report. In the File Name field, type aname for the report. Select the arrow to the right of the Save as type field.A menu opens. Select List Files, and then select Save.
To view the report later, from the Manage Report Definitions window,select Globals � Output
The Output window opens. Then select Tools � Text Editor � File �Open
The Open window opens. In the Look In field, select the directory thatcontains the file. In the Files of Type field, select List Files. Select thename of the file, and select Open. The report is displayed.
Note: If some of the border characters in the report are incorrect, you canedit the report with an ASCII editor and replace those characters with thecorrect characters. For example, you can replace the hex83 derived character(which sometimes displays as an italic “f”) with an underscore.
4 Iconize the SAS Graph or Output window. The Results window becomes active.5 Select the Manage Report Definitions window.6 To return to the main window of SAS IT Resource Management, select Close in
the Manage Report Definitions window.
Deleting a ReportTo delete an output file that you have saved, use the remove command that is specific
to the system on which you have installed the SAS IT Resource Management client.
Troubleshooting Report ProblemsIf your report displays no observations (it is empty) or if your report displays
observations from only one part of the data that you specified in your date/time rangecriteria, review the following tips for assistance correcting your report.

514 Troubleshooting Report Problems � Chapter 24
� Verify that your date and time ranges that are specified in the Subset Data windoware valid for the reduction levels in the PDB that you are using for this report.
� Check the SAS LOG window for possible errors or warnings.
� If you receive strange error messages or no messages at all, you might haveselected variables that are not available in the selected table or PDB. Verify thatthe tables and variables for your report definition are available in the active PDB.
� If the report definition that you are running is a supplied report, make sure thatyou have fulfilled all setup requirements for the report definition.
To reset the datetime range for your report, follow these steps from the ManageReport Definitions window (see “Using the Manage Report Definitions Tool” on page 468for more information about this window):
1 From the Folders list box, select the name of the folder that contains the reportdefinition that you want to modify.
2 From the Reports list box, select the name of the report definition that you wantto modify.
3 Select the arrow beside the Subset Data text box. The Subset Data window opens.
4 Select the Table Status tab to review the date and time ranges for data at eachreduction level.
5 Select the Start/End Dates/Times tab and modify the date/time ranges to reflectthe correct range of data. You can also remove the date/time ranges so that yourreport includes the complete range of data at the specified level of the PDB.
6 Select OK to close the window and save the criteria.
7 Rerun the report definition.
If you are reporting from the client GUI and directing a report to the Web, the reportmight go to a SAS window instead of to the Web. If that happens, do not run the reportremotely. Run the report locally by selecting Run � Local
If you are running a tabular-style report definition in batch mode (by calling%CPTABRPT) and you are using the macro’s BY= parameter and you are running on z/OS, then you might prefer to set the HTMLDIR= parameter to direct the reports to adirectory in the z/OS UNIX File System area. (Typically, this directory is one of thedirectories that are created by calling the %CPHTREE macro.) For more information,see the BY= parameter for the topic %CPTABRPT in the SAS IT Resource Managementmacro reference documentation.
Similarly, if you are running a print-style report definition in batch mode (by calling%CPPRINT) and you are using the macro’s PAGEBY= parameter and you are runningon z/OS, then you might prefer to set the HTMLDIR= parameter to direct the report toa directory in the z/OS UNIX File System area. (Typically, this directory is one of thedirectories that are created by calling the %CPHTREE macro.) For more information,see the PAGEBY= parameter for the topic %CPPRINT in the SAS IT ResourceManagement macro reference documentation.
If you use the vertical bar chart style to generate reports that are based on very lowdata values, some of the resulting reports might display only a horizontal row of zerosacross the center of the page and no vertical bars. This problem occurs because the datavalues are so low that they translate to a bar height of zero, so no bars are actuallydisplayed; however, the values of the bars are still displayed. The data values for eachbar in a vertical bar chart are ordinarily centered above the bars; however, if thenumerals are wider than the width of the bars, the numerals are not displayed. If adata value is zero, it will always be displayed because the numeral zero is never widerthan the width that is allowed for a vertical bar. Therefore, if each data value in areport is low enough to translate to a bar height of zero, then no bars are displayed, butzeros are displayed in each position where a bar would ordinarily appear. If this

Reporting: Working with Reports � Troubleshooting Report Problems 515
problem occurs, select a horizontal bar chart style. The data values in horizontal barcharts are always displayed at the far right of the chart, no matter how high or low thevalues might be, so that all the reports that are generated have a similar appearance.

516
517
C H A P T E R
25Reporting: Working with PaletteDefinition Folders
Working with Palette Definition Folders 517Overview of Palette Definition Folders 517
Adding a Palette Definition Folder 518
Adding a Palette Definition Folder (UNIX, Windows) 518
Creating a Palette Definition Folder 519
Creating a Palette Definition Folder (UNIX, Windows) 519Deleting a Palette Definition Folder 521
Deleting a Palette Definition Folder (UNIX, Windows) 521
Removing a Palette Definition Folder 521
Removing a Palette Definition Folders (UNIX, Windows) 521
Viewing the List of Palette Definitions in a Palette Definition Folder 522
Viewing the List of Palette Definitions in a Palette Definition Folder (UNIX, Windows) 522Viewing Your List of Known Palette Definition Folders 522
Viewing Your List of Known Palette Definition Folders (UNIX, Windows) 522
Working with Palette Definition Folders
Overview of Palette Definition FoldersPalette definition folders contain palette definitions.You have a list of known palette definition folders. Originally, your list contains the
names of the palette definition folders that have the supplied palette definitions.If you create one or more palette definition folders, their names are automatically
added to your list. You can also add the names of palette definition folders that otherpeople create.
Similarly, you can remove the names of palette definition folders from your list. (Thenames of the folders are deleted from your list, but the actual folders are not deleted.)
For more information about palette definition folders, see the following topics:� “Adding a Palette Definition Folder” on page 518� “Creating a Palette Definition Folder” on page 519� “Deleting a Palette Definition Folder” on page 521� “Removing a Palette Definition Folder” on page 521� “Viewing the List of Palette Definitions in a Palette Definition Folder” on page 522� “Viewing Your List of Known Palette Definition Folders” on page 522.
518 Adding a Palette Definition Folder � Chapter 25
Adding a Palette Definition FolderYou can add the name of an existing palette definition folder (for example, a palette
definition folder that someone else created) to your list of known palette definitionfolders
� by using the SAS IT Resource Management GUI for UNIX and Windows.
Adding a Palette Definition Folder (UNIX, Windows)In the SAS IT Resource Management GUI for UNIX and Windows, you can add the
name of an existing palette definition folder to your list of known palette definitionfolders by following these steps:
1 If you want to add the name of an existing palette definition folder that is on aremote server, first activate a PDB on that server.
For more information about activating a PDB, see “Activating a PDB” on page299.
2 From the main window’s Reporting tab, select Manage Report Definitions.The Manage Report Definitions window opens.
3 Select Locals. A menu opens. From the menu, select Select Palette. ThePalette Management window opens. The top of the window displays your list ofknown palette definition folders.
4 Select File. A menu opens. Select Add folder. The Add or Create New Folderwindow opens.
5 Select the arrow to the right of the Libref field. A menu opens. It contains a listof the libraries for which a libref has already been defined. Select the library thatcontains the palette definition folder whose name you want to add.
If the library that you want to use is not on that list, select Define Library.The Define a SAS Library window opens.
a In the Libref field, type the libref that you want to use for the library. Thelibref should begin with an alphabetic character. The remaining characterscan be alphabetic or numeric.
b In the Path field, type the full path and name of the library’s directory(UNIX, Windows) or PDS (on z/OS).
c In the Access field, select the access mode that you want to use (assumingthat you have permission from the owner or security system to use thatmode).
d In the Location field, select Local or Remote. If you select Remote, theServer ID field opens. The value in that field defaults to the server ID of theserver to which you most recently connected.
e Select OK. The value of the Library field is the libref that you defined.6 In the Catalog field, type the name of the catalog that contains the folder.7 Select Add Folder to List. You are returned to the Manage Report Definitions
window. The folder whose name you added is now on your list of known palettedefinition folders.
8 Select Close. You are returned to the Manage Report Definitions window.9 When you want to return to the main window of SAS IT Resource Management, in
the Manage Report Definitions window select Close.
Note: 1. If you have a “write” lock on the library to which you added the folder, assoon as you finish using the folder for “write” purposes (for example, saving palettedefinitions to it), remember to free the library fully or partially so that other people and

Reporting: Working with Palette Definition Folders � Creating a Palette Definition Folder 519
tasks can use it. One way to free the library is to exit from SAS IT ResourceManagement and SAS. Another ways is to follow these steps:
� From the main window’s Reporting tab, select Manage Report Definitions.The Manage Report Definitions window opens.
� Select Locals. A menu opens. From the menu, select Select Palette. ThePalette Management window opens.
� Select File. A menu opens. From the menu, select Add Folder. The Add orCreate New Folder window opens.
� Select Define Library. The Define a SAS Library window opens.1 In the Libref field, type the libref of the library to which you added the folder.2 If the libref was one that you created, leave the Path field blank (if you do
not intend to use that library again during your current SAS session). Thatwill entirely free the library.
If the libref was one that you did not create or one that you did create butnow can use in “read” mode, in the Access field select Readonly. That willpartially free the library: people will be able to use it for read access, but notfor write access.
3 Select OK.
Note: If you set a path to blank for a libref that you defined, the libref willbe de-assigned and (in the SAS message area at the bottom of the window)you will get a confirmation message that says “not assigned.” (This is aNOTE level message. Ignore the word ERROR.) �
� Select OK.
�
Note: 2. If the library to which you added the folder was remote, in addition tofreeing that library (see Note 1), you also need to release the lock on the PDB so thatother people and tasks (such as the process task and reduce task) can use it. For moreinformation about releasing the lock, see “Releasing the Lock on the Active PDB” onpage 319. �
Creating a Palette Definition FolderYou can create a new palette definition folder and automatically add its name to your
list of known palette definition folder� by using the SAS IT Resource Management GUI for UNIX and Windows.
Creating a Palette Definition Folder (UNIX, Windows)In the SAS IT Resource Management GUI for UNIX and Windows, you can create a
new palette definition folder and automatically add its name to your list of knownpalette definition folders by following these steps:
1 If you want to create the palette definition folder on a remote server, first activatea PDB on that server. For more information about activating a PDB, see“Activating a PDB” on page 299.
2 From the main window’s Reporting tab, select Manage Report Definitions.The Manage Report Definitions window opens.
3 Select Locals. A menu opens. From the menu, select Select Palette. ThePalette Management window opens. The top of the window displays your list ofknown palette definition folders.

520 Creating a Palette Definition Folder � Chapter 25
4 Select File. A menu opens. Select Add folder. The Add or Create New Folderwindow opens.
5 Select the arrow to the right of the Libref field. A menu opens. It contains a listof the libraries for which a libref has already been defined. Select the librarywhere you want to place the new palette definition folder.
If the library that you want to use is not on that list, select Define Library.The Define a SAS Library window opens.
a In the Libref field, type the libref that you want to use for the library. Thelibref should begin with an alphabetic character. The remaining characterscan be alphabetic or numeric.
b In the Path field, type the full path and name of the library’s directory(UNIX, Windows) or PDS (on z/OS). On UNIX or Windows, the library will becreated if it does not exist; on z/OS, the library must already exist.
c In the Access field, select Write if it is not already selected.
Note: You must have prior permission from the owner of this library to use“write” access. �
d In the Location field, select Local or Remote. If you select Remote, theServer ID field opens. The value in that field defaults to the server ID of theserver to which you most recently connected.
e Select OK. The value of the Library field is the libref that you defined.6 In the Catalog field, type the name of the folder.7 Select Add Folder to List. You are returned to the Manage Report Definitions
window. The folder that you created is now on your list of known palette definitionfolders.
8 Select Close. You are returned to the Manage Report Definitions window.9 When you want to return to the main window of SAS IT Resource Management, in
the Manage Report Definitions window select Close.
Note: 1. If you have a “write” lock on the library to which you added the folder, assoon as you finish using the folder for “write” purposes (for example, saving palettedefinitions to it), remember to free the library fully or partially so that other people andtasks can use it. One way to free the library is to exit from SAS IT ResourceManagement and SAS. Another ways is to follow these steps:
� From the main window’s Reporting tab, select Manage Report Definitions.The Manage Report Definitions window opens.
� Select Locals. A menu opens. From the menu, select Select Palette. ThePalette Management window opens.
� Select File. A menu opens. From the menu, select Add Folder. The Add orCreate New Folder window opens.
� Select Define Library. The Define a SAS Library window opens.1 In the Libref field, type the libref of the library to which you added the folder.2 If the libref was one that you created, leave the Path field blank (if you do
not intend to use that library again during your current SAS session). Thatwill entirely free the library.
If the libref was one that you did not create or one that you did create butnow can use in “read” mode, in the Access field select Readonly. That willpartially free the library: people will be able to use it for read access, but notfor write access.
3 Select OK.
Note: If you set a path to blank for a libref that you defined, the libref willbe de-assigned and (in the SAS message area at the bottom of the window)

Reporting: Working with Palette Definition Folders � Removing a Palette Definition Folder 521
you will get a confirmation message that says “not assigned.” (This is aNOTE level message. Ignore the word ERROR.) �
� Select OK.
�
Note: 2. If the library to which you added the folder was remote, in addition tofreeing that library (see Note 1), you also need to release the lock on the PDB so thatother people and tasks (such as the process task and reduce task) can use it. For moreinformation about releasing the lock, see “Releasing the Lock on the Active PDB” onpage 319. �
Deleting a Palette Definition FolderYou can delete a palette definition folder (which also automatically removes its name
from your list of known palette definition folders)� by using the SAS IT Resource Management GUI for UNIX and Windows.
Note: If you do not want to delete the folder but only remove it from your list, see“Removing a Palette Definition Folder” on page 521. �
Deleting a Palette Definition Folder (UNIX, Windows)In the SAS IT Resource Management GUI for UNIX and Windows, you can delete a
palette definition folder (and automatically remove its name from your list of knownpalette definition folders) by following these steps:
1 From the main window’s Reporting tab, select Manage Report Definitions.The Manage Report Definitions window opens.
2 Select Locals. A menu opens. From the menu, select Select Palette. ThePalette Management window opens and displays, at the top, the list of the namesof the known palette definition folders.
3 Select the name of the palette definition folder that you want to delete.4 Select File. A menu opens. Select Delete Folder.5 The Palette Management window redisplays the list of known palette definition
folders. The one that you selected is no longer on the list (and also no longerexists).
6 Select Close. You return to the Manage Report Definitions window.7 When you are finished using the Manage Report Definitions window, select Close
to return to the main window.
Removing a Palette Definition FolderYou can remove the name of a palette definition folder from your list of known
palette definition folders� by using the SAS IT Resource Management GUI for UNIX and Windows.
Note: Removing the name of the folder from the list does not delete the folder. Thefolder continues to exist. If you want both to remove the name and delete the folder, see“Deleting a Palette Definition Folder” on page 521. �
Removing a Palette Definition Folders (UNIX, Windows)In the SAS IT Resource Management GUI for UNIX and Windows, you can remove
the name of a palette definition folder from your list of known palette definition foldersby following these steps:
522 Viewing the List of Palette Definitions in a Palette Definition Folder � Chapter 25
1 From the main window’s Reporting tab, select Manage Report Definitions.The Manage Report Definitions window opens.
2 Select Locals. A menu opens. From the menu, select Select Palette. ThePalette Management window opens and, at the top, displays the list of knownpalette definition folders.
3 Select the name of the palette definition folder that you want to remove from thelist.
4 Select File. A menu opens. From the menu, select Remove Folder.5 The Palette Management window redisplays the list of known palette definition
folders. The one that you selected is no longer on the list.6 Select Close. You return to the Manage Report Definitions window.7 When you are finished using the Manage Report Definitions window, select Close
to return to the main window.
Viewing the List of Palette Definitions in a Palette Definition FolderYou can view a report definition folder� by using the SAS IT Resource Management GUI for UNIX and Windows.
Viewing the List of Palette Definitions in a Palette Definition Folder (UNIX,Windows)
In the SAS IT Resource Management GUI for UNIX and Windows, you can view thelist of report definitions in a report definition folder by following these steps:
1 From the main window’s Reporting tab, select Manage Report Definitions.The Manage Report Definitions window opens.
2 Select Locals. A menu opens. From the menu, select Select Palette. ThePalette Management window opens and, at the top, displays a list of the knownpalette definition folders.
3 If the folder whose contents you want to see is not on the list, add it to the list.For more information, see “Adding a Palette Definition Folder” on page 518.
4 From the list of the known palette definition folders, select the folder whosecontents you want to see. The list of palette definitions in that folder is displayedin the lower half of the window.
5 If you want to work with a palette definition, see “Overview of Palette Definitions”on page 525.
6 When you want to return to the Manage Report Definitions window, select Close.7 When you want to return to the main window of SAS IT Resource Management,
select Close in the Manage Report Definitions window.
Viewing Your List of Known Palette Definition FoldersYou can view your list of known palette definition folders� by using the SAS IT Resource Management GUI for UNIX and Windows.
Viewing Your List of Known Palette Definition Folders (UNIX, Windows)In the SAS IT Resource Management GUI for UNIX and Windows, you can view your
list of known report definition folders by following these steps:

Reporting: Working with Palette Definition Folders � Viewing Your List of Known Palette Definition Folders 523
1 From the main window’s Reporting tab, select Manage Report Definitions.The Manage Report Definitions window opens.
2 Select Locals. A menu opens. From the menu, select Select Palette. ThePalette Management window opens and, at the top, displays your list of knownpalette definition folders.
3 When you want to return to the Manage Report Definitions window, select Close.
4 When you want to return to the main window of SAS IT Resource Management,select Close in the Manage Report Definitions window.

524
525
C H A P T E R
26Reporting: Working with PaletteDefinitions
Working with Palette Definitions: Main Topics 525Overview of Palette Definitions 525
Associating a Palette Definition with a Report Definition 526
Associating a Palette Definition with a Report Definition (UNIX, Windows) 526
Copying a Palette Definition 526
Copying a Palette Definition (UNIX, Windows) 527Creating/Editing/Viewing a Palette Definition 527
Creating/Editing/Viewing a Palette Definition (UNIX, Windows) 527
Deleting a Palette Definition 528
Deleting a Palette Definition (UNIX, Windows) 528
Exploring Supplied Palette Definitions 528
Exploring Supplied Palette Definitions (UNIX, Windows) 528Saving a Palette Definition 529
Saving a Report Definition (UNIX, Windows) 529
Specifying/Editing/Viewing the Default Palette Definition 529
Specifying/Editing/Viewing the Default Palette Definition (UNIX, Windows) 529
Working with Palette Definitions: Main Topics
Overview of Palette DefinitionsA palette definition contains the specification for a palette. A palette definition
enables you to specify and save a group of graphic options and SAS options, and then touse those options for a report by associating the palette definition with the reportdefinition.
For example, you might want to create a palette definition� to set display options that you want to use whenever you run reports on a specific
platform� to set specific options for a report type such as reports that you want to display on
the Web� to set default options that you frequently use for your reports.
By using a palette definition, you can set options such as symbols, colors, legends,patterns, axes options, fonts, line width, and so on.
For more information about palette definitions, see the following topics:� “Associating a Palette Definition with a Report Definition” on page 526� “Copying a Palette Definition” on page 526� “Creating/Editing/Viewing a Palette Definition” on page 527

526 Associating a Palette Definition with a Report Definition � Chapter 26
� “Deleting a Palette Definition” on page 528� “Exploring Supplied Palette Definitions” on page 528� “Saving a Palette Definition” on page 529� “Specifying/Editing/Viewing the Default Palette Definition” on page 529.
Associating a Palette Definition with a Report DefinitionFor any particular report definition, you can specify the palette definition that you
want to be used with the report definition� by using the SAS IT Resource Management GUI for UNIX and Windows.
Note: Any number of report definitions can be associated with a particular palettedefinition. �
Note: If you do not associate a particular palette definition with the reportdefinition, the default palette definition will be used with the report definition. Formore information about the default palette definition, see “Specifying/Editing/Viewingthe Default Palette Definition” on page 529. �
Associating a Palette Definition with a Report Definition (UNIX, Windows)In the SAS IT Resource Management GUI for UNIX and Windows, you can associate
a palette definition with a report definition by following these steps:1 Create, edit, or view the report definition.
For more information, see “Creating/Editing/Viewing a Report Definition” onpage 481.
2 Create, edit, or view the palette definition.For more information, see “Creating/Editing/Viewing a Palette Definition” on
page 527.3 Select Close to return to the Manage Report Definitions window.4 You can confirm the palette definition that is associated with the report definition
by selecting Locals � Preview Macro SourceThe value of the PALETTE= parameter is the name of the palette definition
that is associated with the report definition that displays in the Preview MacroSource window.
5 You can run the report definition now to see the effect of the palette definition. Ifyou prefer, you can save the report definition with the associated palette definition.
For more information, see “Running a Report Definition” on page 488 and“Saving a Report Definition” on page 489.
6 When you are ready to return to the main window, select Close in the ManageReport Definitions window.
Copying a Palette DefinitionYou can copy a palette definition to the same palette definition folder (if you use
another name for the definition) or to another palette definition folder� by using the SAS IT Resource Management GUI for UNIX and Windows.
Note: Palettes definitions can be created only by using Manage Report Definitionson the Reporting tab in the SAS IT Resource Management main window. Therefore, ifyou want to run report definitions (interactively or in batch mode) on a server host and

Reporting: Working with Palette Definitions � Creating/Editing/Viewing a Palette Definition 527
you want to use a palette definition that you created on a client host, you must copy thepalette definition to a folder on the server. �
Copying a Palette Definition (UNIX, Windows)In the SAS IT Resource Management GUI for UNIX and Windows, you can copy one
or more palette definitions to the same folder or another folder by following these steps:1 View the palette definition that you want to copy.
For more information, see “Creating/Editing/Viewing a Palette Definition” onpage 527.
2 Use the Save as button to save the palette definition to another folder.
For more information, see “Saving a Palette Definition” on page 529.
Creating/Editing/Viewing a Palette DefinitionYou can create, edit, or view a palette definition� by using the SAS IT Resource Management GUI for UNIX and Windows.
Creating/Editing/Viewing a Palette Definition (UNIX, Windows)In the SAS IT Resource Management GUI for UNIX and Windows, you can create,
edit, or view a palette definition by following these steps:
1 From the main window’s Reporting tab, select Manage Report Definitions.The Manage Report Definitions window opens.
2 Select Locals. A menu opens. From the menu, select Select Palette. ThePalette Management window opens.
3 If you want to create a new palette definition, select File. A menu opens. Fromthe menu, select New Palette. The Graphics Palette Properties window opens.
If you want to edit or view an existing report definition, list the existing palettedefinitions and select the one that you want to view or modify. The GraphicsPalette Properties window opens. For more information about listing palettedefinitions, see “Viewing the List of Palette Definitions in a Palette DefinitionFolder” on page 522.
4 To specify or edit the palette definition, click on each tab and provide or modify thevalues of the fields on the tabs. (Because so much information needs to be added ifyou are specifying a new palette definition, it might be easier to start a newpalette definition by copying the palette definition that is the most similar to thenew definition that you want to create. For more information about copying apalette definition, see “Copying a Palette Definition” on page 526.)
To view the palette definition, click on each tab and look at the values of thefields on the tabs.
For more information about the fields, select Help in the Graphics PaletteProperties window.
5 When you finish creating or editing the palette definition, select Save (to write thepalette definition to its previous location) or Save as (to write the palettedefinition to a new location).
When you finish viewing the palette definition, select Cancel.6 When you finish working in the Palette Management window, select Close.7 When you finish working in the Manage Report Definitions window, select Close.
528 Deleting a Palette Definition � Chapter 26
Deleting a Palette DefinitionYou can delete a palette definition
� by using the SAS IT Resource Management GUI for UNIX and Windows.
Deleting a Palette Definition (UNIX, Windows)In the SAS IT Resource Management GUI for UNIX and Windows, you can delete a
palette definition by following these steps:
1 From the main window’s Reporting tab, select Manage Report Definitions.The Manage Report Definitions window opens.
2 Select Locals. A menu opens. From the menu, select Select Palette. ThePalette Management window opens.
3 From the Folders list, select the folder that contains the palette definition thatyou want to delete.
4 From the Palettes list, select the palette definition that you want to delete.
5 Select File. A menu opens. From the menu, select Delete Palette. The palettethat you selected is deleted and is removed from the Palettes list.
6 When you are ready to return to the Manage Report Definitions window, selectClose.
7 When you are ready to return to the main window, select Close in the ManageReport Definitions window.
Exploring Supplied Palette DefinitionsYou can explore supplied palette definitions
� by using the SAS IT Resource Management GUI for UNIX and Windows.
Exploring Supplied Palette Definitions (UNIX, Windows)In the SAS IT Resource Management GUI for UNIX and Windows, you can explore
supplied palette definitions by following these steps:
1 View the list of palette definitions in the PGMLIB.PALETTE palette definitionfolder. For more information, see “Viewing the List of Palette Definitions in aPalette Definition Folder” on page 522.
2 For each palette definition that interests you, view the palette definition. For moreinformation, see “Creating/Editing/Viewing a Palette Definition” on page 527.
3 If you want to see the effect of a particular palette definition, associate the palettedefinition with a report definition, and run the report definition. For moreinformation, see “Associating a Palette Definition with a Report Definition” onpage 526 and “Running a Report Definition” on page 488.
Note: Before you try different palette definitions, submit
options source;
in the SAS Program Editor window in order to write the source code to the log asit is executed. The name of each palette that you apply will then be recorded inthe log. You can refer to the log to find the name of any palette that you want toreapply. �

Reporting: Working with Palette Definitions � Specifying/Editing/Viewing the Default Palette Definition 529
Saving a Palette DefinitionYou can save a palette definition
� by using the SAS IT Resource Management GUI for UNIX and Windows.
Saving a Report Definition (UNIX, Windows)In the SAS IT Resource Management GUI for UNIX and Windows, you can save a
report definition by following these steps:
1 Create, edit, or view a palette definition.
For more information about creating, editing, or viewing a palette definition, see“Creating/Editing/Viewing a Palette Definition” on page 527.
2 In the Graphics Palette Properties window, select Save to write to the currentlyselected palette definition folder, using the palette definition name on the Generaltab.
Or select Save as to have a choice of palette definition folders and palettedefinition names.
3 When you want to return to the Manage Report Definitions window, select Close.
4 When you want to return to the main window, select Close in the Manage ReportDefinitions window.
Specifying/Editing/Viewing the Default Palette Definition
When you select a default palette, this palette will be used anytime you create andrun a report definition without specifying a palette for that specific report definition.Unless you override the default for an individual report, the default palette is used,regardless of the platform on which you are running the reports or the type of reportyou are running. For example, if you select a default palette and you create a reportthat you want to display on the Web, your default palette is used unless you select theWeb palette (PGMLIB.PALETTE.WEB) or another palette for that report.
You must set the default palette in the SAS IT Resource Management GUI, but it isused both in the GUI and in batch, unless you select another palette when you run thereport definition.
If you do not specify a default palette and you create and run a report definitionwithout selecting a palette for that report, the default palette for your current host isused. For example, on Windows, the PGMLIB.PALETTE.WIN palette is the defaultpalette for that operating environment.
You can specify one palette definition to use as the default for any report that doesnot have an associated palette definition (or edit the specification so that there is nodefault palette definition)
� by using the SAS IT Resource Management GUI for UNIX and Windows.
Specifying/Editing/Viewing the Default Palette Definition (UNIX, Windows)In the SAS IT Resource Management GUI for UNIX and Windows, you can specify
the palette definition that is used by default (or edit the specification so that there is nodefault palette definition) by following these steps:
1 View your list of known palette definition folders.

530 Specifying/Editing/Viewing the Default Palette Definition � Chapter 26
For more information, see “Viewing Your List of Known Palette DefinitionFolders” on page 522.
2 At the bottom of the Palette Management window, the value in the DefaultPalette field is the name of the palette definition that is used by default.
3 If you want to use a different palette definition as the default palette definition,select the folder that has the palette definition that you do want to use.
4 Select the palette definition that you want to use by default. Click the right mousebutton. A menu opens. Select Make Default. At the bottom of the PaletteManagement window, the Default Palette field displays the name of the palettedefinition that you selected.
Note: If you do not want a default palette definition, you can click on the value inthe Default Palette field and then delete the characters, so that the result is anempty field. �
5 When you finish with the Palette Management window, select Close. You arereturned to the Manage Report Definitions window.
6 When you finish with the Manage Report Definitions window, select Close. Youare returned to the main window of SAS IT Resource Management.

531
C H A P T E R
27Reporting: Working with RuleDefinition Folders
Working with Rule Definition Folders: Main Topics 531Overview of Rule Definition Folders 531
Adding/Creating a Rule Definition Folder 532
Creating/Adding a New Rule Definition Folder (UNIX, Windows) 532
Deleting a Rule Definition Folder 532
Deleting a Rule Definition Folder (UNIX, Windows) 533Evaluating (Running) a Rule Definition Folder 533
Evaluating (Running) a Rule Definition Folder (UNIX, Windows) 533
Viewing the List of Rule Definitions in a Rule Definition Folder 534
Viewing the List of Rule Definitions in a Rule Definition Folder (UNIX, Windows) 534
Viewing Your List of Known Rule Definition Folders 534
Viewing Your List of Known Rule Definition Folders (UNIX, Windows) 534
Working with Rule Definition Folders: Main Topics
Overview of Rule Definition FoldersA rule is a specification for detecting exceptions. A rule definition includes
information such as the table and level, the expression, the message, and otherattributes. In addition, a rule definition can include subsetting information. It can alsocontain a recommendation, perhaps for follow-up reports. Rule definitions reside in ruledefinition folders.
Some exception rules are supplied with your SAS IT Resource Management software.These rules reside in a (read-only) folder called PGMLIB.CPXRULE. You can alsocreate customized rules and add them to any location (that is, folder and library) towhich you have write access (for example, SASUSER.CPXRULE).
Note: You can organize your rules into multiple rules folders, as needed. (You mightwant to separate your rules folders by data source. Alternatively, the rules that arespecific to a PDB can reside in a folder called ADMIN.CPXRULE. Rules that apply toyour site can reside in the SITELIB.CPXRULE definition folder.) �
When you run the rule, the exceptions that are detected are called the results. Bydefault, the results are placed in SASUSER.XRESULTS. You can direct the results toanother location, such as ADMIN.RESULTS, if you have write access to the library andif you specify a unique name for the results data set.
For more information about rule definition folders, see the following topics:
� “Adding/Creating a Rule Definition Folder” on page 532
� “Deleting a Rule Definition Folder” on page 532
532 Adding/Creating a Rule Definition Folder � Chapter 27
� “Evaluating (Running) a Rule Definition Folder” on page 533� “Viewing the List of Rule Definitions in a Rule Definition Folder” on page 534� “Viewing Your List of Known Rule Definition Folders” on page 534.
Adding/Creating a Rule Definition FolderYou can create a new rule definition folder and add it to your list of rule definition
folders� by using the SAS IT Resource Management GUI for UNIX and Windows.
Note: Your local host must have a SAS IT Resource Management client and/orserver license. �
Creating/Adding a New Rule Definition Folder (UNIX, Windows)In the SAS IT Resource Management GUI for UNIX and Windows, you can create a
new rule definition folder and add it to your list of known rule definition folders byfollowing these steps:
1 From the main window’s Reporting tab, select Perform Exception Analysis. Alist of rule definition folders opens. (You can view the rules that are contained in afolder by clicking a rule definition folder.)
2 Right-click in the folder area to open the menu of actions that you can perform.Click New folder.
Alternatively, you can select File � Folders � Create/Add3 When the Create or Add Folder window opens, enter the name of the library
where you want the folder to reside.Alternatively, you can click the right arrow to list the libraries that are
available. The Select a Library window opens. Select the library that you want touse and then click OK to return to the Create or Add a Folder window.
If you want to use a library that is not listed, click the Define Library button.The Define a SAS Library window opens. Enter the path and select the access toand location of the library. Click OK.
4 Enter the name of the folder that you want to create. The name of the ruledefinition folder must be between one and eight characters and can containnumbers, letters, and underscores. (The name cannot begin with a number; it canbegin with a letter or an underscore.)
Alternatively, you can click the right arrow to list the folders that are available.The Select a Library window opens. Select the folder you want to use and thenclick OK to return to the Create or Add a Folder window.
The new folder name must be unique. Click the right arrow to list the foldersthat are already available. Be sure that the name you have chosen is not on thatlist of available folders.
5 Enter the description.6 Click OK to create the new folder.7 Click Close to return to the main Reporting tab.
Deleting a Rule Definition FolderYou can delete a rule definition folder� by using the SAS IT Resource Management GUI for UNIX and Windows.

Reporting: Working with Rule Definition Folders � Evaluating (Running) a Rule Definition Folder 533
Note: Your local host must have a SAS IT Resource Management client and/orserver license. �
Deleting a Rule Definition Folder (UNIX, Windows)In the SAS IT Resource Management GUI for UNIX and Windows, you can delete a
rule definition folder by following these steps:1 From the main window’s Reporting tab, select Perform Exception Analysis. A
list of rule definition folders opens for you to view.2 Click to select the folder that you want to delete. A list of the rules that reside in
that folder opens.3 Right-click on that folder. A menu opens that lists the actions that you can
perform. Select Delete folder.Alternatively, you can select File � Folders � Delete
4 You are asked if you are sure that you want to delete the rule definition folder.Click Yes to delete.
Note: When the rule definition folder is deleted, all the rules in that ruledefinition folder are deleted. �
5 Click Close to return to the main Reporting tab.
Evaluating (Running) a Rule Definition FolderYou can evaluate (run) a rule definition folder� by using the SAS IT Resource Management GUI for UNIX and Windows.
Note: Your local host must have a SAS IT Resource Management client and/orserver license. �
Evaluating (Running) a Rule Definition Folder (UNIX, Windows)In the SAS IT Resource Management GUI for UNIX and Windows, you can evaluate
(run) a rule definition folder by following these steps:1 From the main window’s Reporting tab, select Perform Exception Analysis. A
list of folders opens.2 To specify the location of the results data set, select Locals � Options
The Options for Rule Evaluation window opens. From the Output tab of thiswindow, you can specify the library name and the data set that you want to use forthe results. Click OK to return to the Exception Reporting window.
To specify the date and time period of the data that you want to evaluate, selectLocals � Options
From the Time tab of this window, you can specify the date and time period thatyou want to include in the results. Click OK to return to the Exception Reportingwindow.
3 From Exception Reporting window, click the rule definition folder that you want toevaluate. Right-click on that folder. A menu opens that lists the actions that youcan perform. Select Evaluate folder.
Alternatively, you can highlight the folder that you want to evaluate and selectFile � Folders � Evaluate
4 For information about viewing the results of the evaluation, see “Overview of RuleResults” on page 547.
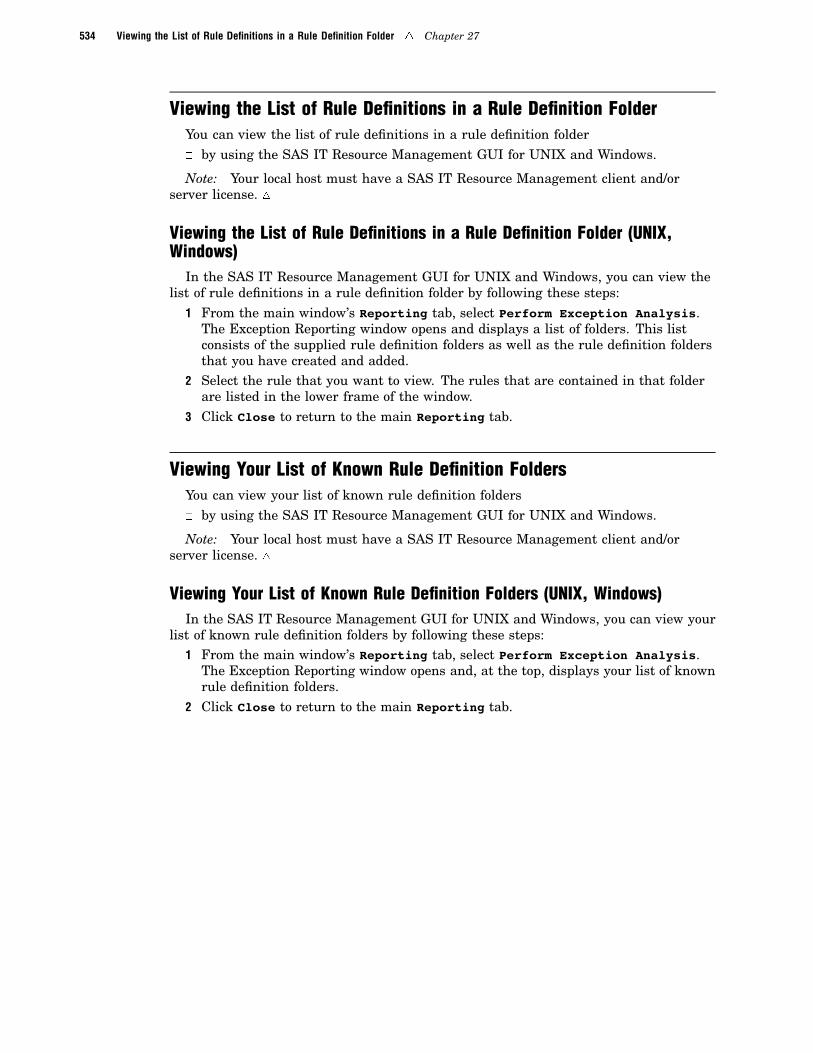
534 Viewing the List of Rule Definitions in a Rule Definition Folder � Chapter 27
Viewing the List of Rule Definitions in a Rule Definition FolderYou can view the list of rule definitions in a rule definition folder� by using the SAS IT Resource Management GUI for UNIX and Windows.
Note: Your local host must have a SAS IT Resource Management client and/orserver license. �
Viewing the List of Rule Definitions in a Rule Definition Folder (UNIX,Windows)
In the SAS IT Resource Management GUI for UNIX and Windows, you can view thelist of rule definitions in a rule definition folder by following these steps:
1 From the main window’s Reporting tab, select Perform Exception Analysis.The Exception Reporting window opens and displays a list of folders. This listconsists of the supplied rule definition folders as well as the rule definition foldersthat you have created and added.
2 Select the rule that you want to view. The rules that are contained in that folderare listed in the lower frame of the window.
3 Click Close to return to the main Reporting tab.
Viewing Your List of Known Rule Definition FoldersYou can view your list of known rule definition folders� by using the SAS IT Resource Management GUI for UNIX and Windows.
Note: Your local host must have a SAS IT Resource Management client and/orserver license. �
Viewing Your List of Known Rule Definition Folders (UNIX, Windows)In the SAS IT Resource Management GUI for UNIX and Windows, you can view your
list of known rule definition folders by following these steps:1 From the main window’s Reporting tab, select Perform Exception Analysis.
The Exception Reporting window opens and, at the top, displays your list of knownrule definition folders.
2 Click Close to return to the main Reporting tab.

535
C H A P T E R
28Reporting: Working with RuleDefinitions
Working with Rule Definitions: Main Topics 535Overview of Rule Definitions 535
Creating a Rule Definition 536
Creating a Rule Definition (UNIX, Windows) 536
Using the RUN_REPORT= Command (UNIX, Windows) 541
Opening a Rule Definition 544Opening a Rule Definition (UNIX, Windows) 545
Deleting a Rule Definition 545
Deleting a Rule Definition (UNIX, Windows) 545
Copying a Rule Definition 545
Copying a Rule Definition (UNIX, Windows) 545
Evaluating (Running) a Rule Definition 546Evaluating (Running) a Rule Definition (UNIX, Windows) 546
Viewing/Editing a Rule Definition 547
Viewing/Editing a Rule Definition (UNIX, Windows) 547
Overview of Rule Results 547
Results of Rule Evaluations 547Generating Rule Exceptions (Using Macros in Batch) 547
Viewing Rule Exceptions (Using Macros in Batch) 548
Generating Rule Exceptions (UNIX, Windows) 548
Viewing Rule Exceptions (UNIX, Windows) 548
Working with Rule Definitions: Main Topics
Overview of Rule DefinitionsA rule definition (also known as a rule) describes how to detect the presence of
exceptional data. A rule definition includes information such as the table and level, theexpression, the recommendation, and other attributes.
For more information about rule definitions, see the following topics:
� “Copying a Rule Definition” on page 545
� “Creating a Rule Definition” on page 536
� “Deleting a Rule Definition” on page 545
� “Evaluating (Running) a Rule Definition” on page 546
� “Opening a Rule Definition” on page 544
� “Viewing/Editing a Rule Definition” on page 547.

536 Creating a Rule Definition � Chapter 28
Creating a Rule DefinitionYou can create a rule definition
� by using the SAS IT Resource Management GUI for UNIX and Windows.
Note: Your local host must have a SAS IT Resource Management client and/orserver license. �
Creating a Rule Definition (UNIX, Windows)In the SAS IT Resource Management GUI for UNIX and Windows, you can create a
rule definition by following these steps:
1 From the main window’s Reporting tab, select Perform Exception Analysis.The Exception Reporting window opens and displays a list of rule definitionfolders.
2 Select the folder where you want the new rule to be stored. (You must have writeaccess to this folder.) Then, select File � Rules � New
3 The Properties for Exception Rule window opens. Enter the information thatspecifies the new rule on these six tabs:
� General tab
� Name field
Enter the name of the rule. The name must be unique within itsrule definition folder. The name can have as many as eight characters,must begin with an alphabetic character, and can contain letters,numbers, and underscores. The name is automatically uppercased.
� Is This Rule Active? field
When this box has an X in it, this rule is active. When this box isempty, this rule is ignored.
� Description field
Enter text that explains or describes the rule.
� Data tab
� Level field
Select the arrow next to the field. This selection opens a menu thatlists (from the active PDB) the librefs of the libraries that have the levelof data that you want to use (these librefs are identical to the levelnames and to the library names: DETAIL, DAY, WEEK, MONTH, andYEAR) and also lists the item Other.
If the data that you want to evaluate is in the detail, day, week,month, or year level of the active PDB, select the libref that correspondsto the level of data that you want to use.
If the data that you want to evaluate is not in the detail, day,week, month, or year level of the active PDB, select Other. A windowopens that lists librefs, and for each libref, lists the library that thelibref currently points to. Select the libref that corresponds to thelibrary whose data you want to use.
� Table field
In order to specify the table name or data set name that containsthe data that you want to evaluate with this rule, select the arrow nextto the field. This selection opens a list of names of the tables and/or data

Reporting: Working with Rule Definitions � Creating a Rule Definition 537
sets that are in the library whose libref you selected. Select the name ofthe table or data set whose data you want to use.
� By fieldSelect the arrow next to the field. A window opens. Each item in
the window is a list of BY variables. Select the list that you want to useor select <none> if you do not want to use a list.
� With a list: When the rule runs, each unique set of values in thelist defines a separate group of data that is evaluated. Forexample, if you select MACHINE RELDEVN and MACHINE has 3values and RELDEVN has 4 values, then 12 groups of data areevaluated. In that same example, the result is zero to 12exceptions. An exception is “owned” by a group and indicates thatone or more observations in the group satisfy the rule.
Note: The BY groups that are available are subsets (up to butnot including the DATETIME variable) of the BY list or CLASS listthat is associated with the libref and table name (or libref and dataset name) that you specified. For example, if DETAIL.DISKS hasBY list of MACHINE CTLR DISK DATETIME SHIFT, choices ofBY grouping for exception analysis are: MACHINE, MACHINECTLR, MACHINE CTLR DISK, and none. �
� Without a list: A BY group value of <none>, means that nosubsetting will be done by BY group. (Other subsetting will bedone if other subsetting conditions are specified.) All the data (thewhole data) is in one group; thus, no more than one exception willbe generated for the rule.
� Subsetting tabYou can subset the data by date, by time of day, and/or by using a WHERE
expression.� Date
You can specify a range of dates by which you want to subset thedata. You can also set the cutoff time for defining the value of LATEST.
� Cutoff Point for LATEST fieldYou can specify a cutoff time for LATEST. On the last date
for which there is data, if data is available from a time later thanthe cutoff time, then the last date for which there is data is used asthe value of LATEST. However, on the last date for which there isdata, if data is not available from a time later than the cutoff time,then the date that is one day before the last date for which there isdata is used as the value of LATEST.
If no cutoff time is specified for LATEST (or if the cutofftime is 0:00), then the value of LATEST is the last date for whichthere is data.
Note: The LTCUTOFF= value is used only to determine the datethat is represented by LATEST. Thus, the cutoff time for LATESThas no effect on the begin time or end time. �
� Begin dateIn the Date Begin field, the begin date is LATEST-0 by
default. To use another begin date, change the number. Forexample, LATEST-1 starts one day before the date that is specifiedby the value of LATEST.
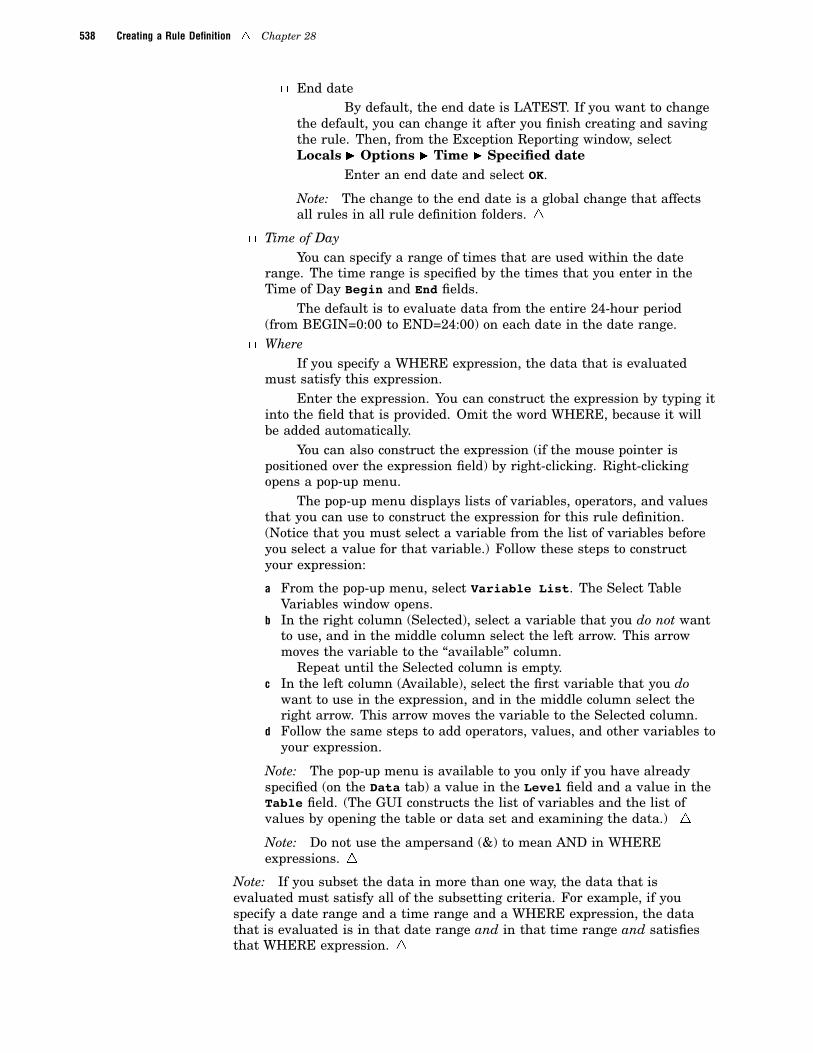
538 Creating a Rule Definition � Chapter 28
� End dateBy default, the end date is LATEST. If you want to change
the default, you can change it after you finish creating and savingthe rule. Then, from the Exception Reporting window, selectLocals � Options � Time � Specified date
Enter an end date and select OK.
Note: The change to the end date is a global change that affectsall rules in all rule definition folders. �
� Time of DayYou can specify a range of times that are used within the date
range. The time range is specified by the times that you enter in theTime of Day Begin and End fields.
The default is to evaluate data from the entire 24-hour period(from BEGIN=0:00 to END=24:00) on each date in the date range.
� WhereIf you specify a WHERE expression, the data that is evaluated
must satisfy this expression.Enter the expression. You can construct the expression by typing it
into the field that is provided. Omit the word WHERE, because it willbe added automatically.
You can also construct the expression (if the mouse pointer ispositioned over the expression field) by right-clicking. Right-clickingopens a pop-up menu.
The pop-up menu displays lists of variables, operators, and valuesthat you can use to construct the expression for this rule definition.(Notice that you must select a variable from the list of variables beforeyou select a value for that variable.) Follow these steps to constructyour expression:
a From the pop-up menu, select Variable List. The Select TableVariables window opens.
b In the right column (Selected), select a variable that you do not wantto use, and in the middle column select the left arrow. This arrowmoves the variable to the “available” column.
Repeat until the Selected column is empty.c In the left column (Available), select the first variable that you do
want to use in the expression, and in the middle column select theright arrow. This arrow moves the variable to the Selected column.
d Follow the same steps to add operators, values, and other variables toyour expression.
Note: The pop-up menu is available to you only if you have alreadyspecified (on the Data tab) a value in the Level field and a value in theTable field. (The GUI constructs the list of variables and the list ofvalues by opening the table or data set and examining the data.) �
Note: Do not use the ampersand (&) to mean AND in WHEREexpressions. �
Note: If you subset the data in more than one way, the data that isevaluated must satisfy all of the subsetting criteria. For example, if youspecify a date range and a time range and a WHERE expression, the datathat is evaluated is in that date range and in that time range and satisfiesthat WHERE expression. �

Reporting: Working with Rule Definitions � Creating a Rule Definition 539
� Expression tabThe expression and condition are combined as follows: After the data is
subset, then the unique BY group (or the data as a whole, if BY groups havenot been specified) has an exception if the expression is true AND the relatedcondition (see the Is True For field) is true.
The top of this tab enables you to define the expression. The bottom of thistab enables you to define the related condition.
� Expression
Enter the expression. You can construct the expression by typing itinto the field that is provided.
You can also construct the expression (if the mouse pointer ispositioned over the expression field) by right-clicking. Right-clickingopens a pop-up menu.
The pop-up menu displays lists of variables, operators, and valuesthat you can use to construct the expression for this rule definition.(Notice that you must select a variable from the list of variables beforeyou select a value for that variable.) Follow these steps to constructyour expression:
a From the pop-up menu, select Variable List. The Select TableVariables window opens.
b In the right column (Selected), select a variable that you do notwant to use, and in the middle column select the left arrow. Thisarrow moves the variable to the “available” column.
Repeat until the Selected column is empty.c In the left column (Available), select the first variable that you do
want to use in the expression, and in the middle column select theright arrow. This arrow moves the variable to the “selected”column.
d Follow the same steps to add operators, values, and other variablesto your expression.
Note: The pop-up menu is available to you only if you have alreadyspecified (on the Data tab) a value in the Level field and a value in theTable field. (The GUI constructs the list of variables and the list ofvalues by opening the table or data set and examining the data.) �
� Is True For field (Related Condition)
This field enables you to select the related condition. Choose one ofthe following conditions, and then (in the case of all conditions exceptthe first one) modify the operator and/or the value of N to tailor thecondition to your needs. (If you do not change the operator and/or thevalue of N, the second, third, and fourth conditions are logicallyequivalent to the first condition.)
� Any Observation: After the data is subset, if the expression is truefor one or more observations in the unique BY group (or in the dataas a whole if BY groups are not defined), then that unique BYgroup (or all the data) has an exception.
� Number of Observations: After the data is subset, if the expressionis true for greater than (or less than, equal to, greater than orequal to, less than or equal to, or not equal to) N observations inthe unique BY group (or in the data as a whole if BY groups arenot defined), then that unique BY group (or all the data) has anexception.
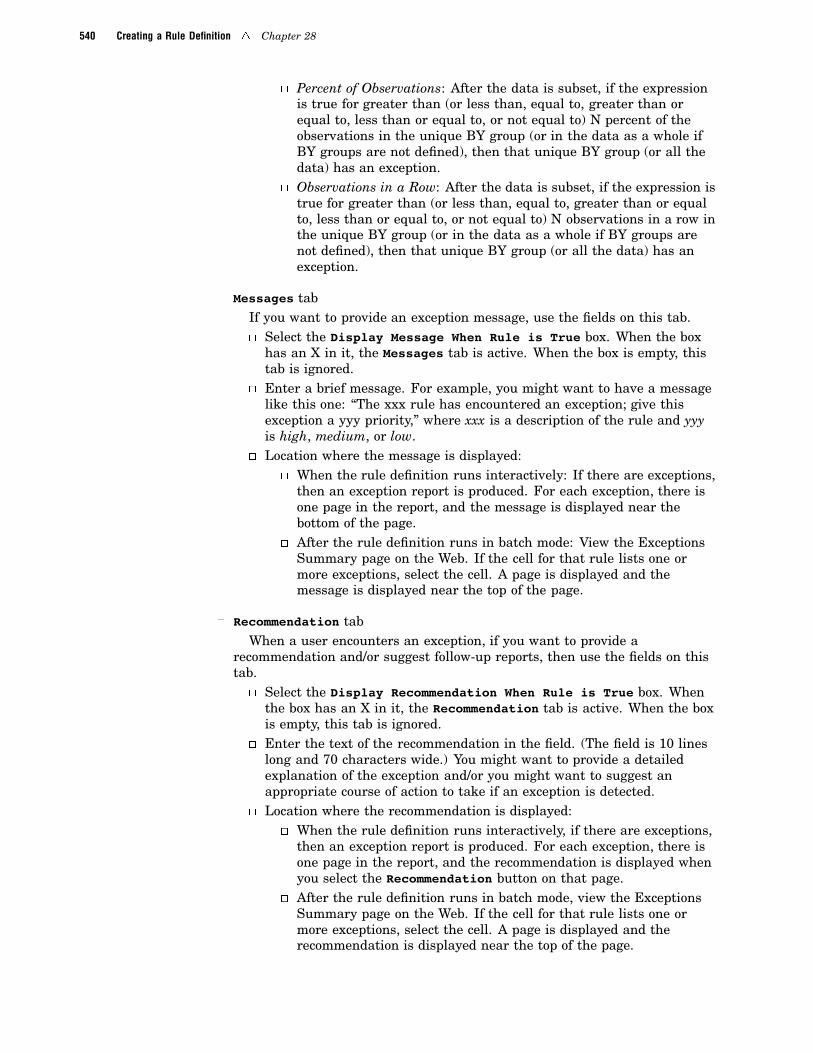
540 Creating a Rule Definition � Chapter 28
� Percent of Observations: After the data is subset, if the expressionis true for greater than (or less than, equal to, greater than orequal to, less than or equal to, or not equal to) N percent of theobservations in the unique BY group (or in the data as a whole ifBY groups are not defined), then that unique BY group (or all thedata) has an exception.
� Observations in a Row: After the data is subset, if the expression istrue for greater than (or less than, equal to, greater than or equalto, less than or equal to, or not equal to) N observations in a row inthe unique BY group (or in the data as a whole if BY groups arenot defined), then that unique BY group (or all the data) has anexception.
� Messages tabIf you want to provide an exception message, use the fields on this tab.� Select the Display Message When Rule is True box. When the box
has an X in it, the Messages tab is active. When the box is empty, thistab is ignored.
� Enter a brief message. For example, you might want to have a messagelike this one: “The xxx rule has encountered an exception; give thisexception a yyy priority,” where xxx is a description of the rule and yyyis high, medium, or low.
� Location where the message is displayed:� When the rule definition runs interactively: If there are exceptions,
then an exception report is produced. For each exception, there isone page in the report, and the message is displayed near thebottom of the page.
� After the rule definition runs in batch mode: View the ExceptionsSummary page on the Web. If the cell for that rule lists one ormore exceptions, select the cell. A page is displayed and themessage is displayed near the top of the page.
� Recommendation tabWhen a user encounters an exception, if you want to provide a
recommendation and/or suggest follow-up reports, then use the fields on thistab.
� Select the Display Recommendation When Rule is True box. Whenthe box has an X in it, the Recommendation tab is active. When the boxis empty, this tab is ignored.
� Enter the text of the recommendation in the field. (The field is 10 lineslong and 70 characters wide.) You might want to provide a detailedexplanation of the exception and/or you might want to suggest anappropriate course of action to take if an exception is detected.
� Location where the recommendation is displayed:� When the rule definition runs interactively, if there are exceptions,
then an exception report is produced. For each exception, there isone page in the report, and the recommendation is displayed whenyou select the Recommendation button on that page.
� After the rule definition runs in batch mode, view the ExceptionsSummary page on the Web. If the cell for that rule lists one ormore exceptions, select the cell. A page is displayed and therecommendation is displayed near the top of the page.

Reporting: Working with Rule Definitions � Creating a Rule Definition 541
� A follow-up report is a report that the person who creates the rulerecommends to a user who wants to understand more about anexception. For each exception, a default follow-up report is availableautomatically, unless you suppress it.
Optionally, you can suggest that the user look at alternate oradditional follow-up reports by entering a RUN_REPORT= commandafter the text of the recommendation. The main purpose of theRUN_REPORT= command is to specify these reports so that they areproduced in batch mode. However, you can produce these reportsinteractively.
For more information about the RUN_REPORT= command, see“Using the RUN_REPORT= Command (UNIX, Windows)” on page 541.
4 Click OK to create the new rule and return to the Exception Reporting window.The new rule will be listed in Exception Rules, which is the lower frame of thiswindow.
Using the RUN_REPORT= Command (UNIX, Windows)The RUN_REPORT= command specifies how the follow-up reports are to be produced.Issuing the Command:Issue the RUN_REPORT= command after the rest of the recommendation. There can
be only one RUN_REPORT= command in the recommendation. The command mustbegin on a new line. If it is too long for one line, it can wrap to one or more additionallines or it can break at one or more new-line characters or carriage-return characters.However, the command must not extend beyond the 10th line of the recommendationfield. The command can be uppercase or lowercase. Do not insert a blank space beforeor after the = sign.
Syntax of the Command:The RUN_REPORT= command has the following syntax (which is broken here for
clarity, but can be on one line or on multiple lines):
RUN_REPORT=report-name--1 <... report-name-n>, FOLDER=libref.folder-name<, BEGIN=SAS-datetime-value><, END=SAS-datetime-value>
where� report-name-1 through report-name-n are names of report definitions in the folder
that is specified by the FOLDER= parameter. If more than one report name isspecified, separate each report name from the next with one or more spaces. Thisparameter is required.
The report definition(s) must be report definitions that are available in theManage Report Definitions window. The specifications of the report definition(s) donot need to match the specifications of this rule. (For example, the rule definitionand the report definition can specify different tables.) However, both should referto data that is in the same PDB or the same Other library.
You can use report definitions that already exist or report definitions that youcreate especially for use with this rule.
For more information about Manage Report Definitions, see “Using the ManageReport Definitions Tool” on page 468. For more information about reportdefinitions, see “Overview of Report Definitions” on page 480.
� libref.folder-name is the name of the report definition folder where the reportdefinitions are stored. This parameter is required.

542 Creating a Rule Definition � Chapter 28
The folder must be a folder that is available in Manage Report Definitions. Thelibref of the folder does not need to be the same as the libref that is specified inthe rule’s definition.
For more information about report definition folders, see “Overview of ReportDefinition Folders” on page 471.
� The BEGIN= and END= parameters subset the data that is used when thefollow-up reports are produced. Each of these parameters is optional. For BEGIN=and for END=:
� if the value is provided on the rule’s Recommendation tab, that value is used;� otherwise, if the value is provided in the report definition, that value is used;� otherwise, the default value is used. The default value for BEGIN= is
EARLIEST. The default value for END= is LATEST.
The value of the LTCUTOFF= parameter is used to choose which date is usedas the value for LATEST when the follow-up reports are produced by%CPRUNRPT. For LTCUTOFF=:
� if the value is provided (that is, is not a missing value) on the rule’sSubsetting tab, that value is used;
� otherwise, if the value is provided in the report definition, that value is used;� otherwise, the default value is used. The default value for LTCUTOFF= is
0:00.
For more information about the BEGIN= parameter, see the Help in this ruledefinition or the BEGIN= parameter for the %CPRUNRPT macro in the SAS ITResource Management macro reference documentation. For more informationabout the END= parameter, see the Help in this rule definition or the END=parameter for the %CPRUNRPT macro in the SAS IT Resource Managementmacro reference documentation. For more information about the LTCUTOFF=parameter, see the Help in this rule definition or the LTCUTOFF= parameter forthe %CPRUNRPT macro in the SAS IT Resource Management macro referencedocumentation.
Viewing the specified follow-up reports:� When you run the rule in batch mode: When the rule definition is evaluated (runs)
in batch mode (by a call to the %CPEXCEPT macro and then a call to the%CPXHTML macro)
1 %CPEXCEPT searches for exceptions and writes the exceptions to theRESULTS= folder.
2 %CPXHTML reads the exceptions from the RESULTS= folder and, dependingon the value of GENERATE= parameter that was specified in the call to%CPXHTML, produces welcome.htm, excwelco.htm, allwelco.htm,srvwelco.htm, and/or any follow-up reports or default follow-up reports.
For the follow-up reports and the default follow-up reports, ifGENERATE=FOLLOWUP (or GENERATE=ALL or if GENERATE= a list ofvalues and one of the values is FOLLOWUP) and if the RUN_REPORT=command is specified, then the follow-up reports (or default follow-up reports)are automatically produced and directed to the Web.
For each exception, if the rule specifies follow-up reports:
a %CPXHTML creates a temporary global macro variable that describesthe exception’s By group.
b To produce the follow-up reports, %CPXHTML calls %CPRUNRPT. Inthe call, the follow-up reports and their folders are specified, andOUTMODE=WEB is specified. For the following parameters, the

Reporting: Working with Rule Definitions � Creating a Rule Definition 543
parameter values in the call to %CPXHTML are copied to the call to%CPRUNRPT: HTMLDIR=, HTMLURL=, IMAGEDIR=, IMAGEURL=,LARGEDEV=, OUTDESC=, OUTLOC=, PALETTE=, SMALLDEV=, andWEBSTYLE=.
c %CPRUNRPT uses the values of its parameters and the value in thetemporary global macro variable to produce the exception’s follow-upreports and direct them to the Web.
Note: When the global WHERE expression (from the temporaryglobal macro variable) is joined with an AND to the local WHEREexpression (from the report definition),
� the WHERE expressions must be compatible in order for a reportto be generated. For example, no report is generated if oneWHERE expression has MACHINE=”Alpha” and the otherWHERE expression has MACHINE=”Beta”. (Joining these twoexpressions with an AND does not result in the condition True.)
� the WHERE expressions must be compatible in order for the globalWHERE expression to affect the report. For example, if the localWHERE expression specifies INSTEAD OF, the global WHEREexpression is ignored. (In the client GUI, INSTEAD OF on theQuery/Where Clause Builder tab in the report definition isequivalent to, in batch mode, omitting SAME AND in the value ofthe WHERE= parameter in the call to the report macro.)
�
For each exception, if the rule does not specify follow-up reports: The samesteps take place as the ones that are described above for the specifiedfollow-up reports, except that %CPXHTML calls %CPPLOT1 (not%CPRUNRPT) to produce the default (best-guess) follow-up report.
3 Use your Web browser to view the Exceptions Summary page on the Web. Ifthe cell for that rule lists one or more exceptions, select the cell. A page isdisplayed. The RUN_REPORT= command is displayed in the middle of thepage (in the Actions field). At the bottom of the page is a list of one or morefollow-up reports. To view a follow-up report, select its Report cell.
For more information about the %CPEXCEPT macro, see the topic %CPEXCEPTin the SAS IT Resource Management macro reference documentation. For moreinformation about the %CPXHTML macro, see the topic %CPXHTML in the SASIT Resource Management macro reference documentation. For more informationabout the %CPRUNRPT macro, see the topic %CPRUNRPT in the SAS ITResource Management macro reference documentation.
� When you run the rule by using the GUI: When the rule definition is evaluated(runs) interactively
1 If there are exceptions, then a set of pages is produced. For each exception,there is one page. On that page, the BY Group field displays the values thatidentify the BY group in which this exception was detected.
2 On that same page, select the Recommendation button. A window opens thatdisplays the recommendation and the RUN_REPORT= command, if it wasspecified.
3 In the Manage Report Definitions tool, run the report definitions as specifiedin the RUN_REPORT= command.
If you want the data in the follow-up reports to be only from the BY group,you can specify a global WHERE that describes the BY group. For example,

544 Opening a Rule Definition � Chapter 28
suppose the BY Group field contains MACHINE=’ABC’, NODE=’DEF’. In theSAS Program Editor window, type
CPWHERE= MACHINE=’ABC’ AND NODE=’DEF’ ;
and then select Run � Submit All report definitions that you run until yousubmit another value for CPWHERE or exit from SAS will subset data as if
MACHINE=’ABC’ AND NODE=’DEF’
were in the Global Query/Where Clause for All Reports field on thetab Query/Where Clause Builder in the window that opens when youselect the arrow next to the Subset Data field in the report definition.
Note: When the global WHERE expression (from CPWHERE) is joined withan AND to the local WHERE expression (from the report definition),
� the WHERE expressions must be compatible in order for a report to begenerated. For example, no report is generated if one WHEREexpression has MACHINE=”Alpha” and the other WHERE expressionhas MACHINE=”Beta”. (Joining these two expressions with an ANDdoes not result in the condition True.)
� the WHERE expressions must be compatible in order for the globalWHERE expression to affect the report. For example, if there is a localWHERE expression and it specifies INSTEAD OF, the global WHEREexpression is ignored.
�
For additional information about the exception and its context, see “Overview ofRule Results” on page 547. For more information about the global macro variableCPWHERE, see the topic “Global and Local Macro Variables” in Chapter 1 of theSAS IT Resource Management macro reference documentation.
Viewing the default follow-up reports:A default follow-up report is a best-guess line plot that is based on the first analysis
variable in the expression.
1 When you run the rule in batch mode: A default follow-up report is produced foreach exception. The data in each follow-up report is from the BY group that“owns” the exception.
You can suppress the default follow-up reports by setting the DEFRPT=parameter to NO in the call to %CPXHTML or by issuing a RUN_REPORT=command in the rule definition.
2 When you run the rule by using the GUI: A default follow-up report is producedwhen you select the Graph button on an exception’s page in the exception report.The data in the default follow-up report is from the BY group that “owns” theexception.
A default follow-up report can be produced for each exception, without regard towhether you specified the RUN_REPORT= command in the rule definition.
Opening a Rule DefinitionYou can open and then edit a rule definition
� by using the SAS IT Resource Management GUI for UNIX and Windows.
Note: Your local host must have a SAS IT Resource Management client and/orserver license. �
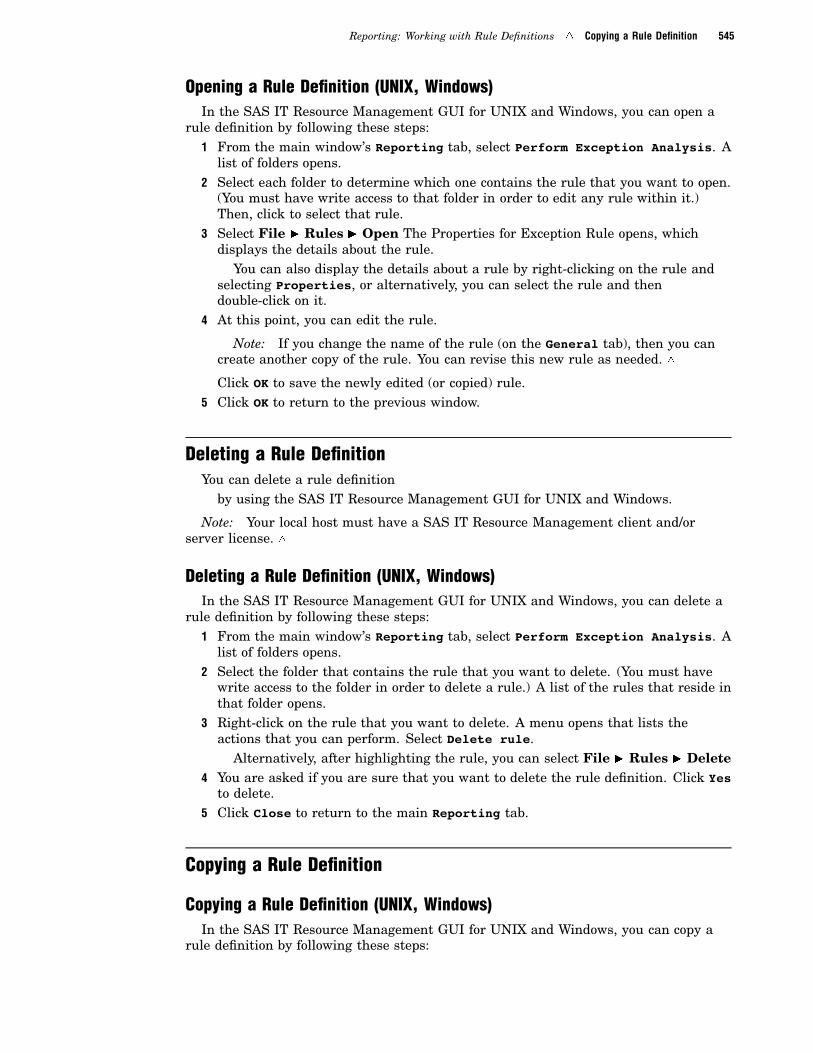
Reporting: Working with Rule Definitions � Copying a Rule Definition 545
Opening a Rule Definition (UNIX, Windows)In the SAS IT Resource Management GUI for UNIX and Windows, you can open a
rule definition by following these steps:1 From the main window’s Reporting tab, select Perform Exception Analysis. A
list of folders opens.2 Select each folder to determine which one contains the rule that you want to open.
(You must have write access to that folder in order to edit any rule within it.)Then, click to select that rule.
3 Select File � Rules � Open The Properties for Exception Rule opens, whichdisplays the details about the rule.
You can also display the details about a rule by right-clicking on the rule andselecting Properties, or alternatively, you can select the rule and thendouble-click on it.
4 At this point, you can edit the rule.
Note: If you change the name of the rule (on the General tab), then you cancreate another copy of the rule. You can revise this new rule as needed. �
Click OK to save the newly edited (or copied) rule.5 Click OK to return to the previous window.
Deleting a Rule DefinitionYou can delete a rule definition� by using the SAS IT Resource Management GUI for UNIX and Windows.
Note: Your local host must have a SAS IT Resource Management client and/orserver license. �
Deleting a Rule Definition (UNIX, Windows)In the SAS IT Resource Management GUI for UNIX and Windows, you can delete a
rule definition by following these steps:1 From the main window’s Reporting tab, select Perform Exception Analysis. A
list of folders opens.2 Select the folder that contains the rule that you want to delete. (You must have
write access to the folder in order to delete a rule.) A list of the rules that reside inthat folder opens.
3 Right-click on the rule that you want to delete. A menu opens that lists theactions that you can perform. Select Delete rule.
Alternatively, after highlighting the rule, you can select File � Rules � Delete4 You are asked if you are sure that you want to delete the rule definition. Click Yes
to delete.5 Click Close to return to the main Reporting tab.
Copying a Rule Definition
Copying a Rule Definition (UNIX, Windows)In the SAS IT Resource Management GUI for UNIX and Windows, you can copy a
rule definition by following these steps:

546 Evaluating (Running) a Rule Definition � Chapter 28
1 From the main window’s Reporting tab, select Perform Exception Analysis. Alist of folders opens.
2 Select the folder that contains the rule that you want to copy. (You must havewrite access to the folder in order to copy a rule.) A list of the rules that reside inthat folder opens.
3 Right-click on the rule that you want to copy. A menu opens that lists the actionsthat you can perform. Select Copy rule.
Alternatively, after highlighting the rule, you can select File � Rules � Copy4 A copy of the rule you selected is added to the list of rules in the folder. The name
of the new rule is constructed from the first seven characters of the original nameand appended to a unique number, for example the original “RULEABC” is copiedto “RULEABC1.”
All the components of the original rule appear in the newly copied rule. To editor change these components, double-click the rule. This opens the Properties forException Rule window, which displays the details about the rule. Click OK toaccept the changes and return to the list of exception rules.
5 Click Close to return to the main Reporting tab.
You can also copy a rule by another method. For further details about this, see“Opening a Rule Definition” on page 544.
Evaluating (Running) a Rule DefinitionYou can evaluate (run) a rule definition� by using the %CPSTART macro (to start SAS IT Resource Management), followed
by the %CPEXCEPT macro (to run the rule definition to generate results) and,optionally, the %CPXHTML macro (to Web-enable the results).
For more information about the %CPSTART macro, see the %CPSTART topic inthe SAS IT Resource Management macro reference documentation . For moreinformation about the %CPEXCEPT macro, see the %CPEXCEPT topic in the SASIT Resource Management macro reference documentation. For more informationabout the %CPXHTML macro, see the %CPXHTML topic in the SAS IT ResourceManagement macro reference documentation .
� by using the SAS IT Resource Management GUI for UNIX and Windows.
Note: Your local host must have a SAS IT Resource Management client and/orserver license. �
Evaluating (Running) a Rule Definition (UNIX, Windows)In the SAS IT Resource Management GUI for UNIX and Windows, you can evaluate
(run) a rule definition by following these steps:1 From the main window’s Reporting tab, select Perform Exception Analysis. A
list of folders opens.2 To specify the location of the results data set, select Locals � Options The
Options for rule evaluation window opens. From the Output tab of this window,you can specify the Library name and the Data Set that you want to use for theresults. Click OK to return to the Exception Reporting window.
To specify the date and time period of the data that you want to evaluate, selectLocals � Options From the Time tab of this window, you can specify the date andtime period that you want to include in the results. Click OK to return to theException Reporting window.
Reporting: Working with Rule Definitions � Results of Rule Evaluations 547
3 From the Exception Reporting window, select the folder that contains the rule thatyou want to evaluate. Double-click the rule to open the Properties for ExceptionRule window.
Then, click Run to evaluate the rule.4 Alternatively, you can click to highlight the rule that you want to evaluate and
then click the right mouse button. From the pop-up menu, click Evaluate rule.5 The results of the rule evaluation will be displayed. If there are no exceptions
detected, a message to that effect will be displayed. For information about viewingthe results, see “Overview of Rule Results” on page 547.
Viewing/Editing a Rule DefinitionYou can view/edit a rule definition� by using the SAS IT Resource Management GUI for UNIX and Windows.
Note: Your local host must have a SAS IT Resource Management client and/orserver license. �
Viewing/Editing a Rule Definition (UNIX, Windows)For information about viewing and/or editing a rule definition, see “Opening a Rule
Definition” on page 544.
Overview of Rule ResultsThe results of running a rule definition consist of zero, one, or more exceptions. An
exception is an observation that satisfies the conditions that are described in a rule.The exceptions are written to the results data set. (The total number of exceptionsindicates the number of groups for which the rule is true, not the number of individualobservations for which the rule is true.)
For more information, see “Results of Rule Evaluations” on page 547.
Results of Rule EvaluationsResults are generated when a rule definition or a rule definition folder runs. Rule
definitions must be defined through the SAS IT Resource Management GUI for UNIXand Windows. Then, you must generate rule exceptions (or results). You can evaluatethe rule
� on a periodic (once each day, once each week, and so on) basis in batch mode. Forinformation about this, refer to “Viewing Rule Exceptions (Using Macros inBatch)” on page 548.
� interactively through the SAS IT Resource Management GUI. For informationabout this method, refer to “Viewing Rule Exceptions (UNIX, Windows)” on page548.
Generating Rule Exceptions (Using Macros in Batch)You can also view an exception by following these steps� Use the %CPSTART macro to start SAS IT Resource Management. For
information about this macro, see the topic %CPSTART in the SAS IT ResourceManagement macro reference documentation.

548 Results of Rule Evaluations � Chapter 28
� Run the %CPEXCEPT macro. (This runs the rule definition and generatesexception results.) For information about this macro, see the topic %CPEXCEPTin the SAS IT Resource Management macro reference documentation.
Viewing Rule Exceptions (Using Macros in Batch)To view rule exceptions, run the %CPXHTML macro (to Web-enable the results), and
then point your Web browser to the Web-enabled results. For information about how toview the Web-enabled results with your Web browser, see the topic %CPXHTML in theSAS IT Resource Management macro reference documentation.
Generating Rule Exceptions (UNIX, Windows)Before you can view the results, you must generate rule exceptions (or results)� by using the SAS IT Resource Management GUI for UNIX and Windows.
Note: Your local host must have a SAS IT Resource Management client and/orserver license. �
To generate results from the evaluation of a single rule, see “Evaluating (Running) aRule Definition” on page 546. To generate results from the evaluation of an entire ruledefinition folder, see “Evaluating (Running) a Rule Definition Folder” on page 533.
Viewing Rule Exceptions (UNIX, Windows)After the rule (or rule definition folder) has been evaluated, the View Results of
Exception Evaluation window opens. This window contains the details of the exceptionthat was detected:
Exception: nof x
the numerical identifier of the exception. This is the nth exception ofthe total x number of exceptions.
Name: the name of the rule that is responsible for the exception. The nameidentifies the rule within the rule definition folder. The name can beup to 8 bytes long and it must begin with an alphabetic character. Itis automatically uppercased.
Level: the level of the PDB in which the exception was detected.
Table: the name of the table, data set, or view in the PDB in which theexception was detected.
Description: the description of the rule. It can be up to 40 characters long.
BY Group: the identifier of the group that is responsible for the exception. TheBY group is a group of observations or rows that have the same valuefor a variable that is specified in a BY statement. (Click the rightarrow to open the Display BY-Group for This Exception window.)
Actual Count: the number of times the exception has been detected in this instanceof the rule evaluation.
Note: The Actual Count field is present only if multipleexceptions are detected. �
Threshold: the number of times the exceptional condition is detected before anexception is flagged.
Note: The Threshold field is present only if multiple exceptionsare detected. �

Reporting: Working with Rule Definitions � Results of Rule Evaluations 549
UsingExpression:
a clause that determines an exceptional condition. It contains alogical or arithmetic operator.
You can take the following actions:
� Click Recommendation to view the suggested actions that can help you handle orminimize the effects of this exception. This can include running follow-up reportsand can be delivered as output to the Web.
� Click Graph to view a graph of observations for the group responsible for theexception.
� Click View Obs to view the observations in the BY group that triggered theexception. To return to the View Results window, close the inner Observationssatisfying exception criteria window.
� Click Goback to return to the prior window, and ultimately to the ExceptionReporting window.

550
551
C H A P T E R
29Reporting: Working withGalleries
Working with Galleries: Main Topics 551Overview of Galleries 551
Adding a Report Definition to the QuickStart Report Job 552
Combining Report Explorer Trees 554
Changing the Style in an Existing Gallery 554
Converting the Existing Gallery 554Converting the Daily Batch Job for Reporting 556
Generating New Reports in the New Style 558
Creating and Displaying Reports on the Web 559
Overview 559
Creating Web-Based Reports by Using the SAS IT Resource Management GUI 560
Creating Web-Based Reports by Using Report Macros 560Accessing Your Web Reports and Managing the Report Files 561
Transferring Web Files from z/OS to a UNIX or Windows Host 561
Customizing a Report Gallery’s Static Files 562
Customizing Gallery Help Files 562
Customizing Gallery Note Files 564Other Static Files 565
Making an Alternate Welcome 565
Modifying Exception Reports in the QuickStart Report Job 566
Removing a Follow-up Report from a Rule in the QuickStart Report Job 567
Removing a Rule from QuickStart Report Job 567Adding a Follow-up Report to a Rule in the QuickStart Report Job 568
Removing a Report from the QuickStart Report Job 568
Updating an Existing QuickStart Report 569
Updating the Report Explorer Tree 570
Working with Galleries: Main Topics
Overview of GalleriesYou can direct reports to a Web gallery interactively or in batch mode.� For more information about directing reports interactively, see
� “Creating/Editing/Viewing a Report Definition” on page 481� “Directing a Report to the Web” on page 491� the GUI information in the section “To Direct a Report to the Web” in the
topic ”How the OUT*= Parameters Work Together” in Chapter 3: ReportMacros in the SAS IT Resource Management macro reference documentation.

552 Adding a Report Definition to the QuickStart Report Job � Chapter 29
� For more information about directing reports in batch mode, see� the report macros that are listed in the topic “Macros Used for Analyzing
Data” in Chapter 3: Report Macros in the SAS IT Resource Managementmacro reference documentation
� the batch mode information in the section “To Direct a Report to the Web” inthe topic “How the OUT*= Parameters Work Together” in Chapter 3: ReportMacros in the SAS IT Resource Management macro reference documentation
� the topic “Examples of the OUT*= Parameters” in “Chapter 3: Report Macros”in the SAS IT Resource Management macro reference documentation.
For additional information about galleries, see the following list of topics, which arein alphabetical order:
� “Adding a Report Definition to the QuickStart Report Job” on page 552� “Changing the Style in an Existing Gallery” on page 554� “Combining Report Explorer Trees” on page 554� “Creating and Displaying Reports on the Web” on page 559� “Customizing a Report Gallery’s Static Files” on page 562� “Grouping Reports in a Web Gallery” on page 46� “Making an Alternate Welcome” on page 565� “Modifying Exception Reports in the QuickStart Report Job” on page 566� “Removing a Report from the QuickStart Report Job” on page 568� “Updating an Existing QuickStart Report” on page 569� “Updating the Report Explorer Tree” on page 570.
Adding a Report Definition to the QuickStart Report JobTo add a new report to the QuickStart batch report job, perform the following steps.1 Start SAS and the SAS IT Resource Management GUI, and activate the
QuickStart PDB with write access.2 From the Reporting tab in the SAS IT Resource Management main window,
select the Manage Report Definitions task.In the Folders list box, select the report folder ADMIN.ITSVRPT if this is the
folder in which to store the new report definition. You do not have to add yourreport definition to the ADMIN.ITSVRPT folder, but all of the other QuickStartreport definitions are stored in that folder, so it might be helpful to put all of thereport definitions for the QuickStart job in one location.
The names of user-created report definitions should not begin with the letter Q,to avoid conflicts with the names of the report definitions that are supplied byrunning the QuickStart Wizard.
3 Create a report definition for the new report that you want to add to theQuickStart job. For assistance with completing the Manage Report Definitionswindow, select Help in that window.
4 When you have completed the modifications, you can save the report definition byselecting File � Save Report Definition
5 Determine where you want to add the new report by finding out the name of anexisting report and then adding your new report adjacent to that existing report.To determine the name of the existing report, open your Web browser and displaythe welcome.htm page that was created by the QuickStart job. On the left side ofthe welcome.htm page, there is a directory or tree structure of the reports that are

Reporting: Working with Galleries � Adding a Report Definition to the QuickStart Report Job 553
displayed on this welcome.htm page. On the right side of the welcome.htm page,there are small graphs or “thumbnails” of each report. Select the report that isadjacent to the location where you want to add the new report. The report name isdisplayed in the bottom-right corner of the browser window.
If the new report is an exception report, and you want information about how toadd or remove exception reports, see “Modifying Exception Reports in theQuickStart Report Job” on page 566.
6 Edit your QuickStart batch report job and find the reference to the existing reportthat will be adjacent to your new report. The report name will appear as the valueof a parameter in a call to the %CPRUNRPT macro. If there are multiplereferences to the report in the batch job, read the comments and reports adjacentto each reference to determine which comments apply to the report name that youare trying to locate.
7 You can add the new report to an existing report group (gallery), to an existingreport directory but in a separate group, or to a new directory. Copy the existing%CPRUNRPT macro call that refers to the existing report that will be adjacent toyour new report, and insert this code in one of the following locations.
� To add a report to an existing report group:
a Insert the copy of the %CPRUNRPT macro call adjacent to the original%CPRUNRPT macro call and update the copy of the %CPRUNRPTmacro call to reference only the new report name.
b Within the new %CPRUNRPT call, do not change the values ofOUTLOC=, OUTMODE=, HTMLDIR=, WEBSTYLE=, and OUTDESC=,so the report output will be displayed in the same gallery as the existingreport in the %CPRUNRPT call that you copied.
c Review the values of all other parameters in the new %CPRUNRPTmacro call in order to ensure that they apply to your new report. (Formore details about specific parameters, see the topic %CPRUNRPT inthe SAS IT Resource Management macro reference documentation.)
� To add a report to an existing report directory but in a separate group:
a Insert the copy of the %CPRUNRPT macro call adjacent to the original%CPRUNRPT macro call, and update the copy of the %CPRUNRPTmacro call to reference only the new report name.
b Within the new %CPRUNRPT call, do not change the values ofOUTLOC=, OUTMODE=, HTMLDIR=, and WEBSTYLE=, so the reportoutput will be displayed in the same directory as the existing report thatyou copied.
c Update the value of the OUTDESC= parameter with a value that isdifferent from the value that is specified in the copied %CPRUNRPTmacro call. This forces the new report into a group (gallery) of its ownbecause one gallery is created for each value of the OUTDESC=parameter.
d Review the values of all other parameters in the new %CPRUNRPTmacro call to make sure they apply to your new report. (For moreinformation about the specific parameters of %CPRUNRPT, see the topic%CPRUNRPT in the SAS IT Resource Management macro referencedocumentation.)
� To add a report to a new report directory:
a Insert a copy of the call to the %CPRUNRPT macro adjacent to theoriginal call to the %CPRUNRPT macro and update the copy toreference only the new report name.

554 Combining Report Explorer Trees � Chapter 29
b Within the copy, update the values of the OUTLOC= and HTMLDIR=parameters, specifying values that are different from any others thatare used in the batch job. This forces the report output to be stored inits own separate directory.
c Add initialization statements as necessary before the copy. For example,to initialize the directory, include a call to the %CPWEBINI macro byusing the values of HTMLDIR= and OUTLOC= (that you specified inthe call to the %CPRUNRPT macro) for the values of DIR= and CAT=(in the call to %CPWEBINI).
d Within the copy, do not modify the values of the OUTMODE= andWEBSTYLE= parameters, so the new report style will match theexisting reports.
e Review the values of all other parameters in the copy to make sure thatthey apply to your new report. (For more details about the specificparameters, see the topic %CPRUNRPT in the SAS IT ResourceManagement macro reference documentation.)
f Create the new directory that is referenced in HTMLDIR= above or, ifyou want to access the new directory via the report explorer tree, followthe instructions in “Updating the Report Explorer Tree” on page 570, tocreate the directory and point to the directory from the report tree.
Combining Report Explorer TreesTo combine one or more “explorer trees” produced by multiple QuickStart report jobs,
copy the Web-based output from each QuickStart report job into one common location.You can then run the %CPHTREE macro with an empty input file to "link" the reporttrees together. You will need to copy the report output to a common location after eachrun of the report jobs. When you copy the report output, replace the old files withnewer ones and rerun %CPHTREE to link the report trees together.
Here is an example:
* Link QuickStart report trees together after copying GIF and HTML files;* This %CPCAT creates an empty file for input to %CPHTREE;
%CPCAT; cards4;;;;;%CPCAT( cat=work.temp.temp.source );%CPHTREE( SUPERLOC=/common/SUPERLOC,
cat=work.temp.temp.source,ptitle2=Combined Reports );
Note: The four semicolons above (;;;;) MUST start in column one. �
Changing the Style in an Existing GalleryTo change the style in an existing gallery:
1 Convert the existing gallery.2 Convert the daily batch job for reporting, and then run the job.3 When you direct new reports to the gallery, use the new style.
Converting the Existing GalleryTo convert a gallery from one style to another, find or re-create the call to
%CPHTREE that originally created your gallery and specify the new gallery style as

Reporting: Working with Galleries � Changing the Style in an Existing Gallery 555
the value of the WEBSTYLE= parameter. Then rerun the call. (Rerunning the call willadd the necessary files to your gallery and will not overwrite or initialize existingreports in the gallery.)
For example, to convert a gallery from the style named GALLERY2 to the stylenamed DYNAMIC, submit a call to the %CPHTREE macro with the WEBSTYLE=parameter set to DYNAMIC. More specifically, convert the gallery by using one of thefollowing methods:
� If you wrote your own catalog entry and call to the %CPHTREE macro to createthe gallery:
1 Locate the catalog entry and call.
2 If your call did not specify the WEBSTYLE= parameter, addWEBSTYLE=DYNAMIC to the call. If your call did specify the WEBSTYLE=parameter, set the WEBSTYLE= parameter to DYNAMIC. For examples, seebelow.
3 Resubmit the call.
� If you recently used the QuickStart Wizard to create your gallery:
1 On UNIX or Windows, locate the xrptstr.sas file that the wizard created inthe qs/cntl or qs\cntl directory. On z/OS, locate the XRPTSTR member thatthe wizard created in the QS.CNTL PDS. (X is a one-letter code thatidentifies the collector.)
2 If your call did not specify the WEBSTYLE= parameter, addWEBSTYLE=DYNAMIC to the call. If your call did specify the WEBSTYLE=parameter, set the WEBSTYLE= parameter to DYNAMIC. For examples, seebelow.
3 Resubmit the program in the file or member.
� If you do not have a copy of the %CPHTREE macro call or the xrptstr.sas file orXRPTSTR member that was used to create your gallery:
1 Create a catalog entry and call to the %CPHTREE macro that correspond toyour gallery. For more information about the catalog entry and the call to%CPHTREE, see “Grouping Reports in a Web Gallery” on page 46 and thetopic “%CPHTREE” in “Chapter 3: Report Macros” in the SAS IT ResourceManagement macro reference documentation .
2 In your call to %CPHTREE, set the WEBSTYLE= parameter to DYNAMIC.For examples, see below.
3 Resubmit the call to %CPHTREE.
Here are examples of calls to the %CPHTREE macro:
� On z/OS, the call to the %CPHTREE macro might look like this:
%CPHTREE(superloc=TMP.MYWEB,subloc=MYTREE,bigspace=%QUOTE((CYL,(1,1,10))),smlspace=%QUOTE((TRK,(1,1,10))),dsparms=%QUOTE(recfm=vb,lrecl=6156,blksize=6160,dsorg=po),cat=work.mytree.source,title1=Server Reportstitle2=z/OS SMF Data,webstyle=dynamic);
� On UNIX or Windows, the call to the %CPHTREE macro might look like this:

556 Changing the Style in an Existing Gallery � Chapter 29
%CPHTREE(superloc=/tmp/myweb,subloc=mytree,cat=work.mytree.source,title1=Server Reports,title2=z/OS SMF Data,webstyle=dynamic);
Note: On Windows, use back slashes (\) instead of forward slashes (/). �
Note: For more information about submitting SAS code or a SAS program, see“Working with the Interface for Batch Mode” on page 18. �
Note: You can omit the WEBSTYLE= parameter and instead specify the globalmacro variable CPWSTYLE, as described below. However, in the call to the %CPHTREEmacro, it is recommended that you explicitly specify the WEBSTYLE= parameter. �
Converting the Daily Batch Job for Reporting1 Locate the daily batch job for reporting.
� If you created your own daily batch job for reporting, the job is probably oneof the jobs that is scheduled to run every night and might have a filenamelike xreport.sas or a member name like xREPORT, where x identifies thecollector whose data is read to produce the reports.
� If you used the QuickStart Wizard to create your PDB and gallery, you willfind the batch job for reporting in the same directory as the xrptstr.sas file orxRPTSTR member that is described above. The batch job for reporting isnamed xreport.sas (on UNIX and Windows) or xREPORT (on z/OS), where xis a one-character abbreviation that identifies the collector.
You might want to print the job for your convenience in carrying out thefollowing steps.
2 In the daily batch job for reporting, locate the calls to the following reportingmacros:
� %CPCCHRT� %CPCHART� %CPG3D� %CPHTREE� %CPMANRPT� %CPPLOT1� %CPPLOT2� %CPPRINT� %CPRUNRPT� %CPSPEC� %CPSRCRPT� %CPTABRPT� %CPWEBINI� %CPXHTML.
3 Immediately after the call to %CPSTART (or at least before the programencounters calls to macros on the above list), add the following line of code:

Reporting: Working with Galleries � Changing the Style in an Existing Gallery 557
%let CPWSTYLE = new_gallery_style ;
where new_gallery_style is the style that you want to convert to. The global macrovariable named CPWSTYLE sets the default value for the WEBSTYLE=parameter. The setting is temporary; it lasts until the end of the job. The settingaffects any call to a macro in the above list that does not explicitly specify theWEBSTYLE= parameter. For example, in the following code, the value ofCPWSTYLE does not affect the first macro call to the %CPRUNRPT macro butdoes affect the second macro call to %CPRUNRPT.
%let CPWSTYLE=DYNAMIC ;...
%CPRUNRPT(myreport_1,folder=myfolder_1,htmldir=/tmp/path/and/directory/name/of/my/gallery,outmode=web,webstyle=gallery2);...
%CPRUNRPT(myreport_2,folder=myfolder_2,htmldir=/tmp/path/and/directory/name/of/my/gallery,outmode=web);
For more information about the global macro variable CPWSTYLE, see the topic“Global and Local Macro Variables” in “Chapter 1: Using SAS IT ResourceManagement Macros” in the SAS IT Resource Management macro referencedocumentation.
4 By adding the specification of CPWSTYLE in the previous step, you converted (tothe new gallery style) all the macro calls that do not specify the WEBSTYLE=parameter. What remains is to convert all the macro calls that do specify theWEBSTYLE= parameter.
Locate all the macro calls that do specify the WEBSTYLE= parameter. Forthese macro calls you have two choices:
� remove the WEBSTYLE= specification, so that the specification of a value forthe CPWSTYLE global macro variable does affect the macro call.
This is the recommended choice. When all macro calls are affected bythe value of CPWSTYLE, then a single change (to the value of CPWSTYLE)changes the reports to another gallery style.
� change the value in the WEBSTYLE= specification to the new gallery style.
Here is an example of a macro call that directs a report to adirectory-based report structure:
%CPRUNRPT(myreport,folder=myfolder,htmldir=/tmp/path/and/directory/name/of/my/gallery,outmode=web,webstyle=GALLERY2);
558 Changing the Style in an Existing Gallery � Chapter 29
To convert this macro call from the gallery style named GALLERY2 tothe Web style named DYNAMIC, change the call as follows:
%CPRUNRPT(myreport,folder=myfolder,htmldir=/tmp/path/and/directory/name/of/my/gallery,outmode=web,webstyle=DYNAMIC);
Here is an example of a macro call that directs a report to a PDS-basedreport structure:
%CPRUNRPT(MYREPORT,folder=MYFOLDER,htmldir=HLQ.AND.PDS.NAME.OF.MY.GALLERY,outmode=web,webstyle=gallery2);
To convert this macro call from the gallery style named GALLERY2 tothe gallery style named DYNAMIC, change the call as follows:
%CPRUNRPT(MYREPORT,folder=MYFOLDER,htmldir=HLQ.AND.PDS.NAME.OF.MY.GALLERY,outmode=web,webstyle=dynamic);
5 Run the batch job for reporting.
Generating New Reports in the New StyleIf you use batch mode to produce new reports in the gallery, use the WEBSTYLE=
parameter as described above. That is, either explicitly specify the value of theWEBSTYLE= parameter to be the new gallery style or omit the specification of theWEBSTYLE= parameter so the macro call will be affected by the value of CPWSTYLE.Omitting the WEBSTYLE= parameter is recommended, so that you can easily makechanges between gallery styles by changing the value of CPWSTYLE.
The style that is specified in the batch job overrides the style that is specified in theGUI if all three of these criteria are true:
� the batch job contains a call to the %CPRUNRPT macro
� the call refers to a report definition that you generated by using the GUI, and thereport definition explicitly specifies a gallery style (as described in the previousparagraph)
� the call to the %CPRUNRPT macro explicitly specifies a gallery style, or the call to%CPRUNRPT does not specify a gallery style but CPWSTYLE specifies a defaultgallery style.
If you use the GUI to generate new reports to the gallery, specify the new style as thevalue of the Web Style field. For more information about the Web Style field, see“Directing a Report to the Web” on page 491.
Note: If you accidentally use a different gallery style when you direct a report to thegallery, the gallery’s style will temporarily change. However, the gallery will changeback to the new style as soon as a report in the new style is directed to the gallery. �

Reporting: Working with Galleries � Creating and Displaying Reports on the Web 559
Creating and Displaying Reports on the Web
OverviewSAS IT Resource Management enables you to create a report definition and specify
an output format of “Web” in order to display the report output by using a Web browsersuch as Microsoft Internet Explorer or Netscape Navigator. You can create reports forthe Web by
� selecting Web Output Mode from the Report Output Options window in the SASIT Resource Management GUI for UNIX and Windows. This is further describedin “Creating Web-Based Reports by Using the SAS IT Resource Management GUI”on page 560.
� selecting OUTMODE=WEB in your report macro. For more information about thisparameter, see the OUTMODE= parameter (which is on most of the reportingmacros) in “Chapter 3: Report Macros” in the SAS IT Resource Managementmacro reference documentation.
When you run your report definition (either interactively or in batch), your Webreports are saved as images. The Web output format also generates text output filesthat utilize a markup language called HTML. The HTML files reference your reportimages, and when you display the HTML file by using your Web browser, your reportimages are displayed within that file.
When you select an output type of Web, you must set additional report options(either in batch or in the SAS IT Resource Management GUI for UNIX and Windows)that determine things such as where your HTML output and images are stored, the sizeof your images, and the style of your Web report. The options that you set are savedwith the report definition.
To create reports that you can display on the Web, follow these steps:1 Decide whether you will you create your HTML reports from the GUI or you will
use batch report macros. You can also create the reports by using the GUI andthen save the macro source to run in batch. (See “Creating Web-Based Reports byUsing the SAS IT Resource Management GUI” on page 560 and “CreatingWeb-Based Reports by Using Report Macros” on page 560.)
2 Decide how you want to store and access your reports. Do you want to store all Webreports in one location? This decision determines how you will access the reports(see “Accessing Your Web Reports and Managing the Report Files” on page 561).
3 Either by using the SAS IT Resource Management GUI for UNIX and Windows orby using the report macros, create a report definition, select an output format ofWeb, and specify the appropriate output options for your Web report by completingthe Output Options window (see “Directing a Report to the Web” on page 491). Toaccess the window, follow this menu path: Locals � Output Options � SetAttributes � select the “Web” option
4 Indicate whether or not to delete the contents of the currently specified SAScatalog and the Web output directory or add new reports to an existing Web pageeach time you run your report definitions (see “Accessing Your Web Reports andManaging the Report Files” on page 561).
5 If you are creating the Web reports on a z/OS server, you can transfer your reportsto a UNIX or Windows host to display them through your Web browser (see“Transferring Web Files from z/OS to a UNIX or Windows Host” on page 561).
Note: When you create reports to be displayed through your Web browser you canuse a palette that is specifically designed for Web reports (see “Overview of PaletteDefinition Folders” on page 517 and “Overview of Palette Definitions” on page 525). �

560 Creating and Displaying Reports on the Web � Chapter 29
Note: In some cases, you can successfully view SAS IT Resource Managementgalleries by using either file: or a network address (that is, in the format\\machinename\directory\welcome.htm instead of http:). However, there are situationswhere this will not work. If you are viewing galleries that were created with SAS ITResource Management 2.4 and earlier versions, and if you are viewing these gallerieswith Internet Explorer release 5.5 (and later releases),
� for non-interactive graphics, http: is recommended; using file: or \\ protocols willnot work.
� for interactive graphics (either the Java applet or the Windows ActiveX drivers),you must access your SAS IT Resource Management Web reports by using a Webserver.
�
Creating Web-Based Reports by Using the SAS IT Resource Management GUITo create a new Web report from the SAS IT Resource Management GUI for UNIX
and Windows, follow these steps:
1 Create a report definition for your report, as you would for any type of report, byproviding the required information in the Manage Report Definitions window. Forinformation about this topic, see “Using the Manage Report Definitions Tool” onpage 468.
2 When you have created the report definition in that window, select the Web outputoption by following this menu path from the Manage Report Definitions window:Locals � Output Options
This opens the Report Output Options window.
3 Select WEB from the Report Output Options window, and then select SetAttributes to open the Generate Web Output window.
4 The options in the Generate Web Output window enable you to specify additionalreport options, such as where your report images are stored, where your HTMLfiles are stored, the Web report style, and more. Provide the required informationin the Generate Web Output window as described in “Directing a Report to theWeb” on page 491.
Creating Web-Based Reports by Using Report MacrosYou can specify OUTMODE=WEB on most batch report macros, to create reports
that you can display by using a Web browser. The WEB option is valid on all platformswhere the report macros are supported (UNIX, Windows, z/OS).
To create a Web report by using batch report macros, follow these steps:
1 Determine which type of report you want to create and then use the appropriatereport macro to create that report.
For a complete list of report macros, see “Chapter 3: Report Macros” in the SASIT Resource Management macro reference documentation.
2 Create a report definition by including the macro in your program and thensubmitting or running the program in batch. When you include the macro, youmust specify OUTMODE=WEB, and the HTMLDIR= parameter. You should alsoreview the other Web parameters on your report macro, in order to set other Webreport options, such as where your report images are stored, the Web report style,and more.
3 If you create the reports on a z/OS server and the report structure is not located inthe z/OS UNIX File System area, you might want to transfer the files to UNIX or

Reporting: Working with Galleries � Creating and Displaying Reports on the Web 561
Windows to view them. For assistance see “Transferring Web Files from z/OS to aUNIX or Windows Host” on page 561.
Accessing Your Web Reports and Managing the Report FilesWhen you create reports that you can display by using your Web browser, many
HTML files are created for you. All of these files can be accessed through one main file,or “Web page.” Your HTML files are created in the location that you specify for yourHTML directory, and they contain links to your report images. To view your reports,use your Web browser to open the welcome.htm page in your HTML output directory.
As you add new reports to an existing HTML directory, the welcome.htm page isupdated and the new reports are appended to that page. If you do not occasionallyclean out this directory, the HTML directory and the associated SAS catalog can becomequite large.
You can clean out the HTML and IMAGE directories and the SAS catalog byselecting the Clear Gallery option in the Web Output window in the GUI. Or, inbatch, you can use the %CPWEBINI macro or use the WEBCLR= parameter on the%CPRUNRPT macro or %CPXHTML macro to clear all reports, or you can selectivelydelete reports by using the %CPMANRPT macro.
(For more information about the %CPWEBINI macro, see the topic %CPWEBINI inthe SAS IT Resource Management macro reference documentation. For moreinformation about the %CPRUNRPT macro, see the topic %CPRUNRPT in the SAS ITResource Management macro reference documentation. For more information about the%CPXHTML macro, see the topic %CPXHTML in the SAS IT Resource Managementmacro reference documentation. And for more information about the %CPMANRPTmacro, see the topic %CPMANRPT in the SAS IT Resource Management macroreference documentation.)
You can clear or selectively delete reports as often as you like, depending on yoursite’s needs. If a report is in the catalog, the macros and parameter assume that thereport is also in the directory, so it is helpful to ensure that the reports in the catalogand the reports in the directory correspond. Notice that when you delete reports fromthe directory, some static files remain. For more information about static files, see“Customizing a Report Gallery’s Static Files” on page 562.
One advantage of storing all reports (or groups of related reports) in the samelocation or catalog is that you can access everything from one main Web page. You cangroup specific types of reports together by using a common report output description,and you can select different descriptions on the welcome.htm page to display differentgroups of reports.
However, if you want to delete one type of report more often than another type ofreport, or if you like the option of accessing different types of reports from different“home” or welcome.htm Web pages, then you might want to store them in separateHTML directories.
Transferring Web Files from z/OS to a UNIX or Windows HostIf you are creating Web-based report files (specifying OUTMODE=WEB) on z/OS and
not using the z/OS UNIX File System area, and then you want to move the files to adirectory-based file system (UNIX, Windows, or the z/OS UNIX File System) in order todisplay them in a Web browser, you can
� use the %CMFTPSND macro� use the sample FTP scripts that are provided with SAS IT Resource Management.
The %CMFTPSND macro sets up control statements and invokes FTP, enabling youto transfer files from a PDS to a specific host and location. This method can be used forany SAS IT Resource Management reports, including those created with the QuickStart

562 Customizing a Report Gallery’s Static Files � Chapter 29
Wizard and those created with SAS IT Resource Management report macros. Forinformation about %CMFTPSND, see the topic %CMFTPSND in the SAS IT ResourceManagement macro reference doc.
The sample jobs that are provided with SAS IT Resource Management can also assistyou in transferring your Web output files from z/OS PDSs (if you are not using the z/OSUNIX File System area for the report structure) to a directory-based file system (UNIX,Windows, or the z/OS UNIX File System). The CMFCPFTP job can be used with anySAS IT Resource Management report macros. However, if you use these scripts totransfer report files that are created by the QuickStart Wizard programs, the reportfiles are transferred but the “tree” structure that is created by %CPHTREE is not.
The CMTCPFTP job is available in CPMISC on z/OS. This job refers to anothermember named TCPSEND. The TCPSEND member is automatically created when youcreate reports with OUTMODE=WEB on z/OS and do not use the z/OS UNIX FileSystem area for the report structure.
The TCPSEND member contains commands to transfer your HTML output files toanother location. The name of the target directory is created based on the last qualifierof the PDS names that are used in the HTMLDIR= and IMAGEDIR= parameters. Forexample, if HTMLDIR=myuser.html.itrmweb and IMAGEDIR=myuser.gifs.itrmweb, thenthe TCPSEND file will contain commands to send the files to the itrmweb directory. Ifthe values were myuser.itrmweb.html and myuser.itrmweb.gifs, the files would be sent tothe HTML and GIFS directories, respectively.
To use this sample CMTCPFTP job to transfer your own files, follow the instructionsat the beginning of that member and modify the file appropriately for your site. Whenyou run the CMFCPFTP job, your Web output files will be transferred to theappropriate directory on the target host. Before you transfer the files, be sure thatthose subdirectories exist on your target host.
Customizing a Report Gallery’s Static FilesA report gallery’s static files are the files that are not cleared when the reports in the
gallery are cleared. You can customize the help.htm, info.htm, instruct.htm, andnotes.htm files. And you can make and customize an alternate welcome.htm file.
Customizing Gallery Help Files
Using the QuickStart Wizard or SAS IT Resource Management Report macros, youcan create reports that you can display by using a Web browser. Multiple reports aredisplayed in one “Web page,” and this is referred to as a report gallery. If you havecreated a gallery of reports and want to provide help or information about the entire setof reports or for an individual gallery, you can do this by attaching a help file to theWeb page.
To provide a link to a help file from your report gallery, create a file called help.htmin the directory that contains the gallery. In the help.htm file, use HTML tags to definea name anchor that matches the value of the OUTDESC= parameter that you specifiedwhen you create this gallery of reports. For example, if you create a gallery of reports,you might specify parameters like the following ones to indicate the location of yourHTML output and the description of the reports in that location:
htmldir=/tmp/myreportsoutdesc=Useful CPU Reports
In this example, the file /tmp/myreports/help.htm might contain help on the galleryof reports in the /tmp/myreports location. The name anchor for these reports could beincluded in help.htm as follows:

Reporting: Working with Galleries � Customizing a Report Gallery’s Static Files 563
<A NAME="Useful CPE Reports"><HR></A><H2>Help on "Useful CPU Reports"</H2>This gallery contains reports on CPU activity. Thesereports are generated by running the job in file.......<A HREF="Javascript:history.go(-1)">Back to Report Gallery</A>
Other reports in the same directory might have used a different value for theOUTDESC= parameter. These reports will appear in different galleries. Help for theseother galleries can be included in the same help.htm file. If you use name anchors toidentify the help for each gallery, each gallery page can use a link to the same help.htmfile, but each link would specify the name anchor for the help on that gallery. Forexample, you might decide to create another gallery of reports in the same directorywith the following parameters:
HTMLDIR=/tmp/myreportsOUTDESC=Useful Disk Reports
The file /tmp/myreports/help.htm might also contain explanatory notes on thatgallery of reports in a different section of the html file. The name anchor in help.htmmight look like this for that section:
<A NAME="Useful Disk Reports"><HR></A><H2>Help on "Useful Disk Reports"</H2>This gallery contains reports on disk activity. These reportsare generated one time each night by job.......<A HREF="Javascript:history.go(-1)">Back to Report Gallery</A>
If you specify a name anchor in the help.htm file and link to it from your gallery Webpage, the Help button in each of these galleries will automatically link to the help.htmfile at the appropriate “name” anchor, which would be “Useful Disk Reports” in thisexample.
The Javascript:history.go(-1) HREF line in the file returns to the previous page,mimicking the browser’s Back button.
You might have a set of reports that have the same value of OUTDESC but are verydifferent reports. For example, an "Overview" set of reports might include summaries ofCPU, Disk, and Network Activity. You can also have sections of your help.htm file thatrefer to a specific report. In this case, the name anchor in the notes file should matchthe name of the report as saved in your SAS IT Resource Management Report folder.
For example, if your report is saved in the folder ADMIN.ITSVRPT and calledCPUOVER, the corresponding section in the help file might look like this:
<A NAME="CPUOVER"><HR></A><H2>Help on CPU Overview Report</H2>This gallery contains reports on disk activity. These reportsare generated one time each night by job.......<A HREF="Javascript:history.go(-1)">Back to Report Gallery</A>
This section will be the target of the Help link when the large GIF file is displayedalone.
You can create the help.htm file by using your favorite file editor or utility or byusing the SAS IT Resource Management %CPENTCPY macro. Examples of using%CPENTCPY appear in the SAS catalog entry PGMLIB.JSWIZCAT.JPSERVI.SOURCE.

564 Customizing a Report Gallery’s Static Files � Chapter 29
Customizing Gallery Note FilesIf you have created a gallery of reports by using SAS IT Resource Management
report macros and would like to provide explanatory notes for an individual gallery,modify or create the notes.htm file in the directory containing your report gallery.Within that file, define a name anchor that matches the value of the OUTDESC=parameter for the gallery. For example, suppose that you use the following parametersto create a gallery of reports:
HTMLDIR=/tmp/myreportsOUTDESC=Useful CPU Reports
The file /tmp/myreports/notes.htm might contain explanatory notes on that galleryof reports in a section of the file that looks like this:
<A NAME="Useful CPU Reports"><HR></A><H2>Help on "Useful CPU Reports"</H2>This gallery contains reports on CPU activity. These reportsare useful to you because.......<A HREF="Javascript:history.go(-1)">Back to Report Gallery</A>
In this example, the name anchor defines the target location for the link on yourreport gallery Web page.
Other reports in the same directory, but with different values of the OUTDESC=parameter, will appear in different galleries. Notes for these other galleries areincluded in the same notes.htm file but following a different name anchor. For example,suppose that another gallery of reports is created in the same directory with thefollowing parameters:
HTMLDIR=/tmp/myreportsOUTDESC=Useful Disk Reports
The file /tmp/myreports/notes.htm might also contain explanatory notes on thatgallery of reports in a section that is identified by a name anchor as shown in thisexample:
<A NAME="Useful Disk Reports"><HR></A><H2>Help on "Useful Disk Reports"</H2>This gallery contains reports on disk activity. Disk reportsare useful to you because.......<A HREF="Javascript:history.go(-1)">Back to Report Gallery</A>
The Notes button in each of these galleries will automatically link to the notes.htmfile at the appropriate name anchor or label. The code Javascript:history.go(-1) HREFacts like the browser’s Back button.
You might have a set of reports that have the same value of OUTDESC but are verydifferent reports. For example, an "Overview" set of reports might include summaries ofCPU, Disk, and Network Activity. You can also have sections of your notes.htm file thatrefer to a specific report. In this case, the name anchor in the notes file should matchthe name of the report as saved in your SAS IT Resource Management Report Folder.
For example, if your report is saved in the folder ADMIN.ITSVRPT and calledCPUOVER, the corresponding section in the notes file might look like this:
<A NAME="CPUOVER"><HR></A><H2>Help on CPU Overview Report</H2>This report gives you an overview of CPU activity forprevious day.......

Reporting: Working with Galleries � Making an Alternate Welcome 565
<A HREF="Javascript:history.go(-1)">Back to Report Gallery</A>
This section will be the target of the Notes link when the large GIF file is displayedalone.
You can create the notes.htm file by using your favorite file creation utility or byusing the SAS IT Resource Management %CPENTCPY macro. Examples of using%CPENTCPY are available in the SAS catalog entryPGMLIB.JSWIZCAT.JPSERVI.SOURCE.
Other Static FilesYou can also customize report gallery instruct.htm files and info.htm files.And you can make alternative welcome.htm files. For more information about
alternative welcome.htm files, see “Making an Alternate Welcome” on page 565.
Making an Alternate WelcomeEach time that you run SAS IT Resource Management report definitions to generate
Web reports to a specified directory, SAS IT Resource Management creates a newwelcome.htm file in that directory. You cannot influence how that file is created, andyou should not modify that file after it is created (because your modifications will belost as soon as the file is re-created).
You can, however, create and use a similar file that displays a different initial page.(For example, you might want to change the frame layout to conform to yourorganization’s standards.) As long as the frames that are defined in your file includeframes called group, bymenu, valmenu, and gallery, they can use the navigational filesthat are created automatically in the specified directory by SAS IT ResourceManagement. Notice that as you add more frames on the page (for example, for aheader or footer banner), there is less display space for the report gallery.
If you generate Web reports to more than one directory, remember to copy thealternate file to each of the directories. You need to copy to each directory only onetime; SAS IT Resource Management does not delete the alternate file when it generatesa new welcome file.
Then tell your users to point their browsers to your file in the specified directory,instead of to welcome.htm.
For example, suppose welcome.htm contains the following:
<HTML><HEAD><TITLE> SAS IT Resource Management</TITLE></HEAD><!-- Generated by SAS IT Resource Management V2.1 9904 --><!-- On Tuesday, May 11, 1999 at 8:42 --><FRAMESET cols="225,*" frameborder="1"><FRAMESET rows="60%,*,*,*" frameborder="1">
<FRAME SRC="info.htm" NAME="info" scrolling="no"><FRAME SRC="group.htm" NAME="group" scrolling="no"><FRAME SRC="empty.htm" NAME="bymenu" scrolling="no"><FRAME SRC="empty.htm" NAME="valmenu" scrolling="no">
</FRAMESET><FRAME SRC="empty.htm" NAME="gallery">
</FRAMESET><NOFRAMES>You must use a frame-capable browser.
</NOFRAMES></HTML>
In that case, you could make an alternate file like this one:

566 Modifying Exception Reports in the QuickStart Report Job � Chapter 29
<HTML><HEAD><TITLE> SAS IT Resource Management</TITLE></HEAD><!-- Generated by SAS IT Resource Management V2.2 9810 --><FRAMESET rows="10%,*,10%" frameborder="0">
<FRAME SRC="samphead.htm" NAME=header scrolling="no"><FRAMESET cols="225,*" frameborder="0">
<FRAMESET rows="60%,*,*,*" frameborder="0"><FRAME SRC="info.htm" NAME="info" scrolling="no"><FRAME SRC="group.htm" NAME="group" scrolling="no"><FRAME SRC="empty.htm" NAME="bymenu" scrolling="no"><FRAME SRC="empty.htm" NAME="valmenu" scrolling="no">
</FRAMESET><FRAME SRC="noreps.htm" NAME="gallery">
</FRAMESET><FRAME SRC=sampfoot.htm" NAME=footer scrolling="no">
</FRAMESET><NOFRAMES>You must use a frame-capable browser.</NOFRAMES></HTML>
Or you could make an alternate file like this one:
<HTML><HEAD><TITLE> SAS IT Resource Management</TITLE></HEAD><!-- Generated by SAS IT Resource Management V2.2 9810 --><FRAMESET rows="10%,*,10%" frameborder="0">
<FRAME SRC="samphead.htm" NAME=header scrolling="no"><FRAMESET cols="225,*" frameborder="0">
<FRAME SRC="info.htm" NAME="info" scrolling="no"><FRAMESET rows="15%,*" frameborder="0">
<FRAMESET cols="33%,33%,*" frameborder="0"><FRAME SRC="group.htm" NAME="group" scrolling="no"><FRAME SRC="empty.htm" NAME="bymenu" scrolling="no"><FRAME SRC="empty.htm" NAME="valmenu" scrolling="no">
</FRAMESET><FRAME SRC="noreps.htm" NAME="gallery">
</FRAMESET></FRAMESET><FRAME SRC=sampfoot.htm" NAME=footer scrolling="no">
</FRAMESET<NOFRAMESYou must use a frame-capable browser.</NOFRAMES</HTML
Modifying Exception Reports in the QuickStart Report JobAfter you run the QuickStart Wizard, you might want to perform the following tasks
to update the exception reports in the QuickStart report job:� “Removing a Follow-up Report from a Rule in the QuickStart Report Job” on page
567� “Removing a Rule from QuickStart Report Job” on page 567� “Adding a Follow-up Report to a Rule in the QuickStart Report Job” on page 568.
For more information about the QuickStart Wizard, see “Using the QuickStartWizard” on page 50.

Reporting: Working with Galleries � Modifying Exception Reports in the QuickStart Report Job 567
Removing a Follow-up Report from a Rule in the QuickStart Report JobAfter you run the QuickStart Wizard and create the batch report job, you might want
to remove a follow-up report from the rule but leave the rule itself in the ExceptionSummary table. To do so, follow these steps:
Note: You must already have run the process job and the report batch job to createthe gallery before you can complete the following steps. �
1 Open your Web browser and display the welcome.htm page that was created bythe QuickStart job. On the left side of the welcome.htm page, there is a directory,or tree structure, of reports. Select a folder that contains the category of reportsthat you want to modify. Then select the Exception Summary folder under theExceptions folder, and select Exceptions � Exception Summary On the rightside of the page, select the cell that contains the follow-up report that you want toremove. A new page opens. On the page, select Report. A new window opens.When you select an exception, the Exception Rule detail page for that exception isdisplayed. The names of selected follow-up reports are listed after the Actionslabel on the Exception Rule detail page. The follow-up report name is aneight-character name that follows the RUN_REPORT= string.
Note: The welcome.htm file is located in the qs subdirectory that you chose whenyou ran the QuickStart. �
2 From the SAS IT Resource Management main window, select the Reporting tab,and then select the Perform Exception Analysis task.
3 From the list of exception folders, select the folder that contains the exception ruleand report that you want to remove. The QuickStart default exception folder isADMIN.CPXRULE.
4 From the list of rules, select the exception rule that you want to modify, and thenselect File � Rules � Open
5 On the Recommendations tab, find Run_Report. Within this code, delete the nameof the report definition that you want to remove. If you do not want any reports torun with this exception, remove the Run_Report code.
Removing a Rule from QuickStart Report JobTo remove an exception rule from the list of default exception rules in the QuickStart
Wizard, follow these steps:
Note: You must already have run the process job and the report batch job to createthe gallery before you can complete the following steps. �
1 Determine the name of the rule that you want to remove from the Exception Rulereport. To determine the rule name, open your Web browser and display thewelcome.htm page that was created by the QuickStart job and that contains thereport that you want to modify. On the left side of the welcome.htm page, there isa directory, or tree structure, of reports. Select the Exception Summary folderunder the Exceptions folder. On the right side of the page, select the exceptionsthat you want to remove. When you select an exception, the Exception Rule detailpage for that exception is displayed. The name of the rule is listed after the RuleName label on the Exception Rule detail page. The exception rule name is aneight-character name that begins with the letter Q (for example, QPCPUUS).
Note: The welcome.htm file is located in the qs subdirectory that you chose whenyou ran the QuickStart. �
2 From the SAS IT Resource Management main window, select the Reporting tab,and then select the Perform Exception Analysis task.
568 Removing a Report from the QuickStart Report Job � Chapter 29
3 From the list of exception folders, select the folder that contains the exception rulethat you want to remove. The default QuickStart exception folder isADMIN.CPXRULE.
4 Select the exception rule that you want to delete, and then select File � Rules �Delete Select Yes to confirm that you want to delete the rule.
Adding a Follow-up Report to a Rule in the QuickStart Report JobTo add a report to an exception rule to the Quick Start batch job, follow these steps:1 From the SAS IT Resource Management main window, select the Reporting tab,
and then select the Perform Exception Analysis task.2 From the list of exception folders, select the folder that contains the exception rule
that you want to modify. The default QuickStart exception folder isADMIN.CPXRULE.
3 Select the exception rule that is associated with the report that you are adding,and then select File � Rules � Open
4 Select the Recommendations tab. If the RUN_REPORT= command is not alreadythere, add it on a new line after the rest of the recommendation. Follow thecommand by the name or names of the report definitions that you want to run toproduce follow-up reports for exceptions. If you do not specify the location of thereport definitions, the exception system searches for the report definitions in theadmin.itsvrpt folder. To specify the folder, use the FOLDER= parameter.
For example, you could type the following command to run the QNCPUSPC andQNCPUQUE report definitions that are in the default folder:
RUN_REPORT=QNCPUSPC QNCPUQUE
Or you could type the following command to run the QNCPUSPC andQNCPUQUE report definitions that are in a folder named myrptlib.itsvrpt:
RUN_REPORT=QNCPUSPC, folder=MYRPTLIB.ITSVRPT
For more information about the RUN_REPORT= command, see “Using theRUN_REPORT= command” in “Creating a Rule Definition” on page 536.
Removing a Report from the QuickStart Report JobTo remove a report name from the source statements of the QuickStart batch report
job, perform the following steps.1 Determine the name of report that you want to remove. To determine the report
name, open your Web browser and display the welcome.htm page that was createdby the QuickStart job and that contains the report that you want to remove. Onthe left side of the welcome.htm page, there is a directory or tree structure of thereports that are displayed on this welcome.htm page. On the right side of thewelcome.htm page, there are small graphs or “thumbnails” of each report. Selectthe report that you want to remove. The report name is displayed in thebottom-right corner of the browser window.
If the report is an exception report, see “Modifying Exception Reports in theQuickStart Report Job” on page 566.
2 Edit the QuickStart batch report job, and locate in the code the name of the reportthat you want to remove. The report name will appear as the value of a parameterin a call to the %CPRUNRPT macro. If there are multiple references to the reportin the batch job, read the comments and reports adjacent to each reference todetermine which comments apply to the report that you want to remove.

Reporting: Working with Galleries � Updating an Existing QuickStart Report 569
3 If the call to the %CPRUNRPT macro contains references to multiple reports,remove or comment out only the report that you want to remove. If the report tobe removed is the only report that is referenced by the macro, you can remove theentire call to the macro (remove %CPRUNRPT, the open and close parentheses,and all the parameters between them up to and including the next semicolon).
4 If this report is the only report in a directory of reports, you might also want toupdate the report explorer tree so it will not point to the directory. You might alsowant to remove from the batch report job any initialization statements specific tothat directory of reports. To remove the initialization statements for a specificdirectory, read the comments in the report batch job that indicate which statementsare used for initialization of just the single directory (typically, a %CPWEBINImacro plus, optionally, some subsetting code). Remove the initialization statementsas indicated in these comments. To remove a reference to a directory from thereport explorer tree, see “Updating the Report Explorer Tree” on page 570.
Updating an Existing QuickStart ReportTo modify one of the reports that are produced by the QuickStart batch report job,
perform the following steps.
1 Determine the name of report that you want to modify. To determine the reportname, open your Web browser and display the welcome.htm page that was createdby the QuickStart job and that contains the report that you want to modify. Onthe left side of the welcome.htm page, there is a directory or tree structure of thereports that are displayed on this welcome.htm page. On the right side of thewelcome.htm page, there are small graphs or “thumbnails” of each report. Selectthe report that you want to modify. The report name is displayed in thebottom-right corner of the browser window.
2 Start SAS and the SAS IT Resource Management GUI for UNIX and Windows,and activate the QuickStart PDB with write access.
3 From the Reporting tab in the SAS IT Resource Management main window,select the Manage Report Definitions task.
In the Folders list box, verify that the report folder ADMIN.ITSVRPT ishighlighted.
4 From the Current PDB Reports list box, select the report you want to modify.For assistance with completing that window and modifying the report definition,select Help in the Manage Report Definitions window. You can test the reportchanges interactively by selecting Run; however, within the GUI you might receivea larger quantity of output than you receive when you run the batch report job.This is because the QuickStart batch job subsets the data prior to running many ofits reports. If you run the report within the GUI, you might want to subset thedata (select Subset Data from the Locals menu) to limit the scope of the reportto just a small subset of the data while you test. Be sure to remove this limitationbefore you save the report.
5 When you have completed the modifications, you can save the report definition byselecting File � Save Report Definition
If you save the report in the ADMIN.ITSVRPT folder and you use the existingreport name, the batch job will automatically use the modified report the next timethe report batch job runs. If you save the updated report definition into a differentfolder or name, you will need to modify the report name in the source statementswithin the batch report job. The original report is also available inPGMLIB.ITSVRPT if you want to refer to it later.

570 Updating the Report Explorer Tree � Chapter 29
Updating the Report Explorer TreeYour Web gallery is based on a hierarchical list of all report directories. This
hierarchical list is called the “report structure,” or the “report explorer tree," or just"the tree.” The tree was created when SAS IT Resource Management and your collectorwere set up to work together at your site.
In the instructions that follow, it is assumed that you have the necessarypermissions. The SAS IT Resource Management administrator at your site has thepermissions that are necessary to update the tree. If you are not the administrator, youcan ask the administrator to update the tree for you.
Here are the steps to update the tree:
1 Find the setup case that applies to your collector. For the mapping of collectors tosetup cases, see “Setting Up the Server, with Setup Cases” on page 38.
2 After you know which setup case applies to your collector, find that setup case:“Overview of Setup Case 1” on page 53, “Overview of Setup Case 2” on page 65,“Overview of Setup Case 3” on page 81, “Overview of Setup Case 4” on page 99, or“Overview of Setup Case 5” on page 119.
3 In that setup case, find the topic named “The Report Structure.”
4 In that topic, find the name of the program that calls the %CPHTREE macro. (Thereport explorer tree is created by a program that calls the %CPHTREE macro.)
For more information about the %CPHTREE macro, see the topic %CPHTREEin the SAS IT Resource Management macro reference documentation.
5 Find that program on your system. The program is likely to be in the samelocation as the programs in the SAS IT Resource Management daily jobs. If theprogram is not there, look for a file (on UNIX or Windows) or a file or PDSmember (on z/OS) that contains the word %CPHTREE.
6 In the setup case that applies to your collector, find the topic “OptionalCustomization.”
7 In that topic, find the instructions for customizing the report structure. Any stepsthat are required are explained either in the topic “Optional Customizations” or intopics, such as “The Report Structure,” that appear earlier in that setup case.
8 Save a copy of the program that calls the %CPHTREE macro and/or any file orcatalog entry that the program refers to, in case you want to refer to the originalversions later.
9 As described in the instructions for customizing the report structure, edit thereport structure program and/or edit the catalog entry that is specified by theCAT= parameter in the call to the %CPHTREE macro in the report structureprogram. Then remove the original tree or not (after consideration of the issuesthat are mentioned in those instructions), and run the edited version of the reportstructure program. That run creates the revised tree.
10 In the daily job that produces reports, find the name and location of the programthat produces the reports.
11 Save a copy of that program under a different name, in case you want to refer tothe original version later.
12 Edit the program that produces the reports so that it directs reports to locations inthe revised tree. For more information about the program, see the topic “TheReport Program(s)” in the setup case that applies to your collector.
571
C H A P T E R
30Reporting: Working with RemoteServer Profiles
Working with Remote Server Profiles: Main Topics 571Overview of Remote Server Profiles 571
Copying a Remote Server Profile 573
Copying a Remote Server Profile (UNIX, Windows) 573
Creating a Remote Server Profile 574
Creating a Remote Server Profile (UNIX, Windows) 574Deleting a Remote Server Profile 576
Deleting a Remote Server Profile (UNIX, Windows) 576
Viewing/Editing a Remote Server Profile 577
Viewing/Editing a Remote Server Profile (UNIX, Windows) 577
Working with Remote Server Profiles: Main Topics
Overview of Remote Server ProfilesA remote server profile provides the specifications for connecting to a remote host
and for accessing SAS IT Resource Management components on that host.Your need for a connection to a remote server depends on the SAS IT Resource
Management software on your host and on the location of the PDB that you want toactivate.
� If the SAS IT Resource Management software on your host has only a clientlicense, the PDBs that you want to activate are typically on one or more servers(hosts on which the SAS IT Resource Management software has a server license)that are remote (see the notes below). If a PDB that you want to activate is notlocal (see the notes below), you must connect to the host on which a remote PDB islocated in order to use that remote PDB.
� If the SAS IT Resource Management software on your host has only a serverlicense, the PDBs that you can activate are local (see the notes below), and youhave no need (or ability) to connect to a remote host.
� If the SAS IT Resource Management software on your host has both a client licenseand a server license, typically the PDBs that you want to activate are local (see thenotes below). If a PDB that you want to activate is not local, you must connect tothe host on which the remote PDB is located in order to use that remote PDB.
�
Note: A local PDB is a PDB that you access from one or more disk drives thatare attached to the local host or from one or more disk drives whose contents areaccessible through a service such as Network Neighborhood, NFS, AFS, or DFS.

572 Overview of Remote Server Profiles � Chapter 30
Thus, if a PDB satisfies the definition of a local PDB, you can access the PDBwithout connecting to a remote server. �
Note: A remote PDB is a PDB that you access by connecting to a remote host thathas the PDB available as a local PDB. Thus, if a PDB does not satisfy thedefinition of a local PDB, you must connect to a remote server if you want toaccess the PDB. �
The typical way to manage your connection to a remote server is to� connect at the same time that you activate the remote PDB.
When you activate a remote PDB, SAS IT Resource Management automaticallyasks for your user ID and password on the remote server and uses them (alongwith the remote server profile that is associated with that PDB) to connect you tothe remote server.
For more information about activating a remote PDB while automaticallyconnecting to the remote server, see “Activating a PDB” on page 299.
Note: An active PDB on a remote server is in read-only mode. While the PDB isactivated in read-only mode, other work that requires write mode (such as theprocess task and reduce task) cannot take place. Thus, it is important tode-activate the remote PDB as soon as you finish using it. (If you de-activate aPDB by making a local demonstration PDB your active PDB, you are less likely toaffect anyone else’s work than if you activate a production PDB.) �
Note: If a site library is specified in the profile that is associated with the remotePDB, that site library becomes the active site library. By default, an active sitelibrary on a remote server is in read-only mode. For information about switchingit to write mode, see “Viewing/Editing Your Active Site Library’s Access Mode” onpage 281. �
Note: If a site library is not specified in the profile that is associated with theremote PDB, the active site library and its access mode are unchanged. �
� work with the remote PDB.For example, run report definitions to generate reports on the data in that PDB.
� disconnect at the same time that you de-activate the remote PDB.De-activate the remote PDB by activating a local PDB. (If you do not have an
immediate use for a local production PDB, you can activate a local demonstrationPDB in order for your access mode to the local PDB to have the least effect onothers’ work.) At that time, SAS IT Resource Management automatically asks ifyou want to disconnect; agree to disconnect.
For more information about activating a local PDB while agreeing to disconnectfrom the remote server, see “Activating a PDB” on page 299.
The specifications for a connection to a remote host (and for accessing SAS ITResource Management components on that remote host) are provided by a remoteserver profile on the SAS IT Resource Management client software.
Note: On a host that has both the SAS IT Resource Management client license andserver license, the functionality is additive. Thus, you can also use remote-serverprofiles on a machine with both licenses. �
Three sample profiles are shipped with SAS IT Resource Management: one forUNIX, one for z/OS (MVS), and one for SAS/SHARE. The sample profiles (and anyother that you make) are stored in your SASUSER library. You cannot use a sampleprofile as is; you must customize it. In order to keep an unchanged, original copy of thesample profile, you might want to copy the sample profile and edit the copy, rather thanedit the original.

Reporting: Working with Remote Server Profiles � Copying a Remote Server Profile 573
Typically, you use one profile for each remote server, regardless of the number ofPDBs that are local to a server.
For more information about remote server profiles, see the following topics:
� “Copying a Remote Server Profile” on page 573
� “Creating a Remote Server Profile” on page 574
� “Deleting a Remote Server Profile” on page 576
� “Viewing/Editing a Remote Server Profile” on page 577.
Note: To see more information about the fields in a remote profile, follow this pathfor UNIX:
From the main window, select Administration � Manage PDBs � File � AddPDB Entry
Then click on the right arrow that is associated with the Remote Server Profile field.Click to highlight UNIX or MVS. Right-click to open the drop-down menu. ClickProperties to display the Remote Server Profile Definition window. Click Help to viewdetailed information about the fields on the remote server profile. Click Close to returnto the Remote Server Profile Definition window.
For Windows:Because SAS IT Resource Management clients usually have network access to theserver if the server is on Windows, the clients rarely need to use a remote profileto access a PDB on a Windows server.
�
Copying a Remote Server ProfileYou can copy a remote server profile
� by using the SAS IT Resource Management GUI for UNIX and Windows.
Note: Your local host must have a SAS IT Resource Management client license. �
Copying a Remote Server Profile (UNIX, Windows)In the SAS IT Resource Management GUI for UNIX and Windows, you can copy a
remote server profile by following these steps:
1 From the main window’s Administration tab, select Manage PDBs. The ManagePDBs window opens.
2 Select Locals. A menu opens. From the menu, select Remote Profile. TheRemote Server Connection Profiles window opens.
3 Select the remote server profile that you want to copy.
4 Select File. A menu opens. From the menu, select Copy. The Remote ServerProfile Definition window opens.
All of the fields have the same values as the profile that you copied, except forthe Profile Name field.
5 In the “to-profile,” make any changes that you need for your purposes. For moreinformation, select Help for that window or see “Creating a Remote Server Profile”on page 574.
Note: SAS IT Resource Management generated a profile name that is uniquewithin your set of remote server profiles. You can change the name of the profile, aslong as the new name is also unique within your set of remote server profiles. Theprofile name can be as many as eight characters in length and it is required. �
574 Creating a Remote Server Profile � Chapter 30
For TCP/IP, the profile works faster if the profile name is the same name as inthe Server Name field. For APPC, the profile name must be the same name as inthe Server Name field. For NetBIOS that uses SAS/CONNECT, the profile name(and the server name) should be the same as the -NETNAME setting that wasused in creating the spawner on the server.
Note: If you want to use a port number in the Server Name field (in order tomake a remote connection by using the z/OS spawner), use two underscorespreceding of the port number. Thus, if the port number is nnnn, the value in theServer Name field should be __nnnn. �
Note: The remote server profiles are in your SASUSER library. Thus, you canmake changes to the remote server profiles without affecting other users. �
Note: The logon and logoff scripts are physical files and can be located anywhere.Thus, changing the script files can affect others, if others use the same scripts. �
6 Select OK. SAS IT Resource Management returns you to the Remote ServerConnection Profiles window. The “to-profile” is now in the list of profiles.
7 Select OK to return to the Manage Report Definitions window.8 Select Close to return to the main window.
Creating a Remote Server ProfileYou can create a remote-server profile� by using the SAS IT Resource Management GUI for UNIX and Windows.
Note: Your local host must have a SAS IT Resource Management client license. �
Note: It is faster to copy a profile that is similar to what you want to use and thenedit it. But you can create an entirely new profile. This topic covers creating an entirelynew profile. �
Creating a Remote Server Profile (UNIX, Windows)In the SAS IT Resource Management GUI for UNIX and Windows, you can create a
remote-server profile by following these steps:1 On the main window’s Administration tab, select Manage PDBs. The Manage
PDBs window opens.2 Select Locals. A menu opens. From the menu, select Remote Profile. The
Remote Server Connection Profiles window opens.3 Select File. A menu opens. From the menu, select New. The Remote Server
Profile Definition window opens.4 On the General tab,
� in the Profile Name field, type a profile name. The profile name can be upto eight characters in length and it is required. The profile name must beunique within your set of remote server profiles.
Note: The profile works faster if the profile name is the same name as in theServer Name field. �
� in the Description field, type a longer description of the profile. This field isoptional.
5 Select the Remote Server tab.� In the Server Name field, type the name of the server. This field is required.
The value is an Internet address.

Reporting: Working with Remote Server Profiles � Creating a Remote Server Profile 575
� In the Server OS field, select the operating system that is running on theserver host: MVS (z/OS), UNIX, or Windows.
� In the Server Type field, select whether you want to make the connection bymeans of Connect (SAS/CONNECT) or Share (SAS/SHARE). SAS/CONNECTis the single-user server, and SAS/SHARE is the multi-user server. (Toconnect with SAS/SHARE, you must contact your SAS IT ResourceManagement administrator to request a SAS/SHARE server on the hostwhere the remote PDB resides.)
Also, if the remote server is using a spawner, select the spawner box. (Thisbox is a toggle. To reverse the selection, select the box again.)
Note: Both SAS/CONNECT and SAS/SHARE servers can be used withTCP/IP.
Use of a spawner for TCP/IP is optional. �
� If you select “Remote server is using a spawner,” the Service Name fieldopens. Type the service name.
Or if you want to use a port number (instead of a service name) in theService Name field, use two underscores preceding the port number. Thus, ifthe port number is nnnn, the value in the Service Name field would be__nnnn.
6 Select the Communication tab.
� In the Communication Method field, select TCP (TCP/IP).
Note: TCP/IP is available on all client/server combinations that SAS ITResource Management supports.
TCP/IP must be installed on both the client and server. TCP/IP is almostalways installed by default with all operating systems. �
� TCP/IP requires a script that is specific for your site.
Select the Logon Script box. (This box is a toggle. To reverse theselection, select the box again.) Also, below the box, provide the full path andname of the script. Sample scripts (named TCP*.scr) are provided in thesasmisc directory in the location where SAS IT Resource Management isinstalled at your site.
Depending on the needs of your site, you might need to edit the script file.Select the Edit button to browse the logon script, determine whether changesare required, and make changes if necessary.
� In the SAS Command on server field, type the name of the command (on theserver host) that invokes SAS.
7 Select the Libraries tab.
� If you want to use the site library on the remote host, in the Location ofSITELIB on server field, type the full path and name (or fully qualifiedname) of that site library. If you do not know the location, ask your SAS ITResource Management administrator.
If you want to use the site library on the local host, leave this field blank.
� In the Location of PGMLIB on server field, type the full path and name(or fully qualified name) of the program library. If you do not know thelocation, ask your SAS IT Resource Management administrator.
� In the Location of ITRM Macros on server field, type the full path andname (or fully qualified name) of the directory or PDS that contains the SASIT Resource Management macros. If you do not know the location, ask yourSAS IT Resource Management administrator.

576 Deleting a Remote Server Profile � Chapter 30
� In the Location of MXG Format Library on server field, type the fullpath and name (or fully qualified name) of the MXG Format Library. If you donot know the location, ask your SAS IT Resource Management administrator.
8 Select the Advanced tab.
� If you want to submit any SAS code on the client host before signing on tothe server host, type the code in the SAS Code to submit locally field,after the two comment lines. Typically, this field is not used.
� If you want to submit any SAS code on the server host after signing on to theserver host, type the code in the SAS Code to submit to server field.Typically, this field is not used.
9 Select OK. If some required field is not filled in, SAS IT Resource Managementdisplays a message in the message area at the bottom of the window.
SAS IT Resource Management returns you to the Remote Server ConnectionProfiles window. The profile that you created is now in the list of profiles.
10 Select OK to return to the Manage PDBs window.
11 Select Close to return to the main window.
For more information about the fields in a remote profile, follow these steps:
1 On the main window’s Administration tab, select Manage PDBs. The ManagePDBs window opens.
2 Select Locals. A menu opens. From the menu, select Remote Profile. TheRemote Server Connection Profiles window opens.
3 Select a remote server profile and click the right mouse button. A menu opens.From the menu, select Properties. The Remote Server Profile Definition windowopens.
4 Click Help to display additional information about the fields in the remote serverprofile.
Note: Because SAS IT Resource Management clients usually have network access tothe server if the server is on Windows, the clients rarely need to use a remote profile toaccess a PDB on a Windows server. �
Deleting a Remote Server ProfileYou can delete a remote server profile
� by using the SAS IT Resource Management GUI for UNIX and Windows.
Note: Your local host must have a SAS IT Resource Management client license. �
Deleting a Remote Server Profile (UNIX, Windows)In the SAS IT Resource Management GUI for UNIX and Windows, you can delete a
remote-server profile by following these steps:
� On the main window’s Administration tab, select Manage PDBs. The ManagePDBs window opens.
� Select the Locals menu. A menu opens. From the menu, select Remote Profile.The Remote Server Connection Profiles window opens.
� Select the name of the profile that you want to delete.
� Select File. A menu opens. From the menu, select Delete. No confirmation isrequested.

Reporting: Working with Remote Server Profiles � Viewing/Editing a Remote Server Profile 577
SAS IT Resource Management redisplays the Remote Server ConnectionProfiles window. The remote server profile that you deleted is no longer in the listof profiles.
� To return to the Manage PDBs window, select OK.
� To return to the main window, select Close.
Viewing/Editing a Remote Server ProfileYou can view or edit the values in a remote-server profile
� by using the SAS IT Resource Management GUI for UNIX and Windows.
Note: Your local host must have a SAS IT Resource Management client license. �
Viewing/Editing a Remote Server Profile (UNIX, Windows)
In the SAS IT Resource Management GUI for UNIX and Windows, you can displayand/or edit the values in a remote-server profile by following these steps:
1 On the main window’s Administration tab, select Manage PDBs. The ManagePDBs window opens.
2 Select Locals. A menu opens. From the menu, select Remote Profile. TheRemote Server Connection Profiles window opens. In it is a list of the sampleprofiles and the additional profiles, if any, that have been created.
3 Select the profile that you want to view.
4 Select File. A menu opens. From the menu, select Open. The Remote ServerProfile Definition window opens.
5 View and/or edit the values of the fields. For information about each field, selectHelp in the Remote Server Profile Definition window or see “Creating a RemoteServer Profile” on page 574.
Note: You can change the name of the profile, as long as the new name is uniquewithin your set of remote server profiles. The profile name can be up to eightcharacters in length and it is required. For TCP/IP, the profile works faster if theprofile name is the same as the server name. For NetBIOS that uses SAS/CONNECT, the server name (and the profile name) should be the same as the-NETNAME setting that was used in creating the spawner on the server. �
Note: If you want to use a port number in the Server Name field (in order tomake a remote connection by using the z/OS spawner), use two underscorespreceding the port number. Thus, if the port number is nnnn, the value in theServer Name field should be __nnnn. �
The remote server profiles are in your SASUSER library. Thus, you can makechanges to the remote server profiles without affecting other users.
Note: The logon and logoff scripts are physical files and can be located anywhere.Thus, changing the script files might affect others, if others use the samescripts. �
6 When you finish viewing or changing the profile, select OK. SAS IT ResourceManagement returns you to the Remote Server Connection Profiles window.
7 Select OK to return to the Manage Report Definitions window.
8 Select Close to return to the main window.

578
579
A P P E N D I X
1Recommended Reading
Here is the recommended reading list for this title:� Getting Started with SAS IT Resource Management� SAS IT Resource Management 2.7: Macro Reference
� SAS IT Resource Management 2.7: Server Setup Guide� SAS IT Resource Management: Administration and Batch Reporting Course Notes� SAS IT Resource Management: Interactive Reporting Course Notes
For a complete list of SAS publications, see the current SAS Publishing Catalog. Toorder the most current publications or to receive a free copy of the catalog, contact aSAS representative at
SAS Publishing SalesSAS Campus DriveCary, NC 27513Telephone: (800) 727-3228*Fax: (919) 677-8166E-mail: [email protected] address: support.sas.com/pubs* For other SAS Institute business, call (919) 677-8000.
Customers outside the United States should contact their local SAS office.

580

581
Glossary
activateto specify that a particular performance data warehouse, site library, or table is theone that you want to use now.
active PDBthe performance data warehouse that you are currently using.
active site librarythe library of site-related information that you are currently using.
active tablethe table to which the control statements in a stream of %CPDDUTL controlstatements currently refer.
administration taskstasks that manage the SAS IT Resource Management server. Administration taskstypically require write access to a performance data warehouse (PDB), to a sitelibrary, or to a program library. See also reporting tasks.
age limitin a table, a unit of time that describes how long existing data is to be kept in aperformance data warehouse (PDB) when new data is processed and reduced. An agelimit specification pertains to the data that is already in a particular level of aparticular table, and does not pertain to any data that is being read in. In a reportgallery, the age limit specification describes how long the reports are to be kept.
aged datadata that is deleted from a level of a table in the performance data warehouse (PDB)by the process task or the reduce task because the data exceeds the age limit forkeeping data in that level of that table.
aggregateanother term for summarize.
analysis variablea numeric variable that is used to calculate statistics or to display values. Usually ananalysis variable contains quantitative or continuous values, but this is not required.
API (application programming interface)a set of software functions that facilitate communication between applications andother kinds of programs, services, or devices.

582 Glossary
archivea set of archive libraries for a specific performance data warehouse (PDB).
archive librarya SAS library that contains the data that was incoming to the detail level of aperformance data warehouse (PDB) during a particular execution of the process task.An archive library is one of the libraries in the archive. See also detail-level data.
archive locationfor a performance data warehouse (PDB), specifies where the archive is stored, if atleast one table specifies archiving. The archive location (root) on z/OS is a partitioneddata set (PDS). The archive location (root) on UNIX and Windows is a directory.
archive statusfor a table, a value that specifies whether data that was incoming to the detail levelof the table is to be copied to an archive.
archived datadata that was incoming to the detail level and which was then copied to an archivelibrary during an execution of the process task.
autoexec filea file that contains SAS statements that are executed automatically when SAS isinvoked. The autoexec file can be used to specify SAS system options, as well as tospecify librefs and filerefs for data sources that are used frequently.
availabilitythe percentage of time that a system is available to respond to the requests of itsusers.
axisa one-dimensional line that represents the scale that is used for plotting the values ofx, y, or z coordinates.
backloadto process and reduce data that was logged before the most recently logged data inthe performance data warehouse (PDB).
backup copya complete copy of one or more libraries.
batch joba unit of work that is submitted to an operating system for batch processing. On z/OS, a batch job is a set of JCL statements; on Windows, a batch job is a task; and onUNIX, a batch job is a background process.
batch modea method of executing SAS programs in which a file that contains SAS statementsplus any necessary operating environment commands is submitted to the computer’sbatch queue. After you submit the program, control returns to your terminal orworkstation, where you can perform other tasks. Batch mode is sometimes referredto as running in the background. The program output can be written to files orprinted on an output device.
browserSee Web browser.
BY variables list1) in the detail level of a table definition, a list of variables that specifies the sortorder and grouping of the observations in the detail level of that table. 2) in a reportdefinition, a list of variables that specifies the sort order and grouping of the data in

Glossary 583
the report. 3) in a rule definition, a list of variables that specifies the sort order andgrouping of the data in the results. See also exception, CLASS variables list.
calculation status1) for a formula variable at any level, an indicator that specifies whether the value ofthe formula variable is to be calculated at that level. 2) for a summary statistic at asummary level, an indicator that specifies whether the value of that summarystatistic is to be calculated at that summary level.
capacity planningthe process of measuring performance, availability, and workload volume in aparticular computing environment and comparing these measurements over time tobaseline values. The object of capacity planning is to predict when resources willneed to be upgraded.
catalog entrySee entry type, SAS catalog.
charta graph in which graphical elements such as bars or pie slices show the magnitude ofdata values. The graphical elements can represent one data value or a range of datavalues.
CLASS variablea variable that is used to group, or classify, data. The data type of CLASS variablescan be either character or numeric. Class variables can have continuous values, butthey typically have a few discrete values that define the classifications of the variable.
CLASS variables list1) in the day, week, month, or year level of a table definition, a list of variables thatspecifies the sort order and grouping of the data that is summarized intoobservations in that level of that table. There is one CLASS variables list for eachsummary level of each table. 2) in a report definition, zero, one, or more variablesthat may interact with other variables (such as the Group, SubGroup, or Stackvariables) to specify the grouping of the data in the report.
clientSee SAS IT Resource Management client.
collectoranother term for data collector.
collector nameone of the two identifiers that specifies a particular set of collector-support software.The other identifier is tool name. For example, the pair of identifiers specifies whichcollector-specific staging code to run during the process task.
collector supporta set of software components that provide a variety of functions that enable SAS ITResource Management to work with data from a particular collector. Eachcollector-support component is identified by both a collector name and a tool name.
combined viewa view that provides access to variables from two or more other views.
continuous valuesvalues of a variable that theoretically could indicate an uncountable number ofpossible values. For example, a variable that measures the temperature of water indegrees Celsius under normal conditions is continuous because it can have any valuefrom 0 to 100, even though the thermometer that is used is not able to measuretemperatures beyond a particular level of decimal precision.

584 Glossary
control data setone of the data sets that the duplicate-data-checking macros maintain and use todetermine whether data from a log has already been processed.
control statementan instruction or a string of keywords that you provide to the data dictionary utilityin order to direct the utility’s actions in batch mode. For example, control statementscan direct the utility to copy a table definition from the supplied table definitions inthe master data dictionary to the active performance data warehouse (PDB), tocreate and print table definitions, and to perform a variety of other functions.
crona UNIX utility for executing batch jobs on a periodic basis.
current site libraryanother term for active site library.
current tableanother term for active table.
daemona process that starts and waits either for a request to perform work or for anoccurrence of a particular event. After the daemon receives the request or detects theoccurrence, it performs the appropriate action. If nothing else is in its queue, thedaemon then returns to its wait state.
data collectorsoftware that collects logged data that is related to IT services. The data collectorcould be a facility of the operating system, a product that is provided by a third-partyvendor, or software that is written by consultants or by SAS IT ResourceManagement customers.
data dictionarySee master data dictionary, PDB’s data dictionary.
data dictionary utilitya macro (%CPDDUTL) that is used for adding, changing, deleting, or checking theinformation in the data dictionary of the performance data warehouse (PDB). Theutility can also generate a preliminary version of a table definition (and its associatedvariable definitions) from a SAS data set or view, from a character-delimited externalfile, or from other types of files.
data reductionthe summarization of data for a day, week, month, or year. The observations for thecurrent week, month, and year contain week-to-date, month-to-date, and year-to-datedata. Data reduction decreases the amount of memory that is required for storingdata, but it still preserves information that can be used for analyzing trends.
data source softwaresoftware that logs data that is related to IT services.
data typean attribute of a variable. In SAS IT Resource Management, a variable can have adata type of either character or numeric. See also interpretation type.
data visualizationthe act of representing data visually or graphically. Charts, plots, and graphs aresome results of data visualization.
date formatin SAS software, the instructions that tell SAS how to write numeric values as datevalues.

Glossary 585
datetime formatin SAS software, the instructions that tell SAS how to write numeric values asdatetime values.
day-level dataperformance data that is summarized for an entire day. Day-level data issummarized from detail-level data.
derived variablea variable whose values are calculated from regular variables, constants, or both. Seealso regular variable, formula variable.
detail-level datain general, performance data that has not been summarized. (For data collectorssuch as SAP that log an extremely large volume of data, detail-level data can bepartially summarized.) Some of the data might have been changed by the stagingcode, by user-written exit routines for the process task, by partial summarization, orby some other means. See also day-level data, week-level data, month-level data,year-level data.
duplicate data1) observations that have identical values in all of the BY or CLASS variables. 2)observations that come from the same log. The meaning that is intended is explainedwhen the term is used.
duplicate-data-checking macrosa set of macros (%CPDUPINT, %CPDUPDSN, %CPDUPCHK, and %CPDUPUPD)that control whether data from a log can be reprocessed into a performance datawarehouse (PDB). See also control data set.
duration1) in records that represent interval data but which do not contain a value for thelength of the interval, a value in seconds that represents the length of time betweenrecords. 2) in records that represent interval data and which do contain a value forthe length of the interval, that value in seconds. 3) in observations for interval-typetables, the variable that contains the length of the interval in seconds.
entry typea characteristic of a SAS catalog entry that identifies the catalog entry’s attributesand structure to SAS software. When a catalog entry is created, SAS automaticallyassigns the entry type as part of the name.
ETL (extract, transform, load)another term for process.
event-type tablea table in which each observation represents an event. The timestamp on theobservation represents the date and time of the event. See also interval-type table.
exceptionan observation that results from evaluating a rule. Each set of unique values of therule’s BY variables represents a group of observations against which the rule ran.The total number of exceptions indicates the number of groups for which the rule istrue, not the number of individual observations for which the rule is true. See alsoresults.
exit codeadditional code that is to be executed at a specified point in the supplied software.
exit point

586 Glossary
a point in the supplied software where additional code runs (if additional code isprovided).
external detaila view that enables data that is formatted like detail-level data to be reduced directlyinto the summary levels of the performance data warehouse (PDB) and therefore tobypass the detail level in the PDB. The data to be reduced might or might not be in aPDB.
external filea file that is created and maintained by a host operating system or by anothervendor’s software application. Either data or stored SAS statements can be readfrom an external file. Data can be written as output to an external file. A SAS dataset is not an external file.
external name1) when referring to a SAS IT Resource Management table, the name of the objectthat contains the data that is to be merged into the table. The object can be a stageddata set, a staged view, or a character-delimited file. 2) when referring to a SAS ITResource Management variable, the name of the corresponding variable in the stageddata set, in the staged view, or in the character-delimited file.
fileref (file reference)a short name (or alias) for the full physical name of an external file. A SASFILENAME statement maps the fileref to the full physical name.
foldera repository for objects that are of the same type. For example, report definitions arestored in one or more report definition folders, rule definitions are stored in one ormore rule definition folders, and palette definitions are stored in one or more palettedefinition folders.
formula variablea variable whose values are calculated from regular variables, derived variables,other formula variables, and/or constants. The values are calculated when they areneeded; they are not stored. The formula’s source statements are stored. See alsoregular variable, derived variable.
fully populated reporta report that contains as much data as the report definition allows.
fully populated tablea table that contains as much data as the age limit specifications allow.
galleryall the reports (and the associated left and right frames) that are visible in a Webbrowser when a particular welcome.htm file is selected.
generic collectorone of the data collectors for which no table definitions are supplied.
Generic Collector Facilitya component of SAS IT Resource Management that enables users to process data intoa table for which the user provides the table definition. The table is typically definedby using the GENERATE SOURCE control statement.
global macro variablea macro variable that can be referenced in any referencing environment in a SASprogram, except when there is a local macro variable that has the same name. Aglobal macro variable exists until the end of the session or program. See also macrovariable.

Glossary 587
graph reporta report that uses high-resolution graphics. See also text report.
graphics optionin a SAS GOPTIONS statement, an option that controls some attribute of thegraphics output. The specified value remains in effect only for the duration of theSAS session. Some graphics options override parameters that have been specified fora graphics output device.
graphics output deviceany terminal, printer, or other output device that is capable of displaying orproducing graphical output.
graphics stream file (GSF)a file that contains device-dependent graphics commands from a SAS/GRAPH devicedriver. This file can be sent to a graphics device or to other software applications.
GSFSee graphics stream file (GSF).
GUIgraphical user interface.
hostan operating environment that is identified by a name. For example, a domain nameor an IP address can be used to identify a computer or a router, and an LPAR namecan be used to identify an LPAR.
ID variablea variable that contains an alternate identifier for the data in a CLASS variable. Forexample, the value of a CLASS variable could be a device address, and the value ofthe corresponding ID variable could be the name of the device. ID variables areuseful for identification because their values rarely change.
ID variables lista list of ID variables. There is one ID variables list for each summary level of eachtable.
index variables lista list of variables for which a simple (non-compound) index is to be built. There isone index variables list for each level of each table. If a variable is indexed, aWHERE expression that includes that variable, such as a WHERE expression thatsubsets data for a report definition or a rule definition, typically runs more quickly.
install a tableto store a table definition and its associated variable definitions (as well as overridecontrol statements, if any) in the master data dictionary, so that the table definitioncan be used for other performance data warehouses (PDBs) as if it were a suppliedtable definition.
install collector supportto integrate user-written collector-support software into SAS IT ResourceManagement so that it looks and works like the collector-support software that issupplied with SAS IT Resource Management.
Internetthe proper name of the super-network that connects many smaller networks aroundthe world and which enables all the computers on those networks to exchangeinformation. All of the computers on the Internet use the same set of communicationprotocols, called TCP/IP. The World Wide Web uses the Internet as an electronichighway. See also internet, intranet.
588 Glossary
internetany group of interconnected networks that use Internet Protocol (IP) for exchanginginformation. The individual networks are not necessarily owned by the samecompany or organization. The Internet is the biggest example of an internet. Seealso intranet.
interpolateto estimate values that are between two or more known values.
interpretation typean attribute of a variable that further defines the data type. For example, the datatype Numeric has interpretation types such as Count, Time, Datetime, and Gauge.The interpretation type determines the default settings of other attributes of thevariable, such as maximum length and format.
interval-type tablea table in which each observation represents an interval of time. The timestamp inthe observation typically represents the beginning of the interval, and the durationin the observation represents the length of the interval. See also event-type table.
intraneta private network of interconnected networks within a single company ororganization. These networks use the same TCP/IP communication protocols that areused on the public, worldwide Internet, but they are either closed to the Internet orthey are connected to the Internet via a firewall. A firewall enables internal users toaccess the Internet, but prevents unauthorized outsiders from accessing the intranet.In other words, intranets enable companies or organizations to share informationwithout making that information available to everyone who has access to theInternet. See also Internet, internet.
ITinformation technology.
IT servicesservices that an IT organization provides to customers. IT services could includesupport for computer systems, networks, applications, telephones, fax machines, andWeb pages, as well as other types of software and hardware services.
keep status1) for a table, a value that indicates whether the table is to be used or ignored. 2) fora variable in a table, a value that indicates whether the variable is to be used orignored.
keyword parametera parameter that is identified by name. For example, in the macro call%CPDUPDSN (SOURCE=WWW);, ’SOURCE’ is a keyword parameter that specifiesthe input for the macro %CPDUPDSN. Keyword parameters can be used in anyorder on the macro call, but they must follow any positional parameters.
LANlocal area network.
levela logical grouping of all data that is consolidated for a specific unit of time. Within atable, there are five levels in which data is stored: detail, day, week, month, and year.
libref (library reference)a short name (or alias) for the full physical name of a SAS library. A SAS LIBNAMEstatement maps the libref to the full physical name. A libref is the first part of amulti-level SAS filename and indicates the SAS data library in which a SAS file is

Glossary 589
stored. For example, in the name SASUSER.ACCTS, SASUSER is the libref, andACCTS is a file in the library that the SASUSER libref refers to. See also SAS library.
local PDBa performance data warehouse (PDB) that is located on a disk that is attached to thelocal computer or which is on a disk drive that is accessible to the local computerthrough a service such as Network Neighborhood, NFS, AFS, or DFS.
LPARlogical partition.
machineany type of data processing hardware that can be recognized by SAS IT ResourceManagement as a single unit. A machine can be a single physical machine such as acomputer, a router, or a telephone switch. It can also be a logical entity such as alogical partition of an S/390 or z900 operating environment or a domain on theSolaris operating system. A computer in which multiple CPUs share the samememory could also be regarded as a single machine.
macro callthe programming code that invokes a macro.
macro sourceanother term for macro call.
macro variablea variable that is part of the SAS macro programming language. The value of amacro variable is a string that remains constant until you change it. Macro variablesare sometimes referred to as symbolic variables.
maintain a tableto apply changes from a table definition in a master data dictionary to a tabledefinition in a performance data warehouse (PDB).
management information baseSee MIB (management information base).
master data dictionaryin the SAS IT Resource Management program library, the master data definitions oftables and their associated variables, as well as override control statements, if any.Master copies of user-written definitions can be installed in the data dictionary, too.
MIB (management information base)a virtual database for data that is gathered by one or more SNMP agents.
migrate a tableto add a table definition and the definitions of its associated variables from themaster data dictionary to a performance data warehouse’s (PDB’s) data dictionary.When a table is migrated, any override %CPDDUTL control statements that areassociated with the table definition or with the definitions of its associated variablesin the master data dictionary are also applied to the PDB’s data dictionary.
month-level dataperformance data that is summarized for an entire month or for the currentmonth-to-date. Month-level data is summarized from detail- level data.
MXG softwarea collection of SAS programs (from Merrill Consultants) that operates on rawperformance data that is created by z/OS, VM, and AS/400 operating systems andsubsystems, and by other programs that log data in the same format.
network
590 Glossary
a configuration of data processing devices and software that are connected for thepurpose of information exchange.
operating environmenta computer, or a logical partition of a computer, and the resources (such as anoperating system and other software and hardware) that are available to thecomputer or partition.
override control statementsone or more %CPDDUTL control statements that are automatically applied to a tabledefinition in the active performance data warehouse (PDB) as the last stage ofadding (migrating) a table definition and the definitions of its associated variablesfrom the master data dictionary to the PDB’s data dictionary. In the master datadictionary, the override statements, if any, are stored separately from the definitionsof the table and its associated variables.
packagecollector support that can be distributed to and incorporated into existing SAS ITResource Management installations in order to provide additional, updated, or newfunctionality. See also collector support.
palettea stored set of SAS and SAS/GRAPH options, such as colors and patterns, that canbe associated with one or more report definitions.
parametera data item that is passed to a routine. In the SAS macro facility, a parameter is aconstant or variable that is passed to the macro routine when the routine is invoked.See also keyword parameter, positional parameter.
PDBSee performance data warehouse.
PDB levelanother term for level.
PDB optionscharacteristics of a specific performance data warehouse (other than data, tabledefinitions, and variable definitions). PDB options include archive device, archivepath, archive parameters, archive engine, active collector, Daylight Saving Timedefinition, Greenwich Mean Time deviation, start of week, work shift schedule, anddefinitions of work shift codes. On z/OS, you can also specify whether to build MXGviews as a PDB option.
PDB’s data dictionaryin a SAS IT Resource Management performance data warehouse (PDB), a SASlibrary whose name and libref are DICTLIB. The library contains metadata such asdefinitions of tables and variables and status information for the data that the tablescontain.
performance datainformation about how your IT system is doing its work. You use this information todetermine whether your system is doing work efficiently and to determine how tochange its load or its tunable parameters so that it will perform more efficiently.
performance data warehouse (PDB)logically, a data warehouse that contains detailed and summarized performance data,as well as information (metadata) that is needed for managing the data. Physically,each PDB consists of a coordinated set of nine SAS libraries that containperformance data plus other information that is related to one or more IT services.

Glossary 591
permanent SAS librarya SAS library that is not deleted when a SAS session ends, and which is thereforeavailable to subsequent SAS sessions.
PGMLIBthe libref (library reference name) and library name for a SAS IT ResourceManagement program library that is on the local server host. See also RPGMLIB.
positional parameterin a SAS macro, a parameter that is identified only by its position in the definitionand invocation of the macro. Positional parameters must be separated by commas. Ifa positional parameter is not used, a comma must be inserted to indicate that theparameter is not being used. For example, if filename is the second positionalparameter in a macro, you would either type the name of your data file in the secondposition (parm1, filename, parm3), or use a comma as a placeholder (parm1, , parm3).
processto extract raw data from a data collector or data source, to optionally transform thedata, and to load the data into a detail-level SAS library in a performance datawarehouse (PDB).
process stepanother term for process task.
process taskthe task (or step) that processes the raw data into the detail level of a performancedata warehouse (PDB).
program librarythe SAS library in which most of the SAS IT Resource Management software resides.For example, the master data dictionary resides in the program library. See alsoPGMLIB, RPGMLIB.
protocola set of rules that govern data communications between computers, betweencomputers and peripheral devices, and between software applications. TCP/IP, FTP,and HTTP are examples of protocols.
pull-down menuthe list of menu items or choices that appears when you choose an item from a menubar or from another menu.
QuickStart Wizarda wizard in the GUIs for the SAS IT Resource Management server. This wizardenables you to select a data collector and the type of log that you want to work with.The wizard creates a new performance data warehouse (PDB). The wizard alsocreates several batch jobs, including jobs that you can use to process data into thePDB, to reduce the data in the PDB, and to generate reports about the data.
reduceanother term for summarize.
reduce stepanother term for reduce task.
reduce taskthe task (or step) that reduces the data in a performance data warehouse (PDB) fromthe detail level to the summarized levels.
reduction levelanother term for summary level.
592 Glossary
regular variablea variable whose values are acquired from the raw data and stored in theperformance data warehouse (PDB). See also derived variable, formula variable.
remote PDBa performance data warehouse (PDB) that SAS IT Resource Management can accessby connecting to a remote host on which the PDB is available as a local PDB. Seealso local PDB.
remote server profilea stored set of values that are used for connecting to a remote server host.
reporta graph or text that is generated by running a report definition.
report definitiona specification that is used for generating a report. A report definition includesinformation such as the table and level, the names of the variables, the report style,and other attributes.
report galleryanother term for gallery.
reporting taskstasks that generate or manage reports. Reporting tasks typically require ’read’ accessto a performance data warehouse (PDB), to a site library, or to a program library. Seealso administration tasks.
response timethe amount of time between the submission of a request for service and the user’sreceipt of the system’s reply to that request.
restoreto recover the contents of a backup copy.
results1) exceptions that are generated by running (evaluating) one or more rule definitions.The exceptions are written to the results data set. 2) reports (text, graphs, or both)that are generated by running one or more report definitions. The reports arewritten to a SAS catalog and then to a directory or PDS. See also exception.
retrieveto recover some or all of the contents of an archive.
RPGMLIBthe libref (library reference name) for the program library on a remote server host.See also PGMLIB.
rule definitiona specification for detecting exceptions. A rule definition includes information such asthe table and level, the expression, the message, and other attributes. See alsoexception.
SAS cataloga SAS file that stores many different kinds of information in smaller units calledcatalog entries. A single SAS catalog can contain several different types of catalogentries, such as graphs (.GRSEGs) and source code (.SOURCEs). See also SAScatalog entry.
SAS catalog entrya separate storage unit within a SAS catalog. Each entry has an entry type thatidentifies its purpose to SAS. Some catalog entries contain system information such

Glossary 593
as key definitions. Other catalog entries contain application information such aswindow definitions, Help windows, formats, informats, macros, or graphics output.
SAS data seta file whose contents are in one of the native SAS file formats. There are two types ofSAS data sets: SAS data files and SAS data views. SAS data files contain datavalues in addition to descriptor information that is associated with the data. SASdata views contain only the descriptor information plus other information that isrequired for retrieving data values from other SAS data sets or from files whosecontents are in other software vendors’ file formats.
SAS data viewa type of SAS data set that retrieves data values from other files. A SAS data viewcontains only descriptor information such as the data types and lengths of thevariables (columns), plus other information that is required for retrieving data valuesfrom other SAS data sets or from files that are stored in other software vendors’ fileformats. Both PROC SQL views and SAS/ACCESS views are considered to be SASdata views. SAS data views are of member type VIEW.
SAS datetime valuean integer that represents a date and a time in SAS software. The integer representsthe number of seconds between midnight, January 1, 1960, and another specifieddate and time. For example, the SAS datetime value for 9:30 a.m., June 5, 2000, is1275816600.
SAS IT Resource Management clienta computer on which SAS IT Resource Management software is installed with aclient license. The client accesses PDBs on servers through a telecommunicationsprotocol such as TCP/IP. Most client access is limited to “readonly” and includessupport for reporting, data visualization, and querying PDB definitions and status.
SAS IT Resource Management servera computer on which SAS IT Resource Management software is installed with aserver license. The server has ’write’ access to the performance data warehouses(PDBs) and is used for processing and reducing data into one or more PDBs that areaccessible through the host operating environment’s file system. In addition, theserver is used for administering PDBs and can also be used to schedule batch work,to create report and rule definitions, to generate reports, and to manage report andrule definitions and reports.
SAS librarya collection of one or more SAS files that are recognized by SAS and that arereferenced and stored as a unit. Each file is a member of the library.
SAS procedurea program that produces reports, manages files, or analyzes data and which isaccessed with a PROC statement. Many procedures are included in SAS software.
scheduled jobin SAS IT Resource Management, one of a set of batch jobs that typically run atnight and that process data into one or more performance data warehouses (PDBs),reduce data in the PDB(s), generate reports, and back up the PDB(s).
schemathe physical layout of logged or collected data.
serverSee SAS IT Resource Management server.
service-level agreement (SLA)

594 Glossary
an agreement that specifies the performance characteristics that a system is to meet.For example, availability, throughput, and response time are characteristics that areoften included in SLAs.
setupthe task of customizing the collector and SAS IT Resource Management software inorder to enable data from the collector to be processed into a performance datawarehouse (PDB) and reduced in the PDB.
simple index variablea variable for which an index is built. The index contains information about thevalues of the variable and about the observations that contain those values.
sitea group of performance data warehouses (PDBs) that are located on the same serverhost and which share the same default values, the same list of holidays, and thesame work shift code for holidays. The shared information, known as site options orsite properties, is stored in a site library. See also site library, site options.
site librarya SAS library in which site-specific information is stored. See also SITELIB, site.
site optionsoptions whose values are intended as default values for all performance datawarehouses (PDBs) for a specific site. These site options include archive device,archive path, archive parameters, archive engine, active collector, Daylight SavingTime definition, Greenwich Mean Time deviation, start of week, work shift schedule,and definitions of work shift codes. Site options can also include some site-levelspecifications that do not act as PDB defaults. These site options include the list ofholidays and the work shift code for holidays. On z/OS, you can also specify whetherto build MXG views as a site option.
SITELIBthe libref (library reference name) for the active site library. See also site library,active site library.
SNMP (Simple Network Management Protocol)a protocol or standard that is used for exchanging network management information,which is information that enables the network to be managed.
SNMP agenta software module that performs network management functions. See also SNMP(Simple Network Management Protocol).
staged dataraw data that has been read, optionally transformed, and either written to a SASdata set or made available through a SAS data view.
staging codeSAS statements that read raw data, transform it, and either write it to a SAS dataset or make it available through a SAS data view.
suffixin SAS IT Resource Management, the eighth character in the name of a variable atthe day, week, month, or year level. The suffix indicates the type of statistic (forexample, N means count, S means sum, and no suffix means average). Earliercharacters in the name contain the name of the detail-level variable on which thestatistic is based.
summarize

Glossary 595
to calculate summary statistics in order to represent the values of variables in thedetail level of a performance data warehouse (PDB). The summary statistics arestored in the day, week, month, and/or year levels of the PDB.
summary levela performance data warehouse (PDB) level in which the performance data issummarized for a specific unit of time. The four summary levels are day, week,month, and year. The data at a particular summary level is stored in a correspondinglibrary. For example, data that is summarized by day is stored in the DAY library ofthe PDB.
supplied collector supportcollector support that is supplied with SAS IT Resource Management.
supplied formata format that is shipped with SAS IT Resource Management.
supplied report definitiona report definition that is shipped with SAS IT Resource Management.
supplied rule definitiona rule definition that is shipped with SAS IT Resource Management.
supplied softwaresoftware that is shipped with SAS IT Resource Management.
supplied table definitiona table definition that is shipped with SAS IT Resource Management.
supplied variable definitiona variable definition that is shipped with SAS IT Resource Management.
tablethe table definition, the status information about the data that is associated with thetable definition, and the data itself. A table’s data is contained in SAS data sets fromeach of the performance data warehouse’s five data libraries: DETAIL, DAY, WEEK,MONTH, and YEAR. A table’s metadata is contained in the performance datawarehouse’s DICTLIB library.
table definition1) the attributes of a particular table. 2) the attributes of a table and the attributesof its associated variables. 3) the attributes of a table and of its associated variables,plus the status information about the data that is associated with the table and itsvariables. The meaning that is intended is explained where the term is used. Seealso table.
text reporta report that tabulates or prints data values or which produces low- resolutiongraphics. See also graph report.
throughputthe rate at which requests for work are serviced by a computer system.
time formatin SAS software, the instructions that tell SAS how to write numeric values as timevalues.
tool nameone of a pair of identifiers that specifies a particular set of collector support. Theother identifier is collector name. For example, the pair of identifiers specifies whichcollector-specific staging code to run during the process task.
tuning

596 Glossary
the process of tracking the performance of an IT service, comparing the performanceto service objectives in order to identify bottlenecks and hardware problems, andthen adjusting the service to eliminate the problems. Tuning also involvesdistributing work equitably to the available computer hardware in order to optimizethe use of resources.
utilization1) for resources that can be partially occupied (for example, memory), the fractionalusage of a resource. 2) for resources that cannot be partially busy (for example, aCPU), the ratio of time that a resource is being used to the total elapsed time.
variablea column in a SAS data set or in a SAS data view. The data values for each variabledescribe a single characteristic for all observations. See also derived variable,formula variable, regular variable.
viewlogically, a set of observations that contains values for regular, derived, and formulavariables. Physically, a view provides information about regular and derivedvariables and their locations, as well as source statements for calculating the valuesof formula variables. There is one view for each level of each table in a performancedata warehouse (PDB).
Web browsera software application such as Microsoft Internet Explorer or Netscape Navigator thatprovides access to information that is on the Internet or on your company’s intranet.
Web galleryanother term for gallery.
Web-enabled reporta report that has attributes that enable it to be displayed by a Web browser.
week-level dataperformance data that is summarized for an entire week or for the currentweek-to-date. Week-level data is summarized from detail-level data.
weighta numerical coefficient that is assigned to an item and which indicates the relativeimportance of the item in a frequency distribution or population.
weighting variablea variable whose values represent the weights for each observation.
workloadthe amount of work a system is experiencing. Workload can be measured in termssuch as characters per second, processes per second, or transactions per second.
year-level dataperformance data that is summarized for an entire year or for the currentyear-to-date. Year-level data is summarized from detail-level data.

Index 597
Index
Aaccess rights 44
administration 44users 45
ADMIN library 10administration
concepts and tools 261data 409extensions to SAS IT Resource Manage-
ment 425levels 337site libraries 270tables 353variables 378whole PDBs 296
Administration tab 30age limits 10Applications tab 32archived data
retrieving 418archiving incoming data 411
Bbatch interface 6, 18
submitting SAS programs through SASGUI 18
batch jobstroubleshooting 48
batch modesubmitting SAS programs in batch mode 19
BY variables listsrestrictions on modifications 348
Ccharts 500client interface 6client setup 43
documentation 12%CMPROCES macro
exit points for 447COLLECT library 10collecting data 413collector support packages
checking contents of 436creating and installing 426
creating collector-support entities 432installing 436installing collector-support entities 428introduction 427overview 427packaging collector-support entities 428, 434process flow 427
collectors 7Generic Collector Facility 13
command line 27commands 26
UNIX 27Windows 27z/OS 27
Coordinated Universal Timetime stamps for 421
CPMISC PDS 265%CPPROCES macro
exit points for 447%CSPROCES macro
exit points for 457%CWPROCES macro
exit points for 457
Ddata
archiving incoming data 411checking for duplicate data 413collecting 413overview 409processing 413purging 415reducing 416retrieving archived data 418staging 419time stamps for Coordinated Universal
Time 421viewing amount of 419viewing datetime range of 419YEARCUTOFF system option 422
data dictionaries 10data sources
customizing 135incorporating into PDBs 133non-SMF, z/OS 153SMF 135
data valuesviewing 420
Data Visualization tool 466datetime range of data
viewing 419DAY library 9Daylight Saving Time expression 421demonstration PDBs 13derived variables 8
creating/editing/viewing 381defining 407deleting 400listing 405
DETAIL library 9dialog boxes
selecting options in 29DICTLIB library 10documentation 13, 14duplicate-data checking 413
extensions to 425
EEditor window 24Enhanced Editor window 24Exception Analysis window 468exception reports 566exit points 442, 446
for %CMPROCES macro 447for %CPPROCES macro 447for %CSPROCES macro 457for %CWPROCES macro 457specific locations of 452table of 447
exit routines 444explorer trees 554Explorer window 24
Fformats
storing custom formats in site libraries 277formula variables 8
creating/editing/viewing 388defining 407deleting 401listing 406

598 Index
GGENERATE SOURCE control statement 13, 48Generic Collector Facility 13, 158
appendices 176C2RATE and D2RATE interpretation
types 173creating table and variable definitions 164customizing table and variable definitions 165duplicate data 173examples 204getting started 159installing table definitions in master dictio-
nary 169setting up for production use 167staging code 171staging data 162, 174steps 161user-defined formats 170verifying logging and collector software 168
Graph Data tool 467Graph window 24GUIs 6
Hhelp 11
Iinterfaces 6
batch interface 6client interface 6server interfaces 6Web interface 6
L_LEVEL_ variable 348levels 8, 9
age limit 346BY or CLASS variables 339ID variables 342index variables 344_LEVEL_ variable 348overview 337restrictions on modifying BY variables
lists 348space usage 349statistics 346time range 351variable indicating datetime, day, week, month,
year 350variable’s presence 338
librariessummarizing PDB data into 9
listserv 14Log window 24
Mmacros 265
Manage Report Definitions tool 468menus 25
pop-up windows 26UNIX 25Windows 25z/OS 25
mib2dict compiler 129MIBS directory 266migration 243MISC directory 265MONTH library 9moving windows 28MXG-based tables 133MXG software 266
Nnaming conventions
report definitions 498tables and variables 371, 374
Oobject manipulation 28Output window 24
Ppalette definition folders
adding 518creating 519deleting 521overview 517viewing list of definitions 522viewing list of known folders 522
palette definitionsassociating with report definitions 526copying 526creating/editing/viewing 527deleting 528overview 525saving 529specifying/editing/viewing default defini-
tion 529supplied definitions 528
PDBs 7activating 299adding to list of known PDBs 301age limits 10associating remote-server profile with 302backing up 303building views 304combining 304copying options to site library 273copying properties to site library 308copying site library options to 274copying site library properties to 308copying within local file system 306creating 308deleting 315demonstrations 13disassociating remote-server profile from 316exporting 316
importing 318incorporating data sources 133properties 326releasing lock on 319removing from list of known PDBs 319splitting into two PDBs 320summarizing data into libraries 9table definitions 8tables 8transporting 322variable definitions 8verifying/correcting data dictionary 322viewing/editing access mode 325viewing file system and profile 323viewing list of known PDBs 324viewing name of 323whole PDBs 296
PDBWORK library 10Perform Exception Analysis tool 468performance data warehouses (PDBs) 7performance databases (PDBs) 7, 264PGMLIB
copying site library options from 274plots 499printed reports 499printing reports 511process exits
exit points 442, 447, 457overview 442variables available to 445writing exit routines 444
process task 9processing data 413Program Editor window 24program library 263purging data 415
QQuickStart Wizard 12
adding report definitions to report job 552examples 13modifying exception reports 566removing reports from report job 568setup and 50
Rreducing data 9, 416reduction levels 9reference documentation 13remote server profiles
copying 573creating 574deleting 576overview 571viewing/editing 577associating with PDBs 302disassociating from PDBs 316
report definition foldersadding 472creating 473overview 471removing 475

Index 599
viewing list of definitions 475viewing list of known folders 476
report definitionsadding to QuickStart report job 552associating palette definitions with 526copying 480creating/editing/viewing 481deleting 487directing reports to the Web 491naming conventions for 498overview 480report styles 499running 488saving 489selecting 491supplied definitions 488variable types 501
report explorer trees 554, 570report galleries 6, 23, 551
changing the styles 554customizing static files 562grouping reports in 46
report groupings 46report styles 499
charts 500plot reports 499printed reports 499source reports 500spectrum reports 500tabular reports 501three-dimensional graphs 500
reportingconcepts and tools 465galleries 551palette definition folders 517palette definitions 525remote server profiles 571report definition folders 471report definitions 480reports 511rule definition folders 531rule definitions 535UNIX tips 505Windows tips 505z/OS tips 502
Reporting tab 30reports 511
deleting 513directing to the Web 491generating 511grouping 46overview 511printing 511saving 512troubleshooting problems 513variable types for 501
resizing windows 28Results window 25retrieving archived data 418rule definition folders
adding/creating 532deleting 532evaluating (running) 533overview 531viewing list of definitions 534viewing list of known folders 534
rule definitionscopying 545creating 536deleting 545evaluating (running) 546opening 544overview 535rule results 547viewing/editing 547
rule exceptionsgenerating 547, 548viewing 548
rule resultsoverview 547results of rule evaluations 547
RUN_REPORT= command 541
Ssample code 13SAS GUI
submitting SAS programs 18SAS IT Charge Management
documentation 14SAS IT Resource Management 3
documentation 14extensions to 425getting started 12, 18interfaces 6listserv 14QuickStart Wizard 12software components 263suggested reading 14Web site 13work flow 5
SAS IT Service Level Managementdocumentation 14
SAS windows 24SASMISC directory 265SASUSER library 264SCHEMA directory 266server interfaces 6server setup 38
case 1 39, 53case 2 40, 65case 3 41, 81case 4 42, 99case 5 42, 119collector-specific documentation 12documentation for 12
setup 37access rights 44client setup 43QuickStart Wizard and 50server setup 38Web browser setup 43
site libraries 264activating 272backing up 273copying options from PGMLIB 274copying options to PDB 274copying PDB options to 273copying PDB properties to 308copying properties to PDB 308creating 275deleting 276
overview 270properties 283releasing lock on 277storing custom formats in 277viewing/editing access mode 281viewing/editing value of default 280viewing file system and profile 279viewing name of 279
SMF data sources 135software components 263source reports 500spectrum reports 500staging data 419summary levels 9
Ttable definitions 8
GENERATE SOURCE control statement 48supplied 362viewing/editing defaults 371
tablesadding 355creating 357deleting 361levels 8naming conventions 371, 374overview 353PDBs 8supplied table definitions 362viewing/editing 364viewing/editing table definition defaults 371viewing status information 363
tabular reports 501Technical Support 16text manipulation 28three-dimensional graphs 500time stamps
for Coordinated Universal Time 421toolbar 27troubleshooting
batch jobs 48reports 513
UUNIX
commands 27menus 25reporting tips for 505
UNIX GUI 22exiting 23starting 21
Vvariable definitions 8
GENERATE SOURCE control statement 48supplied 404viewing/editing defaults 406
variablescopying regular variables 380creating/editing/viewing derived variables 381

600 Index
creating/editing/viewing formula vari-ables 388
creating/editing/viewing regular variables 394defining derived variables 407defining formula variables 407deleting derived variables 400deleting formula variables 401deleting regular variables 403derived variables 8formula variables 8interpretation types 408listing derived variables 405listing formula variables 406listing regular variables 406overview 378
views 8
WWeb
directing reports to 491
Web-based reports
alternate welcome file 565
creating and displaying 559
Web browser setup 43
Web interface 6
Web site 13
WEEK library 9
welcome file 565
window-specific help 13
Windows
commands 27
menus 25
reporting tips for 505
Windows GUI 22
exiting 23
starting 21
work flow 5
YYEAR library 9YEARCUTOFF system option 422
Zz/OS
commands 27menus 25reporting tips for 502
z/OS GUI 21exiting 21starting 19
Your Turn
If you have comments or suggestions about SAS IT Resource Management 2.7: User’sGuide, please send them to us on a photocopy of this page, or send us electronic mail.
For comments about this book, please return the photocopy to
SAS PublishingSAS Campus DriveCary, NC 27513E-mail: [email protected]
For suggestions about the software, please return the photocopy to
SAS Institute Inc.Technical Support DivisionSAS Campus DriveCary, NC 27513E-mail: [email protected]