saperion workflow version 7 - hyland · 1 workflow introduction 2 this allows users to intuitively...
TRANSCRIPT

SAPERION Workflow Version 7.1

Copyright © 2016 Lexmark. All rights reserved.
Lexmark is a trademark of Lexmark International, Inc., registered in the U.S. and/or other countries. All other trademarksare the property of their respective owners. No part of this publication may be reproduced, stored, or transmitted in anyform without the prior written permission of Lexmark.

Table of Contents
1 Workflow Introduction ........................................................................................ 1
1.1 Adhoc Workflow .................................................................................................. 1
1.1.1 Characteristics of the Adhoc Workflow .......................................................... 2
1.1.2 Configuration in the Adhoc Workflow Definition ........................................... 2
1.1.3 Configuration of Escalation ............................................................................ 3
2 Administration .................................................................................................... 3
2.1 Workflow Tasks .................................................................................................... 3
2.1.1 The "Workflow Escalations" Task ................................................................... 3
2.1.2 The "Workflow Reminder" Task ...................................................................... 4
2.2 "Workflow" Module ............................................................................................. 5
2.2.1 Workflow Processor ......................................................................................... 6
2.2.2 Definitions ....................................................................................................... 7
2.2.3 Server Processes ............................................................................................. 8
2.2.4 System Log ..................................................................................................... 8
2.2.5 User Interface .................................................................................................. 9
2.2.6 Process Log ..................................................................................................... 9
2.2.7 Not Present ..................................................................................................... 10
2.2.8 Substitution ..................................................................................................... 10
2.2.9 Workflow Inbox ................................................................................................ 10
2.2.10 Workflow Status Colors ................................................................................... 11
2.3 Monitoring Workflow in the Applications Server Branch .................................. 11
2.3.1 "Action" Column ............................................................................................. 12
2.4 Configuring the User Administration ................................................................. 12
2.4.1 Setup Options for Users ................................................................................. 13
Substitute ....................................................................................................... 15
Configuration for Users in Several Organizational Units ............................ 15
2.4.2 Setup Options for Groups .............................................................................. 16
2.4.3 Unauthorized Receiver of a Business Case ................................................... 17
2.5 Setup of Organizational Structure ..................................................................... 17
2.5.1 Reorganization of an Organizational Structure ............................................. 18
Creation of Organizational Units ................................................................. 18
Creating Organization Roles ......................................................................... 19
Assignment of the Organization Roles in the Company Structure ............. 20
Assigning Users within the Company Structure .......................................... 20
2.6 Setting Up Workflow Scenarios .......................................................................... 20
2.6.1 Adjusting the Database Definition (DDC) ..................................................... 20
2.6.2 Adjusting the Query Form .............................................................................. 22
2.7 Setting Up Business Case Starts ........................................................................ 22
2.7.1 Starting a Business Case Automatically when Archiving .............................. 22

2.7.2 Limiting Process Choice ................................................................................ 23
2.7.3 Denying the Manual Start of Business Cases ................................................ 24
2.8 Adjusting the Workflow Inbox ............................................................................ 24
2.8.1 Updating the Inbox Automatically .................................................................. 25
2.8.2 Adjusting the Workflow Folder ....................................................................... 25
Updating the Folder ...................................................................................... 26
2.8.3 De-/ Activating Task Folder ........................................................................... 26
2.8.4 Localization ...................................................................................................... 27
Multiple Languages ....................................................................................... 27
Naming the Workflow Folder ....................................................................... 28
2.8.5 Adjusting the Result List ................................................................................ 28
2.9 Activating and Configuring the Workflow Log ................................................... 28
2.9.1 The PDFDOCVECTOR Log Table ................................................................... 29
2.10 Cleaning Up the XDFDOCVECTOR Business Case Table ................................. 29
3 Workflow Process Design ................................................................................... 30
3.1 The ProcessDesigner .......................................................................................... 30
3.1.1 The Tools of the ProcessDesigner .................................................................. 31
[File] Button ................................................................................................... 31
Ribbon ............................................................................................................ 32
Properties ....................................................................................................... 33
Debug Window .............................................................................................. 34
3.2 The Process Definition ....................................................................................... 34
3.2.1 Versioning a Process Definition ..................................................................... 34
3.2.2 Saving Old Versions ........................................................................................ 35
3.3 Objects ................................................................................................................. 35
3.3.1 Events ............................................................................................................... 36
3.3.2 Gateways .......................................................................................................... 36
Hints regarding Usage of Gateways ............................................................ 36
3.3.3 Tasks ................................................................................................................. 37
3.3.4 Subprocess ...................................................................................................... 37
3.3.5 Sequence Flow ................................................................................................. 38
3.3.6 Artifacts ............................................................................................................ 38
3.4 Creating an Object .............................................................................................. 38
3.4.1 Workflow User Task ......................................................................................... 39
"Receiver Selection" Area ............................................................................. 40
"Receiver Options" Area ............................................................................... 43
"Selectable" Area ........................................................................................... 43
"Role-Group Member Options" Area ........................................................... 44
3.4.2 Script Task ....................................................................................................... 44
3.4.3 Subprocess ...................................................................................................... 45
3.5 Object Properties ................................................................................................ 46

3.5.1 Diagram Properties ......................................................................................... 46
3.5.2 Element Properties .......................................................................................... 47
Task Type ........................................................................................................ 47
Characteristic ................................................................................................. 47
Task Description ............................................................................................ 47
History Entry .................................................................................................. 47
Receiver .......................................................................................................... 48
Communication Medium .............................................................................. 48
Escalation Levels ........................................................................................... 51
Responsible .................................................................................................... 51
Majority Check ............................................................................................... 51
Insert Template .............................................................................................. 52
Receiver becomes Owner ............................................................................. 52
Memorize Receiver ........................................................................................ 52
Estimated Working Time [min] ..................................................................... 52
Index Forms ................................................................................................... 53
Document Access ......................................................................................... 53
Field-Mapping: Document -> Task ............................................................... 54
Field-Mapping: Task -> Document ............................................................... 55
Context Menu ................................................................................................ 56
Events ............................................................................................................. 57
3.5.3 Properties of Automatic Activities .................................................................. 59
Start Activity .................................................................................................. 59
End Activities ................................................................................................. 60
Macro Activity ................................................................................................ 60
3.6 Sequence Flows ................................................................................................... 60
3.6.1 Conditional Flow ............................................................................................. 60
3.6.2 Default Flow .................................................................................................... 61
3.6.3 Manual Flow .................................................................................................... 61
3.6.4 Timer Sequence Flow (interrupting) .............................................................. 61
3.6.5 Timer Sequence Flow (non interrupting) ...................................................... 62
3.6.6 Error Sequence Flow (interrupting) ............................................................... 62
3.7 Creating a Sequence Flow .................................................................................. 62
3.8 Sequence Flows Properties ................................................................................. 63
3.8.1 Diagram Properties ......................................................................................... 63
3.8.2 Sequence Flow Properties .............................................................................. 64
3.9 Owner of a Business Case Activity .................................................................... 65
3.10 Escalation ............................................................................................................. 66
3.10.1 Creating an Escalation Level ........................................................................... 66
3.10.2 Escalation Types .............................................................................................. 67
3.10.3 Receiver Selection for an Escalation .............................................................. 68
3.11 Macros ................................................................................................................. 70

3.11.1 Overview of Macro Process ............................................................................ 70
3.11.2 Macros in Processes ....................................................................................... 71
OnExit/ OnEntry/ OnAction on the Workflow Server .................................. 71
OnExit on the Client ..................................................................................... 71
3.11.3 "Document.DocflowAction" ............................................................................ 71
3.11.4 Macros on the Server ..................................................................................... 72
3.11.5 Macros on the Client ...................................................................................... 73
4 Workflow API ....................................................................................................... 73
4.1 Methods ............................................................................................................... 73
4.1.1 "WFRequest" Method ..................................................................................... 73
Function Description of Workflow Actions .................................................. 74
4.1.2 "SelectUser" Method ...................................................................................... 78
4.1.3 "WfGetInstances" Method ............................................................................ 78
4.1.4 "WfGetParent" Method ................................................................................... 79
4.1.5 "WfGetChildren" Method .............................................................................. 79
4.1.6 "WfGetMainInstance" Method ...................................................................... 80
4.1.7 "WfGetTokenId" Method ............................................................................... 80
4.2 Status Information after an "Escalation Event" ................................................. 81
4.3 Starting Business Cases by Task ........................................................................ 82
4.4 Notes for the API Use ....................................................................................... 83
4.4.1 Combining the "Pause" and "End" Workflow Actions ................................... 83
4.4.2 Refresh the Results List after a Workflow Action ......................................... 83
4.4.3 Workflow Action from a Form ........................................................................ 83
4.4.4 Setting Business Case Values in the Start Activity using OnAction Macro or
Mapping ...........................................................................................................
83
4.5 Examples of API Use .......................................................................................... 83
4.5.1 Starting Business Case on Several Documents ............................................. 83
4.5.2 Starting Business Case with Query of the Process Definition ....................... 84
4.5.3 Dual Control .................................................................................................... 85
4.5.4 Forwarding from an Index Using a Macro ..................................................... 86
4.6 API Error Codes ................................................................................................... 86
4.6.1 System Error Communication Layer .............................................................. 86
4.6.2 Regular Return Codes ..................................................................................... 86
4.6.3 Regular Document Access Runtime Errors ................................................... 88
4.6.4 Init Errors ......................................................................................................... 88
4.6.5 Internal Errors ................................................................................................. 89
4.6.6 File Errors ........................................................................................................ 90
4.6.7 Database Errors ............................................................................................... 90
4.7 API Error Codes ................................................................................................... 90
4.7.1 System Error Communication Layer ............................................................ 90
4.7.2 Regular Return Codes ..................................................................................... 91
4.7.3 Regular Document Access Runtime Errors ................................................... 92

4.7.4 Init Errors ......................................................................................................... 92
4.7.5 Internal Errors ................................................................................................. 93
4.7.6 File Errors ........................................................................................................ 94
4.7.7 Database Errors ............................................................................................... 94
5 Appendix .............................................................................................................. 95
5.1 Defining a Receiver of a User Task .................................................................... 95
5.1.1 Receiver Selection "Predetermined" ............................................................... 95
5.1.2 Receiver Selection "User selects recipient" ................................................... 96
5.2 PROGRAM.INI/ ARCHIEF.INI ............................................................................ 97
5.2.1 [Docflow] Section ............................................................................................ 98
5.2.2 [Docflow. Docflow Escalations] Section ......................................................... 101
5.2.3 [Docflow. Docflow Reminder] Section ............................................................ 102
5.2.4 [Docflow.Processes] Section ........................................................................... 102

1.1 Adhoc Workflow
1
SAPERION Workflow Version 7.1
1 Workflow Introduction
The SAPERION Workflow option provides tools to automate your business processes:
+ Display of structured processes
+ Rules for distribution to users/groups using their roles in the organizational structure
+ Escalation rules, reminder date
+ Substitute rules/holiday substitution based on the organizational structure
+ SAPERION forms, e-mail notifications
+ Integration of external applications (for data exchange)
+ Historizing, monitoring, and process controlling
The "Workflow" option corresponds to the usual SAPERION standards in terms of simple installation,
configuration, and use. Due to complete integration in SAPERION, all business cases carry the
advantages of archived documents from the start, and in particular feature complete revision security.
The "Workflow" option is tuned to the typical applications in the office environment, for example,
initialing, approval and forwarding of documents and task reminders.
The user receives the business cases requiring processing in his or her distribution center, the workflow
inbox, which is an adaptable query form. Common functions to process business cases are available
here. The query form is represented by an additional basket in the SAPERION user interface. The user
can therefore continue to work with his/her usual interface, and there is no need for training.
SAPERION offers a simple way to create a workflow process through integration of the ProcessDesigner
in the "Workflow" option. The processes are created using basic graphical operations. The following
features characterize the ProcessDesigner:
+ Intuitive use
+ No programming experience required.
+ Predefined objects
+ Integration in the SAPERION user interface
i The sending of e-mails from SAPERION needs to be configured before you can use the "E-mail"
property.
1.1 Adhoc Workflow
Adhoc workflow also gives you the possibility to create and automate a routing list without workflow
licensing. A number of activities are available for this that allow sequential forwarding and step-by-step
processing of a document.

1 Workflow Introduction
2
This allows users to intuitively define and forward smaller processes. Adhoc workflow is designed for
unstructured, small processes that are used from time to time.
! As in the general workflow, the database definitions of the original document must be
workflow-enabled.
1.1.1 Characteristics of the Adhoc Workflow
The following limitations need to be remembered when working with adhoc workflow:
+ Activities with several users cannot be used, as only one receiver can be entered
+ Only escalations of the type "unread" and notification may be used
+ It is not possible to go back more than one step (approval, verification)
+ If a document form is stored for the activities, the adhoc workflow is only able to use one archive
+ Preset receivers do not have an influence on the display of the hierarchy in the routing list
Compared with the normal workflow, the following changes have been made to the delivery in the
ADHOC.DFD process definition that is used for the adhoc workflow:
+ The editor is noted
+ Forwarding to everyone
+ The context function "not responsible" has been hidden
1.1.2 Configuration in the Adhoc Workflow Definition
The adhoc workflow is defined by editing the process definition "ADHOC.DFD" with the help of
the ProcessDesigner. The supplied "ADHOC.DFD" is the process definition with the smallest set of
activities. The administrator can make any changes to the process definition. Since no adhoc-specific
consistency check is carried out by the ProcessDesigner, the administrator is responsible for setting the
corresponding configurations. The following points should be observed here:
+ Existing activities can be deleted
+ Further activities can be inserted

2.1 Workflow Tasks
3
+ It is not worthwhile using start, end, subflow, and macro activities
1.1.3 Configuration of Escalation
No escalations are preset in the supplied "ADHOC.DFD" process definition. They can be configured
with the aid of the ProcessDesigner. Except for forwarding via output links, all levels and types can be
used in their entirety.
2 Administration
You can make a number of configuration settings in the Microsoft Management Console (MMC) to set
up your SAPERION workflow.
2.1 Workflow Tasks
The tasks for the Workflow are displayed in the "Tasks" area of the Core Server when the workflow server
is running.
Fig. 2–1: MMC – Workflow-Tasks
2.1.1 The "Workflow Escalations" Task
The "Workflow Escalations" task allows you to specify when and how often the system checks whether
an escalation case has occurred. The configuration screen is opened using the "Edit" entry from the
right-click shortcut menu.
For each activity in the ProcessDesigner, the user specifies when an escalation is set for a business case
and which action should be run when the escalation time arrives.

2 Administration
4
Fig. 2–2: Dialog "Edit Task" - Docflow Escalations
In the "Scheduled" section, specify when and how the task should be carried out. The settings that must
be chosen should be selected based on how precise the time must be at which the escalation occurs.
In time-critical applications, a value in the minute range is set. In less critical cases, it may be sufficient
for the task to be executed once during the night.
The following start types are possible:
Start types
Start Type Description
Disabled With this start type, the task does not run.
Run periodically For this start type, a time interval (such as every 10 minutes) as well as a time frame (such
as between 10:00 p.m. and 11:00 p.m.) can be specified as parameters.
Run immediately With this start type, the task runs immediately.
Later execution With this start type, a time can be specified at which the task will run.
! Any time settings you have made here will be overwritten in the INI-file settings when you reboot.
Be sure that the entries match up.
2.1.2 The "Workflow Reminder" Task
This task is for controlling reminders. Here you can specify how often the system checks whether a
document exists for which a reminder must be generated.
Fig. 2–3: "Edit task" dialog – Docflow Reminder
In the "Scheduled" section, specify when and how the task should be carried out. The settings to be
chosen depend on how soon the business cases must be fetched from the reminder. In time-critical
applications, a value in the minute range is set. In less critical cases, it may be sufficient for the task to
be executed once during the night.
The following start types are possible:

2.2 "Workflow" Module
5
Start types
Start Type Description
Disabled With this start type, the task does not run.
Run periodically For this start type, a time interval (such as every 10 minutes) as well as a time frame (such
as between 10:00 p.m. and 11:00 p.m.) can be specified as parameters.
Run immediately With this start type, the task runs immediately.
Later execution With this start type, a time can be specified at which the task will run.
i If the Core Server is working at an average of more than 50% capacity, and reminders and
escalations are frequently used, causing performance to be sharply reduced while these tasks are
taking place, we recommend setting up a separate Core Server for these tasks.
2.2 "Workflow" Module
When using the "Workflow" option, an entry in the Application Server branch will be displayed that
indicates you are using the option.
Fig. 2–4: MMC: Applications branch
Double clicking the "Workflow" entry opens a window in which you can configure the "Workflow" options.
The settings made here are saved in ARCHIEF.INI on the server.
2 Administration
6
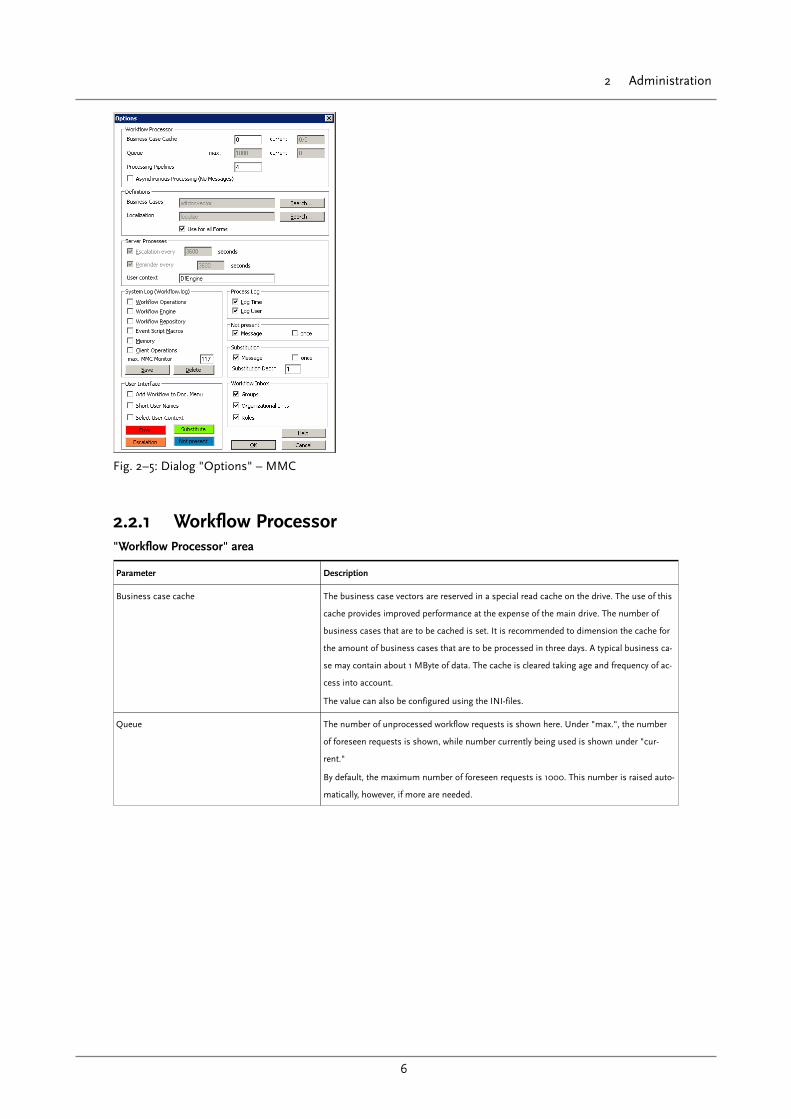
Fig. 2–5: Dialog "Options" – MMC
2.2.1 Workflow Processor
"Workflow Processor" area
Parameter Description
Business case cache The business case vectors are reserved in a special read cache on the drive. The use of this
cache provides improved performance at the expense of the main drive. The number of
business cases that are to be cached is set. It is recommended to dimension the cache for
the amount of business cases that are to be processed in three days. A typical business ca-
se may contain about 1 MByte of data. The cache is cleared taking age and frequency of ac-
cess into account.
The value can also be configured using the INI-files.
Queue The number of unprocessed workflow requests is shown here. Under "max.", the number
of foreseen requests is shown, while number currently being used is shown under "cur-
rent."
By default, the maximum number of foreseen requests is 1000. This number is raised auto-
matically, however, if more are needed.

2.2 "Workflow" Module
7
Parameter Description
Processing pipelines The number of pipelines (queues) can be changed here. A custom thread is created on the
server for each pipeline, which raises the server load and improves performance. It is advi-
sable to raise the number of pipelines if the thread monitor shows that the queues are con-
stantly occupied. This is the case when a green icon constantly appears next to the work-
flow queues in the "Diagnostics > Threads" branch (see also figure "MMC - Threads work-
flow queue" below).
However, the administration of the queues also uses processor resources. The optimum
number of queues, therefore, must be ascertained through experimentation where necessa-
ry.
Experience has shown that 8 pipelines are necessary to achieve proper system behavior for
a single-processor machine with 1 GByte of RAM.
The value can also be configured using the INI-files.
Asynchronous processing (no messages) By default, you can only work with the client again once the forwarding of the business case
to the next activity has been completed. When the checkbox is selected, you can continue
work with the client beforehand. Please note that any messages, for example, receiver ab-
sence notes, are not displayed.
NOTE: This setting should be used if the connections to the database or workflow server
are slow. The performance mainly depends on the ping times in this case. The limits are:
LAN: 1 ms, WAN: 5 ms
Fig. 2–6: MMC – Threads workflow queue
2.2.2 Definitions
"Definitions" area
Settings Description
Business Cases This field indicates which table is used for the administration of the business cases. By
default, this is the XDFDOCVECTOR table. Unless this setting requires modification in a
project, it should not be changed.
NOTE: If it should be necessary to expand the tables, we recommend using the tables un-
der another name for later updates.
The value can also be configured using the INI-files.

2 Administration
8
Settings Description
Localization This field indicates the table for the language setting. By default, the LOCALIZE table is
used. Unless this setting requires modification in a project, it should not be changed.
NOTE: If you specify a different table here, you must ensure that this table is also refe-
renced as a translation table in the workflow forms; i.e., appropriate adjustments must be
made here as well.
The value can also be configured using the INI-files.
2.2.3 Server Processes
"Server Processes" area
Settings Description
Escalation This setting indicates the interval at which the system checks whether an escalation must
be executed. The display is only for your information and cannot be edited here.
NOTE: The escalation setting should be deactivated for backup servers in a failover system.
After the installation, the default setting is "60 seconds." This value places unnecessary
stress on the system and should be set to at least 15 minutes. In less critical escalation en-
vironments, the value can be set even higher. If escalation is not used, the task should be
deactivated.
Reminder This setting indicates the interval at which the system checks whether a business case
should be retrieved from the reminder. The display is only for your information and cannot
be edited here.
NOTE: The reminder setting should be deactivated for backup servers in a failover system.
After the installation, the default setting is "60 seconds." This value places unnecessary
stress on the system and should be set to at least 15 minutes (900 seconds). In less critical
reminder environments, the value can be set even higher. If the reminder is not used, the
task should be deactivated.
User context The user context indicates the user – and thus the rights – within which the workflow ser-
ver works. By default, a user called "DfEngine" is used, which is created with a correspon-
ding profile during the installation. The default setting can be changed here.
The value can also be configured using the INI-files.
2.2.4 System Log
Here you can select the workflow actions that will be logged in the "WORKFLOW.LOG" log file. The log
can, on the one hand, be written to the Core Server, where the Core Server actions are logged; and on
the other hand, to the client, where the client actions are logged. In each case, the log files are located
in the default temp folder.
The following settings are possible:
Log settings
Settings Description
Workflow operations The workflow operations are logged along with their results.

2.2 "Workflow" Module
9
Settings Description
Workflow engine All operations carried out by the workflow engine are logged to determine the next activity
with the respective user.
Workflow repository Loading and saving of XML-files are logged.
Event script macros Call, execution, and results of macros are logged.
Memory Reserved for internal use.
Debug window The debug readings are issued not only in the log file, but also in the DBWIN window. This
requires a system restart.
Client operations On each client, all workflow operations are logged in the workflow.log file in the default
temp folder.
Delete With this setting, the administrator can delete the current workflow.log file.
To make the log file more manageable, a setting can be made to create a new log file when a defined
file size has been reached.
2.2.5 User Interface
"User Interface" area
Settings Description
Add workflow to doc. menu If the "Business case menu on original document" checkbox in this area is enabled, the for-
warding functions of the business case are also displayed in the context menu of the origi-
nal document in the original scenario. This only holds for an original document with an ac-
tive business case.
NOTE: This setting does not apply until the Core Server has been restarted.
Short user name When this checkbox is enabled, the short name will be used instead of the complete name.
The setting made in this location has no effect on display in the inbox. If the user name
from the inbox is to be used, this must be configured separately.
Select user context If a user is registered in several organizational units, it may be necessary when starting a
business case to determine in which context the user functions relative to this business ca-
se. If the checkbox is enabled, a dialog for selecting the organizational unit is opened at the
beginning for the business case. If the function is not enabled, the first organizational unit
to show up alphabetically will be used.
2.2.6 Process Log
The following settings can be made in the "Process Log" area:
"Process Log" area
Settings Description
Log time If the checkbox is enabled, the performed action will be logged with the exact time.

2 Administration
10
Settings Description
Log user names If the checkbox is enabled, the performed action will be logged with the name of the active
user.
NOTE: Please note that, in some countries, it is not permitted to store personal informati-
on that allows a detailed examination of the working time. For this reason, it is recommen-
ded to use logging either without personal names or limited to the date.
2.2.7 Not Present
"Not Present" area
Settings Description
Message If the "Message" checkbox is enabled, the user receives an appropriate message if he or
she sends a business case to an absent user.
Once If the "once" checkbox is enabled, the user receives this message only once a day per recei-
ver.
The value can also be configured using the INI files.
2.2.8 Substitution
"Substitution" area
Settings Description
Message If the "Message" checkbox is enabled, the user receives an appropriate message if the ab-
sent user has been substituted.
Once If the "once" checkbox is enabled, the user receives this message only once a day per recei-
ver.
Substitutions The substitution depth controls how far reassignment may propagate from the defined
substitutes. If a depth of 1 is specified, reassignment will only continue to the substitu-
te of the original receiver. If a depth of 2 is specified, reassignment will continue to the
substitute's substitute if he is also absent, and so on.
The value can also be configured using the INI files.
2.2.9 Workflow Inbox
You can change the appearance of the inbox using the three checkboxes provided here.
+ Groups
+ Organizational units
+ Roles
If you clear one or more of the checkboxes, the corresponding outliner entries will not be created by
the server.

2.3 Monitoring Workflow in the Applications Server Branch
11
! The configuration made here will only be evaluated when the workflow inbox is opened for the
first time and the folders will be created accordingly.
2.2.10 Workflow Status Colors
You may define a color for each of the following case statuses (this is intended to signal the status to
the affected user). Click the following buttons to open the color selection dialog:
+ Error
+ Substitute
+ Escalation
+ Not present
2.3 Monitoring Workflow in the Applications Server
Branch
The workflow monitor provides an overview of the currently running workflow actions.
Fig. 2–7: MMC – Workflow Monitor
The workflow monitor contains the following information (columns):
Workflow monitor
Column Description
Action see chapter entitled "The "Action" Column" below.
Date/ Time Date and time that the action was executed.
Actor Name of the user who has executed the action.
Subject Contents of the SUBJECT table field in the XDFDOCVECTOR business case table at the ti-
me the action was executed.
Activity Name of the relevant activity along with its ID in the process definition. In the ProcessDesi-
gner, this is a text underneath the activity.

2 Administration
12
Column Description
Process Name of the relevant process definition.
Business case-ID ID of the relevant business case from the DFUID field of the XDFDOCVECTOR business
case table.
Document-ID Current XHDOC of the original document linked to the business case.
2.3.1 "Action" Column
The "Action" column is given in the following format:
<Symbol for operation status> <System operation> <System user>.<Docflow action>][<Execution status>]
"Action" column
Entry Description
<Symbol for operation status> + A red square indicates that the workflow action is currently
being executed or that an error has occurred.
+ A green triangle indicates that the workflow action has been
executed without error.
<System operation> There are three different system operations:
+ Update: The entry in the XDFDOCVECTOR business case
table has been changed based on the status change affected
by the executed workflow action.
+ Protocol: An entry has been written to the PDFDOCVECTOR
log table.
+ Mail: The business case has also been sent by e-mail.
<System user> The action has been executed in the context of this user. This corresponds to the setting in
the "User context" workflow option in the MMC.
<Docflow action> This entry references the executed workflow action. Details are located in the workflow API
table.
<Execution status> The following entries are possible here:
+ OK: The action has been executed without error.
+ <Error>: If an error has occurred, a text appears here with a
reference to the error that has arisen.
2.4 Configuring the User Administration
To use the "Workflow" option, you must make certain settings in user administration in the Rich Client.
1. Log in to the Rich Client. In order to be able to make the necessary settings, you will need
appropriate administrator rights.

2.4 Configuring the User Administration
13
2. Click the ADMINISTRATION ribbon > USERS group > ADMINISTRATION command. The
"User Manager" dialog appears.
3. Open the "User properties" dialog by double-clicking an entry in the list of available users
or clicking the [New] button.
Workflow-relevant settings are made in this dialog under the "Workflow" tab. Furthermore, an
organization can be set up with which you can mirror the hierarchical structures within a company.
i When you use the "Workflow" option, we recommend using an SQL database for the user
administration.
The following entries are automatically made in the user administration when the "Workflow" option
is installed:
+ DfEngine User
A user called "DfEngine" is created in the user administration. This user has administrative rights
over membership to the "grpDfEngine" group, which is also created.
+ grpDfEngine Group
A group called "grpDfEngine" is created. Membership in this group gives the user "DfEngine"
administrative rights.
+ roleDfEngine Profile
The profile called "roleDfEngine" is assigned to the "grpDfEngine" group. It contains full
administrative rights.
! The user, group, and profile are created automatically when the "Workflow" option is created.
These entities involve internal parameters for the Core Server, to which no alterations can be made.
2.4.1 Setup Options for Users
You may now make a range of settings for use of the "Workflow" option for the individually created
SAPERION users. These settings can be found on the "Workflow" tab of the user properties.
Fig. 2–8: "User Properties" dialog – Workflow

2 Administration
14
"User Properties" dialog
Settings Description
E-mail An e-mail address can be entered in the field to be used to send messages for various acti-
ons within the workflow (e.g., escalation).
NOTE: A prerequisite for the use of the e-mail property is the installed e-mail function in
SAPERION.
In some cases, it may be necessary to ensure that no replies are sent to workflow e-mails. If
so, a no-reply address should be used as the mailing address. This no-reply address is defi-
ned using the ReplyTo=<address> parameter in the [Setup.Mail] section. This option is only
valid for SMTP.
Communication Medium The communication medium determines how users are informed of sent business cases
and in which form editing can take place. The following options may be selected:
+ SAPERION: The business cases appear in the SAPERION
workflow inbox.
+ SAPERION & E-mail: The business cases appear in the SA-
PERION workflow inbox. Additionally, the receiver of the
business case receives an e-mail with a reference to it.
Present The "Present" checkbox shows the presence or absence of a user. Except in the user mana-
ger, the use of which requires administrative rights, the presence setting can also be chan-
ged in the personal user settings. A "Present" checkbox has been integrated into the dialog
box. Changes to the presence setting apply immediately.
The following consequences arise through the absence of a user:
+ Business cases that are sent to a user who is not present
are forwarded to a defined substitute. The substitute can be
the personal substitute. If the business case has been sent
to a role whose owner is the absent user, an entered role
substitution has precedence over the personal substitute.
+ If a substitute cannot be specified, the receiver is retained
and the business case is tagged with the [head] icon and
highlighted in orange, thus allowing the owner or an admi-
nistrator for this business case to recognize it more easily
and respond promptly.
+ The personal inbox of the user being substituted can be seen
by the substitute and the previously available business case
can be taken over and edited by the substitute. The real edi-
tor is entered in the history.
Substitute See chapter entitled "Substitute" below.
Substitute has access to user's inbox If this checkbox is enabled and tasks are in the substituted person’s personal inbox, the
"Tasks" folder will be displayed to the substitute.
Display of substitutions may be controlled both centrally by the administrator and perso-
nally by the user.
NOTE: Tasks transferred after the point at which the substituted person became absent will
automatically be filed in the substitute’s folder.
The substitute can take these tasks over and process them according to the workflow defi-
nition, or return them

2.4 Configuring the User Administration
15
2.4.1.1 Substitute
A substitute can be created for each user.
The organizational structure can be shown using the [Substitute] button, a substitute can be selected
and dragged to the "Selected" area with the left mouse button held down.
It is also possible to search for specific people. You can search using the wildcard "*".
Searching for a specific name where the first two letters are known must always be used in combination
with "*". Otherwise initials beginning in this way will be found.
For example, to find the name "Pfennig," you must enter "PF*". Omitting the "*" will search for an initial
starting with the letters PF.
The substitute will only see the inbox in his folder structure if the substituted person had unprocessed
tasks in his inbox before his absence. Work items in this folder can be taken over and put back.
i A substitute does not have a forwarding menu for the business case if he is not a member of the
ACL on the original document. In this case, the substitute cannot forward the business case, but
only declare himself not responsible for it.
New activities that are sent to the user being substituted are forwarded to the substitute’s personal
inbox, and are highlighted in green.
i If the substitute for the registered user is also absent, the business case remains with the original
receiver.
The following can be selected as a substitute:
+ User
+ Organizational units
+ Organization roles (role classes)
+ Roles (role entities)
i Here it is also possible to select a substitute through the personal user settings of the user.
2.4.1.2 Configuration for Users in Several Organizational Units
If users are entered as members in several organizational units, then it is necessary to know the context
in which the user is to be used for this business case at the start of the business case or the query. The
following settings can be made in ARCHIEF.INI:
Example
[Docflow]
AskForContext=TRUE

2 Administration
16
[Docflow] section
Parameter Description
AskForContext TRUE = If a user is in more than one organizational unit, the list of available organizational
units for the user is displayed for selection during every start. The last selected organizatio-
nal unit is selected by default.
FALSE = When starting, the first organizational unit of the user is used; if the user does
not belong to an organizational unit, then the first organizational unit of the system is valid
(default).
2.4.2 Setup Options for Groups
Settings can also be made to the workflow in the created groups and organizational units of SAPERION.
These settings can also be found on the "Workflow" tab of the group properties dialog box.
Fig. 2–9: "Group Properties" dialog
"Group Properties"
Settings Description
E-mail distributor An e-mail distributor can be entered in this field to be used to send messages for various
actions within the Workflow. For example, an e-mail is sent to this address if "SAPERION &
e-mail" has been selected as the communication medium for the members of the group.
NOTE: A prerequisite for the use of the e-mail property is the installed e-mail function in
SAPERION.
In some cases it is necessary that workflow e-mails should not be replied. Then, a no-reply
mail address has to be used. This address is defined by the switch ReplyTo = <address> in
the [Setup.Mail] section. This is only possible when using SMTP.
Activating the workflow pool If you activate the "Enable in workflow inbox" checkbox and a task is in the group folder,
the pool will be displayed to a user who is a member of the group or organizational unit.
If the checkbox is not enabled, the pool will be hidden.

2.5 Setup of Organizational Structure
17
Settings Description
Direct access storage Tasks routed to a group or organizational unit must – if manual transfer is defined – be ta-
ken over from the group folder by a member of the group before they can be processed and
forwarded.
In this case, two steps must be carried out. To minimize work for the group members, the
settings for groups or organizational units may be set so that direct processing and forwar-
ding is possible.
Enable the "Direct Access Storage" checkbox to allow direct forwarding. The receiver will
see the context menu in his inbox and the button in the Tasks ribbon, which is also availa-
ble for a task in his personal task folder.
If the checkbox is disabled, direct forwarding is not possible. In this case, the receiver must
first transfer the task to his personal tasks folder.
2.4.3 Unauthorized Receiver of a Business Case
Over the course of a process, a receiver not included in the original document ACL may receive a business
case based on this document. By default, the receiver will receive the business case with empty metadata;
the corresponding document is marked with a [Lock] icon in the workflow inbox. In this case, it is possible
for the user to edit the business case metadata and run workflow functions. The cause is that the business
case receives the ACL of the original document at the start.
To suppress this transfer of access rights using the ACL, make the following entry in the [Docflow] section
of ARCHIEF.INI:
[Docflow]
NoCaseACL=TRUE
As before, the business case receiver will still not be able to edit the document, but all workflow functions
will be possible (e.g., reassign the case or declare themselves as not responsible).
2.5 Setup of Organizational Structure
You will need a so-called organizational structure to use the "Workflow" option. This is used to depict
the hierarchical structures within a company.
To create this organizational structure, open the User Manager by selecting ADMINISTRATION ribbon
> USER group > ADMINISTRATION command.

2 Administration
18
Fig. 2–10: Displaying the organizational structure
This section in the User Manager is used to depict the organizational structure of a company with its
departments, sub departments, and other hierarchical structures.
i The entry "BroadcastUserChanges=TRUE" needs to be added to the [Core] section of the
PROGRAM.INI so that any changes made are also visible on the other Core Servers when several
Core Servers are being used.
2.5.1 Reorganization of an Organizational Structure
When an organizational structure is reorganized, only the two entries "Organization" and "Organization
Roles" are displayed in the organizational structure section. We recommend the following procedure:
+ Creation of organizational units
+ Creation of organization roles (e.g., department manager)
+ Assignment of the organization roles in the company structure (drag and drop)
+ Assignment of the users in the company structure (drag and drop)
2.5.1.1 Creation of Organizational Units
In the organization section, you can depict the structure of a company with its departments and areas.
To facilitate this depiction, so-called organizational units are used. Technically, organizational units are
groups that have advanced properties.
In general, organizational units behave the same way as SAPERION groups. This means that they must
have a unique name within an organization and in reference to the SAPERION groups, also when they

2.5 Setup of Organizational Structure
19
are placed in different branches. Because of a special identifier, organizational units are not shown in all
forms where SAPERION has access to group lists.
Proceed as follows to create a new organizational unit:
1. Select "Organization" and click the "New" entry from the right-click shortcut menu. The
"Group Properties" dialog appears.
2. For further workflow settings, see the chapter entitled "Setup Options for Groups."
i Please note that you only provide the name of an organizational unit once – if a new organizational
unit is created that already exists, no warning is issued.
2.5.1.2 Creating Organization Roles
In the organization role section, you can define recurring roles of a company, for example, head of
department, deputy head of department, etc.
Organization roles serve as placeholders within a process definition. This allows you to ensure that a
single change within the organization does not require that all affected positions in the process definition
be changed but only the relation of the user to the role.
Example using the "Supervisor" Role
The role assignment constellation in our example is as follows:
Every organizational unit is assigned a "Supervisor." The "Supervisor" role is respectively allocated to
one user. Other users are then assigned to the organizational unit.
When an activity is received, only the direct members of the respective organizational unit are reached,
but not the user with the respective "Supervisor" role instance. If this user is also meant to receive the
activity, he or she must also be entered directly in the organizational unit.
+ If the current activity is followed by an activity with a concrete role instance as a receiver, this user
receives the activity in his or her inbox.
+ If the current activity is followed by an activity with a role class as the receiver, the user in the
respective role of the group of last users receives the activity in his or her inbox.
+ If a role is assigned more than one user, each of these users receives an additional group inbox,
which they can all access.
Proceed as follows to create a new organization role:
1. Select "Organization roles" and click the "New" entry from the right-click shortcut menu.
The "Group Properties" dialog appears.

2 Administration
20
2. In the "General" tab, you can assign a name, description, and further information to the
individual roles.
3. You can assign substitute role classes in the "Workflow" tab.
Example
The "Manager" role class is the assigned "Manager substitute" as a substitute.
In the sales and marketing organizational units, the "Manager" and "Manager substitute"
roles are each assigned a different person. If the person with the "Manager in sales" role
responds as being absent, then only the person with the "Manager substitute in sales"
receives the future business cases, and not the person with the "Manager in marketing"
role.
2.5.1.3 Assignment of the Organization Roles in the Company Structure
The individual organization roles (role class) can be integrated in the company structure displayed under
"Organization" using drag and drop. In contrast to the organizational units, which are unique (having
unique names within the organizational structure), a role class can occur as often as desired (role
instance) in the organizational structure.
If it is necessary to remove a user from a group, select the respective user and click the "Remove from
group" entry from the right-click shortcut menu.
2.5.1.4 Assigning Users within the Company Structure
Once the organizational structure and the organization roles have been distributed, you can now also
distribute the individual users among the individual structure points of the organization using drag and
drop.
2.6 Setting Up Workflow Scenarios
2.6.1 Adjusting the Database Definition (DDC)
In order for the documents in the scenarios to be available for processing using the Workflow or
Adhoc Workflow options, the SYSDOCFLOWDATA field must be added to the corresponding database
definition.

2.6 Setting Up Workflow Scenarios
21
This is done by selecting the "Enable Workflow" checkbox when creating the DDC. The drop-down box
in the Parameters column allows you to specify how many business cases can be started at the same
time for a document (1 - 5 or unlimited).
Fig. 2–11: "Edit Tables Definition" dialog
i Even existing database definitions can be made Workflow-capable by adding the two fields.
+ SYSACLLIST
Data type: Character
Length: Variable, depending on the maximum number of ACLs to be assigned
You should expect about 12 bytes for every ACL that is entered in the "sysACLList" field. We
recommend a length of 128 bytes, which is designed for the normally sufficient number of 10 ACLs.
+ SYSDOCFLOWDATA
Data type: Character
Length: 45 characters
Multi-value field separators: Semicolon
Recommendations
+ We recommend that you do not put mandatory fields in the database definition, but only in the
properties of the field in the form. In the form designer, the "Form Field" dialog will automatically
appear when inserting a field. This dialog contains the "Mandatory" checkbox on the "Processing"
tab. This must be enabled.
During the processing of a business case, it may happen that changes to the index fields of the
original document cannot be accepted because mandatory fields cannot be filled in. Use the "Index
form validation" activity property to ensure the completeness and correctness of the index data for
the original document at the time it is forwarded.

2 Administration
22
+ If at a given time only one business case is active for a document, then it is only possible to
work with this scenario. In such a case, we recommend using the "ACTIVITY," "STATUS," and
"RECEIVER" fields in the definition of this table. These fields should be synchronized with the
"DESCRIPTION," "STATUSTEXT," and "USERNAME" fields, respectively, in the XDFDOCVECTOR
table for each activity. In this case, the user can search for entries with the user or the user’s group
in the scenario and process the relevant business cases from here. This allows the user to avoid
using the workflow inbox.
2.6.2 Adjusting the Query Form
If a database definition is workflow-capable, additions can be made as necessary in the query forms of
the relevant scenarios at the start of business cases.
In a workflow-capable scenario, the user receives additional functions in the context menu of the result
list, as well as a symbol indicating whether a business case has been started for a document. Additional
details on working with the query form can be found in the chapter of the same name.
Macro buttons can also be built into the form, allowing you to use the workflow API, execute appropriate
workflow actions, and start business cases.
A business case can only be started with a SAPERION document that is already located in the archive. For
the sake of clarity, note that a SAPERION document consists of an index record from the relevant archive
table and, optionally, a document or structured document. A document is not strictly necessary, i.e., it
is possible for business cases to be processed with only the index form in the sense of form processing.
Examples are vacation requests and business trip requests.
2.7 Setting Up Business Case Starts
Administrators can configure different business case starts as required: business cases can be started
automatically - this can be triggered for example by a certain event like the initial archiving of a document.
Furthermore process definitions to be started can be limited for end users.
In this chapter you will learn about the different configuration possibilities.
2.7.1 Starting a Business Case Automatically when Archiving
You can use archiving events for documents which are newly archived to start automatically a business
case. This is done via the definition of a content type.
1. First create a new content type by clicking the ADMINISTRATION ribbon > RECORDS
MANAGEMENT group > NEW CONTENT TYPE command.
2. In the "Edit Content Type" dialog, specify the name of the content type.

2.7 Setting Up Business Case Starts
23
3. Then enter the name of the workflow process in the field "Process definition" that should
be started when archiving.
4. Open the DDC designer in order to add the the system field SYSCONTENTTYPE to the
workflow-enabled database definition.
5. The field SYSCONTENTTYPE must then be integrated to the used index form.
With these information the business case will be started with the specified process definition once a
document is archived with the selected content type.
2.7.2 Limiting Process Choice
By default, all users can manually start all process definition for any scenario (original document). This
takes place through the "Start business case" function in the context menu of the original document.
The corresponding section of the ARCHIEF.INI of the Core Server contains the following entry:
[Docflow.Processes]
Count=0
You may differentiate a process manually startable only for certain archive definitions.
To accomplish this, the following settings must be made:
Example
[Docflow.Processes]
Count=2
[Docflow.Processes.1]
ProcessName=SIMPLE
ProcessDescr=My Test Process
AllowedDefs=TRADING;TEST
[Docflow.Processes.2]
ProcessName=RELEASE
ProcessDescr=Approval procedure
AllowedDefs=TRADING;TEST

2 Administration
24
[Docflow.Processes] section
Parameter Description
count Amount of the following specified process definitions
[Docflow.Processes.1] Start of the first section for the configuration of the first process definition.
ProcessName Name of the process definition. This name is shown to the user in the list of possible pro-
cess definition for the manual start.
ProcessDescr Short text describing the process definition, which is only used here.
AllowedDefs List of the names of archive definitions, which may be selected for the start of a business
case.
As soon as this section of ARCHIEF.INI is used, only the entered process definitions will be offered for
the manual start of a business case via the user interface. The value of "ProcessName" is shown as
process definition name.
If no process definitions are explicitly named, they can only be called via API.
2.7.3 Denying the Manual Start of Business Cases
If you wish to completely deny users the right to start business cases manually, the "Count" key can be
set to "1," and the value "none" entered for the "AllowedDefs" key in the first section. Although the users
still retain the "Start business case" context menu item, they receive the following message: "You cannot
start a business case for this document."
The corresponding configuration in ARCHIEF.INI will then appear as follows:
[Docflow.Processes]
Count=1
[Docflow.Processes.1]
ProcessName=RELEASE
ProcessDescr=Approval procedure
AllowedDefs=NONE
i Administrators always have access to the selection form with all processes.
2.8 Adjusting the Workflow Inbox
The workflow inbox is a special form for which an additional folder is created in the user interface. The
workflow inbox serves as a distribution center for all incoming business cases for all users, regardless of
the archive in which the original documents are located or which process definition serves as the basis.

2.8 Adjusting the Workflow Inbox
25
Fig. 2–12: Example: A user’s workflow inbox
2.8.1 Updating the Inbox Automatically
The workflow inbox is normally refreshed by clicking the [Search] button. However, it is possible to refresh
the inbox automatically at regular intervals, by adding the following switch to your INI-file:
[Navigation]
RefreshTimerMs=1000
The setting is in milliseconds, and the default is 1000. By setting RefreshTimerMs=0, you effectively
cancel the automatic refresh.
2.8.2 Adjusting the Workflow Folder
A Workflow inbox is based on the XDFDOCVECTOR archive definition and consists of the default "Tasks"
folder structure in the navigation area. The following workflow-relevant folders are displayed beneath
this item:
+ Overdue Tasks
+ Reminder
+ Owned Tasks
+ Task Pools
+ Substitutions
+ Forwarded (hidden by default)
You can use the localization table to show and hide workflow folders. You can also carry out the
localization of folder names in this way (see chapter entitled "Localization").

2 Administration
26
2.8.2.1 Updating the Folder
Workflow folders also feature a display of all elements in a folder. These appear in brackets behind the
folder name and indicate the number of unread and total elements.
Configuration to enable automatic update of the folder can be made in the INI-switch. To do so, define the
interval in which the workflow folder should be updated (by default, this is set to 10 minutes). If the user
clicks the folder in question before the defined interval has elapsed, an update will also be carried out.
Example
WfFolderRefresh=600 in seconds
i A counter configured in this way is only effective for the uppermost folder level, e.g., for the "Tasks"
folder. Grouped folders are not taken into consideration.
PROGRAM.INI
In the PROGRAM.INI the following configuration can be done:
Example
[Docflow]
Sync=1
[Docflow] section
Value Description
1 After each workflow action the inbox will be updated, a query inclusive the counter () can
be submitted to the database. This setting is recommended for quick systems. It is also the
default setting at new installations.
0 After each workflow action the current item is greyed out, an update will be processed with
the next automatic update. This setting is recommended for systems with poor performan-
ce.
2.8.3 De-/ Activating Task Folder
As administrator you have the facility of de-/ activating task folder for all users. This can be executed via
the context menu entry "Activate" respectively "Deactivate".
Fig. 2–13: Deactivate a workflow folder

2.8 Adjusting the Workflow Inbox
27
i Deactivated task folders are shown in italics to the administrator.
2.8.4 Localization
2.8.4.1 Multiple Languages
We recommend that you use only default workflow terminology for the inbox designations in the forms,
and that you specify the definitive individual terms for a language with the help of the LOCALIZE table. If
the appropriate entry for the selected language does not exist in the localization table, the English entry
will be used automatically.
i Administrator rights are required to edit the localization table.
Fig. 2–14: Localize table
Server logging can also be influenced by the settings in this table. If the default text is entered here and
another text for each language, it uses the terms saved here for the history and logging, dependent on
the language that is set for it.

2 Administration
28
i To increase the performance of the workflow inbox, the LOCALIZE table should be enabled as the
global localization table and removed from the properties of all workflow forms using the Forms
Designer.
2.8.4.2 Naming the Workflow Folder
You can show and hide the default workflow folder using the localization table. To do so, you can filter
out the all workflow entries from the localization form for editing using a standard filter.
+ Workflow folder names can be titled using "%s %s", e.g., "%s Tasks%s" for the "Tasks" folder.
+ The "NULL" translation value hides the folder.
+ The " " translation value (no entry) means the default text will be used.
2.8.5 Adjusting the Result List
First and foremost, the result list presents information on the status of the business case. This includes
the date the business case was started and received, the last active user, the name of the process and
of the current activity, and the last action. The subject serves the user as the main criterion for the
business case (e.g., process number, title, etc.) and should be mapped accordingly at the beginning of
the business case (see the "Mapping:Document -> Task" activity property). The use of the subject should
be discussed with the user during the fine design process.
If the contents of additional fields of the original document are meant to be shown in the result list of
the inbox, the user-defined fields "USERDEFINED1 – 5" in the XDFDOCVECTOR table should be used
for mapping. These fields must be added to the result list.
The configuration of the workflow inbox is an essential task in the fine design process. This involves
the general look of the form, which inboxes the user will be given, and which columns the result list
will present. It is especially important to clarify the use of the fields "USERDEFINED1 – 5", i.e., which
data from the original document should be mapped here so that the user receives useful information
on the business case.
i If the user works with very different processes, i.e., if user-defined fields become occupied by more
than one entry, then it is necessary to work with more than one form for the inbox.
2.9 Activating and Configuring the Workflow Log
i Workflow logging is deactivated by default.
The logging of all Workflow actions for the purpose of statistical evaluation is activated as follows:
1. In the Rich Client, select the ADMINISTRATION ribbon > LOGGING group > SETTINGS
command. The "Define Logs" dialog appears.

2.10 Cleaning Up the XDFDOCVECTOR Business Case Table
29
2. Enable the checkbox for the "Workflow" event.
3. Enter the director path where the logs are to be saved.
4. Click the [OK] button.
! If logging of the workflow actions is enabled or disabled here, the
server will then have to be restarted.
2.9.1 The PDFDOCVECTOR Log Table
The PDFDOCVECTOR default log table is used for logging.
Please observe the following points:
+ The "USERDEFINDE1-5" fields of the XDFDOCVECTOR business case table are, by default, not
contained in the PDFDOCVECTOR definition and must be added if needed. This will be the case
especially if statistical evaluation requires stronger differentiation with respect to scenario data, e.g.,
by document type, sales region, etc.
+ If additional fields are added to the XDFDOCVECTOR business case table, and if their current
contents are meant to be logged at the time that logging takes place, then these fields must be added
to the PDFDOCVECTOR definition and referenced in the XDFDOCVECTOR definition as log fields.
i Active logging affects the performance behavior of the Core Server and database servers.
2.10 Cleaning Up the XDFDOCVECTOR Business Case
Table
Records from closed business cases (e.g., status) are saved in the XDFDOCVECTOR database table and
are not automatically deleted. For performance reasons, it is recommended to delete workflow records
from the table.

3 Workflow Process Design
30
If "SAPERION" is used as the repository, delete the records over the COM API using
"iCursor.DeleteCurrent".
3 Workflow Process Design
3.1 The ProcessDesigner
The ProcessDesigner is available for the design of workflow processes in SAPERION. The
ProcessDesigner can be opened by clicking the DESIGN ribbon > MODELLING group > PROCESS
DESIGNER command.
i To be able to design a workflow process, you have to be logged in as an administrator.
Fig. 3–1: The SAPERION ProcessDesigner
The ProcessDesigner window is divided into the following sections:
+ Ribbon
Multifunctional bar with elements divided into tabs, groups, and the actual commands.
+ Left-hand window area
In the left-hand window area – the drawing sheet – the process is created and graphically displayed.
+ Right-hand window area
The properties of the selected activities and links are displayed and can in some cases be edited.
+ Lower window area
The lower window area is the status area. The results of the syntax check are displayed here.
Within the ProcessDesigner, a process is displayed through activities and established links to which
corresponding attributes have been assigned.

3.1 The ProcessDesigner
31
3.1.1 The Tools of the ProcessDesigner
3.1.1.1 [File] Button
The [File] button can be used to call general functions.
Fig. 3–2: [File] Button
When you click the [File] button, a list of menu commands appears. This list contains the following
entries:
[File] menu commands
Menu Item Function
New You can create a new process definition for editing on the drawing sheet. The start activi-
ties of the process are created automatically.
Load... An already existing process definition is opened in the ProcessDesigner. The selection win-
dow will appear. The last build of a definition is always displayed; it is not possible to open
a previous version of the process definition.
Back up a previous build by keeping a copy of the file in another directory.
Save By default, the process definition is saved in the "<Process name>.DFD" form in the
"DocFlow" folder of the SAPERION directory on the Core Server. The name given when
the file is saved is the valid process name, which is displayed to the user when selecting a
workflow process.
Save as... The currently opened process definition can be saved under a different name by means of
this command.
Export as XPDL... The currently opened process definition will be saved as an XPDL file along with an XSL
template and a CSS stylesheet, which support the display of the XPDL file.
XPDL (XML Process Definition Language) is an XML-based language used for the descrip-
tion of business processes in the workflow.
View documentation... Shows a process documentation based on an XPDL file. This appears exactly as the display
of an exported file.
Print Both, the process documentation and graphical workflow process are printed.
Print preview A preview of the created process opens.

3 Workflow Process Design
32
Menu Item Function
Create version Using this tool, you can save a process definition as a version.
Syntax check... The current process definition is checked for syntax errors. The result of the check is shown
in the status window.
Close The ProcessDesigner is closed. If changes have been made to a process definition, a confir-
mation message appears asking if you want to save the changes.
3.1.1.2 Ribbon
The ribbon contains the respective editing functions in contextual groups.
Fig. 3–3: Ribbon
Ribbon commands
Command Function
EDIT group
Delete The objects selected on the drawing sheet are deleted.
Select all All activities and links are selected for collective editing. The selected objects can be moved
or deleted together.
Objects group
Select While holding the right mouse button, an area can be drawn on the drawing sheet, and all
elements within the rectangle will be selected.
Create new activity While holding the right mouse button, an area can be drawn on the drawing sheet. After
the button is released, the dialog to select a new element will appear.
Order Foreground: The selected object is always in the foreground when it overlaps with other ob-
jects.
Background: The selected object is always in the background with it overlaps with other ob-
jects.
Adjust All selected objects are aligned in the same way. The alignment is based on the element po-
sitioned at the top, bottom, left, or right.
Resize The selected object will be resized to the maximal or minimal height or width.
Appearance group
Size You can enlarge and reduce the view of the process chart on the drawing sheet (zoom).
Font You can specify and configure the default font.
NOTE: For existing processes, the font change will only affect new elements.
Background color You can define the background color.
Grid The "Grid" function displays a grid on the drawing sheet as a guide for aligning objects.

3.1 The ProcessDesigner
33
Command Function
Snap to grid The "Snap to Grid" function automatically snaps all objects to the next grid point.
3.1.1.3 Properties
Diagram Properties
The diagram properties of a selected object are displayed in the "Properties" section. It reflects the
appearance of the activity in the chart. You can also make changes to properties here.
Fig. 3–4: Example: Diagram properties
The left column of the table lists the respective property (e.g., text, font, etc.). The right column contains
the associated values, which you can adjust according to your needs. To do so, click the corresponding
entry and make changes.
Element Properties
The activities of the respectively selected activity (synonym: node) and links inside the workflow process
are displayed here.
Fig. 3–5: Example: Element properties
Depending on the type of activity or link, the corresponding properties are displayed. The left column
of the table lists the respective property (e.g., escalation level, insert template, etc.). The right column
contains the associated values, which you can adjust according to your needs. To do so, click the
corresponding entry and make changes.

3 Workflow Process Design
34
For further details, see the chapter entitled "Object Properties."
3.1.1.4 Debug Window
Debug output appears in the DBWIN window.
3.2 The Process Definition
Process indicates a series of defined activities, which are executed to reach one or more goals. The
smallest possible process consists of three elements – "Start, Activity, and End" – which must be linked
with one another through sequence flows.
The process definition is used to created automated and non-automated processes, and to model
them in temporally logical workflows. The generated process diagram serves as a basis for SAPERION
workflow, which ensures development of a process complying with the definitions specified in the
system.
SAPERION includes the ProcessDesigner (available in the Rich Client with administrator rights) for
the modeling of business processes. It supports Business Process Modeling Notation (BPMN), the
standardized specification language belonging to the DESCRIPTIVE conformity class.
The core elements of a process chart are:
+ Events
+ Gateways (conditions)
+ Tasks
+ Sequence Flow (links between the activities)
+ Subprocesses
+ Artifacts
3.2.1 Versioning a Process Definition
If you make changes to the workflows inside a process chart, for example, if it becomes necessary to
add additional process steps or remove already created activities, the original process definition will be
modified in a way that may lead to inconsistencies.
For running business cases, it is important that changes to the process model do not have an immediate
effect on the already started workflow. To avoid this, you can version the process modeling.
With each save operation in the process definition, a build is created that is placed in the "..\docflow"
directory with the name of the definition and the ending "DFD" (Doc Flow Definition). If the saved build
is modified, the change applies to all running business cases that were started with this build.
If the affected business case is run with the original build of the process definition, a version of the
build must be available. The number of the version and the build are displayed in the title bar of the
ProcessDesigner.

3.3 Objects
35
Example
"<BuildName> V0/ B1"
For the file name, a version receives a consecutive number beginning with "1" after the name of the
process definition, as well as the ending "DFV".
As long as no version exists, the current build (there is only one file) is always used for the start of
a business case. If versions exist, the file with the highest version number is always used to start. An
exception is made for the administrator through the test mode. If, after the last creation of a version, the
process definition is again changed and saved, a new build is created and the file is saved with the ending
"DFD". In order for this new build to be tested, i.e., for a business case to be started with this build, the
administrator must activate the test mode via the context menu in the inbox. If the administrator starts
the business case in test mode, the DFD files are always started, i.e., not the DFV files of the last version.
As soon as the tested process definition is to become productive, a version must be created again.
! In test mode, the current build is used for processing business cases that have already been
started. The administrator must be especially careful to ensure that the changes made to the build
that will be used do not create any problems with respect to the version formerly used. This could
be the case if, for example, different link conditions are used for which there were no parameters
in the old version.
The business cases that were started with a version proceed with this version until the end. A version
cannot be changed.
A version receives a consecutive number beginning with 1 following the name of the ProcessDefinition,
and the ending "DFV".
Since macros are frequently linked with a flow and form a unit with a graph, this must also be considered
during the versioning. For this reason, the selection of macros is limited to a macro file of the same
name within a process definition.
3.2.2 Saving Old Versions
Only one loadable build exists for the ProcessDesigner; this build is the current version.
If you want to use older versions of a process definitions again later, you must save the relevant build
(*.DFD) under an appropriate name in a separate directory. This makes it possible to specifically load
this version at a later time using the ProcessDesigner.
3.3 Objects
Objects can be fundamentally differentiated into two different types: One is a link between already created
elements (sequence flow), the other includes objects that depict an activity (tasks, events, gateways, or
subprocesses).
When creating an object, a list of all available objects will appear. These objects and their properties are
described in more details in the following chapters.

3 Workflow Process Design
36
3.3.1 Events
The following events are available:
+ Start
+ End
+ Termination
+ Notification
A process may make use of only one start event, but several end events. If a termination event is reached,
further processing of the process is aborted.
The process ends when an end event is reached. Any asynchronous subprocesses started by the process
are not affected by the end of the process and will continue to run.
3.3.2 Gateways
Gateways are responsible for control of a process in which different branches may be processed.
The gateway and its output sequences specify the conditions under which a branch is run.
Gateways always constitute a pair: A pair typically consists of a gateway that splits the process. Its
counterpart is a join gateway.
There are a total of three different gateway types available for selection:
+ Parallel (AND)
All output sequence flows run after passing through this gateway. Depending on the number of
outputs, n parallel processes will be processed independently of one another.
i A splitting parallel gateway must be followed by a merging join gateway.
+ Exclusive Gateway (XOR)
This gateway also has n output sequence flows, however each one contains conditions. A condition
must be set so that only one flow is taken (true). A default flow must be present, to be followed
if all conditions are false.
+ Inclusive Gateway (OR)
An inclusive gateway runs all output sequence flows that are true. This may be one or several flows.
3.3.2.1 Hints regarding Usage of Gateways
Using the OR- and AND split gateways the branches must always brought together with the appropriate
join gateways, otherwise the defined process definition will not work. This procedure in modeling is also
BPNM-specific.
+ after an OR split gateway the OR join gateway or an end event must follow
+ after an AND split gateway the AND join gateway or an end event must follow

3.3 Objects
37
+ interleaving of an AND and an OR gateway is not possible
+ it is not allowed to simplify the process by dragging the exits of two or more AND/OR gateways
to one OR/AND join gateway.
+ during runtime at least one exit of an AND/OR gateway must reach its AND/OR join gateway,
otherwise the system will report Df_NotJoined error.
The only exception is: If all exits of an AND gateway are terminated the process is finished if no
more instances exist (exclude notifications) and only one end event is defined. If more than one
end event is defined Df_DeadEnd is reported.
+ a task with free user selection must not follow after gateways.
3.3.3 Tasks
Tasks are the central objects used to carry out the desired purpose of the business process.
The following types are available:
+ User Task
A user task is used if the process requires a person for an action, for example, authorization or
checking for a received invoice.
+ Script Task
A script task is processed automatically by the workflow engine.
+ Rule Engine Task
The rule engine tasks requires the integration of a Rule Engine. The Rule Engine decides how the
process will proceed based on stored rules.
+ Service Task
Here, the appropriate performer class is defined when the Business Rules Server is in use.
3.3.4 Subprocess
In highly complex processes, it may make sense to separate the process into main and subprocesses.
Subprocesses are defined in separate process definitions. Their notation follows the general rules for
process definitions.
Subprocesses are integrated in the main process using two different elements:
+ Subprocess
This object is used to synchronously integrate the subprocess. Once the main process reaches this
task, it stops. The subprocess then begins. The main process will only continue when the subprocess
is complete.
+ Asynchronous subprocess

3 Workflow Process Design
38
This object is used to asynchronously integrate the subprocess. When the main process reaches this
task, it does not stop. The subprocess starts, and the main process continues. The main process
does not wait for the subprocess to complete – both process are run in parallel.
3.3.5 Sequence Flow
Sequence flows represent the link between objects. They control the direction in which a business
process is processed. In the Designer, they appear as dotted arrows between events, gateways, tasks,
and subprocesses.
The following sequence flow types are available:
i Events, gateways, tasks, and subprocesses provide different sequence flows depending on their
characteristics.
Sequence flows and their properties are described in detail in the respective sections below.
3.3.6 Artifacts
Artifacts are used as explanations in process charts. The "Text" object can be used to attach explanatory
text to an object.
The "Rectangle" object can be used to visualize groupings. This can be used to depict pools and lanes
in BPMN 2.0.
3.4 Creating an Object
For the creation of an object the ProcessDesigner provides a selection of all available objects in a library.
The following definition of object parameters is made in further dialogs.
Proceed as follows to create a new object:
1. In the Designer, click the DESIGNER ribbon > OBJECTS group > CREATE NEW ELEMENT
radio button.
2. Draw a rectangle while holding the left mouse button down. The "Object Library" dialog
will appear when you release the mouse button.

3.4 Creating an Object
39
3. All available activities are listed in the library. Select the desired entry. The respective
objects are displayed in the right half of the dialog.
4. Make the following entries:
+ Name
This entry represents the label in your process modeling chart, and serves solely to
provide a better overview. It is not visible to the user.
+ History and Log
Text in the history and log.
+ Task Description
The task description appears for the user in the workflow inbox inside the results list
and in the right-click context menu.
Click the [Next] button.
5. If you have selected a user task or notification event, you must make more specific settings
for the receiver in the next step. The "Workflow User Task" dialog appears.
Configure settings to select the receiver and any receiver options (see the chapter entitled
"Workflow User Task" below).
6. If you selected a script, business rule, or Service Task, you must enter the corresponding
formula in the next step (see chapter entitled "Script Task").
7. If you selected the "Subprocess" or "Subprocess (asynchronous)" activity, you must select
the desired subprocess in the next step (see chapter entitled "Subprocesses").
8. Click the [Next] button. This completes the object definition.
3.4.1 Workflow User Task
If you have selected an activity of the "User Task" or "Notification Event" type, you must configure more
specific settings for the receiver in the next step. This takes place in the "Workflow User Task" dialog,
which appears automatically.

3 Workflow Process Design
40
Fig. 3–6: "Workflow User Task" dialog
The dialog "Workflow User Task" is divided into four main areas.
+ Receiver Selection
+ Receiver Options
+ Selectable
+ Role-Group Member Options
These four areas are described in detail in the following sections.
3.4.1.1 "Receiver Selection" Area
In the "Receiver Selection" dialog area, you can define how the editor in the activity is determined if the
business case is sent to the corresponding activity during runtime.
Following types of determination are available whereas only one type can be selected:
+ Predetermined
"Predetermined" means that the receiver of this activity is already defined when the process is
designed (see chapter "Predetermined" below).
+ User selects recipient
"User selects recipient" means that the recipient is defined by the user at runtime (see chapter
"User selects recipient" below).
+ To owner of the business case
"To owner of the business case" means that the current owner of the business case is the recipient
of the activity (see chapter "To owner of the business case" below).
+ Selection macro
"Selection macro" means that the receiver is defined by a macro (see chapter "Selection macro").
Depending on the type of determination the dialog guidance is different. Details are described in the
chapters regarding types of determination.
You will find in chapter "Defining a Receiver of a User Task" in the appendix of this manual a matrix of
possible combinations for the selection of receiver and also impact during the workflow runtime.
Predetermined

3.4 Creating an Object
41
"Predetermined" means that the receiver is already determined during modeling of the activity. Therefore
the activity will be sent to the defined recipient at runtime.
i An organizational unit or a group can also be entered as the receiver. This does not mean, however,
that all members of the group can or must process the activity. As soon as a processor has taken
on the business case in his or her personal in tray, the business case can no longer be seen by the
other members, unless the processor places the case back in the common tray. If the processor
does this, then another member can take on and process the business case.
If you have selected the "Predetermined" option you must define the receiver out of the organization unit.
1. Activate the "Predetermined" radio button in the "Receiver selection" area. The
2Organizational Structure" dialog appears.
2. In the left-hand section of the window the existing organizational structure (as it is
designed in the user administration) is viewed. In the left-hand side the selected entry
is shown. The selection is made either by dragging the desired entry with the left mouse
button held down into the right area, or by double-clicking or via the "Search for user"-
function.
3. If the selected receiver is an organization (group or organization role) you have to specify
the final processor (via a context menu) because event though the receiver of the activity is
an organization but a single member will deal with it). You have the following possibilities
for the allocation:
+ Manual transfer
+ Automatic evenly distributed
+ Automatic by load

3 Workflow Process Design
42
4. If you have chosen the "Several recipients" option you can enter multiple recipients who
are reached sequentially or in parallel at runtime.
In this case the behavior of forwarding is controlled by the activity property "Majority
check" and also by the connection properties "Voting" and "Minimum value".
5. Click [OK] to complete your selection.
User Selects Recipient
Upon activation of this option the user of the previous activity specifies which editor receives the
business case at runtime. At runtime, a window opens in which the next receiver must be selected.
i This window allows you to use the "*" wildcard for searching. Searching for a specific name where
the first two letters are known must always be used in combination with "*". Otherwise, initials
beginning in this way will be found. For example, to find the name "Pfennig", you must enter
"PF*". Omitting the "*" will search for an initial starting with the letters "PF".
To Owner of the Business Case
The business case is sent to the current owner of the business case. The person who started the business
case is the owner by default. The owner of a business case can be changed during runtime using the
property "Receiver becomes owner." Furthermore, a change is also made on the administrative level.
Selection Macro
A macro with which the receiver is defined needs to be specified. This macro can either run on the
workflow server or on the client computer. The "On client" checkbox allows you to run the selected macro
on the client computer. This is necessary, for example, if computer-specific settings are contained in the
macro, for example, the call of an external application not available on all computers, or for interactions
with the user. The macro works in the context of the business case, including the original document. The
use of methods is not restricted. Since the return value must be a string, a function must be used.
Example

3.4 Creating an Object
43
Function SetRecipient() As String
Dim sRecipient1 As String
' sRecipient = "<User's full name>"
' sRecipient = "<Unique name of an organizational unit>/<User within an organizational unit>"
' sRecipient = "<Unique name of an organizational unit>"
sRecipient = "<instance of a roll class>"
' sRecipient = "<roll class>"
Dim sRecipient2 As String
...
SetRecipient = sRecipient1;sRecipient2
End Function
Following sample statements are allowed:
SetRecipient="<usershortname> ; <usershortname>
SetRecipient="<user full name> ; <user full name>
3.4.1.2 "Receiver Options" Area
If you have chosen the "Predetemined" option you have to make some configuration in the "Receiver
Options" area. Select here one of the entry:
+ One recipient
"One recipient" means that the activity is forwarded by one single user or by one group at runtime.
+ Several recipients (serial)
"Several recipients (serial)" means that the activity will be sent to a list of multiple defined receivers
at runtime. These can be single users and/ or groups. "Serial" signifies the dispatch of the activity
from one user to the next. The activity is then finished when all users of the list have handled the task.
Exceptions apply to models with majority decisions.
+ Several recipients (parallel)
"Several recipients (parallel)" means that the activity will be sent to a list of multiple defined
receivers at runtime. These can be single users and/ or groups. "Parallel" signifies the dispatch of
the activity to all listed recipients in parallel. The activity is then finished when all users of the list
have handled the task.
Exceptions apply to models with majority decisions.
3.4.1.3 "Selectable" Area
The "Selectable" section is only relevant if you specified previously that the user defines the receiver. In
this case, you can define in this section the receiver or receiver group of the business case to which the
user can forward. The following self-explanatory possibilities are available:
+ Single users

3 Workflow Process Design
44
+ Role group members
+ Groups, roles
3.4.1.4 "Role-Group Member Options" Area
In this section, you can specify the way the business cases should be distributed within a group, an
organizational unit or a role with more than one member. The following options are available:
+ automatic evenly distributed
The business cases are distributed equally among all members. If new members are added, they
are included in the distribution from this time point. If members are removed from a group, they
will no longer receive any new business cases from that time on.
+ automatic by load
The business cases are automatically divided among the individual users according to the load.
Consideration is only taken as to how many yet to be edited business cases each user has in their
inbox. No weighting is performed.
+ manual transfer
The business cases are stored in a common inbox. The members pick up the business case manually
from this inbox.
3.4.2 Script Task
If you selected a script, business rule, or Service Task, the "Formula" dialog will automatically appear for
the entry of the corresponding formula/ macro.
This macro is run automatically when this point in the process is reached without user intervention,
but is executed in the context of the forwarding processor, provided that the macro is not registered in
the definition under another context. That is to say that if this macro activity is followed by an activity
involving receiver selection on the part of the user, the processor will also be requested to specify the
receiver.
1. Click the [Macro...] button in the dialog "Formula". The "EventScript" dialog appears.

3.4 Creating an Object
45
2. Select the desired macro or create a new one by clicking the button [New].
i If an error occurs in the specification of the next activity after the macro activity, the business case
remains with the forwarding processor and is marked with an error designation. In this case, the
administrator should be notified.
3.4.3 Subprocess
If you have selected the "Subprocess" or "Subprocess (asynchronous)" activities, the "Load Workflow"
dialog will appear automatically. You can load a created workflow process and integrate it in your process
definition here.

3 Workflow Process Design
46
Fig. 3–7: "Load Workflow" dialog
3.5 Object Properties
The properties of the selected object are displayed in the right area of the ProcessDesigner window.
Properties of activities (synonym: nodes) and connections within a workflow process are represented.
i Depending on the type of activity or link, various properties are displayed.
3.5.1 Diagram Properties
The object properties of a selected element are displayed in the "Properties" section. It reflects the
appearance of the activity in the chart and may be adjusted if necessary.
Fig. 3–8: Properties
You can make settings for the general graphical display of your chart in the chart properties.
Diagram properties
Property Description
Text Text that is displayed in the activity.
ToolTip Text displayed as a tool tip for this activity.
Font Font and font size for displaying text.
Shape Shape of the displayed activity.

3.5 Object Properties
47
Property Description
Draw style Shape of the displayed line.
Draw width Weight of the displayed line.
Left Position of the object related to the left-hand edge.
Top Position of the object related to the top edge.
Transparent Display with transparent background.
3.5.2 Element Properties
Fig. 3–9: Element Properties
3.5.2.1 Task Type
The task type is selected when creating the activity and cannot be modified afterwards.
3.5.2.2 Characteristic
Describes the element type.
3.5.2.3 Task Description
You can add additional information to the activity which is also displayed by default in the workflow input
under "Description."
3.5.2.4 History Entry
The attribute is specified by entering it in the "History and log" field in the first property box when an
activity is created. It can be changed later in this same box.
The content of the attribute is written in the PDFDOCVECTOR log table if "Workflow" has been selected
in the log options.

3 Workflow Process Design
48
i Activities with identical system-wide task descriptions should have different log descriptions so
that they can be distinguished in the history.
3.5.2.5 Receiver
The set receiver is shown here. Clicking the [...] button opens the dialog for selecting a receiver, where
you are able to edit the configured receiver.
3.5.2.6 Communication Medium
The communication medium determines how a user is informed about arriving business cases and
which application will be used for the process. The following options can be selected:
Fig. 3–10: Element Property: Communication medium
+ SAPERION: The new business cases only arrive in the appropriate workflow inboxes
+ E-Mail: An e-mail with a corresponding message is sent to the corresponding user. The e-mail is
structured as follows:
The e-Mail of the business Case receiver is built as follows:
For the sender address, you can select whether only the server address or the address of last forwarding
user is to be shown. A corresponding INI-entry is available for this in the ARCHIEF.INI in the following
section:
[Setup.Mail]
Interface=4
Server=<Server address>
ServerPort=25
SenderAddress=<Sender address>
SenderName=<Sender name>
The keys in the LOCALTEXT field are as follows:
Keys in the field LOCALTEXT
Key Description
MAILBUSINESSCASE := Default: "..." This hyperlink directly opens a window with the list of possible workflow functions.
MAILCONTEXT := Default: "Basisdokument" This hyperlink opens the HTML index form of the original document that was configured in
the activity.
MAILINBOX := Default: "Geschäftsfall"/"Business
Case"
This hyperlink opens the HTML inbox.

3.5 Object Properties
49
i If an empty string is entered for one of the keys, the corresponding menu item does not appear
in the body of the mail.
Furthermore, you can configure further e-mail settings:
Fig. 3–11: Property: E-mail options
E-mail configuration
Parameter Description
E-mail format You can choose between various formats here. The following are available:
+ SDL link to business case: Send an e-mail with the standard
link SDL.
+ HTML template: Send an e-mail which uses a HTML-file as
template (see sample template below).
+ Macro generated: Sending an e-mail with a standard subject
and a freely designed mail body. A macro with which the text
is created is required for this.
NOTE: The HTML formats can only be used with SMTP.
Workflow inbox The form that opens when you double-click the standard link SDL is stored with the work-
flow inbox.
HTML index form Configure HTML template:
In order to use a HTML template for the mail creation you have to set up a dummy query
form (e.g., "HTM_Dummy.qbe") The form name equals the name of the used HTML tem-
plate (see chapter entitled "HTML-Template" below).
Mail subject (formula) A formula that is responsible for the set-up of the mail subject is entered here.
Example
"SAPERION: >" + Df.NodeName + "< >" + UserName + "< >" + DocName
+ "<"
The workflow properties are accessed here through df.<propertyname>, so in this case
"Df.NodeName".
The document properties are accessed through <propertyname>, in this case "DocName".
Mail message text (formula) The name of macro with which the text in the mail body should be created is saved.
Macro generated The name of the macro with which the text in the mail body is to be generated is entered
here. The macro has full control, so e-mail dispatch must also be controlled by the macro.
NOTE: No dialogs can be used since the macros run on the server.
HTML Template
Using HTML-templates properties of the workflow object can be integrated into the template. In this
way the e-mail is equipped with additional information.

3 Workflow Process Design
50
i Please note that properties of the associated base document cannot be used in this context.
You have to copy the appropriate HTML-template into the istallation directory of the Core Server (root
directory in case of an All-in-One installation or "Application" folder in case of a distributed installation).
The fields are integrated according to this syntax:
$Feldname$
Sample Template
<!DOCTYPE HTML PUBLIC "-//W3C//DTD HTML 4.01 Transitional//EN">
<html>
<head>
<title>Workflow HTML Mail</title>
</head>
<body>
<p>
Good day,<br>
<br>
USERDEFINED1: $USERDEFINED1$<br>
USERDEFINED2: $USERDEFINED2$<br>
USERDEFINED3: $USERDEFINED3$<br>
USERDEFINED4: $USERDEFINED4$<br>
USERDEFINED5: $USERDEFINED5$<br>
<br>
Subject: $SUBJECT$<br>
Last user: $LASTUSER$<br>
<br>
Please complete the following request!<br>
</p>
</body>
</html>
! It is imperative that the file extension contains ".htm" (in this example: "HTM_Dummy.htm").
The received e-mail looks like the following:

3.5 Object Properties
51
Fig. 3–12: Example: Received e-mail
Business Case per E-Mail
If a business case is sent to the receiver by e-mail, the e-mail will contain a link to the business case.
Clicking the link opens the SAPERION Client with the last used client-type setting.
You can configure whether only the server address is to be shown in the e-mail as sender or the last
forwarding user.
The corresponding entry in ARCHIEF.INI is as follows:
[Docflow]
UseDocflowUserMailAddress=TRUE / FALSE (default: TRUE)
Business case per e-mail
Parameter Description
UseDocflowUserMailAddress TRUE = The e-mail address of the last forwarding user is shown as sender (default).
FALSE = The server address is shown shown as sender.
3.5.2.7 Escalation Levels
To prevent inactivity in a business case, e.g., if the responsible receiver does not process it for a long
period of time, you can introduce escalation levels, the number of which is displayed here. See also
chapter entitled "Escalation" below.
3.5.2.8 Responsible
You can specify a responsible person for every user activity. This person is authorized to make decisions
on the further processing of the business case in question in the case of errors or problems.
3.5.2.9 Majority Check
This property is configured only for the user activities with the "Several receivers" option. Together
with the "Majority value" and "Majority" link properties, this property regulates when the business case
should be forwarded to the next activity. In the case of the "After all Users" value, the system does not

3 Workflow Process Design
52
check which link should be used to forward the business case to the next activity until after the last
receiver has been reached. In the case of the "After each User" value, the system checks after each
receiver whether the business case can be forwarded. This could be the case, for example, when a simple
majority, i.e., over 50%, of the specified receivers have forwarded the case via one of the links.
i If votes are tied (e.g., three for and three against out of six receivers), forwarding will take place
via the first link.
3.5.2.10 Insert Template
For certain activities, a SAPERION document can be added to a business case as a template document.
The pages of the document are added to the original document of the business case when the activity
is set up.
i In order for a document to be added, the original document must be a structured document.
The template document can be dragged from a result list to a previously selected activity. This causes
the UID of the document to be entered in the activity properties.
3.5.2.11 Receiver becomes Owner
Business cases have only one user at any given time, who plays an administrative role in case an error
occurs. It is only one user, never a role or an organizational unit.
If this option is activated, the corresponding editor becomes the owner of the business case when
entering into the activities (see "Owner of a business case").
In the case of groups, the one who accepts the business case from the group folder becomes the owner
of the business case. When it is returned to the group folder, this user remains the owner until the
business case is taken over again.
i When workflow tasks are processed directly from a group inbox, the user processing the task is
not set as the owner.
3.5.2.12 Memorize Receiver
The "Memorize Receiver" property controls whether or not the last editor of the activity is saved. When
the activity is reactivated – after a loop run, for example – the saved editor receives the activity again. This
is a useful feature when a group has been entered as the receiver according to the process definition,
but the last editor should resume work on the business case.
3.5.2.13 Estimated Working Time [min]
This property is for statistical purposes. The times are logged in the PDFDOCVECTOR table
(ESTWORKINGTIMEAC and ESTWORKINGTIMEBC fields) and are made available for evaluation. If you

3.5 Object Properties
53
enter a value >0 here, the affected user editing the business case will automatically be asked to enter his
actual working time in a dialog. The specified value is saved in the WORKINGTIMEAC field.
i Currently, it is not possible for SAPERION to determine the working time because it cannot reliably
determine when processing of a business case begins and ends, or whether there have been
pauses during that period. For a given project you must ensure that, for each of the decisive
starting and ending events (punch in/punch out) for processing, an individual entry is written in
the log table. This allows a well-founded evaluation of the processing time. Pauses taken during
this period are still a problem, however.
3.5.2.14 Index Forms
Index forms for various properties can be entered in this area:
Fig. 3–13: Property: Index forms
Configuration index forms
Parameter Description
Task Here you can enter the name of the index form that opens when a user opens the index of
a business case in the result list of the workflow inbox or via the context menu.
Document Here you can enter the index form that can be opened from the result list of the workflow
inbox if editing of the document attributes is allowed.
Validation Here you can enter the index form with which the available index data from the original do-
cument can be checked in the background after forwarding is triggered by the user. If the
results of the check are not satisfactory, the form is opened and the editor must correct the
data as necessary. Canceling does not leave the activity and forwarding does not take place.
The forms for the business case and the document can be entered in the start activity. If no other form
is entered later in the activity, the form entered here applies.
3.5.2.15 Document Access
The settings for editing the individual documents are brought together in the "Document access" area.
Fig. 3–14: Property: Document access

3 Workflow Process Design
54
Configuration document access
Parameter Description
Edit document This property controls the right to open and edit the original document in this activity. If
this right is withdrawn, the function is grayed out in the context menu of the workflow in-
box. This right is activated by default.
Edit document index This property controls the right to edit the index data of the document during the activity.
This assumes that a correct index form is entered under "Index form (document)". If this
right has been withdrawn, the function is grayed out in the Context menu in the workflow
inbox. This right is activated by default.
Edit task index This property controls the right to edit the index data of the business case during the activi-
ty. This assumes that a correct index form is entered under "Index form (task)". If this right
has been withdrawn, the function is grayed out in the Context menu in the workflow inbox.
This right is activated by default.
Lock document This property controls whether the original document is blocked for general editing as long
as the activity is active. This property is set by default, so the document is shown in the re-
sults list, but access is denied. If the applicable property is deactivated later in the defini-
tion, this change applies only to the business cases that later reach this activity. This also
applies for a loop in the process. All business cases that are in the activity at the time the
change is made remain in the preexisting condition. Reassignment of the activity does not
change this condition. If a process definition without version is used and the attribute is
changed, then this business case change will only be effective after its next forwarding.
Document ACL One or more additional access control lists can be entered here. The lists can be entered in
such a way that the corresponding rights are either granted or denied. This makes it possi-
ble for users who lack sufficient rights for accessing the document to have access during
the activity.
3.5.2.16 Field-Mapping: Document -> Task
This property allows the field contents of the original document to be synchronized with the field contents
of the business case. (Multi-value fields are also supported.)
Fig. 3–15: Property: Field-Mapping: Document -> task
In the "Field-mapping: document-> task" group, only the uncritical, changeable fields of the business
case table XDFDOCVECTOR are listed. In the other group, the complete set of fields for mapping is
provided.
Mapping is accomplished through the following workflow actions:
+ Reaching the activity
+ Taking and returning the task from or to the group folder

3.5 Object Properties
55
+ Reassigning the business case
The following differentiation is maintained in the syntax when defining formula during mapping:
<GF-Fieldname> = <Dok-Fieldname>
The fieldname in the original document definition to/from which mapping is to be carried out is used as
the value of the property. The business case subject and the "free formula" property are special cases.
It is also possible to use strings in the cases.
Examples
+ Field of the group "Field-Mapping: Document -> Task"
Betreff: VorgangsNr + "/" + EingangsDatum
3.5.2.17 Field-Mapping: Task -> Document
For mapping from the task to the document, a revision of the original document is created.
If the main document contains the SYSINDEXSTATE field, this will be set by default to the value 2. As a
result, the data is only written in the database table allowing the maximum performance to be reached.
The value can be changed with an entry in ARCHIEF.INI on the Core Server.
If an identical mapping is to be carried out for every activity, you can specify this mapping in the start
activity once so that it is automatically run for all following activities.
Fig. 3–16: Property: Field-Mapping: Task -> Document
The syntax for the definition of the formula is as follows:
<Dok-Fieldname> = Df.<GF-Fieldname>

3 Workflow Process Design
56
Examples
+ Field of the group "Filed-mapping: Task -> document"
Free formula: DocStatus="gebucht";ExtraFeld=USERDEFINED6
+ For the property "System folder"
DTFOLDERSYS="My documents
DTFOLDER1=DokKlasse
DTFOLDER2=DokTyp
"DokKlasse" und "DokTyp" are free field names of the archive for the original document. If new
values are mapped to the DTFOLDERSYS and DTFOLDER1-5 business fields, the corresponding
subfolders are automatically created for the outliner.
+ In order to prevent mapping with some workflow actions, forms can also be used in the mapping
lines.
The "Status" field is occupied with "Forward" if the last workflow action code was "2". Otherwise,
the field is mapped with the value of the business case status.
Status: DFAction=2?"Forward":DF.Status
+ Filed-Mapping task -> document with a free formula
USERDEFINED1=BPMN_Mapping_Macro_05!GetAnsi
3.5.2.18 Context Menu
Define the functions of the context menu within the workflow inbox here. The individual commands of
the context menu can be shown and hidden from here (i.e., "Reminder", "Comments", "Not responsible"
etc.)
Fig. 3–17: Property: Context menu
When the checkboxes are enabled, the corresponding entry is hidden in the context menu.
Owner/ Admin Menu
By making the context menu entry "Owner/ Admin" invisible the owner of the business case is deprived
of workflow administrative rights.

3.5 Object Properties
57
i Despite of being hidden administrators with admin client license do have corresponding menu
entries so that they could intervene in case errors occurs in the workflow.
Reassign
For the context menu entry "Reassign" you can select the according command in the dropdown menu:
+ None
+ Any (the receiver is allowed to choose from the user selection dialog one of all available users in
SAPERION).
+ Group (this function only effects tasks that are taken out of the group inbox. The receiver is allowed
to choose one of the users who is member of this group.)
"OK", Reject" and "For Correction"
Hiding the menu entries "OK", Reject" and "For Correction" has only effect for processes of SAPERION
version 6. These entries are only hidden when the receiver of the activity is working with an index client.
If the user is working with an admin client the entries are visible in spite of being hidden.
i Manual gateways with corresponding notation (e.g. "OK") in processes of SAPERION version 7
cannot be affected.
3.5.2.19 Events
All properties pertaining to the use of macros are brought together here.
Fig. 3–18: Property: Events
OnEntry macro
Every user activity has the "OnEntry" event, which is executed as soon as a business case reaches,
escalates, or reassigns this activity. A macro can be entered for this event, which is then run
synchronously on the server before the business case is shown in an inbox. If a FALSE is returned, the
action is canceled, a message announcing the cancellation is issued, and the current activity remains
active.
i When a workflow action is based on a "Reassign"-action a cancellation will not take place but an
assignment to the delegated user.
At the time the macro is executed, the server does not know the context of this activity, i.e., the receiver,
the date of receipt, and several other metadata have not yet been updated. Because the macro runs
synchronously, the server waits until the macro has ended.
The new receiver should be defined with USERNAME when there is reassignment.

3 Workflow Process Design
58
The following macro example shows the "status" of the last run workflow action and the "user" of the
executing user. In addition to the usual workflow action values, the following settings are also available:
+ 36 Reminder was reset
+ 37 Reminder was reached
Function check_4_eyes( status As Long, user As String ) As Boolean
check_open_twice = True
If status = 7 Then
If Document.GetProperty("FistSigner") = user Then
check_open_twice = False
docflow.SetProperty "ErrMsg", "You're not allowed to take over this document"
End If
End Select
End If
End Function
OnExit macro
Every user activity has the OnExit event, which is executed as soon as a business case exits this activity.
A macro can be entered for this event, which is then run synchronously on the server as soon as the user
forwards the business case. If a FALSE is returned, the action is canceled, a message announcing the
cancellation is issued, and the current activity remains active.
Function Besitzerwechsel() as Boolean
Dim retc As Intege
retc = Document.DocflowAction (15, "", Application.username, "", false )
Besitzerwechsel=TRUE
End Function
Because the macro runs synchronously, the server waits until the macro has ended. The following macro
finds the ID of the link, which corresponds to the "order" link property, displayed in the ProcessDesigner,
through which forwarding takes place:
Function Bearbeiten_OnExit( status As Long, user As String) As Boolean
Bearbeiten_OnExit = True
End Function
Function GetLinkId() As Integer
Dim sLinkID As String
Dim iFirst As Integer
Dim iLast As Integer
sLinkID = Docflow.GetProperty("svDfVars")
If Len(sLinkID) > 0 Then
iFirst = InStr(1, sLinkID, "LinkId=") + 7
iLast = InStr( iFirst, sLinkID , ";")
If iLast = 0 Then iLast = Len (sLinkID)+1
GetLinkId = CInt(Mid(sLinkID, iFirst, iLast-iFirst))

3.5 Object Properties
59
Else
GetLinkId = 0
End If
End Function
OnAction
The "OnAction" property contains a formula or the name of the macro that is executed synchronously
on the server if the evaluation of the "OnEntry" property has run positively, and the activity has thus been
entered as positive in the business case. At this point, the entire context of the activity is known.
The macro is executed only when the activity is reached, and is not executed again when the case is
returned to the group tray or delegated.
Macro context
The "Macro context" records the name of the user in whose profile the macro entered in the "Macro"
property is executed. This is necessary, for example, if actions are to be executed that require more rights
than the forwarding editor possesses.
Escalation levels
The actions that are defined in the escalation levels will be carried out at a specified time (see chapter
entitled "Escalation" below).
3.5.3 Properties of Automatic Activities
The automatic activities "start," "end," and "macro" have several other properties, which are discussed
in this chapter.
3.5.3.1 Start Activity
The "start" type activity is set automatically in the ProcessDesigner when a new process is created.
Because there can only be one start activity, it is not possible to select further start activities from the
library.
The start activity can have any desired number of link outputs. It has no link input.
In the workflow inbox, the entry for the activity that follows the start activity is designated with a
corresponding symbol ([cog] icon).
A revision is created for the original document at the start of the business case.
The forms entered in the "index form, business case & document" properties apply to the entire process.
If other forms are to be used in other user activities, they must be indicated explicitly there.

3 Workflow Process Design
60
If a mapping is defined in the start activity, this mapping also applies for each other activity. This allows
synchronization with the business case and the data to be made accordingly visible in the user’s inbox,
for example, if data in the original document changes frequently.
3.5.3.2 End Activities
The "end" type activity must occur at least once in the diagram and can occur several times.
When the business case reaches this activity, it is marked as "finished" by the Server, which prevents it
from appearing in any other inbox. The business case history is attached by the repository (XML file) to
the original document, and a revision is created.
The activity is executed in the context of the last processor. This and other information are documented
in the history.
Deletion of the business case with its data from the XDFDOCVECTOR business case table and from the
repository can be set as the end activity with the "delete" type escalation.
3.5.3.3 Macro Activity
The "macro" type activity can have any desired number of outputs for the "continue" link type.
This is an automatic activity without interaction with the user. Any desired macro can be specified, which
will be executed by the server as appropriate. After the macro is executed, the business case is forwarded
to the next activity.
3.6 Sequence Flows
Sequence flows are directional graphics, each of which links two objects. In the ProcessDesigner, these
links are displayed using arrows, the direction of which indicates advancement within the process.
Sequence flows can only be created between two already existing objects.
Different link types may be selected from a library, depending on the starting activity, for process design.
The following list introduces these link types.
3.6.1 Conditional Flow
The conditional sequence flow is displayed as a directional arrow with a diamond at the starting point.
The condition appears in the chart.
The conditional flow contains a condition which defines when it is run and when not.
For conditional flow, it is also necessary to define the corresponding condition using a formula or macro.
An activity with conditional flow typically has several outputs, each of which corresponds with one
condition.

3.6 Sequence Flows
61
For the case that none of the defined conditions matches, a default flow (see the chapter entitled "Default
Flow") must also be defined.
3.6.2 Default Flow
The default flow is displayed as a directional arrow with a vertical line at the starting point. The "Default
Flow" link may only be selected once.
The default flow is run if all other conditions do not apply (see the chapter entitled "Conditional Flow").
3.6.3 Manual Flow
The manual flow is displayed as a directional arrow.
In a manual flow, the respective user decides on how to forward to a particular following activity. This
means that there are always multiple outputs for this case. The available actions are collected in your
process definition, which are available for the user as a context menu entry. The label of the context menu
entry is made in the "Activity" field of the "Workflow Activity Properties" dialog.
i The "Description" dialog is used to specify the label on this chart. This improves clarity and is
only displayed to you in the ProcessDesigner.
3.6.4 Timer Sequence Flow (interrupting)
The timer sequence flow (interrupting) is displayed as a directional arrow with a clock icon in a circle at
the starting point. The starting point is attached to the lower right corner of the activity.
With the timer sequence flow (interrupting), you must specify a termination. If the activity has not
progressed to a following activity after a certain period of time you have defined has elapsed, it will be
interrupted. The process flow is directed to a following activity created for this purpose (e.g., the business
case is returned, unprocessed, to the owner).
Specify the time period in the "Escalation Level" dialog.
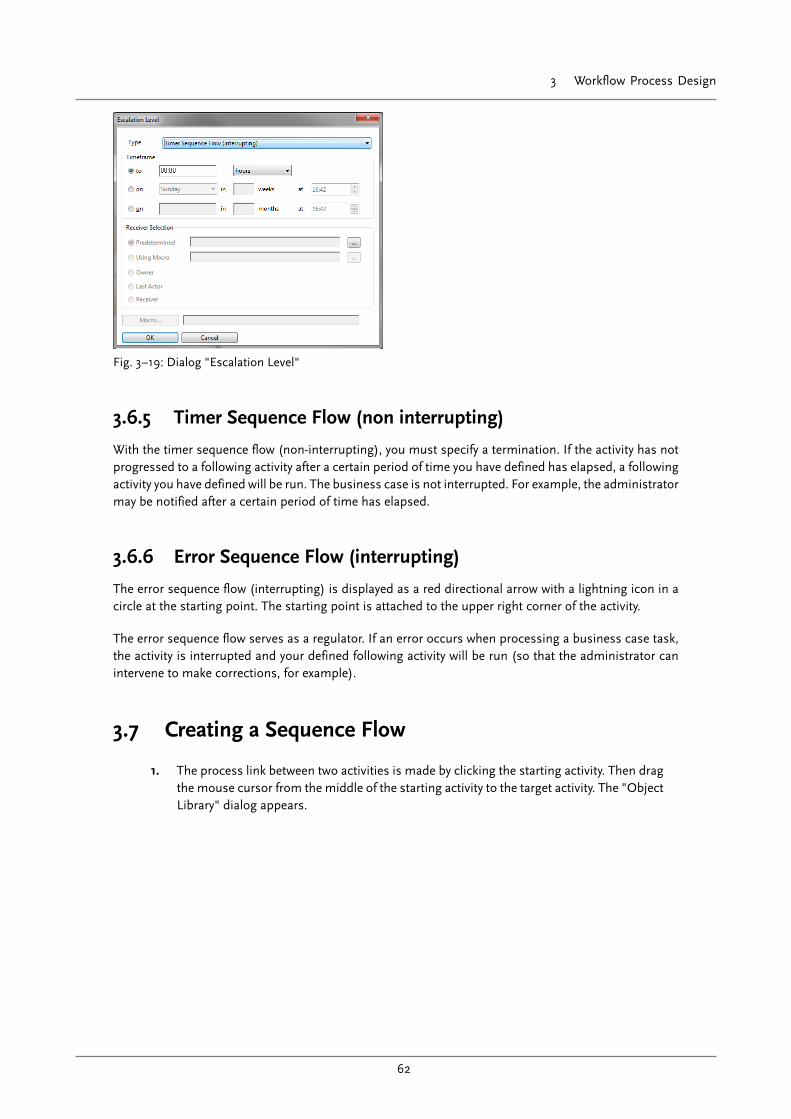
3 Workflow Process Design
62
Fig. 3–19: Dialog "Escalation Level"
3.6.5 Timer Sequence Flow (non interrupting)
With the timer sequence flow (non-interrupting), you must specify a termination. If the activity has not
progressed to a following activity after a certain period of time you have defined has elapsed, a following
activity you have defined will be run. The business case is not interrupted. For example, the administrator
may be notified after a certain period of time has elapsed.
3.6.6 Error Sequence Flow (interrupting)
The error sequence flow (interrupting) is displayed as a red directional arrow with a lightning icon in a
circle at the starting point. The starting point is attached to the upper right corner of the activity.
The error sequence flow serves as a regulator. If an error occurs when processing a business case task,
the activity is interrupted and your defined following activity will be run (so that the administrator can
intervene to make corrections, for example).
3.7 Creating a Sequence Flow
1. The process link between two activities is made by clicking the starting activity. Then drag
the mouse cursor from the middle of the starting activity to the target activity. The "Object
Library" dialog appears.

3.8 Sequence Flows Properties
63
2. Depending on the starting activity, a number of different options will be displayed for
selection.
3. Select the desired sequence flow and click [Next].
4. Depending on the type of link, further dialogs will appear, for example, to specify the label
or the macro.
After successfully configuring the link, it is graphically displayed in the ProcessDesigner
with the corresponding properties.
3.8 Sequence Flows Properties
The properties of the links are displayed in the top right-hand section of the ProcessDesigner window.
To display the properties, you must select the link in question in the process chart. You can then change
and adjust the properties of the link if necessary.
3.8.1 Diagram Properties
The diagram properties reflect the appearance of links in the process chart. The following properties are
displayed and may be adjusted:
Fig. 3–20: Diagram properties

3 Workflow Process Design
64
Diagram Properties
Property Description
Text Text that is displayed in the link line.
ToolTip Text that is displayed as a tooltip for this link line.
Middle arrow Form of an arrow displayed in the center of the link.
ArrowOrg Form of an arrow displayed at the start of the line.
ArrowDst Form of an arrow displayed at the end of the line.
Font Font and size for displaying text.
Draw width Thickness of the displayed link line.
Draw color Color of the displayed link line.
Link style Style in which the start and end points are linked with one another.
Draw style Style of the displayed line.
Orienting text Style for how text is aligned against the line.
Text segment
3.8.2 Sequence Flow Properties
Depending on the type of link, the following properties are specified in the ProcessDesigner for the active
link:
Sequence flow properties
Property Description
Sequence flow type Specification of the type of link (see above for description). It is not possible to change the
type of link at a later stage.
Forwarding condition The "Forwarding condition" attribute pertains only to the "Forward" type. To handle ca-
ses where there is more than one "Forward," a formula or the name of the checking macro
should be included. The server checks one link after the next until a TRUE value is returned.
If the macro returns a TRUE value, the process continues along this link. The order of the
check follows the number that is displayed in the "Order" link property. The number is de-
termined by the time at which the link was made and always pertains to the activity from
which the link originates. The syntax of the formula corresponds to that of the evaluation of
fields in the forms. The field names of the archive definition of the original document can
be used directly in the formula. If the field names of the business-case vector XDFDOC-
VECTOR are used, a "Df." must be placed in front.
Example
Amount > 5000 AND Df.PRIORITY = 2
Macro You may specify a macro here. The corresponding macro is running when the server advan-
ces the business case along this link.
NOTE: The macro is executed only. The return value is Boolean.
History entry Enter a text here to be displayed in the business case's log (table PDFDOCVECTOR).

3.9 Owner of a Business Case Activity
65
Property Description
Confirmation This property can be used to cancel a forwarding operation that the user selected by mista-
ke. Enter the text here that is displayed in a message box in the case of intentional forwar-
ding (e.g., confirmation query that triggers forwarding when [OK] is clicked). This property
is only available for links of the "Manual flow" type.
Order The "Order" property contains a number from 1 upward, which corresponds to the order of
the creation of the link that originates from the respective activity. The order can be chan-
ged here, but a clear order is important.
Reason You can use this checkbox to force the user in question to enter a reason. The reason is en-
tered in the "Comment" field, the history and the comment list.
Authentication An authentication can be set for forwarding documents over certain branches. Forwar-
ding over this branch is only possible with the corresponding authentication. Entering a
password or a signature can be used as authentication. This can also be linked simulta-
neously with a document approval.
Voting If the link originates from an activity with the "Several receivers" option, a majority can be
specified here that must be reached in order for forwarding to take place using this link.
+ With the "Simple majority" setting, the business case is for-
warded via the link if the majority of users have chosen this
link.
+ With "unanimous" setting, the business case is forwarded
via the link if all users have chosen this link.
+ If there is a discrepancy, the person who is entered in the
"Responsible" task property receives the business case for
further processing.
+ With the "Quorum" and "Minimum percentage" settings,
the business case is forwarded via this link if the "Minimum
value" that was set in the provided field is reached.
Majority determination Specify here if the business case can be forwarded prematurely if a majority has been rea-
ched. Note that the voting type is specified in all outgoing links of an activity. All links must
contain the same voting type.
For example, if a voting of type "Simple majority" is carried out, all outgoing links from the
activity must be configured with the corresponding majority type.
NOTE: In case the user is not to be given the possibility of forwarding by using the cor-
responding link in the context menu for the business case, the designation of the "Menu
font" property can be set to "$" from the start. This makes forwarding using this link only
possible via API.
3.9 Owner of a Business Case Activity
A responsible person is specified for every business case activity. This is the owner of the business case,
and they receive special rights. This person will always be informed or will receive the business case in
their personal inbox if no responsible person was set in the process definition and one of the following
events occurs:
+ An editor declares themselves not responsible

3 Workflow Process Design
66
+ An error occurs during the process
This allows the owner of the business case to rectify the problem and continue the workflow process.
Furthermore, every user has a "My Tasks" folder in their personal folder, in which all business cases
for which they are the owner are displayed. These business cases can be edited by the user with owner
functions, if appropriately configured.
Business cases have exactly one owner, which may only be one single user, at any time. Roles or
organizational units cannot act as owner of a business case.
With the start of a business case, the starting user is automatically set as the owner of the business case.
There is the possibility to change the owner while editing the business case via the "Receiver becomes
owner" property, or through the workflow API.
3.10 Escalation
Workflow documents may stay for an unnecessarily long period of time in an inbox if they are not
processed by the responsible user. This holds up the process of working through a business case.
To prevent this, you can specify any number of escalation levels for each running process activity. The
actions specified in the escalation levels are run after a definable time. In this way, you can regulate and
guarantee advancement through the workflow process using control mechanisms (for example, e-mail
notifications to the owner).
3.10.1 Creating an Escalation Level
1. In the "Properties" area, click the "Escalation levels" entry. The number of escalation levels
will appear.
2. Then click the [...] button. The "Escalations" dialog appears. The overview displays the
already defined escalation levels with specification of the action, the time, and the target.
3. Click [New] to specify an additional escalation level, or select an entry from the list and
click [Edit] to edit it. The "Escalation level" dialog appears.

3.10 Escalation
67
4. Configure the following settings:
+ Type
Select the desired escalation action from the dropdown-list (see chapter entitled
"Escalation Types").
+ Timeframe
Specify the timeframe in which the defined escalation level should commence.
+ Receiver Selection
You can specify the receiver of the notification in the case of escalation in this area.
5. Click [OK] to save your settings. The newly created escalation level then appears on the
list of escalations.
3.10.2 Escalation Types
You can select different escalation types to intervene to regulate a business case. This takes place in the
"Escalation Level" dialog. Select the desired escalation type from the "Type" dropdown list.
Escalation Types
Escalation Type Description
Set unread If the deadline is missed, the business case is set to unread and appears in the workflow
inbox in bold.
E-mail notification When a deadline is exceeded, an e-mail notification is sent to the selected user if an e-mail
address has been entered and an e-mail connection has been set up. The e-mail is sent in
the format specified under the "E-mail options" configuration item.

3 Workflow Process Design
68
Escalation Type Description
For information When a deadline is exceeded, the selected user receives an entry in the result list of the
workflow inbox. The entry is deleted using the context menu.
Move to When a deadline is about to be exceeded, the selected user or the selected group is entered
as the new user/ receiver. This causes the business case to appear in the corresponding re-
sult list in the workflow inbox.
E-mail notification (non-interrupting) If a deadline has been missed, the selected user is automatically sent an e-mail with corre-
sponding information.
Notification (non-interrupting) If a deadline has been missed, the selected user is automatically sent a notification with
corresponding information.
Cyclic e-mail notification (non-interrupting) If a deadline has been missed, the selected user is automatically sent a notification with
corresponding information. The procedure repeats over the time interval defined in the "Ti-
meframe" area.
Cyclic notification (non-interrupting) If a deadline has been missed, the selected user is automatically sent a notification with
corresponding information. The procedure repeats over the time interval defined in the "Ti-
meframe" area.
Delete The end activity only offers one (special) escalation type for selection. This is the "Delete"
escalation. The workflow information (like information from other documents as well) is
saved to a medium. The "Delete" escalation deletes the workflow information from this
medium.
3.10.3 Receiver Selection for an Escalation
Depending on the escalation types you selected, it may be necessary to select a receiver for an escalation,
for example, for the "E-mail notification" escalation type. This is done in the "Receiver selection" section
of the "Escalation Level" dialog.
In addition to the options
+ owner
+ last actor
+ receiver
+ Predetermined
To define a receiver, click the [...] button to select a receiver from the created organizational structure.
The "Organizational Structure" dialog appears.
+ Macro
To query the escalation levels in a macro, the following call needs to be carried out:
Docflow.GetProperty("svDFVars")
"ESCALATIONID=<ID>", "ESCALATIONTYPE=<TYPEID>" will be returned as a result.
The following values can result for TYPEID:
EscalationUnread = 0
EscalationMail = 1
EscalationNotice = 2

3.10 Escalation
69
EscalationMoveTo = 3
EscalationPutBack = 4
EscalationAutomatic = 5
EscalationMacro = 6
EscalationTerminate = 7
EscalationRemove = 8
EscalationSetNode = 9
EscalationForward1 = 10
EscalationForward2 = 11
EscalationForward3 = 12
EscalationForward4 = 13
EscalationForward5 = 14
EscalationForward6 = 15
EscalationForward7 = 16
EscalationForward8 = 17
EscalationForward9 = 18
EscalationForward10 = 19
EscalationForwardFormel = 20
Example
Function Bearbeiten_OnEscal( status As Long, user As String ) As String
Dim s As String
Dim result As String
Dim pair As String
Dim varName As String
Dim value As String
Dim escId As Long
Dim u As Object
On Error GoTo OnEscalError
s = Docflow.GetProperty( "svDfVars" )
Set u = Application.Utility
If u.ParseInit(s, ";") Then
pair = u.Parsenext()
If u.ParseRelease() Then
End If
If Len(pair) > 0 Then
If u.ParseInit(pair, "=") Then
varName = u.ParseNext( )
value = u.ParseNext()
escId = Val(value)
If u.ParseRelease() Then
End If
If escId = 1 Then
result = Str(Date()) + ";14:30"
Else
result = u.AddDays( Str(Date()), 2 ) + ";9:00"
End If
Bearbeiten_OnEscal = Trim(result)
End If
End If

3 Workflow Process Design
70
End If
' Bearbeiten_OnEscal = "Fehler:" + s
Set u = Nothing
Exit Function
OnEscalError:
' Error handler
Exit Function
End Function
3.11 Macros
Macros can be run either on the workflow server or on the client. In some cases this can be controlled
by a checkbox when selecting the macro. On other location, the macros are run only on the server.
Macros can only be selected from a file that is labeled exactly like the workflow (see chapter "Versioning").
When creating a macro, a procedure is predefined that suggests the required parameters and the
function type. If necessary, the name must be modified since it could contain possible impermissible
special characters.
! Please do not use Unicode characters for the macro file names because only ANSI characters are
supported.
Each macro has two objects of the class "Saperion.Document":
+ Workflow: Business case document
+ Document: Original document
3.11.1 Overview of Macro Process
Overview of macro process
Macro interface Client Server
User selection X X
OnEntry X
On Action X
OnExit X X
Escalation type macro X
Link conditions X

3.11 Macros
71
Macro interface Client Server
Action activity X
3.11.2 Macros in Processes
3.11.2.1 OnExit/ OnEntry/ OnAction on the Workflow Server
Changes to the business case are saved by workflow server.
3.11.2.2 OnExit on the Client
Changes to document must be saved by you (Document.SaveChanges).
Changes to the vector must be saved by you (Docflow.SaveChanges)
3.11.3 "Document.DocflowAction"
In principle, "Document.DocflowAction" should only be called when the respective document is not
locked (e.g., by opening the index form), since the Queue Server has to lock the document itself within
a macro or for other reasons.
When starting/ ending a process, a lock to the main document is placed by the Queue Server. With all
other workflow actions, a lock can also be necessary, for example, if a server macro wants to influence
the main document.
Beware of macros that do not explicitly lock the document and then run a "Save changes." It may happen
that the client and the Queue Server work against each other and overwrite one another.
To ensure that the user or process has exclusive access to the document, the methods "lock" and
"unlock" for the document object must be used for all critical actions. Critical actions related to the
document object are all of those that make a revision necessary as a consequence of the action. The
competing accesses that may result from the actions can damage the revision chain if "lock" and
"unlock" are not used. All locked documents with a reference to the locking user are listed in the XLOCKS
system table.
Example
Set oCursor = Application.SelectSQL(INDEX_TABLE, "Status='Neu' order by
DocNr asc")
If oCursor.First() Then
Write_Log MODULE_NAME & " | " & oCursor.Count() &
" business cases in start queue ", LOG_FILENAME
On Error GoTo ErrorHandler
Do
Set oDocument = oCursor.Document()
sXHDOC = oCursor.Document.HEXUID()

3 Workflow Process Design
72
If oDocument.Load() Then
If oDocument.Unlock() Then
If oDocument.Lock() Then
If Len(oDocument.GetProperty("OE")) > 0 Then
sDfName = DFPOST & oDocument.GetProperty("OE")
Else
sDfName = DFPOST & "Korrektur"
End If
iRetCode = oDocument.DocflowAction(1, sDfName, "")
If iRetCode <> 0 Then
Write_Log MODULE_NAME & " | " & sDfName & " nicht
erfolgreich gestartet " & sXHDOC & " | " &
oDocument.LastErrorMsg() & " Error = " & Str(iRetCode),
LOG_FILENAME
On Error GoTo ErrorHandler
Else
Write_Log MODULE_NAME & " | " & sDfName & "
erfolgreich gestartet " & sXHDOC, LOG_FILENAME
On Error GoTo ErrorHandler
End If
If oDocument.Unlock() Then
Else
Write_Log MODULE_NAME & " | Dokument konnte nicht entsperrt
werden!", LOG_FILENAME
End If
Else
Write_Log MODULE_NAME & " | Dokument konnte nicht gesperrt
werden!", LOG_FILENAME
End If
Else
Write_Log MODULE_NAME & " | Dokument konnte nicht entsperrt
werden!", LOG_FILENAME
End If
Else
Write_Log MODULE_NAME & " | Dokument konnte nicht geladen werden -
" & sXHDOC, LOG_FILENAME
On Error GoTo ErrorHandler
End If
Loop until Not oCursor.Next()
Else
Write_Log MODULE_NAME & " | start queue ist leer", LOG_FILENAME
On Error GoTo ErrorHandler
End If
3.11.4 Macros on the Server
For macros running on the server, the user under which they run plays an important role. The following
rules apply:
+ If a special context (user) is given, the macro is run with this context.

4.1 Methods
73
+ With normal user activities, they are always run under the registration of the active user (even when
the macro runs on the server).
+ With action activities, they are run with the context of the last user.
+ For action activities, you can optionally specify a special context.
3.11.5 Macros on the Client
For macros that run on the client, the following rule applies:
+ The macros run in the context of the logged in user.
+ All local macros are run under the last active user until the document reaches a user activity or the
business case ends. This can also mean that the affected machine may be locked for a period of
time while the macro runs.
4 Workflow API
This chapter deals with macro programming and describes the workflow-specific API.
The API comprises all methods also used by the inbox.
4.1 Methods
4.1.1 "WFRequest" Method
! As of SAPERION version 6, the "DocFlowAction" method is renamed to "WFRequest." If you
are still using scripts that call the DocFlowAction method, no change is necessary, since the API
automatically interprets these as WfRequest.
Syntax
INTEGER WFRequest (Action code [ , Par1 ] [ , Par2 ] [ , Par3 ] [ , Par4 ] [ , Par5 ] [ , Par6 ] [ , Par7 ] [ , Par8 ] [ , Par9 ] )
"WfRequest" method
Parameter Description
Action code Number that designates the action to be performed (Integer)
Par1 Parameter depending on action code [Optional](String)
For action code=16, the NodeID is specified here.
For action code=50, SetEscalationDate is specified here (dd.mm.yyyy;hh:mm:ss). The associated escalation le-
vel is specified in the last parameter.
Par2 Parameter depending on action code [Optional](String)
For action code=16, nextuser is specified here.

4 Workflow API
74
Parameter Description
Par3 User name, within whose user context the action is run [Optional](String)
Default: logged in user
Par4 Specifies if the action is carried out synchronously (TRUE) or asynchronously (FALSE) with reference to the cli-
ent running it [Optional](Boolean)
Par5 Specifies if the action is carried out synchronously (TRUE) or asynchronously (FALSE) with reference to the cli-
ent running it [Optional](Boolean)
Default: FALSE
Par6 Comment – Content of additional entries in the history and the comment fields. If a "?" is passed for workflow
Action 9 (Reminder), the reminder dialog will appear.
NOTE: Only use on the client, as user interaction is required.
Par7 Parameter is only used when calling from within an original document form. TRUE will delay execution of
the call until the form is closed. It is buffered in the "vDocflowAction" temporary variable. It is also possi-
ble to save multiple calls. If the form is closed with a cancel operation, the variable should still be set to ""
[Optional](Boolean)
Par8 For a forwarding (Action 2, 4, 5), the time (WORKINGTIMEAC field) used to process the business case in the
current activity may be specified in minutes for the entry in the PDFDOCVECTOR.
Par9 ContextCheck. If the parameter is set to TRUE, only actions which can be called from the business case context
menu may be run. (Boolean).
Default: FALSE
Return value
The return value of the method includes an error code.
4.1.1.1 Function Description of Workflow Actions
Action code 1: Start business case
INTEGER WFRequest (1, <Process definition>, <Next recipient/ organizational unit>, <User>, <TRUE/ FALSE>,
<History/status comment>, <TRUE/ FALSE>)
Action code 2: Forward
INTEGER WFRequest (2 , <Name/ ID of link>, <Next recipient/ organizational unit>, <User>, <TRUE/ FALSE>, " ",
<TRUE/ FALSE>)
Action code 4: Reject
INTEGER WFRequest (4 , " ", <Next recipient/ organizational unit>, <User>, <TRUE/ FALSE>, " ", <TRUE/ FALSE>)
Action code 5: Correction
INTEGER WFRequest (5 , " ", <Next recipient/ organizational unit>, <User>, <TRUE/ FALSE>, " ", <TRUE/ FALSE>)

4.1 Methods
75
Action code 6: Not responsible
INTEGER WFRequest (6 , " ", " ", <User>, <TRUE/ FALSE>, <History/ status comment>, <TRUE/ FALSE>)
Action code 7: Take over
INTEGER WFRequest (7 , " ", " ", <User>, <TRUE/ FALSE>, " ", <TRUE/ FALSE>)
This action can only be processed out of a group inbox.
Action code 8: Delete business case
INTEGER WFRequest (8)
The business case must have been stopped previously.
Action code 9: Set reminder
INTEGER WFRequest (9 , <Reminder date:date;time>, " " , <User>, <TRUE/ FALSE>, " ", <TRUE/ FALSE>)
The escalation level will not be changed with this action.
Action code 11: Call activity information
INTEGER WFRequest (11 , " ", " ", <User>, <TRUE/ FALSE>, " ", <TRUE/ FALSE>)
With this action a file is copied into the Temp directory and an XML-formatted string including the file
name is returned.
Action code 12: Pause
INTEGER WFRequest (12 , " ", " ", <User>, <TRUE/ FALSE>, " ", <TRUE/ FALSE>)
Action code 13: Continue
INTEGER WFRequest (13 , " ", " ", <User>, <TRUE/ FALSE>, " ", <TRUE/ FALSE>)
The action must have been paused previously.
Action code 14: Terminate
INTEGER WFRequest (14 , " ", " ", <User>, <TRUE/ FALSE>, " ", <TRUE/ FALSE>)
The action must have been paused previously.

4 Workflow API
76
Action code 15: Change owner
INTEGER WFRequest (15 , " ", <User/ organizational unit>, <User>, <TRUE/ FALSE>, " ", <TRUE/ FALSE>)
The action must have been paused previously.
Action code 16: Go to activity
i This action can only be used if no recipient is specified.
INTEGER WFRequest (16 , <ActivityID>, <Recipient/ organizational unit>, <User>, <TRUE/ FALSE>, " ", <TRUE/
FALSE>)
This action enables any desired positioning within the business case.
Action code 17: Delegate
INTEGER WFRequest (17 , (Internally reserved), <Recipient/ organizational unit>, <User>, <TRUE/ FALSE>, <Comment>,
<TRUE/ FALSE>)
Action code 20: Get user information
INTEGER WFRequest (20 , " ", " ", <User>, <TRUE/ FALSE>, " ", <TRUE/ FALSE>)
With this action an XML-formatted string including user information user information is returned.
Action code 21: Get history entry
INTEGER WFRequest (21 , " ", " ", <User>, <TRUE/ FALSE>, " ", <TRUE/ FALSE>)
With this action an XML-formatted string including history information is returned.
Action code 22: Put back
INTEGER WFRequest (22 , " ", " ", <User>, <TRUE/ FALSE>, " ", <TRUE/ FALSE>)
This action can only processed out of a personal inbox.
Action code 23: Delete asynchronous notification
INTEGER WFRequest (23 , " ", " ", <User>, <TRUE/ FALSE>, " ", <TRUE/ FALSE>)
Action code 25: Add history entry
INTEGER WFRequest (25 , " ", " ", <User>, <TRUE/ FALSE>, <Comment>, <TRUE/ FALSE>)

4.1 Methods
77
Action code 26: Get comment
INTEGER WFRequest (26 , " ", " ", <User>, <TRUE/ FALSE>, " ", <TRUE/ FALSE>)
With this action an XML-formatted string including comments is returned..
Action code 27: New comment
INTEGER WFRequest (27 , <Comment>, " ", <User>, <TRUE/ FALSE>, <Comment>, <TRUE/ FALSE>)
Action code 29: Start adhoc workflow
WFRequest ( 29 , Adhoc)
API
WF_STARTADHOC = 29
iDocument.WfRequest ( WF_STARTADHOC, processName )
the process name formats <adhoc process>!<template>!<subject>
<adhoc process> =
if workflow option is enabled any process starting with ADHOC,
if workflow option is not enabled only ADHOC is valid
<template> =
name of the public or private template.
Public is preferred.
?M? shows dialog to load private template,
?P? to load public template
<subject> =
any ANSI subject,
unicode subjects only by link formula from ddc,
if left blank the link formula is used,
e.g. iDocument.WfRequest ( WF_STARTADHOC, "ADHOC!PublicTemplate!My Subject" )
! The existing DFD file "Adhoc.DFD" may not be renamed.
Action code 36: Delete reminder
INTEGER WFRequest (36)
With this action the reminder is removed, but the escalation date is not changed.
Action code 50: Set escalation date
INTEGER WFRequest (50 , <Escalation date:date;time>, " ", <User>, <TRUE/ FALSE>, " ", <TRUE/ FALSE>)

4 Workflow API
78
With this action the specified escalation date is set for the current escalation level.
4.1.2 "SelectUser" Method
The "SelectUser" method opens the user selection and returns the selected objects of the organizational
structure, separated by semicolons ";". A more detailed description is contained in the documentation
of the COM objects.
+ STRING SelectUser (Multiuser , "" , "" , Filter, <List> , <Title>)
+ Multiuser:boolean with TRUE selection of more than one element of the user administration is
allowed (Default: FALSE).
+ Filter:boolean with TRUE selection is restricted to the branches of the organizational structure given
under "List" (Default: FALSE).
+ ListSTRING; list of the names of the groups and organizational units, separated with semicolons,
for restricting the selection.
+ TitleSTRING Title of the selection window
Example
Selection of several users:
s = Application.SelectUser ( TRUE, "", "", TRUE, "Meier;Müller;Vertrieb", "Benutzerauswahl" )
Selection of one user:
s = Application.SelectUser ( FALSE, "", "", TRUE, "Meier", "Benutzerauswahl" )
4.1.3 "WfGetInstances" Method
By means of the "WfGetInstances" method a collection of all workflow instances (iDocument Object)
for this document object is returned. Each object is iDocument object of the XDFDOCVECTOR DDC
and has to be loaded by iDocument.LoadLink() before workflow commands on it can be executed by
iDocument.WfRequest()
Syntax
Public Sub WfGetInstances( _
) As Object
Return value
iDocument object collection
The method returns an empty collection if the document object has no workflow started. An exception
is thrown, when the workflow items cannot be found anymore.

4.1 Methods
79
Before any workflow operation can be executed the object must be loaded by iDocument.loadlink(). All
workflow commands can then be executed with iDocument.WfRequest().
4.1.4 "WfGetParent" Method
By means of the "WfGetParent" method the main instance of a workflow item is delivered.
Syntax
Public Sub WfGetParent( _
) As Object
Return value
iDocument object of the (main) parent workflow item
The method can fail with an exception if the parent cannot be found. If the object has no parent
the iDocument object is the current item. You can access the properties like process name, process
version, SYSROWID etc. directly with the document object after you have loaded the instance by
iDocument.LoadLink().
4.1.5 "WfGetChildren" Method
By means of the "WfGetChildren" method a collection of all sub instances (iDocument Object) for this
workflow item is returned. Objects are for example synchronous sub processes, interrupting timer events
or gateway tokens.
Syntax
Public Sub WfGetChildren ( _
) As Object
Return value
iDocument object collection
The document object of this collection contains the index data but not the content. Before a workflow
operation can be executed the object must be loaded by iDocument.loadlink(). All workflow commands
can then be executed by iDocument.WfRequest().
For identifying the gateway token you have to check the document property TokenID.

4 Workflow API
80
If the collection has the count "0" the item is a instance and not a gateway. Check by the "WfGetParent"
method whether it is the main instance.
4.1.6 "WfGetMainInstance" Method
The "WfGetMainInstance" method returns the main workflow instance (iDocument Object) for this
workflow item. Key feature is that the ancestor of the instance has no ancestors itself.
Syntax
Public Sub WfGetMainInstance( _
) As Object
Return value
iDocument object
The document object returned contains the index data but not the content. Before a workflow operation
can be executed the object must be loaded by iDocument.loadlink(). All workflow commands can then
be executed by iDocu-ment.WfRequest().
4.1.7 "WfGetTokenId" Method
The "WfGetTkenId" method returns the token ID of this instance. If the instance has no parent instance
the token ID is invalid. Otherwise it is the ID which the split sequence flow assigns to its token.
Syntax
Public Sub WfGetTokenId( _
) As String
Return value
String
Example
Dim wfInstances As Object
Dim wfTasks As Object
Dim wfInstance As Object
Dim wfTask As Object
Dim tokenID As String
‘get the started workflows for a archived document object (sysdocflowdata)
Set wfInstances = Document.WfGetInstances()
‘get one workflow instance object (xdfdocvector document)
Set wfInstance = wfInstances(1)

4.2 Status Information after an "Escalation Event"
81
‘ get all sub instances for this main instance
Set wfTasks = wfInstance. WfGetChildren ()
If wfTasks.Count() = 0 Then
‘if the workflow instance has no sub instances we have a simple single instance process and can work with this instance
directly
Set wfTask = wfInstance
Else
Set WfTask = wfTasks(1)
‘ load the task object (xdfdocvector document)
wfTask.LoadLink
‘ get the new TokenID property
tokenID = wfTask.WfGetTokenId()
End if
‘ Forward the task
wfTask.WfRequest ( 2 )
4.2 Status Information after an "Escalation Event"
After an "Escalation Event," an "OnEntry" macro can be used to query what exactly was triggered. The
"svDfVars" system variable is used for this:
svDfVars=ESCALATIONID=<ID>;ESCALATIONTYPE=<TYPE>
ID = Stufe der Eskalation beginnend mit 1
TYPE
1 = set unread
2 = a mail is sent to the processor
3 = a mail is sent to to s.o. else
4 = the document is moved to a user
5 = put back to pool
6 = select automatically from pool
7 = a macro is executed
8 = terminate case
9 = remove case
10 = set to activity
11 = 1. link direct
12 = 2. link direct
13 = 3. link direct
14 = 4. link direct
15 = 5. link direct
16 = 6. link direct
17 = 7. link direct
18 = 8. link direct
19 = 9. link direct
20 = 10. link direct

4 Workflow API
82
21 = Escalation by evaluation formular
4.3 Starting Business Cases by Task
You can link a macro with a periodically running task so that business cases with the "OrderProcessing"
process definition with different document statuses and types are started in the "MyOrderArchive"
archive.
Example
Private Function BrokerTaskDFStart(sDocType As String, sState As String) As
Boolean
Dim oCur As Object
Dim oDoc As Object
Dim bThere As Boolean
Dim iRetC As Long
Dim sDocID As String
On Error GoTo BrokerTaskDFStartERR
'----------------------------------------
' search for open orders
'----------------------------------------
Set oCur = Application.SelectSQL("MyOrderArchive","DocType='" &
sDocType & "' AND State='"& sState & "'")
bThere = oCur.First
If bThere Then'dokumentsfound
While bThere
Set oDoc = oCur.document'get document
oDoc.load
iRetC = oDoc.DocflowAction (1, "OrderProcessing" , "")'start business case
If iRetC <> 0 Then
HandleDfError iRetC
ElseIf conLogLevel = "0" Then'alles loggen
sDocID = Str( oDoc.GetProperty("DocID") )
End If
bThere = oCur.next
Set oDoc = nothing
Wend
End If
BrokerTaskDFStart= TRUE
Set oDoc = nothing
Set oCur = nothing
Exit Function
BrokerTaskDFStartERR:
BrokerTaskDFStart= False
Set oDoc = nothing
Set oCur = nothing

4.4 Notes for the API Use
83
End Function
4.4 Notes for the API Use
4.4.1 Combining the "Pause" and "End" Workflow Actions
If workflow actions 12 and 14 are executed directly one after the other, we recommend inserting an
execution pause of at least three seconds with util.sleep 3000. Otherwise, the revision chaining of the
original document may be destroyed.
4.4.2 Refresh the Results List after a Workflow Action
If a workflow action is executed for selected documents in the result list of the inbox using a button,
it may be necessary for the result list to be reconstructed afterward. This is especially the case with
forwarding or reminders. To refresh the list, "Mask.RefreshList=TRUE" can be called. This causes the
result list to behave as if the workflow action had been called via the context menu.
4.4.3 Workflow Action from a Form
If a form was called with document.editindex using a button, a workflow action, e.g., forwarding using a
certain link can also be done here. If the document is linked to more than one business case, the relevant
DFUID of the desired business case must be attached to the document as a vDocflowUID variable.
Example
Document.DocFlowAction 2, "Freigeben","","",FALSE,"", TRUE
Document.AddProperty "vDocflowUid", FALSE, Left(Document.GetProperty("SysDocflowData" ), 44 )
Mask.OK
4.4.4 Setting Business Case Values in the Start Activity using
OnAction Macro or Mapping
If business case values are set in the start activity using an "OnAction" macro or mapping, these values
can only be evaluated with the "OnAction" macro of the next reached activity. In other words, a macro
for a link condition cannot yet evaluate these set values. Therefore, only the index values of the original
document can be evaluated on the links after the start activity.
4.5 Examples of API Use
4.5.1 Starting Business Case on Several Documents
The following example can be used to start a business case on several selected documents in the results
list of a query form, each of which will go first to the same receiver. The macro is started using a button.

4 Workflow API
84
Sub StartBusinessCases( )
Dim iRetc As Integer
Dim oUtil As Object
Dim oDoc As Object
Dim sUids As String
Dim sUid As String
Dim sReceiver As String
Dim sFlow As String
sFlow=MyFlow
On Error GoTo Start_Err
sUids = Mask.Selected ' uid list of marked business cases
If Len(sUids) > 0 Then
'First let the user select a receiver for each business case that will be started
sReceiver=Application.SelectUser(False,"","",TRUE,"MyCompany","Select User")
Set oUtil = Application.Utility
If oUtil.ParseInit (sUids, ";") Then
While oUtil.ParseHasNext() ' cycle throught each business case
sUid=oUtil.ParseNext() ' Get next UID of business Case
Set oDoc = CreateObject( "Saperion.Document" ) ' load business Case
oDoc.Load sUid
retc = oDoc.DocflowAction (1, sFlow , sReceiver , "" ,false) ' take context of current user, asynchronious
Wend
oUtil.ParseRelease
Set oDoc=nothing
End If
Set oUtil=nothing
Else
MsgBox "Please, select one or more business cases",64,"Start"
End If
Exit Sub
Start_Err
Dim iErr As Integer
MsgBox "Workflow: General Error at Start of Business Case",16,"Start"
Set oUtil=nothing
Set oDoc=nothing
End Sub
4.5.2 Starting Business Case with Query of the Process Definition
The following example shows the start of business cases for which the dialog is called for the selection
of the process definition. Error processing is omitted here.
Sub StartDocflow()
Dim oDoc As Object
Dim iRetC As Integer
Dim sUids As String
Dim sUid As String
Dim oUtil As Object

4.5 Examples of API Use
85
Set oUtil = Application.Utility
sUids = Mask.Selected
If oUtil.ParseInit (sUids, ";") Then
While oUtil.ParseHasNext()
sUid=oUtil.ParseNext() ' Get Next UID of document list
set oDoc = application.createdoc ()
oDoc.Load sUid
IRetC = oDoc.docflowAction (1, "", "", "", true )
Set oDoc = Nothing
Wend
Set oUtil = Nothing
End If
End Sub
4.5.3 Dual Control
After verification by a colleague of an organizational unit, the first activity of a business case is approved.
The following activity is then forwarded to the same organizational unit. By using the following "OnEntry"
macro, you can be sure that the same employee will not receive the case again.
Function check_open_twice( status As Long, user As String ) As Boolean
check_4_eyes = True
If status = 2 or status = 1 Then
docFlow.AddProperty "DFVarLastUser", true
If docflow.getproperty("DESCRIPTION") = "1st Check Activity" Then
docFlow.setProperty "DFVarLastUser", Docment.getproperty("firstsigner")
End If
End If
If status = 7 Then
Select Case DocFlow.GetProperty("NodeName")
Case "2nd Check Actitvity"
If Document.GetProperty("firstsigner") = User Then
check_4_eyes = False
docflow.SetProperty "ErrMsg", "You're not allowed to take over this document"
End If
End Select
End If
End Function
The transfer parameters of the function are the last workflow action for the status and the executing
user for the user. Something must be done in this macro if the activity is reached (forward) or a transfer
(take) is made into the personal inbox.
If the activity is reached, the first signer variable is determined by setting the system "DFVarLastUser"
variables to the last user. Workflow writes the value in the LASTUSER column of the XDFDOCVECTOR
table. By doing so, the name of the approver is shown in the inbox in the LASTUSER column of the result

4 Workflow API
86
list. In this way, it is clear to the user which of the business cases he can approve himself and can no
longer take over.
If, however, the user does take over the case, the second part of the macro makes sure that he receives
a message and the take over is canceled.
4.5.4 Forwarding from an Index Using a Macro
If a business case is to be forwarded from an index form using a macro, you can use the following
configuration:
Set Doc = Mask.Document
If Doc.UID"" Then
ok=Doc.SaveChanges ' Speicherung von neuem Index
If ok=True Then
If Doc.GetProperty("v1ZahlungNEIN")="Ja" or
Doc.GetProperty("v2ZahlungNEIN")="Ja" Then
Doc.docFlowAction 4,"","",TRUE,"",TRUE
Else
Doc.docFlowAction 2,"","",TRUE,"",TRUE
End If
End If
Else
Doc.Store
End If
Mask.Cancel
Changes to the index data of the original document are saved manually using the "SaveChanges"
method. The document object is then directed to the server with the "DocflowAction" method.
4.6 API Error Codes
4.6.1 System Error Communication Layer
System error communication layer
Return Code Error Short Description
-1 Ret_DataTrunction, RPC data communication error: not all data received or sent
-2 Ret_ServerNotAvailable , RPC data communication error: access to SAPERION broker server failed
-5 Ret_MemOverflow, RPC data communication error: Memory allocation failed
4.6.2 Regular Return Codes
Regular return codes
Return Code Error Short Description
1000 Workflow not available

4.6 API Error Codes
87
Return Code Error Short Description
0 No error
1 Free node, user can select a user
2 Free node, user can select a group
3
4 Free node, user can select a group
5 User did not select a process
6 User did not select a user/ group/ role
7 Process finished
8 "onExit" macro and/ or user on client
9
10 Process finished
11 User selected or action macro on the client is executed
12
13
1001 Unspecified error
1002 Possible Addflow load error
1003 Process could not be found in XDFPROCESSES
1004 Forward/ reject, applying not allowed
1005 Adhoc workflow could not be started
1006 An error occurred during the execution of a macro
1007 Next node could not be entered
1008 Exit from the node not possible
1009 Document is finished but could not be moved by the workflow
1010 Macro process seems to be busy to do something
1011 No more links, although there is no end node
1012 Invalid checksum, document has been manipulated outside the workflow engine
1013 Document could not be added
1014 Role for a role class could not be found in the current organizational unit
1015 For information only: user is absent and has not defined any substitute
1016 For information only: forward of multi user activity without majority, sent to responsible
1017 User is absent and cannot receive the document
1018 Mail could not be sent
1019 SDL-file for the mail could not be created
1020 For information only: user is absent and substitute is set
1021 Max. number of business cases reached

4 Workflow API
88
Return Code Error Short Description
1022 Validation failed
4.6.3 Regular Document Access Runtime Errors
Regular document access runtime errors
Return Code Error Short Description
1101 No rights to access to the document
1102 The document is already used for a workflow process
1103 The document could not be loaded
1104 The document is checked out
1105 Record has been deleted
1106 The document could not be deleted
1107 Changes could not be saved
1108 Changes could not be saved
1109 Changes could not be saved
1110 The document could not be archived
1111 Setting revision comment failed
1112 Setting ACL failed
1113 Getting DfEngine parameter (eMPARAM) failed
1114 Setting DfEngine parameters (eMPARAM) failed
1115 Getting DfEngine field failed
1116 Setting DfEngine field failed
1117 No workflow vector
1118 The document is locked
1119 The vector is locked
1120 The server is busy
4.6.4 Init Errors
Init errors
Return Code Error Short Description
1201 The log file could not be opened
1202 Writing of log file failed
1203 Login failed
1204 The database definition could not be loaded
1205 The index/ query form could not be found
1206 The name of the macro is not valid

4.6 API Error Codes
89
Return Code Error Short Description
1207 No nodes defined
1208 Invalid user or role name
1209 No end node found
1210 No start node found
1211 More than one condition have no macro
1212 No link condition is TRUE
1213 Reject/ forward link found, where no one was expected
1214 No conditions defined
1215 Context and formula conditions mixed
1216 The process definition could not be loaded
4.6.5 Internal Errors
Internal errors
Return Code Error Short Description
2001 Memory allocation/ lock failed
2002 A forward is made on an end activity
An attempt is made to call up the "WfRequest" (Terminate) without stopping beforehand
2003 Internal error
2004 Function is not available
2005 Workplace document could not be created
2006 Inserting of Hash list failed
2007 Invalid user/ group/ role name
2008 Invalid user/ group/ role name
2009 Invalid node
2010 Invalid link type
2011 Invalid node type
2012 Invalid parameter
2013 Different user
2014 User authentication failed
2015 Ret_Except
2016 Ret_XMLVersion
2017 Ret_XMLCreate
2018 Ret_XMLOpen
2019 Ret_XMLRead

4 Workflow API
90
Return Code Error Short Description
2020 Ret_XMLWrite
4.6.6 File Errors
File errors
Return Code Error Short Description
2101 File could not be deleted
2102 File could not be saved
2103 File exists
2104 File could not be opened
2105 File could not be created
2106 Directory could not be created
2107 Directory exists
2108 Possible Addflow load error
2109 File could not be processed
2110 Possible Addflow load error
4.6.7 Database Errors
Database errors
Return Code Error Short Description
2201 Table could not be opened
2202 Inserting a new record failed
2203 Update of record failed
2204 Record could not be found
2205 Query failed
2206 Invalid field
2207 Field could not be deleted
2208 No index information
4.7 API Error Codes
4.7.1 System Error Communication Layer
System error communication layer
Return Code Error Short Description
-1 Ret_DataTrunction, RPC data communication error: not all data received or sent.
-2 Ret_ServerNotAvailable , RPC data communication error: access to SAPERION broker server failed

4.7 API Error Codes
91
Return Code Error Short Description
-5 Ret_MemOverflow, RPC data communication error: Memory allocation failed
4.7.2 Regular Return Codes
Regular return codes
Return Code Error Short Description
1000 Workflow not available
0 No error
1 Free node, user can select a user
2 Free node, user can select a group
3
4 Free node, user can select a group
5 User did not select a process
6 User did not select a user/group/role
7 Process finished
8 "onExit" macro and/or select user on client,
9
10 Process finished
11 User selected or action macro on the client is executed
12
13
1001 Unspecified error
1002 Possible Addflow load error
1003 Process could not be found in XDFPROCESSES
1004 Forward/ reject, applying not allowed
1005 Adhoc workflow could not be started
1006 An error occurred during the execution of a macro
1007 Next node could not be entered
1008 Exit from the node not possible
1009 Document is finished but could not be moved by the workflow
1010 Macro process seems to be busy to do something
1011 No more links, although there is no end node
1012 Invalid checksum, document has been manipulated outside the workflow engine
1013 Document could not be added
1014 Role for a role class could not be found in the current organizational unit
1015 For information only: user is absent and has not defined any substitute
1016 For information only: forward of multi user activity without majority, sent to responsible

4 Workflow API
92
Return Code Error Short Description
1017 User is absent and cannot receive the document
1018 Mail could not be sent
1019 SDL-file for the mail could not be created
1020 For informatiojn only: user is absent and substitute is set
1021 Max. number of business cases reached
1022 Validation failed
4.7.3 Regular Document Access Runtime Errors
Regular document access runtime errors
Return Code Error Short Description
1101 No rights to access to the document
1102 The document is already used for a workflow process
1103 The document could not be loaded
1104 The document is checked out
1105 Record has been deleted
1106 The document could not be deleted
1107 Changes could not be saved
1108 Changes could not be saved
1109 Changes could not be saved
1110 The document could not be archived
1111 Setting revision comment failed
1112 Setting ACL failed
1113 Getting DfEngine parameter (eMPARAM) failed
1114 Setting DfEngine parameter (eMPARAM) failed
1115 Getting DfEngine field failed
1116 Setting DfEngine field failed
1117 No workflow vector
1118 Document locked
1119 Vector locked
1120 Server is busy
4.7.4 Init Errors
Regular document access runtime errors
Return Code Error Short Description
1201 Log file could not be opened

4.7 API Error Codes
93
Return Code Error Short Description
1202 Writing of log file failed
1203 Login failed
1204 The database definition could not be loaded
1205 The index/ query form could not be found
1206 The name of the macro is invalid
1207 No nodes defined
1208 Invalid user or role name
1209 No end node found
1210 No start node found
1211 More than one condition have no macro
1212 No link condition is TRUE
1213 Reject/ forward link found, where no one was expected
1214 No conditions defined
1215 Context and formula conditions mixed
1216 The process definition could not be loaded
4.7.5 Internal Errors
Regular document access runtime errors
Return Code Error Short Description
2001 Memory allocation/ lock failed
2002 A forward is made on an end activity
An attempt is made to call up the "WfRequest" (Terminate) without stopping beforehand
2003 Internal case error
2004 Function not available
2005 Create desktop document failed
2006 Hash list insert failed
2007 Invalid user/ group/ role name
2008 Invalid user/ group/ role name
2009 Invalid node
2010 Invalid link type
2011 Invalid node type
2012 Invalid parameter
2013 Different user
2014 User authentication failed
2015 Ret_Except
2016 Ret_XMLVersion

4 Workflow API
94
Return Code Error Short Description
2017 Ret_XMLCreate
2018 Ret_XMLOpen
2019 Ret_XMLRead
2020 Ret_XMLWrite
4.7.6 File Errors
Regular document access runtime errors
Return Code Error Short Description
2101 File could not be deleted
2102 File could not be saved
2103 File exists
2104 File could not be opened
2105 File could not be created
2106 Directory could not be created
2107 Directory exists
2108 Possible Addflow load error
2109 File could not be processed
2110 Possible Addflow load error
4.7.7 Database Errors
Regular document access runtime errors
Return Code Error Short Description
2201 Open table failed
2202 Inserting a new record failed
2203 Update record failed
2204 Record could not be found
2205 Query failed
2206 Invalid field
2207 Field could not be deleted

5.1 Defining a Receiver of a User Task
95
Return Code Error Short Description
2208 No index information
5 Appendix
5.1 Defining a Receiver of a User Task
The SAPERION Workflow Suite offers for the definition of a receiver of a task a series of possibilities.
In this context the basis is the concept of organizational structure and roles. Within the organizational
structure organizational units, groups, users and roles can be defined as members. Roles classes are
then instances (e.g., head of department X).
Generally, you have the following options for defining a receiver of a user task:
+ Predetermined
If the receiver is predetermined, an organizational unit, a role instance or a role class is normally
set. In addition, you can configure whether the task should be taken over by members manually,
evenly distributed or by load during runtime.
+ User selects recipient
In this case the agent of the task is available to select the next user during runtime. You can define
the users for the selection in advance.
+ To owner of the business case
The task will be put into the personal tray of the owner during runtime.
+ Selection macro
You can provide a macro which evaluates the recipient based on stored data and logics.
By means of the following matrices you can see the respective impact during runtime of you
combinations.
5.1.1 Receiver Selection "Predetermined"
Choosing the receiver selection "Predetermined", you have the following combination possibilities:

5 Appendix
96
Fig. 5–1: Receiver selection "Predetermined"
5.1.2 Receiver Selection "User selects recipient"
Choosing the receiver selection "User selects recipient", you have the following combination
possibilities:
Fig. 5–2: Receiver selection "User selects recipient" - one recipient
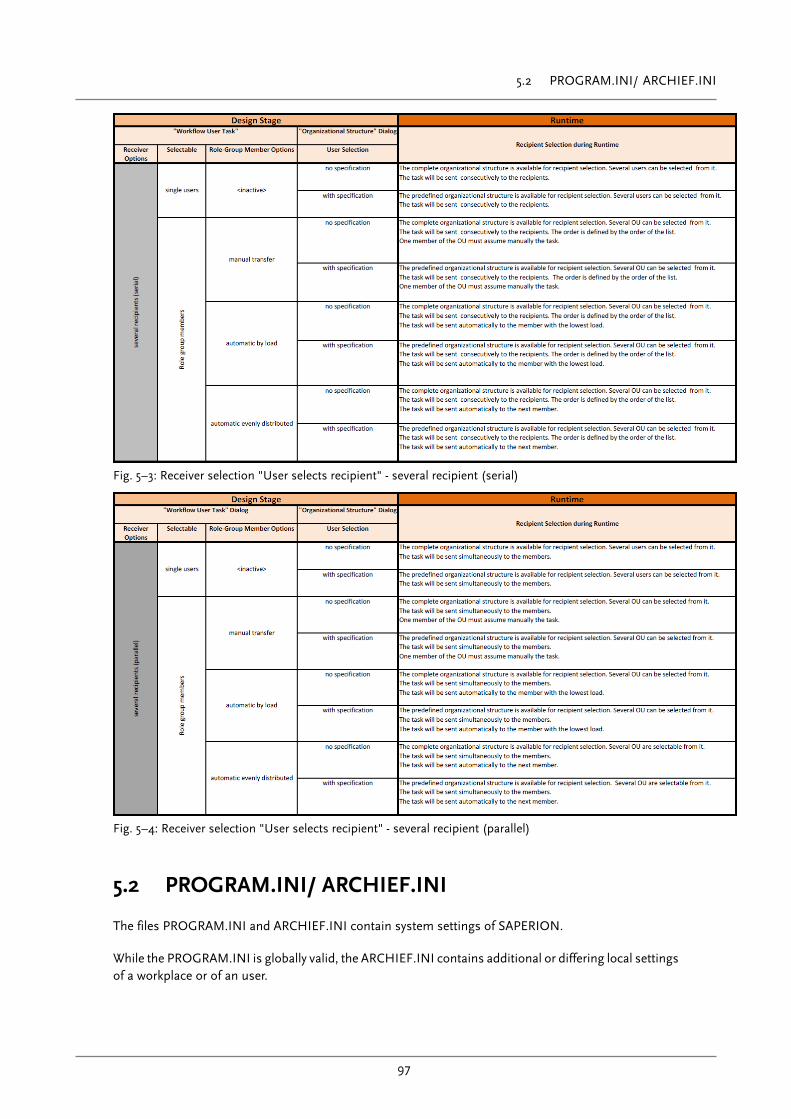
5.2 PROGRAM.INI/ ARCHIEF.INI
97
Fig. 5–3: Receiver selection "User selects recipient" - several recipient (serial)
Fig. 5–4: Receiver selection "User selects recipient" - several recipient (parallel)
5.2 PROGRAM.INI/ ARCHIEF.INI
The files PROGRAM.INI and ARCHIEF.INI contain system settings of SAPERION.
While the PROGRAM.INI is globally valid, the ARCHIEF.INI contains additional or differing local settings
of a workplace or of an user.
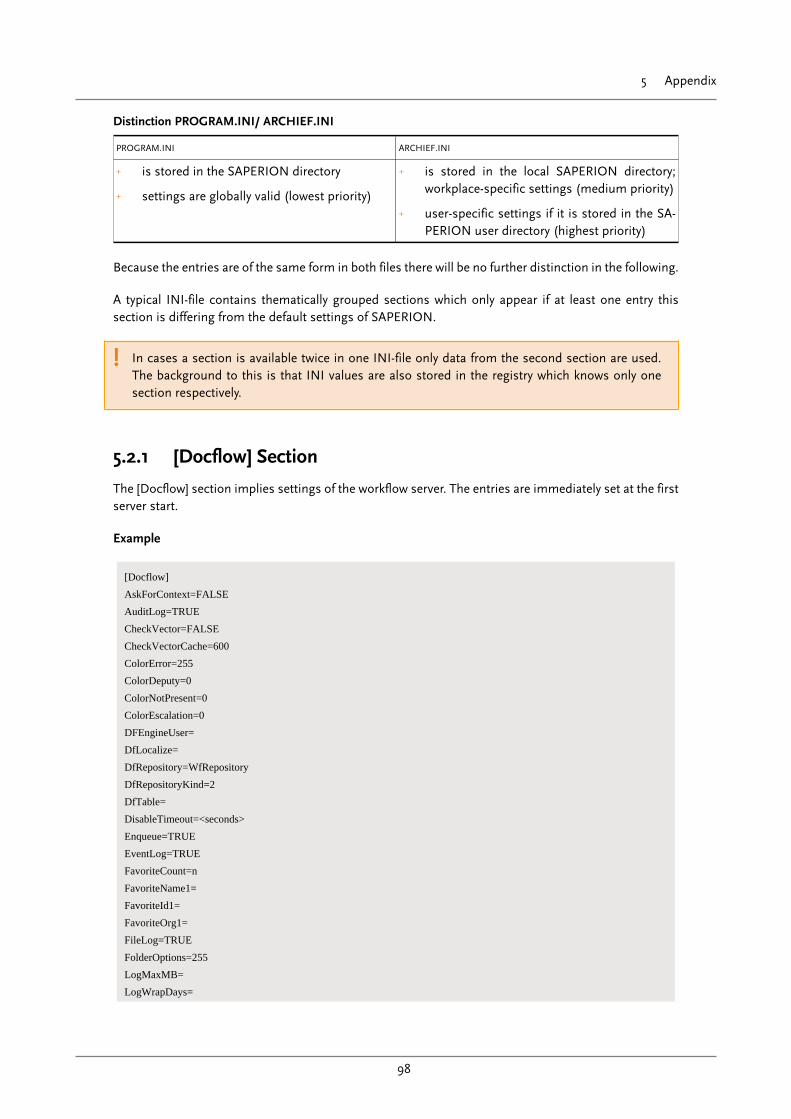
5 Appendix
98
Distinction PROGRAM.INI/ ARCHIEF.INI
PROGRAM.INI ARCHIEF.INI
+ is stored in the SAPERION directory
+ settings are globally valid (lowest priority)
+ is stored in the local SAPERION directory;
workplace-specific settings (medium priority)
+ user-specific settings if it is stored in the SA-
PERION user directory (highest priority)
Because the entries are of the same form in both files there will be no further distinction in the following.
A typical INI-file contains thematically grouped sections which only appear if at least one entry this
section is differing from the default settings of SAPERION.
! In cases a section is available twice in one INI-file only data from the second section are used.
The background to this is that INI values are also stored in the registry which knows only one
section respectively.
5.2.1 [Docflow] Section
The [Docflow] section implies settings of the workflow server. The entries are immediately set at the first
server start.
Example
[Docflow]
AskForContext=FALSE
AuditLog=TRUE
CheckVector=FALSE
CheckVectorCache=600
ColorError=255
ColorDeputy=0
ColorNotPresent=0
ColorEscalation=0
DFEngineUser=
DfLocalize=
DfRepository=WfRepository
DfRepositoryKind=2
DfTable=
DisableTimeout=<seconds>
Enqueue=TRUE
EventLog=TRUE
FavoriteCount=n
FavoriteName1=
FavoriteId1=
FavoriteOrg1=
FileLog=TRUE
FolderOptions=255
LogMaxMB=
LogWrapDays=

5.2 PROGRAM.INI/ ARCHIEF.INI
99
MapIndexState=0
MaxMonitor=117
MaxProxyLevel=<n>
MaxVectorCache=1000
Mode=0
Monitor=FALSE
NameFileLog=DOCFLOW.LOG
NoCaseACL=FALSE
NotPresentMsg=<n>
PersonalizedProtocol=TRUE
ProtoFlags=1985
ProxyMsg=<n>
SingleProcessMode=
Statistics=TRUE
Sync=0
TestSchema=TRUE
ThreadCnt=
TimeoutVectorCache=86400
TimeProtocol=TRUE
TraceLevel=63
UseDisplayName=TRUE
UseDocflowUserMailAddress=TRUE
UseFavoriteList=TRUE
[Docflow] section
Parameter Description
AskForContext
AuditLog TRUE = Additional logging in the "Audit Log" (SAPERION "Logging" option)
CheckVector
CheckVectorCache Interval of the cache checking in seconds
ColorDeputy
ColorError
ColorEscalation
ColorNotPresent
DfEngineUser User context in which the workflow server is working
DfLocalize Table for localization
DfRepository
DfRepositoryKind
DfTable Table for the administration of business cases
DisableTimeout Describes the max. time in seconds the workflow server is needing in order to forward an
item of an activity to the next. This is depending on the process (e.g., macros) and on the
load.
Default: 30 seconds
Enqueue Corresponds to the "Asynchronous processing (no message)" option in the MMC configu-
ration for workflow

5 Appendix
100
Parameter Description
EventLog TRUE = Errors are additionally logged in the event log
FavoriteCount Count of favorites
FavoriteName1 Name of the first favorite
FavoriteId1 ID of the first favorite
FavoriteOrg1 Organizational unit of the first favorite
FileLog TRUE = Log file is activated
FolderOptions Indicates which folders should be created for an user.
Default: 0 (no folder)
GroupReminder
LogMaxMB Log file size, if reached a new file will be created
LogWrapDays Storage period for log files in days
MapIndexState In cases the main document is containing the SYSINDEXSTATE field this value is set to 2
as the max. performance is achieved as data are only written into the database. Via MapIn-
dexState it is possible to control the value because the value 2 does not grant optimum da-
ta security.
Default: 2
MaxMonitor
MaxProxyLevel Proxy level
1 = only direct substitute
>1 = in absence also the substitute of the substitute
MaxVectorCache Size of the business case cache
Mode 0 = The queue server loads the last version of docflow. If none is available the DFD-file will
be loaded.
1 = Test mode: DFD is loaded, if necessary several times in case of changes (only allowed
for Docflow administrators)
Monitor
NameFileLog Name of the log file which is stored in the TEMP-directory
NotPresentMsg Information at absence of the receiver
n = 0 no message
n = 1 messages
n = 2 one message per day
PersonalizedProtocol
ProtoFlags
ProxyMsg Information when the business case is forwarded to the substitute
n = 0 no message
n = 1 messages
n = 2 one message per day
SingleProcessMode
Statistics TRUE =

5.2 PROGRAM.INI/ ARCHIEF.INI
101
Parameter Description
Sync By means of this switch you are allowed to turn on/ off the synchronous processing of
commands for workflow. In addition, in fast systems this mode has the advantage that the
inbox is updated after each call so that the user is always offered the current data.
Default: 0 (off)
TestSchema TRUE = XML tests of the workflow server is activated. This test serves QA purposes and
is only necessary when errors such as XML read, XML write appear. The test is executed at
the start of the workflow server.
ThreadCnt Count of the used pipelines (queues).
TimeProtocol
TimeoutVectorCache Time in seconds after which a document will be deleted automatically from the vector ca-
che unless MaxVectorCache has been exceeded.
Default: 1 day
TraceLevel
UseDisplayName TRUE = the display name is used for login
UseDocflowUserMailAddress TRUE = When sending e-mails the address of the last forwarding user is used as sender ad-
dress.
FALSE = The server address is used as sender address.
Default: TRUE
UseFavoritList TRUE = User favorite list is activated when assigning workflows.
5.2.2 [Docflow. Docflow Escalations] Section
The [Docflow. Docflow Escalations] section contains entries for escalation checking.
Example
[Docflow. Docflow Escalations]
Name=Docflow Escalations
CheckDir=TRUE
CheckTime=3600
CheckFromTo=FALSE
RunOnce=FALSE
RunDaily=FALSE
[Docflow. Docflow Escalations] section
Parameter Description
Name Name of the escalation task
CheckDir
CheckTime Interval of the check in seconds
CheckFromTo Time frame of the planned action
CheckFrom Time from which on the planned action has to be executed

5 Appendix
102
Parameter Description
CheckTo Time to which the planned action has to be executed
5.2.3 [Docflow. Docflow Reminder] Section
The [Docflow. Docflow Reminder] section contains entries for the reminder.
Example
[Docflow.Docflow Reminder]
Name=Docflow Reminder
CheckDir=TRUE
CheckTime=3600
CheckFromTo=FALSE
RunOnce=FALSE
RunDaily=FALSE
[Docflow.Docflow Reminder] section
Parameter Description
Name Name of the reminder task
CheckDir
CheckTime Interval of the check in seconds
CheckFromTo Time frame of the planned action
RunOnce
RunDaily
5.2.4 [Docflow.Processes] Section
By default, all users can manually start all processes definitions for any scenario (original document).
In the ARCHIEF.INI you may differentiate these rights. This allows you to make a process manually
startable only for certain archive definitions.
! The defined restrictions are only valid for the manual start of business cases via the user interface
and have no effects to workflow starts via API.
Default settings
[Docflow.Processes]
Count=0
[Docflow.Processes] section
Parameter Description
Count 0 = All processes can be started on documents of a workflow-capable DDC.

5.2 PROGRAM.INI/ ARCHIEF.INI
103
In the ARCHIEF.INI you can define the processes that can be started in specified DDCs.
Example
[Docflow.Processes]
Count=2
[Docflow.Processes.1]
ProcessName=<DFD1>
ProcessDescr=<Description DFD1>
AllowedDefs=<DDC1>;<DDC2>
[Docflow.Processes] section
Parameter Description
count Amount of the following specified process definitions
[Docflow.Processes.<n>] Start of the n section for the configuration of the n process definition.
ProcessName Name of the process definition
ProcessDescr Short text describing the process definition, which is only used here.
AllowedDefs List of the names of archive definitions, which may be selected for the start of a business
case.