sap workforce performance builder - sap help portal€¦ · 2.2 installation of the microsoft sql...
TRANSCRIPT

Installation Guide
Workforce Performance Builder Document Version: 1.0 – 2016-06-28
CUSTOMER
SAP Workforce Performance Builder 9.5 Installation Guide
2
Customer
© 2016 SAP SE. All rights reserved.
SAP Workforce Performance Builder 9.5
Typographic Conventions
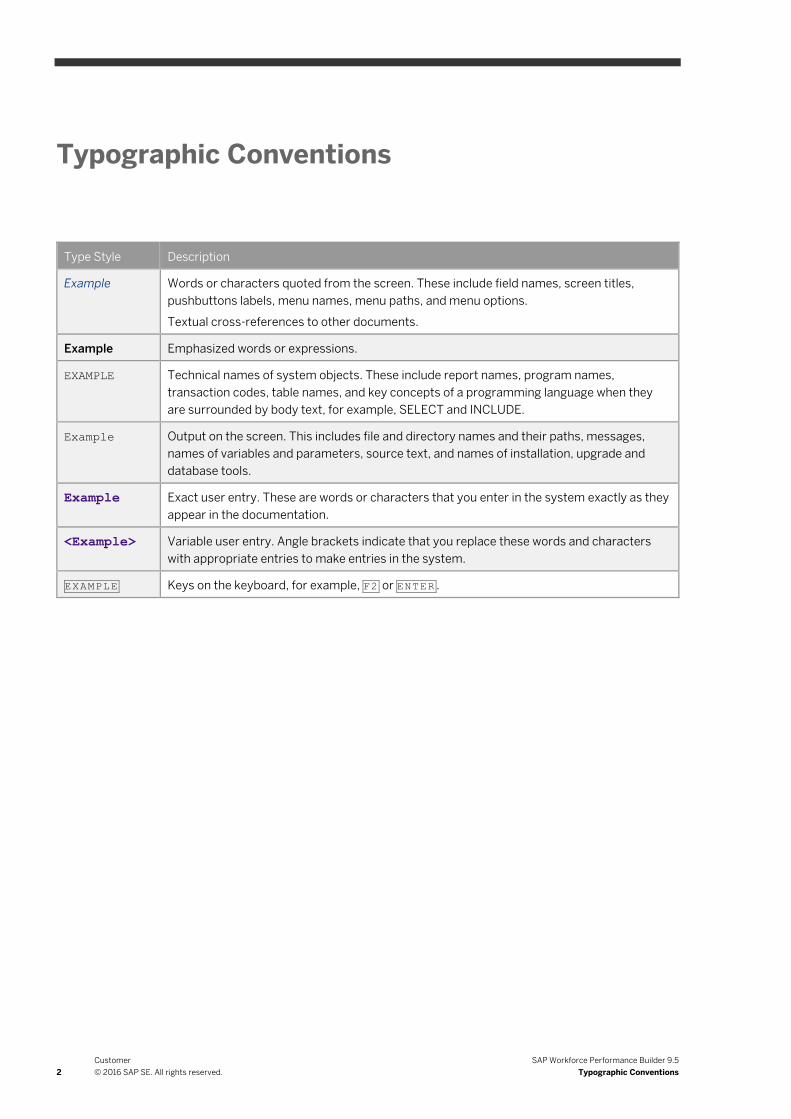
Typographic Conventions
Type Style Description
Example Words or characters quoted from the screen. These include field names, screen titles,
pushbuttons labels, menu names, menu paths, and menu options.
Textual cross-references to other documents.
Example Emphasized words or expressions.
EXAMPLE Technical names of system objects. These include report names, program names,
transaction codes, table names, and key concepts of a programming language when they
are surrounded by body text, for example, SELECT and INCLUDE.
Example Output on the screen. This includes file and directory names and their paths, messages,
names of variables and parameters, source text, and names of installation, upgrade and
database tools.
Example Exact user entry. These are words or characters that you enter in the system exactly as they
appear in the documentation.
<Example> Variable user entry. Angle brackets indicate that you replace these words and characters
with appropriate entries to make entries in the system.
EXAMPLE Keys on the keyboard, for example, F2 or ENTER .
SAP Workforce Performance Builder 9.5
Table of Contents
Customer
© 2016 SAP SE. All rights reserved. 3
Table of Contents
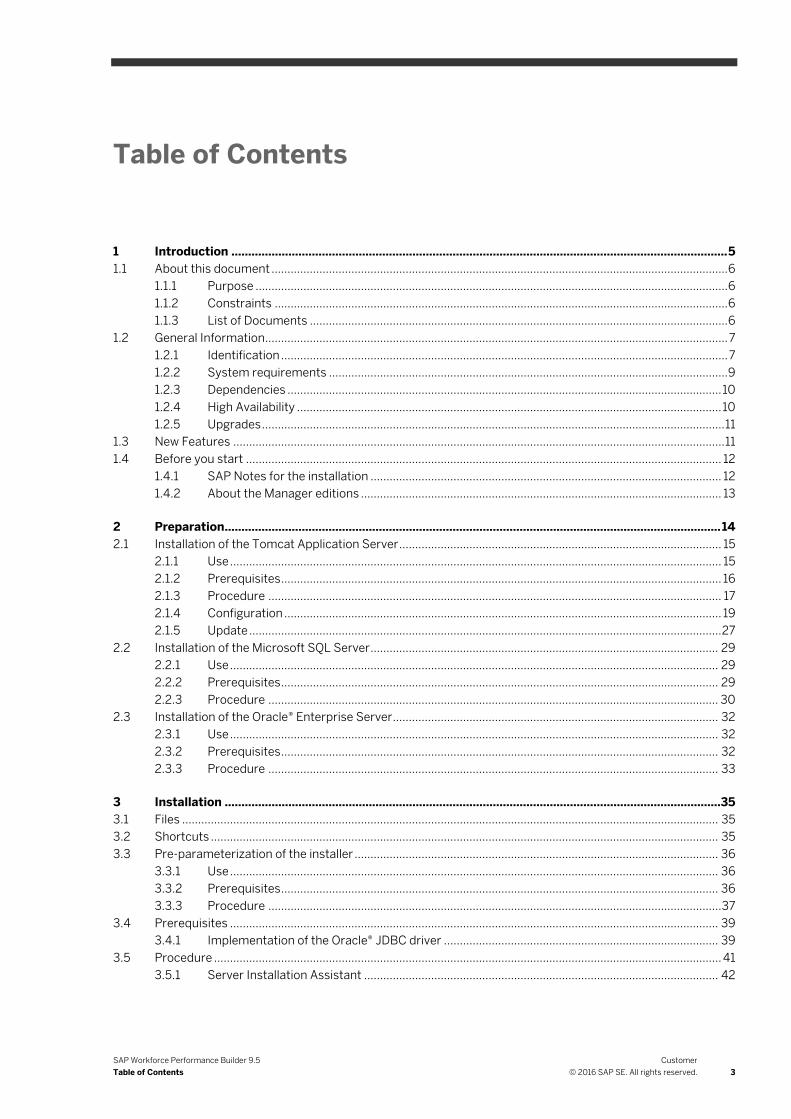
1 Introduction .................................................................................................................................................... 5 1.1 About this document ............................................................................................................................................... 6
1.1.1 Purpose .................................................................................................................................................... 6 1.1.2 Constraints .............................................................................................................................................. 6 1.1.3 List of Documents ................................................................................................................................... 6
1.2 General Information ................................................................................................................................................. 7 1.2.1 Identification ............................................................................................................................................ 7 1.2.2 System requirements ............................................................................................................................. 9 1.2.3 Dependencies ........................................................................................................................................ 10 1.2.4 High Availability ..................................................................................................................................... 10 1.2.5 Upgrades ................................................................................................................................................. 11
1.3 New Features .......................................................................................................................................................... 11 1.4 Before you start ..................................................................................................................................................... 12
1.4.1 SAP Notes for the installation .............................................................................................................. 12 1.4.2 About the Manager editions ................................................................................................................. 13
2 Preparation .................................................................................................................................................... 14 2.1 Installation of the Tomcat Application Server ..................................................................................................... 15
2.1.1 Use .......................................................................................................................................................... 15 2.1.2 Prerequisites .......................................................................................................................................... 16 2.1.3 Procedure .............................................................................................................................................. 17 2.1.4 Configuration ......................................................................................................................................... 19 2.1.5 Update .................................................................................................................................................... 27
2.2 Installation of the Microsoft SQL Server ............................................................................................................. 29 2.2.1 Use ......................................................................................................................................................... 29 2.2.2 Prerequisites ......................................................................................................................................... 29 2.2.3 Procedure ............................................................................................................................................. 30
2.3 Installation of the Oracle® Enterprise Server ...................................................................................................... 32 2.3.1 Use ......................................................................................................................................................... 32 2.3.2 Prerequisites ......................................................................................................................................... 32 2.3.3 Procedure ............................................................................................................................................. 33
3 Installation ....................................................................................................................................................35 3.1 Files ........................................................................................................................................................................ 35 3.2 Shortcuts ............................................................................................................................................................... 35 3.3 Pre-parameterization of the installer .................................................................................................................. 36
3.3.1 Use ......................................................................................................................................................... 36 3.3.2 Prerequisites ......................................................................................................................................... 36 3.3.3 Procedure .............................................................................................................................................. 37
3.4 Prerequisites ......................................................................................................................................................... 39 3.4.1 Implementation of the Oracle® JDBC driver ...................................................................................... 39
3.5 Procedure ............................................................................................................................................................... 41 3.5.1 Server Installation Assistant ............................................................................................................... 42

4
Customer
© 2016 SAP SE. All rights reserved.
SAP Workforce Performance Builder 9.5
Table of Contents
4 Post-Installation .......................................................................................................................................... 49 4.1 Environment Variable ............................................................................................................................................ 49 4.2 Database ................................................................................................................................................................ 49 4.3 Files ......................................................................................................................................................................... 51 4.4 Registry .................................................................................................................................................................. 51
5 Deinstallation ................................................................................................................................................ 52 5.1 Undeploy Manager ................................................................................................................................................ 52 5.2 Delete base directory ............................................................................................................................................ 52 5.3 Remove database .................................................................................................................................................. 53 5.4 Deinstall dependencies ......................................................................................................................................... 54
6 Additional Information ................................................................................................................................ 55 6.1 Known Errors ......................................................................................................................................................... 55
6.1.1 Installation with restricted SQL login permissions ............................................................................ 56 6.2 Update .................................................................................................................................................................... 59
SAP Workforce Performance Builder 9.5
Introduction
Customer
© 2016 SAP SE. All rights reserved. 5
1 Introduction
The SAP Workforce Performance Builder Manager serves as a central content management and collaboration
platform, simplifying the teamwork of authors. Additionally, it is possible to publish content for specific target
groups depending on roles and users as well as measuring the success of the training.
The Manager is a Server Application to be run on the Apache Tomcat Application Server with writing data to a
database server (Microsoft SQL Server or Oracle® database server) and to a server sided file storage.
Due to these dependencies the installation of the Manager needs third-party applications to be installed in
advance.

6
Customer
© 2016 SAP SE. All rights reserved.
SAP Workforce Performance Builder 9.5
Introduction
1.1 About this document
1.1.1 Purpose
This document is intend to guide you through all installation and configuration processes which are necessary to
successfully run your component of the SAP Workforce Performance Builder for first time.
1.1.2 Constraints
This document is not intended to give you information about user processes or configuration methods within the
installed Manager.
Go the chapter List of Documents to find more related documentation.
1.1.3 List of Documents
The following table lists all documents mentioned in this Guide:
Document Link
Producer Installation Guide SAP Help Portal
Producer Manual SAP Help Portal
Producer Security Guide SAP Service Marketplace*
Instant Producer Installation Guide SAP Help Portal
Instant Producer Manual SAP Help Portal
Manager Installation Guide SAP Service Marketplace*
Manager Operations Guide SAP Service Marketplace*
Manager Manual SAP Help Portal
Manager Security Guide SAP Service Marketplace*
Navigator Installation Guide SAP Help Portal
SLC Player Installation Guide SAP Help Portal
System Requirements SAP Help Portal
* Requires Login

SAP Workforce Performance Builder 9.5
Introduction
Customer
© 2016 SAP SE. All rights reserved. 7
1.2 General Information
1.2.1 Identification
Property Values
Software Name SAP Workforce Performance Builder
Software Version 9.5
Component Name Manager
Component Version 9.5.1 (Build number: see installation file)
Software Language
<LCID decimal: Identifier>
1. 1033: English
2. 1031: German
3. 1034: Spanish
4. 1036: French
5. 1043: Dutch
6. 1046: Portuguese (Brazil)
7. 1041: Japanese
8. 1042: Korean
9. 1049: Russian
10. 2052: Chinese (Simplified)
11. 1028: Chinese (Traditional)
12. 1029: Czech
13. 1030: Danish
14. 1035: Finnish
15. 1038: Hungarian
16. 1040: Italian
17. 1045: Polish
18. 1054: Thai
19. 1057: Indonesian
20. 1066: Vietnamese
21. 1081: Hindi
22. 1086: Malay
23. 1026: Arabic (Saudi Arabia)
24. 1037: Hebrew
25. 2074: Serbian (Latin)
26. 1055: Turkish
Software Manufacturer SAP

8
Customer
© 2016 SAP SE. All rights reserved.
SAP Workforce Performance Builder 9.5
Introduction
Property Values
Installer Size (MB) Microsoft Edition: ~ 48 MB
Oracle Edition: ~ 82 MB
Operating System Microsoft™ Windows Server 2012 (R2)
Microsoft™ Windows Server 2008 (R2)
Microsoft™ Windows 7*
Microsoft™ Windows 8*
Microsoft™ Windows 10*
Included in
software packages
SAP Workforce Performance Builder Enterprise
Edition
SAP Workforce Performance Builder Manager
Description The Manager serves as a central content management
and collaboration platform, simplifying the teamwork
of authors. Additionally, it is possible to publish
content for specific target groups depending on roles
and users as well as measuring the success of the
training
*Observe that these systems are not designed to be used as a server, thus they are not recommended for productive use and not tested for full functionality.
SAP Workforce Performance Builder 9.5
Introduction
Customer
© 2016 SAP SE. All rights reserved. 9
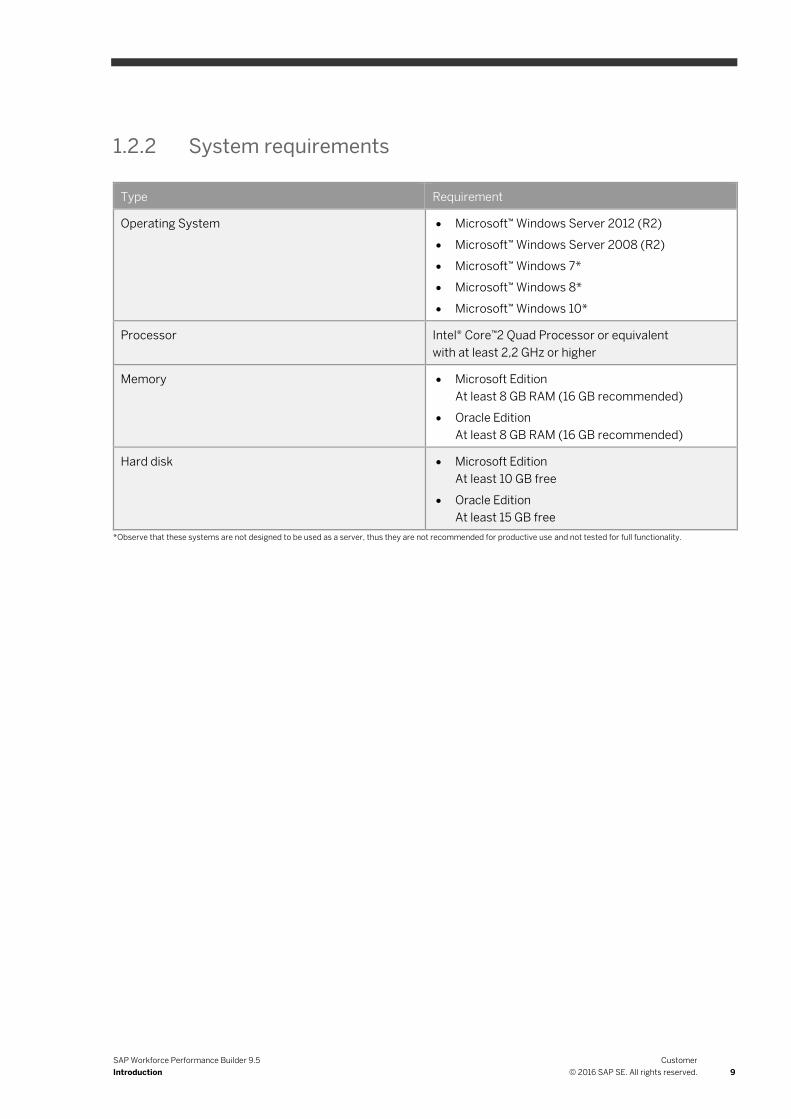
1.2.2 System requirements
Type Requirement
Operating System Microsoft™ Windows Server 2012 (R2)
Microsoft™ Windows Server 2008 (R2)
Microsoft™ Windows 7*
Microsoft™ Windows 8*
Microsoft™ Windows 10*
Processor Intel® Core™2 Quad Processor or equivalent
with at least 2,2 GHz or higher
Memory Microsoft Edition
At least 8 GB RAM (16 GB recommended)
Oracle Edition
At least 8 GB RAM (16 GB recommended)
Hard disk Microsoft Edition
At least 10 GB free
Oracle Edition
At least 15 GB free
*Observe that these systems are not designed to be used as a server, thus they are not recommended for productive use and not tested for full functionality.
10
Customer
© 2016 SAP SE. All rights reserved.
SAP Workforce Performance Builder 9.5
Introduction
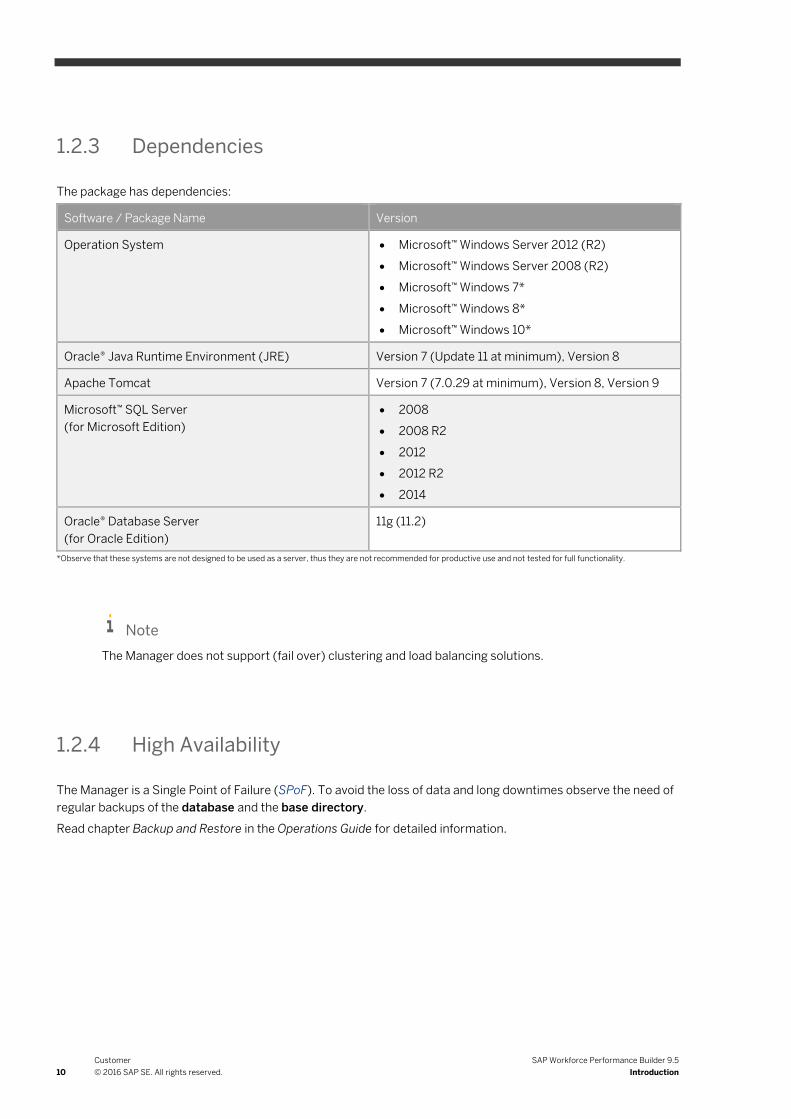
1.2.3 Dependencies
The package has dependencies:
Software / Package Name Version
Operation System Microsoft™ Windows Server 2012 (R2)
Microsoft™ Windows Server 2008 (R2)
Microsoft™ Windows 7*
Microsoft™ Windows 8*
Microsoft™ Windows 10*
Oracle® Java Runtime Environment (JRE) Version 7 (Update 11 at minimum), Version 8
Apache Tomcat Version 7 (7.0.29 at minimum), Version 8, Version 9
Microsoft™ SQL Server
(for Microsoft Edition)
2008
2008 R2
2012
2012 R2
2014
Oracle® Database Server
(for Oracle Edition)
11g (11.2)
*Observe that these systems are not designed to be used as a server, thus they are not recommended for productive use and not tested for full functionality.
Note
The Manager does not support (fail over) clustering and load balancing solutions.
1.2.4 High Availability
The Manager is a Single Point of Failure (SPoF). To avoid the loss of data and long downtimes observe the need of
regular backups of the database and the base directory.
Read chapter Backup and Restore in the Operations Guide for detailed information.

SAP Workforce Performance Builder 9.5
Introduction
Customer
© 2016 SAP SE. All rights reserved. 11
1.2.5 Upgrades
Does the package upgrade existing package(s):
Package Version Upgrade actions
SAP Workforce Performance Builder 9.3 Upgrade database
Upgrade base directory items
Upgrade HTML editor architecture
SAP Workforce Performance Builder 9.3 SP1 Upgrade database
Upgrade base directory items
Upgrade HTML editor architecture
SAP Workforce Performance Builder 9.3 SP2 Upgrade database
Upgrade base directory items
Upgrade HTML editor architecture
SAP Workforce Performance Builder 9.4 Upgrade database
Upgrade base directory items
Upgrade HTML editor architecture
SAP Workforce Performance Builder 9.4 SP1 Upgrade database
Upgrade base directory items
Upgrade HTML editor architecture
SAP Workforce Performance Builder 9.4 SP2 Upgrade database
Upgrade base directory items
Upgrade HTML editor architecture
SAP Workforce Performance Builder 9.5 Upgrade database
Upgrade base directory items
Upgrade HTML editor architecture
1.3 New Features
Please read the What's New document according to your version to find out newly implemented functions as well
as enhanced features in your component of the SAP Workforce Performance Builder.
The What's New documents are to be find here.

12
Customer
© 2016 SAP SE. All rights reserved.
SAP Workforce Performance Builder 9.5
Introduction
1.4 Before you start
1.4.1 SAP Notes for the installation
You must read the following SAP Notes before you start the installation. These SAP Notes contain the most
recent information on the installation, as well as corrections to the installation documentation.
Make sure that you have the up-to-date version of each SAP Note, which you can find in the SAP Service
Marketplace at the Internet address:
http://service.sap.com/notes
Use the following component identifiers to filter SAP Notes Search by filter Application Area:
KM-WPB // Workforce Performance Builder
KM-WPB-PRO // Workforce Performance Builder – Producer
KM-WPB-IPR // Workforce Performance Builder – Instant Producer
KM-WPB-MGR // Workforce Performance Builder - Manager
KM-WPB-NAV // Workforce Performance Builder - Navigator
KM-WPB-SMI // Workforce Performance Builder - Solution Manager Integration
If you are not familiar with the SAP Service Marketplace, read the following information:
To access the SAP Support Portal you need an S-user ID and password. You can request access data from
your SAP Super Administrator or register online on the SAP Service Marketplace page under ‘Registration‘.
With this user, you have read-access to all the contents of the SAP Support Portal, you can use the SAP
Community Network and SAP Help Portal, and you can also book courses under SAP Education.
If you want to work with the support applications (Incident Wizard, license key request, system data
maintenance, manage remote connections, software download and so on), you need the corresponding
authorizations, which your SAP Super Administrator can give you.
You can find information for new users and about support applications on the Support Portal Homepage under
‘Learn More‘. There you can also register for a personal overview demonstration of the SAP Support Portal.
In case of problems with SAP Service Marketplace contact your local Customer Interaction Center.
An online web form is available on http://support.sap.com/contactus. This web form should be used for all
written communication with your local customer interaction center. More Details about Incident Processing,
Support Addresses and Hotline Numbers can be found here:
http://service.sap.com/sap/support/notes/560499
Are you interested in a tour through the SAP Support Portal? Register for an online demo.
SAP Workforce Performance Builder 9.5
Introduction
Customer
© 2016 SAP SE. All rights reserved. 13
1.4.2 About the Manager editions
Both Editions are specialized for different database server scenarios:
The Microsoft Edition needs a database hosted by a Microsoft™ SQL Server.
The Oracle Edition needs a database hosted by a Oracle® Database server, but is able to use a
Microsoft™ based SQL database alternatively as well.
Migration of an existing MS SQL database to a Oracle® database is not supported. Older Manager versions
have to be updated to Version 9.3 using MS SQL Edition prior they can be migrated for usage by the Oracle
Edition.
Missing functionalities in the Oracle Edition in comparison to the Microsoft Edition are marked in the
application help and manuals and will be added in upcoming service packs.
Since the Oracle® database is a much more complex database needing more hardware resources than the
Microsoft™ SQL Server the requirements to your hardware are higher.
14
Customer
© 2016 SAP SE. All rights reserved.
SAP Workforce Performance Builder 9.5
Preparation
2 Preparation
Since the third-party applications need special frameworks and components to run successfully you may have to
install these first. Check your system for existence of these versions in minimum:
1. Oracle® Java Runtime Environment 7 Update 11
Necessary framework for the functionalities of the Apache Tomcat Server.
If you don't have installed one or more of these products please find according installation instructions within
according Prerequisites chapter.
Recommendation
Check the chapter Known Errors within the Additional information part to avoid installation conflicts
which might come up in a special scenario.
SAP Workforce Performance Builder 9.5
Preparation
Customer
© 2016 SAP SE. All rights reserved. 15
2.1 Installation of the Tomcat Application Server
2.1.1 Use
The Apache Tomcat Application Server provides a server environment which enables Web applications to be run
by Java code using the server sided Java Runtime Environment. The Manager uses Java technology for database
management and application functionality.
Nevertheless all Java functionalities are only server sided. This means that no client user has to have a Java
browser plugin installed or activated at any time to be able to use the browser interface of the Manager.

16
Customer
© 2016 SAP SE. All rights reserved.
SAP Workforce Performance Builder 9.5
Preparation
2.1.2 Prerequisites
Oracle® Java Runtime Environment
The Oracle® Java Runtime Environment (JRE) is essential for the functionality of the Tomcat Application Server.
Consider to match the system requirements.
You can check as follows, whether Java Runtime Environment (JRE) has been installed on your operating system
before and, if so, in which version it has been installed:
Version verification via Control Panel:
Go to Start -> Settings -> Control Panel
Choose Programs and Features.
Search in the list of installed programs for the entry Java x Update x.
If there is no such entry or an entry showing an older version, you have to install it.
Version verification via command line:
Press keys Windows + R
Type cmd into the Run dialog and press Enter
Type java -version into command line and press Enter
Notes:
Ensure to download the correct version fitting your operating system architecture (32bit/64bit).
If your programs list displays an existing Java entry, please note that the 64bit version will be identified
with the suffix (64-bit).
Using the command line, the 64-bit version can be identified by the line Java Hotspot(TM) 64-Bit Server
VM (build... ).
Download the installer
You can download the installation file by using the following link:
http://www.java.com/en/download/manual.jsp
Download the Tomcat Installer file
You can download the most recent Installer file for the Tomcat Application Server here:
http://tomcat.apache.org/download-70.cgi (Tomcat 7)
or
http://tomcat.apache.org/download-80.cgi (Tomcat 8)
Note
Version 7.0.29 has to be used as minimum.

SAP Workforce Performance Builder 9.5
Preparation
Customer
© 2016 SAP SE. All rights reserved. 17
2.1.3 Procedure
1. Start the installation of the Tomcat server by a double click on the Installer file apache-tomcat-X.0.xx.exe.
2. The installation dialog appears. Just accept the license agreement by a click on the button I agree.
3. In the Choose Components dialog use installation type Normal. Check that Tomcat Core and the
component Manager have been selected at least and click the button Next.
4. In the Configuration dialog enter your individual credentials for the administrative user. You will need this
later on to access the Tomcat Application Manager interface. HTTP Connector Port number 8080 should
not be customized, unless you have other needs and the experience to do so.

18
Customer
© 2016 SAP SE. All rights reserved.
SAP Workforce Performance Builder 9.5
Preparation
Recommendation
The parameter Server Shutdown Port specifies a port for shutting down the server by a telnet or ssh client
connection from another machine located in the same local network. To avoid security issues we
recommend to enter another port number than default. Furthermore you should consider to change the
command string which initiates shutdown. To do so, open the configuration file server.xml and replace
the string "SHUTDOWN" in <Server port="8005" shutdown="SHUTDOWN"> by another free defined
string.
5. In the Java Virtual Machine dialog the path to the designated java installation is set. Usually the path is
recognized automatically. If there is no path recognized or if you have some other needs for choosing
another java installation, choose the path by your own. By default a standard java installation should be
installed in C:\Program Files\java\.
6. In the next dialog you may customize the target directory for your installation.
Afterwards click the button Install.
7. Installation will now start. This will need a short while.
8. Click the button Finish. This will finalize the installation process.
SAP Workforce Performance Builder 9.5
Preparation
Customer
© 2016 SAP SE. All rights reserved. 19
2.1.4 Configuration
The default values for the Tomcat Application Server environment are not suitable for productive environments.
Hence you will have to do additional configuration steps after installation process.
Read the following chapters to get information about security and performance relevant settings.
2.1.4.1 Increase upload size for Tomcat Application Manager
Using the default settings the browser-based Tomcat Application Manager, available by subdomain /manager,
might not be able to deploy the Manager installation file due to low file-size restrictions.
You will face the following error message:
HTTP Status 500 -
org.apache.tomcat.util.http.fileupload.FileUploadBase$SizeLimitExceededExcept
ion: the request was rejected because its size (xxxxxxxxxx) exceeds the
configured maximum (52428800)
As a result you will have to increase the file-size restrictions to enable users to deploy the installation file using the
browser interface.
Procedure
Proceed as follows to increase the file-size restrictions:
1. Go to the webapps folder in the Tomcat installation directory.
2. Open directory manager.
3. Open directory WEB-INF.
4. Open the file web.xml in your favorite text editor application.
Note: you may require administration privileges to make changes to this file.
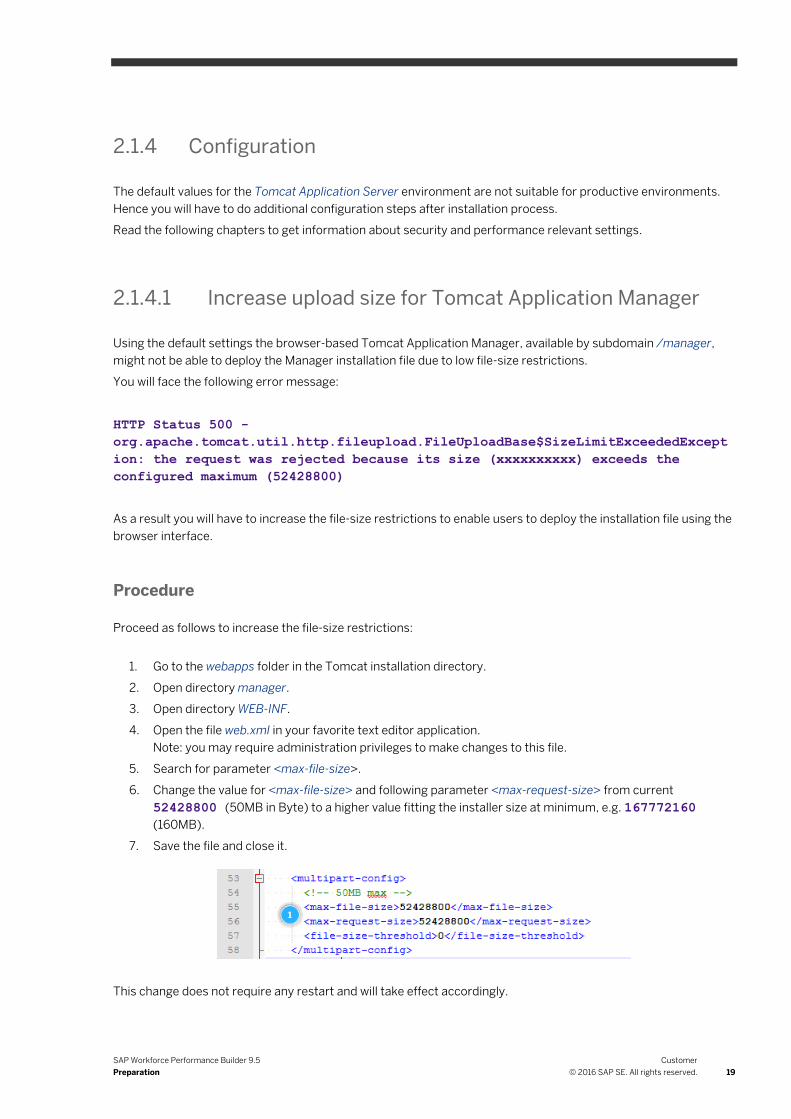
5. Search for parameter <max-file-size>.
6. Change the value for <max-file-size> and following parameter <max-request-size> from current
52428800 (50MB in Byte) to a higher value fitting the installer size at minimum, e.g. 167772160
(160MB).
7. Save the file and close it.
This change does not require any restart and will take effect accordingly.

20
Customer
© 2016 SAP SE. All rights reserved.
SAP Workforce Performance Builder 9.5
Preparation
Alternatives
By default Tomcat is enabled to auto-deploy installation files on putting the installation file into webapps directory.
In case you did not deactivate this setting just copy or move the installation file into webapps directory. It will be
deployed automatically.
2.1.4.2 Configure a secure connection (SSL)
Apache Tomcat provides the creation of self-signed certificates as even as the import of TTP certificates (Trusted
Third Party, for example by VeriSign, TC TrustCenter, Signtrust, TeleSec, Thawte Consulting). By using an SSL
certificate you are able to encrypt all communication with the server, thus the communication with Manager.
Using an SSL connection you will have to call the Manager with https:// as prefix of address.
Please read the Manager Security Guide for details on setting up SSL encrypted communication
Find additional information at distributor's product documention:
http://tomcat.apache.org/tomcat-7.0-doc/ssl-howto.html (Tomcat 7)
or
http://tomcat.apache.org/tomcat-8.0-doc/ssl-howto.html (Tomcat 8)
2.1.4.3 Change of the Connector port
Note
Choosing your desired port number, please consider that several port numbers are maybe already in use
by other applications (server-sided as well as user-sided) which can result in errors. If you are unsure
which port to use, you may check ports already in use by Windows command line (cmd). Typing
command netstat -a will list all open ports.
Using another port number than 80 we highly recommend the setup of a redirect using a DNS Alias. This
has to be setup as CNAME if you are using Single sign-on.
Read more using the following link:
http://support.microsoft.com/kb/168322
The Connector port, by which the server is accessible, can be changed as you desire - facing some specialized
port numbers which should not be used.
Please do steps as following to change the Connector port:
1. Go to the installation directory of your Tomcat instance.
2. Open folder conf.
3. Open file server.xml.
4. Search for entry starting like this:

SAP Workforce Performance Builder 9.5
Preparation
Customer
© 2016 SAP SE. All rights reserved. 21
Syntax
<Connector port="8080" protocol="HTTP/1.1"...
5. Change the parameter port as desired.
6. Save and close the file.
7. Restart the Tomcat Server.
2.1.4.4 Reconfigure remote access valve in Tomcat 9
As a new security feature Tomcat 9 installs with an initially activated remote access filter for the browser-based
application manager, a so called valve.
By this default configuration you will not be able to access the servers’ application manager from another machine
than the server itself.
To be able to access the application manager for managing the web applications from elsewhere you must
reconfigure this Remote Address Valve.
To do so, proceed as follows:
1. On the server navigate to Tomcat’s application folder webapps.
2. Navigate to …/webapps/manager/META-INF/.
3. Open the file context.xml with a text editor application.
4. Go to parameter line <Valve className="org.apache.catalina.valves.RemoteAddrValve" allow="
127\.0\.0\.1 " />.
5. Change the value for allow to “.*” to make the application manager available for remote access from any
machine or specify an according IP range you only want to let access, like e.g. “10\.26.\0\.*”.
6. Save the file and close it.
7. The Tomcat application manager webapp will now be available for the specified IP range as well.
Read more about the valve configuration and other possible valves in the Apache Tomcat 9 Configuration
Reference at https://tomcat.apache.org/tomcat-9.0-doc/config/valve.html.
22
Customer
© 2016 SAP SE. All rights reserved.
SAP Workforce Performance Builder 9.5
Preparation
2.1.4.5 Performance optimizations
The performance of Apache Tomcat depends mostly on the parameters set for the Java Virtual Machine (JVM).
Unfortunately Apache Tomcat by default runs with very low defaults for these parameters, hence it we strongly
recommend to change these to gain best performance.
2.1.4.5.1 In Tomcat Monitor
Apache Tomcat provides the Windows Application Monitor Tomcat, which allows you to change the most
common configuration settings for the Java Virtual Machine.
How to start the Configuration Interface
Start the Tomcat Monitor as following:
1. Go to Start -> Programs -> Apache Tomcat x.0 -> Configure Tomcat. Alternatively you may start it by using
the file Tomcat8w.exe, which is located inside the bin folder in Tomcat installation directory.
2. Select the tab Java.
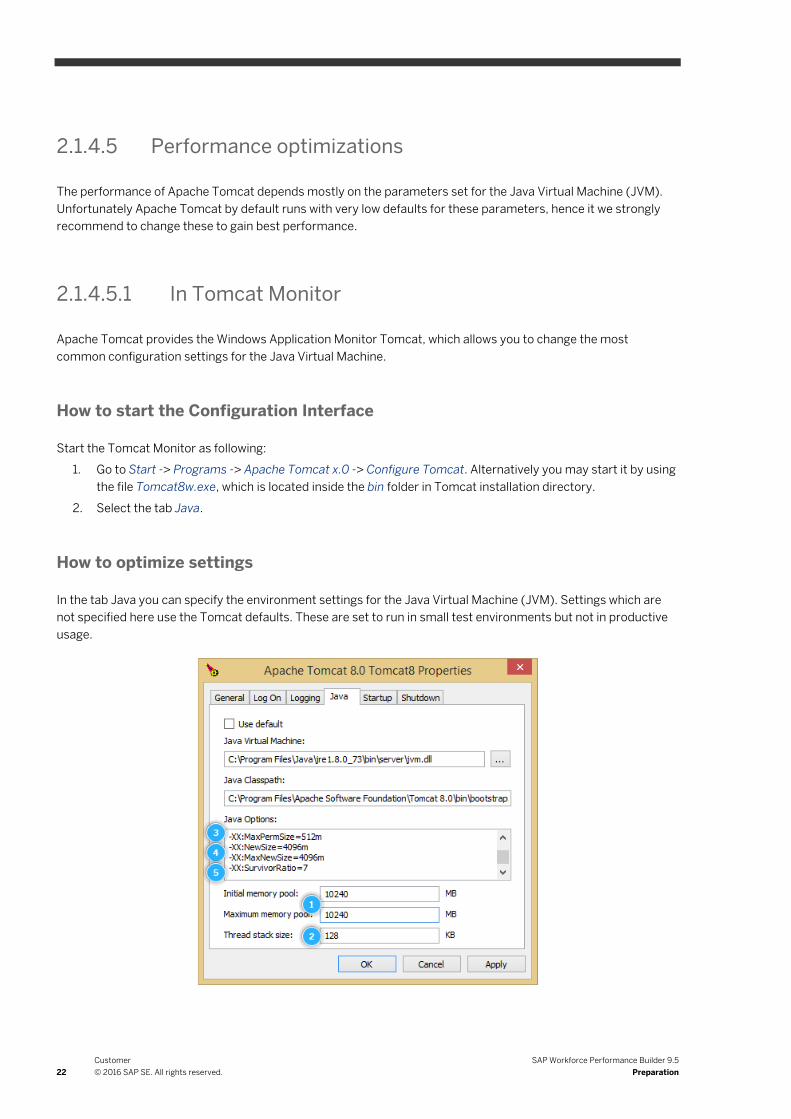
How to optimize settings
In the tab Java you can specify the environment settings for the Java Virtual Machine (JVM). Settings which are
not specified here use the Tomcat defaults. These are set to run in small test environments but not in productive
usage.
SAP Workforce Performance Builder 9.5
Preparation
Customer
© 2016 SAP SE. All rights reserved. 23
Set memory heap space
By default Tomcat uses an overall memory allocation (memory heap space) with a size of ~64 MB. Insert a higher
value accordant to your machines memory into the fields Initial memory pool and Maximum memory pool (1).
To avoid Tomcat slowing down by constant recalculation of floating memory you should define the same value for
both fields.
Consider to leave enough memory for the database engine (if on the same machine) and the operating system:
1-tier system: use not more than 50% of available physical memory
2-tier system: use not more than 75% of available physical memory
Note
Microsoft Windows restricts the memory allocation of java within a 32bit environment. Insert 1380 as
maximum value. Otherwise the Tomcat service won’t work.
This restriction does not apply within a 64bit environment. If Service Status shows Stopped after trying to
start the service, the value for the memory pool might be overvalued. Enter a lower value and try again.
Set thread stack size
By default Tomcat uses a thread stack size of 64 KB. Running a productive scenario with a high amount of objects
this size might be to less e.g. on running the synchronization between the Producer and the Manager. To avoid
thread aborts and resulting problems in synchronization behavior it is highly recommended to enter a higher value
into field Thread stack size (2).
A thread stack size of 128 KB or 256 KB should be sufficient.
Consider that increasing the thread stack size results in a more rapid fill of the memory pool. Having a high
amount of authors creating content you should think about to provide more memory to the memory pool (or the
server itself).
Set PermGen cache size
On startup Tomcat loads all Java classes of each web application into the so called PermGen pool which is
allocated at 64 MB by default. Deploying multiple web applications/Manager instances on one Tomcat application
server, it may happen that the server stops suddenly with an Out-of-memory error message (in the log file).
Increase the PermGen allocation by adding the following new line to the field Java options (3) - replace <size> with
an accordant value:
-XX:MaxPermSize=<size>m
A value of 128 up to 256 should be sufficient. Consider to have enough memory heap space specified.

24
Customer
© 2016 SAP SE. All rights reserved.
SAP Workforce Performance Builder 9.5
Preparation
Set survivor cache ratio and memory pool sizes
The memory heap space of Tomcat is divided into different pools containing objects of different ages. The
purpose of this splitting is to improve the performance of garbage collection (cleaning up unused memory), hence
briefly used objects are cleaned up quickly. To speed up the cleaning of recent objects with no long term usage
(young generation pool) it is recommended to change Tomcats default values as following.
1. Specify the same fixed initial and maximum size for the young generation pool by adding the following new
lines to the field Java options (4) - replace <size> with an accordant value:
-XX:NewSize=<size>m (default 2m)
-XX:MaxNewSize=<size>m (unlimited, if not specified)
The correct size depends on your overall memory heap size (1). It should not be more than 50% of it.
2. Change the ratio the so called survivor cache (to copy collection from young to older cache pool) uses to
determine its size (based on the size of the young pool) by adding the following line to the field Java
options (5):
-XX:SurvivorRatio=6 (default: 32)
This means each survivor space will be 1/8 the young generation. A value of 6 - 8 in most cases is the best.
How to apply optimized settings
To apply your changed settings, you will have to restart the Tomcat service. Proceed as following:
1. Choose tab General.
2. Stop the service by clicking on Stop.
1. Start the service by clicking on Start.
Note that it might take a while until the button Start gets active, since the server needs a while to shut
down and unload all data.

SAP Workforce Performance Builder 9.5
Preparation
Customer
© 2016 SAP SE. All rights reserved. 25
2.1.4.5.2 In Server configuration files
Additionally to the improvements on JVM parameters you can improve performance and robustness by changing
xml configuration parameters the Tomcat server uses itself.
Where to find the configuration files
Proceed as following:
1. Go to the Tomcat installation directory.
2. Open the directory conf.
3. Open the file server.xml in your favorite text editor application.
Note you may require administration privileges to make changes to this file.
How to optimize parameters
Within the file server.xml you can specify all server parameters according to connectivity and accessibility.
Consider to make a backup of that file before editing.
Increase maximum number of threads
The maximum number of simultaneous request processing threads to be created by a connector is set to 200. If
this number is reached the connector will block any other incoming request. In a larger content creation and
learning scenario this limit might be reached quickly. Hence it is highly recommended to increase the maximum
value for thread handles to a value accordant to your scenario. It should be at least one and a half times of the
number of simultaneous end users you expect. An example:
Your planned scenario: 100.000 end user/5.000 active (concurrent) user = 7500 maximum threads
Proceed as following to add the maximum thread definition:
1. Scroll to the part of the Connector definitions.
2. Add the parameter maxThreads to each definition of an active connector. In box below you see an
example of an adapted connector element. The added parameter is marked red.
Syntax
<Connector port="8443" protocol="HTTP/1.1" SSLEnabled="true"
keystoreFile="/.keystore" keystorePass="changeit" maxThreads="2000"
scheme="https" secure="true" clientAuth="false" sslProtocol="TLS"
maxHttpHeaderSize="65536" />

26
Customer
© 2016 SAP SE. All rights reserved.
SAP Workforce Performance Builder 9.5
Preparation
Increase http header size
In some cases e.g. of users which are assigned to a big amount of groups it may happen, that the length of the
http header exceeds the maximum size as permitted by Tomcat server. This happens because of the need to send
all group dependencies inside the header. In this case the Tomcat server unfortunately discards the
authentication, resulting in a server error message which is display to the user after calling the Manager. To solve
this issue, an adaption of the default value (8Kb) will be necessary. Proceed as following:
1. Scroll to the part of the Connector definitions.
2. Add the parameter maxHttpHeader to each definition of an active connector. In box below you see an
example of an adapted connector element. The added parameter is marked red.
Syntax
<Connector port="8443" protocol="HTTP/1.1" SSLEnabled="true"
keystoreFile="/.keystore" keystorePass="changeit" maxThreads="150"
scheme="https" secure="true" clientAuth="false" sslProtocol="TLS"
maxHttpHeaderSize="65536" />
*Input value has to be defined in Bytes. The example given matches 64KB.
How to apply optimized settings
To apply the changed server settings proceed as follows:
1. Save and close the file.
1. Restart the Tomcat server service.

SAP Workforce Performance Builder 9.5
Preparation
Customer
© 2016 SAP SE. All rights reserved. 27
2.1.5 Update
Please read the instructions as follows to do a successful update of your Apache Tomcat Server without any loss
of your web application data.
Preparation
1. Right-click the Tomcat Monitor application icon in the notification bar.
2. Click the menu entry Stop service to shut down the server.
3. Close the Tomcat Monitor by clicking menu entry Exit.
Procedure
1. Open the WIndows Control Panel.
2. Select Programs and Features.
3. Select list entry Apache Tomcat X.0 (remove only) from the programs list.
4. Click Uninstall/Change on top of the programs list.
5. Click Uninstall in the installer dialog.
6. Within the uninstallation process a dialog asks you to delete all data in the installation directory of Apache
Tomcat.
Click No to keep your server instances and web application data.
7. Finalizing the uninstallation click the button Close to close the uninstall wizard.
8. Start the installation process of the newer Apache Tomcat version by double-clicking the file apache-
tomcat-X.0.xx.exe. Please follow the installation steps in chapter Installation of the Apache Tomcat Server.

28
Customer
© 2016 SAP SE. All rights reserved.
SAP Workforce Performance Builder 9.5
Preparation
Recommendation
In case you upgrade to a newer major version (like e.g. Tomcat 6 to Tomcat 7) using the default
installation path, the program directories will differ. This will result in an unavailability of your previous
installed web applications.
To solve this, stop the Tomcat Server and go to the folder webapps of your previous Tomcat installation.
Copy or move all application directories but ROOT, Manager and docs to the webapps folder of your new
Tomcat environment. All applications will be available again after starting the Tomcat Server.
SAP Workforce Performance Builder 9.5
Preparation
Customer
© 2016 SAP SE. All rights reserved. 29
2.2 Installation of the Microsoft SQL Server
2.2.1 Use
The Microsoft SQL Server provides a managed database to store object, task and user relevant data. The
database environment can be available as local installation on the same machine hosting the Tomcat Server or on
another machine in the network (dedicated server). Observe that the use of a dedicated database might need a
high performance network connection between both server machines.
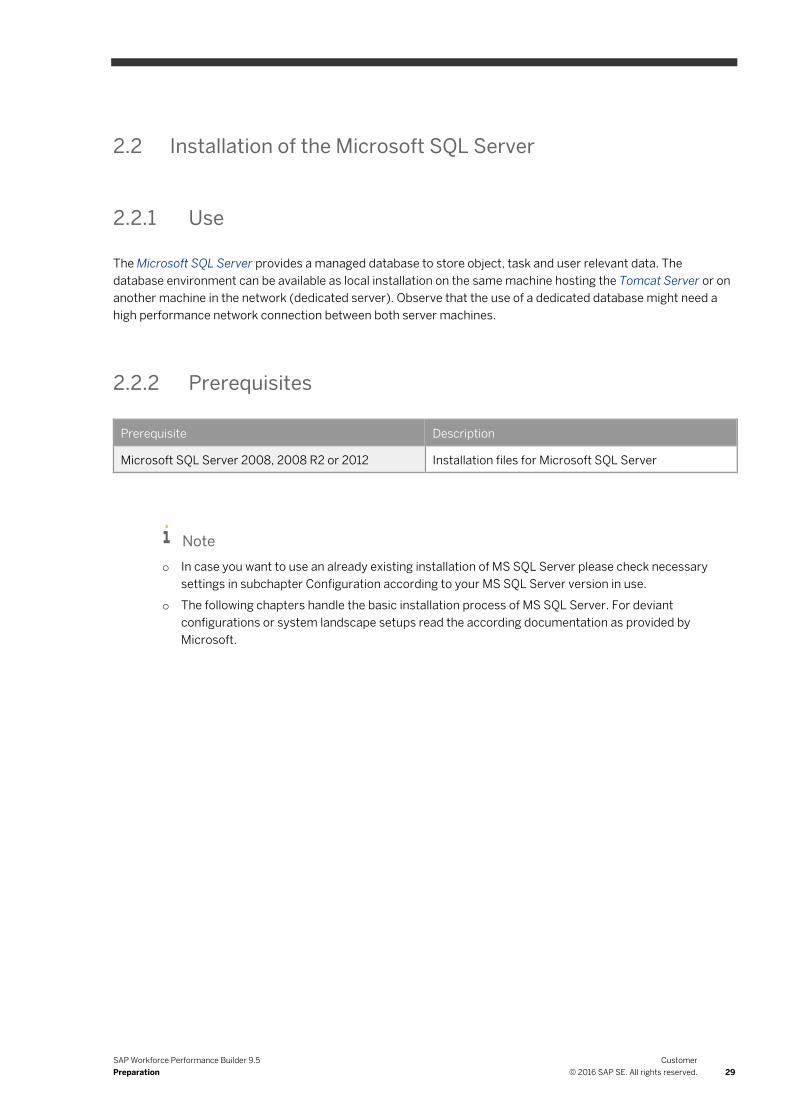
2.2.2 Prerequisites
Prerequisite Description
Microsoft SQL Server 2008, 2008 R2 or 2012 Installation files for Microsoft SQL Server
Note
o In case you want to use an already existing installation of MS SQL Server please check necessary
settings in subchapter Configuration according to your MS SQL Server version in use.
o The following chapters handle the basic installation process of MS SQL Server. For deviant
configurations or system landscape setups read the according documentation as provided by
Microsoft.
30
Customer
© 2016 SAP SE. All rights reserved.
SAP Workforce Performance Builder 9.5
Preparation
2.2.3 Procedure
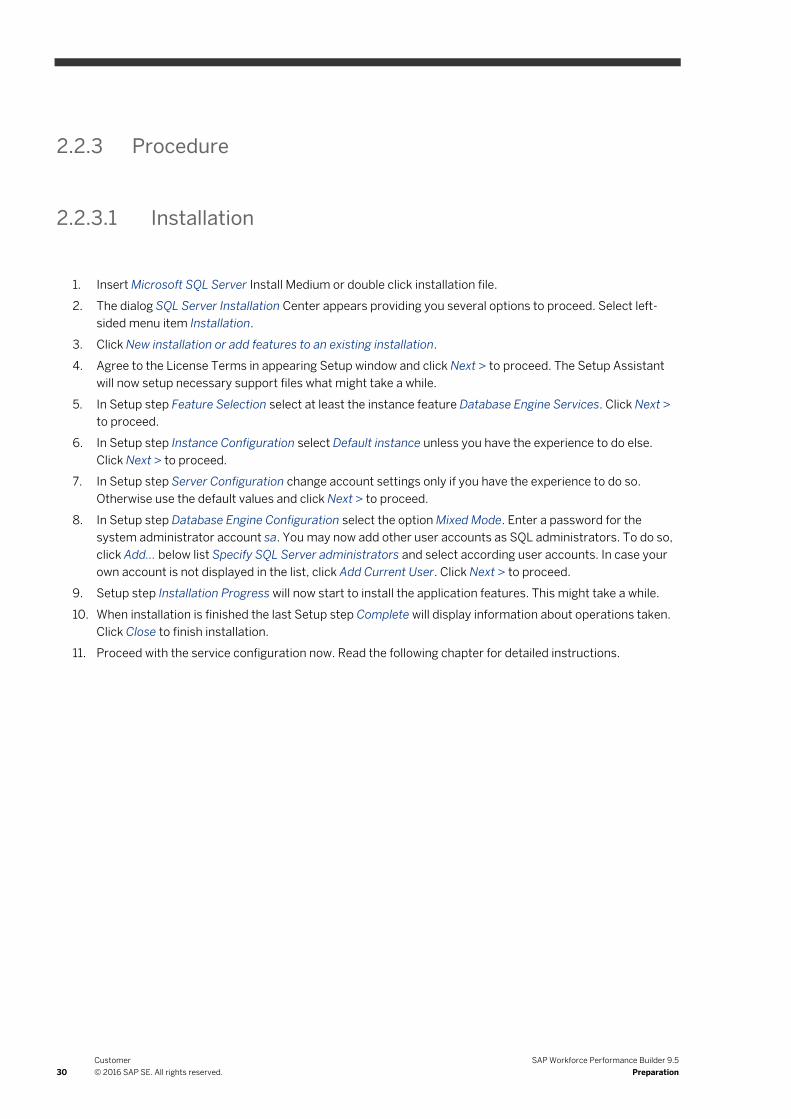
2.2.3.1 Installation
1. Insert Microsoft SQL Server Install Medium or double click installation file.
2. The dialog SQL Server Installation Center appears providing you several options to proceed. Select left-
sided menu item Installation.
3. Click New installation or add features to an existing installation.
4. Agree to the License Terms in appearing Setup window and click Next > to proceed. The Setup Assistant
will now setup necessary support files what might take a while.
5. In Setup step Feature Selection select at least the instance feature Database Engine Services. Click Next >
to proceed.
6. In Setup step Instance Configuration select Default instance unless you have the experience to do else.
Click Next > to proceed.
7. In Setup step Server Configuration change account settings only if you have the experience to do so.
Otherwise use the default values and click Next > to proceed.
8. In Setup step Database Engine Configuration select the option Mixed Mode. Enter a password for the
system administrator account sa. You may now add other user accounts as SQL administrators. To do so,
click Add... below list Specify SQL Server administrators and select according user accounts. In case your
own account is not displayed in the list, click Add Current User. Click Next > to proceed.
9. Setup step Installation Progress will now start to install the application features. This might take a while.
10. When installation is finished the last Setup step Complete will display information about operations taken.
Click Close to finish installation.
11. Proceed with the service configuration now. Read the following chapter for detailed instructions.

SAP Workforce Performance Builder 9.5
Preparation
Customer
© 2016 SAP SE. All rights reserved. 31
2.2.3.1.1 Configuration
Start the SQL Server Configuration Manager from Start -> Programs -> Microsoft SQL Server 2008 (R2) ->
Configuration Tools.
Note
o Using an already existing installation of MS SQL Server please check that you have the SQL Native
Client installed and the protocols for Named Pipes and TCP/IP enabled.
o In the following steps the instance name SQLSERVER is used. In case you specified another instance
name replace this value by your own.
1. Expand the item SQL Server Network Configuration in the left frame of the SQL Server Configuration
Manager. Select the sub node Protocols for SQLSERVER.
2. Enable the protocols for Named Pipes and TCP/IP by selecting the context menu entry Enable of each
item.
3. Right-click the item TCP/IP and select Properties in the context menu.
4. Select the tab IP Addresses and insert the port number 1433 in every line where a TCP-Port is requested.
Click on the button Apply and close the window with the Ok button.
5. Now select the node SQL Server Services inside the left frame.
6. Select entry SQL Server (SQLSERVER). Consider that the name in brackets might vary in case you entered
an individual instance name in installation process.
7. Restart the server instance by context menu entry Restart. Alternatively you can use the control menu
icons below the menu bar.
8. Close the SQL Server Configuration Manager.
Note
These settings won’t work until you have restarted the server.

32
Customer
© 2016 SAP SE. All rights reserved.
SAP Workforce Performance Builder 9.5
Preparation
2.3 Installation of the Oracle® Enterprise Server
2.3.1 Use
Oracle® provides a managed database to store object, task and user relevant data. The machine hosting the
database environment can be available as local installation on the same machine hosting the Tomcat Server or as
another machine in the network (dedicated server). Observe that the use of a dedicated database might need a
high performance network connection between both server machines.
2.3.2 Prerequisites
The following prerequisites will be needed:
Prerequisite Description
Oracle® 11g Installation files for Oracle® 11g database.

SAP Workforce Performance Builder 9.5
Preparation
Customer
© 2016 SAP SE. All rights reserved. 33
2.3.3 Procedure
2.3.3.1 Installation
1. Start the installation wizard by inserting the installation medium of double-clicking the setup.exe file
located inside the root folder of the installation directory.
2. In Setup step Configure Security Updates you may enter your Oracle® Support data. If you don't do so an
error dialog will appear. Click Yes to close the dialog and proceed with installation.
3. In Setup step Download Software Updates select Ignore Software Updates and click Next to proceed.
4. In Setup step Installation option select Create and configure database and click Next to proceed.
5. In Setup step System class select Desktop class and click Next to proceed.
6. In Setup step Standard installation specify values as following and click Next to proceed.
1. Administrative Password:
The password has to have a length between 8 and 128 signs and has to consist of uppercase and
lowercase letters as well as digits at least. The special sign "@" is not supported.
1. Global database name:
By this value the database instance will be available for access, configuration and maintenance. The
length of the name is restricted to a maximum of 8 letter without special signs.
2. Location modifiers (optional):
Modify the directories for Oracle base, Software location and Database location if needed. To do so,
click each button Browse and select new target directory.
2. The installation wizard will now run a check for fulfilling all requirements. This might take a while.
3. Having checked successfully the Setup Step Overview will provide all parameters as specified for
installation process. Its recommended to save the data by clicking Save response file.... This will enable you
to have all data at the hand later on. If you don't do so, note down at least the value displayed for Oracle®
System Identifier (SID) since you will need this for further installation processes.
4. Click Install to start the installation. The installation wizard will now extract and copy the necessary files as
well as it will configure all parameters for the Net-environment and the database itself. This might take a
while.
5. Having finished successfully click Close to finish the installation wizard.
6. Proceed now with the instructions of chapter Configuration.

34
Customer
© 2016 SAP SE. All rights reserved.
SAP Workforce Performance Builder 9.5
Preparation
2.3.3.2 Configuration
To setup necessary configuration proceed as follows:
1. Open your Browser.
2. Enter https://localhost:1158/em into the address bar.
3. The browser may display a warning about identifying a problem with the websites security certificate.
Confirm to proceed, e.g. for Internet Explorer click Continue to this website (not recommended).
4. The authentication area of the Oracle® Enterprise Manager will appear. Enter user name SYS and the
password as you specified in installation for the administrator account. Select SYSDBA in dropdown
Connect As.
5. In the Manager interface select tab Server.
6. Select Security > Users.
7. Click button Create on the right side above the user list.
8. Specify at least the following parameters:
1. Name
The user name you will logon later on.
1. Enter Password
Specify a password to logon.
2. Confirm Password
Repeat the password you specified in the field before.
3. Default Tablespace
Enter USERS or alternatively click the icon next to the field and select USERS in the dialog box.
4. Temporary Tablespace
Enter TEMP or alternatively click the icon next to the field and select TEMP in the dialog box.
2. Select tab Roles.
3. Click the button Edit List.
4. In the overview Modify Roles click Move All and confirm with OK.
5. Select tab System Privileges.
6. Click the button Edit List.
7. In the overview Modify System Privileges click Move All and confirm with OK.
8. Click OK to finish user creation.
9. An error message will appear, saying that global roles cannot be granted. You can ignore this message
since its error handling will just remove the critical roles from your selection, but leave all roles and
privileges you will need.
10. Click Logout in upper right window corner to leave the Oracle® Enterprise Manager interface.
11. Proceed with the installation of the SAP Workforce Performance Builder Manager - Oracle Edition.
SAP Workforce Performance Builder 9.5
Installation
Customer
© 2016 SAP SE. All rights reserved. 35
3 Installation
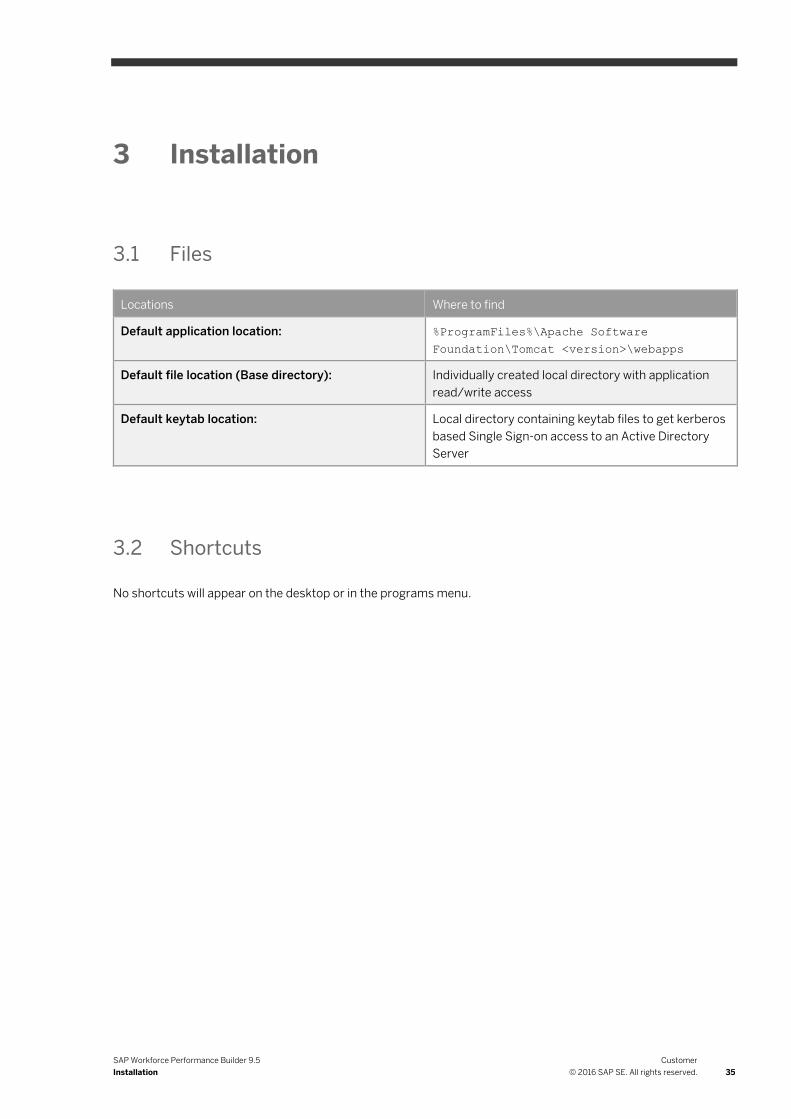
3.1 Files
Locations Where to find
Default application location: %ProgramFiles%\Apache Software
Foundation\Tomcat <version>\webapps
Default file location (Base directory): Individually created local directory with application
read/write access
Default keytab location: Local directory containing keytab files to get kerberos
based Single Sign-on access to an Active Directory
Server
3.2 Shortcuts
No shortcuts will appear on the desktop or in the programs menu.
36
Customer
© 2016 SAP SE. All rights reserved.
SAP Workforce Performance Builder 9.5
Installation
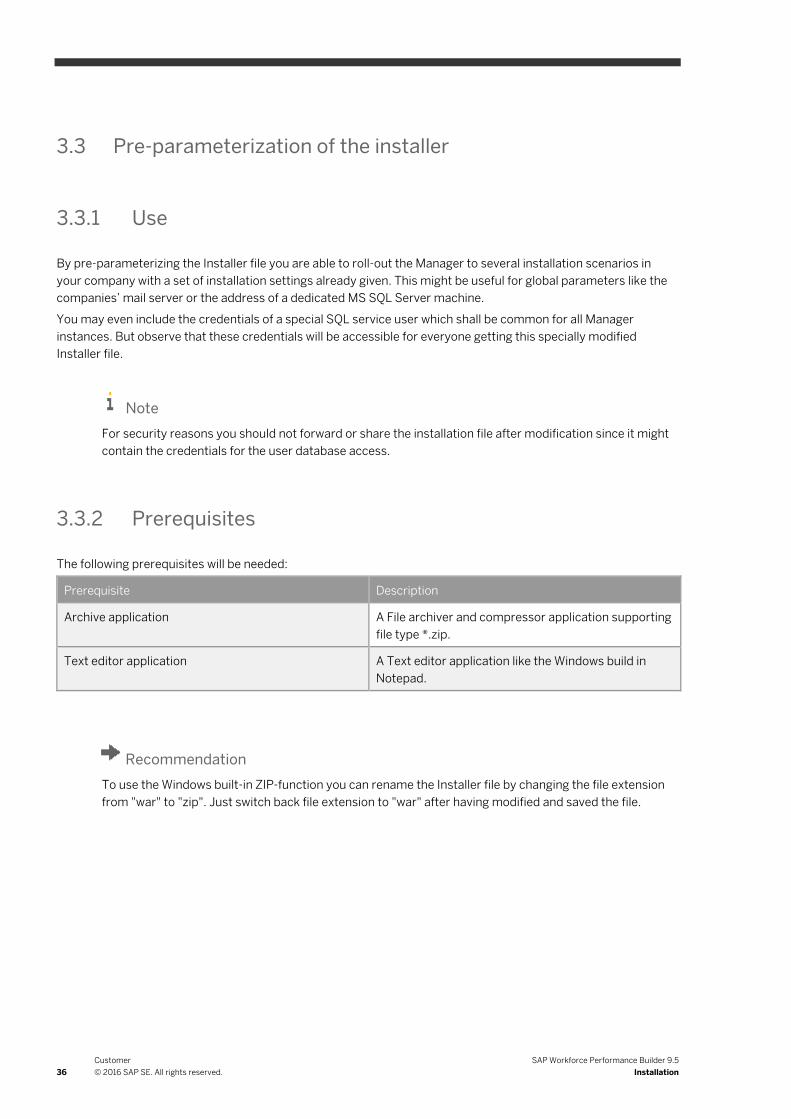
3.3 Pre-parameterization of the installer
3.3.1 Use
By pre-parameterizing the Installer file you are able to roll-out the Manager to several installation scenarios in
your company with a set of installation settings already given. This might be useful for global parameters like the
companies’ mail server or the address of a dedicated MS SQL Server machine.
You may even include the credentials of a special SQL service user which shall be common for all Manager
instances. But observe that these credentials will be accessible for everyone getting this specially modified
Installer file.
Note
For security reasons you should not forward or share the installation file after modification since it might
contain the credentials for the user database access.
3.3.2 Prerequisites
The following prerequisites will be needed:
Prerequisite Description
Archive application A File archiver and compressor application supporting
file type *.zip.
Text editor application A Text editor application like the Windows build in
Notepad.
Recommendation
To use the Windows built-in ZIP-function you can rename the Installer file by changing the file extension
from "war" to "zip". Just switch back file extension to "war" after having modified and saved the file.

SAP Workforce Performance Builder 9.5
Installation
Customer
© 2016 SAP SE. All rights reserved. 37
3.3.3 Procedure
To ensure the web application installer file (*.war) is correctly configured you have to edit the according files
before deploying the file on the Tomcat server.
Note
You may also edit the files after deployment, but this will require you to restart the Tomcat service
affecting other already running web applications.
How to modify the installer file
Follow these steps to pre-parameterize the Installer file of the Manager:
1. Right-click the Installer file (*.war).
2. Select Open with in context menu and select your preferred File Archiving Application.
3. After editing the files described below save your changes to the Installer file with the File Archiving
Application.
Modify application properties
It is highly recommended to edit the config.properties file for security and performance reasons:
1. In the file structure of the installer file double-click directory WEB-INF.
2. Now double-click directory classes.
3. Double-click the file config.properties. Select a text editor when asked for how to open the file.
4. Modify the parameters in the file according to your needs. See descriptions in table below.
5. Save and close the file.
6. Save your changes to the Installer file with the File Archiving Application.
Property Description
Database
dbs.address Enter address of the Database Server. In case the
Database Server will run on the same machine as the
Manager enter "localhost".
dbs.username Enter the username, with which the database shall be
accessed.
dbs.password Password of the user.
db.dbname Enter name of already existing database to be used.
38
Customer
© 2016 SAP SE. All rights reserved.
SAP Workforce Performance Builder 9.5
Installation
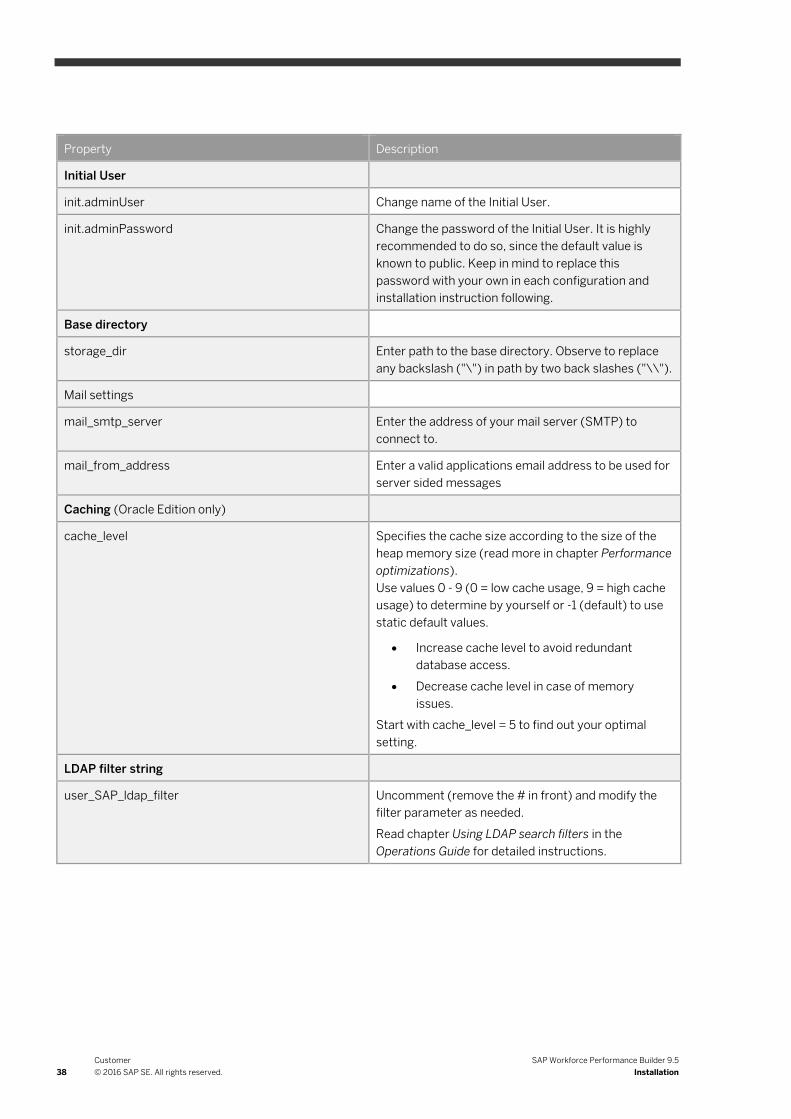
Property Description
Initial User
init.adminUser Change name of the Initial User.
init.adminPassword Change the password of the Initial User. It is highly
recommended to do so, since the default value is
known to public. Keep in mind to replace this
password with your own in each configuration and
installation instruction following.
Base directory
storage_dir Enter path to the base directory. Observe to replace
any backslash ("\") in path by two back slashes ("\\").
Mail settings
mail_smtp_server Enter the address of your mail server (SMTP) to
connect to.
mail_from_address Enter a valid applications email address to be used for
server sided messages
Caching (Oracle Edition only)
cache_level Specifies the cache size according to the size of the
heap memory size (read more in chapter Performance
optimizations).
Use values 0 - 9 (0 = low cache usage, 9 = high cache
usage) to determine by yourself or -1 (default) to use
static default values.
Increase cache level to avoid redundant
database access.
Decrease cache level in case of memory
issues.
Start with cache_level = 5 to find out your optimal
setting.
LDAP filter string
user_SAP_ldap_filter Uncomment (remove the # in front) and modify the
filter parameter as needed.
Read chapter Using LDAP search filters in the
Operations Guide for detailed instructions.
SAP Workforce Performance Builder 9.5
Installation
Customer
© 2016 SAP SE. All rights reserved. 39
3.4 Prerequisites
Preliminary to the installation of the Manager you have to rename the installation file the same as the instance
name on the application server shall be available for users, e.g. your instance shall be accessible by
http://<tomcat-server>/myManager you have to name the file myManager.war.
Recommendation
Prospecting future version updates or implementation of other contents we highly recommend to choose
an instance name free of version or contextual information.
Caution
Do not name your instance Manager in single hence this instance name is reserved by Tomcat for its
onboard application Manager and will result in conflicts by overwriting this resource folder.
JDBC driver for Oracle® Edition
Due to legal restrictions the JDBC driver to connect with Oracle® databases is not included within the provided
installation file. You will have to download and implement it additionally. Read chapter Implementation of the
Oracle® JDBC driver for detailed information on the necessary steps.
3.4.1 Implementation of the Oracle® JDBC driver
The Oracle® JDBC driver is mandatory to be able to connect the Manager - Oracle® Edition with the Oracle®
database. You will have to download and integrate it before starting the installation process.
Download of JDBC driver
1. Open your browser by clicking the following link:
http://www.oracle.com/technetwork/database/features/jdbc/index-091264.html
2. Select the correct version of JDBC driver according to your version of the Oracle® database server.
3. Select "Accept License Agreement" before selecting file to download
4. Select file download ojdbc6.jar. Note, that although it is not mentioned, it is fully compatible with Java 1.7.
5. Enter your Oracle credentials or create a new account in upcoming login window. A valid account is
mandatory for being able to download the file.
6. After successful login the file download starts directly.

40
Customer
© 2016 SAP SE. All rights reserved.
SAP Workforce Performance Builder 9.5
Installation
Implement JDBC driver in Manager Installer file
To avoid the need of restarting your Tomcat server it is highly recommended to implement the JDBC driver
before deploying the Manager Installer file. To do so follow these steps:
1. Rename the file suffix of the installation file from *.war to *.zip.
2. Double-click the file to open the archive with your systems default application for archive handling.
3. In the archive go to WEB-INF > lib.
4. Copy the downloaded file ojdbc6.jar into the lib directory.
5. Save the zip file and close the archive application.
6. Rename the file suffix back to *.war.
Implement JDBC driver in deployed Manager
If you already have deployed the Manager, proceed as follows:
1. Go to the webapps directory of your Tomcat installation.
2. Open the directory of your deployed Manager instance and go to WEB-INF > lib.
3. Copy the downloaded file ojdbc6.jar into the lib directory.
4. Restart your Tomcat server.
Note
Copying the file into the already deployed Manager directory you will have to repeat these steps every
time you redeploy the Manager application.
SAP Workforce Performance Builder 9.5
Installation
Customer
© 2016 SAP SE. All rights reserved. 41
3.5 Procedure
As following the instance/file name myManager(.war) will be used.
Consequentially the instance would be available by entering this address:
http://<tomcat-server>:<port>/myManager
Note
Using an OSGi tomcat server, please note the missing support for instance names containing periods.
Rename server installation file before starting the deployment.
1. For the installation of the Manager application open your favorite browser and type in the following
address to access the Tomcat Application Manager:
http://<tomcat-server>:<port>/Manager/html
2. An authentication window appears. Insert the username and password as specified in the installation
process of the Tomcat server.
3. The Tomcat Application Manager interface will open in the browser window. Scroll to the section Deploy
and click the button Browse…. Go to the file myManager.war, select it and click the button Open.
4. Now click on the button Deploy. The browser window refreshes automatically after the file has been
integrated successfully.
5. You will find a new entry in the list of applications. It should have the same title as the file you have
deployed.
6. Click on the path entry in the column Path. This will open the according Manager instance.
7. Again an authentication window appears. Please insert login data as following. Note that these credentials
might have been changed within a pre-parameterized Installer file - in this case use credentials as
separately delivered by your responsible contact.
1. Username: admin
2. Password: dfkhvlkp$75
Caution
o Since this document is available for public we highly recommend to change the initial password after
finishing the installation. Please read the Security Guide as delivered with software download to do so.
o Using Manager - Oracle® Edition ensure you have added the Oracle® JDBC driver as described in
chapter Prerequisites, since the installation assistant won't be able to connect to the database
without the presence of this driver.

42
Customer
© 2016 SAP SE. All rights reserved.
SAP Workforce Performance Builder 9.5
Installation
3.5.1 Server Installation Assistant
The server installation assistant will guide you through the installation process of the Manager.
You can define all initial parameters individually in just a few steps. The following chapters will give you an
overview of the values to be setup in each installation step. Consider to choose between the instructions for the
Microsoft Edition and the Oracle Edition since each Edition has different requirements.
Some parameter will already show a hint what to enter, closed in lower-than and greater-than signs (<hint>).
Those hints have to be replaced by according values.
Mandatory fields are marked with an asterisk (*).

SAP Workforce Performance Builder 9.5
Installation
Customer
© 2016 SAP SE. All rights reserved. 43
3.5.1.1 Microsoft Edition
3.5.1.1.1 SQL Server Connection
Server Address*:
Specify the address of the server, which is allocating the Microsoft SQL Server. If the SQL Server is located on
your own workstation, you may enter localhost as server address.
Specify the port number by an appendix to the IP address, if your default SQL port is set to something else than
the default port 1433.
Schematic Example: 192.168.100.132:1433
Authentication User*:
As if you are not owning another individual account insert username sa. This username is used for the system
administrator of the SQL-Server. Any individual user account must have permission to create and manage
databases. Read the instructions in chapter Installation with restricted SQL login permissions to learn how to
handle missing SQL user permissions.
Authentication Password*:
Insert password according to your SQL user account.
3.5.1.1.2 Database Initialization
You have the opportunity to choose between selecting an existing database, for example one from a previous
installation, or creating a new one. Choose your option by selecting one of the radio buttons shown for every
opportunity. Note that a database connection is mandatory to proceed with the installation.
Select existing database:
Within this option you will get a list of all existing databases in a dropdown menu. Choose the database of your
choice and click the button Next Step.
Create new database:
Insert a name for the database, which will be created, and define a database path, where the created database
files will be stored. Take care for the correct permission rights of the defined folder. In Windows Vista it might be
advisable to create the folder before, defining the specific folder permissions inside the folder properties dialog
manually. After entering the data click the button Next Step.
44
Customer
© 2016 SAP SE. All rights reserved.
SAP Workforce Performance Builder 9.5
Installation
3.5.1.1.3 Various settings
File storage:
In the field base directory* enter the path to the directory, where the objects and contents of the Manager will be
stored. Ensure that this directory has the correct access permissions.
Note
The base directory is usually automatically created as entered by path statement. Using a Windows
operating system which works restricted by user access control it is not possible to create that directory
automatically. You have to create the directory manually with the windows explorer before. As created,
please check folder permission for operating smoothly.
Using an already existing database the button Check enables you to check the path saved in database for validity
and correct behavior. Furthermore it will check for existing file structures of workareas as defined in database.
The result of the check will be displayed below the input field:
-OK
-Error message (e.g: Warning: 0 of x workareas found in base directory.)
Caution
The base directory is mandatory for the functionality of the Manager. It contains all the file contents
uploaded to the Manager. Observe the following facts on this directory:
o Consider to select safe storage for the base directory. If applicable, do not select operating systems
drive C:\ as target location for this directory.
o Backup this directory regularly. See chapter la in the Operations Guide for instructions on how to do.
o Never delete this directory or files and folders inside unless you are instructed by support team to do
so.
Mail server:
Specify the address of the mail server to use in field SMTP Server. Usually this address is composed of server
name and domain name, like servername.domainname.de.
Enter a sender address*. This address is used for the mails which were generated by Manager and will be shown
as sender of every automatic generated email. To catch returns and response mails the mail address has to be
registered on the mail server.

SAP Workforce Performance Builder 9.5
Installation
Customer
© 2016 SAP SE. All rights reserved. 45
3.5.1.1.4 Manager Initialization
Super Admin:
Specify login data for the first user profile in Manager by entering the fields User Name* and Password*. This user
profile will get administrator permissions by default.
Caution
o Note this credentials since the Manager will become inaccessible without it.
o Do not use your existing username as specified in Active Directory server. Due to security reasons the
initial user profile is prohibited to be manipulated or updated by external import using LDAP or Excel
list. An existing user profile with same username will be ignored in import process.
Initial Workarea:
Specify the display name* which will be shown in initial arranged Workarea.
You should define a clear allocable short variant of that name, without spaces, in the field Workarea ID*, for
example wa for Workarea.
Specify the name of the root group in initial arranged Workarea by entering the field Root Group (Display Name)*.
Initial Configuration:
In field SSO Keytab Files Folder enter the path to your local storage where keytab files, as needed for single sign-
on, shall be stored. You can enter or edit this settings later in the server settings.
3.5.1.1.5 Install content packages
In step Install Content you get the opportunity to upload predefined sceneries to the Manager. This functionality is
for development and testing purposes only. Please click Next step to proceed with the installation process.
3.5.1.1.6 Finish of installation process
The window Finished informs you about completion of the install process.
Clicking the button Close Wizard will lead you directly to logon area of the newly installed Manager.

46
Customer
© 2016 SAP SE. All rights reserved.
SAP Workforce Performance Builder 9.5
Installation
3.5.1.2 Oracle Edition
3.5.1.2.1 SQL Server Connection
Database:
Specify which database provider you want to use. Note, that the following descriptions provide information on the
provider selection ORACLE. In case you select MS SQL please follow the installation description for the Microsoft
Edition.
Server Address*:
Specify the address of the server, which is allocating the Oracle® Enterprise Server. If the Oracle® Enterprise
Server is located on your own workstation, you may enter localhost as server address. Specify the according
database port number as appendix to the IP address. Using a default configuration the Oracle® database port is
1521.
Schematic Example: 192.168.100.132:1521
SID*:
Enter the Oracle® System Identifier (SID) as noted in installation summary. I f you don't have this by the hand you
can read it out by logging on to the Oracle® Enterprise Manager (see according Configuration chapter). It is the
first value of the displayed Database Instance followed by a period.
Authentication User*:
Enter the name of the according user you have created previously in the Oracle® Enterprise Manager.
Authentication Password*:
Insert password as specified for this user.

SAP Workforce Performance Builder 9.5
Installation
Customer
© 2016 SAP SE. All rights reserved. 47
3.5.1.2.2 Various settings
File storage:
In the field Base Directory* enter the path to the directory, where the objects and contents of the Manager will be
stored. Ensure that this directory is having the correct access permissions.
Note
The base directory is usually automatically created as entered by path statement. Using a Windows
operating system which works restricted by user access control it is not possible to create that directory
automatically. You have to create the directory manually with the windows explorer before. As created,
please check folder permission for operating smoothly.
Using an already existing database the button Check enables you to check the path saved in database for validity
and correct behavior. Furthermore it will check for existing file structures of workareas as defined in database.
The result of the check will be displayed below the input field:
-OK
-Error message (e.g: Warning: 0 of x workareas found in base directory.)
Caution
The base directory is mandatory for the functionality of the Manager. It contains all the file contents
uploaded to the Manager. Observe the following facts on this directory:
o Consider to select safe storage for the base directory. If applicable, do not select operating systems
drive C:\ as target location for this directory.
o Backup this directory regularly. See chapter la in the Operations Guide for instructions on how to do.
o Never delete this directory or files and folders inside unless you are instructed by support team to do
so.
Mail server:
Specify the address of the mail server to use in field SMTP Server. Usually this address is composed of server
name and domain name, like servername.domainname.de.
Enter a sender address*. This address is used for the mails which were generated by Manager and will be shown
as sender of every automatic generated email. To catch returns and response mails the mail address has to be
registered on the mail server.
48
Customer
© 2016 SAP SE. All rights reserved.
SAP Workforce Performance Builder 9.5
Installation
3.5.1.2.3 Install content
In step Install Content you get the opportunity to upload predefined sceneries to the Manager. This functionality is
for development and testing purposes only. Please click Next step to proceed with the installation process.
3.5.1.2.4 Finish of installation process
The window Finished informs you about completion of the install process.
Clicking the button Close Wizard will lead you directly to logon area of the newly installed Manager.
Note
To avoid client errors you should restart the Tomcat Server now.

SAP Workforce Performance Builder 9.5
Post-Installation
Customer
© 2016 SAP SE. All rights reserved. 49
4 Post-Installation
4.1 Environment Variable
The package uses the existing variables:
Variable Name Variable Value
JAVA CLASSPATH C:\Program Files\Apache Software
Foundation\Tomcat
<version>\bin\bootstrap.jar;C:\Program
Files\Apache Software Foundation\Tomcat
<version>\bin\tomcat-juli.jar
The package creates environment variable:
Variable Name Variable Value
- -
4.2 Database
The package connects to a database:
Microsoft Edition
Attributes Values
Data Access Technology JDBC
Data Management Microsoft SQL
Data Registration Machine|User
Server localhost|dedicated
Database Defined in installation process. Property db.dbname in
config.properties file of the application path
Language (Default)
Collation SQL_Latin1_General_CP1_CI_AS
Translate Character Data No
Log Long Running Queries No

50
Customer
© 2016 SAP SE. All rights reserved.
SAP Workforce Performance Builder 9.5
Post-Installation
Attributes Values
Log Driver Statistics No
Use Integrated Security No
Use Regional Settings No
Prepared Statements Option -
Use Failover Server No
Use ANSI Quoted Identifiers No
Use ANSI Null, Paddings and Warnings No
Data Encryption Yes
Oracle Edition
Attributes Values
Data Access Technology JDBC
Data Management Oracle® Enterprise server
Data Registration Machine|User
Server localhost|dedicated
Database Defined in installation process. Property db.dbname in
config.properties file of the application path
Language (Default)
Collation SQL_Latin1_General_CP1_CI_AS
Translate Character Data No
Log Long Running Queries No
Log Driver Statistics No
Use Integrated Security No
Use Regional Settings No
Prepared Statements Option -
Use Failover Server No
Use ANSI Quoted Identifiers No
Use ANSI Null, Paddings and Warnings No
Data Encryption Yes
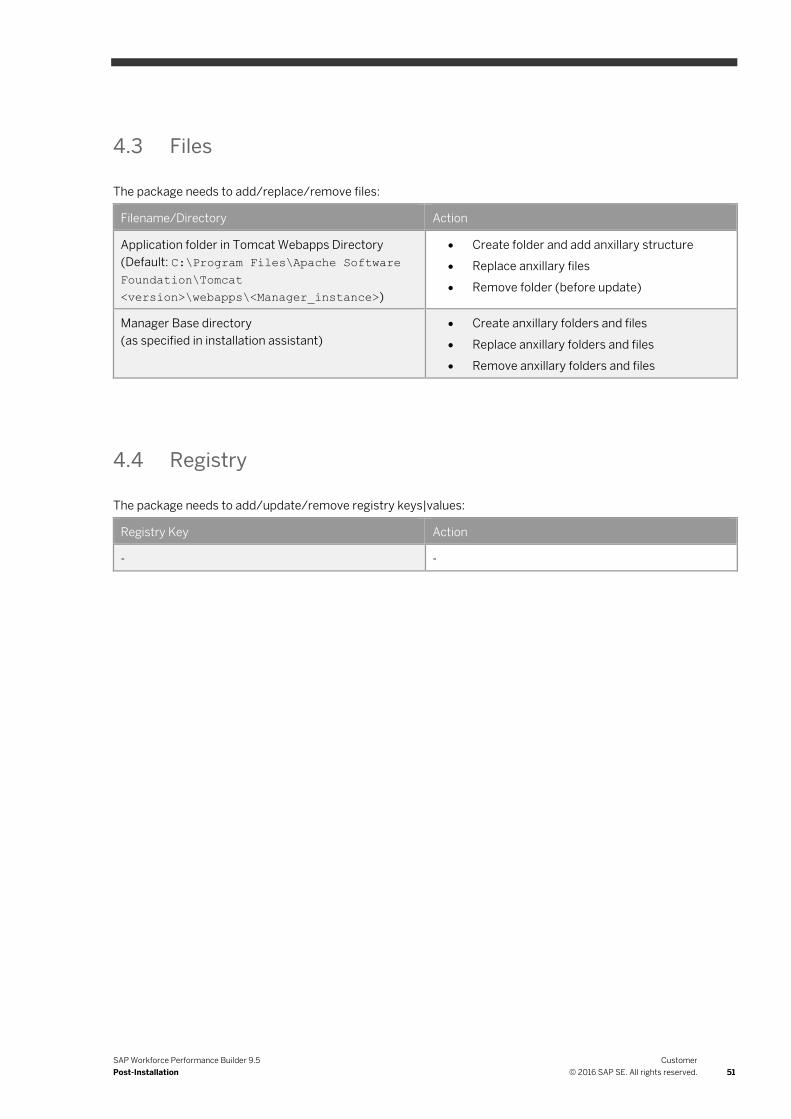
SAP Workforce Performance Builder 9.5
Post-Installation
Customer
© 2016 SAP SE. All rights reserved. 51
4.3 Files
The package needs to add/replace/remove files:
Filename/Directory Action
Application folder in Tomcat Webapps Directory
(Default: C:\Program Files\Apache Software
Foundation\Tomcat
<version>\webapps\<Manager_instance>)
Create folder and add anxillary structure
Replace anxillary files
Remove folder (before update)
Manager Base directory
(as specified in installation assistant)
Create anxillary folders and files
Replace anxillary folders and files
Remove anxillary folders and files
4.4 Registry
The package needs to add/update/remove registry keys|values:
Registry Key Action
- -

52
Customer
© 2016 SAP SE. All rights reserved.
SAP Workforce Performance Builder 9.5
Deinstallation
5 Deinstallation
5.1 Undeploy Manager
To undeploy your Manager instance proceed as follows:
1. Open your browser.
2. Browse to Tomcat Application Manager by entering address like following:
http://<servername>:<port>/Manager/html
3. Enter your authentication data to administrate the Tomcat application list.
4. Click command link Undeploy in the commands column of your Manager instance.
5. Your Manager instance now has been removed from list and is not available anymore.
6. Consider to restart Tomcat to remove data which is still hold in memory.
Although you have removed the Manager application itself, the database and the base directory are still present.
You may leave them for a later Manager installation or remove them as described in the following chapters.
5.2 Delete base directory
To delete the base directory proceed as follows:
1. Open Windows Explorer
2. Move to the location you have specified for you Manager instance
3. Select the root folder and press DEL on your keyboard
4. Confirm deletion
Consider that the deletion of the base directory might need a long time depending on the amount of files stored in.
The base directory contains all files and their versions from all central workareas located at the according
previously undeployed Manager instance.
Recommendation
o To avoid having to delete this large amount of files a second time from trash as well you can delete all
items direct permanently by pressing SHIFT + DEL.
o Considering that you may need the data later on, backup or archive the base directory to some safe
storage before deletion.
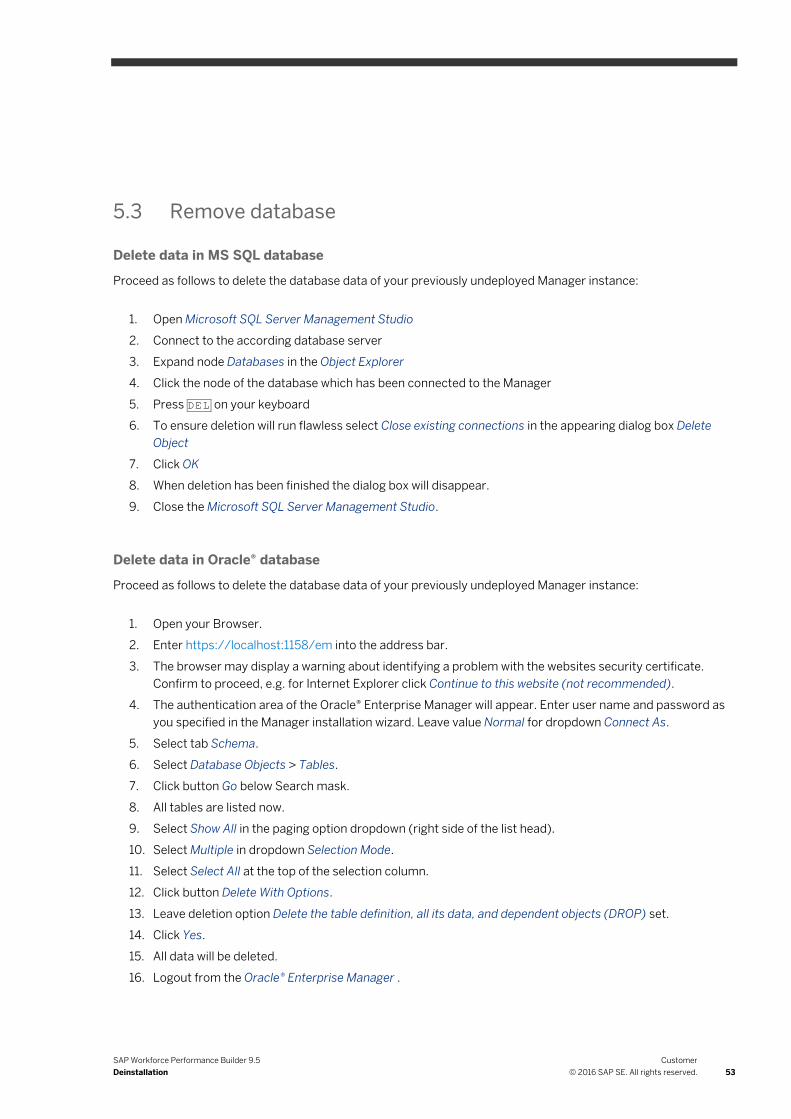
SAP Workforce Performance Builder 9.5
Deinstallation
Customer
© 2016 SAP SE. All rights reserved. 53
5.3 Remove database
Delete data in MS SQL database
Proceed as follows to delete the database data of your previously undeployed Manager instance:
1. Open Microsoft SQL Server Management Studio
2. Connect to the according database server
3. Expand node Databases in the Object Explorer
4. Click the node of the database which has been connected to the Manager
5. Press DEL on your keyboard
6. To ensure deletion will run flawless select Close existing connections in the appearing dialog box Delete
Object
7. Click OK
8. When deletion has been finished the dialog box will disappear.
9. Close the Microsoft SQL Server Management Studio.
Delete data in Oracle® database
Proceed as follows to delete the database data of your previously undeployed Manager instance:
1. Open your Browser.
2. Enter https://localhost:1158/em into the address bar.
3. The browser may display a warning about identifying a problem with the websites security certificate.
Confirm to proceed, e.g. for Internet Explorer click Continue to this website (not recommended).
4. The authentication area of the Oracle® Enterprise Manager will appear. Enter user name and password as
you specified in the Manager installation wizard. Leave value Normal for dropdown Connect As.
5. Select tab Schema.
6. Select Database Objects > Tables.
7. Click button Go below Search mask.
8. All tables are listed now.
9. Select Show All in the paging option dropdown (right side of the list head).
10. Select Multiple in dropdown Selection Mode.
11. Select Select All at the top of the selection column.
12. Click button Delete With Options.
13. Leave deletion option Delete the table definition, all its data, and dependent objects (DROP) set.
14. Click Yes.
15. All data will be deleted.
16. Logout from the Oracle® Enterprise Manager .
54
Customer
© 2016 SAP SE. All rights reserved.
SAP Workforce Performance Builder 9.5
Deinstallation
5.4 Deinstall dependencies
To remove application dependencies you should refer to the documentation instruction of the according
manufacturer. See the list of software dependencies to decide what to remove from your system.

SAP Workforce Performance Builder 9.5
Additional Information
Customer
© 2016 SAP SE. All rights reserved. 55
6 Additional Information
6.1 Known Errors
Does the application produce any errors while installing or using it:
Edition Error/Description Read chapter
1. Microsoft Edition Creation of database fails Installation with
restricted SQL-login

56
Customer
© 2016 SAP SE. All rights reserved.
SAP Workforce Performance Builder 9.5
Additional Information
6.1.1 Installation with restricted SQL login permissions
Preparation by the system administrator (sa)
The database to be used for installation of the Manager has to be created by the user sa. To simplify this process
please use the script as provided below this text. You have to change the values for @dbname and @path. Having
done this adaptations run this script in Microsoft SQL Server Management Studio or by using command line.
dbname: name of database to be created (free choice)
path: local path to storage folder of SQL databases
Syntax
USE [master]
DECLARE @dbname nvarchar(512)
SET @dbname = 'my_database'
DECLARE @path nvarchar(512)
SET @path = 'c:\Program Files\Microsoft SQL
Server\MSSQL10_50.MSSQLSERVER\MSSQL\DATA\'
EXEC('
CREATE DATABASE [' + @dbname + '] ON PRIMARY
( NAME = N''' + @dbname + '_Data'', FILENAME = N''' + @path + @dbname + '.MDF''
, SIZE = 36736KB , MAXSIZE = UNLIMITED, FILEGROWTH = 80KB )
LOG ON
( NAME = N''' + @dbname + '_Log'', FILENAME = N''' + @path + @dbname + '_1.LDF''
, SIZE = 97536KB , MAXSIZE = UNLIMITED, FILEGROWTH = 10%)
')
EXEC dbo.sp_dbcmptlevel @dbname= @dbname , @new_cmptlevel=90 ;
EXEC(' IF (1 = FULLTEXTSERVICEPROPERTY(''IsFullTextInstalled''))
begin
EXEC [' + @dbname + '].[dbo].[sp_fulltext_database] @action = ''enable'';
end
ALTER DATABASE ' + @dbname + ' SET ANSI_NULL_DEFAULT OFF
ALTER DATABASE ' + @dbname + ' SET ANSI_NULLS OFF
ALTER DATABASE ' + @dbname + ' SET ANSI_PADDING OFF
ALTER DATABASE ' + @dbname + ' SET ANSI_WARNINGS OFF
ALTER DATABASE ' + @dbname + ' SET ARITHABORT OFF
ALTER DATABASE ' + @dbname + ' SET AUTO_CLOSE ON
ALTER DATABASE ' + @dbname + ' SET AUTO_CREATE_STATISTICS ON
ALTER DATABASE ' + @dbname + ' SET AUTO_SHRINK OFF
ALTER DATABASE ' + @dbname + ' SET AUTO_UPDATE_STATISTICS ON
ALTER DATABASE ' + @dbname + ' SET CURSOR_CLOSE_ON_COMMIT OFF
ALTER DATABASE ' + @dbname + ' SET CURSOR_DEFAULT GLOBAL
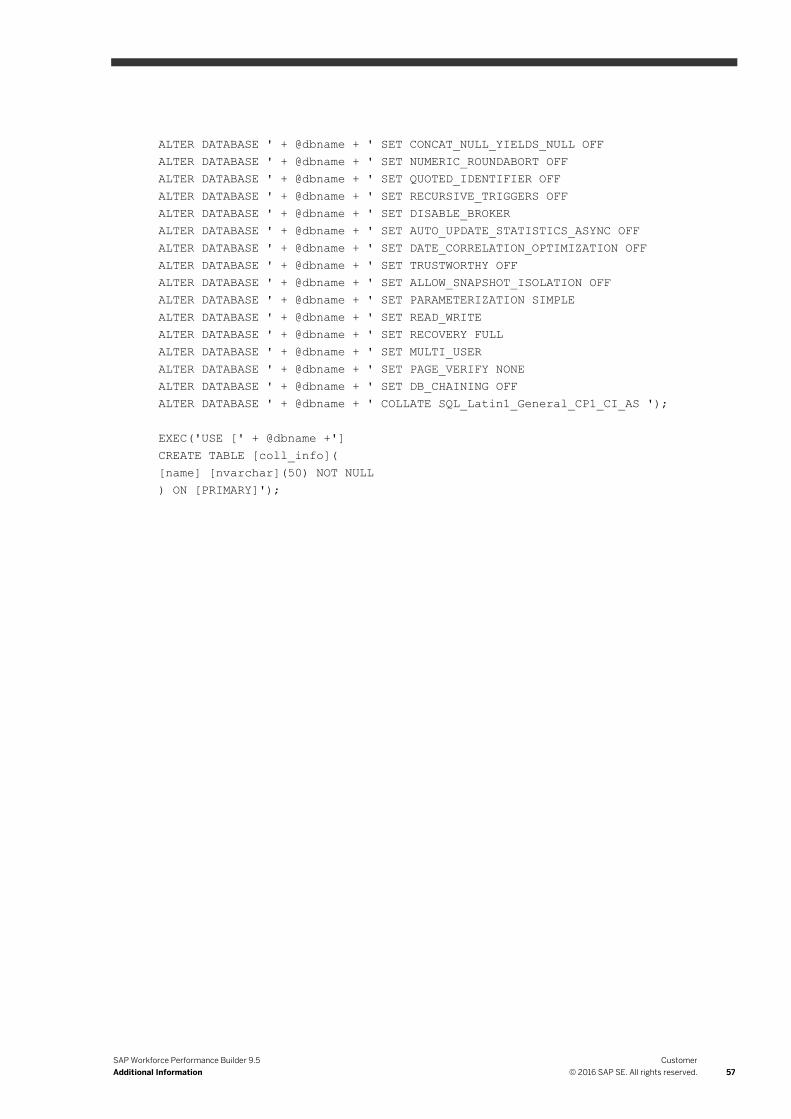
SAP Workforce Performance Builder 9.5
Additional Information
Customer
© 2016 SAP SE. All rights reserved. 57
ALTER DATABASE ' + @dbname + ' SET CONCAT_NULL_YIELDS_NULL OFF
ALTER DATABASE ' + @dbname + ' SET NUMERIC_ROUNDABORT OFF
ALTER DATABASE ' + @dbname + ' SET QUOTED_IDENTIFIER OFF
ALTER DATABASE ' + @dbname + ' SET RECURSIVE_TRIGGERS OFF
ALTER DATABASE ' + @dbname + ' SET DISABLE_BROKER
ALTER DATABASE ' + @dbname + ' SET AUTO_UPDATE_STATISTICS_ASYNC OFF
ALTER DATABASE ' + @dbname + ' SET DATE_CORRELATION_OPTIMIZATION OFF
ALTER DATABASE ' + @dbname + ' SET TRUSTWORTHY OFF
ALTER DATABASE ' + @dbname + ' SET ALLOW_SNAPSHOT_ISOLATION OFF
ALTER DATABASE ' + @dbname + ' SET PARAMETERIZATION SIMPLE
ALTER DATABASE ' + @dbname + ' SET READ_WRITE
ALTER DATABASE ' + @dbname + ' SET RECOVERY FULL
ALTER DATABASE ' + @dbname + ' SET MULTI_USER
ALTER DATABASE ' + @dbname + ' SET PAGE_VERIFY NONE
ALTER DATABASE ' + @dbname + ' SET DB_CHAINING OFF
ALTER DATABASE ' + @dbname + ' COLLATE SQL_Latin1_General_CP1_CI_AS ');
EXEC('USE [' + @dbname +']
CREATE TABLE [coll_info](
[name] [nvarchar](50) NOT NULL
) ON [PRIMARY]');

58
Customer
© 2016 SAP SE. All rights reserved.
SAP Workforce Performance Builder 9.5
Additional Information
Assignment of database to specific user
Assign the database as created by the script above to the user who will run the installation of Manager.
1. In Microsoft SQL Server Management Studio open properties of the user by a right click on specific login
(Security > Logins).
2. Select the page User Mapping in page selection ( ).
3. Check the database which has been created by the provided script ( ).
4. Click the entry-specific selection button in column Default Schema ( ).
5. Enter "[dbo]" (without quotes) into field for object names ( ) and click OK.
6. Check db_owner ( ) in field Database role membership for: [database_name].
7. Click OK.

SAP Workforce Performance Builder 9.5
Additional Information
Customer
© 2016 SAP SE. All rights reserved. 59
Installation by a restricted user role
The user doing the installation now will find the newly created and empty database within the dropdown for
selection of existing databases.
6.2 Update
For instructions to update your Manager instance read the according chapter in the SAP Workforce Performance
Builder Manager Operations Guide.
www.sap.com/contactsap
Material Number
© 2016 SAP SE. All rights reserved.
No part of this publication may be reproduced or transmitted in any
form or for any purpose without the express permission of SAP SE.
The information contained herein may be changed without prior
notice.
Some software products marketed by SAP SE and its distributors
contain proprietary software components of other software
vendors.
Microsoft, Windows, Excel, Outlook, and PowerPoint are registered
trademarks of Microsoft Corporation.
IBM, DB2, DB2 Universal Database, System ads, System i5, System
p, System p5, System x, System z, System z10, System z9, z10, z9,
iSeries, pSeries, xSeries, zSeries, eServer, z/VM, z/OS, i5/OS,
S/390, OS/390, OS/400, AS/400, S/390 Parallel Enterprise
Server, PowerVM, Power Architecture, POWER6+, POWER6,
POWER5+, POWER5, POWER, OpenPower, PowerPC, BatchPipes,
BladeCenter, System Storage, GPFS, HACMP, RETAIN, DB2
Connect, RACF, Redbooks, OS/2, Parallel Sysplex, MVS/ESA, AIX,
Intelligent Miner, WebSphere, Netfinity, Tivoli and Informix are
trademarks or registered trademarks of IBM Corporation.
Linux is the registered trademark of Linus Torvalds in the U.S. and
other countries.
Adobe, the Adobe logo, Acrobat, PostScript, and Reader are either
trademarks or registered trademarks of Adobe Systems
Incorporated in the United States and/or other countries.
Apple, App Store, FaceTime, iBooks, iPad, iPhone, iPhoto, iPod,
iTunes, Multi-Touch, Objective-C, Retina, Safari, Siri, and Xcode are
trademarks or registered trademarks of Apple Inc.
Oracle and Java are registered trademarks of Oracle and its
affiliates.
UNIX, X/Open, OSF/1, and Motif are registered trademarks of the
Open Group.
Citrix, ICA, Program Neighborhood, MetaFrame, WinFrame,
VideoFrame, and MultiWin are trademarks or registered trademarks
of Citrix Systems, Inc.
HTML, XML, XHTML and W3C are trademarks or registered
trademarks of W3C®, World Wide Web Consortium, Massachusetts
Institute of Technology.
SAP, R/3, xApps, xApp, SAP NetWeaver, Duet, PartnerEdge,
ByDesign, SAP Business ByDesign, and other SAP products and
services mentioned herein as well as their respective logos are
trademarks or registered trademarks of SAP SE in Germany and in
several other countries all over the world. All other product and
service names mentioned are the trademarks of their respective
companies. Data contained in this document serves informational
purposes only. National product specifications may vary.
These materials are subject to change without notice. These
materials are provided by SAP SE and its affiliated companies ("SAP
Group") for informational purposes only, without representation or
warranty of any kind, and SAP Group shall not be liable for errors or
omissions with respect to the materials. The only warranties for SAP
Group products and services are those that are set forth in the
express warranty statements accompanying such products and
services, if any. Nothing herein should be construed as constituting
an additional warranty.