rins1322-5 v2 gsm user manual vfgc amended 2 v2 gsm user manu… · pyronix ltd page: 8 keys...
TRANSCRIPT
Speaker Microphone
RINS1322-5
GSM Speech Dialler with Automation Control
USER MANUAL
User Manual V2 GSM
Pyronix Ltd Page: 2
EASY START GUIDE
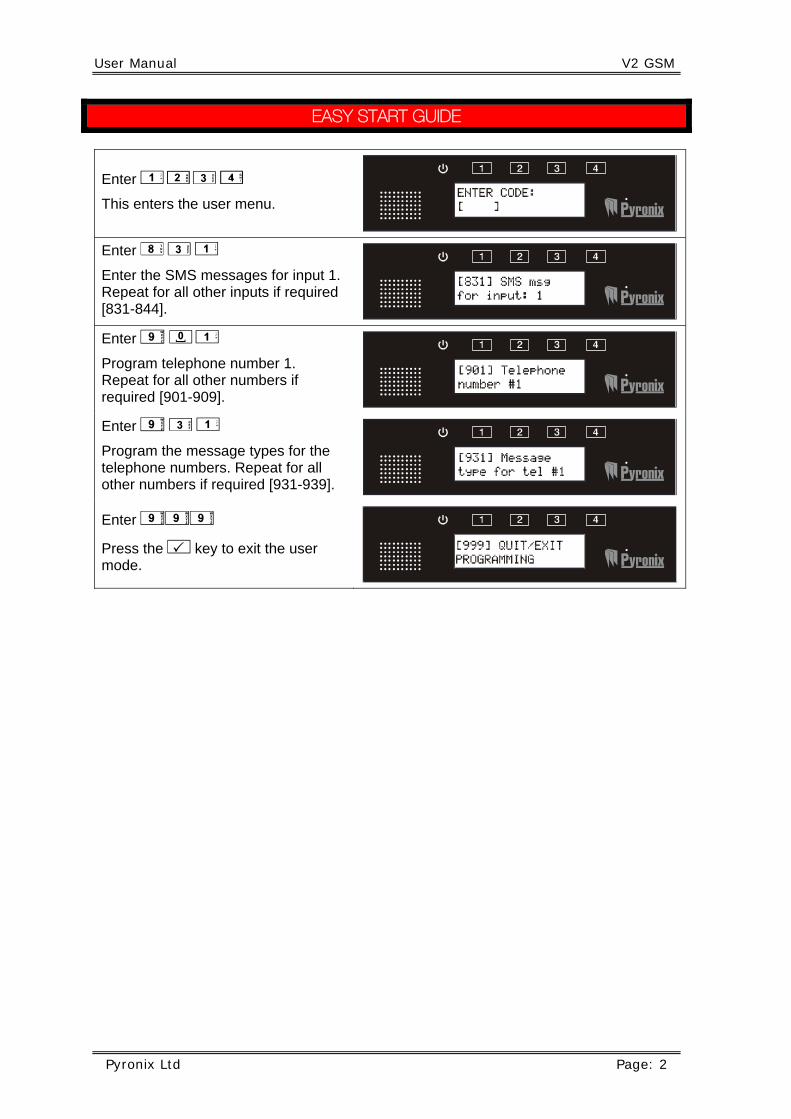
Enter 1 2 3 4 This enters the user menu.
Enter 8 3 1 Enter the SMS messages for input 1. Repeat for all other inputs if required [831-844].
Enter 9 0 1
Program telephone number 1. Repeat for all other numbers if required [901-909].
Enter 9 3 1 Program the message types for the telephone numbers. Repeat for all other numbers if required [931-939].
Enter 999
Press the t key to exit the user mode.
V2 GSM User Manual
Page: 3 Pyronix Ltd
CHAPTER 1 : CONTENTS PAGE
CHAPTER 1: CONTENTS PAGE ..............................................................................2
CHAPTER 2: INTRODUCTION .................................................................................4
CHAPTER 3: HOW THE V2 GSM WORKS...............................................................5 3.1 THE V2 GSM PROCESS ...............................................................................................5
CHAPTER 4: OPERATING THE KEYPAD................................................................6 4.1 SCROLLING THROUGH MAIN MENUS............................................................................6
4.1.1 Scrolling through main menu ...............................................................................6 4.1.2 Scrolling through sub menu .................................................................................7 4.1.3 Entering a sub menu/main menu function............................................................7
4.2 ENTERING TEXT ...........................................................................................................7
CHAPTER 5: THE USER MENU ...............................................................................9 5.1 ENTERING THE USER MENU...........................................................................................9 5.2 EXITING THE USER MENU...........................................................................................9 5.3 CALL TELEPHONE NUMBER [600]...............................................................................10 5.4 ACTIVATING THE ON BOARD 4 OUTPUTS..................................................................10 5.5 ADDITIONAL OUTPUT CONTROL [700] .........................................................................11 5.6 PLAY / RECORD ALARM VOICE MESSAGES [800] ......................................................11 5.7 PLAY / RECORD COMMON MESSAGE [820] ........................................................12 5.8 WRITE SMS ALARM MESSAGES [830] .................................................................12 5.9 WRITE SMS RESTORE MESSAGES [870].............................................................13 5.10 PROGRAM TELEPHONE NUMBERS [900]..........................................................14 5.11 MESSAGE TYPE [930] ..............................................................................................15 5.12 CALL ACKNOWLEDGEMENT CODE [960] ...................................................................16 5.13 COPY ACKNOWLEDGEMENT CODE 1 TO ALL [980] ...................................................16 5.14 SET SIM-CARD SECRET PIN [981] ............................................................................17 5.15 TEST REMOTE MIC [982]........................................................................................17 5.16 TEST REMOTE SPEAKER [983]..................................................................................17 5.17 ENABLE REMOTE LISTEN-IN [984] ............................................................................17 5.18 VIEW EVENT LOG [985]............................................................................................18 5.19 CHANGE USER CODE [986] ......................................................................................18
CHAPTER 6: RECEIVING A CALL FROM THE V2 GSM.......................................19
CHAPTER 7: REMOTE CONTROL VOICE MENU .................................................20
CHAPTER 8: SMS REMOTE TEXT COMMANDS ..................................................21 8.1 CHANGING A TELEPHONE NUMBER VIA SMS ........................................................21 8.2 ACTIVATING / DEACTIVATING AN OUTPUT VIA SMS..................................................21 8.3 READING AN EXTERNAL SYSTEM STATUS VIA SMS ....................................................22 8.4 READING THE INPUT STATUS VIA SMS.........................................................................22
CHAPTER 9: DISCLAIMER.....................................................................................23
CHAPTER 10: SHORTCUT FUNCTION REFERENCE ..........................................24
CHAPTER 11: INPUTS/OUTPUTS APPENDIX ......................................................25 11.1 INPUTS.....................................................................................................................25 11.2 OUTPUTS .................................................................................................................25
User Manual V2 GSM
Pyronix Ltd Page: 4
CHAPTER 2 : I NTRODUCT ION
The V2 GSM is 2 way GSM audio communication and remote automation module. The V2 GSM has the following features:
Call any telephone number (just like a mobile phone)
Supports 2 way speech via the built on SPK and microphone
Activate outputs (to turn on lights, open gates, etc)
o Locally via the integrated keypad
o Remotely via SMS or voice menu command
Program voice messages (Up to 14, 1 for each alarm input)
Program SMS messages (Up to 14, 1 for each alarm input)
Send SMS or voice alerts to up to 9 different user phone numbers
View the V2 event log (256 events, time and date)
Remotely by phone operate the V2 using the built in voice menu:
o Listen in
o Talk and listen
o Control output
o Check the status of an external device that is connected to the V2 (for example system armed or disarmed)
Remotely by SMS text commands operate the V2:
o Change telephone number
o Control outputs
o Check the status of an external device that is connected to the V2 (for example system armed or disarmed)
V2 GSM User Manual
Page: 5 Pyronix Ltd
CHAPTER 3 : HOW THE V2 GSM WORKS
3 .1 THE V2 GSM PROCESS
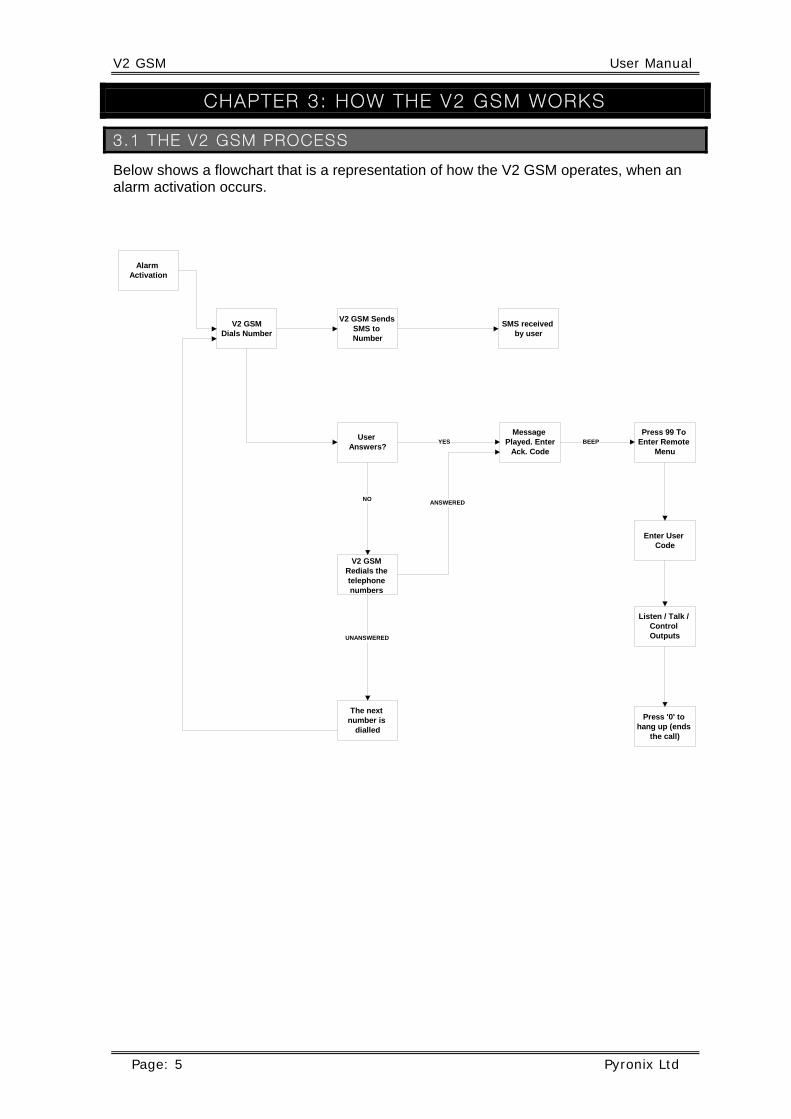
Below shows a flowchart that is a representation of how the V2 GSM operates, when an alarm activation occurs.
Alarm Activation
V2 GSMDials Number
V2 GSM Sends SMS to Number
User Answers?
Message Played. Enter
Ack. Code
Press 99 To Enter Remote
Menu
V2 GSM Redials the telephone numbers
The next number is
dialled
SMS received by user
BEEP
Listen / Talk / Control Outputs
Enter User Code
YES
NO
UNANSWERED
ANSWERED
Press '0' to hang up (ends
the call)
User Manual V2 GSM
Pyronix Ltd Page: 6
CHAPTER 4 : OPERAT ING THE KEYPAD
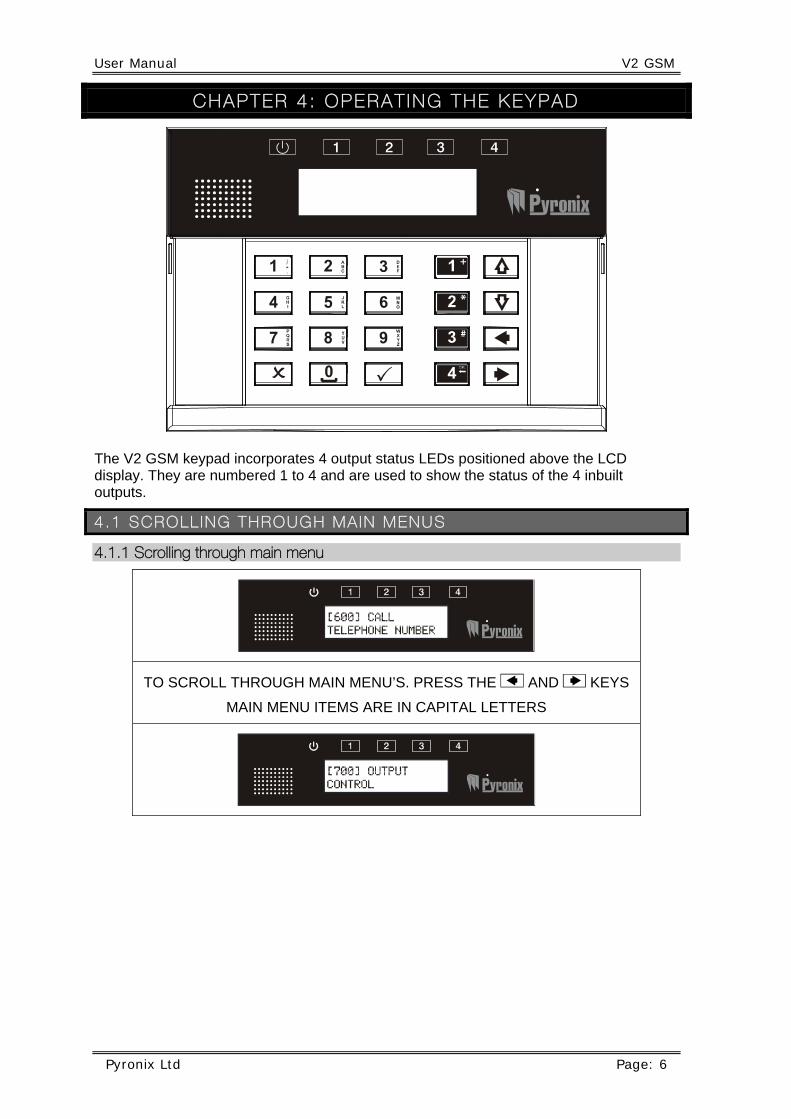
The V2 GSM keypad incorporates 4 output status LEDs positioned above the LCD display. They are numbered 1 to 4 and are used to show the status of the 4 inbuilt outputs.
4 .1 SCROLL ING THROUGH MA IN MENUS
4.1.1 Scrolling through main menu
TO SCROLL THROUGH MAIN MENU’S. PRESS THE [ AND ] KEYS
MAIN MENU ITEMS ARE IN CAPITAL LETTERS
V2 GSM User Manual
Page: 7 Pyronix Ltd
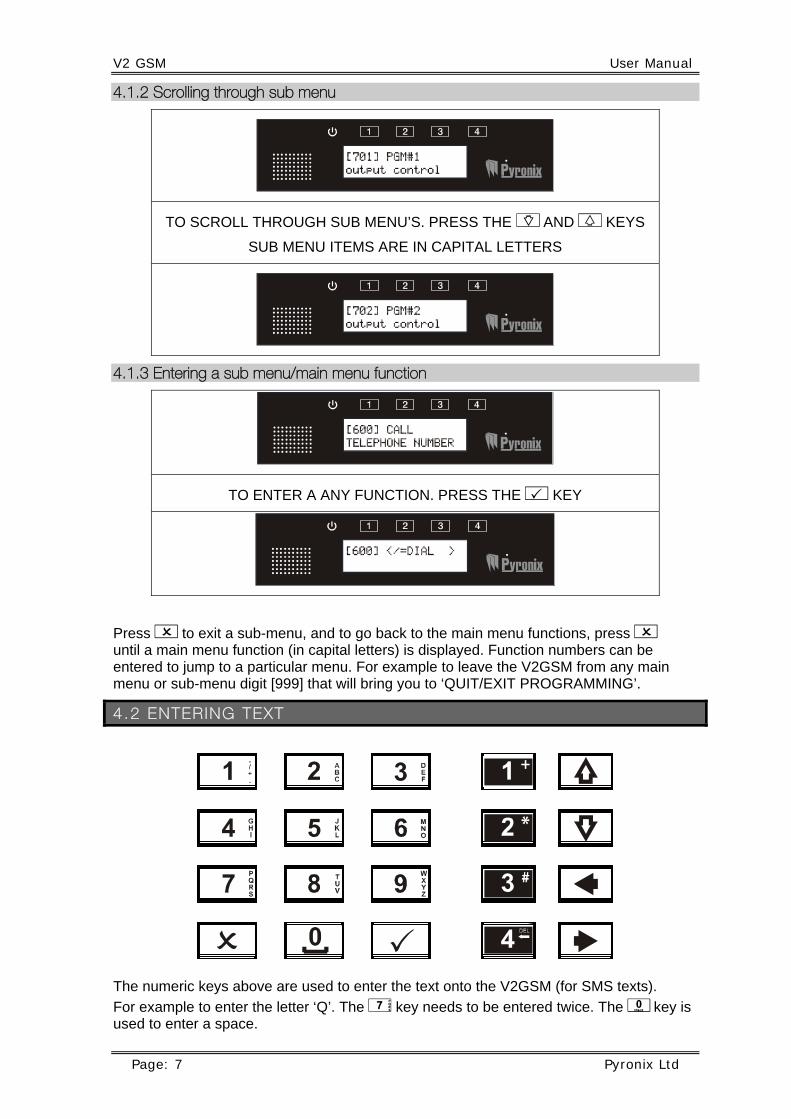
4.1.2 Scrolling through sub menu
TO SCROLL THROUGH SUB MENU’S. PRESS THE M AND N KEYS
SUB MENU ITEMS ARE IN CAPITAL LETTERS
4.1.3 Entering a sub menu/main menu function
TO ENTER A ANY FUNCTION. PRESS THE t KEY
Press x to exit a sub-menu, and to go back to the main menu functions, press x until a main menu function (in capital letters) is displayed. Function numbers can be entered to jump to a particular menu. For example to leave the V2GSM from any main menu or sub-menu digit [999] that will bring you to ‘QUIT/EXIT PROGRAMMING’.
4 .2 ENTER ING TEXT
The numeric keys above are used to enter the text onto the V2GSM (for SMS texts).
For example to enter the letter ‘Q’. The 7 key needs to be entered twice. The 0 key is used to enter a space.
User Manual V2 GSM
Pyronix Ltd Page: 8
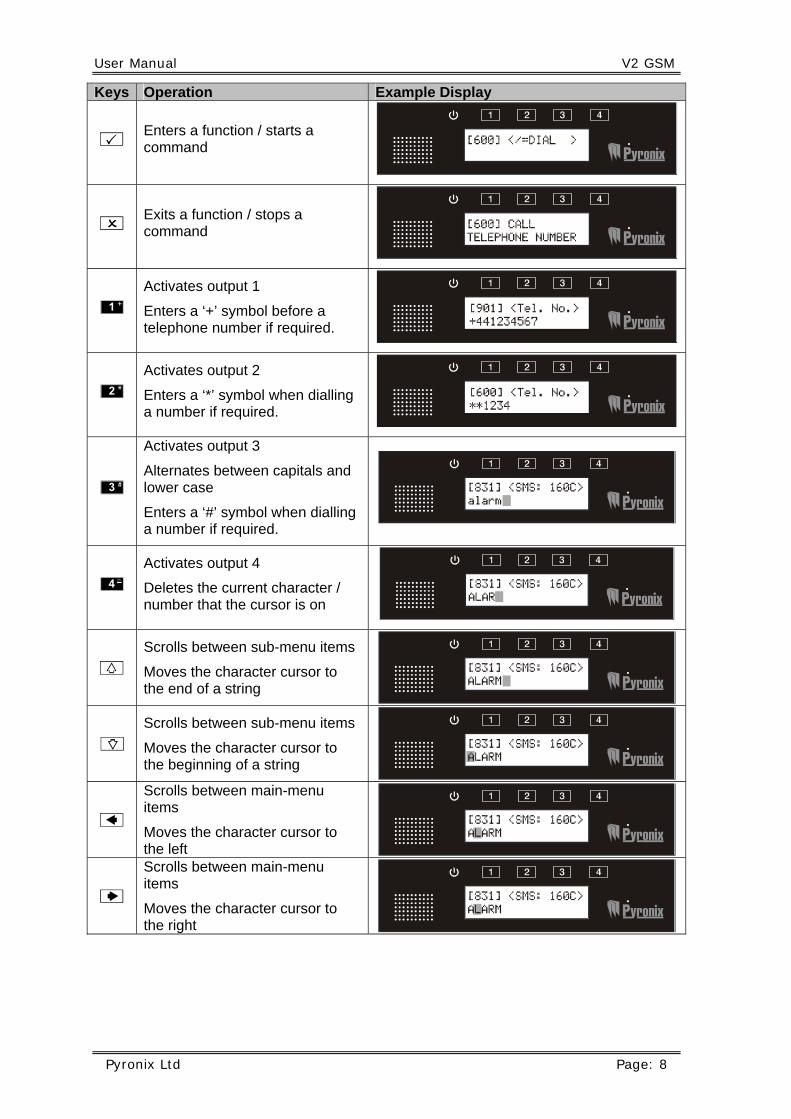
Keys Operation Example Display
t Enters a function / starts a command
x Exits a function / stops a command
I
Activates output 1
Enters a ‘+’ symbol before a telephone number if required.
J
Activates output 2
Enters a ‘*’ symbol when dialling a number if required.
K
Activates output 3
Alternates between capitals and lower case
Enters a ‘#’ symbol when dialling a number if required.
L
Activates output 4
Deletes the current character / number that the cursor is on
N
Scrolls between sub-menu items
Moves the character cursor to the end of a string
M
Scrolls between sub-menu items
Moves the character cursor to the beginning of a string
[
Scrolls between main-menu items
Moves the character cursor to the left
]
Scrolls between main-menu items
Moves the character cursor to the right
V2 GSM User Manual
Page: 9 Pyronix Ltd
CHAPTER 5 : THE USER MENU
5 .1 ENTER ING THE USER MENU
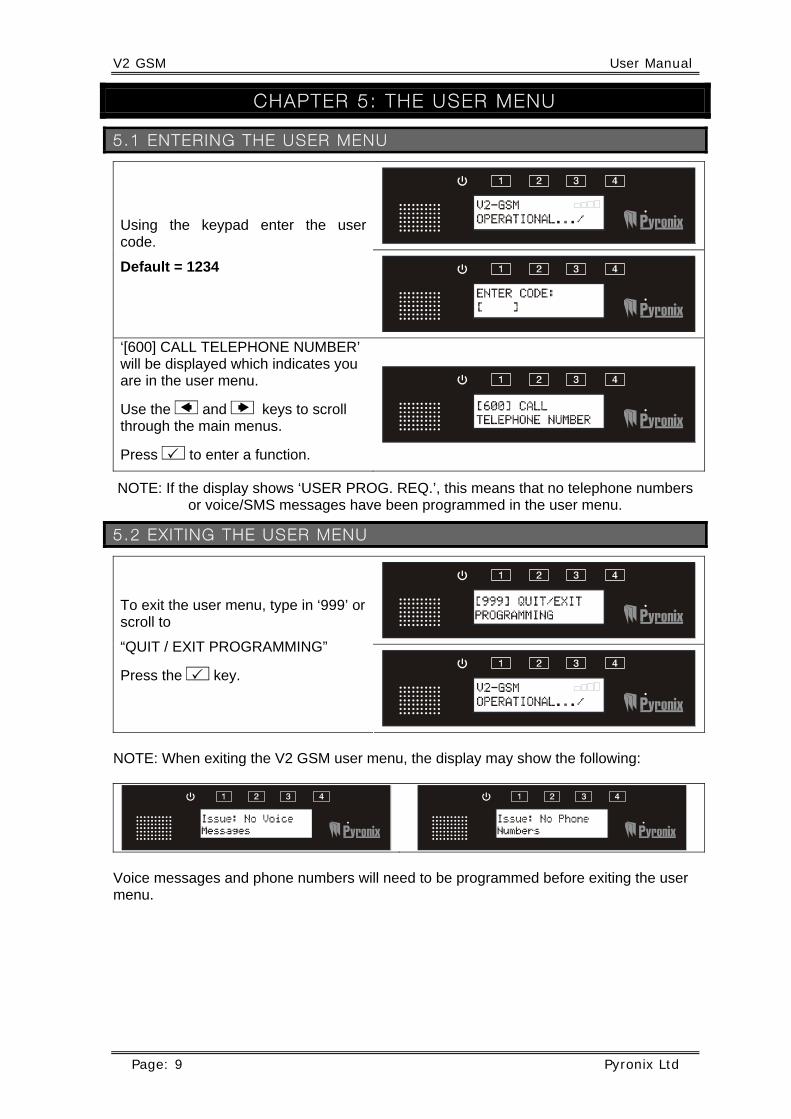
Using the keypad enter the user code.
Default = 1234
‘[600] CALL TELEPHONE NUMBER’ will be displayed which indicates you are in the user menu.
Use the [ and ] keys to scroll through the main menus.
Press t to enter a function.
NOTE: If the display shows ‘USER PROG. REQ.’, this means that no telephone numbers or voice/SMS messages have been programmed in the user menu.
5 .2 EX IT ING THE USER MENU
To exit the user menu, type in ‘999’ or scroll to
“QUIT / EXIT PROGRAMMING”
Press the t key.
NOTE: When exiting the V2 GSM user menu, the display may show the following:
Voice messages and phone numbers will need to be programmed before exiting the user menu.
User Manual V2 GSM
Pyronix Ltd Page: 10
5 .3 CALL TELEPHONE NUMBER [600 ]
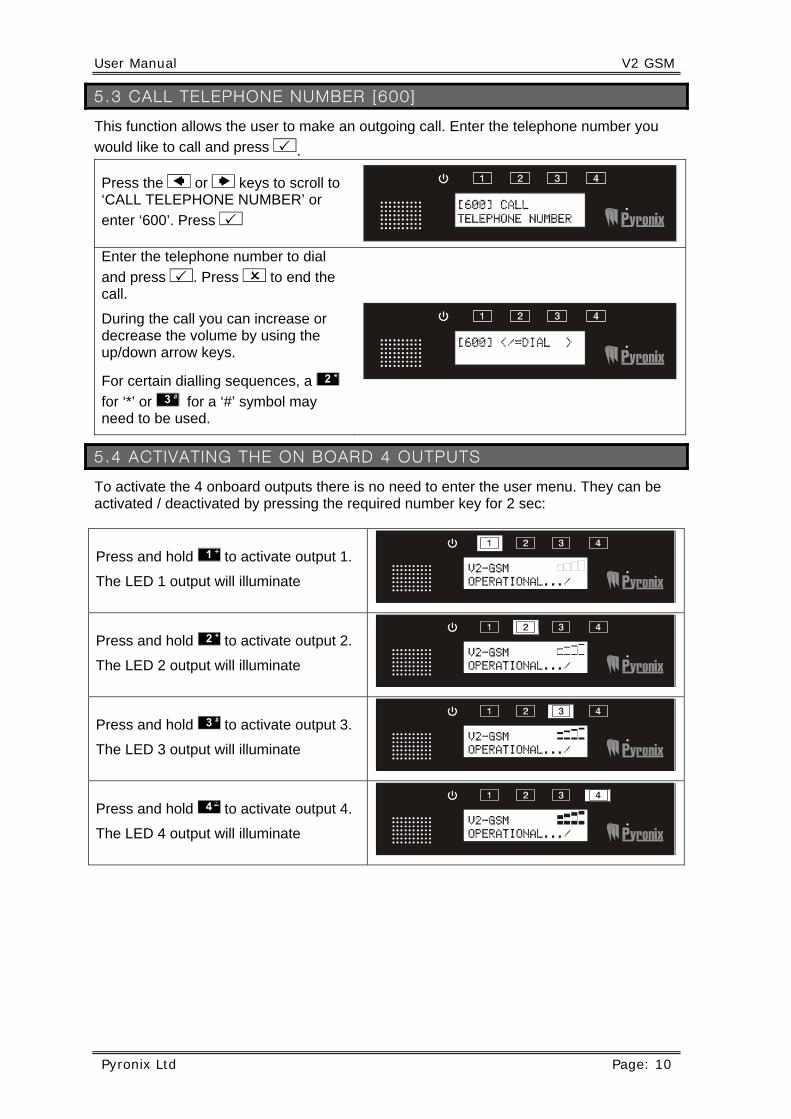
This function allows the user to make an outgoing call. Enter the telephone number you
would like to call and press .t
Press the [ or ] keys to scroll to ‘CALL TELEPHONE NUMBER’ or
enter ‘600’. Press t
Enter the telephone number to dial
and press t. Press x to end the call.
During the call you can increase or decrease the volume by using the up/down arrow keys.
For certain dialling sequences, a J
for ‘*’ or K for a ‘#’ symbol may need to be used.
5.4 ACT IVAT ING THE ON BOARD 4 OUTPUTS
To activate the 4 onboard outputs there is no need to enter the user menu. They can be activated / deactivated by pressing the required number key for 2 sec:
Press and hold I to activate output 1.
The LED 1 output will illuminate
Press and hold J to activate output 2.
The LED 2 output will illuminate
Press and hold K to activate output 3.
The LED 3 output will illuminate
Press and hold L to activate output 4.
The LED 4 output will illuminate
V2 GSM User Manual
Page: 11 Pyronix Ltd
5 .5 ADD IT IONAL OUTPUT CONTROL [700 ]
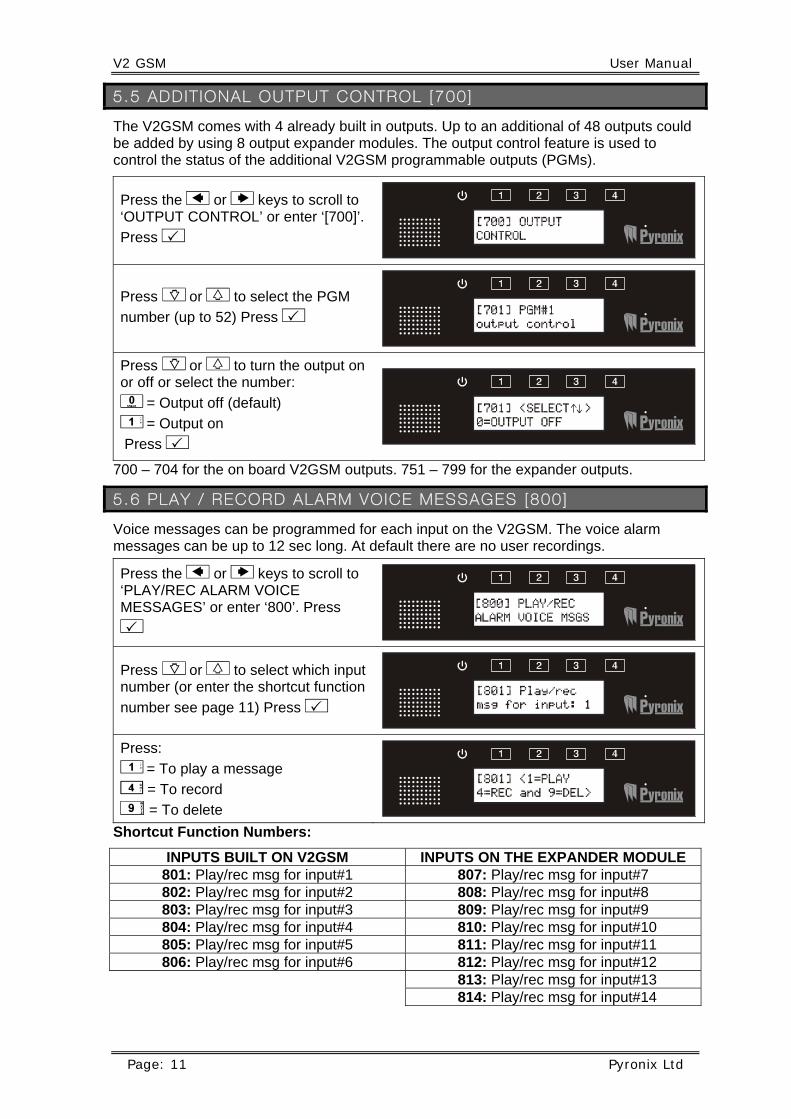
The V2GSM comes with 4 already built in outputs. Up to an additional of 48 outputs could be added by using 8 output expander modules. The output control feature is used to control the status of the additional V2GSM programmable outputs (PGMs).
Press the [ or ] keys to scroll to ‘OUTPUT CONTROL’ or enter ‘[700]’.
Press t
Press M or N to select the PGM
number (up to 52) Press t
Press M or N to turn the output on or off or select the number:
0 = Output off (default)
1 = Output on Press t
700 – 704 for the on board V2GSM outputs. 751 – 799 for the expander outputs.
5 .6 PLAY / RECORD ALARM VO ICE MESSAGES [800 ]
Voice messages can be programmed for each input on the V2GSM. The voice alarm messages can be up to 12 sec long. At default there are no user recordings.
Press the [ or ] keys to scroll to ‘PLAY/REC ALARM VOICE MESSAGES’ or enter ‘800’. Press
t
Press M or N to select which input number (or enter the shortcut function
number see page 11) Press t
Press:
1 = To play a message
4 = To record
9 = To delete
Shortcut Function Numbers:
INPUTS BUILT ON V2GSM INPUTS ON THE EXPANDER MODULE 801: Play/rec msg for input#1 807: Play/rec msg for input#7 802: Play/rec msg for input#2 808: Play/rec msg for input#8 803: Play/rec msg for input#3 809: Play/rec msg for input#9 804: Play/rec msg for input#4 810: Play/rec msg for input#10 805: Play/rec msg for input#5 811: Play/rec msg for input#11 806: Play/rec msg for input#6 812: Play/rec msg for input#12
813: Play/rec msg for input#13 814: Play/rec msg for input#14
User Manual V2 GSM
Pyronix Ltd Page: 12
5 .7 PLAY / RECORD COMMON MESSAGE [820 ]
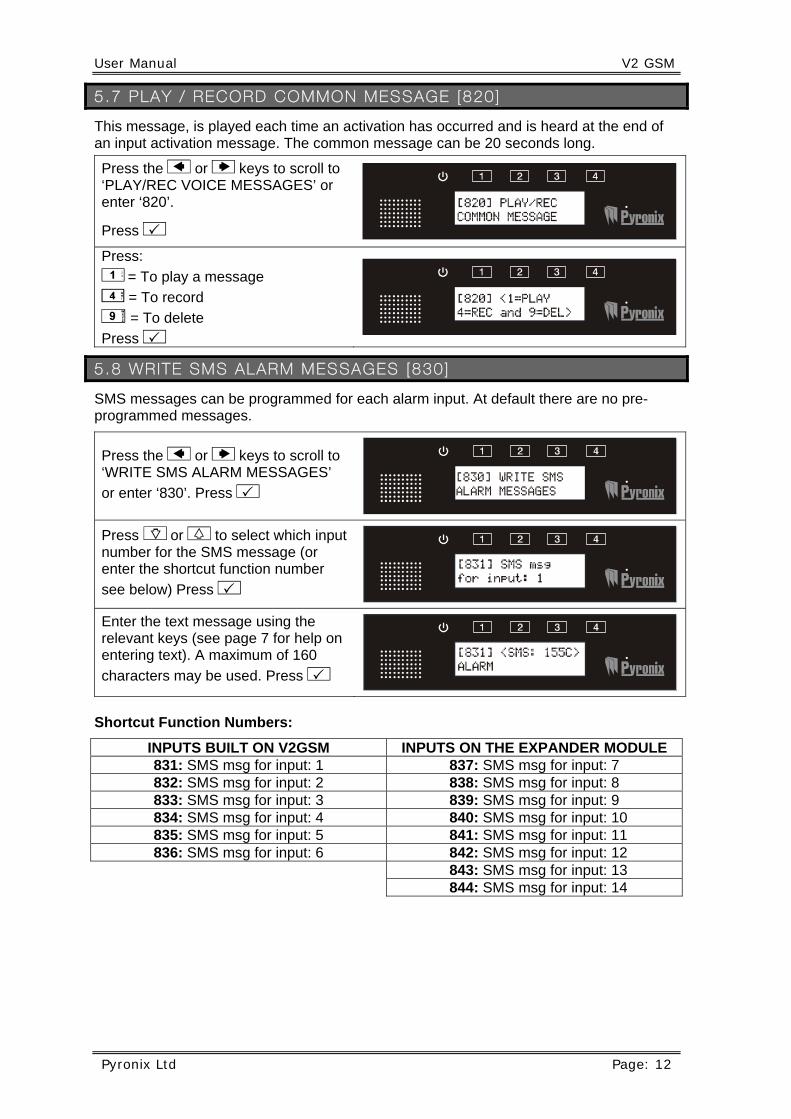
This message, is played each time an activation has occurred and is heard at the end of an input activation message. The common message can be 20 seconds long.
Press the [ or ] keys to scroll to ‘PLAY/REC VOICE MESSAGES’ or enter ‘820’.
Press t
Press:
1 = To play a message
4 = To record
9 = To delete
Press t
5 .8 WR ITE SMS ALARM MESSAGES [830 ]
SMS messages can be programmed for each alarm input. At default there are no pre-programmed messages.
Press the [ or ] keys to scroll to ‘WRITE SMS ALARM MESSAGES’
or enter ‘830’. Press t [830] WRITE SMSALARM MESSAGES
Press M or N to select which input number for the SMS message (or enter the shortcut function number
see below) Press t
Enter the text message using the relevant keys (see page 7 for help on entering text). A maximum of 160
characters may be used. Press t
Shortcut Function Numbers:
INPUTS BUILT ON V2GSM INPUTS ON THE EXPANDER MODULE 831: SMS msg for input: 1 837: SMS msg for input: 7 832: SMS msg for input: 2 838: SMS msg for input: 8 833: SMS msg for input: 3 839: SMS msg for input: 9 834: SMS msg for input: 4 840: SMS msg for input: 10 835: SMS msg for input: 5 841: SMS msg for input: 11 836: SMS msg for input: 6 842: SMS msg for input: 12
843: SMS msg for input: 13 844: SMS msg for input: 14
V2 GSM User Manual
Page: 13 Pyronix Ltd
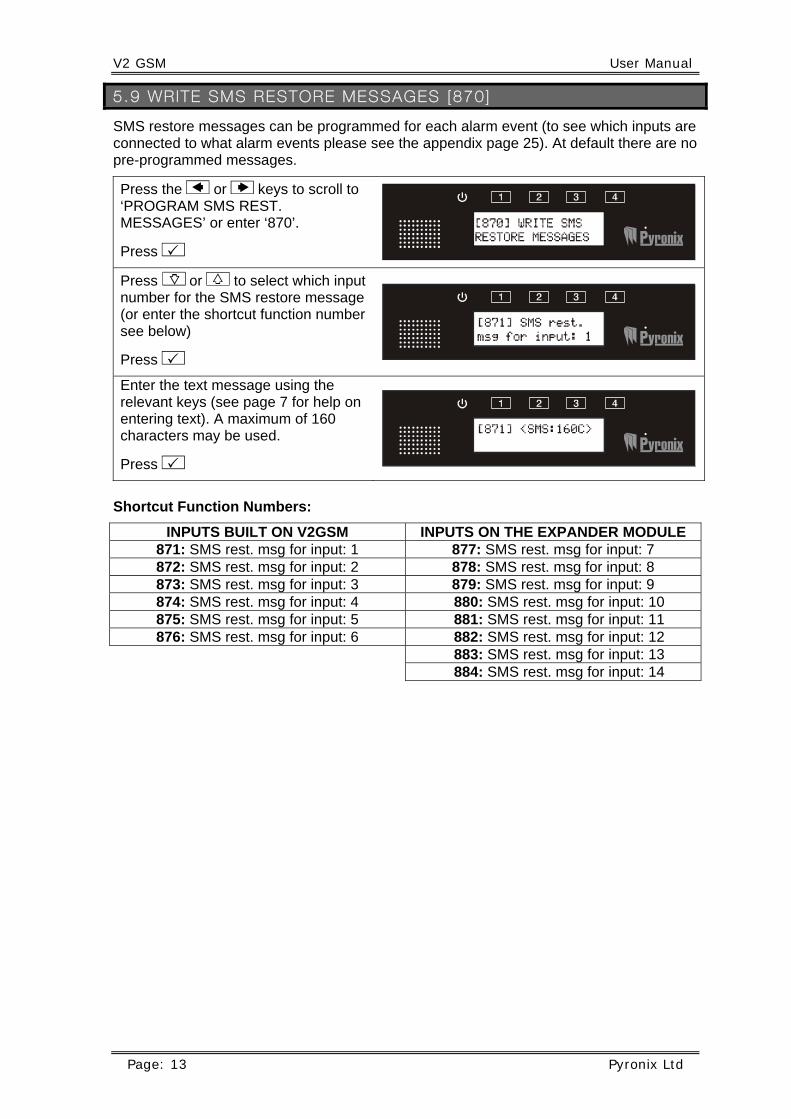
5 .9 WR ITE SMS RESTORE MESSAGES [870 ]
SMS restore messages can be programmed for each alarm event (to see which inputs are connected to what alarm events please see the appendix page 25). At default there are no pre-programmed messages.
Press the [ or ] keys to scroll to ‘PROGRAM SMS REST. MESSAGES’ or enter ‘870’.
Press t
Press M or N to select which input number for the SMS restore message (or enter the shortcut function number see below)
Press t
Enter the text message using the relevant keys (see page 7 for help on entering text). A maximum of 160 characters may be used.
Press t
Shortcut Function Numbers:
INPUTS BUILT ON V2GSM INPUTS ON THE EXPANDER MODULE 871: SMS rest. msg for input: 1 877: SMS rest. msg for input: 7 872: SMS rest. msg for input: 2 878: SMS rest. msg for input: 8 873: SMS rest. msg for input: 3 879: SMS rest. msg for input: 9 874: SMS rest. msg for input: 4 880: SMS rest. msg for input: 10 875: SMS rest. msg for input: 5 881: SMS rest. msg for input: 11 876: SMS rest. msg for input: 6 882: SMS rest. msg for input: 12
883: SMS rest. msg for input: 13 884: SMS rest. msg for input: 14
User Manual V2 GSM
Pyronix Ltd Page: 14
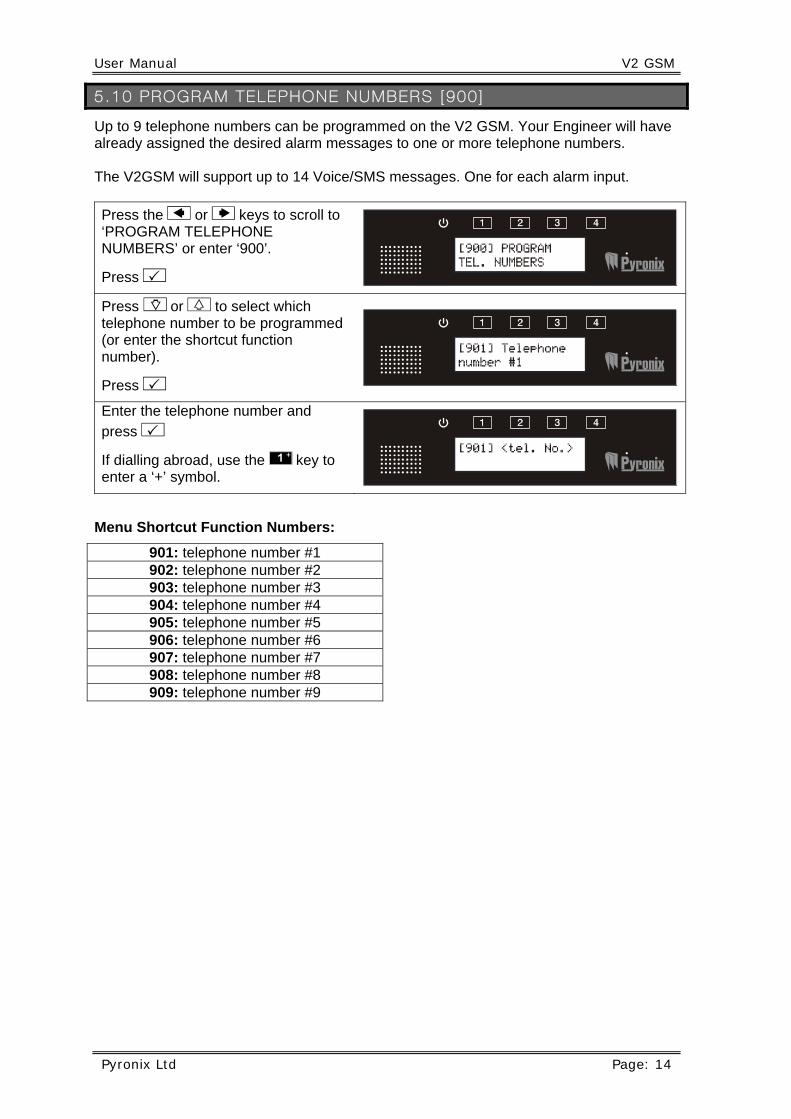
5 .10 PROGRAM TELEPHONE NUMBERS [900 ]
Up to 9 telephone numbers can be programmed on the V2 GSM. Your Engineer will have already assigned the desired alarm messages to one or more telephone numbers. The V2GSM will support up to 14 Voice/SMS messages. One for each alarm input.
Press the [ or ] keys to scroll to ‘PROGRAM TELEPHONE NUMBERS’ or enter ‘900’.
Press t
Press M or N to select which telephone number to be programmed (or enter the shortcut function number).
Press t
Enter the telephone number and
press t
If dialling abroad, use the I key to enter a ‘+’ symbol.
Menu Shortcut Function Numbers:
901: telephone number #1 902: telephone number #2 903: telephone number #3 904: telephone number #4 905: telephone number #5 906: telephone number #6 907: telephone number #7 908: telephone number #8 909: telephone number #9

V2 GSM User Manual
Page: 15 Pyronix Ltd
5 .11 MESSAGE TYPE [930 ]
This function allows the choice of what message type is sent for each telephone number. The following different message types can be programmed:
Voice: Sends a voice message only (example: ALARM, ALARM, ALARM).
Voice + Common: Sends a voice message and common message (example: ALARM, ALARM, ALARM. This is Mr and Mrs Jones of West Street).
SMS: Sends an SMS text only (example: Text Message = ALARM, ALARM, ALARM)
Press the [ or ] keys to scroll to ‘MESSAGE TYPE’ or enter ‘930’.
Press t
Press M or N to select which message type for which telephone number needs to be programmed (or enter the programmed function number).
Press t
Press M or N to select which message type or select the number:
0 = Voice = Default
1 = Voice + common
2 = SMS
Press t
Menu Shortcut Function Numbers:
931: Message type for tel#1 932: Message type for tel#2 933: Message type for tel#3 934: Message type for tel#4 935: Message type for tel#5 936: Message type for tel#6 937: Message type for tel#7 938: Message type for tel#8 939: Message type for tel#9

User Manual V2 GSM
Pyronix Ltd Page: 16
5 .12 CALL ACKNOWLEDGEMENT CODE [960 ]
When the V2GSM calls a telephone number, the relevant message will be played. At the end of the message the V2GSM will ask you to enter a code number to acknowledge that the message has been received. If the call is not acknowledged then the V2GSM will make a repeat call.
This code is programmable and can be anything from up to 1 to 10 digits long.
Press the [ or ] keys to scroll to ‘CALL ACKNOWLEDGE CODE’ or
enter ‘960’. Press t
Press M or N to select the call acknowledgement code for the telephone number (or enter the programmed function number).
Press t
Enter the code.
Press t
Default = 5.
Menu Shortcut Function Numbers:
961: Call ack. code for tel:1 966: Call ack. code for tel:6 962: Call ack. code for tel:2 967: Call ack. code for tel:7 963: Call ack. code for tel:3 968: Call ack. code for tel:8 964: Call ack. code for tel:4 969: Call ack. code for tel:9 965: Call ack. code for tel:5
5 .13 COPY ACKNOWLEDGEMENT CODE 1 TO ALL [980 ]
This function supplies a shortcut to copy the acknowledgement code programmed in telephone number 1 (function 961) to all 8 other telephone numbers.
Press the [ or ] keys to scroll to ‘COPY ACK CODE 1 TO ALL’ or enter ‘980’.
Press t
Press M or N to select the Yes or No or select the number:
0 = No = Default
1 = Yes
Press t
V2 GSM User Manual
Page: 17 Pyronix Ltd
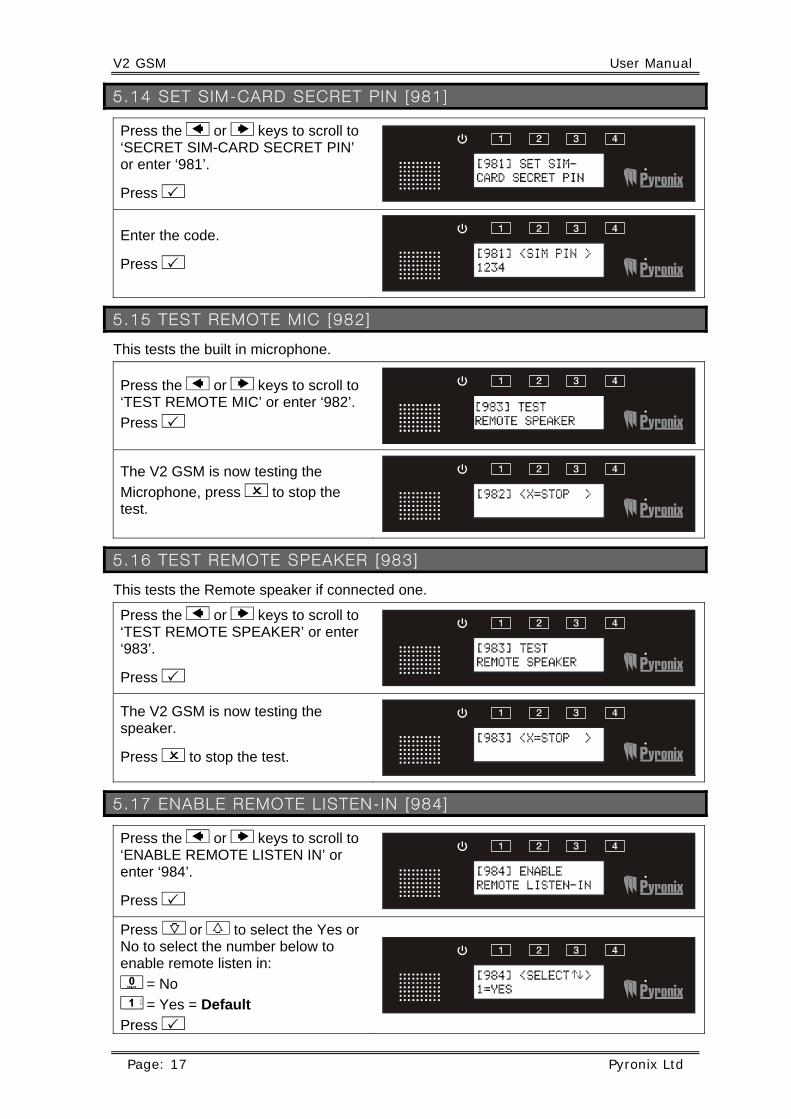
5 .14 SET S IM-CARD SECRET P IN [981 ]
Press the [ or ] keys to scroll to ‘SECRET SIM-CARD SECRET PIN’ or enter ‘981’.
Press t
Enter the code.
Press t
5 .15 TEST REMOTE M IC [982 ]
This tests the built in microphone.
Press the [ or ] keys to scroll to ‘TEST REMOTE MIC’ or enter ‘982’.
Press t
The V2 GSM is now testing the
Microphone, press x to stop the test.
5 .16 TEST REMOTE SPEAKER [983 ]
This tests the Remote speaker if connected one.
Press the [ or ] keys to scroll to ‘TEST REMOTE SPEAKER’ or enter ‘983’.
Press t
The V2 GSM is now testing the speaker.
Press x to stop the test.
5 .17 ENABLE REMOTE L ISTEN- IN [984 ]
Press the [ or ] keys to scroll to ‘ENABLE REMOTE LISTEN IN’ or enter ‘984’.
Press t
Press M or N to select the Yes or No to select the number below to enable remote listen in:
0 = No
1 = Yes = Default
Press t

User Manual V2 GSM
Pyronix Ltd Page: 18
5 .18 V IEW EVENT LOG [985 ]
All events that occur are recorded in the event log. The V2 GSM display will show all information in order, starting at the most recent event.
The above display shows the following:
001 = Event number (up to 256 events can be logged)
00:32 = Time
010110 = Date (DD:MM:YY)
Press the [ or ] keys to scroll to ‘VIEW EVENT LOG’ or enter ‘985’.
Press t
Press M or N to scroll back and
forth through the log. Press the ] key to jump to the last event.
Press x to exit.
5 .19 CHANGE USER CODE [986 ]
The user code can be up to 4 digits.
Press the [ or ] keys to scroll to ‘CHANGE USER CODE’ or enter ‘986’.
Press t
Enter the new user code,
press t
Default user code = 1234

V2 GSM User Manual
Page: 19 Pyronix Ltd
CHAPTER 6 : RECE IV ING A CALL FROM THE V2 GSM
After an alarm activation has occurred, the V2 GSM will call one or more of the programmed telephone numbers. Voice Alarm Transmission: V2 GSM dials the programmed telephone number
The user answers the call
Voice Alarm Message is played
V2GSM will ask for call acknowledgement code
The user will enter the required acknowledgement code to acknowledge the call
A long beep is heard and the call will be finished
At the end of the long beep, If the ‘9’ key is pressed twice (99) a remote control menu is entered (if enabled by the engineer).
SMS Alarm Transmission: V2 GSM dials the programmed telephone number
The user receives the alarm SMS message
User Manual V2 GSM
Pyronix Ltd Page: 20
CHAPTER 7 : REMOTE CONTROL VO ICE MENU
The V2GSM remote control menu can be accessed in two different ways: Method 1: After acknowledging an alarm call at the end of the long beep, If the ‘9’ key is pressed twice (99) the remote control menu is entered (if enabled by the engineer). Method 2: Call the V2GSM telephone number. After a pre-programmed number of rings the V2GSM will answer- The V2GSM voice menu will ask you:
Enter your user code. This is the same code that is used to enter the user menu on the V2 GSM.
After entering a valid user code the V2GSM voice menu will say: Enter your command number or press ‘9’ for help. The command numbers available on the V2GSM are as follow: Press 1 = listen Press 2 = talk and listen full duplex Press 3 = control output Press 4 = system status Press 0 = to hang up.
If you press 9 for help the following messages will be played:
Press 1 to listen, 2 to talk and listen, 3 to control output, 4 for system status or press 0 to hang up.
If you decided to control an output, press 3. The voice menu on V2GSM will say: Enter the output number. Enter the output that you wish to operate. 1 to 4 for the build in outputs and 51 to 99 for the external outputs if installed (see the output appendix on page 25).
After choosing an output to control the voice menu on V2GSM will say:
Press ‘1’ to turn on, ‘0’ to turn off. This turns on and off the chosen output.
If you decided to check the external system status, press “4” key. The V2GSM will
say: Armed or Disarmed. This function needs to be enabled by the Engineer.
To exit the V2GSM voice menu press “0” key. The voice menu will say:
‘Goodbye’

V2 GSM User Manual
Page: 21 Pyronix Ltd
CHAPTER 8 : SMS REMOTE TEXT COMMANDS
SMS text commands can be sent to the V2 GSM to initiate certain commands.
8 .1 CHANGING A TELEPHONE NUMBER V IA SMS
- To change a telephone number on the V2GSM, send the following SMS text command:
Example: CHANGE 1 TO +447711700200
This means that telephone “1” will change to the following number: “+447711700200”.
- If you would like to receive confirmation of the phone number change, add to the command string CONFIRM.
Example: CHANGE 1 TO +447711700200 CONFIRM
The V2GSM will then send an SMS back to your mobile phone showing the new phone number in the following format:
Example Feedback: V2-GSM: TEL#1: +447711700200
PLEASE NOTE IT IS ONLY POSSIBLE TO CHANGE A TELEPHONE NUMBER IF IT ALREADY EXISTS. TELEPHONE NUMBERS CANNOT BE ADDED.
8 .2 ACT IVAT ING / DEACT IVAT ING AN OUTPUT V IA SMS
1) To activate an output remotely send the following SMS text command:
Example: PGM 3 ON
2) To deactivate an output remotely send the following SMS text command:
Example: PGM 3 OFF
- If you would like to receive confirmation of the output status change, add to the command string CONFIRM.
Example: PGM 3 ON CONFIRM
The V2GSM will then send an SMS back to your mobile phone showing the new change of the PGM 3 status.
Example Feedback: V2-GSM: PGM#3 = ON
User Manual V2 GSM
Pyronix Ltd Page: 22
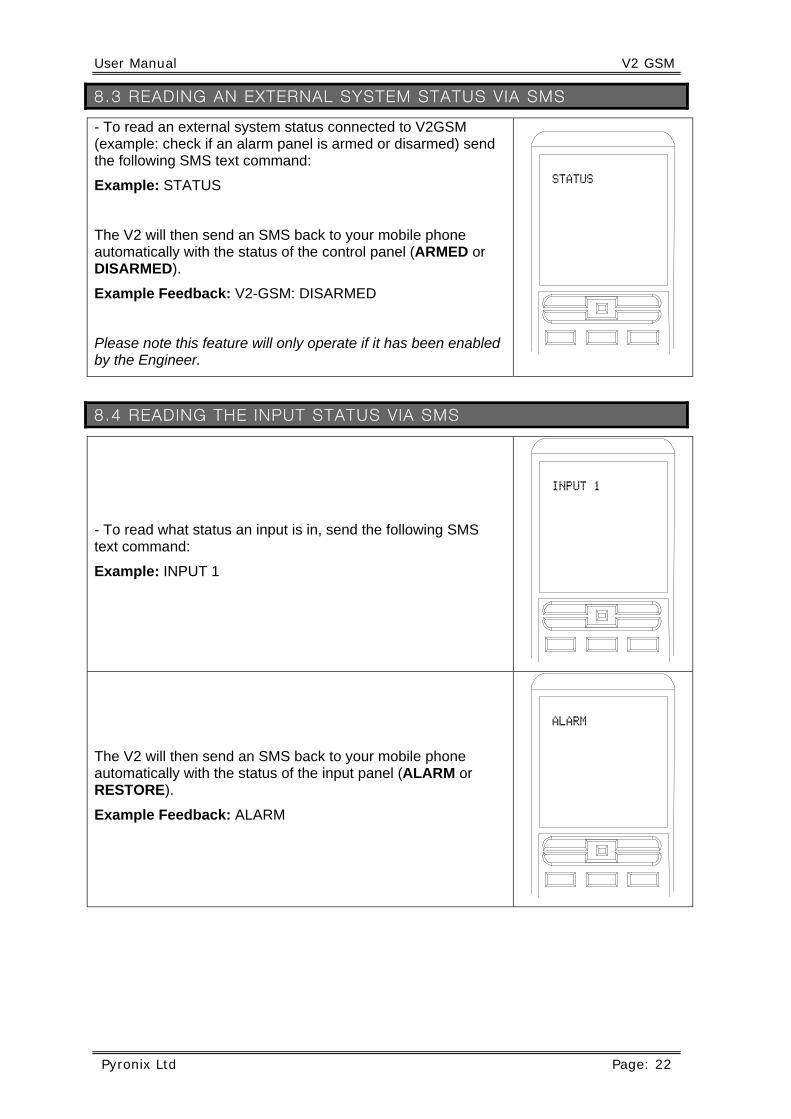
8 .3 READ ING AN EXTERNAL SYSTEM STATUS V IA SMS
- To read an external system status connected to V2GSM (example: check if an alarm panel is armed or disarmed) send the following SMS text command:
Example: STATUS
The V2 will then send an SMS back to your mobile phone automatically with the status of the control panel (ARMED or DISARMED).
Example Feedback: V2-GSM: DISARMED
Please note this feature will only operate if it has been enabled by the Engineer.
8 .4 READ ING THE INPUT STATUS V IA SMS
- To read what status an input is in, send the following SMS text command:
Example: INPUT 1
The V2 will then send an SMS back to your mobile phone automatically with the status of the input panel (ALARM or RESTORE).
Example Feedback: ALARM
V2 GSM User Manual
Page: 23 Pyronix Ltd
CHAPTER 9 : D ISCLA IMER
If there are 2 V2 GSM units communicating with each other then, jamming test calls may have been enabled by your engineer, which will send regular test calls at programmed intervals. If these test calls are successful, no charge is made. However, if the test call is unsuccessful a charge will occur (this may be costly depending on how regular the test calls have been programmed and how many times the call has failed to reach its partner V2. Pyronix Ltd hold no responsibility in any costs that occur due to numerous test calls. If you are concerned by this, please discuss these test calls with your installer. Pyronix Ltd hold no responsibility for any calls that do not get sent to a telephone number after an alarm due to signal loss, or network failure, this is the responsibility of the network provider.
User Manual V2 GSM
Pyronix Ltd Page: 24
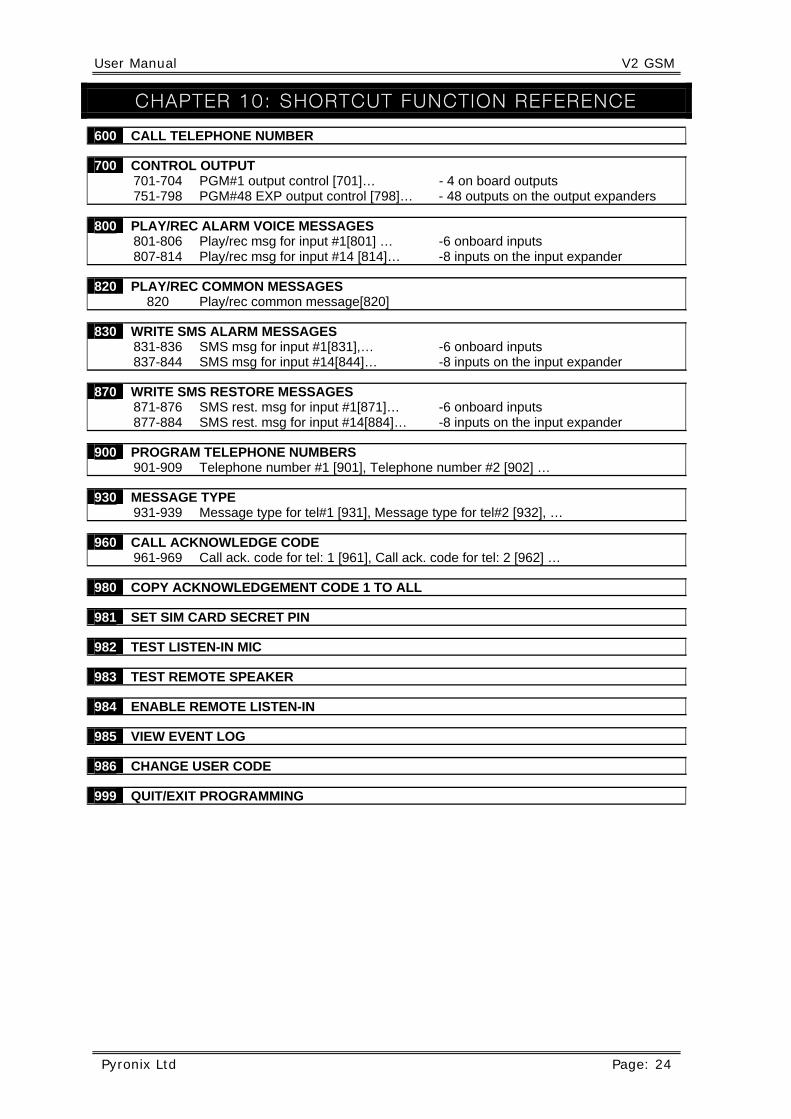
CHAPTER 10 : SHORTCUT FUNCT ION REFERENCE
600 CALL TELEPHONE NUMBER
700 CONTROL OUTPUT
701-704 751-798
PGM#1 output control [701]… - 4 on board outputs PGM#48 EXP output control [798]… - 48 outputs on the output expanders
800 PLAY/REC ALARM VOICE MESSAGES
801-806 807-814
Play/rec msg for input #1[801] … -6 onboard inputs Play/rec msg for input #14 [814]… -8 inputs on the input expander
820 PLAY/REC COMMON MESSAGES 820 Play/rec common message[820]
830 WRITE SMS ALARM MESSAGES
831-836 837-844
SMS msg for input #1[831],… -6 onboard inputs SMS msg for input #14[844]… -8 inputs on the input expander
870 WRITE SMS RESTORE MESSAGES
871-876 877-884
SMS rest. msg for input #1[871]… -6 onboard inputs SMS rest. msg for input #14[884]… -8 inputs on the input expander
900 PROGRAM TELEPHONE NUMBERS 901-909 Telephone number #1 [901], Telephone number #2 [902] …
930 MESSAGE TYPE 931-939 Message type for tel#1 [931], Message type for tel#2 [932], …
960 CALL ACKNOWLEDGE CODE 961-969 Call ack. code for tel: 1 [961], Call ack. code for tel: 2 [962] …
980 COPY ACKNOWLEDGEMENT CODE 1 TO ALL
981 SET SIM CARD SECRET PIN
982 TEST LISTEN-IN MIC
983 TEST REMOTE SPEAKER
984 ENABLE REMOTE LISTEN-IN
985 VIEW EVENT LOG
986 CHANGE USER CODE
999 QUIT/EXIT PROGRAMMING
V2 GSM User Manual
Page: 25 Pyronix Ltd
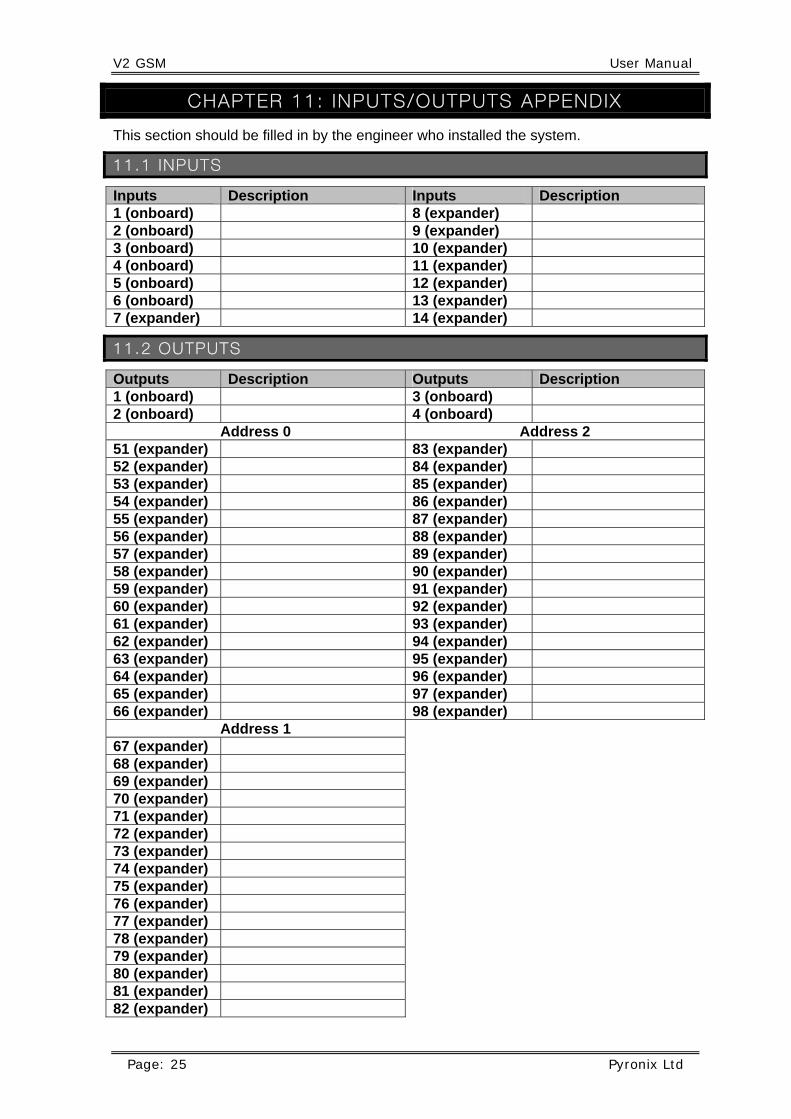
CHAPTER 11 : I NPUTS/OUTPUTS APPEND IX
This section should be filled in by the engineer who installed the system.
11 .1 INPUTS
Inputs Description Inputs Description 1 (onboard) 8 (expander) 2 (onboard) 9 (expander) 3 (onboard) 10 (expander) 4 (onboard) 11 (expander) 5 (onboard) 12 (expander) 6 (onboard) 13 (expander) 7 (expander) 14 (expander)
11 .2 OUTPUTS
Outputs Description Outputs Description 1 (onboard) 3 (onboard) 2 (onboard) 4 (onboard)
Address 0 Address 2 51 (expander) 83 (expander) 52 (expander) 84 (expander) 53 (expander) 85 (expander) 54 (expander) 86 (expander) 55 (expander) 87 (expander) 56 (expander) 88 (expander) 57 (expander) 89 (expander) 58 (expander) 90 (expander) 59 (expander) 91 (expander) 60 (expander) 92 (expander) 61 (expander) 93 (expander) 62 (expander) 94 (expander) 63 (expander) 95 (expander) 64 (expander) 96 (expander) 65 (expander) 97 (expander) 66 (expander) 98 (expander)
Address 1 67 (expander) 68 (expander) 69 (expander) 70 (expander) 71 (expander) 72 (expander) 73 (expander) 74 (expander) 75 (expander) 76 (expander) 77 (expander) 78 (expander) 79 (expander) 80 (expander) 81 (expander) 82 (expander)


Secure Holdings Pyronix House Braithwell Way
Hellaby Rotherham S66 8QY
Website: www.pyronix.com