reverse auction desktop instructions - bechtel...infrastructure mining & metals nuclear,...
TRANSCRIPT
INFRASTRUCTURE
MINING & METALS
NUCLEAR, SECURITY & ENVIRONMENTAL
OIL, GAS & CHEMICALS
Reverse Auction Desktop Instructions For Suppliers
Last Updated: 9-Aug-17
i
Table of Contents
1 Registering for an Account ............................................................................................................................................ 1
2 Logging into iSupplier Portal ......................................................................................................................................... 4
3 Navigating to an Invitation ............................................................................................................................................. 7
4 Acknowledging Participation ......................................................................................................................................... 9
5 Creating a Bid ............................................................................................................................................................. 10
Header ........................................................................................................................................................................ 11
Lines – Entering Bids Directly ..................................................................................................................................... 11
6 Monitoring an Auction ................................................................................................................................................. 14
7 Actions Available to Supplier ...................................................................................................................................... 15
8 Online Discussions ..................................................................................................................................................... 17
1
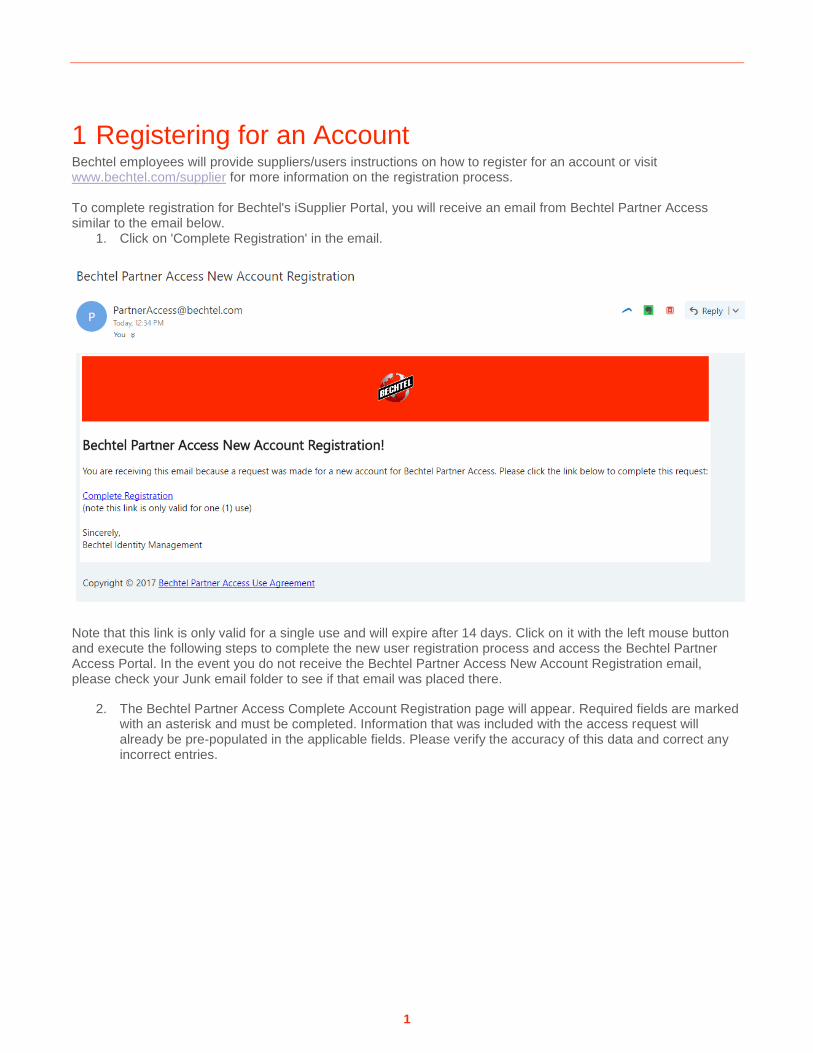
1 Registering for an Account Bechtel employees will provide suppliers/users instructions on how to register for an account or visit www.bechtel.com/supplier for more information on the registration process. To complete registration for Bechtel's iSupplier Portal, you will receive an email from Bechtel Partner Access similar to the email below.
1. Click on 'Complete Registration' in the email.
Note that this link is only valid for a single use and will expire after 14 days. Click on it with the left mouse button and execute the following steps to complete the new user registration process and access the Bechtel Partner Access Portal. In the event you do not receive the Bechtel Partner Access New Account Registration email, please check your Junk email folder to see if that email was placed there.
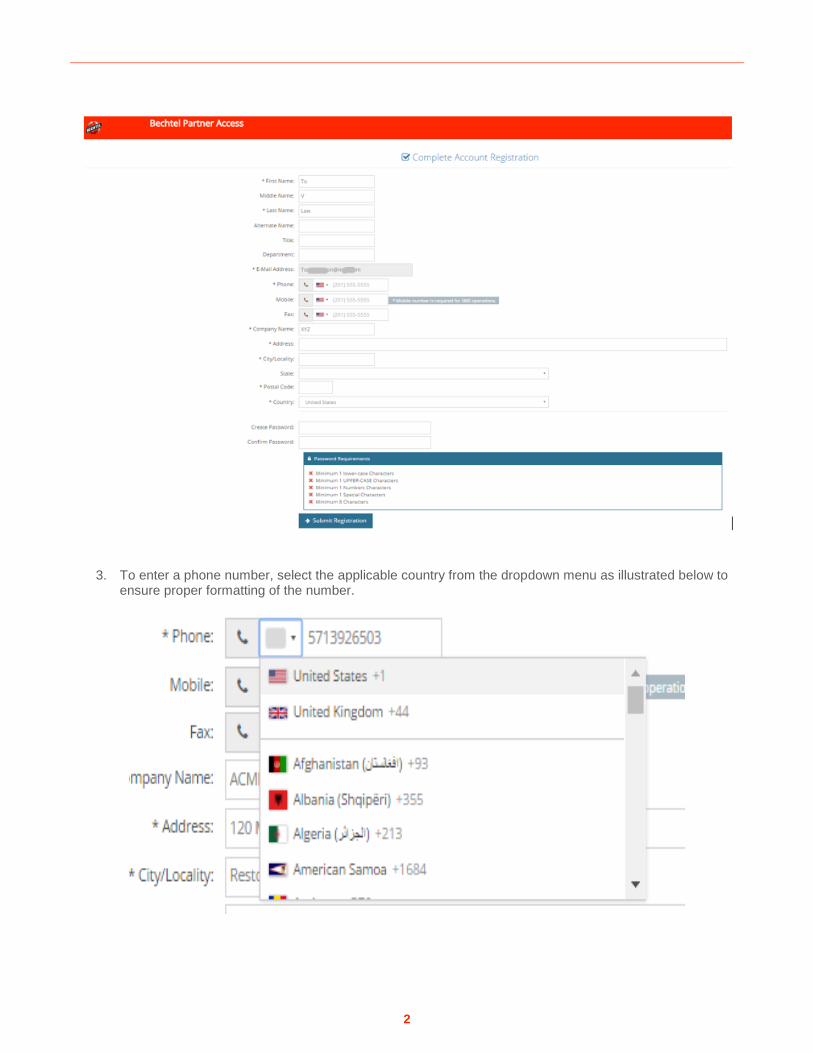
2. The Bechtel Partner Access Complete Account Registration page will appear. Required fields are marked with an asterisk and must be completed. Information that was included with the access request will already be pre-populated in the applicable fields. Please verify the accuracy of this data and correct any incorrect entries.
2
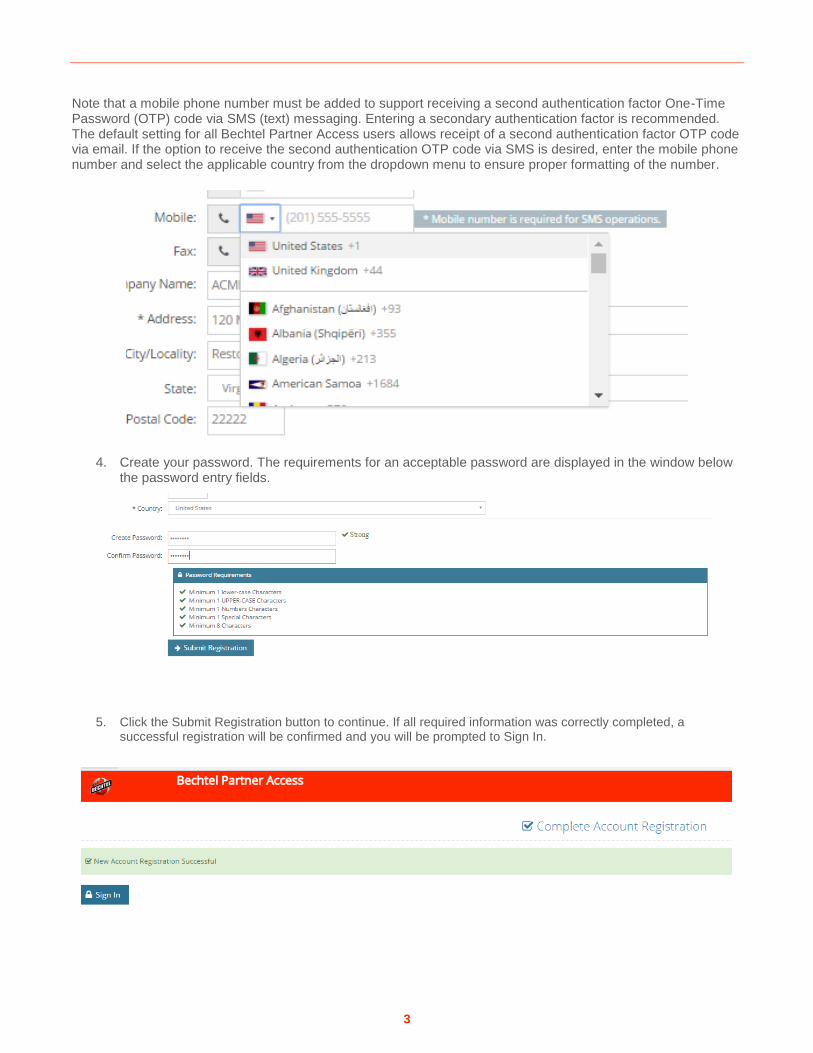
3. To enter a phone number, select the applicable country from the dropdown menu as illustrated below to ensure proper formatting of the number.
3
Note that a mobile phone number must be added to support receiving a second authentication factor One-Time Password (OTP) code via SMS (text) messaging. Entering a secondary authentication factor is recommended. The default setting for all Bechtel Partner Access users allows receipt of a second authentication factor OTP code via email. If the option to receive the second authentication OTP code via SMS is desired, enter the mobile phone number and select the applicable country from the dropdown menu to ensure proper formatting of the number.
4. Create your password. The requirements for an acceptable password are displayed in the window below the password entry fields.
5. Click the Submit Registration button to continue. If all required information was correctly completed, a successful registration will be confirmed and you will be prompted to Sign In.
4
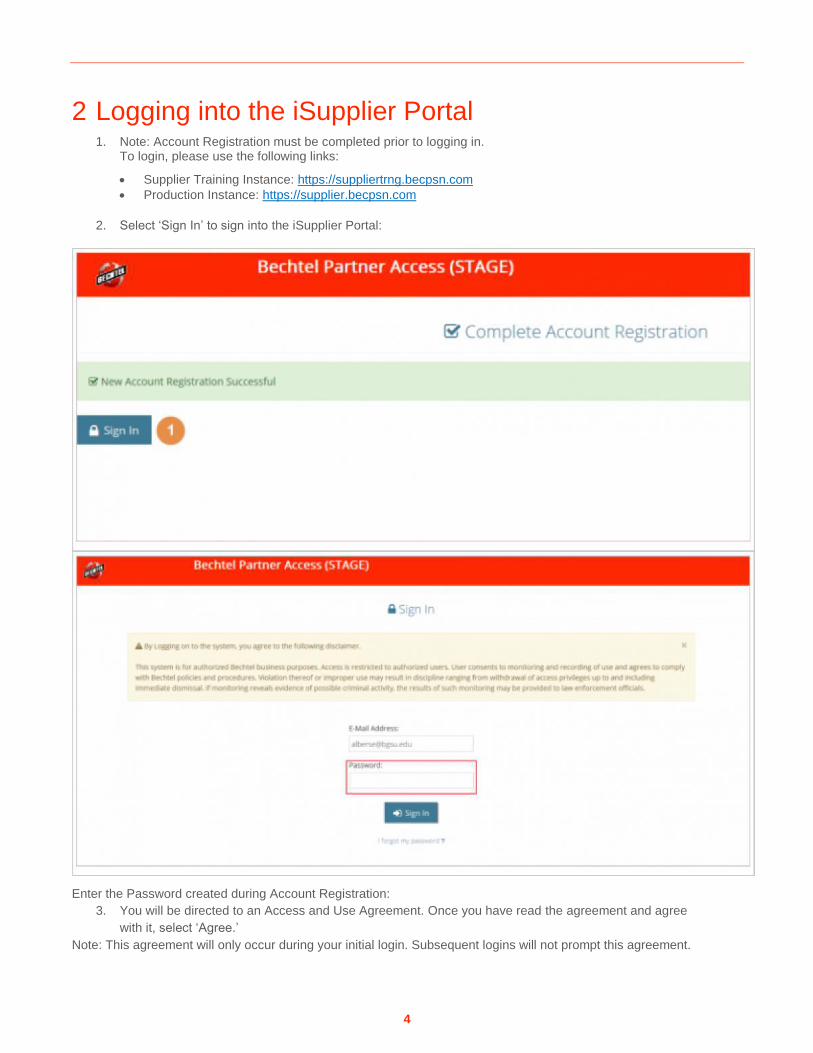
2 Logging into the iSupplier Portal 1. Note: Account Registration must be completed prior to logging in.
To login, please use the following links:
• Supplier Training Instance: https://suppliertrng.becpsn.com
• Production Instance: https://supplier.becpsn.com
2. Select ‘Sign In’ to sign into the iSupplier Portal:
Enter the Password created during Account Registration:
3. You will be directed to an Access and Use Agreement. Once you have read the agreement and agree
with it, select ‘Agree.’
Note: This agreement will only occur during your initial login. Subsequent logins will not prompt this agreement.
5
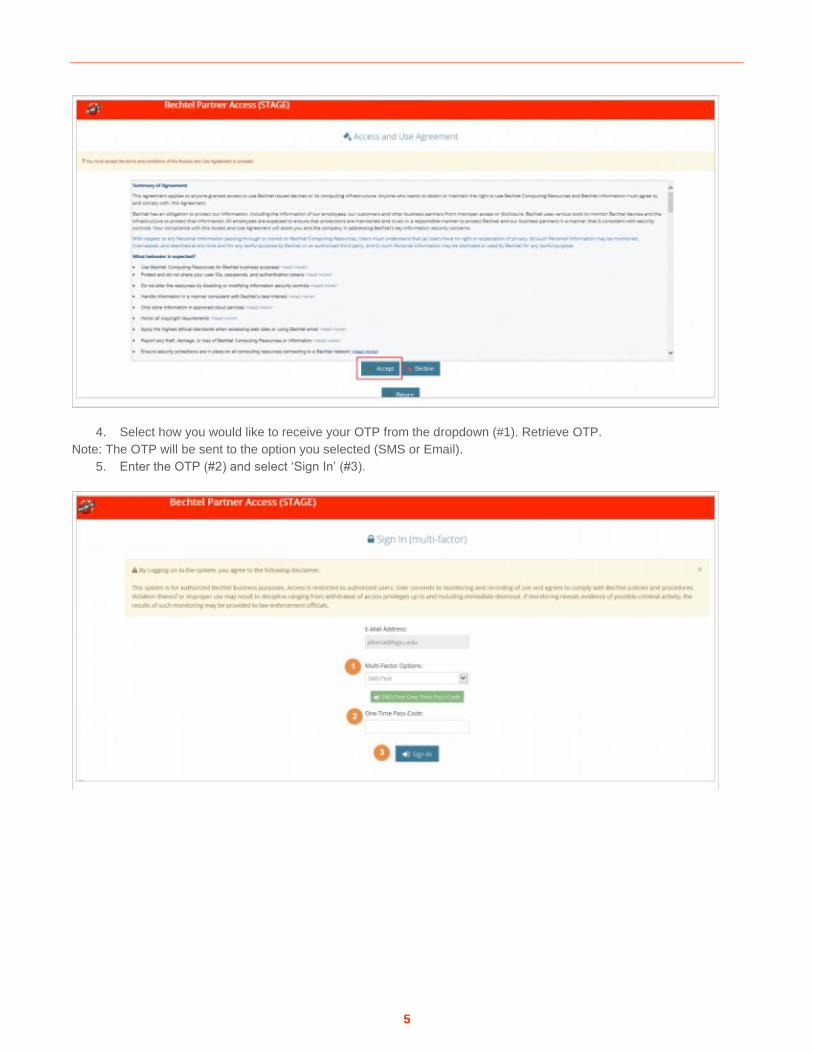
4. Select how you would like to receive your OTP from the dropdown (#1). Retrieve OTP.
Note: The OTP will be sent to the option you selected (SMS or Email).
5. Enter the OTP (#2) and select ‘Sign In’ (#3).
6
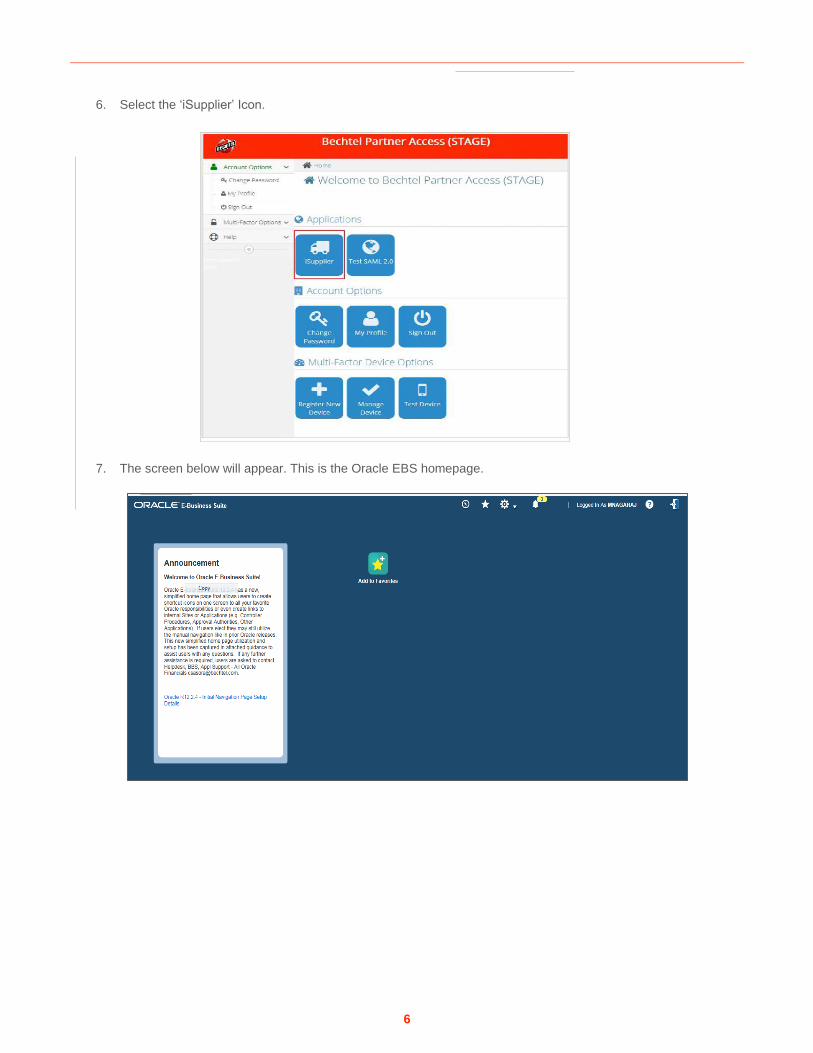
6. Select the ‘iSupplier’ Icon.
7. The screen below will appear. This is the Oracle EBS homepage.
7
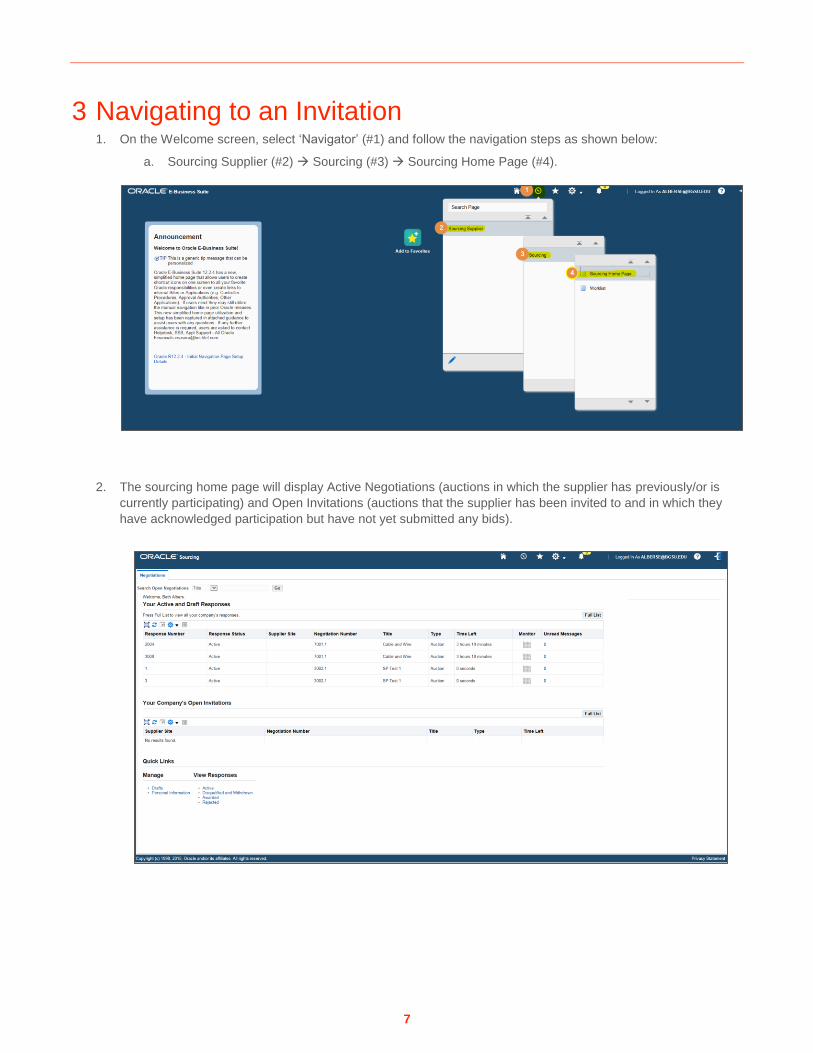
3 Navigating to an Invitation 1. On the Welcome screen, select ‘Navigator’ (#1) and follow the navigation steps as shown below:
a. Sourcing Supplier (#2) Sourcing (#3) Sourcing Home Page (#4).
2. The sourcing home page will display Active Negotiations (auctions in which the supplier has previously/or is
currently participating) and Open Invitations (auctions that the supplier has been invited to and in which they
have acknowledged participation but have not yet submitted any bids).
8
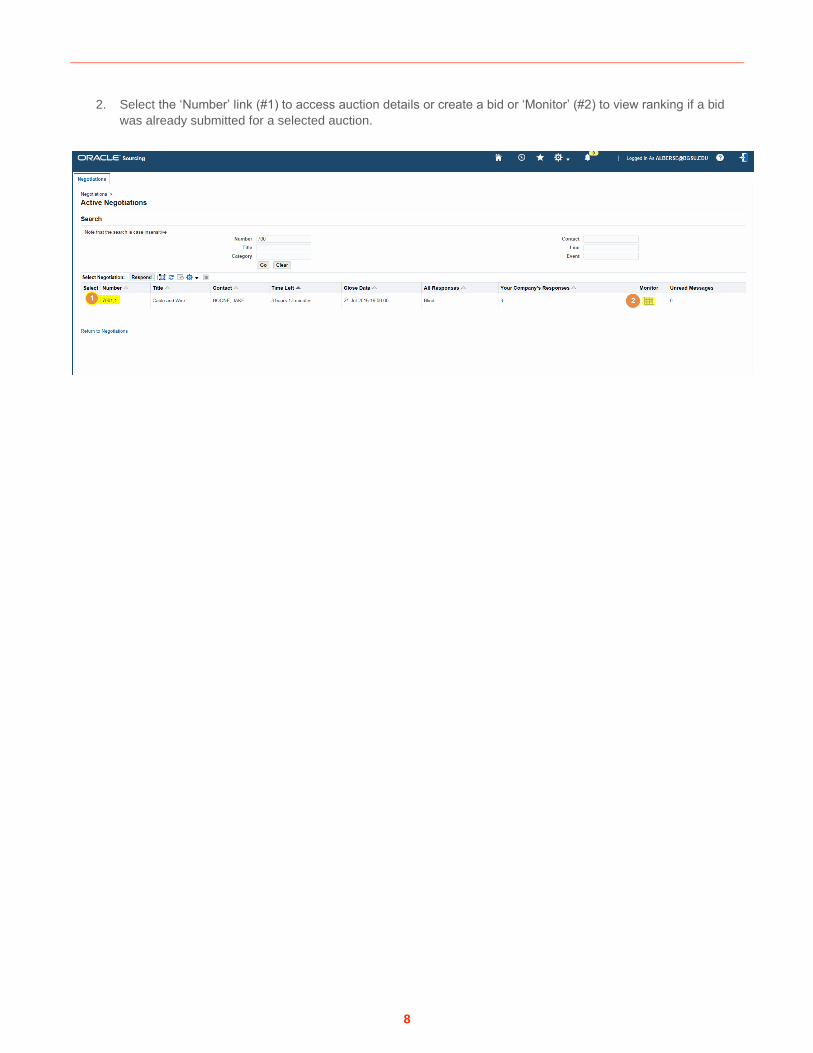
2. Select the ‘Number’ link (#1) to access auction details or create a bid or ‘Monitor’ (#2) to view ranking if a bid
was already submitted for a selected auction.
9
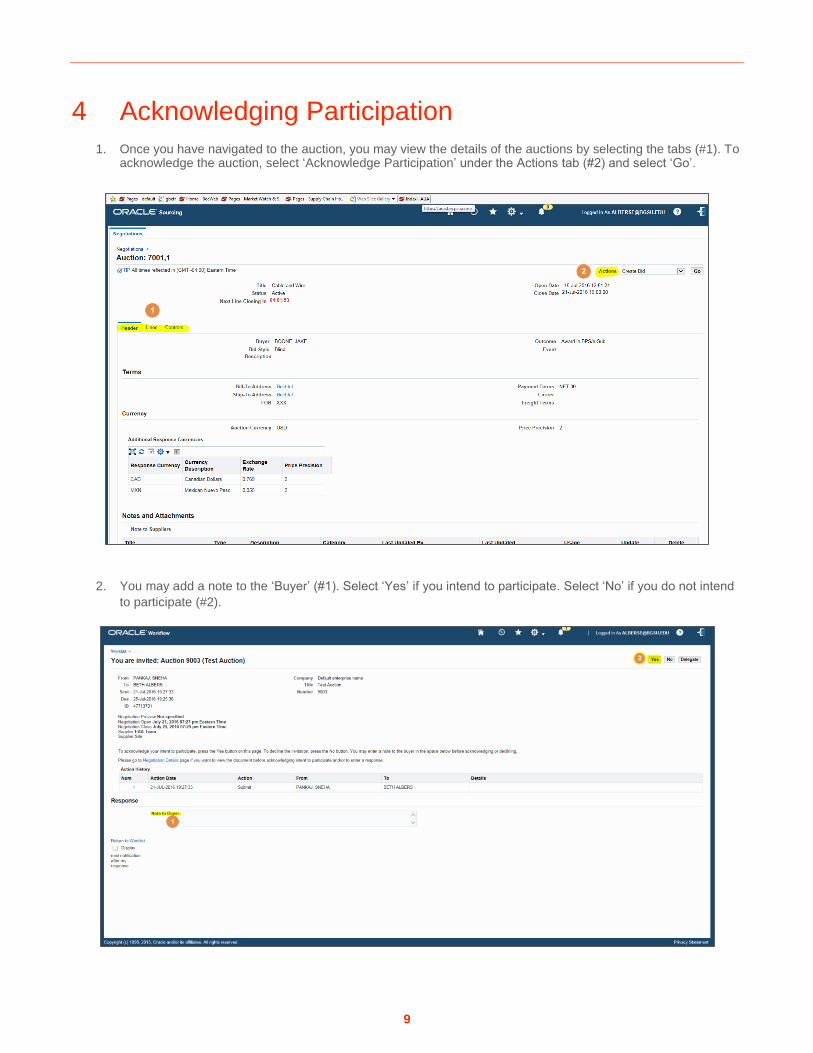
4 Acknowledging Participation
1. Once you have navigated to the auction, you may view the details of the auctions by selecting the tabs (#1). To acknowledge the auction, select ‘Acknowledge Participation’ under the Actions tab (#2) and select ‘Go’.
2. You may add a note to the ‘Buyer’ (#1). Select ‘Yes’ if you intend to participate. Select ‘No’ if you do not intend
to participate (#2).
10
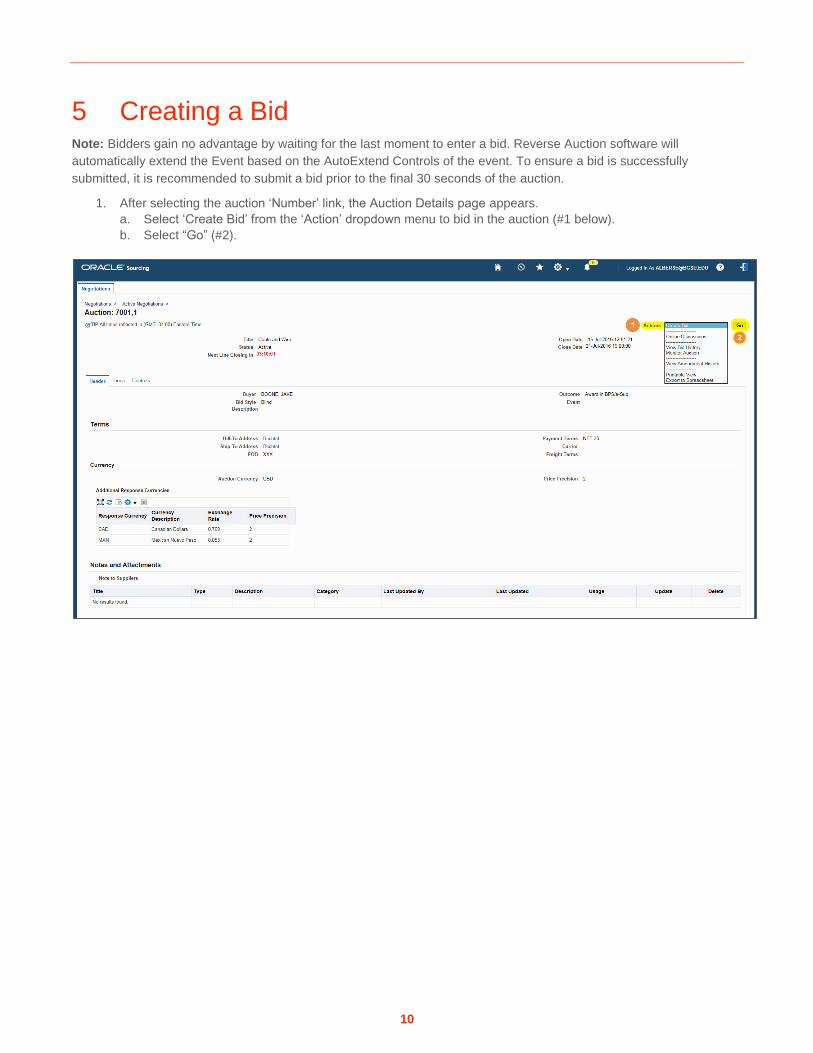
5 Creating a Bid Note: Bidders gain no advantage by waiting for the last moment to enter a bid. Reverse Auction software will
automatically extend the Event based on the AutoExtend Controls of the event. To ensure a bid is successfully
submitted, it is recommended to submit a bid prior to the final 30 seconds of the auction.
1. After selecting the auction ‘Number’ link, the Auction Details page appears.
a. Select ‘Create Bid’ from the ‘Action’ dropdown menu to bid in the auction (#1 below).
b. Select “Go” (#2).
11
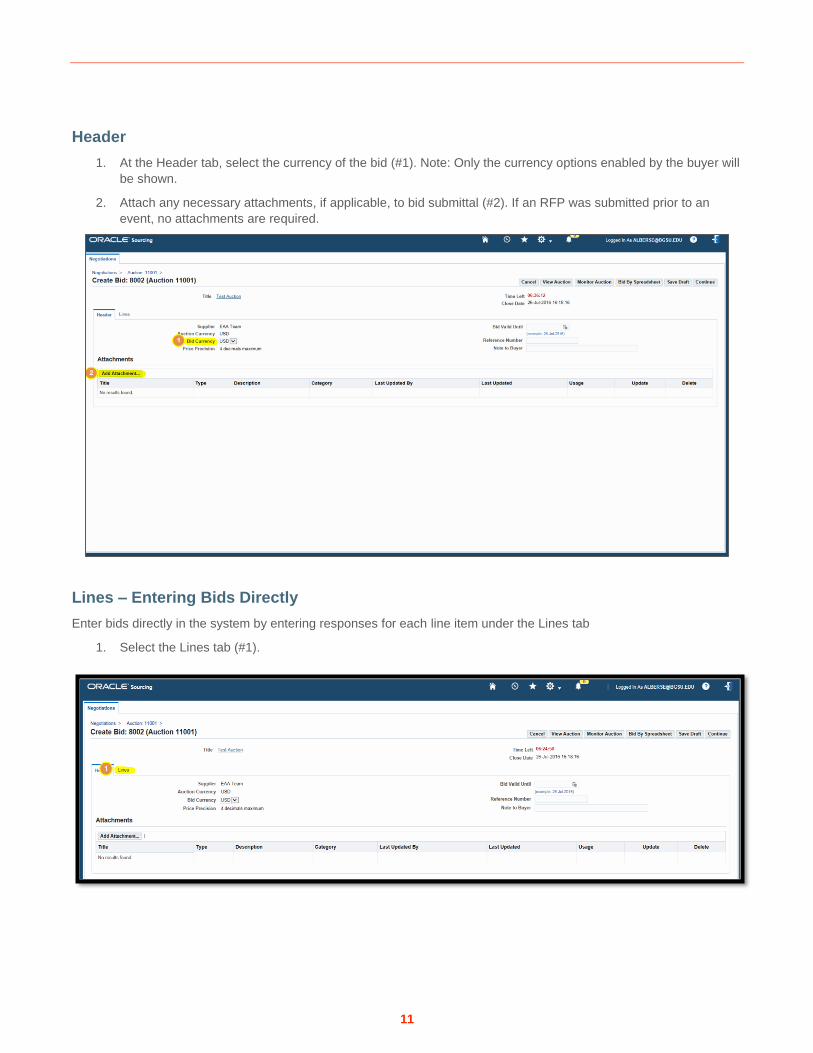
Header
1. At the Header tab, select the currency of the bid (#1). Note: Only the currency options enabled by the buyer will
be shown.
2. Attach any necessary attachments, if applicable, to bid submittal (#2). If an RFP was submitted prior to an
event, no attachments are required.
Lines – Entering Bids Directly
Enter bids directly in the system by entering responses for each line item under the Lines tab
1. Select the Lines tab (#1).
12
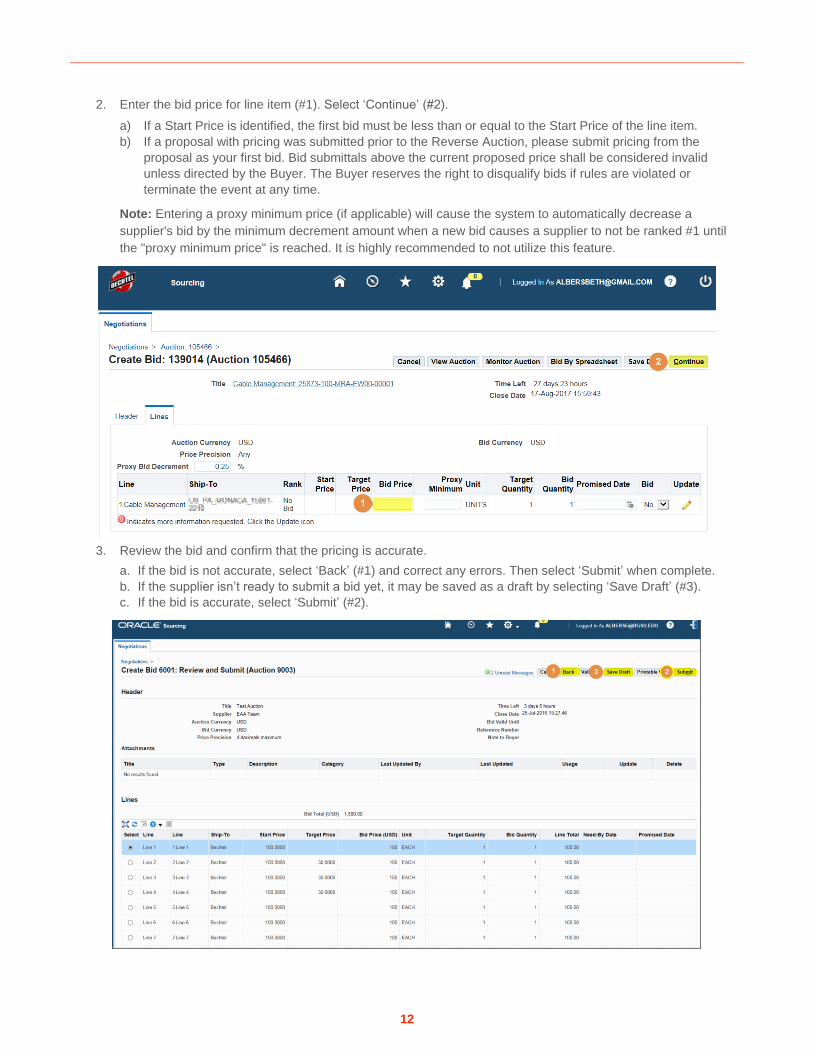
2. Enter the bid price for line item (#1). Select ‘Continue’ (#2).
a) If a Start Price is identified, the first bid must be less than or equal to the Start Price of the line item.
b) If a proposal with pricing was submitted prior to the Reverse Auction, please submit pricing from the
proposal as your first bid. Bid submittals above the current proposed price shall be considered invalid
unless directed by the Buyer. The Buyer reserves the right to disqualify bids if rules are violated or
terminate the event at any time.
Note: Entering a proxy minimum price (if applicable) will cause the system to automatically decrease a
supplier's bid by the minimum decrement amount when a new bid causes a supplier to not be ranked #1 until
the "proxy minimum price" is reached. It is highly recommended to not utilize this feature.
3. Review the bid and confirm that the pricing is accurate.
a. If the bid is not accurate, select ‘Back’ (#1) and correct any errors. Then select ‘Submit’ when complete.
b. If the supplier isn’t ready to submit a bid yet, it may be saved as a draft by selecting ‘Save Draft’ (#3).
c. If the bid is accurate, select ‘Submit’ (#2).
13
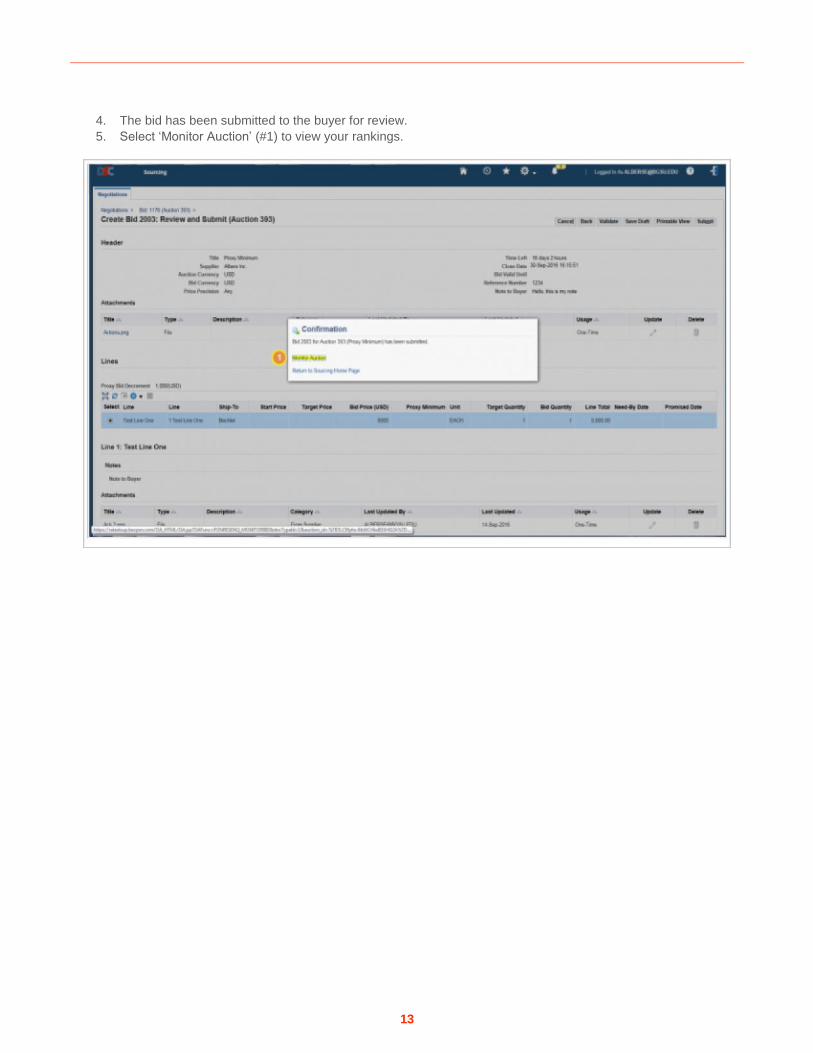
4. The bid has been submitted to the buyer for review.
5. Select ‘Monitor Auction’ (#1) to view your rankings.
14
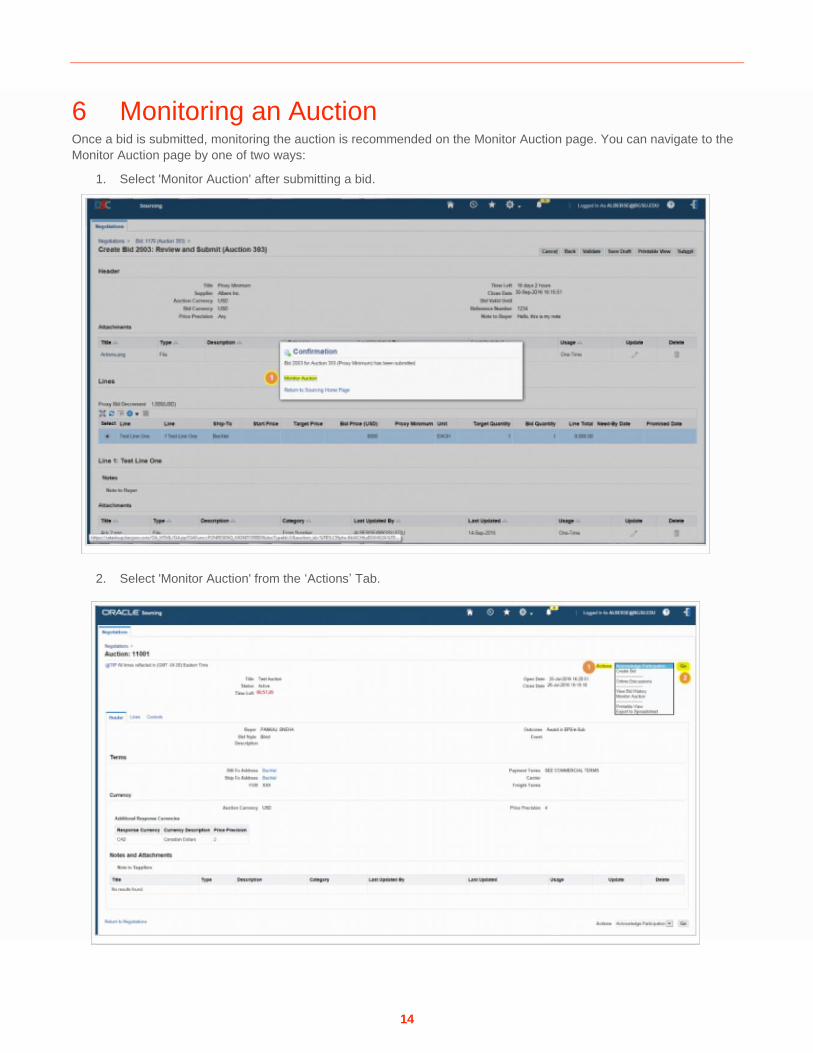
6 Monitoring an Auction Once a bid is submitted, monitoring the auction is recommended on the Monitor Auction page. You can navigate to the
Monitor Auction page by one of two ways:
1. Select 'Monitor Auction' after submitting a bid.
2. Select 'Monitor Auction' from the ‘Actions’ Tab.
15
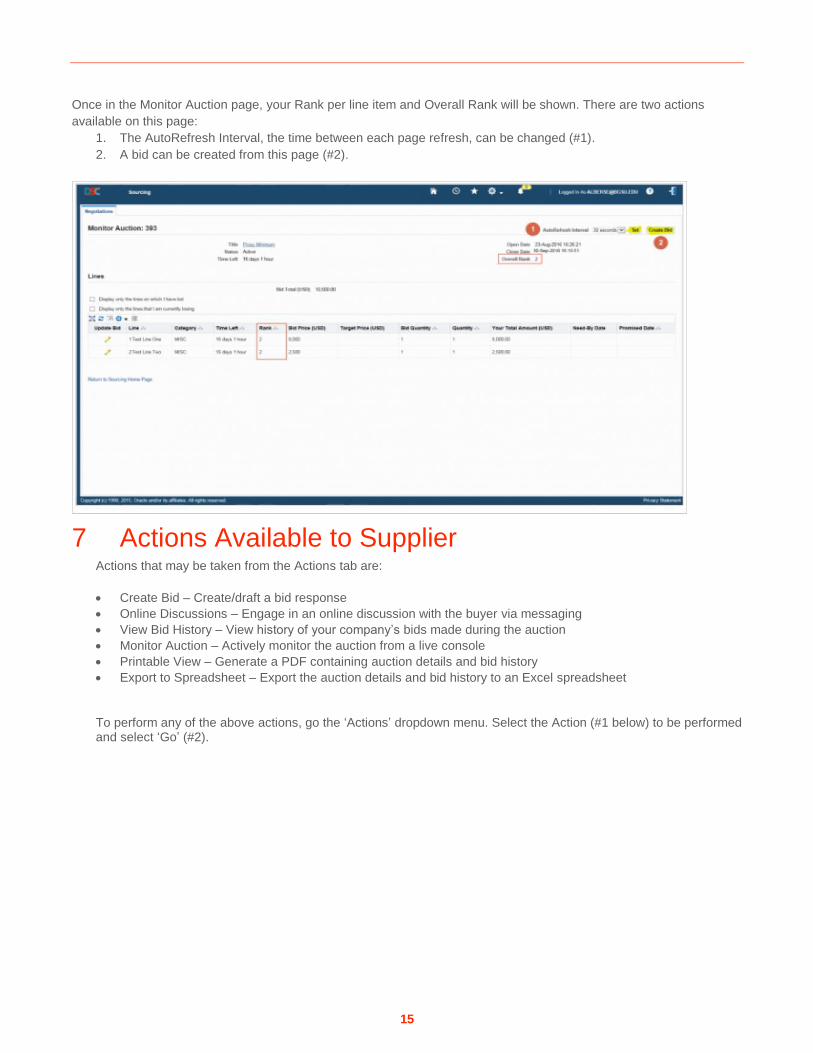
Once in the Monitor Auction page, your Rank per line item and Overall Rank will be shown. There are two actions
available on this page:
1. The AutoRefresh Interval, the time between each page refresh, can be changed (#1).
2. A bid can be created from this page (#2).
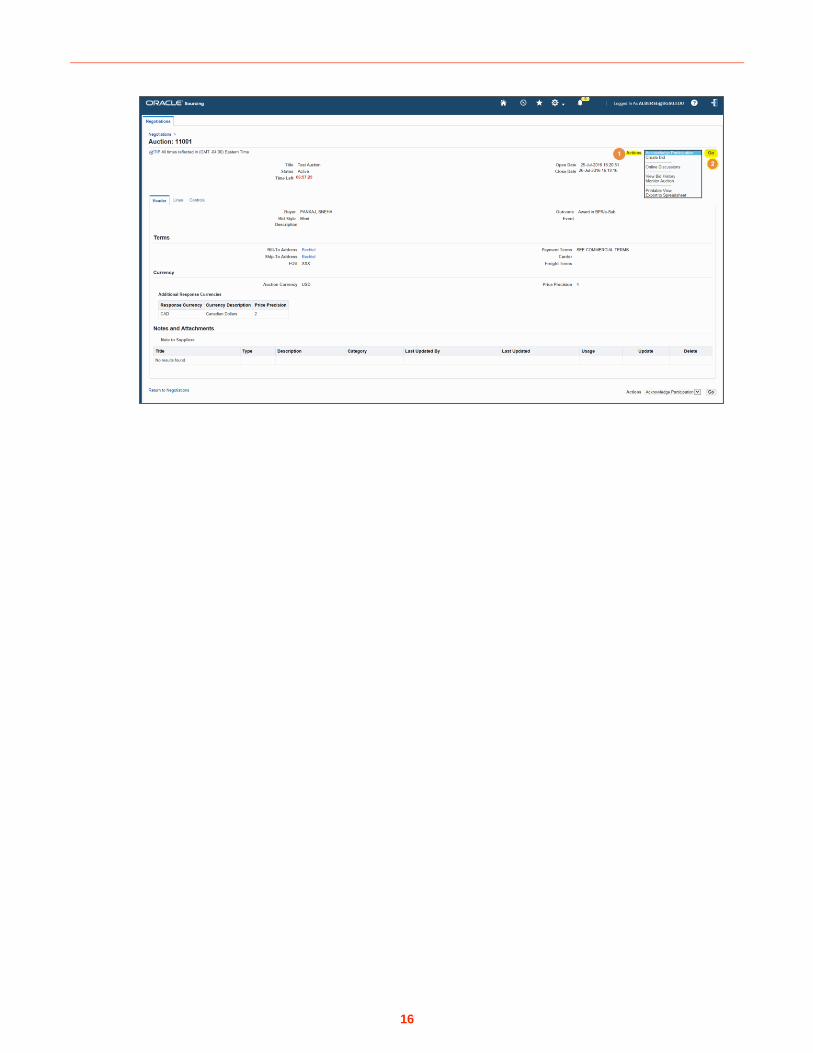
7 Actions Available to Supplier Actions that may be taken from the Actions tab are:
• Create Bid – Create/draft a bid response
• Online Discussions – Engage in an online discussion with the buyer via messaging
• View Bid History – View history of your company’s bids made during the auction
• Monitor Auction – Actively monitor the auction from a live console
• Printable View – Generate a PDF containing auction details and bid history
• Export to Spreadsheet – Export the auction details and bid history to an Excel spreadsheet
To perform any of the above actions, go the ‘Actions’ dropdown menu. Select the Action (#1 below) to be performed and select ‘Go’ (#2).
16

17
8 Online Discussions It is strongly recommended that all communications during an auction occur via Online Discussions. You will
receive a notification that appears above the Actions dropdown menu.
1. Select on the notification to view the message (#1).
2. Select the blue link (#1) under the Message column to view the message.
3. Select ‘Reply’ if you want to reply to the message.
18
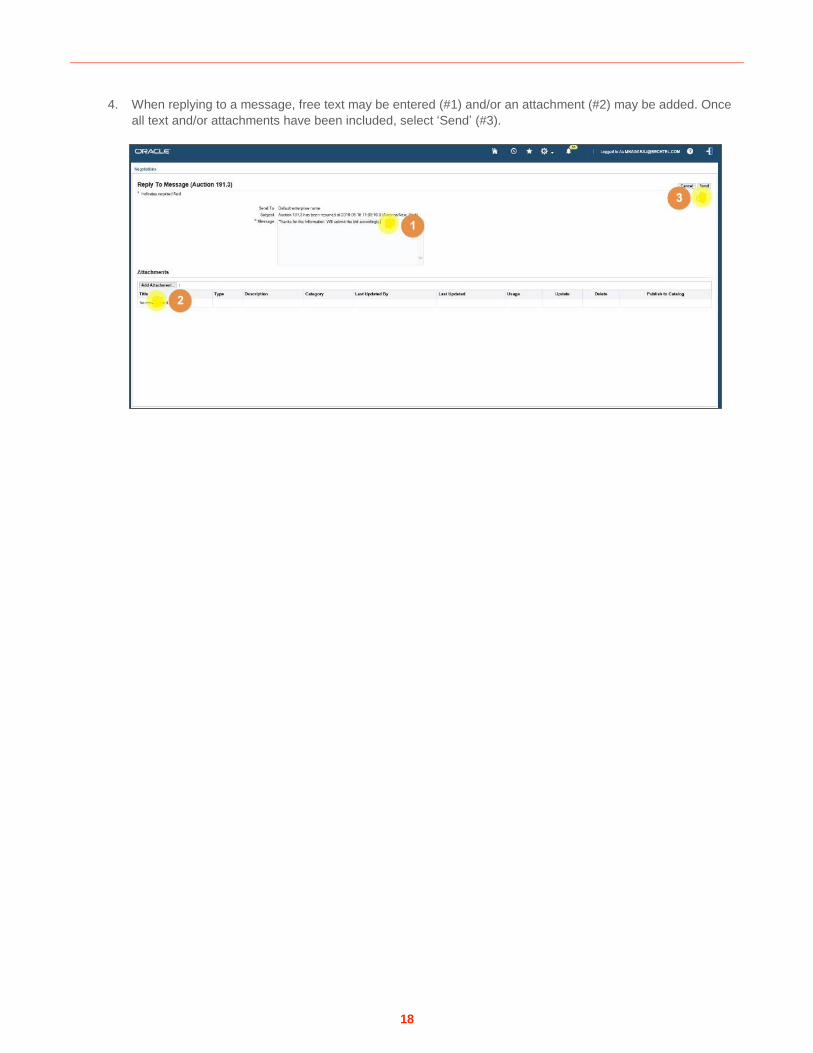
4. When replying to a message, free text may be entered (#1) and/or an attachment (#2) may be added. Once
all text and/or attachments have been included, select ‘Send’ (#3).