programs required - freeservice.free.frfreeservice.free.fr/3dguide.pdf · we'll use megui for...
TRANSCRIPT

Programs Required
Pismo File Mount Audit Package - http://www.pismotechnic.com/pfm/
AVFS Avisynth Virtual File System - http://www.turtlewar.org/avfs/
AVISynth 2.5.8 - http://sourceforge.net/projects/avisynth2/files/Avi Synth%202.5/
Virtual Dub 1.9.11 - http://virtualdub.sourceforge.net/
CLOWNBD v0.79 - http://www.clownbd.com/
*FFdshow 3882 - http://www.xvidvideo.ru/ffdshow-tryouts-project-x86 -x64/ffdshow-tryouts-project-svn-3882-x86-x64.html
*other ffdshow build may also work
Sonic Scenarist 3D 5.6 minimum - http://www.sonic.com
Sonic Cinevision 3.6 minimum - http://www.sonic.com
ChapterGen - http://forum.doom9.org/showthread.php?t=150148
Virtual clone drive - http://www.slysoft.com/en/download.html
MEGUI - http://sourceforge.net/projects/megui/
TSMUXER - http://www.videohelp.com/tools/tsMuxeR
*BioMvc - from here - http://www.megaupload.com/?d=33H7R1SI
INSTALL all of the above progs.
*Unzip the biomvc files somewhere with plenty of sp ace.
Were going to be working with uncompressed AVI's. 2 TB will be plenty for all movie lengths.
you will need to modify the biomvc files to match t he drive/folder location you choose. In this exampl e were using D:\3d
1

Create a folder for your uncompressed avis also eg 3d_avis
LETS GET STARTEDFor this project im using The Lion King 3D
So you've ripped your disc to an ISO, you can now m ount it using Virtual Clone Drive.
Open clown BD and set the Movie Location to that of your virtual drive and the demux/remux location to D:\3d
2

once done, click NEXT, a popup will tell you that D :\3d Is Not Empty. Click OK (its only those biomvc files)
clownBD will take a few seconds to do an analyse pa ss, then its time to select your video/audio stream s to demux.
As were going to be re-encoding to bd25 you might w ant to select CORE as the Output Audio Format so yo u have more birate for the video streams
3
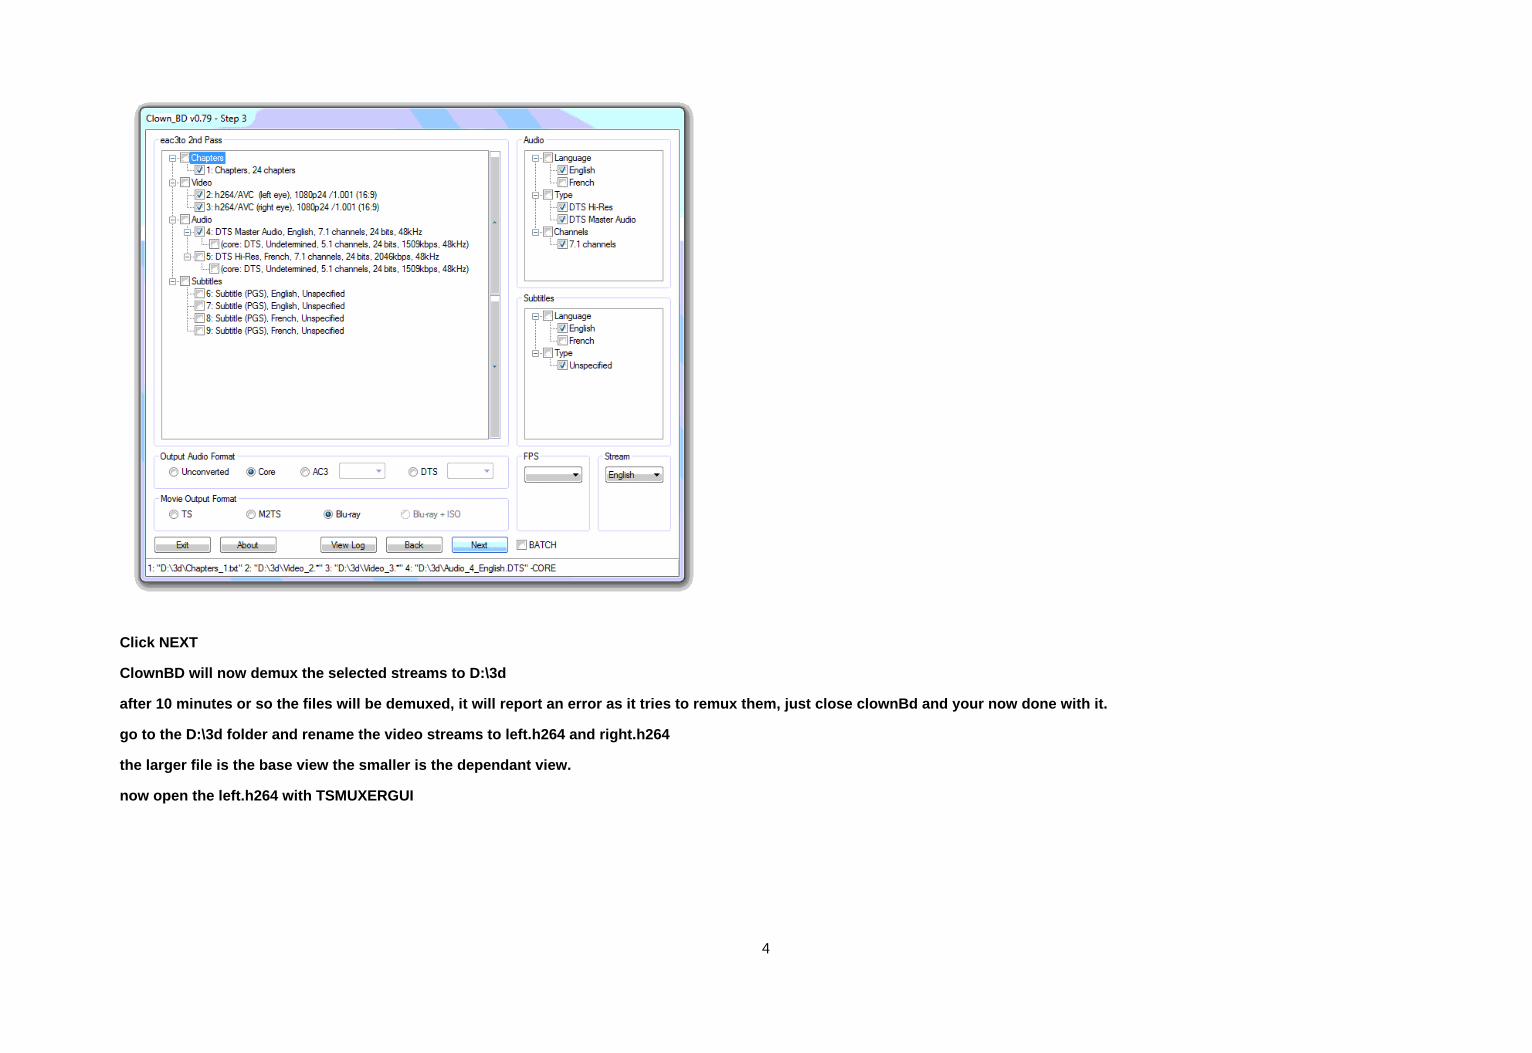
Click NEXT
ClownBD will now demux the selected streams to D:\3 d
after 10 minutes or so the files will be demuxed, i t will report an error as it tries to remux them, j ust close clownBd and your now done with it.
go to the D:\3d folder and rename the video streams to left.h264 and right.h264
the larger file is the base view the smaller is the dependant view.
now open the left.h264 with TSMUXERGUI
4

select M2TS muxing then Start muxing
5

When its done you can close it.
When clownBD demuxed the files it also created LOG files
Open eac3to_PASS3_LOG.LOG
and note how many frames the video file contain
Video track 2 contains 127815 frames.
Video track 3 contains 127815 frames.
Open the Left_EYE.AVS with notepad and enter the fr ame value from the eac3 log into it replacing the X XXXXXX
DirectshowSource("D:\3d\Left.m2ts", fps=23.976, fra mecount=XXXXXXX, audio=false)
ConvertToYV12().AssumeFPS(24000,1001)
so it looks like this, then save.
DirectshowSource("D:\3d\Left.m2ts", fps=23.976, fra mecount=127815, audio=false)
ConvertToYV12().AssumeFPS(24000,1001)
Now open this avs file with Virtual dub. (FFdshow w ill then decode this in the background)
What we need to do is trim a few seconds off the en d of the movie because Biomvc craps out before reac hing the end. Its easier to set a nice cut point us ing the left eye stream as its much faster to decode than the right eye stream.I c hoosen a point right after the end credits, just be fore the Mickey Mouse steam boat logo appears givin g me a frame count of 127460 frames. You could choose to cut the credits complet ely. Its up to you.
Close Virtual Dub
6
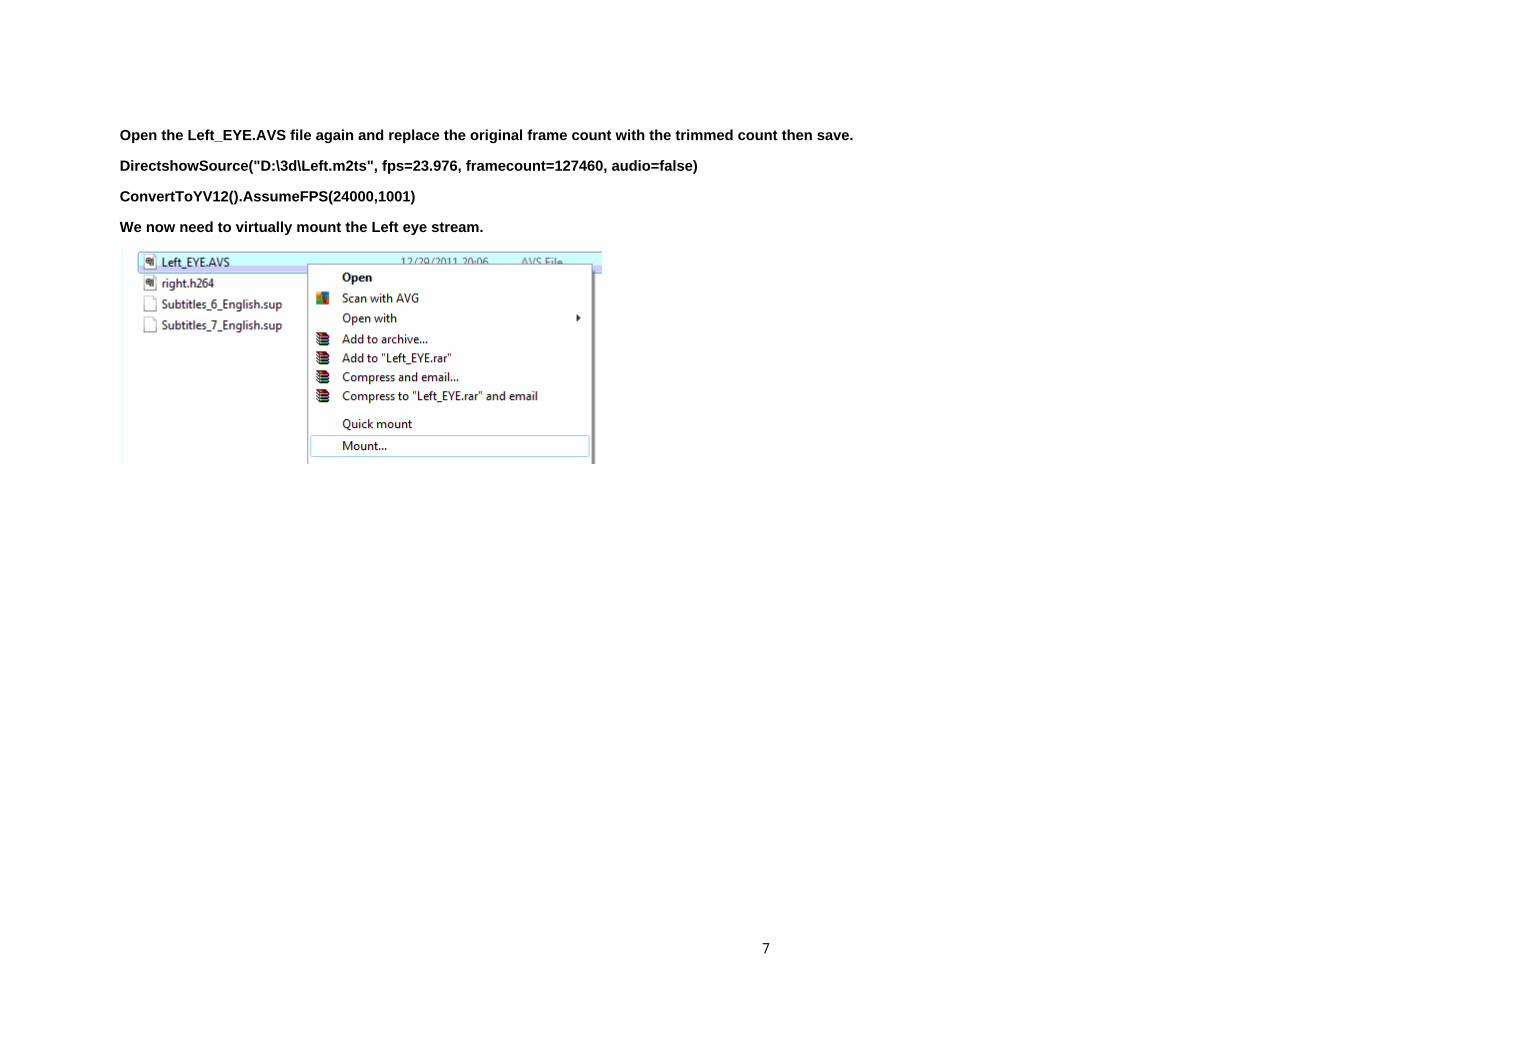
Open the Left_EYE.AVS file again and replace the or iginal frame count with the trimmed count then save .
DirectshowSource("D:\3d\Left.m2ts", fps=23.976, fra mecount=127460, audio=false)
ConvertToYV12().AssumeFPS(24000,1001)
We now need to virtually mount the Left eye stream.
7

After mounting a new folder containing the virtual Left eye avi will be created.
Copy the avi file
8
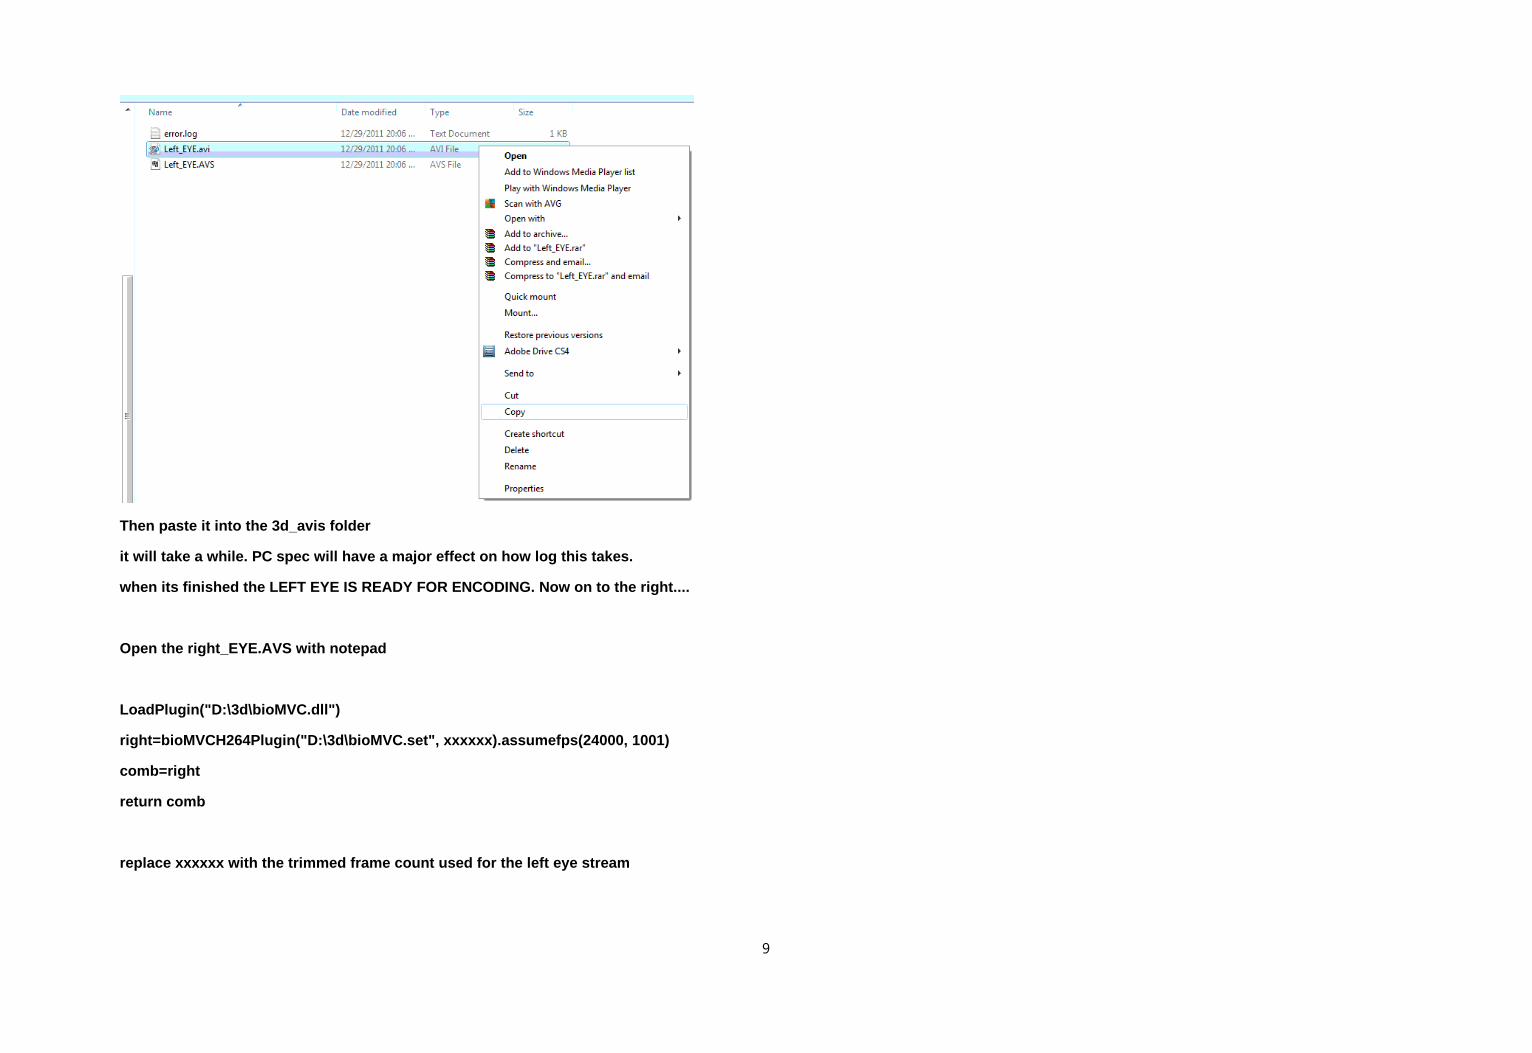
Then paste it into the 3d_avis folder
it will take a while. PC spec will have a major eff ect on how log this takes.
when its finished the LEFT EYE IS READY FOR ENCODIN G. Now on to the right....
Open the right_EYE.AVS with notepad
LoadPlugin("D:\3d\bioMVC.dll")
right=bioMVCH264Plugin("D:\3d\bioMVC.set", xxxxxx). assumefps(24000, 1001)
comb=right
return comb
replace xxxxxx with the trimmed frame count used fo r the left eye stream
9

LoadPlugin("D:\3d\bioMVC.dll")
right=bioMVCH264Plugin("D:\3d\bioMVC.set", 127460). assumefps(24000, 1001)
comb=right
return comb
then save.
We now need to virtually mount the right eye stream .
10

After mounting a new folder containing the virtual avi will be created, just like when you did the lef t eye mount.
O
11

Copy the avi file
then paste it into the 3d_avis folder
it will take a while, double the time it took for t he left eye. PC spec will have a major effect on ho w log this takes.
when its finished the RIGHT EYE IS NOW READY FOR EN CODING.
your streams will be the same frame count and file size if you have followed this guide correctly (hop efully)
NOW ONTO THE ENCODING
Open Cinevision then add your media files you have just created
12
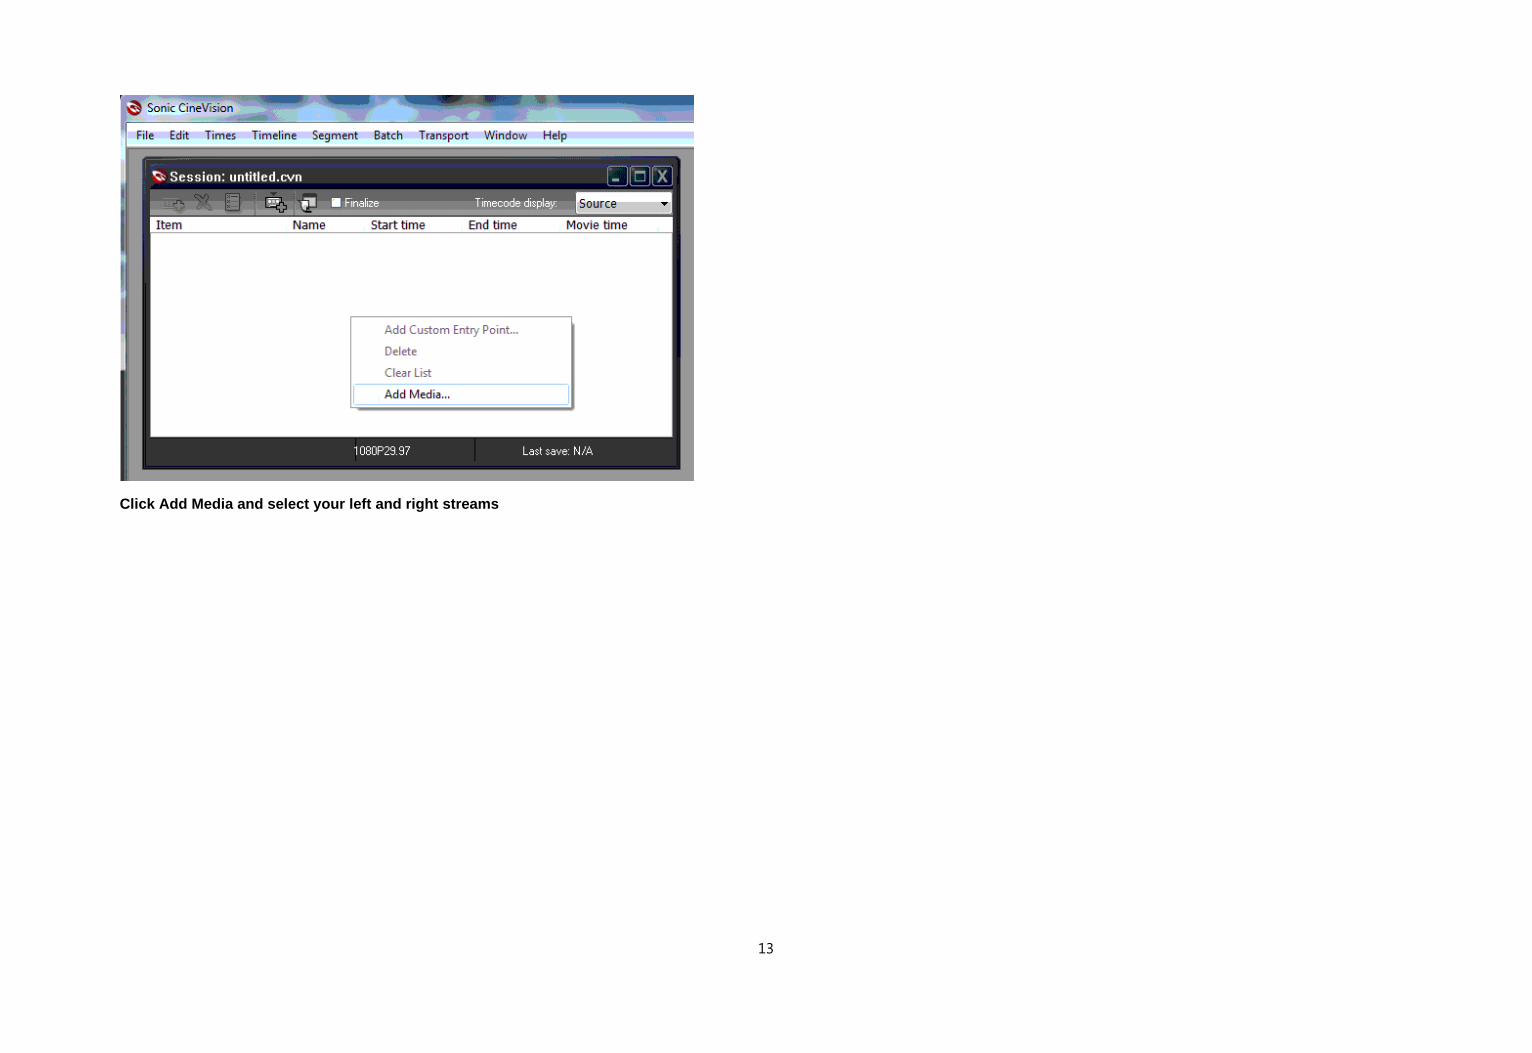
Click Add Media and select your left and right stre ams
13
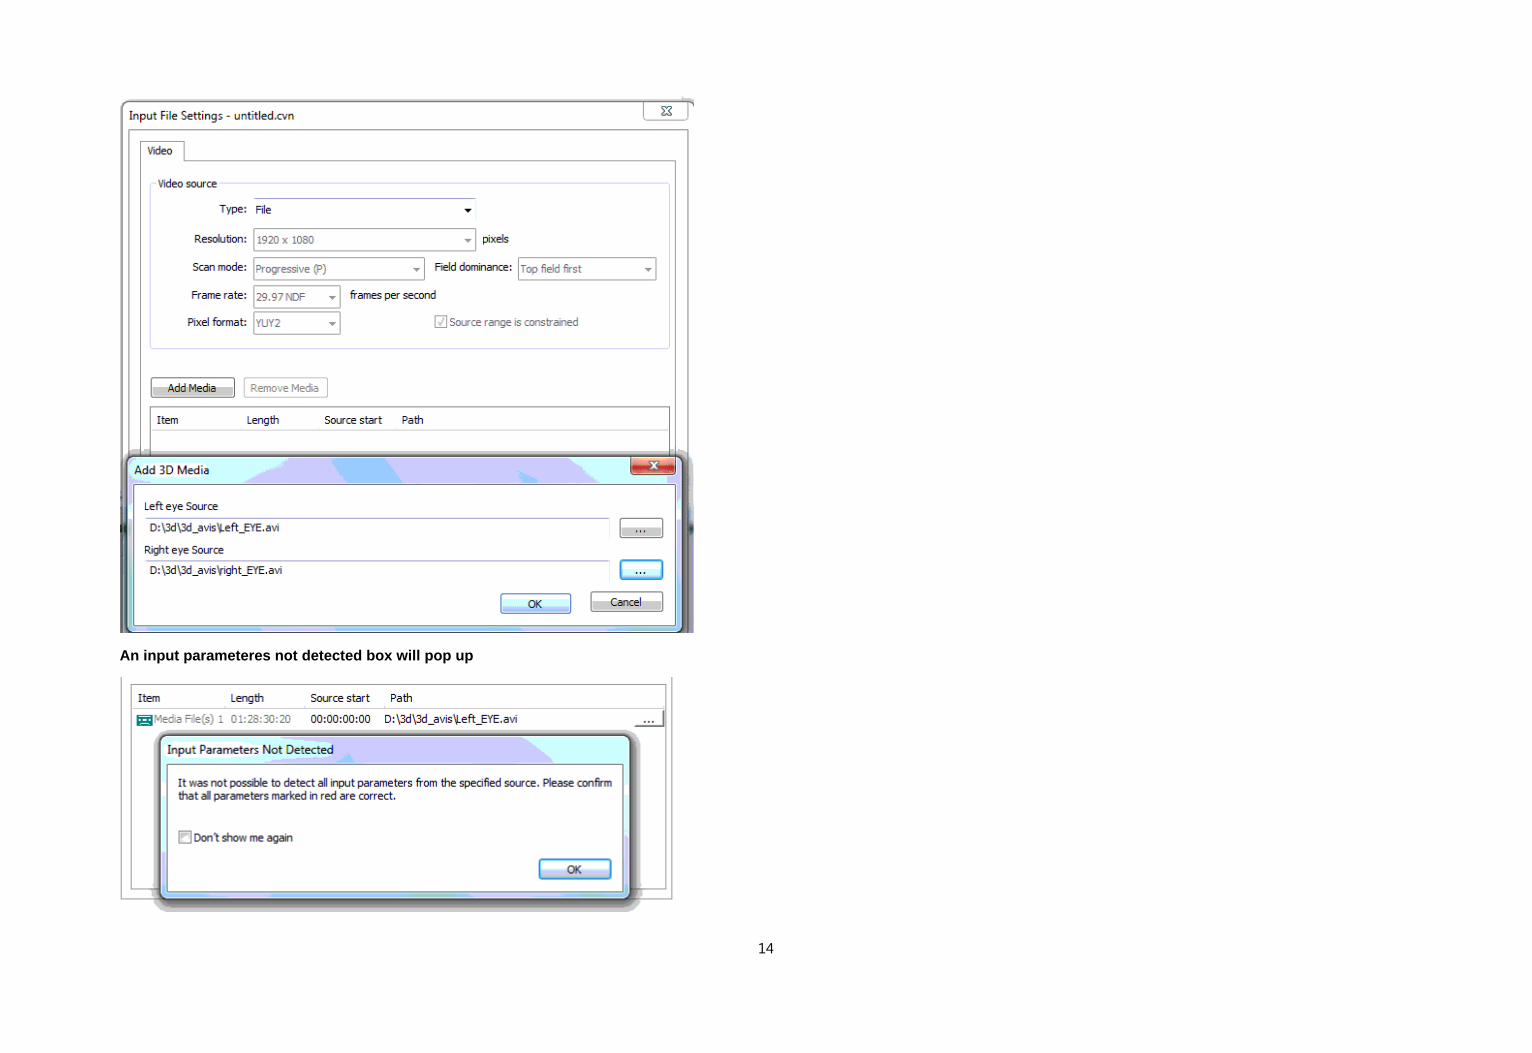
An input parameteres not detected box will pop up
14

just click OK
Make sure Scan mode is set to Progressive and Pixel format is YV12
then click OK
On the settings window click on Video, then Edit se ttings...
15

Then Bit rate.
We'll use MeGUI for this, so open than now.
select the TOOLS tab, then Bitrate Calculator tab
set the running time to match the video, load the d emuxed audio track if your not sure of the bitrate of it.
select BD (23450MB) from the Total Filesize options . You will now see how much bitrate you have to pla y with for the video.
16
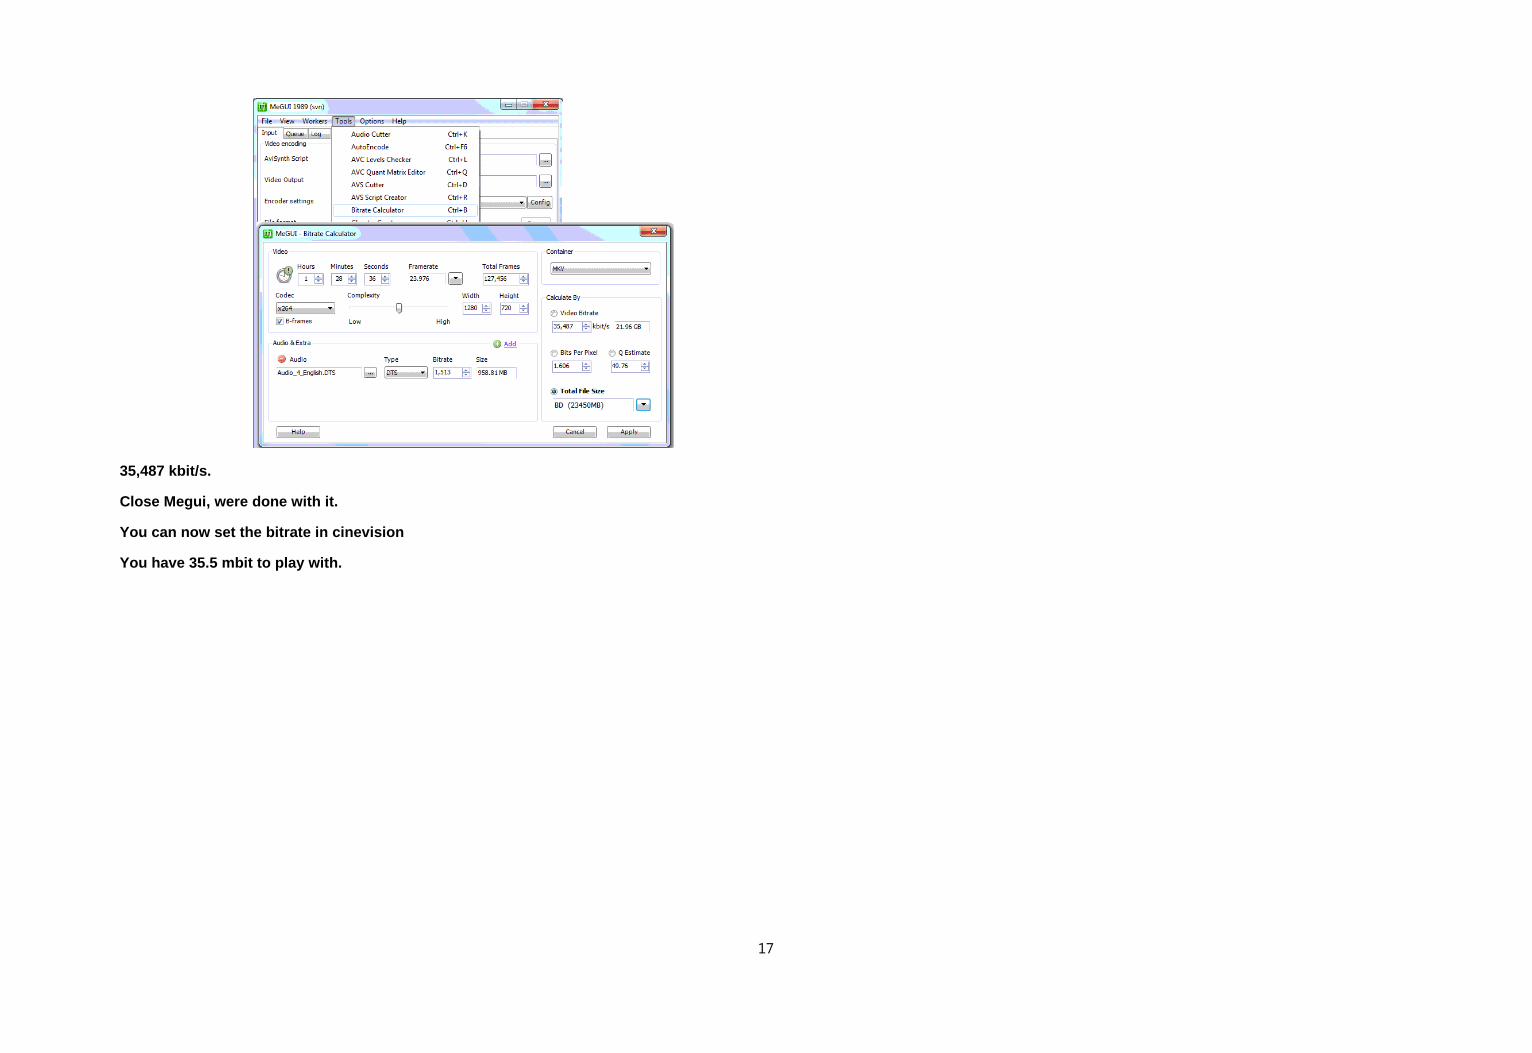
35,487 kbit/s.
Close Megui, were done with it.
You can now set the bitrate in cinevision
You have 35.5 mbit to play with.
17

Its upto you how you split it, i always hold some b itrate back in case of an over size or segment re-e ncoding.
Now onto the Picture Structure tab
18
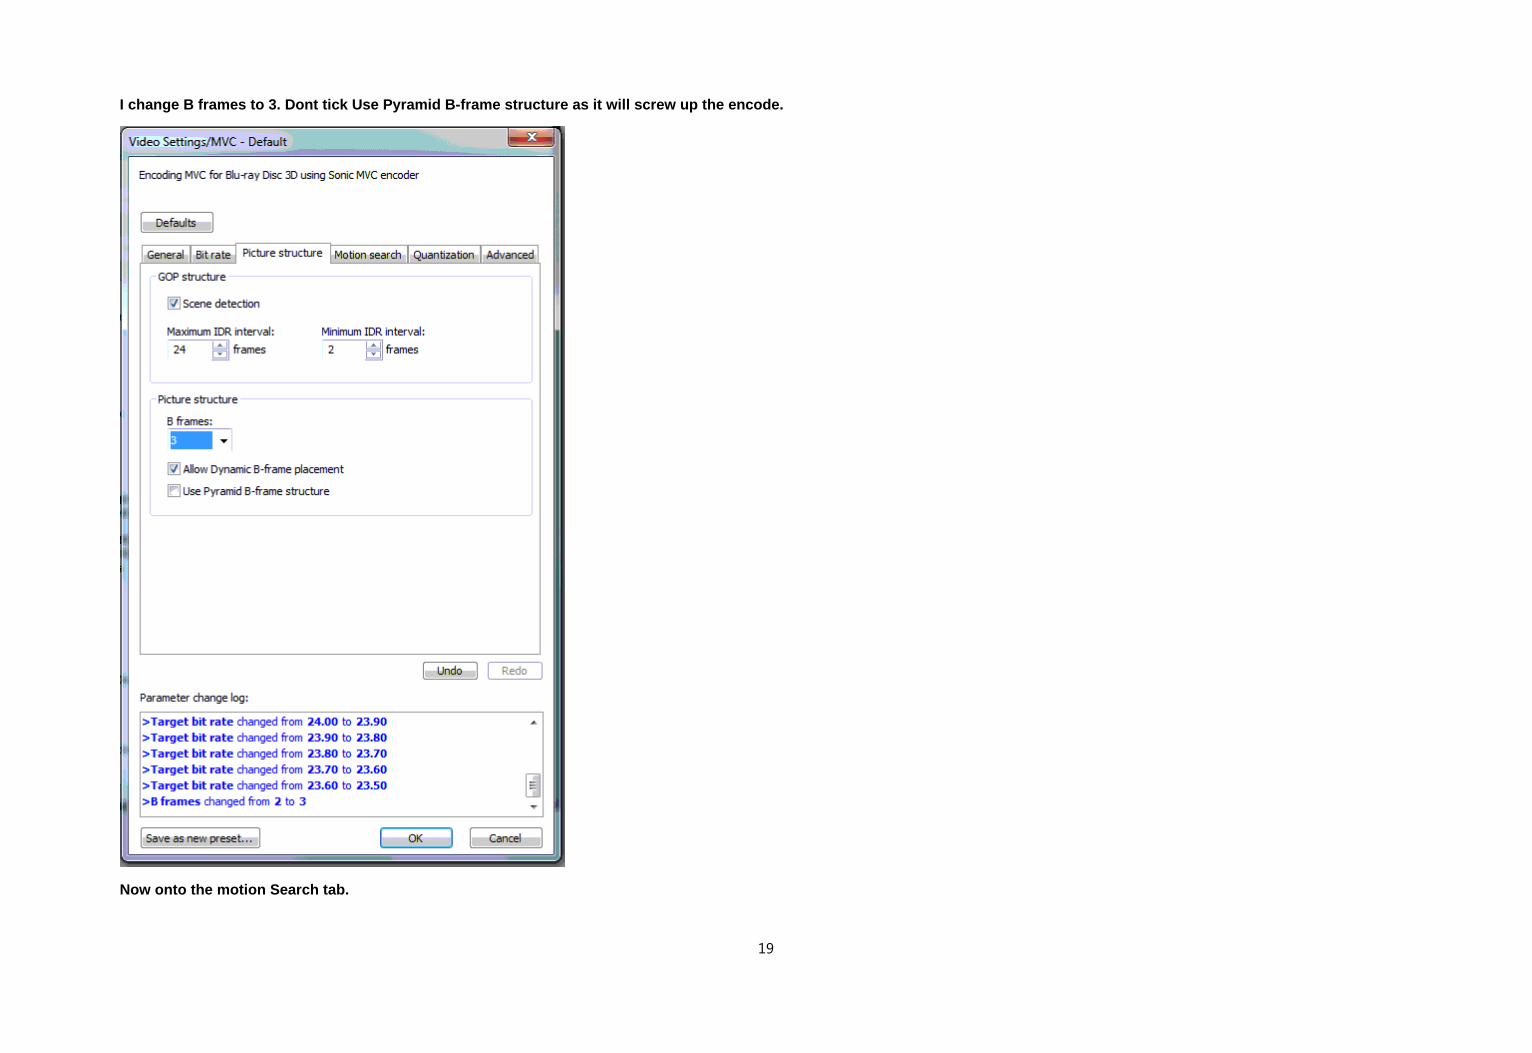
I change B frames to 3. Dont tick Use Pyramid B-fra me structure as it will screw up the encode.
Now onto the motion Search tab.
19
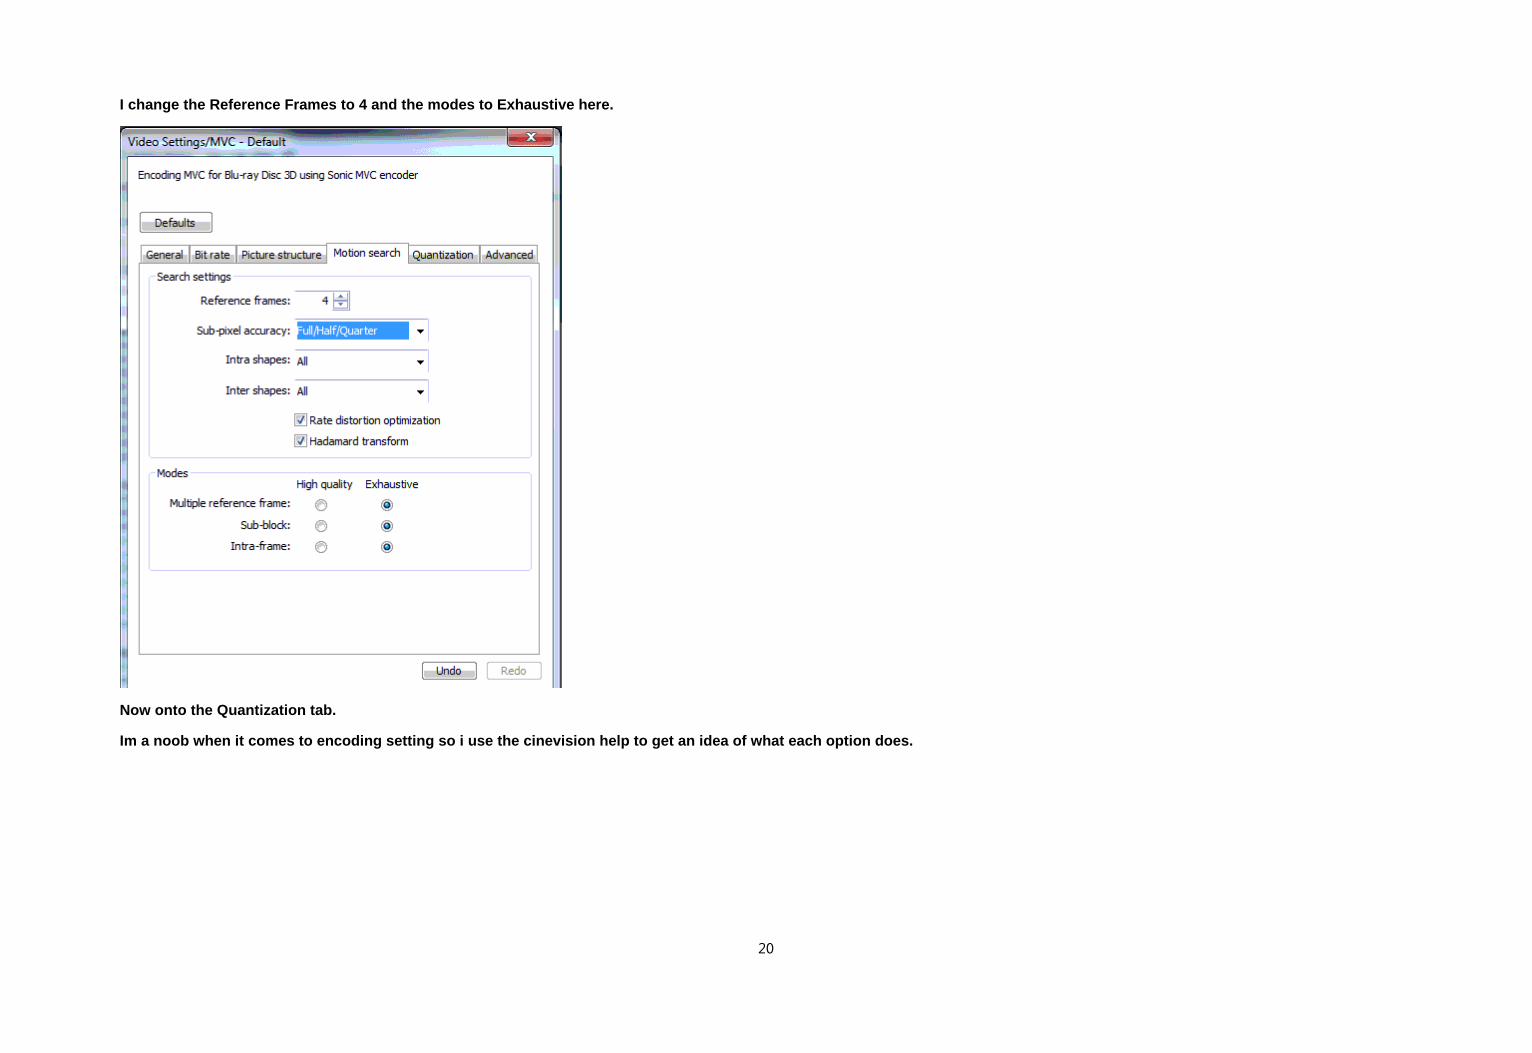
I change the Reference Frames to 4 and the modes to Exhaustive here.
Now onto the Quantization tab.
Im a noob when it comes to encoding setting so i us e the cinevision help to get an idea of what each o ption does.
20

I leave the Advanced tab as is and just save as new preset, Cartoon etc......
then save settings as....
21

Your then ready to encode.
22
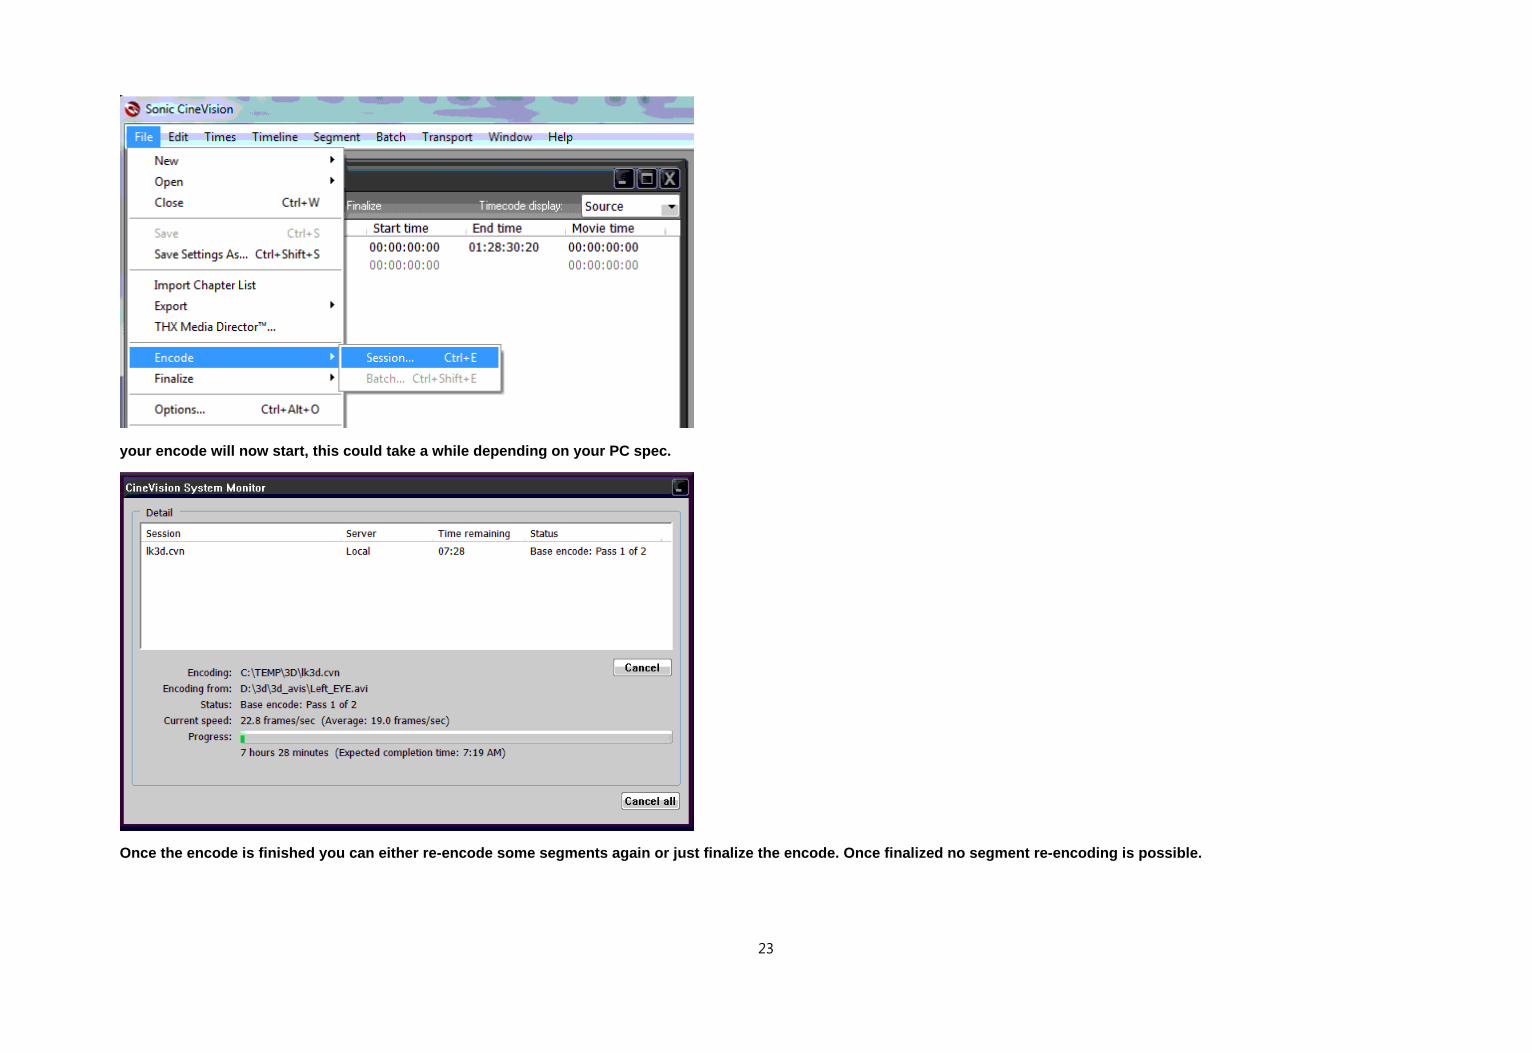
your encode will now start, this could take a while depending on your PC spec.
Once the encode is finished you can either re-encod e some segments again or just finalize the encode. Once finalized no segment re-encoding is possible.
23

Save the mvc's and your ready for authoring.
Now its time to fire up Scenarist.
Once its open, hit the FILE tab and NEW SOLUTION op tion. Name it and select a folder to us then hit OK .
Right click your newly created solution and click N EW PROJECT
24
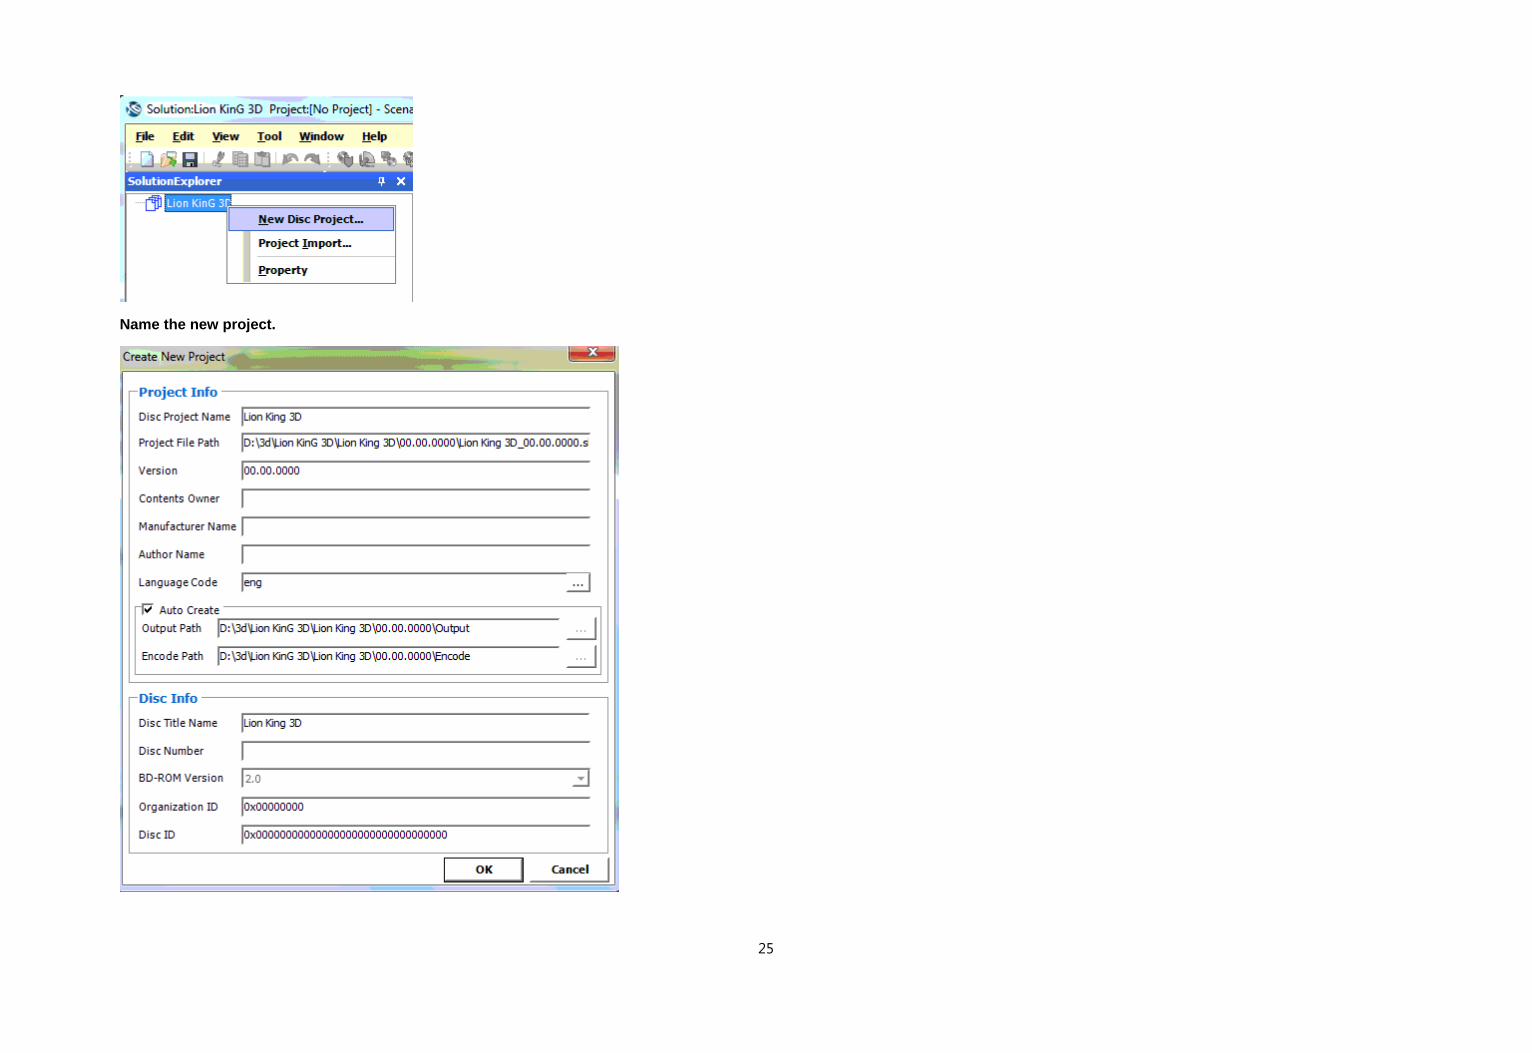
Name the new project.
25

Now its time to import your files.
Select the Data Editor tab in the scenarist window.
Locate the mvc files and audio file on your hard di sc and select 1 of the mvc files along with the aud io file then drag and drop them into the Data edito r window.
A Select Coding Type window will pop up when import ing xxx.DTSHD audio. Hit OK. The other option in th e drop down box is only used when importing seconda ry audio (as used in PIP tracks etc).
A Creating VES/MUI/UXI files.... window will pop up .
When it imports the mvc files it will ask you for t he location on the Dependant view file path. find i t then Hit OK
It will then create VES/MUI/XUI files for these.
26

A reading ES.... window will then pop up, once that s done you will see 2 file icons, 1 for audio 1 for video in the Data Editor window.
Highlight them both (right click CTRL right click). With them both highlighted, left click then select the GENERATE tab, then select PLAYLIST.
Change the Data Editor window to Senario Editor and change the Solution Explorer to StreamTree.
27

In the Senario Editor window RIGHT click on FirstPl ayBack then LEFT click on Set MovieObject then clic k OK in the popup window.
Do the same for the TopMenu.
28

Now select the playlist from the StreamTree window and drag it to the FirstPlayback MO. Do the same fo r the TopMenu MO.
For easy navigation we can add chapters. ClownBD wi ll have demuxed these and and created a chapter.txt file. We use the ChapterGen prog to convert this t xt file into a Scenarist CSV file. Just open the TXT file and save it as a Scena rist csv file then close it.
Back in Scenarist
29

Now select Stream Editor and RIGHT click on the Pla yItem 00:00:00:00 - 01:28:30:20 23.976, select IMPO RT then CHAPTER IMPORT FILE
Chapters will be imported, you will notice there ar e warnings in the Results window. You can ignore th ose.
30

We now need to trim the audio as it wont mux it as the video running time is shorter as we trimmed it when creating the avi's.
First change the frame rate in the attributes windo w to 23.976 from 29.97 then
Select the Clip Editor window, you will notice the video is 15 seconds shorter than the audio.
Just RIGHT click the audio track, LEFT CLICK Time I nfo and change it to match the Video length.
ere almost ready to mux :)
Click on the CPS tab on the top tool bar, click set tings... then tick Unencrypted Settings then OK, an d OK again.
31
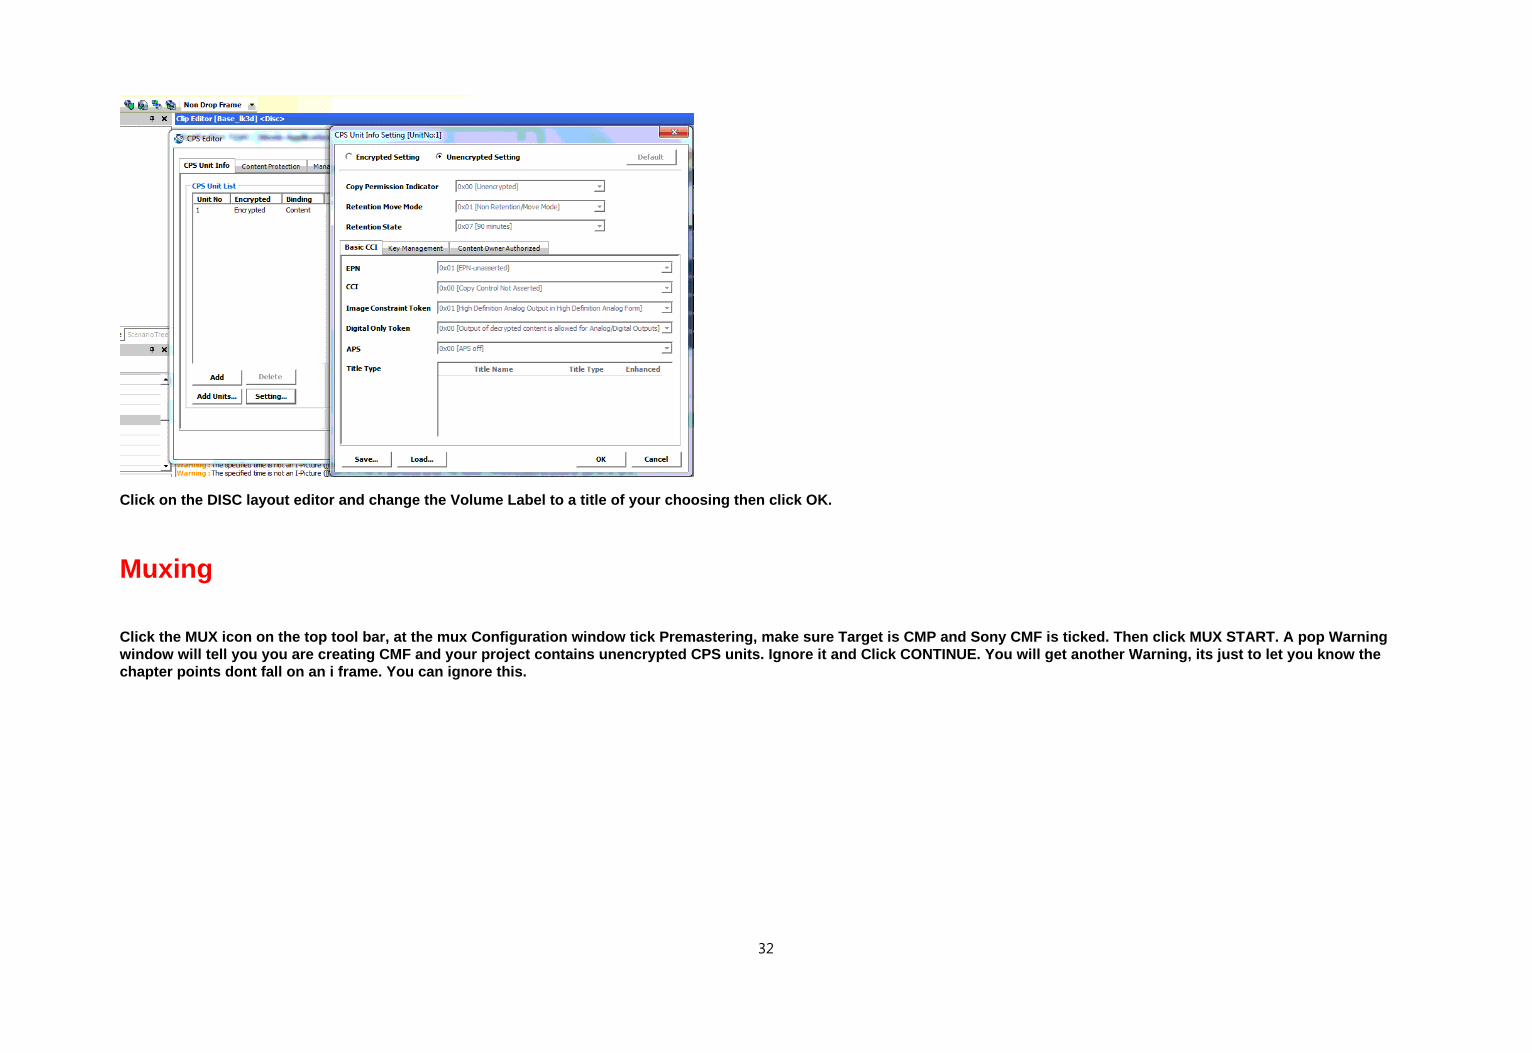
Click on the DISC layout editor and change the Volu me Label to a title of your choosing then click OK.
Muxing
Click the MUX icon on the top tool bar, at the mux Configuration window tick Premastering, make sure T arget is CMP and Sony CMF is ticked. Then click MUX START. A pop Warning window will tell you you are creating CMF and your project contains unencrypted CPS units. Ignore it a nd Click CONTINUE. You will get another Warning, it s just to let you know the chapter points dont fall on an i frame. You can ign ore this.
32

33

if the mux fails with a BUFFER UNDERFLOW, you need to manually change the TSRecording Rate from the de fault -1. Open the Clip folder in the StreamTree an d LEFT click the Base_lk3d.
You need to know your video and audio bitrate combi ned. It normally falls between 37000000 -42000000. You dont need to be exact.
34
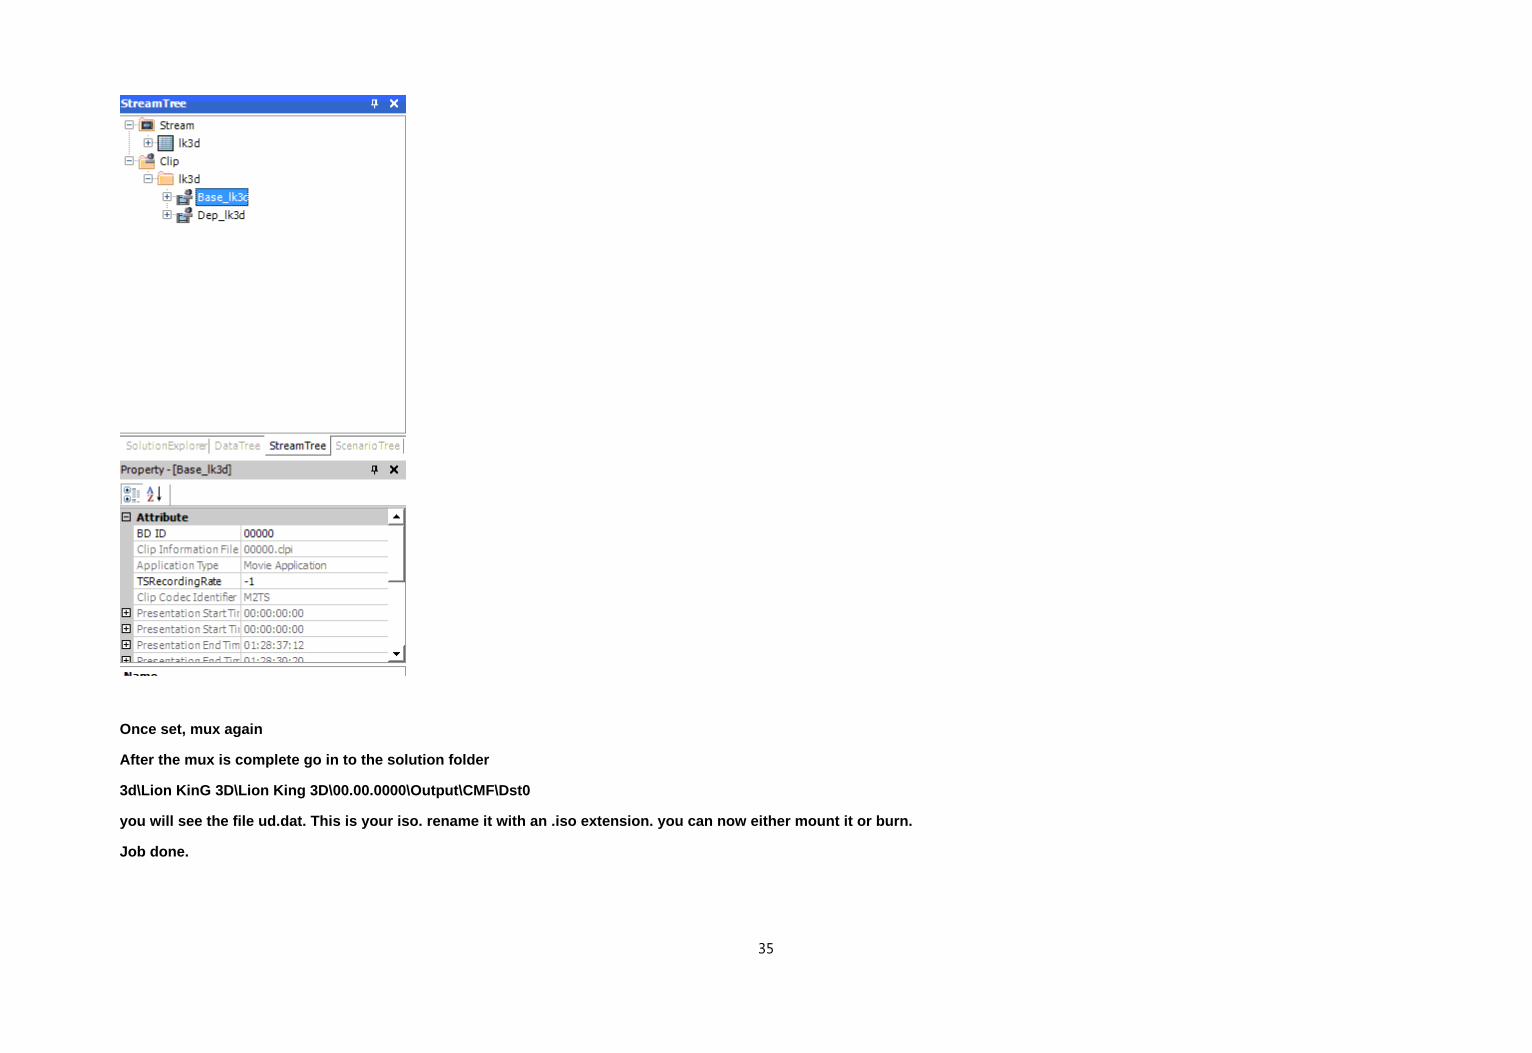
Once set, mux again
After the mux is complete go in to the solution fol der
3d\Lion KinG 3D\Lion King 3D\00.00.0000\Output\CMF\ Dst0
you will see the file ud.dat. This is your iso. ren ame it with an .iso extension. you can now either m ount it or burn.
Job done.
35

36

37