producing bean seed - cgiarciat-library.ciat.cgiar.org/articulos_ciat/handbook_1_english.pdf ·...
TRANSCRIPT

PRODUCING BEAN SEEDHANDBOOK ONE
HANDBOOKS FOR SMALL-SCALEBEAN SEED PRODUCERS
This publication was developed by theInternational Centre for Tropical Agriculture
(CIAT)
Written and Edited by
Soniia David
Illustrated by
Bahizi Jovan
Design and layout by
Fineline Pictures
i
Correct citation:
S. David. 1998. Producing bean seed: handbooks for
small-scale bean producers. Handbook 1. Network on
Bean Research in Africa, Occasional Publications Se-
ries, No. 29. CIAT, Kampala, Uganda
CIAT encourages institutions and organisations
to translate, reproduce or adapt this publica-
tion.
Please send information on the translation,
reproduction and adaptation of this publication
to:
CIAT
P.O. Box 6247, Kampala, Uganda
Fax: 256-41-567635
Email: [email protected]
Copies of illustrations can be obtained
upon request from the same address
ii

Acknowledgements ............... v
Introduction ............... vi
Why is seed quality important? ............... 1
What is good quality bean seed?............... 2
Field operations ............... 6
Varietal selection ............... 7
Seed selection ............... 7
Site selection ............... 7
Land preparation ............... 10
Improving soil fertility ............... 11
Planting ............... 13
Weeding and rouging ........... .... 14
Controlling insects ............... 15
Harvesting ............... 17
Post-harvest operations ............... 18
Drying in pods ............... 18
Threshing ............... 21
Drying threshed seed ............... 23
Winnowing and sorting ............... 25
Measuring moisture content ............... 27
Testing for germination ............... 29
Treatment ............... 37
Storage ............... 45
Summary ............... 51
CONTENTSPage Number
iii

Page Number
Words used by seed producers ............... 53
Quality standards for improved
and certified bean seed ............... 55
A seed quality experiment ............... 56
Common questions farmers ask ................ 62
Technical drawings:
Parts of a bean seed ................ 65
Threshing rack ................ 66
Platform sorter ................ 67
Sampling spear ................ 68
Treatment drum ................ 69
Silo ................ 70
iv

Acknowledgements
Financial support for this manual comes fromthe Canadian International Development Agency(CIDA), the Swiss Agency for Development andCo-operation (SDC) and the United States Agencyfor International Development (USAID).
The technical input of several individuals andinstitutions are gratefully acknowledged. Inparticular, The Post Harvest Programme atKawanda Agricultural Research Institute inUganda played a major role in developing post-harvest equipment and procedures for producingbean seed. The assistance of Michael Odong,Cedric Mutyaba and Ulysses Acasio are grate-fully acknowledged. Martin Wamaniala and MarkWood of the IDEA (Initiative for the Develop-ment of Export Agriculture) Project in Kam-pala, Uganda provided technical advice. AnnaSzakaly provided much needed assistance in re-writing the first draft and Christine Scypinskihelped with editing, layout and illustrationdevelopment. Charles Wortmann and RobinBuruchara gave valuable technical suggestionson agronomy and bean pathology.
v

INTRODUCTION TO THE HANDBOOKSFOR SMALL-SCALE BEAN SEED
PRODUCERS SERIES
This handbook is intended to be used by small-scale
farmers interested in producing bean seed for sale.
It is written for farmers who have no formal train-
ing or experience in bean seed production. You may
seekassistance in understanding some of the topics
covered in this handbook from researchers, extension
agents or NGOs.
This handbook on seed production is intended to be
used together with two other handbooks:
A note on technical words: Since some technical
words do not exist in local languages, it will be
necessary for you to develop new words in your
language. In this handbook, these technical words
are in English.
1. Controlling diseases and insect pests in
bean seed fields, and,
2. Business skills for small-scale seed
producers
vi
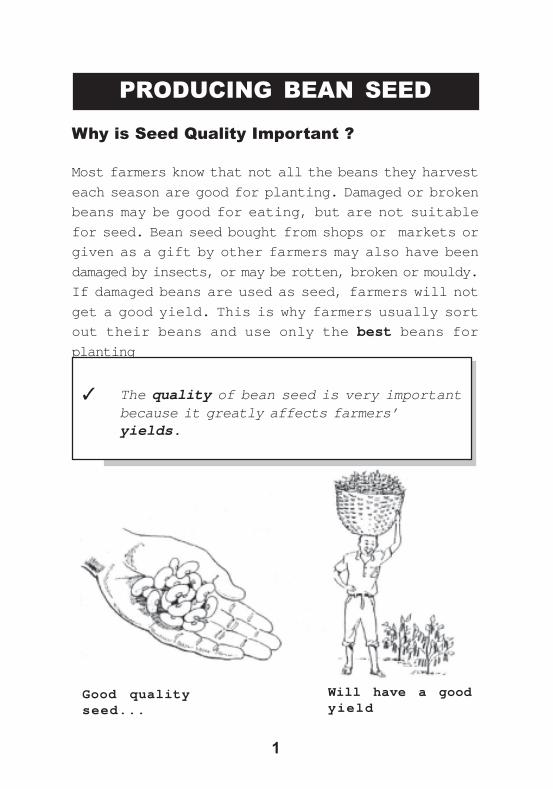
Why is Seed Quality Important ?
Most farmers know that not all the beans they harvest
each season are good for planting. Damaged or broken
beans may be good for eating, but are not suitable
for seed. Bean seed bought from shops or markets or
given as a gift by other farmers may also have been
damaged by insects, or may be rotten, broken or mouldy.
If damaged beans are used as seed, farmers will not
get a good yield. This is why farmers usually sort
out their beans and use only the best beans for
planting
PRODUCING BEAN SEED
✓ The quality of bean seed is very importantbecause it greatly affects farmers’yields.
Good qualityseed...
Will have a goodyield
1
What is Good Quality Bean Seed ?Good quality bean seed has the following properties:
a high germination rate;
well dried;
pure: all seeds are of the same variety and
of the same size;
clean: is not mixed with foreign matter such
as stones or dirt, or other seeds;
not damaged, broken, shrivelled, mouldy, or
insect damaged;
not rotten (may be diseased);
not discoloured or faded (may be diseased).
Bad quality seed... Will not growwell
2
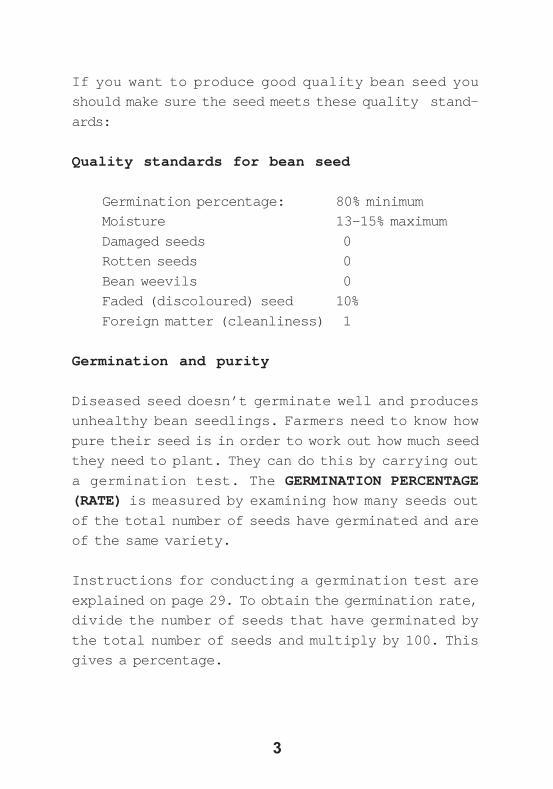
If you want to produce good quality bean seed you
should make sure the seed meets these quality stand-
ards:
Quality standards for bean seed
Germination percentage: 80% minimum
Moisture 13-15% maximum
Damaged seeds 0
Rotten seeds 0
Bean weevils 0
Faded (discoloured) seed 10%
Foreign matter (cleanliness) 1
Germination and purity
Diseased seed doesn’t germinate well and produces
unhealthy bean seedlings. Farmers need to know how
pure their seed is in order to work out how much seed
they need to plant. They can do this by carrying out
a germination test. The GERMINATION PERCENTAGE
(RATE) is measured by examining how many seeds out
of the total number of seeds have germinated and are
of the same variety.
Instructions for conducting a germination test are
explained on page 29. To obtain the germination rate,
divide the number of seeds that have germinated by
the total number of seeds and multiply by 100. This
gives a percentage.
3

Good quality bean seed should be pure and clean, that
is, all seed should be of the same variety and the
same size. It should not include any of the follow-
ing: dirt, stones, broken seed, shrivelled seed, mouldy
seed, rotten seed, insect damaged seed. Only 10% of
discoloured or faded (i.e. diseased) seed is al-
lowed.
To obtain the percentage of damaged seed, divide the
number of damaged seeds by the total number of seeds
and multiply by 100.
✓ If 80 seeds out of 100 germinate, the
germination rate is 80%.
80 divide by 100 = 0.8
0.8 x 100% = 80%
✓ If 5 seeds out of a total of 60 seeds are
damaged, then 8% are damaged.
5 divided by 60 = 0.083
0.083 x 100 = 8.3%
4
For Example:
For Example:

Moisture content
Determining the moisture content of a bean seed is
more difficult and requires more experience. This
procedure is explained in detail on page 27. One way
to test for seed moisture content is by biting the
seed with your teeth or by pinching it between your
fingers. The bean should be hard. It if soft, it is
too moist.
Biting or pinching can help you test seed
moisture content
Seed classes
Bean seed is classified into classes to show differences
in quality. Quality is measured by the same criteria
already mentioned; germination rate, whether the seed
is pure, sufficiently dry and free from diseases.
Seed produced by specialised producers for sale to
farmers is called CERTIFIED SEED. Specialised
producers might be seed projects or researchers. The
instructions given in this handbook are for the
production of IMPROVED SEED, a slightly lower class
of seed than certified seed, which can be produced
under farmers’ conditions.
5

FIELD OPERATIONS
Once you have decided to start a bean seed business
(see the handbook “Establishing a Bean Seed Busi-
ness”), there are certain steps you should follow to
produce good quality bean seed. This section on field
operations describes what to do in the field, from
selecting the site to harvesting the bean crop. The
section on post-harvest operations describes what to
do after harvesting, from drying the seed to storing
it.
These are the steps you must follow to grow bean
seed:
1. select varieties to be multiplied;
2. select seed for planting;
3. select the site where the seed will be grown;
4. prepare the land;
5. plant the seed;
6. weed and remove ROGUE (unwanted) plants in the
field;
7. control diseases and insect pests; and harvest
the seed.
6
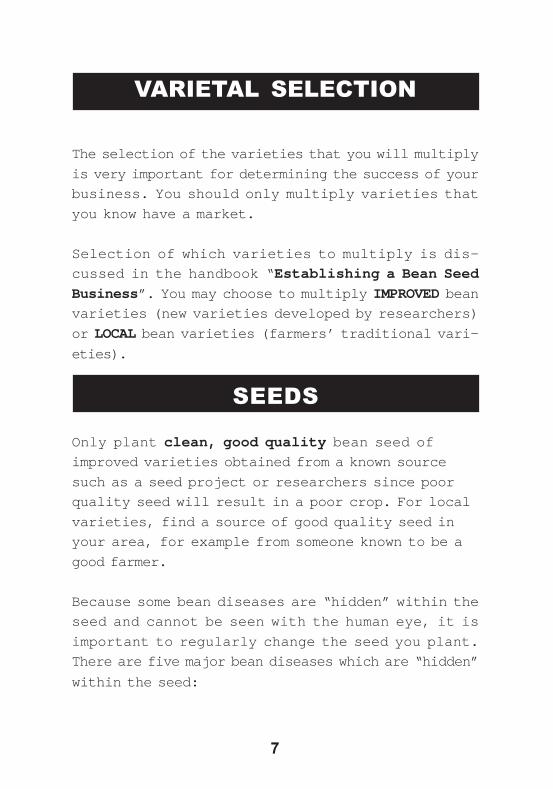
The selection of the varieties that you will multiply
is very important for determining the success of your
business. You should only multiply varieties that
you know have a market.
Selection of which varieties to multiply is dis-
cussed in the handbook “Establishing a Bean Seed
Business”. You may choose to multiply IMPROVED bean
varieties (new varieties developed by researchers)
or LOCAL bean varieties (farmers’ traditional vari-
eties).
SEEDS
Only plant clean, good quality bean seed of
improved varieties obtained from a known source
such as a seed project or researchers since poor
quality seed will result in a poor crop. For local
varieties, find a source of good quality seed in
your area, for example from someone known to be a
good farmer.
Because some bean diseases are “hidden” within the
seed and cannot be seen with the human eye, it is
important to regularly change the seed you plant.
There are five major bean diseases which are “hidden”
within the seed:
VARIETAL SELECTION
7

common bacterial blight, bean common mosaic virus,
anthracnose, halo blight and ascochyta. For informa-
tion on how to identify these diseases, read the
handbook “Controlling Diseases and Insect Pests
in Bean Seed Fields”. If you observe that most
plants in a field are affected by any of these five
diseases, change your seed every 1 or 2 seasons to
ensure you have a disease-free crop.
SITE SELECTION
To ensure high bean yields, select highly productive
land suitable for bean production. For example, you
should avoid steeply sloping land, land which is near
a swamp, very sandy soil and areas with shallow sur-
face soil and a lot of couch grass. Look for signs
that indicate high soil fertility.
Sloping land
Dangerous weeds likecouch grass Sandy
Swampy land
8
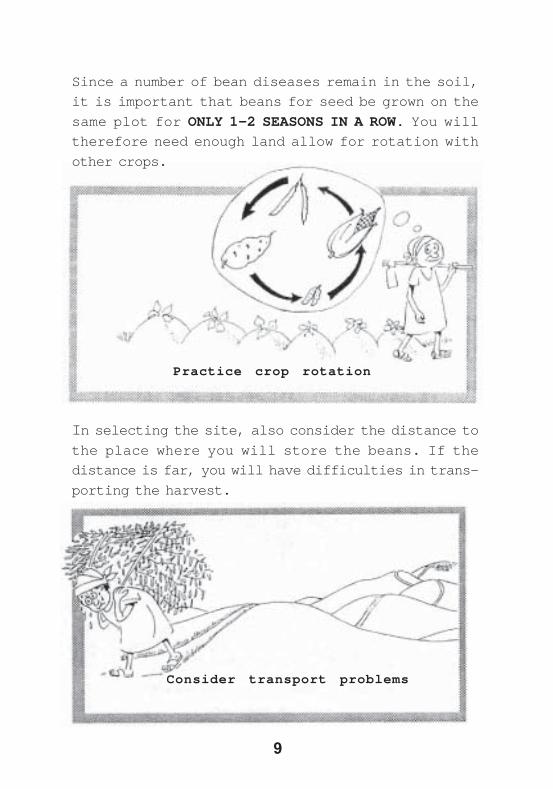
Since a number of bean diseases remain in the soil,
it is important that beans for seed be grown on the
same plot for ONLY 1-2 SEASONS IN A ROW. You will
therefore need enough land allow for rotation with
other crops.
In selecting the site, also consider the distance tothe place where you will store the beans. If the
distance is far, you will have difficulties in trans-
porting the harvest.
Practice crop rotation
Consider transport problems
9

Once you have selected your site, prepare your land
early. Dig or plough deeply. If there is a lot of
grass or weeds in the field, you should plough at
least one month before planting so that all organic
material rots down. If you do not do this, the beans
may emerge yellow or grow poorly.
Good land preparation (dig deeply)
Poor land preparation (shallow digging)
LAND PREPARATIONS
10
11
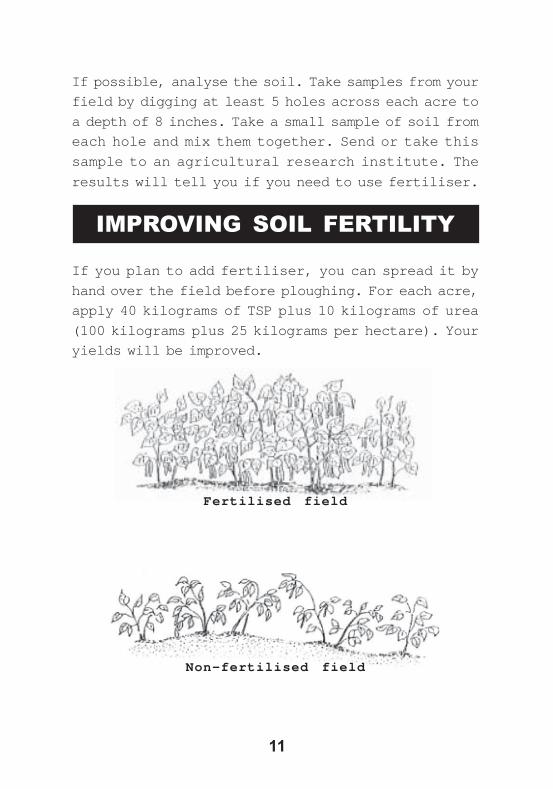
If possible, analyse the soil. Take samples from your
field by digging at least 5 holes across each acre to
a depth of 8 inches. Take a small sample of soil from
each hole and mix them together. Send or take this
sample to an agricultural research institute. The
results will tell you if you need to use fertiliser.
IMPROVING SOIL FERTILITY
If you plan to add fertiliser, you can spread it by
hand over the field before ploughing. For each acre,
apply 40 kilograms of TSP plus 10 kilograms of urea
(100 kilograms plus 25 kilograms per hectare). Your
yields will be improved.
Fertilised field
Non-fertilised field

You can also use animal manure (especially chicken
droppings) or compost to improve your soil condi-
tions. The use of plants called MUCUNA and CANAVALIA
can also increase soil productivity. You can obtain
seed of Mucuna and Canavalia from an agricultural
research institute. Your extension agent may also
know how to obtain seed. Either plant should be planted
the season before and left on the soil surface. Plant
two seeds of Mucuna or Canavalia per hole at a spac-
ing of 60 centimetres (2 feet) between plants and 75
centimetres (2.5 feet) between rows (similar to the
spacing for planting maize). Since the plants grow
vigorously and cover the ground quickly, it may be
necessary to weed once 3 weeks after planting. When
you are ready to plant a crop of bean seed, simply
uproot the Mucuna or Canavalia plants and leave them
to dry on the ground. There is no need to first dig
the soil.
12

PLANTING
If you are planting certified bean seed, put only one
seed in each hole. If the seed is obtained from other
farmers or from shops, plant 2-3 seeds in each hole.
Plant the beans in rows. This makes it easier to weed
the crop. The recommended spacing is: 50 centimetres
between rows and 15-20 centimetres between plants.
Recommended spacing between plants
When planting different bean varieties, make sure to
maintain a space of 2 metres between areas where each
different variety is planted to prevent mixing of
varieties.
Recommended spacing between varieties
13

Many farmers like the idea of intercropping beans.
You should not intercrop a field planted with a bean
seed crop because intercropping makes the management
of the crop more difficult and you are likely to
harvest less.
WEEDING AND ROGUING
Weeds reduce yields. This is why it is important to
weed at least 1-2 times each season. The first weeding
must take place 3 weeks after planting the seed. The
timing of the next weeding will depend on the weed
and crop growth.
During the first 5 weeks after planting, check the
field for diseased plants three (3) times:
1. when the plants first emerge from the
soil;
2. two (2) weeks later;
3. when the first flowers emerge.
Bean plants are affected by many diseases. You may
not even be aware of many of these diseases. More
details on how to identify bean diseases and how to
inspect your field are provided in the handbook
“Controlling Diseases and Insect Pests in Bean
Seed Fields”. If only a few of the plants show signs
of disease, remove them so that the disease does not
spread to the healthy plants. This is called ROGUING.
Pull out the diseased plants and burn them.
14
To keep the bean crop pure, you should remove plants
that look very different in growth from the varieties
you have planted. For example, remove plants which
climb or have a different leaf shape or flower color.
CONTROLLING INSECTS
The most common insects that affect bean plants are
aphids, the bean stem maggot, flower thrips, ootheca
(a beetle which eats the leaves of bean plants) and
different types of insects which eat pods and leaves.
The handbook “Controlling Diseases and Insect
Pests in Bean Seed Fields” teaches you how to
recognise and control insects. Since insects can damage
an entire crop of seed, check the field regularly for
insects. Details on how to inspect your field are
provided in the handbook “Controlling Diseases
and Insect Pests in Bean Seed Fields”. Not all
insects, however, cause damage to the bean plant. For
example, bees will not harm your crop. Some insects
such as spiders, lady birds and ants are natural
enemies of harmful insects.
Chemicals
Insects can be controlled by spraying the crop with
chemicals.
15
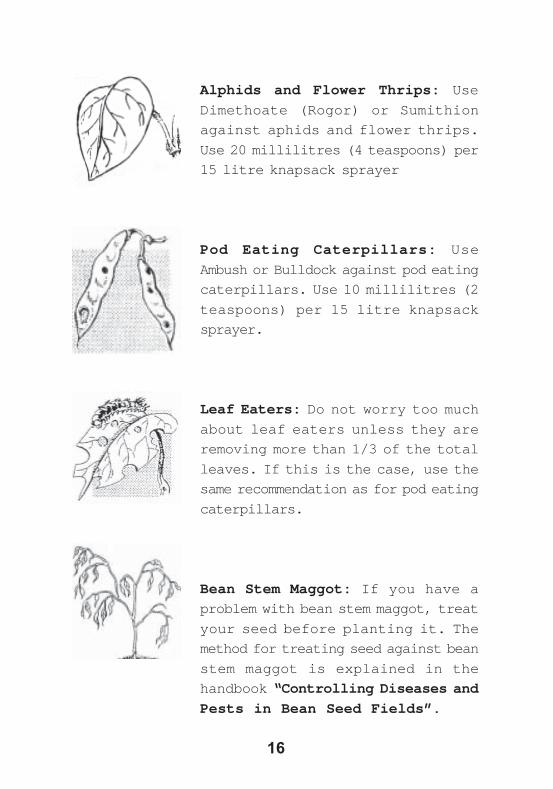
Alphids and Flower Thrips: Use
Dimethoate (Rogor) or Sumithion
against aphids and flower thrips.
Use 20 millilitres (4 teaspoons) per
15 litre knapsack sprayer
Pod Eating Caterpillars: Use
Ambush or Bulldock against pod eating
caterpillars. Use 10 millilitres (2
teaspoons) per 15 litre knapsack
sprayer.
Leaf Eaters: Do not worry too much
about leaf eaters unless they are
removing more than 1/3 of the total
leaves. If this is the case, use the
same recommendation as for pod eating
caterpillars.
Bean Stem Maggot: If you have a
problem with bean stem maggot, treat
your seed before planting it. The
method for treating seed against bean
stem maggot is explained in the
handbook “Controlling Diseases and
Pests in Bean Seed Fields”.
16

HARVESTING
Only harvest those plants that are ready (usually 90-
120 days after planting depending on the variety
grown). Seed which is harvested too early will not
grow into healthy plants. When all leaves and pods of
upright bush bean varieties are yellow, you know that
the plants are ready for harvesting. Harvest pods of
climbing and trailing beans as they mature. Do not
harvest bean pods that are touching the soil as they
may be infected with disease pathogens found in the
soil.
Do not leave the beans to dry in the field after they
are harvested as they can be affected by disease or
eaten by insects and animals. Beans left in the sun
too long may become too dry for threshing, and if
left in the rain, will be too wet for threshing.
Harvest plants ontime
Avoid harvestinglate
17

POST-HARVEST OPERATIONSThese steps should be followed after harvesting:
1. drying in pods;
2. threshing;
3. drying threshed seed;
4. winnowing and sorting;
5. measuring moisture content;
6. testing for germination;
7. treatment;
8. storing.
DRYING IN PODS
Before beans can be threshed, they must be dried in
the pod. If you start threshing immediately after
harvesting, you will damage the seed because it is
too moist to be threshed.
You should test the moisture of the seed before
threshing using your teeth or pinching with your
fingers and again before treatment using the salt
test. The procedure for testing the moisture of seed
is explained on page 27.
18

Do not dry beans on the ground. They can get dirty,
wet, or eaten by animals if they are dried in this
way. Instead, you can dry beans in their pods on a
mat.
It is better to dry the beans on a plastic sheet, on
a raised platform or in a maize crib.
Crop drying on a mat
Crop drying on a raised platform
19

Watch over the drying pods
Ask someone to watch the beans while they dry. This
person can cover the beans if it rains and can chase
away animals.
Once you have prepared a
place to dry the beans,
follow these steps:
1. Sort the seed pods and
remove weeds and immature
pods.
2. Arrange the pods loosely
on the platform, mat, or
crib. If you put them too
close together, the air
will not circulate and the
beans will get mouldy.
20
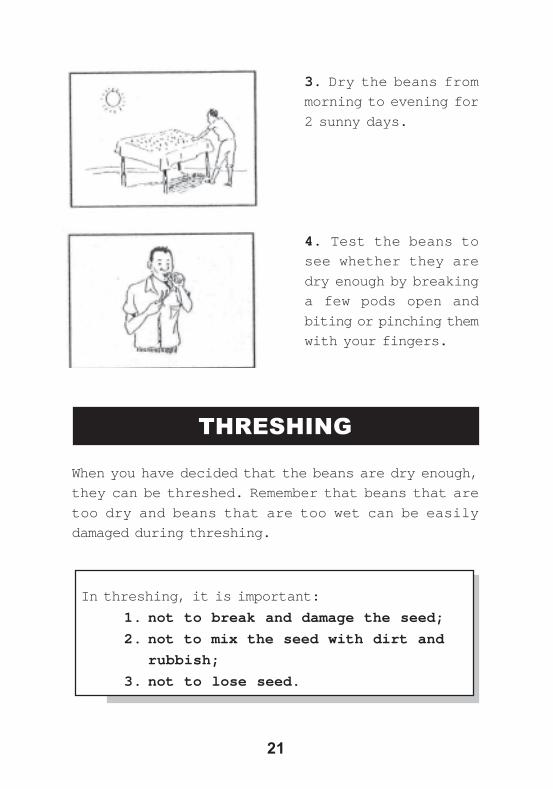
3. Dry the beans from
morning to evening for
2 sunny days.
4. Test the beans to
see whether they are
dry enough by breaking
a few pods open and
biting or pinching them
with your fingers.
THRESHING
When you have decided that the beans are dry enough,
they can be threshed. Remember that beans that are
too dry and beans that are too wet can be easily
damaged during threshing.
In threshing, it is important:
1. not to break and damage the seed;
2. not to mix the seed with dirt and
rubbish;
3. not to lose seed.
21

Threshing on the ground or in a gunny bag can easily
damage the seed. Broken or cracked seed is more likely
to be attacked by insects and mould and may not
germinate.
Threshing on a threshing rack protects the seed from
damage and dirt and prevents it from scattering.
A woman threshing on a threshing rack
A threshing rack consists of strips of wood arranged
on a platform with a wire mesh tray on the bottom to
catch the threshed seed. The seed is prevented from
scattering during threshing by the high wooden sides.
This threshing rack can be made by a local
carpenter using a design - see drawing on
page 66 for details
22

DRYING THRESHED SEED
After the seed has been threshed, it must be dried
again. As always, it is important to protect the seed
from rain, insects, animals and dirt.
Threshed seed should be dried on mats, plastic sheets
or wire mesh trays raised on a platform.
1.Spread the seed thinly on the drying sur-
face to allow air to pass through it.
2.Turn the seed regularly to avoid over-heating.
23
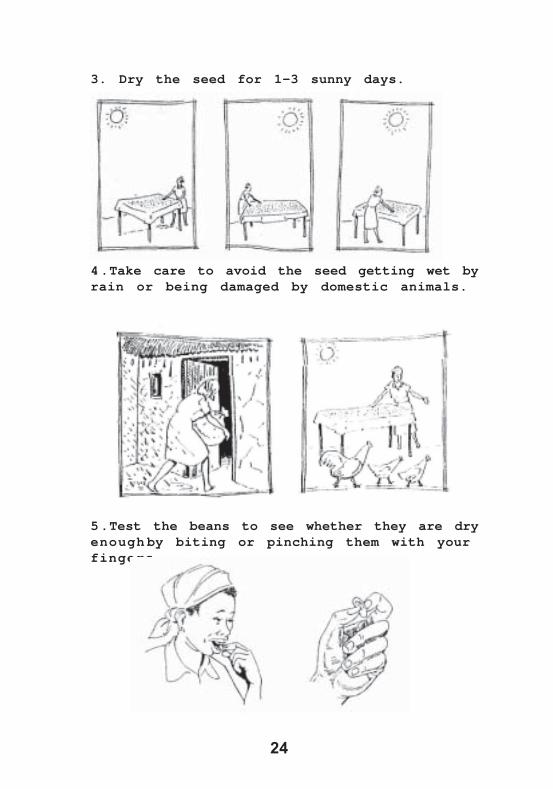
3. Dry the seed for 1-3 sunny days.
4.Take care to avoid the seed getting wet byrain or being damaged by domestic animals.
5.Test the beans to see whether they are dryenough by biting or pinching them with yourfingers.
24
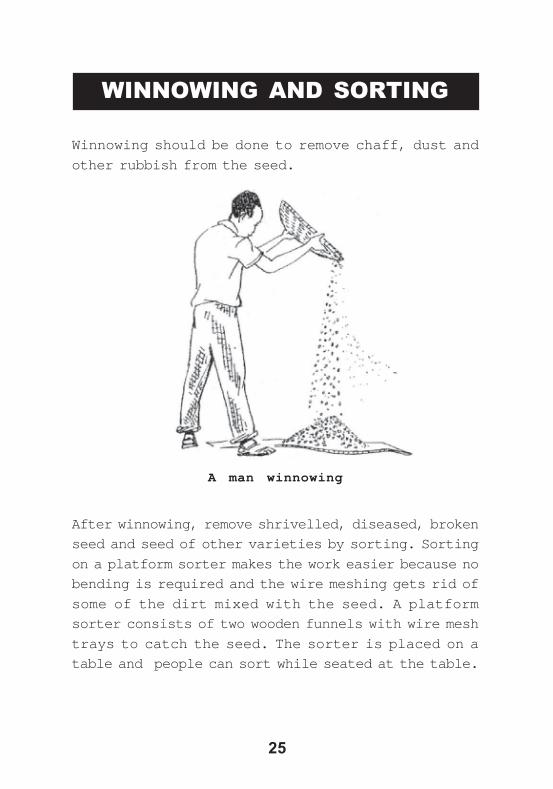
Winnowing should be done to remove chaff, dust and
other rubbish from the seed.
After winnowing, remove shrivelled, diseased, broken
seed and seed of other varieties by sorting. Sorting
on a platform sorter makes the work easier because no
bending is required and the wire meshing gets rid of
some of the dirt mixed with the seed. A platform
sorter consists of two wooden funnels with wire mesh
trays to catch the seed. The sorter is placed on a
table and people can sort while seated at the table.
WINNOWING AND SORTING
A man winnowing
25
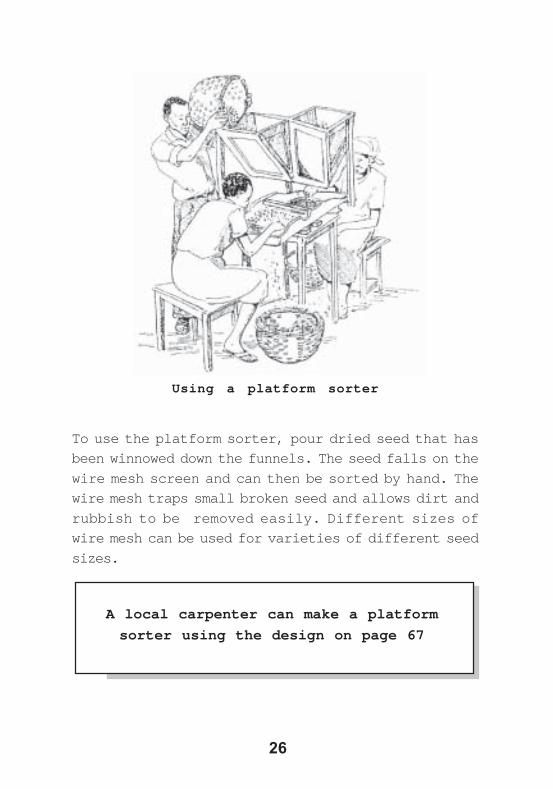
Using a platform sorter
To use the platform sorter, pour dried seed that has
been winnowed down the funnels. The seed falls on the
wire mesh screen and can then be sorted by hand. The
wire mesh traps small broken seed and allows dirt and
rubbish to be removed easily. Different sizes of
wire mesh can be used for varieties of different seed
sizes.
A local carpenter can make a platform
sorter using the design on page 67
26

The salt test is a good way to determine the moisture
of threshed seed:
For this test you will need a clean, dry jarwith a lid, some salt and a sample of bean
seed.
MEASURING MOISTURE CONTENT
Take one sample (a handful is
enough) from the middle of
each bag of bean seed. It is
best to remove a sample using
a special instrument called
a sampling spear (see page 67
for details on how to make
it). Treat each sample sepa-
rately.
Steps for the Salt Test
1. Make sure that the jar you
are using is clean and
completely dry.
27

2. Put the salt in the jar
(enough salt to fill up a
quarter of the jar) and add
a sample of seed (enough to
fill half of the jar). Put
the lid on the jar.
3. Shake the jar well and
then allow the seed to set-
tle for about 10 minutes.
4. If after 10 minutes you
can see damp salt stuck to
the sides of the jar, the
seed is too moist. This means
that the amount of moisture
in the seed is above the 13-
15% required for improved
bean seed. If the jar is dry
and there is no salt stuck
to the sides of the jar, the
seed is dry.
28

TESTING FOR GERMINATION
After cleaning and sorting, a sample of seed should
be tested for germination.
The results of the test will tell farmers how much
seed they need to plant to get good yields. For
example, if you know that 90% of your seed will
germinate (i.e. it has a 90% germination rate), you
can work out how much seed to plant, taking into
consider If you have seed with a 60% germination
rate, you will need to plant more seed than that with
a 90% germination rate.
Seed should be tested for germination before it is
stored. If seed has been stored for more than five
months another germination test should be performed
before it is sold.
Steps for the Germination TestStep 1. Obtain a
sample for testing
a) Wash your hands.
Take samples of seeds
(a handful is enough)
from the top, middle
and bottom of each bag
produced using a sam-
pling spear.
29

b) In a plastic bowl or
basin, mix all of the three
samples from the bag to-
gether.
c) Remove a one kilogram
seed sample from the bowl
and mix it again in another
bowl.
d) Pour seed on a clean
wooden table and count out
the first 200 seeds that
you see. Do not pick out
particular seeds deliber-
ately; count all 200 seeds
from one end of the pile.
Put the remaining seed back
into the bags.
30
Step 2. Plant the seeds
Wash your hands. Separate the sample of 200 seeds,
into 2 equal groups (batches) of 100 seeds each.
Plant each batch of 100 seeds into two separate con-
tainers using the following instructions. You can
also use more containers and smaller samples (25 or
50 seeds per container), if don’t have large contain-
ers to fit 100 seeds.
It is better to use sand as a planting medium, but if
you do not have sand, you can use soil. Put clean,
moist sand or soil at a depth of 10-12 centimetres
loosely into each container. Make small planting holes
2-3 centimeters apart in rows with a small stick.
Plant 1 bean seed per hole.
Planting seed in soil
31

Cloth, paper towels or newspaper can also be used
instead of sand or soil. Moisten the cloth, paper
towel or newspaper in water and place the seeds on it
(each seed should be spaced 2-3cm apart). Cover the
seeds with another piece of moist cloth, paper towel
or newspaper.
Planting seed on moist cloth, paper towels or
newspaper
The containers should be kept indoors for the next
two weeks to allow time for the seeds to germinate.
It is important that you control the moisture level
during this time. The seeds should be kept moist,
but not wet. Both too much or too little water can
prevent seed germination. After planting, water the
seed and check daily to ensure that the sand or soil
does not get too dry. Make sure that the container
has holes on the bottom to allow water to drain.
Seedlings should begin to emerge 7-11 days after
planting.
32
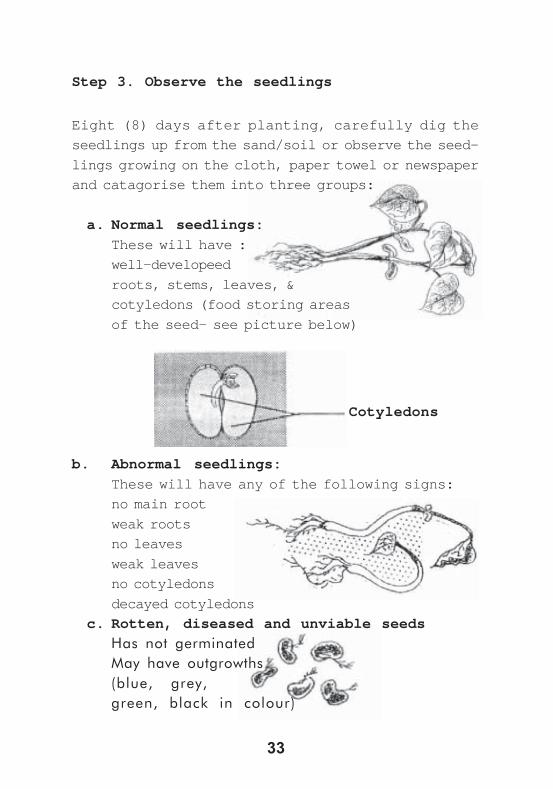
Eight (8) days after planting, carefully dig the
seedlings up from the sand/soil or observe the seed-
lings growing on the cloth, paper towel or newspaper
and catagorise them into three groups:
a. Normal seedlings:
These will have :
well-developeed
roots, stems, leaves, &
cotyledons (food storing areas
of the seed- see picture below)
b. Abnormal seedlings:
These will have any of the following signs:
no main root weak roots no leavesweak leaves
no cotyledons decayed cotyledons
c. Rotten, diseased and unviable seeds
Has not germinated
May have outgrowths
(blue, grey,
green, black in colour)
33
Cotyledons
Step 3. Observe the seedlings
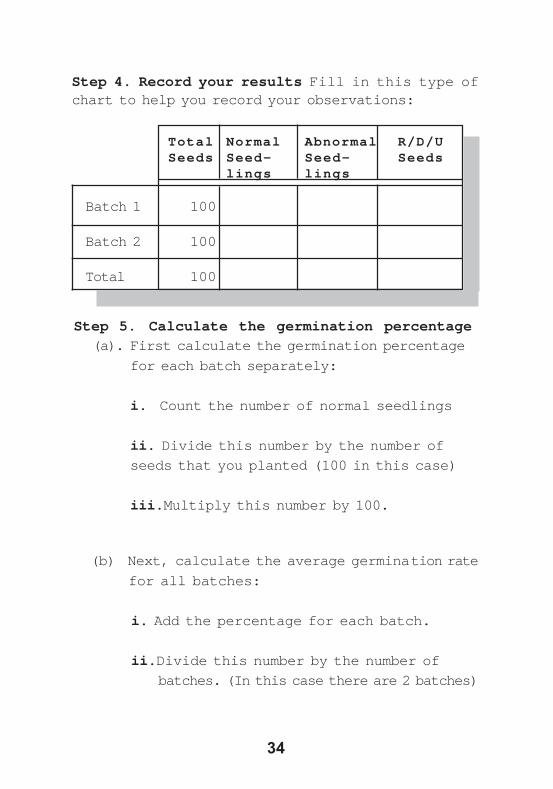
Step 5. Calculate the germination percentage
(a). First calculate the germination percentage
for each batch separately:
i. Count the number of normal seedlings
ii. Divide this number by the number of
seeds that you planted (100 in this case)
iii.Multiply this number by 100.
Step 4. Record your results Fill in this type ofchart to help you record your observations:
Batch 1 100
Batch 2 100
Total 100
TotalSeeds
NormalSeed-lings
AbnormalSeed-lings
R/D/USeeds
34
(b) Next, calculate the average germination rate
for all batches:
i. Add the percentage for each batch.
ii.Divide this number by the number of
batches. (In this case there are 2 batches)
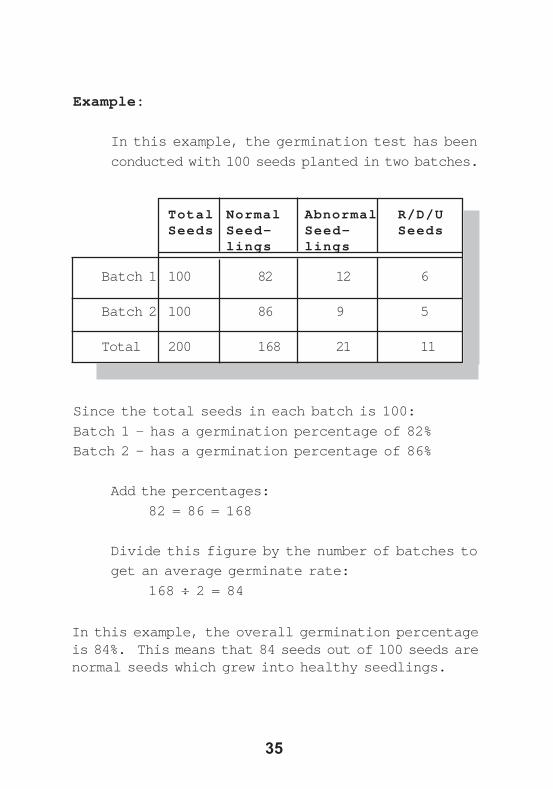
Example:
In this example, the germination test has been
conducted with 100 seeds planted in two batches.
Since the total seeds in each batch is 100:
Batch 1 – has a germination percentage of 82%
Batch 2 – has a germination percentage of 86%
Add the percentages:
82 = 86 = 168
Divide this figure by the number of batches to
get an average germinate rate:
168 ÷ 2 = 84
TotalSeeds
NormalSeed-lings
AbnormalSeed-lings
R/D/USeeds
Batch 1 100 82 12 6
Batch 2 100 86 9 5
Total 200 168 21 11
35
In this example, the overall germination percentageis 84%. This means that 84 seeds out of 100 seeds arenormal seeds which grew into healthy seedlings.
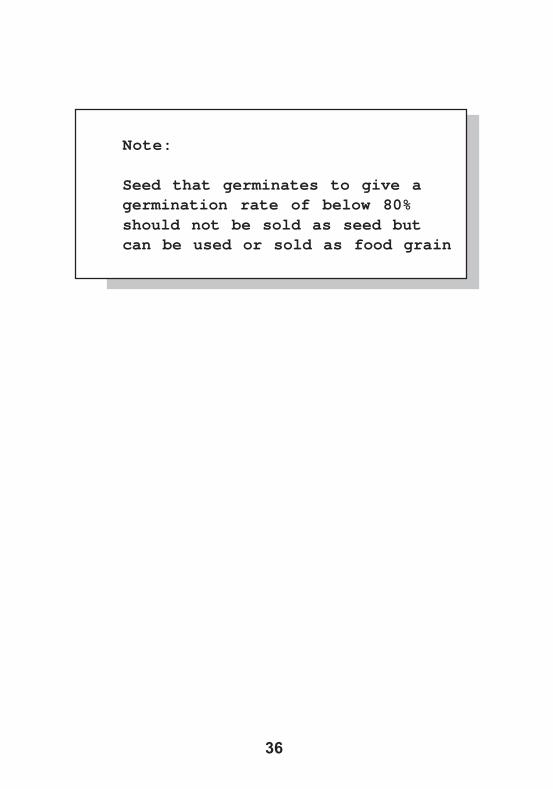
Note:
Seed that germinates to give agermination rate of below 80%should not be sold as seed butcan be used or sold as food grain
36

The purpose of treating bean seed is to protect it
from damage by insects, rats and mould when stored
for long periods of time.
Weevil damaged seed
Seed can also be treated to protect the crop against
diseases and field insects such as bean stem maggot.
Read the handbook “Controlling Diseases and In-
sect Pests in Bean Seed Fields” for more details
on seed treatment for bean stem maggot.
Traditional treatments against damage during
storage
These include: frequent drying in the sun, coating
with banana juice or mixing with ash, termite soil,
hot pepper or eucalyptus leaves.
TREATMENT
37
Treatment with chemicals
Chemicals can be more effective that traditional
methods. However, chemicals are poisonous, and great
care must be taken when using them.
Important
Use insecticides only after you
have been trained.
Strictly follow the instructions on the
container of the chemicals.
Insecticides loose their strength over
time. If they have been on the self for
a long time before you buy them, they
may not be effective.
Never eat seed that has been treated
with chemicals - even if it has been
stored for a long time after treatment.
38
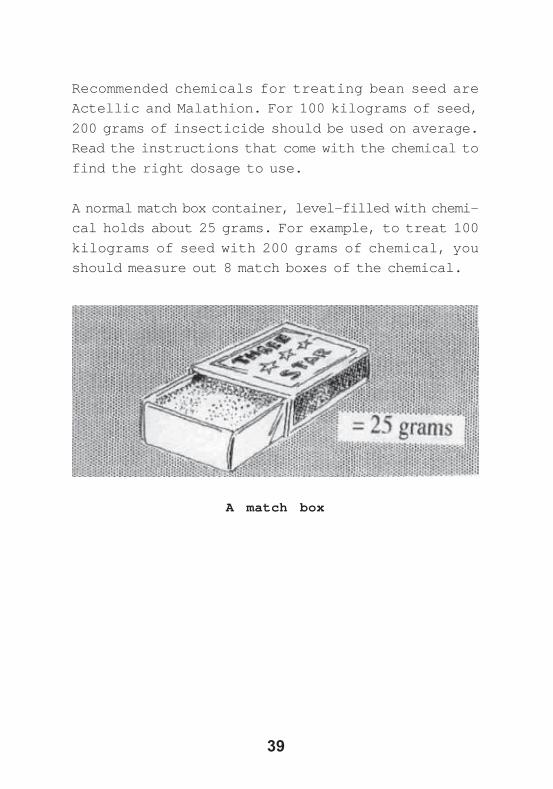
Recommended chemicals for treating bean seed are
Actellic and Malathion. For 100 kilograms of seed,
200 grams of insecticide should be used on average.
Read the instructions that come with the chemical to
find the right dosage to use.
A normal match box container, level-filled with chemi-
cal holds about 25 grams. For example, to treat 100
kilograms of seed with 200 grams of chemical, you
should measure out 8 match boxes of the chemical.
A match box
39

Applying seed treatment chemicals with a shovel
Chemicals are poisonous. You must
use them only in a well ventilated
place. Do not smoke, eat or drink
while the work is being done.
1. Empty the seed onto a clean concrete floor or a
clean polythene sheet that is kept only for this
purpose.
Warning !
Be aware that when applying treatmentchemicals with a shovel or container, youare likely to inhale the chemicals whichmay be dangerous to your health.
40

2. Sprinkle the recommended amount of insecticide
evenly over the seed.
3. Using a clean shovel, hoe, large bowl or a cut-off
20 litre tin, gently mix the chemical into the heap
of seeds until all of the seeds are evenly coated.
When you are finished, you should not be able to see
any patches of powder on the heap.
41
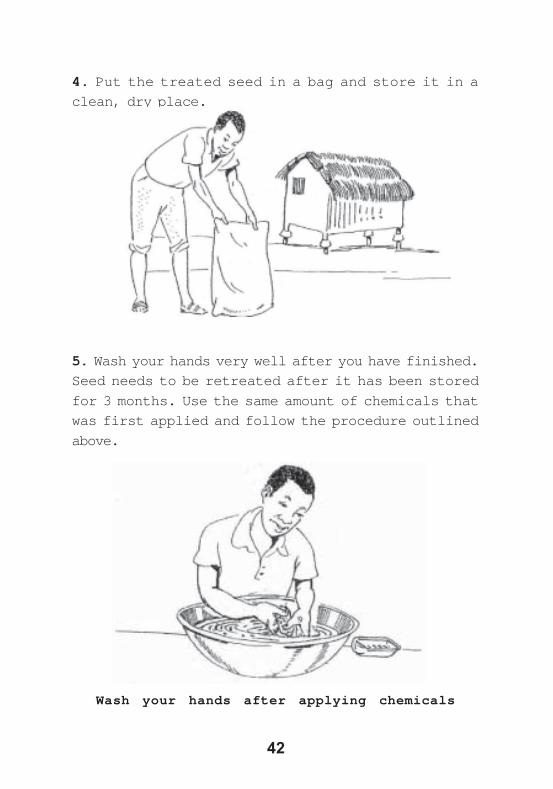
4. Put the treated seed in a bag and store it in a
clean, dry place.
5. Wash your hands very well after you have finished.
Seed needs to be retreated after it has been stored
for 3 months. Use the same amount of chemicals that
was first applied and follow the procedure outlined
above.
Wash your hands after applying chemicals
42
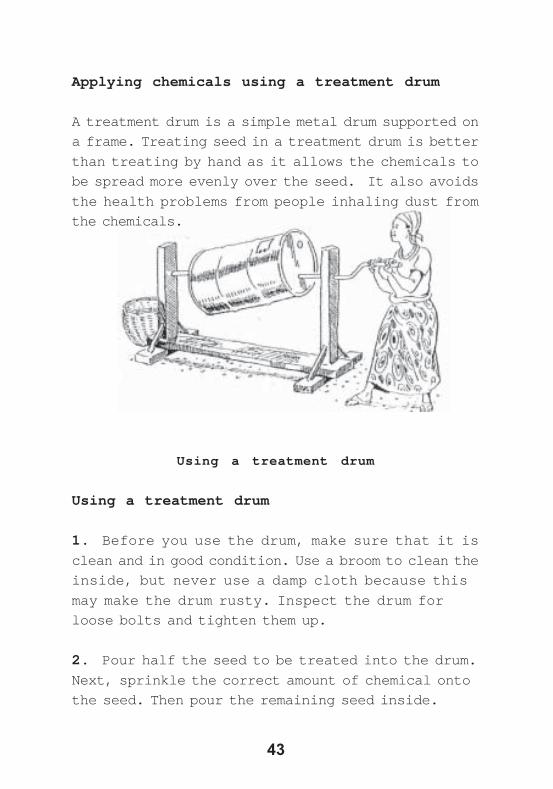
Applying chemicals using a treatment drum
A treatment drum is a simple metal drum supported on
a frame. Treating seed in a treatment drum is better
than treating by hand as it allows the chemicals to
be spread more evenly over the seed. It also avoids
the health problems from people inhaling dust from
the chemicals.
Using a treatment drum
Using a treatment drum
1. Before you use the drum, make sure that it is
clean and in good condition. Use a broom to clean the
inside, but never use a damp cloth because this
may make the drum rusty. Inspect the drum for
loose bolts and tighten them up.
2. Pour half the seed to be treated into the drum.
Next, sprinkle the correct amount of chemical onto
the seed. Then pour the remaining seed inside.
43

3. Seal the small door by tightening the bolts with aspanner. If there is space between the door andthe body of the drum, cover the opening with apiece of cloth before bolting the door.
4. Turn the drum 15 times while standing in an up-right position. Wait for 5 minutes for the dust tosettle before opening the door. Chemicals are poi-sonous, so do not inhale the dust.
5. Spread a large plastic sheet or container belowthe door to collect the treated seed. Swing thedrum from side to side to make sure that all theseed has been removed. If there are a few seedsleft in the drum, you can remove them with abroom.
The treatment drum shown on page 68 has a capacity of100 kilograms of seed. You will need a size 13 span-ner to open and close the door of the drum.
A local welder can make a treatmentdrum by using the design on page 69
44
Store your seed carefully to avoid damaging it. Make
sure that you keep your seed clean and dry.
Seed must be dry before it is packaged and stored.
Proper drying reduces the chance of mould. The mois-
ture content should not be greater than 13-15%. If
salt sticks to the jar when you do the salt test for
moisture (see page 27 for details), dry the seed
again before you store it.
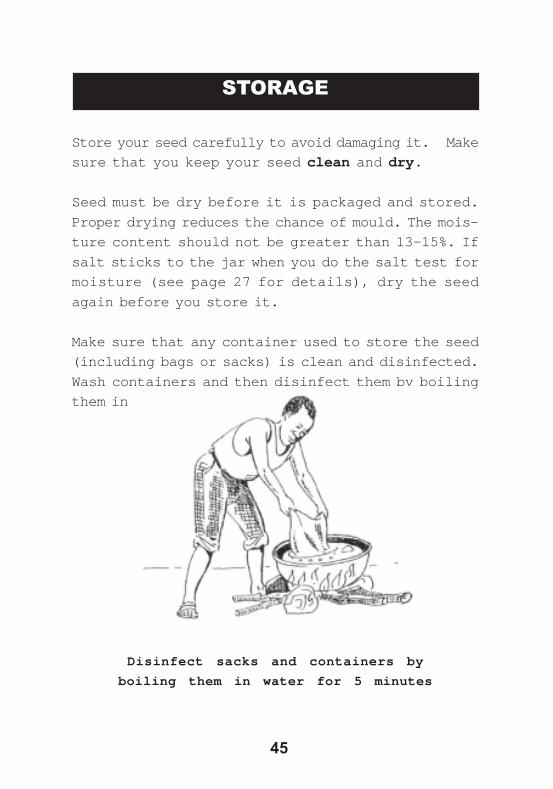
Make sure that any container used to store the seed
(including bags or sacks) is clean and disinfected.
Wash containers and then disinfect them by boiling
them in water for 5 minutes.
Disinfect sacks and containers by
boiling them in water for 5 minutes
STORAGE
45

If you are disinfecting a polythene sack, make sure
that it does not touch the outside of the pot. The
heat may damage it. All sacks and containers must be
completely dry before you use them to store seeds.
dry sacks well
Once you have put the beans in sacks or other con-
tainers, they should be stored in a clean, dry and
well ventilated place. Make sure that the storage
place you use has no leaks. Rain water should not run
down the walls of the storage place.
Close holes whererodents can come
in
Do not let rain leakinto the storage place
46

Rats and mice
Close all holes and openings where rats, insects and
water can get in. Fill in cracks in the walls, floor
and ceiling. Keep the storage area very clean to
discourage rats and mice. These animals like to eat
and hide in rubbish, so you should remove any rubbish
from the storage area.
Remove all rubbish
Cut the grass around the storage area as rats do not
like to cross open spaces, If you have a storage
structure on poles, build rat guards to keep rats
from climbing them.
47
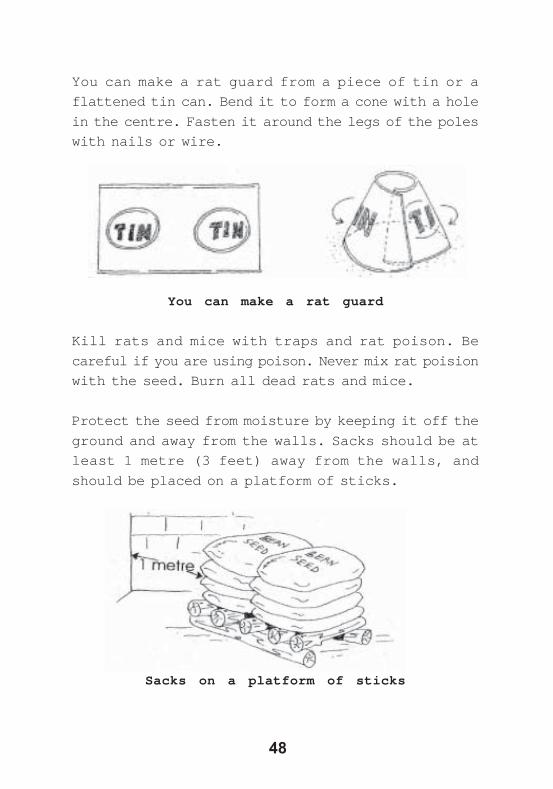
You can make a rat guard from a piece of tin or a
flattened tin can. Bend it to form a cone with a hole
in the centre. Fasten it around the legs of the poles
with nails or wire.
You can make a rat guard
Kill rats and mice with traps and rat poison. Be
careful if you are using poison. Never mix rat poision
with the seed. Burn all dead rats and mice.
Protect the seed from moisture by keeping it off the
ground and away from the walls. Sacks should be at
least 1 metre (3 feet) away from the walls, and
should be placed on a platform of sticks.
Sacks on a platform of sticks
48
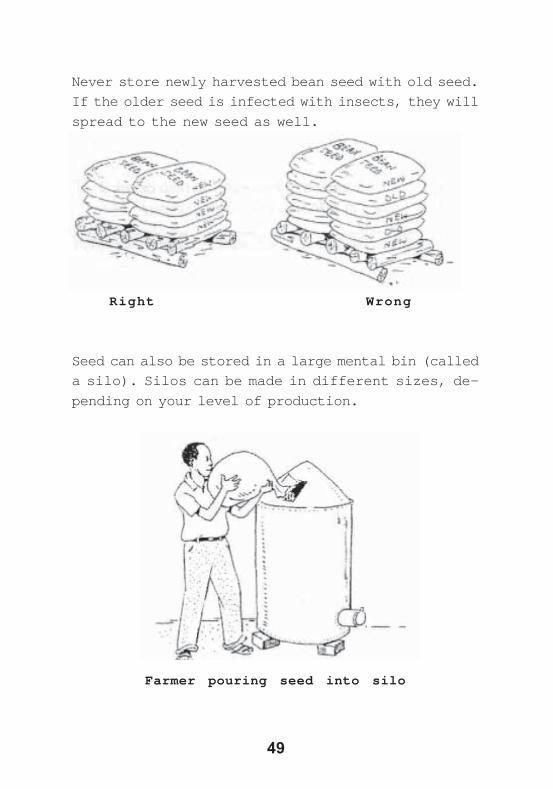
Never store newly harvested bean seed with old seed.
If the older seed is infected with insects, they will
spread to the new seed as well.
Right Wrong
Seed can also be stored in a large mental bin (called
a silo). Silos can be made in different sizes, de-
pending on your level of production.
Farmer pouring seed into silo
49

Since the silo is made of metal, the seed is well
protected against insects and moisture. The seed can
easily be poured into the silo and emptied out when
needed.
A local welder can make silos to holddifferent amounts using the design on
page 70
50
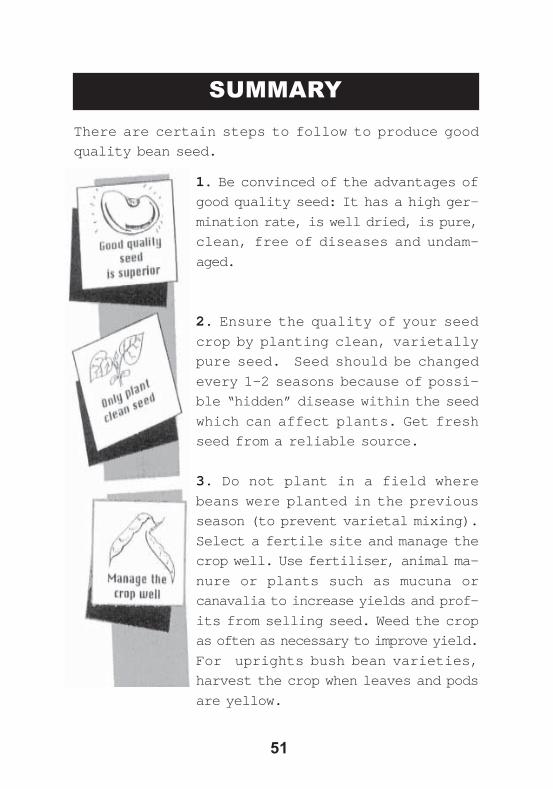
SUMMARY
1. Be convinced of the advantages of
good quality seed: It has a high ger-
mination rate, is well dried, is pure,
clean, free of diseases and undam-
aged.
2. Ensure the quality of your seed
crop by planting clean, varietally
pure seed. Seed should be changed
every 1-2 seasons because of possi-
ble “hidden” disease within the seed
which can affect plants. Get fresh
seed from a reliable source.
3. Do not plant in a field where
beans were planted in the previous
season (to prevent varietal mixing).
Select a fertile site and manage the
crop well. Use fertiliser, animal ma-
nure or plants such as mucuna or
canavalia to increase yields and prof-
its from selling seed. Weed the crop
as often as necessary to improve yield.
For uprights bush bean varieties,
harvest the crop when leaves and pods
are yellow.
There are certain steps to follow to produce good
quality bean seed.
51
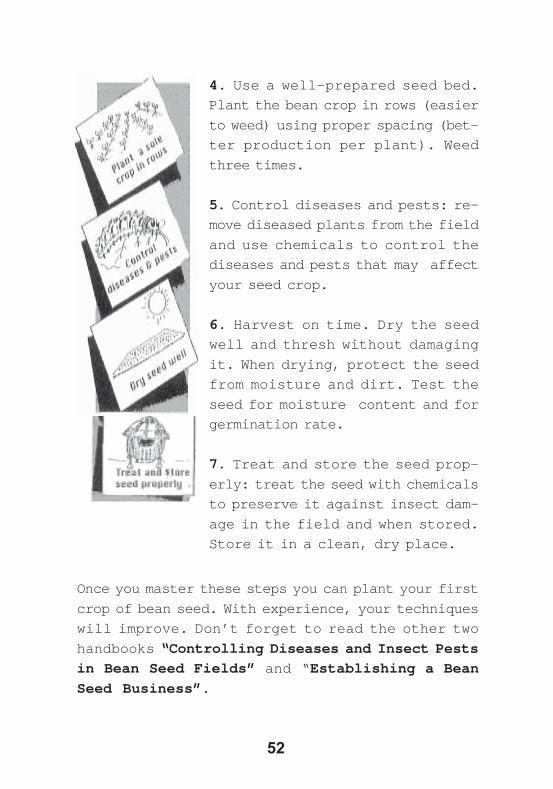
4. Use a well-prepared seed bed.
Plant the bean crop in rows (easier
to weed) using proper spacing (bet-
ter production per plant). Weed
three times.
5. Control diseases and pests: re-
move diseased plants from the field
and use chemicals to control the
diseases and pests that may affect
your seed crop.
6. Harvest on time. Dry the seed
well and thresh without damaging
it. When drying, protect the seed
from moisture and dirt. Test the
seed for moisture content and for
germination rate.
7. Treat and store the seed prop-
erly: treat the seed with chemicals
to preserve it against insect dam-
age in the field and when stored.
Store it in a clean, dry place.
Once you master these steps you can plant your first
crop of bean seed. With experience, your techniques
will improve. Don’t forget to read the other two
handbooks “Controlling Diseases and Insect Pests
in Bean Seed Fields” and “Establishing a Bean
Seed Business”.
52

WORDS USED BY SEED PRODUCERS
WORD THE WORDMEANS
MORE ONPAGE
3, 429 - 36
BEANSEED
Beans produced spe-cially for plantingrather than eating.
1 – 3
CERTI-FIEDSEED
Carefully producedseed of high qualitywhich meets certainrequirements.
5
IMPROVED BEANVARIETIES
Bean varieties thathave been developedby researchers.Thesevarieties havehigher yields andare usually moreresistant to dis-eases and pests thanfarmers’ varieties.
7
IMPROVEDSEED
Carefully producedseed of high qualitywhich meets qualityrequirements that areslightly lower thancertified seed.
5, 55
LOCAL BEANVARIETIES
Bean varieties thatfarmers grow tradi-tionally.
7
GERMINATIONPERCENTAGE(RATE)
The number of seedsexpected to germi-nate out of 100seeds planted.
53
WORD THE WORDMEANS
MORE ONPAGE
MUCUNA ANDCANAVALIA
Plants which can begrown on crop landand then incorpo-rated into the soilto improve soilfertility
12
ROGUING To remove unwantedplants from a field.Plants may be un-wanted because theyarediseased or of adifferent varietythan the otherplants.
14
54

QUALITY PARAMETERS FOR IMPROVED ANDCERTIFIED BEAN SEED
IMPROVED SEED
Isolation (meters) 2 5
Purity (by weight) 90% 99%
Germination(minimum) 80% 80%
Disease level (atfinal inspection)
Halo blight,Commonbacterialblight,Anthracnose:signs onleaves onlyBean commonmosaic virus:none
None
Moisture 13% 13%
Varietal purity N.A. 99%
Off-types 10/10,000 10/10,000(maximum)
55
CERTIFIED SEED

A SEED QUALITY EXPERIMENT
To see the difference between seed of different qual-
ity, try the following experiment.
1. Take small samples (50-100 seeds) of 4 types of
bean seed of the same variety:
(i) sort seed using your usual method of sorting;
(ii) Seed that you do not sort at all;
56

(iii) “Bad” seed that you rejected when sorting
and;
(iv) Clean seed: seed that you get from research-
ers, a seed project, or seed that you have produced
using the methods described in this handbook.
2. Select an area with good soil fertility where
beans have not been grown for 1 or more seasons.
57

3. Plant the 4 types of seed separately in differ-
ent rows or blocks. For example, sorted seed may
be planted in the first 2 rows, unsorted seed in
the next two rows “bad” seed in the next two rows
and “clean” seed in the next two rows. Do not
forget to mark each row indicating the type of
seed planted. Make sure to plant all 4 types of
seed on the same day and record the date of planting.
58

4. Observe the plants at different stages of growth:
i. 3-5 days after planting to check for
germination;
ii.when the leaves emerge;
iii.at flowering, and;
iv.just before harvesting.
5. To help note observations, answer these questions
for each type of seed:
1. Germination:
a) How many days afterplanting did the seedsgerminate?
b) How many seeds didyou plant?
c) How many germinated?
59
C l e a n S o r t e d U n s o r t e d B a d

2. Grow:
a) How many days afterplanting did the leavesappear?
b) How many days afterplanting did the flowersappear?
3. Disease:
a) Are any of the plants sick(diseased)?
b) Ifyes,how many?
c) What does the sicknesslook like?
60
CleanSortedUnsortedB a d
CleanSortedUnsortedB a d
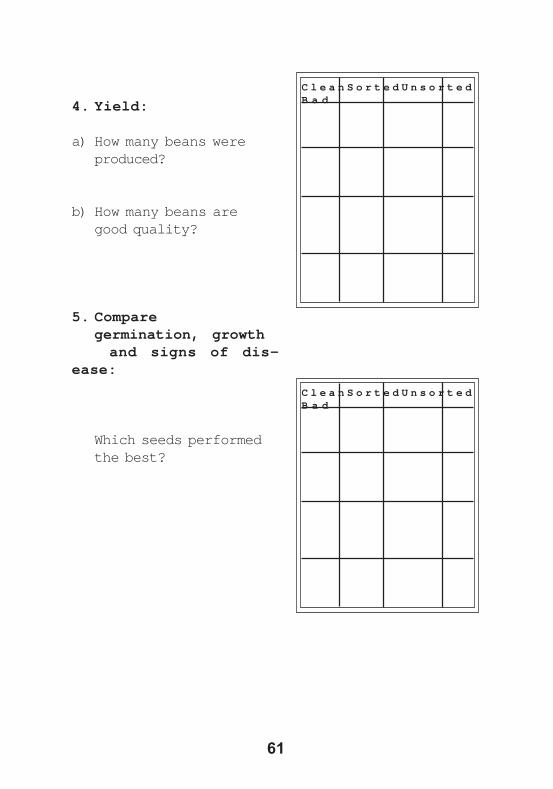
4. Yield:
a) How many beans wereproduced?
b) How many beans aregood quality?
5. Comparegermination, growthand signs of dis-
ease:
Which seeds performedthe best?
61
C l e a n S o r t e d U n s o r t e dB a d
C l e a n S o r t e d U n s o r t e dB a d

QUESTION:If I continue planting beans on the same pieceof land for over 2 seasons, what will happen?
ANSWER:Your yields will decline, the crop is likelyto be diseased and the roots may be affectedby worms.
QUESTION:I would prefer to intercrop my seed crop. Whycan’t I do this?
ANSWER:You will have to decide whether your businesscan afford to have reduced yields. Remember,you are producing bean seed for a business andtherefore you want to increase yields so as tomake more money.
QUESTION:Can I also plant climbing beans as a seedcrop?
ANSWER:Yes, if you think there is demand in your areaof climbing beans. Follow all steps outlinedin the manual. You should harvest climbingbean pods as they mature.
QUESTION:Do I have to use all the equipment mentionedin this manual?
COMMON QUESTIONS FARMERS ASK
62

ANSWER:The equipment mentioned in this manual was de-signed to make seed production easier and to ensureproduction of good quality seed. It is thereforestrongly recommended that you use the equipment.All equipment can be made by local craftsmen.
QUESTION:
From my experience, boiling polythene bags causesthem to break up after some time. What should Ido?
ANSWER:This may be true but even without boiling, over
time polythene bags will break up. Although it isrecommended that you boil your bags to kill in-sects, you will have to make the best decisionfor your situation.
QUESTION:
Is there likely to be moisture in the silo?
ANSWER:No, unless the silo is not well raised above theground and if the seed in it is not well dried.
QUESTION:The manual states that you should never eat seedthat has been treated with chemicals even if ithas been stored for a long time. I don’t want tothrow that seed away. What should I do?
63

ANSWER:It is very important not to eat treated seed to avoidillness from the chemicals. You could do one of twothings: sell the seed for a lower price to get rid ofit quickly or keep it in storage until you can sellit, re-treating it every 3 months.
If you take a long time to sell seed of a particularvariety, this is a sign that you need to do bettermarket research or plan better. Slow sales means thatthere is little demand for a particular variety orthat the price is too high. You may have to reduce
your price, your level of production or stop growingthe variety in question.
64

PARTS OF A BEAN SEED
Plumule
Radicle
Cotyledon
Testa
65

THRESHING RACK
Wire meshtray
Sacking
66

PLATFORM SORTER
67
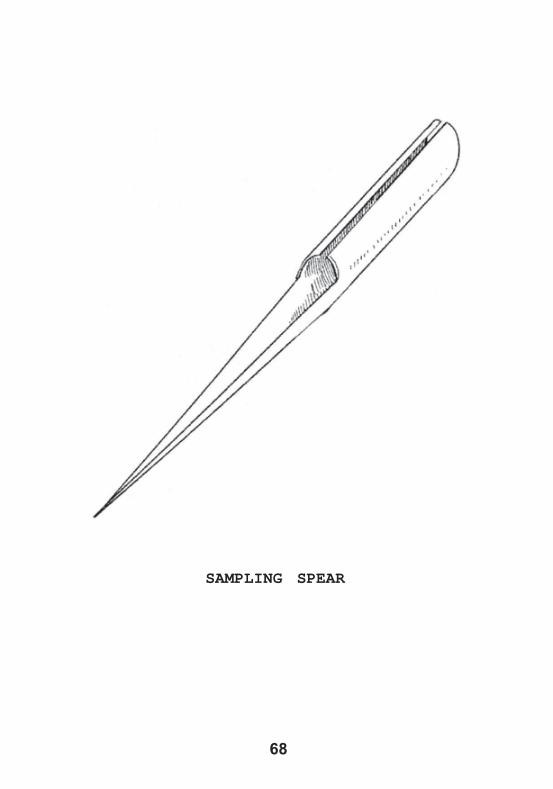
SAMPLING SPEAR
68

TREATMENT DRUM
69

A SILO
70

The Handbooks for Small-Scale Seed ProducersSeries is produced by the International Centrefor Tropical Agriculture (CIAT)
For more information contact:Pan African Coordinator, CIATP.O. Box 6247, Kampala, UGANDAEmail: [email protected]