partshere troubleshooting document
TRANSCRIPT

www.partshere.com Partshere Troubleshooting
Troubleshooting
Chapter contents
IntroductionTroubleshooting process
Pre-troubleshooting checklistTroubleshooting flowchartTroubleshooting power-on
Printer error troubleshootingStatus messagesWarning messages Error messagesCritical error messagesAlphabetical printer messages Numerical printer messages
To better help our customers - this HP Color Laserjet 4600 series troubleshooting page is simply a guide / additional information for your convenience, as you search for assistance in repairing your machine. Although this information is provided for your convenience it is recommended, for the most part, that a technician inspects your office equipment.
It is recommended to consult with a professional when ordering your printer part(s).

C9660-90901 Partshere Troubleshooting
Introduction
This troubleshooting chapter assumes the reader has a basic understanding of the color laser printing process. Explanations of each mechanical assembly, printer systems, and the basic theory of operation are found in Chapter 5. Do not perform any of these troubleshooting processes without fully understanding the function of each mechanism.
This chapter contains the following sections:
● Troubleshooting process includes a pre-troubleshooting checklist and a troubleshooting flowchart. These tools contain information about common printer errors that can inhibit proper operation or create print quality problems. These tools also include recommendations for solving the cause of the error.
● Printer error troubleshooting explains each control panel display message and suggests recommendations for clearing the cause of each message. When the printer message indicates a failure for which the root cause is not obvious, use the printer error troubleshooting section and the troubleshooting tools section found later in this chapter to solve the problem.
● Paper path troubleshooting provides techniques to solve feed problems. Explanations regarding print media checks, troubleshooting jams, and the differences between jams caused by media and those caused by the printer are discussed.
● Image formation troubleshooting suggests methods for solving print quality problems.
● Interface troubleshooting provides techniques for isolating communication problems to the printer hardware, printer configuration, network configuration, or software application.
● Control panel troubleshooting provides procedures for printing a menu map from the printer control panel. It also describes the control panel menus, the items within each menu, and the possible values for the menu items.
● Troubleshooting tools help isolate the cause of printer failures. This section includes explanations of the printer configuration page and the event log.
● Diagnostics provides instructions on how to access and use the diagnostic tools incorporated into the printer.
● Service menu provides procedures for entering the service menu and performing service-oriented tasks. These tasks include counts for entering the serial number, service ID, transfer unit maintenance, fuser maintenance, color page, total page, and clearing the event log.
● Diagrams provides graphical locations and tables for the printer’s internal assemblies and sensors.

Troubleshooting process www.partshere.com
Troubleshooting process
When the printer malfunctions or encounters an unexpected situation, the printer control panel alerts you of the situation. This section contains a pre-troubleshooting checklist to filter out many possible causes of the problem. A troubleshooting flowchart helps you diagnose the root cause of the problem. The remainder of this chapter provides steps for correcting problems.
● Use the pre-troubleshooting checklist to evaluate the source of the problem and to reduce the number of steps required to fix the problem.
● Use the troubleshooting flowchart to pinpoint the root cause of hardware malfunctions. The flowchart guides you to the appropriate section of this chapter that provides steps for correcting the malfunction.
Before beginning any troubleshooting procedure, check the following:
● Are supply items within their rated life?
● Does the configuration page reveal any configuration errors?
Note The customer is responsible for checking supplies and for using supplies that are in good condition.
www.partshere.com Partshere Troubleshooting
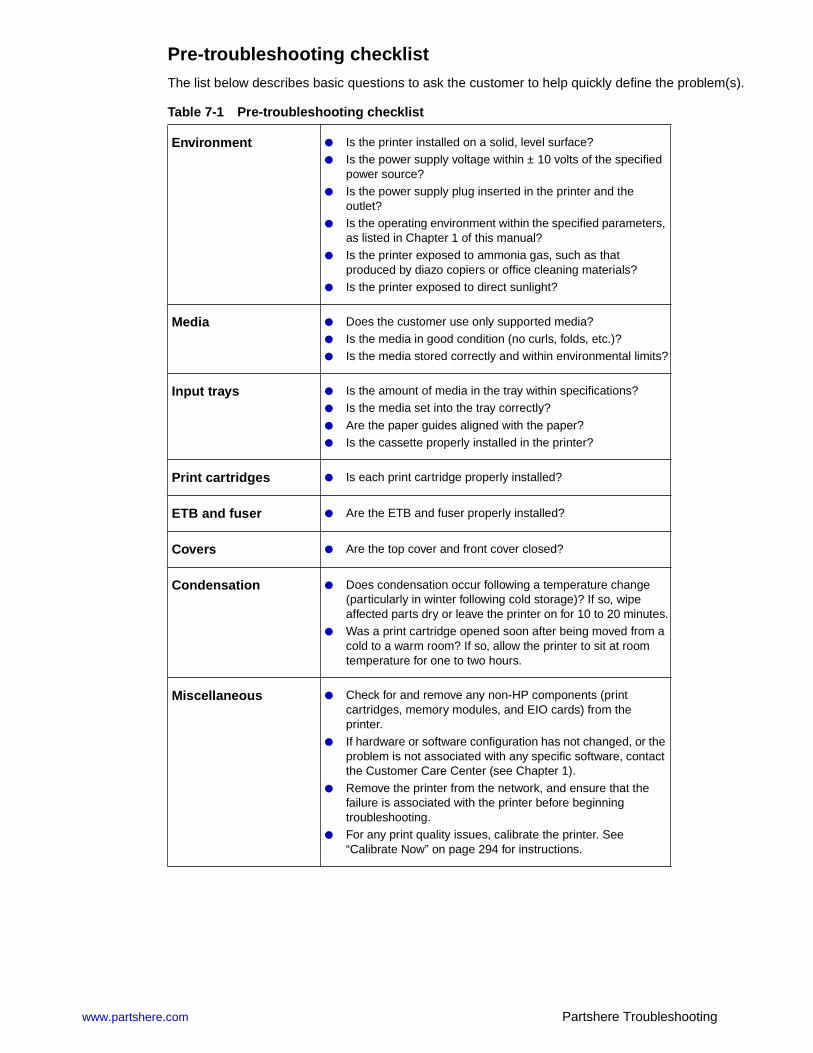
Pre-troubleshooting checklistThe list below describes basic questions to ask the customer to help quickly define the problem(s).
Table 7-1 Pre-troubleshooting checklist
Environment ● Is the printer installed on a solid, level surface?
● Is the power supply voltage within ± 10 volts of the specified power source?
● Is the power supply plug inserted in the printer and the outlet?
● Is the operating environment within the specified parameters, as listed in Chapter 1 of this manual?
● Is the printer exposed to ammonia gas, such as that produced by diazo copiers or office cleaning materials?
● Is the printer exposed to direct sunlight?
Media ● Does the customer use only supported media?
● Is the media in good condition (no curls, folds, etc.)?● Is the media stored correctly and within environmental limits?
Input trays ● Is the amount of media in the tray within specifications?
● Is the media set into the tray correctly?
● Are the paper guides aligned with the paper?● Is the cassette properly installed in the printer?
Print cartridges ● Is each print cartridge properly installed?
ETB and fuser ● Are the ETB and fuser properly installed?
Covers ● Are the top cover and front cover closed?
Condensation ● Does condensation occur following a temperature change (particularly in winter following cold storage)? If so, wipe affected parts dry or leave the printer on for 10 to 20 minutes.
● Was a print cartridge opened soon after being moved from a cold to a warm room? If so, allow the printer to sit at room temperature for one to two hours.
Miscellaneous ● Check for and remove any non-HP components (print cartridges, memory modules, and EIO cards) from the printer.
● If hardware or software configuration has not changed, or the problem is not associated with any specific software, contact the Customer Care Center (see Chapter 1).
● Remove the printer from the network, and ensure that the failure is associated with the printer before beginning troubleshooting.
● For any print quality issues, calibrate the printer. See “Calibrate Now” on page 294 for instructions.

Troubleshooting process www.partshere.com
Troubleshooting flowchart The flowchart on these two pages highlights the general processes to quickly isolate and solve printer hardware problems.
Each heading depicts a major troubleshooting step. A "yes" answer to the questions allows you to proceed to the next major step.
A "no" answer indicates that additional testing is needed. Proceed to the referenced section in this chapter, and follow the instructions. After completing this additional testing, proceed to the next major step in the troubleshooting flowchart.
Figure 7-1 Troubleshooting flowchart
Note If the printer’s display is blank, but the power-on checks pass, try printing an engine test page to determine whether the problem is with the engine/display or with the formatter. See page 292 for instructions.

www.partshere.com Partshere Troubleshooting
Troubleshooting flowchart (continued)

Troubleshooting process www.partshere.com
Troubleshooting power-on When you turn on the printer, if it does not make any sound or if the control panel display is blank, check the following items:
1 Verify that the printer is plugged into an active electrical outlet with the correct voltage.
2 Verify that the on/off switch is in the ON position.
3 Make sure the rear fan is running, indicating the system is operational.
4 Verify that the firmware DIMM and the formatter are seated and operating properly.
5 Remove any HP Jetdirect or other EIO cards, then try to turn the printer on again.
6 Make sure the control panel display is connected.
7 Check the fuses in the power supply.
8 If necessary, replace the power supply.
9 If necessary, replace the DC controller.
C9660-90901 Partshere Troubleshooting
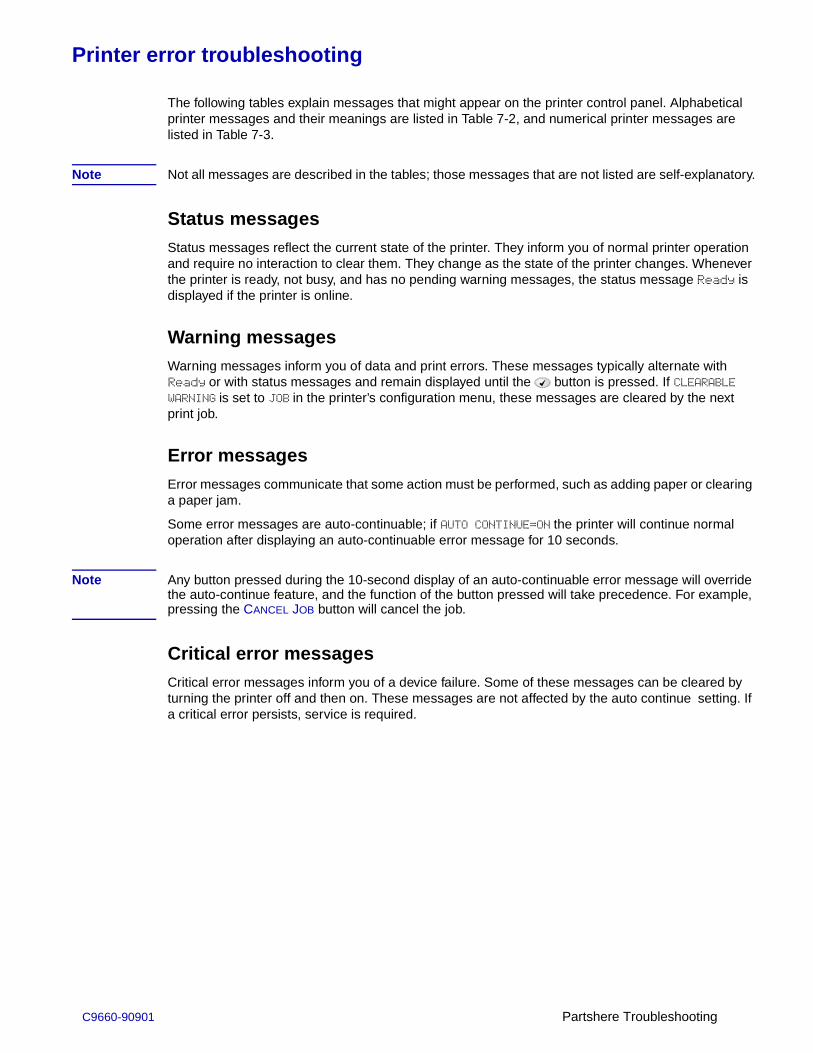
Printer error troubleshooting
The following tables explain messages that might appear on the printer control panel. Alphabetical printer messages and their meanings are listed in Table 7-2, and numerical printer messages are listed in Table 7-3.
Note Not all messages are described in the tables; those messages that are not listed are self-explanatory.
Status messages Status messages reflect the current state of the printer. They inform you of normal printer operation and require no interaction to clear them. They change as the state of the printer changes. Whenever the printer is ready, not busy, and has no pending warning messages, the status message Ready isdisplayed if the printer is online.
Warning messages Warning messages inform you of data and print errors. These messages typically alternate with Ready or with status messages and remain displayed until the button is pressed. If CLEARABLEWARNING is set to JOB in the printer’s configuration menu, these messages are cleared by the next print job.
Error messages Error messages communicate that some action must be performed, such as adding paper or clearing a paper jam.
Some error messages are auto-continuable; if AUTO CONTINUE=ON the printer will continue normal operation after displaying an auto-continuable error message for 10 seconds.
Note Any button pressed during the 10-second display of an auto-continuable error message will override the auto-continue feature, and the function of the button pressed will take precedence. For example, pressing the CANCEL JOB button will cancel the job.
Critical error messages Critical error messages inform you of a device failure. Some of these messages can be cleared by turning the printer off and then on. These messages are not affected by the auto continue setting. If a critical error persists, service is required.

Printer error troubleshooting www.partshere.com
Alphabetical printer messages
Note Many of the procedures in this section instruct you to replace the DC controller PCB, the ETB, the formatter, the drum drive motors, the drum drive gears, or a laser/scanner unit. After replacing one of these items, you must access the Print Quality menu and select CALIBRATE NOW to ensure proper print quality after the repair. See “Calibrate Now” on page 294 for instructions on calibrating the printer. When the ETB or the fuser are replaced before their normal end of life, access the resets menu and reset the counter to zero. See page 81 and page 83 for instructions.
Table 7-2 Alphabetical printer messages
Message Description Action
Access deniedmenus locked
An attempt has been made to modify a menu item while the control panel security mechanism is enabled by the printer administrator. The message will disappear shortly, and the printer will return to Ready state.
Contact the printer administrator to change settings.
CHOSEN PERSONALITY NOT AVAILABLEFor help press
alternates with
CHOSEN PERSONALITY NOT AVAILABLETo continue press
PJL encountered a request for a personality that did not exist in the printer. The job is aborted and no pages will be printed.
1 Press for detailed information.2 Press and to step through
the instructions.
CLOSE FRONT COVERSFor help press
The covers need to be closed. 1 Press for more information.2 Close front covers.
Note: This message might also appear if the fuser is missing or incorrectly installed. Ensure that the fuser is correctly installed.
CPR SENSOROUT OF RANGE
The CPR Sensor is not behaving properly.
1 Force a calibration by selecting Calibrate Now from the Print Quality menu. See “Calibrate Now” on page 294.
2 If the message persists, verify the cables are seated properly and the connector J1024 is making good contact with the DC controller.
3 Replace the color registration detection unit.
4 If the message still persists, replace the DC controller PCB. Calibrate the printer after replacing the DC controller.
DATA RECEIVEDTo print last page press
The printer received data and is waiting for a form feed. When the printer receives another file, the message should disappear.
Press to continue.

C9660-90901 Partshere Troubleshooting
DETECTABLE SIZEIN TRAY XXFor help press
alternates with
DETECTABLE SIZE IN TRAY XXRecommend move switch to STANDARD
A tray has been loaded with paper that is a standard size and the switch in the tray is set to custom.
1 Press for detailed information.2 Press and to step through
instructions.
DISK DEVICEFAILURE
alternates with
ReadyFor menus press
A device failure has occurred on the specified drive.
1 Printing may continue for jobs that do not require access to the disk drive.
2 To clear the message, turn the printer off and then back on.
3 If the message persists, remove and re-install the EIO disk drive.
4 If the message persists, replace the EIO disk drive.
DISK FILE OPERATION FAILED
alternates with
ReadyFor menus press
The printer received a PJL file system command that attempted to perform an illogical operation (for example, to download a file to a non-existent directory).
1 Printing may continue.2 Turn the printer off and then back
on.3 If the message reappears, there
may be a problem with the software application.
DISK FILESYSTEM IS FULL
alternates with
ReadyFor menus press
The printer received a PJL file system command that attempted to store something on the file system but was unsuccessful because the file system is full.
1 Use the HP Web Jetadmin software to delete files from the EIO disk drive and try again.
2 To remove this message from the display, turn the printer off and then back on.
DISK ISWRITE PROTECTED
alternates with
ReadyFor menus press
The file system device is protected and no new files can be written to it.
1 To enable writing to the disk, turn off write protection, using HP Web Jetadmin.
2 To remove this message from the display, turn the printer off and then back on.
EIO DISK XNOT FUNCTIONALFor help press
The EIO disk in slot X is not working correctly.
Remove the EIO disk from the slot indicated and replace with a new EIO disk drive.
FLASH DEVICE FAILURE
alternates with
ReadyFor menus press
A device failure has occurred on the specified drive.
1 Printing may continue for jobs that do not require the Flash DIMM.
2 To remove this message from the display, turn the printer off and then back on.
3 If the message persists, remove and re-install the Flash DIMM.
4 If the message persists, replace the Flash DIMM.
Table 7-2 Alphabetical printer messages (continued)
Message Description Action
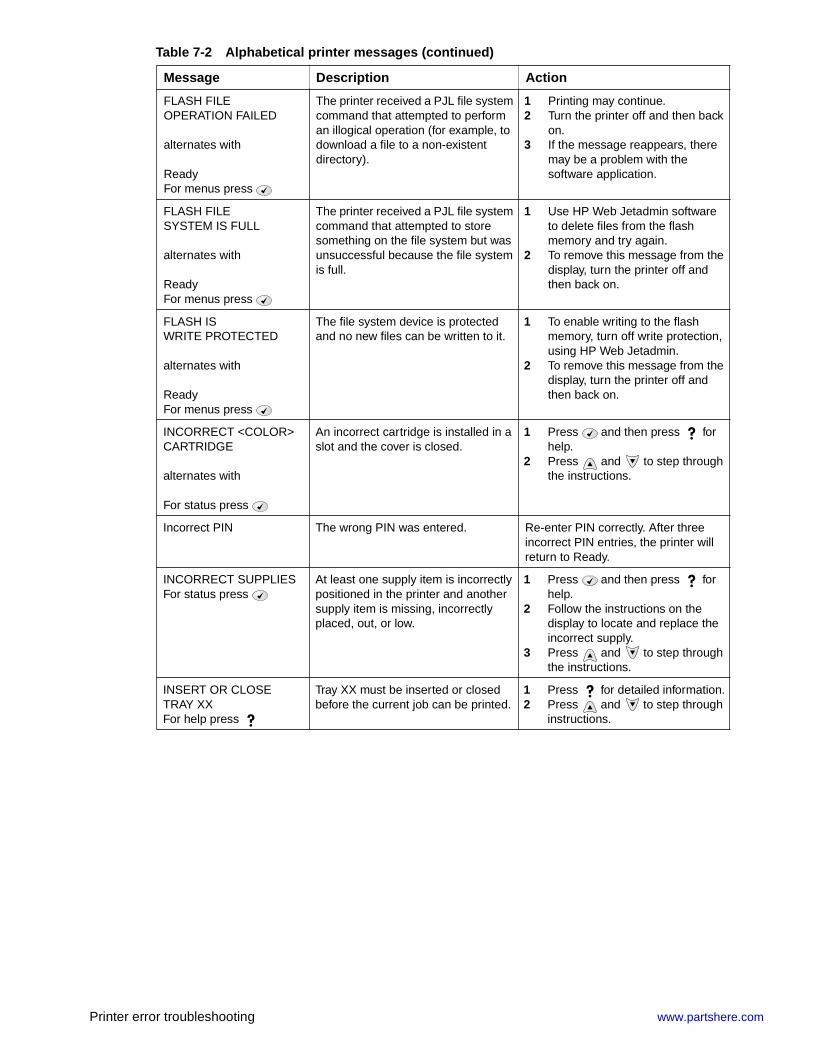
Printer error troubleshooting www.partshere.com
FLASH FILE OPERATION FAILED
alternates with
ReadyFor menus press
The printer received a PJL file system command that attempted to perform an illogical operation (for example, to download a file to a non-existent directory).
1 Printing may continue.2 Turn the printer off and then back
on.3 If the message reappears, there
may be a problem with the software application.
FLASH FILESYSTEM IS FULL
alternates with
ReadyFor menus press
The printer received a PJL file system command that attempted to store something on the file system but was unsuccessful because the file system is full.
1 Use HP Web Jetadmin software to delete files from the flash memory and try again.
2 To remove this message from the display, turn the printer off and then back on.
FLASH ISWRITE PROTECTED
alternates with
ReadyFor menus press
The file system device is protected and no new files can be written to it.
1 To enable writing to the flash memory, turn off write protection, using HP Web Jetadmin.
2 To remove this message from the display, turn the printer off and then back on.
INCORRECT <COLOR> CARTRIDGE
alternates with
For status press
An incorrect cartridge is installed in a slot and the cover is closed.
1 Press and then press for help.
2 Press and to step through the instructions.
Incorrect PIN The wrong PIN was entered. Re-enter PIN correctly. After three incorrect PIN entries, the printer will return to Ready.
INCORRECT SUPPLIESFor status press
At least one supply item is incorrectly positioned in the printer and another supply item is missing, incorrectly placed, out, or low.
1 Press and then press for help.
2 Follow the instructions on the display to locate and replace the incorrect supply.
3 Press and to step through the instructions.
INSERT OR CLOSETRAY XXFor help press
Tray XX must be inserted or closed before the current job can be printed.
1 Press for detailed information.2 Press and to step through
instructions.
Table 7-2 Alphabetical printer messages (continued)
Message Description Action

www.partshere.com Partshere Troubleshooting
INSTALL <COLOR> CARTRIDGE
alternates with
For help press
The cartridge is either not installed or not correctly installed in the printer.
1 Insert the cartridge or make sure the cartridge is fully seated.
2 Press for detailed information.3 Press and to step through
the instructions.4 If the error persists, replace the
cartridge.5 Verify that the connectors
between the memory tag antenna, memory controller board, and the DC controller are seated properly.
6 Replace the antenna PCB for the indicated color.
7 Replace the memory controller PCB.
8 Replace the DC controller PCB. Calibrate the printer after replacing the DC controller. See “Calibrate Now” on page 294.
INSTALL FUSERFor help press
The fuser is either not installed or not correctly installed in the printer.
1 Insert the fuser or make sure the installed fuser is fully seated.
2 Press for detailed information.3 Press and to step through
the instructions.4 If the error persists, verify that
fuser connector J4034 is good; replace it if necessary.
5 Replace the fuser assembly.6 Replace the DC controller PCB.
Calibrate the printer after replacing the DC controller. See “Calibrate Now” on page 294.
INSTALL SUPPLIESFor status press
At least one supply item is missing or is not correctly seated in the printer and another supply item is missing, incorrectly placed, out, or low. Insert the supply item or make sure the installed supply item is fully seated.
1 Press and then press for help.
2 Follow the instructions on the display to locate and replace the missing or incorrect supply.
3 Press and to step through the instructions.
INSTALL TRANSFERUNITFor help press
The transfer unit is either not installed or not correctly installed in the printer.
1 Insert the transfer unit or make sure the installed transfer unit is fully seated.
2 Press for detailed information.3 Press and to step through
the instructions.4 If the error persists, verify that the
ETB connectors (J4017 on the ETB and J1014 on the DC controller PCB) are good. Replace connectors as necessary.
5 Replace the ETB.6 Replace the DC controller PCB.
Calibrate the printer after replacing the DC controller. See “Calibrate Now” on page 294.
Table 7-2 Alphabetical printer messages (continued)
Message Description Action
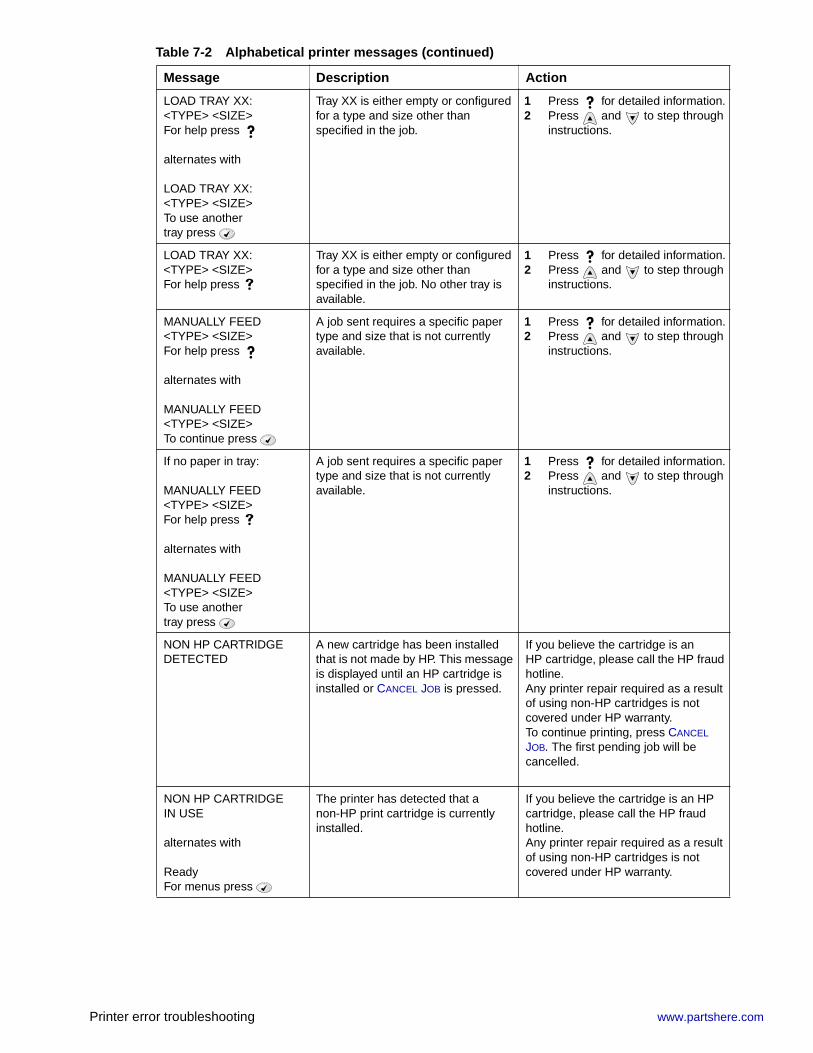
Printer error troubleshooting www.partshere.com
LOAD TRAY XX:<TYPE> <SIZE>For help press
alternates with
LOAD TRAY XX:<TYPE> <SIZE>To use anothertray press
Tray XX is either empty or configured for a type and size other than specified in the job.
1 Press for detailed information.2 Press and to step through
instructions.
LOAD TRAY XX:<TYPE> <SIZE>For help press
Tray XX is either empty or configured for a type and size other than specified in the job. No other tray is available.
1 Press for detailed information.2 Press and to step through
instructions.
MANUALLY FEED<TYPE> <SIZE>For help press
alternates with
MANUALLY FEED<TYPE> <SIZE>To continue press
A job sent requires a specific paper type and size that is not currently available.
1 Press for detailed information.2 Press and to step through
instructions.
If no paper in tray:
MANUALLY FEED<TYPE> <SIZE>For help press
alternates with
MANUALLY FEED<TYPE> <SIZE>To use another tray press
A job sent requires a specific paper type and size that is not currently available.
1 Press for detailed information.2 Press and to step through
instructions.
NON HP CARTRIDGEDETECTED
A new cartridge has been installed that is not made by HP. This message is displayed until an HP cartridge is installed or CANCEL JOB is pressed.
If you believe the cartridge is an HP cartridge, please call the HP fraud hotline.Any printer repair required as a result of using non-HP cartridges is not covered under HP warranty.To continue printing, press CANCEL
JOB. The first pending job will be cancelled.
NON HP CARTRIDGEIN USE
alternates with
ReadyFor menus press
The printer has detected that a non-HP print cartridge is currently installed.
If you believe the cartridge is an HP cartridge, please call the HP fraud hotline.Any printer repair required as a result of using non-HP cartridges is not covered under HP warranty.
Table 7-2 Alphabetical printer messages (continued)
Message Description Action

www.partshere.com Partshere Troubleshooting
ORDER <COLOR>CARTRIDGE
alternates with
To continue press
The identified print cartridge is nearing the end of its useful life and the SUPPLIES LOW setting in the SYSTEM SETUP submenu is set to STOP. Override by pressing .
1 Order the identified print cartridge.
2 Press to continue.3 Press for detailed information.4 Press and to step through
instructions.5 Supplies ordering information is
also available from the embedded Web server.
ORDER <COLOR>CARTRIDGE
alternates with
XXXX PAGES LEFT
The identified print cartridge is near end of life.The printer is ready and will continue for the estimated number of pages indicated.
1 Order the identified print cartridge.
2 Estimated pages remaining is based upon historical page coverage of this printer.
3 Printing will continue until REPLACE <COLOR> CARTRIDGE is shown.
4 Press for detailed information.5 Press and to step through
instructions.6 Supplies ordering information is
also available from the embedded Web server.
ORDER FUSER KITXXXX PAGES LEFTTo continue press
The fuser is near end of life and the SUPPLIES LOW setting in the SYSTEM SETUP submenu is set to STOP.
1 Order the image fuser kit.2 Press to continue printing.
Printing can continue until the fuser reaches end of life.
3 Supplies ordering information is also available from the embedded Web server.
ORDER FUSER KITXXXX PAGES LEFTTo enter menus press
The fuser is near end of life.The printer is ready and will continue for the estimated number of pages indicated.
1 Order the image fuser kit.2 Printing can continue until the
fuser reaches end of life.3 Press for detailed information.4 Press and to step through
instructions.5 Supplies ordering information is
also available from the embedded Web server.
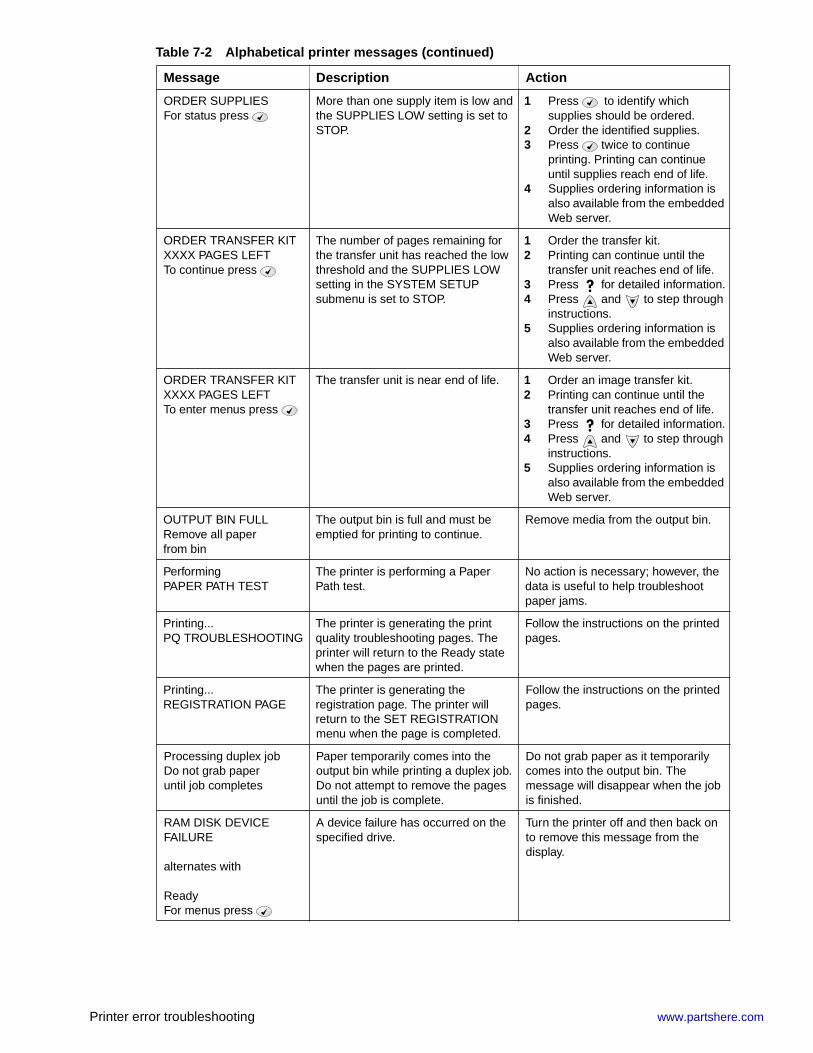
ORDER SUPPLIESFor menus press
More than one supply item is low. 1 Press to identify which supplies should be ordered.
2 Order the identified supplies.3 Printing can continue until
supplies reach end of life.4 Press for detailed information.5 Press and to step through
instructions.6 Supplies ordering information is
also available from the embedded Web server.
Table 7-2 Alphabetical printer messages (continued)
Message Description Action
Printer error troubleshooting www.partshere.com
ORDER SUPPLIESFor status press
More than one supply item is low and the SUPPLIES LOW setting is set to STOP.
1 Press to identify which supplies should be ordered.
2 Order the identified supplies.3 Press twice to continue
printing. Printing can continue until supplies reach end of life.
4 Supplies ordering information is also available from the embedded Web server.
ORDER TRANSFER KITXXXX PAGES LEFTTo continue press
The number of pages remaining for the transfer unit has reached the low threshold and the SUPPLIES LOW setting in the SYSTEM SETUP submenu is set to STOP.
1 Order the transfer kit.2 Printing can continue until the
transfer unit reaches end of life.3 Press for detailed information.4 Press and to step through
instructions.5 Supplies ordering information is
also available from the embedded Web server.
ORDER TRANSFER KITXXXX PAGES LEFTTo enter menus press
The transfer unit is near end of life. 1 Order an image transfer kit.2 Printing can continue until the
transfer unit reaches end of life.3 Press for detailed information.4 Press and to step through
instructions.5 Supplies ordering information is
also available from the embedded Web server.
OUTPUT BIN FULLRemove all paper from bin
The output bin is full and must be emptied for printing to continue.
Remove media from the output bin.
PerformingPAPER PATH TEST
The printer is performing a Paper Path test.
No action is necessary; however, the data is useful to help troubleshoot paper jams.
Printing...PQ TROUBLESHOOTING
The printer is generating the print quality troubleshooting pages. The printer will return to the Ready state when the pages are printed.
Follow the instructions on the printed pages.
Printing...REGISTRATION PAGE
The printer is generating the registration page. The printer will return to the SET REGISTRATION menu when the page is completed.
Follow the instructions on the printed pages.
Processing duplex jobDo not grab paperuntil job completes
Paper temporarily comes into the output bin while printing a duplex job. Do not attempt to remove the pages until the job is complete.
Do not grab paper as it temporarily comes into the output bin. The message will disappear when the job is finished.
RAM DISK DEVICE FAILURE
alternates with
ReadyFor menus press
A device failure has occurred on the specified drive.
Turn the printer off and then back on to remove this message from the display.
Table 7-2 Alphabetical printer messages (continued)
Message Description Action
www.partshere.com Partshere Troubleshooting
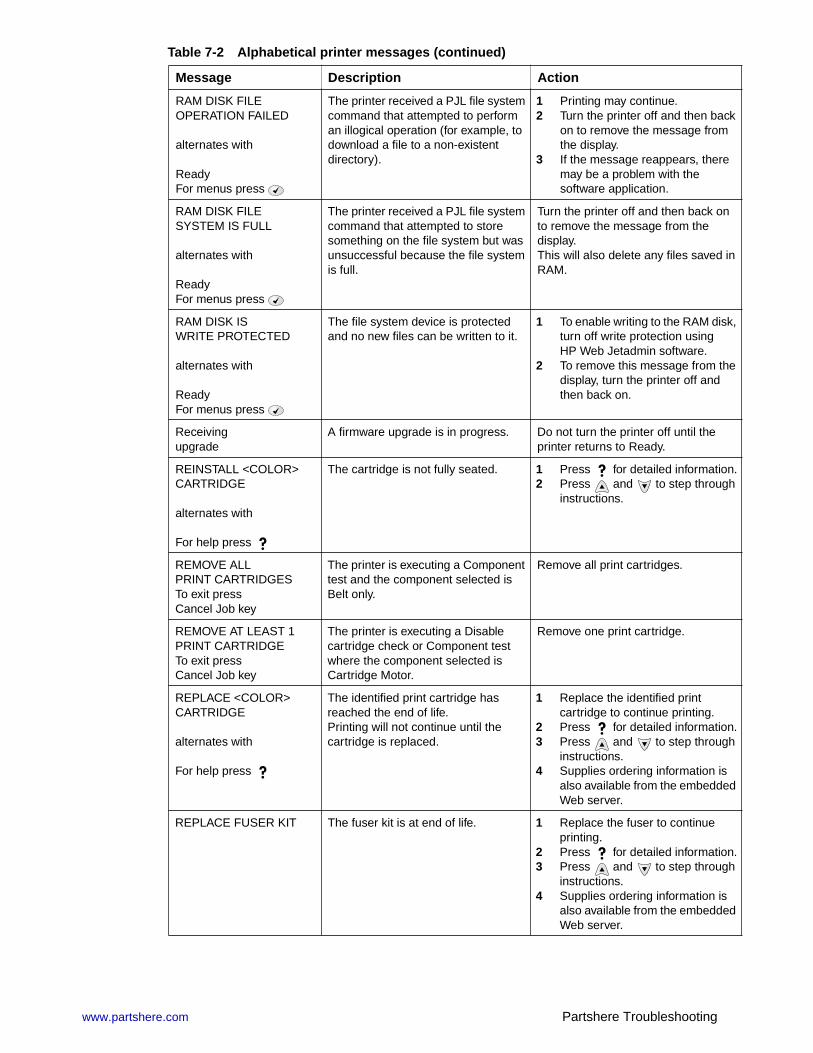
RAM DISK FILE OPERATION FAILED
alternates with
ReadyFor menus press
The printer received a PJL file system command that attempted to perform an illogical operation (for example, to download a file to a non-existent directory).
1 Printing may continue.2 Turn the printer off and then back
on to remove the message from the display.
3 If the message reappears, there may be a problem with the software application.
RAM DISK FILESYSTEM IS FULL
alternates with
ReadyFor menus press
The printer received a PJL file system command that attempted to store something on the file system but was unsuccessful because the file system is full.
Turn the printer off and then back on to remove the message from the display. This will also delete any files saved in RAM.
RAM DISK ISWRITE PROTECTED
alternates with
ReadyFor menus press
The file system device is protected and no new files can be written to it.
1 To enable writing to the RAM disk, turn off write protection using HP Web Jetadmin software.
2 To remove this message from the display, turn the printer off and then back on.
Receiving upgrade
A firmware upgrade is in progress. Do not turn the printer off until the printer returns to Ready.
REINSTALL <COLOR> CARTRIDGE
alternates with
For help press
The cartridge is not fully seated. 1 Press for detailed information.2 Press and to step through
instructions.
REMOVE ALLPRINT CARTRIDGESTo exit pressCancel Job key
The printer is executing a Component test and the component selected is Belt only.
Remove all print cartridges.
REMOVE AT LEAST 1 PRINT CARTRIDGETo exit pressCancel Job key
The printer is executing a Disable cartridge check or Component test where the component selected is Cartridge Motor.
Remove one print cartridge.
REPLACE <COLOR>CARTRIDGE
alternates with
For help press
The identified print cartridge has reached the end of life.Printing will not continue until the cartridge is replaced.
1 Replace the identified print cartridge to continue printing.
2 Press for detailed information.3 Press and to step through
instructions.4 Supplies ordering information is
also available from the embedded Web server.
REPLACE FUSER KIT The fuser kit is at end of life. 1 Replace the fuser to continue printing.
2 Press for detailed information.3 Press and to step through
instructions.4 Supplies ordering information is
also available from the embedded Web server.
Table 7-2 Alphabetical printer messages (continued)
Message Description Action

Printer error troubleshooting www.partshere.com
REPLACE SUPPLIESFor status press
At least one supply item is out and needs to be replaced and another supply item is either out or low.
1 Press to identify which supplies should be replaced.
2 Replace the identified supplies to continue printing.
3 Press for detailed information.4 Press and to step through
instructions.5 Supplies ordering information is
also available from the embedded Web server.
REPLACE TRANSFER KITFor help press
The transfer unit has reached end of life.
1 Replace the transfer unit to continue printing.
2 Press for detailed information.3 Press and to step through
instructions.4 Supplies ordering information is
also available from the embedded Web server.
Resendupgrade
The firmware upgrade was not completed successfully.
Attempt upgrade again.
Rotating. . .alienation motorTo exit press CANCEL JOB
The printer is testing the developing disengaging motor. (This motor is called the "alienation motor" in firmware messages.)
Press CANCEL JOB when ready to stop this test.
Rotating. . . belt driveTo exit pressCANCEL JOB
The printer is executing a Component Test and the component selected is Belt Only.
Press CANCEL JOB when ready to stop this test.
Rotating <color> cartridge motorTo exit pressCANCEL JOB
A component test is in progress; the component selected is the <color> Cartridge motor.
Press CANCEL JOB when ready to stop this test.
Rotating. . .fuser motorTo exit press CANCEL JOB
The printer is executing a Component test and the component selected is Fuser Motor.
Press CANCEL JOB when ready to stop this test.
Rotating <color> Laser ScannerTo exit pressCANCEL JOB
A Scanner test is in progress. Press CANCEL JOB when ready to stop this test.
Rotating. . .transfer motorsTo exit press CANCEL JOB
The printer is executing a Component test and the component selected is Transfer Motors.
Press CANCEL JOB when ready to stop this test.
SIZE MISMATCHTRAY XX=<SIZE>For help press
alternates with
ReadyFor menus press
The tray is loaded with media longer or shorter in the feed direction than the size configured for the tray.
1 Adjust the side and rear media guides against the paper.
2 If the media used is Letter, A4, Executive, B5 JIS, A5, or Legal sized, the tray switch should be set to STANDARD. Set the tray switch to CUSTOM for all other media sizes. The tray switch must be set before the size can be selected from the control panel.
3 Reset the paper size in the paper handling menu.
Table 7-2 Alphabetical printer messages (continued)
Message Description Action

www.partshere.com Partshere Troubleshooting 221
TRAY XX CONTAINSUNKNOWN MEDIA
The media type in the specified tray cannot be determined.
1 To change media type, press . Use and to highlight the type, then press to select.
2 To change the media size to Letter, A4, Executive, B5 JIS, A5, or Legal, leave the tray switch in the STANDARD position.
3 To change the media size to other sizes, move the tray switch to CUSTOM, adjust the paper guides against the paper, and close the tray.
4 Use and to highlight the media size, then press to select.
TRAY XX EMPTY<TYPE> <SIZE>
alternates with
ReadyFor menus press
The specified tray is empty and needs to be filled but the current job does not need this tray to print correctly.
Refill the tray at a convenient time.
TRAY XX OPENFor help press
alternates with
ReadyFor menus press
The specified tray is open or not closed completely.
Close the tray.
TRAY XX SIZE=<XXXX SIZE>For help press
alternates with
TRAY XX SIZE=<XXXX SIZE>To change, move switch in tray XX
A non-detectable media size was selected from the menu and the tray switch is set to STANDARD.
The size selected from the menu does not match the size detected by the tray. Size detection occurs when the tray switch is set in the STANDARD position.
1 Adjust the side and rear media guides against the paper.
2 If the media used is Letter, A4, Executive, B5 JIS, A5, or Legal sized, the tray switch should be set to STANDARD. Set the tray switch to CUSTOM for all other media sizes. The tray switch must be set before the size can be selected from the control panel.
3 Reset the paper size in the paper handling menu.
TRAY XX<TYPE> <SIZE>Size detected by tray
alternates with
TRAY XX<TYPE> <SIZE>To change type press
The printer is reporting the current configuration of tray XX. The tray switch is in the STANDARD position.
1 To change media type, press . Use and to highlight the type, then press to select.
2 To change the media size to Letter, A4, Executive, B5 JIS, A5, or Legal, leave the tray switch in the STANDARD position.
3 To change the media size to other sizes, move the tray switch to CUSTOM, adjust the paper guides against the paper, and close the tray.
4 Use and to highlight the media size, then press to select.
Table 7-2 Alphabetical printer messages (continued)
Message Description Action

Printer error troubleshooting www.partshere.com
Note Not all messages are described in the tables; those messages that are not listed are self-explanatory.
TRAY XX<TYPE> <SIZE>Size specified by user
alternates with
TRAY XX<TYPE> <SIZE>To change type press
The printer is reporting the current configuration of tray XX. The tray switch is in the CUSTOM position.
1 To change media type, press . Use and to highlight the type, then press to select.
2 To change the media size to Letter, A4, Executive, B5 JIS, A5, or Legal, set the tray switch to the STANDARD position and adjust the media guides to the correct positions.
3 To change the media size to other sizes, leave the tray switch in the CUSTOM position, adjust the media guides against the media, and close the tray.
4 Select the paper handling menu from the control panel. Configure the size for the tray.
TYPE MISMATCHTRAY XX= <TYPE>
alternates with
ReadyTo enter menus press
This warning appears after the printer has detected an overhead transparency in the paper path when the tray is configured for another type, resulting in a 41.5 Unexpected Type in Tray XX error. The user did not reconfigure the tray after the error message appeared, so the printer determines that the type of media is not what the tray is configured to hold.
To change media type, press . Use and to highlight the type, then
press to select.
Unable to store job<JOBNAME>
A job cannot be stored because of a memory, disk, or configuration problem.
Install additional memory in the printer, or install a disk drive into the printer.
If a disk drive is installed, delete previously stored print jobs.
USE INSTEAD?TRAY 2: <TYPE><SIZE>TRAY 3: <TYPE>
The printer is offering a selection of alternate media to use for the print job.
Highlight the media with and . Press to select a choice.
Table 7-2 Alphabetical printer messages (continued)
Message Description Action

www.partshere.com Partshere Troubleshooting
Numerical printer messages
Note Many of the procedures in this section instruct you to replace the DC controller PCB, the ETB, the formatter, the drum drive motors, the drum drive gears, or a laser/scanner unit. After replacing one of these items, you must access the Print Quality menu and select CALIBRATE NOW to ensure proper print quality after the repair. See “Calibrate Now” on page 294 for instructions on calibrating the printer. When the ETB or the fuser are replaced before their normal end of life, access the Resets menu and reset the counter to zero. See page 81 and page 83 for instructions.
Table 7-3 Numerical printer messages
Message Description Action
10.XX.YY SUPPLIESERRORFor help press
NOTE: The printer cannot always determine whether the error lies with the cartridge or with the printer reader/writer.
The printer cannot read or write to at least one print cartridge memory tag or at least one memory tag is missing.
XX Description00 memory error on supply item10 memory tag missing
YY Description00 black print cartridge01 cyan print cartridge02 magenta print cartridge03 yellow print cartridge
1 Turn the printer off and then back on.
2 Swap the cartridge for the color indicated with a cartridge in another slot to determine whether the error follows the cartridge or stays with the slot. If the error follows the cartridge, replace that cartridge. Otherwise, continue with step 3.
3 Reseat the connectors between the memory PCB (J602-J605) and the antenna PCBs (J901A-D), the memory PCB, and the DC controller PCB (J1028).
4 Replace the antenna PCB.5 Replace the memory PCB.6 Replace the DC controller PCB.
Calibrate the printer after replacing the DC controller. See “Calibrate Now” on page 294.
13.XX.YY.DUPLEXJOB INTERRUPTEDFor help press
alternates with
13.XX.YY.DUPLEXJOB INTERRUPTEDDiscard top sheet and press
or
13.XX.YY.DUPLEXJOB INTERRUPTEDDiscard top two sheets and press
A duplex job was interrupted by interference as media passed through the output bin during duplexing.
1 Press for more information.2 Remove one or two pages from
the output bin as directed by the display.
3 Press to continue printing.
NOTE: If JAM RECOVERY = OFF some pages will not be reprinted. Re-send the missing pages.

Printer error troubleshooting www.partshere.com
13.XX.YY.JAM INDUPLEX PATHFor help press
There is a jam in the duplex path. 1 Press for detailed information about clearing the jam.
2 Press and to step through the instructions.
3 Check if the ETB rollers or gears are worn or defective. Replace the ETB if they are.
4 Check the duplex feed guide, which is part of the control panel crossmember assembly. If the guide is worn or damaged, replace the crossmember assembly.
13.XX.YY.JAM INPAPER INPUT PATHFor help press
There is a jam in the media input path.
1 Press for detailed information about clearing the jam.
2 Press and to step through the instructions.
3 Check the registration shutter, and make sure it is in place. Replace the paper pickup assembly if the shutter is damaged.
4 Check the paper pickup feed rollers, and replace them if they are worn or damaged.
5 Check the connectors, gears, solenoids, motors, and PCB on the paper pickup assembly. Replace the paper pickup assembly if necessary.
13.XX.YY JAM INPAPER PATHFor help press
There is a jam in the media path. 1 Press for detailed information about clearing the jam.
2 Press and to step through the instructions.
3 If paper is folding into an accordion shape, check whether the shutter on each print cartridge opens as you close the ETB and if each cartridge is turning properly. Replace defective print cartridges or drive motors.
4 Clean the attaching roller at the bottom of the ETB and make sure the spring is holding it in place.
5 If the attaching roller gears are defective, replace the ETB. Calibrate the printer after replacing the ETB. See “Calibrate Now” on page 294.
6 Replace the paper pickup PCB.7 Replace the ETB if it is not
moving paper properly. Calibrate the printer.
8 Replace the DC controller PCB. Calibrate the printer after replacing the DC controller. See “Calibrate Now” on page 294.
Table 7-3 Numerical printer messages (continued)
Message Description Action

www.partshere.com Partshere Troubleshooting
13.XX.YY JAM IN TOPCOVER AREAFor help press
There is a jam in the top cover area. 1 Press for detailed information about clearing the jam.
2 Press and to step through the instructions.
WARNING! The fuser might be hot.3 Check that the fuser paper sensor
is in place. If it is defective, replace it.
4 Replace the fuser.5 Replace the DC controller PCB.
Calibrate the printer after replacing the DC controller. See “Calibrate Now” on page 294.
13.XX.YY.JAM INTRAY 1For help press
A page is jammed in the multi-purpose tray.
1 Press for detailed information about clearing the jam.
2 Press and to step through the instructions.
3 Clean the pickup roller. If it is worn or damaged, replace it.
4 Clean or replace the separation pad.
5 Replace the Tray 1 pickup solenoid.
6 Replace the pickup motor.7 Replace the paper pickup
assembly.8 Replace the DC controller PCB.
Calibrate the printer after replacing the DC controller. See “Calibrate Now” on page 294.
13.XX.YY.JAM INTRAY 2For help press
A page is jammed in Tray 2. 1 Press for detailed information about clearing the jam.
2 Press and to step through the instructions.
3 Clean the pickup roller. If it is worn or damaged, replace it.
4 Clean the feed roller. If it is worn or damaged, replace it.
5 Replace the Tray 2 pickup solenoid.
6 Replace the pickup motor.7 Replace the paper pickup
assembly.8 Replace the DC controller PCB.
Calibrate the printer after replacing the DC controller. See “Calibrate Now” on page 294.
Table 7-3 Numerical printer messages (continued)
Message Description Action

Printer error troubleshooting www.partshere.com
13.XX.YY.JAM INTRAY 3For help press
A page is jammed in Tray 3. 1 Press for detailed information about clearing the jam.
2 Press and to step through the instructions.
3 Clean the pickup roller. If it is worn or damaged, replace it.
4 Clean the feed roller. If it is worn or damaged, replace it.
5 Replace the Tray 3 pickup solenoid.
6 Replace the Tray 3 pickup motor.7 Replace the Tray 3 paper feeder
PCB.8 Replace the DC controller PCB.
Calibrate the printer after replacing the DC controller. See “Calibrate Now” on page 294.
20 INSUFFICIENTMEMORYFor help press
alternates with
20 INSUFFICIENTMEMORYTo continue press
The printer has received more data from the computer than fits in available memory.
1 Press to resume printing.Note: A loss of data will occur.2 Reduce the complexity of the
print job to avoid this error.3 Adding memory to the printer may
allow printing of more complex pages.
22 EIO XBUFFER OVERFLOWTo continuepress
The printer’s EIO card in slot X has overflowed its I/O buffer during a busy state.
Press to resume printing.
Note: A loss of data will occur.
22 PARALLEL I/OBUFFER OVERFLOWFor help press
alternates with
22 PARALLEL I/OBUFFER OVERFLOWTo continuepress
The printer’s parallel buffer has overflowed during a busy state.
Press to resume printing.
Note: A loss of data will occur.
22 SERIAL I/OBUFFER OVERFLOWTo continuepress
The printer’s serial buffer has overflowed during a busy state.
Press to resume printing.
Note: A loss of data will occur.
40 BAD SERIALTRANSMISSIONTo continuepress
A serial data error (parity, framing, or line overrun) has occurred while the printer was receiving data.
Press to resume printing.
Note: A loss of data will occur.
40 EIO X BAD TRANSMISSIONTo continuepress
A connection with the card in EIO slot X has been abnormally broken.
1 Press to resume printing.Note: A loss of data will occur.2 Check that all cables are
connected to the EIO ports and that the EIO board is seated properly.
3 If possible, print to another network printer to verify the network is working properly.
Table 7-3 Numerical printer messages (continued)
Message Description Action

www.partshere.com Partshere Troubleshooting
41.3 UNEXPECTED SIZE IN TRAY XXFor help press
alternates with
LOAD TRAY XX:[TYPE] [SIZE]For help press
Media is loaded which is longer or shorter in the feed direction than the size configured for the tray.
1 If the incorrect size was selected, cancel the job or press to access help.
2 Press and to step through the instructions.
41.5 UNEXPECTEDTYPE IN TRAY XXFor help press
alternates with
LOAD TRAY XX:[TYPE] [SIZE]For help press
The printer senses a different media type in the media path than configured in the tray.
1 If the incorrect type was selected, cancel the job or press to access help.
2 Press and to step through the instructions.
41.XPRINTER ERRORFor help press
alternates with
41.XPRINTER ERRORTo continuepress
A printer error has occurred.
X Description1 unknown misprint error2 beam detect misprint error3 media feed error (size)4 no VSYNC error5 media feed error (type)6 ETB detection error7 feed delay error9 noise VSREQ
1 Press to continue or press for more information.
2 If the message persists, turn the printer off and then back on.
Table 7-3 Numerical printer messages (continued)
Message Description Action

Printer error troubleshooting www.partshere.com
49.XXXXPRINTER ERRORTo continueturn off then on
A critical firmware error has occurred that caused the processor on the formatter to abort operation. This type of error can be caused by invalid print commands, corrupt data, or invalid operations. In some cases, electrical noise in the cable can corrupt data during transmission to the printer. Other causes include poor quality parallel cables, poor connections, or home-grown applications. On rare occasions, the formatter is at fault, which is usually indicated by a 79 Service Error.
1 Press CANCEL JOB to clear the print job from the printer memory.
2 Turn the printer off and then back on.
3 Try printing a job from a different software application. If the job prints, go back to the first application and try printing a different file. If the message appears only with a certain software application or print job, contact the software vendor for assistance.
4 If the message persists with different software applications and print jobs, disconnect all cables to the printer that connect it to the network or PC.
5 Turn the printer off.6 Remove all memory DIMMs or
third-party DIMMs from the printer. (Do not remove the firmware DIMM in slot J1.)
7 Remove all EIO devices from the printer.
8 Turn the printer on.9 If the error no longer exists, install
each DIMM and EIO device one at a time, making sure to turn the printer off and back on as you install each device.
10 Replace a DIMM or EIO device if you determine that it causes the error.
11 Remember to reconnect all cables that connect the printer to the network or computer.
12 If the error persists, replace the firmware DIMM.
13 Replace the formatter and calibrate the printer. See “Calibrate Now” on page 294.
Table 7-3 Numerical printer messages (continued)
Message Description Action

www.partshere.com Partshere Troubleshooting
50.X FUSER ERRORFor help press
A fuser error has occurred.
X Description1 low fuser temperature2 fuser warmup service3 high fuser temperature4 faulty fuser5 inconsistent fuser6 open fuser
1 Turn the printer off and allow it to cool down.
2 Reinstall the fuser, and check the connector J4034 that connects the fuser and the printer. Replace the connector if it is damaged.
3 Turn the printer off and remove the fuser. Measure the resistance between the connector pins on the fuser. If resistance does not meet the following guidelines, replace the fuser.
J4034-5 to J4034-6: 300 - 500 KOhmsJ4034-1 to J4034-2: less than 1 KOhm4 Check for continuity between
connector pins J4034-4 and J4034-2. If there is no continuity, replace the fuser.
5 Replace the fuser power supply PCB.
6 Replace the DC controller PCB. Calibrate the printer after replacing the DC controller. See “Calibrate Now” on page 294.
51.XYPRINTER ERRORFor help press
alternates with
51.XYPRINTER ERRORTo continueturn off then on
A printer error has occurred.
X Description1 beam detect error2 laser error
Y Description0 no colorK blackC cyanM magentaY yellow
1 Press to continue.2 Turn the printer off and then back
on.3 Reseat the connectors between
the laser/scanner and DC controller PCB (J1009 - J1012).
4 Replace the defective laser/scanner assembly. Calibrate the printer after replacing the laser/scanner. See “Calibrate Now” on page 294.
5 Replace the DC controller PCB. Calibrate the printer after replacing the DC controller. See “Calibrate Now” on page 294.
52.XYPRINTER ERRORFor help press
alternates with
52.XYPRINTER ERRORTo continueturn off then on
A printer error has occurred.
X Description1 scanner error2 scanner startup error3 scanner rotation error
Y Description0 no colorK blackC cyanM magentaY yellow
1 Press to continue.2 Turn the printer off and then back
on.3 Reseat the connectors between
the laser/scanner and DC controller PCB (J1009 - J1012).
4 Replace the defective laser/scanner assembly. Calibrate the printer after replacing the laser/scanner. See “Calibrate Now” on page 294.
5 Replace the DC controller PCB. Calibrate the printer after replacing the DC controller. See “Calibrate Now” on page 294.
53.X0.ZZPRINTER ERRORTo continueturn off then on
An error has occurred in the onboard RAM.
1 Press to continue.2 Turn the printer off and then back
on.
Table 7-3 Numerical printer messages (continued)
Message Description Action
Printer error troubleshooting www.partshere.com
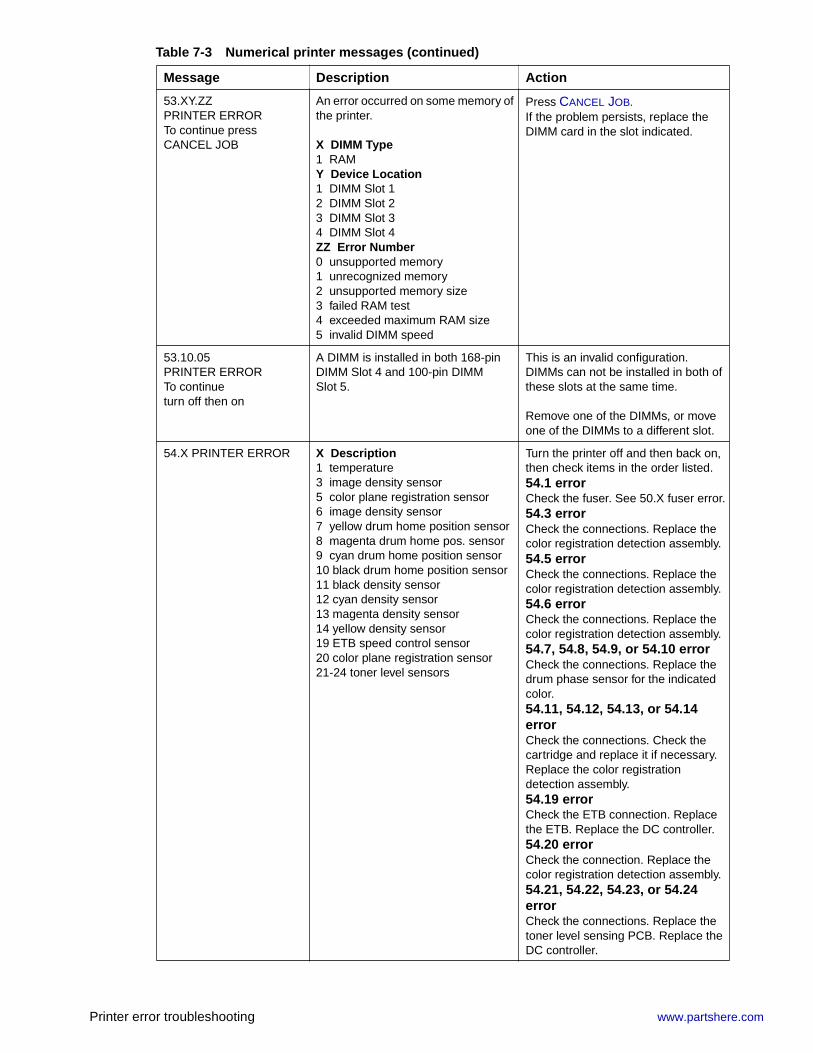
53.XY.ZZPRINTER ERRORTo continue pressCANCEL JOB
An error occurred on some memory of the printer.
X DIMM Type1 RAMY Device Location1 DIMM Slot 12 DIMM Slot 23 DIMM Slot 34 DIMM Slot 4ZZ Error Number0 unsupported memory 1 unrecognized memory 2 unsupported memory size3 failed RAM test4 exceeded maximum RAM size5 invalid DIMM speed
Press CANCEL JOB.If the problem persists, replace the DIMM card in the slot indicated.
53.10.05PRINTER ERRORTo continueturn off then on
A DIMM is installed in both 168-pin DIMM Slot 4 and 100-pin DIMM Slot 5.
This is an invalid configuration. DIMMs can not be installed in both of these slots at the same time.
Remove one of the DIMMs, or move one of the DIMMs to a different slot.
54.X PRINTER ERROR X Description1 temperature3 image density sensor 5 color plane registration sensor6 image density sensor7 yellow drum home position sensor8 magenta drum home pos. sensor9 cyan drum home position sensor10 black drum home position sensor11 black density sensor12 cyan density sensor13 magenta density sensor14 yellow density sensor19 ETB speed control sensor20 color plane registration sensor21-24 toner level sensors
Turn the printer off and then back on, then check items in the order listed.54.1 errorCheck the fuser. See 50.X fuser error.54.3 errorCheck the connections. Replace the color registration detection assembly.54.5 errorCheck the connections. Replace the color registration detection assembly.54.6 errorCheck the connections. Replace the color registration detection assembly.54.7, 54.8, 54.9, or 54.10 errorCheck the connections. Replace the drum phase sensor for the indicated color.54.11, 54.12, 54.13, or 54.14 errorCheck the connections. Check the cartridge and replace it if necessary. Replace the color registration detection assembly.54.19 errorCheck the ETB connection. Replace the ETB. Replace the DC controller.54.20 errorCheck the connection. Replace the color registration detection assembly.54.21, 54.22, 54.23, or 54.24 errorCheck the connections. Replace the toner level sensing PCB. Replace the DC controller.
Table 7-3 Numerical printer messages (continued)
Message Description Action
www.partshere.com Partshere Troubleshooting
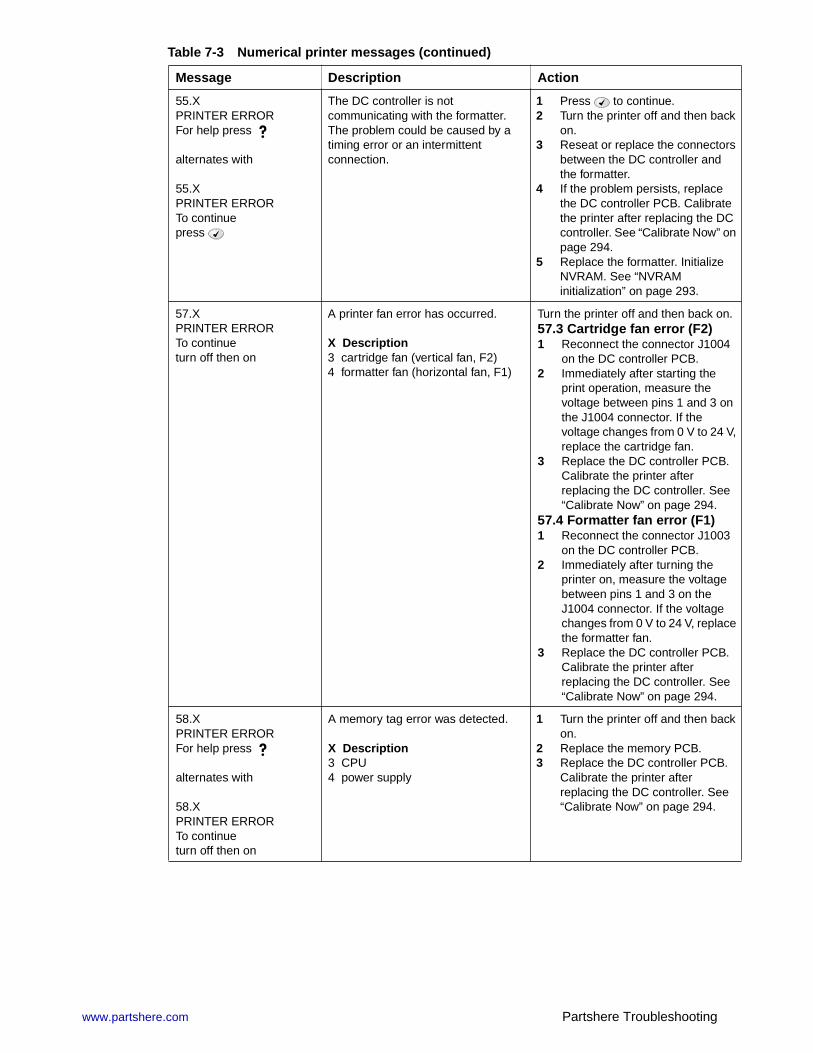
55.XPRINTER ERRORFor help press
alternates with
55.XPRINTER ERRORTo continuepress
The DC controller is not communicating with the formatter. The problem could be caused by a timing error or an intermittent connection.
1 Press to continue.2 Turn the printer off and then back
on.3 Reseat or replace the connectors
between the DC controller and the formatter.
4 If the problem persists, replace the DC controller PCB. Calibrate the printer after replacing the DC controller. See “Calibrate Now” on page 294.
5 Replace the formatter. Initialize NVRAM. See “NVRAM initialization” on page 293.
57.XPRINTER ERRORTo continue turn off then on
A printer fan error has occurred.
X Description3 cartridge fan (vertical fan, F2)4 formatter fan (horizontal fan, F1)
Turn the printer off and then back on.57.3 Cartridge fan error (F2)1 Reconnect the connector J1004
on the DC controller PCB.2 Immediately after starting the
print operation, measure the voltage between pins 1 and 3 on the J1004 connector. If the voltage changes from 0 V to 24 V, replace the cartridge fan.
3 Replace the DC controller PCB. Calibrate the printer after replacing the DC controller. See “Calibrate Now” on page 294.
57.4 Formatter fan error (F1)1 Reconnect the connector J1003
on the DC controller PCB.2 Immediately after turning the
printer on, measure the voltage between pins 1 and 3 on the J1004 connector. If the voltage changes from 0 V to 24 V, replace the formatter fan.
3 Replace the DC controller PCB. Calibrate the printer after replacing the DC controller. See “Calibrate Now” on page 294.
58.XPRINTER ERRORFor help press
alternates with
58.XPRINTER ERRORTo continueturn off then on
A memory tag error was detected.
X Description3 CPU4 power supply
1 Turn the printer off and then back on.
2 Replace the memory PCB.3 Replace the DC controller PCB.
Calibrate the printer after replacing the DC controller. See “Calibrate Now” on page 294.
Table 7-3 Numerical printer messages (continued)
Message Description Action
Printer error troubleshooting www.partshere.com
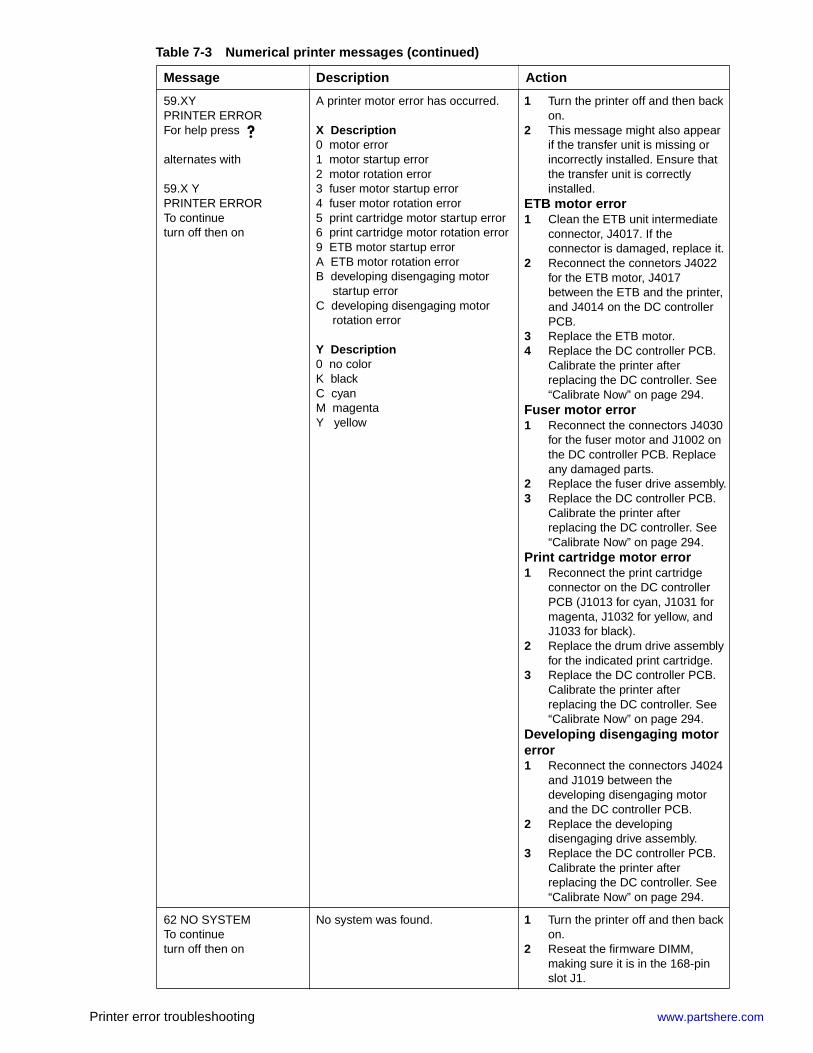
59.XYPRINTER ERRORFor help press
alternates with
59.X YPRINTER ERRORTo continue turn off then on
A printer motor error has occurred.
X Description0 motor error1 motor startup error2 motor rotation error3 fuser motor startup error4 fuser motor rotation error5 print cartridge motor startup error6 print cartridge motor rotation error9 ETB motor startup errorA ETB motor rotation errorB developing disengaging motor startup errorC developing disengaging motor rotation error
Y Description0 no colorK blackC cyanM magentaY yellow
1 Turn the printer off and then back on.
2 This message might also appear if the transfer unit is missing or incorrectly installed. Ensure that the transfer unit is correctly installed.
ETB motor error1 Clean the ETB unit intermediate
connector, J4017. If the connector is damaged, replace it.
2 Reconnect the connetors J4022 for the ETB motor, J4017 between the ETB and the printer, and J4014 on the DC controller PCB.
3 Replace the ETB motor.4 Replace the DC controller PCB.
Calibrate the printer after replacing the DC controller. See “Calibrate Now” on page 294.
Fuser motor error1 Reconnect the connectors J4030
for the fuser motor and J1002 on the DC controller PCB. Replace any damaged parts.
2 Replace the fuser drive assembly.3 Replace the DC controller PCB.
Calibrate the printer after replacing the DC controller. See “Calibrate Now” on page 294.
Print cartridge motor error1 Reconnect the print cartridge
connector on the DC controller PCB (J1013 for cyan, J1031 for magenta, J1032 for yellow, and J1033 for black).
2 Replace the drum drive assembly for the indicated print cartridge.
3 Replace the DC controller PCB. Calibrate the printer after replacing the DC controller. See “Calibrate Now” on page 294.
Developing disengaging motor error1 Reconnect the connectors J4024
and J1019 between the developing disengaging motor and the DC controller PCB.
2 Replace the developing disengaging drive assembly.
3 Replace the DC controller PCB. Calibrate the printer after replacing the DC controller. See “Calibrate Now” on page 294.
62 NO SYSTEMTo continueturn off then on
No system was found. 1 Turn the printer off and then back on.
2 Reseat the firmware DIMM, making sure it is in the 168-pin slot J1.
Table 7-3 Numerical printer messages (continued)
Message Description Action
www.partshere.com Partshere Troubleshooting
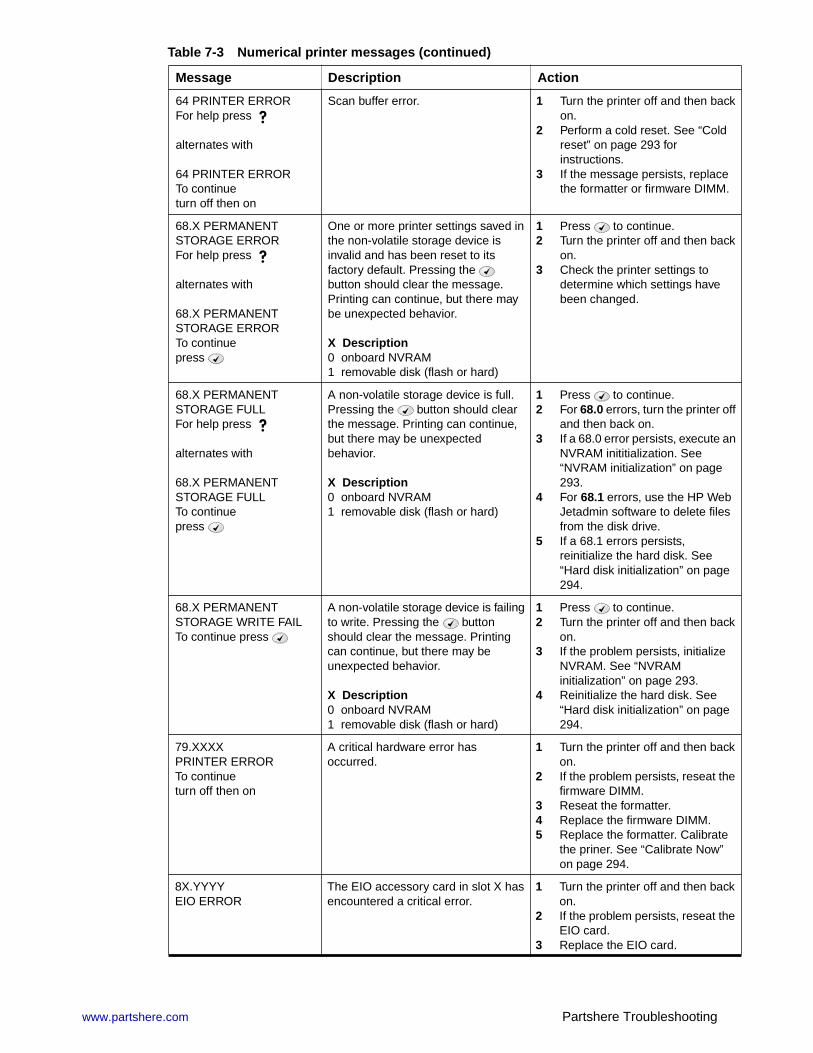
64 PRINTER ERRORFor help press
alternates with
64 PRINTER ERRORTo continue turn off then on
Scan buffer error. 1 Turn the printer off and then back on.
2 Perform a cold reset. See “Cold reset” on page 293 for instructions.
3 If the message persists, replace the formatter or firmware DIMM.
68.X PERMANENTSTORAGE ERRORFor help press
alternates with
68.X PERMANENTSTORAGE ERRORTo continuepress
One or more printer settings saved in the non-volatile storage device is invalid and has been reset to its factory default. Pressing the button should clear the message. Printing can continue, but there may be unexpected behavior.
X Description0 onboard NVRAM1 removable disk (flash or hard)
1 Press to continue.2 Turn the printer off and then back
on.3 Check the printer settings to
determine which settings have been changed.
68.X PERMANENTSTORAGE FULLFor help press
alternates with
68.X PERMANENTSTORAGE FULLTo continuepress
A non-volatile storage device is full. Pressing the button should clear the message. Printing can continue, but there may be unexpected behavior.
X Description0 onboard NVRAM1 removable disk (flash or hard)
1 Press to continue.2 For 68.0 errors, turn the printer off
and then back on.3 If a 68.0 error persists, execute an
NVRAM inititialization. See “NVRAM initialization” on page 293.
4 For 68.1 errors, use the HP Web Jetadmin software to delete files from the disk drive.
5 If a 68.1 errors persists, reinitialize the hard disk. See “Hard disk initialization” on page 294.
68.X PERMANENTSTORAGE WRITE FAILTo continue press
A non-volatile storage device is failing to write. Pressing the button should clear the message. Printing can continue, but there may be unexpected behavior.
X Description0 onboard NVRAM1 removable disk (flash or hard)
1 Press to continue.2 Turn the printer off and then back
on.3 If the problem persists, initialize
NVRAM. See “NVRAM initialization” on page 293.
4 Reinitialize the hard disk. See “Hard disk initialization” on page 294.
79.XXXXPRINTER ERRORTo continue turn off then on
A critical hardware error has occurred.
1 Turn the printer off and then back on.
2 If the problem persists, reseat the firmware DIMM.
3 Reseat the formatter.4 Replace the firmware DIMM.5 Replace the formatter. Calibrate
the priner. See “Calibrate Now”on page 294.
8X.YYYYEIO ERROR
The EIO accessory card in slot X has encountered a critical error.
1 Turn the printer off and then back on.
2 If the problem persists, reseat the EIO card.
3 Replace the EIO card.
Table 7-3 Numerical printer messages (continued)
Message Description Action