tes troubleshooting outline - tesdrying · tes trouble shooting 1 this document outlines questions...
TRANSCRIPT
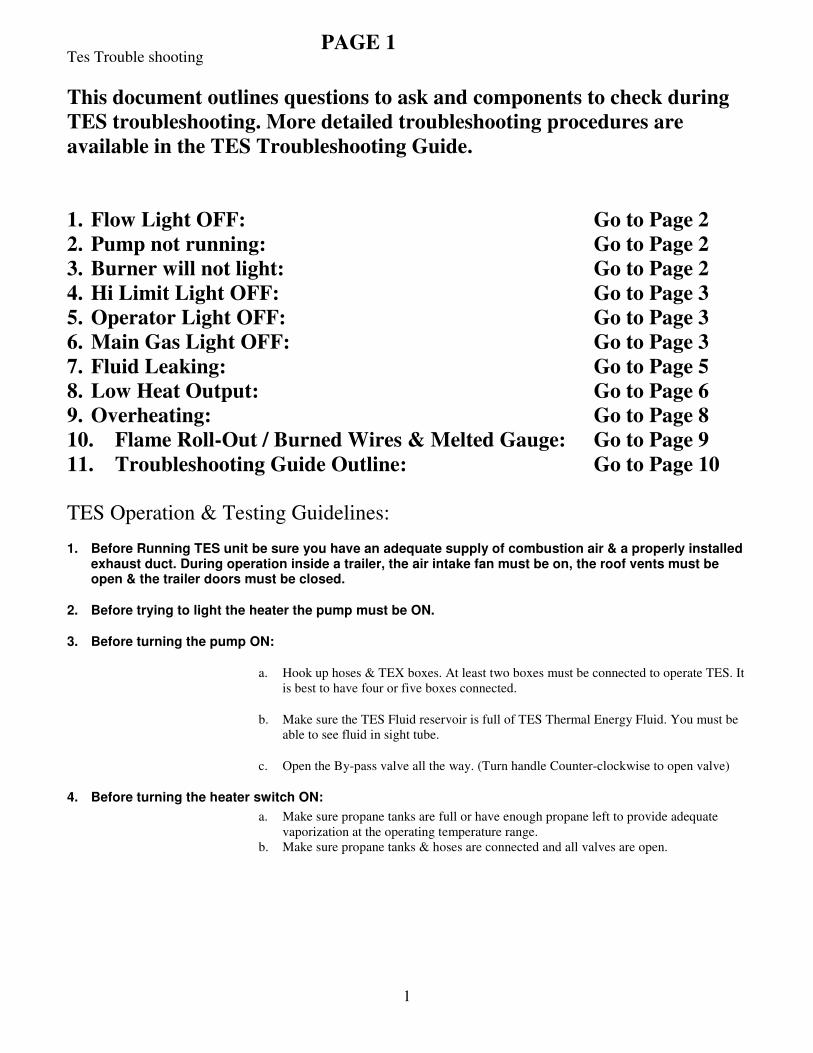
Tes Trouble shooting
1
This document outlines questions to ask and components to check during TES troubleshooting. More detailed troubleshooting procedures are available in the TES Troubleshooting Guide. 1. Flow Light OFF: Go to Page 2 2. Pump not running: Go to Page 2 3. Burner will not light: Go to Page 2 4. Hi Limit Light OFF: Go to Page 3 5. Operator Light OFF: Go to Page 3 6. Main Gas Light OFF: Go to Page 3 7. Fluid Leaking: Go to Page 5 8. Low Heat Output: Go to Page 6 9. Overheating: Go to Page 8 10. Flame Roll-Out / Burned Wires & Melted Gauge: Go to Page 9 11. Troubleshooting Guide Outline: Go to Page 10 TES Operation & Testing Guidelines:
1. Before Running TES unit be sure you have an adequate supply of combustion air & a properly installed exhaust duct. During operation inside a trailer, the air intake fan must be on, the roof vents must be open & the trailer doors must be closed.
2. Before trying to light the heater the pump must be ON.
3. Before turning the pump ON:
a. Hook up hoses & TEX boxes. At least two boxes must be connected to operate TES. It is best to have four or five boxes connected.
b. Make sure the TES Fluid reservoir is full of TES Thermal Energy Fluid. You must be able to see fluid in sight tube.
c. Open the By-pass valve all the way. (Turn handle Counter-clockwise to open valve)
4. Before turning the heater switch ON: a. Make sure propane tanks are full or have enough propane left to provide adequate
vaporization at the operating temperature range. b. Make sure propane tanks & hoses are connected and all valves are open.
PAGE 1

Tes Trouble shooting
2
NO
Repair or replace Pressure reducing Valve
By-pass Valve could be bad. Pressure reducing valve could be bad Check valve operation. Filter fluid, clean filters & heat exchangers. (Troubleshooting Guide Section 3)
Push the fast fill button do you hear the FloJet system pressure pump running?
YES NO
Is the pressure gauge showing a steady pressure or is it jumping around?
NO
Disconnect Outlet hose & test Flojet pump flow.
Good Flow No Flow
Repair or replace the Flojet System Pressure pump
Steady – Turn Heater Switch ON – See page 3 Jumping
YES
NO
YES
Hold the fast fill button & watch the fluid level in the Reservoir. Does the level go down?
Is approx. 30PSI of pressure showing on the gauge?
Lower
YES
Higher
When you turn the pump switch ON, do you hear the main solution pump running?
NO - Check the Power to Flojet pump. Power Found?
PAGE 2 Check the Power from source into unit & wiring from terminal block to pump switch to then pump. Repair wiring or replace pump (Troubleshooting Guide Section 2)
YES
Is this the first time you have reached this point in the testing process?
YES NO
Failure to maintain 30psi and hold steady pressure even with the system pressure pump supplying fluid could indicate that the pressure gauge is bad or that the Main Solution Pump is not working properly. The gauge should show 12-30psi just from the fluid supplied by the Flojet System Pressure pump. If there is no pressure showing on the gauge or the fluid has drained from the gauge, replace the gauge. If the pressure is still low or jumping around repair or replace the Main Solution pump as needed.
Repair Wiring

Tes Trouble shooting
3
NO
Check 2amp Fuse & Replace the 2amp fuse as needed. Check for causes of fuse blowing. Check 24V power at terminal #1 & #2 of 24V terminal block. Replace transformer, heater switch & wires as needed to restore power to terminals #2 & ground to #1 and the POWER light. If needed replace the light panel. (Troubleshooting Guide Section 4)
OPERATOR - ON
NO
NO
YES
NO
MAIN GAS - ON
YES
NO
YES
HI LIMIT - ON
YES
LOW FLOW - ON
If the solution temperature is over 230˚F or the Hi-Limit control is set too low the light will stay off. It may turn off & on during normal operation. Let the boiler cool down, check the setting & reset control as needed. The power must first go through the hi-limit control to power the other lights. Check wires & control function Repair wires or replace control as needed to restore power to the light. If needed replace the light panel. (Troubleshooting Guide Section 6)
If the solution temperature is over 200˚F or the operator control is set too low the light will stay off. It may turn off & on during normal operation. Let the boiler cool down, check the setting & reset control as needed. Check wires & control function. Repair wires or replace control as needed to restore power to the light. If needed replace the light panel. (Troubleshooting Guide Section 7)
Test the continuity through the yellow & red wires going to the flow switch & repair wires & flow switch as needed to restore continuity when the fluid flow rate is adequate and break continuity when the flow rate is low. Repair wires, replace flow switch or roll out switch as needed. (Troubleshooting Guide Section 1)
Return to Page 2 & repeat pump tests or Replace or repair pump
NO
YES
Go to Page 4
If burner stays on, unit is OK.
If burner turns off, Main Gas Light turns OFF & all other lights stay ON – Go to Page 4
If burner turns off, Main Gas light turns off & any other lights turn off.
POWER - ON
Make sure by-pass valve is open all the way & pump is running. Check pressure reading on gauge. If the pressure is low or jumping around, return to Page 2. Slowly turn by-pass valve clockwise to close valve. Do not close valve all the way. After completing test open valve all the way. Does the pressure go up as you close the valve?
PAGE 3
When you turn the Heater switch ON, look at the indicator light panel what lights are ON

Tes Trouble shooting
4
Most common cause would be a restriction in the propane supply. Check tank levels & make sure valves are open. Check pressure at gas valve with manometer. Replace regulator & POL fitting as needed to restore flow. Other cause could be Pilot Assy, Burner ignition control or gas valve. Replace components as needed
Check for spark & check power at PV & C terminals on Gas Valve Replace Burner ignition control or gas valve. (Troubleshooting Guide Section 5)
Does the Main Gas Light come on but then turn off or does it not come on at all?
Does Not Come ON at All Comes ON & turns OFF Comes ON & Blows Fuse
Fuse Blows
Most Common cause would be a bad Main Gas Valve. Disconnect all wires from gas valve. Turn pump & heater switches ON.
Fuse Does Not Blow
Examine wires & look for other possible causes. Replace Burner Ignition control & any burnt wires.
Reconnect the brown & gray wires to the gas valve & retest.
Fuse Blows Fuse Does Not Blow
Replace the gas valve
Fuse Does Not Blow
Reconnect the orange & red wires to the gas valve & retest. Fuse Blows
Fuse Does Not Blow
Replace the gas valve
Check power to terminal #6 of Burner Ignition control where blue wire is connected. Power found?
YES NO
If all other indicator lights are ON there has to be a broken wire from the terminal block to the Burner Ignition control or on some machines the roll-out switch may be bad. Check wires & replace roll out switch to restore power to terminal #6
Return to Page 3.
Are any other indicator lights OFF?
YES NO
PAGE 4

Tes Trouble shooting
5
Where is the fluid leaking?
Leaking from barbs under the left side of the machine base.
Leaking from above burner in combustion chamber
HP Solution Pump
Side of combustion chamber
Pump Compartment above pump
Control Panel – Outside of combustion chamber
Flojet System Pressure Pump
Repair or replace Flojet System Pressure Pump or outlet hose as needed
The fluid can come from Spiro-Vent or Safety Pressure Relief Valve. Clean-out Float Valve on Spiro-Vent. Replace Safety Pressure Relief Valve.
The fluid can is probably coming from a ruptured heat exchanger. Replace Tube Bundle assembly.
Most likely the mechanical seal is bad. Repair or replace the HP Solution Pump.
The fluid can be coming from a ruptured heat exchanger or a leaking seal between the header & the heat exchanger. Remove Headers & replace o-rings & pressure test the Tube Bundle assembly. Replace the Tube Bundle assembly as needed.
Examine hoses & fittings for leaks. Tighten hose clamps, replace hoses & fittings as needed. Also check reservoir & heat exchanger header for leaking.
Examine hoses & fittings for leaks. Tighten hose clamps; replace hoses & fittings as needed. Also pressure gauge & pressure relief valve may need to be replaced.
PAGE 5
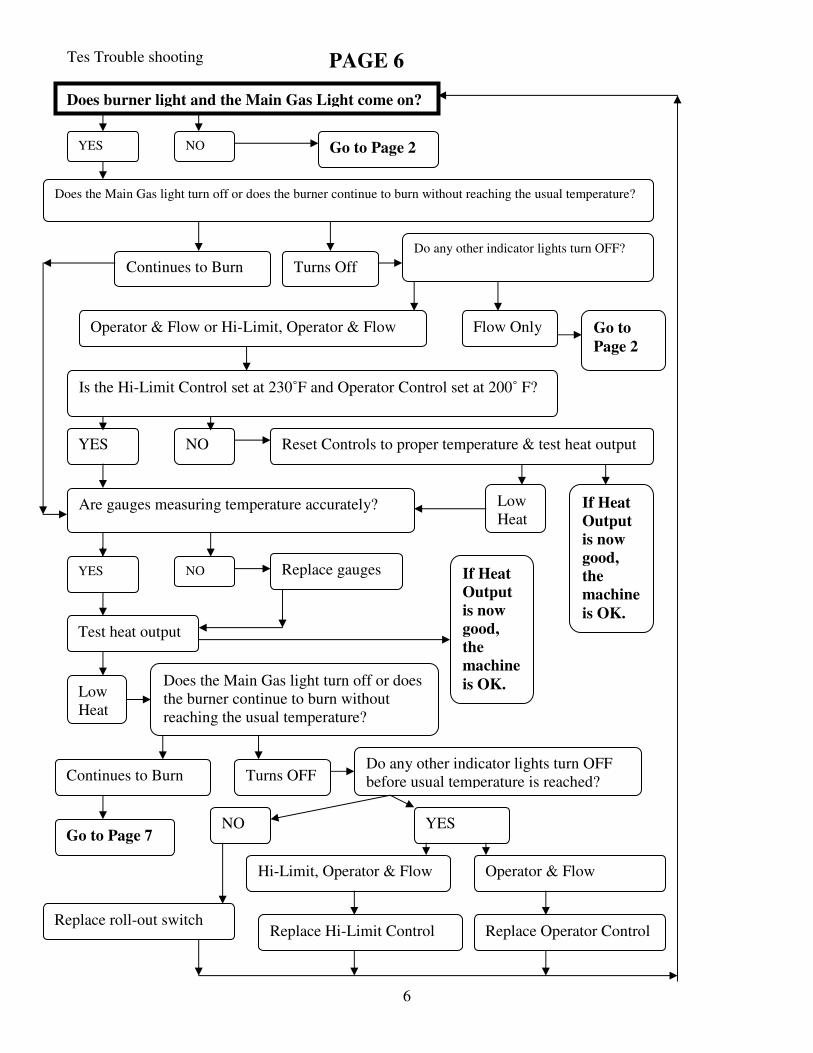
Tes Trouble shooting
6
Does burner light and the Main Gas Light come on?
Go to Page 2 YES NO
Are gauges measuring temperature accurately?
NO
YES NO
Low Heat
If Heat Output is now good, the machine is OK.
Continues to Burn Turns Off Do any other indicator lights turn OFF?
Flow Only Operator & Flow or Hi-Limit, Operator & Flow Go to Page 2
Test heat output
Replace gauges YES
Do any other indicator lights turn OFF before usual temperature is reached?
Low Heat
If Heat Output is now good, the machine is OK.
NO YES
Hi-Limit, Operator & Flow Operator & Flow
Replace Hi-Limit Control Replace Operator Control
Does the Main Gas light turn off or does the burner continue to burn without reaching the usual temperature?
Continues to Burn Turns OFF
Go to Page 7
Replace roll-out switch
Does the Main Gas light turn off or does the burner continue to burn without reaching the usual temperature?
Is the Hi-Limit Control set at 230˚F and Operator Control set at 200˚ F?
Reset Controls to proper temperature & test heat output
PAGE 6

Tes Trouble shooting
7
Most common cause of low heat output would be low vaporization or a restriction in the propane supply. Make sure you have the correct number of propane tanks to supply the propane necessary for heater operation at the current outdoor temperature. The vaporization rate drops with temperature & tank level. Check tank levels & fill as needed. Make sure all valves are open. Check pressure at gas valve inlet with manometer.
Correct propane pressure measured at gas valve inlet.
Low propane pressure measured at gas valve inlet.
Adjust regulator or replace regulator & POL fitting, valves & hoses as needed to restore flow.
Test heat output
Low Heat
If Heat Output is now good, the machine is OK.
Check pressure at gas valve outlet with manometer.
Correct propane pressure measured at gas valve outlet.
Adjust Gas Valve or replace regulator & POL fitting, valves & hoses as needed to restore flow.
Low propane pressure measured at gas valve inlet.
Clean or replace burner tubes. Clean heat exchanger exterior fins. Remove right side header & clean inside of heat exchanger tubes (Troubleshooting Guide Section 8)
PAGE 7
Tes Trouble shooting
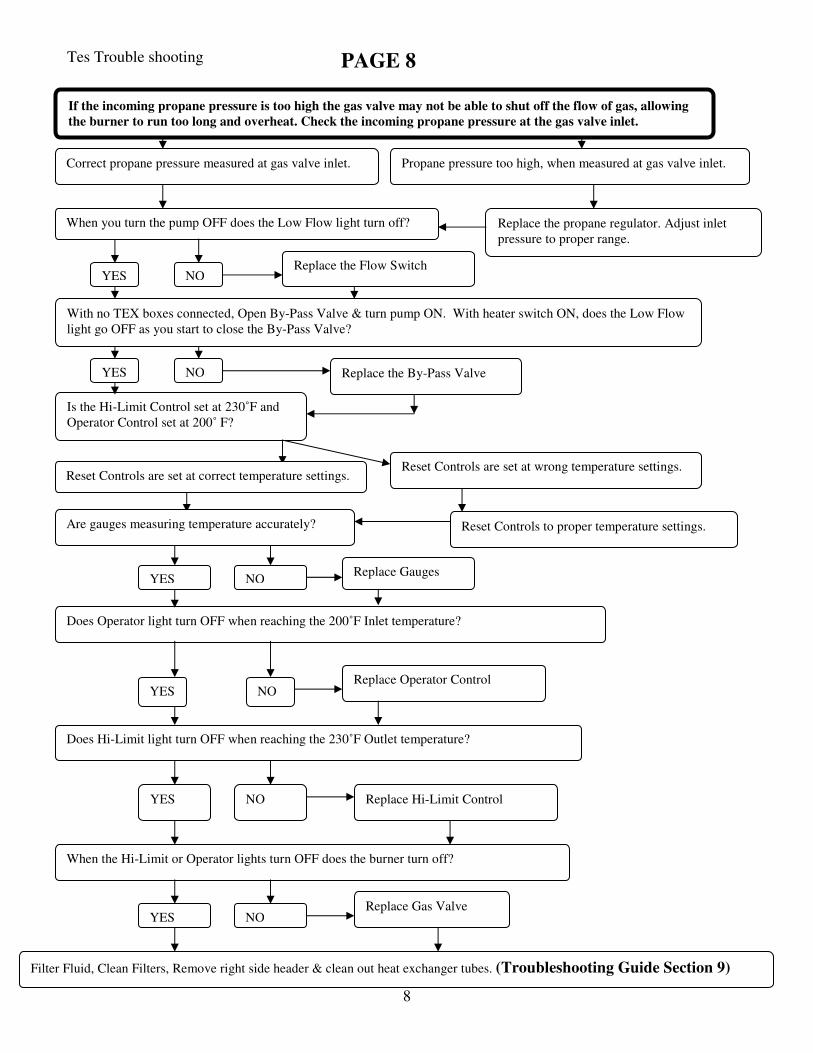
8
Is the Hi-Limit Control set at 230˚F and Operator Control set at 200˚ F?
Correct propane pressure measured at gas valve inlet. Propane pressure too high, when measured at gas valve inlet.
Replace the propane regulator. Adjust inlet pressure to proper range.
Reset Controls to proper temperature settings.
Does Operator light turn OFF when reaching the 200˚F Inlet temperature?
Reset Controls are set at wrong temperature settings.
NO Replace Gauges
NO Replace Operator Control
Does Hi-Limit light turn OFF when reaching the 230˚F Outlet temperature?
YES NO Replace Hi-Limit Control
When the Hi-Limit or Operator lights turn OFF does the burner turn off?
YES NO Replace Gas Valve
When you turn the pump OFF does the Low Flow light turn off?
YES Replace the Flow Switch
NO
Reset Controls are set at correct temperature settings.
Are gauges measuring temperature accurately?
YES
YES
Filter Fluid, Clean Filters, Remove right side header & clean out heat exchanger tubes. (Troubleshooting Guide Section 9)
With no TEX boxes connected, Open By-Pass Valve & turn pump ON. With heater switch ON, does the Low Flow light go OFF as you start to close the By-Pass Valve?
YES NO Replace the By-Pass Valve
If the incoming propane pressure is too high the gas valve may not be able to shut off the flow of gas, allowing the burner to run too long and overheat. Check the incoming propane pressure at the gas valve inlet.
PAGE 8

Tes Trouble shooting
9
The most common cause of Flame Roll-Out is improper trailer ventilation (Troubleshooting Guide Section 10) An adequate supply of clean combustion air & the removal of hot exhaust gases are required for safe efficient operation of the TES unit.
1. TES Exhaust pipe must be installed as outlined in TES Installation instructions in the TES Operator’s Manual & TES Install Manual.
2. Roof Vents must be installed as outlined in TES Installation instructions in the TES Operator’s Manual & TES Install Manual.
3. Air Intake Fan must be installed as outlined in TES Installation instructions in the TES Operator’s Manual & TES Install Manual. (Air flow must be directed into trailer.)
4. Air Intake Fan must be on and running at all times during TES operation 5. Hose access door must be installed as outlined in TES Installation instructions in the TES
Operator’s Manual & TES Install Manual. 6. All trailer doors must be closed during TES operation. Improper trailer ventilation may not always lead directly to Flame Roll-Out, but poor ventilation will prevent complete combustion of the propane causing soot build-up which can cause exhaust restriction allowing the heat to build-up and roll-out to damage wiring and gauges. Other Causes of soot build-up:
� Propane Supply – Overfilled tanks can blow liquid propane through system causing soot build-up.
� Propane Regulator – If the propane pressure & flow is too high the excess propane will not burn completely causing soot build-up.
� Jets – The wrong size burner jets for the altitude at which the unit is operating can allow excess propane flow, which will not burn completely causing soot build-up.
� Gas Valve Failure – Can allow excess propane flow which will not burn completely causing soot build-up.
If soot build-up is found, the Heat Exchanger Tube Bundle will need to be removed & cleaned to allow the hot exhaust gasses to flow up & out the exhaust pipe.
PAGE 9

Tes Trouble shooting
10
1. FLOW LIGHT OFF: Possible Causes: LOW FLOW: Pump not running Power Motor Failure Pump running but not pumping Not Primed – System Pressure Pump Failure Restricted Flow
Pump Failure FLOW LIGHT POWER: Flow Switch High Limit Control Operator Control
Wiring Light Failure
2. PUMP NOT RUNNING: Possible Causes: POWER SUPPLY
WIRING PUMP MOTOR FAILURE
3. HIGH SYSTEM PRESSURE: Possible Causes: GAUGE FAILURE PRESSURE REDUCING VALVE
RESTRICTED FLOW
4. NO POWER TO HEATER: Possible Causes: POWER SUPPLY
FUSE BLOWN WIRING TRANSFORMER FAILURE
5. BURNER WILL NOT LIGHT:
Possible Causes: NO POWER TO HEATER LOW FLOW
OPERATOR CONTROL HI-LIMIT CONTROL
PROPANE SUPPLY Tank Level Regulator Hose Restriction PILOT LIGHT FAILURE Orifice Plugged Flame Adjustment Flame Sensor Failure Ignition Cable Failure
BURNER IGNITION CONTROL Wiring Failure
GAS VALVE Valve Closed Valve needs adjustment / Valve Failure
PAGE 10
Tes Trouble shooting
11
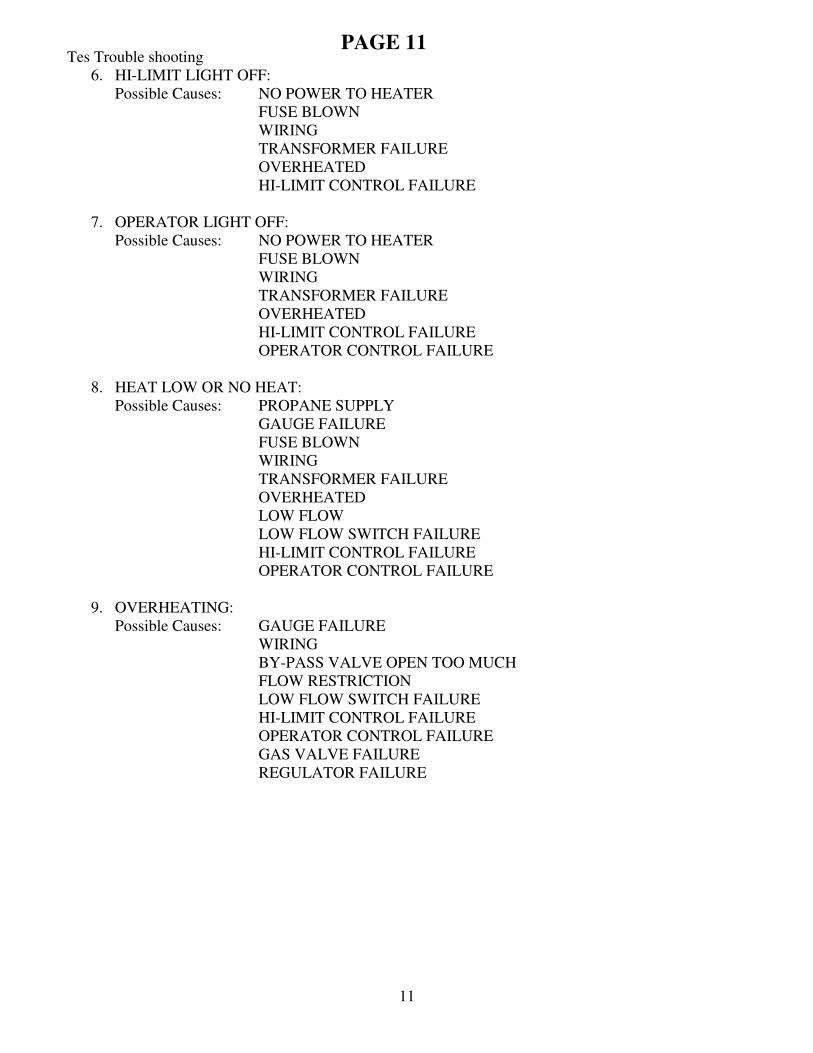
6. HI-LIMIT LIGHT OFF: Possible Causes: NO POWER TO HEATER
FUSE BLOWN WIRING TRANSFORMER FAILURE OVERHEATED HI-LIMIT CONTROL FAILURE
7. OPERATOR LIGHT OFF:
Possible Causes: NO POWER TO HEATER FUSE BLOWN WIRING TRANSFORMER FAILURE OVERHEATED HI-LIMIT CONTROL FAILURE OPERATOR CONTROL FAILURE
8. HEAT LOW OR NO HEAT: Possible Causes: PROPANE SUPPLY GAUGE FAILURE
FUSE BLOWN WIRING TRANSFORMER FAILURE OVERHEATED LOW FLOW LOW FLOW SWITCH FAILURE HI-LIMIT CONTROL FAILURE OPERATOR CONTROL FAILURE
9. OVERHEATING:
Possible Causes: GAUGE FAILURE WIRING BY-PASS VALVE OPEN TOO MUCH FLOW RESTRICTION LOW FLOW SWITCH FAILURE HI-LIMIT CONTROL FAILURE OPERATOR CONTROL FAILURE GAS VALVE FAILURE REGULATOR FAILURE
PAGE 11
Tes Trouble shooting
12
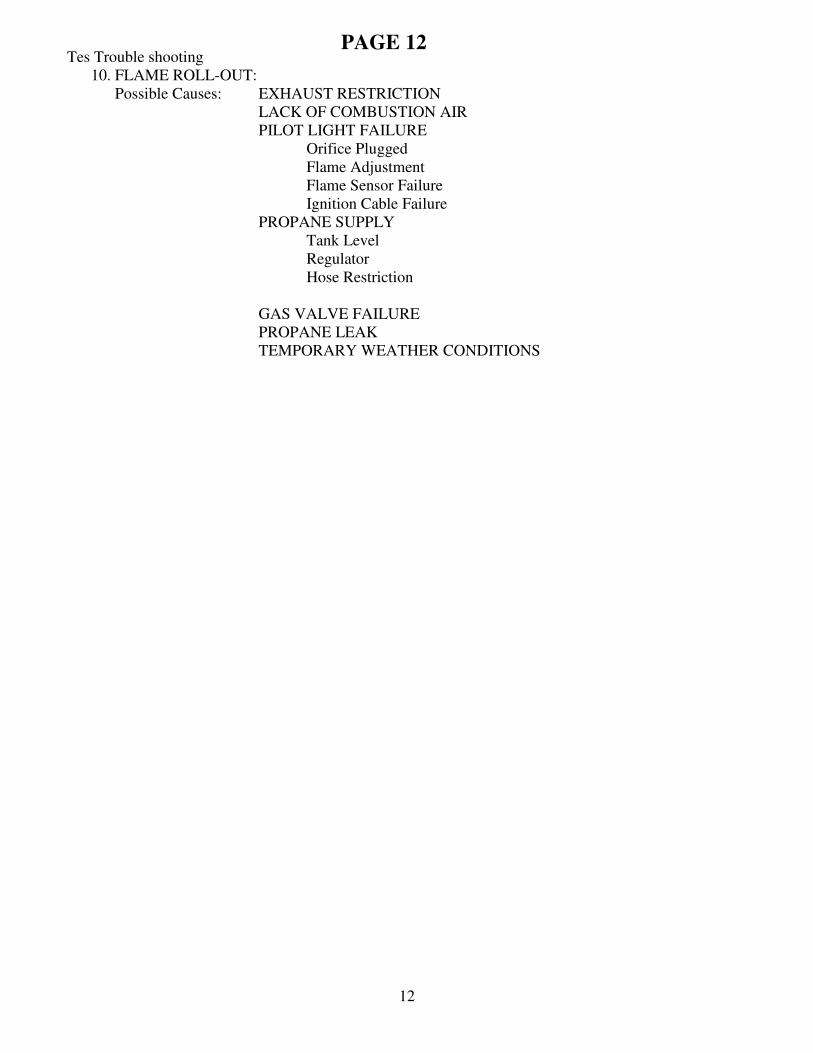
10. FLAME ROLL-OUT: Possible Causes: EXHAUST RESTRICTION
LACK OF COMBUSTION AIR PILOT LIGHT FAILURE
Orifice Plugged Flame Adjustment Flame Sensor Failure Ignition Cable Failure
PROPANE SUPPLY Tank Level Regulator Hose Restriction
GAS VALVE FAILURE PROPANE LEAK TEMPORARY WEATHER CONDITIONS
PAGE 12

Tes Trouble shooting
13

Tes Trouble shooting
14
Tes Trouble shooting
15