package of practices for major horticultural crops€¦ · horticultural crops central island...
TRANSCRIPT

Central Agricultural Research Institute
Port Blair, Andaman and Nicobar Islands
Training Manual
on
Package of Practices for Major Horticultural Crops
M.Sankaran
V.Damodaran
K.Abirami
D.R.Singh
S.K.Zamir Ahmed

Tribal Sub Plan
M.Sankaran
V.Damodaran
K.Abirami
D.R.Singh
S.K.Zamir Ahmed
Training Manual on Package of Practices for Major
Horticultural Crops
Central Island Agricultural Research Institute
Port Blair- 744101, Andaman and Nicobar Islands
Tribal Sub Plan
M.Sankaran
V.Damodaran
K.Abirami
D.R.Singh
S.K.Zamir Ahmed
Training Manual on Package of Practices for Major
Horticultural Crops
Central Island Agricultural Research Institute
Port Blair- 744101, Andaman and Nicobar Islands
Tribal Sub Plan
M.Sankaran
V.Damodaran
K.Abirami
D.R.Singh
S.K.Zamir Ahmed
Training Manual on Package of Practices for Major
Horticultural Crops
Central Island Agricultural Research Institute
Port Blair- 744101, Andaman and Nicobar Islands

1
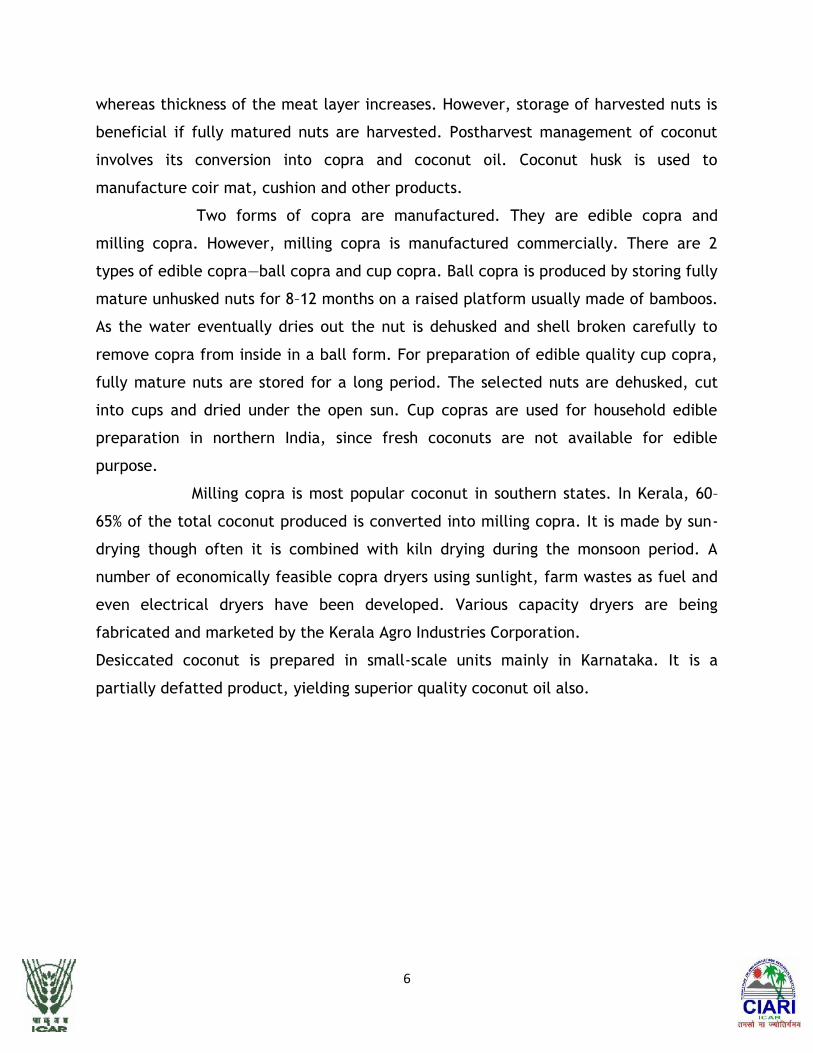
1. Coconut
Coconut (Cocos nucifera) is a commercial crop in India. Kerala, Tamil Nadu, Andhra
Pradesh and Karnataka are major coconut producing states in India. Kerala accounts
for 54.7% of the total area and 42.3% of the production, followed by Tamil Nadu and
Karnataka.
Climate and Soil
Coconut can be successfully cultivated up to 600m above mean sea-level, though it is
cultivated even above 900m. Well-distributed rainfall of 800–2,500mm/year is ideal.
In regions, where prolonged dry spell occurs, irrigation is essential. Coconut can also
withstand water logging during the rainy season. To get highest yield mean annual
temperature of 27°C with a diurnal variation of 5°–7°C is optimum. Low temperature
particularly below 15°C results in cold injuries to the palms, resulting in abnormal
fruit development. Warm and humid conditions are desirable for its cultivation in
coastal region of south India. The humidity should be 80–90%. The relative humidity
below 50% affects opening of the stomata. Since coconut palms love sunlight, its
growth is affected in overcrowded plantations and mixed cropping systems. Sunshine
of 2,000hr/year or more is suitable for profuse growth and productivity.
Laterite, lateritic red, sandy, alluvial sandy, alluvial coastal, and black soils are good
for coconut cultivation. Laterite and lateritic soils in humid tropical zones in the
western and eastern belts of India are the predominant soils wherein coconut is
extensively cultivated. These are highly weathered, moderately deep to deep loamy
to clayey, well-drained and predominantly acidic with a pH of 4.5–6.8.
Varieties
There are 2 types of varieties of coconuts, e.g. tall and dwarf. The tall palms are
most commonly cultivated. They grow to a height of 25–30m, the pre-bearing age
being 6–10 years. Tall palms are normally cross-pollinated as there is no overlapping
of male and female phases. Medium-to-large sized nuts in tall palms mature in 12
months. Andaman Giant Tall, Katchal Tall, Nicobar Tall and Andaman Ordinary Tall
are the tall types cultivated in A&N Islands.
1
1. Coconut
Coconut (Cocos nucifera) is a commercial crop in India. Kerala, Tamil Nadu, Andhra
Pradesh and Karnataka are major coconut producing states in India. Kerala accounts
for 54.7% of the total area and 42.3% of the production, followed by Tamil Nadu and
Karnataka.
Climate and Soil
Coconut can be successfully cultivated up to 600m above mean sea-level, though it is
cultivated even above 900m. Well-distributed rainfall of 800–2,500mm/year is ideal.
In regions, where prolonged dry spell occurs, irrigation is essential. Coconut can also
withstand water logging during the rainy season. To get highest yield mean annual
temperature of 27°C with a diurnal variation of 5°–7°C is optimum. Low temperature
particularly below 15°C results in cold injuries to the palms, resulting in abnormal
fruit development. Warm and humid conditions are desirable for its cultivation in
coastal region of south India. The humidity should be 80–90%. The relative humidity
below 50% affects opening of the stomata. Since coconut palms love sunlight, its
growth is affected in overcrowded plantations and mixed cropping systems. Sunshine
of 2,000hr/year or more is suitable for profuse growth and productivity.
Laterite, lateritic red, sandy, alluvial sandy, alluvial coastal, and black soils are good
for coconut cultivation. Laterite and lateritic soils in humid tropical zones in the
western and eastern belts of India are the predominant soils wherein coconut is
extensively cultivated. These are highly weathered, moderately deep to deep loamy
to clayey, well-drained and predominantly acidic with a pH of 4.5–6.8.
Varieties
There are 2 types of varieties of coconuts, e.g. tall and dwarf. The tall palms are
most commonly cultivated. They grow to a height of 25–30m, the pre-bearing age
being 6–10 years. Tall palms are normally cross-pollinated as there is no overlapping
of male and female phases. Medium-to-large sized nuts in tall palms mature in 12
months. Andaman Giant Tall, Katchal Tall, Nicobar Tall and Andaman Ordinary Tall
are the tall types cultivated in A&N Islands.

2
Dwarf palms are short-statured, their pre-bearing age is 3–4 years. Dwarf palms yield
heavily though they have an irregular bearing habit. They are identified by colour of
fruits—orange, yellow, and green.
Selection of mother palms
Select mother palms having the following characters:
1. Regular bearing habit and yielding not less than 80 nuts / annum.
2. Age 20 years or more (5 years after reaching full bearing capacity). If the mother
palms are the progeny of elite planting material and gives consistently higher yields
for a period of not less than 6 years, seed nuts can be collected from such palms.
There is no need for insisting 20 years as minimum age for mother palms in such
conditions.
3. More than 30 fully opened leaves with short strong petioles and wide leaf base
firmly attached to the stem.
4. Bearing at least 12 bunches of nuts with strong bunch stalks.
5. Bearing nuts of medium size and oblong shape.
6. Husked nuts should weigh not less than 600 g.
7. Mean copra content of 150 g per nut or more.
Avoid palms which (i) have long, thin and pendulous inflorescence stalks (ii) produce
long, narrow, small sized or barren nuts (iii) show shedding of immature nuts in large
numbers and (iv) are grown under favourable environmental conditions.
Propagation
Coconut is propagated only through seedlings. Seedlings should receive utmost
attention since the performance of these seedlings can be judged only after several
years of planting when the yield stabilizes.
Selection of seedlings is an important criteria for obtaining quality planting material.
Early germinated nuts having a faster rate of leaf production is correlated with early
flowering and high nut production. Those seed nuts which germinate within 3 months
after sowing are suitable for planting and it is advisable to reject all the sprouts
which appear 5 months after sowing. Short stem with good girth at collar, tendency to

3
produce large number of leaves, dark green in colour and early splitting of the leaves
are characteristics of quality seedlings which subsequently result in high-yielding
palms.
In India, 9–12 months old seedlings are generally transplanted. Pruning of roots in
seedlings up to 12 months does not cause any damage. However, in certain parts of
Karnataka and Andhra Pradesh, 2–3 years old seedlings are also planted particularly in
areas subjected to flooding and poor drainage in soil. However, in such cases,
considerable root damage occurs to seedlings, resulting in delayed establishment and
early growth retardation.
Cultivation
Planting
The preparation of land for field planting depends upon topography, soil type and
watertable. In undulating and slopy lands, after clearing under growth, soil
conservation measures should be adopted to prevent soil erosion. Adequate drainage
is also necessary in the initial years in waterlogged areas so that the roots of coconut
palms do not come in contact directly with water. In waterlogged areas, coconut
should be planted on raised mounds or bunds.
The major criterion for deciding optimum spacing for coconut is that the canopies of
coconut plants should not touch each other between eighth and twentieth year of
planting. At a spacing of 7.5m × 7.5m about 74% of the roots of coconut palm do not
go beyond 2m laterally and 82% of the roots are confined between 30 and 120cm
depth in soil. Thus the active root zone of coconut utilizes only 25% of the available
land. In view of this there is a scope for variation in spacing adopted depending on
soil type, varieties, inter- and mixed cropping. In square system of planting, a spacing
of 7.5m or 9m is ideal for tall varieties, accommodating 175 and 124 palms/ha
respectively. In triangular system, a spacing of 9m accommodates about 140 palms.
Hedge system of planting is also adopted particularly in case of establishment of seed-
gardens with dwarfs and talls planted in alternate rows in different spacings to
facilitate easy hybridization. In single hedge systems, a spacing of 9m from row-to-
row and 5m within rows should be adopted.

4
Pits of 1m × 1m × 1m size are prepared during summer months. However, surface
planting is also adopted particularly in Karnataka and coastal Maharashtra. In lowlying
areas, coconuts are planted on raised mounds/bunds. Organic wastes are put into the
planting pits and burnt before planting. Furdan @ 5g/pit is also added. The pits are
filled up to 0.25–0.30m depth with a mixture of top soil, sand and wood-ash. A small
pit to accommodate the nut portion of the seedling is deepened in the filled up
portion of the pit. The seedlings are planted at the centre of pits. The soil around the
pit is firmly pressed. Care should be taken to see that the collar of the seedling is not
covered by the soil. Suitable supports are given so that the roots are not affected by
wind. The planting season varies from place-to-place. However, most appropriate
time of planting is during the beginning of the monsoon period (May–June) and
October–November in the lowlying areas.
The young seedlings planted in fields require adequate shade during first year of
planting. Shading properly reduces initial mortality of plants. Keep the field weed-
free. Regular irrigation should be given during summers.
Manuring and fertilization
Coconut palms should be manured from the first year of planting itself. The
productivity of coconut is adversely affected if its palms are not fed property in the
beginning. A dose of 0.5kg N, 0.32kg P2O5 and 1.2kg K2O/year is optimum for an adult
palm. However equivalent quantity of FYM or compost can be followed under organic
cultivation. The first dose of fertilizer should be applied 3 months after planting. The
dosage should be gradually increased.
The fertilizer should be applied under optimum soil moisture condition. The one-third
dose of fertilizer is applied immediately after the onset of south–east monsoon and
the remaining dose at the end of the monsoon. A shallow trench of 1.8m radius
around the base of the coconut is made. One-third of the fertilizer dose is applied
around the basin covered with organic manure and soil. Application of farmyard
manure (50kg/palm) is essential to supplement inorganic fertilizer. For phosphatic
fertilizer, rock phosphate is cheapest and best, particularly for acidic soil. The
application of P can be skipped for a few years if available P in the soil is more than
20ppm. Basin cultivation of green manure crops like Calopogonium and Mimosa imvisa
5
during the monsoon season can generate up to 25kg green manure which can be
incorporated into the basin before flowering. Compared to the local talls, hybrids
particularly D×T are found to be most efficient users of applied nutrients.
Irrigation
Response of coconut palms to irrigation is location-specific and depends on climate,
soil, topography and ground water table. Moisture stress increases leaf fall, lowers
growth rate of reproduction, resulting in lower leaf area and reduction in light
interception. The effect of moisture stress is reflected by the reduction of yield due
to reduction in number of bunches, number of female flowers/inflorescence and
setting percentage besides shedding of tender nuts. The size of nut and copra content
are also reduced due to moisture stress. During summer months in coastal Kerala and
Karnataka, 200 litres water once in 4 days in the basin of 1.8m radius is
recommended. The irrigation requirement of coconut depends on amount of rainfall,
its distribution, soil characteristics, climatic condition, annual temperature, relative
humidity and pan evaporation. Drip irrigation economizes use of water, besides
improving the water-use efficiency. In drip irrigation, 30–40 litres water/day is
optimum for west coast condition. Sprinkler or perfo spray is recommended in
coconut plantations with inter- and mixed crops and coconut-based cropping system.
Mulching with coconut husk, coir dust, green leaves and dry coconut leaves not only
improves water-retention capacity but also reduces the soil erosion hazards. It helps
in controlling weeds apart from conservation of soils moisture.
Harvesting and Postharvest Management
On an average, coconut yields 44 nuts/palm/year. However, under scientific
cultivation West Coast Tall gives 80 nuts/palm/year in coastal Kerala and Karnataka.
The hybrids yield 100–140 nuts/palm/year. Coconut ripen in 12–13 months from the
opening of the inflorescence. To get maximum yield of copra and oil only fully mature
nuts should be harvested. Immature nuts provide 6–33 and 5–33% less copra and oil
respectively. Superior, golden-brown, quality fibre with elastic and good tungston
strength is obtained from 10-month-old nuts.
The harvested nuts are stored in heaps under shade for a few days
since the stored nuts are easy to husk. The moisture content of the meat decreases,
6
whereas thickness of the meat layer increases. However, storage of harvested nuts is
beneficial if fully matured nuts are harvested. Postharvest management of coconut
involves its conversion into copra and coconut oil. Coconut husk is used to
manufacture coir mat, cushion and other products.
Two forms of copra are manufactured. They are edible copra and
milling copra. However, milling copra is manufactured commercially. There are 2
types of edible copra—ball copra and cup copra. Ball copra is produced by storing fully
mature unhusked nuts for 8–12 months on a raised platform usually made of bamboos.
As the water eventually dries out the nut is dehusked and shell broken carefully to
remove copra from inside in a ball form. For preparation of edible quality cup copra,
fully mature nuts are stored for a long period. The selected nuts are dehusked, cut
into cups and dried under the open sun. Cup copras are used for household edible
preparation in northern India, since fresh coconuts are not available for edible
purpose.
Milling copra is most popular coconut in southern states. In Kerala, 60–
65% of the total coconut produced is converted into milling copra. It is made by sun-
drying though often it is combined with kiln drying during the monsoon period. A
number of economically feasible copra dryers using sunlight, farm wastes as fuel and
even electrical dryers have been developed. Various capacity dryers are being
fabricated and marketed by the Kerala Agro Industries Corporation.
Desiccated coconut is prepared in small-scale units mainly in Karnataka. It is a
partially defatted product, yielding superior quality coconut oil also.
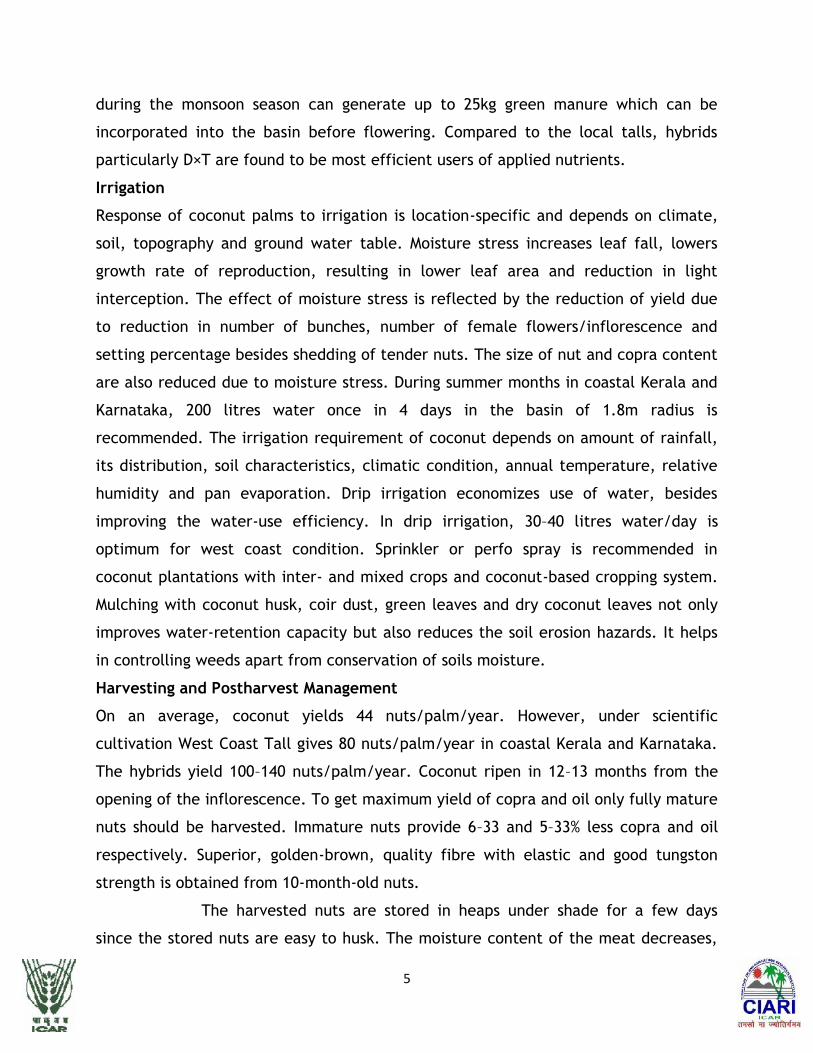
777

888

9
2.Arecanut
Arecanut or betel nut or supari (Areca catechu) is chewed both as raw nut and after
processing. While ripe arecanut is favoured in Assam, Kerala and Northern parts of
West Bengal, chaliis more popular is Western and Northern parts of India. Processed
green nut kalipak is the choice in Karnataka and Tamil Nadu. Owing to the medicinal
properties, it is used in treating leucoderma, cough, fits, worms, anaemia and
obesity. Arecanut is of utmost importance in many religious ceremonies. Tannins in
arecanut are being used for dyeing clothes, ropes and for tanning leather. Plastic,
hard boards and craft paper of satisfactory strength can be made from its husk. The
leaf sheath is a good material for making throw-away cups and plates, plyboards,
decorative veneer panels and picture mounds. Its stem forms a useful building
material in the villages. Arecanut is mostly grown in Kerala, Karnataka, Assam, West
Bengal and Tamil Nadu.
Climate and Soil
Though arecanut grows up to 1,000m above mean sea-level, its quality is affected
adversely at higher altitudes. In most of the states, it is grown in the plains. The crop
flourishes well at a temperature range of 14°–36°C. Extremes of temperature and
wide diurnal variations are not conducive for desirable performance. The largest area
of arecanut is found in gravelly laterite soils of red clay. In parts of Karnataka,
arecanut is planted in fertile clay soils with an admixture of tank silt. Sticky clay,
sandy, brakish and calcarious soils are not favourable for its cultivation.
Varieties
Mangala, Sumangala, Sreemangala, Mohitnagar, Samrudhi and SAS 1 are released
varieties for various arecanut-growing regions of India.
Propagation
Arecanut is propagated only through seeds. Seed nuts are collected from selected
high-yielding mother palms, 5 years after their first bearing. Apart from high yield,

10
the age of first bearing and higher percentage of nut set (above 50%) are important
characters to be considered for selection. Lowering the ripe bunches using a rope is
advantageous. Only fully ripe nuts with a minimum weight of 35g are selected.
The whole nuts are sown in sand beds 5–6cm apart, with their stalk ends pointing
upwards. Sand is spread just to cover the nuts. The nursery should be irrigated daily.
Germination starts in about 40 days and the sprouts are retained in the primary
nursery till they produce 2–3 leaves which usually takes 3–4 months. The seedlings are
transplated to secondary nursery beds at a spacing of 35–45cm. The beds can be of
any size but 150cm wide and 15cm high are convenient. A basal dose of well-
decomposed cattle manure (5 tonnes/ha) may be applied in the secondary nursery.
Partial shade should be provided through Pandal or by growing Cocciniaindica. Copious
irrigation during summer and proper drainage during monsoon are essential. Weeding
and mulching should be done periodically.
Instead of transplanting sprouts in the secondary nursery, they can also be raised in
polythene bags of 25cm × 15cm size. The bags should be filled with a potting mixture
containing loam or top soil, dried and powdered farmyard manure and sand in 7:3:2
ratio.
Cultivation
Planting
Since arecanut palm is very delicate, the field should have protection from exposure
to south-western sun by way of either hillocks or tall evergreen trees. The land should
have irrigation facility. Feasibility of drainage is another prerequisite where water
table is high.
The spacing of 2.7m × 2.7m is adequate. Square, rectangular, triangular and quincunx
systems of planting are used. Planting in proper alignment helps prevent sun scorching
of the stem. In square system planting, the north-south line should be deflected at an
angle of 35 degrees towards west.
About 12–18 months old seedlings are used for planting. Selected seedlings are
removed with a ball of earth for transplanting. If they are raised in polythene bags,
transporting can be done straightway to any distance without damage.

11
May–June or the onset of monsoon is best time for planting. In clayey soils having
waterlogging, it is taken up in August–September. Pits of 90cm × 90cm × 90cm size are
dug and filled with a mixture of top soil, farmyard manure and sand or top soil to a
height of 50–60cm from bottom. The seedlings are planted in the centre of the pit,
covered with soil to the collar level and firmly pressed. Where higher watertable
prevails, seedlings are planted in shallow pits or in extreme cases on mounds raised
for the purpose. In such conditions, earthing-up is required in subsequent years to
prevent exposure of roots.
Manuring
Manuring is done around the palm in basins 15–20cm deep and 1m wide. The quantity
of fertilizers recommended is 100:40:140g NPK/palm/year. However equivalent
quantity to substitute the recommended dose of nutrients through FYM or compost
can be adopted under organic cultivation.
The fertilizers are applied in 2 split doses during April–May and September–October.
These are broadcast around the base of each palm and forked. Application of 25kg
organic manure as green leaf, compost or farmyard manure is recommended. These
can be applied as single dose. In acidic soils, application of lime is necessary. The
lime requirement in each soil has to be determined and the required quantity should
be broadcast around the basins preferably during dry months and mixed with soil by
forking.
Aftercare
To ensure adequate drainage, one drain channel should be provided for every 2 rows
of palms. The channels should be at least 15–30cm deeper than the depth at which
the seedlings are planted. The drains are to be cleaned at the beginning of monsoon
each year. The planted pits are also to be provided with outlets and emptied to the
drains.
Young seedlings are best protected by raising banana crop during the early years. This
also helps the farmers to get some income till the areca palm starts giving revenue.
Protecting the stem from sun scorching is important since the parts once damaged

12
cannot be recouped. From the beginning of October, the exposed stems of palms are
to be covered with dry leaves of arecanut or by white opaque polythene film.
The cultural practices followed by cultivators in different parts of India vary. Light
digging in October–November is required to break up any crust formed at the soil
surface and to uproot weeds. Mulching the interspaces of arecanut gardens is another
field operation which prevents soil erosion during heavy rains and adds humus to the
soil.
Irrigation
Areca is grown as a rainfed crop in West Bengal, Assam and southern parts of Kerala.
Since irrigation increases its yield, it is recommended to irrigate during long dry spell.
In West Coast, watering once in 7 days during November–December, once in 6 days
during January–February and once in 3–5 days during March–May is recommended.
Irrigation of 30mm depth when CPE is 30mm is the best. For efficient water use, drip
irrigation is recommended.
Multiple cropping
Multiple cropping and intercropping in arecanut gardens provides an additional
income. The intercrops should be tolerant to shade, should not compete with
arecanut for various resources and should have marketing feasibility. Banana,
pineapple, elephant-foot yam, tapioca, dioscorea, sweet potato, ginger and turmeric
are ideal crops for intercropping depending on the region where cultivated. Cocoa is
most popular crop for multiple cropping system. Cocoa is planted at 2.7m spacing
between alternate rows of standing arecanut palms. Black pepper trained on arecanut
is another popular multiple cropping system. Cinnamon, coffee, betel vine and
cardamom are also grown along with arecanut in certain areas.
Harvesting and Postharvest Management
The bunches are harvested when they are fully ripe if the end use is chali or kotapak
(dried ripe nuts). About 6–7 months old nuts which are dark green and soft are
harvested to produce kalipak.The most important trade types of arecanuts are dried

13
ripe nuts (chali or kotapak), kalipak and scented supari. To prepare chali or kotapak,
ripe nuts are dried under the sun for 35–40 days. These are then dehusked and
marketed as whole nuts.
13
ripe nuts (chali or kotapak), kalipak and scented supari. To prepare chali or kotapak,
ripe nuts are dried under the sun for 35–40 days. These are then dehusked and
marketed as whole nuts.
13
ripe nuts (chali or kotapak), kalipak and scented supari. To prepare chali or kotapak,
ripe nuts are dried under the sun for 35–40 days. These are then dehusked and
marketed as whole nuts.

14
3. Banana
Banana and plantain (Musa sp.) are one of the important fruits widely cultivated in
India for its great socio-economic significance, dessert fruit for millions apart from a
staple food owing to its rich and easily digestible carbohydrates with a calorific value
of 67–137/100g fruit. Due to itsmultiple uses starting from underground stem up to
the male flower. Hence, it is referred as Kalpatharu (a plant of virtues). In India,
banana contributes to 31.72% of the total fruit production. India is the largest
producer of banana in the world. Andhra Pradesh, Assam, Bihar, Gujarat, Karnataka,
Kerala, Madhya Pradesh, Maharashtra, Orissa and West Bengal are major banana-
growing states, the highest productivity being 52.18 tonnes/ ha in Maharashtra
followed by Gujarat (40 tonnes/ha). The lowest productivity is from the north-eastern
region.
Climate and soil
Banana is well-suited for cultivation from humid subtropical to semi-arid subtropics up
to 2,000m above mean sea-level. In India, it is successfully grown from 8°N to 28°N
latitudes with a temperature of 15°–35°c and a rainfall of 500–2,000mm/year. Mean
temperature of 20°–30°c is optimum for its growth. Water stagnation in poorly-
drained soils also leads to slow growth. The plants collapse in extreme cases. Apart
from temperature and water, wind poses a major constraint in banana production.
High wind results in uprooting and collapse of plants. Avoidance of bunching during
the period of high wind velocity is advocated through adjustment in time of planting.
Banana can be grown in all kinds of soils having good drainage. In sandy loam soil
plants grow faster compared to vertisol or clay loam soil. Though soil pH of 6.5–7.5 is
optimum, banana can be grown in soils having a pH up to 8.5 with suitable
amendments. More organic amendments are essential in sandy as well as heavy soils.

15
Varieties
The Dwarf Cavendish, Robusta, Katta Champa, Mitta Champa,
Karpooravalli, Korangi, Red Banana & Rathalu are commonly cultivated in Andaman &
Nicobar Islands.
Production systems
Depending upon resource availability, cultivars, traditions and marketing, different
production systems are adopted.
Homestead or backyard cultivation
In traditional growing regions, homestead cultivation of banana is common. The
choice of cultivars is governed by family requirements and quality preference of the
household. Backyard cultivation is traditional because of the ease in establishment,
availability of area around farmhouse, minimum capital investment, ease of
monitoring and sharing of labour among family members. Homestead farming is
characterized by improper spacing, inadequate use of fertilizer and pesticides, high
productivity and longer crop duration.
Multistorey system: It is commonly followed in plantations of Tamilnadu, Karnataka
and Kerala where crops with different canopy levels are planted. High-density
planting with coconut and arecanut forming the upperstorey followed by banana, next
with tapioca and lower-most storey with colocasia, turmeric, ginger and garlic. High
input management is its important feature. Semi-tall banana Poovan and Ney Poovan
are preferred in this system. This kind of production systems are highly suitable to
farmers of Andaman & Nicobar islands
Propagation
Banana is propagated through suckers or corms. Sword-suckers with a well-developed
rhizome, conical in shape with lanceolate leaves and actively growing central buds,
weighing 500–750g are generally used. Propagation through shoot-tip culture is cost-
effective for the production of disease-free plants. In-vitropropagated banana is

16
becoming popular. Micropropagation has been preferred over conventional
propagation owing to its faster multiplication, uniformity in planting material and
disease-free material from transmissible pests and diseases. In-vitro propagated
plants are becoming a commercial reality along with fertigation.
Time of planting
Time of planting is determined by the choice of cultivar, agroclimatic conditions and
market demand. March-April is the ideal time for planting of banana because of
occurrence of Sigatokaleafspot in Dwarf Cavendish in A&N islands, by adjusting time
of planting, bunch emergence in rainy season can be avoided.
System of planting
Depending on tradition, resource availability and existing constraints planting systems
vary in different regions. Pit planting is commonly followed in garden land system of
cultivation. Pits of 60cm × 60cm × 60cm size are dug, filled with a mixture of soil,
sand and farmyard manure in a 1: 1: 1 ratio. Suckers are planted in the centre of the
pit and soil around is compacted. This is mostly followed for Dwarf Cavendish,
Rasthali, Robusta, Poovan and Karpuravalli banana.
Manuring and fertilization
All the macro- and micro-elements are required by banana. Among macronutrients, N
is most essential element. For normal plant growth and development 100–250g of
N/plant is advised depending on nutrient status of soil and cultivar. Urea is commonly
used as a source of N. It should be applied in 3–4 splits. Application of 150g N in
vegetative phase and 50g N in reproductive phase enhances the yield and delays the
leaf senescence. Application of 25% N as farmyard manure and 1kg neem cake is
beneficial. The application of 25% N in organic form, 75% N in inorganic form along
with growing of green manure crops like Crotalaria is ideal.
The P requirement of banana is comparatively low. Superphosphate forms
the major source of P followed by the application of rock phosphate 50–95g/plant at
planting. In acidic soils, triple superphosphate or diammonium phosphate is

17
recommended. Phosphorus is applied in single dose at the time of planting and
quantity of P2O5 depends upon soil type and varies from 20 to 40g/plant. Application
of K (100g) in 2 splits during vegetative phase and 100g in 2 splits during reproductive
phase is recommended. Application of 200–300g K2O is recommended depending upon
cultivar. Invariably, plantains require higher K than other group of cultivars. Calcium
influences yield through its interaction with N, P and K. In acidic soils, use of
dolomite (MgCO3) and limestone (CaCO3) as soil amendments is common. Magnesium,
an important component of chlorophyll assumes a vital role in normal growth and
development of the plant. In acute deficiencies foliar spraying of MgSO4 is found to
relieve the plant. The application of Zn (0.1%), B (0.005%) and Mn (0.1%) improves
yield.
Water management
Depending on water availability, banana is grown either as rainfed or irrigated or
wetland crop. Water requirement of banana varies from 1,800–2,200mm. In A&N
islands, banana is mostly cultivated as rainfed crop and it is also cultivated as
irrigated crop (Only Dwarf Cavendish) Normal furrow and basin and trench systems are
followed. The furrow or basin system is useful if water availability is not a constraint.
Weed management
Weeds reduce yield up to 40–50% depending upon cultivar and soil. First 6 months of
growth are most critical for weed growth. The plantation has to be kept completely
weed-free by following regular hand- weeding. Apart from cultural practices,
chemical control using 0.4% Glycel spray is also effective. But an
integrated management of weeds by intercropping cowpea, soil mulching with
sugarcane trash and paddy straw and one spraying of Glycel is economical.
Aftercare
Desuckering once in 45 days is a common practice in banana plantation. In a young
plantation of up to 2–3 months, emerging small suckers are simply headed back with a
sharp knife. In later stages , removal along with their rhizomes is a must. For that a

18
crow bar of 1 m with a flattened, spoon-like edge is used and care is taken not to
damage the mother plant. Cutting back the sucker and pouring kerosene (4ml) into
the small gouged cavity made in the centre or injection of kerosene from the side of
the sucker just above the meristem can also be adopted.
Intercropping
Intercropping is a common practice in banana orchards to check weed growth,
improve soil health and to augment the additional income. In initial years, soybean,
cowpea, beans and yam are grown.The crops which can attract nematodes or soil-
borne diseases should be avoided. Brinjal or cucurbits should not be grown.
Mulching
Mulching helps conserve soil moisture and suppress weed growth. Organic mulching
also improves soil health. Sugarcane trash @ 10 tonnes/ ha provides effective
mulching for conservation of moisture. Paddy straw, dried leaves and Pongamialeaves
can also be used. Experiments have proved the superiority of polythene sheet
mulching for better conservation of moisture and suppressed weed growth.
Management of Orchards
As the young plants grow, and lower leaves dry, they are separated from pseudostem
and fall apart. To avoid weakening of the pseudostem, it is a common practice to tie
all the leaf sheaths with a dried banana leaf. This operation is done periodically at
bimonthly intervals. Dried or diseased leaves are also required to be removed at
regular intervals to reduce disease load and also to give exposure to sunlight. For
maximum yield, a minimum of 10–12 leaves are required to be retained on the mother
plant.
Propping
Strong wind is a threat for successful banana production. Bamboo or Casurinapoles
are commonly used. These poles have effective life of 3–4 years. Props using
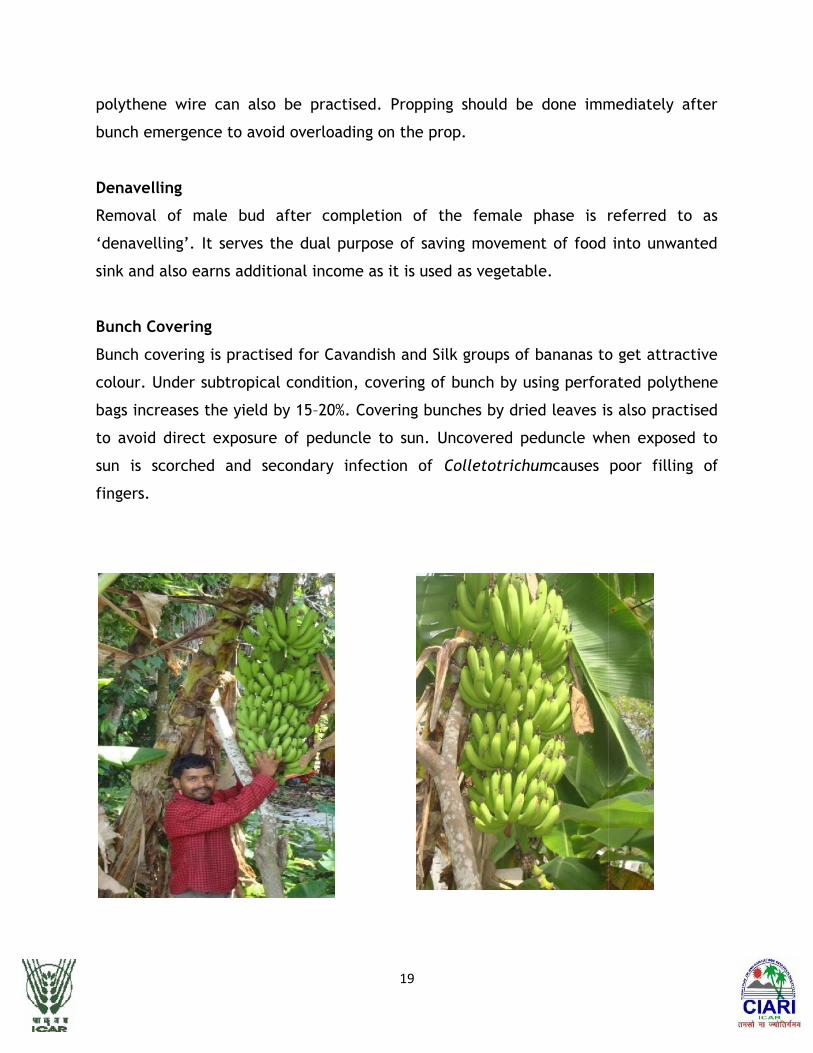
19
polythene wire can also be practised. Propping should be done immediately after
bunch emergence to avoid overloading on the prop.
Denavelling
Removal of male bud after completion of the female phase is referred to as
‘denavelling’. It serves the dual purpose of saving movement of food into unwanted
sink and also earns additional income as it is used as vegetable.
Bunch Covering
Bunch covering is practised for Cavandish and Silk groups of bananas to get attractive
colour. Under subtropical condition, covering of bunch by using perforated polythene
bags increases the yield by 15–20%. Covering bunches by dried leaves is also practised
to avoid direct exposure of peduncle to sun. Uncovered peduncle when exposed to
sun is scorched and secondary infection of Colletotrichumcauses poor filling of
fingers.
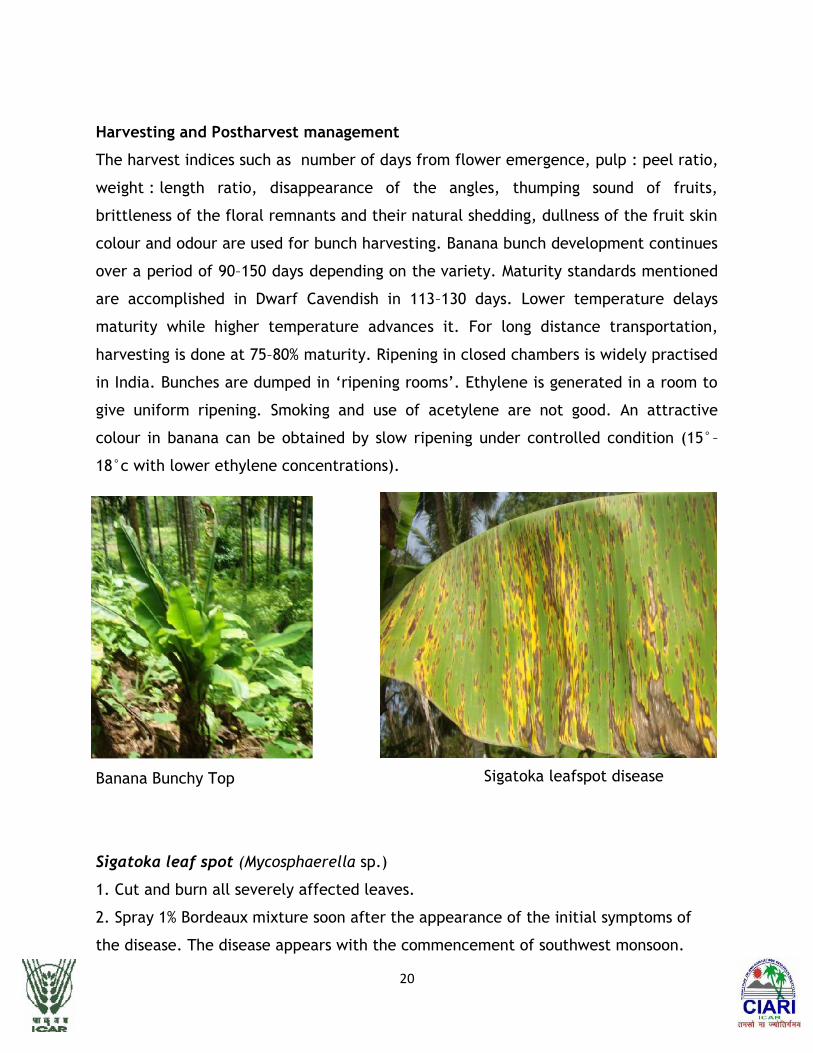
20
Harvesting and Postharvest management
The harvest indices such as number of days from flower emergence, pulp : peel ratio,
weight : length ratio, disappearance of the angles, thumping sound of fruits,
brittleness of the floral remnants and their natural shedding, dullness of the fruit skin
colour and odour are used for bunch harvesting. Banana bunch development continues
over a period of 90–150 days depending on the variety. Maturity standards mentioned
are accomplished in Dwarf Cavendish in 113–130 days. Lower temperature delays
maturity while higher temperature advances it. For long distance transportation,
harvesting is done at 75–80% maturity. Ripening in closed chambers is widely practised
in India. Bunches are dumped in ‘ripening rooms’. Ethylene is generated in a room to
give uniform ripening. Smoking and use of acetylene are not good. An attractive
colour in banana can be obtained by slow ripening under controlled condition (15°–
18°c with lower ethylene concentrations).
Sigatoka leaf spot (Mycosphaerella sp.)
1. Cut and burn all severely affected leaves.
2. Spray 1% Bordeaux mixture soon after the appearance of the initial symptoms of
the disease. The disease appears with the commencement of southwest monsoon.
Banana Bunchy Top Sigatoka leafspot disease

21
Five to six sprayings at fortnightly intervals are to be given depending upon the
severity of the disease.
3. Power oil (mineral oil) 1% emulsion is also effective in controlling the disease.
4. Spray carbendazim (0.1%) or give alternate sprays of tridemorph (0.05%), mancozeb
(0.2 %) and carbendazim (0.1%) soon after the appearance of initial symptoms of the
disease. Three to four sprayings at fortnightly intervals are to be given depending on
the severity of disease.

22
4. Papaya
Papaya (Carica papaya) requires less area for tree, is easy to cultivate, comes to
fruiting in a year, and provides more income/ha next to banana. It has a high nutritive
and medicinal value. Papain prepared from dried latex of its immature fruits is used
in meat tenderising, manufacture of chewing gum, cosmetics, for degumming natural
silk and to give shrink resistance to wool. Besides, it is also used in pharmaceutical
industries, textile and garment cleaning, paper and adhesive manufacture, sewage
disposal, etc.
Climate and Soil
It grows well in tropical condition but it can also also grows well in the subtropical
regions of the country up to 1,000m above mean sea-level. It is very much sensitive to
frost, strong winds and water stagnation.It can grow in a wide variety of soils,
provided these are well-drained and aerated. A rich, well-drained sandy loam soil is
ideal for its cultivation. Soils with high pH (8.0) and low pH (5.0) should be avoided.
Varieties
A large number of local varieties are cultivated. However, the varieties such as
Pusa Delicious, Pusa Majesty, Pusa Giant, PusaDwarfPusaNanha, Co1,
Co2,Co3,Co4,Co5,Co6,Co7, Coorg Honey DewSunrise Solo and Arka Surya are
commonly cultivated in India.
Propagation
Papaya is commercially propagated by seed. Gynodioecious varieties breed true-to-
type and are preferred by commercial growers. Since papaya is commercially grown
by seed, production of quality seed is most important for successful production and
establishing papaya-based industries in the country.
Seedling raising
About 250–300g seeds are sufficient for a hectare. The seedlings can be raised in
nursery-beds 3m long, 1m wide and 10cm high as well as in pots or polythene bags.

23
The seeds should be sown 1cm deep in rows 10cm apart and covered with fine
compost or leaf-mould. Light watering should be done with watercan in the morning.
The nursery-beds may be covered with polythene sheet or dry paddy straw to protect
seedlings. Tender seedlings should also be protected from heavy rainfall. Dusting of
insecticides to protect the seedlings against insect pests is also advised. Damping off
is most serious disease. Treating seeds with 0.1% Monosan (phenyle mercury acetate),
Ceresan, Agrosan or Thiram dust before sowing is the best preventive measure to
check it. The nursery-beds should also be treated with 5% formaldehyde solution
before sowing. If disease appears in the nursery, Bordeaux mixture (1%) or copper
oxychloride (0.2%) should be sprayed.
The seedlings raised in polythene bags stand transplanting better than those raised in
seed-beds. Perforated polythene bags of 20cm × 15cm size of 150–200 gauge can be
used as a container. They are filled with a mixture of farmyard manure, soil and sand
in equal proportion. Four to five seeds are sown in each bag. After germination only
three seedlings are retained.
The seedlings may be transferred to nursery-beds or pots or polythene bags to avoid
overcrowding and further check of growth of. This is also done when the field is not
ready for planting. Generally 15–20cm tall seedlings become ready for planting in
about two months.
Field preparation
Since papaya does not withstand waterlogging, a well-drained upland should be
selected for its cultivation.The seedlings are planted in pits of 60cm × 60cm × 60cm
size. The pits are dug about 15 days before in summer and filled with top soil along
with 20kg farmyard manure, 1kg neem or karanj cake and 1kg bone-meal or fish-meal.
Tall and vigorous varieties are planted at greater spacing, while medium and dwarf
ones at closer spacing.
Planting
Papaya is planted during spring (February–March), monsoon (June–July) and autumn
(October–November). Spring planting is done in areas where the climatic condition is

24
mild throughout the year. Planting distance is determined by the integration of light
interception, cultivar and economic consideration. A spacing of 1.8m × 1.8m is
normally followed for most of the cultivars. Planting of papaya seedlings should be
preferred in the evening. The seedlings from nursery-beds are lifted with a ball of
earth and planted in the field. Plants raised in polythene bags are planted after
removal of polythene. Three seedlings should be planted in each pit followed by light
irrigation. Only one seedling may be planted with pure gynodioecious varieties. It is
also important to keep some extra plants reserved in the nursery or in polythene bags
for gap filling in the field.
Aftercare
Proper care should be taken to save the seedlings in the field especially against insect
pests and heavy rainfall in early stage. In frost-prone areas, they should be protected
with small thatches or polythene structure. Some extra seedlings reserved in the
nursery may be utilized for gap filling.Weeds grow luxuriantly in papaya fields and
exhaust most of the applied nutrients. In the beginning, they also compete for light,
air and water, resulting in poor fruiting. Deep hoeing is recommended during first few
months to check weed growth. Hoeing should not be done in rainy season or after
fruiting since its plants are shallow-rooted. Overgrowth of weeds also causes
waterlogging condition and makes the plants vulnerable to root-rot and foot-rot in
rainy season. Therefore weeding should be regularly done, especially around the
plants. Application of Fluchloralin or Alachlorin or Butachlorine (2.0g/ha) as pre-
emergence 2 months after transplanting can control all weeds for 4 months.
Removing unwanted male plants
It is necessary to keep 10% male plants in papaya orchards for good pollination, where
dioecious varieties are cultivated. As soon as the plants flower, extra male plants
should be uprooted.

25
Manuring and fertilization
Papaya is a heavy feeder and needs heavy doses of manures and fertilizers. Apart
from the basal dose of manures applied in the pits, 200–250g each of N, P2O5 and K2O
are recommended for getting high yield. Application of 200g N is optimum for fruit
yield but papain yield increases with increase in N up to 300g. A dose of 250g N, 250g
P and 500g K/plant is recommended. However equivalent quantity to substitute the
recommended dose of nutrients through FYM or compost can be adopted under
organic cultivation.
Deficiency of lime and B has often been observed in papaya orchards. Spraying of 0.5%
zinc sulphate (twice) and one spray of Borax (0.1%) may be done depending upon the
nutrient status of soil.
Irrigation
Optimum soil moisture is essential for growth, yield and quality of fruits. Under low
moisture conditions, floral sex shifts towards female sterility, resulting in low yield.
At the same time, over-irrigations may cause root-rot disease. Thus efficient water
management is required in papaya cultivation. Number of irrigations depends upon
soil type and weather conditions of the region. Protective irrigation is required in the
first year of planting. In the second year when its plants are ladden with fruits,
irrigation at fortnightly interval in winter and at 10 days interval in summer is needed
from October till May.
Apart from the organic manures, a dose of chemical fertilizers containing N (50g), P
(50g) and K (75g) should be applied as topdressing. Chemical fertilizers should be
applied after flowering. The same quantity should be repeated in each month from
July to October. Precaution should be taken that these fertilizers are applied at least
15cm away from the plant in a circular fashion. Water should be immediately applied
after each topdressing

26
Local Papaya in Neil Island Local Papaya in Neil Islands
Harvesting and Postharvest management
The fruits should be left on tree until they fully mature. Usually fruits are harvested
when they are of full size, light green with tinge of yellow at epical end. On ripening,
fruits of certain varieties turn yellow while some of them remain green. When the
latex ceases to be milky and become watery, the fruits are suitable for harvesting.
While picking fruits from the tree, care must be taken that they are not scratched,
and are free from any blemishes, otherwise these are attacked by fungus and start
decaying during marketing. On an average each plant of improved varieties bears 30–
45 fruits, weighing 40–75kg in one fruiting season. On an average, yield of 60–75
tonnes/ha may be expected in a season from an orchard of papaya.

27
5. Pineapple
Pineapple (Ananascomosus) is an important fruit crop in India. A good source of
vitamins A and B, pineapple is fairly rich in vitamins C, calcium, magnesium,
potassium and iron. It is also a source of bromelin, a digestive enzyme.The cultivation
of pineapple is confined to high rainfall and humid coastal regions in the peninsular
India and hilly areas of north-eastern region of the country. The pineapple is grown
commercially in Assam, Meghalaya, Tripura, Mizoram, West Bengal, Kerala, Karnataka
and Goa, and on a small scale in Gujarat, Maharashtra, Tamil Nadu, Andhra Pradesh,
Orissa, Bihar and Uttar Pradesh.
Climate and Soil
The pineapple is a crop of humid tropics. The fruit grows well near the sea coast as
well as in the interior, so long as the temperatures are not extreme. The optimum
temperature for successful cultivation is 22°–32°C. Leaves and roots grow best at
32°C and 29°C respectively. Their growth ceases below 20°C and above 36°C. A high
temperature at night is deleterious and a difference of at least 4°C between day and
night temperature is desirable. It can be grown up to 1,100m above mean sea-level, if
the area is frost-free. Although optimum annual rainfall for its commercial cultivation
is 100–150cm, it grows remarkably well under a wide range of rainfall. In areas where
the rainfall is less, supplementary protective irrigations are necessary during dry
season.The plants come up well in any type of soil except on very heavy clay soil.
Sandy loam soils are ideal. The soil should be 45–60cm in depth without hard pan or
stones. Low-lying areas with high watertable should be avoided. The plants prefer a
soil pH of 5.0–6.0.
Varieties
The important varieties are Kew,Giant Kew,CharlotteRothchild,Queen,
Mauritious,Jaldhup and Lakhat.

28
Propagation
Pineapple is propagated mainly through vegetative method. There are three types of
planting materials in pineapple namely, suckers,slips and crown. The performance of
the plant depends on vigour, growth rate, timetaken for bearing, fruit size and quality
of planting material. In suckers and slips, larger planting material gives more vigorous
plants. Of the types and sizes of propagules tried, slips and suckers weighing about
350 and 450g respectively are ideal for higher yield with better produce.
Cultivation practices
Planting
Planting time is very important for natural flowering period, which differs from
region-to-region. By the time of natural flowering, if the plant does not attain the
optimum physiological maturity, either it escapes flowering the next season or if
flowering is induced in the same season, the plant, bear very small fruits. The best
time of planting is April–June. Delaying in planting as late as September, delays crop
at least by 7–9 months. The peak flowering under these conditions comes during
January–March. System of planting varies according to land and rainfall.
Planting methods
There are 4 planting systems—flat-bed, furrow, contour and trench.Plant density of
pineapple depends on growth of the plant and system of planting. Adoption of low-
planting densities has been the major constraint in India, contributing to high cost of
production. The plant density of 63,400 plants/ha (22.5cm × 60cm × 75cm) is ideal for
subtropical and mild humid conditions, whereas for hot and humid conditions a plant
density of 53,300 plants/ha spaced at 25cm from plant-to-plant within a row, 60cm
from row-to-row and 90cm from trench-to-trench (25cm × 60cm × 90cm) provides high
yield.
Manuring and fertilization
Pineapple is a shallow feeder with high N and K requirement. Since these nutrients
are prone to heavy losses in soils, practices relating to time of application and form of

29
fertilizer determine their efficient use. For medium-fertile soils in West Bengal, N
(12–16g), P2O5, (2–4g) and K2O (10–12g)/plant are optimum or equivalent dose organic
fertilizers may be applied.
Intercultural operations
i.Earthing up: This is an essential operation in pineapple cultivation aimed at good
anchorage to the plants. It involves pushing the soil into the trench from the ridge
where trench planting is a common practice. As its roots are very shallow, the plants
are eventually lodged especially under flat-bed planting in heavy rainfall areas.
Lodging of plants at the time of fruit development results in lopsided growth, uneven
development and ripening of fruits. It is more important in ratoon crop as the base of
ratoon plants shifts up, crop after crop. High-density planting minimizes its necessity
as the plants prop each other preventing lodging.
ii.Weed control: Weeds could be effectively and economically controlled by
application of Diuron (3 kg/ha) or a combination of Bromacil + Diuron @ 2kg/ha each
as pre-emergent spray and repeated with half of the dose, 5 months after first
application. The quantity of each herbicide should be mixed in 1,000 litres of water
for a hectare of crop.
iii.Mulching: It is essential to conserve soil moisture. Though mulching is not a
common practice in India, use of dry leaves or straw is in practice in south India.
Mulching with black polythene and saw-dust results in better growth of plants than
white polythene and paddy-straw.
iv.Removal of suckers, slips and crowns: Suckers start growing with the emergence
of inflorescence, whereas slips grow with the developing fruits. The fruit weight
increases with increasing number of suckers/plant, while the increased number of
slips delays fruit maturity. Crown size has no bearing on the fruit weight or quality.
Hence desuckering can be delayed as much as possible, while the slips are

30
recommended to be removed as soon as they attain the size required for planting.
Removal of crown is not required as it mars the appeal of the fruit and also makes
handling difficult. Partial pinching of crown consisting of the removal of the
innermost whorl of leaflets along with growing tips 45 days after fruit set is ideal to
get fruits of better size and shape.
Irrigation
Although pineapple is cultivated mostly under rainfed conditions, supplementary
irrigation can help produce good-sized fruits in areas having optimum rainfall.
Irrigation can also help establish an off-season planting to maintain its year-round
production. In scanty rainfall and during hot weather irrigating pineapple once in 20–
25 days is advisable.
Use of growth regulators
Flowering in pineapple Kew could be induced with the application of Ethephon or
ethrel (2-chloroethyl phosphonic acid) (100ppm). The concentration of Ethephon
could be reduced to 25ppm by combining it with 2% urea and 0.04% sodium carbonate.
The application of 50ml solution/plant containing calcium carbide (20g/litre) or
Ethrel (0.25ml/litre) causes flower induction. Flower induction should be done when
the plants attain at least 35–40 functional leaves, so that the plants produce fruits of
normal size.Application of NAA (200–300ppm) 2–3 months after fruit set increases 15–
20% fruit size. To get the year-round availability of pineapple, it should be planted at
regular intervals round the year. Using suckers and slips of different sizes and crowns
as planting material and applying flower-inducing chemicals also provide its
availability round the year.
Harvesting and Postharvest Management
Pineapple plants flower 10–12 months after planting and fruits become ready 15–18
months after planting. With a slight colour change at the base of developing fruits, it
could be harvested for canning purpose. But for table purpose, the fruits could be

31
retained till they develop golden yellow colour. The fruits with the crown, can be
kept without damage for 10–15 days after harvesting.
31
retained till they develop golden yellow colour. The fruits with the crown, can be
kept without damage for 10–15 days after harvesting.
31
retained till they develop golden yellow colour. The fruits with the crown, can be
kept without damage for 10–15 days after harvesting.

32
6. Mango
Mango (Mangifera indica), the king of fruits, is grown in India for over 400 years. More
than 1,000 varieties exist today. It is grown in almost all the states. India shares about
56% of total mango production in the world.
Climate and soil
Mango can be grown on a wide variety of soils under varied climatic conditions. It can
be grown from alluvial to lateritic soils except in black cotton soil having poor
drainage. It grows well in soils with slightly acidic pH. It does not perform well in soils
having pH beyond 7.5. Soils having good drainage are ideal for mango. The
temperature between 24 and 27°C is ideal for its cultivation. Higher temperature
during fruit development and maturity gives better-quality fruits. The areas
experiencing frequent showers and high humidity are prone to many pests and
diseases. Thus it can be grown best in regions with a rainfall between 25cm and
250cm. Regions having bright sunny days and moderate humidity during flowering are
ideal for mango growing.
Varieties
India is the home of about 1,000 varieties. Most of them are the result of open
pollination arisen as chance seedlings. However, only a few varieties are
commercially cultivated throughout India. In India, mango is available from March to
mid-August The North Indian cultivars are alternate-bearer whereas south Indian ones
are generally regular-bearer. About 20 varieties are grown commercially. They are
Alphonso,Banganapalli,BombayGreen,Chausa,Dashehari, Fazli, GulabKhas,
Himsagar, Kesar, Kishenbhog, Langra, Mankurad, Neelum, PairiTotapuri. A number
of selections/hybrids of mango have been evolved. These include Clone C-51 from
Dashehari selected at the CISH, Lucknow, and an off-season selection, Niranjan,
selected at Parbhani. New clonal selections from Langra and Sunderja have been
made at Varanasi and Rewa. A clonal selection, Paiyur 1, has been made from
Neelum, in addition to few dwarf polyembryonic selections made in the north-eastern
region.As a result of systematic hybridization, several hybrids have been released.

33
However, only a few such as Amrapalli, Mallika, Ratna and ArkaPuneet are becoming
quite popular.
Propagation
Mango is a highly heterozygous and cross-pollinated crop. There are 2 types of mango
varieties. Most of the varieties in south are polyembryonic and thus give true-to-type
seedlings. In north, there are monoembryonic and need to be propagated
vegetatively. Mango is propagated on mango rootstock. For raising rootstock, the
seeds of mango are sown within 4–5 weeks after extraction otherwise they lose their
viability. For sowing the seeds, raised beds are prepared with a mixture of farmyard
manure, red soil and sand. In some places, seeds are sown directly in polythene bags.
After germination, the leaves turn green in 2–4 weeks. These seedlings are
transplanted to polythene covers containing red soil, sand and farmyard manure.
Addition of nitrogenous fertilizer to polythene covers after the establishment of
plants helps in quick growth of seedlings. The seedlings thus raised should be used for
grafting at different ages. Several methods of grafting are practised. They are:
Inarching, Veneer and side grafting and Epicotyl/stone grafting.
Cultivation practices
Planting
The square and rectangular systems plantings are ideal. The main field is brought to
fine tilth. Pits of 1m × 1m× 1m size are dug. These are exposed to sun for about 30
days. Before planting, pits are filled with well-rotten farmyard manure. The top and
sub-soil are taken out reparately while digging the pits. The grafts should be planted
during rainy season. In the in-situ grafting, rootstocks are planted in the main field.
Then they are raised for 6 months to 1 year. Then the scions of the variety that need
to be grown are taken and grafted. This is usually done when humidity is high. After
grafting the scions are covered with polythene covers.
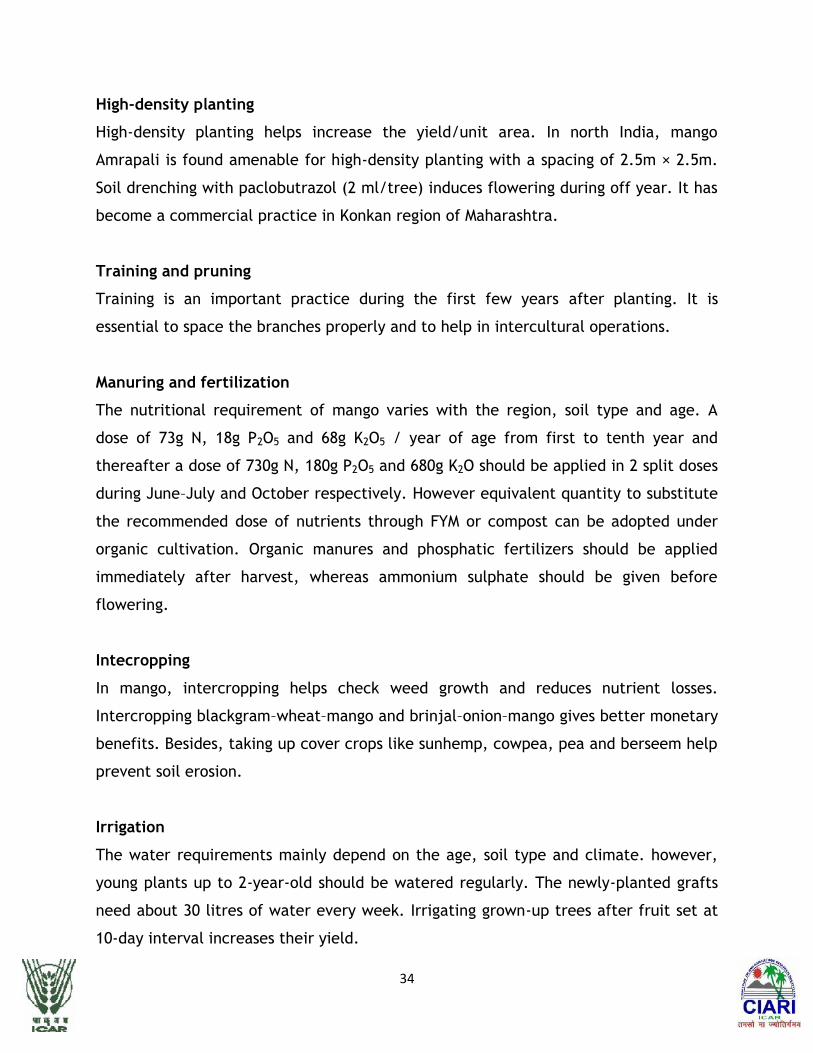
34
High-density planting
High-density planting helps increase the yield/unit area. In north India, mango
Amrapali is found amenable for high-density planting with a spacing of 2.5m × 2.5m.
Soil drenching with paclobutrazol (2 ml/tree) induces flowering during off year. It has
become a commercial practice in Konkan region of Maharashtra.
Training and pruning
Training is an important practice during the first few years after planting. It is
essential to space the branches properly and to help in intercultural operations.
Manuring and fertilization
The nutritional requirement of mango varies with the region, soil type and age. A
dose of 73g N, 18g P2O5 and 68g K2O5 / year of age from first to tenth year and
thereafter a dose of 730g N, 180g P2O5 and 680g K2O should be applied in 2 split doses
during June–July and October respectively. However equivalent quantity to substitute
the recommended dose of nutrients through FYM or compost can be adopted under
organic cultivation. Organic manures and phosphatic fertilizers should be applied
immediately after harvest, whereas ammonium sulphate should be given before
flowering.
Intecropping
In mango, intercropping helps check weed growth and reduces nutrient losses.
Intercropping blackgram–wheat–mango and brinjal–onion–mango gives better monetary
benefits. Besides, taking up cover crops like sunhemp, cowpea, pea and berseem help
prevent soil erosion.
Irrigation
The water requirements mainly depend on the age, soil type and climate. however,
young plants up to 2-year-old should be watered regularly. The newly-planted grafts
need about 30 litres of water every week. Irrigating grown-up trees after fruit set at
10-day interval increases their yield.

35
Harvesting
Mangoes should be harvested with pedicel. Injury to the fruits during harvesting brings
down their quality and also makes them prone to fungal attack. Several types of
harvesters have been developed. These devices are simple and efficient in harvesting.
Yield in mango varies with the variety. However, on an average mango yields 8
tonnes/ha.
36
7. Black pepper
Black pepper (Piper nigrum), the king of spices, is being cultivated on a large scale
in India. Over the years (1992–96), there has been expansion in area under black
pepper in India. Indian pepper reaches homes in 75 countries, the North American
region being the major importer of Indian pepper. In India, it is grown in Kerala,
Karnataka, Tamil Nadu, Andaman and Nicobar Islands and Pondicherry. India is also a
major consumer of black pepper.
Climate and Soil
Black pepper is a crop of warm humid tropics. It requires adequate rainfall (200–250
rainy days with a total annual rainfall of 2,000–3,000mm) and a dry spell of 30–45 days
before flowering with the onset of rains and high humidity (75–95%). The hot and
humid climate of submountainous tracts of Western Ghats are ideal for its cultivation.
It grows successfully up to 1,500m above mean sea-level. The crop tolerates
temperature between 10°C and 40°C. Black pepper thrives best on virgin, well-
drained, red, lateritic or alluvial soils rich in humus. The pH of 4.5–6.0 is ideal.
Pepper is grown in red loam, sandy loam, clay loam, and red lateritic sandy clay loam
soils; but virgin soils rich in humus of the hill slopes of the Western Ghats are best-
suited for its cultivation.
Varieties
So far 10 varieties and hybrids have been released for cultivation On an average the
yield ranges from 1.09 tonnes/ha (Panniyar 5) to 2.677 tonnes/ha (Sreekara).
Panniyar 1 and Panniyar 3 are the F1 hybrids.
Propagation
Black pepper has 3 types of aerial shoots—terminal shoots, runner shoots originating
from base of vines and fruit-bearing lateral branches with limited growth. It is
propagated through shoot-cuttings. Seed propagation is also possible but not
followed. Runner shoots are generally used. The lateral shoots on rooting give rise to
37
bush black pepper. Runner shoots from high-yielding and healthy vines are kept coiled
on wooden pegs fixed at the base of the vine to prevent shoots from coming in
contact with soil and striking roots. The runner shoots are separated from vines during
February–March and after trimming leaves, cuttings of 2–3 nodes each are planted
either in nursery beds or in polythene bags filled with fertile soil. Adequate shade
should be provided and watering be done frequently. The cuttings strike roots and
become ready for planting in May–June. Rapid multiplication of black pepper has
become popular in India. It is advantageous because besides multiplication being
rapid there is better field establishment of vines and more vigorous growth. The
protocols are also available for its micropropagation through direct regeneration from
explants of leaf, stem, terminal and side buds. The tissue cultured plants of black
pepper are also now available.
Cultivation
Planting
Black pepper, being a climber, needs standards for support. Pepper is also trained on
coconut, arecanut, jackfruit tree etc. in a mixed homestead farming. The live
standards are used at a spacing of 2.7 × 2.7m, accommodating 1,100 vines/ha in its
monocropping system. But in multiple cropping system, prevalent in Kerala, only 540–
560 vines/ha are accommodated. With the onset of south-west monsoon, 2–5 rooted
cuttings of black pepper are planted individually in pits on the northern side of the
standard.
Training/pruning
As the black pepper cuttings grow, the shoots are tied to standards as often as
required. The young vines should be protected from hot sun during summer by
providing shade using coconut leaves. Regulation of shade by lopping branches of
standards before the south-west monsoon, is necessary not only for providing
optimum light to vines, but also for enabling standards to grow straight. Adequate

38
mulch with green leaf should be given (before the end of north-east monsoon) after
digging around standards at 1m radius.
Black pepper on Arecanut Black pepper on Glyricidia standards
Manuring and fertilization
Major pepper-growing tracts in Kerala and Karnataka have in general satisfactory level
of N, but are poor in P, K, Ca, Mg and Zn. An application of 140gN, 55g P2O5 and 270g
K2O/vine/year is optimum. The dose of 50kg N along with 100kg P2O5 and 200kg
K2O/ha is also good in Kerala. The specific recommendations are: NPK at 100:40:140
g/vine/year for Panniyur region, northern part of Kerala and similar agroclimatic
conditions, NPK at 50:50:200g/vine/year and for Calicut and similar agroclimatic
region, NPK at 140:55:70g/vine/year. One-third of the recommended dose is applied
during the first year which is increased to two-thirds in the second year. Full dose is

39
given third year onwards. The fertilizers are applied in 2 doses, the first half in April
with the onset of monsoon and the second half in August–September. The fertilizers
are applied at a distance of about 30cm all around the vine and at a depth of about
15cm and the soil is forked in after application. Besides, organic manure in the form
of cattle manure or compost is given @ 10kg/vine in May. Application of lime @
500g/vine during April–May in alternate years is also recommended.
Aftercare
If the terrain of the land is slopy or uneven, carry out contour bunding or terracing to
prevent soil erosion. Carry out digging around the standards and vines at 1m radius
from the base or in the entire plantation, twice during the year, the first at the onset
of monsoon and the second towards the end of north-east monsoon. Weeding around
the plants is to be done according to necessity. In the early stages, the vines are tied
to the standards, if found necessary. When pepper is grown on plantation scale,
growing of cover crops is recommended. When such cover crops are grown, they are
to be cut back regularly from the base of the plants to prevent them from twining
along with the pepper vines. Lowering of vines after 1 year’s growth promotes lateral
branch production. Intercropping of pepper gardens with ginger, turmeric, colocacia
and elephant-foot yam is advantageous. Banana as an intercrop in yielding gardens,
reduces pepper yields. Therefore, banana is not recommended beyond 3–4 years after
planting of pepper. However, in the early years, banana provides shade to young
plants and protects them from drying up during summer months.
If pepper is grown in open places, shading and watering of young seedlings may be
done during summer months for the first 1–3 years. The young plants may be
completely covered with dry arecanut leaves, coconut leaves or twigs of trees until
summer months are over. Mulching the basins of pepper vines during summer months
is highly advantageous. Saw-dust, arecanut husk and dry leaves are suitable mulching
materials. Removal of unwanted terminal shoot growth and hanging shoots should be
done as and when necessary.
Prune and train the standards in March–April every year to remove excessive over-
growth and to give them a proper shape. The effective height of the standards is to

40
be limited to 6m. A second pruning of the standards is to be limited to 6m. It is done
in July–August, if there is an excessive shade in the garden.
After regular bearing for about 20 years, the vines of most varieties start declining in
yield. The age of yield decline varies from variety-to-variety and also depending on
agroclimatic factors and management practices. So, underplanting should be
attempted at about 20 years after planting or when a regular declining trend in yield
appears. The old and senile vines must be removed 3–5 years after underplanting,
depending on the growth of young vine.
Irrigation
Irrigating pepper plants from November/December till the end of March and
withholding irrigation thereafter till monsoon break, increases pepper yield by about
50%. The depth of irrigation recommended is 10mm (100 litres water/irrigation at 8–
10 days interval) under Panniyur condition. The water is to be applied in basins taken
around the plants at a radius of 75cm. The basins may be mulched with dry leaves or
other suitable materials.
Harvesting and Postharvest management
Pepper berries mature and become ready for harvesting in 180–200 days. In high
altitude areas, this period may be more by about 30–45 days. If spikes are harvested
before attaining full maturity, 15–20% reduction in the weight of processed material
may result.
Black pepper is produced by sun-drying the mature pepper berries for 3–5 days after
their separation from spikes by threshing. To give a uniformly lustrous black colour to
the finished product and to prevent mouldiness of the berries, a heat treatment is
recommended as described here.
Collect suitable quantity of separated berries in a perforated basket/vessel or clean
gunny bag. Dip the berries along with the container in boiling water for one minute,
take out, drain and spread on a clean surface for sun-drying.
White pepper is produced by collecting fully mature berries (yellow or orange),
retting them in clear water for 5–7 days, removing the outer skin completely and

41
drying the seed after thorough washing and cleaning. Black pepper starts yielding
from third year onwards. Average pepper yield in India is 273kg/ha, while it is
425kg/ha in Indonesia, 2,000kg/ha in Malaysia and 431kg/ha in Sri Lanka.
The major products are white pepper, canned tender green pepper, bottled green
pepper in brine, dehydrated green pepper, pepper oleoresin and pepper oil.
42
8. Cinnamon
Cinnamon (Cinnamomumverum) is an evergreen tree reaching to a height of 6–15m.
The National Conservatory of Cassia Germplasm consists of 30 accessions. A few high
quality lines have been selected from this collection and are in pre-release stage.
Cinnamon and cassia are the oldest known spices. The dried inner barks of these two
species are the products of commerce. The oldest cinnamon plantation is the
Anjarakandy Estate (250ha) in Cannanore district of Kerala. It is cultivated in Kerala,
Karnataka and Tamil Nadu. Its cultivation is more prevalent in hilly regions of the
Western Ghats.
Climate and Soil
Cinnamon is a hardy plant. It tolerates a wide range of soil and climatic conditions. In
the West Coast of India, its trees are grown in laterite and sandy patches with poor
nutrient status. It comes up well up to an elevation of about 1,000m. It is mostly
raised as an unirrigated crop. An annual rainfall of 200–250cm is ideal for its
cultivation.
Varieties
Only 2 varieties have been released for commercial cultivation. They are: Navashree
and Nithyashree.
Navashree is a superior selection. It has high and stable regeneration capacity (6–7
shoots/year), high yield (average yield 56kg/ha in the first 4 year), high bark recovery
(40.6%), in addition to excellent quality characters (bark oil 2.7% with a very good
cinnamaldehyde content 73%, bark oleoresin 8%, leaf oil 2.8%). Its very young flushes
are purple which turn green in 7–10 days. It is recommended for all cinnamon-growing
regions in the country, both in plains and in high altitudes (in open condition).
KonkanTej and Yercaud1, have also been released for commercial cultivation in
Karnataka and Tamil Nadu, respectively.

43
Propagation
Cinnamon is commonly propagated through seed, though it can be propagated by
cuttings and air layers. Under the West Coast conditions, cinnamon flowers in January
and fruits ripen during June–August. The fully ripe fruits are either picked up from the
tree or fallen ones are collected from the ground. Seeds are removed from fruits,
washed free of pulp, and sown without much delay, as the seeds have a low viability.
The seeds are sown in sand beds or polythene bags containing a mixture of sand, soil
and well-powdered dried cowdung in a 3:3:1 ratio. The seeds germinate within 10–20
days. Frequent irrigation is required for maintaining adequate moisture level. The
seedlings require artificial shading till they become 6 months old.
Cultivation
Planting
The pits of 50cm × 50cm × 50cm size are dug at a spacing of 3m × 3m. They are filled
with compost and top soil before planting. Cinnamon is planted during June–July to
take advantage of the monsoon for the establishment of seedlings. One-year-old
seedlings are planted. In each pit, 5 seedlings can be planted. In some cases, the
seeds are directly dibbled in pits that are filled with compost and soil. Partial shade
in the initial years is advantageous for healthy and rapid growth of the plants.
Manuring and fertilization
Two weedings in a year (June–July and October–November) and one digging of soil
around the bushes (during August–September) are done. A fertilizer dose of 20g N, 18g
P2O5 and 25g K2O/seedling is recommended for the first year. This dose is increased
gradually to 200g N, 180g P2O5 and 200g K2O for grown-up plants of 10 years and
above. However equivalent quantity to substitute the recommended dose of nutrients
through FYM or compost can be adopted under organic cultivation. The fertilizers are
to be applied in 2 equal split doses in May–June and September–October. The
cinnamon leaves, after distillation for oil, are used as a mulch in its plantations.
Irrigation

44
It is raised mostly as unirrigated crop. But an annual rainfall of 200–250cm is ideal. In
the initial 2–3 years, watering is given during summer months twice a week. The
quantity of water depends upon the soil moisture level and growth of plants.
Harvesting and Postharvest management
Two-year-old plants are coppiced during June–July to a height of about 15cm from
the stump. This operation encourages the development of side shoots from the stump
(Copicing). This is repeated for every side shoot, developing from the main stem
during the succeeding seasons, so that the plants assume the shape of a low bush of
about 2m height and a bunch of canes suitable for peeling crop up in a period of
about 4 years. Regular peeling operations could be commenced in case of seedling
bushes, from fourth or fifth year, depending upon the extent of development of
peeler shoots.
Shoots are harvested from September to November. Usually coppicing is done in
alternate years. The shoots having finger thickness and uniform brown colour are
ideal for bark extraction. A ‘test cut’ can be made on the stem with a sharp knife to
judge the suitability of time of peeling. If the bark separates readily, the cutting can
be commenced immediately. The stems are cut close to the ground when they are
about 2 years old, as straight as possible, 1.0–1.25m length and 1.25cm thickness.
Such shoots are bundled after removing leaves and terminal shoots.
Cutting is followed by scraping and peeling operations. The peeling is a specialized
operation, requiring some skill and considerable experience. It is done by using a
specially made knife, which has a small and round end with projection in one side to
facilitate ripping of the bark. The rough outer bark is first scrapped off. Then with
brass rod, the scrapped portion is polished to facilitate easy peeling. A longitudinal
slit is made from one end to the other. Then working the knife between the bark and
wood, the bark is ripped quickly. The shoots cut in the morning are peeled on the
same day. The peels are gathered and kept overnight under shade. They are dried
first in shade for a day and then in the sunlight for 4 days. During drying, the bark
contracts and assumes the shape of quill. The smaller quills are inserted into larger
ones to form compound quills.

45
The quills are graded from ‘00000’ being the finest quality, to ‘0’ the coarsest
quality. The small pieces of the bark, left after preparing the quills are graded as
‘quillings’. The very thin inner pieces of bark are dried as ‘featherings’. From the
coarser canes, the bark is scrapped off, instead of peeling, and this grade is known as
‘scrapped chips’. The bark is also scrapped off without removing the outer bark and is
known as ‘unscrapped chips’. The different grades of bark are powdered to get
‘cinnamon powder’.
46
9. Clove
Clove (Syzygiumaromaticum) of commerce is the dried aromatic, fully-grown but
unopened flower buds. Cloves have been used in India since ancient times. It is an
evergreen tree.
Climate and soil
Clove grows well in rich, loamy soil of the humid tropics. It can be grown successfully
in all the areas except in the coastal sandy belt. It comes up well in the red soil of the
midland of Kerala as well as in the hilly terrains of the Western Ghats at higher
elevations.
Propagation
The seeds should be collected from fully ripe fruits. Fruits for seed collection,
popularly known as mother of clove, are allowed to ripen on trees itself and drop
down naturally. Such fruits are collected from the ground and sown directly in nursery
or soaked in water overnight. The pericarp is removed before sowing. The second
method gives quicker and higher germination. Only fully developed and uniform-sized
seeds which show signs of germination by the presence of pink radicle are used for
sowing. Though the ripe fruits can be stored for a few days by spreading them in a
cool shaded place, it is advisable to sow the seeds immediately after harvesting.
Heaping the fruits or keeping them tied up in airtight bags hastens the death of the
seeds. Approach grafting of clove on its own rootstock is successful.
Cultivation
Beds of 15–20cm height, 1m width and convenient length are made. They are made of
loose soil-sand mixture over which a layer of sand may be spread (about 5–8cm thick).
Seeds can be sown in pure river sand beds but care should be taken to prevent
leaching of salts in rain. Seeds are sown at 2cm spacing. The seed beds are protected
from direct sunlight. If small quantity of seeds is available, they can be sown directly
in polybags filled with soil and cowdung mixture. They should be kept in a shady, cool
place. The germination commences in about 10–15 days and may last for about 40
days. The germinated seedlings are transplanted in polythene bags (30cm × 15cm),

47
containing a mixture of soil, sand and well decomposed cowdung in a 3:3:1 ratio. The
seedlings are again transplanted after one year to large polythene bags containing the
same potting mixture. The 18–24 months old seedlings are ready for transplanting in
the field. The nurseries are sually shaded and irrigated daily to ensure uniform
seedling stand. To avoid damage by crickets, 5% BHC dust may be applied in the
nursery.
Planting
The pits of 75cm × 75cm × 75cm size are dug at a spacing of 6–7m. If planted as an
intercrop, the spacing is to be adjusted based on the spacings of the major crop. The
pits are partially filled with compost, green leaf or cattle manure and covered with
top soil. The seedlings are transplanted in the main field during onset of rainy season
in June–July, in lowlying areas towards the end of the monsoon (September–October).
Clove prefers partial shade. It comes up well at higher elevations, having well-
distributed rainfall. Under Indian conditions, it is best suited for mixed cropping in
older coconut or areanut gardens or in coffee estates. Intercropping with banana is
very good. Its seedlings are planted together with coconut, banana, jackfruit and
mango. Training and pruning is not recommended.
Manuring and aftercare
Apply 50kg manure or compost and bone-meal or fish meal to a bearing tree/year.
Organic manures can be applied as a single dose at the onset of the rainy season in
trenches dug around the tree. The application of inorganic fertilizers @ 20g N(430g
urea), 18g P2O5 (110g superphosphate), and 50g K2O (80g of muriate of potash)
/tree/year is recommended. The dose can be increased to 300g N (600g urea), 250g
P2O5 (1,560g superphosphate) and 750g K2O (1,250g muriate of potash)/year for a
grown-up tree of 15 years or more. However equivalent quantity to substitute the
recommended dose of nutrients through FYM or compost can be adopted under
organic cultivation. The fertilizers must be applied in 2 equal split doses in May–June
and September–October in shallow trenches dug around the plant normally about 1–

48
1½m away from the base. The plant basin must be always kept weed free and
mulched.
Irrigation
In the first 3–4 years, extreme care should be taken especially during summer months.
Plant based water application has to be very scrupulously followed.
Postharvest Management
Clove trees flower from the fourth year of its planting under good soil and
management conditions. But full bearing stage is reached only after 15 years. The
flowering season is September–October in plains and December–January at high
altitudes. The unopened buds are harvested when they begin to turn pink. At this
time, they are less than 2cm long. The opened flowers are not valued as a spice.
Harvesting should be done using step ladders without damaging the branches, as it
adversely affects the succeeding growth. It is a common practice among the growers
not to leave the trees to bear fruits (mother of clove), as it has an adverse effect on
subsequent tree growth.
The harvested flower buds are separated from the cluster by hand and
spread in the drying yard for drying. The correct stage of drying when the stem of the
bud becomes dark brown and the rest of the bud lighter brown. Well-dried cloves are
only one-third the weight of the original. About 11,000–15,000 dried cloves weigh one
kilogram.

49
10. Nutmeg
Nutmeg (Myristicafragrans) is an evergreen, conical tree reaching a height of about
10m. It produces 2 distinctly different spices—nutmeg and mace. Nutmeg is the dried
kernel of seed, whereas mace is dried aril surrounding the seeds.
Climate and soil
Nutmeg thrives well in warm, humid, conditions in locations with an annual rainfall of
150cm and more. It grows well up to 1,300m above mean sea-level. Clay loam, sandy
loam and red laterite soils are ideal for its cultivation. Dry climate and waterlogged
conditions are not good for nutmeg.
Varieties
There are no released varieties of nutmeg in India. However 10 nutmeg accessions
with high fruit set have been identified as promising lines. One line, A9/4, is in the
pre-release stage. Sixty elite trees have been identified based on a survey. They could
be used as parent trees for multiplication of planting materials along with other
selections.
Propagation and rootstock
Nutmeg is usually propagated by seeds. Its trees being perennial and dioceious in
nature, an alternate method for vegetative propagation is in progress. Epicotyl
grafting, approach grafting and patch budding have proved successful in nutmeg.
However, epicotyl grafting is adopted widely for its propagation.
Cultivation
Nursery
Naturally split, healthy fruits harvested during June–July are used for raising nursery.
The seeds are extracted from the pericarp and sown immediately in sand beds of
convenient length, 1–1.5m width and 15cm height, prepared using river sand. Regular
watering is necessary for good germination. The germination commences from 30–90
days after sowing. About 20 days old sprouts are transplanted to polythene bags

50
containing a mixture of good soil, sand and well-decomposed cowdung in a 3:3:1
ratio. About 18–24 months old seedlings are used for transplanting in the field.
Planting
The planting in the main field is done at the onset of rainy season. The spacing varies
widely. Even a spacing of 6–7m appears to be inadequate. For graft 5m × 5m spacing
is optimum. Pits of 0.75m × 0.75m × 0.75m size are dug and filled with organic
manure and soil 15 days earlier to planting.
The plants should be shaded in the early stages to protect from sun scorch.
Permanent shade trees are planted when the site is on a hilly slope when nutmeg is
grown as a monocrop. It can best be grown as an intercrop in old coconut gardens,
where light shade conditions are suitable. The coconut gardens along the river- beds
and adjoining areas are best-suited for its cultivation. Nutmeg requires irrigation in
summer.
Generally organic manures are applied for nutmeg. Bone-meal is very popular among
the growers. Manures are applied in shallow trenches or pits dug around the plants.
However, a dose of 20g N(40g urea), 18g P2O5 (110g superphosphate) and 50g K2O (80g
muriate of potash) during the initial year and 500g N (1,090g urea), 250g P2O5 (1,560g
superphosphate) and 100g K2O (1,670g muriate of potash)/year in subsequent years
for a fully grown up tree of 15 years or more is recommended. However equivalent
quantity to substitute the recommended dose of nutrients through FYM or compost
can be adopted under organic cultivation.
Aftercare
Nutmeg can be grown as an intercrop in coconut, clove, arecanut and coffee gardens.
Regular mulching of plant basins after slashing weeds and shading in summers in the
early years are very essential. Banana can be raised for shade in early growth phase of
nutmeg at 1m away from nutmeg on three sides.
51
Irrigation
Nutmeg needs sufficient water for its growth, requiring irrigation in summer season.
The quantity/frequency of watering depends upon the region and the condition of the
plant.
Harvesting and Postharvest management
The female nutmeg tree starts fruiting from the sixth year, the peak harvesting period
reaches after 20 years. The fruits are ready for harvesting 9 months after flowering.
Flowering and harvesting continue throughout the year. But June– August is the peak
period. The fruits ripen and become ready for harvesting when their pericarp splits
open. Harvesting is done by a bill hook. The fruits are split open, the outer fleshy
portion is removed, and the mace is manually separated from the nut. The nuts and
mace are dried separately on a drying yard, or on a platform arranged in a kitchen.
The scarlet coloured mace gradually becomes yellowish-brown and brittle when
drying is completed. The fresh pericarp can be used for making pickles, jams and
jellies.

52
11. Ginger
Ginger (Zingiber officinale) is one of the oldest spices with a distinct flavour and
pungency. It has a wide range of uses that include culinary, flavourant in soft drinks,
alcoholic and non-alcoholic beverages, confectionery, pickles, pharmaceutical
preparations. India is the largest grower of ginger and also the largest producer of dry
ginger in the world. Other countries cultivating ginger extensively are West Indies,
Brazil, China, Japan and Indonesia. In India Kerala, Orissa, Andhra Pradesh, Himachal
Pradesh, Meghalaya and West Bengal are important ginger growing states. About 60%
of the area is confined to Kerala, accounting for 25% of the country's total production.
Climate and soil
Ginger grows well in warm and humid climate. It is cultivated up to 1,500m above
mean sea-level. However, an optimum elevation for its successful cultivation is 300–
900m. Moderate rainfall at sowing till the rhizomes sprout, fairly heavy and well-
distributed showers during the growing period and dry weather about one month
before harvesting are optimum requirements for its successful cultivation. Early
planting helps in better growth and development of rhizomes and higher yields.
A rich soil with good drainage and aeration is ideal for its cultivation. It grows well in
sandy or clayey loam, red loam and lateritic loam soils. Drainage is absolutely
necessary for the prevention of disease incidence. Ginger should not be grown in the
same site year-after-year.
Varieties
Several cultivars are grown in different areas in India. Ginger is always propagated by
cuttings of rhizomes known as seed rhizome or sets. Rhizome sets should be treated
with 0.3% Dithane M-45 solution for 30 minutes to control fungal diseases. If required,
they may also treated with 0.05% Malathion and 200ppm Streptocycline. For planting,
rhizome bits of 15–20g @ 1,200–1,800kg/ha may be used.

53
Cultivation
Planting
The land should be ploughed 4–5 times to bring the soil into fine tilth. Beds of 1m
width, 15cm height and 3m length or of any convenient length are prepared at 40cm
spacing. About 2,000 beds of 3m × 1m size are prepared in one hectare land. Being
irrigated crop, ridges are formed 40cm apart. The optimum spacing is 30cm × 30cm
under bed system of planting. A bed of 3m ×1m can accommodate 40 plants.
Manuring and fertilization
A basal dose of 25–30 tonnes of farmyard manure with NPK 75 : 50 : 50 kg/ha is
recommended. Whole of P2O5 and half of K2O may be applied at the time of planting.
Half of N is applied 40 days after planting and the remaining N and K2O month after
that. Application of neem cake (2 tonnes/ha) as basal dressing helps reduce the
incidence of soft rot of ginger and increases the yield.
Weeding and mulching
Mulching enhances germination, increases organic matter, conserves soil moisture and
prevents washing of soil due to heavy rains. Two weedings are generally given to the
crop. The first weeding is done just before the second mulching and repeated
depending on the intensity of weed growth. If necessary, weeding is to be repeated
for the third time. Mulching of ginger beds helps in soil and water conservation. The
first mulching is done at the time of planting with 12.5 tonnes of green leaves/ha and
the second after 40 days with 5 tonnes of green leaves/ha.
Rotation and intercropping of ginger
The crops most commonly rotated with ginger in Kerala are tapioca, chilli, rice,
gingelly, ragi, groundnut and maize. Ginger is also grown with maize as a mixed crop
and as an intercrop in coconut and arecanut gardens.
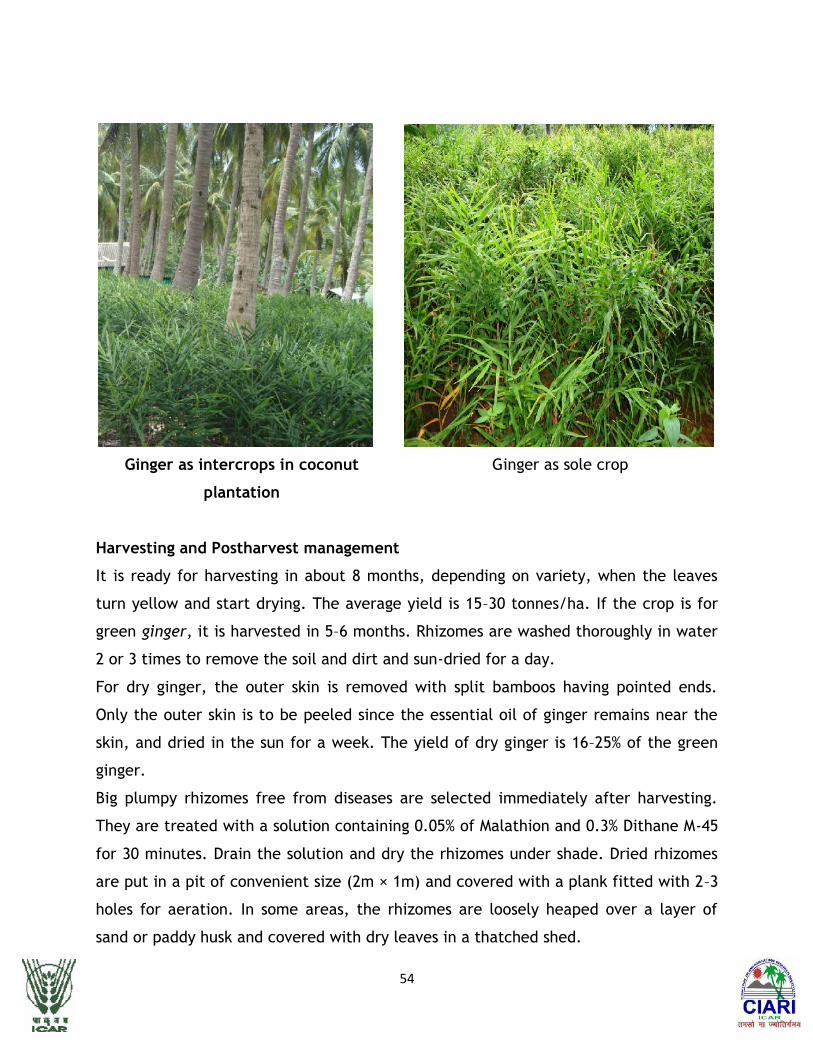
54
Ginger as intercrops in coconut
plantation
Ginger as sole crop
Harvesting and Postharvest management
It is ready for harvesting in about 8 months, depending on variety, when the leaves
turn yellow and start drying. The average yield is 15–30 tonnes/ha. If the crop is for
green ginger, it is harvested in 5–6 months. Rhizomes are washed thoroughly in water
2 or 3 times to remove the soil and dirt and sun-dried for a day.
For dry ginger, the outer skin is removed with split bamboos having pointed ends.
Only the outer skin is to be peeled since the essential oil of ginger remains near the
skin, and dried in the sun for a week. The yield of dry ginger is 16–25% of the green
ginger.
Big plumpy rhizomes free from diseases are selected immediately after harvesting.
They are treated with a solution containing 0.05% of Malathion and 0.3% Dithane M-45
for 30 minutes. Drain the solution and dry the rhizomes under shade. Dried rhizomes
are put in a pit of convenient size (2m × 1m) and covered with a plank fitted with 2–3
holes for aeration. In some areas, the rhizomes are loosely heaped over a layer of
sand or paddy husk and covered with dry leaves in a thatched shed.

55
For processing into its products, ginger rhizomes are harvested 5 months after
planting. The rhizomes are immature, tender and succulent. They are washed in
water to remove soil and processed into salted ginger, preserved ginger in sugar syrup
or brine and dry and crystallized ginger.
55
For processing into its products, ginger rhizomes are harvested 5 months after
planting. The rhizomes are immature, tender and succulent. They are washed in
water to remove soil and processed into salted ginger, preserved ginger in sugar syrup
or brine and dry and crystallized ginger.
55
For processing into its products, ginger rhizomes are harvested 5 months after
planting. The rhizomes are immature, tender and succulent. They are washed in
water to remove soil and processed into salted ginger, preserved ginger in sugar syrup
or brine and dry and crystallized ginger.

56
12. Turmeric
Turmeric (Curcuma longa) is used as spice, dye and in cosmetic industry and religious
ceremonies. It is cultivated in Andhra Pradesh, Orissa, West Bengal, Tamil Nadu,
Karnataka and Kerala. It is an erect, perennial herb grown as an annual crop.
Climate and Soil
Turmeric prefers a warm, humid climate with a rainfall of 1,500mm and temperature
of 20°–30°C. It thrives well up to 1,200m above mean sea-level. Well-drained sandy or
clayey loam or red loamy soils having acidic to slightly alkaline pH are ideal for its
cultivation.
Varieties
Based on maturity group, its cultivars are classifed as short-duration (7 months),
medium-duration (8 months) and long-duration (9 months).
Propagation
Whole or split mother rhizome or finger rhizomes are used for planting. Seed @
2,500kg/ha is optimum. Each planting unit consists of bits of 20–25g each. The seed
rhizomes are treated with Dithane M-45 (0.3%) and Ekalux (0.2%) for 30 minutes
before storage as well as during the planting time.
It is either planted on raised beds of 1m width and convenient length with 15cm
height or on ridges and furrows or in flat system. The spacing is kept 30cm × 15cm or
30cm × 20cm (in beds), 40–60cm × 25cm (on ridges and in furrows) and 50cm × 15cm
(in flat system). Repeated cropping in the same area should be avoided.
Cultivation
Manuring and fertilization
A basal dose of farmyard manure @ 40 tonnes/ha may be incorporated at the time of
land preparation. A fertilizer dose of 60:50:120kg NPK/ha is recommended. The entire
dose of K2O and half of P2O5 is applied as basal dose. Half of N is given 45 days after

57
planting and the other half with the remaining dose of P2O5 is given 3 months after
planting.
The general dose of fertilizer should be 30–120kg N, 30–60kg P and 60–120kg K/ha
depending on place and growing conditions (irrigated/non-irrigated) in 3 splits. The
beds should be earthed up after each fertilizer application.
The crop is mulched immediately after planting with green leaves @ 1,2000–
15,000kg/ha. It may be repeated for a second time with the same quantity of green
leaves after the second fertilizer application.
Aftercare
First earthing up should be given 50–60 days after planting and the next after 40 days.
It cannot withstand prolonged waterlogging and also does not tolerate heavy shade.
Intercropping
Turmeric comes up well under sparse shade also. It can be grown as an intercrop in
coconut gardens like ginger or as mixed crop with red gram, chilli, colocasia,
vegetables, maize and ragi.
Irrigation
Turmeric can be grown either as a rainfed crop (Kerala, Orissa and north-eastern
states) or an irrigated crop (Andhra Pradesh and Tamil Nadu) depending on location.
In case of irrigated crop, depending on weather and soil conditions, 15–40 irrigations
may be necessary at 7–10 days intervals.

58
Harvesting and Postharvest Technology
Turmeric takes 7–9 months for harvesting. Drying up of the aerial portion indicates
maturity. On an average, a yield of 25–30 tonnes/ha of fresh rhizomes may be
obtained. The harvested rhizomes are washed well to remove adhering soil. The
fingers are separated and cooked in boiling water for 1hr under slight alkaline
condition (100g of sodium bicarbonate or sodium carbonate in 100 litres of water) and
sun-dried on bamboo mat or drying floor for 10–15 days. For boiling turmeric, usually
copper galvanized/iron or earthern vessels are used. It takes 40–60 minute of boiling
to reach the correct stage (soft).
The cleaned fingers (50kg) are taken in a perforated trough of convenient size made
of GI or MS sheet with extended parallel handle. The fingers are then immersed in a
paddle. The alkaline solution is poured into a pan so as to immerse the fingers. It is
boiled till they become soft. Mother and finger rhizomes are generally cured
separately.
59
The dry recovery varies from 15–30% depending on variety, location and cultural
practices. The dried turmeric is subjected to polishing either manually by rubbing it
on concrete flooring or mechanically in power operated drums. Turmeric powder is
added to the drum either as powder or as emulsion for giving bright colour to the
rhizome. Cured turmeric is sorted as finger, round ‘split’, and marked under its
varietal/trade name such as Alleppey, Erode, Duggirala, Nizamabad, Rajapuri and
Cudlapah.

60
13. Cassava
Cassava (Manihot esculenta) tubers being rich in starch, is an important subsidiary
food. It forms a raw material for industry (Starch & Sago) and is a component of
animal, fish, and poultry feeds due to stability of starch granules in water. Starch
extraction from cassava tubers is easy because of non-availability of non starchy
constituents such as protein and lipids. It is processed in to food products like chips,
sago, vermicelli, papads etc.
Soil and climate
This crop can be grown between 300N and 300S latitude and as altitude up
to 2000 MSL but it performs better at lower altitudes. It is the most draught tolerant
species among the cultivated plants (Partial opening of the stomata and changing the
leaf position against sunlight at Noon time ). The crop can with stand very high
temperature even 350C but it cannot with stand frost and the growth ceases when
temperature goes down to 10’C. This crop prefers the slightly acidic soil with good
soil depth.
Varieties:
Several the high yielding varieties screened for the island ecosystem, the Sree Jaya
and Sree Vijaya were found to be high yielding.
Plate.5 Plate. 6

61
Planting season
Under irrigated conditions, cassava can be planed throughout the year. For rainfed
cultivation plant the setts in April-May before the onset of Southwest monsoon and
the next best time for planting is August-September, with the onset of Northeastern
Showers.
Tapioca grows well in well drained laterite sandy loam (or) red loam soil with a
pH.between 4.5-6.5. It requires well aerated soil for uniform tuber development. The
soil should be relatively high in organic matter content.
Method of land preparation
1. Flat bed planting: for light textural soils
2. Ridge planting: for sloppy lands for rainfed crop, prepare ridges across the
slope/along the contour to a height of 25-30 cm.
3. Pit/ mound method: prepare the pit of 45 cm3 and apply the FYM and mix it
with soil and mound to a height of 25-30 cm. (poorly drained soils).
Planting material
Tapioca is propagated from cutting obtained for mature stems, discarding about 10
cm from the lower part and about 25-30 cm from top portion. In traditional system
stem of planting, cassava setts of 20 cm length with 10 to 12 buds are used as
planting material. However, out of the 10 or 12 buds only two are allowed to sprout
and then retained, while the rest are discarded and hence wasted. By minisett
technique it is possible to utilize the capability of every bud to sprout and grow as a
new plant and thus enhance the multiplication ratio. It is based on the concept that
once the bud sprouts, the roots developed would start drawing nutrients from the soil
and no more from the mother planting material and therefore the size of planting
material actually does not matter as far as sprouting is concerned.
.

62
Time of planting
Under irrigated conditions, planting of cassava can be done throughout the year. As a
rain fed crop the best time of planting is April-May with the onset of pre-monsoon
showers. The next best season is August-September, with the onset of north-east
monsoon showers.
Land Preparation
Soil physical condition influences the plant growth and hence proper tillage is
required for the successful cultivation of cassava. Loosening the soil to a depth of 20-
25 cm either by tractor ploughing or spade digging facilitate better rooting. Different
methods of land preparation, such as pit followed by mound, flat method, mound
method and ridge method did not show any significant difference in yield. According
to the situation different methods are being followed. In light textured soil flat
method of land preparation, in heavy textural soil mound method and under irrigated
condition ridges and furrow method of land preparation is suggested.
Selection of planting material
Disease and pest free planting material of 7-10 months maturity having a thickness of
2-3 cm may be selected for planting. For better establishment and root yield stakes
obtained from bottom and middle portion of the stem after discarding the 1/3 from
the total length of the stem from the top is preferred for the preparation of stakes for
planting. While preparing the stakes, it is better to have a smooth circular cut rather
than an irregular cut for uniform callus formation and root initiation.
Stake length and depth of planting
A stake length of 15-20 cm is found to be advantageous for higher yield. Shallow
planting facilitates production of a greater number of roots. When the soil is
sufficiently loose and friable stakes can be planted to a depth of 5 cm. Planting the
stakes deeper results in swelling of the mother stem with consequent reduction in
root size and yield. This is especially true when the soil becomes compacted.
63
Method of planting stakes
Different methods of planting stakes such as vertical, (90 0 to the ground), slanted
(45o angle) and horizontal, showed that vertical planting resulted in more uniform
formation of callus tissue around the cut surface, which helped in the uniform
distribution of tuber forming roots all around the base of the plant.
Spacing and plant population
Based on the branching behaviour, cassava genotypes are classified into branching,
semi-branching and non-branching types. Non-branching type requires a spacing of 75
x 75 cm while semi-branching and branching types require 90 x 90 cm for optimum
production. Normally, one stake is planted/hill but planting two/ hill could improve
the total tuber yield but reduce the tuber size resulting adversely the market quality
of the tuber.
Shoot number per hill
The sprouts emerging from the top buds are more vigorous than those emerging from
the lower nodes of the stake. Removal of excess sprouts by retaining two per plant at
opposite sides is better for the production of more number of tubers per plant.
Gap filling
Under field condition, all the stakes planted may not establish due to the use of poor
quality planting material and adverse weather conditions, which necessitated gap
filling within a reasonable time. At the time of planting stakes in the main field,
about 5% of the stakes (600 No.) may be planted separate at a very close spacing of 4
x 4 cm in a nursery area of one square metre with pot watering so that the settlings
at the age of 20-25 days old may be uprooted and used for gap transplantation.
Interculture and earthing up
Interculturing is important especially in the early stage of the crop for the control of
weeds and to improve the physical condition of the soil. Once the cassava plant puts
forth enough canopies to cover the entire field, weeds do not generally become a

64
problem. The first interculturing shall be sufficiently deep, done at 45-60 days after
planting and a shallow interculturing and earthing up given one month after the first.
The removal of excess sprouts, after retaining two at opposite sides can be done at
the time of first intercultural operation.
Manures and fertilizers
A cassava crop producing a yield of 30 t/ha removes 187 kg nitrogen, 33 kg
phosphorus and 233 kg potassium per ha. So in order to maintain the soil productivity
the crop has to be manured adequately. For high yielding varieties of cassava, a basal
dose of 12.5 tonnes of FYM/compost along with a fertilizer dose of 50 kg nitrogen, 50
kg phosphorus and 50kg potassium is recommended at the time of land preparation.
When the crop attains 45-60 days after planting, a top dressing of 50 kg nitrogen and
50 kg potassium/ha has to be applied along with the first intercultural operation. For
short duration varieties of cassava and local types a fertilizer dose of 50:25:50 kg N,
P2O5 and K2O/ha is recommended in splits of 25:25:25 kg/ ha of N, P2O5 and K2O as
basal and 25:25 kg of N and K2O as top dressing. Application of manures and
fertilizers at the above rate can maintain a proper balance of nutrients in the soil.
Moreover, it can also maintain the availability of major, secondary and micronutrients
in the soil. Nowadays, farm yard manure is a scarce resource. Experiments
conducted at CTCRI revealed that green manuringin situ with cowpea and
incorporation of residue of the crop itself can be used as alternate sources of FYM. In
high P soils, P application can be skipped for the first four years, further P at the rate
of 25 kg P2O5/ ha is enough. Soil application of lime at the rate of 1-2 t/ha was found
beneficial in terms of yield and quality of tubers in acid laterite soils. Continuous
cultivation of cassava leads to deficiency of micronutrients, particularly zinc. In such
cases, soil application of Zn at the rate of 1 g/plant (12.5 kg/ha) at the time of
planting can maintain its level in the soil and improve tuber yield.

65
Inter cropping
Being a long duration crop, tapioca is always cultivated with a companion cropping
such as french bean, cowpea, groundnut and black gram which are short duration in
nature.
Intercultural operation
Sixty to seventy five days after planting the intercrop is harvested and then the top
dressing is done with 50 kg N, cassava crops in earthed up and irrigated. By the spread
of the canopy there may not be any further weed growth. When weeding and hoeing
are done cone should be taken not to damage the roots. Irrigation is given in 10-15
days interval.
In most of the areas the deficiency of micro nutrient like iron and zinc is commonly
seen. The leaves will be pate green (or) Complete yellow to avoid this 0.5% Znso4 and
1% ferrous sulphate solution are sprayed on 60th, 75th and 90th day of planting.
Plant Protection
Tuber rot
Tuber rot is caused by Phytophthora drechisleri. Infected tubers show brown
discoloration of internal tissue, rotten and emit foul smell and unfit for consumption
(or) marketing.
Control measures
i. Provide drainage
ii. Remove the infected tubers.
iii. Incorporate Trichoderma viridae in the soil.
Harvesting and yield
The tuber maturity is indicated by the cracks formed in the soil, yellowing and falling
of leaves. Harvesting is done by removing the soil from base of the plants. The plants
are cut leaving 1-2 feet of the basal and of the stem.

66
14. Sweet potato
Sweet potato (Ipomea batata) is an herbaceous trailing perennial but cultivated as
annual crop. The adventitious roots developing from stem cuttings modify in to tubers
by the accumulation of starch. The tubers area rich in carbohydrates (18-29% starch),
1-2%, 0.5-2% reducing sugars. The carotene content ranges from 4 mg to 12 mg per
100g of tuber depending upon the cultivator. sweet potato is cultivated for human
food and animal feed.
Soil and climate
Sweet potato is widely grown in tropical, subtropical and warm temperate areas
throughout the world between 400N and 320S. This crop prefers a sandy loam with
high organic matter content and good drainage is ideal. The heavy clay, saline and
alkaline soils are not suitable. A pH range of 5.6-6.6 is considered to be the optimum
for getting high yield. Short days promote tuber development.
Varieties
About 25 varieties were screened for their yield potential. Among them the variety
Sree Bhadra and Acc. 440038 recorded the highest yield (32.8t/ha) followed by SB-
198/115. However, the varieties such as CARI-SP1 and CARI-SP2 were found to be high
yielding under island condition.

67
Nursery raising
The apical cuttings are found to be the best to secure high yields from sweet potato.
A vine length of 20-40 cm with at least 3-5 nodes is found to be optimum for tuber
production in different parts of India. The cut vines with intact leaves when stored
under shade for two days prior to planting in main field promote better root
initiation, early establishment of vines and high tuber yield. The leaves can be
removed where the vines are to be transported to distant places to reduce the bulk.
This method can be adopted for multiplication of planting material which involves
transportation costs.
Field preparation and planting
The field is ploughed 2-3 times after incorporating 20-25 tonnes of FYM/ha. While
ploughing care should be taken not to go very deep as this will encourage the
production of longer roots giving very deep and becoming very slander. Hence, the
preparation of soil up to the depth of 15-20 cm is sufficient for good crop.
The cuttings can be planted either on ridges with a spacing of 60 x 20 cm (or) even in
flat beds where there is no problem of heavy rains and water stagnation. In some
areas, long vines of 40cm length are used and planting is done in such a way that the
middle portion of the cutting is burried by exposing both the ends.
Planting Season
This crop can be cultivated through the year. However, it can be planted in June-
July, August-September and February-March.
Manuring
Farm yard manure (or) compost may be broadcasted @ 10 tonnes/ha. A basal dressing
of 20 kg of nitrogen, 80kg of phosphorus and 120 kg of potash has to be before
planting

68
Irrigation
The first irrigation is given immediately before planting and then the life irrigation
can be given on the third day irrigation may be given in the morning and evening for
two days in cases no rain in received. Moisture stress should be avoided during the
period of initiations.
Inter cultivation
One weeding is necessary at 20th-25th day after planting. A quantity of 20kg of
nitrogen is applied as top dressing and incorporated in to the soil. The vines should be
turned 45-50 days after planting so as to prevent the production of more and more
adventitious roots at each and every node.
Plant protection
Sweet potato weevil (Cylasformicarius)
Sweet potato weevil is the most dangerous pest causing very severe damage to the
crops. The weevil is a tiny black ant like insect with distinct long snout and is 5-8 mm
in length. Female lays eggs on the base of vines. The emerging grub feed the vines
and its lifecycle is completed in a month. The emerging adults live for 90-120 days.
Nature of damage
Weevil feeds on the base of plants cause proliferation and hyper trophy of tissues
resulting in the detachment of the aerial parts from roots. The grubs bore and make
number of holes and tunnels in the tuber. Even slightly damaged tubers are unsuitable
for consumption due to bitterness.
Control measures
(i) Dip the vine cuttings in fenthion (or) Fenitrothion (or) Monochrotophos 0.05%
solution for 10 minutes before planting.
IPM practices for Sweet potato weevil.
Field sanitation (destroy the alternate host)
Crop rotation – Paddy-Paddy-Sweet potato- Paddy
Paddy –Cowpea- Sweet potato
Colocasia – Sweet potato

69
Pheromone trap
Semio chemical released by the female weevil to attract the male weevil for
mating. Install the pheromone trap at 10m interval in the sweet potato crop form
the day of planting.
Harvesting
The plants are ready for harvest about 110-125 days after planting. Remove the vines
and dig the tubers with injuring the tubers.
Plate.11 &Plate.12 .
Sweet potato field day at farmers field in South Andaman

70
15. Colocasia
Colocasia or taro (Colocasia esculanta) is most important and one of the oldest tuber
crops of the tropical and subtropical regions. The tubers, leaves and petioles are used
as vegetables. The tubers contain starch (10-15 X), protein 91-2.5%), minerals,
phosphorus and iron compared to other tubers.
Climate and Soil
Taro requires ware and humid conditions with mean temperature of 21-270C a well
distributed rain fall of 700-1000mm during growth period. This crops comes up in all
types of soils but performs better in well drained fertile loamy soils. It can stand well
in heavy soils and with stand water logged condition the pH of 5-5-7.0 is idea.
Varieties
The performance of taro varieties such as Sree Rashmi, Sree kiran and Sree Pallavi
were found to be good but all of them are susceptible to phytophthora leaf blight as
compared to local varieties.
Plate.11 SreeRashmi Plate12.Sree Pallavi Plate 13.Andaman Local
Planting season: April- May.
Propagation: Colocasia is propagated vegetatively mostly by small cormels weighting
20-25g, healthy, disease and injury free and uniform sized planning materials.
71
Field Preparation
The field should be ploughed thoroughly. Then the ridges and furrows are formed at a
spacing of 45-60 cm. Corms or cormels are planted on one side of the ridges at a
spacing of 30-45 cm and depth of 5-7.5 cm. To plant one hectare 37000 seed tubers
will be required, which is about 300kg/ha.
Colocasia needs adequate soil moisture at the time of planting for corm sprouting and
development. This crop can with stand water logged condition.
Mulching
Seed tubers start sprouting 30-45 days after planting. Mulching helps to hasten
sprouting, control weed growth, regulate soil temperature and retain soil moisture,
mulching with dry grass (or) leaf.
Gap filling
Generally, 5-10% of the seed tubers fail to sprout in field condition. Hence, about
2000-2500 corms /cormels/ha may be planted in nursery at a close spacing so that
sprouted tubers from nursery can be used for gap filling.
Fertilizer Application
The application of 80: 60: 60 : N : P :K kg / ha is economical dose for Colocasia. Half
dose of N and K, and full dose of P is given at the time of planting, while the
remaining half dose of N and K should be applied in two split doses first 7-10 days
after sprouting and second a month later. Earthing up should be done after each top
dressing.
Intercultural operation
Weeding: Weeding should be done at periodically interval to promote growth and
development of corms and cormels. After weeding, earthingup is to be done along
with pruning of side shoots.

72
Plant Protection
1. Aphids, flea beetle, leaf eating caterpillar, scale insects and taro leaf hoppers,
are the major pests attacking the crop. To control these pests, the crop should
be sprayed with quinalphos (or Dimethoate 0.05% spray). Mealy bugs and scale
insects damage cormels and corms and hence select corms free of these pests
for planting.
2. Diseases:
(i). Colocasia blight: This disease is caused by phytophthoracolocasiae. The major
symptoms are oval (or) irregular purplish (or) brownish lesions with water soaked
periphery appearance or leaves. In severe cases, the entire leaf lamina and the
petioles are affected giving a blighted appearance and collapse of the plant.
Plate 14a.Taro Blight damage
Plate 14b. Leaf eating caterpillar

73
Integrated Disease management of taro blight.
- Use of field resistant varieties like mutakeshi, Jhankri and Tripura local.
- Early planting to avoid heavy monsoon rains.
- Use of healthy planting materials.
- Rouging the off types.
- Spray fungicides like Mancozeb (0.2%) or Meta laxly (0.05%).
- Treat the seed tubers with bio control agent’s viz. Trichoderma viridae.
Harvesting
The crop matures in 150-180 days after planting. One month prior to harvest all the
suckers may be wrapped around the base of the mother plant and cover with soil by
earthing up and withheld the irrigation for arresting further vegetative growth. By
using hand hoes (or) spades, the entire plant is to be pulled out and then the corms
are separated. Damage to tubers should be avoided while harvesting. The dasheen
colocasia has higher yield potential as compared to eddoe type. The average yield
ranges from 12-15 ton/ha.

747474

75
16. Elephant foot yam
Elephant foot yam (or) suran is as under ground stem tuber which is gaining popularity
because of its yield potential and culinary properties. Due to introduction of high
yielding, non-acrid varieties, this is being adopted for commercial cultivation in
allover India. The corms are rich sources of carbohydrate and minerals like calcium
and phosphorus. The tubers are used in various ayurvedic preparations to control
piles, dysentery, asthma, swelling of lungs, vomiting, abdominal pain and as blood
purifier.
Climate and soil
Amorphophallus grows very well in tropical and subtropical humid climate with a
mean annual temperature of 30-350C and a well distributed rain fall of 1000-1500 mm
spread over a period of 6-8 months. It can come up on variety soils but a well drained
sandy loam soil (or) sandy clay loam soil with a the pH of 5.5-7.0 is ideal for the
growth of this crop.
Varieties
Gajendra, Sree Padma
Plate.15 Gajendra corm Plate 16.Gajendra plant
Propagation
(i) Use of corm pieces
Amorphophallus is usually propagated by offsets (or) corms the off sets are miniature
tubers arising from the mother corm. In some varieties/types the daughter corms are

76
not produced in which the mother corm is cut vertically in to pieces of 750-1000g
weight in such a way that each piece has portion of central bud from where the
future bud initiates after planting. Dipping of planning material in their cow dung
slurry followed by during in a shaded place is effective in entrancing the sprouting.
Amorphophalus tubers have long dormancy period which can be broken by treating
them with thiourea (0.1%), GA3 and ethrel 50-100 ppm.
Plate.17. Preparation of setts Plate 18.Setts or corm pieces
Plate.19 Cormels
Field preparation and planting
The land is prepared by ploughing two the three times. Pits of 60 x 60 x 45 cm are
dug at a spacing of 90 x 90 cm (or) 75 x 75 cm and the pits are filled with 4-5 kg of
FYM and top soil. The planting material is placed vertically in the pits and is then
covered with soil and compacted lightly. Shallow planting is ideal as the deep planting
would interfere with intercultural operations, besides, most of its feeder roots are
found on the surface. The ideal planting time is March-April.

77
Manures and Manuring
The FYM/compost @ 4-5 kg at the time of planting is applied. As base dressing of 40
kg of N, 60 kg of P and 50 kg of K is applied at the time of planting. The cut pieces of
corms are dipped in cowdung slurry, dried in shade and then planted in pits at a depth
of 20 cm. top dress with 40 kg N and 50 kg out one month later along with shallow
intercultural operations.
Intercultural operations
Mulching: Immediately after planting, the pits are mulched with dried leaves which
will induce better sprouting by conservation of moisture and helps controlling weed
grown, regulates soil temperature. Paddy straw (or) green (or) dried leaves are use as
mulch.
Weeding: One (or) two manual weeding is necessary, first at 45 days after planting
and the second, one month after the first. The top dressing operation can be
combined with this intercultural operation.
Irrigation: Immediately after planting the first irrigation is to be given to et uniform
sprouting. Subsequent irrigation before monsoon can be given depending or the
requirement and care should be taken to avoid water stagnation in the field.

78
Plate.20.Intercropping coconut garden
Plate 21. Intercropping arecanut garden
78
Plate.20.Intercropping coconut garden
Plate 21. Intercropping arecanut garden
78
Plate.20.Intercropping coconut garden
Plate 21. Intercropping arecanut garden

79
Cultivation of Elephant foot yam as an intercrop in the existing coconut gardens
Coconut and arecanut are the important plantation crops of Andaman & Nicobar
islands. Presently, coconut occupies 50 % of the area (20,927ha) whereas arecanut is
grown in 4046 ha. Further, horizontal expansion of area is limited in these islands,
orientation should be more on the utilization of the existing available areas in the
interspaces of these coconut and arecanut gardens. Intercropping of elephant foot
yam is an age old practice in different parts of the country, however this technology
is becoming popular in these islands very recently. Due to heavy rainfall prevailing in
these islands fertilizer applied to coconut is subjected to severe leaching loss which
ultimately affects the yield of main crop as well as intercrop. However, with a view to
optimize the fertilizer requirement suitable to this island conditions for growing
amorphophallus as an intercrop in coconut garden an experiment was conducted with
4 levels of fertilizers combinations in 20 year old coconut garden. The study revealed
that application of 120:90:50 kg NPK ha-1 recorded maximum tuber weight (3.17 kg)
the highest yield (18.31 t ha-1) followed by application of 80:60:100 kg NPK ha-1 with a
yield of 15.27 t ha-1.
Plant protection
(i) Collar rot : This disease is caused by a soil borne fungus sclerotiumrolfsiiand
Rhizactoniasolani.
Symptoms
Brownish lesions first occur on collar regions which spread to the entire pseudo stem
and cause complete yellowing of the plant. In severe case pseudo stem toppled dorm.

80
Plate 22. Collar rot disease Control
This disease occurs mainly due to poor drainage water logging and mechanical
injury at collar regions.
The disease can be managed by
- Using disease free planting materials.
- Field sanitation.
- Providing proper drainage facility.
- In cooperation of neem cake.
- Use of biocontrolagents viz., Trichodermaharzianum.
Drenching the soil with 0.2% captan.
Harvesting :This crop becomes ready for harvest 8-9 months after planting. The
harvesting is done in November-December. The maturity is indicated by yellowing and
drooping of the leaves. A light irrigation is necessary before harvest. The corms are
dug out, cleaned and stored in well vent elated rooms ever for several months
without damage. The come yield ranges from 75-100 t/ha.
17. Greater yam
81
Greater yam (Dioscorea alata L.) belongs to the family Dioscoreaceae. The genus
Dioscorea has several species which are edible (D. alata, D. esculentaand D.
rotundata) and for medicinal purpose (D. floribunda). Among the above-mentioned
species, the D alatais commonly and mostly grown in India. The Greater yam performs
better in warm humid tropical and Sub tropical condition and it is known for high
production and productivity unit area. In Tripura, the greater yam performs better
than any other States of India because of the favourableagroclimatic Condition. It is
considered as subsidiary Starch food among the tribal masses. Further, it is used for
various purposes like preparation of fries, chips and flakes. This crop has tremendous
potential/scope grow in coconut &arecanut gardens.
Climate
The Greater yam is widely cultivated in tropical regions of the world where there is a
good combination of adequate moisture and good drainage. The optimum
temperature verges from 30-350C. The high temperature (> 400C) coupled with dry
conditions, the growth is affected at the same time if temperature goes down below
200C the growth becomes poor. This crop is highly susceptible to frost. However, this
crop prefer the subtropical warm humid condition/climate
Soil
Greater yam performs better in ample moisture condition and it is relatively tolerant
to dry condition. However, for better tuber grown and high yield, the maintenance of
optimum moisture regime from 14th to 20th week of growth. A deep, well drained
sandy loam soil with pH range of 6-6.5 is ideal for the tuber development. Heavy soils
are not suitable because of water logging leads to poor tuber development and rotting
of the tuber and of the tuber. In Tripura, the soils are acidic and the peak growth
period (16th-20th week of the plant) coincides with the rainy season, hence the
irrigation is not required (or) otherwise on (or) two irrigation would be required.
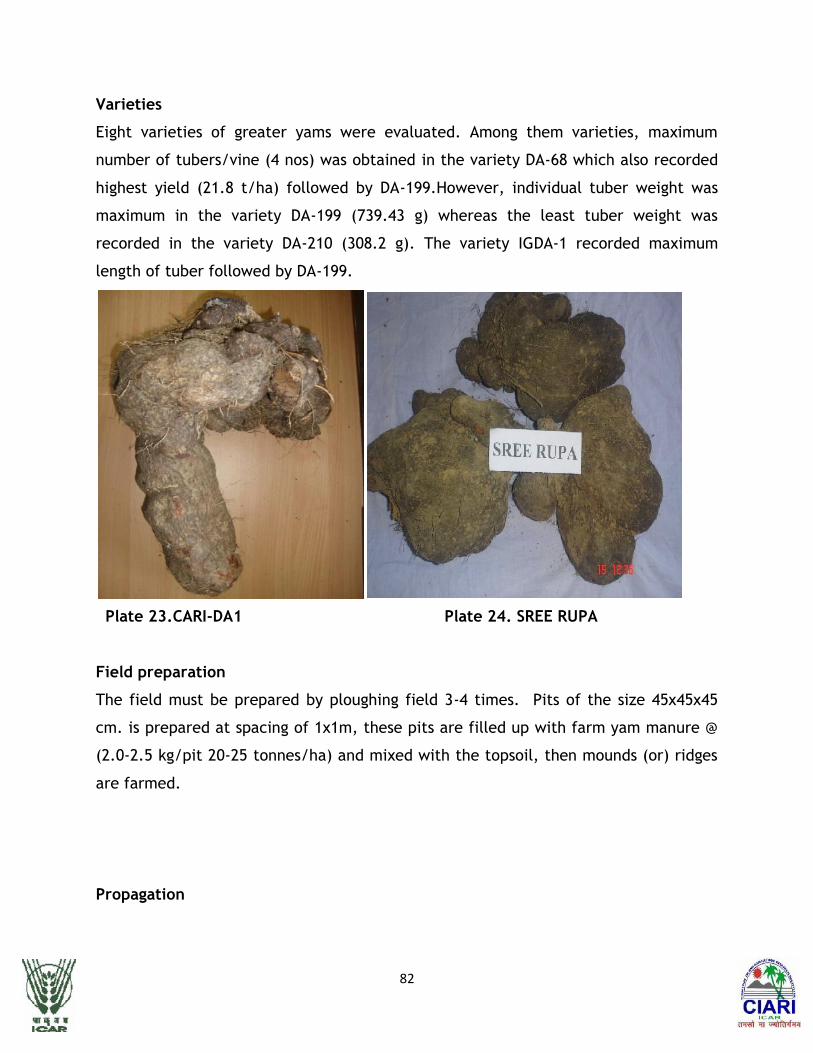
82
Varieties
Eight varieties of greater yams were evaluated. Among them varieties, maximum
number of tubers/vine (4 nos) was obtained in the variety DA-68 which also recorded
highest yield (21.8 t/ha) followed by DA-199.However, individual tuber weight was
maximum in the variety DA-199 (739.43 g) whereas the least tuber weight was
recorded in the variety DA-210 (308.2 g). The variety IGDA-1 recorded maximum
length of tuber followed by DA-199.
Plate 23.CARI-DA1 Plate 24. SREE RUPA
Field preparation
The field must be prepared by ploughing field 3-4 times. Pits of the size 45x45x45
cm. is prepared at spacing of 1x1m, these pits are filled up with farm yam manure @
(2.0-2.5 kg/pit 20-25 tonnes/ha) and mixed with the topsoil, then mounds (or) ridges
are farmed.
Propagation

83
The most common method of propagation is by tuber and it is practiced commercially
by cutting the tuber in to several pieces (Top, middle, bottom) which are called as
setts. The cut pieces of tuber must have the dormant bud (or) eye in it. To get
healthy plant and high yield the use of tip portion to the tuber would be ideal as
compared to middle and bottom of the same tuber when used as setts. There is a
positive association between size of the setts and emergence early and produce large
canopy, which inturn provides large photosynthetic area with increasing in
photosynthetic efficiency leading to high dry matter production. The optimum set size
would be 250-300gm/ piece/pit. Around 2500-3000 kg/ha is required to cover 1 ha of
land. Aerial tubers/bulbils can also be used as planting material.
Tuber dormancy
The tubers exhibit definite period of dormancy due to the presence of batatasins
(poly phenolic compounds) which is useful to extend to storage life of tubers. The
period of dormancy varied from 2-3 months depending on the species. The cutting of
the tuber in to pieces/ setts is done 1-2 days before the scheduled date of the
planting. This helps the cut surface of heal before planning. Dusting ash at cut surface
is a common traditional practice. Treating the cut surface with pesticide also can be
done.
Plate 25.Cut tubers or setts Plate.26. Sprouted tubers
84
A major hindrance in the popularization of high yielding varieties is its very low
multiplication ratio. Yam is propagated vegetatively and seed yam (whole tuber) is the
ideal source of planting material. Traditionally yam is cultivated by making setts of 250
g from mother seed yam. These are planted in mounds formed over pits at a spacing of
90 x 90 cm.From 1 kg mother seed yam only four setts could be obtained limiting the
multiplication ratio to just 1:4.
Season
The photoperiodism plays a major not in aerator yam production. The day length is
critical, the day lengths greater than 12 hours favours vine growth and shorter days
favorer tuber formation and tuber yield. It is a sun loving crop and cannot tolerate
the shade. Hence, the planting is done March-April which suits this requirement.
Planting
The cat tubers are dipped in cowdung stump and 0.2% Dithane M-45 and dried in
shade. The /pieces/setts are planted at the centre of the mounds at a depth of 30-
40cm.
Intercultural operations
Mulching: Mulching with paddy straw (or) crop residues (or) organic stubbles would be
beneficial immediately after planting for early sprouting and better growth and
development. Greater yam takes about 3-4 weeks for sprouting and another 8 weeks
for sufficient vegetative cover.
Weeding: Greater yam is sensitive to competition of weeds during the early part of
their growth. The weeds interferes the greater yam, when it is in leaf development
and tuber bulking Weeding and earthing up to mounds are the essential intercultural
operations. Two weeding will be sufficient the check the weed growth and to provide
favourable conditions for the growth of plants. The first weeding should be done at
the first week after 50% sprouting and second after a month. The earthing up is
carried out usually along with fertilizer applications. During rainy season, the washing
85
away of soil from the base of the plant is common in Tripura. Hence, earthing up is
very important to cover up the growing tuber which is exposed by rain as well as to
bring back the fertile soil eroded by rains from the yam rhizosphere.
Manuring: Greater yam responds well to the fertilizer application. The basal dose is
60: 60 : 80 kg NPK/ha to top dressing should be done on 40th day of planting with
40kg nitrogen/ha.
Staking: Basically it is a vine crop; hence, the vines have to be staked for better
yield. The staking is done with the help of bamboo poles of 3-4 m length and 10-15 cm
thick so that the leaves are exposed to sun light and encourages more photosynthesis
Yield from the staked plants are generally higher than those of non staked plants.
Yam as intercrop in Plantation crops
Yams are the most preferred and popular intercrop in plantation crops especially
coconut and areca nut gardens as well as horticultural crops like banana and papaya.
In coconut garden with the palms spaced at 7.5 x 7.5 m apart, only 25% of the land is
being utilized by the palm and with the palms of more than 25 years of age only 45-
50% of the sunlight is intercepted and the remaining is infiltrated on to the ground. In
young coconut plantations (>10 years), plenty of sunlight is available to intercrops. In
order to utilize this natural resources efficiently along with soil nutrients and water,
easily adaptable and cultivable yams and aroids are recommended. Intercropping in
coconut and areca nut gardens is an age-old practice and economic gains due to
intercropping had been well documented. In such cropping, coconut palms and areca
nut generate the cash income and Yams and aroids partially meet the food
requirements of the farm family. The adaptability of tuber crops to low input
conditions makes them desirable as intercrops.
In a newly established coconut garden intercropping of yam was proved
economically viable. However, as the canopy cover extends with the age of the palm,
the performance of the intercrop may differ. Studies also reported that there is no
reduction of yield level at 25% shade in yams when grown under different shade

86
conditions and higher tuber length, mean tuber girth and tuber yield/plant were
obtained with larger sett size and planting at wider spacing under established coconut
garden. Closer planting of 60 x 60 cm was recorded with higher yield due to more
number of plants per unit area. However, the highest net returns of 37750/- and
benefit cost ratio of 2.06 was realised when greater yam was planted with 200 g sett
size at 90 x 90 cm spacing under coconut.
Harvesting and yield: Greater yam comes to harvest 8-9 months after planting that
too when large scale leaf yellowing and drying of leaves. The tuber is dug without
causing injury. The tuber yield of this crop would be 30-35 ton/ha.
Diseases
Anthracnose: Anthracnose of D. alata is caused by Colletotrichumgloeoporoides.
This disease is wide spread and occurs in all dioscorea species grown in India.
Symptoms: This disease first appears as dark brown pin-held like spots on the leaves
and stems. Spots on the stem spread, coalesce providing a glazed black colour to the
stem which gives charred appearance externally. The leaf spots also enlarge and
coalesce and the leaves dry and wither. If the young leaves are infected the whole
leaf is blighted and killed.
Control:
- burning the crop residues, which is a main source of inoculum’s would help to reduce
the intensity and spread of the disease.
- Use of resistant varieties recommended by CTCRI, Trivandrum / Bhubaneshwar
- Spray of 0.5% Zineb (0r) ferbam at 10 days interval could control the disease
effectively.
Cercospona leaf spot: The disease is caused by Cercospora sp. affect the Diuscorea
sp. in all the places where crop is grown but it is severe in warm humid regions
with good rainfall.
87
Symptoms:Dark brown spots coalesce as the disease progress.
Control: Spray of Bavistin (0.05%), Dithane M45 (0.25%) at 15 days interval
commencement of the disease.
Pests
Spotted Beetle: They feeds on young leaves and tender vines. Adult is 8 mm long with
blue elytra and yellow body. Eggs are laid in groups of 10-12 on leaves (or) vines. The
grub is yellowish with thick fleshy abdomen and it carries in excrement on its back. It
will appear in May and is found up to November. In severe cases they causes
excessive defoliation.
Control: Spraying Malathion (or) Carbaryl (0-05%)
18. Tannia (or) Xanthosona
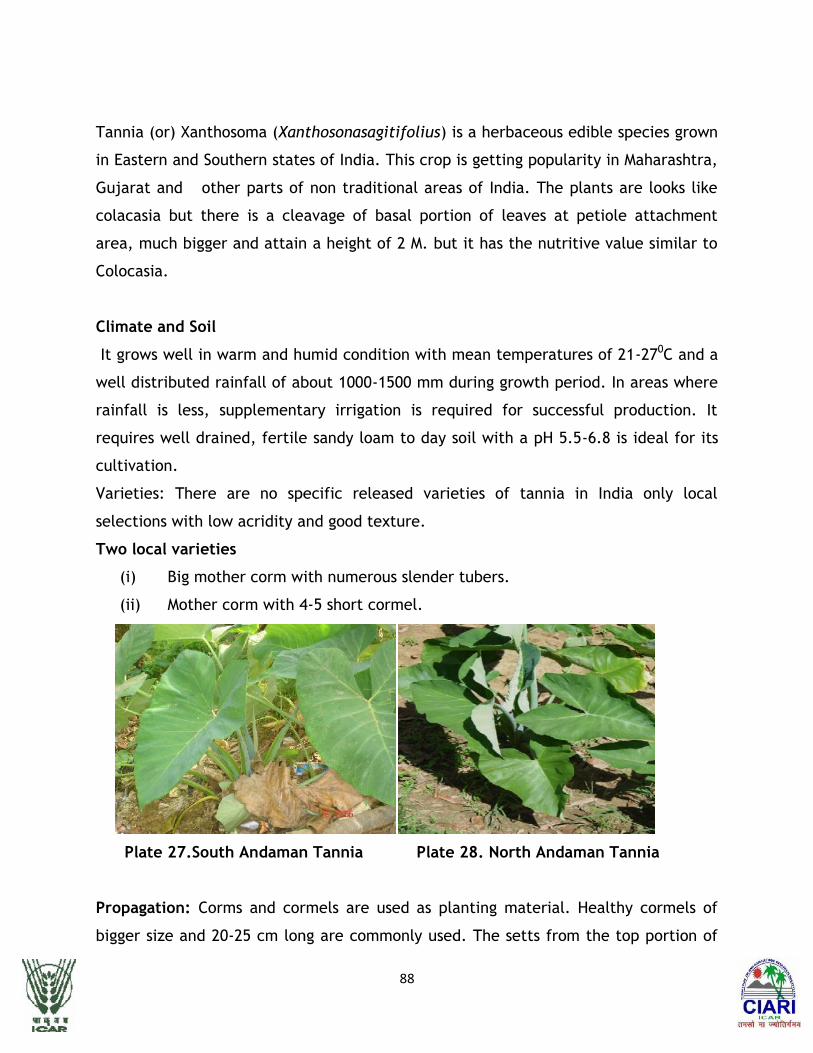
88
Tannia (or) Xanthosoma (Xanthosonasagitifolius) is a herbaceous edible species grown
in Eastern and Southern states of India. This crop is getting popularity in Maharashtra,
Gujarat and other parts of non traditional areas of India. The plants are looks like
colacasia but there is a cleavage of basal portion of leaves at petiole attachment
area, much bigger and attain a height of 2 M. but it has the nutritive value similar to
Colocasia.
Climate and Soil
It grows well in warm and humid condition with mean temperatures of 21-270C and a
well distributed rainfall of about 1000-1500 mm during growth period. In areas where
rainfall is less, supplementary irrigation is required for successful production. It
requires well drained, fertile sandy loam to day soil with a pH 5.5-6.8 is ideal for its
cultivation.
Varieties: There are no specific released varieties of tannia in India only local
selections with low acridity and good texture.
Two local varieties
(i) Big mother corm with numerous slender tubers.
(ii) Mother corm with 4-5 short cormel.
Plate 27.South Andaman Tannia Plate 28. North Andaman Tannia
Propagation: Corms and cormels are used as planting material. Healthy cormels of
bigger size and 20-25 cm long are commonly used. The setts from the top portion of

89
the main corm with a thickness of 5-10 cm containing apical bud are also used for
propagation.
Field preparation: Ploughing should be done 2-3 times to a depth of 20-25c until the
soil is brought to a fine tilth. Pits of 60X60x45 cm are dug at a spring of 90 x 90 cm
and then the pits are filled with 3-4 kg of FYM and top soil.
Method of Planting: The cut pieces of corms are dipped in ash and planted vertically
in the pits and is then covered with soil and compacted lightly. Usually the seed
cornels (or) cut pieces are planter 5-6 cm depth.
Season: March-April.
Manures and fertilizers:Application of 10-15 t /ha of FYM at the time of last plough.
The synthetic fertilizers dose of 80: 60: 80 kg /ha of NPK is economical. Half dose of N
and K and full dose of P are applied at the time of planting. Remaining dose of N and
K is applied in 2 split doses. First 7-10 days after sprouting and second 30 days after
first applicative.
Intercultural operations
Weeding: Weeding and earthing up should be done at the time of fertilizer
application lower leaves and petioles should be removed when start drying.
Irrigation: Irrigation is required immediately of the planting and on 3rd day as life
resignation there after once in a week up to 30-45 days after planting. It cannot with
stand water logging. During summer and drought periods it is essential to give 5-6
shallow irrigation to maintain soil moisture.
Pests and diseases
Pests

90
There are no major pest attacking this crop, however, the flea beetle, leaf eating
cater pillar and leafhoppers do affect this crop. To control these pests, the crop
should be sprayed with endosulphan at 0.05% (or) carbaryl at 0.2%.
Diseases
(i) Leaf Blight: this disease is caused by Phytophthorasp
Symptoms
(i) Yellowing of the marginal leaves (or) brownish necrotic lesions with water soaked
periphery appear on leaves. In severe cases, the entire leaf lamina and the petioles
are affected giving a blighted appearance and collapse of the plant.
-The disease can be managed by which has running.
-Shade for planting.
-Use healthy planting material.
-Spraying fungicides viz., Mancozeb (0.2%) or Metalaxyl (0.05).
-Tract the seed tubers with bio control agents viz. Trichodermaviridae.
Harvesting: Crop is ready for harvesting 8-9 months after planting. The leaves are
harvested along with the petiole. Petioles are used as vegetables. By using how S (or)
spades, the entire plant is to be pulled out and thin the corms are separated. After
harvesting, curing of the corms and cormels is done in sun light for 4-5 days. The
comes and cormelscab be stored embedded in dry soil (or) sand for a period of 4-5
months under ventilated dry and semi dark condition. The average yield ranges from
30-35 t/ha.
*********************************************************************************************************

Central Agricultural Research InstitutePort Blair , Andaman and Nicobar Islands