oryx linux documentation
TRANSCRIPT
Oryx Linux DocumentationRelease 0.5.0
Togán Labs
Oct 23, 2019

Contents
1 Introduction 31.1 Motivation . . . . . . . . . . . . . . . . . . . . . . . . . . . . . . . . . . . . . . . . . . . . . . . . 31.2 Support . . . . . . . . . . . . . . . . . . . . . . . . . . . . . . . . . . . . . . . . . . . . . . . . . . 41.3 Notation . . . . . . . . . . . . . . . . . . . . . . . . . . . . . . . . . . . . . . . . . . . . . . . . . 41.4 Glossary . . . . . . . . . . . . . . . . . . . . . . . . . . . . . . . . . . . . . . . . . . . . . . . . . 41.5 Copyright and Trademark notices . . . . . . . . . . . . . . . . . . . . . . . . . . . . . . . . . . . . 4
2 Release History 72.1 Oryx Linux . . . . . . . . . . . . . . . . . . . . . . . . . . . . . . . . . . . . . . . . . . . . . . . . 72.2 oryx-apps . . . . . . . . . . . . . . . . . . . . . . . . . . . . . . . . . . . . . . . . . . . . . . . . . 11
3 Getting Started 153.1 Supported Platforms . . . . . . . . . . . . . . . . . . . . . . . . . . . . . . . . . . . . . . . . . . . 153.2 Installation . . . . . . . . . . . . . . . . . . . . . . . . . . . . . . . . . . . . . . . . . . . . . . . . 153.3 Logging In . . . . . . . . . . . . . . . . . . . . . . . . . . . . . . . . . . . . . . . . . . . . . . . . 163.4 Adding Guest Containers . . . . . . . . . . . . . . . . . . . . . . . . . . . . . . . . . . . . . . . . 16
4 Using oryxcmd 194.1 Managing Sources . . . . . . . . . . . . . . . . . . . . . . . . . . . . . . . . . . . . . . . . . . . . 194.2 Managing Guests . . . . . . . . . . . . . . . . . . . . . . . . . . . . . . . . . . . . . . . . . . . . . 204.3 oryxcmd Usage Modes . . . . . . . . . . . . . . . . . . . . . . . . . . . . . . . . . . . . . . . . . . 214.4 Common oryxcmd Arguments . . . . . . . . . . . . . . . . . . . . . . . . . . . . . . . . . . . . . . 224.5 Command Reference . . . . . . . . . . . . . . . . . . . . . . . . . . . . . . . . . . . . . . . . . . . 22
5 Building Oryx Linux Images 315.1 System Profiles . . . . . . . . . . . . . . . . . . . . . . . . . . . . . . . . . . . . . . . . . . . . . . 315.2 Application Profiles . . . . . . . . . . . . . . . . . . . . . . . . . . . . . . . . . . . . . . . . . . . 325.3 Preconfiguration and the Local Image Feed . . . . . . . . . . . . . . . . . . . . . . . . . . . . . . . 335.4 OpenEmbedded Recipes . . . . . . . . . . . . . . . . . . . . . . . . . . . . . . . . . . . . . . . . . 355.5 Using Integrated Sources . . . . . . . . . . . . . . . . . . . . . . . . . . . . . . . . . . . . . . . . . 355.6 Using meta-oryx as a Standalone Layer . . . . . . . . . . . . . . . . . . . . . . . . . . . . . . . . . 39
6 Mender Integration 416.1 Building Native Mender Images . . . . . . . . . . . . . . . . . . . . . . . . . . . . . . . . . . . . . 416.2 Building a Host Image For Use With Mender Update Modules . . . . . . . . . . . . . . . . . . . . . 426.3 Building Guest Images For Use With Mender Update Modules . . . . . . . . . . . . . . . . . . . . . 42
i

7 How to Contribute 437.1 Reporting Issues . . . . . . . . . . . . . . . . . . . . . . . . . . . . . . . . . . . . . . . . . . . . . 437.2 Contributing Code . . . . . . . . . . . . . . . . . . . . . . . . . . . . . . . . . . . . . . . . . . . . 43
ii
Oryx Linux Documentation, Release 0.5.0
Oryx Linux is a Linux® distribution targeted at embedded applications and based on the work of The Yocto Projectand OpenEmbedded. It incorporates a lightweight container runtime engine to bring the benefits of containerization tothe embedded sector without disrupting existing developer workflows. For further details, see the Motivation sectionof this documentation.
This documentation covers the 0.5.0 version of Oryx Linux.
The latest version of the documentation is available online at the Oryx ReadTheDocs site.
Contents 1

Oryx Linux Documentation, Release 0.5.0
2 Contents
CHAPTER 1
Introduction
1.1 Motivation
The Oryx Linux project is primarily motivated by a desire to incorporate a lightweight Linux container implemen-tation into the OpenEmbedded build system whilst maintaining the benefits of both systems. The key word here is‘lightweight’: we’re avoiding fully-integrated systems such as Docker which are targeted at cloud computing deploy-ments rather than embedded deployments. Instead we’re using runc, the lightweight container runtime which sits atthe heart of Docker, without any of the surrounding tools such as containerd and docker itself. This gives us theflexibility to address the needs of the embedded use-case.
One of the main aims of this project is to provide a developer workflow which is familiar to existing OpenEmbeddedusers. You should not be required to learn a new build system or method of creating images (such as Docker and itscorresponding Dockerfile syntax) in order to incorporate the benefits of containers into an embedded Linux product.Keeping the focus on the OpenEmbedded workflow ensures that we retain all the benefits of this system, such as theexcellent license compliance tooling, the extensible SDK and a proper cross-compilation environment. Other methodsof creating container-based Linux systems are typically targeted at cloud computing deployments and don’t addressthese issues that crop up when shipping an embedded Linux product.
The benefits of Linux containers have been discussed at length elsewhere so we won’t cover the general benefits here.However, it’s worth mentioning the additional benefits that we get in the embedded world:
• The ability to isolate applications requiring access to specialized hardware from those which just use ‘normal’Linux interfaces such as the network and filesystems.
• The ability to mix legacy software which is dependent on specific older versions of system libraries with anup-to-date and secure base system. This is especially relevant in the embedded space where legacy applicationsabound.
• The ability to update and restart a full application stack cleanly and quickly by restarting a container guestinstead of rebooting the whole device. For devices with long startup times there can be significant benefit here.
3
Oryx Linux Documentation, Release 0.5.0
1.2 Support
Please report any bugs, feature requests or other feedback via the Oryx issue tracker.
Discussion about Oryx usage and development also occurs on the Oryx mailing list.
1.3 Notation
The following notation is used for arguments:
• ARGUMENT: A required argument.
• [ARGUMENT]: An optional argument.
• ARGUMENTS...: One or more required arguments which are not parsed further, typically used when these arepassed through to another application.
1.4 Glossary
Application Profile An application profile defines the software to be installed into an Oryx image along with anyrequired configuration. For more details see Application Profiles.
System Profile A system profile defines the way that an Oryx image is deployed on a target, which artifacts are neededfor deployment and how the image is started on the target device. For more details see System Profiles.
System Profile Type System profiles are grouped into two types: native and guest. This determines the type ofOryx image that will be built as defined below.
Image Type Oryx images are grouped into two types, matching the corresponding system profile types. These aredefined below.
Guest Image A guest image is essentially the template for an Oryx guest. It defines the initial state of the rootfswithin the guest, the Linux capabilities to be assigned and the commands to run when the guest is started.
Native Image A native image is installed directly onto a target device and so includes components like the kernel andbootloader which are not needed in a guest image.
Source In the context of oryxcmd, a source is the location from which guest images can be obtained. This canbe a directory on the local filesystem, a website accessible over HTTP/HTTPS, or any other supported type oflocation.
Guest An Oryx guest is an application or service running within a Linux container on an Oryx host system. Thecontainer isolation separates guests from each other, from the host system and from hardware resources thatthey haven’t been given explicit permission to access.
Host An Oryx host system is typically built as a native image using the host application profile. This systemincludes the oryxcmd application and the runc lightweight container engine, allowing guests to be deployedand managed within the system.
1.5 Copyright and Trademark notices
4 Chapter 1. Introduction

Oryx Linux Documentation, Release 0.5.0
This work is licensed under a Creative Commons Attribution 4.0 International License.
Linux® is the registered trademark of Linus Torvalds in the U.S. and other countries.
1.5. Copyright and Trademark notices 5

Oryx Linux Documentation, Release 0.5.0
6 Chapter 1. Introduction
CHAPTER 2
Release History
2.1 Oryx Linux
2.1.1 Release Series Status
Release Series Yocto Project Branch Release Date End-of-life Datev0.6.x zeus Target Jan 2020 TBCv0.5.x warrior Target Oct 2019 2020-04-30v0.4.x sumo 2018-05-22 2019-05-31v0.3.x rocko 2017-11-13 2018-11-30v0.2.x pyro 2017-06-18 2018-05-31v0.1.x N/A 2016-12-26 Alpha release only
2.1.2 v0.5.0
Changes since v0.4.0:
• Updated to OpenEmbedded “warrior” stable release.
• Updated to oryx-apps v0.3.0. See the oryx-apps release notes for further details.
• Updated to the Linux LTS release series 4.19.y for all supported platforms.
• Switched to a new oryx repository using git submodules instead of the repo tool to pull together all the requiredcomponents. The oryx-build and documentation repositories are retired and their contents is mergedinto the new top level. Local patches to the submodules are staged in the patches directory.
• Updated the list of supported machines.
• Moved the build script to scripts/build.py, overhaul and expand. It is no longer necessary to sourcebuild/conf/setenv before running the build script. Support for capturing task logs and running cleanbuilds has been dropped. Support for several new arguments was added to the build script, see the commandreference for details.
7
Oryx Linux Documentation, Release 0.5.0
• Support creation of a mirror archive containing all open source components downloaded during the build. Thismay be used as part of the copyleft license compliance process as well as allowing images to be re-built fromsource without needing to re-download these components from their original location.
• It’s now possible to build multiple images in one run of the build script by passing multiple -M and -T argu-ments. Each listed system profile and application profile pair will be built for each listed machine.
• Added contribution guidelines.
• Switched to a Buildbot CI instance at https://bb.oryx-linux.org instead of using GitLab CI.
• Switched to the systemd init system and the glibc C library.
• Added a new host-test application profile which extends the host profile with various testing utilities.
• Added support for the creation of a local feed of guest images within the root file system of a native image. Thisallows offline creation of guests on the target device.
• Enabled security flags when building Oryx images.
• Greatly improved the documentation and published to https://oryx.readthedocs.io.
• Added optional Mender.io Over-the-Air (OTA) update integration to support reliable and remotely managedupgrade of native and guest software images.
The following platforms are supported in this release:
• qemux86
• qemux86-64
• qemuarm
• qemuarm64
• raspberrypi3
• raspberrypi3-64
This release is available in the following forms:
• Source code via git: See tag “v0.5.0” in the repository at https://gitlab.com/oryx/oryx.git.
• Source code tarball: See https://www.toganlabs.com/downloads/oryx/distro/0.5.0/oryx-0.5.0.tar.xz.
• Various compiled images: See files under https://www.toganlabs.com/downloads/oryx/distro/0.5.0/.
2.1.3 v0.4.0
Changes since v0.3.1:
• Updated to OpenEmbedded “sumo” stable release.
• Updated to oryx-apps v0.2.4. See the oryx-apps release notes for further details: http://downloads.toganlabs.com/oryx/oryx-apps/0.2.4/RELEASE_NOTES.txt.
• Use the Linux LTS release series 4.14.y for all supported platforms.
The following platforms are supported in this release:
• qemux86
• qemux86-64
• raspberrypi
• raspberrypi2
8 Chapter 2. Release History
Oryx Linux Documentation, Release 0.5.0
• raspberrypi3
• raspberrypi3-64
• beaglebone-yocto
This release is available in the following forms:
• Source code using repo tool: See tag “v0.4.0” in the git repository at https://gitlab.com/oryx/oryx-manifest.git.
• Source code tarball: See https://www.toganlabs.com/downloads/oryx/distro/0.4.0/oryx-0.4.0.tar.xz.
• Various compiled images: See files under https://www.toganlabs.com/downloads/oryx/distro/0.4.0/.
2.1.4 v0.3.1
Changes since v0.3.0:
• Incorporated bugfixes and security patches accumulated on the “rocko” branch of Yocto Project.
• Updated to oryx-apps v0.2.2. See the oryx-apps release notes for further details:
– https://downloads.toganlabs.com/oryx/oryx-apps/0.2.2/RELEASE_NOTES.txt
– https://downloads.toganlabs.com/oryx/oryx-apps/0.2.1/RELEASE_NOTES.txt
• Added support for Beaglebone Black devices using the meta-yocto-bsp layer.
• Added oryx-guests initscript to auto-start all enabled guests at boot and stop all guests at shutdown.
• Allow configuration of Linux capabilities granted to guest containers. Example application profiles intended forusage as guests (minimal and full-cmdline profiles) select the capabilities needed to run sshd.
• Add a start-sshd script, used in minimal and full-cmdline example application profiles to launchsshd with necessary initialization and output logging.
• Drop obsolete demo application profile.
The following platforms are supported in this release:
• beaglebone
• qemux86
• qemux86-64
• raspberrypi
• raspberrypi2
• raspberrypi3
• raspberrypi3-64
This release is available in the following forms:
• Source code using repo tool: See tag “v0.3.1” in the git repository at https://gitlab.com/oryx/oryx-manifest.git
• Source code tarball: See https://www.toganlabs.com/downloads/oryx/distro/0.3.1/oryx-0.3.1.tar.xz
• Various compiled images: See files under https://www.toganlabs.com/downloads/oryx/distro/0.3.1/
2.1. Oryx Linux 9
Oryx Linux Documentation, Release 0.5.0
2.1.5 v0.3.0
Changes since v0.2.0:
• Updated to OpenEmbedded “rocko” stable release
• Updated to oryx-apps v0.2.0. See the oryx-apps release notes for further details: http://downloads.toganlabs.com/oryx/oryx-apps/0.2.0/RELEASE_NOTES.txt.
• Added support for 64-bit demo platforms: qemux86-64 and raspberrypi3-64.
• Dropped support for the arduino-yun platform and Oryx Lite. This was holding back further integration ofthe core features we want to include in Oryx so we had to let it go.
• Use the Linux LTS release series 4.9.y for all supported platforms.
• Switch guest image init system from oryx-guest-init to dumb-init. This is a more widely deployedand better tested tiny init system written in C.
• Add ca-certificates into the host application profile to support the use of https source URLs.
• Allow the main service which runs when a guest image is started to be specified via theORYX_APPLICATION_COMMAND variable in an application profile.
• Provide image.json file with all images including more detailed information to support development of animage index.
The following platforms are supported in this release:
• qemux86
• qemux86-64
• raspberrypi
• raspberrypi2
• raspberrypi3
• raspberrypi3-64
This release is available in the following forms:
• Source code using repo tool: See tag “v0.3.0” in the git repository at https://gitlab.com/oryx/oryx-manifest.git.
• Source code tarball: See https://www.toganlabs.com/downloads/oryx/distro/0.3.0/oryx-0.3.0.tar.xz.
• Various compiled images: See files under https://www.toganlabs.com/downloads/oryx/distro/0.3.0/.
2.1.6 v0.2.0
This release incorporates the following components:
• OpenEmbedded “pyro” stable release
• meta-oryx v0.2.0
• oryx-apps v0.1.1
The following platforms are supported in this release:
• qemux86
• raspberrypi
• raspberrypi3
10 Chapter 2. Release History
Oryx Linux Documentation, Release 0.5.0
• arduino-yun
This release is available in the following forms:
• Source code using repo tool: See tag “v0.2.0” in the git repository at https://gitlab.com/oryx/oryx-manifest.git.
• Source code tarball: See https://www.toganlabs.com/downloads/oryx/distro/0.2.0/oryx-0.2.0.tar.xz.
• Various compiled images: See files under https://www.toganlabs.com/downloads/oryx/distro/0.2.0/.
2.1.7 v0.1.0
This was an initial alpha-quality release and is now only of historical interest.
2.2 oryx-apps
2.2.1 v0.3.0
This is a feature release of the oryx-apps project. The following changes were made since v0.2.5:
• Added preconfigure command which parses preconfiguration data from the /usr/share/oryx/preconfig.d directory and sets up sources and guests accordingly.
• Added startup and shutdown commands for the convenience of the systemd service files.
• Ensured that the oryxcmd state file is always created with valid json data.
This release is available in the following forms:
• Source code via git: See tag “v0.3.0” in the git repository at https://gitlab.com/oryx/oryx-apps.git
• Source code tarball: See https://www.toganlabs.com/downloads/oryx/oryx-apps/0.3.0/oryx-apps-0.3.0.tar.xz
2.2.2 v0.2.5
This is a feature release of the oryx-apps project. The following features are added:
• Support switch to systemd.
This release is available in the following forms:
• Source code via git: See tag “v0.2.5” in the git repository at https://gitlab.com/oryx/oryx-apps.git
• Source code tarball: See https://www.toganlabs.com/downloads/oryx/oryx-apps/0.2.5/oryx-apps-0.2.5.tar.xz
2.2.3 v0.2.4
This is a bugfix release of the oryx-apps project. The following bugs are fixed:
• Version number was not updated correctly for previous release.
This release is available in the following forms:
• Source code via git: See tag “v0.2.4” in the git repository at https://gitlab.com/oryx/oryx-apps.git
• Source code tarball: See https://www.toganlabs.com/downloads/oryx/oryx-apps/0.2.4/oryx-apps-0.2.4.tar.xz
2.2. oryx-apps 11
Oryx Linux Documentation, Release 0.5.0
2.2.4 v0.2.3
This is a feature release of the oryx-apps project. The following features are added:
• Add initial test suite.
This release is available in the following forms:
• Source code via git: See tag “v0.2.3” in the git repository at https://gitlab.com/oryx/oryx-apps.git
• Source code tarball: See https://www.toganlabs.com/downloads/oryx/oryx-apps/0.2.3/oryx-apps-0.2.3.tar.xz
2.2.5 v0.2.2
This is a feature release of the oryx-apps project. The following features are added:
• Handle runc kill failure in oryxcmd stop_guest
• Add tmpfs mounts for guest containers
• Allow configuration of guest capabilities
This release is available in the following forms:
• Source code via git: See tag “v0.2.2” in the git repository at https://gitlab.com/oryx/oryx-apps.git
• Source code tarball: See https://www.toganlabs.com/downloads/oryx/oryx-apps/0.2.2/oryx-apps-0.2.2.tar.xz
2.2.6 v0.2.1
This is a feature release of the oryx-apps project. The following features are added:
• Add oryx-guests initscript to autostart enabled guests at boot and autostop guests at shutdown.
• Improve messages for autostart_all/autostop_all commands.
This release is available in the following forms:
• Source code via git: See tag “v0.2.1” in the git repository at https://gitlab.com/oryx/oryx-apps.git
• Source code tarball: See https://www.toganlabs.com/downloads/oryx/oryx-apps/0.2.1/oryx-apps-0.2.1.tar.xz
2.2.7 v0.2.0
This is a feature release of the oryx-apps project. The following features are added:
• Drop oryx-guest-init, switch to dumb-init (https://github.com/Yelp/dumb-init) for PID 1 insideguests.
• Add start_guest and stop_guest commands, allowing simple container management without having tolearn the exact arguments needed by runc. Guests started via start_guest receive no input from the terminaland write all output to a log file in the container’s directory under /var/lib/oryx-guests.
• Add enable_guest and disable_guest commands, allowing guests to be configured for automatic starton boot of the host system.
• Add autostart_all and autostop_all commands, intended for use within an initscript to start allenabled guests during system boot and stop all running guests during system shutdown.
• Allow the main command within a guest to be chosen during image creation.
This release is available in the following forms:
12 Chapter 2. Release History
Oryx Linux Documentation, Release 0.5.0
• Source code via git: See tag “v0.2.0” in the git repository at https://gitlab.com/oryx/oryx-apps.git.
• Source code tarball: See https://www.toganlabs.com/downloads/oryx/oryx-apps/0.2.0/oryx-apps-0.2.0.tar.xz.
2.2.8 v0.1.1
This is a bugfix release of the oryx-apps project. The following bugs are fixed:
• oryxcmd failed to create the /var/lib/oryx-guests directory on the first command invocation.
This release is available in the following forms:
• Source code via git: See tag “v0.1.1” in the git repository at https://gitlab.com/oryx/oryx-apps.git.
• Source code tarball: See https://www.toganlabs.com/downloads/oryx/oryx-apps/0.1.1/oryx-apps-0.1.1.tar.xz.
2.2.9 v0.1.0
This initial release contains the following applications:
• oryx-guest-init: A cut-down init system suitable for use in a guest container.
• oryxcmd: A command-line tool for managing guest containers within an Oryx Linux host system. The fol-lowing features are supported:
– Add sources which define the locations where container images may be downloaded from.
– Create new guest containers using images available from the defined sources.
– Remove defined sources and guests.
– List and show defined sources and guests.
– Use runc to execute defined guests.
This release is available in the following forms:
• Source code via git: See tag “v0.1.0” in the git repository at https://gitlab.com/oryx/oryx-apps.git.
• Source code tarball: See https://www.toganlabs.com/downloads/oryx/oryx-apps/0.1.0/oryx-apps-0.1.0.tar.xz.
2.2. oryx-apps 13

Oryx Linux Documentation, Release 0.5.0
14 Chapter 2. Release History
CHAPTER 3
Getting Started
This section describes how to install and use Oryx Linux on an embedded device.
3.1 Supported Platforms
This release of Oryx Linux supports all features on the following demonstration platforms:
• Emulated QEMU systems:
– qemuarm: 32-bit emulated ARM system.
– qemuarm64: 64-bit emulated ARM system.
– qemux86: 32-bit emulated x86 system.
– qemux86-64: 64-bit emulated x86-64 system.
• Raspberry Pi 3 ARM based systems:
– raspberrypi3: Raspberry Pi 3 in 32-bit mode.
– raspberrypi3-64: Raspberry Pi 3 in 64-bit mode.
3.2 Installation
3.2.1 QEMU Systems
Download the appropriate rootfs and kernel images for the desired QEMU platform from the v0.5.0 release:
• x86: Rootfs image, Kernel image
• x86-64: Rootfs image, Kernel image
• 32-bit ARM: Rootfs image, Kernel image
• 64-bit ARM: Rootfs image, Kernel image
15
Oryx Linux Documentation, Release 0.5.0
The rootfs image must first be decompressed:
unxz oryx-native-host-qemux86.ext4.xz
To launch qemu (example for qemux86 target):
qemu-system-i386 -kernel bzImage-qemux86.bin -hda oryx-native-host-qemux86.ext4 \-append "root=/dev/hda"
For further details on the configuration and use of qemu, see the qemu documentation.
3.2.2 Raspberry Pi 3
Download the appropriate SD card image and BMAP file for the Raspberry Pi 3 from the v0.5.0 release:
• 32-bit: SD card image, BMAP file
• 64-bit: SD card image, BMAP file
Once the appropriate SD card image has been downloaded, it may be written to an SD card using bmaptool (in thisexample the target SD card appears in the system as /dev/sdb but this should be replaced by the correct path for thesystem in use):
bmaptool copy oryx-native-host-raspberrypi3.wic.xz /dev/sdb
The SD card may then be removed and placed into the Raspberry Pi device itself.
3.3 Logging In
After installation you can login as root with the default password oryx.
3.4 Adding Guest Containers
One the Oryx Linux host system has been set up, the oryxcmd tool may be used to create guest containers.
Firstly, the appropriate official source for this release should be configured:
• qemux86:
oryxcmd add_source oryx \http://downloads.toganlabs.com/oryx/distro/0.5.0/qemux86
• qemux86-64:
oryxcmd add_source oryx \http://downloads.toganlabs.com/oryx/distro/0.5.0/qemux86-64
• qemuarm:
oryxcmd add_source oryx \http://downloads.toganlabs.com/oryx/distro/0.5.0/qemuarm
• qemuarm64:
16 Chapter 3. Getting Started
Oryx Linux Documentation, Release 0.5.0
oryxcmd add_source oryx \http://downloads.toganlabs.com/oryx/distro/0.5.0/qemuarm64
• raspberrypi3:
oryxcmd add_source oryx \http://downloads.toganlabs.com/oryx/distro/0.5.0/raspberrypi3
• raspberrypi3-64:
oryxcmd add_source oryx \http://downloads.toganlabs.com/oryx/distro/0.5.0/raspberrypi3-64
Once this source is configured, a guest container can be created from one of the following images:
• minimal image:
oryxcmd add_guest test oryx:minimal
• full-cmdline image:
oryxcmd add_guest test oryx:full-cmdline
The guest image may then be booted using runc as follows:
oryxcmd start_guest test
For further details, see the Using oryxcmd section.
3.4. Adding Guest Containers 17

Oryx Linux Documentation, Release 0.5.0
18 Chapter 3. Getting Started
CHAPTER 4
Using oryxcmd
oryxcmd is the core of the “host” application profile within Oryx Linux. It is responsible for the management ofguest containers and the sources from which container images may be obtained. As a command-line application it hasboth an interactive mode and a non-interactive mode.
4.1 Managing Sources
To create a guest within Oryx we first need to configure one or more sources. These sources represent collections ofimages compatible with the target device. Each source is identified by a name and has a single configuration value -the URL where the collection of images is published. This URL may use the file protocol when the images are storeddirectly on the target device or on removable media which can be accessed locallay. Alternatively the URL will usethe HTTP or HTTPS protocols where images are retrieved over the network.
To define a new source we use oryxcmd add_source, giving the name we will use to identify the source and theURL from which images will be obtained. For example, to add the collection of images for the raspberrypi3 providedwith the v0.5.0 release:
$ oryxcmd add_source oryx https://downloads.toganlabs.com/oryx/distro/0.5.0/→˓raspberrypi3Added source "oryx" with URL "http://downloads.toganlabs.com/oryx/distro/0.5.0/→˓raspberrypi3"
This new source may be inspected by using oryxcmd show_source, giving the name of the source to inspect.Currently this will just show the URL configured for the source. For example, to show the configuration for the ‘oryx’source we created above:
$ oryxcmd show_source oryx{
"url": "http://downloads.toganlabs.com/oryx/distro/0.5.0/raspberrypi3"}
The full list of sources currently configured can be shown by using oryxcmd list_sources. For example:
19
Oryx Linux Documentation, Release 0.5.0
$ oryxcmd list_sourcesoryx
A source that is no longer needed can be removed by using oryxcmd remove_source, giving the name of thesource to remove. For example, to remove the ‘oryx’ source we created above:
$ oryxcmd remove_source oryxRemoved source "oryx"
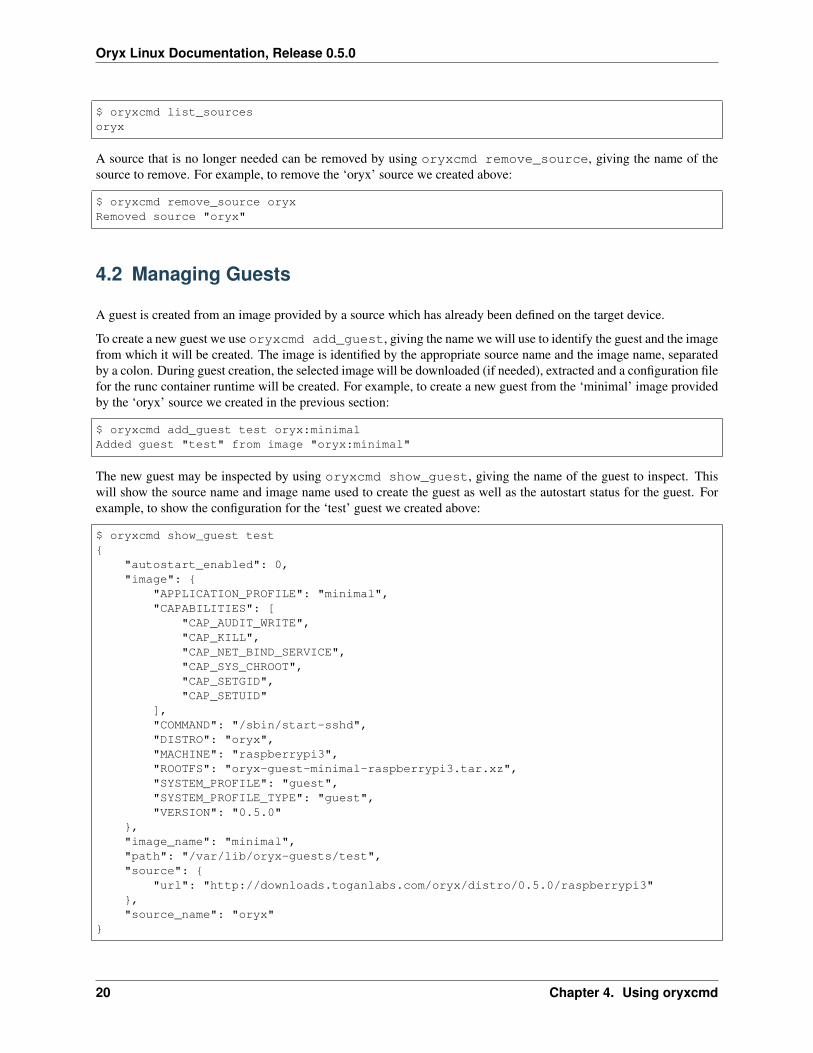
4.2 Managing Guests
A guest is created from an image provided by a source which has already been defined on the target device.
To create a new guest we use oryxcmd add_guest, giving the name we will use to identify the guest and the imagefrom which it will be created. The image is identified by the appropriate source name and the image name, separatedby a colon. During guest creation, the selected image will be downloaded (if needed), extracted and a configuration filefor the runc container runtime will be created. For example, to create a new guest from the ‘minimal’ image providedby the ‘oryx’ source we created in the previous section:
$ oryxcmd add_guest test oryx:minimalAdded guest "test" from image "oryx:minimal"
The new guest may be inspected by using oryxcmd show_guest, giving the name of the guest to inspect. Thiswill show the source name and image name used to create the guest as well as the autostart status for the guest. Forexample, to show the configuration for the ‘test’ guest we created above:
$ oryxcmd show_guest test{
"autostart_enabled": 0,"image": {
"APPLICATION_PROFILE": "minimal","CAPABILITIES": [
"CAP_AUDIT_WRITE","CAP_KILL","CAP_NET_BIND_SERVICE","CAP_SYS_CHROOT","CAP_SETGID","CAP_SETUID"
],"COMMAND": "/sbin/start-sshd","DISTRO": "oryx","MACHINE": "raspberrypi3","ROOTFS": "oryx-guest-minimal-raspberrypi3.tar.xz","SYSTEM_PROFILE": "guest","SYSTEM_PROFILE_TYPE": "guest","VERSION": "0.5.0"
},"image_name": "minimal","path": "/var/lib/oryx-guests/test","source": {
"url": "http://downloads.toganlabs.com/oryx/distro/0.5.0/raspberrypi3"},"source_name": "oryx"
}
20 Chapter 4. Using oryxcmd
Oryx Linux Documentation, Release 0.5.0
The full list of guests currently configured can be shown by using oryxcmd list_guests. For example:
$ oryxcmd list_gueststest
A guest may be started by using oryxcmd start_guest, giving the name of the guest to start. This works muchthe same way as starting a systemd service, starting the guest in the background. A runc container will be created forthe guest and the main command (which was defined when the corresponding image was built) will be executed. Theguest will be automatically allocated an IP address in the 172.19.0.0/24 network by using netns. For example, to startthe ‘test’ guest we created above:
$ oryxcmd start_guest testStarted guest "test"
A running guest may be stopped by using oryxcmd stop_guest, giving the name of the guest to stop. This worksmuch the same way as stopping a systemd service. The SIGTERM signal will be sent to the appropriate runc container,followed by the SIGKILL signal to shut it down. For example, to stop the ‘test’ guest we created above:
$ oryxcmd stop_guest testStopped guest "test"
A guest may be configured to start automatically (‘autostart’) when the device is booted by using oryxcmdenable_guest, giving the name of the guest for which to enable autostart. This works much the same way asenabling a systemd service. The autostart status for a guest can be seen in the autostart_enabled value wheninspecting the guest configuration. For example, to enable autostart for the ‘test’ guest we created above:
$ oryxcmd enable_guest testEnabled guest "test"
A guest may be configured not to start automatically when the device is booted by using oryxcmddisable_guest, giving the name of the guest for which to disable autostart. This works much the same waysas disabling a systemd service. For example, to disable autostart for the ‘test’ guest we created above:
$ oryxcmd disable_guest testDisabled guest "test"
A guest that is no longer required can be removed by using oryxcmd remove_guest, giving the name of theguest to remove. For example, to remove the ‘test’ guest we created above:
$ oryxcmd remove_guest testRemoved guest "test"
4.3 oryxcmd Usage Modes
oryxcmd may be used in either interactive mode or non-interactive mode as described below. The usage descriptionsin the previous section showed the non-interactive mode for convenience.
4.3.1 Interactive Mode
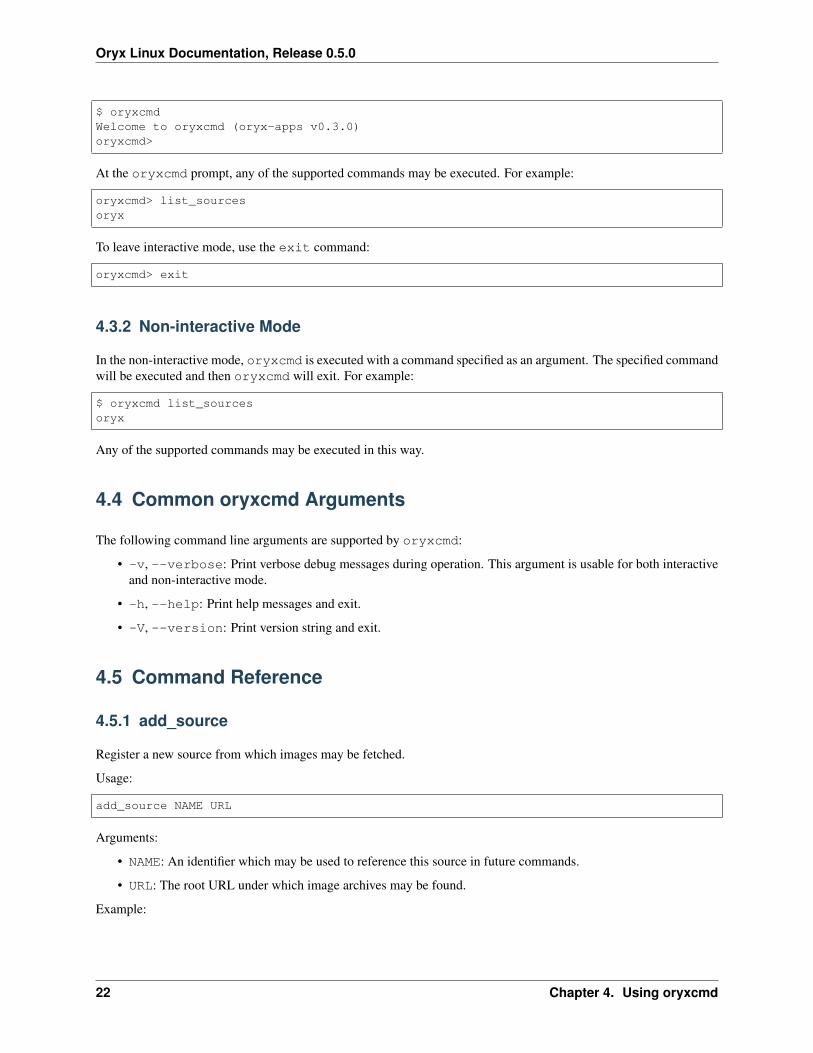
In the interactive mode, oryxcmd is started without specifying a command:
4.3. oryxcmd Usage Modes 21
Oryx Linux Documentation, Release 0.5.0
$ oryxcmdWelcome to oryxcmd (oryx-apps v0.3.0)oryxcmd>
At the oryxcmd prompt, any of the supported commands may be executed. For example:
oryxcmd> list_sourcesoryx
To leave interactive mode, use the exit command:
oryxcmd> exit
4.3.2 Non-interactive Mode
In the non-interactive mode, oryxcmd is executed with a command specified as an argument. The specified commandwill be executed and then oryxcmd will exit. For example:
$ oryxcmd list_sourcesoryx
Any of the supported commands may be executed in this way.
4.4 Common oryxcmd Arguments
The following command line arguments are supported by oryxcmd:
• -v, --verbose: Print verbose debug messages during operation. This argument is usable for both interactiveand non-interactive mode.
• -h, --help: Print help messages and exit.
• -V, --version: Print version string and exit.
4.5 Command Reference
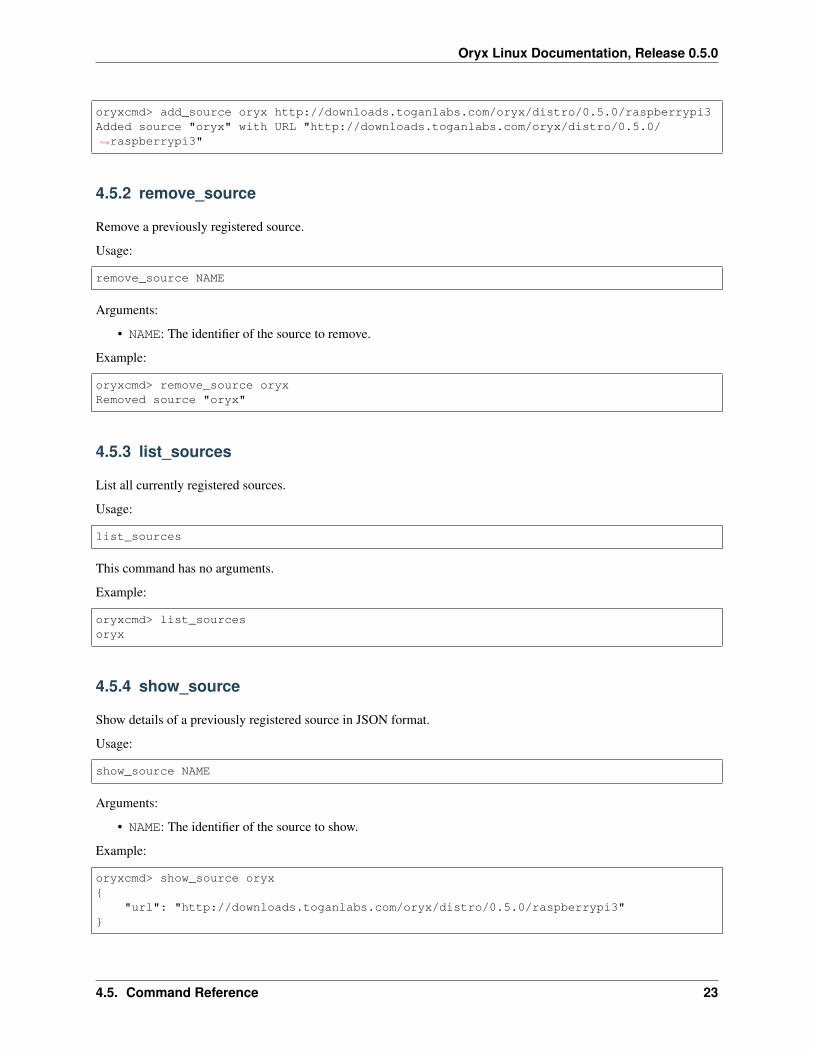
4.5.1 add_source
Register a new source from which images may be fetched.
Usage:
add_source NAME URL
Arguments:
• NAME: An identifier which may be used to reference this source in future commands.
• URL: The root URL under which image archives may be found.
Example:
22 Chapter 4. Using oryxcmd
Oryx Linux Documentation, Release 0.5.0
oryxcmd> add_source oryx http://downloads.toganlabs.com/oryx/distro/0.5.0/raspberrypi3Added source "oryx" with URL "http://downloads.toganlabs.com/oryx/distro/0.5.0/→˓raspberrypi3"
4.5.2 remove_source
Remove a previously registered source.
Usage:
remove_source NAME
Arguments:
• NAME: The identifier of the source to remove.
Example:
oryxcmd> remove_source oryxRemoved source "oryx"
4.5.3 list_sources
List all currently registered sources.
Usage:
list_sources
This command has no arguments.
Example:
oryxcmd> list_sourcesoryx
4.5.4 show_source
Show details of a previously registered source in JSON format.
Usage:
show_source NAME
Arguments:
• NAME: The identifier of the source to show.
Example:
oryxcmd> show_source oryx{
"url": "http://downloads.toganlabs.com/oryx/distro/0.5.0/raspberrypi3"}
4.5. Command Reference 23
Oryx Linux Documentation, Release 0.5.0
4.5.5 add_guest
Create a new guest container from an image.
Usage:
add_guest NAME IMAGE
Arguments:
• NAME: An identifier which may be used to reference this source in future commands.
• IMAGE: A fully-qualified reference to an image which is available from one of the sources which has beenconfigured. The format of this reference is <source>:<image_name>:
– source: The identifier of a registered source.
– image_name: The name of an image which is available within the identified source. The image nametypically matches the name of an Application Profile which has been built for the system on whichoryxcmd is running.
Example:
oryxcmd> add_guest test oryx:minimalAdded guest "test" from image "oryx:minimal"
4.5.6 remove_guest
Delete an existing guest container.
Usage:
remove_guest NAME
Arguments:
• NAME: The identifier of the guest container to remove.
Example:
oryxcmd> remove_guest testRemoved guest "test"
4.5.7 list_guests
List all currently registered guests.
Usage:
list_guests
This command has no arguments.
Example:
oryxcmd> list_gueststest
24 Chapter 4. Using oryxcmd

Oryx Linux Documentation, Release 0.5.0
4.5.8 show_guest
Show details of a previously registered guest in JSON format.
Usage:
show_guest NAME
Arguments:
• NAME: The identifier of the guest to show.
Example:
oryxcmd> show_guest test{
"autostart_enabled": 0,"image": {
"APPLICATION_PROFILE": "minimal","CAPABILITIES": [
"CAP_AUDIT_WRITE","CAP_KILL","CAP_NET_BIND_SERVICE","CAP_SYS_CHROOT","CAP_SETGID","CAP_SETUID"
],"COMMAND": "/sbin/start-sshd","DISTRO": "oryx","MACHINE": "raspberrypi3","ROOTFS": "oryx-guest-minimal-raspberrypi3.tar.xz","SYSTEM_PROFILE": "guest","SYSTEM_PROFILE_TYPE": "guest","VERSION": "0.5.0"
},"image_name": "minimal","path": "/var/lib/oryx-guests/test","source": {
"url": "http://downloads.toganlabs.com/oryx/distro/0.5.0/raspberrypi3"},"source_name": "oryx"
}
4.5.9 enable_guest
Enable auto-start of a previously registered guest during system boot.
Usage:
enable_guest NAME
Arguments:
• NAME: The identifier of the guest to enable.
Example:
oryxcmd> enable_guest testEnabled guest "test"
4.5. Command Reference 25
Oryx Linux Documentation, Release 0.5.0
4.5.10 disable_guest
Disable auto-start of a previously registered guest during system boot.
Usage:
disable_guest NAME
Arguments:
• NAME: The identifier of the guest to disable.
Example:
oryxcmd> disable_guest testDisabled guest "test"
4.5.11 start_guest
Start an existing guest container. The container is launched in the background, without access to the terminal wherestart_guest was executed.
Usage:
start_guest NAME
Arguments:
• NAME: The identifier of the guest container to start.
Example:
oryxcmd> start_guest testStarted guest "test"
4.5.12 stop_guest
Stop a running guest container. SIGTERM is sent to the container so that it can shutdown cleanly. After 10 seconds,the container is halted.
Usage:
stop_guest NAME
Arguments:
• NAME: The identifier of the guest container to stop.
Example:
oryxcmd> stop_guest testStopped guest "test"
26 Chapter 4. Using oryxcmd
Oryx Linux Documentation, Release 0.5.0
4.5.13 autostart_all
Start all containers which have autostart enabled.
Usage:
autostart_all
This command has no arguments.
Example:
oryxcmd> autostart_allStarted guest "test"Started 1 of 1 enabled guests
4.5.14 autostop_all
Stop all currently running containers.
Usage:
autostop_all
This command has no arguments.
Example:
oryxcmd> autostop_allStopped guest "test"Stopped 1 of 1 guests
4.5.15 preconfigure
Read pre-configuration data from /usr/share/oryx/preconfig.d and add the listed sources and guests.
Usage:
preconfigure
This command has no arguments.
Example:
oryxcmd> preconfigureAdded source "local" with URL "file:///usr/share/oryx/local-feed"Added guest "preconfig-test" from image "local:minimal"Enabled guest "preconfig-test"
4.5.16 startup
Convenience function for use in systemd service file. Runs ‘preconfigure’ then ‘autostart_all’.
Usage:
4.5. Command Reference 27
Oryx Linux Documentation, Release 0.5.0
startup
This command has no arguments.
Example:
oryxcmd> startupStarted guest "preconfig-test"Started 1 of 1 enabled guests
4.5.17 shutdown
Convenience function for use in systemd service file. Runs ‘autostop_all’.
Usage:
shutdown
This command has no arguments.
Example:
oryxcmd> shutdownStopped guest "preconfig-test"Stopped 1 of 1 guests
4.5.18 runc
Execute runc for an existing guest container. See the documentation of runc for further details.
Usage:
runc NAME ARGS...
Arguments:
• NAME: The identifier of the guest container for which ‘runc’ will be executed.
• ARGS...: Command line arguments passed through to the ‘runc’ application.
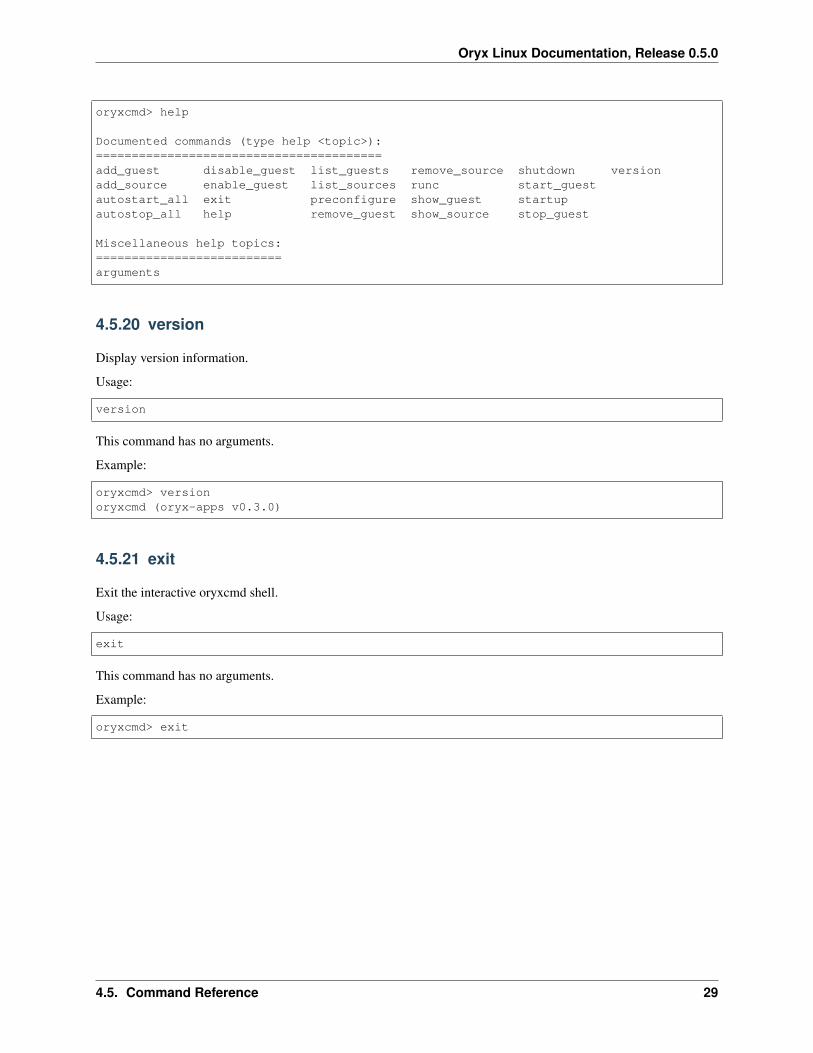
4.5.19 help
List available commands with “help” or detailed help with “help cmd”.
Usage:
help [CMD]
Arguments:
• CMD: The name of a supported command. If this argument is given, detailed help for the chosen command isprinted.
Example:
28 Chapter 4. Using oryxcmd
Oryx Linux Documentation, Release 0.5.0
oryxcmd> help
Documented commands (type help <topic>):========================================add_guest disable_guest list_guests remove_source shutdown versionadd_source enable_guest list_sources runc start_guestautostart_all exit preconfigure show_guest startupautostop_all help remove_guest show_source stop_guest
Miscellaneous help topics:==========================arguments
4.5.20 version
Display version information.
Usage:
version
This command has no arguments.
Example:
oryxcmd> versionoryxcmd (oryx-apps v0.3.0)
4.5.21 exit
Exit the interactive oryxcmd shell.
Usage:
exit
This command has no arguments.
Example:
oryxcmd> exit
4.5. Command Reference 29

Oryx Linux Documentation, Release 0.5.0
30 Chapter 4. Using oryxcmd
CHAPTER 5
Building Oryx Linux Images
Oryx Linux introduces two major new concepts to the OpenEmbedded build system: these are System Profiles andApplication Profiles. This section will also discuss how these concepts are integrated into the OpenEmbedded Recipesin the meta-oryx layer.
5.1 System Profiles
A system profile complements the OpenEmbedded machine selection and essentially specifies how the image we arebuilding will be deployed onto the selected machine. Many platforms may be booted in multiple ways (local boot fromflash memory vs remote boot via tftp for instance) and a system profile may be used to specify a boot mechanism.Additionally, an image may run under different virtualization methods on a given platform and a system profile maybe used to specify the chosen method. In each case the system profile will ensure that the correct build artifacts areproduced to match how the image will be used. As system profiles are orthogonal to machine selection, consistentboot or virtualization methods may be enforced across multiple platforms.
The following system profiles are provided in this release:
• native: This profile indicates that the image will run “bare metal” on the chosen platform. Build artifactssuitable for writing to an SD card, USB stick or embedded flash memory are produced and are then compressedto save space. When possible, u-boot is enabled to provide greater boot-time flexibility.
• native-mender: This profile extends the native system profile to add integration with the Mender.io OTAupdate system. See the section on Mender Integration for details on how to use this system profile.
• guest: This profile indicates that the image will run as a container guest under runc. No bootloader or kernelis compiled for this profile. Build artifacts are always compressed tar archives of a rootfs, ready for installationonto a host system.
• guest-mender-update-module: This profile extends the guest system profile to add integration withthe Mender.io Update Modules feature. See the section on Mender Integration for details on how to use thissystem profile.
The system profile is determined by the ORYX_SYSTEM_PROFILE variable.
31
Oryx Linux Documentation, Release 0.5.0
5.1.1 Porting the Native System Profile
When porting Oryx Linux to new target platforms it is usually necessary to modify the native system profile. Thefollowing variables need to be correctly defined for each target platform:
• IMAGE_FSTYPES: This variable determines the format of the rootfs image which is created. For physicaldevices this is usually a complete image, including kernel and bootloader, ready to be directly copied into flashmemory or onto an SD Card or USB stick. However for emulated targets this may simply be a filesystemimage. For officially supported platforms, xz compression is usually used to reduce the storage and bandwidthrequirements on our servers.
• ORYX_ROOTFS_IMAGE: This is the filename of the main rootfs image as produced by bitbake for the targetplatform. The existing values for supported platforms may be used for reference as the filename typically onlydiffers in the extension (which is determined by the value of IMAGE_FSTYPES). However, the filename can bechanged completely if the rootfs artifact for the target platform is not named in the usual way.
• ORYX_KERNEL_IMAGE: The is the filename of the kernel image as produced by bitbake for the target plat-forms. Where the rootfs image contains the kernel and bootloader this is usually left empty.
Most platforms can be supported with modification of just the above variables. If further customization is needed, seethe following section on Writing System Profiles.
5.1.2 Writing System Profiles
The existing native and guest system profiles are suitable for most use cases but it may occasionally be necessaryto create new profiles.
The key variables in a system profile are as follows:
• ORYX_SYSTEM_PROFILE_PACKAGES: This is the list of additional packages to install into the rootfs for thissystem profile.
• ORYX_SYSTEM_PROFILE_OUTPUT_DEPENDS: This is the list of bitbake tasks to be completed before col-lecting artifacts for output to the images directory, in addition to building oryx-image.
• ORYX_SYSTEM_PROFILE_OUTPUT_FILES: This is the list of files to output to the images directory, inaddition to the image json file. It typically contains the rootfs image and any supporting files (such as a kernelimage, bootloader image, etc).
• ORYX_SYSTEM_PROFILE_TYPE: This selects how the resulting image will be used and must be set to oneof the following options. These match the two core system profiles included with Oryx, allowing additionalcustomized native and guest system profiles to be defined with different names.
– native: The resulting image will run directly on the target hardware.
– guest: The resulting image will run as a container managed by oryxcmd.
5.2 Application Profiles
An application profile specifies the use-case of a given image and typically corresponds to a particular software pack-age or package group. The configurability here is greater than a traditional OpenEmbedded image recipe though, asthe application profile may set PACKAGECONFIG values and other options to be applied to all components withinan image. So it’s possible to build a lightweight configuration of a library for one application profile but then enableadditional options when building for a different application profile.
An Oryx Linux image is built with only one application profile. The expected use case is to deploy the host applica-tion profile using the native system profile onto a device and build additional images using the guest system profile
32 Chapter 5. Building Oryx Linux Images
Oryx Linux Documentation, Release 0.5.0
for each required application profile. With this method each application profile corresponds to a separate containerwithin the host system resulting in a more secure and manageable device.
The following application profiles are provided in this release:
• full-cmdline: This profile simply includes the OpenEmbedded full-cmdline packagegroup along with theSSH server. It is a good demonstration container as it has a user-friendly set of command line tools installedwith documentation.
• minimal: This profile provides the minimal software needed to boot and run a system along with the SSHserver. It is a good starting point for developing new application profiles.
• host: This profile includes runc and other tools needed to setup Linux containers. It provides a host environ-ment for images built using the guest system profile described above.
• host-test: This profile includes everything in the host application profile plus additional testing and debugtools. It is primarily used in the development of Oryx itself.
• host-mender-update-modules: This profiles includes everything in the host application profile plusadditional support for updating guests using Mender Update Modules. See the section on Mender Integrationfor details on how to use this application profile.
It’s expected that Oryx will be enhanced by the addition of many more application profiles in future releases.
The application profile is determined by the ORYX_APPLICATION_PROFILE variable.
5.2.1 Writing Application Profiles
A new application profile is typically written for each application or service which is to be deployed in Oryx Linux.
The key variables in an application profile are as follows:
• ORYX_APPLICATION_PROFILE_PACKAGES: This is the list of additional packages to install into the rootfsfor this application profile.
When the guest system profile is selected, the following additional variables are used to configure the guest con-tainer:
• ORYX_GUEST_CAPABILITIES: This is the list of Linux capabilities to grant to the container. It defaults tothe minimal capability set of CAP_AUDIT_WRITE, CAP_KILL and CAP_NET_BIND_SERVICE and typi-cally you will just need to extend this list with any additional capabilities needed. For details on the availablecapabilities, see the Linux capabilities(8) manual page.
• ORYX_APPLICATION_COMMAND: This is the main application command to execute when the guest containeris started. The command line is tokenized into separate arguments however no further parsing is performed (sofor example environment variables cannot be used). The best practice is to create a start script which performsany necessary initialization and then starts the main service or application. For an example of a start script seethe start-sshd script and recipe in the meta-oryx layer.
5.3 Preconfiguration and the Local Image Feed
Oryx Linux supports the preconfiguration of sources and guests defined at build time so that these do not need tobe created by manually invoking oryxcmd at runtime. This is done by writing recipes which install preconfigurationfiles into /usr/share/oryx/preconfig.d where the oryxcmd will process them on first boot. These files areparsed in alphanumeric sort order so it’s recommended to use a 2 digit prefix on all file names to enforce the desiredprocessing order. Once parsed, the options creating sources are handled first followed by the options creating guests.
5.3. Preconfiguration and the Local Image Feed 33
Oryx Linux Documentation, Release 0.5.0
The syntax of preconfiguration files is based on the INI configuration file format with sections for each source or guestthat should be created on first boot.
5.3.1 Preconfiguring Sources
A section with a heading of the format [source:NAME] defines a source with the given name.
The following options are required to preconfigure a source:
• url: This is equivalent to the URL argument to the add_source oryxcmd action.
5.3.2 Preconfiguring Guests
A section with a heading of the format [guest:NAME] defines a guest with the given name.
The following options are required to preconfigure a guest:
• image: This is equivalent to the IMAGE argument to the add_guest oryxcmd action.
The following options may also be set as desired:
• enable: If this option is true then the guest in enabled after creation so that it starts automatically on boot.This is equivalent to running oryxcmd enable_guest after the guest is created.
5.3.3 Preconfiguration Example
The following example illustrates how sources and guests can be preconfigured. If this text is placed in a file under/usr/share/oryx/preconfig.d by a recipe then on first boot on the target the defined items will be created:
[source:onsite]url = http://192.168.1.10/oryx/qemux86
[guest:test]image = onsite:minimalenable = True
This is equivalent to running the following commands on the target on the first boot:
oryxcmd add_source onsite http://192.168.1.10/oryx/qemux86oryxcmd add_guest test onsite:minimaloryxcmd enable_guest test
5.3.4 Using the Local Feed
The recipe oryx-local-feed builds on the preconfiguration support to define a local feed with images stored in/usr/share/oryx/local-feed. This allows guests to be created on the first boot of a device without requiringany network access to a remote source. The preconfiguration file to define the local source is installed as part of thisrecipe and so it is not necessary to implement this yourself.
All images which will be placed in the local feed must have already been built before the final native image is built.
The local feed is configured by setting the following variables, typically in the application profile which will be usedto build the final image:
34 Chapter 5. Building Oryx Linux Images
Oryx Linux Documentation, Release 0.5.0
• ORYX_LOCAL_FEED_IMAGE: A whitespace separated list of images to include in the local feed. Each entry isof the form SYSTEM_PROFILE:APPLICATION_PROFILE, for example guest:minimal to include theimage built from the guest system profile and the minimal application profile. These images will be copiedinto the local feed directory in the final image.
For an example of how the local feed is used, see the host-test application profile.
5.4 OpenEmbedded Recipes
5.4.1 oryx-image
The concept of an application profile effectively supersedes the OpenEmbedded concept of an image recipe. Thereforewe only make use of one image recipe within Oryx and this is the oryx-image recipe. This recipe pulls in thepackages needed by the chosen application and system profiles.
The oryx-image recipe also ensures that an extended os-release file is included in the image. Thisos-release file includes the usual information such as the distro name, version and home URL as well as Oryx-specific information such as the selected system profile, application profile and machine.
To simplify deployment of Oryx images and prevent artifacts being overwritten by subsequent builds for differentmachine, system profile or application profile settings, the output files are collected into an images directory (usuallyplaced in build/images). Within this images directory, a hierarchy of subdirectories is created for each machine,system profile and application profile. As only those files required by the boot or installation method used with a givensystem profile are copied into the new directory, there is no clutter or confusion.
In normal usage, the top-level bitbake recipe used to build an Oryx image will therefore be oryx-image.
5.4.2 image-json-file
The image-json-file recipe creates a JSON formatted data file for the current image which is used by Usingoryxcmd when downloading the image onto a host system.
5.5 Using Integrated Sources
The recommended way to build Oryx Linux images is to use the integrated source tree which combines themeta-oryx layer and a pre-configured build environment with the OpenEmbedded build system. This is the methodwhich is used for Oryx Linux releases and is regularly tested as part of the Continuous Integration (CI) system.
The full contents of the integrated Oryx Linux sources is as follows:
• The base openembedded-core layer.
• The corresponding version of bitbake.
• Additional supporting layers: meta-openembedded and meta-virtualization.
• Additional BSP layers: meta-raspberrypi.
• The Oryx Linux distro layer: meta-oryx.
• Pre-configured build environment consisting of build/conf/local.conf and build/conf/bblayers.conf files which typically do not require further modification.
• Build script scripts/build.py.
5.4. OpenEmbedded Recipes 35
Oryx Linux Documentation, Release 0.5.0
5.5.1 Fetching and Updating Sources
Integrated sources may be obtained either from a source release in .tar.xz format, or from git.
Using a Source Release
Each point release of Oryx Linux includes a source tarball alongside the compiled images. This integrated source re-lease contains all OpenEmbedded layers needed to build Oryx Linux images and is essentially a point-in-time snapshotof the sources which may be obtained from git.
For the v0.5.0 release, this source release may be obtained from https://downloads.toganlabs.com/oryx/distro/0.5.0/oryx-0.5.0.tar.xz.
Once a source release has been downloaded, it simply needs to be extracted before using the Build Script.
Using git
The Oryx git repository uses submodues to download and track the other git repositories that it depends on so it mustbe cloned using the --recurse-submodues flag.
• To use the master branch of Oryx Linux:
git clone --recurse-submodules https://gitlab.com/oryx/oryx.git
The master branch is the active development branch and so may incorporate breaking changes at any time.Follow the master branch at your own risk!
• To use a formal release of Oryx Linux, such as the v0.5.0 release:
git clone --recurse-submodules https://gitlab.com/oryx/oryx.git \-b v0.5.0
The git submodules should be periodically updated with the following command:
git submodule update
5.5.2 Build Script
Once you have the Oryx sources, you can use the build script scripts/build.py to build images. This script usesbitbake to build the recipe specified by oryx-image and so places output files into the images directory.
Building Single Images
The build script can be used most straightforwardly to build a single Oryx Linux image along with any associatedcollateral (such as the image_native.json or image_guest.json file as appropriate).
The build script defaults to selecting the qemux86 machine, the native system profile and the host applicationprofile when building images. To build an image for this combination, simply invoke the build script with no argu-ments:
./scripts/build.py
36 Chapter 5. Building Oryx Linux Images
Oryx Linux Documentation, Release 0.5.0
Additional arguments may be passed to the build script to change the selected machine (-M or--machine argument), system profile (-S or --system-profile argument) and application profile (-A or--application-profile argument). For example, to build an image for the Raspberry Pi 3 device using theguest system profile and the minimal application profile:
./scripts/build.py -M raspberrypi3 -S guest -A minimal
As an alternative to the above form, the -T argument can be used with a colon-separated system profile and applicationprofile pair such as native:host or guest:minimal. For example, the above build can also be performed usingthe following command:
./scripts/build.py -M raspberrypi3 -T guest:minimal
Building Multiple Images in One Step
The build script is also capable of building multiple images in a single execution, running bitbake more than once asnecessary.
Repeating the -S and -A arguments with different system profile or application profile selections would be ambiguousas it would not be clear how to pair up entries in the list of system profiles with entries in the list of application profiles.Instead, the -T argument must be used to specify multiple system profile and application profile pairs. The build scriptadds these pairs to an ordered list in the order that they are specified on the command line and this determines the orderin which these builds are performed. This ordering may be important where one build depends on the results of another,such as when building the host-test application profile which requires a minimal guest image to have already beenbuilt for the same machine. For example, the following command can be used to successfully build this test image forthe Raspberry Pi 3 device:
./scripts/build.py -M raspberrypi3 -T guest:minimal -T native:host-test
Note that this build may fail if -T native:host-test appeared first on the command line as the required guestimage would not have been built.
It is also possible to build images for multiple target machines by using the -M argument more than once. Alternatively,the --all-machines argument may be passed to build images for all officially supported machines. For example,the following command can be used to build the native host image for both x86 and x86-64 QEMU machines:
./scripts/build.py -M qemux86 -M qemux86-64 -S native -A host
If both multiple machines and multiple system profile and application profile pairs are provided, each profile pair isbuilt for each machine listed on the command line. For example, the following command can be used to build theminimal and full-cmdline guest images for both the 32-bit and 64-bit ARM QEMU machines:
./scripts/build.py -M qemuarm -M qemuarm64 -T guest:minimal \-T guest:full-cmdline
As a further example, the following command can be used to build the host and host-test native images, along with theminimal guest image required by the host-test application profile, for all supported machines:
./scripts/build.py --all-machines -T guest:minimal -T native:host \-T native:host-test
Building Documentation
The sources for this documentation are included in the Oryx repository under the docs directory. The Sphinx docu-mentation generator is used to build HTML and PDF output from the reStructuredText and Markdown source files.
5.5. Using Integrated Sources 37
Oryx Linux Documentation, Release 0.5.0
Sphinx requires Python version 3.5 or later along with the pip tool. To install Sphinx and the required modules forbuilding the Oryx documentation the requirements.txt file included with the documentation sources may beused as follows:
pip install -r docs/requirements.txt
The following command may then be used to build the documentation:
./scripts/build.py --docs --no-bitbake
The resulting HTML and PDF artifacts are placed in the docs directory within the output directory.
Starting a Development Shell
During development it may be desirable to use bitbake directly, for example to build a particular recipe rather than awhole image. This can be achieved by starting a development shell using the build script with the --shell argument.The -M, -S, -A and -T arguments can be used to select the machine, system profile and application profile that willbe used for the build. However, note that it is not possible to invoke a development shell for more than one machineor more than one system profile and application profile pair at a time. In this mode of operation the build script willsetup the required environment variables for an Oryx build and then start the bash shell.
For example, to start a development shell with the raspberrypi3 machine, native system profile andhost-test application profile selected:
./scripts/build.py -M raspberrypi3 -S native -A host-test --shell
Please note that the user and system bashrc files will be parsed by the new shell instance and this may interfere withthe required environment variables set by the build script. If problems are observed when using the development shellbut not when bitbake is directly invoked by the build script then the appropriate bashrc files should be examined.
When the development shell is no longer needed, remember to end the session by using exit.
Argument Reference
The build script understands the following arguments:
• -V VERSION, --build-version VERSION: Sets the version string used to identify this build. The de-fault value is dev.
• -S SYSTEM_PROFILE, --system-profile SYSTEM_PROFILE: Sets the system profile to be built.See the System Profiles section for details on how system profiles work, and what options are available. Thedefault value is native.
• -A APPLICATION_PROFILE, --application-profile APPLICATION_PROFILE: Sets the appli-cation profile to be built. See the Application Profiles section for details on application profiles, as well as theoptions available. The default value is host.
• -T SYSTEM_PROFILE:APPLICATION_PROFILE, --target-pair SYSTEM_PROFILE:APPLICATION_PROFILE:Sets the system profile and application profile to be built. This is an alternative to specifying the -S and-A arguments separately. This argument may be specified more than once to build multiple images in oneinvocation of the build script (which is not possible when using the -S and -A arguments). The images arebuilt in the order that they are given on the command line and for each specified machine.
• -M MACHINE, --machine MACHINE: Sets the target machine for which the image will be built.Supported machines are: qemux86, qemux86-64, qemuarm, qemuarm64, ``raspberrypi3 andraspberrypi3-64. The default value is “qemux86”. This argument may be specified more than once tobuild multiple images in one invocation of the build script.
38 Chapter 5. Building Oryx Linux Images

Oryx Linux Documentation, Release 0.5.0
• -k, --continue: Continue as far as possible after an error. This is equivalent to the -k argument to bitbake.
• --oryx-base ORYX_BASE: Set the base directory of the Oryx source tree. The default value is the currentdirectory so this argument is only useful in special cases.
• --shell: Start a development shell instead of running bitbake directly. This allows more control over theinvocation of bitbake and is typically useful in development and in debugging failed builds.
• -o OUTPUT_DIR, --output-dir OUTPUT_DIR: Set the output directory where build artifacts will beplaced. The default value is build/images.
• --all-machines: Build images for all supported target machines. This is an alternative to manually speci-fying the full list with multiple -M arguments. See the release notes for the current list of supported machines.
• --rm-work: Remove temporary files after building each recipe to save disk space. This enables the rm_workbbclass.
• --mirror-archive: Populate a download mirror for all open source components included in the image.This is placed in the mirror directory within the output directory. It can be published and used as a mirror ora premirror for subsequent builds.
• --enable-mender: Enable the inclusion of Mender layers in BBLAYERS. These layers are required tobuild Mender images but prevent the building of non-Mender images. This option is typically used along with asystem profile which is configured for Mender integration.
• --dl-dir DL_DIR: Set the path for the downloads directory. The default value is build/downloads.
• --sstate-dir SSTATE_DIR: Set the path for the sstate cache directory. The default value is build/sstate-cache.
• --docs: Build the documentation in HTML and PDF formats. The resulting artifacts are placed in the docsdirectory within the output directory.
• --source-archive: Create an archive of the complete Oryx Project sources including Bitbake and all YoctoProject layers. The archive is placed in the output directory. This requires that the sources have been obtainedfrom git and not from a previously made source archive.
• --checksum: Create SHA256SUMS checksum files in each subdirectory within the output directory thatcontains files.
• --release: Perform a full release of the Oryx Project. This is equivalent to passing the following arguments:
-T guest:minimal -T guest:full-cmdline -T native:host -T native:host-test \--all-machines --docs --mirror-archive --source-archive --checksum
• --no-bitbake: Disable bitbake invocation so that no images are built. This argument is useful if you onlywant to build the documentation, create a source archive or similar.
5.6 Using meta-oryx as a Standalone Layer
Although the above method of Using Integrated Sources is preferred as this is the tested and supported method, it’salso possible to use the meta-oryx layer as a traditional OpenEmbedded layer. This layer may be obtained from thegit repository at https://gitlab.com/oryx/meta-oryx and added into an OpenEmbedded build environment as normal.
Once the meta-oryx layer has been added to the OpenEmbedded build environment, the following variables shouldbe set in conf/local.conf or another appropriate location to fully configure the Oryx Linux distribution:
• Set the distro: DISTRO = "oryx".
• Set the Oryx Linux version: ORYX_VERSION = "custom". Using a unique version string here will helpidentify this build.
5.6. Using meta-oryx as a Standalone Layer 39

Oryx Linux Documentation, Release 0.5.0
• Choose a System Profile: ORYX_SYSTEM_PROFILE = "native".
• Choose an Application Profile: ORYX_APPLICATION_PROFILE = "minimal".
Once these variables are set appropriately, bitbake may be executed as normal. As discussed in the section onOpenEmbedded Recipes, the top-level command to build an Oryx Linux image is typically bitbake oryx-image.
40 Chapter 5. Building Oryx Linux Images
CHAPTER 6
Mender Integration
With version 0.5.0 of Oryx Linux we have added integration with the Mender.io Over-The-Air (OTA) update system.Further Mender documentation can be found at https://docs.mender.io.
6.1 Building Native Mender Images
Native Mender images can be built using the native-mender system profile. These images include redundantrootfs partitions as well as a data partition as required by the Mender update system. To use this system profile, the--enable-mender argument must be passed to the build script to enable use of the Mender layers.
For example, to build a native Mender image for the Raspberry Pi 3 device using the host application profile:
./scripts/build.py --enable-mender -M raspberrypi3 -S native-mender -A host
When using the native-mender system profile, the image filename extension is typically .sdimg.xz or .uefiimg.xz instead of the usual .wic.xz used by Oryx Linux. The sdimg format images may be directlywritten to an SD card in the same was as wic images.
Additionally, update artifacts with the filename extension .mender are produced for each image. These artifacts aresuitable for upload to a Mender server instance to be pushed out as updates to a fleet of devices. Alternatively, theycan be used directly with mender on the command line on a target device to install the updated rootfs image.
6.1.1 Testing With The Mender Demo Server
Testing with the Mender demo server requires the default HTTPS certificates and the demo server IP to be bakedinto an image at build time. These modifications are performed when the meta-mender-demo layer is included inBBLAYERS. Therefore this extra layer must be disabled for normal builds and enabled for demo builds.
Enabling the meta-mender-demo layer is currently a manual process, requiring minor additions to both thebblayers.conf and local.conf files in the build/conf directory. Once these additions have been made,follow the instructions above to build a native Mender image for the desired target device.
To enable the required layer, add the following line to bblayers.conf:
41
Oryx Linux Documentation, Release 0.5.0
BBLAYERS += "${ORYX_BASE}/meta-mender/meta-mender-demo"
Assuming the demo server IP address is 192.168.0.100, add the following line to local.conf:
MENDER_DEMO_HOST_IP_ADDRESS = "192.168.0.100"
The IP address in the above assignment should obviously be changed to match your local test environment.
After building and booting and image with these changes, the target device should contact the demo server automati-cally.
6.2 Building a Host Image For Use With Mender Update Modules
To update guest images using the Mender Update Modules support, the host image must be built with thehost-mender-update-modules application profile. To use this application profile, the --enable-menderargument must be passed to the build script to enable use of the Mender layers.
For example, to build a host image for the Raspberry Pi 3 supporting both Mender integration for rootfs updates andMender Update Modules integration for guest updates:
./scripts/build.py --enable-mender -M raspberrypi3 -S native-mender -A host-mender-→˓update-modules
6.3 Building Guest Images For Use With Mender Update Modules
For guest images to be updated using the Mender Update Modules support, they need to be packaged correctlyinto .mender artifacts. This packaging is provided by the oryx-mender-update-module recipe used by theguest-mender-update-module system profile. To use this system profile, the --enable-mender argumentmust be passed to the build script to enable use of the Mender layers.
For example, to build a minimal guest image for the Raspberry Pi 3 for use with Mender Update Modules:
./scripts/build.py --enable-mender -M raspberrypi3 -S guest-mender-update-module -A→˓minimal
42 Chapter 6. Mender Integration
CHAPTER 7
How to Contribute
Oryx accepts contributions via Gitlab pull requests. Here we outline some of the conventions on development work-flow, commit message formatting, contact points and other resources to make it easier to get your contribution ac-cepted.
The components within Oryx are licensed as follows:
• Recipes and build scripts: MIT License
• Documentation: Creative Commons Attribution 4.0 International License
• Patches to third-party software: Distributed under the same license as the software being patched
By contributing to this project you agree to the Developer Certificate of Origin (DCO). This document was createdby the Linux Kernel community and is a simple statement that you, as a contributor, have the legal right to make thecontribution. See the DCO text at the end of this file for details.
7.1 Reporting Issues
Bugs and feature requests may be reported via our issue tracker.
Please do not use our public issue tracker to report security bugs or other sensitive issues, instead please report theseby email to [email protected].
7.2 Contributing Code
• Fork the repository on Gitlab
• Read the Yocto Project Community Guidelines
• Play with the project, submit bugs, submit patches!
43
Oryx Linux Documentation, Release 0.5.0
7.2.1 Contribution Flow
This is an outline of what a contributor’s workflow looks like:
• Create a topic branch from where you want to base your work (usually master).
• Make commits of logical units.
• Make sure your commit messages are in the proper format (see below).
• Push your changes to a topic branch in your fork of the repository.
• Submit a pull request to the original repository.
Thanks for your contributions!
7.2.2 Format of the Commit Message
See the OpenEmbedded patch guidelines.
See the OpenEmbedded styleguide
7.2.3 Developer Certificate of Origin
Developer Certificate of OriginVersion 1.1
Copyright (C) 2004, 2006 The Linux Foundation and its contributors.660 York Street, Suite 102,San Francisco, CA 94110 USA
Everyone is permitted to copy and distribute verbatim copies of thislicense document, but changing it is not allowed.
Developer's Certificate of Origin 1.1
By making a contribution to this project, I certify that:
(a) The contribution was created in whole or in part by me and Ihave the right to submit it under the open source licenseindicated in the file; or
(b) The contribution is based upon previous work that, to the bestof my knowledge, is covered under an appropriate open sourcelicense and I have the right under that license to submit thatwork with modifications, whether created in whole or in partby me, under the same open source license (unless I ampermitted to submit under a different license), as indicatedin the file; or
(c) The contribution was provided directly to me by some otherperson who certified (a), (b) or (c) and I have not modifiedit.
(d) I understand and agree that this project and the contributionare public and that a record of the contribution (including all
(continues on next page)
44 Chapter 7. How to Contribute

Oryx Linux Documentation, Release 0.5.0
(continued from previous page)
personal information I submit with it, including my sign-off) ismaintained indefinitely and may be redistributed consistent withthis project or the open source license(s) involved.
7.2. Contributing Code 45