linux desktops documentation - read the docs
TRANSCRIPT

Linux Desktops DocumentationRelease RHEL7
University of Southampton
Aug 17, 2018


Basics
1 Desktop Manager 3
2 Installing software 5
3 Backups 7
4 Local storage 9
5 Network storage 11
6 Printing 15
7 E-Mail 17
8 Installation 19
9 Migration Guide 29
10 Permissions 33
11 Remote access 37
12 Desktop environments 39
13 Virtualisation 41
14 Firewall 43
15 GNOME Extensions 45
16 Environment modules system 47
17 Software collections (SCL) 49
18 Python 51
19 C and C++ 57
20 Fortran 61
i

21 Java 63
22 TeX Live (LaTeX) 65
23 R 67
24 CUDA 69
25 OpenMPI 71
26 Ruby 73
27 Perl 75
28 Index of specialist software 77
29 EPEL 85
30 IUS 87
31 RHDT 89
32 SCL 91
ii

Linux Desktops Documentation, Release RHEL7
Welcome to the documentation for Linux Desktops at the University of Southampton
Basics 1

Linux Desktops Documentation, Release RHEL7
2 Basics

CHAPTER 1
Desktop Manager
You can manage your desktop using the Desktop Manager tool. Log in to your desktop computer, open a web browserand go to the following location:
https://deskctl
You can also open the Desktop Manager tool within GNOME by press the Start button and searching for “DesktopManager” and then selecting the resulting entry for the tool.
Desktop manager allows you to:
• Install software, including University provided software
• Manage permissions (change who can do what)
• Check the status of backups
• Start a backup on demand
• Check the software update status
• Check the health of the system
• View the system hardware information
• Open this documentation
3

Linux Desktops Documentation, Release RHEL7
4 Chapter 1. Desktop Manager

CHAPTER 2
Installing software
2.1 Desktop Manager
The recommended method for installing software is via the Desktop Manager tool. This tool contains specialistsoftware, packages created by iSolutions, and all software specifically requested by members of the university. If apackage is missing from it, and you think it should be listed, let us know!
2.2 GNOME Software
You can also use the GNOME Software tool to install software. It only includes graphical applications (GUI apps)and does not include specialist software or packages created by iSolutions.
It does however include most of the default GUI software in Red Hat Enterprise Linux so if you’re looking for astandard GUI application then GNOME Software will probably let you install it.
To start GNOME Software press the Start button and search for “Application Installer”.
2.3 yum
If you’re not afraid of the command line then the easiest and fastest way to install software is to use yum. You cansearch for software like this:
sudo yum search <name>
You can then install a package once you’ve found it like this:
sudo yum install <package-name>
Or remove a package:
5

Linux Desktops Documentation, Release RHEL7
sudo yum remove <package-name>
6 Chapter 2. Installing software

CHAPTER 3
Backups
Your home directory is backed up automatically at least once a day.
3.1 When are backups taken?
Your workstation will attempt to back up all the data in /home between 11pm and 12am. If your computer is switchedoff at this time do not worry, the next time you start your computer a backup will be attempted then instead.
3.2 Do I need to keep my computer on overnight?
You do not need to leave your computer on overnight. If you prefer to keep your computer turned off then backupswill still take place. Whenever your computer starts up it determines if a backup should be taken and then initiates abackup if required.
3.3 How long are backups kept for?
Backups of each workstation are kept for 30 days after the backup was taken.
If your machine is not switched on, or otherwise unavailable, for 30 days, then all backup data will be deleted. Toensure you always have a copy of data in case of hardware failure please ensure your computer takes at least onebackup a month.
3.4 How can I check the backups are working?
You can use Desktop Manager to check the status of the last backup attempt.
You can also run the following command in a terminal:
7

Linux Desktops Documentation, Release RHEL7
sudo drone backup status
3.5 Can I trigger a backup?
Yes you can start a backup whenever you need to. This allows you, for example, to take a backup before turning yourcomputer off before leaving the office. You can start a backup using Desktop Manager or if you prefer you can run thefollowing command in a terminal:
sudo drone backup now
3.6 Can I use my PC whilst a backup is underway?
Yes. The backup system takes a snapshot of the data when the process begins and backs up the data in the snapshot.You can thus carry on using your computer without affecting the backup (or the backup affecting your data). Thebackup system uses LVM thin snapshots to accomplish this.
3.7 Do backups work when outside the University network?
For the backups to work you must connect to the University network via one of these methods:
• Connect to the university network via an Ethernet cable
• Connect to the eduroam wireless network
• Connect to the university virtual private network (VPN) service
3.8 Can backups be disabled?
In very rare circumstances iSolutions will disable backups on a workstation.
To do this, you need to be a member of iSolutions staff with root access, and you run the following command to do so:
sudo drone backup disable
Backups can be then enabled again at a later date with:
sudo drone backup enable
8 Chapter 3. Backups

CHAPTER 4
Local storage
4.1 Your home directory
• Location: /home/$username/
• Backed up: Yes
Your home directory is stored on the computer’s local drive. This data is backed up every day - see Backups for details.You are not limited by a quota but the /home partition/drive is only 50GB in size. If you expect your computer to beused by multiple people please be considerate and don’t use all the space on the partition.
You can check the usage of the drive in Desktop Manager
4.2 Local scratch space
• Location: /local/scratch/$username/
• Backed up: No
If you need space for large amounts of data you should store this within your local scratch space. This space is howevernot backed up, so don’t store anything important there!
The scratch space is stored within the /local partition, thus this is only limited by the size of the drive within yourcomputer.
You can check the usage of the drive in Desktop Manager
4.3 Other locations
Some computers have multiple drives installed, in which case an iSolutions technician will have set up the seconddrive at /data. Directories are not automatically created within this location. Any data stored there is not backed up.
9

Linux Desktops Documentation, Release RHEL7
10 Chapter 4. Local storage

CHAPTER 5
Network storage
5.1 Available locations
There are several storage systems available to connect to on the University network:
5.1.1 Personal Filestore (via SSH)
• Location: sftp://ssh.soton.ac.uk/home/$username/
• Protocol: SSH/SFTP
• Linux friendly semantics: Yes
This is your central university storage or ‘filestore’. Data stored here is backed up and available on Linux, Windowsand Mac OS X computers. You can also access data stored here via Filestore Web Access.
5.1.2 Personal Filestore (via SMB)
• Location: sftp://ssh.soton.ac.uk/home/$username/
• Protocol: SMB1, SMB2
• Linux friendly semantics: No
You can also access your personal filestore via the SMB protocol (the Windows file sharing protocol). If you connectvia this method then you will not be able to set or view file/directory permissions, create symbolic links or use anyother POSIX (Linux/UNIX) features. Due to this it is strongly recommended that you utilise SSH instead.
5.1.3 Linux Shared Filestore
• Location: sftp://ssh.soton.ac.uk/research/$groupname/
• Protocol: SSH/SFTP
11

Linux Desktops Documentation, Release RHEL7
• Linux friendly semantics: Yes
Many research groups and departments have access to shared storage locations specifically designed for use fromLinux systems. These are available at the above location. Data stored here is backed up. You can also access datastored here via Filestore Web Access.
5.1.4 Other Shared Filestore
• Location: smb://filestore.soton.ac.uk/$sharename/
• Protocol: SMB1, SMB2
• Linux friendly semantics: No
Many other shared locations exist, such as the “J: drive” shared storage locations. These are available at the abovelocation. Data stored here is backed up. You can also access data stored here via Filestore Web Access.
These locations are unfortunately designed for use by Windows users. You will not be able to set or view file/directorypermissions, create symbolic links or use any other POSIX (Linux/UNIX) features.
5.2 How to connect
There are various methods of connecting to network storage:
5.2.1 via the file browser
If you’re using GNOME (the default), XFCE, MATE or KDE then you can simply open the file browser and enter thelocation you want to connect to by pressing Ctrl+L or clicking Connect to server in the menu. You will beprompted for a username and password as necessary.
We strongly recommend you use this mechanism to connect to network storage. You can also access the connectedstorage from other applications and the command line. Once connected they are available via the normal file systemhere:
/run/user/$uid/gvfs/
5.2.2 via FUSE (SSH only)
If you prefer to connect to networked storage on the command line only, you can do so using the sshfs command.We strongly recommend you use the above mechanism (the file browser) instead since that can also be accessed fromthe command line.
If you do want to use sshfs directly then run the command like so:
sshfs [user@]host:[dir] mountpoint
For example, here is how to connect to your personal filestore as testuser:
mkdir ~/personalfssshfs [email protected]:/home/testuser/ ~/personalfs
You can then later disconnect with:
12 Chapter 5. Network storage

Linux Desktops Documentation, Release RHEL7
fusermount -u ~/personalfs
5.2.3 via the mount command
You can also instruct the kernel to mount network storage if you desire. This can however be quite complicated andthis documentation only covers the basics.
You can use the mount command via sudo if you are in the sys group (see Permissions for more information). Youcan thus use the command like so:
sudo mount <options>
Here is an example of how to mount personal filestore via the cifs driver with the example username testuser:
mkdir ~/personalfssudo mount -t cifs -o username=testuser,password=<password>,domain=soton.ac.uk //→˓filestore.soton.ac.uk/users/testuser/ /home/testuser/personalfs/
5.2. How to connect 13

Linux Desktops Documentation, Release RHEL7
14 Chapter 5. Network storage

CHAPTER 6
Printing
The university uses a ‘follow me’ printing service where you can submit a print job from your desktop and then printfrom any multi-function printer (MFD) on the university network.
There are two default printer queues set up for this on your Linux desktop which you can use ‘out of the box’. Thequeues are called mono and colour. The first time you print to either of them you will be prompted to enteryour university username and password. Sadly owing to limitations in CUPS (the Linux printing system) we cannotautomatically authenticate you. Instead you can opt to save your username and password, and the password is storedin your GNOME keyring (where it is encrypted).
If you have administrator rights granted to you on your desktop (i.e. you are in the sys group), you can add and editprinters. You may want to add a new printer if you are in a lab which has a printer other than the normal UniversityMFDs.
To add such a printer:
1. Open the GNOME Settings application (Applications -> System Tools -> Settings) and then choose Printers.Note that you may also find Print Settings, which is a separate method of adding a printer and not documentedhere.
2. Choose Unlock and, if prompted, enter your username and password to authenticate.
3. Next, click the plus (+) button that’s underneath the list of printers and the Add a New Printer dialog will appear.
4. In the text box at the bottom of the dialog, enter: smb://servername/, where servername should belisted on the label on the printer you wish to add. servername will often be something like server1.printing.soton.ac.uk.
5. As you enter this you will be prompted to authenticate to the print server, after which, you should be given a listof printers.
6. Double-click on your printer from the list - it should match the name that is on the label on the printer, e.g.PR_B12_R3456_P01
7. Next, the Select Printer Driver dialog should appear. Choose Generic from the list on the left and thenGeneric PostScript Printer from the list on the right.
8. Press the Select button.
15

Linux Desktops Documentation, Release RHEL7
9. The printer is now added to the system, and you should now be able to print to it
10. Note that you can’t set a system-wide default printer here as that is managed by system policy (and if youmanage to change it, it will get reverted), however you can change the default printer for your account on yourdesktop using the documentation below.
To change the default printer:
1. Open the Print Settings application
2. Right-click the printer you wish to make the default for you
3. Choose Set as Default from the menu
4. Choose Set as my personal default printer
5. Click OK
16 Chapter 6. Printing

CHAPTER 7
At present, the univerity’s e-mail solution is Microsoft Exchange for most staff and Office 365 for students.
7.1 Using Outlook web access
The easiest way to access your e-mail (and calendars and contacts) is to use Outlook web access:
• Staff and postgraduates: www.outlook.soton.ac.uk
• Students: www.outlook.com/soton.ac.uk
7.2 Using GNOME / Evolution
The next easiest way to access your e-mail (and contacts) is to use the e-mail client in GNOME - evolution. The fastestway to set it up is to open Settings and click Online Accounts.
• Click “Add an online account”
• Choose “Microsoft Exchange”
• Enter the E-Mail as [email protected]
• Enter your normal university password
Open Evolution and your e-mail account will have automatically been created.
7.3 Using other clients
If you decide to use another e-mail client you’ll likely want to use IMAP and SMTP for sending and receiving e-mails.The support in Microsoft Exchange for IMAP clients is very poor however (performance is appauling and the IMAPserver is not very compliant to the RFC - surprising, no?). We thus recommend either using Outlook Web Access orEvolution, but if you really do want to take the plunge, here are the details:
17

Linux Desktops Documentation, Release RHEL7
• IMAP server: imap.exchange.soton.ac.uk
• IMAP security: SSL/TLS (port 993)
• SMTP server: smtp.soton.ac.uk
• SMTP security: STARTTLS (port 25)
18 Chapter 7. E-Mail

CHAPTER 8
Installation
Note: To install the University Linux Desktop system you need to be a member of iSolutions staff (i.e. in the ‘jfStaff’group). We are working on a way for anybody to install Linux desktops, but this is not yet available.
8.1 Before you begin
• Ensure that no USB hard drives or thumb drives are attached
• Ensure that no non-standard devices are attached by USB or otherwise
• Check for second or third hard drives. These should not be wiped, but if they contain data customers want, bestpractice is to disconnect them first.
• Make sure the PC is set to BIOS mode (not UEFI)
• Ensure Hybrid graphics are disabled, if offered
8.2 Start the installation
Turn the computer on and select network boot (PXE boot) as it starts. When prompted, press F12 to start the networkinstallation system:
19

Linux Desktops Documentation, Release RHEL7
The network build menu should then appear, choose Linux:
and then on the next menu choose Linux desktops:
20 Chapter 8. Installation

Linux Desktops Documentation, Release RHEL7
Finally, choose Linux Desktop 7:
8.2. Start the installation 21
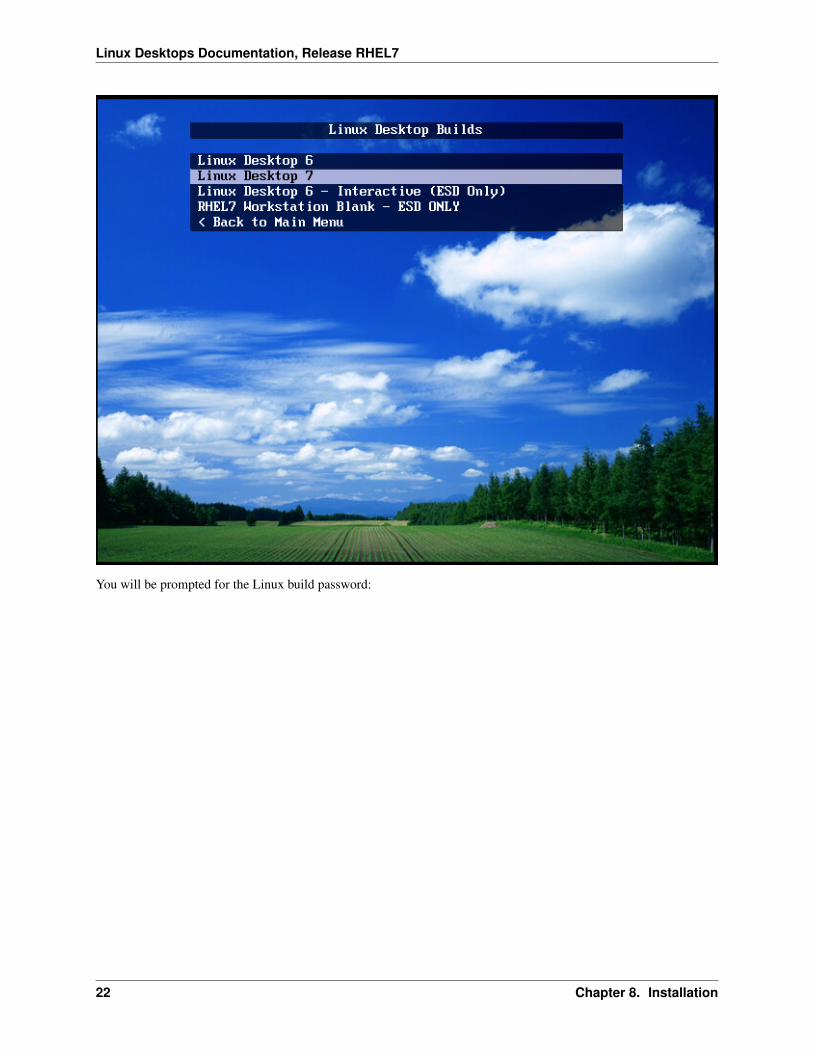
Linux Desktops Documentation, Release RHEL7
You will be prompted for the Linux build password:
22 Chapter 8. Installation

Linux Desktops Documentation, Release RHEL7
If the build starts you’ll see a loading screen like this one:
8.2. Start the installation 23

Linux Desktops Documentation, Release RHEL7
Followed by the Red Hat installer running automatically:
24 Chapter 8. Installation

Linux Desktops Documentation, Release RHEL7
The installation will take between 10 and 20 minutes. During this time you don’t need to watch the computer, its fullyautomatic.
8.3 University installer
Once the Red Hat installer is finished the system will reboot and it will display a message telling you that the Universityinstaller has started and is ready to be used:
8.3. University installer 25

Linux Desktops Documentation, Release RHEL7
Press any key to start the installer and then enter the computer name if it was not automatically detected:
You then need to enter your university username and password. The account must be within the jfStaff group - sodon’t use adm accounts, use your normal account.:
26 Chapter 8. Installation

Linux Desktops Documentation, Release RHEL7
The University installer will then complete all its tasks automatically without requiring any further input. It can takebetween 5 and 15 minutes for this to finish, dependening on the speed of the hard drive:
Once complete the installer will show “all done” and you can restart to use the new Linux desktop by pressing anykey:
8.3. University installer 27

Linux Desktops Documentation, Release RHEL7
8.4 Post-installation tasks
Once the system has rebooted you might want to grant additional permissions to the user for whom you built theworkstation for. To do so, logon to the system and use Desktop Manager to change Permissions. Your account mustbe within the linuxadm or linuxsys Linux groups to do this.
28 Chapter 8. Installation

CHAPTER 9
Migration Guide
Note: This guide is intended for iSolutions staff only.
9.1 Introduction
This guide is intended to assist you migrating a customer’s workstation from either RHEL5 or RHEL6 to our currentRHEL7 platform. Before you start, you should make sure that you have a USB disk with no data on it that you canuse to store data on the customer wishes to keep.
9.2 Migration outline
• Check for non-backed up data in /local/scratch/
• Copy data from /home/ to the USB drive
• Copy data from /local/scratch/ to the USB drive
• Check for secondary hard drives in the system
• Disconnect any secondary hard drives
• Install RHEL7
• Reconnect secondary hard drives
• Set up secondary hard drives to be automatically mounted
• Copy data back from the USB drive to /local/scratch/
• Copy data back from the USB drive to /home/
• Copy home directory data back
29

Linux Desktops Documentation, Release RHEL7
9.3 Check for non-backed up data in /local/scratch/
Users will probably want you to back up the data that is in /local/scratch/ on the workstation. Although thisdata is not backed up normally, and is ‘scratch’ space we will still back it up to make things easier.
Ask the user if they have data they wish to keep in /local/scratch, and check if there is any other user data in/local/scratch/ as well. If there is, it makes sense to back it up.
Do not check for data in /data - this is likely a second hard drive, which we will come onto later.
9.4 Attach the USB disk
Ask the user to log out of the system and ensure nobody else is logged in. Then login on the console and gain root. Toswitch to the console type Ctrl+Alt+F3.
Now plug in the USB disk you’re going to use to store data on during the migration. You should then run the commandlsscsi to list the attached storage devices. If lsscsi is not installed, installed it with:
yum install lsscsi
You can then run it like so:
lsscsi
And you should get an output somewhat similar to this:
[0:0:0:0] disk ATA KINGSTON SA400S3 71E0 /dev/sda[1:0:0:0] cd/dvd TSSTcorp CDDVDW SH-224BB SB00 /dev/sr0[2:0:0:0] disk Seagate Expansion 9300 /dev/sdb
As you can see from the above, the USB drive (in this case a Seagate USB drive) is listed and it is available at the path/dev/sdb. If you’ve already set up the disk to be used by Linux systems then you can go ahead and mount the drive.We’ll create a place to mount it:
mkdir /mnt/migrate
And then mount it:
mount /dev/sdb1 /mnt/migrate
9.5 Copy data
Now you’ll want to use rsync to copy the data from the local system to the USB hard drive. We’ll run it twice, oncefor /home and the second time for /local/scratch/. Here are the commands you’ll want to run:
rsync -av --progress /home/ /mnt/migrate/home/rsync -av --progress /local/scratch/ /mnt/migrate/scratch/
You can run these commands again to make sure all changes have been copied as they ‘mirror’ the data and only copychanges as needed. These commands will likely take a long time to run dependent on the speed of the hard drives andthe amount of data.
30 Chapter 9. Migration Guide
Linux Desktops Documentation, Release RHEL7
9.6 Secondary hard drives
Sometimes a workstation will have a second or even a third physical disk installed. We don’t have to back up thisdata as the installation for RHEL7 won’t touch these disks - the data will be retained. However, it is best practice todisconnect these drives ‘just in case’. If its easy to open the case and disconnect secondary hard drives, do so (whenthe power is off of course!) so as to prevent any chance of data on these disks from being lost.
Make a note as to how many of these drives there are, and where they are currently mounted. You can get a list ofphysical drives with lsscsi:
lsscsi
and you can get a list of mounted partitions with df:
df -h
This will let you figure out what drives are there, and what mount points to add once you’ve installed RHEL7. Makesure to write down the full path to the disk, e.g. it will probably be /dev/sdb1 for the device path. You’ll also wantto make sure you write down the file system type, hopefully it will be ext4.
9.7 Install RHEL7
Once you’ve done the above steps, power the machine off, and unplug the USB hard disk. Then power it back on andfollow the Installation guide.
9.8 Reconnect secondary hard drives
Once you’ve installed RHEL7 you should power the machine off again and reconnect any hard drives you previouslydisconnected. You can then power the machine back on and reconnect them. Log in and gain root, and then find a listof the new drives:
lsscsi
You should then re-create the directories where you want to mount the drives. In nearly all cases this will be /dataso just run:
mkdir /data
Now you’ll need to edit the file system tab (fstab) to add a record so the drive is mounted at startup. Edit /etc/fstab in the editor of your choice and add the following:
/dev/sdb1 /data ext4 defaults 0 0
Change this line to match what you need it to - .e.g change /dev/sdb to be the device path you wrote down in theearlier steps. Change /data to be wherever the disk should be mounted. And change ext4 to whatever file systemis in use (and you wrote down earlier). In nearly all cases though you probably won’t need to change anything.
Once that is done, save and exit the file, and run:
mount -a
Now check the disk is mounted:
9.6. Secondary hard drives 31

Linux Desktops Documentation, Release RHEL7
df -h
9.9 Copy data back
The last step is to copy data back onto the workstation. You’ll have to plug in the USB drive in again, and then workout what it got attached as:
lsscsi
And you should get an output somewhat similar to this:
[0:0:0:0] disk ATA KINGSTON SA400S3 71E0 /dev/sda[1:0:0:0] cd/dvd TSSTcorp CDDVDW SH-224BB SB00 /dev/sr0[2:0:0:0] disk Seagate Expansion 9300 /dev/sdb
As you can see from the above, the USB drive (in this case a Seagate USB drive) is listed and it is available at the path/dev/sdb. Create the place we’ll mount it:
mkdir /mnt/migrate
And then mount it:
mount /dev/sdb1 /mnt/migrate
Now we can copy data back. Start with the /local/scratch/ directory and use rsync again to copy back:
rsync -av –progress /mnt/migrate/scratch/ /local/scratch/
You can then recover the /home directory data. You probably should not recover the data directly though. In mostcases, users will be moving from GNOME 2 to GNOME 3, and starting with a fresh home directory makes moresense. If a user insists they want their original home directory, feel free to restore it, but it can lead to problems, andso you should recommend that they do not.
Either restore the data into /local/scratch/home/ like so:
rsync -av --progress /mnt/migrate/home/ /local/scratch/home/
Or restore individual directories for users (not recommended):
rsync -av –progress /mnt/migrate/home/<username>/ /home/<username/
32 Chapter 9. Migration Guide

CHAPTER 10
Permissions
10.1 Standard permissions
All members of the University of Southampton can log on to any Linux Desktop. Once logged in you are granted allnormal Linux account rights, and in addition you may perform the following actions:
• Can install software packages via Desktop Manager
• Can install software packages via GNOME Software
• Can mount and umount file systems via sudo mount (See Network storage)
• Mount a file systems via GNOME disk management
• Can manage NVIDIA graphics settings via sudo nvidia-settings
• Can reboot/poweroff/hibernate/suspend the computer
• Can run the following commands: reboot, poweroff, halt
• Can start a backup with sudo drone backup now
• Can check the backup status with sudo drone backup status
10.2 Additional permissions
There are four user groups on each workstation which grant additional privileges:
10.2.1 SSH Access
Users in the group users are granted the privilege of being able to logon to the system via SSH from anywhere withinthe university network.
33

Linux Desktops Documentation, Release RHEL7
10.2.2 Administrator
Users in the group sys are considered administrators. Although they lack full root access they are granted severalprivileges. They can use sudo to run the following commands as root:
• yum - for installing software packages
• rpm - for installing local RPM packages
• pip - for installing Python packages
• cpan - for installing Perl modules
• gem - for installing Ruby gems (packages)
They are also granted permissions via PolicyKit to do the following:
• Manage local storage via GNOME disks (or any udisks2 application)
• Full control over power management
• Change locale settings
• Remove software packages
• Update the system software
• Trigger an offline system update
• Manage the date and/or time
• Manage printers (including adding printers)
• Manage the network settings
• Manage tuned
• Reinstall the VirtualBox kernel module (See Virtualisation)
• Set the default version of java/javac (See Java)
iSolutions are more than happy to grant additional privileges to these users upon request.
10.2.3 Virtual Box
Users in the vboxusers group can utilise USB devices in Virtual Box and can reinstall the VirtualBox kernel module.
10.2.4 Root access
Users in the wheel group are granted full root access via sudo and are granted all privileges via policykit. Onlymembers of iSolutions can grant access to this group and is done so rarely.
10.3 Granting permissions
You can use Desktop Manager to add and remove users from groups. Local administrators (users in the group sys)can add and remove users from the following groups:
• SSH access (users)
• Administrators (sys)
34 Chapter 10. Permissions

Linux Desktops Documentation, Release RHEL7
• VirtualBox users (vboxusers)
Only iSolutions staff in the linuxadm or linuxsys groups can add or remove users from the wheel group.
10.3. Granting permissions 35

Linux Desktops Documentation, Release RHEL7
36 Chapter 10. Permissions

CHAPTER 11
Remote access
11.1 SSH
You can connect to your Linux desktop via the SSH protocol. To do so your user account needs to be in the usersgroup. Read the Permissions page for more details about permissions, or use Desktop Manager to add yourself to theSSH group.
The address to connect to will be of the form:
uos-NNNNN.clients.soton.ac.uk
If you don’t know what your computer’s “UOS” number is, you can find out by either opening Desktop Manager orby opening a terminal and typing:
hostname
For example if your computers UOS name were uos-57292 you would connect to the address uos-57292.clients.soton.ac.uk. You can then login with your normal university username and password.
37

Linux Desktops Documentation, Release RHEL7
38 Chapter 11. Remote access

CHAPTER 12
Desktop environments
12.1 GNOME 3
GNOME 3 is the default desktop environment on university Linux desktops. It is the most feature complete and usefuldesktop and as such as we highly recommend using it.
GNOME 3, like many recent desktop environments, does not use the classic Windows style task bar model, or the MacOS X style dock model. It can however be heavily customised by the GNOME Tweak Tool and GNOME Extensions.
12.2 Xfce 4
XFCE is a lightweight alternative to GNOME, whilst still utilising a lot of the core components of GNOME. It can beheavily customised and is considered a more traditional desktop environment. If you do not like GNOME 3 then werecommend using XFCE instead.
You can use Desktop Manager to install XFCE, or use the following command in a terminal:
sudo yum groupinstall xfce-desktop
12.3 KDE Plasma
KDE Plasma is the latest version of the K Desktop Environment, an alternative desktop platform based on the Qtframework. Unlike KDE 3, the KDE Plasma environment is not well regarded, and it lacks a lot of features andmaturity of both GNOME and XFCE. Although available to install we do not recommend using KDE Plasma.
You can use Desktop Manager to install KDE, or use the following command in a terminal:
sudo yum groupinstall kde-desktop-environment
39

Linux Desktops Documentation, Release RHEL7
12.4 MATE
MATE is a fork of the GNOME 2 project, and as such it is essentially an updated GNOME 2 desktop environment. Ifyou liked GNOME 2, and wish to continue using it, then MATE may suit you. The latest version of MATE - 1.16 - isavailable and despite being based on GNOME 2 has been largely rewritten in GTK3.
You can use Desktop Manager to install MATE, or use the following command in a terminal:
sudo yum groupinstall kde-desktop-environment
12.5 i3
i3 is a tiling window manager similar to wmii. It is not a full desktop environment and it is intended for advancedusers. Unless you have experience with ultra lightweight tiling window managers we do not recommend using i3.
You can use Desktop Manager to install i3, or use the following command in a terminal:
sudo yum install i3
12.6 Others
Several other desktops are available:
• Cinnamon: sudo yum install cinnamon-desktop
• LXDE / LXQt: sudo yum install lxqt-session lxqt-panel lxqt-configlxqt-powermanagement lxqt-wallet lxqt-policykit
Several other window managers are available:
• xmonad: sudo yum install xmonad
• fluxbox: sudo yum install fluxbox
• openbox: sudo yum install openbox
• IceWM: sudo yum install icewm
• Matchbox: sudo yum install matchbox-window-manager
• WindowMaker: sudo yum install WindowMaker
• spectrwm: sudo yum install spectrwm
• fvwm: sudo yum install fvwm
• pekwm: sudo yum install pekwm
• vtwm: sudo yum install vtwm
40 Chapter 12. Desktop environments

CHAPTER 13
Virtualisation
13.1 VirtualBox
iSolutions recommends the use of VirtualBox for creating and running virtual machines on the linux desktop platform.VirtualBox is designed for a multi user environment, unlike KVM/libvirt which runs everything as root.
You can install the latest VirtualBox with the following command:
sudo yum install VirtualBox-5.1
Older versions are available but we recommend you install the latest.
Once installed you can start VirtualBox and start creating virtual machines straight away! We recommend you storeyour virtual machine disks in the /local/scratch/<username/ directory - see Local storage for more info.
13.2 Rebuilding the kernel module
After a kernel update is installed you might find that VirtualBox no longer works and generates an error similar toKernel driver not installed. To fix this you must run the following command in a terminal:
sudo /usr/lib/virtualbox/vboxdrv.sh setup
To run the above command you must be in the sys or vboxusers group. See Permissions for more information.
13.3 VirtualBox user group
In previous versions of VirtualBox anybody who wanted to use the software had to be in the vboxusers group. Thisis no longer the case and membership of this group is only required if:
• You want to be able to rebuild the kernel module without being in sys
41

Linux Desktops Documentation, Release RHEL7
• You want to be able to use USB passthrough devices
See Permissions for more information.
42 Chapter 13. Virtualisation

CHAPTER 14
Firewall
From RHEL7 (Red Hat Enterprise Linux Version 7) onwards you can now manage the firewall of your workstationprovided you are a member of the sys users group. See Permissions for further information on groups.
The firewall is managed by the firewalld utility. To manage the firewall you need to start the graphical tool“Firewall Config”. You can then use this GUI tool to make changes.
Please only make changes to the firewall if absolutley necessary. The defaults are probably all you need.
43

Linux Desktops Documentation, Release RHEL7
44 Chapter 14. Firewall

CHAPTER 15
GNOME Extensions
GNOME 3 features a unique extension system which allows you to install various add on packages within GNOME.These extensions can be used to fix a lot of the behaviour of GNOME 3 that many people do not like.
When you first login to a RHEL7 (Red Hat Enterprise Linux version 7) desktop you will be logged into ‘GNOMEClassic’ which is GNOME 3 with a lot of extra GNOME extensions.
15.1 Finding and installing extensions
Open the Firefox web browser and navigate to extensions.gnome.org
The website itself is used to find and install extensions.
Once installed you can open the GNOME Tweak Tool to configure extensions.
15.2 Recommended extensions
iSolutions recommend the following extensions which will enhance GNOME 3:
• Dash to Dock
• TopIcons
• Sound input & output device chooser
• Places status indicator
• Log out button
• Trash button
For laptops:
• Battery Percentage
• Refresh Wifi Connections
45

Linux Desktops Documentation, Release RHEL7
46 Chapter 15. GNOME Extensions

CHAPTER 16
Environment modules system
Most of the scientific and research software provided by iSolutions uses the environment modules system. Most if notall of the software on the IRIDIS super computer also uses the environment module system.
The modules system is a way to dynamically alter your environment (e.g. variables in your terminal session) in a‘modular’ way. An application specifies a ‘module file’ which contains code to modify the shell so that the applicationworks. You can then ‘load’ the module which uses the module file.
16.1 How to load a module
First you have to install some software which makes use of the modules system, for example you could install PyPy5.6:
sudo yum install pypy256
Once the package is installed you can switch into the module like so:
module load pypy/5.6
Once loaded you can use the pypy binary directly.
16.2 How to unload a module
Just replace module load with module unload:
module unload pypy/5.6
47

Linux Desktops Documentation, Release RHEL7
16.3 List available modules
You can list all the modules installed with:
module avail
16.4 Show the help for the module
Each module should have some help text, use this command to show it:
module help pypy/5.6
16.5 List loaded modules
You can list the modules in use right now type:
module list
48 Chapter 16. Environment modules system

CHAPTER 17
Software collections (SCL)
Sofware collections - or SCL - is a collection of ‘add-on’ software packages created and maintained by Red Hat. Theywere created in order to deliver more up to date versions of software to customers on Red Hat Enterprise Linux whichtypically does not update software “mid-life” of a product. Via SCL Red Hat is able to provide more recent stableversions of software for customers to use without affecting the stability and security of the base product.
Due to our education licence all SCL software is available to users of our linux desktops. More information about allthe available packages can be found on the dedicated software collections website.
17.1 How to install SCL packages
SCL packages are normal rpm software packages and thus can be installed via the usual tools, see Installing softwarefor more information. Typically the SCL packages will contain ‘rh’ in the name, but not all do.
17.2 How to use SCL packages
Once you have installed an SCL package you must first ‘enable’ its use and run a program with the package enabled.For example:
scl enable rh-python35 bash
This ‘enables’ the rh-python35 package (Python 3.5) and then runs the command bash. The bash command isstarted with some environment variables changed so that the SCL software is then available, in a similar way to howEnvironment modules system work.
You can also enable two or more environments at the same time like so:
scl enable sclone scltwo bash
In the above example both sclone and scltwo are enabled.
49
Linux Desktops Documentation, Release RHEL7
17.3 Using SCL without the scl command
Unlike the environment modules system the binaries of the programs do not have a PREFIX set so they can locateshared libraries (shared/dynamic objects) without setting the LD_LIBRARY_PATH variable. This is set automaticallyby the scl enable command.
You can however source a script instead of having to use the scl command. Each SCL package is installed into opt:
/opt/rh/<package-name>/
Within that directory there is a script named enable which you can source:
source /opt/rh/<package-name>/enable
For example this is how to source Python 3.5:
source /opt/rh/rh-python35/enable
50 Chapter 17. Software collections (SCL)

CHAPTER 18
Python
Python is a popular and versatile programming language used in many scientific disciplines across the university. It isby far the most popular language in use by staff at Southampton and is the most used tool on Windows desktops too!
The university Linux desktop platform has a large number of Python implementations for you to choose from. We’veworked hard to try to provide the options you might need and granted you the privileges needed to install packages asrequired.
Note: To install python modules via sudo pip you need to be in the Administrators group. See Permissions formore information. You don’t need to be in this group to use the conda command. You can also use pip directly,without sudo, and install packages in your home directory.
18.1 List of available implementations
• CPython
– RHEL system python - 2.7.5
– Miniconda (Anaconda) - 2.7, 3.6
– IUS packages - 3.4.6, 3.5.3, 3.6.0
– SCL packages - 2.7.8, 3.3.2, 3.4.2, 3.5.1
– EPEL package - 3.4.5
• PyPy
– PyPy 5.6 - 2.7.12
– PyPy3 5.5-alpha - 3.3
• Jython
– SCL Jython 2.7
51

Linux Desktops Documentation, Release RHEL7
You can use Desktop Manager to install the various options, or read below for the yum commands to use instead.
18.2 Which implementation should I use?
• If you want to use Python 2, and you don’t need conda packages, then use the RHEL system Python, and usepip to install packages.
• If you want to use Python 3, and you don’t need conda pacakges, then use the IUS Python 3.6 package and usepip3.6m to install pacakges
• If you need conda packages (Anaconda Python packages) then use miniconda
18.3 RHEL system Python
Unless you need Python 3 or conda packages then we recommend you use the system python in /usr/bin/python. This is supported by Red Hat and kept up to date with security and bug fixes.
You can install packages by running sudo pip eg:
sudo pip install numpy
18.4 IUS Python
The IUS repository provides Python 3 packages for Red Hat Enterprise Linux. If you need to use Python 3 then werecommend you use the IUS Python packages. Several versions are available for install:
• Python 3.4 - sudo yum install python34u python34u-pip
• Python 3.5 - sudo yum install python35u python35u-pip
• Python 3.6 - sudo yum install python36u python36u-pip
You can then use Python via the following paths to the binary:
• Python 3.4 - /usr/bin/python3.4
• Python 3.5 - /usr/bin/python3.5
• Python 3.6 - /usr/bin/python3.6
The version of Python in /usr/bin/python3 depends on the order the IUS packages are installed, so we don’trecommend you use that path.
You can install packages via sudo pip:
• Python 3.4 - sudo pip3.4
• Python 3.5 - sudo pip3.5
• Python 3.6 - sudo pip3.6
For example, to install numpy on IUS Python 3.6:
sudo pip3.6 install numpy
52 Chapter 18. Python

Linux Desktops Documentation, Release RHEL7
18.5 PyPy
PyPy is a just-in-time (JIT) compiler for Python which aims to be compatible with the standard CPython implementa-tion. Using PyPy often yields significant performance benefits.
To install PyPy run the following command:
sudo yum install pypy256
This installs PyPy 5.6 which is compatible with CPython 2.7.12.
To install PyPy3 run the following command:
sudo yum install pypy3355
This installs PyPy3 5.5-alpha which is compatible with CPython 3.3.5.
To run PyPy you can either use the following paths:
• /usr/bin/pypy56 - PyPy 5.6 (Python 2.7.12)
• /usr/bin/pypy3355 - PyPy 5.5-alpha (Python 3.3.5)
Or you can use the module system:
• module load pypy/5.6 - PyPy 5.6 (Python 2.7.12)
• module load pypy/3.3-5.5 - PyPy 5.5-alpha (Python 3.3.5)
Once you’ve loaded the module you can use the pypy command directly and it will correspond to the version of pypyyou chose to load.
You can install packages with pip:
• sudo /local/software/pypy/5.6/bin/pip - PyPy 5.6 (Python 2.7.12)
• sudo /local/software/pypy/3.3-5.5/bin/pip3 - PyPy 5.5-alpha (Python 3.3.5)
For example, to install numpy on PyPy 5.6:
sudo /local/software/pypy/5.6/bin/pip install numpy
18.6 Miniconda (Anaconda)
Anaconda, and its conda package manager, is an alternative to the pip package manager (although the developersinsist it complements pip and solves different problems).
Anaconda, conda and miniconda are not designed for “system-wide” use, they are intended for individual users todownload and install for just that one user. Better multi user support is planned, but as of March 2017, is not yetavailable.
To use conda you don’t need to download and install Anaconda or miniconda yourself, instead you can get startedby installing miniconda which just contains conda and python:
sudo yum install miniconda
Once installed you can use conda to create a new environment within your home directory with whatever version ofPython and whichever Python packages you need.
You should start by creating an environment, e.g:
18.5. PyPy 53
Linux Desktops Documentation, Release RHEL7
conda create -n yourenvname python=x.x
You specify the version of python you want with the python=x.x flag, but this is optional and if omitted conda willuse the version of Python shipped with miniconda which at the time of writing is Python 3.6.0.
You can specify at creation time the packages you want installed. For example, to install the entire anaconda set ofpackages you can do the following:
conda create -n yourenvname python=3.6 anaconda
You can then use your new environment like so:
source activate yourenvname
And you can then stop using it like so:
source deactivate
You can install additional packages with conda:
conda install -n yourenvname [package]
And if you want to delete an environment do the following:
conda remove -n yourenvname -all
18.7 SCL Python
Note: The SCL python33 package conflicts with the IUS Python packages. You cannot have both versions installedat the same time. To install the SCL python33 package you must first remove the IUS Python packages. In any casewe strongly recommend you use the IUS packages rather than SCL.
Red Hat provides several CPython packages as part of its “Software Collections” system. These packages are generallyolder than the IUS packages and are more difficult to use - they require the use of the scl command. At the time ofwriting the following versions are available:
• Python 2.7.8 - sudo yum install python27 python27-python-pip
• Python 3.3.2 - sudo yum install python33
• Python 3.4.2 - sudo yum install rh-python34 rh-python34-python-pip
• Python 3.5.1 - sudo yum install rh-python35 rh-python35-python-pip
Once installed you can’t use python until you use the scl command which is somewhat like the environment modulesystem:
• Python 2.7.8 - scl enable python27 bash
• Python 3.3.2 - scl enable python33 bash
• Python 3.4.2 - scl enable rh-python34 bash
• Python 3.5.1 - scl enable rh-python34 bash
54 Chapter 18. Python

Linux Desktops Documentation, Release RHEL7
Once you’ve run the scl command then the python command will now be the version of Python you requested.The pip command will also be updated for the SCL python, but it won’t work unless you use a special sclsudocommand we’ve created. So to install packages you should run:
sclsudo pip install numpy
18.8 EPEL Python
Note: The EPEL python 3.4 package conflicts with the IUS Python 3.4 package. You cannot have both versionsinstalled at the same time. To install the EPEL python you must first remove the IUS Python 3.4 packages. In any casewe strongly recommend you use the IUS packages rather than EPEL.
Another alternative Python 3 package is provided by :doc‘epel‘. We recommend that you use the IUS packages insteadsince the EPEL Python package is now quite out of date. If you do want to use it, install it like so:
sudo yum install python34 python34-pip
You can then use the package with the binary path:
/usr/bin/python3.4
and you can install packages with pip:
sudo /usr/bin/pip3.4 install numpy
18.9 Jython
Jython is an implementation of Python running on the Java virtual machine (JVM). Red Hat have provided a packagedversion of Jython as part of their Developer Toolset 4 product. To install it run this command:
sudo yum install devtoolset-4 devtoolset-4-jython
Then run the scl command to enable it:
scl enable devtoolset-4 bash
You can then run jython directly:
jython
18.8. EPEL Python 55

Linux Desktops Documentation, Release RHEL7
56 Chapter 18. Python

CHAPTER 19
C and C++
C is a general-purpose, low level, imperative computer programming language, supporting structured programming,lexical variable scope and recursion, while a static type system prevents many unintended operations. C++ is anextension of C with object-oriented features and a much larger standard library.
19.1 List of compilers
Several C and C++ compilers are available on the Linux desktop platform:
• GCC (GNU compiler collection)
– v4.8 - Red Hat’s built in GCC
– v4.9 - part of RHDT 3
– v5.3 - part of RHDT 4
– v6.2 - part of RHDT 6
• ICC/ICPC (Intel compiler suite)
– 2017 Update 2
• Clang (LLVM C/C++ compiler)
– v4.0.0
– v3.9.1
– v3.4.2 from the EPEL project
• PGI (NVIDIA Portland Group Compiler Suite)
– 17.1
57

Linux Desktops Documentation, Release RHEL7
19.2 GCC
Several versions of GCC are available. The system gcc - the one used to build Red Hat Enterprise Linux 7 - is version4.8. You can install it like so:
sudo yum install gcc gcc-c++
Later versions are available as part of the RHDT bundles:
• v4.9: sudo yum install devtoolset-3-gcc devtoolset-3-gcc-c++
• v5.3: sudo yum install devtoolset-4-gcc devtoolset-4-gcc-c++
• v6.2: sudo yum install devtoolset-6-gcc devtoolset-6-gcc-c++
Once you have installed the packages you need to use SCL to use the updated version of gcc like so:
* v4.9: ``scl enable devtoolset-3 bash``
* v5.3: ``scl enable devtoolset-4 bash``
* v6.2: ``scl enable devtoolset-6 bash``
Once those commands are run then running ‘gcc’ will run the version you requested.
See the Software collections (SCL) document for more information on using SCL.
19.3 Intel
Intel’s C and C++ compiler is part of the Intel Parallel Studio XE product. This is available to you as a member ofthe University. At the time of writing the latest version - 2017 Update 2 - is available. To install it you can use thefollowing command:
sudo yum install intel-parallel-studio-2017u2
This installs all of the components of the Cluster Edition of the Intel Parallel Studio. To use the Parallel Suite youmust first load the environment module:
module load intel/2017u2
Once loaded all of the environment modules are set such that you should be able to run the configure script (orsimilar mechanism) and it should use the Intel compilers. You can also use icc, icpc and ifort directly.
See Environment modules system for more information on using the module system.
19.4 LLVM Clang
Clang is the compiler from the LLVM project. To use it first install the latest version:
sudo yum install llvm400
The LLVM package includes:
• LLVM core libraries
• Clang
• compiler-rt
58 Chapter 19. C and C++

Linux Desktops Documentation, Release RHEL7
• LLDB (LLVM debugger)
• LLD (LLVM linker)
Once installed you should use the Environment modules system to use clang itself:
module load llvm/4.0.0
See Environment modules system for more information on using the module system.
19.5 NVIDIA PGI Compilers
The portland group (PGI) compilers, now owned by NVIDIA, are a series of high performance C, C++ and Fortrancompilers which are heavily used within high performance computiing. To use the PGI compilers first install the latestversion:
sudo yum install pgi171
Once installed you should use the Environment modules system to use the compilers:
module load pgi/17.1
You can then use pgcc (the C compiler), pgc++ (the C++ compiler) or pgfortran (the Fortran compiler) directly.
See Environment modules system for more information on using the module system.
19.5. NVIDIA PGI Compilers 59

Linux Desktops Documentation, Release RHEL7
60 Chapter 19. C and C++
CHAPTER 20
Fortran
Fortran is a general-purpose, imperative programming language that is especially suited to numeric computation andscientific computing. FORTRAN was developed in the 1950s making it one of the oldest languages still in use. It isoften use for computational chemistry and fluid dynamics.
20.1 List of compilers
Several different compilers are available:
• gFortran (Part of the GNU compiler collection)
– v4.8 - Red Hat’s built in gFortran
– v4.9 - part of RHDT 3
– v5.3 - part of RHDT 4
– v6.2 - part of RHDT 6
• NVIDIA Portland Group (PGI) Fortran
– 17.1
• Intel Parallel Studio XE:
– 2017 Update 2
20.2 GCC
Several versions of gFortran are available. The standard version, tied to the system GCC version, is v4.8 You caninstall it like so:
sudo yum install gcc-gfortran
Later versions are available as part of the RHDT bundles:
61

Linux Desktops Documentation, Release RHEL7
• v4.9: sudo yum install devtoolset-3-gcc-gfortran
• v5.3: sudo yum install devtoolset-4-gcc-gfortran
• v6.2: sudo yum install devtoolset-6-gcc-gfortran
Once you have installed the packages you need to use SCL to use the updated version of gfortran like so:
• v4.9: scl enable devtoolset-3 bash
• v5.3: scl enable devtoolset-4 bash
• v6.2: scl enable devtoolset-6 bash
Once those commands are run then running ‘gfortran’ will run the version you requested.
See the Software collections (SCL) document for more information on using SCL.
20.3 PGI Fortran
The portland group (PGI) compilers, now owned by NVIDIA, are a series of high performance C, C++ and Fortrancompilers which are heavily used within high performance computiing. To use the PGI compilers first install the latestversion:
sudo yum install pgi171
Once installed you should use the Environment modules system to use the compilers:
module load pgi/17.1
You can then use pgfortran (the Fortran compiler) directly, or one of the several version specific binaries:
• pgf77
• pgf90
• pgf95
See Environment modules system for more information on using the module system.
20.4 Intel
Intel’s Fortran compiler - ifort - is part of the Intel Parallel Studio XE product. This is available to you as a memberof the University. At the time of writing the latest version - 2017 Update 2 - is available. To install it you can use thefollowing command:
sudo yum install intel-parallel-studio-2017u2
This installs all of the components of the Cluster Edition of the Intel Parallel Studio. To use the Parallel Suite youmust first load the environment module:
module load intel/2017u2
Once loaded all of the environment modules are set such that you should be able to run the configure script (orsimilar mechanism) and it should use the Intel compiler. You can also use ifort directly.
See Environment modules system for more information on using the module system.
62 Chapter 20. Fortran

CHAPTER 21
Java
Java is a general purpose object oriented programming language and runtime. It is intended to let application devel-opers “write once, run anywhere” through compiling Java code to ‘byte code’ which is then run on the Java virtualmachine.
21.1 Java implementations
There are several implementations of Java available on the Linux desktop platform:
• Oracle - v1.6, v1.7, v1.8
• OpenJDK - v1.6, v1.7, v1.8
• IBM - v1.7, v1.8
We strongly recommend the use of either Oracle Java 1.8 or OpenJDK Java 1.8.
You can install the different versions via Desktop Manager or if you prefer here are the commands to run in a terminalto install them instead:
Oracle Java 1.6 sudo yum install java-1.6.0-sun-develOracle Java 1.7 sudo yum install java-1.7.0-oracle-develOracle Java 1.8 sudo yum install java-1.8.0-oracle-develOpenJDK Java 1.6 sudo yum install java-1.6.0-openjdk-develOpenJDK Java 1.7 sudo yum install java-1.7.0-openjdk-develOpenJDK Java 1.8 sudo yum install java-1.8.0-openjdk-develIBM Java 1.7 sudo yum install java-1.7.1-ibm-develIBM Java 1.8 sudo yum install java-1.8.0-ibm-devel
Sadly the Java packages do not use the Environment modules system or the SCL system, so you will have to use thefull path to the java or javac binaries:
63

Linux Desktops Documentation, Release RHEL7
Oracle Java 1.6 /usr/lib/jvm/java-1.6.0-sun.x86_64/bin/javaOracle Java 1.7 /usr/lib/jvm/java-1.7.0-oracle/bin/javaOracle Java 1.8 /usr/lib/jvm/java-1.8.0-oracle/bin/javaOpenJDK Java 1.6 /usr/lib/jvm/java-1.6.0-openjdk.x86_64/bin/javaOpenJDK Java 1.7 /usr/lib/jvm/java-1.7.0-openjdk/bin/javaOpenJDK Java 1.8 /usr/lib/jvm/java-1.8.0-openjdk/bin/javaIBM Java 1.7 /usr/lib/jvm/java-1.7.0-ibm/bin/javaIBM Java 1.8 /usr/lib/jvm/java-1.8.0-ibm/bin/java
21.2 Setting the default system Java
Instead of having to use the above method to use a particular version of Java you may use the alternativescommand to change the default version of Java in use. This will affect every user on the system so please only do thisif you are sure you will not impact other users.
Note: To set the system wide default Java you need to be in the Administrators group. See Permissions for moreinformation.
Run the following commands and follow the instructions to change the default:
sudo alternatives --config javasudo alternatives --config javac
64 Chapter 21. Java

CHAPTER 22
TeX Live (LaTeX)
TeX and LaTeX are document production tools otherwise known as typesetting systems. TeX and LaTeX are usedto produce high quality documents and books, especially within academia. LaTeX is used for producing scientificdocuments throughout the University.
TeX Live is a distribution which contains both TeX and LaTeX, among many other tools and programs.
22.1 Versions of TeX Live
There are two versions of TeX Live available:
• Tex Live 2013: sudo yum install texlive
• Tex Live 2016: sudo yum install texlive2016
The former version is packaged by Red Hat and does not include the tlmgr TeX package manager. As such werecommend you install TeX Live 2016 which is the latest version and it includes the package manager.
22.2 Using Tex Live 2016
TeX Live 2016 uses the Environment modules system. To use it open a terminal and run the following:
module load texlive/2016
Once loaded you can use all the normal TeX/LaTeX commands (and man pages).
22.3 Installing TeX modules
65

Linux Desktops Documentation, Release RHEL7
Note: To install TeX modules via sudo tlmgr you need to be in the Administrators group. See Permissions formore information. You can also install modules in your home directory if you prefer.
TeX Live 2016 comes with a package manager called tlmgr. You can install modules like so:
sudo tlmgr install <modulename>
If you prefer to install a module just for yourself, or if you don’t have permission to use sudo tlmgr, run:
tlmgr --usermode install <modulename>
66 Chapter 22. TeX Live (LaTeX)

CHAPTER 23
R
R is an open source programming language intended for use within statistical computing and data analysis. It isnot installed by default on the Linux desktop platform but it can be installed easily via the following command in aterminal:
sudo yum install R
23.1 Installing R packages
There are two methods to installing R packages. Either install them via yum or via CRAN within R itself. Only alimited number of packages are available via yum so we recommend using R itself.
To find the list of R packages you can install via yum run this command:
sudo yum list R-\*
Since very few packages are available its best to install packages via CRAN from within R. First start R in a terminal:
R
then enter the following command:
install.packages("pkgname")
Replace pkgname with the package to install, e.g. for Bio3D:
install.packages("bio3D")
You can install multiple packages like this:
install.packages(c("bio3D","devtools"))
67

Linux Desktops Documentation, Release RHEL7
The first time you try to install packages R will prompt you to install into your home directory and create a librarythere, do so and you will be able to install R packages.
Note: If you wish to install the devtools package you should first run the command sudo yum installopenssl-devel libcurl-devel libssh2-devel so that the prerequisite development files are available.
Sadly there is no easy way to allow via sudo the ability for you to install R packages system wide so any user can usethem. This is because you must first start R as root and execute a specific command. We’ll keep working on a way tosolve this but as for now you’ll need to install R packages in your home directory - sorry about that!
68 Chapter 23. R
CHAPTER 24
CUDA
CUDA is a mechanism for allowing general purpose computing on graphics cards rather than the normal CPU. Itis thus optimised for parallel computing and high memory throughput. CUDA requires a CUDA-enabled graphicsprocessing unit (GPU) which means a NVIDIA graphics card is required.
24.1 Installing CUDA
The NVIDIA CUDA software repository is available on the Linux desktop platform so you can install the variousversions like this:
• 8.0: sudo yum install cuda-8-0
• 7.5: sudo yum install cuda-7.5
• 7.0: sudo yum install cuda-7-0
This installs the official NVIDIA CUDA packages. CUDA is installed into:
/usr/local/cuda-N.N/
Where N.N is the version, e.g. /usr/local/cuda-8.0. To add CUDA to your path add this to your .bashrc:
export PATH=/usr/local/cuda-8.0/bin${PATH:+:${PATH}}
24.2 Using CUDA Samples
Once installed you can deploy and build the CUDA samples like this:
mkdir ~/cuda/usr/local/cuda-8.0/bin/cuda-install-samples-8.0.sh ~/cudacd ~/cuda/NVIDIA_CUDA*make
69

Linux Desktops Documentation, Release RHEL7
That will build all the samples, which you probably don’t want. Instead change into a sample sub directory and buildjust one at at time, like so:
cd ~/cuda/NVIDIA_CUDA*/0_Simple/clock/make
You can then run the compiled clock like so:
[db2z07@uos-212247 clock]$ ./clockCUDA Clock sampleGPU Device 0: "GeForce GTX 750 Ti" with compute capability 5.0
Average clocks/block = 4042.890625
70 Chapter 24. CUDA

CHAPTER 25
OpenMPI
OpenMPI is the defacto standard implementation of the Message Passing Interface system. OpenMPI allows develop-ers to create programs that scale across multiple machines.
25.1 Available versions
Several versions of OpenMPI are available for use:
• Compiled by gcc 4.8
– 1.10.3 (Red Hat package)
– 1.10.6
– 2.0.2
• Compiled by gcc 6.2
– 1.10.6
– 2.0.2
– 2.1.0
• Compiled by icc (Intel)
– 1.10.6
– 2.0.2
• Compiled by PGI
– 1.10.6
– 2.0.2
The implementations are either compiled with the GNU Compiler Collection (GCC), the Intel C/C++ compiler (icc)or the PGI C/C++ compiler. You can use the implementation and version based on the C/C++ compiler you’ve chosen
71

Linux Desktops Documentation, Release RHEL7
to use. All of the GCC versions have been compiled with the RHEL7 default GCC (GCC 4.8). On request we willcompile additional versions with newer versions of GCC.
25.2 Installing OpenMPI
Select a version and then run the command for that version listed below. You can install all of the different versions atthe same time:
• 1.10.3 (gcc 4.8): sudo yum install openmpi
• 1.10.6 (gcc 4.8): sudo yum install openmpi1106
• 1.10.6 (gcc 6.2): sudo yum install openmpi1106-gcc62
• 1.10.6 (icc): sudo yum install openmpi1106-intel
• 1.10.6 (pgi): sudo yum install openmpi1106-pgi
• 2.0.2 (gcc 4.8): sudo yum install openmpi202
• 2.0.2 (gcc 6.2): sudo yum install openmpi202-gcc62
• 2.0.2 (icc): sudo yum install openmpi202-intel
• 2.0.2 (pgi): sudo yum install openmpi202-pgi
• 2.1.0 (gcc 6.2): sudo yum install openmpi210-gcc62
25.3 Using OpenMPI
All of the OpenMPI implementations use the Environment modules system. Thus to use an implementation simplymodule load the version you prefer:
• 1.10.3 (gcc 4.8): module load mpi/openmpi-x86_64
• 1.10.6 (gcc 4.8): module load openmpi/1.10.6
• 1.10.6 (gcc 6.2): module load openmpi/1.10.6-gcc62
• 1.10.6 (icc): module load openmpi/1.10.6-intel
• 1.10.6 (pgi): module load openmpi/1.10.6-pgi
• 2.0.2 (gcc 4.8): module load openmpi/2.0.2
• 2.0.2 (gcc 6.2): module load openmpi/2.0.2-gcc62
• 2.0.2 (icc): module load openmpi/2.0.2-intel
• 2.0.2 (pgi): module load openmpi/2.0.2-pgi
• 2.1.0 (gcc 6.2): module load openmpi/2.1.0-gcc62
72 Chapter 25. OpenMPI

CHAPTER 26
Ruby
Ruby is a dynamic, open source programming language with a focus on simplicity and productivity. According to itsdevelopers it it has an elegant syntax that is natural to read and easy to write.
26.1 Installing Ruby
Red Hat Enterprise Linux 7 includes Ruby version 2.0 and can be installed like this in a terminal:
sudo yum install ruby rubygems ruby-devel
Other versions are also available as part of SCL:
• Ruby 1.9.3: sudo yum install ruby193 ruby193-ruby-devel
• Ruby 2.2: sudo yum install rh-ruby22 rh-ruby22-ruby-devel
• Ruby 2.3: sudo yum install rh-ruby23 rh-ruby23-ruby-devel
To use the other versions of Ruby you must first ‘enable’ them like so:
• Ruby 1.9.3: scl enable ruby193 bash
• Ruby 2.2: scl enable rh-ruby22 bash
• Ruby 2.3: scl enable rh-ruby23 bash
For more information see Software collections (SCL)
26.2 Installing gems (packages)
Note: To install Ruby gems via sudo gem you need to be in the Administrators group. See Permissions for moreinformation. You can also use gem without sudo to install gems in your home directory.
73
Linux Desktops Documentation, Release RHEL7
You can install additional Ruby packages (gems) with the gem command line tool:
sudo gem install <package>
If you’re using one of the SCL packaged versions of Ruby then you need to run this command instead:
sclsudo gem install <package>
If you don’t have access to run sudo gem or you don’t want to install the gem for everybody on the system you caninstall the gem in your home directory instead like this:
gem install --user-install <package>
To use gems installed in that location you should edit your ~/.bashrc file and add:
if which ruby >/dev/null && which gem >/dev/null; thenPATH="$(ruby -rubygems -e 'puts Gem.user_dir')/bin:$PATH"
fi
And then restart your shell/terminal.
74 Chapter 26. Ruby

CHAPTER 27
Perl
Perl is an open source dynamic, interpreted general purpose programming language. Perl is primarily a scriptinglanguage, but it is also heavily used in web development and bioinformatics.
Perl 5.16 is installed by default on the Linux desktop platform.
27.1 Installing CPAN modules
Note: To install Perl modules via sudo cpan you need to be in the Administrators group. See Permissions for moreinformation.
You can use sudo to install cpan modules like so:
sudo cpan install <modulename>
75

Linux Desktops Documentation, Release RHEL7
76 Chapter 27. Perl

CHAPTER 28
Index of specialist software
28.1 Amber
Assisted Model Building with Energy Refinement (AMBER) is a family of force fields for molecular dynamics ofbiomolecules originally developed by Peter Kollman’s group at the University of California, San Francisco.
• sudo yum install amber16
28.2 autodock
AutoDock is a suite of automated docking tools. It is designed to predict how small molecules, such as substrates ordrug candidates, bind to a receptor of known 3D structure.
• sudo yum install autodock426
28.3 Avogadro
Avogadro is an advanced molecule editor and visualizer designed for cross platform use in computational chemistry,molecular modeling, bioinformatics, materials science, and related areas. It offers flexible high quality rendering anda powerful plugin architecture.
• sudo yum install avogadro120
28.4 BIOVIA Discovery Studio
Built on the BIOVIA Foundation, Discovery Studio is BIOVIA’s comprehensive predictive science application for theLife Sciences.
• sudo yum install biovia-discovery-studio-2016
77
Linux Desktops Documentation, Release RHEL7
28.5 CCDC CSD System
For chemists in academia and industry wanting to discover, access and visualise crystal structures easily to supporttheir research. The CSD-System brings you the essential crystallographic and structural chemistry capabilities todeliver knowledge from the CSD.
• sudo yum install ccdc2017
28.6 CUDA
See CUDA
28.7 DL_POLY
DL_POLY is a general purpose classical molecular dynamics (MD) simulation software developed at Daresbury Lab-oratory by I.T. Todorov and W. Smith.
• sudo yum install dlpoly408
28.8 Dropbox
Dropbox is the gold standard file hosting and synchronisation solution for modern operating systems. Although weprovide this package we offer no support for Dropbox and please do not store any university data within your Dropboxaccount.
• sudo yum install nautilus-dropbox
28.9 FFTW
FFTW is a C subroutine library for computing the Discrete Fourier Transform (DFT) in one or more dimensions, ofboth real and complex data, and of arbitrary input size.
• sudo yum install fftw fftw-devel
28.10 gcc
See C and C++ and Fortran
28.11 GNU Plot
Gnuplot is a command-line driven, interactive function plotting program especially suited for scientific data represen-tation. Gnuplot can be used to plot functions and data points in both two and three dimensions and in many differentformats.
• sudo yum install gnuplot501
78 Chapter 28. Index of specialist software

Linux Desktops Documentation, Release RHEL7
28.12 GROMACS
GROMACS is a versatile package to perform molecular dynamics.
• 4.6.7: sudo yum install gromacs467
• 5.1.4: sudo yum install gromacs514
28.13 GSView
A user friendly viewer for Postscript, PDF, XPS, EPUB1, CBZ, JPEG and PNG files.
• sudo yum install gsview60
28.14 Intel Parallel Studio
See C and C++ and Fortran
28.15 Java
See Java
28.16 Kile
Kile is a user friendly (La)TeX source editor and TeX shell.
• sudo yum install kile
28.17 LAMMPS
LAMMPS is a classical molecular dynamics code, and an acronym for Large-scale Atomic/Molecular MassivelyParallel Simulator.
• sudo yum install lammps lammps-doc lammps-openmpi lammps-python
28.18 latexmk
A make-like utility for LaTeX files. Latexmk is a Perl script for running LaTeX the correct number of times to resolvecross references, etc.
• sudo yum install latexmk
28.12. GROMACS 79

Linux Desktops Documentation, Release RHEL7
28.19 libxc
Libxc is a library of exchange-correlation functionals for density-functional theory. The aim is to provide a portable,well tested and reliable set of exchange and correlation functionals that can be used by all the ETSF codes and alsoother codes.
• sudo yum install libxc300
28.20 LLVM
See C and C++
28.21 lyx
LyX is a WYSIYM (What You See Is What You Mean) document editor that acts as a front-end for TeX/LaTeX.
• sudo yum install lyx
28.22 Marvin Suite
Marvin Suite is a series of applications and an API for chemical sketching, visualisation and data exploration.
• sudo yum install Marvin
28.23 Mathematica
Wolfram Mathematica is a mathematical symbolic computation program, sometimes termed a computer algebra sys-tem or program, used in many scientific, engineering, mathematical, and computing fields.
• sudo yum install mathematica1101
28.24 MatLab
MATLAB (matrix laboratory) is a multi-paradigm numerical computing environment and fourth-generation program-ming language.
• sudo yum install matlab2016b
28.25 Mendeley Desktop
Mendeley Desktop lets you save PDFs, share thoughts with colleagues and automatically back up and sync your filesacross different computers.
• sudo yum install mendeley1178
80 Chapter 28. Index of specialist software

Linux Desktops Documentation, Release RHEL7
28.26 Mercury
Crystal Structure Visualisation, Exploration and Analysis Made Easy. Mercury offers a comprehensive range of toolsfor 3D structure visualization and the exploration of crystal packing.
• sudo yum install mercury39
28.27 MOE
Molecular Operating Environment (MOE) is a drug discovery software platform that integrates visualization, modelingand simulations, as well as methodology development, in one package.
• sudo yum install moe20160802
28.28 netcdf
A set of software libraries and self-describing, machine-independent data formats that support the creation, access,and sharing of array-oriented scientific data.
• sudo yum install netcdf
28.29 NWChem
NWChem aims to provide its users with computational chemistry tools that are scalable both in their ability to treatlarge scientific computational chemistry problems efficiently, and in their use of available parallel computing resourcesfrom high-performance parallel supercomputers to conventional workstation clusters.
• sudo yum install nwchem nwchem-openmpi
28.30 Octave
GNU Octave is a high-level language, primarily intended for numerical computations. It provides a convenient com-mand line interface for solving linear and nonlinear problems numerically, and for performing other numerical exper-iments using a language that is mostly compatible with Matlab.
• sudo yum install octave420
28.31 OpenMPI
See OpenMPI
28.32 Perl
See Perl
28.26. Mercury 81

Linux Desktops Documentation, Release RHEL7
28.33 PGI Compilers
See C and C++ and Fortran
28.34 Povray
The Persistence of Vision Ray Tracer, or PoV-Ray is a ray-tracing program which generates images from a text-baseddescription of a scene.
• sudo yum install povray37
28.35 PyMol
PyMOL is a Python-enhanced molecular graphics tool. It excels at 3D visualization of proteins, small molecules,density, surfaces, and trajectories. It also includes molecular editing, ray tracing, and movies.
• sudo yum install pymol1840
28.36 Python
See Python
28.37 R, RStudio and RStudio Server
See R
RStudio is a set of integrated tools designed to help you be more productive with R. It includes a console, syntax-highlighting editor that supports direct code execution, as well as tools for plotting, history, and workspace manage-ment.
• sudo yum install rstudio
• sudo yum install rstudio-server
28.38 SageMath
SageMath is a free open-source mathematics software system licensed under the GPL. It builds on top of many existingopen-source packages: NumPy, SciPy, matplotlib, Sympy, Maxima, GAP, FLINT, R and many more.
• sudo yum install sagemath751
28.39 Team Viewer
TeamViewer is a proprietary computer software package for remote control, desktop sharing, online meetings, webconferencing and file transfer between computers.
• sudo yum install teamviewer
82 Chapter 28. Index of specialist software

Linux Desktops Documentation, Release RHEL7
28.40 texlive
See TeX Live (LaTeX)
28.41 USCF Chimera
UCSF Chimera is a highly extensible program for interactive visualization and analysis of molecular structures andrelated data, including density maps, supramolecular assemblies, sequence alignments, docking results, trajectories,and conformational ensembles.
• sudo yum install chimera1112
28.42 VirtualBox
VirtualBox is a powerful PC virtualization solution allowing you to run a wide range of PC operating systems on yourLinux system. This includes Windows, Linux, FreeBSD, DOS, OpenBSD and others.
• sudo yum install VirtualBox-5.1
28.43 VisIT
VisIt is an Open Source, interactive, scalable, visualization, animation and analysis tool.
• sudo yum install visit2121
28.44 VMD
VMD is a molecular visualization program for displaying, animating, and analyzing large biomolecular systems using3-D graphics and built-in scripting.
• sudo yum install vmd193
28.45 VTK
VTK is an open-source software system for image processing, 3D graphics, volume rendering and visualization.VTK includes many advanced algorithms (e.g., surface reconstruction, implicit modeling, decimation) and renderingtechniques (e.g., hardware-accelerated volume rendering, LOD control).
• sudo yum install vtk vtk-qt
28.46 xdvi
A legacy previewer for DVI files within the X Window System.
• sudo yum install texlive-xdvi
28.40. texlive 83

Linux Desktops Documentation, Release RHEL7
28.47 xmgrace
Grace is a WYSIWYG 2D plotting tool for the X Window System and Motif.
• sudo yum install xmgrace5125
28.48 xpdf
Xpdf is a legacy viewer for Portable Document Format (PDF) files. Xpdf is a small and efficient program which usesstandard X fonts.
• sudo yum install xpdf
28.49 Zim Desktop Wiki
Zim is a WYSIWYG text editor written in PyGTK which aims to bring the concept of a wiki to your desktop. Everypage is saved as a text file with wiki markup. Pages can contain links to other pages, and are saved automatically.
• sudo yum install zim
28.50 Zotero
Zotero is a free, easy-to-use tool to help you collect, organize, cite, and share your research sources.
• sudo yum install zotero402910
84 Chapter 28. Index of specialist software

CHAPTER 29
EPEL
29.1 Extra Packages for Enterprise Linux
EPEL is a repository of extra software packages designed for users of Red Hat Enterprise Linux - the basis of theuniversity Linux desktop platform. EPEL provides a wide range of software packages. EPEL packages are availableto install on the university Linux desktop platform and can be installed like any other software package, see Installingsoftware for information.
A complete list of EPEL packages is available here.
85

Linux Desktops Documentation, Release RHEL7
86 Chapter 29. EPEL

CHAPTER 30
IUS
30.1 Inline with Upstream Stable
IUS is a repository of add on software for Red Hat Enterprise Linux. It provides up to date copies of important toolslike Python, PHP and Git. Although it is intended primarily for use on servers IUS provided packages for Python andPHP offer the latest stable releases and are thus excellent for desktop users of those programming languages too.
A complete list of IUS packages is available here.
87

Linux Desktops Documentation, Release RHEL7
88 Chapter 30. IUS

CHAPTER 31
RHDT
RHDT, or the Red Hat Developer Toolset, is a bundle of software for developing applications. Bundles are releasedwith new versions once per year and are supported by Red Hat for two years. RHDT uses the SCL system so that thetools are installed alongside and do not conflict with the base software within Red Hat Enterprise Linux.
RHDT includes the following packages:
• GCC (C, C++, and Fortran)
• Eclipse IDE
• GDB
• binutils, elfutils
• strace and ltrace
• GNU make
• memstomp
• SystemTap
• valgrind
• Dyninst
• OProfile
89

Linux Desktops Documentation, Release RHEL7
90 Chapter 31. RHDT

CHAPTER 32
SCL
32.1 Software Collections
Sofware collections - or SCL - is a collection of ‘add-on’ software packages created and maintained by Red Hat. Theywere created in order to deliver more up to date versions of software to customers on Red Hat Enterprise Linux whichtypically does not update software “mid-life” of a product. Via SCL Red Hat is able to provide more recent stableversions of software for customers to use without affecting the stability and security of the base product.
Due to our education licence all SCL software is available to users of our linux desktops. More information about allthe available packages can be found on the dedicated software collections website.
91