oracle enterprise manager · oracle® enterprise manager oracle exadata database machine getting...
TRANSCRIPT

Oracle® Enterprise ManagerOracle Exadata Database Machine Getting Started Guide
13c Release 2
E73824-02
February 2017

Oracle Enterprise Manager Oracle Exadata Database Machine Getting Started Guide, 13c Release 2
E73824-02
Copyright © 2015, 2016, Oracle and/or its affiliates. All rights reserved.
This software and related documentation are provided under a license agreement containing restrictions onuse and disclosure and are protected by intellectual property laws. Except as expressly permitted in yourlicense agreement or allowed by law, you may not use, copy, reproduce, translate, broadcast, modify, license,transmit, distribute, exhibit, perform, publish, or display any part, in any form, or by any means. Reverseengineering, disassembly, or decompilation of this software, unless required by law for interoperability, isprohibited.
The information contained herein is subject to change without notice and is not warranted to be error-free. Ifyou find any errors, please report them to us in writing.
If this is software or related documentation that is delivered to the U.S. Government or anyone licensing it onbehalf of the U.S. Government, then the following notice is applicable:
U.S. GOVERNMENT END USERS: Oracle programs, including any operating system, integrated software,any programs installed on the hardware, and/or documentation, delivered to U.S. Government end users are"commercial computer software" pursuant to the applicable Federal Acquisition Regulation and agency-specific supplemental regulations. As such, use, duplication, disclosure, modification, and adaptation of theprograms, including any operating system, integrated software, any programs installed on the hardware,and/or documentation, shall be subject to license terms and license restrictions applicable to the programs.No other rights are granted to the U.S. Government.
This software or hardware is developed for general use in a variety of information management applications.It is not developed or intended for use in any inherently dangerous applications, including applications thatmay create a risk of personal injury. If you use this software or hardware in dangerous applications, then youshall be responsible to take all appropriate fail-safe, backup, redundancy, and other measures to ensure itssafe use. Oracle Corporation and its affiliates disclaim any liability for any damages caused by use of thissoftware or hardware in dangerous applications.
Oracle and Java are registered trademarks of Oracle and/or its affiliates. Other names may be trademarks oftheir respective owners.
Intel and Intel Xeon are trademarks or registered trademarks of Intel Corporation. All SPARC trademarks areused under license and are trademarks or registered trademarks of SPARC International, Inc. AMD, Opteron,the AMD logo, and the AMD Opteron logo are trademarks or registered trademarks of Advanced MicroDevices. UNIX is a registered trademark of The Open Group.
This software or hardware and documentation may provide access to or information about content, products,and services from third parties. Oracle Corporation and its affiliates are not responsible for and expresslydisclaim all warranties of any kind with respect to third-party content, products, and services unlessotherwise set forth in an applicable agreement between you and Oracle. Oracle Corporation and its affiliateswill not be responsible for any loss, costs, or damages incurred due to your access to or use of third-partycontent, products, or services, except as set forth in an applicable agreement between you and Oracle.

Contents
Preface ................................................................................................................................................................ ix
Audience ....................................................................................................................................................... ix
Documentation Accessibility ..................................................................................................................... ix
Conventions.................................................................................................................................................. ix
What's Changed ............................................................................................................................................ x
What's New ....................................................................................................................................................... xi
Features and Enhancements for Oracle Exadata Plug-in 13.2.0.1.0...................................................... xi
Supported Hardware and Software Configurations — What’s New for 13.2.0.1.0................... xi
Exadata Virtualization Provisioning ............................................................................................... xii
Support for Exadata Flash Cache Features..................................................................................... xii
Enhanced Exadata Hardware Management................................................................................... xii
Patching Automation Support of the Exadata Stack.................................................................... xiii
ORAchk/EXAchk Integration ......................................................................................................... xiii
Auto Service Request (ASR) Integration: Fault Telemetry.......................................................... xiv
Support for IPv6 Environments ....................................................................................................... xv
1 Introduction to the Plug-in
1.1 Oracle Exadata Plug-in Features .................................................................................................... 1-1
1.1.1 Monitoring and Notification Features................................................................................ 1-1
1.1.2 Hardware Support Features ................................................................................................ 1-2
1.1.3 Exadata Software Support.................................................................................................... 1-3
1.1.4 Target Discovery Features ................................................................................................... 1-4
1.1.5 Exadata Storage Server Grid Home Page and Server Home Page Features................. 1-4
1.1.6 Exadata Performance Page Features .................................................................................. 1-5
1.1.7 Exadata Metrics Features ..................................................................................................... 1-5
1.2 Oracle Exadata Database Machine Supported Hardware and Software ................................. 1-5
1.2.1 Exadata Database Machine Configuration Support......................................................... 1-5
1.2.2 Oracle SuperCluster Support - Exadata Plug-in Release 12.1.0.4.0 and Later.............. 1-8
1.2.3 Supported Component Versions....................................................................................... 1-12
1.2.4 Supported Operating Systems........................................................................................... 1-13
1.2.5 Oracle Exadata Database Machine Hardware Not Supported..................................... 1-13
iii

2 Installation and Deployment
2.1 Oracle Exadata Plug-in Deployment Prerequisites ..................................................................... 2-1
2.1.1 Create a Database Server ILOM Service Processor User ................................................. 2-1
2.1.2 Verify Software Versions ..................................................................................................... 2-2
2.1.3 Verify Names Resolution ..................................................................................................... 2-4
2.1.4 Verify Firewall Configuration ............................................................................................. 2-4
2.1.5 Enable Support for IPv6 Environments ............................................................................. 2-7
2.1.6 Oracle SuperCluster Prerequisites ...................................................................................... 2-8
2.2 User Roles .......................................................................................................................................... 2-8
2.3 Install Enterprise Manager Agent .................................................................................................. 2-8
2.3.1 Agent Installation Prerequisite - Solaris 11 Only.............................................................. 2-9
2.3.2 Install Agents and Set Up Exadata Monitoring Using Automated Kit ......................... 2-9
2.3.3 Install Enterprise Manager Agent Using the Push Method.......................................... 2-10
2.4 Manually Deploy Exadata Plug-in ............................................................................................... 2-12
3 Exadata Database Machine Discovery
3.1 Running the Discovery Precheck Script ........................................................................................ 3-1
3.1.1 Secure Storage for Target Monitoring Credentials........................................................... 3-1
3.1.2 Download the Discovery Precheck Script ......................................................................... 3-2
3.1.3 Run the Discovery Precheck Script..................................................................................... 3-2
3.1.4 Automatic Verification ......................................................................................................... 3-2
3.1.5 Manual Verification .............................................................................................................. 3-4
3.2 Discovering an Exadata Database Machine.................................................................................. 3-5
3.3 Discover Oracle SuperCluster as an Exadata Database Machine............................................ 3-16
3.4 Discovering Grid Infrastructure and RAC.................................................................................. 3-18
3.4.1 Discover Grid Infrastructure (Cluster) Targets............................................................... 3-18
3.4.2 Discover Oracle Real Application Clusters Targets ....................................................... 3-18
3.5 Switch from Using CellCLI to ExaCLI after Storage Server Locked Down ........................... 3-19
4 Post-Discovery Configuration and Verification
4.1 Set Up SNMP Trap Forwarding on Compute Node ................................................................... 4-2
4.1.1 Set Up Compute Node Agent - Linux ................................................................................ 4-2
4.1.2 Set Up Compute Node Agent - Solaris............................................................................... 4-3
4.2 Configure Storage Cell SNMP for Enterprise Manager Monitoring......................................... 4-4
4.2.1 Using the ALTER CELL Command.................................................................................... 4-5
4.2.2 Check Current SNMP Configuration ................................................................................. 4-5
4.2.3 Configure SNMP Values Using cellcli................................................................................ 4-6
4.2.4 Configure SNMP Values Using dcli (optional)................................................................. 4-8
4.2.5 Verify SSH Connectivity ...................................................................................................... 4-8
4.2.6 Remove a Subscription ......................................................................................................... 4-8
4.3 Configure and Verify SNMP for InfiniBand Switch Targets...................................................... 4-9
4.3.1 Set Up SNMP for InfiniBand Switch Targets Using Enterprise Manager................... 4-10
iv

4.4 Configure the Compute Node ILOM SNMP for Enterprise Manager Monitoring .............. 4-11
4.4.1 Configure the Compute Node ILOM SNMP for Compute Nodes Running
Management Server.................................................................................................................. 4-12
4.4.2 Configure SNMP Values Using dbmcli ........................................................................... 4-13
4.4.3 Configure SNMP for Oracle SuperCluster ...................................................................... 4-13
4.5 Verify Configuration for Oracle ILOM Server ........................................................................... 4-13
4.6 Set Up SNMP for Cisco Ethernet Switch Targets....................................................................... 4-14
4.6.1 Verify the Cisco Ethernet Switch SNMP Configuration................................................ 4-15
4.7 Set Up SNMP for Power Distribution Unit (PDU) Targets ...................................................... 4-15
4.7.1 Verify the PDU SNMP Configuration .............................................................................. 4-16
4.8 Set Up SNMP for KVM Targets .................................................................................................... 4-16
4.8.1 Set Up SNMP in KVM Management Console................................................................. 4-17
4.8.2 Verify the KVM SNMP Configuration (Base SNMP Configuration) - Linux............. 4-17
4.8.3 Verify the KVM SNMP Configuration (Base SNMP Configuration) - Solaris ........... 4-18
4.8.4 Verify the KVM SNMP Configuration (SNMP Forwarding to Agent) ....................... 4-19
4.9 Accessing Oracle Support Workbench for Exadata Storage Server ........................................ 4-19
4.10 Oracle Exadata Database Machine Dashboard Creation ........................................................ 4-21
4.10.1 Dashboard Creation for Exadata Database Machine Plug-in Release 12.1.0.3.0 and
Later ............................................................................................................................................ 4-21
4.10.2 How to Make the Report "Public" ................................................................................... 4-22
4.10.3 Find All Database Machine Reports ............................................................................... 4-22
5 Oracle Exadata Database Machine Administration
5.1 Creating Roles to Manage the Plug-in ........................................................................................... 5-1
5.2 View Exadata Database Machine Topology ................................................................................. 5-2
5.2.1 Drilling Down to Individual Targets.................................................................................. 5-3
5.2.2 Viewing Critical Hardware Information for the Database Machine ............................. 5-4
5.2.3 Viewing DB Machine Alerts ................................................................................................ 5-4
5.2.4 Viewing Metrics..................................................................................................................... 5-4
5.2.5 Adding Exadata Components Manually ........................................................................... 5-5
5.2.6 Removing an Exadata Database Machine Target ............................................................. 5-5
5.2.7 Deleting a Component of a Database Machine Target .................................................... 5-6
5.2.8 Updating the Exadata Database Machine Schematic Diagram ...................................... 5-6
5.3 Exadata Cell Metrics and Alert Settings...................................................................................... 5-11
5.4 Exadata Storage Server Management .......................................................................................... 5-11
5.4.1 About Exadata Storage Server........................................................................................... 5-12
5.4.2 Using Exadata As a Cloud Control Target ...................................................................... 5-12
5.4.3 Viewing an Exadata Storage Server Configuration........................................................ 5-13
5.4.4 Performing Administration Tasks on Exadata Storage Servers ................................... 5-13
5.4.5 Managing the IO Resource................................................................................................. 5-14
5.4.6 Diagnosing Exadata Cell Alerts ........................................................................................ 5-17
5.5 Managing the InfiniBand Network.............................................................................................. 5-17
5.5.1 InfiniBand Metrics............................................................................................................... 5-18
v

5.5.2 Performing Administration Tasks on Infiniband Networks......................................... 5-18
5.5.3 Setting Up Alerts ................................................................................................................. 5-19
5.6 Flash Cache Resource Monitoring................................................................................................ 5-20
5.7 Exadata Database Machine Fault Monitoring ............................................................................ 5-21
5.8 Monitoring Exadata Database Machine Components............................................................... 5-23
5.8.1 Storage Cells......................................................................................................................... 5-23
5.8.2 InfiniBand Switches ............................................................................................................ 5-24
5.8.3 Cisco Switch ......................................................................................................................... 5-24
5.8.4 ILOM Targets ....................................................................................................................... 5-24
5.8.5 Power Distribution Units (PDUs) ..................................................................................... 5-25
5.8.6 KVM Switch ......................................................................................................................... 5-25
5.9 Using the Conversion Wizard to Convert 12c Targets to 13c Targets .................................... 5-25
6 Virtualized Exadata Database Machine
6.1 Integration with Virtualization Infrastructure Plug-in ............................................................... 6-1
6.2 Discovering Virtualized Exadata Database Machine .................................................................. 6-2
6.3 Post-Discovery Configuration ........................................................................................................ 6-9
6.4 Exadata Virtualized Provisioning .................................................................................................. 6-9
6.4.1 Creating a Database Cluster ................................................................................................ 6-9
6.4.2 Scaling Up a Database Cluster .......................................................................................... 6-16
6.4.3 Scaling Down a Database Cluster ..................................................................................... 6-18
6.4.4 Deleting a Database Cluster............................................................................................... 6-19
6.5 Viewing Virtualized Exadata Database Machine ...................................................................... 6-19
6.6 Resource Utilization Graphs ......................................................................................................... 6-20
6.6.1 Cluster Placement................................................................................................................ 6-20
6.6.2 Database Placement ............................................................................................................ 6-21
6.6.3 Database CPU Utilization .................................................................................................. 6-21
6.6.4 Database Memory Utilization............................................................................................ 6-22
7 Exadata Metrics
7.1 Accessing Exadata Metrics .............................................................................................................. 7-1
7.2 Aggregated Exadata FlashDisk and HardDisk Metric Example ............................................... 7-3
7.3 Exadata Cell Metric Example.......................................................................................................... 7-4
8 Troubleshooting the Exadata Plug-in
8.1 Establish SSH Connectivity ............................................................................................................. 8-1
8.2 Discovery Troubleshooting ............................................................................................................. 8-2
8.2.1 Hardware Availability.......................................................................................................... 8-3
8.2.2 Discovery Failure Diagnosis ................................................................................................ 8-3
8.2.3 Cell is not Discovered ........................................................................................................... 8-3
8.2.4 Compute Node Error Message............................................................................................ 8-4
8.2.5 Compute Node or InfiniBand Switch is not Discovered ................................................. 8-4
8.2.6 Compute Node not Managed by Enterprise Manager .................................................... 8-5
vi

8.2.7 Extra or Missing Components in the Newly Discovered Exadata Database Machine
....................................................................................................................................................... 8-5
8.2.8 InfiniBand Network Performance Page Shows No Data ................................................ 8-5
8.2.9 ILOM, PDU, KVM, or Cisco Switch is not Discovered.................................................... 8-5
8.2.10 Target Does not Appear in Selected Targets Page.......................................................... 8-6
8.2.11 Target is Down or Metric Collection Error After Discovery......................................... 8-6
8.2.12 ILOM Credential Validation Fails During 12c Discovery ............................................. 8-7
8.2.13 Discovery Process Hangs ................................................................................................... 8-8
8.3 Troubleshooting the Exadata Database Machine Schematic File .............................................. 8-8
8.4 Exadata Database Machine Management Troubleshooting....................................................... 8-9
8.5 Exadata Derived Association Rules ............................................................................................... 8-9
8.6 InfiniBand Patch Details Missing ................................................................................................. 8-10
8.7 Oracle Auto Service Request (ASR) Issues.................................................................................. 8-10
8.7.1 Oracle ASR Not Working on Exadata Storage Server ................................................... 8-10
8.7.2 No Slots Available Error..................................................................................................... 8-10
8.8 Target Status Issues ........................................................................................................................ 8-11
8.9 Metric Collection Issues ................................................................................................................. 8-11
8.10 Status: Pending Issues.................................................................................................................. 8-11
8.10.1 Cellsys Targets ................................................................................................................... 8-11
8.10.2 Database Machine Target or Any Associated Components ....................................... 8-12
8.11 Enhanced MIB Incompatibility................................................................................................... 8-12
8.12 Monitoring Agent Not Deployed for IPv6 Environments...................................................... 8-13
8.13 Configure IPv6–SNMPv3 Subscription ..................................................................................... 8-13
Index
vii

viii

Preface
Oracle Enterprise Manager provides the tools to effectively and efficiently manageyour Oracle Exadata Database Machine. With a consolidated view of the ExadataDatabase Machine, Oracle Enterprise Manager provides a consolidated view of all thehardware components and their physical location with indications of status. OracleEnterprise Manager also provides a software view of the databases residing on it andtheir resource consumption on compute node and Exadata Storage Cell.
This document provides the installation and administration instructions to set upOracle Enterprise Manager to monitor and manage your Oracle Exadata DatabaseMachine.
AudienceThis system monitoring installation guide is for users who perform administrative andproblem-resolution tasks on Oracle Exadata Database Machine.
Documentation AccessibilityFor information about Oracle's commitment to accessibility, visit the OracleAccessibility Program website at http://www.oracle.com/pls/topic/lookup?ctx=acc&id=docacc.
Access to Oracle Support
Oracle customers that have purchased support have access to electronic supportthrough My Oracle Support. For information, visit http://www.oracle.com/pls/topic/lookup?ctx=acc&id=info or visit http://www.oracle.com/pls/topic/lookup?ctx=acc&id=trs if you are hearing impaired.
ConventionsThe following text conventions are used in this document:
Convention Meaning
boldface Boldface type indicates graphical user interface elements associatedwith an action, or terms defined in text or the glossary.
italic Italic type indicates book titles, emphasis, or placeholder variables forwhich you supply particular values.
ix

Convention Meaning
monospace Monospace type indicates commands within a paragraph, URLs, codein examples, text that appears on the screen, or text that you enter.
What's ChangedThis table provides a brief overview of the document changes for the latest publicationof the Oracle® Enterprise Manager Managing and Monitoring an Exadata Database Machine:
Part Number Change Summary
E56534-01 Updated for support of Enterprise Manager Cloud Control 13c.
x

What's New
The Oracle Exadata plug-in provides a consolidated view of the Exadata DatabaseMachine within Oracle Enterprise Manager, including a consolidated view of all thehardware components and their physical location with indications of status.
This chapter highlights the significant features and enhancements provided by theOracle Exadata plug-in in the following release summaries:
• Features and Enhancements for Oracle Exadata Plug-in 13.2.0.1.0
Features and Enhancements for Oracle Exadata Plug-in 13.2.0.1.0Oracle Exadata Plug-in Release 13.2.0.1.0 includes a variety of bugs fixed andenhancements implemented for the following feature areas:
• Supported Hardware and Software Configurations — What’s New for 13.2.0.1.0
• Exadata Virtualization Provisioning
• Support for Exadata Flash Cache Features
• Enhanced Exadata Hardware Management
• Patching Automation Support of the Exadata Stack
• ORAchk/EXAchk Integration
• Auto Service Request (ASR) Integration: Fault Telemetry
• Support for IPv6 Environments
Supported Hardware and Software Configurations — What’s New for 13.2.0.1.0As Oracle releases new hardware and software, the Oracle Exadata plug-in is updated,tested, and certified to accommodate the new products. For complete hardware andsoftware support details, see Oracle Exadata Database Machine Supported Hardwareand Software in Introduction to the Plug-in .
Oracle Exadata Plug-in Release 13.2.0.1.0 supports the following hardware andsoftware:
• X6, including certification of Exadata Storage Server 12.1.2.3.1
– X6–2
– X6–8
xi
Exadata Virtualization ProvisioningProvisioning involves repeatable, reliable, automated, unattended, and scheduled massdeployment of a RAC Cluster including virtual machines (VMs), Oracle Database(DB), Grid Infrastructure, and ASM on Virtualized Exadata.
With the Exadata plug-in's virtualization provisioning functionality, you can:
• Create and delete a RAC Cluster including VMs, Oracle Database (DB), GridInfrastructure, and ASM.
• Scale up and scale down a RAC Cluster by adding or removing VMs includingDB, Grid Infrastructure, and ASM.
See Exadata Virtualized Provisioning for the details.
Support for Exadata Flash Cache FeaturesThe Exadata plug-in provides the following features in support of Exadata FlashCache:
• Monitor "Extreme Flash" introduced from X5 onwards:
– Enhanced Database Machine schematic diagram.
– Enhanced incident details page for disk failure.
– Enhanced capacity reporting, I/O Resource Management (IORM), andperformance charts.
• Flash I/O Resource Monitoring and Management, including:
– Flash Cache space usage monitoring.
– Administration of flash IORM.
– New charts on Cell and Grid home page and Performance page.
– I/O Resource consumption and performance monitoring for Flash.
Enhanced Exadata Hardware ManagementThe Exadata plug-in has been enhanced to provide improved monitoring details for allExadata Database Machine components, this is made possible via the SystemInfrastructure target type. These details include:
• ILOM overview details and health status.
• Updated the schematic diagram to enhanced views into your Exadata DatabaseMachine, including:
– Photo-realistic hardware view. From this view, administrators have visibilityinto hardware and can correlate errors across tools (like an intermittent errorwith Exadata performance).
– Logical view, which shows additional CPU details and status.
– Energy view.
xii

– Network connectivity.
– Service processor (SP) configuration.
Patching Automation Support of the Exadata StackThe Exadata plug-in support additional patching features in support of the entireExadata stack, including:
• Compute nodes: Firmware and operating system (OS).
• Exadata Storage Server cells: Firmware and cell software.
• InfiniBand network: Switch firmware.
• Quarterly Full Stack Patch Download (QFSDP) is released every quarter. Primarycomponents are:
– Database (Database, Clusterware).
– Infrastructure includes Exadata Storage Server, InfiniBand Switch, and PDU.
• Exadata systems patching includes:
– Comprehensive overview of the maintenance status and needs.
– Proactive patch recommendations for the quarterly full stack patches.
– Supports auto patch download, ability to patch either in rolling or non-rollingmodes.
– Ability to schedule runs.
– Proactive notification of the status updates.
– Granular step-level status tracking with real-time updates.
– Log monitoring and aggregation, supporting quick filing of support issueswith pre-packaged log dumps.
For more details, see the following documents:
• The Updating Exadata Storage Servers and Updating Exadata InfiniBand Switchessections of the Oracle® Enterprise Manager Lifecycle Management Administrator'sGuide.
• Exadata Database Machine and Exadata Storage Server Supported Versions (Doc ID888828.1) in My Oracle Support:
https://support.oracle.com/rs?type=doc&id=888828.1
ORAchk/EXAchk IntegrationThe ORAchk/EXAchk utility proactively scans for the most significant problemsacross the various layers within Oracle Database and Exadata Database Machine. TheExadata plug-in integrates the ORAchk/EXAchk utility and provides the followingfeatures through Enterprise Manager Cloud Control:
• Install, set up, upgrade, and schedule the ORAchk utility within EnterpriseManager.
xiii

• View all ORAchk/EXAchk results as Enterprise Manager Compliance Standardviolations.
• Allows you to review and implement ORAchk/EXAchk best practices.
The ORAchk/EXAchk utility provides a comprehensive list of checks and alerts,including:
• Verify Disk Cache Policy on DatabaseServer
• Verify Database Server disk controllersuse writeback cache
• Verify RAID Controller Battery Condition(Database Server)
• Verify RAID Controller BatteryTemperature (Database Server)
• Verify Database Server Virtual DriveConfiguration
• Verify Database Server Physical DriveConfiguration
• Imageinfo version comparison acrossdatabase and storage servers
• Verify Hardware and Firmware onDatabase and Storage Servers(CheckHWnFWProfile) (DatabaseServer)
• Verify Software on Storage Servers(CheckSWProfile.sh)
• NFS Mount Point - Attribute Caching• Verify /conf/configvalid File• Backend Check• ORAchk not running• Results and Exception file(s) missing• Metric Parsing Failed
For details about the ORAchk plug-in, see the ORAchk Healthchecks User's Guide.
Auto Service Request (ASR) Integration: Fault TelemetryOracle Auto Service Request (ASR) provides auto-case generation when commonhardware component faults occur. ASR is designed to enable faster problem resolutionby eliminating the need to initiate contact with Oracle Support Services for commonhardware component failures, reducing both the number of phone calls needed andoverall phone time required.
The Exadata plug-in integrates with Oracle ASR to provide the following benefits:
• Enables ASR capability for Exadata Database Machine. Creates a Service Request(SR) automatically and updates the SR number to Enterprise Manager.
• Installs and deploys quickly with the emcli command.
• Includes ASR Incidents for viewing within the Enterprise Manager IncidentManager.
• Works for all Engineered Systems that are certified for ASR.
Enterprise Manager recognizes the following three fault telemetry types:
• Integrated Lights Out Manager (ILOM): Provides fault information, power andenvironmental, CPU, and memory fault information from the service processor(SP).
• Exadata-detected Events (HALRT): Provides fault coverage for disks, flash, andPCI cards within Oracle Exadata Database Machine.
• Fault Management Architecture (FMA): Provides CPU and memory faultinformation from the host.
For more details about using Oracle ASR with Enterprise Manager, see Managing andMonitoring Oracle Auto Service Request (ASR) Assets User's Guide.
xiv

For product details about Oracle ASR, see http://oracle.com/asr.
Support for IPv6 EnvironmentsThe Oracle Exadata plug-in 13.2.0.1.0 now supports monitoring and management ofall Exadata components using IPv6, except for InfiniBand Switches which use IPv4.
For details, see Enable Support for IPv6 Environments.
xv


1Introduction to the Plug-in
This chapterchapter provides a general overview of the Oracle Exadata plug-in,including supported hardware and software. The following topics are discussed:
• Oracle Exadata Plug-in Features
• Oracle Exadata Database Machine Supported Hardware and Software
1.1 Oracle Exadata Plug-in FeaturesHighlights of the Oracle Exadata plug-in release 13.1.0.0.0 include the followingfeatures:
• Monitoring and Notification Features
• Hardware Support Features
• Exadata Software Support
• Target Discovery Features
• Exadata Storage Server Grid Home Page and Server Home Page Features
• Exadata Performance Page Features
• Exadata Metrics Features
1.1.1 Monitoring and Notification FeaturesWith the Oracle Exadata plug-in, you can monitor Exadata targets through EnterpriseManager Cloud Control 13c. The plug-in provides seamless integration withsupported Exadata software so that you can receive notification on any Exadata target.Features include:
• Monitoring of the Exadata Database Machine as an Enterprise Manager target.
• Monitoring of the Exadata target, including the Exadata Cell, within EnterpriseManager's I/O Resource Management (IORM) feature.
• Support SNMP notification for Exadata cell.
• Support dashboard report creation from Enterprise Manager Cloud Control,including a simplified configuration of the service dashboard.
• Support of client network hostnames for compute nodes.
• Enhanced InfiniBand network fault detection and InfiniBand schematic port statereporting.
Introduction to the Plug-in 1-1
• Modification of Enterprise Manager monitoring agents as needed for all ExadataDatabase Machine components.
• IORM for multi-tenancy database (CDB/PDB) environment:
– CDB-level I/O Workload Summary with PDB-level details breakdown.
– I/O Resource Management for Oracle Database 12c.
– Exadata Database Machine-level physical visualization of I/O Utilization forCDB and PDB on each Exadata Storage Server.
– Integration link to Database Resource Management UI.
• Support discovery of locked down storage servers.
1.1.2 Hardware Support FeaturesYou can use the Oracle Exadata plug-in to optimize the performance of a wide varietyof Exadata targets, including:
• Oracle SuperCluster, including:
– Versions: SuperCluster V1.1, V1.0.0 + October Quarterly Maintenance Update(QMU)
– Configurations:
* LDOM: Control domain, IO/guest domain
* Zone: Global, non-global
– Discover, monitor, and manage Exadata Database Machine-relatedcomponents residing on SuperCluster Engineering System
– See Oracle SuperCluster Support - Exadata Plug-in Release 12.1.0.4.0 andLater for more details.
• Multi-Rack support:
– Supports discovery use cases: Initial discovery, add a rack
– Side-by-side rack schematic
• Support for Storage Expansion Rack hardware.
• Full partition support:
– Logical splitting of an Exadata Database Machine Rack into multipleDatabase Machines.
– Each partition is defined through a single OneCommand deployment.
– Compute nodes are not shared between partitions.
– Multiple partitions connected through the same InfiniBand network.
– Compute nodes in same partition share the same Cluster.
– Ability to specify a customized DBM name during discovery of the target.
Oracle Exadata Plug-in Features
1-2 Oracle Enterprise Manager Oracle Exadata Database Machine Getting Started Guide

– User can confirm and select individual components for each DBM.
– Flexibility to select "small-p" targets for individual partitions.
– Flexibility to select some or all of the InfiniBand switch as part of monitorednetwork, including the ability to add switches post discovery.
– Flexibility to select some or all of the Cells to be shared among ExadataDatabase Machines.
• Support for the increasing types of Exadata Database Machine targets. See OracleExadata Database Machine Supported Hardware and Software for a complete listof supported hardware.
• InfiniBand Switch Sensor fault detection, including power supply unit sensorsand fan presence sensors.
• Support for on-demand refresh of InfiniBand schematic.
1.1.3 Exadata Software SupportThrough the Oracle Enterprise Manager Cloud Control interface, you can use theOracle Exadata plug-in to access Exadata Storage Software functionality to efficientlymanage your Exadata hardware. Support includes:
• Integration with Exadata Storage Software.
• Support for the latest Exadata Server Versions 12.1.2.3.1 and earlier:
– 11.2.3.3.1 or earlier.
– A plug-in that supports 12.1.1.1.0 and beyond will have support for Oracledatabase 12c.
– 12.1.2.1.0.
– 12.1.2.1.1.
– 12.1.2.1.1 release and patch 2024004. See Doc ID 1959143.1 in My OracleSupport:
https://support.oracle.com/rs?type=doc&id=1959143.1
– 12.1.1.1.2.
– 12.1.1.1.2 release and patch 20699031. See Doc ID 1995937.1 in My OracleSupport:
https://support.oracle.com/rs?type=doc&id=1995937.1
– 12.1.2.2.0. See Doc ID 2038073.1 in My Oracle Support for details:
https://support.oracle.com/rs?type=doc&id=2038073.1
– 12.1.2.3.0. See Doc ID 2031447.1 in My Oracle Support for details:
https://support.oracle.com/rs?type=doc&id=2031447.1
Note: For latest supported configurations please refer to Doc ID 1626579.1 inMy Oracle Support
Oracle Exadata Plug-in Features
Introduction to the Plug-in 1-3

1.1.4 Target Discovery FeaturesThe target discovery process is streamlined and simplified with the Oracle Exadataplug-in. Features include:
• Automatically push the Exadata plug-in to agent during discovery.
• Discovery prerequisite checks updates, including:
– Check for critical configuration requirements.
– Check to ensure either databasemachine.xml or catalog.xml files existand are readable.
– Prevent discovered targets from being rediscovered.
• Credential validation and named credential support.
• Ability to apply a custom name to the Exadata target.
• Support enabled for discovery using the client access network.
• Automate SNMP notification setup for Exadata Storage Server and InfiniBandSwitches.
• Support discovery of compute nodes with client network host names.
• Support discovery using the new catalog.xml file generated from the OEDAJava-based Configurator.
• Additional credential validation and named credential support.
• Support customization of Exadata Database Machine name.
• Support discovery of locked down storage servers.
Note:
Exadata Database Machine targets are configured with OOB defaultthresholds for the metrics. No additional template is provided by Oracle.
1.1.5 Exadata Storage Server Grid Home Page and Server Home Page FeaturesThe Exadata Storage Server Grid home page and Server home page provides thefollowing features:
• Provides a fine-grained performance summary for flash and hard disk.
• Provides new usage statistics to highlight flash cache and Smart Scan efficiency.
• Provides a new, detailed summary of flash space usage.
• Provides new metrics for:
– I/O time distribution by flash and hard disk.
– IORM wait per database.
Oracle Exadata Plug-in Features
1-4 Oracle Enterprise Manager Oracle Exadata Database Machine Getting Started Guide

1.1.6 Exadata Performance Page FeaturesThe Performance home page provides the following features:
• Side-by-side comparison of flash and hard disk performance.
• Performance comparison between multiple Exadata Storage Servers.
• Performance utilization for flash and hard disk to identify workload reachinghardware limit.
• Provides Exadata Storage Server performance charts to help with diagnosingperformance issues when I/O reaching hardware limits.
1.1.7 Exadata Metrics FeaturesMetrics reports are critical to manage your Oracle Exadata Database Machineeffectively. With the metrics, you can determine where additional resources areneeded, when peak usage times occur, and so forth.
• Enhanced metric scalability in large environment to reduce time out by reducingcellcli calls.
• Reduce metric collection error for the Exadata HCA metric. Improvements tocombine the HCA port data collection in a single cellcli call to reduce chancesof time out.
• Reduced metric collection error from Exadata IORM Status metric. The metric wasremoved, and the user interface now uses the available configuration data.
1.2 Oracle Exadata Database Machine Supported Hardware and SoftwareThe following sections describe the supported hardware and software by the OracleExadata plug-in:
• Exadata Database Machine Configuration Support
• Oracle SuperCluster Support - Exadata Plug-in Release 12.1.0.4.0 and Later
• Supported Component Versions
• Supported Operating Systems
• Oracle Exadata Database Machine Hardware Not Supported
1.2.1 Exadata Database Machine Configuration SupportEnterprise Manager Cloud Control 13c is supported on the following ExadataDatabase Machine configurations:
• Supported Exadata Database Machine Types
• Multi-Rack Support
• Partitioned Support
Oracle Exadata Database Machine Supported Hardware and Software
Introduction to the Plug-in 1-5

Note:
Unless otherwise noted, support is provided for all versions of Oracle Exadataplug-in Release 13.1.
1.2.1.1 Supported Exadata Database Machine Types
The following Exadata Database Machine types are supported:
• V2
Note:
V2 machines discovered in Enterprise Manager Cloud Control 12c are stillsupported in 13c. However, discovery of V2 machines in Enterprise ManagerCloud Control 13c is not supported.
• X2
– X2-2: Full rack, half rack, and quarter rack
– X2-8: Full rack
• X3
– X3-2: Full rack, half rack, quarter rack, and eighth rack (requires release12.1.0.3 or higher)
– X3-8: Full rack
• X4
– X4-2
• X5
– X5-8
• X6
– X6–2
– X6–8
• Oracle SuperCluster, including (requires release 12.1.0.4 or higher):
– Support for Oracle SuperCluster V1.1 on LDOM and Zone (Global & Non-Global)
– Support for Oracle SuperCluster V1.0.1 with October QMU on LDOM andZone
1.2.1.2 Multi-Rack Support
Enterprise Manager supports managing multiple connected racks of Oracle DatabaseMachine of the supported machine types listed above (Supported Exadata Database
Oracle Exadata Database Machine Supported Hardware and Software
1-6 Oracle Enterprise Manager Oracle Exadata Database Machine Getting Started Guide

Machine Types). Also, the following two racks can be monitored in a multi-rack asthese cannot exist as a standalone single rack:
• Storage Expansion Rack (requires release 12.1.0.4 or higher)
• Compute Node Expansion Rack (requires release 12.1.0.4 or higher)
1.2.1.3 Partitioned Support
The following partitioned configurations are supported:
• Partitioned Exadata Database Machine - the logical splitting of a DatabaseMachine Rack into multiple Database Machines. The partitioned ExadataDatabase Machine configuration must meet the following conditions to be fullysupported by Enterprise Manager Cloud Control 13c:
– Each partition is defined through a single OneCommand deployment.
– Cells and compute nodes are not shared between partitions.
– Multiple partitions are connected through the same InfiniBand network.
– Compute nodes in same partition share the same Cluster.
The expected behavior of a partitioned Exadata Database Machine includes:
For Oracle Exadata plug-in Release 12.1.0.3.0 and later:
– The target names for the Exadata Database Machine, Exadata Grid, andInfiniBand Network will be generated automatically during discovery (forexample, Database Machine dbm1.mydomain.com, Database Machinedbm1.mydomain.com_2, Database Machine dbm1.mydomain.com_3, etc.).However, users can change these target names at the last step of discovery.
– All InfiniBand switches in the Exadata Database Machine must be selectedduring discovery of the first Database Machine partition. They will beincluded in all subsequent Database Machine targets of the other partitions.The KVM, PDU, and Cisco switches can be individually selected for the DBMachine target of each partition.
– User can confirm and select individual components for each DatabaseMachine.
For Oracle Exadata plug-in Release 12.1.0.2.0 and earlier:
– The target names for the Exadata Database Machine, Exadata Grid, andInfiniBand Network will be generated automatically during discovery (forexample, Database Machine dbm1.mydomain.com, Database Machinedbm1.mydomain.com_2, Database Machine dbm1.mydomain.com_3, etc.).Users cannot specify these target names.
– All shared components (such as, KVM, PDU, Cisco switch, and InfiniBandswitches) must be selected during discovery of the first Database Machinepartition. They will be included in all subsequent Database Machine targets ofthe other partitions.
– User can confirm and select individual components for each DatabaseMachine.
Oracle Exadata Database Machine Supported Hardware and Software
Introduction to the Plug-in 1-7

1.2.2 Oracle SuperCluster Support - Exadata Plug-in Release 12.1.0.4.0 and LaterOnly Oracle SuperCluster with software Version 1.1 with DB Domain on ControlLDOM-only environments are supported. Earlier versions of Oracle SuperCluster canbe made compatible if you update to the October 2012 QMU release. You can confirmthis requirement by looking at the version of the compmon pkg installed on thesystem (using either pkg info compmon or pkg list compmon commands tocheck). You must have the following minimum version of compmon installed:
pkg://exa-family/system/platform/exadata/[email protected],5.11-0.1.0.11:20120726T024158Z
The following hardware configurations are supported:
• Oracle SuperCluster:
– T5-8 server
– T4-4 server
The following software configurations are supported:
• LDOM
– Control Domain
– IO/Guest Domain
• Zone
– Global
– Non-Global
The following software versions are supported:
• Oracle SuperCluster V1.1
• Oracle SuperCluster V1.0.1 + October QMU
The following issues have been fixed for the 12.1.0.4.0 release of the Oracle Exadataplug-in:
• Exadata Storage Server monitoring: If multiple DB clusters share the sameExadata Storage Server, in one Enterprise Manager management serverenvironment, you can discover and monitor the first DB Machine target and all itscomponents. Also, for additional DB Machine targets sharing the same ExadataStorage Server, the Oracle Exadata Storage Server Grid system and the OracleDatabase Exadata Storage Server System will now show all Exadata StorageServer members.
This issue reported in the plug-in's 12.1.0.3.0 release has been fixed in 12.1.0.4.0.
• HCA port error monitoring: If the perfquery command installed in the OracleSuperCluster has version 1.5.8 or later, a bug (ID 15919339) was reported wheremost columns in the HCA Port Errors metric in the host targets for the computenodes will be blank.
If there are errors occurring on the HCA ports, it is now reported in EnterpriseManager.
Oracle Exadata Database Machine Supported Hardware and Software
1-8 Oracle Enterprise Manager Oracle Exadata Database Machine Getting Started Guide

To check your version, run the following command:
$ perfquery -V
This issue reported in the plug-in's 12.1.0.3.0 release has been fixed in 12.1.0.4.0.
1.2.2.1 Oracle SuperCluster Known Issues
The following known issues have been reported for the Oracle SuperCluster:
• PAGE13 is empty in the /opt/oracle.SupportTools/onecommand/catalog.xml file. This issue prevents Enterprise Manager from displaying theschematic diagram on the Database Machine home page. (Bug 16719172)
Workaround: Manually replace the PAGE13 section by the one listed below:
<PAGE13> <RACKS> <RACK ID="0"> <MACHINE TYPE="203"/> <ITEM ID="1"> <TYPE>ibs</TYPE> <ULOC>1</ULOC> <HEIGHT>1</HEIGHT> </ITEM> <ITEM ID="2"> <TYPE>cell</TYPE> <ULOC>2</ULOC> <HEIGHT>2</HEIGHT> </ITEM> <ITEM ID="3"> <TYPE>cell</TYPE> <ULOC>4</ULOC> <HEIGHT>2</HEIGHT> </ITEM> <ITEM ID="4"> <TYPE>cell</TYPE> <ULOC>6</ULOC> <HEIGHT>2</HEIGHT> </ITEM> <ITEM ID="5"> <TYPE>cell</TYPE> <ULOC>8</ULOC> <HEIGHT>2</HEIGHT> </ITEM> <ITEM ID="6"> <TYPE>comp</TYPE> <ULOC>10</ULOC> <HEIGHT>8</HEIGHT> </ITEM> <ITEM ID="7"> <TYPE>ibl</TYPE> <ULOC>18</ULOC> <HEIGHT>1</HEIGHT> </ITEM> <ITEM ID="8"> <TYPE>cisco</TYPE> <ULOC>19</ULOC> <HEIGHT>1</HEIGHT> </ITEM> <ITEM ID="9"> <TYPE>zfs</TYPE>
Oracle Exadata Database Machine Supported Hardware and Software
Introduction to the Plug-in 1-9

<ULOC>20</ULOC> <HEIGHT>4</HEIGHT> </ITEM> <ITEM ID="10"> <TYPE>ibl</TYPE> <ULOC>24</ULOC> <HEIGHT>1</HEIGHT> </ITEM> <ITEM ID="11"> <TYPE>head</TYPE> <ULOC>25</ULOC> <HEIGHT>1</HEIGHT> </ITEM> <ITEM ID="12"> <TYPE>head</TYPE> <ULOC>26</ULOC> <HEIGHT>1</HEIGHT> </ITEM> <ITEM ID="13"> <TYPE>comp</TYPE> <ULOC>27</ULOC> <HEIGHT>8</HEIGHT> </ITEM> <ITEM ID="14"> <TYPE>cell</TYPE> <ULOC>35</ULOC> <HEIGHT>2</HEIGHT> </ITEM> <ITEM ID="15"> <TYPE>cell</TYPE> <ULOC>37</ULOC> <HEIGHT>2</HEIGHT> </ITEM> <ITEM ID="16"> <TYPE>cell</TYPE> <ULOC>39</ULOC> <HEIGHT>2</HEIGHT> </ITEM> <ITEM ID="17"> <TYPE>cell</TYPE> <ULOC>41</ULOC> <HEIGHT>2</HEIGHT> </ITEM> <ITEM ID="18"> <TYPE>pdu</TYPE> <ULOC>0</ULOC> <HEIGHT>0</HEIGHT> </ITEM> <ITEM ID="19"> <TYPE>pdu</TYPE> <ULOC>0</ULOC> <HEIGHT>0</HEIGHT> </ITEM> </RACK> </RACKS> </PAGE13>
• The Assert OK power sensor raises a critical alert in Enterprise Manager. (Bug17445054 )
Oracle Exadata Database Machine Supported Hardware and Software
1-10 Oracle Enterprise Manager Oracle Exadata Database Machine Getting Started Guide

Note:
This bug does not apply to X3-2 and X4-2 machines.
• Wrong machine names in the databasemachine.xml file. When the database isinstalled in a local zone on a Oracle SuperCluster T5-8, thedatabasemachine.xml file ends up with the machine name of the global zonerather than that of the local zone that the database is installed into.
Workaround: Manually edit the file to change the hostnames for the databasenodes to those of the zone name.
(Bug 17582197)
• In Enterprise Manager, the Schematic & Resource Utilization report will displayonly one LDOM per server.
• Enterprise Manager will not report hard disk predictive failure on compute nodein an Oracle SuperCluster environment.
• The pre-requisite check script exadataDiscoveryPreCheck.pl that is bundledin Exadata plug-in 12.1.0.3.0 does not support the catalog.xml file. Pleasedownload the latest exadataDiscoveryPreCheck.pl file from My OracleSupport as described in Download the Discovery Precheck Script.
• On the Oracle SuperCluster Zone while deploying the Management Agent, theagent prerequisite check may fail with the following error:
Note:
The error can be ignored and you can continue to proceed with installation ofthe Management Agent.
@ During the agent install, the prereq check failed:@ @ Performing check for CheckHostName@ Is the host name valid?@ Expected result: Should be a Valid Host Name.@ Actual Result: abc12345678@ Check complete. The overall result of this check is: Failed <<<<@ @ Check complete: Failed <<<<@ Problem: The host name specified for the installation or retrieved from the@ system is incorrect.@ Recommendation: Ensure that your host name meets the following conditions:@ (1) Does NOT contain localhost.localdomain.@ (2) Does NOT contain any IP address.@ (3) Ensure that the /ect/hosts file has the host details in the following@ format.@ <IP address> <host.domain> <short hostname>@ @ If you do not have the permission to edit the /etc/hosts file,@ then while invoking the installer pass the host name using the@ argument@ ORACLE_HOSTNAME.
Oracle Exadata Database Machine Supported Hardware and Software
Introduction to the Plug-in 1-11

1.2.3 Supported Component VersionsTable 1-1 shows the component versions supported by the Oracle Exadata plug-inRelease 12.1:
Table 1-1 Supported Component Versions
Component Firmware/Software Versions Exadata Plug-in Version Support
Storage Server 12.1.2.3.1, 12.1.2.3.0, 12.1.2.2.2 orbelow
13.1.0.0.0 , 12.1.0.6.0
Note: EM 12c PS3 is tested with ExadataServer Software 12.1.2.2.0. SSH Lockdown will not be a supportedconfiguration under 12c PS3/PS4,however, it is certified to work with13c.
11.2.3.3.0
12.1.1.1.0
12.1.0.6.0 and later
12.1.0.5.0 with following patchesapplied (not cell related):
• Agent platform: Patch ID17872949
• OMS plug-in: Patch ID 17861041• Agent plug-in: Patch ID
17965602
11.2.3.2.1.130109 12.1.0.4.0 and later
11.2.3.2.0.120713 12.1.0.3.0 and later
11.2.2.3.0
11.2.2.3.2
11.2.2.3.5
11.2.2.4
11.2.3.1.0
11.2.3.1.1
All versions
InfiniBand Switch 2.1.3-4
2.0.6-1 (for SuperCluster)
12.1.0.4.0 and later
1.1.3-2
1.3.3-2
All versions
Integrated Lights Out Manager(ILOM)
3.1 or later 13.1 and later
v3.0.16.15.a r73751 or later (v2)
v3.0.16.10.d or later (X2)
v3.0.16.20.b or later (X2-8)
v3.0.16.20.b or later (X3-8)
v3.1.2.10 r74387 or later (X3-2)
12.1.0.4.0 and later
Oracle Exadata Database Machine Supported Hardware and Software
1-12 Oracle Enterprise Manager Oracle Exadata Database Machine Getting Started Guide

Table 1-1 (Cont.) Supported Component Versions
Component Firmware/Software Versions Exadata Plug-in Version Support
v3.0.9.19.c r63792 All versions
ILOM ipmitool Linux: 1.8.10.3 or later
Oracle Solaris: 1.8.10.4 or later
All versions
Power Distribution Unit (PDU) 1.04 or later 13.1 and later
1.05
1.06
12.1.0.4.0 and later
1.01
1.02 (default version after reimage)
1.04
All versions
Avocent MergePoint Unity KVMSwitch
Application: 1.2.8.14896
Boot: 1.4.14359
All versions
Cisco Switch 15.1(2)SG2 12.1.0.6.0 and later
12.2(31)SGA9 All versions
1.2.4 Supported Operating SystemsThe following operating systems (where OMS and agent is installed on) are supportedby the Oracle Exadata plug-in 13.2:
• Management Server plug-in (all OMS-certified platforms):
– IBM AIX on POWER Systems (64-bit)
– HP-UX Itanium
– Linux x86 and x86-64
– Microsoft Windows x64 (64-bit)
– Oracle Solaris on SPARC (64-bit)
– Oracle Solaris on x86-64 (64-bit)
• Agent plug-in:
– Linux x86-64
– Oracle Solaris on x86-64 (64-bit)
– Oracle Solaris on SPARC (64-bit)
1.2.5 Oracle Exadata Database Machine Hardware Not SupportedThe following Oracle Exadata Database Machine hardware configurations are notsupported for Enterprise Manager Cloud Control Exadata plug-in 13.x:
• V1 hardware
Oracle Exadata Database Machine Supported Hardware and Software
Introduction to the Plug-in 1-13

• V2 hardware
Note:
V2 machines discovered in Enterprise Manager Cloud Control 12c are stillsupported in 13c. However, discovery of V2 machines in Enterprise ManagerCloud Control 13c is not supported.
Oracle Exadata Database Machine Supported Hardware and Software
1-14 Oracle Enterprise Manager Oracle Exadata Database Machine Getting Started Guide

2Installation and Deployment
This chapter provides the instructions for deployment of the Oracle Exadata plug-in.The following topics are discussed:
• Oracle Exadata Plug-in Deployment Prerequisites
• User Roles
• Install Enterprise Manager Agent
• Manually Deploy Exadata Plug-in
2.1 Oracle Exadata Plug-in Deployment PrerequisitesBefore deploying the Oracle Exadata plug-in, make sure the following prerequisitesare met:
• Create a Database Server ILOM Service Processor User
• Verify Software Versions
• Verify Names Resolution
• Verify Firewall Configuration
• Oracle SuperCluster Prerequisites
2.1.1 Create a Database Server ILOM Service Processor UserFor the Enterprise Manager agent to communicate with an ILOM service processor,there must be a specific user ID established on the ILOM service processor.
Note:
Adding the specific user ID requires administrator level privilege on theILOM service processor.
The specific ILOM user ID can be added in the ILOM service processor web interface,ILOM CLI, or with the ipmitool command. This example uses ILOM CLI.
For security reasons, the password to the ILOM service processor root user ID doesnot appear in the ILOM CLI commands in this example.
1. Log in to the Service Processor as root:
# ssh root@[Service Processor IP]Password:
Installation and Deployment 2-1

2. Change to the users directory:
# cd /SP/users
3. Create the oemuser user and password:
# create oemuser
Creating user...Enter new password: ********Enter new password again: ********
Created /SP/users/oemuser
4. Change to the new user's directory and set the role:
# cd oemuser/SP/users/oemuser
set role='cro'Set 'role' to 'cro'
5. Test the ILOM user ID created in step 3 by listing the last 10 system events:
• For Exadata X2 through X4:
# ipmitool -I lan -H <ilom_hostname> -U oemuser -P oempasswd -L USER sel list last 10
• For Exadata X5-2 (requires the -I lanplus command option):
# ipmitool -I lanplus -H <ilom_hostname> -U oemuser -P oempasswd -L USER sel list last 10
6. Repeat steps 1 through 5 for the rest of the compute node ILOM service processorsin your Oracle Database Machine.
2.1.2 Verify Software VersionsVerify the following software versions:
• Exadata Storage Server Software
• ILOM ipmitool
• InfiniBand Switch
• PDU Firmware
• KVM Application
• Grid Infrastructure/DB Cluster
2.1.2.1 Exadata Storage Server Software
The supported version is Exadata Storage Server Software 11g Release 2 (see ExadataSoftware Support for specific release version details). To verify the cell softwareversion on the Exadata cell, ssh to the Exadata cell as the root, celladmin, orcellmonitor user. Run:
# cellcli -e 'list cell detail'
Oracle Exadata Plug-in Deployment Prerequisites
2-2 Oracle Enterprise Manager Oracle Exadata Database Machine Getting Started Guide

Look for "releaseVersion" in the output.
2.1.2.2 ILOM ipmitool
Enterprise Manager requires a minimal ipmitool software version of 1.8.10.4 or laterfor Oracle Solaris and 1.8.10.3 for Oracle Linux. To view the software version:
• For Oracle Linux, run the following command as the root user on one of thedatabase servers in the cluster:
# dcli -g ~/dbs_group -l root ipmitool –V
Note:
The dbs_group file contains the list of compute node hostnames, one on eachline. If the file does not exist, you can create it before running the dclicommand.
• For Oracle Solaris, run the following command on each of the database servers inthe cluster:
# /opt/ipmitool/bin/ipmitool -V
2.1.2.3 InfiniBand Switch
To verify the version of the InfiniBand switch firmware in your environment:
1. Log on to the management interface for the InfiniBand Switch (using ssh).
2. Run the following command:
# nm2version
The output should be similar to this:
# nm2versionSun DCS 36p version: 1.1.3-2
This example shows a supported configuration for deploying the plug-in tomonitor.
3. If the nm2version command returns output similar to this:
# nm2versionNM2-36p version: 1.0.1-1
Then you must upgrade your InfiniBand switch firmware. Follow the instructionslisted in My Oracle Support (MOS) Document 888828.1:
https://support.oracle.com/CSP/main/article?cmd=show&type=NOT&doctype=REFERENCE&id=88882
2.1.2.4 PDU Firmware
The PDU firmware version must be 1.04 or later. The current version can be obtainedby logging into the web interface of the PDU. On the left side of the screen, clickModule Info to view the PDU firmware version.
Software updates for the PDU are available at:
Oracle Exadata Plug-in Deployment Prerequisites
Installation and Deployment 2-3

https://updates.oracle.com/Orion/PatchDetails/process_form?patch_num=12871297
2.1.2.5 KVM Application
The KVM Application software version must be 1.2.8 or later. The current version canbe obtained by logging into the web interface of the KVM. On the left side of thescreen under Unit View, Appliance, Appliance Settings, click Versions to view theApplication software version.
Software updates for KVM are available at:
http://www.avocent.com/Support_Firmware/MergePoint_Unity/MergePoint_Unity_Switch.aspx
2.1.2.6 Grid Infrastructure/DB Cluster
Grid Infrastructure/DB Cluster is required to be up and running before discovery.
2.1.3 Verify Names ResolutionThe Enterprise Manager OMS server(s) require direct network access to each of thecompute nodes. If the names of the compute nodes are not registered in the OMSnodes' DNS, then they will have to be manually entered in the /etc/hosts file foreach OMS.
Each compute node should be verified to be able to resolve the hostnames of the ILOMservers, PDU's, storage cell nodes, and InfiniBand and Cisco switches. Again, if thenames of those components are not registered in DNS, then entries can be added tothe /etc/hosts file of each compute node.
To manage the Exadata Database Machine components from Enterprise ManagerCloud Control 13c, it is necessary for your local machine to be able to resolve the hostname of Cloud Control 13c.
To access any of the Exadata Database Machine components directly from your localmachine, it is also necessary for your local machine to be able to resolve the names ofthose components.
2.1.4 Verify Firewall ConfigurationTo verify the firewall configuration:
1. Allow ping
In many secure network environments, it is normal for the ping service to bedisabled. Enterprise Manager uses ping to establish the basic availability andstatus of the Exadata Database Machine components.
• The compute nodes need to have the ping service and port enabled from theOMS Server(s).
• All other Exadata Database Machine components (ILOM servers, PDU's,storage cell nodes, InfiniBand switches, and Cisco switch) need to have theping service and port enabled from the compute nodes (where the agents arerunning).
Oracle Exadata Plug-in Deployment Prerequisites
2-4 Oracle Enterprise Manager Oracle Exadata Database Machine Getting Started Guide

Note:
The ping traffic overhead is minimal. The agent pings the targets every fiveminutes.
2. Open Database Ports
The database listener ports must be opened for the Enterprise Manager OMSserver(s). Note that Exadata Database Machine databases will use SCAN listeners;so, ports will need to be opened for the base compute node, the compute nodevirtual IP, and scan listeners addresses.
For example, if an Exadata Database Machine quarter rack has been configuredwith two compute nodes - exadbnode1.example.com andexadbnode2.example.com - and the listeners are using port 1521, then port1521 will have to be opened to the Enterprise Manager Server for the followingaddresses:
• The compute node hostnames - exadbnode1.example.com andexadbnode2.example.com
• The virtual IPs for each compute node - exadbnode1-vip.example.comand exadbnode1-vip.example.com
• The scan listener hostname - scan-exadatadb
3. Open Enterprise Manager Upload Port
The Enterprise Manager Cloud Control 13c agents require access to the EnterpriseManager Servers upload service, normally configured on port 4889 for HTTPuploads and 4900 for HTTPS. To verify the ports assigned, run the followingcommand on the OMS server command line.
$ emctl status oms -details
These ports will need to be opened for each of the compute nodes.
4. Open Agent Ports
The OMS server(s) will need to be able to connect to the Enterprise ManagerCloud Control 13c Agent HTTP/HTTPS port on each compute node. The Agentport defaults to 3872. If port 3872 is not available, the next available port startingfrom port 1830 is used.
To identify the port used:
• Run the following command on the compute node command line:
$ emctl status agent
• Alternatively, you can look for the value of the EMD_URL property in theemd.properties file the following directory:
<AGENT_HOME>/agent_inst/sysman/config
5. Open SSH Ports (port 22)
The Enterprise Manager Cloud Control 13c Agents require ssh access to theExadata Database Machine components they monitor. As the Agents will run onthe compute nodes the ssh ports, 22, on each of the storage cells, ILOMs, PDUs,
Oracle Exadata Plug-in Deployment Prerequisites
Installation and Deployment 2-5
KVMs, InfiniBand switches, and Cisco switch will need to be opened for each ofthe compute nodes.
Note:
The emkit configures ssh access but still requires the ports to be opened first.
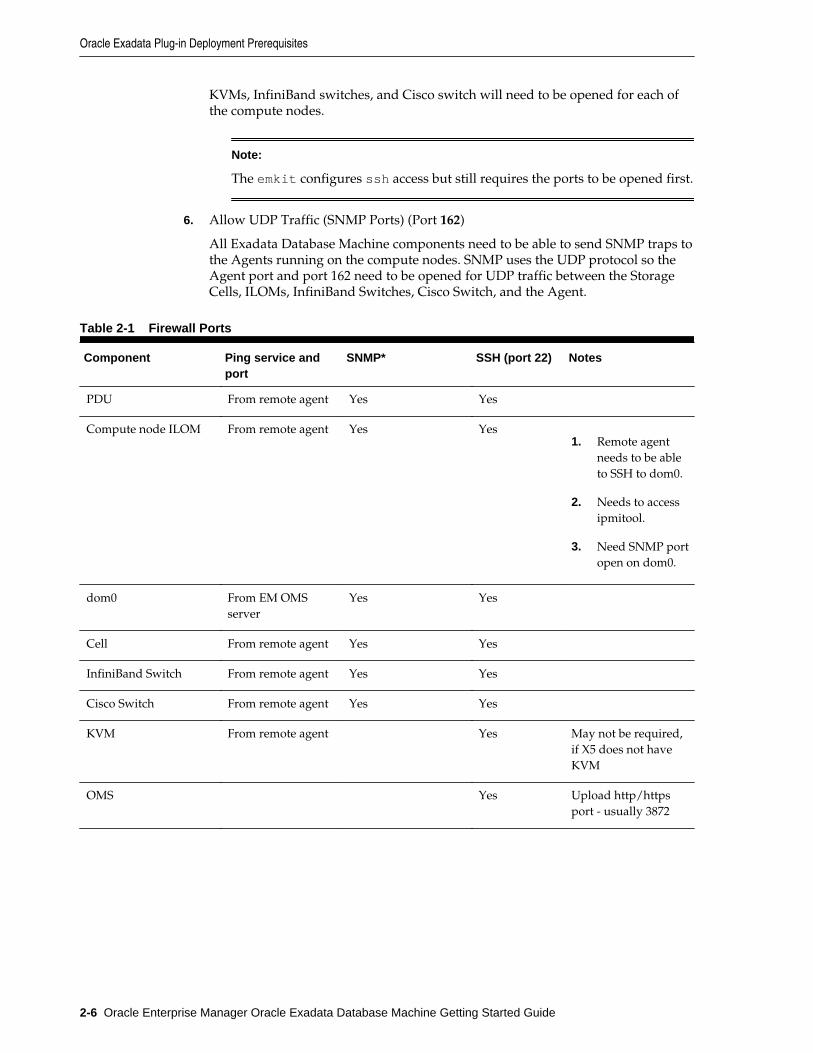
6. Allow UDP Traffic (SNMP Ports) (Port 162)
All Exadata Database Machine components need to be able to send SNMP traps tothe Agents running on the compute nodes. SNMP uses the UDP protocol so theAgent port and port 162 need to be opened for UDP traffic between the StorageCells, ILOMs, InfiniBand Switches, Cisco Switch, and the Agent.
Table 2-1 Firewall Ports
Component Ping service andport
SNMP* SSH (port 22) Notes
PDU From remote agent Yes Yes
Compute node ILOM From remote agent Yes Yes1. Remote agent
needs to be ableto SSH to dom0.
2. Needs to accessipmitool.
3. Need SNMP portopen on dom0.
dom0 From EM OMSserver
Yes Yes
Cell From remote agent Yes Yes
InfiniBand Switch From remote agent Yes Yes
Cisco Switch From remote agent Yes Yes
KVM From remote agent Yes May not be required,if X5 does not haveKVM
OMS Yes Upload http/httpsport - usually 3872
Oracle Exadata Plug-in Deployment Prerequisites
2-6 Oracle Enterprise Manager Oracle Exadata Database Machine Getting Started Guide

Table 2-1 (Cont.) Firewall Ports
Component Ping service andport
SNMP* SSH (port 22) Notes
Agent The OMS server(s)will need to be able toconnect to theEnterprise ManagerCloud Control 12cAgent HTTP/HTTPSport on each computenode. The Agent portdefaults to 3872. Ifport 3872 is notavailable, the nextavailable port startingfrom port 1830 isused.
* SNMP uses the UDP protocol; so, the Agent port and port 162 need to be opened for UDP traffic
2.1.5 Enable Support for IPv6 Environments
Note:
Internet Protocol version 6 (IPv6) is the most recent version of the InternetProtocol (IP), the communications protocol that provides an identification andlocation system for computers on networks and routes traffic across theInternet.
To perform an Exadata Database Machine discovery on IPv6-based client ormanagement network, you must deploy agents on a host that supports dual stack(IPV4 and IPV6).
If the compute node hosts are pure IPv6-based hosts, then deploy the agent on aremote host that supports both IPV4 and IPV6 and perform "remote agent" baseddiscovery.
This agent deployment is needed for monitoring those components in DB Machinethat do not yet support IPV6 (for example, Infiniband Switch and PDU. For moredetails, see IPv6 support status on Exadata Database Machine (Doc ID 2056895.1),available in My Oracle Support:
https://support.oracle.com/rs?type=doc&id=2056895.1
Note:
For a virtualized DB Machine, the VI target discovery should be done first asdescribed in Discovering Virtualized Exadata Database Machine.
Oracle Exadata Plug-in Deployment Prerequisites
Installation and Deployment 2-7

2.1.6 Oracle SuperCluster PrerequisitesTable 2-2 shows the required versions of OneCommand and Config-O-Matic (COM)supported by the Oracle SuperCluster hardware configurations.
Table 2-2 Oracle SuperCluster Prerequisites
Hardware Configuration OneCommand Version Config-O-Matic Version
M6-32
databasemachine.xml
only
14.063 and later 1.6.4 and later
T5-8
databasemachine.xml
14.042 and later 1.5.8 COM and later
T5-8
catalog.xml (non-JavaOneCommand)
n/a 1.5.4 COM and earlier
T4-4
catalog.xml only
Note: Because the T4-4 OracleSuperCluster is at its "end oflife," this entry is only forexisting systems.
n/a 1.1.6 COM and earlier
2.2 User RolesTo manage the Exadata Storage Server, you need to create roles and then assign rolesto administrators. Creating these roles restricts the privileges that each user has, forexample in deleting the plug-in or accessing reports. See Oracle Exadata DatabaseMachine Administration .
2.3 Install Enterprise Manager Agent
Note:
Enterprise Manager Exadata discovery supports the use of either managementnetwork hostname or client network hostname for the compute nodes. Wheninstalling the Enterprise Manager agent on the compute nodes, you shoulduse the same hostname as used in Oracle Clusterware.
You can identify the hostname of the nodes in the cluster by running theolsnodes command on one of the compute nodes. It is recommended that afully qualified hostname, including the domain name, be used whenspecifying an Enterprise Manager agent hostname.
There are two methods for installing the Enterprise Manager Agent. Chose the onethat works best for your environment:
• Install Agents and Set Up Exadata Monitoring Using Automated Kit
User Roles
2-8 Oracle Enterprise Manager Oracle Exadata Database Machine Getting Started Guide
• Install Enterprise Manager Agent Using the Push Method
Note:
• Make sure any prerequisites are met. See Agent Installation Prerequisite -Solaris 11 Only.
• The Enterprise Manager agent must be deployed to all compute nodes ofthe Database Machine. The host target name of the compute node must bethe fully qualified host name, for example, dbm1db01.mydomain.com.
• Non-fully qualified hostname (for example, dbm1db01) or IP addressmust not be used for the host target name of the compute node.
• The same version of the Enterprise Manager agent and the same versionof the Exadata plug-ins should be deployed on all compute nodes withinthe same Database Machine.
2.3.1 Agent Installation Prerequisite - Solaris 11 OnlyIf you are running Exadata Storage Server Software Release 11g Release 2 (11.2.3.1) onOracle Solaris, follow the steps below before installing the agent.
1. Log in to the compute node host as agent user and execute the ppriv $$command. This command displays the E (Effective), P (Permitted), I (Inherited),and L (Limited) privileges.
Generally, E, P, and I have the same set of basic privileges and for any normal user.
2. Assuming that output of the above command shows basic privileges, add thepriv_sys_net_config privilege to the agent user so that InfiniBand commandscan be executed.
Log in as root and run:
# usermod -K defaultpriv=basic,priv_sys_net_config <agent_user>
This command adds sys_net_config to the agent user.
3. Log in as the agent user again and run the ppriv $$ command to verify if theprivileges are set. The output will show the sys_net_config privilege alongwith the existing (basic) set of privileges.
2.3.2 Install Agents and Set Up Exadata Monitoring Using Automated KitThe Oracle Enterprise Manager Cloud Control 13c Setup Automation kit is availablefor download from My Oracle Support as a patch. The kit simplifies the process ofdeploying the agents on each of the compute nodes considerably, allowing agents tobe deployed to all of the compute nodes, in one go, from one of the compute nodes,using one simple command. Instructions for using the kit to deploy agents on thecompute nodes are provided in the patch README.txt.
To download the Automation kit for your platform, see Doc ID 1440951.1 in My OracleSupport:
https://support.oracle.com
Install Enterprise Manager Agent
Installation and Deployment 2-9

Oracle Enterprise Manager Cloud Control 13c uses a holistic approach to manage theExadata Database Machine and provides comprehensive lifecycle management frommonitoring to management and ongoing maintenance for the entire engineeredsystem.
The patch README provides instructions for how to install Management Agents onan Oracle Exadata Database Machine and point them to an existing Cloud Controlenvironment or install a new stand alone Enterprise Manager environment and deploythe Management Agents pointing to this new environment. This standaloneenvironment can be used when you do not want to take the corporate environmentoffline to apply the patches needed to monitor Oracle Exadata Database Machine.
The following procedures described in the README can be performed at any time,such as during initial configuration of Oracle Exadata Database Machine, or later:
• Preparing a corporate Oracle Enterprise Manager Cloud Control server to monitorOracle Exadata Database Machine
• Installing Oracle Enterprise Manager Cloud Control 13c on a standalone server tomonitor Oracle Exadata Database Machine
• Installing Oracle Enterprise Manager Cloud Control 13c Management Agents onOracle Exadata Database Machine
• Removing Oracle Enterprise Manager Cloud Control 13c Management Agentsfrom Oracle Exadata Database Machine when using a standalone server
• Removing Oracle Enterprise Manager Cloud Control 13c from a standalone server
2.3.3 Install Enterprise Manager Agent Using the Push MethodThe installation instructions were captured on a Quarter Rack configuration (forexample, 2 compute nodes, 3 cells).
1. Add the Exadata Database Machine compute nodes as host targets to OracleEnterprise Manager Cloud Control 13c. From the Enterprise Manager home page,click the Setup menu (upper right corner), Add Target, then Add TargetsManually.
2. On the Add Host Targets: Host and Platform screen, specify a session name. Thenidentify the fully qualified hostnames and select the platform.
Note:
If the Agent software is not available for your platform, go to the Extensibilitypage and download it first.
Figure 2-1 shows how the selection should look for the Linux x86-64 platform.
Install Enterprise Manager Agent
2-10 Oracle Enterprise Manager Oracle Exadata Database Machine Getting Started Guide

Figure 2-1 Add Host Targets
3. Click Next to add the details for the host.
4. On the Installation Details screen, provide the following information:
• Installation Base Directory
• Instance Directory
• Named Credential
• For Port, leave this field blank. As part of the installation process, an availableport will be selected automatically.
5. Click Next to review the details about the host.
6. Click Deploy Agent to start the agent deployment process.
7. As the deployment process continues, remote prerequisite checks are automaticallychecked. If there are no issues, you will be presented with an Agent DeploymentSummary with an indication that the agent deployment has passed. Figure 2-2shows an example of a successful agent deployment.
Install Enterprise Manager Agent
Installation and Deployment 2-11

Figure 2-2 Agent Deployment Summary
Note:
If the root.sh was not executed during deployment, then make sure toexecute it on all compute nodes.
2.3.3.1 Installing Oracle Management Agent in Silent Mode Option
You can install Oracle Management Agent in silent mode as an alternative to installingit using the Add Host Target Wizard. Silent mode requires you to use a response filefor providing the installation details and a deployment script for silently installing theManagement Agent using the information supplied in the response file.
See the Installing Oracle Management Agent in Silent Mode chapter in the OracleEnterprise Manager Cloud Control Advanced Installation and Configuration Guide for moreinformation.
2.4 Manually Deploy Exadata Plug-inUnder the following conditions, you may need to manually deploy the Exadata plug-in on each of the compute nodes:
• For a new or fresh installation: Deploy the plug-in manually if you did not deploythe agent using Automation kit or push the latest version of the agent throughOMS.
• For an upgrade to an existing installation: Deploy the Exadata plug-in manually ifan older version of the Exadata plug-in has been deployed to the agent alreadyand you would like to upgrade to the latest version of the Exadata plug-in.
To determine if the Exadata plug-in is deployed on each compute node and whatversion it is, you have two options:
• From a terminal window, run the following command:
Manually Deploy Exadata Plug-in
2-12 Oracle Enterprise Manager Oracle Exadata Database Machine Getting Started Guide

emctl listplugins agent
Note:
The emctl listplugins agent command must be run on the computenode using the emctl in the agent installation directory.
• From Enterprise Manager Cloud Control, click the Setup menu (upper rightcorner), Extensibility, and then Plug-ins.
To manually deploy the Exadata plug-in:
1. From the Enterprise Manager home page, click the Setup menu (upper rightcorner), Extensibility, and then Plug-ins.
2. On the Plug-ins page, select Oracle Exadata from the Name list.
Note:
The selected version should be for Release 12.1.0.1.0, 12.1.0.2.0, or 12.1.0.3.0.Oracle recommends that you deploy the latest version of the Exadata andDatabase plug-ins to the agent.
3. With Oracle Exadata selected, click Deploy On, then Management Agent.
4. On the Deploy Plug-in on Management Agent pop-up, click Add. A search pop-upwill appear to allow you to search for targets to add. In the Target Type drop-down, select Agent, then click Search.
Select a Target name from the results list and click Select. Repeat for each agenttarget.
5. After you have added the agents, click Next on the Deploy Plug-in on ManagementAgent screen to review and verify the agent information.
6. Click Deploy to deploy the plug-in to the agents.
7. Once the plug-in has been deployed to all agents, a confirmation screen willappear. Click OK to dismiss the pop-up or Show Status to display the status of theagent in the Enterprise Manager Deployment Activities screen.
Manually Deploy Exadata Plug-in
Installation and Deployment 2-13

Manually Deploy Exadata Plug-in
2-14 Oracle Exadata Database Machine Getting Started Guide

3Exadata Database Machine Discovery
This chapter provides instructions for discovery of the Oracle Exadata DatabaseMachine through Enterprise Manager Cloud Control 13c.
The following sections describe how to discover the Exadata Database Machine andother supported targets:
1. Running the Discovery Precheck Script
2. Discovering an Exadata Database Machine
3. Discover Oracle SuperCluster as an Exadata Database Machine
4. Discovering Grid Infrastructure and RAC
5. Switch from Using CellCLI to ExaCLI after Storage Server Locked Down
3.1 Running the Discovery Precheck ScriptBefore you begin the guided discovery process, there are several checks you shouldperform to ensure a smooth discovery. A discovery precheck script is available toautomatically verify many of the common problem areas prior to discovery.
Some Exadata discoveries in Oracle Enterprise Manager 13c may run into issuesbecause of various configuration mismatches in software setup. This discoveryprecheck script helps to resolve the most common configuration problems. Run thescript before all Database Machine discovery and examine the output thoroughlybefore proceeding with Discovering an Exadata Database Machine.
Follow the steps below to run the discovery precheck script:
1. Secure Storage for Target Monitoring Credentials.
2. Download the Discovery Precheck Script.
3. Run the Discovery Precheck Script.
4. Automatic Verification.
5. Manual Verification.
3.1.1 Secure Storage for Target Monitoring CredentialsAs you begin the discovery process, cell monitoring requires log in and passwordcredentials to be entered. These credentials are handled in the following manner:
• For the cellmonitor user: SSH equivalence is set up for between thecellmonitor user and the agent user. The root credentials being prompted forduring discovery are not needed for metric collection afterwards. You can
Exadata Database Machine Discovery 3-1

optionally choose to store the cell root password as a named credential in theEnterprise Manager repository.
• For the cell ILOM user (oemuser): This monitoring credential is encrypted andstored in the Enterprise Manager repository and in the targets.xml file on theagent.
• For the InfiniBand Switch user (nm2user): SSH equivalence is set up for betweenthe nm2user user and the agent user. The nm2user credentials being promptedfor during discovery are not needed for metric collection afterward. You canoptionally choose to store the nm2user password as a named credential in theEnterprise Manager repository.
3.1.2 Download the Discovery Precheck ScriptYou can obtain the script in one of the following ways
• Access the script as part of Exadata plug-in 13.1.0.0.0 after the plug-in is deployedto the agent:
<agent installation directory>/plugins/oracle.sysman.xa.discovery.plugin_12.1.0.3.0/discover/dbmPreReqCheck/exadataDiscoveryPreCheck.pl
Note:
The Exadata plug-in includes an additional script that enables enhancedmonitoring through Enterprise Manager Cloud Control 13c.
• Download the script from Prerequisite script for Exadata Discovery in OracleEnterprise Manager Cloud Control 12c (Doc ID 1473912.1) in My Oracle Support:
https://support.oracle.com/rs?type=doc&id=1473912.1
• Access the script as described in Obtaining the Oracle Enterprise Manager SetupAutomation kit for Exadata (Doc ID 1440951.1) in My Oracle Support for moreinformation on the kit:
https://support.oracle.com/rs?type=doc&id=1440951.1
3.1.3 Run the Discovery Precheck ScriptTo run the script:
$ <agent installation directory>/plugins/oracle.sysman.xa.discovery.plugin_<plugin version>/discover/dbmPreReqCheck/$ $ORACLE_HOME/perl/bin/perl ./exadataDiscoveryPreCheck.pl
As the script runs, you will be prompted for various inputs. It will execute all thebuilt-in checks and will display all messages on standard output along with anexecution log.
3.1.4 Automatic VerificationThe discovery precheck script checks for the following information:
Running the Discovery Precheck Script
3-2 Oracle Enterprise Manager Oracle Exadata Database Machine Getting Started Guide

• Verifies that the user who is running the Enterprise Manager agent has read andexecute permissions on at least one of the 11.2 (or later) Database Oracle homedirectory <ORACLE_HOME>/bin/kfod binaries.
• Verifies the management server and cell server is up and running on the Exadatacell. You can verify the status by running:
$ cellcli -e 'list cell attributes cellsrvStatus,msStatus'
• Verifies log in credentials. These credentials are required to complete thediscovery process. Make sure you have the information of the followingcredentials before starting the discovery process:
– Agent host credentials: the username and password of the user running theagents on the compute nodes
– Monitoring credentials:
* Cell Root Password or ExaCLI credentials if you plan to use ExaCLI
* InfiniBand Switch Nm2user Password
* ILOM username and password
– InfiniBand Switch root credentials: Username and Password
• Verifies the Database Machine schematic file requirements for Exadata Release11.2.3.1, 11.2.3.2, and later, including:
– That the schematic file should exist on the agent host selected for discoveringthe Exadata Database Machine at:
/opt/oracle.SupportTools/onecommand/databasemachine.xml
– That the schematic file has the world-readable privilege so that it is readableby the agent user.
– That the version is 503 or later. The schematic file version is in the header ofthe file.
– That the values of <ADMINNAME> and <ADMINIP> in the schematic fileshould be the current host names and management IP addresses of thecompute nodes, Exadata cells, InfiniBand switches, KVM, PDU, and Ciscoswitch.
• Verifies the Database Machine schematic file requirements for Exadata Release11.2.3.2 and later:
– Verifies that the schematic file exists on the agent host selected fordiscovering the Exadata Database Machine at:
/opt/oracle.SupportTools/onecommand/catalog.xml
– Verifies that the schematic file has the world-readable privilege so that it isreadable by the agent user.
– Verifies that the schematic file version is 868 or later. The schematic fileversion is in the header of the file.
– In addition, the values of <ADMINNAME> and <ADMINIP> in the schematic fileshould be the current host names and management IP addresses of the
Running the Discovery Precheck Script
Exadata Database Machine Discovery 3-3

compute nodes, Exadata cells, InfiniBand switches, KVM, PDU, and Ciscoswitch.
Client network naming is only supported in Exadata plug-in Release12.1.0.3.0 and later.
Note:
If the Database Machine schematic file does not exist or its version does notmeet the requirement, open a Service Request with Oracle Support to get thelatest version of the schematic file.
3.1.5 Manual VerificationAfter running the discovery precheck script, you will still need to perform thefollowing checks manually:
1. Use the 11.2 (or later) Database Oracle home directory when prompted for in Discovering an Exadata Database Machine.
2. Pre-requirements for platform and Database Machine version.
3. Compute node needs to be first discovered as Enterprise Manager host targets byinstalling the Enterprise Manager agents on these hosts.
• The Enterprise Manager agent must be deployed to all compute nodes of theExadata Database Machine. The host target name of the compute node must bethe fully qualified host name (for example, dbm1db01.mydomain.com). Non-fully qualified hostnames (for example, dbm1db01) or IP addresses must notbe used for the host target name of the compute node.
• If you are using Exadata plug-in Release 12.1.0.1.0 or 12.1.0.2.0, the target nameof the compute node host target should be the host name in the managementnetwork, not the client network.
• If you are using Exadata plug-in Release 12.1.0.3.0 or later, the target name ofthe compute node host target can be the host name in the managementnetwork or the client network.
4. The host names of the compute nodes and Exadata cells in each individualDatabase Machine should have a unique prefix. In other words, Exadata DatabaseMachine racks that are not connected by the same InfiniBand network to form oneDB Machine should not share the same prefix for the host names.
5. For users of Oracle Enterprise Manager Cloud Control 12c Release 12.1.0.1.0 or ifthe installed version has been upgraded to Release 12.1.0.2.0 from 12.1.0.1.0 of theplug-in, you must manually push the Exadata plug-in to the agent.
6. For IPV6-based Exadata Database Machine, verify the following information in theschematic files:
Running the Discovery Precheck Script
3-4 Oracle Enterprise Manager Oracle Exadata Database Machine Getting Started Guide

Note:
The schematic files are usually located in the /opt/oracle.SupportTools/onecommand directory on the compute nodes, andare named databasemachine.xml, catalog.xml orexdatabasemachine.xml.
a. Check if all the ADMINNAME, ILOMNAME and CLIENTNAME entries are valid hostnames.
b. Check if the ADMINIP and ILOMIP are in IPv6 format for the cells, computenodes, and Cisco switch entries.
c. As an example, the entries would be formatted like this:
<ITEM ID="2"> <TYPE>cellnode</TYPE> <ADMINNAME>XXXXXceladm04</ADMINNAME> <ADMINIP>XXXX:YYYY:XXXX:YYYY:XXXX:YYYY:XXXX:YYYY</ADMINIP> <ILOMNAME>XXXXXceladm04-ilom</ILOMNAME> <ILOMIP>XXXX:ZZZZ:XXXX:ZZZZ:XXXX:ZZZZ:XXXX:ZZZZ</ILOMIP> <ULOCATION>2</ULOCATION> <UHEIGHT>2</UHEIGHT></ITEM>
d. Ensure that the IPv4 address is used for InfiniBand Switch and PDU as they donot support IPV6. For more details, see IPv6 support status on ExadataDatabase Machine (Doc ID 2056895.1), available in My Oracle Support:
https://support.oracle.com/rs?type=doc&id=2056895.1
3.2 Discovering an Exadata Database MachineTo discover a Database Machine target, follow these steps:
1. From the Enterprise Manager home page, select the Setup menu (upper rightcorner), Add Target, and then Add Targets Manually.
2. On the Add Targets Manually page (Figure 3-1), click Add Targets Using GuidedProcess. From Add Using Guided Process window, select Oracle ExadataDatabase Machine from the list and click Add (Figure 3-2).
Discovering an Exadata Database Machine
Exadata Database Machine Discovery 3-5

Figure 3-1 Add Targets Manually
Figure 3-2 Select Oracle Exadata Database Machine
3. On the Oracle Exadata Database Machine Discovery page (Figure 3-3), select one ofthe following tasks:
• Discover a new Database Machine and its hardware components as targets.With this selection, choose one of the following monitoring options:
– 13c target type. With this target type, enhanced monitoring is availablethrough Enterprise Manager Cloud Control 13c (additional credentials arerequired).
Discovering an Exadata Database Machine
3-6 Oracle Enterprise Manager Oracle Exadata Database Machine Getting Started Guide

Enhanced monitoring of the 13c target type allows the Exadata plug-in tomonitor the Exadata Storage Server and KVM, and the EnterpriseManager Systems Infrastructure (EMSI) plug-in monitors of all otherhardware targets with the Exadata rack. The EMSI plug-in is includedwith your installation of Enterprise Manager.
– 12c target type.
After you select the monitoring type, the table will update to show the targettypes and the credentials required for discovery.
• Discover newly added hardware components in an existing Database Machineas targets. Select a Database Machine from the drop-down menu. The table willupdate to show the target types and the credentials required for discovery.
Figure 3-3 Oracle Exadata Database Machine Discovery Page
Click Discover Targets. The Exadata Discovery Wizard begins.
4. On the Discovery Inputs page (Figure 3-4), enter the following information:
• For the Discovery Agents section:
– Agent URL: The Agent deployed on compute node. Click the search iconto select from available URLs.
Note:
For IPv6-based DB Machines, select the agents that are deployed on hosts withdual stack (IPv4 and IPv6) support.
• For the Schematic Files section:
– Once you have specified the Agent URL, a new row (hostname andschematic file information) is automatically added. The default schematic
Discovering an Exadata Database Machine
Exadata Database Machine Discovery 3-7

file, databasemachine.xml, describes the hardware components of theExadata Database Machine.
– Click Set Credential to set the credentials for the host.
– Check/modify the schematic file location.
– Select the schematic file name from drop-down menu.
Note:
You only need to customize the Schematic file location if one of the followingis true:
– The Schematic file is not in the default location.
– The Database Machine contains a Storage Expansion Rack.
– The hardware components are specified in multiple schematic files.
Figure 3-4 Database Machine Discovery: Discovery Inputs
Click Next.
5. On the InfiniBand Discovery page (Figure 3-5), enter the following information:
• IB Switch Host Name: The InfiniBand switch host name. The IB Switch hostname is usually pre-populated.
• InfiniBand Switch ILOM host credential: The user name (usually ilom-admin or ilom-operator) and password for the InfiniBand switch ILOMhost.
Discovering an Exadata Database Machine
3-8 Oracle Enterprise Manager Oracle Exadata Database Machine Getting Started Guide

Figure 3-5 Database Machine Discovery: InfiniBand Discovery
Click Next.
6. On the Prerequisite Check page (Figure 3-6), Enterprise Manager will try todiscover hardware components dynamically based on your environment. If anycritical issues are encountered, then you can click Back to resolve them. EnterpriseManager will the show the problem and its severity (Info, Warning, or Critical).
Any warning issues or informational messages may also be displayed. These donot interfere with the discovery process.
Figure 3-6 Database Machine Discovery: Prerequisite Check
Click Next.
7. On the Components page (Figure 3-7), the components below are pre-selected. Youcan deselect any unwanted component. Components include, but are not limitedto, the following:
Discovering an Exadata Database Machine
Exadata Database Machine Discovery 3-9

• Compute Node: Select the hosts that are compute nodes in the Oracle ExadataDatabase Machine.
• Oracle Exadata Storage Server: Select the Oracle Exadata Storage Servers thatare part of this Oracle Exadata Database Machine target.
• InfiniBand Switch: Select the InfiniBand Switches that are part of the OracleExadata Database Machine. These also will be added as managed targets.
• Ethernet Switch: Select the Ethernet switches that are part of the OracleExadata Database Machine. The Ethernet switches will be added as managedtargets.
• Compute Node ILOM: Select the Integrated Lights Out Managers (ILOM) ofthe compute nodes that are part of this Oracle Exadata Database Machine.These ILOMs will be added as managed targets.
• KVM: Select the KVM switches that are part of the Oracle Exadata DatabaseMachine. The KVM switches will be added as managed targets.
Note:
A partitioned rack can list other components that should be deselectedmanually (for example, compute nodes).
Figure 3-7 Database Machine Discovery: Components
Click Next.
8. On the Monitoring Agents page (Figure 3-8), select an agent for the MonitoringAgent, and then one for the Backup Monitoring Agent from the drop-downselection.
Discovering an Exadata Database Machine
3-10 Oracle Enterprise Manager Oracle Exadata Database Machine Getting Started Guide

Note:
A Warning will be thrown if only one agent is used as monitoring and backupagents. Click Select Agents to add more agents, if available.
Figure 3-8 Database Machine Discovery: Monitoring Agents
Note:
Reminder: For IPv6-based DB Machines, select the agents that are deployedon hosts with dual stack (IPv4 and IPv6) support.
Click Next.
9. On the Monitoring Credential page, select either ExaCLI or CellCLI for monitoringand set the monitoring credentials appropriately. ExaCLI is recommended as itallows SSH access to the Exadata Storage Server to be locked down for highersecurity. Select from the following:
• Monitor using ExaCLI where the credentials are the same for all cells. Forexample:
Discovering an Exadata Database Machine
Exadata Database Machine Discovery 3-11

• Monitor using ExaCLI where the credentials are different for all cells. Forexample:
• Monitor using CellCLI. If you select CellCLI, then you must supply the rootcredentials (which are not stored) to set up SSH access from the monitoringagent to the Exadata Storage Server.
10. On the Agent Credential page, set the credentials for all components within theExadata Database Machine (for example, the Storage Server, PDU, InfiniBandSwitch, and so forth).
Discovering an Exadata Database Machine
3-12 Oracle Enterprise Manager Oracle Exadata Database Machine Getting Started Guide

Click Set Credential to set the credential for the component. If the users andpasswords are the same, choose Same for all and enter the user and passwordcombination.
Select Set up ASR subscription option for receiving Oracle Auto Service Request(ASR)-oriented traps in Enterprise Manager. This option is needed if you are usingEnterprise Manager to raise a Service Request (SR) instead of using ASR Manageron the cell.
Depending on the component, you may need to provide additional information.For example, in the Exadata Storage Server Credentials window, you must enterthe SNMP Credentials as well as the Root Credentials (Figure 3-9):
Figure 3-9 Example: Set Oracle Exadata Storage Server Credentials
Note:
For IPv6 environments, only SNMPV3 credential type (SNMPV3Creds) issupported.
The SNMP community String is like a password. It is sent along with eachSNMP Get-Request, allow or deny access to device. Please check with yournetwork administrator to get the community string details for your enterprise.
The Agent requires SSH access to the Cisco Ethernet switch. You must specifythis SSH access credentials when setting credentials for the Ethernet switch.
Click OK and set the credentials for all other components. Once all credentials areset, the Set Credentials page will update to show the credentials set (as shown in Figure 3-10):
Discovering an Exadata Database Machine
Exadata Database Machine Discovery 3-13

Figure 3-10 Database Machine Discovery: Credentials
Click Next.
11. On the Review page, verify each section is correct. Figure 3-11 shows an example ofan accurate review.
Discovering an Exadata Database Machine
3-14 Oracle Enterprise Manager Oracle Exadata Database Machine Getting Started Guide

Figure 3-11 Database Machine Discovery: Review
Click Submit.
12. After the Database Machine components are promoted, a Target CreationSummary page displays to show all discovered targets and components. If thereare any errors, the Status column will display a red flag. Place your cursor over theflag for a pop-up window for additional information about the error (Figure 3-12):
Discovering an Exadata Database Machine
Exadata Database Machine Discovery 3-15

Figure 3-12 Database Machine Discovery: Target Creation Summary
The discovery of the Oracle Exadata Database Machine is complete.
3.3 Discover Oracle SuperCluster as an Exadata Database MachineYou can use the Exadata plug-in to discover and monitor an Oracle SuperClustersystem. You can monitor only the Database and Exadata components of the OracleSuperCluster installed on LDOM and Zones. To monitor specific LDOM orvirtualization configurations at the operating system level, please use OracleEnterprise Manager Ops Center 12c.
To discover the Oracle SuperCluster as an Exadata Database Machine:
1. See the Discovering and Promoting Oracle Solaris Zones in the Oracle® EnterpriseManager Cloud Control Administrator's Guide for completing the prerequisite ofpushing the agent to the control domain and zones.
2. Open a Service Request (SR) and upload the following files from your first 11gR2LDOM:
/opt/oracle.SupportTools/onecommand/onecommand.params/opt/oracle.SupportTools/onecommand/config.dat
Discover Oracle SuperCluster as an Exadata Database Machine
3-16 Oracle Enterprise Manager Oracle Exadata Database Machine Getting Started Guide

Note:
Make a backup of your /opt/oracle.SupportTools/onecommanddirectory as you will overwrite it with the new configurations.
3. Oracle Support will provide you the file(s) generated based on the informationprovided in your configuration files. Copy all files into your /opt/oracle.SupportTools/onecommand directory.
4. Ensure that READ permissions are open for all files in this directory as well as inthe /opt/oracle.SupportTools/em directory. The agent must be able to readthese files during discovery.
5. Run Self Update from Enterprise Manager to download the Solaris SPARC agentsoftware on the OMS. Apply that download to the OMS to make it available fordeployment:
a. From Enterprise Manager, click Setup, then Extensibility, and finally SelfUpdate. Click Agent Software.
b. Select Oracle Solaris on SPARC (64-bit).
c. If the status is Available, then click Download from the Actions menu.
d. Once downloaded, you must Apply it to the OMS from the same Self Updatepage.
For more details on Self Update in Online or Offline mode, see the Updating CloudControl chapter in the Oracle® Enterprise Manager Cloud Control Administrator'sGuide.
6. Install an agent on each of the Database nodes of the Oracle SuperCluster:
a. From Enterprise Manager, select Setup, then Add Target, and finally AddTargets Manually.
b. Select Add Host Targets (selected by default) and click Add Host.
c. Continue with the installation wizard and ensure that you run root.sh oneach node once installation is completed.
Note:
You may run into a known issue where you have to edit the Ciphers entryin /etc/ssh/sshd_config and restart ssh (see bug 13822068 for details).See SSHD Connection Errors After Upgrading To Exadata Version 11.2.3.1.0 (DocID 1437596.1) in My Oracle Support:
https://support.oracle.com/rs?type=doc&id=1437596.1
7. Configure the database nodes for Database Machine discovery.
This step is needed to set descriptions of each DB node by updating the DB nodeIP address, Host Channel Adapter ID, and management hostname in theInfiniBand configurations using set_nodedesc.sh. Enterprise Manager Agentslook for this information when discovering the Database Machine.
Discover Oracle SuperCluster as an Exadata Database Machine
Exadata Database Machine Discovery 3-17

Run:
# ibnetdiscover | grep your_db_nodes
If no output is not returned, then run the following command to set the nodedescriptions from all database nodes:
# /bin/ib_set_node_desc_ssc.sh
8. Discover Exadata Database Machine from Enterprise Manager using ManualDiscovery wizard. This discovery process is the same as any other Exadata DBMtarget. See Discovering an Exadata Database Machine.
9. Discover the HA RAC Cluster and the cluster databases and configure each targetas usual.
3.4 Discovering Grid Infrastructure and RACThe following sections provide instructions for discovering Grid Infrastructure andOracle Real Application Clusters targets:
• Discover Grid Infrastructure (Cluster) Targets
• Discover Oracle Real Application Clusters Targets
3.4.1 Discover Grid Infrastructure (Cluster) Targets
1. From the Setup menu, select Add Targets, then Add Targets Manually.
2. In the Add Targets Manually page, select Add Non-Host Targets Using GuidedProcess (Also Adds Related Targets) and Target Type as Oracle Cluster and HighAvailability Services.
3. Click Add Using Guided Discovery and follow the wizard.
4. On the Add Cluster Target: Specify Host page, select the first database node andclick Continue.
5. The cluster home details are displayed. Ensure that all database nodes are shown inSelected Hosts section.
6. Click Add.
3.4.2 Discover Oracle Real Application Clusters Targets
1. From the Setup menu, select Add Targets, then Add Targets Manually.
2. In the Add Targets Manually page, select Add Non-Host Targets Using GuidedProcess (Also Adds Related Targets) and Target Type as Oracle Database,Listener and Automatic Storage Management.
3. Click Add Using Guided Discovery and follow the wizard.
4. In the wizard pages, configure Cluster Databases (dbsnmp password required) andCluster ASM (asmsnmp password required).
Discovering Grid Infrastructure and RAC
3-18 Oracle Enterprise Manager Oracle Exadata Database Machine Getting Started Guide

3.5 Switch from Using CellCLI to ExaCLI after Storage Server LockedDown
You can at any time lock down an Exadata Storage Server and switch to ExaCLI formonitoring/administration (See Exadata Storage Server User Guide to know moreabout ExaCLI). From the Exadata Storage Server menu, select Target Setup, then selectMonitoring Configuration, as shown in Figure 3-13:
Figure 3-13 Monitoring Credentials Menu Item
On the Monitoring Configuration page, set the Support ExaCLI value to 1 (the defaultis 0), as shown in Figure 3-14:
Switch from Using CellCLI to ExaCLI after Storage Server Locked Down
Exadata Database Machine Discovery 3-19

Figure 3-14 Monitoring Configuration: Set to Monitor Using ExaCLI
Switch from Using CellCLI to ExaCLI after Storage Server Locked Down
3-20 Oracle Enterprise Manager Oracle Exadata Database Machine Getting Started Guide

4Post-Discovery Configuration and
Verification
discoverypost-discovery configuration and verificationOnce the Oracle ExadataDatabase Machine has been discovered through Enterprise Manager Cloud Control13c, you must complete post-discovery configuration on the following targets:
• Set Up SNMP Trap Forwarding on Compute Node
• Configure Storage Cell SNMP for Enterprise Manager Monitoring
• Configure and Verify SNMP for InfiniBand Switch Targets
• Configure the Compute Node ILOM SNMP for Enterprise Manager Monitoring
• Verify Configuration for Oracle ILOM Server
• Set Up SNMP for Cisco Ethernet Switch Targets
• Set Up SNMP for Power Distribution Unit (PDU) Targets
• Set Up SNMP for KVM Targets
• Accessing Oracle Support Workbench for Exadata Storage Server
• Oracle Exadata Database Machine Dashboard Creation
Note:
You must remove the SNMP notification on the cell, InfiniBand switch, ILOM,Cisco switch, PDU, and KVM manually if you remove these targets fromEnterprise Manager.
Starting with Exadata plug-in Release 12.1.0.3.0, when the Exadata DatabaseMachine target is deleted through Enterprise Manager Cloud Control, there isan option to remove the SNMP notification from the cells and InfiniBandswitches.
Note:
View a video of how to monitor your Exadata environment:
https://apex.oracle.com/pls/apex/f?p=44785:24:0::NO:24:P24_CONTENT_ID,P24_PREV_PAGE:5664,1
Post-Discovery Configuration and Verification 4-1

4.1 Set Up SNMP Trap Forwarding on Compute Node
Note:
If you do not need to monitor KVM, then you can skip this section.
The traps from the KVM will be sent to UDP port 162 on the monitoring agent host.For the Enterprise Manager Agent to receive traps from the KVM, SNMP trapforwarding must be set up on the host where the Enterprise Manager Agent is runningso that the snmptrapd daemon can receive traps using port 162 and forward the trapto the agent receivelet's listening port.
Ideally, you should perform the steps on all compute nodes in preparation for ascenario when monitoring is moved to a compute node that was not previously beingused to monitor the KVM targets.
• Set Up Compute Node Agent - Linux
• Set Up Compute Node Agent - Solaris
4.1.1 Set Up Compute Node Agent - LinuxThe following commands must be run as root user:
1. Get the port value from EMD_URL property in the <AGENT_INST>/sysman/config/emd.properties file. This is the port at which receivelet will listen overUDP for traps (for this example, the port value is 3872).
2. Confirm that the receivelet is listening on this port over UDP. An entry should beseen in the below command's output:
# netstat -an | grep 3872 | grep udp
3. Run the following command to stop the SNMP trap daemon:
# service snmptrapd stop
Typically, the service command will be located in the /sbin directory.
4. Add the following entry to the /etc/snmp/snmptrapd.conf configuration file:
authcommunity log,execute,net <community string>forward default udp:localhost:3872
Note:
If the /etc/snmp/snmptrapd.conf file does not exist, create one and addthe lines as described above.
5. Edit the /etc/hosts.allow file to add the following line:
snmptrapd : ALL
6. Run the following command:
# chkconfig snmptrapd on
Set Up SNMP Trap Forwarding on Compute Node
4-2 Oracle Enterprise Manager Oracle Exadata Database Machine Getting Started Guide

7. Run the following command to start the SNMP trap daemon:
# service snmptrapd start
4.1.2 Set Up Compute Node Agent - SolarisThe following commands must be run as root user:
1. Get the port value from EMD_URL property in the <AGENT_INST>/sysman/config/emd.properties file. This is the port at which receivelet will listen overUDP for traps (for this example, the port value is 3872).
2. Confirm that the receivelet is listening on this port over UDP. An entry should beseen in the below command's output:
# netstat -an | grep 3872 | grep udp
3. Run the following command to stop the SNMP trap daemon:
# svcadm disable snmptrapd
You may see the following message. If so, then you can ignore it:
svcadm: Pattern 'snmptrapd' doesn't match any instances
Typically, the svcadm command will be located in the /usr/sbin directory.
4. Add the following entry to the /etc/net-snmp/snmp/snmptrapd.confconfiguration file:
authcommunity log,execute,net <community string>forward default udp:localhost:3872
Note:
If the /etc/net-snmp/snmp/snmptrapd.conf file does not exist, createone and add the lines as described above.
5. Create a /tmp/snmptrapd.xml file with the following content:
<?xml version="1.0"?><!DOCTYPE service_bundle SYSTEM"/usr/share/lib/xml/dtd/service_bundle.dtd.1"><service_bundle type='manifest' name='snmptrapd'> <service name='application/management/snmptrapd' type='service' version='1'> <create_default_instance enabled='true' /> <single_instance /> <dependency name='network' grouping='require_all' restart_on='none' type='service'> <service_fmri value='svc:/milestone/network:default' /> </dependency> <exec_method type='method' name='start' exec="/usr/sbin/snmptrapd -Lsd -p /var/run/snmptrapd.pid" timeout_seconds ="60"/> <exec_method type='method' name='stop' exec=':kill' timeout_seconds='60'/> <stability value='Evolving' /> <template> <common_name> <loctext xml:lang='C'>net-snmp SNMP trap daemon</loctext> </common_name> </template>
Set Up SNMP Trap Forwarding on Compute Node
Post-Discovery Configuration and Verification 4-3

</service></service_bundle>
6. Validate the /tmp/snmptrapd.xml file you have just created in step 5:
# svccfg validate /tmp/snmptrapd.xml
7. Import the /tmp/snmptrapd.xml file:
# svccfg import snmptrapd.xml
8. Make sure that the snmptrapd daemon is running:
# svcs snmptrapd
An example of the output is:
STATE STIME FMRIonline 16:20:00 svc:/application/management/snmptrapd:default
9. If needed, you can start the snmptrapd daemon with the following command:
# svcadm enable snmptrapd
4.2 Configure Storage Cell SNMP for Enterprise Manager MonitoringExadata Storage Cell SNMP configuration is performed using the cellcli commandand can be run in batch using dcli from a compute node.
Note:
• For Enterprise Manager Cloud Control 12c Bundle Pack 1 (BP1):
The SNMP trap subscription for Exadata Storage Cells is doneautomatically after finishing the guided discovery process.
• For Exadata plug-in Release 12.1.0.2.0 and later:
During the discovery process, you can optionally provide the necessaryroot credentials to subscribe for SNMP traps from Exadata Storage Cells.If you have done so, then you can skip the remaining steps of this sectionand proceed with Configure and Verify SNMP for InfiniBand SwitchTargets.
• While the public string is used for the SNMP examples in the followingsections, it is supported to use any valid SNMP community string.
• Because of a limitation with the V1 protocol and JDMK API, if an IPv6component sends SNMPv1 traps, then the sender's IP address is always0.0.0.0. Therefore, if the Exadata Storage Server environment is IPv6,then the snmpv1 subscription should not be allowed.
• Use an SNMP V3 subscription for IPv6-based cell targets because of thelimitation in SNMP V1 protocol.
Configure Storage Cell SNMP for Enterprise Manager Monitoring
4-4 Oracle Enterprise Manager Oracle Exadata Database Machine Getting Started Guide

4.2.1 Using the ALTER CELL CommandWhile using the ALTER CELL command, all existing subscribers should be specifiedalong with the new subscriber being added. Similarly, you can also modify thenotificationPolicy or notificationMethod attributes.
While using the ALTER CELL command, the host= and community= attributevalues should be quoted, and type= is NOT quoted.
If you are using the DCLI utility to set up SNMP alerting, then any commandcontaining punctuation, which will be interpreted by the local shell, must be enclosedwith double quotation marks. If the command includes the following characters, thenouter quotation marks and escape characters are required:
$ (dollar sign)' (quotation mark)< (less than)> (greater than)( ) (parentheses)
The backslash (\) is the escape character that allows the characters to be passed to theCellCLI utility without being interpreted by the remote shell.
4.2.2 Check Current SNMP ConfigurationCheck the current SNMP configuration using the following cellcli commands:
1. To list the current subscribers for SNMP:
# cellcli -e list cell attributes snmpSubscriber
When correctly configured, this command should list the primary and backupagents for the cell target, for example:
# cellcli -e list cell attributes snmpSubscriber((host=[hostname.mycompany.com],port=3872,community=public),(host=[hostname2.mycompany.com],port=3872,community=public))
2. To list the currently configured notification methods:
# cellcli -e list cell attributes notificationMethod
Possible values are snmp, mail and snmp,mail. When correctly configured, thiscommand should return either snmp or snmp,mail, for example:
# cellcli -e list cell attributes notificationMethodsnmp,mail
3. To list the currently configured notification policy for SNMP:
# cellcli -e list cell attributes notificationPolicy
Possible values are any or all of Critical, Warning, and Clear. When correctlyconfigured, this command should return Critical, Warning, Clear, forexample:
# cellcli -e list cell attributes notificationPolicyCritical,Warning,Clear
Configure Storage Cell SNMP for Enterprise Manager Monitoring
Post-Discovery Configuration and Verification 4-5

4.2.3 Configure SNMP Values Using cellcliTo set the values of snmpSubscriber, notificationMethod andnotificationPolicy:
1. Set the snmpSubscriber value:
• SNMP V1
# cellcli -e "alter cell snmpSubscriber=((host='[host name]',port=[port]),(host='[host name]',port=[port]))"
Where [host name] and [port] values are Agents monitoring your celltargets.
• SNMP V3
The process is same as above, but along with the host and port, an SNMP V3user and type must be provided:
ALTER CELL snmpSubscriber=((host='host1.example.com',port=[port], snmpUser='[v3user]', type=V3))
Before you run the command, make sure that a v3user is a valid SNMP useron the cell. You can check by running following command:
cellcli -e "list cell attributes snmpUser"
If there is no valid SNMP user on the cell, then add a V3 user with thefollowing command:
ALTER CELL snmpUser=((name='[v3user]', authProtocol='MD5', authPassword='[passwd]', privProtocol='DES', privPassword='[passwd]'))
Note:
The Enterprise Manager Agent supports only DES and MD5/SHAcombination as of now. AES is not supported.
• Oracle Auto Service Request (ASR) subscription
The above two steps describe the process of adding an SNMP subscription forcell traps in MS MIB format. If you want to subscribe for SNMP traps in theOracle Auto Service Request (ASR) format as well, then along with the entriesmentioned above you must add another entry with type=ASR (for V3, it istype=V3ASR).
For example, for SNMP V1:
ALTER CELL snmpSubscriber=((host='host1.example.com',port=[port],community='[community string]'), (host='host1.example.com',port=[port],community='[community]',type=ASR))
For example, for SNMP V3:
ALTER CELL snmpSubscriber=(((host='host1.example.com',port=[port],community='[community string]'),(host='host1.example.com',port=[port], snmpUser='[v3user]', type=V3ASR))
Configure Storage Cell SNMP for Enterprise Manager Monitoring
4-6 Oracle Enterprise Manager Oracle Exadata Database Machine Getting Started Guide

Note:
Take special care not to overwrite existing settings for snmpSubsriber. Ifthere are existing subscribers, then append the agent subscriptions. Forexample, if the cellcli -e list cell attributes snmpSubscribercommand returned:
# cellcli -e list cell attributes snmpSubscriber ((host=ilm-asr1.example.com,port=162,community=public,type=asr))
Then you must append the Agent subscriptions:
#cellcli -e "alter cell snmpSubscriber=((host='ilm-asr1.example.com',port=162,community=public,type=asr),(host='[host name]',port=[port]),(host='[host name]',port=[port]))"
2. For SNMP V3, update the following in Enterprise Manager:
• Ensure that the V3 monitoring credentials are set up on the cell target inEnterprise Manager which match the v3 user on the cell:
– Log in to Enterprise Manager.
– From the Setup menu, select Security, then select MonitoringCredentials.
– Select the Exadata Storage Server type and click Manage MonitoringCredentials.
– Select the cell and set the V3 credentials.
• Ensure that the snmpengineid property is set up on the target in EnterpriseManager:
– Log in to Enterprise Manager.
– Go to the Exadata Storage Server home page.
– From the Exadata Storge Server menu, select Monitoring Configuration.
– If the snmpengineid property is not set, then set it manually inEnterprise Manager. You can obtain it from the cell with the followingcommand
list cell attributes snmpengineidhex
All of the above steps are automatically taken care of it SNMP V3subscription along with ASR option are selected during Exadata DatabaseMachine discovery.
3. Set the notificationMethod value:
# cellcli -e "alter cell notificationMethod='snmp,mail'"
4. Set the notificationPolicy value:
# cellcli -e "alter cell notificationPolicy='Critical,Warning,Clear'"
Configure Storage Cell SNMP for Enterprise Manager Monitoring
Post-Discovery Configuration and Verification 4-7

4.2.4 Configure SNMP Values Using dcli (optional)The SNMP configuration commands can be run using dcli to perform theconfiguration in batch on all storage cells:
1. Set the snmpSubscriber value:
$ dcli -g cell_group -l root "cellcli -e \"alter cell snmpSubscriber=((host='[host name]',port=[port]),(host='[host name]',port=[port]))\""
Where [host name] and [port] values are Agents monitoring your cell targets.
2. Set the notificationMethod value:
$ dcli -g cell_group -l root "cellcli -e \"alter cell notificationMethod='snmp,mail'\""
3. Set the notificationPolicy value:
$ dcli -g cell_group -l root "cellcli -e \"alter cell notificationPolicy='Critical,Warning,Clear'\""
4.2.5 Verify SSH ConnectivityOpen a new terminal and verify whether the SSH connectivity was successfullyestablished:
$ ssh -l cellmonitor <cell_ipaddress> cellcli -e 'list cell detail'
• If you are not prompted for any password, then you can assume that theconnectivity is established.
• If you are asked to confirm whether you want to continue connecting, specify Yes.
4.2.6 Remove a SubscriptionTo remove the subscription, use the ALTER CELL command again by excluding thehost name that you want to remove from the snmpsubscriber list.
Note:
The SNMP receivelet listens on a single address and port for all monitoredtargets. The port is the UDP port with the same number as the TCP port usedin the EMD_URL.
By default, the SNMP receivelet listens on all addresses; if the propertySnmpRecvletListenNIC is set in the emd.properties file, the receiveletwill attempt to resolve the value as either a name or IP address, and listen ononly that address.
This parameter is independent of AgentListenOnAllNICs and EMD_URLbecause in some installations, the Agent may need to communicate with theOMS and with managed targets on different networks.
Configure Storage Cell SNMP for Enterprise Manager Monitoring
4-8 Oracle Enterprise Manager Oracle Exadata Database Machine Getting Started Guide

4.3 Configure and Verify SNMP for InfiniBand Switch TargetsThe SNMP configuration for Enterprise Manager monitoring of InfiniBand Switches isdone automatically as part of the Enterprise Manager guided discovery process. It isgood practice, however, to verify that SNMP configuration has been successful.
Note:
• For Enterprise Manager Cloud Control 12c Bundle Pack 1 (BP1):
The SNMP Trap setup for Infiniband Switches is done automatically afterfinishing the guided discovery process.
• For Exadata plug-in Release 12.1.0.2.0 and later:
During the discovery process, you can optionally provide the necessaryroot credentials to set up SNMP trap for the InfiniBand Switch. If youhave done so, then you can skip the remaining steps of this section andproceed with Configure the Compute Node ILOM SNMP for EnterpriseManager Monitoring.
To configure (if necessary) and verify the SNMP configuration for an InfiniBandSwitch:
1. Log in to the InfiniBand Switch ILOM web interface using the URL https://<ib_switch_hostname> as root.
Note:
Try using Internet Explorer if the console does not display all fields/values inyour browser of choice.
2. Click Configuration, then System Management Access, and finally SNMP.
3. Ensure the following values are set:
State=EnabledPort=161Protocols=v1,v2c,v3
If you need to make changes, make sure you click Save.
4. Click Configuration, then System Management Access, then SNMP, and finallythe Communities link. The page scrolls to the SNMP Communities table. In theSNMP Communities table, click Add.
A new window opens.
5. Type the community name into the Community Name field. Select the permissionsfrom the Permission drop-down menu. Click Save.
The community is created, and the window closes.
6. Click Alert Management.
Configure and Verify SNMP for InfiniBand Switch Targets
Post-Discovery Configuration and Verification 4-9

7. If not already listed, for each Agent that monitors the InfiniBand Switch target,select an empty alert (one that has the Destination Summary 0.0.0.0, snmpv1, community 'public') and click Edit. Provide the following values:
Level = MinorType = SNMP TrapAddress = [agent compute node hostname]Destination Port = [agent port]SNMP Version = v1Community Name = public
Click Save.
8. Verify the InfiniBand Switch SNMP configuration for Enterprise Managermonitoring:
snmpget -v 1 -c <community_string> <hostname_of_IB_switch> 1.3.6.1.4.1.42.2.70.101.1.1.9.1.1.5
For example:
$ snmpget -v 1 -c public my_IB_switch.my_company.com 1.3.6.1.4.1.42.2.70.101.1.1.9.1.1.5SNMPv2-SMI::enterprises.42.2.70.101.1.1.9.1.1.5 = INTEGER: 1
Note:
If the Timeout message is displayed as a output for the above command, thenit means that the InfiniBand Switch is not yet configured for SNMP.
Note:
To remove the subscription, follow steps 1 to 5 above (step 3 is not needed). Instep 5, set the Agent compute node host name to 0.0.0.0 and the port to 0.
4.3.1 Set Up SNMP for InfiniBand Switch Targets Using Enterprise ManagerYou can set up SNMP for InfiniBand Switch targets using the Enterprise ManagerCloud Control console:
1. Navigate to the IB Network target (not the individual switches) and selectAdministration.
2. Select the IB Switch target type, then one of the IB Switch targets.
3. Select the Setup SNMP Subscription command, then select the management agentURL that monitors the InfiniBand switch target from the Agent URL list. ClickNext.
4. Provide credentials for the InfiniBand switch. Click Next.
5. Review the details you provided. If there are no further changes, then click Submit.
Perform steps 1-5 for both the Monitoring Agent and Backup Monitoring Agent of theInfiniBand switch target.
Configure and Verify SNMP for InfiniBand Switch Targets
4-10 Oracle Enterprise Manager Oracle Exadata Database Machine Getting Started Guide

4.4 Configure the Compute Node ILOM SNMP for Enterprise ManagerMonitoring
Note:
These instructions apply only for the Exadata Database Machine and are notapplicable to the Oracle SuperCluster.
The compute node ILOM targets are responsible for displaying a number of diskfailure alerts for their respective compute node that are received as SNMP traps. ForEnterprise Manager to receive those traps, the /opt/oracle.cellos/compmon/exadata_mon_hw_asr.pl script must be run to configure SNMP subscriptions forthe agents (both primary and backup agents) that have been configured to monitor thecompute node ILOM targets. This step is applicable to Exadata plug-in Release12.1.0.2.0 and later.
The exadata_mon_hw_asr.pl script is run as the root user with the -set_snmp_subscribers parameter to add SNMP subscribers. For example:
# /opt/oracle.cellos/compmon/exadata_mon_hw_asr.pl -set_snmp_subscribers "(host=hostname1.mycompany.com,port=3872,community=public,type=asr,fromip=11.222.33.444),(host=hostname2.mycompany.com,port=3872,community=public,type=asr,fromip=12.345.67.890)"Try to add ASR destination Host - hostname1.mycompany.com IP - 11.222.33.44 Port - 3872 Community - public From IP - 22.333.44.555Try to add ASR destination Host - hostname2.com IP - 11.111.11.111 Port - 3872 Community - public From IP - 22.333.44.555
The script needs to be run on each compute node:
• The host values should be the hostnames of the agents configured to monitor thecompute node ILOM target associated with the compute node.
• The fromip values should be the IP address of the compute node that thecompute node ILOM target is associated with.
For example, if you have an X2-2 machine with compute node targets edbm01db01through edbm01db08 and associated compute node ILOM targets edbm01db01-cthrough edbm01db08-c, then you would need to run the script once on each computenode - therefore, the script would be run eight times in total.
• On compute node edbm01db01, the host and port values would be thehostnames and ports of the agents monitoring compute node ILOM targetedbm01db01-c and the fromip value would be the IP address of the computenode itself, edbm01db01.
• On compute node edbm01db02, the host and port values would be thehostnames and ports of the agents monitoring compute node ILOM targetedbm01db02-c and the 'fromip' value would be the IP address of the computenode itself, edbm01db02, ... and so on.
This is a good example of where Manual selection of Management Agents for targetsis useful. If the first two compute nodes are always the Monitoring Agent and BackupMonitoring Agent, then it is easy to work out the values needed for -
Configure the Compute Node ILOM SNMP for Enterprise Manager Monitoring
Post-Discovery Configuration and Verification 4-11

set_snmp_subscribers parameters, the host and port values would be the samefor all compute nodes.
Note:
The exadata_mon_hw_asr.pl script, overwrites any existing SNMPsubscriptions. While setting the SNMP subscribers, make sure that currentsubscribers are included in the new list of subscribers.
It is possible to use the exadata_mon_hw_asr.pl script to get the currentset of subscribers using the -get_snmp_subscribers parameter.
For example:
# /opt/oracle.cellos/compmon/exadata_mon_hw_asr.pl -get_snmp_subscribers -type=asr
Suppose the current list is:
(host=hostname1.mycompany.com,port=162,community=public,type=asr,fromip=11.222.33.444),(host=hostname2.mycompany.com,port=162,community=public,type=asr,fromip=11.222.33.444)
Then new subscriptions can be added using the following command:
# /opt/oracle.cellos/compmon/exadata_mon_hw_asr.pl -set_snmp_subscribers "(host=asrhostname1.mycompany.com,port=162,community=public,type=asr,fromip=11.222.33.444),(host=asrhostname2.mycompany.com,port=162,community=public,type=asr,fromip=11.222.33.444),(host=hostname1.mycompany.com,port=3872,community=public,type=asr,fromip=11.222.33.444),(host=hostname2.mycompany.com,port=3872,community=public,type=asr,fromip=11.222.33.444)"
After adding the new subscribers, run the command exadata_mon_hw_asr.plscript with the -get_snmp_subscribers parameter to get the list of SNMPsubscribers and verify the new SNMP subscriptions were added successfully. Forexample:
# /opt/oracle.cellos/compmon/exadata_mon_hw_asr.pl -get_snmp_subscribers -type=asr(host=asrhostname1.mycompany.com,port=162,community=public,type=asr,fromip=10.10.10.226),(host=asrhostname2.mycompany.com,port=162,community=public,type=asr,fromip=10.10.10.226),(host=hostname1.mycompany.com,port=3872,community=public,type=asr,fromip=10.10.10.226),(host=hostname2.mycompany.com,port=3872,community=public,type=asr,fromip=10.10.10.226)
4.4.1 Configure the Compute Node ILOM SNMP for Compute Nodes RunningManagement Server
For compute nodes running Management Server, the call to theexadata_mon_hw_asr.pl script is replaced with dbmCLI commands, which aresimilar to cellCLI commands on the Storage Cells.
Configure the Compute Node ILOM SNMP for Enterprise Manager Monitoring
4-12 Oracle Enterprise Manager Oracle Exadata Database Machine Getting Started Guide

Oracle Exadata Database Machine X5-2 (up to X6) runs the Management Server oncompute nodes.
4.4.2 Configure SNMP Values Using dbmcli
1. Set the snmpSubscriber value:
# dbmcli -e "ALTER DBSERVER snmpSubscriber=((host=[agent1_hostname],port=[agent1_port],community=public,type=asr),(host='agent2_hostname',port=<agent's port>,type=asr))"
Where [host name] maps to the Enterprise Manager agents monitoring yourcompute node target.
2. Set the notificationMethod value:
# dbmcli -e "ALTER DBSERVER notificationMethod="mail,snmp", notificationPolicy="critical,warning,clear", smtpFrom="admin", smtpFromAddr=[sender email address], smtpPort=[port], smtpServer=[smtp server], smtpToAddr=[recipient email address], smtpUseSSL=TRUE
3. Verify the updates by executing:
# dbmcli -e "LIST DBSERVER attributes snmpSubscriber"
For Virtualized Exadata, these commands need to be executed in Dom0.
4.4.3 Configure SNMP for Oracle SuperCluster
1. Log in to the Oracle SuperCluster ILOM web interface, which is accessible via abrowser using the url http://<ilom_hostname> and the root credentials.
2. Select Configuration, then Alert Management.
3. Add a row for each agent.
4. Select an empty slot and click Edit.
5. Specify the following information:
• Level: Minor
• Type: SNMP Trap
• Address: IP Address of the Agent
• Destination Port: Uncheck Autoselect, then specify Agent port manually
• SNMP Version: v1
• Community Name: {your chosen community name}
6. Click Save.
4.5 Verify Configuration for Oracle ILOM ServerTo verify that Alerts can be successfully raised and cleared for the Oracle ILOM Servertargets, perform the following steps:
Verify Configuration for Oracle ILOM Server
Post-Discovery Configuration and Verification 4-13

1. Log in to the Enterprise Manager Cloud Control console as an administrator.
2. Click Targets and select Exadata. Select one of the Oracle ILOM Server targetsusing the Target Navigation pane.
The ILOM target page will be displayed, showing the current status of that targetas well as any incidents that have been raised for it.
3. Raise an alert manually from the ILOM Server being validated. Run followingcommand as root on the first database server in the cluster:
# ipmitool -I lan -H sclczdb01-c -U oemuser -P oempasswd -L OPERATOR event PS0/VINOK deassert
The output will be similar to:
Finding sensor PS0/VINOK... ok0 | Pre-Init Time-stamp | Power Supply #0x65 | State Deasserted
After running the above command, wait a few minutes then refresh the ILOMtarget page. An incident should appear in the Incidents section.
4. Clear the alert raised in step 3. Run the following command as root on the firstdatabase server in the cluster:
# ipmitool -I lan -H sclczdb01-c -U oemuser -P oempasswd -L OPERATOR event PS0/VINOK assert
The output will be similar to:
Finding sensor PS0/VINOK... ok0 | Pre-Init Time-stamp | Power Supply #0x65 | State Asserted
After running the above command, wait a few minutes then refresh the ILOMtarget page. The incident that was raised in step 3 should show as cleared in theIncidents section.
Note:
Do not forget to clear the alert raised in step 3, as it was raised for testing onlyand did not reflect a true fault condition!
5. Repeat for the remaining configured ILOM service processors in your OracleDatabase Machine.
4.6 Set Up SNMP for Cisco Ethernet Switch TargetsThe Cisco Ethernet Switch must be configured to allow the Agents that monitor it tobe able to both poll the switch and to receive SNMP alerts from the switch. To allowthis, perform the following steps (swapping the example switch name dm01sw-ipwith the name of the Cisco Ethernet Switch target being configured):
1. Log in to the Cisco switch and enter Configure mode:
# ssh cisco-switch-host -l <admin user>User Access Verification Password: dm01sw-ip> enablePassword:dm01sw-ip# configure terminal
Set Up SNMP for Cisco Ethernet Switch Targets
4-14 Oracle Enterprise Manager Oracle Exadata Database Machine Getting Started Guide

Enter configuration commands, one per line. End with CNTL/Z.dm01sw-ip(config)#
2. Enable access to allow the Agents monitoring Cisco Switch target to poll the switch.
In the command, [EMagentIPaddr] is the IP address of the server where theEnterprise Manager Agent is running. The SNMP community specified must matchthe value provided when configuring the Cisco Switch target:
dm01sw-ip(config)# access-list 1 permit [EMagentIPaddr]dm01sw-ip(config)# snmp-server community <community_string> ro 1
3. Set the monitoring Agent as the location where SNMP traps are delivered. TheSNMP community specified must match the value provided during EnterpriseManager Cisco Switch Management Plug-In setup:
dm01sw-ip(config)# snmp-server host <EMagentIPaddr> version 1 <community string> udp-port [EMagentRecvltListenPort]
Where [EMagentRecvltListenPort] is the EMD_URL port of the emagent orSnmpRecvletListenNIC property value if it is enabled.
4. Configure the Cisco Switch to send only environmental monitor SNMP traps:
dm01sw-ip(config)# snmp-server enable traps envmon
5. Verify settings and save the configuration:
dm01sw-ip(config)# enddm01sw-ip# show running-configdm01sw-ip# copy running-config startup-config
4.6.1 Verify the Cisco Ethernet Switch SNMP ConfigurationRun the snmpwalk command line utility or equivalent tool to verify the Cisco Switchconfiguration.
Run the following commands to fetch and display the data from the Cisco switch:
$ snmpget –v 1 –c <community_string> <hostname_of_cisco_switch> 1.3.6.1.4.1.9.2.1.56.0$ snmpget –v 2c –c <community_string> <hostname_of_cisco_switch> 1.3.6.1.4.1.9.2.1.56.0
Note:
If a timeout message is displayed as an output for the above command, then itmeans that the Cisco Switch is not yet configured correctly.
4.7 Set Up SNMP for Power Distribution Unit (PDU) TargetsTo enable Enterprise Manager to collect metric data and raise events for the PDUtarget, you must configure the PDU to accept SNMP queries from the Agents thatmonitor the PDU target. Also, appropriate threshold values for different phase valuesneeds to be set on the PDU.
This section assumes that this is a first time configuration of the PDU. SNMP must beenabled and the trap section completed. Granting SNMP access to a different
Set Up SNMP for Power Distribution Unit (PDU) Targets
Post-Discovery Configuration and Verification 4-15

monitoring Agent IP address is an example where only the "Trap Host Setup" sectionneeds to be changed.
1. Log in to the PDU network interface through a browser at http://<pdu-name>,for example: http://edbm01-pdu1.example.com
2. Click Net Configuration, then log in again.
3. Scroll down until you reach the SNMP section of the frame.
Note:
The network interface for the PDU is a frame within a window. In order toscroll down on this page, you must see the scroll bar for the PDU frame aswell as the outside scroll bar for the browser in which you accessed the PDU.
4. If your PDU is not SNMP-enabled, select the SNMP Enable check box, then clickSubmit.
5. Scroll to the NMS region of the frame.
6. Enter the following in Row 1 under NMS:
• IP: Enter the IP address of the first monitoring Agent
• Community: Enter "public"
7. Click Submit.
For details on configuring the PDU thresholds settings, see the "Configuring OracleExadata Database Machine" chapter in your Exadata Database Machine Owner's Guide.This guide is pre-loaded along with other Exadata user documentation onto yourOracle Exadata Database Machine.
4.7.1 Verify the PDU SNMP ConfigurationUse the snmpwalk command line utility or equivalent tool to verify the PDUconfiguration.
Run the following command to fetch and display the data from PDU:
snmpget –v 1 –c <community_string> <hostname_of_pdu> 1.3.6.1.4.1.2769.1.2.3.1.1.1.0
Note:
If a timeout message is displayed as an output for the above command, then itmeans that the PDU is not yet configured correctly.
4.8 Set Up SNMP for KVM TargetsThe KVM needs to be configured to send SMNP traps to the Agents that monitor it.See the following sections to set up SNMP for KVM targets:
• Set Up SNMP in KVM Management Console
• Verify the KVM SNMP Configuration (Base SNMP Configuration) - Linux
Set Up SNMP for KVM Targets
4-16 Oracle Enterprise Manager Oracle Exadata Database Machine Getting Started Guide

• Verify the KVM SNMP Configuration (Base SNMP Configuration) - Solaris
• Verify the KVM SNMP Configuration (SNMP Forwarding to Agent)
Note:
The SNMP forwarder setup described in Set Up SNMP Trap Forwarding onCompute Node is required on the compute node agent that monitors the KVMtarget. If the SNMP forwarder is not set up, the agent will not receive trapsfrom the KVM device.
4.8.1 Set Up SNMP in KVM Management ConsoleConfigure the KVM to send traps to the monitoring agent host:
1. Log in to the KVM management console through a browser at:
https://<kvm-name>
For example:
https://edbm01sw-kvm.example.com
2. Click SNMP under Target Devices in the left-hand navigation bar.
3. Select the Enable SNMP check box and enter the appropriate community name inthe Read, Write, and Trap fields (for example, enter "public").
4. Click Save.
5. Click Destinations under SNMP in the left-hand navigation bar.
6. Enter the IP address of the Agent monitoring the KVM target.
7. Click Save.
The traps from the KVM device will be sent to UDP port 162 on the monitoring agenthost. Refer to Set Up SNMP Trap Forwarding on Compute Node for details to set upthe trap forwarder to forward traps received on port 162 to the Enterprise Manageragent receivelet port.
4.8.2 Verify the KVM SNMP Configuration (Base SNMP Configuration) - LinuxRun the snmptrapd command line utility to verify the KVM configuration. Make surethat the steps outlined in Set Up SNMP Trap Forwarding on Compute Node has beenperformed.
Follow the steps below on the monitoring agent host for the KVM target:
1. Log in as root.
2. Run the following command:
# service snmptrapd stop# /usr/sbin/snmptrapd -d -Lsd -p /var/run/snmptrapd.pid
3. Reboot the KVM to generate SNMP traps. To reboot the KVM:
a. Log in to the KVM.
Set Up SNMP for KVM Targets
Post-Discovery Configuration and Verification 4-17

b. Click Overview on the left side of the screen under Unit View, Appliance.
c. Click Reboot.
d. In the confirmation window, click OK to confirm KVM reboot.
4. Check that snmptrapd logs messages in the /var/log/messages file from theIP address of the KVM. The following example shows the messages for the KVM'sIP address (10.1.1.240):
Jul 30 14:51:05 dbm1db02 snmptrapd[65800]: Received 72 bytes from UDP: [10.1.1.240]:32768.Jul 30 14:51:05 dbm1db02 snmptrapd[65800]: 0000: 30 82 00 44 02 01 00 04 06 70 75 62 6C 69 63 A4 0..D.....public..Jul 30 14:51:05 dbm1db02 snmptrapd[65800]: 0016: 82 00 35 06 09 2B 06 01 04 01 D1 32 12 01 40 04 [email protected] 30 14:51:05 dbm1db02 snmptrapd[65800]: 0032: 0A F5 13 F0 02 01 06 02 01 02 43 03 6D 19 4C 30 ..........C.m.L0.Jul 30 14:51:05 dbm1db02 snmptrapd[65800]: 0048: 82 00 15 30 13 06 0B 2B 06 01 04 01 D1 32 12 02 ...0...+.....2...Jul 30 14:51:05 dbm1db02 snmptrapd[65800]: 0064: 06 01 04 04 72 6F 6F 74 ....root.Jul 30 14:51:05 dbm1db02 snmptrapd[65800]:
5. If step 4 is confirmed, the KVM has been configured correctly. Run the followingcommands:
# service snmptrapd stop# service snmptrapd start
4.8.3 Verify the KVM SNMP Configuration (Base SNMP Configuration) - SolarisRun the snmptrapd command line utility to verify the KVM configuration. Make surethat the steps outlined in Set Up Compute Node Agent - Solaris have been performed.
Follow the steps below on the monitoring agent host for the KVM target:
1. Log in as root and run the following command:
# svcadm disable snmptrapd# /usr/sbin/snmptrapd -d -Lsd -p /var/run/snmptrapd.pid
2. Reboot the KVM to generate SNMP traps. To reboot the KVM:
a. Log in to the KVM.
b. Click Overview on the left side of the screen under Unit View, Appliance.
c. Click Reboot.
d. In the confirmation window, click OK to confirm KVM reboot.
3. Check that the snmptrapd daemon logs messages in the /var/log/messagesfile from the IP address of the KVM. The following example shows the messagesfor the KVM's IP address (10.1.1.240):
Set Up SNMP for KVM Targets
4-18 Oracle Enterprise Manager Oracle Exadata Database Machine Getting Started Guide

Jul 30 14:51:05 dbm1db02 snmptrapd[65800]: Received 72 bytes from UDP: [10.1.1.240]:32768
Jul 30 14:51:05 dbm1db02 snmptrapd[65800]: 0000: 30 82 00 44 02 01 00 04 06 70 75 62 6C 69 63 A4 0..D.....public.
Jul 30 14:51:05 dbm1db02 snmptrapd[65800]: 0016: 82 00 35 06 09 2B 06 01 04 01 D1 32 12 01 40 04 ..5..+.....2..@.
Jul 30 14:51:05 dbm1db02 snmptrapd[65800]: 0032: 0A F5 13 F0 02 01 06 02 01 02 43 03 6D 19 4C 30 ..........C.m.L0
Jul 30 14:51:05 dbm1db02 snmptrapd[65800]: 0048: 82 00 15 30 13 06 0B 2B 06 01 04 01 D1 32 12 02 ...0...+.....2..
Jul 30 14:51:05 dbm1db02 snmptrapd[65800]: 0064: 06 01 04 04 72 6F 6F 74 ....root
Jul 30 14:51:05 dbm1db02 snmptrapd[65800]:
4. If step 3 is confirmed, the KVM has been configured correctly. Stop thesnmptrapd process currently running:
# ps -ef | grep snmptrapd# kill -9 <snmptrapd process ID>
5. Start the snmptrapd daemon:
# svcadm enable snmptrapd
4.8.4 Verify the KVM SNMP Configuration (SNMP Forwarding to Agent)After performing the steps in Verify the KVM SNMP Configuration (Base SNMPConfiguration) - Linux or Verify the KVM SNMP Configuration (Base SNMPConfiguration) - Solaris, follow the steps below to validate that the monitoring Agentcan receive the SNMP traps generated by the KVM and convert the received traps toEnterprise Manager events.
1. In the Enterprise Manager Cloud Control console, go to the KVM target page.
2. In the Targets menu, select Monitoring, then Alert History.
You should see an entry for Reboot Started Status in the Alert History table.
3. In the Alert History table, click Reboot Started Status. You should see thefollowing warning alert with the message:
The appliance is rebooting. Command issued by user root.
4.9 Accessing Oracle Support Workbench for Exadata Storage ServerYou can access the Oracle Support Workbench for the current Exadata Storage Serverto access diagnostic data for problems and incidents related to the cell.
To access the Support Workbench for a single Exadata cell, follow these steps:
1. From the Target menu of the Exadata Storage Server for which you want to accessthe Oracle Support Workbench, select Diagnostics, then select SupportWorkbench as shown in Figure 4-1:
Accessing Oracle Support Workbench for Exadata Storage Server
Post-Discovery Configuration and Verification 4-19

Figure 4-1 Support Workbench Menu
2. If you are logging in to the Support Workbench for the first time, you must firstinitialize the Support Workbench properties. For first-time log in, the InitializeSupport Workbench Properties window will be displayed as shown in Figure 4-2:
Figure 4-2 Initialize Support Workbench Properties
Enter the Automatic Diagnostic Repository (ADR) Base Path. A typical looks likethis (Figure 4-3):
Figure 4-3 ADR Base Path
The ADR Home Path is a target-specific, writable path on the agent where thegenerated package is to be stored. During initializing, it is not editable as it isgenerated automatically once the ADR base path is specified.
Accessing Oracle Support Workbench for Exadata Storage Server
4-20 Oracle Enterprise Manager Oracle Exadata Database Machine Getting Started Guide

Click Create.
3. Once the Support Workbench properties have been initialized, the SupportWorkbench page displays showing a list of any problems for the Database Machine(Figure 4-4):
Figure 4-4 Support Workbench Page
4.10 Oracle Exadata Database Machine Dashboard CreationYou can create a Database Machine dashboard to monitor the performance and usagemetrics of the Database Machine system, its sub-components, as well as all thedatabase system components residing on the Database Machine.
• Dashboard Creation for Exadata Database Machine Plug-in Release 12.1.0.3.0 andLater
• How to Make the Report "Public"
• Find All Database Machine Reports
4.10.1 Dashboard Creation for Exadata Database Machine Plug-in Release 12.1.0.3.0and Later
For Exadata Database Machine plug-in Release 12.1.0.3.0 and later, create the DatabaseMachine Dashboard:
1. Log in to Enterprise Manager.
2. From the Enterprise Manager home page, click the Enterprise menu. Select the Jobsubmenu, then Activity.
3. Select Database Machine Services Dashboard from the drop-down menu next tothe Create Job option.
4. Click Go.
5. Enter a name of the job (for example, CREATE_DBM_JOB_1).
6. Click Add and select the DBMachine target. After adding, make sure the target isselected by clicking on the check box next to it.
7. Click the Parameters tab.
Oracle Exadata Database Machine Dashboard Creation
Post-Discovery Configuration and Verification 4-21

Three options are provided through the drop-down:
• Select Create if it is a new report.
• Select Update for updating an existing report with new components.
• Select Cleanup to remove services created by the Create job executed earlier.
8. Finally, click Submit to perform the operation.
A message CREATE_DBM_JOB_1 submitted successfully should display.
You can monitor the job by clicking on the link corresponding to the job.
4.10.2 How to Make the Report "Public"The generated report is accessible only by the Enterprise Manager user who creates it.To make the report public:
1. Select the dashboard report from the list of reports shown after following the stepsmentioned above.
2. Click Edit.
3. Select the Run report using target privileges of the report owner option underPrivileges section in General tab.
4. Click the Access tab.
5. Select the Allow viewing without logging in to Enterprise Manager option.
6. Click OK.
4.10.3 Find All Database Machine ReportsTo find all Database Machine reports:
1. Log in to Enterprise Manager.
2. From the Enterprise Manager home page, click the Enterprise menu. SelectReports, then Information Publisher Reports.
3. Search for the report name. Dashboard report names, one for each DatabaseMachine, are displayed in the following format:
[DBMachine Name]_DASHBOARD_REPORT
4. Click on the report to view the dashboard report.
Oracle Exadata Database Machine Dashboard Creation
4-22 Oracle Enterprise Manager Oracle Exadata Database Machine Getting Started Guide

5Oracle Exadata Database Machine
Administration
This chapter provides the information needed to administer your Oracle ExadataDatabase Machine through Oracle Enterprise Manager Cloud Control 13c. Thefollowing topics are discussed:
• Creating Roles to Manage the Plug-in
• View Exadata Database Machine Topology
• Exadata Cell Metrics and Alert Settings
• Exadata Storage Server Management
• Managing the InfiniBand Network
• Flash Cache Resource Monitoring
• Exadata Database Machine Fault Monitoring
• Monitoring Exadata Database Machine Components
• Using the Conversion Wizard to Convert 12c Targets to 13c Targets
Note:
View a video of how to manage and monitor your Oracle Exadata DatabaseMachine using Oracle Enterprise Manager Cloud Control 13c:
https://youtu.be/5S0mIx6cegE
5.1 Creating Roles to Manage the Plug-inTo manage the plug-in, you need to create roles and administrators, and then assignroles to administrators. This restricts the privileges that each user has, for example indeleting the plug-in or accessing reports.
Note:
For security reasons, Oracle recommends that the SYSMAN account be usedonly as a template to create other accounts, and not used directly.
To create roles to provide management rights to users:
1. Log in to the Enterprise Manager Cloud Control as the super administrator user.
Oracle Exadata Database Machine Administration 5-1

2. Click Setup, then Security.
3. Select Roles.
On the Security page, a list of predefined roles is provided. These roles can serve asbasis to define custom roles to suite specific site level requirements.
Note:
The predefined roles provided cannot be edited or deleted.
4. Select a role that closely matches the role you wish to create. Click Create Like.
5. On the Properties page, enter a name for the role you wish to create. You canoptionally add a description.
Click Next.
6. On the Roles page, select the roles from the list of Available Roles. Click Move toadd the role to Selected Roles.
Click Next.
7. On the Target Privileges page, select the privilege you want to grant to the newrole.
Click Next.
8. On the Resource Privileges page, you can edit specific privileges to be explicitlygranted. Click the Manage Privilege Grant edit icon to make the changes.
Click Next.
9. On the Administrators page, select the administrators from the list of AvailableAdministrators that you want to grant the new role to. Click Move to add theadministrator to Selected Administrators.
Click Next.
10. On the Review page, a complete summary of the new role you have created isdisplayed. Click Back to go to previous screens to make changes. Click Finish tocomplete the role creation.
When the newly created administrator logs in, unlike SYSMAN, the administrator isrestricted by the privileges set.
Note:
For more information and details, see the Working with Systems InfrastructureTargets chapter of the Oracle® Enterprise Manager Cloud Control Administrator'sGuide.
5.2 View Exadata Database Machine TopologyDatabase Machine management simplifies monitoring and managing tasks byintegrating all hardware and software components into one entity. You do not need to
View Exadata Database Machine Topology
5-2 Oracle Enterprise Manager Oracle Exadata Database Machine Getting Started Guide
monitor each target individually, but instead you can view the whole ExadataDatabase Machine as a single target. You can view all critical issues in the system,monitor performance, and drill down to individual targets from the Database Machinetarget home page.
The following topology topics are presented in this section:
• Drilling Down to Individual Targets
• Viewing Critical Hardware Information for the Database Machine
• Viewing DB Machine Alerts
• Viewing Metrics
• Adding Exadata Components Manually
• Removing an Exadata Database Machine Target
• Deleting a Component of a Database Machine Target
• Updating the Exadata Database Machine Schematic Diagram
Use the Topology page of Database Machine to view the topology of the system byCluster or by Database. Clusters are a complete software system starting with a RACdatabase, the underlying ASM, and CRS. Clusters define one logical entity that isinterconnected. The Database Machine could include several clusters, one cluster, orcould just be a number of individual databases. While cabinets define the hardwaretopology of the Database Machine, clusters define the logical or system topology of theDatabase Machine.
You can view the Topology by Cluster or Database. Click an element in the Topologyand view alert data associated with the element.
You can monitor all components of the Database Machine. Database Machinemonitors all subcomponent targets, whether hardware or software. This includes thedatabase, ASM, CRS, hosts, Exadata and the InfiniBand network.
To view the topology of an existing Database Machine target:
1. From the Targets menu, select Exadata.
Enterprise Manager displays the Oracle Exadata Database Machines page showingall the available Database Machine targets. From this page, you can add hardwarecomponents (such as Oracle Exadata Storage Servers, InfiniBand switches, EthernetSwitches, KVM switches, PDU, and compute node ILOM) in the Oracle DatabaseMachine as managed targets.
2. From the Oracle Exadata Database Machines page, select the Oracle DatabaseMachine target whose topology you want to view.
3. From the Oracle Database Machine Home page, click the Database Machine menu,then select Members Topology from the drop-down menu.
Enterprise Manager Cloud Control displays the Configuration Topology page.
5.2.1 Drilling Down to Individual TargetsYou can drill down immediately to a subcomponent target of the Database Machine(such as RAC, a database instance, or an Exadata cell).
To drill down to individual targets:
View Exadata Database Machine Topology
Oracle Exadata Database Machine Administration 5-3

1. From the Targets menu, select Exadata.
Enterprise Manager displays the Oracle Exadata Database Machines page showingall the available Database Machine targets.
2. From the Oracle Exadata Database Machines page, select the Oracle DatabaseMachine target whose components you want to view.
Enterprise Manager displays the Oracle Database Machine Home page showing anOverview, Schematic, and Incident section for the selected Database Machine.
3. From the Oracle Database Machine Home page, use the left navigation panel toexpand the list of available targets that comprise the Database Machine.
4. Click the target to which you want to drill down.
5.2.2 Viewing Critical Hardware Information for the Database MachineYou can view critical metrics for all the hardware subcomponents of the DatabaseMachine such as DB hosts, Exadata Storage Servers, InfiniBand switches and so on.These metrics vary for different component targets. For example, database servernodes and Exadata servers include the CPU, I/O, and storage metrics.
To view critical hardware-centric information for the entire Database machine:
1. From the Targets menu, select Exadata.
Enterprise Manager displays the Oracle Exadata Database Machines page showingall the available DB Machine targets.
2. From the Oracle Exadata Database Machines page, select the Oracle DatabaseMachine target whose hardware information you want to view.
3. From the Oracle Database Machine Home page, view the hardware schematic ofthe Database Machine.
5.2.3 Viewing DB Machine AlertsYou can view alerts on the Database Machine and drill down to details about eachalert. These alerts may be performance/configuration metrics or hardware faults.
To view Database Machine alerts:
1. From the Targets menu, select Exadata.
Enterprise Manager displays the Oracle Exadata Database Machines page showingall the available DB Machine targets.
2. From the Oracle Exadata Database Machines page, select the Oracle DatabaseMachine target whose machine configuration information you want to view.
Enterprise Manager displays the Oracle Database Machine home page on whichyou can see all alerts associated with the current DB Machine.
5.2.4 Viewing MetricsTo view the Exadata metrics:
1. Navigate to the Exadata Cell home page by choosing the Exadata target from theAll Targets page of Enterprise Manager.
View Exadata Database Machine Topology
5-4 Oracle Enterprise Manager Oracle Exadata Database Machine Getting Started Guide

Enterprise Manager displays the Exadata Cell Home page for the target youselected.
2. From the Exadata Storage Server drop-down menu, choose Monitoring and thenAll Metrics.
The All Metrics page appears where you can a wide variety of Exadata metrics. Fora complete description of the Exadata metrics available, see the "Oracle Exadata"chapter of the Oracle® Enterprise Manager Oracle Database and Database-Related MetricReference Manual:
http://docs.oracle.com/cd/E24628_01/em.121/e25160/oracle_exadata.htm
5.2.5 Adding Exadata Components ManuallyYou can add Exadata components manually using the following steps:
1. From the Setup menu, select Add Target, then select Add Targets Manually.
Enterprise Manager displays the Add Targets Manually page where you canchoose the type of target you want to add.
2. From the Add Targets Manually section, choose Add Non-Host Targets bySpecifying Target Monitoring Properties.
3. In the Target Type combo box, choose the appropriate target type, for example,KVM for kvm, PDU for pdu, Cisco switch for Cisco, and Oracle ILOM Server forilom plug-in).
4. Choose the monitoring agent using the search option.
5. Click Add Manually and provide the required properties
5.2.6 Removing an Exadata Database Machine TargetTo delete and Exadata Database Machine target, you have the choice to:
• Remove all members of the Oracle Exadata Database Machine. If the membertarget is shared with another Database Machine target, then the member targetwill not be deleted and will continue to be monitored. In other words, the membertargets will be deleted if they are associated with only this Database Machinetarget.
• Remove only system members of the Oracle Exadata Database Machine. The othermember targets will not be deleted and will continue to be monitored. They canbe associated to another Oracle Exadata Database Machine, if required.
To remove an Exadata Database Machine target:
1. From the Database Machine target menu, select Target Setup, then select RemoveTarget.
2. On the Remove page, select whether to remove all members or to remove only thesystem members.
If you choose to remove all members, then you also have an additional option tounsubscribe SNMP subscriptions for member Exadata Storage Servers andInfiniband Switches. Specify the appropriate user credentials to unsubscribe theSNMP subscriptions.
View Exadata Database Machine Topology
Oracle Exadata Database Machine Administration 5-5

3. Click Yes to initiate the remove job.
Note:
Host targets for the compute nodes and any targets that are also membertargets of another Oracle Exadata Database Machine target will not beremoved. System and non-system targets include:
System Targets:
• Oracle Exadata Database Machine
• Oracle Infiniband Network (Enterprise Manager 12c target)
• Oracle Exadata Storage Server Grid
Non-System Targets:
• Oracle Exadata Storage Server
• Oracle Exadata KVM
• Systems Infrastructure Switch
• Systems Infrastructure PDU
• Systems Infrastructure Rack
• Oracle Infiniband Switch (Enterprise Manager 12c target)
• Oracle Engineered System Cisco Switch (Enterprise Manager 12c target)
• Oracle Engineered System PDU (Enterprise Manager 12c target)
• Oracle Engineered System ILOM Server (Enterprise Manager 12c target)
5.2.7 Deleting a Component of a Database Machine TargetIf you need to remove a component of an Exadata Database Machine target, you canperform this task within Enterprise Manager Cloud Control 13c:
1. From the DB Machine home page's Target Navigation pane, right-click on thetarget item you wish to remove. You may need to expand the Exadata Grid item toview all of the available cells.
2. Select Target Setup, then Remove Target.
3. A warning page will display to confirm the target deletion. Click Yes to continue.
5.2.8 Updating the Exadata Database Machine Schematic DiagramIn some cases, the Exadata Database Machine schematic diagram is not displaying thecomponents correctly. For example:
• You may have successfully discovered the Exadata Database Machine, but somecomponents are not displaying correctly in the Exadata schematic diagram.Instead, an empty slot is shown in place of the component.
View Exadata Database Machine Topology
5-6 Oracle Enterprise Manager Oracle Exadata Database Machine Getting Started Guide

• The Exadata Database Machine schematic diagram shows shows the status of thecomponent as "red/down" where as individual components would really showthat they are up and running fine.
• You want to re-locate or rearrange the order of the components in the slots ofExadata Database Machine schematic diagram.
To accomplish these tasks, you will need to drop a component from the schematicdiagram and add the correct one:
• Drop a Component from the Exadata Database Machine Schematic Diagram
• Add Components to the Exadata Database Machine Schematic Diagram
5.2.8.1 Drop a Component from the Exadata Database Machine Schematic Diagram
To drop a component from the Exadata Database Machine schematic diagram:
1. From the Targets menu, select Exadata.
2. On the Exadata Database Machine schematic diagram, click Edit as shown in Figure 5-1:
Figure 5-1 Schematic Diagram Edit Button
3. Right-click on the component you want to drop. In the pop-up window, selectDelete Component as shown in Figure 5-2:
View Exadata Database Machine Topology
Oracle Exadata Database Machine Administration 5-7

Figure 5-2 Delete Component
4. Ensure you have selected the correct component in pop-up shown and click OK asshown in Figure 5-3:
Figure 5-3 Confirm Delete
5. The Exadata Database Machine schematic diagram will refresh to show the emptyslot, as shown in Figure 5-4:
View Exadata Database Machine Topology
5-8 Oracle Enterprise Manager Oracle Exadata Database Machine Getting Started Guide

Figure 5-4 Refreshed Schematic Diagram with Empty Slot
6. Once you see the component deleted in the slot you specify, click Done on theExadata Database Machine schematic diagram.
5.2.8.2 Add Components to the Exadata Database Machine Schematic Diagram
To add a component from the Exadata Database Machine schematic diagram:
1. From the Targets menu, select Exadata.
2. On the Exadata Database Machine schematic diagram, click Edit.
3. Right-click on the empty slot for the component you want to add. In the pop-upwindow, select Add Component as shown in Figure 5-5:
View Exadata Database Machine Topology
Oracle Exadata Database Machine Administration 5-9

Figure 5-5 Add Component
4. If there are multiple components to be added to schematic diagram, select thecorrect component from the Component drop-down menu, as shown in Figure 5-6:
Figure 5-6 Add Multiple Components
Also select the correct slot number in Available Location (Unum) drop-downmenu, as shown in Figure 5-7:
View Exadata Database Machine Topology
5-10 Oracle Enterprise Manager Oracle Exadata Database Machine Getting Started Guide

Figure 5-7 Available Location
Click Add.
5. Once you see the component added in the slot you specify, click Done on theExadata Database Machine schematic diagram.
5.3 Exadata Cell Metrics and Alert SettingsTo access the settings for Exadata Cell metrics/alert:
1. From the Enterprise Manager home page, select Targets, then Exadata. Select anExadata Storage Server from the list.
2. From the Exadata Storage Server menu, click Monitoring, then All Metrics todisplay all editable metric alert setting.
3. To change a setting, click Monitoring, then Metric and Collection Settings fromthe Exadata Storage Server menu. The default View option "Metrics withthresholds" is displayed. You can modify the following parameters:
• Warning Threshold
• Collection Schedule - click the link to set a collection schedule.
• Click the Edit icon for advanced settings.
4. Click OK to save any changes.
5.4 Exadata Storage Server ManagementThis section provides introductory instructions for managing Exadata Storage Servers.The following topics are presented:
• About Exadata Storage Server
• Using Exadata As a Cloud Control Target
• Viewing an Exadata Storage Server Configuration
Exadata Cell Metrics and Alert Settings
Oracle Exadata Database Machine Administration 5-11

• Performing Administration Tasks on Exadata Storage Servers
• Managing the IO Resource
• Diagnosing Exadata Cell Alerts
• Accessing Oracle Support Workbench for Exadata Storage Server
• Deleting a Component of a Database Machine Target
5.4.1 About Exadata Storage ServerAn Exadata Storage Server is a network-accessible storage array with Exadatasoftware installed on it. Use the Exadata Home page to manage and monitor theOracle Exadata Storage Server (also known as Exadata cell) by managing it as anEnterprise Manager Cloud Control target. You can discover and consolidatemanagement, monitoring and administration of a single or a group of Oracle ExadataStorage Servers in a datacenter using Enterprise Manager.
Exadata Storage Servers can be discovered automatically or manually. Oncediscovered, you can add them as Enterprise Manager targets. The individual ExadataStorage Server is monitored and managed as an Enterprise Manager target andprovides the exception, configuration and performance information.
Grouping of Exadata Storage Servers is used for easy management and monitoring ofthe set of Storage Servers. You can group them both manually and automatically. Thegrouping function provides an aggregation of exceptions, configuration andperformance information of the group of cells.
You can view performance analysis by linking Exadata performance both at a cell leveland group level to ASM and database performance. You can drill down to Exadataconfiguration and performance issues from both the database and ASM targets.
Storage Grid (for example, multiple database/ASM instances sharing the sameExadata Storage Server) is supported to the same extent as dedicated storage.
5.4.2 Using Exadata As a Cloud Control TargetUse Oracle Exadata to manage and monitor the Oracle Exadata Storage Server (alsoknown as Exadata cell) by managing the Exadata cells as Enterprise Manager CloudControl targets. You can discover and consolidate management, monitoring andadministration of a single or a group of Oracle Exadata Storage Servers in a datacenterusing Enterprise Manager.
Exadata cells can be discovered automatically or manually. Once discovered, you canadd the Exadata cells as Enterprise Manager targets.
The individual Exadata cell is monitored and managed as an Enterprise Managertarget and provides the exception, configuration and performance information.
Grouping of Exadata cells is used for easy management and monitoring of the set ofExadata cells. You can group Exadata cells both manually and automatically. Thegrouping function provides an aggregation of exceptions, configuration andperformance information of the group of cells.
You can view performance analysis by linking Exadata performance both at a cell leveland group level to ASM and database performance. You can drill down to Exadataconfiguration and performance issues from both the database and ASM targets.
Exadata Storage Server Management
5-12 Oracle Enterprise Manager Oracle Exadata Database Machine Getting Started Guide

5.4.3 Viewing an Exadata Storage Server ConfigurationYou can view the configuration of an Oracle Exadata Storage Server target byfollowing the steps below:
1. Navigate to the Exadata Storage Server home page by choosing the Exadata targetfor which you want to view the IORM Performance page from the All Targets page.
Enterprise Manager displays the Exadata Storage Server Home page for the targetyou selected.
2. From the Target menu, choose Configuration and then Topology.
Enterprise Manager displays the Configuration Topology page for the selectedExadata Storage Server. The topology page provides a visual layout of a the target'srelationships with other targets. From this page you can:
• Do a target search filtered by target status/events/target type)
• Select from a set of relationships to represent in the graph
• Select annotations to display in the graph, such as alerts and link labels
• Select from a set of options: view navigator, expand or collapse all, togglegraph layout, reload topology
• Zoom via the slide control
• Pan via the navigator control
• Toggle the presentation from graph to table
When you hover over a node or group member, a popup displays detailedinformation about the entity. A link can appear in the popup to more detailedinformation such as customer documentation.
5.4.4 Performing Administration Tasks on Exadata Storage ServersTo perform an administration operation on an Exadata Storage Server, such asexecuting a cell command, follow these steps:
1. Navigate to the Exadata Storage Server home page by choosing the Exadata targetfor which you want to perform an administrative task from the All Targets page.
Enterprise Manager displays the Exadata Storage Server Home page for the targetyou selected.
2. Click Target, then select Administration.
From this menu you can choose either Execute Cell Command, SupportWorkbench, or Manage IO Resource.
3. Click Execute Cell Command.
The Command page of the Exadata Storage Server Administration wizard appears.Enter a CELLCLI command as the administrative command to be executed on thecell. You must read the Command Instructions before you enter a command. Onlya single CELLCLI command is allowed to execute. You must enter the command
Exadata Storage Server Management
Oracle Exadata Database Machine Administration 5-13

without the cellcli -e prefix, which is automatically appended when yousubmit the command. Finally, you cannot use the following characters: ; / ' < > / |.
4. Click Next to continue.
Enterprise Manager displays the Admin Credentials page. Select or enter theAdministration credentials to execute the command. The credentials you enter areused when submitting the operation. You can choose between PreferredCredentials, Named Credentials, and New Credentials. You can also click MoreDetails to view information about Credential Type, Last modified, CredentialName, Credential Owner, Last Modified Date, Last Modified By, and PreferredCredentials Set At.
5. Click Next.
Enterprise Manager displays the Schedule page. Use the Schedule page to schedulethe administration task. Enter the Job Name and the Job Description, then providethe job information in the Schedule the Administration Job section. You can chooseto begin the job immediately or enter the time you want the job to begin.
6. Click Next to continue.
The Summary page displays. Use the Summary page to ensure you have enteredthe correct values and then submit the command. The Summary page lists the JobName, Description, Command to Execute, when the job is Scheduled, and theSelected Cell.
7. Click Submit Command to submit the job.
The Job Status page displays. Use the Job Status page to link to the Job Detail pageof the administration task.
5.4.5 Managing the IO ResourceOracle Exadata Database Machine Cells are added as targets during the databasemachine discovery workflow (see Exadata Database Machine Discovery) and aregrouped automatically under the group Exadata Storage Server Grid.
To access the IORM Performance page:
1. Select an Exadata Storage Server cell. One way to select the cell:
a. From the Targets menu, select Exadata.
b. Select a DB Machine from the list of Target Names.
c. In the Target Navigation pane, expand the Exadata Grid item and click one ofthe cells.
2. Once you have selected an Exadata Storage Server cell, click the Exadata StorageServer menu, select Administration, then Manage IO Resource.
Once you have accessed the IORM page, you can make the following modifications:
• Add/Update IORM Configuration
• The Inter-Database Plan
The IORM Monitoring section of the page provides a view of the performancestatistics of Disk IO (Wait, IOPS, MBPS, Utilization, Latency, and Objective charts).
Exadata Storage Server Management
5-14 Oracle Enterprise Manager Oracle Exadata Database Machine Getting Started Guide

These statistics help to identify which databases and consumer groups are using theavailable resources. They also help to adjust the IORM configuration (using IORMSettings section on the same page) as needed.
For further details on managing I/O resources, refer to the Managing I/O Resourceschapter in the Oracle® Exadata Storage Server Software User's Guide.
5.4.5.1 Add/Update IORM Configuration
To update the I/O Resource Manager (IORM) settings (for Exadata Storage Serversoftware release 12.1.2.1.0 and later):
1. Navigate to the IORM Performance page as described above. Figure 5-8 shows theI/O Resource Manager (IORM) Settings pane.
Figure 5-8 I/O Resource Manager (IORM) Settings
Note:
You can also update a single cell. Expand the Exadata Grid group to view allcells associated with the group. Click the cell you want to update.
The steps to update the IORM settings is the same for a single cell or group ofcells.
2. From the Database Name column, select a database from the drop-down menu.
3. Enter a value for the Hard Disk I/O Utilization Limit column.
4. Enter a value for the Database I/O Share column.
5. Enter minimum and maximum values (in MB) for the Flash Cache column.
6. In the Disk I/O Objective drop-down menu, select an objective from the list (Autois the default):
• Low Latency - Use this setting for critical OLTP workloads that requireextremely good disk latency. This setting provides the lowest possible latencyby significantly limiting disk utilization.
• Balanced - Use this setting for critical OLTP and DSS workloads. This settingbalances low disk latency and high throughput. This setting limits disk
Exadata Storage Server Management
Oracle Exadata Database Machine Administration 5-15

utilization of large I/Os to a lesser extent than Low Latency to achieve abalance between good latency and good throughput.
• High Throughput - Use this setting for critical DSS workloads that requirehigh throughput.
• Auto - Use this setting to have IORM determine the optimization objective.IORM continuously and dynamically determines the optimization objective,based on the workloads observed, and resource plans enabled.
• Basic - Use this setting to disable I/O prioritization and limit the maximumsmall I/O latency.
Click Update. The Exadata Cell Administration Wizard will appear promptingyou for the information necessary to complete the Disk I/O Objectiveconfiguration:
a. On the Command page, the Cell Control Command-Line Interface (CellCLI)value should be:
# alter iormplan objective = 'auto'
Click Next.
b. On the Admin Credentials page, enter the username and password for theselected cells.
Click Next.
c. On the Schedule page, enter a job name (required) and job description(optional). Select an option to start Immediately or Later. If you select theLater option, enter the time you want the job to run.
Click Next.
d. On the Review page, verify the settings are correct. If there are no changes,click Submit Command.
e. Once the job is successfully submitted, the Job Status page will display.
Click Return to return to the I/O Resource Manager (IORM) Settings pane.
7. Click Get Latest to refresh the page, which will include your Disk I/O Objectiveselection.
8. Confirm the IORM objective settings. From the command line, run the followingcommand:
# dcli -g cell_group cellcli -e "list iormplan attributes objective"
Output should show a value of auto:
cell01: autocell02: autocell03: auto...cell14: auto
Exadata Storage Server Management
5-16 Oracle Enterprise Manager Oracle Exadata Database Machine Getting Started Guide

5.4.5.2 The Inter-Database Plan
An inter-database plan specifies how resources are allocated by percentage or shareamong multiple databases for each cell. The directives in an inter-database planspecify allocations to databases, rather than consumer groups. The inter-database planis configured and enabled with the CellCLI utility at each cell.
The inter-database plan is similar to a database resource plan, in that each directiveconsists of an allocation amount and a level from 1 to 8. For a given plan, the totalallocations at any level must be less than or equal to 100 percent. An inter-databaseplan differs from a database resource plan in that it cannot contain subplans and onlycontains I/O resource directives. Only one inter-database plan can be active on a cellat any given time.
You can view the current configured inter-database plan and update an existingPercentage/Share based inter-database plan and a new Percentage/Share based plancan be configured using the Add/Remove options.
You can also view Share, Percentage Radio buttons and a drop down with Basic,Advance options.
Note:
If the Exadata plug-in version is 12.1.0.3.0 and earlier or if the Exadata StorageServer version is 11.2.3.1.0 or earlier, the Share, Percentage based inter-database plan radio buttons are not available. You can view only Percentage-based options (that is, the drop-down only displays the Basic, Advanceoptions).
When considering an inter-database plan:
• If Oracle Exadata Storage Server is only hosting one database, then an inter-database plan is not needed.
• If an inter-database plan is not specified, then all databases receive an equalallocation.
For further details on the inter-database plan, refer to the About Interdatabase ResourceManagement section in the Oracle® Exadata Storage Server Software User's Guide.
5.4.6 Diagnosing Exadata Cell AlertsEnterprise Manager listens for Exadata Cell alerts sent from the Exadata CellManagement Server; so, any hardware failure or cell error will be reported inEnterprise Manager. For detailed cell error code and its interpretation, refer to theHardware Alert Messages section in Appendix B, "Alerts and Error Messages" of theOracle® Exadata Storage Server Software User's Guide.
5.5 Managing the InfiniBand NetworkAll InfiniBand Switches are discovered automatically during the database machinediscovery workflow (see Exadata Database Machine Discovery) and are groupedautomatically under the group IB Network.
1. From the Enterprise Manager home page, select Targets, then Oracle ExadataDatabase Machine.
Managing the InfiniBand Network
Oracle Exadata Database Machine Administration 5-17

2. In the Target Navigation pane, select IB Network from the list.
3. In the IB Network pane, you can view an overview and activity summary for allInfiniBand Switches.
4. Click Refresh for an On Demand refresh of the InfiniBand schematic. Updatesreflect the real-time data.
The following topics address managing your InfiniBand network:
• InfiniBand Metrics
• Performing Administration Tasks on Infiniband Networks
• Setting Up Alerts
5.5.1 InfiniBand MetricsThe following metrics are available for your InfiniBand Network:
• Aggregate Sensor
• Response
• Switch Configuration
5.5.1.1 Aggregate Sensor
The Aggregate Sensor takes input from multiple sensors and aggregates the data toidentify problems with the switch that require attention. Whenever the sensor tripsinto an "Asserted" state (indicating a problem) or "Deasserted" (indicating that theproblem is cleared) for a component on the switch, associated Enterprise Managerevents will be generated.
5.5.1.2 Response
This is the main metric indicating availability of the InfiniBand switch. It is collectedevery 60 seconds by default through the management interface of the switch.
5.5.1.3 Switch Configuration
This metric captures the switch configuration. The information collected is valuableonly to Oracle Support, which will use it to assist in debugging situations.
5.5.2 Performing Administration Tasks on Infiniband NetworksTo perform an administration operation on an Infiniband Network, follow these steps:
1. Navigate to the DB Machine home page of the Infiniband Network by choosing theDB Machine for which you want to perform an administrative task from the AllTargets page.
Enterprise Manager displays the DB Machine Home page for the target youselected.
2. Select the IB Network for which you want to perform an administrative task.
3. From the Target menu item, choose Administration.
Managing the InfiniBand Network
5-18 Oracle Enterprise Manager Oracle Exadata Database Machine Getting Started Guide

The Target & Command page of the Infiniband Network Administration wizardappears.
4. Choose the Target Type and then select the target on which you want to performthe administrative task from the Target drop-down list. Enter the administrativecommand you want to execute. The available operations from which you can selectare dependent on the target type and target you selected. Once you choose theoperation, you may need to select a value that will appear after choosing theoperation.
5. Click Next to continue.
Enterprise Manager displays the Credentials & Schedule page. Select or enter thecredentials to execute the command. The credentials you enter are used whensubmitting the operation. You can choose between Preferred Credentials, NamedCredentials, and New Credentials. Schedule the administration task. Provide thejob information in the Administration Job Schedule section. You can choose tobegin the job immediately or enter the time you want the job to begin
6. Click Next to continue.
The Review page appears. Use the Review page to ensure you have entered thecorrect values and then submit the command. The Review page lists the Job Name,Description, Command to Execute, when the job is Scheduled, the Target Type, andthe Selected Target.
7. Click Submit Command to submit the job.
When you click Submit Command, a popup is shown if the job is successful. Youcan go to the Job Detail Page or back to the page from where this wizard waslaunched.
5.5.3 Setting Up AlertsAfter configuring the InfiniBand Switch targets to send SNMP alerts, set up alerts inEnterprise Manager Cloud Control.
1. Log in to Enterprise Manager Cloud Control.
2. Click Targets, then All Targets. All discovered targets will display.
3. In the All Targets page, click Oracle Exadata InfiniBand Switch.
4. Click the target you are interested in. The target home page appears.
5. In the drop-down menu for the Oracle Exadata InfiniBand Switch, select Metricand Collection Settings.
6. In the Metric and Collection Settings page, you can modify metric threshold values,edit monitoring settings for specific metrics, change metric collection schedules,and disable collection of a metric.
You can modify the thresholds directly in the table or click the edit icon (pencilicon) to access the Edit Advanced Settings page. For more information on the fieldsdisplayed in this page and how the thresholds can be modified, click Help from thetop-right corner of this page.
Managing the InfiniBand Network
Oracle Exadata Database Machine Administration 5-19

5.6 Flash Cache Resource MonitoringThe Oracle Exadata plug-in release 13.1.0.1.0 and later provides flash cache resourcemonitoring for Oracle Exadata Storage Servers. From the Storage Server home page orfrom the IO Distribution Detail page, Cloud Control provides a high-level overview offlash cache resources (Figure 5-9). Details include:
• I/O Utilization (as a percentage).
• Hard Drive I/O Time Breakdown (in milliseconds per request).
• Flash I/O Time Breakdown (in milliseconds per request).
Figure 5-9 I/O Distribution by Databases
From the IO Distribution Details page, which provides a view of all availabledatabases statistics, select Table View (the default is Graph View) to view the data asa table (Figure 5-10):
Figure 5-10 I/O Distribution by Databases - Table View
Flash Cache Resource Monitoring
5-20 Oracle Enterprise Manager Oracle Exadata Database Machine Getting Started Guide

The IORM Performance Page (Figure 5-11) provides detailed metrics, such as AverageThrottle Time for Disk I/Os for both hard drives and flash drives. Select Flash CacheSpace Usage (Figure 5-12) for detailed performance about flash cache space.
Figure 5-11 IORM Performance Page
Figure 5-12 IORM Performance - Flash Cache Space Usage
5.7 Exadata Database Machine Fault MonitoringOracle Enterprise Manager Cloud Control provides hardware fault monitoring forOracle Exadata Database Machine. Table 5-1 shows the fault monitoring for theExadata Storage Server. Table 5-2 shows the fault monitoring for the compute nodes.
Exadata Database Machine Fault Monitoring
Oracle Exadata Database Machine Administration 5-21

Note:
The fault monitoring information in the following tables, whilecomprehensive, may not always be complete. As new fault monitoringfunctionality is added, these tables will be updated accordingly.
Table 5-1 Exadata Storage Server Fault Monitoring
Area Fault Monitoring
Access Cell cannot be accessed (e.g. ping failure).
Memory Memory Controller Error
Memory DIMM Error
Memory Channel Error
Memory DIMM Temperature Sensor Error
Memory Correctable ECC Error
CPU Internal Processor Error
Intel 5500 Chipset Core Error
Data Cache Error
Cache Error
Instruction Cache Error
ESM ESM Battery Charge Error
ESM Battery Life Error
Hard Disk SCSI Error for Media, Device
Disk Temperature Threshold Excess
Physical Disk Not Present
Block Corruption
Flash Disk Flash Disk Failure
Flash Disk Predictive Failure
Flash Disk not Present
Miscellaneous Chassis or Power Supply Fan Error
PCI-E Internal Error
Power Supply Voltage Excess Error
Temperature Excess Error
Network Port Disconnection and Fault
Exadata Database Machine Fault Monitoring
5-22 Oracle Enterprise Manager Oracle Exadata Database Machine Getting Started Guide

Table 5-2 Compute Node Fault Monitoring
Area Fault Monitoring
Memory Memory Controller Error
Memory DIMM Error
Memory Channel Error
Memory DIMM Temperature Sensor Error
Memory Correctable ECC Error
CPU Internal Processor Error
Intel 5500 Chipset Core Error
Data Cache Error
Cache Error
Instruction Cache Error
Disk SCSI Error for Media, Device
Disk Temperature Threshold Excess
Block Corruption
Miscellaneous Chassis or Power Supply Fan Error
Non-fatal PCI-E Internal Error
Power Supply Voltage Excess Error
Temperature Excess Error
Network Port Disconnection and Fault
5.8 Monitoring Exadata Database Machine ComponentsEnterprise Manager collects details for the following components:
• Storage Cells
• InfiniBand Switches
• Cisco Switch
• ILOM Targets
• Power Distribution Units (PDUs)
• KVM Switch
5.8.1 Storage CellsAn Enterprise Manager Agent runs the cellcli command via ssh to collect StorageCell metrics. SNMP traps are sent to the Enterprise Manager Agent for subscribedalert conditions.
Monitoring requires the cellmonitor ssh eq setup with an Agent user.
ASM targets and disk groups are associated.
On the home page, rich storage data is collected, including:
Monitoring Exadata Database Machine Components
Oracle Exadata Database Machine Administration 5-23

• Aggregate storage metrics.
• Cell alerts via SNMP (PUSH).
• Capacities.
• IORM consumer and Database-level metrics.
5.8.2 InfiniBand SwitchesAn Enterprise Manager Agent runs remote ssh calls to the InfiniBand switch to collectmetrics. The InfiniBand Switch sends SNMP traps (PUSH) for all alerts.
Monitoring requires ssh eq. for the nm2user for metric collections such as:
• Response
• Various sensor status
– Fan
– Voltage
– Temperature
• Port performance data
• Port administration
5.8.3 Cisco SwitchAn Enterprise Manager Agent runs a remote SNMP get call to collect metric data forthe Cisco switch, including details on:
• Status / Availability
• Port status
• Vital signs: CPU, Memory, Power, Temperature
• Network interface various data
– Incoming traffic errors, traffic kb/s and %
– Outgoing traffic errors, traffic kb/s and %
– Administration and Operational bandwidth Mb/s
5.8.4 ILOM TargetsAn Enterprise Manager Agent runs remote ipmitool calls to each Compute NodeILOM target. Monitoring requires the nm2user user credentials to run ipmitool.
The following details are collected:
• Response – availability
• Sensor alerts
– Temperature
Monitoring Exadata Database Machine Components
5-24 Oracle Enterprise Manager Oracle Exadata Database Machine Getting Started Guide

– Voltage
– Fan speeds
– Configuration Data: Firmware version, serial number, and so forth.
5.8.5 Power Distribution Units (PDUs)An Enterprise Manager Agent runs remote SNMP get calls and receives SNMP traps(PUSH) from each PDU. Collected details include:
• Response and ping status.
• Phase values.
5.8.6 KVM SwitchAn Enterprise Manager Agent runs remote SNMP get calls and receives SNMP traps(PUSH) from the KVM switch. Collected details include:
• Status and response.
• Reboot events.
• Temperature.
• Fan status.
• Power state.
• Factory settings.
5.9 Using the Conversion Wizard to Convert 12c Targets to 13c TargetsTo convert an Exadata Database Machine discovered by Enterprise Manager 12c to bemonitored by Enterprise Manager 13c:
1. From the Database Machine menu, select Convert 12c Member Targets(Figure 5-13):
Using the Conversion Wizard to Convert 12c Targets to 13c Targets
Oracle Exadata Database Machine Administration 5-25

Figure 5-13 Convert 12c Member Target Menu
2. Select a Conversion Option (Figure 5-14):
• (Default) Delete 12c targets and their historical data. This option halts allmonitoring of legacy targets and deletes the historical data. This options allowsfor a clean start for all Enterprise Manager 13c target monitoring.
• Retain 12c targets and their historical data. This option preserves the historicaldata for legacy targets.
Using the Conversion Wizard to Convert 12c Targets to 13c Targets
5-26 Oracle Enterprise Manager Oracle Exadata Database Machine Getting Started Guide

Figure 5-14 Database Machine Conversion: Conversion Option
Once you have selected a conversion option, click Next.
3. Set the Credentials (Figure 5-15). For the conversion, you must set the credentialsfor the Exadata Database Machine components to be converted.
Figure 5-15 Database Machine Conversion: Credentials
From the Set Credential menu, you can set the credentials for a single componentor for the entire component types:
• InfiniBand Switch (Figure 5-16)
Using the Conversion Wizard to Convert 12c Targets to 13c Targets
Oracle Exadata Database Machine Administration 5-27

Enter the username and password for the InfiniBand Switch's ILOMadministration.
In the SNMP Credentials section:
If you select SNMP V1 from the Credential type drop-down, then enter publicfor the Community String.
If you select SNMP V3 credentials for the Credential Type, then enter ausername and authorization password, select an authorization protocol, andenter a privacy password, as shown in Figure 5-17:
Figure 5-16 InfiniBand Switch Credentials
Using the Conversion Wizard to Convert 12c Targets to 13c Targets
5-28 Oracle Enterprise Manager Oracle Exadata Database Machine Getting Started Guide

Figure 5-17 InfiniBand Switch SNMP V3 Credentials
Click Test Connection for any credential to verify the connection. Click OK.
• Compute Node Server ILOM
To set the Compute Node Server ILOM, select New and enter a username andpassword, as shown in Figure 5-18:
Figure 5-18 Compute Node Server ILOM Credentials
Click Test Connection for any credential to verify the connection. Click OK.
• Ethernet Switch (Figure 5-19)
Using the Conversion Wizard to Convert 12c Targets to 13c Targets
Oracle Exadata Database Machine Administration 5-29

To set the Ethernet Switch credentials, enter the Cisco IOS username,password, and privileged EXEC password. For the SNMP V3 credentials, entera username and authorization password, select an authorization protocol, andenter a privacy password.
Figure 5-19 Ethernet Switch Credentials
Click Test Connection for any credential to verify the connection. Click OK.
• PDU
To set the HTTP monitoring credentials, select New and enter a username andpassword. For the SNMP V3 credentials, enter a username and authorizationpassword, select an authorization protocol, and enter a privacy password.
Using the Conversion Wizard to Convert 12c Targets to 13c Targets
5-30 Oracle Enterprise Manager Oracle Exadata Database Machine Getting Started Guide

Figure 5-20 PDU Credentials
Click Test Connection for any credential to verify the connection. Click OK.
Once you have set the credentials, the Credentials page will update to show thecredentials set for all components to be converted. Click Next.
4. Review the components to be converted in the following three sections(Figure 5-21):
• Summary: This section summarizes the number of targets to be converted andif any targets will have additional monitoring information available to youafter the conversion.
• Targets to be Converted: This table shows all Enterprise Manager 12c targetsto be converted for monitoring by Enterprise Manager 13c and provides thenew target name information.
• Targets Not Impacted by Conversion: All components of the ExadataDatabase Machine do not need to be converted to be monitored by EnterpriseManager 13c. This list identifies those components that to not need to beconverted. These components are already monitored by Enterprise Manager13c.
Using the Conversion Wizard to Convert 12c Targets to 13c Targets
Oracle Exadata Database Machine Administration 5-31

Figure 5-21 Database Machine Conversion: Review
Click Submit to begin the conversion.
5. A Processing pop-up window will appear (Figure 5-22), which shows you thestatus of the conversion and a summary of the success or failure of the componentsto be converted.
Do not close this window until the processing is complete!
Figure 5-22 Processing Targets
You can select the option to close the window after the processing is complete, orclick Done.
Using the Conversion Wizard to Convert 12c Targets to 13c Targets
5-32 Oracle Enterprise Manager Oracle Exadata Database Machine Getting Started Guide
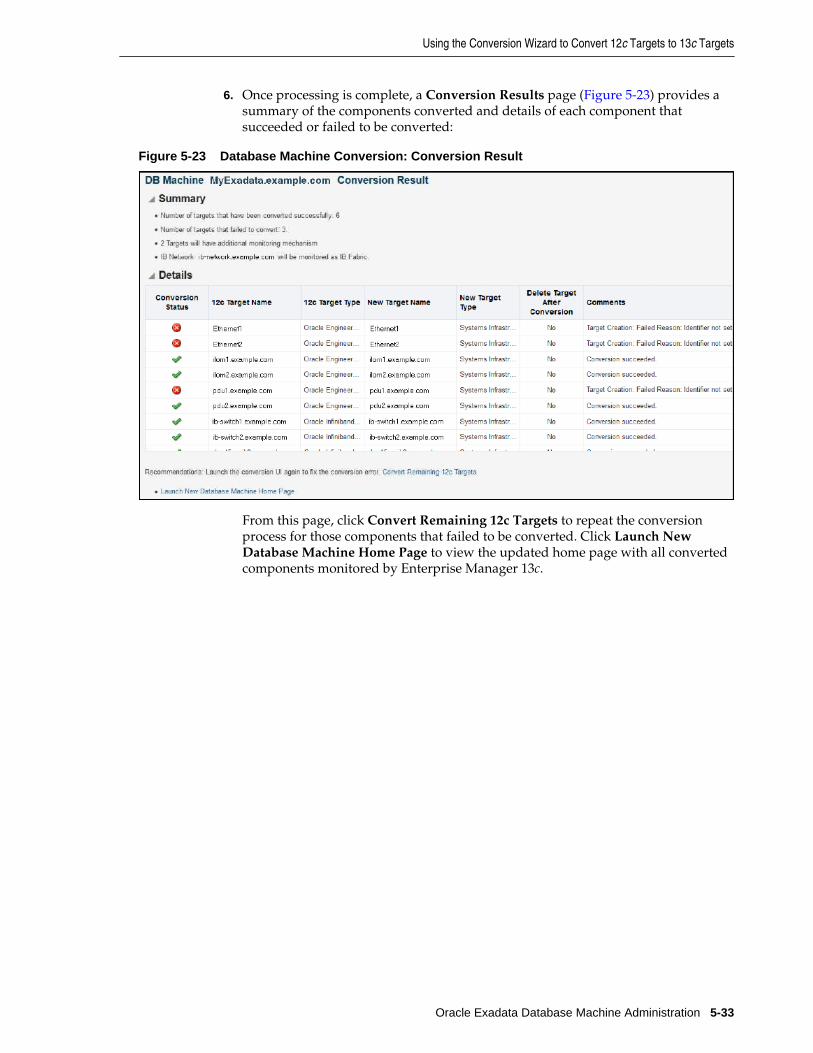
6. Once processing is complete, a Conversion Results page (Figure 5-23) provides asummary of the components converted and details of each component thatsucceeded or failed to be converted:
Figure 5-23 Database Machine Conversion: Conversion Result
From this page, click Convert Remaining 12c Targets to repeat the conversionprocess for those components that failed to be converted. Click Launch NewDatabase Machine Home Page to view the updated home page with all convertedcomponents monitored by Enterprise Manager 13c.
Using the Conversion Wizard to Convert 12c Targets to 13c Targets
Oracle Exadata Database Machine Administration 5-33

Using the Conversion Wizard to Convert 12c Targets to 13c Targets
5-34 Oracle Exadata Database Machine Getting Started Guide

6Virtualized Exadata Database Machine
This chapter describes how to manage and monitor a virtualized Oracle ExadataDatabase Machine with DB clusters using Oracle Virtual Machine (OVM) for x86 andOracle Exadata Storage Servers in Exadata plug-in 12.1.0.6 and later.
The Exadata plug-in discovers, manages, and monitors virtualized Exadata DatabaseMachine in conjunction with the Virtualization Infrastructure plug-in. For detailsabout this plug-in, see the "Direct Monitoring of Xen Based Systems" chapter of the Oracle® Enterprise Manager Cloud Administration Guide:
http://docs.oracle.com/cd/E24628_01/doc.121/e28814/direct_monitor_cs.htm#EMCLO531
The following sections describe how to discover a virtualized Exadata DatabaseMachine and other supported targets:
• Integration with Virtualization Infrastructure Plug-in
• Discovering Virtualized Exadata Database Machine
• Post-Discovery Configuration
• Exadata Virtualized Provisioning
• Viewing Virtualized Exadata Database Machine
• Resource Utilization Graphs
Once you have completed the discovery of a virtualized Exadata Database Machine,continue with the configuration steps outlined in Post-Discovery Configuration andVerification.
6.1 Integration with Virtualization Infrastructure Plug-inThe physical server (physical Oracle Server target), Dom0 (Virtual Platform target), andDomU (virtual Oracle Server target) are discovered and monitored by the VirtualizationInfrastructure (VI) plug-in.
The Exadata discovery can work with the VI plug-in by the physical server, Dom0, andDomU are discovered using the VI plug-in before Exadata Database Machine discovery.During Exadata discovery, the discovery code looks up the existing Virtual Platformtarget that corresponds to the Dom0 of the compute node.
The Exadata discovery flow with VI plug-in integration includes the following checks:
1. Check whether the Exadata Database Machine is virtualized based on theconfiguration metric of the host target of the discovery agent.
Virtualized Exadata Database Machine 6-1

2. Check whether the VI plug-in is deployed. If not, you will be prompted to deployit as described in the "Direct Monitoring of Xen Based Systems" chapter of the Oracle® Enterprise Manager Cloud Administration Guide:
http://docs.oracle.com/cd/E24628_01/doc.121/e28814/direct_monitor_cs.htm#EMCLO531
6.2 Discovering Virtualized Exadata Database MachineWith virtualized Exadata, one Exadata Database Machine target will be created foreach physical Database Machine instead of one DB Machine target for each DB clusterdeployed through OEDA. Compute nodes, Exadata Storage Servers, InfiniBandswitches, compute node ILOM, PDU, KVM, and Cisco switches targets are discoveredby the Exadata plug-in.
With only the compute nodes virtualized, the physical servers, Dom0 and DomU, aremonitored by the Virtualization Infrastructure (VI) plug-in. The Exadata plug-in isintegrates with the VI plug-in for discovery and target management as discussedbelow.
The hardware targets in virtualized Exadata are discovered in almost the same way asphysical Exadata (see Discovering an Exadata Database Machine) except as notedbelow:
• The Dom0 of the compute nodes are discovered using ibnetdiscover. Computenode ILOM to compute node mapping and VM hierarchy are obtained from theVI plug-in.
• Exadata Storage Servers are discovered using ibnetdiscover instead of kfod.Therefore, there is no need to specify the Database Oracle Home duringdiscovery.
• InfiniBand switches are discovered using ibnetdiscover.
• Compute node ILOM, PDU, and Cisco switch are discovered based on thedatabasemachine.xml schematic file.
• Cluster and Database Target Discovery
– The cluster and database target discovery is similar to the physical Exadatacase (see Discovering Grid Infrastructure and RAC). The only difference isthat the Enterprise Manager agents needed to be deployed on the DomU of theDatabase cluster before the cluster, ASM, and database targets can bediscovered using the DB plug-in.
• Agent Placement
– The primary and backup Enterprise Manager agents monitoring the Exadatahardware targets should be deployed in two dedicated DomU that will not besuspended or shut down, and are ideally on different physical servers toensure high availability.
– For static virtual machine configurations, the Enterprise Manager agents thatare used to monitor the Database clusters can be used to monitor the Exadatahardware.
To discover a virtualized Exadata Database Machine:
1. From the Setup menu, select Add Target then Add Targets Manually.
Discovering Virtualized Exadata Database Machine
6-2 Oracle Enterprise Manager Oracle Exadata Database Machine Getting Started Guide

2. On the Add Targets Manually page, select Add Using Guided Process (Figure 6-1):
Figure 6-1 Add Targets Manually
3. In the Add Using Guided Process pop-up window, select Oracle Virtual Platformand click Add (Figure 6-2):
Figure 6-2 Add Oracle Virtual Platform
Note:
This option will be available only if the Virtualization Infrastructure (VI) plug-in has been deployed.
If the plug-in is not deployed, then the Oracle Virtual Platform option will notappear. Deploy the VI plug-in as described in the Direct Monitoring of XenBased Systems chapter of the Oracle® Enterprise Manager Cloud AdministrationGuide.
Discovering Virtualized Exadata Database Machine
Virtualized Exadata Database Machine 6-3

4. On the Discover Oracle Virtual Platforms page, register Oracle Virtual Platformswith Enterprise Manager. Target credentials and/or monitoring agent can bespecified for each target. If set, these override the defaults for that target.
• Set the Default Monitoring Agent and Credentials (Figure 6-3). Click the
magnifying glass icon to search for the monitoring agent location. For theCredential Properties, enter root for the Username and provide the host's rootpassword.
Note:
A non-root user with sudo privilege can also be used. Refer to the VI plug-indocumentation for the necessary setup steps.
Figure 6-3 Default Monitoring Agent and Credentials
• Add a Host Name or IP address. Click Add and enter the fully qualifieddomain name (FQDM) or IP address for the host in the pop-up window(Figure 6-4). If you have more than one, each entry must appear on a separateline.
Figure 6-4 Discover Virtual Serves: Add Host/IP Address
Discovering Virtualized Exadata Database Machine
6-4 Oracle Enterprise Manager Oracle Exadata Database Machine Getting Started Guide

Click Add to close the pop-up window.
Once added, the Hostname and IP address fields will update as shown in Figure 6-5:
Figure 6-5 Enter Hostname or IP Address
• Click Submit. A job is submitted to register the Oracle Virtual Platform, whichcreates the virtual targets. Approximately five (5) minutes is required tocomplete the job. Click Job Details to check the status, or click Close to closethe window (Figure 6-6):
Figure 6-6 Submit Oracle Virtual Platform Registration Job
5. Once the job completes, then discover the Exadata Database Machine. From theSetup menu, select Add Target then Add Targets Manually.
6. On the Add Targets Manually page, select Add Using Guided Process (Figure 6-7):
Figure 6-7 Add Targets Manually
7. For the Target Types drop-down menu, select Oracle Exadata Database Machine(Figure 6-8):
Discovering Virtualized Exadata Database Machine
Virtualized Exadata Database Machine 6-5

Figure 6-8 Add Using Guided Process: Add Oracle Exadata Database Machine
8. On the Oracle Exadata Database Machine Discovery page, select the Discover anew Database Machine and its hardware components as targets option and clickDiscover Targets.
9. On the Discovery Inputs page, click the magnifying glass icon to search for anagent in a DomU that resides in the DB Machine to be discovered. Do not search fora virtual platform (Dom0) because you cannot install an Enterprise Manager Agentin Dom0. Just like the physical Exadata case, you are specifying a host on which theschematic file can be read. Usually, it will be the same host as the discovery agent.It will not be the Dom0
In the Schematic Files section, select a host on which the schematic file can be read,and set the host credential that can read the schematic file. Click Set Credential toset the log in and password (Figure 6-9) for the host you registered in the previoussteps. Click OK.
Figure 6-9 Set Credential
Click Next.
Discovering Virtualized Exadata Database Machine
6-6 Oracle Enterprise Manager Oracle Exadata Database Machine Getting Started Guide

10. On the InfiniBand Discovery page, set the nm2user credential. Select the Newoption and enter nm2user for the Username field and provide a password asshown in Figure 6-10:
Figure 6-10 Set InfiniBand Credentials
Click Next.
Note:
A known issue about missing CLIENTNAME and CLIENTIP information willcause an Error pop-up message. Click OK to dismiss the pop-up and tocontinue with the guided discovery.
11. On the Prerequisite Check page, verify the Status is successful, then click Next.
12. On the Components page, review the Exadata components that were discovered,then click Next.
13. On the Monitoring Agents page, review the names, locations, and backup locationsof the Monitoring Agents. Click Next.
14. On the Agent Credential page, if the credentials are the same for all agents, thenyou can enter a new username and password or accept the default. Click Next.
If the credentials are different for all agents, then select the Different for all agentsoption and enter usernames and passwords for all hosts. Click Next.
15. On the Monitoring Credentials page, verify or enter the credentials for thefollowing components:
• Oracle Exadata Storage Server
• InfiniBand Switch
• ILOM
Click Test Connection for each component to verify the connection. If thecredentials are different for each component, then provide the appropriateusername and password.
Click Next.
16. On the SNMP Subscription page, enter the SNMP Community String (default ispublic) value for both Oracle Exadata Storage Server and InfiniBand Switch areas.For the InfiniBand Switch, provide the root credentials (Figure 6-11). Click Next.
Discovering Virtualized Exadata Database Machine
Virtualized Exadata Database Machine 6-7
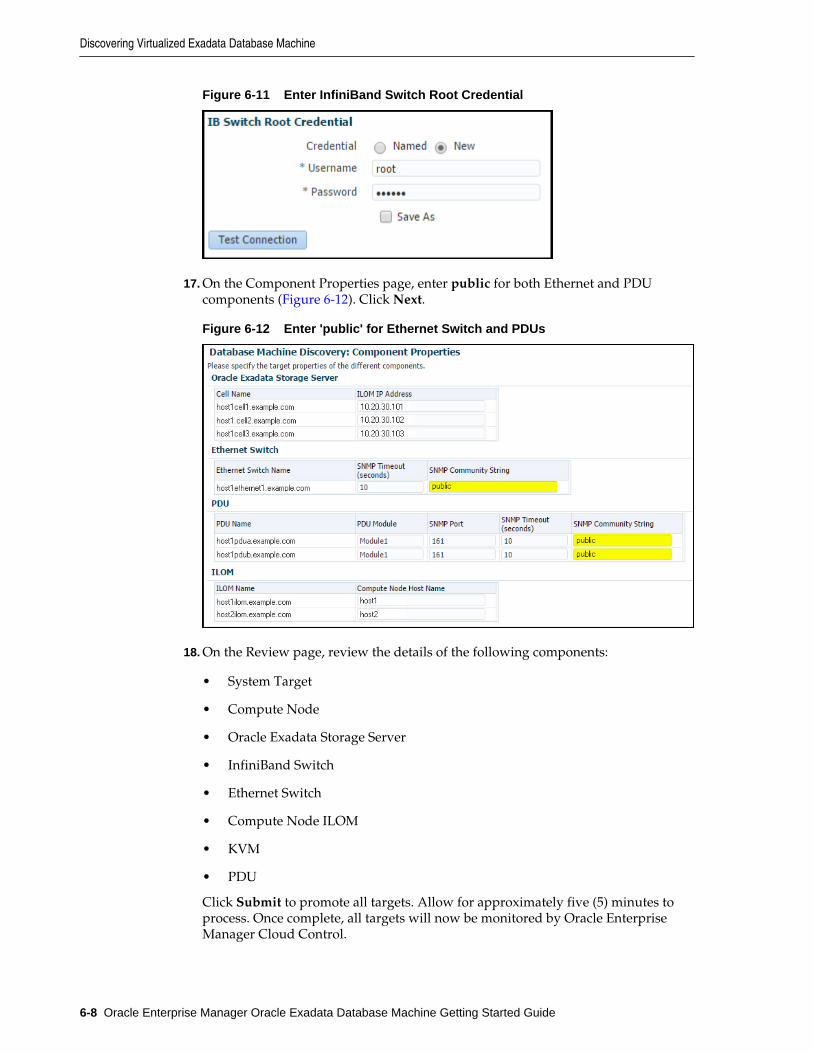
Figure 6-11 Enter InfiniBand Switch Root Credential
17. On the Component Properties page, enter public for both Ethernet and PDUcomponents (Figure 6-12). Click Next.
Figure 6-12 Enter 'public' for Ethernet Switch and PDUs
18. On the Review page, review the details of the following components:
• System Target
• Compute Node
• Oracle Exadata Storage Server
• InfiniBand Switch
• Ethernet Switch
• Compute Node ILOM
• KVM
• PDU
Click Submit to promote all targets. Allow for approximately five (5) minutes toprocess. Once complete, all targets will now be monitored by Oracle EnterpriseManager Cloud Control.
Discovering Virtualized Exadata Database Machine
6-8 Oracle Enterprise Manager Oracle Exadata Database Machine Getting Started Guide

Note:
The VI plug-in regularly checks whether a VM is added or deleted. The OracleVM instance targets are auto-promoted once they are detected by the VI plug-in. If you want to monitor the OS, ASM, and DB in the VM, you need to pushthe Enterprise Manager agent to the VM.
6.3 Post-Discovery ConfigurationSince agents run inside DomU nodes and remotely monitor cells, ILOMs, switches, andPDUs, ensure that Primary and Backup agents are on physically different DomU hosts.In case of a Dom0 outage, Enterprise Manager can continue to monitor such targetsusing an agent that is running on an active DomU hosted by a different Dom0 that is stillrunning. This will achieve continuous monitoring in case of a complete Dom0 outage.
For details on how agents monitor Exadata targets remotely, refer to Post-DiscoveryConfiguration and Verification, for details.
6.4 Exadata Virtualized ProvisioningProvisioning involves repeatable, reliable, automated, unattended, and scheduled massdeployment of a RAC Cluster including virtual machines (VMs), Oracle Database(DB), Grid Infrastructure, and ASM on Virtualized Exadata.
With the Exadata plug-in's virtualization provisioning functionality, you can:
• Creating a Database Cluster
• Scaling Up a Database Cluster
• Deleting a Database Cluster
6.4.1 Creating a Database ClusterTo create a database cluster:
1. From the Database Machine target menu, select Provisioning, then select CreateCluster (Figure 6-13):
Post-Discovery Configuration
Virtualized Exadata Database Machine 6-9

Figure 6-13 Provisioning Menu
The Exadata Provisioning Wizard will display.
2. On the Exadata Provisioning: Cluster page, provide the information for:
• Cluster Definition: Create a cluster name. Click Show existing clusters todisplay a list of database clusters already provisioned.
• Virtual Machine Location: Select the servers on which you want to create thevirtual machines. Select one or more from the Available Servers pane, thenclick the move button to move the selected server to the Selected Servers pane(Figure 6-14):
Figure 6-14 Select Virtual Machine Location
• Storage Definition: Select the Exadata Storage Servers to be used by thevirtual machines. Select one or more from the Available Storage Servers pane,then click the move button to move the selected server to the Selected StorageServers pane:
Exadata Virtualized Provisioning
6-10 Oracle Enterprise Manager Oracle Exadata Database Machine Getting Started Guide

Figure 6-15 Select Exadata Storage Servers
Click Next.
3. On the Credentials page, set the credentials for:
• Compute Server: Set the credentials for the root user. From the SetCredentials drop-down, select All to apply the settings to all servers, or selectone or more servers from the list and select Selected to apply the settings toonly the selected servers.
In the Set Server Credential pop-up window, select an existing namedcredential or select New to create a new one.
Click Test Connection to verify that the credentials are properly set. Ifsuccessful, the Test Credential Status will update to show Succeeded(Figure 6-16):
Figure 6-16 Set Compute Server Credentials
• Exadata Storage Server: Set the credentials for the cell administrator.
In the Set Server Credential pop-up window, select an existing namedcredential or select New to create a new one.
Click Test Connection to verify that the credentials are properly set. Ifsuccessful, the Test Credential Status will update to show Succeeded(Figure 6-17):
Exadata Virtualized Provisioning
Virtualized Exadata Database Machine 6-11

Figure 6-17 Set Exadata Storage Server Credentials
Click Next to define the Virtual Machines.
4. On the Virtual Machines (VMs) page, provide the following information:
Note:
When available, the Exadata Provisioning Wizard will pre-populate the fieldswith the appropriate defaults. You can change this information to suit yourenvironment.
• Virtual Machine Definition: In this region (Figure 6-18), provide the details todefine the VM:
– Virtual Machine Size: Select Small, Medium, or Large. Click Customize toadjust the number of CPU cores and available memory.
– Root password: Create a password in the two password fields.
– Verify the Prefix, DNS, and NTP fields.
– Time Zone: select the appropriate time zone from the drop-down list.
Figure 6-18 Exadata Provisioning: Virtual Machine Definition
• Software Locations: When available, the Exadata Provisioning Wizard willpre-populate the fields (Figure 6-19); otherwise, provide the followinginformation:
Exadata Virtualized Provisioning
6-12 Oracle Enterprise Manager Oracle Exadata Database Machine Getting Started Guide

– Inventory Location
– Grid Infrastructure Home
– Database Home Location
– Agent Installation Base Directory
– Agent Port (optional)
– Software Language (optional)
Figure 6-19 Exadata Provisioning: Software Locations
• Operating System Users and Groups: Like the Software Location region, theExadata Provisioning Wizard will pre-populate the fields except for thepassword fields (Figure 6-20). Otherwise, provide the following information:
– User name: including the ID, password, and home directory.
– DBA group name and ID.
– OINSTALL group name and ID.
Figure 6-20 Exadata Provisioning: Operating System Users and Groups
Click Next to provide the Network details.
5. On the Network page, specify the IP address, name and domain used for theAdmin, Client and Private network. Provide the details for the followinginformation:
• Gateway and Domain Details: The domain and subnet mask details shouldalready be supplied by the Exadata Provisioning Wizard. Enter a valid IPaddress for the Admin and Client gateway (Figure 6-21):
Exadata Virtualized Provisioning
Virtualized Exadata Database Machine 6-13

Figure 6-21 Exadata Provisioning: Network Gateway and Domain Details
• Virtual Machine 1 (Figure 6-22): For the first virtual machine in the cluster, theExadata Provisioning Wizard will auto-complete the Prefix and Start ID field.You can enter an optional Suffix. Enter a valid IP address.
Figure 6-22 Exadata Provisioning: Virtual Machine 1
• Generated Virtual Machine Name and IP (Figure 6-23): After you haveentered the information for the first VM, click Generate to create theinformation for the other VMs in the cluster. You can always enter the detailsmanually.
Figure 6-23 Exadata Provisioning: Generated Virtual Machine Name and IP
Once you have entered all the necessary information, click Validate IP at the top ofthe page to verify the IP addresses. Click Next to continue to the enter the detailsfor Grid Infrastructure and to create the Initial Database.
6. On the Grid Infrastructure and Initial Database page, enter the details for:
• Grid Infrastructure (Figure 6-24): Enter the details for the Cluster (SCANname and port) and verify the Disk Group information. The ExadataProvisioning Wizard will pre-populate the details, but you can adjust them asneeded.
Exadata Virtualized Provisioning
6-14 Oracle Enterprise Manager Oracle Exadata Database Machine Getting Started Guide
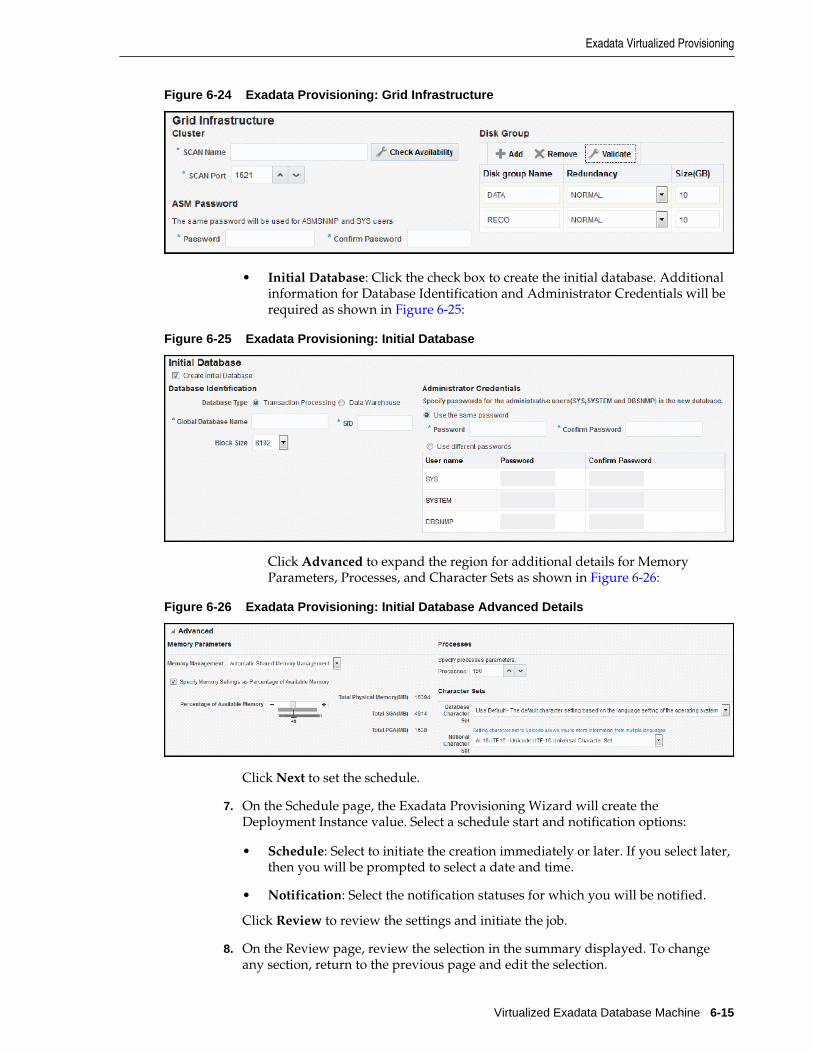
Figure 6-24 Exadata Provisioning: Grid Infrastructure
• Initial Database: Click the check box to create the initial database. Additionalinformation for Database Identification and Administrator Credentials will berequired as shown in Figure 6-25:
Figure 6-25 Exadata Provisioning: Initial Database
Click Advanced to expand the region for additional details for MemoryParameters, Processes, and Character Sets as shown in Figure 6-26:
Figure 6-26 Exadata Provisioning: Initial Database Advanced Details
Click Next to set the schedule.
7. On the Schedule page, the Exadata Provisioning Wizard will create theDeployment Instance value. Select a schedule start and notification options:
• Schedule: Select to initiate the creation immediately or later. If you select later,then you will be prompted to select a date and time.
• Notification: Select the notification statuses for which you will be notified.
Click Review to review the settings and initiate the job.
8. On the Review page, review the selection in the summary displayed. To changeany section, return to the previous page and edit the selection.
Exadata Virtualized Provisioning
Virtualized Exadata Database Machine 6-15

Click Submit to begin the creation job.
6.4.2 Scaling Up a Database ClusterTo scale up a database cluster:
1. From the Database Machine target menu, select Provisioning, then select Scale UpCluster.
The Exadata Provisioning Wizard will display.
2. On the Cluster page, enter the cluster name or click the Search icon to select acluster from the list.
Select one or more from the Available Servers pane, then click the move button tomove the selected server to the Selected Servers pane.
Click Next to set the credentials.
3. On the Credentials page, set the credentials for:
• Compute Server: Set the credentials for the root user. From the SetCredentials drop-down, select All to apply the settings to all servers, or selectone or more servers from the list and select Selected to apply the settings toonly the selected servers.
In the Set Server Credential pop-up window, select an existing namedcredential or select New to create a new one.
Click Test Connection to verify that the credentials are properly set. Ifsuccessful, the Test Credential Status will update to show Succeeded(Figure 6-27):
Figure 6-27 Set Compute Server Credentials
• Virtual Machines (Figure 6-28): Set the credentials for the DomU Host andRoot and for the Cluster ASM and Database.
You have the option to use preferred credentials or to override the preferredcredentials.
Click Test Connection to verify that the credentials are properly set.
Exadata Virtualized Provisioning
6-16 Oracle Enterprise Manager Oracle Exadata Database Machine Getting Started Guide

Figure 6-28 Scale Up Cluster: Virtual Machines Credentials
Click Next.
4. On the Virtual Machines page, click Next.
5. On the Network page, specify the IP address, name and domain used for theAdmin, Client and Private network. Provide the details for the followinginformation:
• Gateway and Domain Details: The domain and subnet mask details shouldalready be supplied by the Exadata Provisioning Wizard. Enter a valid IPaddress for the Admin and Client gateway (Figure 6-29):
Figure 6-29 Scale Up: Network Gateway and Domain Details
• Virtual Machine 1 (Figure 6-30): For the first virtual machine in the cluster, theExadata Provisioning Wizard will auto-complete the Prefix and Start ID field.You can enter an optional Suffix. Enter a valid IP address.
Figure 6-30 Scale Up: Virtual Machine 1
• Generated Virtual Machine Name and IP (Figure 6-29): After you haveentered the information for the first VM, click Generate to create theinformation for the other VMs in the cluster. You can always enter the detailsmanually.
Exadata Virtualized Provisioning
Virtualized Exadata Database Machine 6-17

Figure 6-31 Scale Up: Generated Virtual Machine Name and IP
Once you have entered all the necessary information, click Validate IP at the top ofthe page to verify the IP addresses.
Click Next to continue to schedule the scale up.
Note:
The step for Grid Infrastructure and Initial Database are skipped because theydo not need to be set up again.
6. On the Schedule page, the Exadata Provisioning Wizard will create theDeployment Instance value. Select a schedule start and notification options:
• Schedule: Select to initiate the scale up immediately or later. If you select later,then you will be prompted to select a date and time.
• Notification: Select the notification statuses for which you will be notified.
Click Review to review the settings and initiate the scale up.
7. On the Review page, review the selection in the summary displayed. To changeany section, return to the previous page and edit the selection.
Click Submit to begin the scale up.
6.4.3 Scaling Down a Database ClusterTo scale down a database cluster, the Virtual Machine is removed from the cluster:
1. From the Database Machine target menu, select Provisioning, then select ScaleDown Cluster.
The Exadata Provisioning Wizard will display.
2. Enter the cluster name you want to scale down or click the Search icon to select anavailable cluster.
Once you have selected a cluster, you will be prompted to:
• Select nodes to delete.
Exadata Virtualized Provisioning
6-18 Oracle Enterprise Manager Oracle Exadata Database Machine Getting Started Guide

• Verify or enter new named credentials for DomU (host, root, and ExadataServer) and for the Exadata Storage Server. Click Test Credentials to verify thecredentials have been selected properly.
Click Next to schedule the scale-down job.
3. On the Schedule page, the Exadata Provisioning Wizard will create theDeployment Instance value. Select a schedule start and notification options:
• Schedule: Select to initiate the scale down immediately or later. If you selectlater, then you will be prompted to select a date and time.
• Notification: Select the notification statuses for which you will be notified.
Click Review to review the settings and initiate the scale down.
4. On the Review page, review the selection in the summary displayed. To changeany section, return to the previous page and edit the selection.
Click Submit to begin the scale down.
6.4.4 Deleting a Database ClusterTo delete an existing cluster:
1. From the Database Machine target menu, select Provisioning, then select DeleteCluster.
The Exadata Provisioning Wizard will display.
2. On the Cluster page, enter the cluster name you want to delete or click the Searchicon to select an available cluster.
The page will update to show the nodes to be deleted
Verify or enter new named credentials for DomU (host, root, and Exadata Server)and for the Exadata Storage Server. Click Test Credentials to verify the credentialshave been selected properly.
Click Next to schedule the delete job.
3. On the Schedule page, the Exadata Provisioning Wizard will create theDeployment Instance value. Select a schedule start and notification options:
• Schedule: Select to initiate the scale down immediately or later. If you selectlater, then you will be prompted to select a date and time.
• Notification: Select the notification statuses for which you will be notified.
Click Review to review the settings and initiate the delete job.
4. On the Review page, review the selection in the summary displayed. To changeany section, return to the previous page and edit the selection.
Click Submit to begin the delete job.
6.5 Viewing Virtualized Exadata Database MachineOnce discovered, the Exadata plug-in shows the virtual machines monitored byEnterprise Manager Cloud Control 12c, as shown in Figure 6-32:
Viewing Virtualized Exadata Database Machine
Virtualized Exadata Database Machine 6-19

Figure 6-32 Virtual Machines Monitored
Note:
The schematic diagram in the Database Machine home page is based on thecontent of the databasemachine.xml file found during discovery. Thevirtual platforms (Dom0) are displayed as compute nodes in the rack in theschematic diagram.
The Database Machine Software topology diagram will not display thephysical Oracle Server, virtual Oracle Server targets (DomU), and VirtualPlatform target (Dom0) targets. However, it will continue to show the hosttargets which are running in DomU.
The Software tab for the Exadata Database Machine target shows all clusters, ASM,and Database targets in the whole physical Database Machine grouped by clusters asdescribed in Figure 6-33:
Figure 6-33 Exadata Database Machine Software Tab
6.6 Resource Utilization GraphsThe following compute resource allocation graphs are available in virtualized Exadata.These graphs are dependent on the virtual machine hierarchy and metric data fromthe VI plug-in:
6.6.1 Cluster PlacementThis graph (Figure 6-34) shows the ClusterWare cluster placement on physical serversin a particular Exadata Database Machine rack. Since this is a placement graph, thewidths of the data series reflect the number of clusters on the physical server that hasthe most number of clusters.
Resource Utilization Graphs
6-20 Oracle Enterprise Manager Oracle Exadata Database Machine Getting Started Guide

Figure 6-34 Resource Utilization: Cluster Placement
6.6.2 Database PlacementThis graph (Figure 6-35) shows the database placement on physical servers in aparticular Exadata Database Machine rack for a particular DB cluster. Since this is aplacement graph, the widths of the data series reflect the number of DB on thephysical server that has the most number of databases for a particular DB cluster.
Figure 6-35 Resource Utilization: Database Placement
6.6.3 Database CPU UtilizationThis graph (Figure 6-36) shows the database CPU utilization per database per VM hostfor a particular DB cluster.
Resource Utilization Graphs
Virtualized Exadata Database Machine 6-21

Figure 6-36 Resource Utilization: Database CPU Utilization
6.6.4 Database Memory UtilizationThis graph (Figure 6-37) shows the database memory utilization per database per VMhost for a particular DB cluster.
Figure 6-37 Resource Utilization: Database Memory Utilization
Resource Utilization Graphs
6-22 Oracle Enterprise Manager Oracle Exadata Database Machine Getting Started Guide

7Exadata Metrics
This chapter describes how to access the various metrics for the Oracle ExadataDatabase Machine and provides examples of key metrics including:
• Accessing Exadata Metrics
• Aggregated Exadata FlashDisk and HardDisk Metric Example
• Exadata Cell Metric Example
7.1 Accessing Exadata MetricsFor a complete list of metrics available for the Oracle Exadata Database Machine, seethe Oracle Exadatachapter of the Oracle® Enterprise Manager Oracle Database Plug-inMetric Reference Manual:
To access the available Exadata Metrics:
1. From the Targets menu, select Exadata (Figure 7-1):
Figure 7-1 Enterprise Manager Targets Menu
2. On the Oracle Exadata Database Machines page, select an Exadata DatabaseMachine from the list.
Exadata Metrics 7-1

3. From the Target Navigation tree, expand the Exadata Grid and select an ExadataStorage Server (Figure 7-2):
Figure 7-2 Expand the Exadata Grid in the Target Navigation Tree
4. On the Storage Server page, select the Exadata Storage Server menu and selectMonitoring then All Metrics (Figure 7-3):
Accessing Exadata Metrics
7-2 Oracle Enterprise Manager Oracle Exadata Database Machine Getting Started Guide

Figure 7-3 Exadata Storage Server Monitoring Menu
5. On the All Metrics page, a variety of metrics are available. Select a metric or click toexpand available metric details.
7.2 Aggregated Exadata FlashDisk and HardDisk Metric ExampleThis metric category contains metrics that are aggregated over either the hard disks orflash disks in a cell. Selecting this metric from the All Metrics page generates a high-level summary, as shown in Figure 7-4:
Figure 7-4 Aggregated Exadata FlashDisk and HardDisk Metric
Expand the Aggregated Exadata FlashDisk and HardDisk Metric in the All Metricspage to show a variety of metric details, such as Average CellDisk Read Throughput(Figure 7-5), which gives an indication of the average number of bytes read from the
Aggregated Exadata FlashDisk and HardDisk Metric Example
Exadata Metrics 7-3

cell disk, or Total CellDisk IO Load (Figure 7-6), which gives an indication of the totalinput/output load to the celldisk.
Figure 7-5 Average CellDisk Read Throughput
Figure 7-6 Total CellDisk IO Load
7.3 Exadata Cell Metric ExampleThis metric category contains the performance metrics collected at the cell level foreach cell, such as CPU utilization and memory utilization. Selecting this metric fromthe All Metrics page generates a high-level summary, as shown in Figure 7-7:
Figure 7-7 Exadata Cell Metric
Expand the Exadata Cell Metric in the All Metrics page to show a variety of metricdetails, such as CPU Utilization (Figure 7-8), which provides information about theCPU utilization, or Disk I/O Objective (Figure 7-9), which provides the optimizationobjective which IORM is configured to achieve (for example, "Low Latency" or"Balanced" for OLTP-oriented databases, or "High Throughput" for data warehouses).
Exadata Cell Metric Example
7-4 Oracle Enterprise Manager Oracle Exadata Database Machine Getting Started Guide
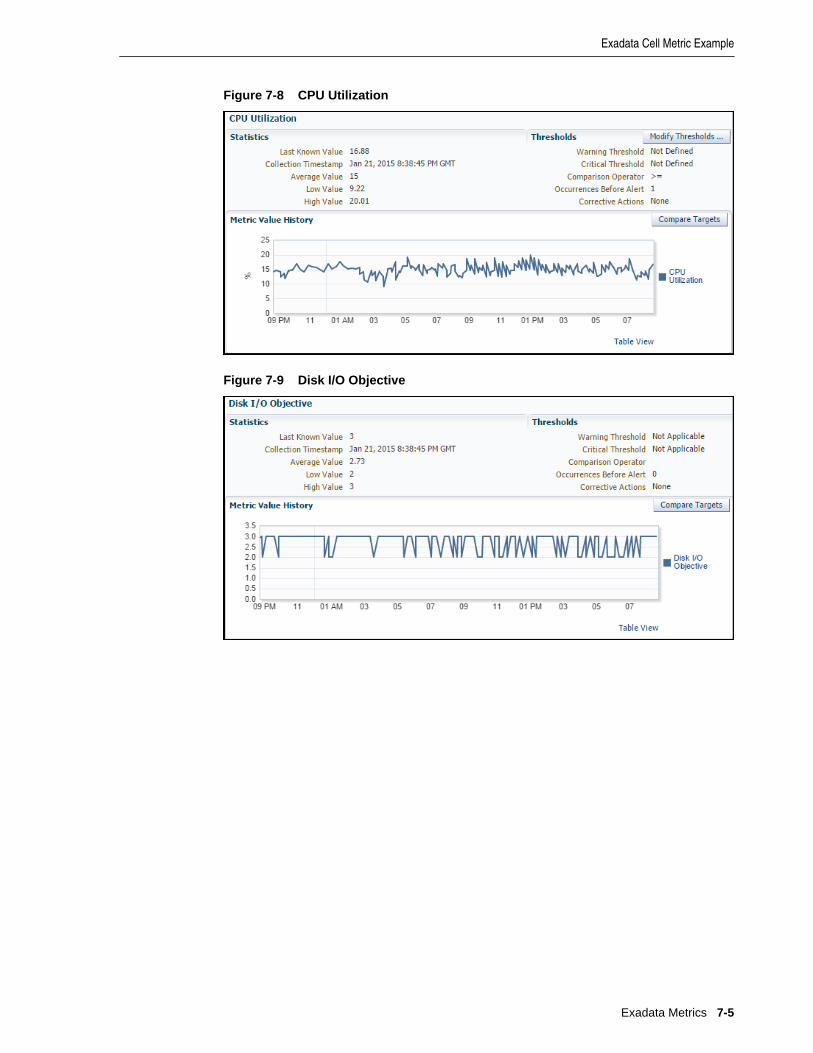
Figure 7-8 CPU Utilization
Figure 7-9 Disk I/O Objective
Exadata Cell Metric Example
Exadata Metrics 7-5

Exadata Cell Metric Example
7-6 Oracle Exadata Database Machine Getting Started Guide

8Troubleshooting the Exadata Plug-in
This chapter provides troubleshooting tips and techniques on installing, discovering,and configuring the Exadata plug-in. The following sections are provided:
• Establish SSH Connectivity
• Discovery Troubleshooting
• Troubleshooting the Exadata Database Machine Schematic File
• Exadata Database Machine Management Troubleshooting
• Exadata Derived Association Rules
• InfiniBand Patch Details Missing
• Oracle Auto Service Request (ASR) Issues
• Metric Collection Issues
• Status: Pending Issues
• Enhanced MIB Incompatibility
• Monitoring Agent Not Deployed for IPv6 Environments
8.1 Establish SSH ConnectivityFor Release 12.1.0.1.0, the SSH key location is <ORACLE_HOME>/.ssh whereORACLE_HOME is the installation directory of the Enterprise Manager agent. Forexample:
/u01/app/oracle/product/gc12/agent/core/12.1.0.1.0
Note:
Some metric collection has a dependency on ~/.ssh/known_hosts.
For Release 12.1.0.2.0 or later, the SSH key location is $HOME/.ssh of the agent user.
To set up SSH connectivity between the computer where Agent is running and theOracle Exadata Storage Server, as the Agent user:
1. Log in to the computer where the Enterprise Manager Agent is running, open aterminal, and run the following commands as the Agent user to generate a pair ofthe SSH private/public keys if they are not present:
• For Release 12.1.0.1.0:
Troubleshooting the Exadata Plug-in 8-1

$ cd <ORACLE_HOME>/.ssh $ ssh-keygen -t dsa -f id_dsa
Where <ORACLE_HOME> is the installation directory of the Enterprise ManagerAgent.
• For Release 12.1.0.2.0:
$ cd $HOME/.ssh$ ssh-keygen -t dsa -f id_dsa
Where $HOME is the home directory of the Agent user.
2. Copy the public key (id_dsa.pub) to the /tmp directory on the storage cell:
$ scp id_dsa.pub root@<cell_ipaddress>:/tmp
3. Add the contents of the id_dsa.pub file to the authorized_keys file inthe .ssh directory within the home directory of the cellmonitor user:
$ ssh -l root <cell_ipaddress> "cat /tmp/id_dsa.pub >> ~cellmonitor/.ssh/authorized_keys"
Note:
If the authorized_keys file does not exist, then create one by copying theid_dsa.pub file to the .ssh directory within the home directory of the usercellmonitor:
$ ssh -l root <cell_ipaddress> "cp /tmp/id_dsa.pub ~cellmonitor/.ssh/authorized_keys; chown cellmonitor:cellmonitor ~cellmonitor/.ssh/authorized_keys"
4. Make sure that the .ssh directory and authorized_keys have the right filepermission:
# chmod 700 ~cellmonitor/.ssh# chmod 600 ~cellmonitor/.ssh/authorized_keys
8.2 Discovery TroubleshootingVery often, the error message itself will include the cause for the error. Look for errormessages in the OMS and agent logs (case insensitive search for dbmdiscovery) or inthe Discovery window itself.
The following sections are provided:
• Hardware Availability
• Discovery Failure Diagnosis
• Cell is not Discovered
• Compute Node Error Message
• Compute Node or InfiniBand Switch is not Discovered
• Compute Node not Managed by Enterprise Manager
Discovery Troubleshooting
8-2 Oracle Enterprise Manager Oracle Exadata Database Machine Getting Started Guide

• Extra or Missing Components in the Newly Discovered Exadata DatabaseMachine
• InfiniBand Network Performance Page Shows No Data
• ILOM, PDU, KVM, or Cisco Switch is not Discovered
• Target Does not Appear in Selected Targets Page
• Target is Down or Metric Collection Error After Discovery
• Discovery Process Hangs
8.2.1 Hardware AvailabilityAll the hardware components must be "known" and reachable; otherwise,communication failures will occur. Use the ping command for each hardwarecomponent of the Exadata rack to make sure all names are resolved.
The MAP targets in Enterprise Manager Cloud Control 13c may fail while collectingthe correlation identifier. This failure can happen if the credentials are incorrect OR if atarget (for example, the ILOM) is too slow in responding.
ILOM can be slow when the number of open sessions on ILOM has exceeded the limit.You can resolve this issue by temporarily closing the sessions on the ILOM.
The rack placement of targets can fail:
• If examan did not return valid rack position for the target.
• If there is an existing target in the same location.
8.2.2 Discovery Failure DiagnosisShould discovery of your Oracle Exadata Database Machine fail, collect the followinginformation for diagnosis:
• Any examan-*.xml, examan-*.html, targets-*.xml, and examan*.logfiles from the AGENT_ROOT/agent_inst/sysman/emd/state directory.
• Agent logs: emagent_perl.trc and gcagent.log
• OMS logs: emoms.trc and emoms.log
• Any snapshot (screen capture) of errors shown on the target summary page.
8.2.3 Cell is not DiscoveredIf the cell itself is not discovered, possible causes could be:
• The installation of RDBMS Oracle Home Release 11.2 is incorrect.
• The /etc/oracle/cell/network-config/cellip.ora file on the computenode is missing or unreadable by the agent user or cell not listed in that file.
• The cell is not listed in the /etc/oracle/cell/network-config/cellip.ora file.
• Management Server (MS) or cellsrv is down.
Discovery Troubleshooting
Troubleshooting the Exadata Plug-in 8-3
• Cell management IP is changed improperly. Bouncing both cellsrv and MS mayhelp.
• To check that the cell is discovered with a valid management IP, run the followingcommand on the compute node used for discovery:
$ORACLE_HOME/bin/kfod op=cellconfig
8.2.4 Compute Node Error MessageProblems with the compute node may generate the following error:
The selected compute node is not an existing host target managed by Enterprise Manager. Please add the compute node as managed target before you continue.
Possible causes for this error include:
• The compute node was not added as an Enterprise Manager host target before theExadata Database Machine discovery.
• The host target name for compute node is an IP address. This problem can bean /etc/hosts or DNS issue.
• The host target name is not fully qualified with domain name (for example,hostname.mycompany.com)
8.2.5 Compute Node or InfiniBand Switch is not DiscoveredIf there are problems with discovery of the compute node or the InfiniBand switch,possible causes could be:
• The InfiniBand switch host name or nm2user password is incorrect.
• The connection from the compute node to the InfiniBand switch through SSH isblocked by a firewall.
• The InfiniBand switch is down or takes too long to respond to SSH.
To resolve problems with the compute node or InfiniBand switch discovery, try:
• If the InfiniBand switch node is not discovered, the InfiniBand switch model orswitch firmware may not be supported by EM Exadata. Run the ibnetdiscovercommand. Output should look like:
Switch 36 "S-002128469f47a0a0" # "Sun DCS 36 QDR switch switch1.example.com" enhanced port 0 lid 1 lmc 0
• To verify discovery of the compute node, run the following command on thecompute node used for discovery:
# ssh <IB switch> -l nm2user ibnetdiscover
• If the compute node is not discovered, run the ibnetdiscover command.Output should look like:
Ca 2 "H-00212800013e8f4a" # " xdb1db02 S 192.168.229.85 HCA-1“
A bug in the 11.2.2.2.2 compute node image shows “S" and the InfiniBand IP asmissing. Output would look like:
Ca 2 " H-00212800013e8f4a " # "xdb1db02 HCA-1“
Discovery Troubleshooting
8-4 Oracle Enterprise Manager Oracle Exadata Database Machine Getting Started Guide

A workaround for this problem is to run the following command as root on thecompute nodes:
# /opt/oracle.cellos/ib_set_node_desc.sh
8.2.6 Compute Node not Managed by Enterprise ManagerIf you encounter an instance where the compute note is not being managed byEnterprise Manager, then check the following troubleshooting steps:
• If the Agent host name is different than the compute node host name, then run thefollowing command as root to match up to agent host name:
# ibnetdiscover
• If the wrong Agent is used for discovery, then select the compute node Agent fordiscovery.
• If the compute node name has been reset from the client to management or vice-versa, then run the following command:
# /usr/sbin/set_nodedesc.sh
• If a short host name is used for agents, then reinstall the agents using fully-qualified host name <hostname.domain>.
8.2.7 Extra or Missing Components in the Newly Discovered Exadata Database MachineIf you are showing extra components or if there are missing components, then checkthe following troubleshooting steps:
• For extra components, examine them for Exadata Database Machine membership.Deselect any extra components manually from the discovered list.
• Verify which schematic file that was used for discovery. Ensure that EnterpriseManager can read the latest xml file (for example, databasemachine.xml) onthe compute node.
• For missing components, check the schematic file content.
• If you need to generate a new schematic file, then log a service request (SR) withOracle Support and provide the details.
8.2.8 InfiniBand Network Performance Page Shows No DataIf the InfiniBand network performance page does not show data, double check that thefiles under the /opt/oracle.SupportTools/em/ directory on compute nodesshould be publicly readable. Se Oracle Bug 13255511 for more information.
8.2.9 ILOM, PDU, KVM, or Cisco Switch is not DiscoveredIf the ILOM, PDU, KVM, or Cisco switch is not discovered, the most likely cause isthat the Exadata Database Machine Schematic file cannot be read or has incorrect data.See Troubleshooting the Exadata Database Machine Schematic File.
Discovery Troubleshooting
Troubleshooting the Exadata Plug-in 8-5

8.2.10 Target Does not Appear in Selected Targets PageEven though no error may appear during the Exadata Database Machine guideddiscovery, the target does not appear on the Select Components page. Possible causesand solutions include:
• Check the All Targets page to make sure that the target has not been added as anEnterprise Manager target already:
– Log in to Enterprise Manager.
– Select Targets, then All Targets.
– On the All Targets page, check to see if the Oracle Exadata target appears inthe list.
• A target that is added manually may not be connected to the Exadata DatabaseMachine system target through association. To correct this problem:
– Delete these targets before initiating the Exadata Database Machine guideddiscovery.
– Alternatively, use the emcli command to add these targets to theappropriate system target as members.
8.2.11 Target is Down or Metric Collection Error After DiscoveryAfter the Exadata Database Machine guided discovery, an error that the target is downor that there is a problem with the metric collection may display. Possible causes andrecommended solutions include:
• For the cell or InfiniBand switch, the setup of SSH may not be configuredproperly. To troubleshoot and resolve this problem:
– The agent's SSH public key in the <AGENT_INST>/.ssh/id_dsa.pub file isnot in the authorized_keys file of $HOME/.ssh for cellmonitor ornm2user.
– Verify permissions. The permission settings for .ssh andauthorized_keys should be:
drwx------ 2 cellmonitor cellmonitor 4096 Oct 13 07:06 .ssh-rw-r--r-- 1 cellmonitor cellmonitor 441842 Nov 10 20:03 authorized_keys
– Resolve a PerformOperationException error. See Troubleshooting theExadata Database Machine Schematic File for more information.
• If the SSH setup is confirmed to be properly configured, but the target status isstill down, then check to make sure there are valid monitoring and backup agentsassigned to monitor the target. To confirm, click the Database Machine menu andselect Monitoring Agent. Figure 8-1 shows an example of the monitoring agents:
Discovery Troubleshooting
8-6 Oracle Enterprise Manager Oracle Exadata Database Machine Getting Started Guide

Figure 8-1 Monitoring Agents Example
• For the ILOM, PDU, KVM, or Cisco switch, possible causes include:
– The Exadata Database Machine Schematic Diagram file has the wrong IPaddress.
– Monitoring Credentials is not set or incorrect. To verify:
* Log in to Enterprise Manager.
* Click Setup, then Security, and finally Monitoring Credentials.
* On the Monitoring Credentials page, click the Oracle Exadata target type.Then set the monitoring credentials.
8.2.12 ILOM Credential Validation Fails During 12c Discovery
ILOM Credential Validation Failure Errors
Note: The following applies to Enterprise Manager Cloud Control Release 2,Plug-in Update 1 and later.
ILOM credential validation may fail while performing a 12c discovery. The followingerrors may occur:
• Authentication failed
Problem: Credentials provided are invalid.
Resolution: Use valid credentials.
• Unable to establish IPMI V2 / RMCP+ session.
Problem: IPMI V2 is not enabled on the ILOM server.
Discovery Troubleshooting
Troubleshooting the Exadata Plug-in 8-7

Resolution: If IPMI V2 was disabled on purpose and the ILOM server isconfigured to use the more secure TLS1.2 protocol, then the IPMI client needs tobe upgraded to use TLS1.2 for establishing a session with ILOM server.
• Unable to establish LAN session.
Problem: Occurs when IPMI V1.5 is not enabled on the ILOM server.
Resolution: Enable IPMI V1.5 on the ILOM server. IPMI V1.5 is used forcommunication as a third option after TLS1.2 and IPMI V2 have failed.
8.2.13 Discovery Process HangsIf the discovery process for the Exadata Database Machine hangs, then check thefollowing troubleshooting steps:
• Examine your network to verify:
– That the host name can be resolved.
– That the Agent(s) can access the OMS.
– That a simple job can be executed from the console.
• If the OMS reported any errors, then check the following log file:
MW_HOME/gc_inst/sysman/log/emoms.log
• For Repository issues, check the Repository database's alert.log file.
• For Agent issues, check the following log file:
$AGENT/agent_inst/sysman/log/gcagent.log
8.3 Troubleshooting the Exadata Database Machine Schematic FileThe Exadata Database Machine Schematic file version 503 is required as a prerequisitefor guided discovery. As part of any discovery troubleshooting, possible causes andrecommended resolution with the schematic file can include:
• The schematic file on the compute node is missing or is not readable by the agentuser.
– For Exadata Release 11.2.3.2 and later, the schematic file is:
/opt/oracle.SupportTools/onecommand/catalog.xml
– For Exadata Release 11.2.3.1 and earlier, the schematic file is:
/opt/oracle.SupportTools/onecommand/databasemachine.xml
• If a PerformOperationException error appears, the agent NMO is notconfigured for setuid-root:
– From the OMS log:
2011-11-08 12:28:12,910 [[ACTIVE] ExecuteThread: '6' for queue: 'weblogic.kernel.Default (self-tuning)'] ERROR model.DiscoveredTarget logp.251 - ERROR: NMO not setuid-root (Unix only) oracle.sysman.emSDK.agent.client.exception.PerformOperationException:
Troubleshooting the Exadata Database Machine Schematic File
8-8 Oracle Enterprise Manager Oracle Exadata Database Machine Getting Started Guide

– As root, run:
# <AGENT_INST>/root.sh
• In the /etc/pam.d file, pam_ldap.so is used instead of pam_unix.so oncompute nodes.
– Even though the agent user and password are correct, this errors appears inthe agent log:
oracle.sysman.emSDK.agent.client.exception.PerformOperationException:ERROR: Invalid username and/or password
• Schematic file has error because of a known Exadata Database Machineconfigurator bug:
– Verify that the Exadata Database Machine configurator is version 12.0
– Verify that the schematic file is version 503
– Older versions may or may not have the bug depending on the ExadataDatabase Machine rack type and partitioning.
• If the schematic file is blank, then:
– Check your browser support and Enterprise Manager Cloud Control 12c.
– Run through discovery again and watch for messages.
– Check the emoms.log file for exceptions at the same time.
• If components are missing, then:
– Add manually to the schematic page (click Edit).
– Check for component presence in Enterprise Manager. Check to see if it ismonitored.
8.4 Exadata Database Machine Management TroubleshootingIf data is missing in Resource Utilization graphs, then run a "view object" SQL query tofind out what data is missing. Common problems include:
• Schematic file is not loaded correctly.
• Cluster, Database, and ASM are not added as Enterprise Manager targets.
• Database or cell target is down or is returning metric collection errors.
• Metric is collected in the Enterprise Manager repository, but has anIS_CURRENT != Y setting.
8.5 Exadata Derived Association RulesExadata derived association rules depend on Exadata and DB/ASM ECM data. Thisdata may take up to 30 minutes to appear depending on metric collection schedule. Tocheck for data availability:
• From the Enterprise Manager Cloud Control console:
Exadata Database Machine Management Troubleshooting
Troubleshooting the Exadata Plug-in 8-9

– Click Targets, then All Targets.
– On the All Targets page, click the Oracle Exadata target from the list.
– Click Database System, then Configuration, and finally Last Collected.
– On the Latest Configuration page, click Actions, then Refresh.
• From the command line:
# emctl control agent runCollection# target_name:target_type <collectionName>
Other troubleshooting tips include:
• Verify that ECM data are collected and present in Enterprise Manager repository.
• Verify that all data and conditions in query are met by running the query in SQL+.
• Verify triggers by enabling debug logging to check for timing issues.
8.6 InfiniBand Patch Details MissingProblem: If you select both InfiniBand switches in an Exadata Database Machine, thePatch Details section is empty. Installation of a patch for both InfiniBand switches arenot affected - only the details of the installed patch.
Workaround: Select each InfiniBand switch individually to review the patch details.
8.7 Oracle Auto Service Request (ASR) Issues• Oracle ASR Not Working on Exadata Storage Server
• No Slots Available Error
8.7.1 Oracle ASR Not Working on Exadata Storage ServerProblem: You may encounter a problem where Oracle ASR is not working on theExadata Storage Server.
Resolution: Ensure that there are two subscriptions on the Exadata Storage Server:
• The type should be ASR or V3ASR for receiving the cell ILOM traps.
• The type should be default (no type) or v3 for receiving the MS MIB traps fromthe cell.
8.7.2 No Slots Available ErrorThe asr type entry on MS MIB adds a subscription to the cell ILOM automatically. Ifthe ILOM SNMP slots are full, then the subscription command on the cell may failwith the following error:
CELL-02669: No slots are available for ILOM SNMP subscribers
There is a limit of 15 subscribers on the ILOM which might cause this failure. You willneed to free up some slots on the ILOM and retry the ASR subscription:
1. Login to the ILOM console (for example: https://XXXCELL-c.example.com).
InfiniBand Patch Details Missing
8-10 Oracle Enterprise Manager Oracle Exadata Database Machine Getting Started Guide

2. Click ILOM Administration and then Notification.
3. Choose the slot and set the subscriber to 0.0.0.0 to clear it up.
8.8 Target Status IssuesIf the Target status shows DOWN inaccurately, then:
• For the Cell: Check ssh equivalence (cellmonitor user) with the followigncommand:
ssh –i /home/oracle/.ssh/id_dsa –l cellmonitor <cell name> -e cellcli list cell
Output should be: <cell name>
• For the PDU: Check to make sure you can access the PDU through your browserto verify that it is connected to your LAN:
http://<pdu name>
• For the Cisco Switch: Check for proper SNMP subscriptions. See Set Up SNMPfor Cisco Ethernet Switch Targets for details.
8.9 Metric Collection IssuesIf the Target status shows a Metric Collection Error, then:
• Hover over the icon or navigate to Incident Manager.
• Read the full text of the error.
• Visit the Monitoring Configuration page and examine the settings. From theSetup menu, select Monitoring Configuration.
• Trigger a new collection: From the Target menu, select Configuration, then selectLast Collected, then Actions, and finally select Refresh.
• Access the monitoring Agent Metric through your browser:
https://<agent URL>/emd/browser/main
Click Target >> and then click Response to evaluate the results. You may need tolog a service request (SR) with Oracle Support.
8.10 Status: Pending IssuesFor those issues where components are in a Pending status, see the followingtroubleshooting steps:
• Cellsys Targets
• Database Machine Target or Any Associated Components
8.10.1 Cellsys TargetsIf the Cellsys target seems to be in a Pending status for too long, then:
• Verify that there is an association for the Cluster ASM, Database, and Storage Cell.
Target Status Issues
Troubleshooting the Exadata Plug-in 8-11
• Check and fix the status of the associated target database.
• Check and fix the status of the associated target ASM cluster.
• Ensure an UP status for all cell server targets.
• Delete any unassociated cellsys targets.
8.10.2 Database Machine Target or Any Associated ComponentsIf the Exadata Database Machine target or any associated components are in a Pendingstatus for too long, then:
• Check for duplicate or pending delete targets. From the Setup menu, selectManage Cloud Control, then select Health Overview.
• Check the target configuration. From the target's home page menu, select TargetSetup, then select Monitoring Configurations.
• Search for the target name in the agent or OMS logs:
$ grep <target name> gcagent.log or emoms.log
8.11 Enhanced MIB IncompatibilityWith some shipments of the X4 series of Exadata and all later version of the hardware,the Exadata Database Machine contains an upgraded PDU that is running a newerversion of firmware. This firmware ships with an enhanced Management InformationBase (MIB) that is not compatible with the Exadata 12.1.x plug-in. In these cases,change the setting in the PDU to using the original MIB as illustrated in Figure 8-2.
1. Select Original MIB if you are monitoring the ILOM as an "Oracle EngineeredSystem PDU" in Enterprise Manager.
2. To use the Enhanced MIB instead, you can use the "Oracle System InfrastructurePDU" and then convert Exadata Database Machine components to use OracleEnterprise Manager Cloud Control 13c. For details on converting to this version,see Using the Conversion Wizard to Convert 12c Targets to 13c Targets.
Enhanced MIB Incompatibility
8-12 Oracle Enterprise Manager Oracle Exadata Database Machine Getting Started Guide

Figure 8-2 Selecting Original MIB
8.12 Monitoring Agent Not Deployed for IPv6 EnvironmentsProblem: For IPv6 environments, the monitoring agent is not deployed.
Cause: If the IPv6 address is not included in the /etc/hosts file, then the agent willnot be deployed.
Resolution: Edit the /etc/hosts of the compute node (or the VM in case of virtualExadata) to map the OMS host name to an IPv6 address.
8.13 Configure IPv6–SNMPv3 SubscriptionYou can only do SNMPv3 subscriptions on Oracle Exadata Storage Server page.
Prerequisites:
• You need to create an SNMPv3 user on Cell. See Step 1 for instructions.
• Exadata Storage Server version must be 12.1.2.2 or later to support SNMPv3subscription.
To configure your IPv6–SNMPv3 subscription:
1. Creating an SNMPv3 user on Exadata Storage Server Target.
• Suppose you need a user called "v3user". You can check whether this user isalready present on the cell using this command:
Monitoring Agent Not Deployed for IPv6 Environments
Troubleshooting the Exadata Plug-in 8-13

cellcli -e "list cell attributes snmpUser"
• If this user is not present on the Exadata Storage Server:
ALTER CELL snmpUser=((name='[v3user]', authProtocol='MD5', authPassword='[passwd]', privProtocol='DES', privPassword='[passwd]'))
Note: The Enterprise Manager Agent supports DES and MD5/SHAcombination.
2. When running the discovery process on 12c and 13c, ensure that the v monitoringcredentials on the cell target in EM match the v user on the cell.
Note: Make sure that an SNMP v3 user has been created before the discoveryprocess is initiated (see Step 1 for instructions).
3. If you need to edit the SNMP v3 monitoring credentials of the Exadata StorageServer after discovery, you can log in to EM and:
• Select Configuration, then Security, then Monitoring Credentials.
• Select Exadata Storage Server type, and click on Manage MonitoringCredentials button.
• Select the Exadata Storage Server and set the v3 Credentials.
Note: Ensure that the v3 monitoring credentials are setup on the cell target inEM which match the v3 user on the cell.
Configure IPv6–SNMPv3 Subscription
8-14 Oracle Enterprise Manager Oracle Exadata Database Machine Getting Started Guide

Index
Aalerts
InfiniBand, 5-19ALTER CELL command, 4-5automated kit, 2-9
C
Cell administration, 5-14Cell management, 5-11Cisco Ethernet Switch
SNMP configuration, 4-14Compute Node Agent
Linux setup, 4-2Solaris setup, 4-3
Compute Node ILOMSNMP configuration, 4-11
creating rolesuser roles
creating, 5-1
Ddashboard
public report, 4-22dashboard creation, 4-21Database Machines
alerts, 5-4delete Exadata Database Machine component, 5-6deploy plug-in, 2-12deployment prerequisites, 2-1derived association rules, 8-9discovery
Grid Infrastructure, 3-18Real Application Clusters (RAC), 3-18review page, 3-14SPARC SuperCluster, 3-16switch troubleshooting, 8-5
discovery precheck script, 3-1Disk I/O Objective, 5-15
EEnterprise Manager Agent
automated kit, 2-9installation, 2-8Solaris 11 only, 2-9
Exadata Cell management, 5-11Exadata component
delete, 5-6Exadata Database Machine
configuration support, 1-5dashboard, 4-21remove target, 5-5troubleshooting, 8-9view topology, 5-2
Exadata software support, 1-3
F
Fault Monitoring, 5-21features
hardware support, 1-2monitoring and notification, 1-1target discovery, 1-4
firewall configuration, 2-4
Hhardware
supported hardware, 1-5view critical information, 5-4
hardware not supported, 1-13hardware support features, 1-2
I
InfiniBand network management, 5-17InfiniBand Switch
configure for SNMP, 4-9IORM Monitoring, 5-14
Index-1

KKVM
SNMP configuration, 4-16
M
manual verification, 3-4manually, 2-12metrics and alert settings, 5-11monitoring and notification features, 1-1multi-rack support, 1-6
N
names resolution, 2-4new features, xi
O
Oracle ILOM server, 4-13Oracle SuperCluster prerequisites
OneCommand, 2-8Oracle SuperCluster support
known issues, 1-9
PPDU
SNMP configuration, 4-15prerequisites
Exadata Storage Server software, 2-2firewall configuration, 2-4ILOM ipmtool, 2-3InfiniBand Switch, 2-3KVM application, 2-4PDU firmware, 2-3plug-in deployment, 2-1
R
remove Exadata Database Machine target, 5-5remove SNMP subscription, 4-8
Sschematic file
schematic file (continued)troubleshooting, 8-8
schematic files, 3-7secure storage, 3-1SNMP
configure using cellcli, 4-6configure using dcli, 4-8set up in KVM management console, 4-17trap forwarding setup on compute node, 4-2verify configuration, 4-17
SNMP configurationCisco Ethernet Switch, 4-14Compute Node ILOM, 4-11InfiniBand Switch, 4-9KVM, 4-16PDU, 4-15
SNMP subscriptionremove, 4-8
snmptrapd.conf configuration file, 4-2, 4-3software support
Exadata, 1-3SPARC SuperCluster
discovery, 3-16SSH connectivity, 4-8, 8-1Storage Cell SNMP configuration, 4-4supported component versions, 1-12supported hardware
partitioned Exadata Database Machine, 1-7supported operating systems, 1-13
T
target discovery features, 1-4troubleshooting
discovery, 8-2Exadata Database Machine, 8-9schematic file, 8-8
U
user roles, 2-8
V
view topology, 5-2
Index-2