symantec enterprise security manager modules for oracle ...€¦ · symantec™ enterprise security...
TRANSCRIPT
Symantec™ EnterpriseSecurity Manager Modulesfor Oracle Databases (UNIX)User Guide
Release 4.1 for Symantec ESM 6.5.x and9.0 For Solaris, AIX, HP-UX, and Red HatLinux
Symantec™ Enterprise Security Manager Modules forOracle Databases (UNIX) User Guide 4.1
The software described in this book is furnished under a license agreement andmay be usedonly in accordance with the terms of the agreement.
Documentation version: 4.1
Legal NoticeCopyright © 2009 Symantec Corporation. All rights reserved.
Symantec, the Symantec Logo, Norton AntiVirus, LiveUpdate, and Symantec SecurityResponse are trademarks or registered trademarks of Symantec Corporation or its affiliatesin theU.S. and other countries. Other namesmay be trademarks of their respective owners.
This Symantec product may contain third party software for which Symantec is requiredto provide attribution to the third party (“Third Party Programs”). Some of the Third PartyPrograms are available under open source or free software licenses. The LicenseAgreementaccompanying the Software does not alter any rights or obligations you may have underthose open source or free software licenses. Please see theThird Party LegalNoticeAppendixto this Documentation or TPIP ReadMe File accompanying this Symantec product for moreinformation on the Third Party Programs.
The product described in this document is distributed under licenses restricting its use,copying, distribution, and decompilation/reverse engineering. No part of this documentmay be reproduced in any form by any means without prior written authorization ofSymantec Corporation and its licensors, if any.
THEDOCUMENTATIONISPROVIDED"ASIS"ANDALLEXPRESSORIMPLIEDCONDITIONS,REPRESENTATIONS AND WARRANTIES, INCLUDING ANY IMPLIED WARRANTY OFMERCHANTABILITY, FITNESS FOR A PARTICULAR PURPOSE OR NON-INFRINGEMENT,ARE DISCLAIMED, EXCEPT TO THE EXTENT THAT SUCH DISCLAIMERS ARE HELD TOBELEGALLYINVALID.SYMANTECCORPORATIONSHALLNOTBELIABLEFORINCIDENTALOR CONSEQUENTIAL DAMAGES IN CONNECTION WITH THE FURNISHING,PERFORMANCE, OR USE OF THIS DOCUMENTATION. THE INFORMATION CONTAINEDIN THIS DOCUMENTATION IS SUBJECT TO CHANGE WITHOUT NOTICE.
The Licensed Software andDocumentation are deemed to be commercial computer softwareas defined in FAR12.212 and subject to restricted rights as defined in FARSection 52.227-19"Commercial Computer Software - Restricted Rights" and DFARS 227.7202, "Rights inCommercial Computer Software or Commercial Computer Software Documentation", asapplicable, and any successor regulations. Any use, modification, reproduction release,performance, display or disclosure of the Licensed Software andDocumentation by theU.S.Government shall be solely in accordance with the terms of this Agreement.

Symantec Corporation350 Ellis StreetMountain View, CA 94043
http://www.symantec.com
Technical SupportSymantec Technical Support maintains support centers globally. TechnicalSupport’s primary role is to respond to specific queries about product featuresand functionality. TheTechnical Support group also creates content for our onlineKnowledge Base. The Technical Support group works collaboratively with theother functional areas within Symantec to answer your questions in a timelyfashion. For example, theTechnical Support groupworkswithProductEngineeringand Symantec Security Response to provide alerting services and virus definitionupdates.
Symantec’s maintenance offerings include the following:
■ A range of support options that give you the flexibility to select the rightamount of service for any size organization
■ Telephone and Web-based support that provides rapid response andup-to-the-minute information
■ Upgrade assurance that delivers automatic software upgrade protection
■ Global support that is available 24 hours a day, 7 days a week
■ Advanced features, including Account Management Services
For information about Symantec’sMaintenance Programs, you can visit ourWebsite at the following URL:
www.symantec.com/techsupp/
Contacting Technical SupportCustomerswith a currentmaintenance agreementmay access Technical Supportinformation at the following URL:
www.symantec.com/techsupp/
Before contacting Technical Support, make sure you have satisfied the systemrequirements that are listed in your product documentation. Also, you should beat the computer onwhich theproblemoccurred, in case it is necessary to replicatethe problem.
When you contact Technical Support, please have the following informationavailable:
■ Product release level
■ Hardware information
■ Available memory, disk space, and NIC information
■ Operating system

■ Version and patch level
■ Network topology
■ Router, gateway, and IP address information
■ Problem description:
■ Error messages and log files
■ Troubleshooting that was performed before contacting Symantec
■ Recent software configuration changes and network changes
Licensing and registrationIf yourSymantecproduct requires registrationor a licensekey, access our technicalsupport Web page at the following URL:
www.symantec.com/techsupp/
Customer serviceCustomer service information is available at the following URL:
www.symantec.com/techsupp/
Customer Service is available to assist with the following types of issues:
■ Questions regarding product licensing or serialization
■ Product registration updates, such as address or name changes
■ General product information (features, language availability, local dealers)
■ Latest information about product updates and upgrades
■ Information about upgrade assurance and maintenance contracts
■ Information about the Symantec Buying Programs
■ Advice about Symantec's technical support options
■ Nontechnical presales questions
■ Issues that are related to CD-ROMs or manuals
Maintenance agreement resourcesIf you want to contact Symantec regarding an existing maintenance agreement,please contact the maintenance agreement administration team for your regionas follows:
[email protected] and Japan
[email protected], Middle-East, and Africa
[email protected] America and Latin America
Additional enterprise servicesSymantec offers a comprehensive set of services that allow you tomaximize yourinvestment in Symantec products and to develop your knowledge, expertise, andglobal insight, which enable you to manage your business risks proactively.
Enterprise services that are available include the following:
These solutions provide early warning of cyber attacks, comprehensive threatanalysis, and countermeasures to prevent attacks before they occur.
SymantecEarlyWarningSolutions
These services remove the burdenofmanaging andmonitoring security devicesand events, ensuring rapid response to real threats.
Managed Security Services
Symantec Consulting Services provide on-site technical expertise fromSymantec and its trustedpartners. SymantecConsultingServices offer a varietyof prepackaged and customizable options that include assessment, design,implementation,monitoring, andmanagement capabilities. Each is focused onestablishing andmaintaining the integrity and availability of your IT resources.
Consulting Services
Educational Services provide a full array of technical training, securityeducation, security certification, and awareness communication programs.
Educational Services
To access more information about Enterprise services, please visit our Web siteat the following URL:
www.symantec.com
Select your country or language from the site index.
Technical Support . . . . . . . . . . . . . . . . . . . . . . . . . . . . . . . . . . . . . . . . . . . . . . . . . . . . . . . . . . . . . . . . . . . . . . . . . . . . . . . . . . . . . . . . . . . . . . . 4
Chapter 1 Introducing Symantec ESM modules for OracleDatabases . . . . . . . . . . . . . . . . . . . . . . . . . . . . . . . . . . . . . . . . . . . . . . . . . . . . . . . . . . . . . . . . . . . . . . . 15
About the Symantec ESM modules for Oracle Databases ... . . . . . . . . . . . . . . . . . . 11What you can do with the Symantec ESM modules Oracle Databases
... . . . . . . . . . . . . . . . . . . . . . . . . . . . . . . . . . . . . . . . . . . . . . . . . . . . . . . . . . . . . . . . . . . . . . . . . . . . . . . . . . . . . . . . . 12Template ... . . . . . . . . . . . . . . . . . . . . . . . . . . . . . . . . . . . . . . . . . . . . . . . . . . . . . . . . . . . . . . . . . . . . . . . . . . . . . . . . . 12Where you can get more information .... . . . . . . . . . . . . . . . . . . . . . . . . . . . . . . . . . . . . . . . . . . . 13
Chapter 2 Installing Symantec ESM modules for OracleDatabases . . . . . . . . . . . . . . . . . . . . . . . . . . . . . . . . . . . . . . . . . . . . . . . . . . . . . . . . . . . . . . . . . . . . . . . 15
Installing ESM modules for Oracle Databases ... . . . . . . . . . . . . . . . . . . . . . . . . . . . . . . . . . 15Before you install .. . . . . . . . . . . . . . . . . . . . . . . . . . . . . . . . . . . . . . . . . . . . . . . . . . . . . . . . . . . . . . . . . . 15Minimum account privileges ... . . . . . . . . . . . . . . . . . . . . . . . . . . . . . . . . . . . . . . . . . . . . . . . . . 16System requirements ... . . . . . . . . . . . . . . . . . . . . . . . . . . . . . . . . . . . . . . . . . . . . . . . . . . . . . . . . . . . 18About using parameters in the oraenv.dat file ... . . . . . . . . . . . . . . . . . . . . . . . . . . 20About installing the ESM modules for Oracle databases ... . . . . . . . . . . . . . . 22How to run the installation program and register the files? ... . . . . . . . . . 24How to add configuration records to enable the ESM security
checking for the Oracle database? ... . . . . . . . . . . . . . . . . . . . . . . . . . . . . . . . . . . . . 25Silently installing the ESM modules for Oracle databases ... . . . . . . . . . . . 30
About using an alternate account ... . . . . . . . . . . . . . . . . . . . . . . . . . . . . . . . . . . . . . . . . . . . . . . . . . 33About registering agents ... . . . . . . . . . . . . . . . . . . . . . . . . . . . . . . . . . . . . . . . . . . . . . . . . . . . . . . . . . . . . 33About customizing checks ... . . . . . . . . . . . . . . . . . . . . . . . . . . . . . . . . . . . . . . . . . . . . . . . . . . . . . . . . . . 33
Customizing .m files ... . . . . . . . . . . . . . . . . . . . . . . . . . . . . . . . . . . . . . . . . . . . . . . . . . . . . . . . . . . . . 34
Chapter 3 About the Symantec ESM Modules for OracleDatabases . . . . . . . . . . . . . . . . . . . . . . . . . . . . . . . . . . . . . . . . . . . . . . . . . . . . . . . . . . . . . . . . . . . . . . . 35
About Oracle SID Discovery .... . . . . . . . . . . . . . . . . . . . . . . . . . . . . . . . . . . . . . . . . . . . . . . . . . . . . . . . 35Configuring theOracle database instances byusing theDiscovery
module ... . . . . . . . . . . . . . . . . . . . . . . . . . . . . . . . . . . . . . . . . . . . . . . . . . . . . . . . . . . . . . . . . . . . . . . . . 36Editing default settings ... . . . . . . . . . . . . . . . . . . . . . . . . . . . . . . . . . . . . . . . . . . . . . . . . . . . . . . . . 37Reporting SID Discovery .... . . . . . . . . . . . . . . . . . . . . . . . . . . . . . . . . . . . . . . . . . . . . . . . . . . . . . 38
Contents
About Oracle accounts ... . . . . . . . . . . . . . . . . . . . . . . . . . . . . . . . . . . . . . . . . . . . . . . . . . . . . . . . . . . . . . . . 40Establishing a baseline snapshot ... . . . . . . . . . . . . . . . . . . . . . . . . . . . . . . . . . . . . . . . . . . . . 40Editing default settings ... . . . . . . . . . . . . . . . . . . . . . . . . . . . . . . . . . . . . . . . . . . . . . . . . . . . . . . . . 40Reporting operating system access ... . . . . . . . . . . . . . . . . . . . . . . . . . . . . . . . . . . . . . . . . . 40Reporting user roles ... . . . . . . . . . . . . . . . . . . . . . . . . . . . . . . . . . . . . . . . . . . . . . . . . . . . . . . . . . . . . 42Reporting user privileges ... . . . . . . . . . . . . . . . . . . . . . . . . . . . . . . . . . . . . . . . . . . . . . . . . . . . . . . 44Reporting user accounts ... . . . . . . . . . . . . . . . . . . . . . . . . . . . . . . . . . . . . . . . . . . . . . . . . . . . . . . . 47Reporting account changes ... . . . . . . . . . . . . . . . . . . . . . . . . . . . . . . . . . . . . . . . . . . . . . . . . . . . 49Reporting account defaults ... . . . . . . . . . . . . . . . . . . . . . . . . . . . . . . . . . . . . . . . . . . . . . . . . . . . 50
About Oracle auditing .... . . . . . . . . . . . . . . . . . . . . . . . . . . . . . . . . . . . . . . . . . . . . . . . . . . . . . . . . . . . . . . . 51Establishing a baseline snapshot ... . . . . . . . . . . . . . . . . . . . . . . . . . . . . . . . . . . . . . . . . . . . . 51Editing default settings ... . . . . . . . . . . . . . . . . . . . . . . . . . . . . . . . . . . . . . . . . . . . . . . . . . . . . . . . . 51Reporting audit status and access ... . . . . . . . . . . . . . . . . . . . . . . . . . . . . . . . . . . . . . . . . . . 52Audit reporting methods .... . . . . . . . . . . . . . . . . . . . . . . . . . . . . . . . . . . . . . . . . . . . . . . . . . . . . . 53Reporting statement audits ... . . . . . . . . . . . . . . . . . . . . . . . . . . . . . . . . . . . . . . . . . . . . . . . . . . . 53Reporting object audits ... . . . . . . . . . . . . . . . . . . . . . . . . . . . . . . . . . . . . . . . . . . . . . . . . . . . . . . . . 55Reporting privilege audits ... . . . . . . . . . . . . . . . . . . . . . . . . . . . . . . . . . . . . . . . . . . . . . . . . . . . . 58
About Oracle configuration .... . . . . . . . . . . . . . . . . . . . . . . . . . . . . . . . . . . . . . . . . . . . . . . . . . . . . . . . . 59Editing default settings ... . . . . . . . . . . . . . . . . . . . . . . . . . . . . . . . . . . . . . . . . . . . . . . . . . . . . . . . . 60Reporting Oracle version information .... . . . . . . . . . . . . . . . . . . . . . . . . . . . . . . . . . . . . 60Reporting link password encryption .... . . . . . . . . . . . . . . . . . . . . . . . . . . . . . . . . . . . . . . 62Reporting operating system account prefixes ... . . . . . . . . . . . . . . . . . . . . . . . . . . . 63Reporting parameter values ... . . . . . . . . . . . . . . . . . . . . . . . . . . . . . . . . . . . . . . . . . . . . . . . . . . 64
About Oracle networks ... . . . . . . . . . . . . . . . . . . . . . . . . . . . . . . . . . . . . . . . . . . . . . . . . . . . . . . . . . . . . . . . 68Editing default settings ... . . . . . . . . . . . . . . . . . . . . . . . . . . . . . . . . . . . . . . . . . . . . . . . . . . . . . . . . 68Reporting SID configuration status ... . . . . . . . . . . . . . . . . . . . . . . . . . . . . . . . . . . . . . . . . 69Oracle net configuration watch .... . . . . . . . . . . . . . . . . . . . . . . . . . . . . . . . . . . . . . . . . . . . . . 69Oracle EXTPROC listeners ... . . . . . . . . . . . . . . . . . . . . . . . . . . . . . . . . . . . . . . . . . . . . . . . . . . . . 69
About Oracle objects ... . . . . . . . . . . . . . . . . . . . . . . . . . . . . . . . . . . . . . . . . . . . . . . . . . . . . . . . . . . . . . . . . . . 70Editing default settings ... . . . . . . . . . . . . . . . . . . . . . . . . . . . . . . . . . . . . . . . . . . . . . . . . . . . . . . . . 70Reporting table privileges ... . . . . . . . . . . . . . . . . . . . . . . . . . . . . . . . . . . . . . . . . . . . . . . . . . . . . . 70
About Oracle passwords .... . . . . . . . . . . . . . . . . . . . . . . . . . . . . . . . . . . . . . . . . . . . . . . . . . . . . . . . . . . . . 73Editing default settings ... . . . . . . . . . . . . . . . . . . . . . . . . . . . . . . . . . . . . . . . . . . . . . . . . . . . . . . . . 73Specifying check variations .... . . . . . . . . . . . . . . . . . . . . . . . . . . . . . . . . . . . . . . . . . . . . . . . . . . 74Comparing passwords to word lists ... . . . . . . . . . . . . . . . . . . . . . . . . . . . . . . . . . . . . . . . . 74Detecting well-known passwords .... . . . . . . . . . . . . . . . . . . . . . . . . . . . . . . . . . . . . . . . . . . 76
About Oracle patches ... . . . . . . . . . . . . . . . . . . . . . . . . . . . . . . . . . . . . . . . . . . . . . . . . . . . . . . . . . . . . . . . . . 77Editing default settings ... . . . . . . . . . . . . . . . . . . . . . . . . . . . . . . . . . . . . . . . . . . . . . . . . . . . . . . . . 77Oracle patches ... . . . . . . . . . . . . . . . . . . . . . . . . . . . . . . . . . . . . . . . . . . . . . . . . . . . . . . . . . . . . . . . . . . . . 77
About Oracle profiles ... . . . . . . . . . . . . . . . . . . . . . . . . . . . . . . . . . . . . . . . . . . . . . . . . . . . . . . . . . . . . . . . . . 79Establishing a baseline snapshot ... . . . . . . . . . . . . . . . . . . . . . . . . . . . . . . . . . . . . . . . . . . . . 79Editing default settings ... . . . . . . . . . . . . . . . . . . . . . . . . . . . . . . . . . . . . . . . . . . . . . . . . . . . . . . . . 79Reporting profiles and their limits ... . . . . . . . . . . . . . . . . . . . . . . . . . . . . . . . . . . . . . . . . . 79
Contents8
Reporting CPU limit violations .... . . . . . . . . . . . . . . . . . . . . . . . . . . . . . . . . . . . . . . . . . . . . . 82Reporting password violations .... . . . . . . . . . . . . . . . . . . . . . . . . . . . . . . . . . . . . . . . . . . . . . . 84
About Oracle roles ... . . . . . . . . . . . . . . . . . . . . . . . . . . . . . . . . . . . . . . . . . . . . . . . . . . . . . . . . . . . . . . . . . . . . . 87Establishing a baseline snapshot ... . . . . . . . . . . . . . . . . . . . . . . . . . . . . . . . . . . . . . . . . . . . . 87Editing default settings ... . . . . . . . . . . . . . . . . . . . . . . . . . . . . . . . . . . . . . . . . . . . . . . . . . . . . . . . . 88Reporting roles ... . . . . . . . . . . . . . . . . . . . . . . . . . . . . . . . . . . . . . . . . . . . . . . . . . . . . . . . . . . . . . . . . . . . 88Reporting role privileges ... . . . . . . . . . . . . . . . . . . . . . . . . . . . . . . . . . . . . . . . . . . . . . . . . . . . . . . 89Reporting role access ... . . . . . . . . . . . . . . . . . . . . . . . . . . . . . . . . . . . . . . . . . . . . . . . . . . . . . . . . . . . 92
About Oracle tablespaces ... . . . . . . . . . . . . . . . . . . . . . . . . . . . . . . . . . . . . . . . . . . . . . . . . . . . . . . . . . . . . 94Creating a baseline snapshot ... . . . . . . . . . . . . . . . . . . . . . . . . . . . . . . . . . . . . . . . . . . . . . . . . . 94Editing default settings ... . . . . . . . . . . . . . . . . . . . . . . . . . . . . . . . . . . . . . . . . . . . . . . . . . . . . . . . . 94Reporting tablespaces ... . . . . . . . . . . . . . . . . . . . . . . . . . . . . . . . . . . . . . . . . . . . . . . . . . . . . . . . . . . 95Reporting tablespace datafiles ... . . . . . . . . . . . . . . . . . . . . . . . . . . . . . . . . . . . . . . . . . . . . . . . 96Reporting SYSTEM tablespace information .... . . . . . . . . . . . . . . . . . . . . . . . . . . . . . 97Reporting DBA tablespace quotas ... . . . . . . . . . . . . . . . . . . . . . . . . . . . . . . . . . . . . . . . . . . . 98
9Contents

Contents10
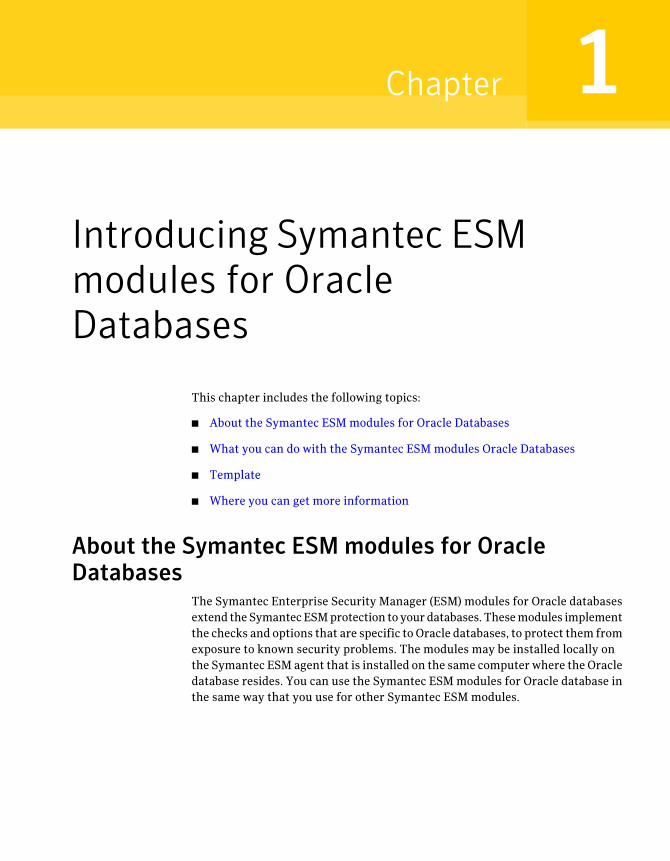
Introducing Symantec ESMmodules for OracleDatabases
This chapter includes the following topics:
■ About the Symantec ESM modules for Oracle Databases
■ What you can do with the Symantec ESM modules Oracle Databases
■ Template
■ Where you can get more information
About the Symantec ESM modules for OracleDatabases
The Symantec Enterprise Security Manager (ESM) modules for Oracle databasesextend theSymantecESMprotection to your databases. Thesemodules implementthe checks and options that are specific to Oracle databases, to protect them fromexposure to known security problems. The modules may be installed locally onthe Symantec ESM agent that is installed on the same computer where the Oracledatabase resides. You can use the Symantec ESM modules for Oracle database inthe same way that you use for other Symantec ESM modules.
1Chapter
What you can do with the Symantec ESM modulesOracle Databases
You can use the ESM Application modules to scan the Oracle databases forreporting vulnerabilities, such as weak passwords, patches update, and so on.
You can perform the following tasks using the ESM console:
■ Create a policy.
■ Configure the policy.
■ Create a rules template.
■ Run the policy.
■ Review the policy run.
■ Correct security problems from the console.
■ Create reports.
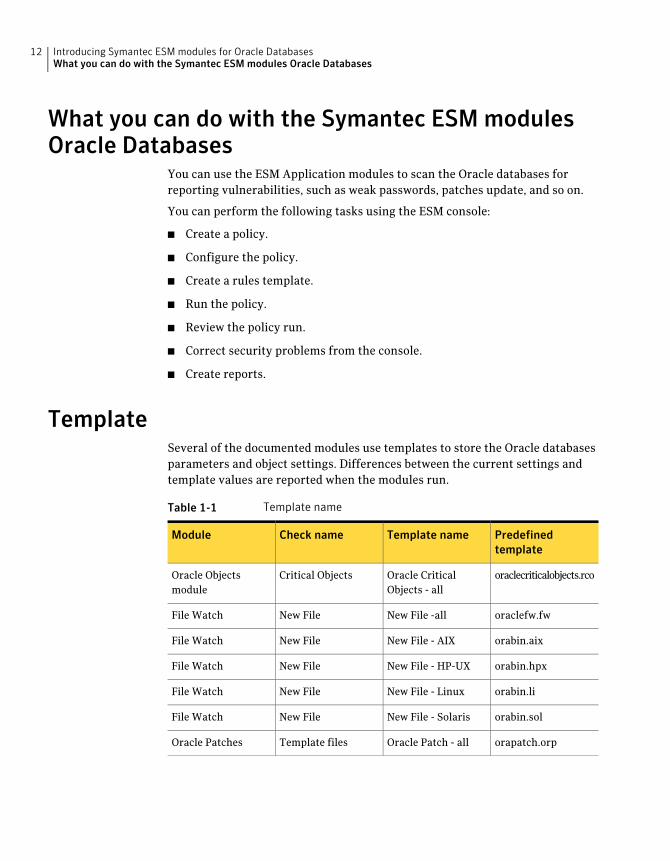
TemplateSeveral of the documented modules use templates to store the Oracle databasesparameters and object settings. Differences between the current settings andtemplate values are reported when the modules run.
Table 1-1 Template name
Predefinedtemplate
Template nameCheck nameModule
oraclecriticalobjects.rcoOracle CriticalObjects - all
Critical ObjectsOracle Objectsmodule
oraclefw.fwNew File -allNew FileFile Watch
orabin.aixNew File - AIXNew FileFile Watch
orabin.hpxNew File - HP-UXNew FileFile Watch
orabin.liNew File - LinuxNew FileFile Watch
orabin.solNew File - SolarisNew FileFile Watch
orapatch.orpOracle Patch - allTemplate filesOracle Patches
Introducing Symantec ESM modules for Oracle DatabasesWhat you can do with the Symantec ESM modules Oracle Databases
12
Where you can get more informationFor more information about Symantec ESM modules and Security Updates, seethe latest versions of the SymantecEnterprise SecurityAdministrator’sGuide andthe Symantec ESM Security Update User’s Guide.
Formore information onSymantec Enterprise SecurityManager (ESM), SymantecESMSecurityUpdates, and Symantec ESM support for database products, see theSymantec Security Response Web site at the following URL: Security ResponseWeb site
13Introducing Symantec ESM modules for Oracle DatabasesWhere you can get more information

Introducing Symantec ESM modules for Oracle DatabasesWhere you can get more information
14
Installing Symantec ESMmodules for OracleDatabases
This chapter includes the following topics:
■ Installing ESM modules for Oracle Databases
■ About using an alternate account
■ About registering agents
■ About customizing checks
Installing ESM modules for Oracle DatabasesYoucan install the followingSymantecEnterpriseSecurityManager (ESM)modulesfor Oracle on Solaris, HP-UX, and AIX platforms.
Before you installBefore you install Symantec ESM Modules for Oracle Databases, you must verifythe following:
At least one computer in your networkmust have aCD-ROMdrive.
CD-ROM access
Youmust have access with the root privileges to an accounton each computer where you plan to install the modules.
Account privileges
2Chapter
The Symantec ESM enterprise console must be able toconnect to the Symantec ESM manager.
Connection to the manager
The Symantec ESM agent must be running and registeredwith at least one Symantec ESM manager.
Agent and manager
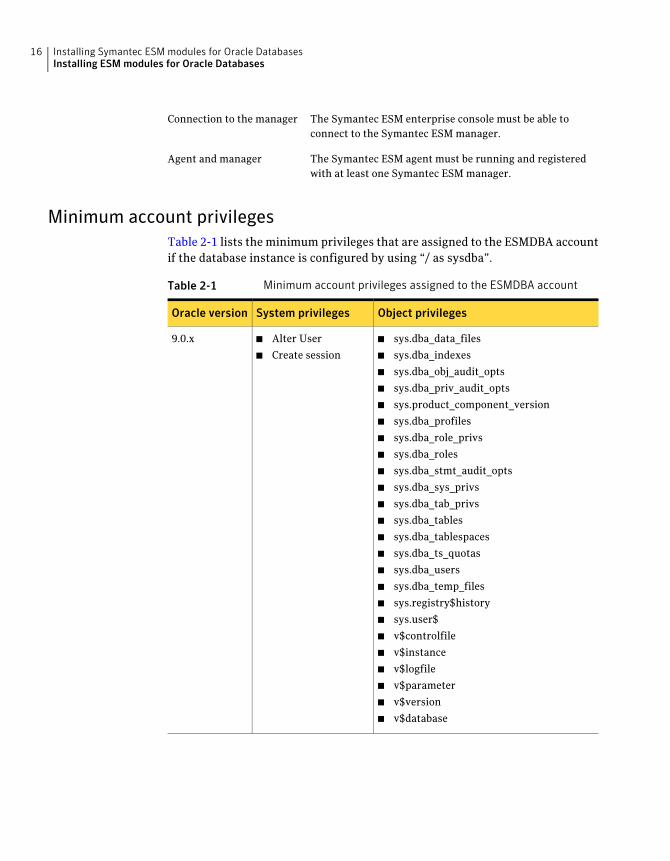
Minimum account privilegesTable 2-1 lists the minimum privileges that are assigned to the ESMDBA accountif the database instance is configured by using “/ as sysdba”.
Table 2-1 Minimum account privileges assigned to the ESMDBA account
Object privilegesSystem privilegesOracle version
■ sys.dba_data_files
■ sys.dba_indexes
■ sys.dba_obj_audit_opts
■ sys.dba_priv_audit_opts
■ sys.product_component_version
■ sys.dba_profiles
■ sys.dba_role_privs
■ sys.dba_roles
■ sys.dba_stmt_audit_opts
■ sys.dba_sys_privs
■ sys.dba_tab_privs
■ sys.dba_tables
■ sys.dba_tablespaces
■ sys.dba_ts_quotas
■ sys.dba_users
■ sys.dba_temp_files
■ sys.registry$history
■ sys.user$
■ v$controlfile
■ v$instance
■ v$logfile
■ v$parameter
■ v$version
■ v$database
■ Alter User
■ Create session
9.0.x
Installing Symantec ESM modules for Oracle DatabasesInstalling ESM modules for Oracle Databases
16
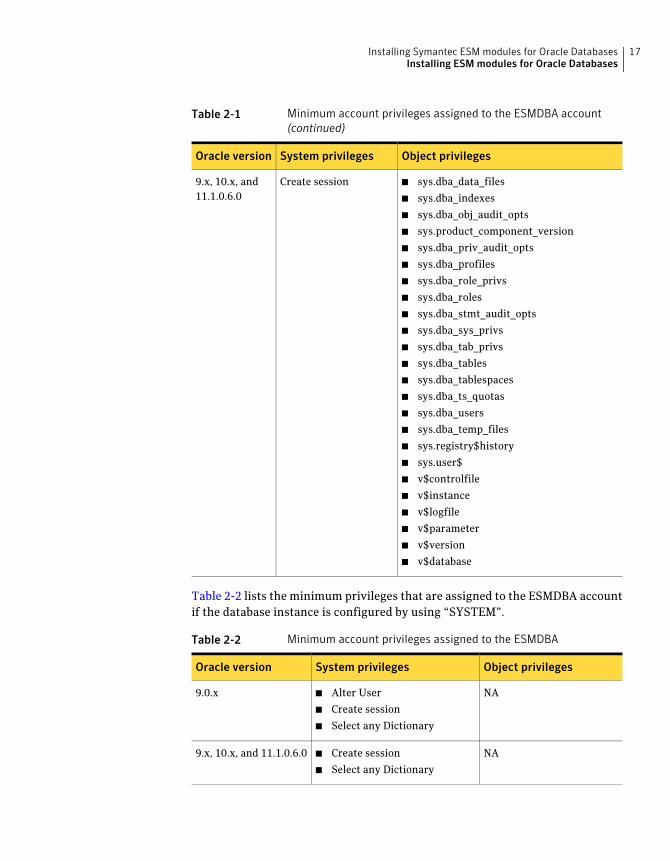
Table 2-1 Minimum account privileges assigned to the ESMDBA account(continued)
Object privilegesSystem privilegesOracle version
■ sys.dba_data_files
■ sys.dba_indexes
■ sys.dba_obj_audit_opts
■ sys.product_component_version
■ sys.dba_priv_audit_opts
■ sys.dba_profiles
■ sys.dba_role_privs
■ sys.dba_roles
■ sys.dba_stmt_audit_opts
■ sys.dba_sys_privs
■ sys.dba_tab_privs
■ sys.dba_tables
■ sys.dba_tablespaces
■ sys.dba_ts_quotas
■ sys.dba_users
■ sys.dba_temp_files
■ sys.registry$history
■ sys.user$
■ v$controlfile
■ v$instance
■ v$logfile
■ v$parameter
■ v$version
■ v$database
Create session9.x, 10.x, and11.1.0.6.0
Table 2-2 lists the minimum privileges that are assigned to the ESMDBA accountif the database instance is configured by using “SYSTEM”.
Table 2-2 Minimum account privileges assigned to the ESMDBA
Object privilegesSystem privilegesOracle version
NA■ Alter User
■ Create session
■ Select any Dictionary
9.0.x
NA■ Create session
■ Select any Dictionary
9.x, 10.x, and 11.1.0.6.0
17Installing Symantec ESM modules for Oracle DatabasesInstalling ESM modules for Oracle Databases
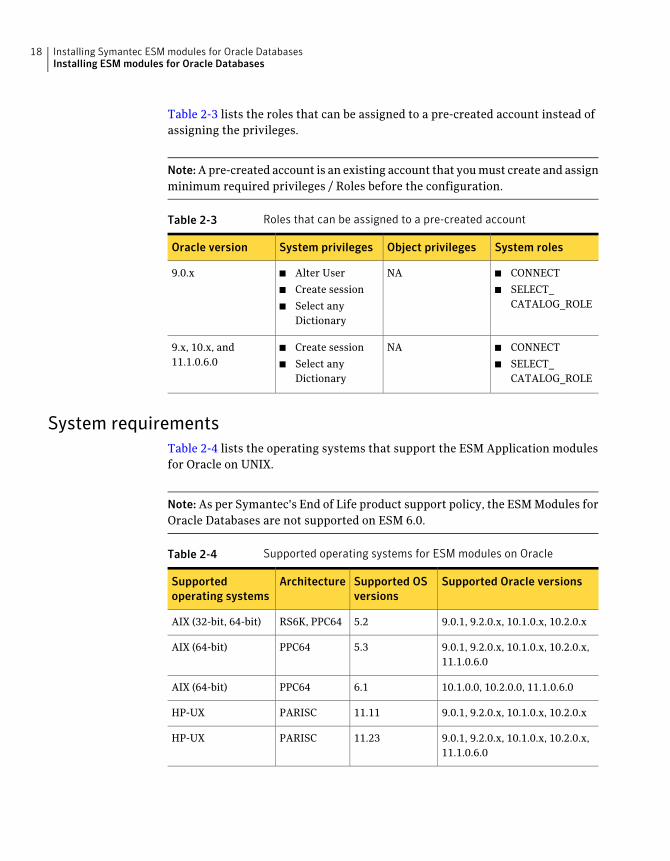
Table 2-3 lists the roles that can be assigned to a pre-created account instead ofassigning the privileges.
Note:Apre-created account is an existing account that youmust create and assignminimum required privileges / Roles before the configuration.
Table 2-3 Roles that can be assigned to a pre-created account
System rolesObject privilegesSystem privilegesOracle version
■ CONNECT
■ SELECT_CATALOG_ROLE
NA■ Alter User
■ Create session
■ Select anyDictionary
9.0.x
■ CONNECT
■ SELECT_CATALOG_ROLE
NA■ Create session
■ Select anyDictionary
9.x, 10.x, and11.1.0.6.0
System requirementsTable 2-4 lists the operating systems that support the ESM Application modulesfor Oracle on UNIX.
Note:As per Symantec's End of Life product support policy, the ESM Modules forOracle Databases are not supported on ESM 6.0.
Table 2-4 Supported operating systems for ESM modules on Oracle
Supported Oracle versionsSupported OSversions
ArchitectureSupportedoperating systems
9.0.1, 9.2.0.x, 10.1.0.x, 10.2.0.x5.2RS6K, PPC64AIX (32-bit, 64-bit)
9.0.1, 9.2.0.x, 10.1.0.x, 10.2.0.x,11.1.0.6.0
5.3PPC64AIX (64-bit)
10.1.0.0, 10.2.0.0, 11.1.0.6.06.1PPC64AIX (64-bit)
9.0.1, 9.2.0.x, 10.1.0.x, 10.2.0.x11.11PARISCHP-UX
9.0.1, 9.2.0.x, 10.1.0.x, 10.2.0.x,11.1.0.6.0
11.23PARISCHP-UX
Installing Symantec ESM modules for Oracle DatabasesInstalling ESM modules for Oracle Databases
18
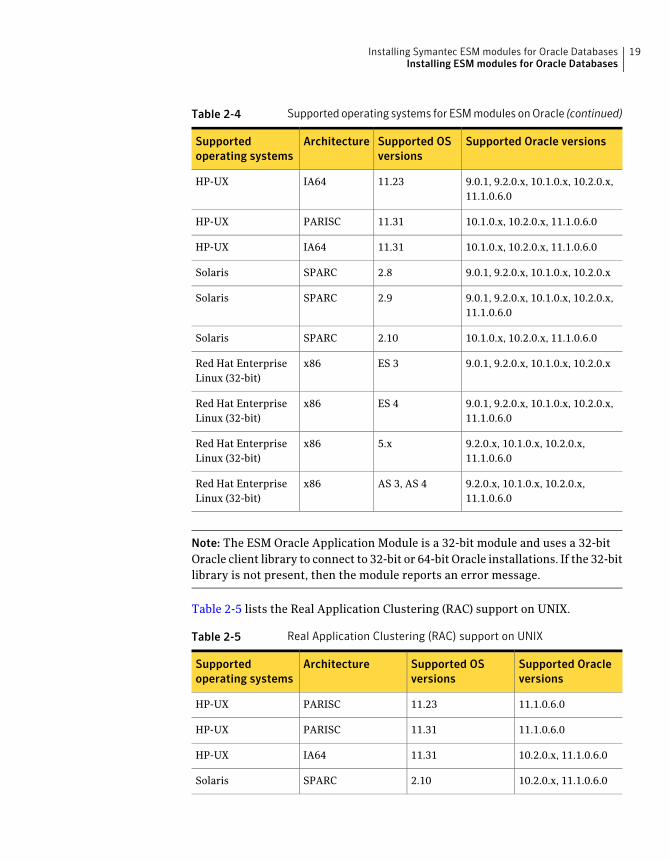
Table 2-4 Supported operating systems for ESM modules on Oracle (continued)
Supported Oracle versionsSupported OSversions
ArchitectureSupportedoperating systems
9.0.1, 9.2.0.x, 10.1.0.x, 10.2.0.x,11.1.0.6.0
11.23IA64HP-UX
10.1.0.x, 10.2.0.x, 11.1.0.6.011.31PARISCHP-UX
10.1.0.x, 10.2.0.x, 11.1.0.6.011.31IA64HP-UX
9.0.1, 9.2.0.x, 10.1.0.x, 10.2.0.x2.8SPARCSolaris
9.0.1, 9.2.0.x, 10.1.0.x, 10.2.0.x,11.1.0.6.0
2.9SPARCSolaris
10.1.0.x, 10.2.0.x, 11.1.0.6.02.10SPARCSolaris
9.0.1, 9.2.0.x, 10.1.0.x, 10.2.0.xES 3x86Red Hat EnterpriseLinux (32-bit)
9.0.1, 9.2.0.x, 10.1.0.x, 10.2.0.x,11.1.0.6.0
ES 4x86Red Hat EnterpriseLinux (32-bit)
9.2.0.x, 10.1.0.x, 10.2.0.x,11.1.0.6.0
5.xx86Red Hat EnterpriseLinux (32-bit)
9.2.0.x, 10.1.0.x, 10.2.0.x,11.1.0.6.0
AS 3, AS 4x86Red Hat EnterpriseLinux (32-bit)
Note: The ESM Oracle Application Module is a 32-bit module and uses a 32-bitOracle client library to connect to 32-bit or 64-bit Oracle installations. If the 32-bitlibrary is not present, then the module reports an error message.
Table 2-5 lists the Real Application Clustering (RAC) support on UNIX.
Table 2-5 Real Application Clustering (RAC) support on UNIX
Supported Oracleversions
Supported OSversions
ArchitectureSupportedoperating systems
11.1.0.6.011.23PARISCHP-UX
11.1.0.6.011.31PARISCHP-UX
10.2.0.x, 11.1.0.6.011.31IA64HP-UX
10.2.0.x, 11.1.0.6.02.10SPARCSolaris
19Installing Symantec ESM modules for Oracle DatabasesInstalling ESM modules for Oracle Databases
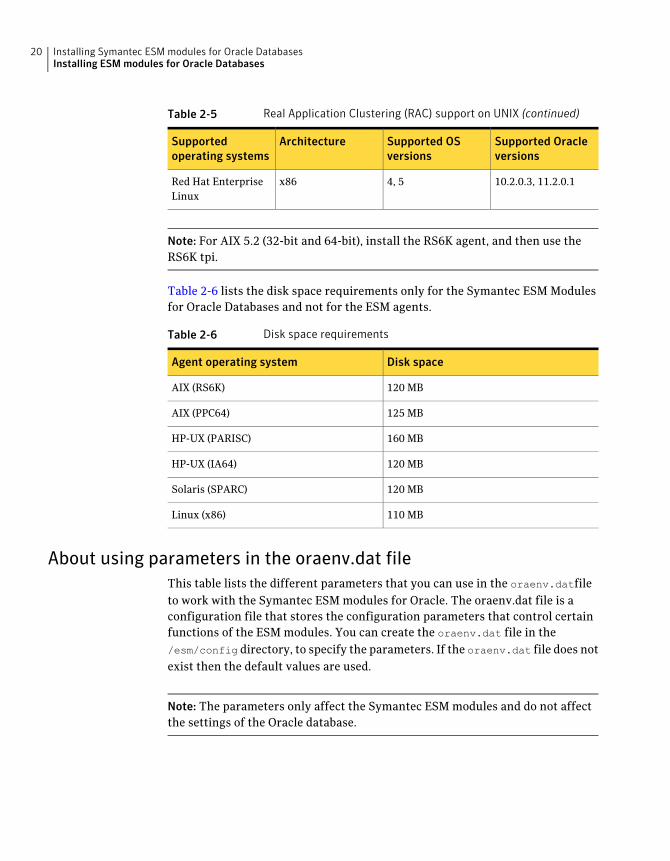
Table 2-5 Real Application Clustering (RAC) support on UNIX (continued)
Supported Oracleversions
Supported OSversions
ArchitectureSupportedoperating systems
10.2.0.3, 11.2.0.14, 5x86Red Hat EnterpriseLinux
Note: For AIX 5.2 (32-bit and 64-bit), install the RS6K agent, and then use theRS6K tpi.
Table 2-6 lists the disk space requirements only for the Symantec ESM Modulesfor Oracle Databases and not for the ESM agents.
Table 2-6 Disk space requirements
Disk spaceAgent operating system
120 MBAIX (RS6K)
125 MBAIX (PPC64)
160 MBHP-UX (PARISC)
120 MBHP-UX (IA64)
120 MBSolaris (SPARC)
110 MBLinux (x86)
About using parameters in the oraenv.dat fileThis table lists the different parameters that you can use in the oraenv.datfileto work with the Symantec ESM modules for Oracle. The oraenv.dat file is aconfiguration file that stores the configuration parameters that control certainfunctions of the ESM modules. You can create the oraenv.dat file in the/esm/config directory, to specify the parameters. If the oraenv.dat file does notexist then the default values are used.
Note: The parameters only affect the Symantec ESM modules and do not affectthe settings of the Oracle database.
Installing Symantec ESM modules for Oracle DatabasesInstalling ESM modules for Oracle Databases
20
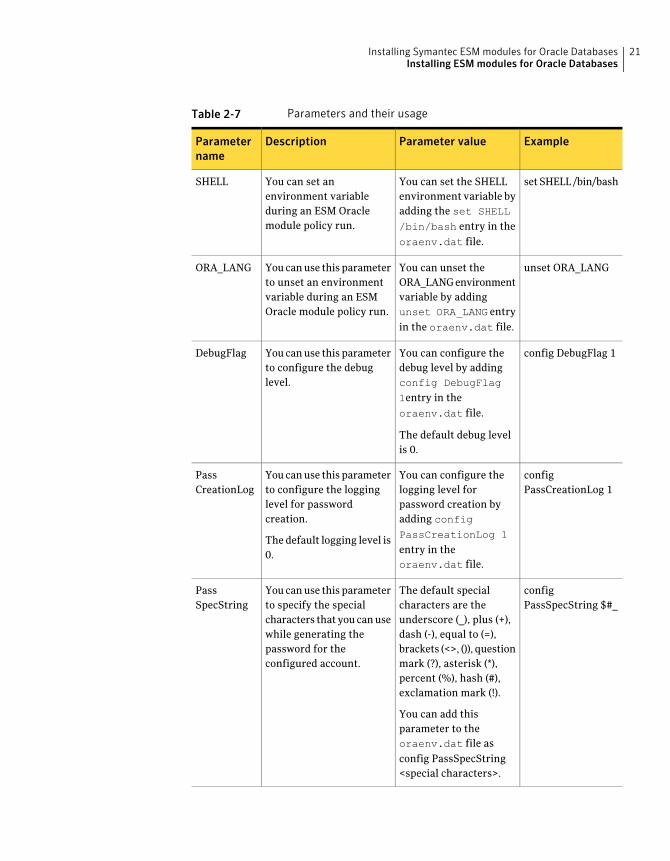
Table 2-7 Parameters and their usage
ExampleParameter valueDescriptionParametername
setSHELL /bin/bashYou can set the SHELLenvironment variable byadding the set SHELL
/bin/bash entry in theoraenv.dat file.
You can set anenvironment variableduring an ESM Oraclemodule policy run.
SHELL
unset ORA_LANGYou can unset theORA_LANGenvironmentvariable by addingunset ORA_LANG entryin the oraenv.dat file.
You canuse this parameterto unset an environmentvariable during an ESMOracle module policy run.
ORA_LANG
config DebugFlag 1You can configure thedebug level by addingconfig DebugFlag
1entry in theoraenv.dat file.
The default debug levelis 0.
You canuse this parameterto configure the debuglevel.
DebugFlag
configPassCreationLog 1
You can configure thelogging level forpassword creation byadding configPassCreationLog 1
entry in theoraenv.dat file.
You canuse this parameterto configure the logginglevel for passwordcreation.
The default logging level is0.
PassCreationLog
configPassSpecString $#_
The default specialcharacters are theunderscore (_), plus (+),dash (-), equal to (=),brackets (<>, ()), questionmark (?), asterisk (*),percent (%), hash (#),exclamation mark (!).
You can add thisparameter to theoraenv.dat file asconfig PassSpecString<special characters>.
You canuse this parameterto specify the specialcharacters that youcanusewhile generating thepassword for theconfigured account.
PassSpecString
21Installing Symantec ESM modules for Oracle DatabasesInstalling ESM modules for Oracle Databases
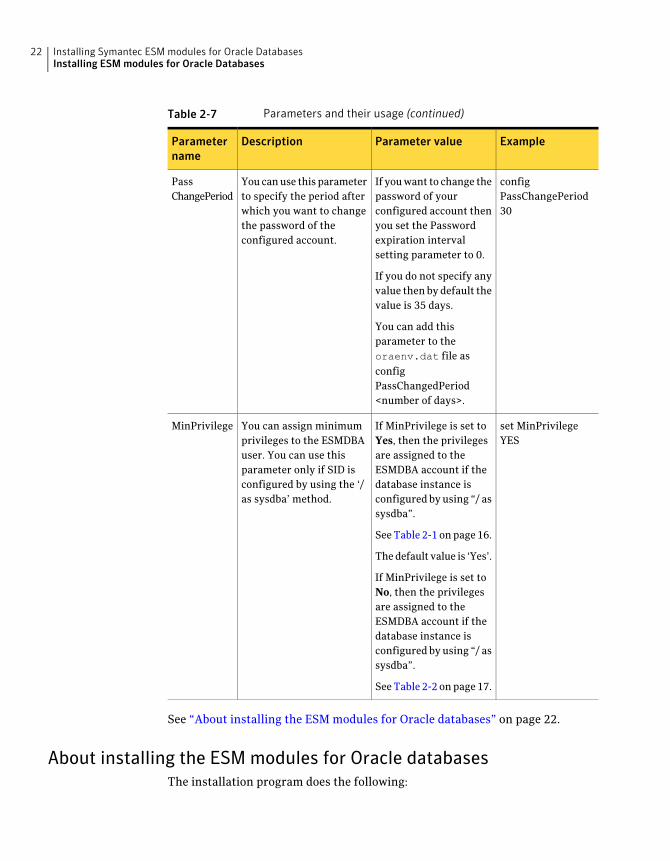
Table 2-7 Parameters and their usage (continued)
ExampleParameter valueDescriptionParametername
configPassChangePeriod30
If youwant to change thepassword of yourconfigured account thenyou set the Passwordexpiration intervalsetting parameter to 0.
If you do not specify anyvalue then by default thevalue is 35 days.
You can add thisparameter to theoraenv.dat file asconfigPassChangedPeriod<number of days>.
You canuse this parameterto specify the period afterwhich you want to changethe password of theconfigured account.
PassChangePeriod
set MinPrivilegeYES
If MinPrivilege is set toYes, then the privilegesare assigned to theESMDBA account if thedatabase instance isconfigured by using “/ assysdba”.
SeeTable 2-1 onpage16.
Thedefault value is ‘Yes’.
If MinPrivilege is set toNo, then the privilegesare assigned to theESMDBA account if thedatabase instance isconfigured by using “/ assysdba”.
SeeTable 2-2 onpage17.
You can assign minimumprivileges to the ESMDBAuser. You can use thisparameter only if SID isconfigured by using the ‘/as sysdba’ method.
MinPrivilege
See “About installing the ESM modules for Oracle databases” on page 22.
About installing the ESM modules for Oracle databasesThe installation program does the following:
Installing Symantec ESM modules for Oracle DatabasesInstalling ESM modules for Oracle Databases
22
■ Extracts and installs module executables, configuration (.m) files, and thetemplate files.
■ Registers the .m and the template files to the ESM manager by using the ESMagent’s registration program.
■ Launches the esmora.tpi executable to create the ESMDBA account forreporting. The esmorasetup is a configuration utility that is used during theinstallation setup. The password of ESMDBA account is 12 characters longand is generated randomly. The password is encrypted by using the 256-bitAES encryption algorithm and is stored in the /esm/config/oracle.dat file.
■ Auto-generates the password for the ESMDBA account. The ESM modules fortheOracle database consider the following parameters during auto-generationof the passwords :
■ PassChangedPeriodThe “PassChangedPeriod” parameter specifies the number of days afterwhich the program automatically changes the password of the configuredaccount. The default days of "PassChangedPeriod" is 35 days. The passwordmust contain at least one uppercase, one lower-case, onenumeric character(0-9), and one special character. The default special characters are theunderscore (_), plus (+), dash (-), equal to (=), brackets (<>), question mark(?), brackets (()), asterisk (*), percent (%), hash (#), and exclamation mark(!).
■ PassSpecStringThe "PassSpecString" parameter specifies the special characters that youcanusewhile generating thepassword for the configured account.Use thisparameter if the config PassSpecString entry is not defined in the/esm/config/oraenv.datfile. If you want to use other special characters,you can also add a parameter "config PassSpecString $#_" entry into the/esm/config/oraenv.dat file before you run esmorasetup configuration.
■ Grants the system privileges based on predefined roles.See Table 2-3 on page 18.
During the policy runs, the ESMDBA account does not create any object in thedatabase.
Note: If you change the password for the pre-created account then you mustmodify the configuration records by using the/esm/bin/<platform>/esmorasetup.exe.
23Installing Symantec ESM modules for Oracle DatabasesInstalling ESM modules for Oracle Databases
Note:TheESMApplicationmodule should be installed on all theOracle databases,including failover. Themodule doesnot automatically detect the failover databasesunless it is installed and configured on the same.
How to run the installation program and register the files?You can install the modules on the ESM agent computer by using the esmora.tpiexecutable.
To run the installation program and register the files
1 At the command prompt, type cd <path> to change to the directory thatcorresponds to your vendor/ operating system/architecture/esmora.tpi.
You can also download and copy the esmora.tpi from the Security ResponseWeb site to the desired location.
2 Choose one of the following options:
To display the contents of the package.Option 1
To install the module.Option 2
3 The Do you want to register the template or .m files? message appears. Doone of the following:
■ Type a Y, if the files are not registered with the manager.
■ Type an N, if the files have already been registered.
Note: You must register the template or *.m files at least once with theagent that is installed on the same operating system and is registered tothe same manager.
4 Enter the ESM manager that the agent is registered to.
Usually, it is the name of the computer that the manager is installed on.
5 Enter the ESM access name (logon name) for the manager.
6 Enter the name of the agent as it is currently registered to the ESMmanager.
Usually, it is the name of the computer that the agent is installed on.
7 Enter the ESM password that is used to log on to the ESM manager.
8 Enter the network protocol that is used to contact the ESM manager.
Installing Symantec ESM modules for Oracle DatabasesInstalling ESM modules for Oracle Databases
24
9 Enter the port that is used to contact the ESM Manager.
The default port is 5600.
10 The Is this information correct? message appears. Do one of the following:
■ Type a Y, the agent continues with the registration to the ESM manager.
■ Type an N, the setup prompts to re-enter the details of the new manager.
How to add configuration records to enable the ESM security checkingfor the Oracle database?
When the extraction is complete, the installation program prompts you to addESMdatabase configuration records to enable the security checking for the oracledatabase.
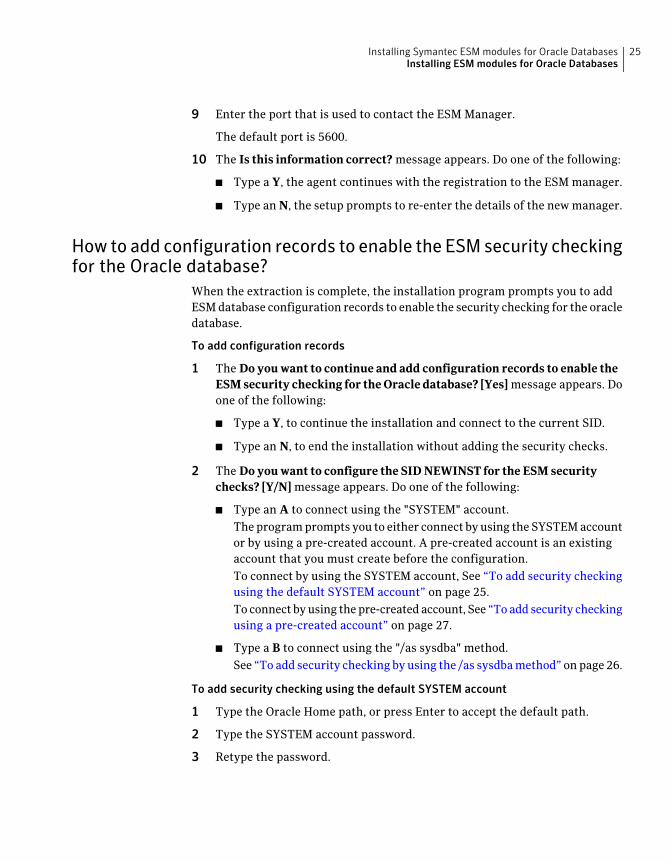
To add configuration records
1 The Do you want to continue and add configuration records to enable theESM security checking for the Oracle database? [Yes] message appears. Doone of the following:
■ Type a Y, to continue the installation and connect to the current SID.
■ Type an N, to end the installation without adding the security checks.
2 The Do you want to configure the SID NEWINST for the ESM securitychecks? [Y/N] message appears. Do one of the following:
■ Type an A to connect using the "SYSTEM" account.The programprompts you to either connect by using the SYSTEMaccountor by using a pre-created account. A pre-created account is an existingaccount that you must create before the configuration.To connect by using the SYSTEM account, See “To add security checkingusing the default SYSTEM account” on page 25.To connect byusing thepre-created account, See “Toadd security checkingusing a pre-created account” on page 27.
■ Type a B to connect using the "/as sysdba" method.See “To add security checking by using the /as sysdbamethod” onpage 26.
To add security checking using the default SYSTEM account
1 Type the Oracle Home path, or press Enter to accept the default path.
2 Type the SYSTEM account password.
3 Retype the password.
25Installing Symantec ESM modules for Oracle DatabasesInstalling ESM modules for Oracle Databases

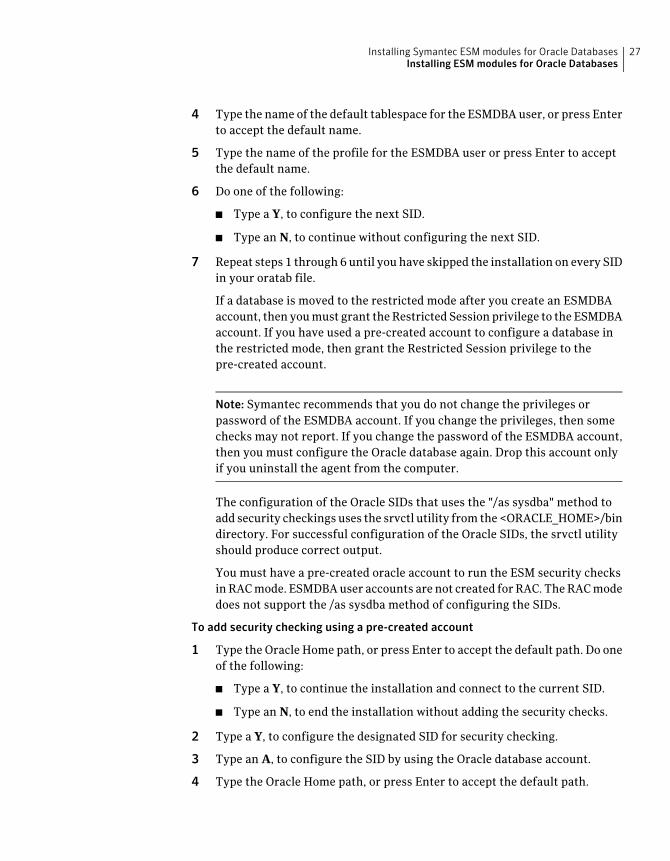
4 Type the name of the temporary tablespace for the ESMDBA user or pressEnter to accept the default name.
5 Type the name of the default tablespace for the ESMDBAuser, or press Enterto accept the default name.
6 Type the name of the profile for the ESMDBA user or press Enter to acceptthe default name.
7 Review the summary information that the installation program displays.Type a Y, to begin the installation.
Symantec ESM does the following:
■ Verifies the password.
■ Connects you to the database as a SYSTEM user.
■ Creates an ESMDBA user account in your Oracle database with privilegesto perform security checksThe SYSTEM account password is not stored. The ESMDBA user accountis used to perform security checks.If an ESMDBA account already exists, Symantec ESM drops it, and thenrecreates it.
■ Finds the next SID in the oratab file and prompts you to continue.
8 Do one of the following:
■ Type a Y, to add security checking for the next SID.
■ Type an N, to continue without adding security checks to the next SID.
9 Repeat steps 1 through 8 until you have skipped the installation on every SIDin your oratab file.
Note: Symantec recommends that you do not change the privileges orpassword of the ESMDBA account. If you change the privileges, then somechecks may not report. If you change the password of the ESMDBA account,then you must configure the Oracle database again. Drop this account onlyif you uninstall the agent from the computer.
To add security checking by using the /as sysdba method
1 Type the Oracle Home path, or press Enter to accept the default path.
2 Type a Y, to add security checking for the designated SID.
3 Type the name of the temporary tablespace for the ESMDBA user or pressEnter to accept the default name.
Installing Symantec ESM modules for Oracle DatabasesInstalling ESM modules for Oracle Databases
26
4 Type the name of the default tablespace for the ESMDBAuser, or press Enterto accept the default name.
5 Type the name of the profile for the ESMDBA user or press Enter to acceptthe default name.
6 Do one of the following:
■ Type a Y, to configure the next SID.
■ Type an N, to continue without configuring the next SID.
7 Repeat steps 1 through 6 until you have skipped the installation on every SIDin your oratab file.
If a database is moved to the restricted mode after you create an ESMDBAaccount, then youmust grant theRestricted Session privilege to the ESMDBAaccount. If you have used a pre-created account to configure a database inthe restricted mode, then grant the Restricted Session privilege to thepre-created account.
Note: Symantec recommends that you do not change the privileges orpassword of the ESMDBA account. If you change the privileges, then somechecks may not report. If you change the password of the ESMDBA account,then you must configure the Oracle database again. Drop this account onlyif you uninstall the agent from the computer.
The configuration of the Oracle SIDs that uses the "/as sysdba" method toadd security checkings uses the srvctl utility from the <ORACLE_HOME>/bindirectory. For successful configuration of the Oracle SIDs, the srvctl utilityshould produce correct output.
You must have a pre-created oracle account to run the ESM security checksinRACmode. ESMDBAuser accounts are not created for RAC. TheRACmodedoes not support the /as sysdba method of configuring the SIDs.
To add security checking using a pre-created account
1 Type the Oracle Home path, or press Enter to accept the default path. Do oneof the following:
■ Type a Y, to continue the installation and connect to the current SID.
■ Type an N, to end the installation without adding the security checks.
2 Type a Y, to configure the designated SID for security checking.
3 Type an A, to configure the SID by using the Oracle database account.
4 Type the Oracle Home path, or press Enter to accept the default path.
27Installing Symantec ESM modules for Oracle DatabasesInstalling ESM modules for Oracle Databases

5 Type the pre-created Oracle account name.
A pre-createdOracle account, used to perform the security checks, is checkedfor CONNECTandSELECTprivileges instead of the default SYSTEMaccount.
6 Type the pre-created Oracle account password.
7 Retype the password.
8 The installation program prompts you to add security checking for the SID.Type Y or N.
Repeat steps 4 through 7 until you have skipped the installation on every SIDin your oratab file.
If you configure an instance that is mounted in RAC cluster database mode,you must use a pre-created account. Otherwise, the esmorasetup programdisplays the following message:
The <SID> instance is mounted in cluster database mode. To preventconflicting password for the ESMDBA account, you need to provide apre-created logon account to be used by the ESM Modules for OracleDatabase security checks. Failed to configure Oracle SID <SID>.
To add or update configuration record for a pre-created Oracle account
■ At the command prompt, type the following:esmorasetup -a {SID} [-A{ACCOUNT}] [-P{PASSWORD}] [-H{ORAHOME}]
Predefined Oracle database logon account-A {Account}
Predefined Oracle database logon account password-P {Password}
Oracle home directory-H {OraHome}
To add or update configuration record for a SID created in RAC environment
■ At the command prompt, type the following:esmorasetup -a {SID} -A (Pre-create account) -P {PASSWORD} [-T
{TEMP}] [-S {USERS}] [-W {DEFAULT}]
Predefined Oracle database logon account-A {Account}
Predefined Oracle database logon account password-P {Password}
Oracle TEMPORARY tablespace for ESMDBA user-T {TblSpace}
Oracle DEFAULT tablespace for ESMDBA user-S {TblSpace}
Oracle PROFILE for ESMDBA user-W {Profile}
Installing Symantec ESM modules for Oracle DatabasesInstalling ESM modules for Oracle Databases
28
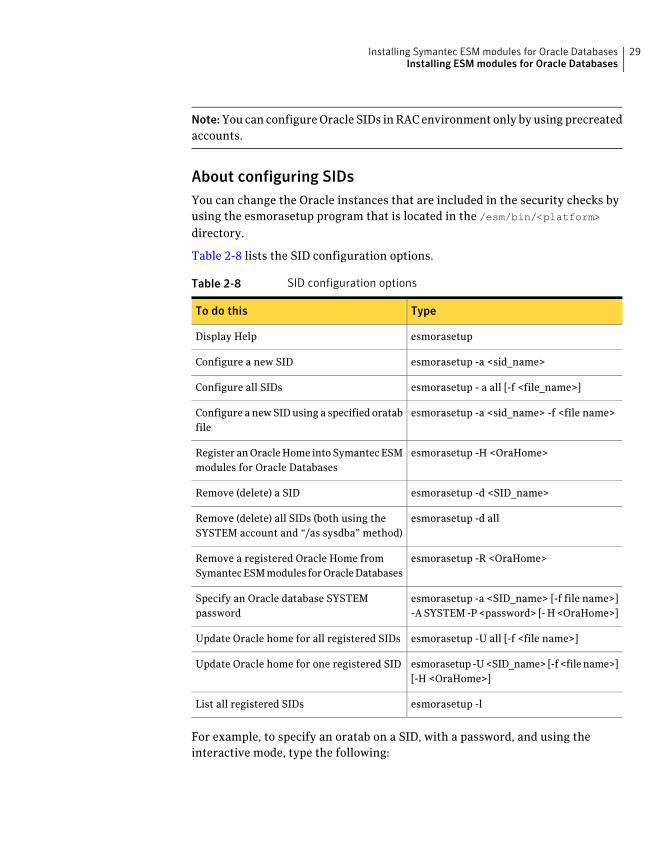
Note:You can configureOracle SIDs inRACenvironment only by using precreatedaccounts.
About configuring SIDsYou can change the Oracle instances that are included in the security checks byusing the esmorasetup program that is located in the /esm/bin/<platform>directory.
Table 2-8 lists the SID configuration options.
Table 2-8 SID configuration options
TypeTo do this
esmorasetupDisplay Help
esmorasetup -a <sid_name>Configure a new SID
esmorasetup - a all [-f <file_name>]Configure all SIDs
esmorasetup -a <sid_name> -f <file name>Configure a newSIDusing a specified oratabfile
esmorasetup -H <OraHome>Register anOracleHome intoSymantecESMmodules for Oracle Databases
esmorasetup -d <SID_name>Remove (delete) a SID
esmorasetup -d allRemove (delete) all SIDs (both using theSYSTEM account and “/as sysdba” method)
esmorasetup -R <OraHome>Remove a registered Oracle Home fromSymantecESMmodules forOracleDatabases
esmorasetup -a <SID_name> [-f file name>]-ASYSTEM-P<password> [-H<OraHome>]
Specify an Oracle database SYSTEMpassword
esmorasetup -U all [-f <file name>]Update Oracle home for all registered SIDs
esmorasetup -U<SID_name> [-f<filename>][-H <OraHome>]
Update Oracle home for one registered SID
esmorasetup -lList all registered SIDs
For example, to specify an oratab on a SID, with a password, and using theinteractive mode, type the following:
29Installing Symantec ESM modules for Oracle DatabasesInstalling ESM modules for Oracle Databases
./esmorasetup <-a|-d> <sid_name|all> [-P <SYS_PASSWORD>] [-f
<file_name>]
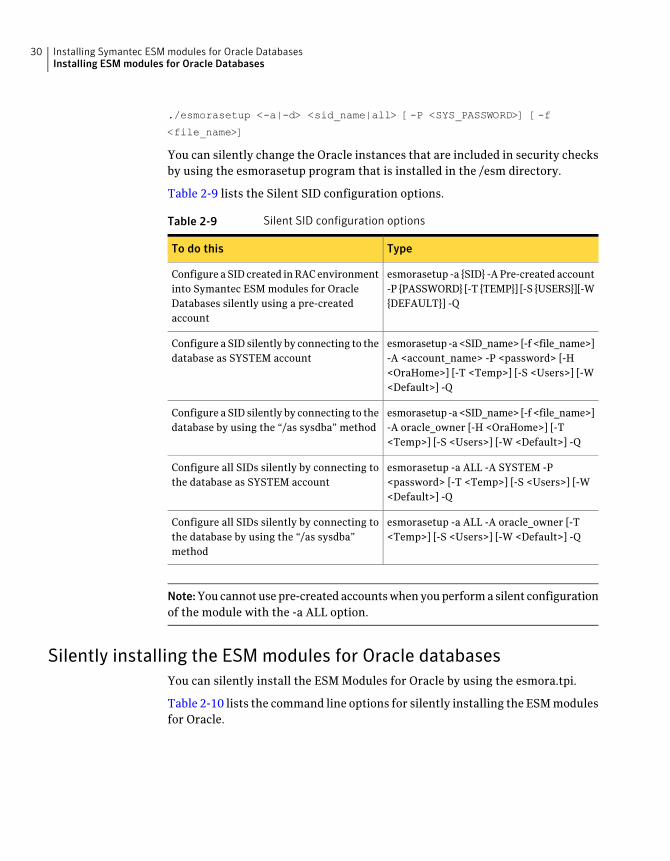
You can silently change the Oracle instances that are included in security checksby using the esmorasetup program that is installed in the /esm directory.
Table 2-9 lists the Silent SID configuration options.
Table 2-9 Silent SID configuration options
TypeTo do this
esmorasetup -a {SID} -APre-created account-P {PASSWORD} [-T {TEMP}] [-S {USERS}][-W{DEFAULT}] -Q
Configure aSID created inRACenvironmentinto Symantec ESM modules for OracleDatabases silently using a pre-createdaccount
esmorasetup -a<SID_name> [-f<file_name>]-A <account_name> -P <password> [-H<OraHome>] [-T <Temp>] [-S <Users>] [-W<Default>] -Q
Configure a SID silently by connecting to thedatabase as SYSTEM account
esmorasetup -a<SID_name> [-f<file_name>]-A oracle_owner [-H <OraHome>] [-T<Temp>] [-S <Users>] [-W <Default>] -Q
Configure a SID silently by connecting to thedatabase by using the “/as sysdba” method
esmorasetup -a ALL -A SYSTEM -P<password> [-T <Temp>] [-S <Users>] [-W<Default>] -Q
Configure all SIDs silently by connecting tothe database as SYSTEM account
esmorasetup -a ALL -A oracle_owner [-T<Temp>] [-S <Users>] [-W <Default>] -Q
Configure all SIDs silently by connecting tothe database by using the “/as sysdba”method
Note:Youcannotusepre-createdaccountswhenyouperformasilent configurationof the module with the -a ALL option.
Silently installing the ESM modules for Oracle databasesYou can silently install the ESM Modules for Oracle by using the esmora.tpi.
Table 2-10 lists the command line options for silently installing the ESMmodulesfor Oracle.
Installing Symantec ESM modules for Oracle DatabasesInstalling ESM modules for Oracle Databases
30
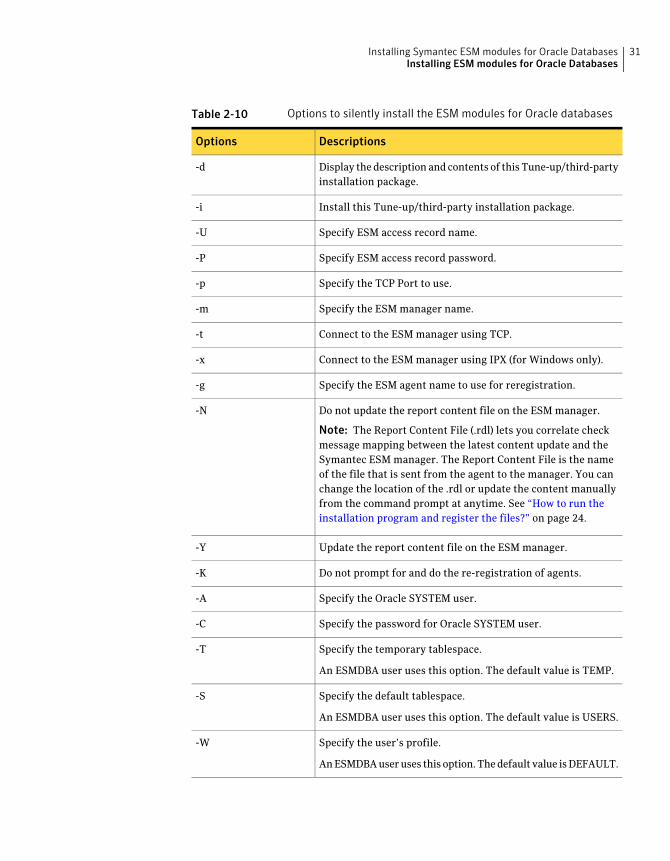
Table 2-10 Options to silently install the ESM modules for Oracle databases
DescriptionsOptions
Display thedescription and contents of thisTune-up/third-partyinstallation package.
-d
Install this Tune-up/third-party installation package.-i
Specify ESM access record name.-U
Specify ESM access record password.-P
Specify the TCP Port to use.-p
Specify the ESM manager name.-m
Connect to the ESM manager using TCP.-t
Connect to the ESM manager using IPX (for Windows only).-x
Specify the ESM agent name to use for reregistration.-g
Do not update the report content file on the ESM manager.
Note: The Report Content File (.rdl) lets you correlate checkmessage mapping between the latest content update and theSymantec ESM manager. The Report Content File is the nameof the file that is sent from the agent to the manager. You canchange the location of the .rdl or update the content manuallyfrom the command prompt at anytime. See “How to run theinstallation program and register the files?” on page 24.
-N
Update the report content file on the ESM manager.-Y
Do not prompt for and do the re-registration of agents.-K
Specify the Oracle SYSTEM user.-A
Specify the password for Oracle SYSTEM user.-C
Specify the temporary tablespace.
An ESMDBA user uses this option. The default value is TEMP.
-T
Specify the default tablespace.
An ESMDBA user uses this option. The default value is USERS.
-S
Specify the user’s profile.
AnESMDBAuseruses this option.Thedefault value isDEFAULT.
-W
31Installing Symantec ESM modules for Oracle DatabasesInstalling ESM modules for Oracle Databases
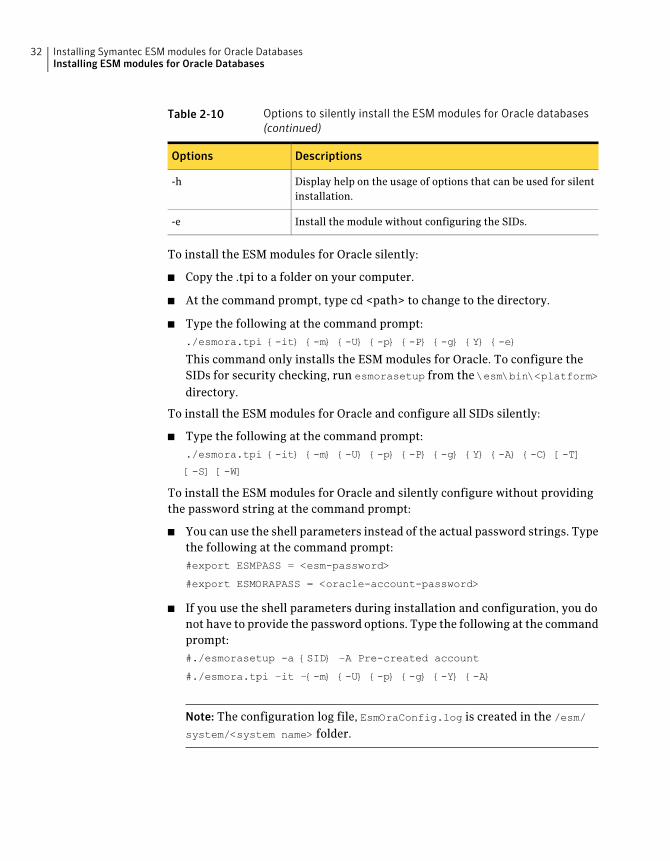
Table 2-10 Options to silently install the ESM modules for Oracle databases(continued)
DescriptionsOptions
Display help on the usage of options that can be used for silentinstallation.
-h
Install the module without configuring the SIDs.-e
To install the ESM modules for Oracle silently:
■ Copy the .tpi to a folder on your computer.
■ At the command prompt, type cd <path> to change to the directory.
■ Type the following at the command prompt:./esmora.tpi {-it} {-m} {-U} {-p} {-P} {-g} {Y} {-e}
This command only installs the ESM modules for Oracle. To configure theSIDs for security checking, run esmorasetup from the \esm\bin\<platform>directory.
To install the ESM modules for Oracle and configure all SIDs silently:
■ Type the following at the command prompt:./esmora.tpi {-it} {-m} {-U} {-p} {-P} {-g} {Y} {-A} {-C} [-T]
[-S] [-W]
To install the ESM modules for Oracle and silently configure without providingthe password string at the command prompt:
■ You can use the shell parameters instead of the actual password strings. Typethe following at the command prompt:#export ESMPASS = <esm-password>
#export ESMORAPASS = <oracle-account-password>
■ If you use the shell parameters during installation and configuration, you donot have to provide the password options. Type the following at the commandprompt:#./esmorasetup -a {SID} –A Pre-created account
#./esmora.tpi –it –{-m} {-U} {-p} {-g} {-Y} {-A}
Note: The configuration log file, EsmOraConfig.log is created in the /esm/system/<system name> folder.
Installing Symantec ESM modules for Oracle DatabasesInstalling ESM modules for Oracle Databases
32
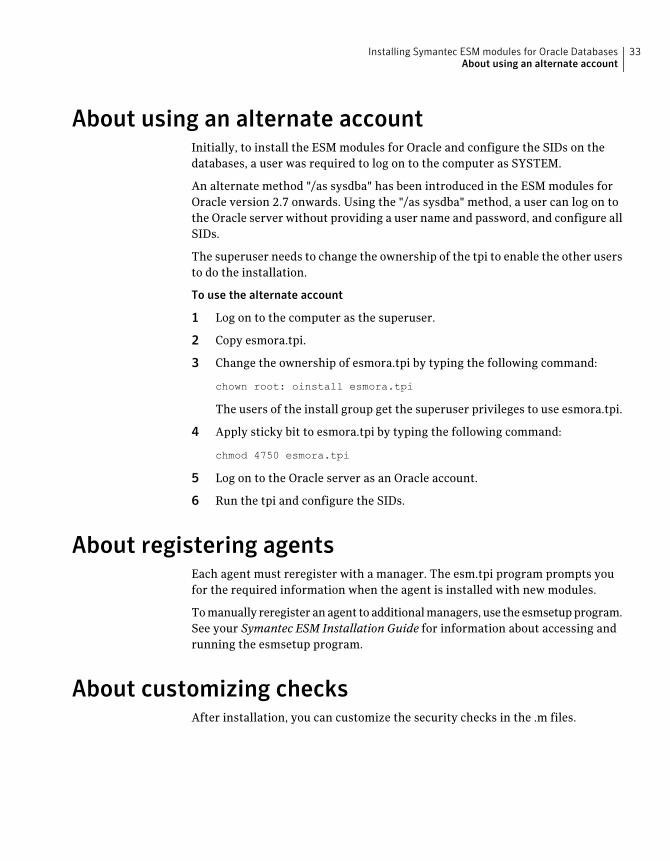
About using an alternate accountInitially, to install the ESM modules for Oracle and configure the SIDs on thedatabases, a user was required to log on to the computer as SYSTEM.
An alternate method "/as sysdba" has been introduced in the ESM modules forOracle version 2.7 onwards. Using the "/as sysdba" method, a user can log on tothe Oracle server without providing a user name and password, and configure allSIDs.
The superuser needs to change the ownership of the tpi to enable the other usersto do the installation.
To use the alternate account
1 Log on to the computer as the superuser.
2 Copy esmora.tpi.
3 Change the ownership of esmora.tpi by typing the following command:
chown root: oinstall esmora.tpi
The users of the install group get the superuser privileges to use esmora.tpi.
4 Apply sticky bit to esmora.tpi by typing the following command:
chmod 4750 esmora.tpi
5 Log on to the Oracle server as an Oracle account.
6 Run the tpi and configure the SIDs.
About registering agentsEach agent must reregister with a manager. The esm.tpi program prompts youfor the required information when the agent is installed with new modules.
Tomanually reregister anagent toadditionalmanagers, use theesmsetupprogram.See your Symantec ESM Installation Guide for information about accessing andrunning the esmsetup program.
About customizing checksAfter installation, you can customize the security checks in the .m files.
33Installing Symantec ESM modules for Oracle DatabasesAbout using an alternate account
Customizing .m filesModule configuration (.m) files contain the message information that ESM usesto report security check results.
For instructions for customizing the .m files, see the SymantecEnterprise SecurityManager Security Update User’s Guide.
Installing Symantec ESM modules for Oracle DatabasesAbout customizing checks
34
About the Symantec ESMModules for OracleDatabases
This chapter includes the following topics:
■ About Oracle SID Discovery
■ About Oracle accounts
■ About Oracle auditing
■ About Oracle configuration
■ About Oracle networks
■ About Oracle objects
■ About Oracle passwords
■ About Oracle patches
■ About Oracle profiles
■ About Oracle roles
■ About Oracle tablespaces
About Oracle SID DiscoveryChecks in this module report the following information:
■ Detects new Oracle database instances.
3Chapter
■ Reports deleted Oracle database instances.
■ Provides an option to automatically configure the newly discovered Oracledatabase instances.
■ Provides an option to automatically remove the deleted Oracle databaseinstances that are still configured.
Note: The Oracle SID Discovery is a host-based module.
Configuring the Oracle database instances by using the Discoverymodule
The ESM Oracle Discovery module is a host-based module that automates theprocess of detection and configuration of new database instances that are not yetconfigured on the local ESM agent computers. The ESMOracle Discoverymodulealso detects the deleted database instances that are still configured on the ESMagent computers. TheESMOracleDiscoverymodule lets youdelete theuninstalleddatabase instances from the ESM agent computers.
Configuring a new Oracle database instanceTo report on the Oracle database instance, you should first configure the Oracledatabase instance on an ESM agent computer.
To configure a new Oracle database instance
1 Run the Discovery module on the ESM agent computers that have Oracledatabase installed.
The module lists all the new database instances that were not previouslyconfigured.
2 Select multiple database instances and do one of the following:
■ Right-click, select Correction option, and enter your system account orpre-created account credentials.The Correction option configures the database instances with SYSTEMaccount credentials or pre-created account credentials.
■ Right-click and select Snapshot Update option.The Snapshot Update option configures the database instance with / asSYSDBA method.
About the Symantec ESM Modules for Oracle DatabasesAbout Oracle SID Discovery
36
Note: The / as SYSDBA method does not work in case of Oracle Real ApplicationCluster (RAC). You must use the correct option and specify pre-created accountcredentials.
Removing deleted instancesAlthough you may have deleted an Oracle database instance, the configurationinformation still exists in the ESM module. As a result, when you execute themodule, it reports the deleted Oracle database instances as deleted databaseinstances.
To remove deleted instances
1 Run the Discovery module on the target ESM agent computers.
The module lists all the deleted database instances that were configuredearlier.
2 Selectmultiple database instances, right-click and select theSnapshotUpdateoption.
The Snapshot Update option deletes the configuration information of suchinstances
Editing default settingsUse the checks in this group to edit the default settings for all the security checksin the module.
Temporary TablespaceYou canuse this option to enter the temporary tablespace name in theTemporaryTablespace text box. If the tablespace that you specify does not exist in thedatabase, then the module uses the default temporary tablespace to create theESMDBA account.
Default TablespaceYou can use this option to enter the default tablespace name in the DefaultTablespace text box. The module reports an error message if the tablespace thatyou specify does not exist in the database. However, the module continues withthe configuration of the rest of the SIDs.
37About the Symantec ESM Modules for Oracle DatabasesAbout Oracle SID Discovery
ProfileYou can use the name list in this check to provide the profile name and thepassword parameters. If the profile that you specify exists in the database, thenthe module uses the existing profile. If the profile that you specify does not existin the database, then the module creates a new profile with the parameters thatyou specify in the name list.
Following are the default values of the profile name and the password parameters:
■ PROFILE=DEFAULT
■ FAILED_LOGIN_ATTEMPTS=DEFAULT
■ PASSWORD_GRACE_TIME=DEFAULT
■ PASSWORD_LIFE_TIME=DEFAULT
■ PASSWORD_LOCK_TIME=DEFAULT
■ PASSWORD_REUSE_MAX=DEFAULT
■ PASSWORD_REUSE_TIME=DEFAULT
■ PASSWORD_VERIFY_FUNCTION=DEFAULT
Reporting SID DiscoveryThe Symantec ESM module for Oracle SID Discovery includes four checks thatlet you automate the detection and the configuration of the oracle databaseinstances on the host computer.
You can use the Symantec ESM module for Oracle SID Discovery to detect andconfigure newly detected database instances and the database instances that havebeen uninstalled.
Detect New InstanceThis check reports the database instances that are newly discovered on the ESMagent computers and which were not configured earlier. Use the name list toinclude or exclude the Oracle SIDs from the configuration.
With the Correct option, you can configure the database instance by using theSYSTEM account or a pre-created account. With the Snapshot Update option,you can configure the database instance by using the /as sysdba method.
The SnapshotUpdate or Correct operation for an Oracle instance functions onlyif the corresponding entries for theOracle instances are present in the oratab file.
You can check the EsmOraConfig.log file for details.
Table 3-1 lists the message that this check reports.
About the Symantec ESM Modules for Oracle DatabasesAbout Oracle SID Discovery
38
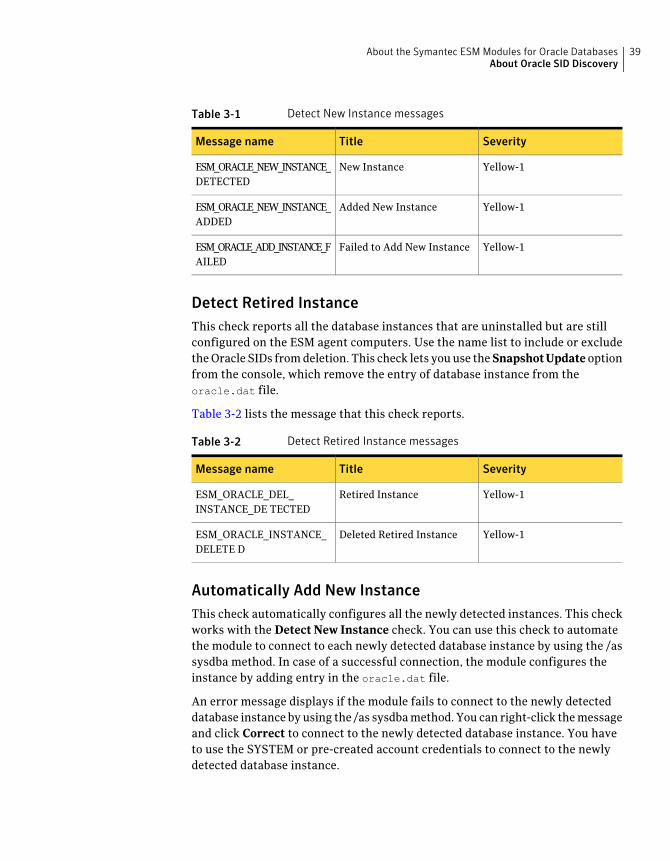
Table 3-1 Detect New Instance messages
SeverityTitleMessage name
Yellow-1New InstanceESM_ORACLE_NEW_INSTANCE_DETECTED
Yellow-1Added New InstanceESM_ORACLE_NEW_INSTANCE_ADDED
Yellow-1Failed to Add New InstanceESM_ORACLE_ADD_INSTANCE_FAILED
Detect Retired InstanceThis check reports all the database instances that are uninstalled but are stillconfigured on the ESM agent computers. Use the name list to include or excludetheOracle SIDs fromdeletion. This check lets youuse theSnapshotUpdate optionfrom the console, which remove the entry of database instance from theoracle.dat file.
Table 3-2 lists the message that this check reports.
Table 3-2 Detect Retired Instance messages
SeverityTitleMessage name
Yellow-1Retired InstanceESM_ORACLE_DEL_INSTANCE_DE TECTED
Yellow-1Deleted Retired InstanceESM_ORACLE_INSTANCE_DELETE D
Automatically Add New InstanceThis check automatically configures all the newly detected instances. This checkworks with the Detect New Instance check. You can use this check to automatethe module to connect to each newly detected database instance by using the /assysdba method. In case of a successful connection, the module configures theinstance by adding entry in the oracle.dat file.
An error message displays if the module fails to connect to the newly detecteddatabase instance byusing the /as sysdbamethod. You can right-click themessageand click Correct to connect to the newly detected database instance. You haveto use the SYSTEM or pre-created account credentials to connect to the newlydetected database instance.
39About the Symantec ESM Modules for Oracle DatabasesAbout Oracle SID Discovery
Note: This check does not work in case of Oracle Real Application Cluster (RAC).You must use the Correct option and specify pre-created account credentials.
Automatically Delete Retired InstanceThis check automatically deletes the corresponding server records from theconfiguration file. This checkworks with the DetectRetiredInstance check. Youcan use this check to automate the module to detect the uninstalled databaseinstances and then to delete the corresponding entries from the oracle.dat file.
About Oracle accountsThis module checks for the user accounts based on the options that you havespecified.
Establishing a baseline snapshotTo establish a baseline snapshot file, run the Symantec ESM module for Oracleaccounts once. Periodically rerun the module to detect changes and update thesnapshot when appropriate.
Automatically update snapshotsEnable this check to automatically update snapshotswith the current information.
Editing default settingsThemodule forOracle accounts includes one option that you canuse to edit defaultsettings for all security checks in the module.
Use the Oracle system identifiers (SIDS) check’s name list to include or excludetheOracle system identifiers (SIDs) that the security checks in themodule shouldreport on. By default, the security checks report all the SIDs that you specifywhenyou configure theSymantecESMmodules forOracleDatabases. The configurationfile for Symantec ESM modules for Oracle Databases is stored in/esm/config/oracle.dat file.
Reporting operating system accessThe OS administrators have exceptional privileges. Some users can access thedatabase directly from the operating system without the protection of Oracleauthentication. Both the user groups should be monitored to ensure that yourcomputers are protected. The checks in this group monitor these users.
About the Symantec ESM Modules for Oracle DatabasesAbout Oracle accounts
40
Users to skip in OS DBA groupsUse the name list to exclude the users for the Users in OS DBA groups check. Bydefault, all users in each group are included.
Users in OS DBA groupsThis check reports users who can connect to a database as INTERNAL, SYSDBA,or SYSOPER. The check also reports userswho connect asmembers ofDBA,OPER,OSDBA, and OSOPER groups.
Use the name list to exclude the users (usually administrators) and include theOS database administrator groups for this check.
Symantec recommends that you remove the unauthorized users from theOSDBAgroups.
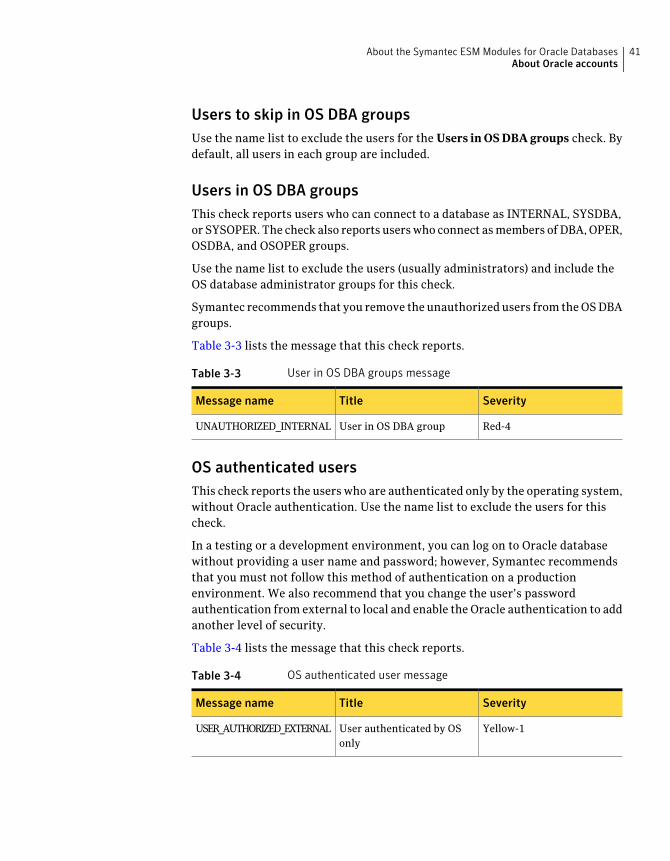
Table 3-3 lists the message that this check reports.
Table 3-3 User in OS DBA groups message
SeverityTitleMessage name
Red-4User in OS DBA groupUNAUTHORIZED_INTERNAL
OS authenticated usersThis check reports the users who are authenticated only by the operating system,without Oracle authentication. Use the name list to exclude the users for thischeck.
In a testing or a development environment, you can log on to Oracle databasewithout providing a user name and password; however, Symantec recommendsthat you must not follow this method of authentication on a productionenvironment. We also recommend that you change the user’s passwordauthentication from external to local and enable the Oracle authentication to addanother level of security.
Table 3-4 lists the message that this check reports.
Table 3-4 OS authenticated user message
SeverityTitleMessage name
Yellow-1User authenticated by OSonly
USER_AUTHORIZED_EXTERNAL
41About the Symantec ESM Modules for Oracle DatabasesAbout Oracle accounts

Globally authenticated usersThis check reports theusers that are authenticatedglobally bySSL,whosedatabaseaccess is through global roles, authorized by an enterprise directory. Use theUsers to Skip name list to exclude the users from reporting.
A centralized directory service, which is outside of the database, manages theusers without Oracle authentication. You require Oracle user authentication foradditional identity verification.
Table 3-5 lists the message that this check reports.
Table 3-5 Globally authenticated users message
SeverityTitleMessage name
Yellow-1User authenticated globallyUSER_AUTHORIZED_GLOBAL
Reporting user rolesThe checks in this group report the roles that have been directly granted to theusers or revoked from the users and the associated user names. Nested roles arenot reported.
For checks that report role definitions, See “About Oracle roles” on page 87..
RolesUse the name list to exclude or include the roles for the Directly-granted rolesand Grantable roles checks to report on.
Grantable rolesThis check reports the user names with permissions to grant roles to other users.Use the name list to exclude the users for this check.
Symantec recommends that you revoke the grantable roles from any user who isnot authorized to grant it. Periodically, you can review all the userswith grantableroles to ensure that they are currently authorized to grant their grantable roles.
Table 3-6 lists the message that this check reports.
Table 3-6 Grantable roles message
SeverityTitleMessage name
Yellow-1Grantable roleGRANTABLE_ROLE
About the Symantec ESM Modules for Oracle DatabasesAbout Oracle accounts
42
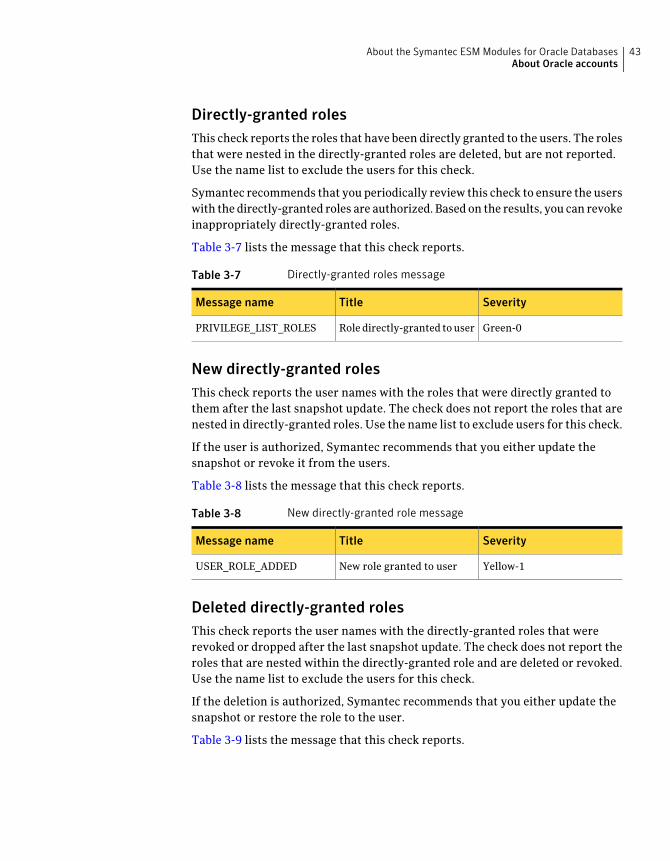
Directly-granted rolesThis check reports the roles that have been directly granted to the users. The rolesthat were nested in the directly-granted roles are deleted, but are not reported.Use the name list to exclude the users for this check.
Symantec recommends that you periodically review this check to ensure the userswith the directly-granted roles are authorized. Based on the results, you can revokeinappropriately directly-granted roles.
Table 3-7 lists the message that this check reports.
Table 3-7 Directly-granted roles message
SeverityTitleMessage name
Green-0Role directly-granted touserPRIVILEGE_LIST_ROLES
New directly-granted rolesThis check reports the user names with the roles that were directly granted tothem after the last snapshot update. The check does not report the roles that arenested in directly-granted roles. Use the name list to exclude users for this check.
If the user is authorized, Symantec recommends that you either update thesnapshot or revoke it from the users.
Table 3-8 lists the message that this check reports.
Table 3-8 New directly-granted role message
SeverityTitleMessage name
Yellow-1New role granted to userUSER_ROLE_ADDED
Deleted directly-granted rolesThis check reports the user names with the directly-granted roles that wererevoked or dropped after the last snapshot update. The check does not report theroles that are nested within the directly-granted role and are deleted or revoked.Use the name list to exclude the users for this check.
If the deletion is authorized, Symantec recommends that you either update thesnapshot or restore the role to the user.
Table 3-9 lists the message that this check reports.
43About the Symantec ESM Modules for Oracle DatabasesAbout Oracle accounts
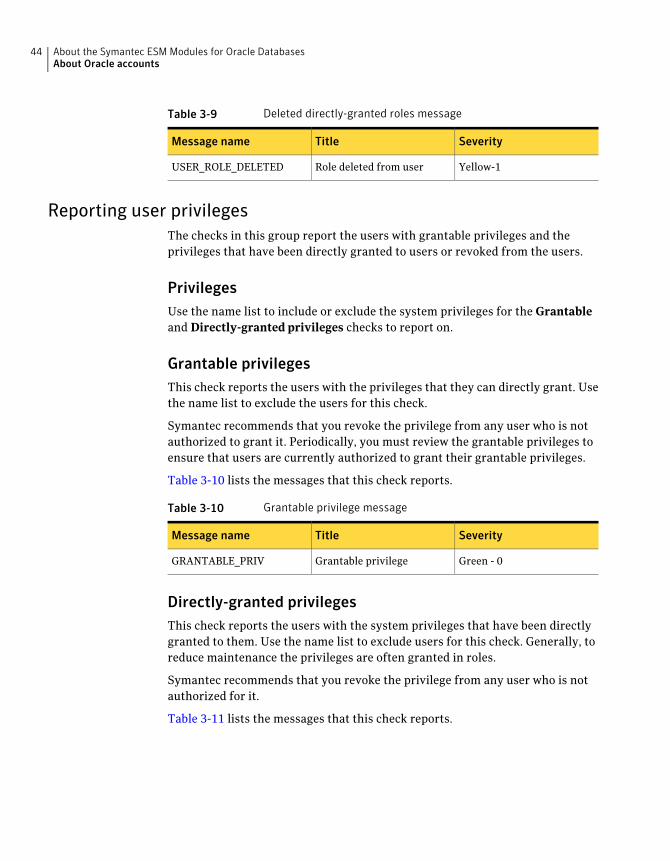
Table 3-9 Deleted directly-granted roles message
SeverityTitleMessage name
Yellow-1Role deleted from userUSER_ROLE_DELETED
Reporting user privilegesThe checks in this group report the users with grantable privileges and theprivileges that have been directly granted to users or revoked from the users.
PrivilegesUse the name list to include or exclude the system privileges for the Grantableand Directly-granted privileges checks to report on.
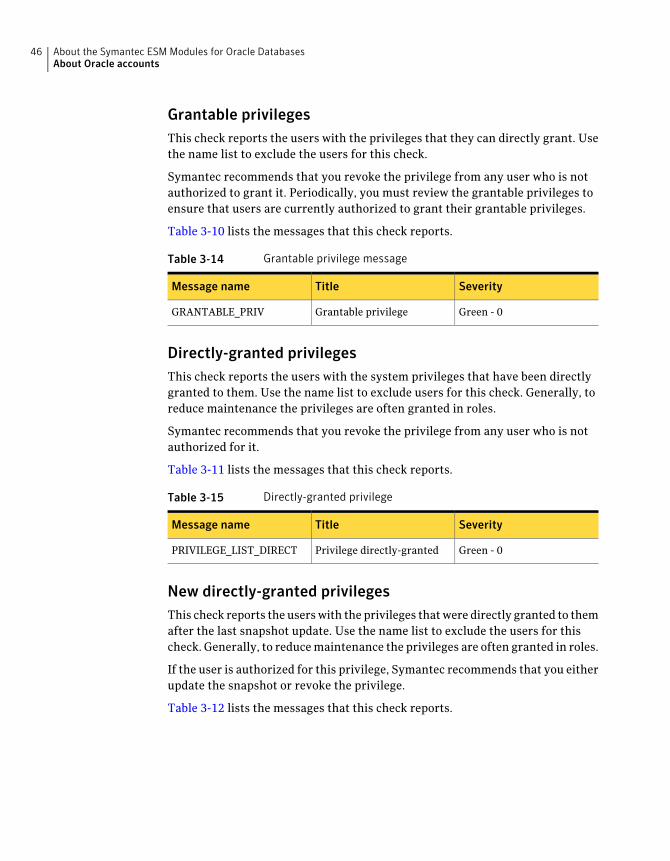
Grantable privilegesThis check reports the users with the privileges that they can directly grant. Usethe name list to exclude the users for this check.
Symantec recommends that you revoke the privilege from any user who is notauthorized to grant it. Periodically, you must review the grantable privileges toensure that users are currently authorized to grant their grantable privileges.
Table 3-10 lists the messages that this check reports.
Table 3-10 Grantable privilege message
SeverityTitleMessage name
Green - 0Grantable privilegeGRANTABLE_PRIV
Directly-granted privilegesThis check reports the users with the system privileges that have been directlygranted to them. Use the name list to exclude users for this check. Generally, toreduce maintenance the privileges are often granted in roles.
Symantec recommends that you revoke the privilege from any user who is notauthorized for it.
Table 3-11 lists the messages that this check reports.
About the Symantec ESM Modules for Oracle DatabasesAbout Oracle accounts
44
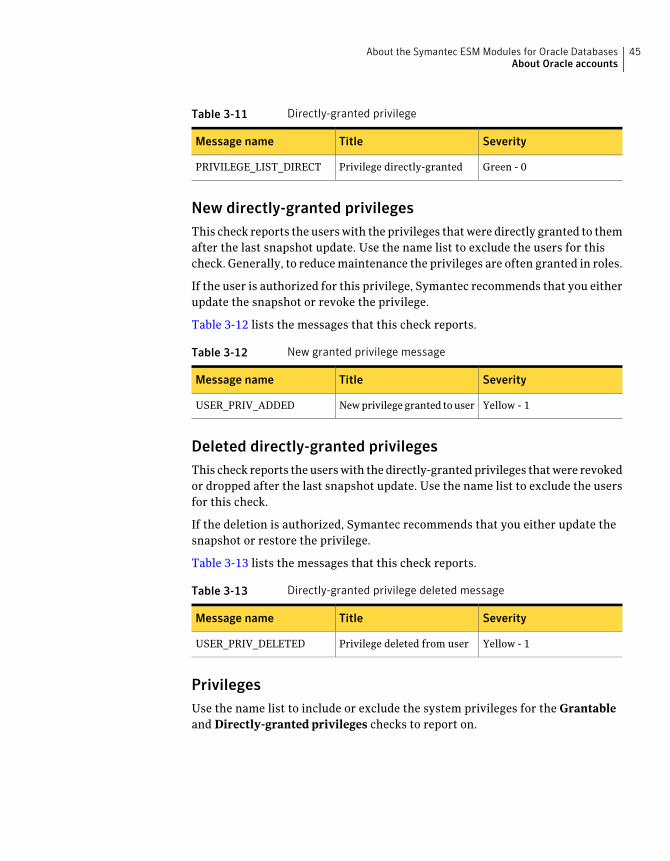
Table 3-11 Directly-granted privilege
SeverityTitleMessage name
Green - 0Privilege directly-grantedPRIVILEGE_LIST_DIRECT
New directly-granted privilegesThis check reports the userswith the privileges thatwere directly granted to themafter the last snapshot update. Use the name list to exclude the users for thischeck. Generally, to reducemaintenance the privileges are often granted in roles.
If the user is authorized for this privilege, Symantec recommends that you eitherupdate the snapshot or revoke the privilege.
Table 3-12 lists the messages that this check reports.
Table 3-12 New granted privilege message
SeverityTitleMessage name
Yellow - 1Newprivilege granted touserUSER_PRIV_ADDED
Deleted directly-granted privilegesThis check reports theuserswith the directly-grantedprivileges thatwere revokedor dropped after the last snapshot update. Use the name list to exclude the usersfor this check.
If the deletion is authorized, Symantec recommends that you either update thesnapshot or restore the privilege.
Table 3-13 lists the messages that this check reports.
Table 3-13 Directly-granted privilege deleted message
SeverityTitleMessage name
Yellow - 1Privilege deleted from userUSER_PRIV_DELETED
PrivilegesUse the name list to include or exclude the system privileges for the Grantableand Directly-granted privileges checks to report on.
45About the Symantec ESM Modules for Oracle DatabasesAbout Oracle accounts
Grantable privilegesThis check reports the users with the privileges that they can directly grant. Usethe name list to exclude the users for this check.
Symantec recommends that you revoke the privilege from any user who is notauthorized to grant it. Periodically, you must review the grantable privileges toensure that users are currently authorized to grant their grantable privileges.
Table 3-10 lists the messages that this check reports.
Table 3-14 Grantable privilege message
SeverityTitleMessage name
Green - 0Grantable privilegeGRANTABLE_PRIV
Directly-granted privilegesThis check reports the users with the system privileges that have been directlygranted to them. Use the name list to exclude users for this check. Generally, toreduce maintenance the privileges are often granted in roles.
Symantec recommends that you revoke the privilege from any user who is notauthorized for it.
Table 3-11 lists the messages that this check reports.
Table 3-15 Directly-granted privilege
SeverityTitleMessage name
Green - 0Privilege directly-grantedPRIVILEGE_LIST_DIRECT
New directly-granted privilegesThis check reports the userswith the privileges thatwere directly granted to themafter the last snapshot update. Use the name list to exclude the users for thischeck. Generally, to reducemaintenance the privileges are often granted in roles.
If the user is authorized for this privilege, Symantec recommends that you eitherupdate the snapshot or revoke the privilege.
Table 3-12 lists the messages that this check reports.
About the Symantec ESM Modules for Oracle DatabasesAbout Oracle accounts
46
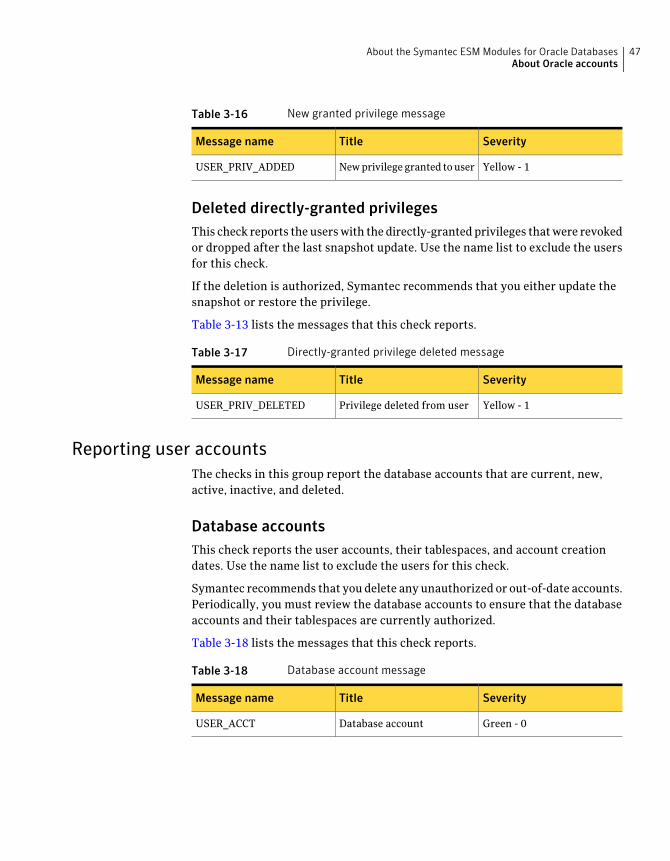
Table 3-16 New granted privilege message
SeverityTitleMessage name
Yellow - 1Newprivilege granted touserUSER_PRIV_ADDED
Deleted directly-granted privilegesThis check reports theuserswith the directly-grantedprivileges thatwere revokedor dropped after the last snapshot update. Use the name list to exclude the usersfor this check.
If the deletion is authorized, Symantec recommends that you either update thesnapshot or restore the privilege.
Table 3-13 lists the messages that this check reports.
Table 3-17 Directly-granted privilege deleted message
SeverityTitleMessage name
Yellow - 1Privilege deleted from userUSER_PRIV_DELETED
Reporting user accountsThe checks in this group report the database accounts that are current, new,active, inactive, and deleted.
Database accountsThis check reports the user accounts, their tablespaces, and account creationdates. Use the name list to exclude the users for this check.
Symantec recommends that you delete any unauthorized or out-of-date accounts.Periodically, you must review the database accounts to ensure that the databaseaccounts and their tablespaces are currently authorized.
Table 3-18 lists the messages that this check reports.
Table 3-18 Database account message
SeverityTitleMessage name
Green - 0Database accountUSER_ACCT
47About the Symantec ESM Modules for Oracle DatabasesAbout Oracle accounts
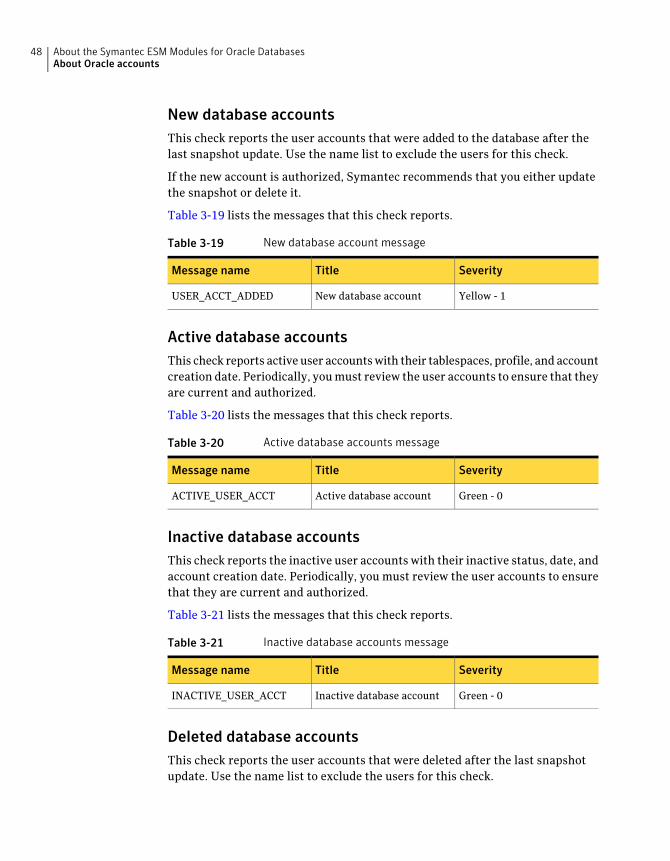
New database accountsThis check reports the user accounts that were added to the database after thelast snapshot update. Use the name list to exclude the users for this check.
If the new account is authorized, Symantec recommends that you either updatethe snapshot or delete it.
Table 3-19 lists the messages that this check reports.
Table 3-19 New database account message
SeverityTitleMessage name
Yellow - 1New database accountUSER_ACCT_ADDED
Active database accountsThis check reports active user accountswith their tablespaces, profile, and accountcreation date. Periodically, youmust review the user accounts to ensure that theyare current and authorized.
Table 3-20 lists the messages that this check reports.
Table 3-20 Active database accounts message
SeverityTitleMessage name
Green - 0Active database accountACTIVE_USER_ACCT
Inactive database accountsThis check reports the inactive user accounts with their inactive status, date, andaccount creation date. Periodically, you must review the user accounts to ensurethat they are current and authorized.
Table 3-21 lists the messages that this check reports.
Table 3-21 Inactive database accounts message
SeverityTitleMessage name
Green - 0Inactive database accountINACTIVE_USER_ACCT
Deleted database accountsThis check reports the user accounts that were deleted after the last snapshotupdate. Use the name list to exclude the users for this check.
About the Symantec ESM Modules for Oracle DatabasesAbout Oracle accounts
48
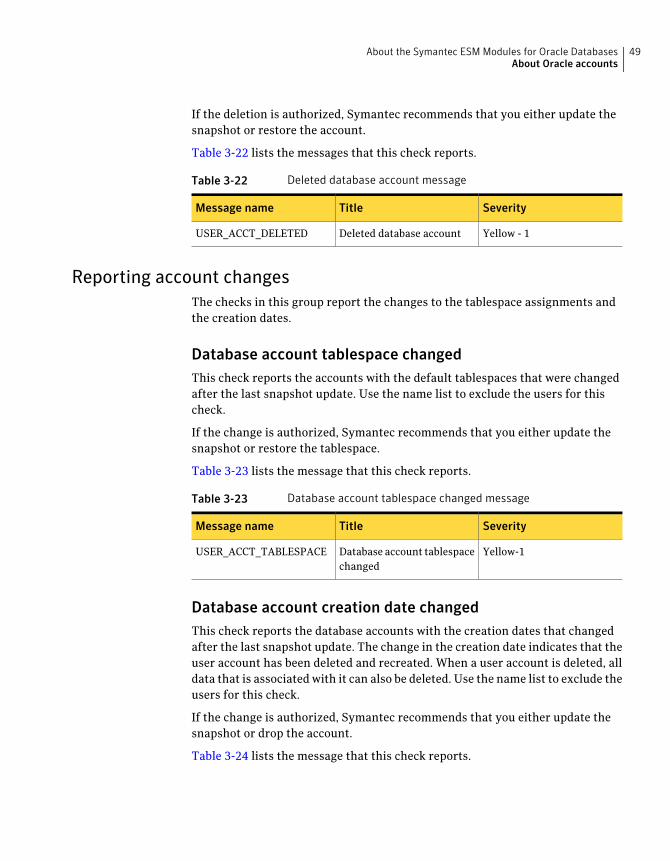
If the deletion is authorized, Symantec recommends that you either update thesnapshot or restore the account.
Table 3-22 lists the messages that this check reports.
Table 3-22 Deleted database account message
SeverityTitleMessage name
Yellow - 1Deleted database accountUSER_ACCT_DELETED
Reporting account changesThe checks in this group report the changes to the tablespace assignments andthe creation dates.
Database account tablespace changedThis check reports the accounts with the default tablespaces that were changedafter the last snapshot update. Use the name list to exclude the users for thischeck.
If the change is authorized, Symantec recommends that you either update thesnapshot or restore the tablespace.
Table 3-23 lists the message that this check reports.
Table 3-23 Database account tablespace changed message
SeverityTitleMessage name
Yellow-1Database account tablespacechanged
USER_ACCT_TABLESPACE
Database account creation date changedThis check reports the database accounts with the creation dates that changedafter the last snapshot update. The change in the creation date indicates that theuser account has been deleted and recreated. When a user account is deleted, alldata that is associated with it can also be deleted. Use the name list to exclude theusers for this check.
If the change is authorized, Symantec recommends that you either update thesnapshot or drop the account.
Table 3-24 lists the message that this check reports.
49About the Symantec ESM Modules for Oracle DatabasesAbout Oracle accounts
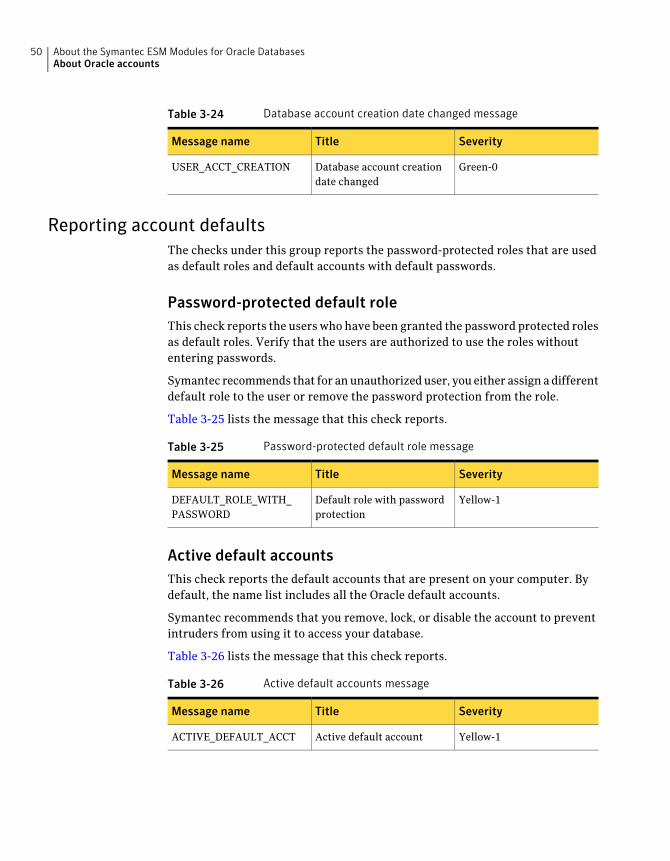
Table 3-24 Database account creation date changed message
SeverityTitleMessage name
Green-0Database account creationdate changed
USER_ACCT_CREATION
Reporting account defaultsThe checks under this group reports the password-protected roles that are usedas default roles and default accounts with default passwords.
Password-protected default roleThis check reports the users who have been granted the password protected rolesas default roles. Verify that the users are authorized to use the roles withoutentering passwords.
Symantec recommends that for anunauthorizeduser, you either assign adifferentdefault role to the user or remove the password protection from the role.
Table 3-25 lists the message that this check reports.
Table 3-25 Password-protected default role message
SeverityTitleMessage name
Yellow-1Default role with passwordprotection
DEFAULT_ROLE_WITH_PASSWORD
Active default accountsThis check reports the default accounts that are present on your computer. Bydefault, the name list includes all the Oracle default accounts.
Symantec recommends that you remove, lock, or disable the account to preventintruders from using it to access your database.
Table 3-26 lists the message that this check reports.
Table 3-26 Active default accounts message
SeverityTitleMessage name
Yellow-1Active default accountACTIVE_DEFAULT_ACCT
About the Symantec ESM Modules for Oracle DatabasesAbout Oracle accounts
50
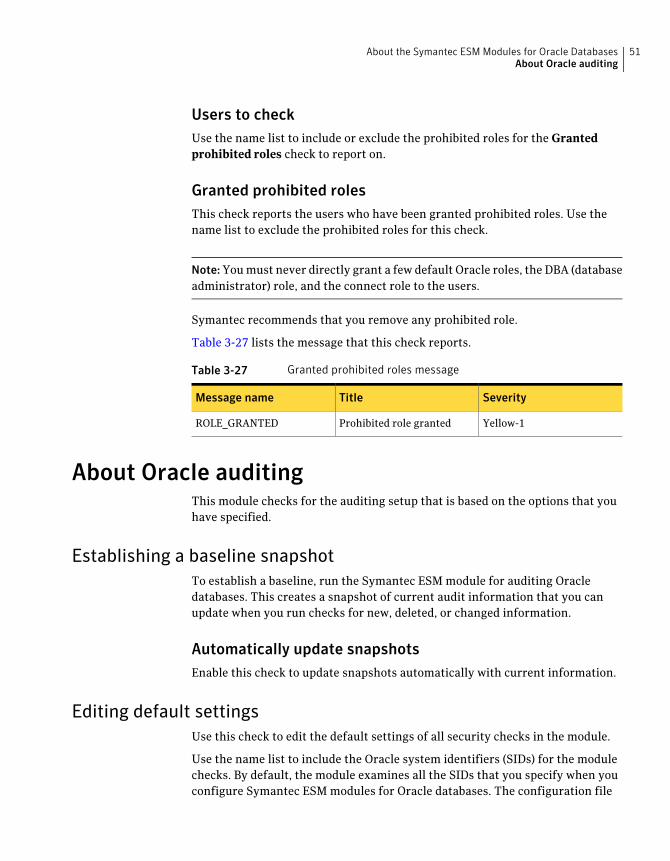
Users to checkUse the name list to include or exclude the prohibited roles for the Grantedprohibited roles check to report on.
Granted prohibited rolesThis check reports the users who have been granted prohibited roles. Use thename list to exclude the prohibited roles for this check.
Note:Youmust never directly grant a few default Oracle roles, the DBA (databaseadministrator) role, and the connect role to the users.
Symantec recommends that you remove any prohibited role.
Table 3-27 lists the message that this check reports.
Table 3-27 Granted prohibited roles message
SeverityTitleMessage name
Yellow-1Prohibited role grantedROLE_GRANTED
About Oracle auditingThis module checks for the auditing setup that is based on the options that youhave specified.
Establishing a baseline snapshotTo establish a baseline, run the Symantec ESM module for auditing Oracledatabases. This creates a snapshot of current audit information that you canupdate when you run checks for new, deleted, or changed information.
Automatically update snapshotsEnable this check to update snapshots automatically with current information.
Editing default settingsUse this check to edit the default settings of all security checks in the module.
Use the name list to include the Oracle system identifiers (SIDs) for the modulechecks. By default, the module examines all the SIDs that you specify when youconfigure Symantec ESM modules for Oracle databases. The configuration file
51About the Symantec ESM Modules for Oracle DatabasesAbout Oracle auditing
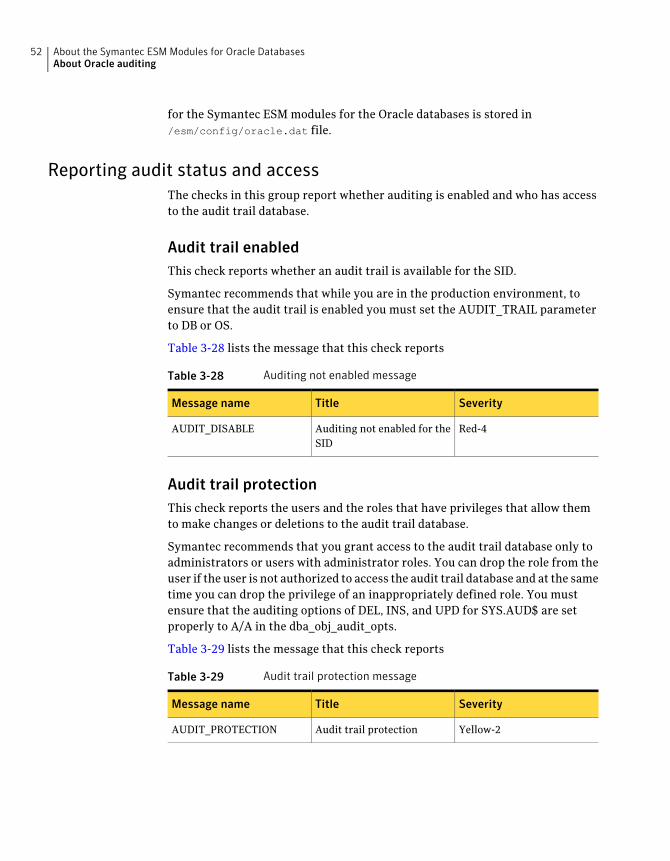
for the Symantec ESM modules for the Oracle databases is stored in/esm/config/oracle.dat file.
Reporting audit status and accessThe checks in this group report whether auditing is enabled and who has accessto the audit trail database.
Audit trail enabledThis check reports whether an audit trail is available for the SID.
Symantec recommends that while you are in the production environment, toensure that the audit trail is enabled you must set the AUDIT_TRAIL parameterto DB or OS.
Table 3-28 lists the message that this check reports
Table 3-28 Auditing not enabled message
SeverityTitleMessage name
Red-4Auditing not enabled for theSID
AUDIT_DISABLE
Audit trail protectionThis check reports the users and the roles that have privileges that allow themto make changes or deletions to the audit trail database.
Symantec recommends that you grant access to the audit trail database only toadministrators or users with administrator roles. You can drop the role from theuser if the user is not authorized to access the audit trail database and at the sametime you can drop the privilege of an inappropriately defined role. You mustensure that the auditing options of DEL, INS, and UPD for SYS.AUD$ are setproperly to A/A in the dba_obj_audit_opts.
Table 3-29 lists the message that this check reports
Table 3-29 Audit trail protection message
SeverityTitleMessage name
Yellow-2Audit trail protectionAUDIT_PROTECTION
About the Symantec ESM Modules for Oracle DatabasesAbout Oracle auditing
52
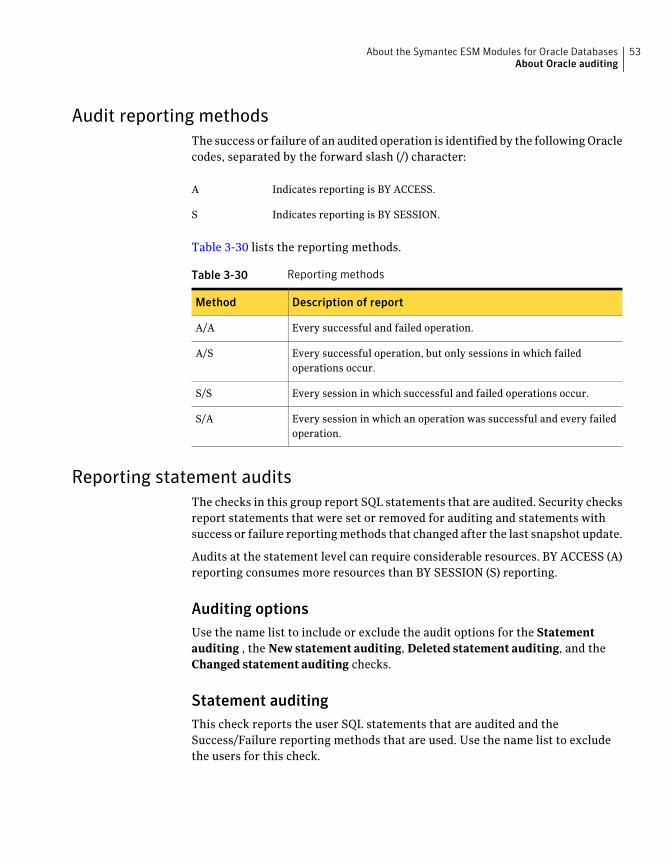
Audit reporting methodsThe success or failure of an audited operation is identified by the followingOraclecodes, separated by the forward slash (/) character:
Indicates reporting is BY ACCESS.A
Indicates reporting is BY SESSION.S
Table 3-30 lists the reporting methods.
Table 3-30 Reporting methods
Description of reportMethod
Every successful and failed operation.A/A
Every successful operation, but only sessions in which failedoperations occur.
A/S
Every session in which successful and failed operations occur.S/S
Every session in which an operation was successful and every failedoperation.
S/A
Reporting statement auditsThe checks in this group report SQL statements that are audited. Security checksreport statements that were set or removed for auditing and statements withsuccess or failure reportingmethods that changed after the last snapshot update.
Audits at the statement level can require considerable resources. BY ACCESS (A)reporting consumes more resources than BY SESSION (S) reporting.
Auditing optionsUse the name list to include or exclude the audit options for the Statementauditing , the New statement auditing, Deleted statement auditing, and theChanged statement auditing checks.
Statement auditingThis check reports the user SQL statements that are audited and theSuccess/Failure reporting methods that are used. Use the name list to excludethe users for this check.
53About the Symantec ESM Modules for Oracle DatabasesAbout Oracle auditing

Symantec recommends that you remove all unauthorized or out-of-datestatements. Youmust ensure that you use appropriate reportingmethods for theavailable resources and perceived risks.
Table 3-31 lists the message that this check reports
Table 3-31 Statement auditing message
SeverityTitleMessage name
Green-0Statement auditingSTMT_AUDITING
New statement auditingThis check reports SQLstatements thatwere set for auditing after the last snapshotupdate, and the Success/Failure reporting methods that are used. Use the namelist to exclude the users for this check.
Symantec recommends that you remove all unauthorized or out-to-datestatements. You must update the snapshot if the auditing of statement isauthorized and the reporting method is correct. You must deactivate the audit ifthe auditing of the statement is not authorized. You must change the reportingmethods if the reporting methods are inappropriate for the available resourcesand perceived risks.
Table 3-32 lists the message that this check reports
Table 3-32 New statement auditing message
SeverityTitleMessage name
Yellow-1New statement auditingNEW_STMT_AUDITING
Deleted statement auditingThis check reports user statements that were removed from auditing after thelast snapshot update. Use the name list to exclude the users for this check.
If the statement deletion is authorized, Symantec recommends that you eitherupdate the snapshot or restore the audit settings.
Table 3-33 lists the message that this check reports
Table 3-33 Deleted statement auditing message
SeverityTitleMessage name
Yellow-1Deleted statement auditingDELETED_STMT_AUDITING
About the Symantec ESM Modules for Oracle DatabasesAbout Oracle auditing
54
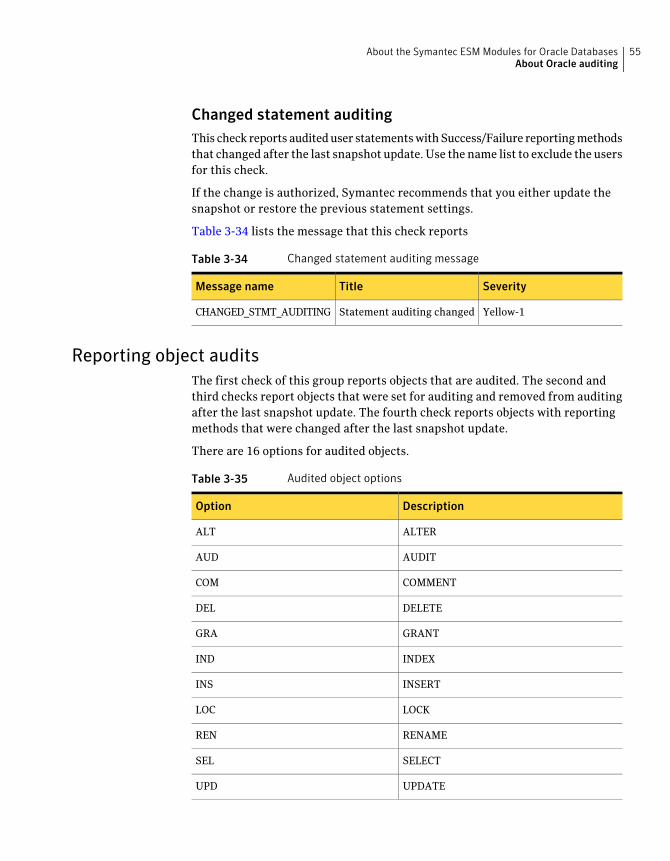
Changed statement auditingThis check reports auditeduser statementswithSuccess/Failure reportingmethodsthat changed after the last snapshot update. Use the name list to exclude the usersfor this check.
If the change is authorized, Symantec recommends that you either update thesnapshot or restore the previous statement settings.
Table 3-34 lists the message that this check reports
Table 3-34 Changed statement auditing message
SeverityTitleMessage name
Yellow-1Statement auditing changedCHANGED_STMT_AUDITING
Reporting object auditsThe first check of this group reports objects that are audited. The second andthird checks report objects that were set for auditing and removed from auditingafter the last snapshot update. The fourth check reports objects with reportingmethods that were changed after the last snapshot update.
There are 16 options for audited objects.
Table 3-35 Audited object options
DescriptionOption
ALTERALT
AUDITAUD
COMMENTCOM
DELETEDEL
GRANTGRA
INDEXIND
INSERTINS
LOCKLOC
RENAMEREN
SELECTSEL
UPDATEUPD
55About the Symantec ESM Modules for Oracle DatabasesAbout Oracle auditing
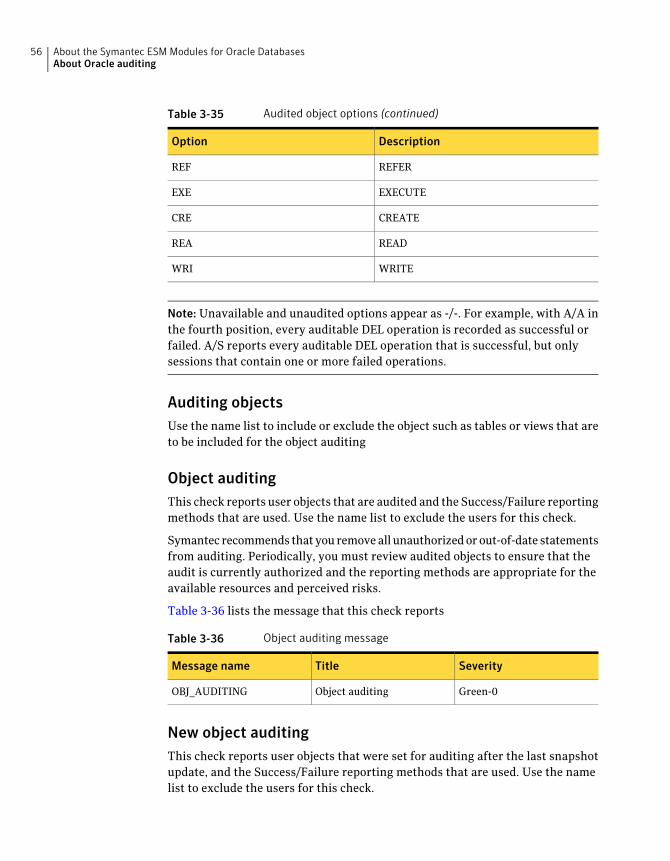
Table 3-35 Audited object options (continued)
DescriptionOption
REFERREF
EXECUTEEXE
CREATECRE
READREA
WRITEWRI
Note: Unavailable and unaudited options appear as -/-. For example, with A/A inthe fourth position, every auditable DEL operation is recorded as successful orfailed. A/S reports every auditable DEL operation that is successful, but onlysessions that contain one or more failed operations.
Auditing objectsUse the name list to include or exclude the object such as tables or views that areto be included for the object auditing
Object auditingThis check reports user objects that are audited and the Success/Failure reportingmethods that are used. Use the name list to exclude the users for this check.
Symantec recommends that you removeall unauthorizedorout-of-date statementsfrom auditing. Periodically, you must review audited objects to ensure that theaudit is currently authorized and the reporting methods are appropriate for theavailable resources and perceived risks.
Table 3-36 lists the message that this check reports
Table 3-36 Object auditing message
SeverityTitleMessage name
Green-0Object auditingOBJ_AUDITING
New object auditingThis check reports user objects that were set for auditing after the last snapshotupdate, and the Success/Failure reporting methods that are used. Use the namelist to exclude the users for this check.
About the Symantec ESM Modules for Oracle DatabasesAbout Oracle auditing
56
For options that can be reported for audited objects, See “Reporting object audits”on page 55.
If the auditing of the object is authorized, Symantec recommends that you eitherupdate the snapshot or remove the object fromauditing. If the reportingmethodsare incorrect then you must correct them.
Table 3-37 lists the message that this check reports
Table 3-37 New object auditing message
SeverityTitleMessage name
Yellow-1New object auditingNEW_OBJ_AUDITING
Deleted object auditingThis check reports user objects andobject options thatwere removed fromauditingafter the last snapshot update. Use the name list to exclude the users for thischeck.
For options that can be reported for audited objects, See “Reporting object audits”on page 55.
If the deletion is authorized, Symantec recommends that you either update thesnapshot or restore audit of the object.
Table 3-38 lists the message that this check reports
Table 3-38 Deleted object auditing message
SeverityTitleMessage name
Yellow-1Deleted object auditingDELETED_OBJ_AUDITING
Changed object auditingThis check reports the audited user objects with the Success/Failure reportingmethods that changed after the last snapshot update and their current reportingmethods.
For options that can be reported for audited objects, See “Reporting object audits”on page 55.
If the change is authorized, Symantec recommends that you either update thesnapshot or restore the previous settings.
Table 3-39 lists the message that this check reports
57About the Symantec ESM Modules for Oracle DatabasesAbout Oracle auditing
Table 3-39 Changed object auditing message
SeverityTitleMessage name
Yellow-1Object auditing changedCHANGED_OBJ_AUDITING
Reporting privilege auditsThe first of these checks reports privileges that are audited. The second and thirdchecks report privileges that were set for auditing and removed from auditingafter the last snapshot update. The fifth check reports privileges with reportingmethods that were changed after the last snapshot update.
Auditing privilegesUse the name list to include or exclude the privileges for the privilege auditingchecks.
Privilege auditingThis check reports user privileges that are audited, and the Success/Failurereporting methods that are used. Use the name list to exclude the users for thischeck.
Symantec recommends that you periodically review the privilege auditing toensure that the audits are currently authorized and that the reporting methodsare appropriate for available resources and perceived risks.
Table 3-40 lists the message that this check reports
Table 3-40 Privilege auditing message
SeverityTitleMessage name
Green-0Privilege auditingPRIV_AUDITING
New privilege auditingThis check reports user privileges thatwere set for auditing after the last snapshotupdate and the Success/Failure reporting methods that are used. Use the namelist to exclude the users for this check.
If the new privilege and its reporting methods are authorized, Symantecrecommends that you update the snapshot. If the new privilege is not authorizedthen you must change the privileges. If the user is unauthorized for the privilegethen you must remove the privilege from the user.
About the Symantec ESM Modules for Oracle DatabasesAbout Oracle auditing
58
Table 3-41 lists the message that this check reports
Table 3-41 New privilege auditing message
SeverityTitleMessage name
Green-0New privilege auditingNEW_PRIV_AUDITING
Deleted privilege auditingThis check reports user privileges that were removed from auditing after the lastsnapshot update. Use the name list to exclude the users for this check.
If the deletion is authorized, Symantec recommends that you either update thesnapshot or restore the user privilege to auditing.
Table 3-42 lists the message that this check reports
Table 3-42 Deleted privilege auditing message
SeverityTitleMessage name
Yellow-1Deleted privilege auditingDELETED_PRIV_AUDITING
Changed privilege auditingThis check reports auditeduser privilegeswithSuccess/Failure reportingmethodsthat changed after the last snapshot update. Use the name list to exclude the usersfor this check.
If the change is authorized, Symantec recommends that you either update thesnapshot or restore the previous audit settings.
Table 3-43 lists the message that this check reports
Table 3-43 Changed privilege auditing message
SeverityTitleMessage name
Yellow-1Privilege auditing changedCHANGED_PRIV_AUDITING
About Oracle configurationThis module checks for the setting of the Oracle parameters and configurationthat can affect the security of the database.
59About the Symantec ESM Modules for Oracle DatabasesAbout Oracle configuration
Editing default settingsUse the check in this group to edit the default settings for all the security checksin the module.
Automatically update snapshotsEnable this check to automatically update the snapshots with the currentinformation.
Oracle system identifiers (SIDs)Use the name list to include or exclude the Oracle system identifiers (SIDs) forthis check. By default, the check examines all the SIDs that you specify when youconfigure the Symantec ESM modules for the Oracle databases. The SymantecESM modules for Oracle Databases configuration is stored in/esm/config/oracle.dat file.
Reporting Oracle version informationThe checks in this group report the Oracle version, status, trace, and alert log fileinformation. For the location of USER_DUMP_DEST files, use Trace file. For themaximum size of trace files, specified by MAX_DUMP_FILE_SIZE, use Trace filesize.
Oracle serverThis check reports the version number and the status of the installed Oraclecomponents on the agent.
Table 3-44 lists the message that this check reports.
Table 3-44 Oracle server version and status message
SeverityTitleMessage name
Green-0Oracle server versionSERVER_VERSION
Oracle componentsThis check reports the version number and status of all Oracle components,including the version and status of the Oracle server.
Table 3-45 lists the message that this check reports.
About the Symantec ESM Modules for Oracle DatabasesAbout Oracle configuration
60
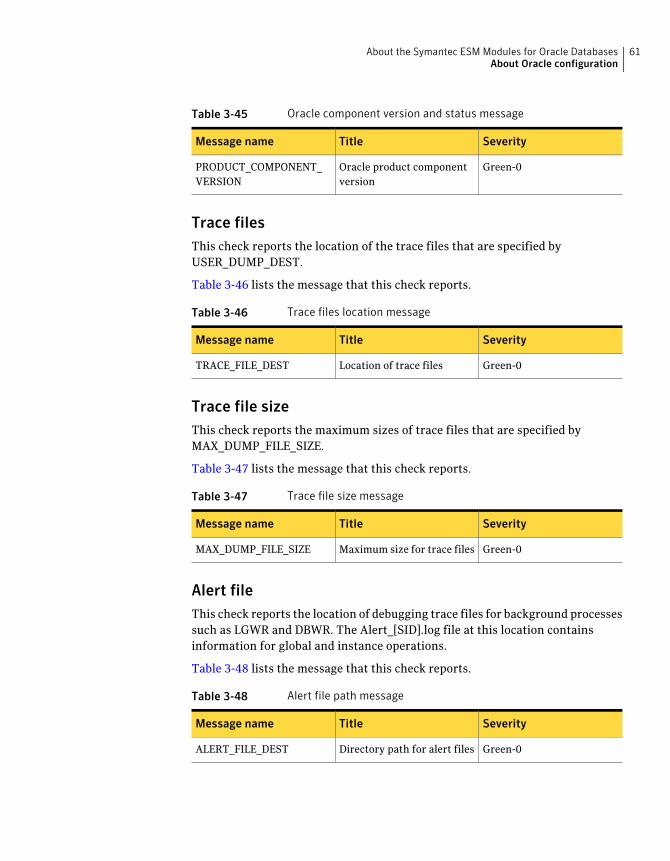
Table 3-45 Oracle component version and status message
SeverityTitleMessage name
Green-0Oracle product componentversion
PRODUCT_COMPONENT_VERSION
Trace filesThis check reports the location of the trace files that are specified byUSER_DUMP_DEST.
Table 3-46 lists the message that this check reports.
Table 3-46 Trace files location message
SeverityTitleMessage name
Green-0Location of trace filesTRACE_FILE_DEST
Trace file sizeThis check reports the maximum sizes of trace files that are specified byMAX_DUMP_FILE_SIZE.
Table 3-47 lists the message that this check reports.
Table 3-47 Trace file size message
SeverityTitleMessage name
Green-0Maximum size for trace filesMAX_DUMP_FILE_SIZE
Alert fileThis check reports the location of debugging trace files for background processessuch as LGWR and DBWR. The Alert_[SID].log file at this location containsinformation for global and instance operations.
Table 3-48 lists the message that this check reports.
Table 3-48 Alert file path message
SeverityTitleMessage name
Green-0Directory path for alert filesALERT_FILE_DEST
61About the Symantec ESM Modules for Oracle DatabasesAbout Oracle configuration

List SID:HOME (oracle.dat)This check reports all the SIDs and their Oracle homes from the oracle.dat file.The configuration information of the Symantec ESMmodules for Oracle is storedin oracle.dat, which is located in the /esm/config directory.
Table 3-49 lists the message that this check reports.
Table 3-49 List SID:HOME (oracle.dat) message
SeverityTitleMessage name
Green-0Oracle.dat file informationSID_HOME_DATFILE
List SID:HOME (oratab)This check reports all the SIDs and their Oracle homes from the oratab file. Theoratab file is created during the installation of Oracle server.
Table 3-50 lists the message that this check reports.
Table 3-50 List SID:HOME (oratab) message
SeverityTitleMessage name
Green-0Oratab file informationSID_HOME_DATFILE
Reporting link password encryptionThe checks in this group report whether encryption is required for the databaselink passwords.
DB link encrypted passwordThis check examines the DBLINK_ENCRYPT_LOGIN setting to report whetherthe encrypted passwords require connecting to other Oracle servers through thedatabase links. This parameter is no longer supported on Oracle 10g and laterversions.
The first attempt to connect to another Oracle server always sends encryptedpasswords. If the reported setting is TRUE, a failed connectionwill not be retried.If FALSE, Oracle reattempts the connection with an unencrypted version of thepassword. TRUE settings provide the best protection for your database.
Table 3-51 lists the message that this check reports.
About the Symantec ESM Modules for Oracle DatabasesAbout Oracle configuration
62
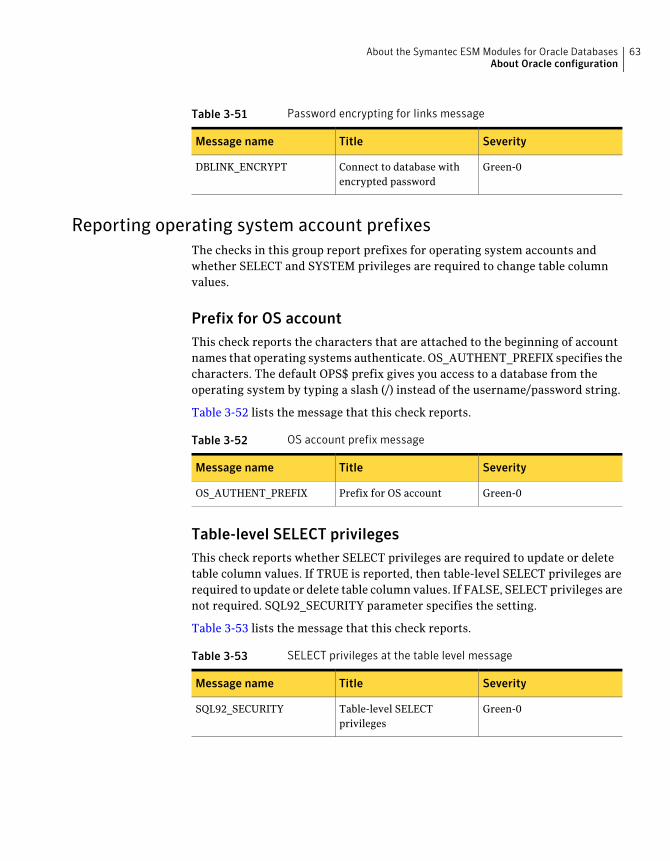
Table 3-51 Password encrypting for links message
SeverityTitleMessage name
Green-0Connect to database withencrypted password
DBLINK_ENCRYPT
Reporting operating system account prefixesThe checks in this group report prefixes for operating system accounts andwhether SELECT and SYSTEM privileges are required to change table columnvalues.
Prefix for OS accountThis check reports the characters that are attached to the beginning of accountnames that operating systems authenticate. OS_AUTHENT_PREFIX specifies thecharacters. The default OPS$ prefix gives you access to a database from theoperating system by typing a slash (/) instead of the username/password string.
Table 3-52 lists the message that this check reports.
Table 3-52 OS account prefix message
SeverityTitleMessage name
Green-0Prefix for OS accountOS_AUTHENT_PREFIX
Table-level SELECT privilegesThis check reports whether SELECT privileges are required to update or deletetable column values. If TRUE is reported, then table-level SELECT privileges arerequired to update or delete table column values. If FALSE, SELECT privileges arenot required. SQL92_SECURITY parameter specifies the setting.
Table 3-53 lists the message that this check reports.
Table 3-53 SELECT privileges at the table level message
SeverityTitleMessage name
Green-0Table-level SELECTprivileges
SQL92_SECURITY
63About the Symantec ESM Modules for Oracle DatabasesAbout Oracle configuration
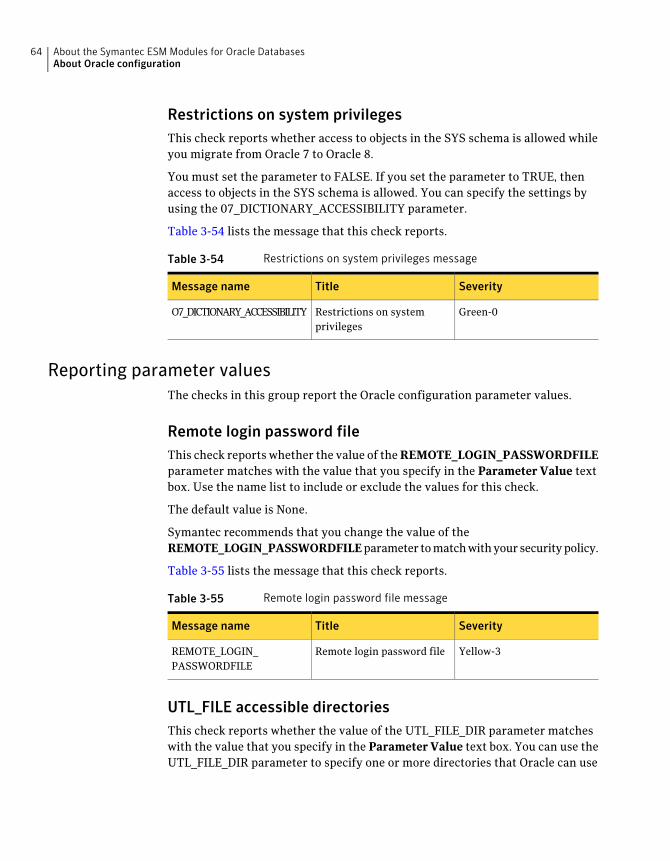
Restrictions on system privilegesThis check reports whether access to objects in the SYS schema is allowed whileyou migrate from Oracle 7 to Oracle 8.
You must set the parameter to FALSE. If you set the parameter to TRUE, thenaccess to objects in the SYS schema is allowed. You can specify the settings byusing the 07_DICTIONARY_ACCESSIBILITY parameter.
Table 3-54 lists the message that this check reports.
Table 3-54 Restrictions on system privileges message
SeverityTitleMessage name
Green-0Restrictions on systemprivileges
O7_DICTIONARY_ACCESSIBILITY
Reporting parameter valuesThe checks in this group report the Oracle configuration parameter values.
Remote login password fileThis check reports whether the value of theREMOTE_LOGIN_PASSWORDFILEparameter matches with the value that you specify in the Parameter Value textbox. Use the name list to include or exclude the values for this check.
The default value is None.
Symantec recommends that you change the value of theREMOTE_LOGIN_PASSWORDFILEparameter tomatchwithyoursecuritypolicy.
Table 3-55 lists the message that this check reports.
Table 3-55 Remote login password file message
SeverityTitleMessage name
Yellow-3Remote login password fileREMOTE_LOGIN_PASSWORDFILE
UTL_FILE accessible directoriesThis check reports whether the value of the UTL_FILE_DIR parameter matcheswith the value that you specify in the Parameter Value text box. You can use theUTL_FILE_DIR parameter to specify one or more directories that Oracle can use
About the Symantec ESM Modules for Oracle DatabasesAbout Oracle configuration
64

for PL/SQL file I/O. The exclude tag of the parameter value specifies acceptablevalues and the include tag specifies unacceptable values.
If the location of the UTL_FILE_DIR is not authorized, Symantec recommendsthat you either change the configuration of the SID’s UTL_FILE_DIR parameterto specify an authorized location or update the snapshot.
Table 3-56 lists the message that this check reports.
Table 3-56 UTL_FILE accessible directories message
SeverityTitleMessage name
Yellow-3UTL_FILE accessibledirectories
UTL_FILE_DIR
Oracle configuration watchThis check reports the unmatched initialization and configuration parametersthat are defined in the templates. Use the name list to include the template filefor this check.
Table 3-57 lists the message that this check reports.
Table 3-57 Oracle configuration watch messages
SeverityTitleMessage name
Red-4Red level conditionORC_RUNTIME_RED
Yellow-1Yellow level conditionORC_RUNTIME_YELLOW
Green-0Green level conditionORC_RUNTIME_GREEN
Red-4Red level conditionORC_INITFILE_RED
Yellow-1Yellow level conditionORC_INITFILE_YELLOW
Green-0Green level conditionORC_INITFILE_GREEN
Green-0Required Oracle parameternot found
ORC_PARAMETER_NOT_FOUND
Redo log filesThis check reports the locations of the SID's redo log files, the violations of redolog file permissions, the discrepancies in the redo log file ownerships, and the filestatus. In the Permission field, do one of the following:
65About the Symantec ESM Modules for Oracle DatabasesAbout Oracle configuration
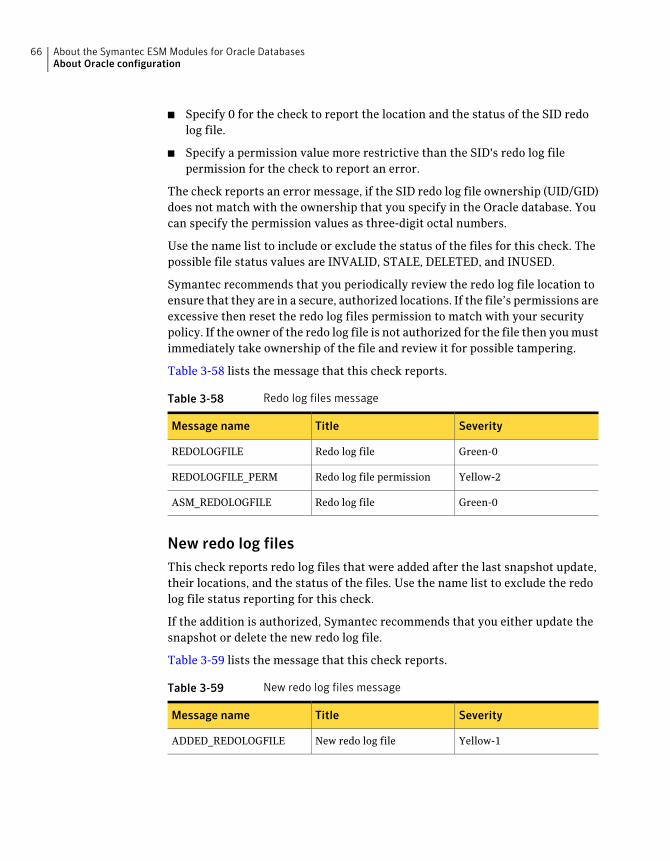
■ Specify 0 for the check to report the location and the status of the SID redolog file.
■ Specify a permission value more restrictive than the SID's redo log filepermission for the check to report an error.
The check reports an error message, if the SID redo log file ownership (UID/GID)does not match with the ownership that you specify in the Oracle database. Youcan specify the permission values as three-digit octal numbers.
Use the name list to include or exclude the status of the files for this check. Thepossible file status values are INVALID, STALE, DELETED, and INUSED.
Symantec recommends that you periodically review the redo log file location toensure that they are in a secure, authorized locations. If the file’s permissions areexcessive then reset the redo log files permission to match with your securitypolicy. If the owner of the redo log file is not authorized for the file then youmustimmediately take ownership of the file and review it for possible tampering.
Table 3-58 lists the message that this check reports.
Table 3-58 Redo log files message
SeverityTitleMessage name
Green-0Redo log fileREDOLOGFILE
Yellow-2Redo log file permissionREDOLOGFILE_PERM
Green-0Redo log fileASM_REDOLOGFILE
New redo log filesThis check reports redo log files that were added after the last snapshot update,their locations, and the status of the files. Use the name list to exclude the redolog file status reporting for this check.
If the addition is authorized, Symantec recommends that you either update thesnapshot or delete the new redo log file.
Table 3-59 lists the message that this check reports.
Table 3-59 New redo log files message
SeverityTitleMessage name
Yellow-1New redo log fileADDED_REDOLOGFILE
About the Symantec ESM Modules for Oracle DatabasesAbout Oracle configuration
66
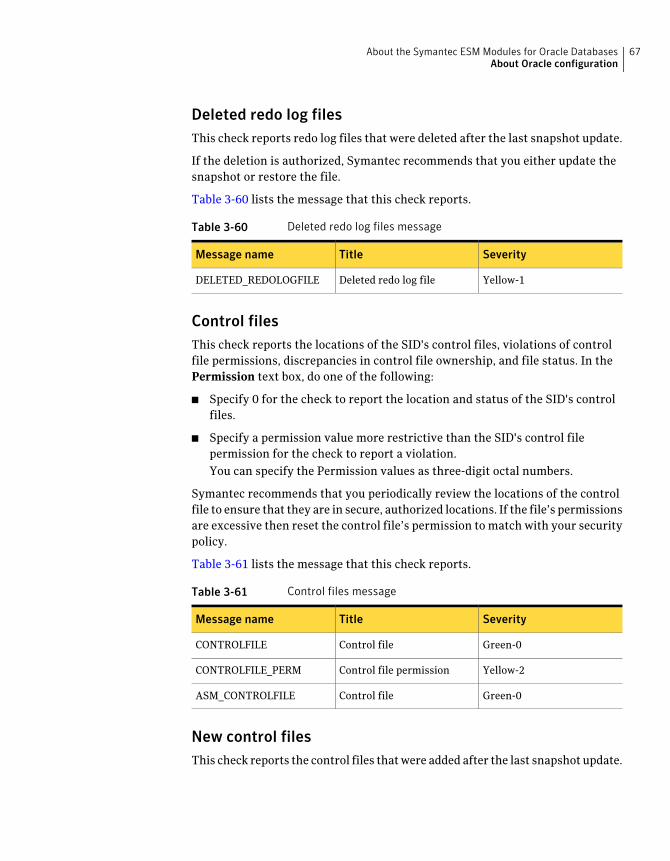
Deleted redo log filesThis check reports redo log files that were deleted after the last snapshot update.
If the deletion is authorized, Symantec recommends that you either update thesnapshot or restore the file.
Table 3-60 lists the message that this check reports.
Table 3-60 Deleted redo log files message
SeverityTitleMessage name
Yellow-1Deleted redo log fileDELETED_REDOLOGFILE
Control filesThis check reports the locations of the SID's control files, violations of controlfile permissions, discrepancies in control file ownership, and file status. In thePermission text box, do one of the following:
■ Specify 0 for the check to report the location and status of the SID's controlfiles.
■ Specify a permission value more restrictive than the SID's control filepermission for the check to report a violation.You can specify the Permission values as three-digit octal numbers.
Symantec recommends that you periodically review the locations of the controlfile to ensure that they are in secure, authorized locations. If the file’s permissionsare excessive then reset the control file’s permission to match with your securitypolicy.
Table 3-61 lists the message that this check reports.
Table 3-61 Control files message
SeverityTitleMessage name
Green-0Control fileCONTROLFILE
Yellow-2Control file permissionCONTROLFILE_PERM
Green-0Control fileASM_CONTROLFILE
New control filesThis check reports the control files thatwere added after the last snapshot update.
67About the Symantec ESM Modules for Oracle DatabasesAbout Oracle configuration
If the addition is authorized, Symantec recommends you to either update thesnapshot or delete the new control file.
Table 3-62 lists the message that this check reports.
Table 3-62 New control files message
SeverityTitleMessage name
Yellow-1New control fileADDED_CONTROLFILE
Deleted control filesThis check reports the control files that were deleted after the last snapshotupdate.
If the deletion is authorized, Symantec recommends you to either update thesnapshot or restore the control file.
Table 3-63 lists the message that this check reports.
Table 3-63 Deleted control files message
SeverityTitleMessage name
Yellow-1Deleted control fileDELETED_CONTROLFILE
About Oracle networksThismodule checks for the oracle network configuration that you have specified.
Editing default settingsUse the check in this group to edit the default settings for all the security checksin the module.
Oracle system identifiers (SIDs)Use the name list to include or exclude the Oracle system identifiers (SIDs) forthis check. By default, the check examines all the SIDs that you specify when youconfigure the Symantec ESM modules for the Oracle databases. The SymantecESM modules for Oracle Databases configuration is stored in/esm/config/oracle.dat file.
About the Symantec ESM Modules for Oracle DatabasesAbout Oracle networks
68
Reporting SID configuration statusThe check in this group report the SIDs that are not configured.
SID configurationThis check reports SIDs that are not configured for Symantec ESM modules forOracle Databases. If an oratab file resides in a different location than /etc/oratabor /var/opt/oracle/oratab, change the value in the oratab file field to specifythe full path. Use name list to exclude the SID’s for this check.
Table 3-64 lists the message that this check reports.
Table 3-64 SID configuration message
SeverityTitleMessage name
Yellow-3SID not configured formodules
UNCONFIG_SID
Oracle net configuration watchThis check reports Oracle Listener, Sqlnet, and Names configuration parametervalues that violate conditions of the corresponding Oracle Net Watch templateparameters. Use the name list to enable and disable the template files for thischeck.
Table 3-65 lists the message that this check reports.
Table 3-65 Oracle net configuration watch message
SeverityTitleMessage name
Red-4Red level conditionORC_NETCONFIG_RED
Yellow-1Yellow level conditionORC_NETCONFIG_YELLOW
Green-0Green level conditionORC_NETCONFIG_GREEN
Yellow-3Required parameter notfound
ORC_NETCONFIG_PARA_MISSING
Oracle EXTPROC listenersThis check reports the Oracle listeners that have EXTPROC-specific entries. Inthe text box, specify 1 to allow the TCP Protocol, on doing so the database listenerports should be different than the EXTPROC ports. Separate listeners must be
69About the Symantec ESM Modules for Oracle DatabasesAbout Oracle networks
specified for the Oracle Databases and for the EXTPROC process. You must usethe IPC protocol for listeners configured for EXTPROC.
Table 3-66 lists the messages that this check reports.
Table 3-66 Oracle EXTPROC listeners messages
SeverityTitleMessage name
Yellow-3Listener for EXTPROC foundORA_EXTPROC_LISTENER_FOUND
Red-4EXTPROC entries found inListener for Databases
ORA_EXTPROC_IN_DB_LISTENER
Red-4Listener for EXTPROC is notconfiguredwith IPCProtocol
ORA_NON_IPC_EXTPROC
Red-4The ports configured forEXTPROC listeners conflictwith database listeners
ORA_TCP_PORT_EXTPROC
About Oracle objectsThis module checks for the access privileges to the Oracle objects that are basedon the options that you have specified.
Editing default settingsUse the check in this group to edit the default settings for all the security checksin the module.
Oracle system identifiers (SIDs)Use the name list to include or exclude the Oracle system identifiers (SIDs) forthis check. By default, the check examines all the SIDs that you specify when youconfigure the Symantec ESM modules for the Oracle databases. The SymantecESM modules for Oracle Databases configuration is stored in/esm/config/oracle.dat file.
Reporting table privilegesThe checks in this group report entities that can:
■ Access SYS.ALL_SOURCE
■ Grant privileges to Oracle objects such as tables, indexes, and views
About the Symantec ESM Modules for Oracle DatabasesAbout Oracle objects
70
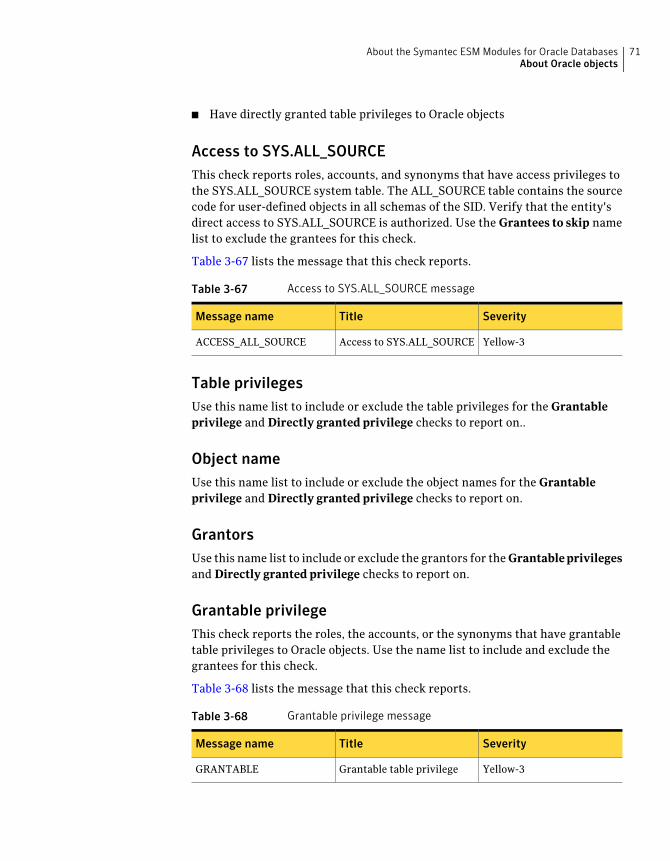
■ Have directly granted table privileges to Oracle objects
Access to SYS.ALL_SOURCEThis check reports roles, accounts, and synonyms that have access privileges tothe SYS.ALL_SOURCE system table. The ALL_SOURCE table contains the sourcecode for user-defined objects in all schemas of the SID. Verify that the entity'sdirect access to SYS.ALL_SOURCE is authorized. Use the Grantees to skip namelist to exclude the grantees for this check.
Table 3-67 lists the message that this check reports.
Table 3-67 Access to SYS.ALL_SOURCE message
SeverityTitleMessage name
Yellow-3Access to SYS.ALL_SOURCEACCESS_ALL_SOURCE
Table privilegesUse this name list to include or exclude the table privileges for the Grantableprivilege and Directly granted privilege checks to report on..
Object nameUse this name list to include or exclude the object names for the Grantableprivilege and Directly granted privilege checks to report on.
GrantorsUse this name list to include or exclude the grantors for the Grantableprivilegesand Directly granted privilege checks to report on.
Grantable privilegeThis check reports the roles, the accounts, or the synonyms that have grantabletable privileges to Oracle objects. Use the name list to include and exclude thegrantees for this check.
Table 3-68 lists the message that this check reports.
Table 3-68 Grantable privilege message
SeverityTitleMessage name
Yellow-3Grantable table privilegeGRANTABLE
71About the Symantec ESM Modules for Oracle DatabasesAbout Oracle objects
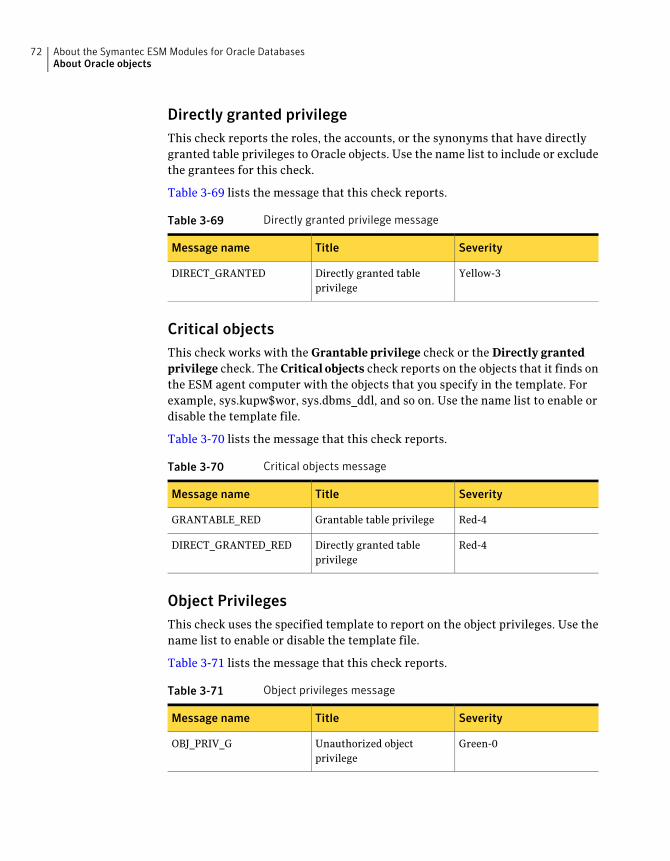
Directly granted privilegeThis check reports the roles, the accounts, or the synonyms that have directlygranted table privileges to Oracle objects. Use the name list to include or excludethe grantees for this check.
Table 3-69 lists the message that this check reports.
Table 3-69 Directly granted privilege message
SeverityTitleMessage name
Yellow-3Directly granted tableprivilege
DIRECT_GRANTED
Critical objectsThis check works with the Grantable privilege check or the Directly grantedprivilege check. The Critical objects check reports on the objects that it finds onthe ESM agent computer with the objects that you specify in the template. Forexample, sys.kupw$wor, sys.dbms_ddl, and so on. Use the name list to enable ordisable the template file.
Table 3-70 lists the message that this check reports.
Table 3-70 Critical objects message
SeverityTitleMessage name
Red-4Grantable table privilegeGRANTABLE_RED
Red-4Directly granted tableprivilege
DIRECT_GRANTED_RED
Object PrivilegesThis check uses the specified template to report on the object privileges. Use thename list to enable or disable the template file.
Table 3-71 lists the message that this check reports.
Table 3-71 Object privileges message
SeverityTitleMessage name
Green-0Unauthorized objectprivilege
OBJ_PRIV_G
About the Symantec ESM Modules for Oracle DatabasesAbout Oracle objects
72
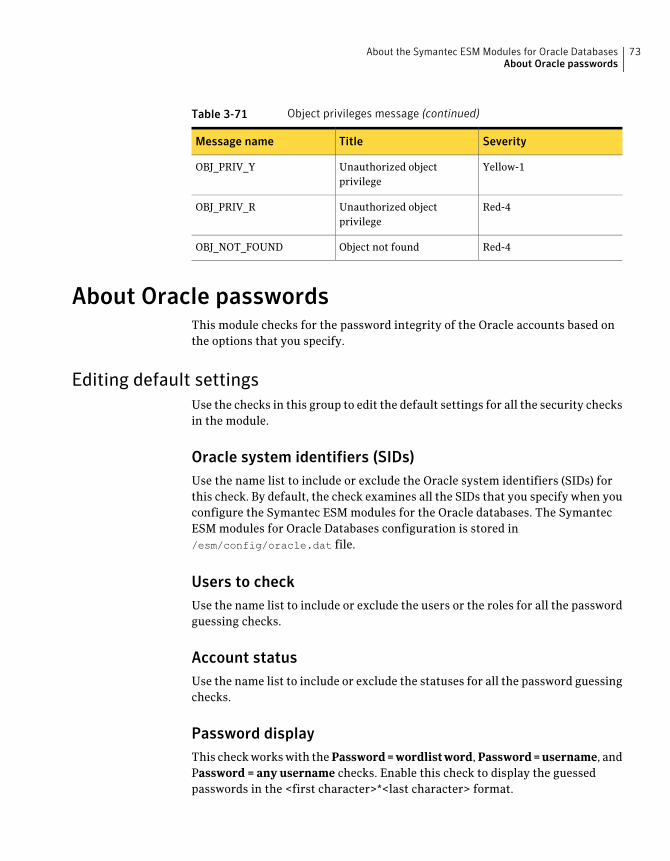
Table 3-71 Object privileges message (continued)
SeverityTitleMessage name
Yellow-1Unauthorized objectprivilege
OBJ_PRIV_Y
Red-4Unauthorized objectprivilege
OBJ_PRIV_R
Red-4Object not foundOBJ_NOT_FOUND
About Oracle passwordsThis module checks for the password integrity of the Oracle accounts based onthe options that you specify.
Editing default settingsUse the checks in this group to edit the default settings for all the security checksin the module.
Oracle system identifiers (SIDs)Use the name list to include or exclude the Oracle system identifiers (SIDs) forthis check. By default, the check examines all the SIDs that you specify when youconfigure the Symantec ESM modules for the Oracle databases. The SymantecESM modules for Oracle Databases configuration is stored in/esm/config/oracle.dat file.
Users to checkUse the name list to include or exclude the users or the roles for all the passwordguessing checks.
Account statusUse the name list to include or exclude the statuses for all the password guessingchecks.
Password displayThis checkworkswith thePassword=wordlistword,Password=username, andPassword = any username checks. Enable this check to display the guessedpasswords in the <first character>*<last character> format.
73About the Symantec ESM Modules for Oracle DatabasesAbout Oracle passwords
Specifying check variationsYou can use the checks under this group to set conditions for guessing thepasswords of the Oracle accounts. You can display the results with or without thefirst and last characters of the password.
Reverse orderEnable this option to have Password = checks report passwords that match thebackward spelling of user names or common words. For example, in Password =wordlist word, password flog matches the word golf.
Double occurrencesEnable this option to have Password = checks report the passwords that matchesthe user names or common words spelled twice. For example, in Password =wordlist word, password golfgolf matches the word golf.
PluralThis option directs Password = checks to compare the plural forms of user names,role names, or common words with the password. For example, in “Password =user name,” the password “golfs” matches the user name “golf.”
PrefixEnable this option so that Password = checks reports the passwords that beginwith a prefix in the user names, role names, or common words. For example, if“pro” is a prefix and “golf” is a user name, then the Password = user name checkreports “progolf “ as a weak password.
SuffixEnable this option so that Password = checks reports the passwords that endwitha suffix in the user names, role names, or common words. For example, if “pro”is a suffix and “golf” is a user name, then the Password = user name check reports“golfpro” as a weak password.
Comparing passwords to word listsThe checks in this group compare the passwords to words that are found in theword lists or the user names. Any matched word is a weak password and shouldbe changed immediately.
About the Symantec ESM Modules for Oracle DatabasesAbout Oracle passwords
74
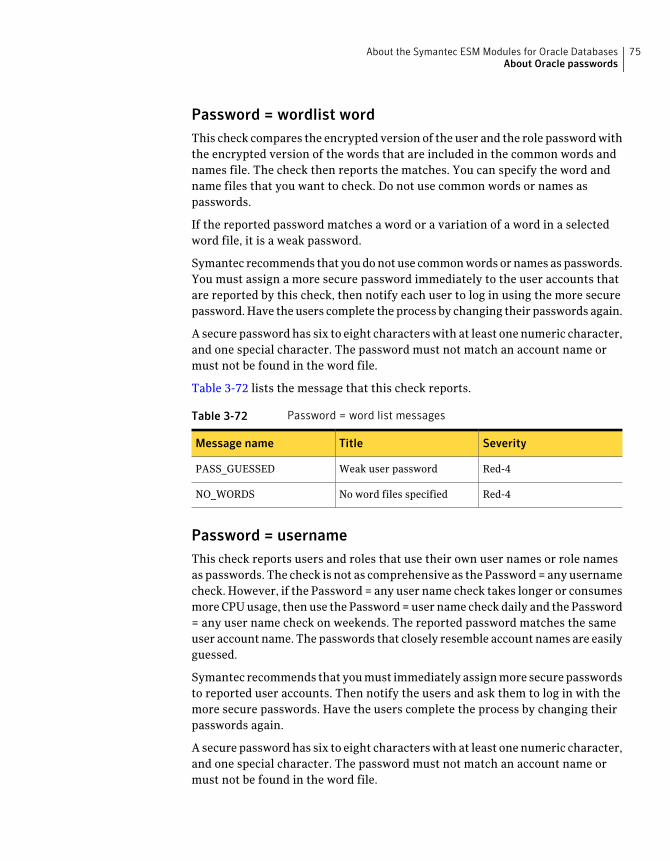
Password = wordlist wordThis check compares the encrypted version of the user and the role passwordwiththe encrypted version of the words that are included in the common words andnames file. The check then reports the matches. You can specify the word andname files that you want to check. Do not use common words or names aspasswords.
If the reported password matches a word or a variation of a word in a selectedword file, it is a weak password.
Symantec recommends that youdonot use commonwords ornames aspasswords.You must assign a more secure password immediately to the user accounts thatare reported by this check, then notify each user to log in using the more securepassword.Have theusers complete theprocess by changing their passwords again.
A secure passwordhas six to eight characterswith at least onenumeric character,and one special character. The password must not match an account name ormust not be found in the word file.
Table 3-72 lists the message that this check reports.
Table 3-72 Password = word list messages
SeverityTitleMessage name
Red-4Weak user passwordPASS_GUESSED
Red-4No word files specifiedNO_WORDS
Password = usernameThis check reports users and roles that use their own user names or role namesas passwords. The check is not as comprehensive as thePassword= anyusernamecheck. However, if the Password = any user name check takes longer or consumesmoreCPUusage, thenuse the Password=user name check daily and the Password= any user name check on weekends. The reported password matches the sameuser account name. The passwords that closely resemble account names are easilyguessed.
Symantec recommends that youmust immediately assignmore securepasswordsto reported user accounts. Then notify the users and ask them to log in with themore secure passwords. Have the users complete the process by changing theirpasswords again.
A secure passwordhas six to eight characterswith at least onenumeric character,and one special character. The password must not match an account name ormust not be found in the word file.
75About the Symantec ESM Modules for Oracle DatabasesAbout Oracle passwords
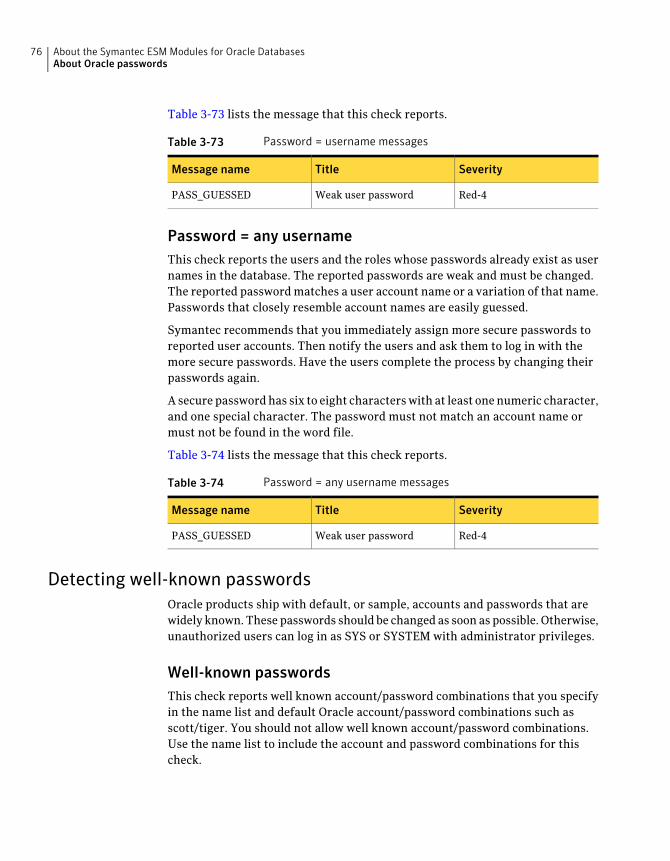
Table 3-73 lists the message that this check reports.
Table 3-73 Password = username messages
SeverityTitleMessage name
Red-4Weak user passwordPASS_GUESSED
Password = any usernameThis check reports the users and the roles whose passwords already exist as usernames in the database. The reported passwords are weak and must be changed.The reported passwordmatches a user account name or a variation of that name.Passwords that closely resemble account names are easily guessed.
Symantec recommends that you immediately assign more secure passwords toreported user accounts. Then notify the users and ask them to log in with themore secure passwords. Have the users complete the process by changing theirpasswords again.
A secure passwordhas six to eight characterswith at least onenumeric character,and one special character. The password must not match an account name ormust not be found in the word file.
Table 3-74 lists the message that this check reports.
Table 3-74 Password = any username messages
SeverityTitleMessage name
Red-4Weak user passwordPASS_GUESSED
Detecting well-known passwordsOracle products ship with default, or sample, accounts and passwords that arewidely known. These passwords should be changed as soon as possible. Otherwise,unauthorized users can log in as SYS or SYSTEM with administrator privileges.
Well-known passwordsThis check reports well known account/password combinations that you specifyin the name list and default Oracle account/password combinations such asscott/tiger. You should not allow well known account/password combinations.Use the name list to include the account and password combinations for thischeck.
About the Symantec ESM Modules for Oracle DatabasesAbout Oracle passwords
76
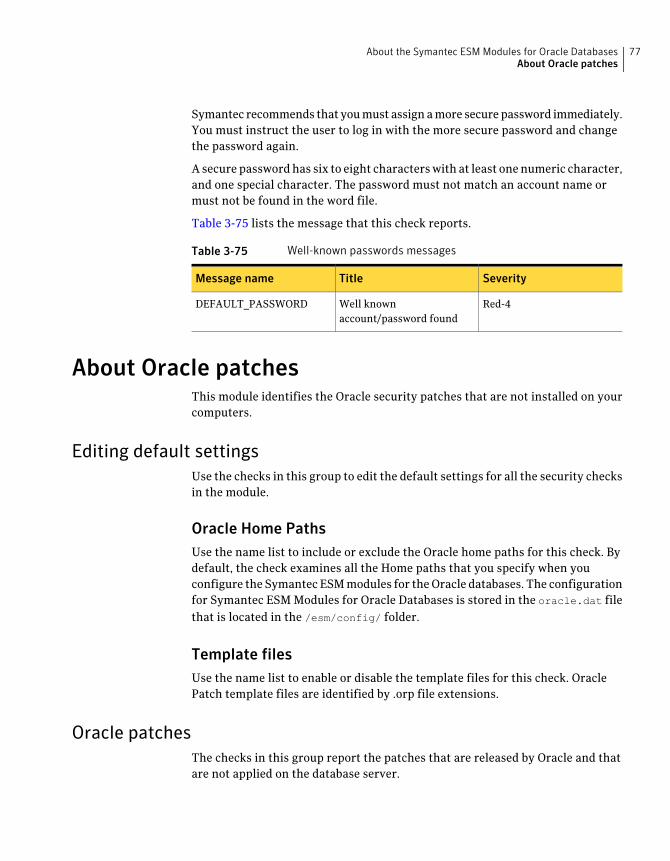
Symantec recommends that youmust assignamore securepassword immediately.You must instruct the user to log in with the more secure password and changethe password again.
A secure passwordhas six to eight characterswith at least onenumeric character,and one special character. The password must not match an account name ormust not be found in the word file.
Table 3-75 lists the message that this check reports.
Table 3-75 Well-known passwords messages
SeverityTitleMessage name
Red-4Well knownaccount/password found
DEFAULT_PASSWORD
About Oracle patchesThis module identifies the Oracle security patches that are not installed on yourcomputers.
Editing default settingsUse the checks in this group to edit the default settings for all the security checksin the module.
Oracle Home PathsUse the name list to include or exclude the Oracle home paths for this check. Bydefault, the check examines all the Home paths that you specify when youconfigure the Symantec ESMmodules for theOracle databases. The configurationfor Symantec ESM Modules for Oracle Databases is stored in the oracle.dat filethat is located in the /esm/config/ folder.
Template filesUse the name list to enable or disable the template files for this check. OraclePatch template files are identified by .orp file extensions.
Oracle patchesThe checks in this group report the patches that are released by Oracle and thatare not applied on the database server.
77About the Symantec ESM Modules for Oracle DatabasesAbout Oracle patches
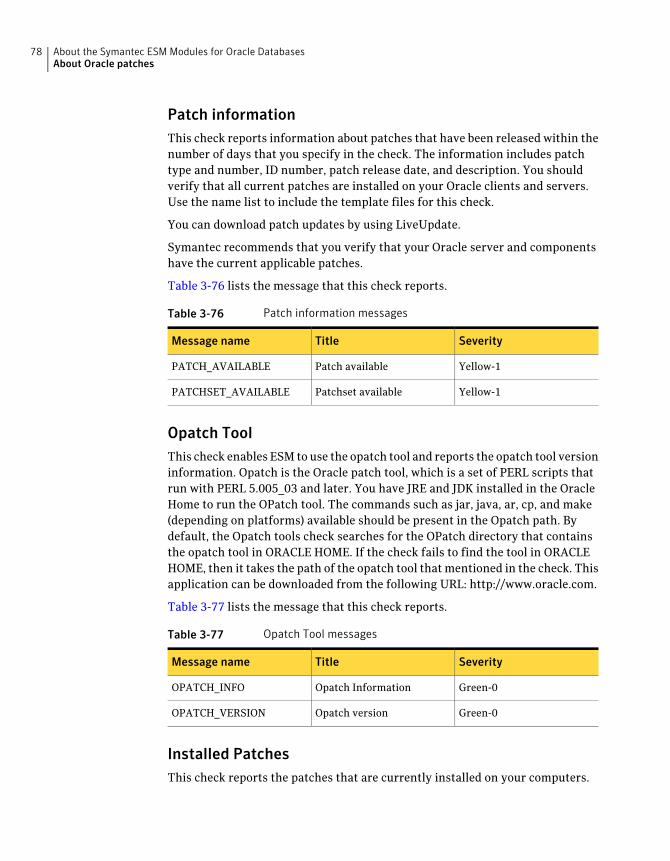
Patch informationThis check reports information about patches that have been released within thenumber of days that you specify in the check. The information includes patchtype and number, ID number, patch release date, and description. You shouldverify that all current patches are installed on your Oracle clients and servers.Use the name list to include the template files for this check.
You can download patch updates by using LiveUpdate.
Symantec recommends that you verify that your Oracle server and componentshave the current applicable patches.
Table 3-76 lists the message that this check reports.
Table 3-76 Patch information messages
SeverityTitleMessage name
Yellow-1Patch availablePATCH_AVAILABLE
Yellow-1Patchset availablePATCHSET_AVAILABLE
Opatch ToolThis check enables ESM to use the opatch tool and reports the opatch tool versioninformation. Opatch is the Oracle patch tool, which is a set of PERL scripts thatrun with PERL 5.005_03 and later. You have JRE and JDK installed in the OracleHome to run the OPatch tool. The commands such as jar, java, ar, cp, and make(depending on platforms) available should be present in the Opatch path. Bydefault, the Opatch tools check searches for the OPatch directory that containsthe opatch tool in ORACLE HOME. If the check fails to find the tool in ORACLEHOME, then it takes the path of the opatch tool thatmentioned in the check. Thisapplication can be downloaded from the following URL: http://www.oracle.com.
Table 3-77 lists the message that this check reports.
Table 3-77 Opatch Tool messages
SeverityTitleMessage name
Green-0Opatch InformationOPATCH_INFO
Green-0Opatch versionOPATCH_VERSION
Installed PatchesThis check reports the patches that are currently installed on your computers.
About the Symantec ESM Modules for Oracle DatabasesAbout Oracle patches
78
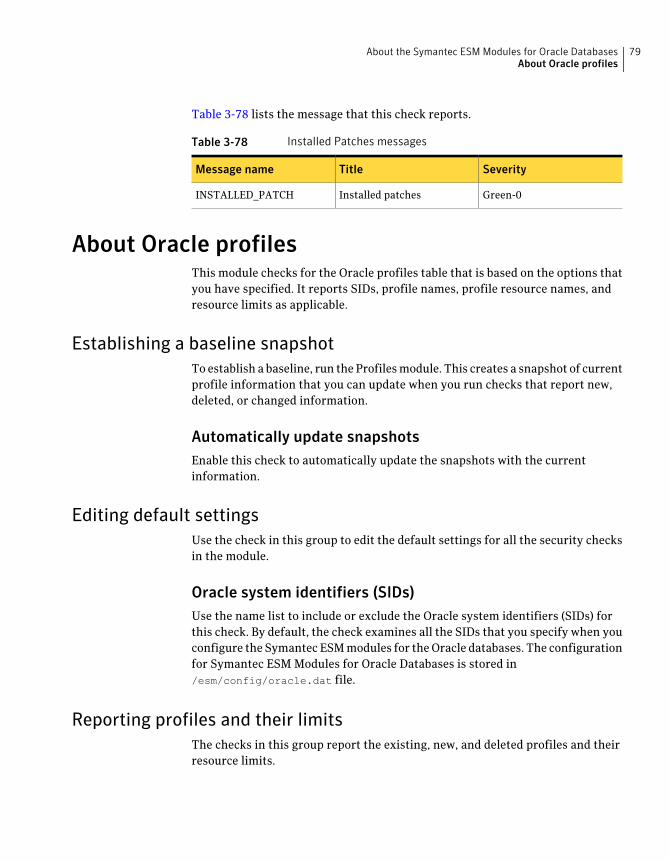
Table 3-78 lists the message that this check reports.
Table 3-78 Installed Patches messages
SeverityTitleMessage name
Green-0Installed patchesINSTALLED_PATCH
About Oracle profilesThis module checks for the Oracle profiles table that is based on the options thatyou have specified. It reports SIDs, profile names, profile resource names, andresource limits as applicable.
Establishing a baseline snapshotTo establish a baseline, run the Profilesmodule. This creates a snapshot of currentprofile information that you can update when you run checks that report new,deleted, or changed information.
Automatically update snapshotsEnable this check to automatically update the snapshots with the currentinformation.
Editing default settingsUse the check in this group to edit the default settings for all the security checksin the module.
Oracle system identifiers (SIDs)Use the name list to include or exclude the Oracle system identifiers (SIDs) forthis check. By default, the check examines all the SIDs that you specify when youconfigure the Symantec ESMmodules for theOracle databases. The configurationfor Symantec ESM Modules for Oracle Databases is stored in/esm/config/oracle.dat file.
Reporting profiles and their limitsThe checks in this group report the existing, new, and deleted profiles and theirresource limits.
79About the Symantec ESM Modules for Oracle DatabasesAbout Oracle profiles
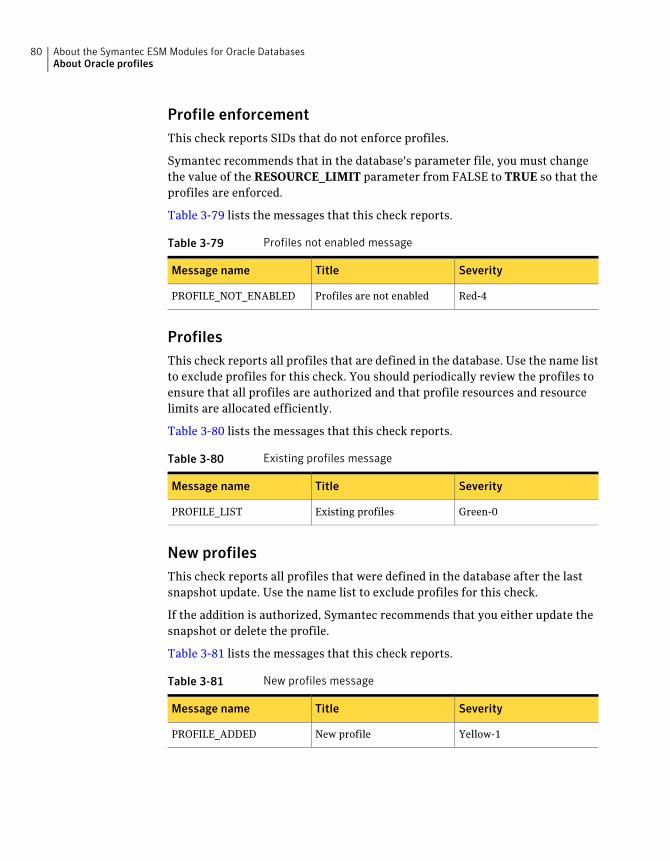
Profile enforcementThis check reports SIDs that do not enforce profiles.
Symantec recommends that in the database's parameter file, you must changethe value of the RESOURCE_LIMIT parameter from FALSE to TRUE so that theprofiles are enforced.
Table 3-79 lists the messages that this check reports.
Table 3-79 Profiles not enabled message
SeverityTitleMessage name
Red-4Profiles are not enabledPROFILE_NOT_ENABLED
ProfilesThis check reports all profiles that are defined in the database. Use the name listto exclude profiles for this check. You should periodically review the profiles toensure that all profiles are authorized and that profile resources and resourcelimits are allocated efficiently.
Table 3-80 lists the messages that this check reports.
Table 3-80 Existing profiles message
SeverityTitleMessage name
Green-0Existing profilesPROFILE_LIST
New profilesThis check reports all profiles that were defined in the database after the lastsnapshot update. Use the name list to exclude profiles for this check.
If the addition is authorized, Symantec recommends that you either update thesnapshot or delete the profile.
Table 3-81 lists the messages that this check reports.
Table 3-81 New profiles message
SeverityTitleMessage name
Yellow-1New profilePROFILE_ADDED
About the Symantec ESM Modules for Oracle DatabasesAbout Oracle profiles
80
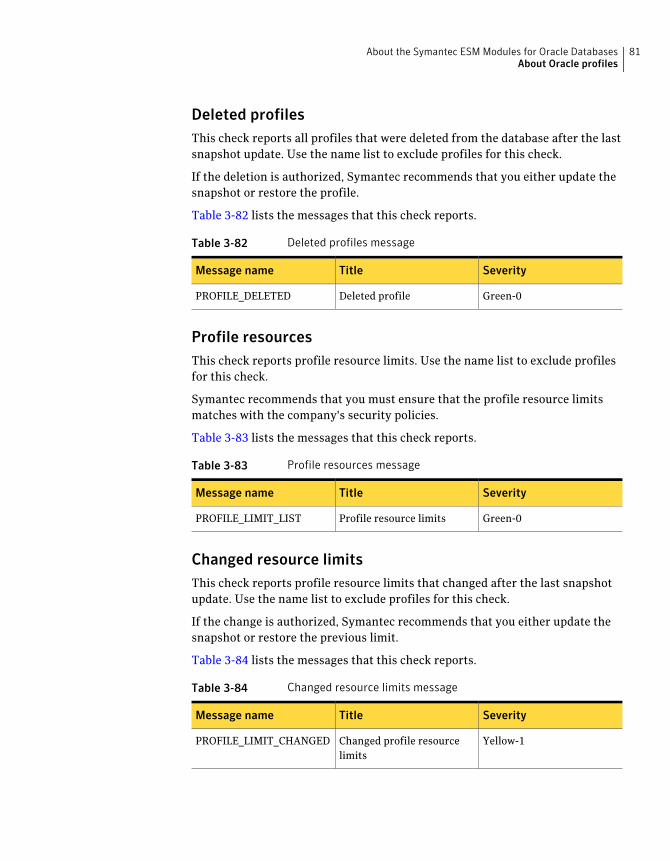
Deleted profilesThis check reports all profiles that were deleted from the database after the lastsnapshot update. Use the name list to exclude profiles for this check.
If the deletion is authorized, Symantec recommends that you either update thesnapshot or restore the profile.
Table 3-82 lists the messages that this check reports.
Table 3-82 Deleted profiles message
SeverityTitleMessage name
Green-0Deleted profilePROFILE_DELETED
Profile resourcesThis check reports profile resource limits. Use the name list to exclude profilesfor this check.
Symantec recommends that you must ensure that the profile resource limitsmatches with the company's security policies.
Table 3-83 lists the messages that this check reports.
Table 3-83 Profile resources message
SeverityTitleMessage name
Green-0Profile resource limitsPROFILE_LIMIT_LIST
Changed resource limitsThis check reports profile resource limits that changed after the last snapshotupdate. Use the name list to exclude profiles for this check.
If the change is authorized, Symantec recommends that you either update thesnapshot or restore the previous limit.
Table 3-84 lists the messages that this check reports.
Table 3-84 Changed resource limits message
SeverityTitleMessage name
Yellow-1Changed profile resourcelimits
PROFILE_LIMIT_CHANGED
81About the Symantec ESM Modules for Oracle DatabasesAbout Oracle profiles
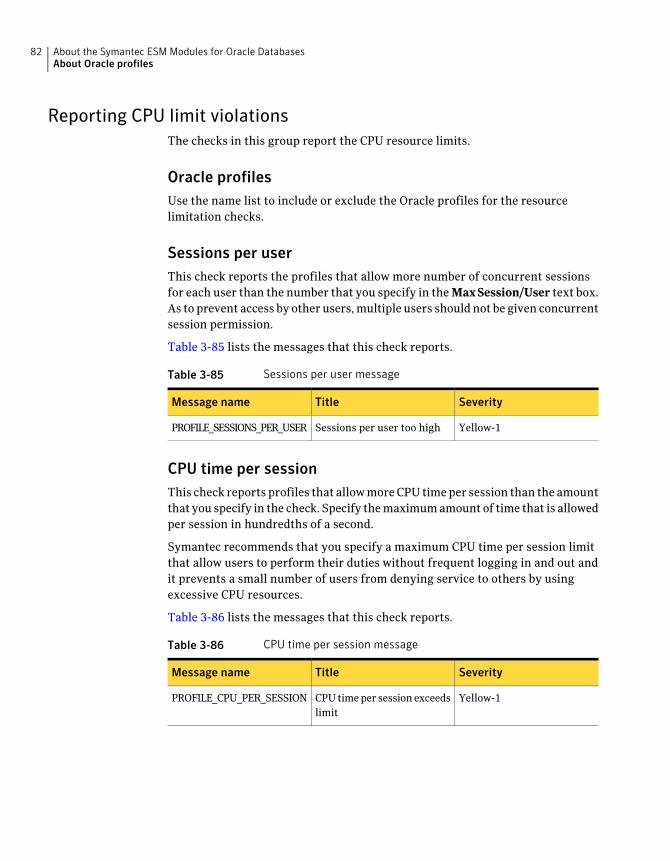
Reporting CPU limit violationsThe checks in this group report the CPU resource limits.
Oracle profilesUse the name list to include or exclude the Oracle profiles for the resourcelimitation checks.
Sessions per userThis check reports the profiles that allow more number of concurrent sessionsfor each user than the number that you specify in the MaxSession/User text box.As to prevent access by other users,multiple users should not be given concurrentsession permission.
Table 3-85 lists the messages that this check reports.
Table 3-85 Sessions per user message
SeverityTitleMessage name
Yellow-1Sessions per user too highPROFILE_SESSIONS_PER_USER
CPU time per sessionThis check reports profiles that allowmoreCPU timeper session than the amountthat you specify in the check. Specify themaximumamount of time that is allowedper session in hundredths of a second.
Symantec recommends that you specify a maximum CPU time per session limitthat allow users to perform their duties without frequent logging in and out andit prevents a small number of users from denying service to others by usingexcessive CPU resources.
Table 3-86 lists the messages that this check reports.
Table 3-86 CPU time per session message
SeverityTitleMessage name
Yellow-1CPUtimeper session exceedslimit
PROFILE_CPU_PER_SESSION
About the Symantec ESM Modules for Oracle DatabasesAbout Oracle profiles
82
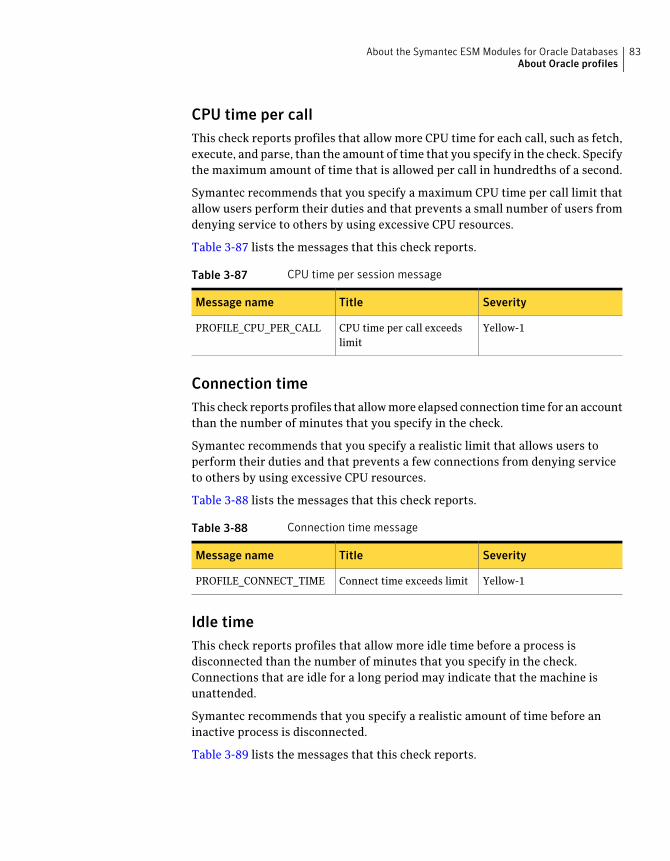
CPU time per callThis check reports profiles that allow more CPU time for each call, such as fetch,execute, and parse, than the amount of time that you specify in the check. Specifythe maximum amount of time that is allowed per call in hundredths of a second.
Symantec recommends that you specify a maximum CPU time per call limit thatallow users perform their duties and that prevents a small number of users fromdenying service to others by using excessive CPU resources.
Table 3-87 lists the messages that this check reports.
Table 3-87 CPU time per session message
SeverityTitleMessage name
Yellow-1CPU time per call exceedslimit
PROFILE_CPU_PER_CALL
Connection timeThis check reports profiles that allowmore elapsed connection time for an accountthan the number of minutes that you specify in the check.
Symantec recommends that you specify a realistic limit that allows users toperform their duties and that prevents a few connections from denying serviceto others by using excessive CPU resources.
Table 3-88 lists the messages that this check reports.
Table 3-88 Connection time message
SeverityTitleMessage name
Yellow-1Connect time exceeds limitPROFILE_CONNECT_TIME
Idle timeThis check reports profiles that allow more idle time before a process isdisconnected than the number of minutes that you specify in the check.Connections that are idle for a long period may indicate that the machine isunattended.
Symantec recommends that you specify a realistic amount of time before aninactive process is disconnected.
Table 3-89 lists the messages that this check reports.
83About the Symantec ESM Modules for Oracle DatabasesAbout Oracle profiles
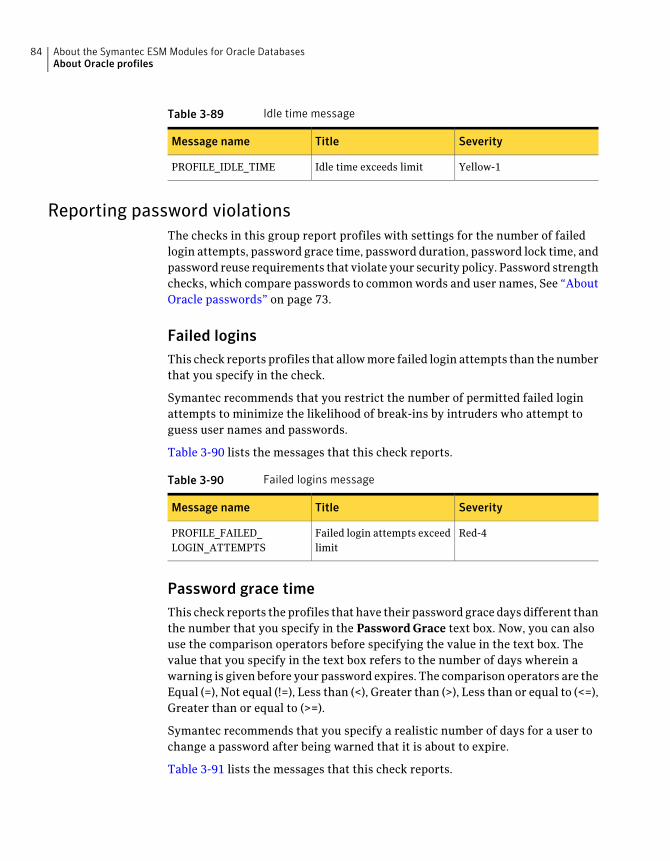
Table 3-89 Idle time message
SeverityTitleMessage name
Yellow-1Idle time exceeds limitPROFILE_IDLE_TIME
Reporting password violationsThe checks in this group report profiles with settings for the number of failedlogin attempts, password grace time, password duration, password lock time, andpassword reuse requirements that violate your security policy. Password strengthchecks, which compare passwords to commonwords and user names, See “AboutOracle passwords” on page 73.
Failed loginsThis check reports profiles that allowmore failed login attempts than thenumberthat you specify in the check.
Symantec recommends that you restrict the number of permitted failed loginattempts to minimize the likelihood of break-ins by intruders who attempt toguess user names and passwords.
Table 3-90 lists the messages that this check reports.
Table 3-90 Failed logins message
SeverityTitleMessage name
Red-4Failed login attempts exceedlimit
PROFILE_FAILED_LOGIN_ATTEMPTS
Password grace timeThis check reports the profiles that have their password grace days different thanthe number that you specify in the Password Grace text box. Now, you can alsouse the comparison operators before specifying the value in the text box. Thevalue that you specify in the text box refers to the number of days wherein awarning is given before your password expires. The comparison operators are theEqual (=), Not equal (!=), Less than (<), Greater than (>), Less than or equal to (<=),Greater than or equal to (>=).
Symantec recommends that you specify a realistic number of days for a user tochange a password after being warned that it is about to expire.
Table 3-91 lists the messages that this check reports.
About the Symantec ESM Modules for Oracle DatabasesAbout Oracle profiles
84
Table 3-91 Password grace time message
SeverityTitleMessage name
Yellow-1Password grace time differsfrom limit
PROFILE_PASS_GRACE_TIME
Password durationThis check reports profiles that permit a password to be used for more days thanthe number that you specify in the check.
Symantec recommends that you require password changes often enough tominimize the possibility that an intruderwill discover passwords but not so oftenthat users have difficulty remembering their passwords.
Table 3-92 lists the messages that this check reports.
Table 3-92 Password duration message
SeverityTitleMessage name
Red-4Password duration too highPROFILE_PASS_LIFE_TIME
Password lock timeThis check reports profiles that lock accounts for fewer days than the numberthat you specify in the check. Accounts are locked after the number of failed loginattempts that you specify in the FAILED_LOGIN_ATTEMPTS parameter of theprofile. PASSWORD_LOCK_TIME specifies the number of days that an accountis locked.
Symantec recommends that you change the resource parameterPASSWORD_LOCK_TIME setting to match with your security policy.
Table 3-93 lists the messages that this check reports.
Table 3-93 Password lock time message
SeverityTitleMessage name
Yellow-1Password lock time too lowPROFILE_PASS_LOCK_TIME
Password reuse maxThis check reports profiles that require fewer password changes before a passwordcan be reused than the number that you specify in the check.
85About the Symantec ESM Modules for Oracle DatabasesAbout Oracle profiles

Note: If you set a PASSWORD_REUSE_MAX value, PASSWORD_REUSE_TIMEmust be UNLIMITED.
Symantec recommends that you change the resource parameterPASSWORD_REUSE_MAX to require a realistic number of times that a passwordmust be changed before it can be reused.
Table 3-94 lists the messages that this check reports.
Table 3-94 Password reuse max message
SeverityTitleMessage name
Yellow-1Password reuse maximumtoo low
PROFILE_PASS_REUSE_MAX
Password reuse timeThis check reports profiles that require fewer days before a password can bereused than the number that you specify in the check.
Note: If this settinghas a value,PASSWORD_REUSE_TIMEmust beUNLIMITED.If you set a PASSWORD_REUSE_TIME value, PASSWORD_REUSE_MAX mustbe UNLIMITED.
Symantec recommends that you change the resource parameterPASSWORD_REUSE_TIME to require a realistic amount of time that must passbefore it can be reused.
Table 3-95 lists the messages that this check reports.
Table 3-95 Password reuse time message
SeverityTitleMessage name
Yellow-1Password reuse time too lowPROFILE_PASS_REUSE_MAX
Password verify functionThis check reports profiles that donot use one ormore of the password complexityfunctions that you specify in the name list. Use the name list to include thefunctions for this check.
About the Symantec ESM Modules for Oracle DatabasesAbout Oracle profiles
86
Note: Password complexity functions are specified in the resource parameterPASSWORD_VERIFY_FUNCTION.
Symantec recommends that you immediately assign amore secure password, andthen instruct the user to log in with the more secure password and change thepassword again.
Table 3-96 lists the messages that this check reports.
Table 3-96 Password verification function message
SeverityTitleMessage name
Yellow-1Password verify functionPROFILE_PASS_VERIFY_FUNCTION
Invalid profilesThis check reports users that are assigned to profiles that fail one or more of theenabled resource limitation checks. Use the name list to exclude the users for thischeck
Table 3-97 lists the messages that this check reports.
Table 3-97 Invalid profiles message
SeverityTitleMessage name
Yellow-3Invalid profile assignedINVALID_PROFILE_ASSIGNED
About Oracle rolesThis module checks for the Oracle roles that are based on the options that youhave specified.
Establishing a baseline snapshotTo establish a baseline, run the Roles module. This creates a snapshot of currentrole information that you can update when you run checks for new, deleted, orchanged information.
Automatically update snapshotsEnable this check to automatically update the snapshots with the currentinformation.
87About the Symantec ESM Modules for Oracle DatabasesAbout Oracle roles
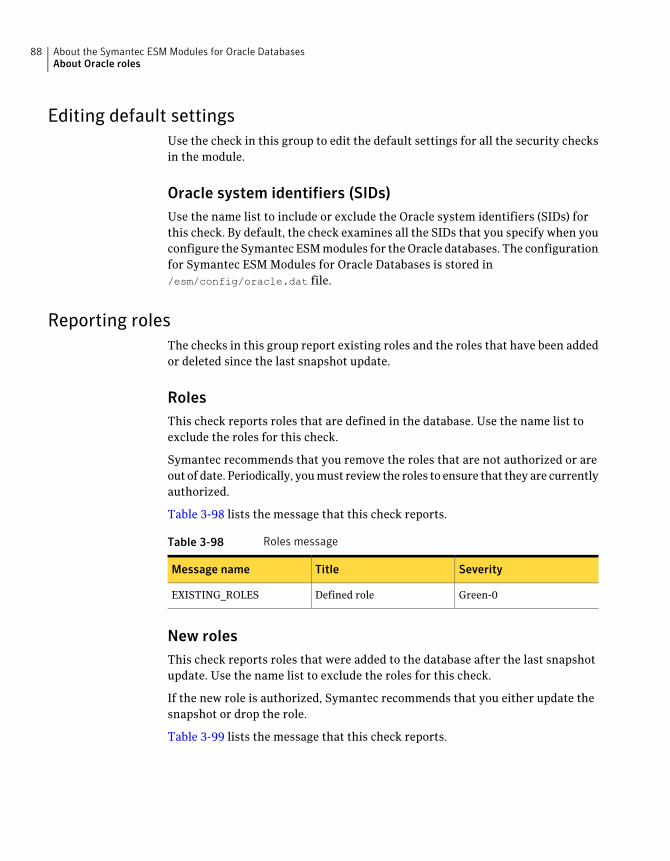
Editing default settingsUse the check in this group to edit the default settings for all the security checksin the module.
Oracle system identifiers (SIDs)Use the name list to include or exclude the Oracle system identifiers (SIDs) forthis check. By default, the check examines all the SIDs that you specify when youconfigure the Symantec ESMmodules for theOracle databases. The configurationfor Symantec ESM Modules for Oracle Databases is stored in/esm/config/oracle.dat file.
Reporting rolesThe checks in this group report existing roles and the roles that have been addedor deleted since the last snapshot update.
RolesThis check reports roles that are defined in the database. Use the name list toexclude the roles for this check.
Symantec recommends that you remove the roles that are not authorized or areout of date. Periodically, youmust review the roles to ensure that they are currentlyauthorized.
Table 3-98 lists the message that this check reports.
Table 3-98 Roles message
SeverityTitleMessage name
Green-0Defined roleEXISTING_ROLES
New rolesThis check reports roles that were added to the database after the last snapshotupdate. Use the name list to exclude the roles for this check.
If the new role is authorized, Symantec recommends that you either update thesnapshot or drop the role.
Table 3-99 lists the message that this check reports.
About the Symantec ESM Modules for Oracle DatabasesAbout Oracle roles
88
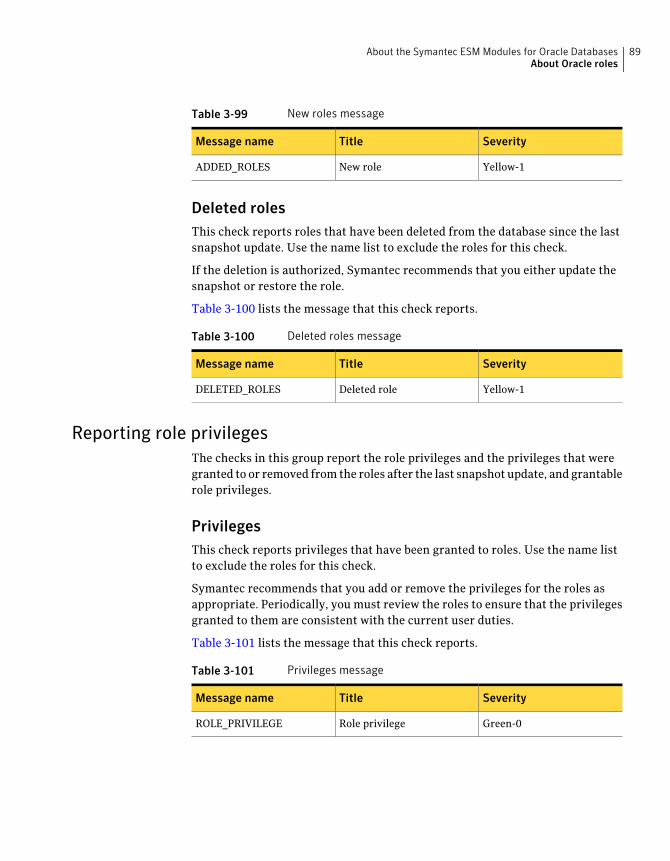
Table 3-99 New roles message
SeverityTitleMessage name
Yellow-1New roleADDED_ROLES
Deleted rolesThis check reports roles that have been deleted from the database since the lastsnapshot update. Use the name list to exclude the roles for this check.
If the deletion is authorized, Symantec recommends that you either update thesnapshot or restore the role.
Table 3-100 lists the message that this check reports.
Table 3-100 Deleted roles message
SeverityTitleMessage name
Yellow-1Deleted roleDELETED_ROLES
Reporting role privilegesThe checks in this group report the role privileges and the privileges that weregranted to or removed from the roles after the last snapshot update, and grantablerole privileges.
PrivilegesThis check reports privileges that have been granted to roles. Use the name listto exclude the roles for this check.
Symantec recommends that you add or remove the privileges for the roles asappropriate. Periodically, you must review the roles to ensure that the privilegesgranted to them are consistent with the current user duties.
Table 3-101 lists the message that this check reports.
Table 3-101 Privileges message
SeverityTitleMessage name
Green-0Role privilegeROLE_PRIVILEGE
89About the Symantec ESM Modules for Oracle DatabasesAbout Oracle roles
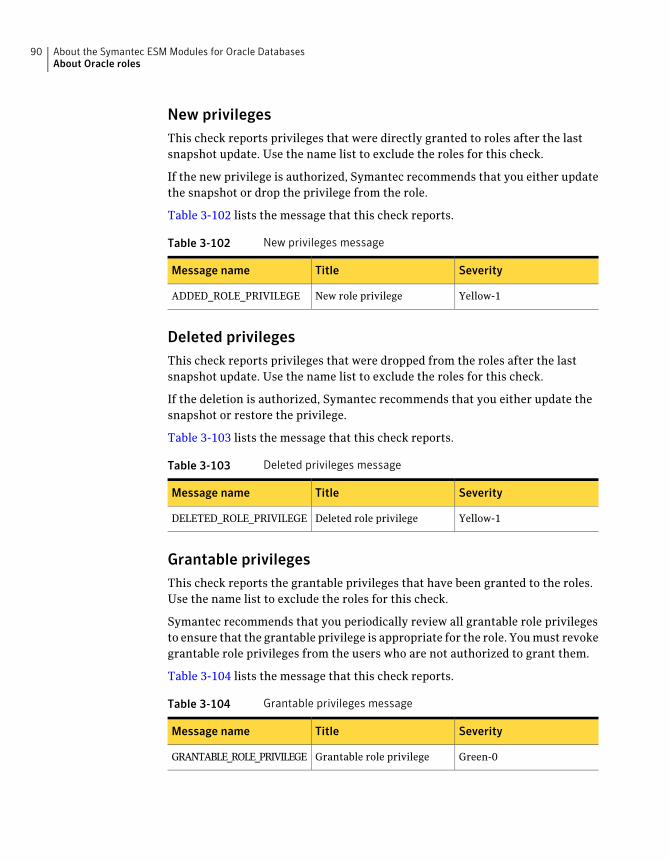
New privilegesThis check reports privileges that were directly granted to roles after the lastsnapshot update. Use the name list to exclude the roles for this check.
If the new privilege is authorized, Symantec recommends that you either updatethe snapshot or drop the privilege from the role.
Table 3-102 lists the message that this check reports.
Table 3-102 New privileges message
SeverityTitleMessage name
Yellow-1New role privilegeADDED_ROLE_PRIVILEGE
Deleted privilegesThis check reports privileges that were dropped from the roles after the lastsnapshot update. Use the name list to exclude the roles for this check.
If the deletion is authorized, Symantec recommends that you either update thesnapshot or restore the privilege.
Table 3-103 lists the message that this check reports.
Table 3-103 Deleted privileges message
SeverityTitleMessage name
Yellow-1Deleted role privilegeDELETED_ROLE_PRIVILEGE
Grantable privilegesThis check reports the grantable privileges that have been granted to the roles.Use the name list to exclude the roles for this check.
Symantec recommends that you periodically review all grantable role privilegesto ensure that the grantable privilege is appropriate for the role. Youmust revokegrantable role privileges from the users who are not authorized to grant them.
Table 3-104 lists the message that this check reports.
Table 3-104 Grantable privileges message
SeverityTitleMessage name
Green-0Grantable role privilegeGRANTABLE_ROLE_PRIVILEGE
About the Symantec ESM Modules for Oracle DatabasesAbout Oracle roles
90
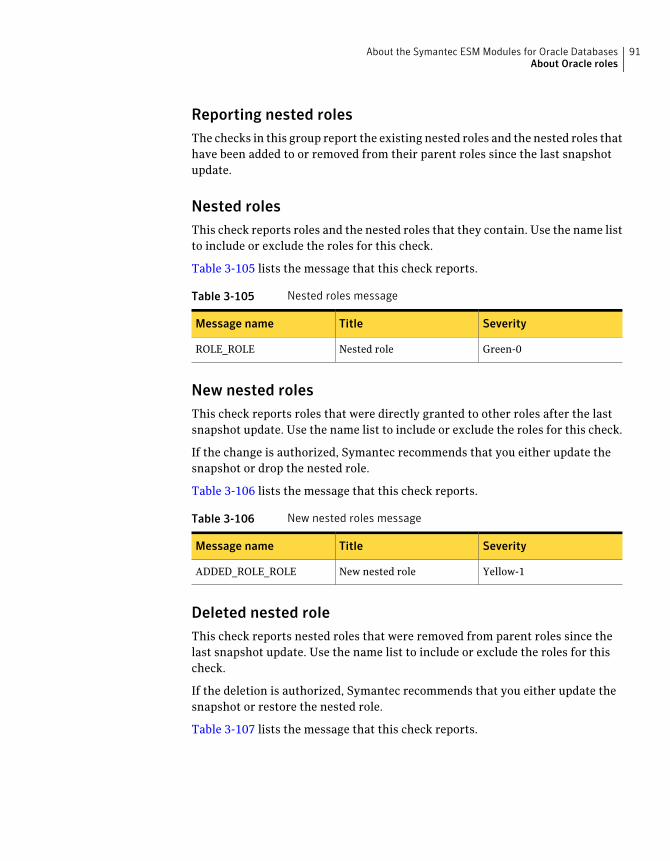
Reporting nested rolesThe checks in this group report the existing nested roles and the nested roles thathave been added to or removed from their parent roles since the last snapshotupdate.
Nested rolesThis check reports roles and the nested roles that they contain. Use the name listto include or exclude the roles for this check.
Table 3-105 lists the message that this check reports.
Table 3-105 Nested roles message
SeverityTitleMessage name
Green-0Nested roleROLE_ROLE
New nested rolesThis check reports roles that were directly granted to other roles after the lastsnapshot update. Use the name list to include or exclude the roles for this check.
If the change is authorized, Symantec recommends that you either update thesnapshot or drop the nested role.
Table 3-106 lists the message that this check reports.
Table 3-106 New nested roles message
SeverityTitleMessage name
Yellow-1New nested roleADDED_ROLE_ROLE
Deleted nested roleThis check reports nested roles that were removed from parent roles since thelast snapshot update. Use the name list to include or exclude the roles for thischeck.
If the deletion is authorized, Symantec recommends that you either update thesnapshot or restore the nested role.
Table 3-107 lists the message that this check reports.
91About the Symantec ESM Modules for Oracle DatabasesAbout Oracle roles
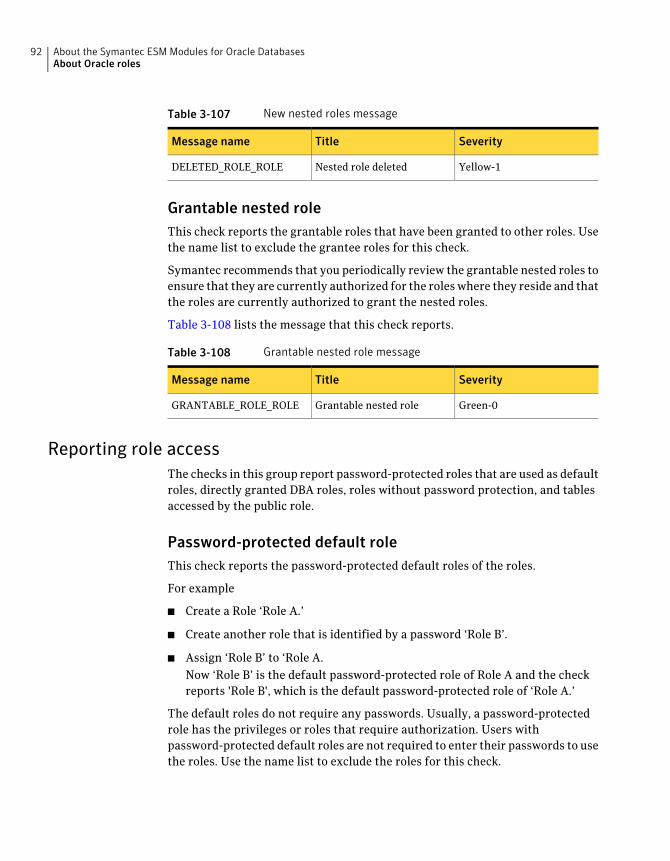
Table 3-107 New nested roles message
SeverityTitleMessage name
Yellow-1Nested role deletedDELETED_ROLE_ROLE
Grantable nested roleThis check reports the grantable roles that have been granted to other roles. Usethe name list to exclude the grantee roles for this check.
Symantec recommends that you periodically review the grantable nested roles toensure that they are currently authorized for the roleswhere they reside and thatthe roles are currently authorized to grant the nested roles.
Table 3-108 lists the message that this check reports.
Table 3-108 Grantable nested role message
SeverityTitleMessage name
Green-0Grantable nested roleGRANTABLE_ROLE_ROLE
Reporting role accessThe checks in this group report password-protected roles that are used as defaultroles, directly granted DBA roles, roles without password protection, and tablesaccessed by the public role.
Password-protected default roleThis check reports the password-protected default roles of the roles.
For example
■ Create a Role ‘Role A.’
■ Create another role that is identified by a password ‘Role B’.
■ Assign ‘Role B’ to ‘Role A.Now ‘Role B’ is the default password-protected role of Role A and the checkreports 'Role B', which is the default password-protected role of ‘Role A.’
The default roles do not require any passwords. Usually, a password-protectedrole has the privileges or roles that require authorization. Users withpassword-protected default roles are not required to enter their passwords to usethe roles. Use the name list to exclude the roles for this check.
About the Symantec ESM Modules for Oracle DatabasesAbout Oracle roles
92
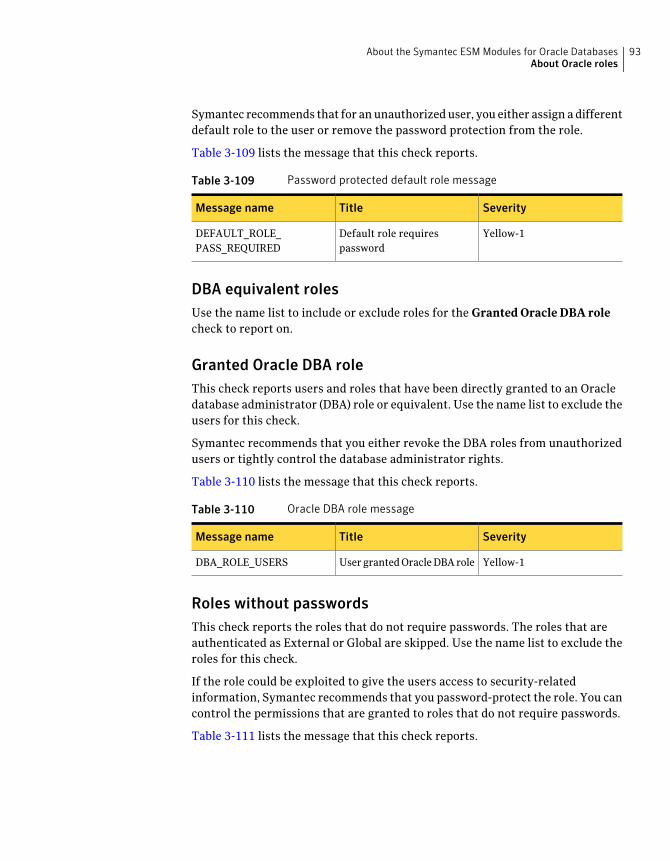
Symantec recommends that for anunauthorizeduser, you either assign adifferentdefault role to the user or remove the password protection from the role.
Table 3-109 lists the message that this check reports.
Table 3-109 Password protected default role message
SeverityTitleMessage name
Yellow-1Default role requirespassword
DEFAULT_ROLE_PASS_REQUIRED
DBA equivalent rolesUse the name list to include or exclude roles for the Granted Oracle DBA rolecheck to report on.
Granted Oracle DBA roleThis check reports users and roles that have been directly granted to an Oracledatabase administrator (DBA) role or equivalent. Use the name list to exclude theusers for this check.
Symantec recommends that you either revoke the DBA roles from unauthorizedusers or tightly control the database administrator rights.
Table 3-110 lists the message that this check reports.
Table 3-110 Oracle DBA role message
SeverityTitleMessage name
Yellow-1UsergrantedOracleDBAroleDBA_ROLE_USERS
Roles without passwordsThis check reports the roles that do not require passwords. The roles that areauthenticated as External or Global are skipped. Use the name list to exclude theroles for this check.
If the role could be exploited to give the users access to security-relatedinformation, Symantec recommends that you password-protect the role. You cancontrol the permissions that are granted to roles that do not require passwords.
Table 3-111 lists the message that this check reports.
93About the Symantec ESM Modules for Oracle DatabasesAbout Oracle roles
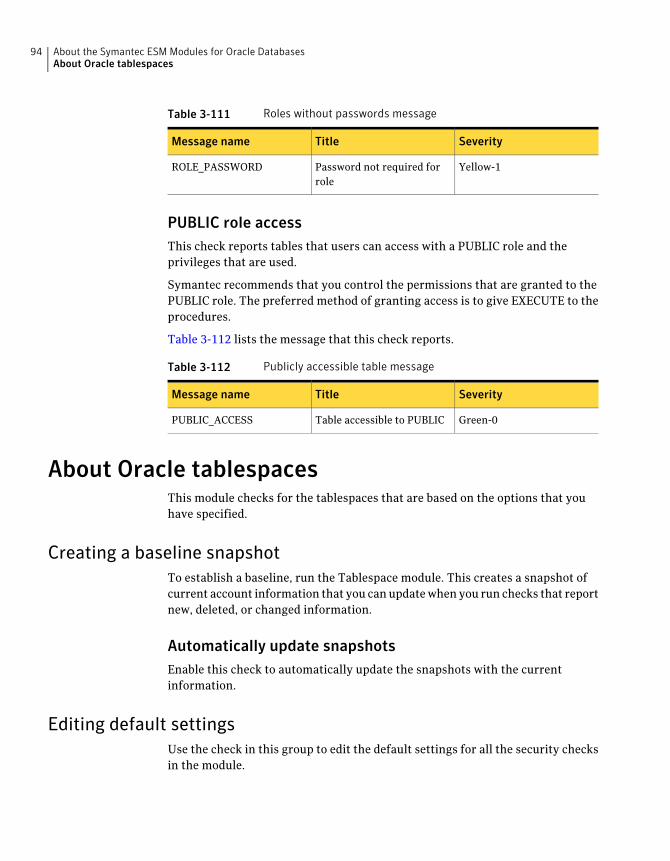
Table 3-111 Roles without passwords message
SeverityTitleMessage name
Yellow-1Password not required forrole
ROLE_PASSWORD
PUBLIC role accessThis check reports tables that users can access with a PUBLIC role and theprivileges that are used.
Symantec recommends that you control the permissions that are granted to thePUBLIC role. The preferred method of granting access is to give EXECUTE to theprocedures.
Table 3-112 lists the message that this check reports.
Table 3-112 Publicly accessible table message
SeverityTitleMessage name
Green-0Table accessible to PUBLICPUBLIC_ACCESS
About Oracle tablespacesThis module checks for the tablespaces that are based on the options that youhave specified.
Creating a baseline snapshotTo establish a baseline, run the Tablespace module. This creates a snapshot ofcurrent account information that you canupdatewhen you run checks that reportnew, deleted, or changed information.
Automatically update snapshotsEnable this check to automatically update the snapshots with the currentinformation.
Editing default settingsUse the check in this group to edit the default settings for all the security checksin the module.
About the Symantec ESM Modules for Oracle DatabasesAbout Oracle tablespaces
94
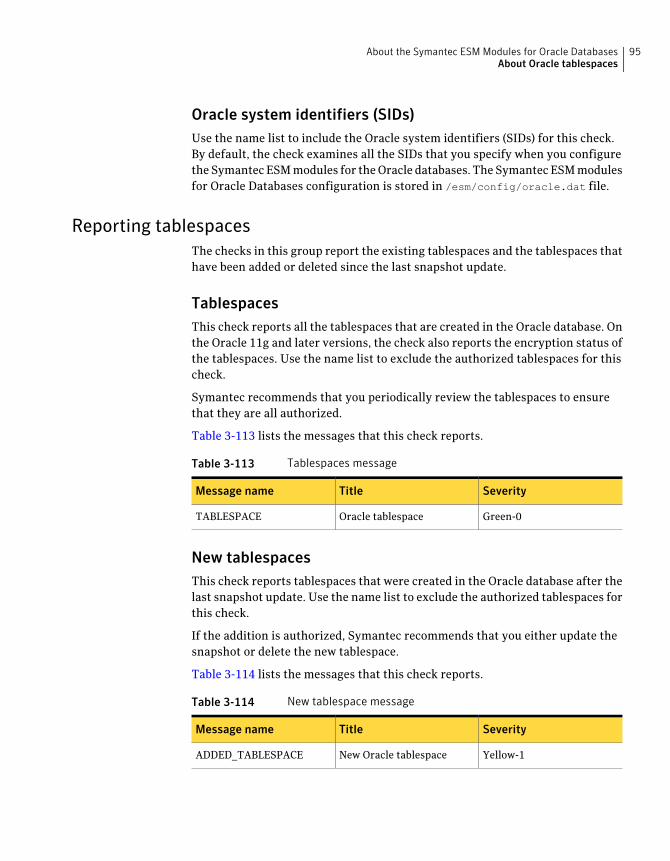
Oracle system identifiers (SIDs)Use the name list to include the Oracle system identifiers (SIDs) for this check.By default, the check examines all the SIDs that you specify when you configurethe Symantec ESMmodules for theOracle databases. The Symantec ESMmodulesfor Oracle Databases configuration is stored in /esm/config/oracle.dat file.
Reporting tablespacesThe checks in this group report the existing tablespaces and the tablespaces thathave been added or deleted since the last snapshot update.
TablespacesThis check reports all the tablespaces that are created in the Oracle database. Onthe Oracle 11g and later versions, the check also reports the encryption status ofthe tablespaces. Use the name list to exclude the authorized tablespaces for thischeck.
Symantec recommends that you periodically review the tablespaces to ensurethat they are all authorized.
Table 3-113 lists the messages that this check reports.
Table 3-113 Tablespaces message
SeverityTitleMessage name
Green-0Oracle tablespaceTABLESPACE
New tablespacesThis check reports tablespaces that were created in the Oracle database after thelast snapshot update. Use the name list to exclude the authorized tablespaces forthis check.
If the addition is authorized, Symantec recommends that you either update thesnapshot or delete the new tablespace.
Table 3-114 lists the messages that this check reports.
Table 3-114 New tablespace message
SeverityTitleMessage name
Yellow-1New Oracle tablespaceADDED_TABLESPACE
95About the Symantec ESM Modules for Oracle DatabasesAbout Oracle tablespaces
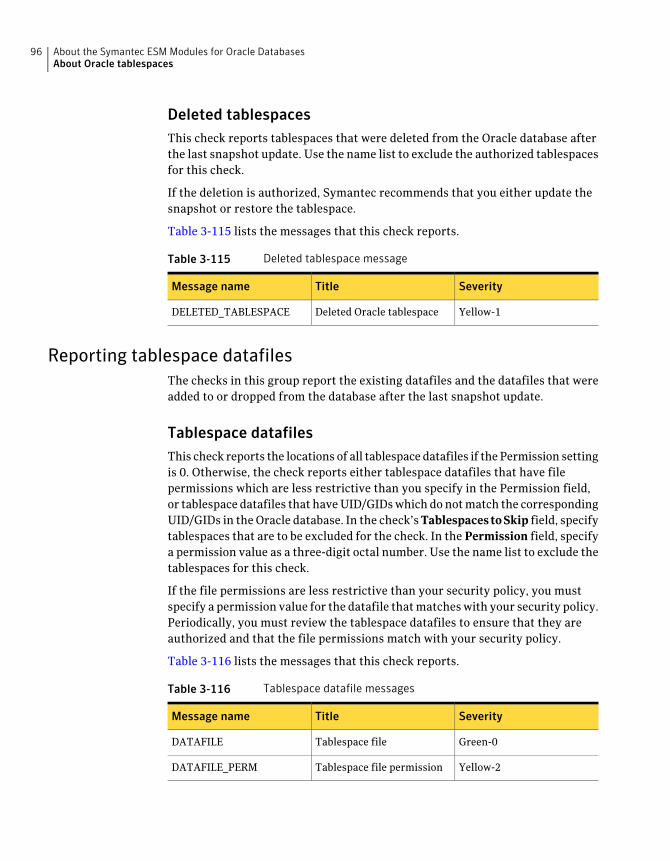
Deleted tablespacesThis check reports tablespaces that were deleted from the Oracle database afterthe last snapshot update. Use the name list to exclude the authorized tablespacesfor this check.
If the deletion is authorized, Symantec recommends that you either update thesnapshot or restore the tablespace.
Table 3-115 lists the messages that this check reports.
Table 3-115 Deleted tablespace message
SeverityTitleMessage name
Yellow-1Deleted Oracle tablespaceDELETED_TABLESPACE
Reporting tablespace datafilesThe checks in this group report the existing datafiles and the datafiles that wereadded to or dropped from the database after the last snapshot update.
Tablespace datafilesThis check reports the locations of all tablespace datafiles if the Permission settingis 0. Otherwise, the check reports either tablespace datafiles that have filepermissions which are less restrictive than you specify in the Permission field,or tablespace datafiles that haveUID/GIDswhich donotmatch the correspondingUID/GIDs in theOracle database. In the check’sTablespacestoSkip field, specifytablespaces that are to be excluded for the check. In the Permission field, specifya permission value as a three-digit octal number. Use the name list to exclude thetablespaces for this check.
If the file permissions are less restrictive than your security policy, you mustspecify a permission value for the datafile thatmatcheswith your security policy.Periodically, you must review the tablespace datafiles to ensure that they areauthorized and that the file permissions match with your security policy.
Table 3-116 lists the messages that this check reports.
Table 3-116 Tablespace datafile messages
SeverityTitleMessage name
Green-0Tablespace fileDATAFILE
Yellow-2Tablespace file permissionDATAFILE_PERM
About the Symantec ESM Modules for Oracle DatabasesAbout Oracle tablespaces
96
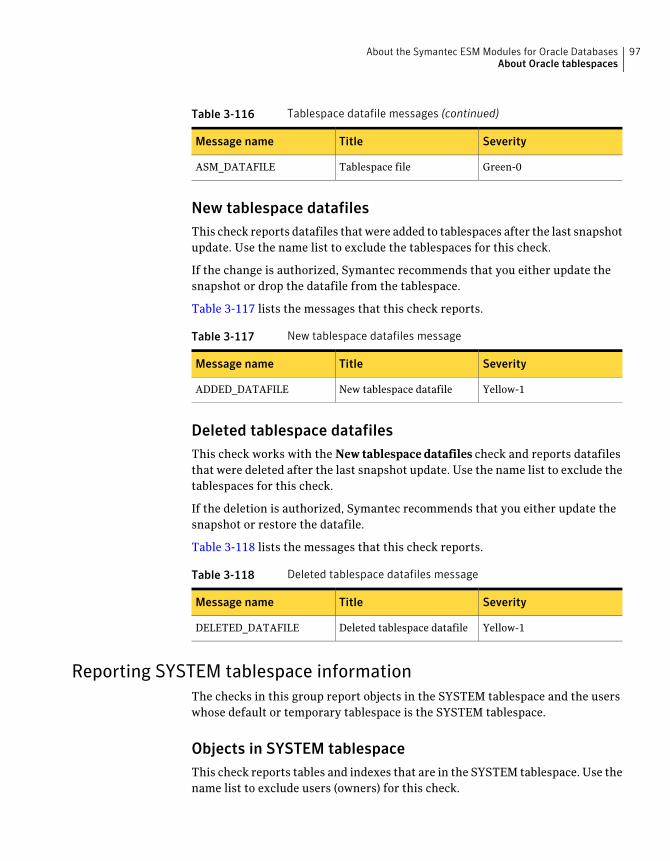
Table 3-116 Tablespace datafile messages (continued)
SeverityTitleMessage name
Green-0Tablespace fileASM_DATAFILE
New tablespace datafilesThis check reports datafiles thatwere added to tablespaces after the last snapshotupdate. Use the name list to exclude the tablespaces for this check.
If the change is authorized, Symantec recommends that you either update thesnapshot or drop the datafile from the tablespace.
Table 3-117 lists the messages that this check reports.
Table 3-117 New tablespace datafiles message
SeverityTitleMessage name
Yellow-1New tablespace datafileADDED_DATAFILE
Deleted tablespace datafilesThis check works with the New tablespace datafiles check and reports datafilesthat were deleted after the last snapshot update. Use the name list to exclude thetablespaces for this check.
If the deletion is authorized, Symantec recommends that you either update thesnapshot or restore the datafile.
Table 3-118 lists the messages that this check reports.
Table 3-118 Deleted tablespace datafiles message
SeverityTitleMessage name
Yellow-1Deleted tablespace datafileDELETED_DATAFILE
Reporting SYSTEM tablespace informationThe checks in this group report objects in the SYSTEM tablespace and the userswhose default or temporary tablespace is the SYSTEM tablespace.
Objects in SYSTEM tablespaceThis check reports tables and indexes that are in the SYSTEM tablespace. Use thename list to exclude users (owners) for this check.
97About the Symantec ESM Modules for Oracle DatabasesAbout Oracle tablespaces
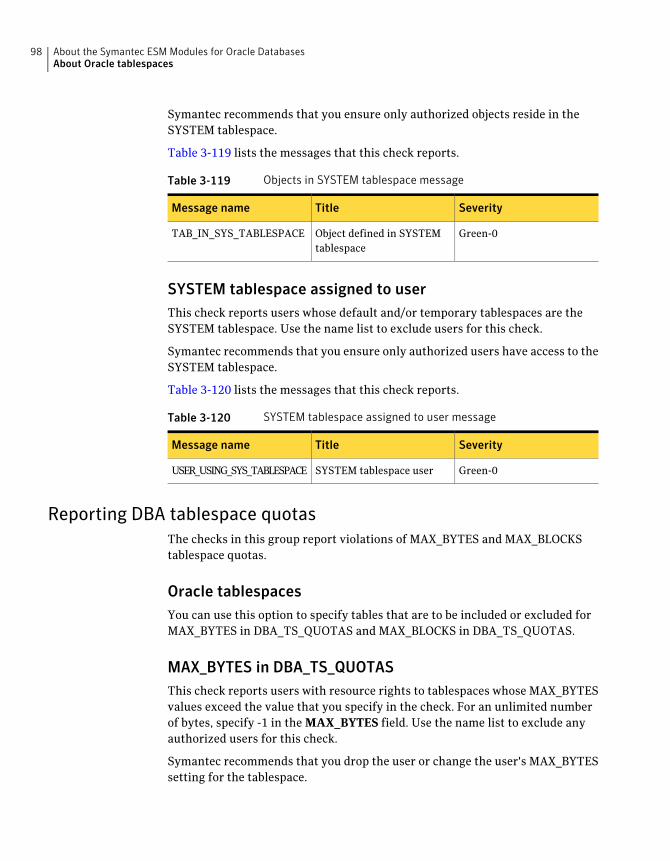
Symantec recommends that you ensure only authorized objects reside in theSYSTEM tablespace.
Table 3-119 lists the messages that this check reports.
Table 3-119 Objects in SYSTEM tablespace message
SeverityTitleMessage name
Green-0Object defined in SYSTEMtablespace
TAB_IN_SYS_TABLESPACE
SYSTEM tablespace assigned to userThis check reports users whose default and/or temporary tablespaces are theSYSTEM tablespace. Use the name list to exclude users for this check.
Symantec recommends that you ensure only authorized users have access to theSYSTEM tablespace.
Table 3-120 lists the messages that this check reports.
Table 3-120 SYSTEM tablespace assigned to user message
SeverityTitleMessage name
Green-0SYSTEM tablespace userUSER_USING_SYS_TABLESPACE
Reporting DBA tablespace quotasThe checks in this group report violations of MAX_BYTES and MAX_BLOCKStablespace quotas.
Oracle tablespacesYou can use this option to specify tables that are to be included or excluded forMAX_BYTES in DBA_TS_QUOTAS and MAX_BLOCKS in DBA_TS_QUOTAS.
MAX_BYTES in DBA_TS_QUOTASThis check reports users with resource rights to tablespaces whose MAX_BYTESvalues exceed the value that you specify in the check. For an unlimited numberof bytes, specify -1 in the MAX_BYTES field. Use the name list to exclude anyauthorized users for this check.
Symantec recommends that you drop the user or change the user's MAX_BYTESsetting for the tablespace.
About the Symantec ESM Modules for Oracle DatabasesAbout Oracle tablespaces
98

Table 3-121 lists the messages that this check reports.
Table 3-121 MAX_BYTES in DBA_TS_QUOTAS message
SeverityTitleMessage name
Yellow-1MAX_BYTES per tablespaceexceeded
MAX_BYTES_QUOTA
MAX_BLOCKS in DBA_TS_QUOTASThis check reports userswith resource rights to tablespaceswhoseMAX_BLOCKSvalues exceed the value that you specify in the check. For an unlimited numberof bytes, specify -1 in the MAX_BLOCKS field. Use the name list to exclude anyauthorized users for this check.
Symantec recommends that you drop the user or change the user'sMAX_BLOCKSsetting for the tablespace.
Table 3-122 lists the messages that this check reports.
Table 3-122 MAX_BLOCKS in DBA_TS_QUOTAS message
SeverityTitleMessage name
Yellow-1MAX_BLOCKSper tablespaceexceeded
MAX_BLOCKS_QUOTA
99About the Symantec ESM Modules for Oracle DatabasesAbout Oracle tablespaces

About the Symantec ESM Modules for Oracle DatabasesAbout Oracle tablespaces
100