operations manual petrel 1 / petrel 2 - aquanaut24€¦ · petrel 1 vs petrel 2 this manual covers...
TRANSCRIPT

Standalone & EXT Models
Operations ManualPetrel 1 / Petrel 2

DocRevD2
Shearwater Petrel SA & EXT
Table of ContentsIntroduction ����������������������������������������������������������������������������������������������������������������5
Models Covered by this Manual ������������������������������������������������������������������������������5Feature List ��������������������������������������������������������������������������������������������������������������6
Turning On �����������������������������������������������������������������������������������������������������������������7Buttons �����������������������������������������������������������������������������������������������������������������������8The Main Screen ��������������������������������������������������������������������������������������������������������9
Color Coding ������������������������������������������������������������������������������������������������������������9The Top Row ����������������������������������������������������������������������������������������������������������10The Center Row �����������������������������������������������������������������������������������������������������12
Center Row Configuration ����������������������������������������������������������������������������������13The Bottom Row ����������������������������������������������������������������������������������������������������14
Info Screens ������������������������������������������������������������������������������������������������������������16Compass (Petrel 2 only) �����������������������������������������������������������������������������������������20Menus �����������������������������������������������������������������������������������������������������������������������22
Open Circuit Menu Structure ���������������������������������������������������������������������������������23Closed Circuit (Int� PPO2) Menu Structure ������������������������������������������������������������24Closed Circuit (Ext� PPO2) Menu Structure �����������������������������������������������������������25
Basic Setup ��������������������������������������������������������������������������������������������������������������26Simple Example Dive ����������������������������������������������������������������������������������������������27Complex Example Dive �������������������������������������������������������������������������������������������28Gauge Mode �������������������������������������������������������������������������������������������������������������31
Stopwatch ��������������������������������������������������������������������������������������������������������������31Resettable Average Depth �������������������������������������������������������������������������������������31
Decompression and Gradient Factors ������������������������������������������������������������������32Menu Reference �������������������������������������������������������������������������������������������������������33
Turn Off ������������������������������������������������������������������������������������������������������������������33Calibration ��������������������������������������������������������������������������������������������������������������33
Single Sensor Mode �������������������������������������������������������������������������������������������34Calibration Problems ������������������������������������������������������������������������������������������34
Switch Setpoint �����������������������������������������������������������������������������������������������������35Select Gas �������������������������������������������������������������������������������������������������������������36
Radio Station Gases ������������������������������������������������������������������������������������������36Select Gas Menu Styles �������������������������������������������������������������������������������������37
Switch to OC/CC ����������������������������������������������������������������������������������������������������38Dive Setup+ �����������������������������������������������������������������������������������������������������������38
Low Setpoint ������������������������������������������������������������������������������������������������������38

Shearwater Petrel SA & EXT
DocRevD3
High Setpoint������������������������������������������������������������������������������������������������������39Define Gas ���������������������������������������������������������������������������������������������������������40Dive Planner+ ����������������������������������������������������������������������������������������������������42Conservatism �����������������������������������������������������������������������������������������������������44NDL Display �������������������������������������������������������������������������������������������������������45External PPO2 Monitoring ���������������������������������������������������������������������������������47Brightness ����������������������������������������������������������������������������������������������������������48
Dive Log Menu �������������������������������������������������������������������������������������������������������49Display Log ��������������������������������������������������������������������������������������������������������49Upload Log ���������������������������������������������������������������������������������������������������������49Edit Log Number ������������������������������������������������������������������������������������������������49
System Setup+ ������������������������������������������������������������������������������������������������������50Dive Setup����������������������������������������������������������������������������������������������������������51Deco Setup ��������������������������������������������������������������������������������������������������������53OC Gases ���������������������������������������������������������������������������������������������������������53CC Gases ����������������������������������������������������������������������������������������������������������53O2 Setup ������������������������������������������������������������������������������������������������������������54Auto SP (Setpoint) Switch ����������������������������������������������������������������������������������54Display Setup �����������������������������������������������������������������������������������������������������55Compass Setup (Petrel 2 only) ��������������������������������������������������������������������������57System Setup �����������������������������������������������������������������������������������������������������59Advanced Configuration 1 ����������������������������������������������������������������������������������60Advanced Configuration 2 ����������������������������������������������������������������������������������61
Firmware Upload and Dive Log Download ������������������������������������������������������������62Changing the Battery ����������������������������������������������������������������������������������������������63
Battery Types ���������������������������������������������������������������������������������������������������������64Tissues Cleared �������������������������������������������������������������������������������������������������������65Error Displays ����������������������������������������������������������������������������������������������������������66Storage and Maintenance ���������������������������������������������������������������������������������������68Servicing ������������������������������������������������������������������������������������������������������������������68Fischer Pin-out ��������������������������������������������������������������������������������������������������������68Specifications ����������������������������������������������������������������������������������������������������������69FCC Warning ������������������������������������������������������������������������������������������������������������70Industry Canada Warning ���������������������������������������������������������������������������������������70
Table of Contents (continued)

DocRevD4
Shearwater Petrel SA & EXT
WARNINGThis computer has bugs� Although we haven’t found them all yet, they are there� It is certain that there are things that this computer does that either we didn’t think about, or planned for it to do something different� Never risk your life on only one source of information� Use a second computer or tables� If you choose to make riskier dives, obtain the proper training and work up to them slowly to gain experience�
This computer will fail� It is not whether it will fail but when it will fail� Do not depend on it� Always have a plan on how to handle failures� Automatic systems are no substitute for knowledge and training�
No technology will keep you alive� Knowledge, skill, and practiced procedures are your best defense (Except for not doing the dive, of course)�
DANGERThis computer is capable of calculating deco stop requirements� These calculations are at best a guess of the real physiological decompression requirements� Dives requiring staged decompression are substantially more risky than dives that stay well within no-stop limits�
Diving with rebreathers and/or diving mixed gases and/or performing staged decompression dives and/or diving in overhead environments
greatly increases the risk of scuba diving�
You really are risking your life with this activity�

Shearwater Petrel SA & EXT
DocRevD5
IntroductionThe Shearwater Petrel is an advanced technical diving computer for open and closed circuit divers�
Although we strive to make the Petrel easy enough to use without reading the manual, please take some time to read this manual to get the best performance from your new computer� Diving involves risk and education is your best tool for managing this risk�
Models Covered by this Manual
This manual provides operating instructions for the Petrel Standalone (SA) and Petrel External (EXT) models� Both the Petrel 1 and Petrel 2 hardware versions are covered by this manual�
Nitrox Recreational (OC Rec) Mode
Operation of the Petrel when set to the "OC Rec" mode is covered by a separate manual, see the Shearwater Petrel Nitrox Recreational Mode Manual� Although the model of Petrel is the same when using this mode, a separate manual was written to keep the instructions simple�
DiveCAN® (Rebreather Controller) Models
For instructions on the Petrel rebreather controller models using DiveCAN® communications, see the Shearwater DiveCAN® Petrel Manual�
Petrel 1 vs� Petrel 2
This manual covers both the Petrel 1 and Petrel 2 models� The difference between the models is that the Petrel 2 has a digital compass and also supports Bluetooth Smart Ready (i�e� dual mode Bluetooth supporting both Bluetooth Classic v2�1 and Bluetooth Smart v4�0)� Bluetooth Smart is used for connecting to iOS devices�
All other features are the same between the Petrel 1 and Petrel 2� Both models use the same firmware file and firmware version number.

DocRevD6
Shearwater Petrel SA & EXT
Feature List
• Depth, time and oxygen sensor display• Bühlmann decompression model with gradient factors conservatism• Optional VPM-B decompression model• Imperial and metric displays• Available in Standalone (SA) model and External (EXT) PPO2 monitoring model• A menu system that adapts to diving status• Automatic turn off after 15 minutes on the surface• Depth sensor rated to 450 feet/140 meters of seawater • Dive Planner• Any combination of oxygen, nitrogen, and helium (Air, Nitrox, Trimix)• Open and closed circuit, switchable during a dive• 5 CC and 5 OC gases• Gases can be changed and added during a dive• CNS tracking• No lockout from violating deco stops• Automatic PPO2 set-point switching (configurable)• Two PPO2 set-points, each of which can be set between �4 and 1�5• Flexible user replaceable battery� Almost any ‘AA’ type• Tilt compensated digital compass (Petrel 2 only)• 1000 hour dive log memory• Log downloads and firmware upgrades using Bluetooth

Shearwater Petrel SA & EXT
DocRevD7
Turning On
To turn the Petrel on, press both the MENU (left) and the SELECT (right) buttons at the same time�

DocRevD8
Shearwater Petrel SA & EXT
ButtonsTwo piezo-electric buttons are used to change settings and view menus�Except for turning the Petrel on, all operations are simple single button presses�
Don’t worry about remembering all the button rules below� Button hints make using the Petrel easy�
MENU button (Left)• From main screen: brings up the menu� • In a menu: moves to the next menu item� • Editing a setting: changes the setting’s value�
SELECT button (Right)• From main screen: steps through information screens�• In a menu: performs command or starts editing�• Editing a setting: saves the setting’s value�
BOTH BUTTONS• When Petrel is off: pressing MENU and SELECT at the same time will turn
the Petrel on�• No other operation requires pressing both buttons at the same time�
When in a menu, button hints label each button�
For example, the hints to the right tell us: use MENU to change the brightness value� use SELECT to save the current value�
Button Hints
SELECT (right)button
MENU (left)button
MENU hint SELECT hint
Shearwater Petrel SA & EXT
DocRevD9
The Main Screen
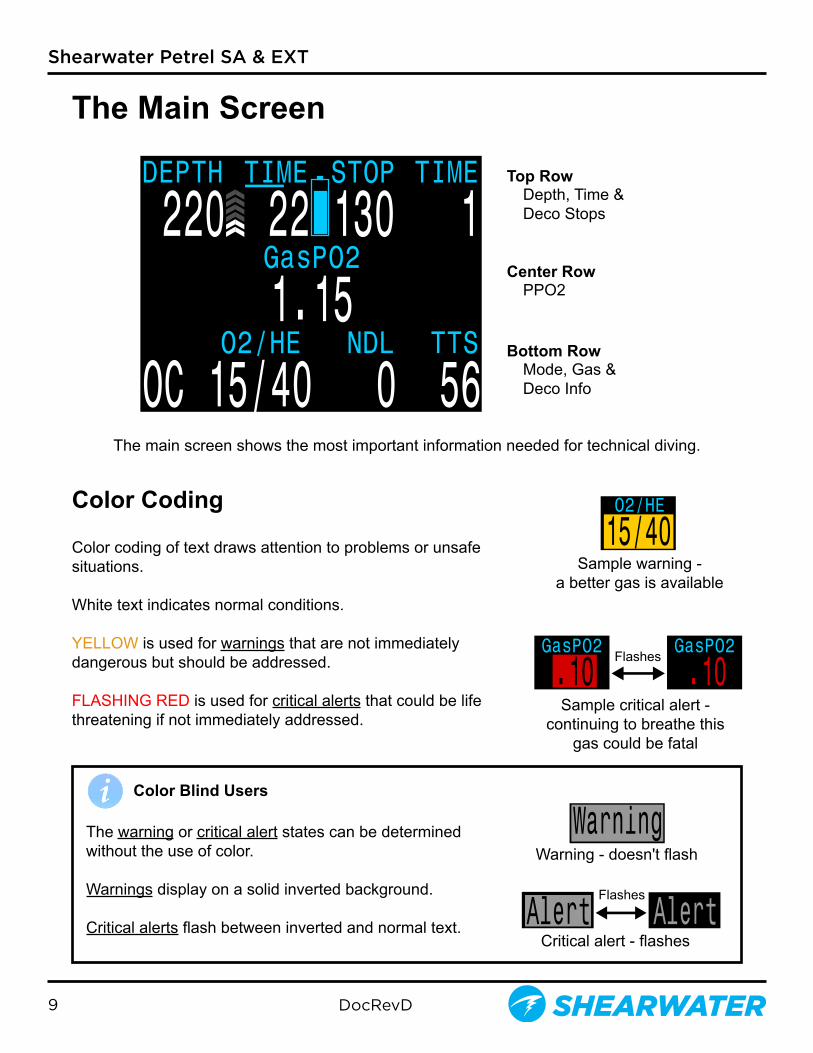
The main screen shows the most important information needed for technical diving�
Color Coding
Color coding of text draws attention to problems or unsafe situations�
White text indicates normal conditions�
YELLOW is used for warnings that are not immediately dangerous but should be addressed�
FLASHING RED is used for critical alerts that could be life threatening if not immediately addressed�
The warning or critical alert states can be determined without the use of color�
Warnings display on a solid inverted background�
Critical alerts flash between inverted and normal text.
Color Blind Users
Top RowDepth, Time & Deco Stops
Center RowPPO2
Bottom RowMode, Gas &Deco Info
Warning - doesn't flash
Critical alert - flashes
Flashes
Sample warning -a better gas is available
Sample critical alert -continuing to breathe this
gas could be fatal
Flashes

DocRevD10
Shearwater Petrel SA & EXT
The Top Row
The top row shows depth and time information
Depth Imperial: In feet (no decimal places)�
Metric: In meters (displays with 1 decimal place up to 99�9m) Note: If the depth shows a Flashing Red zero, then the depth sensor needs service�
Ascent Bar Graph Shows how fast you are currently ascending� Imperial: 1 arrow per 10 feet per minute (fpm) of ascent rate�
Metric: 1 arrow per 3 meters per minute (mpm) of ascent rate�
White when 1 to 3 arrows, Yellow when 4 to 5 arrows, and Flashes Red when 6 arrows or more�
Note: Deco calculations assume 33fpm (10mpm) ascent rate�
Dive TimeThe length of the current dive in minutes�
The seconds display as a bar drawn below the word “Time�” It takes 15 seconds to underline each character in the word� Does not display the seconds bar when not diving�
Battery Icon Yellow when the battery needs to be changed� Red when the battery must be replaced immediately� The default behavior is that battery icon is shown on the surface but disappears when diving� If low or critical then the battery icon will appear while diving�
229
25TIME
69.7
DEPTH
in feet
in meters
30 fpm9 mpm
50 fpm15 mpm
60+ fpm15+ mpm
DEPTH
25TIME
in minutes
seconds barat about 45s
OK
low battery
change now!

Shearwater Petrel SA & EXT
DocRevD11
Stop Depth and Time Stop – The next stop depth in the current units (feet or meters)� This is the shallowest depth to which you can ascend� Time – The time in minutes to hold the stop�
Will Flash Red if you ascend shallower than the current stop�
By default the Petrel uses a 10ft (3m) last stop depth� At this setting, you may perform the last stop at 20ft (6m) with no penalty� The only difference is that the predicted time-to-surface will be shorter than the actual TTS since off-gasing is occurring slower than expected�
There is also an option to set the last stop to 20ft (6m) if you wish�
Surface Interval When on the surface, the STOP DEPTH and TIME are replaced by a surface interval display�
Shows the hours and minutes since the end of your last dive� Above 4 days, the surface interval is displayed in days�
The surface interval is reset when the decompression tissues are cleared� See the section on Tissues Cleared�
9O 2STOP TIME
84 62 9O 2 DEPTH TIME STOP TIME
2hr 45mnSURFACE
Stop at 90ft for 2 min
Alert - depth is shallower than the
90ft stop depth
Sample surface main screen showing the surface interval

DocRevD12
Shearwater Petrel SA & EXT
The Center RowThe center row displays PPO2� PPO2 units are absolute atmospheres (1ata = 1013mbar)�
The layout varies depending on the current mode:
Mode Menu Setup Center Row Display
Open Circuit
Closed Circuitwith
Internal PPO2 Setpoints
Closed Circuitwith
External PPO2 Monitoring
(Only availableon EXT model)
In CC mode, PPO2 displays in Flashing Red when less than 0�40 or greater than 1�6�
In OC mode, PPO2 displays in Flashing Red when less than 0�19 or greater than 1�65�
The above limits can be adjusted in the Adv. Config 2 menu.
1.15GasPO2
1.3
1.29 1.31 1.28
OC Gas
CC Internal Setpoint
CC External Measured

Shearwater Petrel SA & EXT
DocRevD13
Center Row Configuration
In most modes, the center row displays can be customized�
Configure the center row in the System SetupCenter Row Menu�
The left and right positions can be set to display the following:
Option DescriptionNone Blank (default value)�Max Depth The maximum depth of the current or previous dive�Avg Depth The average depth of the current or previous dive�@+5 The TTS if remaining at current depth for 5 more minutes�Ceil The current decompression ceiling (not rounded to the stop
interval)�GF99 The Bühlmann ZHL-16C super-saturation percent gradient�CNS Central Nervous System (CNS) toxicity clock as a percentage� Clock The time-of-day in 24hr or am/pm format (same as system
setting)� Does not show ”am” or “pm”�DET Dive End Time� The time-of-day when the dive will end (i�e� Clock
plus TTS)� In 24hr or am/pm format (same as system setting)� Does not show “am” or “pm”�
Dil PPO2 The diluent PPO2 at the current depth (Only available when CC is available)�
FiO2 The fraction of inspired O2 as a percentage (Only available when CC or SC is available)�
The center position can only display PPO2� In OC only mode, the PPO2 display can optionally be turned off�
Unfortunately, customization is not possible when using External PPO2 monitoring of three O2 sensors, as all the space is already used�

DocRevD14
Shearwater Petrel SA & EXT
The Bottom Row
The bottom row displays the current mode, gas and decompression information�
Circuit Mode The current breathing configuration. One of: OC = Open circuit (when CC available, displays in Yellow to indicate bailout condition) CC = Closed circuit SC = Semi-closed circuit (only available on EXT model)
Current Gas (O2/He)The current gas shown as a percentage of Oxygen and Helium� The remainder of the gas is assumed to be Nitrogen�
In closed circuit mode, this gas is the diluent� In open circuit mode this is the breathing gas�
Displays in Yellow when there is better deco gas available than the current gas�
No Decompression Limit (NDL)The time remaining, in minutes, at the current depth until decompression stops will be necessary� Displays in Yellow when the NDL is less than 5 minutes�
Once NDL reaches 0 (i�e� deco stops needed), the NDL display is just wasting space� To address this, a few different values can be set to replace the NDL (see Dive SetupNDL Display)�The options are:
CEIL: The current ceiling in the current units (feet or meters)� Flashes Red if you ascend shallower than the current ceiling�
CC
CCSC
OC or OC
21/OOO2/HE
10/5OO2/HE
21/OOO2/HE
2O
5
NDL
NDL
74CEIL
21% O279% N2Air {
Tx { 10% O250% He40% N2
a better decogas available

Shearwater Petrel SA & EXT
DocRevD15
The bottom row is also used to show additional information�
By using only the bottom row for this additional information, the critical information contained on the Top and Center Rows is always available during a dive�
The additional information that can be displayed on the bottom row includes:
Info Shows additional dive information�Screens: Press SELECT (right button) to step through info screens�
Menus: Allows changing settings� Press MENU (left button) to enter menus�
Warnings: Provide important alerts� Press SELECT (right button) to clear a warning�
GF99: The raw percentage of the Bühlmann allowable supersaturation at the current depth�
@+5: The predicted time-to-surface (TTS) if you were to stay at the current depth for 5 more minutes�
Time-to-Surface (TTS)The time-to-surface in minutes� This is the current time to ascend to the surface including the ascent plus all required deco stops�
Assumes:• Ascent rate of 33 feet per minute (10 meters per minute)�• Decompression stops will be followed� • Programmed gases will be used as appropriate�
2O@+5
8O%GF99
35 TTS
The bottom row is used to display additional information
DocRevD16
Shearwater Petrel SA & EXT
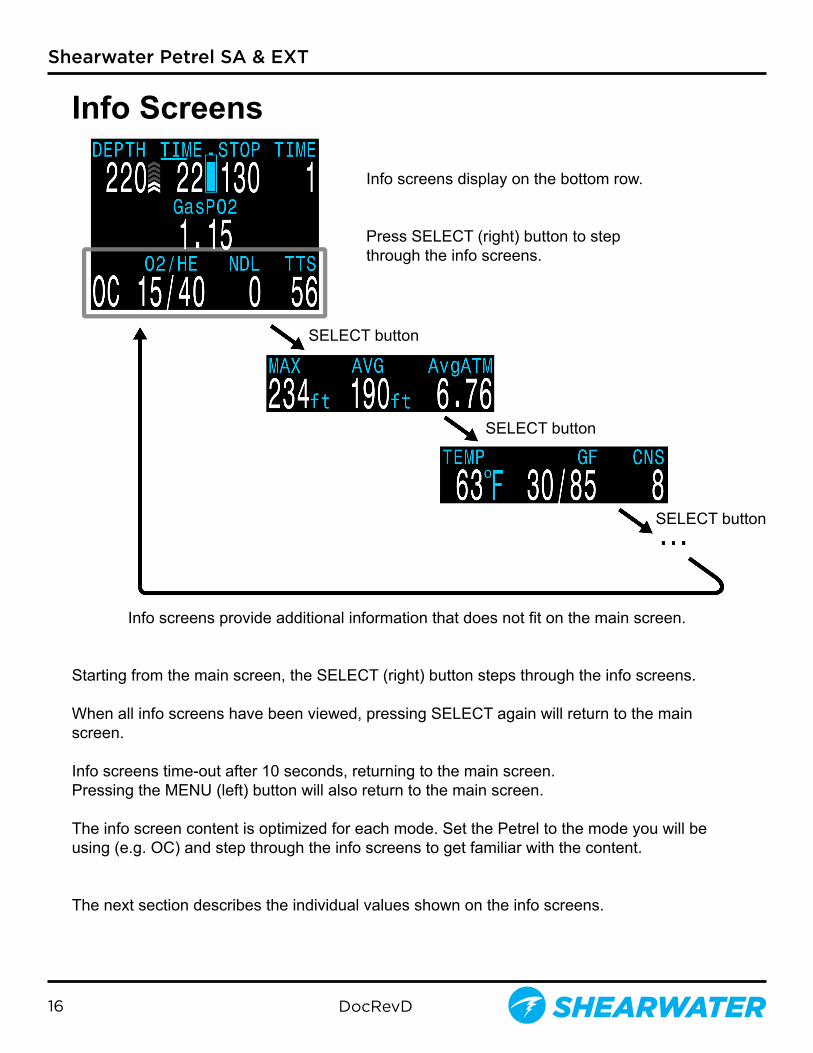
Info Screens
Info screens provide additional information that does not fit on the main screen.
Starting from the main screen, the SELECT (right) button steps through the info screens�
When all info screens have been viewed, pressing SELECT again will return to the main screen�
Info screens time-out after 10 seconds, returning to the main screen� Pressing the MENU (left) button will also return to the main screen�
The info screen content is optimized for each mode� Set the Petrel to the mode you will be using (e�g� OC) and step through the info screens to get familiar with the content�
The next section describes the individual values shown on the info screens�
SELECT button
SELECT button
SELECT button
Info screens display on the bottom row�
Press SELECT (right) button to stepthrough the info screens�

Shearwater Petrel SA & EXT
DocRevD17
Average DepthDisplays the average depth of the current dive, updated once per second�When not diving, shows the average depth of the last dive�
Average Depth in Atmospheres (AvgATM)The average depth of the current dive, measured in absolute atmospheres (i�e� a value of 1�0 at sea level)� When not diving, shows the average depth of the last dive�
Maximum DepthThe maximum depth of the current dive�When not diving, displays the maximum depth of the last dive�
CNS Toxicity PercentageCentral Nervous System oxygen toxicity loading percentage�Flashes Red when 100 or greater�
The CNS percentage is calculated continuously, even when on the surface and turned off� When deco tissues are reset, the CNS will also be reset�
PPO2 (average PPO2)Only relevant when external PPO2 monitoring is used, since other modes already show PPO2 on the center row� The purpose of this value is to show what PPO2 is actually being used for decompression calculations�
When three external sensors are used, the Petrel votes on the three measured values to decide what is the most likely true PPO2� This value shows the result of the voting�
Also, when using external sensors and you have bailed out to OC, the center row continues to display the external measured PPO2� Use this info display to see the OC PPO2�
In CC mode, displays in Flashing Red when less than 0�40 or greater than 1�6�
In OC mode, displays in Flashing Red when less than 0�19 or greater than 1�65�
5Oft
2.52
AVG
AvgATM
26Oft
11
1OO
MAX
CNS
CNS
.98
.16
.36
PPO2
PPO2
PPO2

DocRevD18
Shearwater Petrel SA & EXT
Diluent PPO2Only displayed in CC mode� Displays in Flashing Red when the partial pressure of the diluent is less than 0�19 or greater than 1�65�
When performing a manual diluent flush, you can check this value to see what the expected PPO2 will be at the current depth�
Fraction Inspired O2 (FiO2)The fraction of the breathing gas composed of O2� This value is independent of pressure�
Tissues Bar GraphThe tissues bar graph shows the tissue compartment inert gas tissue tensions based on the Bühlmann ZHL-16C model� Note that VPM-B also tracks tensions in the same way�
The fastest tissue compartment is shown on the top, and the slowest on the bottom� Each bar is the combined sum of the nitrogen and helium inert gas tensions� Pressure increases to the right�
The vertical black line shows the inert gas inspired pressure� The boundary between the green and yellow zones is the ambient pressure� The boundary between the yellow and red zone in the ZHL-16C M-Value pressure�
Note that the scale for each tissue compartment above the green zone is different� The reason the bars are scaled in this way is so that the tissues tensions can be visualized in terms of risk (i�e� how close they are as a percentage to Bühlmann's original super-saturation limits)� Also, this scale changes with depth, since the M-Value line also changes with depth�
.99DilPPO2
FiO2
.42
Ambient pressureIncreasing pressure
M-Value pressureInspired inertgas pressure
16 tissuecompartments
On surface (sat� with air)
After descent
On-gassing
Last deco stop
Some Sample TissuesGraphs
Deep stop

Shearwater Petrel SA & EXT
DocRevD19
3O/85GF
SURF1O13 NOW1O11
28-Jun-12 16:31
42.O 46.O 43.O
1234ABCD 2OOOO12
73°F
3.99V
PRESSURE mBar
DATE TIME
MilliVolts
SERIAL NO VERSION
TEMP
BATTERY
Gradient Factor:The deco conservatism value when the deco model is set to GF� The low and high gradient factors control the conservatism of the Bühlmann GF algorithm� See “Clearing up the Confusion About Deep Stops” by Erik Baker�
VPM-B (and VPM-BG):The deco conservatism value when the deco model is set to VPM-B�If the deco model is VPM-B/GFS, also displays the gradient factor for surfacing�
Pressure:The pressure in millibars� Two values are shown, the surface (surf) pressure and the current (now) pressure� The current pressure is only shown on the surface�The surface pressure is set when the Petrel is turned on� If the Altitude setting is set to SeaLvl, then surface pressure is always 1013 millibars�
Temperature:The current temperature in degrees Fahrenheit (when depth in feet) or degrees Celsius (when depth in meters)�
Battery:The Petrel’s internal battery voltage� Displays in Yellow when the battery is low and needs replacement� Displays in Flashing Red when the battery is critically low and must be replaced as soon as possible� Also shows battery type�
Millivolts:The raw millivolt readings from the PPO2 sensors� Only available when external PPO2 monitoring is used�
Date and Time: In the format dd-mon-yy 12 or 24 hour clock time�
Serial Number & Version:Each Petrel has a unique serial number� The version number indicates the available features� The last two numbers are the firmware version (V12 in this image).
28-Jun-12 4:31pmDATE TIME
3.7VLiIon
+3VPM-B
+3/90VPM-BG

DocRevD20
Shearwater Petrel SA & EXT
Compass (Petrel 2 only) The Petrel 2 model contains a tilt-compensated digital compass�
Compass features:• 1° resolution• ±5° accuracy• Smooth, high-speed refresh rate• User set heading marker with reciprocal• True North (declination) adjustment • Tilt compensation ±45°
Viewing the CompassWhen enabled, the compass is viewed by pressing the SELECT (right) button once� Press SELECT again to continue on to view the regular info screens�Unlike the regular info screens, the compass never times out back to the main screen� Press MENU (left) button to return to the main screen�
It is important to understand some compass limitations before use�
Calibration - The digital compass needs occasional calibration� This can be done in the System SetupCompass menu and takes only one minute�
Battery Changes - When the battery is changed, the compass should be calibrated� This is because each battery has its own magnetic signature that interacts with the compass� Fortunately this effect can be removed with proper calibration�
Interference - Since a compass operates by reading the Earth's magnetic field, the compass heading is affected by anything that distorts that field or creates its own�
• Ferromagnetic materials (such as iron, steel, or nickel) should be kept away from the Petrel 2 when using the compass�
• A traditional compass should also not be placed too close, as it contains a permanent magnet�
• Electric motors and high current cabling (such as from dive lights) can also cause interference and should be kept at a distance�
• Being inside or near a shipwreck may also affect the compass heading�
Compass Limitations

Shearwater Petrel SA & EXT
DocRevD21
Only one heading can be marked at a time, it can however be changed� Once a heading has been marked, there is no way to clear the heading arrows from the display�
Mark the heading to remember the current
direction
This feature makes it easy to determine if you are off
course
When the marked heading is off screen, an arrow points the shortest way
back
When facing the opposite direction, the reciprocal
heading is shown as a pair of red triangles
Marking a HeadingTo mark a heading, press MENU (left) button until "Mark Compass" is displayed, then press SELECT (right) button to mark the current direction� The display will then jump back to the compass display� The heading is shown as a pair of green triangles�

DocRevD22
Shearwater Petrel SA & EXT
Menus
Menus perform actions and allow settings to be changed
Starting from the main screen, pressing the MENU (left) button steps through the menus� When all menus have been viewed, pressing MENU again will return to the main screen�
Pressing the SELECT (right) button when a menu is displayed, either performs that action or enters a sub-menu�
If no buttons are pushed for 1 minute, the menu system will time-out, returning to the main screen� Anything that had been previously saved will be retained� Anything that was in the middle of editing will be discarded�
MENU button
Press MENU (left) button to stepthrough the menus�
Press SELECT (right) button to executecommand or enter sub-menu�
Menus display on the bottom row�
MENU button
MENU button
SELECTbutton
Petrel Turns Off
SELECTbutton Enter
Select Gassub-menu
Only menus necessary for the current mode are shown� This keeps operation simple, prevents mistakes, and reduces buttons presses�
Adaptive Menus

Shearwater Petrel SA & EXT
DocRevD23
The following sections show the menu structure in various operating modes�
Open Circuit Menu Structure
Main Screen
Turn Off
Select Gas
Dive Setup+
Dive Log+
System Setup+
Surfaceonly
Surfaceonly
Surfaceonly
Define Gas
Dive Planner+
Conserv.
NDL Display
Brightness
Display Log
Upload Log
Edit Log Number
Dive Setup
Deco Setup
Center Row
OC Gases
Display Setup
System Setup
Advanced Config
Sub-Menus

DocRevD24
Shearwater Petrel SA & EXT
Closed Circuit (Int� PPO2) Menu Structure
Main Screen
Turn Off
Select Gas
Dive Setup+
Dive Log+
System Setup+
Surfaceonly
Surfaceonly
Surfaceonly
Define Gas
Dive Planner+
Conserv.
NDL Display
BrightnessDisplay Log
Upload Log
Edit Log Number
Dive Setup
Deco Setup
Center Row
CC Gases
Display Setup
System Setup
Advanced Config
Switch .7 > 1.3
Switch CC > OC
Edit Low SP
Edit High SP
PPO2 Mode
OC Gases
Auto SP Switch
Sub-Menus

Shearwater Petrel SA & EXT
DocRevD25
Closed Circuit (Ext� PPO2) Menu Structure
Main Screen
Turn Off
Select Gas
Dive Setup+
Dive Log+
System Setup+
Surfaceonly
Surfaceonly
Surfaceonly
Define Gas
Dive Planner+
Conserv.
NDL Display
Brightness
Display Log
Upload Log
Edit Log Number
Dive Setup
Deco Setup
Center Row
CC Gases
Display Setup
System Setup
Advanced Config
Calibrate
Switch CC > OC
PPO2 Mode
OC Gases
O2 Setup
Surfaceonly
Sub-Menus

DocRevD26
Shearwater Petrel SA & EXT
Basic SetupBefore using the computer there are several things that need to be configured. This is not an exhaustive list of the pre-requisites for diving the system, but a suggestion of key tasks�
• On a system with external oxygen sensors, calibrate the oxygen sensors� • In the System Setup menu set the units to metric or imperial, also set the date and time�• Depending on the model of computer, enter the gases that you will use for the closed
circuit portion of your dive, and/or enter the gases for you will use for open circuit�• The system will use the gases that are available in the order of oxygen content during the
Time To Surface (TTS) prediction� The system will use the next available gas that has a PPO2 of less than 1�0 for closed circuit diving�
• If the computer is in open circuit or is switched to open circuit during a dive, the system will calculate the TTS based on the configured open circuit gases that are available. It will use the next available gas that has a PPO2 of less than 1�6 for open circuit diving�
NOTE: These gases are used automatically only for TTS predictions� The gas used to calculate the current tissue load and the current ceiling is always the gas actually selected by the diver�
Shearwater Petrel SA & EXT
DocRevD27
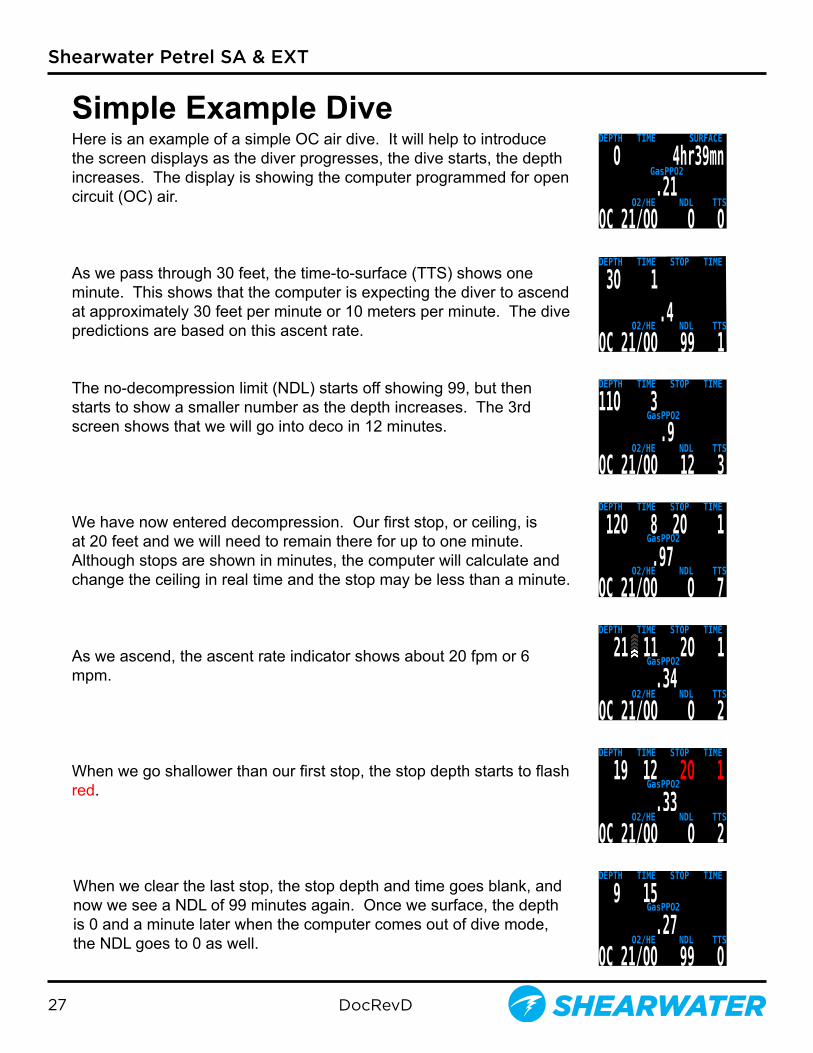
Simple Example DiveHere is an example of a simple OC air dive� It will help to introduce the screen displays as the diver progresses, the dive starts, the depth increases� The display is showing the computer programmed for open circuit (OC) air�
As we pass through 30 feet, the time-to-surface (TTS) shows one minute� This shows that the computer is expecting the diver to ascend at approximately 30 feet per minute or 10 meters per minute� The dive predictions are based on this ascent rate�
The no-decompression limit (NDL) starts off showing 99, but then starts to show a smaller number as the depth increases� The 3rd screen shows that we will go into deco in 12 minutes�
We have now entered decompression. Our first stop, or ceiling, is at 20 feet and we will need to remain there for up to one minute� Although stops are shown in minutes, the computer will calculate and change the ceiling in real time and the stop may be less than a minute�
As we ascend, the ascent rate indicator shows about 20 fpm or 6 mpm�
When we go shallower than our first stop, the stop depth starts to flash red�
When we clear the last stop, the stop depth and time goes blank, and now we see a NDL of 99 minutes again� Once we surface, the depth is 0 and a minute later when the computer comes out of dive mode, the NDL goes to 0 as well�
DEPTH TIME STOP TIME
3O 1GasPPO2
OC 21/OO 99 1 O2/HE NDL TTS
DEPTH TIME STOP TIME
GasPPO211O 3
OC 21/OO 12 3 O2/HE NDL TTS
DEPTH TIME STOP TIME
GasPPO2 12O 8 2O 1
OC 21/OO O 7 O2/HE NDL TTS
DEPTH TIME SURFACE
GasPPO2 O 4hr39mn
OC 21/OO O O .21
O2/HE NDL TTS
DEPTH TIME STOP TIME
12O 8 2O 1
OC 21/OO O 4 O2/HE NDL TTS
DEPTH TIME STOP TIME
GasPPO2 21 11 2O 1
OC 21/OO O 2 O2/HE NDL TTS
DEPTH TIME STOP TIME
12O 8 2O 1
OC 21/OO O 4 O2/HE NDL TTS
DEPTH TIME STOP TIME
GasPPO2 19 12 2O 1
OC 21/OO O 2 .33
O2/HE NDL TTS
DEPTH TIME STOP TIME
GasPPO2 9 15
OC 21/OO 99 O .27
O2/HE NDL TTS
.4
.9
.97
.34

DocRevD28
Shearwater Petrel SA & EXT
Complex Example DiveThis is an example of the displays that might be seen on a dive� This example shows a complicated dive with multiple Closed Circuit (CC) gases and multiple Open Circuit (OC) bail-out gases� A normal, single gas CC or OC dive wouldn’t have any button pushes at all, so there isn’t much to show�The first step is to calibrate. Since we are on the surface and not diving, MENU will bring up “Turn Off”, then “Calibrate.” Once the loop is flushed with oxygen, SELECT will bring up the confirmation display, and another SELECT will calibrate.
Next, we check the closed circuit diluent gases that we have programmed� Entering the gas selection function by pressing SELECT with the “Select Gas” menu item showing will display the first CC gas that is available. MENU will increment to the next gas available. Another MENU takes us back to the “Select Gas” menu item. Those are the only two gases configured. We SELECT gas number 2, the Trimix 10/50�
The system will use both of these gases for our dive when calculating the TTS� It assumes a diluent switch at a PPO2 of 1�05� That means that it will assume that you have switched to an air diluent at 124 feet� This is only for the TTS prediction� The computer will always use the currently selected gas for tissue loading calculations�
Then we switch to open circuit to look at our bail-out gases� Flipping through the gases with MENU shows that we have three gases available� (Whether they are appropriate gases is a subject for one of the web forums�)
DEPTH TIME SURFACE
O
Calibrate .85 .86 .84
DEPTH TIME SURFACE
O
CC 21/OO O O .98 .98 .98 O2/HE NDL TTS
DEPTH TIME STOP TIME
O
Select Gas .98 .98 .98
Cal. milliVolts
Cancel Calibrate
45.1 46.3 44.O
Cal. @ FO2= .98 .85 .86 .84
DEPTH TIME STOP TIME
DEPTH TIME STOP TIMEDEPTH TIME STOP TIME
DEPTH TIME STOP TIME
DEPTH TIME STOP TIME
Next Gas
Next GasNext Gas
Cancel
Cancel
Select
SelectSelect
Select
Select
O
O O
O
O
Set A1 CC 21/OO
Set 2 OC 5O/2OSet A1 OC 99/OO
Set 2 CC 1O/5O
Set 3 OC 14/55
.98 .98 .98
.98 .98 .98 .98 .98 .98
.98 .98 .98
.98 .98 .98

Shearwater Petrel SA & EXT
DocRevD29
These are the gases that will be used to estimate TTS in the event that you switch to open circuit during a dive� In OC mode, the computer will assume that you will switch gases when the PPO2 of the next available gas is less than 1�6�
Automatic decisions of when to switch gases for the TTS calculation means that it is very easy to set up your CC and OC gases� There is no need to enter a depth or a PPO2 to switch gas� Any gases that are turned on will be used in the decompression calculation�
If a gas is available in the CC gas list, (entered and turned on),it will be used in CC, and it will be used at an appropriate depth. The same is true for OC. It is always configured correctly if you are actually carrying the gases you have entered and turned on�
If it is necessary to switch to OC while diving, 4 button pushes will do it� You will be switched to OC and will be using the gas that has the highest PPO2 less than 1�61� Your OC gas list is likely very different from your diluent gas list, but you set it up before the dive so it is immediately available in the case of a bail-out�Now switch back to closed circuit and start the dive�
We have reached a depth now that will incur decompression soon� The NDL is 8 minutes, and the TTS is 4 minutes� The TTS is showing the planned ascent time at 30 fpm�
The computer has automatically switched to the high setpoint� This can be disabled if automatic setpoint switching isn’t required�
We are now at our maximum depth. Our first stop is at 90 feet.
The diver is ascending to the 90 foot stop� Note the ascent rate indicator showing a 20 fpm / 6 mpm ascent rate� The Petrel assumes a 30 fpm ascent rate in calculating the decompression schedule� Since the diver ascended slower than was predicted, there is now a 100 foot stop�
DEPTH TIME STOP TIME
O
Switch OC > CC .98 .98 .98
DEPTH TIME STOP TIME
O
CC 1O/5O O O .98 .98 .98 O2/HE NDL TTS
DEPTH TIME STOP TIME
126 2
CC 1O/5O 8 4 1.3O 1.29 1.29 O2/HE NDL TTS
DEPTH TIME STOP TIME
257 8 9O 1
CC 1O/5O O 23 1.31 1.29 1.22 O2/HE NDL TTS
DEPTH TIME STOP TIME
98 15 1OO 1
CC 1O/5O O 22 1.3O 1.29 1.29 O2/HE NDL TTS

DocRevD30
Shearwater Petrel SA & EXT
But the diver missed the stop, and has ascended to 95 feet� At this point, the stop depth and time is flashing red to show that the depth is above the recommended stop�
The diver switches to the other programmed CC gas� Note that if you change the diluent on the computer you must flush the loop to change the diluent in the loop� At the same time the 100 foot stop clears. It is common for the first stops to clear in less than a minute� They mainly just slow down the ascent�
At 60 feet a problem develops that causes the diver to bail out to open circuit. The first push on MENU brings up Select Gas.
The second push brings up Switch CC > OC� A push on SELECT does the switch�
Note that OC displays in Yellow to clearly indicate that this is a OC bailout condition�
The system has switched the gas set from the closed circuit gas set to the open circuit gas set, picked the gas with the highest PPO2 less than 1�6, and recalculated the decompression based on the new profile.
At 20 feet, one push on MENU brings up select gas�
A push on SELECT enters the select gas menu, and another SELECT picks the O2� Since the gases are sorted by oxygen content, the O2 is the first gas offered.
This was a multi-gas trimix dive with a multi-gas open circuit bailout, and it required 9 button pushes�
DEPTH TIME STOP TIME
95 15 1OO 1
CC 1O/5O O 22 1.3O 1.29 1.29 O2/HE NDL TTS
DEPTH TIME STOP TIME
95 15 9O 1
CC 21/5O O 22 1.3O 1.3O 1.29 O2/HE NDL TTS
DEPTH TIME STOP TIME
6O 19 6O 1
Select Gas 1.3O .99 1.29
DEPTH TIME STOP TIME
Switch CC > OC 1.3O 1.OO 1.29
DEPTH TIME STOP TIME
6O 19 6O 1
OC 5O/2O O 36 1.3O 1.O9 1.29 O2/HE NDL TTS
DEPTH TIME STOP TIME
2O 25 2O 3
Select Gas .87 .95 .79 O2/HE NDL TTS
DEPTH TIME STOP TIME
Cancel Select
2O 25 2O 3
Set 1 OC 99/OO .87 .95 .79
6O 19 6O 1

Shearwater Petrel SA & EXT
DocRevD31
Gauge ModeGauge Mode turns the Petrel into a simple depth and time display (a�k�a� a bottom timer)�
Change to Gauge Mode in the System SetupDive Setup menu�
Since decompression tissues are not tracked in Gauge Mode, changing to or from Gauge Mode resets the deco tissues�
Features: • Extra-Large Depth Display (in feet or meters) • Extra-Large Time Display (in minutes:seconds) • Maximum and Average Depth on main screen� • Stopwatch • Resettable Average Depth
The Gauge display is organized as� • Depths along the left� • Times along the right� • Most important information (Depth, Dive Time) on the top row�
StopwatchThe Stopwatch is only available in Gauge Mode�
When diving, starting or stopping the Stopwatch is the first menu option.
When stopped, the word “Stopwatch” displays in red�
When non-zero, the stopwatch can be reset� Reset behavior depends on state: • If running when reset, it continues running, counting up again from 0� • If stopped when reset, then it is set 0 and remains stopped�
Resettable Average DepthDuring a dive, the average depth can be reset�
While on the surface, the MAX and AVG values display the maximum and average depth of the last dive� The AVG depth displayed on the surface is for the entire dive, regardless of whether the reset average depth option was used� The dive log also records the average depth for the entire dive�
Gauge - Surface Display
Gauge - Dive Display
Stopwatch Running
Stopwatch Stopped

DocRevD32
Shearwater Petrel SA & EXT
Decompression and Gradient FactorsThe basic decompression algorithm used for the computer is Bühlmann ZHL-16C� It has been modified by the use of Gradient Factors that were developed by Erik Baker. We have used his ideas to create our own code to implement it� We would like to give credit to Erik for his work in education about decompression algorithms, but he is in no way responsible for the code we have written�
The computer implements Gradient Factors by using levels of conservatism� The levels of conservatism are pairs of number like 30/70� For a more detailed explanation of their meaning, please refer to Erik Baker’s excellent articles: Clearing Up The Confusion About “Deep Stops” and Understanding M-values. The articles are readily available on the web� You might also want to search for “Gradient Factors” on the web�
The default of the system is 30/70� The system provides several settings that are more aggressive than the default�
Don’t use the system until you understand how it works�
Graph from Erik Baker’s “Clearing Up The Confusion About Deep Stops”

Shearwater Petrel SA & EXT
DocRevD33
Menu Reference
Turn OffThe “Turn Off” item puts the computer to sleep� While sleeping, the screen is blank, but the tissue contents are maintained for repetitive diving� The “Turn Off” menu item will not appear during a dive on any model� It will also not appear after a dive until the End Dive Delay Time has expired to allow for a continuation dive�
CalibrationThe Calibrate menu is only available on the Petrel EXT model� It will only appear when in CC mode with the PPO2 mode set to Ext� This menu calibrates the mV output from the oxygen sensors to PPO2�
Upon selecting the calibration menu, the screen will show:• Top row: Millivolt (mV) readings from the 3 O2 sensors�• Middle row: PPO2 values (using the previous calibration)�• Bottom row: The calibration gas fraction of O2 (FO2)�
If you need to change the calibration gas FO2, do this in the System SetupO2 Setup menu�
After flooding the breathing loop with the calibration gas (typically pure oxygen), press the SELECT button to perform the calibration�
Good sensors should be in the range of 35 - 65 mV at sea level in 100% oxygen, so a sensor will fail calibration if not in the range of 30mV to 70 mV� This allowable range scales automatically with changes to FO2 and barometric pressure� A millivolt reading is shown in yellow if outside the allowable range�
Once the calibration completes, a report will be shown� This shows which sensors passed calibration, and the value of the expected PPO2 based on barometric pressure and the FO2�
Back at the main screen, the displays should now all read the expected PPO2� For example, if FO2 is 0�98 and barometric pressure is 1013 mbar (1 ata), then PPO2 will be 0�98� If any display shows FAIL, the calibration has failed because the mV reading is out of range�
The “Calibrate” menu item will not display during a dive�
DEPTH TIME STOP TIME
O
Turn Off .98 .98 .98
DEPTH TIME STOP TIME
O
Calibrate .85 .86 .84
DEPTH TIME STOP TIME
O
CC 21/OO O O .98 .98 FAIL O2/HE NDL TTS
Cal. milliVolts
Cancel Calibrate
42 46 25
Cal. @ FO2= .98 .85 .86 .62

DocRevD34
Shearwater Petrel SA & EXT
Single Sensor Mode
A single external O2 sensor may be used�
To enter this mode, perform the calibration with only the middle sensor connected�
The Petrel will see that only one sensor is connected, and automatically switch to single sensor mode�
Calibration Problems
One sensor displays FAIL after calibrationThis could indicate a bad sensor� It has failed because the mV output was not in range� The sensor could be old or damaged, and should be inspected� Damage and corrosion to wires or connectors is also a common problem� Fix the problem and recalibrate before diving�
All sensors display FAIL after calibrationThis could be caused by an accidentally unplugged cable or a damaged cable or connector� Also, accidentally performing the calibration in air or without a proper oxygen flush could cause this problem. A failed calibration can only be fixed by performing a successful calibration�
PPO2 does not show 0.98 after calibrationIf you use a calibration FO2 setting of 0�98 and are at sea level, you probably expect the calibrated PPO2 to show 0�98� Sometimes you might correctly get a different value like 0�96 or 1�01�
This is because weather causes minor changes in barometric pressure� For example, say a low-pressure weather system has reduced the normal (1013mbar) barometric pressure to 990mbar� The PPO2 in absolute atmospheres is then 0�98 * (990/1013) = 0�96�
The 0�96 PPO2 result is, in this case, correct� At high altitudes, the difference between FO2 and PPO2 will be even larger� To see the current pressure, start at the main screen and press the SELECT button a few times (displays as Pressure mBar NOW)�
DEPTH TIME STOP TIME
.98 O2/HE NDL TTSCC 21/OO O O
O
DEPTH TIME STOP TIME
.98 .97 FAIL O2/HE NDL TTSCC 21/OO O O
O
DEPTH TIME STOP TIME
FAIL FAIL FAIL O2/HE NDL TTSCC 21/OO O O
O
Cal. milliVolts
Cancel Calibrate
O 46 O
Cal. @ FO2= .98 .OO .86 .OO
DEPTH TIME STOP TIME
.96 .96 .96 O2/HE NDL TTSCC 21/OO O O
O
DEPTH TIME STOP TIME
.96 .96 .96PRESSURE mBar
O
SURF 99O 99ONOW

Shearwater Petrel SA & EXT
DocRevD35
Switch Setpoint
This menu is only available in CC mode when PPO2 mode is set to Int� (internal)�
The internal PPO2 mode is used to calculate decompression for a unconnected rebreather� In this case, the setpoints are switched in the computer to approximate the rebreather setpoint�
During a dive the “Switch Setpoint” menu item will be the first item displayed, since the “Turn Off” and “Calibrate” displays are disabled when diving�
Pressing SELECT when this menu is displayed changes the PPO2 setpoint from the low setpoint to the high setpoint or vice-versa� To redefine the PPO2 value of a setpoint, use the Dive Setup menu.
This menu item performs a manual switching of PPO2 setpoint� In the System SetupAuto SP Switch menu, the Petrel can be setup to automatically perform setpoint switches at programmable depths� When auto setpoint switches are enabled, this menu item is still available to provide manual control�
DEPTH TIME SURFACE
O
Switch .7 > 1.3 .7
DEPTH TIME SURFACE
O
CC 1O/5O O 22 1.3 O2/HE NDL TTS

DocRevD36
Shearwater Petrel SA & EXT
Select GasThis menu item allows you to pick a gas from the gases you have created� The selected gas will be used either as the breathing gas in open circuit mode, or the diluent in closed circuit mode�
Gases are always sorted from most to least oxygen content�
Use the MENU button to increment to the desired diluent/gas, then press the SELECT button to select that diluent/gas�
If you increment past the number of gases available, the display will fall back out of the “Select Gas” display without changing the selected gas�
An ‘A’ will appear next to the currently active gas�
A gas that is off will be shown in magenta, but can still be selected� It will be turned on automatically if it is selected� Off gases are not used in decompression calculations�
Radio Station Gases
For computer models that support open circuit and closed circuit operation, the system maintains two sets of gases - one for open circuit and one for closed circuit�
The way they operate is very similar to the way car radios work with AM and FM stations�
When you are listening to an FM station and you push a station selection button, it will take you to another FM station� If you add a new station, it will be an FM station�
Similarly, if you are in the AM mode, adding or deleting a station would add or delete an AM station�
With radio station gases, when you are in open circuit, adding, deleting or selecting a gas will refer to an open circuit gas� Just like the FM stations are selected when your radio is in FM mode, the closed circuit gases are available in the closed circuit mode� When you switch to open circuit, the gases available will be open circuit gases�
DEPTH TIME SURFACE
O
Select Gas .87 .86 .84
DEPTH TIME SURFACE
DEPTH TIME SURFACE
Next Gas
Next Gas
Select
Select
O
O
A1 CC On 21/OO
2 CC On 1O/5O
.87 .86 .84
.87 .86 .84
DEPTH TIME SURFACE
Next Gas Select
O
2 CC Off 1O/5O .87 .86 .84

Shearwater Petrel SA & EXT
DocRevD37
Select Gas Menu Styles
Two styles of Select Gas menus are available, Classic and New�
Change between the two styles in the Adv. Config 1 menu.
Classic Style Select GasThe classic Select Gas style is as described on the previous page�
• One gas is shown at a time� • Press MENU to step through gases, and SELECT to select the
shown gas� • Gases are sorted from highest O2% to lowest O2%�• Stepping past the last gas will exit the menu without changing the
active gas�• Upon entering the Select Gas menu, the first gas shown is always
the highest O2% gas�
New Style Select Gas
The new style makes visualizing the gas list easier� It also reduces button presses for deco gas switches�
• Shows all gases on the screen at once�• Press MENU to step through gases, and SELECT to select the
pointed to gas�• A gas must be selected to exit the menu (scrolling past last gas
wraps back to first gas).• The active gas is shown with a white background�• Turned off gases are shown in magneta (purple)�• Gases are sorted from highest O2% to lowest O2%�• When diving and there is a deco stop, the first gas pointed to will
be the most appropriate gas (highest PPO2 less than 1�61)� This reduces button presses in most cases�
• On the surface or when no deco stops are needed, the first gas pointed to will be the active gas�
New Style Select Gas
Off Gases are Magenta
Classic Select Gas
Active Gas is White

DocRevD38
Shearwater Petrel SA & EXT
Switch to OC/CCDepending on the current computer setting, this selection will show as either “Switch CC > OC” or “Switch OC > CC”�
Pressing SELECT will select the displayed mode for decompression calculations� When switching to open circuit while diving, the most appropriate open circuit gas will become the breathing gas for calculations�
At this point, the diver may want to switch to a different gas, but since the diver may have other things to deal with, the computer will make a “best guess” of which gas the diver would choose�
On computers with external oxygen sensor monitoring, there is also an option to set the computer to calculate decompression predictions using semi-closed circuit� This is enabled in the System Setup menu�
You can also switch to from CC to OC on a fixed PPO2 model. In that case, the computer will use the user entered high and low setpoints�
Dive Setup+The Dive Setup menus are available both on the surface and when diving�
The values in Dive Setup+ can also be accessed in the Systems Setup+ menu, but the System Setup+ menu is not available when diving�
Pressing SELECT will enter the Dive Setup sub-menu�
Low Setpoint
This item allows you to set the low setpoint value� It will display the currently selected value� Values from 0�4 to 1�5 are allowed�A press of MENU will increment the setpoint�
Press the SELECT button when “Edit Low SP” is displayed and the edit display will be shown� It is set at the lowest valid value for setpoint, �4�
DEPTH TIME SURFACE
O 2Hr 45Mn
Switch CC > OC
DEPTH TIME SURFACE
O 2Hr 45Mn
Switch OC > CC .85 .86 .84
DEPTH TIME SURFACE
O 2Hr 45Mn
Switch OC > SC .85 .86 .84
DEPTH TIME SURFACE
O 2Hr 45Mn
Dive Setup+ .85 .86 .84
DEPTH TIME SURFACE
O 2Hr 45Mn
Switch CC > OC 1.3
DEPTH TIME SURFACE
DEPTH TIME SURFACE
Next
Change
Edit
Save
O 2Hr 45Mn
O 2Hr 45Mn
Edit Low SP O.7
Edit Low SP O.4
.85 .86 .84
.85 .86 .84
Shearwater Petrel SA & EXT
DocRevD39
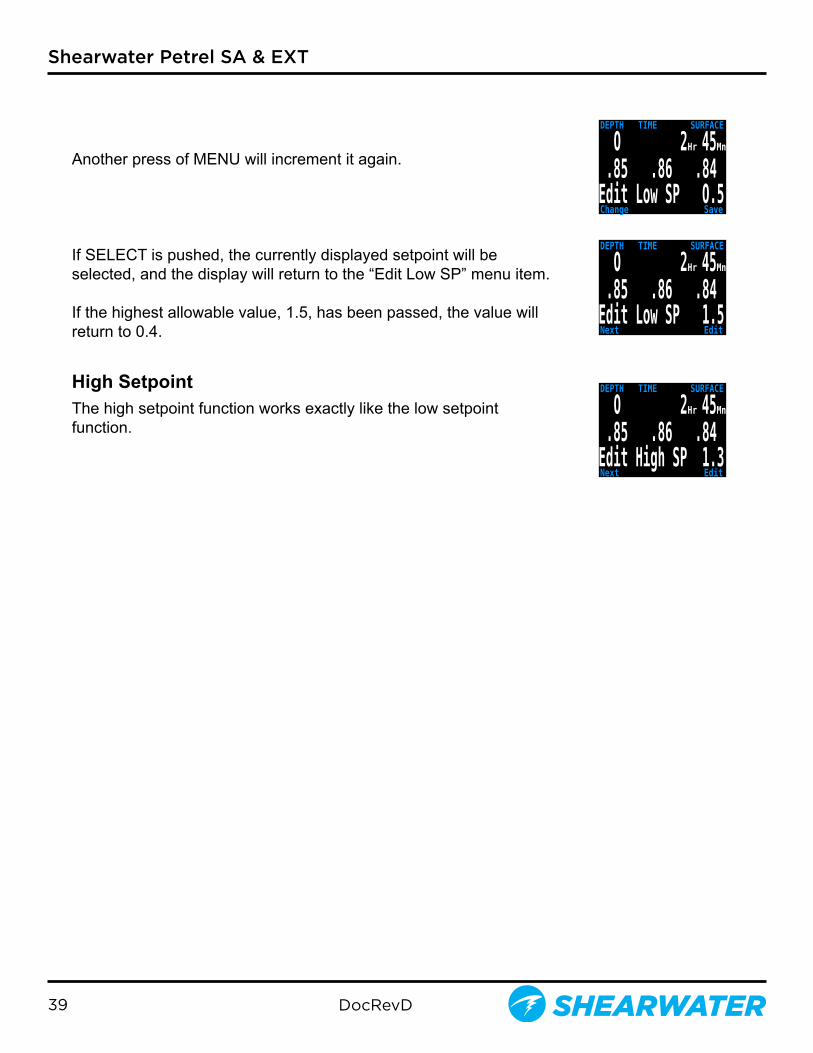
Another press of MENU will increment it again�
If SELECT is pushed, the currently displayed setpoint will be selected, and the display will return to the “Edit Low SP” menu item�
If the highest allowable value, 1�5, has been passed, the value will return to 0�4�
High SetpointThe high setpoint function works exactly like the low setpoint function�
DEPTH TIME SURFACE
DEPTH TIME SURFACE
Change
Next
Save
Edit
O 2Hr 45Mn
O 2Hr 45Mn
Edit Low SP O.5
Edit Low SP 1.5
.85 .86 .84
.85 .86 .84
DEPTH TIME SURFACE
Next Edit
O 2Hr 45Mn
Edit High SP 1.3 .85 .86 .84

DocRevD40
Shearwater Petrel SA & EXT
Define Gas
The function allows you to set up 5 gases in Closed Circuit and 5 gases in Open Circuit� You must be in Open Circuit to edit open circuit gases, and you must be in Closed Circuit to edit closed circuit diluents� For each gas, you can select the percentage of oxygen and helium in the gas� The remainder is assumed to be nitrogen�
Pushing SELECT when “Define Gas” is displayed presents the function to define gas number 1.
Pushing the MENU button will display the next gas�
Pushing SELECT will allow you to edit the current gas� The gas contents are edited one digit at a time� The underline will show you the digit being edited�
Each push of the MENU button will increment the digit being edited� When the digit reaches 9, it will roll over to 0�
Pushing SELECT will lock in the current digit, and move on to the next digit�
Pushing SELECT on the last digit will finish editing that gas, and bring you back to the gas number�Any gases that have both oxygen and helium set to 00 will not be displayed in the “Select Gas” function�
DEPTH TIME STOP TIME
Next Define
O
Define Gas .85 .86 .84
DEPTH TIME STOP TIME
DEPTH TIME STOP TIME
DEPTH TIME STOP TIME
DEPTH TIME STOP TIME
DEPTH TIME STOP TIME
DEPTH TIME STOP TIME
Next Gas
Next Gas
Change
Change
Change
Change
O2%
O2%
HE%
HE%
Edit
Edit
Next
Next
Next
Save
O
O
O
O
O
O
1 OC On 99/OO
2 OC On 5O/OO
2 OC On 5O/OO
2 OC On 5O/OO
2 OC On 5O/OO
2 OC On 5O/OO
.85 .86 .84
.85 .86 .84
.85 .86 .84
.85 .86 .84
.85 .86 .84
.85 .86 .84

Shearwater Petrel SA & EXT
DocRevD41
Pushing MENU will continue to increment the gas number�
Note: The “A” denotes the active gas� You cannot delete the active gas� If you try, it will generate an error� You can edit it, but cannot set both the O2 and HE to 00� The computer will display all 5 gas entries available to allow you to enter new gases�
Pressing MENU one more time when the fifth gas is displayed will return you to the “Define Gas” menu item.
DEPTH TIME STOP TIME
DEPTH TIME STOP TIME
DEPTH TIME STOP TIME
Next Gas
Done
Change HE%
Edit
Edit
Save
O
O
O
A3 OC On 14/55
5 OC On OO/OO
2 OC On 5O/OO
.85 .86 .84
.85 .86 .84
.85 .86 .84
Only turn-on gases you are carrying
Only turn on the gases you are actually carrying on the dive� With radio station gases, the computer has a full picture of the OC and CC gases you are carrying and can make informed predictions about decompression times� There is no need to turn gases off and on when you switch from CC to OC, because the computer already knows what the gas sets are� You should have the CC and OC gases you are actually carrying turned on�
If you often use other gases, but not on this dive, you can enter the gas and turn it off� You can turn gases on and off during a dive and you can also add or remove a gas dur-ing the dive if needed�

DocRevD42
Shearwater Petrel SA & EXT
Dive Planner+
INTRODUCTION
• Calculates decompression profiles for simple dives.• In closed-circuit (CC) mode, also calculates open-circuit (OC) bail-out (BO)�
SETUP
Uses the current gases programmed into the Petrel, as well as the current GF low/high settings� VPM-B dive planning is available on units with the optional VPM-B unlock�Deco profile is computed for the current circuit mode (CC or OC).
ON THE SURFACE
Enter the dive bottom depth, bottom time, respiratoryminute volume(RMV) and PPO2 (closed-circuit only)�
Note: Residual tissue loading (and CNS%) from recentdives will be used in calculating the profile.
DURING A DIVE
Computes the decompression profile assuming the ascent Dive Plan Setupwill begin immediately� There are no settings to enter�(RMV is last used value)
LIMITATIONS
The Petrel Dive Planner is intended for simple dives� Multi-level dives are not supported�
The Petrel Dive Planner makes the following assumptions:
• Descent rate is 60ft/min (18m/min) and the ascent rate is 33ft/min (10m/min)�• For OC, the gas in use will be the gas with the highest PPO2 less than 1�40 for the bottom
gas, and 1.61 for deco gases (the deco gas max PPO2 can be changed in the Adv Config 1 menu)�
• For CC, the gas in use will be the gas with the highest PPO2 less than 1�05�• The planner will use the configured last stop depth.• For CC, the PPO2 is constant for the entire dive�• The RMV is the same while diving as during deco�• Semi-closed uses a metabolic offset�

Shearwater Petrel SA & EXT
DocRevD43
The Dive Planner does not provide thorough validation of the profile. For example, it does not check for nitrogen narcosis limitations, gas usage limitations, CNS percentage violations, or isobaric counter-diffusion risks due to sudden helium switches� The user is responsible for ensuring a safe profile is followed.
RESULT SCREENS
The results are given in tables showing:
• Stp: Stop Depth In feet (or meters)• Tme: Stop Time In minutes• Run: Run Time In minutes• Qty: Gas Quantity in CuFt (or liters)� OC and BO only
The first two rows are special, the first row showing the bottom time and the second showing the ascent to the first stop. When diving, these two rows are not displayed.
Example Results Table for Closed-Circuit and Bailout�
If more than 5 stops are needed, the results will be split onto on several screens� Use the right button to step through the screens�
For OC or BO profiles, a total gas consumption report is given.
Gas Usage Report

DocRevD44
Shearwater Petrel SA & EXT
The final result screen shows the total dive time, the time spent on deco and final CNS%.
Results Summary Screen
If no decompression is required, no table will be shown� Instead, the total No-Decompression-Limit (NDL) time in minutes, at the given bottom depth will be reported� Also, the gas quantity required to surface (bailout in CC) will be reported�
No Decompression Results Screen
ConservatismThe conservatism settings (GF High and GF Low) can be edited in the Dive Setup menu� While diving, only the GH High value can be edited� This allows changing the surfacing conservatism during a dive� For example, if you worked much harder on the bottom segment than expected, you may wish to add conservatism by reducing the GF High setting
DEPTH TIME STOP TIME
Next Edit
O
Conserv 3O/7O .85 .86 .84

Shearwater Petrel SA & EXT
DocRevD45
NDL Display
The NDL Display option allows you to display four different values during the dive� The display can be changed during the dive to provide different information�
Pushing SELECT will make the NDL display editable. The first choice available will be NDL� If you select NDL, the NDL will always be displayed during the dive whether or not you have a decompression ceiling�
The next selection is CEIL� With this setting, as long as the NDL time is 0 (you have a decompression ceiling), the raw ceiling will be displayed instead of the NDL� This is the equivalent of the ‘Man on a rope’� It will show your ceiling without it being rounded up to the next even 10 foot or 3 meter stop� Please note that there is very limited information on the effects of following a continuous ceiling instead of stopping at stops and only moving up to the next stop when the stop has cleared�
It is the author’s opinion that all stops should be honored� It seems intuitive that if you have bubbles, and you stop, you give the bubbles an opportunity to be resorbed� If you continuously ascend, the ambient pressure is continuously reduced which prevents bubbles from shrinking� Because of this belief, the computer will give one MISSED DECO STOP message during the dive and one after the dive, and will flash the stop depth and time in red as long as you are above the stop depth� It will use the increased gradient though, and your calculated off-gassing will be faster than staying at the stops�
The next option is to display the actual supersaturation gradient for a pure Bühlmann (99/99) profile.
The selection is GF99� With this setting, as long as the NDL time is 0 (you have a decompression ceiling), the gradient will be displayed instead of the NDL� The number shown is the percentage of supersaturation� The number is calculated by reference to the Ambient Pressure Line and the M-Value line� It can be thought of as the current GF, but it is different in a couple of ways� First, the current GF generates stops rounded to the nearest 10 feet or 3 meters� So a gradient of 40 may reflect a ceiling of 15 feet, but the computer will show a rounded-up 20 foot stop�
DEPTH TIME STOP TIME
DEPTH TIME STOP TIME
DEPTH TIME STOP TIME
Next
Change
Change
Edit
Save
Save
O
O
O
NDL Display NDL
NDL Display NDL
NDL Display CEIL
.85 .86 .84
.85 .86 .84
.85 .86 .84
DEPTH TIME STOP TIME
1.12 .98 .98 O2/HE GF99 TTS
CC 1O/5O 12 42
34.7 15 24 1
DEPTH TIME STOP TIME
Change Save
O
NDL Display GF99 .85 .86 .84

DocRevD46
Shearwater Petrel SA & EXT
This number can be used in several ways� First, it can be used to calculate an aggressive ascent that still has some justification in decompression science. For example, if a diver were to lose a significant portion of their gas and needed to get shallow fast, they could ascend until they reached a gradient of 90, then stop until it dropped to 80, then ascend to 90 again, etc� That would produce a Bühlmann-like profile with very little conservatism. In an emergency, that may be an acceptable risk�
Another use might be to do a slower ascent on a dive to sightsee, but to stay in the decompression zone by keeping the gradient above 0�
Another use would be to observe the rapidly increasing gradient in the last 10 feet to the surface and slow that ascent�
All of this is based on gradient theory that may be completely false� There is significant disagreement in the decompression research community about the nature and practice of decompression� Any techniques described here should be considered experimental, but the concepts may be useful to the advanced diver�
The last selection is @+5� This feature was inspired by Dan Wible’s CCR2000 computer (Thanks Dan!) It is the time-to-surface (TTS) if you were to stay at the current depth for five more minutes. This can be used as a measure of how much you are on-gassing or off-gassing�
DEPTH TIME STOP TIME
Change Save
O
NDL Display @+5 .85 .86 .84
For example, on a dive on a wreck, you go to the bottom until you accumulate the desired decompression and TTS� After ascending to the second deck, you notice that the @+5 and TTS are the same� That means that you can spend 5 minutes exploring this deck without incurring more decompression�
Once you get to the top deck, the current has picked up� The line runs from the top of the deck to the surface which is a distance of 30 feet/10 m� You see that your @+5 is 11 minutes and your TTS is 15 minutes� That means that you can stay down out of the current for 5 minutes and burn off about 4 minutes of deco� You may decide to accept the 80% decompression efficiency and stay out of the current.
When your TTS is 10 minutes, you see that your @+5 is 9 minutes� Since the decompression is not very efficient now, you go up the line and spend the last 10 minutes in the current.

Shearwater Petrel SA & EXT
DocRevD47
External PPO2 Monitoring
The next menu item is used to turn external PPO2 monitoring on and off� By default, external monitoring is turned off and reads “Int�” for Internal fixed setpoint mode. This setting can be changed to “Ext.” to enable external PPO2 monitoring from oxygen sensors�
Now the PPO2 of the three sensors is displayed� A valid calibration must have been previously performed (see the Calibration section)�
This system is plugged into three sensors and using the PPO2 input from the sensors as the system average PPO2 used for decompression calculations and CNS tracking�
A voting algorithm is used to decide which of the three sensors are likely to be correct� If a sensor matches either of the other two sensors within ±20%, it passes voting� The system average PPO2 is the average of all sensors that have passed voting�
For example, here sensor 3 has failed voting� The PPO2 is displayed in yellow to show that it has failed voting� The system average PPO2 is the average PPO2 of sensor 1 and 2�
If all sensors fail voting, then the display will alternate VOTING FAILED with the PPO2 measurements (which will all be yellow to indicate that voting has failed)� When voting has failed, the lowest PPO2 reading will be used for deco calculations (i�e� the most conservative value)�
Switching to Open Circuit bailout with External PPO2 Monitoring
If you bailout to OC mode, the external PPO2 will continue to display on the main screen� However, the system PPO2 used for deco calculations will change to OC mode (i�e� PPO2 is the fraction of O2 multiplied by the current depth’s pressure)�
The external PPO2 continues to display because the diver may need to return to the loop, and will need to know the PPO2 status of the loop, even though the sensor input is not being used as the system PPO2�
DEPTH TIME STOP TIME
.96 .97 .97 O2/HE NDL TTS
CC 21/OO O O
O
DEPTH TIME STOP TIME
.96 .97 1.26DilPO2 CNS AvgPO2
.21 O .97
O
DEPTH TIME STOP TIME
.48 .97 1.26Switch CC > OC
O
DEPTH TIME STOP TIME
.48 .97 1.26 CNS AvgPO2
O .21
O
DEPTH TIME STOP TIME
.48 .97 1.26 O2/HE NDL TTS
OC 21/OO O O
O
DEPTH TIME STOP TIME
DEPTH TIME STOP TIME
Change
Change
Save
Save
O
O
PPO2 Mode Int.
PPO2 Mode Ext. .96 .97 .97
.7

DocRevD48
Shearwater Petrel SA & EXT
If we now unplug sensor 1 and sensor 3, the computer will use voting logic to pick the two sensors that agree and will think the PPO2 is 0. Sensor 2 will be voted out and flashing yellow� This is a limitation of voting logic, and the user will have to determine which sensors are correct�
With sensors one and three unplugged, we simulate the situation of single sensor monitoring� If we calibrate in this situation, the system will assume that this computer is only attached to one sensor, and will re-configure for fourth sensor monitoring.
It will no longer average the sensors or vote on them� Now the single sensor is the only one considered and the PPO2 used for calculations is the PPO2 of the single sensor�
BrightnessThe display brightness has three fixed brightness settings plus an Auto mode�
The fixed options are:• Low: Longest battery life�• Med: Best mix of battery life and readability�• High: Easiest readability, especially in bright sunlight�
Auto will use the light sensor to determine the brightness of the display� The more ambient light there is, the brighter the display will get� At depth, or in dark water, very little brightness is needed to see the display�
The Auto setting works well in most situations�
The brightness of the display is the major determinant of battery life� Up to 80% of the power consumption is to power the display� When a low battery alert occurs, the display brightness is automatically reduced to extend battery life�
DEPTH TIME STOP TIME
.97 O2/HE NDL TTS
CC 21/OO O O
O
DEPTH TIME STOP TIME
.97DilPO2 CNS AvgPO2
.21 O .97
O
DEPTH TIME STOP TIME
Exit Edit
O
Brightness Auto .85 .86 .84

Shearwater Petrel SA & EXT
DocRevD49
DEPTH TIME STOP TIME
DEPTH TIME STOP TIME
DEPTH TIME STOP TIME
Oft
163ft
Back
Next
Next
40min
DisplayNext
Edit
Edit
Start 2:10PM
DEPTH TIME STOP TIME
O
O
O
O
Dive Log
Display Log
Edit Log Number
Log Number= OOOO
.85 .86 .84
.85 .86 .84
.85 .86 .84
.85 .86 .84
Dive Log Menu
Display LogAt the “Display Log” prompt, press SELECT to view the most recent dive�The profile of the dive is plotted in blue, with decompression stops plotted in red� The following information is displayed:
- Maximum and Average depth- Dive number- Date (mm/dd/yy) - Start- Start of dive- End- End of dive- Length of dive in minutes
Press MENU to see the next dive, or SELECT to quit viewing logs�Press Back to see the list of dive logs, and next to select the next dive and View�
Upload LogSee “Firmware Upload and Dive Log Download” instructions�
Logs are uploaded using Bluetooth� Selecting this menu item starts the Bluetooth connection and then waits for commands from a desktop or laptop computer�
Edit Log NumberThe dive log number can be edited� This is useful if you want the Petrel log numbers to match your lifetime dive count�
At the “Edit Log Number” prompt, press SELECT to begin editing� While editing, use MENU to change the value of the currently underlined digit, and SELECT to move to the next digit�
The next dive number will be +1 from the value entered here� For example, if you enter 0015, then the next dive will be dive number 16�

DocRevD50
Shearwater Petrel SA & EXT
Example Menu
Example Menu
‣Example
‣Example
Example
Example
Example
Example
Example
Example
Example
Example
Next
Change
Edit
Next
O.OO
O.OO
O.OO
O.OO
O.OO
O.OO
O.OO
O.OO
O.OO
O.OO
DEPTH TIME STOP TIME
O
System Setup+ .85 .86 .84
System Setup+
System Setup contains configuration settings together in a convenient format for updating the configuration before a dive.
System setup cannot be accessed during a dive�
However, many of the settings are also available during the dive in a single line interface� Although all of the settings available in Dive Setup are available in System Setup, not all settings in System Setup can be edited in Dive Setup� The MENU and SELECT buttons are context sensitive to each sub menu and individual setting�
When cycling through the sub-menus, MENU will carry the user to the next sub-menu, while SELECT will allow the user to edit the options in this submenu�
Once the user has pressed SELECT to edit a submenu, MENU will cycle the user through the different submenu listings, while SELECT will let the user edit those listings�
Once the user has pressed SELECT to edit a submenu listing MENU will be used to change the context sensitive variable, while the SELECT button will be used to move to the next field. Once the user has pressed SELECT through all the fields, the new user preferences will be saved�

Shearwater Petrel SA & EXT
DocRevD51
Dive SetupThe first submenu of System Setup+ is Dive Setup.
ModeMode sets which breathing circuit configurations are available: • OC/CC (default) • OC • OC/SC (only on models with external PPO2 connector)� • Gauge (e�g� bottom timer mode)
When changing to or from Gauge mode, the decompression tissues are cleared� This is because when in Gauge mode the Petrel does not know what gas you are breathing�
SalinityWater type (salinity) affects how the measured pressure is converted to depth� Settings:• Fresh• EN13319• SaltFresh and Salt water differ by about 3%� Salt water, being denser, will display a shallower depth for the same measured pressure versus the Fresh water setting�The EN13319 value is between Fresh and Salt� It is from the European CE standard for dive computers, and is the Petrel’s default value�
High SP
Edit
O.7 1.3 CEIL
Next
‣Dive SetupMode
Edit
Salinity
Low SPHigh SP
OC/CCSalt
0.71.3
Important information for OPEN CIRCUIT divers
All Petrel models include Closed Circuit (CC) functionality�
Leaving CC mode enabled makes the Petrel more complex and less optimized for OC diving�
Switch Mode from OC/CC to OC before performing an open circuit only dive�
Also, when CC mode is available, then OC is treated as bailout� This is why OC is shown as a yellow warning when CC mode is available�
PPO2 Mode Int

DocRevD52
Shearwater Petrel SA & EXT
PPO2 Mode
PPO2 mode is only set when CC is enabled�
On the Petrel Standalone (SA) model, this value is always Int (internal fixed PPO2).
On the Petrel External (EXT) model, this value can be set to either: • Int. (Internal fixed PPO2 set points) • Ext� (External measured PPO2)
The PPO2 Mode can also be changed, even during a dive, in the Dive Setup menu�
When semi-closed circuit (SC) is used, the PPO2 mode must be Ext�
Low and High Setpoints
The Low and High PPO2 Setpoints are only available when CC is enabled and PPO2 Mode is Internal�
Each setpoint can be set from 0�4 to 1�5�
The setpoints can also be edited, even during a dive, in the Dive Setup menu�
High SP
Edit
O.7 1.3 CEIL
Next
‣Dive SetupMode
Edit
Salinity
Low SPHigh SP
OC/CCSalt
0.71.3
PPO2 Mode Int

Shearwater Petrel SA & EXT
DocRevD53
‣ OC Gases 1 OC On 2 OC Off 3 OC Off 4 OC Off 5 OC Off
Next Edit
21/OO OO/OO OO/OOOO/OOOO/OO
‣ CC Gases A1 CC On 2 CC Off 3 CC Off 4 CC Off 5 CC Off
Next Edit
21/OO OO/OOOO/OO OO/OO OO/OO
Deco Setup
Deco ModelMay just show Bühlmann ZHL-16 with gradient factors model, or it may allow you to switch between GF and various types of VPM-B� The choices will be available if you have unlocked VPM-B�
Conservatism Can be adjusted in either the GF or VPM model�For a more detailed explanation of their meaning for the GF algorithm, please refer to Erik Baker’s excellent articles: Clearing Up The Confusion About “Deep Stops” and Understanding M-values. The articles are readily available on the web� VPM-B has conservatism settings from 0 to +5, with higher numbers being more conservative�
Last Stop Allows you to chose where to do your last stop� The choices are 10ft/3m and 20ft/6m� Note that this setting does not affect decompression� It only makes the TTS prediction more accurate�
NDL Display These options were previously covered in the Dive Setup+ section�
OC Gases The next submenu is OC Gases� This menu allows the user to edit the open circuit gases� The options contained here are the same as those in the “Define Gases” subsection of the “Dive Setup” section contained earlier in this manual. The interface conveniently displays all five gases simultaneously�
For a description of how to appropriately set each gas, please see the above Define Gas section
CC Gases The next submenu is CC Gases� This menu allows the user to edit the closed circuit diluent gases� The options contained here are the same as those in the “Define Gases” subsection of the “Dive Setup” section contained earlier in this manual� The interface conveniently displays all five gases simultaneously. For a description of how to appropriately set each gas, please see the above Define Gas section
‣ Deco SetupDeco Model Conserv(GF) Last Stop
Next Edit
GF 3O/7O 6m
NDL Display CEIL

DocRevD54
Shearwater Petrel SA & EXT
O2 SetupThis menu page is only available in Closed-Circuit (CC) or Semi-Closed (SC) mode when PPO2 mode is set to external (see Dive Setup page)�
Cal. FO2This setting allows you to set the fraction of oxygen (FO2) of the calibration gas�
In CC mode, the calibration gas FO2 can be set from 0�70 to 1�00� The default value of 0�98 is for pure oxygen, but assumes about 2% water vapor due to the diver’s breathing on the loop during the flushing process.
In SC mode, the calibration gas FO2 can be set from 0�20 to 1�00� This is because semi-closed divers do not always have oxygen available�
Note: When in SC mode the user cannot utilize internal PPO2 monitoring�
Sensor DispSets the sensor display mode on the center row of the main screen�
In CC mode, the available settings are:• Large: the PPO2 text is the normal large font�• Giant: the PPO2 text is larger�
In SC mode, the available settings are:• PPO2: the PPO2 is shown�• FiO2: the Fraction of inspired O2 (FiO2) is shown�• Both: PPO2 shown is large font, FiO2 below in small font�
Auto SP (Setpoint) SwitchThis menu page is only available in CC mode when PPO2 mode is set to internal (see Dive Setup page)�
Auto Setpoint Switch configuration sets up the setpoint switching. It can be set up to auto switch up only, down only, both, or neither�
First, you set the whether the “Up” switch occurs automatically or manually� If “Up” is set to “Auto”, then you can set the depth at which the auto switch occurs�
‣O2 SetupCal. FO2 Sensor Disp
Next Edit
O.98Giant
‣ Auto SP SwitchUp: O.7>1.3Up Depth
Down: 1.3>O.7Down Depth
Next Edit
AutoO7Oft
AutoO4Oft
O2 Setup Cal. FO2 ‣Sensor Disp
Change Save
O.98FiO2
DEPTH TIME STOP TIME
96% 97% 97% O2/HE NDL TTSCC 21/OO O O
O
In SC Mode, the centerrow can show FiO2
instead of PPO2

Shearwater Petrel SA & EXT
DocRevD55
The menu options are the same for the down setpoint switch�
Example: Up: 0�7>1�3 = Auto, Up Depth = 70 ft� Down: 1�3>0�7 = Auto, Down Depth = 41ft
The dives starts at the 0�7 setpoint� As you descend past 70ft, the setpoint switches “up” to 1�3� You finish your bottom time, then begin ascending. When you ascend above 41ft, it switches “down” to 0�7�
When a switch is set to “Auto”, you can always manually override the setting at any time during the dive�
Each auto setpoint switch can occur only once per dive�
Either switch can be set to auto or manual independent of the other switch�
The values 0�7 and 1�3 are shown as examples only� Other values for the low and high setpoint can be adjusted in the Dive Setup menu�
Display Setup
UnitsTwo options are available:
• Feet: Imperial units (depth in feet, temperature in °F)• Meters: Metric units (depth in meters, temperature in °C)
BrightnessScreen brightness can be set to fixed levels or an automatic setting.Fixed options:
• Low: Longest battery life�• Med: Best mix of battery life and readability�• High: Easiest readability, especially in bright sunlight�
The “Auto” option measures ambient light levels and then adjusts the screen brightness to best performance� It provides maximum brightness in bright sunlight, but then lowers brightess to save battery life when the environment gets darker�
Auto SP SwitchUp: O.7>1.3Up Depth
‣Down: 1.3>O.7
Change Save
AutoO7Oft
Manual
Display Setup
Display Setup
Display Setup
‣Units
Units
Units
Brightness
‣Brightness
‣Brightness
Altitude
Altitude
Altitude
Flip Screen
Flip Screen
Flip Screen
Next
Change
Change
Edit
Save
Save
Feet
Feet
Feet
Auto
Med
Auto
SeaLvl
SeaLvl
SeaLvl
Auto SP SwitchUp: O.7>1.3‣Up Depth
Down: 1.3>O.7Down Depth
Change Next
AutoO7Oft
AutoO41ft

DocRevD56
Shearwater Petrel SA & EXT
AltitudeThe altitude setting when set to ‘Auto’ will compensate for pressure changes when diving at altitude� If all your diving is at sea level, then setting this to ‘SeaLvl’ will assume that surface pressure is always 1013 mBar (1 atmosphere)�
Further, when diving at altitude, you must turn the computer on at the surface� If the auto-on safety feature is allowed to turn the computer on after a dive has started then the computer assumes the surface pressure is 1013 mBar� If at altitude this could result in incorrect decompression calculations�
Flip ScreenThis function displays the contents of the screen upside down� This is used for systems with a permanent connection to a rebreather� It allows the computer to be worn on the right arm�
Display Setup
Display Setup
Units
Units
Brightness
Brightness
‣Altitude
‣Altitude
Flip Screen
Flip Screen
Change
Change
Save
Save
Feet
Feet
Auto
Auto
SeaLvl
Auto
Display Setup UnitsBrightness Altitude‣Flip Screen
Exit Flip
FeetAuto
SeaLvl
Diving At Altitude
When diving at altitude you must set this option to ‘Auto’ (the default setting is ‘SeaLvl’)�

Shearwater Petrel SA & EXT
DocRevD57
Compass Setup (Petrel 2 only)
Compass ViewThe Compass View setting can be set to:
• Off: The compass is disabled and the Mark Compass option is removed from the menus�
• 60°, 90°, or 120°: Sets the range of the compass dial that is visible on the main screen� The actual amount of arc that is shown on the screen is 60°, so this may seem the most natural� The 90° or 120° setting can be used to see a wider range�
True NorthIn most places, a compass does not point towards True North, but rather to Magnetic North� The difference in angle between these two directions is called the magnetic declination (also called magnetic variation), and varies around the world� The declination in your location can be found on maps or by searching online�
This setting can be set from -99° to +99°�
If you only need to match an uncompensated compass, or your navigation is all based on relative directions, then this setting is not necessary and can be left at 0°�
Compass ‣Compass View 9O° Calibrate True North + O°
Next Edit
Compass Compass View 9O° Calibrate ‣True North + O°
Next Edit

DocRevD58
Shearwater Petrel SA & EXT
CalibrateCalibration of the compass may be needed if the accuracy drifts over time or if a permanent magnet or ferromagnetic metal (e�g� iron or nickel) object is mounted very close to the Petrel� To be calibrated out, such an object must be mounted with the Petrel so that it moves along with the Petrel�
Compare the Petrel with a known good compass or fixed references to determine if calibration is needed� If comparing against fixed references, remember to consider the local deviation between Magnetic North and True North (declination)�
Calibration is typically not needed when travelling to different locations� The adjustment needed then is the True North (declination)�
When calibrating, rotate the Petrel smoothly through as many 3D twists and turns as possible in 15 seconds� Keep metal and magnetic objects away during calibration� The calibration can also be reset back to the factory values� After calibration, it is recommended to compare the compass accuracy with a known good compass or fixed references
Compass Enable ‣Calibrate Adjust True North
Next Calibrate
On
Compass Cal. ‣Calibrate Factory Reset Exit
Next Calibrate
Tips For a Good Compass Calibration
The following tips will help ensure a good calibration�
• Stay away from metal objects� For example, wrist watches, metal desks, boat decks, desktop computers, etc� can all interference with the Earth's magnetic field.
• Rotate to as many 3D positions as possible� Upside down, sideways, on edge, etc�
• Compare with another compass (not a smartphone, those are terrible) to check your calibration�
Battery Affects the Compass Calibration
Each battery has its own magnetic signature, mostly due to its steel case� Therefore, recalibrating the compass when changing the battery is recommended�

Shearwater Petrel SA & EXT
DocRevD59
System Setup
System Setup
System Setup
System Setup
System Setup
‣Date
Date
Date
Date
Date
Time
‣Time
Time
Time
Time
Unlock
Unlock
‣Unlock
Unlock
‣8567OOOOOOOOOOOO
Load Upgrade
Load Upgrade
Load Upgrade
Load Upgrade
Load Upgrade
Reset to Defaults
Reset to Defaults
Reset to Defaults
‣Reset to Defaults
Reset to Defaults
Next
Next
Next
Exit
Change Next
Edit
Edit
Unlock
Reset
Unlock
14-Aug-2O12
14-Aug-2O12
14-Aug-2O12
O3:28PM
12:28PM
12:28PM
12:28PM
12:28PM
System Setup
DateThe first ‘System Setup’ changeable option is ‘Date,’ which allows the user to set the current date�
TimeThe next ‘System Setup’ changeable option is ‘Time’, which allows the user to set the current time� The format can be set to AM, PM or 24 hour time�
Unlock CodeThe next ‘System Setup’ changeable option is ‘Unlock’, which allows the user to enter in an unlock in order to change models and to set other features�
Load UpgradeUse this option to load firmware upgrades. This starts a Bluetooth connection and then waits for commands from a laptop or desktop computer�
See the section ‘Firmware Upload and Dive Log Download’ for detailed instructions�
Reset to DefaultsThe final ‘System Setup’ option is ‘Reset to Defaults’. This will reset all user changed options to factory settings and clear the tissues on the Petrel� ‘Reset to Defaults’ cannot be reversed�
Note: This will not delete dive logs, or reset dive log numbers�
14-Aug-2O12
14-Aug-2O12

DocRevD60
Shearwater Petrel SA & EXT
Advanced Configuration 1Advanced configuration contains items that will be used infrequently and can be ignored by most users� They provide more detailed configurations.
The first screen allows you to enter the advanced configuration area, or to set the advanced configurations settings to their default.
Title ColorThe title colors can be changed for added contrast or visual appeal� Default is Cyan, with gray, white and blue also available�
End Dive DelaySets the time in seconds to wait after surfacing before ending the current dive�This value can be set from 20 seconds to 600 seconds (10 minutes)� Default is 60s�
This value can be set to a longer time if you want brief surface intervals connected together into one dive� Some instructors use a longer end dive delay when teaching courses� Alternatively, a shorter time can be used to exit dive mode more quickly upon surfacing�
Battery IconThe behavior of the battery icon can be changed here� Options are:
Surf+Warn: The battery icon displays always when on the surface� During dive it displays only if there is a low battery warning�
Always: The battery icon always displays�
Warn Only: The battery icon only appears when there is a low battery warning (this is how the Predator operates)�
Gas SelectThe style of Select Gas menu� Either Classic or New� Classic style shows one gas at a time in the large font� New style shows all gases at once, but in the small font�
Done
Advanced ConfigReset Adv. Config
Edit
‣Adv. Config 1End Dive DelayBat Icon
BlueO6Os
Surf + Warn
Title Color
Enter Adv. Config
Next Edit
System InfoBattery Info
Gas Select Classic

Shearwater Petrel SA & EXT
DocRevD61
Advanced Configuration 2
This section allows changing of PPO2 limits�
Warning: Do not change these values unless you understand the effect�
All values are in absolute atmospheres [ata] of pressure (1 ata = 1�013 Bar)
OC Min. PPO2PPO2 displays in flashing red when less than this value. (Default 0.19)
OC Max. PPO2PPO2 displays in flashing red when greater than this value. (Default1�65)
OC Deco. PPO2The decompression predictions (TTS and NDL) will assume that the gas in use at a given depth is the gas with the highest PPO2 that is less than or equal to this value� Also, the suggested gas switches (when the current gas is displayed in yellow) are determined by this value� If you change this value, please understand its effect� For example, if lowered to 1�50, then oxygen (99/00) will not be assumed at 20ft/6m� (Default 1�61)Note: Semi-closed (SC) PPO2 alarms and gas switch depths use the OC values�
CC Min. PPO2 PPO2 displays in flashing red when less than this value. (Default 0.40)
CC Max. PPO2PPO2 displays in flashing red when greater than this value. (Default 1�60)
Note: In both OC and CC mode, a “Low PPO2” or “High PPO2” alert is displayed when the limits are violated for more than 30 seconds�
‣Adv. Config 2OC Min. PPO2OC Max. PPO2OC Deco PPO2CC Min. PPO2CC Max. PPO2Done Edit
O.19 1.65 1.61 O.4O 1.6O

DocRevD62
Shearwater Petrel SA & EXT
Firmware Upload and Dive Log DownloadBluetooth communications are used for both Firmware Uploading and Dive Log Downloading�
NOTE: Upgrading the firmware resets decompression tissue loading. Plan repetitive dives accordingly�
Start a Bluetooth connection by selecting the Upload Log menu�The Petrel screen will switch from ”Initializing” to “Wait PC” which will have a countdown�
Now go back to the Shearwater Desktop� Click start from the open “Update Firmware Box”, or “Download Log.” The PC will then connect to the Petrel, and send the new firmware.
The Petrel screen will give percentile updates of receiving the firmware, then the Personal Computer will read “Firmware successfully sent to the computer”�
After receiving the new firmware, the Petrel will reset and display a message stating either firmware update success or failure.
Warning: During the update process, the screen may flicker or go blank for a few seconds� Do not remove the battery during the upgrade process�
DEPTH TIME STOP TIME
UploadNext
O
Upload Log .85 .86 .84

Shearwater Petrel SA & EXT
DocRevD63
Changing the BatteryNOTE: A large coin or washer is required for this section�
Turn off the PetrelIt is a good practice to turn off the Petrel before removing the battery� If removed while on, thenthere is a small chance (about 1 in 5000) that the deco tissues will be corrupted� The Petrel detects this using a cyclic redundancy check (CRC), so there is no danger� However, the tissues will be lost and repetitive dives will need to be planned accordingly�
Remove the battery capInsert the coin or washer into the battery cap slot� Unscrew by turning counter clockwise until the battery cap is free� Be sure to store the battery cap in a clean dry space�
Exchange the batteryRemove the existing battery by tilting the Petrel computer� Insert the new battery positive contact first. A small diagram on the bottom of the Petrel shows the proper orientation.
Accepted battery typesThe Shearwater Petrel can accept a wide variety of AA sized batteries� The Petrel can accept any AA sized (or 14500 size) battery that outputs a voltage between 0�9V and 4�3V�
Reinstalling the battery capIt is very important that the battery cap O-ring is clear of dust or debris� Carefully inspect your O-ring for any debris or damage and gently clean� It is recommended that you lubricate your battery cap’s O-ring on a regular basis with an O-ring lubricant compatible with Buna-N (Nitrile) O-rings� Lubricating helps ensure that the O-ring seats properly and does not twist or bunch�
Insert the battery cap into the Petrel and compress the battery contact springs� While the springs are compressed rotate the battery cap clockwise to engage the threads� Be sure not to cross thread the battery cap’s threads� Tighten the battery cap until snug� Do not over tighten the battery cap�

DocRevD64
Shearwater Petrel SA & EXT
Battery Types
After changing the battery, a screen will prompt for the battery typeto be entered�
The Petrel attempts to guess what type of battery is being used� Ifthe battery type is incorrect, it should be manually edited�
Having the battery type set correctly is important so that the Petrelcan give low battery warnings at the proper voltage levels�
Supported battery types are:
1�5V Alkaline: The common AA battery type that can be purchased at most supermarkets and electronics stores around the world� Not rechargeable� Inexpensive and reliable, they provide 35 hours of operation� Recommended�
1�5V Photo Lithium: Fairly common, but more expensive than alkalines� They provide about 55 hours of operation� Not rechargeable� Good for use in very cold water� Recommended�
1�2V NiMH: Common rechargeable batteries used in digital camerasand photo flashes. Can have high self discharge. Provide about 30 hoursof operation per charge� Can die quickly, so care should be taken to ensure sufficient charge prior to diving.
3�6V Saft: The Saft LS14500 lithium batteries provide very high energy density� However, their high cost makes other battery types a better choice for most users� Provide about 100 hours of operation� Can die quickly, so care should be taken to ensure sufficient charge prior to diving.
3�7V Li-Ion: Rechargeable14500 Li-Ion batteries provide about 35 hoursof operation per charge� Can be ordered from the internet� Have moregradual voltage drop as discharged, so easier to determine remainingcapacity than NiMH rechargeables� Good in cold water�
NOTE: Battery operating lifetimes are given with screen on medium brightness and at room temperature� Higher brightness and lowertemperature can reduce life� Lower brightness can increase life�

Shearwater Petrel SA & EXT
DocRevD65
Tissues ClearedSome conditions will cause the decompression inert gas tissue loadings to be cleared�When cleared, the tissues are set to being saturated with breathing air at the current barometric pressure�
The Petrel does not lock-out when the tissues are cleared� If the tissues are cleared, then the diver must take appropriate cautions when planning repetitive dives. The Petrel clearly notifies when tissues are cleared, so that the diver has the proper information to make responsible decisions�
For example, after changing the battery, you will see one of these two screens:
Conditions that cause the tissues to be cleared are:
Firmware Updates: A firmware update will clear the tissues. Therefore, updating the firmware in the middle of a dive trip is not a good idea�
User Request: You can clear the tissues manually in the System SetupSystem Setupmenu� Use the Reset To Defaults option� This will then prompt if you want to reset the settings only, the tissues only, or both�
Slow Battery Change: Quick battery changes do not normally cause the tissues to be cleared� A super capacitor stores energy to keep the clock running for at least 15 minutes during a battery change� If battery removed for longer than 15 minutes, then the tissues will be cleared�
Corruption: A 32-bit cyclic redundancy check (CRC) is used to verify the integrity of the tissues each time the Petrel is turned on� If corrupted, the tissues will be cleared� The mostlikely cause of corruption is removing the battery with the Petrel turned on� Therefore, turning the Petrel off before changing the battery is the best practice�
Changing To/From Gauge Mode: In gauge mode the Petrel does not know what gas you arebreathing and cannot track tissue loading� Therefore, when changing to or from gauge mode, the tissues are cleared�

DocRevD66
Shearwater Petrel SA & EXT
Error DisplaysThe system has several displays that alert an error condition�
Each of the alarms will display the message in yellow until dismissed� The error is dismissed by pressing SELECT�
This message will appear if the average PPO2 goes above 1�6 for more than 30 seconds�
This message will appear if the average PPO2 goes below 0�4 (�19 for OC or SC) for more than 30 seconds�
It is not unusual to get this error immediately after submerging with a manual CCR and a hypoxic mix. The first breath after submerging floods the loop with low PPO2 gas. The situation is usually resolved by increasing depth such that when the error is noticed, the PPO2 is no longer low� This condition will also cause the “LOW PPO2” display to appear� Here, the computer does not have two sensors that have confirming values� There is no way to know the actual PPO2, and the average PPO2 will be calculated as 0�11 (the lowest value is the most conservative for decompression calculations)�
This message will appear when your internal battery is low for 30 seconds� The battery needs to be changed� The computer will also flash the battery symbol red�
DEPTH TIME STOP TIME
1.6O 1.62 1.61Error ConfirmHIGH PPO2
45
DEPTH TIME STOP TIME
.3O .32 .31Error ConfirmLOW PPO2
45
DEPTH TIME STOP TIME
.3O .62 .11Error ConfirmLOW PPO2
45
DEPTH TIME STOP TIME
1.3O 1.32 1.31 Error CONFIRM LOW BATTERY INT
45
Limitations of Alarms
All alarm systems share common weaknesses�
They can alarm when no error condition exists (false positive)� Or they can fail to alarm when a real error condition occurs (false negative)�
So by all means respond to these alarms if you see them, but NEVER depend on them� Your judgement, education, and experience are your best defenses� Have a plan for failures, build experience slowly, and dive within your experience�

Shearwater Petrel SA & EXT
DocRevD67
This alarm is a notification that there has either been a very fast ascent for a short period of time, or that there has been an ascent of more than 66 fpm / 20 mpm maintained for over a minute� This alarm may return after being dismissed if the condition occurs again�
The alarm occurs when the diver has been above the minimum depth for a decompression stop for more than one minute� This alarm will only appear once during a dive, but it will also appear once on the surface after the dive�
This alarm will show when the decompression tissues are cleared� All decompression information has been lost�
This alarm happens when the computer does not complete all of its tasks in the time allotted� It can happen occasionally from a transient problem like a battery bounce after an impact� It can also be the result of a hardware problem�
This reset shows up after a software update� This is the normal event that shows the computer has been rebooted after the software update�
This is not an exhaustive list� Please contact Shearwater if you experience any unexpected errors�
DEPTH TIME STOP TIME
1.3O 1.32 1.31 Error CONFIRM FAST ASCENT
45
DEPTH TIME STOP TIME
1.3O 1.32 1.31 Error CONFIRM MISSED DECO
45 5O 2
DEPTH TIME STOP TIME
1.3O 1.32 1.31 Error CONFIRM TISSUES CLEARED
45
The center row also shows permanent "Low PPO2" or "High PPO2" messages when the PPO2 is not in a safe range� These message will clear automatically once a safe PPO2 is restored�
DEPTH TIME STOP TIME
1.3O 1.32 1.31Error ConfirmUPGRADE RESET
45
DEPTH TIME STOP TIME
1.3O 1.32 1.31Error ConfirmWATCHDOG RESET
45

DocRevD68
Shearwater Petrel SA & EXT
Storage and MaintenanceThe Petrel dive computer should be stored dry and clean�
Do not allow salt deposits to build up on your dive computer� Wash your computer with fresh water to remove salt and other contaminants� Do not use detergents or other cleaning chemicals as they may damage the Petrel dive computer� Allow to dry naturally before storing�
Do not wash under high pressure jets of water as it may cause damage to the depth sensor�
Store the Petrel dive computer out of direct sunlight in a cool, dry and dust free environment� Avoid exposure to direct ultra-violet radiation and radiant heat�
ServicingThere are no user serviceable parts inside the Petrel�
Do not tighten or remove the faceplate screws�
Clean with water ONLY� Any solvents may damage the Petrel dive computer�
Service of the Petrel may only be done at Shearwater Research, or by any of our authorized service centers�
Your nearest service center can be found at www�shearwaterresearch�com/contact
Fischer Pin-outOn the EXT model, the Fischer connector pin-out is as shown (looking into socket on Petrel)�
1 = Common - (GND)
2 = O2 Sensor 1+
3 = O2 Sensor 2+
4 = O2 Sensor 3+

Shearwater Petrel SA & EXT
DocRevD69
SpecificationsSpecification Standalone (SA) Model External PPO2 (EXT) ModelOperating Modes OC
OC/CC (internal PPO2)Gauge
OCOC/CC (internal PPO2)OC/CC (external PPO2)OC/SC (external PPO2)Gauge
Decompression Model Bühlmann ZHL-16C with GFVPM-B and VPM-B/GFS (optional)
Pressure (depth) sensor Piezo-resistiveRange 0 Bar to 14 BarAccuracy +/-20 mBar (at surface)
+/-100 mBar (at 14bar)Crush Depth Limit 30 Bar (~290msw)Surface Pressure Range 500 mBar to 1080 mBarDepth of dive start 1�6 m of sea waterDepth of dive end 0�9 m of sea waterCompass Resolution 1° (Petrel 2 only)Compass Accuracy +/- 5° (Petrel 2 only)Operating Temperature Range +4ºC to +32ºCShort-Term (hours) Temperature Range -10ºC to +50ºC
Long-Term Storage Temperature Range +5ºC to +20ºC
Battery AA Size, 0�9V to 4�3VBattery Operating Life (Display Medium Brightness)
35 Hours (AA 1�5V Alkaline)100 Hours (SAFT LS14500)
External Connector Socket N/A Fischer 103, 7-pinExternal O2 Sensor Type N/A "10mV in air" Type:
Zero offsetLinear response to PPO2
Temp� comp� in sensorCommon negative
Range 0mV to 100mVExternal O2 Sensor Input Resistance
N/A 100kΩ
Weight 0�4kgSize (W X L X H) 84mm X 74mm X 38mm 100mm X 74mm X 38mm

DocRevD70
Shearwater Petrel SA & EXT
FCC Warninga) USA-Federal Communications Commission (FCC)This equipment has been tested and found to comply with the limits for a Class B digital device, pursuant to Part 15 of FCC Rules� These limits are designed to provide reasonable protection against harmful interference in a residential installation� This equipment generates, uses, and can radiate radio frequency energy� If not installed and used in accordance with the instructions, it may cause harmful interference to radio communications� However, there is no guarantee that interference will not occur in a particular installation�
If this equipment does cause harmful interference to radio or television reception, which can be determined by tuning the equipment off and on, the user is encouraged to try and correct the interference by one or more of the following measures:• Reorient or relocate the receiving antenna• Increase the distance between the equipment and the receiver�• Connect the equipment to outlet on a circuit different from that to which the receiver is connected�• Consult the dealer or an experienced radio/TV technician for help�Any changes or modifications not expressly approved by the party responsible for compliance could void the user’s authority to operate the equipment�
Caution: Exposure to Radio Frequency Radiation�This device must not be co-located or operating in conjunction with any other antenna or transmitter�Contains TX FCC ID: T7VEBMU
Industry Canada Warningb) Canada - Industry Canada (IC)This device complies with RSS 210 of Industry Canada�Operation is subject to the following two conditions:(1) this device may not cause interference, and(2) this device must accept any interference, including interference that may cause undesired operation of this device�L‘utilisation de ce dispositif est autorisée seulement aux conditions suivantes :(1) il ne doit pas produire d’interference, et(2) l’utilisateur du dispositif doit étre prêt à accepter toute interference radioélectrique reçu, même si celle-ci est susceptible de compromettre le fonctionnement du dispositif�
Caution: Exposure to Radio Frequency Radiation�The installer of this radio equipment must ensure that the antenna is located or pointed such that it does not emit RF field in excess of Health Canada limits for the general population; consult Safety Code 6, obtainable from Health Canada’s website www�hc-sc�gc�ca/ewh-semt/pubs/radiation/radio_guide-lignes_direct-eng�php#sc6Contains TX IC: 216QEbzzMU