observing the moon
TRANSCRIPT

Observing the MoonThe modern astronomer’s guide
GERALD NORTH BSc

published by the press s yndic ate of the universit y of c ambridgeThe Pitt Building, Trumpington Street, Cambridge, United Kingdom
c ambridge universit y pressThe Edinburgh Building, Cambridge CB2 2RU, UK http://www.cup.cam.ac.uk40 West 20th Street, New York, NY 10011-4211, USA http://www.cup.org10 Stamford Road, Oakleigh, Melbourne 3166, AustraliaRuiz de Alarcón 13, 28014 Madrid, Spain
© Gerald North 2000
This book is in copyright. Subject to statutory exception andto the provisions of relevant collective licensing agreements,no reproduction of any part may take place without thewritten permission of Cambridge University Press.
First published 2000
Printed in the United Kingdom at the University Press, Cambridge
Typeface Swift Regular 9.25/13pt. System QuarkXPress™ [se ]
A catalogue record for this book is available from the British Library
Library of Congress Cataloguing in Publication data
North, Gerald.Observing the moon : the modern astronomer’s guide / Gerald North.
p. cm.Includes index.ISBN 0 521 62274 3 (hc.)1. Moon–Observers’ manuals. I. Title.QB581.N67 2000523.3 21–dc21 99-044584
ISBN 0 521 62274 3 hardback

Preface vii
Acknowledgements ix
1 “Magnificent desolation” 1
1.1 An orbiting rock-ball 2
1.2 Phases and eclipses 4
1.3 Gravity and the tides 14
1.4 More about the motions
of the Moon – libration 15
1.5 Co-ordinates on the
surface of the Moon 20
1.6 Occultations 22
1.7 Timing and recording
occultations 26
2 The Moon through the looking
glass 29
2.1 The Moon in focus 30
2.2 The pioneering
selenographers 41
3 Telescopes and drawing
boards 47
3.1 What type of telescope
do you need? 48
3.2 How big a telescope do
you need? 55
3.3 Eyepieces and
magnification 57
3.4 Making the best of what
you have 59
3.5 Drawing the Moon 61
4 The Moon in camera 69
4.1 Films for lunar
photography 71
4.2 Tripods and telephoto
lenses, focal ratios and
exposures 74
4.3 Lunar photography
through the telescope –
at the principal focus 80
4.4 High-resolution
photography 84
4.5 Slow films and large
effective focal ratios 92
4.6 Processing the film and
techniques to bring out
detail in printing 93
4.7 Photography through
coloured filters 95
4.8 Further reading 97
5 Moonshine and chips 99
5.1 Some basic principles of
CCD astrocameras 100
5.2 CCD astrocameras in
practice 102
5.3 Videoing the Moon 106
5.4 Image processing 117
5.5 Getting hard copy 118
5.6 Some CCD equipment
suppliers 124
6 The physical Moon 125
6.1 The first lunar scouts 125
6.2 Men on the Moon 128
6.3 The post-Apollo Moon 132
6.4 Not green cheese but . . . 133
6.5 Genesis of the Moon 134
6.6 The Moon’s structure 135
v
CONTENTS

6.7 The evolution of the
Moon – a brief overview 137
6.8 Lunar chronology 139
6.9 Filling in the details 140
7 The desktop Moon 145
7.1 The Lunar Sourcebook 145
7.2 Spacecraft imagery 146
7.3 The Internet 146
7.4 Lunar ephemerides 147
7.5 Measuring lunar surface
heights 147
7.6 Maps, globes, posters and
charts 150
7.7 Key map for Chapter 8 151
8 ‘A to Z’ of selected lunar
landscapes 155
8.1 Agarum, Promontorium 156
8.2 Albategnius 159
8.3 Alpes, Vallis 159
8.4 Alphonsus 161
8.5 Apenninus, Montes 164
8.6 Ariadaeus, Rima 168
8.7 Aristarchus 171
8.8 Aristoteles 177
8.9 Bailly 179
8.10 Bullialdus 181
8.11 Cassini 184
8.12 Clavius 187
8.13 Copernicus 190
8.14 Crisium, Mare 198
8.15 Endymion 204
8.16 Fra Mauro 208
8.17 Furnerius 213
8.18 ‘Gruithuisen’s lunar
city’ 219
8.19 Harbinger, Montes 222
8.20 Hevelius 225
8.21 Hortensius 232
8.22 Humorum, Mare 235
8.23 Hyginus, Rima 243
8.24 Imbrium, Mare 246
8.25 Janssen 256
8.26 Langrenus 260
8.27 Maestlin R 265
8.28 Messier 267
8.29 Moretus 269
8.30 Nectaris, Mare 271
8.31 Neper 276
8.32 Pitatus 279
8.33 Plato 283
8.34 Plinius 290
8.35 Posidonius 296
8.36 Pythagoras 299
8.37 Ramsden 302
8.38 Regiomontanus 306
8.39 Russell 311
8.40 Schickard 316
8.41 Schiller 320
8.42 Sirsalis, Rimae 324
8.43 “Straight Wall”
8.43 (Rupes Recta) 329
8.44 Theophilus 332
8.45 Torricelli 337
8.46 Tycho 339
8.47 Wargentin 346
8.48 Wichmann 349
9 TLP or not TLP? 353
9.1 The mystery unfolds 353
9.2 Categories of TLP 358
9.3 The mystery continues 359
9.4 What might be the
cause(s) of TLP? 368
9.5 Possible causes of bogus
TLP 370
9.6 TLP observing
programme 373
Index 375
vi CONTENTS

The moon through the looking glass
Who first looked at the Moon through a telescope? The honest answer is
that we do not know. We cannot even be sure as to when the telescope was
invented, let alone who was first to look at the Moon through one.
Until a few years ago most historians had settled upon 1608 as the prob-
able year of invention of the telescope and a Dutch spectacle maker, Hans
Lippershey, as its probable inventor. Recently, however, evidence for an
earlier invention has come to light. For instance, an Englishman, Thomas
Digges, is thought to have produced a form of telescope sometime around
1555.
What we can be certain of is that Galileo heard of the Dutch telescope
and, with few clues to help him, he did manage to design and build a small
refracting telescope for himself in 1609. Shortly thereafter he built other
slightly better and more powerful versions (though still extremely imper-
fect and lacking in magnification by modern standards) and we know that
he used them to observe the celestial bodies, including the Moon.
Galileo made sketches of the lunar surface. An Englishman, Thomas
Harriott, had managed to obtain a telescope from Europe and also used
it to observe the Moon at about the same time as Galileo. Harriott even
produced what was very probably the first complete map of the Moon’s
Earth-facing side to have been made using optical aid. Despite the imper-
fections of his telescope, Harriott’s map does show features we can recog-
nise today.
You might have expected the coarsest features of the Moon to have been
charted before the invention of the telescope. Undoubtedly they were,
though the earliest ‘map’ produced without optical aid that we know of is
that by William Gilbert. This was published posthumously in 1651, though
it is supposed that he made it in 1600, or at some time close to that date,
approximately three years before his death.
29
CHAPTER 2

Although the very beginnings of lunar study might be shrouded in the
mists of time, all that occurred after Galileo’s era is quite well documented.
The Moon had become a subject for serious scientific study and astronomers
set about mapping its surface features. As telescopes improved in their
power and quality, so successive observers produced better and better maps.
An essential for any cartographic exercise is the standardisation of
nomenclature. Naming systems were devised by Langrenus in 1645 and by
Johannes Hevelius in 1647. As an aside, Hevelius’s maps were notable
because they were the first to take account of, and to represent, the regions
of the Moon that were only shown as a result of libration. Despite this
advance, Hevelius’s system of nomenclature was quickly superseded. Our
modern scheme of naming lunar surface features really stems from that
devised by Giovanni Riccioli. Riccioli was an Italian Jesuit. A pupil of his,
Francesco Grimaldi, had made a telescopic study of the Moon. Riccioli com-
bined Grimaldi’s observations into a map, which was published in 1651.
Before taking our story further, it will benefit us to pause to consider
the appearance of the Moon through a telescope and to get a brief overview
of the modern nomenclature of the main types of surface features revealed
by one of these wonderful devices.
2.1 THE MOON IN FOCUS
Even a casual glance made without any form of optical aid reveals that the
Moon is not a blank, shining disk. Aside from the phases, the Moon’s silvery
orb clearly shows patchy dark markings. These give rise to the “Man in the
Moon” (and the variety of animals and maidens which feature in other folk
lores) effect which is so obvious around the time of the full Moon. Figures
2.1–2.5 show the general appearance of the Moon at successive stages in its
lunation, as it is seen through a normal astronomical telescope stationed
in the Earth’s northern hemisphere – in other words, with south upper-
most. Since this book is intended for the amateur telescopist and since
most of its readers are expected to reside in the northern hemisphere, all
the telescopic views of the Moon in this book are orientated with south at
least approximately uppermost.
The large dark areas are known as maria, Latin for ‘seas’; the singular
form is mare. Thanks to Riccioli, we have such charming names as Mare
Imbrium (Sea of Showers), Mare Serenitatis (Sea of Serenity), and Mare
Tranquillitatis (Sea of Tranquillity) to encounter on the Moon.
In Galileo’s time it was widely believed that the patches on the Moon
actually were seas. Admittedly, a few scholars considered the darker areas
to be the land masses and the rest of the Moon’s globe to be ocean-covered.
Much later the true, arid, nature of the Moon was recognised and the dif-
ference in hue was taken to indicate a difference in chemical composition.
30 THE MOON THROUGH THE LOOKING GLASS

In pre-space-age times the dark plains were termed lunarbase, while the
lighter-hued materials were termed lunarite.
As well as the ‘seas’, we have one ‘ocean’ (oceanus): Oceanus Procellarum
(Ocean of Storms) and several ‘bays’ (sinus for the singular case), such as
Sinus Iridum (Bay of Rainbows). These are the larger dark areas. In addition
there are a number of ‘marshes’ (paludes), such as Palus Somnii (Marsh of
Sleep) and ‘lakes’ (lacus for the singular case), for example Lacus Mortis
2.1 THE MOON IN FOCUS 31
Figure 2.1 The 4-day-oldMoon, photographed byTony Pacey. He used his10-inch (254 mm)Newtonian reflector at itsf/5.5 Newtonian focus todirectly image the Moononto Ilford FP4 film, subse-quently processed inAculux developer. The1/125 second exposure wasmade on 1991 January 19d.The details of the precisetime (from which I couldwork out the value of theSun’s selenographic colon-gitude) was not given.However, I estimate theSun’s selenographic colon-gitude as approximately307° at the time of theexposure.

(Lake of Death). These are the smaller mare-type dark plains. They are all
easily visible to the user of a pair of binoculars. The lunar equivalent of the
Earthly ‘cape’ is the promontorium. An example is the Promontorium
Agarum (Cape Agarum) on the south-eastern (IAU co-ordinates) border of
the Mare Crisium.
You will find a coarse map of some named lunar features presented in
Chapter 7 (p. 152) of this book. In addition, many of the features named in
32 THE MOON THROUGH THE LOOKING GLASS
Figure 2.2 The 6-day-oldMoon photographed byTony Pacey. Same arrange-ment as for Figure 2.1 buthe used a 1/60 secondexposure on Ilford Pan Ffilm, processed in ID11developer. The photographwas taken on 1992 January10d 19h 00m UT, when thevalue of the Sun’s seleno-graphic colongitude was327°.5.
this chapter are discussed in detail in Chapter 8 and images/illustrations
of them under differing lighting conditions are included there.
Of course, the view grows more detailed when a proper astronomical
telescope is used. Even a small telescope reveals a mass of detail and the
sight of the lunar surface in anything larger than a 3- or 4-inch (76 mm or
102 mm) telescope is impressive to say the least. I find that the appearance
of the Moon’s surface through such a telescope, and using a magnification
of the order of 3100, reminds me of plaster of Paris. The waterless ‘seas’
and other dark plains appear various shades of steely grey and the rougher,
crater-strewn, ‘highlands’ that make up the rest of the surface seem greyish
white.
2.1 THE MOON IN FOCUS 33
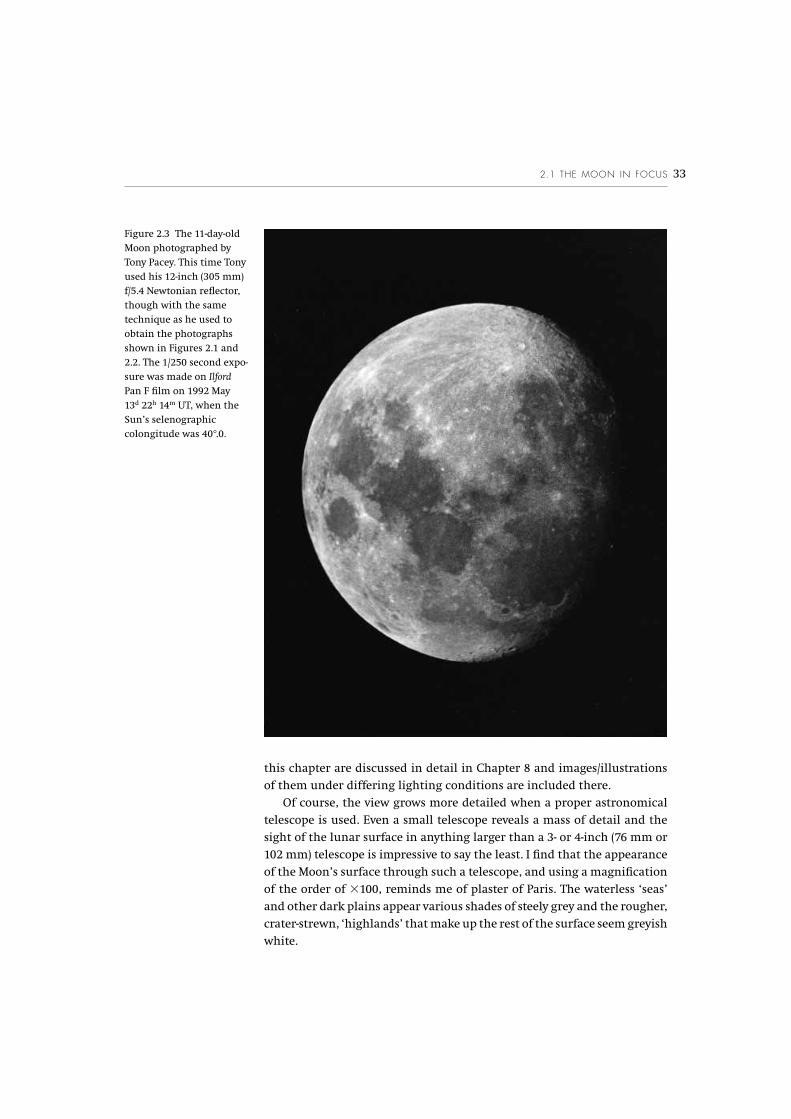
Figure 2.3 The 11-day-oldMoon photographed byTony Pacey. This time Tonyused his 12-inch (305 mm)f/5.4 Newtonian reflector,though with the sametechnique as he used toobtain the photographsshown in Figures 2.1 and2.2. The 1/250 second expo-sure was made on IlfordPan F film on 1992 May13d 22h 14m UT, when theSun’s selenographiccolongitude was 40°.0.

When the Moon is close to full (as shown in Figures 2.3, 2.4 and 2.5) its
surface seems dazzlingly bright and covered in bright streaks and spots
and blotches. At these times it is difficult to imagine that the Moon is made
up of relatively dark rock. In fact the Moon’s albedo is 0.07, meaning that it
reflects, on average, 7 per cent of the light falling on it.
Surface features are difficult to make out near full Moon because the
sunlight is pouring onto the lunar surface from almost the same direction
as we are looking from. This means we cannot see the shadows, so we see
very little in the way of the surface relief as a result.
Away from the times when the Moon is full the effect is far less confus-
ing. Shadowing then makes the lunar surface details stand out. This is espe-
cially so close to the terminator, where the sunlight is striking the Moon at
a very shallow angle. This is evident even by comparing the wide-angle (and
hence low-resolution) views shown in Figures 2.1 to 2.5. Notice how the
surface relief along the terminator in Figures 2.1 and 2.2 is virtually invis-
ible in the corresponding positions in Figures 2.3, 2.4 and 2.5.
Under low-angle lighting even the lunar maria are shown to be less
than perfectly smooth. Dorsum, networks of ridges crossing the maria, then
become obvious (see Figure 2.6). Dorsa are ridges occurring elsewhere than
on the lunar maria. They are named after people, for example Dorsa
Andrusov and Dorsum Arduino, but the average lunar observer will not
have occasion to use these names.
34 THE MOON THROUGH THE LOOKING GLASS
Figure 2.4 The 14.7-day-oldMoon photographed byTony Pacey on 1990December 31d 20h 15m UT,when the Sun’s seleno-graphic colongitude was78°.7. He used a 1/1000second exposure. All otherdetails as for Figure 2.1.

If the lunar ‘seas’ are the easiest features to see with the minimum of
optical aid, then the craters must count as the next-most-dominant surface
feature on the Moon. These saucer-shaped depressions range in size from
the smallest resolvable in telescopes (and smaller, down to just a few
metres across, as revealed by the manned landings) to a few that are several
hundred kilometres in diameter. The smaller craters vastly outnumber the
larger ones.
Following the scheme originated by Riccioli, craters are given the
names of famous personalities, most usually astronomers. If it strikes you
that this is potentially a rather contentious system then you are correct!
Over the years many selenographers had taken it upon themselves to
modify the nomenclature assigned by the earlier workers, often putting
their own names and the names of their friends onto their maps. The
result was that a particular crater might have different names on differ-
ent maps. Even more confusing, a particular name might refer to differ-
ent craters on different maps! Fortunately, the system has been
overhauled by the International Astronomical Union in modern times.
Under the IAU-standardised scheme, craters are still named after famous
personalities (with the proviso that the personality is deceased – the only
exception to that being the Apollo astronauts) and most of the older
assigned names have been retained. The IAU nomenclature is most
2.1 THE MOON IN FOCUS 35
Figure 2.5 The 16-day-oldMoon photographed byTony Pacey on 1992November 11d 21h 45m UT,when the Sun’s seleno-graphic colongitude was100°.9. The exposure givenwas 1/500 second. Otherdetails as for Figure 2.3.

definitely the one to be adhered to and I would advise caution when using
pre-1975 maps.
When seen close to the terminator, craters are largely filled with deep-
black shadow and give the impression of being very deep holes. In reality
they are rather shallow in comparison to their diameters and can often be
quite difficult to identify when they are seen well away from the termina-
tor. Craters saturate the highland areas of the Moon (see Figure 2.7) but
there is an obvious paucity of larger craters on the maria. An observer using
36 THE MOON THROUGH THE LOOKING GLASS

a typical amateur-sized telescope (around 200 mm aperture) can resolve
craters down to about 1–2 km in size and yet many areas of the maria
appear craterless. Nonetheless, the photographs sent back by close-range
orbiting probes show that even these areas are saturated with small and
very small craters. Where there are recognised chains of small craters,
these are termed catena and are named after the nearest most appropriate
named feature. Catena Abulfeda is one example; a 210 km-long chain of
small craters near the major crater Abulfeda.
Often the floors of large craters are cluttered with smaller craters and
there are many examples of craters breaking into others. In almost all
the cases it is the smaller crater which breaks into the larger. Clavius
(see Section 8.12), Gassendi (Section 8.22), Posidonius (Section 8.35) and
Cavalerius (Section 8.20) are examples of these.
Craters differ in more than their sizes. Some, such as Copernicus, have
elaborately terraced walls. Copernicus (Section 8.13) is also an example of
one of the many craters to have centrally positioned mountain masses.
Other craters, such as Plato (Section 8.33), have their floors flooded with
mare material. Some craters have their walls broken down and are almost
totally immersed in mare material. Some craters have bright interiors,
such as Tycho (see Section 8.46), which is also one of the best examples of
craters which are the source of bright streaks of material, termed rays,
which extend radially from the source crater. Tycho is very easy to see
through a pair of binoculars any time close to full Moon, appearing as a
bright spot in the Moon’s southern highlands. The rays also seem to extend
more than half-way around the Moon’s globe. Figure 2.5 shows them par-
ticularly well. Other craters have relatively dark interiors and no associated
ray systems. All this tells a story and I will have much more to say about
crater morphologies and the evolution of the Moon and its various surface
details later in this book. For now, we will continue our extremely brief
survey of the main types of lunar surface feature and nomenclature.
After the maria and the craters, mountains (generic name mons) and
mountain ranges and groups of peaks (montes) vie for the attention of the
telescope-user. They have been named after their Earthly counterparts, so
one can find the Apennine Mountains (Montes Apenninus – see Section 8.5)
and Carpathian Mountains (Montes Carpatus – close to the crater
Copernicus – see Section 8.13) on the Moon. The lunar highlands are very
rough and hummocky, whereas the maria are much smoother. However,
mountain ranges often border a mare. Isolated peaks also exist, sometimes
actually on a mare. Examples of this type are Mons Piton and Mons Pico
(close to the crater Plato – see Section 8.33), situated on the Mare Imbrium.
Relatively small blister-like swellings on the lunar surface are termed domes
but these are not given specific names and are, instead, identified by their
2.1 THE MOON IN FOCUS 37
Figure 2.6 With sunlightilluminating the surface ata low angle even the lunarmaria appear far fromcompletely smooth.Patterns of ridges cross thepart of the Mare Nubiumthat is shown in thisCatalina Observatory pho-tograph. The instrumentused was the observatory’s1.5 m reflector and thephotograph was taken on1966 May 29d 04h 41m UT,when the Sun’s seleno-graphic colongitude was22°.6. (Courtesy ProfessorE. A. Whitaker and theLunar and PlanetaryLaboratory, Arizona.)

proximity to a known major location in the same way as for the crater
chains. The easiest domes to locate are those near the crater Hortensius.
These are described in Section 8.21.
The closest match to an Earthly cliff on the Moon’s surface is an escarp-
ment (a sudden rise in the ground which continues along an approxi-
mately linear, or slowly curved path). The generic name for these features
are rupes, an example being the Altai Scarp (Rupes Altai – see Sections 8.30
and 8.44) on the Moon’s south-eastern quadrant.
As well as the craters and the various raised formations, features sunk
38 THE MOON THROUGH THE LOOKING GLASS

below the Moon’s surface abound. Gorge-like valleys, called vallis, such as
the huge Rheita Valley (Vallis Rheita – see Section 8.25) are at one extreme
of the size range. Much finer (though often longer) sinuous channels,
known as rilles (obsolete spelling rills; in old books you will also find them
often referred to as clefts, particularly so the larger examples), also cross
the lunar terrain. Several are shown in Figure 2.8. As far as naming them
goes, rima is used for single examples and rimae for networks or groups of
rilles. Hence, Rima Hadley and Rimae Arzachel. Many examples are
detailed in Chapter 8. All the rilles and most of the lunar escarpments
and valleys are named after the closest appropriate major feature. The
sole exceptions are: Rupes Altai, Rupes Recta, Vallis Bouvard and Vallis
Schröteri.
2.1 THE MOON IN FOCUS 39
Figure 2.7 The crater-satu-rated southern highlandsof the Moon, photo-graphed using the 1.5 mreflector of the CatalinaObservatory, Arizona,on 1966 September5d 11h 30m UT, when theSun’s selenographiccolongitude was 155°.5.(Courtesy Professor E. A.Whitaker and the Lunarand Planetary Laboratory,Arizona.)
Figure 2.8 Systems of rillessituated near the centre ofthe Earth-facing hemi-sphere of the Moon.Photograph taken usingthe 74-inch (1.9 m)reflector at Kottamia,Egypt, on 1965 August4d 20h 43m UT. (Courtesy DrT. W. Rackham.)

All the foregoing described features can be seen through small tele-
scopes. Even a humble 3-inch (76 mm) refractor is sufficient to show many
rilles, despite their being hard to resolve due to their thinness, when they
are seen under low-angle illumination from the Sun (and so largely filled
with black shadow). They were first noted by Christian Huygens with the
primitive telescopes of the seventeenth century.
As I indicated earlier, the Moon appears rather monochrome when seen
with a small telescope (aside from the prismatic splitting of light through
our atmosphere which causes images seen in a telescope often to be spoiled
by colour fringing – discussed later in this book). However, if a sufficient
aperture is used then some coloured tints can become visible to the
observer. Or at least that is the case for many observers. Sensitivity to
colours varies enormously from person to person. Some observers fail to
see colour in anything they look at through the telescope. For a few lucky
individuals the Universe is a very colourful place. Others can see some
colours through the telescope eyepiece, perhaps just the strongest hues on
Jupiter and the overall colours of Mars and Saturn.
I am fairly fortunate in that I can easily see colours in many objects
through a telescope of sufficient size, though I must say that I have noticed
some reduction in my colour-sensitivity as I have got older. I find that I can
see subtle coloured tints on the Moon’s surface when using a sufficiently
low magnification on a reasonably large telescope; for example, 3144 on my
181⁄4-inch (0.46 m) Newtonian reflector. The overall colour of the rough high-
lands are still greyish, though perhaps a little ‘creamier’ in colour than
through a smaller telescope, but the large plain of the maria seem tinted
with faint blues and greens. In particular, the Mare Tranquillitatis seems
especially blue when seen near full Moon. The interiors of some craters,
such as Langrenus, appear with a faint brownish or even a golden-yellow
tint at these times. Aristarchus appears slightly bluish-white while the
raised plateau on which it stands seems particularly brownish to my eyes.
Of course, these colours are very far from accurate. Spectroscopic anal-
ysis reveals that the surface of the Moon is really various shades of brown.
The human eye has a tendency to normalise the overall colour of the Moon
as white. Hence the different shades of brown manifest as the apparent
colours seen. A slightly ‘redder’ brown produces an apparent yellowish or
brownish tint, while a ‘cooler’ shade of brown seems to the observer to be
a greenish or bluish tint.
Figure 2.9 shows a specially prepared photograph on which all the
usual grey-scale tones have been obliterated. Instead, the shades of grey
represent colour differences. Redder tones show up as lighter, and bluer
tones show up as darker. Note the relative blueness of the maria and the
relative redness of the interiors of many craters. As far as I can ascertain
40 THE MOON THROUGH THE LOOKING GLASS

only a minority of people can perceive these subtle tints through even a
large telescope. To most users of small telescopes, the Moon is a world of
black and white, and steely greys.
2.2 THE PIONEERING SELENOGRAPHERS
As the seventeenth century progressed so refracting telescope object glasses
were made which were a little larger than the first, tiny, examples. However,
these lenses were single pieces of glass and so suffered badly from chro-
matic aberration. The remedy for this aberration (and to an extent the other
aberrations that arose mainly from the crudeness of the methods of lens
manufacture) was to make the lens of larger focal ratio (and hence greater
focal length). To reduce the aberrations to a tolerable level, the focal length
had to increase out of proportion to the aperture. So, longer and longer
refracting telescopes were made. In some cases the focal lengths reached
hundreds of feet (several tens of metres). Even then, the sizes of the objec-
tive lenses were still less than 9 inches (23 cm)! Despite this handicap, sele-
nography, the charting of the Moon’s surface features, steadily improved.
2.2 THE PIONEERING SELENOGRAPHERS 41
Figure 2.9 Colour-differ-ence (610 nm – 370 nm).photograph of the MoonThe normal grey-scale hasbeen eliminated. Lighterregions are redder anddarker regions are bluer.

Probably the best map of the Moon made in the seventeenth century
was that published in 1680 by Cassini. His 54 cm map (54 cm representing
the Moon’s diameter), is of remarkable quality considering the cumber-
some telescopes he had to work with. Not only is it artistically a fine piece
of work but also the positional accuracy of the features it depicts is very
good for the time (admittedly it is hardly up to modern standards in this
respect!). It showed unprecedented fine details, such as the minute craters
(which we now know as secondary craters) around Copernicus. It is also more
comprehensive in its depiction of features than earlier works, for instance
showing the ray systems that surround many bright craters (de Rheita was,
arguably, the first to comprehensively chart the rays in 1645) and some-
thing of the variations of hue of the lunar maria.
The later years of the seventeenth century also saw the invention of the
common forms of reflecting telescope (the Newtonian, the Cassegrain and
the now obsolete Gregorian) which eventually led to more manageable and
yet higher-quality instruments, and ever better lunar observations.
In Germany Tobias Mayer produced a small, though accurate, map, pub-
lished posthumously in 1775. He was notable in that he was the first to
introduce a system of co-ordinates for lunar surface features, having made
his measurements with the aid of a primitive eyepiece micrometer.
As far as the ‘leading lights’ of selenography go, Germans dominated
the period from Tobias Mayer’s work through to the late nineteenth
century. Perhaps the most famous of these was Johann Hieronymous
Schröter. Schröter was a magistrate at Lilienthal (near Bremen, in
Germany), where he had enough wealth and leisure time to set up his own
observatory. He had various telescopes, including two by William Herschel.
His largest (not by Herschel) was a 20-inch (0.51 m) Newtonian reflector of
about 8 metres focal length. Completed in 1793, it was the largest telescope
in Europe at the time and was surpassed only by William Herschel’s 48-
inch (1.2 m) of 40 feet (12 m) focal length, though it is thought that the
optical quality of the 20-inch was not particularly good.
From 1778 to 1813, Schröter devoted considerable amounts of time and
energy to observing the Moon and planets. He set himself the task of making
the most detailed map of the Moon to date and he made hundreds of lunar
drawings to that end. He used a crude eyepiece micrometer to aid his work,
including making measurements of the heights of lunar mountains. He was
the first to make a really detailed study of the crack-like rilles. In the end he
did not complete his proposed lunar map but instead published the com-
pleted sections in a book, Selenotopographische Fragmente, in 1791 (a second part
was completed and a bound two-volume edition published in 1802). Schröter’s
work attracted much attention and other selenographers undoubtedly were
inspired by the (sometimes controversial) results issuing from Lilienthal.
42 THE MOON THROUGH THE LOOKING GLASS

On the downside, Schröter was not a particularly good draughtsman
and he certainly made his fair share of mistakes. In particular he thought
he had detected changes on the lunar surface over the years during which
he carried out his observations and he was convinced that the Moon pos-
sessed a dense atmosphere. Of course, neither are true.
A cruel blow was to befall Schröter when, in April 1813, invading French
soldiers looted and then burnt Lilienthal to the ground. His observatory
was also looted and then destroyed. At that time Schröter was 67 years old
and his health was already in decline. It was too late for him to rebuild his
observatory and begin again. Undoubtedly the shock and sorrow he suf-
fered hastened his death. He died three years later.
Wilhelm Lohrmann, of Dresden, also attempted to map the entire face
of the Moon in great detail. The first sections of his map were published in
1824 but Lohrmann was eventually defeated by failing eyesight. However,
he did manage a general map of the surface of 39 cm diameter. The quest
was taken up by Wilhelm Beer and his collaborator Johann Mädler. Beer
had a 33⁄4-inch (95 mm) refractor at Berlin and, together, they used this tele-
scope to study the Moon in detail for over a decade. They eventually (1837)
produced a highly detailed and very accurate map. On it, the whole Moon
had a diameter of just over 0.9 m. It remained unsurpassed for decades to
follow, a significant achievement given the diminutive size of the telescope
they used. Beer and Mädler’s map was supplemented with their book Der
Mond. They portrayed the Moon as utterly dead and changeless, in complete
contrast to the picture of it painted by Schröter.
Whereas the Moon of Schröter, with its supposed changes and active
weather tended to excite the interest of others, that portrayed by Beer and
Mädler tended to do the opposite. Given, also, the high quality of their
map, the general feeling was that ‘the last word’ had been stated as regards
lunar studies. Few others studied the Moon seriously for more than the
next quarter-century.
However, one exception was Julius Schmidt. Schmidt had a lifelong
interest in the Moon. After posts at various German observatories, he
became Director of the Athens Observatory, in Greece, in 1858. He used the
7-inch (178 mm) refracting telescope there to continue his lunar studies. As
well as revising the sections of the lunar maps of Lohrmann, and then
going on to complete the mapping of the missing sections, Schmidt was
eventually to complete one of his own by 1878.
Schmidt’s map, 1.9 m to the Moon’s diameter (the map was divided into
25 sections) was incredibly detailed as well as being reasonably accurate. It
recorded and placed some 32 856 individual features. It took over the torch
from Beer and Mädler as the best lunar map. It was to hold this premier
position until 1910, when a 1.5 m map of greater positional accuracy was
2.2 THE PIONEERING SELENOGRAPHERS 43

published by Walter Goodacre, the second Director of the Lunar Section of
the British Astronomical Association (BAA).
This was not Schmidt’s only contribution to selenography. Owing to an
erroneous interpretation of his, and other people’s, observations, he re-
invigorated lunar research. The whole episode concerns a small crater,
called Linné, in the Mare Serenitatis. Lohrmann, Beer and Mädler, and
Schmidt himself had often recorded Linné as a deep crater. Then, in 1866,
Schmidt announced that the crater had disappeared! In its place Schmidt
could only find a small light patch. As one might expect, a statement like
that was sure to get astronomers turning their telescopes back to the Moon.
Many leading astronomers joined in and a vigorous debate ensued. In fact,
many astronomers continued to cite Linné as a prime example of an area
of the Moon that had changed significantly within the history of Man’s
observations of it, even to as late as the middle of the twentieth century!
We now know that Linné is really a small crater surrounded by a light
area. Under certain angles of illumination it can, indeed, appear in the
guise of a deep, apparently larger, crater. It seems certain that Schmidt
was mistaken. There never was any change in this lunar feature within the
period when astronomers were looking at it. However, this mistake was
just what was needed at the time to counter the view of the Moon as a dead
and uninteresting world that pervaded after Beer and Mädler’s epic study
of it.
As well as the maps, various other studies of the Moon’s topography
appeared in the form of books. For instance, there was The Moon jointly
authored by James Nasmyth (a famous engineer and the inventor of the
steam hammer) and James Carpenter. First published in 1874, the authors
made serious efforts to understand the origins of the Moon and the evolu-
tion of its surface features (though their theories bear little relation to our
modern ideas). Much of their researches were based on observations made
with Nasmyth’s home-made 20-inch (0.51 m) reflector of novel design.
Incidentally, the optical arrangement Nasmyth originated is often used
in today’s largest telescopes and is known by his name. Nasmyth and
Carpenter’s book also contains beautiful drawings and photographs of
sculpted models of regions of the lunar surface (at that time, photography
had not technically advanced enough to enable good, detailed, photo-
graphs to be taken of the Moon’s surface direct through the telescope)
along with written descriptions.
Other notable books about the Moon included The Moon written by the
Englishman Edmund Nevill and published two years after Nasmyth and
Carpenter’s book of the same name. Actually, Nevill wrote under the name
Neison. His book contained a map based on that of Beer and Mädler, along
with detailed descriptions of the named features.
44 THE MOON THROUGH THE LOOKING GLASS

If, as a result of the necessary brevity of these historical notes,* I have
given the impression that selenography was only carried out by a few indi-
viduals then I must rectify that impression. For instance in England there
was the Selenographical Society, formed in the early 1870s specifically for
lunar studies. The British Association for the Advancement of Science appointed
the Secretary of the Society, W. R. Birt, to head a committee to organise the
construction of a new and more detailed map of the Moon. It was intended
to be 200 inches (5.08 m) to the diameter of the Moon. Birt was an energetic
selenographer and a start was made, though Birt’s death and the eventual
demise of the Selenographical Society in 1882 meant that the scheme did
not bear fruit.
Also, many national and provincial astronomical societies had sections
devoted to lunar study. One very active group of the period was the Liverpool
Astronomical Society. It’s director was T. G. Elger, who became the first direc-
tor of the Lunar Section of the British Astronomical Association when it
formed in 1890. In those early years many people spent a great many hours
at the eyepieces of their telescopes studying the Moon.
The last really substantial Moon map to be made using the old-fash-
ioned methods of eye and drawing board to record its finest details was the
300 inch (7.6 m to the Moon’s full diameter) colossus of H. P. Wilkins. He
published the first version of it in 1946 and made revisions in subsequent
years. At the time he was Director of the Lunar Section of the British
Astronomical Association. The only version of Wilkins’ map I have seen is
that reproduced in reduced scale in twenty-five sections in the book The
Moon by Wilkins and Patrick Moore, published by Faber and Faber in 1955.
I was lucky enough to find a copy of this work in a second-hand bookshop
some years ago, though it is now very rare. The complexity of the hand-
drawn details in the map is mind-boggling. Though it is now recognised
that Wilkins’ map contains many inaccuracies in its depictions of details
(I have stumbled across several, myself, without making any effort to find
them), the scale of his achievement still warrants admiration.
Photography, invented in the early nineteenth century, was sufficiently
developed to come to the aid of Moon-mappers in the last decade of the
nineteenth century and, particularly, those of the twentieth century – but
that is a tale for later in this book. Now, after this ‘potted’ history of the ear-
liest years of lunar study (admittedly leaving out much detail and not even
mentioning many of the more minor participants), it is time to consider
how the observer of today can get the best out of his/her telescope and
enjoy and study the Moon’s starkly beautiful vistas.
* Note added in proof: just published by Cambridge University Press is Mapping andNaming the Moon by E. A. Whitaker – a detailed and fascinating account of the historyof selenography.
2.2 THE PIONEERING SELENOGRAPHERS 45