nys vaccines for children (vfc) program fridge …®2l data logger: ... unaddressed alarms are...
TRANSCRIPT
NYS Vaccines for Children (VFC) Program Fridge-Tag®2L Data Logger: Implementation and User Guide
Contents Purpose......................................................................................................................................................2
Equipment Checklist ..................................................................................................................................2
Calibration Certificates ............................................................................................................................2
Setup ............................................................................................................................................................4
Fridge-Tag®2L Glycol/Probe Setup ........................................................................................................4
.. Probe Access Ports .............................................................................................................................5
Fridge-Tag®2L Display Monitor Activation and Setup .............................................................................5
Using the Fridge-Tag®2L...........................................................................................................................8
VFC Program Requirements for Monitoring Temperatures.....................................................................8
Understanding the Fridge-Tag®2L Display Monitor ................................................................................8
Performing Daily Temperature Checks using the Fridge Tag®2.............................................................. 9
Additional Display Indicators ...............................................................................................................10
Warning Symbol ..............................................................................................................................10
Low Battery Indicator .......................................................................................................................10
Alarms ....................................................................................................................................................10
Addressing a Current Alarm .................................................................................................................11 .
Reviewing the Alarm History on the Fridge-Tag®2L Display ...............................................................12 ..
Connection Error Alarm (Alarm with No Temperature Value) ..............................................................13
How to Download Data .........................................................................................................................14
Interpreting the PDF Report................................................................................................................. 18
Interpreting the PDF Report: Part 1 – Daily Readings Table .............................................................. 19
Interpreting the PDF Report: Part 2 – Weekly Graphs ......................................................................... 21
Interpreting the Text Report................................................................................................................. 22
Adjusting Display Monitor Settings (Date/Time, Celsius/Fahrenheit) ......................................................23
Device Maintenance ..................................................................................................................................24
Calibration ...............................................................................................................................................24
Device Probe Wire Care ..........................................................................................................................24
Warranty ...................................................................................................................................................24
Resources ..................................................................................................................................................25

NYS VFC Program Fridge-Tag®2L Implementation and User Guide December 2017 Page 2 of 24
Calibration Certificates Review each calibration certificate to ensure
Purpose
This document is intended to provide guidance to New York State Vaccines for Children (VFC) providers on the setup and use of state-supplied Fridge-Tag®2L data loggers.
Refer to the separate document NYS VFC Program Fridge-Tag®2L Policy for additional guidance on provider responsibilities. Questions should be directed to the NYS VFC Program at 1-800-543-7468 or [email protected]
Equipment Checklist
Use this checklist to help identify equipment and to ensure everything has been included in your shipment.
2 Fridge-Tag®2L display monitors (1 yellow for fridge, 1 blue for freezer)
2 glycol bottles with white probe cable attached (1 cable labeled “fridge”, 1 cable labeled “freezer”)
6 Velcro strips and 4 zip ties: (4) larger Velcro strips to secure display monitors to outside of storage units and (2) smaller strips to secure glycol to plastic/glass shelf 4 zip ties to secure probe cable to wire shelf
information for each Fridge-Tag®2L device.
2 calibration certificates (1 for Refrigerator, 1 for Freezer)
that the model and serial number matches the

NYS VFC Program Fridge-Tag®2L Implementation and User Guide December 2017 Page 3 of 24
1. The serial number is located on the bottom of the Fridge-Tag®2L display monitor.
2. Confirm that the information on each calibration certificate matches the information on each display monitor.
• Model reads FRIDGE-TAG2L for fridge version and FRIDGE-TAG2L-FZR for freezer version
• Unique serial number corresponds to serial number on each device.
• If discrepancies are identified, contact the VFC Program at 1-800-543-7468 or [email protected]
3. File the calibration certificates with your practice’s Vaccine Storage and Handling Plan so that they can be easily retrieved on VFC program site visits.

NYS VFC Program Fridge-Tag®2L Implementation and User Guide December 2017 Page 4 of 24
Setup
Fridge-Tag®2L Glycol/Probe Setup The Fridge-Tag®2L data loggers are pre-configured to monitor either a refrigerated vaccine storage unit (refrigerator) temperatures or a frozen vaccine storage unit (freezer) temperatures.
The yellow Fridge-Tag®2L display monitor is configured for the refrigerator while the blue
labeled Fridge-Tag®2L display monitor is configured for the freezer. If the devices are not set
up in the correct storage units, they will alarm, causing unnecessary disruption.
The white connecting probe cable attached to each glycol bottle also has a storage unit specification
(fridge or freezer) on the tag. Always attach the corresponding refrigerator probe cable to the
refrigerator display monitor (yellow) and the corresponding freezer probe cable to the
freezer display monitor (blue).
1. Place the glycol-filled bottle inside the storage unit where publicly-funded vaccine is stored. The
glycol should be centrally placed inside the storage unit near the vaccine supply and away from ceilings, walls, vents, fans and coils. Important: Do this at least 2 hours prior to device activation to allow the glycol time to acclimate to the storage unit temperatures.
a. If the unit has wire shelves, the glycol can be hung between the shelves using zip-ties (image left). If the unit has plastic or glass shelves, the glycol bottle can be secured directly to the shelf using a Velcro strip and the cable wire can be secured against the shelf using duct or packing tape (see image below).
2. Pass the white connecting probe cable through the gap in the storage unit door. Note: The probe wire can also be passed through a probe access port, if one is available (see page 5).
Do not tie the zip ties too tightly around the probe cable as this can damage the cable.

NYS VFC Program Fridge-Tag®2L Implementation and User Guide December 2017 Page 5 of 24
Probe Access Ports Some purpose-built vaccine storage units have dedicated probe access ports, where the probe can be inserted to avoid threading the probe wire through the storage unit door. Refer to the storage unit product manual or contact the manufacturer to determine if the unit has a probe access port.
If your practice has received a freezer unit from the NYS VFC Program, the location of the rear access port is identified in the images below:
If you received a freezer unit from the NYS VFC Program and require assistance with determining the location of the probe access port, contact ThermoScientific at 1-866-984-3766 – Option 3. Fridge-Tag®2L Display Monitor Activation and Setup After the glycol bottle has acclimated to your storage unit temperatures (≥ 2 hours elapsed), proceed with activating and setting up the display monitor.
1. The Fridge-Tag®2L is shipped in “Sleep Mode”. This means that the LCD display is blank when the device is first received.
2. Press the READ button if you would like to cycle through pre-configured
information (e.g., preconfigured alarm settings).
SET and READ buttons
Use the READ button to change values on the device. Use the SET button to commit the current value
A training video on device activation is available at:
3. To activate the device, press the SET and READ buttons at the same time and hold both buttons for 4 seconds.
to memory and move to the next setting.
https://www.youtube.c om/watch?v=Yf5prLtl 37g
4. Press SET to save the calendar format as MM DD YYYY. 5. After setting the calendar format, the first digit of the date will start flashing. 6. To set the date, press the READ button until the appropriate month displays. 7. Press SET to set the month and move to the day field.
8. Press the READ button until the appropriate day displays. 9. Press SET to set the day and move to the year field. 10. Press the READ button until the appropriate year displays. 11. Press SET to finish setting the date.

NYS VFC Program Fridge-Tag®2L Implementation and User Guide December 2017 Page 6 of 24
Note: If SET is pressed mistakenly, continue with activation. Instructions for correcting setup mistakes are located on page 23.
After setting the date, the first digit of the time setting will start flashing. The clock function operates as a 24- hour clock. For example, 1:47 pm = 13:47. In this example, we’ll set the time to 1:47 pm or 13:47.
12. The first clock digit is flashing. Press READ until “1” displays. 13. Press SET to save the first digit and move to the next. 14. The second digit is flashing. Press READ until “3” displays. 15. Press SET to save the second digit and move to the next. 16. The third digit is flashing. Press READ until “4” displays. 17. Press SET to save the third digit and move to the next. 18. The fourth digit is flashing. Press READ until “7” displays. 19. Press SET to save the fourth digit and finish setting the
time.
If you pass a number, continue to press READ until you cycle back around to the number again.
After setting the time, the display will show a check mark and the date and time. Once the probe is connected to the display monitor, the current temperature will be displayed within one minute.
Note: A connection alarm will occur if the probe is not connected to the display monitor within 15 minutes.
Note: The display monitor will go to sleep if a button is not pressed for 60 seconds before activation is completed. If this happens, start with step 1 on page 5 to start the process over.
20. Before adhering the Fridge-Tag®2L display monitor to the outside of the unit, make sure that the white probe wire from the glycol bottle will be able to reach the location where the display monitor will be adhered.
The color of the Fridge-Tag®2L display monitor indicates which unit the device should be set up for (yellow=refrigerator or blue=freezer) and the white connecting probe cable attached to the glycol also has a storage unit specification (fridge or freezer) on the tag. Make sure to attach the refrigerator probe cable to the corresponding refrigerator display monitor and the freezer probe cable to the corresponding freezer display monitor.
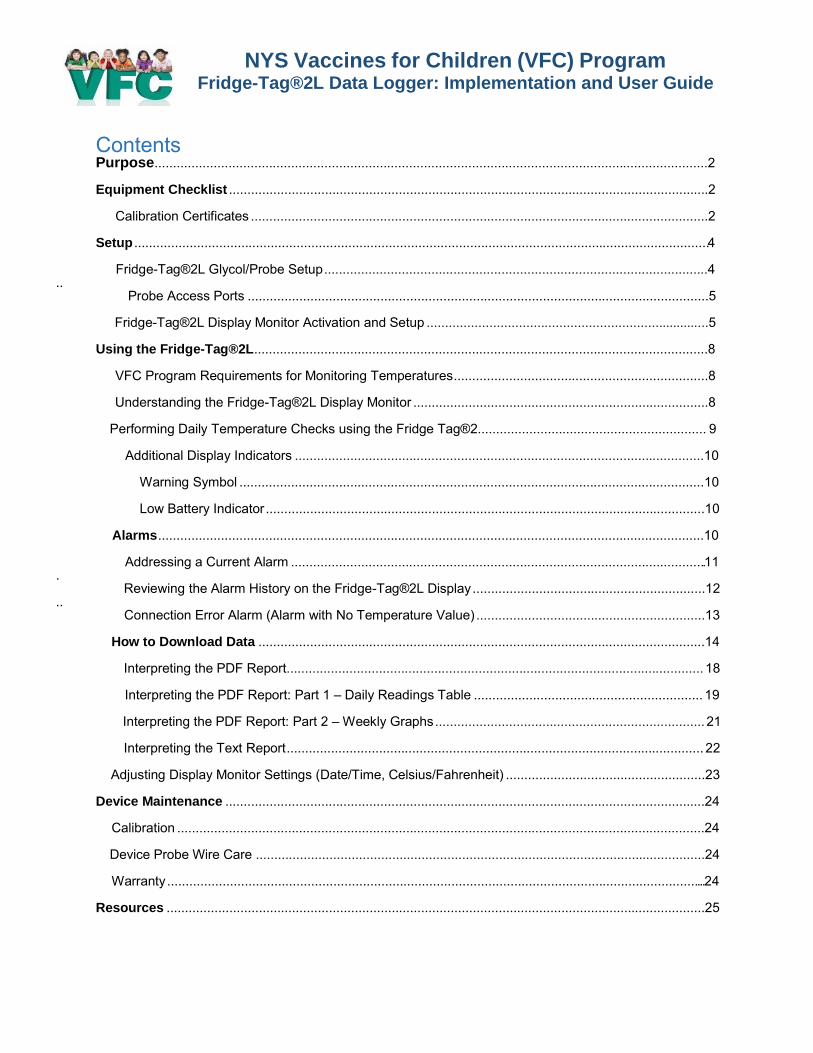
21. Insert the white probe wire into the right side of the display monitor. (Remove the black stopper from the probe hole first.) You should hear a “click” confirming the probe is fully inserted.
NYS VFC Program Fridge-Tag®2L Implementation and User Guide December 2017 Page 7 of 24
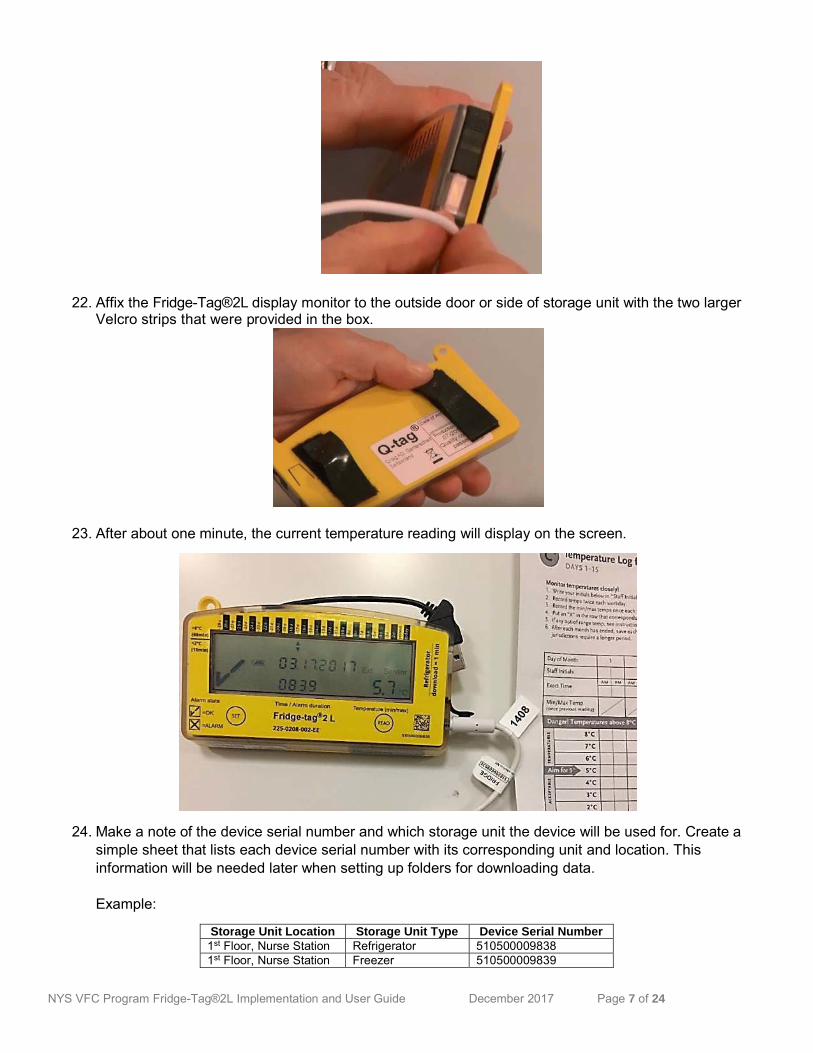
22. Affix the Fridge-Tag®2L display monitor to the outside door or side of storage unit with the two larger Velcro strips that were provided in the box.
23. After about one minute, the current temperature reading will display on the screen.
24. Make a note of the device serial number and which storage unit the device will be used for. Create a simple sheet that lists each device serial number with its corresponding unit and location. This information will be needed later when setting up folders for downloading data.
Example:
Storage Unit Location Storage Unit Type Device Serial Number
1st Floor, Nurse Station Refrigerator 510500009838 1st Floor, Nurse Station Freezer 510500009839
NYS VFC Program Fridge-Tag®2L Implementation and User Guide December 2017 Page 8 of 24
Using the Fridge-Tag®2L
VFC Program Requirements for Monitoring Temperatures
Using the Fridge-Tag®2L or any type of continuous temperature monitoring device DOES NOT replace your twice daily temperature checks or entry of temperatures into the New York State Information System (NYSIIS) temperature log. New York State VFC Providers will continue to be required to perform their twice daily assessment and recording of temperatures into the NYSIIS temperature log. Note: NYSIIS does not currently have the functionality to accept data logger file uploads therefore manual entry of temperatures is still required. In addition to the current temperature recordings, NYS VFC providers will also now be required to enter minimum and maximum (min/max) temperature readings into the NYSIIS Temperature log at least once per day. It is recommended that the min/max temperature readings be checked each day when the office first opens.
NYS VFC Providers are required to contact the VFC program (1-800-543-7468) when any of the following situations apply:
a. the Fridge-Tag®2L has an active or unaddressed alarm indicated on the display monitor (indicated by an X)
b. unaddressed alarms are discovered during the weekly data download c. temperature readings are out of range
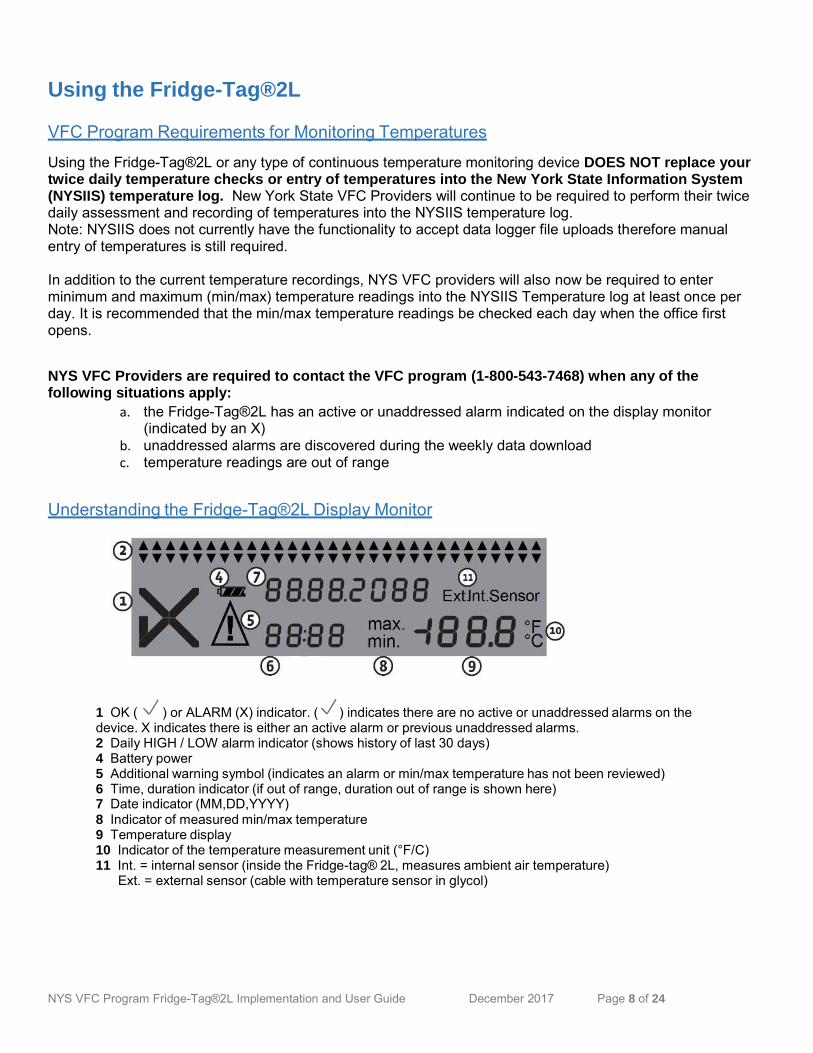
Understanding the Fridge-Tag®2L Display Monitor
1 OK ( ) or ALARM (X) indicator. ( ) indicates there are no active or unaddressed alarms on the device. X indicates there is either an active alarm or previous unaddressed alarms. 2 Daily HIGH / LOW alarm indicator (shows history of last 30 days) 4 Battery power 5 Additional warning symbol (indicates an alarm or min/max temperature has not been reviewed) 6 Time, duration indicator (if out of range, duration out of range is shown here) 7 Date indicator (MM,DD,YYYY) 8 Indicator of measured min/max temperature 9 Temperature display 10 Indicator of the temperature measurement unit (°F/C) 11 Int. = internal sensor (inside the Fridge-tag® 2L, measures ambient air temperature)
Ext. = external sensor (cable with temperature sensor in glycol)

NYS VFC Program Fridge-Tag®2L Implementation and User Guide December 2017 Page 9 of 24
Performing Daily Temperature Checks using the Fridge‐Tag®2L When the office opens for the day, look at the Fridge-Tag®2L display monitor on each storage unit to view the current and min/max temperature and to check for any ALARMS.
1. The current temperature is displayed on the screen.
a. If there are no active or unaddressed alarms, a check symbol will display in the left corner of the screen.
b. If an alarm is indicated, the device will beep and/or the display will indicate an “X” in the left corner of the screen. If an alarm is indicated or out of range temperatures* are observed, contact the NYS VFC Program at 1-800-543-7468. Out of range temperatures may require providers to complete and fax a NYS VFC Vaccine Manufacturer Follow-up Information Sheet. For additional information visit: https://www.health.ny.gov/prevention/immunization/vaccines_for_children/storage_and_handlin g.htm#respondtemp
2. Press the “READ” button on the display monitor once. An up arrow will flash under the text “today” in the top right corner of the screen. This is the warmest or maximum temperature the device has recorded since midnight.
3. Press the “READ” button a second time. A down arrow will flash under the text “today” in the top right corner of the screen. This is the coldest or minimum temperature the device has recorded since midnight.
4. Press READ a third time to continue to cycle back and review the maximum temperature from yesterday. An up arrow will flash under the text “yesterd.” in the top right corner of the screen.
Tip: Press SET anytime to return to the main screen.
5. Press READ a fourth time to review the minimum temperature from yesterday. A down arrow will flash under the text “yesterd.” in the top right corner of the screen.
6. Assess the readings* then enter the readings taken during steps 2, 5 and 6 into the New York State Immunization Information System (NYSIIS) temperature log.
a. If you cannot access NYSIIS at the time of the temperature check, you can document temperatures on a paper temperature log then transfer the temperatures into NYSIIS on a weekly basis.
i. You should have a minimum of four (4) temperature readings documented in NYSIIS for each day that your office is open: current temperature reading when office opens;

NYS VFC Program Fridge-Tag®2L Implementation and User Guide December 2017 Page 10 of 24
minimum temperature reading when office opens (from YESTERDAY); maximum temperature reading when office opens (from YESTERDAY); and a current temperature reading before the office closes.
7. If applicable, press READ to go back and review temperatures from days when your office was closed (e.g., if you typically close on the weekend and are performing your Monday temperature check, go back and review temperatures from Friday and Saturday).
8. Before closing for the day, check the current temperature on the FridgeTag2L data logger. 9. Record the closing current temperature in the NYSIIS temperature log.
Additional Display Indicators
Warning Symbol
When checking min/max temperatures, if a warning symbol ( ) displays:
• next to an “X” this means there is a current or previously unaddressed alarm. Visit page 10 for more information on addressing alarms.
• next to a check mark ( ) this means that the current min/max temperature reading is in range but that there are previous min/max temperatures that have not been reviewed.
• Press the READ button on the display monitor to go back and review previously unchecked temperatures.
Low Battery Indicator
The battery power indicator ( ) on the display monitor indicates the remaining life of the battery. Under normal operation, the battery should last through the calibration period (3 years).
Note: The battery indicator illustrated above illustrates 3 bars, or full power.
Contact the NYS VFC Program at [email protected] or 1-800-543-7468 if the display monitor indicates that the battery is low.
Alarms The Fridge-Tag®2L sounds an audible alarm when the temperature in the storage unit is out of range and has exceeded the pre-configured parameters. Alarms are also indicated on the display monitor and in the reports. The main screen of the display monitor will indicate an X when there is either a current alarm or a previous unaddressed alarm. Anytime an “X” appears on the Fridge-Tag®2L display monitor, follow the steps below and contact the NYS VFC Program at 1-800-543-7468.
The Fridge-Tag®2L has the following pre-configured alarm parameters that cannot be adjusted by the user: Refrigerator: ALARM will occur following a 60-minute interval of temperature warmer than 8°C (46°F). ALARM will occur following an observed temperature value colder than 2°C (36°F) for 15 minutes or more. Freezer: ALARM will occur following a 60-minute interval of temperature warmer than -15°C (5°F).
NYS VFC Program Fridge-Tag®2L Implementation and User Guide December 2017 Page 11 of 24
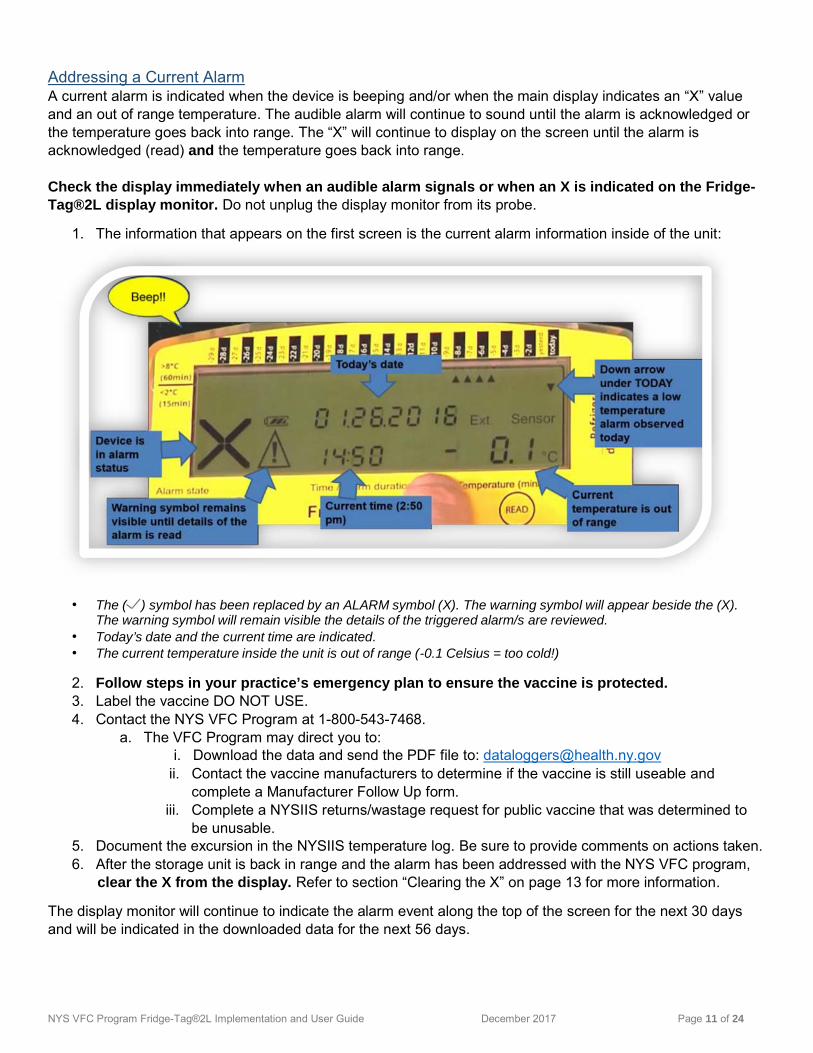
Addressing a Current Alarm A current alarm is indicated when the device is beeping and/or when the main display indicates an “X” value and an out of range temperature. The audible alarm will continue to sound until the alarm is acknowledged or the temperature goes back into range. The “X” will continue to display on the screen until the alarm is acknowledged (read) and the temperature goes back into range. Check the display immediately when an audible alarm signals or when an X is indicated on the Fridge- Tag®2L display monitor. Do not unplug the display monitor from its probe.
1. The information that appears on the first screen is the current alarm information inside of the unit:
• The ( ) symbol has been replaced by an ALARM symbol (X). The warning symbol will appear beside the (X). The warning symbol will remain visible the details of the triggered alarm/s are reviewed.
• Today’s date and the current time are indicated. • The current temperature inside the unit is out of range (-0.1 Celsius = too cold!)
2. Follow steps in your practice’s emergency plan to ensure the vaccine is protected. 3. Label the vaccine DO NOT USE. 4. Contact the NYS VFC Program at 1-800-543-7468.
a. The VFC Program may direct you to: i. Download the data and send the PDF file to: [email protected]
ii. Contact the vaccine manufacturers to determine if the vaccine is still useable and complete a Manufacturer Follow Up form.
iii. Complete a NYSIIS returns/wastage request for public vaccine that was determined to be unusable.
5. Document the excursion in the NYSIIS temperature log. Be sure to provide comments on actions taken. 6. After the storage unit is back in range and the alarm has been addressed with the NYS VFC program,
clear the X from the display. Refer to section “Clearing the X” on page 13 for more information.
The display monitor will continue to indicate the alarm event along the top of the screen for the next 30 days and will be indicated in the downloaded data for the next 56 days.

NYS VFC Program Fridge-Tag®2L Implementation and User Guide December 2017 Page 12 of 24
Reviewing the Alarm History on the Fridge-Tag®2L Display The alarm history appears along the top of the display monitor for the last 30 days. The # of days in the past
(e.g., -2d= 2 days ago) and a high and/or low alarm is indicated for each alarm event. If you have alarm events that have not been read or “unaddressed” alarms, an X will appear on the display monitor’s main screen along with a current in-range temperature value.
1. To access the alarm history, continue to repeatedly press the READ button until you reach the alarm event OR hold down the READ button for 3 seconds. This will “jump” to the first alarm event.
Tip: Hold READ button down for 3 seconds to jump to alarm events.
• The device had a high and low alarm today. A low alarm is indicated at March 1, 2017 at 15:26 or 3:26 pm. • The warning symbol indicates that the details of the alarm have not yet been read.
2. Press the READ button a second time to access the second, more detailed screen regarding this alarm
event.

NYS VFC Program Fridge-Tag®2L Implementation and User Guide December 2017 Page 13 of 24
• The total time out of the allowable temperature range (“dur” or duration) was 1 hour and 28 minutes. • The lowest recorded temperature during the alarm period was -0.9˚C (too cold for refrigerated vaccine).
3. Make a note of the information on the screen. Press SET to return to the main screen.
a. If additional unaddressed alarms are present, hold the READ button down for another 3 seconds to jump to the next alarm in the history.
4. Contact the VFC program (if you have not already done so) and provide this information to them when calling (1-800-543-7468).
5. Document the excursion in the NYSIIS temperature log. 6. After the alarm has been addressed with the NYS VFC program, clear the X from the display.
a. See next section “Clearing the X”.
The display monitor will continue to indicate the alarm event along the top “piano keys” of the device for the next 30 days and will be indicated in the downloaded data for the next 56 days.
A training video on reviewing alarms is also available at: https://www.youtube.com/watch?v=id8xsN6U004
Clearing the “X”
Once temperatures have returned to the acceptable range and the alarm has been reported to the NYS VFC program, clear the X from the main screen. To clear the X, while viewing the alarm event, be sure to press the READ button to navigate back to the day before the alarm was observed. This will commit the temperature check to memory and clear the X from the main screen.
The display monitor will continue to indicate the alarm event along the top “piano keys” of the device for the next 30 days and will be indicated in the downloaded data for the next 56 days. Note: Downloading data will not clear the X. The X can only be cleared by reviewing the event from the display monitor.
Connection Error Alarm (Alarm with No Temperature Value) If the display monitor is disconnected from its probe or if the probe is defective, the display will indicate a connection error alarm after 15 minutes. A connection error is indicated by an “X” and dashes for the temperature value.
• Always ensure that the probe is firmly secure when connecting the probe into the Fridge- Tag®2L display monitor. Press and twist until you hear a click.
• As soon as the issue is fixed, the display monitor will show the current temperature and logging will continue.
• Connection error alarms do not require follow up with the NYS VFC Program.
NYS VFC Program Fridge-Tag®2L Implementation and User Guide December 2017 Page 14 of 24
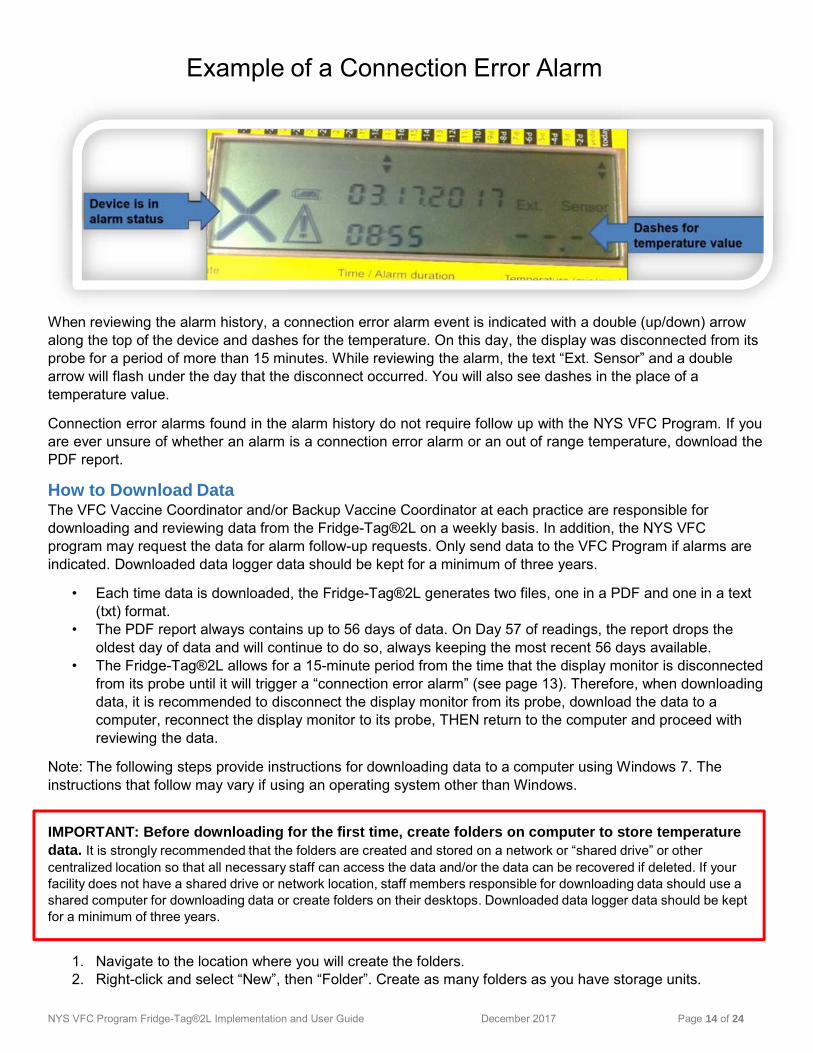
Example of a Connection Error Alarm When reviewing the alarm history, a connection error alarm event is indicated with a double (up/down) arrow along the top of the device and dashes for the temperature. On this day, the display was disconnected from its probe for a period of more than 15 minutes. While reviewing the alarm, the text “Ext. Sensor” and a double arrow will flash under the day that the disconnect occurred. You will also see dashes in the place of a temperature value.
Connection error alarms found in the alarm history do not require follow up with the NYS VFC Program. If you are ever unsure of whether an alarm is a connection error alarm or an out of range temperature, download the PDF report.
How to Download Data The VFC Vaccine Coordinator and/or Backup Vaccine Coordinator at each practice are responsible for downloading and reviewing data from the Fridge-Tag®2L on a weekly basis. In addition, the NYS VFC program may request the data for alarm follow-up requests. Only send data to the VFC Program if alarms are indicated. Downloaded data logger data should be kept for a minimum of three years.
• Each time data is downloaded, the Fridge-Tag®2L generates two files, one in a PDF and one in a text (txt) format.
• The PDF report always contains up to 56 days of data. On Day 57 of readings, the report drops the oldest day of data and will continue to do so, always keeping the most recent 56 days available.
• The Fridge-Tag®2L allows for a 15-minute period from the time that the display monitor is disconnected from its probe until it will trigger a “connection error alarm” (see page 13). Therefore, when downloading data, it is recommended to disconnect the display monitor from its probe, download the data to a computer, reconnect the display monitor to its probe, THEN return to the computer and proceed with reviewing the data.
Note: The following steps provide instructions for downloading data to a computer using Windows 7. The instructions that follow may vary if using an operating system other than Windows.
IMPORTANT: Before downloading for the first time, create folders on computer to store temperature data. It is strongly recommended that the folders are created and stored on a network or “shared drive” or other centralized location so that all necessary staff can access the data and/or the data can be recovered if deleted. If your facility does not have a shared drive or network location, staff members responsible for downloading data should use a shared computer for downloading data or create folders on their desktops. Downloaded data logger data should be kept for a minimum of three years.
1. Navigate to the location where you will create the folders. 2. Right-click and select “New”, then “Folder”. Create as many folders as you have storage units.

NYS VFC Program Fridge-Tag®2L Implementation and User Guide December 2017 Page 15 of 24
3. Name the folders per the storage unit location and type and use the last four digits of the device serial number.
a. For example, one folder name may be “1st Floor Nurse Fridge 9838”.
Note: Steps 1-3 above will only need to be performed upon initial setup.
4. Disconnect the Fridge-Tag®2L display monitor from its probe in the storage unit. 5. Plug the black USB (attached to the display monitor) into an available USB port on your computer.
6. If downloading data for the first time to this computer:
a. You may need to allow a few moments for the device to be recognized. b. A balloon in the bottom right corner of the screen will appear which states: “Installing device
driver software.” c. Allow the device driver to fully install before proceeding. Successful installation is indicated by a
icon that appears in the bottom right of the desktop window or a popup message on the screen.
Don’t see the drive listed or having trouble connecting the device to your computer? Try the following steps:
1. Click on the icon in the bottom right corner of the desktop screen. Then selecting “Open Devices and Printers”. The Fridge-Tag®2Lshould be located under the Devices section.
2. Contact your internal IT support. 3. If you do not have internal ITS support, contact the product manufacturer, Berlinger USA, at 1-508-366-0084 or
7. The Fridge-Tag®2L will display the following screen until it has finished downloading the report. You can see that the device is working from the continuously flashing arrows in the upper display area.
8. When the reports are ready, the display will indicate the word “usb” with a checkmark. Note: Report creation may take a couple of minutes.
9. Follow the prompt on your screen or navigate to “Computer” by clicking on the start menu (bottom left corner of desktop window) and navigating to the Computer option.
NYS VFC Program Fridge-Tag®2L Implementation and User Guide December 2017 Page 16 of 24
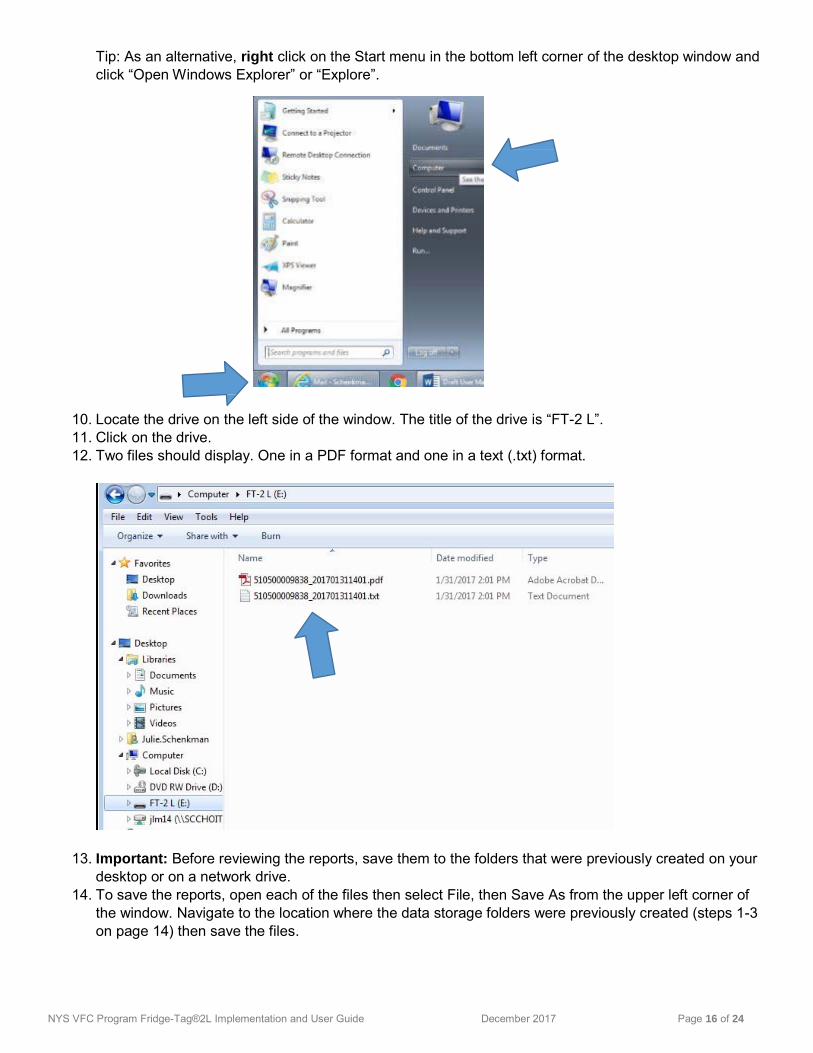
Tip: As an alternative, right click on the Start menu in the bottom left corner of the desktop window and click “Open Windows Explorer” or “Explore”.
10. Locate the drive on the left side of the window. The title of the drive is “FT-2 L”. 11. Click on the drive. 12. Two files should display. One in a PDF format and one in a text (.txt) format.
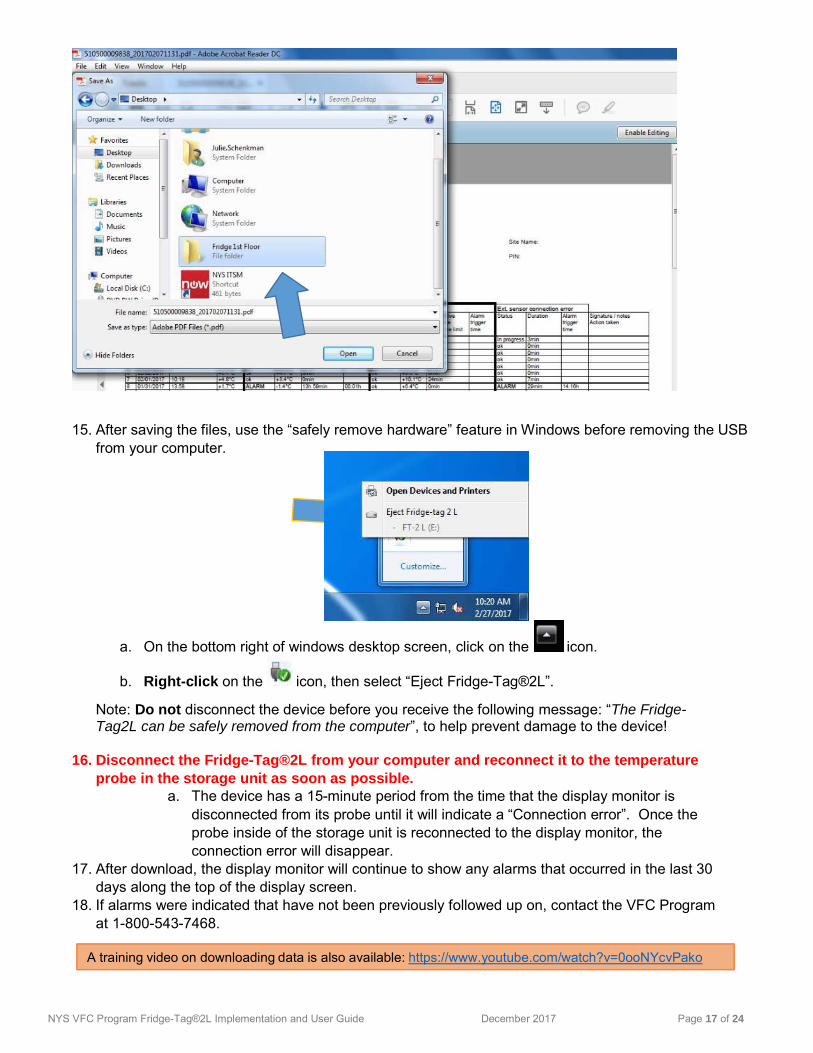
13. Important: Before reviewing the reports, save them to the folders that were previously created on your desktop or on a network drive.
14. To save the reports, open each of the files then select File, then Save As from the upper left corner of the window. Navigate to the location where the data storage folders were previously created (steps 1-3 on page 14) then save the files.
NYS VFC Program Fridge-Tag®2L Implementation and User Guide December 2017 Page 17 of 24
15. After saving the files, use the “safely remove hardware” feature in Windows before removing the USB from your computer.
a. On the bottom right of windows desktop screen, click on the icon.
b. Right-click on the icon, then select “Eject Fridge-Tag®2L”.
Note: Do not disconnect the device before you receive the following message: “The Fridge- Tag2L can be safely removed from the computer”, to help prevent damage to the device!
16. Disconnect the Fridge-Tag®2L from your computer and reconnect it to the temperature
probe in the storage unit as soon as possible. a. The device has a 15-minute period from the time that the display monitor is
disconnected from its probe until it will indicate a “Connection error”. Once the probe inside of the storage unit is reconnected to the display monitor, the connection error will disappear.
17. After download, the display monitor will continue to show any alarms that occurred in the last 30 days along the top of the display screen.
18. If alarms were indicated that have not been previously followed up on, contact the VFC Program at 1-800-543-7468.
A training video on downloading data is also available: https://www.youtube.com/watch?v=0ooNYcvPako

Interpreting the PDF Report Review the downloaded data after reconnecting the Fridge-Tag®2L display monitor to its probe and reattaching it outside of the storage unit. The PDF report always contains up to 56 days of data. On Day 57 of readings, the report drops the oldest day of data and will continue to do so, always keeping the most recent 56 days available.
A training video on downloading and reviewing data is also available at: https://youtu.be/0ooNYcvPako
1. On your computer, navigate to the location where the data files were saved.
Each time data is downloaded the Fridge-Tag®2L generates two files, one in a PDF and one in a text (txt) format.
a. The files are generated with the following information in the filename: the 12-digit device serial number, the date and the time.
12-digit serial # Date of download: February 10, 2017 (20170210)
Time of download: 9:47 am 09:47
2. Double-click to open the PDF version of the report that you would like to review.
The PDF report has a total of 4 pages. Pages 1 and 2 display the first 28 days of temperature data. Pages 3 and 4 display days 29-56 of temperature data.
Note: After initial device activation, pages 3 and 4 will not populate until the device has been recording for >28 days.
• The first page of the report displays daily information on the first 28 days of readings in a table format. The most recent day appears on the first row. Click here for guidance on interpreting tabular data.
• The second page displays the temperature data in a graph format that corresponds to the data in the table on page 1. Each graph displays one week’s worth of temperature data. Click here for guidance on interpreting graphical data.
• The third page of the PDF report displays daily information on days 29-56 in a table format.
• Page 4 of the PDF report displays temperature data in a graph format that corresponds to the data in the table on page 3.
NYS VFC Program Fridge-Tag®2L Implementation and User Guide December 2017 Page 18 of 24

Interpreting the PDF Report: Part 1 – Daily Readings Table Example of a PDF report download with 23 days of readings
B C D
E F G H
The Lower Alarm Limit, Upper Alarm Limit and External Sensor connection error will always indicate an alarm in progress for DAY 1 or Today whenever the data is downloaded. This does not indicate there is a current alarm unless the current temperature was out of range when downloading.
On February 1, 2017 at 14:16 or 2:16 pm, the device was disconnected from its probe and remained disconnected for >15 minutes, which triggered an “External sensor connection error” alarm. The device spent a total of 29 minutes disconnected from its probe (likely while the provider was reviewing all of the alarms!).
On January 19, 2017 at 11:18 am (and many other days), the device went into alarm status. During the 19th the unit spent 12 hours and 57 minutes out of the acceptable temperature range and reached a minimum temperature of -4.8C.
I
NYS VFC Program Fridge-Tag®2L Implementation and User Guide December 2017 Page 19 of 24

The first and third pages of the PDF report displays data on days 1-28 and days 29-56, respectively. The top portion of these pages contain:
• the device identification or serial number (this should be used to decipher what folder the data should be stored in)
• the date/time the report was downloaded • the date the device was first activated • the pre-configured upper and lower alarm limits • the measurement interval (1 minute) – device checks for and displays new temperature on screen every 1
minute • the sampling or logging interval (5 minutes) – device logs a reading into memory every 5 minutes
A. The first column is the day beginning with day #1. The first row always displays data for Today. B. The second column is the Date column. C. The third column is the Events column. This column documents the times at which temperature checks
were performed. D. The Average Temp column displays the average temperature that was observed that day. E. The Lower Alarm Limit column group displays all minimum temperatures that were recorded for that
day (each day is a row). It will also display all low alarms or alarms that were colder than the 2°C alarm threshold.
a. The first column displays the Status. The Status column can display the following: In Progress, ok, Alarm. During download, this column will always display as In Progress for Today. A status of ok means no lower alarms were detected. A status of Alarm indicates an alarm was activated.
b. The minimum temperature value for each day displays in the Min. temp column. If an alarm was indicated previously, the Status column will say ALARM and the Cumulative daily time below the limit column and the Alarm Trigger Time column will be populated with values.
i. The Cumulative daily time below the limit column indicates the total time that day that the device was out of range.
ii. The Alarm Trigger Time column indicates the exact time the alarm was triggered. F. The Upper Alarm Limit column group displays all maximum temperatures that were recorded for that
day along with any upper alarms. a. The first column displays the Status. The Status column can display the following: In Progress, ok, Alarm.
During download, this column will always display as In Progress for Today. A status of ok means no upper alarms were detected. A status of Alarm indicates an alarm was activated.
b. The maximum temperature value for each day displays in the Max temp column. If an alarm was indicated previously, the Status column will say ALARM and the Cumulative daily time below the limit column and the Alarm Trigger Time column will be populated with values.
i. The Cumulative daily time below the limit column indicates the total time that day that the device was out of range.
ii. The Alarm Trigger Time column indicates the exact time the alarm was triggered. G. The Ext. Sensor Connection Error column group displays information any time that the display monitor
was unplugged from the probe. a. The Status column can display the following: In Progress, ALARM or ok. A status of In Progress indicates
that the device is currently detached from the sensor’s probe. During download, this column will always display as In Progress for Today. A status of ALARM means that the device was disconnected from its probe for a period of 15 or more minutes and triggered the alarm.
i. If an alarm is indicated the Duration and the Alarm Trigger Time columns will also be populated. 1. Usually alarms are triggered around the time of data downloads if the device is not
plugged back into its probe in a timely manner. A status of ok in the external sensor connection error status column indicates that either no sensor disconnection occurred on that day or the disconnection was within the allowed time frame for disconnection and no alarm occurred.
H. The last column or Signature/Notes/Action Taken column is for practice staff to indicate any action or follow up steps that were taken.
NYS VFC Program Fridge-Tag®2L Implementation and User Guide December 2017 Page 20 of 24

Interpreting the PDF Report: Part 2 – Weekly Graphs Example of PDF Report Download with 23 days of readings
The X (horizontal) axis displays the date.
The red line is the upper alarm limit for the device (8°C for refrigerator, -15°C for freezer).
The blue line is the lower alarm limit for the device (2°C for freezer).
The black line represents actual temperature values measured over time. Black lines that display either below or above the red or blue lines are out of range temperatures.
The refrigerator spent the entire week out of range on the low end (the black line appears below the lower alarm limit of 2°C (blue line)).
NYS VFC Program Fridge-Tag®2L Implementation and User Guide December 2017 Page 21 of 24
NYS VFC Program Fridge-Tag®2L Implementation and User Guide December 2017 Page 22 of 25
The second and fourth pages of the PDF report display graphical data for days 1-28 and days 29-56 respectively. Each graph contains one week of data. These graphs correspond to the tabular information on pages 1 and 3.
The temperature range appears along the Y (vertical) axis with the warmest temperatures appearing towards the top of the graph.
I. The X (horizontal) axis displays the date. J. The red line is the upper alarm limit of the device (in this example, because temperature data is for a
refrigerator and the device is set to measure in Celsius, the upper alarm limit is 8°C). K. The blue line is the lower alarm limit for the device (in this example, because temperature data is for
refrigerator and the device is set to measure in Celsius, the lower alarm limit is 2°C). L. The black line represents actual temperature values measured over time. Black lines that stay within the
blue and red lines are in-range temperatures. Black lines that display either below or above the red and blue lines are out of range temperatures.
a. For Graph 3, which displays data for the week of January 21st 2017, the refrigerator spent the entire week out of range on the low end (the black line appears below the lower alarm limit of 2°C, indicated by the blue line).
These graphs can be helpful in identifying patterns inside of storage units including trends associated with thermostat changes, weekly inventory checks, receipt of large shipments of vaccine and trends that may even be associated with storage unit failure (usually a gradual incline or decline in temperature that cannot be explained by thermostat changes).
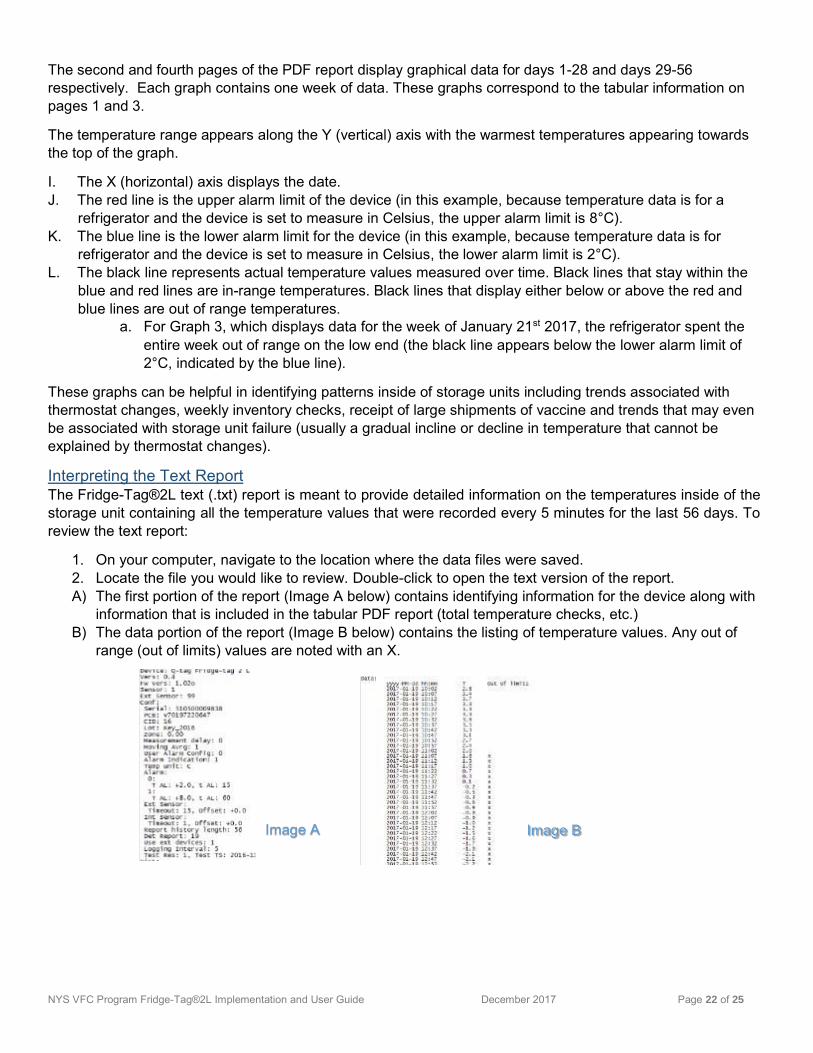
Interpreting the Text Report The Fridge-Tag®2L text (.txt) report is meant to provide detailed information on the temperatures inside of the storage unit containing all the temperature values that were recorded every 5 minutes for the last 56 days. To review the text report:
1. On your computer, navigate to the location where the data files were saved. 2. Locate the file you would like to review. Double-click to open the text version of the report. A) The first portion of the report (Image A below) contains identifying information for the device along with
information that is included in the tabular PDF report (total temperature checks, etc.) B) The data portion of the report (Image B below) contains the listing of temperature values. Any out of
range (out of limits) values are noted with an X.
Image A Image B

NYS VFC Program Fridge-Tag®2L Implementation and User Guide December 2017 Page 23 of 25
Adjusting Display Monitor Settings (Date/Time, Celsius/Fahrenheit) To make a change to the date/time or temperature measurement scale, follow the instructions below.
A training video on adjusting settings is also available at: https://www.youtube.com/watch?v=GRzUv2olSuA
Set the Device to Change Mode
1. Press and continue to hold SET. 2. Press and hold the READ button.
3. Then release both buttons simultaneously. 4. “OUT SIDE” is now displayed on the screen. This screen also shows the temperature measured by the
internal sensor or the ambient (air) temperature. 5. You have now entered “Change mode”. 6. While in “Change mode” you can access the following menus:
• SET DATE - change date/time settings • READ CONF - read the alarm settings • CELS FAHR - change to Celsius or Fahrenheit
Change the Date/Time
1. Ensure the device is in “change mode” (see section Set the Device to Change Mode above). The display should show the menu “OUT SIDE”.
2. Press READ until the display shows “SET DATE” 3. Adjust the date format, date or time settings using the instructions in the previous section.
Change Temperature Measurement Unit (Celsius/Fahrenheit)
1. Ensure the device is in “change mode” (see section Set the Device to Change Mode above). The display should show the menu “OUT SIDE”.
2. Press READ until the display shows “CELS FAHR”. 3. Press SET to access the menu to change the temperature measurement unit. 4. To change the unit, press READ until the display shows the desired sign (°C/°F). 5. Press SET to confirm the measurement unit.

NYS VFC Program Fridge-Tag®2L Implementation and User Guide December 2017 Page 24 of 25
Device Maintenance
Calibration The calibration for the Fridge-Tag®2L is performed by a laboratory accredited by the International Laboratory Accreditation Cooperation (ILAC) and meets NYS VFC Program requirements. The calibration is valid for a period of three (3) years. File the calibration certificates with your practice’s Vaccine Storage and Handling Plan so that they can be easily retrieved on VFC program site visits.
The device cannot be recalibrated and is intended to be discarded after calibration has expired.
Dispose or recycle of the device in accordance with local regulations or return the device to the manufacturer contact to ensure proper recycling. Package the device to protect fragility and return to the following address:
AERC 2591 Mitchell Ave. Allentown, PA 18103 Attn: Karen Olewine
Please note your company address and phone number on the packaging. Only return Fridge-Tag®2Ls to this address. Device Probe Wire Care The probe wire cable can be easily broken if not handled properly. Use the probe cable plug (circled below) and not the cable itself whenever connecting or disconnecting the probe cable wire into the side of the Fridge-Tag®2L unit. Pull the cable plug gently to the right to disconnect it from the data logger. Do not pull the cable cord up or down.
When connecting the cable, gently insert the probe cable plug into the cable port until it clicks into place. Do not force the probe into the cable port. Warranty Each Fridge-Tag®2L provided by the NYS VFC program comes with a two-year product replacement warranty. This includes units that experience battery failure within the two-year warranty period. Contact the NYS VFC Program for device trouble shooting and/or for information on warranty replacement at 1-800-543-7468 or [email protected]
NYS VFC Program Fridge-Tag®2L Implementation and User Guide December 2017 Page 25 of 25
Resources New York State Vaccines for Children (VFC) Program Phone: 1-800-543-7468 Email: [email protected] Web: www.health.ny.gov/vfc Data Logger Support and Temperature Excursion Data: [email protected] Manufacturer Follow-up Form http://www.health.ny.gov/prevention/immunization/vaccines_for_children/docs/vaccine_manuf_follow- up_info_sheet.pdf Related Documents: Fridge-Tag®2L Quick Reference Sheets Fridge-Tag®2L Provider Policy Berlinger USA Fridge-Tag®2L Training Videos http://www.berlingerusa.com/fridgetag2/supportvideos/ Device Technical Support 1-508-366-0084 or [email protected]
Immunization Action Coalition Paper Temperature Logs http://www.immunize.org/handouts/temperature-logs.asp