monitor reduce save instruction manual - efergy
TRANSCRIPT
MONITOR REDUCE SAVE
ENERGY MANAGEMENT SOFTWARE
INSTRUCTION MANUAL
ENERGY MANAGEMENT SOFTWARE
For Windows XP, Vista, Windows 7 ( 32 & 64 bit ) Mac OSX 10.5+
System Requirements:Min 800x600 or above - Java V6.0+
Adobe Air V1.5+
2.0

CONTENTS INTRODUCTION
INTRODUCTION ELINK IN THREE EASY STEPS
SELECTING YOUR DEVICE
ADJUSTING YOUR SETTINGS Personal Settings Adjusting Time and Data Energy Costs and Tariffs Tier and Standing Charge
MONITORING ENERGY CONSUMPTION Summary Current Usage Usage History
MANAGING ENERGY CONSUMPTION Adding Stickies Energy Demand Targets & Budgets Tariff Options Energy Reporting Back up and Restore
elink 2.0 is an energy consumption management tool to help you increase your understanding and awareness about energy consumption. Our new version keeps the basic features and includes more sophisticated tools to help you savemoney. elink 2.0 will also help you to:
• Use the data from your efergy wireless monitor to produce graphs and demand curves for your energy consumption
• Help compare different tariffs that could reduce energy costs
• Discover the advantages of shifting consumption to lower tariff rate periods
• Introduce ideas on energy saving plans
How To Contact Us
If you have any questions about using your efergy products, please feel free to contact us, or visit the website for up to date information, downloads, and frequently asked questions.
Email your questions at [email protected]
We aim to answer all emails within 48 hours.
2
3
5
7 9 11 13
15 17 19
21 23 2527 31 33
2

ELINK IN THREE EASY STEPS
Step 1. Installation
Note: • You should have Adobe Air V1.5+, Java V6.0+ pre-installed before running the installation. • If you are re-installing the program, backup your data and uninstall any previous versions of elink software. Delete any files related to the application under elink folder in program files. • If you are using Vista or Windows 7, check that your UAC (User Account Control) is disabled. This can be found under Control Panel, User Account Settings. Turn it off in Vista or lower it to minimum level in Windows 7 and restart your computer. * UAC can be turned back on after the installation is finished. • Date and time of your efergy device should be same as to your computer. If the difference is more than one hour then your computer will be unable to download any data. Please adjust this before connecting the device.
PCInsert the CD into your PC, run the installation setup file, follow the setup instructions.
IMPORTANT: In Vista and Windows 7 right click the set-up file and install by choosing ‘Run as administrator’.
MacInsert the CD into your Mac, follow the setup instructions and install all the driver files.
On finishing the installation go to Step 2 to configure your settings before connecting your efergy device.
Step 2. Adjusting Settings & TariffsBefore downloading any data to your computer you will need to set the correct tariff rates and other details. You can find more information on how to do this under topic Adjusting your settings on following pages.
Step 3. Collect Data From Efergy DevicePlease launch or run the elink program before connecting your efergy device. Connect your computer to the efergy device with the supplied USB cable. A message will appear stating your device is now connected and the elink icon on top left (next to username) will change colour from grey to blue. Depending on your computer it could take 15-30 seconds for your computer to recognise your efergy device.
To download data click the Collect Data icon button on the left side under Summary tab.
In the event does not find the efergy device, unplug the USB cable wait for 10 seconds and plug it again in the same USB port or try in another USB port.
3 4

SELECTING YOUR DEVICE
6 5
When you first start the elink program you will be asked to choose which device you will be using to send messages to your transmitter. Select your device from the options available to begin reviewing your energy consumption.
IMPORTANT: The values on the wireless monitor and elink software may vary from one another. Some data sets can be interpreted differently. You may find that the data on the display differ to that on the PC.
The wireless electricity monitor and elink cannot be used as a comparison to your electricity meter. Electricity meters have to conform to much stricter guidelines and testing procedure, which are not applicable to wireless monitors. All data collected from the e2 should be for reference only.
USB dongle
Transmitter
e2 Wireless Energy Monitor ecotouch
ADJUSTING YOUR SETTINGS
PERSONAL SETTINGS
7 8
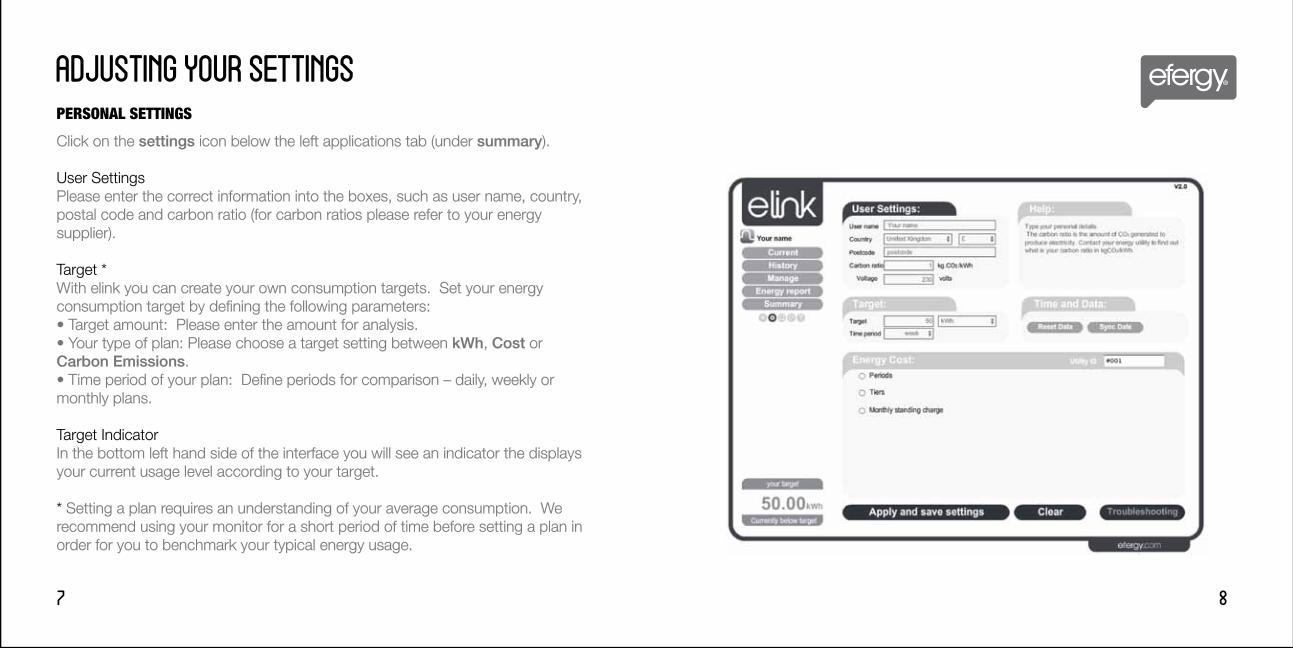
Click on the settings icon below the left applications tab (under summary).
User SettingsPlease enter the correct information into the boxes, such as user name, country, postal code and carbon ratio (for carbon ratios please refer to your energy supplier).
Target *With elink you can create your own consumption targets. Set your energy consumption target by defining the following parameters:• Target amount: Please enter the amount for analysis.• Your type of plan: Please choose a target setting between kWh, Cost or Carbon Emissions.• Time period of your plan: Define periods for comparison – daily, weekly or monthly plans.
Target IndicatorIn the bottom left hand side of the interface you will see an indicator the displays your current usage level according to your target.
* Setting a plan requires an understanding of your average consumption. We recommend using your monitor for a short period of time before setting a plan in order for you to benchmark your typical energy usage.
ADJUSTING TIME AND DATA
ADJUSTING YOUR SETTINGS
10 9
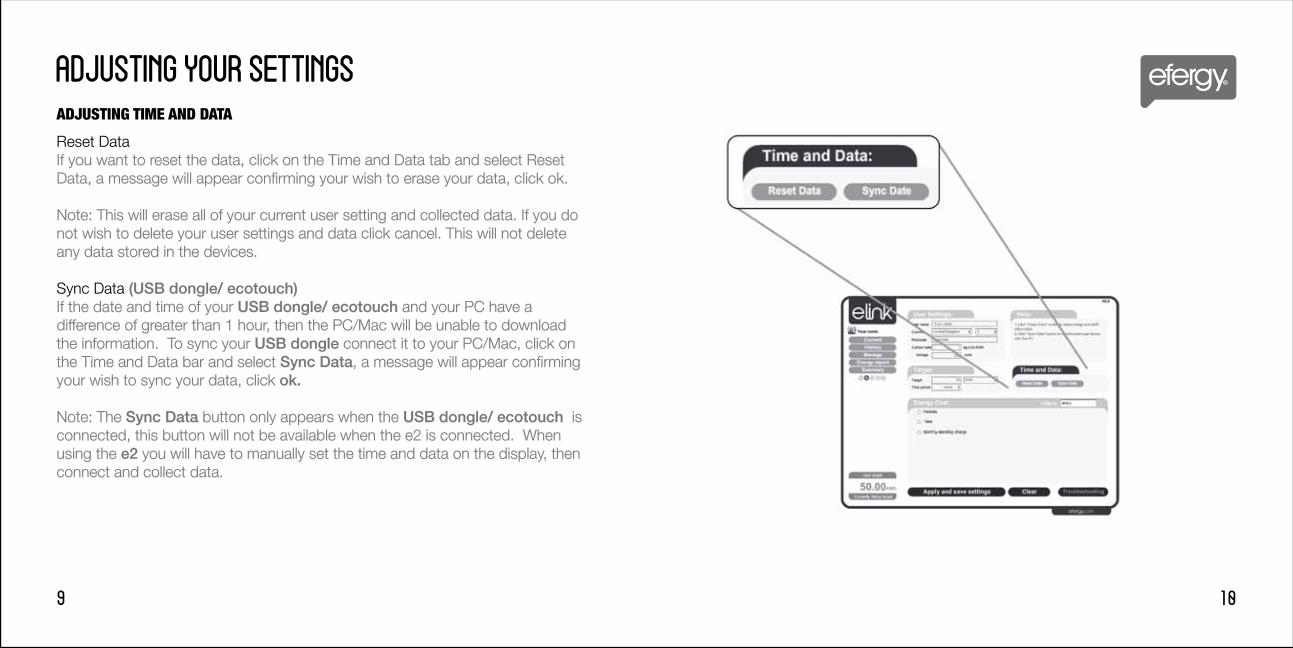
Reset DataIf you want to reset the data, click on the Time and Data tab and select Reset Data, a message will appear confirming your wish to erase your data, click ok.
Note: This will erase all of your current user setting and collected data. If you do not wish to delete your user settings and data click cancel. This will not delete any data stored in the devices.
Sync Data (USB dongle/ ecotouch)If the date and time of your USB dongle/ ecotouch and your PC have a difference of greater than 1 hour, then the PC/Mac will be unable to download the information. To sync your USB dongle connect it to your PC/Mac, click on the Time and Data bar and select Sync Data, a message will appear confirmingyour wish to sync your data, click ok.
Note: The Sync Data button only appears when the USB dongle/ ecotouch is connected, this button will not be available when the e2 is connected. When using the e2 you will have to manually set the time and data on the display, then connect and collect data.
ENERGY COSTS AND TARIFFS
ADJUSTING YOUR SETTINGS
11 12
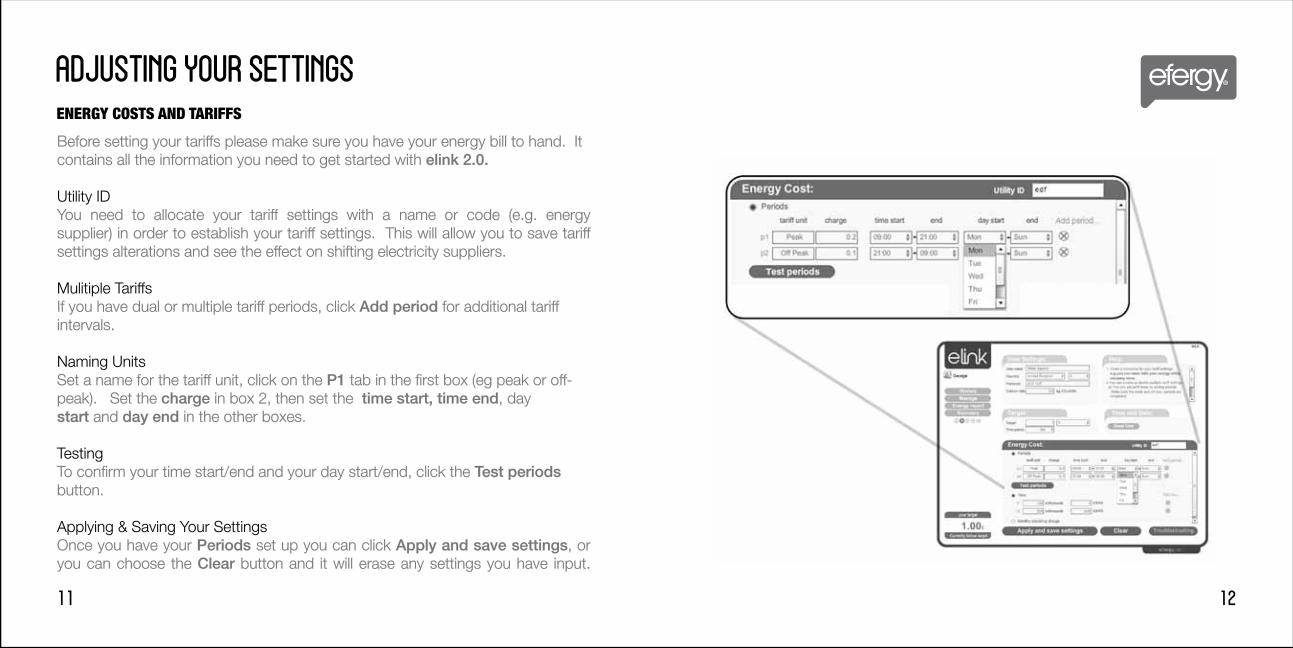
Before setting your tariffs please make sure you have your energy bill to hand. It contains all the information you need to get started with elink 2.0.
Utility IDYou need to allocate your tariff settings with a name or code (e.g. energy supplier) in order to establish your tariff settings. This will allow you to save tariffsettings alterations and see the effect on shifting electricity suppliers.
Mulitiple TariffsIf you have dual or multiple tariff periods, click Add period for additional tariff intervals.
Naming UnitsSet a name for the tariff unit, click on the P1 tab in the first box (eg peak or off-peak). Set the charge in box 2, then set the time start, time end, daystart and day end in the other boxes.
TestingTo confirm your time start/end and your day start/end, click the Test periods button.
Applying & Saving Your SettingsOnce you have your Periods set up you can click Apply and save settings, oryou can choose the Clear button and it will erase any settings you have input.
TIERS AND STANDING CHARGES
ADJUSTING YOUR SETTINGS
14 13
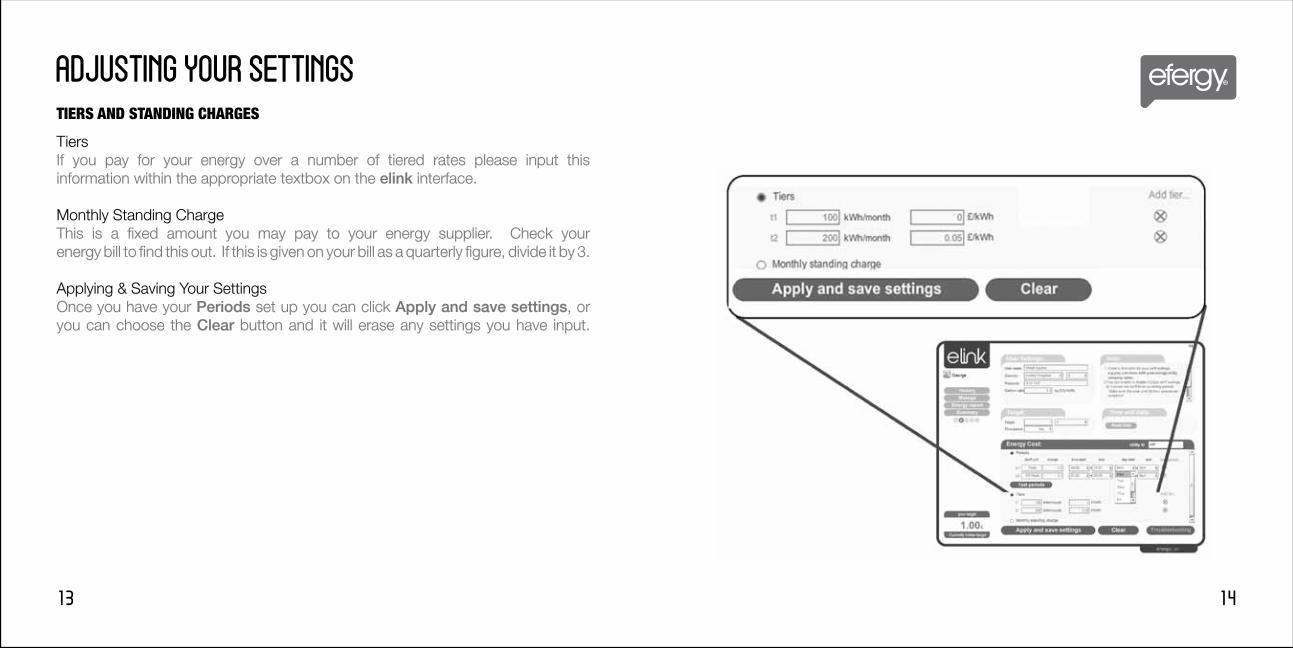
TiersIf you pay for your energy over a number of tiered rates please input thisinformation within the appropriate textbox on the elink interface.
Monthly Standing ChargeThis is a fixed amount you may pay to your energy supplier. Check yourenergy bill to find this out. If this is given on your bill as a quarterly figure, divide it by 3.
Applying & Saving Your SettingsOnce you have your Periods set up you can click Apply and save settings, oryou can choose the Clear button and it will erase any settings you have input.
MONITORING ENERGY CONSUMPTION
15 16
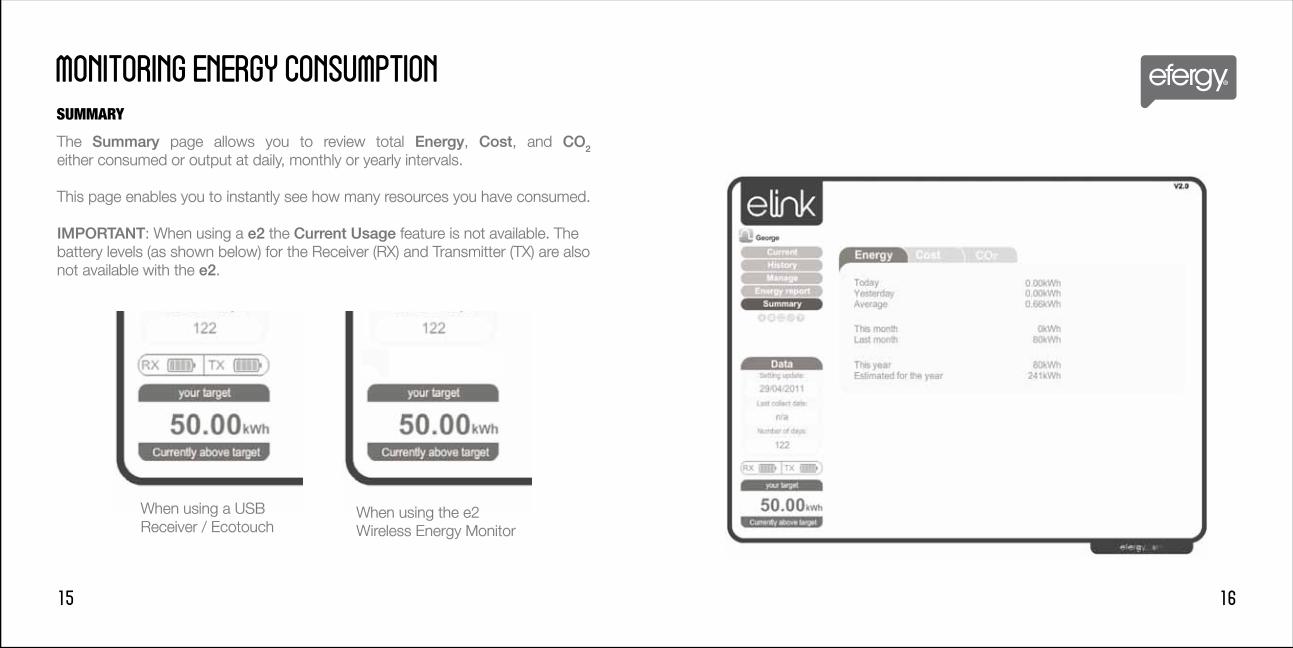
The Summary page allows you to review total Energy, Cost, and CO2
either consumed or output at daily, monthly or yearly intervals.
This page enables you to instantly see how many resources you have consumed.
IMPORTANT: When using a e2 the Current Usage feature is not available. The battery levels (as shown below) for the Receiver (RX) and Transmitter (TX) are also not available with the e2.
SUMMARY
When using the e2 Wireless Energy Monitor
When using a USB Receiver / Ecotouch
CURRENT USAGE (USB dongle/ ecotouch)
MONITORING ENERGY CONSUMPTION
17 18
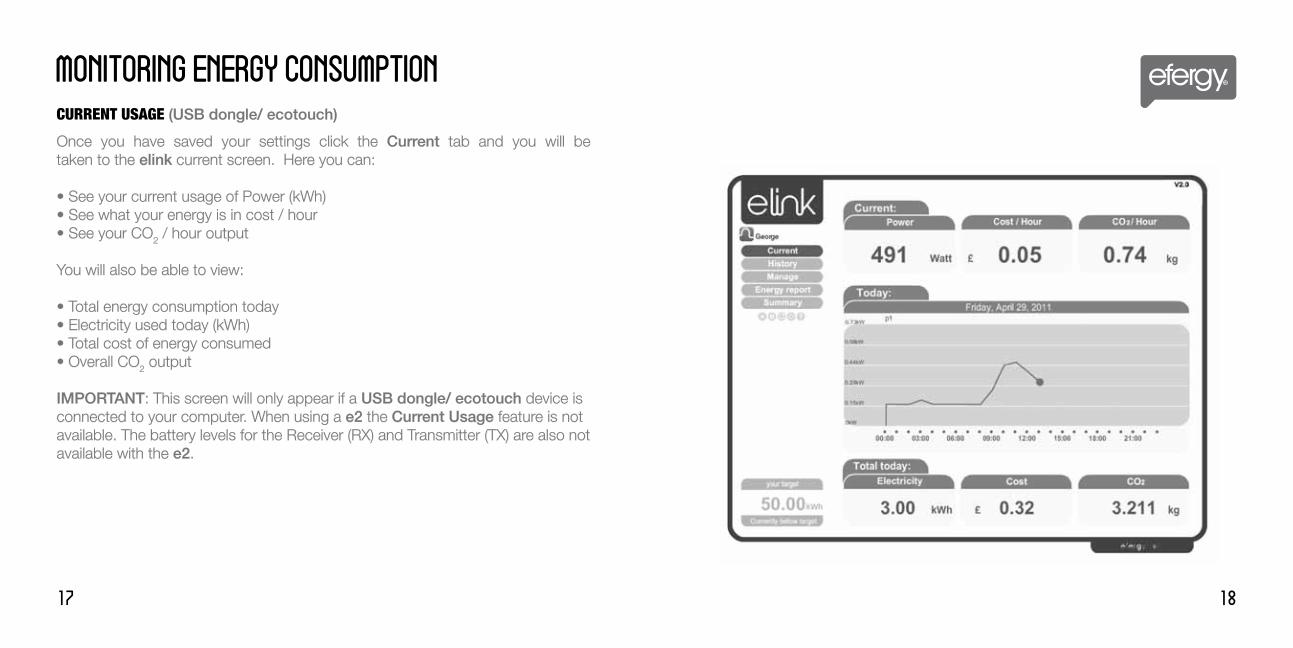
Once you have saved your settings click the Current tab and you will betaken to the elink current screen. Here you can:
• See your current usage of Power (kWh)• See what your energy is in cost / hour• See your CO2 / hour output
You will also be able to view:
• Total energy consumption today• Electricity used today (kWh)• Total cost of energy consumed • Overall CO2 output
IMPORTANT: This screen will only appear if a USB dongle/ ecotouch device is connected to your computer. When using a e2 the Current Usage feature is not available. The battery levels for the Receiver (RX) and Transmitter (TX) are also not available with the e2.
USAGE HISTORY
MONITORING ENERGY CONSUMPTION
20 19
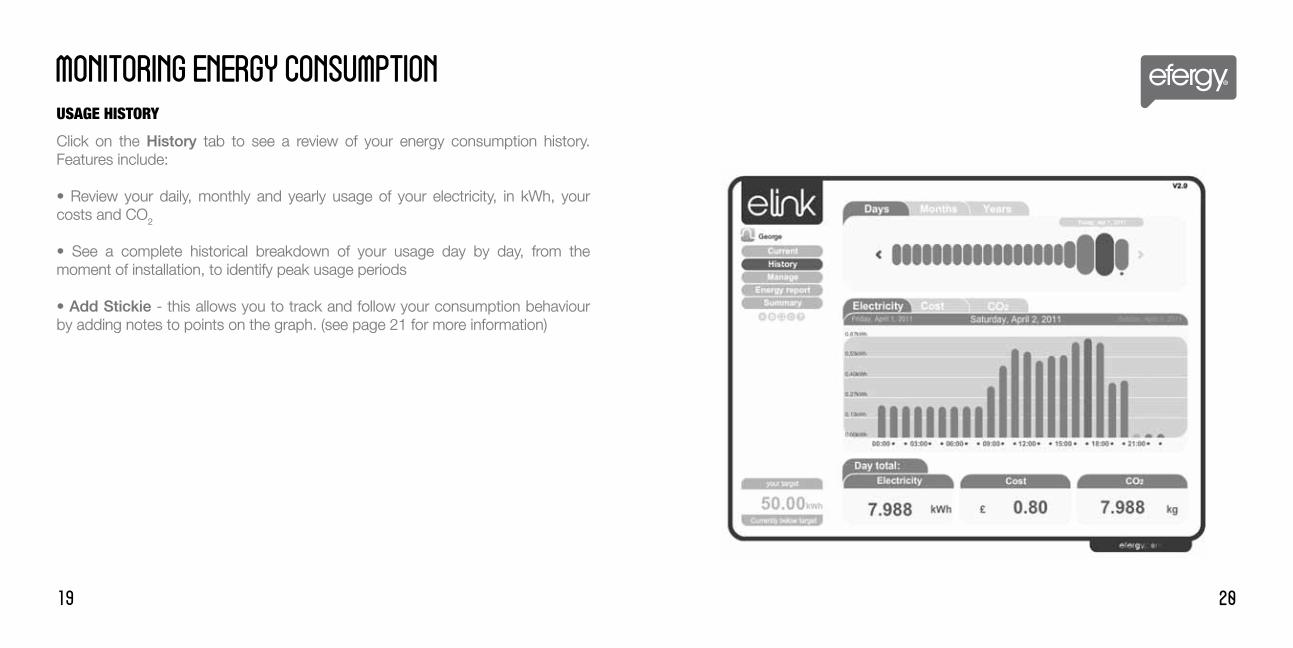
Click on the History tab to see a review of your energy consumption history. Features include:
• Review your daily, monthly and yearly usage of your electricity, in kWh, yourcosts and CO2
• See a complete historical breakdown of your usage day by day, from themoment of installation, to identify peak usage periods
• Add Stickie - this allows you to track and follow your consumption behaviourby adding notes to points on the graph. (see page 21 for more information)
ADDING STICKIES
MANAGING ENERGY CONSUMPTION
22 21
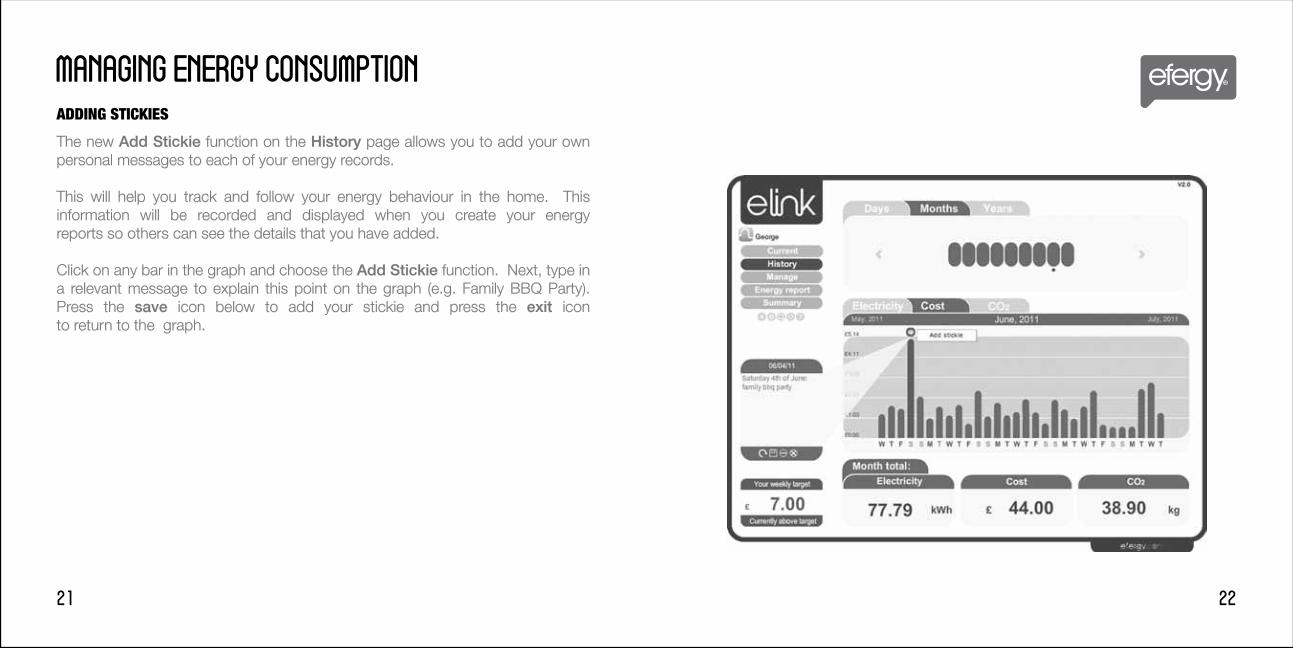
The new Add Stickie function on the History page allows you to add your ownpersonal messages to each of your energy records.
This will help you track and follow your energy behaviour in the home. This information will be recorded and displayed when you create your energyreports so others can see the details that you have added.
Click on any bar in the graph and choose the Add Stickie function. Next, type ina relevant message to explain this point on the graph (e.g. Family BBQ Party). Press the save icon below to add your stickie and press the exit iconto return to the graph.
ENERGY DEMAND
MANAGING ENERGY CONSUMPTION
23 24
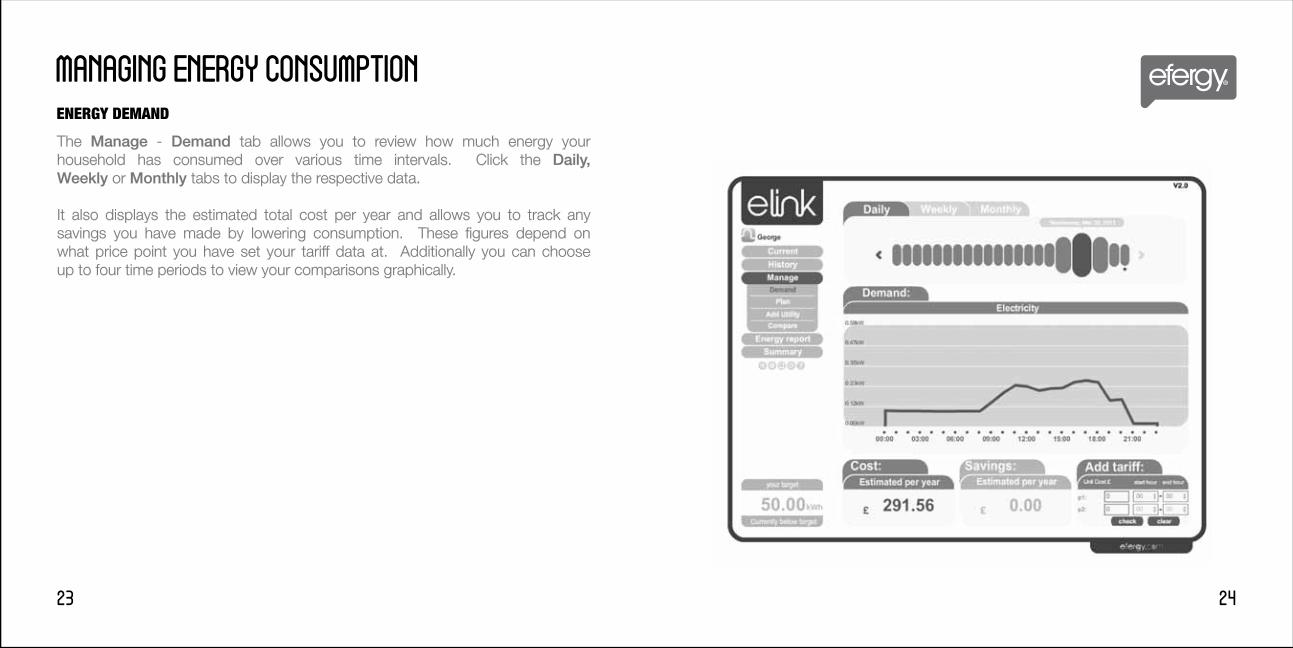
The Manage - Demand tab allows you to review how much energy your household has consumed over various time intervals. Click the Daily,Weekly or Monthly tabs to display the respective data.
It also displays the estimated total cost per year and allows you to track any savings you have made by lowering consumption. These figures depend on what price point you have set your tariff data at. Additionally you can chooseup to four time periods to view your comparisons graphically.
TARGETS & BUDGETS
MANAGING ENERGY CONSUMPTION
26 25
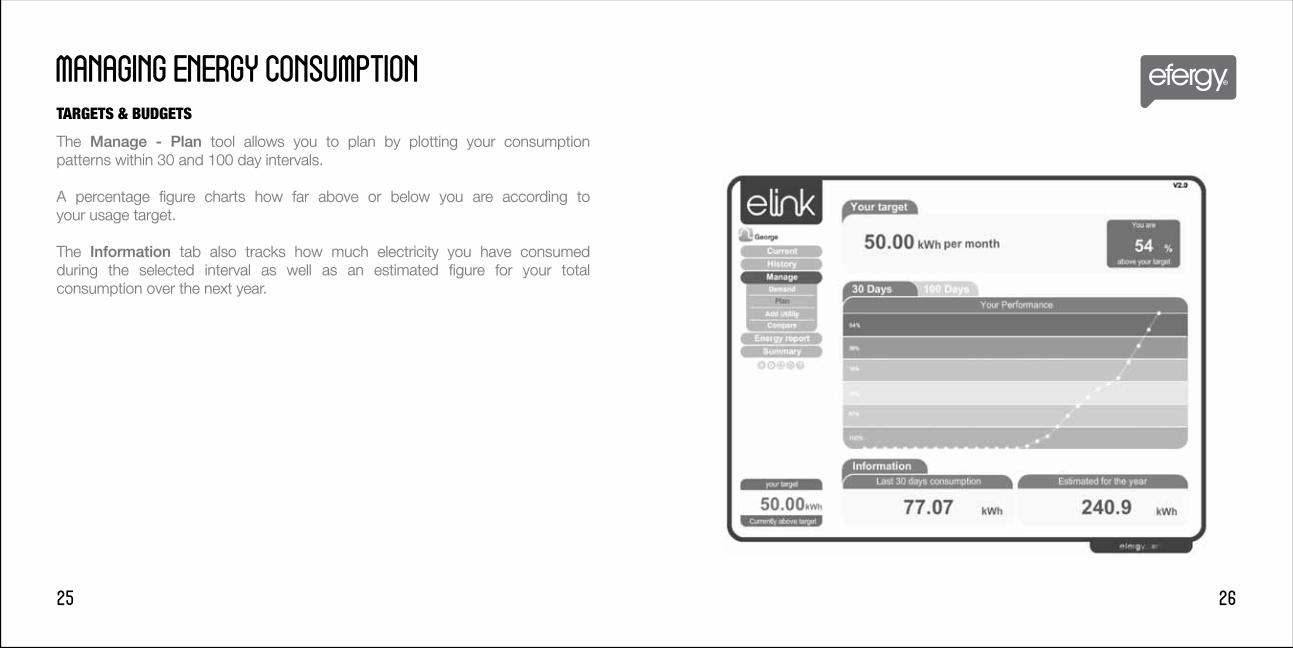
The Manage - Plan tool allows you to plan by plotting your consumptionpatterns within 30 and 100 day intervals.
A percentage figure charts how far above or below you are according toyour usage target.
The Information tab also tracks how much electricity you have consumed during the selected interval as well as an estimated figure for your totalconsumption over the next year.
TARIFF OPTIONS
MANAGING ENERGY CONSUMPTION
27 28
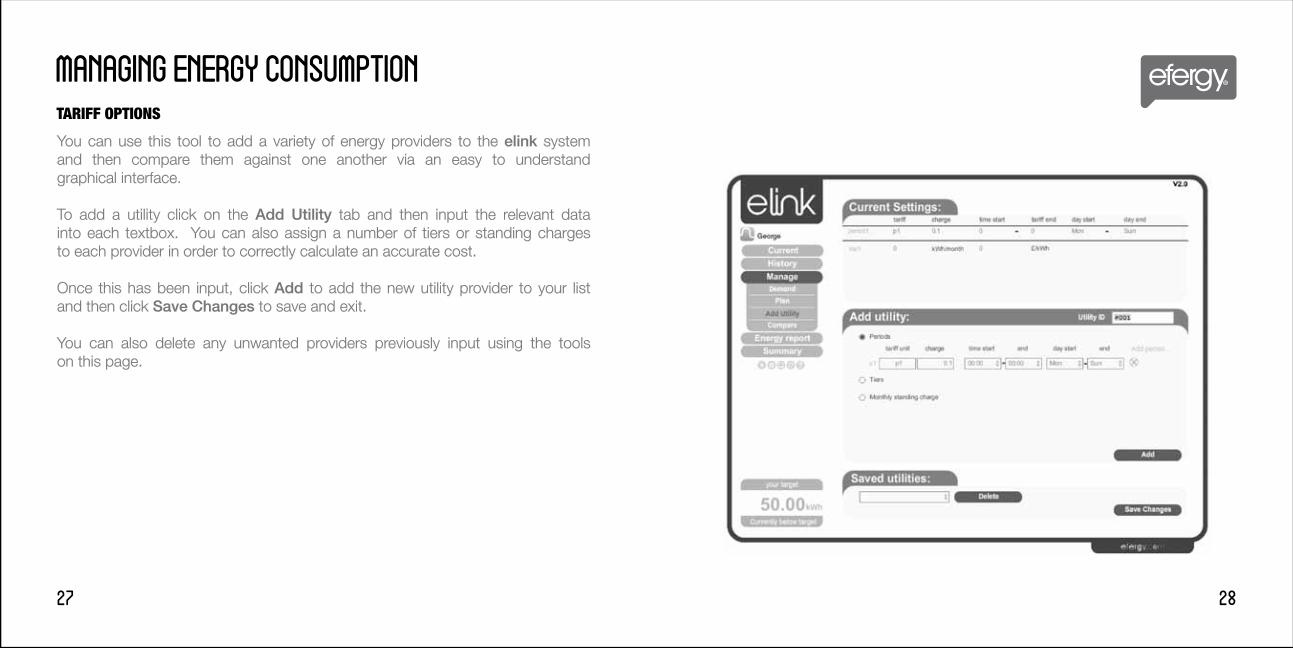
You can use this tool to add a variety of energy providers to the elink system and then compare them against one another via an easy to understandgraphical interface.
To add a utility click on the Add Utility tab and then input the relevant data into each textbox. You can also assign a number of tiers or standing chargesto each provider in order to correctly calculate an accurate cost.
Once this has been input, click Add to add the new utility provider to your listand then click Save Changes to save and exit.
You can also delete any unwanted providers previously input using the toolson this page.
TARIFF OPTIONS CONTINUED
MANAGING ENERGY CONSUMPTION
30 29
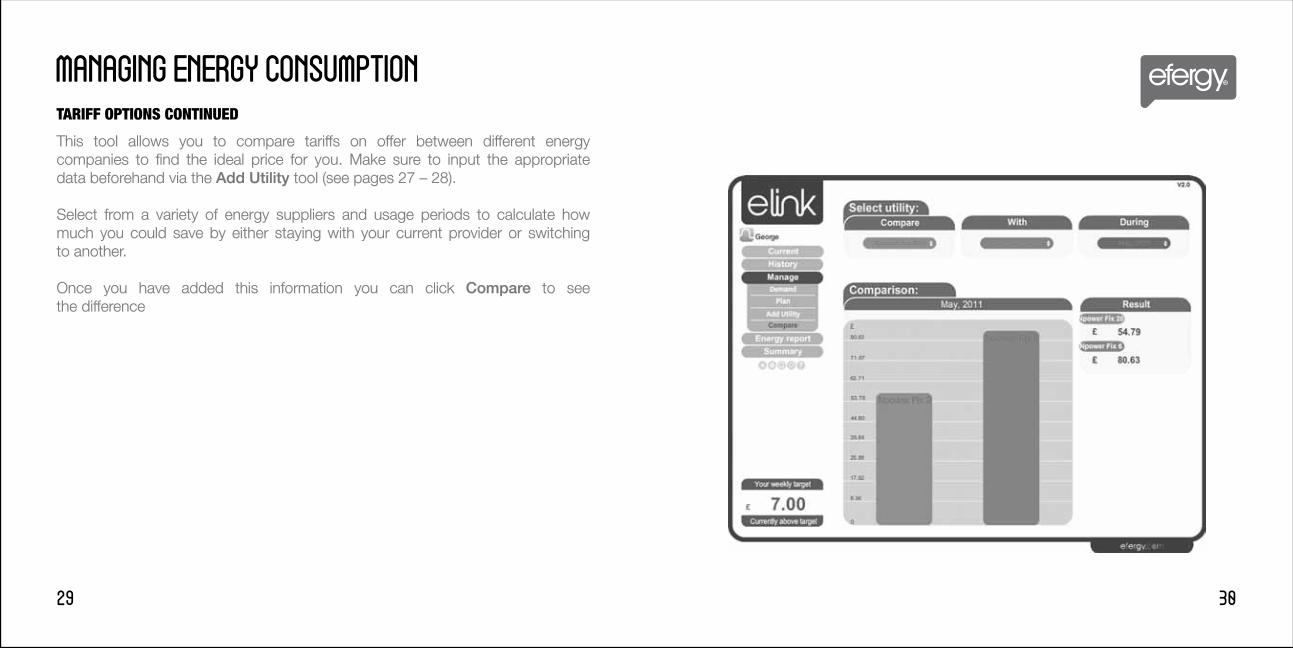
This tool allows you to compare tariffs on offer between different energy companies to find the ideal price for you. Make sure to input the appropriatedata beforehand via the Add Utility tool (see pages 27 – 28).
Select from a variety of energy suppliers and usage periods to calculate how much you could save by either staying with your current provider or switchingto another.
Once you have added this information you can click Compare to see the difference
ENERGY REPORTING
MANAGING ENERGY CONSUMPTION
31 32
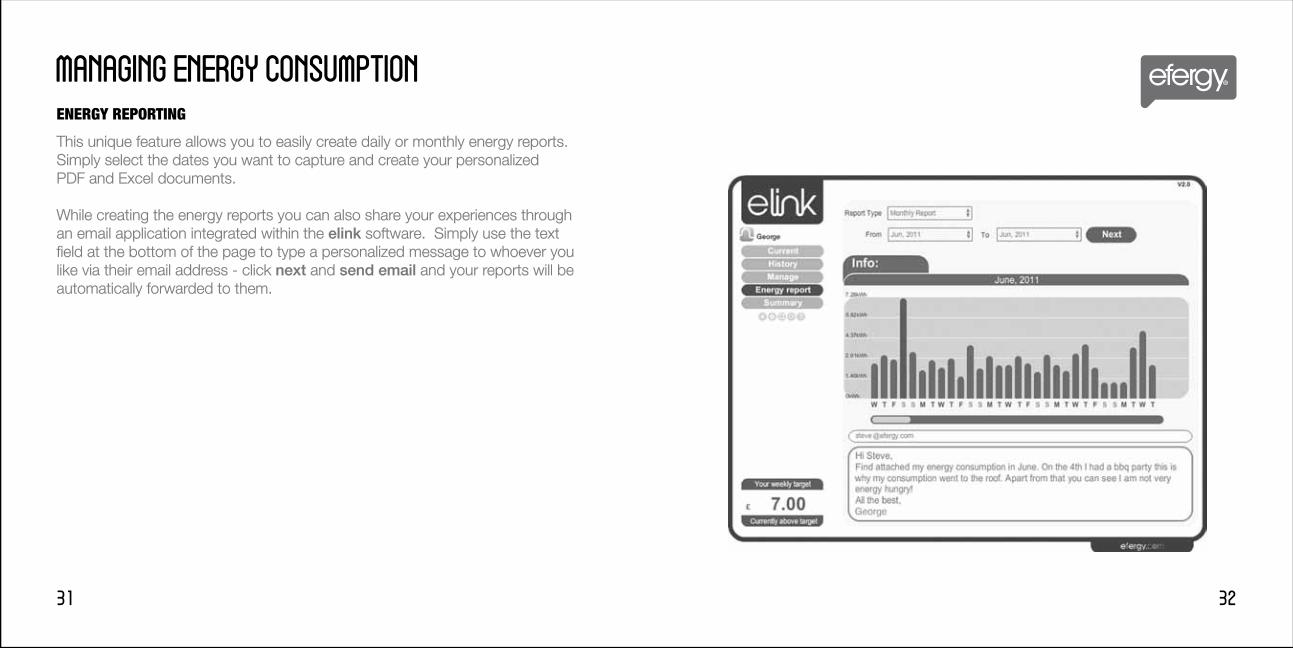
This unique feature allows you to easily create daily or monthly energy reports. Simply select the dates you want to capture and create your personalizedPDF and Excel documents. While creating the energy reports you can also share your experiences through an email application integrated within the elink software. Simply use the text field at the bottom of the page to type a personalized message to whoever you like via their email address - click next and send email and your reports will be automatically forwarded to them.
MANAGING ENERGY CONSUMPTION
34 33
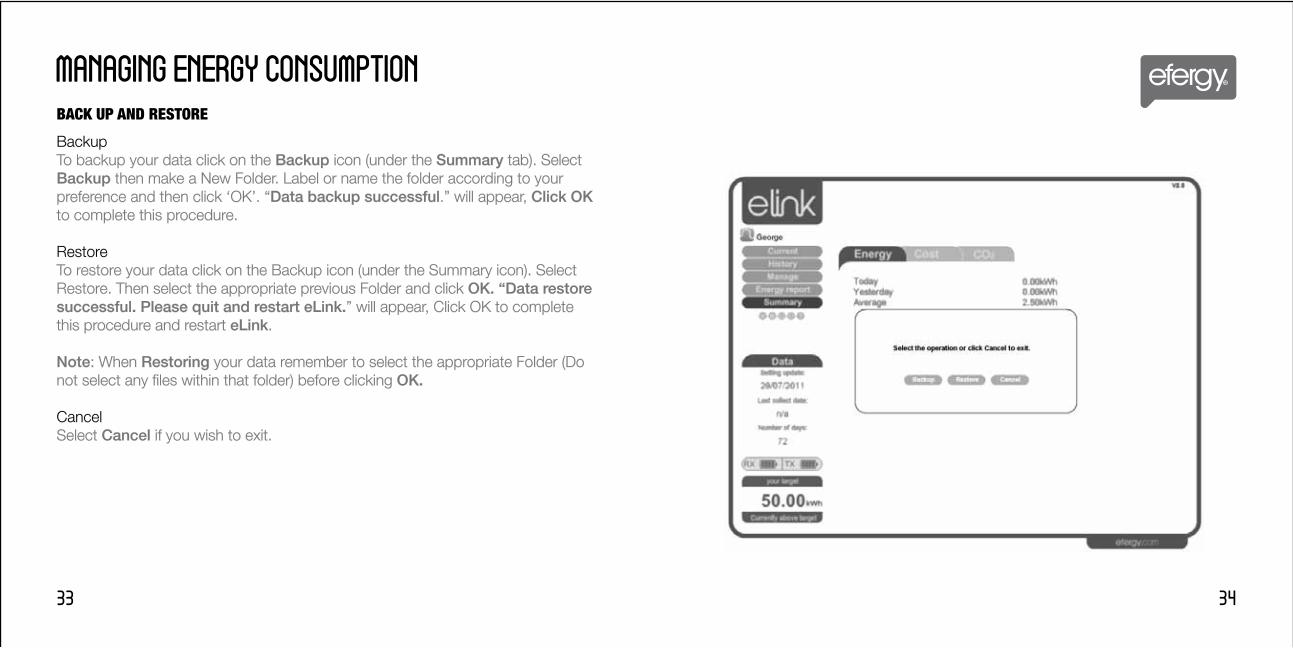
BackupTo backup your data click on the Backup icon (under the Summary tab). Select Backup then make a New Folder. Label or name the folder according to your preference and then click ‘OK’. “Data backup successful.” will appear, Click OK to complete this procedure.
RestoreTo restore your data click on the Backup icon (under the Summary icon). Select Restore. Then select the appropriate previous Folder and click OK. “Data restore successful. Please quit and restart eLink.” will appear, Click OK to complete this procedure and restart eLink.
Note: When Restoring your data remember to select the appropriate Folder (Do not select any files within that folder) before clicking OK.
CancelSelect Cancel if you wish to exit.
BACK UP AND RESTORE