module1 print
TRANSCRIPT

Print Services

Xerox Corporation
Print Services – Learner’s Guide 2 September, 2007
Xerox Corporation Global Language and Knowledge Services 800 Phillips Road Webster, New York 14580 ©2007 by Xerox Corporation All rights reserved. Copyright protection claimed includes all forms and matters of copyrightable material and information now allowed by statutory or judicial law or hereinafter granted. Printed in the United States of America. Xerox® and all Xerox products mentioned in this publication are trademarks of Xerox Corporation Xerox Corporation Changes are periodically made to this document. Changes, technical inaccuracies, and typographic errors will be corrected in subsequent editions.
Xerox Corporation
Print Services – Learner’s Guide 3 September, 2007
Table of Contents
INTRODUCTION 4 What’s In It For You? 4
NETWORK PRINTING OVERVIEW 5
TROUBLESHOOTING AND ESCALATING PRINTER PROBLEMS – FLOW CHART 6
ISOLATING PRINTER PROBLEMS 7 The Configuration Report 7 The PWS Network Adapter (NIC) 10 The Crossover Cable 12 The PWS IP Address 14
NETWORK PRINTING PROTOCOLS 16 The TCP/IP Port 17 Line Printer Remote (LPR) Printing 17 Port 9100 (RAW) Printing 18 Printing with Internet Services (Web UI) 19
PRINT DRIVERS 21 PCL Drivers 21 PostScript Drivers 21 Downloading Print Drivers 22 Installing Print Drivers 24 Configuring the Printer Port 26 Diagnosing Problems 28 Troubleshooting Printer Problems 29 Sample Configuration Report #1 31 Highlighted Configuration Report #1 32 Sample Configuration Report #2 33 Highlighted Configuration Report #2 34 Sample Configuration Report #3 35 Highlighted Configuration Report #3 36 The Customer System Environment 37 Talk Track for Printing Issues 38 Talk Track for IT Issues 39
Xerox Corporation
Print Services – Learner’s Guide 4 September, 2007
Introduction
This module explains the following Printing topics:
• Network Printing Overview
• Troubleshooting
• Network Printing Protocols
• Print Drivers
What’s In It For You?
After completing this module, you will be able to:
• Understand CSE and Customer roles and responsibilities, relating to isolating printer problems within a connected environment and properly escalate the problem.
• Improve network setup procedures knowledge.
• Troubleshoot basic network printing problems using the PWS.
• Load print drivers on the PWS.
• Configure and Remove Printers

Xerox Corporation
Print Services – Learner’s Guide 5 September, 2007
Network Printing Overview
When a customer receives a Xerox device, they will receive the necessary software to install the printer on their network workstations. This software will include the printer drivers and may also include additional utilities to help the customer install the printer and monitor the printer after installation.
Depending on the product, there may also be programs that will provide scanning services, or auditron accounting services. Although the program may be provided to the customer at no cost, depending on the product there may be an additional charge to the customer to enable the feature on the machine.
Network printers are intended to be connected at a separate location used by several people through a network and not directly to a users workstation. Sometimes the document will print on printers on different floors or buildings. The document is electronically sent and must pass thru several network devices and protocols until it is finally printed where it was intended. For this reason the printers’ properties need to be monitored and even controlled at remote locations.
All Xerox Printers have embedded web pages within the printer. This requires no additional software except for a web browser (Internet Explorer, Netscape) and IP services enabled on the users workstation and at the machine. The Network Administrators can access the printer properties via CentreWare Internet Services and modify settings from their workstations. The print drivers are loaded onto the client’s workstation, allowing them to print, choose settings, and access the devices features.
Xerox Corporation
Print Services – Learner’s Guide 6 September, 2007
Troubleshooting and Escalating Printer Problems – Flow Chart
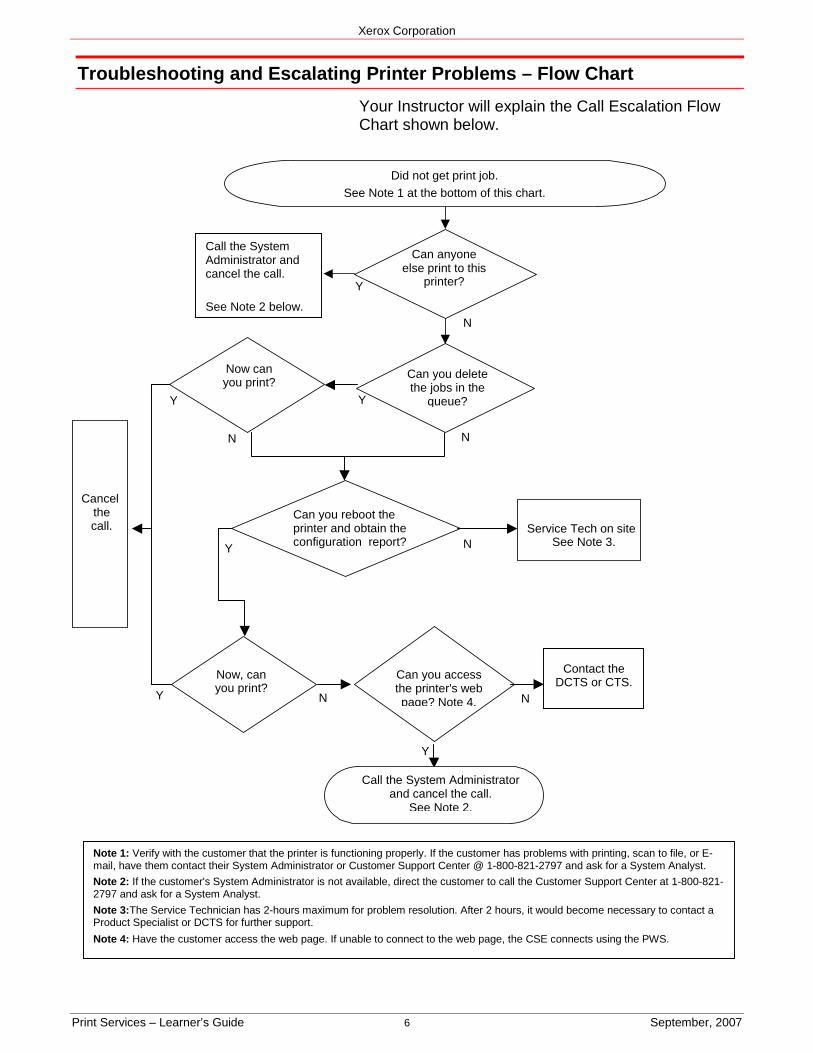
Your Instructor will explain the Call Escalation Flow Chart shown below.
.
Y
Y
N
Call the System Administrator and cancel the call.
See Note 2.
Y
N
Y
Y
N N
Y
N
N
Note 1: Verify with the customer that the printer is functioning properly. If the customer has problems with printing, scan to file, or E- mail, have them contact their System Administrator or Customer Support Center @ 1-800-821-2797 and ask for a System Analyst. Note 2: If the customer's System Administrator is not available, direct the customer to call the Customer Support Center at 1-800-821-2797 and ask for a System Analyst.
Note 3:The Service Technician has 2-hours maximum for problem resolution. After 2 hours, it would become necessary to contact a Product Specialist or DCTS for further support.
Note 4: Have the customer access the web page. If unable to connect to the web page, the CSE connects using the PWS.
Can anyone else print to this
printer?
Can you reboot the printer and obtain the configuration report?
Call the System Administrator and cancel the call. See Note 2 below.
Did not get print job.
See Note 1 at the bottom of this chart.
Now, can you print?
Can you access the printer's web page? Note 4.
Now can you print?
Service Tech on site See Note 3.
Contact the DCTS or CTS.
Can you delete the jobs in the
queue?
Cancel the call.

Xerox Corporation
Print Services – Learner’s Guide 7 September, 2007
Isolating Printer Problems
The Configuration Report
Isolating problems with a customer’s printer can be assisted by viewing the Configuration Report, which is printed at the device.
The following information is available on the Configuration Report for most Xerox devices:
• IP Address
• Subnet Mask
• Gateway Address
• NetWare Port Status
• LPD Port Status

Xerox Corporation
Print Services – Learner’s Guide 8 September, 2007
The detailed steps required for Printing a Configuration Report are shown below.
1. Touch the Machine Status button on the device control panel.
2. Touch Print Reports.
3. Touch Reports.
Exercise P-1
Xerox Corporation
Print Services – Learner’s Guide 9 September, 2007
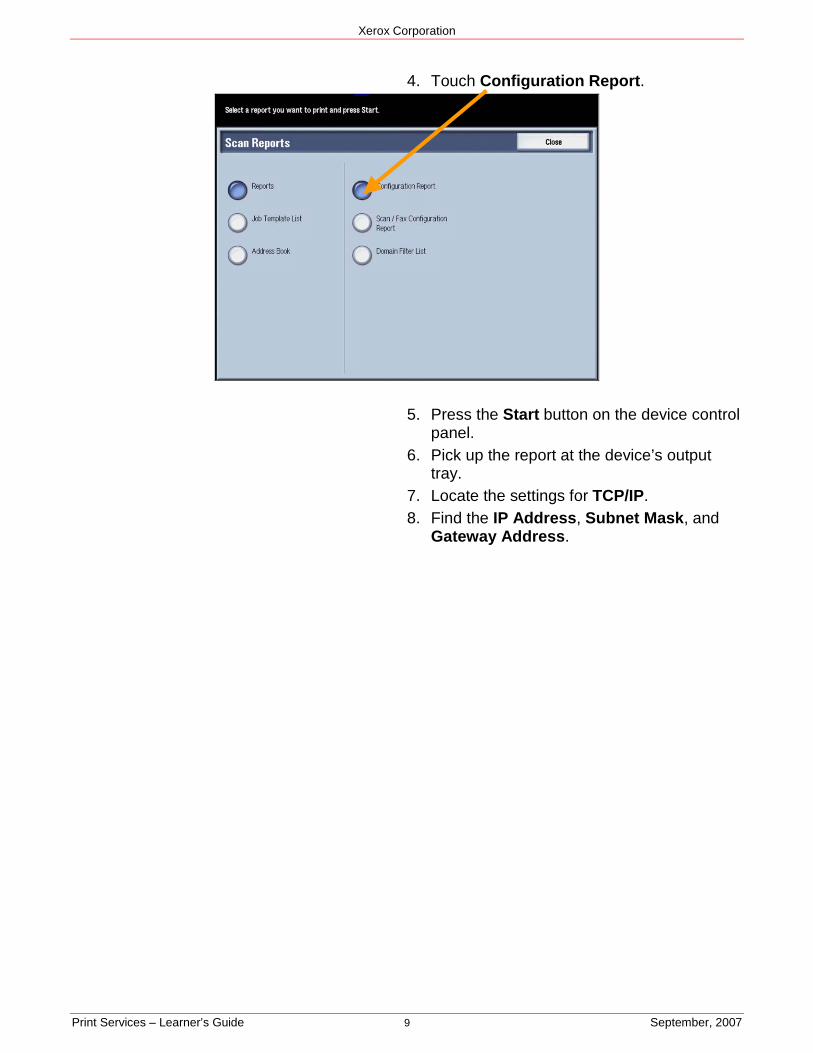
4. Touch Configuration Report.
5. Press the Start button on the device control panel.
6. Pick up the report at the device’s output tray.
7. Locate the settings for TCP/IP. 8. Find the IP Address, Subnet Mask, and
Gateway Address.

Xerox Corporation
Print Services – Learner’s Guide 10 September, 2007
The PWS Network Adapter (NIC)
To properly troubleshoot printer problems, it is important to Verify the PWS has a working Network Adapter, (NIC) and that it is properly connected to the network.
A network card, network adapter or NIC (network interface card) is a piece of computer hardware designed to allow computers to communicate over a computer network. It allows users to connect to each other either by using cables or wirelessly.
Xerox Corporation
Print Services – Learner’s Guide 11 September, 2007
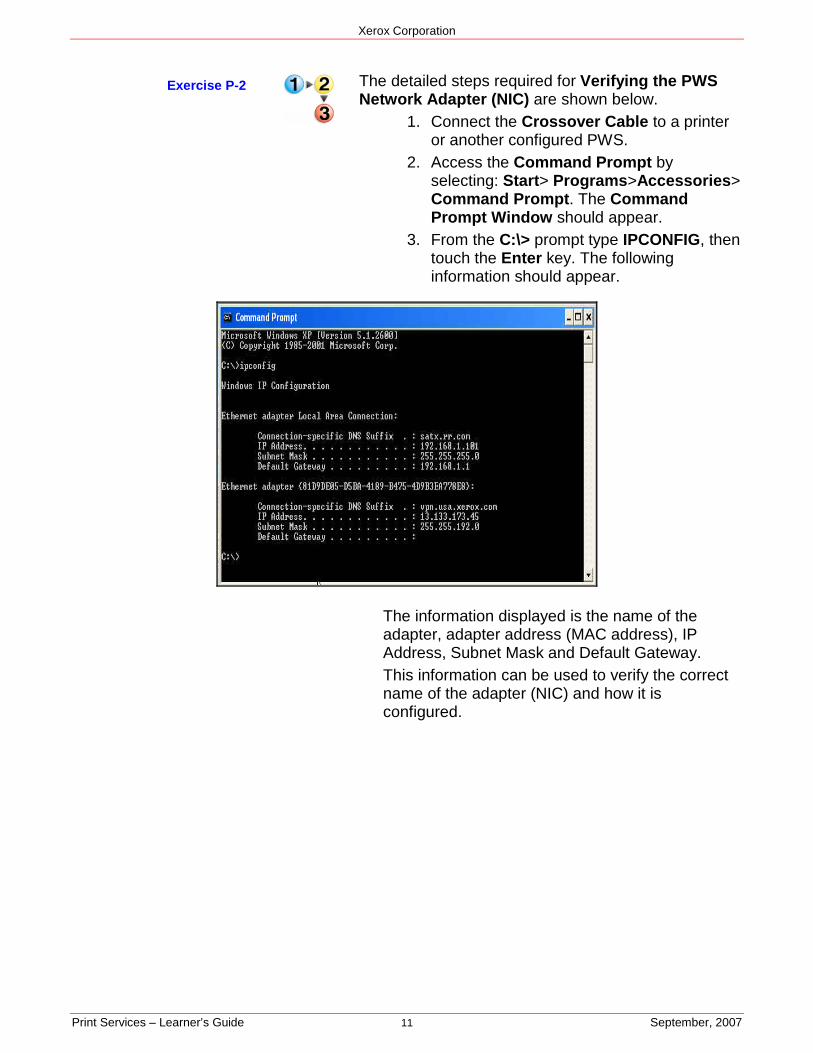
The detailed steps required for Verifying the PWS Network Adapter (NIC) are shown below.
1. Connect the Crossover Cable to a printer or another configured PWS.
2. Access the Command Prompt by selecting: Start> Programs>Accessories> Command Prompt. The Command Prompt Window should appear.
3. From the C:\> prompt type IPCONFIG, then touch the Enter key. The following information should appear.
The information displayed is the name of the adapter, adapter address (MAC address), IP Address, Subnet Mask and Default Gateway. This information can be used to verify the correct name of the adapter (NIC) and how it is configured.
Exercise P-2

Xerox Corporation
Print Services – Learner’s Guide 12 September, 2007
The Crossover Cable
You can troubleshoot printing problems using a Crossover Cable connected to your PWS Network Adapter. The Crossover Cable, also called a swap cable (600T2252) gives you the ability to send a network print job from a client to a printer without using a hub. This allows you to simulate being on the customer’s network without actually being on it.
A Crossover Cable is a cable with wire pairs 1 & 3 and 2 & 6 crossed, shown below.
You can use the Crossover Cable to ping a printer. Ping is a computer network tool used to test whether a particular host is reachable across an IP network. It works by sending echo request packets to the target host and listening for echo response replies. Ping estimates the round-trip time, generally in milliseconds, and records any packet loss when finished.
Xerox Corporation
Print Services – Learner’s Guide 13 September, 2007
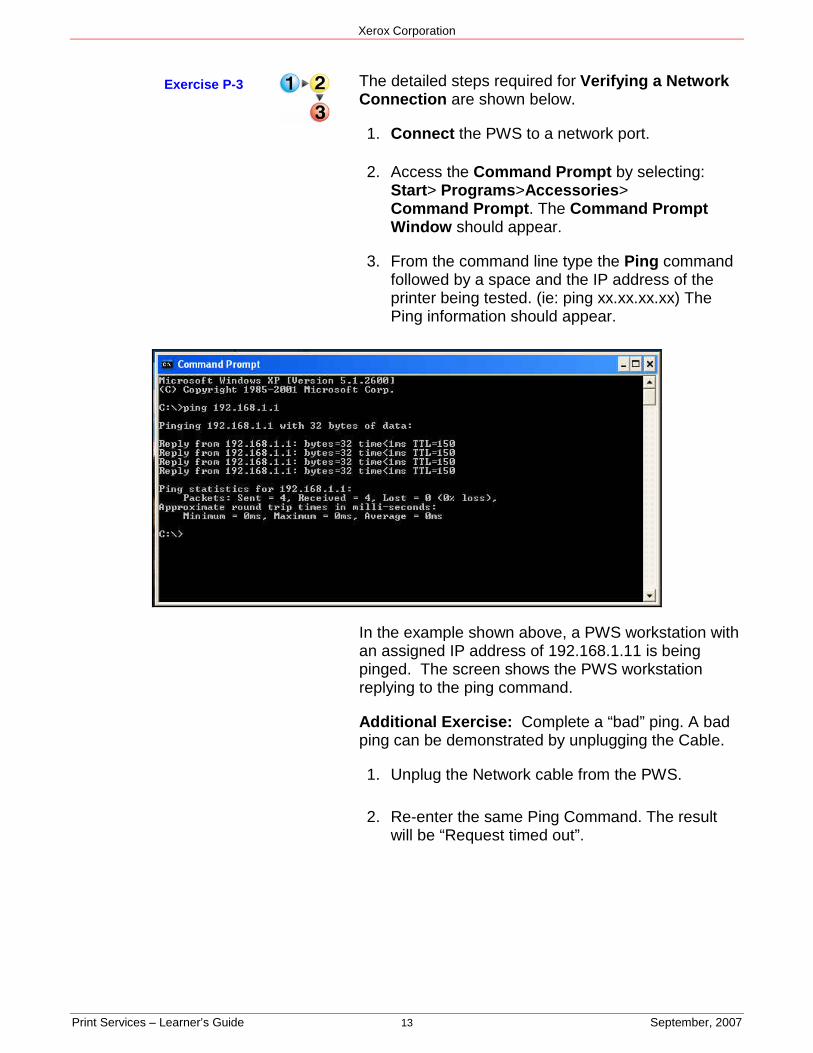
The detailed steps required for Verifying a Network Connection are shown below.
1. Connect the PWS to a network port.
2. Access the Command Prompt by selecting: Start> Programs>Accessories> Command Prompt. The Command Prompt Window should appear.
3. From the command line type the Ping command followed by a space and the IP address of the printer being tested. (ie: ping xx.xx.xx.xx) The Ping information should appear.
In the example shown above, a PWS workstation with an assigned IP address of 192.168.1.11 is being pinged. The screen shows the PWS workstation replying to the ping command.
Additional Exercise: Complete a “bad” ping. A bad ping can be demonstrated by unplugging the Cable.
1. Unplug the Network cable from the PWS.
2. Re-enter the same Ping Command. The result will be “Request timed out”.
Exercise P-3
Xerox Corporation
Print Services – Learner’s Guide 14 September, 2007
The PWS IP Address
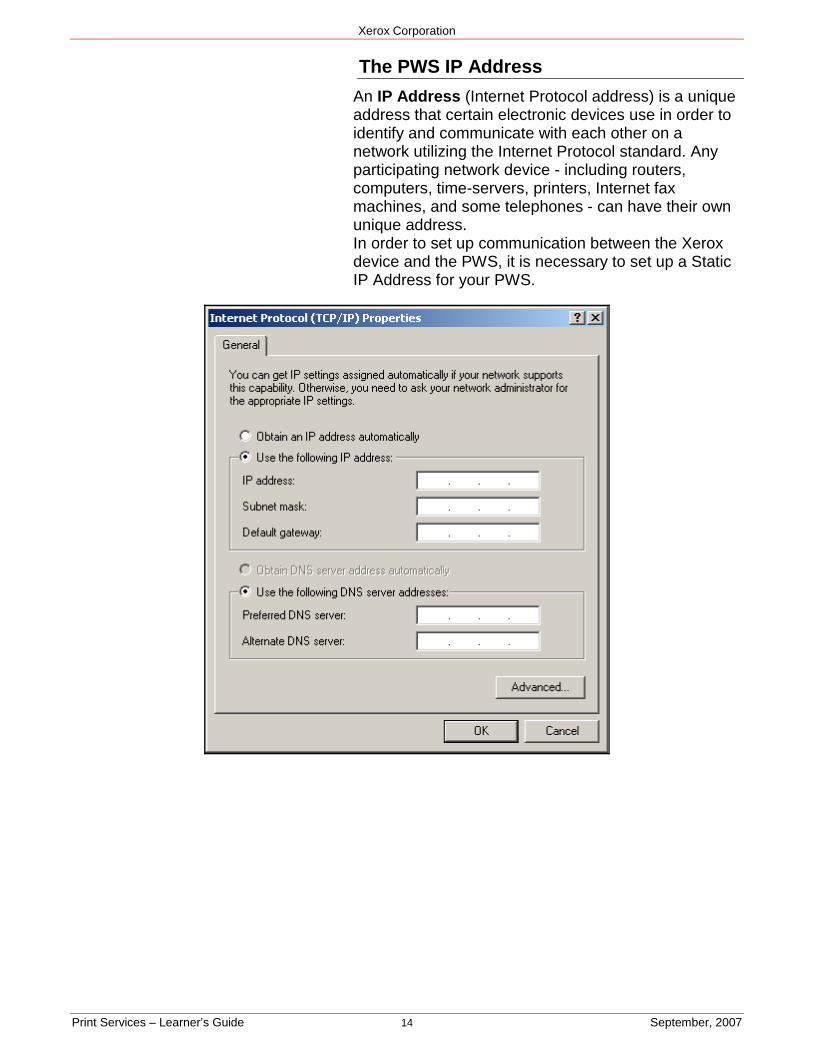
An IP Address (Internet Protocol address) is a unique address that certain electronic devices use in order to identify and communicate with each other on a network utilizing the Internet Protocol standard. Any participating network device - including routers, computers, time-servers, printers, Internet fax machines, and some telephones - can have their own unique address. In order to set up communication between the Xerox device and the PWS, it is necessary to set up a Static IP Address for your PWS.
Xerox Corporation
Print Services – Learner’s Guide 15 September, 2007
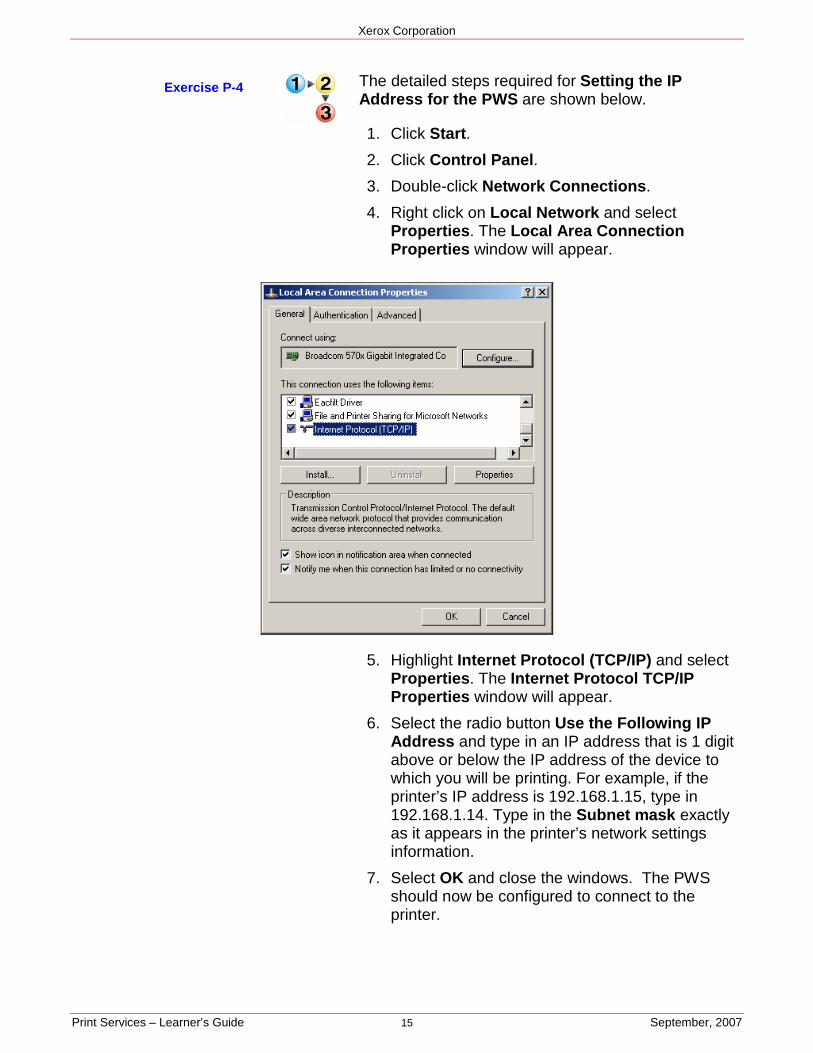
The detailed steps required for Setting the IP Address for the PWS are shown below.
1. Click Start.
2. Click Control Panel.
3. Double-click Network Connections.
4. Right click on Local Network and select Properties. The Local Area Connection Properties window will appear.
5. Highlight Internet Protocol (TCP/IP) and select Properties. The Internet Protocol TCP/IP Properties window will appear.
6. Select the radio button Use the Following IP Address and type in an IP address that is 1 digit above or below the IP address of the device to which you will be printing. For example, if the printer’s IP address is 192.168.1.15, type in 192.168.1.14. Type in the Subnet mask exactly as it appears in the printer’s network settings information.
7. Select OK and close the windows. The PWS should now be configured to connect to the printer.
Exercise P-4

Xerox Corporation
Print Services – Learner’s Guide 16 September, 2007
Network Printing Protocols
The customer has several options when printing to a networked machine.
• Print through a Server using the protocol of their choice.
• Print using LPR printing
• Print using Port 9100
• Print using the Internet Services web page (commonly referred to as the Web UI) that is built into most Xerox networked equipment
Printing through a server is the common method used by customers, because it gives added security and control, providing a place for the jobs to be spooled, queued and processed. The methods of printing available to the CSE do not include server-based printing because that would require connection to the customers network. The CSE should never connect to customers network. The protocols discussed will be those that are available to the CSE through the use of a cross over cable.

Xerox Corporation
Print Services – Learner’s Guide 17 September, 2007
The TCP/IP Port
The TCP/IP Port is a software port that resides in your PC’s supporting Operating System, and should not be confused with the hardware Ethernet port attached to the NIC adapter or integrated system PWB. It will interface with the printer in one of two ways: LPR or Port 9100 (RAW).
Line Printer Remote (LPR) Printing
Line Printer Remote (LPR) is an application-level printing protocol that uses TCP/IP to establish connections between printers and workstations on a network. LPR maintains a constant connection allowing for many users to access the printer and more accurate print status messages, i.e., fewer unnecessary service calls. The Port Settings information for the LPR protocol is shown below.
NOTE: The Queue Name will vary with the printer, however “raw” is a common queue, and “lp” is used in most Document Centres. DFEs often use “print” or “processprint”. The Queue Name is case sensitive - use only lower case. For more information, consult the customer printer documentation, the Xerox website, or the website of the printer DFE.
NOTE: It is recommended to always “check” the LPR Byte Counting Enabled box.

Xerox Corporation
Print Services – Learner’s Guide 18 September, 2007
Port 9100 (RAW) Printing
Port 9100 (RAW) printing is very efficient, but it is not generally the best choice for office products. Each time that a user tries to print, the port must be opened and a connection established. If the printer port is busy, the user will get an error. In general, there are two reasons to use the Port 9100 protocol:
1. If the queue name is unknown.
2. If you are printing very large files.
Port 9100 printing should only be used where there are few users and there is generally no good reason for it to be chosen over LPR in office products. The Port Settings information for the Port 9100 (Raw) protocol is shown below.

Xerox Corporation
Print Services – Learner’s Guide 19 September, 2007
Printing with Internet Services (Web UI)
The Job Submission option on the Internet Services web page is a useful printing feature which enables users to send documents to the printer when they are remote from the office or intranet. The machine contains a web site (Internet Services) that users can access from anywhere in the world using its IP address, as long as they have remote access rights to the intranet. The document must be in either a PDF format or a postscript (print file) format. A typical Job Submission portion of an Internet Services web page is shown below.

Xerox Corporation
Print Services – Learner’s Guide 20 September, 2007
The detailed steps required for Printing with Internet Services are shown below.
1. Print a Configuration Report at the printer.
2. Open a web browser on your PWS.
3. Enter the IP Address of the printer into the Address field, then click Go (or press the Enter key). The Internet Services web page should appear.
4. Select the Print tab.
5. Click the Browse button and navigate to the file
you want to print.
NOTE: Only print ready files(*.ps, *.pcl, *.pdf, *.prn, *.jpeg, *.tiff, *.txt, etc.) may be submitted to the device from this page
6. Click on Submit Job. The job will be sent to the printer.
Exercise P-5
Xerox Corporation
Print Services – Learner’s Guide 21 September, 2007
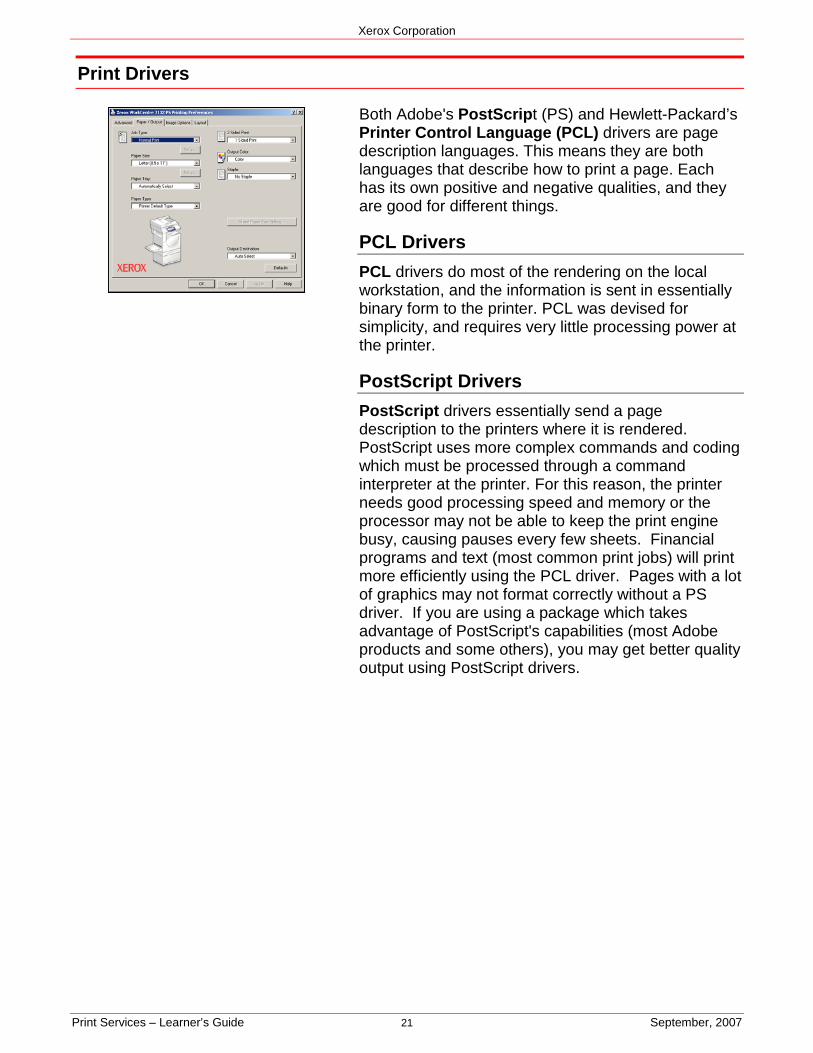
Print Drivers
Both Adobe's PostScript (PS) and Hewlett-Packard’s Printer Control Language (PCL) drivers are page description languages. This means they are both languages that describe how to print a page. Each has its own positive and negative qualities, and they are good for different things.
PCL Drivers
PCL drivers do most of the rendering on the local workstation, and the information is sent in essentially binary form to the printer. PCL was devised for simplicity, and requires very little processing power at the printer.
PostScript Drivers
PostScript drivers essentially send a page description to the printers where it is rendered. PostScript uses more complex commands and coding which must be processed through a command interpreter at the printer. For this reason, the printer needs good processing speed and memory or the processor may not be able to keep the print engine busy, causing pauses every few sheets. Financial programs and text (most common print jobs) will print more efficiently using the PCL driver. Pages with a lot of graphics may not format correctly without a PS driver. If you are using a package which takes advantage of PostScript's capabilities (most Adobe products and some others), you may get better quality output using PostScript drivers.

Xerox Corporation
Print Services – Learner’s Guide 22 September, 2007
Downloading Print Drivers
In general, printer drivers are made up of three types of files:
• Configuration or Printer Interface File: Displays the Properties and Preferences dialog boxes when you configure a printer. This file has a .dll extension.
• Data File: Provides information about the capabilities of a specific printer, including its resolution capability, whether it can print on both sides of the page, and what size paper it can accept. This file could have a .dll, .pcd, .gpd, or .ppd extension.
• Printer Graphics Driver File: Translates device driver interface (DDI) commands into commands that a printer can understand. Each driver translates a different printer language. For example, the file Pscript.dll translates the PostScript printer language. This file has a .dll extension.
These files, which are usually accompanied by a Help file, work together to make printing possible. For example, when you install a new printer, the configuration file reads the data file and displays the available printer options. When you print, the graphics driver file queries the configuration file about your selections so that it can create the proper printer commands.
Xerox print drivers can be downloaded from the Xerox Web site at www.xerox.com.

Xerox Corporation
Print Services – Learner’s Guide 23 September, 2007
The detailed steps required for Downloading Print Drivers are shown below.
1. Open a web browser and access http://www.xerox.com.
2. Select Support & Drivers from the title bar.
3. From the Support & Drivers page, select the print driver for the correct product.
4. Select the Drivers & Downloads link.
5. Your operating system will be recognized. If you are downloading for an operating system that is on another computer, make the proper choice.
6. Choose the appropriate language.
7. For your tests, choose a non-Microsoft Certified driver and the highest level PS driver.
8. Accept the Software Licensing Agreement.
9. Save the “Zip” file to your desktop or another location that you can easily find.
10. Close your browser window and right-click in the empty space on your desktop. Select New, then Folder. Rename the folder as you wish.
11. Open the “zip” file and select Extract. Highlight the folder you just created and select Extract.
12. When complete, you may close the zip window and delete or store for later use.
Exercise P-6
Xerox Corporation
Print Services – Learner’s Guide 24 September, 2007
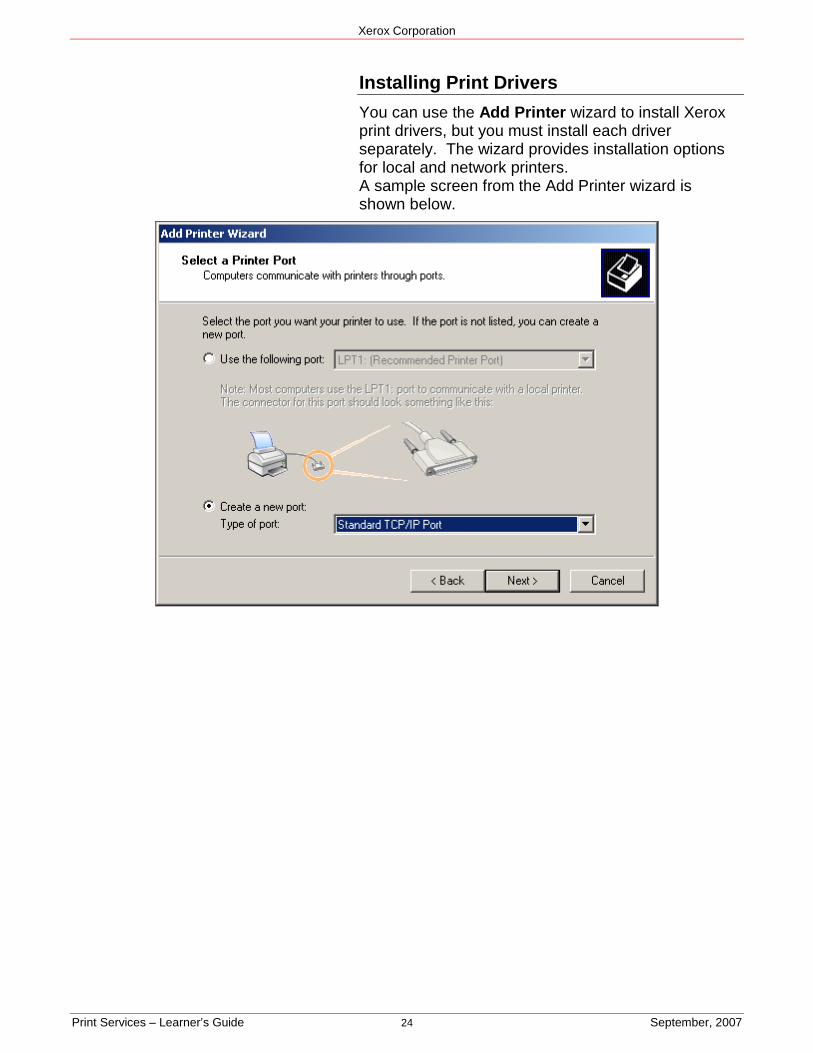
Installing Print Drivers
You can use the Add Printer wizard to install Xerox print drivers, but you must install each driver separately. The wizard provides installation options for local and network printers. A sample screen from the Add Printer wizard is shown below.
Xerox Corporation
Print Services – Learner’s Guide 25 September, 2007
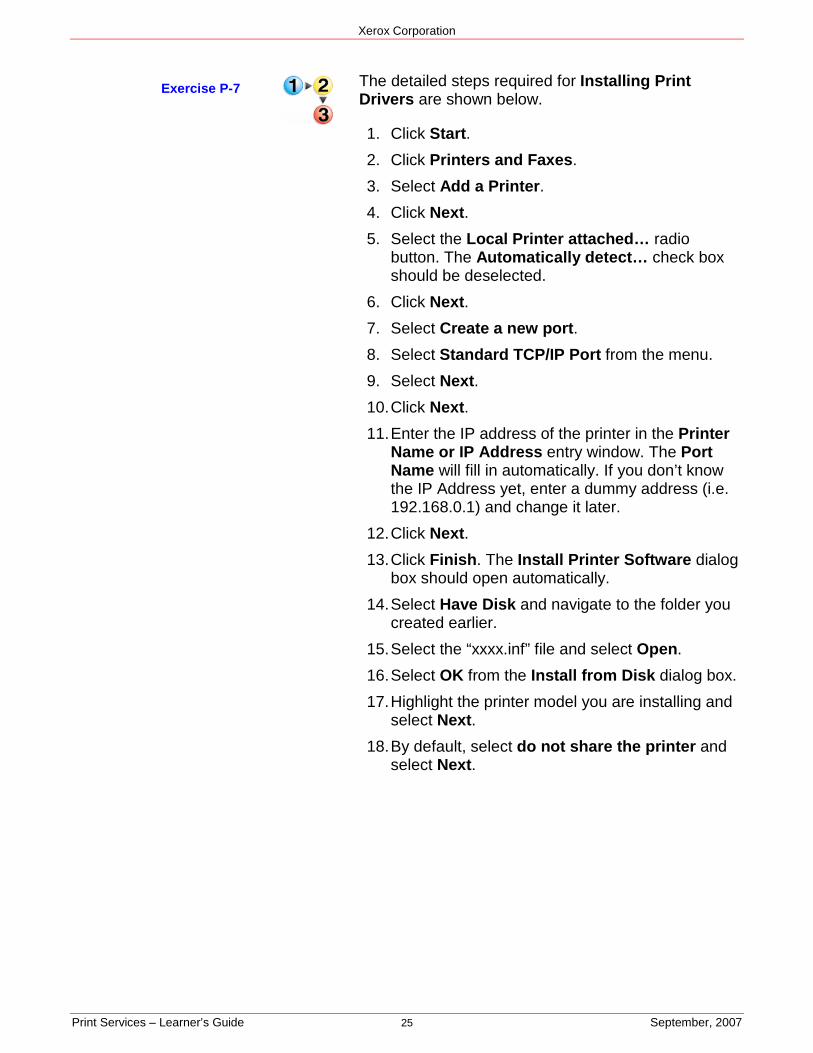
The detailed steps required for Installing Print Drivers are shown below.
1. Click Start.
2. Click Printers and Faxes.
3. Select Add a Printer.
4. Click Next.
5. Select the Local Printer attached… radio button. The Automatically detect… check box should be deselected.
6. Click Next.
7. Select Create a new port.
8. Select Standard TCP/IP Port from the menu.
9. Select Next.
10. Click Next.
11. Enter the IP address of the printer in the Printer Name or IP Address entry window. The Port Name will fill in automatically. If you don’t know the IP Address yet, enter a dummy address (i.e. 192.168.0.1) and change it later.
12. Click Next.
13. Click Finish. The Install Printer Software dialog box should open automatically.
14. Select Have Disk and navigate to the folder you created earlier.
15. Select the “xxxx.inf” file and select Open.
16. Select OK from the Install from Disk dialog box.
17. Highlight the printer model you are installing and select Next.
18. By default, select do not share the printer and select Next.
Exercise P-7

Xerox Corporation
Print Services – Learner’s Guide 26 September, 2007
Configuring the Printer Port
A Printer Port is the interface through which a printer communicates with the computer. You can add printer ports while adding a printer (using the Add Printer Wizard), from the Ports tab in the printer's property page, or through the print server property page.
A typical Port Settings window is shown below.

Xerox Corporation
Print Services – Learner’s Guide 27 September, 2007
The detailed steps required for Configuring a Printer Port are shown below.
1. Click Start.
2. Click Printers and Faxes.
3. Select a Printer.
4. Click File.
5. Click Properties.
6. Select the Ports tab.
7. Select the existing port you want to configure.
8. Click the Configure Port… button.
9. Enter the Port Name.
10. Choose a Protocol (Raw or LPR).
11. If you selected Raw in Step 10 above, then assign a Port Number (usually 9100).
12. If you selected LPR in Step 10 above, then assign a Queue Name in the LPR Settings field.
NOTE: The Queue Name for a Xerox DFE will be different than ESS/Network Controller machines. Common DFE Queue Names are lower case ‘print’ and ‘direct’.
13. Click OK.
14. Click OK.
Exercise P-8

Xerox Corporation
Print Services – Learner’s Guide 28 September, 2007
Job Aids / Troubleshooting
Diagnosing Problems
The best way to approach a printing problem is to start at one end and go from there. Ask questions first. The Call Escalation Flowchart on Page 6 will be useful in troubleshooting. Some of the questions will reveal more information that will be helpful in your troubleshooting. • Start with the basics. • Try a different application. • Try a different driver (PCL or PostScript). • Try the physical connections, switch cables or
ports.
The device settings and the configuration report will help here. Compare previous reports and see if anything has changed. • Try a TCP/IP Communications test to check ESS
and check communication between the client and the host. This can also be done using web services or ping from the client.
• Have customer check their printer properties and load drivers again.
• Remember that if a configuration report is printed, then the ESS is booted up properly.
• Also if web services can print a test page, then communication is OK between the client and the host.
• If the client’s printer properties dialog box can print a test page, the driver is loaded correctly.
• Once again, we must emphasize that the customer is responsible for client configuration settings.

Xerox Corporation
Print Services – Learner’s Guide 29 September, 2007
Troubleshooting Printer Problems
Follow the steps below when troubleshooting a printer problem.
1. Verify machine settings from a current Configuration Report and check the TCP/IP settings. Be sure that HTTP is enabled, Software Options are installed, Port 9100 is enabled, and the LPR port is enabled.
2. Assign an IP Address to your PWS that is similar to the printer’s IP Address. Open the command prompt and type ipconfig /all to verify that the IP address you intended to assign to your PWS is correctly listed.
3. Connect the PWS to the printer using a known good Crossover Cable (600T2252).
4. Ping the printer to verify connection. Alternatively, try accessing the Internet Services web page for the printer.
5. Ensure you have a printer of the correct model installed.
6. Right-click on the correct printer, select Properties and then select the Ports tab. Select the Configure Port button and input the correct IP address for the printer in the Printer Name or IP address box. Select either the LPR or Raw radio button, then input the queue name (lower case) if selecting LPR. Select OK, then Apply, then select the General tab and Select Print Test Page.
7. Select the Ports tab on the top of the printer window, then select Configure Port. Select the radio button for either LPR or Raw, whichever was NOT selected previously. Input the queue name if you selected LPR. Select OK, then Apply, then select the General tab and Print Test Page again to test the alternate port.
8. To test HTTP printing, type the IP address of the printer in the address bar of a web browser. Navigate to Job Submission and select your .PRN test file, then select the green Submit button. You may also submit PDFs or .TXT files through this utility.

Xerox Corporation
Print Services – Learner’s Guide 30 September, 2007
This page intentionally left blank.

Xerox Corporation
Print Services – Learner’s Guide 31 September, 2007
Sample Configuration Report #1
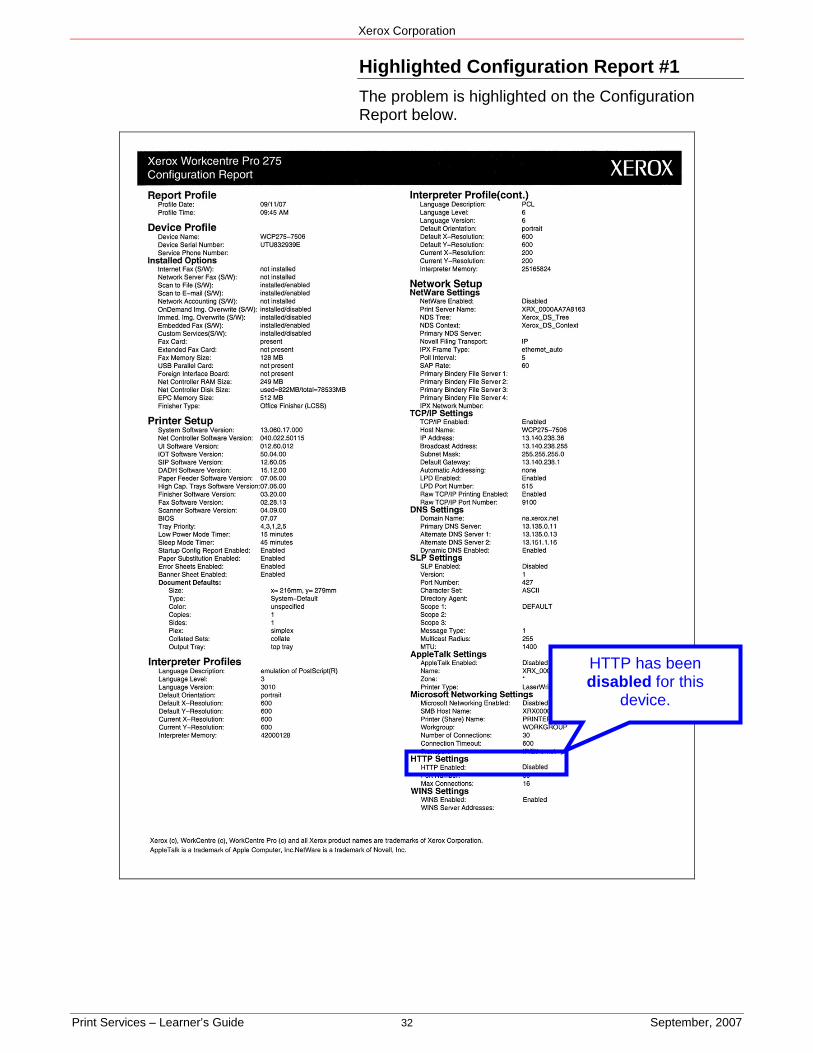
A sample Configuration Report for the WorkCentre Pro 275 is shown below. The customer has informed you that they cannot access Internet Services to configure printing. Review the Configuration Report for potential problems. The problem is highlighted on the next page.
Xerox Corporation
Print Services – Learner’s Guide 32 September, 2007
Highlighted Configuration Report #1
The problem is highlighted on the Configuration Report below.
HTTP has been disabled for this
device.
Xerox Corporation
Print Services – Learner’s Guide 33 September, 2007
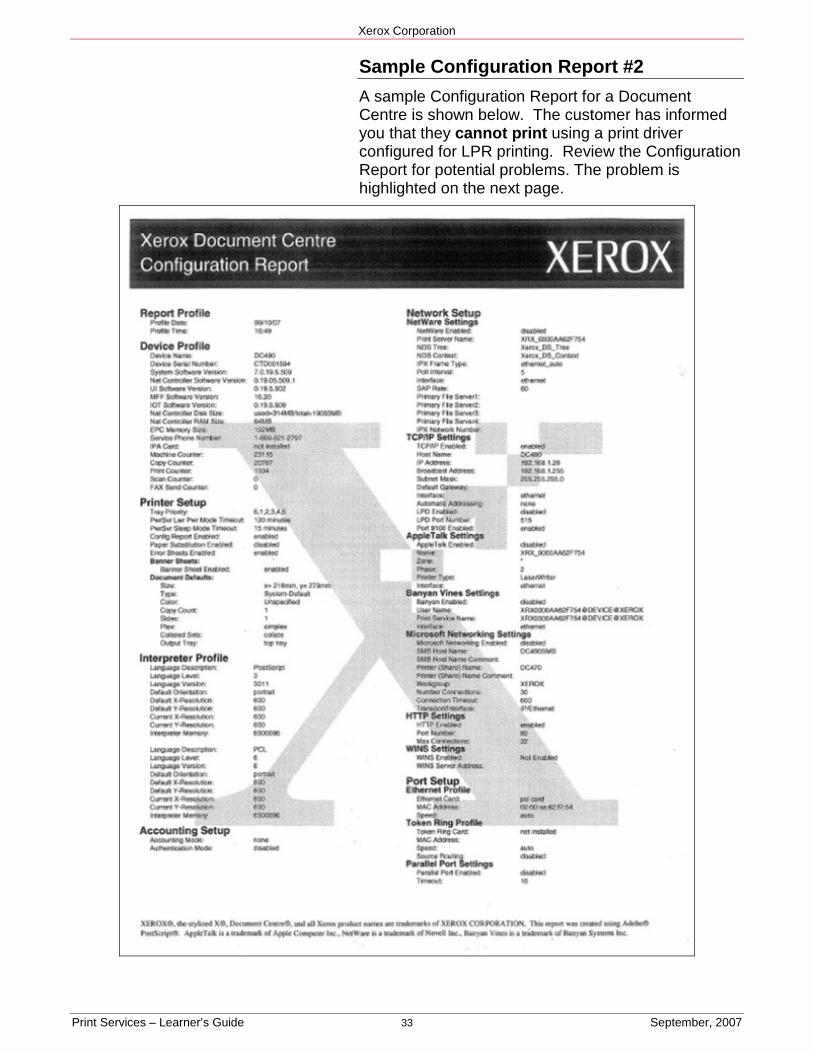
Sample Configuration Report #2
A sample Configuration Report for a Document Centre is shown below. The customer has informed you that they cannot print using a print driver configured for LPR printing. Review the Configuration Report for potential problems. The problem is highlighted on the next page.

Xerox Corporation
Print Services – Learner’s Guide 34 September, 2007
Highlighted Configuration Report #2
The problem is highlighted on the Configuration Report below.
LPD has been disabled for this
device. This disables LPR
printing to Port 515.

Xerox Corporation
Print Services – Learner’s Guide 35 September, 2007
Sample Configuration Report #3
A sample Configuration Report for the WorkCentre Pro C3545 is shown below. The customer has informed you that they cannot print when using a print driver with an LPR Protocol and a Port set to 13.140.22.3. Review the Configuration Report for potential problems. The problem is highlighted on the next page.

Xerox Corporation
Print Services – Learner’s Guide 36 September, 2007
Highlighted Configuration Report #3
The problem is highlighted on the Configuration Report below.
The IP Address of the printer
does not match the IP address of the port specified in the print driver.

Xerox Corporation
Print Services – Learner’s Guide 37 September, 2007
The Customer System Environment
Your Instructor will explain the Customer System Environment (shown below). This will help to define the boundaries of a network printing problem.

Xerox Corporation
Print Services – Learner’s Guide 38 September, 2007
Talk Track for Printing Issues
Use the following script as a reference when talking to any customer with an unresolved network printing problem:
I have just completed testing your device. Printing was successful through a laptop computer and crossover cable. The device is performing to specification with this test.
After going through this diagnosis, additional troubleshooting to resolve this printing problem will require those people who provide technical support for the network components.
If needed, additional support is available by a Xerox Office Network Systems Analyst. On a fee basis, the Systems Analyst can provide detailed diagnostics of network performance to isolate any printing issues. Should the Analyst determine the cause is with the Xerox device then, of course, the fee is waived.
Network troubleshooting is not covered by the Xerox Full Service Maintenance agreement. However, Xerox provides this optional fee based service to those customers who require a level of technical support beyond the device’s Full Service Maintenance Agreement.
You have the option to have your regular network support provider perform the problem diagnosis within the network.
Would you like me to contact a Xerox Network Specialist for you?
Xerox Corporation
Print Services – Learner’s Guide 39 September, 2007
Talk Track for IT Issues
When we troubleshoot an ESS / Network Controller and suspect an HDD or software problem, we should immediately engage the customer’s IT professional. If they are off-site, make a call to them if possible and state:
“Hi _(IT person’s name)_, I am __(your name)__ from Xerox Services. I am troubleshooting the printer in __(location)__, I will be replacing the Machine’s Network Drive with one that has the highest general release of software. I want to verify that you have the network settings for this machine. I will be able to enter the TCP/IP settings so you can remotely connect to the WEB UI, but I will need you to take it from there. I am hoping you can assure me of this before I move further with this repair that may lose all network settings.”
Generally, you can get this agreement from the IT professional. After your work is complete re-enter the TCP/IP settings, follow the applicable tests presented in the Network Escalation Help Sheet, and then carefully enter the data that was displayed on a recent configuration report (esp.: enable HTTP and TCP/IP values). Call IT and say…
“Hi _(IT Person’s Name)_, this is __(Your Name)__ from Xerox Services again. I have completed repairs and the device is fully functional per my tests. If you can connect to this network (remotely) you should be able to bring up the WEB UI as I have. As a courtesy, I did enter the network settings that were displayed on a configuration report I had from __(date)__. Please verify that these settings are correct and complete the settings not named. I am not a network professional and am depending on your skills to describe your network to the Xerox device. Is there anything else you need from me before I close my responsibilities with my contact?”
The talk tracks above respect and cooperate with the network professional’s responsibilities contractually with Xerox. They work with the expectation they already have, and it removes you from liability in replacing these settings. IT knows we will not have the server authentication strings or passwords important to their network’s security. If you replaced an ESS PWB, let them know that the machine will bear a new MAC address because this is important in some network environments (such as Novell NetWare and MS Server).

Xerox Corporation
Print Services – Learner’s Guide 40 September, 2007
Self Check
1. In general printing terms, the acronym LPR stands for…
A. Light Process Report B. Line Printer Remote C. Large Print Record D. Laser Printer Recharge
2. Xerox printers all have an “internal” web page called…
A. Internet Shared Printer B. Web Printer C. Internet Services D. Internet Test Printer
3. What tool is used at the command prompt to test a connection to another device?
A. The “ping” command B. The “dir” command a. The “lpconfig” command b. The “save” command
4. What is a piece of computer hardware designed to allow computers to communicate over a computer network called??
A. Web UI Template B. Web Server C. Network Printer D. Network Interface Card (NIC)
5. What information sections are not part of the Configuration Report?
A. IP Address B. Subnet Mask C. Machine Repair Rates D. Gateway Address

Xerox Corporation
Print Services – Learner’s Guide 41 September, 2007
6. Which of the following is a software port that resides in your PC’s supporting operating system?
A. SMB Port B. LPT1 port C. COM1 port D. TCP/IP port
7. What tool is used at the command prompt to find the client IP, subnet mask, and default gateway settings?
A. The dir command B. The lpconfig command C. The save command D. The ping command
8. The acronym PCL stands for… A. Printer Cost Ledger B. Printer Control Language C. Printing Copy Loss D. Printer Correction Language
9. Which of the following is a possible drawback when Port 9100 (Raw) printing is used?
A. Printer Errors due to connection loss B. Inferior Image Quality C. Costly Phone Rates D. Increased Toner Usage
10. Which of the following is not a port type that can be selected when installing a printer?
A. Local Port B. LPR Port C. SNMP Port D. Standard TCP/IP Port

Xerox Corporation
Print Services – Learner’s Guide 42 September, 2007
This page intentionally left blank.