minutes of 13 april meeting - sdshipmodelersguild.org
TRANSCRIPT

MAY 2005 NEWSLETTER VOLUME XXIX, NO. 5 8
MINUTES OF 13 APRIL MEETING Contributed by Bob McPhail
Guildmaster Hewitt opened the
meeting at 7PM. Twenty-seven members and guests were in attendance. New members and guests were asked to introduce themselves. Guest Tony Robles is interested in modeling and joining the Guild. He has been working on miniature metal warships and other modern vessels.
Purser’s Report. Ron Hollod reported the 28 February revised balance was $<redacted>. The balance as of 31 March 2005 was $<redacted>.
Editor’s Report. Chuck Seiler provided members with the new roster and address book. He indicated he used ACCESS, WORD and Adobe Acrobat to assemble this. He had more problems than expected and asked if anyone has experience with this sort of thing, to let him know (for future editions).
Museum Happenings
-- Robert Hewitt stated that the former Soviet Foxtrot class submarine COBRA was still enroute. Later, Bob
Crawford announced that negotiations had been held up, that the Museum had JUST closed the deal on the submarine and it was on its way from Seattle.
(Note: sub arrived 22 April). The sub will open for guests on Memorial Weekend. A special early viewing will be available for Museum members on Wednesday, 25 May.
Old Business
-- The San Diego County Fair dates are June 10 – July 4. Robert Hewitt
discussed some of the duties to be performed while in the booth. As usual, two tickets will be provided each volunteer for each full day worked. Parking passes will be provided this year as well. Robert will distribute the tickets and passes when received.
--Members of the Trafalgar Project met earlier in the day, compared notes and made plans for future progress. It was decided that the focus for the May meeting would be to finish painting hulls. We would discuss rigging and review rigging material available at the May meeting. One completed model and several semi completed models were displayed. See “Announcements” for more info.
OFFICERS
Guild Master Robert Hewitt phone redacted
First Mate K.C. Edwards phone redacted
Purser Ron Hollod phone redacted
Editor Chuck Seiler phone redacted address redacted
Log Keeper Bob McPhail phone redacted
Newsletter Distribution Bob Wright Robert Hewitt
Established in
1972 by
Bob Wright and
Russ Merrill
San Diego Ship Modelers’ Guild is affiliated with and
supports the Maritime Museum
of San Diego

Meeting Minutes-Continued
New Business.
-- Festival of Sail (17 – 20 August). (this was mentioned last month, so is not technically new). The Museum is sponsoring its third Festival of Sail event. Twelve to sixteen sailing vessels are expected to be in San Diego for this event. There are expected to be more class A and large class B ships involved than were involved in 2002. Bob Crawford stated that the Festival of Sail will be more than just sail, with Coast Guard vessels, Scripps Institute vessels, USS Dolphin (SS-555) FLIP, tugs and harbor police boats participating and all open to visitors. The museum is looking for volunteers to assist in this effort. There will be three shifts a day, covering many different areas of endeavor (security, food vendor, ship access, etc). We are also looking for San Diego Model Guild volunteers interested in manning a model booth or the model shop? More info will be promulgated on this as we get closer.
--Bill Luther updated everyone on the 21 March mishap with the brigantine IRVING JOHNSON. There was extensive damage and it will take about six to nine months to repair. Several systems will have to be replaced such as the piping, engine, and
electrical. There was also some structural damage. The most important fact is that the level of damage was MUCH LESS than normally sustained by such a grounding.
--Bob Crawford discussed the Nautical Research Guild Convention that will be here in San Diego, 12 - 15 October 2006. Volunteers are needed for the planning committee and to help during the actual convention (tours, registration, model displays, etc. If interested in the planning committee, please contact Robert Hewitt by the next meeting. There will be a meeting of volunteers at 7 PM, 18 May on the BERKELEY. Discussion/Demonstration.
Richard Strange discussed restoring ship models. Topics included were job estimating, working the project, contingencies, and problems (and what to do) that could arise during the restoration process. Dick said that since you were usually tasked simply to restore the model to its former state, one of the hardest parts of the project is to avoid trying to correct the original modeler’s errors. Dick provided an excellent handout, which is available upon request.
.
Bow shot of schooner DALLAS Two ship of the “Trafalgar Project” John McShefferty’s HMS DEFIANCE dismasts Chuck Seiler’s French 74 PLUTON
Photo by John Wickman
SHOW AND TELL
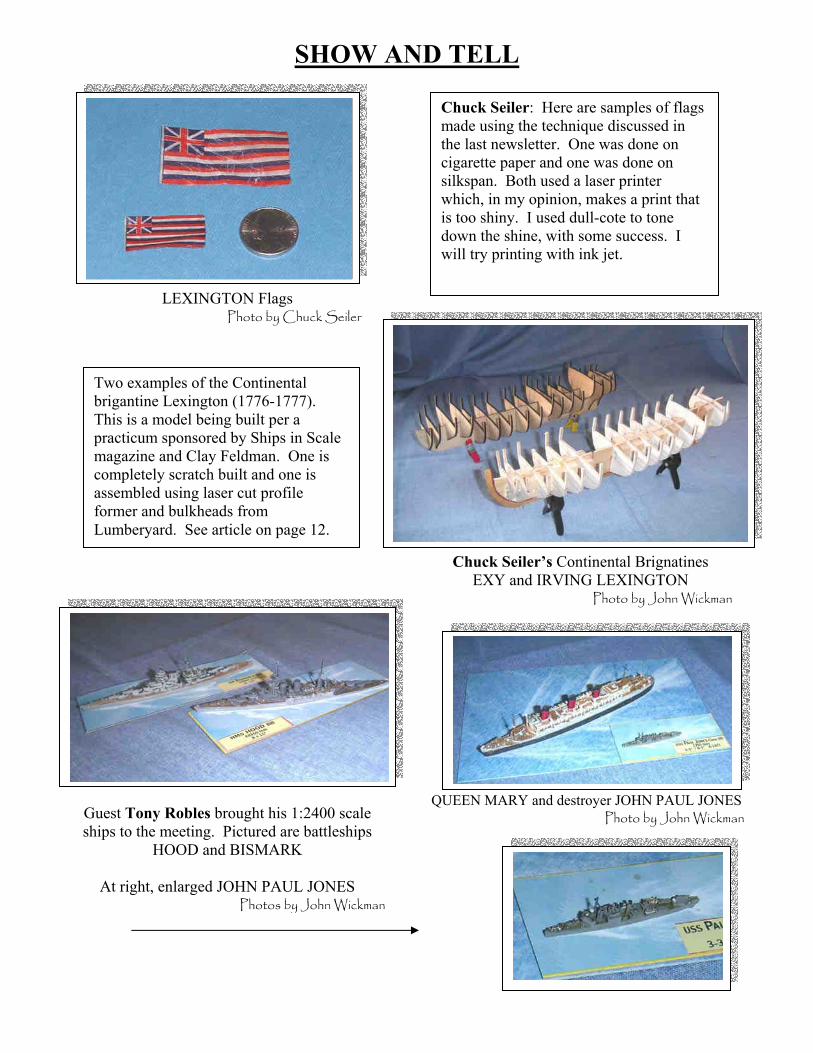
Chuck Seiler: Here are samples of flags made using the technique discussed in the last newsletter. One was done on cigarette paper and one was done on silkspan. Both used a laser printer which, in my opinion, makes a print that is too shiny. I used dull-cote to tone down the shine, with some success. I will try printing with ink jet.
LEXINGTON Flags Photo by Chuck Seiler
Two examples of the Continental brigantine Lexington (1776-1777). This is a model being built per a practicum sponsored by Ships in Scale magazine and Clay Feldman. One is completely scratch built and one is assembled using laser cut profile former and bulkheads from Lumberyard. See article on page 12.
Chuck Seiler’s Continental Brignatines EXY and IRVING LEXINGTON
Photo by John Wickman
Guest Tony Robles brought his 1:2400 scale ships to the meeting. Pictured are battleships
HOOD and BISMARK
At right, enlarged JOHN PAUL JONES Photos by John Wickman
QUEEN MARY and destroyer JOHN PAUL JONES
Photo by John Wickman

SHOW AND TELL-Continued
Larry Malopy’s Yacht MARY. After a 20
year hiatus, Larry brought his model of the YACHT MARY out of storage. The original ship was built in Holland and was presented to Prince Charles Stuart by the city of Amsterdam on the occasion of his being proclaimed King of England. The ship sank in 1675 after hitting a rock. The kit is based on the archeological survey of the wreckage, which was found in 1975. It is a 1:54 scale Mamoli kit. Larry says it is a good kit with excellent castings and at a scale which is good for an average modeler.
Photo by John Wickman
Close up of sloop’s guns and deck Photo by John WickmanMark Malopy’s Armed Virginia Sloop
Photo by John Wickman
Mark Malopy’s Virginia Sloop. Larry’s son Mark is building the 1:48 scale Model Shipways kit
of the ARMED VIRGINIA SLOOP. This is his first ship model and he is using Bob Hunt’s AVS practicum to help build it. This model represents a generic armed sloop from the Revolutionary War period. WASP was one such vessel which was part of the Continental Navy. He plans to do some color bashing to give it personality. Lookin’ good!
HMS Beagle was built as a 10 gun brig for the Royal Navy in May 1820. In July she took part in a naval review celebrating the coronation of King george IV in which she was the first ship to sail under the new London Bridge. after years in “reserve”, she was rerigged as a bark and commissioned as a scientific exploration vessel. On December 27, 1831 she embarked on the second of three voyages. Captain Fitzroy brought along a companion, 20 year old naturalist Charles Darwin. (You may have heard of the lad.) This 1:30 scale Mamoli plank on bulkhead kit is Chari’s first model. She has subsequently finished others but has kept this as her “Fair model”. After 5 years, this model has been extensively modified by the builder and is almost finished
Chari Wessel’s BEAGLE Photo by John Wickman

SHOIW AND TELL- Continued
Richard Roos: NONSUCH The eight gun
ketch NONSUCH was constructed in Essex, England in 1650 as a merchant ship. It was purchased by the navy in 1654, captured by the Dutch in 1658 and recaptured by the English a year later. She was the ship responsible for the founding of the Hudson Bay Company in 1667 when she was captained by Zacharia Gillam. NONSUCH stayed in Hudson Bay for 10 months, trading with the Indians and making contacts which would be beneficial in the future. A near replica of the NONSUCH is now at the Manitoba Museum of Man and Nature in Winnipeg Canada. NONSUCH is a 1”=3” scale model from Aeropiccola that Dick is finally finished. It is a large scale which Dick likes because the knots are easier to work with. It is painted with water based paint above the waterline and lacquer below. He likes the lacquer because it has better color and better finish.
NONSUCH by Dick Roos Photo by John Wickman
Bob McPhail’s “wherry” Photo by John Wickman
Here are a couple examples of small utility boats/fun craft. Bob McPhail’s model of a wherry is a replica of a small boat used during the 19th century, ideal for in shore salmon fishery in Maine. Lapstrake planking made the boat light and strong. LOA: 15.75 inches.
Bob Wright’s CATBOAT Photo by John Wickman
At right is miniature model (see quarter in photo) of a catboat used for fun sailing in bays and what-not, generally on the east coast. This model was built by Al Hollie and was sold to Bob
Wright by Al’s wife Ann.

SHOW AND TELL-Continued
John Wickman’s schooner HARVEY Photo by Elwood P. Dowd
Close-up of one of HARVEY’s guns Photo by Elwood P. Dowd
Briefly featured in last months newsletter, Ernie
Andrew’s HAUNTED LADY is built from a Midwest kit. Steam launches similar to this were used to haul all types of cargo up and rivers and other inland waterways from the 1800s to the early 1900s. HAUNTED LADY is a steam powered radio controlled model with a haunted past of its own. Ernie has run the HAUNTED LADY on the San Diego boat pond for about five years. In that time it sank twice and caught fire twice. In the most recent sinking, HAUNTED LADY was submerged in the salt-water pond for about 4 weeks with considerable damage to the electronics. Miraculously, the radio receiver was salvageable. Ernie found small sharks living in the boat when it was brought to the surface.
Ernie Andrew’s HAUNTED LADY (no Jaws)Photo by John Wickman
Chuck Seiler’s 1876 Missouri river steamboat FAR WEST-Look Ma, no rigging!!!
Photo by Chuck Seiler
Chuck Peabody’s CUTTY SARK. First layer of planking complete!!!
Photo by John Wickman

SHOW y TELL-Continued: The Hewitt Collection
KINGCHOW RIVER JUNK 1”=20ft. By Robert Hewitt Built of boxwood in 2002. The model is from plans in “The Junks and Sampans of the Yangtze” by G. R. G. Worcester. The bow features a “stick in the mud” anchor. The masts are fastened to tabernacles for ease of lowering. Copper wire rigging is painted with Floquil rust color. The wire is purchased from Precision Scale Model Engineering. Their phone number is 508-478-3148 or you may e-mail them at [email protected]. The model, built the same as the original with bulkheads, is mounted on gold plated stanchions attached to an ebony pith. The model won the Dana Mc Calip best miniature award at Wisconsin Maritime Museum in 2002. Photo by John Wickman
H M FLY 1”=40 feet by Robert Hewitt All of the yards, square sails and rigging for the mast is complete. All of this is made off of the model. The spanker will be added and the mast glued to the finished hull. Stays and jibs will be next. The hull is mounted to a building block and all of the deck furniture is in place.
Photo by John Wickman
RIVAL 1”=20 feet by Robert Hewitt The ship is a San Diego bait carrier owned by Buck Everingham. Originally it was a Navy garbage scow, built by Bethlehem Steel Co in 1945. The ship was converted by Buck and has resided at the G street pier for many years. I was allowed to go aboard and measure the ship and I drew the plans in AutoCAD. Sadly, the ship no longer looks the same as the model. It is currently being modified to a fishing vessel. The classic lines of the ship have been spoiled. The ship is shown coming alongside of a fishing vessel and the man on the bow is getting ready to toss two lines to them
Photo by John Wickman

SHOW AND TELL-Continued
Dave Dana’s RED DRAGON Photo by John Wickman
Howie Franklin’s SPINDRIFT Photo by John Wickman
John McShefferty’s NINA and PINTA Photo by John Wickman
Close-up of RED DRAGON’s launch and gunsPhoto by John Wickman
Ed Trasoras’ 100 gun Spanish ship RAYO, part of the Trafalgar Fleet. See story on page 9.
Photo by John Wickman

THRU THE
LUBBERS
HOLE By Robert Hewitt
I have just finished painting one of the hulls of a
French ship for the Trafalgar exhibit. These little 1:1200 cast hulls have very fine details that can be accented very well. There are cavities along the sides of the hull that need to be painted with a color of white (French), red (Spanish) and yellow (English). My first attempt was only fair but I learned a few tricks along the way and I wish to pass them along.
The first item I needed was a good brush. Fortunately I have a Floquil 5/0 that was purchased from Reeds Train Shop. The brush is more like a 15/0 as there are very few bristles in it and they form to a sharp point. The paint I am using is Floquil reefer white. Out of the bottle, the paint is way too thick. I stir the paint with a Popsicle stick and put a few drops into a small paint dish. Thinner is then put into the dish with an eyedropper. The mixture is about a 1:1 ratio. I wear a vinyl glove on the hand that holds the
ship to keep the rest of the hull clean. The tip of the brush is dipped into the paint so the smallest bead of paint is on the end. If you place the tip near the bottom corner of the cavity to be painted, the paint should wick into the corner. Move the brush to near the top corner and let the paint wick in. If the paint does not wick in, it’s too thick. If no color shows it’s too thin. Turn the hull around and do the other two corners. You may need to add thinner as you paint. After doing one cavity, I dip the brush into thinner and wipe it out on a 3x5 card. Twirl the brush as you wipe it to keep the brush from developing a tiny hook in the end of the bristles. It’s important to keep the brush completely clean. The small amount of paint dries quickly and will restrict the paint from flowing. Two coats may be necessary.
To paint the windows, a larger brush is used. Cover the entire window area with paint and quickly wipe across the area with a piece of paper towel. When dry, the frames can be highlighted with a dry brush in black.
Oh, did I mention that the entire hull is to be primed?
Another Country Heard From Making of the miniature RAYO
By Ed Trasoras
The ship is the Spanish 100 guns first rate ship of the line RAYO. It is 1/1200 scale ‘kit’ from GHQ, made of pewter. I used Model Masters paint and found it to be too thick. For rigging I used black thread. A large magnifying glass with extra light was required to be able to paint and rig at that scale.
After painting, I rigged each mast separately, off the model, then installed them. It was impossible to drill holes in the channels for the shrouds and backstays, so I used a fine file to notch the channel. This worked okay and looked okay when done. The life boats are lashed together on deck.
I will do the next ship with black thread on stays and shrouds and fine tan thread for the running rigging. Super glue was a disaster and has an affinity for pewter. it runs everywhere!!!! I found Elmer’s white glue will stick to paint. I used plastic model glue to secure knots and a floquil 15/0 pure red sable paint brush.
And Another By Chuck Seiler
This was an exercise in frustration! I had done this many years ago, so it should have been easy. I don’t think my expectations were as high then…and my work was not going to be viewed by 10,000 people.
All I have learned over the years about toning down colors and subtlety was really put to the test at this hyper-hewitt scale. I found the Floquil railroad lacquer paints to be outstanding. They dried very smooth, with virtually no brush marks. The flat finishes worked well. I had some problems with my gray primer, particularly when overpainting with white, but the resulting slightly gray-cast to the white looked even better (at least to me) at a distance. Using the three examples at close hand, I used a light “earth” mixed with white for a subtle tan deck. Again, the gray under primer gave it an interesting color.
I will be using black thread for braces, with a fine wire for shrouds and stays. I think just a hint of rigging will do. Like Ed, I had problems drilling holes so I notched the channels with my exacto.

. Abaft, towards the stern of a ship, relative to some other object or position. Abaft the beam, any bearing or direction between the beam of a ship and her stern.
Aft, at or towards the stern or after part of a ship, as a word either of position or motion. A gun may be mounted aft (an expression of position) and seamen sent aft to man it (an expression of motion). Fore and aft, from stem to stern. It is a contraction of abaft, though used in a general, not a relative, sense. The adjective is after, e.g., the after part of a ship, as above.
Man the Yards, to or Man Ship, to, a form of ceremonial salute in a warship with masts and yards in the days of sail to honour the visit of a high official. The yards were lined by men standing upon them supported by lifelines rigged between the lifts and the masts and with one man, known as the button-man, standing on the truck of each topgallant mast. This form of salute continued in the British Navy until about 1885, when sail finally gave way to steam. But the practice is still occasionally seen in square-rigged sail training ships and in shore training establishments which have a mast crossed with yards.
Son of a gun, a description given by the lower deck to children born on board ships of the British Navy during the period when the wives of seamen were allowed to live on board in harbour and, occasionally, at sea. As the gangways always had to be kept clear, the only place on board where women in labour could produce their children was in the spaces between the guns on the gundecks. Inevitably, any male child born on board was known as a “son of a gun”. Such a birth gave rise to the saying “Begotten in the galley and born under a gun. Every hair a rope yarn, every tooth a marline spike, every finger a fishhook, and his blood right good Stockholm tar.”
Founder, to, the act of a ship which sinks at sea, generally understood to be by the flooding of her hull either through springing a leak or through striking a
rock. Other causes of a ship sinking, such as explosion, etc., are not usually associated with the word.
Scandalize, to, a method of reducing sail in fore-and-aft rig by hauling up the tack and lowering the peak of a sail. It was used by the older sailing trawlers to reduce speed through the water when operating a trawl. Also the yards in a square-rigged ship are said to be scandalized when they are not set square to the masts after the ship has anchored. Scandalizing the yards of a ship was a sign of mourning for a death on board.
Furniture, the whole moveable equipment of a ship – rigging, sails, spars, anchors, boats and everything with which she is fitted out to operate her, but not including her consumable stores, such as fuel and victuals.
Cuddy, originally a cabin in the after part of a sailing ship under the poop deck for the captain and his passengers. The term is also sometimes used to denote a small cabin on board a boat, or very occasionally a small cookhouse on board, though caboose was a more usual word for this. In larger ships the cuddy was the compartment where the officers had their meals.
Pendant, sometimes written and always pronounced pennant, a narrow tapering flag used for signaling or to designate some particular purpose. There are ten numbered pendants and fourteen special pendants used in British naval signaling, and ten numbered pendants and an answering pendant in the International Code of Signals.
Yoke, a transverse board fitted to the top of a rudder in a small boat instead of a tiller, the rudder being moved by yoke lines attached to the ends of the yoke and operated by the helmsman. Yokes are mainly to be found in small boats which are pulled by oars; and very occasionally in small, open sailing craft where the position of a mizzen or jigger mast makes the operation of a tiller impossible.
Timbers, the frames or ribs of a ship, connected to the keel, which give a ship’s hull both its shape and its strength. In wooden ships of any size, the timbers are made of several pieces of wood scarfed together to the required shape. In steel ships the frames are of steel angle iron, bent to the desired shape by heat treatment.
Salty Language From the Oxford Companion
to Ships and the Sea
Contributed by Jacki Jones
TIPS and HINTS
Recently on the Seaways Shipmodeling List (SSL), a new modeler asked about tools and helpful hints for the beginner. Mike Graff responded:
“Others have commented on several aspects of
getting started in the building of wooden ship
models. Herewith a couple of additional thoughts...
“The most frequently used tool in my collection is a
simple finger nail file by Revlon - the compact emeryl
file (2345-10) sold in a blister pack in drug stores
and elsewhere. The 'grit' on one side is finer than on
the other. It is stiff enough to provide a firm working
surface, but also slightly limber to allow it to 'give'
and fit along non-straight surfaces. When it gets
filled with wood dust just blow it clean or, if
necessary, give it a few light strokes with a brass
brush.
‘Speaking of blowing, a can of 'canned' air comes
in handy to move a lot of dust quickly. But be careful
- too big of a blast can damage some parts; too long
of a blast can literally freeze parts of the model and
the frozen parts will be brittle until they warm up
again.
“Before you start cutting out and assembling parts,
do go through the instruction booklet from start to
finish. Have the parts and plans at hand. You'll
become familiar with the parts, their names, and
where they go on the model. You'll also get a feel for
how the entire kit goes together. More importantly,
you'll begin seeing the kit as more than a collection of
parts to be stuck together and develop the basis for
questioning procedures and sequences. Repeat this
look-ahead exercise as you move through the
instructions. It will help you both plan ahead and
avoid making mistakes.
“Glue wood to wood for the most secure joints.
Wood glued to paint is less secure. And paint glued
to paint is least secure. Plan ahead to be sure to
leave places to which parts will have to be glued
unpainted. For example, your model will probably
have a toe rail installed around the edge of the deck.
If so, it will be made of a thin strip of wood. Mask off
the edge of the deck before painting it, or varnishing
it, or applying polyurethane coating. Similarly, do
not paint, varnish, of polyurethane coat the side of the
wood strip that will be glued to the deck.
“A word about drilling holes: match the drill bit to
the size of the part for which you are drilling a hole.
The goal is to get a snug fit - not squeaky tight and
not wobbley loose. Drill a test hole in a piece of
scrap before drilling on the model itself.
“Finally, if something breaks or gets bent out of
shape, or trimmed too much, don't panic - the kit is
Not ruined. More often than not, broken parts can be
glued back together. Out of shape parts can be
soaked in water and bent back into shape. Parts that
are trimmed too much or broken beyond repairing
can be replaced - by you using your own two hands.
Sometimes replacements can be made from the scrap
wood in the kit. Or you can easily obtain balsa
and/or basswood sticks and sheets from local hobby
shops or by mail/internet order. .
“Take your time. Think things through. Try making
cardstock mockups to get a feel for how an assembly
will go together and look. Sketch or outline how you
plan to accomplish what may seem like difficult
steps. Consult with other ship model builders. And
post questions in this forum”. ” Mike Graff”
One writer suggested cutting up Venetian blinds and using a spray adhesive to attach abrasives. Mike responded: “Or go to the beauty aids section of the
drug store next time you vist and pick up one of the
metal bladed files to which abrasive is permanently
bonded (in 2 grits), with a nice plastic handle and a
'lifetime guarantee' for about $3.50.
“Yes, I do make sanding sticks to meet special needs
by selecting and shaping a bit of wood from the scrap
box, cutting a slip of sandpaper to fit, and using a dab
of Elmer's wood glue to stick them together. CA glue
can be used, too, but I've found that it tends to crack
and loosen more quickly than the Elmer's wood glue
for this application.” .
Mike Graff
Chuck Seiler responded: “I have done this also,
except I have used popsicle sticks. If you are not a
popsicle person, you can get them at a craft store.
Instead of glue, I use double stick tape (this is slightly
wider than the stick so some trimming is necessary).
It gives a nice firm sanding surface, is small enough
to get into tight places and is easily replaceable. The
ones I use generally have different grades of paper
(one finer than the other) on either side
.
Continued on page 12

Our combined efforts at building the Continental Brigantine LEXINGTON as part of Clay Feldman’s practicum is falling short of expectations. I cannot say why Ron Hollod is behind the power curve, but I can speak well of my own misadventures.
Presently I am in a hiatus mode due to a heavy work schedule and other Guild commitments. I am at delicate stage where I need to focus my attention. Until I can do that, I would rather wait.
My goal was to build the model scratch. This meant I needed to cut the profile former, bulkheads, stem-piece, stern-piece and keel myself rather than rely on the semi kit provided by the Lumberyard. This was truly an adventure. I used the scroll saw in the model shop for the profile and bulkheads, cutting them out of 1/8” model airplane plywood. Practice makes perfect, so after 12 more tries, I might get it right. Instead, I decided to press on after 2 tries.
While the initial plans had some errors, my cutting resulted in some pretty wide tolerances. The scarf joints where the stem piece and keel join has a lot to be desired as well. My intent is to seek advice on how to better cut these important items.
Listening to some of the other participants grouse about how bad the Lumberyard semi kit was because of a 1/16” error here or 1/32”error there, I could only wish my frame were as tight. When I finally decided to buy a set of bulkheads/profile to do a second
model, I was amazed at how good it was. What took me 4 or 5 weeks to do with my scratch frame, I could do in 15 minutes with the Lumberyard frame.
So, my second attempt was reasonably fair (as in fairing the hull) and my slots were close enough for government work. Before assembling the frame, Clay has you attach a 3/64 strip of wood to the keel and stem to act as the rabbet. This is possible since the keel and stem piece are actually a little wider than the profile. It sure is a lot easier that cutting it into the keel and stem. Using Clay’s method of using blocks to stabilize the bulkheads and measuring very carefully, I slowly assembled the frame. This was a potential problem because since my tolerances were quite wide in the slots, even minor errors could cause large errors in the fairing process.
Finally, the frame was assembled. With the blocks in place, it is quite solid and will resist warping. a batten check of the hull shows the fairing is not what is should be and some building/sanding of bulkheads will be required, but not significantly so. The addition of bow and transom blocks as well as bulwark fillers will be required to help in the planking process. Adding these blocks and the final fairing is critical for the rest of the model. The frame looks like an old cow, but if properly faired, nobody will know once planked. If not faired, it will always be a cow.
So far, this practicum has been quite a learning experience. I have learned new techniques I can use for kits in the future and become more comfortable with the possibility of further scratch building in the future. By being ‘forced’ to make things I have gained a greater appreciation for the process. Nest stop, the Fair and planking.
TIPS AND HINTS-Continued
“When I am doing a model-building demo, I take
these, and others, to demonstrate the 'sophisticated
equipment' required. The finger nail file gets the
ladies attention. I use Lego blocks for spacing and
squaring-this gets the kids attention. The dremel gets
the guys attention.” .
Chuck Seiler
: In a discussion about making waterways, as park of the deck planking process, David Botton wrote:
“I have found the easiest method is the
traditional KISS method. Take 1/32 x 1/32 stock.
Take the first strip and glue it down to the edge of the
deck. Then follow the same procedure by laminating
each strip to the next one until you get the width you
need. Then sand or scrape the waterway to the
thickness you need. Easy to do and when done
nobody can tell the difference. There are other ways
but this one has served me well.”
Lexington Report by Chuck Seiler

TRAFALGAR PROJECT Trafalgar Project will meet at 6 PM on 11 May, before the general Guild meeting. All team members are requested to have their ships completely painted by the May meeting. This does not include masting and rigging. If not complete, bring as many as you have. (Schedule for completed models with masting and rigging will be determined at this meeting) Rigging and rigging material for the 1:1200 scale models will be discussed at the May meeting. Please bring in samples of the rigging material that you plan to use. If you have any models rigged or partially rigged, bring them as well.
NRG VOLUNTEERS NRG’s first committee meeting will be 7:00PM aboard the Berkeley on Wednesday May 18. Come one and all! We need chairs for tours, model show, speakers, hospitality, vendors, registration, etc.
The LANE VICTORY a restored 455-foot Victory Ship, will be visiting the Maritime Museum of San Diego on Memorial Day weekend. Hundreds of these cargo ships were built during World War II to support the war effort. They played a vital role in the allied victories in Europe and the Pacific. Her all-volunteer crew keeps the ship in working condition and two on-board museums contain artifacts relating to the history of the merchant marine. Entrance to the ship is included with paid admission to the maritime museum.
Medea finished her annual Coast Guard
boiler and deck inspection Monday and we’ll be underway a lot this summer.
AUCTION “Barker Bob” Hewitt says we have a number of fine items to auction off at the May meeting. Most are models. They include:
SULTANA Model Shipways brand new 1:64 scale.
FLYING CLOUD Bluejacket, started.
DALLAS Revenue Cutter, Artesana Latina 1:50 scale.
CHARLES MORGAN Artesana kit, scale 1:50.
GOLDEN HIND large scale, started.
Book “THE FIRST FRIGATES” by Robert Gardiner, cover damaged.
Collections office has moved aft against the
engine room bulkhead opposite the crew galley aboard the Berkeley. Old office will now be devoted to item storage
ROSTER CORRECTION
Edward Sachs <redacted>
DISCUSSION TOPICS Start thinking about discussion topics for future meetings. This can be a topic you want info on, something we can discuss in an open forum or we can get a speaker to speak about. You would really make Hewitt’s month if you would volunteer to speak on a topic.
NEWSLETTER DEADLINE
Articles, photos, tips and hints are
appreciated. Please have newsletter inputs to
me by 31 MAY 2005. If you cannot get it to
me on-line, call me to arrange transfer of info,
I’ll see you in the funny papers.

S M T W T F S
1 2 3 4 5 6 7 8 9 10 11 12 13 14
15 16 17 18 19 20 21 22 23 24 25 26 27 28 29 30 31
MAY 2005
Next meeting is Wednesday May 11th on the
BERKELEY 6:30 pm Social, 7:00 PM Meeting
Bring models !
1492 N. Harbor Drive San Diego, CA 92101
ADVERSARIES NEW AND OLD Former Soviet Foxtrot class submarine COBRA is moored behind replica of “HMS” ROSE (now SURPRISE).
Photo by Rupert Morgan