mathsfacts in a flash software manual€¦ · uk renaissance learning uk ltd. 32 harbour exchange...
TRANSCRIPT

MathsFacts in a FlashTM
Software Manual

UK
Renaissance Learning UK Ltd.32 Harbour Exchange SquareLondonE14 9GE
Tel: +44(0)845 260 3570Fax: +44(0)20 7538 2625
Email: [email protected]: www.renlearn.co.uk
Copyright NoticeCopyright © 2015 by Renaissance Learning, Inc. All Rights Reserved.
This publication is protected by US and international copyright laws. It is unlawful to duplicate or reproduce any copyrighted material without authorization from the copyright holder. This document may be reproduced only by staff members in schools that have a license for MathsFacts in a Flash, Renaissance Place software. For more information, contact Renaissance Learning, Inc., at the address above.
All logos, designs, and brand names for Accelerated Maths, AM, Accelerated Maths Fluency, Accelerated Reader, AR, ATOS, MathsFacts in a Flash, NEO, NEO 2, Renaissance Home Connect, Renaissance Learning, Renaissance-U, STAR, STAR Assessments, STAR Early Literacy, STAR Maths and STAR Reading are trademarks of Renaissance Learning, Inc. and its subsidiaries, registered, common law or pending registration in Australia, the United Kingdom, United States and other countries. All other product and company names should be considered as the property of their respective companies and organisations.
Any standards referenced in this manual, software, or reports are the property of their respective copyright holders.
Apple, iPad, iPhone, iPod, iPod touch, iTunes, Macintosh and Safari are trademarks of Apple Inc., registered in the US and other countries. App Store is a service mark of Apple Inc. Content purchased from the iTunes Store is for personal lawful use only. Do not steal music.
Microsoft, Windows and Internet Explorer are registered trademarks of Microsoft Corporation in the United States and/or other countries.
Adobe, Flash and Reader are either registered trademarks or trademarks of Adobe Systems Incorporated in the United States and/or other countries.
Firefox is a registered trademark of the Mozilla Foundation (www.mozilla.org/).
As technology advances it becomes necessary for software companies to drop support for older operating systems and third-party software. It is the responsibility of customers to keep their computers, networks, operating systems and third-party software up-to-date and functional. Although Renaissance Learning will not discontinue support for older products immediately, we will continue to evaluate system requirements and do our best to provide advance notice when it becomes necessary to raise our requirements.
Australia
Renaissance Learning AustraliaPO Box 329Toowong DC QLD 4066
Phone: 1800 467 870
Email: [email protected]: www.renaissance.com.au
11/2015 MFFRPUK

Contents
Welcome to MathsFacts in a Flash . . . . . . . . . . . . . . . . . . . . . . 1How It Works in Your Classroom . . . . . . . . . . . . . . . . . . . . . . . . . . . . . . . . . . . . . . . . . . . . . . . . .1
Programs You Will Use . . . . . . . . . . . . . . . . . . . . . . . . . . . . . . . . . . . . . . . . . . . . . . . . . . . . . . . . . .2MathsFacts in a Flash Software . . . . . . . . . . . . . . . . . . . . . . . . . . . . . . . . . . . . . . . . . . . . . . . . . . . . . . 2Renaissance Place . . . . . . . . . . . . . . . . . . . . . . . . . . . . . . . . . . . . . . . . . . . . . . . . . . . . . . . . . . . . . . . . . . 3Other Software You May Need . . . . . . . . . . . . . . . . . . . . . . . . . . . . . . . . . . . . . . . . . . . . . . . . . . . . . . . 3
Tour of the Home Page . . . . . . . . . . . . . . . . . . . . . . . . . . . . . . . . . . . . . . . . . . . . . . . . . . . . . . . . .5
Did You Know? . . . . . . . . . . . . . . . . . . . . . . . . . . . . . . . . . . . . . . . . . . . . . . . . . . . . . . . . . . . . . . . . .6
Alerts . . . . . . . . . . . . . . . . . . . . . . . . . . . . . . . . . . . . . . . . . . . . . . . . . . . . . . . . . . . . . . . . . . . . . . . . .6
Tools to Help You With MathsFacts in a Flash. . . . . . . . . . . . . . . . . . . . . . . . . . . . . . . . . . . . . .7Help in the Software . . . . . . . . . . . . . . . . . . . . . . . . . . . . . . . . . . . . . . . . . . . . . . . . . . . . . . . . . . . . . . . . 7Manuals and Other Documents . . . . . . . . . . . . . . . . . . . . . . . . . . . . . . . . . . . . . . . . . . . . . . . . . . . . . . 9Resources . . . . . . . . . . . . . . . . . . . . . . . . . . . . . . . . . . . . . . . . . . . . . . . . . . . . . . . . . . . . . . . . . . . . . . . . . 9Live Chat Support . . . . . . . . . . . . . . . . . . . . . . . . . . . . . . . . . . . . . . . . . . . . . . . . . . . . . . . . . . . . . . . . . . 9
Need More Help? . . . . . . . . . . . . . . . . . . . . . . . . . . . . . . . . . . . . . . . . . . . . . . . . . . . . . . . . . . . . . .10
Getting Started . . . . . . . . . . . . . . . . . . . . . . . . . . . . . . . . . . . . . 11Logging In (Personnel) . . . . . . . . . . . . . . . . . . . . . . . . . . . . . . . . . . . . . . . . . . . . . . . . . . . . . . . . .11
Setup Checklist . . . . . . . . . . . . . . . . . . . . . . . . . . . . . . . . . . . . . . . . . . . . . . . . . . . . . . . . . . . . . . .12
Navigating the Software . . . . . . . . . . . . . . . . . . . . . . . . . . . . . . . . . . . . . . . . . . . . . . . . . . . . . . .13
Working in a Different School Year . . . . . . . . . . . . . . . . . . . . . . . . . . . . . . . . . . . . . . . . . . . . . .13
Switching Roles and Schools . . . . . . . . . . . . . . . . . . . . . . . . . . . . . . . . . . . . . . . . . . . . . . . . . . .14
Logging Out and Closing the Software. . . . . . . . . . . . . . . . . . . . . . . . . . . . . . . . . . . . . . . . . . .14
Software Requirements. . . . . . . . . . . . . . . . . . . . . . . . . . . . . . 15Current Requirements . . . . . . . . . . . . . . . . . . . . . . . . . . . . . . . . . . . . . . . . . . . . . . . . . . . . . . . . .15
Checking for the Software You Need (Downloads Page) . . . . . . . . . . . . . . . . . . . . . . . . . . .15
Getting Ready for a New School Year. . . . . . . . . . . . . . . . . . . 16Renaissance Place Tasks for the New School Year . . . . . . . . . . . . . . . . . . . . . . . . . . . . . . . .16
IT Department/ICT Support Tasks for the New School Year . . . . . . . . . . . . . . . . . . . . . . . .17
MathsFacts in a Flash Tasks for the New School Year. . . . . . . . . . . . . . . . . . . . . . . . . . . . . .18
The Assignment Book. . . . . . . . . . . . . . . . . . . . . . . . . . . . . . . . 20Symbols Used in the Assignment Book . . . . . . . . . . . . . . . . . . . . . . . . . . . . . . . . . . . . . . . . . .20
Viewing the Assignment Book for a Class . . . . . . . . . . . . . . . . . . . . . . . . . . . . . . . . . . . . . . . .21
iMathsFacts in a Flash™Software Manual

Contents
Student Detail Page . . . . . . . . . . . . . . . . . . . . . . . . . . . . . . . . . . . . . . . . . . . . . . . . . . . . . . . . . . .22
Student Work Shown in the Assignment Book (Online and Offline Work) . . . . . . . . . . . .23
Levels . . . . . . . . . . . . . . . . . . . . . . . . . . . . . . . . . . . . . . . . . . . . . 24General Information About Levels. . . . . . . . . . . . . . . . . . . . . . . . . . . . . . . . . . . . . . . . . . . . . . .24
Things to Remember About Levels . . . . . . . . . . . . . . . . . . . . . . . . . . . . . . . . . . . . . . . . . . . . . .24Benchmarks . . . . . . . . . . . . . . . . . . . . . . . . . . . . . . . . . . . . . . . . . . . . . . . . . . . . . . . . . . . . . . . . . . . . . .24Reorder Levels Before Setting Levels . . . . . . . . . . . . . . . . . . . . . . . . . . . . . . . . . . . . . . . . . . . . . . . .25When You Can Set a Level . . . . . . . . . . . . . . . . . . . . . . . . . . . . . . . . . . . . . . . . . . . . . . . . . . . . . . . . . .25Starting Levels . . . . . . . . . . . . . . . . . . . . . . . . . . . . . . . . . . . . . . . . . . . . . . . . . . . . . . . . . . . . . . . . . . . .25Experienced or Older Students . . . . . . . . . . . . . . . . . . . . . . . . . . . . . . . . . . . . . . . . . . . . . . . . . . . . . .25Levels and Renaissance Home Connect . . . . . . . . . . . . . . . . . . . . . . . . . . . . . . . . . . . . . . . . . . . . . .25
Level Names . . . . . . . . . . . . . . . . . . . . . . . . . . . . . . . . . . . . . . . . . . . . . . . . . . . . . . . . . . . . . . . . . .26
Available Levels . . . . . . . . . . . . . . . . . . . . . . . . . . . . . . . . . . . . . . . . . . . . . . . . . . . . . . . . . . . . . . .28Levels Available to Students (By Program and Hardware) . . . . . . . . . . . . . . . . . . . . . . . . . . . . . .28
Determining the Level for a Student. . . . . . . . . . . . . . . . . . . . . . . . . . . . . . . . . . . . . . . . . . . . .29
Setting a Level . . . . . . . . . . . . . . . . . . . . . . . . . . . . . . . . . . . . . . . . . . . . . . . . . . . . . . . . . . . . . . . .30Things to Remember about Setting a Level . . . . . . . . . . . . . . . . . . . . . . . . . . . . . . . . . . . . . . . . . . .30How to Set a Level . . . . . . . . . . . . . . . . . . . . . . . . . . . . . . . . . . . . . . . . . . . . . . . . . . . . . . . . . . . . . . . . .30If You Chose One Student. . . . . . . . . . . . . . . . . . . . . . . . . . . . . . . . . . . . . . . . . . . . . . . . . . . . . . . . . . .32If You Chose More Than One Student . . . . . . . . . . . . . . . . . . . . . . . . . . . . . . . . . . . . . . . . . . . . . . . .32
Holding or Resetting Levels . . . . . . . . . . . . . . . . . . . . . . . . . . . . . . . . . . . . . . . . . . . . . . . . . . . .33If You Chose One Student. . . . . . . . . . . . . . . . . . . . . . . . . . . . . . . . . . . . . . . . . . . . . . . . . . . . . . . . . . .34If You Chose More than One Student . . . . . . . . . . . . . . . . . . . . . . . . . . . . . . . . . . . . . . . . . . . . . . . . .35
Mastery Criteria . . . . . . . . . . . . . . . . . . . . . . . . . . . . . . . . . . . . . . . . . . . . . . . . . . . . . . . . . . . . . . .36Reported Time Score vs. Completion Time . . . . . . . . . . . . . . . . . . . . . . . . . . . . . . . . . . . . . . . . . . .36
Editing the Mastery Time for a Level. . . . . . . . . . . . . . . . . . . . . . . . . . . . . . . . . . . . . . . . . . . . .37If You Chose One Student. . . . . . . . . . . . . . . . . . . . . . . . . . . . . . . . . . . . . . . . . . . . . . . . . . . . . . . . . . .38
To set the same mastery time for all levels . . . . . . . . . . . . . . . . . . . . . . . . . . . . . . . . . . . . . . .38To set the mastery time for one or more individual levels . . . . . . . . . . . . . . . . . . . . . . . . .38To reset default mastery time to the default for all levels . . . . . . . . . . . . . . . . . . . . . . . . . .39
If You Chose More Than One Student . . . . . . . . . . . . . . . . . . . . . . . . . . . . . . . . . . . . . . . . . . . . . . . .39To set the mastery time for one or more individual levels . . . . . . . . . . . . . . . . . . . . . . . . .39To reset default mastery time to the default for all levels . . . . . . . . . . . . . . . . . . . . . . . . . .41
Adding or Removing Levels. . . . . . . . . . . . . . . . . . . . . . . . . . . . . . . . . . . . . . . . . . . . . . . . . . . . .42
Reordering Levels . . . . . . . . . . . . . . . . . . . . . . . . . . . . . . . . . . . . . . . . . . . . . . . . . . . . . . . . . . . . .43
Copying Levels Between Classes . . . . . . . . . . . . . . . . . . . . . . . . . . . . . . . . . . . . . . . . . . . . . . . .44
Transferring Student Data from One Class to Another . . . . . . . . . . . . . . . . . . . . . . . . . . . . .45
Practice Materials for Students . . . . . . . . . . . . . . . . . . . . . . . 46Description of Practice Materials. . . . . . . . . . . . . . . . . . . . . . . . . . . . . . . . . . . . . . . . . . . . . . . .46
Printing Practice Materials . . . . . . . . . . . . . . . . . . . . . . . . . . . . . . . . . . . . . . . . . . . . . . . . . . . . .47Printing All Materials (Except the Level Practice Worksheet and Flash Cards) . . . . . . . . . . . .47Printing the Level Practice Worksheet . . . . . . . . . . . . . . . . . . . . . . . . . . . . . . . . . . . . . . . . . . . . . . .48Printing the Level Practice Flash Cards. . . . . . . . . . . . . . . . . . . . . . . . . . . . . . . . . . . . . . . . . . . . . . .49
iiMathsFacts in a Flash™Software Manual

Contents
MathsFacts in a Flash RP (for Students) . . . . . . . . . . . . . . . . 50What You Need to Do Before Students Practise or Test . . . . . . . . . . . . . . . . . . . . . . . . . . . .50
How Students Log In . . . . . . . . . . . . . . . . . . . . . . . . . . . . . . . . . . . . . . . . . . . . . . . . . . . . . . . . . .51
When Students Forget Their User Names or Passwords . . . . . . . . . . . . . . . . . . . . . . . . . . .51Find User Name . . . . . . . . . . . . . . . . . . . . . . . . . . . . . . . . . . . . . . . . . . . . . . . . . . . . . . . . . . . . . . . . . . .51
List of Student User Names, Passwords and PINs . . . . . . . . . . . . . . . . . . . . . . . . . . . . . . . . .52
How to Change Student User Names and Passwords. . . . . . . . . . . . . . . . . . . . . . . . . . . . . .52
How Students Work in MathsFacts in a Flash RP . . . . . . . . . . . . . . . . . . . . . . . . . . . . . . . . . .53Procedure . . . . . . . . . . . . . . . . . . . . . . . . . . . . . . . . . . . . . . . . . . . . . . . . . . . . . . . . . . . . . . . . . . . . . . . .53Instructions to Students (Text Only) . . . . . . . . . . . . . . . . . . . . . . . . . . . . . . . . . . . . . . . . . . . . . . . . .56Work at a Current Level (Practising and Testing) . . . . . . . . . . . . . . . . . . . . . . . . . . . . . . . . . . . . . .58
What You See While Testing . . . . . . . . . . . . . . . . . . . . . . . . . . . . . . . . . . . . . . . . . . . . . . . . . . . .58Test Results: Wrong Answers . . . . . . . . . . . . . . . . . . . . . . . . . . . . . . . . . . . . . . . . . . . . . . . . . . .59Test Results: Master a Level . . . . . . . . . . . . . . . . . . . . . . . . . . . . . . . . . . . . . . . . . . . . . . . . . . . .60
Work at a Previously Mastered Level (Best Times) . . . . . . . . . . . . . . . . . . . . . . . . . . . . . . . . . . . . .61Reports with Best Times Information. . . . . . . . . . . . . . . . . . . . . . . . . . . . . . . . . . . . . . . . . . . .61How to Try for a Best Time . . . . . . . . . . . . . . . . . . . . . . . . . . . . . . . . . . . . . . . . . . . . . . . . . . . . .61
Things to Remember When Practising and Testing. . . . . . . . . . . . . . . . . . . . . . . . . . . . . . . .63Stopping a Practice or Test . . . . . . . . . . . . . . . . . . . . . . . . . . . . . . . . . . . . . . . . . . . . . . . . . . . . . . . . .63
How to Stop a Practice or Test. . . . . . . . . . . . . . . . . . . . . . . . . . . . . . . . . . . . . . . . . . . . . . . . . .64Tracking Stopped Practices and Tests . . . . . . . . . . . . . . . . . . . . . . . . . . . . . . . . . . . . . . . . . . .64Table of Stopped Practices and Tests (Authorisation Password and Saved inHistory Information). . . . . . . . . . . . . . . . . . . . . . . . . . . . . . . . . . . . . . . . . . . . . . . . . . . . . . . . . . .65
Cannot Skip Problems . . . . . . . . . . . . . . . . . . . . . . . . . . . . . . . . . . . . . . . . . . . . . . . . . . . . . . . . . . . . .65What Students See is Determined by Preferences . . . . . . . . . . . . . . . . . . . . . . . . . . . . . . . . . . . . .65How Students Answer Questions . . . . . . . . . . . . . . . . . . . . . . . . . . . . . . . . . . . . . . . . . . . . . . . . . . . .66Practices and Tests are Timed . . . . . . . . . . . . . . . . . . . . . . . . . . . . . . . . . . . . . . . . . . . . . . . . . . . . . .66Number of Problems on Practices and Tests. . . . . . . . . . . . . . . . . . . . . . . . . . . . . . . . . . . . . . . . . .66Unanswered Problems . . . . . . . . . . . . . . . . . . . . . . . . . . . . . . . . . . . . . . . . . . . . . . . . . . . . . . . . . . . . .66Wrong Answers During Practices . . . . . . . . . . . . . . . . . . . . . . . . . . . . . . . . . . . . . . . . . . . . . . . . . . . .66Going Back One Problem on a Test (Changing an Answer) . . . . . . . . . . . . . . . . . . . . . . . . . . . . .67Reported Time Score versus Overall Elapsed Time . . . . . . . . . . . . . . . . . . . . . . . . . . . . . . . . . . . .67Personal Best Time (Challenging Best Times) . . . . . . . . . . . . . . . . . . . . . . . . . . . . . . . . . . . . . . . . .68TOPS Reports . . . . . . . . . . . . . . . . . . . . . . . . . . . . . . . . . . . . . . . . . . . . . . . . . . . . . . . . . . . . . . . . . . . . .68
Tablets and MathsFacts in a Flash . . . . . . . . . . . . . . . . . . . . . 69Things to Remember About Using MathsFacts in a Flash on a Tablet. . . . . . . . . . . . . . . .69
MathsFacts in a Flash Renaissance Place versus Renaissance Home Connect . . . . . . . . . . . .69List of Student User Names and Passwords. . . . . . . . . . . . . . . . . . . . . . . . . . . . . . . . . . . . . . . . . . .69
Before Students Use MathsFacts in a Flash on a Tablet . . . . . . . . . . . . . . . . . . . . . . . . . . . .69
TOPS Reports and Tablets . . . . . . . . . . . . . . . . . . . . . . . . . . . . . . . . . . . . . . . . . . . . . . . . . . . . .69
Frequently Asked Questions: Tablets and MathsFacts in a Flash. . . . . . . . . . . . . . . . . . . .70What tablets work with MathsFacts in a Flash?. . . . . . . . . . . . . . . . . . . . . . . . . . . . . . . . . . . . . . . .70Do I need to install an app on my tablet to work in MathsFacts in a Flash? . . . . . . . . . . . . . . .70Can anyone use a tablet to work in MathsFacts in a Flash? . . . . . . . . . . . . . . . . . . . . . . . . . . . . .70Can a teacher log in and perform management tasks on a tablet? . . . . . . . . . . . . . . . . . . . . . .70Can students work from home on their own personal tablet? . . . . . . . . . . . . . . . . . . . . . . . . . .70
iiiMathsFacts in a Flash™Software Manual

Contents
Renaissance Receivers. . . . . . . . . . . . . . . . . . . . . . . . . . . . . . . 71Renaissance Receivers and MathsFacts in a Flash . . . . . . . . . . . . . . . . . . . . . . . . . . . . . . . .71
Additional Information about Renaissance Receivers . . . . . . . . . . . . . . . . . . . . . . . . . . . . .71
Renaissance Wireless Server Utility . . . . . . . . . . . . . . . . . . . . . . . . . . . . . . . . . . . . . . . . . . . . .72
How to Connect a Renaissance Receiver to Your Computer . . . . . . . . . . . . . . . . . . . . . . . .73
How to Name the Receiver . . . . . . . . . . . . . . . . . . . . . . . . . . . . . . . . . . . . . . . . . . . . . . . . . . . . .74
How to Set the Renaissance Place URL for MathsFacts in a Flash . . . . . . . . . . . . . . . . . . .75
Default Administrator PIN . . . . . . . . . . . . . . . . . . . . . . . . . . . . . . . . . . . . . . . . . . . . . . . . . . . . . .76
Monitoring Receiver Activity and Status . . . . . . . . . . . . . . . . . . . . . . . . . . . . . . . . . . . . . . . . .76
NEO 2s and MathsFacts in a Flash. . . . . . . . . . . . . . . . . . . . . . 77General Information about NEO 2s . . . . . . . . . . . . . . . . . . . . . . . . . . . . . . . . . . . . . . . . . . . . . .77
Additional Information about NEO 2s . . . . . . . . . . . . . . . . . . . . . . . . . . . . . . . . . . . . . . . . . . .77
Updates for NEO 2. . . . . . . . . . . . . . . . . . . . . . . . . . . . . . . . . . . . . . . . . . . . . . . . . . . . . . . . . . . . .77
Things to Remember About MathsFacts in a Flash on NEO 2 . . . . . . . . . . . . . . . . . . . . . . .78Online versus Offline Work. . . . . . . . . . . . . . . . . . . . . . . . . . . . . . . . . . . . . . . . . . . . . . . . . . . . . . . . . .78Renaissance Receiver . . . . . . . . . . . . . . . . . . . . . . . . . . . . . . . . . . . . . . . . . . . . . . . . . . . . . . . . . . . . . .79List of Student User Names, Passwords and PINs . . . . . . . . . . . . . . . . . . . . . . . . . . . . . . . . . . . . .79
Before Students Start Working on NEO 2s. . . . . . . . . . . . . . . . . . . . . . . . . . . . . . . . . . . . . . . .79
Using the MathsFacts in a Flash RP SmartApplet. . . . . . . . . . . . . . . . . . . . . . . . . . . . . . . . . .80How Students Practise or Test . . . . . . . . . . . . . . . . . . . . . . . . . . . . . . . . . . . . . . . . . . . . . . . . . . . . . .80
Working at the Current Level . . . . . . . . . . . . . . . . . . . . . . . . . . . . . . . . . . . . . . . . . . . . . . . . . . .81Working at a Previously Mastered Level . . . . . . . . . . . . . . . . . . . . . . . . . . . . . . . . . . . . . . . . .82Answering Questions during a Practice or Test . . . . . . . . . . . . . . . . . . . . . . . . . . . . . . . . . . .82Tips for Practices and Tests . . . . . . . . . . . . . . . . . . . . . . . . . . . . . . . . . . . . . . . . . . . . . . . . . . . .82Stopping a Practice or Test. . . . . . . . . . . . . . . . . . . . . . . . . . . . . . . . . . . . . . . . . . . . . . . . . . . . .83After a Practice or Test. . . . . . . . . . . . . . . . . . . . . . . . . . . . . . . . . . . . . . . . . . . . . . . . . . . . . . . . .83Logging Out of the SmartApplet . . . . . . . . . . . . . . . . . . . . . . . . . . . . . . . . . . . . . . . . . . . . . . . .84
Using the MathsFacts in a Flash (offline) SmartApplet . . . . . . . . . . . . . . . . . . . . . . . . . . . . .84Opening the SmartApplet . . . . . . . . . . . . . . . . . . . . . . . . . . . . . . . . . . . . . . . . . . . . . . . . . . . . . . . . . .84Practising MathsFacts in a Flash Levels or Taking Tests . . . . . . . . . . . . . . . . . . . . . . . . . . . . . . . .85
Tips for Practices and Tests . . . . . . . . . . . . . . . . . . . . . . . . . . . . . . . . . . . . . . . . . . . . . . . . . . . .86Stopping a Practice or Test. . . . . . . . . . . . . . . . . . . . . . . . . . . . . . . . . . . . . . . . . . . . . . . . . . . . .86
Viewing the History . . . . . . . . . . . . . . . . . . . . . . . . . . . . . . . . . . . . . . . . . . . . . . . . . . . . . . . . . . . . . . . .87Viewing the History for One Level . . . . . . . . . . . . . . . . . . . . . . . . . . . . . . . . . . . . . . . . . . . . . . .87Viewing the History for All Practices and Practice Tests . . . . . . . . . . . . . . . . . . . . . . . . . . .88
Printing, Clearing or Sending the History to Renaissance Place . . . . . . . . . . . . . . . . . . . . . . . . .88Printing the History . . . . . . . . . . . . . . . . . . . . . . . . . . . . . . . . . . . . . . . . . . . . . . . . . . . . . . . . . . .89Sending the History to Renaissance Place . . . . . . . . . . . . . . . . . . . . . . . . . . . . . . . . . . . . . . .90Clearing the History . . . . . . . . . . . . . . . . . . . . . . . . . . . . . . . . . . . . . . . . . . . . . . . . . . . . . . . . . . .90
Renaissance Responders and MathsFacts in a Flash . . . . . . 91General Information about Renaissance Responder . . . . . . . . . . . . . . . . . . . . . . . . . . . . . .91
ivMathsFacts in a Flash™Software Manual

Contents
Things to Remember About MathsFacts in a Flash on Responder . . . . . . . . . . . . . . . . . . .92Firmware . . . . . . . . . . . . . . . . . . . . . . . . . . . . . . . . . . . . . . . . . . . . . . . . . . . . . . . . . . . . . . . . . . . . . . . . .92Renaissance Receiver . . . . . . . . . . . . . . . . . . . . . . . . . . . . . . . . . . . . . . . . . . . . . . . . . . . . . . . . . . . . . .92List of Student User Names, Passwords and PINs . . . . . . . . . . . . . . . . . . . . . . . . . . . . . . . . . . . . .92Offline Work on Responder . . . . . . . . . . . . . . . . . . . . . . . . . . . . . . . . . . . . . . . . . . . . . . . . . . . . . . . . .92MathsFacts in a Flash Program on Responder . . . . . . . . . . . . . . . . . . . . . . . . . . . . . . . . . . . . . . . .92Tracking MathsFacts in a Flash Work on Responder . . . . . . . . . . . . . . . . . . . . . . . . . . . . . . . . . . .92
Responder Basics . . . . . . . . . . . . . . . . . . . . . . . . . . . . . . . . . . . . . . . . . . . . . . . . . . . . . . . . . . . . .93Responder Model, Firmware Versions and Updates . . . . . . . . . . . . . . . . . . . . . . . . . . . . . . . . . . .93
Firmware Version of Your Responder and How to Identify It . . . . . . . . . . . . . . . . . . . . . . .93Updating Responder Firmware . . . . . . . . . . . . . . . . . . . . . . . . . . . . . . . . . . . . . . . . . . . . . . . . .94
Choosing MathsFacts in a Flash in the Renaissance Responder Menu . . . . . . . . . . . . . . . . . . .95How Responder Users Answer MathsFacts in a Flash Questions . . . . . . . . . . . . . . . . . . . . . . . .95Wrong Answers during Practices . . . . . . . . . . . . . . . . . . . . . . . . . . . . . . . . . . . . . . . . . . . . . . . . . . . .96Go Back One Problem (Tests Only) . . . . . . . . . . . . . . . . . . . . . . . . . . . . . . . . . . . . . . . . . . . . . . . . . .96Time Limits . . . . . . . . . . . . . . . . . . . . . . . . . . . . . . . . . . . . . . . . . . . . . . . . . . . . . . . . . . . . . . . . . . . . . . .96Connecting to Computers with Renaissance Receivers . . . . . . . . . . . . . . . . . . . . . . . . . . . . . . . .97Stopping a Practice or Test . . . . . . . . . . . . . . . . . . . . . . . . . . . . . . . . . . . . . . . . . . . . . . . . . . . . . . . . .97
Before Students Start Working on Renaissance Responders . . . . . . . . . . . . . . . . . . . . . . .98Questions to Answer . . . . . . . . . . . . . . . . . . . . . . . . . . . . . . . . . . . . . . . . . . . . . . . . . . . . . . . . . . . . . . .98Tasks to Complete . . . . . . . . . . . . . . . . . . . . . . . . . . . . . . . . . . . . . . . . . . . . . . . . . . . . . . . . . . . . . . . . .98
Working Offline with MathsFacts in a Flash on Renaissance Responder . . . . . . . . . . . . .99How Students Work on Offline Practices . . . . . . . . . . . . . . . . . . . . . . . . . . . . . . . . . . . . . . . . . . . . .99How Students Take Offline Tests to Practise Levels . . . . . . . . . . . . . . . . . . . . . . . . . . . . . . . . . .100Viewing the MathsFacts History on Responder . . . . . . . . . . . . . . . . . . . . . . . . . . . . . . . . . . . . . . .101Printing the MathsFacts History . . . . . . . . . . . . . . . . . . . . . . . . . . . . . . . . . . . . . . . . . . . . . . . . . . . .102
To enter the Student Information, follow these steps:. . . . . . . . . . . . . . . . . . . . . . . . . . . .102To print the history: . . . . . . . . . . . . . . . . . . . . . . . . . . . . . . . . . . . . . . . . . . . . . . . . . . . . . . . . . .102
Sending the Responder MathsFacts History to Renaissance Place . . . . . . . . . . . . . . . . . . . . .103Clearing the MathsFacts Offline History . . . . . . . . . . . . . . . . . . . . . . . . . . . . . . . . . . . . . . . . . . . . .104
Renaissance Home Connect and MathsFacts in a Flash . . . 105What Is Renaissance Home Connect?. . . . . . . . . . . . . . . . . . . . . . . . . . . . . . . . . . . . . . . . . . 105
Renaissance Home Connect Web Address (URL) . . . . . . . . . . . . . . . . . . . . . . . . . . . . . . . . 106
Reports . . . . . . . . . . . . . . . . . . . . . . . . . . . . . . . . . . . . . . . . . . . . . . . . . . . . . . . . . . . . . . . . . . . . 106
Renaissance Home Connect Informational Letter. . . . . . . . . . . . . . . . . . . . . . . . . . . . . . . 106
Log In to Renaissance Home Connect . . . . . . . . . . . . . . . . . . . . . . . . . . . . . . . . . . . . . . . . . 108
Results at School. . . . . . . . . . . . . . . . . . . . . . . . . . . . . . . . . . . . . . . . . . . . . . . . . . . . . . . . . . . . 110
Results at Home . . . . . . . . . . . . . . . . . . . . . . . . . . . . . . . . . . . . . . . . . . . . . . . . . . . . . . . . . . . . 111
Practise or Practise Test in Renaissance Home Connect . . . . . . . . . . . . . . . . . . . . . . . . . 112
Stopping a Practice or Test. . . . . . . . . . . . . . . . . . . . . . . . . . . . . . . . . . . . . . . . . . . . . . . . . . . 115
How Students View Their Progress in Renaissance Home Connect . . . . . . . . . . . . . . . 116
Working at Home vs. Working at School . . . . . . . . . . . . . . . . . . . . . . . . . . . . . . . . . . . . . . . 117
vMathsFacts in a Flash™Software Manual

Contents
Reports . . . . . . . . . . . . . . . . . . . . . . . . . . . . . . . . . . . . . . . . . . 119MathsFacts in a Flash Reports . . . . . . . . . . . . . . . . . . . . . . . . . . . . . . . . . . . . . . . . . . . . . . . . 119
List of MathsFacts in a Flash Reports . . . . . . . . . . . . . . . . . . . . . . . . . . . . . . . . . . . . . . . . . . 119
Which Report Should I Use? . . . . . . . . . . . . . . . . . . . . . . . . . . . . . . . . . . . . . . . . . . . . . . . . . . 120
Printing Reports . . . . . . . . . . . . . . . . . . . . . . . . . . . . . . . . . . . . . . . . . . . . . . . . . . . . . . . . . . . . 122Printing Reports from the Reports Page. . . . . . . . . . . . . . . . . . . . . . . . . . . . . . . . . . . . . . . . . . . . .122Printing Reports from the Assignment Book . . . . . . . . . . . . . . . . . . . . . . . . . . . . . . . . . . . . . . . . .123Stop the TOPS Report From Automatically Printing . . . . . . . . . . . . . . . . . . . . . . . . . . . . . . . . . .123
Reporting Parameter Groups . . . . . . . . . . . . . . . . . . . . . . . . . . . . . . . . . . . . . . . . . . . . . . . . . 124
Report Descriptions . . . . . . . . . . . . . . . . . . . . . . . . . . . . . . . . . . . . . . . . . . . . . . . . . . . . . . . . . 125Certificate . . . . . . . . . . . . . . . . . . . . . . . . . . . . . . . . . . . . . . . . . . . . . . . . . . . . . . . . . . . . . . . . . . . 125Class Progress . . . . . . . . . . . . . . . . . . . . . . . . . . . . . . . . . . . . . . . . . . . . . . . . . . . . . . . . . . . . . . . 125Parent . . . . . . . . . . . . . . . . . . . . . . . . . . . . . . . . . . . . . . . . . . . . . . . . . . . . . . . . . . . . . . . . . . . . . . 125Student Progress. . . . . . . . . . . . . . . . . . . . . . . . . . . . . . . . . . . . . . . . . . . . . . . . . . . . . . . . . . . . . 126Student Record . . . . . . . . . . . . . . . . . . . . . . . . . . . . . . . . . . . . . . . . . . . . . . . . . . . . . . . . . . . . . . 126
Report Options . . . . . . . . . . . . . . . . . . . . . . . . . . . . . . . . . . . . . . . . . . . . . . . . . . . . . . . . . . . . . 127Accessing the Report Options Page . . . . . . . . . . . . . . . . . . . . . . . . . . . . . . . . . . . . . . . . . . . . . . . . .127
TOPS Report. . . . . . . . . . . . . . . . . . . . . . . . . . . . . . . . . . . . . . . . . . . . . . . . . . . . . . . . . . . . . . . . . 127Sample Report Options Page . . . . . . . . . . . . . . . . . . . . . . . . . . . . . . . . . . . . . . . . . . . . . . . . . . . . . .128Definitions of Options . . . . . . . . . . . . . . . . . . . . . . . . . . . . . . . . . . . . . . . . . . . . . . . . . . . . . . . . . . . . .129
Renaissance Place Summary Dashboard. . . . . . . . . . . . . . . 133
Preferences . . . . . . . . . . . . . . . . . . . . . . . . . . . . . . . . . . . . . . . 134General Information . . . . . . . . . . . . . . . . . . . . . . . . . . . . . . . . . . . . . . . . . . . . . . . . . . . . . . . . . 134
List of the MathsFacts in a Flash Preferences . . . . . . . . . . . . . . . . . . . . . . . . . . . . . . . . . . . 135
Copying Classroom Preferences . . . . . . . . . . . . . . . . . . . . . . . . . . . . . . . . . . . . . . . . . . . . . . 135
Types of Preferences . . . . . . . . . . . . . . . . . . . . . . . . . . . . . . . . . . . . . . . . . . . . . . . . . . . . . . . . 135Classroom Preferences. . . . . . . . . . . . . . . . . . . . . . . . . . . . . . . . . . . . . . . . . . . . . . . . . . . . . . . . . . . .135User and School Preferences . . . . . . . . . . . . . . . . . . . . . . . . . . . . . . . . . . . . . . . . . . . . . . . . . . . . . .136
Mandatory Practice Preference . . . . . . . . . . . . . . . . . . . . . . . . . . . . . . . . . . . . . . . . . . . . . . . 136Things to Remember About the Mandatory Practice Preference . . . . . . . . . . . . . . . . . . . . . . .136Changing the Mandatory Practice Preference. . . . . . . . . . . . . . . . . . . . . . . . . . . . . . . . . . . . . . . .137
Authorisation Password Preference . . . . . . . . . . . . . . . . . . . . . . . . . . . . . . . . . . . . . . . . . . . 137Things to Remember About the Authorisation Password Preference . . . . . . . . . . . . . . . . . . .137Changing the Authorisation Password Preference. . . . . . . . . . . . . . . . . . . . . . . . . . . . . . . . . . . .138
Problem Format Preference . . . . . . . . . . . . . . . . . . . . . . . . . . . . . . . . . . . . . . . . . . . . . . . . . . 139Things to Remember About the Problem Format Preference . . . . . . . . . . . . . . . . . . . . . . . . . .139Problem Formats . . . . . . . . . . . . . . . . . . . . . . . . . . . . . . . . . . . . . . . . . . . . . . . . . . . . . . . . . . . . . . . . .140
Horizontal . . . . . . . . . . . . . . . . . . . . . . . . . . . . . . . . . . . . . . . . . . . . . . . . . . . . . . . . . . . . . . . . . . .140Vertical . . . . . . . . . . . . . . . . . . . . . . . . . . . . . . . . . . . . . . . . . . . . . . . . . . . . . . . . . . . . . . . . . . . . .140Combination . . . . . . . . . . . . . . . . . . . . . . . . . . . . . . . . . . . . . . . . . . . . . . . . . . . . . . . . . . . . . . . .140
Changing the Problem Format Preference . . . . . . . . . . . . . . . . . . . . . . . . . . . . . . . . . . . . . . . . . .140
viMathsFacts in a Flash™Software Manual

Contents
Question Type Preference. . . . . . . . . . . . . . . . . . . . . . . . . . . . . . . . . . . . . . . . . . . . . . . . . . . . 143Things to Remember About the Question Type Preference . . . . . . . . . . . . . . . . . . . . . . . . . . . .143How Students Answer Questions . . . . . . . . . . . . . . . . . . . . . . . . . . . . . . . . . . . . . . . . . . . . . . . . . . .144Levels That Use Only Multiple Choice . . . . . . . . . . . . . . . . . . . . . . . . . . . . . . . . . . . . . . . . . . . . . . .145Question Types. . . . . . . . . . . . . . . . . . . . . . . . . . . . . . . . . . . . . . . . . . . . . . . . . . . . . . . . . . . . . . . . . . .145
Free Response . . . . . . . . . . . . . . . . . . . . . . . . . . . . . . . . . . . . . . . . . . . . . . . . . . . . . . . . . . . . . . .145Multiple Choice . . . . . . . . . . . . . . . . . . . . . . . . . . . . . . . . . . . . . . . . . . . . . . . . . . . . . . . . . . . . . .145Multiple Choice Shortcut Keys . . . . . . . . . . . . . . . . . . . . . . . . . . . . . . . . . . . . . . . . . . . . . . . . .145
Changing the Question Type Preference . . . . . . . . . . . . . . . . . . . . . . . . . . . . . . . . . . . . . . . . . . . .145
Time Targets Preference . . . . . . . . . . . . . . . . . . . . . . . . . . . . . . . . . . . . . . . . . . . . . . . . . . . . . 149Things to Remember About the Time Targets Preference . . . . . . . . . . . . . . . . . . . . . . . . . . . . .149Changing the Time Targets Preference. . . . . . . . . . . . . . . . . . . . . . . . . . . . . . . . . . . . . . . . . . . . . .149
Time-Out Preference . . . . . . . . . . . . . . . . . . . . . . . . . . . . . . . . . . . . . . . . . . . . . . . . . . . . . . . . 151Things to Remember About the Time-Out Preference . . . . . . . . . . . . . . . . . . . . . . . . . . . . . . . .151Changing the Time-Out Preference . . . . . . . . . . . . . . . . . . . . . . . . . . . . . . . . . . . . . . . . . . . . . . . . .151
TOPS Report Preference . . . . . . . . . . . . . . . . . . . . . . . . . . . . . . . . . . . . . . . . . . . . . . . . . . . . . 153Things to Remember About the TOPS Report Preference . . . . . . . . . . . . . . . . . . . . . . . . . . . . .153TOPS Report Preference: Effect by Program, Hardware and Firmware Version . . . . . . . . . .154Changing the TOPS Report Preference . . . . . . . . . . . . . . . . . . . . . . . . . . . . . . . . . . . . . . . . . . . . . .154
General Preference . . . . . . . . . . . . . . . . . . . . . . . . . . . . . . . . . . . . . . . . . . . . . . . . . . . . . . . . . . 155Things to Remember About the General Preference . . . . . . . . . . . . . . . . . . . . . . . . . . . . . . . . . .155Changing the General Preference . . . . . . . . . . . . . . . . . . . . . . . . . . . . . . . . . . . . . . . . . . . . . . . . . .155
Benchmarks Preference . . . . . . . . . . . . . . . . . . . . . . . . . . . . . . . . . . . . . . . . . . . . . . . . . . . . . 157What Are Benchmarks?. . . . . . . . . . . . . . . . . . . . . . . . . . . . . . . . . . . . . . . . . . . . . . . . . . . . . . . . . . . .157Resource for Teachers: Year-Level Benchmarks . . . . . . . . . . . . . . . . . . . . . . . . . . . . . . . . . . . . . .157Viewing Benchmarks. . . . . . . . . . . . . . . . . . . . . . . . . . . . . . . . . . . . . . . . . . . . . . . . . . . . . . . . . . . . . .158
Benchmarks Preference Page . . . . . . . . . . . . . . . . . . . . . . . . . . . . . . . . . . . . . . . . . . . . . . . . .158Benchmarks Set for Mastery Table . . . . . . . . . . . . . . . . . . . . . . . . . . . . . . . . . . . . . . . . . . . . .158
Editing Benchmarks . . . . . . . . . . . . . . . . . . . . . . . . . . . . . . . . . . . . . . . . . . . . . . . . . . . . . . . . . . . . . .159
Parents. . . . . . . . . . . . . . . . . . . . . . . . . . . . . . . . . . . . . . . . . . . 161Involving Parents . . . . . . . . . . . . . . . . . . . . . . . . . . . . . . . . . . . . . . . . . . . . . . . . . . . . . . . . . . . 161
Reports for Parents and Guardians. . . . . . . . . . . . . . . . . . . . . . . . . . . . . . . . . . . . . . . . . . . . 161
Parent’s Guide to MathsFacts in a Flash . . . . . . . . . . . . . . . . . . . . . . . . . . . . . . . . . . . . . . . 161
Parent Access to Renaissance Home Connect . . . . . . . . . . . . . . . . . . . . . . . . . . . . . . . . . . 161
Time Settings in MathsFacts in a Flash . . . . . . . . . . . . . . . . 163Reported Time Score vs. Completion Time. . . . . . . . . . . . . . . . . . . . . . . . . . . . . . . . . . . . . 163
Time-Out (per Problem, Practice or Test) . . . . . . . . . . . . . . . . . . . . . . . . . . . . . . . . . . . . . . 163
Mastery Time . . . . . . . . . . . . . . . . . . . . . . . . . . . . . . . . . . . . . . . . . . . . . . . . . . . . . . . . . . . . . . . 163
Time Targets . . . . . . . . . . . . . . . . . . . . . . . . . . . . . . . . . . . . . . . . . . . . . . . . . . . . . . . . . . . . . . . 164
Best Time . . . . . . . . . . . . . . . . . . . . . . . . . . . . . . . . . . . . . . . . . . . . . . . . . . . . . . . . . . . . . . . . . . 164
Lockout Time (5 minutes) . . . . . . . . . . . . . . . . . . . . . . . . . . . . . . . . . . . . . . . . . . . . . . . . . . . . 165
viiMathsFacts in a Flash™Software Manual

Contents
Student Capacity . . . . . . . . . . . . . . . . . . . . . . . . . . . . . . . . . . 166What Is Student Capacity? . . . . . . . . . . . . . . . . . . . . . . . . . . . . . . . . . . . . . . . . . . . . . . . . . . . 166
Capabilities . . . . . . . . . . . . . . . . . . . . . . . . . . . . . . . . . . . . . . . 167Things to Remember About Capabilities . . . . . . . . . . . . . . . . . . . . . . . . . . . . . . . . . . . . . . . 167
User Groups in the Software. . . . . . . . . . . . . . . . . . . . . . . . . . . . . . . . . . . . . . . . . . . . . . . . . . 167
Your Capabilities in Renaissance Place . . . . . . . . . . . . . . . . . . . . . . . . . . . . . . . . . . . . . . . . 168
Troubleshooting and FAQs . . . . . . . . . . . . . . . . . . . . . . . . . . 169Issues . . . . . . . . . . . . . . . . . . . . . . . . . . . . . . . . . . . . . . . . . . . . . . . . . . . . . . . . . . . . . . . . . . . . . . 169
Software needs to be installed . . . . . . . . . . . . . . . . . . . . . . . . . . . . . . . . . . . . . . . . . . . . . . . . . . . . .169My students cannot work in Renaissance Home Connect . . . . . . . . . . . . . . . . . . . . . . . . . . . . .169It is the beginning of the school year. Courses and classes are set up, but mystudents cannot use MathsFacts in a Flash.. . . . . . . . . . . . . . . . . . . . . . . . . . . . . . . . . . . . . . . . . .169A student tries to use MathsFacts in a Flash, but the message “This student isalready logged in” displays. . . . . . . . . . . . . . . . . . . . . . . . . . . . . . . . . . . . . . . . . . . . . . . . . . . . . . . .169TOPS Reports are not printing, even though the TOPS Report Preference is set toprint after each practice or test. . . . . . . . . . . . . . . . . . . . . . . . . . . . . . . . . . . . . . . . . . . . . . . . . . . . .170When I log in, I cannot do tasks that I normally do or I do not see the correct schoolinformation. . . . . . . . . . . . . . . . . . . . . . . . . . . . . . . . . . . . . . . . . . . . . . . . . . . . . . . . . . . . . . . . . . . . . .170
Frequently Asked Questions (FAQs) . . . . . . . . . . . . . . . . . . . . . . . . . . . . . . . . . . . . . . . . . . . 171How do I find my students’ user names, passwords and PINs?. . . . . . . . . . . . . . . . . . . . . . . . .171How do I find personnel user names and passwords?. . . . . . . . . . . . . . . . . . . . . . . . . . . . . . . . .171A student is locked out of Renaissance Place and cannot log in. . . . . . . . . . . . . . . . . . . . . . . .171A teacher, staff member or administrator is locked out of Renaissance Place andcannot log in . . . . . . . . . . . . . . . . . . . . . . . . . . . . . . . . . . . . . . . . . . . . . . . . . . . . . . . . . . . . . . . . . . . . .172Can I stop TOPS reports from automatically printing? . . . . . . . . . . . . . . . . . . . . . . . . . . . . . . . .172How do I change the way problems display?. . . . . . . . . . . . . . . . . . . . . . . . . . . . . . . . . . . . . . . . .172How do I change how students choose their answers?. . . . . . . . . . . . . . . . . . . . . . . . . . . . . . . .172How do I stop a practice or test? . . . . . . . . . . . . . . . . . . . . . . . . . . . . . . . . . . . . . . . . . . . . . . . . . . .173How do I limit the time a student can spend on a problem, practice or test? . . . . . . . . . . . .173How do I identify struggling students? . . . . . . . . . . . . . . . . . . . . . . . . . . . . . . . . . . . . . . . . . . . . . .173I want my students to practice with paper and pencil. Can MathFacts in a Flashhelp me?. . . . . . . . . . . . . . . . . . . . . . . . . . . . . . . . . . . . . . . . . . . . . . . . . . . . . . . . . . . . . . . . . . . . . . . . 173Can I track MathsFacts in a Flash work my students do in Renaissance Home Connectand offline work on NEO 2 and/or Responder? . . . . . . . . . . . . . . . . . . . . . . . . . . . . . . . . . . . . . . .173Can I identify MathsFacts in a Flash work my students do using tablets?. . . . . . . . . . . . . . . .173Can students master levels in Renaissance Home Connect?. . . . . . . . . . . . . . . . . . . . . . . . . . .173Do students access Renaissance Home Connect via Renaissance Place? . . . . . . . . . . . . . . .174Does my Assignment Book show work completed using tablets, NEO 2, Responderor Renaissance Home Connect? . . . . . . . . . . . . . . . . . . . . . . . . . . . . . . . . . . . . . . . . . . . . . . . . . . . .174Can I transfer a student’s history from one class to another? . . . . . . . . . . . . . . . . . . . . . . . . . .174Do I need additional software to use MathsFacts in a Flash?. . . . . . . . . . . . . . . . . . . . . . . . . . .174How do I make sure my NEO 2s and Responders are up-to-date? . . . . . . . . . . . . . . . . . . . . . .175Can I change the size of the print (font) used by the Responder? . . . . . . . . . . . . . . . . . . . . . . .175What are Benchmarks? . . . . . . . . . . . . . . . . . . . . . . . . . . . . . . . . . . . . . . . . . . . . . . . . . . . . . . . . . . . .175
viiiMathsFacts in a Flash™Software Manual

Contents
How do I know what benchmarks are set for my school?. . . . . . . . . . . . . . . . . . . . . . . . . . . . . .176What are the times measured in MathsFacts in a Flash?. . . . . . . . . . . . . . . . . . . . . . . . . . . . . . .176What is Challenging Best Times? . . . . . . . . . . . . . . . . . . . . . . . . . . . . . . . . . . . . . . . . . . . . . . . . . . .176Can I set a different level for each student? . . . . . . . . . . . . . . . . . . . . . . . . . . . . . . . . . . . . . . . . . .177What is the difference between putting a level on hold and resetting a level? . . . . . . . . . . .177How do students master a level? . . . . . . . . . . . . . . . . . . . . . . . . . . . . . . . . . . . . . . . . . . . . . . . . . . .177Can I change the requirements for mastering a level? . . . . . . . . . . . . . . . . . . . . . . . . . . . . . . . .177Can I change the levels my class uses? . . . . . . . . . . . . . . . . . . . . . . . . . . . . . . . . . . . . . . . . . . . . . .177Can I share the levels I use in one class with another class? . . . . . . . . . . . . . . . . . . . . . . . . . . .177What has to be changed to allow a teacher to enrol students in classes? . . . . . . . . . . . . . . .178
Index . . . . . . . . . . . . . . . . . . . . . . . . . . . . . . . . . . . . . . . . . . . . 179
ixMathsFacts in a Flash™Software Manual

xMathsFacts in a Flash™Software Manual

Welcome to MathsFacts in a Flash
MathsFacts in a Flash, Renaissance Place (RP) software for mastering computational fluency enables teachers to give students at all skill levels valuable practice on their addition, subtraction, multiplication, division and other maths facts.
MathsFacts in a Flash
Helps you individualise teaching in your classroom
Allows you to maintain levels for each student
Marks students’ work immediately after completing a practice or test
Allows you to view the results of practices and tests after the studentcompletes them
Times tests and practices to allow you to evaluate students’ level and/orprogress
Tells you the levels students have mastered and which level they areworking on
How It Works in Your ClassroomA typical MathsFacts in a Flash session operates something like this:
1. You set the level the students will begin working on (see page 30).
2. You print the practice worksheets and flashcards (see page 47).
3. Students practise and test using a computer or tablet (seven inches orlarger) (see page 50), a NEO 2 (see page 77), or a Renaissance Responder(see page 99).
Note: Students may also practice offline (practice that does not counttoward mastery). They can do this using Renaissance Home Connect (seepage 105), the MathsFacts in a Flash (offline) SmartApplet on NEO 2 (seepage 84), or MathsFacts in a Flash Offline on the Renaissance Responder(see page 99).
4. To master a level, students must answer all test problems correctly andwithin the time allowed. See “Mastery Criteria” on page 36.
5. Students practise problems they get wrong. Then, students take anothertest to try to master the level. Students must master a level before movingto the next level.
6. MathsFacts in a Flash marks each student’s test and generates a TOPSReport (see page 127). The program, hardware and firmware version youare using (see page 154) determine when and how the TOPS report prints.TOPS reports can always be printed from the Assignment Book (seepage 123).
7. You and the student discuss the TOPS Report.
The TOPS Report tells students their scores and the problems they
got wrong.
1MathsFacts in a Flash™Software Manual

Welcome to MathsFacts in a FlashPrograms You Will Use
Programs You Will UseMathsFacts in a Flash includes two programs
MathsFacts in a Flash software (see page 2)
Renaissance Place (see page 3)
The following may also be available:
Renaissance Home Connect (see page 105)
NEO 2 (see page 77); uses the:
MathsFacts in a Flash RP SmartApplet (see page page 80)
MathsFacts in a Flash (offline) SmartApplet (see page 84)
Renaissance Responder (see page 91); uses the:
MathsFacts in a Flash (offline) SmartApplet (see page 99)
MathsFacts in a Flash SoftwareThe MathsFacts in a Flash software, which is accessible from the Home page, manages the program in your classroom and keeps track of students’ progress.
Use MathsFacts in a Flash to See Page
Have students complete practices and tests on essential maths skills
50
Get documents to help you use MathsFacts in a Flash in your classroom
9
Set levels for one or more students 30
Hold or reset levels 33
Set the mastery criteria for the levels 36
Add or remove levels 42
Reorder levels 43
Copy levels 44
Print practice materials 46
Print reports 122
Change the problem format for individual students or an entire class (using the Problem Format Preference)
139
Change how individual students or an entire class answer problems (using the Question Type Preference)
143
2MathsFacts in a Flash™Software Manual

Welcome to MathsFacts in a FlashPrograms You Will Use
Renaissance PlaceThe Renaissance Place management tasks A (found under the products and under Dashboards and Reporting on the Home page) lets you view and manage school network, school, student, teacher, parent or guardian, course and class information in the Renaissance Place database, which is shared by all Renaissance Place software used in your school network or school.
The tasks you can perform in the Renaissance Place depend on your user group. For more information about user groups, see “Capabilities” on page 167.
For example, administrators have more management tasks to perform than teachers. Sample tasks may include:
Adding, editing or deleting courses and classes
Assigning teachers and students to classes
Selecting a different school year to work in
Viewing student information
Clearing locked accounts (when students or personnel cannot log in)
Printing reports with data from multiple Renaissance Place programs
Other Software You May NeedPDF Viewer (such as Adobe Reader)
To view or print reports, a PDF viewer (such as Adobe Reader) must be available on the computer or tablet being used.
To install Adobe Reader, use:
The Downloads page (see page 15).
On the bottom of the Reports page, select Get Adobe Reader. You will go to a site where you can download Adobe Reader.
For information on Renaissance Place, see the Renaissance
Place Software Manual or click Help in the software.
A
3MathsFacts in a Flash™Software Manual

Welcome to MathsFacts in a FlashPrograms You Will Use
Tablets
To use tablets with MathsFacts in a Flash, you do not need to download or install an app. You must either connect to your school’s Renaissance Place web address or to your school’s Renaissance Home Connect web address.
See “Checking for the Software You Need (Downloads Page)” on page 15
See “Renaissance Home Connect Web Address (URL)” on page 106
The ability to print from a tablet depends on the type of tablet being used, the type of printer being used and/or the program or system being used to connect the tablet to a printer. For assistance, contact your IT Department/ ICT Support.
NEO 2s and Responders
If you use NEO 2s and/or Responders, the Renaissance Wireless Server Utility must be installed on the computer that the Renaissance Receiver is connected to. This must be done to allow MathsFacts in a Flash to use NEO 2s and Renaissance Responders to communicate with Renaissance Place.
The Renaissance Wireless Server Utility is automatically installed as part of the installation of any of the four programs listed below.
Which of these four programs you use depends on the other software (Accelerated Maths or the 2Know! Toolbar) and hardware (NEO 2 or Responder) your school uses.
For more information, see page 72.
NEO Manager: Download this from www.renlearn.co.uk/neo-2/manuals-and-downloads/
2Know! Toolbar: Download this from www.renlearn.co.uk/neo-2/manuals-and-downloads/
Renaissance Responder Program: Download this from the Downloads page (see page 15).
AccelTest: Available from Renaissance Learning
4MathsFacts in a Flash™Software Manual

Welcome to MathsFacts in a FlashTour of the Home Page
Tour of the Home PageFor more information on the Home page and the program functions that can be accessed from it, see either the Renaissance Place Help or the Renaissance Place Software Manual. To access, select Help or Manuals (as shown below).
If you belong to more than one user group, or are assigned to more than one school, use this drop-down list to change your role (or to log out).
For help, select the ?, then: Select Help to open a
help page related to the software page you’re viewing.
Select Manuals to access all the products’ software manuals.
Select the live support icon to chat with a member of our support staff.
Select the home icon to return to the Home page.
Alerts let you know when there is new information about your software or if it needs administrative attention (for example, a subscription renewal).
The Dashboards and Reporting options give you a way to quickly get an overview of how your school(s) are performing.
Each program used by your school is listed on the Home page. Select a program to see links that allow you to go to specific program features. For in-depth explanations of its program features, see each program’s help or software manual.
Did you know? articles provide information about program functions and resources to help you use the software more effectively.
5MathsFacts in a Flash™Software Manual

Welcome to MathsFacts in a FlashDid You Know?
Did You Know?On the bottom of the Home page, the Did you know? area displays information about program features to help you use the software more effectively. The software will automatically cycle from one topic to the next each time the Home page is refreshed. You can click the left or right arrows A to move through the topics at your own pace, or you can click View All B to go to a new page where all the current topics (and some of the previously featured items) can be seen. For each topic, you can click Learn more C to get more in-depth information about that feature.
AlertsWhen you log in to Renaissance Place, you will see an Alerts area on the bottom of the Home page. You may see one or more alerts, depending on your role:
There are three types of alerts:
General product information : Inform you of new product features or other changes to your software. For example, if the server hosting Renaissance Place for you will be undergoing maintenance, you would be notified in an alert.
Action necessary : You must take specific action in the software. For example, if your product subscription is going to expire in the next 30–90 days, this type of alert will remind you to renew it.
Immediate attention : You must take immediate action. For example, if the terms of the Renaissance Place Licence Agreement change, you will need to agree to the new terms before you can use the software.
Alerts will have whatever links are necessary for you to take action, view more information or dismiss the alert. Licence agreement alerts and subscription alerts require special attention:
Licence agreement alerts: School network administrators and school administrators will be presented with a notice that they must view and accept the terms of the Renaissance Place Licence Agreement. They will be provided with a link to view the licence; on the licence page, they can choose to accept or not accept the agreement.
If an administrator-level user does not accept the agreement within 30 days after the alert first appears, the alert will appear on the Home pages
C
AB
6MathsFacts in a Flash™Software Manual

Welcome to MathsFacts in a FlashTools to Help You With MathsFacts in a Flash
for district staff, school staff and teachers. At least one user per site must agree to the licence agreement.
Subscription alerts: When 90 days remain before your subscription runs out, an alert appears to remind you. This alert can be dismissed, but it will reappear again when the subscription is down to 60 days, then 30, then 15. During this time frame, if your subscription is renewed, Renaissance Learning will enter the new subscription code, and this alert will not reappear until 90 days prior to the end date of the new code (next year).
Tools to Help You With MathsFacts in a FlashThese tools will help you use MathsFacts in a Flash:
Help in the software (see page 7)
Manuals and other documents (see page 9)
Resources (see page 9)
Live Chat Support (see page 9)
Help in the SoftwareClick Help on any MathsFacts in a Flash page for more information. The help looks like the examples below (depending on your screen or window size). Use the Contents (A on the next page), Search B and Related Topics to find the information you need. Use the Other Products option to go to the help for another Renaissance Place product (such as STAR Maths). You can provide feedback if you have comments or questions.
The logo C lets you know that you are in the MathsFacts in a Flash help. If you go to another program’s help, you will see the logo for that program.
To print or email the current help topic, use the links just under the topic title D.
7MathsFacts in a Flash™Software Manual

Welcome to MathsFacts in a FlashTools to Help You With MathsFacts in a Flash
A
A
A
B
B
B
C
C
C
D
D
D
8MathsFacts in a Flash™Software Manual

Welcome to MathsFacts in a FlashTools to Help You With MathsFacts in a Flash
Manuals and Other DocumentsTo find the software manuals and other useful documents, select Manuals in the upper-right corner of any page. (On the Home page, select ?, then Manuals.) The page that opens lists the documents available for the Renaissance Place programs that you have available. For MathFacts in a Flash, you’ll find these documents helpful:
Some of these documents are also available on the Resources page in MathFacts in a Flash. For more information, see page 9.
ResourcesThe MathsFacts in a Flash software contains resources to help you use MathsFacts in a Flash in your classroom.
To find links, research, strategies, techniques and other helpful documents, go to the Home page, select MathsFacts in a Flash, and then select Resources.
Live Chat SupportTo chat with a member of the support staff, select the chat icon on the Home page or Live Chat Support on other pages (as shown to the right). By default, you can access chat from any Renaissance Place page; however, district administrators can set a preference to make it accessible from the Home page only or to turn it off entirely. See the Renaissance Place Software Manual for details.
Document Includes
MathsFacts in a Flash Software Manual
General information about the program Step-by-step instructions for working with the
program
MathsFacts in a Flash Tips for Getting Started
Helpful hints to get you started using the program
Renaissance Place Software Manual
Procedures for managing all school and school network information
Instructions for consolidating data and generating custom reports
2Know! Classroom Response System Installation and Set-up Guide
Provides information about working with Renaissance Receivers and Renaissance Responders
NEO 2 Quick Guide Provides information about working with NEO 2s
9MathsFacts in a Flash™Software Manual

Welcome to MathsFacts in a FlashNeed More Help?
Need More Help? Knowledge Base: For technical support information, search the
Renaissance Learning Knowledge Base on the web: http://support.renaissance.com/techkb/.
Email: In the UK, send questions to [email protected]. In Australia, send questions to [email protected].
Phone: In the UK, call +44(0)20 7184 4000. In Australia, call 1800 467 870.
10MathsFacts in a Flash™Software Manual

Getting Started
Logging In (Personnel)Use these instructions to log in to Renaissance Place, change your password (either by choice or when the software requires it) and access the MathsFacts in a Flash program.
1. In your web browser, go to the URL for Renaissance Place.
2. Select I’m a Teacher/Administrator.
3. Enter your user name and password.
4. Select Log In.
If you are not required to change your password, your Home page opens.
If you are asked to change your password, one of two things has happened. Either your system administrator wants you to change it for security reasons or you have not changed it in a year and the software requires it.
If you have forgotten your user name or password, click Forgot
Your User Name or Password? on the right side of the login page. You can use your email address or security questions to verify your identity and retrieve your user name or reset your password. You can only use this feature if you have previously entered your email address on the Renaissance Place Login Settings page and verified that address. For more information, see the Renaissance Place Software Manual.
11MathsFacts in a Flash™Software Manual

Getting StartedSetup Checklist
Setup ChecklistThe tasks listed below must be performed before you start using MathsFacts in a Flash in your classroom. You may or may not be the one required to do any of these tasks.
Task
Usually Performed By
Where to Find Instructions
School Network School
TeacherAdmin. Staff Admin. Staff
Enter school network information Renaissance Place Software Manual or Renaissance Place help
Add school administrators and school network staff
Add teachers, school staff and students; add parents and guardians, if desired
Add school marking periods
Add courses and classes, assign teachers (designate a lead teacher for each MathsFacts in a Flash class) and enrol students in classes
Get a list of student user names, passwords and PINs
Page 52
Make sure teacher and student computers have the necessary software installed
Page 15
Use the Assignment Book to set a level for each student to work on (this is optional but recommended)
Page 30
Use the Assignment Book to edit the mastery times for the levels you assigned (this is optional)
Page 37
Add benchmarks. This is optional but recommended; you must use benchmarks in order to use Dashboard (see page 133)
Page 157
If you are using tablets in your classroom and/or with Renaissance Home Connect: Be prepared to provide your students with
the web addresses of both Renaissance Place and Renaissance Home Connect.
If you want to print from the tablets, you will need to work with your school’s Technology/Computer Coordinator.
12MathsFacts in a Flash™Software Manual

Getting StartedNavigating the Software
Navigating the SoftwareThe navigation bar at the top of each page shows you where you are in the software, as shown here.
To go back to a previous page, use the links in the navigation bar rather than the web browser’s Back button, which can sometimes give you unexpected results. For example, if you are on the Reports page and want to display the Home page, select Home in the navigation bar.
Working in a Different School YearThe school year that you are working in now is shown to the right of your name in the upper-right section of any Renaissance Place program page.
Changing the school year that you are working in is useful if you are adding information for the next school year or reviewing results from a previous school year.
When you choose to work in a different school year, the change affects you only—not anyone else working in the software. You will continue to work in the school year you have chosen until you log out or until you follow the steps below.
1. On the Home page, click School Years.
2. Click Work in a Different School Year on the School Years page.
3. Click the school year that you want to work in. You will return to your Home page; the new active school year will be shown at the top of the page.
If you choose to work in a past or future school year, the school year that you are working in will be shown in gold A next to the Renaissance Learning logo.
On other pages, you will see a gold bar B toward the top of the page with a message reminding you of the school year you are working in.
Who Can Do This? School network Administrators
School network Staff
School Administrators
School Staff
TeachersLearn more about capabilities on page 167.
Students can only work in the current school year. They
cannot choose to work in another school year.
A
B
13MathsFacts in a Flash™Software Manual

Getting StartedSwitching Roles and Schools
Switching Roles and SchoolsSome people in your school network or school may be assigned more than one role. For example, the librarian may also teach a class.
Renaissance Place keeps track of these multiple roles. You can switch between roles or schools after you log in or any time while you are using the software.
People normally change their user types or location in order to perform tasks in the program that are restricted to specific user groups. If you are trying to perform a task and finding you do not have access, try switching your user type in the drop-down list.
On the Home page, select your user name, then select Change Role. Then, choose the role you want to work as and click Done.
Logging Out and Closing the SoftwareWhen you are finished working in MathsFacts in a Flash, log out to keep your data secure.
1. On the Home page, select your user name, then click Log Out. On other pages, select Log Out in the top-right corner of the page.
2. Close the software by closing your web browser.
You may also see the Change Role option if you have been given
extra capabilities, even if you do not have more than one role in your school or school network. If you have been granted more capabilities and you do not see the links you need, check for the Change Role option and choose the role that applies to the task. For more about capabilities, see page 167.
Automatic logout after 80 minutes. If you do not use any
Renaissance Place product for about 80 minutes, you will automatically be logged out and you will have to log in again when you return to the software.
14MathsFacts in a Flash™Software Manual

Software Requirements
Current RequirementsFor the most up-to-date software, hardware, operating system and browser requirements for Renaissance Place, refer to this document: http://doc.renlearn.com/KMNet/R003777603GF3F7F.pdf.
Checking for the Software You Need (Downloads Page)Many Renaissance Place programs require supporting software programs, such as Adobe Reader to print reports.
The supporting software must be installed on each individual computer used to work with Renaissance Place programs. If some of the software that you need to use Renaissance Place is not installed, or is outdated, you or your students may see messages about the missing software.
There are two ways to go to the Downloads page:
Before logging in, click Check Software Requirements on the Renaissance Place Welcome page A.
After logging in, on the Home page, click Product Administration. Then, on the Product Administration page, below Setup and Maintenance, click Download Supporting Software.
Click Downloads on the left to see which Renaissance Place and third-party downloads are available or required.
For more information about the System, Downloads, and Support tabs, refer to the Renaissance Place Software Manual.
If any programs need to be installed or updated, make sure
you are logged into the computer with the rights or permissions required to install software for all users. If you do not know whether you have those rights at the computer, or if you don't have those rights, contact your school's IT department/ICT support.
A
A
15MathsFacts in a Flash™Software Manual

Getting Ready for a New School Year
Before you start each new school year, you need to check, add, edit and delete information as needed so that your teachers are ready to use Accelerated Reader with their new classes.
Perform these tasks after the previous school year has ended but before the start of the next school year.
Renaissance Place Tasks for the New School YearBefore you get Accelerated Reader ready for the new school year, administrators or other non-teaching staff need to perform these tasks in Renaissance Place. For details, see the Renaissance Place Software Manual.
Add the new school year (must be done by school network administrators or school network staff). When the new school year begins, it will be the year that all users are working in automatically when they log in.
Add the marking periods for each school (used for targets and reports) or copy the marking periods from the previous school year. (If you copy last year’s classes, your class marking periods will also be copied, so you do not need to add the marking periods.)
Add the non-teaching days for each school (used for report calculations) or copy the non-teaching days from the previous school year.
Set reporting periods for Renaissance Place consolidated reports (RP administrator or school administrators only).
If a properly formatted file is available from a student information system, import student, personnel, class and/or course information. You may also be able to import updates to student enrolments and personnel assignments.
Check to see which personnel are in the software and add, edit or delete personnel as needed.
Check to see which students are in the software and add or delete students as needed. You can also transfer students from one school to another, edit student information and edit student characteristics. This is also a good time to check for duplicate students and merge student records if necessary.
Review the course list for each school and add, edit or delete courses as needed.
If you want to use your Renaissance Place programs
during summer school, you should wait to perform these steps. For tips, see Knowledge Base article 7901571 at support.renaissance.com/techkb/techkb/7901571e.asp.
16MathsFacts in a Flash™Software Manual
Getting Ready for a New School YearIT Department/ICT Support Tasks for the New School Year
Copy classes from the previous school year, or add classes to the new school year. (Classes do not carry over from one school year to the next, so you need to add them each year.) Class preference settings will also be copied. Check your school marking periods after copy classes; the dates for copied marking periods may need to be changed.
You must also choose the correct teachers for each class, choose the products the class will use and enrol students in each class.
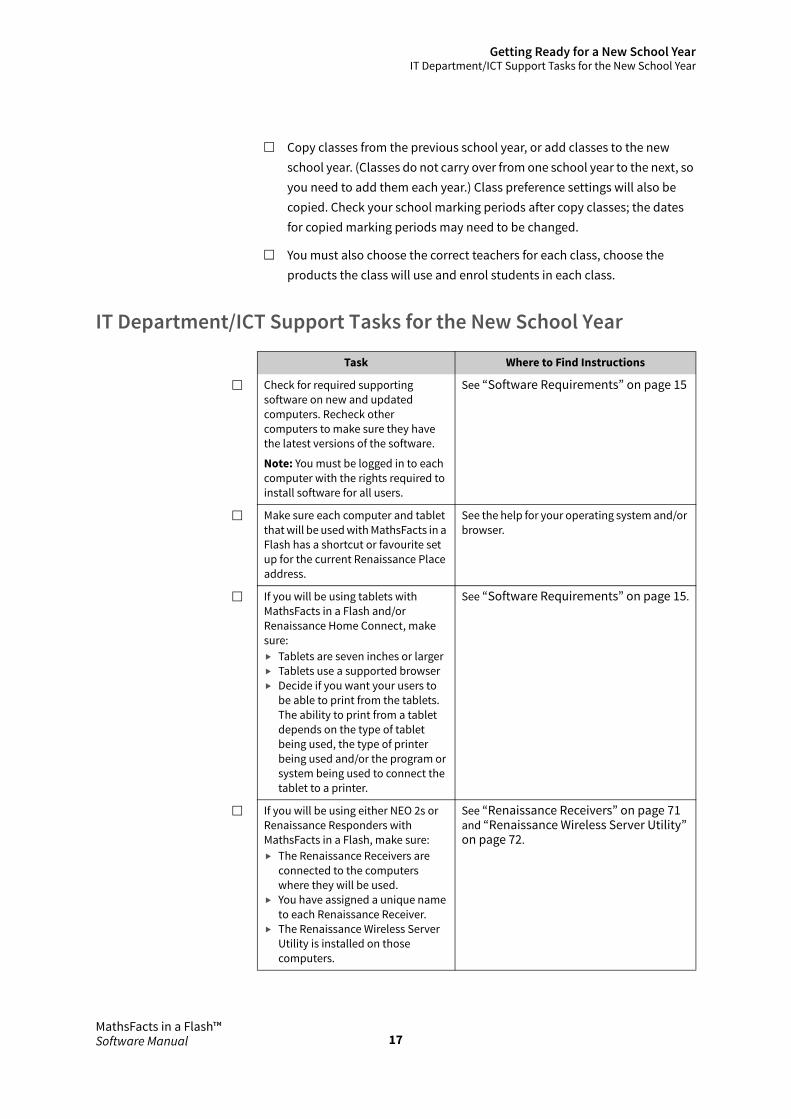
IT Department/ICT Support Tasks for the New School Year
Task Where to Find Instructions
Check for required supporting software on new and updated computers. Recheck other computers to make sure they have the latest versions of the software.
Note: You must be logged in to each computer with the rights required to install software for all users.
See “Software Requirements” on page 15
Make sure each computer and tablet that will be used with MathsFacts in a Flash has a shortcut or favourite set up for the current Renaissance Place address.
See the help for your operating system and/or browser.
If you will be using tablets with MathsFacts in a Flash and/or Renaissance Home Connect, make sure: Tablets are seven inches or larger Tablets use a supported browser Decide if you want your users to
be able to print from the tablets. The ability to print from a tablet depends on the type of tablet being used, the type of printer being used and/or the program or system being used to connect the tablet to a printer.
See “Software Requirements” on page 15.
If you will be using either NEO 2s or Renaissance Responders with MathsFacts in a Flash, make sure: The Renaissance Receivers are
connected to the computers where they will be used.
You have assigned a unique name to each Renaissance Receiver.
The Renaissance Wireless Server Utility is installed on those computers.
See “Renaissance Receivers” on page 71 and “Renaissance Wireless Server Utility” on page 72.
17MathsFacts in a Flash™Software Manual

Getting Ready for a New School YearMathsFacts in a Flash Tasks for the New School Year
MathsFacts in a Flash Tasks for the New School YearThese tasks can be performed by school network administrators, school administrators and teachers.
Task Where to Find Instructions
Complete the Renaissance Place setup tasks and the IT department/ICT Support tasks for the new school year.
See page 16 and page 17.
The Renaissance Place setup tasks need to be completed before you perform the tasks listed below so that your new classes will be available for MathFacts in a Flash.
The IT/ICT Support tasks ensure that your computers and tablets are ready to use with the software.
For each class and/or teacher, get a list of student user names, passwords and PINs).
See page 52.
For each class, check the levels and add or remove levels as needed.
1. On the Home page, select MathsFacts in a Flash, then Assignment Book.
2. If necessary, use the drop-down lists to choose a school and class.
3. To begin viewing the available levels, on the left, select Add/Remove.
For more information, see “Levels” on page 24.
Set starting levels for any students who need to start at a higher level than 1 (Addition of 1, 0).
1. On the Home page, select MathsFacts in a Flash, then Assignment Book.
2. If necessary, use the drop-down lists to choose a school and class.
3. Tick the boxes next to students who need changes.
4. On the left, select Set Level and choose the starting levels.
For more information, see “Setting a Level” on page 30.
Change mastery times for students who need longer or shorter times than two minutes.
1. On the Home page, select MathsFacts in a Flash, then Assignment Book.
2. If necessary, use the drop-down lists to choose a school and class.
3. Tick the boxes next to students who need changes.
4. On the left, select Edit Mastery Time and make your changes.
For more information, see “Editing the Mastery Time for a Level” on page 37.
18MathsFacts in a Flash™Software Manual

Getting Ready for a New School YearMathsFacts in a Flash Tasks for the New School Year
Check preference settings. Since classes do not carry over automatically from one school year to the next, preference settings do not automatically carry over either. You can copy classes and class preference settings from one year to the other. If you do not copy classes and class preference settings, you will need to set preferences for this year’s classes.
1. On the Home page, select MathsFacts in a Flash, then Preferences.
2. If necessary, use the drop-down lists to choose a school and class.
3. To see the settings for a preference (and to make changes if necessary), select the preference name.
For more information, see “Preferences” on page 134.
Check benchmark settings for the school. Administrators (School Network and School) can make changes if necessary.
1. On the Home page, select MathsFacts in a Flash, then Preferences.
2. Select Benchmarks.3. Choose a school from the drop-down list if
necessary.4. Make changes to the target date and year-level
benchmarks as needed.
For more information, see “Benchmarks Preference” on page 157.
If you are using tablets in your classroom and/or with Renaissance Home Connect: Be prepared to provide
your students with the web addresses of both MathsFacts in a Flash Renaissance Place and Renaissance Home Connect.
If you want to print from the tablets, you will need to work with your school’s IT Department/ICT Support.
The ability to print from a tablet depends on the type of tablet being used, the type of printer being use and/or the program or system being used to connect the tablet to a printer.
If you are using Renaissance Home Connect, make sure Renaissance Home Connect is activated for your schools. Print Informational Letters for the parents of your MathsFacts in a Flash students.
A school network administrator must activate Renaissance Home Connect for your schools. For more information, click Help on any Renaissance Home Connect page or see Setting Up Renaissance Home Connect on the Manuals page.
To print Informational Letters, see page 106.
Task Where to Find Instructions
19MathsFacts in a Flash™Software Manual

The Assignment Book
The Assignment Book is where you manage activities, reports and levels within MathsFacts in a Flash.
In the Assignment Book you can:
Assign levels to students (see page 30)
Put levels on hold or reset them (see page 33)
Edit the mastery time for the levels (see page 37)
Remove the levels (see page 42)
Reorder the levels (see page 43)
Copy the level order between your classes (see page 44)
Transfer student data from one class to another (see page 45)
Print flash cards and worksheets (see page 47)
Print reports (see page 122)
View the work completed by a student (see page 23)
Symbols Used in the Assignment BookMany of the pages in the Assignment Book use symbols that represent the working states of the levels. The following table explains the symbols that you will see.
Symbol Name What It Means
Ready to Work
Indicates the level to be worked on next. When a student is enrolled in a MathsFacts in a Flash class, the program automatically sets the first level in the Assignment Book as Ready to Work. Teachers can set a different level for the student. For details, see page 30.
Working The student has completed the baseline test at this level. The student may have also completed one or more practices or tests, but has not yet achieved mastery of the level.
Mastered The student has met the mastery criteria for the level. See page 36 for the criteria.
Hold The teacher has put the level on hold; see page 33. The program will not administer practices or tests to the student at this level until the hold is removed.
20MathsFacts in a Flash™Software Manual

The Assignment BookViewing the Assignment Book for a Class
Viewing the Assignment Book for a ClassEach class has its own Assignment Book. Follow these steps to view an Assignment Book for a specific class.
1. On the Home page, select MathsFacts in a Flash, then Assignment Book.
2. If necessary, use the drop-down lists to select your school and class.
3. To see information about a specific student, select the student’s name G.
For more information about viewing the Student Detail page for a single student, see page 22.
For more information about the student work shown in the Assignment Book, see page 23.
Who Can Do This? School Network Administrator
School Network Staff
School Administrator
School Staff
Teachers
Learn more about capabilities on page 167.
Only results from work the student completes in school
will be displayed. This includes work completed on a computer actively connected to MathsFacts in a Flash RP and the MathsFacts in a Flash RP SmartApplet on NEO 2. Results from practices and tests the student completes using Renaissance Home Connect, Responders or the MathsFacts in a Flash (offline) SmartApplet on NEO 2 will not be displayed in the Assignment Book.
A
B DE
F
C
G
A Use the drop-down lists to choose a school and class.
B The Tests column shows the number of tests the students completed in their current level.
C The Practices column shows the number of practices the students completed in their current level.
D The Last Session column shows the most recent date each student took a practice or test at the current
level. Dates more than three days in the past are in bold.
E The Total Levels Mastered column shows the number of levels the students have mastered.
F The left side of the page lists the tasks you can perform. Some tasks require you to tick the box next to at least one student’s name before selecting the link.
21MathsFacts in a Flash™Software Manual

The Assignment BookStudent Detail Page
Student Detail PageFollow these steps to view MathsFacts in a Flash information about a single student.
1. On the Home page, select MathsFacts in a Flash, then Assignment Book.
2. If necessary, select a school and class from the drop-down lists A.
3. To see information about a specific student, select the student’s name B.
4. The Student Detail page opens.
To choose another student, use the Student drop-down list C.
To exit, on the left side of the page, select Return to Assignment Book D.
Who Can Do This? School Network Administrator
School Network Staff
School Administrator
School Staff
Teachers
Learn more about capabilities on page 167.
A
B
Only results from work the student completes in school
will be displayed. This includes work completed on a computer actively connected to MathsFacts in a Flash RP and the MathsFacts in a Flash RP SmartApplet on NEO 2. Results from practices and tests the student completes using Renaissance Home Connect, Responders or the MathsFacts in a Flash (offline) SmartApplet on NEO 2 will not be displayed in the Assignment Book
D
E
F G I
C
H
E The Level Name column shows the levels that have been assigned to the student.
F The Tests column shows the total number of tests the student completed at each level.
G The Practices column lists the total number of practices the student completed at each level.
H The Last Session column shows the most recent date the student took a practice or test at each level. Dates more than three days in the past are in bold.
I The Mastered Time column shows the student’s mastery time at each level (if the student has mastered the level).
22MathsFacts in a Flash™Software Manual

The Assignment BookStudent Work Shown in the Assignment Book (Online and Offline Work)
Student Work Shown in the Assignment Book (Online and Offline Work)
The Assignment Book shows online work—work that counts toward the mastery of levels.
Some student work is offline—it is simply practice work that the student does outside of school work. This includes:
Work done in Renaissance Home Connect.
Work done on NEO 2 in the MathFacts in a Flash (Offline) SmartApplet (not the RP SmartApplet).
Work done on certain Renaissance Responders or using MathFacts in Flash Offline on newer Renaissance Responders.
See the table below for details.
Offline/practice MathFacts in a Flash work can be tracked in two MathFacts in a Flash reports:
Class Progress Report (see page 125)
Student Record Report (see page 126)
For both reports, teachers can choose to include Practice Summaries, which include students’ offline work.
Program, Hardware, and Firmware Version
Online work that is shown in the
Assignment Book?
MathsFacts in a Flash Renaissance Place
Computer or tablet (see page 50) Yes
NEO 2 Using the MathFacts in a Flash RP SmartApplet (see page 80)
Yes
Using the MathFacts in a Flash (offline) SmartApplet (see page 84)
No
Renaissance Responder
Renaissance Responder using firmware version 2.51 (see page 99)
No
Renaissance Home Connect
Computers or tablets (see page 50) No
Send the history to Renaissance Place, To track the offline work
done using NEO 2 and/or Responder, students must send the history to Renaissance Place. For NEO 2, see page 90. For Responder, see page 103.
23MathsFacts in a Flash™Software Manual

Levels
General Information About LevelsEach level in MathsFacts in a Flash focuses on a different maths skill (or skills). MathsFacts in a Flash levels are ordered by strand according to increasing difficulty.
When students are enrolled in a MathsFacts in a Flash class, the program automatically sets the first level in the Assignment Book as Ready to Work ( ) for the students.
You can set a new level for students at any time; students do not have to master lower levels first. Before your students begin working in the program for the first time, you must determine a starting level for each student, then set the level for each student. After you set a level, the program automatically tracks the progress of the student in the Assignment Book; see page 21.
When a student masters a level, the program automatically marks the student’s next open level as Ready to Work ( ).
You can do the following with students’ levels:
Set levels for a students (see page 30).
Place levels on hold or reset levels (see page 33).
Edit the mastery time for levels (see page 37). For a definition of the mastery criteria, see page 36.
Add or remove levels (see page 42).
Reorder levels (see page 43).
Copy levels from one class to another (see page 44).
Transfer students’ mastered levels from one class to another (see page 45).
Things to Remember About Levels
BenchmarksBenchmarks are levels that students must master by a target date. Administrators (School Network and School) choose the target date and levels. For more information on Benchmarks, see page 157.
24MathsFacts in a Flash™Software Manual

LevelsThings to Remember About Levels
Reorder Levels Before Setting LevelsMathsFacts in a Flash levels are ordered by strand according to increasing difficulty. However, you may want to change the order of the levels to match your instruction.
If you decide to reorder the levels, do this before setting levels for students.
To reorder levels, see page 43.
To set a level for a student, see page 30.
When You Can Set a LevelYou can set a new level for students at any time; students do not have to master lower levels first.
Starting LevelsThe default starting level is level 1. However, it is a good idea to set starting levels according to the ability of each student. As you set MathsFacts in a Flash levels, keep in mind to start students at:
Levels at which they can experience success immediately.
Levels for which they have already received instruction.
The program automatically advances students through higher levels as they master each level.
Experienced or Older StudentsConsider starting experienced or older students at review levels such as Multiplication Review or Division Review to build their automaticity. Or challenge them to achieve shorter time targets at all levels.
Levels and Renaissance Home ConnectIf your students will access MathsFacts in a Flash from home using Renaissance Home Connect (see page 105), be aware that while working in Renaissance Home Connect, students may practice or test at any level, regardless of their assigned level in class. Students use Renaissance Home Connect to practise; they cannot master levels using Renaissance Home Connect.
25MathsFacts in a Flash™Software Manual

LevelsLevel Names
Level NamesThis table shows the MathsFacts Level Names. The information is shown in the default order of the levels.
Level Name
1 Addition of 0 or 1 to a single-digit number
2 Addition to 10
3 Addition of 10 to a two-digit number
4 Subtraction of 0 or 1 from a single-digit number
5 Subtraction from 10
6 Alternate Forms: Subtraction 0, 1, from 10
7 Review Subtraction: Subtraction 0, 1, from 10
8 Multiplication by 0 or 1
9 Multiplication by 2
10 Addition to 20 with a single-digit number
11 Alternate Forms: Addition to 20
12 Review Addition: Addition to 20
13 Addition to 20 with a two-digit number
14 Addition of multiple of 10 to a two-digit number
15 Alternate Forms: Addition to multiples of 10
16 Addition Review 1
17 Addition Review 2
18 Subtraction of 10
19 Subtraction of a multiple of 10
20 Subtraction Review 1
21 Multiplication by 10
22 Alternate Forms: Multiplication by 0, 1, 2, 10
23 Multiplication Review: 0, 1, 2, 10
24 Multiplication by 5
25 Division by 1
26 Division by 2 of an even number to 20
27 Review: Division by 1, 2 to 20
28 Division by 5
26MathsFacts in a Flash™Software Manual

LevelsLevel Names
29 Division by 10
30 Alternate Forms: Division by 1, 2, 5, 10
31 Review: Division by 5, 10
32 Subtraction of single-digit from two-digit number
33 Subtraction of two-digit from two-digit number
34 Alternate Forms: Subtraction up to two-digits
35 Subtraction Review 2
36 Review: +, –
37 Multiplication by 3 or 4
38 Alternate Forms: Multiplication by 3, 4, 5
39 Multiplication Review: 3, 4, 5
40 Multiplication by 6 or 7
41 Division by 3 or 4
42 Division by 6 or 7
43 Alternate Forms: Division by 3, 4, 6
44 Multiplication by 8 or 9
45 Alternate Forms: Multiplication by 6, 7, 8, 9
46 Square of a multiple of 10 to 100
47 Multiplication Review 1
48 Multiplication Review 2
49 Review: +, –, ×
50 Division by 8 or 9
51 Alternate Forms: Division by 7, 8, 9
52 Division Review 1
53 Division Review 2
54 Review: +, –, ×, /
55 Fractions to Decimals
56 Decimals to Fractions
57 Conversion Review
58 Review: +, –, ×, /, conversions
Level Name
27MathsFacts in a Flash™Software Manual

LevelsAvailable Levels
Available LevelsMathsFacts in a Flash has a total of 58 possible levels. By default, all 58 levels are available (on/selected) for a class. To turn levels on or off, see “Adding or Removing Levels” on page 42.
Levels Available to Students (By Program and Hardware)The levels that are available to students vary according to the program and the hardware being used.
Program and Hardware Levels Available to Students
MathsFacts in a Flash Renaissance Place (computer or tablet)
All levels that are assigned to the student (see page 30).
Teachers decide what levels to assign (set) to a student.
Students have to complete the levels in the order set by the teacher.
The teacher can reorder the levels at any time.
Students can master levels in this program.
NEO 2, using the MathsFacts in a Flash RP SmartApplet
All levels that are assigned to the student (see page 30).
Teachers decide what levels to assign (set) to a student.
Students have to complete the levels in the order set by the teacher.
The teacher can reorder the levels at any time.
Students can master levels in this SmartApplet.
NEO 2, using the MathsFacts in a Flash (offline) SmartApplet
All available levels (see page 28).
Students can complete the levels in any order at any time; they do not have to follow the order set by the teacher.
Students cannot master levels using this SmartApplet.
Renaissance Responder (using firmware version 2.51)
Only the levels for addition, subtraction, multiplication and division.
Students can complete the levels in any order at any time.
Students cannot master levels using this hardware. and software
Renaissance Home Connect (computer or tablet)
Any level at any time, regardless of both the level assigned in class and the order of the levels in class.
Students cannot master levels using Renaissance Home Connect.
28MathsFacts in a Flash™Software Manual

LevelsDetermining the Level for a Student
Determining the Level for a StudentThere is no single method for placing students in MathsFacts in a Flash; the program lets you decide.
A resource you may find helpful is Assigning Students to a Level. This document provides a brief overview of assigning levels. To access this resource, on the Home page, select MathsFacts in a Flash, then Resources. Then, select Using MathsFacts in a Flash in the Classroom; in that category, select Assigning Students to a Level.
Many teachers base students’ initial levels on last year’s performance, standardised test data or informal diagnostic strategies.
Here are additional strategies that teachers have used for identifying students’ initial MathsFacts in a Flash levels:
Start all students at the first level and let them work straight through the remaining levels.
This approach allows a high degree of initial success for most students, but it may take some time for students to reach the level where they will make the most growth.
Use STAR Maths data to place students in MathsFacts in a Flash levels.
If you are using STAR Maths, the Diagnostic Report identifies a year-equivalent maths score that can be used in conjunction with MathsFacts in a Flash default benchmarks to approximate initial placement. (For information about benchmarks, see page 157.) The Diagnostic Report also shows where students fit on a continuum of computational skills.
Use printed MathsFacts in a Flash worksheets as a quick diagnostic test.
Print a worksheet from one of the cumulative review levels and give it to students as a timed diagnostic test. This will allow you to observe how quickly students answer the questions and if students appear to be “figuring out” the facts.
Some teachers start by giving the first addition-level review worksheet to all students as a timed test. Those students who were successful on the first test take a teacher-timed test with the next level of review worksheet and so on, until the teacher has found the best level for each student. This method takes more time, but it provides documentation that you may need later when talking with parents about a student’s initial placement.
For information about printing worksheets, see page 48.
Who Can Do This? School Network Administrator
School Network Staff
School Administrator
School Staff
Teachers
Learn more about capabilities on page 167.
29MathsFacts in a Flash™Software Manual

LevelsSetting a Level
Setting a Level
Things to Remember about Setting a Level Review “Levels Available to Students (By Program and Hardware)” on
page 28.
Review the resource Assigning Students to a Level in the MathsFacts in a Flash resources under Using MathsFacts in a Flash in the Classroom.
Reorder the levels before assigning levels to students; see page 43.
The default starting level is level 1.
You can set a new level for students at any time; students do not have to master lower levels first.
Remember to start students at:
Levels at which they can experience success immediately.
Levels for which they have already received instruction.
The program automatically advances students through higher levels as they master each level.
Experienced or older students
Consider starting experienced or older students at review levels such as Multiplication Review or Division Review to build their automaticity. Or challenge them to achieve shorter time targets at all levels.
How to Set a Level Review “Levels Available to Students (By Program and Hardware)” on
page 28.
Review “Things to Remember about Setting a Level” on page 30.
1. View the Assignment Book for the class. For instructions on viewing the Assignment Book, see page 21.
2. Tick the box by each student for whom you need to set a level A.
To select all students in the class, tick the Student box at the top of the column.Even if you choose
multiple students, you can set a different
level for each one.
30MathsFacts in a Flash™Software Manual

LevelsSetting a Level
3. On the left side of the page, below Activities, select Set Level B.
4. The Set Level page opens. It lists the levels available to the student.
Levels may have symbols. Hover your mouse over a symbol to see what it means.
For an explanation of the symbols used in the Assignment Book, see page 20.
5. Follow the steps for the number of students you chose:
One student: See page 32.
More than one student: See page 32.
A
B
The Benchmarks Set for Mastery Table shows the benchmarks
set for your school. For more information, see “Benchmarks Preference” on page 157.
31MathsFacts in a Flash™Software Manual

LevelsSetting a Level
If You Chose One Student1. Find the level you want to assign to this student.
To move through the list, select Next >> or << Previous A.
2. In the Select column, select the circle for the level you prefer B.
3. Select Save C.
If you assign a new level and the student is already working on a level ( ), the program puts the old level on Hold. The student’s work on the old level is not lost when a level is on Hold.
If You Chose More Than One Student1. Find the level you want to assign to each student.
To move through the list, select Next >> or << Previous A.
2. You have two options:
To set all the students you selected at the same level, select the circle by the level number at the top of the column B.
To set a different level for each student you selected, select the circle in the intersection of the column and row for that level and student C. Do this for each student for whom you want to assign a new level.
3. Select Save D.
The Benchmarks Set for Mastery Table shows the benchmarks
set for your school. For more information, see “Benchmarks Preference” on page 157.
A
B
C
If you are not sure which level corresponds to each
number, the program describes each in the list above the table D. (Scroll down to see all the descriptions.)
AB
D
C
D
The Benchmarks Set for Mastery Table shows the benchmarks
set for your school. For more information, see “Benchmarks Preference” on page 157.
32MathsFacts in a Flash™Software Manual

LevelsHolding or Resetting Levels
Holding or Resetting LevelsWhen You Put a Level on Hold
Any work the student may have completed is not lost. If you set the student at that level again (see page 30), the student will be able to resume working where he or she left off.
Here are two examples of when to put a level on hold.
Put a level on hold if a student is struggling with it. When you put that level on hold, the student can work on another level before returning to the one on hold.
Put a level on hold if you want a student to review it later.
When You Reset a Level
The program deletes all the student’s work for that level. Once a level is reset, you cannot get the student’s work back. This can be useful if a student accidentally logs in as a different student and completes work on a level. You can reset the level so the student does not receive credit for work completed by the student who logged in incorrectly.
1. View the Assignment Book for the class. For instructions on viewing the Assignment Book, see page 21.
2. Tick the box by each student for whom you want to put a level on hold or reset a level A.
To choose all the students on the page, tick the Student box in the column heading.
3. On the left side of the page, under Activities, select Hold/Reset B.
4. Your next action depends on the number of students you chose.
One student: see “If You Chose One Student” on page 34.
More than one student: see “If You Chose More than One Student” on page 35.
Who Can Do This? School Network Administrator
School Network Staff
School Administrator
School Staff
Teachers
Learn more about capabilities on page 167.
A
B
33MathsFacts in a Flash™Software Manual

LevelsHolding or Resetting Levels
If You Chose One Student1. Tick the boxes by the levels you want to put on hold or reset A.
To choose all the levels, tick the Select box in the column heading.
2. Select Hold or Reset B.
If you select Hold, the program will put the level on hold. The program automatically takes you back to the Assignment Book page.
If you select Reset, you will see a dialogue box that asks “All data related to the selected level(s) will be deleted. Do you wish to continue?”. To continue, select OK. The program will reset the level(s). The program automatically takes you back to the Assignment Book page.
To cancel, select Cancel. The program does not do anything and you remain on the Hold/Reset Levels page.
Hold or reset? When you reset a level, all the student’s work
on that level is deleted. When you put a level on hold, the student’s work on that level is not deleted.
The Benchmarks Set for Mastery Table shows the benchmarks
set for your school. For more information, see “Benchmarks Preference” on page 157. B
A
34MathsFacts in a Flash™Software Manual

LevelsHolding or Resetting Levels
If You Chose More than One Student1. Tick the boxes by the levels you want to put on hold or reset for each
student A.
To select the same level for all the students, tick the box by the level number at the top of the column.
If you are not sure which level corresponds to each number, the program describes each in the Levels list above the table B. (Scroll down the list to see all the descriptions.)
2. Select Hold or Reset C.
If you select Hold, the program will put the level on hold. The program automatically takes you back to the Assignment Book page.
If you select Reset, you will see a dialogue box that asks “All data related to the selected students and level(s) will be deleted. Do you wish to continue?” To continue, select OK. The program will reset the level(s). The program automatically takes you back to the Assignment Book page.
To cancel, select Cancel. The program does not do anything and you remain on the Hold/Reset Levels page.
Hold or reset? When you reset a level, all the student’s work
on that level is deleted. However, when you put a level on hold, the student’s work on that level is not deleted.
The Benchmarks Set for Mastery Table shows the benchmarks
set for your school. For more information, see “Benchmarks Preference” on page 157.
B
C
A
35MathsFacts in a Flash™Software Manual

LevelsMastery Criteria
Mastery CriteriaEach level has its own set of mastery criteria. The mastery criteria is a set of requirements that students must meet before the program marks the level Mastered.
Students must meet both of the following requirements during a single test to master a level:
100% accuracy
A time score that is at or below the mastery time set for the level
You cannot change the accuracy requirement.
You can change the mastery time. For more information, see “Editing the Mastery Time for a Level” on page 37.
The default mastery time target is two minutes on tests at all levels. You can adjust the mastery time target at each level so that it matches your students’ capabilities.
Research shows that three seconds per fact (two minutes on a 40-problem test) is the benchmark for mastering maths facts in the lower years. Students in their 5th year and above may be able to average two seconds per fact on a 40-problem test.
Reported Time Score vs. Completion TimeIf you measure the total time it takes a student to complete a practice or test session (completion time), you may notice a difference between your time measurement and the reported time score.
The reported time score is the sum of the problem response times, not the overall elapsed time. The program measures only the time it takes a student to respond to a problem. The time required to display the problem and the answer is not included in the reported time score the student receives.
Example: A test that takes the student 3 minutes to complete could have a reported time score of 2 minutes and 20 seconds.
36MathsFacts in a Flash™Software Manual

LevelsEditing the Mastery Time for a Level
Editing the Mastery Time for a LevelYou can change the mastery time for:
individual students and levels or
multiple students at one or more levels
If a student has already worked on a level you are editing, your changes could affect the status of his or her work.
If you increase the mastery time, a student whose time (for completing a test at that level) is now at or below the new mastery time limit will have the status of that level changed to Mastered. No other work will need to be completed.
If you decrease the mastery time, a student whose time (for completing the test at that level) now exceeds the new mastery time limit will have the Mastered state removed. The level will be put on Hold.
1. View the Assignment Book for the class. For instructions on viewing the Assignment Book, see page 21.
2. Tick the box by each student for whom you want to adjust the mastery time A.
To choose all the students on the page, tick the Student box in the column heading.
3. On the left side of the page, under Activities, select Edit Mastery Time B.
4. Your next action depends on the number of students you chose.
One student: see page 38
More than one student: see page 39
Who Can Do This? School Network Administrator
School Network Staff
School Administrator
School Staff
Teachers
Learn more about capabilities on page 167.
If a student has already worked on a level you are editing,
your changes could affect the status of his or her work.
A
B
37MathsFacts in a Flash™Software Manual

LevelsEditing the Mastery Time for a Level
If You Chose One StudentYou have three options:
set the same mastery time for all levels
set the mastery time for one or more individual levels
reset the mastery time to the default for all levels
To set the same mastery time for all levels
1. Type the minutes and seconds in the appropriate blank fields C (at the top of the page).
2. Select Set All D.
If the student you chose has worked in the program and/or has levels on hold, you will see this message: “Changing the mastery time will affect the mastery state for one or more levels.”
To continue, select OK. The program changes the mastery time(s) and you return to the Assignment Book page.
To cancel, select Cancel. The program does not do anything and you remain on the Edit Mastery Time page.
Depending on the time you entered in step 1, you may see this caution: “This Mastery Time Setting is extremely low.”
To continue, select OK. The program changes the mastery time(s) and you return to the Assignment Book page.
To cancel, select Cancel. The program does not do anything and you remain on the Edit Mastery Time page.
To set the mastery time for one or more individual levels
1. Select in the Minutes and Seconds fields for a level.
Delete the existing numbers and type the mastery time you want used for that level F.
Repeat this for each level you want to change.
2. Select Save E.
The Benchmarks Set for Mastery Table shows the benchmarks
set for your school. For more information, see “Benchmarks Preference” on page 157.
D
E
F
C
G
38MathsFacts in a Flash™Software Manual

LevelsEditing the Mastery Time for a Level
If the student you chose has worked in the program and/or has levels on hold, and you are changing the mastery time for one of these levels, you will see this message: “Changing the mastery time will affect the mastery state for one or more levels.”
To continue, select OK. The program changes the mastery time(s) and you return to the Assignment Book page.
To cancel, select Cancel. The program does not do anything and you remain on the Edit Mastery Time page.
Depending on the time you entered in step 1, you may see this caution: “This Mastery Time Setting is extremely low.”
To continue, select OK. The program changes the mastery time(s) and you return to the Assignment Book page.
To cancel, select Cancel. The program does not do anything and you remain on the Edit Mastery Time page.
To reset default mastery time to the default for all levels
1. To reset the mastery time to the default for all levels, select Default G.
The default is two minutes and zero seconds.
If the student you chose has worked in the program and/or has levels on hold, you will see this message: “Changing the mastery time will affect the mastery state for one or more levels.”
To continue, select OK. The program changes the mastery time(s) and you return to the Assignment Book page.
To cancel, select Cancel. The program does not do anything and you remain on the Edit Mastery Time page.
If You Chose More Than One Student
To set the mastery time for one or more individual levels
1. Tick the boxes in the intersection of a level and a student for the levels you want to change A. Make sure all the levels you choose can share the same mastery time.
To select the same level for all the students, tick the box by the level number in the column heading B.
If you are not sure which level corresponds to each number, the program describes each in the Levels list above the table C. (Scroll down to see all the descriptions.)
2. Type the time you want to use (for the students and levels you chose) in the blank Minutes and Seconds fields D.
3. Select Set Time E.
You can go back to the default time of two minutes for all the
students and levels by selecting Default.
The Benchmarks Set for Mastery Table shows the benchmarks
set for your school. For more information, see “Benchmarks Preference” on page 157.
39MathsFacts in a Flash™Software Manual

LevelsEditing the Mastery Time for a Level
If the students you have chosen have worked in the program and/or have levels on hold, you will see this message: “Changing the mastery time will affect the mastery state for some students. This change also overrides individual student time targets.”
To continue, select OK. The program changes the mastery time(s) and you return to the Assignment Book page.
To cancel, select Cancel. The program does not do anything and you remain on the Edit Mastery Time page.
Depending on the time you entered in step 1, you may see this caution: “This Mastery Time Setting is extremely low.”
To continue, select OK. The program changes the mastery time(s) and you return to the Assignment Book page.
To cancel, select Esc. The program does not do anything and you remain on the Edit Mastery Time page.
4. Repeat these steps for each mastery time you want to change.
A
B
DE
C
F
40MathsFacts in a Flash™Software Manual

LevelsEditing the Mastery Time for a Level
To reset default mastery time to the default for all levels
1. Tick the boxes in the intersection of a level and a student for the levels you want to change A. Make sure all the levels you choose can share the same mastery time.
To select the same level for all the students, tick the box by the level number in the column heading B.
If you are not sure which level corresponds to each number, the program describes each in the Levels list above the table C. (Scroll down to see all the descriptions.)
2. To reset the mastery time to the default for the levels you selected, select Default F.
The default is two minutes and zero seconds.
If the students you have chosen have worked in the program and/or have levels on hold, you will see this message: “Changing the mastery time will affect the mastery state for some students. This change also overrides individual student time targets.”
To continue, select OK. The program changes the mastery time(s) and you return to the Assignment Book page.
To cancel, select Cancel. The program does not do anything and you remain on the Edit Mastery Time page.
41MathsFacts in a Flash™Software Manual

LevelsAdding or Removing Levels
Adding or Removing LevelsAll the MathsFacts in a Flash levels were installed with the software. If you do not need some of the levels for your class, you can remove them. If you need the levels later, you can add them again so they are available to your class.
You cannot remove a level that any of your students are currently working on (any level that has the Working symbol [ ] displayed next to it).
If you remove a level, all completed student work on the level is lost, as well as any changes you have made to the level’s mastery time.
1. View the Assignment Book for the class for which you need to add or remove levels. For instructions on viewing the Assignment book, see page 21.
2. On the left side of the page, under Manage Levels, select Add/Remove A.
3. Make changes on the Add/Remove Level page as described below.
To add a level, tick the box by it B.
To remove a level, clear the tick mark C.
To select all the levels on the page, in the column heading, tick the Select box D.
4. Select Save E.
Who Can Do This? School Network Administrator
School Network Staff
School Administrator
School Staff
Teachers
Learn more about capabilities on page 167.
A
The Benchmarks Set for Mastery Table shows the benchmarks
set for your school. For more information, see “Benchmarks Preference” on page 157.
B
D
E
C
42MathsFacts in a Flash™Software Manual

LevelsReordering Levels
Reordering Levels1. View the Assignment Book for the class for which you need to reorder
levels. For instructions on viewing the Assignment book, see page 21.
2. On the left side of the page, below Manage Levels, select Reorder A.
3. Tick the boxes by the levels that you want to move B.
You can choose one or more levels.
To move the level up or down one or more positions in the list, type the number of positions you want the level moved in the blank field next to the appropriate button C. Then, select Move Up or Move Down.
To move the level to a specific position in the list, type the desired position in the blank field next to the Move To button D. If you chose more than one level, this will be the position of the first one (numerically) that you chose. Then, select Move To.
To return all the levels to the order they were in when the software was installed, select Default E. The Original Order column shows the original order that the levels were installed in.
4. Select Save.
Who Can Do This? School Network Administrator
School Network Staff
School Administrator
School Staff
Teachers
Learn more about capabilities on page 167.
A
The Benchmarks Set for Mastery Table shows the benchmarks
set for your school. For more information, see “Benchmarks Preference” on page 157.
B
D
E
C
43MathsFacts in a Flash™Software Manual

LevelsCopying Levels Between Classes
Copying Levels Between ClassesWhen you copy levels between classes, the available levels and the order they are in are copied.
To add or remove levels, see page 42.
To change the order of levels, see page 43.
Levels that are in the class you are copying from, but not in the class you are copying into, will be added to the “into” class.
Levels that are in the class you are copying into, but not in the class you are copying from, will be removed from the “into” class. The students’ work, including Mastered states, is deleted on the levels that will be removed.
1. View the Assignment Book for the class you need to copy levels into.
For instructions on viewing the Assignment book, see page 21.
2. On the left side of the page, under Manage Levels, select Copy Levels A,.
3. The Copy Levels page opens.
Select the class that you want to copy the levels from; use the Class drop-down list B.
4. To see the levels and the order they are in for the class you chose to copy from, select View C.
Who Can Do This? School Network Administrator
School Network Staff
School Administrator
School Staff
Teachers
Learn more about capabilities on page 167.
A
B
D
C
The program will not allow you to copy levels if doing so
will remove a level that at least one student is actively working on.
44MathsFacts in a Flash™Software Manual

LevelsTransferring Student Data from One Class to Another
5. Select Copy D. You may see a message telling you that levels will be removed and all student work on those levels will be deleted. To continue copying the levels, select OK.
Transferring Student Data from One Class to AnotherAt times, you may want to transfer a student’s history of mastered levels from one class to another.
For example: As students move from one year to the next, you may want information on the levels they have already mastered available in their new MathsFacts in a Flash class.
1. View the Assignment Book for the class that you need to transfer student data into. For instructions on viewing the Assignment book, see page 21.
2. To select one or more students, tick the box by the students who need their mastered levels transferred into the class A.
To choose all the students, tick the Student box in the column heading.
3. On the left side of the page, below Other, select Transfer Student Data B.
4. Tick the box by each class from which you want to transfer the data C.
5. Select Transfer D.
Who Can Do This? School Network Administrator
School Network Staff
School Administrator
School Staff
Teachers
Learn more about capabilities on page 167.
A
B
What data will be transferred? Only data on the levels that
a student has mastered can be transferred. The data can only be transferred from classes that are no longer active.
D
C
45MathsFacts in a Flash™Software Manual

Practice Materials for Students
Description of Practice MaterialsMathsFacts in a Flash offers flash cards, worksheets and charts you can print and reproduce for your students to use at school or to send home with them for additional practice.
This table explains each of the practice materials:
Name Description
Adding 2 Numbers up to 10 Chart
This chart can help students practise and learn their addition facts from 0 + 10 to 10 + 10.
Count in Fours Worksheet
This worksheet can help students practise and learn to count in fours from 4 to 100.
Count in Threes Worksheet
This worksheet can help students practise and learn to count in threes from 3 to 99.
Even Numbers Worksheet
This worksheet can help students practise and learn the even numbers from 2 to 100.
Hundred Chart This chart lists all the numbers from 1 through 100. It makes it easy for students to learn number sequences from 1 to 100.
Level Practice Flash Cards
These are flash cards from a level you choose. Students can cut the flash cards apart and use them to practise their maths facts. Every time you generate the flash cards, the problems will be presented in a random order.
Level Practice Worksheet
This is a worksheet with maths problems from a level you choose. You can also choose whether the problems are presented in a vertical or horizontal format. Every time you generate a worksheet, the problems will be presented in a random order.
Multiplication Square (to 12) Chart
This chart can help students practise and learn their multiplication facts from 0 × 0 to 12 × 12.
Odd Numbers Worksheet
This worksheet can help students practise and learn the odd numbers from 1 to 99.
Random Numbers Worksheet
This chart lists numbers from 1 to 100 with random numbers missing. It can help your students learn number sequences from 1 to 100. Every time you generate this worksheet, it will have different numbers missing.
46MathsFacts in a Flash™Software Manual

Practice Materials for StudentsPrinting Practice Materials
Printing Practice Materials
Printing All Materials (Except the Level Practice Worksheet and Flash Cards)1. View the Assignment Book for any class.
For instructions on viewing the Assignment book, see page 21.
2. On the left side of the page, below Activities, select Print Practice A.
3. To print any of the practice worksheets or charts (except the Level Practice Worksheet and the Level Practice Flash Cards), select the item’s name B.
To print the Level Practice Worksheet, see page 48.
To print the Level Practice Flash cards, see page 49.
4. The item you chose generates. It opens in a PDF viewer (such as Adobe Reader) within a browser window or a separate window.
If it opens in a browser window, to save, print or email it, use the PDF viewer buttons. If you try to use the browser’s print function instead, only the top of the page will print. (In Adobe Reader X or XI, the Adobe Reader buttons may be hidden until you move the mouse over the bottom center of the document or press F8.)
Who Can Do This? School Network Administrator
School Network Staff
School Administrator
School Staff
Teachers
Learn more about capabilities on page 167.
A
B
47MathsFacts in a Flash™Software Manual

Practice Materials for StudentsPrinting Practice Materials
Printing the Level Practice Worksheet1. View the Assignment Book for any class.
For instructions on viewing the Assignment Book, see page 21.
2. On the left side of the page, below Activities, select Print Practice. The Print Practice page opens.
3. Select the Level drop-down list and choose a level A.
4. Use the second drop-down list to choose the number of problems (10, 20, 30 or 40) and the format (horizontal or vertical) B.
5. By default, the Include a Number Lines when applicable box C is ticked. If you do not want to include number lines, remove the tick mark.
6. Select Level Practice Worksheet D.
7. The item generates.
It opens in a PDF viewer (such as Adobe Reader) within a browser window or a separate window.
If it opens in a browser window, to save, print or email it, use the PDF viewer buttons. If you try to use the browser’s print function instead, only the top of the page will print. (In Adobe Reader X or XI, the Adobe Reader buttons may be hidden until you move the mouse over the bottom center of the document or press F8.)
Who Can Do This? School Network Administrator
School Network Staff
School Administrator
School Staff
Teachers
Learn more about capabilities on page 167.
AB
DC
48MathsFacts in a Flash™Software Manual

Practice Materials for StudentsPrinting Practice Materials
Printing the Level Practice Flash Cards1. View the Assignment Book for any class.
For instructions on viewing the Assignment book, see page 21.
2. On the left side of the page, below Activities, select Print Practice.
3. Select the Level drop-down list and choose a level A.
4. Select Level Practice Flash Cards B.
5. The item generates.
It opens in a PDF viewer (such as Adobe Reader) within a browser window or a separate window.
If it opens in a browser window, to save, print or email it, use the PDF viewer buttons. If you try to use the browser’s print function instead, only the top of the page will print. (In Adobe Reader X or XI, the Adobe Reader buttons may be hidden until you move the mouse over the bottom center of the document or press F8.)
Who Can Do This? School Network Administrator
School Network Staff
School Administrator
School Staff
Teachers
Learn more about capabilities on page 167.
AB
49MathsFacts in a Flash™Software Manual

MathsFacts in a Flash RP (for Students)
After you assign maths levels to students, the students log into MathsFacts in a Flash RP and complete practices and tests.
This section explains how students log in and use MathsFacts in a Flash RP on a computer or tablet.
For information on how students work with MathsFacts in a Flash and:
NEO 2s: see page 77
Renaissance Responders: see page 91
Renaissance Home Connect: see page 105
What You Need to Do Before Students Practise or Test Add students to the database and enrol them in MathsFacts in a Flash
classes.
To add students, create MathsFacts in a Flash classes, and enrol students in those classes, refer to either the Help or the Renaissance Place Software Manual.
Check the software installed on each computer that students will use.
To check each computer and install the necessary software, on the Login page, select Check Software Requirements. See page 15. For information about other software you may need, see page 3.
Make sure the students know their user names, passwords and PINs; see page 52.
Know how to unlock student accounts.Locked accounts can be unlocked manually by teachers and other personnel. Locked accounts are also automatically unlocked at midnight. See page 171.
If your students will be using tablets, see page 69.
50MathsFacts in a Flash™Software Manual

MathsFacts in a Flash RP (for Students)How Students Log In
How Students Log InNote: User names and passwords are not case-sensitive. However, if the CAPS LOCK key is engaged, pupils may experience problems logging in (symbols may be substituted for numbers).
1. Start the web browser and go to the Renaissance Place address (URL).
2. On the welcome page, select I am a Student. The Student log in page opens.
3. The student enters his or her user name and password, and then selects Log In.
When Students Forget Their User Names or Passwords
Find User NameWhen logging in on a computer or tablet, students who do not know their user names can select Forgot Your User Name? The software will ask the student to choose the school and search for his or her name; then it will fill in the user name. Students cannot search for their passwords.
The ability to find user names is a security option for students in the Renaissance Place Product Administration options. This security option can be turned on or off.
If the Forgot Your User Name? link is not visible, contact your administrator.
To access this security option:
1. On the Home page, select Product Administration.
2. Under Access and Security, select Set Security Options for Students.
51MathsFacts in a Flash™Software Manual

MathsFacts in a Flash RP (for Students)How to Change Student User Names and Passwords
3. In the row for Provide Student Login Assistance, select Show the “Did you forget your user name...” option.
4. Change the setting and select Save.
List of Student User Names, Passwords and PINs
To get a list of student user names, passwords and PINs through Renaissance Place:
1. On the Home page, select Users.
2. On the Personnel and Students page, select View Students.
3. Use the search fields to choose the students to search for.
4. Select Search.
5. If results are found, select the Passwords tab.
This tab lists each student’s ID, year, user name, password and NEO 2 or Responder PIN.
If the list of search results is long, it will be split into multiple pages. Select to go to the next page of results or to go back. You can also select to go
to the last page of results or to go back to the first page.
To print the page of search results that you are viewing, select Print Page. If you have more than 50 results, only the page of results that you are viewing will print.
To print all of the search results (and choose grouping and sorting options):
a. Select View PDF.
b. Choose the options you prefer. Select View Report.
c. When the list opens, to save or print it, use the Adobe Reader buttons. If you use the browser’s print function, only the top of the page will print. In Adobe Reader X or XI, the Adobe Reader buttons may be hidden until you move the mouse over the bottom center of the document or press F8.
The ability to print from a tablet depends on the type of tablet being used, the type of printer being used and/or the program or system being used to connect the tablet to a printer. For assistance, contact your school’s IT Department/ICT Support.
How to Change Student User Names and PasswordsAn administrator can change the assigned user name and/or password by editing the student’s information in Renaissance Place. You can also choose to require the student to edit his or her password after logging in the next time. For more information, refer to the help or the Renaissance Place Software Manual.
52MathsFacts in a Flash™Software Manual
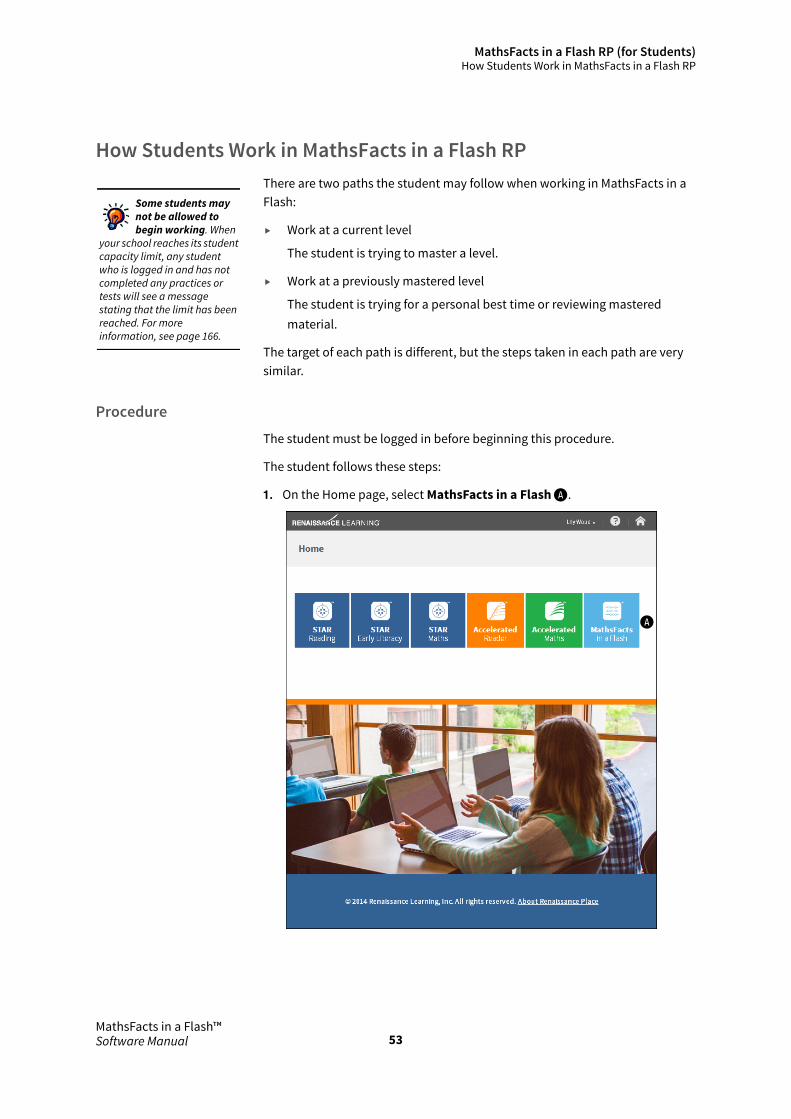
MathsFacts in a Flash RP (for Students)How Students Work in MathsFacts in a Flash RP
How Students Work in MathsFacts in a Flash RPThere are two paths the student may follow when working in MathsFacts in a Flash:
Work at a current level
The student is trying to master a level.
Work at a previously mastered level
The student is trying for a personal best time or reviewing mastered material.
The target of each path is different, but the steps taken in each path are very similar.
ProcedureThe student must be logged in before beginning this procedure.
The student follows these steps:
1. On the Home page, select MathsFacts in a Flash A.
Some students may not be allowed to begin working. When
your school reaches its student capacity limit, any student who is logged in and has not completed any practices or tests will see a message stating that the limit has been reached. For more information, see page 166.
A
53MathsFacts in a Flash™Software Manual

MathsFacts in a Flash RP (for Students)How Students Work in MathsFacts in a Flash RP
2. If you are enrolled in more than one MathsFacts in a Flash class, you must choose a class to work in.
Select the class name B.
3. You must choose the type of work to do: current level C or previously mastered level D.
If you have not mastered a level yet, you will see the message: “You have no work at a previously mastered level.* For assistance, see your Teacher (if necessary) E.
4. What you do next depends on the type of work selected (work at the current level or work at a previously mastered level).
When working at the current level (you are trying to master a level)
1. Select Practice or Test.
If you are testing, select Start Test.
2. Take the practice or test.
Teachers: For an example of what the student will see, see page 58.
When working at a previously mastered level (you are trying for a personal best time on a previously mastered level)
1. Select the appropriate level.
2. Select Challenge.
Take the test.
Teachers: For an example of what the student will see, see page 61.
B
C
D
E
A baseline test is the first test taken at a level.
54MathsFacts in a Flash™Software Manual

MathsFacts in a Flash RP (for Students)How Students Work in MathsFacts in a Flash RP
5. When you have finished a practice or test, one thing will happen automatically and you will also have two choices.
What Happens Automatically
You see a screen with results and targets.
Problems you got wrong are also shown. This lets you review the correct answer. See page 59.
You master a level when you answer all of the problems correctly and you meet or beat the mastery time (the default mastery time is 2 minutes). See page 60.
To view your TOPS report, select TOPS.
Next, to print your TOPS report, select Print.
Choices
You can either continue working or you can stop working.
To continue working
Note: Depending on the results of your practice or test, you will see one or more of these options.
To complete practice problems for the current level, select Practice.
To complete a test for the current level, select Test.
To try for a personal best time, select Challenge.
To begin work on mastering the next available level, select Next Level.
To continue working at the current level, select Try Again.
Use this to improve accuracy and/or time.
If you have met all of the Time Targets for this level (see page 125), Try Again will not be shown.
To work with a previously mastered level, select New Target.
Use this to improve your personal best time and to review information.
To stop working
If you have finished working, select Exit. The program returns to the page where you can select the type of work to do.
In the upper-right corner., select Log Out.
To change the mastery time, see page 37.
55MathsFacts in a Flash™Software Manual

MathsFacts in a Flash RP (for Students)How Students Work in MathsFacts in a Flash RP
Instructions to Students (Text Only)
How to Take Practices and Tests
1. After you log in, you will see your Home page. Select Start Working under MathsFacts in a Flash.
2. If you are enrolled in more than one MathsFacts in a Flash class, you must choose
a class to work in. Select the class name.
3. Use the next screen to make the following choices:
Choose the type of work you want to do.
To practise or test to master a level, select Work at your current level.
To try for a personal best time on a level you have already mastered, select Work at a previously mastered level.
4. What you do next depends on what type of work you picked.
Work at your current level:
You are trying to master this level.
Select Practice or Test. If you are testing, select Start Test. Take the practice or test.
Work at a previously mastered level:
You are trying for a personal best time on a level you have already mastered.
Select the level you want to work with.
Select Challenge.
Take the test.
5. When you finish a practice or test:
You will see a screen with your results and targets.
The screen includes the problems you got wrong so you can review the correct answers.
To view your TOPS report, select TOPS.
Next, to print your TOPS report, select Print.
If you have finished working, select Exit.
You will return to the page where you select the type of work you want to do.
To exit MathsFacts, select Logout (in the upper-right corner).
If you want to keep working:
To work on mastering the next available level, select Next Level.
To continue working at the current level, select Try Again. Use this to improve your
accuracy and/or your time.
To work with a level you have already mastered, select New Target. Use this to improve your time and to review.
56MathsFacts in a Flash™Software Manual

MathsFacts in a Flash RP (for Students)How Students Work in MathsFacts in a Flash RP
When you are testing or practicing
The screen shows your name, whether you are taking a practice or a test and a count showing what problem you are on out of the total number of problems.
As each problem is displayed, choose an answer. You cannot skip a problem.
Your teacher decides how you answer problems. You will usually use your mouse to select on the answer.
To choose an answer, you can:
use your mouse to select the answer
use the arrow keys
type the letter of the answer
type the answer itself
When you have selected or entered your answer, press Enter or return.
During tests, select < Back at the bottom of the screen to go back one problem and choose a different answer.
You can only go back one problem.
During practices, if you choose a wrong answer, the program draws an X over the wrong answer and circles the correct answer.
The same problem is shown to you again. This gives you a chance to answer the problem correctly and remember the correct answer.
If you see a clock flashing on the screen, it means that the time is almost up (either for the current problem or for the entire practice or test). You should choose an answer quickly.
Tests always have 40 problems.
Practices are at least 20 problems long, but they may be longer.
How to Take Practices and Tests
57MathsFacts in a Flash™Software Manual

MathsFacts in a Flash RP (for Students)How Students Work in MathsFacts in a Flash RP
Work at a Current Level (Practising and Testing)
What You See While Testing
A You should see your name here. If you do not, ask your teacher for help.
B This tells you how to choose an answer.
Computer
If you are answering multiple choice questions, with no shortcut keys defined, you will see: Use the or keys to select the answer, then press Enter.
If you are answering multiple choice questions, with shortcut keys defined, you will see: Use the or keys or press x, y, z to select the answer, then press Enter. (x, y, z will be the defined shortcut keys.)
If you are answering free response questions, you will see: Type your answer, then press Enter.
Tablet
Tap your answer choice.
C This tells you whether you are taking a test or a practice.
D During tests, you can go back and change your answer to the previous problem by selecting Back. You can only go back one problem. The additional time it takes you to answer the problem the second time will be
added to the total time for the test. You can still master the level if the total time is equal to or less than the
mastery time target for that level. You cannot go back to the previous problem during practices.
E This tells you which problem you are on and the total number of problems in the test. Note: Tests have 40 problems; practices have at least 20.
F A clock flashes in the upper-right corner if the time limit is almost up.
G To stop a test before you have finished the test, select Stop Test . To stop a practice before you have finished the practice, select Stop Practice.
A
C D E
F
B
G
58MathsFacts in a Flash™Software Manual

MathsFacts in a Flash RP (for Students)How Students Work in MathsFacts in a Flash RP
Test Results: Wrong Answers
The results of the test show your actual test time and accuracy A compared to the targets for time and accuracy B.
To view your TOPS report, select TOPS C.
To master a level, you must achieve 100% accuracy and meet or beat the mastery time (the default mastery time is 2 minutes).
When you do not master a level, you can
Practise problems at this level. Select Practice D.
Test at this level. Select Test E.
Note: Usually, you have to practise if you fail the first test for a level.
Teachers: See page 136 for information about the Mandatory Practice Preference.
If you have finished working, select Exit F.
The program returns to the page where you can select the type of work to do.
Select Log Out (in the upper-right corner).
F D E
A B
C
59MathsFacts in a Flash™Software Manual

MathsFacts in a Flash RP (for Students)How Students Work in MathsFacts in a Flash RP
Test Results: Master a Level
The results of the test show your actual test time and accuracy A compared to the targets for time and accuracy B.
To view your TOPS report, select TOPS C.
To master a level, you must achieve 100% accuracy and meet or beat the mastery time (the default mastery time is 2 minutes).
When you master a level, you have four options.
1. You can try for a faster time at the same level.
Select Try Again D.
If you have met all of the Time Targets (see page 149) for this level, you will not see Try Again.
2. You can try for a faster time (see page 149) on a different level.
Select New Target E.
3. You can move on to the next level.
Select Next Level F.
4. You can stop working.
If you have finished working, select Exit G.
The program returns to the page where you can select the type of work you want to do.
Select Log Out (in the upper-right corner).
G
D E
A B
F
C
60MathsFacts in a Flash™Software Manual

MathsFacts in a Flash RP (for Students)How Students Work in MathsFacts in a Flash RP
Work at a Previously Mastered Level (Best Times)You must master a level before you can try for a personal best time (challenge). When you work at a previously mastered level, you can try for a personal best time (challenge). Trying for a personal best time does not affect the mastered status of a level.
When you choose to work at a previously mastered level, you are:
Trying for a personal best time or
Reviewing mastered material
Reports with Best Times Information
These reports contain information about Best Times:
TOPS Report (see page 127)
When you achieve a personal best time, the TOPS report will include the best time, date of the best time and a congratulatory message.
Student Record Report (see page 126)
The Student Record Report shows the best time and the date the best time was achieved for each mastered level.
Note: The best time will have the same date and time as the mastered time unless the student challenges it and achieves a faster time.
Parent Report (see page 125)
The Parent Report shows the best time and the date the best time was achieved for each mastered level.
Note: The best time will have the same date and time as the mastered time unless the student challenges it and achieves a faster time.
How to Try for a Best Time
The student follows these steps:
1. You are logged in, working in MathsFacts in a Flash and have chosen to work at a previously mastered level. See page 51.
You see a list of all of the levels you have mastered.
If all Time Targets are achieved for a level, the program will show “--” in the New Time Target column.
2. Select the level to work on A.
61MathsFacts in a Flash™Software Manual

MathsFacts in a Flash RP (for Students)How Students Work in MathsFacts in a Flash RP
3. Select Challenge B.
4. Take the test.
There are three possible results:
Wrong answers (you did not achieve 100% accuracy)
Time did not improve
Time did improve
5. When the test is completed, you see a page with results and targets.
A
B
F
D EC
62MathsFacts in a Flash™Software Manual

MathsFacts in a Flash RP (for Students)Things to Remember When Practising and Testing
To view your TOPS report, select TOPS C.
To continue working:
Note: You will see one or more of these options, depending on the results of the challenge.
To continue working at the current level, select Try Again D. Use this to improve accuracy and/or time. If you have met all of the Time Targets (see page 125) for this level, Try Again will not be shown.
To work with a different previously mastered level, select New Target E. Use this for review and/or to improve your personal best time.
If you have finished working, select Exit F.
The program returns to the page where the you can select the type of work you want to do.
Select Log Out in the upper-right corner.
Things to Remember When Practising and Testing
Stopping a Practice or TestNote: Stopped practices and tests cannot be resumed.
There are three things that you should consider when stopping a practice or test.
Effect of the Authorisation Password Preference
Depending on the setting in the Authorisation Password Preference (see page 137), you may be asked to enter the authorisation password to confirm that you want to stop the practice or test. For more information, see “Table of Stopped Practices and Tests (Authorisation Password and Saved in History Information)” on page 65.
How to stop the practice or test
How you stop a practice or test varies according to the program, hardware and firmware version you are using. See the table (below).
Is the stopped practice or test saved in history?
Stopped practices and tests may or may not be saved in the practice/test history (tracked in reports and the student details information). For more information, see “Tracking Stopped Practices and Tests” on page 64.
63MathsFacts in a Flash™Software Manual

MathsFacts in a Flash RP (for Students)Things to Remember When Practising and Testing
How to Stop a Practice or Test
Tracking Stopped Practices and Tests
Stopped practices and tests are not saved in the practice/test history for
NEO 2s, using the MathsFacts in a Flash (offline) SmartApplet
Offline MathsFacts in a Flash work completed on Responders
Original Responder (RES-1001), using firmware version 2.51
Stopped practices and tests may or may not be shown in the Assignment Book and reports (Class Progress, see page 125; Student Progress, see page 126; and Student Record, see page 126), depending on the hardware and software used to take the practice or test.
Stopped practices and tests that are shown in the Assignment Book and reports:
MathsFacts in a Flash Renaissance Place (see page 50).
NEO 2 using the MathsFacts in a Flash RP SmartApplet (see page 80).
The Assignment Book (page 20), Class Progress Report (page 125) and Student Record Report (page 126) track both completed and stopped practices and tests. These reports do not distinguish between completed and stopped work. Example: A student completes two tests, two practices and stops while taking a third test. The Assignment Book, Class Progress Report and Student Record Report would all show 3 tests and 2 practices.
To stop a practice or test after it has started in/on: Do this:
MathsFacts in a Flash Renaissance Place (see page 50)
Computer using Windows Press Ctrl+A
Select Stop Test.
Select Stop Practice.
Computer using Macintosh Press control+A
Select Stop Test.
Select Stop Practice.
Tablet Select Stop Test.
Select Stop Practice.
NEO 2 Using the MathsFacts in a Flash RP SmartApplet (see page 80)
Press ctrl+A or /cmd+A
Using the MathsFacts in a Flash (offline) SmartApplet (see page 84)
Press applets
Responder Original Responder using firmware version 2.51 (see page 91)
Press Menu
Renaissance Home Connect (see page 105)
Computer using Windows Press Ctrl+A
Computer using Macintosh Press control+A
Tablet Tap x (close the window)
64MathsFacts in a Flash™Software Manual

MathsFacts in a Flash RP (for Students)Things to Remember When Practising and Testing
The Student Progress Report (page 126) identifies stopped practices and tests with an asterisk and footnote on the bar chart page.
Stopped practices and tests that are not shown in the Assignment Book and reports:
NEO 2 using the MathsFacts (offline) SmartApplet (see page 84)
Responders (see page 91)
Renaissance Home Connect (see page 105)
Table of Stopped Practices and Tests (Authorisation Password and Saved in History Information)
Cannot Skip ProblemsStudents cannot skip problems. As each problem is presented, the student must choose an answer.
What Students See is Determined by PreferencesMandatory Practice Preference: Determines if students must practice after failing the first test at a level. See page 136.
Problem Format Preference: Determines the format (horizontal, vertical or combination) of test problems. See page 139.
Time Targets Preference: Determines if students will meet additional time targets (after a level is mastered). See page 149.
Program, Hardware and Firmware Version
Affected by the
Authorisation Password Preference?
Is the stopped
practice or test saved in
history?
MathsFacts in a Flash Renaissance Place
Computer (see page 50) Yes Yes
Tablet (see page 69) No Yes
NEO 2 Using the MathsFacts in a Flash RP SmartApplet (see page 80)
Yes Yes
Using the MathsFacts in a Flash (offline) SmartApplet (see page 84)
No No
Responder Original Responder (RES-1001), using firmware version 2.xx (see page 99)
No No
Renaissance Home Connect
Computer or tablet (see page 105) No No
65MathsFacts in a Flash™Software Manual

MathsFacts in a Flash RP (for Students)Things to Remember When Practising and Testing
How Students Answer QuestionsHow students answer questions depends on both the hardware/program being used and the setting of the Question Type preference (Multiple Choice or Free Response, see page 143). See “How Students Answer Questions” on page 144.
Practices and Tests are Timed Teachers can use the Time-Out Preference to set the time limits; see page 151.
If a student “times out” on a practice or test, the program stops it. For MathsFacts in a Flash RP, stopped tests are noted in the Assignment Book and reports (Class Progress, see page 125; Student Progress, see page 126; and Student Record, see page 126).
When the student sees a clock flashing on the page, the time limit is almost up for the problem, practice or test. The student should choose an answer quickly. If the student does not select an answer before time runs out, the next problem will appear.
Number of Problems on Practices and TestsPractices are at least 20 problems long.
Practices consist of
problems that are considered difficult for the level and
problems that the student missed on the last test at that level.
Tests are always 40 problems long.
Unanswered ProblemsUnanswered problems are always scored as wrong answers.
If the correct answer is selected when time runs out, it will be scored as a correct answer.
Wrong Answers During PracticesDuring practices, wrong answers are marked as the problem is answered.
The same problem is then presented to the student again. This gives the student a chance to answer the problem correctly and commit it to memory.
How wrong answers are marked depends on the hardware that is being used.
Computer and NEO 2
How wrong answers display depends on the Question Type Preference (see page 143).
66MathsFacts in a Flash™Software Manual

MathsFacts in a Flash RP (for Students)Things to Remember When Practising and Testing
If the preference is set to Multiple Choice or Multiple Choice Shortcut Keys, the program draws an X over the wrong answer and a rounded box (computer or tablet)/dashed box (NEO 2) around the correct answer. The student chooses the correct answer and moves on to the next problem.
If the preference is set to Free Response, an X appears in the blank field. The correct answer then displays. The student enters the correct answer and moves on to the next problem.
Renaissance Responder
This applies to Responders using firmware version 2.51.
When the student enters or selects a wrong answer, the program draws an X over the wrong answer or in the answer blank. If the student chooses answers by selecting a letter, the program puts a dashed box around the correct answer. The student enters or selects the correct answer and moves on to the next problem.
Going Back One Problem on a Test (Changing an Answer)During tests, the student can go back and change the answer on the previous problem. The student can only go back one problem.
Students cannot go back one problem when completing a practice.
To go back and change the answer on the previous problem while taking a test:
MathsFacts in a Flash RP (computer or tablet): Select Back.
NEO 2: Press the backspace key.
Responder: Press Clear.
Renaissance Home Connect (computer or tablet): Select Back.
The additional time it takes the student to answer the problem the second time is added to the total time for the test.
The student can still:
master the level if the total time is equal to or less than the mastery time target for that level
achieve a personal best time if the total time is equal to or less than the current best time for that level
Reported Time Score versus Overall Elapsed TimeIf you measure the total time it takes a student to complete a test, you may notice a difference between your time measurement and the reported time score. This is because the reported time score is the sum of the problem response times rather than the overall elapsed time. As a result, a test that actually takes a student 3 minutes to complete could be reported as 2 minutes and 20 seconds. The program is designed to measure only the time it takes a
67MathsFacts in a Flash™Software Manual
MathsFacts in a Flash RP (for Students)Things to Remember When Practising and Testing
student to respond to a problem. Therefore, the time it takes the program to display the problem and the answer has no effect on the time score the student receives.
Personal Best Time (Challenging Best Times)Once a student masters a level, he or she can try for a personal best time (Challenge Best Times). Students can challenge as many times as they like; there is no limit. A challenge is successful when the student achieves 100% accuracy and a new personal best time (see page 164).
TOPS ReportsWhen the practice or test is finished, a TOPS report is generated.
Whether the report will automatically print is determined by:
the program, hardware and firmware version you are using (see page 154)
the setting of the TOPS Report Preference (see page 153)
TOPS reports can be printed from the Assignment Book (see page 123).
By default, TOPS reports will automatically print for online work completed using a NEO 2 and the MathsFacts in a Flash RP SmartApplet
TOPS reports do not automatically print after practices or tests:
on computers or tablets using MathsFacts in a Flash Renaissance Place
on Renaissance Responders
on computers or tablets using Renaissance Home Connect
68MathsFacts in a Flash™Software Manual

Tablets and MathsFacts in a Flash
Things to Remember About Using MathsFacts in a Flash on a Tablet
MathsFacts in a Flash Renaissance Place versus Renaissance Home ConnectStudents can use tablets to work in both MathsFacts in a Flash Renaissance Place and Renaissance Home Connect. To use these programs on tablets, students must know the web address for each program.
List of Student User Names and PasswordsYou can get a list of student user names, passwords and PINs from Renaissance Place (see page 52).
Before Students Use MathsFacts in a Flash on a TabletComplete the following steps before students use MathsFacts in a Flash on a tablet:
Establish an Internet connection.
If students are working at school, establish a connection to Renaissance Place.
If students are working at home, establish a connection to Renaissance Home Connect.
TOPS Reports and TabletsTOPS reports do not print automatically from tablets.
When students complete a practice or test on a tablet using MathsFacts in a Flash Renaissance Place, they can tap a TOPS button to view a summary of their work.
The ability to print from a tablet depends on the type of tablet being used, the type of printer being used and/or the program or system being used to connect the tablet to a printer. For assistance, contact your school’s IT Department/ICT Support.
TOPS reports can be printed from the Assignment Book (see page 123).
69MathsFacts in a Flash™Software Manual

Tablets and MathsFacts in a FlashFrequently Asked Questions: Tablets and MathsFacts in a Flash
Frequently Asked Questions: Tablets and MathsFacts in a Flash
What tablets work with MathsFacts in a Flash?Tablets (seven inches or larger), using a supported browser.
For current system requirements, see: http://doc.renlearn.com/KMNet/R003777603GF3F7F.pdf
Do I need to install an app on my tablet to work in MathsFacts in a Flash?No. MathsFacts in a Flash is a web page you connect to using a browser and does not need to be downloaded or installed. To use MathsFacts in a Flash on a tablet, you must either connect to your school’s Renaissance Place web address or to your school’s Renaissance Home Connect web address.
Can anyone use a tablet to work in MathsFacts in a Flash?To use a tablet with MathsFacts in a Flash, you must be connected to either your school’s Renaissance Place web address (URL) or to your school’s Renaissance Home Connect address.
Can a teacher log in and perform management tasks on a tablet?At this time, Renaissance Place has not been optimized for use on tablets or mobile devices. You may be able to successfully connect, but you may have unexpected results when viewing screens or performing tasks.
Can students work from home on their own personal tablet?Yes, by connecting to Renaissance Home Connect (see page 105). However, students can only practice from home; they cannot test (master levels).
Renaissance Learning recommends that schools set restrictions within the software such as monitor authorisation passwords (page 137) and IP restrictions. Both monitor passwords and IP restrictions will help prevent working from outside the school (unless Renaissance Home Connect is being used).
By default, IP restrictions are determined by server administrators and/or school network administrators.
1. On the Home page, select Product Administration.
2. Select Set Security Options for Students.
For more information about IP restrictions, see the Renaissance Place help or the Renaissance Place Software Manual.
This is Renaissance Learning’s recommendation for all schools, regardless of what devices they are using to ensure that testing takes place in a secure, monitored environment.
70MathsFacts in a Flash™Software Manual

Renaissance Receivers
Renaissance Receivers and MathsFacts in a FlashRenaissance Receivers allow NEO 2s and Renaissance Responders to communicate with Renaissance Place. NEO 2s can use Renaissance Receivers to have a “live” (on-line) connection to Renaissance Place. This means that student work is automatically sent to MathsFacts in a Flash RP. Work completed in this manner is reported the same as work completed when students log in to Renaissance Place using a computer.
You can also choose to have your students work offline with both NEO 2s and Renaissance Responders, which means that the student work is not automatically sent to MathsFacts in a Flash RP. This work is not lost; you can choose to have the students send their work history (for both NEO 2s and Renaissance Responders) to MathsFacts in a Flash RP. This work can be included on the Class Progress Report (see page 125) and Student Record Report (see page 126) by including the practice summary.
This manual provides basic information about using Renaissance Receivers with MathsFacts in a Flash.
Additional Information about Renaissance ReceiversFor more information about using Renaissance Receivers with
NEO 2, see the NEO 2 Quick Guide.
Renaissance Responder, see the 2Know! Classroom Response System Installation and Setup Guide.
To view these documents, on any page in Renaissance Place, in the upper-right corner, select Manuals. (On the Home page, select ?, then Manuals.) Both of these documents are found under Accelerated Maths; the NEO 2 Quick Guide is also found under Accelerated Reader, Keywords and MathsFacts in a Flash.
71MathsFacts in a Flash™Software Manual

Renaissance ReceiversRenaissance Wireless Server Utility
Renaissance Wireless Server UtilityNote: The Renaissance Wireless Server Utility must be installed for MathsFacts in a Flash to use NEO 2s and Renaissance Responders with a Renaissance Receiver to communicate with Renaissance Place.
The Renaissance Wireless Server Utility is a program that:
Allows communication between the hardware pieces (Renaissance Receivers, NEO 2s and Responders) and the software pieces (MathsFacts in a Flash and Renaissance Place)
Allows you to set the Renaissance Place URL (see page 75)
The Renaissance Wireless Server Utility is automatically installed as part of the installation of any of these four programs:
NEO Manager
2Know! Toolbar
Renaissance Responder Program
AccelTest
Which of these four programs you use depends on the other software (Accelerated Maths or the 2Know! Toolbar) and hardware (NEO 2 or Responder) your school uses.
You must use at least one of the four programs/utilities listed below to install the Renaissance Wireless Server Utility. Your school may use one or more of these programs/utilities:
NEO Manager
Download this from www.renlearn.co.uk/neo-2/manuals-and-downloads/.
If your school uses NEO 2s, you installed NEO Manager as part of setting up your NEO 2s. NEO Manager is used to send files and SmartApplets to the NEOs, change settings on the NEOs as well as retrieve files from the NEO to your computer. This can be used with the SmartOption Bundle or a single NEO plugged directly into your computer.
NEO Manager does not communicate with Renaissance Responders, or MathsFacts in a Flash, but it does install the Renaissance Wireless Server Utility. You use the Renaissance Wireless Server Utility to set the Renaissance Place URL (see page 75).
For more information about NEO Manager, refer to the NEO 2 Quick Guide.
2Know! Toolbar
Download this from www.renlearn.co.uk/neo-2/manuals-and-downloads/ or directly from the Download Center (available via the same link).
72MathsFacts in a Flash™Software Manual

Renaissance ReceiversHow to Connect a Renaissance Receiver to Your Computer
The 2Know! Toolbar allows teachers to ask students different questions types that can be answered with Renaissance Responders or NEO 2s.
MathsFacts in a Flash does not use the 2Know! Toolbar directly. The 2Know! Toolbar does install the Renaissance Wireless Server Utility. You use the Renaissance Wireless Server Utility to set the Renaissance Place URL (see page 75).
For more information about the 2Know! Toolbar, refer to the 2Know! Classroom Response System Installation and Setup Guide.
Renaissance Responder Program
Download this from the Downloads page (see page 15).
If your school uses Accelerated Maths, you install the Renaissance Responder Program to complete Accelerated Maths assignments with either Renaissance Responders or NEO 2s.
If your school does not use Accelerated Maths, Renaissance Learning recommends installing either the NEO Manager or the 2Know! Toolbar.
If your school does use Accelerated Maths, and you have the Renaissance Responder Program installed, you will still need to set the Renaissance Place URL for MathsFacts in a Flash (see page 75).
For more information about the Renaissance Responder program, see the Accelerated Maths Software Manual.
AccelTest
Download this from www.renlearn.co.uk/neo-2/manuals-and-downloads/.
AccelTest software helps you create questions and answer choices that can be viewed on students’ handheld responders, eliminating the need for paper or projector.
If your school does not use AccelTest, Renaissance Learning recommends installing either the NEO Manager or the 2Know! Toolbar.
For more information about AccelTest, see the AccelTest User Manual installed with the software.
How to Connect a Renaissance Receiver to Your ComputerYou need a Renaissance Receiver to transfer data between NEO 2s and/or Renaissance Responders and MathsFacts in a Flash RP.
Before connecting the Renaissance Receiver, you must have the Renaissance Wireless Server Utility installed on the computer that will have the Renaissance Receiver connected. The Renaissance Wireless Server Utility must
73MathsFacts in a Flash™Software Manual

Renaissance ReceiversHow to Name the Receiver
be installed for MathsFacts in a Flash to use NEO 2s and Renaissance Responders to communicate with Renaissance Place.
The Renaissance Wireless Server Utility is automatically installed with any of these four programs: NEO Manager, the 2Know! Toolbar, Renaissance Responder Program and AccelTest. For more information, see “Renaissance Wireless Server Utility” on page 72.
Follow these steps to connect a Renaissance Receiver to your computer.
1. If this is the first time you have connected the Receiver to your computer, make sure you are logged in to your computer as an administrator or that you have permissions that allow the device drivers to load properly.
2. Find the Renaissance Receiver A and the USB data cable B.
3. Plug the end of the data cable that is nearly square C into the connector on the back of the Receiver D.
4. Connect the USB connector on the data cable E to an open USB port on your computer.
How to Name the ReceiverIt is important to set a name for the computer/Receiver combination so that students know they are connecting to the right Receiver when they use NEO 2s and Renaissance Responders for MathsFacts in a Flash work. This is especially important if your school has more than one Renaissance Receiver.
To name the Receiver:
1. Start the Renaissance Wireless Server Utility:
Windows computers: Right-click in the lower-right corner of your computer screen (the system tray) and choose Manage from the menu that appears. If you do not see this icon in your system tray, select Start All Programs Renaissance Wireless Server Renaissance Wireless Server Utility.
Macintosh computers: In your computer’s Applications folder, open the Renaissance Wireless Server folder. Then, double-click Renaissance Wireless Server Utility.
2. To log in, type 1234 and select OK. (The default Administrator PIN is 1234. If you have changed the PIN, enter your new PIN.)
If necessary, select Start.
3. Select the Server Settings tab.
DA
E
C
B
The Renaissance Wireless Server Utility must be
installed before you follow these steps. See page 72.
74MathsFacts in a Flash™Software Manual

Renaissance ReceiversHow to Set the Renaissance Place URL for MathsFacts in a Flash
4. In the Network Name field, enter a new name for the Renaissance Receiver.
Make sure the name is different from names used for other Renaissance Receivers within the building.
5. Select Update Network Settings.
6. When the program finishes updating the network settings. select OK.
Make sure that any students who will be using NEO 2 with MathsFacts in a Flash know which Receiver name to connect to.
How to Set the Renaissance Place URL for MathsFacts in a FlashYou must set the Renaissance Place URL so that the NEO 2s and the Renaissance Responders can communicate with Renaissance Place.
Follow these steps to set the URL:
1. Start the Renaissance Wireless Server Utility:
Windows computers: Right-click in the lower-right corner of your computer screen (the system tray) and choose Manage from the menu that appears. If you do not see this icon in your system tray, select Start Programs Renaissance Wireless Server Renaissance Wireless Server Utility.
Macintosh computers: In your computer’s Applications folder, open the Renaissance Wireless Server folder. Then, double-click Renaissance Wireless Server Utility.
2. To log in, type 1234 and select OK. (The default Administrator PIN is 1234. If you have changed the PIN, enter your new PIN.)
If necessary, select Start.
3. Select the Server Settings tab.
The Renaissance Wireless Server Utility must be
installed before you follow these steps. See page 72.
75MathsFacts in a Flash™Software Manual

Renaissance ReceiversDefault Administrator PIN
4. Select Renaissance Place Settings A.
5. Enter the web address or IP address for the Renaissance Place server that has MathsFacts in a Flash RP installed.
6. After entering the address, select Verify to make sure the utility recognises it as a valid address. Then, select OK.
7. When the program verifies that the settings were changed successfully, select OK. The OK button is available after you verify the URL as described in step 6.
Default Administrator PINThe default administrator PIN is 1234. This PIN is required when you use the Renaissance Wireless Server Utility program on your computer.
Monitoring Receiver Activity and StatusIn the Renaissance Wireless Server Utility, the Log tab shows you Receiver activity and the Receivers tab shows you the status of the Receiver connected to your computer. To start the utility, follow the instructions for your operating system:
Windows: Select StartAll ProgramsRenaissance Wireless ServerRenaissance Wireless Server Utility.
Macintosh: Open the Applications folder, then the Renaissance Wireless Server folder. Double-click Renaissance Wireless Server Utility.
A
76MathsFacts in a Flash™Software Manual

NEO 2s and MathsFacts in a Flash
General Information about NEO 2sNEO 2 was designed specifically for Reception-12 classrooms.
NEO 2 may be used with MathsFacts in a Flash as well as Accelerated Maths, Accelerated Reader, NEO Share software, and the 2Know! Toolbar. It also includes KeyWords for keyboarding instruction.
This section provides basic information about using NEO 2s with MathsFacts in a Flash. For more information, see below.
Additional Information about NEO 2s This manual provides basic information about using NEO 2s with MathsFacts in a Flash.
For more information, refer to the NEO 2 Quick Guide. To view this document, on any page in Renaissance Place, in the upper-right corner, select Manuals. (On the Home page, select ?, then Manuals.)
Updates for NEO 2To get the latest software, utilities or manuals for NEO 2s, go to www.renlearn.co.uk/neo-2/manuals-and-downloads/. You will find the newest versions of the NEO Manager software, which may include updates to your NEO 2 system software or SmartApplets. You will also find other software and utilities that can help you make the most of your NEO 2s.
77MathsFacts in a Flash™Software Manual

NEO 2s and MathsFacts in a FlashThings to Remember About MathsFacts in a Flash on NEO 2
Things to Remember About MathsFacts in a Flash on NEO 2
Online versus Offline WorkStudents can do two types of MathsFacts in a Flash work on NEO 2s:
Online Work Using the MathFacts in a Flash RP SmartApplet: This student work is automatically sent from NEO 2 to MathsFacts in a Flash RP.
To work online, students use the MathsFacts in a Flash RP SmartApplet on the NEO 2. When students use this SmartApplet, they are actively connected to MathsFacts in a Flash RP. This SmartApplet is used for testing (to master levels) and practice (practice problems and tests). For more information, see page 80.
Offline Work Using the MathFacts in a Flash (Offline SmartApplet): Student work is not automatically sent from NEO 2 to MathsFacts in a Flash RP. This work is simply practice.
To work offline, students use the MathsFacts in a Flash (offline) SmartApplet on the NEO 2. When students use this SmartApplet, they are not actively connected to MathsFacts in a Flash RP. This SmartApplet is used only for practice (practice problems and tests).
The work history can be sent from the NEO 2 to MathFacts in a Flash RP via a Renaissance Receiver (see “Sending the History to Renaissance Place” on page 90.
The table on the next page shows you the differences between the two SmartApplets.
78MathsFacts in a Flash™Software Manual

NEO 2s and MathsFacts in a FlashBefore Students Start Working on NEO 2s
Renaissance ReceiverThe NEO 2 communicates with MathsFacts in a Flash RP via a Renaissance Receiver.
For more information, see “Renaissance Receivers” on page 71.
List of Student User Names, Passwords and PINsYou can get a list of the students, their user names, passwords and PINS from Renaissance Place (see page 52).
Before Students Start Working on NEO 2sNote: When the NEO 2 is used with the MathsFacts in a Flash (offline) SmartApplet, many of the items listed below only apply if you want to send the history to Renaissance Place.
Before students use the NEO 2, make sure you have completed the following:
Installed NEO Manager (see the NEO 2 Quick Guide for instructions).
Connected a Renaissance Receiver to your computer (see page 73).
Named the Renaissance Receiver (see page 74).
Entered the Renaissance Place URL in the Renaissance Place Settings of the Renaissance Wireless Server Utility (see page 75).
MathsFacts in a Flash (offline) SmartApplet
MathsFacts in a Flash RP SmartApplet
Need to be in range of a Renaissance Receiver while working?
No, only when printing and sending the history.
Yes
Can students practise and take practice tests?
Yes Yes
Can students master levels? No Yes
Can students challenge best times? No Yes
Do changes to mastery time and preferences in MathsFacts in a Flash RP affect this SmartApplet?
No Yes
How are the results of work shown on reports?
They can be included on the Class Progress and Student Record Reports by including the practice summary (similar to work completed in Renaissance Home Connect or on a Renaissance Responder).
Work completed in this SmartApplet is reported the same as work completed when students log in to Renaissance Place using a computer.
What problem format is used? Assisted-response. Depends on the setting of MathsFacts in a Flash preferences.
79MathsFacts in a Flash™Software Manual

NEO 2s and MathsFacts in a FlashUsing the MathsFacts in a Flash RP SmartApplet
In Renaissance Place, make sure your students have been added to the database and are enrolled in a MathsFacts in a Flash class.
Make sure students know their user names, passwords and PINs. You can get this list from Renaissance Place (see page 52).
Note: Students do not need to know their user names and passwords to use the MathsFacts in a Flash (offline) SmartApplet.
In MathsFacts in a Flash RP, set the Classroom preferences (see page 134).
Note: Classroom preferences do not affect the MathsFacts in a Flash (offline) SmartApplet.
If you have younger students, explain how the problems and answers are displayed on the screen and how to use the arrow keys to select answers.
Review “Things to Remember When Practising and Testing” on page 63.
Using the MathsFacts in a Flash RP SmartApplet The MathsFacts in a Flash RP SmartApplet makes it easy for students to practise maths facts and be able to test to master levels. These instructions explain how to use the SmartApplet.
How Students Practise or Test1. The teacher’s computer must be on, with the Receiver connected.
The teacher’s computer can be used for other things while students are working in MathsFacts in a Flash; the computer does not need to be dedicated to this task.
2. Turn the NEO 2 on by pressing on/off; then, press applets.
3. Press (down arrow) until the cursor is next to MathsFacts in a Flash RP. Then, press enter.
Note: MathsFacts in a Flash (offline) is the other MathsFacts in a Flash SmartApplet. It allows student to practise independently (without being connected to Renaissance Place). For more information, see page 84.
4. The first time you use the MathsFacts in a Flash RP SmartApplet, it will list the Networks that are available.
Networks are Renaissance Receivers connected to computers.
Use the or (down or up arrows) to highlight the Receiver you want to connect to; then, press enter.
The name that you gave the Renaissance Receiver is the one
students will see in the Networks list. See page 74 to change the name of the Receiver.
80MathsFacts in a Flash™Software Manual

NEO 2s and MathsFacts in a FlashUsing the MathsFacts in a Flash RP SmartApplet
If you have chosen a Receiver before, the program may ask if you want to stay connected. Press Y for yes or N for no, then press enter. (If you chose no, you will need to select another Receiver.)
5. When the program asks for your user name and password, type your user name and press enter or (down arrow). Then, type your password and press enter.
6. If you are enrolled in more than one MathsFacts in a Flash class, your classes will be listed. Use the or (down or up arrows) to highlight the class that you are doing work for; then, press enter.
7. The screen will give you a few options. Press or (down or up arrows) to choose what you want. Then, press enter.
Your choices are:
Work at your current level
This allows you to practise or test at the level you are working on now.
Work at a previously mastered level (if you have mastered at least one level):
Choose this if you want to challenge your best test time for a level.
Working at the Current Level
When you work at the current level, you may be asked whether to start a practice or test. If so, press Y for yes or N for no. Then, press enter.
If the screen shows you the results of your recent work without giving you choices, press enter to continue. Then, press or (down or up arrows) to choose what you want. Then, press enter:
To test at a new time target
To go to the next level.
To exit. Exit takes you back to either the results screen or the choice between working at the current level or a previously mastered level.
If the NEO says that you are already logged in, you may
have turned off the NEO without finishing MathsFacts in a Flash work. Press applets to leave the MathsFacts in a Flash SmartApplet. Then, go back to step 3 to start again.
81MathsFacts in a Flash™Software Manual

NEO 2s and MathsFacts in a FlashUsing the MathsFacts in a Flash RP SmartApplet
Working at a Previously Mastered Level
If you choose to work at a previously mastered level, follow these steps:
1. Press or (down or up arrows) to highlight the level you want to work on.
Then, press enter.
2. You will be shown a time target and asked whether you want to start a test.
Press Y to start the test or N to not start it.
Then, press enter.
Answering Questions during a Practice or Test
During a practice or test, you will see problems like the one shown below.
The way you answer the problem depends on what you see on the screen.
If you see arrows below the answers, press , or (left, down or right arrow) and press enter. The circles below the answer choices will show you what keys to press to choose each answer.
If you see letters or numbers below the answers, press the letter or number for the answer and press enter. The circles below the answer choices will show you what keys to press to choose each answer.
If you do not see any answer choices, type your answer and press enter.
Tips for Practices and Tests
During practices, the program will let you know if you enter or select an incorrect answer.
If you select answers with arrow keys or letters the program will put an X over the wrong answer and a box around the correct answer. Then, the program will give you the chance to choose the correct answer.
If you type your answers instead of selecting them, the program will put an X in the blank and then display the correct answer. Then you can type the correct answer.
During tests, you can press esc or back space to go back one problem.
If the time limit is almost up for a problem, practice or test, a clock will flash in the middle of the black bar at the top of the screen. If you run out of time for the practice or test, the program will let you know.
If you have beaten the best time target, no target (or a dash) is
shown. In this case, you are simply trying to beat your best time.
Teachers: if you want to change how students enter
answers, change the Question Type Preference (see page 143). You can require students to enter an answer instead of choosing one.
82MathsFacts in a Flash™Software Manual

NEO 2s and MathsFacts in a FlashUsing the MathsFacts in a Flash RP SmartApplet
The time limit for a problem, practice or test is set via the Time-Out Preference (see page 151).
Other time limits are set via the Time Targets Preference (see page 149) and the Mastery Time for a Level (see page 37).
Time-Out Preference: The defaults are: (1) Time-Out per Practice or Test: 10 minutes and (2) Time-Out per Problem: 30 seconds.
Time Targets Preference: The default is: Enable Time Targets. Target 1 is 2 minutes, 0 seconds. Subsequent targets decrease 15 seconds per targets.
Mastery Time for a Level: The default is 2 minutes and 0 seconds.
Best Time: Once you master a level, you can always try to improve your personal best time for that level. When you achieve a new personal best time for completing a test, a congratulatory message will be included on your TOPS report.
Stopping a Practice or Test
To stop a practice or test, press ctrl+A or /cmd+A. If the NEO 2 asks for a authorisation password, your teacher must enter the MathsFacts in a Flash authorisation password (Teachers, see page 137).
Practices and tests stopped on a NEO 2 using the MathsFacts in a Flash RP SmartApplet are shown in the Assignment Book and reports (Class Progress, see page 125; Student Progress, see page 126; and Student Record, see page 126).
After a Practice or Test
After you finish the practice or test, the screen will show you how you did.
If the screen asks whether you want to practise now, press Y to practise or N to not practise now.
If the screen tells you to press enter, press it. The next screen will give you choices. Press or (down or up arrows) to highlight your choice. Then, press enter. Your choices might include:
Whether to do another practice or test
Whether to do a practice, take a test or exit.
Exit takes you to the choice between working at the current level or a previously mastered level.
Whether to test (try) again at a new time target, try for a new target at another mastered level or move on to the next level.
83MathsFacts in a Flash™Software Manual

NEO 2s and MathsFacts in a FlashUsing the MathsFacts in a Flash (offline) SmartApplet
To go back to the choice between working at the current level or a previously mastered level, press esc.
A TOPS Report may be sent to the default printer for your teacher’s computer.
Logging Out of the SmartApplet
When you would like to stop working in the MathsFacts in a Flash RP SmartApplet, press the applets key.
You will be logged out and will go back to the list of SmartApplets.
Using the MathsFacts in a Flash (offline) SmartApplet The MathsFacts in a Flash (offline) SmartApplet for NEO 2 lets students practise maths facts on their own. Students can take practices and tests just as they would for their MathsFacts in a Flash school work, but there are some differences:
Students cannot master levels in this SmartApplet.
MathsFacts in a Flash RP preferences do not affect this SmartApplet, so practices and tests are always assisted-response (multiple-choice).
Students do not need to be in range of a Renaissance Receiver while they are working.
Student work from this SmartApplet is not automatically sent to Renaissance Place.
It can be sent manually; see “Printing, Clearing or Sending the History to Renaissance Place” on page 88.
Student work from this Smart Applet is not included on most MathsFacts in a Flash reports.
The Class Progress and Student Record reports can include the student work information if:
The student work history has been sent to Renaissance Place (see page 88), and
You choose to include the practice summary information
Opening the SmartApplet1. With the NEO 2 on, press the applets key.
2. Use the arrow keys to highlight MathsFacts in a Flash (offline); then, press enter.
Teachers: The MathsFacts in a Flash TOPS Report
Preference setting determines when the report prints. To change the preference, see page 153.
84MathsFacts in a Flash™Software Manual

NEO 2s and MathsFacts in a FlashUsing the MathsFacts in a Flash (offline) SmartApplet
Practising MathsFacts in a Flash Levels or Taking TestsNotes:
Practices include 20–40 problems.
Tests always include 40 problems.
Students follow these steps to practise a level or take a test
1. Open the MathsFacts in a Flash (offline) SmartApplet.
2. Leave Practice/Test highlighted and press enter.
3. Press or (down or up arrows) to highlight the type of maths facts you want to practise as shown below.
Then, press enter.
4. Press or (down or up arrows) to highlight the level you want to work on.
Then, press enter.
5. Press or (down or up arrows) to highlight either Practice or Test on the option screen.
Press enter.
6. For each problem, press , or (left, down or right arrow) for the answer that you want to choose
Then, press enter.
For example, to choose the answer “10” in the problem shown below, you would press (down arrow) on the NEO because that is the arrow shown below “10” on the screen.
Levels that you have already worked on are marked with an
asterisk (*). Clearing the history clears the asterisks. The history is automatically cleared when you send it to Renaissance Place (see page 90). You can also choose to clear the history when you print it (see page 89) or select the Clear option in the History menu (see page 90).
If you have tested on this level and the test is still in the history, a
practice will include any problems you missed on the practice test plus problems deemed difficult for the level.
85MathsFacts in a Flash™Software Manual

NEO 2s and MathsFacts in a FlashUsing the MathsFacts in a Flash (offline) SmartApplet
7. After you answer the last problem, the screen will show you how many problems you answered correctly out of the total number you saw.
It will also show you which problems you answered incorrectly and their correct answers.
Press or (down or up arrows) to scroll through the results.
When you have finished, press enter to go back to the Select a Level screen.
Tips for Practices and Tests
If time is almost up for a problem, a clock icon will flash in the black bar at the top of the screen; choose an answer as soon as you can and press enter. If time runs out before you answer the problem, the next problem will appear.
For practices
If you choose the correct answer, a square will appear around the answer, and then the next problem will appear.
If you choose the wrong answer, an X will appear over the answer you chose; then, a dotted square will appear around the correct answer. When the square disappears, choose the correct answer and press enter.
You cannot go back to previous problems.
For tests
After you answer a problem, the next problem appears. The screen will not show you whether the answer was correct.
To go back one problem, press esc or backspace.
To stop, press applets.
Stopping a Practice or Test
To stop a practice or test when you are using the MathsFacts in a Flash (offline) SmartApplet on a NEO 2, press applets.
Stopped practices and tests will not be saved in the practice/test history.
Practices and tests stopped on a NEO 2 using the MathsFacts in a Flash (offline SmartApplet) are not shown in the Assignment Book and reports (Class Progress, see page 125; Student Progress, see page 126; and Student Record, see page 126).
86MathsFacts in a Flash™Software Manual

NEO 2s and MathsFacts in a FlashUsing the MathsFacts in a Flash (offline) SmartApplet
Viewing the HistoryFor the MathsFacts in a Flash (offline) SmartApplet on the NEO 2, students can view the history for one level (see below) or for all the work they have completed (see page 88).
Viewing the History for One Level
Students follow these steps to see a detailed history for one level.
1. Open the MathsFacts in a Flash (offline) SmartApplet (see page 84).
2. Leave Practice/Test highlighted and press enter.
3. Press or (down or up arrows) to highlight the type of maths facts you want to see the history for as shown below.
Then, press enter.
4. Press or (down or up arrows) to highlight the level you want to see the history for.
Only levels marked with an asterisk have history available since they are the only ones that you have worked on since the history was last cleared.
After choosing a level., press enter
5. Press or (down or up arrows) to highlight History.
Then, press enter.
6. You will see the history of your work for this level.
When you have finished reading the history, press enter to go back to the options for the level you selected.
87MathsFacts in a Flash™Software Manual

NEO 2s and MathsFacts in a FlashUsing the MathsFacts in a Flash (offline) SmartApplet
Viewing the History for All Practices and Practice Tests
Students follow these steps to view the history of their practices and practice tests in the MathsFacts in a Flash (offline) SmartApplet.
1. Open the MathsFacts in a Flash (offline) SmartApplet (see page 84).
2. Press or (down or up arrows) to highlight History; then, press enter.
3. Leave View highlighted.
Press enter.
4. The next screen lists the activities you have completed so far, including the level name, whether it was a practice or practice test, the number of problems you answered correctly and the time you took.
To see the full results for an activity (including a list of problems you got wrong), press or (down or up arrows) to highlight the activity
Then, press enter.
5. When you have finished viewing full results for an activity, press enter or esc.
You will return to this screen.
Printing, Clearing or Sending the History to Renaissance PlaceStudents follow these steps to print or clear the history, or to send the history to Renaissance Place from their NEO 2s.
1. Open the MathsFacts in a Flash (offline) SmartApplet (see page 84).
2. Press or (down or up arrows) to highlight History.
Then, press enter.
88MathsFacts in a Flash™Software Manual

NEO 2s and MathsFacts in a FlashUsing the MathsFacts in a Flash (offline) SmartApplet
3. You will see the MathsFacts History Screen:
Press or (down or up arrows) to highlight one of the options (View, Print, send to Renaissance Place or Clear).
Then, press enter.
Go to the steps for the option you chose.
Viewing the History, see page 88
Printing the History (below)
Sending the History to Renaissance Place, see page 90
Clearing the History, see page 90
Printing the History
1. The NEO asks you about your network connection. (Networks are Renaissance Receivers connected to computers).
You must either select a network or confirm whether you want to stay connected to the last network you selected.
To select a network: Press or (down or up arrows) to highlight the one you want to connect to. Then, press enter.
To confirm/continue with the last network you selected: Press Y for yes and press enter. If you need to choose a different Receiver, press N for no, then enter.
2. Enter your name or ID. (This information will be printed on the history.)
Then, press enter.
3. After your history has been sent to the computer’s default printer, you will be asked if you want to clear the history; that is, erase the history of the practice you have completed so far in this SmartApplet.
If you want to clear (erase) the history, press Y for yes. Then, press enter.
If you do not want to clear the history, press N for no. Then, press enter.
To name the Renaissance Receiver (network), see page
74.
89MathsFacts in a Flash™Software Manual

NEO 2s and MathsFacts in a FlashUsing the MathsFacts in a Flash (offline) SmartApplet
Sending the History to Renaissance Place
Notes for Teachers:
You can get a list of student user names, passwords and PINs from Renaissance Place (see page 52).
The history will be sent to the Renaissance Place address that you set in the Renaissance Wireless Server Utility. For instructions, see page 75.
In MathsFacts in a Flash RP, you can see the practice data in the Class Progress Report (see page 125) and Student Record Report (see page 126) if you choose to include the practice summary in these reports.
To perform this procedure, you must know your PIN. If you do not know your PIN, ask your teacher.
1. The NEO asks you about your network connection. (Networks are Renaissance Receivers connected to computers).
You must either select a network or confirm whether you want to stay connected to the last network you selected.
To select a network: Press or (down or up arrows) to highlight the one you want to connect to. Then, press enter.
To confirm/continue with the last network you selected: Press Y for yes and press enter. If you need to choose a different Receiver, press N for no, then enter.
2. The next screen will remind you that the history is cleared from this NEO when you send it to Renaissance Place.
If you want to continue, press Y for yes. Then, press enter.
If you do not want to continue, press N for no. Then, press enter.
3. Next, enter your MathsFacts in a Flash PIN. (Teachers who are following these steps enter the PIN for the appropriate student.) Then, press enter.
4. The NEO will notify you when the history has been sent and cleared.
Press enter.
Clearing the History
Note: There are two other ways to clear the history.
It can be cleared after you print it.
It is automatically cleared whenever you send it to Renaissance Place.
You will see this message:
The MathsFacts history has not been printed or sent to Renaissance Place. Are you sure you want to clear? Do you want to clear the history?
To clear the history, press Y for yes. Then, press enter.
If you do not want to clear the history, press N for no. Then, press enter.
You may want to print the history before you send it to
Renaissance Place. The history is automatically cleared when you send it.
If students are sharing NEOs, clear the history after
each session.
90MathsFacts in a Flash™Software Manual

Renaissance Responders and MathsFacts in a Flash
General Information about Renaissance ResponderRenaissance Responder is a hand-held device that can be used for offline MathsFacts in a Flash work. It can also be used by students to practise their maths facts anytime, anywhere. Renaissance Responder is part of the 2Know! Toolbar.
Renaissance Responder uses radio-frequency (RF) response technology. This means that it does not require aiming and it is not affected by line-of-sight obstructions. Renaissance Responder is lightweight and ergonomically designed (ideal for one-hand-use). The keys are designed, arranged and color-coded for fast, easy use. The large LCD screen clearly displays questions and answer choices.
This chapter provides basic information about using Renaissance Responders with MathsFacts in a Flash.
For more information, refer to the 2Know! Classroom Response System Installation and Setup Guide. To view this document, on any page in Renaissance Place, in the upper-right corner, select Manuals. (On the Home page, select ?, then Manuals.) Under Accelerated Maths, select the name of the document.
91MathsFacts in a Flash™Software Manual

Renaissance Responders and MathsFacts in a FlashThings to Remember About MathsFacts in a Flash on Responder
Things to Remember About MathsFacts in a Flash on Responder
FirmwareThe Renaissance Responder has different versions of firmware. The firmware determines what type of MathsFacts work your students will be able to do on that Responder.
For more information, see “Responder Model, Firmware Versions and Updates” on page 93.
Renaissance ReceiverThe Responder communicates with MathsFacts in a Flash RP via a Renaissance Receiver. For more information, see “Renaissance Receivers” on page 71.
List of Student User Names, Passwords and PINsYou can get a list of the students, their user names, passwords and their Responder PINs from Renaissance Place (see page 52).
Offline Work on ResponderStudent work completed using MathsFacts in a Flash on Responder is offline.
Notes:
Offline work is not tracked in the Assignment Book. However, it can be tracked by two reports:
Class Progress Report (see page 125)
Student Record Report (see page 126)
For both reports, teachers can choose to include Practice Summaries for offline work students did in Renaissance Home Connect and/or using a Responder or NEO 2.
MathsFacts in a Flash Program on ResponderThere is one MathsFacts in a Flash program used with Responders: MathsFacts in a Flash Offline. Students can only use this program to practise MathsFacts in a Flash.
Tracking MathsFacts in a Flash Work on ResponderMathsFacts in a Flash work completed on Responder is not tracked. This is also known as offline MathsFacts in a Flash work. See page 99.
Students can send their offline work history to MathsFacts in a Flash Renaissance Place (see page 103). If the work history is sent, it can be tracked by two reports:
92MathsFacts in a Flash™Software Manual

Renaissance Responders and MathsFacts in a FlashResponder Basics
Class Progress Report (see page 125)
Student Record Report (see page 126)
For both reports, teachers can choose to include Practice Summaries for offline work students did using Responder, NEO 2 and Renaissance Home Connect.
Note: When working offline with MathsFacts in a Flash, the Responder saves a total of 50 practices or practice tests. Once the limit of 50 is reached, the oldest result is deleted to make room for the newest. Renaissance Learning strongly recommends that you regularly send the history to Renaissance Place and/or clear the history from the Responder. To sent the history, see page 103. To clear the history, see page 104.
Responder Basics
Responder Model, Firmware Versions and Updates
Firmware Version of Your Responder and How to Identify It
Firmware is the software that runs inside your Responders and Receiver.
The firmware version that can be run on your Responder depends on your Responder model, which is shown on the label on the back of each Responder.
To do MathsFacts in a Flash work, your students need the Renaissance Responder to be using firmware version 2.51.
Responders with the model number RES-1001 on the back may use firmware version 1.x, 2.x or 3.x. The firmware version that you use determines what functions and features you will have on the Responder.
Only one version of firmware may be installed on the Responder at a time. However, you can install a different firmware version at any time.
To identify the version of firmware your Responder is using, follow these steps.
1. Turn the Responder on.
2. Use the arrow keys to highlight Settings and press Enter.
3. Use the arrow keys to highlight About and press Enter. You will see Version x.xx (where x.xx = the version number).
93MathsFacts in a Flash™Software Manual

Renaissance Responders and MathsFacts in a FlashResponder Basics
This table describes what is included and what is not included in each firmware version.
Updating Responder Firmware
Before updating your Responder firmware, check the firmware already on your Responder (see page page 93). If your Responder has firmware version 2.51, it is up-to-date for MathsFacts in a Flash and does not need to be updated.
Only one version of firmware may be installed on the Renaissance Responder at a time. However, you can install a different firmware version at any time.
To update Responder firmware:
You must have the Renaissance Wireless Server Utility installed on the teacher’s computer (see page 72).
The two programs that include the Renaissance Wireless Server utility and firmware for Responder are NEO Manager and Renaissance Responder (see page 72).
Firmware Versions What Is Included What Is Not Included
1.xx Ability to join sessions for AccelTest or the 2Know! Toolbar
Support for owned Responders Homework Notes Settings Synchronizing with AccelTest Calculator Small or large font based on firmware
selected
MathsFacts in a Flash practice and history features
Ability to answer short answer questions in AccelTest or the 2Know! Toolbar
2.51 Ability to join sessions for AccelTest or the 2Know! Toolbar
MathsFacts in a Flash practice MathsFacts in a Flash practice/test history Ability to send MathsFacts in a Flash
practice data to Renaissance Place Settings
Support for owned Responders
Homework Notes Synchronizing with AccelTest Ability to answer short answer
questions in AccelTest or the 2Know! Toolbar
Calculator Small or large font based on
firmware selected
3.xx Ability to join sessions for AccelTest or the 2Know! Toolbar
Support for owned Responders Homework Notes Settings Synchronizing with AccelTest Ability to answer short answer questions
in AccelTest or the 2Know! Toolbar
Calculator Small or large font based on
firmware selected MathsFacts in a Flash practice
and history features
Time required to update Responders. The time it takes to
perform an update depends on the number of Responders being updated. If you are updating all of the Responders for your classroom, it could take up to two hours.
94MathsFacts in a Flash™Software Manual

Renaissance Responders and MathsFacts in a FlashResponder Basics
To update the firmware for your Responders, follow these steps:
1. Press the On/Off key to start the Responder.
2. Use the arrow keys to highlight Settings and press Select.
3. Use the arrow keys to highlight Firmware Update and press Select.
4. If the Responder asks if you want to stay connected to the Receiver, press yes/True and then Enter.
5. If updated firmware is available, scroll to the newest update available and press Select.
6. Enter the Administrator PIN (the default is 1234) and press Enter.
If you changed the Administrator PIN when you changed the Receiver settings, use the PIN you set.
The Responder will start updating the firmware. The program shows you its progress as it does the update. When the update is complete, the Responder will show you the new version number. Press any key to go to the Responder menu or the student PIN entry screen.
Choosing MathsFacts in a Flash in the Renaissance Responder MenuWhen you first turn the Responder on, and whenever you press Menu, you will go to the main menu for the Responder.
In the menu, use the arrow keys to highlight MathsFacts in a Flash. Then, press Select.
How Responder Users Answer MathsFacts in a Flash QuestionsResponders and the Question Type Preference
The Question Type Preference (see page 143) does not affect what students see using Renaissance Responder (RES-1001) using firmware version 2.51.
How to Answer Questions
For MathsFacts in a Flash on Responder, students answer Multiple-Choice questions.
Moving through the menu. To move through the
menu items, use the up and down arrow keys. If you have selected a menu item and want to move back to the previous menu level, press Clear.
95MathsFacts in a Flash™Software Manual

Renaissance Responders and MathsFacts in a FlashResponder Basics
During a practice or test, you will see questions with letters next to the choices.
Press a letter key (A, B, C, D or E).
Press Enter after choosing an answer. You will advance to the next question.
Wrong Answers during PracticesDuring practices, the program will let you know if you enter or select an incorrect answer by putting an X over the answer you chose or in the answer blank.
The program will also put a dashed box around the correct answer.
Then, you can try to answer the question again.
Go Back One Problem (Tests Only)During tests, you can go back to the previous problem and change your answer. You can only go back during tests (not practices) and you can only go back one problem.
To do this, press Clear.
The additional time it takes you to answer the problem the second time will be added to the total time for the test.
Time LimitsIf the time limit is almost up for the problem, practice or test, a clock will flash in the middle of the black bar at the top of the screen. Choose an answer as soon as possible.
Online Offline
96MathsFacts in a Flash™Software Manual

Renaissance Responders and MathsFacts in a FlashResponder Basics
If time runs out for a question, you will go to the next one. If you run out of time for the practice or test, the program will let you know.
Timeout/unanswered questions are treated like incorrect answers.
For more information, see “Time Settings in MathsFacts in a Flash” on page 163.
Connecting to Computers with Renaissance ReceiversResponders need to connect to Receivers when you do the following:
Print the MathsFacts in a Flash practice and test history. See page 102.
Send the MathsFacts in a Flash practice and test history to MathsFacts in a Flash RP. See page 103.
When you use one of these features, the Responder will do one of the following:
If you have not connected to a Receiver before or if the last Receiver that you connected to is not available, the Responder will ask you to choose a Receiver; look for the name you assigned (see page 74) and select that Receiver.
If you have connected before, but you have shut off the Responder, the Responder may ask if you want to stay connected to the last Receiver you chose (if that Receiver is still available). Press yes (True) or no (False).
If you have connected before and you have not shut off the Responder, it will use the last Receiver you connected to.
Stopping a Practice or TestStudents follow these steps to stop a practice or test that they have started.
Stopped practices and tests will not be saved in the practice/test history.
1. Press Menu.
2. You may be asked to enter the authorisation password.
If the authorisation password is required, the teacher must enter that password using texting techniques and press Enter. The default password is ADMIN.
If the password is not required, press yes (True) to confirm that you want to stop the practice or test; then, press Enter.
3. A message will confirm that the practice or test has been stopped. Press Enter.
Authorisation Password. The Authorisation
Password Preference (see page 137) determines if a authorisation password is required to stop a test.
97MathsFacts in a Flash™Software Manual

Renaissance Responders and MathsFacts in a FlashBefore Students Start Working on Renaissance Responders
Practices and tests stopped while using a Responder are not shown in the Assignment Book and reports (Class Progress, see page 125; Student Progress, see page 126; and Student Record, see page 126).
Before Students Start Working on Renaissance Responders
Questions to AnswerBefore deciding what you need to use MathsFacts in a Flash on Renaissance Responder, you will need to answer the following questions. Your answers will determine the software and hardware pieces you will need to install and/or update.
1. What do I want my students to do?
See “Tracking MathsFacts in a Flash Work on Responder” on page 92.
2. Is a Renaissance Receiver installed in my classroom?
A Renaissance Receiver is used with NEO 2s and NEO Manager and the 2Know! Toolbar.
For more information about Renaissance Receivers, see page 71.
Tasks to CompleteNote: When the Renaissance Responder is used with MathsFacts in a Flash Offline, many of the items listed below only apply if you want to send the history to Renaissance Place.
Before students use Renaissance Responders, make sure you have completed the following:
Identified the Renaissance Responder model(s) and firmware you have on hand (see page 93).
Installed any updates (see page 94).
Make sure the Renaissance Wireless Server Utility is installed on the computer that will have the Renaissance Receiver connected. The Renaissance Wireless Server Utility is automatically installed as part of the installation of any of these four programs:
NEO Manager
2Know! Toolbar
Renaissance Responder Program
AccelTest
Which of these four programs you use depends on the other software (Accelerated Maths or the 2Know! Toolbar) and hardware (NEO 2 or Responder) your school uses. For more information, see page 72.
Connected a Renaissance Receiver to your computer (see page 73).
98MathsFacts in a Flash™Software Manual

Renaissance Responders and MathsFacts in a FlashWorking Offline with MathsFacts in a Flash on Renaissance Responder
Named the Renaissance Receiver (see page 74). Make sure students know the name you set.
Entered the Renaissance Place URL in the Renaissance Place Settings of the Renaissance Wireless Server Utility (see page 75).
In Renaissance Place, make sure your students have been added to the database and are enrolled in a MathsFacts in a Flash class.
Make sure students know their user names and passwords. You can get this list from Renaissance Place (see page 52).
Note: Students do not need to know their user names and passwords to use MathsFacts in a Flash Offline.
Classroom preferences (see page 134) do not affect MathsFacts in a Flash Offline work.
If you have younger students, explain how the problems and answers are displayed on the screen and how to use the keys to select answers (see page 95).
Reviewed “Things to Remember When Practising and Testing” on page 63.
The MathsFacts in a Flash Offline program can only be used for practice (practice problems and practice tests).
Working Offline with MathsFacts in a Flash on Renaissance Responder
How Students Work on Offline PracticesOffline work may be completed on the Renaissance Responder. Students follow these steps to practise facts for a MathsFacts in a Flash level. Practices include 20–40 problems.
1. Turn on the Responder by pressing On/Off.
2. From the main menu, use the arrow keys to highlight MathsFacts in a Flash. Then, press Select or Enter.
3. Use the arrow keys to highlight what you want to practise: addition, subtraction, multiplication or division. Then, press Select or Enter.
99MathsFacts in a Flash™Software Manual

Renaissance Responders and MathsFacts in a FlashWorking Offline with MathsFacts in a Flash on Renaissance Responder
4. Use the arrow keys to highlight the level you want to practise. Then, press Select or Enter.
5. Practice should be highlighted. Press Select or Enter.
6. Complete the practice.
Refer to the following sections:
“How Responder Users Answer MathsFacts in a Flash Questions” on page 95
“Wrong Answers during Practices” on page 96
“Time Limits” on page 96
“Stopping a Practice or Test” on page 97
7. After you answer the last question, the screen will show your results, including the number of problems you answered correctly and the total number of problems in the practice session.
It will also show the problems you got wrong and their correct answers.
Use the arrow keys to scroll up and down through the results.
When you have finished, press Select or Enter.
How Students Take Offline Tests to Practise LevelsWhile working offline on Renaissance Responders, students can take practice tests. Tests always include 40 problems. Students follow these steps to take a test for a MathsFacts in a Flash level.
1. Turn on the Responder by pressing On/Off.
2. From the main menu, use the arrow keys to highlight MathsFacts in a Flash. Then, press Select or Enter.
3. Use the arrow keys to highlight what you want to test on: addition, subtraction, multiplication or division. Then, press Select or Enter.
4. Use the arrow keys to highlight the level you want to test on; then, press Select or Enter.
Levels that you have already worked on are checked. If you
want to view the practice and test history for one of those levels, highlight it and press ?. You will see the results for the last practice or test. Clearing the history clears the check marks; see page 104.
If the student has tested on this level and the test is still in
the history, the practice will include any problems the student missed plus questions deemed difficult for the level. The student will see the results for the last practice or test.
Levels that you have already worked on are checked. If you
want to view the practice and test history for one of those levels, highlight it and press ?. Clearing the history clears the check marks; see page page 104.
100MathsFacts in a Flash™Software Manual

Renaissance Responders and MathsFacts in a FlashWorking Offline with MathsFacts in a Flash on Renaissance Responder
5. Use the arrow key to highlight Test; then, press Select or Enter.
6. Complete the test.
Refer to the following sections:
“How Responder Users Answer MathsFacts in a Flash Questions” on page 95
“Go Back One Problem (Tests Only)” on page 96
“Time Limits” on page 96
“Stopping a Practice or Test” on page 97
7. After you answer the last question, the screen will show your results, including the time you took, the number of problems you answered correctly and the total number of problems in the test.
It will also show the problems you got wrong and their correct answers.
Use the arrow keys to scroll up and down through the results.
When you have finished, press Select or Enter.
Viewing the MathsFacts History on ResponderStudents follow these steps to view their MathsFacts in a Flash practice and test history on a Renaissance Responder.
1. Turn on the Responder by pressing On/Off.
2. From the main menu, choose the history.
a. Use the arrow keys to highlight MathsFacts History.
b. Press the down arrow.
3. Use the arrow keys to highlight View.
Then, press Select or Enter.
4. The next screen will list the activities you have completed so far, including the level name, (T) for test or (P) for practice, the number of problems you answered correctly and the time you took for that practice or test.
Use the arrow keys to scroll up and down through the list. If you want to see more information about an activity, use the arrow keys to highlight it; then, press Select or Enter.
5. When you select a practice or test, you will see the full results, including how long it took you, the number of problems you answered correctly and a list of problems you answered incorrectly with the correct answers. Press Select or Enter when you have finished.
6. To leave the MathsFacts History, press Menu.
You can also view the history for a specific level that you have
practiced while you are choosing a level to work on. Just highlight the level and press ?.
101MathsFacts in a Flash™Software Manual

Renaissance Responders and MathsFacts in a FlashWorking Offline with MathsFacts in a Flash on Renaissance Responder
Printing the MathsFacts HistoryNote: To include the student’s name or ID in the printed history, you must enter the student’s name or ID in the Responder Settings under Student Information.
To enter the Student Information, follow these steps:
1. Press On/Off to turn on the Responder.
2. Highlight Settings in the main menu and press Select.
3. Use the arrow keys to highlight Student Information. Press Select.
4. Enter the student name or ID that you want to include when you print the MathsFacts in a Flash practice/test history.
If the Responder is owned, the owner’s name will be shown and you cannot change the student information. Note: Responder Ownership is used with AccelTest, not MathsFacts in a Flash.
5. When you have finished entering the student name or ID, press Select.
To print the history:
1. The teacher’s computer must be on, with the Renaissance Receiver connected. (Teachers can use the computer to do other things while students work in MathsFacts in a Flash on Responder.)
2. Turn on the Responder by pressing On/Off.
3. From the main menu, choose the history.
a. Use the arrow keys to highlight MathsFacts History.
b. Press the down arrow.
4. Use the arrow keys to highlight Print.
Then, press Select or Enter.
5. If the Responder asks whether to stay connected to a specific Receiver, press yes or no. Then, press Select or Enter.
If the Responder shows a list of Receivers, use the arrow keys to highlight the correct Receiver name. Then, press Select or Enter.
6. The history will be sent to the default printer for the computer that is connected to the Renaissance Receiver. When the history has been sent, the Responder will ask you whether you want to clear (delete) the history. Press yes or no and then Select or Enter.
102MathsFacts in a Flash™Software Manual

Renaissance Responders and MathsFacts in a FlashWorking Offline with MathsFacts in a Flash on Renaissance Responder
Sending the Responder MathsFacts History to Renaissance PlaceNote: The history is automatically cleared from the Responder when you send it to Renaissance Place.
The history will be sent to the Renaissance Place address that you set in the Renaissance Wireless Server Utility (see page 75).
You can see information about Responder practice when you choose to include the practice summary in the Class Progress Report (see page 125) and Student Record Report (see page 126).
Students or teachers follow these steps to send the practice and test history from a Responder to MathsFacts in a Flash Renaissance Place.
1. Be prepared to provide students with their PINs. Students use their PIN to send the history to Renaissance Place. You can get a list of student user names, passwords and PINs from Renaissance Place (see page 52).
2. The teacher’s computer must be on, with the Renaissance Receiver connected. (Teachers can use the computer to do other things while students work in MathsFacts in a Flash on Responder.)
3. Turn on the Responder by pressing On/Off.
4. From the main menu, choose the history.
a. Use the arrow keys to highlight MathsFacts History.
b. Press the down arrow.
5. Use the arrow keys to highlight Send to Renaissance Place.
Then, press Select or Enter.
6. The Responder will notify you that all data will be cleared from the history when you send it to Renaissance Place. If you want to continue, press yes (True). Then, press Select or Enter.
7. If the Responder asks whether to stay connected to a specific Receiver, press yes or no and press Enter.
If the Responder shows a list of Receivers, use the arrow keys to highlight the correct Receiver name and press Enter.
8. Enter the 9-digit PIN for the student (see step 1).
As you enter the PIN, if you enter an wrong digit, press Clear to erase the last digit you entered.
When you have finished entering the PIN, press Enter.
The Responder will notify you if the PIN you entered was too short (fewer than 9 digits) or if it is wrong.
9. The data will be sent to MathsFacts in a Flash RP and cleared from the Responder.
If you have an older version of MathsFacts in a Flash RP that is
not able to receive the information from the Responder, the Responder will notify you. Press Enter after reading this message.
103MathsFacts in a Flash™Software Manual

Renaissance Responders and MathsFacts in a FlashWorking Offline with MathsFacts in a Flash on Renaissance Responder
Clearing the MathsFacts Offline HistoryStudents follow these steps to clear (delete) the MathsFacts in a Flash practice and test history from this Responder.
Note: You cannot get the results back after clearing the history. Renaissance Learning strongly recommends that you either print the history before clearing it (see page 102) or send the history to Renaissance Place, which will clear the history but preserve the information in Renaissance Place (see page 103).
To clear (delete) the Responder MathsFacts History:
1. Turn on the Responder by pressing On/Off.
2. From the main menu, choose the history.
a. Use the arrow keys to highlight MathsFacts History.
b. Press the down arrow.
3. Use the arrow keys to highlight Clear.
Then, press Select or Enter.
4. The Responder will ask if you are sure that you want to clear the MathsFacts History.
It will also notify you if the history has not yet been sent to Renaissance Place or printed.
You cannot get the results of your work back once you clear the history.
If you want to clear it anyway, press yes.
If you do not want to clear the history, press no.
Then, press Select or Enter.
After you clear the history, you will see the message “MathsFacts History Cleared”.
Next, the Responder will show the menu.
If students are sharing Responders, clear the history after
each session.
Levels that students have already worked on will no longer be
checked when they select activities after you clear the history.
104MathsFacts in a Flash™Software Manual

Renaissance Home Connect and MathsFacts in a Flash
What Is Renaissance Home Connect?Renaissance Home Connect is a web-based program that allows students, parents and guardians to actively monitor student progress from home.
To make sure Renaissance Home Connect is available, a school network administrator should check the Renaissance Home Connect setup and activate Renaissance Home Connect for the schools that have Accelerated Reader Enterprise, Accelerated Maths Enterprise or MathsFacts in a Flash.
For information on setting up Renaissance Home Connect, refer to either the Renaissance Home Connect Help or Setting Up Renaissance Home Connect on the Manuals page.
For MathsFacts in a Flash, Renaissance Home Connect supports further acceleration of learning in maths by supporting parents/guardians’ efforts to monitor their children’s maths progress, motivating student maths practice beyond the classroom and removing barriers to progressing at their own pace.
The program administrator and teachers can select Renaissance Home Connect on the Home page.
Students can use Renaissance Home Connect to:
Complete MathsFacts in a Flash practices and tests at home
View their progress (both at school and at home)
Before students use Renaissance Home Connect, check the following:
Make sure the student knows the Renaissance Home Connect web address.
Note: The Renaissance Home Connect web address is not the same as the Renaissance Place URL.
Make sure the student knows his or her user name and password.
Get a list of student user names and passwords from Renaissance Place (see page 52).
Review “Working at Home vs. Working at School” on page 117.
There are important differences between working in
Renaissance Home Connect and MathsFacts in a Flash at school. Review “Working at Home vs. Working at School” on page 117.
Students cannot master levels in Renaissance Home
Connect. They can only practise.
105MathsFacts in a Flash™Software Manual

Renaissance Home Connect and MathsFacts in a FlashRenaissance Home Connect Web Address (URL)
Renaissance Home Connect Web Address (URL)There are two ways to find the web address for Renaissance Home Connect:
View the Renaissance Home Connect Informational Letter (see page 106).
The web address for Renaissance Home Connect is your Renaissance Place web address/homeconnect.
Sample web address: http://ukhosted123.renlearn.com/9876543.
Sample Renaissance Home Connect address: http://ukhosted123.renlearn.com/9876543/homeconnect.
ReportsTwo MathsFacts in a Flash reports help teachers track work completed by students in Renaissance Home Connect:
Class Progress Report (see page 125)
Student Record Report (see page 126)
For both reports, teachers can choose to include Practice Summaries for Renaissance Home Connect.
For the Class Progress Report, teachers can choose to include students with or without data.
Renaissance Home Connect Informational LetterThe Renaissance Home Connect Informational Letter:
informs parents, guardians and students about Renaissance Home Connect
provides the website for Renaissance Home Connect
Note: This address is not the same as the address used for Renaissance Place.
provides the user name and password of the student
provides instructions for setting up email notifications of the student’s quiz and test results
To print the Informational Letter:
1. On the Home page, select Renaissance Home Connect, then Reports.
106MathsFacts in a Flash™Software Manual

Renaissance Home Connect and MathsFacts in a FlashRenaissance Home Connect Informational Letter
2. If necessary, use the drop-down list to select a school A.
3. Select Informational Letter B.
4. Use the Report Options page to select the students C and products D you want to print Informational Letters for.
5. When you have made your selections, select View Report E.
6. The Informational Letter generates.
It opens in Adobe Reader within a browser window or a separate window.
If it opens in a browser window, to save, print or email it, use the Adobe Reader buttons. If you try to use the browser’s print function instead, only the top of the page will print. (In Adobe Reader X or XI, the Adobe Reader buttons may be hidden until you move the mouse over the bottom center of the document or press F8.)
7. You have three options.
To generate the letter again with different custom options, select Customise this Report.
To create a different report, select Select a Different Report.
To go to a different page, select Home in the navigation bar at the top of the page.
A
B
C
E
D
107MathsFacts in a Flash™Software Manual

Renaissance Home Connect and MathsFacts in a FlashLog In to Renaissance Home Connect
Log In to Renaissance Home ConnectParents and guardians use their child’s student user name and password to log in to Renaissance Home Connect.
Follow these steps to log in:
1. In a web browser, go to the address provided by your teacher or school.
Renaissance Home Connect uses a different website address (URL) than that used by Renaissance Place. See “Renaissance Home Connect Web Address (URL)” on page 106.
2. Type your student user name and password A.
This is the same user name and password you use at school to log in to Renaissance Place.
3. Select Log In B.
4. If necessary, select the maths tab C.
There are important differences between working in
Renaissance Home Connect and MathsFacts in a Flash at school. Review “Working at Home vs. Working at School” on page 117.
A
B
108MathsFacts in a Flash™Software Manual

Renaissance Home Connect and MathsFacts in a FlashLog In to Renaissance Home Connect
5. If necessary, select the MathsFacts in a Flash tab D.
6. If you are enrolled in more than one school and/or class, use the drop-down lists to select the appropriate school and class E.
See the following sections for instructions on what you can do in Renaissance Home Connect for MathsFacts in a Flash.
7. When you have finished using Renaissance Home Connect, select Log Out F in the upper-right corner.
D
C
E
F
109MathsFacts in a Flash™Software Manual

Renaissance Home Connect and MathsFacts in a FlashResults at School
Results at SchoolTo see details about your progress for the last mastered level and the current benchmark level, in addition to details about the last test taken at school, select School Results A.
To see a list of the levels mastered at school, under Levels Mastered, select View All B.
A
B
110MathsFacts in a Flash™Software Manual

Renaissance Home Connect and MathsFacts in a FlashResults at Home
Results at HomeTo see details about the last test you took at home, select Home Results A.
Details include:
the level name
the percent correct
the time it took you to complete the test
your time target (if any)
incorrect problems (if any)
A
111MathsFacts in a Flash™Software Manual
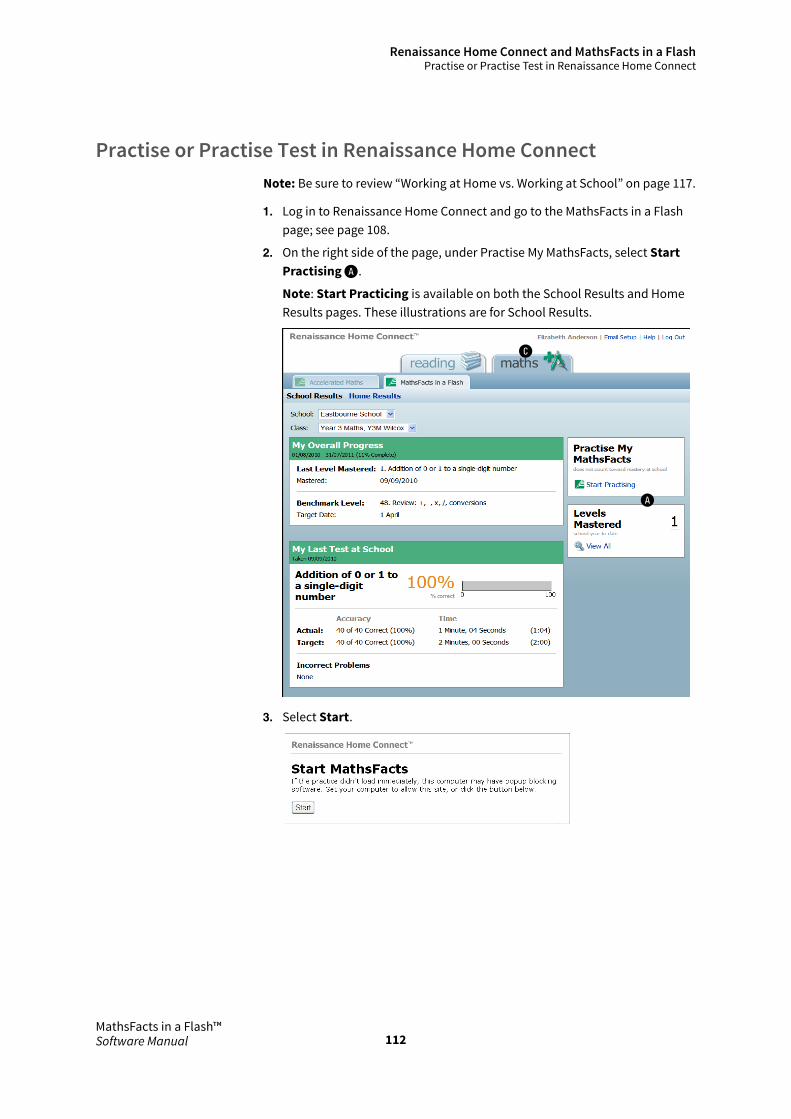
Renaissance Home Connect and MathsFacts in a FlashPractise or Practise Test in Renaissance Home Connect
Practise or Practise Test in Renaissance Home ConnectNote: Be sure to review “Working at Home vs. Working at School” on page 117.
1. Log in to Renaissance Home Connect and go to the MathsFacts in a Flash page; see page 108.
2. On the right side of the page, under Practise My MathsFacts, select Start Practising A.
Note: Start Practicing is available on both the School Results and Home Results pages. These illustrations are for School Results.
3. Select Start.
C
A
112MathsFacts in a Flash™Software Manual

Renaissance Home Connect and MathsFacts in a FlashPractise or Practise Test in Renaissance Home Connect
4. The Select a Level page lists the levels you can choose from.
You have several options:
Select the level the you want to work on B.
Use the scroll bar at the right C to scroll down the list.
View information about your last session per level D.
Select either Practice or Practice Test E at any level.
Log out of Renaissance Home Connect; select Exit F .
5. Complete the practice or test by selecting the answer to each problem.
If open-ended problems are used (see page 143), you must type in the answer.
You will see both a Practice and a Test button. In
Renaissance Home Connect, you can work at any MathsFacts in a Flash level. You can also choose to practise or take a practice test at any time. There are no restrictions as there are at school.
E
F
D
B
C
G L
H
JI K
113MathsFacts in a Flash™Software Manual

Renaissance Home Connect and MathsFacts in a FlashPractise or Practise Test in Renaissance Home Connect
You should see your name here G. If you do not, log out and log in again.
This tells you how to choose an answer H.
Computers
If you are answering multiple-choice questions, with no shortcut keys defined, you will see: Use the or keys to select the answer, then press Enter.
If you are answering multiple-choice questions, with shortcut keys defined, you will see: Use the or keys or press x, y, z to select the answer, then press Enter. (x, y, z will be the defined shortcut keys.)
If you are answering free response questions, you will see: Type your answer, then press Enter.
Tablets
Tap your answer choice
Depending on the work you are doing, you will see either Practise or Practise Test I.
During practice tests, you can go back and change the answer on the previous problem by selecting Back J.
You can only go back one problem.
The additional time it takes you to answer the problem the second time will be added to the total time for the practice test.
Note: During practices, you cannot go back one problem.
The problem you are on and the total number of problems in the practice or practice test is displayed here K.
When the time limit is almost up, a clock flashes in the upper-right corner L.
6. You will see the results of your practice or practice test.
The results include:
The time it took you to complete the test I (tests only)
The Time Target you were trying to meet or beat J (tests only)
Accuracy K (practices and tests)
Problems you got wrong (with the correct answer) L (practices and tests)
7. To continue practising, select Show Levels M. See step 4.
114MathsFacts in a Flash™Software Manual

Renaissance Home Connect and MathsFacts in a FlashStopping a Practice or Test
8. To log out of Renaissance Home Connect, select Exit N.
Stopping a Practice or TestNote: Stopped practices and tests cannot be resumed.
To stop the practice or test (before completing it):
Windows computer: Ctrl+A
Macintosh computer: control+A
Tablet: Tap x (close the window).
For Renaissance Place Home Connect, stopped practices and tests are not shown in the Assignment Book and reports (Class Progress, see page 125; Student Progress, see page 126; and Student Record, see page 126).
Practice Test
K
L
N M
I JK
L
N M
115MathsFacts in a Flash™Software Manual

Renaissance Home Connect and MathsFacts in a FlashHow Students View Their Progress in Renaissance Home Connect
How Students View Their Progress in Renaissance Home ConnectStudents use Renaissance Home Connect to view information about the MathsFacts in a Flash sessions completed both at school (on either a computer, tablet, NEO 2 or a Responder) and at home.
To view their progress, students follow these steps:
1. Log in to Renaissance Home Connect and go to the MathsFacts in a Flash page; see page 108.
2. The page that opens displays your results at school.
To see the results from the last session completed at home, select Home Results A.
To return to the school session results, select School Results B.
3. When you are finished using Renaissance Home Connect, in the upper-right corner, select Log Out C.
Work at School Work at Home
C
B A
C
B A
116MathsFacts in a Flash™Software Manual

Renaissance Home Connect and MathsFacts in a FlashWorking at Home vs. Working at School
Working at Home vs. Working at SchoolPractising and testing in Renaissance Home Connect is very similar to working in MathsFacts in a Flash at school.
However, there are differences. Be sure to review “Things to Remember When Practising and Testing” on page 63.
Differences to be aware of:
Renaissance Home Connect uses a different website address (URL) than that used by Renaissance Place. See “Renaissance Home Connect Web Address (URL)” on page 106.
Students cannot practise or test in Renaissance Home Connect until they have first worked in MathsFacts in a Flash at school.
Students practise in Renaissance Home Connect. A student cannot master a level in Renaissance Home Connect. The student must meet the mastery criteria (see page 36) on a MathsFacts in a Flash test taken at school before the program will mark the level as Mastered.
Data from the student’s work in Renaissance Home Connect will not be available in the MathsFacts in a Flash Assignment Book at school.
Renaissance Home Connect may or may not display information about the student’s last activity in MathsFacts in a Flash.
If the information is available to Renaissance Place, Renaissance Home Connect will display it.
Information displays in Renaissance Home Connect when the student worked with a:
Computer or tablet connected to MathsFacts in a Flash RP
NEO 2, using the MathsFacts in a Flash RP SmartApplet
Information may not display in Renaissance Home Connect when the student worked with a:
NEO 2, using the MathsFacts in a Flash (offline) SmartApplet
Renaissance Responder using firmware 2.51 (see page 91)
Note: When students complete offline MathsFacts work on either NEO 2 or Responder, that work can be sent to MathsFacts in a Flash Renaissance Place. If the offline work is sent to MathsFacts in a Flash Renaissance Place, it will display in Renaissance Home connect.
To send offline MathsFacts in a Flash work to MathsFacts in a Flash Renaissance Place, see
For NEO 2, see page 90
For Responder, see page 103
117MathsFacts in a Flash™Software Manual

Renaissance Home Connect and MathsFacts in a FlashWorking at Home vs. Working at School
How students answer questions depends on both the hardware/program being used and the setting of the Question Type preference (Multiple Choice or Free Response). See “How Students Answer Questions” on page 144.
Unanswered problems in Renaissance Home Connect are always marked as wrong answers.
TOPS Reports are not generated after a MathsFacts in a Flash session taken in Renaissance Home Connect.
Teachers may choose to include summaries from the practices and practice tests students complete in Renaissance Home connect. This information can be included in the Class Progress Report and/or the Student Record Report. For more information, see “Printing Reports from the Reports Page” on page 122.
118MathsFacts in a Flash™Software Manual

Reports
MathsFacts in a Flash ReportsUse the Reports page to generate reports about your students’ work in MathsFacts in a Flash.
To open the MathsFacts in a Flash reports page, go to the Home page, select MathsFacts in a Flash, then Reports A.
List of MathsFacts in a Flash Reports
ReportDescription(see page)
Can be Customised?
How to Print From the:
Assignment Book (see page)
Reports Page
(see page)
Certificate 125 Yes 122
Class Progress 125 Yes 122
Parent 125 Yes 122
Student Progress 126 No 123 122
Student Record 126 Yes 122
TOPS 127 No 123
MathsFacts in a Flash is not included in the Consolidated Reports
listed under Dashboards and Reporting on the Home page.
A
119MathsFacts in a Flash™Software Manual

ReportsWhich Report Should I Use?
Which Report Should I Use?The following table should help you decide which report(s) can best serve your needs. If more than one report is listed, read the report descriptions to narrow down the choices.
Another helpful resource is Monitoring Student Progress with Reports. This document provides information about these key MathsFacts in a Flash reports: TOPS, Student Progress, Student Record and Class Progress. To access this resource:
1. On the Home page, select MathsFacts in a Flash, then Resources.
2. Select Using MathsFacts in a Flash in the Classroom.
3. Select Monitoring Student Progress With Reports.
Task/Information Needed Report to Use Page
Viewing MathsFacts in a Flash Information--General
Benchmark target date Student Progress 126
Passwords (students) Get a list of student user names and passwords from
Renaissance Place
52
PINs for NEO 2/Responder
User names (students)
Viewing Practice- and Test-Taking Data
Class average of the number of best time attempts Class Progress 125
Class average of the number of levels mastered Class Progress 125
Class average of the number of practices completed Class Progress 125
Class average of the number of tests taken Class Progress 125
Date of the student’s last work in MathsFacts in a Flash Class Progress 125
Date of offline practices completed by a student using NEO 2 Student Record 126
Date of offline practices completed by a student using Renaissance Home Connect Student Record 126
Date of offline practices completed by a student using Responder Student Record 126
Students who practiced offline using a NEO 2, Responder or Renaissance Home Connect
Class Progress 125
Planning Instruction
Identify if a student needs to work on speed and/or accuracy Class Progress 125
Student Progress 126
Identify struggling students Class Progress 125
Student Record 126
Identify students who are testing more than they are practising Class Progress 125
Identify which problems a student missed while practising or testing TOPS 127
Viewing Scores
View the score for a practice TOPS 127
120MathsFacts in a Flash™Software Manual

ReportsWhich Report Should I Use?
View the score for a test Student Progress 126
TOPS 127
Gauging Growth and Progress
Accuracy and speed of the student at the current level Student Progress 126
Student Record 126
Best time attempts: class average Class Progress 125
Best time for a test, by a student (includes the date achieved) Student Progress 126
Student Record 126
Chart of benchmark target, benchmark level achieved and level mastered Student Progress 126
Charts of an individual student’s progress Student Progress 126
Class averages (number of best time attempts, number of levels mastered, number of practices completed and number of tests taken)
Class Progress 125
How many days since a student worked in MathsFacts in a Flash? Class Progress 125
How many levels has a student mastered? Class Progress 125
How many practices (all levels) has a student completed? Class Progress 125
How many practices (at the current level) has a student completed? Class Progress 125
How many tests (all levels) has a student completed? Class Progress 125
How many tests (at the current level) has a student completed? Class Progress 125
Levels a student has mastered Student Progress 126
Student Record 126
Levels a student has worked on. Student Record 126
Mastery Time: Identify students who have improved their mastery times Class Progress 125
Progress of the student at the current level Class Progress 125
Student Progress 126
Progress of the student toward the benchmark Student Progress 126
Snapshot of the class Class Progress 125
Targets: Mastery Time Target Student Progress 126
Student Record 126
Task/Information Needed Report to Use Page
121MathsFacts in a Flash™Software Manual

ReportsPrinting Reports
Printing Reports
Printing Reports from the Reports PageNote: A PDF Viewer (such as Adobe Reader) must be available on each individual computer or tablet used to view and print reports, forms and charts. For more information, see “Software Requirements” on page 15.
Use the Reports Page to print most of the reports in MathsFacts in a Flash.
You can print the Class Progress, Student Progress and TOPS reports from the Assignment Book (see page 123).
To print reports from the Reports Page:
1. To go to the Reports page, do one of the following:
On the Home page, select MathsFacts in a Flash, then Reports.
If you are on the Assignment Book page, on the left side of the page, below Reports, select More Reports.
2. If necessary, use the drop-down list to choose the desired school.
3. In the list, select the report name.
4. If the Report Options page opens, choose the options for that report. Each customizable report has its own set of options. To view a sample Report Options page, see page 128.
For many reports, you can choose students by name or class. Use the drop-down list or select one of the links provided.
Reporting parameter groups let you choose students with common traits. For more information, see page 124.
To generate the report, select View Report.
If the Report Options page does not open; the report cannot be customised.
5. MathsFacts in a Flash generates the report you selected.
The report opens in Adobe Reader or your default PDF Reader within a browser window or a separate window.
To select a different report, select Select a Different Report. To modify the report, select Customise this Report if custom options are available.
Who Can Do This? School Network Administrator
School Network Staff
School Administrator
School Staff
Teachers
Learn more about capabilities on page 167.
122MathsFacts in a Flash™Software Manual

ReportsPrinting Reports
Printing Reports from the Assignment BookNote: A PDF Viewer (such as Adobe Reader) must be available on each individual computer or tablet used to view and print reports, forms and charts. For more information, see “Software Requirements” on page 15.
You can print these reports from the Assignment Book: Class Progress, Student Progress and TOPS. To access (and print) all other reports, select More Reports.
1. View the Assignment Book for the class for which you need to print reports; see page 21.
2. Select the students you want to include in the report.
To select a one or several students, select the box by each student you want included.
To choose all the students on the page, in the column heading, select the Student box A.
3. On the left side of the page, below Reports, select the name of the report B.
4. The report generates and opens in Adobe Reader (or your default PDF Reader) within a browser window or a separate window.
To modify the report, select Customise this Report. For information on customising reports, see “Printing Reports from the Reports Page” on page 122. Note: Not all reports can be customised.
To select a different report, select Select a Different Report.
To return to the Assignment Book, in the navigation bar, select Assignment Book.
Stop the TOPS Report From Automatically PrintingTo stop TOPS reports from automatically printing, you must change the TOPS Report preference. See page 153.
Who Can Do This? School Network Administrator
School Network Staff
School Administrator
School Staff
Teachers
Learn more about capabilities on page 167.
A
B
Reports can also be printed from the Reports page (see
page 122).
123MathsFacts in a Flash™Software Manual

ReportsReporting Parameter Groups
Reporting Parameter GroupsReporting parameter groups let you limit reports to students with common traits. When you customise some MathsFacts in a Flash reports, you can choose a reporting parameter group from a drop-down list on the Report Options page. To create or change a group, select Create New or Edit Selected.
Use the Reporting Parameter Group Name field A to name your group.
To select students enrolled in the school before a date you specify; enter the desired date in the Enrol Date field B.
Each student’s ethnicity, gender, language and year can be specified when the student is added to the database or when the student’s information is edited.
Characteristics C can be assigned to students separately. Custom characteristics can be created and assigned to students.
For more information, see either the Renaissance Place Help or the Renaissance Place Software Manual.
The reporting parameter groups you create in
MathsFacts in a Flash are available in your other Renaissance Place programs as well.
B
C
A
If you do not see ethnicity or characteristics, it is
because the Filter Reports by Ethnicity and Filter Reports by Characteristics capabilities have been removed. For more information on capabilities, see page 167.
124MathsFacts in a Flash™Software Manual

ReportsReport Descriptions
Report DescriptionsThis table lists the reports in the MathsFacts in a Flash software.
Report Why You Would Use It Things You Can Change
Certificate Lists the title, name of the student receiving the certificate, date the certificate is generated and the accomplishment.
Things to Note The accomplishment can be standardised text or your own
customised text. By customising the report, you can add signature lines (the
teacher and the head teacher, by default) and choose a border.
You may select: classes or students to
include date range text for the certificate signature lines border
Class Progress Shows the class, teacher, the students’ current assigned level, date the student last worked on it (practice or test), number of school days since the student’s last session, number of practices and tests the student has completed at the current level, number of all the practices and tests completed (all levels), number of all levels mastered and class averages of the number of practices completed, tests taken, levels mastered and best time attempts.
Things to Note This report can be generated from the Assignment Book; see
page 123. This report has two practice summary columns:
Renaissance Home Connect Practices/practice tests do not count toward a level masteryUse to practise at home
Renaissance Responder and NEO 2 Renaissance Responder
Practices/practice tests do not count toward a level masteryUse to work and practise at school Use to practise at home
NEO 2Use to work and practise at school Use to practise at home
You may select: classes or students to
include date range which practice
summaries to include. Practice work is organised into two groups: (1) Students using Renaissance Home Connect and (2) students using NEO 2 and/or Renaissance Responder. For each group, you can choose to include students with data, students without data or both.
grouping method sorting method page breaks whether to show the
report options
Parent Gives parents or guardians a snapshot of their child’s maths progress. Includes the name of the class, teacher, student, the level the student is currently working on and a list of the levels the student has mastered, the date each level was mastered, the student’s best time for completing the test and the date when the best time was achieved.
Things to Note Each student’s information is printed on a separate page.
You may select: classes or students to
include date range signature lines for the
teacher and the parent
125MathsFacts in a Flash™Software Manual

ReportsReport Descriptions
Student Progress Lists your student’s name, teacher, class, year, level you chose to report on and the mastery time target for it and the date of the last test the student completed at that level. Includes graphs showing the student’s test accuracy and time scores. Also lists the levels and date the student mastered the level.
Things to Note There is room on the report for the teacher to sign it and add
comments. There is also room for a parent’s signature. This report can be generated from the Assignment Book; see
page 123.
You may select: classes or students to
include student ID whether to show
graphs sorting method
Student Record Lists the levels a student has worked on. For each level, it shows information about the last test, current time target and the number of practices and tests the student has taken at that level. It also shows a summary of the levels the student has mastered, the date each level was mastered, the student’s best time for completing the test and the date when the best time was achieved.
Things to Note You can choose to show only the Mastered Levels Summary
on the report. Practices and tests taken using Renaissance Home Connect
do not count toward level mastery.
You may select: classes or students to
include date range which practice
summaries to include. Practice work is organised into two groups: (1) Students using Renaissance Home Connect and (2) students using NEO 2 and/or Renaissance Responder. You can choose to include one group, both groups or no groups.
sorting method page breaks content whether to show the
report options
Report Why You Would Use It Things You Can Change
126MathsFacts in a Flash™Software Manual

ReportsReport Options
Report Options
Accessing the Report Options PageThe Report Options page opens for reports that have customisable options.
The reports with customisable options are: Certificate, Class Progress, Parent, Student Progress and Student Record. The Report Options page opens when you select one of these reports on the Reports page (see page 122). After generating a report, you can also go back and change the options for a report by selecting Customise this Report.
TOPS Report Shows the results for individual practices or tests. The report includes the student’s score and the level the student was working on. The report may also show which problems the student got wrong. If a student achieves a new best time for completing a test, a congratulatory message will be included.
Things to Note The TOPS report can be reprinted from the Assignment Book;
see page 123. The TOPS report cannot be printed from the Reports Page. When students complete an practice or test on a computer or
tablet using MathsFacts in a Flash Renaissance Place, they will see a screen with the results of their work. To view a TOPS report of their work, students select TOPS (in the lower-right corner of the screen). Next, to print the report, students select Print.
By default, the TOPS report prints automatically for online work completed using a NEO 2.
The program, hardware and firmware version you are using (see page 154) determines when and how the TOPS report prints.
Use the TOPS Report Preference (see page 153) to change when and how the report prints.
You may select: when the report prints signature line for the
parent or guardian
Report Why You Would Use It Things You Can Change
127MathsFacts in a Flash™Software Manual

ReportsReport Options
Sample Report Options Page
128MathsFacts in a Flash™Software Manual

ReportsReport Options
Definitions of Options
Option Definition Reports That Have It
Border Choose the type of border to print on the certificate.
Options are: Award Border or Math Border (appropriate for younger students)
Default: Award Border.
Certificate
Content If you tick the Only display the levels mastered section box, only students who have mastered at least one level will appear on the report.
Default: List all students (box is not ticked).
Student Record
Group By Use this option to decide whether to group information on the report or how to group it.
Options are: Class, Year, Teacher and Do Not Group
Default: Class
Things to Note If a report uses both Group By and Sort By options, the
Group By option is applied first.
Class Progress
Include Practice Summary
Use this to include information from: Renaissance Home Connect
and/or NEO 2 or Renaissance Responder
If you choose to include information from any or all of the above, you also choose to: List Students With Data List Students Without Data
Defaults are: Not to include information List Students Without Data
Class Progress Student Record
Page Break If you print a report, this makes it easier to keep the records separated and confidential.
Use this to decide where the page breaks will be when you create the report.
When page break is enabled (ticked), the page breaks will occur after the Group By setting (Class, Year or Teacher)
If “Do Not Group” is selected for the Group By option, you cannot include page breaks in the report.
Default: Do not insert page breaks (box is not ticked)
Certificate Student Record
Print Report Options
The ability to print a list of the options you have chosen for a report is itself an option. If you decide to run a report again at a later date, you can refer to this list of options to make sure you are using the same ones.
Default: Print the selected options (box is ticked)
Class Progress Student Record
129MathsFacts in a Flash™Software Manual

ReportsReport Options
Reporting Parameter Group
Reporting parameter groups allow you to select students to include on a report based on characteristics assigned to the students, such as gender, ethnicity or language.
See “Reporting Parameter Groups” on page 124.
When given the option to include a reporting parameter group on a report, you will also have the opportunity to create a new group or edit a group after you have selected it.
Default: All Demographics
Certificate Class Progress Parent Student Progress Student Record
Reporting Period Many reports show how test results or other data has changed over a specific period of time.
The time period is either: a predefined date range (set in Renaissance Place by a
school network administrator or school administrator),
or a date range of your own choice (you select the
beginning and ending dates).
If no reporting periods have been set by a school network administrator or school administrator, the school year itself can usually be used as a reporting period.
Default: Current school year
Certificate Class Progress Parent Student Record
Select Students or Select Specific Students | Classes
Use to choose one or more students or classes to include on a report. When selecting specific students, you will see a
checklist of all students enrolled in MathsFacts in a Flash classes. Tick each student you want on the report or tick the Student box at the top of the column to select all of them.
When selecting specific classes, you will see a checklist of all MathsFacts in a Flash classes. Tick each class you want on the report. To select all of the classes, tick the Class box at the top of the column.
Once the desired students/classes have been selected and saved, you will return to the Report Options page.
Default: All Classes
Certificate Class Progress Parent Student Progress Student Record
Option Definition Reports That Have It
130MathsFacts in a Flash™Software Manual

ReportsReport Options
Show Graph The Student Progress Report is a combination of text, graphs and tables.
What you see on the report depends on where the student is in the program and what the student has worked on and/or mastered.
By default, both Current Level and Levels Mastered are ticked. Use the drop-down list to select the Student’s Current Level (default) or any other available level.
If a student is working on a level, you will see the Test Accuracy Graph (Number Correct) and Test Time Graph (in seconds).
As the student masters levels, you will see the Levels Mastered Graph, which plots the Levels Mastered, Benchmark Targets and Benchmark Level Achieved information.
If the student masters more than one level in a day, only the highest level will be shown in the graphs. All mastered levels will appear in the table.
Student Progress
Show Student ID Use this to include the Student ID in the report.
Default: Yes
Student Progress
Signature(s) Use this to include signature lines on the report.
Certificate Report Can include two signature lines. Can include a printed name or title below each line. Default: Include two lines (boxes are ticked).
Parent Report Can include one signature line (for parent) Default: Include the signature line (box is ticked)
Certificate Parent
Sort By Use to determine how the students on the report will be sorted.
Note: If a report uses both Group By and Sort By options, the Group By option is applied first.
Options are:
Class Progress Last Name (default) Level Last Session
Student Information Last Name (default) ID
Student Progress and Student Record Level (default) Date Mastered (the date a student masters a level)
Class Progress Student Progress Student Record
Option Definition Reports That Have It
131MathsFacts in a Flash™Software Manual

ReportsReport Options
Text Use this to specify the reason the certificate is being awarded. The reason prints on the certificate.
Options are: Number of Levels Mastered (default) Create Your Own Text
If you select Create Your Own Text, you must select the blank field and type the text you want printed on the certificate. Limit: 40 characters
Certificate
Option Definition Reports That Have It
132MathsFacts in a Flash™Software Manual

Renaissance Place Summary Dashboard
The Renaissance Place Summary Dashboard gives administrators, staff and teachers a way to quickly get an overall view of how their school(s) are performing in several different areas.
To open the Dashboard, on the Home page, select Summary Dashboard A under Dashboards and Reporting.
For MathsFacts in a Flash, the Dashboard shows the percentage of students who met the benchmark and the total number of levels mastered and facts practised for the school year to date. Custom views can also be added to the Dashboard. For more information about using the Dashboard, select help in the upper-right corner of the page.
A
133MathsFacts in a Flash™Software Manual

Preferences
General InformationPreferences help you customise MathsFacts in a Flash for yourself, your classes and your students. By default,
Teachers can only edit the preferences for classes assigned to them.
School Network Administrators and School Administrators can change the preferences for any class they have access to.
School Network Staff and School Staff can only view the setting of all classroom and school preferences. When they have finished viewing a preference, select Cancel.
There are two types of preferences (see page 135): 1) Classroom and 2) User and School.
The effect of a preference varies according to the program and hardware you are using.
134MathsFacts in a Flash™Software Manual

PreferencesList of the MathsFacts in a Flash Preferences
List of the MathsFacts in a Flash Preferences Mandatory Practice (see page 136)
Authorisation Password (see page 137)
Problem Format (see page 139)
Question Type (see page 143)
Time Targets (see page 149)
Time-Out (see page 151)
TOPS Report (see page 153)
General (see page 155)
Benchmarks (see page 157)
Copying Classroom PreferencesIf your classes are similar to those from a previous school year, your school can copy the classes from that year, including the assigned teachers, assigned products and enrolled students. The class preference settings are also copied. For more information, see “Getting Ready for a New School Year” on page 16.
For MathsFacts in a Flash, all class preferences are copied, but not exclusions to preferences. The Problem Format preference (see page 139) and Question Type preference (see page 143) allow you to set individual exceptions to the class preference setting for one or more students. These are the exceptions that are not copied.
The User and School Preferences cannot be copied. These are the General preference (see page 155) and the Benchmarks preference (see page 157).
Types of PreferencesThere are two types of preferences: 1) Classroom and 2) User and School.
Classroom Preferences The class preferences can be different for each class. They control:
Mandatory practice options (see page 136)
Password authorisation (see page 137)
Problem formatting (see page 139)
Question type (see page 143)
Time targets (see page 149)
Time-out options (see page 151)
When the TOPS Report prints and the information included on the report (see page 153)
135MathsFacts in a Flash™Software Manual

PreferencesMandatory Practice Preference
Two preferences, Problem Format (see page 139) and Question Type (see page 143), can also be set for individual students or an entire class.
If your school copies your classes from the previous school year, your school can also copy the assigned teachers, assigned products, enrolled students and class preference settings. See page 16.
User and School PreferencesThe user preference (the General Preference, see page 155) can be set differently for every user. It governs lists on the pages in the software and allows you to choose how many items you see at once in vertical lists with Next >> and << Previous links.
Note: The General Preference does not affect (1) lists of students or (2) lists with information that extends horizontally. Most of the MathsFacts in a Flash lists are one of these two types.
The school preference (Benchmarks, see page 157) can only be set by a school network or school administrator. Benchmarks are set for an entire school.
Mandatory Practice Preference
Things to Remember About the Mandatory Practice PreferenceThe Mandatory Practice preference allows you to require that your students complete a practice after failing the first test at a new level.
The default is: Student is required to practise after the first test on a level.
If your school copies your classes from the previous school year, the Mandatory Practice preference settings are also copied. See page 135.
The effect of this preference varies according to the program, hardware and firmware version you are using (see the table below).
Program, Hardware and Firmware Version
Affected by the Mandatory
Practice Preference?
MathsFacts in a Flash Renaissance Place (see page 50)
Computer or tablet Yes
NEO 2 Using the MathsFacts in a Flash RP SmartApplet (see page 80)
Yes
Using the MathsFacts in a Flash (offline) SmartApplet (see page 84)
No
Responder Renaissance Responder using firmware version 2.51 (see page 84)
No
Renaissance Home Connect (see page 105)
Computer or tablet No
Who Can Do This? School Network Administrator
School Network Staff
School Administrator
School Staff
Teachers
Learn more about capabilities on page 167.
136MathsFacts in a Flash™Software Manual

PreferencesAuthorisation Password Preference
Changing the Mandatory Practice Preference1. On the Home page, select MathsFacts in a Flash, then Preferences.
2. If necessary, use the drop-down lists to select a school and class.
3. In the list of classroom preferences, select Mandatory Practice.
4. Remove the tick mark from the box. Students in this class will not have to practise after failing the first test at a new level A.
To return to the default setting, tick the box or select Default.
5. Select Save B.
Authorisation Password Preference
Things to Remember About the Authorisation Password PreferenceThe Authorisation Password preference allows you to:
Specify whether an authorisation password is required when a student stops a test or a mandatory practice. (To stop a practice or test, see page 63.)
Set the authorisation password
The default setting is Require Authorisation Password. The default password is ADMIN.
If your school copies your classes from a previous school year, the Authorisation Practice preference settings are also copied. See page 135.
If you stop a practice or test before it is completed, the practice or test cannot be resumed. Stopped practices and tests may or may not be saved in history (tracked in reports and the student details information); see the table below.
The effect of this preference varies according to the program, hardware and firmware version you are using (see the table below).
A
B
Who Can Do This? School Network Administrator
School Network Staff
School Administrator
School Staff
Teachers
Learn more about capabilities on page 167.
137MathsFacts in a Flash™Software Manual

PreferencesAuthorisation Password Preference
Changing the Authorisation Password Preference1. On the Home page, select MathsFacts in a Flash, then Preferences.
2. If necessary, use the drop-down lists to select a school and class.
3. In the list of classroom preferences, select Authorisation Password.
4. Make your changes.
To stop tests and practices without an authorisation password, remove the tick from the box A.
To change the password, delete the old password and type the new authorisation password you want to use B.
To return to the default setting, select Default.
5. Select Save C.
Program, Hardware and Firmware Version
Affected by the
Authorisation Password Preference?
Is the stopped
practice or test saved in
history?
MathsFacts in a Flash Renaissance Place
Computer (see page 50) Yes Yes
Tablet (see page 69) No Yes
NEO 2 Using the MathsFacts in a Flash RP SmartApplet (see page 80)
Yes Yes
Using the MathsFacts in a Flash (offline) SmartApplet (see page 84)
No No
Responder Renaissance Responder firmware version 2.xx (see page 99)
No No
Renaissance Home Connect
Computer or tablet (see page 105) No No
AB
C
138MathsFacts in a Flash™Software Manual

PreferencesProblem Format Preference
Problem Format Preference
Things to Remember About the Problem Format PreferenceThe Problem Format preference allows you to specify which format the program will use during practices and tests: Horizontal, Vertical or Combination. The default is Horizontal. Combination is a random mix of horizontal and vertical. For more information about each choice, see “Problem Formats” on page 140. Things to note:
You can set the preference for all of the students in a class and also set it individually for one or more students.
Once you have made a student an exception, that student will not be affected by the class setting for this preference, unless you remove the student from the exception list.
If your school copies your classes from one year to the next, the Problem Format preference settings were also copied; see page 135. Exceptions to preferences set for individual students are not copied.
The effect of this preference varies according to the program, hardware and firmware version you are using (see the table below).
Program, Hardware and Firmware Version
Affected by the Problem Format
Preference?
MathsFacts in a Flash Renaissance Place (see page 50)
Computer or tablet Yes
NEO 2 Using the MathsFacts in a Flash RP SmartApplet (see page 80)
Yes
Using the MathsFacts in a Flash (offline) SmartApplet (see page 84)
No
Responder Renaissance Responder using firmware version 2.51 (see page 84)
No
Renaissance Home Connect (see page 105)
Computer or tablet Yes
Who Can Do This? School Network Administrator
School Network Staff
School Administrator
School Staff
Teachers
Learn more about capabilities on page 167.
139MathsFacts in a Flash™Software Manual

PreferencesProblem Format Preference
Problem Formats
Horizontal
Vertical
Combination
When Combination is selected, students will see both horizontal and vertical problems.
Changing the Problem Format Preference1. On the Home page, select MathsFacts in a Flash, then Preferences.
2. If necessary, use the drop-down lists to select the school and class.
3. In the list of classroom preferences, select Problem Format.
The Problem Format Preference page displays.
A
B
C
D
140MathsFacts in a Flash™Software Manual

PreferencesProblem Format Preference
4. To change the setting for an entire class, select Horizontal A, Vertical B or Combination C.
At this point, you can
Change settings for individual students. Go to step 5.
Continue the procedure without changing the setting for individual students. Go to step 7.
5. To change the setting for an individual student or students, select Add Students D.
Use the list of students on the right.
Tick the box in front of the desired student’s name(s) E.
When you have finished selecting the student(s), select < Add F.
6. The students you selected are listed on the left, under Exceptions to Class Setting.
For each student in the Exceptions table, choose one of the options in the Problem Format column G.
Once you have made a student an exception, that student will not be affected by the class setting for this preference unless you remove the student from the exception list.
F
E
141MathsFacts in a Flash™Software Manual

PreferencesProblem Format Preference
7. Review your selections. Make any desired changes.
To exit without saving your changes, select Cancel H.
To return the class setting to the default (Horizontal), select Default I. This will return the class setting to the default; it does not change any exceptions (individual students).
When you are finished, select Save J.
GJ
IH
142MathsFacts in a Flash™Software Manual

PreferencesQuestion Type Preference
Question Type Preference
Things to Remember About the Question Type PreferenceThe Question Type Preference allows you to choose the type of questions your students will have to answer during practices and tests. The choices are Free Response or Multiple Choice; the default is Multiple Choice. For more information about each choice, see “Question Types” on page 145.
You can set the preference for all of the students in a class and also set it individually for one or more students.
How students answer questions depends on both the hardware/program being used and the setting of the Question Type preference (Multiple Choice or Free Response). See “How Students Answer Questions” on page 144.
Note: You cannot use a mouse with NEO 2 or Responder.
Some levels cannot use Free Response. For a list of the levels, see “Levels That Use Only Multiple Choice” on page 145. Levels that cannot use Free Response always use Multiple Choice (even if Free Response is set as the question type).
The effect of this preference varies according to the program, hardware and firmware version you are using (see the following table).
Program, Hardware and Firmware Version
Affected by the Question Type
Preference?
MathsFacts in a Flash Renaissance Place (see page 50)
Computer or tablet Yes
NEO 2 Using the MathsFacts in a Flash RP SmartApplet (see page 80)
Yes
Using the MathsFacts in a Flash (offline) SmartApplet (see page 84)
No
Responder Renaissance Responder using firmware version 2.51 (see page 84)
No
Renaissance Home Connect (see page 105)
Computer or tablet Yes
Who Can Do This? School Network Administrator
School Network Staff
School Administrator
School Staff
Teachers
Learn more about capabilities on page 167.
143MathsFacts in a Flash™Software Manual

PreferencesQuestion Type Preference
How Students Answer Questions
Hardware/Program Being Used Question Type Preference Setting What Students Use
MathsFacts in a Flash RP
and
Renaissance Home Connect
Multiple Choice Mouse (computer)
Arrow keys (computer)
Tap (tablet)
Multiple Choice Shortcut Keys Shortcut keys (default: A, S, D, can be defined by user, see page 146)
Arrow keys (computer)
Mouse (computer)
Free Response (levels that can use Free Response)
Keyboard (computer or tablet)
Free Response (levels that cannot use Free Response)
Mouse (computer)
Arrow keys (computer)
Shortcut keys (default: A, S, D, see page 146)
Tap (tablet)
NEO 2
using the MathsFacts in a Flash RP Smart Applet
Multiple Choice Arrow keys
Multiple Choice Shortcut Keys Shortcut keys (default: A, S, D)
Arrow keys
Free Response (levels that can use Free Response)
Keyboard
Free Response (levels that cannot use Free Response)
Arrow keys
NEO 2
using the MathsFacts in a Flash (offline) Smart Applet
No effect Arrow keys
Responder No effect Letter keys (A, B, C, D, E) on the Responder
144MathsFacts in a Flash™Software Manual

PreferencesQuestion Type Preference
Levels That Use Only Multiple ChoiceFor the levels listed below, a single question may have multiple forms of the correct answer (for example: ¾, .75 and 75%), but the program recognises only one correct form for each question.
For these levels, problems are always Multiple Choice format (even if Free Response is selected). See “How Students Answer Questions” on page 144.
Conversion Review
Review: +, –, ×, /, conversions
Question Types
Free Response
This is also known as Open-Ended. The program will not display any answers for your students to choose from. Students use the keyboard to type the answer, then press Enter or return to go to the next problem.
Note: Even if Free Response is selected as the Question Type, some levels (see above) cannot use it. Also see “How Students Answer Questions” on page 144.
Multiple Choice
Your students will be shown three answers to choose from. See “How Students Answer Questions” on page 144.
Multiple Choice Shortcut Keys
Use this option to define which keys on the keyboard will correspond to the left, middle and right answer choices students will see.
The keys you can use are the alphabet keys.
You cannot use number or symbol keys.
Your students will be shown three answers to choose from. See “How Students Answer Questions” on page 144.
Changing the Question Type Preference1. On the Home page, select MathsFacts in a Flash, then Preferences.
2. If necessary, use the drop-down lists to select the school and class.
145MathsFacts in a Flash™Software Manual

PreferencesQuestion Type Preference
3. In the list of classroom preferences, select Question Type.
The Question Type Preference page displays.
4. To change the setting for an entire class, select Free Response (Open-Ended Questions) A or Multiple Choice B.
Note: Some levels cannot use Free Response, even if Free Response is set as the default question type. These levels always use Multiple Choice. See “Levels That Use Only Multiple Choice” on page 145 and “How Students Answer Questions” on page 144.
At this point, you can
Define the keys used to answer multiple choice questions. See “Multiple Choice Shortcut Keys” on page 146.
Change the settings for individual students. Go to step 5.
Continue the procedure without defining the multiple choice shortcut keys or changing settings for individual students. Go to step 7.
Multiple Choice Shortcut Keys
When Multiple Choice is selected, how students answer questions depends on both the hardware/program being used. See “How Students Answer Questions” on page 144.
You can decide which keys your students will use for multiple choice questions. To do this, select Multiple Choice Shortcut Keys C.
To change keys, use the drop-down in each distractor to pick the desired letter. You must define all three distractors. The default choices are A, S and D. You can only use letters, not numbers or symbols.
AB
146MathsFacts in a Flash™Software Manual

PreferencesQuestion Type Preference
5. To change the setting for an individual student or students, select Add Students D.
Use the list of students on the right.
Tick the box in front of the desired student name(s) E.
When you have finished selecting the student(s), select < Add F .
6. The students you selected are listed on the left, under Exceptions to Class Setting.
For each student in the Exceptions table, choose either Free Response or Multiple Choice in the Question Type column G.
C
D
F
E
147MathsFacts in a Flash™Software Manual

PreferencesQuestion Type Preference
Note: Some levels cannot use Free Response, even if Free Response is set as the default question type. These levels always use Multiple Choice. See “Levels That Use Only Multiple Choice” on page 145 and “How Students Answer Questions” on page 144.
7. Review your selections. Make any desired changes.
To exit without saving your changes, select Cancel H.
To return the class setting to the default setting (Multiple Choice), select Default I. This will return the class setting to the default; it does not change any exceptions (individual students).
When you are finished, select Save J.
G
JIH
148MathsFacts in a Flash™Software Manual

PreferencesTime Targets Preference
Time Targets Preference
Things to Remember About the Time Targets PreferenceThe Time Targets preference allows you to define five decreasing time targets for your students to achieve on tests. These targets are separate from the mastery time (see page 37) that you set for the levels.
The default is: Enable Time Targets. Target 1, two minutes, zero seconds. Subsequent targets decrease 15 seconds per target.
If your school copies your classes from the previous school year, the Time Targets preference settings are also copied. See page 135.
The effect of this preference varies according to the program, hardware and firmware version you are using (see the table below).
Changing the Time Targets Preference1. On the Home page, select MathsFacts in a Flash, then Preferences.
2. If necessary, use the drop-down lists to select a school and class.
3. In the list of classroom preferences, select Time Targets.
4. You have several choices.
If you do not want your students to work toward and achieve time targets on tests, remove the tick mark from the Enable Time Targets box A.
To change the time targets, leave the tick mark in the Enable Time Targets box. If you enable time targets, you must set all five targets.
Program, Hardware and Firmware Version
Affected by the Time Targets Preference?
MathsFacts in a Flash Renaissance Place (see page 50)
Computer or tablet Yes
NEO 2 Using the MathsFacts in a Flash RP SmartApplet (see page 80)
Yes
Using the MathsFacts in a Flash (offline) SmartApplet (see page 84)
No
Responder Renaissance Responder using firmware version 2.51 (see page 84)
No
Renaissance Home Connect (see page 105)
Computer or tablet No
Who Can Do This? School Network Administrator
School Network Staff
School Administrator
School Staff
Teachers
Learn more about capabilities on page 167.
149MathsFacts in a Flash™Software Manual

PreferencesTime Targets Preference
Change the Minutes and Seconds for each of the five time targets B. You must enter them in decreasing order (Target 1 must be the longest time target and Target 5 must be the shortest).
To go back to the default setting, select Default.
5. Select Save C.
A
B
C
150MathsFacts in a Flash™Software Manual

PreferencesTime-Out Preference
Time-Out Preference
Things to Remember About the Time-Out PreferenceThe Time-Out preference allows you to specify the amount of time your students can spend on a single problem or on the whole practice or test.
The defaults are:
Time-Out per Practice or Test: 10 minutes
Time-Out per Problem: 30 seconds
If your school copies your classes from the previous school year, the Time-Out preference settings were also copied. See page 135.
The effect of this preference varies according to the program, hardware and firmware version you are using (see the table below).
Changing the Time-Out Preference1. On the Home page, select MathsFacts in a Flash, then Preferences.
2. If necessary, use the drop-down lists to select a school and class.
3. In the list of classroom preferences, select Time-Out.
Program, Hardware and Firmware Version
Affected by the Mandatory
Practice Preference?
MathsFacts in a Flash Renaissance Place (see page 50)
Computer or tablet Yes
NEO 2 Using the MathsFacts in a Flash RP SmartApplet (see page 80)
Yes
Using the MathsFacts in a Flash (offline) SmartApplet (see page 84)
No
Responder Renaissance Responder using firmware version 2.51 (see page 84)
No
Renaissance Home Connect (see page 105)
Computer or tablet No
Who Can Do This? School Network Administrator
School Network Staff
School Administrator
School Staff
Teachers
Learn more about capabilities on page 167.
151MathsFacts in a Flash™Software Manual

PreferencesTime-Out Preference
4. Make your changes.
Practices and Tests
Change the maximum number of minutes you want to allow your students to spend on any one practice or test A.
The available time range is from 5 to 99 minutes.
If the student times out, the program will stop the practice or test.
Problems
Change the maximum number of seconds you want the student to spend on any one problem B.
If the student times out on a problem, it will be counted as wrong if:
no answer is selected
the student has selected or entered the wrong answer (multiple choice letters, arrows or numbers) when it times out
If the student times out on a problem, it will be counted as correct if the student has selected or entered the correct answer when it times out.
If you choose a very short Time-Out per Problem (8 seconds or less), students will see a flashing clock when the problem first displays, or very soon after.
Default
To return to the default settings, select Default.
The defaults are:
Time-Out per Practice or Test: 10 minutes
Time-Out per Problem: 30 seconds
5. Select Save C.
A
B
C
152MathsFacts in a Flash™Software Manual

PreferencesTOPS Report Preference
TOPS Report Preference
Things to Remember About the TOPS Report PreferenceThe TOPS Report preference allows you to specify if and when a TOPS Report will print and also whether it will include a line for the parent/guardian’s signature.
To stop TOPS reports from printing automatically, use this preference.
The defaults are:
print a TOPS Report after each online practice and test on a NEO 2
do not include the parent/guardian signature line
TOPS reports can be printed from the Assignment Book (see page 123).
Online work on computers and tablets generate TOPS reports. However, the reports do not automatically print. Students can choose to print the reports.
Offline work does not generate TOPS reports. See the table below.
If “After a practice session” or “After a test session” are selected,
NEO 2 or Renaissance Responder: When a session is completed, a TOPS Report will print.
Computer or Tablet: For online work, the data on the TOPS report will only reflect the last completed practice or test, not the entire session.
If “Disabled for practices” and/or “Disabled for tests” are selected, the TOPS button will not appear when a test or practice is completed on a computer or tablet.
If your school copied classes from a previous year, the TOPS Report preference settings were also copied. See page 135.
The effect of this preference varies according to the program, hardware and firmware version you are using (see the table on the next page).
Who Can Do This? School Network Administrator
School Network Staff
School Administrator
School Staff
Teachers
Learn more about capabilities on page 167.
153MathsFacts in a Flash™Software Manual

PreferencesTOPS Report Preference
TOPS Report Preference: Effect by Program, Hardware and Firmware Version
Changing the TOPS Report Preference1. On the Home page, select MathsFacts in a Flash, then Preferences.
2. If necessary, use the drop-down lists to select a school and class.
3. In the list of classroom preferences, select TOPS Report.
4. Select the options that describe when you want a TOPS Report to print for your students. TOPS Reports can print after each online session, practice or test completed on a NEO 2.
A session is defined as all the activity completed by a student between log in and log out. A session consists of students practising, testing or both practising and testing.
The TOPS Report printed after each session includes all of the practices or tests for that session.
Program, Hardware and Firmware Version Affected by the TOPS Report Preference?
MathsFacts in a Flash Renaissance Place
Computer or tablet (see page 50) Yes; If “Disabled for practices” and/or “Disabled for tests” are selected, the TOPS button will not appear when a test or practice is completed on a computer or tablet.
NEO 2 Using the MathsFacts in a Flash RP SmartApplet (see page 80)
Yes
Using the MathsFacts in a Flash (offline) SmartApplet (see page 84)
No
Responder Renaissance Responder using firmware version 2.xx (see page 99)
No
Renaissance Home Connect
Computer or tablet (see page 105) No
154MathsFacts in a Flash™Software Manual

PreferencesGeneral Preference
You will pick one option for practices A and one for tests B.
If “After a practice session” or “After a test session” are selected, when an online session is completed on a NEO 2 or a Renaissance Responder, a TOPS Report will print.
To include a line for the parent/guardian’s signature on the TOPS Reports, tick the Print Parent Signature box C.
To return to the default settings, select Default.
5. Select Save D.
General Preference
Things to Remember About the General PreferenceMathsFacts in a Flash has one user preference (the General preference).
The General preference allows you to specify how many rows you want to see at one time in a vertical list while you are working with MathsFacts in a Flash. The other items in the list will still be visible if you select Next >> or << Previous.
The default is 20 rows.
This preference setting cannot be copied from one year to the next.
The General Preference does not affect lists of students or lists with information that extends horizontally. Most of the MathsFacts in a Flash lists are one of these two types.
Changing the General Preference1. On the Home page, select MathsFacts in a Flash, then Preferences.
2. If necessary, use the drop-down list to select the school A.
You do not need to select a class.
A
B
D
C
Who Can Do This? School Network Administrator
School Network Staff
School Administrator
School Staff
Teachers
Learn more about capabilities on page 167.
155MathsFacts in a Flash™Software Manual

PreferencesGeneral Preference
Note: The General Preference only affects what you see; it does not affect other users.
3. At the bottom of the page, under User Preferences, select General B.
4. Enter the number of rows you want to see at one time in lists C.
To return to the default setting, select Default.
5. Select Save D.
B
A
C
D
156MathsFacts in a Flash™Software Manual

PreferencesBenchmarks Preference
Benchmarks Preference
What Are Benchmarks?Benchmarks are levels that students must master by a target date.
Administrators (school network and school) choose the target date and levels.
Notes:
All users can view the Benchmarks Preference page, but only administrators (school network and school) can edit the benchmark levels.
Administrators (school network and school) can either use the default benchmark levels and target date or select different levels and a different date.
The use of benchmarks is optional, but highly recommended. The Summary Dashboard uses benchmark data, which gives you a high-level overview of your students’ performance. For information about the Summary Dashboard, see page 133.
The Benchmarks Preference is the only school preference in MathsFacts in a Flash.
This preference setting cannot be copied from one year to the next.
Resource for Teachers: Year-Level BenchmarksNotes: To view and/or print this resource, a PDF viewer (such as Adobe Reader) must be available to your computer or tablet. For more information, see “Software Requirements” on page 15.
1. On the Home page, select MathsFacts in a Flash, then Resources.
2. Select Research and Benchmarks.
3. Select Year-Level Benchmarks.
4. The resource opens in a separate window and is displayed in Adobe Reader.
In Adobe Reader X or XI, the Adobe Reader buttons may be hidden until you move the mouse over the bottom center of the document or press F8.
Who Can Do This? School Network Administrator
School Network Staff
School Administrator
School Staff
TeachersLearn more about capabilities on page 167.
157MathsFacts in a Flash™Software Manual

PreferencesBenchmarks Preference
Viewing BenchmarksThere are two ways to view Benchmarks:
Benchmarks Preference page
Benchmarks Set for Mastery Table
Benchmarks Preference Page
1. On the Home, select MathsFacts in a Flash, then Preferences.
2. If necessary, select a school from the drop-down list. Benchmarks are set at the school level, so selecting a class is not necessary.
3. Under User and School Preferences, select Benchmarks. The Set Benchmarks page opens.
Benchmarks Set for Mastery Table
The Benchmarks Set for Mastery Table A shows the benchmarks set for your school.
This table appears on these pages:
Set Level (see “Setting a Level” on page 30)
Hold/Reset (see “Holding or Resetting Levels” on page 33)
Edit Mastery Time (see “Editing the Mastery Time for a Level” on page 37)
Add/Remove Level (see “Adding or Removing Levels” on page 42)
Reorder Levels (see “Reordering Levels” on page 43)
Who Can Do This? School Network Administrator
School Network Staff
School Administrator
School Staff
Teachers
Learn more about capabilities on page 167.
A
158MathsFacts in a Flash™Software Manual

PreferencesBenchmarks Preference
Editing BenchmarksTo edit the Benchmarks Preference:
1. On the Home page, select MathsFacts in a Flash, then Preferences.
2. If necessary, use the drop-down list to select a school A. You do not have to select a class. Benchmarks are set at the school level.
3. Under User and School Preferences, select Benchmarks B.
4. The Set Benchmarks page opens.
If necessary, select a school from the drop-down list C.
5. To change the Benchmark Target Date, select the calendar button D and select the desired date.
The default Benchmark Target Date is April 1.
Who Can Do This? School Network Administrator
School Network Staff
School Administrator
School Staff
Teachers
Learn more about capabilities on page 167.
B
A
E
D
F
C
159MathsFacts in a Flash™Software Manual

PreferencesBenchmarks Preference
6. To change the Benchmark for a specific year, select the drop-down list E in the Benchmark column for the year and select the desired level.
The years shown are the years available to the school.
The maximum range of possible years is Nursery through 13.
By default, benchmarks are assigned to years 1–13.
Year 1 Multiplication by 2
Year 2 Review: Division by 5, 10
Year 3 Alternate Forms: Division by 3, 4, 6
Year 4-13 Review: +, -, ×, /, conversions
7. You have several options.
To save your changes and return to the Home page, select Save F .
To restore the default settings and return to the Home page, select Default.
To return to the Home page without saving any of your changes, select Cancel.
160MathsFacts in a Flash™Software Manual

Parents
Involving ParentsMathsFacts in a Flash helps you involve parents in their children’s progress in math.
Reports for parents and guardians (see below)
Parent’s Guide to MathsFacts in a Flash (see below)
Parent access to Renaissance Home Connect (see page 161)
For more information, see Involving Parents, available in MathsFacts in a Flash Resources.
Reports for Parents and GuardiansTOPS reports can be printed and sent home with students. Parents can sign and return the report.
For more information about each report, see these pages:
Parent Report, see page 125
Student Record Report, see page 126
TOPS Report, see page 127
Parent’s Guide to MathsFacts in a FlashThe Parent’s Guide to MathsFacts in a Flash is a document that helps parents and guardians understand the MathsFacts in a Flash work that their child may be doing. The guide is a PDF file.
Parent Access to Renaissance Home ConnectRenaissance Home Connect (see page page 105) is a web-based program that allows students, parents and guardians to actively monitor student progress from home.
Progress at school: Last mastered level, list of the levels mastered at school, current benchmark level and details about the last test taken at school.
Progress at home: Details about the last test taken at home, including the level name and percent correct, the time it took to complete the test, the time goal (if any) and incorrect problems (if any).
Students cannot master levels in Renaissance Home
Connect. They can only practice.
161MathsFacts in a Flash™Software Manual

ParentsParent Access to Renaissance Home Connect
For parents, guardians and students to access Renaissance Home Connect, your school network administrator must:
Check the Renaissance Home Connect setup and activate Renaissance Home Connect for the schools that have Accelerated Reader Enterprise, Accelerated Math Enterprise or MathsFacts in a Flash.
Make sure the parent knows the Renaissance Home Connect web address. This address is available in the Informational Letter (see page 106).
Note: The Renaissance Home Connect web address is not the same as the Renaissance Place URL. See “Renaissance Home Connect Web Address (URL)” on page 106.
Make sure the parent knows his or her child’s user name and password. Parents, guardians and students share the child’s user name and password. A list of student user names and passwords is available through Renaissance Place (see page 52).
For information on setting up Renaissance Home Connect, refer to either the Renaissance Home Connect Help or Setting Up Renaissance Home Connect (on the Manuals page).
162MathsFacts in a Flash™Software Manual

Time Settings in MathsFacts in a Flash
MathsFacts in a Flash has several different time settings.
Reported Time Score vs. Completion Time
Time-Out (per problem, practice or test)
Mastery Time
Time Targets
Best Times
Lockout Time (5 minutes)
Reported Time Score vs. Completion TimeIf you measure the total time it takes a student to complete a practice or test session (completion time), you may notice a difference between your time measurement and the reported time score.
The reported time score is the sum of the problem response times, not the overall elapsed time. The program measures only the time it takes a student to respond to a problem. The time required to display the problem and the answer is not included in the reported time score the student receives.
Example: A test that takes the student 3 minutes to complete could have a reported time score of 2 minutes and 20 seconds.
Time-Out (per Problem, Practice or Test) The Time-Out Preference allows you to specify the amount of time your students can spend on a single problem or on the whole practice or test.
The defaults are:
Time-Out per Practice or Test: 10 minutes
Time-Out per Problem: 30 seconds
For more information, see page 151.
Mastery TimeTo master a level, students must meet the Mastery Time limit and answer all 40 problems correctly within this time limit.
When a student masters a level, the time and date for that test automatically becomes the personal best time and date for that level. This date and time will always be the Mastery Time and date; the Best Time date may change if the student tries for a new personal best time.
The default Mastery Time is 2 minutes. To edit the Mastery Time, see page 37.
163MathsFacts in a Flash™Software Manual

Time Settings in MathsFacts in a FlashTime Targets
Time TargetsThese times are set by teachers and may be turned on or off by teachers.
Once students master a level, you may have them re-test to improve their completion times. Each mastered level may have up to five Time Targets. The defaults are: Time Targets are enabled (turned on), with times of 2:00, 1:45, 1:30, 1:15 and 1:00. Time Targets are not the same thing as Best Times (see the next section).
To change the Time Targets, see page 149.
The resource Working With Time Targets provides a brief overview of adjusting time targets in MathsFacts in a Flash. To access this resource, on the Home page, select MathsFacts in a Flash, then Resources. Then, select Using MathsFacts in a Flash in the Classroom to find the resources.
Best TimeOnce students master a level, they can always try to improve their personal best time for that level. When a student masters a level, the time and date for that test automatically becomes the personal best time and date for that level. This date and time will always be the Mastery Time and date; the Best Time date may change as the student achieves a new personal best time.
Best Times (personal best times) are not the same thing as Time Targets (see the previous section). When students achieve new personal best times for completing a test, a congratulatory message will be included on their TOPS report. For more information about the TOPS report, see page 127.
The Parent Report includes best time information: the best time achieved by the student for a level and the date the time was achieved. For more information about the Parent Report, see page 125.
The program, hardware and firmware version you are using determines if a student can try to improve their personal best times. See the table below.
Program, Hardware and Firmware Version
Can a student try for Best
Times?
MathsFacts in a Flash Renaissance Place
Computer or tablet; see page 50 Yes
NEO 2 using the MathsFacts in a Flash RP SmartApplet (see page 80) Yes
using the MathsFacts in a Flash (offline) SmartApplet (see page 84) No
Responder Renaissance Responder using firmware version 2.51 (see page 91) No
Renaissance Home Connect
Computer or tablet; see page 105 No
164MathsFacts in a Flash™Software Manual

Time Settings in MathsFacts in a FlashLockout Time (5 minutes)
Lockout Time (5 minutes)When a student logs in and tries to work on two computers or tablets at the same time, MathsFacts in a Flash imposes an automatic five minute lock-out.
The five minute lock-out minimizes the chance of a student working in the software on more than one computer at a time.
For more information, see “A student tries to use MathsFacts in a Flash, but the message “This student is already logged in” displays.” on page 169.
165MathsFacts in a Flash™Software Manual

Student Capacity
What Is Student Capacity?The student capacity determines how many students can use MathsFacts in a Flash within a subscription year.
The student capacity was set when you purchased the software subscription.
Each student who has practices or tested in MathsFacts in a Flash at school counts toward your student capacity.
For teachers and administrators, alerts will appear on the Home page when (1) you are near your student capacity limit and (2) when the student capacity limit has been reached.
Students who try to work in the program for the first time after your student capacity limit has been reached will be notified of that and they will not be allowed to work.
You can purchase an increase to your student capacity limit. For more information, contact Renaissance Learning.
It may take up to 24 hours for the capacity count to reflect the
change after students have been un-enrolled from a school.
166MathsFacts in a Flash™Software Manual

Capabilities
Things to Remember About CapabilitiesCapabilities give you the right to perform specific tasks in the software.
By default, your capabilities are determined by your user group. The position you hold determines what user group you are in; you can be in more than one user group. See “User Groups” below.
There are two types of capabilities:
Capabilities in Renaissance Place
Capabilities in a specific program. MathsFacts in a Flash does not have any unique capabilities. Only the Renaissance Place capabilities affect how users interact with this program.
By default, only school network administrators or school administrators can change your capabilities.
For more about capabilities, see the Renaissance Place help or Renaissance Place Software Manual.
User Groups in the SoftwareThe Renaissance Place software contains these six user groups:
Each person added to the Renaissance Place database is assigned to a user group and a specific position within that group. The positions included in each user group are listed below.
School Network Administrators School Administrators Teachers
School Network Staff School Staff Students
School Network Administrators
RP Administrator
School Network Staff Chief Education Officer Other School Network Staff
Curriculum Director Personnel Director
Educational Psychologist * Reading Specialist *
Gifted/Talented Director Secretary—School Network
Library/Learning Resource Centre (LRC) Manager **
Special Education Director
Capabilities are sometimes known as rights, access and/or
privileges.
167MathsFacts in a Flash™Software Manual

CapabilitiesYour Capabilities in Renaissance Place
Your Capabilities in Renaissance PlaceThe best way to find your capabilities is to ask your administrator, because your administrator may have customised (changed) the capabilities assigned to you.
If you are assigned multiple roles or to multiple schools, see “Switching Roles and Schools” on page 14.
School Administrators
Deputy Head Teacher Intervention Specialist
Head Teacher Librarian **
School Staff Doctor Occupational Therapist
EAL Coordinator Other School Staff
Educational Psychologist * Physiotherapist
G&T Coordinator Reading Specialist
Guidance Counsellor School Nurse
Head of Department School Secretary
ICT Subject Leader Science Subject Leader
Interpreter SENCO
Librarian/Resource Coordinator **
Social Worker
Literacy Subject Leader Speech Therapist
Maths Subject Leader Teaching Assistant
Teachers Class Teacher - Lead Teacher - (Product Name)
Class Teacher - (Product Name) Teacher - Supply
Class Teacher - EAL, Special Duty or Special Education
Team - (Product Name)
Class Teacher - Team
StudentsStudents will log in to use some software programs, such as MathsFacts in a Flash.
The three positions (listed below) have similar names. Each
position has different access and capabilities.
Library/Learning Resource Centre (LRC) Manager: This is a school network staff position, and has access to information in the school network. Provides the most access and capabilities of the three positions.
Librarian: This is a school administrator position and has access to information for a school.
Librarian/Resources Coordinator: This is a school staff position and has access to information for a school. Provides the least access and capabilities of the three positions.
168MathsFacts in a Flash™Software Manual

Troubleshooting and FAQs
While using MathsFacts in a Flash, you can use this section to find:
solutions to issues you might experience
answers to frequently asked questions
For further assistance, contact Renaissance Learning (see page 10).
Issues
Software needs to be installedResolution 1
If any programs need to be installed or updated, contact your school’s IT Department/ICT Support. For more information, see “Software Requirements” on page 15.
Resolution 2
If you have downloaded/updated all of the required software, a pop-up blocker may be causing the error. Note: Contact your school’s IT Department/ICT Support before disabling a pop-up blocker. For more information, see the Knowledge Base article 4751376.
My students cannot work in Renaissance Home ConnectStudents must work in MathsFacts in a Flash at school before they can work in Renaissance Home Connect.
It is the beginning of the school year. Courses and classes are set up, but my students cannot use MathsFacts in a Flash.
Make sure that a teacher is assigned to the class, MathsFacts in a Flash is selected for the class and that students are enrolled in the class.
For more information, see “Getting Ready for a New School Year” on page 16.
A student tries to use MathsFacts in a Flash, but the message “This student is already logged in” displays.
When a student logs in and tries to work on two computers or tablets at the same time, MathsFacts in a Flash imposes a five minute lock-out.
The five minute lock-out minimises the chance of a student working in the software on more than one computer or tablet at a time.
169MathsFacts in a Flash™Software Manual

Troubleshooting and FAQsIssues
Possible causes
The student is logged in at another computer or tablet and selected the link to start working in MathsFacts in a Flash.
The student closed the practice or test browser window, before completing the test.
The computer or tablet the student was working on crashed or lost connection to the Renaissance Place server.
If any of the above scenarios occur, and the student moves to another computer or tablet, logs in and tries to use MathsFacts in a Flash, the message “This student is already logged in” will display.
Resolution
If possible, the student should log out of the second computer, return to the first computer and finish the practice or test. This assumes that the practice or test is open on the first computer.
If the session on the first computer closed unexpectedly, the student will need to wait five minutes for the lock to clear.
If a practice or test window is closed before a student completes the practice or test, the work cannot be resumed. The student must start over from the beginning.
TOPS Reports are not printing, even though the TOPS Report Preference is set to print after each practice or test.
By default, TOPS reports print automatically for online work completed on a NEO 2 (see page 80). For work completed on a computer or tablet using MathFacts in a Flash Renaissance Place, TOPS reports are generated, but do not print automatically. Students can choose to print the TOPS report.
The ability to print from a tablet depends on the type of tablet being used, the type of printer being used and/or the program or system being used to connect the tablet to a printer. For assistance, contact your school’s IT Department/ICT Support
When I log in, I cannot do tasks that I normally do or I do not see the correct school information.
You must use the correct user type and/or school. You may be assigned:
More than one user type (role/position)
To more than one school
Extra capabilities
On the Home page, click your name at the top of the page and check to see if you have a Change Role option in the popup menu. If you have this option, choose it to change roles or schools; for more information, see page 14.
170MathsFacts in a Flash™Software Manual

Troubleshooting and FAQsFrequently Asked Questions (FAQs)
Another possibility is that your school administrator or school network administrator may have changed the capabilities assigned to you. For more information, see “Capabilities” on page 167.
Frequently Asked Questions (FAQs)
How do I find my students’ user names, passwords and PINs?You can get this list from Renaissance Place (see page 52).
How do I find personnel user names and passwords?For security reasons, you cannot view or print a list of passwords for teachers, staff members or administrators. User names may be viewed by administrators. Passwords cannot be viewed, but they can be changed/reset by administrators.
Personnel who know their current passwords can change their password on the Login Settings page in Renaissance Place. If they enter an email address on that page, personnel can also retrieve their user name or reset a forgotten password later by clicking Forgot Your User Name or Password? on the login page.
For more information, see either the Renaissance Place Help or the Renaissance Place Software Manual.
A student is locked out of Renaissance Place and cannot log inStudents may be temporarily locked out of all Renaissance Place software if they attempt to log in too many times with an incorrect password. If an account is locked, it will automatically be unlocked at midnight.
You can also clear student locks by following these steps:
1. On the Home page, select Renaissance Place, then Users.
2. On the Personnel and Students page, under Students, select Clear Locked Students.
The Clear Locked Students page will list all students whose accounts are locked.
3. To clear locks for all students at once, select Clear All Student Locks.
To clear locks for individual students, select Clear in the row for each student.
4. When you have finished clearing the locks, select Done.
Who Can Do This? School Network Administrator
School Network Staff
School Administrator
School Staff
Teachers
Learn more about capabilities on page 167.
171MathsFacts in a Flash™Software Manual

Troubleshooting and FAQsFrequently Asked Questions (FAQs)
A teacher, staff member or administrator is locked out of Renaissance Place and cannot log in
Personnel may be temporarily locked out of all Renaissance Place software if they attempt to log in too many times with an incorrect user name and or password.
If an account is locked, it will automatically be unlocked at midnight. You can also clear personnel locks by following the steps below. This procedure will not work for a locked school network administrator account; for that account, contact Renaissance Learning (see page 10).
1. On the Home page, select MathFacts in a Flash, then Users.
2. On the Personnel and Students page, under Personnel, select Clear Locked Personnel. The Clear Locked Personnel page will list all personnel whose accounts are locked.
3. To clear locks for all personnel at once, select Clear All Personnel Locks. To clear locks for individual personnel, select Clear in the row for each person.
4. When you have finished clearing the locks, select Done.
Can I stop TOPS reports from automatically printing?Yes. For more information, see “TOPS Report Preference” on page 153.
How do I change the way problems display?Change the setting of the Problem Format Preference. See page 139.
This preference affects what students see using MathsFacts in a Flash RP, Renaissance Home Connect and NEO 2s using the MathsFacts in a Flash RP SmartApplet. It does not affect what students see using Responders or NEO 2s using the MathsFacts in a Flash (offline) SmartApplet.
Note: You can change the way problems display for all of the students in a class and also set it individually for one or more students.
How do I change how students choose their answers?Change the setting of the Question Type Preference. See page 143. The choices are Free Response or Multiple Choice. Note: You can change the way answers are chosen for all of the students in a class and also set it individually for one or more students.
This preference affects what students see using MathsFacts in a Flash RP, Renaissance Home Connect and NEO 2s using the MathsFacts in a Flash RP SmartApplet. It does not affect what students see using Responders or NEO 2s using the MathsFacts in a Flash offline SmartApplet.
Who Can Do This? School Network Administrator
School Network Staff
School Administrator
School Staff
Teachers
Learn more about capabilities on page 167.
172MathsFacts in a Flash™Software Manual

Troubleshooting and FAQsFrequently Asked Questions (FAQs)
How do I stop a practice or test?How you stop a practice or test varies according to the program, hardware and firmware version you are using. See page 63.
How do I limit the time a student can spend on a problem, practice or test?Change the setting of the Time-Out Preference. See page 151.
How do I identify struggling students?One way is to check to see how long the student has been working on the level and the number of tests taken without success. If a students takes five or more tests without mastering the level, the student may be struggling.
I want my students to practice with paper and pencil. Can MathFacts in a Flash help me?Yes. MathFacts in a Flash has many practice materials that can be printed. For more information, see “Practice Materials for Students” on page 46.
Can I track MathsFacts in a Flash work my students do in Renaissance Home Connect and offline work on NEO 2 and/or Responder?
Yes. Two MathsFacts in a Flash reports help teachers track work completed by students in Renaissance Home Connect and/or offline work completed using NEO 2 or a Responder.
Note: To track the offline work completed using NEO 2 and/or Responder, students have to send the history to Renaissance Place. For NEO 2, see page 90. For Renaissance Responder, see page 103.
In the Class Progress and Student Record Reports, teachers can choose to include Practice Summaries. These summaries will list the work students did in Renaissance Home Connect and/or offline work completed using a Responder or NEO 2.
Class Progress Report (see page 125)
Student Record Report (see page 126)
Can I identify MathsFacts in a Flash work my students do using tablets?No. Work completed using tablets is not identified as such; it is tracked the same as work completed using computers.
Can students master levels in Renaissance Home Connect?No. Students can only use Renaissance Home Connect to practice.
173MathsFacts in a Flash™Software Manual

Troubleshooting and FAQsFrequently Asked Questions (FAQs)
Do students access Renaissance Home Connect via Renaissance Place?No. Renaissance Home Connect uses a different website address (URL) than that used by Renaissance Place. See the Informational Letter (page 106).
Does my Assignment Book show work completed using tablets, NEO 2, Responder or Renaissance Home Connect?
It depends on the program, hardware and firmware being used. See the table below.
For more information, see “Student Work Shown in the Assignment Book (Online and Offline Work)” on page 23.
Can I transfer a student’s history from one class to another?Yes, with restrictions. You can only transfer information:
about mastered levels
Note: Practice information will not transfer.
from a class that is no longer active
Example: A student has advanced from year 3 to year 4; you can transfer the student’s mastered level information from year 3 to year 4.
Do I need additional software to use MathsFacts in a Flash?Yes. What you need depends on the hardware you are using (NEO 2 and Responder) and what you want to do (direct printing of reports).
PDF Viewer (such as Adobe Reader)
To view or print reports, a PDF viewer (such as Adobe Reader) must be available on the computer or tablet being used.
Program and Hardware
Is work shown in the Assignment
Book?
MathsFacts in a Flash Renaissance Place (see page 50)
Computer or tablet Yes
NEO 2 using the MathsFacts in a Flash RP SmartApplet (see page 80)
Yes
using the MathsFacts in a Flash (offline) SmartApplet (see page 84)
No
Responder Renaissance Responder using firmware version 2.51 (see page 99)
No
Renaissance Home Connect (see page 105)
Computer or tablet No
174MathsFacts in a Flash™Software Manual

Troubleshooting and FAQsFrequently Asked Questions (FAQs)
The Downloads page provides a link to help you with Adobe Reader. For more information, see page 15. Also, on the bottom of the Reports page, you can select Get Adobe Reader. You will go to a site where you can download Adobe Reader.
NEO 2 and Responder
The Renaissance Wireless Server Utility must be installed for MathsFacts in a Flash to use NEO 2s and Renaissance Responders with a Renaissance Receiver to communicate with Renaissance Place.
The Renaissance Wireless Server Utility is automatically installed as part of the installation of any of these four programs:
NEO Manager
2Know! Toolbar
Renaissance Responder Program
AccelTest
For more information, see page “Renaissance Wireless Server Utility” on page 72.
Tablets
To use tablets with MathsFacts in a Flash, you do not need to download or install an app. You must either connect to your school’s Renaissance Place web address or to your school’s Renaissance Home Connect web address.
The ability to print from a tablet depends on the type of tablet being used, the type of printer being used, and/or the program or system being used to connect the tablet to a printer. For assistance, contact your IT Department/ICT Support.
How do I make sure my NEO 2s and Responders are up-to-date?Please contact Renaissance Learning (see page 10).
Can I change the size of the print (font) used by the Responder?Yes. You can change the font size using the Responder Settings. For more information, see the 2Know! Classroom Response System Installation and Setup Guide.
What are Benchmarks?Benchmarks are levels that students must master by a target date. Administrators choose the target date and levels. Note: All users can view the Benchmarks Preference page, but only administrators (School Network and School) can edit the benchmark levels. Administrators can either use the
175MathsFacts in a Flash™Software Manual

Troubleshooting and FAQsFrequently Asked Questions (FAQs)
default benchmark levels and target date or select different levels and a different date.
Note: The use of benchmarks is optional, but highly recommended. The Summary Dashboard uses benchmark data, which gives you a high-level overview of your students’ performance. To open the Dashboard, go to the Home page and select Summary Dashboard under Dashboards and Reporting.
How do I know what benchmarks are set for my school?View the Benchmark Set for Mastery Table. This table is automatically shown on many pages in MathsFacts in a Flash. For more information, see “Benchmarks Set for Mastery Table” on page 158.
What are the times measured in MathsFacts in a Flash?MathsFacts in a Flash has several different time settings:
Reported Time Score vs. Completion Time
Time-Out (per problem, practice or test)
Mastery Time
Time Targets
Best Times
For more information, see “Time Settings in MathsFacts in a Flash” on page 163.
What is Challenging Best Times?Once students master a level, they can always try to improve their personal best time for that level. This is known as Challenging Best Times. Best Times (personal best times) are not the same thing as Time Targets.
When a student masters a level, the time and date for that test automatically becomes the personal best time and date for that level. This date and time will always be the Mastery Time and date; the Best Time date and time may change as the student achieves a new personal best time.
When students achieve new personal best times for completing a test, a congratulatory message will be included on their TOPS report. For more information about the TOPS report, see page 127.
The Parent Report includes best time information: the best time achieved by the student for a level and the date the time was achieved. For more information about the Parent Report, see page 125.
For more information, see “How to Try for a Best Time” on page 61.
176MathsFacts in a Flash™Software Manual

Troubleshooting and FAQsFrequently Asked Questions (FAQs)
Can I set a different level for each student?Yes. For more information, see “Setting a Level” on page 30.
What is the difference between putting a level on hold and resetting a level?When you put a level on hold, it does not delete any completed work. When you reset a level, all completed work on that level is deleted. For more information, see “Holding or Resetting Levels” on page 33.
How do students master a level?Students must achieve 100% accuracy and a time score that is at or below the mastery level. For more information, see “Mastery Criteria” on page 36.
Can I change the requirements for mastering a level?You cannot change the accuracy requirement (100%). You can change the time requirement. For more information, see “Editing the Mastery Time for a Level” on page 37.
Can I change the levels my class uses?Yes. You can add levels, delete levels and change the order of the levels.
For more information, see:
“Adding or Removing Levels” on page 42
“Reordering Levels” on page 43
Can I share the levels I use in one class with another class?Yes. When you copy levels between classes, the available levels and the order they are in are copied.
Levels that are in the class you are copying from, but not in the class you are copying into, will be added to the “into” class.
Levels that are in the class you are copying into, but not in the class you are copying from, will be removed from the “into” class. The students’ work, including Mastered levels, is deleted for the levels that will be removed.
For more information, see “Copying Levels Between Classes” on page 44.
177MathsFacts in a Flash™Software Manual

Troubleshooting and FAQsFrequently Asked Questions (FAQs)
What has to be changed to allow a teacher to enrol students in classes?Your school network administrator or school administrator will have to change the capabilities assigned to the teacher (or teachers). The capability to enrol students in classes is the Manage Courses and Classes capability. However, please note that teachers who have this capability can also do the following:
Assign or unassign products from any and all classes in their school.
Assign the primary teacher and assign or unassign team teachers for any and all classes in their school.
Enrol or unenrol students in any and all classes in their school.
Create new courses and classes in their school (valid for all other users to see and use) or copy classes from the previous school year.
Delete courses in their school (which will delete all classes associated with the course).
For more information, see either the Renaissance Place Help or the Renaissance Place Software Manual.
178MathsFacts in a Flash™Software Manual

Index
Numerics2Know! Classroom Response System Installation and Set-
up Guide, 92Know! Toolbar, 72
AAccelTest, 73Adding 2 Numbers up to 10 Chart, 46Adding levels, 42Addition facts, learning, 46Administrative rights to a computer, 15Administrator
locked out, 172user name and password, 171
Administrator PIN, 75Administrator PIN (default), 74Adobe Reader, 3, 174Alerts, 6
licence agreement, 6subscription, 7
Answer types, 143Answers
changing on tests (MathsFacts in a Flash RP), 67changing on tests (NEO 2), 82changing on tests (Renaissance Home Connect), 114changing on tests (Responder), 96entering in MathsFacts in a Flash RP, 144entering in Renaissance Home Connect, 114entering on NEO 2, 82entering on Renaissance Responder, 95how students answer questions, 144table of how students answer questions, 144wrong, during practices, 67
Assignment Book, 20editing the mastery time for a level, 37printing practice materials, 46printing reports, 123setting levels for students to work on, 30symbols, 20viewing for a class, 21viewing student work, 21
Authorisation Password preference, 137Automatic logout, 14
BBaseline test, 54, 55Benchmarks, 157
Benchmarks Set for Mastery Table, 158changing, 159
Dashboard, 157default settings, 160definition, 157preference, 157viewing, 158
Best Times, Challenging, 164Border (report option), 129Browser requirements, 15
CCapabilities
capabilities you have, 168changing your user type or school, 14computer rights, 15how to find your capabilities, 168Renaissance Place, 15user groups, 167
Certificate Report, 125customisation, 125description, 125printing, 122things you can change, 125
Challenging Best Times, 164Changing passwords
students, 52teachers, staff, administrators, 11
Changing test answersMathsFacts in a Flash RP, 67NEO 2, 82Renaissance Home Connect, 114Responder, 96
Changing user namesstudents, 52teachers, staff members, administrators, 171
ChartsAdding 2 Numbers up to 10, 46Hundred, 46Multiplication Square (to 12), 46
Class Progress Report, 125customisation, 125description, 125printing from the Assignment Book, 123printing from the Reports page, 122things you can change, 125
Classroom preferences, 134, 135Clock symbol, 66
NEO 2, 82, 86Renaissance Home Connect, 114Renaissance Responder, 96Time-Out Preference, 152
Closing the software, 14
179MathsFacts in a Flash™Software Manual

Index
Completion Time (practice or test), 163Computer
administrative rights, 15rights to install software, 15
Content (report option), 129Copying levels between classes, 44Count in Fours Worksheet, 46Count in Threes Worksheet, 46Counting in fours, learning, 46Counting in threes, learning, 46Customising reports, 122
DDashboard (Renaissance Place Dashboard), 133Dashboard, and Benchmarks, 157Data transfer between classes, 45Date of last practice or test by a student, 21, 22Descriptions of reports, 125Did You Know? information, 6Documents, 9
2Know! Classroom Response System Installation and Set-up Guide, 9
MathsFacts in a Flash Software Manual, 9MathsFacts in a Flash Tips for Getting Started, 9NEO 2 Quick Guide, 9Parent’s Guide to MathsFacts in a Flash, 161Renaissance Place h Software Manual, 9Resources, 9
EEditing
Authorisation Password preference setting, 137Benchmarks preference, 159Mandatory Practice preference settings, 136mastery time for a level, 37Problem Format preference setting, 139Question Type preference, 143Time Targets preference settings, 149Time-Out preference settings, 151TOPS Report preference, 123TOPS Report preference setting, 153
Entering answers, 144in MathsFacts in a Flash RP, 144in Renaissance Home Connect, 114on NEO 2, 82on Renaissance Responder, 95
Even Numbers Worksheet, 46Even numbers, learning, 46
FFind password
student, 51, 52teacher, staff, administrator, 171
Find user nameduring student log in, 51student, 51, 52teacher, staff, administrator, 171
Firmware versions for Responders, 93Firmware, updating Renaissance Responder, 94Flash cards, 46Flashing clock, 66
MathsFacts in a Flash RP, 66NEO 2, 82, 86Renaissance Home Connect, 114Renaissance Responder, 96Time-Out Preference, 152
Forgotten passwordstudent, 52teacher, staff, administrator, 171
Format of problems on practices and tests, 139Free Response
answers (open ended), 145levels that cannot use Free Response, 145
Frequently asked questions (FAQs)about MathsFacts in a Flash, 171about tablets and MathsFacts in a Flash, 70
GGroup By, 129Guardians. See ParentsGuide
2Know! Classroom Response System Installation and Set-up Guide, 9
NEO 2 Quick Guide, 9Parent’s Guide to MathsFacts in a Flash, 161
HHardware requirements, 15Hardware updates, 175Help
email addresses (for assistance), 10how to use, 9Knowledge Base (technical support information), 10Live Chat, 9phone numbers for assistance, 10
Historyincluding the students information, 102student activity, NEO 2, 87, 88student activity, Responder, 101, 102, 103, 104
Hold symbol, 20Holding levels, 33
180MathsFacts in a Flash™Software Manual

Index
Home page, 5How MathsFacts in a Flash works, 1Hundred Chart, 46
IInclude Practice Summary (report option), 129Input methods, 145Installing software, 15IT Department/ICT Support
new school year tasks, 17
KKeyboard input method, 145Knowledge Base (technical support information), 10
LLength of practices and tests, 66Level Practice Flash Cards, 46Level Practice Worksheet, 46Levels
adding, 42assigned to a student, 22Benchmarks Set for Mastery Table, 158cannot master in Renaissance Home Connect, 117copying between classes, 44editing the mastery time, 37holding, 33how to master, 36levels that cannot use Free Response, 145Mastered (Challenging Best Times), 164Mastered (Time Targets), 164mastery criteria, 36Mastery Time, 22, 163removing, 42reordering, 43resetting, 33setting to work on, 30
Licence agreement alert, 6List of student user names and passwords in Renaissance
Place, 52Live Chat, 9Locked account
student, 171teacher, staff member, administrator, 172
Locked outstudent, 171teacher, staff member, administrator, 172
Lockout time (5 minutes), 165Logging in
students (to NEO 2s), 80students (to Renaissance Place), 51
teachers, staff, administrators, 11to Renaissance Home Connect, 108
Logging outautomatic, 14of the software, 14teachers, staff, administrators, 14
Lost passwordstudent, 51, 52teacher, staff, administrator, 171
Lost user namestudent, 51, 52teacher, staff, administrator, 171
MMandatory Practice preference, 136Manuals, 9
2Know! Classroom Response System Installation and Set-up Guide, 9
MathsFacts in a Flash Software Manual, 9MathsFacts in a Flash Tips for Getting Started, 9NEO 2 Quick Guide, 9Parent’s Guide to MathsFacts in a Flash, 161Renaissance Place Software Manual, 9
Mastered levelChallenging Best Times, 164how to master a level (mastery criteria), 36Time Targets, 164
Mastered symbol, 20Mastery criteria for levels, 36Mastery Time
description, 163editing for a level, 37student mastery time at each mastered level, 22
MathsFacts in a Flash, 1, 2answering questions, 144preferences, 134reports, 119setting up, 12
MathsFacts in a Flash Offline, on Renaissance Responder, 99
MathsFacts in a Flash Software Manual, 9MathsFacts in a Flash Tips for Getting Started, 9Menu, Renaissance Responder, 95Mobile device. See TabletModel types (Responders), 93Multiple choice questions, 143, 145Multiple positions (roles), 14Multiplication facts, learning, 46Multiplication Square (to 12) Chart, 46
181MathsFacts in a Flash™Software Manual

Index
NName, user
Find user name (during student log in), 51student, 51, 52teacher, staff, administrator, 171
Navigating the software, 13NEO 2
answering questions, 82available networks, 80before practicing or testing, 79, 98history of student activity (MathsFacts in a Flash
(offline) SmartApplet), 87history of student activity, printing, clearing or
sending (MathsFacts in a Flash (offline) SmartApplet), 88
history of student activity, viewing (MathsFacts in a Flash (offline) SmartApplet), 87
PIN (student), 52PINs (list of student user names, passwords and PINs
in Renaissance Place), 52taking a test, 80updates (software, utilities, or manuals), 77wrong answers, 67
NEO 2 Quick Guide, 9NEO Manager, 72, 79Networks, available
NEO 2, 80Responder, 103
New school year tasks, 16Number line, on practice worksheet, 48Number of problems in practices and tests, 66Number sequences, learning, 46
OOdd Numbers Worksheet, 46Odd numbers, learning, 46Online help, 7Operating system requirements, 15
PPage Break, 129Parent Report, 125
customisation, 125description, 125printing from the Reports page, 122things you can change, 125
Parent’s Guide to MathsFacts in a Flash, 161Parents
accessing Renaissance Home Connect, 108Parent’s Guide to MathsFacts in a Flash, 161reports they can view, 161
Passwordsauthorisation password, 137changing (student), 52changing (teachers, staff, administrators), 11student, 51, 52student, list of student user names and passwords in
Renaissance Place, 52teacher, staff, administrator, 171
Permission to install software, 15Personnel
user names and passwords, 171PIN
Administrator, 75Administrator (default), 74list of student user names, passwords and PINs in
Renaissance Place, 52student (NEO 2 and/or Responder), 52
Positions, multiple, 14Practice
flashing clock, 66last date work done by a student, 21, 22length, 66number line on worksheets, 48number of student practices at a level, 22number of student practices at each level, 22Renaissance Home Connect, 112skipping problems, 65stopping, 63, 173students working in the program, 53time limit, 66time-out limits, 163unanswered problems, 66, 118what to do before starting, 50wrong answers, 66, 67
Practice materials, printing, 46Preferences, 134
Authorisation Password, 137Benchmarks, 157Mandatory Practice, 136Problem Format, 139Question Type, 143Time Targets, 149Time-Out, 151TOPS Report, 123, 153user, 155
Print Report Options, 129Printing
practice materials, 46reports, 122reports from the Assignment Book, 123reports from the Reports page, 122TOPS report (stopping), 123
Problem Format preference, 139
182MathsFacts in a Flash™Software Manual

Index
Problemsformat on practices and tests, 139time limits, 163
QQuestion Type preference, 143Questions
answering, 144answering in MathsFacts in a Flash RP, 144answering in Renaissance Home Connect, 114answering on NEO 2, 82answering on Renaissance Responder, 95format on problems and tests, 139Live Chat, 9test types, 143
RRandom Numbers Worksheet, 46Ready to Work symbol, 20Removing levels, 42Renaissance Home Connect
access by a parent, 108answering questions, 114cannot master levels, 117logging in, 108viewing student progress, 116working in the program, 112
Renaissance Place, 2, 3connecting with tablets, 69Home page, 5
Renaissance Place Software Manual, 9Renaissance Receiver
connecting to, 73naming, 74
Renaissance Responder, 91answering questions, 95changing a test answer, 96Enter the Student Information, 102firmware versions, 93firmware, updating, 94go back one problem, 96history of student activity (MathsFacts in a Flash
Offline), 101, 102, 103, 104MathsFacts in a Flash Offline, 99Menu, 95models, 93Original (RES-1001), 92PIN (student), 52PINs (list of student user names, passwords and PINs
in Renaissance Place), 52RES-1001 (Original), 92stopping a practice or test, 97
updating the firmware, 93, 94wrong answers, 67
Renaissance Responder Program, 73Renaissance Wireless Server Utility, 72, 74, 75
installed with 2Know! Toolbar, 72installed with AccelTest, 73installed with NEO Manager, 72installed with Renaissance Responder Program, 73
Reordering levels, 43Report Options page, 122Reported Time Score, 163Reporting parameter groups, 130Reporting Period, 130Reports
Certificate, 125Class Progress, 125customising, 122description, 125MathsFacts in a Flash, 119Parent, 125parents, reports for parents, 161printing from the Assignment Book, 123printing from the Reports page, 122stop printing the TOPS Report, 123Student Progress, 126Student Record, 126TOPS, 127TOPS Report, stop printing, 123
Reports, customisation optionsBorder, 129Content, 129Group By, 129Include Practice Summary, 129Page Break, 129Print Report Options, 129Reporting parameter groups, 130Reporting Period, 130Select Students or Select Specific Students | Classes,
130Show Graphics, 131Show Student ID, 131Signatures, 131Sort By, 131Text, 132
Requirementsbrowser, 15for tablets, 70hardware, 15operating system, 15software, 15
Research, 9Resetting levels, 33Resources, 9Responder. See Renaissance Responder, 91Rights to install software, 15
183MathsFacts in a Flash™Software Manual

Index
Rights you have in Renaissance Place, 15Roles, 14Roles, switching, 14
SSchool administrators
Benchmarks Preference, 157capabilities in Renaissance Place, 167passwords, 171positions in Renaissance Place, 168user group, 167, 168user names, 171
School network administratorsBenchmarks Preference, 157capabilities in Renaissance Place, 167passwords, 171positions in Renaissance Place, 167user group, 167user names, 171
School network staff, 167capabilities in Renaissance Place, 167passwords, 171positions in Renaissance Place, 167user names, 171
School staff, 167, 168capabilities in Renaissance Place, 167passwords, 171positions in Renaissance Place, 168user names, 171
School year, newIT Department/ICT Support tasks, 17Renaissance Place tasks, 16setup overview, 16Setup, new school year, 18
School, Benchmarks, 158School, changing the one you are working in, 14Search for password
student, 51teacher, staff, administrator, 171
Search for user namestudent, 51, 52teacher, staff, administrator, 171
Select Students or Select Specific Students | Classes, 130Setting levels for students to work on, 30Setting up the software, 12Setup, new school year
IT Department/ICT Support tasks, 17overview, 16Renaissance Place tasks, 16
Show Graphics (report option), 131Show Student ID (report option), 131Signatures, 131Skipping problems on a practice or test, 65SmartApplets, updates for NEO 2, 77
Software ManualMathsFacts in a Flash Software Manual, 9Renaissance Place Software Manual, 9
Software requirements, 15Software, updates for NEO 2, 77Sort By, 131Specifications, for tablets, 70Staff
locked out, 172user names and passwords, 171
Stop printing TOPS reports, 123Stopping a practice or test, 63, 173Student cannot test
cannot remember user name, 51Student capacity, 166Student Detail page, 22Student Detail page, viewing for a student, 21Student Information, entering on the Responder, 102Student input method, 145Student Progress Report, 126
customisation, 126description, 126printing from the Assignment Book, 123printing from the Reports page, 122things you can change, 126
Student Record Report, 126customisation, 126description, 126printing, 122things you can change, 126
Studentsanswering questions, 144Assignment Book, 21automatic lockout time (5 minutes), 165before they practise or test, 50Best Time (Challenging Best Times), 164clearing the history from Renaissance Responder,
104counting against student capacity, 166date of last practice or test, 21, 22entering a PIN to send NEO 2 history to Renaissance
Place, 90Find user name (during student log in), 51levels assigned, 22list of student user names and passwords, 52locked out, 171logging in to Renaissance Home Connect, 108logging in to Renaissance Place, 51Mastery Time at a level, 22number of practices at a level, 22number of tests at a level, 22passwords, 52PINs (list of student user names, passwords and PINs
in Renaissance Place), 52PINs (NEO 2 and/or Responder), 52
184MathsFacts in a Flash™Software Manual

Index
printing the history from Renaissance Responder, 102
sending history from Renaissance Responder to MathsFacts in a Flash RP, 103
setting levels to work on, 30stopping a practice or test, 63, 173Student Detail page, 21transferring data between classes, 45user group, 167, 168user names, 51, 52user names (list of student user names and
passwords in Renaissance Place), 52viewing progress in Renaissance Home Connect, 116viewing the history from Renaissance Responder, 101working in MathsFacts in a Flash, 53working in Renaissance Home Connect, 112
Subscription alert, 7Subscription codes, 166Summer school, 16Supporting software, 3, 15Switching positions (roles), 14Switching roles in the software, 14Symbols in the Assignment Book, 20
TTable, Benchmarks Set for Mastery, 158Tablet
connecting to Renaissance Place, 69specifications, 70using with MathsFacts in a Flash, 69
Targets, Time, 60, 164Teachers
capabilities in Renaissance Place, 167locked out, 172passwords, 171positions in Renaissance Place, 168user group in Renaissance Place, 167user names, 171
Technical support information, 10Test answers, changing
MathsFacts in a Flash RP, 67NEO 2, 82Renaissance Home Connect, 114Responder, 96
Testsflashing clock, 66last date test taken by a student, 22last date work done by a student, 21, 22length, 66number of student tests at a level, 22number of student tests at each level, 22Renaissance Home Connect, 112skipping problems, 65stopping, 63, 173
students working in the program, 53time limit, 66time-out per test, 163type of questions (multiple choice, free response),
143unanswered problems, 66, 118what to do before starting, 50
Text (report option), 132Time
automatic lockout time (5 minutes), 165automatic logout, 14Best Time (Challenging Best Times), 164Challenging Best Times, 164Completion Time (practice or test), 163lockout time (5 minutes), 165Mastery, 163mastery (by a student), 22, 37Reported Time Score, 163Time Targets, 60, 164Time Targets preference, 149time-out per problem, practice or test, 163Time-Out preference, 151
Time limit, 66Time Targets
changing the mastery time, 37default mastery time, 36student results, 60Time Targets preference, 149
Time Targets preference, 149Time-Out preference, 151TOPS Report, 68, 127
preference, 123printing from the Assignment Book, 123stop printing, 123
TOPS Report preference (for printing), 123, 153Transfer student data between classes, 45Troubleshooting
Live Chat, 9student is locked out of Renaissance Place, 171
Types of questions (multiple choice, free response), 143
UUnanswered problems, 66, 118Updates
for NEO 2, 77Renaissance Responder firmware, 93, 94
Updates (Did You Know? information), 6User groups, 167User names
changing (student), 52Find user name (during student log in), 51student, 51, 52
185MathsFacts in a Flash™Software Manual

Index
student (list of student user names, passwords, and PINs in Renaissance Place), 52
teacher, staff, administrator, 171User preference, 134, 155User type, changing the one you are using, 14
VViewing the Assignment Book, 21
WWhat you can do in Renaissance Place, 15Working in the program, 53Working symbol, 20Worksheets
Count in Fours, 46Count in Threes, 46Even Numbers, 46Level Practice, 46number line on practice, 48Odd Numbers, 46Random Numbers, 46
Wrong answers on practices, 67
YYear
new school year, 16See also Setup, new school year
186MathsFacts in a Flash™Software Manual

R43866.1511
About Renaissance Learning UK
Renaissance Learning is a leading provider of cloud-based assessment technology for primary and secondary schools. A member of the British Educational Suppliers Association (BESA), we also support the National Literacy Trust (NLT), Chartered Institute of Library and Information Professionals (CILIP) and World Book Day.
Our STAR Assessments for reading, maths and early learning incorporate learning progressions built by experts at the National Foundation for Educational Research (NFER), and provide detailed skill-based feedback on student performance, linked to the new curriculum.
The short, computer-adaptive tests provide feedback when it is most valuable – immediately – and bridge assessment and instruction. The reports identify not only the skills students know but also the skills they are ready to learn next. STAR also reports Student Growth Percentiles (SGPs), a measure of student growth new to the UK market.
Our Accelerated Reader (AR) and Accelerated Maths (AM) software programmes help to enhance literacy and numeracy skills. They support differentiated instruction and personalised practice, motivating students to work towards ambitious but realistic targets.
AR and AM are motivational because they provide teachers with immediate feedback to students and their teachers, giving opportunities for praise and for directing future learning. A comprehensive set of reports allow teachers to make monitor and measure growth.