mapi user guide v1
TRANSCRIPT
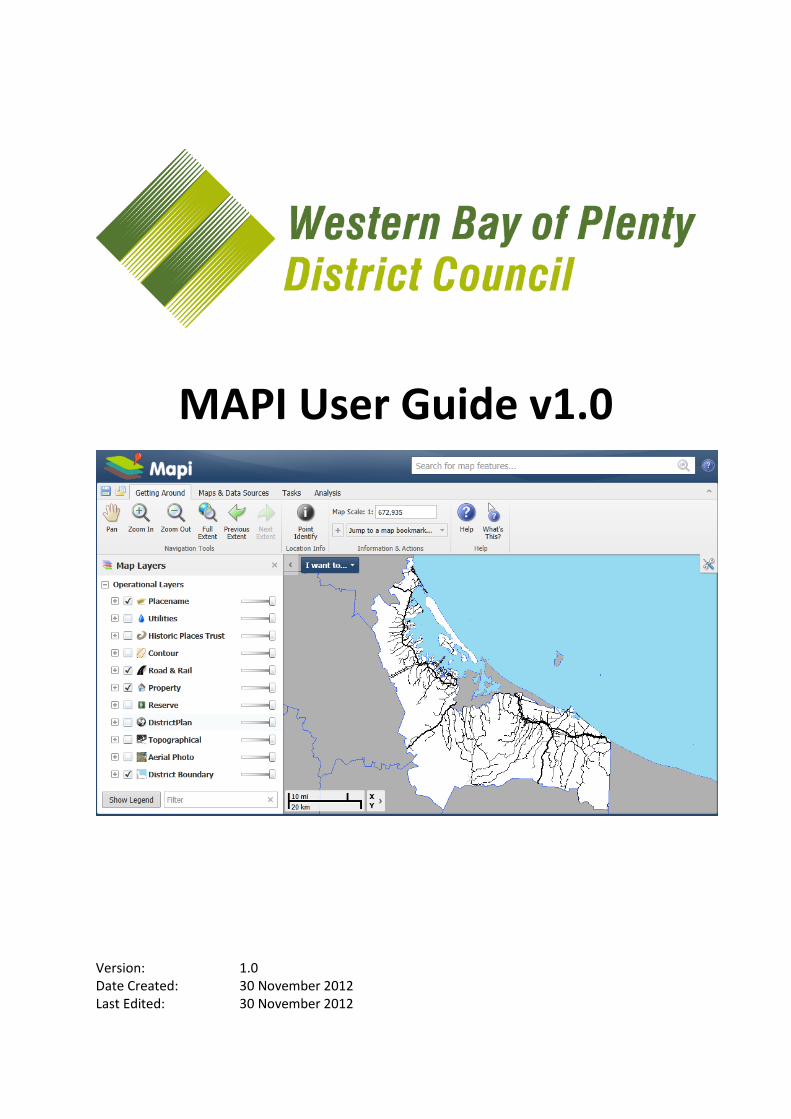
MAPI User Guide v1.0
Version: 1.0 Date Created: 30 November 2012 Last Edited: 30 November 2012
MAPI User Guide
Page 1
Contents Page Using the Web Viewer for the first time ................................................................................................. 2
What am I looking at? ......................................................................................................................... 2 What do the tools do? ........................................................................................................................ 2
Searching for Data and Processing Results ............................................................................................. 3 What can I search for? ........................................................................................................................ 3 How can I search for my property? .................................................................................................... 3
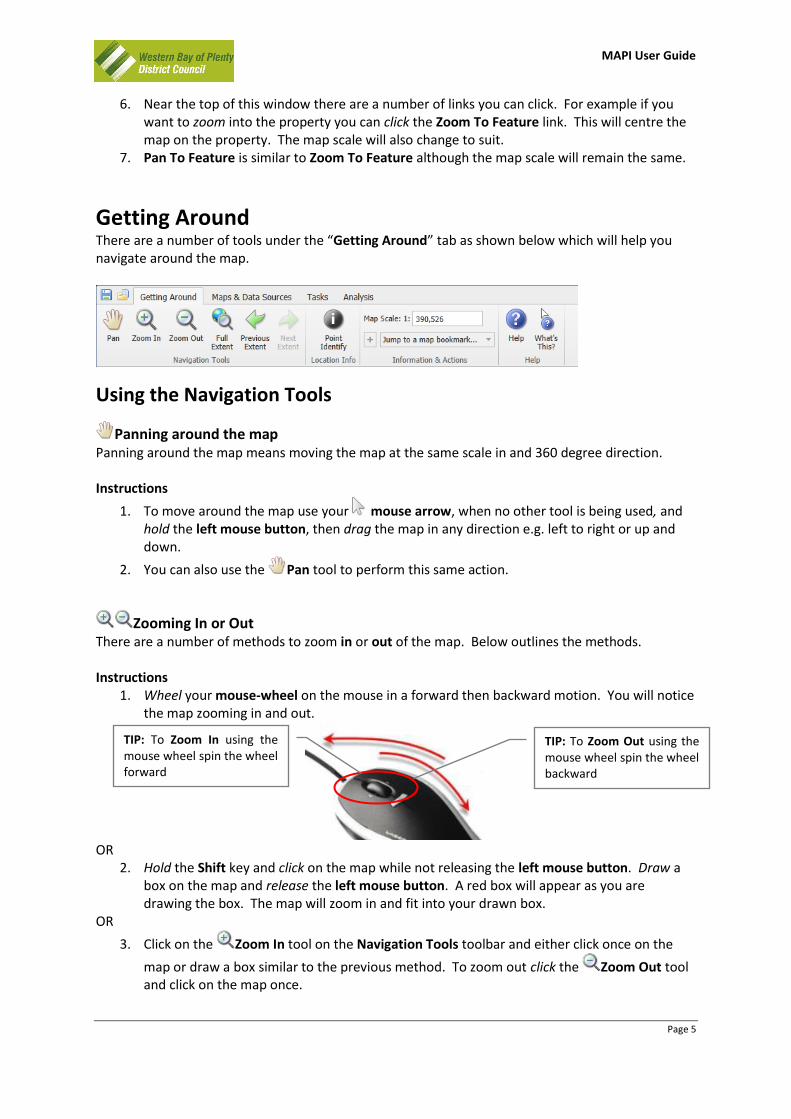
Getting Around ....................................................................................................................................... 5 Using the Navigation Tools ................................................................................................................. 5
Panning around the map ........................................................................................................... 5
Zooming In or Out ................................................................................................................. 5
Full Extent .................................................................................................................................. 6
Previous and Next Extent ...................................................................................................... 6
Point Identify.............................................................................................................................. 6 Map Scale ........................................................................................................................................ 6 Bookmarks ...................................................................................................................................... 6
Working with Map layers .................................................................................................................. 7 Layer Groups ....................................................................................................................................... 7 Getting started with the Map Layers tool .......................................................................................... 7 Turning Layers On and Off .................................................................................................................. 8 How do I view the map legend / key? ................................................................................................ 9
Printing and Exporting ............................................................................................................................ 9
Printing a Map .............................................................................................................................. 9
Exporting a Map ............................................................................................................................ 9 Using the “I want to” tool ..................................................................................................................... 10
Identifying Features on the Map .................................................................................................... 10 Location Information Tools ............................................................................................................... 10
Point Identify ........................................................................................................................... 10
Freehand Identify .................................................................................................................... 11
Line Identify ............................................................................................................................ 11
Polygon Identify ...................................................................................................................... 11
Rectangle Identify ................................................................................................................... 11 Advanced Searching, Processing, and Exporting Results ...................................................................... 11
Saving and Opening your Project ............................................................................................... 14 Additional Resources ............................................................................................................................ 14
MAPI User Guide
Page 2
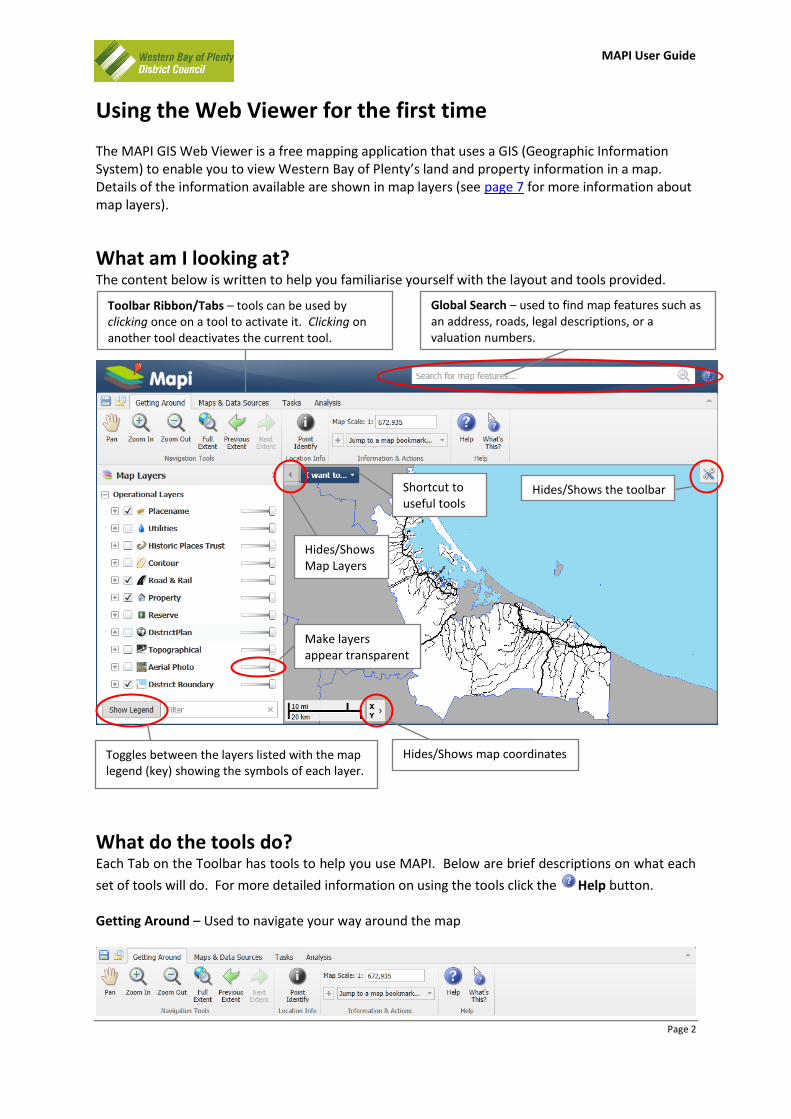
Using the Web Viewer for the first time The MAPI GIS Web Viewer is a free mapping application that uses a GIS (Geographic Information System) to enable you to view Western Bay of Plenty’s land and property information in a map. Details of the information available are shown in map layers (see page 7 for more information about map layers).
What am I looking at? The content below is written to help you familiarise yourself with the layout and tools provided.
What do the tools do? Each Tab on the Toolbar has tools to help you use MAPI. Below are brief descriptions on what each
set of tools will do. For more detailed information on using the tools click the Help button. Getting Around – Used to navigate your way around the map
Toggles between the layers listed with the map legend (key) showing the symbols of each layer.
Hides/Shows the toolbar
Hides/Shows map coordinates
Hides/Shows Map Layers
Shortcut to useful tools
Toolbar Ribbon/Tabs – tools can be used by clicking once on a tool to activate it. Clicking on another tool deactivates the current tool.
Make layers appear transparent
Global Search – used to find map features such as an address, roads, legal descriptions, or a valuation numbers.
MAPI User Guide
Page 3
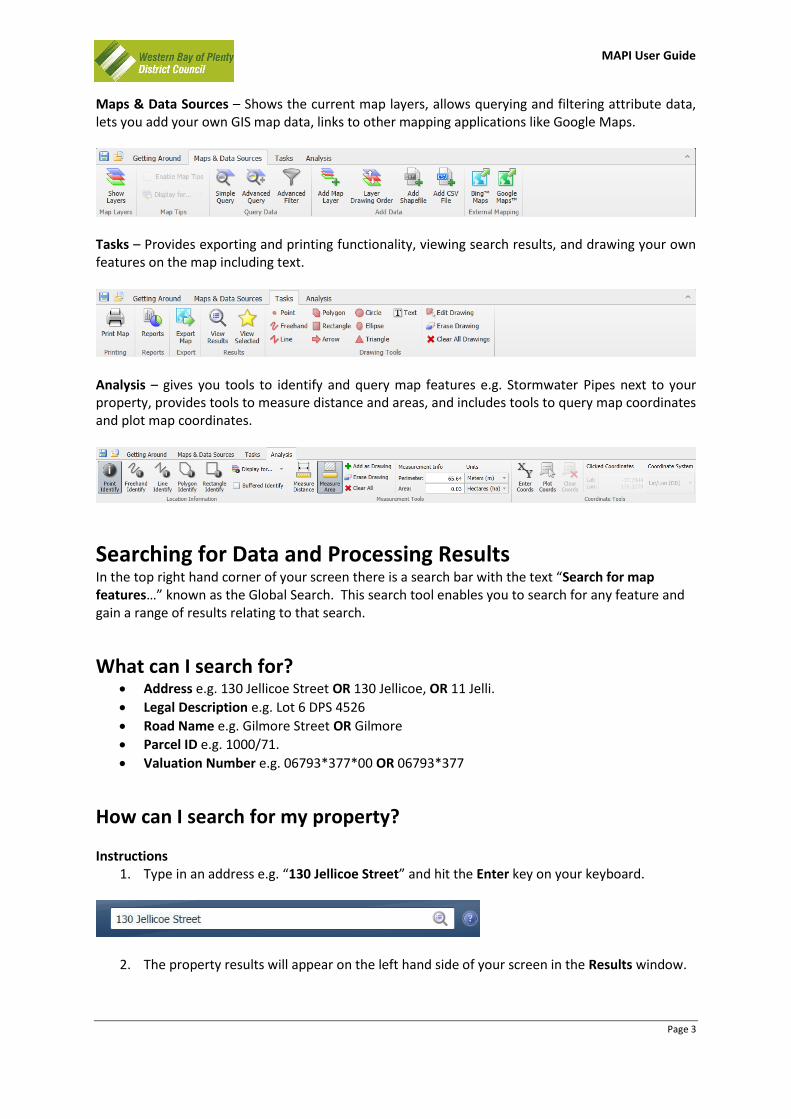
Maps & Data Sources – Shows the current map layers, allows querying and filtering attribute data, lets you add your own GIS map data, links to other mapping applications like Google Maps.
Tasks – Provides exporting and printing functionality, viewing search results, and drawing your own features on the map including text.
Analysis – gives you tools to identify and query map features e.g. Stormwater Pipes next to your property, provides tools to measure distance and areas, and includes tools to query map coordinates and plot map coordinates.
Searching for Data and Processing Results In the top right hand corner of your screen there is a search bar with the text “Search for map features…” known as the Global Search. This search tool enables you to search for any feature and gain a range of results relating to that search.
What can I search for? Address e.g. 130 Jellicoe Street OR 130 Jellicoe, OR 11 Jelli.
Legal Description e.g. Lot 6 DPS 4526
Road Name e.g. Gilmore Street OR Gilmore
Parcel ID e.g. 1000/71.
Valuation Number e.g. 06793*377*00 OR 06793*377
How can I search for my property? Instructions
1. Type in an address e.g. “130 Jellicoe Street” and hit the Enter key on your keyboard.
2. The property results will appear on the left hand side of your screen in the Results window.
MAPI User Guide
Page 4
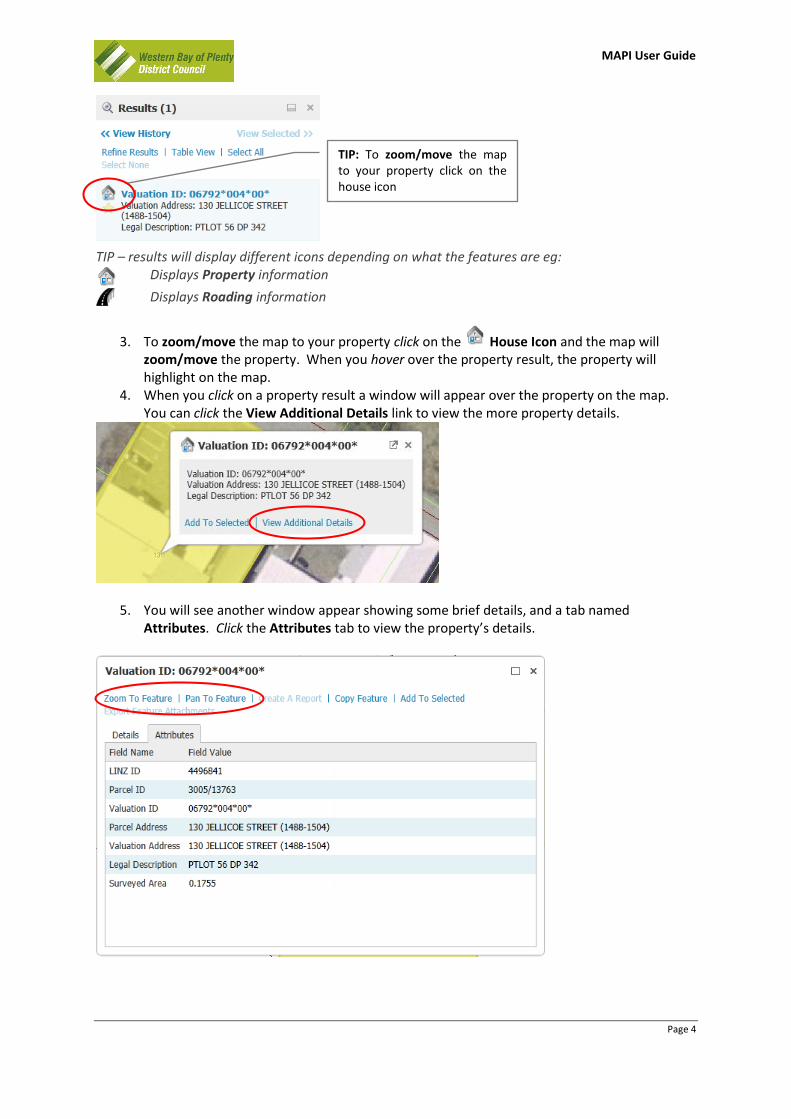
TIP – results will display different icons depending on what the features are eg:
Displays Property information
Displays Roading information
3. To zoom/move the map to your property click on the House Icon and the map will zoom/move the property. When you hover over the property result, the property will highlight on the map.
4. When you click on a property result a window will appear over the property on the map. You can click the View Additional Details link to view the more property details.
5. You will see another window appear showing some brief details, and a tab named Attributes. Click the Attributes tab to view the property’s details.
TIP: To zoom/move the map to your property click on the house icon
MAPI User Guide
Page 5
6. Near the top of this window there are a number of links you can click. For example if you want to zoom into the property you can click the Zoom To Feature link. This will centre the map on the property. The map scale will also change to suit.
7. Pan To Feature is similar to Zoom To Feature although the map scale will remain the same.
Getting Around There are a number of tools under the “Getting Around” tab as shown below which will help you navigate around the map.
Using the Navigation Tools
Panning around the map Panning around the map means moving the map at the same scale in and 360 degree direction. Instructions
1. To move around the map use your mouse arrow, when no other tool is being used, and hold the left mouse button, then drag the map in any direction e.g. left to right or up and down.
2. You can also use the Pan tool to perform this same action.
Zooming In or Out There are a number of methods to zoom in or out of the map. Below outlines the methods. Instructions
1. Wheel your mouse-wheel on the mouse in a forward then backward motion. You will notice the map zooming in and out.
OR
2. Hold the Shift key and click on the map while not releasing the left mouse button. Draw a box on the map and release the left mouse button. A red box will appear as you are drawing the box. The map will zoom in and fit into your drawn box.
OR
3. Click on the Zoom In tool on the Navigation Tools toolbar and either click once on the
map or draw a box similar to the previous method. To zoom out click the Zoom Out tool and click on the map once.
TIP: To Zoom In using the mouse wheel spin the wheel forward
TIP: To Zoom Out using the mouse wheel spin the wheel backward
MAPI User Guide
Page 6
Full Extent Instructions
1. Use the Full Extent button to revert back to the original zoom extent (Western Bay of Plenty District Council view).
Previous and Next Extent Using these tools will let you go back and forth to retrace your navigation steps. Instructions
1. Using the Previous Extent and the Next Extent buttons you can move back and forth from past and present extents.
Point Identify The Point Identify tool allows you to click on any map feature and return valuable information about that feature. Instructions
1. To identify location information use the Point Identify button. 2. After selecting the Point Identify button, click the feature on the map that you want to
identify. The features attributes will appear in the Information window.
Map Scale You can specify a map scale and the map will redraw at that chosen scale.
Instructions
1. Use the Map Scale to specify a new scale for the map by typing in a number e.g. type in 10000 your map scale will be 1:10000. The lower the number the closer to the ground level.
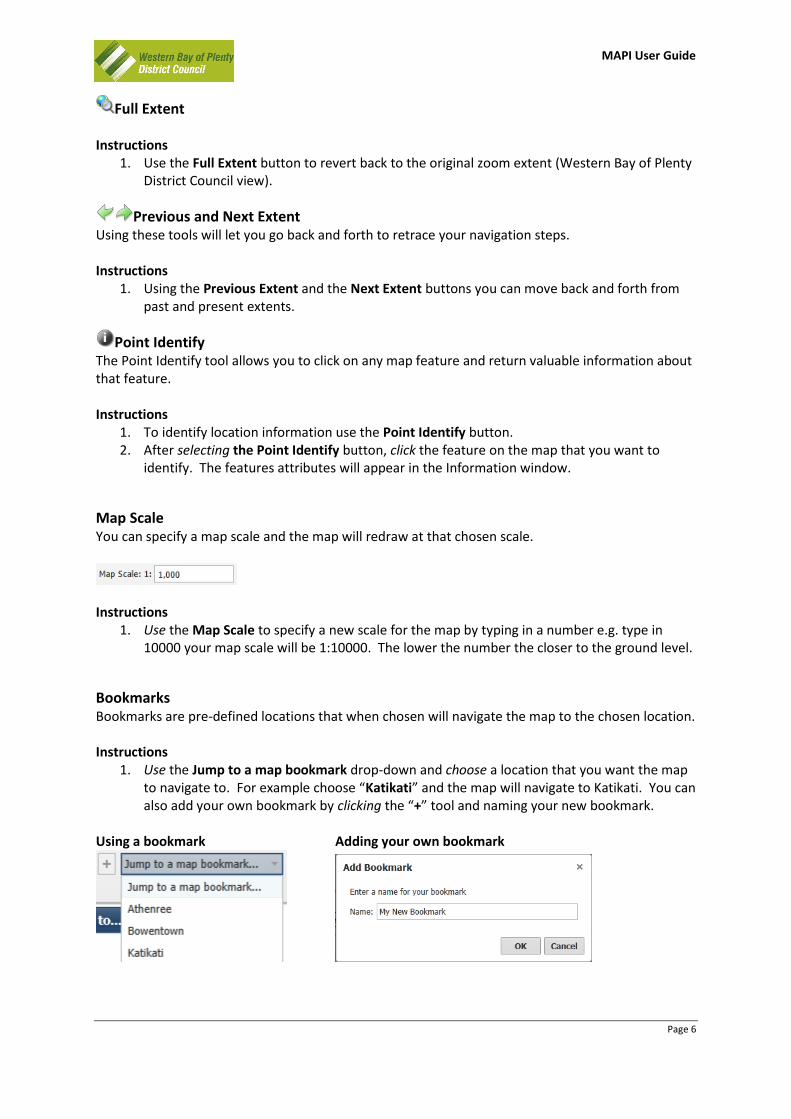
Bookmarks Bookmarks are pre-defined locations that when chosen will navigate the map to the chosen location. Instructions
1. Use the Jump to a map bookmark drop-down and choose a location that you want the map to navigate to. For example choose “Katikati” and the map will navigate to Katikati. You can also add your own bookmark by clicking the “+” tool and naming your new bookmark.
Using a bookmark Adding your own bookmark
MAPI User Guide
Page 7
Working with Map layers The MAPI site is made up of a map with a number of layers in it. You can set layers to be visible, not visible, view their legend or key, and find out what scale each layer will appear on the map.
Layer Groups Each layer group contains a subset of map data layers. Listed below are descriptions of the Layer Groups.
Placename Displays map labels of locations throughout the district.
Utilities All Council maintained underground assets, for example Stormwater, Wastewater, and Water Supply.
Historic Places Trust New Zealand Historic Places Trust (NZHPT) Archaeological Sites (including Pa Sites) and Waahi Tapu Sites.
Contour Contour Elevation data within the District shown at 0, 1, and 2 meter intervals.
Road & Rail Land Information New Zealand (LINZ) Road Network data.
Property Property Boundaries with relevant map labels, for example label by Property Area, Legal Description, Street Number, and Council Rateable Valuation Number. This group also displays Refuse Days, Cross and Rail Lease Boundaries, and allows you to shade by Owner for a quick display of DOC & Council owned land.
Reserve Reserve Boundaries within the district split out as individual Property Boundaries.
District Plan The current Council District Plan showing Zones, Structure Plans, and Designations.
Topographical LINZ Topographical data showing land features.
Aerial Photo Aerial Photography covering the entire district as well as locations with separate photography flown in different years for various council projects.
District Boundary The defined District Boundary as well as some hydro information, for example Rivers and map labels.
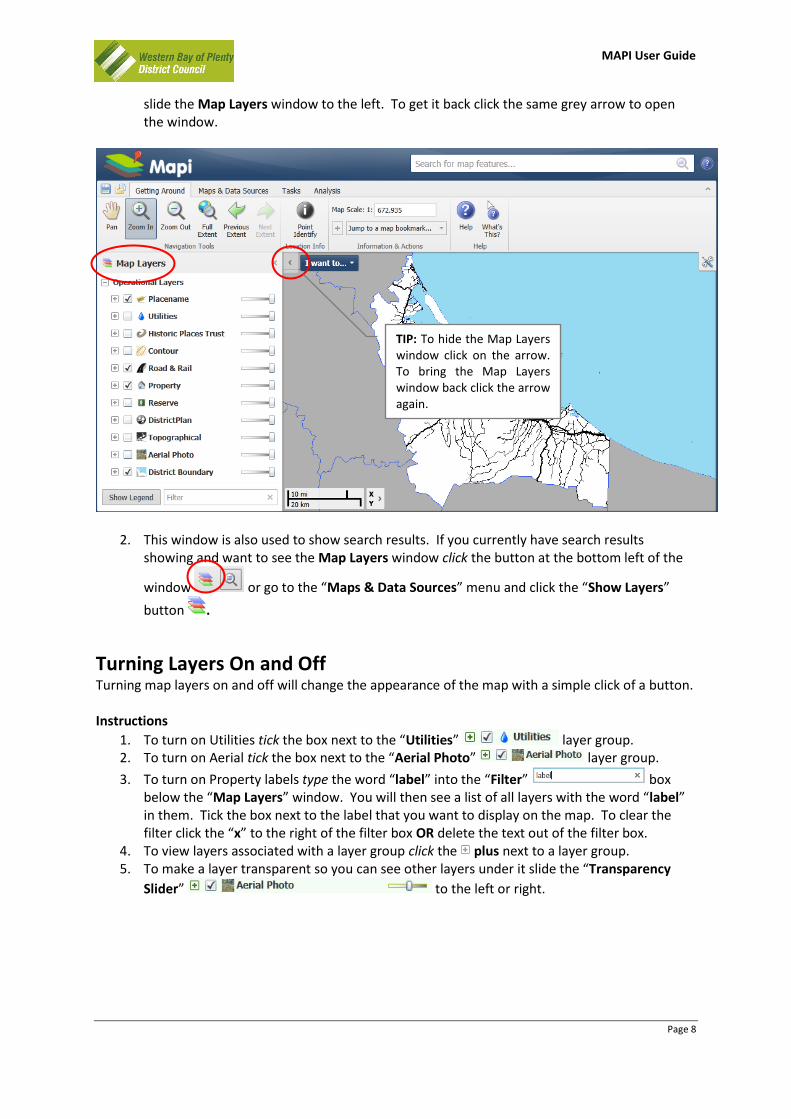
Getting started with the Map Layers tool Instructions
1. When you first launch the MAPI site you will notice that the Map Layers window will open by default on the left of your screen (as shown below). To hide the Map Layers window click the grey arrow between the “I want to…” drop-down and the Map Layers window. This will
MAPI User Guide
Page 8
slide the Map Layers window to the left. To get it back click the same grey arrow to open the window.
2. This window is also used to show search results. If you currently have search results showing and want to see the Map Layers window click the button at the bottom left of the
window or go to the “Maps & Data Sources” menu and click the “Show Layers”
button .
Turning Layers On and Off Turning map layers on and off will change the appearance of the map with a simple click of a button. Instructions
1. To turn on Utilities tick the box next to the “Utilities” layer group. 2. To turn on Aerial tick the box next to the “Aerial Photo” layer group.
3. To turn on Property labels type the word “label” into the “Filter” box below the “Map Layers” window. You will then see a list of all layers with the word “label” in them. Tick the box next to the label that you want to display on the map. To clear the filter click the “x” to the right of the filter box OR delete the text out of the filter box.
4. To view layers associated with a layer group click the plus next to a layer group. 5. To make a layer transparent so you can see other layers under it slide the “Transparency
Slider” to the left or right.
TIP: To hide the Map Layers window click on the arrow. To bring the Map Layers window back click the arrow again.
MAPI User Guide
Page 9
How do I view the map legend / key? Instructions
1. To view the “legend / key” of a layer click on the layers text in the “Map Layers” list.
2. To view the entire map “legend / key” click on the Show Legend button .
Printing and Exporting
Printing a Map Instructions – how to print a map
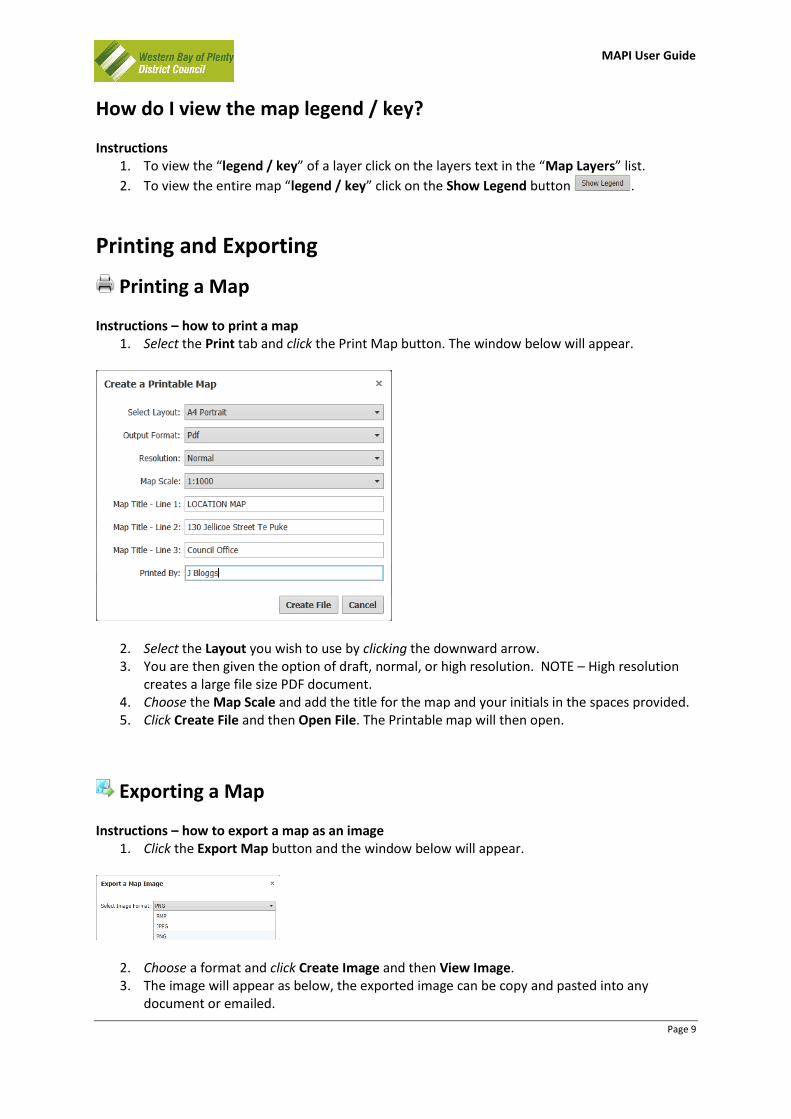
1. Select the Print tab and click the Print Map button. The window below will appear.
2. Select the Layout you wish to use by clicking the downward arrow. 3. You are then given the option of draft, normal, or high resolution. NOTE – High resolution
creates a large file size PDF document. 4. Choose the Map Scale and add the title for the map and your initials in the spaces provided. 5. Click Create File and then Open File. The Printable map will then open.
Exporting a Map Instructions – how to export a map as an image
1. Click the Export Map button and the window below will appear.
2. Choose a format and click Create Image and then View Image. 3. The image will appear as below, the exported image can be copy and pasted into any
document or emailed.
MAPI User Guide
Page 10
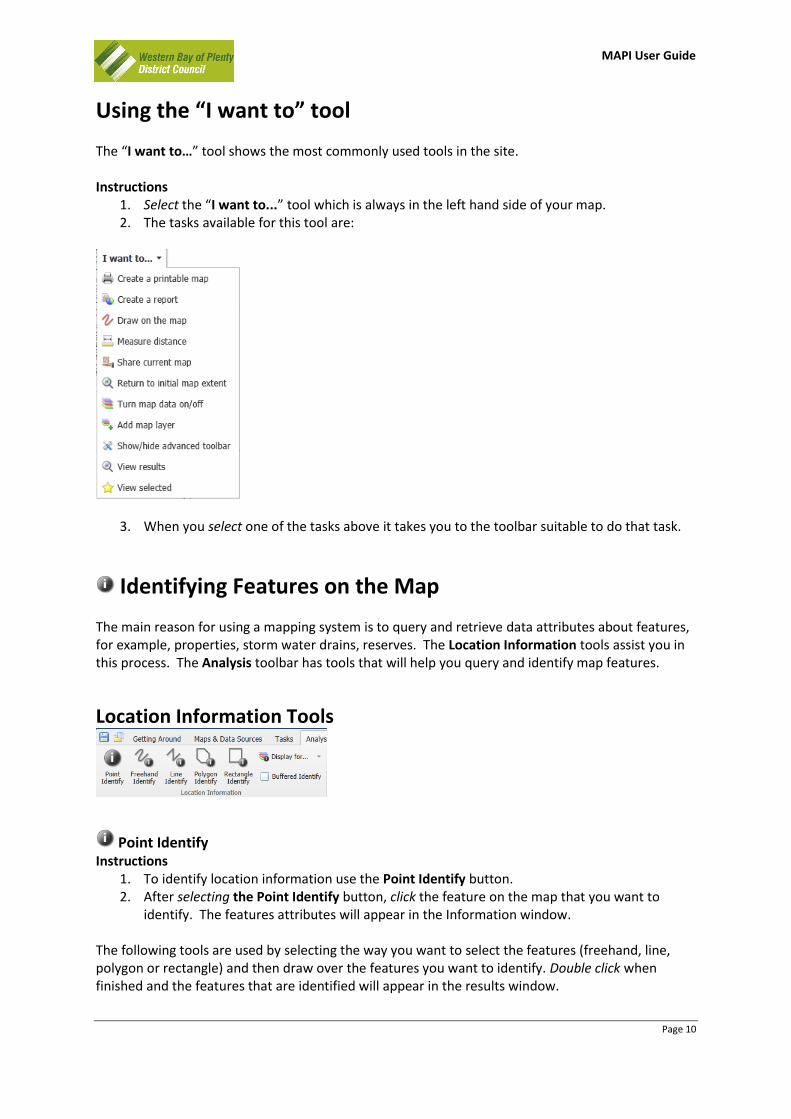
Using the “I want to” tool The “I want to…” tool shows the most commonly used tools in the site. Instructions
1. Select the “I want to...” tool which is always in the left hand side of your map. 2. The tasks available for this tool are:
3. When you select one of the tasks above it takes you to the toolbar suitable to do that task.
Identifying Features on the Map The main reason for using a mapping system is to query and retrieve data attributes about features, for example, properties, storm water drains, reserves. The Location Information tools assist you in this process. The Analysis toolbar has tools that will help you query and identify map features.
Location Information Tools
Point Identify Instructions
1. To identify location information use the Point Identify button. 2. After selecting the Point Identify button, click the feature on the map that you want to
identify. The features attributes will appear in the Information window. The following tools are used by selecting the way you want to select the features (freehand, line, polygon or rectangle) and then draw over the features you want to identify. Double click when finished and the features that are identified will appear in the results window.
MAPI User Guide
Page 11
Freehand Identify Instructions
1. To identify features using a freehand drawn line select the Freehand Identify button. 2. Click the left mouse button and hold it while moving the mouse. When you release the left
mouse button the freehand line will be completed.
Line Identify Instructions
1. To identify features using a drawn line select the Line Identify button. 2. Click the left mouse button and hold it while moving the mouse and release the left mouse
button. Effectively you are starting at point “A” with a click and finishing at point “B” by releasing the mouse.
Polygon Identify Instructions
1. To identify features using a drawn polygon select the Polygon Identify button. 2. Click the left mouse button on the map and release it. Then move to a new location and
click the left mouse button again. Repeat these steps until you have drawn your polygon. Double-click to finish the polygon.
Rectangle Identify Instructions
1. To identify features using a drawn rectangle select the Rectangle Identify button. 2. Click the left mouse button and hold it while moving the mouse. You will notice that a
rectangle is being drawn. When you release the left mouse button the rectangle will be complete.
Advanced Searching, Processing, and Exporting Results Once you have performed a search you can refine your results further. Once you have refined your results you can then export the text and map. Instructions – perform a Road Search
1. Type in a road name e.g. “Queen Street” and hit the Enter key on your keyboard.
2. The results will appear on the left hand side of your screen in the Results window. You will notice that this particular search will return the Road layer and the Parcel layer.
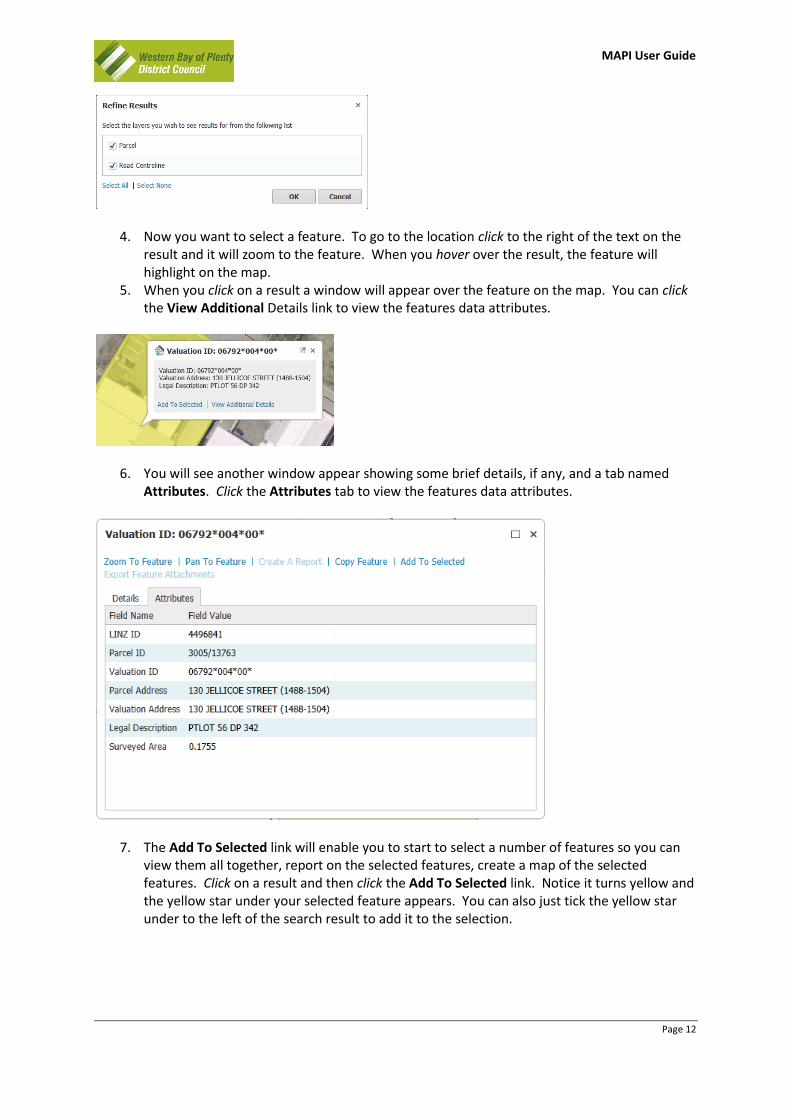
3. Click the Refine Results link. A window below will appear. This will let you choose which layers you would like to see in your results. Un-tick the Road Centreline layer and click OK. You will notice that only Parcel layer now has features in the Results window.
MAPI User Guide
Page 12
4. Now you want to select a feature. To go to the location click to the right of the text on the result and it will zoom to the feature. When you hover over the result, the feature will highlight on the map.
5. When you click on a result a window will appear over the feature on the map. You can click the View Additional Details link to view the features data attributes.
6. You will see another window appear showing some brief details, if any, and a tab named Attributes. Click the Attributes tab to view the features data attributes.
7. The Add To Selected link will enable you to start to select a number of features so you can view them all together, report on the selected features, create a map of the selected features. Click on a result and then click the Add To Selected link. Notice it turns yellow and the yellow star under your selected feature appears. You can also just tick the yellow star under to the left of the search result to add it to the selection.
MAPI User Guide
Page 13
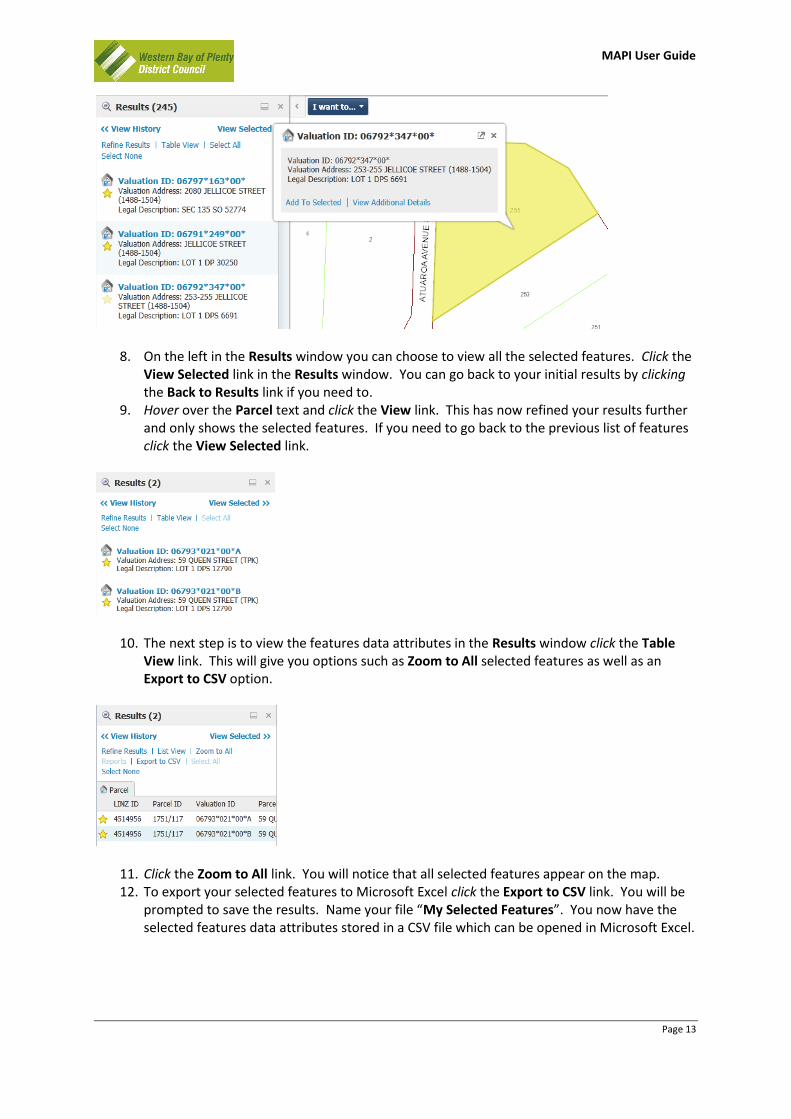
8. On the left in the Results window you can choose to view all the selected features. Click the View Selected link in the Results window. You can go back to your initial results by clicking the Back to Results link if you need to.
9. Hover over the Parcel text and click the View link. This has now refined your results further and only shows the selected features. If you need to go back to the previous list of features click the View Selected link.
10. The next step is to view the features data attributes in the Results window click the Table View link. This will give you options such as Zoom to All selected features as well as an Export to CSV option.
11. Click the Zoom to All link. You will notice that all selected features appear on the map. 12. To export your selected features to Microsoft Excel click the Export to CSV link. You will be
prompted to save the results. Name your file “My Selected Features”. You now have the selected features data attributes stored in a CSV file which can be opened in Microsoft Excel.

MAPI User Guide
Page 14
Saving and Opening your Project An advanced feature of MAPI is to allow you to save your current map, for example if you have drawn your own features on the map, and/or wish to refer to it at a later date. Instructions
1. To save the map you are working on select Save Project button which is just below the banner at the top on the left hand side. This will save the map with all the drawings and alterations you have made.
2. Enter a Project Name for your map and add your name to the Created By field so its easier for you to find your maps. You can add a Description in as well.
3. To open a previously saved map, select the Open Project button. This will give you the option to open previously saved maps.
Additional Resources
For more detailed information on using MAPI you can click the Help Button to open the online help or click the link http://mapi.westernbay.govt.nz/Help/Default.htm.