user guide v1 - westcotec
TRANSCRIPT
1 01362 853124 | [email protected] | www.westcotec.co.uk
Registered Office: Westcotec Ltd 34 Bertie Ward Way Rash’s Green Ind. Est. Dereham Norfolk NR19 1TE
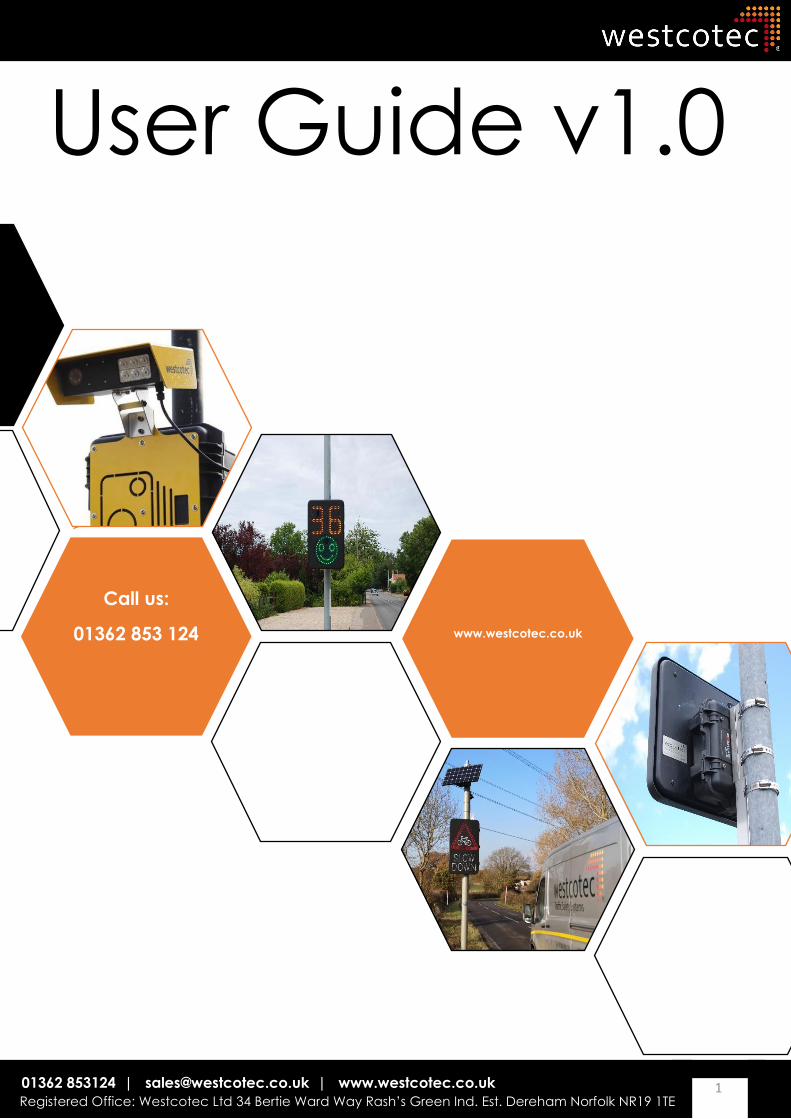
User Guide v1.0
Call us:
01362 853 124
www.westcotec.co.uk
2 01362 853124 | [email protected] | www.westcotec.co.uk
Registered Office: Westcotec Ltd 34 Bertie Ward Way Rash’s Green Ind. Est. Dereham Norfolk NR19 1TE
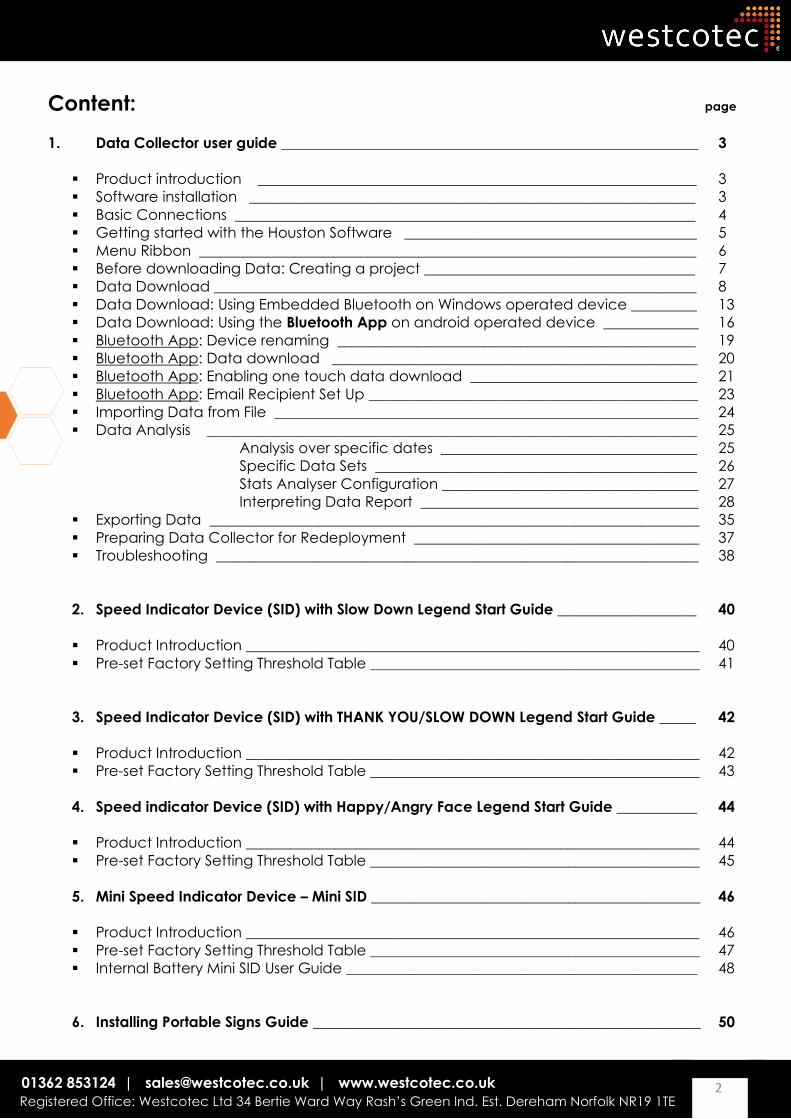
Content: page
1. Data Collector user guide _________________________________________________________ 3
▪ Product introduction ____________________________________________________________ 3
▪ Software installation _____________________________________________________________ 3
▪ Basic Connections _______________________________________________________________ 4
▪ Getting started with the Houston Software ________________________________________ 5
▪ Menu Ribbon ____________________________________________________________________ 6
▪ Before downloading Data: Creating a project _____________________________________ 7
▪ Data Download __________________________________________________________________ 8
▪ Data Download: Using Embedded Bluetooth on Windows operated device _________ 13
▪ Data Download: Using the Bluetooth App on android operated device _____________ 16
▪ Bluetooth App: Device renaming _________________________________________________ 19
▪ Bluetooth App: Data download __________________________________________________ 20
▪ Bluetooth App: Enabling one touch data download _______________________________ 21
▪ Bluetooth App: Email Recipient Set Up _____________________________________________ 23
▪ Importing Data from File __________________________________________________________ 24
▪ Data Analysis ___________________________________________________________________ 25
Analysis over specific dates ___________________________________ 25
Specific Data Sets ____________________________________________ 26
Stats Analyser Configuration ___________________________________ 27
Interpreting Data Report ______________________________________ 28
▪ Exporting Data ___________________________________________________________________ 35
▪ Preparing Data Collector for Redeployment _______________________________________ 37
▪ Troubleshooting __________________________________________________________________ 38
2. Speed Indicator Device (SID) with Slow Down Legend Start Guide ___________________ 40
▪ Product Introduction ______________________________________________________________ 40
▪ Pre-set Factory Setting Threshold Table _____________________________________________ 41
3. Speed Indicator Device (SID) with THANK YOU/SLOW DOWN Legend Start Guide _____ 42
▪ Product Introduction ______________________________________________________________ 42
▪ Pre-set Factory Setting Threshold Table _____________________________________________ 43
4. Speed indicator Device (SID) with Happy/Angry Face Legend Start Guide ___________ 44
▪ Product Introduction ______________________________________________________________ 44
▪ Pre-set Factory Setting Threshold Table _____________________________________________ 45
5. Mini Speed Indicator Device – Mini SID _____________________________________________ 46
▪ Product Introduction ______________________________________________________________ 46
▪ Pre-set Factory Setting Threshold Table _____________________________________________ 47
▪ Internal Battery Mini SID User Guide ________________________________________________ 48
6. Installing Portable Signs Guide _____________________________________________________ 50
3 01362 853124 | [email protected] | www.westcotec.co.uk
Registered Office: Westcotec Ltd 34 Bertie Ward Way Rash’s Green Ind. Est. Dereham Norfolk NR19 1TE
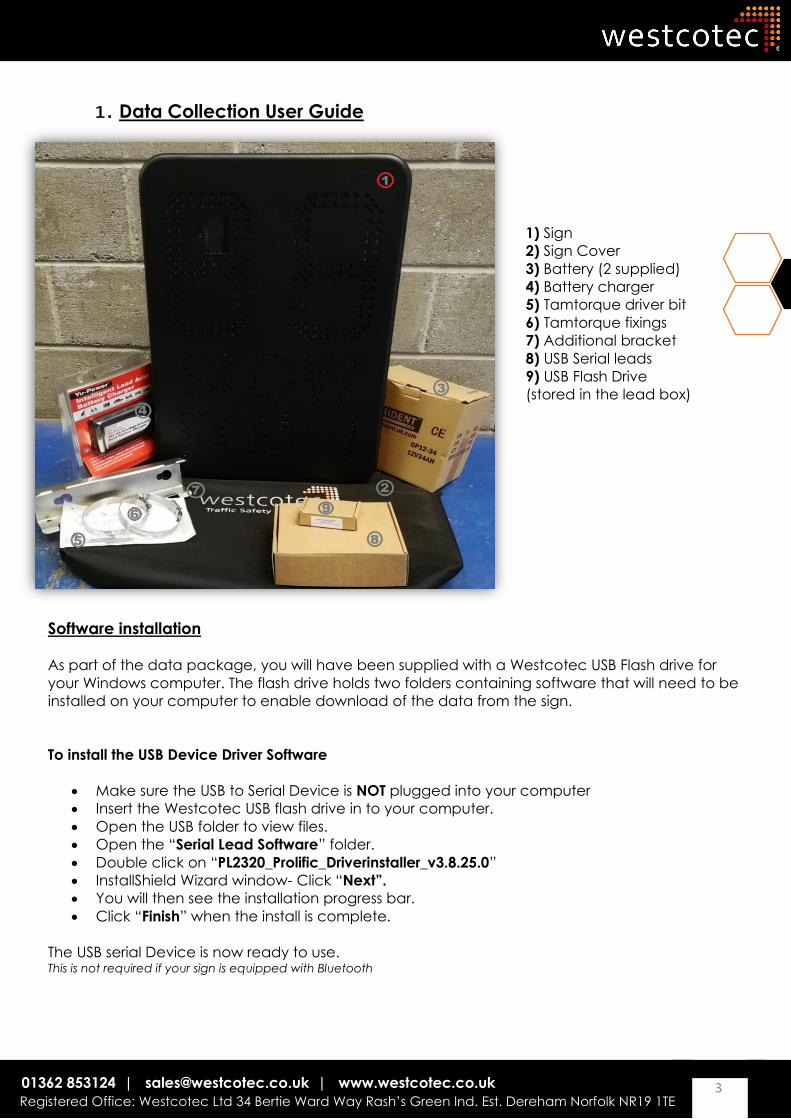
1. Data Collection User Guide
1) Sign
2) Sign Cover
3) Battery (2 supplied)
4) Battery charger
5) Tamtorque driver bit
6) Tamtorque fixings
7) Additional bracket
8) USB Serial leads
9) USB Flash Drive
(stored in the lead box)
Software installation
As part of the data package, you will have been supplied with a Westcotec USB Flash drive for
your Windows computer. The flash drive holds two folders containing software that will need to be
installed on your computer to enable download of the data from the sign.
To install the USB Device Driver Software
• Make sure the USB to Serial Device is NOT plugged into your computer
• Insert the Westcotec USB flash drive in to your computer.
• Open the USB folder to view files.
• Open the “Serial Lead Software” folder.
• Double click on “PL2320_Prolific_Driverinstaller_v3.8.25.0”
• InstallShield Wizard window- Click “Next”.
• You will then see the installation progress bar.
• Click “Finish” when the install is complete.
The USB serial Device is now ready to use. This is not required if your sign is equipped with Bluetooth
4 01362 853124 | [email protected] | www.westcotec.co.uk
Registered Office: Westcotec Ltd 34 Bertie Ward Way Rash’s Green Ind. Est. Dereham Norfolk NR19 1TE
To install the Stats software
• Insert the Westcotec USB Flash Drive in to your computer
• Open the USB folder to view files
• Open the “Data Collection Software” Folder.
• Double click on “HoustonRadarStatsAnalyzerUpgrade_v09.00.0007”*
• A Houston Stats Analyzer screen will open. Click “Next”.
• Setup Wizard window: Click “Next”.
• Setup Wizard Window: Tick “Everyone” then “Next”.
• Setup Wizard Window: Click “Next” to start install.
• You will then see the installation progress bar.
• You may get a User Account Control window pop up: Click “Yes”.
• Installation Complete window: Click “Close”.
The Houston radar Software is now ready to use. *Software version may differ as updates are applied.
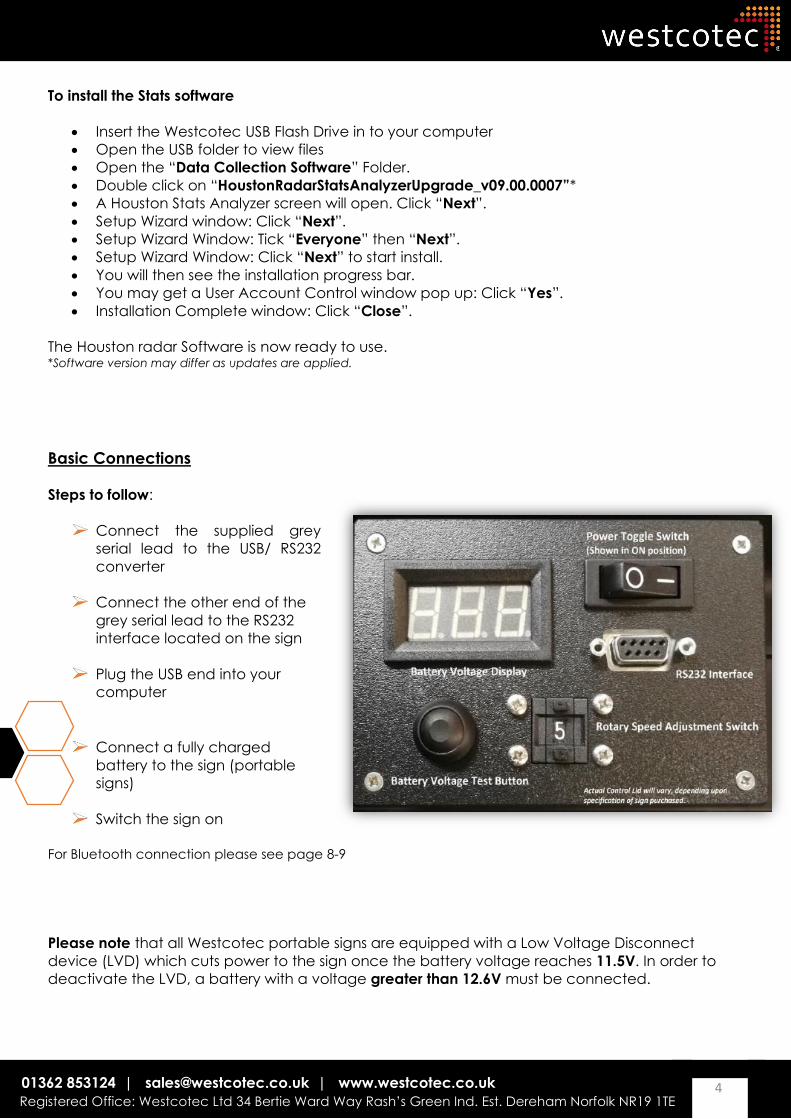
Basic Connections
Steps to follow:
Connect the supplied grey
serial lead to the USB/ RS232
converter
Connect the other end of the
grey serial lead to the RS232
interface located on the sign
Plug the USB end into your
computer
Connect a fully charged
battery to the sign (portable
signs)
Switch the sign on
For Bluetooth connection please see page 8-9
Please note that all Westcotec portable signs are equipped with a Low Voltage Disconnect
device (LVD) which cuts power to the sign once the battery voltage reaches 11.5V. In order to
deactivate the LVD, a battery with a voltage greater than 12.6V must be connected.
5 01362 853124 | [email protected] | www.westcotec.co.uk
Registered Office: Westcotec Ltd 34 Bertie Ward Way Rash’s Green Ind. Est. Dereham Norfolk NR19 1TE
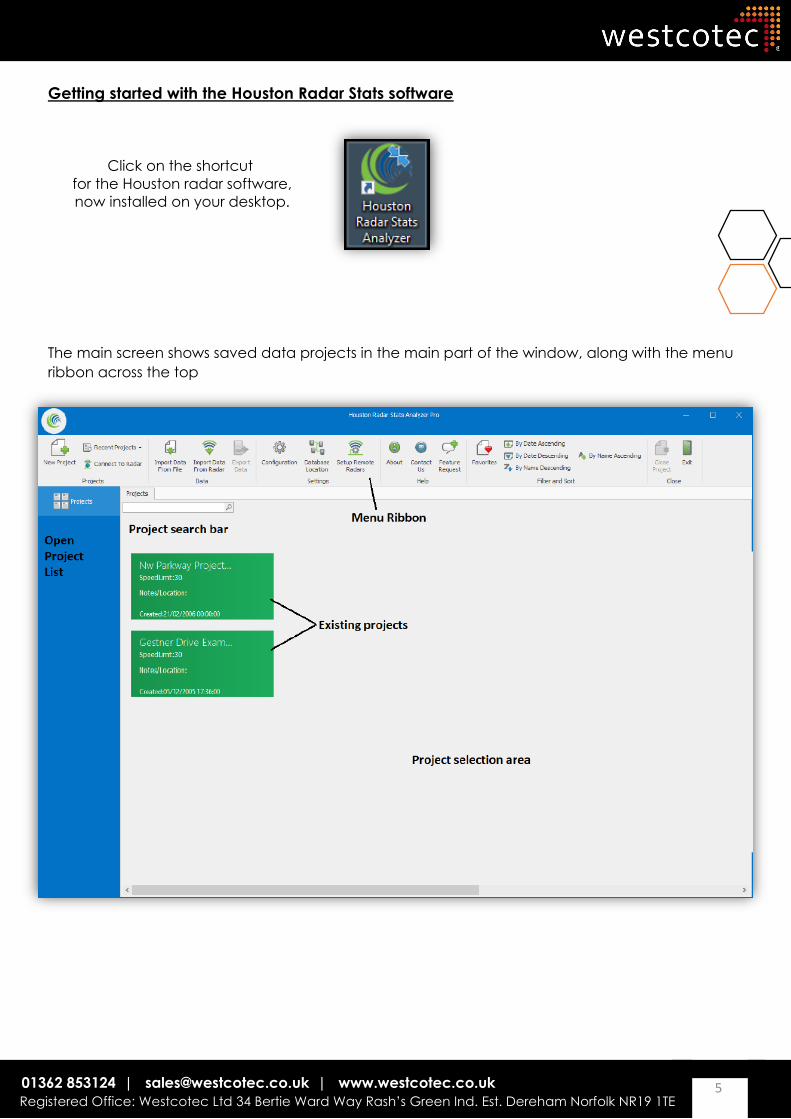
Getting started with the Houston Radar Stats software
Click on the shortcut
for the Houston radar software,
now installed on your desktop.
The main screen shows saved data projects in the main part of the window, along with the menu
ribbon across the top
6 01362 853124 | [email protected] | www.westcotec.co.uk
Registered Office: Westcotec Ltd 34 Bertie Ward Way Rash’s Green Ind. Est. Dereham Norfolk NR19 1TE
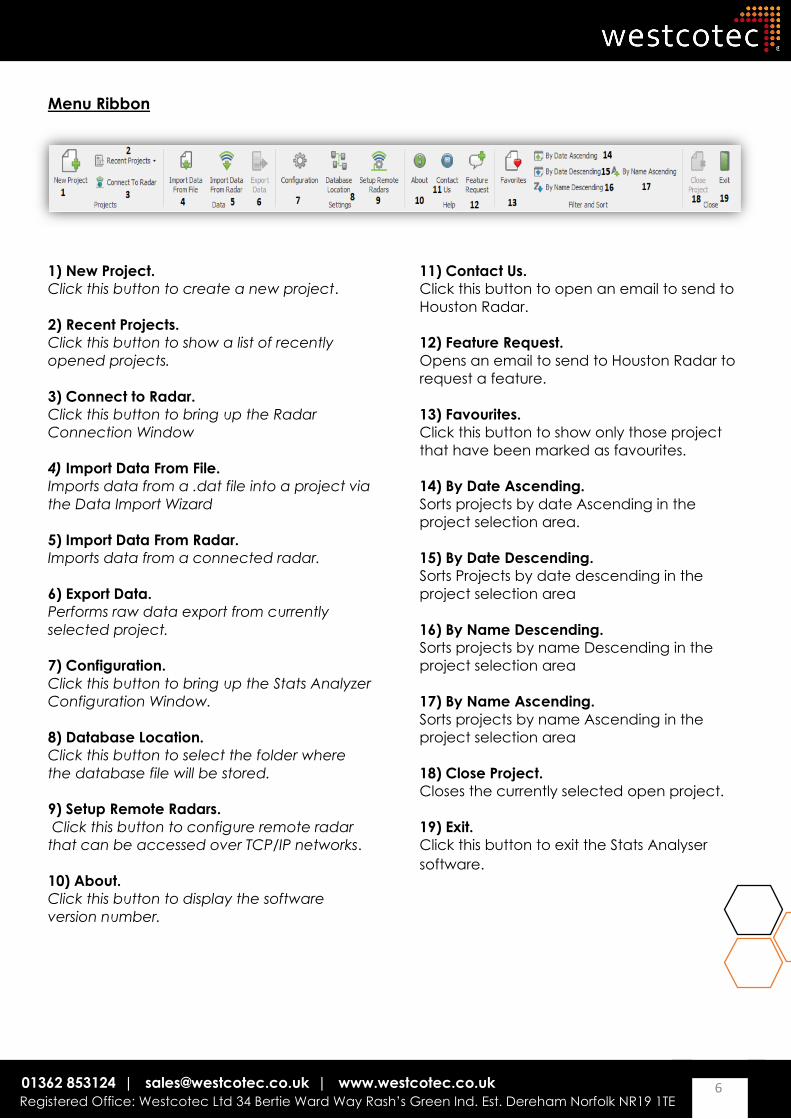
Menu Ribbon
1) New Project.
Click this button to create a new project.
2) Recent Projects.
Click this button to show a list of recently
opened projects.
3) Connect to Radar.
Click this button to bring up the Radar
Connection Window
4) Import Data From File.
Imports data from a .dat file into a project via
the Data Import Wizard
5) Import Data From Radar.
Imports data from a connected radar.
6) Export Data.
Performs raw data export from currently
selected project.
7) Configuration.
Click this button to bring up the Stats Analyzer
Configuration Window.
8) Database Location.
Click this button to select the folder where
the database file will be stored.
9) Setup Remote Radars.
Click this button to configure remote radar
that can be accessed over TCP/IP networks.
10) About.
Click this button to display the software
version number.
11) Contact Us.
Click this button to open an email to send to
Houston Radar.
12) Feature Request.
Opens an email to send to Houston Radar to
request a feature.
13) Favourites.
Click this button to show only those project
that have been marked as favourites.
14) By Date Ascending.
Sorts projects by date Ascending in the
project selection area.
15) By Date Descending.
Sorts Projects by date descending in the
project selection area
16) By Name Descending.
Sorts projects by name Descending in the
project selection area
17) By Name Ascending.
Sorts projects by name Ascending in the
project selection area
18) Close Project.
Closes the currently selected open project.
19) Exit.
Click this button to exit the Stats Analyser
software.
1) New Project.
1) New Projec
1) New Project. Cli
7 01362 853124 | [email protected] | www.westcotec.co.uk
Registered Office: Westcotec Ltd 34 Bertie Ward Way Rash’s Green Ind. Est. Dereham Norfolk NR19 1TE
Before Downloading the data: Creating a project
All data that needs to be analysed must first be downloaded into a project. A project is simply a
place to organise the different sets of data together.
It is recommended that a project is made for each site that the sign is deployed at, as this will
assist the user in making comparisons for each data set. It will also make life much easier as the
data will then be stored in folders using the project name.
To create a project:
From the menu ribbon click “New Project” found in the left-hand side of the Menu Ribbon
A new window will open:
Simply give the project a name, add any extra details and click OK. This information can be
edited at any time by clicking the “Project settings” button within the open project screen
The new project will be shown as a new box in the Project Selection area. To open, hover
the mouse over the project and click the Open icon to open the project.
8 01362 853124 | [email protected] | www.westcotec.co.uk
Registered Office: Westcotec Ltd 34 Bertie Ward Way Rash’s Green Ind. Est. Dereham Norfolk NR19 1TE
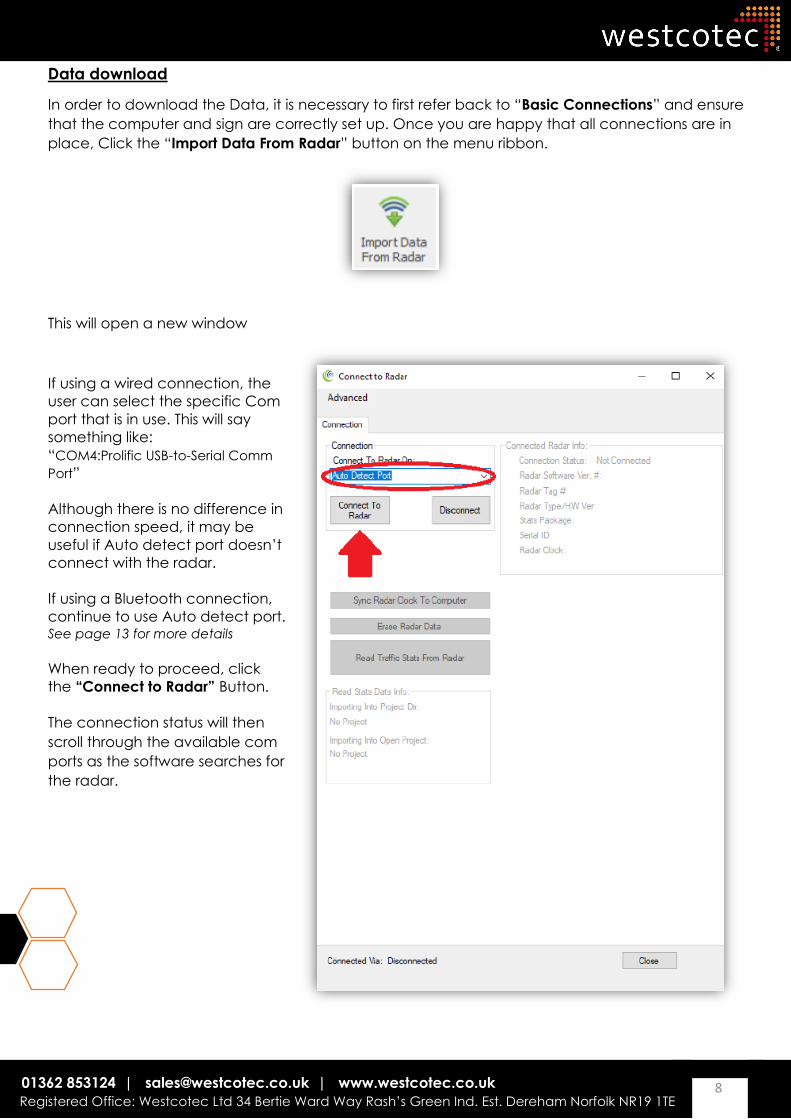
Data download
In order to download the Data, it is necessary to first refer back to “Basic Connections” and ensure
that the computer and sign are correctly set up. Once you are happy that all connections are in
place, Click the “Import Data From Radar” button on the menu ribbon.
This will open a new window
If using a wired connection, the
user can select the specific Com
port that is in use. This will say
something like:
“COM4:Prolific USB-to-Serial Comm
Port”
Although there is no difference in
connection speed, it may be
useful if Auto detect port doesn’t
connect with the radar.
If using a Bluetooth connection,
continue to use Auto detect port. See page 13 for more details
When ready to proceed, click
the “Connect to Radar” Button.
The connection status will then
scroll through the available com
ports as the software searches for
the radar.
9 01362 853124 | [email protected] | www.westcotec.co.uk
Registered Office: Westcotec Ltd 34 Bertie Ward Way Rash’s Green Ind. Est. Dereham Norfolk NR19 1TE
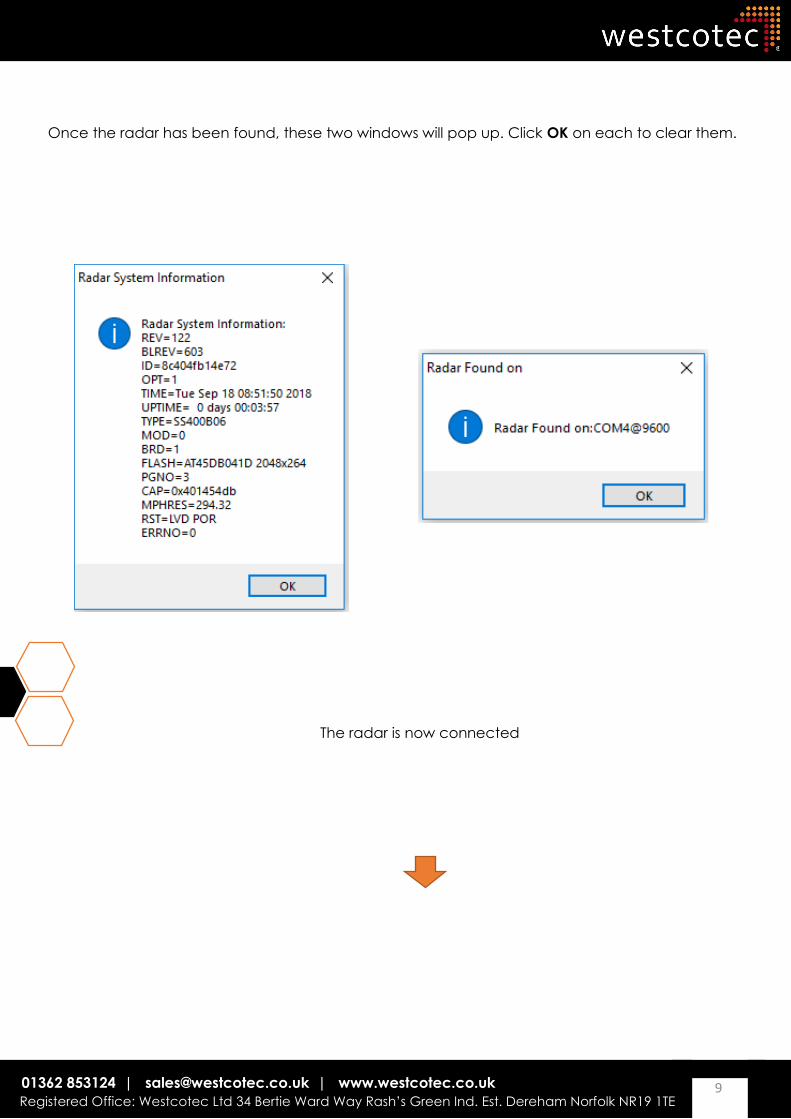
Once the radar has been found, these two windows will pop up. Click OK on each to clear them.
The radar is now connected
10 01362 853124 | [email protected] | www.westcotec.co.uk
Registered Office: Westcotec Ltd 34 Bertie Ward Way Rash’s Green Ind. Est. Dereham Norfolk NR19 1TE
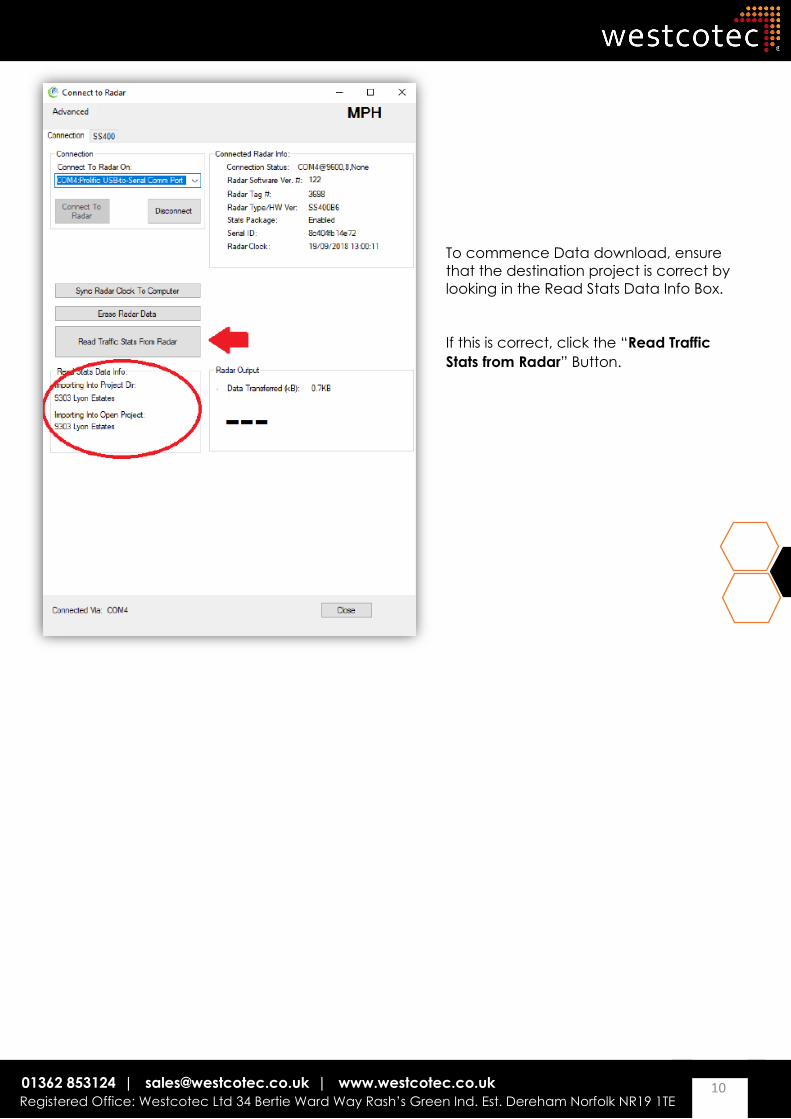
To commence Data download, ensure
that the destination project is correct by
looking in the Read Stats Data Info Box.
If this is correct, click the “Read Traffic
Stats from Radar” Button.
11 01362 853124 | [email protected] | www.westcotec.co.uk
Registered Office: Westcotec Ltd 34 Bertie Ward Way Rash’s Green Ind. Est. Dereham Norfolk NR19 1TE
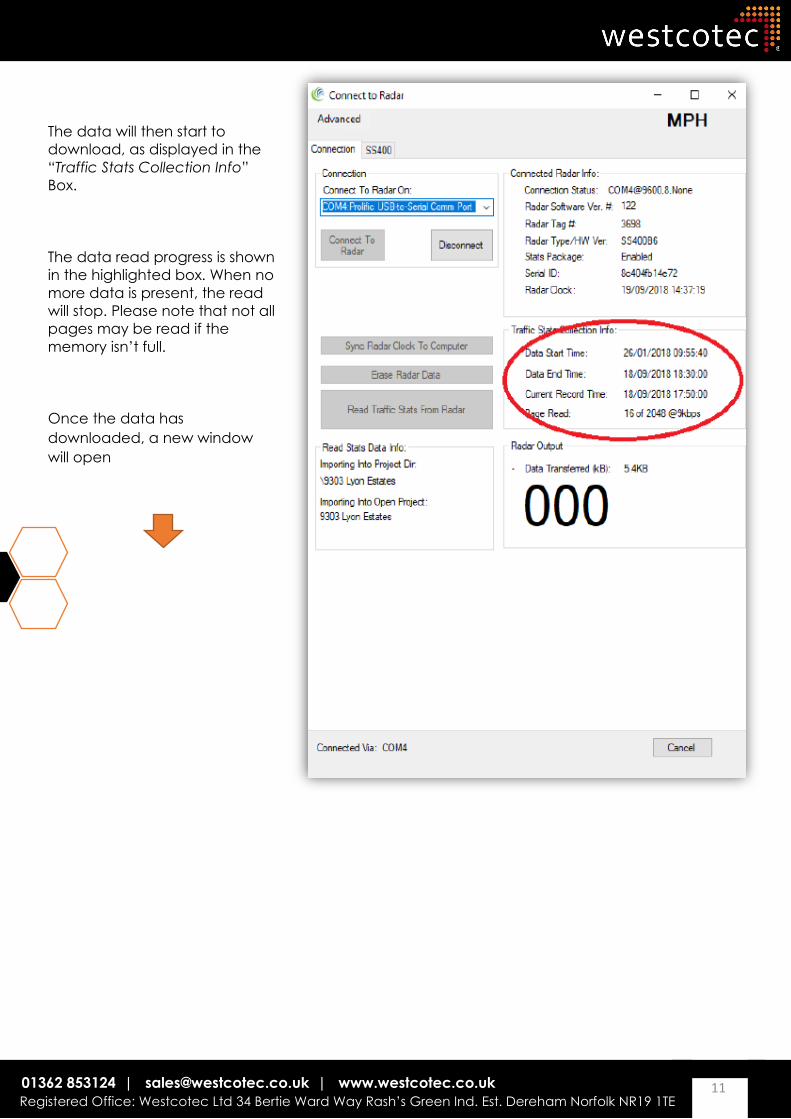
The data will then start to
download, as displayed in the
“Traffic Stats Collection Info”
Box.
The data read progress is shown
in the highlighted box. When no
more data is present, the read
will stop. Please note that not all
pages may be read if the
memory isn’t full.
Once the data has
downloaded, a new window
will open

12 01362 853124 | [email protected] | www.westcotec.co.uk
Registered Office: Westcotec Ltd 34 Bertie Ward Way Rash’s Green Ind. Est. Dereham Norfolk NR19 1TE
The new screen will look like the below screenshot. Simply click and drag the Data file into your
chosen project.
Once the data is showing in the project, Click IMPORT to finalise. Please note: If IMPORT is not clicked then the operation will not have been completed.
13 01362 853124 | [email protected] | www.westcotec.co.uk
Registered Office: Westcotec Ltd 34 Bertie Ward Way Rash’s Green Ind. Est. Dereham Norfolk NR19 1TE
Data Download:
Using embedded Bluetooth on a Windows device
If you have purchased the additional Bluetooth Download option and have access to a Bluetooth
enabled Windows device, then this can be used to analyse as well as download the data.
Method shown uses Windows 10. Earlier versions of Windows may vary.
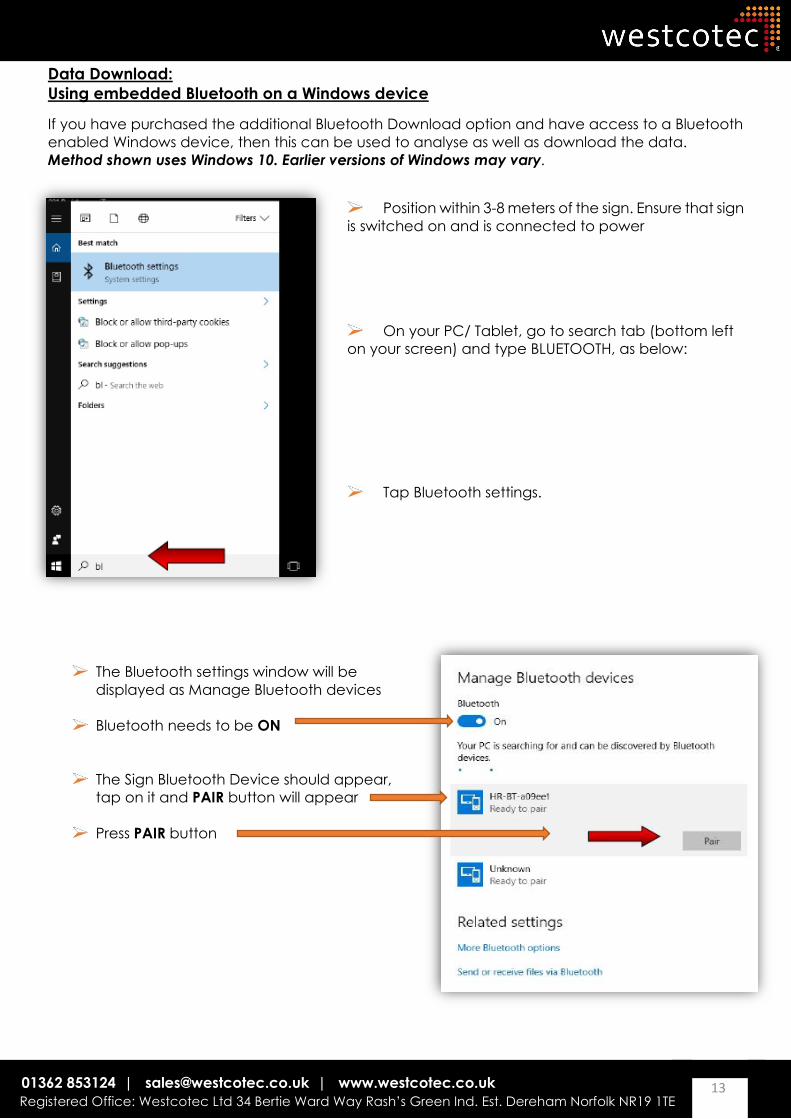
Position within 3-8 meters of the sign. Ensure that sign
is switched on and is connected to power
On your PC/ Tablet, go to search tab (bottom left
on your screen) and type BLUETOOTH, as below:
Tap Bluetooth settings.
The Bluetooth settings window will be
displayed as Manage Bluetooth devices
Bluetooth needs to be ON
The Sign Bluetooth Device should appear,
tap on it and PAIR button will appear
Press PAIR button
14 01362 853124 | [email protected] | www.westcotec.co.uk
Registered Office: Westcotec Ltd 34 Bertie Ward Way Rash’s Green Ind. Est. Dereham Norfolk NR19 1TE
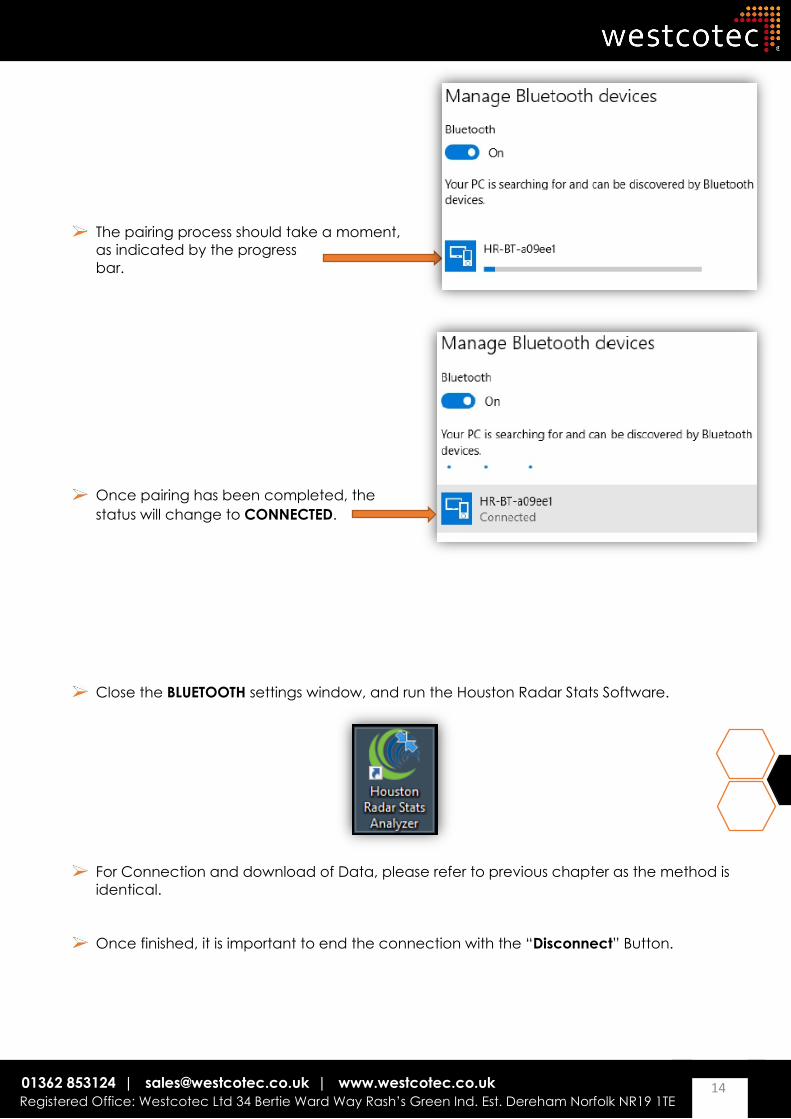
The pairing process should take a moment,
as indicated by the progress
bar.
Once pairing has been completed, the
status will change to CONNECTED.
Close the BLUETOOTH settings window, and run the Houston Radar Stats Software.
For Connection and download of Data, please refer to previous chapter as the method is
identical.
Once finished, it is important to end the connection with the “Disconnect” Button.
15 01362 853124 | [email protected] | www.westcotec.co.uk
Registered Office: Westcotec Ltd 34 Bertie Ward Way Rash’s Green Ind. Est. Dereham Norfolk NR19 1TE
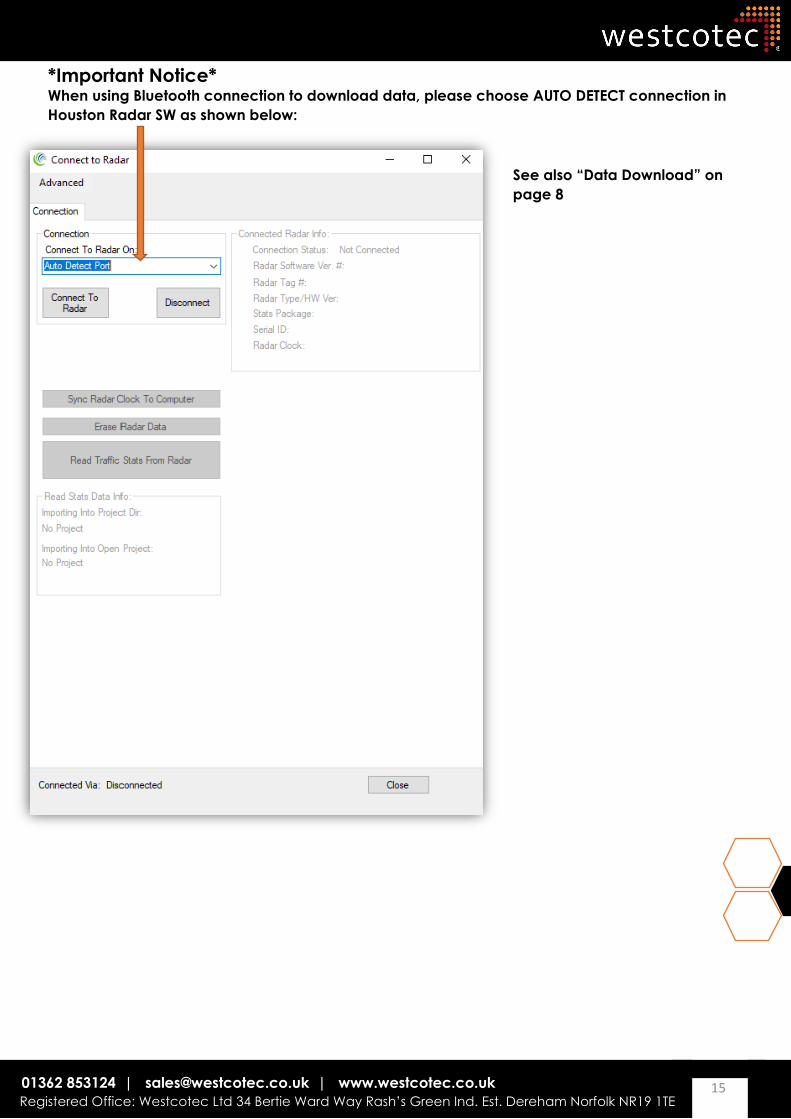
*Important Notice* When using Bluetooth connection to download data, please choose AUTO DETECT connection in
Houston Radar SW as shown below:
See also “Data Download” on
page 8
16 01362 853124 | [email protected] | www.westcotec.co.uk
Registered Office: Westcotec Ltd 34 Bertie Ward Way Rash’s Green Ind. Est. Dereham Norfolk NR19 1TE
Data Download:
Using the Bluetooth App. on an Android device
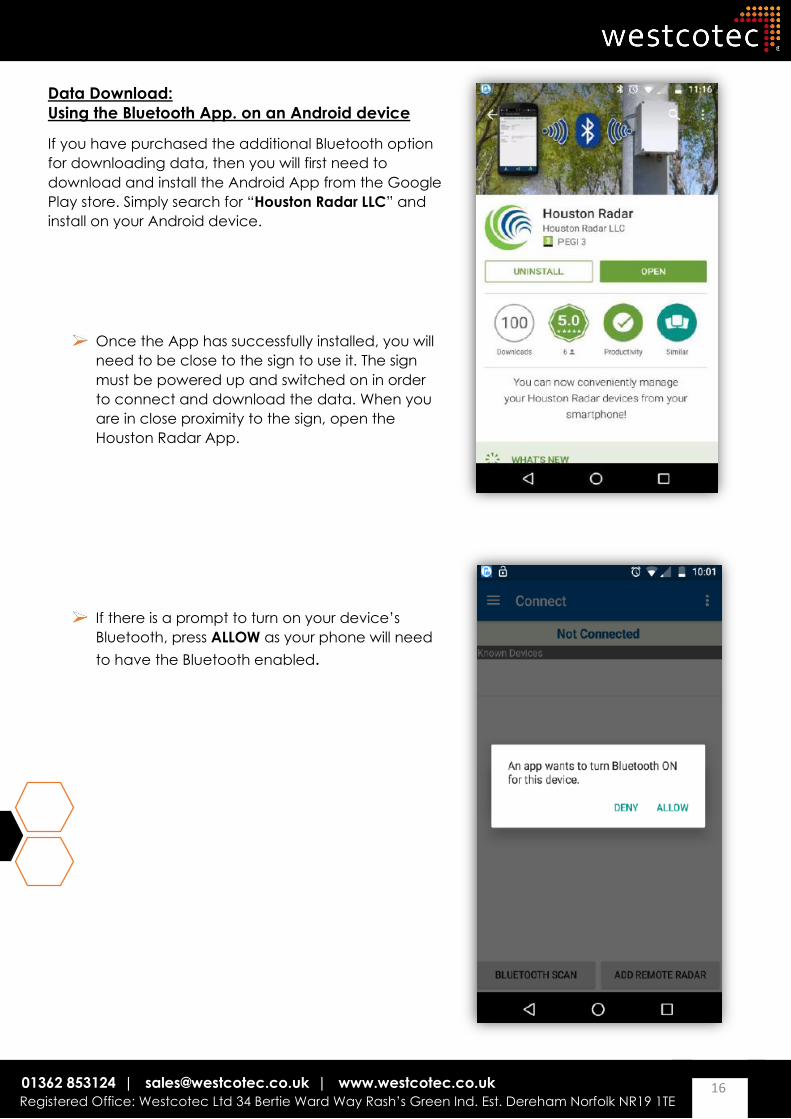
If you have purchased the additional Bluetooth option
for downloading data, then you will first need to
download and install the Android App from the Google
Play store. Simply search for “Houston Radar LLC” and
install on your Android device.
Once the App has successfully installed, you will
need to be close to the sign to use it. The sign
must be powered up and switched on in order
to connect and download the data. When you
are in close proximity to the sign, open the
Houston Radar App.
If there is a prompt to turn on your device’s
Bluetooth, press ALLOW as your phone will need
to have the Bluetooth enabled.
17 01362 853124 | [email protected] | www.westcotec.co.uk
Registered Office: Westcotec Ltd 34 Bertie Ward Way Rash’s Green Ind. Est. Dereham Norfolk NR19 1TE
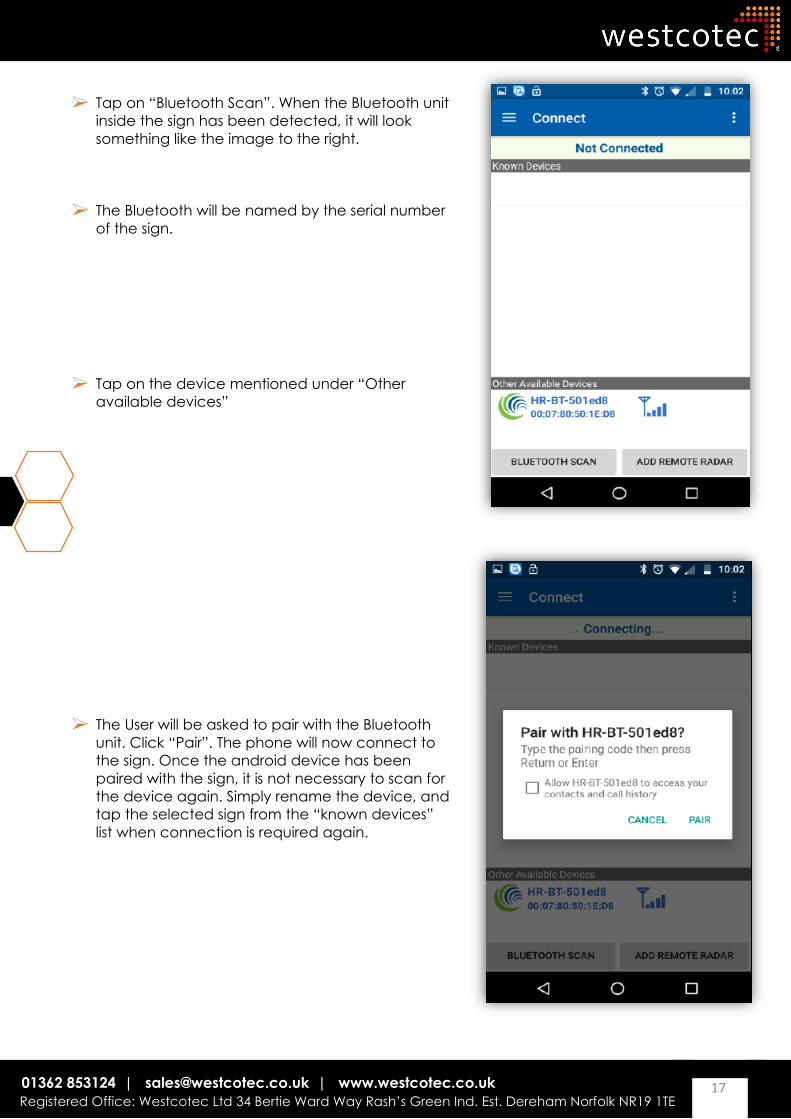
Tap on “Bluetooth Scan”. When the Bluetooth unit
inside the sign has been detected, it will look
something like the image to the right.
The Bluetooth will be named by the serial number
of the sign.
Tap on the device mentioned under “Other
available devices”
The User will be asked to pair with the Bluetooth
unit. Click “Pair”. The phone will now connect to
the sign. Once the android device has been
paired with the sign, it is not necessary to scan for
the device again. Simply rename the device, and
tap the selected sign from the “known devices”
list when connection is required again.
18 01362 853124 | [email protected] | www.westcotec.co.uk
Registered Office: Westcotec Ltd 34 Bertie Ward Way Rash’s Green Ind. Est. Dereham Norfolk NR19 1TE
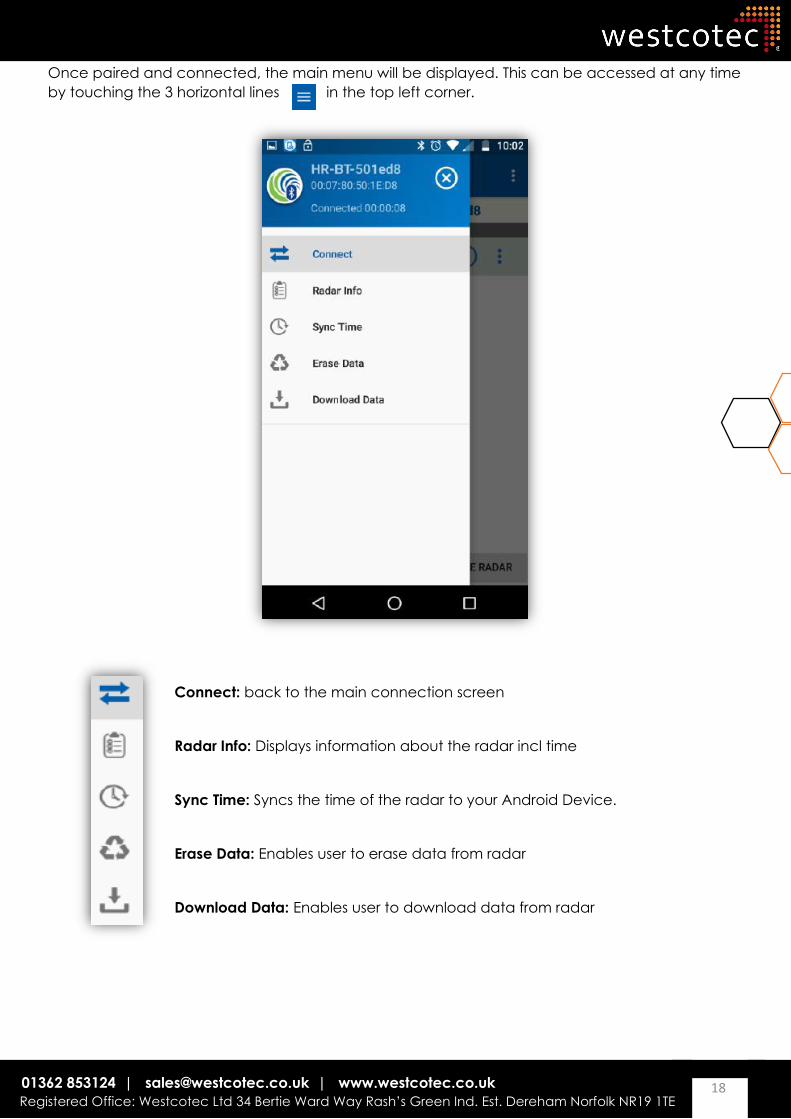
Once paired and connected, the main menu will be displayed. This can be accessed at any time
by touching the 3 horizontal lines in the top left corner.
Connect: back to the main connection screen
Radar Info: Displays information about the radar incl time
Sync Time: Syncs the time of the radar to your Android Device.
Erase Data: Enables user to erase data from radar
Download Data: Enables user to download data from radar
19 01362 853124 | [email protected] | www.westcotec.co.uk
Registered Office: Westcotec Ltd 34 Bertie Ward Way Rash’s Green Ind. Est. Dereham Norfolk NR19 1TE
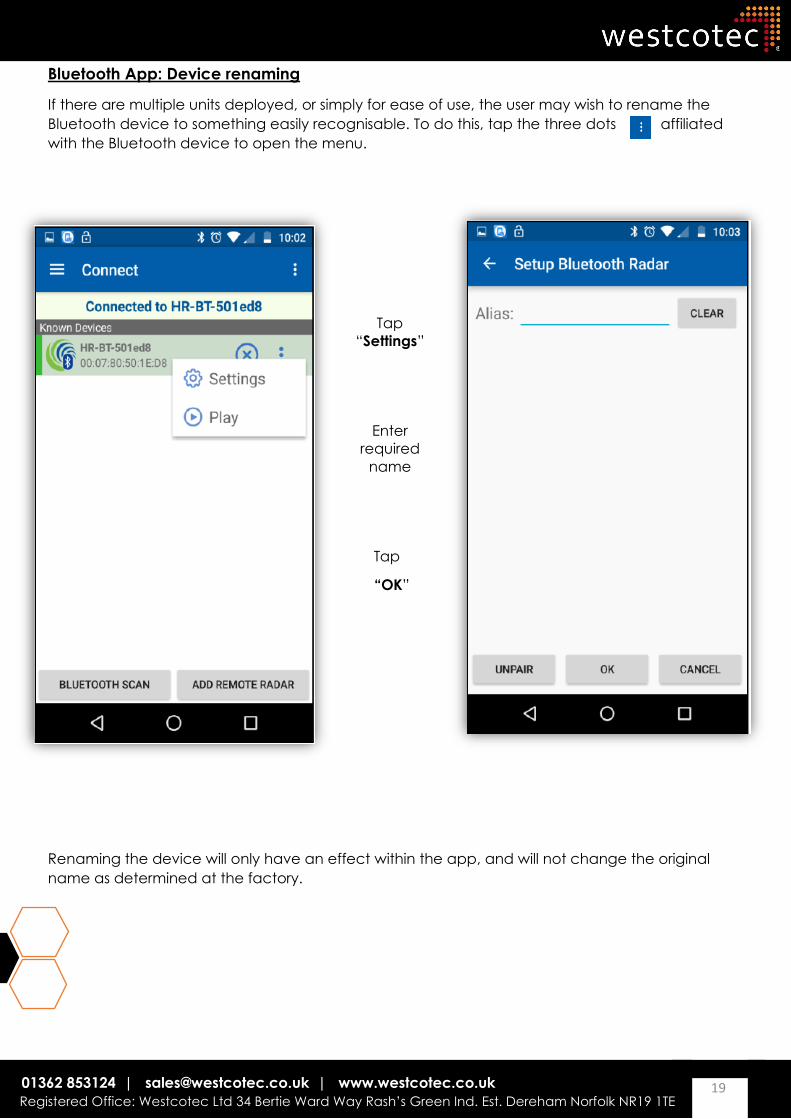
Bluetooth App: Device renaming
If there are multiple units deployed, or simply for ease of use, the user may wish to rename the
Bluetooth device to something easily recognisable. To do this, tap the three dots affiliated
with the Bluetooth device to open the menu.
Tap
“Settings”
Enter
required
name
Tap
“OK”
Renaming the device will only have an effect within the app, and will not change the original
name as determined at the factory.
20 01362 853124 | [email protected] | www.westcotec.co.uk
Registered Office: Westcotec Ltd 34 Bertie Ward Way Rash’s Green Ind. Est. Dereham Norfolk NR19 1TE
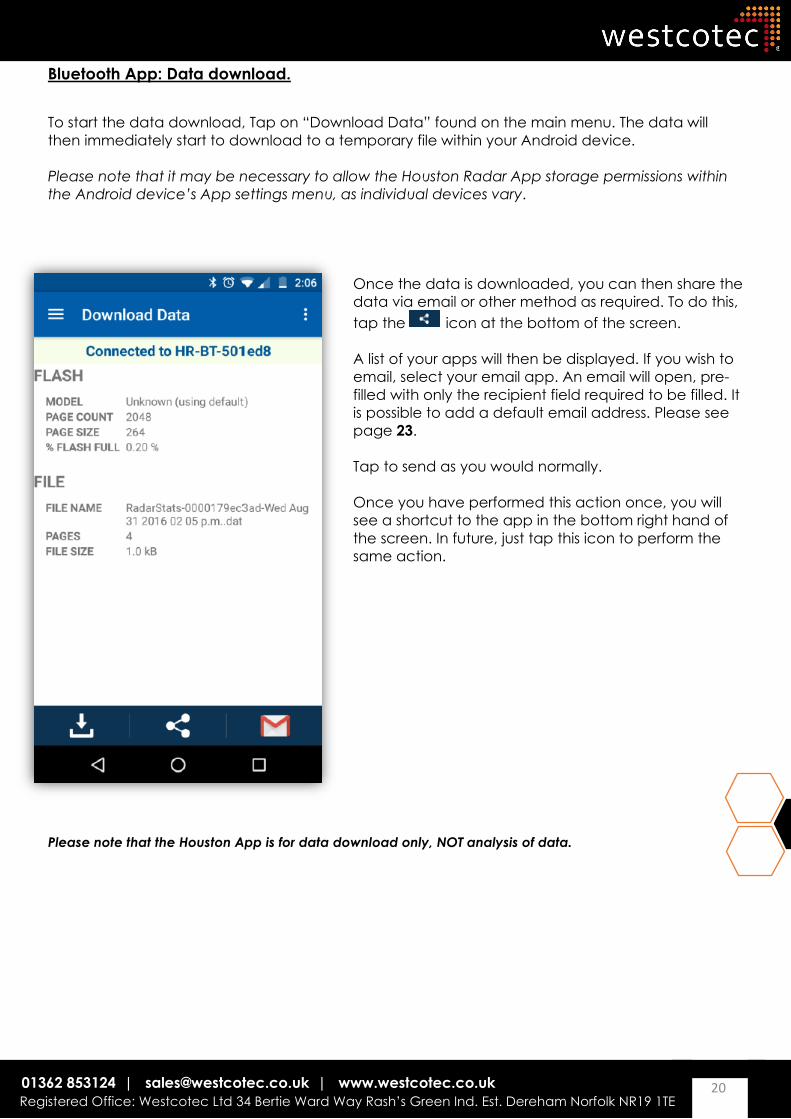
Bluetooth App: Data download.
To start the data download, Tap on “Download Data” found on the main menu. The data will
then immediately start to download to a temporary file within your Android device.
Please note that it may be necessary to allow the Houston Radar App storage permissions within
the Android device’s App settings menu, as individual devices vary.
Once the data is downloaded, you can then share the
data via email or other method as required. To do this,
tap the icon at the bottom of the screen.
A list of your apps will then be displayed. If you wish to
email, select your email app. An email will open, pre-
filled with only the recipient field required to be filled. It
is possible to add a default email address. Please see
page 23.
Tap to send as you would normally.
Once you have performed this action once, you will
see a shortcut to the app in the bottom right hand of
the screen. In future, just tap this icon to perform the
same action.
Please note that the Houston App is for data download only, NOT analysis of data.
21 01362 853124 | [email protected] | www.westcotec.co.uk
Registered Office: Westcotec Ltd 34 Bertie Ward Way Rash’s Green Ind. Est. Dereham Norfolk NR19 1TE
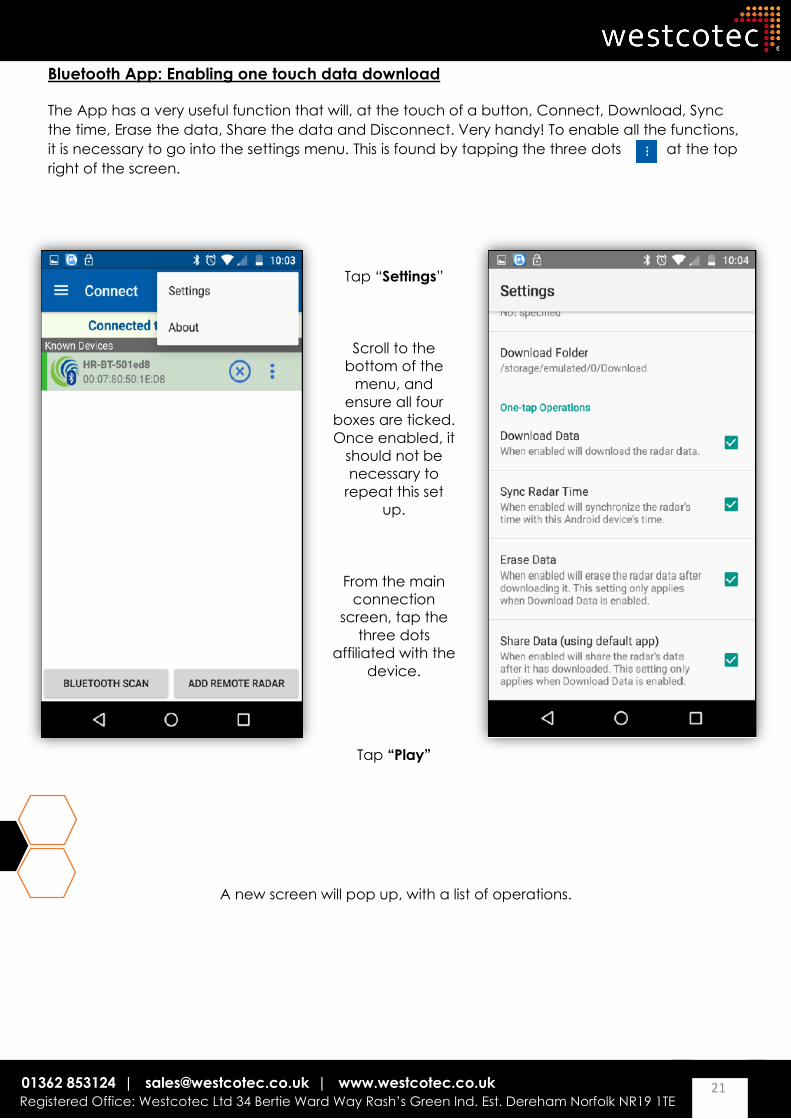
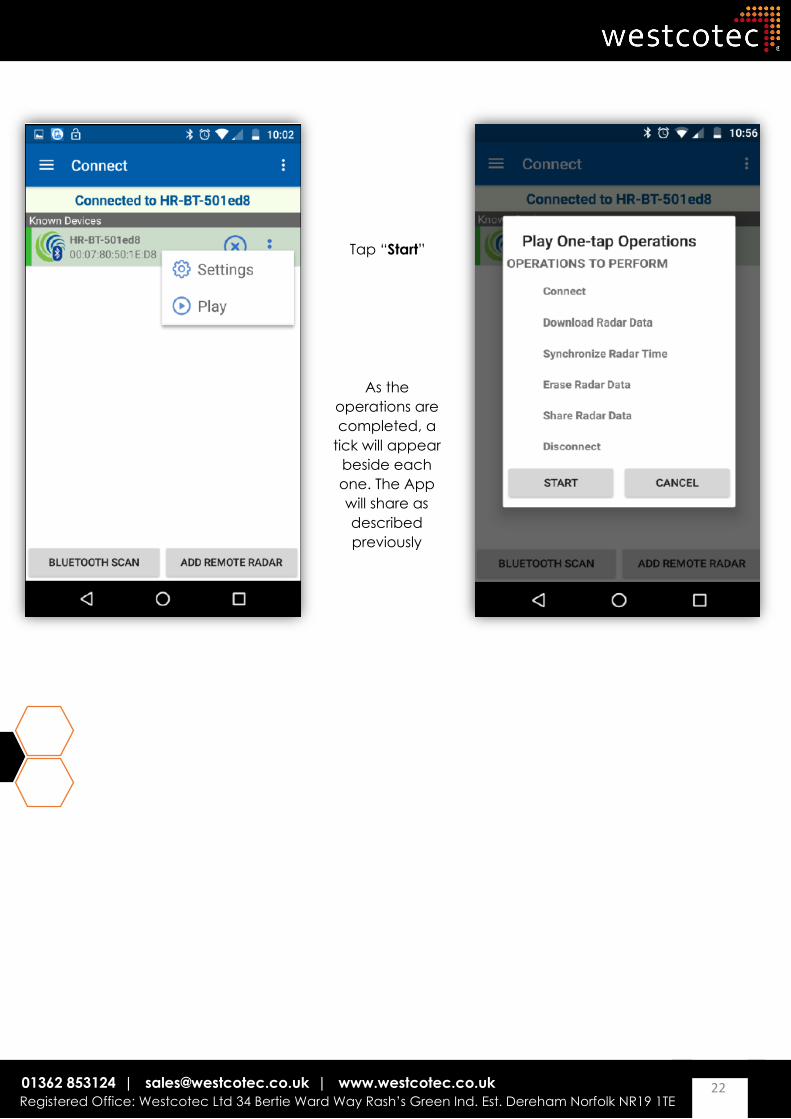
Bluetooth App: Enabling one touch data download
The App has a very useful function that will, at the touch of a button, Connect, Download, Sync
the time, Erase the data, Share the data and Disconnect. Very handy! To enable all the functions,
it is necessary to go into the settings menu. This is found by tapping the three dots at the top
right of the screen.
Tap “Settings”
Scroll to the
bottom of the
menu, and
ensure all four
boxes are ticked.
Once enabled, it
should not be
necessary to
repeat this set
up.
From the main
connection
screen, tap the
three dots
affiliated with the
device.
Tap “Play”
A new screen will pop up, with a list of operations.
22 01362 853124 | [email protected] | www.westcotec.co.uk
Registered Office: Westcotec Ltd 34 Bertie Ward Way Rash’s Green Ind. Est. Dereham Norfolk NR19 1TE
Tap “Start”
As the
operations are
completed, a
tick will appear
beside each
one. The App
will share as
described
previously
23 01362 853124 | [email protected] | www.westcotec.co.uk
Registered Office: Westcotec Ltd 34 Bertie Ward Way Rash’s Green Ind. Est. Dereham Norfolk NR19 1TE
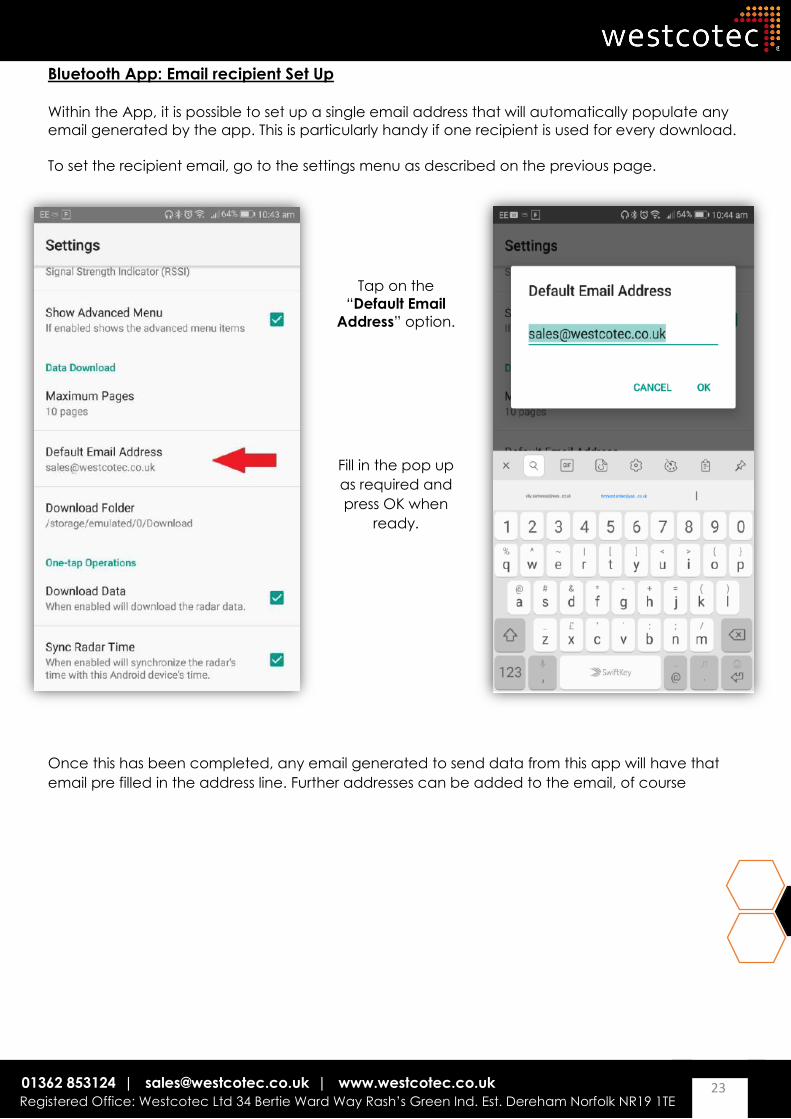
Bluetooth App: Email recipient Set Up
Within the App, it is possible to set up a single email address that will automatically populate any
email generated by the app. This is particularly handy if one recipient is used for every download.
To set the recipient email, go to the settings menu as described on the previous page.
Tap on the
“Default Email
Address” option.
Fill in the pop up
as required and
press OK when
ready.
Once this has been completed, any email generated to send data from this app will have that
email pre filled in the address line. Further addresses can be added to the email, of course
24 01362 853124 | [email protected] | www.westcotec.co.uk
Registered Office: Westcotec Ltd 34 Bertie Ward Way Rash’s Green Ind. Est. Dereham Norfolk NR19 1TE
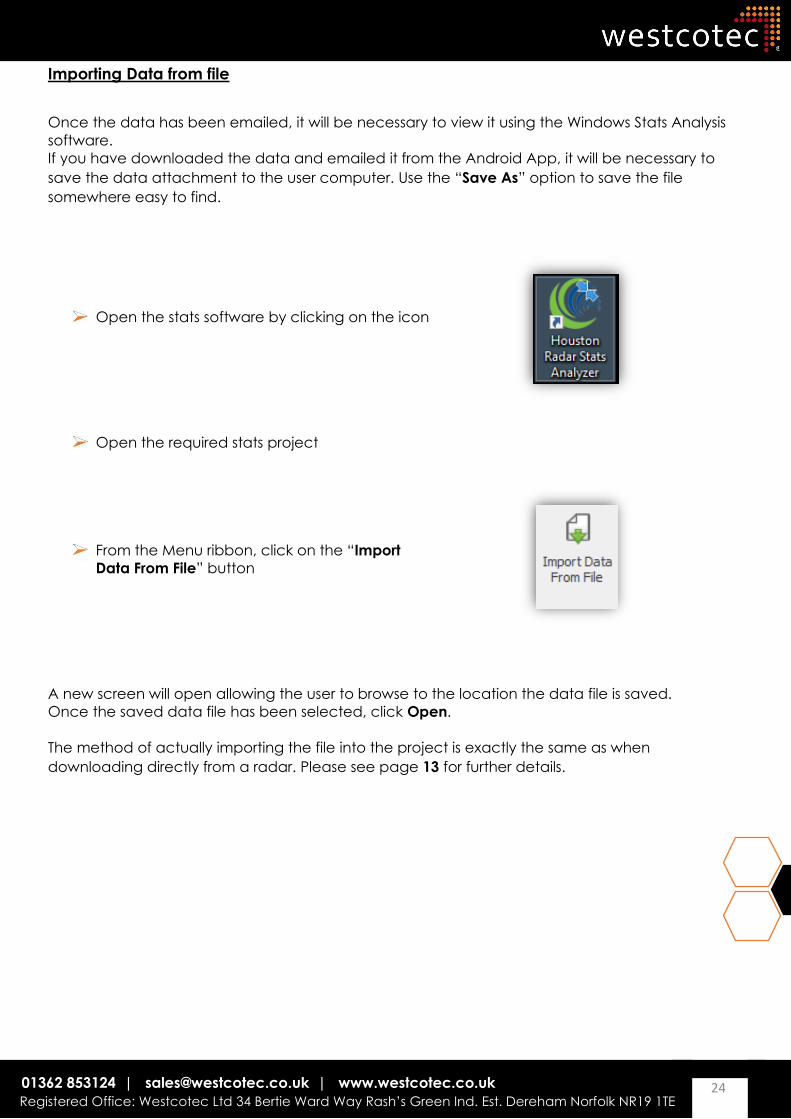
Importing Data from file
Once the data has been emailed, it will be necessary to view it using the Windows Stats Analysis
software.
If you have downloaded the data and emailed it from the Android App, it will be necessary to
save the data attachment to the user computer. Use the “Save As” option to save the file
somewhere easy to find.
Open the stats software by clicking on the icon
Open the required stats project
From the Menu ribbon, click on the “Import
Data From File” button
A new screen will open allowing the user to browse to the location the data file is saved.
Once the saved data file has been selected, click Open.
The method of actually importing the file into the project is exactly the same as when
downloading directly from a radar. Please see page 13 for further details.
25 01362 853124 | [email protected] | www.westcotec.co.uk
Registered Office: Westcotec Ltd 34 Bertie Ward Way Rash’s Green Ind. Est. Dereham Norfolk NR19 1TE
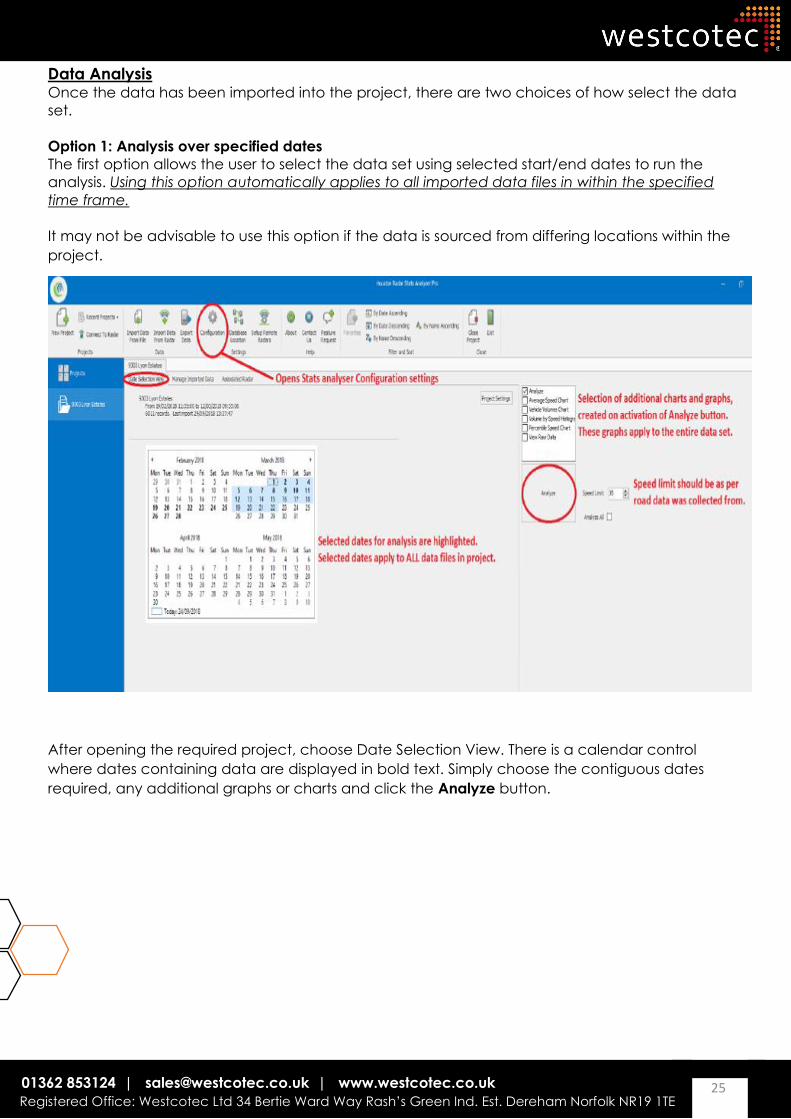
Data Analysis Once the data has been imported into the project, there are two choices of how select the data
set.
Option 1: Analysis over specified dates
The first option allows the user to select the data set using selected start/end dates to run the
analysis. Using this option automatically applies to all imported data files in within the specified
time frame.
It may not be advisable to use this option if the data is sourced from differing locations within the
project.
After opening the required project, choose Date Selection View. There is a calendar control
where dates containing data are displayed in bold text. Simply choose the contiguous dates
required, any additional graphs or charts and click the Analyze button.
26 01362 853124 | [email protected] | www.westcotec.co.uk
Registered Office: Westcotec Ltd 34 Bertie Ward Way Rash’s Green Ind. Est. Dereham Norfolk NR19 1TE
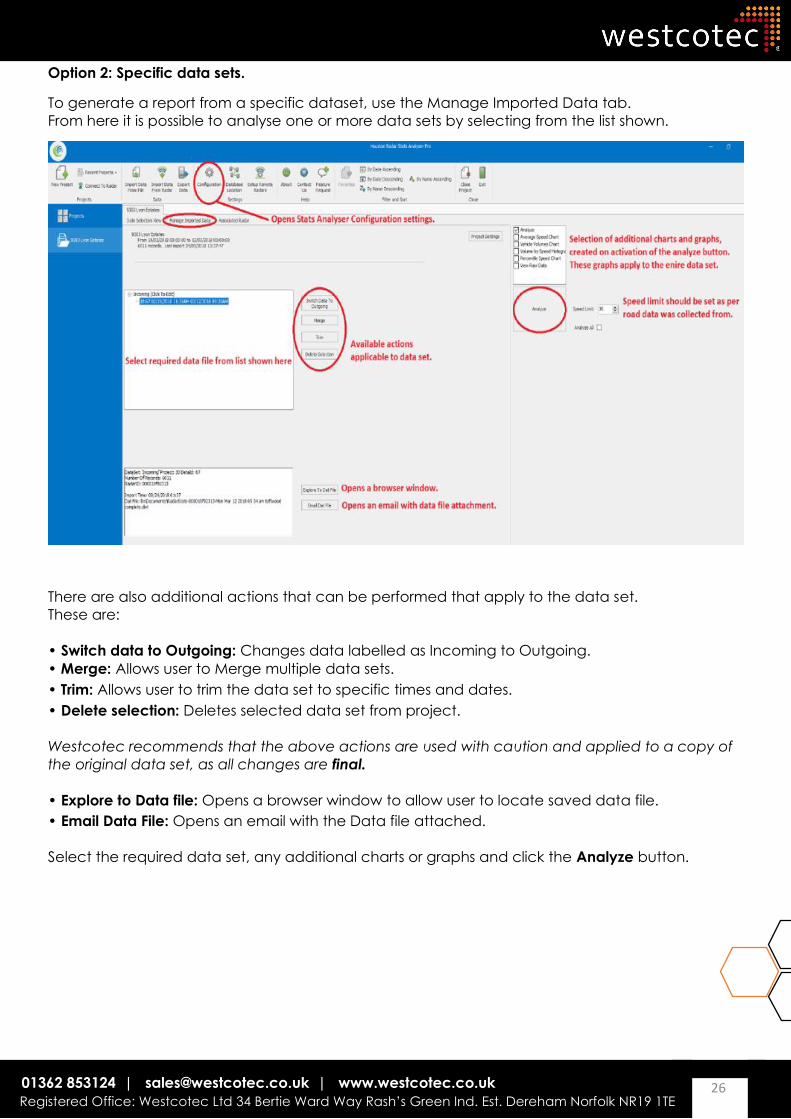
Option 2: Specific data sets.
To generate a report from a specific dataset, use the Manage Imported Data tab.
From here it is possible to analyse one or more data sets by selecting from the list shown.
There are also additional actions that can be performed that apply to the data set.
These are:
• Switch data to Outgoing: Changes data labelled as Incoming to Outgoing.
• Merge: Allows user to Merge multiple data sets.
• Trim: Allows user to trim the data set to specific times and dates.
• Delete selection: Deletes selected data set from project.
Westcotec recommends that the above actions are used with caution and applied to a copy of
the original data set, as all changes are final.
• Explore to Data file: Opens a browser window to allow user to locate saved data file.
• Email Data File: Opens an email with the Data file attached.
Select the required data set, any additional charts or graphs and click the Analyze button.
27 01362 853124 | [email protected] | www.westcotec.co.uk
Registered Office: Westcotec Ltd 34 Bertie Ward Way Rash’s Green Ind. Est. Dereham Norfolk NR19 1TE
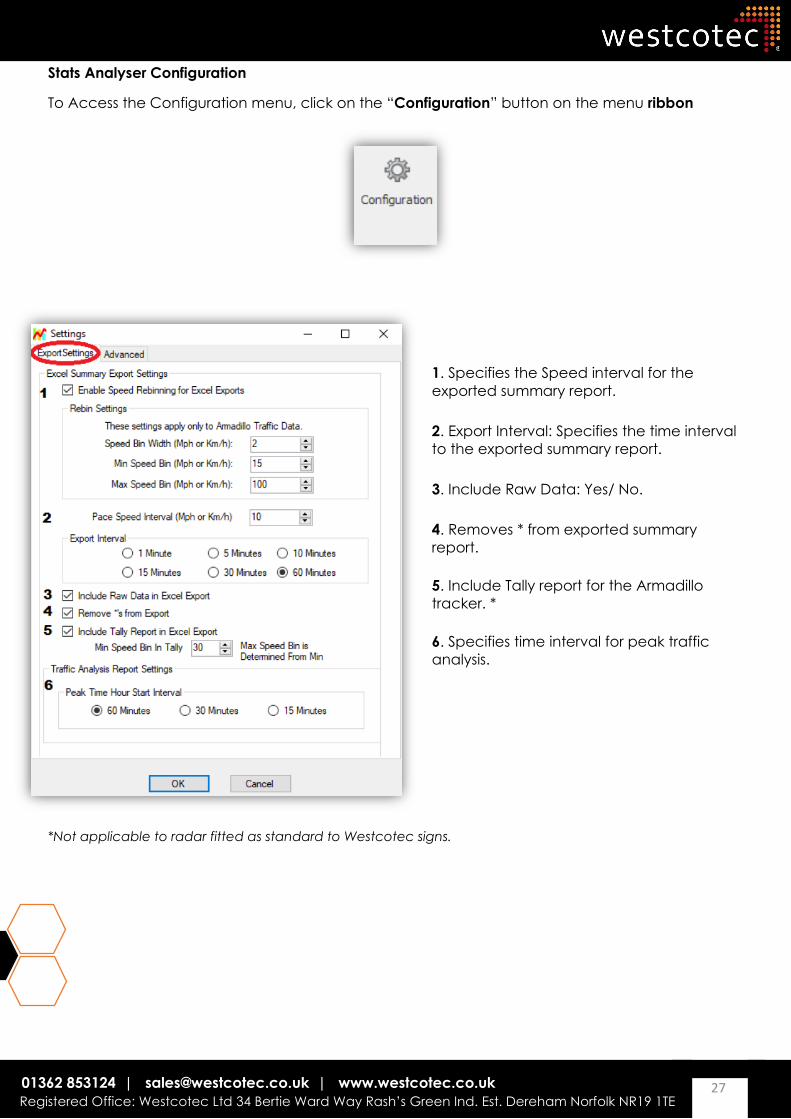
Stats Analyser Configuration
To Access the Configuration menu, click on the “Configuration” button on the menu ribbon
1. Specifies the Speed interval for the
exported summary report.
2. Export Interval: Specifies the time interval
to the exported summary report.
3. Include Raw Data: Yes/ No.
4. Removes * from exported summary
report.
5. Include Tally report for the Armadillo
tracker. *
6. Specifies time interval for peak traffic
analysis.
*Not applicable to radar fitted as standard to Westcotec signs.

28 01362 853124 | [email protected] | www.westcotec.co.uk
Registered Office: Westcotec Ltd 34 Bertie Ward Way Rash’s Green Ind. Est. Dereham Norfolk NR19 1TE
Interpreting the Analysis report
Once the “Analyze” button has been clicked, the software will generate the analysis report.
Reports can be selected by clicking on the tabs at the top of the screen.
Monthly counts/ Speed averages
The initial screen is a table containing the Average Hourly counts over the selected month. At the
top of the chart is an option to select between counts, average speed and 85th percentile*. It is
also possible to select between the months.
All Analysis is done on an hourly basis and reported by the day of the week.
For example, if the user selects counts for the month of February, the value in the first cell (Hour 0-
1, Day= Monday) is the Total of the counts from midnight to 1am on all Mondays in February
(where data is present). This continues throughout the cells.
The weekday 85% Avg Speed column contains the average of that row, but excludes weekends.
*For an explanation of the 85th Percentile, please refer to the FAQ section
29 01362 853124 | [email protected] | www.westcotec.co.uk
Registered Office: Westcotec Ltd 34 Bertie Ward Way Rash’s Green Ind. Est. Dereham Norfolk NR19 1TE
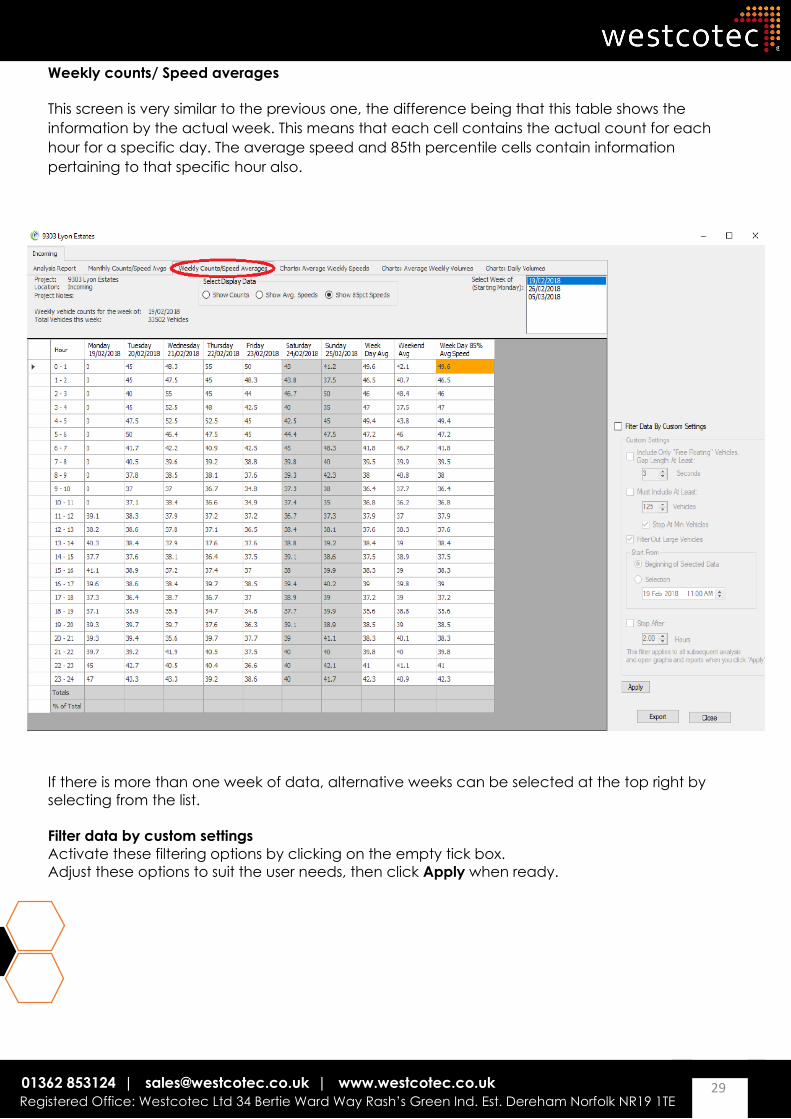
Weekly counts/ Speed averages
This screen is very similar to the previous one, the difference being that this table shows the
information by the actual week. This means that each cell contains the actual count for each
hour for a specific day. The average speed and 85th percentile cells contain information
pertaining to that specific hour also.
If there is more than one week of data, alternative weeks can be selected at the top right by
selecting from the list.
Filter data by custom settings
Activate these filtering options by clicking on the empty tick box.
Adjust these options to suit the user needs, then click Apply when ready.
30 01362 853124 | [email protected] | www.westcotec.co.uk
Registered Office: Westcotec Ltd 34 Bertie Ward Way Rash’s Green Ind. Est. Dereham Norfolk NR19 1TE
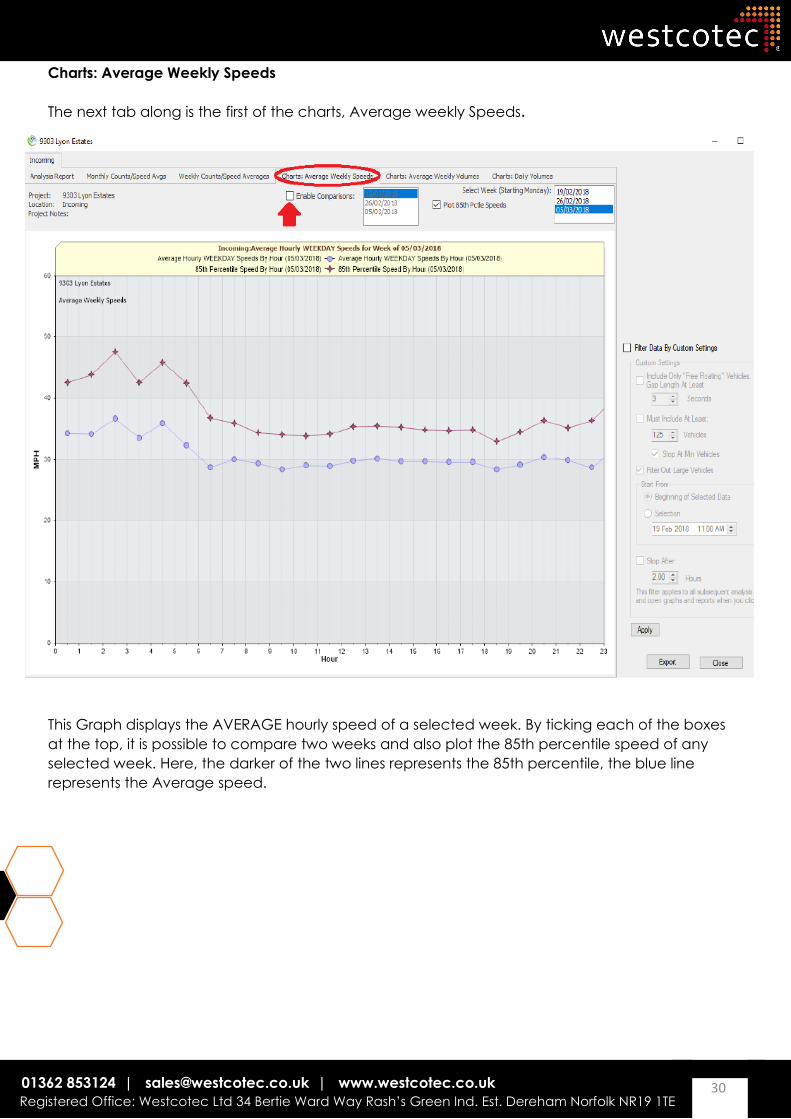
Charts: Average Weekly Speeds
The next tab along is the first of the charts, Average weekly Speeds.
This Graph displays the AVERAGE hourly speed of a selected week. By ticking each of the boxes
at the top, it is possible to compare two weeks and also plot the 85th percentile speed of any
selected week. Here, the darker of the two lines represents the 85th percentile, the blue line
represents the Average speed.
31 01362 853124 | [email protected] | www.westcotec.co.uk
Registered Office: Westcotec Ltd 34 Bertie Ward Way Rash’s Green Ind. Est. Dereham Norfolk NR19 1TE
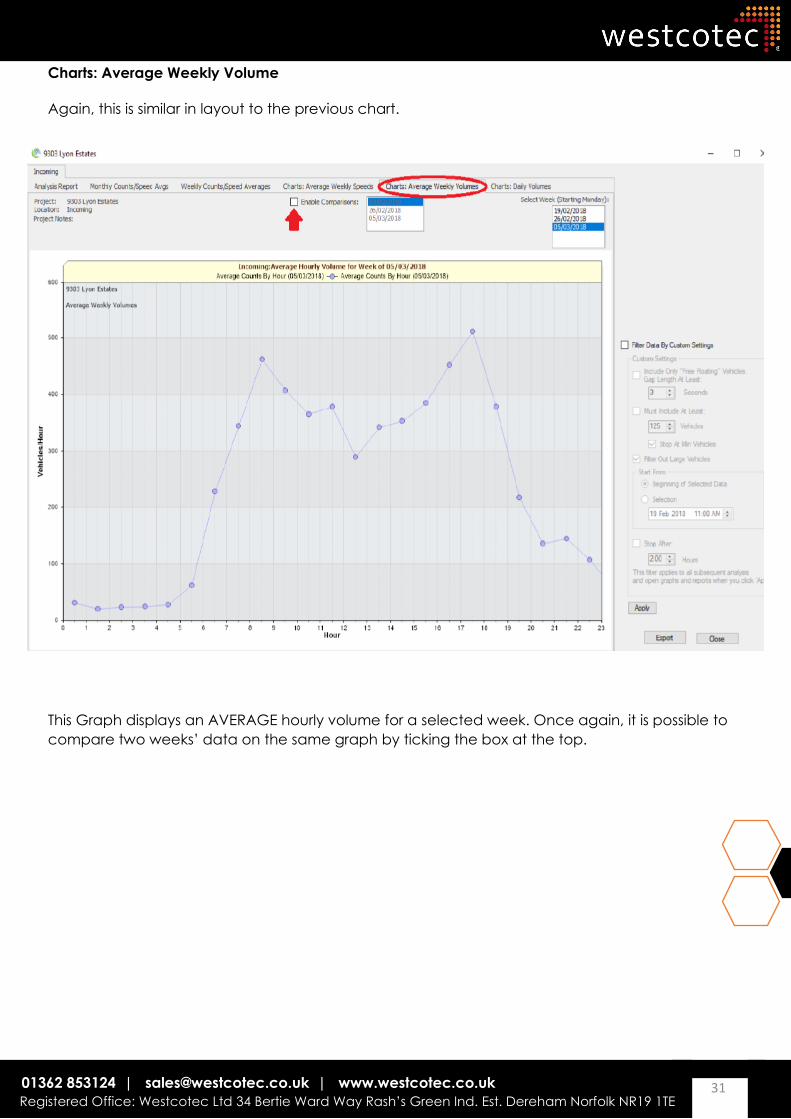
Charts: Average Weekly Volume
Again, this is similar in layout to the previous chart.
This Graph displays an AVERAGE hourly volume for a selected week. Once again, it is possible to
compare two weeks’ data on the same graph by ticking the box at the top.
32 01362 853124 | [email protected] | www.westcotec.co.uk
Registered Office: Westcotec Ltd 34 Bertie Ward Way Rash’s Green Ind. Est. Dereham Norfolk NR19 1TE
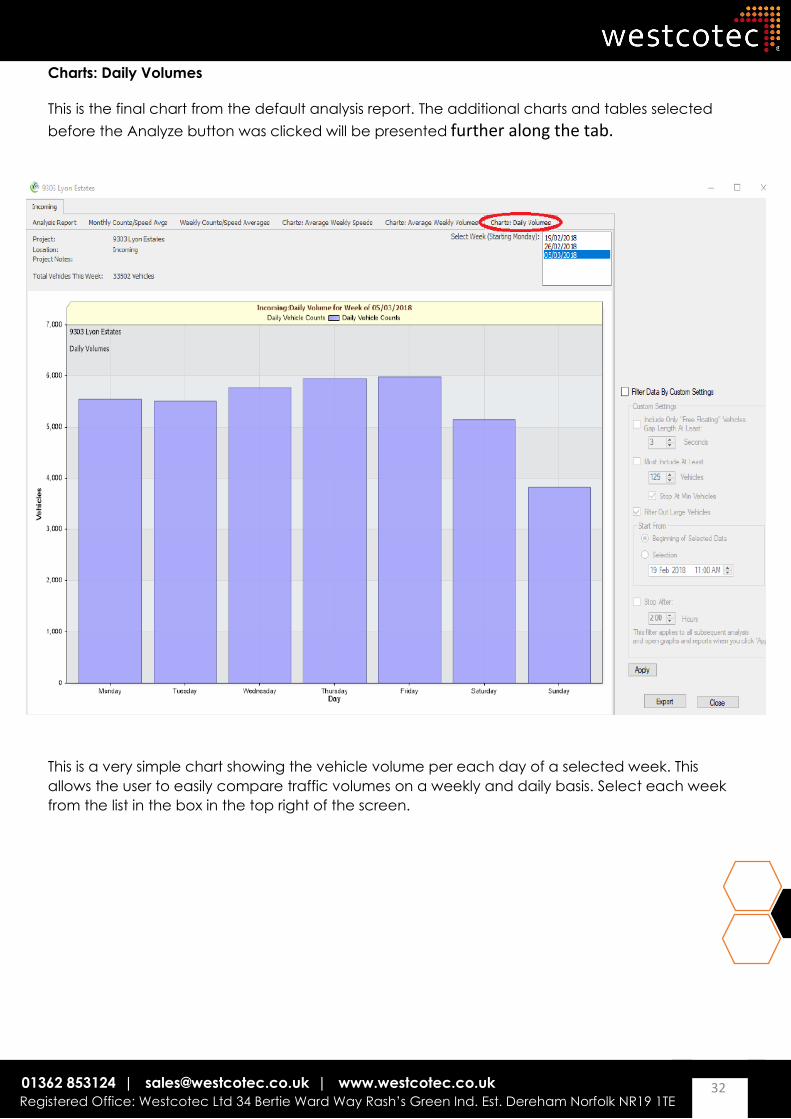
Charts: Daily Volumes
This is the final chart from the default analysis report. The additional charts and tables selected
before the Analyze button was clicked will be presented further along the tab.
This is a very simple chart showing the vehicle volume per each day of a selected week. This
allows the user to easily compare traffic volumes on a weekly and daily basis. Select each week
from the list in the box in the top right of the screen.
33 01362 853124 | [email protected] | www.westcotec.co.uk
Registered Office: Westcotec Ltd 34 Bertie Ward Way Rash’s Green Ind. Est. Dereham Norfolk NR19 1TE
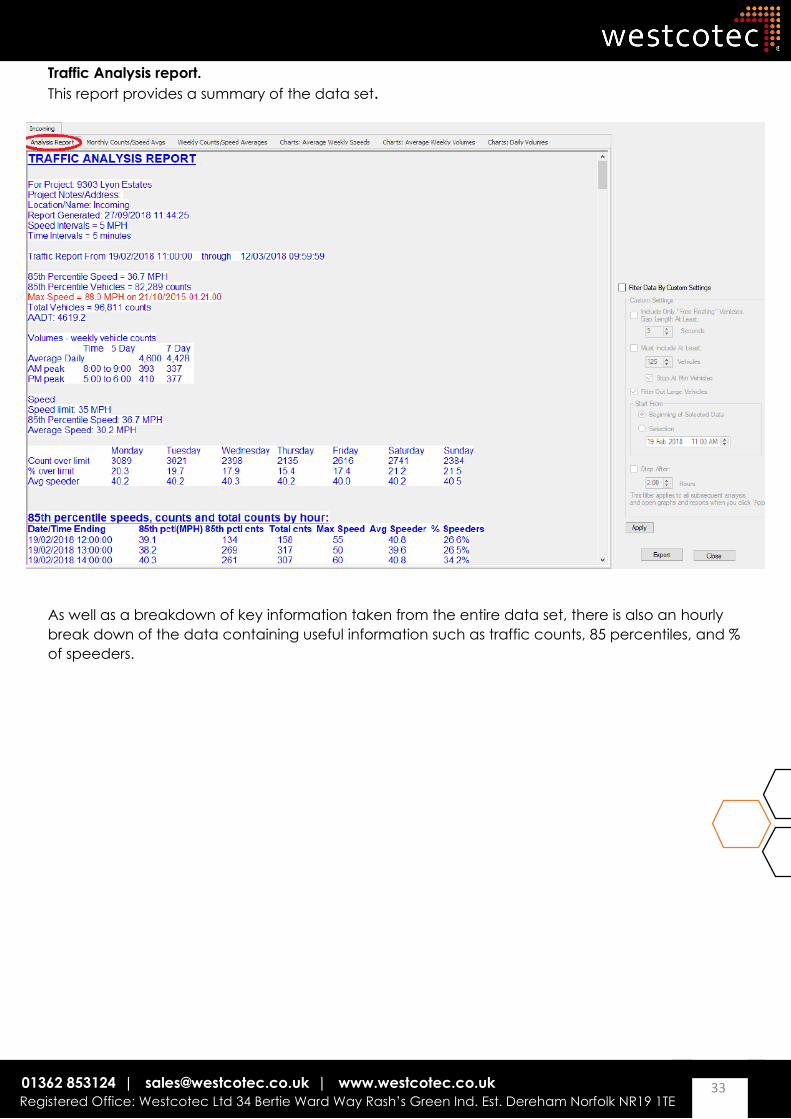
Traffic Analysis report.
This report provides a summary of the data set.
As well as a breakdown of key information taken from the entire data set, there is also an hourly
break down of the data containing useful information such as traffic counts, 85 percentiles, and %
of speeders.
34 01362 853124 | [email protected] | www.westcotec.co.uk
Registered Office: Westcotec Ltd 34 Bertie Ward Way Rash’s Green Ind. Est. Dereham Norfolk NR19 1TE
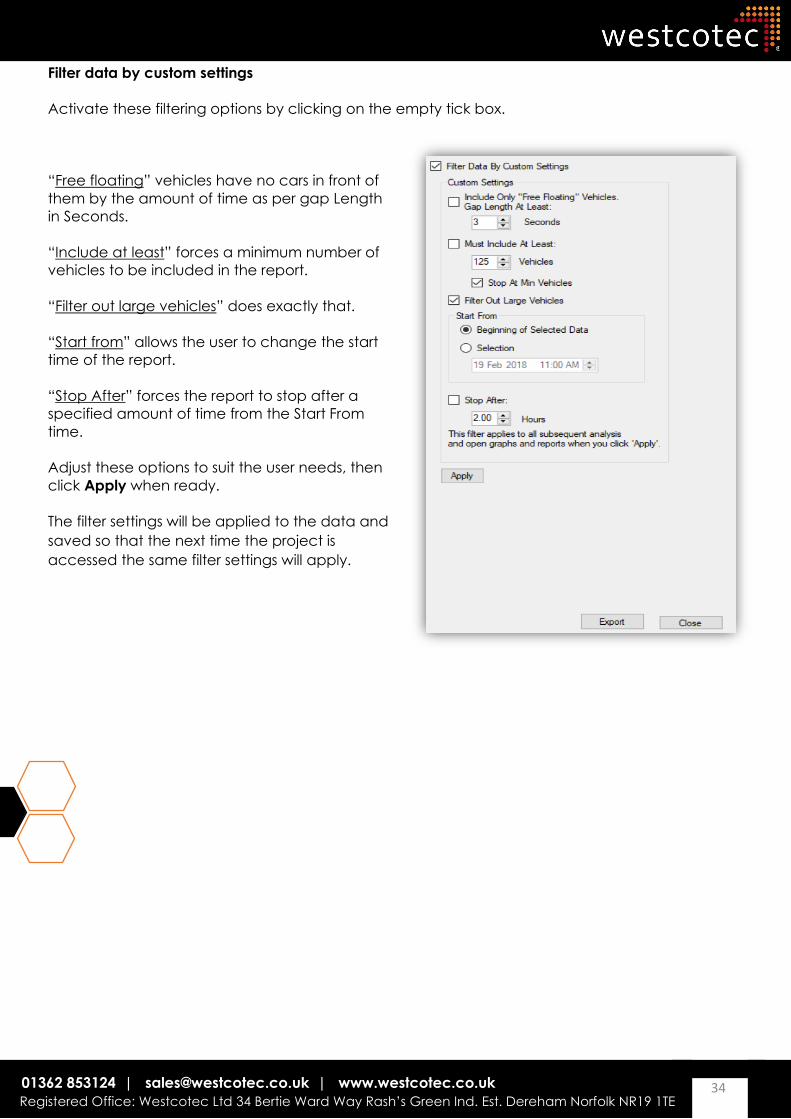
Filter data by custom settings
Activate these filtering options by clicking on the empty tick box.
“Free floating” vehicles have no cars in front of
them by the amount of time as per gap Length
in Seconds.
“Include at least” forces a minimum number of
vehicles to be included in the report.
“Filter out large vehicles” does exactly that.
“Start from” allows the user to change the start
time of the report.
“Stop After” forces the report to stop after a
specified amount of time from the Start From
time.
Adjust these options to suit the user needs, then
click Apply when ready.
The filter settings will be applied to the data and
saved so that the next time the project is
accessed the same filter settings will apply.
35 01362 853124 | [email protected] | www.westcotec.co.uk
Registered Office: Westcotec Ltd 34 Bertie Ward Way Rash’s Green Ind. Est. Dereham Norfolk NR19 1TE
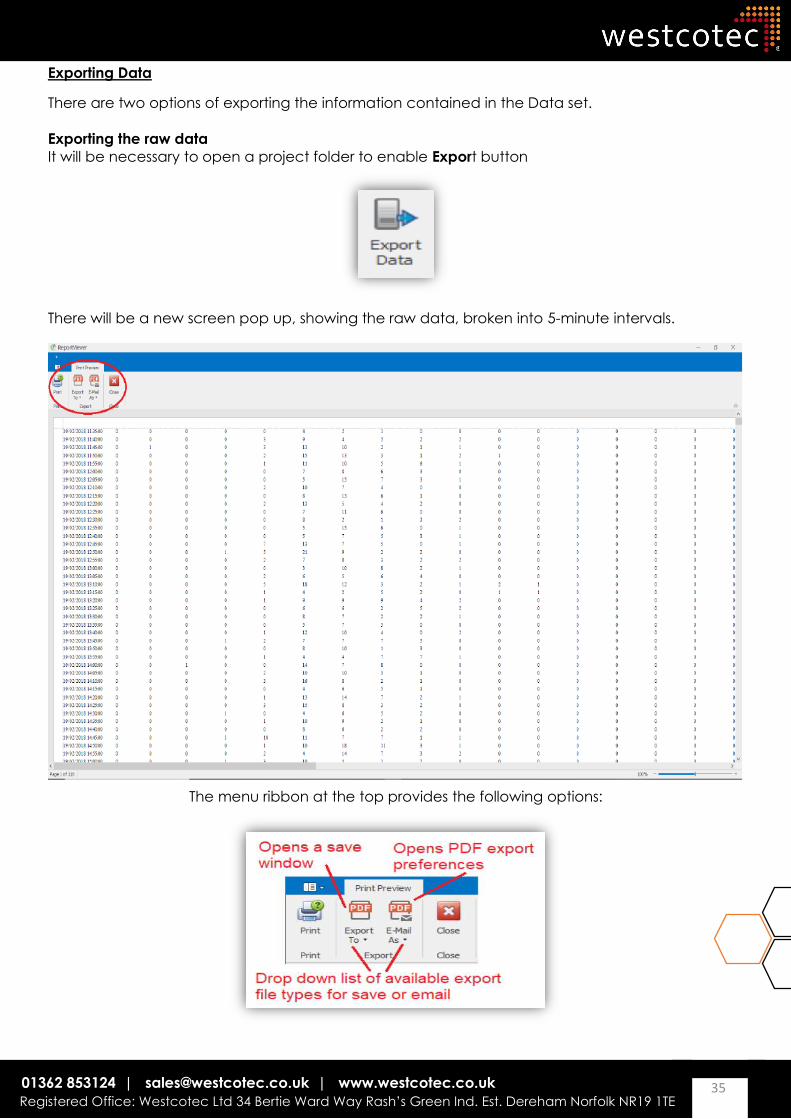
Exporting Data
There are two options of exporting the information contained in the Data set.
Exporting the raw data
It will be necessary to open a project folder to enable Export button
There will be a new screen pop up, showing the raw data, broken into 5-minute intervals.
The menu ribbon at the top provides the following options:
36 01362 853124 | [email protected] | www.westcotec.co.uk
Registered Office: Westcotec Ltd 34 Bertie Ward Way Rash’s Green Ind. Est. Dereham Norfolk NR19 1TE
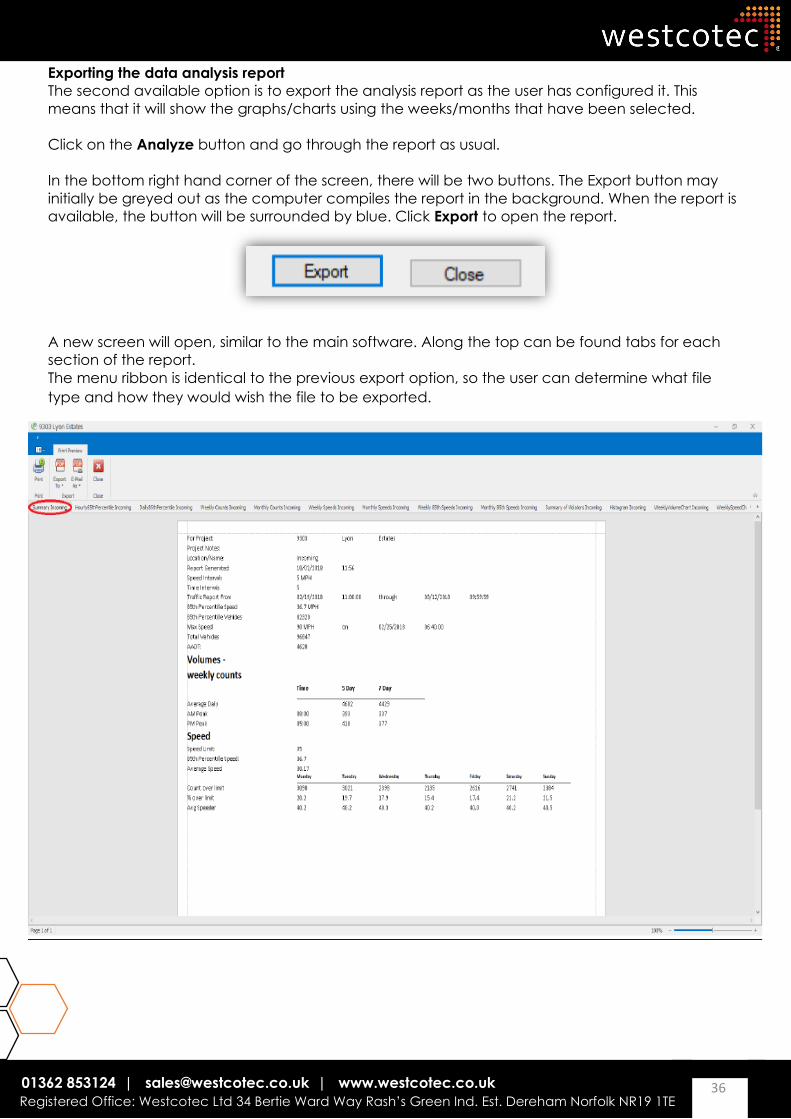
Exporting the data analysis report
The second available option is to export the analysis report as the user has configured it. This
means that it will show the graphs/charts using the weeks/months that have been selected.
Click on the Analyze button and go through the report as usual.
In the bottom right hand corner of the screen, there will be two buttons. The Export button may
initially be greyed out as the computer compiles the report in the background. When the report is
available, the button will be surrounded by blue. Click Export to open the report.
A new screen will open, similar to the main software. Along the top can be found tabs for each
section of the report.
The menu ribbon is identical to the previous export option, so the user can determine what file
type and how they would wish the file to be exported.
37 01362 853124 | [email protected] | www.westcotec.co.uk
Registered Office: Westcotec Ltd 34 Bertie Ward Way Rash’s Green Ind. Est. Dereham Norfolk NR19 1TE
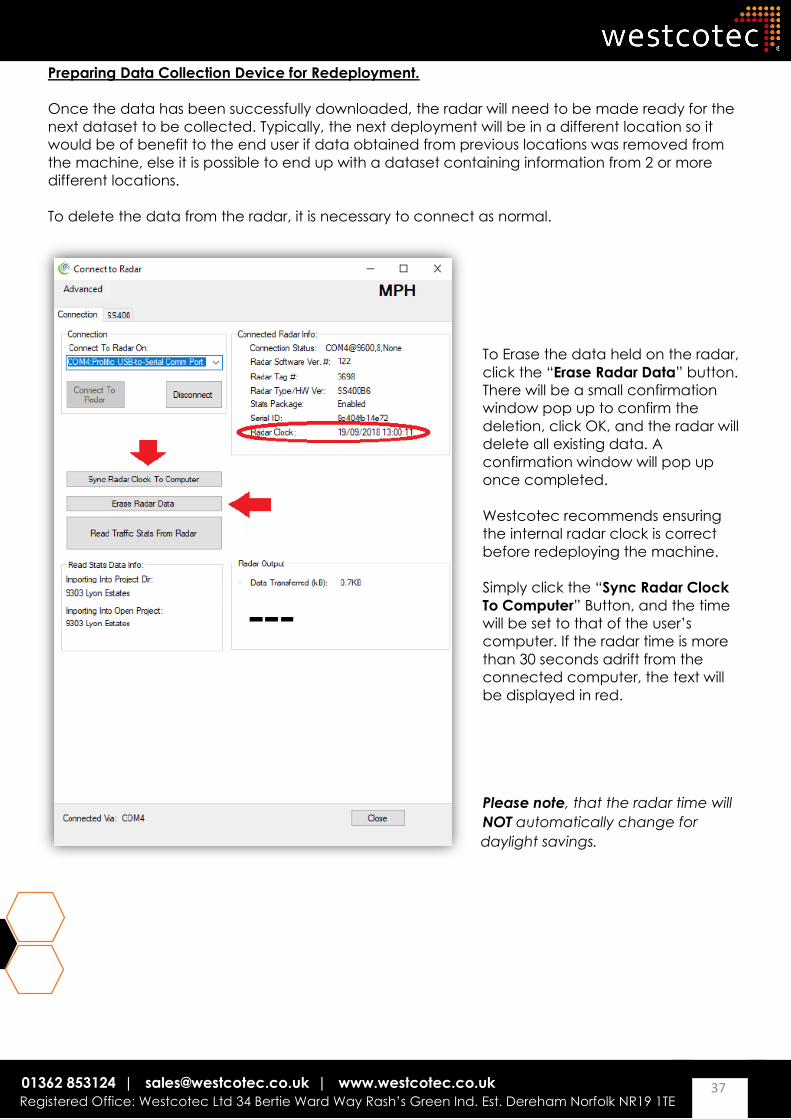
Preparing Data Collection Device for Redeployment.
Once the data has been successfully downloaded, the radar will need to be made ready for the
next dataset to be collected. Typically, the next deployment will be in a different location so it
would be of benefit to the end user if data obtained from previous locations was removed from
the machine, else it is possible to end up with a dataset containing information from 2 or more
different locations.
To delete the data from the radar, it is necessary to connect as normal.
To Erase the data held on the radar,
click the “Erase Radar Data” button.
There will be a small confirmation
window pop up to confirm the
deletion, click OK, and the radar will
delete all existing data. A
confirmation window will pop up
once completed.
Westcotec recommends ensuring
the internal radar clock is correct
before redeploying the machine.
Simply click the “Sync Radar Clock
To Computer” Button, and the time
will be set to that of the user’s
computer. If the radar time is more
than 30 seconds adrift from the
connected computer, the text will
be displayed in red.
Please note, that the radar time will
NOT automatically change for
daylight savings.
38 01362 853124 | [email protected] | www.westcotec.co.uk
Registered Office: Westcotec Ltd 34 Bertie Ward Way Rash’s Green Ind. Est. Dereham Norfolk NR19 1TE
FAQs/ Troubleshooting
Q. I have got the sign connected to my computer, but the software keeps telling me that the radar
is not found?
A. Please check the following:
• Is this the first time you have connected? If so, has the USB device driver been correctly
installed?
• Has the sign and the computer been restarted?
• Is the Battery connected?
• Is the Battery Fully Charged? (Over 12.6V)
• Is the fuse intact?
• Is the sign switched on?
Q. What is this blue CD-Rom that comes with the serial lead?
A. This is the manufacturer supplied software disc. We have found that most computers come
without a disc drive these days, so have supplied the software on the USB Flash Drive. The software
on the flash drive is usually more up to date than that on the Disc, so we recommend using the
flash drive anyway.
Q. This Guide mentions a USB Flash Drive. I can’t find it?
A. Depending upon the specifications of the sign, if standard download was ordered then the
flash drive is located in a small box at the front of the larger cardboard box that contains the
leads. If Bluetooth download has been specified then the USB will be in the box the sign came in.
Q. Can I download the software I need?
A. Yes, it is now possible to download all files and software required from the Westcotec Website.
Go to www.westcotec.co.uk/downloads
Q. How can I get the data into Excel?
A. The user computer MUST have Excel installed.
Please see the section on Exporting Data, found on page 33.
Q. How can I email the data?
A. Please see page 22 as there is a function that will generate an email for you. Alternatively,
when the Houston Data software is installed it automatically creates a new folder in the
computer’s “Documents” Folder, called “My Radar Stats”. Within the “My radar Stats” folder, a sub
folder can be found for each Stats Project created. Within this sub folder, you will find a .DAT file.
This is the file that contains the data. Each .DAT file has a time stamp to identify it. If you have
exported the data to Excel, this file will also appear in the same project folder. You can send
either file via email, but the recipient must have the Houston Stats software installed to open the
.DAT file.
39 01362 853124 | [email protected] | www.westcotec.co.uk
Registered Office: Westcotec Ltd 34 Bertie Ward Way Rash’s Green Ind. Est. Dereham Norfolk NR19 1TE
Q. My Android device can’t “find” the Bluetooth enabled sign.
A. This does happen occasionally with Bluetooth. Please try the following:
• Are you in range?
• Restart the Android device
• Restart the sign
• Attempt to do a Bluetooth search without using the app. If it appears, pairing with it will
automatically make it show in the Houston Radar App.
Q. There was a problem storing the data on the Android Device, so I am unable to share it via
email.
A. You need to go into the Settings menu of your device, and allow the app access to Storage.
Usually this is achieved by going to Settings> Apps> Houston Radar LCC> Permissions> then tap
“storage” to change the switch setting.
Q. The speed limit on the project window says 35mph, but the sign should have been set to
30mph. Why is there a difference?
A. The speed limit selector on the project window is purely for the analysis software, and does not
affect, or have any bearing on the sign. Simply set this to the speed limit within which the sign was
deployed in when the current data set was recorded.
Q. I have a Bluetooth dongle that I can put in my Laptop to make it Bluetooth. Can I connect with
that?
A. Possibly. Bluetooth Dongles are notoriously unreliable, so it would be a case of trying it and
finding out. If the dongle will pair with the sign Bluetooth device, then it should be possible. Please
note, that whilst Westcotec will always endeavour to provide support, we will not be able to help if
a third-party Bluetooth dongle is used.
Q. What does the 85th percentile mean?
A. The 85th Percentile is used extensively in decision making as it is indicative of the speed that the
majority of road users are travelling at.
Use of the 85th percentile speed concept is based on the theory that:
• the large majority of drivers:
❖ are reasonable and prudent
❖ do not want to have a crash
❖ desire to reach their destination in the shortest possible time
• a speed at or below which 85 percent of people drive at any given location under good
weather and visibility conditions may be considered as the maximum safe speed for that location
40 01362 853124 | [email protected] | www.westcotec.co.uk
Registered Office: Westcotec Ltd 34 Bertie Ward Way Rash’s Green Ind. Est. Dereham Norfolk NR19 1TE
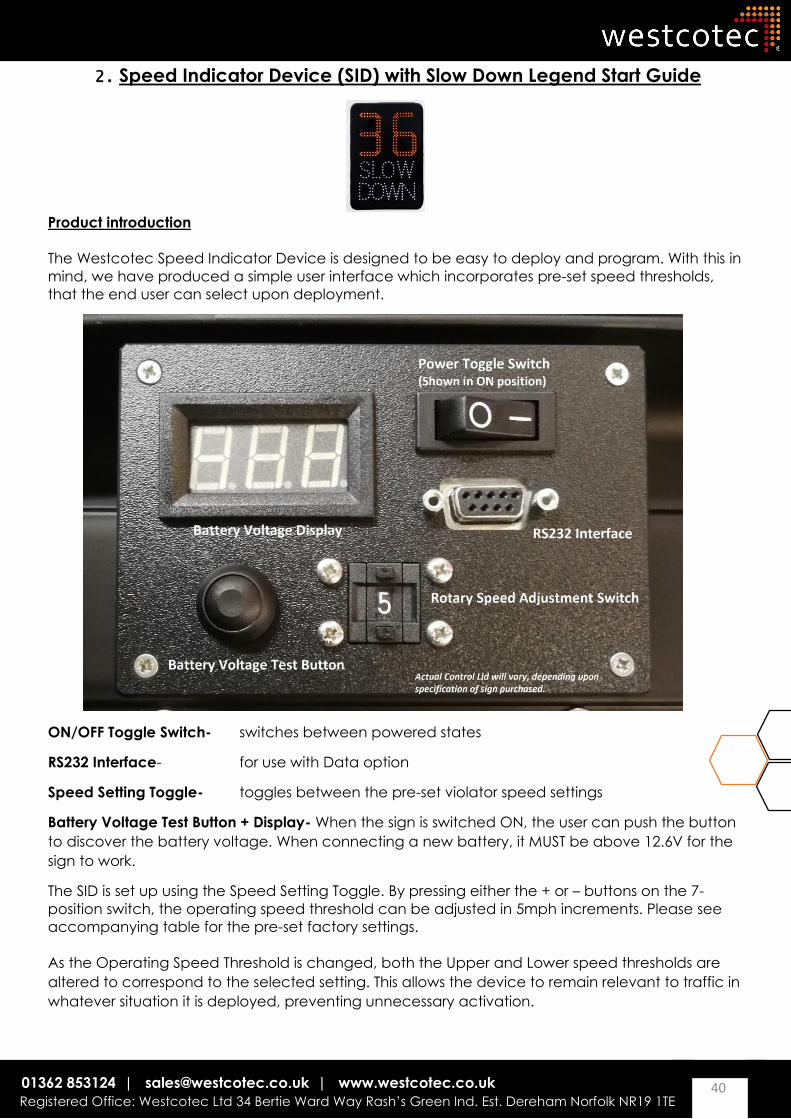
2. Speed Indicator Device (SID) with Slow Down Legend Start Guide
Product introduction
The Westcotec Speed Indicator Device is designed to be easy to deploy and program. With this in
mind, we have produced a simple user interface which incorporates pre-set speed thresholds,
that the end user can select upon deployment.
ON/OFF Toggle Switch- switches between powered states
RS232 Interface- for use with Data option
Speed Setting Toggle- toggles between the pre-set violator speed settings
Battery Voltage Test Button + Display- When the sign is switched ON, the user can push the button
to discover the battery voltage. When connecting a new battery, it MUST be above 12.6V for the
sign to work.
The SID is set up using the Speed Setting Toggle. By pressing either the + or – buttons on the 7-
position switch, the operating speed threshold can be adjusted in 5mph increments. Please see
accompanying table for the pre-set factory settings.
As the Operating Speed Threshold is changed, both the Upper and Lower speed thresholds are
altered to correspond to the selected setting. This allows the device to remain relevant to traffic in
whatever situation it is deployed, preventing unnecessary activation.
41 01362 853124 | [email protected] | www.westcotec.co.uk
Registered Office: Westcotec Ltd 34 Bertie Ward Way Rash’s Green Ind. Est. Dereham Norfolk NR19 1TE
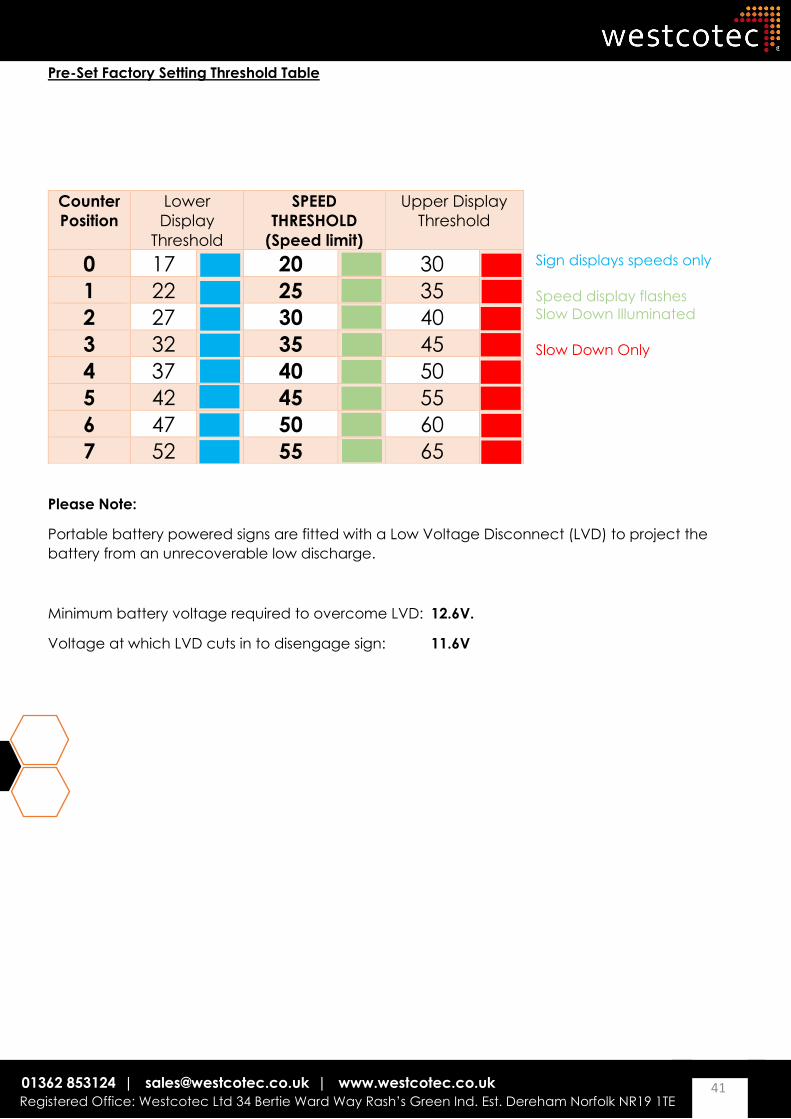
Pre-Set Factory Setting Threshold Table
Sign displays speeds only
Speed display flashes
Slow Down Illuminated
Slow Down Only
Please Note:
Portable battery powered signs are fitted with a Low Voltage Disconnect (LVD) to project the
battery from an unrecoverable low discharge.
Minimum battery voltage required to overcome LVD: 12.6V.
Voltage at which LVD cuts in to disengage sign: 11.6V
Counter
Position
Lower
Display
Threshold
SPEED
THRESHOLD
(Speed limit)
Upper Display
Threshold
0 17 20 30
1 22 25 35
2 27 30 40
3 32 35 45
4 37 40 50
5 42 45 55
6 47 50 60
7 52 55 65
42 01362 853124 | [email protected] | www.westcotec.co.uk
Registered Office: Westcotec Ltd 34 Bertie Ward Way Rash’s Green Ind. Est. Dereham Norfolk NR19 1TE
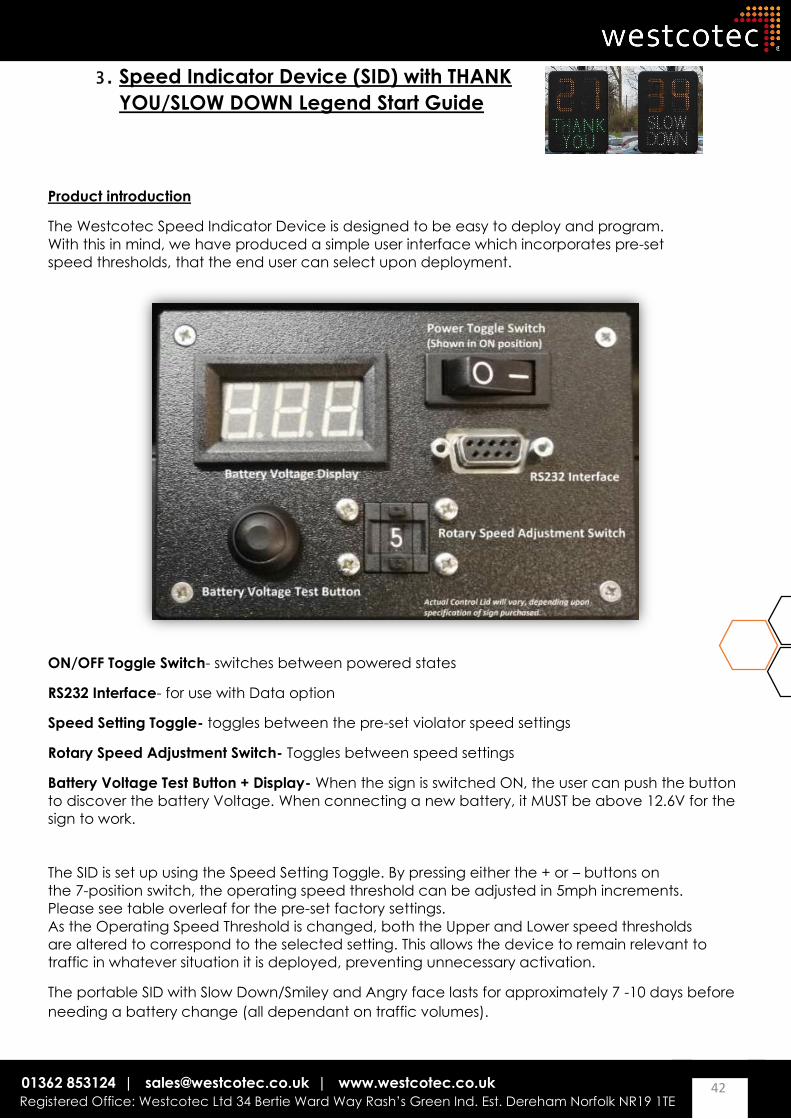
3. Speed Indicator Device (SID) with THANK
YOU/SLOW DOWN Legend Start Guide
Product introduction
The Westcotec Speed Indicator Device is designed to be easy to deploy and program.
With this in mind, we have produced a simple user interface which incorporates pre-set
speed thresholds, that the end user can select upon deployment.
ON/OFF Toggle Switch- switches between powered states
RS232 Interface- for use with Data option
Speed Setting Toggle- toggles between the pre-set violator speed settings
Rotary Speed Adjustment Switch- Toggles between speed settings
Battery Voltage Test Button + Display- When the sign is switched ON, the user can push the button
to discover the battery Voltage. When connecting a new battery, it MUST be above 12.6V for the
sign to work.
The SID is set up using the Speed Setting Toggle. By pressing either the + or – buttons on
the 7-position switch, the operating speed threshold can be adjusted in 5mph increments.
Please see table overleaf for the pre-set factory settings.
As the Operating Speed Threshold is changed, both the Upper and Lower speed thresholds
are altered to correspond to the selected setting. This allows the device to remain relevant to
traffic in whatever situation it is deployed, preventing unnecessary activation.
The portable SID with Slow Down/Smiley and Angry face lasts for approximately 7 -10 days before
needing a battery change (all dependant on traffic volumes).

43 01362 853124 | [email protected] | www.westcotec.co.uk
Registered Office: Westcotec Ltd 34 Bertie Ward Way Rash’s Green Ind. Est. Dereham Norfolk NR19 1TE
Pre-Set Factory Setting Threshold Table
Speed Display
Shown and Thank
You Illuminated
Speed display flashes.
Slow Down Illuminated
Slow Down Only
Please Note:
Portable battery powered signs are fitted with a Low Voltage Disconnect (LVD)
to protect the battery from an unrecoverable low discharge.
Minimum battery voltage required to overcome LVD: 12.6V.
Voltage at which LVD cuts in to disengage sign: 11.6V.
Counter
Position
Lower
Display
Threshold
Lower
Display
Threshold
Upper
Display
Threshold
0 17 20 30
1 22 25 35
2 27 30 40
3 32 35 45
4 37 40 50
5 42 45 55
6 47 50 60
7 52 55 65
44 01362 853124 | [email protected] | www.westcotec.co.uk
Registered Office: Westcotec Ltd 34 Bertie Ward Way Rash’s Green Ind. Est. Dereham Norfolk NR19 1TE
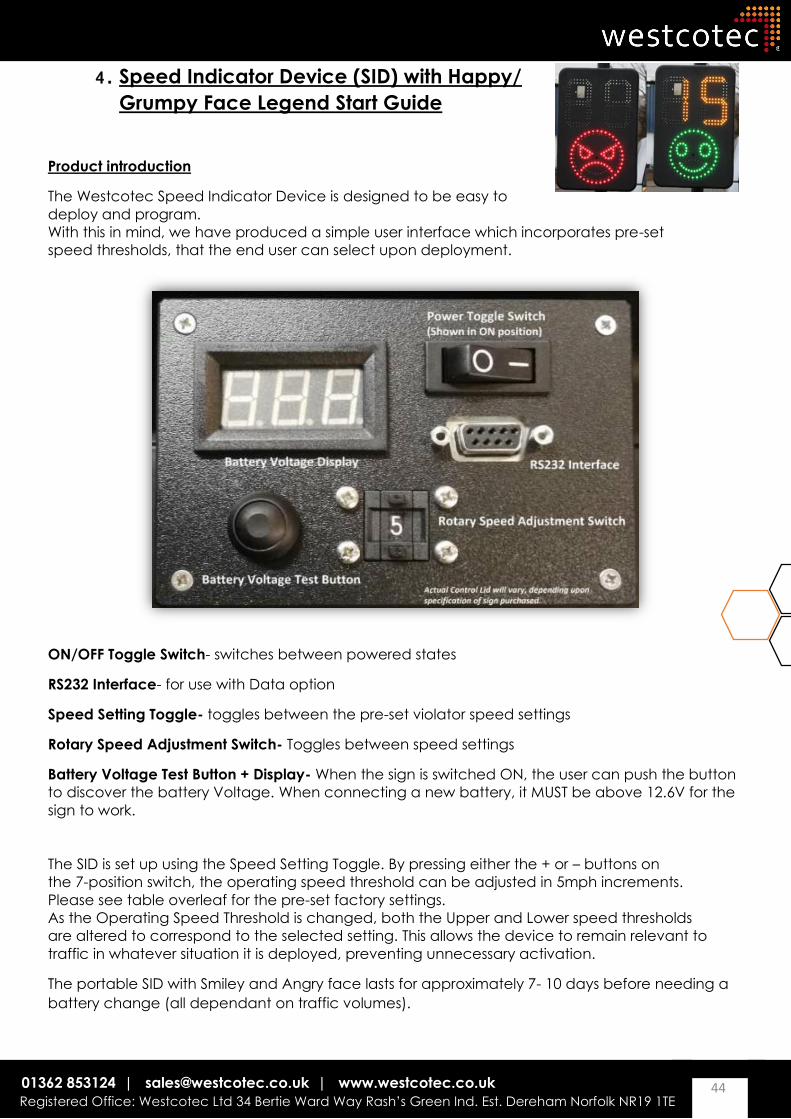
4. Speed Indicator Device (SID) with Happy/
Grumpy Face Legend Start Guide
Product introduction
The Westcotec Speed Indicator Device is designed to be easy to
deploy and program.
With this in mind, we have produced a simple user interface which incorporates pre-set
speed thresholds, that the end user can select upon deployment.
ON/OFF Toggle Switch- switches between powered states
RS232 Interface- for use with Data option
Speed Setting Toggle- toggles between the pre-set violator speed settings
Rotary Speed Adjustment Switch- Toggles between speed settings
Battery Voltage Test Button + Display- When the sign is switched ON, the user can push the button
to discover the battery Voltage. When connecting a new battery, it MUST be above 12.6V for the
sign to work.
The SID is set up using the Speed Setting Toggle. By pressing either the + or – buttons on
the 7-position switch, the operating speed threshold can be adjusted in 5mph increments.
Please see table overleaf for the pre-set factory settings.
As the Operating Speed Threshold is changed, both the Upper and Lower speed thresholds
are altered to correspond to the selected setting. This allows the device to remain relevant to
traffic in whatever situation it is deployed, preventing unnecessary activation.
The portable SID with Smiley and Angry face lasts for approximately 7- 10 days before needing a
battery change (all dependant on traffic volumes).
45 01362 853124 | [email protected] | www.westcotec.co.uk
Registered Office: Westcotec Ltd 34 Bertie Ward Way Rash’s Green Ind. Est. Dereham Norfolk NR19 1TE
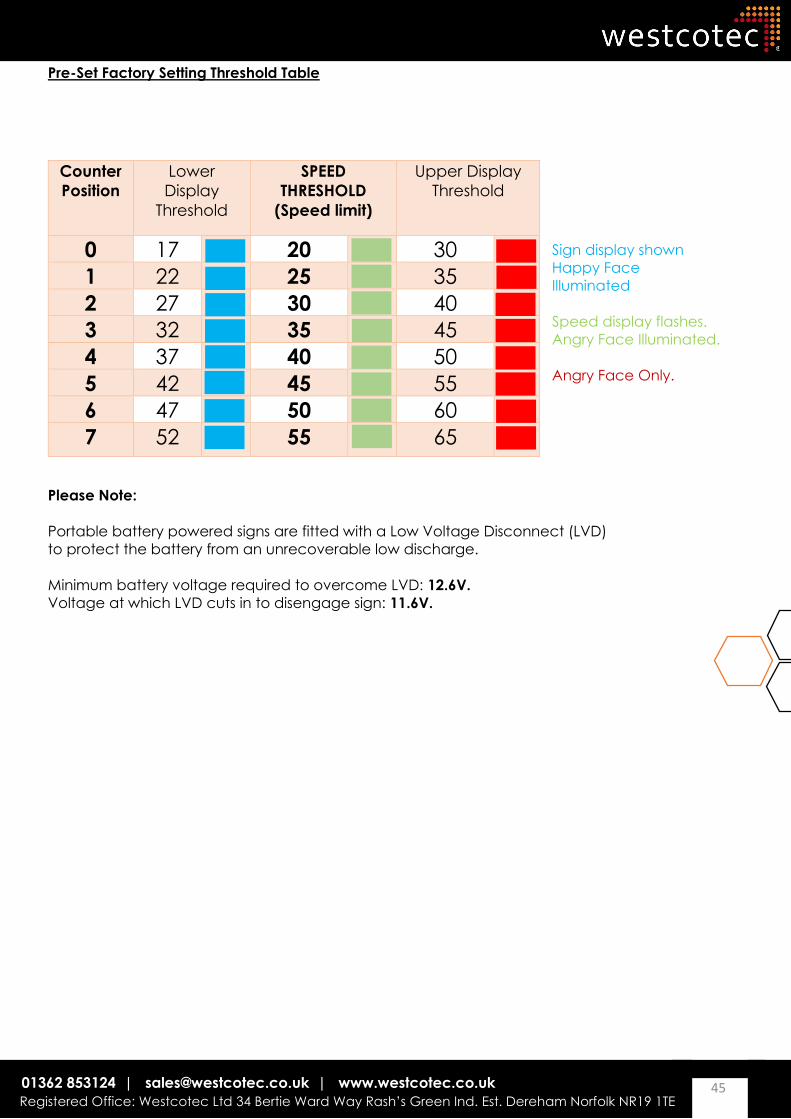
Pre-Set Factory Setting Threshold Table
Sign display shown
Happy Face
Illuminated
Speed display flashes.
Angry Face Illuminated.
Angry Face Only.
Please Note:
Portable battery powered signs are fitted with a Low Voltage Disconnect (LVD)
to protect the battery from an unrecoverable low discharge.
Minimum battery voltage required to overcome LVD: 12.6V.
Voltage at which LVD cuts in to disengage sign: 11.6V.
Counter
Position
Lower
Display
Threshold
SPEED
THRESHOLD
(Speed limit)
Upper Display
Threshold
0 17 20 30
1 22 25 35
2 27 30 40
3 32 35 45
4 37 40 50
5 42 45 55
6 47 50 60
7 52 55 65
46 01362 853124 | [email protected] | www.westcotec.co.uk
Registered Office: Westcotec Ltd 34 Bertie Ward Way Rash’s Green Ind. Est. Dereham Norfolk NR19 1TE
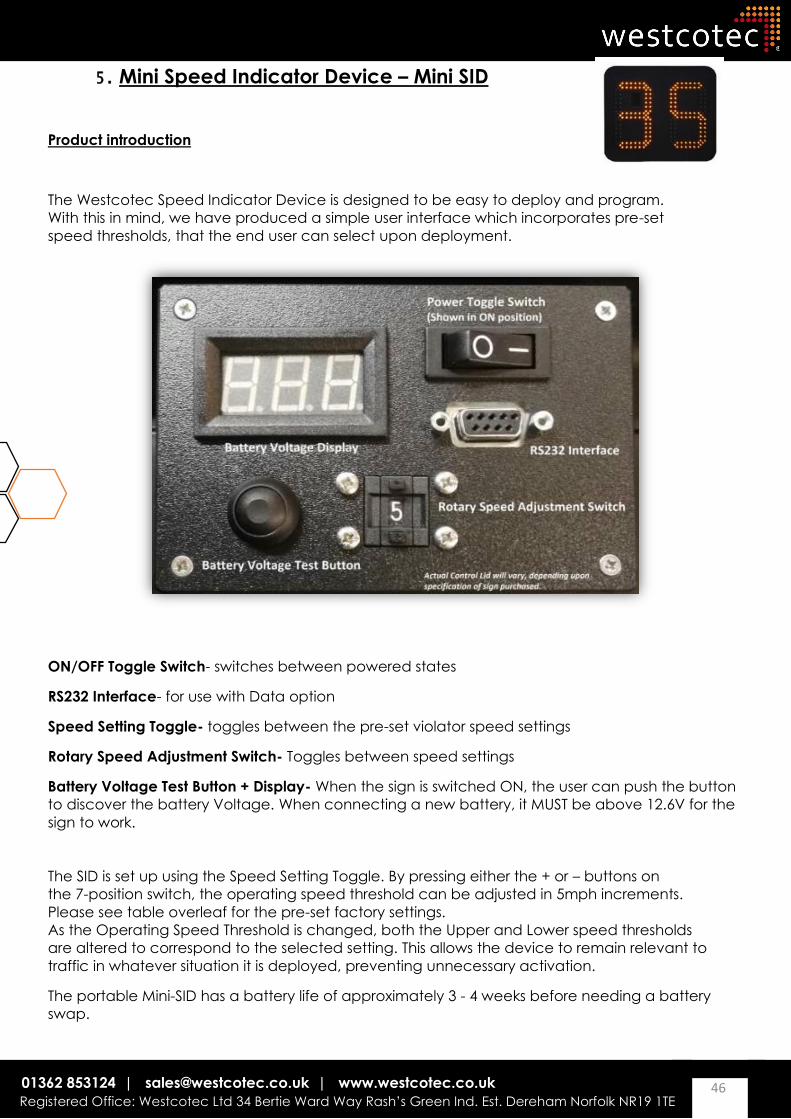
5. Mini Speed Indicator Device – Mini SID
Product introduction
The Westcotec Speed Indicator Device is designed to be easy to deploy and program.
With this in mind, we have produced a simple user interface which incorporates pre-set
speed thresholds, that the end user can select upon deployment.
ON/OFF Toggle Switch- switches between powered states
RS232 Interface- for use with Data option
Speed Setting Toggle- toggles between the pre-set violator speed settings
Rotary Speed Adjustment Switch- Toggles between speed settings
Battery Voltage Test Button + Display- When the sign is switched ON, the user can push the button
to discover the battery Voltage. When connecting a new battery, it MUST be above 12.6V for the
sign to work.
The SID is set up using the Speed Setting Toggle. By pressing either the + or – buttons on
the 7-position switch, the operating speed threshold can be adjusted in 5mph increments.
Please see table overleaf for the pre-set factory settings.
As the Operating Speed Threshold is changed, both the Upper and Lower speed thresholds
are altered to correspond to the selected setting. This allows the device to remain relevant to
traffic in whatever situation it is deployed, preventing unnecessary activation.
The portable Mini-SID has a battery life of approximately 3 - 4 weeks before needing a battery
swap.
47 01362 853124 | [email protected] | www.westcotec.co.uk
Registered Office: Westcotec Ltd 34 Bertie Ward Way Rash’s Green Ind. Est. Dereham Norfolk NR19 1TE
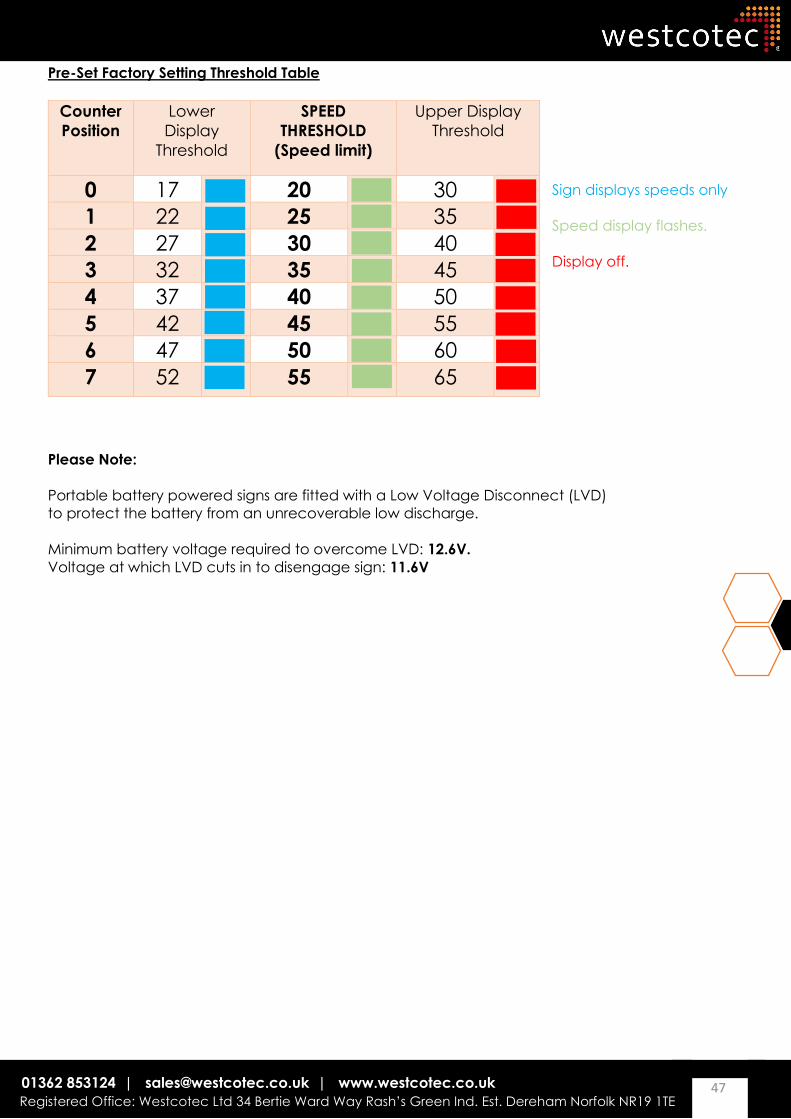
Pre-Set Factory Setting Threshold Table
Sign displays speeds only
Speed display flashes.
Display off.
Please Note:
Portable battery powered signs are fitted with a Low Voltage Disconnect (LVD)
to protect the battery from an unrecoverable low discharge.
Minimum battery voltage required to overcome LVD: 12.6V.
Voltage at which LVD cuts in to disengage sign: 11.6V
Counter
Position
Lower
Display
Threshold
SPEED
THRESHOLD
(Speed limit)
Upper Display
Threshold
0 17 20 30
1 22 25 35
2 27 30 40
3 32 35 45
4 37 40 50
5 42 45 55
6 47 50 60
7 52 55 65
48 01362 853124 | [email protected] | www.westcotec.co.uk
Registered Office: Westcotec Ltd 34 Bertie Ward Way Rash’s Green Ind. Est. Dereham Norfolk NR19 1TE
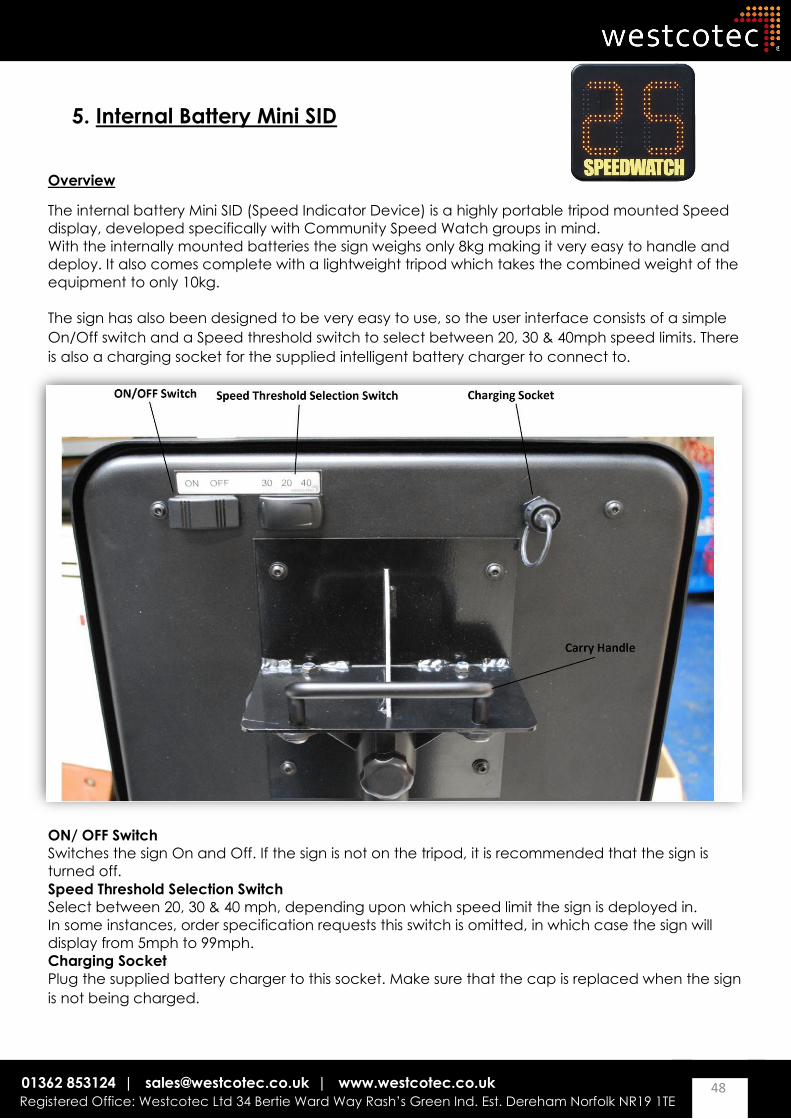
5. Internal Battery Mini SID
Overview
The internal battery Mini SID (Speed Indicator Device) is a highly portable tripod mounted Speed
display, developed specifically with Community Speed Watch groups in mind.
With the internally mounted batteries the sign weighs only 8kg making it very easy to handle and
deploy. It also comes complete with a lightweight tripod which takes the combined weight of the
equipment to only 10kg.
The sign has also been designed to be very easy to use, so the user interface consists of a simple
On/Off switch and a Speed threshold switch to select between 20, 30 & 40mph speed limits. There
is also a charging socket for the supplied intelligent battery charger to connect to.
ON/ OFF Switch
Switches the sign On and Off. If the sign is not on the tripod, it is recommended that the sign is
turned off.
Speed Threshold Selection Switch
Select between 20, 30 & 40 mph, depending upon which speed limit the sign is deployed in.
In some instances, order specification requests this switch is omitted, in which case the sign will
display from 5mph to 99mph.
Charging Socket
Plug the supplied battery charger to this socket. Make sure that the cap is replaced when the sign
is not being charged.
49 01362 853124 | [email protected] | www.westcotec.co.uk
Registered Office: Westcotec Ltd 34 Bertie Ward Way Rash’s Green Ind. Est. Dereham Norfolk NR19 1TE
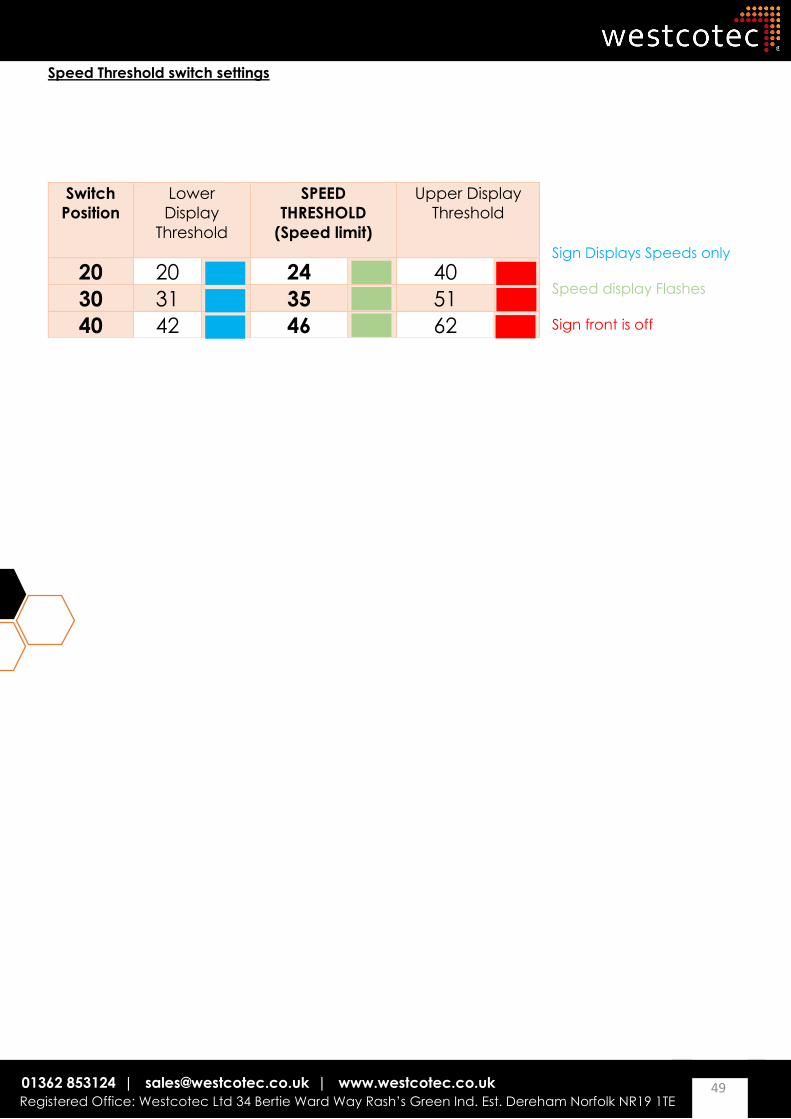
Speed Threshold switch settings
Sign Displays Speeds only
Speed display Flashes
Sign front is off
Switch
Position
Lower
Display
Threshold
SPEED
THRESHOLD
(Speed limit)
Upper Display
Threshold
20 20 24 40
30 31 35 51
40 42 46 62
50 01362 853124 | [email protected] | www.westcotec.co.uk
Registered Office: Westcotec Ltd 34 Bertie Ward Way Rash’s Green Ind. Est. Dereham Norfolk NR19 1TE
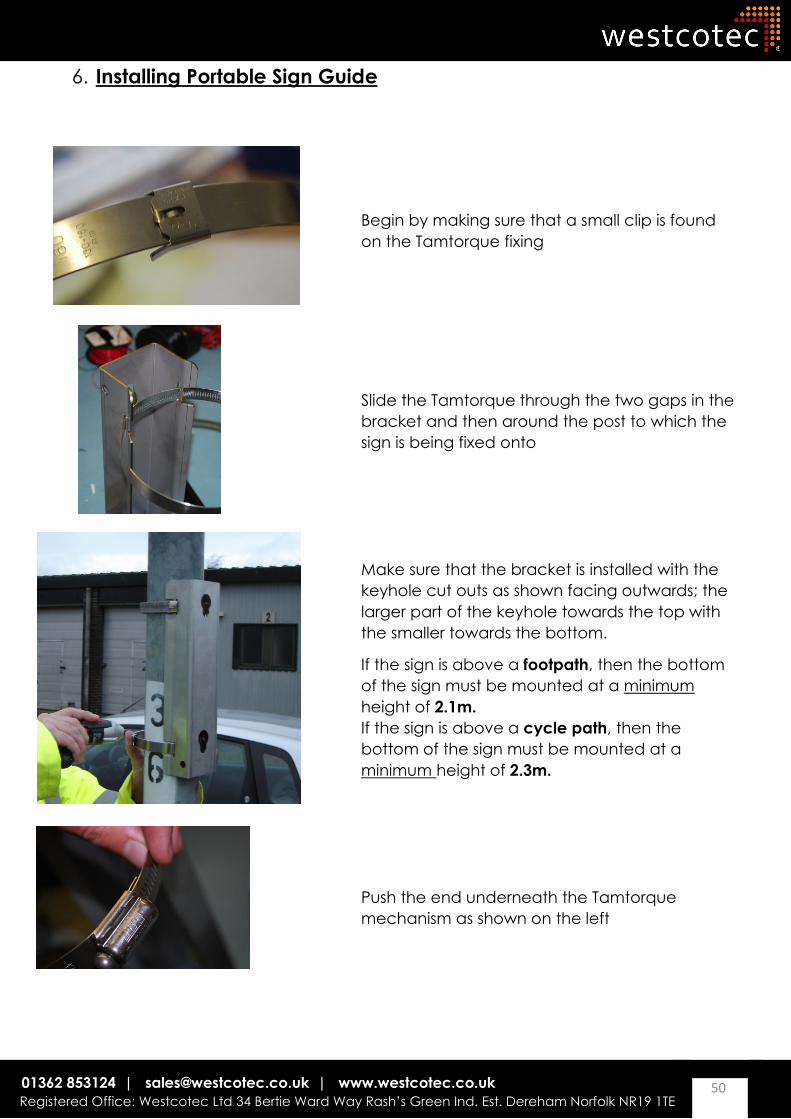
6. Installing Portable Sign Guide
Begin by making sure that a small clip is found
on the Tamtorque fixing
Slide the Tamtorque through the two gaps in the
bracket and then around the post to which the
sign is being fixed onto
Make sure that the bracket is installed with the
keyhole cut outs as shown facing outwards; the
larger part of the keyhole towards the top with
the smaller towards the bottom.
If the sign is above a footpath, then the bottom
of the sign must be mounted at a minimum
height of 2.1m.
If the sign is above a cycle path, then the
bottom of the sign must be mounted at a
minimum height of 2.3m.
Push the end underneath the Tamtorque
mechanism as shown on the left
51 01362 853124 | [email protected] | www.westcotec.co.uk
Registered Office: Westcotec Ltd 34 Bertie Ward Way Rash’s Green Ind. Est. Dereham Norfolk NR19 1TE
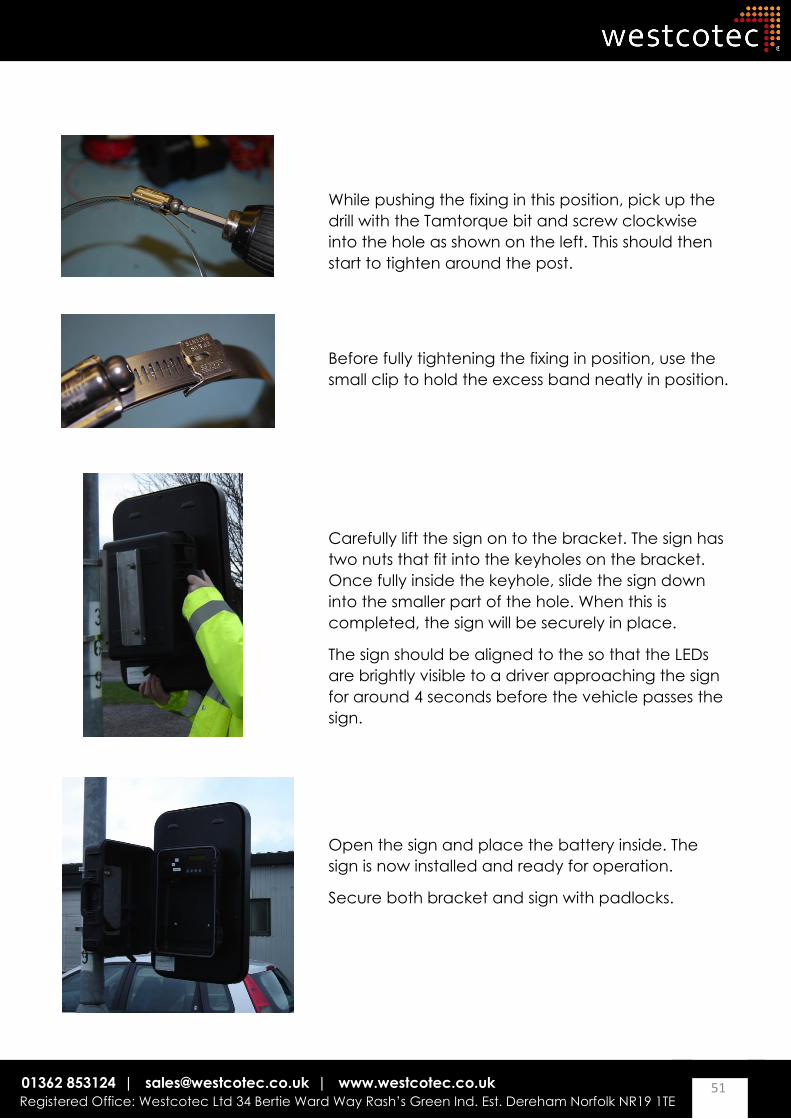
While pushing the fixing in this position, pick up the
drill with the Tamtorque bit and screw clockwise
into the hole as shown on the left. This should then
start to tighten around the post.
Before fully tightening the fixing in position, use the
small clip to hold the excess band neatly in position.
Carefully lift the sign on to the bracket. The sign has
two nuts that fit into the keyholes on the bracket.
Once fully inside the keyhole, slide the sign down
into the smaller part of the hole. When this is
completed, the sign will be securely in place.
The sign should be aligned to the so that the LEDs
are brightly visible to a driver approaching the sign
for around 4 seconds before the vehicle passes the
sign.
Open the sign and place the battery inside. The
sign is now installed and ready for operation.
Secure both bracket and sign with padlocks.