lirraa--ssaapprr 22001199
TRANSCRIPT

LIRA-SAPR 2019
© 2011-2019, LiraLand Group. All rights reserved. 1
LLIIRRAA--SSAAPPRR 22001199
MMooddeerrnn ssooffttwwaarree ppaacckkaaggee ffoorr
aannaallyyssiiss aanndd ddeessiiggnn ooff bbuuiillddiinngg aanndd
mmeecchhaanniiccaall eennggiinneeeerriinngg ssttrruuccttuurreess
ooff ddiiffffeerreenntt ppuurrppoosseess
IInnssttaallllaattiioonn GGuuiiddee
LLiirraaLLaanndd GGrroouupp,, 22001199

Installation Guide
2 © 2011-2019, LiraLand Group. All rights reserved.
©©22001111--22001199,, LLiirraaLLaanndd GGrroouupp..

LIRA-SAPR 2019
© 2011-2019, LiraLand Group. All rights reserved. 3
Contents
The LIRA-SAPR 2019 package contents 4 The LIRA-SAPR hardware protection key 4
General data 4 Types of hardware keys 5 Remote modification of software configuration set 5
System Requirements 5 Software 5 Hardware 6
Processor 6 Random Access Memory (RAM) 6 Hard disk space 6 Monitor 6 DVD-ROM drive 6 Ports 6 Peripheral devices 7
Installing LIRA-SAPR 2019 7 Installation procedure 7
Special features of installing KM-SAPR 15 Special features of installing ‘Import floor plans’ 17 Special features of installing ‘Integration with Revit Structure’ 17 Special features of installing 'Integration with TEKLA Structures’ 20 Special features of installing net version of LIRA-SAPR 20
Uninstalling LIRA-SAPR 2019 21 How to work with KeyUserInfo utility 22
Preparing the hardware key to update procedure 24 Updating memory of the hardware key 25

Installation Guide
4 © 2011-2019, LiraLand Group. All rights reserved.
TThhee LLIIRRAA--SSAAPPRR 22001199 ppaacckkaaggee ccoonntteennttss
The LIRA-SAPR package you have purchased contains the following components:
A DVD with the software for Windows. Comments on installation of the software are presented in the corresponding sections of this guide.
A hardware protection key (dongle). For installation, please refer to the corresponding section of this guide.
Important. The LIRA-SAPR Hardware Protection Key is an
integral part of the program. Lost Protection Keys are not replaceable.
Documentation set:
The software license agreement.
Tutorial (electronic document).
Note. The package contents may differ.
TThhee LLIIRRAA--SSAAPPRR hhaarrddwwaarree pprrootteeccttiioonn kkeeyy
GGeenneerraall ddaattaa
LIRA-SAPR 2019 comes either with local or network hardware protection key for USB port.
Description of configuration set for the software you purchased is stored in the hardware key (dongle). The LIRA-SAPR hardware protection key is an integral part of the program.
It is mandatory that your hardware key be properly installed at all times when LIRA-SAPR is running. The light indicator on the key should come on and not flicker. If the key is missing or improperly installed, you will not be able to continue your work or even launch LIRA-SAPR.
If you believe that your protection key is faulty or damaged, please contact your local LIRA-SAPR reseller or LIRA SAPR company for a replacement.

LIRA-SAPR 2019
© 2011-2019, LiraLand Group. All rights reserved. 5
For information about installing the LIRA-SAPR hardware protection key, please read instructions in the corresponding sections of this guide.
TTyyppeess ooff hhaarrddwwaarree kkeeyyss
LIRA-SAPR 2019 comes with the following types of hardware protection keys: Guardant Code (local key) or Guardant Sign Net (net key) for USB port.
Figure 1. Guardant hardware key (dongle)
Note. The network protection key is very similar to the local
hardware protection key. However, its different working method means that the two keys cannot be interchanged.
RReemmoottee mmooddiiffiiccaattiioonn ooff ssooffttwwaarree ccoonnffiigguurraattiioonn sseett
Remote programming of the hardware key enables you to modify configuration set of LIRA-SAPR software quickly and easily. In this case you will still be able to work with the program. To get the remote update of the key memory, use the KeyUserInfo utility located in the base LIRA-SAPR directory. Comments on work with KeyUserInfo utility are presented in the corresponding sections of this guide.
SSyysstteemm RReeqquuiirreemmeennttss
SSooffttwwaarree
Microsoft Windows 7/8/10.
Microsoft .NET Framework 4.5.2 (is installed together with LIRA-SAPR 2019).
Internet Explorer 9/10/11.

Installation Guide
6 © 2011-2019, LiraLand Group. All rights reserved.
HHaarrddwwaarree
Processor
An Intel Pentium 2 GHz or another compatible CPU.
Note. In order to achieve higher speed, LIRA-SAPR requires
a higher compatibility level. Intel Core i7 4 GHz (or compatible) is recommended.
Random Access Memory (RAM)
Min RAM recommended for the OS in use is required, 2 GB or more is recommended.
Hard disk space
About 2.2 Gb free hard disk space is required for a full installation of LIRA-SAPR 2019. For work with the program, free hard disk space is required according to model complexity but 2 Gb as a minimum.
Monitor
A 324-bit video display adapter and a 19 or larger monitor are recommended a suitable monitor are required. For OpenGL library to work properly, video adapter should provide hardware acceleration for graphics. LIRA-SAPR 2019 supports standard OpenGL 1.1. For graphics that works based on Direct X technology, it is necessary to have video adapter with support of Direct X11.
Note. The quality of the images and the speed at which the
screen is refreshed depends on the type and quality of the display card.
DVD-ROM drive
Necessary for installation of LIRA-SAPR 2019 from DVD.
Ports
To work with LIRA-SAPR 2019, your computer should have at least one free USB port to connect the LIRA-SAPR hardware protection key. Type of hardware protection key is selected when you purchase LIRA-SAPR program.

LIRA-SAPR 2019
© 2011-2019, LiraLand Group. All rights reserved. 7
Peripheral devices
A mouse or any Windows compatible pointing device is required.
IInnssttaalllliinngg LLIIRRAA--SSAAPPRR 22001199
IInnssttaallllaattiioonn pprroocceedduurree
Insert the LIRA-SAPR DVD in the DVD-ROM drive. To start the installation, launch the SetupLiraSAPR.2019.exe file from the root directory of LIRA-SAPR DVD.
The Installer Wizard will be opened in the language defined for the operating system (OS).
Important. Guardant hardware protection key should be attached to the corresponding port when the installation is complete.
Note. If the Autorun feature is disabled, you can also install LIRA-SAPR 2019 if you click SetupLiraSAPR2019.exe file from the directory ./Installations/LIRA_SAPR that is located on the installation DVD LIRA-SAPR 2019.
When you start installation procedure, you will see dialog box (see Figure 2) where it is possible to select the language for installation procedure. You can choose Russian, Ukrainian or English.
To cancel installation procedure at any stage, click Cancel.
Figure 2. ‘Select Setup Language’ dialog box
When you choose the language and click OK, the Installer Wizard dialog box opens (see Figure 3).

Installation Guide
8 © 2011-2019, LiraLand Group. All rights reserved.
Important. If LIRA-SAPR 2019 has already been installed on your computer and you run Setup.exe again, Installer Wizard suggests that you delete your copy of LIRA-SAPR 2019.
Important. If you obtain new release of LIRA-SAPR 2019 and you have previous release of the program already installed on the computer, then Installer Wizard suggests that you delete your version of LIRA-SAPR 2019. When previous release is deleted, installation of the new release is done automatically.
When preparing for the installation of LIRA-SAPR 2019, the Installer Wizard checks whether MS .NET Framework 4.5.2 component is installed on your computer. If not, it will be installed together with LIRA-SAPR software.
Installation procedure for Microsoft.NET Framework 4.5.2 takes much time and requires a reboot.
When MS .NET Framework is installed, the Installer Wizard continues installation of LIRA-SAPR 2019 (see Figure 3).
Figure 3. The Welcome message of Installer Wizard
When you click Next, the License Agreement dialog box opens (see Figure 4). Read and accept the License Agreement and click Next.

LIRA-SAPR 2019
© 2011-2019, LiraLand Group. All rights reserved. 9
Figure 4. ‘License Agreement’ dialog box
Important. The Next button will become available only when you select the option I accept the terms of the license agreement.
Note. To print the license agreement, just click the Print button.
In the Choose Destination Location dialog box (see Figure 5) you can define the directory where LIRA-SAPR 2019 will be installed by default. To do this, click Browse and indicate a path to the directory.

Installation Guide
10 © 2011-2019, LiraLand Group. All rights reserved.
Figure 5. ‘Choose Destination Location’ dialog box
In the Select Features dialog box you can select the features you want to install.
Figure 6. ‘Select Features’ dialog box

LIRA-SAPR 2019
© 2011-2019, LiraLand Group. All rights reserved. 11
In the next dialog box (see Figure 7) you can begin installation of the program.
Figure 7. ‘Ready to Install the Program’ dialog box
In the Setup Status dialog box (see Figure 8) you will see the status of the setup.

Installation Guide
12 © 2011-2019, LiraLand Group. All rights reserved.
Figure 8. ‘Setup Status’ dialog box
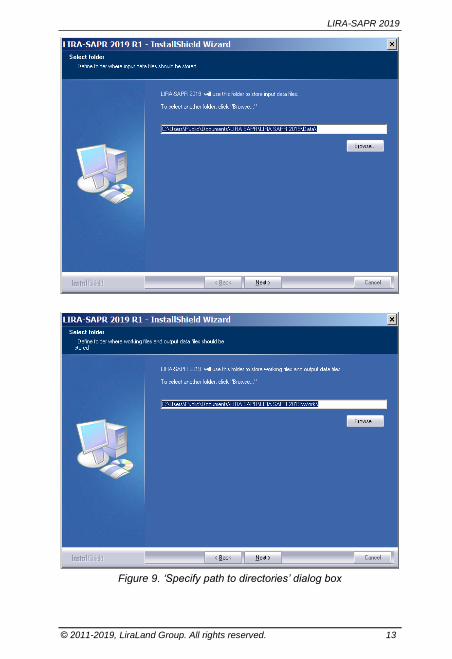
When files are copied to computer hard disk, Installer Wizard requires path to directories where files with input data and analysis results of LIRA-SAPR 2019 should be saved (see Figure 9).
LIRA-SAPR 2019
© 2011-2019, LiraLand Group. All rights reserved. 13
Figure 9. ‘Specify path to directories’ dialog box

Installation Guide
14 © 2011-2019, LiraLand Group. All rights reserved.
Then the Installer Wizard will adjust settings for SAPFIR program. The whole SAPFIR program will be installed as well as SAPFIR-Structures and SAPFIR-RC modules.
Note. By default, LIRA-SAPR 2019 will be installed with Ribbon interface where the working area will be organized with tabbed toolbars. After installation of the program, it is possible to change the interface type to Classic interface where the working area will be organized with menus and toolbars.
When the installation is complete, all settings are modified and shortcuts are created, the Installer Wizard suggests installation of the hardware key driver (see Figure 10) (if you previously selected Guardant key item).
Figure 10. Installer Wizard requests installation of hardware key driver
Note. If you accidentally cancel installation of Guardant hardware key driver, it could be done after installation of LIRA-SAPR 2019. To install the driver, start appropriate installation program from the base LIRA directory (by default, it is C:\Program Files\LIRA SAPR\LIRA SAPR 2019\Guardant) or from the ./Installations/Guardant directory on DVD disk.
Important. If the hardware key driver is not installed, LIRA-SAPR 2019 will not be able to work with the hardware protection key.
When the Guardant key driver is installed, the Installer Wizard informs you that LIRA-SAPR 2019 is installed on your computer (see Figure 11).

LIRA-SAPR 2019
© 2011-2019, LiraLand Group. All rights reserved. 15
Figure 11. ‘InstallShield Wizard Complete’ dialog box
Attach the hardware key to the USB port. Then Windows Wizard will automatically install new peripheral equipment and the indicator light on the key will come on.
When you install the key driver, you can work with LIRA-SAPR 2019.
Special features of installing KM-SAPR
KM-SAPR is utility program (add-on) that runs in AutoCAD environment. KM-SAPR can run only if AutoCAD is installed on the computer where KM-SAPR is started.
Important. KM-SAPR does not support AutoCAD LT.
Note. KM-SAPR cannot work with several versions of AutoCAD simultaneously.
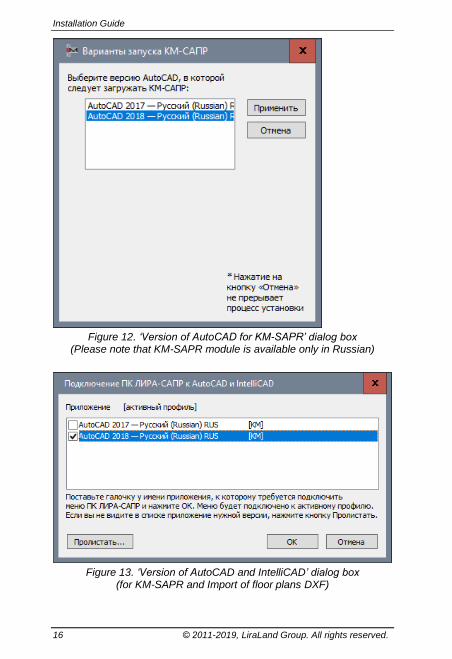
To install KM-SAPR, in the Select Features dialog box (see Figure 6), select KM-SAPR check box. When the files are copied, the Version of AutoCAD dialog boxes open (see Figure 12 and 13).
Installation Guide
16 © 2011-2019, LiraLand Group. All rights reserved.
Figure 12. ‘Version of AutoCAD for KM-SAPR’ dialog box
(Please note that KM-SAPR module is available only in Russian)
Figure 13. ‘Version of AutoCAD and IntelliCAD’ dialog box (for KM-SAPR and Import of floor plans DXF)

LIRA-SAPR 2019
© 2011-2019, LiraLand Group. All rights reserved. 17
Special features of installing ‘Import floor plans’
In LIRA-SAPR 2019 it is possible to import construction lines, walls, slabs, columns and beams from DXF files. For LIRA-SAPR 2019 to import these objects, in DXF file they should be presented in appropriate way and belong to the layer with predefined name.
Installer Wizard of LIRA-SAPR 2019 integrates its own LIRA menu to programs that support AutoLISP (such as AutoCAD or IntelliCAD). The commands of LIRA menu help the user to generate floor plans.
To install ‘Import floor plans’ feature, in the Select Features dialog box (see Figure 6), select ‘Import floor plans DXF’ check box. When the files are copied, the Version of AutoCAD and IntelliCAD dialog box opens (see Figure 12).
Important. ‘Import floor slabs’ feature does not support AutoCAD LT.
Note. ‘Import floor slabs’ feature can work with several versions of AutoCAD and IntelliCAD simultaneously.
Special features of installing ‘Integration with Revit Structure’
In LIRA-SAPR 2019 it is possible to import structural models from Revit Structure 2008…2019 and visualize selected reinforcement in Revit.
To install the ‘Integration with Revit Structure’ feature, in the Select features dialog box select appropriate option. It is also necessary to close all open copies of Revit Structure program.
In some cases manual installation may be necessary.
To install manually Revit Structure versions 2008/2009/2010/2011, perform the following steps:
1. Close all opened copies of Revit Structure program.
2. Open Revit.ini file in order to edit it.
By default, this file is located in the base Revit Structure directory, for example, "C:\Program Files\Autodesk Revit Structure 2011\Program\"
3. Find [ExternalCommands] section. If this section does not exist, then to the end of Revit.ini add the line [ExternalCommands] that will open this section.
4. In this section find the line ECCount=%0, then increase value %0 by 1. If this line does not exist, then add the line ECCount=1.
5. In this section, add the following lines:
ECName%1=Export to LIRA-SAPR
Installation Guide
18 © 2011-2019, LiraLand Group. All rights reserved.
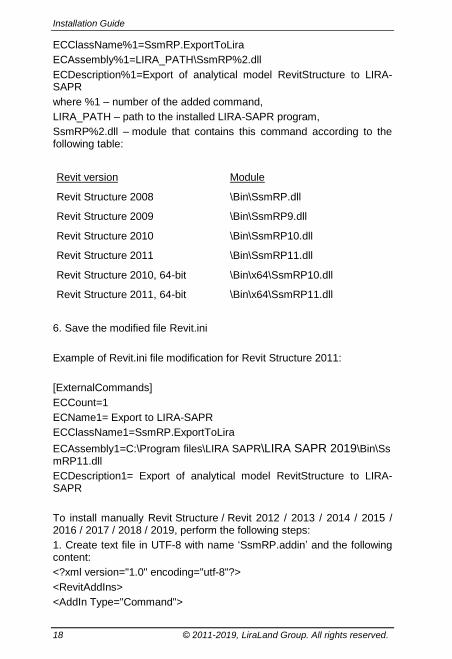
ECClassName%1=SsmRP.ExportToLira
ECAssembly%1=LIRA_PATH\SsmRP%2.dll
ECDescription%1=Export of analytical model RevitStructure to LIRA-SAPR
where %1 – number of the added command,
LIRA_PATH – path to the installed LIRA-SAPR program,
SsmRP%2.dll – module that contains this command according to the following table:
Revit version Module
Revit Structure 2008 \Bin\SsmRP.dll
Revit Structure 2009 \Bin\SsmRP9.dll
Revit Structure 2010 \Bin\SsmRP10.dll
Revit Structure 2011 \Bin\SsmRP11.dll
Revit Structure 2010, 64-bit \Bin\x64\SsmRP10.dll
Revit Structure 2011, 64-bit \Bin\x64\SsmRP11.dll
6. Save the modified file Revit.ini
Example of Revit.ini file modification for Revit Structure 2011:
[ExternalCommands]
ECCount=1
ECName1= Export to LIRA-SAPR
ECClassName1=SsmRP.ExportToLira
ECAssembly1=C:\Program files\LIRA SAPR\LIRA SAPR 2019\Bin\SsmRP11.dll
ECDescription1= Export of analytical model RevitStructure to LIRA-SAPR
To install manually Revit Structure / Revit 2012 / 2013 / 2014 / 2015 / 2016 / 2017 / 2018 / 2019, perform the following steps:
1. Create text file in UTF-8 with name ‘SsmRP.addin’ and the following content:
<?xml version="1.0" encoding="utf-8"?>
<RevitAddIns>
<AddIn Type="Command">

LIRA-SAPR 2019
© 2011-2019, LiraLand Group. All rights reserved. 19
<Assembly>C:\Program Files\LIRA SAPR\LIRA SAPR 2019\Bin\SsmRP%3.dll</Assembly>
<ClientId>80BB17C2-2E40-44fd-8FA5-841D44402019</ClientId>
<FullClassName>SsmRP.ExportToLira</FullClassName>
<Text> Export to LIRA-SAPR </Text>
<Description> Export of analytical model RevitStructure to LIRA-SAPR</Description>
<VisibilityMode>AlwaysVisible</VisibilityMode>
<VendorId>LIRA</VendorId>
<VendorDescription>LIRA SAPR Ltd., www.liraland.ru </VendorDescription>
</AddIn>
</RevitAddIns>
If the installation directory differs from C:\Program Files\LIRA SAPR\LIRA SAPR 2019, then you should mention the necessary directory in the 'SsmRP.addin’ file.
SsmRP%3.dll – executable module according to the following table:
Revit version Module
Revit Structure 2012 SsmRP12.dll
Revit Structure 2013 SsmRP13.dll
Revit Structure 2014 SsmRP14.dll
Revit Structure / Revit 2015 SsmRP15.dll
Revit Structure / Revit 2016 SsmRP16.dll
Revit Structure / Revit 2017 SsmRP17.dll
Revit Structure / Revit 2018 SsmRP18.dll
Revit Structure / Revit 2019 SsmRP19.dll
Revit Structure 2012, 64-bit x64\SsmRP12.dll
Revit Structure 2013, 64-bit x64\SsmRP13.dll
Revit Structure 2014, 64-bit x64\SsmRP14.dll
Revit Structure / Revit 2015, 64-bit x64\SsmRP15.dll
Revit Structure / Revit 2016, 64-bit x64\SsmRP16.dll
Revit Structure / Revit 2017, 64-bit x64\SsmRP17.dll

Installation Guide
20 © 2011-2019, LiraLand Group. All rights reserved.
Revit Structure / Revit 2018, 64-bit x64\SsmRP18.dll
Revit Structure / Revit 2019, 64-bit x64\SsmRP19.dll
2. Move this file to the directory:
for Vista/Windows 7/8/10:
C:\ProgramData\Autodesk\Revit\Addins\2012\
For Revit 2013/2014/2015/2016/2017/2018/2019 and Revit Structure 2013 / 2014 / 2015 / 2016 / 2017 / 2018 / 2019 it is necessary to replace 2012 with 2013, 2014, 2015, 2016, 2017, 2018 or 2019 in the directory name.
Special features of installing 'Integration with TEKLA Structures’
New technology ‘Tekla Structures — LIRA-SAPR — Tekla Structures’ is introduced. It allows the user to generate the model in Tekla Structures, then import it to LIRA-SAPR, carry out static and dynamic analyses, select sections of elements and reinforcement, export analysis results to Tekla Structures and further obtain detail drawings (for reference, in Russian - drawings KMD) and CNC.
When you install LIRA-SAPR 2019, it appeares as add-in application to Tekla Structures version 21.0, 21.1, 2016, 2017, 2017i, 2018, 2018i.
To install ‘Integration with Tekla Structures’ option, in the list of available features (see Figure 7), select appropriate item. It is also necessary to close all open versions of Tekla Structures program.
Important. You could install ‘Integration with Tekla Structures’ only in case Tekla Structures program is installed on your computer.
Special features of installing net version of LIRA-SAPR
When you install net version of LIRA-SAPR 2019 on computer of administrator, n the Select Features dialog box (see Figure 6), select Guardant Net Server component. Make sure that Key driver component should also be selected. If the Guardant Net Server is not selected during installation, then it may be installed manually from installation DVD LIRA-SAPR 2019 (see directory .\Installations\Guardant).
When you install net version of LIRA-SAPR 2019 on other workstations, it is not necessary to install additional components. Key driver component is not obligatory.

LIRA-SAPR 2019
© 2011-2019, LiraLand Group. All rights reserved. 21
If the local network (where the net version of the program functions) is not adequate and (or) contains too many computers, then when you start the program it may take some time to search for the key. To speed up the search procedure in wide networks, modify the GNCLIENT.INI file located in the directory where program data is usually stored on workstation, for example: C:\Users\Public\Documents\LIRA SAPR\LIRA SAPR 2019\Settings.
(Documents/Public documents...).
In this file specify IP-address or network name of computer where Guardant Net Server is installed:
[server]
ip_name = 192.168.1.1
In this case it is supposed that the NET key is inserted to computer with IP-address 192.168.1.1.
Important. Manual for the work with Guardant Net Server is presented in the ./Installations/Guardant directory on DVD disk or in the ./Guardant directory located in the base LIRA directory (by default, it is C:\Program Files\LIRA SAPR\LIRA SAPR 2019).
UUnniinnssttaalllliinngg LLIIRRAA--SSAAPPRR 22001199
To uninstall LIRA-SAPR 2019, on the taskbar, click the Start button, and then select Control panel, and double-click the Add or Remove Programs (Programs and Features) icon. In the list of currently installed programs select LIRA-SAPR 2019 and click Change/Remove. In the dialog box presented in Figure 14 click OK.
In this case all files and programs installed with LIRA-SAPR 2019 will be removed. Files of projects created in LIRA-SAPR 2019 as well as files of analysis results are not removed.
Figure 14. ‘Confirm uninstall’ message box

Installation Guide
22 © 2011-2019, LiraLand Group. All rights reserved.
Note. When started, the Installer Wizard checks whether LIRA-SAPR 2019 is installed. If LIRA-SAPR 2019 is already installed on computer, Installer Wizard suggests that you delete the software (if there are new components in the current Installer). When previous version is deleted, new release of the program will be installed automatically.
Important. You can re-install LIRA-SAPR 2019 again when you remove (uninstall) it.
HHooww ttoo wwoorrkk wwiitthh KKeeyyUUsseerrIInnffoo uuttiilliittyy
KeyUserInfo utility is meant to obtain information about the hardware protection key connected to your computer and for remote update of the key memory.
Start KeyUserInfo.exe utility when the hardware key is connected to the computer. The Information about the hardware key dialog box will be presented on the screen (see Figure 15). In this dialog box you will find detailed information about the key, list of programs available for the key and configuration of every allowed program in detail.

LIRA-SAPR 2019
© 2011-2019, LiraLand Group. All rights reserved. 23
Figure 15. ‘Information about hardware key’ dialog box of the
KeyUserInfo utility

Installation Guide
24 © 2011-2019, LiraLand Group. All rights reserved.
Note. If the hardware key is not connected to the computer or more than one key is found, then the key cannot be initialized.
To edit configuration of the programs, in the Information about hardware key dialog box (see Figure 15), perform the following steps:
- Prepare and send an update request;
- Receive update file and update the key data.
These steps are used for remote update of key memory and end-users are not recommended to perform them without special instructions.
PPrreeppaarriinngg tthhee hhaarrddwwaarree kkeeyy ttoo uuppddaattee pprroocceedduurree
Important. This action should be performed only after special instructions of our representatives or our company.
To prepare the hardware key for remote update of the key memory, in the KeyUserInfo.exe utility dialog box, select the Select mode of preparing update request for the key option that is located in the Update request area and then click Save. In the Generate update request file dialog box (see Figure 16), select directory where you want to save the file with update request and click Save.
Then send this file with your contact data to our representatives or our company.
Important. Only one update file corresponds to a certain file of update request. That’s why, when you save the update request file, it is necessary to wait for the update file itself.
Important. The Select mode of updating the key option (located in the Update area in the KeyUserInfo utility box) will automatically become active as soon as update request file is generated.

LIRA-SAPR 2019
© 2011-2019, LiraLand Group. All rights reserved. 25
Figure 16. ‘Generate update request file’ dialog box of the KeyUserInfo utility
UUppddaattiinngg mmeemmoorryy ooff tthhee hhaarrddwwaarree kkeeyy
Important. This action should be performed only after special instructions of our representatives or our company.
KeyUserInfo.exe utility and the update file that contains all necessary modifications are used to modify configuration of your hardware key. This update file you will obtain from developers by e-mail.
Insert the hardware key to the port and start the KeyUserInfo.exe utility. In the KeyUserInfo.exe utility box (see Figure 15), select the Select mode of updating the key memory option that is located in the
Update area, and then click the Select update file button . In the Select update file dialog box (see Figure 17), select the directory where you saved the update file for the key. Then select the received file from the list and click Open.
Then, in the KeyUserInfo.exe utility window (see Figure 15), click Apply button located in the Update area.

Installation Guide
26 © 2011-2019, LiraLand Group. All rights reserved.
Figure 17. ‘Select update file’ dialog box
Note. It is recommended to use automatically generated names for request file and update file because the key ID is mentioned in both these file names. This information helps you quickly identify the pair of necessary files (request and update) and the hardware key connected to the computer.
Important. When the Select mode of updating the key
option is selected, the Select update file button located in the Update area in the KeyUserInfo utility box will be inactive until the request for key update is generated.
If the hardware key is authorized successfully, you will get a message ‘Key memory successfully updated’. Then, click the Read the key
button located in the Information area of the KeyUserInfo.exe utility.
If the key memory was not updated or necessary programs do not work properly, contact your local reseller or our company.