libretto fox i-gb-f - finlandese - nh-koneet · il manuale dell'operatore deve essere...
TRANSCRIPT

VIA VALSUGANA,26 - CURTAROLO - PADOVA - ITALY - TEL. 049/9620477
MANUALE USO E MANUTENZIONE USE AND MAINTENANCE MANUAL
NOTICE D’INSTRUCTIONS KÄYTTÖOHJE
Venditore / Dealer / Revendeur / Myyjä :____________________________________________________ Data di consegna / Delivery date / Date de livraison / Luovutuspäivämäärä :_________________________ Proprietario o utilizzatore :______________________________________________________________________ User or owner:_______________________________________________________________________________ Propriétarie ou utilisateur:_______________________________________________________________________ Koneen valmistusnumero:_________________________________________________________________ N.B. : Questa parte del manuale deve essere completata al momento della conse gna o installazione ; è impor-
tante citare i numeri sopra riportati in ogni comunicazione con il vostro rivenditore. This manual part must be filled in at delivery or installation; it is important to cite the numbers above mentioned for
any communication on enquiry with your dealer. Cette partie de la notice doit être complétée au moment de la livraison ou de l’installation; il est important de men-
tionner les numéros ci-dessus pour toute comunication avec votre revendeur. Omistaja HUOM! Täytä konetiedot yllä oleville riveille, jotta ne olisivat käsillä niitä tarvittaessa. Käyttöohjekirjan
katsotaan olevan kiinteä koneen osa. Sen tulee olla aina koneen käyttäjän saatavilla. Käyttöohjekirja on luovutettava koneen uudelle omistajalle, mikäli kone vaihtaa omistajaa.
Trinciaerba Falil Mower Broyeur a Herbe Niittomurskain
Modello/Model/Konemerkki:
FOX
Macchina: Machine:
I GB F
FIN
Mod. FOX 1000 Code: 05026000 Mod. FOX 1200 Code: 05027000 Mod. FOX 1400 Code: 05045000 Mod. FOX 1600 Code: 05028000
Edit:
10/
2008
- 10
0

2 4 6 6 8
10
12 14 16 18
20-22 20
24-26 28 28 30 32 34 34
36 38 38 40 42
FOREWORD / INDEX We thank you to have bought a PERUZZO’s equi-pment. This handbook shows either the operation and mainte-nanceinstructions and the spare parts of your bush re-moving arm. The right running of your equipment depends on a right operation and maintenance. Therfore, we recommend you to follow strictly what herein enclosed, in order to prevent all troubles which could hinder a good running. It is furthermore important to follow these instruction, since the manufacturer refuses all responsibilities due to negligence and non fulfilment of such rules. This handbook contains: Pag. iIntroduction Index...............…..............……............ iForeword................................................................ iIdentification note................................................... iWarranty................................................................. iUtilisation of the machine..................................... iSafety regulations................................................... iUse of the machine: Checking and suggestions before operating.......……………….............……….. iFitting to the tractor................................................ iAdjustment cutting height..................................... iFailure-troubles-solutions..................................... iMaintenance.................................................... iPeriodical maintenance table................................ iSignaling labels............................................... iStretching adjustment of the driving belts............. iReplacement of belts............................................ iLocking of the pulleys............................................ iReplacement of flails........................................ iWinter storage....................................................... iTransport of the machine....................................... iTechnical characteristic / Technical data / Performance..............……................................ iGetting rid of the machine..................................... iSpare parts list...................................................... iVertical Cutting……………………………………... iTechnical Advantages……………………………...
INTRODUZIONE / INDICE Vi ringraziamo per aver acquistato una attrezzatura PERUZZO. Questo manuale descrive le norme d’uso, di manuten-zione e le parti di ricambio relative. Dal corretto uso e dall’adeguata manutenzione dipende il regolare funzionamento dell’attrezzatura. E’ altresì importante attenersi a quanto descritto in que-sto manuale in quanto la ditta costruttrice declina ogni e qualsiasi responsabilità per incidenti e/o danni dovuti alla negligenza e/o alla mancata osservanza delle nor-me riportate. Questo manuale contiene: Pag. iIntroduzione Indice................................…………...... iPrefazione.................................................…............. iNote identificative....................................…............... iGaranzia..........................................…....................... iUtilizzo della macchina...................…...……….......... iNorme antinfortunistiche.............…..…...................... iUso della macchina: Controlli e consigli prima della messa in moto.............…........................ iApplicazione al trattore...................…...................... iRegolazione dell’altezza di taglio.........…................. iGuasti - Inconvenienti - Rimedi...............….............. iManutenzione.....................................…............. iTabella manutenzione periodica......…..................... iEtichette segnaletiche.............…....................... iRegolazione tensione cinghie di trasmissione.....................................…................. iSostituzione cinghie...........................….................. iBloccaggio pulegge........................…...................... iSostituzione delle mazze............……...................... iMessa a riposo...................................….................. iTrasporto della macchina............…......................... iCaratteristiche tecniche, dati tecni-ci,prestazioni................………...............………............ iSmaltimento della macchina.................…............... iLista parti di ricambio..........................…................. iIl taglio verticale…………………………..………….. iVantaggi Tecnici…………………………..………….
2 4 6 6 8
10
12 14 16 18
20-22 20
24-26
28 28 30 30 34 34
36 38 38 40 42
I GB
2

3 5 7 7 9
11
13 15 17 19
21-23 21
25-27
29 29 31 33 35 35
37 39 39 41 43
5 7 7 9
11
13 15 17 19
21-23 21
25-27 29 29 31 33 35 35
37 39 41
INTRODUCTION / INDEX Ce livret décrit normes d’emploi, opérations d’entretien et pièces de rechange de votre tondeuse. Le fonctionnement régulier de l’équipement dépend de son correct emploi et d’un entretien approprié. Il est conseillé de suivre scrupuleusement ce qui est indiqué dans cette notice. Le constructeur décline toute responsabilité en cas d’accident et/oiu dommages dûs à la négligence et au manque de consultations des rè-gles reportées dans cette notice. De plus, il faut suivre ce livret avec soin, puisque l Ce livret contient: Pag. iIntroduction Index .........................………….............. iPréface............................................…………............ iNotes d’identification......................………….............. iGarantie........................................…………............... iUtilisation de la machine..........…………................ iRéglage de sécurité...............…..
…………................... iUsage de la machine: Controles et conseils avant
son utilisation...............…………….………………..... iApplication au tracteur.......................…………......... iRéglage de la hauteur de coupe........…………........ iPanne - Inconvenients - Conseils........…………....... iMaintenance....................................…………...... iTableau de maintenance periodique...…………....... iSymboles.....................................…………........ iRéglage et tension des courroies de transmis-
sion...............................…………...……………........ iRemplacement des courroies..........…………..........�iBloquage des poulies........................…………......... iRemplacement des couteaux.……………........... iMise à repos.......................…......………….............. iTransport de la machine........………….................... iCaracteristiques techniques / Données techniques /
Prestations.........………......…………………...... iElimination de la machine...............…………...........�iListe de piéces détachées...............………….......... iLa coupe verticale……………………………………. iAvantages Techniques……………………………….
3
F FIN JOHDANTO
Arvois asiakkaamme, Kiitämme Peruzzo-tehdasta kohtaan osoittamastasi luottamuksesta hankittuasi uuden FOX-niittomurskaimen. Tutustu koneeseen yksityiskohtaisesti ennen sen käyttöönottoa. Keskustele koneen myyjän kanssa niittomurskaimen käytöstä, säädöistä ja huollosta. Pintapuolinen asioiden läpikäynti ei korvaa perusteellista asioihin paneutumista ja käyttöohjeen tutkiskelua. Käyttöohjekirja on tehty niin, että siitä selviää koneen kiinnitys traktoriin, käyttötapa, säädöt ja huolto. Runsas kuvitus helpottaa asioihin paneutumistasi. Lue tämä käyttöohje huolellisesti. Kiinnitä huomiota erityisesti turvaohjeisiin. Sisältö: Sivu: iJohdanto ................................................…………. iSisällysluettelo ...........................................………. iKoneen käyttäjälle .........................................………. iOhjekirjan merkinnät ...................…..........………. iKonekilpi .........................……………….....………. iTakuu Niittomurskaimen käyttö .............................………. iTurvallisuussäädöksiä ...............................………. iYleisiä turvallisuusohjeita ............................………. iKoneen käyttö ………….......................………. iMurskaimen kiinnitys traktoriin ........…………........ iLeikkuukorkeuden säätö …................................... iIrrotus traktorista .............…........……..….............. iVian paikallistaminen ..….......…..………………...... iHuolto ...............………........................................... iOhjetarrat ........………............................................ iKiilahihnat ............………………………...….......... iVarstojen vaihto ..………………………………....... iTalvivarastointi ..................................…………...... iTekniset tiedot iKoneen hävittäminen Ausgemusterten Machine .................…………........ iVaraosat .......................................…………........ iPystyleikkuu ………………………………..………...

PREFAZIONE
Il presente manuale è parte integrante della macchina e contiene le informazioni necessarie al funzionamento ed alla manutenzione della stessa. Il Manuale dell'operatore deve essere conservato per tutta la durata dell’attrezzatura a cui si riferisce e deve essere trasferito a qualsiasi altro utente o successivo proprietario. E’ necessario leggerlo attentamente e seguire le istru-zioni. Il libretto, o copia dello stesso deve essere sempre a portata di mano per la consultazione da parte dell’operatore. Consigliamo inoltre di contattare la Casa Costruttrice per ogni necessità di informazioni, ricambi od accesso-ri. GUIDA ALLA CONSULTAZIONE PERICOLO Richiama l’attenzione a situazioni o proble-mi che possono pregiudicare la sicurezza delle persone per infortuni o rischio di mor-te. ATTENZIONE Richiama l’attenzione a situazioni o proble-mi connessi con l’efficienza della macchina che non pregiudicano la sicurezza delle persone.
Tutte le norme di sicurezza sono importanti e come tali devono essere rigorosamente osservate. Vietato trasportare persone. Pericolo di taglio Pericolo cinghie in movimento. Gli schemi allegati sono ad uso esclusivo del personale tecnico specializzato che viene autorizzato dalla ditta Peruzzo ad eseguire manutenzioni e controlli straordi-nari. E' assolutamente vietato servirsene per apportare modifiche all’attrezzatura. IMPORTANTE: La velocità di avanzamento durante il lavoro deve va-riare: Massimo 2-3 Km orari per erba alta, fitta, su ter-reni sconnessi e durante l’operazione di verticut. Massimo 4-6 Km orari per erba bassa, rada e su terre-ni pianeggianti.
USE OF EQUIPMENT The present manual is integrate part of the machine and cover its necessary information for operation and maintenance. The Owner's Manual must be kept for the entire machine working life and must be given to any o-ther user or next owner. It is necessary read it carefully and follow the instruc-tions. The manual, or copy of it, must be within reach al-ways for any reference by the operator. Moreover we advise to contact the manufacturer for any necessity information, spare parts or fittings. REFFERENCE GUIDE
DANGER This is used to call the attention to the problems that may endanger the safety of people as these imply the risk of injury and death. CAUTION This is used to call the attention to situa-tions and problems related to the ma-chine’s efficiency that do not pose a risk to the people’s safety.
All safety norms are important and as such must be strictly observed. Forbidden transport people. Cutting hazards. Moving belts hazards. The enclosed drawings and tables are at exclusive Pe-ruzzo proper technical staff use that is authorized to operate maintenance and special checking. Is strictly forbidden to use it in order to modify the machine. IMPORTANT: The working speed during operation must be within the range of: 2-3 Km/hour for high and thick grass, on une-ven grounds and during verticut operations. Maximum 4-6 Km/hour for short, thin on flat grounds.
I GB
4

PREFACE
Cette notice d’instruction fait partie de la machine et contient les informations nécessaires pour son fonc-tionnement et son entretien. Le manuel de l’opérateur doit etre gardé pour toute la durée de l’équipement auquel il se refère et doit etre transféré à tout autre utilisateur ou propriétaire succes-sif de la machine. Il est important de le lire scrupuleusement et suivre les instructions reportées. Le notice, ou une copie, doit toujours être à la por-tée de la main de l’opérateur pour le consulter en cas de nécessité. Nous conseillons en outre de contacter le Constructeur pour toute nécessité d’informations, de pièces déta-chées ou accessoires. GUIDE A LA CONSULTATION DANGER Rappelle l’attention à des situations ou pro-blèmes qui peuvent compromettre la sécu-rité des personnes pour accidents ou dan-ger de mort. ATTENTION Rappelle l’attention à des situations ou pro-blèmes liés à l’efficacité t de l’équipement qui ne compromettent pas la sécurité des personnes.
Toutes les règles de sécurité sont importantes et doi-vent donc être scrupuleusement observées. Défense de transport de personnes. Risque de coupure. Danger de courroies en mouvement. Les schémas ci-joints sont à usage exclusif du person-nel technique spécialisé qui est authorisé par la sté: Peruzzo à effectuer des services et controles extraor-dinaires. Il est absolument défendu de s’en servir pour apporter des modifications à l’équipement . IMPORTANT: La vitesse de travail doit varier de la façon suivante: Max. 2-3 km/h dans l’herbe haute et drue, sur les ter-rains irréguliers et accidentés et durant les opérations de verticoupe. Max 4-6 km/h dans l’herbe basse et claire et sur les terrains plats.
KONEEN KÄYTTÄJÄLLE
Käyttöohjekirjan katsotaan olevan kiinteä koneen osa. Kirjassa selvitetään koneen rakenne ja ne huoltotoimenpiteet, jotka on suoritettava konetta käytettäessä.
Käyttöohjeen tulee olla aina koneen käyttäjän saatavilla. Käyttöohjekirja on luovutettava koneen uudelle omistajalle, mikäli kone vaihtaa omistajaa.
Koneen käyttäjän tulee noudattaa kirjassa annettuja ohjeita. Koneen myyjä, varaosamyyjät ja huoltomiehet antavat tarvittaessa lisätietoja.
OHJEKIRJAN MERKINNÄT
VAARA Vaara-sana ja yleinen varoitusmerkki -kuvio esiintyy sellaisissa kohden, joissa on olemassa vakava loukkaantumisen tai jopa tapaturmaiseen kuolemaan johtava vaaratilanne.
VAROITUS Varoitus-sana ja nuoli-kuvio esiintyy sellaisissa kohden, joissa annetaan oleellisen tärkeää tietoa koneen oikeasta käyttötavasta.
Turvallisuusohjeet on annettu käyttäjän työturvallisuuden varmistamiseksi, ja niitä on ehdottomasti noudatettava, sellaisia ovat esimerkiksi:
- Koneen päällä ei saa kuljettaa matkustajia. - Puristumisvaara! - Varo liikkuvaa kiilahihnaa.
Kirjassa olevat piirrokset ovat Peruzzo-tehtaan teknisen osaston toimittamat. Niissä annetaan yksityiskohtaisia tietoja ja selventäviä ohjeita koneen oikeaa käyttöä varten.
TÄRKEÄÄ Paksussa ruohikossa, epätasaisella maalla sopiva kelamurskaimen työnopeus on 2-3 km/h. Heikkokasvuista nurmea tasaisella maalla silputtaessa voidaan ajaa 4-6 km/h nopeudella.
F
5
FIN

IDENTIFICATION NOTE The identification plate of the machine indicating all data is situated on fig.1 The plate showing the maximum speed on tractor PTO is positioned on fig. 2 It is suggested the plates and hazard symbols to be always cleaned and in well conditions; eventually have to be replaced with original ones requiring them from the manufacturer (pag. 24-26) The new symbols must be positioned on the same place as the damaged or ones.
WARRANTY The guarantee decay when the machine is used differ-ently as explained in this manual. Check the machine when delivered to inspect eventual transport damages. Eventual complaints must be forwarded to “Peruzzo s.r.l.” in writing within 8 (eight) days from the receipt. The guarantee can be applied with the replacement or repairing only for the defective part, after a careful checking from Peruzzo Srl company. The guarantee is 12 months valid from purchasing date. The guarantee decay in case the information of the present manual are not respected, moreover decay in case of modification by the owner or fitted not original spare parts. Court to be due of Padova.
NOTE IDENTIFICATIVE La targhetta di identificazione della macchina riportan-te tutti i suoi dati è situata in fig. 1 La targhetta indicante la velocità max. presa di forza è posizionata in fig. 2 Si raccomanda che sia la targhetta che i simboli di pericolo siano sempre puliti e in buono stato; even-tualmente vanno sostituiti con altri originali richieden-doli alla casa costruttrice (pag. 24-26). I nuovi simboli vanno applicati nella posizione di quelli sostituiti.
GARANZIA
La garanzia decade qualora si faccia un uso diverso da quello prescritto. Controllare la macchina al momento della consegna per verificare eventuali danni da trasporto. Eventuali reclami devono essere inviati alla “ PERUZ-ZO S.R.L.” per iscritto entro 8 (otto) giorni dalla ricezio-ne. La garanzia prevede la sola sostituzione, o riparazione delle parti riconosciute difettose, dopo attento esame da parte della PERUZZO Srl. La garanzia è valida per 12 mesi dalla data di acquisto. La garanzia decade se non si rispettano le istruzioni del seguente libretto, decade inoltre se vengono opera-ti dei cambiamenti o vengono montati pezzi di ricambio non originali. Foro competente di Padova.
I GB
6

NOTES D’IDENTIFICATION La plaquette d’identification de la machine indique toutes ses données et elle est située. Fig.1 La plaquette (autocollant) indiquant la vitesse max. de la prise de force est située. Fig. 2 Il est conseillé de garder les plaquettes et les symbo-les de danger toujours propres et en bon état. Ils doi-vent être éventuellement remplacés en demandant les originaux au Constructeur. Pag. 25-26 I nuovi simboli vanno applicati nella posizione di quelli sostituiti.
GARANTIE La garantie échoue en cas d’usage différent de celui prescrit. Contrôler la machine au moment de la livraison afin de vérifier s’il y a eu des dommages durant le transport. Pour toute réclamation, s’adresser directement à la société “Peruzzo s.r.l.” par écrit, maximum 8 jours dès la machine. La garantie a une validité de 12 mois à partir de la da-te d’achat. La garantie ne prévoit que le remplacement ou la ré-paration des pièces qui ont été reconnues défectueu-ses, à la suite d’un contrôle par la sté. Peruzzo Srl. La garantie n’est plus valable si les instructions repor-tées dans cette notice n’ont pas été scrupuleusement observées, dans le cas de changements apportées à la machine et dans le cas de montage de pièces déta-chées non originales. Tribunal de compétence de Padova.
HERSTELLERKENNZEICHEN
KONEKILPI Konekilpi on sijoitettu koneen eturungon oikeaan päähän (kuva 2). Kilpeen on merkitty kaikki konetta koskevat tiedot ja hyväksymismerkintä. Konekilpeä ei saa turmella eikä sitä saa poistaa. Koneen käyttöä koskeva ohjetarra on kulmavaihteesta koneen päätyyn menevän käyttöakselin suojusputkessa (kuva 1).
TAKUU Tehdas myöntää Fox-niittomurskaimella 12 kk:n takuun, joka lasketaan alkavaksi koneen luovutuspäivästä. Takuun voimassapysyminen edellyttää, että konetta käytetään ohjeita noudattaen siihen työhön, mihin se on suunniteltu. Koneen rakennetta ei saa muuttaa ja siinä on käytettävä alkuperäisiä kulutus-, huolto- ja varaosia. Asiakkaan on tarkastettava vastaanottamansa kone. Mahdolliset muistutukset on tehtävä 7 päivän kuluessa. Reklamaatio on tehtävä kirjallisesti. Mikäli kone vaurioituu normaalissa käytössä ja asiakas katsoo tapauksen kuuluvan takuun piiriin, on hänen tehtävä siitä kirjallinen takuuanomus, josta selviää käyttöolosuhteet, käytön määrä jne. Vaurioituneet, takuuseen anotut osat on säilytettävä ja tarvittaessa ne on toimitettava maahantuojalle takuutarkastusta varten. Takuuasioita hoitavat Agrimarketin varaosamyymälät ja Hankkija-Maatalouden huolto-osasto. Tarkemmat tiedot paikallisen Agrimarketin varaosapäälliköltä tai suoraan maahantuonnista (Hankkija-Maatalous Oy, pienkoneiden huoltopäällikkö, puh. 010 - 7683 000.
F
7
FIN

UTILISATION OF THE MACHIE This flail mower is suitable for the cutting and shred-ding into fine grass and leaves on parks, gardens, sports grounds golf courses, public authorities etc. Its strength and technical features, allow fast cutting and collection performances with grate hourly profits.
The machine can be fitted on any kind of tractor of suitable power : Mod. 1000 kW 11 (15 HP) Mod. 1200 kW 13 (18 HP) Mod. 1400 kW 15 (20 HP) Mod. 1600 kW 16 (22 HP)
and supplied with universal 3 point hitch or triangle linkage. It is consented its use from adult people only. It is not allowed to get people on the machine while working neither be carried. It is forbidden to use the machine on lawns or gardens where is present gravel, in this case it would verify a dangerous throwing of stones both
for the user and for possible people in the neighbour-hood. It is forbidden its use for cutting brushes. This flail mower can be fitted with three kind of flails: 1) Flails type (A) is utilized for high grass reduction (shredding) and fast operation while the quality cut pre-sent a wavy line. 2) Flail type (B) is supplied on re-quest, used for good quality cut as you see the linear finish. 3) Flail type (C) must be used on lawns with no stones or bushes and its central part ( vertical blade ) must just touch the ground surface for scarifying duties. 4) The flail (D) is very sturdy for high grass and for shredding branches with diameters of 1-2 cm.
Any arbitrary modification caused on the ma-chine relieves the manufacturer from any re-sponsibility for eventual derived damages.
UTILIZZO DELLA MACCHINA Questo trinciaerba è adatto al taglio e macinazione fina di erba, foglie e feltro su prati, parchi, giardini e aree pubbliche e private in genere, campi sportivi, campi da golf etc. Data la sua robustezza e le sue caratteristiche tecni-che, consente un’alta velocità di avanzamento abbina-ta ad una ottima redditività oraria.
La macchina è applicabile a qualsiasi tipo di trat-tore : La macchina è applicabile a qualsiasi tipo di trat-tore di adeguata potenza : Mod. 1000 kW 11 (15 HP) Mod. 1200 kW 13 (18 HP) Mod. 1400 kW 15 (20 HP) Mod. 1600 kW 16 (22 HP)
e munito di attacco universale a tre punti o attac-co triangolo. Non si deve usare la macchina in prati o giardini dove siano presenti sassi dove si verificherebbe un lancio di parti sassose pericoloso per le per-sone vicine e per la macchina stessa. E’ consentito l’uso solo a persone adulte. Non è consentito salire sulla macchine in lavoro
e ne farsi trasportare. Questa macchina può utilizzare tre tipi di coltelli: 1) Il coltello (A) viene utilizzato per una maggiore ridu-zione dell’erba e velocità di avanzamento, mentre pre-senta una qualità di taglio ondulata. 2) Il coltello (B) viene utilizzato su richiesta per esigen-ze di taglio lineare e preciso, senza compromettere la sua redditività oraria. 3) Il coltello (C) viene usato su terreni privi di sassi e arbusti per l’azione di verticut (arieggiatura) del manto erboso. 4) Il coltello (D) molto robusto adatto per erba alta e piccoli arbusti di 1-2 cm di diametro.
Ogni modifica arbitraria apportata alla mac-china solleva il produttore da ogni responsa-bilità per eventuali danni derivanti.
Distanza di sicurezza Safety distance
5 mt.
15 mt. 5 mt.
I GB
8
Potenza Minima Utilizzabile {
Minimum Useful Power {

UTILISATION DE LA MACHINE Cette tondeuse à fléaux est conçue pour la coupe de l’herbe et de feuilles, feûtre sur parcs, jardins, terrains de sport, terrains de golf, espaces verts publics etc Grâce à sa construction robuste et à ses caractéristi-ques techniques, elle permet une vitesse de travail élevée et une excellente capacité horaire.
La machine s’applique à tout tracteur de puis-sance proportionnée. Mod. 1000 kW 11 (15 HP) Mod. 1200 kW 13 (18 HP) Mod. 1400 kW 15 (20 HP) Mod. 1600 kW 16 (22 HP)
et muni d’attelage 3 points universel ou triangle. La machine ne doit être utilisée que par du per-sonnel adulte. Il est interdit de monter sur la machine au travail, ni de se faire transporter. La machine ne doit jamais être utilisée sur des
terrains ayant du graver, la projection éventuelle de cailloux pourrait s’avérer dangereuse pour l’opérateur et les personnes éventuellement dans les parages. Il est défendu d’uliser la machine pour la coupe d’arbustes. Cette tondeuse peut monter 3 types de couteaux diffé-rents: 1) Le cateau (A) est monté standard et permet une bonne coupe de l‘herbe et une bonne vitesse de tra-vail. Le type de coupe effectué est ondulé. 2) Couteau (B) est monté sur demande uniquement et s‘emploie pour des exigences de coupe linéaire et pré-cise. 3) Couteau (C) pour le défeûtrage et le ramassage de feûtre, herbe et mousse 4)Le couteau (D) doit travailler en abscence de cailloux et arbustes (buissons) et sa partie centrale (lame verti-cale) doit seulement rayer la pelouse.
Toute modification arbitraire effectuée sur la machine libère le constructeur de toute re-sponsabilité des dommages éventuels qui pourraient en dériver.
NIITTOMURSKAIMEN KÄYTTÖ Niittomurskain on tarkoitettu ruohokasvillisuuden ja maahan pudonneiden lehtien niittoon ja murskaukseen. Käyttökohteita ovat esim. maisemoidut alueet, puistot, puutarhat, ulkoilualueet, urheilukentät, golfkentät jne. Lujan rakenteensa ansiosta kone soveltuu ammattimaiseen käyttöön.
Fox-murskainmen käyttö edellyttää, että sen voimanlähteenä käytetään sopivan kooista traktoria. Taulukossa selviävät mallikohtaiset voimantarpeet (voimanotosta mitattuna): Malli 1000 15 hv (11 kW) Malli 1200 18 hv (13 kW) Malli 1400 20 hv (15 kW) Malli 1600 22 hv (16 kW) Murskain kiinnitetään vetotraktorin kolmipistenostolaitteeseen ja käyttövoimansa se saa voimanotosta nivelakselin välityksellä. Murskainta saa käyttää vain sen toiminnan hallitseva henkilö. Konetta ei saa käyttää sellaisilla alueilla, jossa on irtokiviä tai soraa. Teristä sinkoavat kivet saattavat aiheuttaa vaaratilanteen lähistöllä
oleville ihmisille ja omaisuudelle. Niittomurskainta ei saa käyttää paksun vesakon murskaukseen. Murskaimessa voidaan käyttää neljää eri terätyyppiä. 1. Korkean heinikon leikkuu. Sivusuunnassa taivutettu terä (A) ripustetaan kiinnikkeisiin pareittain, jolloin ne muodostavat Y-kirjaimen muotoisen teräparin. Leikkuujälki on hieman epätasainen. 2. Varsta-tyyppiset terät (B) on saatavana erikoistilauksesta. Ne tekevät tasaisen leikkuujäljen. 3. Pystyleikkuuterät (C) on saatavana erikoistilauksesta. Ne asennetaan kiinnikkeeseen Y-terän puolikkaiden väliin, jolloin kussakin kiinnikkeessä on kolme terää. Leikkuukorkeus säädetään niin, että keskimmäisenä oleva pystyleikkuuterän kärki uppoaa maahan. Maan tulee olla täysin kivetön. 4. Järeät varstaterät (D) on saatavana erikoistilauksesta. Ne on tarkoitettu paksun, villiintyneen heinikon niittoon, jossa on halkaisijaltaan 1-2 cm paksuja risuja.
Koneen rakennetta ei saa muuttaa. Valmistajan vastuu raukeaa, jos rakennetta muutetaan.
A C D B
F
9
Puissance minimum d’utilisation {
FIN

UTILIZZO DELLA MACCHINA
x�Ogni impiego della macchina diverso da quelli sopra indicati è da considerarsi non autorizzato e pericoloso.
x�Prima di utilizzare la macchina accertarsi che non vi sia nessuno nel raggio d’azione della macchina ed a una distanza non inferiore a quella di sicurezza.
xDeve essere azionata solo da personale che è a co-
noscenza delle sue particolari caratteristiche e che è al corrente delle principali procedure di sicurezza e dotato degli opportuni dispositivi di protezione per-sonale e che abbia effettuato un corso di addestra-mento sul suo utilizzo.
xNon si deve utilizzare la macchina se si è stanchi,
ammalati, o sotto l’effetto di alcool, farmaci o dro-ghe.
xIl livello di pressione acustica della macchina in condizioni di massimo carico di funzionamento è di: 70 dB (A) - 80 dB (A) pertanto è obbligatorio l'uso di cuffie di protezione.
UTILISATION OF THE MACHIE x�Any machine use that differ from the ones
given from Peruzzo company is considered not authorized and dangerous for people and things near by.
x�Before operating with the machine the use must be sure that there aren’t people nearby the machine and things on the operation area as fixed by Peruzzo on page 8 .
x� Must be operated from authorized staff that has a perfect details knowledge of the present man-ual, its items and knows the main safety proce-dures and proper body safety devices and must have made a proper training course on its uses.
x� The machine must not be used in case the op-erator is tired, ill, drunk or after taking medi-cines or drugs.
x�The machine noise pressure in full operation power is around: 70 dB (A) - 80 dB (A) than is advised wearing safety heads or Caps protects ears.
I GB
10

NIITTOMURSKAIMEN KÄYTTÖ Koneen tulee olla siinä kunnossa kuin myyjä on sen luovuttanut. Koneen rakennetta ei saa muuttaa. Muunneltu kone vaarallinen käyttäjälle ja lähellä oleville ihmisille ja se voi aiheuttaa myös omaisuusvahinkoja. Varmistaudu, että ulkopuoliset ovat turvallisen välimatkan päässä koneesta. Turvaetäisyys sivusuunnassa on 5 m ja koneen takana 15 m. Koneen käyttäjän tulee olla perehtynyt murskaimen toimintaan ja hallita sen käyttö sekä käyttöön liittyvät turvallisuuskysymykset. Konetta ei saa käyttää väsyneenä eikä alkoholin tai huumaavien lääkeaineiden vaikutuksen alaisena. Työssä koneen käyntiääni on n. 70 dB(A). Kuulosuojainten käyttö on suositeltavaa jos voimanlähteenä käytettävässä traktorissa on vain turvakaari ääntä vaimentavan turvaohjaamon sijaan.
UTILISATION DE LA MACHINE xOgni impiego della macchina diverso da quelli sopra indicati è da considerarsi non autorizzato e pericoloso. xPrima di utilizzare la macchina accertarsi che non vi sia nessuno nel raggio d’azione della macchina ed a una distanza non inferiore a quella di sicurezza.
xDeve essere azionata solo da personale che è a co-
noscenza delle sue particolari caratteristiche e che è al corrente delle principali procedure di sicurezza e dotato degli opportuni dispositivi di protezione per-sonale e che abbia effettuato un corso di addestra-mento sul suo utilizzo.
xNon si deve utilizzare la macchina se si è stanchi,
ammalati, o sotto l’effetto di alcool, farmaci o dro-ghe.
xIl livello di pressione acustica della macchina in condizioni di massimo carico di funziona-mento è di: 70 dB (A) - 80 dB (A) pertanto è obbligatorio l'uso di cuffie di protezione.
F
11
FIN

NORME ANTINFORTUNISTICHE Al fine di evitare infortuni è necessario fare attenzione alle indicazioni riportate nelle etichette di sicurezza ap-plicate sulla macchina.
Fare sempre attenzione che durante il lavoro non ci siano persone nel raggio di azione, so-prattutto bambini.
Tenere sempre questo libretto a portata di mano dell’operatore. Quando la macchina non lavora, spegnere il motore del trattore, sostare su di un terreno in piano con il freno di stazionamento innestato, con la marcia innestata, la presa di forza disinserita e con l’attrezzatura appoggia-ta al terreno.
Le paratoie anteriori devono essere sempre i buone condizioni onde evitare un lancio di sassi o altro materiale. Non eseguire nessun lavoro di pulizia o manu-tenzione con il motore in moto, né con la presa di forza inserita. Per la circolazione su strada è necessario atte-nersi alle norme del codice stradale. In lavorazione l’operatore deve usare occhiali di protezione e mascherina antipovere, qualora il trattore non sia cabinato.
E’ bene ricordare che un operatore prudente è la migliore sicurezza contro qualsiasi infortunio.
SAFETY REGULATIONS In order to avoid accidents is necessary pay attention at the indications mentioned on the safety labels placed on the machine.
Pay always attention that during the work no people and moreover children must be on the range of action.
Keep this manual within reach always of the user. When the machine doesn’t operate, stop the tractor engine and park on a flat ground with hand break en-gaged, with speed engaged and P.T.O. disconnected and the equipment laid on the ground.
The front safety plates gate must be in good conditions always in order to avoid a dangerous throwing of stones or others materials. Don’t carry out any cleaning work or mainte-nance while engine is working nor with con-nected P.T.O.
For traffic on the street is necessary to observe the highway code norms.
While working the user must ware protection glasses and in case the tractor is not supplied with its cab the user must ware the mask against dust.
A careful user is the best safety against any kind of accident.
I GB
12

TURVALLISUUSSÄÄDÖKSIÄ Kuljettajan tulee noudattaa koneen ohjetarroissa annettuja ohjeita. Varmistaudu, että ulkopuoliset ovat turvallisen välimatkan päässä koneesta. Turvaetäisyys sivusuunnassa on 5 m ja koneen takana 15 m. Käyttöohjekirjan tulee olla aina koneen käyttäjän saatavilla. Pysäköitäessä kytke voimanotto pois päältä, kytke pysäköintijarru päälle, laske murskain maahan ja pysäytä traktorin moottori. Konetta käytettäessä murskaimen etusuojuksen tulee olla kunnossa, jotta se estäisi kovien esineiden sinkoutumisen. Kytke voimanotto pois päältä, kytke pysäköintijarru päälle ja pysäytä traktorin moottori ennen koneen huoltoa tai säätöä. Julkisella tiellä liikuttaessa koneyhdistelmän tulee olla varustettu liikenneasetusten mukaisesti. Noudata liikennesääntöjä. Käytä tarvittavia suojavälineitä, esim. kuulosuojaimet, suojalasit ja hengityssuojain pölyä vastaan. Aja maltillisesti. Muista työturvallisuus.
REGLES DE SECURITE Afin d’éviter tout accident il est nécessaire d’observer scrupuleusement les symboles et les étiquettes de sé-curité appliqués sur la machine.
S’assurer toujours que personne, surtout des enfants, ne se trouve dans la zone de travail de la machine.
Cette notice d’instruction doit toujours être à la portée de l’opérateur. Si la machine n’est pas en phase de travail, arrêter le moteur du tracteur et s’arrêter sur un terrain plat, ayant le frein de stationnement et une vitesse inséré. La prise de force doit être dégagée du cardan et la machine doit être posée par terre.
Les protections antérieures doivent toujours être en bon état afin d’éviter. Ne jamais effectuer aucune opération de net-toyage ou de maintenance avec le moteur en marche ni la prise de forze insérée. Pour la circulation sur route, suivre les règles de circulation routière.
Durant le travail, l’opérateur doit être muni de lunettes de protection et de masque à poussiè-re, si le tracteur est dépourvu de cabine. Il est interdit de s’approcher de la zone de ben-nage du bac de ramassage.
Un opérateur prudent est la meilleure sécurité contre tout accident.
F
13
FIN

NORME ANTINFORTUNISTICHE
xLa macchina è stata progettata per essere uti-lizzata da un solo operatore che deve aver letto e assimilato il contenuto di questo manuale.
xIl libretto se venisse smarrito o danneggiato richiedere una copia sostitutiva alla ditta costruttrice.
x�Prima di utilizzare la macchina assicurarsi che tutti i dispositivi di sicurezza siano collocati correttamente al loro posto ed in buono stato; qualora si verificassero guasti o danneggiamenti alle protezioni sostituirle im-mediatamente.
xE' obbligatorio usare un abbigliamento idoneo come previsto nel presente manuale e dalle leggi vigenti nel Paese di utilizzo dell’attrezzatura; vanno in ogni modo evitati abiti larghi e svolazzanti, cinture, anelli e cate-nine.
x�Non lasciare mai incustodita la macchina quando è in moto.
x�Prima di scendere dalla trattrice e prima di ogni ope-razione di pulizia, manutenzione, regolazione aziona-re il freno di stazionamento, spegnere il motore, to-gliere la chiave di accensione dal cruscotto ed inserire la marcia.
x�Ispezionare il terreno prima di utilizzare la macchina allo scopo di individuare e rimuovere eventuali osta-coli (pietre, fili di ferro, tombini sporgenti, ecc..)
xAccertarsi delle condizioni del suolo tenendo presente che con erba troppo bagnata non è possibile operare.
xEvitare di affrontare curva ad alta velocità; sollevare la barra alle testate degli appezzamenti se si opera in pendenza
xNei terreni declivi è preferibile operare nel senso della massima pendenza (……..dB) per evitare il ribalta-mento.
xScegliere una velocità di avanzamento compatibile con le condizioni del terreno su cui si opera.
xDurante il lavoro soprattutto con colture molto alte fare attenzione all’eventuale presenza di persone o anima-li.
xDurante la circolazione su strada è necessario atte-nersi alle norme del codice stradale vigenti nel paese di utilizzo.
xNel caso si accertano vibrazioni o rumori duranti la lavorazione, spegnere immediatamente il motore del-la trattrice e verificarne le cause.
xDurante l’uso la macchina può dare luogo a emissioni di polveri. Si consiglia di verificare periodicamente i filtri sul sistema di ventilazione della cabina della trat-trice oppure di utilizzare idonei sistemi di protezione delle vie respiratorie quali maschere antipolveri o ma-schere con filtro.
xPrima di immettersi nella circolazione stradale verifica-re che gli stabilizzatori siano bloccati nella posizione di trasporto.
SAFETY NORMS xThe machine is manufactured to be used by one user only that must have read and assimi-lated all manual details. x� In case of manual loss or damage, it must
be requested to PERUZZO manufacturing company. x�Before using the machine the operator must be sure
that all safety devices must be in proper position and in good been; in case of failures or damages to the safety protections must be promptly changed.
x�Is compulsory use suitable clothes as informed on the present manual and as per safety norms on the coun-try where the machine is operated; however must not wear large or loose clothes, belts, rings or loose neck-lace.
x�Never leave the machine when it is operating or with engine switched on.
x�Before getting off the tractor and before any cleaning maintenance or adjustment, activate the tractor brake, turn tractor engine off, disconnect the key from dashboard, insert the gear and disconnect the PTO.
x�Hydraulic system operations or maintenance must be done after discharging oil pressure by acting to the tractor levers.
x�Verify the hydraulic tubes wear; In case of wearing, provide new hydraulic tubes change from PERUZZO.
x�Carefully check on the field surface where you intend to operate with the machine that must be free from stones, metal parts, ropes or similar items.
x�Before beginning the cutting operation check the grass humidity that must not exceed over 50%.
x�Avoid any bending with mowers fixed on 3 points link-age, on steep grounds or at any end of cutting field where the mower must be lifted to cut on opposite side. In case you want bending without lifting the mower it must be fitted with proper trailing draw bar.
x�On hilly grounds the machine must not lean over 30 degree in order to prevent overturning or damages to machine and ground surface.
x�Choose a working speed suitable with ground and grass conditions, however not more than 7 Km/hour.
x�In case of high grass cut check that must not people, animal or parts near by the cutting area.
x�On road transport operations is necessary to check the street laws on the country where the machine is used.
x�In case of rising machine vibrations or strange noise during operation, immediately stop working and check the causes. In case of continuous vibrations do not keep working with the machine.
x�During machine use it may cause powder emissions. It is advised to check the tractor cabin filters that must be cleaned always or use proper safety powder masks.
x�Before driving on roads check that tractor 3 points linkage must be fixed with its chains to prevent ma-chine swinging and use lights bar in case the machine cover the tractor lights.
I GB
14

YLEISIÄ TURVALLISUUSOHJEITA xKonetta saa käyttää vain siihen tehtävään, mihin se on suunniteltu.
xKäyttöohjekirjan tulee olla koneen käyttäjän saatavilla. xKuljettajan on tarkastettava kone ennen sen
käynnistämistä ja varmistauduttava, että siinä olevat suojukset ja turvalaitteet ovat kunnossa ja asianmukaisesti paikallaan. Vajavaiset tai vaurioituneet turvalaitteet on saatettava välittömästi vaatimuksien mukaiseen kuntoon.
xKuljettajan tulee käyttää asianmukaista työvaatetusta ja suojavarusteita. Väljät vaatteet ja pitkät liepeet saattavat tarttua koneen osiin ja aiheuttaa vaaratilanteen.
xKytke voimanotto pois päältä, laske työkone maahan ja pysäytä traktorin moottori ennen kuin poistut koneen luota.
xKytke voimanotto pois päältä ja pysäytä traktorin moottori sekä kytke pysäköintijarru päälle ennen koneen huoltoa tai säätöä.
xTee hydraulijärjestelmä paineettomaksi ennen hydraulisten laitteiden säätöä tai huoltoa.
xKäytä aina alkuperäisiä huolto-, vara- ja kulutusosia mukaan lukien hydrauliikkaan liittyvät osat.
xTutustu ennen työn aloittamista työkohteeseen ja varmistaudu, että alueella ei ole työtä haittaavia tai vaaraa aiheuttavia esteitä.
xTyöhön ei pidä ryhtyä sateella tai ruohikon kosteuspitoisuuden ollessa yli 50%.
xOle varovainen epätasaisella ja mäkisellä alustalla työskenneltäessä. Murskaimen laskiessa notkelmaan tai noustessa esteen yli nivelakseli saattaa joutua liian jyrkkään kulmaan.
xNoudata varovaisuutta rinteen suuntaisesti ajaessasi. Kaatumisvaara!
xValitse ajonopeus kasvuston ja ajoalustan mukaan. Suurin sallittu työnopeus on 7 km/h.
xNoudata erityistä varovaisuutta korkeassa kasvustossa ajaessasi. Maassa saattaa olla pieneläimiä tai kiinteitä esteitä.
xJulkisella tiellä liikuttaessa koneyhdistelmän tulee olla varustettu liikenneasetusten mukaisesti. Noudata liikennesääntöjä.
xKeskeytä työ välittömästi, jos murskain joutuu epätasapainoon tai jos se pitää voimakasta asiaankuulumatonta ääntä.
xTietyissä työskentelyolosuhteissa koneen ympärille saattaa muodostua tiheä pölypilvi. Varmistaudu, että voimanlähteenä käytettävän koneen moottorin ja mahdollisen ohjaamon ilmansuodattimet ovat toimintakuntoiset. Kuljettajalle suositellaan hengityssuojaimen käyttöä.
xKytke nostolaitteen sivurajoittimet kiinteiksi kuljetusajon ajaksi, jotta murskain ei heijaisi puolelta toiselle.
REGLES DE SECURITE xLa macchina è stata progettata per essere uti-lizzata da un solo operatore che deve aver letto e assimilato il contenuto di questo manuale.
xIl libretto se venisse smarrito o danneggiato richiedere una copia sostitutiva alla ditta costruttrice.
x�Prima di utilizzare la macchina assicurarsi che tutti i dispositivi di sicurezza siano collocati correttamente al loro posto ed in buono stato; qualora si verificassero guasti o danneggiamenti alle protezioni sostituirle im-mediatamente.
xE' obbligatorio usare un abbigliamento idoneo come previsto nel presente manuale e dalle leggi vigenti nel Paese di utilizzo dell’attrezzatura; vanno in ogni modo evitati abiti larghi e svolazzanti, cinture, anelli e cate-nine.
x�Non lasciare mai incustodita la macchina quando è in moto.
x�Prima di scendere dalla trattrice e prima di ogni ope-razione di pulizia, manutenzione, regolazione aziona-re il freno di stazionamento, spegnere il motore, to-gliere la chiave di accensione dal cruscotto ed inserire la marcia.
x�Ispezionare il terreno prima di utilizzare la macchina allo scopo di individuare e rimuovere eventuali osta-coli (pietre, fili di ferro, tombini sporgenti, ecc..)
xAccertarsi delle condizioni del suolo tenendo presente che con erba troppo bagnata non è possibile operare.
xEvitare di affrontare curva ad alta velocità; sollevare la barra alle testate degli appezzamenti se si opera in pendenza
xNei terreni declivi è preferibile operare nel senso della massima pendenza (……..dB) per evitare il ribalta-mento.
xScegliere una velocità di avanzamento compatibile con le condizioni del terreno su cui si opera.
xDurante il lavoro soprattutto con colture molto alte fare attenzione all’eventuale presenza di persone o anima-li.
xDurante la circolazione su strada è necessario atte-nersi alle norme del codice stradale vigenti nel paese di utilizzo.
xNel caso si accertano vibrazioni o rumori duranti la lavorazione, spegnere immediatamente il motore del-la trattrice e verificarne le cause.
xDurante l’uso la macchina può dare luogo a emissioni di polveri. Si consiglia di verificare periodicamente i filtri sul sistema di ventilazione della cabina della trat-trice oppure di utilizzare idonei sistemi di protezione delle vie respiratorie quali maschere antipolveri o ma-schere con filtro.
xPrima di immettersi nella circolazione stradale verifica-re che gli stabilizzatori siano bloccati nella posizione di trasporto.
F
15
FIN

USO DELLA MACCHINA Controlli e consigli prima
della messa in moto Questi controlli vanno eseguiti a trattore spento e presa di forza disinserita.
Controllare l’usura dei coltelli.
Bloccare sempre i perni con le apposite copiglie di si-curezza a scatto.
Innestare l’albero cardanico assicurandosi che sia scattato il fermo di sicurezza. Assicurarsi che il cardano in posizione di massi-ma chiusura resti aperto non meno di 4 cm. Assicurarsi che il cardano in posizione di massi-ma chiusura resti aperto non meno di 4 cm, in caso di massima apertura i due pezzi devono essere sovrapposti non meno di 15 cm. Fig. 6
Prima di mettere in moto la macchina assicurarsi del parallelismo di questa con il terreno, il rullo posteriore di contatto deve poggiare a terra.
Controllare ed assicurare il cardano come da istruzione della casa costruttrice e agli apparati di sicurezza della trinciaerba stessa.
IMPORTANTE : Nel caso si noti una vibrazione, fermare il tratto-re immediatamente, controllare subito nella trin-cia se mancano o sono danneggiati delle mazze o coltelli . Nel caso manchi o sia rotto 1 solo col-tello procedere subito alla sostituzione con maz-ze o coltelli originali PERUZZO.
x� Tali operazioni devono essere svolte dal conduttore del mezzo.
x� Questi controlli vanno eseguiti a trattore spento, con freno di stazionamento inserito, con marcia inserita e presa di forza disinserita.
x� Verificare l'integrità della macchina, il corretto posiziona-mento e funzionamento dei dispositivi di sicurezza.
x� Imparare perfettamente il significato e l'uso dei comandi per il funzionamento.
x� Ispezionare il terreno allo scopo di individuare e rimuove-re eventuali ostacoli (pietre, fili di ferro, tombini sporgenti, ecc..)
USE OF THE MACHINE Checking and suggestions before operating.
These checking must be executed with tractor power-off engine and P.T.O. disconnected.
Check the wear of flails.
Lock always the point hitch pins with the suitable safety split-pins.
Fit the cardan shaft and make sure that the safety lock is been released. Fit the cardan shaft and make sure that the safety lock is been released. Make sure that the cardan shaft in maximum lo-cking position remain opened not less than 4 cm / 1,57 inch, in case of maximum opening the two pieces must be superimposed not less than 15 cm / 5,90 inch.Fig. 6
Before working with the machine make sure its paralle-lism on the ground, the rear roller must be laid on the ground as well as the two front castor wheels.
Check and assure the P.T.O. shaft as per in-structions supplied from its manufacturing company and on machine safety devices.
IMPORTANT : In case of mower vibration, stop right away the tractor engine and PTO, check immediately if the-re are missing flails or broken ones. In case of
missing of broken, (even 1 flail), dispose at once the change of the flail with original one from PE-RUZZO.
x�These duties must be executed by the machine user and after manual knowledge.
x�These checking must be done after, activating the tractor brake, turning tractor engine off, disconnect-ing the key from dashboard, inserting the gear and disconnecting the PTO.
x�Check the machine integrity, the correct position and safety devices operation.
x�Learn completely the use and meaning of every trac-tor and machine use and features.
x�Check the working field must be free from obstacles (stones, metal ropes, holes or parts that could ob-struct the machine).
I GB
16
MIN. 4 Cm
MIN.
FIG. 6

KONEEN KÄYTTÖ Koneen tarkastaminen ennen käyttöä Alla mainittuja tarkastuksia suoritettaessa voimanoton tulee olla kytkettynä pois päältä ja traktorin moottorin tulee olla pysähtyneenä.
Tarkasta varstojen kunto.
Varmistaudu, että kiinnitystapit vetovarsissa ja työntövarressa on varustettu asianmukaisin kiinnityssokin. Kiinnitä nivelakseli murskaimen ja traktorin välille. Varmistaudu, että akselin lukitusnappi napsahtaa uraansa. Lyhimmässä asennossaan akselin pään ja nivelristikon tyven välyksen tulee olla vähintään 4 cm. Pisimmässä asennossaan akselin puolikkaiden tulee olla vähintään 15 cm verran
sisäkkäin. Tarkasta ennen koneen käynnistämistä, että murskain on ajosuunnassa vaakasuorassa. Tarkasta myös, että takatela nojaa maahan ja että kannatuspyörät edessä ovat maassa.
Varmistaudu, että nivelakseli vastaa valmistajan vaatimuksia, ja että sen suojakaulus on paikallaan ja pyörimisen estävä turvaketju on kytketty traktorin kiinteään osaan.
TÄRKEÄÄ Jos murskain alkaa käydä väristen ja epätasapainoisesti, kytke voimanotto pois päältä, pysäytä kone ja tarkasta onko jokin kelan varstoista vaurioitunut tai irronnut. Vaihda vaurioitunut osa uuteen alkuperäiseen varaosaan.
Murskain tulee kiinnittää traktoriin ohjekirjan ohjeiden mukaisesti.
Kytke voimanotto pois päältä, kytke pysäköintijarru päälle ja pysäytä traktorin moottori ennen koneen huoltoa tai säätöä.
Varmistaudu, että voimanlähteenä käytettävä traktori on sopivan kokoinen. Tarkasta, että turvalaitteet ovat paikallaan ja asianmukaisessa kunnossa.
Perehdy huolellisesti koneen käyttötapaan ja toimintaan ellet ole sitä aikaisemmin käyttänyt.
Tutustu ennen työn aloittamista työkohteeseen ja varmistaudu, että alueella ei ole työtä haittaavia tai vaaraa aiheuttavia esteitä.
USAGE DE LA MACHINE Controles et conseils avant son utilisation.
Les contrôles doivent être effectués en ayant le moteur du tracteur arrêté et la prise de force dégagée.
Contrôler l’état d’usure des couteaux.
Fixer toujour les pivots de l’attelage points à l’aide des groupilles de sûreté.
Fixer le cardan en s’assurant qu’il soit bien blo-qué sur la prise de force en faisant déclencher le dispositif de sûreté. Fixer le cardan en s’assurant qu’il soint bien blo-qué sur la prise de force en faisant déclencher le dispositif de sûreté. S’assurer que le cardan soit ouvert d’au moins 4 cm en position de fermeture max. et que les deux parties se superposent d’au moins 15 cm dans la position d’allongement max. Fig. 6
Avant de mettre la machine en fonction, veiller à ce qu’elle soit parallèle au terrain et que le rouleau arriè-re et les roues avant touchent le sol.
Vérifier et fixer le cardan selon les instructions du constructeur du cardan (dans la notice livrée avec le cardan) et l’assurer au tracteur et à la tondeuse au moyen des chaînettes de fixation.
IMPORTANT : Si l’on perçoit des vibrations, arreter le tracteur immédiatment, et vérifier de suite sur le broyeur s’il manque des fléaux ou s’ils sont endommagés. Dans le cas ou l’on remarque 1 seul fléau cassé ou manquant, procéder à son remplacement par une pièce originale PERUZZO.
x�Tali operazioni devono essere svolte dal conduttore del
mezzo. x�Questi controlli vanno eseguiti a trattore spento, con freno
di stazionamento inserito, con marcia inserita e presa di forza disinserita.
x�Verificare l'integrità della macchina, il corretto posiziona-mento e funzionamento dei dispositivi di sicurezza.
x� Imparare perfettamente il significato e l'uso dei comandi per il funzionamento.
xIspezionare il terreno allo scopo di individuare e rimuovere eventuali ostacoli (pietre, fili di ferro, tombini sporgenti, ecc..)
F
17
FIG. 6 Min. 15 cm
MAX
FIN

FITTING TO THE TRACTOR
x�The machine linkage to the tractor is considered a dangerous operation: keep a safety distance from the machine and bear in mind the instructions given in the present manual.
x�Place tractor and machine on complete flat ground. x�Activate the tractor brake, turn tractor engine off, dis-
connect the key from dashboard, insert the gear and disconnect the PTO., than get off from the tractor (Check that tractor PTO must be carefully disengaged or disconnected acting on its lever or switch button ).
Put the tractor lifting arms inside the fixing supports of the machine 3-point hitch, in case of large tractor lifting arms unscrew the pins (3-4) and screw them back ou-tside (2). Fig. 7 Put the pin and fix it with the split pins connect the PTO shaft and check it is fixed in the proper way on tractor P.T.O. and on flail mower.
Connect the third point checking that the P.T.O. axis must be parallel to the ground and assure yourself that the machine must work touching the ground. Assure yourself that the 3rd point pin must be in the middle of its slot in order to pre-vent prevent dangerous machine shocks on une-ven grounds. Fig. 7 A Remember always to lift the front feet before any machine working operation. The front feet it is used just to place the machine after working. Fig. 7
APPLICAZIONE AL TRATTORE
x� L’aggancio della macchina alla trattrice è considerata un’operazione pericolosa: attenersi alle istruzioni ri-portate e tenersi a distanza di sicurezza dall’area di manovra.
x� Posizionare la trattrice e la macchina su un terreno compatto e in piano.
x� Spegnere il motore della trattrice, estrarre la chiave di accensione, azionare il freno di stazionamento ed inserire la marcia, quindi scendere dal mezzo (Verificare che la p.d.f. sia disinserita).
Accostare le barre del sollevatore del trattore, ponen-dole all’interno delle piastre della macchina nel caso il trattore disponga di bracci stretti , nel caso il trattore sia provvisto di bracci larghi è possibile svitare i perni (3) e (4) e fissarli accuratamente nel verso opposto (2) Fig. 7 Inserire il perno e bloccarlo con le copiglie di sicurezza a scatto. Innestare il giunto cardanico e assicurarsi che sia bloc-cato sulla presa di forza.
Collegare il terzo punto, avendo cura che l’asse della presa di forza risulti parallelo al piano di terra, far si che il terzo punto lavori a macchina orizzontale ed appoggiata a terra e la spina del 3° punto sia sempre a metà della ferritoia per prevenire eventuali puntamenti della macchina. (Vedi fig. 7 A)
Ricordarsi sempre di alzare il piedino di staziona-mento prima di ogni messa in funzione della mac-china. fig. 7
I GB
18
Fig. 7
Fig. 7 A

MURSKAIMEN KIINNITYS TRAKTORIIN x� Ole varovainen, kun kytket murskaimen traktoriin.
Kytkentävaiheeseen liittyy lukuisia vaaramomentteja. Noudata käyttöohjekirjassa annettuja neuvoja.
x� Kytkentää suoritettaessa traktorin ja murskaimen tulee olla vaarasuoralla, kovalla alustalla.
x� Varmistaudu, että traktori ja murskain pysyvät paikallaan, kun kytket vetovarret, työntövarren ja nivelakselin paikoilleen. Pysäytä traktorin moottori nivelakselin kytkennän ajaksi.
Kytke vetovarret murskaimen kiinnitystappeihin (3 ja 4), kuva 7. Kiinnitystapit on käännettävä, jos traktorissa on isoilla rei’illä varustetut vetovarsien kiinnityspallot. Varmista kiinnitys lukkosokilla. Kytke työntövarsi paikalleen. Aseta lukkosokka työntövarren tappiin. Säädä työntövarren pituutta niin, että murskain on ajosuunnassa katsoen vaakasuorassa.
Työasennossa ollessaan työntövarren kiinnitystapin tulee olla pitkänomaisen reiän puolivälissä. Tällöin murskan pääsee myötäämään maanpinnan muotoja.
Nosta tukijalka ylös ja lukitse se yläasentoon ennen kuin käynnistät koneen.
APPLICATION AU TRACTEUR
x� L’aggancio della macchina alla trattrice è considerata un’operazione pericolosa: attenersi alle istruzioni ri-portate e tenersi a distanza di sicurezza dall’area di manovra.
x� Posizionare la trattrice e la macchina su un terreno compatto e in piano.
xSpegnere il motore della trattrice, estrarre la chiave di accensione, azionare il freno di stazionamento ed inserire la marcia, quindi scendere dal mezzo (Verificare che la p.d.f. sia disinserita).
Approcher les barres du relevage hydraulique à l’attelage 3 points de la machine, en les faisant glisser à l’intérieur des supports de fixage . Dans le cas ou les les bras du relevage soient trop larges, dévisser les pivots (3-4) et les mettre à l’extérieur (voir fig. 2) Fig. 7 Enfiler le pivot et le bloquer à l’aide des goupilles. Placer le cardan en s’assurant qu’il soit bien bloqué sur la prise de force.
Fixer le troisième point en veillant à ce que l’axe de la prise de force soit parallèle au sol. Le troisième point doit travailler, ayant la machine en position horizontale et touchant le sol, au cen-tre de la glissière de l’attelage 3 points, afin d’éviter des coups brusques ou saccades au troi-sième point en cas de terrain irrégulier. Fig. 7 A
Avant la mise en fonction de la tondeuse, s’assurer que la béquille de stationement (voir fig. 7B) soit soulevée et bloquée à l’aide de la goupille appro-priée.
F
19
4
3
2
Fig. 7
FIN

FITTING TO THE TRACTOR
x Before operating any adjustment the user must, turn off the tractor engine, activate the tractor brake, turn tractor engine off, disconnect the key from dashboard, insert the gear and dis-connect the PTO. x Check that PTO shaft must be supplied with CE mark and in good conditions and plastic protection must not be damaged. x Check the PTO shaft length. x Insert the PTO shaft to tractor PTO and than to
the mower PTO checking the right assembling and mounting from PTO shaft manual and mower rotation, check that safety PTO shaft pins must be locked properly to the PTO shafts. x Connect the PTO shaft safety chains to Trac-tor and mower points as explained on PTO shaft manual.
APPLICAZIONE AL TRATTORE
x� Prima di effettuare il collegamento è obbli-gatorio spegnere il motore della trattrice, estrar-re la chiave di accensione, azionare il freno di stazionamento, innestare la marcia e verificare che la p.d.f. sia disinserita. x� Verificare che l’albero cardanico sia dotato di marcatura CE e sia in buono stato, e che la protezione in plastica non sia danneggiata x�Verificare la lunghezza dell’albero cardanico.
x� Innestare l’albero cardanico alla p.d.f. della trat-
trice e poi alla macchina rispettando il verso di rotazione ed il verso di montaggio evidenziato sul cardano, assicurandosi che sia scattato il fermo di sicurezza. x�Agganciare agli appositi punti i dispositivi di trat-tenuta (catenelle).
I GB
20
Fig. 7
Fig. 7 A

MURSKAIMEN KIINNITYS TRAKTORIIN x� Kytke voimanotto pois päältä, kytke pysäköintijarru päälle ja pysäytä traktorin moottori ennen sovitusta, huoltoa tai säätöä. x� Varmistaudu, että nivelakseli on varustettu CE-tunnuksella ja vastaa valmistajan vaatimuksia. Varmistaudu, että nivelakseli on sopivan mittainen. x� Kiinnitä nivelakseli ensin traktorin voimanottoon ja sitten työkoneen puoleiseen akselitappiin. x� Varmistaudu, että lukitusnastat napsahtavat akselitapin uriin. x� Varmistaudu, et tä nivelaksel in suojakaulus on paikallaan ja pyörimisen estävä turvaketju on kytketty traktorin kiinteään osaan.
APPLICATION AU TRACTEUR
x� Prima di effettuare il collegamento è obbli-gatorio spegnere il motore della trattrice, estrar-re la chiave di accensione, azionare il freno di stazionamento, innestare la marcia e verificare che la p.d.f. sia disinserita. x� Verificare che l’albero cardanico sia dotato di marcatura CE e sia in buono stato, e che la protezione in plastica non sia danneggiata x� Verificare la lunghezza dell’albero cardani-co.
x� Innestare l’albero cardanico alla p.d.f. della trat-
trice e poi alla macchina rispettando il verso di rotazione ed il verso di montaggio evidenziato sul cardano, assicurandosi che sia scattato il fermo di sicurezza.
x� Agganciare agli appositi punti i dispositivi di trat-tenuta (catenelle).
F
21
4
3
2
Fig. 7
FIN

REGOLAZIONE DELL’ALTEZZA DI TAGLIO
Per regolare l’altezza di taglio si deve agire anterior-mente sulle ruote pivottanti, spostare gli appositi spes-sori ( Vedi Fig. 9) Si può agire posteriormente sul bullone (B) del rullo (Vedi Fig.9A ).
Queste operazioni devono essere eseguite a motore spento con la presa di forza disinserita. Quando viene alzata la macchina con l’uso dei tre punti del trattore per regolare l’altezza di ta-glio, puntellare la macchina a terra ambo i lati con opportuni tappi. Quando si procede alla regolazione del rullo po-steriore si deve sollevare la macchina, ricordarsi di puntellare la macchina a terra ambo i lati con opportuni tappi. Non lavorare con la macchina regolata nella sua posizione minima, perchè i coltelli possono toc-care il terreno e quindi danneggiare la macchina stessa più le persone o cose nelle vicinanze. Eseguire la regolazione con l’ausilio di una se-conda persona prima di iniziare il lavoro avendo a disposizione gli attrezzi necessari. Prima di effettuare qualsiasi regolazione è obbli-gatorio spegnere il motore della trattrice, estrar-re la chiave di accensione, azionare il freno di stazionamento, innestare la marcia e verificare che la p.d.f. sia disinserita.
Profilato ad L posto a contatto del rullo per la pulizia dello stesso.
ADJUSTING CUTTING HEIGHT To adjust height of cut, act on front castor wheels by moving the spacers (See Fig. 9) It is possible to adjust the cutting height on rear roller, by acting on the bolt (B) ( See Fig. 9 A).
These operations must be effected with tractor power-off engine and P.T.O. disconnected. When lifting the machine with tractor lifter to a-djust the height of cut, prop it on both sides. In order to adjust the rear roller, lift the machine and remember toprop it on both sides. Do not work with machine adjusted on lower position as the flails may touch the ground, thro-wing objects with a consequent damage for ma-chine and to nearby people or things. Make the adjustment with the help of a second person and make sure to have necessary tools , gloves and clodes available before beginning the operation. Before operating any adjustment the user must, turn off the tractor engine, activate the tractor brake, turn tractor engine off, disconnect the key from dashboard, insert the gear and disconnect the PTO.
Rear bar is placed near the roller but must not touch the surface for a perfect cleaning.
Fig. 9
I GB
22
Fig. 9 A

LEIKKUUKORKEUDEN SÄÄTÖ
Leikkuukorkeutta säädetään koneen varustuksesta riippuen kannatuspyöriä säätäen tai takatelaa säätämällä. Pyörien tai takatelan säätöä varten murskain on nostettava maasta nostolaitteen varaan. Kytke voimanotto pois päältä, kytke pysäköintijarru päälle ja pysäytä traktorin moottori ennen sovitusta, huoltoa tai säätöä. Muista asettaa kannatuspyörät ja takatelan molemmissa päädyissä olevat säätöruuvit toisiaan vastaaviin reikiin. Älä säädä konetta liian alas. Maahan osuvat varstat saattavat heittää irtokiviä. Käytä kunnollisia työkaluja ja suojakäsineitä.
REGLAGE DE LA HAUTEUR DE COUPE
Le réglage de la hauteur de coupe se fait en agissant sur les roues avant, en augmentant ou en diminuant le nombre de bagues.Voir Fig. 9 On peut agir sur le boulon (B) du rouleau arrière Voir Fig. 9A
Toutes ces opérations doivent être effectuées en ayant le moteur arrêté et la prise de force dégagée. Quand la machine est soulevée à l’aide du rele-vage hydraulique du tracteur , afin de régler la hauteur de coupe, étayer la machine sur les deux côtés. Quand on procède au réglage du rouleau arrière il faut soulever la machine et se rappeler d’étayer la machine sur les deux côtés. Ne jamais travailler avec la machine réglée sur sa position plus basse car les fléaux pourraient toucher le sol et par conséquent endommager la machine et nuire aux personnes ou choses qui se trouvent dans le voisinage. Effectuer le réglage avec l’aide d’une deuxième personne ayant les outils nécessaires à disposi-tion avant de commencer le travail. Prima di effettuare qualsiasi regolazione è obbli-gatorio spegnere il motore della trattrice, estrar-re la chiave di accensione, azionare il freno di stazionamento, innestare la marcia e verificare che la p.d.f. sia disinserita. Profilato ad L posto a contatto del rullo per la pulizia dello stesso.
F
23
FIN

DISTACO DALLA TRATTRICE
xIl distacco della macchina deve essere ef-fettuato appoggiando la stessa su un terre-no in piano e compatto, con motore della trattrice spento, chiave di accensione disin-serita, freno di stazionamento innestato, marcia inserita e p.d.f. disinserita. xProcedere rispettando i seguenti punti:
x abbassare il piede di stazionamento, se presente.
x abbassare gradualmente il solleva-mento della trattrice
x disinserire l’albero cardanico dalla trattrice
x staccare il terzo punto x staccare i perni di collegamento alle
barre di sollevamento
TRACTOR RELEASE
x�Place tractor and machine on complete flat ground. x�Activate the tractor brake, turn tractor engine off, disconnect the key from dashboard, insert the gear and disconnect the PTO., than get off from the tractor (Check that tractor PTO must be carefully disengaged or disconnected acting on its lever or switch button ). xProceed the down mentioned steps:
x Lower the parking foot if supplied. x Lower the mower in a slow way by the
tractor 3 points linkage. x Disconnect the tractor PTO. x Disconnect the mower 3 point linkage. x Disconnect the linking tractor arms
from the mower.
I GB
24

MURSKAIMEN IRROTUS TRAKTORISTA x Pysäköi koneyhdistelmä kovalle tasaiselle alustalle. Irrotuksen aikana traktorin moottorin tulee olla pysähtyneenä ja pysäköintijarrun päälle kytkettynä. x Toimi alla olevan ohjeen mukaan:
x Laske murskain maahan. x Laske tukijalka alas. x Irrota nivelakseli. x Irrota työntövarsi. x Irrota kone vetovarsista.
REGLAGE DE LA HAUTEUR DE COUPE
xIl distacco della macchina deve essere ef-fettuato appoggiando la stessa su un terre-no in piano e compatto, con motore della trattrice spento, chiave di accensione disin-serita, freno di stazionamento innestato, marcia inserita e p.d.f. disinserita. xProcedere rispettando i seguenti punti:
x abbassare il piede di stazionamento, se presente.
x abbassare gradualmente il solleva-mento della trattrice
x disinserire l’albero cardanico dalla trattrice
x staccare il terzo punto x staccare i perni di collegamento alle
barre di sollevamento
F
25
FIN

- GUASTI - INCONVENIENTI - RIMEDI -
INCONVENIENTE : • Eccessiva vibrazione della macchina. CAUSA : • Rottura od eccessiva usura di qualche coltello. • Rottura di un supporto rotore. • Rottura di un supporto albero trasmissione. • Nel peggiore dei casi, deformazione del rotore dovuta
ad urti. RIMEDIO : • Sostituzione del coltello. • Sostituzione del supporto rotore con uno originale. • Sostituzione del supporto albero con uno originale. • Sostituzione del rotore con uno originale, o ripristino
mediante manutenzione. PERICOLOSITA’ : • Per la sostituzione dei coltelli vedere paragrafo relati-
vo la manutenzione. • Negli altri due casi le sostituzioni devono essere ese-
guite da personale specializzato. INCONVENIENTE : • L’erba non viene tagliata. CAUSA : • Rottura od eccessiva usura dei coltelli. • Slittamento delle cinghie. • Rottura delle cinghie. • Slittamento delle pulegge sugli alberi. • Rottura moltiplicatore. RIMEDIO : • Sostituzione o affilatura dei coltelli. • Registrazione tensione cinghie. • Sostituzione delle cinghie. • Bloccaggio calettatori pulegge. • Riparazione o sostituzione moltiplicatore. PERICOLOSITA’ : • Per la sostituzione dei coltelli, registrazione tensione
cinghie, sostituzione delle cinghie, bloccaggio caletta-tori, vedere paragrafi relativi la manutenzione.
- FAILURES - TROUBLES - SOLUTIONS - FAILURE : • Eccessive vibration of the machine. CAUSE : • Breakage of flails. • Breakage of rotor support. • Breakage of driving support shaft. • The worst : deformation of the rotor due to impacts. SOLUTION : • Replace broken or worn flails. • Replace rotor support with original one. • Replace shaft support with original one. • Replace rotor with original one or repairing by means of maintenance.
LEVEL OF DANGER : • For flails replacement paragraph relating maintenan-ce.
• In the other cases, replacement must be done by spe-cialised staff.
FAILURE : • The grass is not cut. CAUSE : • Breakage or wear of flails. • Belt slipping. • Breakage of belts. • Pulleys slipping on shafts. • Breakage of the gear box. SOLUTION : • Replacement or sharpening of flails. • Adjustment belt stretching. • Replacement belts. • Fixing pulley lock joints. • Repairing or replacement of gear box. LEVEL OF DANGER : • For replacement of flails, adjustment or replacement belts and fixing lock joints, see paragraph relating maintenance.
I GB
26

VIAN PAIKALLISTAMINEN ONGELMA • Murskain ravistaa ja käy epätasapainoisesti. MAHDOLLINEN SYY • Varsta on vaurioitunut. • Kelan kiinnityskorvake on vaurioitunut. • Nivelakselin kiinnike on varioitunut. • Kela on vääntynyt kiinteään esteeseen ajon
seurauksena. TOIMENPIDE • Vaihda vaurioituneen / kuluneen varstan tilalle uusi
osa. • Vaihda kelan kiinnityskorvake. • Vaihda nivelakselin kiinnityskorvake TYÖN VAATIVUUS • Varstojen vaihdon voi tehdä käyttäjä. • Vaativamman työn suorittaminen on jätettävä
huoltomiehen tehtäväksi. ONGELMA • Murskain ei leikkaa ruohoa. MAHDOLLINEN SYY • Varstat vaurioituneet tai liian kuluneet. • Hihna luistaa. • Hihna on katkennut. • Hihnapyörät pyörivät akselillaan. • Kulmavaihde on vaurioitunut. TOIMENPIDE • Vaihda vaurioituneen / kuluneen varstan tilalle uusi
osa. • Säädä hihnan kireys. • Lukitse hihnapyörät akselilleen. • Korjaa tai vaihda kulmavaihde. TYÖN VAATIVUUS T• yön vaativuuden mukaan suorittaa koneen käyttäjä
tai koulutettu huoltomies.
- PANNE- INCONVENIENTS- CONSEILS- INCONVENIENT : • Vibration eccessive de la machine. CAUSE : • Cassure de couteaux. • Cassure d’un support du rotor. •Cassure d’un support de l’arbre de transmission. • Dan le pire des cas, déformation du rotor dû aux chocs.
SOLUTION : • Remplacer les couteaux cassés. • Remplacer le support du rotor aver un autre original. • Remplacer le support de l’arbre avec un autre d’origine.
• Remplacer le rotor avec un autre d’origine. NIVEAU DE RISQUE : • Pour le remplacement des couteaux, voir le paragra-phe relatif à la maintenance.
• Dans les autres cas, le remplacement doit être effec-tué par le personnel spécialisé.
INCONVENIENT : • L’herbe n’est pas coupée. CAUSE : • Cassure ou usure des couteaux • Patinement des couroies. • Rupture des courroies. • Glissement des poulies sur les arbres. • Rupture du renvoi d’angle. • Les zones hydrauliques postérieures restent baissées en position de transport.
SOLUTION : • Remplacer les couteaux. • Réglage de la tension des courroies. • Remplacer les courroies. • Fixer les pièces de calage des poulies. • Réparation ou remplacement du renvoi d’angle. NIVEAU DE RISQUE : • Pour le remplacement des couteaux, des courroies, le
réglage de la tension des courroies, et le bloquage
F
27
FIN

MANUTENZIONE
Ogni manutenzione deve essere effettuata da persona-le competente in stretta osservanza a quanto prescritto nel presente libretto.
Prima di effettuare qualsiasi operazione di ma-nutenzione assicurarsi che la macchina sia ap-poggiata a terra, spegnere il motore della trat-trice, estrarre la chiave di accensione, azionare il freno di stazionamento, innestare la marcia e disinserire la p.d.f.. Prima di eseguire qualsiasi manutenzione o controllo, pulire sempre la zona di lavoro, usare utensili idonei ed in buono stato. Usare i dispositivi di protezione individuali (guanti da lavoro) e utensili idonei e in buono stato, pericolo di taglio
MANUTENZIONE PERIODICA
OGNI FINE LAVORO : • E’ consigliabile lavare all’interno la macchina. OGNI 10 ORE DI LAVORO : • Ingrassare le crociere del cardano. • Ingrassare i supporti del rotore. Vedi Fig. 11 • Controllare la tensione cinghie. • Controllare il bloccaggio viti. • Controllare l’usura dei coltelli. OGNI 50 ORE DI LAVORO : • Controllare il livello olio del moltiplicatore per mez-
zo dell’apposito tappo. Vedi Fig. 12 OGNI 200 ORE DI LAVORO : • Sostituire olio moltiplicatore.
Ogni volta che si cambia l’olio del moltiplica-tore, questo deve essere raccolto e portato agli appositi centri di smaltimento.
x� Applicare alla macchina un cartello che ne indi-chi la particolare situazione
"Macchina fuori uso per manutenzione: al personale non autorizzato è vietato avvicinarsi ed avviarla ".
MAINTENANCE
Every maintenance must be effected by specialized staff and carefully conforming to what indicated in the present handbook.
Before operating any adjustment the user must, turn off the tractor engine, activate the tractor brake, turn tractor engine off, discon-nect the key from dashboard, insert the gear and disconnect the PTO. Before any maintenance or control operation, clean the working zone, use proper tools al-ways and in good condition. Use safety protections (gloves, glasses etc.) and suitable tools in good conditions. Cutting hazards.
PERIODICAL MAINTENANCE
EVERY END OF WORKING : • It is advisable wash the inside part of the inside
part of the machine. EVERY 10 WORKING HOURS : • Grease the PTO shaft cross. • Grease the rotor supports. See Fig. 11 • Check the belts stretching. • Check the tight of the screws. • Check the wear of the flails. EVERY 50 WORKING HOURS : • Check the oil level in the gear box through the
proper cap. See Fig. 12 EVERY 200 WORKING HOURS : • Replace oil in the gear box.
Any time the gear box oil must be changed collect it and bring it to special recycling cen-tres. x��Put on the machine a placard informing its
maintenance situation : " Machine broke down under service : Is forbid-den to get close or operate from not authorised staff. “
I GB
28

HUOLTO Niittomurskaimen huollon suorittavan henkilön tulee olla perehtynyt koneen käyttöön ja sen rakenteeseen. Huolto suoritetaan käyttöohjekirjassa neuvotulla tavalla.
Kytke voimanotto pois päältä, kytke pysäköintijarru päälle ja pysäytä traktorin moottori ennen sovitusta, huoltoa tai säätöä.
Puhdista huoltokohde ennen huoltoon ryhtymistä. Käsineiden ja suojalasien käyttö on suositeltavaa.
HUOLTOKOHTEET TYÖPÄIVÄN JÄLKEEN • Kiinnijuuttunut, märkä ruohosilppu edesauttaa
ruostumista. Puhdista vesisuihkulla niittomurskaimen alapinta.
10 KÄYTTÖTUNNIN VÄLEIN • Voitele konerasvalla nivelakselin ristikot. • Voitele konerasvalla roottoriakselin laakerit (kuva 11) • Tarkasta kiilahihnojen kireys. • Tarkasta, että ruuvit ovat tiukasti kiinni. • Tarkasta varstojen kuluneisuus. 50 KÄYTTÖTUNNIN VÄLÄEIN • Tarkasta kulmavaihteen öljymäärä (kuva 12) 200 KÄYTTÖTUNNIN VÄLEIN • Vaihda kulmavaihteen öljy.
Öljy on ongelmajätettä. Vie jäteöljy ongelmajätteen keräyspisteeseen. Kiinnitä huollon ajaksi koneeseen huollosta kertova kilpi:
”Kone on huollossa. Ei saa koskea.”
MAINTENANCE
Toute maintenance doit être effectuée par du person-nel compétent en observant scrupuleusement ce qui est indiqué dans cette notice.
Prima di effettuare qualsiasi operazione di ma-nutenzione assicurarsi che la macchina sia ap-poggiata a terra, spegnere il motore della trat-trice, estrarre la chiave di accensione, azionare il freno di stazionamento, innestare la marcia e disinserire la p.d.f.. Avant toute maintenance ou contrôle, nettoyer toujours la zone de travail, utiliser toujours des outils corrects et en bon état. Usare i dispositivi di protezione individuali (guanti da lavoro) e utensili idonei e in buono stato, pericolo di taglio
MAINTENANCE PERIODIQUE
APRES CHAQUE UTILISATION : • Il est conseillé de laver soigneusement l’intérieur
de la machine. TOUTES LES 10 HEURES DE TRAVAIL : • Graisser les joints du cardan. • Graisser les supports du rotor. (Voir Fig. 11) • Contrôler la tension des courroies. • Contrôler le bloquage des vis. • Vérifier l’etat d’usure des couteaux. TOUTES LES 50 HEURES DE TRAVAIL : • Vérifier le niveau de l’huile de renvoi d’angle à tra-
vers le bouchon. (Voir Fig. 12) TOUTES LES 200 HEURES DE TRAVAIL : • Remplacer l’huile du renvoi d’angle.
L’huile remplacée du renvoi d’angle doit être recueillie et livrée aux centre de recyclage.
x� Applicare alla macchina un cartello che ne indi-chi la particolare situazione
"Macchina fuori uso per manutenzione: al personale non autorizzato è vietato avvici-narsi ed avviarla ".
F
29
FIN

MAINTENANCE MANUTENZIONE
Fig. 11
I GB
30
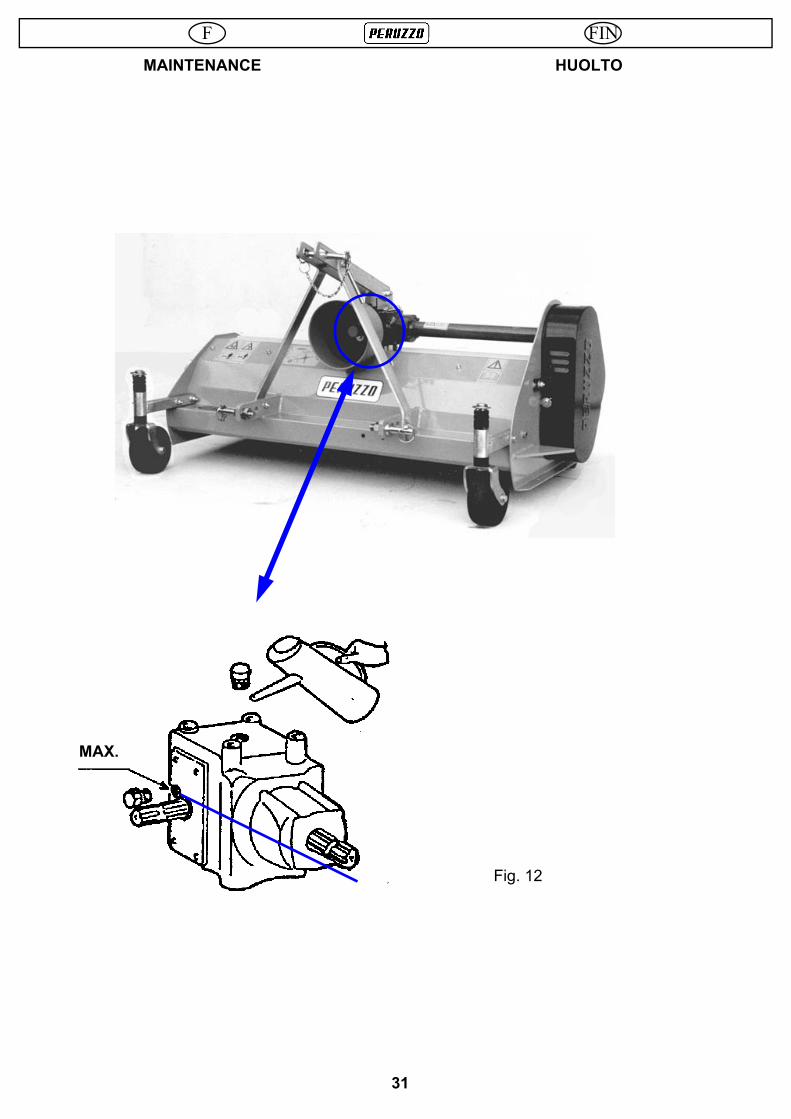
HUOLTO MAINTENANCE
Fig. 12
F
31
MAX.
FIN

ETICHETTE SEGNALETICHE
Le etichette con i simboli e le avvertenze devono esse-re tenute pulite ed in buono stato; Si raccomanda la sostituzione con gli originali da richiedere al costruttore.
1)Leggere il manuale dell’operatore prima di avviare la macchina.
2)Freccia di indicazione senso di rotazione trasmissio-
ne. 3)Velocità di rotazione della presa di forza. 4)Punti di ingrassaggio. 5)Tenere lontani i piedi: pericolo di taglio. 6)Mantenere una distanza di sicurezza dalla macchina:
pericolo di eiezione di parti. 7)Punto di attacco per il sollevamento. 8)Tenere sotto controllo le cinghie. 9)Fare attenzione alle mani zona di pericolo. 10) ATTENZIONE Rimuovere l’angolare sottoscocca in
caso d’applicazione di coltelli a scarifica.
STICKERS LIST
It is suggested the plates and hazard symbols to be cleaned and in well conditions always; eventually have to be replaced with original ones, requiring them from the manufacturer.
1) Read the use and maintenance manual before oper-ating with the machine.
2) Harrow indicating the belts rotation. 3) Tractor PTO allowed speed . 4) Greasing points. 5) Keep your feet away. 6) Keep a safety distance from the machine: Danger of
throwing objects. 7) Linking points for machine lifting operations. 8) Keep belts always well tight. 9) Keep you hands away. Cutting hazard. 10) ATTENTION Remove the angle bar underneath
mower frame in case of scarifying flails fitting.
I GB
32

LISTE DES ETIQUETTES
Les étiquettes avec les symboles et les avertissement doivent toujours être propres et en bon état. Il est conseillé de les remplacer avec les originaux en les demandant au costructeur.
1)Lire la notice d’instructions avant de mettre en
marche la machine. 2)Flèche indiquant le sens de rotation. 3)Vitesse de rotation de la prise de force. 4)Points de graissage. 5)Eloigner les pieds: Danger de coupe. 6)Garder une distance de sécurité de la machine:
risque de lancement (éjection). 7)Point de fixation pour le soulèvement. 8)Courroies bien tenduees. 9)Eloigner les pieds: Danger de coupure. 10) ATTENTION Enlever la contre-lame montée sous
le chassis, dans le cas d’utilisation de fléaux verti-coupe.
OHJETARRAT Koneeseen on kiinnitetty ohje- ja varoitustarroja. Pidä tarrat puhtaina ja luettavassa kunnossa. Korvaa vaurioituneet tarrat varaosamyymälästä saatavilla uusilla tarroilla. Tarrojen viesti (kts. sivu 34): 1. Lue käyttöohjekirja 2. Hihnan pyörimissuuntaa osoittava nuoli 3. Nivelakselin kierrosluku 4. Voitelukohteet 5. Puristumisvaara. Varo jalkojasi. 6. Muista turvaetäisyys. Kone saattaa singota kiviä. 7. Nostoliinan kiinnityskohta. 8. Pidä kiilahihnat oikealla kireydellä. 9. HUOM! Irrota vastaterä jos koneessa käytetään pystyleikkuuteriä.
F
33
FIN

ETICHETTE SEGNALETICHE SIGNALING LABELS
(7)
(9)
(4)
(4)
(3) (2) (1)
(7) (9) TENERE SEMPRE
LE CINGHIE BEN TESE
KEEP BELTS WELL TIGHT
TENIR TOUJOURS LES COURROIES BIEN TENDUEES
(8)
I GB
34
Pidä kiilahihnat oikealla
kireydellä !
VAARA! Älä vie käsiä tai jalkoja koneen alle!

ETIQUETTES D’INDICATION OHJETARRAT
(5) (6)
(2) (4)
(6) (5) (4)
(10)
(8) (3)
F
35
INTERFERENZA !!! INTERFERENCE !!!
ATTENZIONE Rimuovere l’angolare sottoscocca in caso d’applicazione di coltelli a scarifica.
ATTENTION Remove the angle bar underneath mower frame in case of scarifying flails fitting.
ATTENTION Enlever la contre-lame montée sous le chassis, dans le cas d’utilisation de fléaux verticoupe.
ACHTUNG Wenn Sie zum Vertikutierer umrüsten, müssen Sie vorher den zusätzlichen Mulch-Schneidbalken entfernen
(10) (1) (7)
FIN
VAROITUS! Pystyleikkuuteriä käytet-täessä kuomun alla oleva vastaterä on irro-tettava.
TÄRKEÄÄ!

REGOLAZIONE TENSIONE CINGHIE DI TRASMISSIONE
Questa regolazione va eseguita con motore spento e presa di forza disinserita.
Togliere il carter di protezione cinghie.Fig. 15 Il corretto tensionamento delle cinghie è dato dal giusto carico ottenuto dal dado del tirante del galoppino ( vedi fig. 15 A ), fino a dare una corretta tensione alle cin-ghie. La cinghia deve flettere, non più di mezzo centi-metro. Controllare mediante una sbarra che le pulegge siano allineate onde evitare surriscaldamento delle cinghie. ( Vedi Fig. 15 B ). Rimontare accuratamente il carter di protezione.
SOSTITUZIONE CINGHIE
Questa operazione va eseguita con motore spento e presa di forza disinserita.
Togliere il carter di protezione delle stesse. Scaricare la tensione delle cinghie come sopra descrit-to. ( Vedi Fig. 15 A ) Sostituire le cinghie e regolare la tensione come sopra descritto. Rimontare accurata-mente il carter di protezione.
STRETCHING ADJUSTMENT OF THE DRIVING BELTS
This operation must be effected with power-off engine and P.T.O. disconnected.
Take the belt guard off. (fig. 15 ) The right belt tightening is due acting to the nut in fig. 15 A adjust the tightening, up to the right stretching. The belt must bent itself up to 5 mm by pressing it with your finger. Check with proper bar that the two driving pulleys must be aligned in order to prevent their overheating or breakage (fig. 15 B). Replace belts protecting guard in the proper way.
REPLACEMENT OF BELTS
This operation must be effected with power-off engine and P.T.O. disconnected.
Take the belts protecting guard off. Unload the spring by acting on the nuts. ( See Fig. 15 A ) Replace the belts and adjust their stretching as above explained. Replace belts protecting guard in the proper way.
Fig. 15
I GB
36
Fig. 15 A

REGLAGE ET TENSION DES COURROIES DE TRANSMISSION
Cette opération doit être effectuée avec le mo-teur arrêté et la prise de force d’égagée. Enlever le carter de protection des courroies (fig.
15) La tension correcte des courroies se faIt en agissant sur l’écrou (fig. 15 A) du tendeur . Les courroies doi-vent fléchir au max. 5 mm à la pression du doigt Contrôler à l’aide d’une barre métallique que les cour-roies soient parfaitement alignées de façon à éviter leur surchauffement ou rupture (fig. 15 B) Remonter le carter de protection.
REMPLACEMENT DES COURROIES
Cette opération doit être effectuée avec le mo-teur arrêté et la prise de force d’égagée.
Enlever le carter de protection des courroies. Détendre les courroies comme indiqué ci-desus ( régla-ge tension des courroies de transmission - voir fig. 15 A) Changer les courroies et les tendre suivant les indi-cations du chapitre “réglage de la tension des cour-roies” de transmission.
Remonter le carter de protection.
KIILAHIHNOJEN KIREYS Kytke voimanotto pois päältä, kytke pysäköintijarru päälle ja pysäytä traktorin moottori ennen sovitusta, huoltoa tai säätöä.
Irrota hihnan suojus (kuva 15). Hihnan kireyttä säädetään säätämällä hihnan kiristyspyörää (kuva 15A). Oikealla kireydellä ollessaan hihna antaa periksi 5 mm verran, kun sitä painetaan pitkältä sivultaan (kuva 15B). Kiinnitä suojapelti takaisin paikalleen hihnan kiristyksen jälkeen.
HIHNOJEN VAIHTO Kytke voimanotto pois päältä, kytke pysäköintijarru päälle ja pysäytä traktorin moottori ennen sovitusta, huoltoa tai säätöä.
Irrota hihnan suojus (kuva 15A). Löysää kiristyspyörän säätöruuvia. Ota vanhat hihna irti ja asenna uudet hihnat paikalleen. Kiristä hihnat oikealle kireydelle. Kiinnitä suojapelti takaisin paikalleen.
F
37
Fig. 15 B
5 mm
FIN

BLOCCAGGIO DELLE PULEGGE
Questa operazione va eseguita con motore spento e presa di forza disinserita.
Togliere il carter di protezione. Allentare la tensione delle cinghie (vedi paragrafo Sostituzione Cinghie). Bloccare i calettatori (Vedi Fig. 16). Controllare me-diante una sbarra che le pulegge siano allineate onde evitare surriscaldamento delle cinghie. ( Vedi Fig. 15 B ). Regolare nuovamente la tensione delle cinghie.
Controllare l’esatto allineamento tra le due puleg-ge. Rimontare accuratamente il carter di protezio-ne.
LOCKING OF THE PULLEYS
This operation must be effected with power-off engine and P.T.O. disconnected.
Take the belts protecting guard off. Reduce belts stretching (see replacement of belts). Lock the joints. ( See Fig. 16 ) Check with the help of a bar that pulleys and belts must be lined up in order to prevent belts overheating and its wear ( See Fig. 15 B ). Adjust belts stretching again.
Replace belts protecting guard in the proper way.
Fig. 16
I GB
38
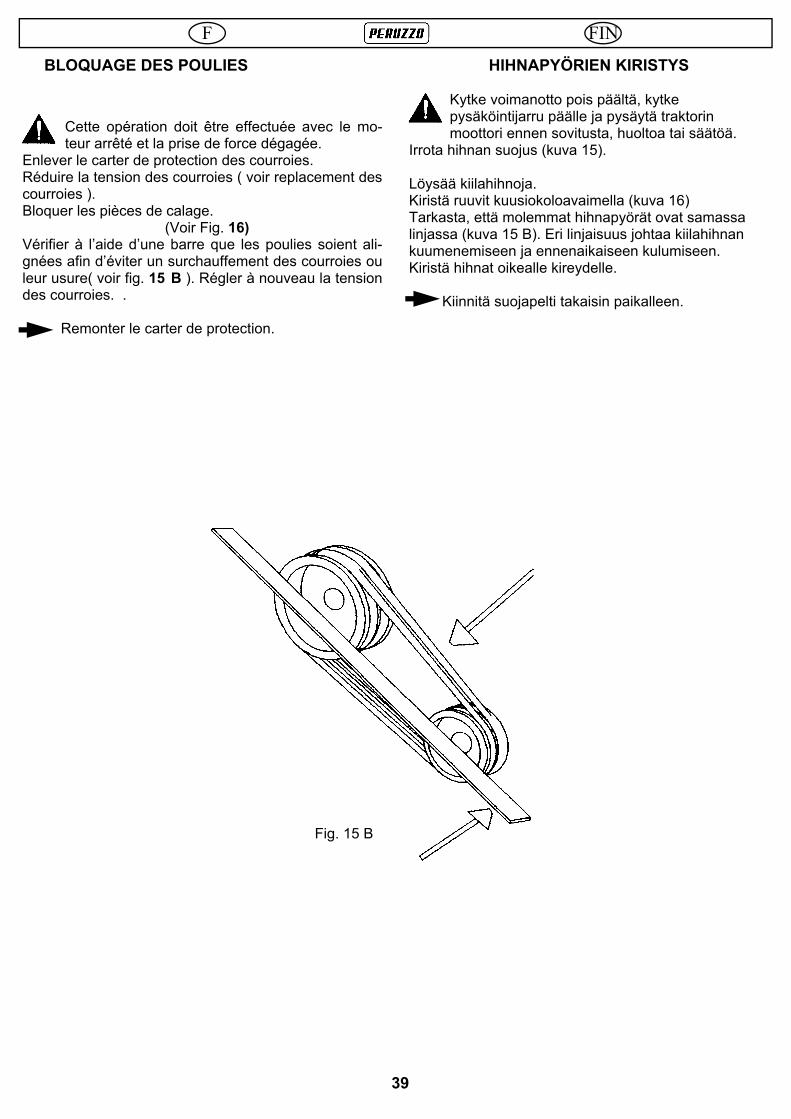
BLOQUAGE DES POULIES
Cette opération doit être effectuée avec le mo-teur arrêté et la prise de force dégagée.
Enlever le carter de protection des courroies. Réduire la tension des courroies ( voir replacement des courroies ). Bloquer les pièces de calage. (Voir Fig. 16) Vérifier à l’aide d’une barre que les poulies soient ali-gnées afin d’éviter un surchauffement des courroies ou leur usure( voir fig. 15 B ). Régler à nouveau la tension des courroies. .
Remonter le carter de protection.
HIHNAPYÖRIEN KIRISTYS Kytke voimanotto pois päältä, kytke pysäköintijarru päälle ja pysäytä traktorin moottori ennen sovitusta, huoltoa tai säätöä.
Irrota hihnan suojus (kuva 15). Löysää kiilahihnoja. Kiristä ruuvit kuusiokoloavaimella (kuva 16) Tarkasta, että molemmat hihnapyörät ovat samassa linjassa (kuva 15 B). Eri linjaisuus johtaa kiilahihnan kuumenemiseen ja ennenaikaiseen kulumiseen. Kiristä hihnat oikealle kireydelle.
Kiinnitä suojapelti takaisin paikalleen.
Fig. 15 B
F
39
FIN

SOSTITUZIONE DEI COLTELLI
Questa operazione va eseguita con motore spento e presa di forza disinserita.
Si può effettuare il cambio dei coltelli nel seguente mo-do: 1)Utilizzando un sollevatore idoneo fissando la macchi-
na all’attacco a 3 punti o altro per impedire qualsiasi suo movimento. (fig. 18)
2) Sganciare la macchina dalla trattrice e capovolgerla
in modo che il rotore dei coltelli sia bene in vista. (Fig.18 A)
Sostituire i coltelli rotti o usurati con altrettanti originali. E’ importante quando si procede alla sostituzione dei coltelli, verificare lo stato di usura delle viti, ed even-tualmente sostituirle con pezzi originali. Fig. 19
Usare guanti di protezione onde evitare infortu-ni dovuti agli spigoli taglienti dei coltelli. E’ consigliabile sostituire dei coltelli rotti o usu-rati in coppie diametralmente opposte onde evitare squilibri e vibrazioni del rotore. (vedi fig. 20)
REPLACEMENT OF FLAILS
This operation must be effected with power-off engine and P.T.O. disconnected.
The replacement of flails can be made in the following way: 1) In case of flails change by lifting the mower, we re-
mind you to use proper lifting equipment to the ma-chine weight and that can fix the mower properly.(fig. 18)
2) Disconnect the flail mower from the tractor and over-
turn it in the way to have the flails shaft in a clear view. (Fig.18 A)
When replacing the knives, carefully check also the wear of the screws and if necessary replace them (See
Fig. 19) with new original ones. Use protecting gloves in order to avoid acci-dents due to cutting edges of the knives. It is suggested to replace the new knives dia-metrically opposite in order to avoid lack of bal-ance and vibrations of the rotor due to less weight . (See Fig. 20)
Fig. 18 Fig. 19
I GB
40

REMPLACEMENT DES CATEAUX
Cette opération doit être effectuée avec le mo-teur arrêté et la prise de force dégagée.
Le remplacement des couteaux peut s’effectuer de la facon suivante: 1) Utilizzando un sollevatore idoneo fissando la mac-
china all’attacco a 3 punti o altro per impedire qual-siasi suo movimento. (fig. 18)
2) Enlever la tondeuse du tracteur et la renverser de
façon à ce que le rotor soit bien visible. (Fig.18 A)
Il est important de vérifier, durant le remplace-ment des couteaux, l’état d’usure des vis et é-ventuellement les remplacer avec des piéces
d’origine ( voir fig. 19 ).
Utiliser des gants de protection afin d’éviter des accidents dûs aux arrêtes tranchantes des cou-teaux. Il est conseillé de remplacer les couteaux par paires diamétralement opposées, afin d’éviter que le rotor ne soit déséquilibré et produise des vibrations . (FIG. 20)
VARSTOJEN VAIHTO Kytke voimanotto pois päältä, kytke pysäköintijarru päälle ja pysäytä traktorin moottori ennen sovitusta, huoltoa tai säätöä.
Varstat vaihdetaan alla kuvatulla tavalla. 1. Varstojen vaihtoa varten niittomurskain käännetään ylösalaisin (kuva 18) 2. Käytä riittävän tukevaa nostoliinaa ja ole varovainen, kun kippaat koneen ympäri (kuva 18A).
Tarkasta kiinnityspultin kunto varstan vaihdon yhteydessä (kuva 19). Käytä tukevia suojakäsineitä. Leikkuuvaara! Teriä vaihdettaessa on suositeltavaa vaihtaa myös roottoriakselin vastakkaisella puolella oleva varsta. Näin kela pysyy tasapainoisena (kuva 20).
Fig. 20
F
41
Fig. 18 A
FIN

MESSA A RIPOSO A fine stagione, o nel caso di lunghi periodi di fermo, è necessa-rio : • Lavare accuratamente la macchina ed eventualmente sostituire le
parti danneggiate od usurate. • Serrare tutti i bulloni avendo cura soprattutto di verificare lo stato
delle viti e dei coltelli. • Effettuare un accurato ingrassaggio al fine di proteggere tutte le
parti. • Coprire la macchina, dopo averla stazionata, in ambiente protetto
e bloccarla onde evitare spostamenti dovuti da urti accidentali. Trovarla in perfette condizioni alla ripresa del lavoro sarà beneficio solo dell’utilizzatore.
TRASPORTO DELLA MACCHINA
Porre la massima attenzione alla sicurezza durante le operazioni di carico e scarico, che dovranno essere effettuate da personale qualificato.
Per il carico su automezzi bisogna sollevare la macchina a g g a n c i a n d o l a a l l ’ a p p o s i t o a t t a c c o Vedi Fig. 20
Assicurarsi che il mezzo di sollevamento e le funi di ancoraggio siano idonee al peso da sollevare.
Assicurarsi che una volta caricata sul mezzo sia fissata con corde adeguate, sempre sui punti di sollevamento.
WINTER STORAGE
At the end of the season or when the machine is laid up for long period of time, it is necessary to : • Wash the machine carefully and wipe it. • Check the machine carefully and replace possible broken or worn
parts. • Tight all bolts and check the wear of the bolts, hooks, flails and
its screws. • Make the proper greasing in order to protect all the parts. • Cover the machine, when properly parked and fixed in order to
avoid any movement due to possible impacts.
To find the equipment in perfect conditions when re-starting, is an advantage of the user.
TRANSPORT OF THE MACHINE
Keep a careful attention always during loading and unloading operations, that must be done by qualified staff trained for this spcial purpose.
To load the machine on transport vehicles, it must be lifted by hanging it on the proper fixing points. See Fig. 20
Check that the lifter and the cables are suitable for the weight to carry.
When loaded on the vehicle the machine must be fixed with proper ropes, always on the hanging points.
Fig. 20
I GB
42

MISE A REPOS
A la fin de la saison, ou dans le cas de longues périodes d’inactivité il est nécessaire de :
• Laver soigneusement la machine et l’essuyer. • La contrôler soigneusement et remplacer éventuellement les piè-
ces endommagées ou usées. • Fixer tous les boulons en vérifiant aussi l’etat des vis et des cou-
teaux. • Effectuer un bon graissage pour protéger toutes les parties. • Couvrir la machine, après l’avoir stationnée et bloquée et afin
d’éviter des déplacements à la suite de coups accidentels.
Trouver la machine en excellent état à la reprise du travail est un bénéfice de l’utilisateur.
TRANSPORT DE LA MACHINE
Porre la massima attenzione alla sicurezza durante le operazioni di carico e scarico, che dovranno esse-re effettuate da personale qualificato.
Pour charger la machine sur des véhicules de transport, il faut la soulever par les points de prises appropriés. Voir Fig. 20
S’assurer que le moyen de soulèvement et les cordes utilisés, soient appropriés au poids à sou-lever.
Une fois que la machine à été chargée sur le véhicule, il faut la fixer à l’aide de cordes appropriées en la bloquant toujours sur les points de prise.
TALVIVARASTOINTI Käyttökauden jälkeen kone varastoidaan konehalliin. Suorita seuraavat toimenpiteet ennen varastointia: • Pese kone ja anna sen kuivua. • Tarkasta koneen kunto. Vaihda kuluneet tai
mahdollisesti vaurioituneet osat. • Tarkasta kaikkien ruuvien ja pulttien kireys. Kiristä
tarpeen mukaan. • Rasvaa kaikki voitelukohteet. • Suihkuta korroosionestoainetta niihin kohtiin, joista
maali on kulunut pois. Tarkastettu ja huollettu kone on valmis käyttöönotettavaksi uuden käyttökauden alkaessa.
KONEEN KULJETUS Noudata huolellisuutta nostaessasi konetta kuljetuslavalle.
Nostoliina kiinnitetään työntövarren kiinnitystappiin (kuva 20).
Käytä riittävän lujaa nostoliinaa.
Kiinnitä kone kuljetusalustaan riittävän tukevin sidontaliinoin.
F
43
FIN

CARATTERISTICHE TECNICHE TECHNICAL CHARACTERISTICS DATI TECNICI
Dimensioni di ingombro: A B C Mod. 1000 1100 x 800 x 640 mm Mod. 1200 1400 x 800 x 640 mm Mod. 1400 1600 x 800 x 640 mm Mod. 1600 1800 x 800 x 640 mm
Peso della macchina: Mod.1000 160 Kg. Mod.1200 175 Kg. Mod.1400 185 Kg. Mod.1600 230 Kg.
Potenza assorbita: (Minima) Mod.1000 kW11 (15 HP) Mod.1200 kW13 (18 HP) Mod.1400 kW15 (20 HP) Mod.1600 kW16 (22 HP)
Presa di forza trattore: Mod.1000/1200/1400/1600 540 rpm
Diametro taglio coltelli: Mod.1000/1200/1400/1600 330 mm.
Numero coltelli: Mod.1000 64 Mod.1200 80 Mod.1400 88 Mod.1600 100
Capacità olio moltiplicatore: Mod.1000/1200/1400/1600 0,5 Litri
TECHNICAL DATA
Overall dimensions: A B C Mod. 1000 1100 x 800 x 640 mm Mod. 1200 1400 x 800 x 640 mm Mod. 1400 1600 x 800 x 640 mm Mod. 1600 1800 x 800 x 640 mm
Weight of the machine: Mod.1000 160 Kg. Mod.1200 175 Kg. Mod.1400 185 Kg. Mod.1600 230 Kg.
Power required: (Minimum) Mod.1000 kW11 (15 HP) Mod.1200 kW13 (18 HP) Mod.1400 kW15 (20 HP) Mod.1600 kW16 (22 HP)
Tractor PTO: Mod.1000/1200/1400/1600 540 rpm
Flails cut diameter: Mod.1000/1200/1400/1600 330 mm.
Number of flails: Mod.1000 64 Mod.1200 80 Mod.1400 88 Mod.1600 100
Gear box oil quantity: Mod.1000/1200/1400/1600 0,5 Lit.
(A) (B)
(C)
I GB
44
Larghezza di taglio: Mod.1000 950 mm. Mod.1200 1190 mm. Mod.1400 1350 mm. Mod.1600 1550 mm.
Altezza di taglio: Mod.1000/1200/1400/1600 3—8 cm
Olio consigliato: Mod. 1000/1200/1400/1600 SAE 90
Grasso consigliato: Grease Rulten Mod. 1000/1200/1400/1600 900 2
PERFORMANCE
Working width: Mod.1000 950 mm. Mod.1200 1190 mm. Mod.1400 1350 mm. Mod.1600 1550 mm.
Height of grass cut: Mod.1000/1200/1400/1600 3—8 cm - 2 – 4 inch
Oil suggested: Mod. 1000/1200/1400/1600 SAE 90
Grease suggested: Grease Rulten Mod. 1000/1200/1400/1600 900 2

CARACTERISTIQUES TECHNIQUES
TEKNISET TIEDOT
DONNEES TECHNIQUES
Dimensions d’encombrement: A B C Mod. 1000 1100 x 800 x 640 mm Mod. 1200 1400 x 800 x 640 mm Mod. 1400 1600 x 800 x 640 mm Mod. 1600 1800 x 800 x 640 mm
Poids de la machine: Mod.1000 160 Kg. Mod.1200 175 Kg. Mod.1400 185 Kg. Mod.1600 230 Kg.
Puissance nécessaire:(Minimum) Mod.1000 kW11 (15 HP) Mod.1200 kW13 (18 HP) Mod.1400 kW15 (20 HP) Mod.1600 kW16 (22 HP)
Prise de force du tracteur: Mod.1000/1200/1400/1600 540 rpm
Diamètre hors-tout du système de coupe (fléaux inclus): Mod.1000/1200/1400/1600 330 mm.
Nombre de fléaux: Mod.1000 64 Mod.1200 80 Mod.1400 88 Mod.1600 100
Quantité d’huile du renvoi d’angle: Mod.1000/1200/1400/1600 0,5 Lit.
PRESTATIONS
Largeur de coupe: Mod.1000 950 mm. Mod.1200 1190 mm. Mod.1400 1350 mm. Mod.1600 1550 mm.
Hauteur de coupe de l’herbe: Mod.1000/1200/1400/1600 3—8 cm
Huile conseillée: Mod. 1000/1200/1400/1600 SAE 90
Graisse conseillée: Grease Rulten Mod. 1000/1200/1400/1600 900 2
SUORITUSKYKY
Työleveys : Mod.1000 950 mm. Mod.1200 1190 mm. Mod.1400 1350 mm. Mod.1600 1550 mm.
Leikkuukorkeus: Mod.1000/1200/1400/1600 3—8 cm
Öljysuositus kulmavaihteeseen: Mod. 1000/1200/1400/1600 SAE 90
Konerasvasuositus : Mod. 1000/1200/1400/1600 900 2
TEKNISET TIEDOT
Mitat: A B C Mod. 1000 1100 x 800 x 640 mm Mod. 1200 1400 x 800 x 640 mm Mod. 1400 1600 x 800 x 640 mm Mod. 1600 1800 x 800 x 640 mm
Paino: Mod.1000 160 Kg. Mod.1200 175 Kg. Mod.1400 185 Kg. Mod.1600 230 Kg.
Tehontarve voimanotossa (vähintään) Mod.1000 kW11 (15 HP) Mod.1200 kW13 (18 HP) Mod.1400 kW15 (20 HP) Mod.1600 kW16 (22 HP)
Traktorin voimanotto: Mod.1000/1200/1400/1600 540 rpm
Varstojen pyörintäkehän halkaisija: Mod.1000/1200/1400/1600 330 mm.
Varstojen pyörintäkehän halkaisija: Mod.1000 64 Mod.1200 80 Mod.1400 88 Mod.1600 100
Varstojen lukumäärä: Mod.1000/1200/1400/1600 0,5 Lit.
F
45
FIN

SMALTIMENTO DELLA MACCHINA
All fine della vita della macchina, prima di portarla da un apposito demolitore, assicurarsi che non vi sia olio nel moltiplicatore o nel sistema idraulico della maccina onde evitare dispersioni nell’ambiente che possono creare danni ecologici.
LISTA PARTI DI RICAMBIO
La sostituzione di parti di ricambio va effettuata da per-sonale specializzato.
Per ordinare qualsiasi pezzo di ricambio, fare riferimento ai dati riportati nella targhetta di i-dentificazione della macchina acquistata.
La garanzia decade qualora non siano usati pezzi di ricambio originali.
GETTING RID OF THE MACHINE
At the end of machine working life and before to be scraped by a special company, ensure that there in no oil into the grar box and in the in the hydraulic system of the machine in order to avoid any leak and ecologi-cal damages.
SAPRE PARTS LIST
The replacement of spare parts must be effected by specialized staff.
To order any spare part, mention all the data indicated in the identification plate of the ma-chine.
The warranty expire when non original spare parts are used.
Article Code Fig. Flail “Y” 05010068 23
Verticut blade normal 135 mm 05010075 24
Verticut blade + welding 135 mm 05010060 25
Sturdy paddle flail 05030030 26
Light paddle flail 07020183 27
Bolt & Nut 05010070 28
Belt XPA 1000 36030117 29
Front wheel fork 05009502 30
Single wheel 27020045 31
Double wheels kit 05009504 32
Articolo Codice Fig. Coltello “Y” 05010068 23
Coltello scarifica normale 135 mm 05010075 24
Coltello scarifica + saldat. 135 mm 05010060 25
Coltello a paletta robusto 05030030 26
Coltello a paletta leggero 07020183 27
Bullone e dado 05010070 28
Cinghia XPA 1000 36030117 29
Forcella ruota 05009502 30
Ruota singola 27020045 31
Kit coppia ruote 05009504 32
Fig. 23 Fig. 27 Fig. 24 Fig. 26 Fig. 28 Fig. 25
I GB
46

ELIMINATION DE LA MACHINE
A la fin de l’utilisation de la machine etravat et avant d’être conduite à un centre de démolition, il faut s’assu-rer qu’il n’y ait pas d’huile dans le renvoi d’angle afin d’en éviter la dispersion et causer des dommages au niveau écologique.
LISTE DE PIECE DETACHEES
Le remplacement des pièces détachées doit être effec-tué par du personnel spécialisé.
Pour toute commande de pièce de rechange, indiquer toutes les données mentionnées sur la plaquette d’identification de la machine.
La garantie échoue dans le cas d’utilisation de piè-ces qui ne sont pas d’origine
KONEEN HÄVITTÄMINEN Omistajan halutessa luopua koneesta on se toimitettava asianmukaiseen romuttamoon. Hydraulijärjestelmästä ja kulmavaihteesta on tyhjennettävä öljy ja se tulee toimittaa ongelmajätteen vastaanottopisteeseen.
VARAOSALISTA Käytä koneessa alkuperäisosia.
Ilmoita varaosamyyjälle koneen malli, valmistusnumero ja hankkimisajankohta.
Takuu raukeaa, jos koneessa käytetään tarvikeosia.
Nimike Numero Kuva Y-terä 05010068 23
Pystyleikkuuterä, normaali 135 mm 05010075 24
Vahvistettu pystyleikkuuterä 135mm
05010060 25
varstaterä, järeä 05030030 26
Varstaterä, normaali 07020183 27
Kiinnityspultti & mutteri 05010070 28
Kiilahihna XPA 1000 36030117 29
Kannatuspyörän haarukka 05009502 30
Kannatuspyörä 27020045 31
Kannatuspyörä-sarja kiinnikkeineen 05009504 32
Article Code Fig. Couteau “Y” 05010068 23
Couteau Verticut normal 135 mm 05010075 24
Couteau Verticut + sal 135 mm 05010060 25
Couteau 05030030 26
Couteau 07020183 27
Boulon & Ecrou 05010070 28
Courroie XPA 1000 36030117 29
Forc roue 05009502 30
Roue 27020045 31
Kit roues frontal 05009504 32
Fig. 31
F
47
Fig. 29 Fig. 30 Fig. 32
FIN

IL TAGLIO VERTICALE
FELTRO È lo strato organico composto da parti vive e morte di erbe, forglie e radici che viene a formarsi tra la superfi-cie del suolo e la vegetazione attiva. CAUSA DELLA FORMAZIONE DEL FELTRO Varietà di specie di graminacee a crescita rapida, ele-vata concimazione azotata, residui di taglio lasciati in campo, acidità del terreno. INCONVENIENTI Se lo strato del feltro è elevato (oltre i 5-6 mm) influisce negativamente sulla qualità del tappeto, creando pro-blemi che, connessi con le malattie fungine, gli insetti e la clorosi fogliare, ne riduce la resistenza agli stress da caldo, freddo e siccità. COME RISOLVERE IL PROBLEMA Applicando gli appositi coltelli tipo C per la scarica, alle trinciaerba PERUZZO, intercambiabili con quelli per il solo taglio dell’erba (tipo A), si effettuano tagli longitu-dinali o microsolchi nel suolo da una profondità variabi-le da 0 a 5-6 mm, utili per la rimozione e l’asportazione del feltro, dei residui vegetali di risulta.
VERTICAL CUTTING
MOSS AND THATCH It is the organic ground surface compound by dead and dry grass parts, leaves and roots from the active vege-tation. CAUSE OF MOSS AND THATCH FORMATION Variety of Gramineae with fast growing high azotes manuring, dried grass left on the ground after various cutting without collecting it and ground acidity. INCONVENIENTS In case of thick moss and thatch (over 5 or 6 mm) it can influence negatively on the quality of the lawn, pro-ducing damages related to mould diseases, insects and green sickness (chlorosis), reducing the endur-ance to hot, cold and dry weather. HOW THE PROBLEM CAN BE SOLVED Mounting the right flails type : C for the scarifying sys-tem on the flail mower “PERUZZO” changeable from the only cutting ones (types A), can be effected longitu-dinal or micro furrows in the ground at a maximum depth of 5-6 mm. Special scarifying flails useful for re-moving moss and thatch all the waste vegetation.
Aria
— A
ir —
Atm
osph
ère
Acqu
a —
Wat
er —
Eau
— W
asse
r
Sost
anze
nut
ritive
—No
urish
ing
Subs
tanc
es—
Élém
ents
nut
ritifs
I GB
48

LA COUPE VERTICALE
FEUTRE Accumulation da matières cellulosiques telles que her-be, feuilles et racines en cours de décomposition qui se forme entre la surface du sol et la végétation active. LA CAUSE DE LA FORMATION DE FEUTRE Variété d’espèces de graminées à croissance rapide, sur fertilisation d’azote, résidus de tonte laissés sur la pelouse, sol acide. INCONVENIENTS Une accumulation de feutre excessive (plus de 5-6 mm) combinée aux maladies dûes aux champignons pathogènes, aux insectes, réduit la résistance du ga-zon à la chaleur, au froid et à la sécheresse. COMMENT RESOUDRE LE PROBLEME En appliquant les couteaux spéciaux pour la coupe ver-ticale C interchangeables avec les couteaux pour la tonte (type A) sur les tondeuses à fléaux PERUZZO. Les couteaux C effectuent des microsillages dans le sol à une profondeur réglable de 0 à 5-6 mm, qui per-mettent un défeûtrage efficace du gazon.
PYSTYLEIKKUU SAMMAL JA NUUTUNUT KASVUSTO Ikääntyneelle nurmikolle saattaa ajan mittaan alkaa kasvaa sammalta ja itse nurmikon elinvoima alkaa hiipua. SAMMALOITTUMISEN SYY Maan happamuus, voimakas typpilannoitus ja nurmikolle jätetyt kasvijätteet saattavat ajan mittaan antaa otollisen maaperän sammaloitumiselle ja nurmikon rapistumiselle. HAITAT Sammaloituminen vie nurmikasvilta elintilaa ja tukahduttaa sen. Sammal on myös hyvin otollinen kasvualusta homeille ja hyönteisille. Sammal heikentää myös ruohokasvin sietokykyä lämpötilan vaihteluille. PYSTYLEIKKUU ON RATKAISU Niittomurskaimeen voidaan asentaa pystyleikkuuterät Y-terien keskelle. Kone säädetään niin, että pystyleikkuuterät tunkeutuvat n. 5-6 mm:n syvyyteen maan pinnasta. Terät tekevät pintamaahan viiltoja ja irrottavat sammalen ja lakastuneen kasvuston. Murskaimen suojakuomun alla oleva vastaterä on irrotettava pystyleikkuuterien käytön ajaksi.
Aria
— A
ir —
Atm
osph
ère—
ilma
Acqu
a —
Wat
er —
Eau
— W
asse
r-Ves
i
Sost
anze
nut
ritive
—No
urish
ing
Subs
tanc
es—
Élém
ents
nut
ritifs
-Rav
iinte
et
F
49
FIN

VANTAGGI TECNICI La duplice operazione di taglio ed asportazione del fel-tro favorisce : • Lo scarico gassoso con l’atmosfera per la liberazione
di CO2 ; • L’assorbimento dell’ossigeno, indispensabile per la
germinazione e per la crescita ; • Riduce la frequenza e la quantità d’acqua
d’irrigazione ; • Favorisce la penetrazione in profondità degli elementi
nutritivi poco solubili ; • Migliora l’approfondamento radicale ; • Accelera la decomposizione del feltro e la formazione
di nuovi stoloni e rizomi ; Detta operazione, eseguita una settimana prima della risemina, favorisce un ottimo contatto tra seme e suolo, riducendo il potenziale di aggressione (malattie) dovute ad un eccessivo livello di feltro.
VANTAGGI ECONOMICI PER CHI UTILIZZA LE TRINCIAERBA PERUZZO • Unica attrezzatura sia per il taglio che per la scarifi-
ca ; • Duplice funzione di arieggiatura e carico del prodotto
di risulta ; • Elevata velocità di lavoro ; • Simultanea rullatura del manto erboso. Ogni modifica arbitraria apportata alla macchina o suo uso improprio solleva il produttore da ogni responsabilità per eventuali danni derivanti.
TECHNICAL ADVANTAGES The double operation of cutting and scarifying at the same time moss and thatch aid :
• The gaseous exchange with the atmosphere for the release of CO2 ;
• The oxygen absorption, essential for the germination and growth ;
• Reduce the quantity and times of irrigation water ; • Help the penetration in depth of nourishing elements
not much soluble ; • Improve the roots deepening ; • Speed up the moss and catch decomposition and
new stolons and rhizomes formation. This operation, performed one week before sowing, aid a perfect contact between seed and ground, highly re-ducing the possibilities of diseases due to excessive moss and thatch level.
ECONOMIC ADVANTAGES WITH PERUZZO’S FLAIL MOWERS USE • Special equipment for cutting and scarifying in one
operation only ; • Double cutting and scarifying function in one opera-
tion only ; • High working speed ; • Simultaneous lawn rolling ; Any arbitrary modification caused on the machine and its wrong use relieves the manufacturer from any responsibility for eventual derived damages.
I GB
50
Calendario degli interventi colturali - Calendar of the cutting and scarifying interventions - Calendrier les opérations de tonte et defe-ûtrage - Nurmikon leikkuun ja pystyleikkuun ajoitus Periodo - Period Période - Ajankohta Frequenza-Performances Fréquence-Frequenz
Mesi Moths Mois
Kuukausi
Gennaio January Janvier
Tammikuu
Febbraio February Février
Helmikuu
Marzo March Mars
Maaliskuu
Aprile April Avril
Huhtikuu
Maggio May Mai
ToukokuuTipo di lavoro-Type of work- Opération-Toimenpide
Settimane Weeks
Semaine Viikko
1 2 3 4 5 6 7 8 9 10 11 12 13 14 15 16 17 18 19 20 21
Rasatura-Cutting-Tonte-Leikkuu 10 - 40
Taglio verticale e del feltro (anni)-Vertical cutting and scarifying (years)-Défeutrage (années) Leikkuu ja pystyleikkuu
1 - 4

PYSTYLEIKKUUN EDUT
Kaksilla terillä (Y-terä ja pystyleikkuuterä) varustettuna niittomurskain tekee kaksi työvaihetta yhdellä ajokerralla. Y-terät leikkaavat nurmen ja pystyleikkuuterät repivät sammalen ja lakastuneen kasvuston sekä tekevät pintamaahan ilmastusviiltoja. maasta vapautuu hiilidioksidia pintamaa saa happea, mikä on kasvun
perusedellytyksiä maan kyky varastoida kosteutta paranee ravinteet pääsevät kasvin juurien ulottuville sammal ja rihmakasvustot häviävät, nurmikko voi
paremmin Pystyleikkuu suositellaan suoritettavaksi n. viikkoa ennen nurmikon paikkauskylvöä.
KELAMURSKAIMEN KÄYTÖN EDUT • Samalla koneella voidaan suorittaa erilaisia
nurmikonhoitotöitä. • Pystyleikkuu voidaan suorittaa samanaikaisesti
leikkuun kanssa. • Fox-kelamurskain on tehokas. • Takakela jyrää nurmikon. Koneen rakenteen muuttaminen johtaa valmistajan vastuun raukeamiseen.
AVANTAGES TECHNIQUES L’opération de tonte/défeûtrage permet : • Une meilleure aération libération de CO2 ; • L’ absorption d’oxygène qui est indispensable à la
germination et à la croisance du gazon ; • Réduit la fréquence de l’irrigation et l’apport d’eau ; • Permet una pénétration plus profonde des engrais
peu solubles ; • Améliore l’enracinement ; • Accélère la décomposition du feûtre et la formation
de stolons et de rhizomes. Si la verticoupe s’effectue une semaine avant l’enga-zonnement, elle favorit un excellent contact entre les semis et le sol, un réduisant les possibilités de conta-minations (maladies) dûes à une accumulation eccessi-ve de feûtre.
AVANTAGES ECONOMIQUES
• Un seul équipement pour la tonte et le défeûtrage ; • Une double fonction de tonte et défeûtrage simulta-
nées • Grande vitesse de travail ; • Opération de roulage du gazon simultanée grâce au
rouleau montés de série sur les tondeuses PERUZ-ZO.
Toute modification arbitraire effectuée sur la ma-chine libère le constructeur de toute responsabilité des dommages éventuels qui pourraient en dériver.
F
51
Calendario degli interventi colturali - Calendar of the cutting and scarifying interventions - Calendrier les opérations de tonte et de-feûtrage - Kalender für Behauungsarbeiten.
Giugnio June Juin
Kesäkuu
Luglio July
Julliet Heinäkuu
Agosto August Août
Elokuu
Settembre September Septembre Syyskuu
Ottobre October Octobre
Lokakuu
Novembre November Novembre
Marraskuu
Dicembre December Décembre Joulukuu
22 23 24 25 26 27 28 29 30 31 32 33 34 35 36 37 38 39 40 41 42 43 44 45 46 47 48 49 50 51 52
FIN

member
S.R.L.
Via Valsugana 30 35010 Curtarolo (PD) - ITALY
Tel.: 0499620477 Fax.:0499620435
www.peruzzo.it
member