led round panel light lpr-40k7-12 · 2017-11-22 · led round panel light important: read all...
TRANSCRIPT
LED Round Panel LightImportant: Read all instructions prior to installation.
LPR-40K7-12LPR-40K9-18
User ManualPart Number:
Rev Date: V0.1 09/05/2017Rev Date: V0.1 09/05/2017
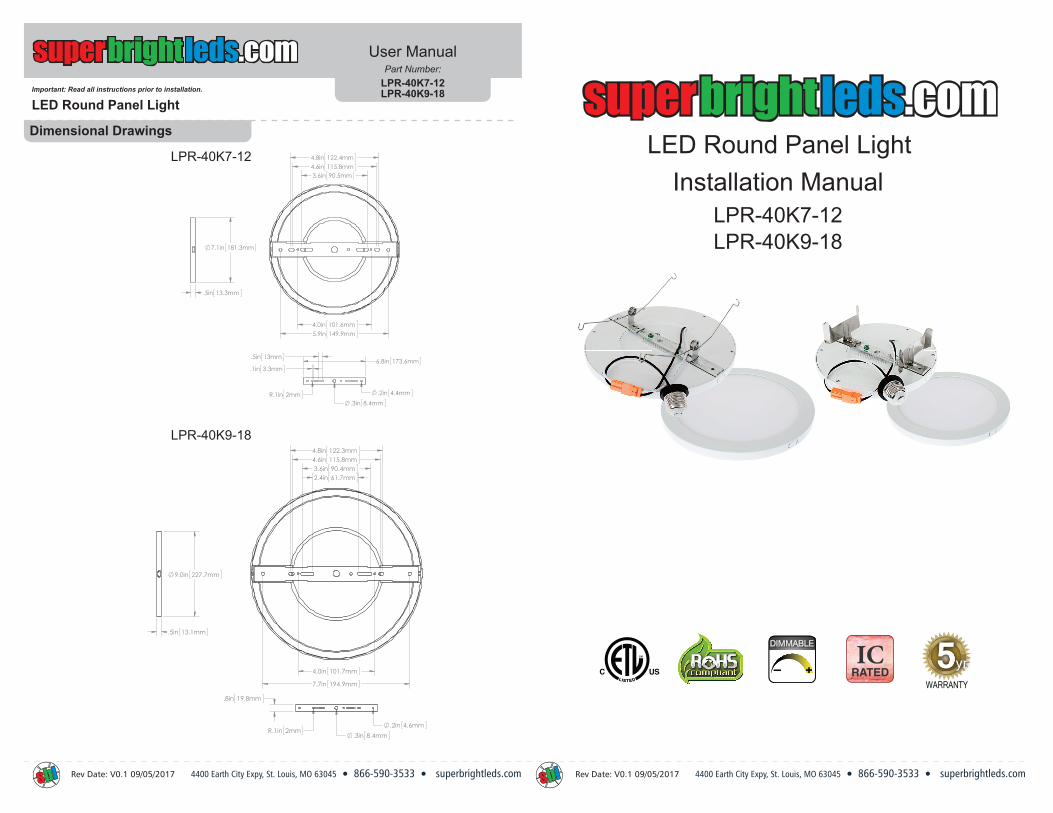
Dimensional Drawings
IC RATED
LED Round Panel LightInstallation Manual
LPR-40K7-12LPR-40K9-18
5yr
DIMMABLE
LPR-40K7-12
LPR-40K9-18
5.9in 149.9mm
4.8in 122.4mm4.6in 115.8mm3.6in 90.5mm
4.0in 101.6mm
7.1in 181.3mm
.5in 13.3mm
R.1in 2mm.3in 8.4mm
.2in 4.4mm
.1in 3.3mm
.5in 13mm6.8in 173.6mm
4.8in 122.3mm4.6in 115.8mm3.6in 90.4mm2.4in 61.7mm
7.7in 194.9mm
4.0in 101.7mm
9.0in 227.7mm
.5in 13.1mm
.3in 8.4mm.2in 4.6mm
.8in 19.8mm
R.1in 2mm

User ManualPart Number:
Junction Box Installation
Can Light Installation
LED Round Panel LightImportant: Read all instructions prior to installation.
Rev Date: V0.1 09/05/2017
Specifications
Optional Accessories (sold separately)
Can Light Conversion Kit (refer to can light installation)
Included Parts
1 - Round Panel Light2 - Wire Nuts4 - Mounting Bracket Clips/Covers
4" Can Retrofit Bracket (LPR-CR4)5-6" Can Retrofit Bracket (LPR-CR56)
LPR-40K7-12-4KIT = (LPR-40K7-12) + (LPR-CR4)LPR-40K7-12-56KIT = (LPR-40K7-12) + (LPR-CR56)
4" Can / J-box
5-6" Can
Safety and Notes
LPR-40K7-12LPR-40K9-18
2 - Anchors with screws2 - Button Head Phillips screws1 - Mounting Bracket
Intensity 1000 lm 1600 lmOperating Voltage 120 VAC 120 VACTotal Power Consumption 12W 18WBeam Angle 120 degree 120 degreeColor Temperature 4000 K 4000 KCRI <79 <79Operating Temperature -4~104°F (-20~40 °C) -4~104°F (-20~40 °C)IP Rating IP20 IP20Fixture Weight 10.6 oz (.30Kg) 1 lbs (.45Kg)Dimmable Yes (Triac) Yes (Triac)Standards and Certifications ETL / RoHS ETL / RoHSWarranty 5 Years 5 Years
LPR-40K7-12 LPR-40K9-18
• This product should be installed by a certified electrician in accordance with local building and electrical codes
• Due to risk of electric shock, ensure that the main power source and circuit breakers are switched off before performing any installation or wiring procedures.
CAUTION! Risk Of Electric Shock
Turn off all power prior to installation by switching off circuit breaker or removing fuse at fuse box.
1. Fix bracket on junction box ensuring bracket is flush with ceiling.
2. Remove trim and existing lamp from recessed fixture.
1. Attach can retrofit bracket on included mounting bracket. Use indicators for appropriate size can. Fix lamp body on bracket using mounting bracket clip/covers.
3. Screw E26 socket adapter into socket in the housing.
4. Use the friction blade/torsion spring to insert the lamp into the housing and restore power.
2. Connect the power wires black to black and white to white using wire nuts.
3. Fix lamp body on bracket using mount-ing bracket clip/covers.