learn to knit - lion brand - yarn and free knitting and...
TRANSCRIPT

Learn to Knit
Visit our website www.lionbrand.com for thousands of free patterns,
free instruction and more!
Copyright ©1998-2005 Lion Brand Yarn Company, all rights reserved. No pattern or other material may be reproduced -- mechanically, electronically, or by any other means,
including photocopying -- without written permission of Lion Brand Yarn Company.

Visit our website www.lionbrand.com for hundreds of free patterns, free instruction
and more!
We are here to help you succeed! If you would like a little help with the instructions on this page, please contact us at [email protected] any time!
Page 2
Copyright ©1998-2005 Lion Brand Yarn Company, all rights reserved. No pattern or other material may be reproduced -- mechanically, electronically, or by any other means,
including photocopying -- without written permission of Lion Brand Yarn Company.
Table of Contents Table of Contents........................................................................................... 2
Before you start ............................................................................................ 4
1. Casting On ................................................................................................ 5
2. The Knit Stitch ..........................................................................................13
3. The Purl Stitch ..........................................................................................18
4. Ribbing ....................................................................................................23
5. Stockinette Stitch......................................................................................25
6. Binding Off ...............................................................................................26
7. Making a Gauge Swatch .............................................................................28
8. Joining New Yarn.......................................................................................29
9. Recovering a dropped stitch........................................................................30
10. Unraveling Stitch by Stitch........................................................................33
11. Avoiding Extra Stitches.............................................................................34
12. Increasing ..............................................................................................36
13. Increasing - Making a Simple Increase........................................................38
14. Increasing Between a Stitch ('Make One') ...................................................39
15. Increasing - The Yarn Over Increase ..........................................................41
16. Decreasing .............................................................................................42
17. Decreasing - Slip, Slip, Knit (SSK/SSP) .......................................................43
18. Decreasing - Knit/Purl Two Together ..........................................................45
19. Slipping Stitches Purlwise and Knitwise.......................................................46
20. Making a cable ........................................................................................47

Visit our website www.lionbrand.com for hundreds of free patterns, free instruction
and more!
We are here to help you succeed! If you would like a little help with the instructions on this page, please contact us at [email protected] any time!
Page 3
Copyright ©1998-2005 Lion Brand Yarn Company, all rights reserved. No pattern or other material may be reproduced -- mechanically, electronically, or by any other means,
including photocopying -- without written permission of Lion Brand Yarn Company.
21. Knitting into the Back Loop/Front Loop .......................................................49
22. Purling into the Back Loop/Front Loop.........................................................50
23. Finishing ................................................................................................52
24. Weaving in Ends......................................................................................54
25. 3-Needle Bind Off ....................................................................................55
26. Picking up Stitches...................................................................................56
27. Knitting with two strands together .............................................................58
28. Duplicate Stitch.......................................................................................59
29. Grafting (Kitchener Stitch) ........................................................................60

Visit our website www.lionbrand.com for hundreds of free patterns, free instruction
and more!
We are here to help you succeed! If you would like a little help with the instructions on this page, please contact us at [email protected] any time!
Page 4
Copyright ©1998-2005 Lion Brand Yarn Company, all rights reserved. No pattern or other material may be reproduced -- mechanically, electronically, or by any other means,
including photocopying -- without written permission of Lion Brand Yarn Company.
Before you start ... Find a comfortable chair in good light. Read through the steps before you start. As with any new skill, learning to knit requires equal measures of patience and perseverance. Remember, you should have fun with your knitting. If you get stuck, take a deep breath, but keep at it! Knitting will give you a lifetime of pleasure and relaxation. You can create handmade knits for yourself and people you love. When you give a lovingly knit gift, part of you goes into it. Your time, talent, the yarn and color you select -- even the thoughts and feelings you have as your work -- are part of your knitted gift.
Visit our website www.lionbrand.com for hundreds of free patterns, free instruction
and more!
We are here to help you succeed! If you would like a little help with the instructions on this page, please contact us at [email protected]
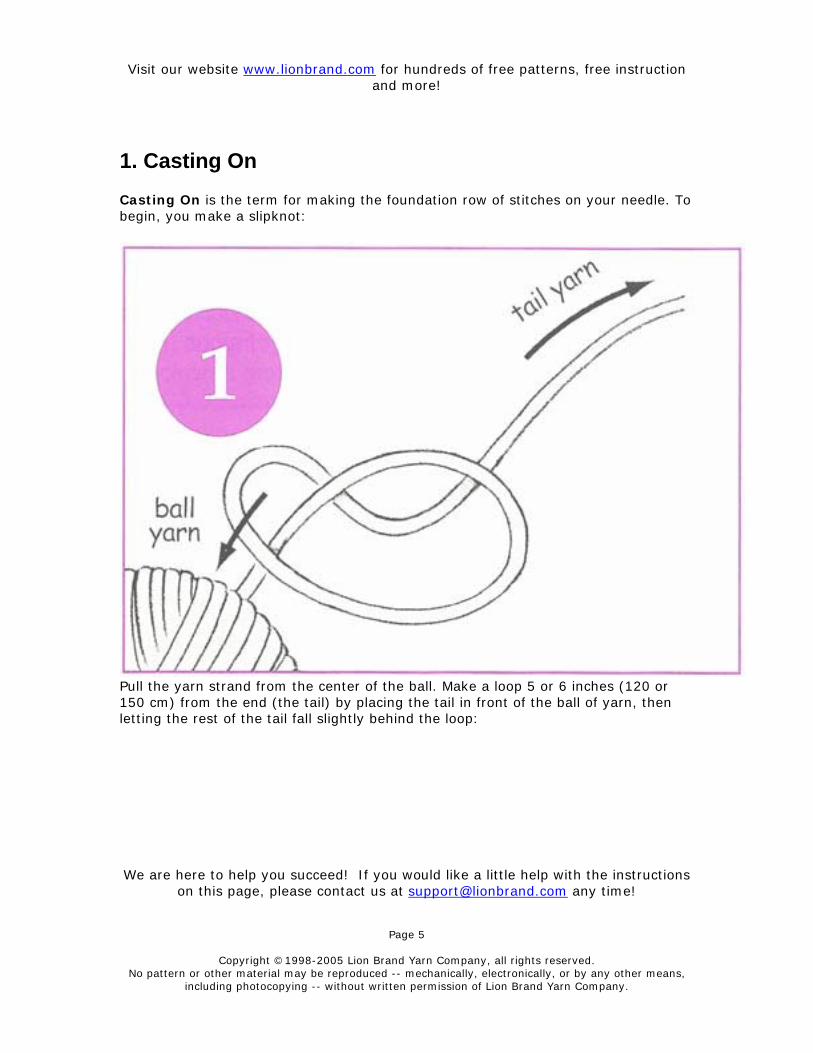
1. Casting On Casting On is the term for making the foundation row of stitches on your needle. To begin, you make a slipknot:
Pull the yarn strand from the center of the ball. Make a loop 5 or 6 inches (120 or 150 cm) from the end (the tail) by placing the tail in front of the ball of yarn, then letting the rest of the tail fall slightly behind the loop:
any time!
Page 5
Copyright ©1998-2005 Lion Brand Yarn Company, all rights reserved. No pattern or other material may be reproduced -- mechanically, electronically, or by any other means,
including photocopying -- without written permission of Lion Brand Yarn Company.

Visit our website www.lionbrand.com for hundreds of free patterns, free instruction
and more!
We are here to help you succeed! If you would like a little help with the instructions on this page, please contact us at [email protected]
Insert your needle into the loop. Scoop up the yarn in the back of the loop with the tip of your needle. Pull it through the front of the loop. Gently pull the tail yarn to tighten loop around the needle. This is your first stitch.
any time!
Page 6
Copyright ©1998-2005 Lion Brand Yarn Company, all rights reserved. No pattern or other material may be reproduced -- mechanically, electronically, or by any other means,
including photocopying -- without written permission of Lion Brand Yarn Company.

Visit our website www.lionbrand.com for hundreds of free patterns, free instruction
and more!
We are here to help you succeed! If you would like a little help with the instructions on this page, please contact us at [email protected]
With the yarn from your ball IN BACK of your needles, hold your hands as shown.
any time!
Page 7
Copyright ©1998-2005 Lion Brand Yarn Company, all rights reserved. No pattern or other material may be reproduced -- mechanically, electronically, or by any other means,
including photocopying -- without written permission of Lion Brand Yarn Company.

Visit our website www.lionbrand.com for hundreds of free patterns, free instruction
and more!
We are here to help you succeed! If you would like a little help with the instructions on this page, please contact us at [email protected]
Insert the tip of your right (empty) needle, from the fron to the back (from the left side of the stitch to the right) into the loop on the left needle. The needles will cross with the left needle remaining on top of the right needle.
Adjust your thumb so that you are gently gripping both needles between the thumb and forefinger of your left hand.
any time!
Page 8
Copyright ©1998-2005 Lion Brand Yarn Company, all rights reserved. No pattern or other material may be reproduced -- mechanically, electronically, or by any other means,
including photocopying -- without written permission of Lion Brand Yarn Company.

Visit our website www.lionbrand.com for hundreds of free patterns, free instruction
and more!
We are here to help you succeed! If you would like a little help with the instructions on this page, please contact us at [email protected]
Holding the yarn with your right hand, wrap the yarn around the tip of the right needle in a clockwise motion as shown.
any time!
Page 9
Copyright ©1998-2005 Lion Brand Yarn Company, all rights reserved. No pattern or other material may be reproduced -- mechanically, electronically, or by any other means,
including photocopying -- without written permission of Lion Brand Yarn Company.

Visit our website www.lionbrand.com for hundreds of free patterns, free instruction
and more!
We are here to help you succeed! If you would like a little help with the instructions on this page, please contact us at [email protected]
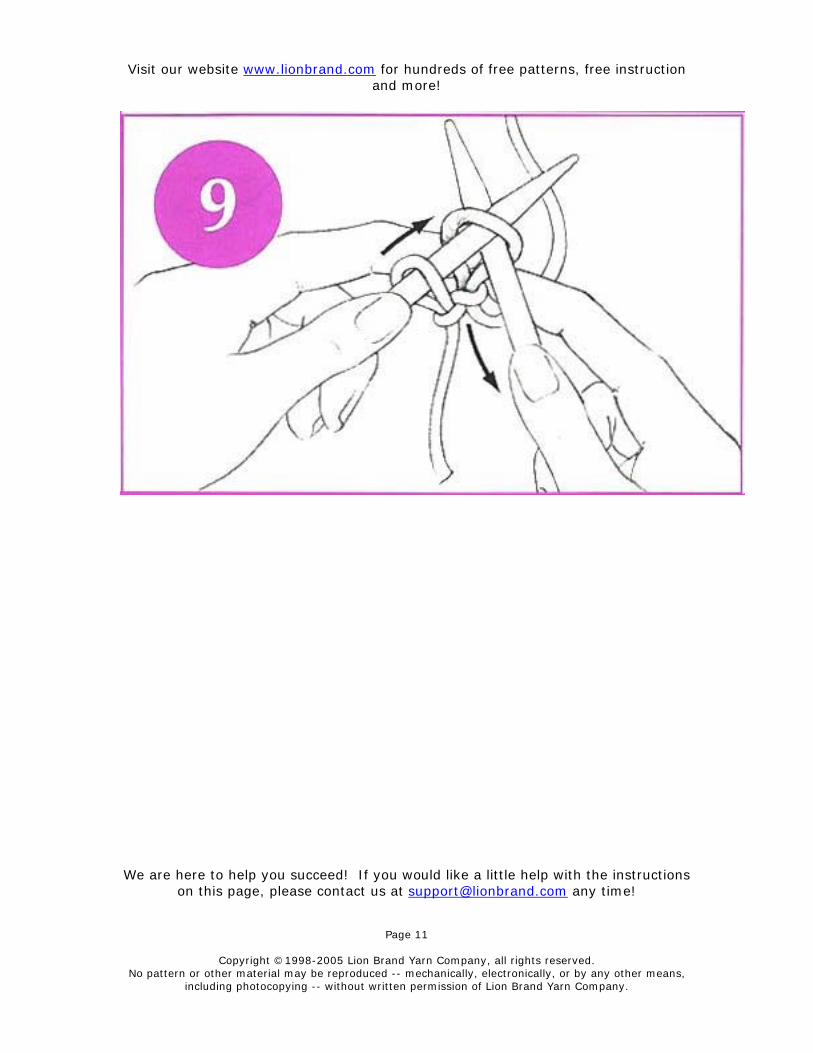
Secure the loop you have just made with your right pointer finger. Pull the tip of the right needle towards you, below the left needle through the center of the stitch. Don't get discouraged if you don't get this on the first try. The tips of your needles now cross with the right one on top and the left one below.
Now you have one loop on each needle. Elongate the pulled-through loop.
any time!
Page 10
Copyright ©1998-2005 Lion Brand Yarn Company, all rights reserved. No pattern or other material may be reproduced -- mechanically, electronically, or by any other means,
including photocopying -- without written permission of Lion Brand Yarn Company.
Visit our website www.lionbrand.com for hundreds of free patterns, free instruction
and more!
We are here to help you succeed! If you would like a little help with the instructions on this page, please contact us at [email protected]
any time!
Page 11
Copyright ©1998-2005 Lion Brand Yarn Company, all rights reserved. No pattern or other material may be reproduced -- mechanically, electronically, or by any other means,
including photocopying -- without written permission of Lion Brand Yarn Company.
Visit our website www.lionbrand.com for hundreds of free patterns, free instruction
and more!
We are here to help you succeed! If you would like a little help with the instructions on this page, please contact us at [email protected]
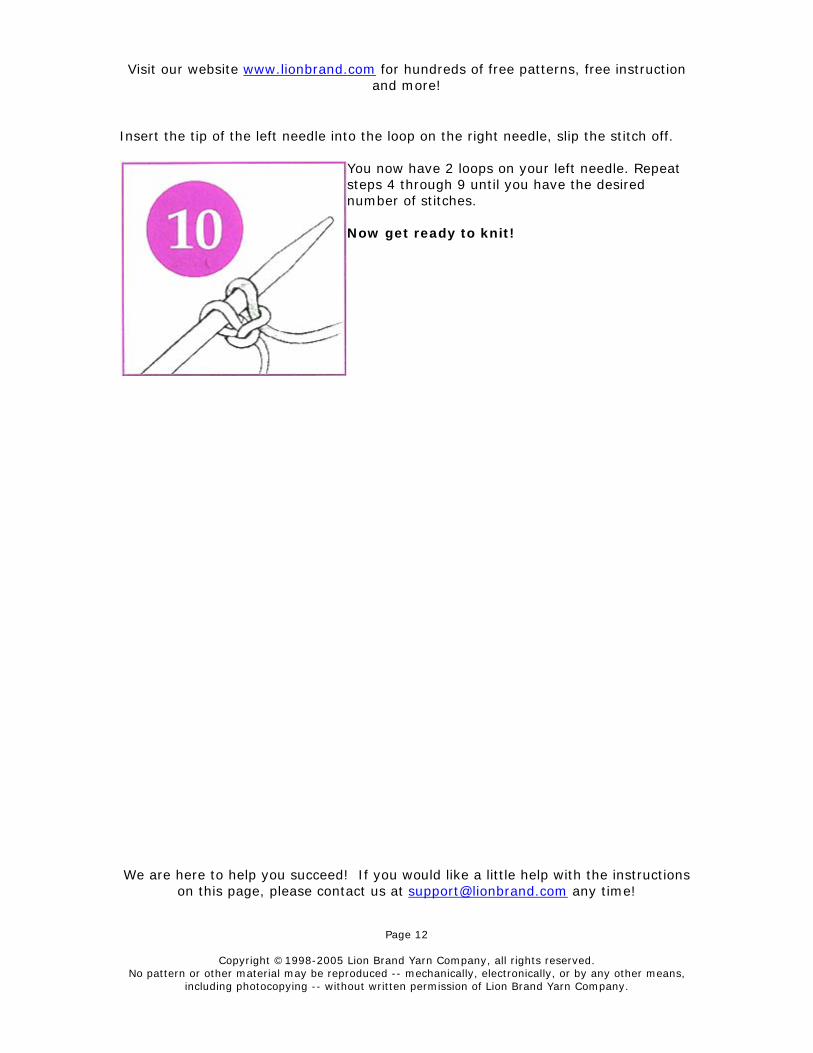
Insert the tip of the left needle into the loop on the right needle, slip the stitch off.
You now have 2 loops on your left needle. Repeat steps 4 through 9 until you have the desired number of stitches. Now get ready to knit!
any time!
Page 12
Copyright ©1998-2005 Lion Brand Yarn Company, all rights reserved. No pattern or other material may be reproduced -- mechanically, electronically, or by any other means,
including photocopying -- without written permission of Lion Brand Yarn Company.

Visit our website www.lionbrand.com for hundreds of free patterns, free instruction
and more!
We are here to help you succeed! If you would like a little help with the instructions on this page, please contact us at [email protected]
2. The Knit Stitch
Hold the needle with the stitches on it in your left hand. The first stitch is approximately an inch from the top. The empty needle is in your right hand.
any time!
Page 13
Copyright ©1998-2005 Lion Brand Yarn Company, all rights reserved. No pattern or other material may be reproduced -- mechanically, electronically, or by any other means,
including photocopying -- without written permission of Lion Brand Yarn Company.

Visit our website www.lionbrand.com for hundreds of free patterns, free instruction
and more!
We are here to help you succeed! If you would like a little help with the instructions on this page, please contact us at [email protected]
Guess what? You already know what to do next! Insert the tip into the stitch closest to the tip of the left needle (from front to back) the same way as you did in step 4 when casting on.
any time!
Page 14
Copyright ©1998-2005 Lion Brand Yarn Company, all rights reserved. No pattern or other material may be reproduced -- mechanically, electronically, or by any other means,
including photocopying -- without written permission of Lion Brand Yarn Company.
Visit our website www.lionbrand.com for hundreds of free patterns, free instruction
and more!
We are here to help you succeed! If you would like a little help with the instructions on this page, please contact us at [email protected]
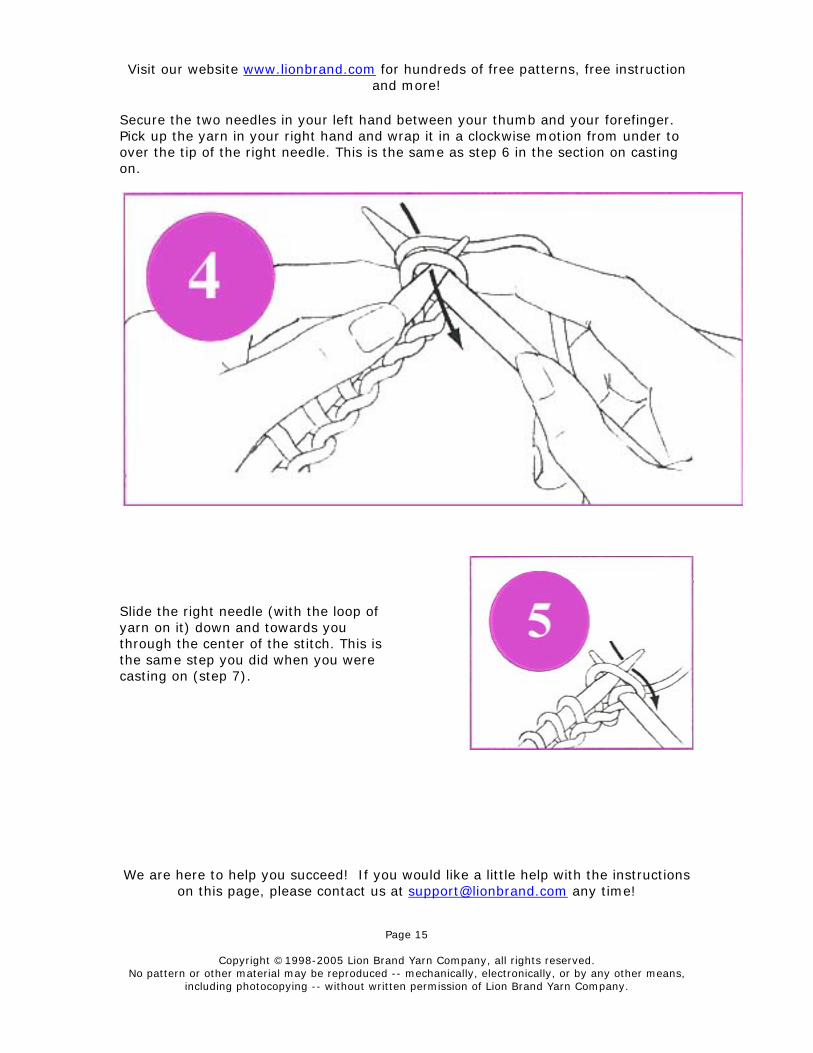
Secure the two needles in your left hand between your thumb and your forefinger. Pick up the yarn in your right hand and wrap it in a clockwise motion from under to over the tip of the right needle. This is the same as step 6 in the section on casting on.
Slide the right needle (with the loop of yarn on it) down and towards you through the center of the stitch. This is the same step you did when you were casting on (step 7).
any time!
Page 15
Copyright ©1998-2005 Lion Brand Yarn Company, all rights reserved. No pattern or other material may be reproduced -- mechanically, electronically, or by any other means,
including photocopying -- without written permission of Lion Brand Yarn Company.

Visit our website www.lionbrand.com for hundreds of free patterns, free instruction
and more!
We are here to help you succeed! If you would like a little help with the instructions on this page, please contact us at [email protected]
Now for something new! Slip the new stitch completely off the tip of the left needle. You now have one stitch on your right needle. CONGRATULATIONS! You have just knit your first stitch! Now continue repeating steps 1 through 7 until you have knit all the stitches off of your left needle. When you reach that last stitch DON'T PANIC. Just knit the stitch. You have now completed a ROW. Now its time to turn your work. Exchange the empty needle in your left hand with the full needle in your right and begin again. Just remember that knitting is a 4-step process:
1. Insert the needle 2. wrap the yarn 3. pull through the loop 4. pull off the new stitch
any time!
Page 16
Copyright ©1998-2005 Lion Brand Yarn Company, all rights reserved. No pattern or other material may be reproduced -- mechanically, electronically, or by any other means,
including photocopying -- without written permission of Lion Brand Yarn Company.
Visit our website www.lionbrand.com for hundreds of free patterns, free instruction
and more!
We are here to help you succeed! If you would like a little help with the instructions on this page, please contact us at [email protected]
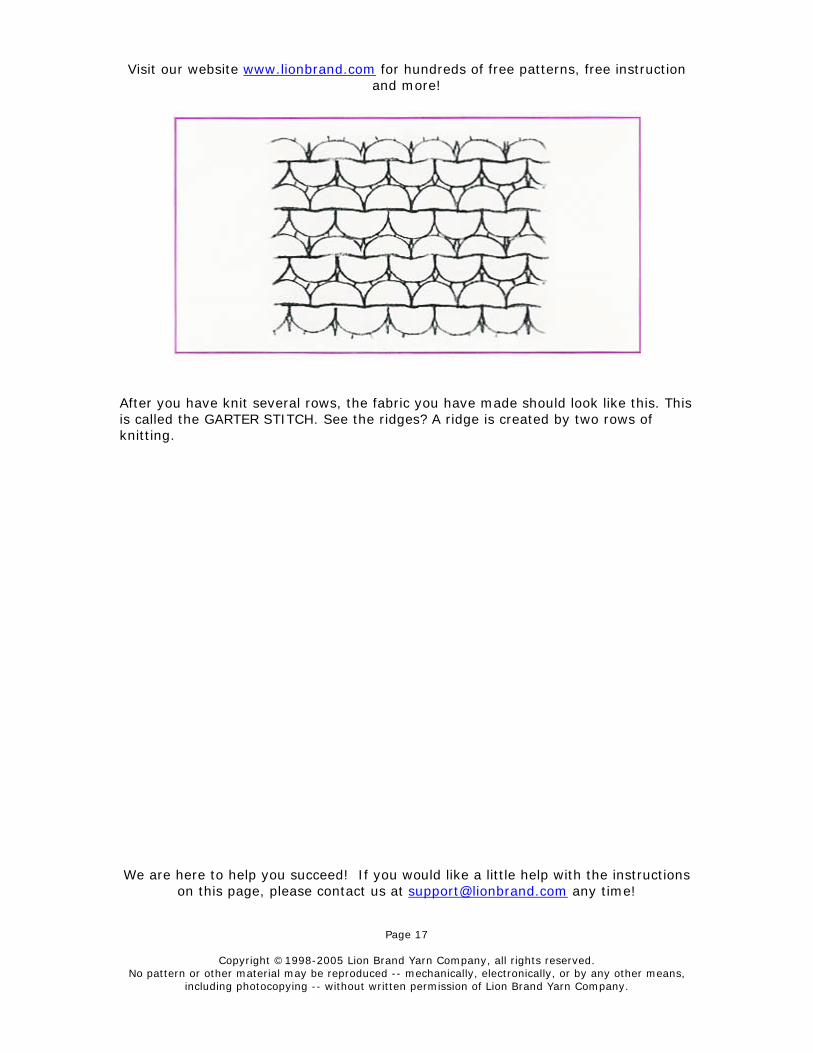
After you have knit several rows, the fabric you have made should look like this. This is called the GARTER STITCH. See the ridges? A ridge is created by two rows of knitting.
any time!
Page 17
Copyright ©1998-2005 Lion Brand Yarn Company, all rights reserved. No pattern or other material may be reproduced -- mechanically, electronically, or by any other means,
including photocopying -- without written permission of Lion Brand Yarn Company.

Visit our website www.lionbrand.com for hundreds of free patterns, free instruction
and more!
We are here to help you succeed! If you would like a little help with the instructions on this page, please contact us at [email protected]
3. The Purl Stitch To make a purl stitch, you do all the same steps as you do to make a knit stitch except with slightly different motions.
Hold the needles as if to knit. Place the yarn IN FRONT of the needle. Insert the right needle from BACK to FRONT (right to left) into the first stitch on the left needle.
any time!
Page 18
Copyright ©1998-2005 Lion Brand Yarn Company, all rights reserved. No pattern or other material may be reproduced -- mechanically, electronically, or by any other means,
including photocopying -- without written permission of Lion Brand Yarn Company.

Visit our website www.lionbrand.com for hundreds of free patterns, free instruction
and more!
We are here to help you succeed! If you would like a little help with the instructions on this page, please contact us at [email protected]
Loop the yarn around the tip of the right needle in a downward (counter-clockwise) motion.
any time!
Page 19
Copyright ©1998-2005 Lion Brand Yarn Company, all rights reserved. No pattern or other material may be reproduced -- mechanically, electronically, or by any other means,
including photocopying -- without written permission of Lion Brand Yarn Company.
Visit our website www.lionbrand.com for hundreds of free patterns, free instruction
and more!
We are here to help you succeed! If you would like a little help with the instructions on this page, please contact us at [email protected]
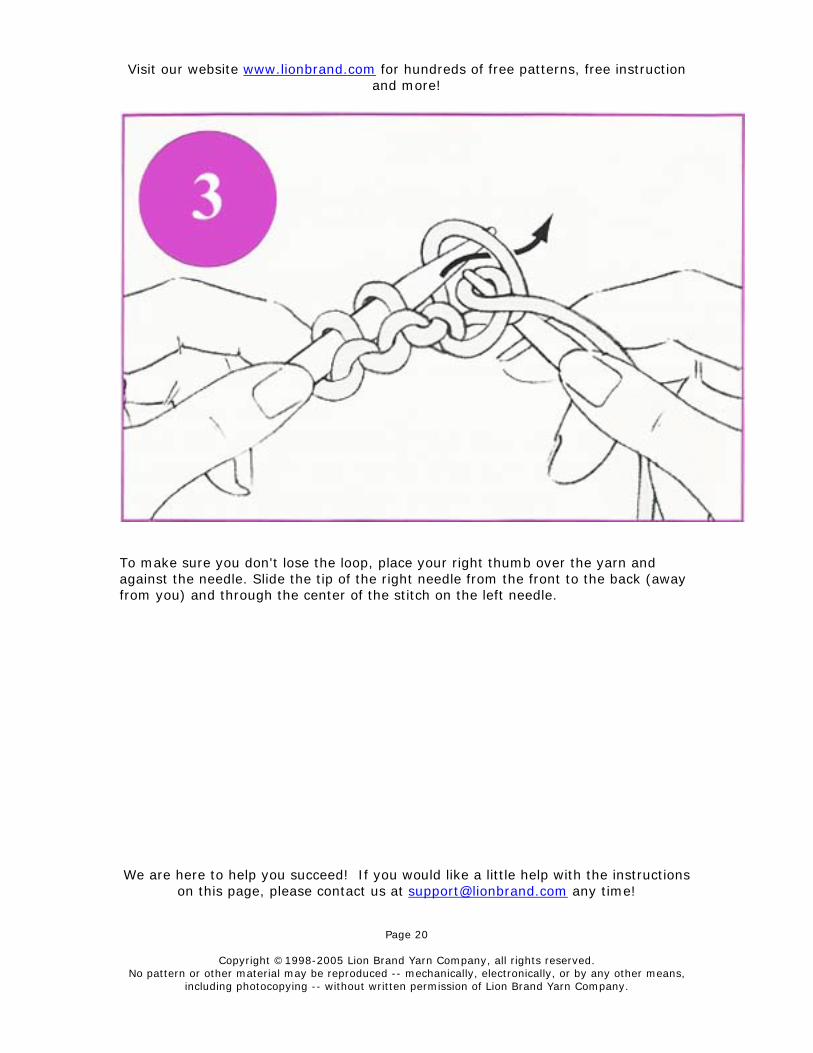
To make sure you don't lose the loop, place your right thumb over the yarn and against the needle. Slide the tip of the right needle from the front to the back (away from you) and through the center of the stitch on the left needle.
any time!
Page 20
Copyright ©1998-2005 Lion Brand Yarn Company, all rights reserved. No pattern or other material may be reproduced -- mechanically, electronically, or by any other means,
including photocopying -- without written permission of Lion Brand Yarn Company.

Visit our website www.lionbrand.com for hundreds of free patterns, free instruction
and more!
We are here to help you succeed! If you would like a little help with the instructions on this page, please contact us at [email protected]
Pull the new loop off the tip of the left needle. You now have a stitch on your right needle.
CONGRATULATIONS! You have just made a purl stitch! Repeat steps 1 through 4 to complete the row. If it feels a little awkward, you are not alone. Many new knitters find it easier to knit than to purl. Soon you'll feel at home doing either stitch. When you have finished this row, turn your work (place the full needle in your left hand and the empty needle in your right hand) and KNIT the next row. After that, PURL the next row. Continue working, alternating each knit row with a purl row. This creates stockinette stitch. Look at your work. One side of your fabric looks like its covered with V's. That's the knit side. The other side looks like its covered with bumps. That's the purl side. To figure out whether you should be knitting the row or purling the row, put your work in your left hand.
any time!
Page 21
Copyright ©1998-2005 Lion Brand Yarn Company, all rights reserved. No pattern or other material may be reproduced -- mechanically, electronically, or by any other means,
including photocopying -- without written permission of Lion Brand Yarn Company.

Visit our website www.lionbrand.com for hundreds of free patterns, free instruction
and more!
We are here to help you succeed! If you would like a little help with the instructions on this page, please contact us at [email protected]
Which side is facing you? If the V's are facing you, you are on the knit side and should knit the row. If the bumps are facing you, you are on the purl side, so purl the row. Congratulations! You have mastered the two stitches that make everything possible!
any time!
Page 22
Copyright ©1998-2005 Lion Brand Yarn Company, all rights reserved. No pattern or other material may be reproduced -- mechanically, electronically, or by any other means,
including photocopying -- without written permission of Lion Brand Yarn Company.

Visit our website www.lionbrand.com for hundreds of free patterns, free instruction
and more!
We are here to help you succeed! If you would like a little help with the instructions on this page, please contact us at [email protected]
4. Ribbing Ribbing is a border that is commonly used on the cuffs of sweaters. It is used because it produces a stretchy fabric. It is made with a combination of knit stitches and purl stitches.
Knit two stitches. Bring the yarn from the back of your work between the needles to the front. Now purl two stitches. Bring the yarn to the back of your work between the needles. Knit two stitches.
any time!
Page 23
Copyright ©1998-2005 Lion Brand Yarn Company, all rights reserved. No pattern or other material may be reproduced -- mechanically, electronically, or by any other means,
including photocopying -- without written permission of Lion Brand Yarn Company.

Visit our website www.lionbrand.com for hundreds of free patterns, free instruction
and more!
We are here to help you succeed! If you would like a little help with the instructions on this page, please contact us at [email protected]
On subsequent rows, knit the knit stitches (V stitches) and purl the purl stitches (bump stitches) Remember to have the working yarn in BACK when you knit and in FRONT when you purl
any time!
Page 24
Copyright ©1998-2005 Lion Brand Yarn Company, all rights reserved. No pattern or other material may be reproduced -- mechanically, electronically, or by any other means,
including photocopying -- without written permission of Lion Brand Yarn Company.

Visit our website www.lionbrand.com for hundreds of free patterns, free instruction
and more!
We are here to help you succeed! If you would like a little help with the instructions on this page, please contact us at [email protected]
5. Stockinette Stitch To figure out whether you should be knitting the row or purling the row, put your work in your left hand.
Which side is facing you? If the V's are facing you, you are on the knit side and should knit the row. If the bumps are facing you, you are on the purl side, so purl the row.
any time!
Page 25
Copyright ©1998-2005 Lion Brand Yarn Company, all rights reserved. No pattern or other material may be reproduced -- mechanically, electronically, or by any other means,
including photocopying -- without written permission of Lion Brand Yarn Company.

Visit our website www.lionbrand.com for hundreds of free patterns, free instruction
and more!
We are here to help you succeed! If you would like a little help with the instructions on this page, please contact us at [email protected]
6. Binding Off
Knit two stitches. Insert the top of the left needle into the first stitch on the right needle. Lift the stitch over the last stitch you knit and over the top of the right needle.
any time!
Page 26
Copyright ©1998-2005 Lion Brand Yarn Company, all rights reserved. No pattern or other material may be reproduced -- mechanically, electronically, or by any other means,
including photocopying -- without written permission of Lion Brand Yarn Company.

Visit our website www.lionbrand.com for hundreds of free patterns, free instruction
and more!
We are here to help you succeed! If you would like a little help with the instructions on this page, please contact us at [email protected] any time!
Page 27
Copyright ©1998-2005 Lion Brand Yarn Company, all rights reserved. No pattern or other material may be reproduced -- mechanically, electronically, or by any other means,
including photocopying -- without written permission of Lion Brand Yarn Company.
One stitch remains on the right needle. Knit another stitch. Lift that stitch over the stitch just knit.

Visit our website www.lionbrand.com for hundreds of free patterns, free instruction
and more!
We are here to help you succeed! If you would like a little help with the instructions on this page, please contact us at [email protected]
7. Making a Gauge Swatch Gauge refers to the number of stitches and rows a knitter or crocheter makes per inch using a certain yarn and needles or hook. Gauge varies from person to person, so it is very important to make sure you are achieving the gauge of your pattern. Your gauge determines the size of your finished piece. If you don't get the proper gauge, the garment will not come out to the intended size. If you are knitting with a thick yarn like Wool-Ease® Thick and Quick® you'll make bigger stitches and have very few stitches and rows per inch. If you are knitting with a finer yarn, you'll make smaller stitches and have more stitches and rows per inch. To make an accurate gauge swatch, cast on or chain enough stitches to equal approximately four inches and work in pattern for four inches. Take your stitches off the needle and, without stretching the fabric, place a tape measure on your work and gently pin where the tape measure reads one inch. Count your stitches. Don't cheat. Make sure to count even a half or quarter of a stitch and include that into your gauge.
any time!
Page 28
Copyright ©1998-2005 Lion Brand Yarn Company, all rights reserved. No pattern or other material may be reproduced -- mechanically, electronically, or by any other means,
including photocopying -- without written permission of Lion Brand Yarn Company.

Visit our website www.lionbrand.com for hundreds of free patterns, free instruction
and more!
We are here to help you succeed! If you would like a little help with the instructions on this page, please contact us at [email protected]
If you have more stitches per inch than the gauge suggests, that means you are working too tightly; try a larger needle or hook. If you have fewer stitches than the suggested gauge, your stitches are too loose; try a smaller needle or hook
8. Joining New Yarn It is always better to add a new ball of yarn at the beginning of a row. Loosely tie a knot with the new yarn around the old yarn, leaving a tail of a least 4 inches. Slide the knot up the tail of the old yarn as close as possible to your work.
any time!
Page 29
Copyright ©1998-2005 Lion Brand Yarn Company, all rights reserved. No pattern or other material may be reproduced -- mechanically, electronically, or by any other means,
including photocopying -- without written permission of Lion Brand Yarn Company.
Visit our website www.lionbrand.com for hundreds of free patterns, free instruction
and more!
We are here to help you succeed! If you would like a little help with the instructions on this page, please contact us at [email protected]
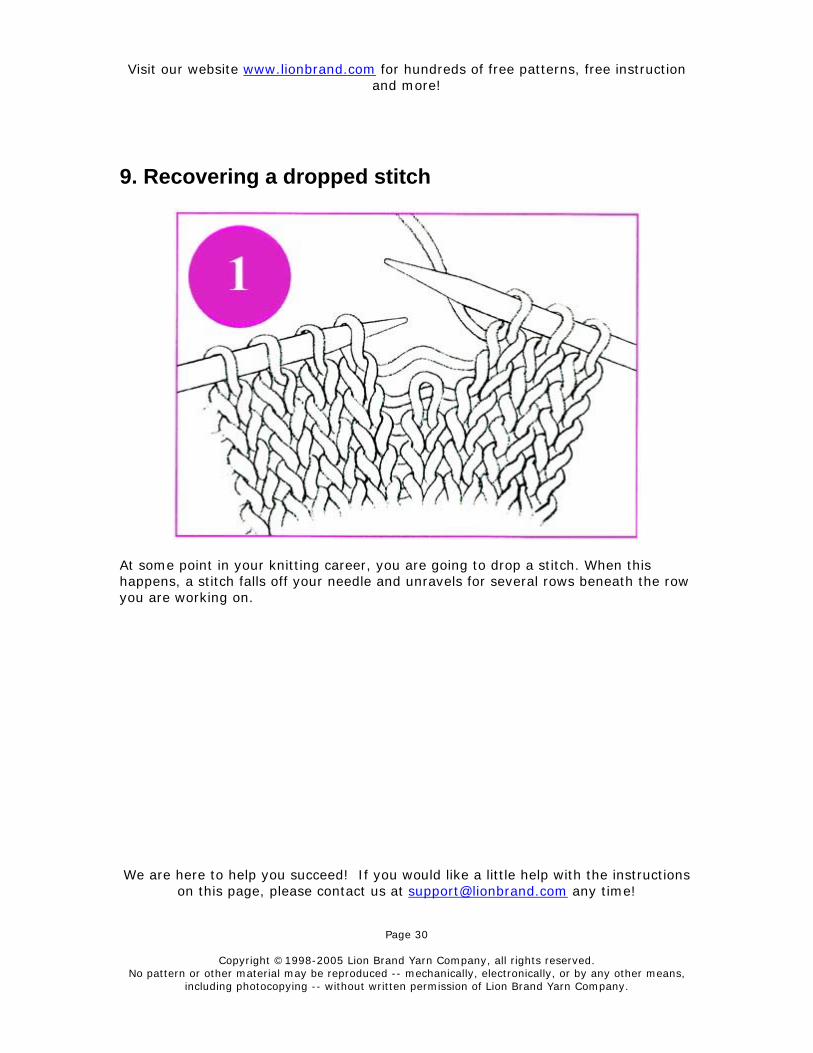
9. Recovering a dropped stitch
At some point in your knitting career, you are going to drop a stitch. When this happens, a stitch falls off your needle and unravels for several rows beneath the row you are working on.
any time!
Page 30
Copyright ©1998-2005 Lion Brand Yarn Company, all rights reserved. No pattern or other material may be reproduced -- mechanically, electronically, or by any other means,
including photocopying -- without written permission of Lion Brand Yarn Company.

Visit our website www.lionbrand.com for hundreds of free patterns, free instruction
and more!
We are here to help you succeed! If you would like a little help with the instructions on this page, please contact us at [email protected]
First of all, don't panic. Knit until you've reached the dropped stitch. Insert a crochet hook (if you don't have one available, the top of your needle will also work) into the loop of the dropped stitch. Now grab the bar of the stitch right above it in the crook of your crochet hook. Pull the bar through the stitch. If your stitch has dropped down several rows, repeat until your stitch is on the same row as the rest of your knitting.
any time!
Page 31
Copyright ©1998-2005 Lion Brand Yarn Company, all rights reserved. No pattern or other material may be reproduced -- mechanically, electronically, or by any other means,
including photocopying -- without written permission of Lion Brand Yarn Company.

Visit our website www.lionbrand.com for hundreds of free patterns, free instruction
and more!
We are here to help you succeed! If you would like a little help with the instructions on this page, please contact us at [email protected]
Slip the stitch onto your knitting needle.
any time!
Page 32
Copyright ©1998-2005 Lion Brand Yarn Company, all rights reserved. No pattern or other material may be reproduced -- mechanically, electronically, or by any other means,
including photocopying -- without written permission of Lion Brand Yarn Company.

Visit our website www.lionbrand.com for hundreds of free patterns, free instruction
and more!
We are here to help you succeed! If you would like a little help with the instructions on this page, please contact us at [email protected]
10. Unraveling Stitch by Stitch Sometimes a mistake is too many rows down to fix with a crochet hook. Instead, you need to unravel your work in order to fix the error. As painful as it may sound, any good knitting teacher will tell you that 'Ripping is part of Knitting." Unravel your knitting by following the directions below. This is a slightly slower but a very safe method to fix your knitting.
On a knit stitch, holding the yarn in the back, insert the left needle into the stitch one row below the first stitch on the right needle. On a purl stitch (not shown), hold the yarn in front and insert the needle from the back of the work. Slip the stitch onto your left needle, gently pulling the yarn out of the stitch above it. Continue in this way until you have reached your mistake.
any time!
Page 33
Copyright ©1998-2005 Lion Brand Yarn Company, all rights reserved. No pattern or other material may be reproduced -- mechanically, electronically, or by any other means,
including photocopying -- without written permission of Lion Brand Yarn Company.

Visit our website www.lionbrand.com for hundreds of free patterns, free instruction
and more!
We are here to help you succeed! If you would like a little help with the instructions on this page, please contact us at [email protected]
11. Avoiding Extra Stitches
any time!
Page 34
Copyright ©1998-2005 Lion Brand Yarn Company, all rights reserved. No pattern or other material may be reproduced -- mechanically, electronically, or by any other means,
including photocopying -- without written permission of Lion Brand Yarn Company.

Visit our website www.lionbrand.com for hundreds of free patterns, free instruction
and more!
We are here to help you succeed! If you would like a little help with the instructions on this page, please contact us at [email protected] any time!
Page 35
Copyright ©1998-2005 Lion Brand Yarn Company, all rights reserved. No pattern or other material may be reproduced -- mechanically, electronically, or by any other means,
including photocopying -- without written permission of Lion Brand Yarn Company.
ometimes an extra stitch is formed at the beginning of your needle. This happens
Swhen you begin to work a row and you take the yarn over the top of the needle. To prevent this, bring your yarn underneath your knitting when moving it from front to back for a knit stitch or from back to front for a purl stitch.
Visit our website www.lionbrand.com for hundreds of free patterns, free instruction
and more!
We are here to help you succeed! If you would like a little help with the instructions on this page, please contact us at [email protected] any time!
Page 36
Copyright ©1998-2005 Lion Brand Yarn Company, all rights reserved. No pattern or other material may be reproduced -- mechanically, electronically, or by any other means,
including photocopying -- without written permission of Lion Brand Yarn Company.
12. Increasing Increasing is the process of adding one or more stitches to a piece. Adding stitches to a knit piece makes it a bigger size. For example, when you knit a sleeve, you increase stitches from the cuff to the shoulder. Please check the FAQ for information and examples of
1. The Simple Increase 2. Increasing Between a Stitch (Make One) 3. The Yarn Over Increase

Visit our website www.lionbrand.com for hundreds of free patterns, free instruction
and more!
We are here to help you succeed! If you would like a little help with the instructions on this page, please contact us at [email protected] any time!
Page 37
Copyright ©1998-2005 Lion Brand Yarn Company, all rights reserved. No pattern or other material may be reproduced -- mechanically, electronically, or by any other means,
including photocopying -- without written permission of Lion Brand Yarn Company.

Visit our website www.lionbrand.com for hundreds of free patterns, free instruction
and more!
We are here to help you succeed! If you would like a little help with the instructions on this page, please contact us at [email protected]
13. Increasing - Making a Simple Increase
An easy way to add a stitch is to use an existing stitch. Insert the right needle into the stitch, wrap the yarn around the needle and pull through as for a normal knit stitch, elongating the loop slightly. Don't pull the stitch over the left needle yet.
Bring the top of the right needle around to the back and knit into the back loop of the stitch as shown (see the FAQ on knitting into the back loop for more detail). You now have two stitches on the right needle.
any time!
Page 38
Copyright ©1998-2005 Lion Brand Yarn Company, all rights reserved. No pattern or other material may be reproduced -- mechanically, electronically, or by any other means,
including photocopying -- without written permission of Lion Brand Yarn Company.

Visit our website www.lionbrand.com for hundreds of free patterns, free instruction
and more!
We are here to help you succeed! If you would like a little help with the instructions on this page, please contact us at [email protected]
14. Increasing Between a Stitch ('Make One')
This increase is also called 'Make One'. Work to the place where the increase is to be made. Insert the left needle from front to back into the horizontal strand between the two stitches:
Knit the stitch through the back loop as shown.
On the purl side, insert the needle from front to back and then purl the stitch through the back loop.
any time!
Page 39
Copyright ©1998-2005 Lion Brand Yarn Company, all rights reserved. No pattern or other material may be reproduced -- mechanically, electronically, or by any other means,
including photocopying -- without written permission of Lion Brand Yarn Company.

Visit our website www.lionbrand.com for hundreds of free patterns, free instruction
and more!
We are here to help you succeed! If you would like a little help with the instructions on this page, please contact us at [email protected] any time!
Page 40
Copyright ©1998-2005 Lion Brand Yarn Company, all rights reserved. No pattern or other material may be reproduced -- mechanically, electronically, or by any other means,
including photocopying -- without written permission of Lion Brand Yarn Company.

Visit our website www.lionbrand.com for hundreds of free patterns, free instruction
and more!
We are here to help you succeed! If you would like a little help with the instructions on this page, please contact us at [email protected]
15. Increasing - The Yarn Over Increase
To work a yarn over increase, bring the yarn to the front and knit the next stitch in the normal way. This leaves an extra loop (new stitch) on the needle.
On the next purl row, purl the loop in the normal way as shown.
any time!
Page 41
Copyright ©1998-2005 Lion Brand Yarn Company, all rights reserved. No pattern or other material may be reproduced -- mechanically, electronically, or by any other means,
including photocopying -- without written permission of Lion Brand Yarn Company.

Visit our website www.lionbrand.com for hundreds of free patterns, free instruction
and more!
We are here to help you succeed! If you would like a little help with the instructions on this page, please contact us at [email protected] any time!
Page 42
Copyright ©1998-2005 Lion Brand Yarn Company, all rights reserved. No pattern or other material may be reproduced -- mechanically, electronically, or by any other means,
including photocopying -- without written permission of Lion Brand Yarn Company.
16. Decreasing Decreasing is the process of removing one or more stitches from a piece. There are a number of ways to decrease and the choice of decrease used is most often determined by the desired slant of the stitches. Two common decreases are:
• Knit two together • ssk (slip, slip, knit)

Visit our website www.lionbrand.com for hundreds of free patterns, free instruction
and more!
We are here to help you succeed! If you would like a little help with the instructions on this page, please contact us at [email protected]
17. Decreasing - Slip, Slip, Knit (SSK/SSP)
Work to the place where the decrease is to be made. Slip the next 2 stitches, one at a time as if to knit, to the right needle.
Insert the left needle into the fronts of these two stitches and knit them together. One stitch is decreased. This decrease slants to the left.
On the purl side of the work, the decrease is called slip, slip, purl (ssp). In the same way as ssk, slip the 2 stitches on at a time as if to knit to the right needle. Purl them together through the back loops (see the FAQ on purling through the back loops for detail). This decrease slants to the left.
any time!
Page 43
Copyright ©1998-2005 Lion Brand Yarn Company, all rights reserved. No pattern or other material may be reproduced -- mechanically, electronically, or by any other means,
including photocopying -- without written permission of Lion Brand Yarn Company.

Visit our website www.lionbrand.com for hundreds of free patterns, free instruction
and more!
We are here to help you succeed! If you would like a little help with the instructions on this page, please contact us at [email protected] any time!
Page 44
Copyright ©1998-2005 Lion Brand Yarn Company, all rights reserved. No pattern or other material may be reproduced -- mechanically, electronically, or by any other means,
including photocopying -- without written permission of Lion Brand Yarn Company.

Visit our website www.lionbrand.com for hundreds of free patterns, free instruction
and more!
We are here to help you succeed! If you would like a little help with the instructions on this page, please contact us at [email protected]
18. Decreasing - Knit/Purl Two Together
Work to the two stitches to be decreased and then knit the two stitches together as shown. The stitches slant to the right.
Purling two stitches together is done in the same manner. This decrease slants the stitches to the right.
any time!
Page 45
Copyright ©1998-2005 Lion Brand Yarn Company, all rights reserved. No pattern or other material may be reproduced -- mechanically, electronically, or by any other means,
including photocopying -- without written permission of Lion Brand Yarn Company.

Visit our website www.lionbrand.com for hundreds of free patterns, free instruction
and more!
We are here to help you succeed! If you would like a little help with the instructions on this page, please contact us at [email protected]
19. Slipping Stitches Purlwise and Knitwise Sometimes stitches are slipped without working from the right needle to the left needle. They can either be slipped purlwise or knitwise. If you are asked to slip stitches and the instructions don't specify which way, slip the stitch or stitches purlwise.
Slipping Stitches Purlwise
Insert the right needle (from back to front) into the next stitch on the left needle and place it on the right needle without working it.
Slipping Stitches Knitwise
Insert the right needle into the next stitch on the left needle as shown and place it on the right needle without working it.
any time!
Page 46
Copyright ©1998-2005 Lion Brand Yarn Company, all rights reserved. No pattern or other material may be reproduced -- mechanically, electronically, or by any other means,
including photocopying -- without written permission of Lion Brand Yarn Company.
Visit our website www.lionbrand.com for hundreds of free patterns, free instruction
and more!
We are here to help you succeed! If you would like a little help with the instructions on this page, please contact us at [email protected]
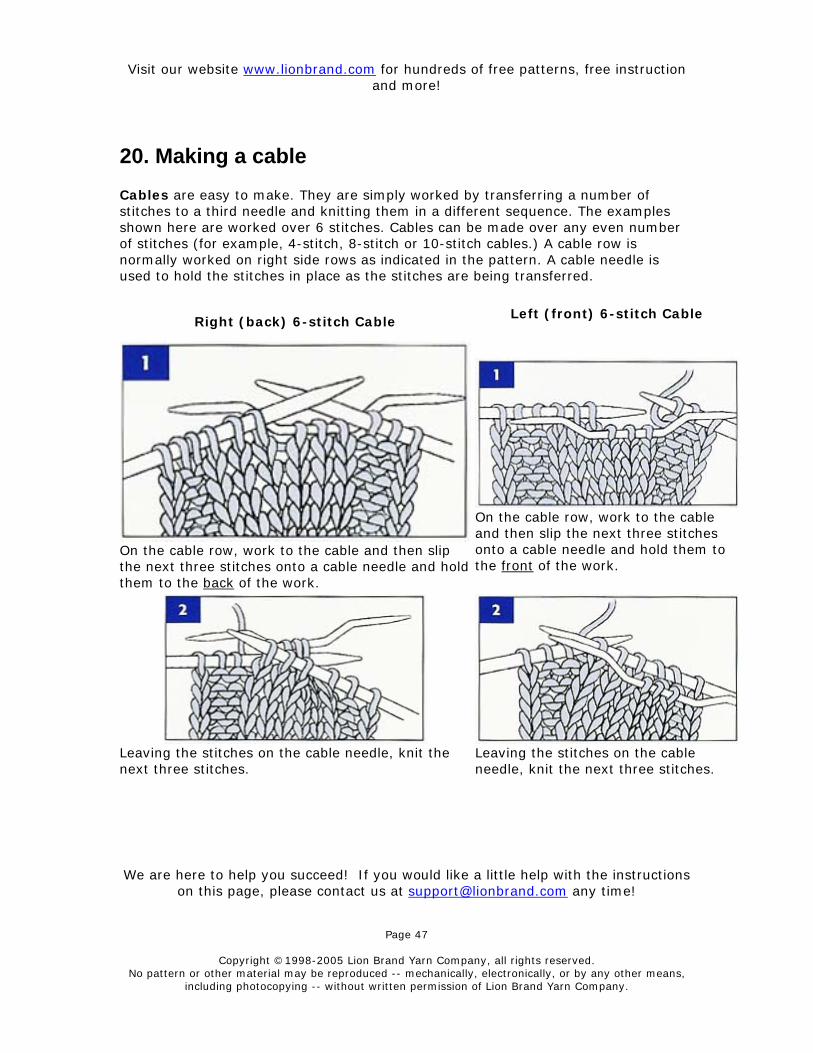
20. Making a cable Cables are easy to make. They are simply worked by transferring a number of stitches to a third needle and knitting them in a different sequence. The examples shown here are worked over 6 stitches. Cables can be made over any even number of stitches (for example, 4-stitch, 8-stitch or 10-stitch cables.) A cable row is normally worked on right side rows as indicated in the pattern. A cable needle is used to hold the stitches in place as the stitches are being transferred.
Right (back) 6-stitch Cable Left (front) 6-stitch Cable
On the cable row, work to the cable and then slip the next three stitches onto a cable needle and hold them to the front of the work.
On the cable row, work to the cable and then slip the next three stitches onto a cable needle and hold them to the back of the work.
Leaving the stitches on the cable needle, knit the next three stitches.
Leaving the stitches on the cable needle, knit the next three stitches.
any time!
Page 47
Copyright ©1998-2005 Lion Brand Yarn Company, all rights reserved. No pattern or other material may be reproduced -- mechanically, electronically, or by any other means,
including photocopying -- without written permission of Lion Brand Yarn Company.

Visit our website www.lionbrand.com for hundreds of free patterns, free instruction
and more!
We are here to help you succeed! If you would like a little help with the instructions on this page, please contact us at [email protected]
Knit the 3 stitches on the cable needle without twisting them.
Knit the 3 stitches on the cable needle without twisting them.
A completed cable with two cable rows.
A completed cable with two cable rows.
any time!
Page 48
Copyright ©1998-2005 Lion Brand Yarn Company, all rights reserved. No pattern or other material may be reproduced -- mechanically, electronically, or by any other means,
including photocopying -- without written permission of Lion Brand Yarn Company.

Visit our website www.lionbrand.com for hundreds of free patterns, free instruction
and more!
We are here to help you succeed! If you would like a little help with the instructions on this page, please contact us at [email protected]
21. Knitting into the Back Loop/Front Loop Knitting into the front loops is the normal procedure and is used unless otherwise specified. Knitting through the back loop twists the stitch.
Knitting Into the Front Loop
Insert the right needle into the front of the stitch from front to back and continue to knit the stitch.
Knitting Into the Back Loop
Insert the right needle into the back of the stitch from the front to back and continue to knit each stitch.
any time!
Page 49
Copyright ©1998-2005 Lion Brand Yarn Company, all rights reserved. No pattern or other material may be reproduced -- mechanically, electronically, or by any other means,
including photocopying -- without written permission of Lion Brand Yarn Company.

Visit our website www.lionbrand.com for hundreds of free patterns, free instruction
and more!
We are here to help you succeed! If you would like a little help with the instructions on this page, please contact us at [email protected]
22. Purling into the Back Loop/Front Loop Purling into the front loops is the normal procedure and is used unless otherwise specified. Purling through the back loop twists the stitch.
Purling Into the Front Loop
Insert the right needle into the front of the stitch from right to left as shown and continue to purl the stitch.
Purling Into the Back Loop
Insert the right needle into the back of the stitch from back to front and continue to purl the stitch.
any time!
Page 50
Copyright ©1998-2005 Lion Brand Yarn Company, all rights reserved. No pattern or other material may be reproduced -- mechanically, electronically, or by any other means,
including photocopying -- without written permission of Lion Brand Yarn Company.

Visit our website www.lionbrand.com for hundreds of free patterns, free instruction
and more!
We are here to help you succeed! If you would like a little help with the instructions on this page, please contact us at [email protected]
On a knit stitch, holding the yarn in the back, insert the left needle into the stitch one row below the first stitch on the right needle. On a purl stitch (not shown), hold the yarn in front and insert the needle from the back of the work. Slip the stitch onto your left needle, gently pulling the yarn out of the stitch above it. Continue in this way until you have reached your mistake.
any time!
Page 51
Copyright ©1998-2005 Lion Brand Yarn Company, all rights reserved. No pattern or other material may be reproduced -- mechanically, electronically, or by any other means,
including photocopying -- without written permission of Lion Brand Yarn Company.
Visit our website www.lionbrand.com for hundreds of free patterns, free instruction
and more!
We are here to help you succeed! If you would like a little help with the instructions on this page, please contact us at [email protected]
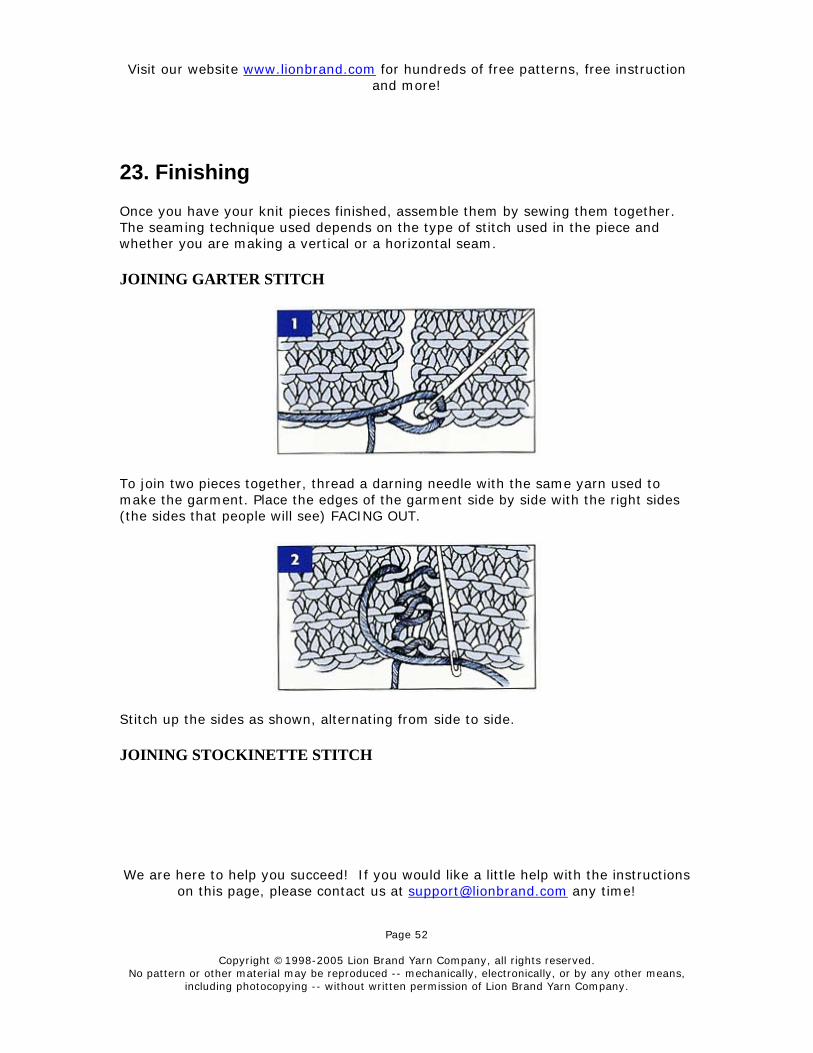
23. Finishing Once you have your knit pieces finished, assemble them by sewing them together. The seaming technique used depends on the type of stitch used in the piece and whether you are making a vertical or a horizontal seam. JOINING GARTER STITCH
To join two pieces together, thread a darning needle with the same yarn used to make the garment. Place the edges of the garment side by side with the right sides (the sides that people will see) FACING OUT.
Stitch up the sides as shown, alternating from side to side. JOINING STOCKINETTE STITCH
any time!
Page 52
Copyright ©1998-2005 Lion Brand Yarn Company, all rights reserved. No pattern or other material may be reproduced -- mechanically, electronically, or by any other means,
including photocopying -- without written permission of Lion Brand Yarn Company.
Visit our website www.lionbrand.com for hundreds of free patterns, free instruction
and more!
We are here to help you succeed! If you would like a little help with the instructions on this page, please contact us at [email protected]
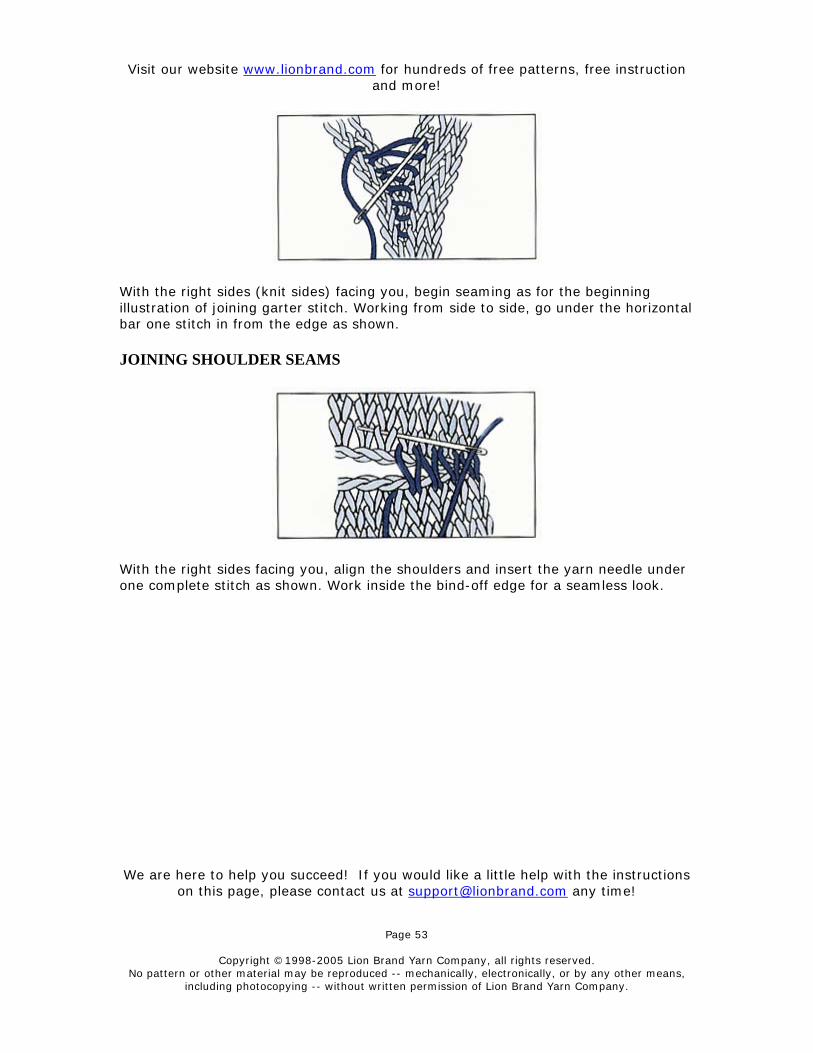
With the right sides (knit sides) facing you, begin seaming as for the beginning illustration of joining garter stitch. Working from side to side, go under the horizontal bar one stitch in from the edge as shown. JOINING SHOULDER SEAMS
With the right sides facing you, align the shoulders and insert the yarn needle under one complete stitch as shown. Work inside the bind-off edge for a seamless look.
any time!
Page 53
Copyright ©1998-2005 Lion Brand Yarn Company, all rights reserved. No pattern or other material may be reproduced -- mechanically, electronically, or by any other means,
including photocopying -- without written permission of Lion Brand Yarn Company.

Visit our website www.lionbrand.com for hundreds of free patterns, free instruction
and more!
We are here to help you succeed! If you would like a little help with the instructions on this page, please contact us at [email protected]
24. Weaving in Ends
Ends of yarn can be woven directly into your knitting. Thread a darning needle with the end of the yarn and run it in and out in an inconspicuous place for an inch or two. Clip remaining excess yarn.
any time!
Page 54
Copyright ©1998-2005 Lion Brand Yarn Company, all rights reserved. No pattern or other material may be reproduced -- mechanically, electronically, or by any other means,
including photocopying -- without written permission of Lion Brand Yarn Company.

Visit our website www.lionbrand.com for hundreds of free patterns, free instruction
and more!
We are here to help you succeed! If you would like a little help with the instructions on this page, please contact us at [email protected]
25. 3-Needle Bind Off
With right sides together, hold in one hand two needles with equal number of stitches on each. With third needle, knit together one stitch from each needle, *knit together one stitch from each needle, pass first stitch worked over second to bind off, repeat form * across to last stitch.
Cut working yarn and pull through last stitch to secure.
any time!
Page 55
Copyright ©1998-2005 Lion Brand Yarn Company, all rights reserved. No pattern or other material may be reproduced -- mechanically, electronically, or by any other means,
including photocopying -- without written permission of Lion Brand Yarn Company.

Visit our website www.lionbrand.com for hundreds of free patterns, free instruction
and more!
We are here to help you succeed! If you would like a little help with the instructions on this page, please contact us at [email protected]
26. Picking up Stitches Picking up stitches is a way to add to a piece that has been completed.
To pick up a stitch:
1. Slide one needle into an existing stitch
2. Slide your other needle underneath, into the stitch as to knit
3. Pull the stitch through as in in knitting
any time!
Page 56
Copyright ©1998-2005 Lion Brand Yarn Company, all rights reserved. No pattern or other material may be reproduced -- mechanically, electronically, or by any other means,
including photocopying -- without written permission of Lion Brand Yarn Company.
Visit our website www.lionbrand.com for hundreds of free patterns, free instruction
and more!
We are here to help you succeed! If you would like a little help with the instructions on this page, please contact us at [email protected]
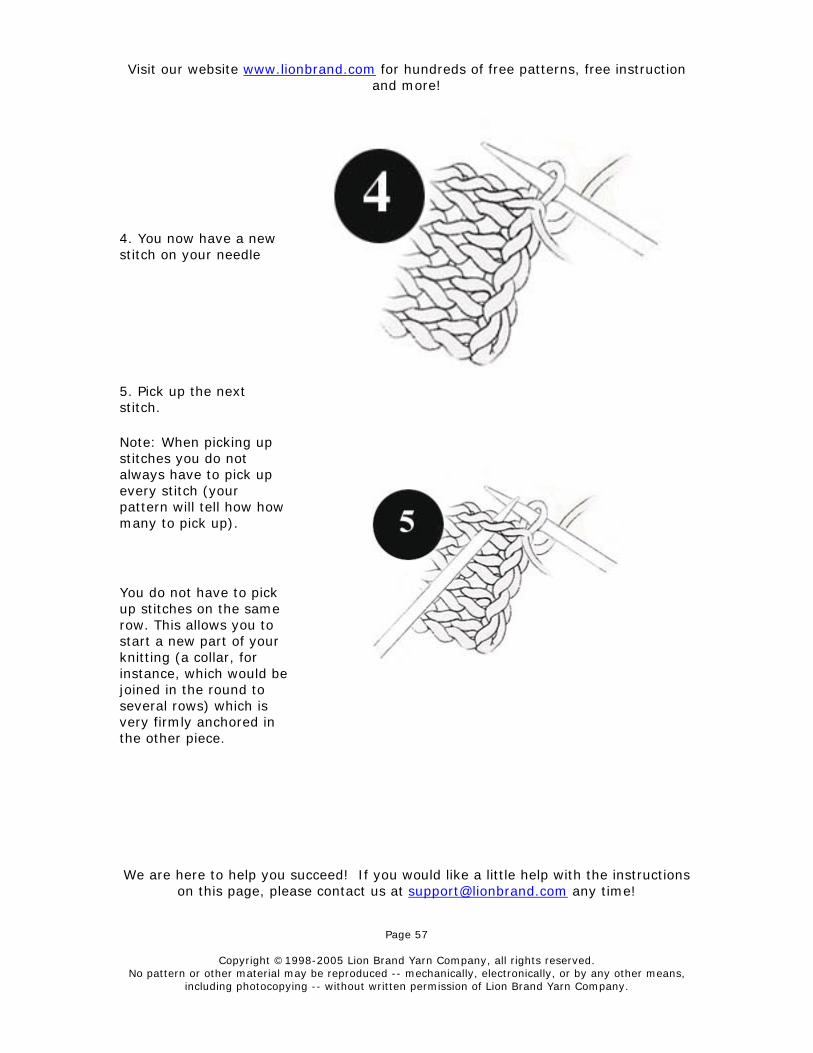
4. You now have a new stitch on your needle
5. Pick up the next stitch.
Note: When picking up stitches you do not always have to pick up every stitch (your pattern will tell how how many to pick up).
You do not have to pick up stitches on the same row. This allows you to start a new part of your knitting (a collar, for instance, which would be joined in the round to several rows) which is very firmly anchored in the other piece.
any time!
Page 57
Copyright ©1998-2005 Lion Brand Yarn Company, all rights reserved. No pattern or other material may be reproduced -- mechanically, electronically, or by any other means,
including photocopying -- without written permission of Lion Brand Yarn Company.

Visit our website www.lionbrand.com for hundreds of free patterns, free instruction
and more!
We are here to help you succeed! If you would like a little help with the instructions on this page, please contact us at [email protected]
27. Knitting with two strands together Some items are made using two strands of yarn held together throughout. If the pattern uses only one skein of yarn, you have two choices:
1. roll each skein into two equal-sized balls
2. use yarn from both the outside and the inside of the skein.
any time!
Page 58
Copyright ©1998-2005 Lion Brand Yarn Company, all rights reserved. No pattern or other material may be reproduced -- mechanically, electronically, or by any other means,
including photocopying -- without written permission of Lion Brand Yarn Company.

Visit our website www.lionbrand.com for hundreds of free patterns, free instruction
and more!
We are here to help you succeed! If you would like a little help with the instructions on this page, please contact us at [email protected]
28. Duplicate Stitch Duplicate stitch is a way to work a design or pattern into your knitting after the piece is complete. It is actually embroidery worked on the surface of the knitted fabric. It is used to add color details, such as a stripe or small motif, but you can also use it to correct small mistakes. Bring yarn to the outside at the base of the stitch below the stitch to be duplicated. Pull yarn through to front. Place needle from right to left behind both sides of the stitch above the one being duplicated. Complete the stitch by returning the needle to where you began. When working a series of horizontal duplicate stitches, complete one stitch and begin the adjacent stitch in one step.
any time!
Page 59
Copyright ©1998-2005 Lion Brand Yarn Company, all rights reserved. No pattern or other material may be reproduced -- mechanically, electronically, or by any other means,
including photocopying -- without written permission of Lion Brand Yarn Company.

Visit our website www.lionbrand.com for hundreds of free patterns, free instruction
and more!
We are here to help you succeed! If you would like a little help with the instructions on this page, please contact us at [email protected] any time!
Page 60
Copyright ©1998-2005 Lion Brand Yarn Company, all rights reserved. No pattern or other material may be reproduced -- mechanically, electronically, or by any other means,
including photocopying -- without written permission of Lion Brand Yarn Company.
29. Grafting (Kitchener Stitch) 1. The Kitchener stitch is used to join two pieces of knitting together by using a
large-eyed blunt needle and sewing in a manner that imitates knitting. It is commonly used to join the toe end of socks so there is no seam to rub on the toes.
2. Cut the yarn, leaving a tail equal to the amount you would normally need to finish the row
3. You'll have two pieces to join, one side on each of two needles. Hold the needles parallel, wrong sides together
4. Thread the end of the yarn through a large-eyed, blunt needle (often called a 'tapestry needle')
5. Working from right to left, insert the large-eyed, blunt needle in first stitch on lower piece as if to purl and draw the thread all the way through. The working thread should be under the needles each time.
6. Insert needle in first stitch on top piece from front to back and second stitch from back to front
7. Pull yarn through and take the stitch off the needles. 8. Insert needle in first stitch on lower piece from front to back and second
stitch from back to front. 9. Pull yarn through and take the stitch off the needle. 10. Repeat until no stitches remain. Bring the tail to the inside of the work and
fasten off.