installation instructions stillen dual hi …inst.pdf · steve millen sportparts, inc. - 3176...
TRANSCRIPT

Steve Millen Sportparts, Inc. - 3176 Airway Avenue - Costa Mesa, CA 92626 - Phone. 714-540-5566 - www.stillen.com
Rev A – 4/1/2014 Page 1 of 4
INSTALLATION INSTRUCTIONS STILLEN DUAL HI-FLOW INTAKE
P/N 402852/402852DF Materials supplied: 1. (2) Air filters with clamps 2. (2) Upper Intake tubes 3. (2) Lower Intake tubes 4. (4) Couplers 5. Silicone hose (PCV) 6. Misc. hardware
Equipment needed: 1. Assorted sockets and wrenches 2. +,- Screwdriver 3. Assorted pliers 4. Rotary tool
����!!!! WARNING:
IF YOU ARE NOT EXPERIENCED IN THE AREA OF AUTOMOTIVE MECHANICS WE STRONGLY URGE THAT YOU REFER THIS INSTALLATION TO YOUR MECHANIC.
WARNING!!!!! – DO NOT ATTEMPT TO START VEHICLE WITH THE MASS AIR SENSOR DISCONNECTED, FAILURE TO FOLLOW WARNING WILL RESULT IN FUTURE DIAGNOSTIC REPAIRS. NOTE: Due to the vehicles sharing some common parts, some of the pictures in these instructions are from a G37 install.
Installation:
1. Disconnect the negative battery cable. Remove the stock engine cover and set aside. It is not necessary to remove the Strut Tower Brace for this install, but it would make it easier.
2. Unplug the Mass Airflow Sensors (MAS) and unclip the wire from the air boxes.
3. Loosen the clamp on the intake tube where it attaches at the throttle body and remove the bolt that holds the air box in using a 10mm socket. Remove the small hose clamp connecting the breather tube to the intake tube. Remove complete intake as 1 piece. It will require a firm tug to release it from the rubber grommets on the bottom.
Steve Millen Sportparts, Inc. - 3176 Airway Avenue - Costa Mesa, CA 92626 - Phone. 714-540-5566 - www.stillen.com
Rev A – 4/1/2014 Page 2 of 4
4. Remove numerous plastic clips and bolts on the forward radiator cover and set the cover out of the way.
5. Remove Fascia. This will require removing the bolts from the lower engine cover. You will also have to remove the plastic clips from the front wheel well liners to reach the bolts under very end of the fascia. After removing all the hardware, firmly pull the fascia out of the clips around the headlights and pull the fascia away from the vehicle. Set out of the way.
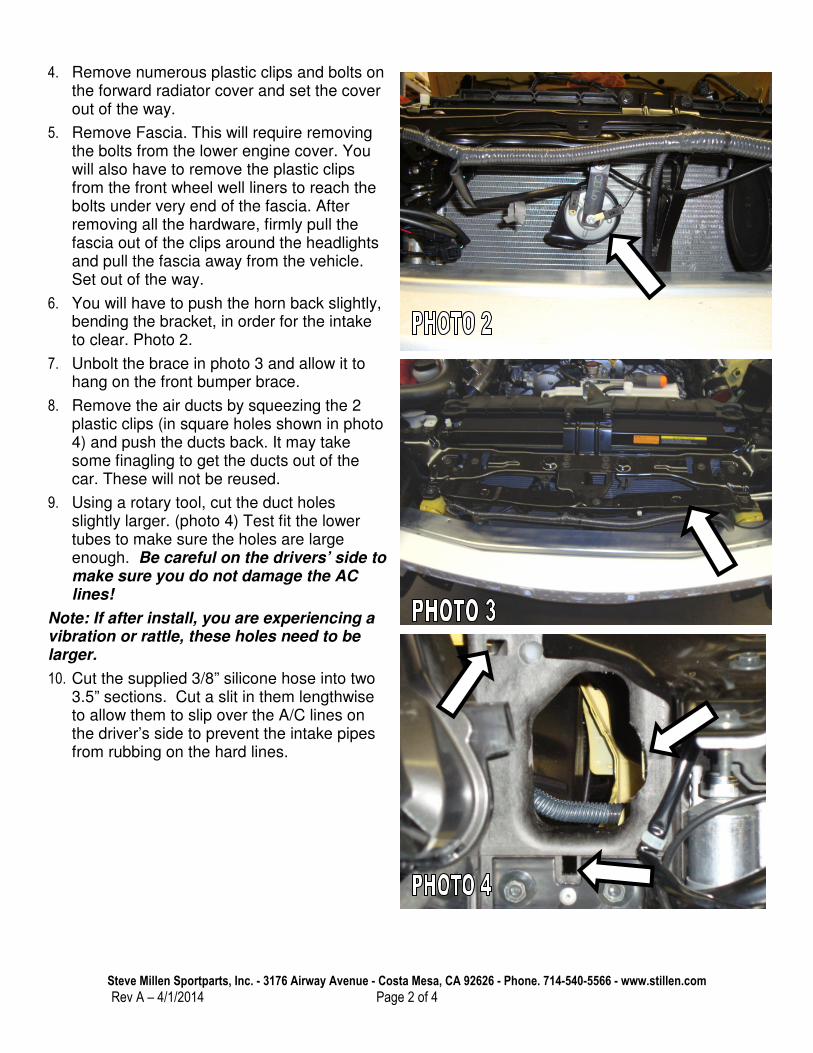
6. You will have to push the horn back slightly, bending the bracket, in order for the intake to clear. Photo 2.
7. Unbolt the brace in photo 3 and allow it to hang on the front bumper brace.
8. Remove the air ducts by squeezing the 2 plastic clips (in square holes shown in photo 4) and push the ducts back. It may take some finagling to get the ducts out of the car. These will not be reused.
9. Using a rotary tool, cut the duct holes slightly larger. (photo 4) Test fit the lower tubes to make sure the holes are large enough. Be careful on the drivers’ side to make sure you do not damage the AC lines!
Note: If after install, you are experiencing a vibration or rattle, these holes need to be larger.
10. Cut the supplied 3/8” silicone hose into two 3.5” sections. Cut a slit in them lengthwise to allow them to slip over the A/C lines on the driver’s side to prevent the intake pipes from rubbing on the hard lines.

Steve Millen Sportparts, Inc. - 3176 Airway Avenue - Costa Mesa, CA 92626 - Phone. 714-540-5566 - www.stillen.com
Rev A – 4/1/2014 Page 3 of 4
11. Install the upper tubes using the supplied stepped hose couplers clamps. The tube with the extra bend will go on the passengers’ side. Use the provided 5/8” silicone hose pieces and clamps for the breather nipples. Install the straight couplers on the lower ends of the tubes using the supplied clamps. (photo 5)
12. Install Filters onto lower tubes. The lower tube marked P is the passenger side tube. Don’t worry; it is almost impossible to install them on the wrong side, as the upper and lower tubes will not line up. Slide the tubes through the holes cut in step. Loosely clamp them to the upper tubes.
13. With all the clamps loose, adjust the upper and lower tubes until they are aligned with each other and the upper tubes are not rubbing on the strut towers. It may be necessary to install a piece of silicone hose between the driver’s side lower tube and the A/C lines to keep them from rubbing. Split open an extra piece of silicone breather hose, wrap around the A/C lines, and secure with zip ties. Tighten all clamps.
14. Reinstall the brace removed in photo 3.
15. Your Passenger side filter install should look like photo 6.

Steve Millen Sportparts, Inc. - 3176 Airway Avenue - Costa Mesa, CA 92626 - Phone. 714-540-5566 - www.stillen.com
Rev A – 4/1/2014 Page 4 of 4
16. Remove the MAS from the OEM air boxes (PHOTO 7) and install them into the new intake tube. Make sure the rubber seal stays in place around the top of the MAS. (PHOTO 8)
17. Plug in the MAS connector.
18. After both intakes are installed and the MAS sensors are plugged in, reinstall the fascia, radiator cover and engine cover. Reconnect the battery.
19. You are now finished with the installation. Enjoy the benefits of the STILLEN Cold Air Intake system.