installation instructions ford s-max (model year … · installation instructions ford s-max (model...
TRANSCRIPT

Confidential. The contents may only be passed on, used or made known with our express permission. All rights reserved.
Installation story, Ford S-MaxInstallation story, Ford S-Max (status: 06/2010)1
Installation Instructions Ford S-Max (model year 04/2006 – 01/2010)

Confidential. The contents may only be passed on, used or made known with our express permission. All rights reserved.
Installation story, Ford S-MaxInstallation story, Ford S-Max (status: 06/2010)2
LEDayFlexThe world’s first flexible daytime running light
Confidential. The contents may only be passed on, used or made known with our express permission. All rights reserved.
Installation story, Ford S-MaxInstallation story, Ford S-Max (status: 06/2010)3
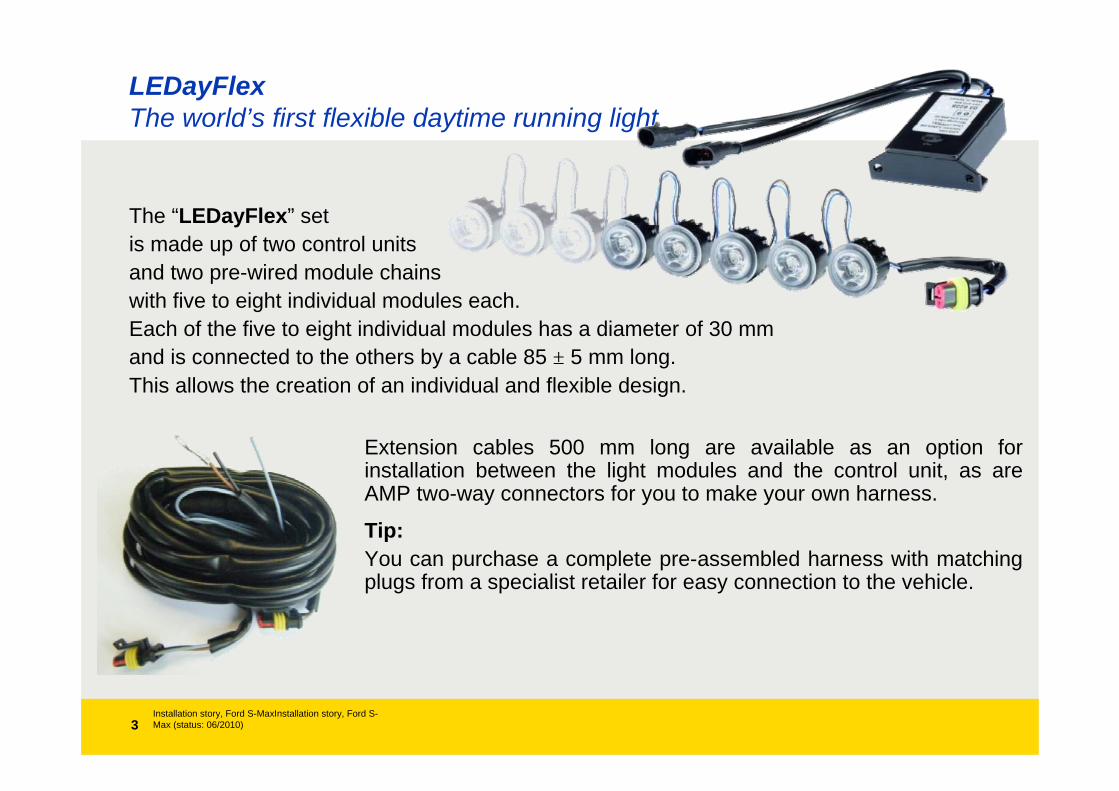
LEDayFlexThe world’s first flexible daytime running light
Extension cables 500 mm long are available as an option for installation between the light modules and the control unit, as are AMP two-way connectors for you to make your own harness.
Tip:You can purchase a complete pre-assembled harness with matching plugs from a specialist retailer for easy connection to the vehicle.
The “LEDayFlex” set is made up of two control units and two pre-wired module chainswith five to eight individual modules each. Each of the five to eight individual modules has a diameter of 30 mm and is connected to the others by a cable 85 ± 5 mm long. This allows the creation of an individual and flexible design.

Confidential. The contents may only be passed on, used or made known with our express permission. All rights reserved.
Installation story, Ford S-MaxInstallation story, Ford S-Max (status: 06/2010)4
LEDayFlexRange overview
Daytime running light modules with and without position light.
5 light modules Daytime running light 2PT 010 458-8015 light modules Daytime running light / Position light* 2PT 010 458-8116 light modules Daytime running light 2PT 010 458-8216 light modules Daytime running light / Position light* 2PT 010 458-8317 light modules Daytime running light 2PT 010 458-8417 light modules Daytime running light / Position light* 2PT 010 458-8518 light modules Daytime running light 2PT 010 458-8618 light modules Daytime running light / Position light* 2PT 010 458-871
• When LEDayFlex is used as a position light, the standard series version must be permanently disabled in accordance with ECE-R 48.

Confidential. The contents may only be passed on, used or made known with our express permission. All rights reserved.
Installation story, Ford S-MaxInstallation story, Ford S-Max (status: 06/2010)5
LEDayFlexRange overview of accessories (not included in the scope of supply)
Connection cable set inc. two-way connector 8KA 165 959-001Extension cable 2-pole 500 mm 8KB 178 139-001AMP two-way connector (1 set) 8KW 744 807-801AMP two-way connector (10 units) 8JA 746 184-032Plug-type contacts (50 units) 8KW 744 837-002Individual seals (50 units) 9GD 746 185-002

Confidential. The contents may only be passed on, used or made known with our express permission. All rights reserved.
Installation story, Ford S-MaxInstallation story, Ford S-Max (status: 06/2010)6
LEDayFlexAdditional material for mounting the LEDayFlex modules
PRACTICAL TIP!Due to the design differences in the front aprons on current vehicles, additional mounting material may in some cases be necessary to fasten the lights in position. With some technical skill you can make suitable holders yourself. Commercially available punched strip, angle brackets or small metal rails (see illustration), for example are always helpful here.
These can then be adapted individually to the respective mounting situation. It is important that the mounting brackets made are well protected against corrosion. Recommendations therefore are that mounting brackets should be made of stainless steel, aluminum or zinc-coated materials.

Confidential. The contents may only be passed on, used or made known with our express permission. All rights reserved.
Installation story, Ford S-MaxInstallation story, Ford S-Max (status: 06/2010)7
LEDayFlexThe world’s first flexible daytime running light
First, the underbody protection is removed. To do this, the corresponding screws are removed in order to be able to pull out the underbody protection towards the rear of the vehicle.
In order to be able to install the daytime running lights, the grille is disengaged and removed from the front bumper.
2
1

Confidential. The contents may only be passed on, used or made known with our express permission. All rights reserved.
Installation story, Ford S-MaxInstallation story, Ford S-Max (status: 06/2010)8
LEDayFlexThe world’s first flexible daytime running light
Important: During mounting, the general installation requirements as described in detail in the mounting instructions must be followed. Thus, for example the LED modules must be aligned parallel to the vehicle’s longitudinal axis and the distance between the individual modules must be min. 1 mm and max. 15 mm. In addition, ECE-R 48 specifies the exact position in which the lights may be installed in terms of height and width.
Confidential. The contents may only be passed on, used or made known with our express permission. All rights reserved.
Installation story, Ford S-MaxInstallation story, Ford S-Max (status: 06/2010)9
LEDayFlexThe world’s first flexible daytime running light
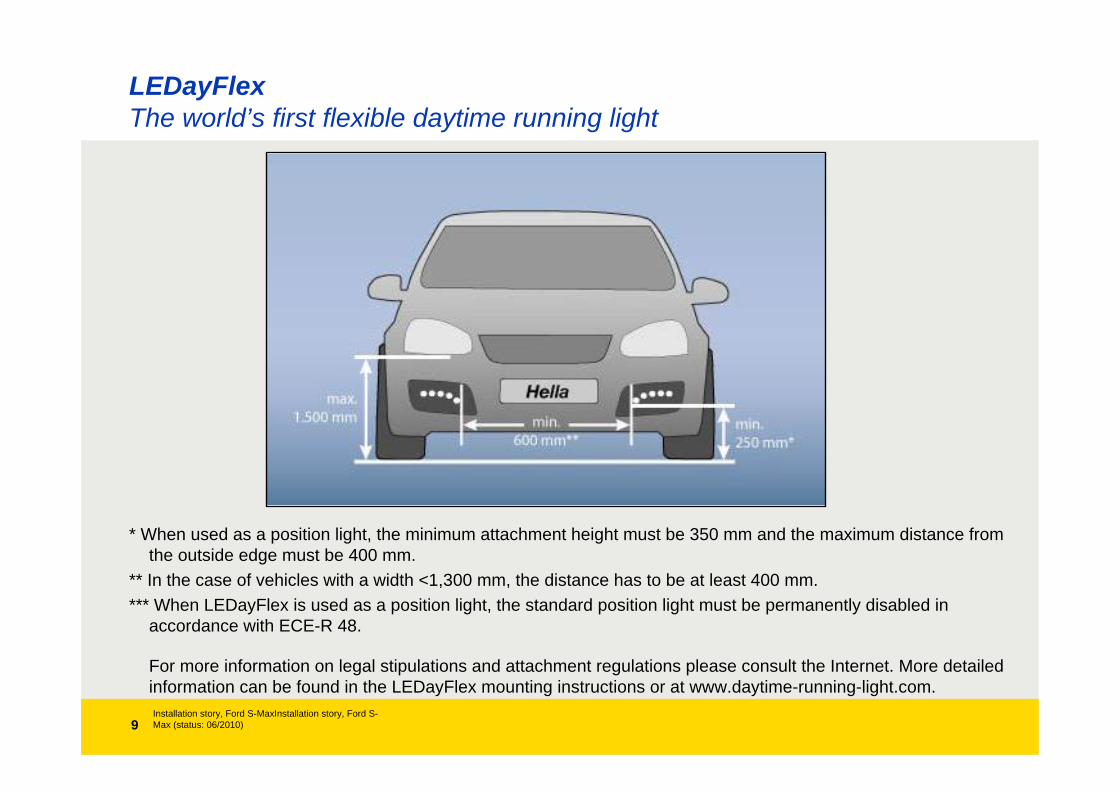
* When used as a position light, the minimum attachment height must be 350 mm and the maximum distance from the outside edge must be 400 mm.
** In the case of vehicles with a width <1,300 mm, the distance has to be at least 400 mm.*** When LEDayFlex is used as a position light, the standard position light must be permanently disabled in
accordance with ECE-R 48.
For more information on legal stipulations and attachment regulations please consult the Internet. More detailed information can be found in the LEDayFlex mounting instructions or at www.daytime-running-light.com.

Confidential. The contents may only be passed on, used or made known with our express permission. All rights reserved.
Installation story, Ford S-MaxInstallation story, Ford S-Max (status: 06/2010)10
LEDayFlexThe world’s first flexible daytime running light
After the grille has been removed, the two splash-protection covers are removed.
Caution! Please do not throw away, because they will be needed again later!
4
3

Confidential. The contents may only be passed on, used or made known with our express permission. All rights reserved.
Installation story, Ford S-MaxInstallation story, Ford S-Max (status: 06/2010)11
LEDayFlexThe world’s first flexible daytime running light
Now the covers must be adapted to the individual modules and with the aid of the additional holders (see "Additional material" on page 6), the individual modules must be fastened one below the other as well as to the suitably modified splash protection (in relation to this see also the "Mounting accessories" summary)
Fastening screw
To adapt the grille, a Dremel with an appropriate grinding attachment was used.
Important: Please make sure that the modules are not covered!
6
5

Confidential. The contents may only be passed on, used or made known with our express permission. All rights reserved.
Installation story, Ford S-MaxInstallation story, Ford S-Max (status: 06/2010)12
LEDayFlexThe world’s first flexible daytime running light
After the lights have been fastened into the grille, connection onto the vehicle are carried out. For this a protected location to fit the control units are needed. In the case of the Ford these are fitted behind the two splash-protection covers. First the holes for fastening are marked and drilled to match the screw size. Then the control units are secured on tightly.
8
7
9 10 11

Confidential. The contents may only be passed on, used or made known with our express permission. All rights reserved.
Installation story, Ford S-MaxInstallation story, Ford S-Max (status: 06/2010)13
LEDayFlexThe world’s first flexible daytime running lightTerminal 15 is needed for the connection vehicle-side. In the case of the Ford this is located in the front fuse box. In order for the fuse box to be able to reach the earth point (terminal 31) as well as terminal 58 for the position light, the drivers side headlight must be removed.
Position-light plus
Firstly for the theory of the connection of the professional harness to terminals 15, 31, 58:
connect the black cable to terminal 15 (ignition +)connect the grey cable with the aid of butt joints or incision connectors to the position-light cable (terminal 58) at the central plug of the headlights, so that the lights are switched off when the parking light or low beam are switched onfasten the brown cable with the eyelet to a suitable earth point
If you prefer, rather than using the available LEDayFlex connection cable set (8KA 165 959-001), you can also prepare the wiring yourself.
Confidential. The contents may only be passed on, used or made known with our express permission. All rights reserved.
Installation story, Ford S-MaxInstallation story, Ford S-Max (status: 06/2010)14
LEDayFlexThe world’s first flexible daytime running light
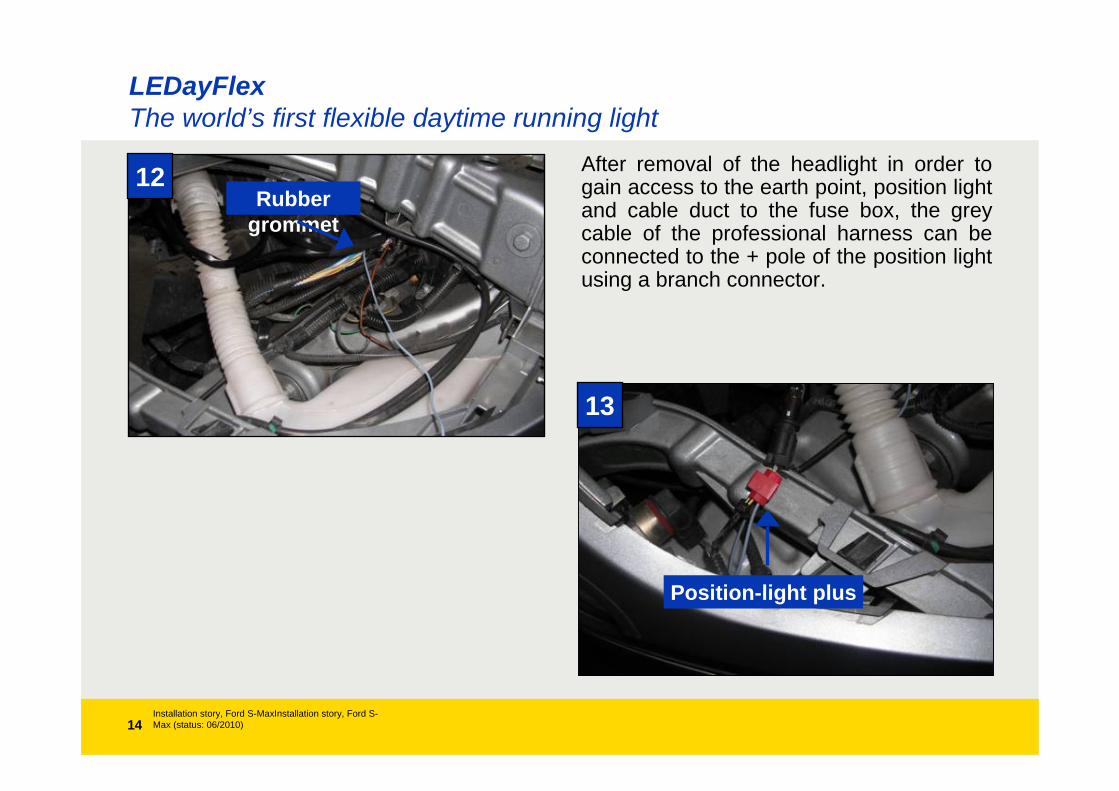
After removal of the headlight in order to gain access to the earth point, position light and cable duct to the fuse box, the grey cable of the professional harness can be connected to the + pole of the position light using a branch connector.
Rubber grommet
Position-light plus
12
13

Confidential. The contents may only be passed on, used or made known with our express permission. All rights reserved.
Installation story, Ford S-MaxInstallation story, Ford S-Max (status: 06/2010)15
LEDayFlexThe world’s first flexible daytime running light
In order to route the black cable (terminal 15) of the professional harness into the fuse box, it is best to go through the rubber grommet. Terminal 15 is then tapped into with the aid of a fuse adapter.
Earth point
Terminal 15
A branch connector, available as an accessory under the number 8JD 743 557-811 (ATO) and the number 8JD 743 557-801 (Mini) from a specialist retailer, can be used for this.
Below the headlights there are several earth points to which the brown cable can be connected.
14
15

Confidential. The contents may only be passed on, used or made known with our express permission. All rights reserved.
Installation story, Ford S-MaxInstallation story, Ford S-Max (status: 06/2010)16
LEDayFlexThe world’s first flexible daytime running light
It is helpful to use cable straps when laying the professional harness in the engine compartment. In relation to this it must be ensured that the cable cannot chaffe or that other cables or pipes cannot be damaged. As soon as the harness has been completely secured, the control units can be connected.
The harness was secured along this yellow line

Confidential. The contents may only be passed on, used or made known with our express permission. All rights reserved.
Installation story, Ford S-MaxInstallation story, Ford S-Max (status: 06/2010)17
LEDayFlexThe world’s first flexible daytime running light
After the professional harness has been secured in the engine compartment, it is necessary to put the grille back into the vehicles front apron and to connect the daytime running lights to the control units. After this the headlight and the underbody protection can be refitted.
15
16

Confidential. The contents may only be passed on, used or made known with our express permission. All rights reserved.
Installation story, Ford S-MaxInstallation story, Ford S-Max (status: 06/2010)18
LEDayFlexThe world’s first flexible daytime running light
Hella wishes you a good trip with your individual LEDayFlex design!