inmailfeaturemanual - กล้องวงจรปิด,ตู้สาขา...
TRANSCRIPT

InMail Feature Manual
A50-031162-001 GEISSUE 1.1May 2011

CopyrightNEC Corporation reserves the right to change the specifications, functions, or features at any time
without notice.
NEC Corporation has prepared this document for use by its employees and customers. The informa-
tion contained herein is the property of NEC Corporation and shall not be reproduced without prior
written approval of NEC Corporation.
Pentium is a trademark or registered trademark of Intel Corporation or its subsidiaries in the United
States and other countries.
Copyright 2011
NEC Corporation
Chapter 1 Quick SetupSection 1 INSTALL THE INMAIL BOARD . . . . . . . . . . . . . . . . . . . . . . . . . . . . . . . . . . . . . . . . . . . . . . . . . . . . . . . . . . . . . . . . 1-1
Section 2 UPGRADE THE INMAIL BOARD . . . . . . . . . . . . . . . . . . . . . . . . . . . . . . . . . . . . . . . . . . . . . . . . . . . . . . . . . . . . . . 1-2
Section 3 START-UP (DEFAULT) INMAIL CONFIGURATION . . . . . . . . . . . . . . . . . . . . . . . . . . . . . . . . . . . . . . . . 1-3
Section 4 BASIC FUNCTIONS WITHOUT MAIN GREETING . . . . . . . . . . . . . . . . . . . . . . . . . . . . . . . . . . . . . . . . . 1-3
Section 5 ENABLE THE MAILBOXES FOR ALL INSTALLED EXTENSIONS . . . . . . . . . . . . . . . . . . . . . . 1-3
Section 6 SET UP AUTOMATED ATTENDANT TO ANSWER OUTSIDE CALLS . . . . . . . . . . . . . . . . . . 1-4
Section 7 SET UP SIMPLE DAY/NIGHT ANSWERING . . . . . . . . . . . . . . . . . . . . . . . . . . . . . . . . . . . . . . . . . . . . . . . . 1-5
Section 8 INMAIL SYSTEM REQUIREMENTS . . . . . . . . . . . . . . . . . . . . . . . . . . . . . . . . . . . . . . . . . . . . . . . . . . . . . . . . . . 1-6
Section 9 SPECIFICATIONS . . . . . . . . . . . . . . . . . . . . . . . . . . . . . . . . . . . . . . . . . . . . . . . . . . . . . . . . . . . . . . . . . . . . . . . . . . . . . . . 1-6
Section 10 EXAMPLES OF COMMON APPLICATIONS . . . . . . . . . . . . . . . . . . . . . . . . . . . . . . . . . . . . . . . . . . . . . . . 1-6
Chapter 2 FeaturesSection 1 INTRODUCTION TO INMAIL FEATURES . . . . . . . . . . . . . . . . . . . . . . . . . . . . . . . . . . . . . . . . . . . . . . . . . . . 2-1
Section 2 FEATURE GLOSSARY . . . . . . . . . . . . . . . . . . . . . . . . . . . . . . . . . . . . . . . . . . . . . . . . . . . . . . . . . . . . . . . . . . . . . . . . . 2-1
Section 3 FEATURE DESCRIPTIONS . . . . . . . . . . . . . . . . . . . . . . . . . . . . . . . . . . . . . . . . . . . . . . . . . . . . . . . . . . . . . . . . . . . . 2-6Announcement Mailbox .... . . . . . . . . . . . . . . . . . . . . . . . . . . . . . . . . . . . . . . . . . . . . . . . . . . . . . . . . . . . . . . . . . . . . . . . . . . . . . 2-7Announcement Message ..... . . . . . . . . . . . . . . . . . . . . . . . . . . . . . . . . . . . . . . . . . . . . . . . . . . . . . . . . . . . . . . . . . . . . . . . . . .2-11Answer Schedule Override .... . . . . . . . . . . . . . . . . . . . . . . . . . . . . . . . . . . . . . . . . . . . . . . . . . . . . . . . . . . . . . . . . . . . . . . . .2-12Answer Table .... . . . . . . . . . . . . . . . . . . . . . . . . . . . . . . . . . . . . . . . . . . . . . . . . . . . . . . . . . . . . . . . . . . . . . . . . . . . . . . . . . . . . . . . . .2-14Auto Attendant Do Not Disturb .... . . . . . . . . . . . . . . . . . . . . . . . . . . . . . . . . . . . . . . . . . . . . . . . . . . . . . . . . . . . . . . . . . . . .2-20Auto Erase or Save ..... . . . . . . . . . . . . . . . . . . . . . . . . . . . . . . . . . . . . . . . . . . . . . . . . . . . . . . . . . . . . . . . . . . . . . . . . . . . . . . . .2-22Auto Time Stamp ..... . . . . . . . . . . . . . . . . . . . . . . . . . . . . . . . . . . . . . . . . . . . . . . . . . . . . . . . . . . . . . . . . . . . . . . . . . . . . . . . . . . .2-23Automated Attendant .... . . . . . . . . . . . . . . . . . . . . . . . . . . . . . . . . . . . . . . . . . . . . . . . . . . . . . . . . . . . . . . . . . . . . . . . . . . . . . . . .2-25Automated Attendant Transfer .... . . . . . . . . . . . . . . . . . . . . . . . . . . . . . . . . . . . . . . . . . . . . . . . . . . . . . . . . . . . . . . . . . . . . .2-29Automatic Access to VM by Caller ID ..... . . . . . . . . . . . . . . . . . . . . . . . . . . . . . . . . . . . . . . . . . . . . . . . . . . . . . . . . . . .2-30Automatic Routing for Rotary Dial Callers .... . . . . . . . . . . . . . . . . . . . . . . . . . . . . . . . . . . . . . . . . . . . . . . . . . . . . . . .2-33Call Forward to a Mailbox .... . . . . . . . . . . . . . . . . . . . . . . . . . . . . . . . . . . . . . . . . . . . . . . . . . . . . . . . . . . . . . . . . . . . . . . . . . .2-34Caller ID ..... . . . . . . . . . . . . . . . . . . . . . . . . . . . . . . . . . . . . . . . . . . . . . . . . . . . . . . . . . . . . . . . . . . . . . . . . . . . . . . . . . . . . . . . . . . . . .2-36Caller ID with Return Call .. . . . . . . . . . . . . . . . . . . . . . . . . . . . . . . . . . . . . . . . . . . . . . . . . . . . . . . . . . . . . . . . . . . . . . . . . . . . .2-38Calling the Automated Attendant .... . . . . . . . . . . . . . . . . . . . . . . . . . . . . . . . . . . . . . . . . . . . . . . . . . . . . . . . . . . . . . . . . . .2-39Cascade Message Notification .... . . . . . . . . . . . . . . . . . . . . . . . . . . . . . . . . . . . . . . . . . . . . . . . . . . . . . . . . . . . . . . . . . . . .2-40Dial Action Table .... . . . . . . . . . . . . . . . . . . . . . . . . . . . . . . . . . . . . . . . . . . . . . . . . . . . . . . . . . . . . . . . . . . . . . . . . . . . . . . . . . . . . .2-49Directory Dialing .... . . . . . . . . . . . . . . . . . . . . . . . . . . . . . . . . . . . . . . . . . . . . . . . . . . . . . . . . . . . . . . . . . . . . . . . . . . . . . . . . . . . . .2-54Directory Dialing Mailbox .... . . . . . . . . . . . . . . . . . . . . . . . . . . . . . . . . . . . . . . . . . . . . . . . . . . . . . . . . . . . . . . . . . . . . . . . . . . .2-62Distribution List ... . . . . . . . . . . . . . . . . . . . . . . . . . . . . . . . . . . . . . . . . . . . . . . . . . . . . . . . . . . . . . . . . . . . . . . . . . . . . . . . . . . . . . . .2-63Email Notification .... . . . . . . . . . . . . . . . . . . . . . . . . . . . . . . . . . . . . . . . . . . . . . . . . . . . . . . . . . . . . . . . . . . . . . . . . . . . . . . . . . . . .2-66Erasing All Messages .... . . . . . . . . . . . . . . . . . . . . . . . . . . . . . . . . . . . . . . . . . . . . . . . . . . . . . . . . . . . . . . . . . . . . . . . . . . . . . . .2-79Exiting a Mailbox .... . . . . . . . . . . . . . . . . . . . . . . . . . . . . . . . . . . . . . . . . . . . . . . . . . . . . . . . . . . . . . . . . . . . . . . . . . . . . . . . . . . . .2-80External Transfer .... . . . . . . . . . . . . . . . . . . . . . . . . . . . . . . . . . . . . . . . . . . . . . . . . . . . . . . . . . . . . . . . . . . . . . . . . . . . . . . . . . . . .2-81Fax Detection .... . . . . . . . . . . . . . . . . . . . . . . . . . . . . . . . . . . . . . . . . . . . . . . . . . . . . . . . . . . . . . . . . . . . . . . . . . . . . . . . . . . . . . . . .2-83Find-Me Follow-Me ..... . . . . . . . . . . . . . . . . . . . . . . . . . . . . . . . . . . . . . . . . . . . . . . . . . . . . . . . . . . . . . . . . . . . . . . . . . . . . . . . . .2-84Flexible Answering Schedules .... . . . . . . . . . . . . . . . . . . . . . . . . . . . . . . . . . . . . . . . . . . . . . . . . . . . . . . . . . . . . . . . . . . . . .2-87Flexible Call Routing .... . . . . . . . . . . . . . . . . . . . . . . . . . . . . . . . . . . . . . . . . . . . . . . . . . . . . . . . . . . . . . . . . . . . . . . . . . . . . . . . .2-88Flexible Mailbox Numbering Plan .... . . . . . . . . . . . . . . . . . . . . . . . . . . . . . . . . . . . . . . . . . . . . . . . . . . . . . . . . . . . . . . . . .2-89Forced Unscreened Transfer .... . . . . . . . . . . . . . . . . . . . . . . . . . . . . . . . . . . . . . . . . . . . . . . . . . . . . . . . . . . . . . . . . . . . . . .2-91Getting Recorded Help .... . . . . . . . . . . . . . . . . . . . . . . . . . . . . . . . . . . . . . . . . . . . . . . . . . . . . . . . . . . . . . . . . . . . . . . . . . . . . .2-92Go To A Mailbox .... . . . . . . . . . . . . . . . . . . . . . . . . . . . . . . . . . . . . . . . . . . . . . . . . . . . . . . . . . . . . . . . . . . . . . . . . . . . . . . . . . . . . .2-93Greeting .... . . . . . . . . . . . . . . . . . . . . . . . . . . . . . . . . . . . . . . . . . . . . . . . . . . . . . . . . . . . . . . . . . . . . . . . . . . . . . . . . . . . . . . . . . . . . . . .2-95Group (Shared) Mailbox .... . . . . . . . . . . . . . . . . . . . . . . . . . . . . . . . . . . . . . . . . . . . . . . . . . . . . . . . . . . . . . . . . . . . . . . . . . . . .2-98Guest Mailbox .... . . . . . . . . . . . . . . . . . . . . . . . . . . . . . . . . . . . . . . . . . . . . . . . . . . . . . . . . . . . . . . . . . . . . . . . . . . . . . . . . . . . . . . 2-103Hang Up ..... . . . . . . . . . . . . . . . . . . . . . . . . . . . . . . . . . . . . . . . . . . . . . . . . . . . . . . . . . . . . . . . . . . . . . . . . . . . . . . . . . . . . . . . . . . . 2-106Hotel Integration .... . . . . . . . . . . . . . . . . . . . . . . . . . . . . . . . . . . . . . . . . . . . . . . . . . . . . . . . . . . . . . . . . . . . . . . . . . . . . . . . . . . . 2-107InMail Upload Download Audio .... . . . . . . . . . . . . . . . . . . . . . . . . . . . . . . . . . . . . . . . . . . . . . . . . . . . . . . . . . . . . . . . . . . 2-109
TABLE OF CONTENTS
InMail Feature Manual i

Instruction Menu ..... . . . . . . . . . . . . . . . . . . . . . . . . . . . . . . . . . . . . . . . . . . . . . . . . . . . . . . . . . . . . . . . . . . . . . . . . . . . . . . . . . . 2-122Language Setting .... . . . . . . . . . . . . . . . . . . . . . . . . . . . . . . . . . . . . . . . . . . . . . . . . . . . . . . . . . . . . . . . . . . . . . . . . . . . . . . . . . . 2-124Leaving a Message ..... . . . . . . . . . . . . . . . . . . . . . . . . . . . . . . . . . . . . . . . . . . . . . . . . . . . . . . . . . . . . . . . . . . . . . . . . . . . . . . 2-127Listening to Messages .... . . . . . . . . . . . . . . . . . . . . . . . . . . . . . . . . . . . . . . . . . . . . . . . . . . . . . . . . . . . . . . . . . . . . . . . . . . . . 2-129Live Record .... . . . . . . . . . . . . . . . . . . . . . . . . . . . . . . . . . . . . . . . . . . . . . . . . . . . . . . . . . . . . . . . . . . . . . . . . . . . . . . . . . . . . . . . . . 2-131Log On to Voice Mail .. . . . . . . . . . . . . . . . . . . . . . . . . . . . . . . . . . . . . . . . . . . . . . . . . . . . . . . . . . . . . . . . . . . . . . . . . . . . . . . . . 2-133Mailbox Announcement Message ..... . . . . . . . . . . . . . . . . . . . . . . . . . . . . . . . . . . . . . . . . . . . . . . . . . . . . . . . . . . . . . . 2-135Mailbox Name ..... . . . . . . . . . . . . . . . . . . . . . . . . . . . . . . . . . . . . . . . . . . . . . . . . . . . . . . . . . . . . . . . . . . . . . . . . . . . . . . . . . . . . . 2-137Mailbox Options Menu ..... . . . . . . . . . . . . . . . . . . . . . . . . . . . . . . . . . . . . . . . . . . . . . . . . . . . . . . . . . . . . . . . . . . . . . . . . . . . 2-139Mailbox Security Code Delete .... . . . . . . . . . . . . . . . . . . . . . . . . . . . . . . . . . . . . . . . . . . . . . . . . . . . . . . . . . . . . . . . . . . . 2-140Main Menu ..... . . . . . . . . . . . . . . . . . . . . . . . . . . . . . . . . . . . . . . . . . . . . . . . . . . . . . . . . . . . . . . . . . . . . . . . . . . . . . . . . . . . . . . . . . 2-141Make Call .. . . . . . . . . . . . . . . . . . . . . . . . . . . . . . . . . . . . . . . . . . . . . . . . . . . . . . . . . . . . . . . . . . . . . . . . . . . . . . . . . . . . . . . . . . . . . . 2-143Message Count Display .... . . . . . . . . . . . . . . . . . . . . . . . . . . . . . . . . . . . . . . . . . . . . . . . . . . . . . . . . . . . . . . . . . . . . . . . . . . 2-146Message Delete .... . . . . . . . . . . . . . . . . . . . . . . . . . . . . . . . . . . . . . . . . . . . . . . . . . . . . . . . . . . . . . . . . . . . . . . . . . . . . . . . . . . . 2-148Message Forward .... . . . . . . . . . . . . . . . . . . . . . . . . . . . . . . . . . . . . . . . . . . . . . . . . . . . . . . . . . . . . . . . . . . . . . . . . . . . . . . . . . 2-149Message Length .... . . . . . . . . . . . . . . . . . . . . . . . . . . . . . . . . . . . . . . . . . . . . . . . . . . . . . . . . . . . . . . . . . . . . . . . . . . . . . . . . . . . 2-151Message Listen Mode ..... . . . . . . . . . . . . . . . . . . . . . . . . . . . . . . . . . . . . . . . . . . . . . . . . . . . . . . . . . . . . . . . . . . . . . . . . . . . 2-152Message Notification .... . . . . . . . . . . . . . . . . . . . . . . . . . . . . . . . . . . . . . . . . . . . . . . . . . . . . . . . . . . . . . . . . . . . . . . . . . . . . . . 2-153Message Playback Direction .... . . . . . . . . . . . . . . . . . . . . . . . . . . . . . . . . . . . . . . . . . . . . . . . . . . . . . . . . . . . . . . . . . . . . . 2-159Message Record .... . . . . . . . . . . . . . . . . . . . . . . . . . . . . . . . . . . . . . . . . . . . . . . . . . . . . . . . . . . . . . . . . . . . . . . . . . . . . . . . . . . 2-160Message Reply .... . . . . . . . . . . . . . . . . . . . . . . . . . . . . . . . . . . . . . . . . . . . . . . . . . . . . . . . . . . . . . . . . . . . . . . . . . . . . . . . . . . . . 2-161Message Storage Limit ... . . . . . . . . . . . . . . . . . . . . . . . . . . . . . . . . . . . . . . . . . . . . . . . . . . . . . . . . . . . . . . . . . . . . . . . . . . . . 2-162Message Waiting Lamp ..... . . . . . . . . . . . . . . . . . . . . . . . . . . . . . . . . . . . . . . . . . . . . . . . . . . . . . . . . . . . . . . . . . . . . . . . . . . 2-163Multiple Company Greetings .... . . . . . . . . . . . . . . . . . . . . . . . . . . . . . . . . . . . . . . . . . . . . . . . . . . . . . . . . . . . . . . . . . . . . . 2-164Next Call Routing Mailbox .... . . . . . . . . . . . . . . . . . . . . . . . . . . . . . . . . . . . . . . . . . . . . . . . . . . . . . . . . . . . . . . . . . . . . . . . . 2-166Park and Page ..... . . . . . . . . . . . . . . . . . . . . . . . . . . . . . . . . . . . . . . . . . . . . . . . . . . . . . . . . . . . . . . . . . . . . . . . . . . . . . . . . . . . . 2-170Programming Voice Mail .. . . . . . . . . . . . . . . . . . . . . . . . . . . . . . . . . . . . . . . . . . . . . . . . . . . . . . . . . . . . . . . . . . . . . . . . . . . . 2-175Quick Message ..... . . . . . . . . . . . . . . . . . . . . . . . . . . . . . . . . . . . . . . . . . . . . . . . . . . . . . . . . . . . . . . . . . . . . . . . . . . . . . . . . . . . 2-177Record and Send a Message ..... . . . . . . . . . . . . . . . . . . . . . . . . . . . . . . . . . . . . . . . . . . . . . . . . . . . . . . . . . . . . . . . . . . . 2-179Remote Programming ..... . . . . . . . . . . . . . . . . . . . . . . . . . . . . . . . . . . . . . . . . . . . . . . . . . . . . . . . . . . . . . . . . . . . . . . . . . . . 2-181Routing Mailbox .... . . . . . . . . . . . . . . . . . . . . . . . . . . . . . . . . . . . . . . . . . . . . . . . . . . . . . . . . . . . . . . . . . . . . . . . . . . . . . . . . . . . 2-182Screened Transfer .... . . . . . . . . . . . . . . . . . . . . . . . . . . . . . . . . . . . . . . . . . . . . . . . . . . . . . . . . . . . . . . . . . . . . . . . . . . . . . . . . . 2-186Security Code ..... . . . . . . . . . . . . . . . . . . . . . . . . . . . . . . . . . . . . . . . . . . . . . . . . . . . . . . . . . . . . . . . . . . . . . . . . . . . . . . . . . . . . . 2-189Single Digit Dialing .... . . . . . . . . . . . . . . . . . . . . . . . . . . . . . . . . . . . . . . . . . . . . . . . . . . . . . . . . . . . . . . . . . . . . . . . . . . . . . . . . 2-191Station Mailbox .... . . . . . . . . . . . . . . . . . . . . . . . . . . . . . . . . . . . . . . . . . . . . . . . . . . . . . . . . . . . . . . . . . . . . . . . . . . . . . . . . . . . . 2-192Subscriber Mailbox .... . . . . . . . . . . . . . . . . . . . . . . . . . . . . . . . . . . . . . . . . . . . . . . . . . . . . . . . . . . . . . . . . . . . . . . . . . . . . . . . . 2-193System Administrator ... . . . . . . . . . . . . . . . . . . . . . . . . . . . . . . . . . . . . . . . . . . . . . . . . . . . . . . . . . . . . . . . . . . . . . . . . . . . . . . 2-196System Administrator Mailbox .... . . . . . . . . . . . . . . . . . . . . . . . . . . . . . . . . . . . . . . . . . . . . . . . . . . . . . . . . . . . . . . . . . . . 2-198System Re-initialization .... . . . . . . . . . . . . . . . . . . . . . . . . . . . . . . . . . . . . . . . . . . . . . . . . . . . . . . . . . . . . . . . . . . . . . . . . . . . 2-199Time and Date .... . . . . . . . . . . . . . . . . . . . . . . . . . . . . . . . . . . . . . . . . . . . . . . . . . . . . . . . . . . . . . . . . . . . . . . . . . . . . . . . . . . . . . 2-201Time and Date Stamp ..... . . . . . . . . . . . . . . . . . . . . . . . . . . . . . . . . . . . . . . . . . . . . . . . . . . . . . . . . . . . . . . . . . . . . . . . . . . . . 2-202Transfer to a Mailbox .... . . . . . . . . . . . . . . . . . . . . . . . . . . . . . . . . . . . . . . . . . . . . . . . . . . . . . . . . . . . . . . . . . . . . . . . . . . . . . 2-203Undefined Routing .... . . . . . . . . . . . . . . . . . . . . . . . . . . . . . . . . . . . . . . . . . . . . . . . . . . . . . . . . . . . . . . . . . . . . . . . . . . . . . . . . 2-204Unscreened Transfer .... . . . . . . . . . . . . . . . . . . . . . . . . . . . . . . . . . . . . . . . . . . . . . . . . . . . . . . . . . . . . . . . . . . . . . . . . . . . . . . 2-205Voice Mail Overflow ..... . . . . . . . . . . . . . . . . . . . . . . . . . . . . . . . . . . . . . . . . . . . . . . . . . . . . . . . . . . . . . . . . . . . . . . . . . . . . . . 2-208Volume Control ... . . . . . . . . . . . . . . . . . . . . . . . . . . . . . . . . . . . . . . . . . . . . . . . . . . . . . . . . . . . . . . . . . . . . . . . . . . . . . . . . . . . . . 2-216
Chapter 3 Soft Key Glossary
TABLE OF CONTENTS
InMail Feature Manualii
Table 2-1 SL1000 Email Account Information . . . . . . . . . . . . . . . . . . . . . . . . . . . . . . . . . . . . . . . . . . . . . . . . . . . . . . . . . .2-66
Table 2-2 Typical SMS Notification (No Wav File) . . . . . . . . . . . . . . . . . . . . . . . . . . . . . . . . . . . . . . . . . . . . . . . . . . . . . .2-71Table 2-3 Common Email Notification SMTP Server Settings . . . . . . . . . . . . . . . . . . . . . . . . . . . . . . . . . . . . . . . .2-72Table 2-4 Some Common Mobile Telephone Service Provider SMS Portals . . . . . . . . . . . . . . . . . . . . . . .2-72Table 2-5 Turn Email Notification On or Off . . . . . . . . . . . . . . . . . . . . . . . . . . . . . . . . . . . . . . . . . . . . . . . . . . . . . . . . . . . . . .2-77Table 2-6 Message Listen Options . . . . . . . . . . . . . . . . . . . . . . . . . . . . . . . . . . . . . . . . . . . . . . . . . . . . . . . . . . . . . . . . . . . . . .2-129
Table 2-7 Mailbox Main Menu . . . . . . . . . . . . . . . . . . . . . . . . . . . . . . . . . . . . . . . . . . . . . . . . . . . . . . . . . . . . . . . . . . . . . . . . . . . 2-141
Table 2-8 Park and Page Call Handling . . . . . . . . . . . . . . . . . . . . . . . . . . . . . . . . . . . . . . . . . . . . . . . . . . . . . . . . . . . . . . . . 2-171Table 2-9 Park and Page Call Handling . . . . . . . . . . . . . . . . . . . . . . . . . . . . . . . . . . . . . . . . . . . . . . . . . . . . . . . . . . . . . . . . 2-171Table 2-10 Recording Your Paging Message . . . . . . . . . . . . . . . . . . . . . . . . . . . . . . . . . . . . . . . . . . . . . . . . . . . . . . . . . 2-173
Table 2-11 Setting the Call Handling Options . . . . . . . . . . . . . . . . . . . . . . . . . . . . . . . . . . . . . . . . . . . . . . . . . . . . . . . . . 2-173
Table 2-12 Picking Up a Parked Call . . . . . . . . . . . . . . . . . . . . . . . . . . . . . . . . . . . . . . . . . . . . . . . . . . . . . . . . . . . . . . . . . . . 2-174Table 2-13 Dial Action Table Key Action Summary . . . . . . . . . . . . . . . . . . . . . . . . . . . . . . . . . . . . . . . . . . . . . . . . . . . 2-191Table 2-14 System Administrator Options . . . . . . . . . . . . . . . . . . . . . . . . . . . . . . . . . . . . . . . . . . . . . . . . . . . . . . . . . . . . . .2-196Table 2-15 Accessing the System Administrator Options . . . . . . . . . . . . . . . . . . . . . . . . . . . . . . . . . . . . . . . . . . . 2-197
LIST OF TABLES
InMail Feature Manual iii

Figure 1-1 InMail Daughter Board (PZ-VM21) Mounting with CPU Card . . . . . . . . . . . . . . . . . . . . . . . . . . . . 1-1
Figure 1-2 InMail Daughter Board with CompactFlash Card Assembly Installed . . . . . . . . . . . . . . . . . . . 1-2
Figure 1-3 Remove the InMail CompactFlash Card . . . . . . . . . . . . . . . . . . . . . . . . . . . . . . . . . . . . . . . . . . . . . . . . . . . . . 1-2Figure 2-1 Example - User Access to Voice Mail . . . . . . . . . . . . . . . . . . . . . . . . . . . . . . . . . . . . . . . . . . . . . . . . . . . . . . .2-30Figure 2-2 Cascade Message Notification Flow Chart . . . . . . . . . . . . . . . . . . . . . . . . . . . . . . . . . . . . . . . . . . . . . . . . .2-41Figure 2-3 Email with Station Name . . . . . . . . . . . . . . . . . . . . . . . . . . . . . . . . . . . . . . . . . . . . . . . . . . . . . . . . . . . . . . . . . . . . . . 2-68Figure 2-4 Email - No Station Name . . . . . . . . . . . . . . . . . . . . . . . . . . . . . . . . . . . . . . . . . . . . . . . . . . . . . . . . . . . . . . . . . . . . . .2-69Figure 2-5 Email with CID Name . . . . . . . . . . . . . . . . . . . . . . . . . . . . . . . . . . . . . . . . . . . . . . . . . . . . . . . . . . . . . . . . . . . . . . . . . . 2-70Figure 2-6 Email - CO No CID . . . . . . . . . . . . . . . . . . . . . . . . . . . . . . . . . . . . . . . . . . . . . . . . . . . . . . . . . . . . . . . . . . . . . . . . . . . . .2-71
LIST OF FIGURES
InMail Feature Manualiv

Before You Read this ManualNotice for Multiline Telephone Users;
The InMail Display Information and Soft keys are only available for IP Multiline Telephone.
However, SL1000 Multiline Telephone users are required to listen to an InMail Voice Announcement and
follow the InMail Voice Announcement to operate each InMail feature. (SL1000 Multiline Telephone has no
display information to assist the InMail feature.)
ISSUE 1.1 SL1000
InMail Feature Manual B-1

Memo
ISSUE 1.1SL1000
B-2

SECTION 1 INSTALL THE INMAIL BOARD
The InMail CompactFlash drive must never be inserted or removed with the KSUpower on. Always turn KSU power OFF when inserting or removing the InMailCompactFlash drive.
1. Take adequate anti-static precautions.
• Wear a grounded wrist strap at all times when installing or removing the InMail Board (PZ-VM21).
• Ensure the wrist strap is attached to a known earth ground (such as the earth ground lug on theKSU).
• Discharge any built-up static electricity by touching the KSU earth ground lug.
2. Install four Nylon-spacers included with the InMail Board before installing the CompactFlash card
assembly.
• Locate Nylon-spacers as shown in Figure 1-1 InMail Daughter Board (PZ-VM21) Mounting withCPU Card on this page.
• Be sure to install the Nylon-spacers from the back (underneath) side of the Board.
3. Install the InMail CompactFlash card assembly face up as shown in Figure 1-2 InMail Daughter
Board with CompactFlash Card Assembly Installed on the next page.
4. Insert the InMail Board into the J6 connector on the CPU card.
• Position the InMail Board over the J6 connector - then push the Board into the connector on theCPU Card.
CPU card
J6
PZ-VM21 PCB
CN1
Nylon-spacers
Nylon-spacers
Figure 1-1 InMail Daughter Board (PZ-VM21) Mounting with CPU Card
Quick Setup 1
QuickSetup
InMail Feature Manual 1-1

SECTION 2 UPGRADE THE INMAIL BOARD
The InMail CompactFlash drive must never be inserted or removed with the KSUpower on. Always turn KSU power OFF when inserting or removing the InMailCompactFlash drive.
The InMail software is integrated into the telephone system software. The InMail voice prompts and
messages are stored on the CompactFlash card that plugs into the InMail Board (PZ-VM21 PCB) .
1. Power down the system before removing the InMail CompactFlash card.
• Ensure the system is powered down.
2. Slide out the CompactFlash card. See Figure 1-3 Remove the InMail CompactFlash Card on this
page.
• Be sure to take adequate static precautions.
3. Reinstall the CompactFlash card and power up the system.
CF card
CF Slot (CN2)
CPU card
PZ-VM21 PCB
Figure 1-2 InMail Daughter Board with CompactFlash Card Assembly Installed
Figure 1-3 Remove the InMail CompactFlash Card
ISSUE 1.1SL1000
Quick Setup1-2

SECTION 3 START-UP (DEFAULT) INMAIL CONFIGURATION
When you install the InMail Board and turn on the system, InMail has the following default program-
ming:
• Subscriber Mailboxes are enabled for extensions 200 ~ 263 . The mailbox numbers are the same asthe extension numbers.
• The Automated Attendant does not answer outside calls.
• The InMail does not answer internal calls.
SECTION 4 BASIC FUNCTIONS WITHOUT MAIN GREETING
To make the InMail answer, the following programming must be done. The example shown is for a
4-port InMail. Extension, Group and Pilot Numbers shown can be adjusted as needed per installation
requirements.
Refer to the SL1000 Programming Manual (Separate Issue) for more detailed programming instruc-
tions.
Example
Program Number Description
47-01-17 Set first port of In-Mail to 25.
10-09-01 Verify at least one resource is set to ICM/TRK or Common.
11-07-01 Set TEL Group Pilot 2 to 400.Never use Group 1, as this is the default group for all extensions.
15-03-01 Set extension 224 ~ 227 to DP.
15-03-03 Set extension 224 ~ 227 to Special.
16-02-01 Put 224 ~ 227 in Group 2.Assign priorities 1 ~ 4 to 224 ~ 227.
16-01-01 Set Group 2 name to VM Hunt.
16-01-10 Set Group 2 to Busy/No Answer.
45-01-01 Set to Group 2.
SECTION 5 ENABLE THE MAILBOXES FOR ALL INSTALLED
EXTENSIONS
Since by default only extensions 200 ~ 263 have Subscriber Mailboxes, you should enable additional
Subscriber Mailboxes for all installed extensions.
To enable additional Subscriber Mailboxes:
1. In 47-02-01 Mailbox Type, enter 1 to enable a Subscriber Mailbox for each extension.
• To make programming easier, consider associating a mailbox number with a station port. Forexample, mailbox 1 should correspond to port 1, which in turn corresponds to extension 200 .
2. In 47-02-02 Mailbox Number, select the extension number to be associated with the mailbox you
are programming.
• Normally, mailbox 1 should use Mailbox Number 200 , mailbox 2 should use Mailbox Number201 , etc.
3. For Voice Mail access;
• You can optionally use 15-07-01 Programming Function Keys to assign a Voice Mail key (code851 + 77).
• If you don’t assign the Voice Mail key for Voice Mail access, an extension user can access hismailbox by the following actions:
ISSUE 1.1 SL1000
InMail Feature Manual 1-3
- Press Speaker key
- Dial InMail pilot number
- Dial mailbox number
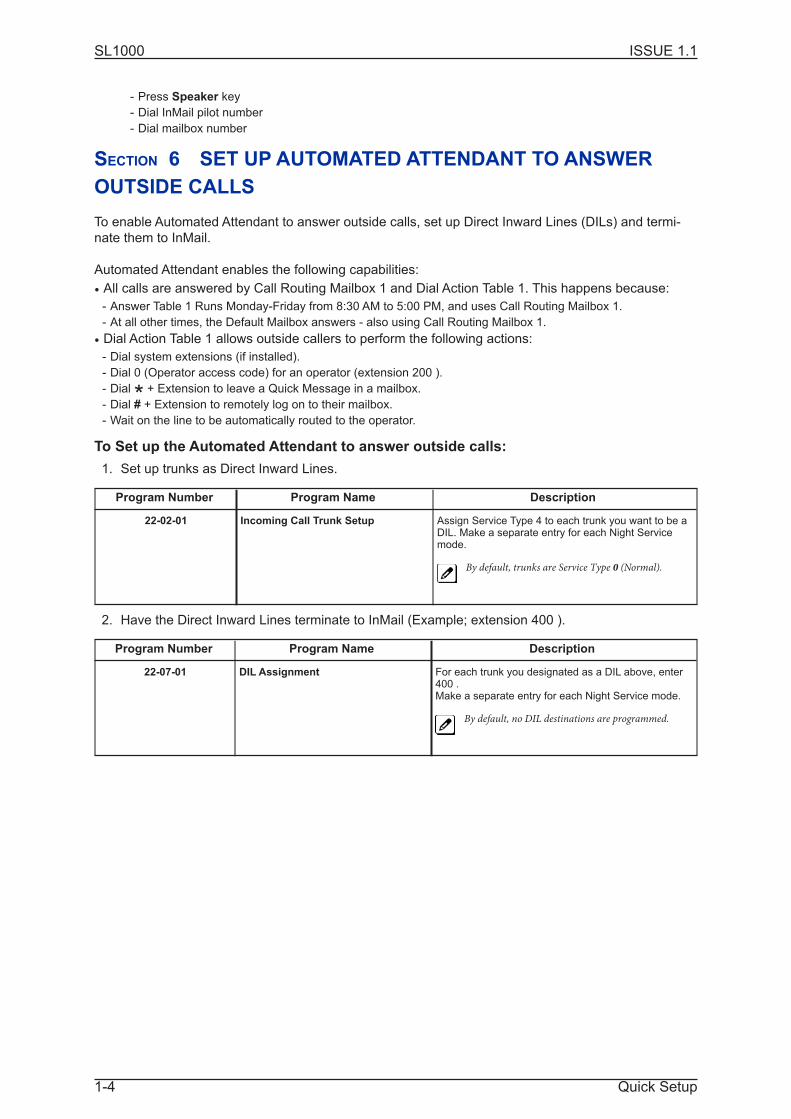
SECTION 6 SET UP AUTOMATED ATTENDANT TO ANSWER
OUTSIDE CALLS
To enable Automated Attendant to answer outside calls, set up Direct Inward Lines (DILs) and termi-
nate them to InMail.
Automated Attendant enables the following capabilities:
• All calls are answered by Call Routing Mailbox 1 and Dial Action Table 1. This happens because:
- Answer Table 1 Runs Monday-Friday from 8:30 AM to 5:00 PM, and uses Call Routing Mailbox 1.
- At all other times, the Default Mailbox answers - also using Call Routing Mailbox 1.
• Dial Action Table 1 allows outside callers to perform the following actions:
- Dial system extensions (if installed).
- Dial 0 (Operator access code) for an operator (extension 200 ).
- Dial * + Extension to leave a Quick Message in a mailbox.- Dial # + Extension to remotely log on to their mailbox.
- Wait on the line to be automatically routed to the operator.
To Set up the Automated Attendant to answer outside calls:
1. Set up trunks as Direct Inward Lines.
Program Number Program Name Description
22-02-01 Incoming Call Trunk Setup Assign Service Type 4 to each trunk you want to be aDIL. Make a separate entry for each Night Servicemode.
By default, trunks are Service Type 0 (Normal).
2. Have the Direct Inward Lines terminate to InMail (Example; extension 400 ).
Program Number Program Name Description
22-07-01 DIL Assignment For each trunk you designated as a DIL above, enter400 .Make a separate entry for each Night Service mode.
By default, no DIL destinations are programmed.
ISSUE 1.1SL1000
Quick Setup1-4
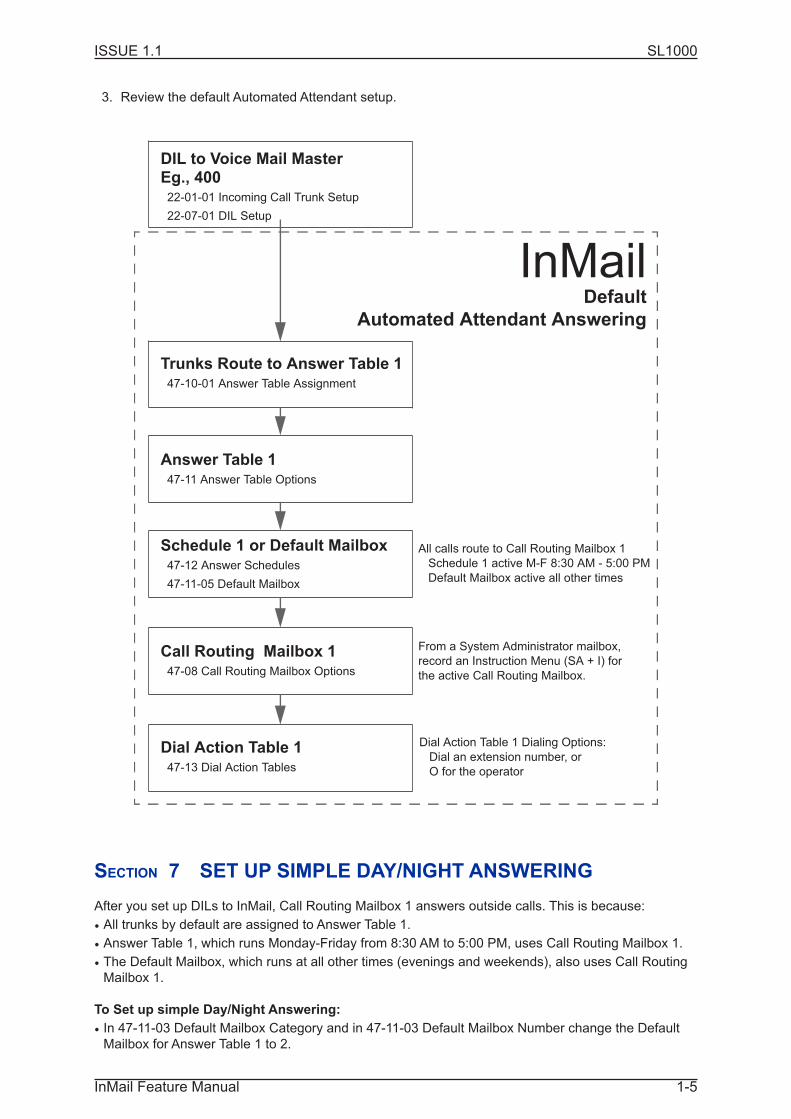
3. Review the default Automated Attendant setup.
SECTION 7 SET UP SIMPLE DAY/NIGHT ANSWERING
After you set up DILs to InMail, Call Routing Mailbox 1 answers outside calls. This is because:
• All trunks by default are assigned to Answer Table 1.
• Answer Table 1, which runs Monday-Friday from 8:30 AM to 5:00 PM, uses Call Routing Mailbox 1.
• The Default Mailbox, which runs at all other times (evenings and weekends), also uses Call RoutingMailbox 1.
To Set up simple Day/Night Answering:
• In 47-11-03 Default Mailbox Category and in 47-11-03 Default Mailbox Number change the DefaultMailbox for Answer Table 1 to 2.
Trunks Route to Answer Table 1 47-10-01 Answer Table Assignment
InMailDefault
Automated Attendant Answering
Answer Table 1 47-11 Answer Table Options
Schedule 1 or Default Mailbox 47-12 Answer Schedules
47-11-05 Default Mailbox
Call Routing Mailbox 1 47-08 Call Routing Mailbox Options
All calls route to Call Routing Mailbox 1
Schedule 1 active M-F 8:30 AM - 5:00 PM
Default Mailbox active all other times
From a System Administrator mailbox,
record an Instruction Menu (SA + I) for
the active Call Routing Mailbox.
Dial Action Table 1 47-13 Dial Action Tables
DIL to Voice Mail Master Eg., 400 22-01-01 Incoming Call Trunk Setup
22-07-01 DIL Setup
Dial Action Table 1 Dialing Options:
Dial an extension number, or
O for the operator
ISSUE 1.1 SL1000
InMail Feature Manual 1-5

• From the System Administrator Mailbox:
1. Dial SA + I and record a new Instruction Menu message for Call Routing Mailbox 1.
2. Dial SA + I and record a new Instruction Menu message for Call Routing Mailbox 2.
Monday through Friday from 8:30 AM to 5:00 PM callers hear the Instruction Menu message for CallRouting Mailbox 1.Evenings and weekends, callers hear the Instruction Menu message for Call Routing Mailbox 2.
Review the feature Automated Attendant on page 2-25.
SECTION 8 INMAIL SYSTEM REQUIREMENTS
• SL1000 Software
• InMail CompactFlash Drive
• PZ-VM21 Daughter Board
SECTION 9 SPECIFICATIONS
InMail Capacities Note
PZ-VM21 PZ-VM21 Daughter Board Interface for InMail CF
IP4WW-CFVRS-C1
InMail 512M CompactFlash Drive (VRS)
IP4WW-CFVMS-C1
InMail 512M CompactFlash Drive (VRS + VM)(1) 15-Hour CompactFlash Card with software.
IP4WW-CFVML-C1
InMail 1 GB Drive(1) 40-Hour CompactFlash Card with software
SL-VM-CHANNEL-2 LIC
Additional InMail Channel License (2 ports)
SL-VM-ADVANCELIC
InMail Advanced Feaqture License (1 license per system)
Mailboxes: Station Mailboxes = 128Routing Mailboxes = 32Group Mailboxes = 32Total Mailboxes = 192
SECTION 10 EXAMPLES OF COMMON APPLICATIONS
The examples below show common applications. The chart in the beginning of each example provides
the following information:
• How the relevant programmable options work by default.
• The Application Summary providing the basic steps to set up the application.
Following the chart are the step-by-step instructions for setting up the application.
For more information, refer to the SL1000 Programming Manual.
Example 1: Set Up Separate Day and Night Greetings
Default Automated Attendant Answering
All trunks answered by the Automated Attendant route to Answer Table 1.• Answer Table 1 uses Schedule 1 to answer calls from 8:30 AM - 5:00 PM Monday through Friday with Call Routing Mailbox
1.
• The Default Mailbox for Answer Table 1 picks up Automated Attendant calls at all other times. The Default Mailbox for
Answer Table 1 is also Call Routing Mailbox 1.
The greeting that plays to outside callers is the Instruction Menu for the Call Routing Mailbox that answers the call.
ISSUE 1.1SL1000
Quick Setup1-6

Since Schedule 1 and the Default Mailbox both use Call Routing Mailbox 1, the Automated Attendant answers all calls thesame way day and night, with the Instruction Menu for Call Routing Mailbox 1.
Application Summary
Change the Default Mailbox from Call Routing Mailbox 1 to 2.Record a night Instruction Menu for Call Routing Mailbox 2.
Change the Default Mailbox to Call Routing Mailbox 2.
47-11-03 Default Mailbox Number, change the Default Mailbox assignment to 2.
Record the daytime and night Instruction Menus.
1. At extension 200 , press Voice Mail key (Code 851 + 77).
2. Dial SA (72) + I (4).
3. Dial 001 (for Call Routing Mailbox 1) + R (7).
4. Record the daytime Instruction Menu message + # twice.
5. Dial I (4).
6. Dial 002 (for Call Routing Mailbox 2) + R (7).
7. Record the night Instruction Menu message + # + hang up.
See the Instruction Menu in this manual.
Example 2: Provide Unique Day and Night Dialing Options for Callers
Default Dial Action Table Options
All Call Routing Mailboxes (1 ~ 8 by default) use Dial Action Table 1.Dial Action Table 1 provides the following dial options:• Dial extension number.
• Dial 0 for the operator.
• Dial * + extension to leave a Quick Message.• Dial # + extension to do a Remote Logon to the mailbox.
• Timeout to operator if no digits dialed.
Application Summary
Allow callers at night to dial 0 to leave a message for the operator.
ISSUE 1.1 SL1000
InMail Feature Manual 1-7

Set up separate day and night greetings.
Following example 1, set up separate day and night Instruction Menus using Call Routing Mailboxes 1
and 2.
1. Example of the day Instruction Menu: Thank you for calling. For Sales, dial 201 . For Technical
Support, dial 202 . To talk to an operator, dial 0 . If you know your party’s extension number,
please dial it now.
2. Example of the night Instruction menu: Thank you for calling. Our normal business hours are 8:30
to 5:00, Monday through Friday. To leave us a message, please dial 0 now.
Assign a unique Dial Action Table (2) to the night time Call Routing Mailbox (2).
In 47-08-01 Dial Action Table, assign Dial Action Table 2 to Call Routing Mailbox 2.
Change the dialing options for the night time Dial Action Table (2).
In 47-13-01 InMail Dial Action Table Actions for Dial Action Table 2, make the following changes:
1. For the digits 3 and 4, enter 0 for the Action entry to prevent callers from dialing extensions at
night.
2. For the digit 0 , change the Action entry to REC1 (by dialing 3) and the Data entry to 200 . This
allows night time callers to dial 0 to leave a message for the operator.
3. Note that the * and # entries are left unchanged so that experienced users can still leave QuickMessages or do Remote Logons at night.
Example 3: Manual Night Mode Control of the Automated Attendant
Default Scheduling Options
There is no manual control of the Automated Attendant.All calls answered by the Automated Attendant automatically follow the schedule set up by Answer Table 1.• Answer Table 1 uses Schedule 1 to answer calls from 8:30 AM - 5:00 PM Monday through Friday with Call Routing Mailbox
1.
• The Default Mailbox for Answer Table 1 picks up Automated Attendant calls at all other times.
The Default Mailbox for Answer Table 1 is also Call Routing Mailbox 1.
Application Summary
Set up a programmable key to switch the system into the night mode.Assign a Group Mailbox to a virtual extension.Have calls at night route to the virtual extension, which is Fixed Call Forwarded to voice mail.
Set up programmable keys to switch the system into the night mode and back into the day
mode.
Night Mode
1. At the extension that should control the system night mode, press Speaker + 851 .
2. Press the programmable function key you want to assign as the day (night mode 1) key.
3. Dial 09 + 1 (for night mode 1).
You hear confirmation beep.
This allows the user to switch the system into the day mode (i.e., night mode 1).
Day Mode
1. Press the programmable function key you want to assign as the night (night mode 2) key.
2. Dial 09 + 2 (for night mode 2).
You hear confirmation beep.
ISSUE 1.1SL1000
Quick Setup1-8
This allows the user to switch the system from the day mode to night mode 2.
3. Press Speaker to hang up.
Allow the extension to switch the system night mode.
1. In 20-07-01 Manual Night Mode Switching, enter 1 to enable night mode switching in the exten-
sion Class of Service.
By default, this ability is Enable (Class1 ~ 15 ).
2. In 20-06-01 Class of Service for Extensions, assign the extension Class of Service.
By default, extension, All extensions have Class of Service 1 .
Set up a Group Mailbox as a Call Routing Mailbox.
1. In 11-07-01 Department Group Pilot Numbers, assign a pilot number (e.g., 400 ) to an unused De-
partment Group (e.g., group 10).
By default, all extensions are assigned to group 1.
2. In 47-03-02 Group Mailbox Number, enter the pilot number assigned in step 1 above.
By default, no Group Mailbox numbers are assigned.
3. In 47-03-03 Group Mailbox Type, enter 1 to assign the Group Mailbox as a Call Routing Mailbox.
By default, Group Mailboxes are assigned as Subscriber Mailboxes (3).
4. In 11-07-01 Department Group Pilot Numbers, press Flash to remove the assignment made in
step 1 above.
You can use the Department Group for other programming.
Set up a virtual extension that will handle the switching for the trunk.
1. In 11-04-01 Virtual Extension Numbering, assign the Group Mailbox Number in step 2 as the ex-
tension number for a virtual extension port.
For example, assign extension 400 to virtual extension port 1.
By default, there are no virtual extension numbers assigned.
Terminate the trunk to the virtual extension in the night mode.
1. In 22-07-01 DIL Assignment, assign the trunk to the virtual extension (e.g., 400 ) in night mode 2.
When the extension user presses the night key, the trunk follows this routing.
By default, there are no DIL assignments set up.
2. Check the setting of 22-02-01 Incoming Call Trunk Setup to be sure the trunk is set up as a Direct
Inward Line (4).
By default, trunk types are set to normal (0).
ISSUE 1.1 SL1000
InMail Feature Manual 1-9
Fixed Call Forward the virtual extension to Voice Mail.
1. In 24-06-01 Fixed Call Forwarding, enable immediate Fixed Call Forwarding to the InMail Master
Number (400 ).
For example, for virtual extension 300 enter 3 for Call Forward Type and 400 for the destination.
By default, Fixed Call Forwarding is not set up.
Record the Instruction Menu for the Group Call Routing Mailbox.
1. At extension 200 , press Voice Mail key.
2. Dial SA (72) + I (4).
3. Dial the number of the Group Call Routing Mailbox (e.g., 600 ) + R (7).
4. Record the Instruction Menu message + # + hang up.
See Instruction Menu on page 2-122 in this manual.
When the system is in the day mode, the trunk is answered by InMail normally and follows the pro-grammed Answer Table.
When the extension user presses the night mode 2 key, the trunk is answered by the programmed CallRouting Mailbox, overriding the Answer Table assignment.
ISSUE 1.1SL1000
Quick Setup1-10

SECTION 1 INTRODUCTION TO INMAIL FEATURES
If you are not familiar with the InMail features, review the Feature Glossary on this page.
This chapter provides detailed information on the InMail features. The features are listed alphabeti-
cally. Each feature description includes the following headings.
• DescriptionRead Description to get an overview of the feature, its benefit, any special considerations you should
be aware of, and how it works in the default system.
• Related FeaturesRelated Features shows you at a glance how each feature interacts with other InMail features.
• ProgrammingHere you'll find easy to follow step-by-step programming instructions for each feature.
• OperationOperation provides charts that show how the feature operates.
SECTION 2 FEATURE GLOSSARY
Feature Name Description Usage
Administrator SecurityCode Control
See Security Code. Voice Mail
Alternate Next CallRouting Mailbox
See Next Call Routing Mailbox. Voice Mail
Announcement Mailbox Mailbox that allows a recorded greeting to play to callers. AutomatedAttendant
Announcement Message The message that the System Administrator records for a specific Announce-ment Mailbox.
AutomatedAttendant
Answer Table Determines how the Automated Attendant answers outside calls on eachtrunk, according to the time of the day and day of the week that the call isringing.
AutomatedAttendant
Answering ScheduleOverride
Enables an alternate greeting and alternate dialing options for callers. AutomatedAttendant
Auto Attendant Do NotDisturb
Auto Attendant Do Not Disturb sends Automated Attendant calls directly to anextension user's mailbox. Their phone does not ring for calls from the Auto-mated Attendant.See Greeting in this glossary.
AutomatedAttendant
Auto Erase or Save When a mailbox user completely listens to a new message and then exits theirmailbox, InMail either automatically archives or deletes the message.
Voice Mail
Auto Time Stamp After a user listens to a message, InMail can optionally announce the time anddate the message was left.
Voice Mail
Automated Attendant The Automated Attendant can automatically answer the telephone systemincoming calls, play an Instruction Menu message, and provide dialing optionsto callers.
AutomatedAttendant
Automated AttendantTransfer
While on a trunk call, an extension user can transfer the trunk call to the Auto-mated Attendant so the caller can use the Automated Attendant dialingoptions.
Voice Mail
Features 2
Features
InMail Feature Manual 2-1

Feature Name Description Usage
Automatic Access to VMby Caller ID
InMail mailbox can be associated with a specific caller ID (CID) number. Whenthe CID number is presented to the InMail it will automatically log the user intotheir mailbox.
Voice Mail
Automatic Call Routingto a Mailbox
See Go to a Mailbox in this glossary. AutomatedAttendant
Automatic MessageErase/Save
See Auto Erase or Save in this glossary. Voice Mail
Automatic Routing forRotary Dial Callers
If an Automated Attendant caller does not dial any digits, InMail automaticallyroutes them to a specified option (such as the operator or a mailbox).
AutomatedAttendant
Call Forward to a Mailbox An extension user can forward calls to their mailbox. Voice Mail
Call Routing Mailbox The mailbox associated with an Answer Table that specifies which dialingoptions (Dial Action Table) and announcements are available to AutomatedAttendant callers.
AutomatedAttendant
Caller ID A telephone company service that provides a caller's number and optionalname. The telephone system can pass this information to InMail to enableCaller ID with Return Call.
System
Caller ID with Return Call See Make Call and Time and Date Stamp. Voice Mail
Calling (Logging On to) aMailbox
See Log On to Voice Mail. Voice Mail
Calling the AutomatedAttendant
Automated Attendant callers can use various InMail features and then return tothe Automated Attendant for additional dialing options.
AutomatedAttendant
Cascade MessageNotification
If an extension user receives a new message in their mailbox, CascadingMessage Notification calls them, at up to five preset destinations, to let themknow a new voice mail message has arrived.
Voice Mail
Day, Night, and HolidayGreetings
See Flexible Answering Schedules. AutomatedAttendant
Deleting a Message See Message Delete. Voice Mail
Deleting Mailbox SecurityCode
See Mailbox Security Code Delete. Maintenance
Dial Action Table Defines the dialing options for a Call Routing Mailbox chosen by the activeAnswer Table, which in turn provides those dialing options to Automated Atten-dant callers.
AutomatedAttendant
Directory Dialing Directory Dialing allows an Automated Attendant caller to reach an extensionby dialing the first few letters in the extension user's name.
AutomatedAttendant
Distribution List A Distribution List shows extensions that receive a message you record andsend to a single Distribution Mailbox. Any message left in the DistributionMailbox is automatically sent to all the mailboxes in the list.
Voice Mail
Email Notification Email Notification automatically sends an email notification when a SubscriberMailbox receives a new message. The email can optionally include therecorded message as a .wav file attachment. To hear the message, the emailrecipient double-clicks the .wav attachment to have the message play in their.wav player (such as Windows Media Player).
Voice Mail
Erasing All Messages Lets the System Administrator delete mailbox messages system-wide. Maintenance
Exiting a Mailbox An extension user can exit their mailbox by dialing a code or by hanging up. Voice Mail
Fax Detection The Automated Attendant can detect incoming fax calls and transfer them to afax machine.
System
Find-Me Follow-Me Find-Me Follow-Me helps an Automated Attendant caller locate an extensionuser who is not at their desk.
AutomatedAttendant
Flexible AnsweringSchedules
The Automated Attendant can answer outside calls with different announce-ments and dialing options, depending on the time of day and day of week.
AutomatedAttendant
Flexible Call Routing The Automated Attendant can provide outside callers with a wide variety ofdialing (routing) options. There are 3 components to Flexible Call Routing.See Answer Table.See Call Routing Mailbox.See Dial Action Table.
AutomatedAttendant
ISSUE 1.1SL1000
Features2-2
Feature Name Description Usage
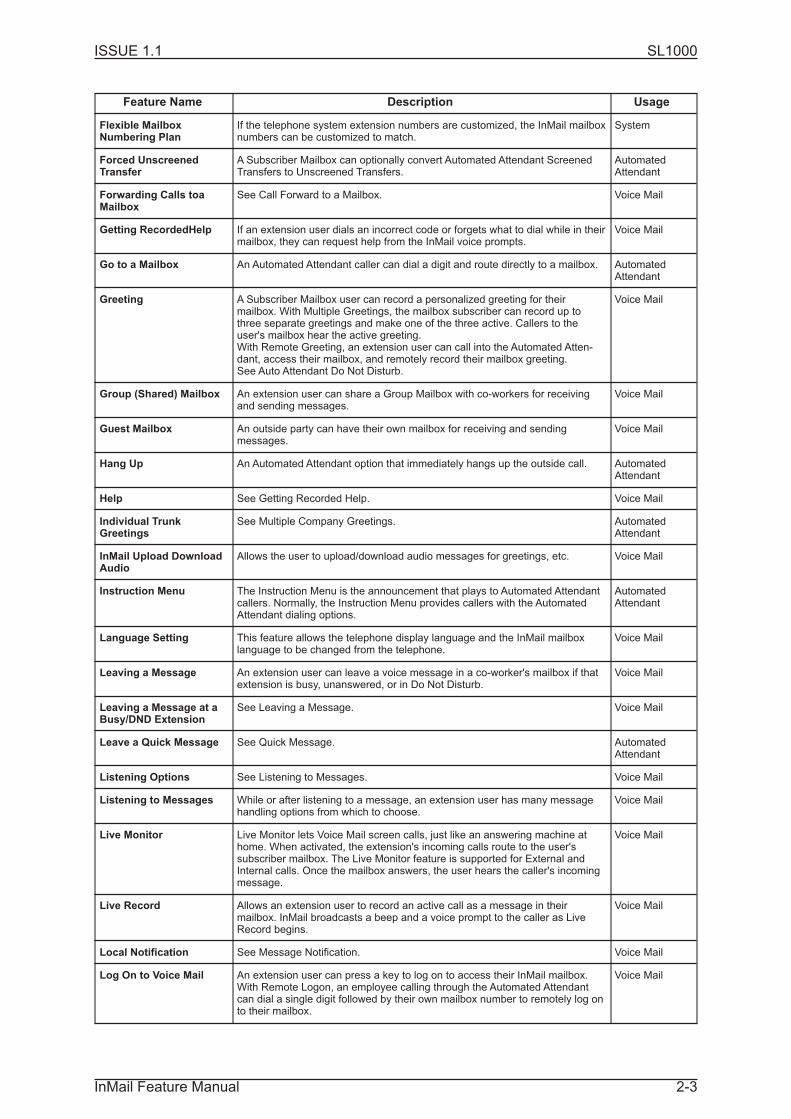
Flexible MailboxNumbering Plan
If the telephone system extension numbers are customized, the InMail mailboxnumbers can be customized to match.
System
Forced UnscreenedTransfer
A Subscriber Mailbox can optionally convert Automated Attendant ScreenedTransfers to Unscreened Transfers.
AutomatedAttendant
Forwarding Calls toaMailbox
See Call Forward to a Mailbox. Voice Mail
Getting RecordedHelp If an extension user dials an incorrect code or forgets what to dial while in theirmailbox, they can request help from the InMail voice prompts.
Voice Mail
Go to a Mailbox An Automated Attendant caller can dial a digit and route directly to a mailbox. AutomatedAttendant
Greeting A Subscriber Mailbox user can record a personalized greeting for theirmailbox. With Multiple Greetings, the mailbox subscriber can record up tothree separate greetings and make one of the three active. Callers to theuser's mailbox hear the active greeting.With Remote Greeting, an extension user can call into the Automated Atten-dant, access their mailbox, and remotely record their mailbox greeting.See Auto Attendant Do Not Disturb.
Voice Mail
Group (Shared) Mailbox An extension user can share a Group Mailbox with co-workers for receivingand sending messages.
Voice Mail
Guest Mailbox An outside party can have their own mailbox for receiving and sendingmessages.
Voice Mail
Hang Up An Automated Attendant option that immediately hangs up the outside call. AutomatedAttendant
Help See Getting Recorded Help. Voice Mail
Individual TrunkGreetings
See Multiple Company Greetings. AutomatedAttendant
InMail Upload DownloadAudio
Allows the user to upload/download audio messages for greetings, etc. Voice Mail
Instruction Menu The Instruction Menu is the announcement that plays to Automated Attendantcallers. Normally, the Instruction Menu provides callers with the AutomatedAttendant dialing options.
AutomatedAttendant
Language Setting This feature allows the telephone display language and the InMail mailboxlanguage to be changed from the telephone.
Voice Mail
Leaving a Message An extension user can leave a voice message in a co-worker's mailbox if thatextension is busy, unanswered, or in Do Not Disturb.
Voice Mail
Leaving a Message at aBusy/DND Extension
See Leaving a Message. Voice Mail
Leave a Quick Message See Quick Message. AutomatedAttendant
Listening Options See Listening to Messages. Voice Mail
Listening to Messages While or after listening to a message, an extension user has many messagehandling options from which to choose.
Voice Mail
Live Monitor Live Monitor lets Voice Mail screen calls, just like an answering machine athome. When activated, the extension's incoming calls route to the user'ssubscriber mailbox. The Live Monitor feature is supported for External andInternal calls. Once the mailbox answers, the user hears the caller's incomingmessage.
Voice Mail
Live Record Allows an extension user to record an active call as a message in theirmailbox. InMail broadcasts a beep and a voice prompt to the caller as LiveRecord begins.
Voice Mail
Local Notification See Message Notification. Voice Mail
Log On to Voice Mail An extension user can press a key to log on to access their InMail mailbox.With Remote Logon, an employee calling through the Automated Attendantcan dial a single digit followed by their own mailbox number to remotely log onto their mailbox.
Voice Mail
ISSUE 1.1 SL1000
InMail Feature Manual 2-3
Feature Name Description Usage
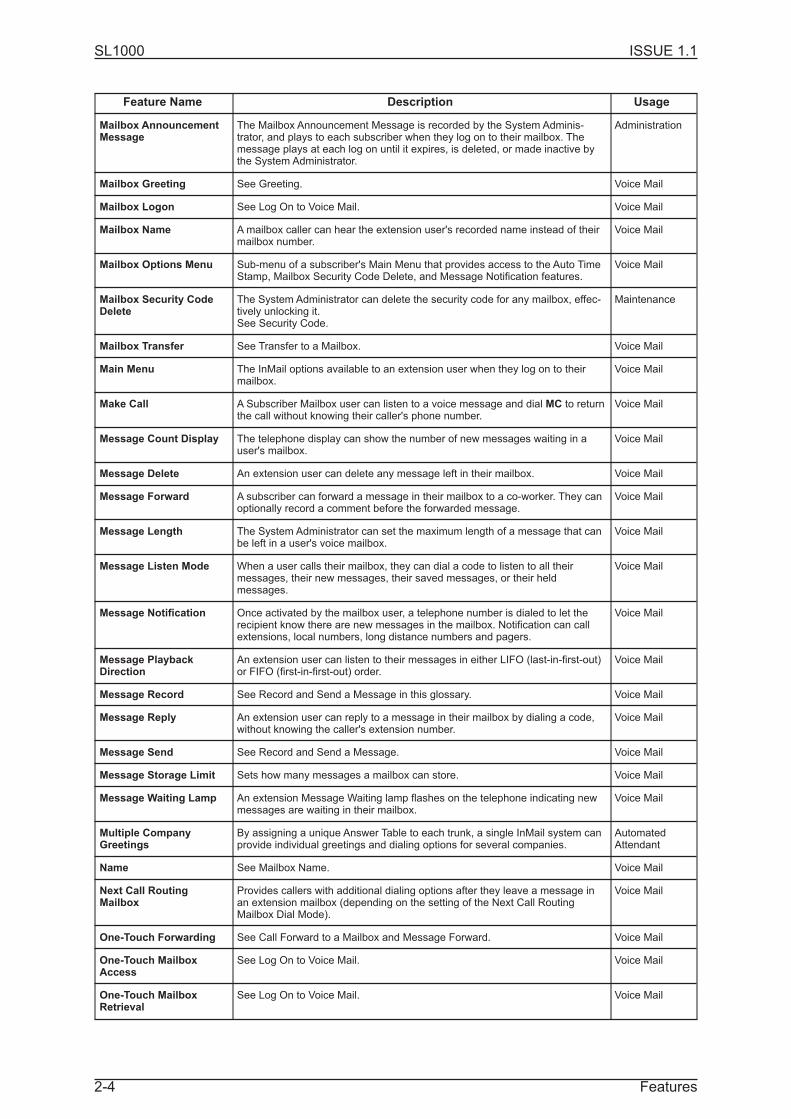
Mailbox AnnouncementMessage
The Mailbox Announcement Message is recorded by the System Adminis-trator, and plays to each subscriber when they log on to their mailbox. Themessage plays at each log on until it expires, is deleted, or made inactive bythe System Administrator.
Administration
Mailbox Greeting See Greeting. Voice Mail
Mailbox Logon See Log On to Voice Mail. Voice Mail
Mailbox Name Amailbox caller can hear the extension user's recorded name instead of theirmailbox number.
Voice Mail
Mailbox Options Menu Sub-menu of a subscriber's Main Menu that provides access to the Auto TimeStamp, Mailbox Security Code Delete, and Message Notification features.
Voice Mail
Mailbox Security CodeDelete
The System Administrator can delete the security code for any mailbox, effec-tively unlocking it.See Security Code.
Maintenance
Mailbox Transfer See Transfer to a Mailbox. Voice Mail
Main Menu The InMail options available to an extension user when they log on to theirmailbox.
Voice Mail
Make Call A Subscriber Mailbox user can listen to a voice message and dial MC to returnthe call without knowing their caller's phone number.
Voice Mail
Message Count Display The telephone display can show the number of new messages waiting in auser's mailbox.
Voice Mail
Message Delete An extension user can delete any message left in their mailbox. Voice Mail
Message Forward A subscriber can forward a message in their mailbox to a co-worker. They canoptionally record a comment before the forwarded message.
Voice Mail
Message Length The System Administrator can set the maximum length of a message that canbe left in a user's voice mailbox.
Voice Mail
Message Listen Mode When a user calls their mailbox, they can dial a code to listen to all theirmessages, their new messages, their saved messages, or their heldmessages.
Voice Mail
Message Notification Once activated by the mailbox user, a telephone number is dialed to let therecipient know there are new messages in the mailbox. Notification can callextensions, local numbers, long distance numbers and pagers.
Voice Mail
Message PlaybackDirection
An extension user can listen to their messages in either LIFO (last-in-first-out)or FIFO (first-in-first-out) order.
Voice Mail
Message Record See Record and Send a Message in this glossary. Voice Mail
Message Reply An extension user can reply to a message in their mailbox by dialing a code,without knowing the caller's extension number.
Voice Mail
Message Send See Record and Send a Message. Voice Mail
Message Storage Limit Sets how many messages a mailbox can store. Voice Mail
Message Waiting Lamp An extension Message Waiting lamp flashes on the telephone indicating newmessages are waiting in their mailbox.
Voice Mail
Multiple CompanyGreetings
By assigning a unique Answer Table to each trunk, a single InMail system canprovide individual greetings and dialing options for several companies.
AutomatedAttendant
Name See Mailbox Name. Voice Mail
Next Call RoutingMailbox
Provides callers with additional dialing options after they leave a message inan extension mailbox (depending on the setting of the Next Call RoutingMailbox Dial Mode).
Voice Mail
One-Touch Forwarding See Call Forward to a Mailbox and Message Forward. Voice Mail
One-Touch MailboxAccess
See Log On to Voice Mail. Voice Mail
One-Touch MailboxRetrieval
See Log On to Voice Mail. Voice Mail
ISSUE 1.1SL1000
Features2-4

Feature Name Description Usage
Park and Page Park and Page can automatically Park a call at an extension and Page theuser with a recorded Paging Message announcing the parked call. The calledextension user can then go to any telephone and implement Personal Park topick up the call.
AutomatedAttendant
Personalized MailboxGreeting
See Greeting. Voice Mail
Programmable SecurityCode
See Security Code and Mailbox Security Code Delete. Voice Mail
Programming VoiceMail You can program (customize) InMail by using the PCPro and WebProprogramming applications. Limited programming can also be done from aSystem Administrator's mailbox.See Programming Voice Mail for more information.Also see System Administrator Mailbox.
Maintenance
Quick Message Automated Attendant callers can dial a digit followed by an extension numberto leave a message directly in a user's mailbox.See Quick Message for more information.
AutomatedAttendant
Record and Send aMessage
A Subscriber Mailbox user can record and send a message to any otherSubscriber Mailbox.
Voice Mail
Recorded Help Prerecorded voice prompts guide the user through the InMail features. Voice Mail
Recording aConversation
See Live Record. Voice Mail
Recording a Message See Record and Send a Message. Voice Mail
Recording ConversationBeep
See Live Record. Voice Mail
Recording Options See Record and Send a Message. Voice Mail
Remote Log On See Log On to Voice Mail. Voice Mail
Remote Greetings See Greeting. Voice Mail
Remote MessageNotification
See Message Notification. Voice Mail
Remote Programming You can remotely program (customize) InMail by using the PCPro and WebProprogramming applications. You can also do limited remote programming fromthe System Administrator's mailbox.
Maintenance
Return Call (with CallerID)
See Make Call. Voice Mail
Rotary Dial Telephones See Automatic Routing for Rotary Dial Callers. AutomatedAttendant
Routing Mailbox Routing Mailboxes are used to route Automated Attendant calls. A RoutingMailbox can be either an Announcement or Call Routing Mailbox.
AutomatedAttendant
Screened Transfer Similar to telephone system screened transfers when the transferring partycontrols the transfer. After an Automated Attendant caller dials an extension,InMail calls (screens) the destination extension to see if the transfer can gothrough.• If the destination is busy or in DND, the Automated Attendant does not
extend the call and immediately provides the caller with additional options.
• If the destination is available, the Automated Attendant rings it. If the destina-
tion answers, the call goes through. If the destination does not answer in a
programmed time, the Automated Attendant does not extend the call and
provides the caller with additional options.
Also see Unscreened Transfer.
AutomatedAttendant
Security Code An extension user's mailbox can have a security code to protect the mailboxfrom unauthorized access.See Mailbox Security Code Delete.
Voice Mail
Select Listen Mode See Message Listen Mode. Voice Mail
Single Digit Dialing An Automated Attendant caller can press a single key to route to an extension,route to another destination, or use an InMail feature.
AutomatedAttendant
Subscriber Mailbox The mailbox type normally used for telephone system extensions. Voice Mail
ISSUE 1.1 SL1000
InMail Feature Manual 2-5
Feature Name Description Usage
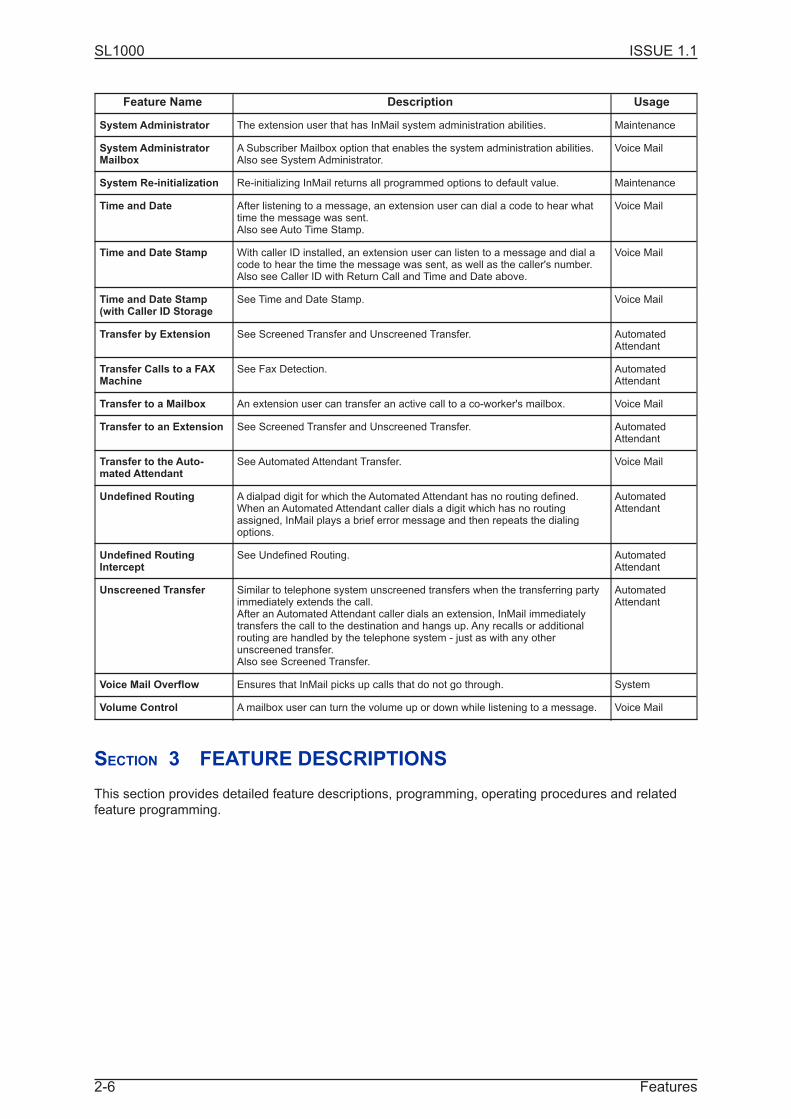
System Administrator The extension user that has InMail system administration abilities. Maintenance
System AdministratorMailbox
A Subscriber Mailbox option that enables the system administration abilities.Also see System Administrator.
Voice Mail
System Re-initialization Re-initializing InMail returns all programmed options to default value. Maintenance
Time and Date After listening to a message, an extension user can dial a code to hear whattime the message was sent.Also see Auto Time Stamp.
Voice Mail
Time and Date Stamp With caller ID installed, an extension user can listen to a message and dial acode to hear the time the message was sent, as well as the caller's number.Also see Caller ID with Return Call and Time and Date above.
Voice Mail
Time and Date Stamp(with Caller ID Storage
See Time and Date Stamp. Voice Mail
Transfer by Extension See Screened Transfer and Unscreened Transfer. AutomatedAttendant
Transfer Calls to a FAXMachine
See Fax Detection. AutomatedAttendant
Transfer to a Mailbox An extension user can transfer an active call to a co-worker's mailbox. Voice Mail
Transfer to an Extension See Screened Transfer and Unscreened Transfer. AutomatedAttendant
Transfer to the Auto-mated Attendant
See Automated Attendant Transfer. Voice Mail
Undefined Routing A dialpad digit for which the Automated Attendant has no routing defined.When an Automated Attendant caller dials a digit which has no routingassigned, InMail plays a brief error message and then repeats the dialingoptions.
AutomatedAttendant
Undefined RoutingIntercept
See Undefined Routing. AutomatedAttendant
Unscreened Transfer Similar to telephone system unscreened transfers when the transferring partyimmediately extends the call.After an Automated Attendant caller dials an extension, InMail immediatelytransfers the call to the destination and hangs up. Any recalls or additionalrouting are handled by the telephone system - just as with any otherunscreened transfer.Also see Screened Transfer.
AutomatedAttendant
Voice Mail Overflow Ensures that InMail picks up calls that do not go through. System
Volume Control Amailbox user can turn the volume up or down while listening to a message. Voice Mail
SECTION 3 FEATURE DESCRIPTIONS
This section provides detailed feature descriptions, programming, operating procedures and related
feature programming.
ISSUE 1.1SL1000
Features2-6

Announcement Mailbox
Description
An Announcement Mailbox plays a recorded announcement to Automated Attendant callers without
providing dialing options. The Announcement Mailbox is typically set up to provide information to
callers and then route back to the Automated Attendant. See the following example:
• The Automated Attendant instructs the caller to dial a digit for company directions.
- Record this in the Instruction Menu message for the active Call Routing Mailbox.See Instruction Menu on page 2-122 for more information.
- Set the dialing options in the Dial Action Table associated with the active Call Routing Mailbox.See Dial Action Table on page 2-49 for more information.
• The caller dials the digit and listens to the recorded Announcement Mailbox message for directions.
• After playing the directions, the caller routes back to the Automated Attendant for additional dialingoptions.
- See the Hang Up on page 2-106 and Next Call Routing Mailbox on page 2-166 options in Programming below.
By default, there are 24 Announcement Mailboxes (Routing Mailboxes 9 ~ 32). However, you can
assign any of the 32 Routing Mailboxes as an Announcement Mailbox.
The Next Call Routing Mailbox Options
The following Mailbox Routing charts show how an Announcement Mailbox handles Automated Atten-
dant calls.
• The first chart explains what happens when the outside call is directly answered by the Announce-ment Mailbox. This happens when the Answer Table uses an Announcement Mailbox for routing
instead of a Call Routing Mailbox.
• The second chart explains what happens when the outside call is answered by a Call Routing Mail-box and then routed to the Announcement Mailbox. This can happen, for example, when a caller
dials a digit to hear an announcement of company directions.
• See Answer Table on page 2-14 for more set up information.
Direct Announcement Mailbox Routing(If the outside caller routes directly to the Announcement Mailbox)
47-09-01 Next CallRouting Mailbox
47-09-02 RepeatCount
47-09-03 Hang UpAfter
Action
0 = Undefined 0 (No repeats) 0 = None1 = Goodbye2 = Silent
• If the caller does not dial, after the announcement
InMail hangs up.
• If the caller dials a digit during the announcement,
InMail says "That is an invalid entry" and hangs up.
1-32 (valid CallRouting Mailbox)
0 (No repeats) 0 = None1 = Goodbye2 = Silent
• If the caller does not dial, after the announcement
they route to the Next Call Routing Mailbox.
• If the caller dials a digit during the announcement,
they route to the Next Call Routing Mailbox.
• If the caller doesn't dial, after the announcement
InMail hangs up.
• If the caller dials a digit during the announcement,
they route to the Next Call Routing Mailbox.
0 = Undefined x (x number ofrepeats)
0 = None1 = Goodbye2 = Silent
• If caller does not dial, they hear the announcement x
number of times and then InMail hangs up.
• If the caller dials a digit during the announcement,
InMail says "That is an invalid entry" and aborts the
announcement. The announcement repeats (if
allowed by the Repeat Count) and then InMail hangs
up.
ISSUE 1.1 SL1000
A
InMail Feature Manual 2-7

Direct Announcement Mailbox Routing(If the outside caller routes directly to the Announcement Mailbox)
47-09-01 Next CallRouting Mailbox
47-09-02 RepeatCount
47-09-03 Hang UpAfter
Action
1-32 (valid CallRouting Mailbox)
x (x number ofrepeats)
0 = None1 = Goodbye2 = Silent
• If caller does not dial, they hear the announcement x
number of times and then route to the Next Call
Routing Mailbox.
• If the caller dials a digit during the announcement,
they route to the Next Call Routing Mailbox.
• If caller does not dial, they hear the announcement x
number of times and then InMail hangs up.
• If the caller dials a digit during the announcement,
they route to the Next Call Routing Mailbox.
Routed Announcement Mailbox Routing(If the outside caller routes to the Announcement Mailbox from a Call Routing Mailbox)
47-09-01 Next CallRouting Mailbox
47-09-02 RepeatCount
47-09-03 Hang UpAfter
Action
0 = Undefined 0 (No repeats) 0 = None1 = Goodbye2 = Silent
• If the caller does not dial, after the announcement
the caller goes back to the initial Call Routing
Mailbox.
• If the caller dials a digit during the announcement,
InMail says "That is an invalid entry" and routes the
caller goes back to the initial Call Routing Mailbox.
• If the caller does not dial, after the announcement
InMail hangs up.
• If the caller dials a digit during the announcement,
InMail says "That is an invalid entry" and hangs up.
1-32 (valid CallRouting Mailbox)
0 (No repeats) 0 = None1 = Goodbye2 = Silent
• If the caller doesn't dial, after the announcement
they route to the Next Call Routing Mailbox.
• If the caller dials a digit during the announcement,
they route to the Next Call Routing Mailbox.
• If the caller does not dial, after the announcement
InMail hangs up.
• If the caller dials a digit during the announcement,
they route to the Next Call Routing Mailbox.
0 = Undefined x (x number ofrepeats)
0 = None1 = Goodbye2 = Silent
• If caller does not dial, they hear the announcement
x number of times and then go back to the initial
Call Routing Mailbox.
• If the caller dials a digit during the announcement,
InMail says "That is an invalid entry" and aborts the
announcement. The announcement repeats (if
allowed by the Repeat Count) and then InMail
routes back to the initial Call Routing Mailbox.
• If caller does not dial, they hear the announcement
x number of times and then InMail hangs up.
• If the caller dials a digit during the announcement,
InMail says "That is an invalid entry" and aborts the
announcement. The announcement repeats (if
allowed by the Repeat Count) and then InMail
hangs up.
1-32 (valid CallRouting Mailbox)
x (x number ofrepeats)
0 = None1 = Goodbye2 = Silent
• If caller does not dial, they hear the announcement
x number of times and then route to the Next Call
Routing Mailbox.
• If the caller dials a digit during the announcement,
they route to the Next Call Routing Mailbox.
• If caller does not dial, they hear the announcement
x number of times and then InMail hangs up.
• If the caller dials a digit during the announcement,
they route to the Next Call Routing Mailbox.
ISSUE 1.1SL1000
A
Announcement Mailbox2-8
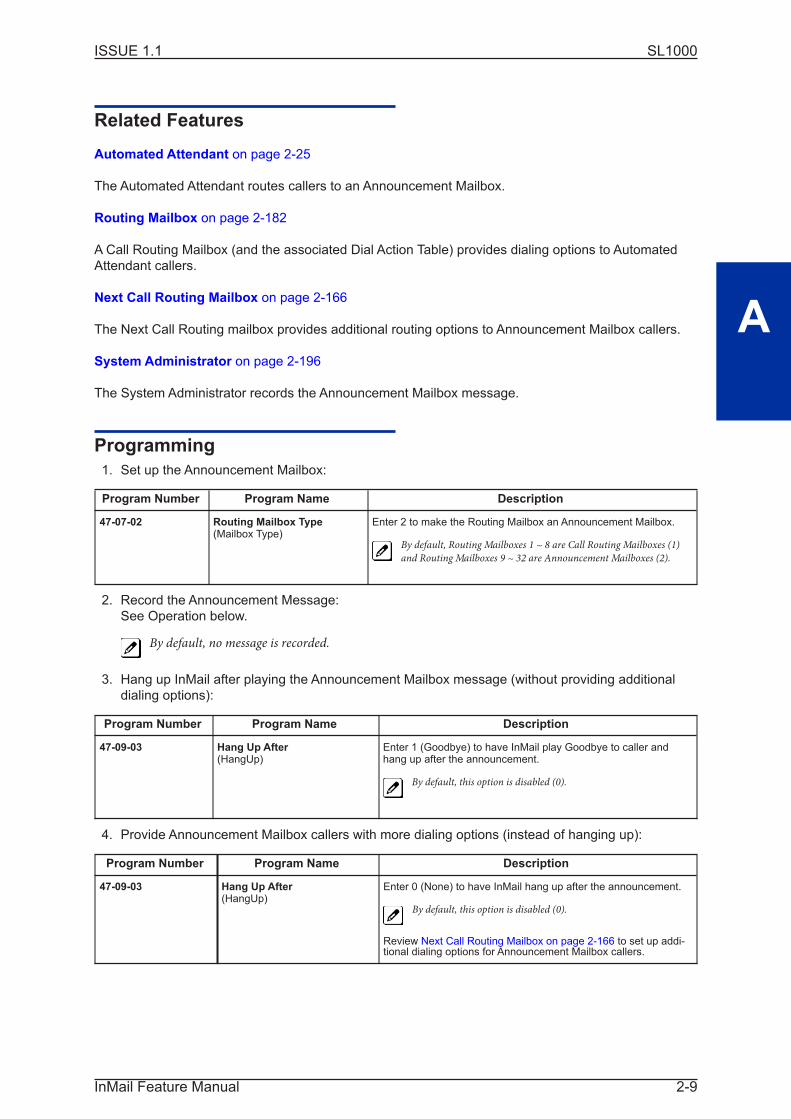
Related Features
Automated Attendant on page 2-25
The Automated Attendant routes callers to an Announcement Mailbox.
Routing Mailbox on page 2-182
A Call Routing Mailbox (and the associated Dial Action Table) provides dialing options to Automated
Attendant callers.
Next Call Routing Mailbox on page 2-166
The Next Call Routing mailbox provides additional routing options to Announcement Mailbox callers.
System Administrator on page 2-196
The System Administrator records the Announcement Mailbox message.
Programming
1. Set up the Announcement Mailbox:
Program Number Program Name Description
47-07-02 Routing Mailbox Type(Mailbox Type)
Enter 2 to make the Routing Mailbox an Announcement Mailbox.
By default, Routing Mailboxes 1 ~ 8 are Call Routing Mailboxes (1)
and Routing Mailboxes 9 ~ 32 are Announcement Mailboxes (2).
2. Record the Announcement Message:
See Operation below.
By default, no message is recorded.
3. Hang up InMail after playing the Announcement Mailbox message (without providing additional
dialing options):
Program Number Program Name Description
47-09-03 Hang Up After(HangUp)
Enter 1 (Goodbye) to have InMail play Goodbye to caller andhang up after the announcement.
By default, this option is disabled (0).
4. Provide Announcement Mailbox callers with more dialing options (instead of hanging up):
Program Number Program Name Description
47-09-03 Hang Up After(HangUp)
Enter 0 (None) to have InMail hang up after the announcement.
By default, this option is disabled (0).
Review Next Call Routing Mailbox on page 2-166 to set up addi-tional dialing options for Announcement Mailbox callers.
ISSUE 1.1 SL1000
A
InMail Feature Manual 2-9
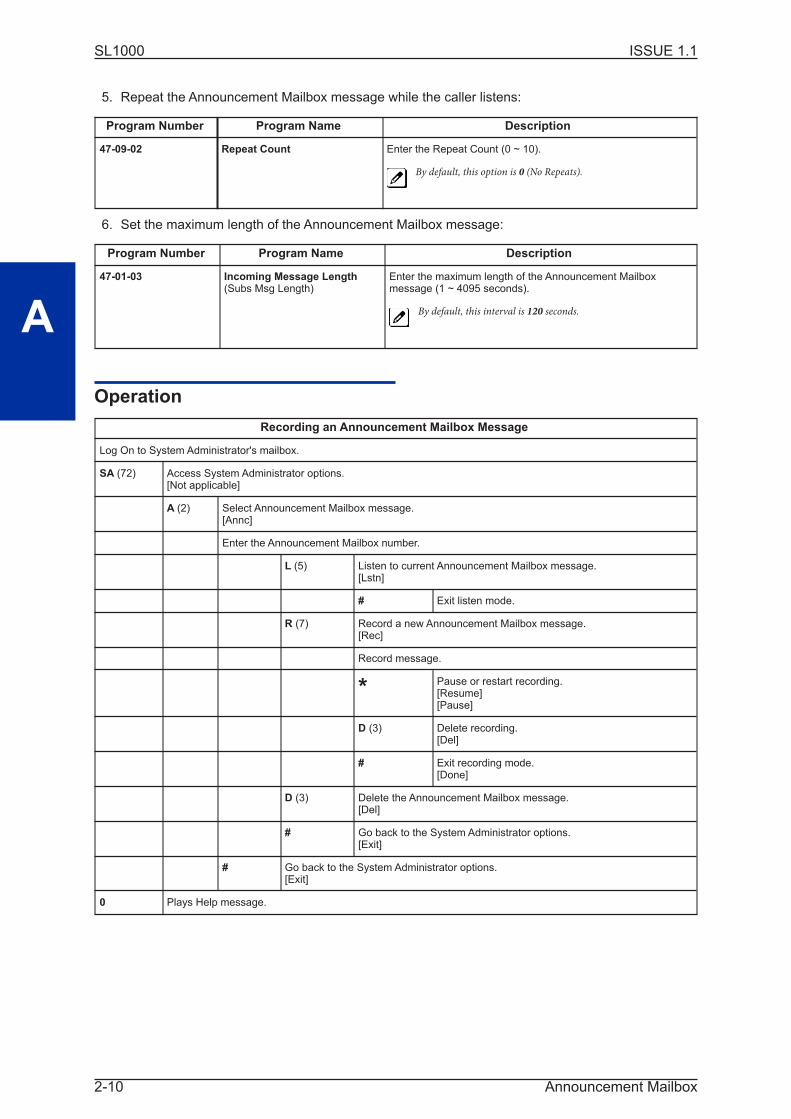
5. Repeat the Announcement Mailbox message while the caller listens:
Program Number Program Name Description
47-09-02 Repeat Count Enter the Repeat Count (0 ~ 10).
By default, this option is 0 (No Repeats).
6. Set the maximum length of the Announcement Mailbox message:
Program Number Program Name Description
47-01-03 Incoming Message Length(Subs Msg Length)
Enter the maximum length of the Announcement Mailboxmessage (1 ~ 4095 seconds).
By default, this interval is 120 seconds.
Operation
Recording an Announcement Mailbox Message
Log On to System Administrator's mailbox.
SA (72) Access System Administrator options.[Not applicable]
A (2) Select Announcement Mailbox message.[Annc]
Enter the Announcement Mailbox number.
L (5) Listen to current Announcement Mailbox message.[Lstn]
# Exit listen mode.
R (7) Record a new Announcement Mailbox message.[Rec]
Record message.
* Pause or restart recording.[Resume][Pause]
D (3) Delete recording.[Del]
# Exit recording mode.[Done]
D (3) Delete the Announcement Mailbox message.[Del]
# Go back to the System Administrator options.[Exit]
# Go back to the System Administrator options.[Exit]
0 Plays Help message.
ISSUE 1.1SL1000
A
Announcement Mailbox2-10

Announcement Message
Description
The Announcement Message is the voice message that the System Administrator records for a specific
Announcement Mailbox. See Announcement Mailbox on page 2-7 for more.
Related Features
See Announcement Mailbox on page 2-7.
Programming
See Announcement Mailbox on page 2-7.
Operation
See Announcement Mailbox on page 2-7.
ISSUE 1.1 SL1000
A
InMail Feature Manual 2-11

Answer Schedule Override
Description
Answer Schedule Override provides alternate answering for Automated Attendant calls. When
enabled, Answer Schedule Override sends calls to the specified Override Mailbox. The Override
Mailbox can be an Announcement, Call Routing, or Subscriber mailbox. You can use Answer Schedule
Override to provide holiday and bad weather closing announcements, for example. Enable override
when you want callers to hear the special announcements; disable override to have the Automated
Attendant answer normally. You can enable Answer Schedule Override from system programming or
from the System Administrator Mailbox.
• If the Override Mailbox is an Announcement Mailbox, the outside caller hears the recorded an-nouncement. Depending on how the Announcement Mailbox is programmed, InMail then hangs up,
reroutes the call, or provides additional dialing options.
• If the Override Mailbox is a Call Routing Mailbox, the outside caller hears the instruction menu andcan dial any option allowed by the associated Dial Action Table.
• If the Override Mailbox is a Subscriber Mailbox, the outside caller hears the mailbox greeting (if re-corded) and can leave a message.
Related Features
Announcement Mailbox on the previous page
The Override Mailbox can be an Announcement Mailbox.
Routing Mailbox on page 2-182
The Override Mailbox can be a Call Routing Mailbox.
Subscriber Mailbox on page 2-193
The Override Mailbox can be a Subscriber Mailbox.
System Administrator on page 2-196
Optionally enable Answer Schedule Override from the System Administrator Mailbox.
Programming
1. Optionally enable Answer Schedule Override from system programming.
ProgramNumber
Program Name Description
47-11-01 Answer Schedule Override(Schedule Override)
Enter 1 (Yes) to enable Answer Schedule Override.You can also enable Answer Schedule Override from theSystem Administrator Mailbox. See Operation below.
By default, Answer Schedule Override is disabled (0).
ISSUE 1.1SL1000
A
Answer Schedule Override2-12

2. Specify the Override Mailbox Category.
Program Number Program Name Description
47-11-02 Override Mailbox Category(Override MB Ctg)
When you enable Answer Schedule Override for theselected Answer Table, you can choose to route AutomatedAttendant calls to any of the following mailbox categories:1 Station Mailbox2 Group Mailbox3 Routing Mailbox0 Undefined
By default, this option is 0.
3. Specify the Override Mailbox Number.
Program Number Program Name Description
47-11-02 Override Mailbox Number(Override MB Num)
For the selected Answer Table, choose the OverrideMailbox number (maximum 3 digits, using 0 ~ 9). Themailbox number you select must match the mailboxcategory specified in 47-11-02 above.
By default, there is No Entry for this option.
4. Optionally enable Answer Schedule Override from the System Administrator Mailbox.
Operation
Enabling Answer Schedule Override
Log On to System Administrator’s Mailbox.
SA(72)
Access System Administrator options.[Not applicable]
O (6) Access Answer Schedule Override.[Not applicable]
1-8 Enter the number of the Answer Table you want to override.You go to the Answer Schedule Override Menu.
O (6) Turn Answer Schedule Override on or off.[On][Off]
C (2) Select the Override Mailbox.[MBOX]
Enter the Override Mailbox number.The Override Mailbox can be an Announcement, Call Routing, or SubscriberMailbox.
# Go back to the Answer Schedule Override Menuwithout entering an Override Mailbox.[Exit]
0 Plays Answer Schedule Override Menu Help message.
# Go back to the System Administrator Menu.[Exit]
# Go back to the System Administrator Menu.[Exit]
# Go back to the Main Menu.[Exit]
0 Plays Help message.
ISSUE 1.1 SL1000
A
InMail Feature Manual 2-13

Answer Table
Description
The Answer Table determines how the Automated Attendant answers outside calls on each trunk,
according to the time of the day and day of the week that the call is ringing. InMail provides 8 Answer
Tables. The Answer Table is an integral part of the Automated Attendant. The Automated Attendant can
automatically answer the telephone system incoming calls, play an Instruction Menu message, and
provide dialing options to callers. Automated Attendant has 3 major components:
• Answer Table on this pageThe Answer Table determines how the Automated Attendant answers outside calls on each trunk,
according to the time of the day and day of the week that the call is ringing. The Answer Table divides
the time of day and day of the week into individual schedules, which in turn assign a Call Routing
Mailbox to each call. When a specific schedule is not in effect, the Answer Table uses its Default
Mailbox to determine routing.
By default, all trunks use Answer Table 1. Answer Table 1 has a single schedule that runs Monday throughFriday from 8:30 AM to 5:00 PM.
• Routing Mailbox on page 2-182A Call Routing Mailbox is associated with an individual Answer Table schedule or the Default Mailbox.
It specifies which dialing options (Dial Action Table) are available to callers. It also provides the In-
struction Menu to callers which typically greets the callers and describes the dialing options.
By default, Answer Table 1 has a single schedule that runs Monday through Friday from 8:30 AM to 5:00PM. This schedule and the Default Mailbox both use Call Routing Mailbox 1.
• Dial Action Table on page 2-49After the Automated Attendant answers, the Dial Action Table provides the dialing options to callers.
Each digit a caller can dial is assigned a specific action (function) in the Dial Action Table. The dial
action used depends on the setting in the active Call Routing Mailbox, which in turn depends on the
Answer Table setup.
By default, Call Routing Mailbox 1 uses Dial Action Table 1.
The block diagram below shows the default InMail Automated Attendant configuration.
ISSUE 1.1SL1000
A
Answer Table2-14
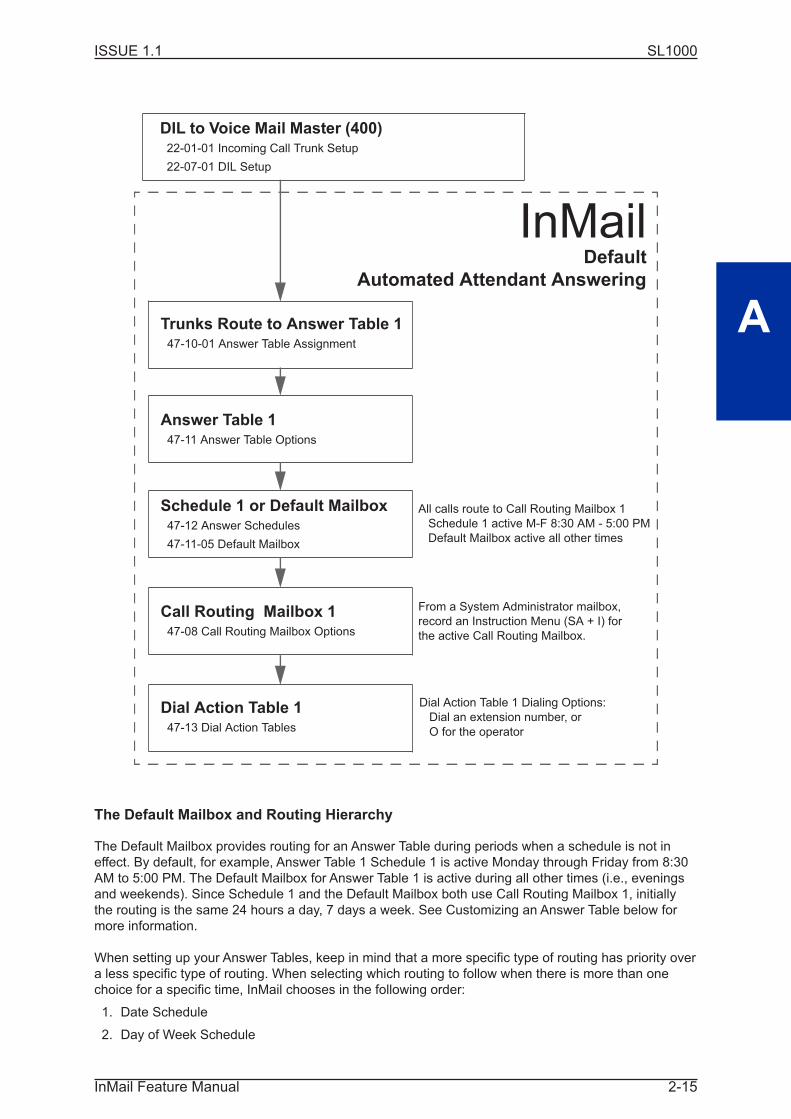
The Default Mailbox and Routing Hierarchy
The Default Mailbox provides routing for an Answer Table during periods when a schedule is not in
effect. By default, for example, Answer Table 1 Schedule 1 is active Monday through Friday from 8:30
AM to 5:00 PM. The Default Mailbox for Answer Table 1 is active during all other times (i.e., evenings
and weekends). Since Schedule 1 and the Default Mailbox both use Call Routing Mailbox 1, initially
the routing is the same 24 hours a day, 7 days a week. See Customizing an Answer Table below for
more information.
When setting up your Answer Tables, keep in mind that a more specific type of routing has priority over
a less specific type of routing. When selecting which routing to follow when there is more than one
choice for a specific time, InMail chooses in the following order:
1. Date Schedule
2. Day of Week Schedule
Trunks Route to Answer Table 1 47-10-01 Answer Table Assignment
InMailDefault
Automated Attendant Answering
Answer Table 1 47-11 Answer Table Options
Schedule 1 or Default Mailbox 47-12 Answer Schedules
47-11-05 Default Mailbox
Call Routing Mailbox 1 47-08 Call Routing Mailbox Options
All calls route to Call Routing Mailbox 1
Schedule 1 active M-F 8:30 AM - 5:00 PM
Default Mailbox active all other times
From a System Administrator mailbox,
record an Instruction Menu (SA + I) for
the active Call Routing Mailbox.
Dial Action Table 1 47-13 Dial Action Tables
DIL to Voice Mail Master (400) 22-01-01 Incoming Call Trunk Setup
22-07-01 DIL Setup
Dial Action Table 1 Dialing Options:
Dial an extension number, or
O for the operator
ISSUE 1.1 SL1000
A
InMail Feature Manual 2-15

3. Range of Days Schedule
4. Default Mailbox
For example, a Date Schedule set up for Christmas day has priority over any other schedules in effect
on December 25.
Customizing an Answer Table
Use the following examples as a guide when customizing your Answer Tables to meet specific site
requirements. Refer to Programming below for the specifics.
To set up daytime and evening/weekend answering (2 schedules):
In this example, use the Default Mailbox (Call Routing Mailbox 1) for evening/weekend answering and
specify a new Call Routing Mailbox for daytime answering.
1. Change the Call Routing Mailbox for Answer Table 1, Schedule 1.
In 47-11 Program Entry, assign Call Routing Mailbox 2 to Answer Table 1, Schedule 1. Use this
setting for daytime answering.
2. From a System Administrator's Mailbox, record an evening/weekend Instruction Menu message
for Call Routing mailbox 1.
This message plays to callers Monday through Friday from 5:00 PM to 8:30 AM and on weekends.
3. From a System Administrator's Mailbox, record a daytime Instruction Menu message for Call
Routing Mailbox 2.
This message plays to callers Monday through Friday from 8:30 AM to 5:00 PM.
To set up daytime, evening, and weekend answering (3 schedules):
This example builds on the example above, but adds a third schedule that plays only on weekday
evenings.
1. Change the Call Routing Mailbox for Answer Table 1, Schedule 1.
In 47-11 Program Entry, assign Call Routing Mailbox 2 to Answer Table 1, Schedule 1. As in the 2
schedule example, use this for daytime answering.
2. Create a new schedule that will run only in the evenings.
In 47-11 Program Entry, create Schedule 2 for Answer Table 1 that will run Monday through Friday
from 5:00 PM to 11:00 PM. Assign Call Routing Mailbox 3 to this new schedule.
3. From a System Administrator's Mailbox, record a late night/weekend Instruction Menu Message
for Call Routing mailbox 1.
This message plays Monday through Friday from 11:00 PM to 8:30 AM, and on weekends.
4. From a System Administrator's mailbox, record the weekday Instruction Menu Message for Call
Routing Mailbox 2.
This message plays Monday through Friday from 8:30 AM to 5:00 PM.
5. From a System Administrator's Mailbox, record the weekday evening Instruction Menu Message
for Call Routing Mailbox 3.
This message plays Monday through Friday from 5:00 PM to 1:00 PM.
Related Features
Automated Attendant on page 2-25
The Answer Table determines how the Automated Attendant answers calls.
Routing Mailbox on page 2-182
The Call Routing Mailbox provides the dialing instructions (Dial Action Table) and announcements to
Automated Attendant Callers.
Dial Action Table on page 2-49
ISSUE 1.1SL1000
A
Answer Table2-16

The Dial Action Table defines the dialing options for the Call Routing Mailbox chosen by the Answer
Table, which in turn provides those options to Automated Attendant callers.
Programming
1. Assign Answer Tables to trunks.
Program Number Program Name Description
47-10-01 Answer Table Assignment(Answer Table)
Assign an Answer Table (1 ~ 8) to each trunk that the AutomatedAttendant should answer.
By default, all trunks are assigned to Answer Table 1.
2. Set up the Automated Attendant to answer trunk calls.
Program Number Program Name Description
22-02-01 Incoming Call Trunk Setup Assign Service Type 4 to each trunk you want to be a DIL. Make aseparate entry for each Night Service mode.
By default, trunks are Service Type 0 (Normal).
22-07-01 DIL Assignment For each trunk you designated above, enter the InMail pilotnumber. Make a separate entry for each Night Service mode.
By default, there are no DIL destinations programmed.
3. Select the Answer Table you want to customize.
Program Number Program Name Description
47-11 InMail Answer Table Options Select the Answer Table you want to customize (1 ~ 8).
47-11-04 Next Answer Table If 10 Answer Schedules in an Answer Table are not sufficient, enterthe number of the Answer Table to which you want to link theselected table. InMail treats the two linked tables as a single 20entry Answer Table.
By default, Answer Tables are not linked (Undefined).
47-11-03 Default Mailbox Category(Default MB Ctg) andDefault Mailbox Number(Default MB Num)
Set the mailbox the Answer Table uses if no Answer Schedule is ineffect.
By default, this option is 3 (Routing Mailbox) for Answer Table 1
and 0 (undefined) for all other Answer Tables.
4. Setting up a Type 1 (Day of Week) schedule
Program Number Program Name Description
47-12 InMail Answer Schedules Select the Schedule Entry you want to customize.
47-12-01 Schedule Type(Entry xx Schedule Type)
Enter 1 to make the Schedule Entry a Day of the Week Schedule.
By default, Schedule Entry 1 of Answer Table 1 is 2 (Range of Days)
schedule. All other Schedule Entries are 0 (Undefined).
ISSUE 1.1 SL1000
A
InMail Feature Manual 2-17

Program Number Program Name Description
47-12-02 Answering Mailbox Category(Entry xx MB Ctg) andAnswering Mailbox Number(Entry xx MB Num)
Select the Routing Mailbox (1 ~ 32) to answer calls when thisSchedule Entry is active.You can optionally assign a Subscriber Mailbox (1), GroupMailbox (2), or Routing Mailbox (3) for this option.
By default, no Type 1 (Day of Week) schedules are enabled.
47-12-03 Day of the Week(Entry xx Day)
Specify the day of the week the Schedule Entry should be active.
By default, Type 1 (Day of Week) schedule is 1.
47-12-07 Schedule Start Time(Entry xx Start Time)
Set the time of day the Schedule Entry should start on the dayspecified.
By default, Type 1 (Day of Week) schedule is 0830 (8:30 AM).
47-12-08 Schedule End Time(Entry xx End Time)
Set the time of day the Schedule Entry should stop on the dayspecified.
By default, Type 1 (Day of Week) schedule is 1700 (5:00 PM).
5. Setting up a Type 2 (Range of Days) schedule
Program Number Program Name Description
47-12 InMail Answer Schedules Select the Schedule Entry you want to customize.
47-12-01 Schedule Type(Entry xx Schedule Type)
Enter 2 to make the Schedule Entry a Range of Days Schedule.
By default, Schedule Entry 1 of Answer Table 1 is a Range of Days
(Type 2) schedule. All other Schedule Entries are undefined.
47-12-02 Answering Mailbox Category(Entry xx MB Ctg) andAnswering Mailbox Number(Entry xx MB Num)
Select the Routing Mailbox (1-32) that will answer calls when thisSchedule Entry is active.
You can optionally assign a Subscriber Mailbox, Group Mailbox, or
Routing Mailbox for this option. By default, Schedule 1 of Answer
Table 1 uses Call Routing Mailbox 1. All other schedules are
undefined.
47-12-04 Start Day(Entry xx Start Day)
Specify the day of the week the Schedule Entry should bebecome active (start).
By default, Schedule 1 of Answer Table 1 starts on Monday (2). All
other schedules are Sunday (1).
47-12-05 End Day(Entry xx End Day)
Specify the day of the week the Schedule Entry should becomeinactive.
By default, Schedule 1 of Answer Table 1 ends on Friday (6). All
other schedules are Sunday(1).
47-12-07 Schedule Start Time(Entry xx Start Time)
Set the time of day the Schedule Entry should start on the dayspecified.
By default, Schedule 1 of Answer Table 1 starts at 8:30 AM (0830).
All other schedules are undefined.
47-12-08 Schedule End Time(Entry xx End Time)
Set the time of day the Schedule Entry should stop on the dayspecified.
By default, Schedule 1 of Answer Table 1 ends at 5:00 PM (1700).
All other schedules are undefined.
ISSUE 1.1SL1000
A
Answer Table2-18
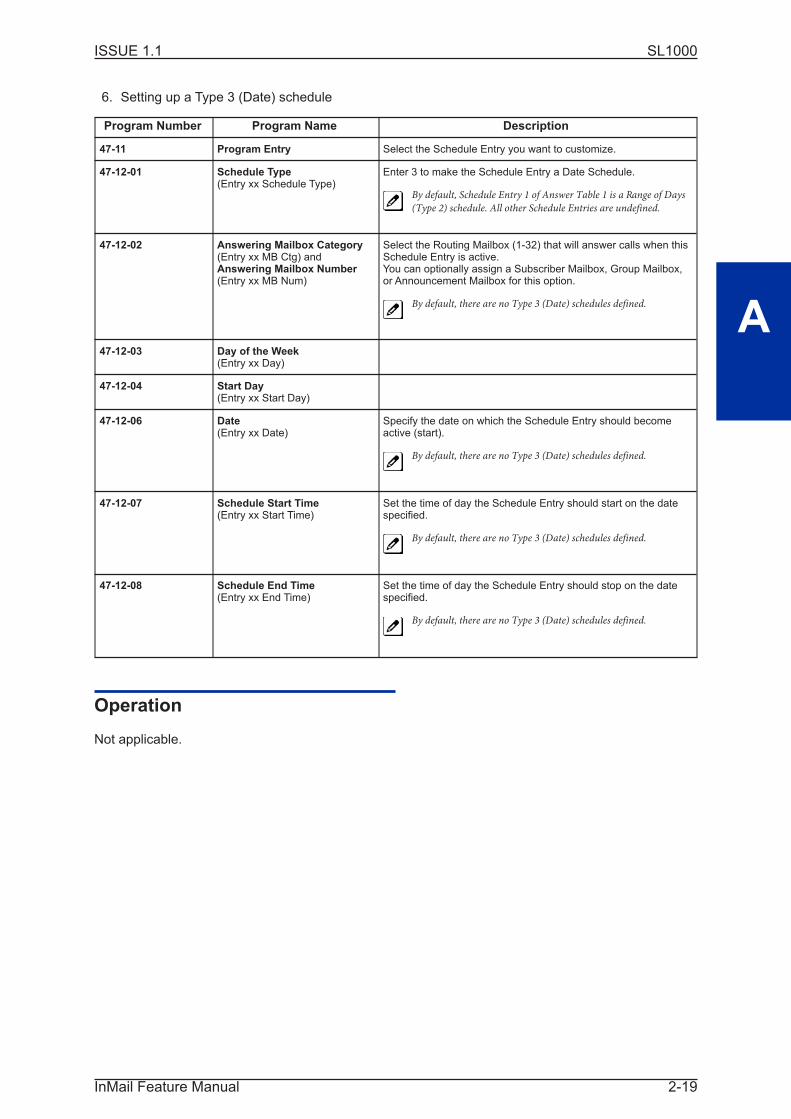
6. Setting up a Type 3 (Date) schedule
Program Number Program Name Description
47-11 Program Entry Select the Schedule Entry you want to customize.
47-12-01 Schedule Type(Entry xx Schedule Type)
Enter 3 to make the Schedule Entry a Date Schedule.
By default, Schedule Entry 1 of Answer Table 1 is a Range of Days
(Type 2) schedule. All other Schedule Entries are undefined.
47-12-02 Answering Mailbox Category(Entry xx MB Ctg) andAnswering Mailbox Number(Entry xx MB Num)
Select the Routing Mailbox (1-32) that will answer calls when thisSchedule Entry is active.You can optionally assign a Subscriber Mailbox, Group Mailbox,or Announcement Mailbox for this option.
By default, there are no Type 3 (Date) schedules defined.
47-12-03 Day of the Week(Entry xx Day)
47-12-04 Start Day(Entry xx Start Day)
47-12-06 Date(Entry xx Date)
Specify the date on which the Schedule Entry should becomeactive (start).
By default, there are no Type 3 (Date) schedules defined.
47-12-07 Schedule Start Time(Entry xx Start Time)
Set the time of day the Schedule Entry should start on the datespecified.
By default, there are no Type 3 (Date) schedules defined.
47-12-08 Schedule End Time(Entry xx End Time)
Set the time of day the Schedule Entry should stop on the datespecified.
By default, there are no Type 3 (Date) schedules defined.
Operation
Not applicable.
ISSUE 1.1 SL1000
A
InMail Feature Manual 2-19

Auto Attendant Do Not Disturb
Description
When a subscriber enables Auto Attendant Do Not Disturb, Automated Attendant calls to their exten-
sion go directly to their mailbox. Their phone does not ring for calls from the Automated Attendant. You
can optionally enable Auto Attendant Do Not Disturb from system programming. A subscriber typically
turns on Auto Attendant Do Not Disturb when they need to work at their desk uninterrupted by outside
callers sent from the Automated Attendant.
Keep in mind that Auto Attendant Do Not Disturb does not block Intercom calls from coworkers or any
other type of outside call not routed through the Automated Attendant. For example, with Automated
Attendant Do Not Disturb enabled, Direct Inwards Lines and transferred outside calls to an extension
work normally.
Related Features
Call Forward to a Mailbox on page 2-34
If a subscriber has calls forwarded immediately to his mailbox, Auto Attendant Do Not Disturb is not
necessary.
Greeting on page 2-95
A subscriber does not have to have a greeting recorded to activate Auto Attendant Do Not Disturb.
Programming
1. Enable Auto Attendant Do Not Disturb From Your Subscriber Mailbox.
Refer to Operation on this page.
2. Optionally enable Auto Attendant Do Not Disturb from System Programming.
Program Number Program Name Description
47-02-09 Auto Attendant Do NotDisturb(Auto-ATT DND)
Enter 1 (Yes) to enable Auto Attendant Do Not Disturb.
By default, this option is disabled (0).
Operation
Recording a Multiple Greeting and Setting Up Auto Attendant Do Not Disturb
Log on to Subscriber Mailbox.
ISSUE 1.1SL1000
A
Auto Attendant Do Not Disturb2-20

Recording a Multiple Greeting and Setting Up Auto Attendant Do Not Disturb
G (4) Access the Mailbox Greeting options.[Greet]InMail does the following:• Plays a summary of your current settings.
• Displays the status of your active Greeting (1-3).
[GREETING n: RECORDED], or
[GREETING n: NOT REC]
• Shows the Auto Attendant Do Not Disturb status.
[AUTO-ATTENDANT DND: OFF], or
[AUTO-ATTENDANT DND: ON]
• Provides soft keys for each of the 3 greetings.
[Gr1]
[Gr2]
[Gr3]
Select a Greeting (which also makes it active).
(1) [Gr1](2) [Gr2](3) [Gr3]
L (5) Listen to the active greeting (if recorded).[Lstn]
R (7) Record a new greeting (if not recorded), or rerecord the current greeting.[Rec]
Record at the tone, then press # when done.
* Pause or restart recording.[Resume][Pause]
D (3) Delete the greeting.[Del]
# End the recording.[Done]
Delete the currently recorded greeting (if any).[Del]
# Go back to the Mailbox Greeting options.[Exit]
Change Auto Attendant Do Not Disturb.
O (6) Turn Auto Attendant Do Not Disturb off or on.[AUTO-ATTENDANT DND: ON][AUTO-ATTENDANT DND: OFF]
# Go back to mailbox Main Menu.[Exit]
0 Plays Help message.
ISSUE 1.1 SL1000
A
InMail Feature Manual 2-21

Auto Erase or Save
Description
When a mailbox user listens to a new message completely and then exits the mailbox, InMail either
automatically archives or deletes the message. The setting of this option depends on subscriber pref-
erences.
The subscriber can choose the Auto Erase option, review messages and archive messages. The
subscriber that chooses the Auto Save option is assured that InMail automatically archives all
messages when the mailbox is exited.
Auto Save Example:
• InMail alerts the subscriber to new messages by a Message Waiting Lamp.
• The subscriber presses L to listen to a portion of each message and then exits his mailbox.
• If a subscriber chooses the Auto Save option, InMail archives partially listened-to messages but doesnot illuminate the message waiting lamp for those messages. InMail archives all the messages and
turns off the message waiting lamp.
• If you hang up while listening to a new message, InMail automatically saves the message as a newmessage.
Related Features
Not applicable, archives or deletes
Programming
1. Set up Auto Erase or Save for a Subscriber Mailbox:
Program number Program Name Description
47-02-05 Auto Erase/Save ofMessages
Select 1 (Save) to save the message; 0 (Erase) to erase the message.
By default, the Subscriber Mailbox saves (1) the message.
Operation
Not applicable.
ISSUE 1.1SL1000
A
Auto Erase or Save2-22

Auto Time Stamp
Description
After a Subscriber Mailbox user listens to a message, InMail can optionally announce the time and
date the message was left. The Subscriber can enable Auto Time Stamp from their mailbox, or you can
optionally enable in from system programming. Auto Time Stamp helps if the subscriber needs to know
the time and date of each message they receive without taking any extra steps. With Auto Time Stamp
turned on, InMail automatically announces the date, time, and (optionally) the caller's number at the
end of each message. With Auto Time Stamp turned off, the subscriber must dial TI (84) while listening
to a message to get the same information.
Related Features
Mailbox Options Menu on page 2-139
Auto Time Stamp is available on the Mailbox Options Menu.
Time and Date on page 2-201
InMail uses the InMail Time and Date.
Time and Date Stamp on page 2-202
An extension can listen to a message and dial a code to hear the time the message was sent.
Programming
1. Enable Auto Time Stamp from your Subscriber Mailbox.
Refer to Operation on this page.
2. Optionally Enable Auto Time Stamp from System Programming.
Program Number Program Name Description
47-02-11 Auto Time Stamp Enter 1 (Yes) to enable Auto Time Stamp.
By default, Auto Time Stamp is disabled (0).
Operation
Turning Auto Time Stamp On or Off
Log On to Subscriber Mailbox.
OP (67) Access the Mailbox Options Menu.[Not applicable]
AT (28) Access Auto Time Stamp.[Time]
InMail plays a summary of your Auto Time Stamp setting. By default, Auto Time Stamp is turnedoff.
O (6) Turn Auto Time Stamp on or off.[On][Off]
ISSUE 1.1 SL1000
A
InMail Feature Manual 2-23

Turning Auto Time Stamp On or Off
# Go back to the Mailbox Options Menu.[Exit]
0 Plays Help message.
ISSUE 1.1SL1000
A
Auto Time Stamp2-24

Automated Attendant
Description
The Automated Attendant answers outside calls on each trunk, according to the time of day and day of
the week. The Answer Table is an integral part of the Automated Attendant. The Automated Attendant
can automatically answer the phone system incoming calls, play an Instruction Menu message, and
provide dialing options to callers. There are three major Automated Attendant components:
• Answer Table on page 2-14The Answer Table determines how the Automated Attendant answers outside calls on each trunk,
according to the time of the day and day of the week. The Answer Table divides the time of day and
day of the week into individual schedules, which in turn assign a Call Routing Mailbox to each call.
When a specific schedule is not in effect, the Answer Table uses its Default Mailbox to determine
routing.
By default, all trunks use Answer Table 1. Answer Table 1 has a single schedule that runs Monday throughFriday from 8:30 AM to 5:00 PM.
• Routing Mailbox on page 2-182A Call Routing Mailbox is a mailbox associated with an individual Answer Table schedule or the De-
fault Mailbox. It specifies which dialing options (Dial Action Table) are available to callers. It also
provides the Instruction Menu to callers which typically greets the callers and describes the dialing
options.
By default, Answer Table 1 has a single schedule that runs Monday through Friday from 8:30 AM to 5:00PM. This schedule and the Default Mailbox both use Call Routing Mailbox 1.
• Dial Action Table on page 2-49After the Automated Attendant answers, the Dial Action Table provides the dialing options to callers.
Each digit a caller can dial is assigned a specific action (function) in the Dial Action Table. The dial
action used depends on the setting in the active Call Routing Mailbox, which in turn depends on the
Answer Table setup.
By default, Call Routing Mailbox 1 uses Dial Action Table 1.
The block diagram below shows the default InMail Automated Attendant configuration.
ISSUE 1.1 SL1000
A
InMail Feature Manual 2-25

Related Features
Answer Table on page 2-14
Determines how the Automated Attendant answers outside calls on each trunk.
Routing Mailbox on page 2-182
The mailbox associated with an Answer Table that specifies the dialing options (Dial Action Table) and
Instruction Menu that announcements are available to Automated Attendant callers.
Dial Action Table on page 2-49
Defines the dialing options for the Call Routing Mailbox chosen by the active Answer Table.
Trunks Route to Answer Table 1 47-10-01 Answer Table Assignment
InMailDefault
Automated Attendant Answering
Answer Table 1 47-11 Answer Table Options
Schedule 1 or Default Mailbox 47-12 Answer Schedules
47-11-03 Default Mailbox
Call Routing Mailbox 1 47-08 Call Routing Mailbox Options
All calls route to Call Routing Mailbox 1
Schedule 1 active M-F 8:30 AM - 5:00 PM
Default Mailbox active all other times
From a System Administrator mailbox,
record an Instruction Menu (SA + I) for
the active Call Routing Mailbox.
Dial Action Table 1 47-13 Dial Action Tables
DIL to Voice Mail Master (400) 22-01-01 Incoming Call Trunk Setup
22-07-01 DIL Setup
Dial Action Table 1 Dialing Options:
Dial an extension number, or
O for the operator.
ISSUE 1.1SL1000
A
Automated Attendant2-26

Fax Detection on page 2-83
The Automated Attendant can route outside calls to the company fax machine.
Multiple Company Greetings on page 2-164
One InMail system can provide individual greetings and dialing options for several companies.
Programming
1. Assign Answer Tables to trunks.
Program Number Program Name Description
47-10-01 Answer Table Assignment(Answer Table)
Assign an Answer Table (1 ~ 8) to each trunk that the Automated Atten-dant should answer.
By default, all trunks are assigned to Answer Table 1.
2. Set up the Automated Attendant to answer trunk calls.
Program Number Program Name Description
22-02-01 Incoming Call Trunk Setup Assign Service Type 4 to each trunk you want to be a DIL. Make aseparate entry for each Night Service mode.
By default, all trunks are Service Type 0 (Normal).
22-07-01 DIL Assignment For each trunk you designated as a DIL above, enter the InMail pilotnumber. Make a separate entry for each Night Service mode.
By default, no DIL destinations are programmed.
3. Set up the Answer Tables.
Turn to Answer Table on page 2-14 for more information.
By default, all trunks use Answer Table 1. Answer Schedule 1 is active and runs continuously.
4. Set up the Call Routing Mailboxes.
Turn to Routing Mailbox on page 2-182 for more information.
The active schedule (Answer Table 1, Answer Schedule 1) uses Call Routing Mailbox 000.
5. Set up the Dial Action Tables.
Turn to Dial Action Table on page 2-49 for more information.
By default, Call Routing Mailbox 000 uses Dial Action Table 1.
6. Set the maximum message length for Automated Attendant callers leaving a message in a mail-
box.
Program Number Program Name Description
47-01-03 Subscriber Message Length(Subs Msg Length)
This sets the maximum message length (1 ~ 4095 seconds) foroutside Automated Attendant callers accessing a mailbox via aLOGON or GOTO command.
The default setting is 120 seconds.
ISSUE 1.1 SL1000
A
InMail Feature Manual 2-27

Program Number Program Name Description
47-01-04 Non-Subscriber MessageLength(Mbox Msg Length)
This sets the maximum message length (1 ~ 4095 seconds) foroutside Automated Attendant callers leaving a message in aSubscriber Mailboxes.
The default setting is 120 seconds.
Operation
Using the Automated Attendant
For the outside caller:After Automated Attendant answers, voice prompts will instruct you which digits to dial.
ISSUE 1.1SL1000
A
Automated Attendant2-28

Automated Attendant Transfer
Description
An extension user can transfer a trunk call to the Automated Attendant to enable an outside caller to
use the Automated Attendant dialing options.
Extensions cannot call or be transferred to the InMail Automated Attendant.
Related Features
Automated Attendant on page 2-25
The Automated Attendant can automatically answer the phone system incoming calls, play an Instruc-
tion Menu message, and provide dialing options to callers.
Programming
No additional programming required.
Operation
Automated Attendant Transfer
To transfer an outside call to the Automated Attendant:
1. While on an outside call, press Hold.
2. Dial the voice mail master number (e.g., 400).
3. Hang up.
ISSUE 1.1 SL1000
A
InMail Feature Manual 2-29

Automatic Access to VM by Caller ID
Description
Before, when a user outside the system accessed their InMail mailbox, they dialed voice mail, then
entered an access code followed by their mailbox number and password (if enabled). InMail mailbox
can be associated with a specific caller ID (CID) number. When the CID number is presented to the
InMail it will automatically log the user into their mailbox. This enhancement improves VM accessibility
for outside callers, allowing them to simply dial the main voice mail number and be automatically
logged into their mailbox.
Two types of voice mail access modes exist for this feature.
1.
Specifying the VM Pilot number as a DID/DIL/DISA/VRS destination.
- OR -
Dialing the VM pilot number after calling in from a Mobile Extension.
2. Program to forward a call to VM (102) by any of following Programs.
• Program 22-05-01 (Incoming Ring Group)
• Program 22-11-05 (Transfer Target number -1)
• Program 22-11-06 (Transfer Target number -2)
• Program 25-03-01 (Incoming Ring Group No.)
• Program 25-04-01 (VRS/DISA Transfer Ring Group at No answer/Busy)
Conditions
• When using this feature the InMail does not prompt for a password on a call from the set CID num-ber.
• To use this feature, the voice mailbox number must be set in Program13-04-11. If not set, the systemrequires the normal log in procedure or entering a valid mailbox and security code to login.
• Two different mailboxes can not be tied to the same inbound CID number. If two mailboxes are set forthe same inbound CID number the system uses the first match it finds.
• This feature is only supported for external calls to the InMail.
• Mobile Extension users can use this feature by setting the VM box number in Program 13-04-11which corresponds to the Speed Dial number registered in Program 15-22-01.
• Common Speed Dial area is used for this feature. Group or Station Speed Dial areas are not sup-ported with this feature.
• When a number in the Common Speed Dial includes a trunk access code or end code (#), the Redialname indication will work if the number matches completely.
• If the same number is registered in the Common Speed Dial bin, the latest Speed Dial number isused.
• The Flexible ringing feature has priority over the InMail - Automatic Access to VM by Caller ID fea-ture.
Figure 2-1 Example - User Access to Voice Mail
ISSUE 1.1SL1000
A
Automatic Access to VM by Caller ID2-30

• To enable this feature, Program 14-01-22 (Caller ID to Voice Mail) must be set to 1.
Default Settings
Disabled
System Availability
Terminals
All Multiline Terminals
Trunks
The following Trunks support sending Caller ID:
• Analog Line
• ISDN Line (BRI)
• ISDN Line (PRI)
• SIP Line
• H.323 Line
Required Component(s)
• PZ-VM21 with CPU card
• InMail Compact Flash
• SL-VM-ADVANCE license
Related Features
Speed Dial - System/Group/Station
Caller ID - Flexible Ringing
Mobile Extension
InMail
Guide to Feature Programming
Program Number Program Name Default
13-04-01 Speed Dialing Number and Name - Speed Dialing Data not assigned
13-04-02 Speed Dialing Number and Name - Name not assigned
13-04-11 Speed Dialing Number and Name - Automatic Access to VoiceMail by Caller ID
0
15-22-01 Mobile Extension Setup Mobile - Extension Target Setup 0
22-02-01 Incoming Call Trunk Setup 0
22-05-01 Incoming Trunk Ring Group Assignment 1
22-11-05 DID Translation Table Number Conversion - Transfer Destina-tion Number 1
0
22-11-06 DID Translation Table Number Conversation - Transfer Desti-nation Number 2
0
25-03-01 VRS/DISA Transfer Ring Group With Incorrect Dialing 0
ISSUE 1.1 SL1000
A
InMail Feature Manual 2-31

Program Number Program Name Default
25-04-01 VRS/DISA Transfer Ring Group With No Answer/Busy 0
Operation
Retrieve VM Messages
To retrieve VM messages from outside of office:
If incoming analog trunks are used in the system
Main Number: 214-555-5678 (DIL)
Outside party number : 214-555-1212
• Program 22-02-01: Trunk 1 DIL
• Program 22-07-01: VM Pilot number, 400
• Program 13-04-01: Speed Dial area No. 0 -> 2145551212
• Program 13-04-11: Speed Dial area No. 0 -> 100 (VM BOX)
1. Call the main number from 214-555-1212.
2. After the VM answers the user can listen to and manage voice messages or change mailbox set-
tings.
If incoming DID trunks are used in the system
Main Number: 214-555-5678
Outside party number: 214-555-1212
• Program 22-02-01: Trunk 1 DID
• Program 22-11-05: Set transfer destination, 102 InMail
• Program 13-04-01: Speed Dial area No. 0 -> 2145551212
• Program 13-04-11: Speed Dial area No. 0 -> 100 (VM BOX)
1. Call the main number from 214-555-1212.
2. After the VM answers the user can listen to and manage voice messages or change mailbox set-
tings.
ISSUE 1.1SL1000
A
Automatic Access to VM by Caller ID2-32

Automatic Routing for Rotary Dial Callers
Description
If an Automated Attendant caller does not dial any digits, InMail automatically routes that caller to a
specified option (such as the operator or a mailbox). This lets rotary phone users stay on the line to
leave a message or have their call processed. Without Automatic Routing for Rotary Dial Callers,
rotary callers cannot use the Automated Attendant.
Related Features
Guest Mailbox on page 2-103
Consider routing rotary dial callers to a Guest Mailbox to collect messages.
Programming
1. Program the Dial Action Table Timeout function.
Program Number Program Name Description
47-13 InMail Dial Action Tables Since rotary dial callers can not dial DTMF digits, the Timeout functionprovides routing.
By default, TIMEOUT is an Unscreened Transfer (UTRF) to the operator
(200).
Operation
Not applicable.
ISSUE 1.1 SL1000
A
InMail Feature Manual 2-33
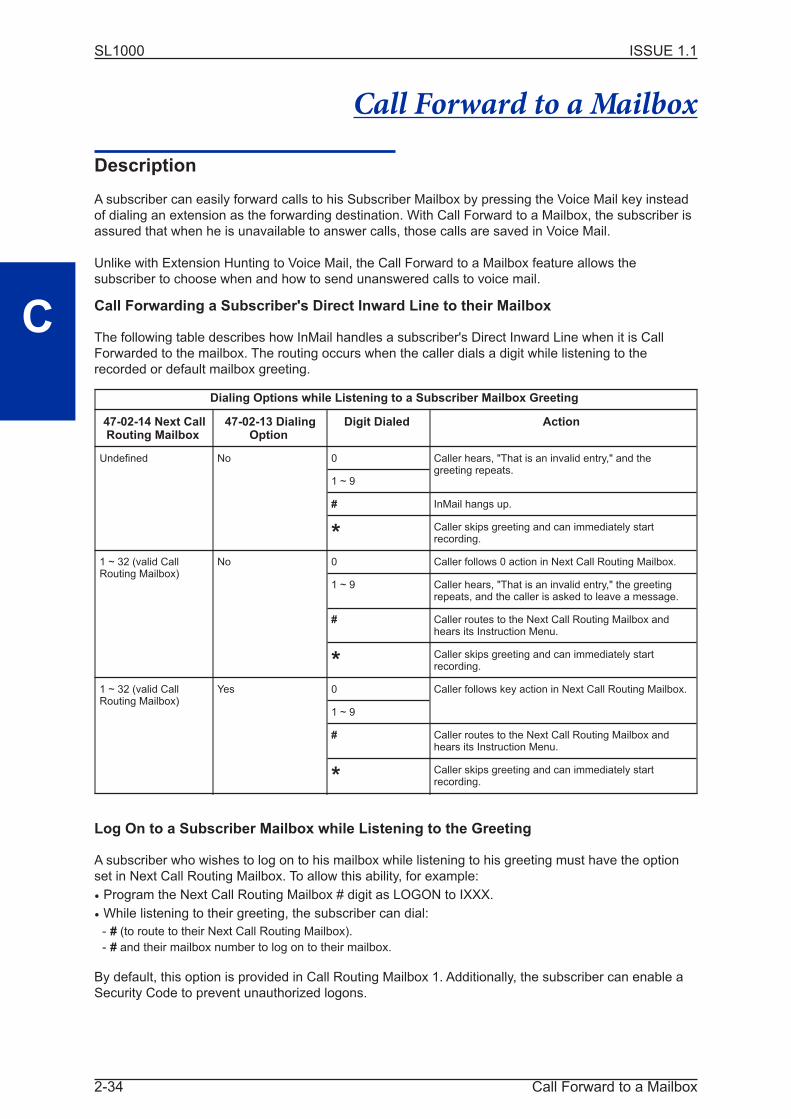
Call Forward to a Mailbox
Description
A subscriber can easily forward calls to his Subscriber Mailbox by pressing the Voice Mail key instead
of dialing an extension as the forwarding destination. With Call Forward to a Mailbox, the subscriber is
assured that when he is unavailable to answer calls, those calls are saved in Voice Mail.
Unlike with Extension Hunting to Voice Mail, the Call Forward to a Mailbox feature allows the
subscriber to choose when and how to send unanswered calls to voice mail.
Call Forwarding a Subscriber's Direct Inward Line to their Mailbox
The following table describes how InMail handles a subscriber's Direct Inward Line when it is Call
Forwarded to the mailbox. The routing occurs when the caller dials a digit while listening to the
recorded or default mailbox greeting.
Dialing Options while Listening to a Subscriber Mailbox Greeting
47-02-14 Next CallRouting Mailbox
47-02-13 DialingOption
Digit Dialed Action
Undefined No 0 Caller hears, "That is an invalid entry," and thegreeting repeats.
1 ~ 9
# InMail hangs up.
* Caller skips greeting and can immediately startrecording.
1 ~ 32 (valid CallRouting Mailbox)
No 0 Caller follows 0 action in Next Call Routing Mailbox.
1 ~ 9 Caller hears, "That is an invalid entry," the greetingrepeats, and the caller is asked to leave a message.
# Caller routes to the Next Call Routing Mailbox andhears its Instruction Menu.
* Caller skips greeting and can immediately startrecording.
1 ~ 32 (valid CallRouting Mailbox)
Yes 0 Caller follows key action in Next Call Routing Mailbox.
1 ~ 9
# Caller routes to the Next Call Routing Mailbox andhears its Instruction Menu.
* Caller skips greeting and can immediately startrecording.
Log On to a Subscriber Mailbox while Listening to the Greeting
A subscriber who wishes to log on to his mailbox while listening to his greeting must have the option
set in Next Call Routing Mailbox. To allow this ability, for example:
• Program the Next Call Routing Mailbox # digit as LOGON to IXXX.
• While listening to their greeting, the subscriber can dial:
- # (to route to their Next Call Routing Mailbox).
- # and their mailbox number to log on to their mailbox.
By default, this option is provided in Call Routing Mailbox 1. Additionally, the subscriber can enable a
Security Code to prevent unauthorized logons.
ISSUE 1.1SL1000
C
Call Forward to a Mailbox2-34

Related Features
Auto Attendant Do Not Disturb on page 2-20
When enabled, Auto Attendant Do Not Disturb automatically sends all calls from the Automated Atten-
dant to the subscriber's mailbox.
Message Forward on page 2-149
A subscriber can forward a message in their Subscriber Mailbox to a coworker.
Next Call Routing Mailbox on page 2-166
The setting of the Next Call Routing Mailbox and Dialing Option options determine the digits a caller
can dial while listening to the recorded or default mailbox greeting.
Programming
1. Set how long an unanswered call will ring before forwarding.
Program Number Program Name Description
24-02-03 Delayed Call Forwarding Time For type 2 and type 4 forwarding, an unanswered call will forwardafter this interval.This time applies to transferred trunk calls, Direct Inward Lines,and Intercom calls.
By default, this interval is 10 seconds.
Operation
Call Forward to your Mailbox
To forward your calls to your mailbox:
1. Press Speaker (or lift the handset at the single line telephone) and choose from the following dial access codes:
848 = Call Forward - Immediate
#1 = Call Forward - Busy
845 = Call Forward - No Answer
844 = Call Forward - Busy/No Answer
842 = Call Forward - Both Ring
846 = Call Forwarding - Follow-Me
2. Dial 1 to set.
3. Dial Voice Mail master number.
4. Press Speaker to hang up (or hang up handset at the single line telephone).
ISSUE 1.1 SL1000
C
InMail Feature Manual 2-35
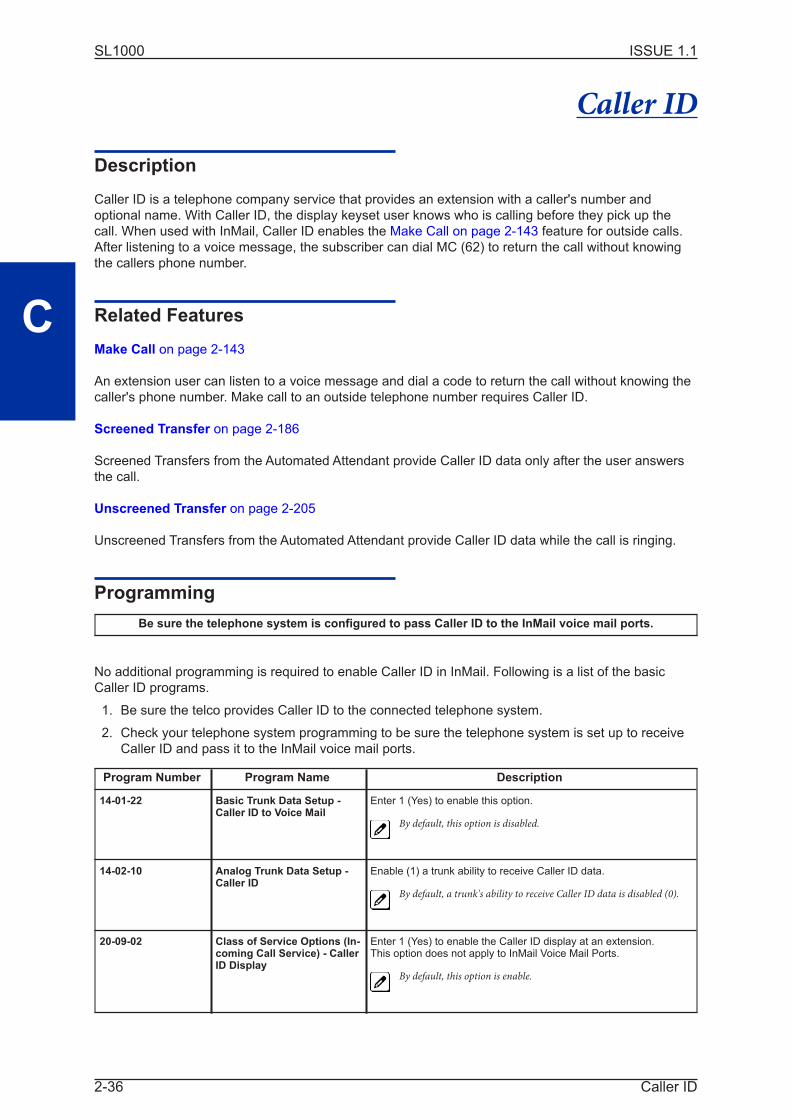
Caller ID
Description
Caller ID is a telephone company service that provides an extension with a caller's number and
optional name. With Caller ID, the display keyset user knows who is calling before they pick up the
call. When used with InMail, Caller ID enables the Make Call on page 2-143 feature for outside calls.
After listening to a voice message, the subscriber can dial MC (62) to return the call without knowing
the callers phone number.
Related Features
Make Call on page 2-143
An extension user can listen to a voice message and dial a code to return the call without knowing the
caller's phone number. Make call to an outside telephone number requires Caller ID.
Screened Transfer on page 2-186
Screened Transfers from the Automated Attendant provide Caller ID data only after the user answers
the call.
Unscreened Transfer on page 2-205
Unscreened Transfers from the Automated Attendant provide Caller ID data while the call is ringing.
Programming
Be sure the telephone system is configured to pass Caller ID to the InMail voice mail ports.
No additional programming is required to enable Caller ID in InMail. Following is a list of the basic
Caller ID programs.
1. Be sure the telco provides Caller ID to the connected telephone system.
2. Check your telephone system programming to be sure the telephone system is set up to receive
Caller ID and pass it to the InMail voice mail ports.
Program Number Program Name Description
14-01-22 Basic Trunk Data Setup -Caller ID to Voice Mail
Enter 1 (Yes) to enable this option.
By default, this option is disabled.
14-02-10 Analog Trunk Data Setup -Caller ID
Enable (1) a trunk ability to receive Caller ID data.
By default, a trunk's ability to receive Caller ID data is disabled (0).
20-09-02 Class of Service Options (In-coming Call Service) - CallerID Display
Enter 1 (Yes) to enable the Caller ID display at an extension.This option does not apply to InMail Voice Mail Ports.
By default, this option is enable.
ISSUE 1.1SL1000
C
Caller ID2-36
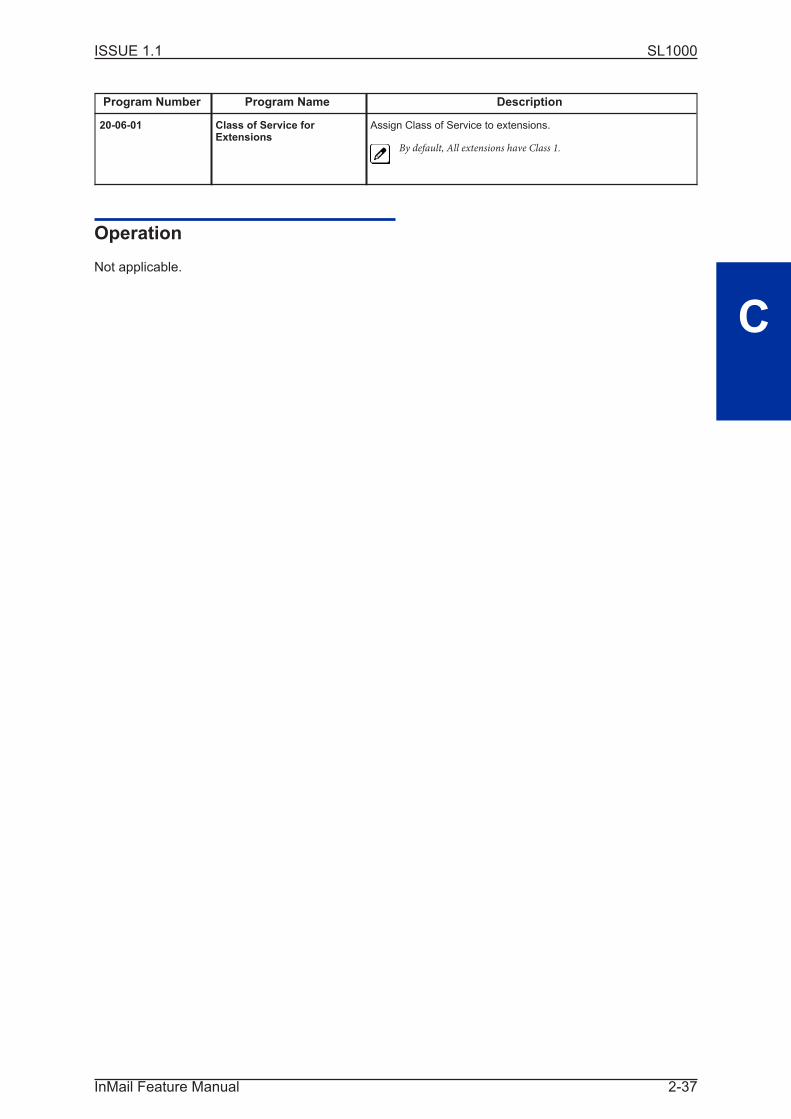
Program Number Program Name Description
20-06-01 Class of Service forExtensions
Assign Class of Service to extensions.
By default, All extensions have Class 1.
Operation
Not applicable.
ISSUE 1.1 SL1000
C
InMail Feature Manual 2-37

Caller ID with Return Call
Description
Refer to Make Call on page 2-143.
Related Features
Refer to Make Call on page 2-143.
Programming
Refer to Make Call on page 2-143.
Operation
Refer to Make Call on page 2-143.
ISSUE 1.1SL1000
C
Caller ID with Return Call2-38

Calling the Automated Attendant
Description
Automated Attendant callers can use various InMail features and then return to the Automated Atten-
dant for additional dialing options. This lets the caller dial other extensions, leave messages for
co-workers, or use other Automated Attendant features. The features below describe several ways to
return to the Automated Attendant.
Automated Attendant Transfer on page 2-29
An extension user can transfer their trunk call to the Automated Attendant so the outside caller can use
the Automated Attendant dialing options.
Next Call Routing Mailbox on page 2-166
The Next Call Routing Mailbox provides callers with additional dialing options after they leave a
message in a mailbox (depending on the setting of the Dialing Option).
Related Features
Refer to the features referenced in Description above.
Programming
Refer to the features referenced in Description above.
Operation
Refer to the features referenced in Description above.
ISSUE 1.1 SL1000
C
InMail Feature Manual 2-39

Cascade Message Notification
Description
If an extension user receives a new message in their mailbox, Cascading Message Notification will call
them, at up to five preset destinations, to let them know a new voice mail message has arrived. A desti-
nation can be an outside number (such as a cell phone, pager, or home office) or a co-worker's
extension.
The Cascading Message Notification destinations are set up in the Notification Schedule. Each of the
five schedule entries can be individually enabled or disabled and provides options for:
• Type: Voice call or pager.
• Start Hour: The time the destinations becomes active.
• End Hour: The time the destinations becomes inactive.
• Number: The destination telephone, pager, or extension number.
• Busy Attempts: The number of times the system will try the destination when it is busy. The systemcancels notification callouts for this entry when the Busy Attempts number is met.
• RNAAttempts: The number of times the system will try the destination when it is unanswered. Thesystem cancels notification callouts for this entry when the RNAAttempts number is met.
• Security: Enables or disables the Security Code requirement for the notification destinations. For ex-ample, you may want to disable the Security Code when the destination is your cell phone and it may
be inconvenient to dial digits after answering the notification callout.
When the extension user enables Cascading Message Notification, the system will try each enabled
destination that is active for the current time (i.e., in-schedule). The system will not try any destinations
that are disabled or are not in-schedule. When the retries for a particular destination have been met,
the system will immediately move to the next destination.
Service Conditions:• The features requires the SL-VM-ADVANCE LIC.
• Retry Interval timers are set on a system wide basis only.
• The pager dial string is set on a system wide basis only.
• Notification settings can be changed using the Telephone Mailbox Option Interface or system pro-gramming only.
• When the retries for a particular destination have been met the system will immediately move to thenext destination even if there is only one destination active.
• Once the notification process begins, a new message does not restart the process if it is already inprogress. Once the process ends (e.g., if the message is acknowledged or the maximum number of
callout attempts is reached), the next new message will restart the process.
• The system determines which numbers are internal extensions or external numbers by the systemdial plan settings.
• Depending on the system, ARS routing may be needed to properly route external calls.
• If no trunks are available when an outside destination is attempted, it is counted as a Busy No An-swer attempt.
ISSUE 1.1SL1000
C
Cascade Message Notification2-40

Message Notification to Normal Telephone Numbers
Below is a basic overview of how Message Notification works with phone numbers, assuming the retry
attempts are at default. The system determines which numbers are internal extensions or external
numbers by the system dial plan settings.
Depending on the system, ARS routing may be needed to properly route external calls.
1. The subscriber activates Message Notification for their mailbox.
2. When the subscriber receives a new message, the InMail dials the first active destination in the
cascade that should receive the Message Notification.
• InMail waits up to 30 seconds (approximately 5 rings) for ringback, reorder, busy, or voice activ-ity from the called number. If nothing is detected, the callout is considered unanswered (RNA).
3. If the recipient answers, InMail plays the notification message ("Hello, I have a message for") and
asks the recipient to dial 1 to log onto their mailbox. The recipient hears the notification message
if:
• They say "Hello" after answering the callout, or
• The system receives answer supervision from the telco after the recipient answers the call.(Note that the recipient can skip the announcement by dialing 1 to log onto their mailbox after
answering the callout - without saying "Hello".), or
• The notification is to a system extension.
Figure 2-2 Cascade Message Notification Flow Chart
ISSUE 1.1 SL1000
C
InMail Feature Manual 2-41

4. Once the recipient logs onto the mailbox, the notification is considered acknowledged and will not
reoccur until the subscriber receives new messages.
5. If the recipient doesn't answer, the system follows the Cascading Message Notification retry at-
tempt settings, and notification will eventually stop if the call is not answered.
6. Once the notification process begins, a new message does not restart the process if it is already
in progress. Once the process ends (e.g., if the message is acknowledged or the maximum num-
ber of callout attempts is reached), the next new message will restart the process.
Message Notification to Pager Numbers
Below is a basic overview of how Message Notification works with pager numbers, assuming the retry
attempts are at default. The system determines which numbers are internal extensions or external
numbers by the system dial plan settings.
Depending on the system, ARS routing may be needed to properly route external calls.
1. The subscriber activates Message Notification for their mailbox.
2. When the subscriber receives a new message, InMail immediately dials the pager service.
• InMail waits up to 30 seconds (approximately 5 rings) for ringback, reorder, busy, or voice activ-ity from the called number. If nothing is detected, the callout is considered unanswered.
3. After the pager service answers, InMail waits for the timer 47-01-08 then sends the dial string in
47-01-07 which causes the pager display to show the subscriber's mailbox number as well as the
number of new messages in the mailbox.
• The notification is considered acknowledged if the subscriber logs onto their mailbox.
• If the notification is not acknowledged (within a programmable time frame, 47-01-12) the pagernotification is repeated (up to the RNA attempts count, 47-20-07).
• If the pager service doesn't answer, the system follows the Cascading Message Notificationrules and notification will eventually stop if the call is not answered.
Feature Programming
Program Number Program Name Default
47-01-07 Digital Pager Callback Number X*M#47-01-08 Dialing Digital Pager Callback Number Delay 30 seconds
47-01-09 Wait Between Digital Pager Callout Attempts 15 minutes
47-01-11 Wait Between Busy Non-Pager 15 minutes
47-01-12 RNA Non-Pager Callout Attempt Interval 30 minutes
47-01-13 Number of RNA rings 5
47-01-14 Maximum Attempts 1
47-02-23 All Message Notification Enabled (Subscriber Mailbox) 1
47-06-21 All Message Notification Enabled (Group Mailbox) 0
47-20-01 Station Mailbox Message Notification Options - Notification 1
47-20-02 Station Mailbox Message Notification Options - Notification BeginHour
00
47-20-03 Station Mailbox Message Notification Options - Notification EndHour
00
47-20-04 Station Mailbox Message Notification Options - Notification Type 1
47-20-05 Station Mailbox Message Notification Options - NotificationNumber
Blank
47-20-06 Station Mailbox Message Notification Options - Notification BusyAttempts
5
ISSUE 1.1SL1000
C
Cascade Message Notification2-42

Program Number Program Name Default
47-20-07 Station Mailbox Message Notification Options - Notification RNAAttempts
5
47-20-08 Station Mailbox Message Security 1
47-22-01 Group Mailbox Message Notification Options - Notification 0
47-22-02 Group Mailbox Message Notification Options - Notification BeginHour
00
47-22-03 Group Mailbox Message Notification Options - Notification EndHour
00
47-22-04 Group Mailbox Message Notification Options - Notification Type 1
47-22-05 Group Mailbox Message Notification Options - NotificationNumber
Blank
47-22-06 Group Mailbox Message Notification Options - Notification BusyAttempts
5
47-22-07 Group Mailbox Message Notification Options - Notification RNAAttempts
5
47-22-08 Group Mailbox Message Notification Options - NotificationSecurity
1
Operation
To set up Cascade Notification:
The Display Information and Soft keys are available only for IP Multiline Telephone. SL1000 Multiline Tele-phone user requires to listen to a voice announcement carefully and follows the voice announcement.
1. Access the All Message Notification Setting menu.
Log onto Subscriber Mailbox.
V m a i l - M a i l b o x : 1 0 1
M s g s N e w : 0 A r c h : 0
L s t n G r e e t L v M s g M o r e >
Dial OP (67) / Press "More >" "Setup".Mailbox Options menu
C o n f i g u r e M b o x 1 0 1
C o d e N o t f y C a l l H M o r e >
Dial N (6) / Press "Notify".Notification Type Selection menu
M e s s a g e N o t i f i c a t i o n
P h o n e E m a i l B a c k
Dial P (7) / Press "Phone".All Message Notifications Setting menu
P h o n e N o t i f i c a t i o n : O f f
ISSUE 1.1 SL1000
C
InMail Feature Manual 2-43
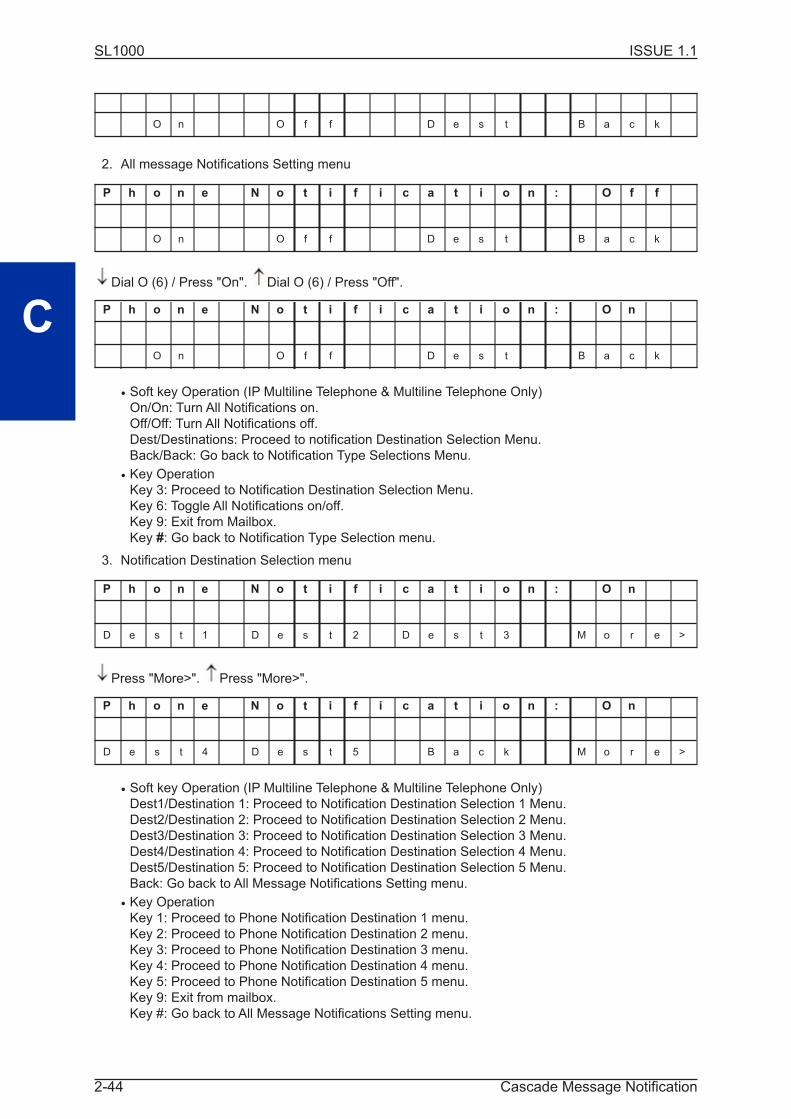
O n O f f D e s t B a c k
2. All message Notifications Setting menu
P h o n e N o t i f i c a t i o n : O f f
O n O f f D e s t B a c k
Dial O (6) / Press "On". Dial O (6) / Press "Off".
P h o n e N o t i f i c a t i o n : O n
O n O f f D e s t B a c k
• Soft key Operation (IP Multiline Telephone & Multiline Telephone Only)On/On: Turn All Notifications on.
Off/Off: Turn All Notifications off.
Dest/Destinations: Proceed to notification Destination Selection Menu.
Back/Back: Go back to Notification Type Selections Menu.
• Key OperationKey 3: Proceed to Notification Destination Selection Menu.
Key 6: Toggle All Notifications on/off.
Key 9: Exit from Mailbox.
Key #: Go back to Notification Type Selection menu.
3. Notification Destination Selection menu
P h o n e N o t i f i c a t i o n : O n
D e s t 1 D e s t 2 D e s t 3 M o r e >
Press "More>". Press "More>".
P h o n e N o t i f i c a t i o n : O n
D e s t 4 D e s t 5 B a c k M o r e >
• Soft key Operation (IP Multiline Telephone & Multiline Telephone Only)Dest1/Destination 1: Proceed to Notification Destination Selection 1 Menu.
Dest2/Destination 2: Proceed to Notification Destination Selection 2 Menu.
Dest3/Destination 3: Proceed to Notification Destination Selection 3 Menu.
Dest4/Destination 4: Proceed to Notification Destination Selection 4 Menu.
Dest5/Destination 5: Proceed to Notification Destination Selection 5 Menu.
Back: Go back to All Message Notifications Setting menu.
• Key OperationKey 1: Proceed to Phone Notification Destination 1 menu.
Key 2: Proceed to Phone Notification Destination 2 menu.
Key 3: Proceed to Phone Notification Destination 3 menu.
Key 4: Proceed to Phone Notification Destination 4 menu.
Key 5: Proceed to Phone Notification Destination 5 menu.
Key 9: Exit from mailbox.
Key #: Go back to All Message Notifications Setting menu.
ISSUE 1.1SL1000
C
Cascade Message Notification2-44
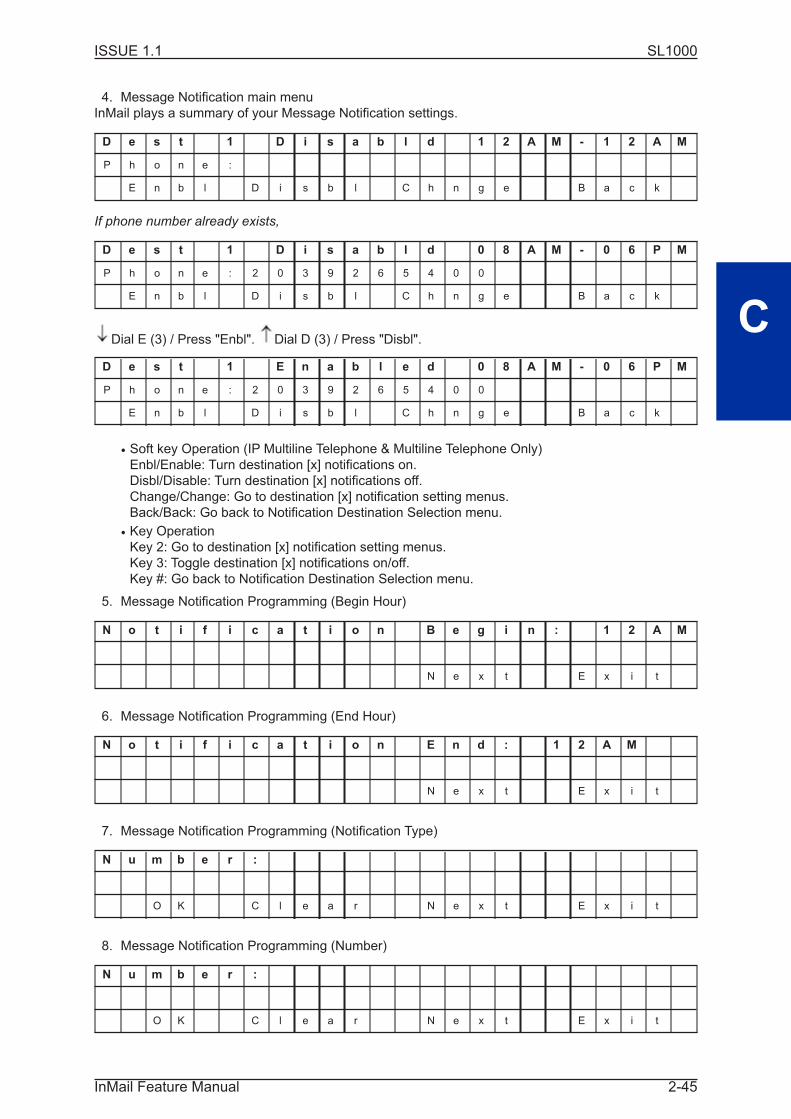
4. Message Notification main menu
InMail plays a summary of your Message Notification settings.
D e s t 1 D i s a b l d 1 2 A M - 1 2 A M
P h o n e :
E n b l D i s b l C h n g e B a c k
If phone number already exists,
D e s t 1 D i s a b l d 0 8 A M - 0 6 P M
P h o n e : 2 0 3 9 2 6 5 4 0 0
E n b l D i s b l C h n g e B a c k
Dial E (3) / Press "Enbl". Dial D (3) / Press "Disbl".
D e s t 1 E n a b l e d 0 8 A M - 0 6 P M
P h o n e : 2 0 3 9 2 6 5 4 0 0
E n b l D i s b l C h n g e B a c k
• Soft key Operation (IP Multiline Telephone & Multiline Telephone Only)Enbl/Enable: Turn destination [x] notifications on.
Disbl/Disable: Turn destination [x] notifications off.
Change/Change: Go to destination [x] notification setting menus.
Back/Back: Go back to Notification Destination Selection menu.
• Key OperationKey 2: Go to destination [x] notification setting menus.
Key 3: Toggle destination [x] notifications on/off.
Key #: Go back to Notification Destination Selection menu.
5. Message Notification Programming (Begin Hour)
N o t i f i c a t i o n B e g i n : 1 2 A M
N e x t E x i t
6. Message Notification Programming (End Hour)
N o t i f i c a t i o n E n d : 1 2 A M
N e x t E x i t
7. Message Notification Programming (Notification Type)
N u m b e r :
O K C l e a r N e x t E x i t
8. Message Notification Programming (Number)
N u m b e r :
O K C l e a r N e x t E x i t
ISSUE 1.1 SL1000
C
InMail Feature Manual 2-45

9. Message Notification Programming (Security Code Required)
S e c u r i t y C o d e O p t i o n
R e q N o R e q N e x t E x i t
• Soft key Operation (IP Multiline Telephone & Multiline Telephone Only)Req/Required: Turn "Security Code Required" flag On.
NoReq/Not Required: Turn "Security Code Required" flag Off.
Next/Next: Keep current setting and proceed to Busy Attempt count menu.
Exit/Exit: Keep current setting and return to main Notification menu.
• Key OperationKey 7: Turn "Security Code Required" flag On.
Key 6: Turn "Security Code Required" flag Off.
Key *: Keep current setting and proceed to Busy Attempt count menu.Key # : Keep current setting and return to main Notification menu.
10. Message Notification Programming (Busy Attempt count)
B u s y A t t e m p t s : 0 5
N e x t E x i t
• Soft key Operation (IP Multiline Telephone & Multiline Telephone Only)Next/Next: Keep current setting and proceed to RNAAttempt menu.
Exit/Exit: Keep current setting and return to main Notification menu.
• Key OperationKey 0-9: Set Busy Attempt count.
Key *: Keep current setting and proceed to RNAAttempt count menu.Key #: Keep current setting and return to main Notification menu.
11. Message Notification Programming (RNAAttempt count)
• Soft key Operation (IP Multiline Telephone & Multiline Telephone Only)Next/Next: Keep current setting and proceed to main Notification menu.
Exit/Exit: Keep current setting and return to main Notification menu.
• Key OperationKey 0-9: Set RNAAttempt count.
Key *: Keep current setting and proceed to main Notification menu.Key #: Keep current setting and return to main Notification menu.
ISSUE 1.1SL1000
C
Cascade Message Notification2-46
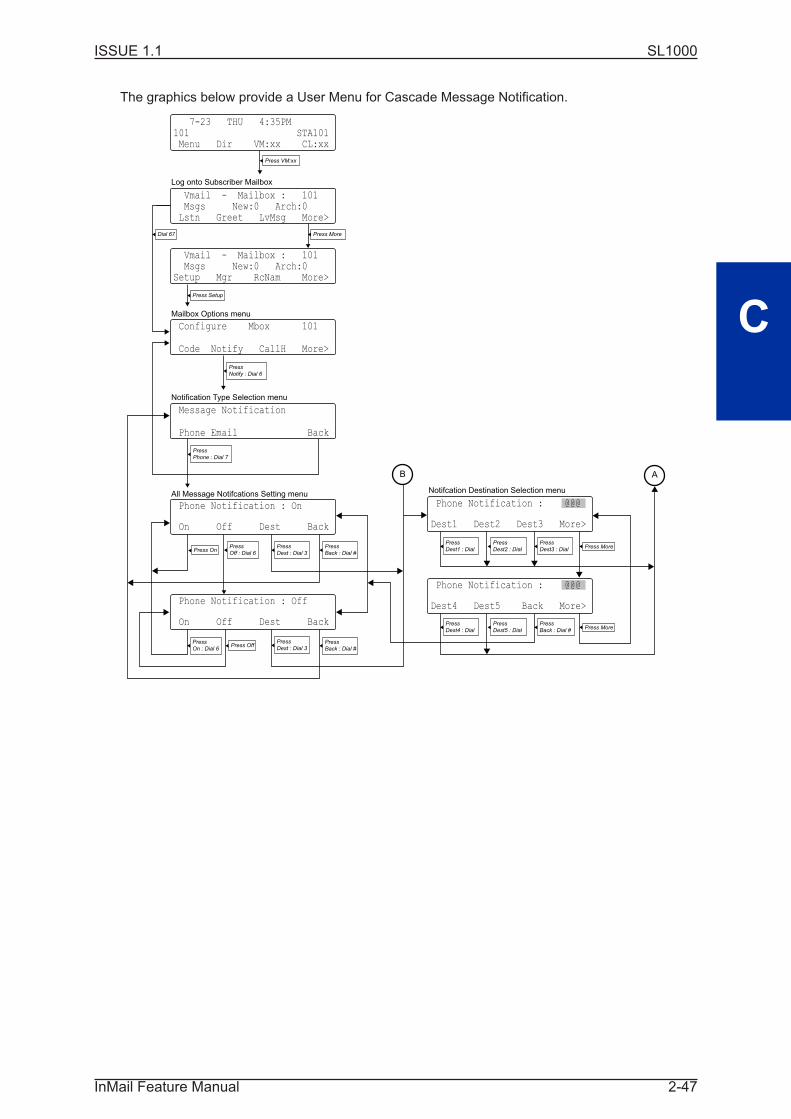
The graphics below provide a User Menu for Cascade Message Notification.
7-23 THU 4:35PM101 STA101 Menu Dir VM:xx CL:xx
Vmail - Mailbox : 101 Msgs New:0 Arch:0 Lstn Greet LvMsg More>
Code Notify CallH More>
On Off Dest Back
Vmail - Mailbox : 101 Msgs New:0 Arch:0 Setup Mgr RcNam More>
Configure Mbox 101
Phone Email Back
Message Notification
Phone Notification : On
On Off Dest Back
Phone Notification : Off
Dest1 Dest2 Dest3 More>
Phone Notification : @@@
Dest4 Dest5 Back More>
Phone Notification : @@@
Log onto Subscriber Mailbox
Mailbox Options menu
Notification Type Selection menu
All Message Notifcations Setting menu Notifcation Destination Selection menu
AB
Press
Notify : Dial 6
Press VM:xx
Press More
Press
Phone : Dial 7
Press
Off : Dial 6
Press
On : Dial 6
Press
Dest : Dial 3
Press
Dest : Dial 3
Press On
Press Off
Press
Back : Dial #
Press
Dest1 : Dial
Press
Dest2 : Dial
Press
Dest3 : Dial Press More
Press
Dest4 : Dial
Press
Dest5 : Dial
Press
Back : Dial #Press More
Press
Back : Dial #
Press Setup
Dial 67
ISSUE 1.1 SL1000
C
InMail Feature Manual 2-47

Dest @ Disabled 12AM - 12AMPhone 2039265400 Enbl Disbl Chnge Back
Dest @ Enable 12AM - 12AMPhone : 2039265400 Enbl Disbl Chnge Back
Dest @ Disabled 12AM - 12AMPhone : Enbl Disbl Chnge Back
Notification Begin : 12AM
Next Exit
Notification Begin : @ @
AM PM Next Exit
Notification End : 12AM
Next Exit
Notification End : @ @ AM PM Next Exit
Notification Via : Number Num Page Next Exit
Number 2035555400 OK Clear Next Exit
Security Code Option Req NoReq Next Exit
Busy Attempts : 05 Next Exit
RNA Attempts : 05 Next Exit
Message Notification Main menuMessage Notification Programming (Begin Hour)
Message Notification Programming (End Hour)
Message Notification Programming (Notification Type)
Message Notification Programming (Number)
Message Notification Programming (Security Code Requierd)
Message Notification Programming (Busy Attempt Count)
Message Notification Programming (RNA Attempt Count)
A
Press
Enbl : Dial 3
Press
Enbl : Dial 3
Press
Enbl
Press
Disbl
Press
Disbl
Press
Chnge : Dial 2
Press
Chnge : Dial 2
Press
Chnge : Dial 2
Press
Disbl : Dial 3
Press
Back : Dial #
Dial 2
digit (01-12)
Press
Next Dial*
Press
Next Dial*Press
PM : Dial 7
Press
AM : Dial 2
Press
Next Dial*Press
PM : Dial 7
Press
AM : Dial 2
Press
Exit : Dial #
Press
Exit : Dial #
Dial 2
digit (01-12)
Dial 2
digit (01-99)
Dial 2
digit (01-99)
Press
Next Dial*Press
Exit : Dial #
Press
Exit : Dial #
Press
Next Dial*Press
Pager : Dial 3
Press
Num : Dial 6
Press
Next Dial*
Press
Next Dial*
Press
Next Dial*
Press
NoReq : Dial 6
Press
Req : Dial 7
Press OK
Dial Number
(Max 16 digit)* # Press Clear
Press
Exit : Dial #
Press
Exit : Dial #
Press
Exit : Dial #
Press
Exit : Dial #
Press
Exit : Dial #
Press
Back : Dial #
Press
Back : Dial #
B
Press
Next Dial*
ISSUE 1.1SL1000
C
Cascade Message Notification2-48

Dial Action Table
Description
The Dial Action Table defines the dialing options for the Call Routing Mailbox chosen by the active
Answer Table, which in turn provides those dialing options to Automated Attendant callers. InMail
provides 16 Dial Action Tables. The Dial Action Table is an integral part of the Automated Attendant.
The Automated Attendant can automatically answer the telephone system's incoming calls, play an
Instruction Menu message, and provide dialing options to callers. There are 3 major Automated Atten-
dant components:
• Answer Table on page 2-14The Answer Table determines how the Automated Attendant answers outside calls on each trunk,
according to the time of the day and day of the week that the call is ringing. The Answer Table divides
the time of day and day of the week into individual schedules, which in turn assign a Call Routing
Mailbox to each call. When a specific schedule is not in effect, the Answer Table uses its Default
Mailbox to determine routing.
By default, all trunks use Answer Table 1. Answer Table 1 has a single schedule that runs Monday throughFriday from 8:30 AM to 5:00 PM
• Routing Mailbox on page 2-182A Call Routing Mailbox is a mailbox associated with an individual Answer Table schedule or the De-
fault Mailbox. It specifies which dialing options (Dial Action Table) are available to callers. It also
provides the Instruction Menu to callers which typically greets the callers and describes the dialing
options.
By default, Answer Table 1 has a single schedule that runs Monday through Friday from 8:30 AM to 5:00PM. This schedule and the Default Mailbox both use Call Routing Mailbox 1.
• Dial Action Table on this pageAfter the Automated Attendant answers, the Dial Action Table provides the dialing options to callers.
Each digit a caller can dial is assigned a specific action (function) in the Dial Action Table. The dial
action used depends on the setting in the active Call Routing Mailbox, which in turn depends on the
Answer Table setup.
By default, Call Routing Mailbox 1 uses Dial Action Table 1.
The following block diagram shows the default InMail Automated Attendant configuration.
ISSUE 1.1 SL1000
D
InMail Feature Manual 2-49

Dial Action Table Options
The following table summarizes the Dial Action Table dial (key) actions and their associated features.
Dial Action Table Key Action Summary
Action Description Feature Reference
TRF Screened Transfer (1)Allows an Automated Attendant caller to place a Screened Transfer to anextension. InMail calls (screens) the destination to see if the call can gothrough.
Screened Transfer onpage 2-186
UTRF Unscreened Transfer (2)Allows an Automated Attendant caller to place an Unscreened Transfer to anextension. InMail transfers the call the destination and then hangs up.
Unscreened Transfer onpage 2-205
Trunks Route to Answer Table 1 47-10-01 Answer Table Assignment
InMailDefault
Automated Attendant Answering
Answer Table 1 47-11 Answer Table Options
Schedule 1 or Default Mailbox 47-12 Answer Schedules
47-11-03 Default Mailbox
Call Routing Mailbox 1 47-08 Call Routing Mailbox Options
All calls route to Call Routing Mailbox 1
Schedule 1 active M-F 8:30 AM - 5:00 PM
Default Mailbox active all other times
From a System Administrator mailbox,
record an Instruction Menu (SA + I) for
the active Call Routing Mailbox.
Dial Action Table 1 47-13 Dial Action Tables
DIL to Voice Mail Master (400) 22-01-01 Incoming Call Trunk Setup
22-07-01 DIL Setup
Dial Action Table 1 Dialing Options:
Dial an extension number, or
O for the operator.
ISSUE 1.1SL1000
D
Dial Action Table2-50

Dial Action Table Key Action Summary
Action Description Feature Reference
REC1 Quick Message with Greeting(3) Allows an Automated Attendant caller to leave a Quick Message at anextension. The caller hears the extension personal greeting.
Quick Message on page2-177
REC2 Quick Message without Greeting (4)Allows an Automated Attendant caller to leave a Quick Message at an exten-sion. The caller does not hear the extension personal greeting.
Quick Message on page2-177
LOGON Log On to Voice Mail (5)Allows an Automated Attendant caller to log on to a mailbox, either directly orone of their choosing.
Log On to Voice Mail onpage 2-133
Hang Up Hang Up (6)InMail says "Goodbye" and hangs up.
Hang Up on page 2-106
GOTO Go to a Mailbox (7)Allows an Automated Attendant caller to route to another mailbox.
Go To A Mailbox on page2-93
UND Undefined Routing (0)This action provides no routing.
Not applicable
Related Features
Automated Attendant on page 2-25
The Automated Attendant can automatically answer the telephone system's incoming calls, play an
Instruction Menu message, and provide dialing options to callers.
Answer Table on page 2-14
Determines how the Automated Attendant answers outside calls on each trunk.
Routing Mailbox on page 2-182
The mailbox associated with an Answer Table that specifies which dialing options (Dial Action Table)
and announcement are available to Automated Attendant callers.
Programming
1. Assign a Dial Action Table to each active Call Routing Mailbox.
Program Number Program Name Description
47-08-01 Dial Action Table The Call Routing Mailbox uses the Dial Action Table assignment toprovide dialing options to callers.
The default Call Routing Mailboxes (1 ~ 8) use Dial Action Table 1.
2. Customize the Dial Action Table options.
Program Number Program Name Description
47-13 InMail Dial Action TablesThe default Dial Action Table dialing options are:
ISSUE 1.1 SL1000
D
InMail Feature Manual 2-51

Dial Action Table Default Settings
Key Dial Action Table 1 Dial Action Tables2-16
1 UND(Undefined)
UND(Undefined)
2 UTRF to XXX(Unscreened Transfer to operator)
UND(Undefined)
3 UTRF to XXX(Unscreened Transfer to user-dialed extension)
UND(Undefined)
4 UND(Undefined)
UND(Undefined)
5 UND(Undefined)
UND(Undefined)
6 UND(Undefined)
UND(Undefined)
7 UND(Undefined)
UND(Undefined)
8 UND(Undefined)
UND(Undefined)
9 HNGUP(Hangup)
UND(Undefined)
0 UTRF to 200(Unscreened Transfer to operator)
UND(Undefined)
* REC1 to IXXX(Quick Message with Greeting to user-dialed extension)
UND(Undefined)
# LOGON to IXXX(Logon to user-dialed mailbox)
UND(Undefined)
Timeout UTRF to 200(Unscreened Transfer to operator)
UND(Undefined)
3. Set the time limit for dialing commands for the Automated Attendant caller.
Program Number Program Name Description
47-08-03 Time Limit for DialingCommands(Dialing Timeout)
Enter the Time Limit for Dialing Commands interval (0~5seconds).
By default, the interval is 5 seconds.
If the caller waits too long to dial:• When the associated Dial Action Table has a Timeout action
programmed, the caller routes to that destination.
• When the associated Dial Action Table does not have a
Timeout action programmed, the Instruction Menu repeats
three times and then InMail hangs up.
4. If using one key dialing from Auto Attendant to a stored speed dial number.
Program Number Program Name Description
41-01-05 Message Wait This program must be disabled (0) for one key dialing to aspeed dial buffer from Auto Attendant to work.
By default, this feature is enabled.
ISSUE 1.1SL1000
D
Dial Action Table2-52

Operation
Not applicable.
ISSUE 1.1 SL1000
D
InMail Feature Manual 2-53

Directory Dialing
Description
Directory Dialing allows an Automated Attendant caller to reach an extension by dialing the first few
letters in the extension user's name. With Directory Dialing, the caller does not have to remember the
extension number of the person they wish to reach - just their name. Here is how Directory Dialing
works:
1. When the Automated Attendant answers, it sends the call to a Directory Dialing Mailbox. (Option-
ally, the caller may be asked to dial a digit to access Directory Dialing.)
2. The Directory Dialing Mailbox plays the Directory Dialing Message (recorded by the System Ad-
ministrator) which asks the caller to dial letters for the name of the person they wish to reach.
3. The caller dials the letters for the person's name plus #. They can dial by first name or last name,
depending on how the Directory Dialing Message was recorded and the Directory Dialing Mailbox
was set up.
4. InMail searches the list of programmed extension names for a match of the caller-entered letters.
5. Voice prompts announce the first three matches, and allow the caller to dial a digit (1 ~ 3) to reach
one of the announced matches. Additionally, the caller can dial 4 to hear additional matches (if
any).
6. The caller dials the digit for the extension they wish to reach, and InMail sends the call to that ex-
tension. The call is sent as a Screened or Unscreened transfer, depending on programming.
For callers to use Directory Dialing, the system must have a name programmed for each extension (up
to 12 characters, A ~ Z, using upper and lower case letters). Each extension should also have a name
recorded in their Subscriber Mailbox. In addition, each extension used by Directory Dialing must be
installed and must have their Subscriber Mailbox active.
The Directory Dialing Mailbox is a Routing Mailbox assigned as a Directory Dialing Mailbox. See Use a
Routing Mailbox for Directory Dialing on this page below or Use a Call Routing Mailbox for Directory
Dialing on page 2-57 for more information.
Related Features
Directory Dialing Mailbox on page 2-62
A Directory Dialing Mailbox is the type of mailbox required to implement Directory Dialing.
System Administrator on page 2-196
Only the System Administrator can record the Directory Dialing Message.
Programming
Use a Routing Mailbox for Directory Dialing
1. Set up the Directory Dialing Mailbox.
Program Number Program Name Description
47-07-02 Routing Mailbox Type(Mailbox Type)
Enter 4 to make the selected Routing Mailbox a Directory DialingMailbox.
By default, there are no Routing Mailboxes assigned as Directory Dial-
ing Mailboxes.
ISSUE 1.1SL1000
D
Directory Dialing2-54

2. Set up the name programming and enter names.
Program Number Program Name Description
47-01-16 Name Format Determine how extension names should be entered in 15-01-01Extension Name or via the telephone. The options are 0 (first namefollowed by last name) or 1 (last name followed by first name).
By default, the system expects names to be entered as first name fol-
lowed by last name (0).
15-01-01 Extension Name(Ext Name)
Enter the name for each extension. Refer to 47-01-16 Name Formatfor name format.
By default, there are no names entered.
47-15-03 Name Match Select the portion of the extension name on which the DirectoryDialing Mailbox should route. Enter 0 for first; 1 for last. This optionallows for dial-by-first-name and dial-by-last-name Directory Dialing.For example, if 47-01-16 Name Format is 0 and the name in15-01-01 Extension Name is entered as first name followed by lastname, enter 1 in this option to set up last name dialing.
By default, the Directory Dialing Mailbox routes on the first portion of
the name (0).
3. Set up Directory Lists to control which extensions Directory Dialing can access.
Program Number Program Name Description
47-02-15 Directory List Number Select the Directory List to which the extension belongs. The entriesare 1 ~ 8 (for lists 1 ~ 8), 0 (for no list), or * (for all lists). DirectoryDialing to the extension can occur only if the list entry matches thesetting in 47-15-02 Directory List Number to Use for the DirectoryDialing Mailbox.
By default, extensions are not included in a Directory List (0).
47-15-02 Directory List Number toUse
The Directory Dialing Mailbox can route calls only to the members ofthe Directory List specified in this option. The entries are 1 ~ 8 (forlists 1 ~ 8).
By default, the Directory Dialing Mailbox uses list 1.
4. Specify the required number of letters of the employee name the caller must dial.
Program Number Program Name Description
47-15-01 Minimum Number of LettersRequired
Specify how many letters of an employee's name the caller must dialto use Directory Dialing. If the caller dials less than the specifiedminimum number of letters, InMail cannot route the call. The entriesare 1 ~ 3 (1 ~ 3 letters).
By default, callers must dial at least 1 letter of the employee's name (1).
5. Select Screened or Unscreened Transfer call routing, when Directory Dialing finds a name match.
Unscreened Transfer
Program Number Program Name Description
47-15-04 Transfer Option Enter 1 to route the call as an Unscreened Transfer.
By default, InMail routes the call as a Screened Transfer (0).
ISSUE 1.1 SL1000
D
InMail Feature Manual 2-55

Screened Transfer
Program Number Program Name Description
47-15-04 Transfer Option Enter 0 to route the call as a Screened Transfer.
By default, InMail routes the call as a Screened Transfer (0).
47-15-05 Screened Transfer Timeout Set how long a Screened Transfer from the Directory DialingMailbox will ring an unanswered extension before recalling. Theentries are 1 ~ 255 seconds or 0 for no recall.
By default, the Screened Transfer Timeout interval is 15 seconds.
6. Change the amount of time Directory Dialing callers have to dial letters.
Program Number Program Name Description
47-15-06 Time Limit for DialingCommands
Enter the new timeout duration (0 ~ 99 seconds).If the caller waits too long to dial, the Directory Dialing Messagerepeats.
By default, Directory Dialing callers have 5 seconds to dial letters.
7. Record a Directory Dialing Message.
See Operation on page 2-59.
The Directory Dialing Message is the Instruction Menu for the Routing Mailbox programmed as a
Directory Dialing Mailbox.
By default (without a custom message recorded), the Directory Dialing Message is, "Please enter one ormore letters of the person's name, then press the pound key."
Program Number Program Name Description
47-01-04 Non-Subscriber MessageLength(Mbox Msg Length)
This option sets the maximum message length (1 ~ 4095 seconds)for Instruction Menus.
By default, this option is 120 seconds.
8. Enable or disable the ability of the Directory Dialing Mailbox to detect and route incoming faxes.
Program Number Program Name Description
47-15-07 Fax Detection Enter 1 to enable Fax Detection; 0 to disable. If enabled, when theDirectory Dialing Mailbox detects incoming fax CNG tone, it routesthe call to the fax extension specified in 47-01-06 Fax Extension.See Fax Detection on page 2-83 for more.
By default, Fax Detection is disabled (0).
9. Enable the Directory Dialing Mailbox caller to dial 0 for other options or # to return to the Auto-
mated Attendant.
Program Number Program Name Description
47-15-08 Next Call Routing Mailbox Assign a Next Call Routing Mailbox (1 ~ 32) to the DirectoryDialing Mailbox.To remove an assignment, press Hold.Once assigned, dialing # returns to the Automated Attendant.Dialing 0 follows the 0 action of the Next Call Routing Mailbox.
By default, no Next Call Routing Mailbox is assigned.
ISSUE 1.1SL1000
D
Directory Dialing2-56
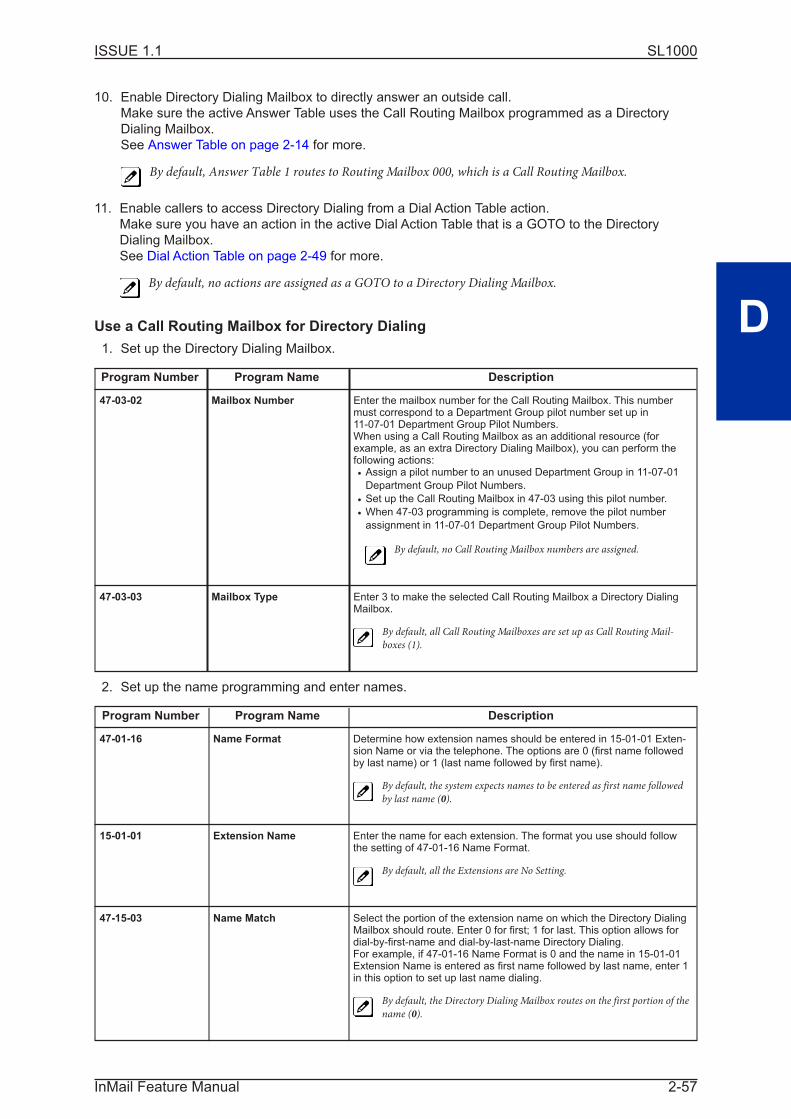
10. Enable Directory Dialing Mailbox to directly answer an outside call.
Make sure the active Answer Table uses the Call Routing Mailbox programmed as a Directory
Dialing Mailbox.
See Answer Table on page 2-14 for more.
By default, Answer Table 1 routes to Routing Mailbox 000, which is a Call Routing Mailbox.
11. Enable callers to access Directory Dialing from a Dial Action Table action.
Make sure you have an action in the active Dial Action Table that is a GOTO to the Directory
Dialing Mailbox.
See Dial Action Table on page 2-49 for more.
By default, no actions are assigned as a GOTO to a Directory Dialing Mailbox.
Use a Call Routing Mailbox for Directory Dialing
1. Set up the Directory Dialing Mailbox.
Program Number Program Name Description
47-03-02 Mailbox Number Enter the mailbox number for the Call Routing Mailbox. This numbermust correspond to a Department Group pilot number set up in11-07-01 Department Group Pilot Numbers.When using a Call Routing Mailbox as an additional resource (forexample, as an extra Directory Dialing Mailbox), you can perform thefollowing actions:• Assign a pilot number to an unused Department Group in 11-07-01
Department Group Pilot Numbers.
• Set up the Call Routing Mailbox in 47-03 using this pilot number.
• When 47-03 programming is complete, remove the pilot number
assignment in 11-07-01 Department Group Pilot Numbers.
By default, no Call Routing Mailbox numbers are assigned.
47-03-03 Mailbox Type Enter 3 to make the selected Call Routing Mailbox a Directory DialingMailbox.
By default, all Call Routing Mailboxes are set up as Call Routing Mail-
boxes (1).
2. Set up the name programming and enter names.
Program Number Program Name Description
47-01-16 Name Format Determine how extension names should be entered in 15-01-01 Exten-sion Name or via the telephone. The options are 0 (first name followedby last name) or 1 (last name followed by first name).
By default, the system expects names to be entered as first name followed
by last name (0).
15-01-01 Extension Name Enter the name for each extension. The format you use should followthe setting of 47-01-16 Name Format.
By default, all the Extensions are No Setting.
47-15-03 Name Match Select the portion of the extension name on which the Directory DialingMailbox should route. Enter 0 for first; 1 for last. This option allows fordial-by-first-name and dial-by-last-name Directory Dialing.For example, if 47-01-16 Name Format is 0 and the name in 15-01-01Extension Name is entered as first name followed by last name, enter 1in this option to set up last name dialing.
By default, the Directory Dialing Mailbox routes on the first portion of the
name (0).
ISSUE 1.1 SL1000
D
InMail Feature Manual 2-57

3. Set up Directory Lists to control which extensions Directory Dialing can access.
Program Number Program Name Description
47-02-15 Directory List Number Select the Directory List to which the extension belongs. The entriesare 1 ~ 8 (for lists 1 ~ 8), 0 (for no list), or * (for all lists). DirectoryDialing to the extension can occur only if the list entry matches thesetting in 47-14-02 Directory List Number to Use for the DirectoryDialing Mailbox.
By default, extensions are not included in a Directory List (0).
47-15-02 Directory List Number toUse
The Directory Dialing Mailbox can route calls only to the members ofthe Directory List specified in this option. The entries are 1 ~ 8 (for lists1 ~ 8).
By default, the Directory Dialing Mailbox uses list 1.
4. How many letters of the employee's name must the caller dial?
Program Number Program Name Description
47-14-01 Minimum Number ofLetters Required
Specify how many letters of an employee's name the caller must dialto use Directory Dialing. If the caller dials less than the specifiedminimum number of letters, InMail cannot route the call. The entriesare 1 ~ 3 (1 ~ 3 letters).
By default, callers must dial at least 1 letter of the employee's name (1).
5. Specify the call routing as a Screened or Unscreened Transfer when Directory Dialing finds a
name match.
Unscreened Transfer
Program Number Program Name Description
47-15-04 Transfer Option Enter 1 to route the call as an Unscreened Transfer.
By default, InMail routes the call as a Screened Transfer (0).
Screened Transfer
Program Number Program Name Description
47-15-04 Transfer Option Enter 0 to route the call as a Screened Transfer.
By default, InMail routes the call as a Screened Transfer (0).
47-15-05 Screened Transfer Timeout Set how long a Screened Transfer from the Directory DialingMailbox will ring an unanswered extension before recalling. Theentries are 1 ~ 255 seconds or 0 for no recall.
By default, the Screened Transfer Timeout interval is 15 seconds.
6. To change the amount of time Directory Dialing callers have to dial letters:
Program Number Program Name Description
47-15-06 Time Limit for DialingCommands
Enter the new timeout duration (0 ~ 99 seconds).If the caller waits too long to dial, the Directory Dialing Messagerepeats.
By default, Directory Dialing callers have 5 seconds to dial letters.
ISSUE 1.1SL1000
D
Directory Dialing2-58
7. To record a Directory Dialing Message:
Refer to Operation on this page.
The Directory Dialing Message is the Instruction Menu for the Call Routing Mailbox programmed
as a Directory Dialing Mailbox.
By default (without a custom message recorded), the Directory Dialing Message is "Please enter one ormore letters of the person's name, then press the pound key."
Program Number Program Name Description
47-01-04 Outgoing Message Length(Mbox Msg Length)
This option sets the maximum message length (1 ~ 4095seconds) for Instruction Menus.
By default, this option is 120 seconds.
8. Enable or disable the ability of the Directory Dialing Mailbox to detect and route incoming faxes.
Program Number Program Name Description
47-15-07 Fax Detection Enter 1 to enable Fax Detection; 0 to disable. If enabled, whenthe Directory Dialing Mailbox detects incoming fax CNG tone, itroutes the call to the fax extension specified in 47-01-06 FaxExtension.See Fax Detection on page 2-83 for more.
By default, Fax Detection is disabled (0).
9. Enable the Directory Dialing Mailbox caller to dial 0 for other options or # to return to the Auto-
mated Attendant:
Program Number Program Name Description
47-15-08 Next Call Routing Mailbox Assign a Next Call Routing Mailbox (1 ~ 32) to the DirectoryDialing Mailbox.To remove an assignment, press Flash.Once assigned, dialing # returns to the Automated Attendant.Dialing 0 follows the 0 action of the Next Call Routing Mailbox.
By default, no Next Call Routing Mailbox is assigned.
10. Enable the Directory Dialing Mailbox to directly answer an outside call.
Make sure the active Answer Table uses the Call Routing Mailbox programmed as a Directory
Dialing Mailbox.
See Answer Table on page 2-14 for more.
By default, Answer Table 1 routes to Routing Mailbox 000, which is a Call Routing Mailbox.
11. Enable callers to access Directory Dialing from a Dial Action Table action:
Make sure you have an action in the active Dial Action Table that is a GOTO to the Directory
Dialing Mailbox.
See Dial Action Table on page 2-49 for more.
By default, no actions are assigned as a GOTO to a Directory Dialing Mailbox.
Operation
Recording a Directory Dialing Message
Log On to System Administrator's mailbox.
SA (72) Access System Administrator options.[Not applicable]
ISSUE 1.1 SL1000
D
InMail Feature Manual 2-59

Recording a Directory Dialing Message
I (4) Select Instruction Menus.[Instr]
Enter the Directory Dialing Mailbox number.
L (5) Listen to the current Directory Dialing Message (if any).[Lstn]
# Exit listen mode.
R (7) Record a new Directory Dialing Message.[Rec]
Record message.
* Pause or restart recording.[Resume][Pause]
D (3) Delete recording.[Del]
# Exit recording mode.[Done]
D (3) Delete the Directory Dialing Message.[Del]
# Go back to the System Administrator options.[Exit]
# Go back to the System Administrator options.[Exit]
0 Plays Help message.
Using Directory Dialing
To use Directory Dialing:
1. After the Automated Attendant answers, wait for the Directory Dialing Message.• The Automated Attendant may ask you to dial a digit for Directory Dialing.
2. Dial the letters that correspond to the name of the person you wish to reach + #.• The Directory Dialing Message tells how many letters you need to dial, and whether you should enter the
person's first name or last name.
• To exit Directory Dialing without selecting a name, just dial #.
3. The Automated Attendant announces the name matches, and tells you which digit to dial (1 ~ 3) to reacheach of the announced names.• To hear additional name matches (if any), dial 4 instead.
4. After you make your selection, the Automated Attendant routes your call to the name selected.
Dialing Options Available while Entering a Name
The following table shows the dialing options available to the caller while they are entering a name into
a Directory Dialing Mailbox.
• By default, the caller can dial the digits 2 ~ 9 to enter the name or dial # to return to the AutomatedAttendant.
• If a Next Call Routing Mailbox is specified, the caller can dial the digits 2 ~ 9 to enter a name, dial 0to follow the 0 action of the Next Call Routing Mailbox, or dial # to route directly to the Next Call Rout-
ing Mailbox.
Directory Dialing Mailbox Name Entry Options(Options available while entering a name)
Dialed Digit 47-15-08: Next CallRouting Mailbox
Action
1 Not applicable Entry is ignored.
ISSUE 1.1SL1000
D
Directory Dialing2-60

Directory Dialing Mailbox Name Entry Options(Options available while entering a name)
Dialed Digit 47-15-08: Next CallRouting Mailbox
Action
2 ~ 9 Not applicable Interprets the digit as a letter and waits about 20 seconds for additionalinput (i.e., more letters or a # to conclude name entry). If no additionaldigits are dialed for 10 seconds, the Directory Dialing Message repeatsand then InMail hangs up.
0 UND (Not assigned) Repeats the Directory Dialing Message (to make a new name entry)each time the caller dials the digit.
1 ~ 32 (valid Call RoutingMailbox)
Caller routes according to the 0 action of the Next Call Routing Mail-box's Dial Action Table.
* Not applicable Repeats the Directory Dialing Message (to make a new name entry)each time the caller dials the digit.
# UND (Not assigned) Routes to the Automated Attendant (i.e., back to the Call RoutingMailbox that initially answered the call).
1 ~ 32 (valid Call RoutingMailbox)
Routes to the Next Call Routing Mailbox and plays that mailboxInstruction Menu.
Timeout UND (Not assigned) Repeats the Directory Dialing Message (to make a new name entry)up to two times and then hangs up.
Dialing Options Available for duplicate Employee Names
If the name the caller enters is used by more than one employee, InMail lets the caller select the
employee to which they want to talk. The caller can dial 1, 2 or 3 to select the employee from the first
three name matches, or dial 4 to hear additional name matches.
• By default, the caller can also dial * to make a new entry or dial # to return to the Automated Atten-dant.
• If a Next Call Routing Mailbox is specified, the caller can also dial * to make a new entry, dial 0 tofollow the 0 action of the Next Call Routing Mailbox, or dial # to route directly to the Next Call Routing
Mailbox.
Directory Dialing Mailbox Routing Options(Options available after a name is entered)
Dialed Digit 47-15-08 Next CallRouting Mailbox
Action
1 ~ 3 Not applicable Route to the respective extension from the list of up to three announcedmatches.
4 Not applicable If more than three matches for the entered name are found, providesaccess to the next set of three matches.
5 ~ 9 Not applicable Plays "That is an invalid entry" and repeats the list of announced matcheseach time the caller dials the digit.
0 UND (Not assigned) Plays "That is an invalid entry" and repeats the list of announced matcheseach time the caller dials the digit.
1 ~ 32 (valid Call RoutingMailbox)
Caller routes according to the 0 action of the Next Call Routing Mailbox'sDial Action Table.
* Not applicable Repeats the Directory Dialing Message (to make a new name entry) eachtime the caller dials the digit.
# UND (Not assigned) Routes to the Automated Attendant (i.e., back to the Call Routing Mailboxthat initially answered the call).
1 ~ 32 (valid Call RoutingMailbox)
Routes to the Next Call Routing Mailbox and plays that mailbox's Instruc-tion Menu.
Timeout UND (Not assigned) Repeats the list of announced matches (up to two times). If no response,repeats the Directory Dialing Message (to make a new name entry) up tothree times and then hangs up.
ISSUE 1.1 SL1000
D
InMail Feature Manual 2-61

Directory Dialing Mailbox
Description
A Directory Dialing Mailbox is the type of mailbox required to implement Directory Dialing. A Directory
Dialing Mailbox is a Routing Mailbox set as a Directory. See Directory Dialing on page 2-54 for more
on how to set up a Directory Dialing Mailbox.
Related Features
Directory Dialing on page 2-54
Directory Dialing allows an Automated Attendant caller to reach an extension by dialing the first few
letters in the extension user's name.
System Administrator on page 2-196
Only the System Administrator can record the Directory Dialing Message.
Programming
A Directory Dialing Mailbox can be either a Routing Mailbox or a Master Mailbox. The type you choose
depends only on available resources and your programming preference, since they work identically.
1. Assign a Routing Mailbox as a Directory Dialing Mailbox:
2. Assign a Master Mailbox as a Directory Dialing Mailbox:
Program Number Program Name Description
47-07-02 Routing Mailbox Type(Mailbox Type)
Enter 3 to make the selected Master Mailbox a Directory DialingMailbox.
By default, no Master Mailboxes are assigned as Directory Dialing
Mailboxes.
Operation
Turn to Directory Dialing on page 2-54 for more on how to use Directory Dialing and record a Directory
Dialing Message.
ISSUE 1.1SL1000
D
Directory Dialing Mailbox2-62

Distribution List
Description
A Distribution List is a list of extensions that will receive a message you record and send to a single
Distribution Mailbox. Any message left in the Distribution Mailbox will be automatically sent to all the
mailboxes in the list. Distribution List saves time when you need to send the same message to many
co-workers. Rather than recording the message and manually specifying a list of recipients, use a
Distribution List instead.
A Distribution List can consist only of Subscriber Mailboxes. The list is managed in a Distribution
Mailbox, which is a type of Routing Mailbox that contains the actual list of member extensions. The
system allows as many Distribution Lists as there are available Routing Mailboxes (up to 32). Each list
can have up to 20 members. You assign the Distribution Mailbox in system programming, but you can
create the Distribution List and edit the list members from either system programming or a System
Administrator's Mailbox. The System Administrator can also record a name for the Distribution List.
Related Features
InMail Features:
Distribution Mailbox
A Distribution Mailbox is a Routing Mailbox that handles Distribution List messages.
System Administrator on page 2-196
The user can edit the members of a Distribution List from a System Administrator Mailbox. The user
can also record a name for the list.
Programming
1. Assign a Routing Mailbox as a Distribution Mailbox:
Program Number Program Name Description
47-07-02 Routing Mailbox Type(Mailbox Type)
Enter 4 to assign the selected Routing Mailbox a Distribution Mailbox.
By default, no Distribution Mailboxes are assigned.
2. Enter the destination extensions into the Distribution List:
Program Number Program Name Description
47-17-01 Distribution MailboxCategory
Set the mailbox type. Use Undefined (0) to skip Mailbox Numbersetting. Use Station Mailbox (1) for setting Mailbox Number to 1~512(Program 47-02). Use Group Number (2) for setting Group Mailbox(1~32) (Program 47-03).
47-17-01 Second Setting Data -Distribution MailboxNumber
Enter the member mailboxes in the Distribution List (20 membersmaximum). When setting this data via phone programming or PC/WebProgramming, the mailboxes are entered by their mailbox number (1 ~512 or 1 ~ 32 for Group mailboxes) not by their extension number.
ISSUE 1.1 SL1000
D
InMail Feature Manual 2-63

Operation
Recording and Sending a Message to a Distribution List
To record and send a message to a Distribution List:
1. Log onto the Subscriber Mailbox.
2. [Rec] Select Record and Send a Message.• Alternately dial RS (77).
3. Record your message.
[Pause] Pause recording• Alternately dial * to pause.
[Resume] Resume recording if paused.• Alternately dial * to resume.
Cncl] Cancel recording.• Alternately dial D to delete a recording.
[Done] End (accept) the recording.• Alternately dial # to accept the recording.
4. Dial the Distribution Mailbox number.
[Cont] Send the message to the selected Distribution List.• Alternately dial # to send the recording.
[Mbox] Back up and reenter the Distribution Mailbox number.• Alternately dial * to back up and reenter.
[Exit] Return to the Main Menu without sending the message.
5. [Exit] Return to the Main Menu after sending the message to the Distribution List.• Alternately dial # to return to the Main Menu.
Editing a Distribution List and Recording a Name
To edit a Distribution List and record a name:
1. Log onto a System Administrator's Mailbox.
2. [Mgr] Select the System Administrator features.• Alternately dial SA (72).
3. [DList] Select Distribution List editing. This is the Distribution List Menu.• Alternately dial L (5).
4. Enter the number of the Distribution List you want to edit (e.g., 008).
[Back] Return to the System Administrator Menu without selecting a list.• Alternately dial #.
5. Select one of the following.
a. [Modfy] [Modfy] Select to edit the Distribution List member list. (This is the List ModifyMenu.)• Alternately dial M (6).
[Add] Select to add an extension to the list.• Alternately dial A (2).
• The extension you add is inserted at the current position in
the list.
[OK] Select to accept the entry and return to theList Modify Menu.• Alternately dial #.
[Clear] [Clear] Select to reenter the mailbox number.• Alternately dial *.
[Back] Select to exit to the List Modify Menu.• Alternately dial *.
ISSUE 1.1SL1000
D
Distribution List2-64

Editing a Distribution List and Recording a Name
[Del] [Del] Select to remove the currently displayed extension fromthe list.• Alternately dial E (3).
[Next] Select to go to the next extension in the list without makingany changes.• Alternately dial N (6).
[Back] [Back] Select to exit the list.• Alternately dial #.
b. [RcNam] [RcNam] Select to record a name for the Distribution List. (This is the RecordName Menu).• Alternately dial RN (76).
[Back] Select to listen to the recorded name (if any).• Alternately dial L (5).
[Rec] Select to record a new name.• Alternately dial R (7).
[Cncl] Select to cancel without recording and goback to the Record Name menu.
[Done] Select to accept the recorded name and goback to the Record Name Menu.• Alternately dial #.
[Del] [Del] Select to delete the recorded name.• Alternately dial D (3).
[Back] [Back] Select to exit to the Distribution List Menu.• Alternately dial #.
[Back] Select to exit to the System Administrator Menu.• Alternately dial #.
ISSUE 1.1 SL1000
D
InMail Feature Manual 2-65
Email Notification
Description
Email Notification automatically sends an email notification when a Subscriber Mailbox receives a new
message. The email can optionally include the recorded message as a wav file attachment. To hear
the message, the email recipient double-clicks the wav attachment to have the message play in their
wav player (such as Windows Media Player).
Email Notification uses SMTP (Simple Mail Transfer Protocol) to deliver messages to the recipient's
email account. If the message recipient has a mobile telephone service provider with an SMS (Short
Message Service) portal, they can optionally choose to have text messages delivered right to their cell
phone. In either case, Email Notification does not provide synchronization - the email account and the
voice mailbox operate independently. For example, deleting the voice mail message does not auto-
matically delete the email and vice-versa.
If Email Notification tries to deliver an email and it doesn't go through because of a connection problem
(i.e., no connection or a dropped connection), it will retry every 15 minutes for 24 hours. If the email
still can't go through, Email Notification cancels the delivery. Email deliveries that fail because authenti-
cation fails or the encryption mode is incorrect are immediately cancelled.
Collecting the Email Notification Data
In order for the installation site's SL1000 to send email notifications, it must have a valid SMTP email
account assigned. To save time during programming, use the following table to help collect the
system's email account information. The email account provider can supply this information. See
Programming in this feature for more.
Table 2-1 SL1000 Email Account Information
Item Description System's Email AccountData
SMTP Email Account The email account that will handle notifications sent from the InMail(e.g., [email protected]).
SMTP Server Name The SMTP server (email provider) will handle email for the SMTPemail account. The SMTP server name is typically similar tosmtp.emailserver.com.
SMTP Port Number The port the SMTP server uses for SMTP delivery.
SMTP Encryption Determines whether or not the SMTP server accepts plain text(unencrypted) or encrypted email (Yes or No).
SMTP Authentication Enter Yes if the SMTP server requires the SMTP Email Account'suser name and password each time the system logs on. Otherwise,enter No.
SMTP User Name In the SMTP Email Account, this is normally the your-name portionof [email protected].
SMTP Password This is the password for the account specified in SMTP EmailAccount above.
Email Reply To If a notification recipient replies to a notification email, this is theaddress to which the reply is sent.
Explanation of the Message Sender (From) Field
Like any other email client, Email Notification uses the From field to identify the person that left the
message being delivered. In the email message, the data in the From field is formatted as Name
[Reply To], where:
• Name identifies the person that left the message.
ISSUE 1.1SL1000
E
Email Notification2-66

• Reply To1 is the email address used when the email recipient replies to the message.
This information is not provided in the recipient's inbox - just the actual email message.
For messages left by Intercom callers:
• Name is:
- The extension name (if programmed).- OR -
- The extension number (if there is no name programmed).
• Reply To1 is:
- The email address of the person that left the message (if programmed).- OR -
- The Reply To Email Address data from Program 47-18-09.- OR -
- The Send From Email Address data from Program 47-18-09.
For messages left by Outside callers:
• Name is always the text "Outside Caller".
• Reply To1 is:
- The Reply To Email Address data from Program 47-18-09.- OR -
- The Send From Email Address data from Program 47-18-09.
Email from Intercom Caller with Programmed Name
When a voice message is left from an extension with a programmed name, Outlook 2007 shows the
following:
• Inbox
- From - The programmed name for the extension that left the message.
- Subject - The text "Voice Message from" followed by the extension name, followed by the message duration.
- Received - The date and time the message was received.
- Size - The message size, which includes the size of the wav file attachment.
• Message Body
- From - The name programmed for the extension that left the message, followed by the programmed Reply Toinformation.
- Sent - The date and time the message was sent from the installation site's SMTP email server.
- Subject - The same subject information shown in the inbox.
- Message - The wav file attachment name and the attachment size. In the example below,
- John Hancock is the name of the extension that left the message.
- 06-22-09 is the date the message was left.
- 4:17 PM is the time the attachment was created.
- Body text - Includes the date and time the voice message was received and the message length.
1. The recipient's inbox only shows the Name portion of the From field. The Reply To portion is not included.
ISSUE 1.1 SL1000
E
InMail Feature Manual 2-67

Email from Intercom without Extension Name
When a voice message is left from an extension without a programmed name, Email Notification
substitutes the extension number for the name. In this example, Outlook 2007 shows the following:
• Inbox
- From - The number of the extension that left the message.
- Subject - The text "Voice Message from" followed by the extension number, followed by the message duration.
- Received - The date and time the message was received.
- Size - The message size, which includes the size of the wav file attachment.
• Message Body
- From - The number of the extension that left the message, followed by the programmed Reply To information.
- Sent - The date and time the message was sent from the installation site's SMTP email server.
- Subject - The same subject information shown in the inbox.
- Message - The wav file attachment name and the attachment size. In the example below,
- Extension 103 is the number of the extension that left the message.
- 06-22-09 is the date the message was left.
- 3:49 PM is the time the attachment was created.
- Body text - Includes the date and time the voice message was received and the message length.
Figure 2-3 Email with Station Name
ISSUE 1.1SL1000
E
Email Notification2-68

Email from Outside Caller with Caller ID
When a voice message is left by an outside caller and Caller ID was provided, Outlook 2007 shows the
following:
• Inbox
- From - Shows that the message is from an outside caller.
- Subject - The text "Voice Message from" followed by the caller's number (provided by Caller ID), followed bythe message duration.
- Received - The date and time the message was received.
- Size - The message size, which includes the size of the wav file attachment.
• Message Body
- From - Shows that the message is from an outside caller, followed by the programmed Reply To information.
- Sent - The date and time the message was sent from the installation site's SMTP email server.
- Subject - The same subject information shown in the inbox.
- Message - The wav file attachment name and the attachment size. In the example below,
- 214-262-3939 is the caller's number (provided by Caller ID).
- 06-22-09 is the date the message was left.
- 4:52 PM is the time the attachment was created.
- Body text - Includes the date and time the voice message was received and the message length.
Figure 2-4 Email - No Station Name
ISSUE 1.1 SL1000
E
InMail Feature Manual 2-69

Email from Outside Caller without Caller ID
When a voice message is left by an outside caller and Caller ID was not provided, Email Notification
substitutes "Outside Caller" for the number. Outlook 2007 shows the following:
• Inbox
- From - Shows that the message is from an outside caller.
- Subject - The text "Voice Message from" followed by "Outside Caller", followed by the message duration.
- Received - The date and time the message was received.
- Size - The message size, which includes the size of the wav file attachment.
• Message Body
- From - Shows that the message is from an outside caller, followed by the programmed Reply To information.
- Sent - The date and time the message was sent from the installation site's SMTP email server.
- Subject - The same subject information shown in the inbox.
- Message - The wav file attachment name and the attachment size. In the example below,
- Outside Caller (since there is no Caller ID number).
- 06-22-09 is the date the message was left.
- 5:20 PM is the time the attachment was created.
- Body text - Includes the date and time the voice message was received and the message length.
Figure 2-5 Email with CID Name
ISSUE 1.1SL1000
E
Email Notification2-70
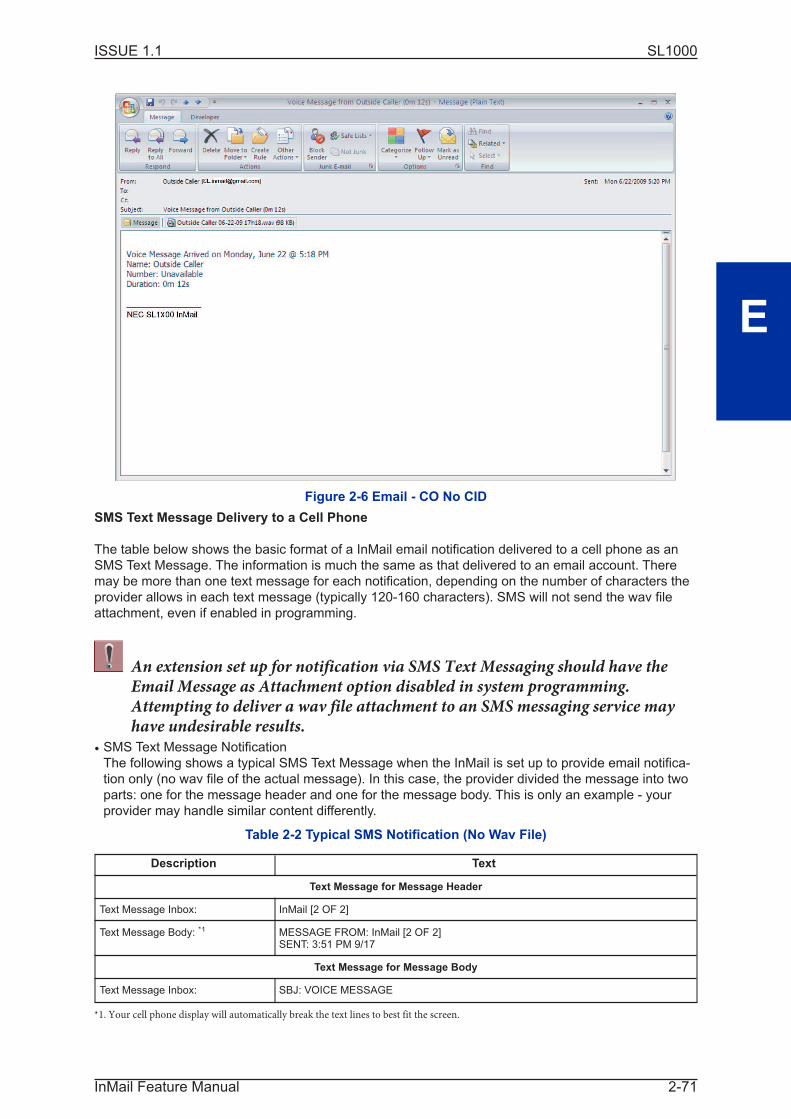
SMS Text Message Delivery to a Cell Phone
The table below shows the basic format of a InMail email notification delivered to a cell phone as an
SMS Text Message. The information is much the same as that delivered to an email account. There
may be more than one text message for each notification, depending on the number of characters the
provider allows in each text message (typically 120-160 characters). SMS will not send the wav file
attachment, even if enabled in programming.
An extension set up for notification via SMS Text Messaging should have theEmail Message as Attachment option disabled in system programming.Attempting to deliver a wav file attachment to an SMS messaging service mayhave undesirable results.
• SMS Text Message NotificationThe following shows a typical SMS Text Message when the InMail is set up to provide email notifica-
tion only (no wav file of the actual message). In this case, the provider divided the message into two
parts: one for the message header and one for the message body. This is only an example - your
provider may handle similar content differently.
Table 2-2 Typical SMS Notification (No Wav File)
Description Text
Text Message for Message Header
Text Message Inbox: InMail [2 OF 2]
Text Message Body: *1 MESSAGE FROM: InMail [2 OF 2]SENT: 3:51 PM 9/17
Text Message for Message Body
Text Message Inbox: SBJ: VOICE MESSAGE
*1. Your cell phone display will automatically break the text lines to best fit the screen.
Figure 2-6 Email - CO No CID
ISSUE 1.1 SL1000
E
InMail Feature Manual 2-71

Description Text
Text Message Body: *1 MESSAGE FROM: XXXXSUBJ: VOICE MESSAGE FROM XXXX- (0M6S)VOICE MESSAGE ARRIVED ON MONDAY, SEPT 17@3:51 PMDURATION: 0M 6S------------NEC [1 OF 2]SENT: 3:51PM 09/17
POP3 Login
InMail Email Notification supports POP3 Login. The logic of this method is that it allows a user to send
e-mail from any location, as long as they can demonstrably also fetch their mail from the same place.
Check with your email provider to see if this type of login is required.
Some Common SMTP Settings
Table 2-3 Common Email Notification SMTP Server Settings
Provider Server Name andAccount
(1105-02, 08)
SMTP Port(1105-03)
Encryption(1105-04)
Authentication(1105-05, 06,
07)
Updated Comments
Yahoo smtp.mail.yahoo.com 465 Yes Yes 6/28/07 Requires POPYahoo! Mail Plus
GMail smtp.gmail.com 465 Yes Yes 6/28/09
OptimumOnline
mail.optonline.net 587 Yes Yes 6/28/07
AOL smtp.aol.com 587 Yes Yes 6/28/07
Some Common SMS Portals
Table 2-4 Some Common Mobile Telephone Service Provider SMS Portals
Provider Email Address for SMS Text Message
Some Popular Provider-Specific SMS Portals
Alltel [email protected]
AT&T Wireless [email protected] OR [email protected]
Boost Mobile [email protected]
Cingular [email protected] OR [email protected]
Nextel [email protected] OR [email protected]
Sprint PCS [email protected]
T-Mobile [email protected] OR [email protected]
Verizon [email protected]
Virgin Mobile [email protected]
A Universal SMS Portal
Teleflip [email protected]
A More Complete SMS Portal Listing
For a more complete SMS portal list, see http://www.livejournal.com/tools/textmessage.bml?mode=details.
Conditions
• An IP4( )-MEMDB-C1 must be mounted on the CPU card to support this feature.
• The Email Notification feature require for SL-VM-ADVANCE license.
ISSUE 1.1SL1000
E
Email Notification2-72
Default Settings
Email Notification disabled.
System Availability
Terminals
All Multiline Terminals
Required Component(s)
• PZ-VM21 with CPU card
• InMail Compact Flash
• SL-VM-ADVANCE license
Related Features
None
Setting Up the System SMTP Options
1. Enable SMTP Email Delivery System Wide.
ProgramNumber
Program Name Description
47-18-01 ENABLE SMTP Enter 1 to enable SMTP email delivery system-wide.
By default, SMTP email delivery is disabled (0).
47-18-08 SMTP EMAIL ADDRESS Specify the email account that the SMTP server will use to process emailsent from the SL1000 (e.g., [email protected]).
By default, there is no entry for this option.
2. Specify the site's SMTP server name and port.
ProgramNumber
Program Name Description
90-11-11 DNS PRIMARY ADDRESS Enter the IP address of primary Domain Name Server (DNS).• The DNS (or name server) is the computer connected to the internet that
converts a domain name (such as www.yahoo.com) to a specific IP
address for routing on the internet. If you want to use a domain name to
identify your SMTP server in the following option, you must make an entry
for this option. The entry is the IP address of your name server.
By default, there is no entry for this option.
90-11-12 DNS SECONDARYADDRESS
Enter the IP address of secondary Domain Name Server (if any).
By default, there is no entry for this option.
ISSUE 1.1 SL1000
E
InMail Feature Manual 2-73
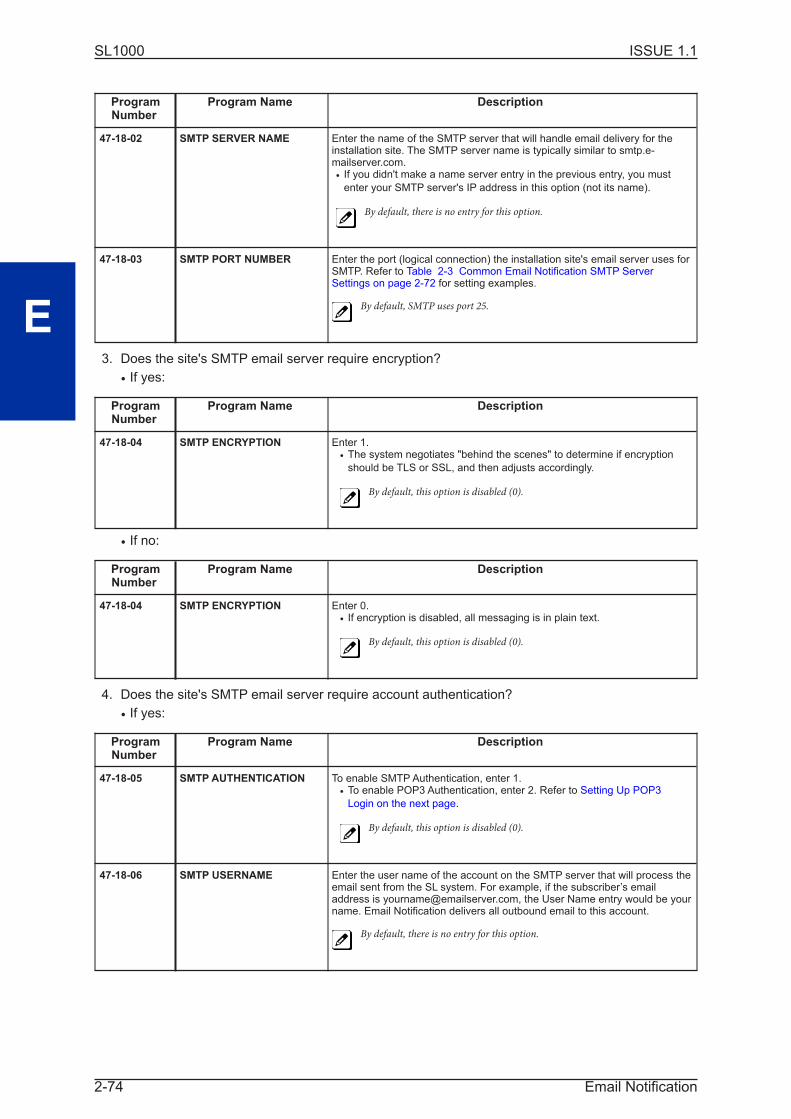
ProgramNumber
Program Name Description
47-18-02 SMTP SERVER NAME Enter the name of the SMTP server that will handle email delivery for theinstallation site. The SMTP server name is typically similar to smtp.e-mailserver.com.• If you didn't make a name server entry in the previous entry, you must
enter your SMTP server's IP address in this option (not its name).
By default, there is no entry for this option.
47-18-03 SMTP PORT NUMBER Enter the port (logical connection) the installation site's email server uses forSMTP. Refer to Table 2-3 Common Email Notification SMTP ServerSettings on page 2-72 for setting examples.
By default, SMTP uses port 25.
3. Does the site's SMTP email server require encryption?
• If yes:
ProgramNumber
Program Name Description
47-18-04 SMTP ENCRYPTION Enter 1.• The system negotiates "behind the scenes" to determine if encryption
should be TLS or SSL, and then adjusts accordingly.
By default, this option is disabled (0).
• If no:
ProgramNumber
Program Name Description
47-18-04 SMTP ENCRYPTION Enter 0.• If encryption is disabled, all messaging is in plain text.
By default, this option is disabled (0).
4. Does the site's SMTP email server require account authentication?
• If yes:
ProgramNumber
Program Name Description
47-18-05 SMTP AUTHENTICATION To enable SMTP Authentication, enter 1.• To enable POP3 Authentication, enter 2. Refer to Setting Up POP3
Login on the next page.
By default, this option is disabled (0).
47-18-06 SMTP USERNAME Enter the user name of the account on the SMTP server that will process theemail sent from the SL system. For example, if the subscriber’s emailaddress is [email protected], the User Name entry would be yourname. Email Notification delivers all outbound email to this account.
By default, there is no entry for this option.
ISSUE 1.1SL1000
E
Email Notification2-74

ProgramNumber
Program Name Description
47-18-07 SMTP PASSWORD Enter the password for the account specified in the previous option. WhenSMTP authentication is enabled, this password is required to log onto theemail account.
By default, there is no entry for this option.
• If no:
ProgramNumber
Program Name Description
47-18-05 SMTP AUTHENTICATION Enter 0.
By default, this option is disabled (0).
5. Enter the email reply data (i.e., the email account to which replies should be sent).
ProgramNumber
Program Name Description
47-18-09 SMTP REPLY-TO ADDRESS Enter the email reply name.• This is a required entry.
• Typically, this is the email account that handles inquiries and administra-
tion for the installation site.
By default, there is no entry for this option.
Setting Up POP3 Login
1. Does the site's SMTP email server require POP3 Login?
• If yes:
ProgramNumber
Program Name Description
47-18-05 SMTP AUTHENTICATION To enable POP3 Authentication, enter 2.
By default, this option is disabled (0)
47-19-01 POP3 SERVER NAME Enter the name of the POP3 server that will handle email delivery for theinstallation site. The POP3 server name is typically similar to pop.e-mailserver.com.• If you didn't make an entry in the 90-11-11 and 90-11-12 DNS Server
options, this entry must be the IP address of the POP3 server since there
is no way to resolve a name.
By default, there is no entry for this option.
47-19-02 POP3 PORT NUMBER Specify the port (logical connection) the installation site's email server usesfor POP3. Normally, this is port 110.
By default, this option is 110.
ISSUE 1.1 SL1000
E
InMail Feature Manual 2-75
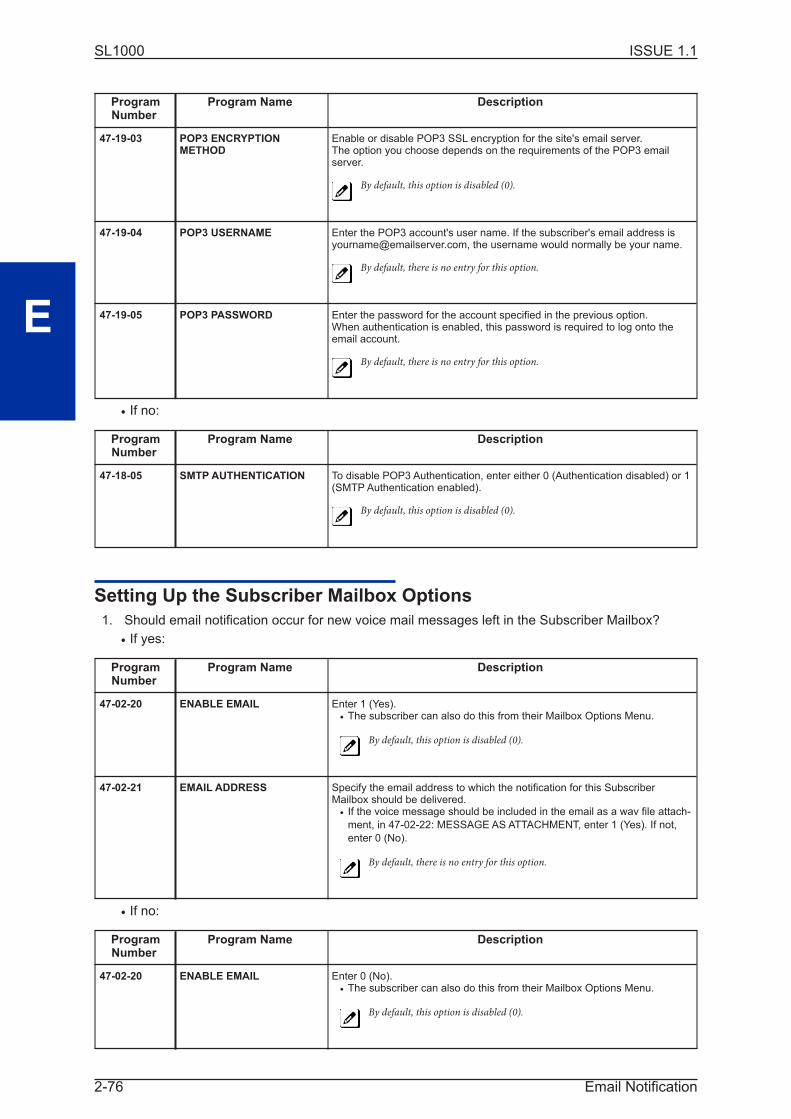
ProgramNumber
Program Name Description
47-19-03 POP3 ENCRYPTIONMETHOD
Enable or disable POP3 SSL encryption for the site's email server.The option you choose depends on the requirements of the POP3 emailserver.
By default, this option is disabled (0).
47-19-04 POP3 USERNAME Enter the POP3 account's user name. If the subscriber's email address [email protected], the username would normally be your name.
By default, there is no entry for this option.
47-19-05 POP3 PASSWORD Enter the password for the account specified in the previous option.When authentication is enabled, this password is required to log onto theemail account.
By default, there is no entry for this option.
• If no:
ProgramNumber
Program Name Description
47-18-05 SMTP AUTHENTICATION To disable POP3 Authentication, enter either 0 (Authentication disabled) or 1(SMTP Authentication enabled).
By default, this option is disabled (0).
Setting Up the Subscriber Mailbox Options
1. Should email notification occur for new voice mail messages left in the Subscriber Mailbox?
• If yes:
ProgramNumber
Program Name Description
47-02-20 ENABLE EMAIL Enter 1 (Yes).• The subscriber can also do this from their Mailbox Options Menu.
By default, this option is disabled (0).
47-02-21 EMAIL ADDRESS Specify the email address to which the notification for this SubscriberMailbox should be delivered.• If the voice message should be included in the email as a wav file attach-
ment, in 47-02-22: MESSAGE AS ATTACHMENT, enter 1 (Yes). If not,
enter 0 (No).
By default, there is no entry for this option.
• If no:
ProgramNumber
Program Name Description
47-02-20 ENABLE EMAIL Enter 0 (No).• The subscriber can also do this from their Mailbox Options Menu.
By default, this option is disabled (0).
ISSUE 1.1SL1000
E
Email Notification2-76

Setting Up the Group Subscriber Mailbox Options
1. Should email notification occur for new voice mail messages left in a Group Subscriber Mailbox?
• If yes:
ProgramNumber
Program Name Description
47-06-18 ENABLE EMAIL Enter 1 (Yes).• The subscriber can also do this from their Mailbox Options Menu.
By default, this option is disabled (0).
47-06-19 EMAIL ADDRESS Specify the email address to which the notification should be delivered.• If the voice message should be included in the email as a wav file attach-
ment, in 47-06-20: MESSAGE AS ATTACHMENT, enter 1 (Yes). If not,
enter 0 (No).
By default, there is no entry for this option.
• If no:
ProgramNumber
Program Name Description
47-06-18 ENABLE EMAIL Enter 0 (No).• The subscriber can also do this from their Mailbox Options Menu.
By default, this option is disabled (0).
Operation
Table 2-5 Turn Email Notification On or Off
To Turn Email Notification On or Off
1. Log onto Subscriber Mailbox.
2. [Optns] Select Mailbox Options.• Alternately dial OP (67).
3. [Notfy] Select Notification.• Alternately dial N (6).
4. [Email] Select Email.• Alternately dial E (6).
5. Do one of the following:
a. [On] Select to turn email notification on.• Alternately dial O (6).
b. [Off] Select to turn email notification off.• Alternately dial O (6).
c. [Back] Select to exit without making any changes.• Alternately dial #.
Conditions
None
ISSUE 1.1 SL1000
E
InMail Feature Manual 2-77

Default Settings
Email Notification disabled.
System Availability
Terminals
All multiline terminals
Required Component(s)
None
Related Features
None
Guide to Feature Programming
ProgramNumber
Program Name Assigned Data
11-04-01 Virtual Extension Numbering Up to eight digitsDefaul: Not assigned
15-01-01 Basic Extension Data Setup - Exten-sion Name
Up to 12 charactersDefault: No setting
15-02-21 Multiline Telephone Basic DataSetup - Virtual Extension AccessMode (when idle Virtual Extensionkey pressed)
Virtual Extension Key Mode0 = DSS1 = OTG (Outgoing)2 = Ignore(default = 2)
Operation
To answer a call ringing a Virtual Extension:
1. Press the flashing Virtual Extension key.
- OR -
Go off-hook.
Program 20-10-08 needs to be set to on (1) for extension Class of Service.
ISSUE 1.1SL1000
E
Email Notification2-78

Erasing All Messages
Description
The System Administrator can delete all messages in a Subscriber Mailbox. Erasing All Messages is
an administrator's maintenance tool. The administrator may need to use this tool if an employee has
left the company or has an excessive number of messages stored in their mailbox. By deleting the
unwanted messages, the administrator can prevent the InMail recording capacity from being reached
(which would disable many of the InMail messaging features).
Related Features
Message Delete on page 2-148
A Subscriber Mailbox user can delete any message left in their mailbox.
System Administrator on page 2-196
Only the System Administrator can delete messages in a coworker's mailbox.
Programming
No additional programming required.
Operation
Erasing All Messages System-Wide
Log On to System Administrator's mailbox.
SA (72) Access System Administrator options.[Not applicable]
S (7) Select Subscriber Mailbox Maintenance options.[Subs]
Enter the number of the Subscriber Mailbox you want to maintain.
DA (32) Delete all Subscriber Mailbox messages.[Msgs]
# Go back to System Administrator options.[Exit]
0 Plays Help message.
ISSUE 1.1 SL1000
E
InMail Feature Manual 2-79

Exiting a Mailbox
Description
A Subscriber Mailbox user can dial a code; press a soft key or hang up to exit their mailbox. After
exiting, the subscriber can use their extension for normal call processing.
Related Features
Not applicable.
Programming
No additional programming required.
Operation
Exiting a Mailbox
To exit your mailbox:
Log On to Subscriber Mailbox.
XX (99) Exit your mailbox.[Exit] + [Exit]
To exit and immediately return to your mailbox:
Log On to Subscriber Mailbox.
X# (9#) Exit and return to your mailbox.[Exit] + [Return]
0 Plays Help message.
ISSUE 1.1SL1000
E
Exiting a Mailbox2-80

External Transfer
Description
External Transfer allows an Automated Attendant caller to automatically route to an outside telephone
number. To set this up, assign a Dial Action Table action as a UTRF to a Common Abbreviated Dialing
bin (e.g., #1000 + Pause for common bin 000). When the Automated Attendant answers, the caller
dials the digit and InMail automatically routes them to the outside number contained in the bin.
External Transfer allows your callers to easily reach branch offices and important off-site associates.
Related Features
Dial Action Table on page 2-49
External Transfer uses the active Dial Action Table to route an Automated Attendant caller to an
outside telephone number.
Programming
1. Assign a Dial Action Table to each active Call Routing Mailbox.
Program Number Program Name Description
47-08-01 Dial Action Table The Call Routing Mailbox uses the Dial Action Table assignment toprovide dialing options to callers.
The default Call Routing Mailboxes (1 ~ 8) use Dial Action Table 1.
2. For an available key, set up a UTRF Dial Action Table option for External Transfer.
Program Number Program Name Description
47-13-01 InMail Dial Action Tables -UTRF Action - UnscreenedTransfer (2)(UTRF)
The corresponding Number option should be 2 followed by theCommon Abbreviated Dialing bin, followed by two pauses (eachpause entered by pressing LK4).• Add additional pauses if the entire common bin does not dial out.
For example, to have External Transfer dial common bin 000, enter
2000 LK4 LK4.
This ability is not assigned by default.
3. Program the Common Abbreviated Dialing bin for External Transfer.
Program Number Program Name Description
13-04-01 Speed Dialing Number andName - Speed Dialing Data
The bin should contain just the outside telephone number youwant External Transfer to dial.Refer to the Programming Manual for more information.
No common Abbreviated Dialing numbers are stored by default.
ISSUE 1.1 SL1000
E
InMail Feature Manual 2-81
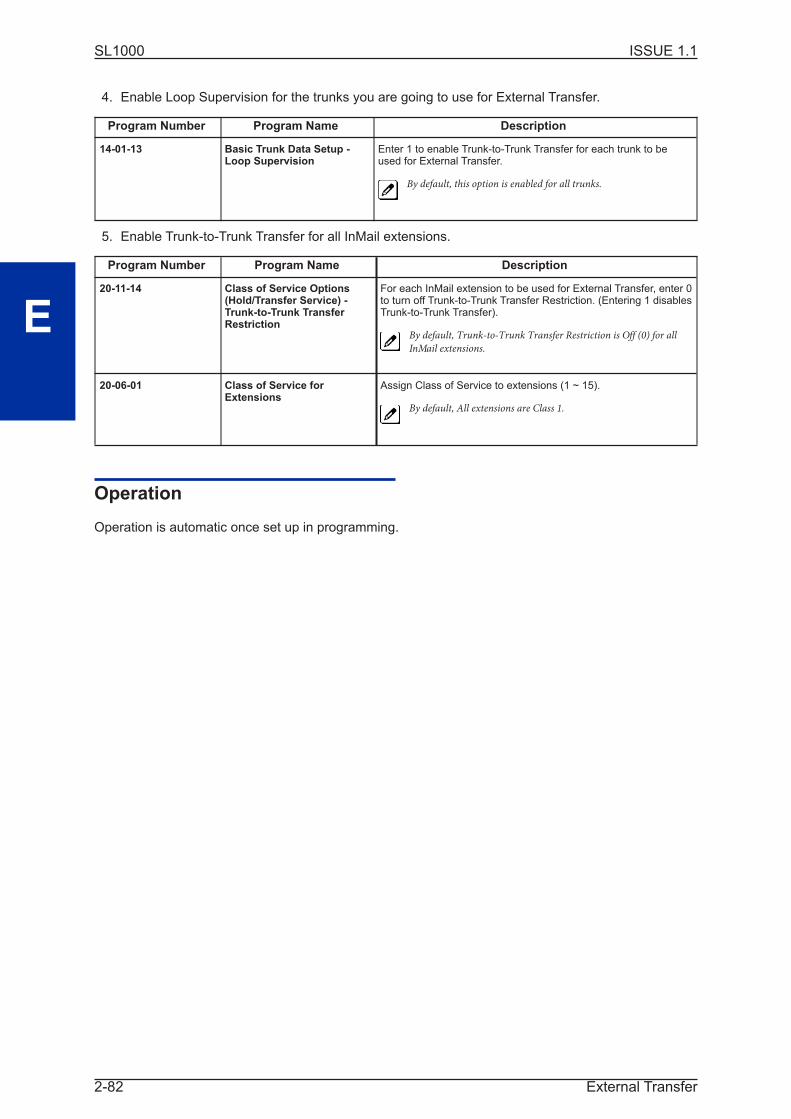
4. Enable Loop Supervision for the trunks you are going to use for External Transfer.
Program Number Program Name Description
14-01-13 Basic Trunk Data Setup -Loop Supervision
Enter 1 to enable Trunk-to-Trunk Transfer for each trunk to beused for External Transfer.
By default, this option is enabled for all trunks.
5. Enable Trunk-to-Trunk Transfer for all InMail extensions.
Program Number Program Name Description
20-11-14 Class of Service Options(Hold/Transfer Service) -Trunk-to-Trunk TransferRestriction
For each InMail extension to be used for External Transfer, enter 0to turn off Trunk-to-Trunk Transfer Restriction. (Entering 1 disablesTrunk-to-Trunk Transfer).
By default, Trunk-to-Trunk Transfer Restriction is Off (0) for all
InMail extensions.
20-06-01 Class of Service forExtensions
Assign Class of Service to extensions (1 ~ 15).
By default, All extensions are Class 1.
Operation
Operation is automatic once set up in programming.
ISSUE 1.1SL1000
E
External Transfer2-82

Fax Detection
Description
The Automated Attendant can detect incoming fax calls and transfer them to a fax machine. With Fax
Detection enabled, after the Automated Attendant answers a call it listens for incoming fax CNG tone.
If it detects the tone, it does an unscreened transfer of the call to the specified company fax machine.
The incoming fax then prints out on the company fax machine. If you disable Fax Detection, the Auto-
mated Attendant does not detect and route incoming fax calls.
Related Features
None
Programming
1. Enable Fax Detection for the active Call Routing Mailbox.
Program Number Program Name Description
47-08-04 Fax Detection Enter 1 (Yes) to enable Fax Detection for the Call Routing Mailbox.
By default, this option is 0 (No).
2. Specify the extension to which InMail should send a fax call when the Automated Attendant de-
tects fax CNG tone.
Program Number Program Name Description
47-08-05 Fax Extension Normally, this is the extension number of the analog port to which thefax machine is connected.
By default, this option is undefined (entered by pressing Hold).
Operation
Not applicable.
ISSUE 1.1 SL1000
F
InMail Feature Manual 2-83

Find-Me Follow-Me
Description
Find-Me Follow-Me helps an outside caller locate an extension user who is not at their desk. If their
call is unanswered and is picked up by voice mail, the caller has the option of dialing a digit to try up to
three alternate Find-Me Follow-Me destinations. A destination can be an outside number (such as a
cell phone or home office) or a co-worker's extension.
The Find-Me Follow-Me destinations are set up in the Find-Me Follow-Me schedule. Each of the three
schedule entries can be individually enabled or disabled and provides options for Start Hour, End Hour,
and destination number. If the caller chooses the Find-Me Follow-Me option, the system will try each
enabled entry that is active for the current time (i.e., in-schedule). The system will not try any entries
that are disabled or are not in-schedule.
When trying the destinations, Find-Me Follow-Me skips an active, in-schedule number that is busy, in
DND, or is unanswered. When all active in-schedule destinations have been tried the caller can then
choose to try Find-Me Follow-Me again or select another option.
You can set up Find-Me Follow-Me for an extension in system programming. In addition, an extension
user can set up Find-Me Follow-Me from their Mailbox Options.
Service Conditions• The features requires the SL-VM-ADVANCE LIC (1015).
• Find-Me Follow-Me settings can be changed using the Telephone Mailbox Option Interface only.
• Find-Me Follow-Me can be used for standard subscriber mailboxes and Group Mailboxes set to sub-scriber in PRG 47-03-03.
• Find-Me Follow-Me requires that Tandem Trunking be enabled on the line that rings into the Auto-mated Attendant. If Tandem Trunking is not enabled, the Find-Me Follow-Me options are not
available.
• Find-Me Follow-Me does not work for internal callers.
Related Features
Group Mailboxes
Guide to Feature Programming
Program Number Program Name Assigned Data
14-01-13 Basic Trunk Data Setup - Trunk-to-Trunk Transfer / Loop DisconnectSupervision
0 = Disable1 = EnableDefault = 0
20-11-14 Trunk-toTrunk Transfer Restriction 0 = Disable1 = EnableDefault = 0
47-02-24 InMail Station Mailbox Options -Enable Find-Me Follow-Me Option
0 = Disable1 = EnableDefault = 0
47-06-22 InMail Group Mailbox Options -Enable Find-Me Follow-Me Option
0 = Disable1 = EnableDefault = 0
ISSUE 1.1SL1000
F
Find-Me Follow-Me2-84

Program Number Program Name Assigned Data
47-21-01 InMail Station Mailbox Options -Enable/Disable Find-Me Follow-MeDestination
0 = Disable1 = EnableDefault = 0
47-21-02 InMail Station Mailbox Options -Find-Me Follow-Me Begin Hour
Two digit number using 24 hour clock.Default = 00
47-21-03 InMail Station Mailbox Options -Find-Me Follow-Me End Hour
Two digit number using 24 hour clock.Default = 00
47-21-04 InMail Station Mailbox Options -Find-Me Follow-Me DestinationPhone Number
Up to 16 digit number.Default = Blank
47-23-01 InMail Group Mailbox Options -Enable/Disable Find-Me Follow-MeDestination
0 = Disable1 = EnableDefault = 0
47-23-02 InMail Group Mailbox Options -Find-Me Follow-Me Begin Hour
Two digit number using 24 hour clock.Default = 00
47-23-03 InMail Group Mailbox Options -Find-Me Follow-Me End Hour
Two digit number using 24 hour clock.Default = 00
47-23-04 InMail Group Mailbox Options -Find-Me Follow-Me DestinationPhone Number
Up to 16 digit number.Default = Blank
Operation
Setting Up Find-Me Follow-Me
Log On to Subscriber Mailbox.
OP (67) Access the Mailbox Options menu.[Setup]
CH (26) Access the Call Handling Options Menu.[CallH]
(1) Access the Find-Me Follow-Me Options Menu.[FMFM]
InMail states your Find-Me Follow-Me status:On or Off
O (6) Turn Find-Me Follow-Me on or off.[On][Off]
D (3) Change your Find-Me Follow-Me destinations.[Dest]
# Back up to the previous level without changing your entry.[Back]
(1)(2)(3)
Enter the destination number to change.[Dest1][Dest2][Dest3]
# Back up to the previous level without changing your entry.[Back]
The system will provide the status of the destination selected.
E (3) Enable selected destination.[Enbl]
D (3) Disable selected destination.[Disbl]
C (2) Change selected destination.[Chnge]
ISSUE 1.1 SL1000
F
InMail Feature Manual 2-85
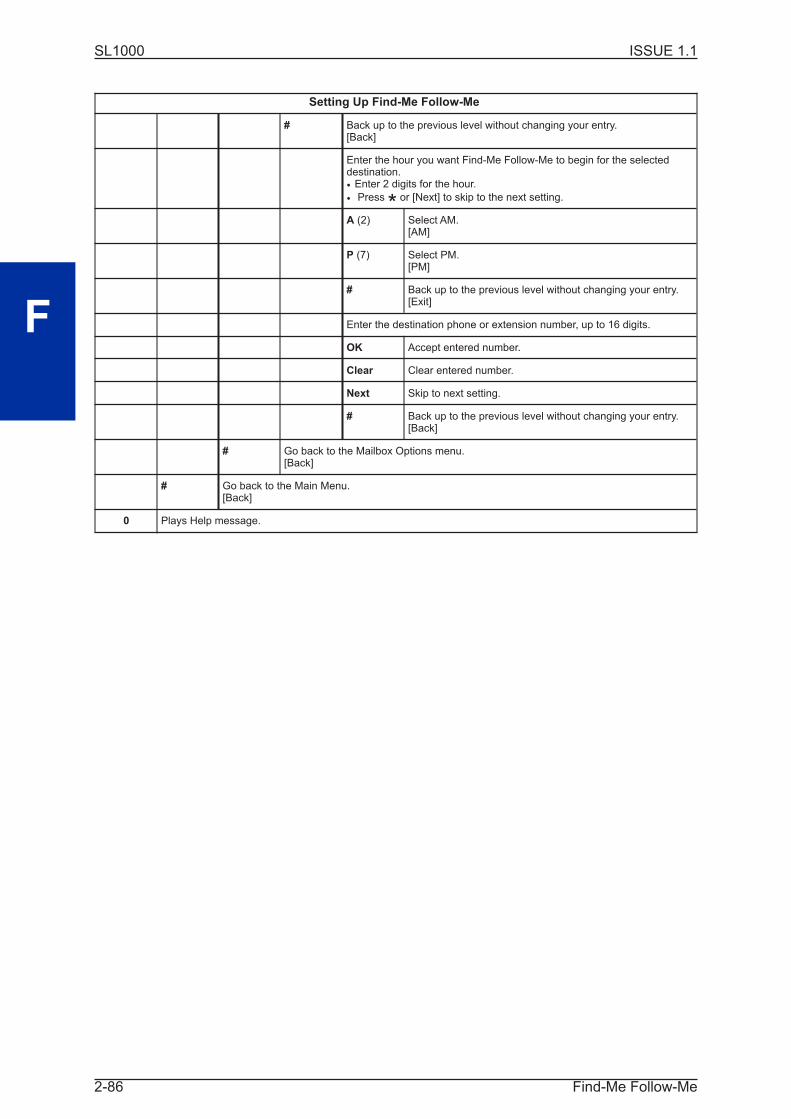
Setting Up Find-Me Follow-Me
# Back up to the previous level without changing your entry.[Back]
Enter the hour you want Find-Me Follow-Me to begin for the selecteddestination.• Enter 2 digits for the hour.
• Press * or [Next] to skip to the next setting.A (2) Select AM.
[AM]
P (7) Select PM.[PM]
# Back up to the previous level without changing your entry.[Exit]
Enter the destination phone or extension number, up to 16 digits.
OK Accept entered number.
Clear Clear entered number.
Next Skip to next setting.
# Back up to the previous level without changing your entry.[Back]
# Go back to the Mailbox Options menu.[Back]
# Go back to the Main Menu.[Back]
0 Plays Help message.
ISSUE 1.1SL1000
F
Find-Me Follow-Me2-86
Flexible Answering Schedules
Description
The Automated Attendant can answer outside calls with different announcements and dialing options,
depending on the time of day and day of week. For example, a company can set up separate sched-
ules for weekdays, evenings, weekends, and specific holidays. Each schedule can play a different
announcement to callers, as well as provide them with unique dialing options. Once set up in program-
ming, the schedule operation is automatic.
The Flexible Answering Schedules are determined by the set up of the InMail Answer Tables. See
Answer Table on page 2-14 for more.
Related Features
Answer Table on page 2-14
Determines how the Automated Attendant answers outside calls on each trunk.
Automated Attendant on page 2-25
The Automated Attendant can automatically answer the telephone system's incoming calls, play an
Instruction Menu message, and provide dialing options to callers.
Routing Mailbox on page 2-182
The mailbox associated with an Answer Table that specifies which dialing options (Dial Action Table)
and announcements are available to Automated Attendant callers.
Dial Action Table on page 2-49
Defines the dialing options for the Call Routing Mailbox chosen by the active Answer Table.
Programming
1. Determine which Answer Table answers each trunk.
Program Number Program Name Description
47-10-01 Answer Table Assignment(Answer Table)
For each trunk, enter the number of the Answer Table that handles thattrunk's Automated Attendant calls. See Answer Table on page 2-14.
By default, all trunks use Answer Table 1.
Operation
Not applicable.
ISSUE 1.1 SL1000
F
InMail Feature Manual 2-87

Flexible Call Routing
Description
The Automated Attendant provides outside callers with a wide variety of dialing (routing) options, such
as customized announcements. Use Flexible Call Routing to eliminate or minimize the need for an
operator or receptionist to handle outside calls.
There are 3 components to Flexible Call Routing.
• Answer Table on page 2-14Determines how the Automated Attendant answers outside calls on each trunk according to the time
of day and day of the week.
• Routing Mailbox on page 2-182The mailbox associated with an Answer Table that specifies which dialing options (Dial Action Table)
and announcement are available to Automated Attendant callers.
• Dial Action Table on page 2-49Defines the dialing options for the Call Routing Mailbox chosen by the active Answer Table, which in
turn provides those dialing options to Automated Attendant callers.
Related Features
Answer Table on page 2-14
Determines how the Automated Attendant answers outside calls on each trunk.
Automated Attendant on page 2-25
The Automated Attendant can automatically answer the telephone system's incoming calls, play an
Instruction Menu message, and provide dialing options to callers.
Routing Mailbox on page 2-182
The mailbox associated with an Answer Table that specifies which dialing options (Dial Action Table)
and announcement are available to Automated Attendant callers.
Dial Action Table on page 2-49
Defines the dialing options for the Call Routing Mailbox chosen by the active Answer Table.
Programming
Refer to Automated Attendant on page 2-25 for more on how to set up your Flexible Answering Sched-
ules.
Operation
Not applicable.
ISSUE 1.1SL1000
F
Flexible Call Routing2-88
Flexible Mailbox Numbering Plan
Description
Flexible Mailbox Numbering Plan allows you to customize site extension numbers and be assured that
InMail adapts to the new configuration. When you change a port extension number, you can change
the number of the mailbox assigned to that port to match. There is no need to reprogram - all of the
options remain intact.
Related Features
Dial Action Table on page 2-49
Be sure the Dial Action Table actions accommodate the revised telephone system numbering.
Programming
Flexible Numbering Plan Example
1. Optionally change the number of digits in extension numbers.
Program Number Program Name Description
11-01-01 System Numbering Optionally change the number of digits required to reach eachrange of extensions.
By default, 3-digit extension numbers are 200 ~ 327.
2. Change the extension number associated with a port.
Program Number Program Name Description
11-02-01 Extension Numbering Assign extension numbers to extension ports. The telephoneprogramming identity follows the port number, not the extensionnumber.
By default, extension-to-port assignments are consecutive starting
with 200 (e.g., port 1 = extensin 200, port 2 = extension 201, etc.)
3. Change the mailbox number to match the new extension number.
Program Number Program Name Description
47-02-02 Mailbox Number Change the mailbox number to match the number of the newextension.
By default, mailbox numbers are consecutively assigned.
Mailbox 1 = 200,
mailboxes 2 ~ 64 = 201 ~ 263,
mailboxes 65 ~ 128 = no entry
4. Modify the Dial Action Tables to accommodate the new numbering.
Refer to TRF Action - Screened Transfer (1) (TRF).
Optionally modify the active Dial Action Table actions for the new extension numbers.For example, to allow Automated Attendant callers to dial extension 5000, for digit 5:
• Change the Action to UTRF (2) or TRF (1).
• Change the Data to XXXX.
ISSUE 1.1 SL1000
F
InMail Feature Manual 2-89

By default (in the above example), the digit 5 is undefined.
2-Digit Extension Numbering Example
InMail Does Not Support 2-Digit Extension Numbers 10-16
When setting up 2-digit extension numbering in a SL1000 with InMail, do not use extensions 10 ~ 32. Although you can set upthis application in 11-01-01 System Numbering and 11-02-01 Extension Numbering, Subscriber Mailboxes assigned in47-02-02 Mailbox Number do not function. This is because mailboxes 1 ~ 32 are reserved for Routing Mailboxes and cannotbe reassigned.
The following example assigns a 2-digit extension number (26) to station port 6 and enables the
Subscriber Mailbox for extension 26. It also changes the * and # digits in the active Dial Action Tableto allow Quick Message and Remote Logon to the new 2-digit extension.
1. Enable 2-digit extension numbers 20 ~ 29.
Program Number Program Name Description
11-01-01 Extension Numbering In 11-01-01 Digit for the digit 2x, enter 2.In 11-01-01 Type for the digit 2x, enter 2.
By default, the digit 1 is set up as a 3-digit extension number (100 ~ 199).
2. Change the extension number for port 6 to 26.
Program Number Program Name Description
11-02-01 Extension Numbering For extension port 6, enter 26.
By default, extension port 6 is assigned to extension 205.
3. Change the mailbox number to match the new extension number.
Program Number Program Name Description
47-02-02 Mailbox Number For mailbox 6, assign mailbox number 26.
By default, mailbox 6 is assigned to mailbox number 205.
4. Modify the Dial Action Tables to accommodate the new numbering.
Make key 1 (digit 1) Action = UTRF (2) and Data = XX
Make key 11 (*) Action = REC1 (3) and Data = XXMake key 12 (#) Action = LOGON (5) and Data = IXX
By default:Key 1 is UND to 0.Key 11 is REC1 to IXXX.Key 12 is LOGON to IXXX.
Operation
Not applicable.
ISSUE 1.1SL1000
F
Flexible Mailbox Numbering Plan2-90
Forced Unscreened Transfer
Description
A Subscriber can optionally convert Automated Attendant Screened Transfers to Unscreened Transfers
by enabling this option in the Mailbox user interface.
• Calls from the Automated Attendant ring like other transferred calls and display the incoming CallerID data (if provided by telco and enabled in programming) as the call is ringing.
• As with Screened Transfers, unanswered calls route to the subscriber's greeting (recorded or default)so the caller can leave a message. However, with Unscreened Transfer the caller cannot dial 2 to
reach the Next Call Routing Mailbox options (if programmed).
Related Features
Dial Action Table on page 2-49
If enabled in the Subscriber Mailbox, InMail automatically converts any Screened Transfers (TRFs) to
the subscriber's extension to Unscreened Transfers (UTRFs).
Screened Transfer on page 2-186
After the Automated Attendant caller dials an extension, InMail calls (screens) the destination exten-
sion to see if the transfer can go through.
Unscreened Transfer on page 2-205
After an Automated Attendant caller dials an extension, InMail immediately transfers the call to the
extension and hangs up.
Programming
1. Enable Forced Unscreened Transfer for the Subscriber Mailbox.
ProgramNumber
Program Name Description
47-02-10 Forced UnscreenedTransfer (Forced UTRF)
Enter 1 (Yes) to enable this option to automatically convert AutomatedAttendant Screened Transfers to Unscreened Transfers.
By default, this option is disabled (0).
Operation
Not applicable.
ISSUE 1.1 SL1000
F
InMail Feature Manual 2-91

Getting Recorded Help
Description
If a Subscriber Mailbox user dials an incorrect code or forgets what to dial while in their mailbox, they
can request help from the InMail voice prompts. Recorded Help provides the user with a built-in, inter-
active user's guide. To get recorded help, the user dials 0.
Related Features
None
Programming
No additional programming required.
Operation
Getting Recorded Help
Log On to your mailbox.
0 Get recorded help.• Recorded help is always available from the Main Menu.
• Recorded help may not be available at all levels.
ISSUE 1.1SL1000
G
Getting Recorded Help2-92

Go To AMailbox
Description
An Automated Attendant caller can dial a digit to route to a Call Routing or Announcement Mailbox.
This is called the Go To (GOTO) action. The GOTO action can route directly to a specific Call Routing
or Announcement Mailbox, or allow the Automated Attendant caller to go to a mailbox of their own
choosing. Use the GOTO action to set up a "tree" of Automated Attendant options.
The block diagram below shows how the Automated Attendant can provide the caller with a tree of
dialing options. Dialing 1 (GOTO 9) routes to Announcement Mailbox 9, which plays the company
directions. Dialing 2 (GOTO 2) routes to Call Routing Mailbox 2, which is set up to give the caller
single-digit dialing to Tech Service technicians.
• The Announcement Message for Announcement Mailbox 9 tells the caller how to locate the company.
• The Instruction Menu for Call Routing Mailbox 2 instructs the caller which digits to dial for each tech-nician. The Dial Action Table for Call Routing Mailbox 2 contains the TRF or UTRF actions to each
technician's extension.
Automated Attendant
Announcement Mailbox 9
Call Routing Mailbox 2
GOTO 9
GOTO 2
Call Routing Mailbox 1
Company
Directions
Tech Service
Technicians
1
2
The GOTO action can also log on to a Subscriber Mailbox, although the LOGON action is normally
reserved for this function.
Related Features
Automated Attendant on page 2-25
The Automated Attendant can automatically answer the telephone system's incoming calls, play an
Instruction Menu message, and provide dialing options to callers.
Dial Action Table on page 2-49
The GOTO action is a Dial Action Table option.
Instruction Menu on page 2-122
Be sure the Instruction Menu for the active Call Routing Mailbox describes how to use the GOTO
action.
ISSUE 1.1 SL1000
G
InMail Feature Manual 2-93
Programming
1. Assign a GOTO action to the active Dial Action Table.
ProgramNumber
Program Name Description
47-13-01 Dial Action TableActions: GOTO Action- Go to Mailbox (7)(GOTO)
To have Automated Attendant callers dial a single digit to go to a CallRouting or Announcement Mailbox, enter the mailbox number in the corre-sponding Number option.• For example, to have key 1 go to Call Routing Mailbox 2, for key 1 enter
GOTO for the Action and 2 for the corresponding Number.
To have InMail require Automated Attendant callers to enter a Call Routing or
Announcement Mailbox to go to, enter XXX in the corresponding Number
option. The key you choose must represent the first digit in the mailbox
numbers.
• For example, to allow callers to go to mailboxes 1 ~ 16, for key 0 enter
GOTO for the Action and XXX for the corresponding Number.
To log into any valid Call Routing or Subscriber Mailbox, enter IXXX in the
corresponding Number option.
• For example, to allow callers to dial 1 plus any Call Routing or Announce-
ment Mailbox number to go to, for key 1 enter GOTO for the Action and
IXXX for the corresponding Number.
By default, there are no GOTO actions assigned.
Operation
Using the Automated Attendant GOTO Action
For the outside caller:After Automated Attendant answers, the voice prompts will instruct you on which digits to dial.
ISSUE 1.1SL1000
G
Go To A Mailbox2-94
Greeting
Description
A Subscriber Mailbox user can record a personalized greeting for his mailbox. After the greeting is
recorded, callers hear a prerecorded personalized greeting rather than a default message.
The recorded message can include the following:
• Subscriber name
• Personal message (such as "Hello - I am on vacation this week")
• Instructions on leaving a message or using other mailbox options
• Next Call Routing Mailbox options, if available
While listening to a mailbox greeting, a caller can dial * to immediately skip the message.Remote Greetings
A Subscriber Mailbox user can call into the Automated Attendant, access their mailbox, and remotely
record their mailbox greeting.
Following are two of the ways a user can do this:
• After the Automated Attendant answers, dial a digit (typically #) followed by their mailbox number.This method allows outside callers to log into their Subscriber Mailboxes from outside the company.
After logging on to their mailbox, the user can dial G to record a greeting.
• If an extension has a Direct Inward Line that is forwarded to voice mail, the caller can dial # and logon to their mailbox (instead of leaving a message). After they log on to their mailbox, the user can
dial G to record a greeting. This option must be set up in the Next Call Routing Mailbox. To allow this
ability, for example:
- Program the Next Call Routing Mailbox # digit as LOGON to IXXX.
- While listening to their greeting, the subscriber can dial:# (to route to their Next Call Routing Mailbox), then# and their mailbox number to log on to their mailbox.
- By default, this option is provided in Call Routing Mailbox 1. Additionally, the subscriber should enable a Secu-rity Code for their mailbox to prevent unauthorized logons.
Multiple Greetings
In systems with Multiple Greetings, the mailbox subscriber can record up to three separate greetings
and make any one of the three active. When a caller leaves a message in the subscriber's mailbox,
they hear the active greeting. This allows the subscriber, for example, to record separate greetings for
work hours, after work, and during vacation. Instead of revising the recording when they leave the
office, they can activate the after work greeting instead.
If an active greeting is not recorded, a caller hears, "At the tone, you can leave your message for
(extension number or name)."
Related Features
Auto Attendant Do Not Disturb on page 2-20
Auto Attendant Do Not Disturb sends Automated Attendant calls directly to a subscriber's mailbox.
Their phone does not ring for calls from the Automated Attendant.
Dial Action Table on page 2-49
The active Dial Action Table must have a LOGON action assigned to a key to enable Remote Greeting.
ISSUE 1.1 SL1000
G
InMail Feature Manual 2-95

Log On to Voice Mail on page 2-133
A Subscriber Mailbox user can record their greeting after remotely logging on to InMail.
Security Code on page 2-189
To prevent unauthorized tampering, the subscriber should enable a Security Code for their mailbox.
System Administrator on page 2-196
With Multiple Greetings, the System Administrator's Subscriber Maintenance EG (34) option simultane-
ously erases all recorded greetings in a Subscriber Mailbox. Additionally, the active greeting is reset to
1.
Programming
1. Set the maximum length of Subscribe Mailbox greetings.
Program Number Program Name Description
47-01-03 Incoming MessageLength(Subs Msg Length)
Set the maximum length of Subscriber Mailbox greetings (1-4095seconds). This option also sets the maximum length of recordedmessages for the following:• Subscriber Mailbox users dialing RS to record and send a message.
• Extension users leaving a message in a Subscriber Mailbox.
• Outside Automated Attendant callers accessing a mailbox via a GOTO
command and then dialing RS to record and send a message.
• Announcement Messages.
• Call Routing Mailbox Instruction Menus.
By default, Subscriber Mailbox greetings are 120 seconds long
maximum.
2. Enable Remote Greeting by programming a LOGON action in the active Dial Action Table.
Program Number Program Name Description
47-13 InMail Dial Action Tables To log directly into a specific Subscriber Mailbox, enter the mailboxnumber in the corresponding Number option.• For example, to have key 4 log directly into Subscriber Mailbox 305,
for key 4 enter LOGON for the Action and 305 for the corresponding
Number.
To have InMail request Automated Attendant callers to select a
Subscriber Mailbox to log on to, enter N in the corresponding Number
option. The key you choose must represent the first digit in the
Subscriber Mailbox numbers.
• For example, to have the Automated Attendant request callers to enter
the number of the Subscriber Mailbox into which they wish to log, for
key 3 enter LOGON for the Action and N for the corresponding
Number. When callers dial 3, they hear, "Please enter your mailbox
number."
To have InMail require Automated Attendant callers to enter a Subscriber
Mailbox to log on to (without playing an announcement), enter XXX in the
corresponding Number option. The key you choose must represent the
first digit in the Subscriber Mailbox numbers.
• For example, to allow callers to log on to mailboxes 200 ~ 299, for key
3 enter LOGON for the Action and XXX for the corresponding Number.
To log into any valid Subscriber Mailbox, enter IXXX in the corresponding
Number option.
• For example, to allow callers to dial 1 plus any Subscriber Mailbox
number to log on, for key 1 enter LOGON for the Action and IXXX for
the corresponding Number.
By default, key # Action = LOGON and Number = IXXX.
ISSUE 1.1SL1000
G
Greeting2-96

Operation
Recording a Multiple Greeting and Setting Up Auto AttendantDo Not Disturb
Log On to Subscriber Mailbox.
G (4) Access the Mailbox Greeting options.[Greet]InMail does the following:• Plays a summary of your current settings.
• Displays the status of your active Greeting (1-3).
[Greeting N: Recorded], or
[Greeting N: Not Rec]
• Shows the Auto Attendant Do Not Disturb status.
[Auto-attendant Dnd: Off], or
[Auto-attendant Dnd: On]
• Provides soft keys for each of the 3 greetings.
[ Gr1]
[ Gr2]
[ Gr3]
Select a Greeting (which also makes it active).
(1) [Gr1](2) [Gr2](3) [Gr3]
L (5) Listen to the active greeting (if recorded).[Lstn]
R (7) Record a new greeting (if not recorded), or rerecord the current greeting.[Rec]
Record at the tone, then press # when done.
* Pause or restart recording.[Resume][Pause]
D (3) Delete the greeting.[Del]
# End the recording.[Done]
Delete the currently recorded greeting (if any).[Del]
# Go back to the Mailbox Greeting options.[Exit]
Change Auto Attendant Do Not Disturb.
O (6) Turn Auto Attendant Do Not Disturb off or on.[Auto-attendant Dnd: On][Auto-attendant Dnd: Off]
# Go back to mailbox Main Menu.[Exit]
0 Plays Help message.
ISSUE 1.1 SL1000
G
InMail Feature Manual 2-97
Group (Shared) Mailbox
Description
Department/Ring Group Mailbox
• Group (Shared) MailboxA Group Mailbox is a Department Group Mailbox shared by a group of co-workers. It is normally a
Subscriber Mailbox. If a caller leaves a message at any extension in the group that shares the mail-
box, the system stores the message in the shared Group Mailbox. The voice mail key Message lamp
at all keyset extensions in the group flashes to indicate that there is a new voice mail message wait-
ing. Any extension user in the group can log onto their mailbox to hear and process the shared
message. The message count on all keyset displays increments and decrements as group messages
are received, listened to, or deleted.
Any extension sharing a Group Mailbox can record and activate the Greeting. The system automati-
cally uses the most recent Greeting, regardless of which member of the group recorded it.
Group Mailboxes are helpful in both residential installations and larger business workgroups, since
extensions share a common voice mailbox. Messages in the Group Mailbox can be listened to, for-
warded, deleted, and otherwise processed by any member of the group.
Group Mailbox uses Department/Ring Group programming. You can separately set up Department/
Ring Group members to have the same Department/Ring Group Mailbox. Since the system provides
32 Department/Ring Groups, there are a total of 328 Ring Group Mailboxes available.
The Department/Ring Group Mailbox can optionally be a Routing Mailbox. Refer to Understanding
Group Mailbox Types on this page.
• Mailbox for a Ring GroupA Ring Group Mailbox can also be the mailbox for a stand-alone Ring Group in which the members
do not share the mailbox, but have personal mailboxes instead. The following types of unanswered
calls route to this type of Ring Group Mailbox:
- Outside calls transferred to the Ring Group master number.
- Automated Attendant transfers (UTRF or STRF) to the Ring Group master number.
- Direct Inward Lines to the Ring Group master number.
UCD Group Mailbox
If a UCD Group is set to overflow to voice mail, an unanswered call into the group is picked up by the
UCD Group Mailbox. The UCD Group Mailbox can be a Subscriber Mailbox (to allow the caller to leave
a message) or a Routing Mailbox (to provide additional dialing options or an announcement). Refer to
Understanding Group Mailbox Types on this page.
Understanding Group Mailbox Types
• If the Group Mailbox is a Subscriber Mailbox (1):
- The Group Mailbox has all the features of any other personal Subscriber Mailbox.
• If the Group Mailbox redirects to a Call Routing Mailbox (2):
- A co-worker attempting to leave a message at an extension assigned to the Group Mailbox hears: "Your callcannot go through. Goodbye." InMail then hangs up.
- An outside caller attempting to leave a message at an extension assigned to the Group Mailbox hears the pre-recorded Instruction Menu message and can dial options allowed by the associated Dial Action Table.
- If the Group Mailbox user presses their voice mail key, they are asked to enter their mailbox number. After en-tering the number, they hear, "That mailbox does not exist."
- An Automated Attendant caller attempting to leave a Quick Message or do a Remote Logon at an extensionassigned to the Group mailbox hears, "That mailbox does not exist." They then return to the Auto-mated Atten-dant.
• If the Group Mailbox redirects to an Announcement Mailbox (2):
- A co-worker attempting to leave a message at an extension assigned to the Group Mailbox hears: "Your callcannot go through. Goodbye." InMail then hangs up.
- An outside caller attempting to leave a message at an extension assigned to the Group Mailbox hears the pre-recorded announcement and can use all other Announcement Mailbox features.
- If the Group Mailbox user presses their voice mail key, they are asked to enter their mailbox number. After en-tering the number, they hear: "That mailbox does not exist."
- An Automated Attendant caller attempting to leave a Quick Message or do a Remote Logon at an extension
ISSUE 1.1SL1000
G
Group (Shared) Mailbox2-98

assigned to the Group mailbox hears, "That mailbox does not exist." They then return to the Automated Atten-dant.
• If the Group Mailbox redirects to a Directory Dialing Mailbox (2):
- A co-worker attempting to leave a message at an extension assigned to the Group Mailbox hears: "Your callcannot go through. Goodbye." InMail then hangs up.
- An outside caller attempting to leave a message at an extension assigned to the Group Mailbox hears the Di-rectory Dialing message and can use any of the options programmed for the Directory Dialing Mailbox.
- If the Group Mailbox user presses their voice mail key, they are asked to enter their mailbox number. After en-tering the number, they hear: "That mailbox does not exist."
- An Automated Attendant caller attempting to leave a Quick Message or do a Remote Logon at an extensionassigned to the Group mailbox hears, "That mailbox does not exist." They then return to the Automated Atten-dant.
Programming
1. Assign extensions to the Department Group.
Program Number Program Name Description
11-07-01 Department Group PilotNumbers
Assigns pilot numbers for Department Group.
By default, this entry is 0 (no pilot number assigned).
16-02-01 Department Group As-signment for Extensions
Set up the Department Group called by the pilot number and the extensionpriority when a group is called.
By default, all extensions are assigned to Department Group 1.
2. If co-workers should share this mailbox, enter Group as the mailbox type for each extension in the
Department/Ring Group. This step should be skipped for a "stand-alone" Ring Group.
Program Number Program Name Description
47-02-01 Mailbox Type Use this option to enable or disable the mailbox. An extension mailbox isnot accessible when it is disabled (even though its stored messages andconfiguration are retained in memory.) If disabled, a user pressing VoiceMail key initiates a remote logon and is asked to enter their mailboxnumber. A voice prompt then announces: "That mailbox does not exist."Options are: 0 (None), 1 (Personal), 2 (Group)
By default, station mailboxes are set to None.
3. For the Department/Ring Group Mailbox that corresponds to the extension's Department/Ring
Group, assign the mailbox type.
For a Subscriber Mailbox:
Program Number Program Name Description
16-02-01 Department GroupAssignment forExtensions
Set up the Department Group called by the pilot number and the exten-sion priority when a group is called.
By default, all extensions are assigned to Department Group 1.
11-07 Department Group Mas-ter Numbers
Check to see to which Department Group the extension belongs (1 ~ 32).
By default, Department Groups do not have master numbers assigned.
ISSUE 1.1 SL1000
G
InMail Feature Manual 2-99

Program Number Program Name Description
47-03-02 Mailbox Number The Group Mailbox Number is the same as the Department Group master(pilot) number. Use this option to select the Department Group master(pilot) number associated with the Group Mailbox you are programming.
By default, Department Group Mailbox Numbers are not assigned.
47-03-03 Mailbox Type Enter 1 to assign the mailbox as a Subscriber Mailbox. Use this option toset the Group Mailbox type. There are two types of InMail mailboxes:Subscriber (1) and Routing (2).
By default, Group Mailboxes are set as Subscriber Mailboxes.
For a Routing Mailbox:
Program Number Program Name Description
47-02-01 Mailbox Type Settings are: 0 (None), 1 (Personal), 2 (Group). Set to 2.
By default, station mailboxes are set to 0.
16-02-01 Department Group As-signment for Extensions
Set up the Department Group called by the pilot number and the exten-sion priority when a group is called.
By default, all extensions are assigned to Department Group 1.
11-07-01 Department Group Mas-ter Numbers
Check to see to which Department Group the extension belongs (1 ~ 32).
By default, Department Groups do not have master numbers assigned.
47-03-02 Mailbox Number The Group Mailbox Number is the same as the Department Group master(pilot) number. Use this option to select the Department Group master(pilot) number associated with the Group Mailbox you are programming.
By default, Department Group Mailbox Numbers are not assigned.
47-03-03 Mailbox Type Enter 1 to assign the mailbox as a Subscriber Mailbox. Use this option toset the Group Mailbox type. There are two types of InMail mailboxes:Subscriber (1) and Routing (2).
By default, Group Mailboxes are set as Subscriber Mailboxes.
47-07 InMail Routing MailboxOptions
Set the type of Routing Mailbox and select the voice prompt language.
By default, all Routing Mailboxes are Call Routing Mailboxes and use UK
English for the voice prompt language.
47-08 Call Routing MailboxOptions
47-09 Announcement MailboxOptions
ISSUE 1.1SL1000
G
Group (Shared) Mailbox2-100

4. Set up the Subscriber Mailbox options for the Department Group Mailbox.
For Auto Attendant Direct to Voice Mail:
ProgramNumber
Program Name Description
47-06-07 Auto Attendant Direct toVoice Mail
Enable (Yes) or disable (No) Auto Attendant Direct to Voice Mail for theGroup Mailbox.
By default, this option is disabled.
47-06-03 Auto Erase/Save ofMessages
Set the auto save option for new messages (1 = Save, 0 = Erase).
By default, this option is set to 1 (Save).
47-06-09 Auto Time Stamp Enable (Yes) or disable (No) Auto Time Stamp for the Group Mailbox.
By default, this option is disabled.
47-06-05 Recording ConversationBeep
Enable (Yes) or disable (No) the Conversation Recording Beep for theGroup Mailbox.
By default, this option is enabled.
47-06-13 Directory List Number Specify the Directory List number (1~8, 0 = None, * = All lists) to whichthe Group Mailbox belongs.
By default, this option is 0.
47-06-08 Forced Unscreened Trans-fer(Forced UTRF)
Enable (Yes) or disable (No) Forced Unscreened Transfer for the GroupMailbox.
By default, this option is disabled.
47-06-02 Message Playback Order Set the Group Mailbox message playback order (1 = LIFO, 0 = FIFO).
By default, this option is set to 0.
47-06-04 Message Retention Set how long the Subscriber Mailbox will retain saved messages.
By default, this option is 0 (indefinite).
47-06-01 Number of Messages Set the maximum number of messages (0 ~ 99) that can be left in theGroup Mailbox.
By default, this option is 20.
47-06-06 Message Waiting Lamp(Update MW Lamp)
Enable (Yes) Message Waiting lamping at the extensions sharing theGroup Mailbox.
By default, this option is enabled.
47-06-11 Dialing Option Enable (Yes) or disable (No) additional dialing options for Next CallRouting Mailbox calls.
By default, this option is disabled.
ISSUE 1.1 SL1000
G
InMail Feature Manual 2-101

ProgramNumber
Program Name Description
47-06-12 Next Call Routing Mailbox(Next CW Mbox)
Optionally assign a Next Call Routing Mailbox (0 ~ 32) to the GroupMailbox.
By default, this option is 1.
47-06-10 System Administrator(System Admin)
Enter 1 (Yes) to optionally designate the Group Mailbox as a SystemAdministrator.
By default, this option is disabled (0).
Related Features
Greeting on page 2-95
Any extension sharing a Department Group Mailbox can record and activate the Greeting. The system
automatically uses the most recent Greeting, regardless of which member of the group recorded it.
Voice Mail Overflow on page 2-208
An unanswered DIL to the Department Group master number can be picked up by the Department
Group Mailbox.
Operation
Refer to the following features for operation of the specific Group Mailbox type:
Announcement Mailbox on page 2-7
Routing Mailbox on page 2-182
Directory Dialing on page 2-54
Subscriber Mailbox on page 2-193
ISSUE 1.1SL1000
G
Group (Shared) Mailbox2-102

Guest Mailbox
Description
An outside party can have their own Guest Mailbox mailbox for receiving and sending messages. A
Guest Mailbox is a Subscriber Mailbox that does not have an extension associated with it. It is instead
associated with a virtual extension. A Guest Mailbox has many of the InMail features of a Subscriber
Mailbox. A company visitor with a Guest Mailbox could, for example:
• Go to any extension, press Speaker + Dial the InMail master number (e.g., 400), then dial their mail-box number.
• Review their messages, leave messages for associates, or record a new greeting for their mailbox.
• Use many other features available to a Subscriber Mailbox.
For a brief overview of the features available at a Guest Mailbox, review the Related Features below.
Then, go to the individual feature to find out how it operates and any programming required to make it
work.
Related Features
Automated Attendant on page 2-25
The Automated Attendant GOTO and LOGON actions (assigned to the active Dial Action Table) can
route callers to a Guest Mailbox.
Auto Erase or Save on page 2-22
After a guest listens to a message in their Guest Mailbox, InMail can automatically erase or save the
message.
Greeting on page 2-95
A Guest Mailbox can have a recorded greeting that plays to callers leaving a message.
Listening to Messages on page 2-129
Review this feature to learn which features are available to the guest while listening to messages.
Mailbox Name on page 2-137
A Guest Mailbox can have a recorded name.
Make Call on page 2-143
A Make Call callback to a Guest Mailbox is helpful only if an extension has a Call Coverage key for the
virtual extension associated with the Guest Mailbox. Otherwise, the callback cannot be answered.
A Guest Mailbox user can use Make Call to return a call left in the Guest Mailbox.
Main Menu on page 2-141
The Main Menu provides access to the features available to a Guest Mailbox.
Message Listen Mode on page 2-152
Set the type of messages a guest listens to when they dial L (5) after logging into their Guest Mailbox.
ISSUE 1.1 SL1000
G
InMail Feature Manual 2-103

Message Notification on page 2-153
Once activated, Message Notification dials a telephone number to let the user know they have new
messages in the Guest Mailbox.
Message Playback Direction on page 2-159
Set the Guest Mailbox message playback order.
Message Record on page 2-160
Review this feature to learn which features are available to the Guest Mailbox while recording and
sending a message.
Message Storage Limit on page 2-162
Set the maximum number of messages that can be left in the mailbox.
Next Call Routing Mailbox on page 2-166
The Next Call Routing Mailbox provides additional dialing options after a caller leaves a message in a
Guest Mailbox.
Security Code on page 2-189
If enabled, a Guest Mailbox caller must enter a security code before logging on to the mailbox.
Transfer to a Mailbox on page 2-203
To transfer an outside call to a Guest Mailbox, the extension user presses Hold + Message (or the
Voice Mail key) + Dials the Guest Mailbox number + Speaker to hang up.
Programming
1. Set up a virtual extension for the Guest Mailbox.
ProgramNumber
Program Name Description
11-04-01 Virtual ExtensionNumbering
Assign an unused extension number to an available virtual station port.For example, assign extension 5000 to virtual station port 1.
2. Activate an unused mailbox for the virtual extension.
ProgramNumber
Program Name Description
47-02-01 Mailbox Type Enter 1 to activate a personal mailbox for the virtual station port. Choose amailbox that is not likely required for an installed extension (e.g., 128).
By default, all mailboxes are set to 1.
ISSUE 1.1SL1000
G
Guest Mailbox2-104

3. Assign a mailbox number to the mailbox you activated for the virtual extension.
ProgramNumber
Program Name Description
47-02-02 Mailbox Number The mailbox number you choose should be the same as the virtual extensionnumber (e.g., 5000).
By default, mailboxes 1 ~ 64 are assigned to extensions 200 ~ 263, mailboxes 65
~ 128 no entry.
4. Refer to Subscriber Mailbox on page 2-193 for additional details on Guest Mailbox setup and op-
eration.
Operation
Logging On to a Guest Mailbox
To log on to a Guest Mailbox:
1. Press Speaker + Dial the InMail master number (e.g., 400).
2. When InMail answers, dial the Guest Mailbox number.
Logging On to a Guest Mailbox from the Automated Attendant
To log on to a Guest Mailbox from the Automated Attendant:
1. After the Automated Attendant answers, dial # + The Guest Mailbox number.• This ability may be disabled for the Automated Attendant.
• Your automated attendant may have GOTO or LOGON actions assigned to the Guest Mailbox. Check with your Commu-
nications Manager.
Transferring your call to a Guest Mailbox
To transfer your active call to a coworker's mailbox:
1. Press Hold.
2. Press Voice Mail key.
3. Dial the Guest Mailbox number.
4. Press Speaker to hang up.• To transfer a call to a coworker's mailbox from a single line telephone, use the following procedure:
Hookflash + Dial *8 + Dial the coworker's mailbox + Hang up.
ISSUE 1.1 SL1000
G
InMail Feature Manual 2-105

Hang Up
Description
Hang Up is an Automated Attendant option that immediately hangs up the outside call. When setting
up a Dial Action Table, you may want to use Hang Up for unused actions (rather than the caller hearing
the standard error message). You might also want to use the Hang Up action as the Timeout destina-
tion for callers that wait too long to dial after the Automated Attendant answers.
Related Features
Automated Attendant on page 2-25
The Automated Attendant can automatically answer the telephone system's incoming calls, play an
Instruction Menu message, and provide dialing options to callers.
Dial Action Table on page 2-49
The Hang Up action is a Dial Action Table option.
Programming
1. Assign the Hang Up action to an available Dial Action Table key.
Program Number Program Name Description
47-13-01 InMail Dial Action TableActions:Hang Up Action (6)(HNGUP)
When the outside caller dials the key programmed with the Hang Upaction, the Automated Attendant immediately hangs up.
By default, the digit 9 is assigned as a Hang Up action.
Operation
Not applicable.
ISSUE 1.1SL1000
H
Hang Up2-106

Hotel Integration
Description
Hotel integration allows the SL1000 InMail to be used in a hotel environment. In addition to other
InMail features it provides basic integration when used in conjunction with dial access codes from the
front desk extension.
The table below shows the supported hotel messages and what if any action is taken for a subscriber
mailbox. For more information on the Hotel Motel feature refer to the Features and Specifications
Manual.
Operation Action
Check-In • Mailbox for the room is cleared of messages.
• The Mailbox language goes back to default.
• Mailbox for the room is cleared of greetings.
• Name for the room is deleted.
• Security code is deleted.
Check-Out No action
Edit No action
Service Conditions• The SL1000 InMail language prompts installed on the CF must be version 2.10 or greater.
• This feature requires the SL1000 be licensed for Hotel/Motel (0007) and the InMail Advanced Fea-tures (1015).
• Wake up call greetings require VRS programming and licensing.
• Wake up call greetings are only provided to single line phones. Multiline phones will hear dial tonewhen answered.
• When a mailbox has a new message and the message is deleted upon check-in the MWI of the mail-box will NOT be cancelled.
Related Features
Mailboxes
Hotel Motel Services
Programming
ProgramNumber
Program Name Description/Comments Assigned Data
40-07-01 Voice Prompt LanguageAssignment for VRS
This sets the default language for the system.This is the language a mailbox will be set towhen a room is checked in.
Any valid language 1-23Default = 2 (UK English)
42-02-01 Hotel/Motel TelephoneSetup - Hotel Mode
Use this option to set a phone to operate in theHotel/Motel mode. Do not set the front deskphone for Hotel/Motel mode.
0 =Normal Mode1 = Hotel ModeDefault = 0
45-02-05 NSL Option Setup - Send4PM Message
Use this option to turn off or on the Send 4PMMessage option. If turned on, the systemsends 4PM message to VoiceMail. This mustbe set to 1 (On) for InMail Hotel Integration towork.
0 = Disabled1 = EnabledDefault = 0
ISSUE 1.1 SL1000
H
InMail Feature Manual 2-107

Operation
Check-In
To set a room as checked in from the front desk phone.
1. Lift the handset.
2. Dial 738.
3. Dial the extension number of the room you want to check in.
4. You hear confirmation tone.
5. Hang up.
Check-Out
To set a room as checked out from the front desk phone.
1. Lift the handset.
2. Dial 739.
3. Dial the extension number of the room you want to check out.
4. You hear confirmation tone.
5. Hang up.
ISSUE 1.1SL1000
H
Hotel Integration2-108

InMail Upload Download Audio
Description
The InMail Upload Download Audio feature allows the upload of mailbox greetings up to 1MB in size,
recorded on a PC or professionally, to any valid subscriber mailbox in the system. It also allows users
to listen to, download and/or delete voice mail messages from callers. Access to the InMail compact
flash drive is via the HTML User Pro (Web Pro).
The User Admin (UA Mode) can change Routing Mailbox greetings for the following Routing mailbox
types: Instruction (Call Routing), Announcement and Group.
Audio Prompt Format:
In order for uploaded greetings to properly play on the InMail they must be in the proper format. Audio
files not recorded in the proper format may not playback on the InMail. The proper format is:
• Bit Rate: 64 kbps
• Sampling Size: 8 bits
• Channel: 1 (Mono)
• Sampling Rate: 8 kHz
• Audio Format: CCiTT A-law
User Pro Access Options:
There are two different User Pro login types available to make changes. To login, open an Internet
browser and enter the IP of the SL1000 LAN port in the address line. At default the IP Address is
192.168.0.10.
1. User Admin Mode (UA Mode): This mode allows the user admin to access any telephone and
mailbox in the system. This mode must be used to change VRS and Routing Mailbox greetings. At
default the login ID is USER1 and the password is 1111.
2. User Mode (UB Mode): This mode allows a user to access only their own telephone and mailbox
when logged in. They will not be able to change any other telephone, mailbox, VRS or Routing
Mailbox. At default the login ID is the "Extension Number" and the password is 1111.
ISSUE 1.1 SL1000
I
InMail Feature Manual 2-109
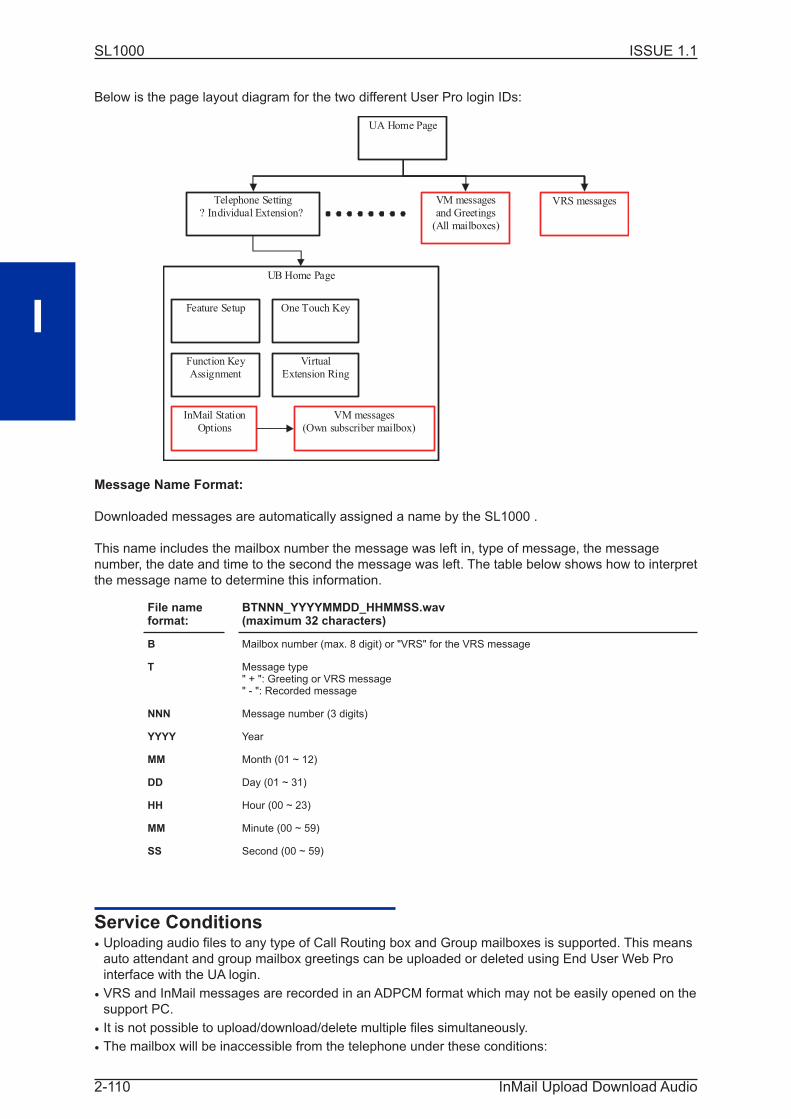
Below is the page layout diagram for the two different User Pro login IDs:
UB Home Page
UA Home Page
Telephone Setting
? Individual Extension? VRS messages VM messages
and Greetings
(All mailboxes)
InMail Station
Options
Virtual
Extension Ring
Function Key
Assignment
One Touch Key Feature Setup
VM messages
(Own subscriber mailbox)
Message Name Format:
Downloaded messages are automatically assigned a name by the SL1000 .
This name includes the mailbox number the message was left in, type of message, the message
number, the date and time to the second the message was left. The table below shows how to interpret
the message name to determine this information.
File nameformat:
BTNNN_YYYYMMDD_HHMMSS.wav(maximum 32 characters)
B Mailbox number (max. 8 digit) or "VRS" for the VRS message
T Message type" + ": Greeting or VRS message" - ": Recorded message
NNN Message number (3 digits)
YYYY Year
MM Month (01 ~ 12)
DD Day (01 ~ 31)
HH Hour (00 ~ 23)
MM Minute (00 ~ 59)
SS Second (00 ~ 59)
Service Conditions• Uploading audio files to any type of Call Routing box and Group mailboxes is supported. This meansauto attendant and group mailbox greetings can be uploaded or deleted using End User Web Pro
interface with the UA login.
• VRS and InMail messages are recorded in an ADPCM format which may not be easily opened on thesupport PC.
• It is not possible to upload/download/delete multiple files simultaneously.
• The mailbox will be inaccessible from the telephone under these conditions:
ISSUE 1.1SL1000
I
InMail Upload Download Audio2-110

- Mailbox XXX will not be accessible when opening the telephone setup screen of extension XXX by UA or UBmode in User Pro.
- Mailbox XXX will not be accessible when selecting the extension XXX on the file upload/download screen ofUA mode User Pro.
- Mailbox XXX will be inaccessible when logging in the UB mode User Pro for extension XXX.
• While uploading an audio file via User Pro the greeting is not accessible by telephone.
• When downloading/deleting an audio file via User Pro, the file is not accessible by another User Prosession or from the telephone.
• This feature is only supported using a LAN connection.
• When uploading an audio file the extension will be checked whether it is "WAV" or not however, theformat of the uploaded file will not be checked. If the uploaded file is not in the proper format it may
not playback properly.
• When a mailbox has a new message and the message is deleted using the User Pro interface theMWI of the mailbox will NOT be cancelled.
• The largest allowed upload file size is approximately 1 MB. Files larger than this cannot be uploaded.
• There is no size limitation when downloading audio files.
• User Pro does not check the uploaded file for correct naming format (i.e. BTNNN_YYYYMMDD_H-HMMSS.wav). The file name will be automatically changed when the file is written in the CF.
• The actual file name of the messages is not displayed in User Pro. The message number, modifieddate and file size are displayed instead. If there is not any message file, " - " will be displayed and the
download/delete icon will not be displayed.
• The User Pro message page does not refresh automatically, to see new messages the page must berefreshed. For instance if a new message is received via regular operation on the system while a
user is viewing the upload/download screen. The new message is not shown until the page is re-
loaded by clicking the icon.
• At default Microsoft Windows will automatically open and play the downloaded WAV. To make "Open"or "Save" selectable, following settings are required:
- Windows XP:
1. Choose file type from "Control Panel" "Folder Options".
2. Click on "File Types" tab.
3. Select "WAV" extension from the list, then click "Advanced".
4. Check "Confirm to open the file after download", then click "OK".
5. Close the folder option by clicking "OK" again.
• Windows Vista: It is not possible to change the save to folder option. So the downloaded file is al-ways automatically opened for playback.
Troubleshooting
The table below shows possible Error messages and their causes.
Error Message Cause
VMDB is not attached. The PZ-VM21 is not attached.
Mailbox "XXX" does not exist. (XXX = mailboxnumber)
The mailbox does not exist.
The mailbox is being used by another session. When the mailbox is being used by another session, either PC or phone.
There is no available space in the CF. When there is no available space in the CF.
The file is being used by another session.Please try again later.
When the file to be downloaded is being used by another session, either PCor phone.
The selected file has already been deleted. When the file selected for download has already been deleted.
The file is being used by another session.Please try again later.
When the file selected for deletion is being used by another session.
ISSUE 1.1 SL1000
I
InMail Feature Manual 2-111

Error Message Cause
The selected file has already been deleted. When the file selected for deletion has already been deleted.
Cannot upload the file since the original file isbeing used by another session. Please try againlater.
When the file to be replaced is being used when trying to upload thereplacement.
Programming
Program Number Program Name Descirption
90-02-01 Programming Password Setup -User Name
Set the system user names. By default each mailbox canbe accessed using the extension number as the username. The User Administrator login user name of USER1.
90-02-02 Programming Password Setup -Password
The default password for the User Administrator andmailbox user login is 1111.
90-02-03 Programming Password Setup -User Level
Used to set the Set the system password user levels.
Listening to Voice Mail Messages using User Admin Mode (UA)
All messages stored on the InMail can be accessed via the Mailbox User Mode for playback, or
deletion.
1. To log in, open an Internet browser and enter the IP of the SL1000 LAN port in the address line. At
default the IP Address is 192.168.0.10.
2. At the login screen, enter username = USER1 and password = 1111.
ISSUE 1.1SL1000
I
InMail Upload Download Audio2-112

3. At the main menu, click on the InMail Audio Up/Down Load icon.
4. Choose the extension number to be changed, and make sure Audio Data is set to Incoming Mes-
sages.
The message numbers correspond to the same message number when accessed via the tele-phone. Message 1 is the first message, message 2 is the second message, etc.
5. To delete a message:
• Click on the red X icon to the right of the appropriate message.
6. To listen to a message:
• To the right of the message you want to hear, click on the download icon.
• Depending on the settings of your browser, you may get a security prompt.
• Click on the menu and choose to allow the file to download.
• Depending on the Windows configuration, you may be prompted again to either Open or Savethe message. If you want to listen to the message, click Open and the default .wav file player will
play the message. If you want to save the message, click on the Save icon and you can browse
ISSUE 1.1 SL1000
I
InMail Feature Manual 2-113

to the location you want the message saved on the local PC.
Listening to Voice Mail Messages using Mailbox User Mode (UB)
1. To log in, open an Internet browser and enter the IP of the SL1000 LAN port in the address line. At
default the IP Address is 192.168.0.10.
2. At the login screen enter username = "The Extension Number" and password = 1111.
ISSUE 1.1SL1000
I
InMail Upload Download Audio2-114

3. In the Main Menu, click on the InMail Audio Up/Down Load icon.
4. The message numbers correspond to the same message number when accessed via the tele-
phone. Message 1 is the first message, Message 2 is the second message, etc.
5. To delete a message:
• Click on the red X icon to the right of the appropriate message.
6. To listen to a message:
• To the right of the message you want to hear, click on the download icon.
• Depending on the settings of your browser, you may get a security prompt.
• Click on the menu and choose to allow the file to download.
• Depending on the Windows configuration, you may be prompted again to either Open or Savethe message. If you want to listen to the message, click Open and the default .wav file player will
play the message. If you want to save the message, click on the Save icon and you can browse
ISSUE 1.1 SL1000
I
InMail Feature Manual 2-115

to the location you want the message saved on the local PC.
Changing Mailbox Greetings using User Admin Mode (UA)
Audio files up to 1 MB may be uploaded to the InMail for any mailbox greeting. In order for uploaded
greetings to properly play on the InMail they must be in the proper format. Audio files not recorded in
the proper format may not playback on the InMail.
The proper format is:
• Bit Rate: 64 kbps
• Sampling Size: 8 bits
• Channel: 1 (Mono)
• Sampling Rate: 8 kHz
• Audio Format: CCiTT A-law
1. To log in, open an Internet browser and enter the IP of the SL1000 LAN port in the address line. At
default the IP Address is 192.168.0.10.
2. At the login screen, enter username = user1 and password = 1111.
ISSUE 1.1SL1000
I
InMail Upload Download Audio2-116

3. At the main menu, click on the InMail Audio Up/Down Load icon.
4. Choose the extension number to be changed, and make sure Audio Data is set to Outgoing Mes-
sages.
The greeting numbers correspond to the same greeting number when accessed via the telephone. Greeting1 is GR1, Greeting 2 is GR2 and Greeting 3 is GR3. Greeting 7 is the paging greeting used with the Parkand Page feature.
5. To delete a greeting:
• Click on the red X icon to the right of the appropriate greeting.
6. To upload a greeting:
• Under message number, enter the greeting number you want replaced on the VM.
ISSUE 1.1 SL1000
I
InMail Feature Manual 2-117
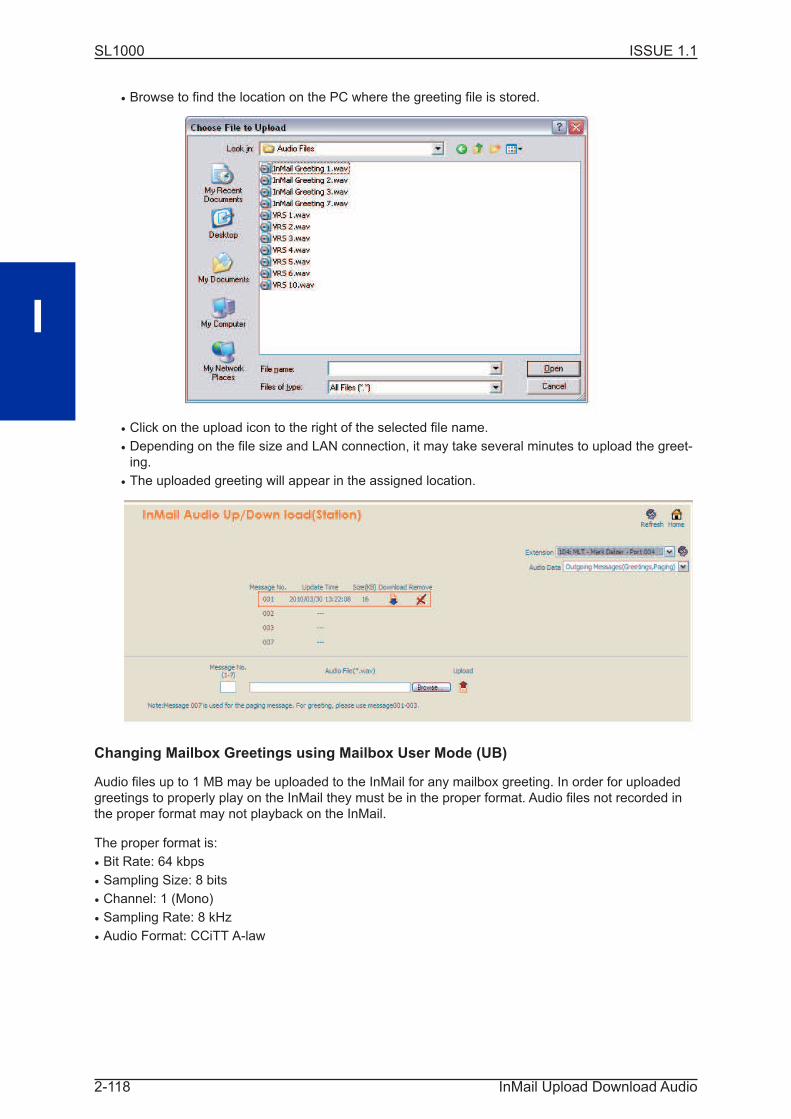
• Browse to find the location on the PC where the greeting file is stored.
• Click on the upload icon to the right of the selected file name.
• Depending on the file size and LAN connection, it may take several minutes to upload the greet-ing.
• The uploaded greeting will appear in the assigned location.
Changing Mailbox Greetings using Mailbox User Mode (UB)
Audio files up to 1 MB may be uploaded to the InMail for any mailbox greeting. In order for uploaded
greetings to properly play on the InMail they must be in the proper format. Audio files not recorded in
the proper format may not playback on the InMail.
The proper format is:
• Bit Rate: 64 kbps
• Sampling Size: 8 bits
• Channel: 1 (Mono)
• Sampling Rate: 8 kHz
• Audio Format: CCiTT A-law
ISSUE 1.1SL1000
I
InMail Upload Download Audio2-118

1. To log in, open an Internet browser and enter the IP of the SL1000 LAN port in the address line. At
default the IP Address is 192.168.0.10.
2. At the login screen, enter username = "The Extension Number" and password = 1111.
ISSUE 1.1 SL1000
I
InMail Feature Manual 2-119

3. The main menu will display. Click on the InMail Audio Up/Down Load icon. At the main menu, click
on the InMail Audio Up/Down Load icon.
The greeting numbers correspond to the same greeting number when accessed via the telephone. Greeting1 is GR1, Greeting 2 is GR2 and Greeting 3 is GR3. Greeting 7 is the paging greeting used with the Parkand Page feature.
4. To delete a greeting:
• Click on the red X icon to the right of the appropriate greeting.
5. To upload a greeting:
• Under message number, enter the greeting number you want replaced on the VM.
ISSUE 1.1SL1000
I
InMail Upload Download Audio2-120
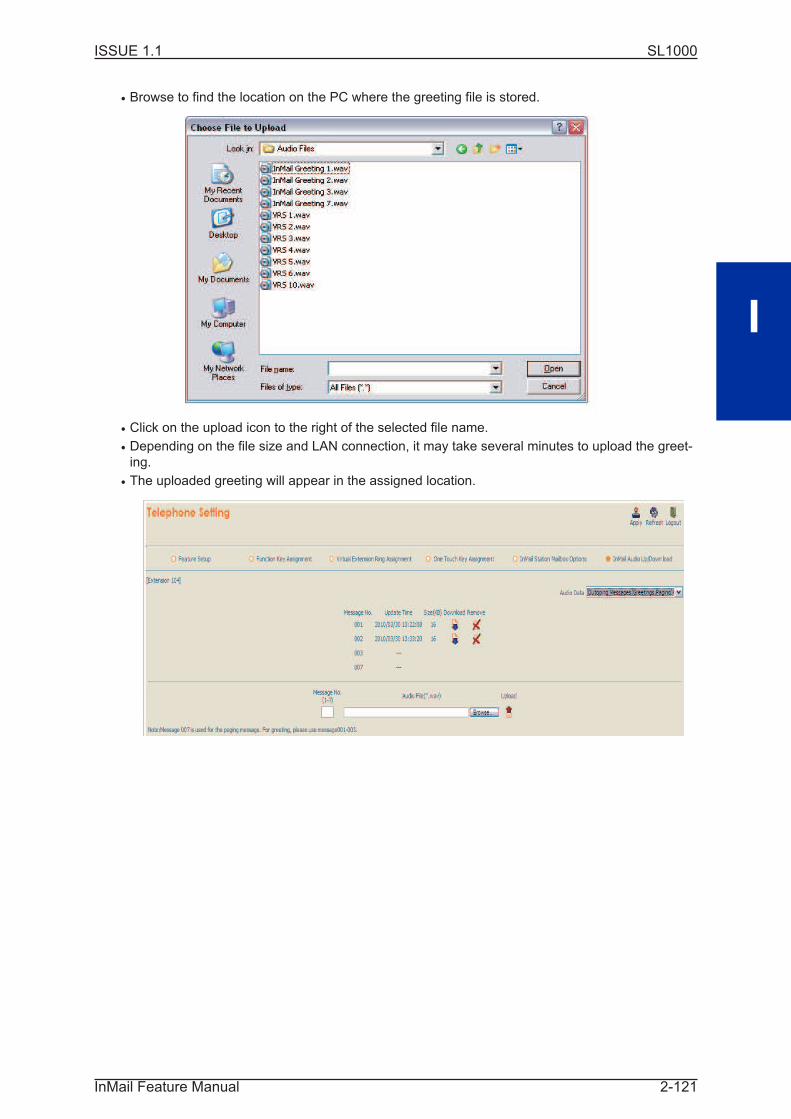
• Browse to find the location on the PC where the greeting file is stored.
• Click on the upload icon to the right of the selected file name.
• Depending on the file size and LAN connection, it may take several minutes to upload the greet-ing.
• The uploaded greeting will appear in the assigned location.
ISSUE 1.1 SL1000
I
InMail Feature Manual 2-121
Instruction Menu
Description
The Instruction Menu is the announcement that plays to Automated Attendant callers. Normally, the
Instruction Menu greets callers and provides them with the Automated Attendant dialing options. The
Instruction Menu is associated with the active Call Routing Mailbox. Normally, you should have the
System Administrator customize (rerecord) the Instruction Menu to match the dialing options enabled
in the site's Dial Action Table. If a custom Instruction Menu is not recorded, the Automated Attendant
callers hear: "If you are calling from a touch tone phone, please dial the extension number you wish to
reach, or dial 0 for assistance. If you are calling from a rotary dial phone, please stay on the line for
assistance."
Related Features
Answer Table on page 2-14
Determines how the Automated Attendant answers outside calls on each trunk.
Automated Attendant on page 2-25
The Answer Table determines how the Automated Attendant answers calls, and assigns the Call
Routing Mailbox to the call.
Routing Mailbox on page 2-182
The mailbox associated with an Answer Table that specifies which dialing options (Dial Action Table)
and Instruction Menu are available to Automated Attendant callers.
Dial Action Table on page 2-49
Defines the dialing options for the Call Routing Mailbox chosen by the active Answer Table.
Single Digit Dialing on page 2-191
An Automated Attendant caller can press a single key to route to an extension, route to another desti-
nation, or use an InMail feature.
System Administrator on page 2-196
Only the System Administrator can record the Instruction Menu.
Programming
Not applicable.
Operation
Recording an Instruction Menu for a Call Routing Mailbox
Log On to System Administrator's mailbox.
SA (72) Access System Administrator options.[Not applicable]
ISSUE 1.1SL1000
I
Instruction Menu2-122
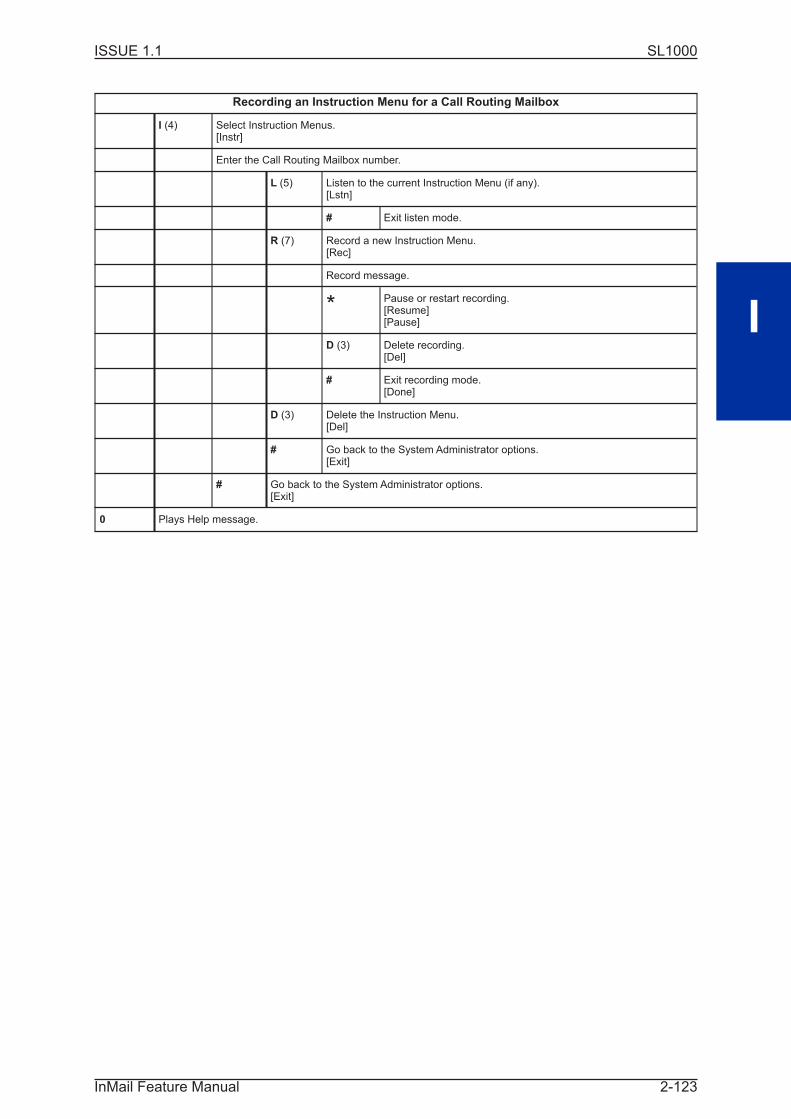
Recording an Instruction Menu for a Call Routing Mailbox
I (4) Select Instruction Menus.[Instr]
Enter the Call Routing Mailbox number.
L (5) Listen to the current Instruction Menu (if any).[Lstn]
# Exit listen mode.
R (7) Record a new Instruction Menu.[Rec]
Record message.
* Pause or restart recording.[Resume][Pause]
D (3) Delete recording.[Del]
# Exit recording mode.[Done]
D (3) Delete the Instruction Menu.[Del]
# Go back to the System Administrator options.[Exit]
# Go back to the System Administrator options.[Exit]
0 Plays Help message.
ISSUE 1.1 SL1000
I
InMail Feature Manual 2-123

Language Setting
Description
The Language Setting feature allows the telephone display language and the InMail mailbox language
to be changed from the telephone. This can be used to change either the user's phone or another
specified telephones display and InMail language if allowed in system programming. Either a dial
access code or Softkey operation is available.
Service Conditions• The telephone display language can be changed using dial access codes or softkeys only.
• The InMail language can be changed using dial access codes, softkeys only or End User Web Pro.
• The ability to change other extensions language options is allowed on a class of server basis in PRG20-13-53.
• All the supported Languages are initially available in the InMail CF.
Supported Languages
InMail Languages Telephone Display Languages
• 01 (US English)
• 02 (UK English)
• 03 (Australian English)
• 04 (French Canadian)
• 05 (Dutch)
• 06 (Mexican Spanish)
• 07 (Latin America Spanish)
• 08 (Italian)
• 09 (German)
• 10 (Madrid Spanish)
• 11 (Norwegian)
• 12 (Parisian French)
• 13 (Brazilian Portuguese)
• 14 (Japanese)
• 15 (Mandarin Chinese)
• 16 (Korean)
• 17 (Iberian Portuguese)
• 18 (Greek)
• 19 (Danish)
• 20 (Swedish)
• 21 (Thai)
• 22 (Taiwan)
• 23 (Flemish)
• 24 (Turkish)
• 1 (English)
• 2 (German)
• 3 (French)
• 4 (Italian)
• 5 (Spanish)
• 6 (Dutch)
• 7 (Portuguese)
• 8 (Norwegian)
• 9 (Danish)
• 10 (Swedish)
• 11 (Turkish)
• 12 (Latin American Spanish)
• 13 (Romanian)
• 14 (Polish)
• 15 (Latin American Portuguese)
• 16 (Russian)
Related Features
Group Mailboxes
Guide to Feature Programming
Program Number Program Name Assigned Data
11-11-13 Service Code Setup (for Setup/Entry Operation) -Display Language Selection for Keyset
Any valid service codeDefault = 778
ISSUE 1.1SL1000
L
Language Setting2-124

Program Number Program Name Assigned Data
11-11-68 Service Code Setup (for Setup/Entry Operation) -IntraMail Language Selection for own extension
Any valid service codeDefault = 764
11-11-69 Service Code Setup (for Setup/Entry Operation) -IntraMail Language Selection for specificextension
Any valid service codeDefault = 765
20-13-53 Service Code Setup (for Setup/Entry Operation) -Language Selection for specific extension
0 = Disabled1 = EnabledDefault = 0
Language Setting Operation (When set PRG15-02-60: 0)
From an Idle Display Phone
Prog Press Program Softkey.
Down Press down arrow.
Down Press down arrow again.
Lang Press Language Softkey.
Disp To change telephone display language press DisplaySoftkey.
Own To change your own extension display languagepress Own Softkey.
ChooseLang
Select desired language, then pressdown arrow to advance to next page.Press Softkey for desired language.
Press Speaker to Exit.
Other To change another extension display languagepress Other Softkey.
Ext # Enter the extension number to bechanged.
ChooseLang
Select desired language,then press the down arrowto advance to the nextpage. Press Softkey fordesired language.
Press Speaker to Exit.
VMail To change spoken InMail mailbox language,press VMail Softkey.
Own To change your own spoken mailboxlanguage, press Own Softkey.
ChangeLang
Select desired language,then press down arrow toadvance to the next page.Press Softkey for desiredlanguage.
Press Speaker to Exit.
Other To change another spoken mailboxlanguage, press Other Softkey.
Ext # Enter the extension numberto be changed.
ChooseLang
Select desired language,then press down arrow toadvance to the next page.Press Softkey for desiredlanguage.
Press Speaker to Exit.
ISSUE 1.1 SL1000
L
InMail Feature Manual 2-125

Display Language Setting Operation (When set PRG15-02-60: 1or 2)
From an Idle Display Phone
Menu Press Menu Softkey.
Next 7times
Press Next Softkey (7 times ) or 82.
Select Press Select Softkey.
Next Press Next Softkey.
Select Press Select Softkey.
<<>>
To change telephone display language press << >> Softkeyto select desired language.
Save To change your own extension display languagepress Save Softkey.
Press Speaker to Exit.
ISSUE 1.1SL1000
L
Language Setting2-126

Leaving a Message
Description
An extension user or outside caller can leave a voice message in a coworker's mailbox if that exten-
sion is busy, unanswered, or in Do Not Disturb. Leaving a voice message is a handy and efficient way
to communicate with coworkers that avoids post-it notes, message pads, and unnecessary email.
Additional Options While Leaving a Message
The following chart shows the additional dialing options a caller may have while listening to the
mailbox greeting prior to leaving a message. What happens depends on the setting of the Next Call
Routing and Dialing Option options.
Dialing Options While Leaving a Message
47-02-14 NextCall RoutingMailbox
47-02-13Dialing Option
DigitDialed
Action
Trunk Call Intercom Call
Undefined No 0 Caller hears, "That is an invalid entry," and the greeting repeats.
1 ~ 9
# InMail hangs up.
* Caller skips greeting and can immediately start recording.
1 ~ 32 (valid CallRouting Mailbox)
No 0 Caller follows 0 action in Next CallRouting Mailbox.
Caller hears, "That is an invalidentry," and the greeting repeats.
1 ~ 9 Caller hears, "That is an invalid entry," and the greeting repeats.
# Caller routes to the Next CallRouting Mailbox and hears itsInstruction Menu.
InMail hangs up.
* Caller skips greeting and can immediately start recording.
1 ~ 32 (Valid CallRouting Mailbox)
Yes 0 Caller follows key's action in NextCall Routing Mailbox.
Caller hears, "That is an invalidentry," and the greeting repeats.
1 ~ 9
# Caller routes to the Next CallRouting Mailbox and hears itsInstruction Menu.
InMail hangs up.
* Caller skips greeting and can immediately start recording.
Related Features
Next Call Routing Mailbox on page 2-166
The Next Call Routing Mailbox provides callers with additional dialing options after they leave a
message in a mailbox (depending on the setting of the Dialing Option options).
Quick Message on page 2-177
Quick Message allows Automated Attendant callers to leave a message in a Subscriber Mailbox.
Programming
No additional programming required.
ISSUE 1.1 SL1000
L
InMail Feature Manual 2-127

Operation
Leaving a Message for a Coworker
To leave a message in the mailbox of an unanswered extension:
1. Press Voice Mail key.
2. Leave message and hang up.
- OR -
Leave message and dial #.
Dialing # sends the message and hangs up.
Leaving a Message from Outside the Company
To leave a message in a mailbox:
1. Leave message and hang up.
- OR -
Leave message and dial #.
Dialing #may provide you with additional dialing options. This depends on how the called mailbox's Next Call Routing Mailbox is
set up.
To leave a message in an extension mailbox, you can be:• Transferred to an extension mailbox by another user.
• Automatically routed to a mailbox when the called party does not answer or is unavailable.
• Sent to the mailbox from the Automated Attendant after dialing * plus the called party's mailbox number.• Routed from the Automated Attendant after dialing a uniquely programmed digit set up to send you to an extension's mailbox.
ISSUE 1.1SL1000
L
Leaving a Message2-128

Listening to Messages
Description
While or after listening to a message, a Subscriber Mailbox user has many message handling options
from which to choose. The listening options let you quickly and efficiently manage your voice mail
messages, respond to the message sender, or forward the message to a coworker for additional
handling. The following table shows these options.
Table 2-6 Message Listen Options
Option Description
RE (73)[Not applicable]
Record a reply.See Message Reply on page 2-161.
MF (63)[Not applicable]
Forward the message to another mailbox.See Message Forward on page 2-149.
MC (62)[Not applicable]
Make a call to the message sender.See Make Call on page 2-143.
TI (84) Hear the time and date the message was sent.See Time and Date on page 2-201.
SA (72) Enter the System Administration menu if allowed.
D (3)[Del]
Delete the message.See Message Delete on page 2-148 for more.
L (5)[Next]
Listen to the next message.
B (2) Back up a few seconds.
BB (22)[Rpt]
Back up to the beginning of the message.
G (4) Go ahead a few seconds.
* Pause/resume recording.
1N (16)[Not applicable]
Select New Message List.See Message Listen Mode on page 2-152.
1S (17)[Not applicable]
Select Saved Message List.See Message Listen Mode on page 2-152.
1A (12)[Not applicable]
Select All Message List.See Message Listen Mode on page 2-152.
#[Exit]
Exit the listen mode.
X (9) Exit your mailbox.
Dial 0 while listening to hear the list of options.
If a subscriber's mailbox is set to Auto Save messages, InMail archives partially listened-to messages but doesnot relamp the keyset for those messages. For example:• A subscriber with new messages calls his mailbox.• The subscriber presses L to listen to a portion of each message and then exits his mailbox.• InMail archives all the messages and turns off the message waiting lamp.
If you hang up before listening to the complete new message, InMail automatically retains the message as anew message.
Telephone Display while Listening to a Message (3-line Display Telephone Only)
While listening to a message, your telephone display shows you important information about the
message. This includes:
ISSUE 1.1 SL1000
L
InMail Feature Manual 2-129

• The caller's telephone number (if available).
• The selected Message List.
• The message number in the selected list.
• The date and time the message was left.
Keyset Display (3-line Display Telephone Only)
2 0 3 -9 2 6 -5 4 0 0 [N -0 0 1 ] 1 1 -1 8 T U E 0 8 :2 4 A M N e x t R p la y D e l M o re >
Caller’s phone number
(requires Caller ID)
Currently selected
Message List
Message number (in
selected Message)
Date message was left. Time message was left.
Related Features
Auto Erase or Save on page 2-22
When a mailbox user completely listens to a new message and then exits their mailbox, InMail either
automatically archives or deletes the message.
Message Record on page 2-160
While recording a message, a Subscriber Mailbox user has many recording options from which to
choose.
Programming
1. Set the Message Backup / Go Ahead Time.
Program Number Program Name Description
47-01-05 Message Backup / GoAhead Time(Msg Bkup/Adv Time)
This interval sets how far InMail backs up (1 ~ 60 seconds) when amailbox user dials B while recording or listening to their messages.This interval also sets how far InMail jumps ahead (1 ~ 60 seconds)when a user dials G while listening to messages.
By default, this interval is 5 seconds.
Operation
Listening to Messages
Log On to Subscriber Mailbox.
L (5) Access the Message Listen mode[Lstn]See Table 2-6 Message Listen Options on the previous page for an explanation of the available options.
0 Plays Help message.
ISSUE 1.1SL1000
L
Listening to Messages2-130

Live Record
Description
Live Record allows a subscriber to record their active call as a new message in their mailbox, which
they can review later on. Live Record can be helpful when an extension user is on a call that involves a
lot of detail (such as a technical discussion or extensive directions). Rather than taking notes as the
call progresses, the user can record the conversation and carefully review it later on. InMail broadcasts
a beep and a voice prompt to the callers as Live Record begins. After calling their mailbox, the
subscriber can archive, edit, or delete the recorded conversation.
Caution
The use of monitoring, recording, or listening devices to eavesdrop, monitor, retrieve, or record telephone conversations orother sound activities, whether or not contemporaneous with transmission, may be illegal in certain circumstances underfederal or state laws. Legal advice should be sought prior to implementing any practice that monitors or records any telephoneconversation. Some federal and state laws require some form of notification to all parties to a telephone conversation, such asusing a beep tone or other notification methods or requiring the consent of all parties to the telephone conversation, prior tomonitoring or recording the telephone conversation. Some of these laws incorporate strict penalties.
Related Features
Subscriber Mailbox on page 2-193
Live Record is available only to subscriber extensions.
Programming
1. Assign a Conversation Recording Key to the extension.
Program Number Program Name Description
15-07-01 Programmable FunctionKeys
Assign a programmable key as a Conversation Recording Key (code78).
By default, no Conversation Recording Keys are assigned.
Optionally assign a Live Record One-Touch key.• To assign the key: Speaker + Dial 851 + Press key + Dial 78 +
Speaker.
• To use the key: While on a call press the One-Touch key.
By default, no Live Record One-Touch keys are assigned.
2. Enable or disable the Live Record beep.
Program Number Program Name Description
47-02-07 Recording ConversationBeep(Rec Conv Beep)
Enable (1) the Live Record beep.
By default, the beep is enabled (1).
ISSUE 1.1 SL1000
L
InMail Feature Manual 2-131
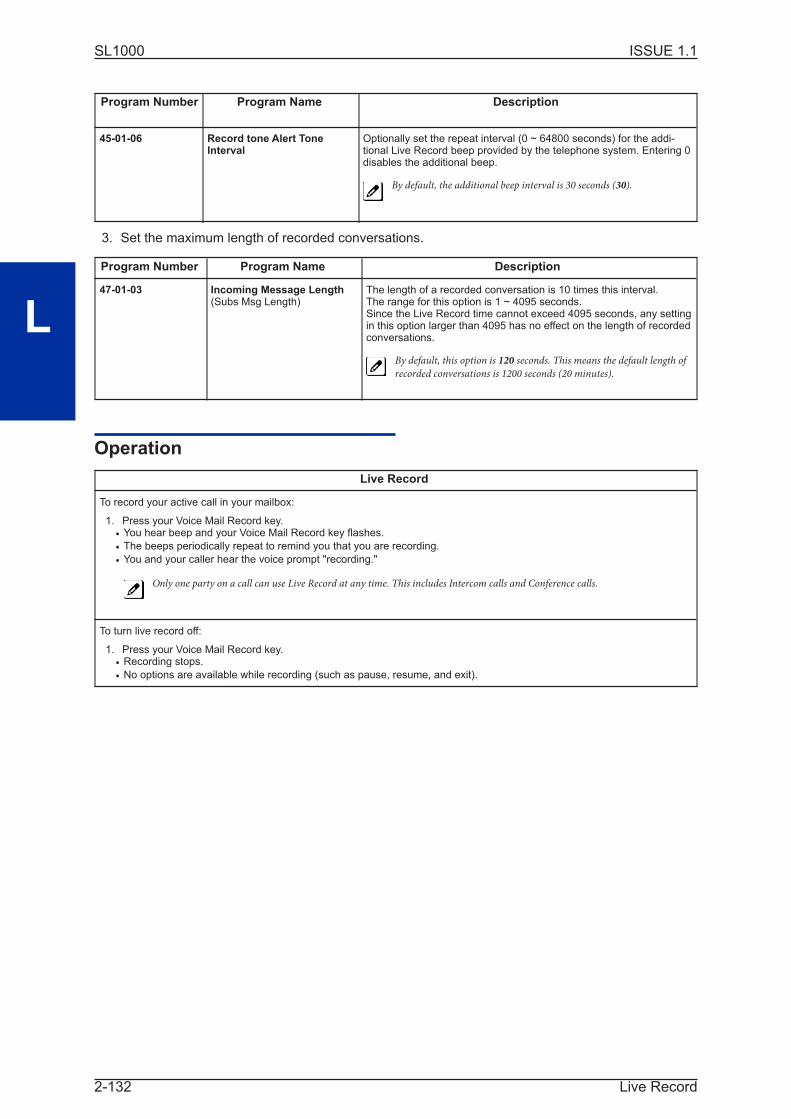
Program Number Program Name Description
45-01-06 Record tone Alert ToneInterval
Optionally set the repeat interval (0 ~ 64800 seconds) for the addi-tional Live Record beep provided by the telephone system. Entering 0disables the additional beep.
By default, the additional beep interval is 30 seconds (30).
3. Set the maximum length of recorded conversations.
Program Number Program Name Description
47-01-03 Incoming Message Length(Subs Msg Length)
The length of a recorded conversation is 10 times this interval.The range for this option is 1 ~ 4095 seconds.Since the Live Record time cannot exceed 4095 seconds, any settingin this option larger than 4095 has no effect on the length of recordedconversations.
By default, this option is 120 seconds. This means the default length of
recorded conversations is 1200 seconds (20 minutes).
Operation
Live Record
To record your active call in your mailbox:
1. Press your Voice Mail Record key.• You hear beep and your Voice Mail Record key flashes.
• The beeps periodically repeat to remind you that you are recording.
• You and your caller hear the voice prompt "recording."
Only one party on a call can use Live Record at any time. This includes Intercom calls and Conference calls.
To turn live record off:
1. Press your Voice Mail Record key.• Recording stops.
• No options are available while recording (such as pause, resume, and exit).
ISSUE 1.1SL1000
L
Live Record2-132

Log On to Voice Mail
Description
A subscriber can log on to their mailbox using a method that best suits their needs and location. While
at their own phone, the subscriber just presses a single key to log on to their mailbox. To use their
mailbox while at a co-worker's phone, the subscriber dials the InMail master number, followed by their
mailbox number (which is normally the same as their extension number). If they are away from the
office, the subscriber can still use their mailbox by calling in through the Automated Attendant.
Local (On-site) Logon
An extension user can log on to their mailbox in the following ways:
• Press their Voice Mail key to log on to their Subscriber Mailbox.
• Dial the InMail master number (e.g., 400), followed by their mailbox number. This method is typicallyused by Guest Mailbox users, as well as subscribers attempting to log into their Subscriber Mailbox
from a coworker's phone.
Remote Log On
A Subscriber Mailbox user can call into the Automated Attendant and log on to their mailbox. Following
are two of the ways a user can do this:
• After the Automated Attendant answers, dial a digit (typically #) followed by their mailbox number.This method allows outside callers to log into their mailboxes from outside the company. After they
log on to their mailbox, they can use the allowed features in the mailbox main menu.
To avoid unauthorized access to their mailbox, the user can enable his own unique Security Code.
• If an extension has a Direct Inward Line that voice mail picks up, the caller can dial # during theirgreeting to log on to their mailbox (instead of leaving a message). This method allows subscribers to
dial their own number and then use the features of their mailbox. This ability must be set up in the
user Next Call Routing Mailbox.
For example:
- Program the Next Call Routing Mailbox # digit as LOGON to IXXX.
- While listening to their greeting, the subscriber can dial:# (to route to their Next Call Routing Mailbox), then# and their mailbox number to log on to their mailbox.
By default, this option is provided in Call Routing Mailbox 1. Additionally, the subscriber should enable a Security
Code for their mailbox to prevent unauthorized logons.
Related Features
Automated Attendant on page 2-25
The Automated Attendant allows Subscriber Mailbox users to log into their mailboxes.
Greeting on page 2-95
After remotely logging on to their mailbox, a subscriber mailbox user can remotely record their
greeting.
Guest Mailbox on page 2-103
A guest can log on to their mailbox by dialing the InMail master number followed by the Guest Mailbox
number.
Security Code on page 2-189
ISSUE 1.1 SL1000
L
InMail Feature Manual 2-133

To avoid unauthorized access to their mailbox (particularly with Remote Log On), the user should
enable their own unique Security Code.
Subscriber Mailbox on page 2-193
A subscriber can log into their mailbox by pressing a key on their telephone, dialing the InMail master
number (followed by their mailbox number), or logging on through the Automated Attendant.
Programming
1. Log on to a mailbox through the Automated Attendant:
ProgramNumber
Program Name Description
47-13-01 Dial Action Table Actions:LOGON Action - Log Onto Voice Mail (5) (LOGON)
To log directly into a specific Subscriber Mailbox, enter the mailbox numberin the corresponding Number option.• For example, to have key 4 log directly into Subscriber Mailbox 305, for
key 4 enter LOGON for the Action and 305 for the corresponding
Number.
To have InMail request Automated Attendant callers to select a Subscriber
Mailbox to log into, enter N in the corresponding Number option. The key
you choose must represent the first digit in the Subscriber Mailbox number.
• For example, to allow callers to log on to mailboxes 200 ~ 299, for key 3
enter LOGON for the Action and XXX for the corresponding Number.
• To enter an X, press LK2.
To log into any valid Subscriber Mailbox, enter IXXX in the corresponding
Number option.
• For example, to allow callers to dial 1 plus any Subscriber Mailbox
number to log on, for key 1 enter LOGON for the Action and IXXX for the
corresponding Number.
• To enter an I, press LK3.To enter an X, press LK2.
See Automated Attendant on page 2-25 for more on how to set up InMail to
answer outside calls.
By default, key # Action = LOGON and Number = None.
Operation
Logging On to Your Mailbox
To log on to your Subscriber Mailbox:Press Voice Mail key.-OR-Press Voice mail key (PGM 15-07 or SC 851: 77 + Pilot e.g. 400).-OR-From an on-premise single line telephone, lift handset and dial *8.To log on to your Guest Mailbox or your Subscriber Mailbox from a coworker's extension: Press the Speaker key + Dial theInMail master number (e.g., 400) + Dial your mailbox number.To log on to your Subscriber Mailbox from the Automated Attendant:
1. Wait for the Automated Attendant to answer.
2. Dial # and your mailbox number.
This option may be different in your system. Check with your Communications Manager.
ISSUE 1.1SL1000
L
Log On to Voice Mail2-134

Mailbox Announcement Message
Description
The Mailbox Announcement Message is a message, recorded by the System Administrator, that plays
to each subscriber when they log onto their mailbox. The message will play at each log on until it
expires, is deleted, or made inactive by the System Administrator. Similar to the Broadcast Message,
the Mailbox Announcement Message is also used for important company announcements such as
weather-related schedule changes and personnel updates. Unlike the Broadcast Message, the
Mailbox Announcement Message cannot be deleted, forwarded, or archived by the subscriber.
After recording the Mailbox Announcement Message, the System Administrator can choose how long
they want the announcement to last. The choices are a specific number of days or indefinite. Once the
specific number of days passes, the message expires (i.e., is made inactive but not deleted). The
message can be reactivated later on if required. The System Administrator can also make the
message inactive before it expires.
If a subscriber has a Security Code enabled for their mailbox, the Mailbox Announcement Message will
play after they enter their security code.
Related Features
Security Code on page 2-189
The Mailbox Announcement Message will play after the subscriber enters their security code.
System Administrator on page 2-196
Only the System Administrator can record and set up a Mailbox Announcement Message.
Programming
Not applicable.
Operation
Recording a Mailbox Announcement Message
To record a Mailbox Announcement Message:
1. Log onto System Administrator's Mailbox.
2. [System Admin][Mgr]
Select the System Administrator Menu.• Alternately dial SA (72).
3. [MboxAn] Select to go to the Mailbox Announcement Message Menu.• Alternately dial 3.
4. Do one of the following:
a. [Lstn] Select to listen to the current Mailbox Announcement Message (if any).• Alternately dial L (5).
# Exit the listen mode.
b. [Rec] Select to record the Mailbox Announcement Message.• Alternately dial R (7).
[Cncl] Select to delete the recording.• Alternately dial E (3).
ISSUE 1.1 SL1000
M
InMail Feature Manual 2-135

Recording a Mailbox Announcement Message
[Done] Select to confirm the recording and exit the recording mode.• Alternately dial #.
• If you don't set the Days in step c below, the message is automatically
set to active (i.e., indefinite).
c. [Days] Enter the number of days the Mailbox Announcement Message will be active (01 ~99, 00 for inactive).• Alternately dial A (2).
[OK] Select to confirm your entry.• Alternately dial C (2).
[Clear] Select to back up to the previous level without making anychanges.• Alternately dial I (4).
[Exit] Select to return to the Mailbox Announcement Message Menuwithout making any changes.• Alternately dial #.
[Reset] Select to make the Mailbox Announcement Message active indefinitely.• Alternately dial *.[OK] Select to confirm your entry.
• Alternately dial C (2).
[Clear] Select to back up to the previous level without making anychanges.• Alternately dial I (4).
[Exit] Select to return to the Mailbox Announcement Message Menuwithout making any changes.• Alternately dial #.
[Del] Select to delete the Mailbox Announcement Message.• Alternately dial D (3).
d. [Exit] Select to go back to the System Administrator Menu.• Alternately dial #.
Listening to a Mailbox Announcement Message
To listen to a Mailbox Announcement Message:
1. Log onto Subscriber Mailbox.
2. Enter your Security Code (if enabled).
3. You hear the Mailbox Announcement Message.
[Skip] Optionally select to skip the Mailbox Announcement Message.
4. When the Mailbox Announcement Message completes, you go to the Mailbox Main Menu.
ISSUE 1.1SL1000
M
Mailbox Announcement Message2-136

Mailbox Name
Description
A caller leaving a message in a Subscriber Mailbox can hear the mailbox's prerecorded name instead
of the mailbox number. The prerecorded Mailbox Name gives the subscriber's mailbox that personal
touch. Prior to leaving a message, callers hear the name instead of the default "extension xxx" prompt.
The recorded name can be up to 10 seconds.
Related Features
Subscriber Mailbox on page 2-193
A subscriber can record a name for their mailbox, or have the System Administrator record one for
them.
System Administrator on page 2-196
The System Administrator can record names for Subscriber Mailboxes.
Programming
Not applicable.
Operation
Recording Your Mailbox Name
Log On to Subscriber Mailbox.
RN (76) Access the Mailbox Name Menu.[ Not applicable]
L (5) Listen to the currently recorded name (if any).[Lstn]
# Exit listen mode.
R (7) Record a new name.[Rec]
Record message.
* Pause or restart recording.[Resume][Pause]
D (3) Delete recording.[Cncl]
# Exit recording mode.[Done]
D (3) Delete the currently recorded name.[Del]
# Go back to the Mailbox Main Menu.[Exit]
0 Plays Help message.
ISSUE 1.1 SL1000
M
InMail Feature Manual 2-137

Recording or Erasing Co-worker's Names from a System Administrator's Mailbox
Log On to System Administrator's Mailbox.
SA (72) Access System Administrator options.[Not applicable]
S (7) Select Subscriber Mailbox Maintenance options.[Subs]
Enter the number of the Subscriber Mailbox you want to maintain.
D (3) Delete the mailbox name.[Name]
N (6) Record a new mailbox name.[Not applicable]
L (5) Listen to currently recorded name (if any).[Lstn]
# Exit listen mode.
R (7) Record a new name.[Rec]
Record message.
* Pause or restart recording.[Resume][Pause]
D (3) Delete recording.[Cncl]
# Exit recording mode.[Done]
D (3) Delete the currently recorded name.[Delete]
# Go back to Subscriber Maintenance Menu.[Exit]
# Go back to System Administrator options.[Exit]
0 Plays Help message.
ISSUE 1.1SL1000
M
Mailbox Name2-138

Mailbox Options Menu
Description
The Mailbox Options Menu is a sub-menu of a subscriber's Main Menu that provides access to the
Auto Time Stamp, Mailbox Security Code Delete, and Message Notification features. The chart below
summarizes these options. Auto Time Stamp helps if the subscriber needs to know the time and date
of each message they receive without taking any extra steps. If mailbox security is not an issue, the
subscriber can delete their security code to simplify logging on to their mailbox.
Mailbox Options Menu
Option Description
S (7)[Code]
Set or delete the mailbox's Security Code.See Mailbox Security Code Delete on the next page.
N (6)[Notif]
Set up Message Notification.See Message Notification on page 2-153.
AT (28)[Time]
Enable or disable Auto Time Stamp.See Auto Time Stamp on page 2-23.
To hear the list of Mailbox Options, dial 0.
Related Features
Auto Time Stamp on page 2-23
InMail can optionally announce the time and date the message was left.
Mailbox Security Code Delete on the next page
The System Administrator can delete the security code for any Subscriber Mailbox.
Message Notification on page 2-153
Message Notification dials a telephone or pager number to let the user know they have new messages
in their mailbox.
Programming
No additional programming required.
Operation
Accessing the Mailbox Options Menu
Log On to Subscriber Mailbox.
OP (67) Access the Mailbox Options Menu.[Not applicable]
0 Plays Help message.
ISSUE 1.1 SL1000
M
InMail Feature Manual 2-139
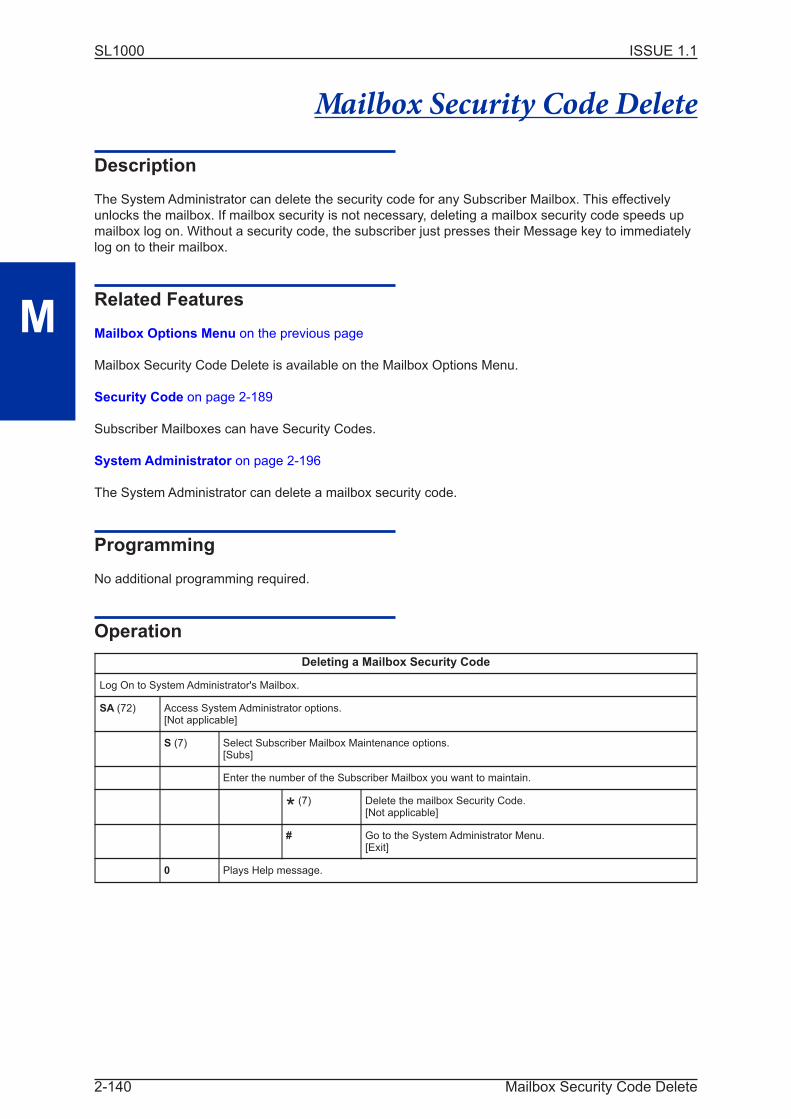
Mailbox Security Code Delete
Description
The System Administrator can delete the security code for any Subscriber Mailbox. This effectively
unlocks the mailbox. If mailbox security is not necessary, deleting a mailbox security code speeds up
mailbox log on. Without a security code, the subscriber just presses their Message key to immediately
log on to their mailbox.
Related Features
Mailbox Options Menu on the previous page
Mailbox Security Code Delete is available on the Mailbox Options Menu.
Security Code on page 2-189
Subscriber Mailboxes can have Security Codes.
System Administrator on page 2-196
The System Administrator can delete a mailbox security code.
Programming
No additional programming required.
Operation
Deleting a Mailbox Security Code
Log On to System Administrator's Mailbox.
SA (72) Access System Administrator options.[Not applicable]
S (7) Select Subscriber Mailbox Maintenance options.[Subs]
Enter the number of the Subscriber Mailbox you want to maintain.
* (7) Delete the mailbox Security Code.[Not applicable]
# Go to the System Administrator Menu.[Exit]
0 Plays Help message.
ISSUE 1.1SL1000
M
Mailbox Security Code Delete2-140
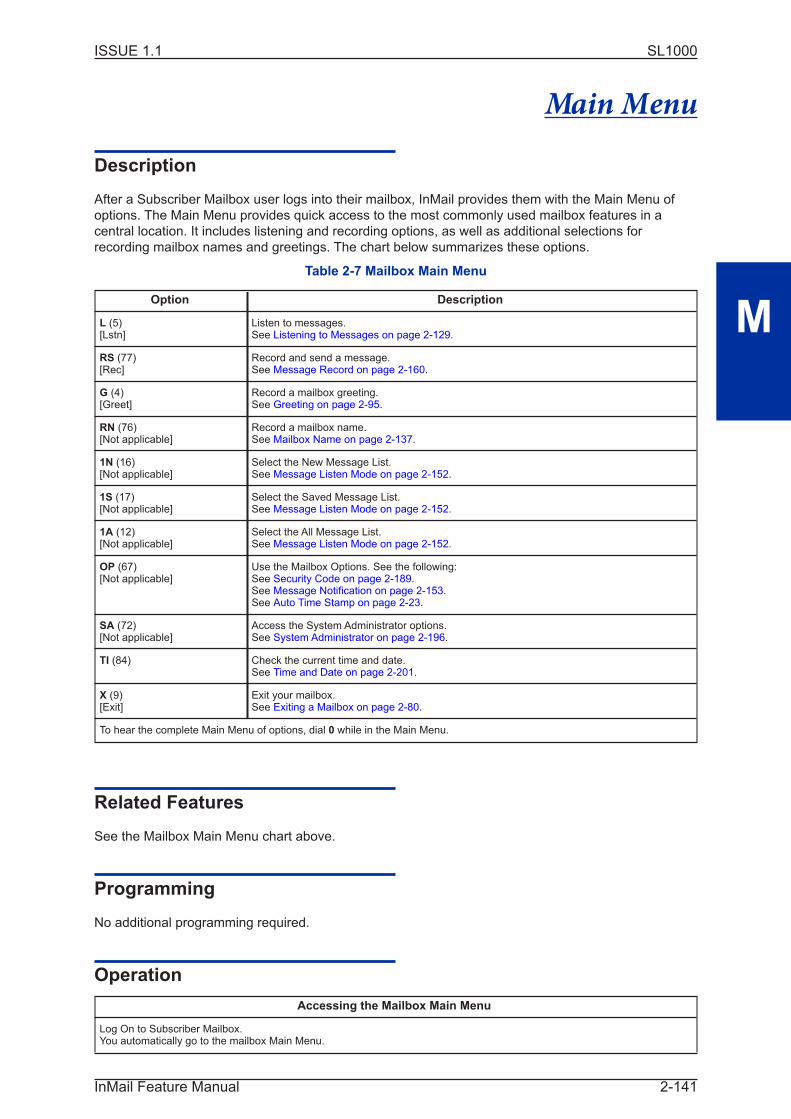
Main Menu
Description
After a Subscriber Mailbox user logs into their mailbox, InMail provides them with the Main Menu of
options. The Main Menu provides quick access to the most commonly used mailbox features in a
central location. It includes listening and recording options, as well as additional selections for
recording mailbox names and greetings. The chart below summarizes these options.
Table 2-7 Mailbox Main Menu
Option Description
L (5)[Lstn]
Listen to messages.See Listening to Messages on page 2-129.
RS (77)[Rec]
Record and send a message.See Message Record on page 2-160.
G (4)[Greet]
Record a mailbox greeting.See Greeting on page 2-95.
RN (76)[Not applicable]
Record a mailbox name.See Mailbox Name on page 2-137.
1N (16)[Not applicable]
Select the New Message List.See Message Listen Mode on page 2-152.
1S (17)[Not applicable]
Select the Saved Message List.See Message Listen Mode on page 2-152.
1A (12)[Not applicable]
Select the All Message List.See Message Listen Mode on page 2-152.
OP (67)[Not applicable]
Use the Mailbox Options. See the following:See Security Code on page 2-189.See Message Notification on page 2-153.See Auto Time Stamp on page 2-23.
SA (72)[Not applicable]
Access the System Administrator options.See System Administrator on page 2-196.
TI (84) Check the current time and date.See Time and Date on page 2-201.
X (9)[Exit]
Exit your mailbox.See Exiting a Mailbox on page 2-80.
To hear the complete Main Menu of options, dial 0 while in the Main Menu.
Related Features
See the Mailbox Main Menu chart above.
Programming
No additional programming required.
Operation
Accessing the Mailbox Main Menu
Log On to Subscriber Mailbox.You automatically go to the mailbox Main Menu.
ISSUE 1.1 SL1000
M
InMail Feature Manual 2-141

Accessing the Mailbox Main Menu
0 Plays Help message which summarizes the Main Menu options.See Table 2-7 Mailbox Main Menu on the previous page for the Main Menu options.
ISSUE 1.1SL1000
M
Main Menu2-142
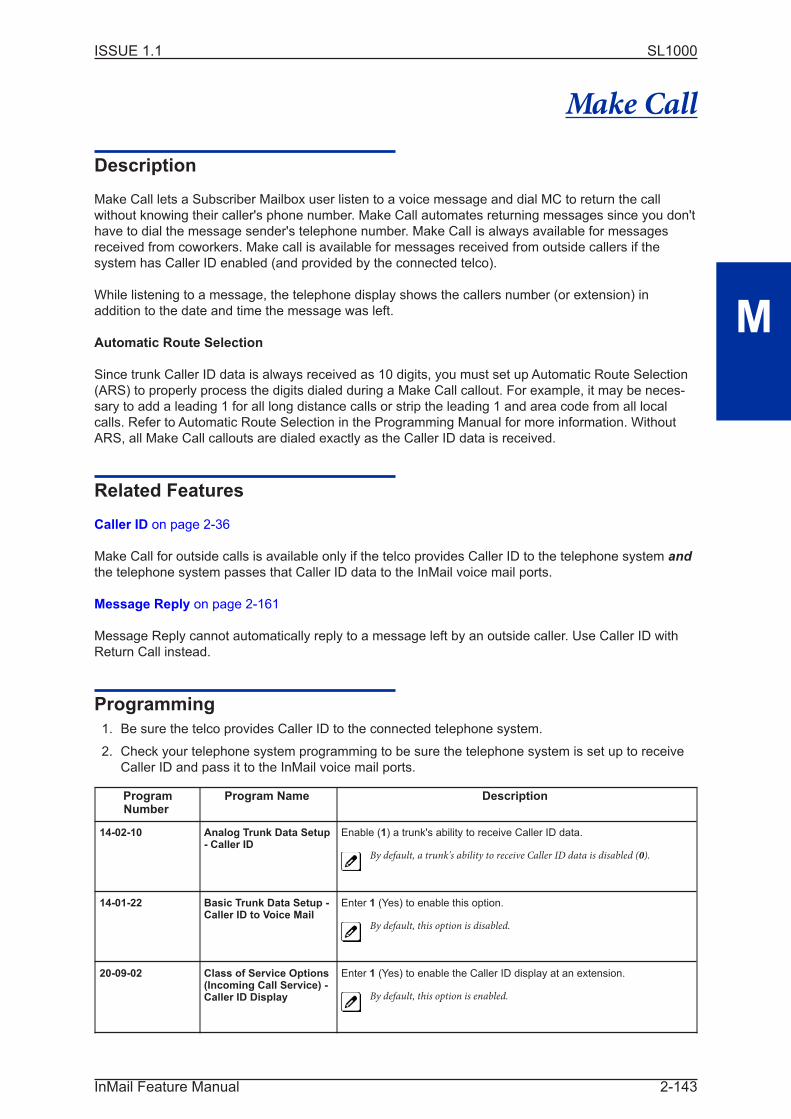
Make Call
Description
Make Call lets a Subscriber Mailbox user listen to a voice message and dial MC to return the call
without knowing their caller's phone number. Make Call automates returning messages since you don't
have to dial the message sender's telephone number. Make Call is always available for messages
received from coworkers. Make call is available for messages received from outside callers if the
system has Caller ID enabled (and provided by the connected telco).
While listening to a message, the telephone display shows the callers number (or extension) in
addition to the date and time the message was left.
Automatic Route Selection
Since trunk Caller ID data is always received as 10 digits, you must set up Automatic Route Selection
(ARS) to properly process the digits dialed during a Make Call callout. For example, it may be neces-
sary to add a leading 1 for all long distance calls or strip the leading 1 and area code from all local
calls. Refer to Automatic Route Selection in the Programming Manual for more information. Without
ARS, all Make Call callouts are dialed exactly as the Caller ID data is received.
Related Features
Caller ID on page 2-36
Make Call for outside calls is available only if the telco provides Caller ID to the telephone system and
the telephone system passes that Caller ID data to the InMail voice mail ports.
Message Reply on page 2-161
Message Reply cannot automatically reply to a message left by an outside caller. Use Caller ID with
Return Call instead.
Programming
1. Be sure the telco provides Caller ID to the connected telephone system.
2. Check your telephone system programming to be sure the telephone system is set up to receive
Caller ID and pass it to the InMail voice mail ports.
ProgramNumber
Program Name Description
14-02-10 Analog Trunk Data Setup- Caller ID
Enable (1) a trunk's ability to receive Caller ID data.
By default, a trunk's ability to receive Caller ID data is disabled (0).
14-01-22 Basic Trunk Data Setup -Caller ID to Voice Mail
Enter 1 (Yes) to enable this option.
By default, this option is disabled.
20-09-02 Class of Service Options(Incoming Call Service) -Caller ID Display
Enter 1 (Yes) to enable the Caller ID display at an extension.
By default, this option is enabled.
ISSUE 1.1 SL1000
M
InMail Feature Manual 2-143
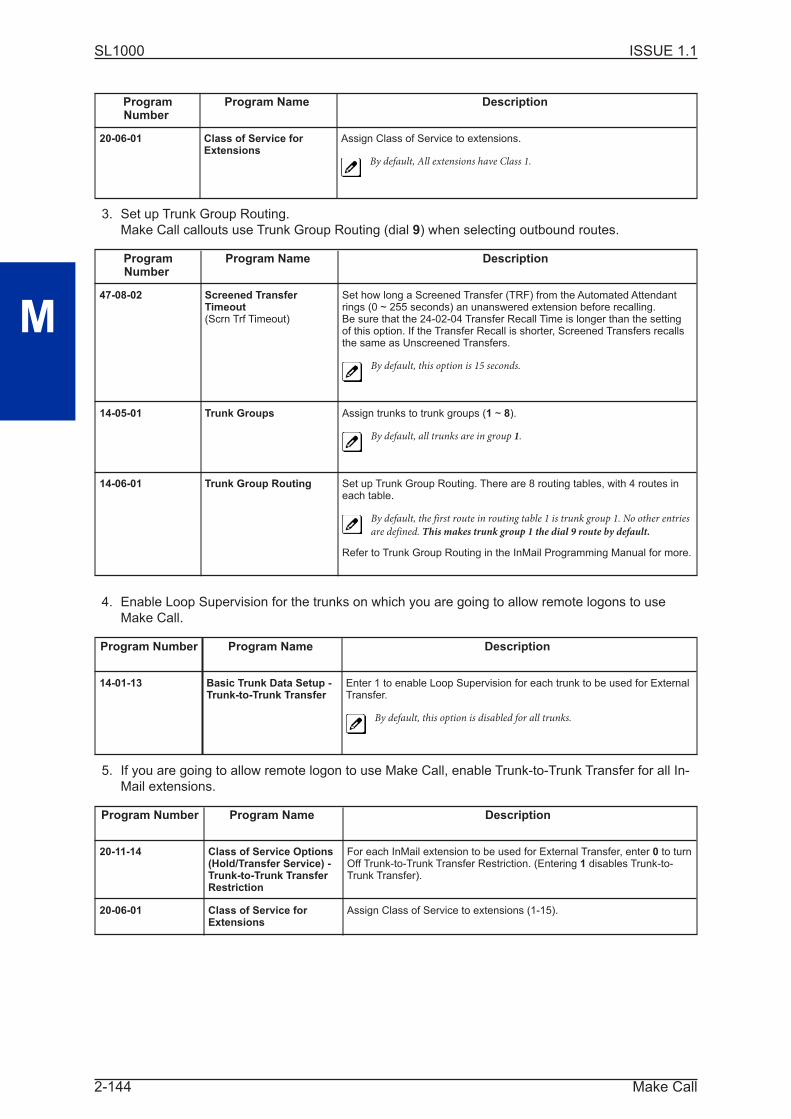
ProgramNumber
Program Name Description
20-06-01 Class of Service forExtensions
Assign Class of Service to extensions.
By default, All extensions have Class 1.
3. Set up Trunk Group Routing.
Make Call callouts use Trunk Group Routing (dial 9) when selecting outbound routes.
ProgramNumber
Program Name Description
47-08-02 Screened TransferTimeout(Scrn Trf Timeout)
Set how long a Screened Transfer (TRF) from the Automated Attendantrings (0 ~ 255 seconds) an unanswered extension before recalling.Be sure that the 24-02-04 Transfer Recall Time is longer than the settingof this option. If the Transfer Recall is shorter, Screened Transfers recallsthe same as Unscreened Transfers.
By default, this option is 15 seconds.
14-05-01 Trunk Groups Assign trunks to trunk groups (1 ~ 8).
By default, all trunks are in group 1.
14-06-01 Trunk Group Routing Set up Trunk Group Routing. There are 8 routing tables, with 4 routes ineach table.
By default, the first route in routing table 1 is trunk group 1. No other entries
are defined. This makes trunk group 1 the dial 9 route by default.
Refer to Trunk Group Routing in the InMail Programming Manual for more.
4. Enable Loop Supervision for the trunks on which you are going to allow remote logons to use
Make Call.
Program Number Program Name Description
14-01-13 Basic Trunk Data Setup -Trunk-to-Trunk Transfer
Enter 1 to enable Loop Supervision for each trunk to be used for ExternalTransfer.
By default, this option is disabled for all trunks.
5. If you are going to allow remote logon to use Make Call, enable Trunk-to-Trunk Transfer for all In-
Mail extensions.
Program Number Program Name Description
20-11-14 Class of Service Options(Hold/Transfer Service) -Trunk-to-Trunk TransferRestriction
For each InMail extension to be used for External Transfer, enter 0 to turnOff Trunk-to-Trunk Transfer Restriction. (Entering 1 disables Trunk-to-Trunk Transfer).
20-06-01 Class of Service forExtensions
Assign Class of Service to extensions (1-15).
ISSUE 1.1SL1000
M
Make Call2-144
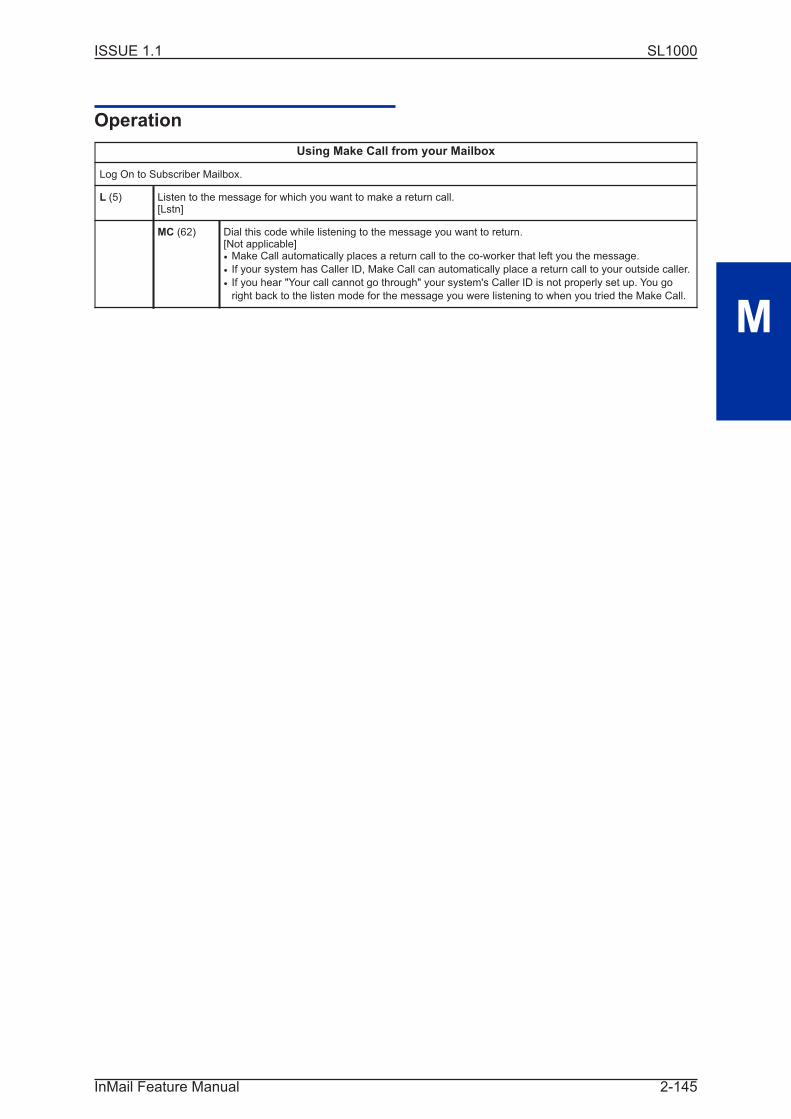
Operation
Using Make Call from your Mailbox
Log On to Subscriber Mailbox.
L (5) Listen to the message for which you want to make a return call.[Lstn]
MC (62) Dial this code while listening to the message you want to return.[Not applicable]• Make Call automatically places a return call to the co-worker that left you the message.
• If your system has Caller ID, Make Call can automatically place a return call to your outside caller.
• If you hear "Your call cannot go through" your system's Caller ID is not properly set up. You go
right back to the listen mode for the message you were listening to when you tried the Make Call.
ISSUE 1.1 SL1000
M
InMail Feature Manual 2-145
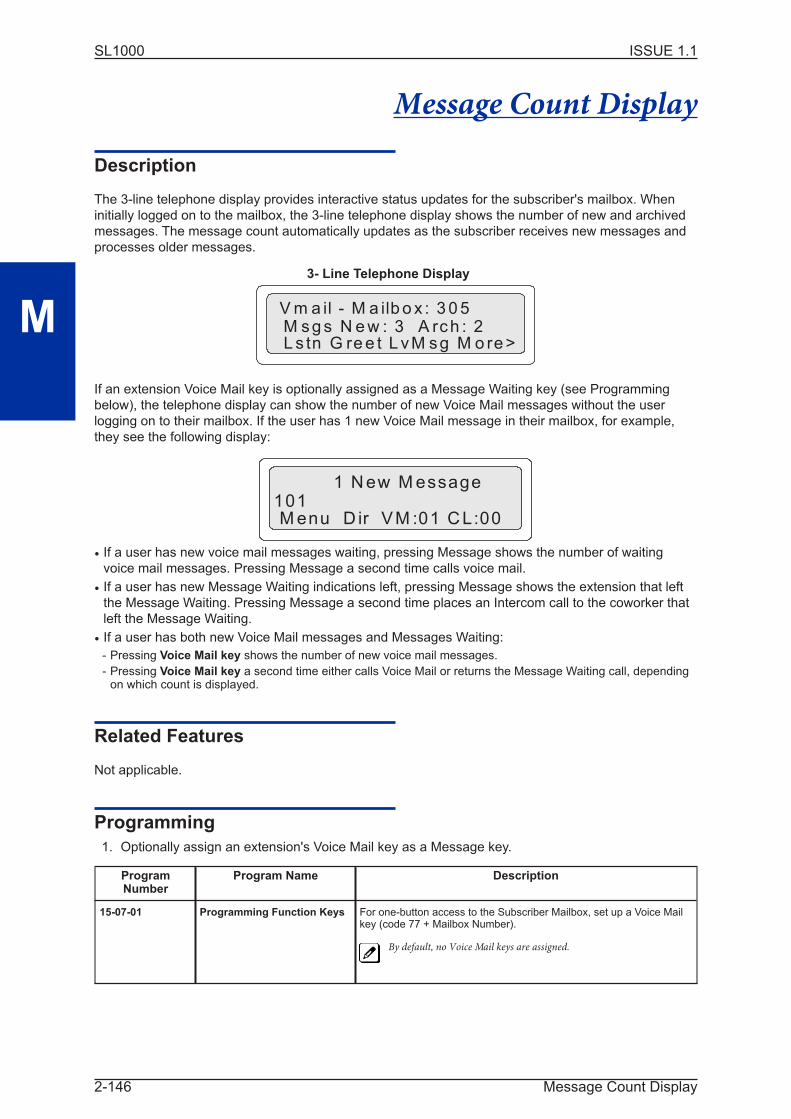
Message Count Display
Description
The 3-line telephone display provides interactive status updates for the subscriber's mailbox. When
initially logged on to the mailbox, the 3-line telephone display shows the number of new and archived
messages. The message count automatically updates as the subscriber receives new messages and
processes older messages.
3- Line Telephone Display
V m a il - M a ilb o x : 3 0 5 M s g s N e w : 3 A rch : 2 L s tn G re e t L vM sg M o re >
If an extension Voice Mail key is optionally assigned as a Message Waiting key (see Programming
below), the telephone display can show the number of new Voice Mail messages without the user
logging on to their mailbox. If the user has 1 new Voice Mail message in their mailbox, for example,
they see the following display:
1 N ew M essage101 M enu D ir VM :01 C L:00
• If a user has new voice mail messages waiting, pressing Message shows the number of waitingvoice mail messages. Pressing Message a second time calls voice mail.
• If a user has new Message Waiting indications left, pressing Message shows the extension that leftthe Message Waiting. Pressing Message a second time places an Intercom call to the coworker that
left the Message Waiting.
• If a user has both new Voice Mail messages and Messages Waiting:
- Pressing Voice Mail key shows the number of new voice mail messages.
- Pressing Voice Mail key a second time either calls Voice Mail or returns the Message Waiting call, dependingon which count is displayed.
Related Features
Not applicable.
Programming
1. Optionally assign an extension's Voice Mail key as a Message key.
ProgramNumber
Program Name Description
15-07-01 Programming Function Keys For one-button access to the Subscriber Mailbox, set up a Voice Mailkey (code 77 + Mailbox Number).
By default, no Voice Mail keys are assigned.
ISSUE 1.1SL1000
M
Message Count Display2-146

Operation
Using the Message Count Display
Operation is automatic.
ISSUE 1.1 SL1000
M
InMail Feature Manual 2-147

Message Delete
Description
A Subscriber Mailbox user can delete any message left in their mailbox. Message Delete lets the
subscriber do their own mailbox maintenance. They can delete messages they no longer need and
archive messages that contain essential information. With Message Delete, the subscriber doesn't
have to rely on the System Administrator to perform these routine mailbox maintenance functions.
Related Features
Erasing All Messages on page 2-79
The System Administrator can delete all messages in a Subscriber Mailbox.
Subscriber Mailbox on page 2-193
A subscriber can log on to their mailbox and delete any of their messages.
Programming
No additional programming required.
Operation
Deleting a Message
Log On to Subscriber Mailbox.
L (5) Access Message Listen mode (to listen to the message that you want to delete).[Lstn]
D (3) Delete the message.[Del]• You automatically return to the Message Listen mode.
• The message count updates after the user hangs up.
ISSUE 1.1SL1000
M
Message Delete2-148
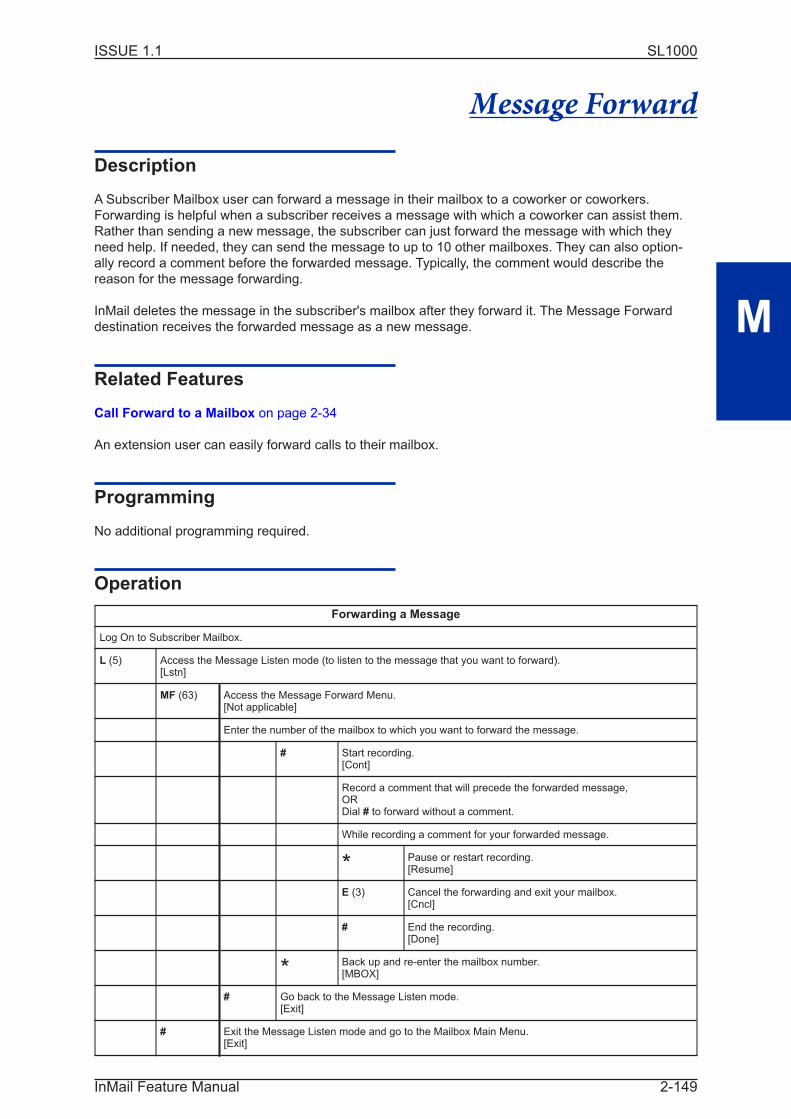
Message Forward
Description
A Subscriber Mailbox user can forward a message in their mailbox to a coworker or coworkers.
Forwarding is helpful when a subscriber receives a message with which a coworker can assist them.
Rather than sending a new message, the subscriber can just forward the message with which they
need help. If needed, they can send the message to up to 10 other mailboxes. They can also option-
ally record a comment before the forwarded message. Typically, the comment would describe the
reason for the message forwarding.
InMail deletes the message in the subscriber's mailbox after they forward it. The Message Forward
destination receives the forwarded message as a new message.
Related Features
Call Forward to a Mailbox on page 2-34
An extension user can easily forward calls to their mailbox.
Programming
No additional programming required.
Operation
Forwarding a Message
Log On to Subscriber Mailbox.
L (5) Access the Message Listen mode (to listen to the message that you want to forward).[Lstn]
MF (63) Access the Message Forward Menu.[Not applicable]
Enter the number of the mailbox to which you want to forward the message.
# Start recording.[Cont]
Record a comment that will precede the forwarded message,ORDial # to forward without a comment.
While recording a comment for your forwarded message.
* Pause or restart recording.[Resume]
E (3) Cancel the forwarding and exit your mailbox.[Cncl]
# End the recording.[Done]
* Back up and re-enter the mailbox number.[MBOX]
# Go back to the Message Listen mode.[Exit]
# Exit the Message Listen mode and go to the Mailbox Main Menu.[Exit]
ISSUE 1.1 SL1000
M
InMail Feature Manual 2-149

Forwarding a Message
0 Plays Help message.
ISSUE 1.1SL1000
M
Message Forward2-150

Message Length
Description
You can set the maximum message length that can be left in a Subscriber Mailbox. When a caller tries
to leave a message that exceeds the limit, they hear, "You have reached the recording limit." InMail
sends the portion of the message that fits within the allowed Message Length and hangs up. The
Message Length option helps maximize the storage space reserved for messages. If you find that
callers are leaving unusually long messages, shorten the Message Length. InMail cuts off the
message when the caller reaches the Message Length limit. On the other hand, if you hear that InMail
is cutting off caller's messages prematurely, increase the Message Length for more time.
Related Features
Not applicable.
Programming
1. Set the maximum length of recorded messages.
ProgramNumber
Program Name Description
47-01-03 Incoming Message Length(Subs Msg Length)
This option sets the maximum length (1 ~ 4095 seconds) of recordedmessages for:• Subscriber Mailbox users dialing RS to record and send a message.
• Extension users leaving a message in a Subscriber Mailbox.
• Outside Automated Attendant callers accessing a mailbox via a GOTO
command and then dialing RS to record and send a message.
• Subscriber Mailbox Greetings.
• Mailbox Names.
• Announcement Messages.
• Call Routing Mailbox Instruction Menus.
By default, these messages are a maximum of 120 seconds.
2. Set the maximum length of recorded Quick Messages.
ProgramNumber
Program Name Description
47-01-04 Outgoing Message Length(Mbox Msg Length)
This option sets the maximum length (1 ~ 4095 seconds) of recordedmessages for:• Automated Attendant callers leaving a message or Quick Message in
a Subscriber Mailbox.
• Outside callers transferred by an extension user to a Subscriber
Mailbox.
By default, these messages are a maximum of 120 seconds.
Operation
Not applicable.
ISSUE 1.1 SL1000
M
InMail Feature Manual 2-151
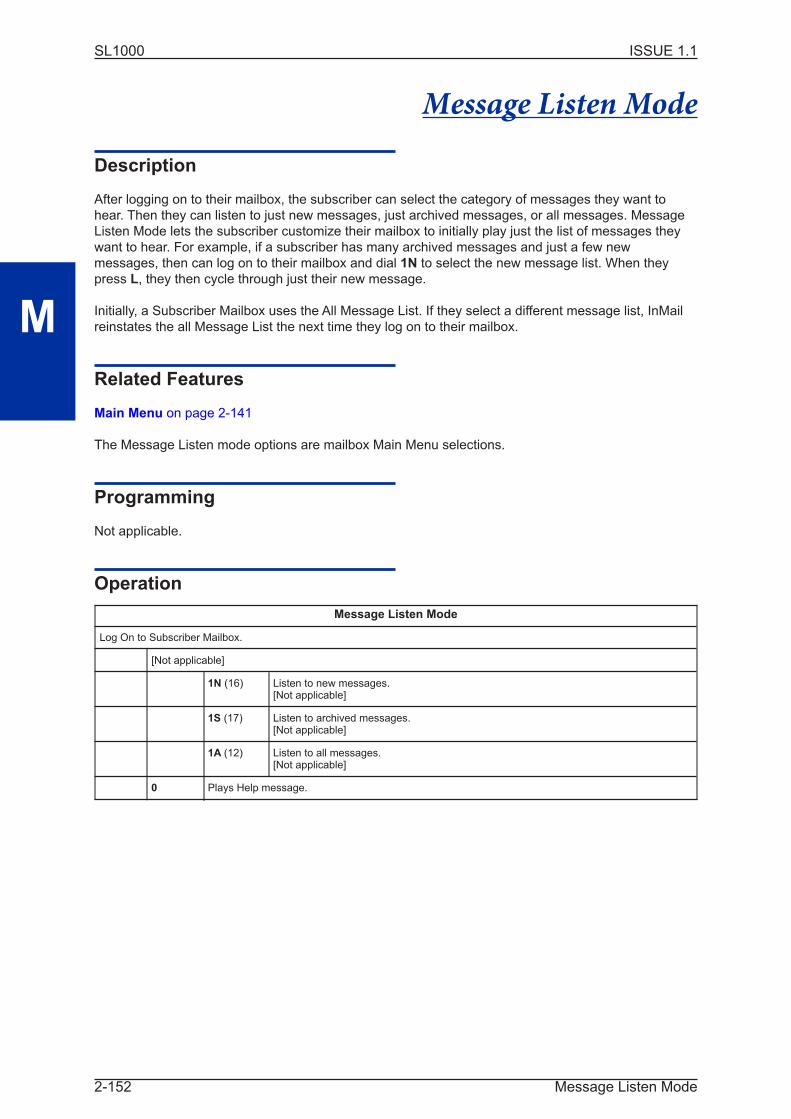
Message Listen Mode
Description
After logging on to their mailbox, the subscriber can select the category of messages they want to
hear. Then they can listen to just new messages, just archived messages, or all messages. Message
Listen Mode lets the subscriber customize their mailbox to initially play just the list of messages they
want to hear. For example, if a subscriber has many archived messages and just a few new
messages, then can log on to their mailbox and dial 1N to select the new message list. When they
press L, they then cycle through just their new message.
Initially, a Subscriber Mailbox uses the All Message List. If they select a different message list, InMail
reinstates the all Message List the next time they log on to their mailbox.
Related Features
Main Menu on page 2-141
The Message Listen mode options are mailbox Main Menu selections.
Programming
Not applicable.
Operation
Message Listen Mode
Log On to Subscriber Mailbox.
[Not applicable]
1N (16) Listen to new messages.[Not applicable]
1S (17) Listen to archived messages.[Not applicable]
1A (12) Listen to all messages.[Not applicable]
0 Plays Help message.
ISSUE 1.1SL1000
M
Message Listen Mode2-152

Message Notification
Description
Once activated by the Subscriber Mailbox user, Message Notification alerts a telephone number to let
the user know when there are new messages in their mailbox. With Message Notification, a subscriber
who is out of the office does not have keep calling their mailbox remotely to find out if they have new
messages. InMail lets them know automatically. Notification can call extensions, local numbers, long
distance numbers and digital pagers. When a Subscriber Mailbox user sets up Message Notification,
they choose from the following options:
• If Message Notification is enabled or disabled.(Message Notification can only occur if it is enabled.)
• The time of day Message Notification should begin and end.(Callouts only occur between the begin and end times.)
• The type of device Message Notification is calling.(Message Notification can call a normal telephone number or a digital pager.)
• The telephone or pager service phone number.
To protect your mailbox from unauthorized access, be sure to record a security code for your mailbox
before enabling Message Notification.
How Message Notification Works to Normal Telephone Numbers
1. The subscriber activates Message Notification for their mailbox (see Operation below).
2. When the subscriber receives a new message, InMail immediately dials the destination that
should receive the Message Notification.
• InMail waits up to 30 seconds for ringback, reorder, busy or voice activity from the called num-ber. If nothing is detected, the callout is considered unanswered.
3. If the recipient answers, InMail plays the notification message ("Hello, I have a message for") and
asks the recipient to dial 1 to log on to their mailbox. The recipient hears the notification message
if:
• They say "Hello" after answering the callout.- OR -
• The system receives answer supervision from the telco after the recipient answers the call.
The recipient can skip the announcement by dialing 1 to log on to their mailbox after answering thecallout - without saying "Hello."
• The notification is to a system extension.
4. After the recipient logs on to the mailbox, the notification is considered acknowledged and does
not reoccur until the subscriber receives new messages.
5. If the recipient doesn't answer, the system retries the callout number. After completing the pro-
grammed number of callout attempts, Message Notification stops.
6. After the notification process begins, a new message does not restart the process if it is already in
progress. After the process ends (e.g., if the message is acknowledged or the maximum number
of callout attempts is reached), the next new message restarts the process.
How Message Notification Works to Digital Pager Numbers
1. The subscriber activates Message Notification for their mailbox (see Operation below).
2. When subscriber receives a new message, InMail immediately dials the pager service.
• InMail waits up to 30 seconds for ringback, reorder, busy or voice activity from the called num-ber. If nothing is detected, the callout is considered unanswered.
3. After the pager service answers, InMail sends a dial string which causes the pager display to
show the subscriber's mailbox number as well as the number of new messages in the mailbox.
• The notification is considered acknowledged if the recipient logs on to the mailbox. Notificationdoes not reoccur until the subscriber receives new messages.
ISSUE 1.1 SL1000
M
InMail Feature Manual 2-153
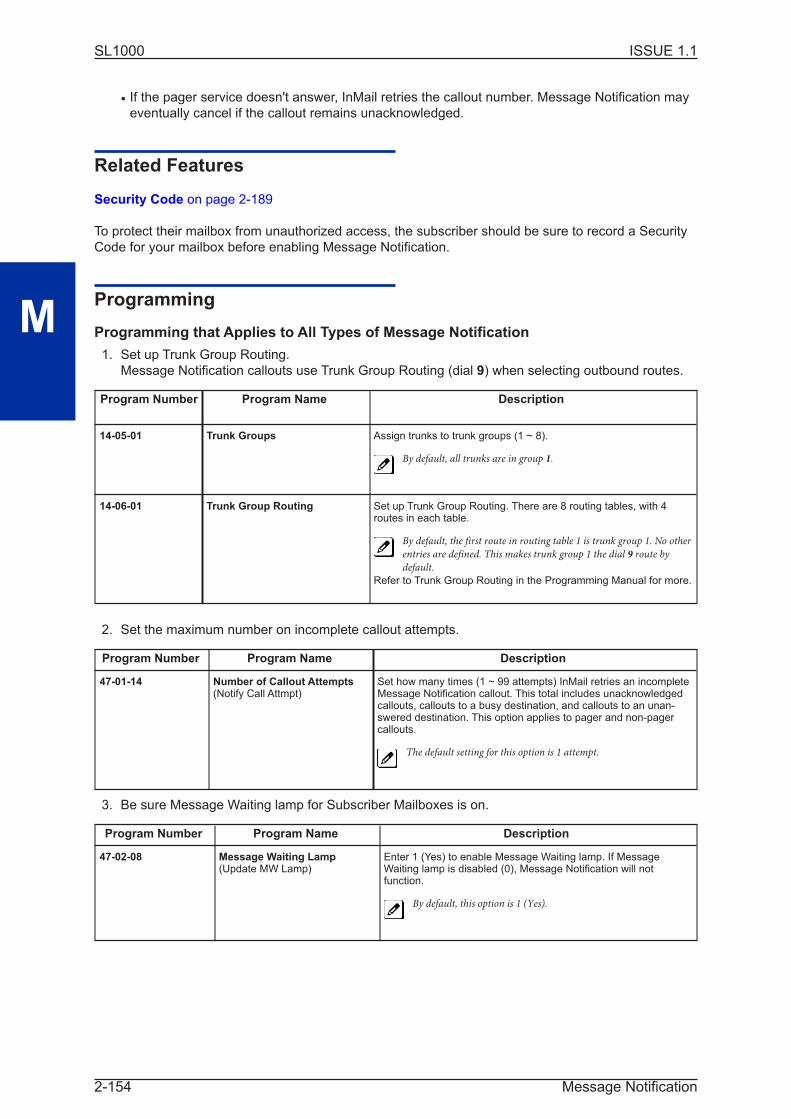
• If the pager service doesn't answer, InMail retries the callout number. Message Notification mayeventually cancel if the callout remains unacknowledged.
Related Features
Security Code on page 2-189
To protect their mailbox from unauthorized access, the subscriber should be sure to record a Security
Code for your mailbox before enabling Message Notification.
Programming
Programming that Applies to All Types of Message Notification
1. Set up Trunk Group Routing.
Message Notification callouts use Trunk Group Routing (dial 9) when selecting outbound routes.
Program Number Program Name Description
14-05-01 Trunk Groups Assign trunks to trunk groups (1 ~ 8).
By default, all trunks are in group 1.
14-06-01 Trunk Group Routing Set up Trunk Group Routing. There are 8 routing tables, with 4routes in each table.
By default, the first route in routing table 1 is trunk group 1. No other
entries are defined. This makes trunk group 1 the dial 9 route by
default.
Refer to Trunk Group Routing in the Programming Manual for more.
2. Set the maximum number on incomplete callout attempts.
Program Number Program Name Description
47-01-14 Number of Callout Attempts(Notify Call Attmpt)
Set how many times (1 ~ 99 attempts) InMail retries an incompleteMessage Notification callout. This total includes unacknowledgedcallouts, callouts to a busy destination, and callouts to an unan-swered destination. This option applies to pager and non-pagercallouts.
The default setting for this option is 1 attempt.
3. Be sure Message Waiting lamp for Subscriber Mailboxes is on.
Program Number Program Name Description
47-02-08 Message Waiting Lamp(Update MW Lamp)
Enter 1 (Yes) to enable Message Waiting lamp. If MessageWaiting lamp is disabled (0), Message Notification will notfunction.
By default, this option is 1 (Yes).
ISSUE 1.1SL1000
M
Message Notification2-154

Unique Programming for Non-Pager Message Notification
1. Set the intervals InMail waits between incomplete non-pager Message Notification callouts.
Program Number Program Name Description
47-01-10 Wait Between Non-PagerCallout Attempts(Notify N-Pgr Intvl)
Set the minimum time (1 ~ 255 minutes) between non-pagerMessage Notification callouts in which the destination answers,says "Hello," dials 1 to acknowledge and then enters the wrongsecurity code.
The default for this option is 20minutes.
47-01-11 Wait Between Busy Non-PagerCallout Attempts(Notify Busy Intvl)
Set how long InMail will wait (1 ~ 255 minutes), after it dials a busynon-pager callout destination, before retrying the callout number.
The default for this option is 15minutes.
47-01-12 Wait Between RNA Non-PagerCallout Attempts(Notify RNA Intvl)
Set how long InMail will wait (1 ~ 255 minutes), after it dials anunanswered non-pager callout destination, before retrying thecallout number. The default setting for this option is 30 minutes.There are three types of unanswered non-pager callouts:• If the callout rings the destination longer than the 47-01-13 Wait
for Answer Non-Pager Callout Attempts option.
• If the destination answers, says "Hello" (or the system detects
answer supervision) and then hangs up without dialing 1 to log
on to their mailbox. This typically happens if someone unfamiliar
with notification answers the callout, or if the callout is picked up
by an answering machine.
• If the destination answers and then hangs up without saying
"Hello." This typically happens if someone unfamiliar with the
notification answers the callout (like the above example), or if
the call is picked up by an answering machine which insufficient
outgoing message volume.
The default for this option is 30minutes.
2. Set how InMail determines when a non-pager callout rings without being answered.
Program Number Program Name Description
47-01-13 Wait for Answer Non-PagerCallout Attempts(Notify RNA Rings)
If a non-pager callout rings the destination longer than this option(1 ~ 99 rings), InMail marks the call as unanswered (Ring NoAnswer) and hangs up.
The default for this option is 5 rings.
Unique Programming for Digital Pager Message Notification
1. Set up the system-wide options that apply to the digital pager callback number.
ProgramNumber
Program Name Description
47-01-07 Digital Pager Callback Number(Pager CBack)
Set the Digital Pager Callback Number portion of the MessageNotification callout number for a digital pager. This is the portionof the callout number that is appended to the pager service tele-phone number.
By default, this option is X*M# where:• X is the number of the extension that generated the notification.• * is a visual delimiter (to make the pager display easier to read).• M is the number of new messages in the extension's mailbox.• # is the digit normally used by the pager service for positivedisconnect.
ISSUE 1.1 SL1000
M
InMail Feature Manual 2-155

ProgramNumber
Program Name Description
47-01-08 Delay in Dialing Digital PagerCallback Number(Pager Dial Delay)
Set the delay (0 ~ 99 seconds) that occurs just before InMail dialsthe Digital Pager Callback Number portion of the Message Notifi-cation callout number for a digital pager. Set this delay so thepager service has enough time to connect to the digital pagerbefore sending the callback number. Your pager service may beable to help you determine the best value for this option (0 ~ 99seconds). When placing a digital pager notification, the system:• Seizes the trunk specified by the Trunk Group Routing setup.
• Dials the user-entered notification number (in Message + OP +
N).
• Waits the 47-01-08 Delay in Dialing Digital Pager Callback
Number interval.
• Dials the number entered in 47-01-07 Digital Pager Callback
Number.
The system assumes that the notification number completes
dialing approximately 4 seconds after trunk seizure. This means
that, by default, the Digital Pager Callback Number is
dialed into the pager service about 13 seconds after trunk
seizure.
Your pager service may be able to help you determine the best
value for this option.
By default, this option is 30 seconds.
2. Set up the system-wide options that apply to digital pager callouts.
ProgramNumber
Program Name Description
47-01-09 Wait Between Digital Pager CalloutAttempts(Notify Pager Intvl)
Set the minimum time (1 ~ 255 minutes) between unacknowl-edged or unanswered digital pager Message Notificationcallouts. (A subscriber acknowledges a digital pager notificationby logging on to their mailbox.) After this interval expires, InMailtries the callout again (for up to the number of times set in47-01-14 Number of Callout Attempts).If the system dials the callout number and the pager service isbusy, it retries the number in one minute.
By default, this option is 15minutes.
47-01-15 Send Pager Callout Until Acknowl-edged(Retry Until Ack)
When this option is enabled (1), InMail continues to retry a digitalpager Message Notification callout until the notification isacknowledged. If this option is disabled (0), InMail retries adigital pager Message Notification the number of times specifiedin 47-01-14 Number of Callout Attempts. This option does notapply to Message Notification callouts to telephone numbers.A digital pager notification is acknowledged when the recipientlogs on to the mailbox.
By default, this option is disabled (0).
Operation
Setting Up Message Notification
Log On to Subscriber Mailbox.
OP (67) Access the Mailbox Options menu.[Not applicable]
N (6) Access the Message Notification Options Menu.[Notif]
ISSUE 1.1SL1000
M
Message Notification2-156

Setting Up Message Notification
InMail plays a summary of your Message Notification settings.The your telephone display shows your current notification settings (see sample below).For telephone numbersNotify On 8am- 5pmNumber: 12039265400- OR -For Pager NumbersNotify On 8am- 5pmPager: 12039265400
O (6) Turn Message Notification on or off.[On][Off]
C (2) Change your Message Notification setup.[Chnge]
When you see: Notification Begin
Enter the hour you want Message Notification to begin.Enter 2 digits for the hour.
A (2) Select AM.[AM]
P (7) Select PM.[PM]
* Skip this option without changing your entry.[Next]
# Back up to the previous level without changing your entry.[Exit]
When you see: Notification End
Enter the hour you want Message Notification to end.• Enter 2 digits for the hour.
• For 24-hour notification, make the End Time the same as the Start Time.
A (2) Select AM.[AM]
P (7) Select PM.[PM]
* Skip this option without changing your entry.[Next]
# Back up to the previous level without changing your entry.[Exit]
When you see: Notify Via
N (6) The notification destination is a telephone number.[Num]
D (3) The notification destination is a digital pager.[Pager]
* Skip this option without changing your entry.[Next]
# Back up to the previous level without changing your entry.[Exit]
When you see: Number
Enter the Message Notification callout number (16 digits max).• Enter the number exactly as you want the system to dial it (including a leading 1
for toll calls, if required).
• If the number you enter is 4 digits or less, it is an Intercom call. If it is more than
4 digits, it is an outside call.
# Accept the number entered and back up to the previouslevel.[OK]
[Clear] Delete the number you just entered.
ISSUE 1.1 SL1000
M
InMail Feature Manual 2-157

Setting Up Message Notification
* Skip this option without changing your entry.[Next]
# Back up to the previous level without changing your entry.[Exit]
# Go back to the Mailbox Options menu.[Exit]
# Go back to the Main Menu.[Exit]
0 Plays Help message.
Answering a Message Notification Callout to a Telephone
To answer a Message Notification to a telephone:
1. Answer the callout at the programmed destination.• If InMail does not hear your voice (or you do not speak), go to the next step and dial 1 to proceed.
2. Dial 1 to accept the Message Notification.
- OR -
hang up to have the Message Notification call back later.
3. When you dial 1, you automatically log on to the subscriber mailbox that left you the Message Notification.
• If you do not log on to your mailbox, InMail resends your notification.
Answering a Digital Pager Message Notification Callout
To answer a Digital Pager notification:
1. Operation is automatic.• If you do not call and log on to your mailbox, InMail resends your pager notification.
ISSUE 1.1SL1000
M
Message Notification2-158
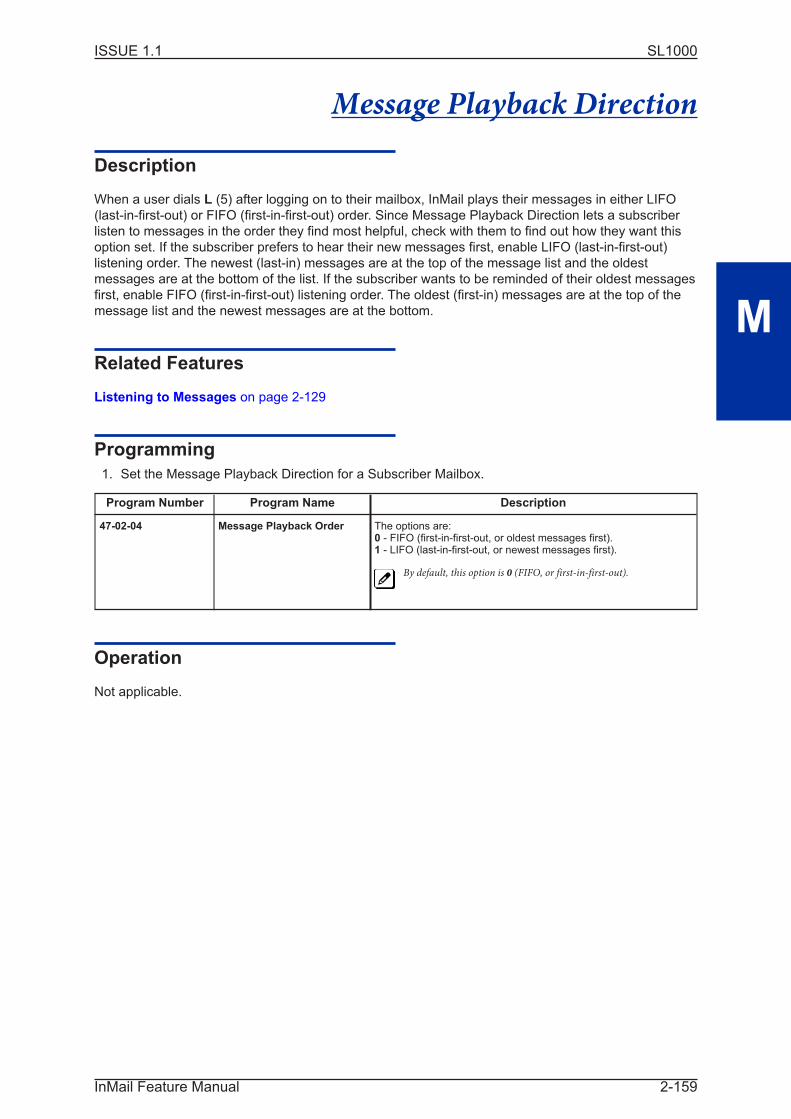
Message Playback Direction
Description
When a user dials L (5) after logging on to their mailbox, InMail plays their messages in either LIFO
(last-in-first-out) or FIFO (first-in-first-out) order. Since Message Playback Direction lets a subscriber
listen to messages in the order they find most helpful, check with them to find out how they want this
option set. If the subscriber prefers to hear their new messages first, enable LIFO (last-in-first-out)
listening order. The newest (last-in) messages are at the top of the message list and the oldest
messages are at the bottom of the list. If the subscriber wants to be reminded of their oldest messages
first, enable FIFO (first-in-first-out) listening order. The oldest (first-in) messages are at the top of the
message list and the newest messages are at the bottom.
Related Features
Listening to Messages on page 2-129
Programming
1. Set the Message Playback Direction for a Subscriber Mailbox.
Program Number Program Name Description
47-02-04 Message Playback Order The options are:0 - FIFO (first-in-first-out, or oldest messages first).1 - LIFO (last-in-first-out, or newest messages first).
By default, this option is 0 (FIFO, or first-in-first-out).
Operation
Not applicable.
ISSUE 1.1 SL1000
M
InMail Feature Manual 2-159

Message Record
Description
See Record and Send a Message on page 2-179.
Related Features
See Record and Send a Message on page 2-179.
Programming
See Record and Send a Message on page 2-179.
Operation
See Record and Send a Message on page 2-179.
ISSUE 1.1SL1000
M
Message Record2-160

Message Reply
Description
A Subscriber Mailbox user can reply to a message from a coworker by dialing RE, without knowing the
caller's extension or mailbox number. Message Reply saves the subscriber valuable time since they
don't need to know the sender's extension number or send a separate message to respond. The
subscriber can just listen to the coworker's message, dial a code, and record their answer. The
message sender receives the reply as a new message.
Related Features
Make Call on page 2-143
Message Reply does not apply to outside calls. If the telephone system provides Caller ID information
to InMail, a subscriber can use Make Call (MC) to call the person back.
Programming
No additional programming required.
Operation
Message Reply
Log On to Subscriber Mailbox.
L (5) Listen to your messages.[Lstn]
While listening to a message.
RE (73) Reply to the message.[Not applicable]If the mailbox does not exist, you are prompted to enter the mailbox number to receive thereply. This can occur if you dial RE while listening to a message from an outside caller.
# Start recording.[Cont]
Options available while recording.
* Pause or restart recording.[Resume][Pause]
D (3) Delete recording.[Cncl]
# End the recording.[Done]
* Back up and re-enter the mailbox number.[MBOX]
[Exit] Exit without recording and go back to the Message Listen menu.
# Exit and go back to the mailbox Main Menu.[Exit]
0 Plays Help message.
ISSUE 1.1 SL1000
M
InMail Feature Manual 2-161

Message Storage Limit
Description
Message Storage Limit sets how many messages can be left in a Subscriber Mailbox. Message
Storage Limit is another invaluable tool for managing InMail's voice message storage space. To
conserve storage space and make it available for new messages, decrease the Message Storage
Limit. If storage space is not an issue, increase the Message Storage Limit so subscribers can store
additional messages. Be sure to let the subscribers know how many messages their mailboxes can
hold. By default, InMail can store up to 99 messages in System Admin mailbox 200 and 20 messages
in all other Subscriber Mailboxes.
Related Features
Erasing All Messages on page 2-79
The System Administrator can delete all messages in a Subscriber Mailbox.
Message Delete on page 2-148
A Subscriber Mailbox user can delete any messages left in their mailbox.
Programming
1. Set the maximum number of messages that can be left in a Subscriber Mailbox.
Program Number Program Name Description
47-02-03 Number of Messages Enter the maximum number of messages the mailbox can store (0 ~99).If a caller tries to leave a message after the maximum number isreached, they hear: "That mailbox is full." InMail then hangs up.
By default, the maximum number of messages that can be left is 99 for
extension 200 and 20 for all others.
Operation
Not applicable.
ISSUE 1.1SL1000
M
Message Storage Limit2-162

Message Waiting Lamp
Description
An extension's Message Waiting (MSG) lamp flashes on the telephone to indicate that the user has
new messages waiting in their mailbox. After InMail is properly installed and programmed, telephone
Message Waiting Lamp operation is automatic. The lamp flashes fast when new messages are in the
extension user's mailbox. The Message Waiting Lamp is a visual reminder of new messages. The
subscriber does not have to call their mailbox and listen to the voice prompts to find out when they
have new messages.
Related Features
None
Programming
1. Turn Message Waiting lamp for Subscriber Mailboxes on or off.
Program Number Program Name Description
47-02-08 Message Waiting Lamp(Update MW Lamp)
Enter 0 (No) to disable Message Waiting lamp.Enter 1 (Yes) to enable Message Waiting lamp.If Message Waiting lamp is disabled (0), Message Notification doesnot function.
By default, this option is 1 (Yes).
Operation
Not applicable.
ISSUE 1.1 SL1000
M
InMail Feature Manual 2-163

Multiple Company Greetings
Description
The Automated Attendant can answer each individual trunk (outside line) with a unique greeting and
unique set of dialing options. Since there are a total of 8 Answer Tables, this allows up to 8 companies
or departments to share a single InMail. Callers to each company hear the company greeting (Instruc-
tion Menu) and can dial options that may be only available to that specific company. Set this up as
follows:
• Assign a unique Answer Table (1 ~ 8) to each trunk that you want to have an individual greeting.
• For each Answer Table, assign the Call Routing Mailbox that handles the call.
• For each assigned Call Routing Mailbox, set up the dialing options (Dial Action Table) and record anInstruction Menu.
If multiple companies or departments share an InMail, messaging and calling between the workers of
each company or department is not restricted.
Related Features
Answer Table on page 2-14
Determines how the Automated Attendant answers outside calls on each trunk.
Automated Attendant on page 2-25
The Automated Attendant can automatically answer the telephone system's incoming calls, play an
Instruction Menu message, and provide dialing options to callers.
Routing Mailbox on page 2-182
The mailbox associated with an Answer Table that specifies which dialing options (Dial Action Table)
and announcements are available to Automated Attendant callers.
Dial Action Table on page 2-49
Defines the dialing options for the Call Routing Mailbox chosen by the active Answer Table.
Programming
1. Assign an Answer Table to each trunk.
Program Number Program Name Description
47-10-01 Answer Table Assignment(Answer Table)
Assign an Answer Table (1 ~ 8) to each trunk that the AutomatedAttendant should answer.
By default, all trunks are assigned to Answer Table 1.
2. See the following features for more:
Answer Table on page 2-14.Automated Attendant on page 2-25.Routing Mailbox on page 2-182.Dial Action Table on page 2-49.
ISSUE 1.1SL1000
M
Multiple Company Greetings2-164

Operation
Not applicable.
ISSUE 1.1 SL1000
M
InMail Feature Manual 2-165

Next Call Routing Mailbox
Description
The Next Call Routing Mailbox provides callers with additional dialing options while listening to a
Subscriber Mailbox recorded, or the default greeting. It also provides additional dialing options to
callers routed to an Announcement Mailbox. Next Call Routing Mailbox lets the caller choose how
InMail should handle their call. For example, if an Automated Attendant caller dials a subscriber's
extension and hears the greeting, Next Call Routing Mailbox (if programmed) allows them to dial other
options instead of hanging up.
Subscriber Mailbox Options
The following chart shows the additional dialing options a caller has while listening to a Subscriber
Mailbox recorded or default greeting. The digits the caller can dial depends on the setting of the Next
Call Routing Mailbox and Dialing Option options. For an explanation of the options a caller can dial
while recording, see Record and Send a Message on page 2-179.
Dialing Options while Listening to a Subscriber Mailbox Greeting
47-02-14Next Call Routing
Mailbox
47-02-13Dialing Option
Digit Dialed Action
Trunk Call Intercom Call
Undefined No 0 Caller hears, "That is an invalid entry," and the greetingrepeats.
1 ~ 9
# InMail hangs up.
* Caller skips greeting and can immediately start recording.
1 ~ 32(valid Call Routing
Mailbox)
No 0 Caller follows 0 action inNext Call Routing Mailbox.
Caller hears, "That is an invalidentry," and the greeting repeats.
1 ~ 9 Caller hears, "That is an invalid entry," and the greetingrepeats.
# Caller routes to the NextCall Routing Mailbox andhears its Instruction Menu.
InMail hangs up.
* Caller skips greeting and can immediately start recording.
1 ~ 32(valid Call Routing
Mailbox)
Yes 0 Caller follows key action inNext Call Routing Mailbox.
Caller hears, "That is an invalidentry," and the greeting repeats.
1 ~ 9
# Caller routes to the NextCall Routing Mailbox andhears its Instruction Menu.
InMail hangs up.
* Caller skips greeting and can immediately start recording.
Logging On to a Subscriber Mailbox while Listening to the Greeting
A subscriber who wishes to log on to their mailbox while listening to their greeting must have the option
set in their Next Call Routing Mailbox. To allow this ability, for example:
• Program the Next Call Routing Mailbox # digit as LOGON to IXXX.
• While listening to their greeting, the subscriber can dial:
- # (to route to their Next Call Routing Mailbox), then
- # and their mailbox number to log on to their mailbox.
By default, this option is provided in Call Routing Mailbox 1. Additionally, the subscriber should enable
a Security Code for their mailbox to prevent unauthorized logons.
ISSUE 1.1SL1000
N
Next Call Routing Mailbox2-166

Announcement Mailbox Options
The following charts show how an Announcement Mailbox handles Automated Attendant calls.
The first chart explains what happens when the outside call is directly answered by the Announcement
Mailbox. This happens when the Answer Table uses an Announcement Mailbox for routing instead of a
Call Routing Mailbox.
The second chart explains what happens when the outside call is answered by a Call Routing Mailbox
and then routed to the Announcement Mailbox. This can happen, for example, when a caller dials a
digit to hear an announcement of company directions.
For more information, see Answer Table on page 2-14.
Direct Announcement Mailbox Routing(If the outside caller routes directly to the Announcement Mailbox)
47-09-01Next Call Routing
Mailbox
47-09-02Repeat Count
47-09-03Hang Up After
Action
Undefined 0 (No repeats) 0 = None1 = Goodbye2 = Silent
• If the caller doesn't dial, after the announcement,
InMail hangs up.
• If the caller dials a digit during the announcement,
InMail says "That is an invalid entry" and hangs up.
1 ~ 32(valid Call RoutingMailbox)
0 (No repeats) 0 = None1 = Goodbye2 = Silent
• If the caller doesn't dial, after the announcement,
they route to the Next Call Routing Mailbox.
• If the caller dials a digit during the announcement,
they route to the Next Call Routing Mailbox.
0 = None1 = Goodbye2 = Silent
• If the caller doesn't dial, after the announcement,
InMail hangs up.
• If the caller dials a digit during the announcement,
they route to the Next Call Routing Mailbox.
Undefined x (x number ofrepeats)
0 = None1 = Goodbye2 = Silent
• If caller doesn't dial, they hear the announcement x
number of times and then InMail hangs up.
• If the caller dials a digit during the announcement,
InMail says "That is an invalid entry" and aborts the
announcement. The announcement repeats (if
allowed by the Repeat Count) and then InMail
hangs up.
1 ~ 32(valid Call RoutingMailbox)
x (x number ofrepeats)
0 = None1 = Goodbye2 = Silent
• If caller doesn't dial, they hear the announcement x
number of times and then route to the Next Call
Routing Mailbox.
• If the caller dials a digit during the announcement,
they route to the Next Call Routing Mailbox.
0 = None1 = Goodbye2 = Silent
• If caller doesn't dial, they hear the announcement x
number of times and then then InMail hangs up.
• If the caller dials a digit during the announcement,
they route to the Next Call Routing Mailbox.
ISSUE 1.1 SL1000
N
InMail Feature Manual 2-167

Routed Announcement Mailbox Routing(If outside caller routes to Announcement Mailbox from Call Routing Mailbox)
47-09-01Next Call Routing
Mailbox
47-09-02Repeat Count
47-09-03Hang Up After
Action
Undefined 0 (No repeats) 0 = None1 = Goodbye2 = Silent
• If the caller doesn't dial, after the announcement,
the caller goes back to the initial Call Routing
Mailbox.
• If the caller dials a digit during the announcement,
InMail says "That is an invalid entry" and routes the
caller goes back to the initial Call Routing Mailbox.
0 = None1 = Goodbye2 = Silent
• If the caller doesn't dial, after the announcement,
InMail hangs up.
• If the caller dials a digit during the announcement,
InMail says "That is an invalid entry" and hangs up.
1 ~ 32(valid Call RoutingMailbox)
0 (No repeats) 0 = None1 = Goodbye2 = Silent
• If the caller doesn't dial, after the announcement,
they route to the Next Call Routing Mailbox.
• If the caller dials a digit during the announcement,
they route to the Next Call Routing Mailbox.
0 = None1 = Goodbye2 = Silent
• If the caller doesn't dial, after the announcement,
InMail hangs up.
• If the caller dials a digit during the announcement,
they route to the Next Call Routing Mailbox.
Undefined x (x number ofrepeats)
0 = None1 = Goodbye2 = Silent
• If caller doesn't dial, they hear the announcement x
number of times and then go back to the initial Call
Routing Mailbox.
• If the caller dials a digit during the announcement,
InMail says "That is an invalid entry" and aborts the
announcement. The announcement repeats (if
allowed by the Repeat Count) and then InMail
routes back to the initial Call Routing Mailbox.
0 = None1 = Goodbye2 = Silent
• If caller doesn't dial, they hear the announcement x
number of times and then InMail hangs up.
• If the caller dials a digit during the announcement,
InMail says "That is an invalid entry" and aborts the
announcement. The announcement repeats (if
allowed by the Repeat Count) and then InMail
hangs up.
1 ~ 32(valid Call RoutingMailbox)
x (x number ofrepeats)
0 = None1 = Goodbye2 = Silent
• If caller doesn't dial, they hear the announcement x
number of times and then route to the Next Call
Routing Mailbox.
• If the caller dials a digit during the announcement,
they route to the Next Call Routing Mailbox.
0 = None1 = Goodbye2 = Silent
• If caller doesn't dial, they hear the announcement x
number of times and then InMail hangs up.
• If the caller dials a digit during the announcement,
they route to the Next Call Routing Mailbox.
Related Features
Call Forward to a Mailbox on page 2-34
The Next Call Routing Mailbox dial options also apply to a subscriber's Direct Inward Line while it is
forwarded to their mailbox.
Record and Send a Message on page 2-179
Turn to this feature for an explanation of the options a caller can dial while recording.
ISSUE 1.1SL1000
N
Next Call Routing Mailbox2-168

Programming
Programming Subscriber Mailboxes
1. Assign the Next Call Routing Mailbox to a Subscriber Mailbox (if required).
Program Number Program Name Description
47-02-14 Next Call Routing Mailbox(Next CR Mbox)
Specify the Routing Mailbox (1 ~ 32) that should provide the callerleaving a message with additional dialing options.
By default, this option is 1 (Call Routing Mailbox 1). Call Routing Mail-
box numbers are 1 ~ 8.
2. Optionally allow the caller to dial additional digits (not just 0) once in the Next Call Routing Mail-
box.
Program Number Program Name Description
47-02-13 Dialing Option Enter 1 to enable additional dialing options.
By default, this option is disabled (0).
Programming Announcement Mailboxes
1. Assign the Next Call Routing Mailbox for the Announcement Mailbox (if required).
Program Number Program Name Description
47-09-01 Next Call Routing Mailbox(Next CR Mbox)
Specify the Routing Mailbox (1 ~ 32) to which the caller should routeafter hearing the Announcement Mailbox message.
By default, this option is 0 (Undefined).
2. Enter the number of times the Announcement Mailbox message should repeat before routing to
the Next Call Routing Mailbox.
Program Number Program Name Description
47-09-02 Repeat Count Specify the number of Announcement Mailbox message repeats (1 ~10, or 0 for no repeats).
By default, this option is 0 (no repeats).
3. Be sure the Announcement Mailbox does not hang up after playing its message.
Program Number Program Name Description
47-09-03 Hang Up After(HangUp)
Enter 0 (None) to disable this option.
By default, this option is disabled (0).
Operation
Not applicable.
ISSUE 1.1 SL1000
N
InMail Feature Manual 2-169
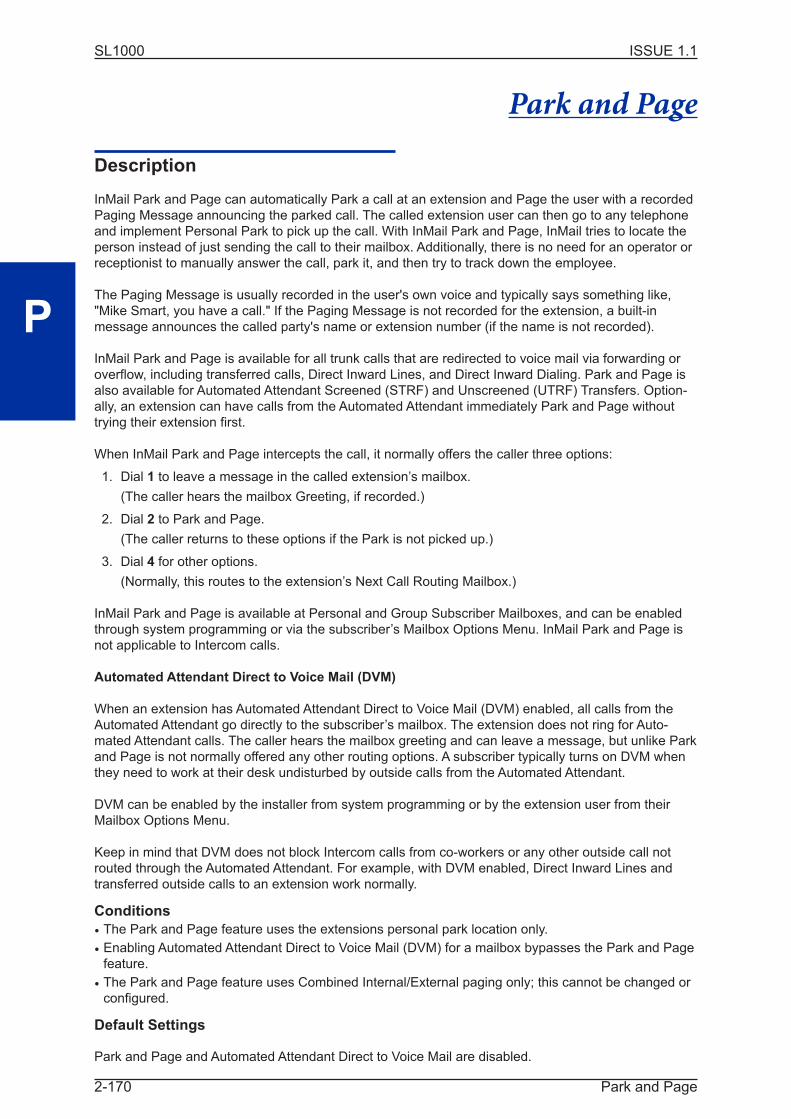
Park and Page
Description
InMail Park and Page can automatically Park a call at an extension and Page the user with a recorded
Paging Message announcing the parked call. The called extension user can then go to any telephone
and implement Personal Park to pick up the call. With InMail Park and Page, InMail tries to locate the
person instead of just sending the call to their mailbox. Additionally, there is no need for an operator or
receptionist to manually answer the call, park it, and then try to track down the employee.
The Paging Message is usually recorded in the user's own voice and typically says something like,
"Mike Smart, you have a call." If the Paging Message is not recorded for the extension, a built-in
message announces the called party's name or extension number (if the name is not recorded).
InMail Park and Page is available for all trunk calls that are redirected to voice mail via forwarding or
overflow, including transferred calls, Direct Inward Lines, and Direct Inward Dialing. Park and Page is
also available for Automated Attendant Screened (STRF) and Unscreened (UTRF) Transfers. Option-
ally, an extension can have calls from the Automated Attendant immediately Park and Page without
trying their extension first.
When InMail Park and Page intercepts the call, it normally offers the caller three options:
1. Dial 1 to leave a message in the called extension’s mailbox.
(The caller hears the mailbox Greeting, if recorded.)
2. Dial 2 to Park and Page.
(The caller returns to these options if the Park is not picked up.)
3. Dial 4 for other options.
(Normally, this routes to the extension’s Next Call Routing Mailbox.)
InMail Park and Page is available at Personal and Group Subscriber Mailboxes, and can be enabled
through system programming or via the subscriber’s Mailbox Options Menu. InMail Park and Page is
not applicable to Intercom calls.
Automated Attendant Direct to Voice Mail (DVM)
When an extension has Automated Attendant Direct to Voice Mail (DVM) enabled, all calls from the
Automated Attendant go directly to the subscriber’s mailbox. The extension does not ring for Auto-
mated Attendant calls. The caller hears the mailbox greeting and can leave a message, but unlike Park
and Page is not normally offered any other routing options. A subscriber typically turns on DVM when
they need to work at their desk undisturbed by outside calls from the Automated Attendant.
DVM can be enabled by the installer from system programming or by the extension user from their
Mailbox Options Menu.
Keep in mind that DVM does not block Intercom calls from co-workers or any other outside call not
routed through the Automated Attendant. For example, with DVM enabled, Direct Inward Lines and
transferred outside calls to an extension work normally.
Conditions
• The Park and Page feature uses the extensions personal park location only.
• Enabling Automated Attendant Direct to Voice Mail (DVM) for a mailbox bypasses the Park and Pagefeature.
• The Park and Page feature uses Combined Internal/External paging only; this cannot be changed orconfigured.
Default Settings
Park and Page and Automated Attendant Direct to Voice Mail are disabled.
ISSUE 1.1SL1000
P
Park and Page2-170

For transferred outside calls, direct inward lines and direct inward dialing refer to Table 2-8 Park and
Page Call Handling on the previous page.
Table 2-8 Park and Page Call Handling
Park and Page (Call Handling)For Transferred Outside Calls, Direct Inward Line and Direct Inward Dialing
47-02-14Next Call Routing
Mailbox
47-02-13Dialing Option
47-02-17Enable Park and
Page
Result
Undefined 0 (No) 0 (No) If unanswered, caller hears greeting and can leave amessage.
Undefined 0 (No) 1 (Yes) If unanswered, caller can dial 1 to leave a message or2 to Park and Page.
Undefined 1 (Yes) 0 (No) If unanswered, caller hears greeting and can leave amessage.
Undefined 1 (Yes) 1 (Yes) If unanswered, caller can dial 1 to leave a message or2 to Park and Page.
Defined 0 (No) 0 (No) If unanswered, caller hears greeting and can leave amessage.
Defined 0 (No) 1 (Yes) If unanswered, caller can dial 1 to leave a message, 2to Park and Page, and 3 for other options (from theNext Call Routing Mailbox).
Defined 1 (Yes) 0 (No) If unanswered, caller hears greeting, can leave amessage, and dial options (from the Next Call RoutingMailbox).
Defined 1 (Yes) 1 (Yes) If unanswered, caller can dial 1 to leave a message, 2to Park and Page, and 3 for other options (from theNext Call Routing Mailbox).
For automated attendant unscreened (UTRF) and screened (STRF) transfers refer to Table 2-9 Park
and Page Call Handling on this page.
Table 2-9 Park and Page Call Handling
Park and Page (Call Handling)For Automated Attendant Unscreened (UTRF) and Screened (STRF) Transfers
47-02-17Enable Park and
Page
47-02-18Paging Option
47-02-09Auto Att Direct to
VM
Result
0 (No) 0 (RNA) 0 (No) If unanswered, caller hears greeting and can leave amessage.*1
0 (No) 0 (RNA) 1 (Yes) Caller immediately hears greeting and can leave amessage.
0 (No) 1 (IMM) 0 (No) If unanswered, caller hears greeting and can leave amessage. *1
0 (No) 1 (IMM) 1 (Yes) Caller immediately hears greeting and can leave amessage.
1 (Yes) 0 (RNA) 0 (No) STRF: If unanswered, caller hears greeting and canleave a message. *1
UTRF: If unanswered, caller can dial 1 to leave amessage or 2 to Park and Page. *2
1 (Yes) 0 (RNA) 1 (Yes) Caller immediately hears greeting and can leave amessage.
1 (Yes) 1 (IMM) 0 (No) Park and Page occurs immediately.
*1. For a Screened Transfer (STRF) with a Next Call Routing Mailbox assigned, caller can dial 1 to leave a message or 2 for other options.
*2. For an Unscreened Transfer (UTRF) with a Next Call Routing Mailbox assigned, caller can dial 1 to leave a message, 2 to Park and Page, and3 for other options.
ISSUE 1.1 SL1000
P
InMail Feature Manual 2-171
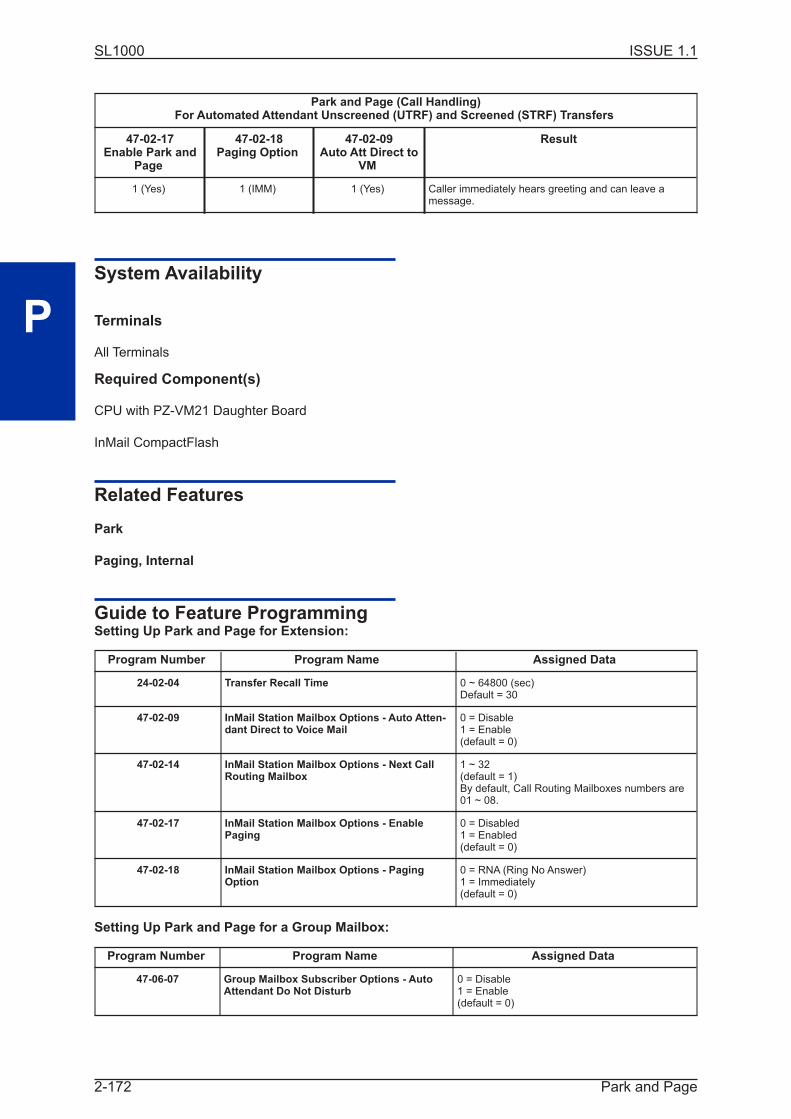
Park and Page (Call Handling)For Automated Attendant Unscreened (UTRF) and Screened (STRF) Transfers
47-02-17Enable Park and
Page
47-02-18Paging Option
47-02-09Auto Att Direct to
VM
Result
1 (Yes) 1 (IMM) 1 (Yes) Caller immediately hears greeting and can leave amessage.
System Availability
Terminals
All Terminals
Required Component(s)
CPU with PZ-VM21 Daughter Board
InMail CompactFlash
Related Features
Park
Paging, Internal
Guide to Feature ProgrammingSetting Up Park and Page for Extension:
Program Number Program Name Assigned Data
24-02-04 Transfer Recall Time 0 ~ 64800 (sec)Default = 30
47-02-09 InMail Station Mailbox Options - Auto Atten-dant Direct to Voice Mail
0 = Disable1 = Enable(default = 0)
47-02-14 InMail Station Mailbox Options - Next CallRouting Mailbox
1 ~ 32(default = 1)By default, Call Routing Mailboxes numbers are01 ~ 08.
47-02-17 InMail Station Mailbox Options - EnablePaging
0 = Disabled1 = Enabled(default = 0)
47-02-18 InMail Station Mailbox Options - PagingOption
0 = RNA (Ring No Answer)1 = Immediately(default = 0)
Setting Up Park and Page for a Group Mailbox:
Program Number Program Name Assigned Data
47-06-07 Group Mailbox Subscriber Options - AutoAttendant Do Not Disturb
0 = Disable1 = Enable(default = 0)
ISSUE 1.1SL1000
P
Park and Page2-172
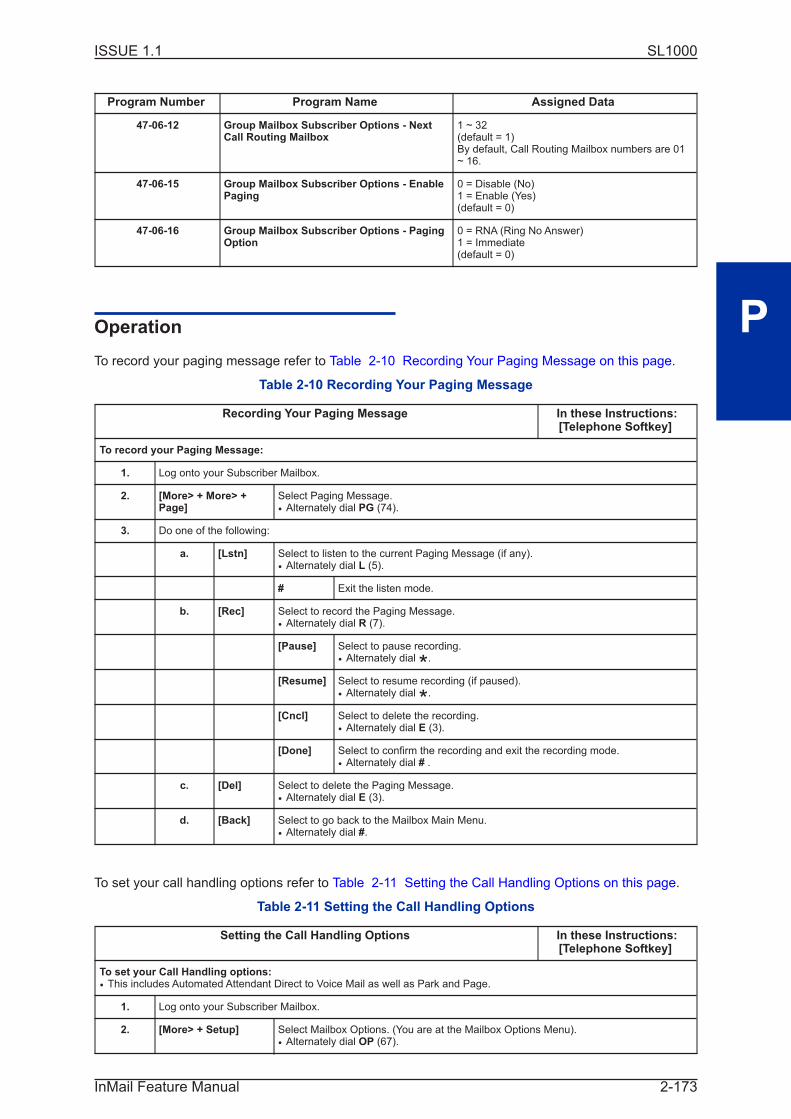
Program Number Program Name Assigned Data
47-06-12 Group Mailbox Subscriber Options - NextCall Routing Mailbox
1 ~ 32(default = 1)By default, Call Routing Mailbox numbers are 01~ 16.
47-06-15 Group Mailbox Subscriber Options - EnablePaging
0 = Disable (No)1 = Enable (Yes)(default = 0)
47-06-16 Group Mailbox Subscriber Options - PagingOption
0 = RNA (Ring No Answer)1 = Immediate(default = 0)
Operation
To record your paging message refer to Table 2-10 Recording Your Paging Message on this page.
Table 2-10 Recording Your Paging Message
Recording Your Paging Message In these Instructions:[Telephone Softkey]
To record your Paging Message:
1. Log onto your Subscriber Mailbox.
2. [More> + More> +Page]
Select Paging Message.• Alternately dial PG (74).
3. Do one of the following:
a. [Lstn] Select to listen to the current Paging Message (if any).• Alternately dial L (5).
# Exit the listen mode.
b. [Rec] Select to record the Paging Message.• Alternately dial R (7).
[Pause] Select to pause recording.• Alternately dial *.
[Resume] Select to resume recording (if paused).• Alternately dial *.
[Cncl] Select to delete the recording.• Alternately dial E (3).
[Done] Select to confirm the recording and exit the recording mode.• Alternately dial # .
c. [Del] Select to delete the Paging Message.• Alternately dial E (3).
d. [Back] Select to go back to the Mailbox Main Menu.• Alternately dial #.
To set your call handling options refer to Table 2-11 Setting the Call Handling Options on this page.
Table 2-11 Setting the Call Handling Options
Setting the Call Handling Options In these Instructions:[Telephone Softkey]
To set your Call Handling options:• This includes Automated Attendant Direct to Voice Mail as well as Park and Page.
1. Log onto your Subscriber Mailbox.
2. [More> + Setup] Select Mailbox Options. (You are at the Mailbox Options Menu).• Alternately dial OP (67).
ISSUE 1.1 SL1000
P
InMail Feature Manual 2-173

Setting the Call Handling Options In these Instructions:[Telephone Softkey]
[CallH] Select Call Options. (You are at the Call Handling Options Menu).• Alternately dial CO (26).
3. Do one of the following:
a. [DVM] Select to turn Automated Attendant Direct to Voice Mail on or off.• Alternately dial O (6).
[Paging] Select to turn Park and Page on or off.• Alternately dial E (3).
[Back] Select to go back to the Mailbox Options Menu.
To retrieve a call parked in a personal parked orbit refer to Table 2-12 Picking Up a Parked Call on
this page.
Table 2-12 Picking Up a Parked Call
Picking Up a Parked Call In these Instructions:[Telephone Softkey]
To retrieve a call parked in a Personal Orbit:
1. Dial **.2. Dial the number of the extension at which the call is parked.
ISSUE 1.1SL1000
P
Park and Page2-174

Programming Voice Mail
Description
You can program (customize) InMail using the PCPro and WebPro programming applications. You can
also do limited programming from the System Administrator's mailbox.
Related Features
System Administrator on page 2-196
The System Administrator can do limited InMail programming, such as recording Automated Attendant
announcements, recording mailbox names, and deleting messages from mailboxes.
ISSUE 1.1 SL1000
P
InMail Feature Manual 2-175
Programming
See Description at the beginning of this feature.
Operation
See Description at the beginning of this feature.
ISSUE 1.1SL1000
P
Programming Voice Mail2-176
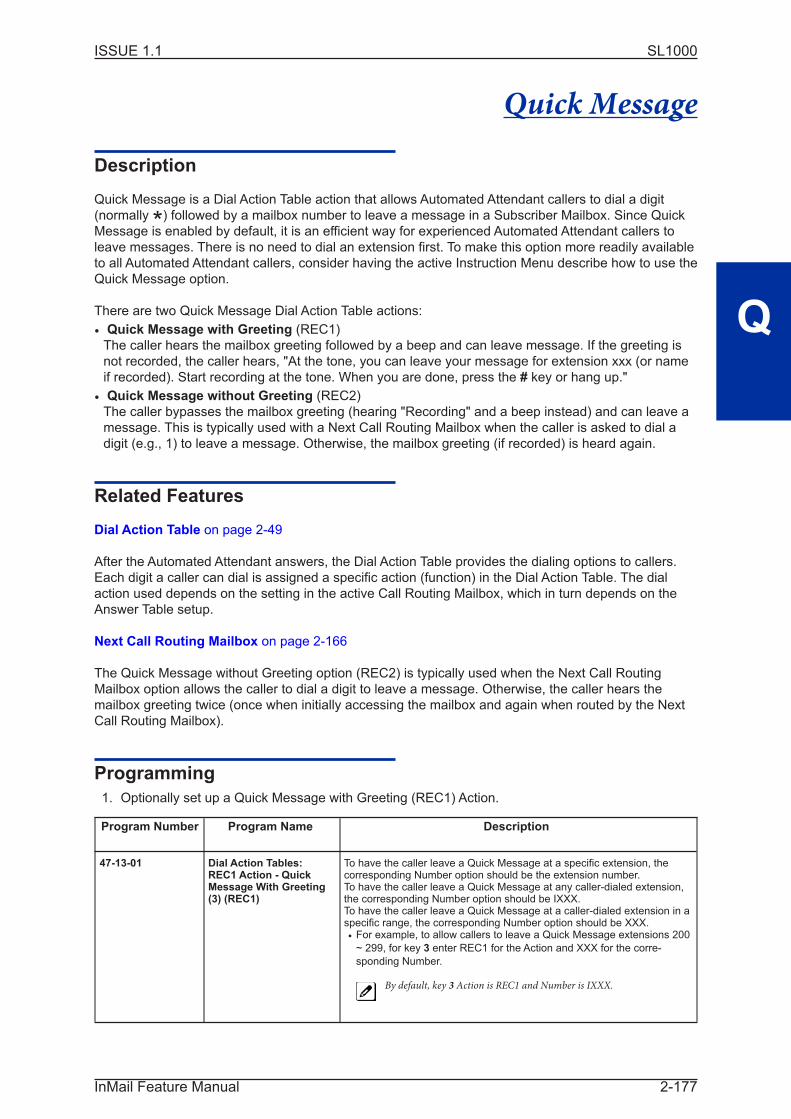
Quick Message
Description
Quick Message is a Dial Action Table action that allows Automated Attendant callers to dial a digit
(normally *) followed by a mailbox number to leave a message in a Subscriber Mailbox. Since QuickMessage is enabled by default, it is an efficient way for experienced Automated Attendant callers to
leave messages. There is no need to dial an extension first. To make this option more readily available
to all Automated Attendant callers, consider having the active Instruction Menu describe how to use the
Quick Message option.
There are two Quick Message Dial Action Table actions:
• Quick Message with Greeting (REC1)The caller hears the mailbox greeting followed by a beep and can leave message. If the greeting is
not recorded, the caller hears, "At the tone, you can leave your message for extension xxx (or name
if recorded). Start recording at the tone. When you are done, press the # key or hang up."
• Quick Message without Greeting (REC2)The caller bypasses the mailbox greeting (hearing "Recording" and a beep instead) and can leave a
message. This is typically used with a Next Call Routing Mailbox when the caller is asked to dial a
digit (e.g., 1) to leave a message. Otherwise, the mailbox greeting (if recorded) is heard again.
Related Features
Dial Action Table on page 2-49
After the Automated Attendant answers, the Dial Action Table provides the dialing options to callers.
Each digit a caller can dial is assigned a specific action (function) in the Dial Action Table. The dial
action used depends on the setting in the active Call Routing Mailbox, which in turn depends on the
Answer Table setup.
Next Call Routing Mailbox on page 2-166
The Quick Message without Greeting option (REC2) is typically used when the Next Call Routing
Mailbox option allows the caller to dial a digit to leave a message. Otherwise, the caller hears the
mailbox greeting twice (once when initially accessing the mailbox and again when routed by the Next
Call Routing Mailbox).
Programming
1. Optionally set up a Quick Message with Greeting (REC1) Action.
Program Number Program Name Description
47-13-01 Dial Action Tables:REC1 Action - QuickMessage With Greeting(3) (REC1)
To have the caller leave a Quick Message at a specific extension, thecorresponding Number option should be the extension number.To have the caller leave a Quick Message at any caller-dialed extension,the corresponding Number option should be IXXX.To have the caller leave a Quick Message at a caller-dialed extension in aspecific range, the corresponding Number option should be XXX.• For example, to allow callers to leave a Quick Message extensions 200
~ 299, for key 3 enter REC1 for the Action and XXX for the corre-
sponding Number.
By default, key 3 Action is REC1 and Number is IXXX.
ISSUE 1.1 SL1000
Q
InMail Feature Manual 2-177

2. Optionally set up a Quick Message without Greeting (REC2) Action.
Program Number Program Name Description
47-13-01 Dial Action Tables:REC2 Action - QuickMessage WithoutGreeting (4) (REC2)
To have the caller leave a Quick Message at a specific extension, thecorresponding Number option should be the extension number.To have the caller leave a Quick Message at any caller-dialed extension,the corresponding Number option should be IXXX.To have the caller leave a Quick Message at a caller-dialed extension in aspecific range, the corresponding Number option should be XXX.• For example, to allow callers to leave a Quick Message extensions
200 ~ 299, for key 3 enter REC2 for the Action and XXX for the corre-
sponding Number.
By default, key 3 Action is REC1 and Number is IXXX.
3. Set the maximum message length for callers leaving a Quick Message in a mailbox.
Program Number Program Name Description
47-01-04 Non-Subscriber MessageLength(Mbox Msg Length)
Set the maximum length (1 ~ 4095 seconds) of recorded messages for:• Automated Attendant callers leaving a message or Quick Message in
a Subscriber Mailbox.
• Outside callers transferred by an extension user to a Subscriber
Mailbox.
By default, this option is 120 seconds.
Operation
Leaving a Quick Message
To leave a Quick Message after the Automated Attendant answers:
1. Dial *.2. Dial the Subscriber Mailbox number.
3. Leave message and hang up.
- OR -
Leave message and dial #.
• Dialing # may provide you with additional dialing options. This depends on how the called mailbox Next Call Routing
Mailbox is set up.
ISSUE 1.1SL1000
Q
Quick Message2-178

Record and Send a Message
Description
A Subscriber Mailbox user can record and send a message to any other Subscriber Mailbox. Record
and Send a Message is the heart of the InMail voice messaging system. It allows coworkers to effi-
ciently stay in touch and exchange essential information without relying on message slips, memos, or
email.
Recording Options
While recording a message, a Subscriber Mailbox user has many recording options from which to
choose. The following table shows these options.
Message Recording Options
Option Description
Options available while recording:
* Pause/resume recording.
D (3) Delete the recording.
# End recording.
Dial 0 while recording to hear the list of options.
Related Features
Listening to Messages on page 2-129
While or after listening to a message, an extension user has many message handling options from
which to choose.
Programming
Not applicable.
Operation
Record and Send a Message
Log On to Subscriber Mailbox.
RS (77) Record and send a message.[Rec]
Enter the number of the mailbox to receive the message.
# Start recording.[Contd]
Options available while recording.
* Pause or restart recording.[Resume][Pause]
D (3) Delete recording.[Cncl]
ISSUE 1.1 SL1000
R
InMail Feature Manual 2-179
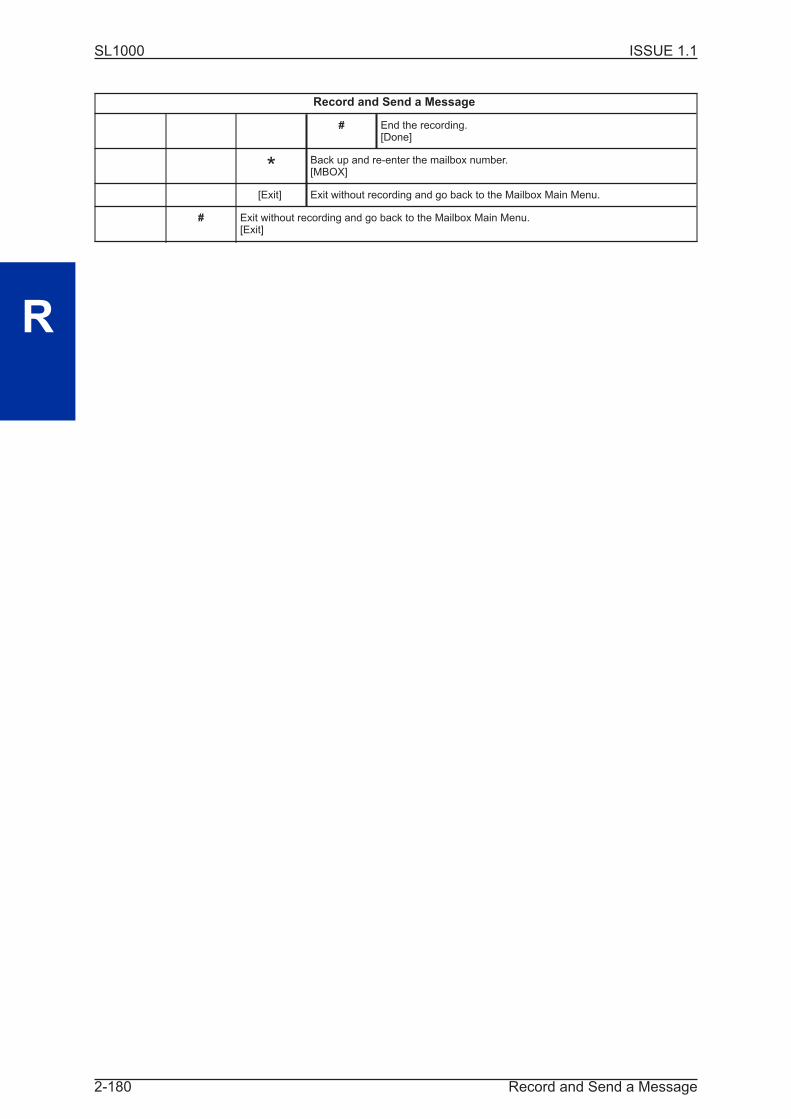
Record and Send a Message
# End the recording.[Done]
* Back up and re-enter the mailbox number.[MBOX]
[Exit] Exit without recording and go back to the Mailbox Main Menu.
# Exit without recording and go back to the Mailbox Main Menu.[Exit]
ISSUE 1.1SL1000
R
Record and Send a Message2-180

Remote Programming
Description
You can remotely program (customize) InMail using the PCPro and WebPro programming applications.
You can also do limited remote programming from the System Administrator's mailbox. Refer to InMail
system documentation for more information.
Related Features
None
Programming
None
Operation
None
ISSUE 1.1 SL1000
R
InMail Feature Manual 2-181
Routing Mailbox
Description
The Call Routing Mailbox, associated with an Answer Table, specifies which dialing options (Dial Action
Table) and announcements are available to Automated Attendant callers. By default, InMail provides
32 Call Routing Mailboxes (1 ~ 32). However, you can assign any Routing Mailboxes as a Call Routing
Mailbox. The Call Routing Mailbox is an integral part of the Automated Attendant. The Automated
Attendant can automatically answer the telephone system incoming calls, play an Instruction Menu
message, and provide dialing options to callers. There are three major Automated Attendant compo-
nents:
• Answer Table on page 2-14The Answer Table determines how the Automated Attendant answers outside calls on each trunk,
according to the time of the day and day of the week that the call is ringing. The Answer Table divides
the time of day and day of the week into individual schedules, which in turn assign a Call Routing
Mailbox to each call. When a specific schedule is not in effect, the Answer Table uses its Default
Mailbox to determine routing.
By default, all trunks use Answer Table 1. Answer Table 1 has a single schedule that runs Monday throughFriday from 8:30 AM to 5:00 PM.
• Routing Mailbox on this pageA Call Routing Mailbox is a mailbox associated with an individual Answer Table schedule or the De-
fault Mailbox. It specifies which dialing options (Dial Action Table) are available to callers. It also
provides the Instruction Menu to callers which typically greets the callers and describes the dialing
options.
By default, Answer Table 1 has a single schedule that runs Monday through Friday from 8:30 AM to 5:00PM. This schedule and the Default Mailbox both use Call Routing Mailbox 531.
• Dial Action Table on page 2-49After the Automated Attendant answers, the Dial Action Table provides the dialing options to callers.
Each digit a caller can dial is assigned a specific action (function) in the Dial Action Table. The dial
action used depends on the setting in the active Call Routing Mailbox, which in turn depends on the
Answer Table setup.
By default, Call Routing Mailbox 1 uses Dial Action Table 1.
The block diagram below shows the default InMail Automated Attendant configuration.
ISSUE 1.1SL1000
R
Routing Mailbox2-182

Related Features
Answer Table on page 2-14
The Call Routing Mailbox associates specific dialing options (Dial Action Table) with an Answer Table.
Automated Attendant on page 2-25
The Automated Attendant can automatically answer the telephone system's incoming calls, play an
Instruction Menu message, and provide dialing options to callers.
Routing Mailbox on the previous page
Trunks Route to Answer Table 1 47-10-01 Answer Table Assignment
InMailDefault
Automated Attendant Answering
Answer Table 1 47-11 Answer Table Options
Schedule 1 or Default Mailbox 47-12 Answer Schedules
47-11-03 Default Mailbox
Call Routing Mailbox 1 47-08 Call Routing Mailbox Options
All calls route to Call Routing Mailbox 1
Schedule 1 active M-F 8:30 AM - 5:00 PM
Default Mailbox active all other times
From a System Administrator mailbox,
record an Instruction Menu (SA + I) for
the active Call Routing Mailbox.
Dial Action Table 1 47-13 Dial Action Tables
DIL to Voice Mail Master (400) 22-02-01 Incoming Call Trunk Setup
22-07-01 DIL Setup
Dial Action Table 1 Dialing Options:
Dial an extension number, or
O for the operator.
ISSUE 1.1 SL1000
R
InMail Feature Manual 2-183
The Call Routing Mailbox provides the dialing instructions (Dial Action Table) and announcements to
Automated Attendant Callers.
Dial Action Table on page 2-49
Defines the dialing options for the Call Routing Mailbox chosen by the active Answer Table.
System Administrator on page 2-196
The System Administrator can record the Instruction Menu for a Call Routing Mailbox. See Operation
below.
Programming
1. Set up the Call Routing Mailbox.
ProgramNumber
Program Name Description
47-07-02 Routing Mailbox Type(Mailbox Type)
Enter 1 to assign the mailbox as a Call Routing Mailbox.
By default, Routing Mailboxes 1-8 are Call Routing Mailboxes and 9-32 are
Announcement Mailboxes.
2. Record an Instruction Menu for the Call Routing Mailbox:
See Operation on the next page.
The default Instruction Menu is: “If you are calling from a touch tone phone...”
3. Assign Dial Action Table to provide dialing options for this Call routing Mailbox:
ProgramNumber
Program Name Description
47-08-01 Dial Action Table Enter the Dial Action Table (e.g., 1) that provides the dialing options.
By default, all Call Routing Mailboxes use Dial Action Table 1.
4. Change the amount of time Automated Attendant callers have to dial options:
See Automated Attendant on page 2-25 for more.
ProgramNumber
Program Name Description
47-08-03 Time Limit for Dialing Com-mands(Dialing Timeout)
Enter the new timeout duration (0-99 seconds).
By default, Automated Attendant callers have 5 seconds to dial commands.
When the timeout duration is exceeded or is not programmed, thefollowing actions occur:• When a Timeout action is programmed, the call routes to that destina-
tion.
• When a Timeout action is not programmed, the Instruction Menu
repeats 3 times and then InMail hangs up.
ISSUE 1.1SL1000
R
Routing Mailbox2-184

5. Set the Maximum Length of Instruction Menus:
ProgramNumber
Program Name Description
47-01-03 Incoming Message Length(Subs Msg Length)
This sets the maximum message length (1-4095 seconds) for Instruc-tion Menus.
The default setting is 120 seconds.
Operation
Recording an Instruction Menu for a Call Routing Mailbox
Log On to System Administrator’s mailbox.
SA (72) Access System Administrator options.[Not applicable]
I (4) Select Instruction Menus.[Instr]
Enter the Call Routing Mailbox number (001 ~ 008).
L (5) Listen to the current Instruction Menu (if any).[Lstn]
# Exit listen mode.
R (7) Record a new Instruction Menu.[Rec]
Record message.
* Pause or restart recording.[Resume][Pause]
D (3) Delete recording.[Cncl]
# Exit recording mode.[Done]
D (3) Delete the Instruction Menu.[Del]
# Go back to the System Administrator options.[Exit]
# Go back to the System Administrator options.[Exit]
0 Plays Help message.
ISSUE 1.1 SL1000
R
InMail Feature Manual 2-185

Screened Transfer
Description
Screened Transfer is an Automated Attendant option that allows callers to directly dial system exten-
sions. Screened Transfer (and its related feature Unscreened Transfer) allows the InMail Automated
Attendant to transfer outside calls to system extensions without the need for a live receptionist or
operator. It is similar to telephone system screened transfers in which the transferring party controls
the transfer. After an Automated Attendant caller dials an extension, InMail calls (screens) the destina-
tion extension to see if the transfer can go through.
• If the destination is busy or in DND, the Automated Attendant doesn't extend the call and immediatelyprovides the caller with additional options.
• If the destination is available, the Automated Attendant rings it. If the destination answers, the callgoes through. If the destination doesn't answer within a preset interval, the Automated Attendant
does not extend the call and provides the caller with additional options.
Screened vs. Unscreened Transfer
Both Screened and Unscreened Transfers allow Automated Attendant callers to directly dial system
extensions. The following summarizes the differences between these two types of Automated Atten-
dant transfer.
• With Unscreened Transfer, calls from the Automated Attendant ring like other transferred calls anddisplay the incoming Caller ID data (if provided by telco and enabled in programming). Screened
Transfers ring like Intercom calls and do not display Caller ID until the call is answered.
• Both Screened and Unscreened Transfers route unanswered calls to the subscriber's greeting (re-corded or default) so the caller can leave a message. However, only Screened Transfer allows the
caller to dial 2 to reach the Next Call Routing Mailbox options (if programmed).
Screened Transfer and Inactive Mailboxes
Screened Transfer to an extension can occur only if the destination extension has an active mailbox. If
the extension's mailbox is inactive, the Automated Attendant caller hears: "That is an invalid entry,"
and returns to the Automated Attendant.
Screened Transfer (TRF) Operation
Call = Call answered by the Automated AttendantExtension = Extension dialed by Automated Attendant caller
If Auto Attendant Do Not Disturb is off, see Auto Attendant Do Not Disturb on page 2-20 for more information.
Extension Idle Extension Busy Extension in DND
With ActiveGreetingRecorded
1. Places a screened (Intercom)call to extension.
• If answered, transfers call.
2. If unanswered*1
• With no Next Call Routing
Mailbox, caller hears greeting
and can leave a message.
• With a Next Call Routing
Mailbox, caller can dial 1 to
leave a message or 2*2 forother options.
When busy:• With no Next Call Routing
Mailbox, caller hears greeting and
can leave a message.
• With a Next Call Routing Mailbox,
caller can dial 1 to leave a
message or 2*2 for other options.
When in DND:• With no Next Call Routing
Mailbox, caller hears greeting
and can leave a message.
• With a Next Call Routing
Mailbox, caller can dial 1 to leave
a message or 2*2 for other
options.
*1. After 47-08-02 Screened Transfer Timeout interval.
*2. Dialing 2 routes the call to the Next Call Routing Mailbox for additional dialing options. See Next Call Routing Mailbox on page 2-166.
ISSUE 1.1SL1000
S
Screened Transfer2-186

Screened Transfer (TRF) Operation
With ActiveGreeting NotRecorded
1. Places a screened (Intercom)call to extension.
• If answered, transfers call.
2. If unanswered*1 :
• With no Next Call Routing
Mailbox, InMail prompts caller
to leave a message.
• With a Next Call Routing
Mailbox, caller can dial 1 to
leave a message or 2*2 for
other options.
When busy:• With no Next Call Routing
Mailbox, InMail prompts caller to
leave a message.
• With a Next Call Routing Mailbox,
caller can dial 1 to leave a
message or 2*2 for other options.
When in DND:• With no Next Call Routing
Mailbox, caller hears greeting
and can leave a message.
• With a Next Call Routing
Mailbox, caller can dial 1 to leave
a message or 2*2 for other
options.
If Auto Attendant Do Not Disturb is on, see Auto Attendant Do Not Disturb on page 2-20 for more information.
Extension Idle Extension Busy Extension in DND
With ActiveGreetingRecorded ornot recorded
1. Sends call immediately to mailbox:• Plays greeting.
• Prompts caller to start recording.
Related Features
Answer Table on page 2-14
Determines how the Automated Attendant answers outside calls on each trunk.
Automated Attendant on page 2-25
The Answer Table determines how the Automated Attendant answers calls.
Routing Mailbox on page 2-182
The mailbox associated with an Answer Table that specifies which dialing options (Dial Action Table)
and announcements are available to Automated Attendant callers.
You cannot program a Call Routing Mailbox as a Screened Transfer (TRF) Dial Action Table destina-
tion.
Caller ID on page 2-36
InMail provides Caller ID data for a Screened Transfer call after it is answered.
Dial Action Table on page 2-49
Defines the dialing options for the Call Routing Mailbox chosen by the active Answer Table.
Forced Unscreened Transfer on page 2-91
The Subscriber Mailbox can optionally convert Automated Attendant Screened Transfers to
Unscreened Transfers.
Unscreened Transfer on page 2-205
After an Automated Attendant caller dials an extension, InMail immediately transfers the call to the
destination and hangs up.
ISSUE 1.1 SL1000
S
InMail Feature Manual 2-187
Programming
1. Assign the TRF action to a key on the active Dial Action Table.
ProgramNumber
Program Name Description
47-13-01 Dial Action Tables:TRF Action - Screened Transfer(1) (TRF)
Normally, the corresponding Number option should be XXX. Note thekey you choose for this action is the first digit of the called extension.• For example, to allow callers to place Screened Transfers to exten-
sions 200 ~ 299, for key 3 enter TRF for the Action and XXX for the
corresponding Number.
To have Screened Transfer call a specific extension, the corre-
sponding Number option should be that extension number. The caller
then dials that single digit to reach the extension.
• For example, to have callers dial 8 to reach extension 303, for key
8 enter TRF for the Action and 303 for the corresponding Number.
By default, key 1 Action is UTRF and Number is XXX. This means
that Automated Attendant callers can place Unscreened Transfers to
extensions 200 ~ 299.
2. Set how long a Screened Transfer rings an unanswered extension before recalling to the Auto-
mated Attendant.
ProgramNumber
Program Name Description
47-08-02 Screened Transfer Timeout(Scrn Trf Timeout)
Set how long a Screened Transfer (TRF) from the Automated Atten-dant rings (0 ~ 255 seconds) an unanswered extension beforerecalling.Be sure that the 24-02-04 Transfer Recall Time is longer than thesetting of this option. If the Transfer Recall is shorter, ScreenedTransfers recalls the same as Unscreened Transfers.
By default, this option is 15 seconds.
Operation
Not applicable.
ISSUE 1.1SL1000
S
Screened Transfer2-188
Security Code
Description
Amailbox can have a security code to protect it from unauthorized access. A Security Code must have
4 digits, using 0 ~ 9. If a subscriber wants to keep their mailbox private, they can enter a Security
Code. No one else can use the subscriber's mailbox, unless they know the code.
After a subscriber sets their Security Code, they can choose to make it required for all logons or just
remote logons. When enabled for all logons the subscriber must always enter their Security Code to
access voice mail, even from their own extension. If enabled just for remote logons, the subscriber can
go right into voice mail from their own telephone. However, the Security Code is still required from
another extension or from outside the system.
The Security Code logon option is a convenience for those who normally leave their office locked or
otherwise secure. Those who work in open areas should normally set their mailbox to always require a
Security Code.
Service Conditions• The new Security Code setting requires the SL-VM-ADVANCE LIC license (1015).
• Security Code settings can be changed using the Telephone Mailbox Option Interface or via EndUser Web Pro.
Related Features
System Administrator on page 2-196
The System Administrator can delete a mailbox security code.
Programming
Not applicable.
ProgramNumber
Program Name Assigned Data
47-02-25 InMail Station Mailbox Options - Security Code Option 0 = Always1 = Remote Logon onlyDefault = 0
47-06-23 InMail Group Mailbox Options - Security Code Option 0 = Always1 = Remote Logon onlyDefault = 0
Operation
Changing or Deleting a Security Code (From your Subscriber Mailbox)
Log On to Subscriber Mailbox.
OP (67) Access the Mailbox Options Menu.[Not applicable]
S (7) Access the Security Code options.[Sec]
ISSUE 1.1 SL1000
S
InMail Feature Manual 2-189

Changing or Deleting a Security Code (From your Subscriber Mailbox)
Enter new Security Code (4 digits).
C (2) Accept Security Code entry and go back to the Mailbox Options Menu.[OK]
I (4) Do not accept Security Code entry and go back to the Security Codeoptions Menu.[Clear]
N (6) Accept security code and require security code entry for remote log only.
R (7) Accept security code and require security code entry for both internal andremote log on.
[Exit] Exit to the Mailbox Options menu without changing your SecurityCode.
* Optionally delete your Security Code and go back to the Mailbox Options Menu.[Del]
# Exit to the Mailbox Options Menu without making any changes to your Security Code.[Exit]
0 Plays Help message.
Deleting a Security Code (From your System Administrator's Mailbox)
Log On to System Administrator's mailbox.
SA (72) Access System Administrator options.[Not applicable]
S (7) Select Subscriber Mailbox Maintenance options.[Subs]
Enter the number of the Subscriber Mailbox you want to maintain.
* Delete mailbox Security Code.[Del]
# Go back to System Administrator options.[Exit]
0 Plays Help message.
ISSUE 1.1SL1000
S
Security Code2-190

Single Digit Dialing
Description
An Automated Attendant caller can press a single key to route to an extension, route to another desti-
nation, or use an InMail feature. Single Digit Dialing simplifies the Automated Attendant since the caller
dials a single digit to reach an extension or use an option. If you set up Single Digit Dialing, be sure to
customize the active Instruction Menu so it describes which digits the caller should dial to use the
available options.
All of the features in the following Dial Action Table Key Action Summary table are accessible from a
single Dial Action Table digit.
Table 2-13 Dial Action Table Key Action Summary
Action Description Feature Reference
TRF Screened Transfer (1)Allows an Automated Attendant caller to place a Screened Transfer to an extension.InMail calls (screens) the destination to see if the call can go through.
Screened Transfer onpage 2-186
UTRF Unscreened Transfer (2)Allows an Automated Attendant caller to place an Unscreened Transfer to an exten-sion. InMail transfers the call the destination and then hangs up.
UnscreenedTransfer on page2-205
REC1 Quick Message with Greeting (3)Allows an Automated Attendant caller to leave a Quick Message at an extension.The caller hears the extension personal greeting.
Quick Message onpage 2-177
REC2 Quick Message without Greeting (4)Allows an Automated Attendant caller to leave a Quick Message at an extension.The caller does not hear the extension personal greeting.
Quick Message onpage 2-177
LOGON Log On to Voice Mail (5)Allows an Automated Attendant caller to log on to a mailbox, either directly or one oftheir choosing.
Log On to VoiceMail on page 2-133
Hang Up Hang Up (6)InMail says "Goodbye" and hangs up.
Hang Up on page2-106
GOTO Go to a Mailbox (7)Allows an Automated Attendant caller to route to another mailbox.
Go To A Mailbox onpage 2-93
UND Undefined Routing (0)This action provides no routing.
Not applicable
Related Features
Instruction Menu on page 2-122
The active Instruction Menu should describe the Single Digit Dialing options.
Also refer to Table 2-13 Dial Action Table Key Action Summary on this page.
Programming
Refer to Table 2-13 Dial Action Table Key Action Summary on this page.
Operation
Refer to Table 2-13 Dial Action Table Key Action Summary on this page.
ISSUE 1.1 SL1000
S
InMail Feature Manual 2-191
Station Mailbox
Description
Station Mailbox is one of three mailbox categories: Personal, Group and Undefined. Personal Mailbox
is the category of mailboxes assigned to stations (extensions). All Personal Mailboxes are Subscriber
Mailboxes.
For more on the options available to Station Mailboxes, see Subscriber Mailbox on the next page.
Related Features
Group (Shared) Mailbox on page 2-98
Group Mailbox is a category of mailboxes normally used for Department Group overflow.
Programming
See Subscriber Mailbox on the next page.
Operation
See Subscriber Mailbox on the next page.
ISSUE 1.1SL1000
S
Station Mailbox2-192
Subscriber Mailbox
Description
A Subscriber Mailbox is the mailbox assigned to a telephone system extension. The telephone
assigned to the Subscriber Mailbox is called the subscriber’s extension. When an extension user
accesses their voice mail, they are using their Subscriber Mailbox. It provides the InMail voice
messaging services. For a brief overview of the features available at a Subscriber Mailbox, review the
Related Features below. Then, go to the individual feature to find out how it operates and what
programming is required to make it work.
At system startup, InMail automatically assigns a Subscriber Mailbox to extensions 200 ~ 263. All other
extensions do not have Subscriber Mailboxes automatically assigned. Refer to Programming on the
next page.
Related Features
Automated Attendant on page 2-25
The Automated Attendant can route callers to a Subscriber Mailbox.
Auto Attendant Do Not Disturb on page 2-20
Auto Attendant Do Not Disturb sends Automated Attendant calls directly to a subscriber’s mailbox.
Their phone does not ring for calls from the Automated Attendant.
Auto Erase or Save on page 2-22
After a subscriber listens to a message in their Subscriber Mailbox, InMail can automatically delete or
archive the message.
Live Monitor on page 2-131
Enable or disable the Live Record beep for the Subscriber Mailbox.
Greeting on page 2-95
A Subscriber Mailbox user can record a personalized greeting for their mailbox. Callers to the user’s
mailbox hear the prerecorded personalized greeting.
Listening to Messages on page 2-129
Review this feature to learn which features are available to a subscriber while listening to messages.
Make Call on page 2-143
To simplify returning outside calls, InMail can ask the caller leaving a message to enter their phone
number prior to leaving the message. The subscriber can then dial MC to call the person back.
Main Menu on page 2-141
The Main Menu provides access to the features available to a Subscriber Mailbox.
Message Listen Mode on page 2-152
Set the type of messages a subscriber will listen to when they dial L (5) after logging on to their
Subscriber Mailbox.
ISSUE 1.1 SL1000
S
InMail Feature Manual 2-193

Message Notification on page 2-153
After activation, Message Notification dials up to 3 telephone numbers to let the user know they have
new Mailbox messages.
Message Playback Direction on page 2-159
Set the subscriber Mailbox message playback order.
Message Record on page 2-160
Review this feature to learn which features are available to a subscriber while recording and sending a
message.
Message Storage Limit on page 2-162
Set the maximum number of messages that can be left in the mailbox.
Next Call Routing Mailbox on page 2-166
The Next Call Routing Mailbox provides additional dialing options after a caller leaves a message in a
Subscriber Mailbox.
Security Code on page 2-189
If enabled, a subscriber must enter a security code before logging on to their Subscriber Mailbox.
System Administrator on page 2-196
A Subscriber Mailbox designated as a System Administrator provides the subscriber with unique
system administration abilities through the SA menu.
Unscreened Transfer on page 2-205
The Subscriber Mailbox can optionally convert Automated Attendant Screened Transfers to
Unscreened Transfers.
Programming
1. Set up a Subscriber Mailbox.
ProgramNumber
Program Name Description
47-02-01 Mailbox Type Activate (1) the Personal Mailbox.
By default, Personal Mailboxes 1 ~ 8 are active (1). All other Station Mailboxes
are inactive (0).
47-02-02 Mailbox Number Assign the mailbox number to each active Subscriber mailbox. Normally, themailbox number is the same as the extension number.
By default, mailboxes 1 ~ 64 correspond to mailbox numbers 200 ~ 263. Mail-
boxes 65 ~ 128 = No entry.
ISSUE 1.1SL1000
S
Subscriber Mailbox2-194

2. Check to be sure message waiting lamp is enabled for the Subscriber Mailbox.
ProgramNumber
Program Name Description
47-02-08 Message Waiting Lamp(Update MW Lamp)
Enter 1 (Yes) to enable Message Waiting lamp for each Subscriber Mailbox.
By default, this option is 1 (Yes).
3. Set the maximum length of recorded messages left in the Subscriber Mailbox.
ProgramNumber
Program Name Description
47-01-03 Incoming MessageLength(Subs Msg Length)
Set the maximum length (1 ~ 4095 seconds) of recorded messages for:• Subscriber Mailbox users dialing RS to record and send a message.
• Extension users leaving a message in a Subscriber Mailbox.
• Outside Automated Attendant callers accessing a mailbox via a GOTO
command and then dialing RS to record and send a message.
• Subscriber Mailbox Greetings.
• Announcement Messages.
• Call Routing Mailbox Instruction Menus.
By default, these messages are a maximum of 120 seconds.
4. Set the maximum length of recorded Quick Messages left in the Subscriber Mailbox.
ProgramNumber
Program Name Description
47-01-04 Outgoing MessageLength(Mbox Msg Length)
Set the maximum length (1 ~ 4095 seconds) of recorded messages for:• Automated Attendant callers leaving a message or Quick Message in a
Subscriber Mailbox.
• Outside callers transferred by an extension user to a Subscriber Mailbox.
By default, these messages are a maximum of 120 seconds.
Operation
Not applicable.
ISSUE 1.1 SL1000
S
InMail Feature Manual 2-195

System Administrator
Description
The System Administrator is a Subscriber Mailbox that has unique system administration features such
as recording Menus and deleting messages in a coworker's mailbox. The System Administrator
features are an essential part of InMail setup since they allow the recording of the system-wide
messages and provide Subscriber Mailbox maintenance. After logging on to their Subscriber Mailbox,
the System Administrator can use all of the features in the SA menu. The System Administrator
Options table below shows these options.
Table 2-14 System Administrator Options
MenuOption
1st SubMenu
2nd SubMenu
Description For more, see:
SA (72)[N/A]
Access the System Administration Options.
I (4)[Instr]
Record, listen to or delete an Instruction Menu. Instruction Menu onpage 2-122 .
A (2)[Annc]
Record, listen to or delete an Announcement Menu. AnnouncementMessage on page 2-11.
S (7)[Subs]
Access the Subscriber Maintenance Menu.
DA (32)[Msgs]
Delete all messages in a mailbox. Erasing AllMessages on page2-79.
DG (34)[Greet]
Delete the Greeting. Greeting on page 2-95.
DN (36)[Name]
Delete the Mailbox name. Mailbox Name on page2-137.
S (7)[Sec]
Delete the Mailbox security code. Mailbox Security CodeDelete on page 2-140.
N (6)[RcNam]
Record, listen to or delete the mailbox name. Mailbox Name on page2-137.
V (8)[Info]
Hear InMail prompt version number.
O (6)[Sched]
To change the Answering Schedule Override for atable.
Answer ScheduleOverride on page 2-12.
L (5)[Dlist]
Create, delete and edit Message Distribution Lists. Distribution List on page2-63.
3[MboxAn]
Record, listen to or delete a Mailbox Announcementmessage.
Mailbox AnnouncementMessage on page2-135.
Related Features
Subscriber Mailbox on page 2-193
Only a Subscriber Mailbox can be a System Administrator.
ISSUE 1.1SL1000
S
System Administrator2-196

Programming
1. Designate a Subscriber Mailbox as a System Administrator.
Program Number Program Name Description
47-02-12 System Administrator Enter 1 (Yes) to designate the Subscriber Mailbox as a SystemAdministrator.
By default, this option is 1 (Yes) at extension 200 and 0 (No) at all
other extensions.
Operation
Refer to the individual features referenced in the Table 2-14 System Administrator Options on the
previous page.
Table 2-15 Accessing the System Administrator Options
Log On to System Administrator's Mailbox.
SA (72) Access the System Administrator Menu.[Not applicable]• Turn to Table 2-14 System Administrator Options on the previous page for more.
0 Plays Help message.
ISSUE 1.1 SL1000
S
InMail Feature Manual 2-197

System Administrator Mailbox
Description
A System Administrator Mailbox is a Subscriber Mailbox in which you have enabled the System Admin-
istrator option. This provides the subscriber with system administration abilities. InMail can have
multiple System Administrator Mailboxes. Turn to System Administrator on page 2-196 for more.
Related Features
Subscriber Mailbox on page 2-193
Only a Subscriber Mailbox can be a System Administrator.
System Administrator on page 2-196
The System Administrator has unique system administration functions, such as recording Welcome
Messages and Instruction Menus, and deleting messages in a coworker's mailbox.
Programming
1. Designate a Subscriber Mailbox as a System Administrator.
Program Number Program Name Description
47-02-12 System Administrator Enter 1 (Yes) to designate the Subscriber Mailbox as a SystemAdministrator.
By default, this option is 1 (Yes) at extension 200 and 0 (No) at all
other extensions.
2. Refer to System Administrator on page 2-196 for more programming details.
Operation
See Table 2-15 Accessing the System Administrator Options on the previous page.
ISSUE 1.1SL1000
S
System Administrator Mailbox2-198

System Re-initialization
Description
Initializing the telephone system automatically initializes all InMail programming. You may want to do
this if the site requirements significantly change and it is easier to start over from default than remove
all your custom programming. Re-initializing InMail returns all programmed options to their default
values.
Re-initializing the telephone system returns all programmed options to their factory set (default) values.Any site specific programming you have done is erased following re-initialization.
To initialize (erase) Subscriber Mailbox Security Codes and all recordings, use a System Administrator
Mailbox.
Related Features
System Administrator on page 2-196
The System Administrator can delete Subscriber Mailbox security codes as well as InMail recorded
messages.
Programming
To initialize (Cold Start) the telephone system:
1. Make sure the system (not InMail) CompactFlash card is not installed.
The system does not boot correctly if the system CompactFlash card is installed.
2. Push the power button to Off.
3. Wait 10 seconds before going to the next step.
This gives the system time to complete the shutdown process.
4. Press and hold the Load button (S1), then turn the power switch to On.
5. Continue to hold down the Load button (S1) for at least 3 seconds.
6. Release the Load button (S1).
The system restarts in about 2 minutes.
When the system restarts, the RUN LED flashes Blue.
To delete recorded messages and Subscriber Mailbox Security Code refer to System Administrator on page2-196.The recorded messages include:• Instruction Menus• Announcement Mailbox messages• Messages left in a Subscriber Mailbox• Subscriber Mailbox greetings• Subscriber Mailbox names
ISSUE 1.1 SL1000
S
InMail Feature Manual 2-199

Operation
Not applicable.
ISSUE 1.1SL1000
S
System Re-initialization2-200

Time and Date
Description
Since InMail is completely integrated with the telephone system software, the InMail time and date is
the same as the phone system time and date. Since time and date is used on telephone displays and
with the Auto Time Stamp and Time and Date Stamp features, be sure to set it accurately. To change
the time and date, use the system programmable options. See Programming below. The Time and
Date is retained if the telephone system power should fail or the system resets.
In addition, a Subscriber Mailbox user can hear the time and date when they call their mailbox.
Related Features
Auto Time Stamp on page 2-23
After a user listens to a message, InMail can optionally announce the time and date the message was
left.
Time and Date Stamp on the next page
An extension can listen to a message and dial TI to hear the time when the message was sent.
Programming
1. To set the system time and date from system programming:
Program Number Program Name Description
10-01-01 Time and Date Set the system Time and Date.
2. To set the system time from a system telephone:
• Press Speaker.
• Dial 828.
• Dial two digits for the hour (24 hour clock, 13 = 1:00 PM).
• Dial two digits for the minutes (00-60).
• Press Speaker to hang up.
Operation
Hearing the Current Time and Date
Log On to Subscriber Mailbox.
TI (84) Access the Time and Date option.• InMail plays the time and date, and then returns you to the mailbox Main Menu.
0 Plays Help message.
ISSUE 1.1 SL1000
T
InMail Feature Manual 2-201

Time and Date Stamp
Description
While listening to a message, a Subscriber Mailbox user can dial TI to hear the Time and Date when
the message was left. This is a handy option while reviewing messages. The subscriber can just dial a
code to find out when the message arrived.
Time and Date Stamp with Caller ID
With Caller ID installed, a mailbox user can dial TI while listening to a message to hear the time when
the message was sent, as well as the caller's number.
Related Features
Auto Time Stamp on page 2-23
After a user listens to a message, InMail can optionally announce the time and date when the
message was left.
Caller ID on page 2-36
With Caller ID installed and programmed, the Time and Date Stamp also includes the caller's number.
Listening to Messages on page 2-129
Turn to this feature for additional listening options.
Time and Date on the previous page
You can set the system time from system programming or from a system extension. You can set the
date only from system programming.
Programming
To get Time and Date Stamp with Caller ID, be sure Caller ID is properly installed and programmed in
the connected telephone system.
Operation
Hearing the Time and Date when a Message was Left
Log On to Subscriber Mailbox.
L (5) Access the Message Listen mode.[Lstn]
TI (84) Hear the time and date when the message was sent.• Turn to Listening to Messages on page 2-129 for more on your listening options.
0 Plays Help message.
ISSUE 1.1SL1000
T
Time and Date Stamp2-202

Transfer to a Mailbox
Description
An extension user can transfer their active call to a coworker's mailbox. This lets the caller leave a
personal message for the coworker. Transfer to a Mailbox is one of the big conveniences of InMail
since the caller can state their business and not have to call back later. It saves the caller time and
cuts down on unnecessary telephone system call processing. Transfer to a Mailbox is frequently used
by attendants and receptionists as well as other coworkers.
Related Features
Auto Attendant Do Not Disturb on page 2-20
When enabled, Auto Attendant Do Not Disturb automatically sends all calls from the Automated Atten-
dant to the subscriber's mailbox.
Screened Transfer on page 2-186
Automated Attendant Screened Transfers can automatically transfer an outside caller to an extension.
Unscreened Transfer on page 2-205
Automated Attendant Unscreened Transfers can automatically transfer an outside caller to an exten-
sion.
Programming
Not applicable.
Operation
Transferring your call to a Coworker's Mailbox
To transfer your active call to a coworker's mailbox:
1. Press Transfer.
2. Press Voice Mail key.
3. Dial your coworker's mailbox number (e.g., 201 for extension 201).
4. Press Speaker to hang up.• To optionally transfer a call to coworker mailbox without first ringing their phone, press Voice Mail key before dialing their
mailbox number. (This is the only procedure you can use to transfer to a Guest Mailbox.)
• To transfer a call to a coworker mailbox from a single line telephone, use the following procedure:
Hookflash + Dial *8 + Dial the coworker's mailbox + Hang up.To transfer your active call and leave a message:
1. Press Transfer.
2. Dial your coworker's mailbox number (e.g., 201 for extension 201).
3. Dial 8.
4. Leave a message and hang up.
This procedure can be used for any telephone.
ISSUE 1.1 SL1000
T
InMail Feature Manual 2-203

Undefined Routing
Description
An Automated Attendant Undefined Routing is a Dial Action Table key assignment for which there is no
routing defined. When an Automated Attendant caller dials a digit and no routing is assigned, InMail
plays: “That is an invalid entry.” InMail then repeats the dialing options (Instruction Menu) to the caller.
If a Dial Action Table key assignment has no function, you should normally leave it undefined. By
default, keys 1, 4, 5, 6, 7, and 8 have Undefined Routing.
Related Features
Dial Action Table on page 2-49
Undefined Routing is a Dial Action Table Action.
Instruction Menu on page 2-122
The active Call Routing Mailbox's Instruction Menu repeats after a caller dials a digit with an Undefined
Routing.
Programming
1. To set up an Undefined Routing for a Dial Action Table:
ProgramNumber
Program Name Description
47-13-01 Dial Action Tables:UND Action - Undefined Routing (0)(UND)
For a key that should have an Undefined Routing, the Actionentry should be UND. There is no corresponding Numberoption entry.
By default, keys 1, 4, 5, 6, 7 and 8 have Undefined Routing.
Operation
Not applicable.
ISSUE 1.1SL1000
U
Undefined Routing2-204

Unscreened Transfer
Description
Unscreened Transfer is an Automated Attendant option that allows callers to directly dial system exten-
sions. Unscreened Transfer (and its related feature Screened Transfer) allows the InMail Automated
Attendant to transfer outside calls to system extensions without a live receptionist or operator. It is
similar to telephone system unscreened transfers in which the transferring party immediately extends
the call. After an Automated Attendant caller dials an extension, InMail transfers the call to the destina-
tion and hangs up. Any recalls or additional routing are handled by the telephone system - just as with
any other unscreened transfer.
Screened vs. Unscreened Transfer
Both Screened and Unscreened Transfers allow Automated Attendant callers to directly dial system
extensions. The following summarizes the differences between these two types of Automated Atten-
dant transfer.
• With Unscreened Transfer, calls from the Automated Attendant ring like other transferred calls anddisplay the incoming Caller ID data (if provided by telco and enabled in programming). Screened
Transfers ring like Intercom calls and do not display Caller ID until the call is answered.
• Both Screened and Unscreened Transfers route unanswered calls to the subscriber's greeting (re-corded or default) so the caller can leave a message. However, only Screened Transfer allows the
caller to dial 2 to reach the Next Call Routing Mailbox options (if programmed).
Unscreened Transfer and Inactive Mailboxes
An Unscreened Transfer goes through to the destination extension even if the destination doesn't have
an active mailbox. If the Unscreened Transfer is unanswered at the destination, the call returns to the
Automated Attendant.
Unscreened Transfer (UTRF) Operation
• Call = Call answered by the Automated Attendant
• Extension = Extension dialed by Automated Attendant caller
If Auto Attendant Do Not Disturb is off, see Auto Attendant Do Not Disturb on page 2-20.
Extension Idle Extension Busy Extension in DND
With ActiveGreetingRecorded
Transfers call to extension.• If answered, connects call (just
like a phone system transfer).
• If unanswered*1 in a defaultphone system, plays greeting (socaller can start recording).*2
1. Transfers call to extension.
2. Retrieves call.
3. If unanswered *1 in a defaultphone system, plays greet-ing (so caller can startrecording).*2
1. Transfers call to extension.
2. Retrieves call.
3. If unanswered *1 in a defaultphone system, plays greeting(so caller can start record-ing).*2
With ActiveGreeting NotRecorded
Transfers call to extension.• If answered, connects call (just
like a phone system transfer).
• If unanswered*1 in a default
phone system, plays name (if
recorded) or extension number.
InMail then prompts caller to
leave a message.*2
Transfers call to extension.• If answered, connects call (just
like a phone system transfer).
• If unanswered*1 in a default
phone system, plays name (if
recorded) or extension number.
InMail then prompts caller to
leave a message.*2
Transfers call to extension.• If answered, connects call (just
like a phone system transfer)
• If unanswered*1 in a default
phone system, plays name (if
recorded) or extension number.
InMail then prompts caller to
leave a message.*2
If Auto Attendant Do Not Disturb is on, see Auto Attendant Do Not Disturb on page 2-20.
Extension Idle Extension Busy Extension in DND
*1. After 24-02-04 Transfer Recall Time.
*2. Custom phone system programming may redirect the unanswered call (for example, to a hunt group or another extension).
ISSUE 1.1 SL1000
U
InMail Feature Manual 2-205

Unscreened Transfer (UTRF) Operation
With ActiveGreetingRecorded
Sends call immediately to mailbox:• Plays greeting.
• Prompts caller to start recording.
With ActiveGreeting NotRecorded
Related Features
Answer Table on page 2-14
Determines how the Automated Attendant answers outside calls on each trunk.
Automated Attendant on page 2-25
The Answer Table determines how the Automated Attendant answers calls.
Routing Mailbox on page 2-182
The mailbox associated with an Answer Table that specifies which dialing options (Dial Action Table)
and announcements are available to Automated Attendant callers.
Caller ID on page 2-36
InMail provides Caller ID data for an Unscreened Transfer as the call is ringing.
Dial Action Table on page 2-49
Defines the dialing options for the Call Routing Mailbox chosen by the active Answer Table.
You cannot program a Call Routing Mailbox as an Unscreened Transfer (UTRF) Dial Action Table
destination.
Forced Unscreened Transfer on page 2-91
The Subscriber Mailbox can optionally convert Automated Attendant Screened Transfers to
Unscreened Transfers.
Next Call Routing Mailbox on page 2-166
The Next Call Routing settings for a Subscriber Mailbox may provide additional options after the caller
leaves a message.
Screened Transfer on page 2-186
After an Automated Attendant caller dials an extension, InMail calls (screens) the destination extension
to see if the transfer can go through.
ISSUE 1.1SL1000
U
Unscreened Transfer2-206

Programming
1. Assign the UTRF action to a key on the active Dial Action Table.
ProgramNumber
Program Name Description
47-13-01 Dial Action Tables: UTRFAction - Unscreened Transfer(2) (UTRF)
Normally, the corresponding Number option should be XXX. Note thatthe key you choose for this action is the first digit of the called extensionnumber.• For example, to allow callers to place Unscreened Transfers to exten-
sions 200 ~ 299, for key 3 enter UTRF for the Action and XXX for the
corresponding Number.
To have Unscreened Transfer call a specific extension, the corre-
sponding Number option should be that extension's number. The caller
then dials that single digit to reach the extension.
• For example, to have callers dial 8 to reach extension 303, for key 8
enter UTRF for the Action and 303 for the corresponding Number.
By default, key 0 and TIMEOUT are both UTRF actions to 200. In addi-
tion, key 3 is a UTRF action to XXX.
2. Optionally set the telephone system Transfer Recall interval.
ProgramNumber
Program Name Description
24-02-04 Transfer Recall Time Unanswered Unscreened Transfers route to the extension mailbox afterthis interval (0 ~ 64800 seconds).
By default, this interval is 30 seconds.
Operation
Not applicable.
ISSUE 1.1 SL1000
U
InMail Feature Manual 2-207

Voice Mail Overflow
Description
The telephone system can automatically reroute unanswered outside calls to the InMail Automated
Attendant. Voice Mail Overflow ensures that InMail picks up calls that do not go through. This allows
callers to leave a message rather than having to call back later. Voice Mail can be the overflow desti-
nation for the following types of calls:
• Direct Inward Line (DIL) OverflowA trunk that directly rings an extension can overflow to that extension's mailbox if not answered.
• Incoming Ring GroupsA trunk ringing an extension's line keys can overflow to the InMail Automated Attendant.
• Department Calling GroupsA call to a Department Group master (pilot) number can overflow to InMail if unanswered. The over-
flow destination is the Group Mailbox assigned to the Department Group. The Group Mailbox can be
a:
- Call Routing MailboxThis gives the Department Group caller additional dialing options if their call is unanswered.
- Announcement MailboxThis plays a prerecorded announcement to the Department Group caller if their call is unanswered. The An-nouncement Mailbox can then hang up or provide additional dialing options.
- Subscriber MailboxThe Department Group caller can leave a message in the group master mailbox. A Member of the group canthen retrieve the message later on.
The call into the Department Group can be one of the following:
- A Direct Inward Line to the Department Group master (pilot) number.
- A Screened Transfer from the InMail Automated Attendant to the Department Group master (pilot) number.
- An Unscreened Transfer from the InMail Automated Attendant to the Department Group master (pilot) number.
Related Features
Answer Table on page 2-14
Determines how the Automated Attendant answers outside calls on each trunk.
Automated Attendant on page 2-25
The Answer Table determines how the Automated Attendant answers calls.
Routing Mailbox on page 2-182
The mailbox associated with an Answer Table that specifies which dialing options (Dial Action Table)
and announcements are available to Automated Attendant callers.
Dial Action Table on page 2-49
Defines the dialing options for the Call Routing Mailbox chosen by the active Answer Table.
Group (Shared) Mailbox on page 2-98
Use Group Mailboxes for:
Department Calling Group Overflow.
Screened Transfer on page 2-186
ISSUE 1.1SL1000
V
Voice Mail Overflow2-208

A Screened Transfer from the InMail Automated Attendant to a Department Group master number can
overflow to the group Mailbox.
Unscreened Transfer on page 2-205
An Unscreened Transfer from the InMail Automated Attendant to a Department Group can overflow to
the group Mailbox.
Programming
Programming DIL Overflow
1. Set up Direct Inward Lines.
ProgramNumber
Program Name Description
22-02-01 Incoming Call Trunk Setup Assign Service Type 4 to each trunk you want to be a DIL. Make a separateentry for each Night Service mode.
By default, trunks are Service Type 0 (Normal).
22-07-01 DIL Assignment For each trunk designated as a DIL above, enter the extension number of theDIL destination (e.g., 306). Make a separate entry for each Night Servicemode.
By default, no DIL destinations are programmed.
2. Assign InMail as the overflow (no answer) destination.
ProgramNumber
Program Name Description
22-08-01 DIL/IRG No AnswerDestination
For each trunk assigned as a DIL above, enter the InMail Department Grouppilot number to make InMail the overflow (no answer) destination.
By default, the overflow (no answer) destination is Incoming Ring Group 1.
3. Set the interval after which unanswered calls should route to the overflow destination.
ProgramNumber
Program Name Description
22-01-04 DIL No Answer RecallTime
Enter the interval (0 ~ 64800 seconds) after which unanswered calls shouldoverflow to the programmed overflow (no answer) destination.
By default, this interval is 0 (no overflow).
Programming Incoming Ring Group Overflow
1. Set up the Incoming Ring Group trunks.
ProgramNumber
Program Name Description
22-02-01 Incoming Call Trunk Setup Assign Service Type 0 (Normal) to each Incoming Ring Group trunk.Make a separate entry for each Night Service mode.
By default, trunks are Service Type 0 (Normal).
ISSUE 1.1 SL1000
V
InMail Feature Manual 2-209
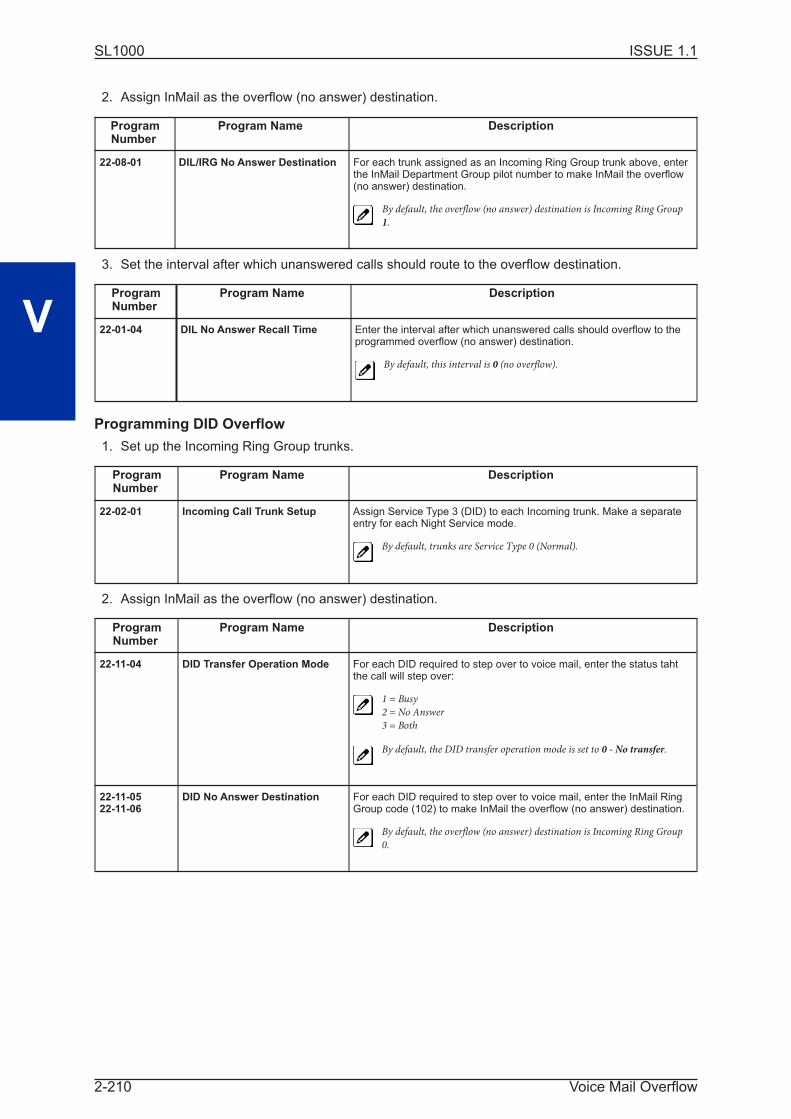
2. Assign InMail as the overflow (no answer) destination.
ProgramNumber
Program Name Description
22-08-01 DIL/IRG No Answer Destination For each trunk assigned as an Incoming Ring Group trunk above, enterthe InMail Department Group pilot number to make InMail the overflow(no answer) destination.
By default, the overflow (no answer) destination is Incoming Ring Group
1.
3. Set the interval after which unanswered calls should route to the overflow destination.
ProgramNumber
Program Name Description
22-01-04 DIL No Answer Recall Time Enter the interval after which unanswered calls should overflow to theprogrammed overflow (no answer) destination.
By default, this interval is 0 (no overflow).
Programming DID Overflow
1. Set up the Incoming Ring Group trunks.
ProgramNumber
Program Name Description
22-02-01 Incoming Call Trunk Setup Assign Service Type 3 (DID) to each Incoming trunk. Make a separateentry for each Night Service mode.
By default, trunks are Service Type 0 (Normal).
2. Assign InMail as the overflow (no answer) destination.
ProgramNumber
Program Name Description
22-11-04 DID Transfer Operation Mode For each DID required to step over to voice mail, enter the status tahtthe call will step over:
1 = Busy
2 = No Answer
3 = Both
By default, the DID transfer operation mode is set to 0 - No transfer.
22-11-0522-11-06
DID No Answer Destination For each DID required to step over to voice mail, enter the InMail RingGroup code (102) to make InMail the overflow (no answer) destination.
By default, the overflow (no answer) destination is Incoming Ring Group
0.
ISSUE 1.1SL1000
V
Voice Mail Overflow2-210
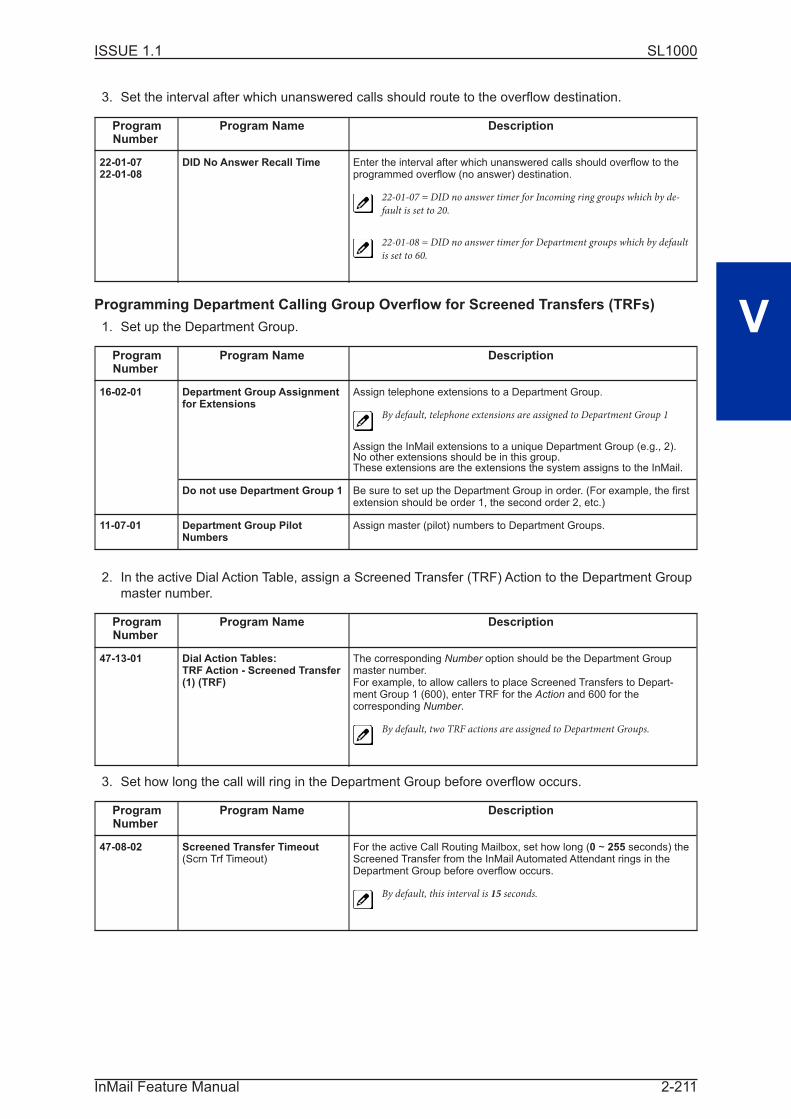
3. Set the interval after which unanswered calls should route to the overflow destination.
ProgramNumber
Program Name Description
22-01-0722-01-08
DID No Answer Recall Time Enter the interval after which unanswered calls should overflow to theprogrammed overflow (no answer) destination.
22-01-07 = DID no answer timer for Incoming ring groups which by de-
fault is set to 20.
22-01-08 = DID no answer timer for Department groups which by default
is set to 60.
Programming Department Calling Group Overflow for Screened Transfers (TRFs)
1. Set up the Department Group.
ProgramNumber
Program Name Description
16-02-01 Department Group Assignmentfor Extensions
Assign telephone extensions to a Department Group.
By default, telephone extensions are assigned to Department Group 1
Assign the InMail extensions to a unique Department Group (e.g., 2).No other extensions should be in this group.These extensions are the extensions the system assigns to the InMail.
Do not use Department Group 1 Be sure to set up the Department Group in order. (For example, the firstextension should be order 1, the second order 2, etc.)
11-07-01 Department Group PilotNumbers
Assign master (pilot) numbers to Department Groups.
2. In the active Dial Action Table, assign a Screened Transfer (TRF) Action to the Department Group
master number.
ProgramNumber
Program Name Description
47-13-01 Dial Action Tables:TRF Action - Screened Transfer(1) (TRF)
The corresponding Number option should be the Department Groupmaster number.For example, to allow callers to place Screened Transfers to Depart-ment Group 1 (600), enter TRF for the Action and 600 for thecorresponding Number.
By default, two TRF actions are assigned to Department Groups.
3. Set how long the call will ring in the Department Group before overflow occurs.
ProgramNumber
Program Name Description
47-08-02 Screened Transfer Timeout(Scrn Trf Timeout)
For the active Call Routing Mailbox, set how long (0 ~ 255 seconds) theScreened Transfer from the InMail Automated Attendant rings in theDepartment Group before overflow occurs.
By default, this interval is 15 seconds.
ISSUE 1.1 SL1000
V
InMail Feature Manual 2-211

4. Set up the Department Group Mailbox.
ProgramNumber
Program Name Description
47-03-02 Mailbox Number The Group Mailbox number must be the same as the DepartmentGroup master number.
By default, no Group Mailbox numbers are assigned.
47-03-03 Mailbox Type Assign the Group Mailbox category (2 = Routing, 1 = Subscriber, 0 =Undefined).
By default, the Group Mailbox type is 1 (Subscriber).
5. Set up the options for the Group Mailbox used for Department Group overflow.
If you entered 2 (Call Routing) for 47-03-03 Group Mailbox Type:
• 47-07 InMail Routing Mailbox Options
• 47-08 Routing Mailbox Call Routing Options
• 47-09 Announcement Mailbox OptionsIf you entered 1 (Subscriber) for 47-03-03 Group Mailbox Type:
• 47-06-01 Number of Messages
• 47-06-02 Message Playback
• 47-06-03 Auto Erase/Save of Messages
• 47-06-05 Recording Conversation Beep (Rec Conv Beep)
• 47-06-06 Message Waiting Lamp (Update MW Lamp)
• 47-06-07 Auto Attendant Direct to Voice Mail
• 47-06-08 Forced Unscreened Transfer (Forced UTRF)
• 47-06-09 Auto Time Stamp
• 47-06-10 System Administrator (System Admin)
• 47-06-11 Dialing Option on page
• 47-06-12 Next Call Routing Mailbox (Next CR Mbox)
• 15-07-01 Programming Function KeysFor each Department Group member, assign a Voice Mail key (code 77) for the group masternumber. This allows group members to easily retrieve the overflow messages.
Programming Department Calling Group Overflow for Unscreened Transfers (UTRFs)
1. Set up the Department Group.
ProgramNumber
Program Name Description
16-02-01 Department Group Assignmentfor Extensions
Assign telephone extensions to a Department Group.Assign the InMail extensions to a unique Department Group (e.g., 2).No other extensions should be in this group.These extensions are the extensions the system assigns to the InMail.Do not use Department Group 1.Be sure to set up the Department Group in order. (For example, the firstextension should be order 1, the second order 2, etc.)
11-07-01 Department Group PilotNumbers
Assign master (pilot) numbers to Department Groups.
ISSUE 1.1SL1000
V
Voice Mail Overflow2-212
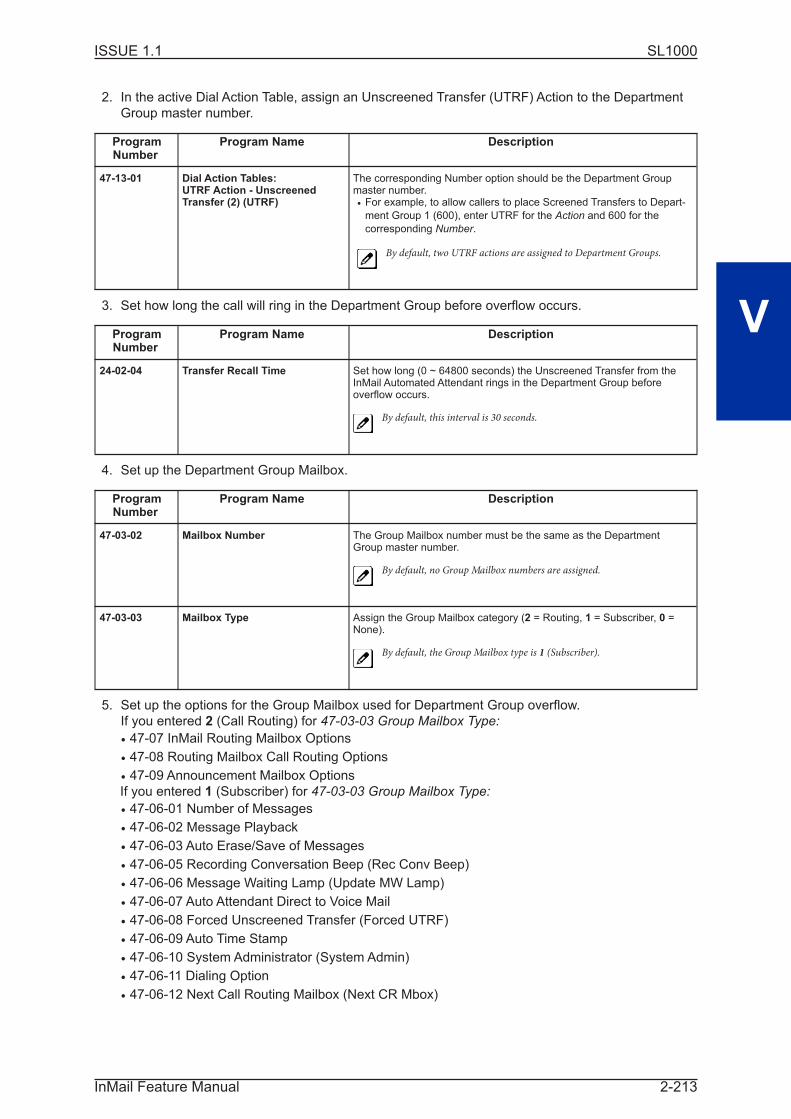
2. In the active Dial Action Table, assign an Unscreened Transfer (UTRF) Action to the Department
Group master number.
ProgramNumber
Program Name Description
47-13-01 Dial Action Tables:UTRF Action - UnscreenedTransfer (2) (UTRF)
The corresponding Number option should be the Department Groupmaster number.• For example, to allow callers to place Screened Transfers to Depart-
ment Group 1 (600), enter UTRF for the Action and 600 for the
corresponding Number.
By default, two UTRF actions are assigned to Department Groups.
3. Set how long the call will ring in the Department Group before overflow occurs.
ProgramNumber
Program Name Description
24-02-04 Transfer Recall Time Set how long (0 ~ 64800 seconds) the Unscreened Transfer from theInMail Automated Attendant rings in the Department Group beforeoverflow occurs.
By default, this interval is 30 seconds.
4. Set up the Department Group Mailbox.
ProgramNumber
Program Name Description
47-03-02 Mailbox Number The Group Mailbox number must be the same as the DepartmentGroup master number.
By default, no Group Mailbox numbers are assigned.
47-03-03 Mailbox Type Assign the Group Mailbox category (2 = Routing, 1 = Subscriber, 0 =None).
By default, the Group Mailbox type is 1 (Subscriber).
5. Set up the options for the Group Mailbox used for Department Group overflow.
If you entered 2 (Call Routing) for 47-03-03 Group Mailbox Type:
• 47-07 InMail Routing Mailbox Options
• 47-08 Routing Mailbox Call Routing Options
• 47-09 Announcement Mailbox OptionsIf you entered 1 (Subscriber) for 47-03-03 Group Mailbox Type:
• 47-06-01 Number of Messages
• 47-06-02 Message Playback
• 47-06-03 Auto Erase/Save of Messages
• 47-06-05 Recording Conversation Beep (Rec Conv Beep)
• 47-06-06 Message Waiting Lamp (Update MW Lamp)
• 47-06-07 Auto Attendant Direct to Voice Mail
• 47-06-08 Forced Unscreened Transfer (Forced UTRF)
• 47-06-09 Auto Time Stamp
• 47-06-10 System Administrator (System Admin)
• 47-06-11 Dialing Option
• 47-06-12 Next Call Routing Mailbox (Next CR Mbox)
ISSUE 1.1 SL1000
V
InMail Feature Manual 2-213

Programming Department Calling Group Overflow for a DIL to the Master Number
1. Set up the Department Group.
ProgramNumber
Program Name Description
16-02-01 Department Group Assignmentfor Extensions
Assign telephone extensions to a Department Group.Assign the InMail extensions to a unique Department Group (e.g., 2).No other extensions should be in this group.These extensions are the extensions the system assigns to the InMail.Do not use Department Group 1.Be sure to set up the Department Group in order. (For example, the firstextension should be order 1, the second order 2, etc.)
11-07-01 Department Group PilotNumbers
Assign master (pilot) numbers to Department Groups.
2. Set up a DIL for the Department Group.
ProgramNumber
Program Name Description
22-02-01 Incoming Call Trunk Setup Assign Service Type 4 to each trunk you want to be a DIL. Make aseparate entry for each Night Service mode.
By default, trunks are Service Type 0 (Normal).
22-07-01 DIL Assignment For each DIL you want to ring the Department Group directly, enter theDepartment Group master number.
By default, no DIL destinations are programmed.
22-08-01 DIL/IRG No Answer Destination For each DIL to the Department Group master number, enter 102 tomake InMail the overflow (no answer) destination.
By default, the overflow (no answer) destination is Incoming Ring Group
1.
3. Set how long a DIL rings in the Department Group before overflow occurs.
ProgramNumber
Program Name Description
22-01-04 DIL No Answer Recall Time Set how long (0 ~ 64800 seconds) the DIL rings in the DepartmentGroup before overflow occurs.
By default, this interval is 0 (no overflow).
4. Set up the Department Group Mailbox.
ProgramNumber
Program Name Description
47-03-02 Group Mailbox Number(Mailbox Number)
The Group Mailbox number must be the same as the DepartmentGroup master number.
By default, no Group Mailbox numbers are assigned.
47-03-03 Group Mailbox Type (MailboxType)
Assign the Group Mailbox category ( 2 = Routing, 1 = Subscriber, 0 =None).
By default, the Group Mailbox type is 1 (Subscriber).
ISSUE 1.1SL1000
V
Voice Mail Overflow2-214
5. Set up the options for the Group Mailbox used for Department Group overflow.
If you entered 2 (Call Routing) for 47-03-03 Group Mailbox Type:
• 47-07 InMail Routing Mailbox Options
• 47-08 Routing Mailbox Call Routing Options
• 47-09 Announcement Mailbox OptionsIf you entered 1 (Subscriber) for 47-03-03 Group Mailbox Type:
• 47-06-01 Number of Messages
• 47-06-02 Message Playback
• 47-06-03 Auto Erase/Save of Messages
• 47-06-05 Recording Conversation Beep (Rec Conv Beep)
• 47-06-06 Message Waiting Lamp (Update MW Lamp)
• 47-06-07 Auto Attendant Direct to Voice Mail
• 47-06-08 Forced Unscreened Transfer (Forced UTRF)
• 47-06-09 Auto Time Stamp
• 47-06-10 System Administrator (System Admin)
• 47-06-11 Dialing Option
• 47-06-12 Next Call Routing Mailbox (Next CR Mbox)
Operation
Not applicable.
ISSUE 1.1 SL1000
V
InMail Feature Manual 2-215

Volume Control
Description
Since InMail is completely integrated with the telephone system software, Volume Control is available
at a subscriber's keyset any time while listening to a message, greeting, or prerecorded voice prompt.
Volume Controls let the user interactively adjust the loudness of the InMail messages and prompts to a
comfortable level.
Related Features
Not applicable.
Programming
No additional programming required.
Operation
Volume Control
To adjust the volume while using any mailbox feature:
1. Press VOL Up or VOL Down.
ISSUE 1.1SL1000
V
Volume Control2-216

(This Chapter is for Version 1.5)
Following is an alphabetical index of the InMail soft keys (available for IP Multiline terminal only). Also
see the Operation section of each feature.
Soft Key Feature Definition
AM Message Notification When programming a MessageNotification time, press toindicate that the entered time isAM.
Annc Announcement MailboxSystem Administrator
Press to access the Announce-ment Mailbox message options.
ATime Auto Time Stamp Press to select the Auto TimeStamp feature.
Back Answer Schedule OverrideAnnouncement MailboxAuto Attendant Do Not DisturbAuto Time StampCall Routing MailboxErasing All MessagesExiting a MailboxGreetingInstruction Menu
Listening to MessagesMailbox NameMailbox Security Code DeleteMain MenuMessage ForwardMessage NotificationMessage ReplyRecord and Send a MessageSecurity Code
Press to go back to the previousmenu level or exit your mailbox.
CallH Auto Attendant Do Not Disturb Press to access Call Handlingoptions, Auto Attendant Do NotDisturb and Paging.
Cancel Announcement MailboxAuto Attendant Do Not DisturbCall Routing MailboxConversation RecordGreeting
Instruction MenuMailbox NameMessage ForwardMessage ReplyRecord and Send a Message
Press to erase the currentmessage, name, or greeting.
Cncl
Chnge Message Notification Change the Message Notifica-tion setup.
Code Security Code Press to access the SecurityCode options.
Cont Message ForwardMessage Reply
Record and Send a Message Press to begin recording.
Del Announcement MailboxAuto Attendant Do Not DisturbCall Routing MailboxGreetingInstruction Menu
Listening to MessagesMailbox NameMessage DeleteSecurity Code
Press to delete the currentlyaccessed message, name,greeting, or Security Code.
DList Distribution ListSystem Administrator
Press to access Distribution Listsetup.
Done Announcement MailboxAuto Attendant Do Not DisturbCall Routing MailboxConversation RecordGreeting
Instruction MenuMailbox NameMessage ForwardMessage ReplyRecord and Send a Message
Press to exit the recordingmode while recording amessage, name, or greeting.
Soft Key Glossary 3
SoftKeyGlossary
InMail Feature Manual 3-1
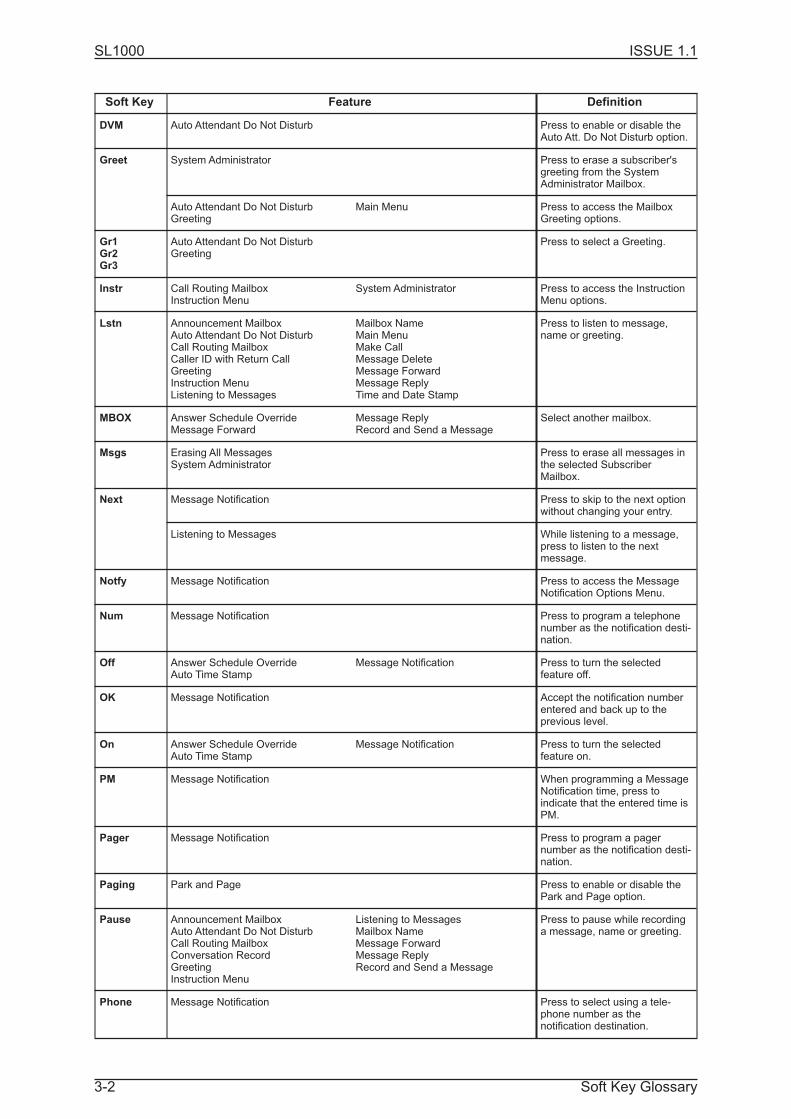
Soft Key Feature Definition
DVM Auto Attendant Do Not Disturb Press to enable or disable theAuto Att. Do Not Disturb option.
Greet System Administrator Press to erase a subscriber'sgreeting from the SystemAdministrator Mailbox.
Auto Attendant Do Not DisturbGreeting
Main Menu Press to access the MailboxGreeting options.
Gr1Gr2Gr3
Auto Attendant Do Not DisturbGreeting
Press to select a Greeting.
Instr Call Routing MailboxInstruction Menu
System Administrator Press to access the InstructionMenu options.
Lstn Announcement MailboxAuto Attendant Do Not DisturbCall Routing MailboxCaller ID with Return CallGreetingInstruction MenuListening to Messages
Mailbox NameMain MenuMake CallMessage DeleteMessage ForwardMessage ReplyTime and Date Stamp
Press to listen to message,name or greeting.
MBOX Answer Schedule OverrideMessage Forward
Message ReplyRecord and Send a Message
Select another mailbox.
Msgs Erasing All MessagesSystem Administrator
Press to erase all messages inthe selected SubscriberMailbox.
Next Message Notification Press to skip to the next optionwithout changing your entry.
Listening to Messages While listening to a message,press to listen to the nextmessage.
Notfy Message Notification Press to access the MessageNotification Options Menu.
Num Message Notification Press to program a telephonenumber as the notification desti-nation.
Off Answer Schedule OverrideAuto Time Stamp
Message Notification Press to turn the selectedfeature off.
OK Message Notification Accept the notification numberentered and back up to theprevious level.
On Answer Schedule OverrideAuto Time Stamp
Message Notification Press to turn the selectedfeature on.
PM Message Notification When programming a MessageNotification time, press toindicate that the entered time isPM.
Pager Message Notification Press to program a pagernumber as the notification desti-nation.
Paging Park and Page Press to enable or disable thePark and Page option.
Pause Announcement MailboxAuto Attendant Do Not DisturbCall Routing MailboxConversation RecordGreetingInstruction Menu
Listening to MessagesMailbox NameMessage ForwardMessage ReplyRecord and Send a Message
Press to pause while recordinga message, name or greeting.
Phone Message Notification Press to select using a tele-phone number as thenotification destination.
ISSUE 1.1SL1000
Soft Key Glossary3-2

Soft Key Feature Definition
Rec Announcement MailboxAuto Attendant Do Not DisturbCall Routing MailboxGreeting
Instruction MenuMailbox NameMain MenuRecord and Send a Message
Press to record a message,name or greeting.
Rpt Listening to Messages Go back to the beginning of themessage.
Resume Announcement MailboxAuto Attendant Do Not DisturbCall Routing MailboxConversation RecordGreeting
Instruction MenuMailbox NameMessage ForwardMessage ReplyRecord and Send a Message
Press to resume while recordinga message, name or greeting.
Return Exiting a Mailbox Press to return to your mailbox.
Subs Erasing All MessagesMailbox NameMailbox Security Code Delete
Security CodeSystem Administrator
Press to select the SubscriberMailbox maintenance options.
ISSUE 1.1 SL1000
InMail Feature Manual 3-3

Memo
ISSUE 1.1SL1000
Soft Key Glossary3-4

Memo
ISSUE 1.1 SL1000
InMail Feature Manual 3-5

InMail Feature Manual
NEC Corporation
ISSUE 1.1