importing from tab-delimited files - oclc from tab-delimited files january 25, 2012 ... this...
TRANSCRIPT

Importing from Tab-Delimited Files January 25, 2012
© 2012 OCLC Page 1 of 19
Importing from Tab-Delimited Files
Tab-delimited text files are an easy way to import metadata for multiple files. (For more general information about using and troubleshooting tab-delimited files, see Using Tab-Delimited Text Files.)
This tutorial leads you through the process of creating a tab-delimited file from a MARC file, configuring and cleaning the data for import, and then adding your metadata to CONTENTdm®.
To successfully complete this tutorial:
The CONTENTdm Server must be running.
The Project Client must be installed on your desktop computer.
Microsoft Excel® must be installed.
Optionally, MarcEdit can be installed (MarcEdit, written by Terry Reese of Oregon State University, is sponsored by the Library of Congress and is used free of charge by thousands of libraries to analyze and manipulate MARC data files. To download, see http://oregonstate.edu/~reeset/marcedit/html/downloads.html.)
Learn About
Section I Creating a Tab-Delimited File from a MARC File
Exporting a Tab-Delimited File Using MarcEdit
Section II Using Microsoft Excel to Prepare File for Import
Section III Importing Dublin Core Metadata Only from MARC File Output
Appendix A Using MarcEdit to Evaluate MARC Fields
Appendix B Cleaning Data in Microsoft Excel
Section I Creating a Tab-Delimited File from a MARC File
In this section you will learn how to export a MARC file from your ILS, and then how to prepare the file for import to CONTENTdm.
1. Create a crosswalk based on the Library of Congress MARC to Dublin Core (DC) crosswalk (http://www.loc.gov/marc/marc2dc.html), adjusting the map to fit your data. In CONTENTdm, only one field, DC.Title, must be mapped to a Dublin Core element.
Following is an example of an abbreviated MARC to DC crosswalk.

Importing from Tab-Delimited Files
© 2012 OCLC Page 2 of 19
Figure 1. Sample local crosswalk
2. In CONTENTdm Administration, configure your DC collection fields according to your MARC to DC crosswalk. (To learn more about field properties, see Editing Field Properties.)
Figure 2. Configure field properties in CONTENTdm Administration

Importing from Tab-Delimited Files
© 2012 OCLC Page 3 of 19
Later, you will need to make sure that the first row of your tab-delimited file contains the field names for your collection. An easy way to ensure that the first row will match your field properties is to export them now while your collection is still empty, as described in the following step.
3. In CONTENTdm Administration, select the Collections tab and then click Export.
4. On the next screen, select the Tab-delimited option and confirm that the Return field names in first record option is checked. Click Next in the lower-right.
Figure 3. Export your empty collection with the field names in the first record
5. Right-click the link to the file, and select Save Target As. Save the file to a directory of choice.
Figure 4. Save the tab-delimited text file
To export a tab-delimited file using MarcEdit:
For import into CONTENTdm, you will need to create a tab-delimited file using MarcEdit. Using the crosswalk as a guide, choose the MARC fields (and subfield[s] as appropriate to the map)
and export the resulting MARC file to a tab-delimited text (.txt) file.
Tip: You may be able to export entire MARC records from your online public access catalog
(OPAC) using your integrated library system’s Export command, and then use MarcEdit to remove unnecessary fields from the tab-delimited file. Alternatively, you can use MarcEdit to export records with only the required fields and subfields from your OPAC directly to the tab-delimited output file. Using the MarcEdit tools MarcBreaker and MarcMaker, you can evaluate which fields are actually used in your catalog. For step-by-step instructions on this alternative
approach, see Appendix A: Use MarcEdit to Evaluate MARC Fields.)

Importing from Tab-Delimited Files
© 2012 OCLC Page 4 of 19
1. Open MarcEdit
Figure 5. Start Screen for MarcEdit
2. From the Tools menu, select Export Tabbed Delimited Records.
Figure 6. Tools menu with Export Tabbed Delimited Records selected
3. Set the file paths by choosing the input file (.mrc, .out, and so on) and output file (tab-delimited .txt) and then click Next.

Importing from Tab-Delimited Files
© 2012 OCLC Page 5 of 19
Figure 7. Set File Paths
4. Define the fields and subfields. Make sure to select Normalize Field Data. This option removes the subfield and indicator characters from the MARC field. Then select the MARC tags to export using your crosswalk as a guide.
Figure 8. Select Normalize Field Data
5. Add each field and then click Export. A confirmation dialog displays.

Importing from Tab-Delimited Files
© 2012 OCLC Page 6 of 19
Figure 9. Tab-delimited file MarcFile.txt is created
Section II: Using Microsoft Excel to Prepare File for Import
After you have created your tab-delimited file from a MARC file, you need to configure and clean the data for importing into CONTENTdm.
1. To remove unwanted characters from the MARC file, locate the MarcFile.txt file on your
computer and open in Microsoft Office Excel.
Figure 10. File in Excel
Note: MarcEdit places MARC tags in row 1. You can map these during the CONTENTdm import process, or you can edit them now to reflect exactly the CONTENTdm fields to which they are
mapped.
2. If you choose to edit now, right-click on the export.txt file that you exported from CONTENTdm and open with Excel.

Importing from Tab-Delimited Files
© 2012 OCLC Page 7 of 19
Figure 11. The file contains your collection field names on the first row
3. With both files open in Excel, from the Window menu, select Arrange… to view the open files horizontally at the same time. You can use the field names as a reference as you format the file for import. Copy the field names and paste them in the first row as appropriate for the column.
Figure 12. Open MarcFile.txt and export.txt and view in separate windows for reference
4. Working with your MARC tab-delimited text file, make sure the columns are correctly aligned and clean up the text as needed (for example, check for multiple tags mapped to the same field name, remove double quotation marks, and so on).
For more information about using the Excel CLEAN function, see Appendix B: Cleaning Data in Microsoft Excel.
Importing from Tab-Delimited Files
© 2012 OCLC Page 8 of 19
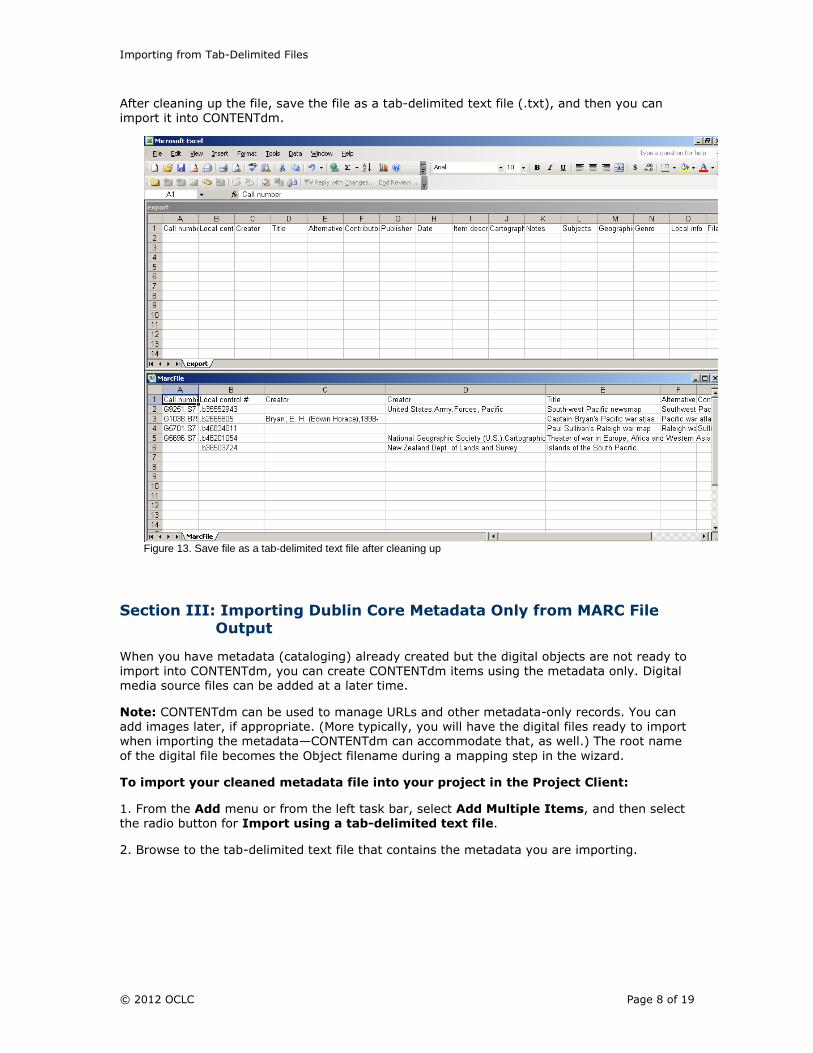
After cleaning up the file, save the file as a tab-delimited text file (.txt), and then you can import it into CONTENTdm.
Figure 13. Save file as a tab-delimited text file after cleaning up
Section III: Importing Dublin Core Metadata Only from MARC File Output
When you have metadata (cataloging) already created but the digital objects are not ready to
import into CONTENTdm, you can create CONTENTdm items using the metadata only. Digital media source files can be added at a later time.
Note: CONTENTdm can be used to manage URLs and other metadata-only records. You can add images later, if appropriate. (More typically, you will have the digital files ready to import when importing the metadata—CONTENTdm can accommodate that, as well.) The root name
of the digital file becomes the Object filename during a mapping step in the wizard.
To import your cleaned metadata file into your project in the Project Client:
1. From the Add menu or from the left task bar, select Add Multiple Items, and then select the radio button for Import using a tab-delimited text file.
2. Browse to the tab-delimited text file that contains the metadata you are importing.

Importing from Tab-Delimited Files
© 2012 OCLC Page 9 of 19
Figure 14. Import a tab-delimited text file containing only metadata
3. On the Import Type screen, select Import metadata only.

Importing from Tab-Delimited Files
© 2012 OCLC Page 10 of 19
Figure 15. The file MarcFile.txt contains metadata only
4. Map your collection fields to the imported fields, adjusting where necessary. For more
information, see Mapping Fields.
5. The field Filename is mapped to the label No map. This indicates that the text file contains no reference to a digital file, and only the metadata will be imported.
Note: If you elected to Import files from a directory earlier in the wizard, the No map field would be replaced with Object file name. You would use this field to specify the import field with the digital media source file.
6. Click Next. The metadata records are added to the project, and the default thumbnail for
a metadata-only item is used.
Your items can now be uploaded for approval from the Project Spreadsheet. In CONTENTdm Administration, the administrator can approve the items and index the collection. This adds the metadata for the new items to your Website.
Figure 16. Browse view of metadata-only record in a collection

Importing from Tab-Delimited Files
© 2012 OCLC Page 11 of 19
Figure 17. Item-level view of one metadata-only record
Importing from Tab-Delimited Files
© 2012 OCLC Page 12 of 19
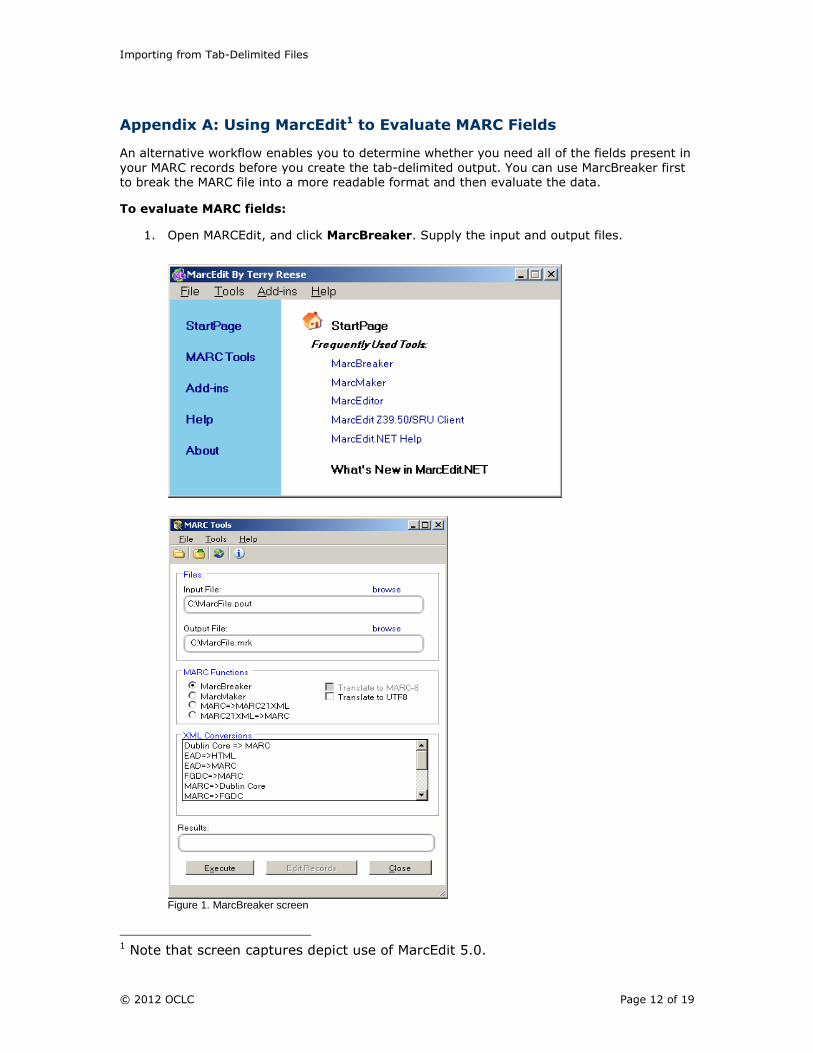
Appendix A: Using MarcEdit1 to Evaluate MARC Fields
An alternative workflow enables you to determine whether you need all of the fields present in
your MARC records before you create the tab-delimited output. You can use MarcBreaker first to break the MARC file into a more readable format and then evaluate the data.
To evaluate MARC fields:
1. Open MARCEdit, and click MarcBreaker. Supply the input and output files.
Figure 1. MarcBreaker screen
1 Note that screen captures depict use of MarcEdit 5.0.

Importing from Tab-Delimited Files
© 2012 OCLC Page 13 of 19
2. Click Execute to process your records.
Figure 2. File processed for edit in MarcEditor
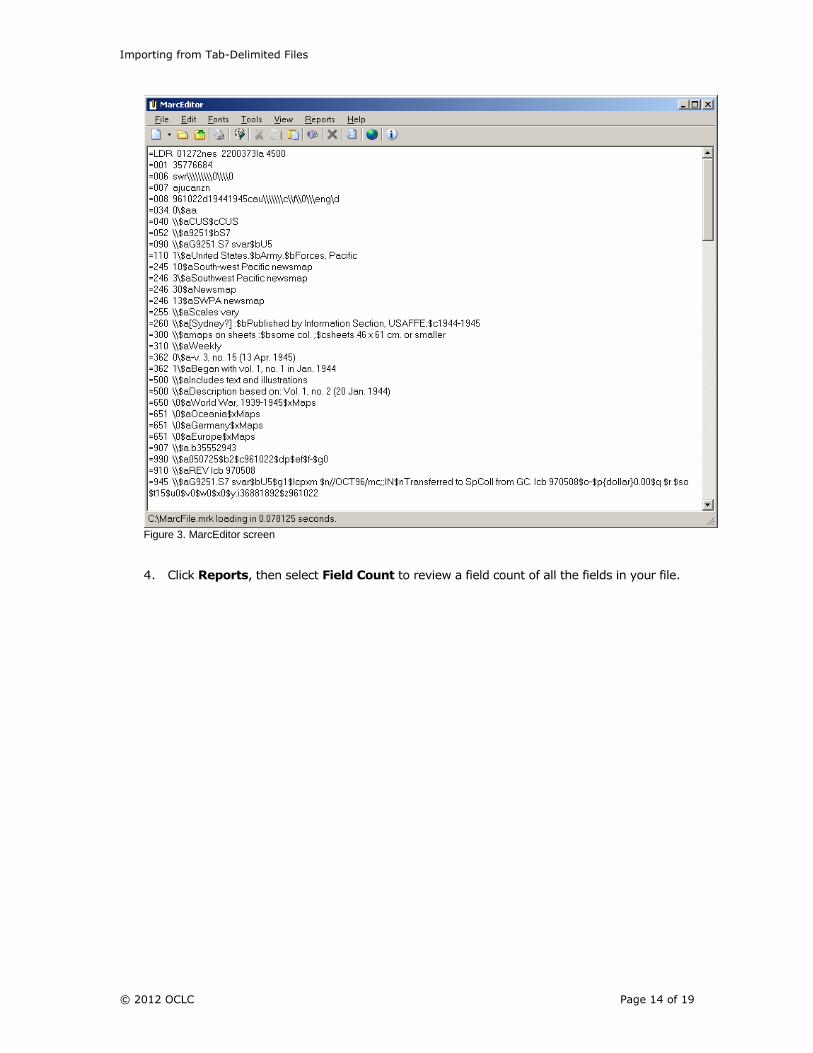
3. Click Edit Records to display records in MarcEditor. You can edit the records as needed.
Importing from Tab-Delimited Files
© 2012 OCLC Page 14 of 19
Figure 3. MarcEditor screen
4. Click Reports, then select Field Count to review a field count of all the fields in your file.

Importing from Tab-Delimited Files
© 2012 OCLC Page 15 of 19
Figure 4. Field count report
5. After evaluating and editing, use the MarcMaker tool to convert the file back into MARC. Once again, supply the input and output files, and click Execute.

Importing from Tab-Delimited Files
© 2012 OCLC Page 16 of 19
Appendix B: Cleaning Data in Microsoft Excel
To clean a column or row, you must have your data open in Microsoft Excel.
1. Create or choose a destination cell for the cleaned data. (In the following example, a new column is inserted after column A.)
2. Place your cursor in the first destination cell to fill in the formula (in this example, cell B2). Click Insert Function.
3. Choose CLEAN, and then click OK.
Figure 5. CLEAN function
The newly cleaned text, free of stray blanks, is inserted in cell B2.

Importing from Tab-Delimited Files
© 2012 OCLC Page 17 of 19
Figure 6. Cleaned text
4. Use the fill handle to copy the formula to the rest of the column. The fill handle is the small black square in the lower-right corner of the selection. When you point to the fill
handle, the pointer changes to a black cross.
5. Click, hold, and drag the fill handle down the column. When you release the handle, column B contains cleaned text.
6. Before you delete the original columns, you must make the destination cells contain
the actual values. Remember that the destination cells only contain the formula. Highlight the column with the CLEAN formulas applied, then right-click and select Copy.

Importing from Tab-Delimited Files
© 2012 OCLC Page 18 of 19
Figure 7. Copy columns to make the destination cells contain the actual values
7. Select the destination column. Then right-click and select Paste Special. Select the Values option, and then click OK.

Importing from Tab-Delimited Files
© 2012 OCLC Page 19 of 19
Figure 8. Columns showing the values, not the formulas
The column now contains the actual values and not the formulas.
8. You can now delete the original column (in this example, column C).