ibanez manuals at americanmusical english s3125a foreword thank you for purchasing the ibanez mimx...
TRANSCRIPT


4

5

6
Table of ContentENGLISH
Foreword ......................................................................................................... 8Important Safety Instructions .......................................................................... 8Precautions during use ................................................................................... 8Safety precautions ........................................................................................ 10Tutorial .......................................................................................................... 12Names and functions of each part ................................................................ 14AMP SELECTION ......................................................................................... 16Factory Presets ............................................................................................. 18Proper Use of the Tap Switch ........................................................................ 19About the "currently-edited" indication of the center display ......................... 19More about the foot controller ....................................................................... 20Troubleshooting ............................................................................................. 21
! ........................................................................................................ 22 !"#$ ............................................................................................. 22 !"##$%&$' ....................................................................... 24 !"#$ ............................................................................................. 26 !"#$% ......................................................................................... 28AMP SELECTION ......................................................................................... 30 !"#$%"&'! ........................................................................... 32TAP !"#$% .................................................................................. 33 !"#$%&'()*+,-./0123456 ............................ 33 !"# $%&%'() .................................................................... 34 !"#$%&' .................................................................................. 35
DEUTSCHVorwort .......................................................................................................... 36Vorsichtsmaßnahmen für den Gebrauch ...................................................... 36Sicherheitshinweise ...................................................................................... 38Tutorial .......................................................................................................... 40Bezeichnungen und Funktionen der Bedienungselemente .......................... 42AMP SELECTION ......................................................................................... 44Werks-Presets .............................................................................................. 46Sinnvoller Einsatz der TAP-Taste .................................................................. 47Über die Bearbeitungsanzeige im mittleren Display ..................................... 47Zusatzinformationen über den Foot Controller ............................................. 48Fehlersuche .................................................................................................. 49
FRANÇAISAvant-propos ................................................................................................. 50Précautions durant l'utilisation ...................................................................... 50Consignes de sécurité .................................................................................. 52Tutoriel .......................................................................................................... 54Nom et fonction de chaque pièce ................................................................. 56AMP SELECTION ......................................................................................... 58Préréglages d'usine par défaut ..................................................................... 60Utilisation du commutateur TAP .................................................................... 61A propos de l'indication " currently edited " sur l'écran central ..................... 61En savoir plus sur la pédale de réglage ........................................................ 62Dépannage ................................................................................................... 63
7
ESPAÑOLPrólogo .......................................................................................................... 64Precauciones de uso .................................................................................... 64Precauciones de seguridad .......................................................................... 66Guía ..............................................................................................................68Nombre y función de cada componente ....................................................... 70Seleccion de programas de amplificacion .................................................... 72Preajustes de fábrica .................................................................................... 74Utilización del interruptor TAP con éxito ....................................................... 75La indicación "actualmente editada" de la pantalla central ........................... 75Más información acerca de pedal ................................................................. 76Localización de problemas ........................................................................... 77
ITALIANOIntroduzione .................................................................................................. 78Precauzioni durante l'uso .............................................................................. 78Precauzioni di sicurezza ............................................................................... 80Guida ............................................................................................................ 82Nomi e funzioni di ogni elemento .................................................................. 84Controllo AMP SELECTION ......................................................................... 86Preimpostazioni di fabbrica ........................................................................... 88Utilizzo efficace dello switch TAP .................................................................. 89Indicazione "modifica in corso" del display centrale ..................................... 89Altre informazioni sul controller a pedale ...................................................... 90Risoluzioni di problemi .................................................................................. 91
中国语
前言 ............................................................................................................... 92重要安全说明 ................................................................................................ 92使用注意事项 ................................................................................................ 92安全注意事项 ................................................................................................ 94操作指南 ........................................................................................................ 96各部分的名称和功能 ...................................................................................... 98AMP SELECTION ....................................................................................... 100出厂预设 ...................................................................................................... 102成功使用TAP开关 ....................................................................................... 103关于中心显示屏的"当前编辑"显示 ............................................................... 103关于脚踏板控制器的更多内容 ..................................................................... 104故障排除 ...................................................................................................... 105
SPECIFICATIONS .......................................................................................... 106
8
EN
GL
ISH
S3125A
ForewordThank you for purchasing the Ibanez MIMX series guitar amplifier. MIMX is adigital modeling amp that boasts high-quality sounds delivered by 32-bit signalprocessing. Read this manual thoroughly prior to using your amplifier in order toget the most out of the functions available. Then keep the manual in a safeplace.
Important Safety Instructions1) Read these instructions.2) Keep these instructions.3) Heed all warnings.4) Follow all instructions.5) Do not use this apparatus near water.6) Clean only with a dry cloth.7) Do not block any ventilation openings. Install in accordance with the
manufacturer’s instructions.8) Do not install near any heat sources such as radiators, heat registers, stoves,
or other apparatus (including amplifiers) that produce heat.9) Do not defeat the safety purpose of the polarized or grounding-type plug. A
polarized plug has two blades with one wider than the other. A grounding typeplug has two blades and a third grounding prong. The wide blade or the thirdprong are provided for your safety. If the provided plug does not fit into youroutlet, consult an electrician for replacement of the obsolete outlet.
10)Protect the power cord from being walked on or pinched particularly at plugs,convenience receptacles, and the point where they exit from the apparatus.
11)Only use attachments/accessories specified by the manufacturer.12)Use only with the cart, stand, tripod, bracket, or table specified
by the manufacturer, or sold with the apparatus. When a cart isused, use caution when moving the cart/apparatus combina-tion to avoid injury from tip-over.
13)Unplug this apparatus during lightning storms or when unusedfor long periods of time.
14)Refer all servicing to qualified service personnel. Servicing is required whenthe apparatus has been damaged in any way, such as power-supply cord orplug is damaged, liquid has been spilled or objects have fallen into the appara-tus, the apparatus has been exposed to rain or moisture, does not operatenormally, or has been dropped.
WARNING - To reduce the risk of fire or electric shock,do not expose this apparatus to rain or moisture.
• “The Lightning Flash with arrowhead symbol within an equilateral triangle, isintended to alert the user to the presence of uninsulated “dangerous voltage”within the product enclosure that may be of sufficient magnitude to constitute arisk of shock to persons”.
• “The exclamation point within an equilateral triangle is intended to alert the userto the presence of important operating and maintenance (servicing) instructionsin the literature accompanying the product”.
Precautions during use1) This product is capable of producing extremely high volumes. In some cases,this
could damage your hearing or cause other bodily impairment. You must becareful of the volume when using this product.
2) Always make sure that a speaker system of the correct impedance is connected.3) Use this product with a power supply of the voltage that is printed on the rear
panel.4) Place this product near the main power outlet, and ensure that the main power
plug can be easily disconnected from the main power outlet if any problemshould occur.
5) This device contains a fuse for protection. The fuse may be broken due toexternal physical shock or because it has reached the end of its lifetime, butsince a broken fuse may indicate that a serious internal malfunction has oc-curred, please contact your dealer before replacing the fuse.
6) When you are not using it, leave the power turned off. As long as the MIMX isconnected to an electrical outlet, it is not completely insulated from the powersupply even if the power switch is turned off. If you will not be using the MIMXfor an extended period, leave the power cable disconnected.
7) Do not turn off the power switch or disconnect the plug from the AC outlet whilethe device is operating. Doing so may cause malfunctions.
8) Do not stand on this device or place heavy objects on it. Doing so may causebreakage or malfunctions.
Cautions regarding location9) If you use the MIMX on top of a speaker cabinet, you must install this equip-
ment securely on the floor or wall. In particular if you're using two speakercabinets (i.e., a full stack), be sure to place the equipment on a flat and levelsurface, and use security belts or similar fasteners to attach the equipment tothe floor or walls so that it cannot fall over.
9
EN
GL
ISH
10)Secure the provided power plug to mains socket-outlets that has a protectiveground terminal.
11)Do not place this device in locations where particularly low temperatures mightoccur, such as walk-in coolers. The device may fail to operate correctly.
12)Do not place this device in locations subject to strong magnetic fields, such asnear a television or radio, or near any other device that emits electromagneticradiation. This device may fail to operate correctly under such conditions.
13)Do not place the device in locations subject to sudden temperature changesIf this device is in a cold room whose temperature is suddenly raised, conden-sation may form inside the device, causing it to fail to operate correctly.
14)Do not place the device in locations of excessive dust or vibration. Such condi-tions may cause damage or malfunction.
15)Depending on the location in which this device is placed, noise may occur in aradio located nearby, or flickering or distortion may be seen in the screen of anearby television. If you suspect that this device is responsible for these condi-tions, turn off the power switch of this device. If this causes the radio or televi-sion to return to normal operation, try moving this device away from the radioor television, or change the orientation of the radio or television.
10
EN
GL
ISH
If a foreign object enters this deviceIf a metallic or flammable foreign object should enter the interior of thisdevice through a jack or other opening, immediately turn off the powerswitch, disconnect the plug from the AC outlet, and contact the dealerfrom whom you purchased the device. Fire or electrocution may occur ifyou continue using the device in this condition.
Do not disassemble or modify the deviceDo not open the cabinet of this device. This device contains high-voltagecomponents, and touching them may produce electrical shock. Contactyour dealer if interior inspection or servicing is required.Do not modify this device. Doing so may cause fire, electrical shock, ormalfunctions.
Do not place water or chemicals on the deviceTo avoid the risk of fire or electrical shock, do not place flower vases,drinks, cosmetics, or containers of chemicals or water on top of this de-vice.
Unplug from the AC outlet if lightning occursIf lightning occurs nearby, turn off the power switch, disconnect the plugfrom the AC outlet, and stop using the device. Lightning can cause fire orelectrical shock.
Do not place the device near flame or heatDo not allow this device or its power cable to be near heating equipment.Such a situation poses a risk that the cabinet or the power cable sheath-ing may melt, causing fire or electrical shock.
Do not use the device at high volume levels for along timeUsing the device at high volume levels through headphones or speakersfor a long time may cause permanent hearing loss depending on theoutput volume setting.
Do not place the device in locations of high humidityDo not use this device in locations of high humidity such as near a bath orhumidifier, or in the rain, or near a body of water. Doing so may cause fireor electrical shock.
WarningsIf the device emits smokeFire or electrocution may occur if you continue to use the device when it isbehaving abnormally, such as emitting smoke or an unusual odor. Imme-diately turn off the power switch, disconnect the plug from the AC outlet,and contact the dealer from whom you purchased the device. Never at-tempt to repair the device yourself, since this can be hazardous.
If the device breaksIf you drop the device or if its cabinet is damaged, immediately turn off thepower switch, disconnect the plug from the AC outlet, and contact thedealer from whom you purchased the device. Fire or electrocution mayoccur if you continue using the device in this condition.
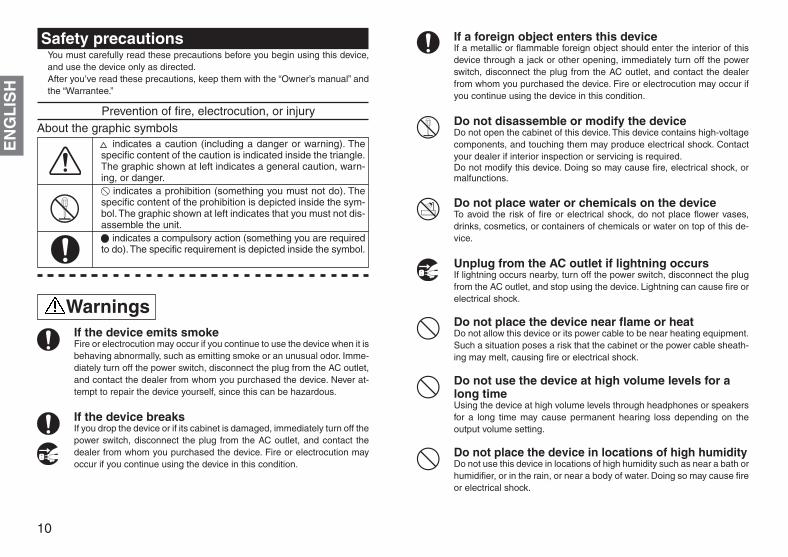
Prevention of fire, electrocution, or injuryAbout the graphic symbols
indicates a caution (including a danger or warning). Thespecific content of the caution is indicated inside the triangle.The graphic shown at left indicates a general caution, warn-ing, or danger.
indicates a prohibition (something you must not do). Thespecific content of the prohibition is depicted inside the sym-bol. The graphic shown at left indicates that you must not dis-assemble the unit. indicates a compulsory action (something you are requiredto do). The specific requirement is depicted inside the symbol.
Safety precautionsYou must carefully read these precautions before you begin using this device,and use the device only as directed.After you’ve read these precautions, keep them with the “Owner’s manual” andthe “Warrantee.”

11
EN
GL
ISH
Do not block the cooling ventsSince the rear of this device functions as a cooling vent, you must leavesufficient space between it and the wall. Blocking the cooling vent willcause heat to be trapped inside the device, possibly causing fire.
Do not place the device in locations of high tem-peratureDo not place this device in locations of high temperature, such as in directsunlight or near equipment that produces heat, such as a stove or heater.Doing so will cause the internal temperature to rise, possibly causing fire.
Do not subject the device to oil spatters or steamDo not place this device where it might be subjected to oil spatters orsteam. This could cause fire or electrical shock.
Use this device only with an AC outlet of thecorrect voltageYou must use this device only with an AC outlet of the correct voltage asmarked on the device itself. Fire or electrical shock may occur if you usethis device with an AC outlet of the wrong voltage.
Do not operate with wet handsDo not connect or disconnect the power cable while your hands are wet.You risk electrical shock if you do so.
Handle the plug with cautionWhen unplugging the cable, be sure to grasp the plug itself. If you unplugthe power cable by pulling the cable itself, you risk damaging the cable,possibly causing fire or electrical shock.
Do not use “octopus-like” connectionsDo not use branching extension cords, power strips, or branching socketsto create “octopus-like” connections from an AC power outlet. Doing somay cause fire or electrical shock.
Handle the power cable with cautionDo not allow the power cable to be scarred, damaged, modified, exces-sively bent, pulled, twisted, or bundled. If heavy objects are placed on thepower cable or if it is subjected to heat, it may be damaged, possiblycausing fire or electrical shock. Please contact your dealer if the powercable becomes damaged.
Use this device only in the country where youpurchased itThis device is designed for the AC power supply voltage of the country inwhich you purchased it; you cannot use it outside the country.
CautionsDisconnect the power cable if you will be awayIf you won’t be using the device for an extended period of time, discon-nect the plug from the AC outlet for safety.
Do not drop the device or subject it to physicalimpactDo not drop this device or subject it to strong physical impact. Doing somay cause breakage or malfunctions.
Do not place the device in an unstable locationDo not place this device in an unstable location, such as on an unsteadystand or at an angle. It may become unbalanced and tip over or fall, caus-ing damage or injury.
12
EN
GL
ISH
TutorialThis section takes you through step-by-step explanations of how to makeconnections to your amp, create sounds, save or reset the sounds you'vecreated, and use rhythm patterns. Once you've followed along with theseexplanations, you'll understand nearly all of the operations of the MIMX.The illustrations appearing here are taken from the control panel of theMIMX 150H.
1. Connections
1)-a Carefully read the cautions for use, and then set up your amp. Nextuse the included power cable to connect the rear panel 12 AC INPUT toan electrical outlet.
Note: The sound (particularly the low-frequency response) of the ampwill change according to the location and conditions in which you set upthe amp.
1)-b If you're using the MIMX 150H, connect 14 SPEAKER OUT to the4Ω input jack of your speaker cabinet. Use a speaker cable to make thisconnection. On Ibanez IS series speaker cabinets, there are two inputjacks. Use the one marked MONO 4Ω.
2) Connect your electric guitar to 1 INPUT. Use a shielded cable tomake the connections.
3) If you're using a compact effect device, use a shielded cable to con-nect it between your guitar and amp.
4) Make sure that 10 MASTER volume is set to 0, and turn on the 11
POWER switch. The startup animation will appear, and the amp is readyto use.
Note: When you're finished using the amp, make sure that 10 MASTERvolume is set to 0 and then turn off the 11 POWER switch.
If you're using the IFC2
By connecting the optional IFC2 (Sold separately), you can access theadditional five pedal effects. For details on making connections, refer tothe IFC2 operating manual.
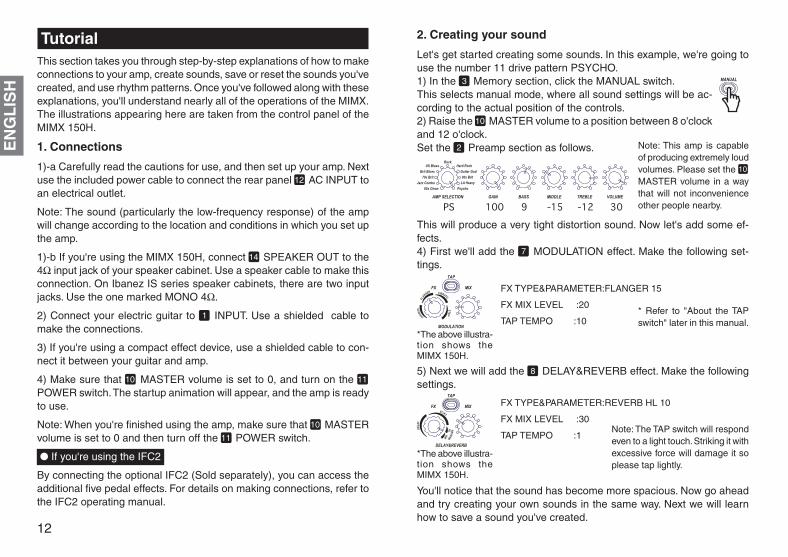
2. Creating your sound
Let's get started creating some sounds. In this example, we're going touse the number 11 drive pattern PSYCHO.1) In the 3 Memory section, click the MANUAL switch.This selects manual mode, where all sound settings will be ac-cording to the actual position of the controls.2) Raise the 10 MASTER volume to a position between 8 o'clockand 12 o'clock.Set the 2 Preamp section as follows.
This will produce a very tight distortion sound. Now let's add some ef-fects.4) First we'll add the 7 MODULATION effect. Make the following set-tings.
5) Next we will add the 8 DELAY&REVERB effect. Make the followingsettings.
You'll notice that the sound has become more spacious. Now go aheadand try creating your own sounds in the same way. Next we will learnhow to save a sound you've created.
Note: This amp is capableof producing extremely loudvolumes. Please set the 10
MASTER volume in a waythat will not inconvenienceother people nearby.
* Refer to "About the TAPswitch" later in this manual.
FX TYPE&PARAMETER:FLANGER 15
FX MIX LEVEL :20
TAP TEMPO :10
FX TYPE&PARAMETER:REVERB HL 10
FX MIX LEVEL :30
TAP TEMPO :1Note: The TAP switch will respondeven to a light touch. Striking it withexcessive force will damage it soplease tap lightly.
*The above illustra-tion shows theMIMX 150H.
*The above illustra-tion shows theMIMX 150H.

13
EN
GL
ISH
3. Saving a sound you created
In this section you'll learn how to save a sound you've created. We'llsave your new sound in bank A, channel 1.* For details on initializing the memory, refer to 5. Factory reset1) Make sure that the 5 Display indicates M. Then, hold down the switchmarked "1" for three seconds or longer. When the settings have beensaved, the 5 Display will indicate A1, and will blink.
A sound you create in manual mode as described here can be saved inany channel. A sound you create in each bank can be saved in a chan-nel within that bank.Here's an example.2) Up to this point, we've used bank A, channel 1 to create a sound, butnow we're going to slightly adjust the position of each control and savethe result in bank A, channel 2. Perform the following steps.
By saving your edited sound in another channel, you'll be able to com-pare the two sounds. Next we're going to try using rhythm patterns.
Note: Each channel consists of two banks, A and B. If youwant to save settings in bank A, channel 1 as described in thistutorial after creating your sound in manual mode, you mustfirst click "1", make sure that you're currently in bank A, andthen click the MANUAL switch once again to return to manualmode before you proceed with the following steps.
Hold down for three seconds or longer.
Hold down for three secondsor longerEdit the sound of
bank A, channel 1
The sound is savedin bank A, channel 2
4. Using rhythm patterns
This section explains how to use rhythm patterns.1) We'll start by playing a rhythm. Click the ON/OFF switch. The TAPswitch will blink, and you'll hear drum sounds.Note: Use the RHYTHM knob to adjust the volume appropriately.2) Next we'll change the pattern. Press + or - until the 5 Display indi-cates 16.3) Let's make the tempo a bit faster. Click the TAP switch several timesat a consistent rhythm until the 5 Display indicates 120.
You can use rhythm patterns by following the procedure described above.
5. Factory reset
This section explains how to initialize the amp to the factory-set condi-tion.1) While holding down the MANUAL switch as shown in the illustrationbelow, turn on the 11 POWER switch. The 5 Display will indicate AL.2) If you press the MANUAL switch in this state, all data will return to thefactory-set condition.3) If you decide to cancel without resetting, operate any control otherthan the MANUAL switch. You will exit factory reset mode.
Play a rhythm pattern Change the rhythm pattern Change the rhythm speed
While holding down theMANUAL switch, turn onthe POWER switch.
The display willindicate AL.
Click the MANUALswitch.
14
EN
GL
ISH
Names and functions of each part1 INPUT: This is a 1/4" phone input jack.
2 Preamp section: This controls the tone of the guitar. Details for eachsection are as follows.1) AMP SELECTION: This knob lets you select from eleven types of preampmodel. For details, refer to the section describing the various amps.2) GAIN: This control knob adjusts the gain. The range of adjustmentwill depend on the AMP SELECTION setting. According to the GAINlevel, the 5 Display will indicate a value between 0 and 100.3) Equalizer: These are the control knobs for the levels (BASS, MIDDLE,TREBLE) of the three-band equalizer. The adjustable range and the func-tion will both differ according to the AMP SELECTION setting. Accordingto the level, the 5 Display will indicate a value between -15 and 15.4) VOLUME: This is the control knob for the output level from the preamp.According to the VOLUME level, the 5 Display will indicate a value be-tween 1 and 50. The output level will be affected by the type of ampyou've selected, the gain level, and the equalizer level. You can use thiscontrol to keep the level consistent between channels, as well as to specifythe desired level. The final volume is set by the 10 MASTER volume.
3 Memory section: To save a sound you created, hold down the switch ofthe desired save-destination channel for three seconds or longer. De-tails are described below.1) MANUAL: This switch selects manual mode, where all sound settings willreflect the actual position of the controls. The 5 Display will indicate M.2) Channels (1-5): These switches choose one of five channels in whichyou can store your own settings. There are two banks (A and B), lettingyou store a total of ten sounds. As an alternative to selecting these fromthe front panel, you can connect the optional IFC2(sold separately) footcontroller and switch channels using your foot. The 5 Display will indi-cate the channel number (1-5).3) A/B bank switch: There are two banks, each containing five channels.
4 Drum section: You can use fifty different rhythm patterns.1) RHYTHM knob: This knob controls the drum volume.2) ON/OFF: This switch turns the rhythm pattern on/off.3) -/+: These switches let you choose from the fifty dif-ferent rhythm patterns. For details on each pattern, re-fer to SPECIFICATIONS.4) TAP switch: This controls the rhythm speed in a rangeof 40 bpm to 199 bpm.
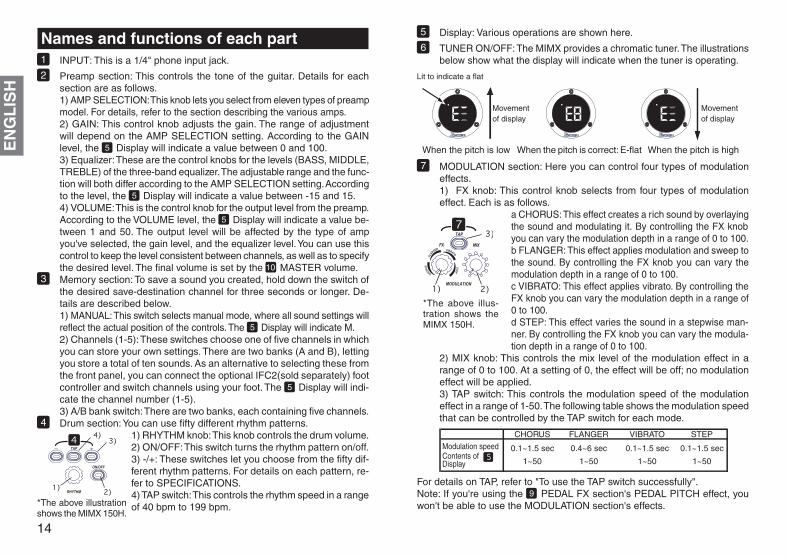
5 Display: Various operations are shown here.
6 TUNER ON/OFF: The MIMX provides a chromatic tuner. The illustrationsbelow show what the display will indicate when the tuner is operating.
7 MODULATION section: Here you can control four types of modulationeffects.1) FX knob: This control knob selects from four types of modulationeffect. Each is as follows.
a CHORUS: This effect creates a rich sound by overlayingthe sound and modulating it. By controlling the FX knobyou can vary the modulation depth in a range of 0 to 100.b FLANGER: This effect applies modulation and sweep tothe sound. By controlling the FX knob you can vary themodulation depth in a range of 0 to 100.c VIBRATO: This effect applies vibrato. By controlling theFX knob you can vary the modulation depth in a range of0 to 100.d STEP: This effect varies the sound in a stepwise man-ner. By controlling the FX knob you can vary the modula-tion depth in a range of 0 to 100.
2) MIX knob: This controls the mix level of the modulation effect in arange of 0 to 100. At a setting of 0, the effect will be off; no modulationeffect will be applied.3) TAP switch: This controls the modulation speed of the modulationeffect in a range of 1-50. The following table shows the modulation speedthat can be controlled by the TAP switch for each mode.
For details on TAP, refer to "To use the TAP switch successfully".Note: If you're using the 9 PEDAL FX section's PEDAL PITCH effect, youwon't be able to use the MODULATION section's effects.
*The above illus-tration shows theMIMX 150H.
CHORUS FLANGER VIBRATO STEP
Contents ofDisplay
0.1~1.5 sec 0.4~6 sec 0.1~1.5 sec 0.1~1.5 sec
1~50 1~50 1~50 1~50
Modulation speed
When the pitch is low When the pitch is high
Lit to indicate a flat
Movementof display
When the pitch is correct: E-flat
Movementof display
*The above illustrationshows the MIMX 150H.

15
EN
GL
ISH
8 DELAY & REVERB section: Here you can control four differentDelay&Reverb effects.1) FX knob: This control knob selects one of four Delay&Reverb effects.These effects are listed below.
a DELAY: This effect adds a delayed copy of the originalsound, somewhat like a musical "round". Use the FXknob to vary the feedback in a range of 0 to 40.b ECHO: This effect produces a warmer DELAY effect.Use the FX knob to vary the feedback in a range of 0 to 40.c REVERB HL: This reverb simulates the acoustics of alarge space such as a concert hall. Use the FX knob to varythe character of the reverberation in a range of 0 to 10.d REVERB RM: This reverb simulates the acoustics of asmall space such as a room. Use the FX knob to varythe character of the reverberation in a range of 0 to 10.
2) MIX knob: This controls the mix level of the Delay&Reverb effect in arange of 0 to 100. At 0 the effect is off, and there will be no Delay&Reverbeffect.3) TAP switch: When using DELAY or ECHO, this controls the delaytime. When using REVERB, this controls the length of reverberation.The following table shows the delay time and reverb time that can becontrolled using the TAP switch in each mode.
For details on TAP, refer to "To use the TAP switch successfully".Note: You can't use REVERB while using the 4 Drum section.
9 PEDAL FX section: You can control pedal-type effects by using a op-tional IFC2(sold separately) foot controller. For details, refer to "Moreabout the foot controller".1) SELECT switch: This selects one of five types of pedal effect. Theseeffects are as follows.
a VOL PEDAL: This is a volume pedal that lets you con-trol the volume using your foot.b RING MOD: This effect gives a metallic character tothe sound.c AUTO RESO: This effect varies the resonant frequencyaccording to the strength of your picking.d WAH WAH: This is a wah-wah effect.e PEDAL PITCH: This effect lets you vary the pitch inreal time.
*The illustrationshows the MIMX150H.
DELAY ECHO REVERB_HL REVERB_RMTime 0.01~1 sec 0.01~1 sec 1~3 sec 0.05~0.8 sec
1~100 1~100 1~30 1~30Content of display
2) Control knob: This knob controls the effect of the 9 PEDAL FX sec-tion. The effects available in each mode are as follows.
3) Foot switch jack: You can use the foot switch by connecting the sepa-rately sold IFC2.4) Foot pedal jack: You can use the 9 PEDAL FX section by connectingthe optional IFC2(sold separately).
10 MASTER volume: This controls the final output that is sent to the speaker.
11 POWER switch: This is the power switch for the amp.
12 AC INPUT: Connect the included power cable here.
13 LINE OUT (MIMX 150H): This is a line-level output jack.
14 SPEAKER OUT (MIMX 150H): This is a speaker output jack. Use aspeaker cable to connect this to either a 4Ω or 8Ω speaker system.Note: If you use a speaker system whose impedance is less than 4Ω,(e.g., a 2Ω speaker system), the power amp will overheat, causing aprotection circuit to engage, and the correct output will not occur.
15 HEADPHONES (MIMX65): This is an output jack for headphones.
16 CD INPUT (MIMX65): This is a line-level input jack. You can connect aportable CD player or MP3 player here.
*The illustration showsthe MIMX 150H.
VOL PEDAL RING MOD AUTO RESO WAH WAH PEDAL PITCH
Control knob Mix levelNA Resonance effect Signal level Pitch change type
Volume Modulation frequency Effect sensitivity Boosted frequency See table 1
Pedal positionMinimum position Maximum position
1 -100 cent2 doubling detune+3 0 cent +1 octave4 0 cent -2 octave5 -1 octave+ +1 octave+6 -700cent+ +500 cent+7 0Hz+ +1 octave8 0Hz+ +1octave+
:Original pitch
Table 1
0~100 0~10 1~100 1~8NAContent ofDisplay Pedal (IFC2)
Content of Display

16
EN
GL
ISH
AMP SELECTIONThe AMP SELECTION dial lets you choose from eleven types of preamps.Of the numerous guitar amps that exist, Ibanez has focused on the dis-tinctive sounds of ten classic amplifiers that are particularly admired bymany guitarists. Everything from the guitar input to the speaker outputhas been analyzed and stored as a preamp. The MIMX is designed sothat sounds similar to these amps can be easily obtained. The EQ foreach preset takes into consideration the sampled amplifier's overall soundincluding the response when things such as "Presence," "Bright," "Reso-nance" or "Deep" Controls are engaged (or not) allowing each model toobtain startlingly detailed snapshots of classic tones. These are not ex-act replications by any means but more a "flavor" if you will. Finally atight, heavy, and smooth Ibanez original sound is provided as SelectionNumber 11. It is appropriately named, "Psycho."PLEASE NOTE: In the following pre-amp descriptions, names of non-Ibanez products are used to give you understandable and familiar tonalreferences and to show the kinds of amp sounds that inspired the MIMXpreamp settings. These references and comparisons to non-Ibanez prod-ucts are entirely subjective. Ibanez does not make any claim whatsoeverthat the MIMX pre-amps are exact tonal representations of the ampsthey reference or are compared to. That said, we think you're going tolove what you hear with the vast selections of tones you can achievewith your new MIMX.
60s Clean:This preset was created to bring to mind the sound of one of the classicamps made by Fender®, the '65 Twin Reverb®, being played through itsNORMAL Channel with the BRIGHT Switch OFF. Mentioning the cleansounds of the '60s will bring this amp to anyone's mind. The sound de-sign of this preamp emphasizes the sparkling crisp high end and solidlows reminiscent of the Classic '60s sounds, but it still has a pleasantlyunique sound all its own.
Jazz Combo:This selection was inspired by the Roland® JC-120, famed for its abilityto convey the straightforward tone of the guitar itself when played throughCHANNEL 1 with the BRIGHT Switch OFF and softened overall tonally.This pre-amp's wide range and uncolored sound over a wide range fromlow to high is a good match for effect processors, making this a highlyversatile selection.
70s Brit:This is a sound we find reminiscent of the classic Marshall® "JCM8002203" combined with the overdrive obtained when the Ibanez®TUBESCREAMER®/TS-9 is employed as a drive booster. From solidchording to glistening solos, this preamp covers a wide range of creativesounds.
Brit Blues:The history of the VOX® "AC30" parallels a broad stream of musicalhistory including blues, rock, and pop. Since its fame continues undimin-ished to this day, and it is still loved by numerous musicians, we thoughta preamp influenced by this type of sound was simply a no-brainer. Whencreating the MIMX flavor we added more gain with a distinctively crispmidrange and tightness so as to in our mind enhance the classic tone.The nuances of your picking will be transmitted faithfully, allowing you toplay with a wide variety of tones.
US Blues:We find this selection very reminiscent of the Fender® "Hot Rod Deville™"played through the DRIVE channel with BRIGHT set to NORMAL, andMORE DRIVE turned ON. The MIMX has tightened up low-end of thatsound and switched the EQ sets to shelving style. The particular attrac-
17
EN
GL
ISH
tion of this selection is a bright sound with a distinctively hard resonance.From a lower gain sound that emphasizes the hard tonal character tothe great sounding drive you get by maxing out the gain, this preampdelivers a broad palette of tones.
Rock:This selection is our take on the sound of the "Ecstasy 101B EL34 Ver-sion," a multi-function tube amp made by the Bogner Corporation, whichis famous for its boutique amps. The settings response provides an im-proved dynamic range from low gain to high gain with more EQ controllevel. While notable for its edged tone, this setting will give you a widevariety from sweet and clean to hard chording sounds, as well as sus-taining overdrive sounds.
Hard Rock:First only offered to a few as custom-made amps, Soldano's® "SL0-100" went on to achieve wider success and reknown. We created thisselection to be similar to the sound of the SLO-100's OVERDRIVE chan-nel with the BRIGHT switch at NORMAL but reduced the possibility offeedback with an overall tension and tightness. We believe the high gainsound is particularly good and is an ideal choice for leads or heavy riffs.
Guitar God:Here you have our idea of what the Peavey® "5150 II®" sounds like. Increating this MIMX preamp, we listened to both the actual Peavey ampas well as the audio sources used on a CD in order to reproduce thesounds that, to our ears, are reminiscent of those recorded. The tight lowend is nice for riffs that intermingle muted notes, and the distortion willmake your sustained solos memorable.
90s Brit:This preamp was also designed by referring to both the amp, in this casethe Marshall® "JCM2000 DSL100" amp, and to the actual audio CDsources of a band who used this amp. Our take on this sound producesa distortion component that is rough, but the sound is tight and welldefined with good separation of notes, making it usable for everythingfrom sparkling arpeggios to flashy riffs. Your guitar sound will be guaran-teed to stand out, even in a loud band.
LA Heavy:The Mesa/Boogie® "Dual Rectifier® Solo Head" has influenced numer-ous musicians of heavy styles. This preamp brings you our interpreta-tion of a collage of the classic sounds of a model introduced in 1989 thathas defined modern heavy guitar tone. Our version provides the distor-tion sound of the original 6L6 power tubes through the RED channelwith the power supply in BOLD mode, using the silicon diode rectifiermode finally played through an Ibanez® Thermion® TN412A four-twelvecabinet. The result is a monstrous low end with good crunch.
Psycho:This is an original Ibanez sound, designed to capture the mainstream oftoday's heavy rock scene. It features a tight and sharp low end, withsuperb crispness. By adjusting the EQ settings, you can use this soundfor any style of music.
* With the exception of Ibanez®, TUBESCREAMER® and Thermion®,company names and product names appearing in this manual arethe trademarks or registered trademarks of their respective owners,and have no affiliation with Ibanez.
Fender®, Twin Reverb®, Hot Rod Deville™ are registered trademarksor trademarks of the Fender Musical Instruments Corporation.Roland® is a registered trademark of Roland Corporation.Marshall® is a registered trademark of Marshall Amplification PLC.VOX® is a registered trademark of VOX R&D limited.Soldano® is a registered trademark of Soldano Custom Amplification.Peavey® is a registered trademark of Peavey Electronics LTD.5150 II® is a registered trademark of E.L.V.H., Inc.Mesa/Boogie® and Dual Rectifier® are registered trademarks ofMesa/Boogie, Limited.
18
EN
GL
ISH
Factory PresetsThese are the sound settings that are assigned to each channel A1-B5when the MIMX is shipped from the factory. With a single click of a but-ton, you can obtain the MIMX's distinctive combinations of sound andeffects.
A1: Immortal ShredAMP SELECTION: PsychoThis preset is ideal for the speedy riffs that are typical of the slash metalor death metal bands in today's music scene. The mid-range is cut toemphasize the high and low ranges, and a firm and robust sound iscreated by raising the bass without excessively reducing the middle.
A2: Shrapnel HeroesAMP SELECTION: PsychoThis preset can be used for guitar solos in a broad range from hard rockto heavy metal. The EQ is relatively flat. If you add a fairly fast delay thispreset will give you a nice sound for soloing.
A3: Cruel HeavinessAMP SELECTION: 90s BritThis preset is for riffs that emphasize rhythm. It is ideal for low-temposongs and the boosted low range will give you a heavy distortion soundthat will pull together the sound of your band. This is ideal for the loudrock sounds of today's music scene.
A4: Legend of the BeastAMP STYLE: Hard RockThis is a solo guitar preset for that classic 80's Metal Sound. This presethas a sound character that is suggestive of the Golden Age of Metal astypified by numerous British and LA metal bands.
A5: Emotional CleanAMP STYLE: 60s CleanThis preset gives you thick lows, a brittle attack, and reverb to create awarm atmosphere. By using a single-coil pickup you can produce a vin-tage brilliant sound. By lowering the mix level of the reverb effect youcan emphasize the sense of attack.
B1: Sounds of the Right HandAMP SELECTION: Guitar GodThis preset is ideal not only for heavy and tight riffs but also leads. Thedistortion obtained by raising the GAIN to the maximum and a punchymid-range are a good match for humbucking pickups. A flanger is lightlyapplied to produce a sense of drive, and delay is added to create spatialeffect.
B2: Purple ToneAMP SELECTION: RockThis is a high gain setting that strongly cuts the low range and adds adistinctive character to the mid-range. By using a single coil pickup, youcan recapture the sound of the mid 70's. As you raise the MIDDLE con-trol, the sound will take on a classical atmosphere --- adjust to your taste.To take full advantage of this sound, play the hard rock riffs that wererevolutionary at the time and have now become the origin of today'sheavy rock.
B3: Crystal CleanAMP SELECTION: Jazz ComboThis preset was designed to produce sparklingly clean and crystal clearsounds. It is most suited to the hard rock and heavy metal "Power Bal-lads" of the 80's and 90's. Try playing it using single-coil pickups, eitherthe center pickup or a combination of the neck/middle pickups. Raisethe effect mix level to get a more lavish sound.
B4: Solo DNAAMP SELECTION: RockThis preset was created for you to play those shredding solos madefamous by the guitar gods of the 80's! It's a setting that's great for goingwild with your musicality. Make free use of string bending, dive bombing,pinch harmonics, sweep arpeggios and express your imagination.
B5: Samurai EdgeAMP SELECTION: 70s BritThis preset is a good choice for comping or bluesy riffs played with asingle coil pickup. It has just the right amount of distortion to accentuatethe nuances of your picking, and has a nice crisp high end. Adjust theamount of reverb to your taste.
19
EN
GL
ISH
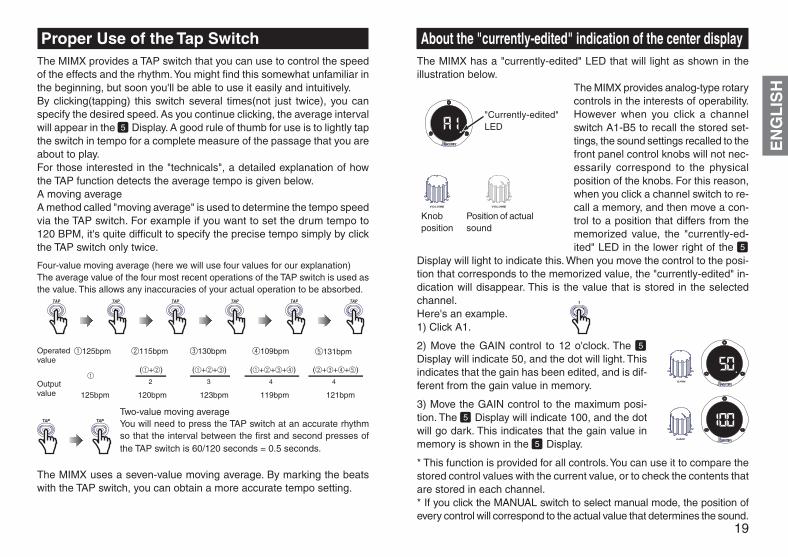
Proper Use of the Tap SwitchThe MIMX provides a TAP switch that you can use to control the speedof the effects and the rhythm. You might find this somewhat unfamiliar inthe beginning, but soon you'll be able to use it easily and intuitively.By clicking(tapping) this switch several times(not just twice), you canspecify the desired speed. As you continue clicking, the average intervalwill appear in the 5 Display. A good rule of thumb for use is to lightly tapthe switch in tempo for a complete measure of the passage that you areabout to play.For those interested in the "technicals", a detailed explanation of howthe TAP function detects the average tempo is given below.A moving averageA method called "moving average" is used to determine the tempo speedvia the TAP switch. For example if you want to set the drum tempo to120 BPM, it's quite difficult to specify the precise tempo simply by clickthe TAP switch only twice.
Four-value moving average (here we will use four values for our explanation)The average value of the four most recent operations of the TAP switch is used asthe value. This allows any inaccuracies of your actual operation to be absorbed.
Two-value moving averageYou will need to press the TAP switch at an accurate rhythmso that the interval between the first and second presses ofthe TAP switch is 60/120 seconds = 0.5 seconds.
The MIMX uses a seven-value moving average. By marking the beatswith the TAP switch, you can obtain a more accurate tempo setting.
About the "currently-edited" indication of the center displayThe MIMX has a "currently-edited" LED that will light as shown in theillustration below.
The MIMX provides analog-type rotarycontrols in the interests of operability.However when you click a channelswitch A1-B5 to recall the stored set-tings, the sound settings recalled to thefront panel control knobs will not nec-essarily correspond to the physicalposition of the knobs. For this reason,when you click a channel switch to re-call a memory, and then move a con-trol to a position that differs from thememorized value, the "currently-ed-ited" LED in the lower right of the 5
Display will light to indicate this. When you move the control to the posi-tion that corresponds to the memorized value, the "currently-edited" in-dication will disappear. This is the value that is stored in the selectedchannel.Here's an example.1) Click A1.
2) Move the GAIN control to 12 o'clock. The 5
Display will indicate 50, and the dot will light. Thisindicates that the gain has been edited, and is dif-ferent from the gain value in memory.
3) Move the GAIN control to the maximum posi-tion. The 5 Display will indicate 100, and the dotwill go dark. This indicates that the gain value inmemory is shown in the 5 Display.
* This function is provided for all controls. You can use it to compare thestored control values with the current value, or to check the contents thatare stored in each channel.* If you click the MANUAL switch to select manual mode, the position ofevery control will correspond to the actual value that determines the sound.
1125bpm 2115bpm 3130bpm 4109bpmOperated value
Output value
5131bpm
1(1+2)
2
(1+2+3)
3
(1+2+3+4)
4
(2+3+4+5)
4
125bpm 120bpm 121bpm119bpm123bpm
Position of actualsound
"Currently-edited"LED
Knobposition
20
EN
GL
ISH
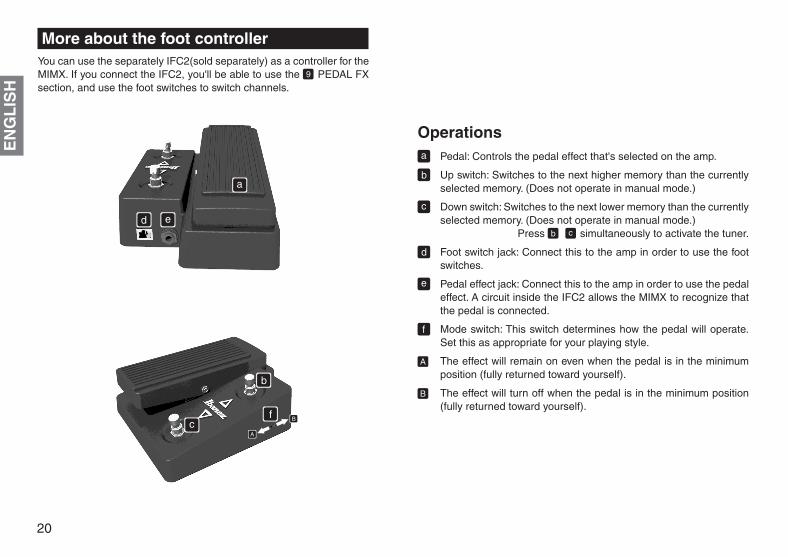
More about the foot controllerYou can use the separately IFC2(sold separately) as a controller for theMIMX. If you connect the IFC2, you'll be able to use the 9 PEDAL FXsection, and use the foot switches to switch channels.
Operationsa Pedal: Controls the pedal effect that's selected on the amp.
b Up switch: Switches to the next higher memory than the currentlyselected memory. (Does not operate in manual mode.)
c Down switch: Switches to the next lower memory than the currentlyselected memory. (Does not operate in manual mode.)
Press b c simultaneously to activate the tuner.
d Foot switch jack: Connect this to the amp in order to use the footswitches.
e Pedal effect jack: Connect this to the amp in order to use the pedaleffect. A circuit inside the IFC2 allows the MIMX to recognize thatthe pedal is connected.
f Mode switch: This switch determines how the pedal will operate.Set this as appropriate for your playing style.
A The effect will remain on even when the pedal is in the minimumposition (fully returned toward yourself).
B The effect will turn off when the pedal is in the minimum position(fully returned toward yourself).
a
c
d e
b
f
A
B
21
EN
GL
ISH
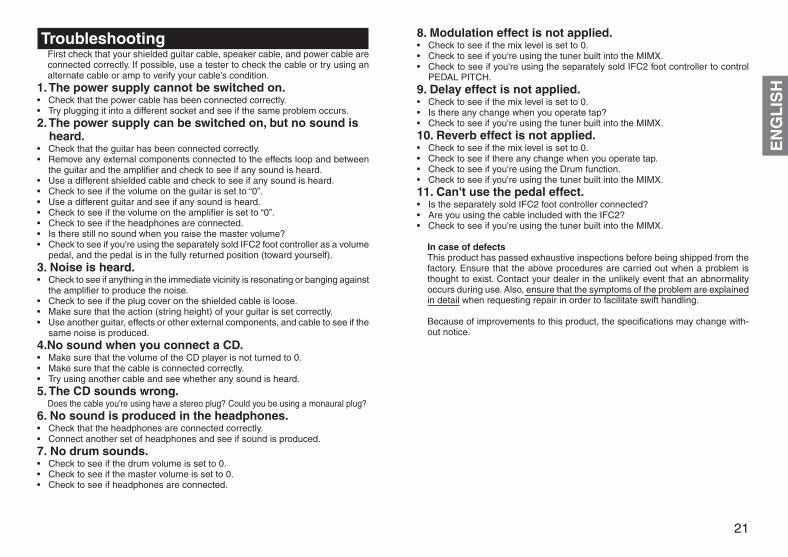
TroubleshootingFirst check that your shielded guitar cable, speaker cable, and power cable areconnected correctly. If possible, use a tester to check the cable or try using analternate cable or amp to verify your cable’s condition.
1. The power supply cannot be switched on.• Check that the power cable has been connected correctly.• Try plugging it into a different socket and see if the same problem occurs.2. The power supply can be switched on, but no sound is
heard.• Check that the guitar has been connected correctly.• Remove any external components connected to the effects loop and between
the guitar and the amplifier and check to see if any sound is heard.• Use a different shielded cable and check to see if any sound is heard.• Check to see if the volume on the guitar is set to “0”.• Use a different guitar and see if any sound is heard.• Check to see if the volume on the amplifier is set to “0”.• Check to see if the headphones are connected.• Is there still no sound when you raise the master volume?• Check to see if you're using the separately sold IFC2 foot controller as a volume
pedal, and the pedal is in the fully returned position (toward yourself).3. Noise is heard.• Check to see if anything in the immediate vicinity is resonating or banging against
the amplifier to produce the noise.• Check to see if the plug cover on the shielded cable is loose.• Make sure that the action (string height) of your guitar is set correctly.• Use another guitar, effects or other external components, and cable to see if the
same noise is produced.4.No sound when you connect a CD.• Make sure that the volume of the CD player is not turned to 0.• Make sure that the cable is connected correctly.• Try using another cable and see whether any sound is heard.5. The CD sounds wrong.
Does the cable you’re using have a stereo plug? Could you be using a monaural plug?6. No sound is produced in the headphones.• Check that the headphones are connected correctly.• Connect another set of headphones and see if sound is produced.7. No drum sounds.• Check to see if the drum volume is set to 0.• Check to see if the master volume is set to 0.• Check to see if headphones are connected.
8. Modulation effect is not applied.• Check to see if the mix level is set to 0.• Check to see if you're using the tuner built into the MIMX.• Check to see if you're using the separately sold IFC2 foot controller to control
PEDAL PITCH.9. Delay effect is not applied.• Check to see if the mix level is set to 0.• Is there any change when you operate tap?• Check to see if you're using the tuner built into the MIMX.10. Reverb effect is not applied.• Check to see if the mix level is set to 0.• Check to see if there any change when you operate tap.• Check to see if you're using the Drum function.• Check to see if you're using the tuner built into the MIMX.11. Can't use the pedal effect.• Is the separately sold IFC2 foot controller connected?• Are you using the cable included with the IFC2?• Check to see if you're using the tuner built into the MIMX.
In case of defectsThis product has passed exhaustive inspections before being shipped from thefactory. Ensure that the above procedures are carried out when a problem isthought to exist. Contact your dealer in the unlikely event that an abnormalityoccurs during use. Also, ensure that the symptoms of the problem are explainedin detail when requesting repair in order to facilitate swift handling.
Because of improvements to this product, the specifications may change with-out notice.
ES
PAÑ
OL
64
PrólogoGracias por adquirir el amplificador de guitarra Ibanez de la serie MIMX. MIMXes un amplificador de modelado digital que refuerza los sonidos de alta calidadsuministrados por un procesamiento de señal a 32 bits. Para sacar el máximopartido de las funciones que le ofrece este amplificador, antes de utilizarlo leaantentamente este manual. Seguidamente guarde el manual en un lugar seguro.
Precauciones de uso1) Lea las precauciones de uso que se facilitan en este manual.2) Tenga a mano las precauciones de uso que se facilitan en este manual para
consultarlas.3) Observe todas las precauciones.4) Siga las instrucciones que se facilitan en este manual.5) Utilice únicamente un paño seco para limpiar el amplificador.6) Este producto puede generar volúmenes extremadamente altos. En algunos
casos ello puede dañar los oídos o provocar otras lesiones. Debe tener cuidadocon el volumen cuando utilice este producto.
7) Verifique siempre que el sistema de altavoces que conecte al amplificador tengala impedancia correcta.
8) Utilice este producto con una fuente de alimentación cuyo voltaje sea igual alindicado en el panel posterior.
9) Evite pellizcar o aplastar el cable de alimentación, especialmente junto al enchufeo a la toma de corriente.
10)Sitúe este producto cerca de la toma de corriente principal y verifique que elenchufe se pueda desconectar fácilmente de la misma en caso de que sepresente algún problema.
11)Utilice únicamente los elementos u opciones incluidos que cumplan lasespecificaciones del fabricante.
12)Este aparato está protegido por un fusible. El fusible se puede romper debido aun golpe externo o por haberse agotado su vida útil; no obstante, dado que larotura del fusible puede indicar que se ha producido un fallo interno grave,consulte a su concesionario antes de cambiarlo.
13)Confíe todas las reparaciones a un técnico autorizado por el distribuidor. Seránecesario proceder a una revisión y reparación si el cable de alimentación o elenchufe resultan dañados, si sale líquido de la unidad, si penetra un objetoextraño en el interior de la unidad, si la unidad se moja, si se cae accidentalmenteo si no funciona con normalidad.
14)Cuando no utilice el amplificador, manténgalo apagado. Mientras el MIMX estéconectado a una toma de corriente, no está completamente aislado de la fuentede alimentación aún cuando el interruptor de alimentación esté desconectado.Cuando no vaya a utilizar el MIMX durante largo tiempo, desenchufe el cable dealimentación.
15)No apague el dispositivo ni lo desenchufe mientras lo esté utilizando. Ello puedeprovocar averías.
16)No se suba al dispositivo ni coloque objetos pesados sobre el mismo. Se puederomper o averiar.
65
ES
PAÑ
OL
Precauciones relativas a la ubicación17)Si utiliza el MIMX sobre una caja acústica, deberá instalar el equipo de forma
segura en el piso o en una pared. Concretamente, si está utilizando dos cajasacústicas (es decir, un apilado completo), cerciórese de colocar el equipo sobreuna superficie plana y nivelada, y utilice correas de seguridad, o sujetadoressimilares, para fijar el equipo al piso o a la pared para evitar que se caiga.
18)No coloque este dispositivo en lugares en que las temperaturas puedan sermuy bajas, por ejemplo cámaras frigoríficas. El dispositivo puede fallar.
19)No coloque este dispositivo en lugares expuestos a campos magnéticosintensos, por ejemplo cerca de un televisor o una radio, o cerca de otro dispositivoque emita radiaciones electromagnéticas. En esas condiciones el dispositivopuede fallar.
20)No coloque el dispositivo en lugares expuestos a variaciones bruscas detemperaturaSi el dispositivo se encuentra en un lugar frío y la temperatura sube rápidamente,puede formarse condensación en su interior y provocar fallos.
21)No coloque el dispositivo en lugares expuestos a un exceso de polvo ovibracionesEn tales condiciones pueden producirse daños o averías.
22)Según el lugar donde se coloque este dispositivo, puede provocar ruidos enuna radio próxima u oscilaciones o distorsión en la pantalla de un televisorcercano. Si sospecha que este dispositivo está provocando dichas interferencias,apáguelo. Si cuando apaga el dispositivo, la radio o el televisor vuelven afuncionar con normalidad, aleje el dispositivo de la radio o del televisor o cambiela orientación de estos.
ES
PAÑ
OL
66
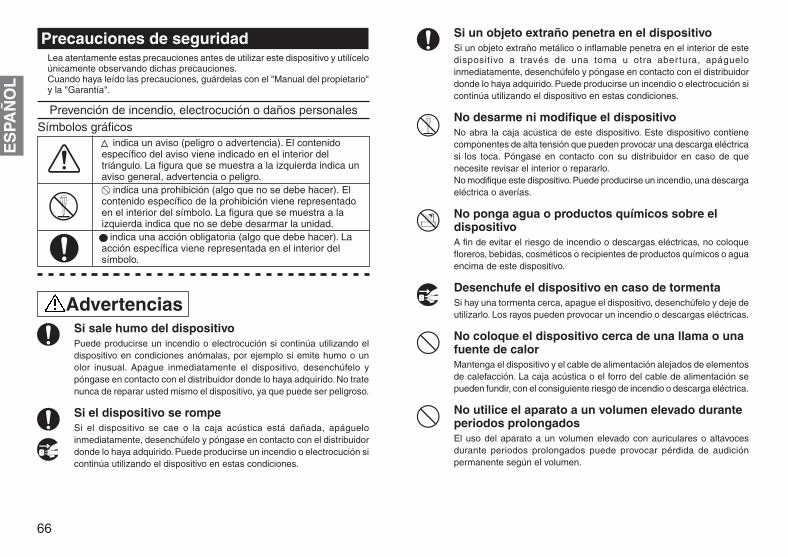
Si un objeto extraño penetra en el dispositivoSi un objeto extraño metálico o inflamable penetra en el interior de estedispositivo a través de una toma u otra abertura, apágueloinmediatamente, desenchúfelo y póngase en contacto con el distribuidordonde lo haya adquirido. Puede producirse un incendio o electrocución sicontinúa utilizando el dispositivo en estas condiciones.
No desarme ni modifique el dispositivoNo abra la caja acústica de este dispositivo. Este dispositivo contienecomponentes de alta tensión que pueden provocar una descarga eléctricasi los toca. Póngase en contacto con su distribuidor en caso de quenecesite revisar el interior o repararlo.No modifique este dispositivo. Puede producirse un incendio, una descargaeléctrica o averías.
No ponga agua o productos químicos sobre eldispositivoA fin de evitar el riesgo de incendio o descargas eléctricas, no coloquefloreros, bebidas, cosméticos o recipientes de productos químicos o aguaencima de este dispositivo.
Desenchufe el dispositivo en caso de tormentaSi hay una tormenta cerca, apague el dispositivo, desenchúfelo y deje deutilizarlo. Los rayos pueden provocar un incendio o descargas eléctricas.
No coloque el dispositivo cerca de una llama o unafuente de calorMantenga el dispositivo y el cable de alimentación alejados de elementosde calefacción. La caja acústica o el forro del cable de alimentación sepueden fundir, con el consiguiente riesgo de incendio o descarga eléctrica.
No utilice el aparato a un volumen elevado duranteperiodos prolongadosEl uso del aparato a un volumen elevado con auriculares o altavocesdurante periodos prolongados puede provocar pérdida de audiciónpermanente según el volumen.
AdvertenciasSi sale humo del dispositivoPuede producirse un incendio o electrocución si continúa utilizando eldispositivo en condiciones anómalas, por ejemplo si emite humo o unolor inusual. Apague inmediatamente el dispositivo, desenchúfelo ypóngase en contacto con el distribuidor donde lo haya adquirido. No tratenunca de reparar usted mismo el dispositivo, ya que puede ser peligroso.
Si el dispositivo se rompeSi el dispositivo se cae o la caja acústica está dañada, apágueloinmediatamente, desenchúfelo y póngase en contacto con el distribuidordonde lo haya adquirido. Puede producirse un incendio o electrocución sicontinúa utilizando el dispositivo en estas condiciones.
Precauciones de seguridadLea atentamente estas precauciones antes de utilizar este dispositivo y utilíceloúnicamente observando dichas precauciones.Cuando haya leído las precauciones, guárdelas con el "Manual del propietario"y la "Garantía".
Prevención de incendio, electrocución o daños personalesSímbolos gráficos
indica un aviso (peligro o advertencia). El contenidoespecífico del aviso viene indicado en el interior deltriángulo. La figura que se muestra a la izquierda indica unaviso general, advertencia o peligro.
indica una prohibición (algo que no se debe hacer). Elcontenido específico de la prohibición viene representadoen el interior del símbolo. La figura que se muestra a laizquierda indica que no se debe desarmar la unidad. indica una acción obligatoria (algo que debe hacer). Laacción específica viene representada en el interior delsímbolo.
67
ES
PAÑ
OL
No coloque el dispositivo en lugares húmedosNo utilice este dispositivo en lugares húmedos, por ejemplo cerca de unbaño o un humidificador, bajo la lluvia o cerca de agua. Puede producirseun incendio o una descarga eléctrica.
No obstruya las aberturas de ventilaciónDado que la parte posterior sirve de abertura de ventilación, debe habersuficiente espacio entre el dispositivo y la pared. Si se obstruye la aberturade ventilación puede acumularse calor en el interior del dispositivo, conel consiguiente riesgo de incendio.
No coloque el dispositivo en lugares expuestos atemperaturas altasNo coloque este dispositivo en lugares expuestos a temperaturas altas,por ejemplo al sol o cerca de equipos que generen calor como estufas ocalefactores. Puede elevarse la temperatura interna del dispositivo, conel consiguiente riesgo de incendio.
Evite exponer el dispositivo a salpicaduras deaceite y al vaporEvite colocar este dispositivo en lugares donde pueda quedar expuestoa salpicaduras de aceite o a vapor. Puede producirse un incendio o unadescarga eléctrica.
Utilice este dispositivo únicamente con una tomade CA del voltaje correctoEste dispositivo se debe utilizar únicamente con una toma de CA delvoltaje correcto, el cual viene indicado en el propio dispositivo. Si se utilizaeste dispositivo con una toma de CA de voltaje incorrecto, puedeproducirse un incendio o una descarga eléctrica.
No manipule el dispositivo con las manos mojadasNo enchufe ni desenchufe el cable de alimentación con las manosmojadas. Puede recibir una descarga eléctrica.
Manipule el enchufe con cuidadoCuando desenchufe el cable, hágalo tirando del enchufe. Si lo desenchufatirando del cable de alimentación, este puede resultar dañado, con elconsiguiente riesgo de incendio o descarga eléctrica.
Evite conectar varios cables a una sola toma decorrienteNo utilice alargadores múltiples, regletas de conexión o ladrones paraconectar varios cables a una única toma de CA. Puede producirse unincendio o una descarga eléctrica.
Manipule el cable de alimentación con cuidadoEvite pelar, dañar, modificar, doblar excesivamente, estirar, retorcer oreliar el cable de alimentación. Si coloca objetos pesados sobre el cablede alimentación o le aplica calor, puede resultar dañado, con elconsiguiente riesgo de incendio o descarga eléctrica. Si el cable dealimentación resulta dañado, póngase en contacto con su distribuidor.
Utilice este dispositivo únicamente en el paísdonde lo ha compradoEste dispositivo está diseñado para funcionar con el voltaje de corrientealterna del país en el que lo ha comprado; no puede utilizarlo fuera dedicho país.
Precauciones
Desconecte el cable de alimentación si va a estarfueraPor razones de seguridad, desenchufe el dispositivo si no va a utilizarlodurante un periodo prolongado.
Evite que el dispositivo caiga o reciba golpesEvite que el dispositivo caiga o reciba golpes fuertes.Se puede romper o averiar.
No coloque el dispositivo en un lugar inestableNo coloque este dispositivo en un lugar inestable, por ejemplo un soporteinseguro o en posición inclinada. Puede desequilibrarse y volcar o caer,con el consiguiente riesgo de daños o lesiones.
68
ES
PAÑ
OL
GuíaEn esta sección se le explicará paso a paso cómo efectuar las conexio-nes al amplificador, crear sonidos, memorizar o recuperar sonidos quehaya creado y utilizar patrones de ritmo. Una vez haya seguido estasexplicaciones entenderá prácticamente todo el funcionamiento del MIMX.Las ilustraciones que se muestran corresponden al panel de control delMIMX 150H.
1. Conexiones
1)-a Lea atentamente las precauciones de uso y luego prepare el ampli-ficador. A continuación utilice el cable de alimentación que se incluyepara conectar la toma 12 AC INPUT a una toma de la red eléctrica.
Nota: El sonido (en particular la respuesta de bajas frecuencias) delamplificador cambiará según la ubicación y las condiciones en que ins-tale el amplificador.
1)-b Si va a utilizar el MIMX 150H, conecte 14 SPEAKER OUT a la tomade entrada de 4 Ω de la caja acústica. Utilice un cable de altavoz paraefectuar esta conexión. Las cajas acústicas Ibanez de la serie IS, dispo-nen de dos tomas de entrada. Utilice la que lleva la marca MONO 4Ω.
2) Conecte la guitarra eléctrica a 1 INPUT. Utilice un cable blindadopara efectuar las conexiones.
3) Si va a usar un procesador de efectos compacto, utilice un cableblindado para conectarlo entre la guitarra y el amplificador.
4) Verifique que el volumen 10 MASTER se encuentre en 0 y enciendael amplificador con el interruptor POWER 11 . Aparece la animación deencendido y el amplificador queda listo para funcionar.
Nota: Cuando haya terminado de utilizar el amplificador, verifique que elvolumen 10 MASTER se encuentre en 0 y luego apague el amplificadorcon el interruptor POWER 11 .
Si va a utilizar el IFC2
Si conecta el IFC2 opcional (vendido por separado), podrá acceder alos cinco efectos de pedal adicionales. Para más detalles acerca de lasconexiones, consulte el manual de instrucciones del IFC2.
2. Creación de sonidos
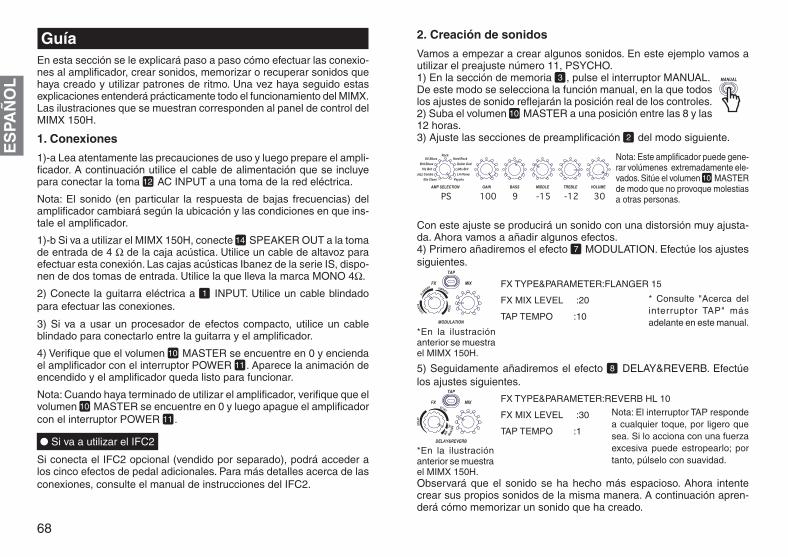
Vamos a empezar a crear algunos sonidos. En este ejemplo vamos autilizar el preajuste número 11, PSYCHO.1) En la sección de memoria 3 , pulse el interruptor MANUAL.De este modo se selecciona la función manual, en la que todoslos ajustes de sonido reflejarán la posición real de los controles.2) Suba el volumen 10 MASTER a una posición entre las 8 y las12 horas.3) Ajuste las secciones de preamplificación 2 del modo siguiente.
Con este ajuste se producirá un sonido con una distorsión muy ajusta-da. Ahora vamos a añadir algunos efectos.4) Primero añadiremos el efecto 7 MODULATION. Efectúe los ajustessiguientes.
5) Seguidamente añadiremos el efecto 8 DELAY&REVERB. Efectúelos ajustes siguientes.
Observará que el sonido se ha hecho más espacioso. Ahora intentecrear sus propios sonidos de la misma manera. A continuación apren-derá cómo memorizar un sonido que ha creado.
Nota: Este amplificador puede gene-rar volúmenes extremadamente ele-vados. Sitúe el volumen 10 MASTERde modo que no provoque molestiasa otras personas.
* Consulte "Acerca delinterruptor TAP" másadelante en este manual.
FX TYPE&PARAMETER:FLANGER 15
FX MIX LEVEL :20
TAP TEMPO :10
FX TYPE&PARAMETER:REVERB HL 10
FX MIX LEVEL :30
TAP TEMPO :1
Nota: El interruptor TAP respondea cualquier toque, por ligero quesea. Si lo acciona con una fuerzaexcesiva puede estropearlo; portanto, púlselo con suavidad.
*En la ilustraciónanterior se muestrael MIMX 150H.
*En la ilustraciónanterior se muestrael MIMX 150H.

69
ES
PAÑ
OL
3. Memorizar un sonido que ha creado
En esta sección aprenderá cómo se guarda un sonido que ha creado.Vamos a guardar el nuevo sonido en el banco A, canal 1.* Para más detalles acerca de la inicialización de la memoria, consulte5. Reposición de los ajustes de fábrica1) Verifique que la Pantalla 5 indique M. A continuación mantenga pul-sado el interruptor con la marca "1" durante un mínimo de tres segun-dos. Cuando los ajustes estén guardados, la Pantalla 5 indicará A1 yparpadeará.
Puede guardar en cualquier canal un sonido creado con la función ma-nual como se describe aquí. Un sonido creado en cada banco se puedeguardar en un canal de ese banco.Veamos un ejemplo.2) Hasta aquí hemos utilizado el banco A, canal 1, para crear un sonido,pero ahora vamos a ajustar ligeramente la posición de cada control yguardar el resultado en el banco A, canal 2. Realice los pasos siguien-tes.
Al guardar el sonido editado en otro banco, podrá comparar ambos so-nidos. A continuación vamos a intentar utilizar patrones de ritmo.
Nota: Cada canal está formado por dos bancos, A y B. Si deseaguardar ajustes en el banco A del canal 1 según se describe en estaguía después de crear un sonido de modo manual, primero debepulsar "1," verificar que se encuentra actualmente en el banco A yluego pulsar el interruptor MANUAL una vez más para volver a lafunción manual antes de continuar con los pasos siguientes.
Mantenga pulsado durante un mínimo de tres segundos.
Mantenga pulsado duranteun mínimo de tres segundosEdite el sonido del
banco A, canal 1El sonido se guarda enel banco A, canal 2
4. Uso de patrones de ritmo
En esta sección se explica cómo utilizar patrones de ritmo.1) Empezaremos por tocar un ritmo. Pulse el interruptor ON/OFF. El inte-rruptor TAP parpadea y se oyen sonidos de batería.Nota: Utilice el mando RHYTHM para ajustar el volumen adecuada-mente.2) A continuación vamos a cambiar el patrón. Pulse + o - hasta que laPantalla 5 indique 16.3) Hagamos el tempo un poco más rápido. Pulse el interruptor TAP va-rias veces a un ritmo uniforme hasta que la Pantalla 5 indique 120.
Puede utilizar patrones de ritmo siguiendo el procedimiento descritoanteriormente.
5. Reposición de los ajustes de fábrica
En esta sección se explica cómo reponer los ajustes de fábrica delamplificador.1) Mientras mantiene pulsado el interruptor MANUAL como se muestraen la ilustración siguiente, encienda el amplificador con el interruptorPOWER 11 . La Pantalla 5 indica AL.2) Si en este momento pulsa el interruptor MANUAL, se restablecerántodos los datos de fábrica.3) Si decide cancelar la operación sin reponer los datos, accione cual-quier control salvo el interruptor MANUAL. De este modo sale de lafunción de reposición de los ajustes de fábrica.
Toque un patrónde ritmo
Cambie el patróndel ritmo
Cambie la velocidaddel ritmo
Mientras mantiene pulsado el in-terruptor MANUAL, encienda elamplificador con el interruptorPOWER.
Pulse el interruptorMANUAL.
La pantallaindica AL.

70
ES
PAÑ
OL
Nombre y función de cada componente1 INPUT: Esta es una toma de entrada de tipo telefónico de 1/4 de pulgada.
2 Sección de preamplificación: Controla el tono de la guitarra. A continuación se detallacada función de preamplificación.1) AMP SELECTION: Este mando permite seleccionar once tipos de preamplificación.Para más detalles, consulte la sección en que se describen los diferentes amplificadores.2) GAIN: Con este mando se ajusta la ganancia. El margen de ajuste depende de laposición del mando AMP SELECTION. Según el nivel de ganancia, la Pantalla 5 indica-rá un valor entre 0 y 100.3) Ecualizador: Estos son los controles de graves, medios y agudos (BASS, MIDDLE,TREBLE) del ecualizador de tres bandas. El margen de ajuste y la función dependeránde la posición del mando AMP SELECTION. Según el nivel, la Pantalla 5 indicará unvalor entre -15 y 15.4) VOLUME: Con este mando se controla el nivel de salida del preamplificador. Según elvolumen, la Pantalla 5 indicará un valor entre 1 y 50. El nivel de salida se verá afectadopor el tipo de amplificador seleccionado, el nivel de ganancia y los niveles del ecualizador.Puede utilizar este control para mantener un nivel consecuente entre los canales, así comopara especificar el nivel deseado. El volumen final se ajusta con el control de volumenMASTER 10 .
3 Sección de memoria: Para guardar un sonido que haya creado, mantenga pulsado duranteun mínimo de tres segundos el interruptor del canal en el que desee guardarlo. A continua-ción se describe el proceso con más detalle.1) MANUAL: Con este interruptor se selecciona la función manual, en la que todos los ajustesde sonido reflejarán la posición real de los controles. La Pantalla 5 indicará M.2) Canales (1-5): Con estos interruptores se selecciona uno de los cinco canales en el quedesee guardar sus propios ajustes. Hay dos bancos de memoria (A y B), en los que podráguardar un total de diez sonidos. Como alternativa, en lugar de seleccionarlos en el panelfrontal, puede conectar el pedal opcional IFC2 (se vende por separado) y seleccionar con éllos canales. La Pantalla 5 indicará el número de canal (1-5).3) Conmutador de los bancos A/B: Hay dos bancos, cada uno de los cuales contienecinco canales.
4 Sección de batería: Puede utilizar cincuenta patrones de ritmo diferentes.1) Mando RHYTHM: Con este mando se controla el volumen de labatería.2) ON/OFF: Con este interruptor se activa/desactiva el patrón rítmico.3) -/+: Con estos interruptores puede escoger uno de los cincuentapatrones de ritmo diferentes. Para más detalles de cada patrón, con-sulte ESPECIFICACIONES.4) Interruptor TAP: Con este interruptor se controla la velocidad delritmo, entre 40 PPM y 199 PPM.
5 Pantalla: En ella se muestran diferentes operaciones.
6 TUNER ON/OFF: El MIMX dispone de un afinador cromático. En las ilustraciones si-guientes se muestra lo que indicará la pantalla cuando esté funcionando el afinador.
7 Sección MODULATION: Aquí puede controlar cuatro tipos de efectos de modulación.1) Mando FX: Con este mando se seleccionan cuatro tipos de efectos de modulación.Estos efectos son los siguientes.
a. CHORUS: Este efecto crea un sonido rico superponiendo el sonido ymodulándolo. Con el mando FX podrá variar la profundidad de modula-ción entre 0 y 100.b. FLANGER: Este efecto aplica modulación y barrido al sonido. Con elmando FX podrá variar la profundidad de modulación entre 0 y 100.c. VIBRATO: Este efecto aplica un vibrato. Con el mando FX podrá variarla profundidad de modulación entre 0 y 100.d. STEP: Este efecto varía el sonido de forma escalonada. Con el man-do FX podrá variar la profundidad de modulación entre 0 y 100.
2) Mando MIX: Controla el nivel de mezcla del efecto de modulación entre 0 y 100. En 0,el efecto está desactivado y no se aplica ningún efecto de modulación.3) Interruptor TAP: Controla la velocidad del efecto de modulación entre 1 y 50. En la tablasiguiente se muestra la velocidad de modulación que se puede controlar con el interrup-tor TAP en cada función.
Para más detalles acerca de la función TAP, consulte "Acerca del interruptor TAP".Nota: Si utiliza el efecto PEDAL PITCH de la sección PEDAL FX 9 no podrá utilizar losefectos de la sección MODULATION.
*En la ilustración an-terior se muestra elMIMX 150H.
CHORUS FLANGER VIBRATO STEP
Contenido de la Pantalla
0.1~1.5 sec 0.4~6 sec 0.1~1.5 sec 0.1~1.5 sec
1~50 1~50 1~50 1~50
Velocidad de modulación
Cuando el tonoestá bajo
Cuando el tono está alto
Movimientode la indicación
Cuando el tono escorrecto: MI bemol
*En la ilustraciónanterior se muestra elMIMX 150H.
Encendido para indicar unbemol
Movimientode la indicación

71
ES
PAÑ
OL
8 Sección DELAY & REVERB: Aquí puede controlar cuatro efectos diferentesde retardo y reverberación.1) Mando FX: Con este mando se selecciona uno de los cuatro efectos deretardo y reverberación. A continuación se enumeran estos efectos.
a. DELAY: Este efecto añade una copia retardada delsonido original, algo así como un "canon" musical. Utiliceel mando FX para variar la realimentación entre 0 y 40.b. ECHO: Este efecto produce un retardo más cálido.Utilice el mando FX para variar la realimentación entre 0y 40.c. REVERB HL: Esta reverberación simula la acústica deun espacio amplio, como una sala de conciertos. Utiliceel mando FX para variar el carácter de la reverberaciónentre 0 y 10.d. REVERB RM: Esta reverberación simula la acústicade un espacio pequeño, como una habitación. Utilice elmando FX para variar el carácter de la reverberación entre0 y 10.
2) Mando MIX: Controla el nivel de mezcla del efecto de retardo y reverbera-ción entre 0 y 100. En 0 el efecto está desactivado y no habrá ningún retardoni reverberación.3) Interruptor TAP: Cuando se utilice DELAY o ECHO, con este interruptor secontrola el tiempo de retardo. Cuando se utiliza REVERB, con este interrup-tor se controla la longitud de la reverberación. En la tabla siguiente se mues-tra el tiempo de retardo y el tiempo de reverberación que se puede controlarcon el interruptor TAP en cada función.
Para más detalles acerca de la función TAP, consulte "Acerca del interruptor TAP".Nota: No se puede usar REVERB mientras se está utilizando la sección debatería 4 .
9 Sección PEDAL FX: Puede controlar los efectos de pedal con un pedal op-cional IFC2 (se vende por separado). Para más detalles, consulte "Más infor-mación acerca del pedal".1) Interruptor SELECT: Con él se selecciona uno de los cinco tipos de efec-tos de pedal. Estos efectos son los siguientes.
a. VOL PEDAL: Es un pedal de volumen que le permitecontrolar el volumen con el pie.b. RING MOD: Este efecto aplica un carácter metálico alsonido.c. AUTO RESO: Este efecto varía la frecuencia de reso-nancia según la intensidad del punteo.d. WAH WAH: Es un efecto wah-wah.e. PEDAL PITCH: Este efecto le permite variar el tono entiempo real.
*En la ilustración semuestra el MIMX 150H.
DELAY ECHO REVERB_HL REVERB_RMTiempo 0.01~1 sec 0.01~1 sec 1~3 sec 0.05~0.8 sec
1~100 1~100 1~30 1~30Contenido de la Pantalla
2) Mando de control: Con este mando se controla el efecto de la sección 9PEDAL FX. Los efectos disponibles en cada función son los siguientes.
3) Toma para pedal: Puede utilizar el pedal conectando el IFC2 que se vendepor separado.4) Toma para pedal: Puede utilizar la sección 9 PEDAL FX conectando elIFC2 opcional (se vende por separado).
10 Volumen MASTER: Controla el nivel de salida final que se envía al altavoz.
11 Interruptor de alimentación POWER: Es el interruptor general del amplifica-dor.
12 AC INPUT: Conecte aquí el cable de alimentación que se incluye.
13 LINE OUT (MIMX 150H): Se trata de una toma de salida de nivel de línea.
14 SPEAKER OUT (MIMX 150H): Se trata de una toma de salida para altavoz.Utilice un cable de altavoces para conectar a esta toma un sistema de alta-voces de 4 Ω o de 8 Ω.Nota: Si utiliza un sistema de altavoces con una impedancia inferior a 4 Ω, (p.ej. un sistema de 2 Ω), el amplificador se recalentará, se activará la protec-ción de los circuitos y no se producirá la salida correcta.
15 HEADPHONES (MIMX65): Es una toma de salida para auriculares.
16 CD INPUT (MIMX65): Se trata de una toma de entrada de nivel de línea.Puede conectar un reproductor de CD portátil o un MP3.
VOL PEDAL RING MOD AUTO RESO WAH WAH PEDAL PITCH
Mando de control Nivel de mezclaNA Efecto de resonancia Nivel de señal Tipo de cambio de tono
Volumen Frecuencia de modulación Sensibilidad del efecto Frecuencia reforzada Ver tabla 1
Posición del pedalPosición mínima Posición máxima
1 -100 cent2 doubling detune+3 0 cent +1 octave4 0 cent -2 octave5 -1 octave+ +1 octave+6 -700cent+ +500 cent+7 0Hz+ +1 octave8 0Hz+ +1octave+
:Tono original
Tabla 1
0~100 0~10 1~100 1~8NAContenido de la Pantalla
Contenido de la Pantalla
Pedal (IFC2)
*En la ilustración semuestra el MIMX 150H.
72
ES
PAÑ
OL
Seleccion de programas de amplificacionEl dial AMP SELECTION le permite escoger once tipos de programasde preamplificación. De los numerosos amplificadores de guitarra queexisten, Ibanez se ha centrado en los sonidos distintivos de diezamplificadores clásicos particularmente apreciados por muchos guita-rristas. Todo lo que hay entre la entrada de la guitarra y la salida delaltavoz se ha analizado y memorizado en forma de programa depreamplificación. El MIMX está diseñado de forma que se puedan con-seguir fácilmente sonidos similares a los de esos amplificadores. En laecualización de cada programa se ha tenido en cuenta el sonido gene-ral muestreado del amplificador, incluida la respuesta cuando se aso-cian (o no) controles como los de presencia, brillo, resonancia o profun-didad, de modo que con cada modelo se pueden obtener llamativasimágenes de los tonos clásicos. No se trata en modo alguno de réplicasexactas, sino más bien de un “sabor”, por así decirlo. Por último, cuentacon un sonido original Ibanez contenido, duro y suave, en el programanúmero 11. Su nombre, muy apropiado, es “Psycho.”NOTA: En la descripción siguiente de los programas de preamplificaciónlos nombres de productos que no son Ibanez se utilizan como referen-cias tonales comprensibles y familiares para ilustrar la clase de sonidosen los que se ha inspirado la programación de la preamplificación delMIMX. Estas referencias y comparaciones con productos no Ibanez sontotalmente subjetivas. Ibanez no afirma en modo alguno que los progra-mas de preamplificación del MIMX sean representaciones tonales exac-tas de los amplificadores objeto de referencia o comparación. Dichoesto, creemos que le va a encantar lo que va a escuchar con esta am-plia selección de tonos que puede conseguir con su nuevo MIMX.
60s Clean:Este programa se ha creado para evocar el sonido de uno de losamplificadores clásicos fabricados por Fender®, el ’65 Twin Reverb®,tocado a través de su canal NORMAL con el BRILLO desactivado. Almencionar los sonidos limpios de los años sesenta todos recordamoseste amplificador. En el sonido de este programa destacan los agudoscristalinos y los sólidos graves, reminiscencia de los sonidos clásicosde la década de los sesenta, aunque no deja de tener un agradable-mente singular sonido propio.
Jazz Combo:Este programa se ha inspirado en el Roland® JC-120, famoso por sucapacidad para trasladar el tono ágil de la propia guitarra tocando através del CANAL 1 con el BRILLO desactivado y el tono general suavi-zado. La amplia gama dinámica de este programa y el sonido descolo-rido desde los graves hasta los agudos combina muy bien con losprocesadores de efectos y, por ello, este programa resulta muy versátil.
70s Brit:Este sonido es una reminiscencia del clásico sonido del Marshall®“JCM800 2203” combinado con la sobreexcitación que se obtiene cuan-do se utiliza el TUBESCREAMER®/TS-9 Ibanez® como refuerzo. Des-de acordes sólidos hasta brillantes solos, este programa abarca un amplioabanico de sonidos creativos.
Brit Blues:La historia del VOX® “AC30” discurre paralela a una extensa franja de lahistoria musical que incluye el blues, el rock y el pop. Puesto que sufama permanece intacta a día de hoy y sigue teniendo numerosos ad-miradores entre los profesionales de la música, crear un programa depreamplificación influido por este tipo de sonido era una decisión obvia.Al crear el sabor MIMX hemos añadido ganancia con unos medios yuna tensión distintivamente claros a fin de potenciar el tono clásico. Losmatices del punteo se transmitirán con total fidelidad y podrá tocar conuna amplia variedad de tonos.
73
ES
PAÑ
OL
US Blues:Opinamos que este programa recuerda mucho al Fender® “Hot RodDeville™” tocado a través del canal EXCITADO con el BRILLO en posi-ción NORMAL y la SOBREEXCITACIÓN activada. El MIMX ha poten-ciado los graves de ese sonido y ha dado a la ecualización un estiloescalonado. El atractivo particular de este programa es un sonido bri-llante con una resonancia distintivamente dura. Desde un sonido conmenos ganancia que resalta el carácter tonal duro hasta la excitacióncon un sonido excelente que se obtiene elevando la ganancia, este pro-grama ofrece una amplia paleta de tonos.
Rock:Este programa es nuestra interpretación del sonido del “Ecstasy 101BEL34 Version”, un amplificador de válvulas polivalente fabricado porBogner Corporation, famosa por sus amplificadores de boutique. La res-puesta a los ajustes da una gama dinámica incrementada desde la ga-nancia baja hasta la ganancia alta, con más nivel de control deecualización. Notable por su tono recortado, este programa le propor-ciona una amplia variedad de sonidos, desde acordes dulces y limpioshasta acordes duros, así como sonidos sobreexcitados sostenidos.
Hard Rock:En un principio el Soldano’s® “SL0-100” sólo se vendió a pocos músi-cos como amplificador personalizado hasta que, finalmente, alcanzó ungran éxito y renombre. Hemos creado este programa para obtener unsonido similar al del canal SOBREEXCITADO del SLO-100 con el BRI-LLO en posición NORMAL pero reduciendo la posibilidad de acopla-miento con una tensión y contención generales. Creemos que el sonidode alta ganancia está particularmente conseguido y resulta ideal parasolos o riffs heavy.
Guitar God:Esta es nuestra idea de cómo suena el Peavey® “5150 II®”. Para creareste programa en el MIMX, hemos escuchado tanto el amplificadorPeavey real como las Fuentes de sonido utilizadas en un CD a fin dereproducir los sonidos que, para nosotros, son la reminiscencia de aque-llos sonidos grabados. Los graves contenidos son adecuados para losriffs que entremezclan silencios y, con la distorsión, conseguirá unossolos con sostenidos memorables.
90s Brit:Este programa se ha diseñado también con referencias tanto al amplifi-cador, en este caso el Marshall® “JCM2000 DSL100”, como a las fuen-
tes reales de audio grabadas en CD de un grupo que utilizaba esteamplificador. Nuestro enfoque con este sonido produce un componentede distorsión rudo, pero el sonido es contenido y bien definido con unabuena separación de las notas, por lo que se puede utilizar en todaclase de elementos, desde arpegios cristalinos hasta riffs ostentosos.Le garantizamos que el sonido de su guitarra destacará, incluso en ungrupo con sonido potente.
LA Heavy:El Mesa/Boogie® “Dual Rectifier® Solo Head” ha influido a numerososmúsicos de estilo heavy. Este programa es nuestra interpretación de uncollage de los sonidos clásicos de un modelo presentado en 1989 queha definido el tono de la guitarra heavy moderna. Nuestra versión apor-ta el sonido distorsionado de las válvulas originales 6L6 a través delcanal RED con la fuente de alimentación en BOLD, utilizando la funciónde rectificador de diodos-silicio finalmente tocada a través de una cajacuatro-doce Ibanez® Thermion® TN412A. El resultado son unos gravesimpresionantes con un buen crujido.
Psycho:Este es un sonido original de Ibanez, diseñado para captar la onda de laescena del rock heavy actual. Los graves son contenidos y afilados, conuna nitidez soberbia. Con los ajustes de ecualización podrá utilizar estesonido en cualquier estilo de música.
* A excepción de Ibanez®, TUBESCREAMER® y Thermion®, losnombres de empresas y de productos que figuran en este manualson marcas comerciales o marcas registradas de sus respectivostitulares y carecen de afiliación alguna con Ibanez.
Fender®, Twin Reverb®, Hot Rod Deville™ son marcas registradaso marcas comerciales de Fender Musical Instruments Corporation.Roland® es una marca registrada de Roland Corporation.Marshall® es una marca registrada de Marshall AmplificationCorporation PLC.VOX® es una marca registrada de VOX R&D limited.Soldano® es una marca registrada de Soldano Custom Amplification.Peavey® es una marca registrada de Peavey Electronics LTD.5150 II® es una marca registrada de E.L.V.H., Inc.Mesa/Boogie® y Dual Rectifier® son marcas registradas de Mesa/Boogie, Limited.
74
ES
PAÑ
OL
Preajustes de fábricaSon los ajustes de sonido asignados a cada canal A1-B5 cuando elMIMX sale de fábrica. Basta pulsar un botón para obtener las combina-ciones distintivas de sonido y efectos del MIMX.
A1: Immortal ShredSELECCIÓN DE AMPLIFICACIÓN: PsychoEste preajuste es ideal para los riffs rápidos típicos de los grupos deslash metal o death metal de la escena musical actual. Los medios serecortan para resaltar los agudos y los graves y se crea un sonido ro-busto elevando los graves sin reducir excesivamente los medios.
A2: Shrapnel HeroesSELECCIÓN DE AMPLIFICACIÓN: PsychoEste preajuste se puede utilizar para solos de guitarra en una gran va-riedad de tipos de música, desde hard rock hasta heavy metal. Laecualización es relativamente plana. Si añade un retardo bastante rápi-do, este preajuste le proporcionará un buen sonido para hacer solos.
A3: Cruel HeavinessSELECCIÓN DE AMPLIFICACIÓN: 90s BritEste preajuste es para riffs en los que se destaca el ritmo. Resulta idealpara temas de tempo bajo y los graves reforzados le proporcionarán unsonido fuertemente distorsionado que empujará al sonido del conjunto.Resulta ideal para los sonidos fuertes del rock actual.
A4: Legend of the BeastESTILO DE AMPLIFICACIÓN: Hard RockEste es un preajuste para guitarra solista con ese sonido Metal de losochenta. Este preajuste posee un carácter sonoro que recuerda a laedad de oro del Metal típico de numerosos grupos metal británicos y deLA.
A5: Emotional CleanESTILO DE AMPLIFICACIÓN: 60s CleanEste preajuste proporciona unos graves gruesos, un ataque seco y re-verberación para crear un ambiente cálido. Si utiliza una pastilla de unasola bobina puede producir un sonido añejo brillante. Reduciendo elnivel de mezcla del efecto de reverberación podrá reforzar la sensacióndel ataque.
B1: Sounds of the Right HandSELECCIÓN DE AMPLIFICACIÓN: Guitar GodEste preajuste es ideal no solo para riffs potentes y veloces, sino tam-bién para solos. La distorsión que se obtiene elevando la ganancia almáximo y unos medios penetrantes combinan bien con las pastillas dedoble bobina. Se aplica un ligero retardo dependiente del tiempo (flanger)para producir una sensación de potencia, así como un retardo para crearun efecto espacial.
B2: Purple ToneSELECCIÓN DE AMPLIFICACIÓN: RockEste es un ajuste de alta ganancia que reduce fuertemente los graves yañade un carácter distintivo a los medios. Con una pastilla de una solabobina puede obtener el sonido de mediados de los setenta. A medidaque suba los medios, el sonido adquirirá una atmósfera clásica paraajustarla a su gusto. Para aprovechar al máximo este sonido, toque losriffs de rock duro que revolucionaron la época y se han convertido en elorigen del rock duro actual.
B3: Crystal CleanSELECCIÓN DE AMPLIFICACIÓN: Jazz ComboEste preajuste se ha pensado para producir unos sonidos limpios y chis-peantes como el cristal. Resulta adecuado para las "Power Ballads" derock duro y heavy metal de los ochenta y los noventa. Intente tocarlocon pastillas de una bobina, ya sea la pastilla central o una combinaciónde las pastillas central/mástil. Eleve el nivel de mezcla del efecto paraobtener un sonido más suntuoso.
B4: Solo DNASELECCIÓN DE AMPLIFICACIÓN: RockEste preajuste se ha creado para tocar esos solos picados que hicieronfamosos a los dioses de la guitarra de los ochenta. Es un ajuste magní-fico para dar rienda suelta a su sentido musical. Utilice libremente laflexión de cuerdas, el picado de trémolo, los armónicos y los arpegios yexprese su imaginación.
B5: Samurai EdgeSELECCIÓN DE AMPLIFICACIÓN: 70s BritEste preajuste es una buena opción para acompañamientos o riffs deestilo blues tocados con pastilla de una bobina. Proporciona el gradojusto de distorsión para acentuar los matices del punteo y produce unosagudos muy claros. Ajuste la reverberación a su gusto.
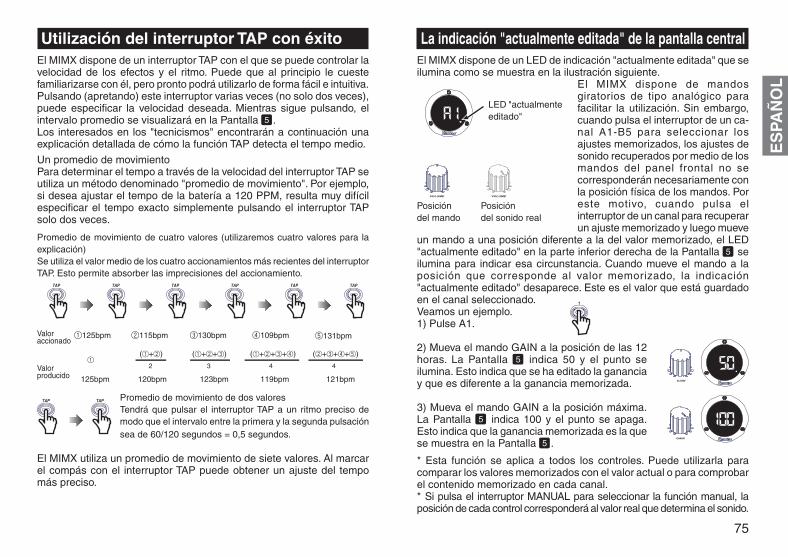
75
ES
PAÑ
OL
Utilización del interruptor TAP con éxitoEl MIMX dispone de un interruptor TAP con el que se puede controlar lavelocidad de los efectos y el ritmo. Puede que al principio le cuestefamiliarizarse con él, pero pronto podrá utilizarlo de forma fácil e intuitiva.Pulsando (apretando) este interruptor varias veces (no solo dos veces),puede especificar la velocidad deseada. Mientras sigue pulsando, elintervalo promedio se visualizará en la Pantalla 5 .Los interesados en los "tecnicismos" encontrarán a continuación unaexplicación detallada de cómo la función TAP detecta el tempo medio.
Un promedio de movimientoPara determinar el tempo a través de la velocidad del interruptor TAP seutiliza un método denominado "promedio de movimiento". Por ejemplo,si desea ajustar el tempo de la batería a 120 PPM, resulta muy difícilespecificar el tempo exacto simplemente pulsando el interruptor TAPsolo dos veces.
Promedio de movimiento de cuatro valores (utilizaremos cuatro valores para laexplicación)Se utiliza el valor medio de los cuatro accionamientos más recientes del interruptorTAP. Esto permite absorber las imprecisiones del accionamiento.
Promedio de movimiento de dos valoresTendrá que pulsar el interruptor TAP a un ritmo preciso demodo que el intervalo entre la primera y la segunda pulsaciónsea de 60/120 segundos = 0,5 segundos.
El MIMX utiliza un promedio de movimiento de siete valores. Al marcarel compás con el interruptor TAP puede obtener un ajuste del tempomás preciso.
La indicación "actualmente editada" de la pantalla centralEl MIMX dispone de un LED de indicación "actualmente editada" que seilumina como se muestra en la ilustración siguiente.
El MIMX dispone de mandosgiratorios de tipo analógico parafacilitar la utilización. Sin embargo,cuando pulsa el interruptor de un ca-nal A1-B5 para seleccionar losajustes memorizados, los ajustes desonido recuperados por medio de losmandos del panel frontal no secorresponderán necesariamente conla posición física de los mandos. Poreste motivo, cuando pulsa elinterruptor de un canal para recuperarun ajuste memorizado y luego mueve
un mando a una posición diferente a la del valor memorizado, el LED"actualmente editado" en la parte inferior derecha de la Pantalla 5 seilumina para indicar esa circunstancia. Cuando mueve el mando a laposición que corresponde al valor memorizado, la indicación"actualmente editado" desaparece. Este es el valor que está guardadoen el canal seleccionado.Veamos un ejemplo.1) Pulse A1.
2) Mueva el mando GAIN a la posición de las 12horas. La Pantalla 5 indica 50 y el punto seilumina. Esto indica que se ha editado la gananciay que es diferente a la ganancia memorizada.
3) Mueva el mando GAIN a la posición máxima.La Pantalla 5 indica 100 y el punto se apaga.Esto indica que la ganancia memorizada es la quese muestra en la Pantalla 5 .
* Esta función se aplica a todos los controles. Puede utilizarla paracomparar los valores memorizados con el valor actual o para comprobarel contenido memorizado en cada canal.* Si pulsa el interruptor MANUAL para seleccionar la función manual, laposición de cada control corresponderá al valor real que determina el sonido.
1125bpm 2115bpm 3130bpm 4109bpmValor accionado
Valor producido
5131bpm
1(1+2)
2
(1+2+3)
3
(1+2+3+4)
4
(2+3+4+5)
4
125bpm 120bpm 121bpm119bpm123bpm
Posicióndel sonido real
LED "actualmenteeditado"
Posicióndel mando

76
ES
PAÑ
OL
Más información acerca de pedalPuede utilizar el pedal IFC2 (vendido por separado) para controlar elMIMX. Si conecta el IFC2 podrá utilizar la sección 9 PEDAL FX y losinterruptores del pedal para cambiar canales.
Operacionesa Pedal: Controla el efecto de pedal seleccionado en el amplificador.
b Interruptor Arriba: Cambia a la memoria inmediatamente superiora la seleccionada actualmente. (No funciona de modo manual).
c Interruptor Abajo: Cambia a la memoria inmediatamente inferior ala seleccionada actualmente. (No funciona de modo manual.)
Pulse b c simultáneamente para activar el afinador.
d Toma para pedal-interruptor: Conecte esta toma al amplificador parautilizar el pedal como interruptor.
e Toma de pedal-efectos: Conecte esta toma al amplificador parautilizar el pedal para efectos. Un circuito interno del IFC2 permite alMIMX reconocer que el pedal está conectado.
f Conmutador de función: Este interruptor determina cómo funcio-nará el pedal. Sitúelo como corresponda a su estilo de tocar.
A El efecto permanecerá activado aunque el pedal se encuentre enla posición mínima (completamente hacia usted).
B El efecto se desactivará cuando el pedal se sitúe en la posiciónmínima (completamente hacia usted).
a
c
d e
b
f
A
B
77
ES
PAÑ
OL
Localización de problemasEn primer lugar compruebe que el cable blindado de la guitarra, el cable delaltavoz y el cable de alimentación estén conectados correctamente. Si es posible,compruebe el cable con un comprobador o utilice un cable o amplificadoralternativos para verificar el estado del cable.
1. No se puede conectar la alimentación.• Compruebe que el cable de alimentación esté correctamente enchufado.• Intente enchufarlo a una toma de corriente diferente y observe si persiste el
problema.2. Se puede conectar la alimentación, pero no se obtiene
sonido.• Compruebe que la guitarra esté conectada correctamente.• Elimine todos los componentes externos conectados al bucle de efectos y en-
tre la guitarra y el amplificador y compruebe si se obtiene algún sonido.• Utilice un cable blindado diferente y compruebe si se obtiene sonido.• Compruebe si el volumen de la guitarra está en “0”.• Utilice una guitarra diferente y compruebe si se obtiene algún sonido.• Compruebe si el volumen del amplificador está en “0”.• Compruebe si están conectados los auriculares.• ¿Sigue sin haber sonido cuando sube el volumen general?• Compruebe si está utilizando el pedal IFC2 que se vende aparte para controlar
el volumen y si dicho pedal se encuentra en posición completamente girada(hacia usted).
3. Se oye ruido.• Compruebe si hay algo cerca que esté resonando o golpeando contra el
amplificador y produzca el ruido.• Compruebe si la cubierta del enchufe del cable blindado está floja.• Asegúrese de que la altura de las cuerdas esté ajustada correctamente.• Utilice otra guitarra, efectos o componentes externos y compruebe si se pro-
duce el mismo ruido.4. No se oye sonido cuando se conecta un reproductor de
CD.• Asegúrese de que el volumen del reproductor de CD no esté ajustado al mínimo.• Asegúrese de que el cable esté conectado correctamente.• Intente utilizar otro cable para ver si hay sonido.5. El CD no suena bien.
¿El cable que está utilizando tiene una clavija estereofónica? ¿Es posible que estéutilizando una clavija monoaural?
6. No se produce sonido en los auriculares• Compruebe que los auriculares estén correctamente conectados.• Conecte otros auriculares y compruebe si se produce sonido.
7. No suena la batería.• Compruebe si el volumen de la batería está en 0.• Compruebe si el volumen general está en 0.• Compruebe si están conectados los auriculares.8. No se aplica el efecto de modulación.• Compruebe si el volumen de mezcla está en 0.• Compruebe si está utilizando el afinador que va incorporado en el MIMX.• Compruebe si está utilizando el pedal de control IFC2 que se vende aparte
para controlar el tono (PITCH).9. No se aplica el efecto de retardo.• Compruebe si el volumen de mezcla está en 0.• ¿Se produce algún cambio cuando acciona el pulsador?• Compruebe si está utilizando el afinador que va incorporado en el MIMX.10. No se aplica el efecto de reverberación.• Compruebe si el volumen de mezcla está en 0.• Compruebe si se produce algún cambio cuando acciona el pulsador.• Compruebe si está utilizando la función DRUM (batería).• Compruebe si está utilizando el afinador que va incorporado en el MIMX.11. No puedo usar el efecto de pedal.• ¿Está conectado el pedal de control IFC2 que se vende aparte?• ¿Está utilizando el cable que se incluye con el IFC2?• Compruebe si está utilizando el afinador que va incorporado en el MIMX.
En caso de defectosEste producto ha sido revisado exhaustivamente antes de salir de fábrica. Cuandopiense que existe un problema, realice los procedimientos indicados más arriba.En el caso improbable de que se produjera alguna anomalía durante la utilización,póngase en contacto con su distribuidor. Además, cuando solicite reparaciones,explique con detalle los síntomas del problema para facilitar su rápida resolución.
Debido a las mejoras de este producto, las especificaciones pueden cambiarsin previo aviso.
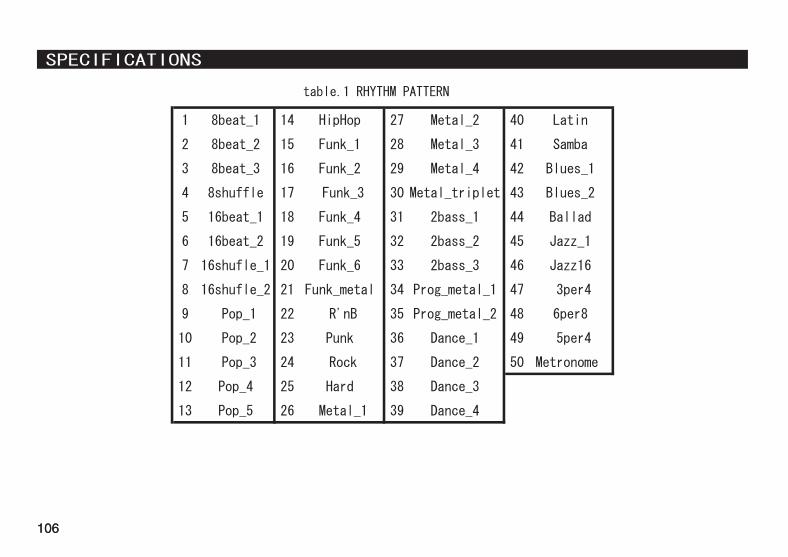
106106

107
MODEL MIMX65 MIMX150H
GUITAR INPUT IMPEDANCE
CHANNEL
PREAMP
EQUALIZER
FX
RHYTHM PATTERN
CD INPUT IMPEDANCE 47kΩ NA
HEADPHONE OUTPUT 120mWrms NA
LINEOUT NA 4dBu
OUTPUT 1%THD 65.6Wrms 158.7Wrms
POWER INPUT
POWER CONSUMPTION 100W 130W
100V/120V:F3.15AL 250V 100V/120V:T4AL 250V 230V/240V:T1AL250V 230V/240V:T2AL 250V
SPEAKER SYSTEM IS1204G(4Ω) NA
DIAMETER 12"(30cm) NA
POWER RATING 80Wrms/160Wmax NA
IMPEDANCE 4Ω NA
SIZE W491xD254xH451 W636xD252xH259
WEIGHT 16.2kg 13.9kg
PRIMARY FUSE RATING
11
3 (BASS MIDDLE TREBLE)
13
50
1MΩ
10(A:5 B:5)
100V/50Hz-60Hz,120V/60Hz,230V/50Hz,240V/50Hz

108108

109

110
MODEL NO. : MIMX65/MIMX150H
LOW VOLTAGE DIRECTIVE