how to manage dc operations with the dc command line ... - sap
TRANSCRIPT

SAP NetWeaver How-To Guide
How To... Manage DC Operations with the DC Command Line Tool
Applicable Releases:
SAP NetWeaver 7.0
IT Practice: Unified Life-Cycle Management
IT Scenario: Software Life-Cycle Management
Version 1.0
September 2008

© Copyright 2008 SAP AG. All rights reserved.
No part of this publication may be reproduced or
transmitted in any form or for any purpose without the
express permission of SAP AG. The information contained
herein may be changed without prior notice.
Some software products marketed by SAP AG and its
distributors contain proprietary software components of
other software vendors.
Microsoft, Windows, Outlook, and PowerPoint are
registered trademarks of Microsoft Corporation.
IBM, DB2, DB2 Universal Database, OS/2, Parallel
Sysplex, MVS/ESA, AIX, S/390, AS/400, OS/390,
OS/400, iSeries, pSeries, xSeries, zSeries, z/OS, AFP,
Intelligent Miner, WebSphere, Netfinity, Tivoli, Informix,
i5/OS, POWER, POWER5, OpenPower and PowerPC are
trademarks or registered trademarks of IBM Corporation.
Adobe, the Adobe logo, Acrobat, PostScript, and Reader
are either trademarks or registered trademarks of Adobe
Systems Incorporated in the United States and/or other
countries.
Oracle is a registered trademark of Oracle Corporation.
UNIX, X/Open, OSF/1, and Motif are registered
trademarks of the Open Group.
Citrix, ICA, Program Neighborhood, MetaFrame,
WinFrame, VideoFrame, and MultiWin are trademarks or
registered trademarks of Citrix Systems, Inc.
HTML, XML, XHTML and W3C are trademarks or
registered trademarks of W3C®, World Wide Web
Consortium, Massachusetts Institute of Technology.
Java is a registered trademark of Sun Microsystems, Inc.
JavaScript is a registered trademark of Sun Microsystems,
Inc., used under license for technology invented and
implemented by Netscape.
MaxDB is a trademark of MySQL AB, Sweden.
SAP, R/3, mySAP, mySAP.com, xApps, xApp, SAP
NetWeaver, and other SAP products and services
mentioned herein as well as their respective logos are
trademarks or registered trademarks of SAP AG in
Germany and in several other countries all over the world.
All other product and service names mentioned are the
trademarks of their respective companies. Data contained
in this document serves informational purposes only.
National product specifications may vary.
These materials are subject to change without notice.
These materials are provided by SAP AG and its affiliated
companies ("SAP Group") for informational purposes only,
without representation or warranty of any kind, and SAP
Group shall not be liable for errors or omissions with
respect to the materials. The only warranties for SAP
Group products and services are those that are set forth in
the express warranty statements accompanying such
products and services, if any. Nothing herein should be
construed as constituting an additional warranty.
These materials are provided “as is” without a warranty of
any kind, either express or implied, including but not
limited to, the implied warranties of merchantability,
fitness for a particular purpose, or non-infringement.
SAP shall not be liable for damages of any kind including
without limitation direct, special, indirect, or consequential
damages that may result from the use of these materials.
SAP does not warrant the accuracy or completeness of the
information, text, graphics, links or other items contained
within these materials. SAP has no control over the
information that you may access through the use of hot
links contained in these materials and does not endorse
your use of third party web pages nor provide any warranty
whatsoever relating to third party web pages.
SAP NetWeaver “How-to” Guides are intended to simplify
the product implementation. While specific product
features and procedures typically are explained in a
practical business context, it is not implied that those
features and procedures are the only approach in solving a
specific business problem using SAP NetWeaver. Should
you wish to receive additional information, clarification or
support, please refer to SAP Consulting.
Any software coding and/or code lines / strings (“Code”)
included in this documentation are only examples and are
not intended to be used in a productive system
environment. The Code is only intended better explain and
visualize the syntax and phrasing rules of certain coding.
SAP does not warrant the correctness and completeness of
the Code given herein, and SAP shall not be liable for
errors or damages caused by the usage of the Code, except
if such damages were caused by SAP intentionally or
grossly negligent.
Disclaimer
Some components of this product are based on Java™. Any
code change in these components may cause unpredictable
and severe malfunctions and is therefore expressively
prohibited, as is any decompilation of these components.
Any Java™ Source Code delivered with this product is only
to be used by SAP’s Support Services and may not be
modified or altered in any way.
Document History Document Version Description
1.00 First official release of this guide

Typographic Conventions Type Style Description
Example Text Words or characters quoted from the screen. These include field names, screen titles, pushbuttons labels, menu names, menu paths, and menu options.
Cross-references to other documentation
Example text Emphasized words or phrases in body text, graphic titles, and table titles
Example text File and directory names and their paths, messages, names of variables and parameters, source text, and names of installation, upgrade and database tools.
Example text User entry texts. These are words or characters that you enter in the system exactly as they appear in the documentation.
<Example text>
Variable user entry. Angle brackets indicate that you replace these words and characters with appropriate entries to make entries in the system.
EXAMPLE TEXT Keys on the keyboard, for example, F2 or ENTER.
Icons Icon Description
Caution
Note or Important
Example
Recommendation or Tip

Table of Contents
1. Scenario................................................................................................................................ 1
2. Background Information..................................................................................................... 1
3. Prerequisites ........................................................................................................................ 1
4. Warning ................................................................................................................................ 2
5. Step-by-Step Procedure...................................................................................................... 3 5.1 Preparation ................................................................................................................... 3
5.1.1 Import Development Configuration .................................................................. 3 5.1.2 Check for open activities.................................................................................. 4 5.1.3 Ensure Active State ......................................................................................... 5 5.1.4 Dependencies .................................................................................................. 7 5.1.5 History .............................................................................................................. 8 5.1.6 Prepare and start the DC tool .......................................................................... 8 5.1.7 Load the Development Configuration .............................................................. 9
5.2 DC Command Line Tool Operations .......................................................................... 10 5.2.1 Renaming a DC ............................................................................................. 10 5.2.2 Moving a DC .................................................................................................. 12 5.2.3 Deleting of a DC............................................................................................. 13
5.3 Post Processing.......................................................................................................... 15 5.3.1 Delete name reservation................................................................................ 15 5.3.2 Undeploy Development Components ............................................................ 15 5.3.3 Troubleshooting ............................................................................................. 15
How To... Manage DC Operations with the DC Command Line Tool
1. Scenario You develop your Java based applications using the NWDI as your development infrastructure. Your application design is based on the SAP Software Component model with Software Components (SCs) and Development Components (DCs). From time to time some changes within your software application architecture concerning the DC structure are needed. You want to rename a DC, move a DC from one Software Component assignment to another or even delete a complete Development Component. To perform these tasks, the DC Command Line Tool is used. This guide will explain step by step on how to setup and use the DC tool for the described DC operations.
2. Background Information The DC Command Line Tool as part of the SAP NetWeaver Development Infrastructure is available since NW 7.0 SP13. It is shipped along with the according NetWeaver Developer Studio.
3. Prerequisites The DC Command Line Tool is available since NWDI NW 7.0 SPS13. Therefore an NWDI installation greater equals NW 7.0 SP13 and a NetWeaver Developer Studio version NW 7.0 SP13 or higher is required.
The following prerequisites have to be fulfilled to perform tasks using the DC tool:
• An understanding and knowledge of the NWDI concepts and tools in general is beneficial to understand and follow this guide.
• NWDI is installed and configured with at least one track
• SAP NetWeaver Developer Studio is installed and configured
• DC Command-Line Tool is prepared (see documentation of the tools)
• Import of Development Configuration in NWDS is possible
• Connection to DTR is possible
• User account with respective permissions on the DTR workspace
More information see:
• Standard documentation → DC Command Line Tool.
• DC Tool Documentation within the NWDS installation: see dctool_manual.html in the NWDS installation directory → <NWDS_installation_path>\eclipse\tools\dc
September 2008 1
How To... Manage DC Operations with the DC Command Line Tool
4. Warning Using the DC Command Line Tool for the DC operations rename, move and delete should be handled with care and reconsidered.
CAUTION Before any of the explained DC operations are performed all developers working with the affected components should be informed to avoid any interference. The developers should unsync the affected DCs. Otherwise problems in the NWDS might occur after the DC operations (rename, move, delete) as the synced version points to an old DTR location.
CAUTION There is no support from the software logistic point of view to deploy changes done by the DC Command Line Tool. In case a software component is already deployed to an SAP Application Server Java – no refactoring operations via deployment are provided to update the DC changes on the runtime system. Renaming a deployable component that is already deployed on the server will not delete the old DC name during deployment. It is recommended to undeploy the DC with the old name manually on the runtime system. But it can lead to inconsistencies or complications in case the DC is used by other DCs for instance. Similar problems might occur when moving or deleting a DC.
September 2008 2

How To... Manage DC Operations with the DC Command Line Tool
5. Step-by-Step Procedure In this section the steps on how to use the DC Command Line Tool are provided. Chapter 5.1 explains the steps that are needed to be able to run the DC tool for a specific development configuration. Chapter 5.2 explains the three most important refactoring DC operations: rename, move and delete. And chapter 5.3 gives some guidance on post processing actions after a DC is deleted or renamed.
5.1 Preparation ...
5.1.1 Import Development Configuration The DC Command Line Tool needs an existing development configuration. The easiest way to get one is to import a development configuration within the NetWeaver Developer Studio in the Development Configurations Perspective as you would normally do when working with NWDI. There is no need to synchronize any DC locally or to create a project.
After the import, locate the folder of the Development Configuration on your file system. The location is shown in the Properties view of the Development Configurations Perspective, when selecting a specific Development Configuration in the Inactive DCs view. See the property Root folder and note this folder path for later use, e.g. in a text file (right-click copy).
Figure 1: Development Configuration Root Folder
The root folder is configured in Windows → Preferences → Java Development Infrastructure → Development Configuration Pool → Root Folder. You can not change the root folder if the root contains imported development configurations.
September 2008 3

How To... Manage DC Operations with the DC Command Line Tool
Figure 2: Development Configuration Root Folder location
5.1.2 Check for open activities Before DC operations are performed, make sure, that no open activity on the affected DC exists. A way to check is using the DTR Web UI. Open a web browser and enter the URL for your DTR Web UI → http://<hostname>:<port>/dtr. Within the Repository Browser navigate to the folder / → system-tools → reports → Activity Search.
Enter the following values and leave all other values as default:
Property Value Note
Workspace /ws/<track-id>/<vendor-name>_<SC-name>/dev/inactive
use the value help on the right (see Figure 3)
User <leave blank>
Opened only checked
Non empty only checked
Folder Path DCs/<vendor-name>/<DC-name> the path to the “_comp” folder of your DC
Figure 3: Select Workspace folder
September 2008 4
How To... Manage DC Operations with the DC Command Line Tool
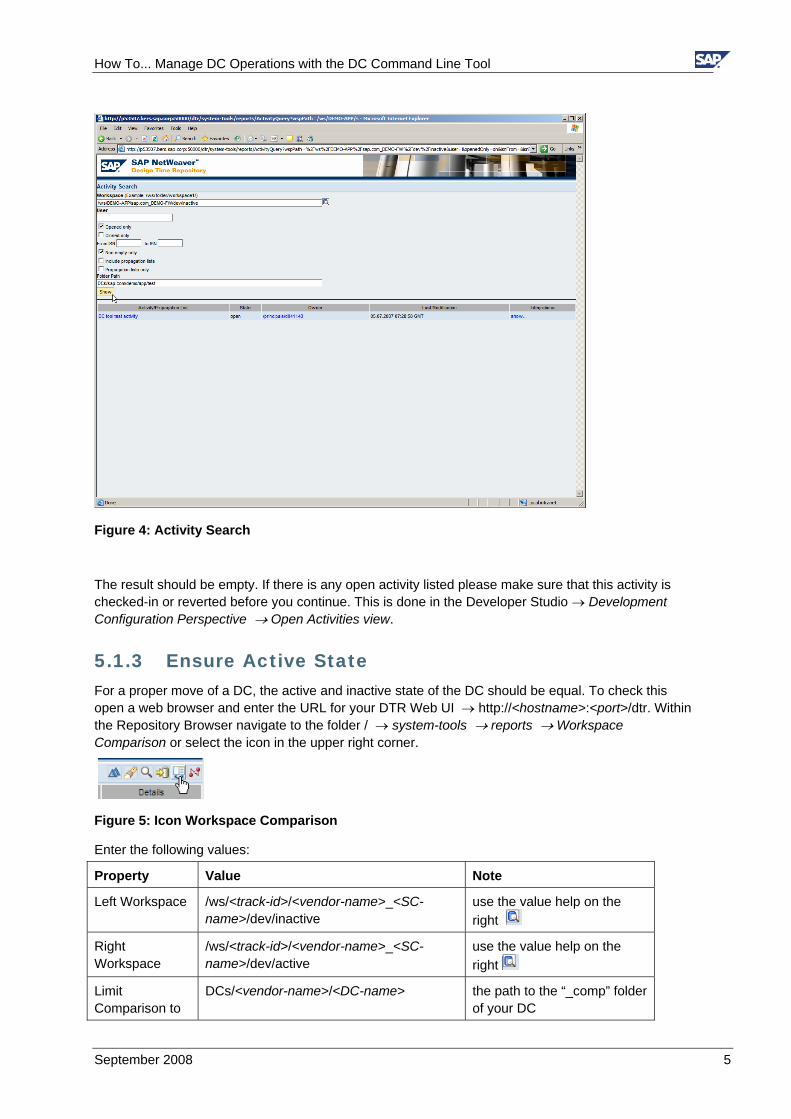
Figure 4: Activity Search
The result should be empty. If there is any open activity listed please make sure that this activity is checked-in or reverted before you continue. This is done in the Developer Studio → Development Configuration Perspective → Open Activities view.
5.1.3 Ensure Active State For a proper move of a DC, the active and inactive state of the DC should be equal. To check this open a web browser and enter the URL for your DTR Web UI → http://<hostname>:<port>/dtr. Within the Repository Browser navigate to the folder / → system-tools → reports → Workspace Comparison or select the icon in the upper right corner.
Figure 5: Icon Workspace Comparison
Enter the following values:
Property Value Note
Left Workspace /ws/<track-id>/<vendor-name>_<SC-name>/dev/inactive
use the value help on the right
Right Workspace
/ws/<track-id>/<vendor-name>_<SC-name>/dev/active
use the value help on the right
Limit Comparison to
DCs/<vendor-name>/<DC-name> the path to the “_comp” folder of your DC
September 2008 5

How To... Manage DC Operations with the DC Command Line Tool
Folder Path
Compare Files
The comparison should detect no differences as shown in the screenshot below.
In the case there are differences as shown in Figure 6, make sure that all activities will be activated before performing DC operations with the DC tool. You can do this in the Activation View of the NWDS (set the user filter to “All users”).
Figure 6: Example for Workspace Comparison
September 2008 6

How To... Manage DC Operations with the DC Command Line Tool
Figure 7: Activate in NWDS Activation View
5.1.4 Dependencies All DC operations may affect other DCs. To prevent issues during the DC operations, please follow these recommendations:
• Analyze the DC structure before you start to detect the dependencies. The CBS WebUI can be used to see the Child DCs, Used DCs and “Using” DCs. Navigate to http://<hostname>:<port> → Component Build Service or enter the URL directly → http://<hostname>:<port>/webdynpro/dispatcher/sap.com/tc.CBS.WebUI/WebUI
Example
Navigate to Compartments → Select the compartment → Select the DC within the compartment → See the DC Details as shown above.
September 2008 7

How To... Manage DC Operations with the DC Command Line Tool
• If multiple DCs are affected, work your way either top-down or bottom-up
• Check if SC dependencies need to be defined (e.g. for DC move).
Example You have three SCs (SC1, SC2, SC3). SC1 is using SC2. Now, you want to move DCx assigned to SC2 from SC2 to SC3. DCy in SC1 is using DCx. To resolve the build errors you need to add a SC dependency between SC1 and SC3 in SLD.
If necessary you need to adjust DC or SC dependencies after you perform the actions. So don’t be confused if a CBS build fails due to changed dependencies.
5.1.5 History Renaming and removing a DC via DC Tool is performed by cut & paste of the involved objects. This will result in a loss of version history, as the original objects are not referred anymore. If you need to preserve the original state you can transport the involved SCs to another workspace.
Note With Enhancement Package 1 for NW 7.0 deleted versions are shown in the DTR Web UI.
5.1.6 Prepare and start the DC tool Before you start the DC tool make sure that there is no instance of NWDS running on the same machine that is using the same Development Configuration as this will interfere with the DC tool operations.
Open a command line on the folder in which the DC Command Line Tool is stored (e.g. by navigating to the folder via the Explorer and using the context command “Command Prompt”). The default folder is <NWDS Installation Directory>\eclipse\tools\dc.
Figure 8: DC Command Line Tool Location
September 2008 8

How To... Manage DC Operations with the DC Command Line Tool
Start the DC tool by typing the command dctool.bat on Windows platform or dctool.sh on UNIX platforms.
Note To be able to use the DC tool, you need to make sure that the environment variables JAVA_HOME and NWDITOOLLIB are set properly. For details please refer to the dctool_manual.html you located in the DC tool directory.
The DC tool is successfully started when the dc prompt is shown as in Figure 9.
Figure 9: DC Prompt
5.1.7 Load the Development Configuration Before you can start using the DC commands on a dedicated DC operation, you need to load the Development Configuration into the DC tool. Use the command loadconfig with the following parameters:
Parameter Value Note
-r <local root folder for development configuration>
Folder where you find the “.confdef” file. See Figure 1.
-c <local DTR synch folder> By default this is the folder .dtr that is by default a parallel folder to the .dtc folder where the development configurations are stored. e.g. “C:\Documents & Settings\<username>\.dtr”
-u <username>
Example loadconfig –r d:\.sapnetweaver\DevStudio\workspace\jdi\1 –c d:\.sapnetweaver\DevStudio\.dtr –u nwdi_admin
September 2008 9

How To... Manage DC Operations with the DC Command Line Tool
You should receive a success message “Successfully imported development configuration ‘xyz’” as shown in Figure 10.
Figure 10: loadconfig ...
5.2 DC Command Line Tool Operations ...
5.2.1 Renaming a DC You want to rename a DC or the vendor of a DC. Use the renamedc command with the following parameters:
Parameter Value Note
-s <compartment> name of compartment, structure is “<vendor-name>_<SC-name>_1”
-n <DC name> Name of your DC
-v <vendor> the vendor name of the DC
--targetname <DC name> New name of the DC
--targetvendor <vendor> New vendor name of the DC
--actname <activity name> Give the rename operation a separate activity
--actdesc <activity description> Optionally add an activity description
Tip To find the proper names for the compartments, use “listdcs” and “listdcs –s <compartment>” to get the exact names.
Example renamedc –s sap.com_DEMO-FW_1 –n demo/app/test –v sap.com --targetname demo/app/newtest –-targetvendor sap.com –-actname “rename a DC”
September 2008 10

How To... Manage DC Operations with the DC Command Line Tool
You should receive a confirmation as shown below.
As a new activity is created for the DC operation, you need to finalize the rename of the DC. Leave the DC-Tool via commend exit. Open the NWDS, login to NWDI, choose the development configuration you are working with and navigate to the Activation View. Select the activity that you created via the rename command in the DC tool. Choose Activate…
Note The name reservation of the original name is not removed from the name reservation service, as it is possible that the name is still used in other development tracks. So only remove the name when you are sure that it is not used anymore. For more details see chapter 5.3.1.
September 2008 11

How To... Manage DC Operations with the DC Command Line Tool
5.2.2 Moving a DC You want to refactor your application by moving a DC from one SC to another SC. Use the DC tool command movedc with the parameters shown in the table below.
Note Moving of a DC requires the DTR permission “integrate”, which is normally only given to the NWDI Administrator user. If you are familiar with DTR permissions you can also assign this permission to the developers, if not please use the NWDI Administrator user for this task.
Parameter Value Note
-s <compartment> name of compartment, structure is “<vendor-name>_<SC-name>_1”
-n <DC name> Name of your DC
-v <vendor> the vendor name of the DC
--targetcompartment <compartment> Name of the target SC
--actname <activity name> Give the move operation a separate activity
--actdesc <activity description> Optionally add a description
Tip To find the proper names for the compartments, use “listdcs” and “listdcs –s <compartment>” to get the exact names.
Example movedc –s sap.com_DEMO-FW_1 –n demo/app/newtest –v sap.com –targetcompartment sap.com_DEMO-APP_1 -–actname “move DC”
You should receive a confirmation as shown in the screenshot below.
For this DC operation four activities with the same name are created. You need to finalize the move operation for that DC by activating these activities. Leave the DC-Tool via commend exit. Open the NWDS, login to NWDI, choose the development configuration you are working with and navigate to
September 2008 12
How To... Manage DC Operations with the DC Command Line Tool
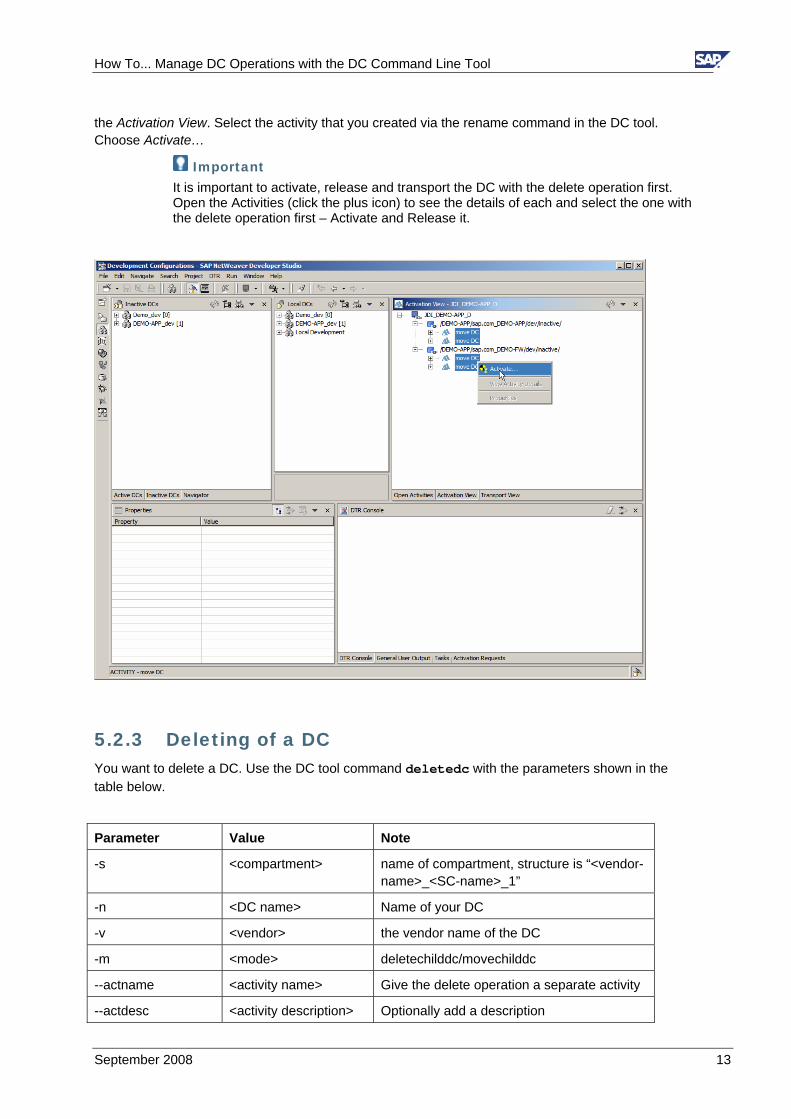
the Activation View. Select the activity that you created via the rename command in the DC tool. Choose Activate…
Important It is important to activate, release and transport the DC with the delete operation first. Open the Activities (click the plus icon) to see the details of each and select the one with the delete operation first – Activate and Release it.
5.2.3 Deleting of a DC You want to delete a DC. Use the DC tool command deletedc with the parameters shown in the table below.
Parameter Value Note
-s <compartment> name of compartment, structure is “<vendor-name>_<SC-name>_1”
-n <DC name> Name of your DC
-v <vendor> the vendor name of the DC
-m <mode> deletechilddc/movechilddc
--actname <activity name> Give the delete operation a separate activity
--actdesc <activity description> Optionally add a description
September 2008 13

How To... Manage DC Operations with the DC Command Line Tool
Tip To find the proper names for the compartments, use “listdcs” and “listdcs –s <compartment>” to get the exact names.
Example deletedc –s sap.com_DEMO-APP_1 –n demo/app/newtest –v sap.com –m deletechilddc -–actname “delete DC”
You should receive a confirmation message as shown below.
As a new activity is created for the DC operation, you need to finalize the delete operation of that DC. Leave the DC-Tool via commend exit. Open the NWDS, login to NWDI, choose the development configuration you are working with and navigate to the Activation View. Select the activity that you created via the rename command in the DC tool. Choose Activate…
September 2008 14

How To... Manage DC Operations with the DC Command Line Tool
5.3 Post Processing
5.3.1 Delete name reservation To be able to re-use the DC name, remove the name reservation from the name reservation server.
CAUTION Before you delete a name reservation please absolutely make sure that the DC name is not used anymore. DC operations are “local” and are performed within one development configuration. A situation might occur where development configuration A needs to delete the DC, but another development configuration B still works with the same DC name. Deleting the name reservation is done globally and will affect all development configurations working with the same SLD.
This has to be done in the SLD that is used as a name server. Open a web browser and enter the SLD URL → http://<host>:<port>/sld. Navigate to Home → Name Revervation → Choose tab Names. Select the name that you want to remove and choose Remove.
Figure 11: Remove name reservation
5.3.2 Undeploy Development Components Neither rename and move nor delete of a DC will undeploy the original DC in the affected WebAS systems. Please make sure to remove the unused DCs of these systems to prevent their continued usage.
5.3.3 Troubleshooting In case you receive messages stating that “Read-only cannot be set”, try to set the TEMP/TMP system variables to point to a short folder name, e.g. “c:\temp”.
September 2008 15

www.sdn.sap.com/irj/sdn/howtoguides