horse - leader guide · 3. 4-h alberta horse project. leader guide. your record book. records must...
TRANSCRIPT
Leader GuideHORSE
The 4-H Motto
“Learn to Do by Doing”
The 4-H PledgeI pledge My Head to clearer thinking, My Heart to greater loyalty, My Hands to larger service, My Health to better living, For my club, my community, and my country.
The 4-H Grace(Tune of Auld Lang Syne)
We thank thee, Lord, for blessings great on this, our own fair land. Teach us to serve thee joyfully, with head, heart, health and hand
AcknowledgementsThis Horse Project Leader Resource Manual is in its second edition. The following volunteers from our Provincial 4-H Horse Advisory Committee (PEAC) contributed countless hours and expertise; researching, editing and reviewing this edition.
Lee Carothers - Stettler Beth MacGougan - CoronationHenry Weigman - 4-H Specialist, Edmonton
The 4-H Alberta program extends a thank you to the following individuals for reviewing portions of this 4-H Horsemanship Assessment Project Book .
Special thank you to our Graphic Designers at Perpetual Notion, Geoff and Julie Kramer of Edmonton, AB
AuthorPat Barriage
Published by:
4-H Section Alberta Agriculture and Forestry 7000 113 ST RM 200 NW EDMONTON AB CANADA T6H 5T6
Check out our web site at: http://www.4h.ab.ca for an on line version of this resource. Email [email protected] Phone 310-0000 (Toll-Free Rite Line) then 780-422-4H4H (4444).
No portion of this manual may be reproduced without written permission from the 4-H Section of Alberta Agriculture and Forestry
October 2004 2nd edition revised- September 2004 1st Edition - September 1998 Revised August 2013

i
4-H A
LBER
TA H
OR
SE P
RO
JECT
LEAD
ER G
UID
E
TABLE OF CONTENTSWelcome ......................................................................................................................................1
How the Alberta Horse Program Works ..................................................................................1Mandatory 4-H Horsemanship Project .....................................................................................1Completion of a 4-H Horse Project Year ..................................................................................1Horse Project Objectives ..........................................................................................................24-H Horse Reference Manual ..................................................................................................24-H Horse Project Books ..........................................................................................................2The 4-H Horse Record Book ....................................................................................................2The Project Assessment Tools (Levels) ....................................................................................3
General Leadership Techniques ................................................................................................7
How Members Learn ................................................................................................................7 Set Kids up to Succeed .............................................................................................................7 Learning Styles .........................................................................................................................7 Hints .........................................................................................................................................8
Horsemanship Teaching Activities ............................................................................................9
Your Challenge .........................................................................................................................9
Horse Handling ......................................................................................................................10 Where Should I Stand ....................................................................................................10 Leading Your Horse Safely ............................................................................................12 Good Hands Game .........................................................................................................13
Grooming and Care ................................................................................................................14
Movement ...............................................................................................................................15 Leads ..............................................................................................................................15 Deviations of Travel .......................................................................................................15 Footfalls .........................................................................................................................16
Feeding .......................................................................................................................................
Horse ID .................................................................................................................................20 Body Bingo ....................................................................................................................20 Height .............................................................................................................................22 Stations ...........................................................................................................................23
Facilities .....................................................................................................................................
Psychology .................................................................................................................................
Tack 25 Tacky Games ..................................................................................................................25 Tack Race .......................................................................................................................26 Bit Severity Lab .............................................................................................................28 Non-Leverage Bits Lab ..................................................................................................32 Leverage Bits .................................................................................................................33

ii
4-H A
LBER
TA H
OR
SE P
RO
JECT
LEAD
ER G
UID
E
Health .....................................................................................................................................35 Parasites .........................................................................................................................35 Deworming ....................................................................................................................37 The Digestive System ....................................................................................................41
Safety ......................................................................................................................................44 Sight ...............................................................................................................................44 Tying ..............................................................................................................................45Where to find Dismounted Assessment Skills in the Horse Project Guide .......................................................................................................47

1
4-H A
LBER
TA H
OR
SE P
RO
JECT
LEAD
ER G
UID
E
WELCOME: VOLUNTEER LEADERS Welcome to teaching our most important resource – our young people. We are excited that you have chosen to become involved in the 4-H Horse Program. We hope you have a great time working with you 4-H members as they make new friends, take part in 4-H activities, work with their horses and learn more about being a responsible horse owner.
This is a supplemental resource to the Horse Project Guide (2013). It outlines the equine project plus provided some teaching hints and techniques that you can use.
How the Alberta Horse Program Works Mandatory 4-H Horsemanship Project
Safety First! To help ensure safety and basic horsemanship skills of 4-H members in the province, a mandatory project has been established. The first three levels of the Horsemanship Project have assessment tools, which provide an opportunity for members to develop basic riding and handling skills. These help to ensure they acquire basic safety techniques and learn about the responsibility involved in caring for their horse. Members can ride either Western or English, but must complete the project assessments for the first three levels with their project animal.
Young horses may be used; however, the ability to complete some of the assessments will depend on the training of the horse.
Once members have completed the first three levels of the Horsemanship Project, they may continue in this project, or they may move on to other projects. If they choose to move on to another project, it is advisable to carry on with Horsemanship 4 -7 to enhance the skills required for your other projects.
Completion of a 4-H Horse Project YearTo complete a yearly 4-H horse project, members must:
• Complete a record book for each project.• Take part in at least 70 per cent of designated club activities.• Take part in Achievement Activity.• Enroll in one of the projects available and work on the assessments required for
that project. Members are not required to finish a project in one year, nor are they required to finish a level in a year. The members yearly project qualifies as long as they have been working on the skills and knowledge for the project in which they enrolled in.

2
4-H A
LBER
TA H
OR
SE P
RO
JECT
LEAD
ER G
UID
E
Horse Project ObjectivesThe 4-H Horse Project gives members an opportunity to:
• Acquire an understanding of horse management through the experience of owning, caring for, and maintaining records on a horse project.
• Develop the skills, patience and understanding of safe handling practices essential in working with horses.
• Develop an appreciation of the horse industry and its importance in the local community, the province and the country.
4-H Horse Project Guide Members and leaders use the main 4-H Horse Project Guide as the members work through the Horsemanship Project and the other 4-H horse projects. This manual has basic horsemanship information that is important for any horse owner to know.
This manual was compiled with the best information available at time of publication. New research is ongoing in the horse world, so some of the information presented may change in the future.
4-H Horse Project BooksThere are many projects available to 4-H horse members and the most popular projects have supplementary project books that provide leaders and members with additional information specific to each project. These books also include activities for members to complete and the assessment tools that you as leaders will work through with your member for each project. Additional information is also available on the 4-H web site at: www.4h.ab.ca.
If members have an interest in an equine project that is not listed or does not have any available 4-H resources, they are encouraged with your direction as a leader to take the Horse Creative Option project. Many of our new horse projects have started as ideas – developed into creative options – turned into a pilot project and become a recognized horse project with resource material developed and supplied.
When new project resources are developed, material will be put on the web site until there is enough interest and information to develop an on-line and written project book.
The 4-H Horse Record BookMembers use the 4-H Horse Project Record Book. It is a member’s responsibility to provide the majority of the feed, management and care of their horse. Feeding records on the member’s horse must be maintained for a minimum of 180 days prior to Achievement Day.
Most 4-H members are in only one horse project; therefore; these members do not have any duplication while keeping records for the required 180 days prior to achievement day. For members in more than one horse project or taking care of more than one project horse the following table outlines their minimum 4-H record keeping expectations are:

3
4-H A
LBER
TA H
OR
SE P
RO
JECT
LEAD
ER G
UID
E
Your Record BookRecords must be kept on a project animal for 180 days prior to the Achievement Day event. A member can only have one project animal per project, with the exception being Rodeo. If a member enrolls a horse in more than one project, they must include project goals specific to that project (Question 4, page 7) and write one story with separate paragraphs for each project (page 39). A record book must be kept on each project animal and only project animals for which a record book has been kept may compete in a 4-H sanctioned event. The only exception would be if the project animal has to be replaced by another animal because of health reasons, and if that replacement has been approved prior to the event.
Horsemanship Assessment (Levels)To provide consistency throughout the province, the 4-H horse project options have been developed with level assessment tools for mounted and dismounted skills. These assessment tools explain to the members what they are expected to learn and what will be used to assess your knowledge and skills in each project. They can be used by a leader, parent, senior member or riding instructor, to assess each member’s knowledge and skills in each project.
These assessment will not be monitored other than through the 4-H club. For the benefit of members, they are encouraged to be honest and realistic with the member’s ability to complete each of the assessments. A benefit of this program is that when members move to different clubs or compete at district, regional or provincial activities club or event organizers should have a good idea where the member’s skill level is.
When completing Horsemanship Levels 1-3, members can be working on more than one part of levels 1-3. Members do not have to, for example, complete all of level 1 before working on the skill levels in level 2 or 3. We do not want to stagnate our member’s drive or enthusiasm.
Members must complete both the mounted and dismounted portions of the assessment tools. Our horse project stresses riding skills, animal husbandry and stable management. For our members to become good horseman – the completion of mounted and dismounted assessments are critical.
Horsemanship Video: an instructional 4-part DVD series that outlines general horsemanship topics and illustrates the assessment standards for equine project levels 1 through 7, English and Western mounting and dismounting procedures. The series is instructed by Muffy Knox and was distributed to 4-H Alberta equine project leaders
4
4-H A
LBER
TA H
OR
SE P
RO
JECT
LEAD
ER G
UID
E
Recognized Horse Project OptionsEnglish Horse Projects
1. Members who wish to gain more experience with the English style of riding are encouraged to participate in these projects.
2. Projects that involve English riding include:
Horsemanship 4-7 - is a continuation of the mandatory Horsemanship Project where members continue to learn horsemanship skills, riding with English equipment.
Jumping - members will learn about and develop basic skills for beginner jumping. Members and horses learn to work together as a team learning correct techniques.
Dressage - members will learn about and develop dressage techniques. Members learn about dressage competitions and develop riding skills that help teach their horses basic dressage movements.
Western Horse Projects1. Members who wish to gain more experience with the Western style of riding are
encouraged to participate in these projects.
2. Projects that involve Western riding include:
Horsemanship 4-7 (a continuation of the mandatory Horsemanship Project) - members will continue to learn more advanced horsemanship skills, riding with Western equipment.
Ranch Horse - members will develop skills in working with cattle, roping, first aid, trail riding and other skills used with ranching.
Rodeo - members will learn about the skills used to compete in rodeo events including: Barrel Racing, Goat Tying, Steer Daubing, Team Roping, Cow or Steer Riding, Pole Bending, Keyhole, Breakaway Roping, Goat Tail Untying, Thread the Needle and Stake Race. Members also learn how to set up and conduct a rodeo.
Packing - members will learn how to safely use pack horses and equipment used in packing and learn how to take part in pack trips.
Reining - members will work with their horse to develop the skills used in reining competitions. Members should have advanced riding skills and horses should be athletic.
Cattle Events (Cutting, Working Cow Horse, and Team Penning) - members will learn about handling cattle and using a horse for the three cattle events. Members and their horses should have some advanced riding skills and lots of experience before enrolling in this project.
5
4-H A
LBER
TA H
OR
SE P
RO
JECT
LEAD
ER G
UID
E
Young Horse ProjectsMembers interested in learning more about the horse industry and about raising and training young horses are encouraged to participate in this project. The young horse project is set up with two participation streams: members having the option to complete the project on their own as a self-directed basis or linked up with an industry based young horse development project. Members must be 12 years of age and must have completed Horsemanship Levels 1-3 before registering in these projects.
Young Horse: This project helps you to care for, teach and train a weanling, yearling or two year old up to its first ride.
Junior Horse: This Project continues on with caring for, teaching and training your 2 to 5 yr old horse, using the skills outlined in the Horsemanship Level 1-3 Project. A Junior Horse is a horse that is 5 years old or younger that has been started under saddle. Members must be 12 years of age and must have completed Horsemanship Levels 1-3 before registering in this project
Green Horse: A Green Horse is a horse of any age over 5 that has had very little or no training. Members wishing to take this project will use the skills outlined in the Young Horse Project Manual if the horse has never been handled and/or the skills from the Horsemanship Level 1-3 Project Manual once the horse has been started under saddle. Members must be 12 years of age and must have completed Horsemanship Levels 1-3 before registering in this project.
Industry Affiliated: When opportunities arise, members apply through the 4-H Branch, ARD (usually by November 1), are then notified that they have been accepted and are linked up with industry groups. Members receive knowledge and corporate support to develop skills and experience the variety of Alberta’s Horse industry.
Standardbred - members apply to join this program, receive a weanling from a standardbred breeder and work through the young horse development levels, care for the animal and then market it for the owner at the annual yearling sale (members receive a percentage of the sale).
Performance Standardbred - members receive a standardbred horse that has recently retired from race training. The member works with the horse to train it for riding and when it is trained the member assists in marketing their project.
Judging Horse Project: This project is designed for members who wish to learn about judging horse events. Members are not required to have a project animal.
Members will advance through the assessment tools that encourage learning about and experiencing the judging of conformation and performance classes.
Members keep a record book on the activities they participate in, recording their experience and training with judging.

6
4-H A
LBER
TA H
OR
SE P
RO
JECT
LEAD
ER G
UID
E
Creative Options Project (COP):This project is designed for intermediate (12 to 14 years old) and senior (15 to 20 years old) members as of January 1st of the current club year.
The members must have completed at least Horsemanship Level 1-3 and wish to design their own area of study. Non-riding projects do not have to complete the mounted abilities of Horsemanship 1-3 to participate in this project. In this unit, members select, plan, share and evaluate their own projects.
Further information on this project is available by ordering the Creative Options Project Book or by contacting the 4-H Specialist in your region.

7
4-H A
LBER
TA H
OR
SE P
RO
JECT
LEAD
ER G
UID
E
GENERAL LEADERSHIP TECHNIQUES
Set Members up to SucceedAs we teach these units, our goal is to always set kids up to succeed.
While some units focus on our youngest members (9-12) with the least amount of knowledge, new 4-H members will benefit no matter what age they are. Older children, who are new to 4-H and also new to the horse world, can assist with these sessions. They will assimilate the content in the process, helping to build a solid foundation.
These sessions are also a great opportunity for enthusiastic senior members to mentor young 4-Hers. Other units focus on members that have finished Horsemanship 1-3. They are informative and challenging.
You have the flexibility of choosing which units you would like to use and when.
Learning StylesSome people learn best through visual methods or auditory methods,. While others learn best by “doing”. Most people learn best through a combination of two or all three styles. If you are reading from notes to a group of visual and kinesthetic learners you will not likely retain their attention for long. Children are a “tough crowd” if you have lost their attention. These sessions have been designed to reach children through all three of these channels. We have provided a brief description of these three learning styles below.
Visual Learners
Visual learners prefer to see pictures, diagrams, illustrations and words written down. They will observe all the physical elements in a classroom. Their learning material will be carefully organized and perhaps decorated. When something is being described, they prefer to have a picture to view.
Auditory Learners
Auditory learners remember what was said very well. They remember best through verbal repetition and saying things aloud. They enjoy group discussions and group presentations including the use of music. They are easily distracted by noise, but also easily distracted by long periods of silence.
Kinesthetic Learners
Kinesthetic learners (or tactile learners) remember what they DO very well. They need to get physically involved. They enjoy making and creating. They like to handle the learning materials. They tend to fiddle with small objects while listening or working. They have trouble staying still or in one place for a long time.

8
4-H A
LBER
TA H
OR
SE P
RO
JECT
LEAD
ER G
UID
E
General Notes:
1. Don’t let any child put themself or another child in danger, either by an act of commission or by an act of omission.
2. Always talk in a normal voice; never squeak or talk down to children
3. Always have a snack on hand and be sure that it gets eaten halfway through a session. Food is very important. Plummeting blood sugar can make things go wrong when they shouldn’t!
4. Small prizes or treats are a fun addition to some of the games.
5. Encourage kids to choose a partner they don’t know very well and to choose a different partner each time.
6. Remember to ALWAYS SET KIDS UP TO SUCCEED.
7. Have fun, enthusiasm is contagious!

9
4-H A
LBER
TA H
OR
SE P
RO
JECT
LEAD
ER G
UID
E
HORSEMANSHIP: TEACHING ACTIVITIES
A Challenge – Share your Horsemanship Project Training Techniques with your fellow 4-H Leaders.
Our challenge is for you as leaders to use this information and to share tips and techniques that you develop. Please send on disc any new or successful activity description, that you develop or modify, to us by June 1 of the project year so we can share it with your fellow 4-H Leaders the following year. Our address is Provincial 4-H Equine Advisory Committee, Box 600, STETTLER AB T0C 2L0 or e-mail document to [email protected], indicating that is a resource for the equine project.

10
4-H A
LBER
TA H
OR
SE P
RO
JECT
LEAD
ER G
UID
E
HORSE HANDLING: WHERE SHOULD I STAND?
IntroductionThis activity will help younger members visualize and practice where they need to stand while their horse is being inspected by a Judge, Vet or Farrier. If they haven’t had any Showmanship experience then you will need to give some general guidelines before they play the game. Explain how the area around the horse is divided into quarters. Discuss the Safety aspect and the importance of always being on the same side of their horse as the person inspecting the hindquarters of their horse. By being in this position they can control the hindquarters by pulling the nose toward them which would cause the horse to swing the hind end away from the person inspecting. When the person inspecting their horse is in front of either shoulder, the handler should be in front of and facing their horse on the opposite side. The Safety consideration here would be the handler can pull the head away from the person inspecting if necessary.
This is a game they can play with an older member. Their partner should be comfortable with Quarters so they can offer guidance during the game. The younger member is the Handler and the older member can be the Judge, Vet or Farrier. The Handler can only move to Box A or B. The Judge, Vet or Farrier can move anywhere. The Handler starts in Box A (on the front, left side of their horse). The Judge, Vet or Farrier places their game piece in any Box and the Handler must respond by moving or staying where they are.
Preparation
Copy enough game cards so each pair will have one. They will also need two game pieces (1 red and 1 black Checker or 2 Quarters – one would be heads and the other tails!).
Meet with the older members prior to the start and explain the game. Also explain their role as the coach, teacher and mentor. They may want to play a few games themselves to get comfortable with the process.
Once they have been partnered up, explain the rules. (See intro).

11
4-H A
LBER
TA H
OR
SE P
RO
JECT
LEAD
ER G
UID
E
12
4-H A
LBER
TA H
OR
SE P
RO
JECT
LEAD
ER G
UID
E
HORSE HANDLING: LEADING YOUR HORSE SAFELYIn this exercise the members will work in pairs. The “horse” is blindfolded and holds his/her hands together just above waist level, elbows bent at waist level. The “horse” will hold the snap end of the lead rope between their hands pressed flat against each other. (If the handler pulls too hard the snap should just slip right out from between their hands.) The other end will be held by the handler, who is in charge of leading the horse, asking it to move off, making it stop and stand, and working through a course of 3 pylons by using the lead rope for signals.
The handler should be on the left side of their horse with the lead rope neatly folded up in their left hand. Make sure there aren’t any sagging loops that hang as low as their knees. Their right hand should be about 6-8” from their horse’s imaginary halter (their partner’s hands). Explain to the members when they lead their real horse they would always stay between its head and shoulder, keeping the horse’s eye in front of them. With their partner they should be right beside them (assuming their hands out in front of them is the head/halter).
Encourage members to “ask” as softly as they can to communicate to their “horse”.
Change positions.
• Ask the horses to tell their partners how they did. • Did they ask gently? • Were they patient and did they give you time to respond before asking again?
13
4-H A
LBER
TA H
OR
SE P
RO
JECT
LEAD
ER G
UID
E
HORSE HANDLING: GOOD HANDS GAMEBridles are required for this game. Members should bring their own. Members play this game in pairs. One person is the “horse” and the other is the “rider”. The horse is blindfolded, has their bridle around their neck and holds the bit in their hands. The rider stays about 3’ behind the horse and uses the reins, not the voice, to ask the horse to stop and turn. The rider can cluck to the horse to initially ask for forward motion. The horse is encouraged to say what they are feeling – whether a rein action is too subtle (not likely) or unnecessarily strong or sudden (all the time!). Cushions or pylons can be set up to mark a course for the rider to follow.
Tell the members there are several ways we use our bodies to communicate with our horses while we ride. Ask what are some of the parts they use. (voice, hands, legs, seat, upper body)
Explain the game as follows:
Good hands are soft hands. Soft hands “ask” instead of hard hands that “demand”.
• Partner up and decide who will start off being the horse and who will be the rider.• Riders – try to have quiet hands / use as little pressure as you can to communicate
to your horse / try not to use your voice except to ask them to move forward.• Horses – you will feel what your horses feel (but in your hands). Keep your hands
up in front of your chin so the reins go over your shoulders. Does your rider have soft hands or hard hands?
Blindfold the horses and they will wear their own bridles. After one time through the course ask the horses to tell their riders how they did. Could they have been lighter? (Definitely!) Try again and be even lighter. Then switch positions and bridles.
14
4-H A
LBER
TA H
OR
SE P
RO
JECT
LEAD
ER G
UID
E
GROOMING & HOOF CARE: GROOMING
IntroductionIn this session members will review the grooming tools found on page 138 and how to use them. Members should have brought their own grooming supplies or they can share with another member.
Have the members turn to page 138 in their manuals. Use the next few pages as your guide and progress through each tool. Each member can find the matching tool in their own supplies. This is a good opportunity for new members to discover some tools they don’t have but should have. Encourage members to name the tool and describe how to use it. You can “add” to their descriptions if necessary.

15
4-H A
LBER
TA H
OR
SE P
RO
JECT
LEAD
ER G
UID
E
MOVEMENT: LEADSIn this game the members will actually lope around the room like a horse. They will lope on the correct lead then on the wrong lead to see how each feels. Allow for a generous space between “horses” and tell them it is their responsibility to keep a safe distance between each other by slowing down or carefully passing on the ‘inside” only. This exercise demonstrates how much easier it is to lope on the correct lead.
Explain to the members when a horse lopes he moves one foreleg and one hind leg, both on the same side of the body, ahead of the other two legs. This is called leading. When your horse is traveling on a circle or around the arena, it is easier for him if he leads with his inside set of legs. It is a smoother ride for them too. Tell them they will try loping on their inside lead and the wrong lead to see how it feels.
• ask a willing member to demonstrate how to “lope” like a horse.• have the group lope to the right on their right lead. • then ask them to change leads but continue going to the right (talk about how
uncomfortable that is).• if the group is still relatively under control, change direction and do it all again!
MOVEMENT: DEVIATIONS OF TRAVELThe ideal way a horse travels is straight on, each leg moves on a straight line. Turn to page 198 in the reference manual or demonstrate for the group. Try one at a time and only at a walk. Only do the most common ones: Paddling, Winging and Plaiting. Explain what interfering is but don’t let them try it.
The next time your club is at the arena have your group watch each other’s horse trot toward them and see if they can spot a paddler, winger or plaiter. (Paddlers are the most common!)
16
4-H A
LBER
TA H
OR
SE P
RO
JECT
LEAD
ER G
UID
E
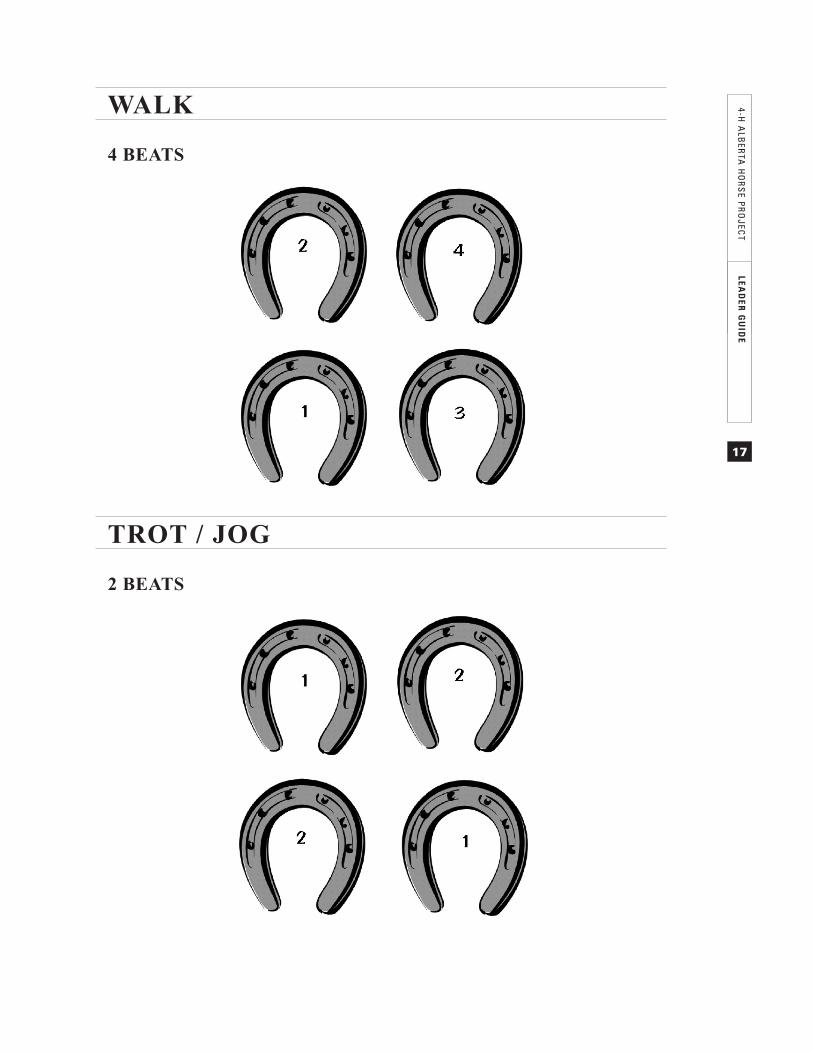
MOVEMENT: FOOTFALLS
Introduction
This is a fun activity the members can do with a partner or alone. They will mimic the footfall sequence of each gait. If done with a partner one person will be the back legs and the other will be the front. The person behind can hang on to their partner’s waist or a lead shank wrapped around their waist (so they can stand further back). If done alone, the member will demonstrate using their own hands and feet.
As a brief intro to the group you should review the following:
What is a gait? The order in which the horse’s feet touch the ground.Walk – 4 beat gait. Each foot is picked up and set down separate from the others.Trot / Jog – 2 beat gait. Diagonal pairs.Diagonals Opposite front and hind feet move at the same time.Right diagonal Right front and left hind are moving togetherLeft diagonal Left front and right hind are moving together
Canter/Lope – 3 beat gait. One hind, diagonal pair then one front.Gallop – 4 beat gait. Each foot is picked up and set down separately.Pace – 2 beat gait. Pairs on same side move together. Standardbreds pace.Stride Distance between two steps of the same foot.Lengthen the stride Reach further with each leg.Back up – 2 beats. Diagonal pairs.
PreparationHang the six posters (provided on the following pages) up on a wall at various points around the room. Divide your group up so you have a few at each poster. An intermediate or senior member should be assigned to each gait to help supervise and teach as the groups are rotated around the room. Meet with these older members prior to the start and explain the activity and your expectations.
Following the initial rotation of the groups and depending on the confidence of your members you could “raise the bar” by removing all of the posters and asking the members to demonstrate a gait for the entire group; their choice of gait or yours.
17
4-H A
LBER
TA H
OR
SE P
RO
JECT
LEAD
ER G
UID
E
WALK
4 BEATS
TROT / JOG
2 BEATS

18
4-H A
LBER
TA H
OR
SE P
RO
JECT
LEAD
ER G
UID
E
CANTER / LOPE
RIGHT LEAD3 BEATS
CANTER / LOPE
LEFT LEAD3 BEATS

19
4-H A
LBER
TA H
OR
SE P
RO
JECT
LEAD
ER G
UID
E
GALLOP
4 BEATS
BACK UP
2 BEATS
20
4-H A
LBER
TA H
OR
SE P
RO
JECT
LEAD
ER G
UID
E
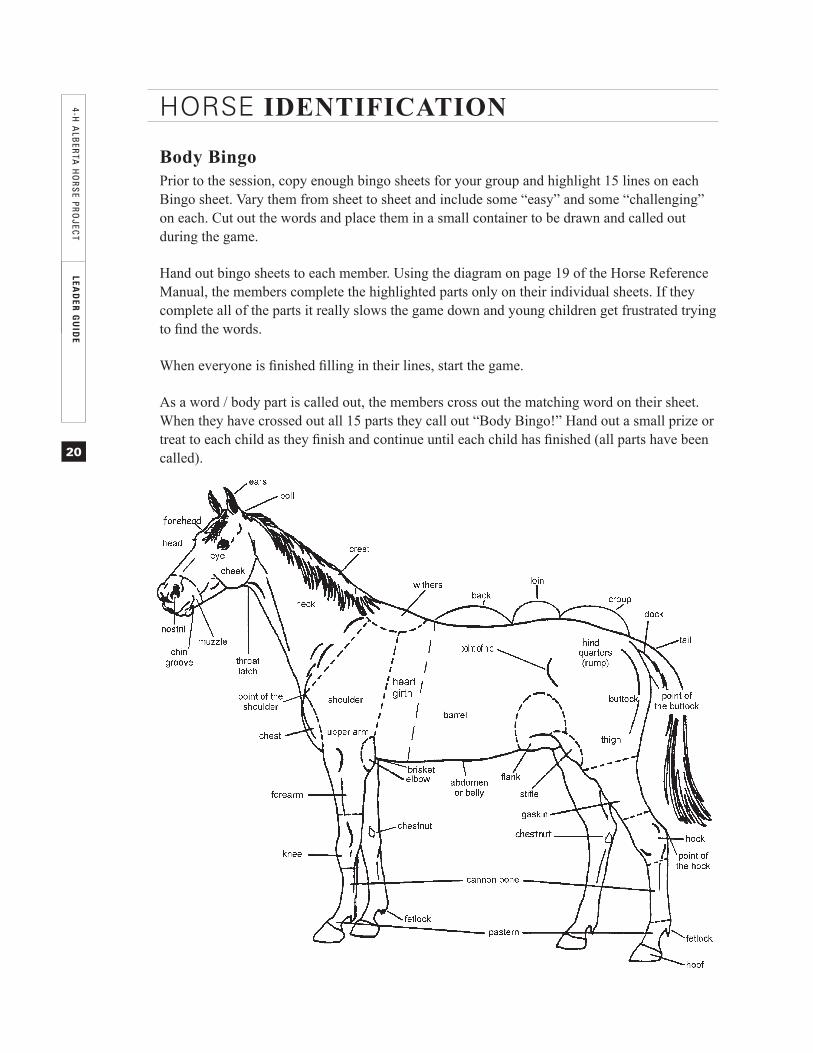
HORSE IDENTIFICATION
Body BingoPrior to the session, copy enough bingo sheets for your group and highlight 15 lines on each Bingo sheet. Vary them from sheet to sheet and include some “easy” and some “challenging” on each. Cut out the words and place them in a small container to be drawn and called out during the game.
Hand out bingo sheets to each member. Using the diagram on page 19 of the Horse Reference Manual, the members complete the highlighted parts only on their individual sheets. If they complete all of the parts it really slows the game down and young children get frustrated trying to find the words.
When everyone is finished filling in their lines, start the game.
As a word / body part is called out, the members cross out the matching word on their sheet. When they have crossed out all 15 parts they call out “Body Bingo!” Hand out a small prize or treat to each child as they finish and continue until each child has finished (all parts have been called).

PARTS OF A HORSE
21
ALB
ERTA
4-H H
OR
SE P
RO
JECT
LEAD
ER R
ESO
UR
CE M
AN
UA
L

22
4-H A
LBER
TA H
OR
SE P
RO
JECT
LEAD
ER G
UID
E
HeightWhat’s in a Hand?
Ask:
Do we measure a horse’s height in inches, centimeters or hands?
In the old days, men would measure the height of a horse using their hands and counting how many “hands” high they were. (demonstrate by turning your hands sideways and stacking one then the other)
How big is a hand? (4 inches)
Using their rulers ask them to measure the width of their hand – how wide is it. (FYI: 4” = 10 cm)
Does anybody have a hand that is 4” wide? (not likely)
See if they can find one that is 4”. (probably an adult in the room)
For this next part draw a line on the board and divide it into 4 sections:
|____|____|____|____|
1” 1” 1” 1” = 4” or 1 HAND
Ask:
If a hand is 4” wide, how many inches are in:
• half of a hand? (2 inches) • a quarter of a hand? (1 inch)• three quarters of a hand? (3 inches)
Younger members tend to watch as the older members, who have already learned about fractions, confidently answer.
When we measure the height of a horse, where do we measure from and to? (ground to the highest point of the withers)
Explain what “hh” means. (hands high)
Write on the board: 14.0 hh 14.1 hh 14.2 hh 14.3 hh 14.4 hh
What do each of these mean?
14 hands 14 h + 1” 14 h + 2” 14 h + 3” 15 hh
Sometimes we see 14.5 hh. It means 14.5 hands high, which should really be expressed as 14.2 hh.
23
4-H A
LBER
TA H
OR
SE P
RO
JECT
LEAD
ER G
UID
E
• Partner up• Using their horse tape measure have the members measure each other in hands.
Invite them to come and record their name and their height on the board. When all of the measurements are on the board, explain the height cut-off point for a pony vs. a horse. (14.2) Give a treat to all of the ponies in the room! (the “ponies” love this!) Then give one to the tallest “horse”. Then give one to all of the other “horses” or the rest of the “herd”.
StationsMembers will learn some basic terminology in these sessions that are used to describe horses. They can work in groups and rotate around to each station. There are two ways you can do this. You can use old magazines and have the members find, cut, paste and label or you can prepare the cut-outs and labels ahead of time, toss them onto a table and the kids have to match the pictures with the correct label. The second method is much cleaner, quicker and can be used over and over. Older members could have a project meeting and do the actual preparation of these units.
Colours StationUse the following colours:
Black/Bay/Grey/Sorrel/Chestnut/Buckskin/Palomino/Brown Check pages 64 and 68 ofthe Horse Project Guide
Markings StationFace markings: star/stripe/blaze/snip/bald face
Leg markings: stocking/half stocking/pastern/half pastern/coronet Check pages 69 and 70 of the Horse Project Guide
Breeds StationQuarterhorse/Arabian/Paint/Morgan/Appaloosa/Percheron/
Thoroughbred Check pages 70-71 of the Horse Project Guide
Age/Sex Foal/Colt/Filly/Mare/Yeld Mare/Stallion/Gelding/
Yearling/Weanling/Aged/Dam/Sire
This session has been prepared for you – see attached.
Refer to page 64 in the Horse Project Guide

24
4-H A
LBER
TA H
OR
SE P
RO
JECT
LEAD
ER G
UID
E
FOAL GELDING COLT MARE
WEANLING STALLION FILLY YELD MARE
YEARLING SIRE AGED DAM
The offspring of horses, either male or female, up to one year of age
Male offspring, up to 4 years old or until gelded.
Female offspring, up to 4 years old, or until the first breeding.
Mature female horse over 4 years old or younger if bred.
Mature female horse that has never given birth, barren.
Male horse that has not been castrated (gelded).
Male horse of any age that has been castrated.
One year old up to 2 years old.
A foal that no longer has access to its mother’s milk. Up to one year old.
Any horse, any sex, over 9 or 10 years old. A foal’s female parent. A foal’s male parent.

25
4-H A
LBER
TA H
OR
SE P
RO
JECT
LEAD
ER G
UID
E
TACK
TACKY GAMESIntroductionIn this session the members will “show and tell” the miscellaneous tack items they brought. They will learn the difference between a snaffle bit and a leverage bit and the styles of riding that would use each. Then they will review the parts of the Western and English saddles and bridles and play a team game to increase their knowledge.
Show and TellHave members who brought miscellaneous pieces of tack show them to the group and tell us about them. (We have seen some real antiques and family treasures!)
BitsThis is a very basic introduction to the difference between the two main categories of bits: non-leverage and leverage. At this level the members just need to know that there are two categories, how they work and what style of riding uses each type. Have a couple of snaffles (non-leverage) and leverage bits that you can pass around as you talk about them.
Non-leverage or Snaffle bit
A snaffle is a mild bit. It puts pressure on the lips first then the bars and tongue. Snaffles can be seen in English and Western. In English riding we use a direct rein (explain) and ride with light contact and no slack in the reins.
Leverage bit
Pressure is applied to the bars, tongue, lips, chin and poll. Bits with a very high port can also put pressure on the roof of the horse’s mouth. This type of bit is considered more severe than a snaffle because it puts pressure on the horse in more areas. A leverage bit has a shank. This increases the amount of pressure applied by your hands. In Western riding we “neck rein” or ride with one hand. Western riding can also demand a more responsive horse with lots of fast turns and stops. With a leverage bit the horse learns to move quickly with very little pressure.
26
4-H A
LBER
TA H
OR
SE P
RO
JECT
LEAD
ER G
UID
E
TACK: TACK RACEReview the parts of the Western and English saddles and bridles. Have members refer to their manuals page 152 for bridle parts and pages 159 and 162 for saddle parts. You can point to the part and have each member take turns to say what that part is.
• Divide the group into two teams; an English team and a Western team.• Post the labeled Sticky Notes on a vertical surface (wall or flip chart) • This is a relay race. The first member runs up to the board and chooses a sticky
note and places it where it belongs then runs back to their team and tags the next person in line.
• There are 5 bridle parts and 15 saddle parts on each set of tack.• Once a winner is declared switch places and repeat. • It is a good idea to enlist two parents or senior members to help out by being a
“judge” at each station to ensure the label is placed in the correct place. • Prior to the meeting prepare sticky notes as indicated on the next page.

27
4-H A
LBER
TA H
OR
SE P
RO
JECT
LEAD
ER G
UID
E
TACK: TACK RACEWrite the following 40 tack parts on small Sticky Notes:
Western EnglishHEADSTALL BRIDLE
crownpiece crownpiece
throatlatch throatlatch
cheekpiece cheekpiece
chin strap noseband
browband browband
SADDLE SADDLE
cantle cantle
seat seat
pommel pommel
gullet gullet
horn skirt
fender dee ring
skirt buckle guard
rear billet rear panel
latigo front panel
seat jockey sweat flap
rear jockey saddle flap
swell stirrup iron
concho & strings stirrup leather
latigo keeper stirrup bar
stirrup hobble billets

28
4-H A
LBER
TA H
OR
SE P
RO
JECT
LEAD
ER G
UID
E
TACK: BIT LAB
Bit Severity Lab Introduction:
In this activity the members will review the difference between a leverage and a non-leverage bit. They will learn the parts of the bit and the factors that determine bit severity. Then they will work with a partner and rate the severity of several bits using the bit severity worksheets attached. As part of your introduction of this activity review pages 145-150 in the manual in conjunction with the notes found below on Non-Leverage and Leverage bits.
Preparation:
The members should read pages 153-158 in the Horse Project Guide.
In preparation for this Lab you will need to collect several different types of bits, both leverage and non-leverage. Vary the shape, size and type of mouthpieces as much as possible. Once you collect all of the bits it’s time to label them. Try using small paper tags with a small string attached (available at office supply stores) that loop through the bridle ring. If you are not sure what type of bit it is you could always take it into a tack store and see if they can help you or try doing some research on the web “Google” search.
The participants will also need a fabric tape measure (in inches). To make things easier, use a soft tape measure and cut it into several 5” strips; each group should be given a 5” strip to use during the Lab.
Lay the bits out on a table separating the leverage from the non-leverage. Group all of the same bits together. For example, if you have several D-ring Snaffles with different types of mouthpieces, lay them next to each other so it is easier to see the subtle differences.
You will also need to make several copies of the worksheets. Allow enough so each group could evaluate most of the bits.

29
4-H A
LBER
TA H
OR
SE P
RO
JECT
LEAD
ER G
UID
E
Non- Leverage Bits
• Also called Snaffles • Reins attach above the mouthpiece• Direct rein pressure applies lb. for lb. pressure • Applies pressure to the tongue, bars and lips (full cheek also applies
pressure to the cheeks)• A broken mouthpiece is NOT a “snaffle-mouth” it is a “jointed”
mouthpiece. Snaffle refers to the rings on each side and the fact that there is no leverage.
• Types: O-ring or Loose ring/Egg Butt/D-ring/full cheek/half cheek/Fulmer (A Fulmer is similar to, but milder than a Full cheek – see photo below.)
Leverage Bits
• Reins attach below the mouthpiece• Applies pressure to tongue, bars, lips, chin, poll and sometimes the palate
6 factors to determine severity:
• Mouthpiece – rubber, copper, sweet iron, steel, chain, twisted wire, etc.• Port – low/medium/high/wide/narrow. The higher and narrower, the more
severe; it can contact the highly sensitive palate. A low wide port will give plenty of room for the tongue – great for horses with a thick tongue.
• Weight – a heavy bit makes any cue stronger. • Hands – a severe bit can be used in a mild way in educated hands. Even the
mildest bit can become severe in uneducated hands.• Purchase – distance between mouthpiece and the bridle ring (point where
headstall attaches); the longer the purchase, the more leverage it can apply. However, a longer purchase can also lessen the leverage ratio depending on the length of the shanks.
• Shanks – severity increases with length and straightness. Shanks that curve back toward horse reduce pressure. S-shaped shanks provide for quicker release when you drop the reins but also quicker contact when you pick up. Pressure is triggered as soon as slack is removed. mouthpiece rotates down/chin strap up/lower jaw is squeezed in vice-like action

30
4-H A
LBER
TA H
OR
SE P
RO
JECT
LEAD
ER G
UID
E
Feel the Vice!Hold the bridle up by the crownpiece with one hand. With your other hand, spread your fingers so your thumb is behind the mouthpiece and your fingers holding the curb strap away. Have someone pull on the reins. Your fingers and thumb will be pulled towards each other by “inches”. Unfortunately for the horse, his lower jaw doesn’t give like your fingers do. At the same time the purchase rotates forward, it pulls down on the crownpiece applying poll pressure
Leverage ratio: length of purchase X length of shank Example: 2” purchase with 6” shanks has a ratio of 1:3. This means for every
pound of pull there is 3 lbs of pressure applied to the horse’s mouth (plus chin and poll pressure)
Bit Severity ActivityYou have collected a variety of bits, labeled them and laid them out in a somewhat organized fashion and are now ready for the members to evaluate them using the
Bit Severity Worksheet. The members should work with a partner. Each pair will need a soft tape measure and a pencil. They will start with the Non–Leverage bits.
1. Hand out one Non-Leverage Worksheet to each group. As an introduction to the activity and to reduce the number of questions you will get later, complete the worksheet together using one of the non-leverage bits from your display.
2. Review the parts of the bit. The cannons (long tubular sections of the mouthpiece), bridle rings, butt (where the mouthpiece meets the sleeve), players, keys and crickets are small moving pieces in the centre of the mouthpiece. Identify a copper, sweet iron, steel and rubber mouthpiece.
3. The first two questions are straight forward. The more severe a characteristic is the higher the score will be. You may need to point out a triangular or edged mouthpiece so it is not mistaken for a smooth mouthpiece.
Question 3 is multiplied by question 4 and the total is carried over to the right hand side. To answer question 4, measure 1” in from the bridle ring, then use your tape measure to wrap around the mouthpiece to measure it’s thickness.
Questions 5, 6 and 7 are all subtracted from the running total as they deal with characteristics that make the bit milder, thereby reducing the total score.
4. Place the Non-Leverage Worksheets in a central spot and let the groups begin!

31
4-H A
LBER
TA H
OR
SE P
RO
JECT
LEAD
ER G
UID
E
Initially, you will find you are answering a lot of questions but once they get the hang of it they will be able to help each other. Once they are all finished, review some of the bits together as a group. See where groups differed on scores and dig deeper to find out why. This is when the learning really begins!
Repeat the steps for the Leverage bits. First hand out worksheets to each pair, then choose a bit and review the parts. In addition to the above parts, a leverage bit will also have a shank, purchase (the part of the lever above the mouthpiece), rein loop or ring, it may have a port (high, medium, and low).
Question 7 is added to question 8 then the total is multiplied by question 9.

32
4-H A
LBER
TA H
OR
SE P
RO
JECT
LEAD
ER G
UID
E
TACK: BIT LAB
NON-LEVERAGE BITS
Type of Snaffle ________________________________________________BIT # _________
1) How many pieces are there in the horse’s mouth? TOTAL SCORE
A. 1 to 3 pieces 1 pt B. more than 3 pieces 5 pts ______________
2) What kind of texture or shape does the mouthpiece have?
A. Sharp (eg. Triangular or edged) 10 pts B. Prickly 10 pts C. Rough (eg.Twisted wire or chain) 10 pts D. Twisted metal 5 pts E. Wrapped with smooth wire 3 pts F. Smooth 1 pt ______________
3) What is the ring shape?
A. Round (rings are circles) 1 pt B. All other shapes 2 pts ____________
4) How thick are the canons? X
A. 1/2” or more 1 pt B. 3/8” but less than 1/2” 3 pts ____________ = ______________ C. less than 3/8” 10 pts
5) How are the rings attached to the canons?
A. Through holes in the canons 1 pt (this would be all snaffles except Fulmer aka Australian loose ring) B. All others including Fulmer 3 pts (______________) SUBTRACT
6) Are there players, keys or a cricket on the bit?
A. Yes 3 pts B. No 0 pts (______________) SUBTRACT
7) Is the mouthpiece rubber, copper, sweet iron, or a flavoured material?
A. Yes 3 pts B. No 0 pts (______________) SUBTRACT
TOTAL: ____________Total score of:1– 5 > Mild 6 – 19 > Moderate 20 or more > Severe
33
4-H A
LBER
TA H
OR
SE P
RO
JECT
LEAD
ER G
UID
E
TACK: BIT LAB
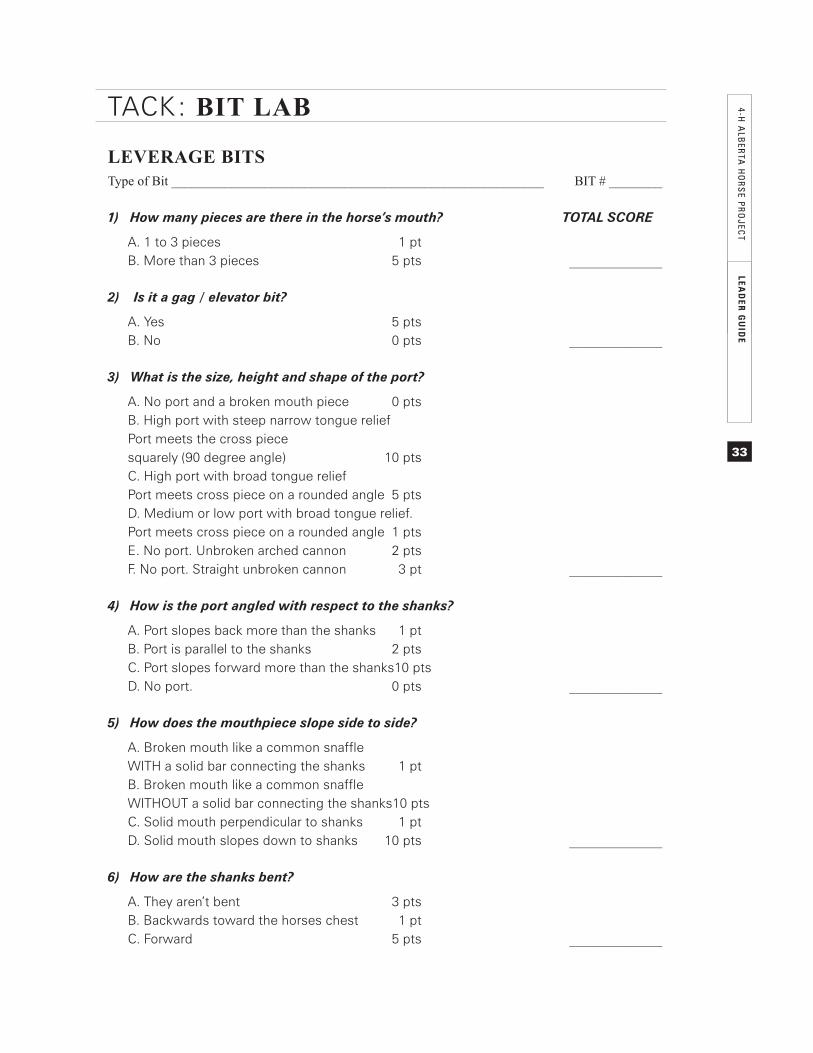
LEVERAGE BITSType of Bit ________________________________________________________ BIT # ________
1) How many pieces are there in the horse’s mouth? TOTAL SCORE
A. 1 to 3 pieces 1 pt B. More than 3 pieces 5 pts ______________
2) Is it a gag / elevator bit?
A. Yes 5 pts B. No 0 pts ______________
3) What is the size, height and shape of the port?
A. No port and a broken mouth piece 0 pts B. High port with steep narrow tongue relief Port meets the cross piece
squarely (90 degree angle) 10 pts C. High port with broad tongue relief
Port meets cross piece on a rounded angle 5 pts D. Medium or low port with broad tongue relief.
Port meets cross piece on a rounded angle 1 pts E. No port. Unbroken arched cannon 2 pts F. No port. Straight unbroken cannon 3 pt ______________
4) How is the port angled with respect to the shanks?
A. Port slopes back more than the shanks 1 pt B. Port is parallel to the shanks 2 pts C. Port slopes forward more than the shanks 10 pts D. No port. 0 pts ______________
5) How does the mouthpiece slope side to side?
A. Broken mouth like a common snaffle WITH a solid bar connecting the shanks 1 pt B. Broken mouth like a common snaffle WITHOUT a solid bar connecting the shanks 10 pts C. Solid mouth perpendicular to shanks 1 pt D. Solid mouth slopes down to shanks 10 pts ______________
6) How are the shanks bent?
A. They aren’t bent 3 pts B. Backwards toward the horses chest 1 pt C. Forward 5 pts ______________
34
4-H A
LBER
TA H
OR
SE P
RO
JECT
LEAD
ER G
UID
E
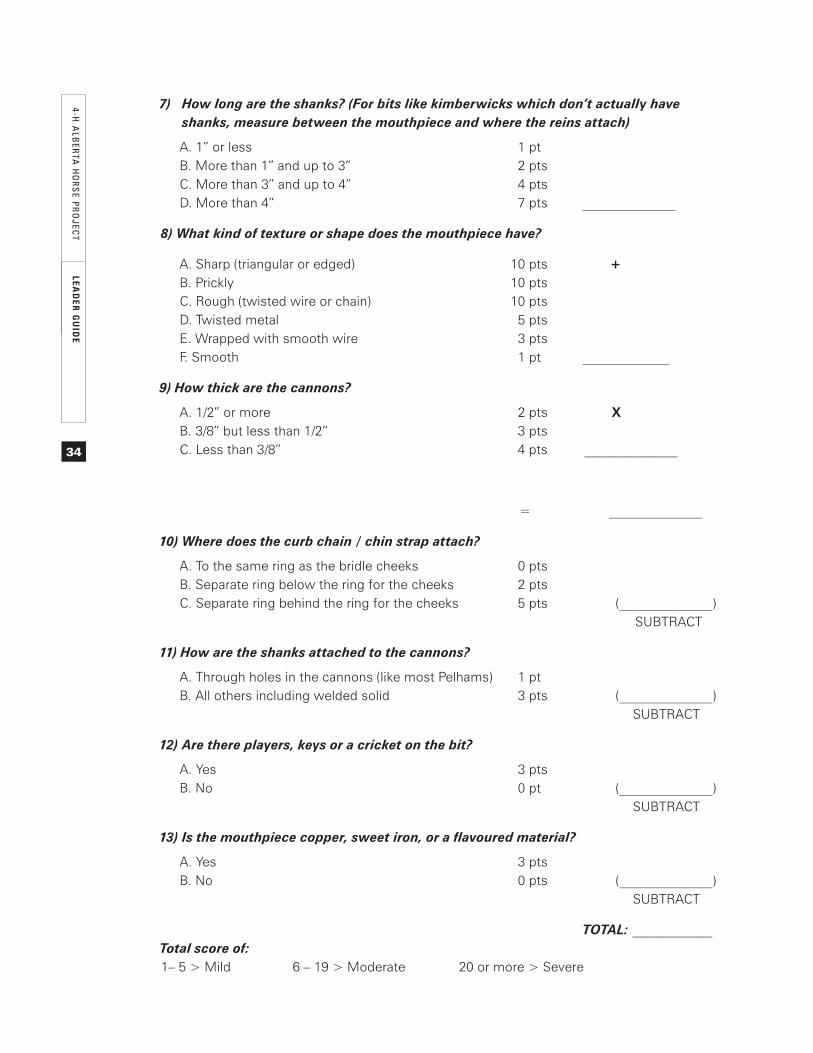
7) How long are the shanks? (For bits like kimberwicks which don’t actually have shanks, measure between the mouthpiece and where the reins attach)
A. 1” or less 1 pt B. More than 1” and up to 3” 2 pts C. More than 3” and up to 4” 4 pts D. More than 4” 7 pts ______________
8) What kind of texture or shape does the mouthpiece have?
A. Sharp (triangular or edged) 10 pts + B. Prickly 10 pts C. Rough (twisted wire or chain) 10 pts D. Twisted metal 5 pts E. Wrapped with smooth wire 3 pts F. Smooth 1 pt _____________
9) How thick are the cannons?
A. 1/2” or more 2 pts X B. 3/8” but less than 1/2” 3 pts C. Less than 3/8” 4 pts ______________
= ______________
10) Where does the curb chain / chin strap attach?
A. To the same ring as the bridle cheeks 0 pts B. Separate ring below the ring for the cheeks 2 pts C. Separate ring behind the ring for the cheeks 5 pts (______________) SUBTRACT
11) How are the shanks attached to the cannons?
A. Through holes in the cannons (like most Pelhams) 1 pt B. All others including welded solid 3 pts (______________) SUBTRACT
12) Are there players, keys or a cricket on the bit?
A. Yes 3 pts B. No 0 pt (______________) SUBTRACT
13) Is the mouthpiece copper, sweet iron, or a flavoured material?
A. Yes 3 pts B. No 0 pts (______________) SUBTRACT
TOTAL: ____________Total score of:1– 5 > Mild 6 – 19 > Moderate 20 or more > Severe

35
4-H A
LBER
TA H
OR
SE P
RO
JECT
LEAD
ER G
UID
E
HEALTH: PARASITES
Parasite PresentationWhat is a parasite? It is an animal that lives off of another animal (the host). It uses the host to provide it with a home and food. It may eat the same food as the host or it might use the fluid from the host’s body (often blood). Ensure the members know the difference between an external parasite and an internal parasite. Damage done to the inside of the horse can be permanent. There are over 12 different kinds of worms and they can produce 1000’s of eggs a day.
Some of the signs that would indicate internal parasites are listed on page 109 in the manual. Review these signs with the members.
Discuss some of the ways we can protect our horses from parasite damage: dewormers, insecticides, bug masks and fly sheets, etc.
This is a very fun way to learn about icky parasites! You will find a sheet of parasites (internal and external) attached. Select enough parasites as you have members. Cut them out and place them in a paper bag. Allow the members to reach in and draw out one parasite. Each child will research their parasite (refer to pages 114 – 120) and prepare a brief description. They should include 1-3 main points, whether it is an internal parasite or an external parasite and how to get rid of it!
The PerformanceThe parasites are all decked out in sunglasses and ball caps on backwards (lookin’ real bad…) standing beside each other. One at a time they take a step forward, introduce themselves and tell a few facts. If you have more than one child playing the same parasite, they can say it in unison or share the lines. It is better if they memorize the lines so encourage them to keep it brief!
Here is an example: “Hi, I am Louie the Louse! I lay eggs in your horse’s hair. I make your horse really itchy! You have to use a special chemical mix to get rid of me!!”
Get together prior to the performance for a bit of a practice. Keep things “light”. Let the kids plan what they are going to say but if it sounds too long they might appreciate you suggesting they cut some of it out. You might need to prompt them to speak up louder and sound tougher like only a parasite can!

36
4-H A
LBER
TA H
OR
SE P
RO
JECT
LEAD
ER G
UID
E
Louse

37
4-H A
LBER
TA H
OR
SE P
RO
JECT
LEAD
ER G
UID
E
HEALTH: DEWORMING
Deworming Programs• Frequency of deworming will depend upon a lot of factors. Here are several things
to take into consideration: climate & season, number of horses, age, health, feeding situations (pasture vs dry lot), manure management practices, pasture rotation, exposure to other livestock.
• Recommended frequency is every two to six months.• There will always be internal parasites in the body of the horse. Good deworming
practices will help to control the amount.• Damage done to internal organs (lungs, liver, arteries and intestines) can be
permanent.• Young horses (birth to 2 years) are at greater risk because they tend to eat manure
and dirt. They also have smaller intestines so a blockage is more likely. They should be treated for tapeworms in midwinter.
• Older horses are more susceptible to worm infestations. They should also be treated for tapeworms in midwinter.
• Review the signs (refer to Horse Project Guide - page 115): rough, dull coat / sheds out later than others / thin with a potbelly / thin, even though they are fed well / frequent colic and diarrhea / worms or eggs in manure / rubbing their tail
• There are over 12 kinds of worms and they can produce 100’s of 1000’s of eggs a day!
• Five main types: - Strongyles (blood worms, palisade worms)- Ascarids (intestinal worms also called round worms) - Pinworms - Bots - Tapeworms
• Bots – treatment in the fall / Tapeworms – treatment in midwinter• Dewormers: 5 different forms – paste, gel, powder, granules and liquid• To prevent parasites from becoming immune to one particular class, a rotation
between classes of dewormers is recommended. Check the chemical content of dewormers, not just the brand name as many brands contain the same drugs.
• Three classes of dewormers: Avermectins, Benzimidazoles, Tetrahydropyrimidines.
In preparation for this exercise members should read pages 114 – 120. Leaders will need to prepare by collecting empty paste deworming boxes with their paper inserts. It is important to find boxes from the three different classes available (see above) as the members will have to research to find the active ingredient. In this activity members will design five deworming programs. Members should work with a partner with guidance provided by the leader as required.

38
4-H A
LBER
TA H
OR
SE P
RO
JECT
LEAD
ER G
UID
E
The first step is to determine the active ingredient in the pastes. The members will need to read the information provided with each dewormer to find the active ingredient. They will write the brand name and active ingredient in the appropriate space on their worksheet. They may be surprised to discover the brands they have been using are all in the same class! Once that task has been completed they can go ahead and design the five programs keeping in mind the points mentioned above and referring to the instruction / information sheets provided with each deworming product. While we have provided some general guidelines for the leaders regarding the deworming programs, there are no right or wrong answers to this activity. It is intended to give the 4-H members a deeper understanding of internal parasites, the different types of paste available and when to use them. As long as they have considered the facts and made an effort to apply their knowledge to each of the following situations, they have succeeded! Always recommend they discuss their personal situations with their Vet. The second step is to design the programs.
Design a Deworming Program for the following horses:A. 10 horses / 1000 acres pasture / horses are free to roam and graze
B. 20 horses / kept in small pens, (as in a boarding facility) 2-3 horses per paddock / fed hay twice a day on the ground
C. 2 horses / 4 acres divided into 2 paddocks
D. 12 young horses (yearlings / 2 year olds) kept in large paddocks on a breeding farm
E. 15 horses ranging in age from 19 – 34 living on a retirement ranch that specializes in the care of seniors
Record the letter corresponding to each class under the month you would recommend using it.
Eg. Jan Mar “A” “T”
Leaders information:Here are a few commonly used dewormers as examples. Feel free to add more brands that are available in your area.
Class Brand Name Active Ingredient
Avermectins Panomec ivermectin
Quest Gel moxidectin
Benzimidazoles Safe-Guard fenbendazole
Tetrahydropyrimidines Strongid P pyrantel pamoate
Exodus pyrantel pamoate

39
4-H A
LBER
TA H
OR
SE P
RO
JECT
LEAD
ER G
UID
E
The members should show an obvious rotation of classes. Look for a Bot treatment in the late fall or early winter months. Look for a Tapeworm treatment in midwinter for the young horses and the seniors. The recommended frequency is 2-6 months. For horses in smaller confined spaces, young horses and seniors look for deworming frequency closer to the 2 month end of the scale while horses kept in larger areas could be closer to the 6 month end. Allow the members to make their own assumptions for each situation. For example, pasture rotation, manure management practices, etc.
40
4-H A
LBER
TA H
OR
SE P
RO
JECT
LEAD
ER G
UID
E
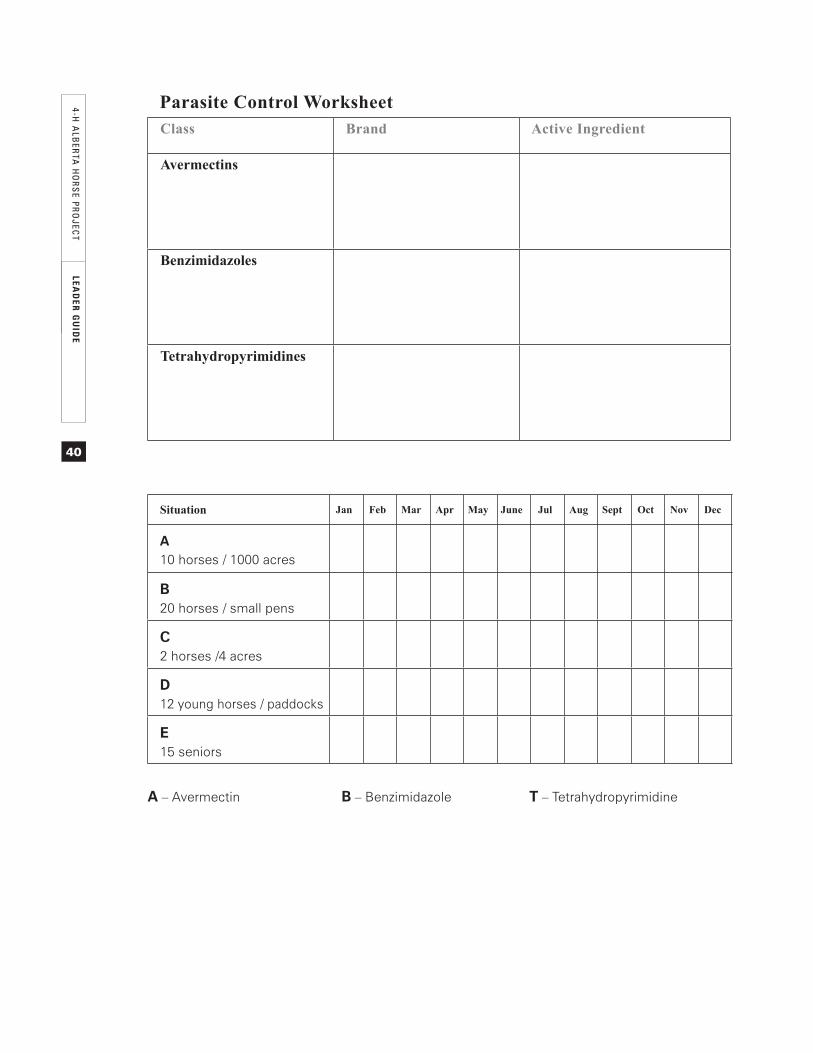
Parasite Control WorksheetClass Brand Active Ingredient
Avermectins
Benzimidazoles
Tetrahydropyrimidines
Situation Jan Feb Mar Apr May June Jul Aug Sept Oct Nov Dec
A10 horses / 1000 acres
B20 horses / small pens
C2 horses /4 acres
D12 young horses / paddocks
E15 seniors
A – Avermectin B – Benzimidazole T – Tetrahydropyrimidine

41
4-H A
LBER
TA H
OR
SE P
RO
JECT
LEAD
ER G
UID
E
HEALTH: THE DIGESTIVE SYSTEMThis activity is intended to educate our older members about the digestive system of the horse in a fun interactive way.
In preparation for this activity members in Horsemanship Levels 4-7 can read pages 102 – 105 in their Horse Project Guide.
Leaders need to cut out the digestive parts and their descriptions. There should be 21 cards all together in no particular order. The Anus card has its description already on it. Whoever draws this card is dubbed Team Captain. They will be the keeper of the name cards. Have 3 small prizes available.
• Step 1 - Distribute descriptions by turning them upside down on a flat surface and let the members pick one. If you have a small group, have each member draw 2 or 3 cards each.
• Members must use their manuals to figure out which part is being described on their card.
• Once they have found it, they report to their team Captain who will check to make sure they are correct. Then their Captain will give them the corresponding name card.
• Once everyone receives their name card they can begin step 2. • Step 2 – Put the 10 parts in order on a table with the descriptions below each name
or if you have a real active group, have them put themselves in order according to the card they hold.
• Present the Captain with a prize for being such a great sport (Captain Anus) and helping with the game.
Bonus questions – Tell everyone to close their manuals. Have a couple of prizes on hand for these questions.
What is the total length of the digestive system? (27 metres or 90 feet)
What is the total capacity of the digestive system? (227 litres or 50 gallons)

42
4-H A
LBER
TA H
OR
SE P
RO
JECT
LEAD
ER G
UID
E
TEETH TONGUE
PHARYNX ESOPHAGUS
STOMACH CECUM
SMALL INTES-TINE LARGE COLON
SMALL COLON RECTUM
ANUS• feces passed out here

43
4-H A
LBER
TA H
OR
SE P
RO
JECT
LEAD
ER G
UID
E
• the incisors pull or pick up the feed
• the molars grind it as it is being mixed with saliva
• it is mixed with saliva and moved to the back of the mouth
• very strong muscles• forces the food down
• muscles move in wave-like motions in one direction only
• this movement prevents vomiting
• glands secrete gastric juices that mix with the saliva-soaked food
• gastric juices are a mixture of water, hydrochloric acid and enzymes (pepsin)
• the enzymes break down vegetable fats and changes proteins into a form that can be absorbed by the body
• the mesentery membrane keeps this attached to the backbone
• enzymes from the liver and pancreas are secreted here
• food breaks down into small molecules that are absorbed through hair-like “villa”
• a.k.a. “water gut”• holds 36 litres (8 gallons)• reservoir for storing water• digests roughage and
absorbs nutrients
• 3 to 4 metres long (10-12 feet)
• Holds 91 litres (20 gallons)• Uses friendly bacteria
to breakdown fibrous portions of food and release carbohydrates
• fluid content is re-absorbed into the horse’s body
• horse droppings are molded here
• they should consist of 25% solids and 75% water

44
4-H A
LBER
TA H
OR
SE P
RO
JECT
LEAD
ER G
UID
E
SAFETY: SIGHT
Eye Sight and Blind Spots Prior to the session draw the picture from page 189 of the Horse Project Guide
on a board or flip chart. Do not label.
Tell the members to focus on something in the room. Ask them to cover one eye and ask if they can still see it. (yes)
Uncover that eye and cover the other eye and ask again. (yes) Explain that our eyes are on the front of our head and they work together to focus on the same thing.
Horses have eyes on the side of their heads. They see two distinctly different pictures at the same time. If I were a horse, what would happen if I covered up one of my eyes? What would I see? (Everything on that side of the room)
Have the members refer to their manuals, page 189. Refer to the diagram you drew on the board. Ask the members what a “blind spot” is. Where are the blind spots for a horse? (there are 3)
Ask for only one at a time and invite the member who gave you the answer to come up to the board and draw/label it on the diagram.
Ask the members why this it is important to know and what we can do to be safe while working / passing through a horse’s blind spot. (speak to your horse)

45
4-H A
LBER
TA H
OR
SE P
RO
JECT
LEAD
ER G
UID
E
SAFETY: TYING
Tying your Horse SafelyFor this session members will need a partner and a ruler. If some of your members don’t know each other, encourage them to choose a partner they may not know very well. This is a great opportunity for members to get to know each other better and make new members feel welcome.
Ask the members:
What shouldn’t you tie your horse to?(The kids are great at this once they get rolling!)
• wire fence, cross rails on a wood fence, flimsy trees, doors, gates, anything thatmoves. Never tie with the reins. Why?
What should you tie your horse to?• strong post in the ground, hitching rail, strong tree trunk, etc.• Always use a halter and lead rope to tie your horse.
It is important not to tie your horse too low. Why? (could get a leg over the rope, etc)
The best height to tie your horse is always wither height. If you can’t find something at this height (or can’t reach!) then your second choice would be to tie at least 1 metre from the ground. (3 times the length of the ruler they brought)
Have the members partner up – they will measure 1 metre up from the floor on the side of their partner. This is the level they should never tie their horse below. First choice: wither height; second choice: 1 metre.
It is easier for kids to remember how high 1 metre is if they have a reference (their armpit!).
Safety Knots
(figure “4” method)
Members can stay with the same partners. One will be the “human” and the other will be the “post”.
Demonstrate the figure “4” method.
46
4-H A
LBER
TA H
OR
SE P
RO
JECT
LEAD
ER G
UID
E
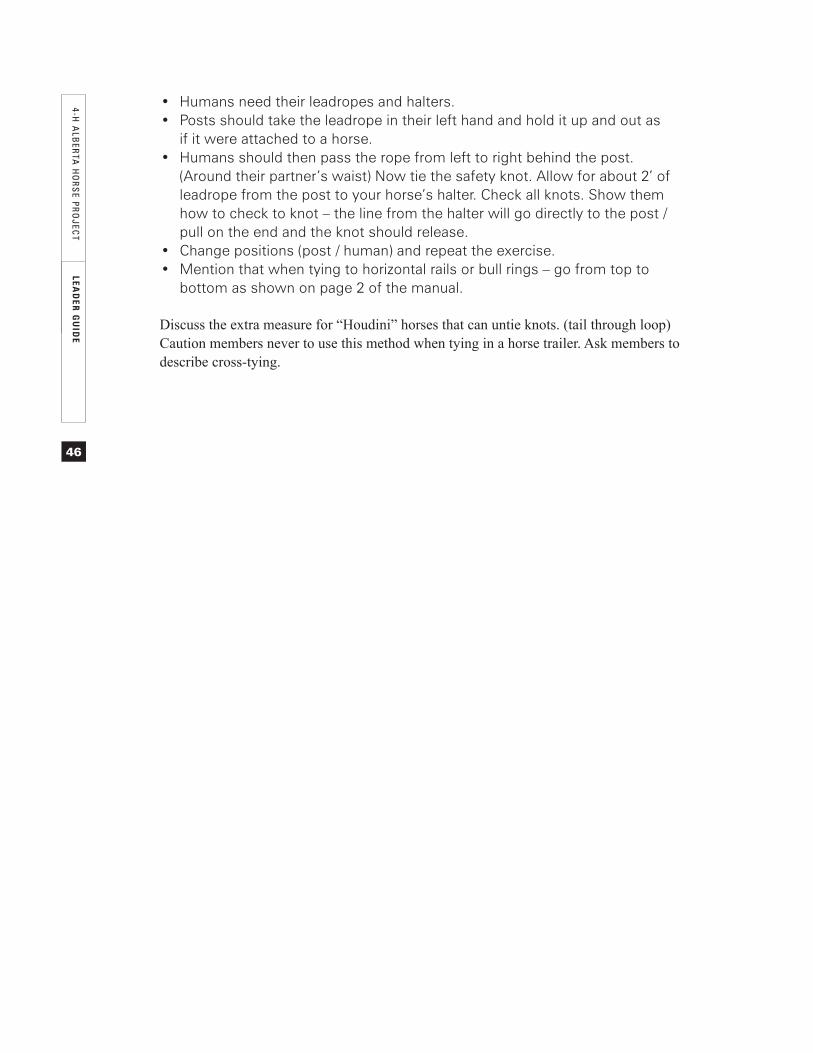
• Humans need their leadropes and halters.• Posts should take the leadrope in their left hand and hold it up and out as
if it were attached to a horse.• Humans should then pass the rope from left to right behind the post.
(Around their partner’s waist) Now tie the safety knot. Allow for about 2’ ofleadrope from the post to your horse’s halter. Check all knots. Show themhow to check to knot – the line from the halter will go directly to the post /pull on the end and the knot should release.
• Change positions (post / human) and repeat the exercise.• Mention that when tying to horizontal rails or bull rings – go from top to
bottom as shown on page 2 of the manual.
Discuss the extra measure for “Houdini” horses that can untie knots. (tail through loop) Caution members never to use this method when tying in a horse trailer. Ask members to describe cross-tying.

47
4-H A
LBER
TA H
OR
SE P
RO
JECT
LEAD
ER G
UID
E
WHERE TO FIND DISMOUNTED ASSESSMENT SKILLS IN THE HORSE PROJECT GUIDE
Pg. 173-174
Pg. 174-176 “ “
Pg. 179
Pg 177
Pg. 138-141Pg. 139
Pg. 190-193(not specific)Pg. 190-193(not specific)Pg. 221Pg. 11 (#3)
Pg. 106Pg. 66-70Pg. 196-197
Pg. 182, 184-185
Pg. 182(saddle)Pg. 185(bridle)
Horsemanship Level One – Dismounted
Levels 1-3 of the horse program are mandatory for all horse members before they can branch out to any of the other projects offered.
Catch and halter your horse safely. Explain how a halter should fit andwhy.
Lead your horse safely at a walk, turn right, stop and back up. Lead around in a large circle (20m) using at least 4 markers. Lead your horse across 2 diagonal lines of the riding area. Demonstrate and explain how and where to tie a horse using a quick
release knot. Demonstrate how your horse moves sideways away from pressure by
cueing with your hand while the horse is tied. Identify five grooming tools and explain their use. Demonstrate how to use a hoof pick correctly by cleaning one of your
horse’s feet (someone else may hold the foot). Give three safety rules to remember while riding your horse (pg. 9-12),
three safety rules to remember when working with your horse on theground (pg. 6-7) and two dress rules (pg. 7 (9)).
What is your horse’s first reaction when he is frightened? (Pg. 192) If heis tied, what is he likely to do? (Not in book) If this happens, what shouldyou do? (Not in book)
Describe three signs that your horse might show if he is going to bite orkick.
Describe three signs that a horse might show if he was going to bolt orbuck.
Explain what you would do if your horse ran away while you were riding. Explain what you would do if someone else’s horse ran away while you
were riding. Describe where you keep your horse. What does your horse eat? Describe three signs that show a horse is healthy. What breed and colour is your horse? What markings does he have? Demonstrate with your own hands and feet the footfall sequence of a
horse at the walk and jog/trot. Unsaddle and unbridle your horse. (Smaller members should be able to
explain correct methods even if they are not able to do it entirely.) Demonstrate how to correctly put your tack away after riding.

48
4-H A
LBER
TA H
OR
SE P
RO
JECT
LEAD
ER G
UID
E
WHERE TO FIND DISMOUNTED ASSESSMENT SKILLS IN THE HORSE PROJECT GUIDE
Pg. 138-141
Pg. 174-176
Pg. 177
Pg.19, 44-55Pg. 6, 189
Pg. 64-65Pg. 108-110
Pg. 106-107
Pg. 90-91Pg. 190-193
Pg. 190-193
Pg. 188Pg. 66-70Pg. 73-76Pg. 77-78Pg 77Pg. 196-197
Pg. 179-185
Pg. 230
Pg. 197
Pg. 230-231
Horsemanship Level Two – Dismounted
Explain, demonstrate and thoroughly groom your horse including cleaningat least two feet (someone else may hold the feet).
Demonstrate leading at the walk, trot, right turn, emergency left turn, haltand more fluid back-up.
Demonstrate how your horse moves sideways away from pressure bycueing with your hand while you are holding him.
Identify at least six external parts of the horse. Explain where a horse’s blind spots are and why it is important to know
this. Show how to measure the height and weight of your horse. Demonstrate how to take your horse’s heart rate and respiration rate, and
know what is normal. Describe three signs that indicate a horse is unhealthy. Explain how much and how often you feed your horse each day. Explain four feeding rules. Explain how a horse would use his body language to show that he is
happy, angry, nervous and curious. Give two clues for each emotion. Describe three signs that other horses in your group may show if they are
going to buck, bite, bolt or kick. Why does your horse want to return to the group? Identify any five colours and five markings that a horse may have. Name five breeds of horses List three ways to keep your barn or pasture safe. List three things your horse’s pen or pasture should have in it. Demonstrate with your own hands and feet the footfall sequence of the
walk, jog/trot, lope/canter and back. Saddle and bridle your horse. (Smaller members should be able to
explain correct methods even if they are not able to do it entirely and mayneed some help).
Identify five parts of the saddle (pg. 159-162) and three parts of the bridle(pg. 152).
While watching a horse being trotted, identify which diagonal the rider ison.
While watching a horse being ridden at a lope/canter, recognize whichlead the horse is on.
Describe the cues you would give your horse to ask him to lope. Alsodescribe the cues you would give to ask for the correct lead.

49
4-H A
LBER
TA H
OR
SE P
RO
JECT
LEAD
ER G
UID
E
WHERE TO FIND DISMOUNTED ASSESSMENT SKILLS IN THE HORSE PROJECT GUIDE
Pg 176
Not in book
Pg 142
Pg. 143
Pg. 147-148
Pg. 108-110
Pg. 115Pg. 115
Pg. 105
Pg. 95
Pg. 188
Pg. 83-85Pg. 77
Pg. 80
Pg. 196-197
Pg. 165-166
Horsemanship Level Three – Dismounted
Demonstrate where to stand when holding your horse when someoneelse is working with it (de-worming, hoof trim). Explain safety for yourselfAND the other person (farrier, vet).
Demonstrate how to trot out, square and pose for conformation analysisor vet inspection.
Demonstrate how to pick up (pg. 142) and clean (pg. 139) all four feet ofyour horse (smaller members may have some assistance).
Explain and demonstrate extra safety precautions you take while cleaningyour horse’s hind feet.
Explain basic foot (hoof?) care (pg. 143) and give three signs that yourhorse needs his hooves trimmed. (pg. 144)
Explain how to clip a bridle path on a quiet horse. Identify all the parts of the horse’s body (pg. 44-46) and feet (pg. 47-48). Identify three horses in your group by colour (pg. 66-68) and markings
(pg. 69-70). Explain and demonstrate how to take a horse’s temperature, test for
dehydration, and capillary refill and know what is normal. Explain what you do to prevent and control parasites in your horse. Describe three signs of a wormy horse.. Name three things that determine what your horse needs to eat (feed by
need). Describe three feeding problems that could make your horse sick.
Identify and describe good quality hay and poor quality hay.
How does a horse’s body language show that he is herd bound,claustrophobic, or sour? Give two clues for each.
Explain how horses work out the pecking order and how you can tellwhich one is the boss in the group.
Name five things that would make your barn or pasture unsafe. If a pasture-kept horse must be stalled, name three things you could do to
make it comfortable and safe. If a horse is kept in a stall, describe and demonstrate how to clean a stall
(not strip it). Demonstrate with your own hands and feet the footfall sequence of the
walk, fog/trot, lope/canter, gallop and back. Identify all the parts of a saddle (pg. 159-162) and bridle (pg. 152-153). Explain and demonstrate the proper cleaning and care of tack. Describe a snaffle bit and how it works (pg. 154) and when to use it.
Describe a leverage bit, how it works (pg. 154) and when to use it.

50
4-H A
LBER
TA H
OR
SE P
RO
JECT
LEAD
ER G
UID
E
WHERE TO FIND DISMOUNTED ASSESSMENT SKILLS IN THE HORSE PROJECT GUIDE
Pg. 166
Pg. 120
Pg. 116Pg. 92-94
Pg. 19-43
Pg. 25-27Pg. 185-187
Pg. 185-187
Pg 177
Pg. 174-175
Pg. 199-200Pg. 241
Pg. 12
Pg. 14
Pg. 153
Pg. 162-163
Pg. 158
Horsmanship Level Four - Dismounted
Explain why a horse would need shoes (pg. 144) and how you wouldrecognize that it is time for a reset.
Explain three safety rules you will apply when bandaging your horse’s leg.(pg. 6-7) Demonstrate how to correctly apply leg bandages for first aid.(pg. 170-171)
Explain three types of leg protection and their purpose. Show a First Aid kit (pg. 121-122) and explain first aid principles.(pg. 123) Explain your spring immunization program and what diseases it guards
against.. Explain at least two forms that dewormers in and how to give them. Identify the five basic nutrients required by a horse and how they get
them. Name ten desirable conformation features. Identify three of the most desirable conformation features of your horse
(pg. 19-43) and describe any desirable breed characteristics that yourhorse shows (pg. 70-71).
Using a string or stick, explain the horse’s balance or symmetry. Explain three safety rules to remember while lunging. How can you tell that a horse is paying attention to you? (pg. 191) How
does he show that he understands what you are asking? (Obvious, butnot in the book.)
Describe the signs you might see in lunging if your horse was going todisobediently stop, turn or bolt. (Not mentioned under lunging but canpossibly be filtered out of Body Language section pg. 181.)
Explain and demonstrate how to safely lunge a horse at the walk, jog/trothalt and reverse (go both directions). Explain the purpose of lunging andwhere you would do it..
Demonstrate at the halter, a turn on the haunch in both directions toprepare for a mounted turn
Make and demonstrate a horse handling pattern (showmanship) – walk,trot, turn right, squaring and posing (not in book) and backing up (left turnis not usually required in showmanship).
Watch a lame horse and explain how you can tell which leg is sore. Watch a ridden horse doing a shoulder in from a rear point of view –
explain when the horse’s legs are in the correct positions. List five things that you would check on your horse trailer to see that it
meets safety standards. Instruct an older member or adult how to safely load and unload a quiet
horse into a trailer. Identify three parts of a bridle that should be checked to assure proper fit
of a bridle. Identify three parts of the saddle that should be checked to assure proper
fit. Explain how and when you would advance your horse from a snaffle to a
leverage bit.
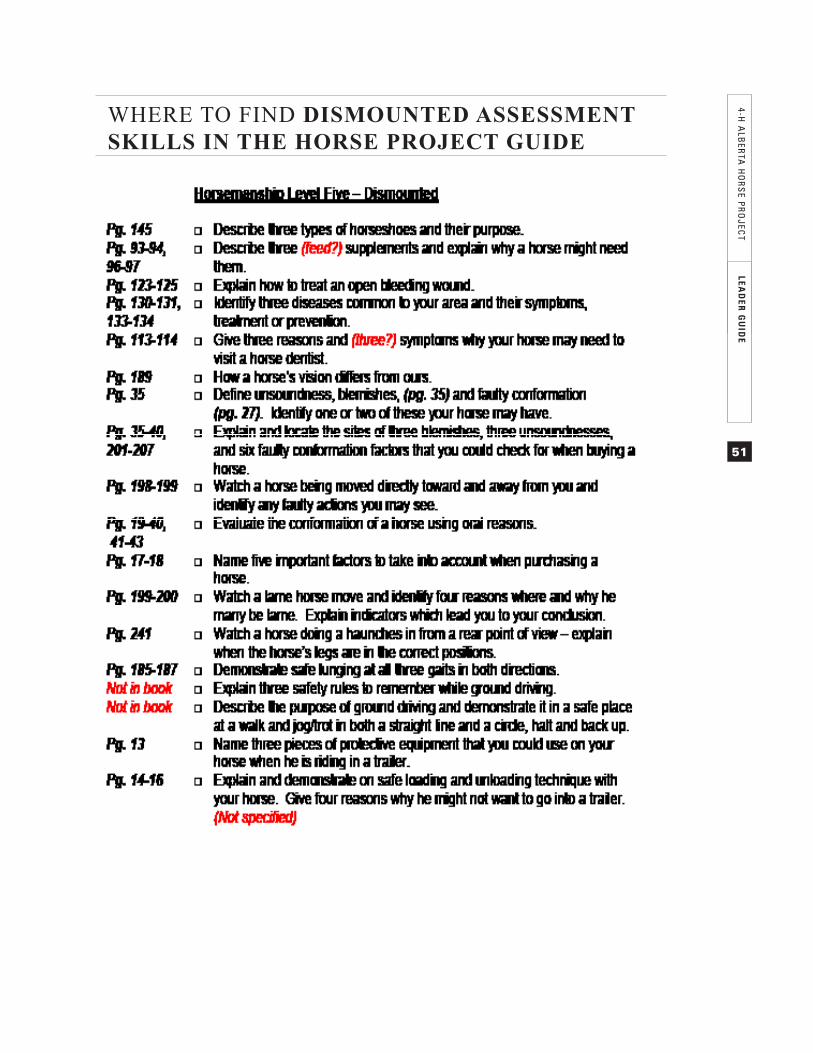
51
4-H A
LBER
TA H
OR
SE P
RO
JECT
LEAD
ER G
UID
E
WHERE TO FIND DISMOUNTED ASSESSMENT SKILLS IN THE HORSE PROJECT GUIDE

52
4-H A
LBER
TA H
OR
SE P
RO
JECT
LEAD
ER G
UID
E
WHERE TO FIND DISMOUNTED ASSESSMENT SKILLS IN THE HORSE PROJECT GUIDE


4-H Section2015