4-h horse project - cecf1.unh.educecf1.unh.edu/pubrequestfiles/cepub312_cohorseman-1.pdf · as a...
TRANSCRIPT

4-H4-H4-H4-H4-HHorHorHorHorHorsesesesesePrPrPrPrProjectojectojectojectoject MA 1500C
Member’s Manual
Reprinted by and revised by University of New Hampshire Cooperative Extension
with permission from Colorado State University Cooperative Extension
September 2004-1

Chapter 1 What is the Horse Project? 4
Chapter 2 NH Health Inspection 6
Chapter 3 Determining Breeds, Color, Markings, Size and Age 7
Chapter 4 Conformation and Judging of Horses 19
Chapter 5 Feeding Horses 27
Chapter 6 Housing and Fencing 47
Chapter 7 Your Horse’s Health 49
Chapter 8 Grooming 64
Chapter 9 Training 68
Chapter 10 Showmanship at Halter 71
Chapter 11 Equipment (Tack) 76
Chapter 12 Saddling and Bridling 83
Chapter 13 The Riding Aids and Gaits 87
Chapter 14 Basics: Western Horsemanship 98
Chapter 15 Basics: English Equitation 101
Chapter 16 Horse Safety Guidelines 104
Appendix I Terms and Definitions 115
Appendix II Breed Associations 121
Appendix III Balance Your Horse’s Feed 125
Table of Contents

Compiled byDr. Ann M. Swinker
Extension Equine SpecialistColorado State University Cooperative Extension
AcknowledgementsThis revised edition of the Colorado 4-H horse project manuals has had many contributors. Members of the ColoradoState University Cooperative Extension Horse Program Committee collected and reviewed information for use in thismanual.
Agents who represented their districts on this committee were:
The committee extends special thanks to those who served as consultants or resource persons in writing and reviewingof the manual. We wish to thank Bill Culbertson, Extension Horse Specialist emeritus, for his contribution to the contentand artwork in this manual and give him special acknowledgement.
Edited by Debby Weitzel, Publications and Printing, Colorado State University; layout and design by Karen Cagle, 4-HYouth Development Program; editorial assistance by Christina Berryman; Dr. Paul Siciliano, Animal Sciences, ColoradoState University; Horse Ration Analysis worksheets by Christopher Fox; diagrams from National 4-H Horse Program;Breed Illustrations from Ideal Breeds; HHSA, AQHA, IAHA, APHA, AHC, AMHA; and Fall 1998 Riding InstructorTraining Class, Heather Schoning and Ginger Greene, Equine Science Instructors, Colorado State University;Jennifer Hyatt, student, Colorado State University, and Diane David, 4-H Leader, Garfield County.
Permission to reproduce publication
Request for permission to reproduce any parts or all of this Colorado 4-H Youth Development publication should bedirected to 4-H Publications Liaison, State 4-H Office, 140 Aylesworth Hall, Colorado State University, Fort Collins, CO80523-4050.
Disclaimer
The content and recommendations found in this manual are based on average horse industry standards at the time ofprinting and under certain conditions these recommendations may be under or over stated. Under certain conditions,professional help may be required; when in doubt consult your veterinarian, county agent or horse industry professional.
Terminology that is gender specific, such as horeseman or cowboy, reflect common usage in the industry. Nodiscrimination is intended.
Issued in furtherance of Cooperative Extension work, Acts of May 8 and June 30, 1914, incooperation with the U.S. Department of Agriculture, Milan A. Rewerts, director of CooperativeExtension, Colorado State University, Fort Collins, Colorado. Cooperative Extension Programsare available to all without discrimination. To simplify technical terminology, trade names forproducts and equipment occasionally will be used. No endorsement of products named isintended nor is criticism implied of projects not mentioned. 04/03
Gary LancasterGary SmallKathryn MilneKurt JonesRobert MathisBill NoblesJim SmithDave McManusBill Ekstron
Todd YeagerBrenda BrownDean OatmanKipp NyeBillie MalchowAmy StarDeb HindiJodie ZeierLori Rodcay
Janice RobertsBonnie CoyryellMark HorneyRuss BrownBernie ElliottCarol McNealVern NutterAl Meier

CHAPTER 1: WHAT IS THE HORSEPROJECT?
4
Basic Requirements of the New Hampshire 4-H Horse Program*
• Own or lease one or more horses (light horse, pony, draft horse or mule). (See leaseagreement details in the 4-H Rule Book.) Horses must be identified with the 4-H HorseApproval Form by April 1 or May 1 of the current year.
• Feed, care for, groom, exercise and take responsibility for your horse when possible.• Keep accurate records and note project progress in the 4-H Horse Project Record Book.• Exhibit or participate with your 4-H Horse Project horse during the 4-H year.• It is recommended that you give a demonstration or speech, or participate in horse
judging, horse bowl, hippology or other 4-H activities (at least at the club level). Theseactivities are not limited to members owning horses.
The purpose of the 4-H Horse Project is to help you learn how to care for and use your horsecorrectly. Through the 4-H Horse Project, you can increase your knowledge and improve yourhorsemanship skills by learning basic handling principles.
As a member in the 4-H Horse Project, you are expected to learn about your own horse, andhorse breeds, safety, body colors, health, markings, care and how to determine a horse’s age.Furthermore, you will learn about shelter, grooming, training, judging, equipment, saddling andbridling, basic horsemanship and showing techniques.
A good horsewoman or horseman is able to self train in addition to training horses. You willdevelop respect for your horse, responsibility in caring for your horse and discipline in the wayyou handle horses. You also will develop patience in training, neatness in your own and yourhorse’s appearance, and pride in yourself.
You can participate in several activities through the 4-H Horse Project including western andEnglish riding, horse safety, horse judging, horse bowl, horse demonstration, horse publicspeaking, hippology, and, for members without a horse, horseless projects. Once enrolled in thehorse project, you can choose any or all of these options.

CHAPTER 1: WHAT IS THE HORSEPROJECT?
5
Being a top horseman or horsewoman requires learning all you can about horses, and setting andachieving goals for you and your horse. With humane training methods, a well-trained horse willrespond to your wishes and give you his or her best.
Additional information is available to 4-H Horse Project members and leaders from the UNHCEwebsite (http://www.ceinfo.unh.edu) or your county Cooperative Extension office. Availableliterature includes NH 4-H Horse Rule Book, 4-H Horse Event Information and Fact Sheets.
Other suggested publications and books:• The Horse, by J. W. Evans, A. Borton, H. Hintz, and L. D. Van Vleck, Second edition, Freeman
Company, New York.• Feeding and Care of the Horse, Lon Lewis, Second Edition, Williams & Wilkins, Media, PA.• Horse Industry Handbook, American Youth Horse Council, Louisville, KY.
Humane Policy Statement for 4-H Horse Project
It is the responsibility of every 4-H member to ensure that proper care is taken of their horseaccording to acceptable methods of good equine husbandry, as set forth by UNH CooperativeExtension and the NH Department of Agriculture. A healthy horse requires sufficient food, water,shelter and correct health care. Cruel and inhumane training methods are not appropriate.Specific equine husbandry guidelines and humane training methods are provided in this 4-HHorse Project Manual.
When I Compete(4-H rule while competing at events)
My performance goal is never only to beat someone else.I respect and learn from other competitors more skilled than myself.I don’t criticize other competitors, officials or judges.I do my best always.I have fun.I stay home if I cannot follow the above rules.

CHAPTER 2: NH HEALTH INSPECTION
6
The New Hampshire Department of Agriculture, Markets & Food’s Division of Animal Industryregulates the entry of animals and poultry into the state and determines which tests andvaccinations are required for animals living in or coming into the state. The goal of thedepartment is to protect NH’s people, livestock and poultry from disease. In addition, thedepartment’s efforts help stabilize production costs which help control the cost of associated foodproducts.
If you live in New Hampshire and plan to bring your animal to a horse show, clinic or camp inNew Hampshire, you must check with the show secretary or person responsible for specifichealth requirements. All 4-H animal shows, events and activities require animals to have a valid,up-to-date rabies vaccination. Some shows/events require a test for Equine Infectious Anemia(EIA) conducted within six months prior to the show. This test is called a Coggins’ test and mustbe performed by an Accredited Veterinarian. (See Chapter 7 for more information about EIA).
If you live outside of the state and plan to bring your horse to a show in New Hampshire, youmust have a “Certificate of Veterinary Inspection” signed by an Accredited Veterinarian. ThisCertificate should indicate the health status of the horse(s) involved, including a valid negativeA.G.I.D. or Coggins’ test for Equine Infectious Anemia conducted within six months prior toentry. A Certificate of Veterinary Inspection, which has been issued for a New Hampshire fair/show, will remain in effect for the entire year’s show season.
If you live in New Hampshire and are traveling with your horse to another state, you must findout the requirements for that state. Each state may have different requirements and therequirements can change from year to year. You should always check for health requirementswell before you transport your animals.
If you have questions about health regulations, please contact the New Hampshire Department ofAgriculture, Markets & Food’s Division of Animal Industry by visiting their web site at: http://www.agriculture.nh.gov/about/animal_industry.htm or call them at 603-271-2404.

CHAPTER 3: DETERMINING BREEDS,COLOR, MARKINGS, SIZE AND AGE
7
What is a breed?
A breed is a group of animals with a common origin. Each group, or breed, has definite breedcharacteristics not commonly found in other breeds. These characteristics are fixed in the geneticmakeup of the breed and will be passed from parents to offspring. Many 4-H’ers can identifyChevrolets or Fords by body styles. You can recognize horse breeds the same way.
Some popular pleasure breeds include Quarter Horse, Arabian, Appaloosa, Morgan,Thoroughbred, American Saddle Horse and Paint Horse. Popular pony breeds for smaller ridersare Shetland, Welsh and Pony of the Americas (P.O.A.). Horses that are crossbred are producedfrom mating two or more breeds and on Table 1 there is more information about other breeds ofhorses.
When you learn to recognize breed characteristics, you can identify if a horse is a Thoroughbred,Arabian or Quarter Horse. You will soon be able to tell when certain breed characteristics appearin crossbred horses.
You are not required to purchase a purebred or registered horse for a 4-H project. Select ahealthy, sound, well-mannered horse. As you learn more about horses, you may begin to preferone breed over another. Remember every breed has good points, but no matter what its breed,your horse can only be as good as your ability to handle it.
Owning a horse is an expensive commitment, requires time and is a big responsibility. Beforebuying a horse, keep in mind:
• the rider’s age, size, interest and riding style,• the family’s knowledge of horses,• available facilities, and• what you can afford.
Horses are classified, regardless of breeding, to the purpose for which they are best suited. Somebreeds may have horses classified in more than one type. When selecting a 4-H mount, determinewhat style or classification best fits you and your family’s interest. Stock horses are used onranches and for pleasure riding but they are also for showring competitions. English pleasure,hunter and jumper horses often are show horses. The type and conformation of major horsebreeds are described in the Colorado 4-H Horse Judging Guide.
Once you decide on a classification, select a horse that fits you. A beginner should choose amature, well-trained horse not a young unbroken horse. The combination of a beginner rider anda green horse generally is not beneficial to either the rider or the horse. Ask a veterinarian, ridinginstructor, trainer or local 4-H leader to inspect a horse before you purchase it. A veterinarian canperform a pre-purchase exam to determine if the horse is healthy or has structural problems thatwould affect its athletic ability.

CHAPTER 3: DETERMINING BREEDS,COLOR, MARKINGS, SIZE AND AGE
8
Horse classifications
Stock horseThese horses are short-coupled, deep-bodied and well muscled. They were developed to work cattle,and often will compete in rodeos. Quarter Horse, Appaloosa, Arabian, Paint, Morgan or P.O.A. usuallypredominate stock horse breeds. Their easy-going gaits are the walk, jog and lope.English styleHorses of this type are found in all light breeds. Their walk, trot and canter are popular for pleasureriding. English pleasure horses usually are more angular than stock horses and have more extremestyle and action. Some of the popular breeds are Saddlebred, Morgan and Arabian.HunterA hunter is a large, clean-cut horse bred for cross-country riding and jumping. It moves boldly andbriskly and has a long purposeful stride. They are usually Thoroughbreds or crossbreds selected forstamina, speed and surefootedness.PoniesPonies are small horses less than 14.2 hands in height at maturity. Most common are the Shetland andthe medium-sized Welsh pony. These two breeds often are crossed with Arabians, Morgans and otherbreeds of light horses to produce larger, more spirited ponies. The POA is the result of cross breedingan Appaloosa with a Shetland. Hackney ponies are noted for their high trotting action and lightcarriage use.Sporthorses (warmbloods)Some of the popular breeds are Holsteiner, Trakehner and Hanoverian. These breeds are used fordressage, jumping, combined training and combined driving. The warmbloods combine theThoroughbred and Arabian blood with draft breeds.Gaited horsesThese horses have a unique gait that results in a smooth and rhythmic comfortable ride. Each breedhas a specific synchronous lateral gait that is characteristic to the breed. Some gaited breeds are PasoFino, Peruvian Paso, Tennessee Walking Horse, Missouri Fox Trotter and Rocky Mountain Horse.RegisteredThese are horses belonging to a specific breed with registration papers documenting the horse’sancestors. Some registered breeds are considered purebreds. Other breeds of horses have openregistries.CrossbredA crossbreed is a horse that combines the characteristics of two or more horse breeds.Color breedsThese are breeds of horses that are bred for their coat colors or markings. Some color breeds arePintos, Palominos and Buckskins. These horses can sometimes be registered with more than oneassociation.Draft horsesThese breeds are heavily muscled horses used as workhorses. They stand 16 hands or taller and weigh1,600 pounds or more. Some breeds of draft horses are Percherons, Belgians, Shires, Clydesdales andSuffolks.

CHAPTER 3: DETERMINING BREEDS,COLOR, MARKINGS, SIZE AND AGE
9
Some breeds of horses
ArabianIdentified by a finely chiseled head and dished face,long arching neck, high tail carriage and light build.They stand 14.1 to 15.2 hands tall and weigh 800 to1,100 pounds. Coat color varies from gray, black,chestnut and bay. The Arabian is the oldest breed ofhorse, developed more than 3,000 years ago. Arabiansoriginated in the Middle East or north Africa. TheArabian is the foundation breed for all modern breeds ofhorses. They are used for general purpose riding andshow.
American Quarter HorseIts well-muscled, compact and very powerful build iswhat gives the American Quarter Horse the ability togain speed in a matter of seconds. Quarter Horsesoriginated in the United States; the Quarter Horse is saidto have run in colonial America for sport. The QuarterHorse ranges from a height of 14 hands to more than 17hands; averaging 15 hands. Their use is determined bytheir physical stature — they can be used for anythingfrom cattle events to English pleasure, depending on thehorse. They range in color from golden palomino to bay and sorrel. White markings on the headand lower legs are acceptable. Quarter Horses can also be gray and roan.
AppaloosaIdentified by their coat patterns, most Appaloosas arespotted. However, non-spotted Appaloosas can beregistered and shown. Most Appaloosas are between950 and 1,250 pounds and 14 to 16 hands tall. They areused for general purpose riding and show. TheAppaloosa Horse Breed recognizes four identifiablecharacteristics of Appaloosa markings (see Appaloosacoat patterns).

CHAPTER 3: DETERMINING BREEDS,COLOR, MARKINGS, SIZE AND AGE
10
Tobiano
Morgan horseThe Morgan horse breed is descended from one horse namedJustin Morgan born in 1789. Today more than 125,000Morgans are recorded. Morgan horses are compact andmuscular yet refined. They have an upheaded, stylish,spirited gait. The Morgan averages 14.2 to 15.2 hands inheight and is usually bay, brown, chestnut or black, but canbe buckskin, palomino or gray. They are used for generalpurpose riding and show.
American Paint HorseThese horses are mainly bred for theircolor markings and are a recognizedbreed. The Paint or Pintocharacteristic may appear on any basecolor and is a combination of whiteand colored markings. The two mostcommon patterns are tobiano andovero. American Paint horses are acombination of conformation, havestrict bloodline requirements and adistinctive stock-horse body type.
Pinto HorsePinto horses are bred for their color, either tobiano or overo. Pinto horses are spotted horses ofany breed registered in the Pinto Horse Association of America. There are four types of Pintosproduced by crossing breeds with a breed that passes on saddle, stock, pleasure and huntercharacteristics.
Thoroughbred HorseThe Thoroughbred originated in England as a middle-distance racehorse, The Jockey Club is theofficial breed registry for all Thoroughbreds born in the United States. The most common coatcolors are bay, brown, black, chestnut and, occasionally, roan or gray. White markings on the faceand legs are common. Thoroughbreds are known for their long stride and are used for flat trackracing, polo, hunting or general purpose riding and show.
Overo
CHAPTER 3: DETERMINING BREEDS,COLOR, MARKINGS, SIZE AND AGE
11
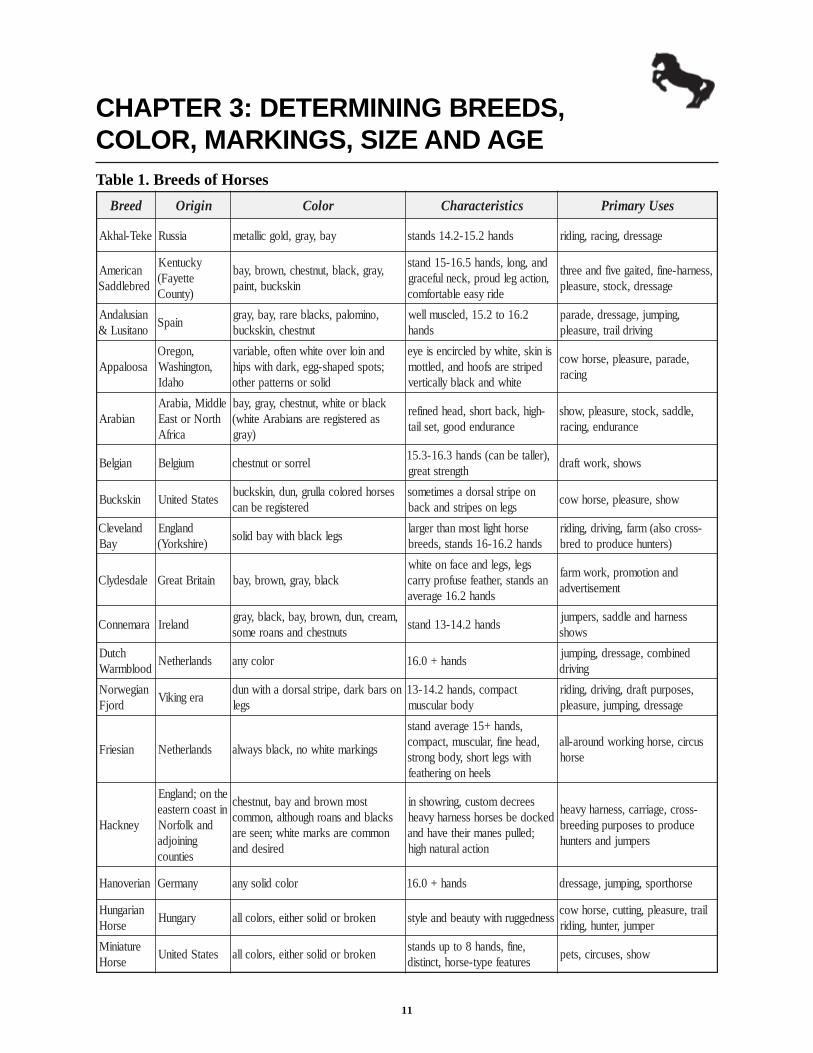
Table 1. Breeds of HorsesdeerB nigirO roloC scitsiretcarahC sesUyramirP
ekeT-lahkA aissuR yab,yarg,dlogcillatem sdnah2.51-2.41sdnats egasserd,gnicar,gnidir
naciremAderbelddaS
ykcutneKetteyaF()ytnuoC
,yarg,kcalb,tuntsehc,nworb,yabnikskcub,tniap
dna,gnol,sdnah5.61-51dnats,noitcagelduorp,kcenlufecarg
edirysaeelbatrofmoc
,ssenrah-enif,detiagevifdnaeerhtegasserd,kcots,erusaelp
naisuladnAonatisuL& niapS ,onimolap,skcalberar,yab,yarg
tuntsehc,nikskcub2.61ot2.51,delcsumllew
sdnah,gnipmuj,egasserd,edarap
gnivirdliart,erusaelp
asoolappA,nogerO
,notgnihsaWohadI
dnaniolrevoetihwnetfo,elbairav;stopsdepahs-gge,kradhtiwspih
dilosrosnrettaprehto
siniks,etihwybdelcricnesieyedepirtserasfoohdna,delttom
etihwdnakcalbyllacitrev
,edarap,erusaelp,esrohwocgnicar
naibarAelddiM,aibarA
htroNrotsaEacirfA
kcalbroetihw,tuntsehc,yarg,yabsaderetsigererasnaibarAetihw(
)yarg
-hgih,kcabtrohs,daehdeniferecnarudnedoog,tesliat
,elddas,kcots,erusaelp,wohsecnarudne,gnicar
naigleB muigleB lerrosrotuntsehc ,)rellatebnac(sdnah3.61-3.51htgnertstaerg swohs,krowtfard
nikskcuB setatSdetinU sesrohderolocallurg,nud,nikskcubderetsigerebnac
noepirtslasrodasemitemossgelnosepirtsdnakcab wohs,erusaelp,esrohwoc
dnalevelCyaB
dnalgnE)erihskroY( sgelkcalbhtiwyabdilos esrohthgiltsomnahtregral
sdnah2.61-61sdnats,sdeerb-ssorcosla(mraf,gnivird,gnidir
)sretnuhecudorpotderb
eladsedylC niatirBtaerG kcalb,yarg,nworb,yabsgel,sgeldnaecafnoetihw
nasdnats,rehtaefesuforpyrracsdnah2.61egareva
dnanoitomorp,krowmraftnemesitrevda
aramennoC dnalerI ,maerc,nud,nworb,yab,kcalb,yargstuntsehcdnasnaoremos sdnah2.41-31dnats ssenrahdnaelddas,srepmuj
swohshctuD
doolbmraW sdnalrehteN rolocyna sdnah+0.61 denibmoc,egasserd,gnipmujgnivird
naigewroNdrojF aregnikiV nosrabkrad,epirtslasrodahtiwnud
sgeltcapmoc,sdnah2.41-31
ydobralucsum,sesopruptfard,gnivird,gnidir
egasserd,gnipmuj,erusaelp
naiseirF sdnalrehteN sgnikrametihwon,kcalbsyawla
,sdnah+51egarevadnats,daehenif,ralucsum,tcapmoc
htiwsgeltrohs,ydobgnortssleehnognirehtaef
sucric,esrohgnikrowdnuora-llaesroh
yenkcaH
ehtno;dnalgnEnitsaocnretsae
dnaklofroNgniniojdaseitnuoc
tsomnworbdnayab,tuntsehcskcalbdnasnaorhguohtla,nommoc
nommoceraskrametihw;neeseraderiseddna
seercedmotsuc,gnirwohsnidekcodebsesrohssenrahyvaeh
;dellupsenamriehtevahdnanoitcalarutanhgih
-ssorc,egairrac,ssenrahyvaehecudorpotsesoprupgnideerb
srepmujdnasretnuh
nairevonaH ynamreG rolocdilosyna sdnah+0.61 esrohtrops,gnipmuj,egasserd
nairagnuHesroH yragnuH nekorbrodilosrehtie,sroloclla ssendeggurhtiwytuaebdnaelyts liart,erusaelp,gnittuc,esrohwoc
repmuj,retnuh,gnidirerutainiM
esroH setatSdetinU nekorbrodilosrehtie,sroloclla ,enif,sdnah8otpusdnatsserutaefepyt-esroh,tcnitsid wohs,sesucric,step
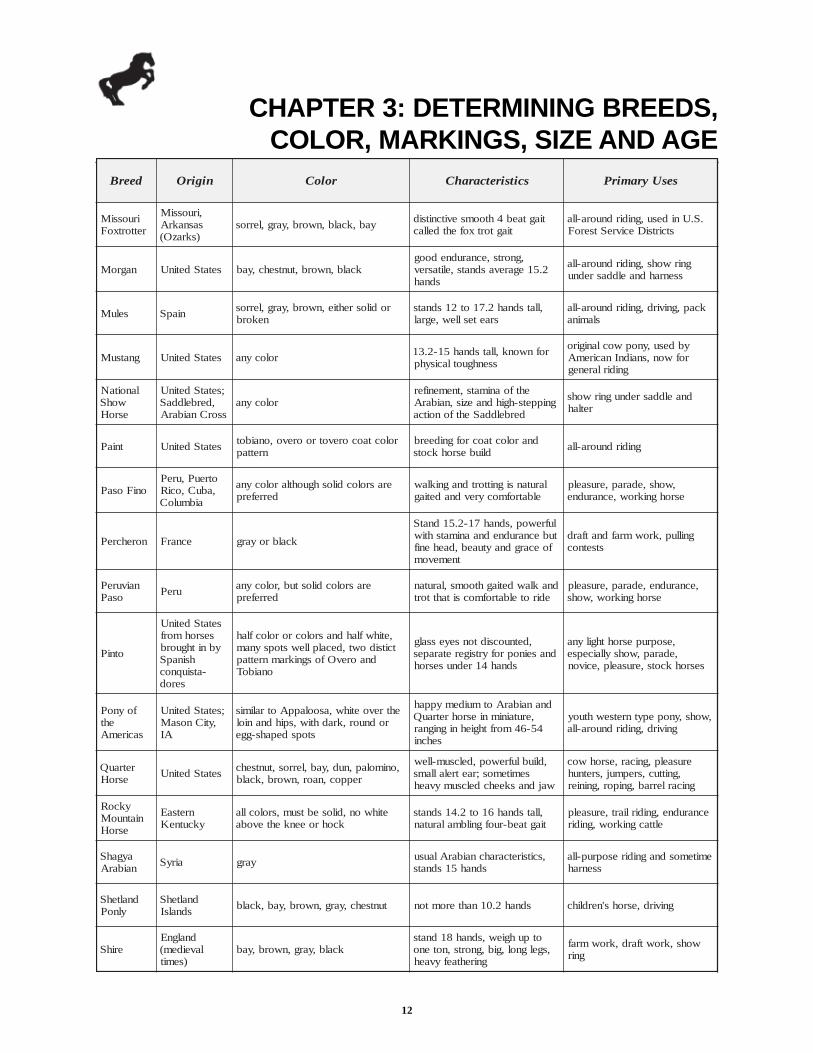
CHAPTER 3: DETERMINING BREEDS,COLOR, MARKINGS, SIZE AND AGE
12
deerB nigirO roloC scitsiretcarahC sesUyramirP
iruossiMrettortxoF
,iruossiMsasnakrA)skrazO(
yab,kcalb,nworb,yarg,lerros tiagtaeb4htoomsevitcnitsidtiagtortxofehtdellac
.S.Unidesu,gnidirdnuora-llastcirtsiDecivreStseroF
nagroM setatSdetinU kcalb,nworb,tuntsehc,yab,gnorts,ecnarudnedoog
2.51egarevasdnats,elitasrevsdnah
gnirwohs,gnidirdnuora-llassenrahdnaelddasrednu
seluM niapS rodilosrehtie,nworb,yarg,lerrosnekorb
,llatsdnah2.71ot21sdnatssraetesllew,egral
kcap,gnivird,gnidirdnuora-llaslamina
gnatsuM setatSdetinU rolocyna rofnwonk,llatsdnah51-2.31ssenhguotlacisyhp
ybdesu,ynopwoclanigirorofwon,snaidnInaciremA
gnidirlareneg
lanoitaNwohSesroH
;setatSdetinU,derbelddaS
ssorCnaibarArolocyna
ehtfoanimats,tnemenifergnippets-hgihdnaezis,naibarA
derbelddaSehtfonoitca
dnaelddasrednugnirwohsretlah
tniaP setatSdetinU roloctaocorevotroorevo,onaibotnrettap
dnaroloctaocrofgnideerbdliubesrohkcots gnidirdnuora-lla
oniFosaPotreuP,ureP,abuC,ociR
aibmuloC
erasrolocdiloshguohtlarolocynaderreferp
larutansignittortdnagniklawdnadetiag yrev elbatrofmoc
,wohs,edarap,erusaelpesrohgnikrow,ecnarudne
norehcreP ecnarF kcalbroyarg
lufrewop,sdnah71-2.51dnatStubecnarudnednaanimatshtiw
foecargdnaytuaeb,daeheniftnemevom
gnillup,krowmrafdnatfardstsetnoc
naivurePosaP ureP erasrolocdilostub,rolocyna
derreferpdnaklawdetiaghtooms,larutan
edirotelbatrofmocsitahttort,ecnarudne,edarap,erusaelp
esrohgnikrow,wohs
otniP
setatSdetinUsesrohmorfybnithguorb
hsinapS-atsiuqnoc
serod
,etihwflahdnasrolocrorolocflahtcitsidowt,decalpllewstopsynam
dnaorevOfosgnikramnrettaponaiboT
,detnuocsidtonseyessalgdnaseinoprofyrtsigeretarapes
sdnah41rednusesroh
,esoprupesrohthgilyna,edarap,wohsyllaicepse
sesrohkcots,erusaelp,ecivon
foynoPeht
saciremA
;setatSdetinU,ytiCnosaM
AI
ehtrevoetihw,asoolappAotralimisrodnuor,kradhtiw,spihdnaniol
stopsdepahs-gge
dnanaibarAotmuidemyppah,erutainimniesrohretrauQ45-64morfthgiehnignignar
sehcni
,wohs,ynopepytnretsewhtuoygnivird,gnidirdnuora-lla
retrauQesroH setatSdetinU ,onimolap,nud,yab,lerros,tuntsehc
reppoc,naor,nworb,kcalb
,dliublufrewop,delcsum-llewsemitemos;raetrelallams
wajdnaskeehcdelcsumyvaeh
erusaelp,gnicar,esrohwoc,gnittuc,srepmuj,sretnuh
gnicarlerrab,gnipor,gninier
ykcoRniatnuoM
esroH
nretsaEykcutneK
etihwon,dilosebtsum,srolocllakcohroeenkehtevoba
,llatsdnah61ot2.41sdnatstiagtaeb-ruofgnilbmalarutan
ecnarudne,gnidirliart,erusaelpelttacgnikrow,gnidir
aygahSnaibarA airyS yarg ,scitsiretcarahcnaibarAlausu
sdnah51sdnatsemitemosdnagnidiresoprup-lla
ssenrah
dnaltehSylnoP
dnaltehSsdnalsI tuntsehc,yarg,nworb,yab,kcalb sdnah2.01nahteromton gnivird,esrohs'nerdlihc
erihSdnalgnE
laveidem()semit
kcalb,yarg,nworb,yabotpuhgiew,sdnah81dnats
,sgelgnol,gib,gnorts,notenognirehtaefyvaeh
wohs,krowtfard,krowmrafgnir

CHAPTER 3: DETERMINING BREEDS,COLOR, MARKINGS, SIZE AND AGE
13
deerB nigirO roloC scitsiretcarahC sesUyramirP
derbdradnatS detinUsetatS
tubnommoctsomyabsrolocdiloslla animatsdoog,kcabregnol+2.51 gnicardnagnivird
eessenneTgniklaW
esroHeessenneT
,tuntsehc,yab,kcalbroonimolapsemitemos
engapmahc
sdnats,gnittortdnagniklawtiagtaeb-ruofsdnah2.51-51
-lla,swohsssenrahdnaelddasgnicardnuora
derbhguorohT dnalgnE rotuntsehc,yab,nworbrolocdilosrehtoyna
tnagele,daehenif;sdnah71-2.41dnatssehcnuahlufrewop,redluohsgnipols,kcen
,gnipmuj,gnitnuh,gnicaregasserd,erusaelp
renhekarT ynamreG rolocdilosyna sdnah2.61-61yllausu gnipmuj,egasserd
ynoPhsleW selaW
tpecxerolocyna,dlabweksdnadlabeip
sgnikrametihwyduagralupoptonera
sdnah41-2.21,ezisllams,ssenrah,stludallams,nerdlihcliart,sretsdaoredarap,gnicar
gnitnuh,gnittuckcots,gnidir
:sessA skcaJstenneJdna
detacitsemodtpygEni
,esonetihwhtiwkcalbyarg,der
retrohs,rellamserasesrohotderapmocnostuntsehcon,liatdnaenamnoriah
dnarellams,sraeregnol,sgeldnihedisni,)yarb(eciovhsrahdnaduol,sfoohrepeed
erom,yrujnirorednuofottcejbussselydrah
ecudorpotsesrohhtiwgnissorc,gnidiredulcnisesoprup;selum
gniwohsdnagnivird
Body colors
Use the terms for various body colors and markings to correctly describe or identify a horse.Color descriptions describe body colors of many horse and pony breeds. Each breed has preferredcolors which are stated in the literature available from the respective breed associations.
BayBody color ranges from tan to red, to reddish-brown or mahogany; mane and tail are black.Usually lower legs are black.
BlackA true black is without light areas with a black mane and tail.
BrownBody color is brown or black with light areas at muzzle, eyes, flanks and inside upper legs; maneand tail are black.
BuckskinBody color is yellowish or gold. Mane and tail are black, and usually black lower legs. No dorsalstripe.
Chestnut or (Sorrel)Body color is dark-red or reddish-brown. Mane and tail usually are the same color as body butmay be flaxen. Color varies from bright yellowish to red or rich mahogany.

CHAPTER 3: DETERMINING BREEDS,COLOR, MARKINGS, SIZE AND AGE
14
CremelloDouble dilution of chestnut with off-white or cream body and even lighter mane and tail. Alsocalled type A albino—not a true albino.
DunBody color is yellowish or gold; mane and tail are black or brown. Must have a dorsal stripe andoften zebra stripes on legs and a transverse stripe over withers.
GrayMixture of white and black or other colored hairs, usually born solid-colored or almost solidcolored and gets lighter with age.
Grullo or GrullaBody color is smokey or mouse-colored, not a mixture of black and white hairs — each hair ismouse-colored. Mane and tail are black, usually lower legs are black and may have a dorsalstripe.
PalominoBody color is golden-yellow, with a white mane and tail.
PerlinoDouble dilution of bay with off-white or pearl body and rust-color tips on the mane, tail, andsometimes on lower legs. Also called type B albino-not a true albino.
Red DunThis is a form of dun with body color solid-yellowish or flesh-colored. Mane, tail and dorsalstripe are red.
RoanBlue roan is a somewhat uniform mixture of white with black hairs over the body, usually with afew red hairs. Red roan is more or less a uniform mixture of white with red hairs on the body,usually darker on the head and lower legs. This color will not change with age.
WhiteA white horse has white skin and hair, but has some dark pigment in locations such as ears, eyes,stomach and hooves. It is born white and will not change with age. A true white foal is born withno pigment, having a genetic disorder called lethal white foal syndrome, known as lethal white,and does not survive.

CHAPTER 3: DETERMINING BREEDS,COLOR, MARKINGS, SIZE AND AGE
15
To identify a horse, discuss the horse’s marking, not just its body color. Instead of identifying ahorse as a dark sorrel, also mention its white blaze and three white socks. There are a variety ofcommon markings.
If you would like more information or better pictures of markings, please look at the followingweb pages:
http://web.vet.cornell.edu/public/cuerp/whitelegs.htm
http://web.vet.cornell.edu/public/cuerp/whitemark.htm
Coronet Pastern Sock Half Stocking Outside Outside InsideStocking heel heel heel
whiteextending
Figure 2. Leg Marking
Star, stripeand snip Blaze
Star andStripe
Star
Bald Face
Figure 1. Head Marking

CHAPTER 3: DETERMINING BREEDS,COLOR, MARKINGS, SIZE AND AGE
16
Other markings
Appaloosa coat patternsThe Appaloosa Horse Breed recognizes four identifiable characteristics of Appaloosa markings.Appaloosa patterns may appear on any basic coat color. Appaloosa horses can have spotted coatpatterns such as leopard — white with spots over the entire body — or a blanket — a whitepatch covering the horses’ hip with or without spots on the blanket. In addition to coat patternsand mottled skin, Appaloosas have white sclera around the eyes, white surrounding the pupil andhave vertically striped hooves. Appaloosas may be solid colored with the other characteristicspresent.
Black PointsCharacteristics are a black mane and tail and extremities of the body (ears, muzzle, legs, etc.).
Paint or PintoThe paint or pinto characteristic may appear on any base color and is a combination of white andcolored markings. The two most common patterns are tobiano (toe-bee-ah’-no) and overo (oh-ver’-oh).
• The tobiano horse will usually have head markings like a solid-color horse. Its legs may bewhite and body markings are often regular and distinct oval or round patterns that extend downover the neck and chest. A two-toned tail is common.
• The overo horse often has a bald face and at least one leg will be dark in color. Body markingsare usually irregular, scattered or splashy white markings, often called calico patterns thatcommonly do not cross the back between the withers and tail. The tail is solid colored, usuallydark but occasionally white. Glass or blue eyes are more prevalent in overos than in tobianos.
• The tovero horse has dark pigmentation around the ears, which may expand to cover theforehead and/or eyes. One or both eyes may be blue. There is dark pigmentation around themouth which may extend up the sides of the face and form spots. Flank spot(s) range in sizeand are often accompanied by smaller spots that extend forward across the barrel and up overthe loin. There may be spots of various size at the base of the tail.
Ray or dorsal stripeThe ray or dorsal stripe is a darker line found down the backbone of some horses.
Transverse crossThe transverse cross is a dark stripe (same color as dorsal stripe) that runs perpendicular acrossthe withers.
Zebra marks

CHAPTER 3: DETERMINING BREEDS,COLOR, MARKINGS, SIZE AND AGE
17
Zebra marks are dark stripes that run horizontally on the forearm, knees and cannon.
Horses are measured in hands
The unit of measurement used to define a horse’s height is a hand. A hand is equal to 4 inches.Measure the horse from the point of the withers to the ground. A horse that is 61 inches tall is15.1 hands or 15 hands and 1 inch. A pony is 14.2 hands or less in height at the withers.
Determining a horse’s age
Look at the horse’s front teeth to judge its age. The following illustrations will give you simpleclues that determine the age of a horse. Practice judging a horse’s age with help from anexperienced person.
Change in shape of tooth surface
Young Middle Age Old
A. Pincers (nippers)B. Intermediates (middles)C. Corners
Figure 3. Incisors.
A
B
C
BUppers
Lowers
C
A
AA
BB
CC

CHAPTER 3: DETERMINING BREEDS,COLOR, MARKINGS, SIZE AND AGE
18
A mature male horse has 40 teeth. There are12 front teeth called incisors, four tushes orbridle teeth, and 24 molars or grinders. Amature mare has 36 teeth; the four tushesseldom are present.
The young horse, either male or female, has24 temporary or milk teeth including 12incisors and 12 molars. Milk teeth aresmaller and whiter than permanent teeth.
First, learn the names of the incisors asshown in figure 3.
From birth to 5 years, the eruption ofincisors is used to judge age. At 5 years,permanent incisors are all in place. After 5years, age is determined by wear on theincisors, shape of biting surface and angle atwhich incisors meet.
For general purposes, judge the approximateage-range by holding the lower lip down fora quick glance to see the shape of the teeth,the angle at which the upper and lowerincisors meet, and the degree of wear shownby the length of the teeth. Consider the ageas being in the foal period, the full-mouthperiod (5 years), the smooth-mouth period(about 11 years) and the old-mouth period(>11 years). Remember most horses begin toserve their best at 8 years and many still gostrong past 15 years or more.
Study the illustrations in Figure 4 for thepoints to look for at each year of age andpractice looking at teeth.
Birth to 10 DaysTemporary nippers erupt
6 WeeksTemporary intermediates erupt
6 to 10 MonthsTemporary corners erupt
Full set of temporary incisors,both upper and lower
2 to 2 1/2 YearsPermanent nippers erupt
All foal teeth show surface wear
3 to 3 1/2 YearsPermanent intermediates eruptOuter edges of nippers show
wearCorner foal teeth blunted
4 1/4 YearsPermanent corners erupt
Male hooks eruptNippers worn on outer and
inner edgesIntermediates worn on outer and
inner edges
5 YearsAll permenent teeth up and same
heightNo wear shows on corners
6 YearsCups disappear in lower nippers
7 YearsCups disappear in lower
intermediates7-year hook evident (see left)
Note angle of teeth as shown tothe right
8 YearsCups disappear in lower coerners
Dark spot will show where allcups have been
Do not mistake spots for cups
9 YearsCups disappear from nippers in
upper teeth
10 YearsCups disappear from upper
intermediates
11 YearsCups disappear from upper
cornersHorse is now smooth mouth
Figure 4. Determine a horse’s age bylooking at its teeth.

CHAPTER 4: CONFORMATION AND JUDGINGOF HORSES
19
A horse that has good conformation is well balanced, muscled and structurally correct.Understanding conformation is necessary when selecting, caring for and using a horse. TheColorado 4-H Horse Judging Guide contains information on conformation and formal judging.Remember, you evaluate your horse every time you study some part of it for grooming, feeding,shoeing, doctoring or training. If you watch for lameness, you are judging its gait. A lame horsewill favor a leg or limp as it moves. To use and care for your horse properly, you must understandconformation, soundness, health and terminology. You also will apply this information to formalshowring judging. Judging is an attempt to identify the horse that most closely resembles what isconsidered the industry ideal. When evaluating conformation, there are four majorconsiderations:• Balance and quality
Quality refers to a horse that exhibits many of the ideal characteristics of a specific breed andrefers to a horse that is correct in structure and refined through the head and ears. A balancedhorse appears symmetrical with all parts blending together nicely. Imagine a horse in the centerof a teeter tooter: the board should stay level, equally heavy in the front half as in the backhalf.
• MusclingA horse should be well-muscled with a fairly wide, deep and full chest. The forearm andgaskin should be well-muscled and it should have deep shoulders and a short, strong, muscularback. The croup should be long, level and well-muscled with deep and heavily muscled rearquarters.
• Structural correctnessSee Figures 5, 6, 7, 8, 9 and 10.
• Breed and sex characteristicsThe horse should look like the breed represented, possessing the characteristic breed standards.Mares should be feminine in appearance; stallions should be masculine in physicaldevelopment. The gelding should display some masculine characteristics with refinement.
When judging a class of four halter horses, consider these characteristics and use a score chart asan aid to rank individual horses. Rank each characteristic first through fourth. Total the numbersfor each horse; the horse with the lowest total score is first.
Example score chartBreed &
Horse # Balance Muscling Structure Sexual Characteristics Total1 1st 2nd 1st 1st 5 pts.2 2nd 1st 2nd 2nd 7 pts.3 3rd 4th 3rd 3rd 13 pts.4 4th 3rd 4th 4th 15 pts.
James C. Heird, Colorado State University Equine Sciences Horse Judging Manual, 1992.Final placement of these horses would be 1-2-3-4.
CHAPTER 4: CONFORMATION AND JUDGINGOF HORSES
20
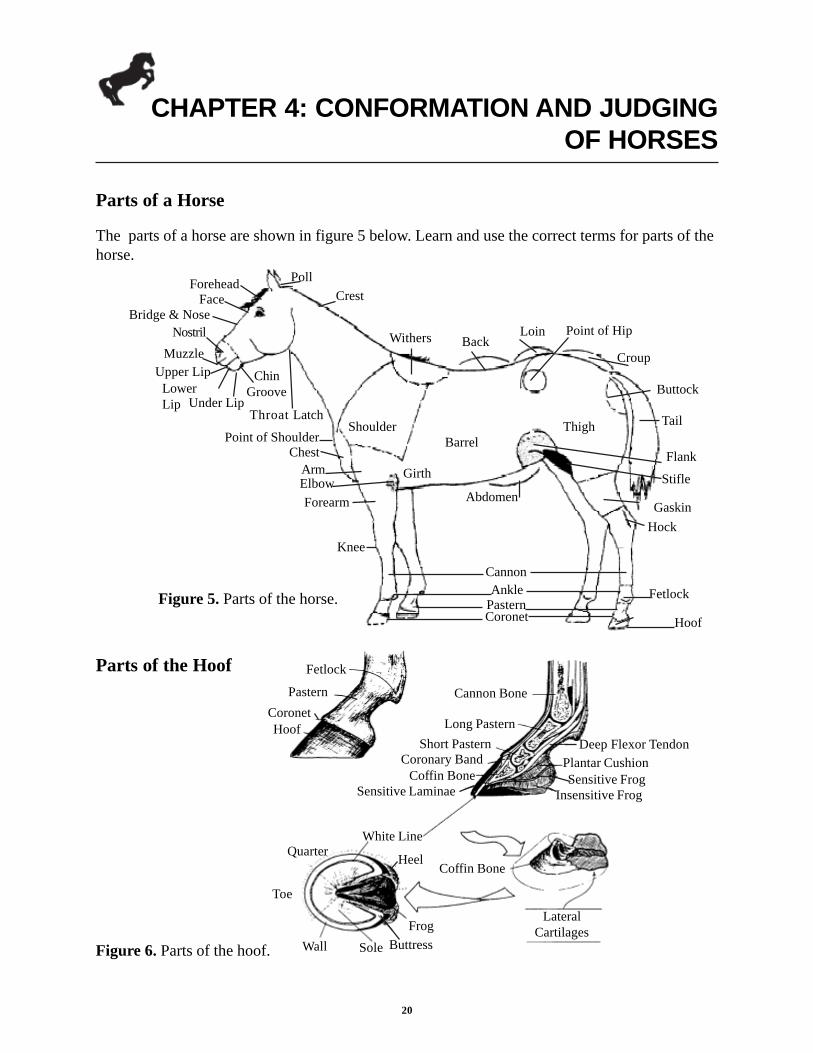
Parts of a Horse
The parts of a horse are shown in figure 5 below. Learn and use the correct terms for parts of thehorse.
Parts of the Hoof
Figure 6. Parts of the hoof.
Fetlock
PasternCoronetHoof
Cannon Bone
Long PasternShort Pastern
Coronary BandCoffin Bone
Sensitive Laminae
Deep Flexor TendonPlantar CushionSensitive Frog
Insensitive Frog
LateralCartilages
Wall
Coffin Bone
ButtressSoleFrog
Toe
White LineQuarter Heel
Hoof
Tail
Stifle
Buttock
GaskinHock
Fetlock
Flank
Forehead
Bridge & NoseNostril
Muzzle
Throat Latch
Upper LipLowerLip Under Lip
ShoulderBarrel
Girth
PollCrest
Knee
Withers BackLoin Point of Hip
Croup
Thigh
CannonAnkle
PasternCoronet
ForearmElbowArm
ChestPoint of Shoulder
Abdomen
Face
ChinGroove
Figure 5. Parts of the horse.

CHAPTER 4: CONFORMATION AND JUDGINGOF HORSES
21
Feet and legs
Study the following illustration of correct and incorrect leg positions commonly seen in horses.Imagine these lines as you study live horses to help you determine if the feet and legs are correct.
Figure 7. A view from the front. A vertical line from the point of the shoulder should fall in thecenters of the knee, cannon, pastern and foot. It divides the entire leg and foot into equal halves.
Ideal position Toes out Bow legged Narrow chested Base narrow Knock kneed Pigeon toes(toes out) (stands close)
Figure 8. The front legs from a side view. A vertical line from the should should fall through thecenter of the elbow joint and the center of the foot.
Ideal position Camped under Camped out Knee sprung Calf kneed(buck kneed)
53° - 55°

CHAPTER 4: CONFORMATION AND JUDGINGOF HORSES
22
Figure 9. The hind legs from the rear. A vertical line from the point of the buttock should fall inthe centers of the hock, cannon, pastern and foot.
Ideal position Stands wide Stands close Bow legged Cow hocked
Figure 10. The hind legs from the side. The vertical line from the point of the buttock shouldtouch the rear edge of the cannon from the hock to the fetlock and meet the ground behind theheel.
Ideal position Stands under Camped out Post legged
53° - 55°

CHAPTER 4: CONFORMATION AND JUDGINGOF HORSES
23
Figure 12. Length and shape of hoof affect the path of flight or the arc of the foot as it moves.
Normal foot forms even arc inflight.
Too stubby - high heel and short toe causeslengthening of first half of stride, long heeltouches ground earlier which shortens lasthalf of stride.
Long toe - short heel causesshortening of first half of strideand lengthening last half of stride.
The action of the horse should be straight and true. A horse may move in a crooked mannerbecause of crooked feet and legs or because of being pulled off-balance as it is led. Watch how ahorse moves to help determine if it has a straight action.
Since few horses move perfectly true, its important to know which movements may be unsafe. Ahorse that wings in can be more unsafe than one that wings out because it may trip itself. Sometravel close, others travel wide. Observe the difference and determine how much value to place.
Figure 11. The path of flight each foot takes relates to the structure of the foot and leg. Example1 shows normal path. Examples 2 and 3 wing in, while examples 4 and 5 wing out.
5. “Pigeon-toed”feet moveforward in wideroutward arcs.
1. Path of the feet asseen from above.Normal foot movesin a straight line.
2. “Base-wide”feet moveforward ininward arcs.
4. “Base narrow”feet moveforward inoutward arcs.
3. Splayed feet,“toes out” moveinward in largerinward arcs.

CHAPTER 4: CONFORMATION AND JUDGINGOF HORSES
24
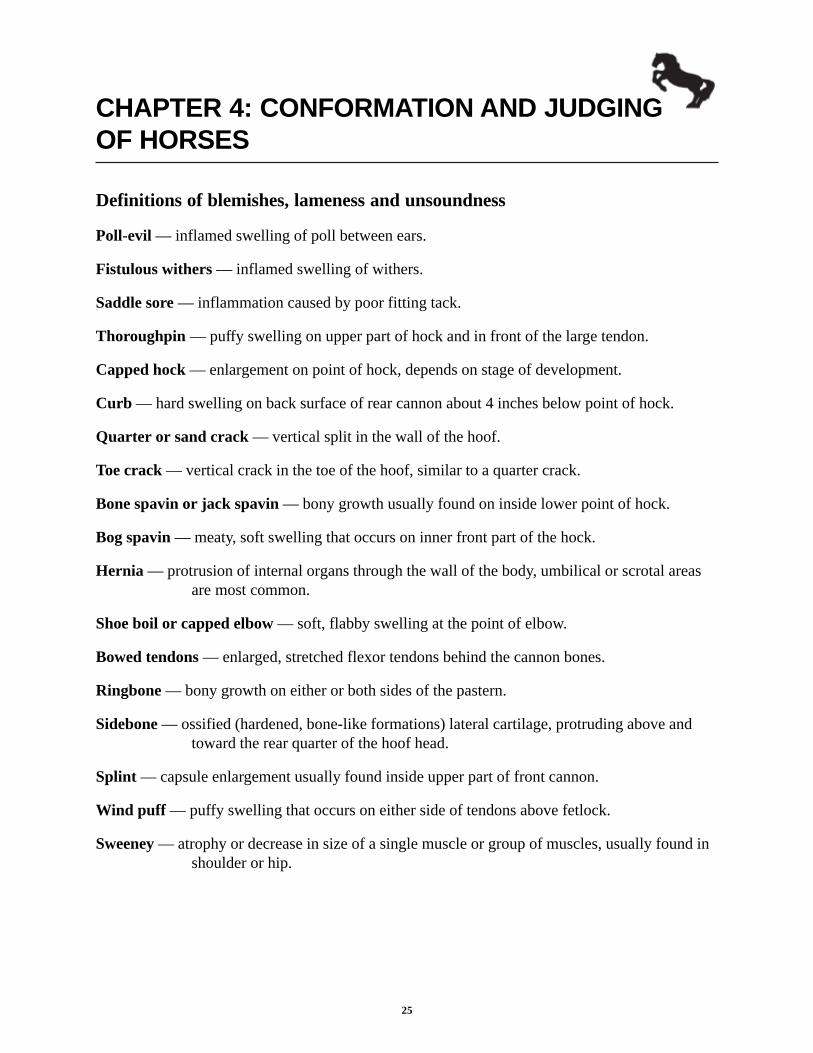
Figure 12 shows how the length and shape of the hoof affects the path of flight of the foot as thehorse moves. Trimming and shoeing influence this. Keep the hoof in its natural shape to avoidleg strain. The correct structure of feet and legs is important because of the shock and strain onthese parts when a horse moves. If the body structure is unsound, the horse may break down inuse. Evaluation of inherited unsoundnesses in body structure is especially important in breedingclasses.
Blemishes, lameness and unsoundness
A horse that is unsound has imperfections that affect its ability to serve. Many unsoundconditions are the result of weaknesses in body structure. These weaknesses will become worsewhen excess strain is placed on already weak parts. A horse that is lame is disabled so thatmovement, especially walking, is difficult and uncomfortable.
Blemishes are imperfections found on horses, but usually do not affect the horse’s ability toserve. Old, healed-over wire cuts, rope burns and saddle marks are blemishes.
No horse is perfect. Understand common blemishes, lameness and unsoundness are judged ontheir importance in relation to the way you will use the horse.
Saddle Sore
FistulousWithersPoll Evil
ThoroughpinCapped Hock
Curb
QuarterCrack
Hernia
Bog Spavin
ShoeBoll
Bone SpavinBowed Tendon
ToeCrackRing Bone
Side Bone
Splint
Over inthe Knee
Sweeney
Figure 13 shows a horse with the most commonly found unsoundnesses.
CHAPTER 4: CONFORMATION AND JUDGINGOF HORSES
25
Definitions of blemishes, lameness and unsoundness
Poll-evil — inflamed swelling of poll between ears.
Fistulous withers — inflamed swelling of withers.
Saddle sore — inflammation caused by poor fitting tack.
Thoroughpin — puffy swelling on upper part of hock and in front of the large tendon.
Capped hock — enlargement on point of hock, depends on stage of development.
Curb — hard swelling on back surface of rear cannon about 4 inches below point of hock.
Quarter or sand crack — vertical split in the wall of the hoof.
Toe crack — vertical crack in the toe of the hoof, similar to a quarter crack.
Bone spavin or jack spavin — bony growth usually found on inside lower point of hock.
Bog spavin — meaty, soft swelling that occurs on inner front part of the hock.
Hernia — protrusion of internal organs through the wall of the body, umbilical or scrotal areasare most common.
Shoe boil or capped elbow — soft, flabby swelling at the point of elbow.
Bowed tendons — enlarged, stretched flexor tendons behind the cannon bones.
Ringbone — bony growth on either or both sides of the pastern.
Sidebone — ossified (hardened, bone-like formations) lateral cartilage, protruding above andtoward the rear quarter of the hoof head.
Splint — capsule enlargement usually found inside upper part of front cannon.
Wind puff — puffy swelling that occurs on either side of tendons above fetlock.
Sweeney — atrophy or decrease in size of a single muscle or group of muscles, usually found inshoulder or hip.

CHAPTER 4: CONFORMATION AND JUDGINGOF HORSES
26
4-H Judging
In 4-H, you can enroll in a horse judging project and judge both halter and performance horseclasses.
HalterHorses are judged on balance and quality, muscling, structural correctness, andbreed and sex characteristics. The Colorado 4-H Horse Judging Guide outlinesrules. Ask your 4-H Extension Educator how to become a member of a local team.
PerformanceHorses are shown in classes such as western pleasure, horsemanship, westernriding, reining, hunter under saddle, hunter hack and equitation. Each class isplaced by the ability of the rider and horse and the way the horse moves. Whenjudging performance, be familiar with the rules of each class and, if applicable,how they are scored.
In a contest, you may judge two to four halter classes and four to seven performance classes.Classes consist of four horses. Each member is judged on how he or she placed that class. Fourto six classes will be selected by officials for contestants to give reasons. Reasons are verbalexplanations on why you placed the class as you did. Your reasons should:
• be accurate,
• emphasize major differences,
• include correct terms when describing the class, and
• flow in an organized sequence.
Your delivery of reasons should be accurate, organized and well spoken. Your coach can help youreach this level of skill. Practice giving many sets of oral reasons will improve your skill; yourcoach or 4-H leader can help you.

CHAPTER 5: FEEDING HORSES
27
Anatomy and physiology of the digestive tract
Understanding the anatomy and function of the horse’s gastrointestinal (GI) tract is critical formaintaining its health and preventing conditions such as colic and laminitis.
A horse’s GI tract consists of the mouth, esophagus, stomach, small intestine, cecum, large colon,small colon and rectum (see figure 14). The volume and length of each compartment of the GItract is shown in the table below.
Forty-five to 72 hours is required for food to completely pass through the digestive tract of thehorse. The time food spends in various parts of the GI tract is illustrated in table 3.
Each part of the digestive system serves a specific function in the digestion and absorption ofnutrients. The mouth has several important functions including prehension (seizing and grabbing)of feed, chewing and swallowing. The lips of the mouth serve as prehension devices aiding in themovement of feed into the mouth and the selection of feeds that are most palatable or tasty.Incisors (front teeth) are used to cut feeds such as forages, whereas the molars (teeth in the rearof the mouth) are used to grind feed, reduce the particle size and aid in the digestive process.
The mechanical grinding of feed by the teeth is known as mastication. Horses chew in a circularmotion that results in the eventual formation of sharp points on the molars that can cut thecheeks, a painful situation that may impair mastication. Sharp points on molars are prevented byhaving the teeth “floated,” which involves filing the sharp points down. Your veterinarian canprovide this service. Swallowing is another function of the mouth. Ingested feed is ground andincorporated into a bolus (ball), lubricated with saliva and then swallowed into the esophagus.
Esophagus4-5 feet
Large Intestine136 quarts
29 feet
Large Colon10-12 feet86 quarts
Anus
Rectum1 foot
Stomach8-19 quarts
Small Colon10-12 feet16 quarts
Cecum4 feet
28-36 quarts
Small Intestine70 feet
68 quarts
Figure 14. The horse’s digestive system.
emuloV)stq(
htgneL)tf(
hcamotS 91-8 -----
llamSenitsetnI 86 07
muceC 63-82 4
egraLnoloC 68 21-01
llamSnoloC 61 21-01
egraLenitsetnI 631 92
Table 2. Horse digestive system.

CHAPTER 5: FEEDING HORSES
28
The esophagus can be thought of as a pipeline from the mouth to the stomach. No digestionoccurs in the esophagus. Food in the esophagus can only move in one direction — toward thestomach. If food becomes lodged in the esophagus the horse may choke. Although choking ispainful and uncomfortable to the horse, it is not life-threatening like that in humans when theairway is cut off. A choking horse’s head often is hung low with saliva and masticated foodcoming out of the horse’s nostrils. A choking horse requires immediate veterinary attention and isusually treated with minimal complications.
The stomach and the small intestine make up the foregut of the horse; the cecum, large colon,small colon and rectum make up the hindgut of the horse. The majority of starch (the principlecomponent of cereal grains metabolized for energy), protein, fat, vitamins and minerals aredigested and absorbed in the foregut (primarily in the small intestine) by enzymes and otherdigestive substances secreted into the small intestine by the pancreas, liver and cells making upthe wall of the small intestine. The hindgut contains microbes, which are bacteria and protozoacapable of digesting dietary fiber supplied by roughages in the diet. The horse does not produceenzymes which digest fiber and need microbes to break it down. Microbes enable horses toutilize fiber quite well. Horses require fiber in their diet for the gut to function normally. It isrecommended that the diet contain no less than 1 percent of body weight of roughage such ashay, pasture, etc. For example, a 1,100 pound horse requires at least 11 pounds of roughage. Italso is important not to overfeed grain to horses because this causes digestive upset such as colic.When too much grain is fed, much of it is digested in the small intestine. It spills into the hindgutwhere microbes digest it rapidly, producing large amounts of gas and acid, both of which cancause discomfort and manifest into colic and, in some cases, laminitis. It is recommended thathorses not be fed more than 1 percent of body weight from a grain source.
Some other important rules of thumb for maintaining the health of the horse’s digestive systemare to feed consistently. For example, feed two to three small meals at the same times each day.The horse’s gut functions best with small amounts of feed moving through it regularly, keeping itsomewhat full. This is best accomplished by trying to maximize the amount of forage being fed
maximum timeminimum time
0 10 20 30 40 50 60 70 80time in hours
Total tract
Stomach
Small Intestine
Large Intestine
Table 3. Rate of passage of food through various segments and the total equine GI tract.
minimum time maximum time

CHAPTER 5: FEEDING HORSES
29
in the diet and minimize the amount of grain while still meeting the horse’s requirements. This isnot to say that grain should not be fed, but only feed the amount necessary to provide what islacking in the forage. In addition, horses should have constant access to plenty of fresh, cleanwater for the gut to function normally.
In summary, the horse’s GI tract is a delicate system. Feeds should be selected not only for theirability to meet the animal’s nutrient requirements, but also for compatibility with the horse’s GItract.
Feeding your horse
When you feed your horse, take into account its age, weight, work and growth to determine itsdiet. Some horses are easier to feed and require fewer nutrients than others. Other horses are verydifficult to feed and require special attention. It is important to know how to feed your horse andto make sure it gets all the nutrients it needs.
Five types of nutrients
A horse requires five types of nutrients. Each nutrient has an important role in the horse’s bodyand is needed to keep the horse healthy. Those nutrients are:
• energy nutrients (such as carbohydrates and fats),• proteins,• vitamins,• minerals and• water.
None is more important than another with the exception of water and energy nutrients. Energy infeeds is measured in Megacalories (Mcal) of digestible energy (DE).
WaterWater is the greatest single part of nearly all living things. Water performs many tasks in thebody. It makes up most of the blood which carries nutrients to cells and takes waste productsaway. In addition, water is the body’s built-in cooling system; it regulates body heat and acts as alubricant. A horse drinks about 10 to 12 gallons of water daily depending on the work it is doing.In hot weather, a horse may drink up to 15 to 20 gallons of water. In very cold weather, waterheaters may be needed to prevent the water from freezing.
Energy nutrientsEnergy nutrients are the body’s fuel and make up the bulk of the diet. After food is digested,blood carries its energy to the body. Energy nutrients power muscle movement to walk, breatheand blink eyes. (At the same time, this energy maintains body temperature).

CHAPTER 5: FEEDING HORSES
30
• Carbohydrates are the main energy source for all animals. Carbohydrates are complexcompounds made up of carbon, hydrogen and oxygen. Cellulose (carbohydrates found in hayand grass) is one of the more complex carbohydrates. Horses can digest cellulose (grass andhay) because they have small microbes in their large intestine (cecum) that can break it down.
• Fat or oil is another source of energy. Like carbohydrates, fat is made up of carbon, hydrogenand oxygen and also provide energy for movement and heat. Energy in fat is more concentratedthan energy in carbohydrates. Fat has 2.25 times more energy per gram than carbohydrates.
ProteinsProteins supply material for body tissue. During digestion, proteins break down into amino acids.Amino acids build bodies; they enter the blood stream from the intestine, and blood carriesamino acids to all parts of the body. Proteins form body tissue.
Proteins eventually become muscle, internal organs, bone and blood. Skin, hair, hooves andmany other parts of a horse also are made of protein. Protein not needed to maintain or build ahorse’s body is either converted into energy or passed through the digestive system. Total proteinin feeds is measured by crude protein (CP).
VitaminsVitamins are needed in much smaller amounts than other nutrients, but they are just as vital. Eachvitamin has a different job in the body. Some vitamins are in the food a horse eats while othersare produced inside the horse. Depending on its diet, a horse may need vitamin supplements.Supplements usually are not necessary if a horse is allowed to graze on grass.
MineralsSmall amounts of minerals usually are needed. Iron, copper, phosphorous, calcium andmagnesium are examples of minerals that are important for a horse’s body. Without iron, bloodcannot carry oxygen to the body’s cells. Without calcium and phosphorous, bones and teeth willnot form properly. Calcium and phosphorous should be fed in a ratio that ranges from 3:1 (threeparts calcium for each part of phosphorous) to 1:1. An imbalance of these minerals can causedevelopmental bone disease in young, growing horses.
Types of feeds
Your horse can get essential nutrients from many types of feed.
Roughage/ForageRoughage, found in hay or grass, is the bulk of the horse’s food. Grass or alfalfa hay, or acombination of the two, are good sources of roughage. Grass hay is generally higher in fiber anddry matter than alfalfa, but alfalfa may be higher in protein, energy, vitamins and calcium.
• Hay comes chopped or cubed, in pellets or, most common, in longstem hay bales. Manyhorsemen feed straight alfalfa or a combination of grass and alfalfa to their horses. Grassesused as hay include brome, orchard, and timothy or grasses native to many areas of the country.

CHAPTER 5: FEEDING HORSES
31
— Longstem hay is the traditional baled hay. It is cut, cured, and baled or crimped. It can bebundled in 50 to 80 pound square bales or large, round or long square bales that can weightons.
— Hay cubes are about an inch wide and one to three inches long.— Hay pellets are ground hay compressed into 1/8 inch by 1/2 inch pellets.— Chopped hay, common in the Midwest, is cut three to four inches long. Horses can eat it
faster and consume more feed in a shorter period of time. Chopped hay is not usually fed tohorses.
Horses need a good quality hay. It should be bright green, leafy and fine textured, with a fresh,pleasant aroma. Musty hay, or other indications of mold or heating, and dust, weeds and otherforeign material in hay can be unhealthy for an animal. Color is an indicator of quality andnutrient content; good hay is a bright green.
Most nutrients in hay are in the leaves, and leafy hay is a valuable source of food. Leafiness isinfluenced by the kind of hay, its maturity when cut, the weather conditions while growing andcuring the hay, and curing procedures of the hay.
Dust is objectionable in any feed for horses. It not only reduces the taste of the hay, it alsoaggravates respiratory problems. Sprinkling or dunking dusty hay in water can reduce dust. Avoidfeeding moldy or dusty hay.
In the field, heavy rain on cut drying hay, leaches energy and protein from the hay. Hay baledbefore it is dry enough will lose nutrients through fermentation, or heating in the bale. Thissometimes starts fires through spontaneous combustion in barnyard stacks of stored, baled hay.This type of hay is unacceptable for horses.
• Good pasture or grass that an animal can graze can be an economical food for horses, butpasture must be maintained. If animals are allowed to graze on a pasture too long, the grassmay be killed. Some of the basic requirements for a good pasture are:
— a supply of appetizing plants such as grasses or legumes;— a paddock or stall to house your horse for part of the day. Only use pastures for daily
exercise and grazing;— a year-round supply of fresh, clean water;— shelter from wind, cold and sun;— safe, durable fencing;— no poisonous plants (see Table 8: Common Poisonous Plants of New Hampshire);— no equipment, holes or other dangerous materials in the pasture; and— grain for highly active horses or if the quality of the grass is poor.
Well-managed pastures reduce feed costs and provide energy, protein, vitamins and minerals toanimals. An exercise lot with a few blades of grass is not a pasture; such a lot, or overgrazedpasture, is not a source of nutrients and can be a serious source of internal parasites. When a

CHAPTER 5: FEEDING HORSES
32
grass stand becomes too thin, overgrown, coarse or unappetizing to a horse, it should beclipped or mowed. Lush pasture forages can act as a laxative in early spring and may causefounder. Introduce horses gradually to pastures by slowly increasing their daily grazing time.
ConcentratesSmall grains, such as corn, oats and barley, are known as concentrates. Concentrates are lower infiber and higher in energy than roughages. The grain should be clean, mold- and insect-free, witha bright color. Grain quality is just as important as hay quality. Grains may be cracked, steamedor rolled, but, if ground too finely, may cause respiratory problems or colic.
Oats are the safest and easiest grain to feed with hay because it is high in fiber and low in energy,and higher in protein than corn. Corn has the highest energy content of any grain and can putweight on a horse quickly. It can be fed on the ear, cracked, rolled or shelled. Barley is anintermediate source of energy and protein content. All grains are low in calcium, but high inphosphorus.
SupplementsProtein and vitamin-mineral supplements are added to the diet to increase the diet’sconcentration. Grains are energy supplements to a high forage diet. Only add supplements to thediet if something is missing.
Some protein supplements are oilseed meals, soybeans, cottonseed, linseed (flaxseed) meal,peanut meal, sunflower seed and rapeseed (canola).
Add vitamin and mineral supplements to the diet only if the horse is deficient.Generally the onlyminerals of concern in feeding horses are calcium, phosphorus and salt. In some geographicalareas, lack of selenium and, in growing horses, copper and zinc, is a concern. Other minerals arelikely to be present in adequate amounts in a normal diet.
Commercial grain mixes or complete feedsConcentrated mixes are cereal grains with supplements added to increase the specific nutrientcontent of the mix. A complete feed is a grain mix that is high in fiber because it contains aforage or high-fiber byproducts feed such as hulls. Complete feeds are held together, usually byextrusion (puffed up like dog food) or by forming into pellets. If you are feeding a commercialcomplete feed, you will not need to feed hay (follow the label for feeding recommendations).
There are also feeds for specific classes of horses. Some feeds are specially formulated foryoung, growing horses (weanlings and yearlings); and for geriatric (aged) horses who are veryold and have specific nutritional needs. Some commercial feed companies make premixed,convenient, easy-to-use formulated feeds for horses who are on different hay diets such as grassor alfalfa. You should not need to add any other supplements to the diet. These feeds may bemore expensive than developing your own ration, but they are good for the owner who does notwant to spend time to research their horse’s diet.

CHAPTER 5: FEEDING HORSES
33
Horse pasture management tips
1. One 1,000-pound horse requires 600 pounds of dry forage each month. Non-irrigated pasturein Colorado produces 500 to 2,500 pounds per acre per year. Horses will trample grass andbe selective in grazing, so follow the “take half, leave half” principle. Generally, a minimumof 29 acres of dryland pasture are needed to support one horse for one year.
2. Divide the pasture into two or three equal units and rotate livestock before grass is grazed tominimum height. Under a three-unit system, graze each unit seven to 10 days, then rest for14 to 20 days, or corral horses and turn them out for a few hours per day to rest grass. (Thisguideline will vary greatly.)
3. “Take half, leave half” is a good rule to follow to allow roots to store enough food toproduce a healthy plant the following season. This is very important in protecting drylandpastures; irrigated pastures can be grazed more intensely.
4. Give your horses extra feed if you do not have enough grass to support them. Livestockpastured on small lots should be confined to pens and allowed to graze and exercise for alimited time. Otherwise, livestock will devour or trample all vegetation in the pasture.
5. Provide adequate water in each grazing pasture. In large pastures, distribute water tanksequal distances apart to encourage more even grazing throughout the pasture.
6. Control weeds that invade your pastures. Spray weeds with an approved herbicide or mowbefore weeds go to seed. Always read and follow label directions for chemical substances.Don’t spray around horses or allow them to graze for several days.
7. Mow uneven growth to prevent spot grazing.
8. When possible, irrigated grass can be fertilized to increase production and the nutrients theycontain. Test soil to determine how much nitrogen, phosphorus and potassium the pastureneeds. A productive, established pasture requires 150 to 180 pounds of nitrogen per acre peryear. Read fertilizer labels for guidelines on grazing after application.
For more information on maintaining a pasture, contact your local Cooperative Extensionoffice.
Nutrient requirements for different horses
The nutrient requirements of a horse vary with its age, weight and the amount of work itperforms. Hay is sufficient feed for a mature horse that is ridden very little. With an increase inwork, grain should be added to its diet.

CHAPTER 5: FEEDING HORSES
34
Use the chart as a general rule or you can be more exact and balance your horse’s ration. ReviewHorse Ration Analysis worksheet.
When balancing or evaluating a ration, use the National Research Council tables as a guideline todetermine available nutrients to meet your horse’s requirements (see Table 5).
When you balance a ration take the following steps.
• Determine the age, weight and level of activity or work of the horse.• Follow the daily nutrient requirements in Table 5 which lists what your horse needs according
to its physiological status and level of activity.• Determine the actual nutrient content of the available feed by sending your feed to a
commercial feed-testing laboratory. Contact your Cooperative Extension county educator forthe name of the laboratory nearest you. If you cannot have your feed tested, use the averagevalues listed in Table 6: Nutrients in Common Horse Feeds.
• Weigh the amount of each feed you plan to use in the ration. If you use premix feed, use theingredient analysis listed on the feed tag for the percent of each ingredient.
• Determine the pounds of forage your horse should eat. This usually is calculated as 1 to 2percent of the horse’s body weight.
• Multiply each nutrient in each food source by the pounds of feed fed per day. Add up individualnutrients for each food source. See your project horse’s nutrient total. (Example: crude protein.
Approximate Amounts1,000-pound horse Hay Grain
___________________________________________________
No work 20-25 lbs. —
Light (1-2 hrs./day) 15-20 lbs. 1-3 lbs.(1-1.5 lbs. grain/hr. of work)
Medium (2-4 hrs./day) 15-20 lbs. 3-8 lbs.(1.5-2 lbs. grain/hr. of work)
Heavy (4 or more hrs/day) 15-20 lbs. 5-10 lbs.(1.5-2.5 lbs. grain/hr. of work)
Only a horse that is worked extremely hard would ever receivehalf of its ration in grain. A race horse in heavy training is anexample of a horse requiring half of its ration in grain.
Table 4. Daily feed required by the average 1,000 pound horse.

CHAPTER 5: FEEDING HORSES
35
If your horse eats 8 pounds per day of a 10 percent protein feed, it consumes 0.8 pounds ofcrude protein per day: 8 lbs. x .10 = 0.8 lbs.).
• Check your totals against the daily nutrient requirements listed in Table 5. If the requirementsare greater than the totals in your ration, then the ration is inadequate or not balanced for thehorse. If your ration is deficient in a nutrient, you can add a good source of the deficientnutrient with a new ingredient to balance the diet, or increase an ingredient you already havethat is a source of the nutrient. Always be careful not to create an excess of other nutrientswhen increasing feed ingredient levels. Excesses of some nutrients can interact with othernutrients. For example, excess calcium can prevent complete utilization of phosphorus. CheckNational Research Council tables for calcium to phosphorus ratios; however, a good rule ofthumb is a 2.5:1 ratio.
Metabolic disorders, such as laminitis, osteochondrosis and epiphysitis, stem from an imbalancein nutrients. Many disorders can be avoided by giving your horse a balanced ration.
Remember, each horse has to be fed as an individual. Feed an amount that is adequate tomaintain a body condition similar to that of an athlete. The National Research Councilrequirements are suggested values; individual horses may require adjustments to these nutrients.Constantly assess the body condition of your horse. A properly conditionedhorse will have enough fat so itsribs don’t show, but you should stillbe able to feel the ribs when yourun your fingers over them. Seefigure 16 for areas emphasized inthe Body Condition Score System.Depending on your horse’s use, youwill want to have its body scorebetween five and six. Some horsesrequire less feed than others.
Figure 16. Diagram of areas emphasized in body conditionscore. Visual appraisal areas used when determining bodycondition score.
Along the neck
Along thewithers
TailheadCreasedown back
Ribs
Behindthe shoulder

CHAPTER 5: FEEDING HORSES
36
Description of body condition score system
(use figure 16 to determine your horse’s body score)
1. PoorAnimal extremely emaciated. Spine, ribs, tailhead, and hooks and pins projecting prominently.Bone structure of withers, shoulders and neck easily noticeable. No fatty tissues can be felt.2. Very thinAnimal emaciated. Slight fat covering over base of spine projection, transverse processes oflumbar vertebrae feel rounded. Spine, ribs, tailhead, and hooks and pins prominent. Withers,shoulders and neck structure faintly discernible.3. ThinFat built up about halfway on spine projection, cannot be felt. Slight fat cover on ribs. Spineprojection and ribs easily discernible. Tailhead prominent, but individual vertebrae cannot bevisually identified. Hook bones appear rounded, but easily discernible. Pin bones notdistinguishable. Withers, shoulders and neck accentuated.4. Moderately thinNegative crease along back. Faint outline of ribs discernible. Tailhead prominence depends onconformation, fat can be felt around it. Hook bones not discernible. Withers, shoulders andneck not obviously thin.5. ModerateBack level. Ribs cannot be visually distinguished but easily can be felt. Fat around tailheadbeginning to feel spongy. Withers appear rounded over spine projection. Shoulders and neckblend smoothly into body.6. Moderate to fleshyMay have slight crease down back. Fat over ribs feels spongy. Fat around tailhead feels soft. Fatbeginning to be deposited along the sides of the withers, behind the shoulders and along thesides of the neck.7. FleshyMay have crease down back. Individual ribs can be felt, but noticeable filling between ribs withfat. Fat around tailhead is soft. Fat deposited along withers behind shoulders and along theneck.8. FatCrease down back. Difficult to feel ribs. Fat around tailhead very soft. Area along withers filledwith fat. Area behind shoulder filled in flush. Noticeable thickening of neck. Fat depositedalong inner buttocks.9. Extremely fat.Obvious crease down back. Patchy fat appearing over ribs. Bulging fat around tailhead, alongwithers, behind shoulders and along neck. Fat along inner buttocks may rub together. Flankfilled in flush.

CHAPTER 5: FEEDING HORSES
37
Figure 17. Estimate your horse’s bodyweight. Multiply the girth (in inches)times itself (heart girth2) times the bodylength (in inches) and divide by 330.Example:
Heart Girth = 74.8 inchesBody length = 63 inches
74.8 x 74.8 x 63330
Equals 1,068 pounds
Feeding tips
These helpful hints will help you care for your horse nutritionally.
• Provide high quality alfalfa or grass roughage with a complementing grain to balance thehorse’s diet. Feed by weight, not by volume.
• Always maintain at least half of the ration as roughage, such as hay or grass.• Never feed moldy or dusty hay, grass or grain.• Never feed lawn grass clippings.• Have fresh, clean water available at all times-except to a hot horse. A hot horse needs to be
given water slowly.• Keep feed and water containers clean. Check and clean water buckets and tanks regularly.• Watch your horse while it eats and inspect feed containers daily to detect abnormal eating or
drinking behaviors.• Check horse’s teeth annually for sharp points that interfere with chewing. Floating sharp
edges of teeth will increase feed efficiency. If a horse dips mouth in water while eating, itmay have a sharp tooth. Tilting head to one side while eating grain may indicate a toothproblem.
• Ration changes be should be gradual — over a minimum of five days to prevent digestivedisturbances.
• Proper exercise improves appetite, digestion, muscle tone and mental health for horses.• Because a horse’s stomach is very small and cannot hold a large amount of feed at one time,
it should be fed at least twice a day on a regular schedule. Some horses benefit from three ormore feedings per day, however, don’t overfeed your horse; too much feed at one time cancause founder.
Pointof the
shoulder
Heart girth
Body length Pointof thebuttocks

CHAPTER 5: FEEDING HORSES
38
Tabl
e 5.
Dai
ly N
utri
ent R
equi
rem
ent o
f Hor
ses (
1,00
0 lb
. mat
ure
wei
ght)
Acc
ordi
ng to
the
Nat
iona
l Res
earc
h C
ounc
ilD
iges
tible
Cru
deEn
ergy
(DE)
Prot
ein
Phos
-M
agne
-Po
tas-
(Meg
acal
orie
s(C
P)Ly
sine
Cal
cium
phor
ussiu
msiu
mV
itam
in A
Ani
mal
1,00
0 ca
lorie
s(g
)(g
)(g
)(g
)(g
)(g
)(1
03 IU
)M
atur
e ho
rses
Mai
nten
ance
16.
4 6
56 2
3 2
0 1
4 7
.5 2
5.0
15W
orki
ng h
orse
sLi
ght w
orka
20.5
820
29
25
18
9.4
31.
222
Mod
erat
e w
orkb
24.6
984
34
30
21
11.
3 3
7.4
22
Inte
nse w
orkc
32.8
1,3
12 4
6 4
0 2
9 1
5.1
49.
9 2
2St
allio
n (b
reed
ing
seas
on)
20.5
820
29
25
18
9.4
31.
222
Preg
nant
mar
es9-
mon
ths
18.
2 8
01 2
8 3
5 2
6 8
.7 2
9.1
30
10-m
onth
s18
.5 8
15 2
9 3
5 2
7 8
.9 2
9.7
30
11-m
onth
s19
.7 8
66 3
0 3
7 2
8 9
.4 3
1.5
30
Lact
atin
g m
ares
Foal
ing
to 3
-mon
ths
28.3
1,4
27 5
0 5
6 3
6 1
0.9
46.
0 3
03-
mon
ths t
o w
eani
ng24
.3 1
,048
37
36
22
8.6
33.
0 3
0G
row
ing
hors
esW
eanl
ing,
4-m
onth
s 1
4.4
720
30
34
19
3.7
11.
38
Wea
nlin
g, 6
-mon
ths
Mod
erat
e gr
owth
15.0
750
32
29
16
4.0
12.
710
Rap
id g
row
th17
.2 8
60 3
6 3
6 2
0 4
.3 1
3.3
10
Year
ling,
12-
mon
ths
Mod
erat
e gr
owth
18.9
851
36
29
16
5.5
17.
815
Rap
id g
row
th21
.395
6 4
0 3
4 1
9 5
.7 1
8.2
15
Long
yea
rling
, 18-
mon
ths
Not
in tr
aini
ng19
.8 8
93 3
8 2
7 1
5 6
.4 2
1.1
18In
trai
ning
26.5
1,1
95 5
0 3
6 2
0 8
.6 2
8.2
18
Two-
year
-old
, 24-
mon
ths
Not
in tr
aini
ng18
.8 8
00 3
2 2
4 1
3 7
.0 2
3.1
20In
trai
ning
26.3
1,1
17 4
5 3
4 1
9 9
.8 3
2.2
20
Not
e:M
ares
sho
uld
gain
wei
ght d
urin
g la
te g
esta
tion
to c
ompe
nsat
e fo
r tis
sue
depo
sitio
n. H
owev
er, n
utrie
nt re
quire
men
ts a
re b
ased
on
mai
nten
ance
bod
y w
eigh
t.a E
xam
ples
are
hor
ses
used
in w
este
rn a
nd E
nglis
h pl
easu
re, b
ridle
pat
h ha
ck, e
quita
tion
and
so fo
rth.
b Exa
mpl
es a
re h
orse
s us
ed in
ranc
h w
ork,
ropi
ng, c
uttin
g, b
arre
l rac
ing,
jum
ping
and
so
forth
.c E
xam
ples
are
hor
ses
in ra
ce tr
aini
ng, p
olo
and
so fo
rth.
Rep
rinte
d co
urte
sy o
f Nat
iona
l Res
earc
h C
ounc
il’s
Hor
se N
utrie
nt R
equi
rem
ents
, 198
9

CHAPTER 5: FEEDING HORSES
39
Table 6: Nutrients in Common Horse Feeds% Dry % Crude Digestible Energy % %
Type Matter Protein (Mcal/lb.) Calcium PhosphorousHayAlfalfa
Early bloom 90.5 18.0 1.02 1.28 0.19Mid-bloom 91.0 17.0 0.94 1.24 0.22Mature 90.9 15.5 0.89 1.08 0.22Dehydrated Meal 90.4 15.6 0.91 1.25 0.23
Native Hay(Mountain meadow) 95.1 8.2 0.73 0.58 0.17Timothy 89.1 9.6 0.83 0.45 0.25Orchard 89.1 11.4 0.88 0.24 0.30Oat 90.7 8.6 0.79 0.29 0.23Smooth Brome 87.6 12.6 0.85 0.29 0.28
PastureAlfalfa
(late veg) 23.2 5.1 0.31 0.40 0.07Bluegrass
(early veg) 30.8 5.4 0.29 0.15 0.14Crested Wheatgrass
(early veg) 28.5 6.0 0.33 0.12 0.09Orchard grass
(early bloom) 23.5 3.0 0.24 0.06 0.09Smooth Brome
(early veg) 26.1 5.6 0.31 0.14 0.12Concentrates
Barley 88.6 11.7 1.49 0.05 0.34Corn 88.0 9.1 1.54 0.05 0.27Cottonseed meal 100.0 45.4 1.37 0.18 1.22Oats 89.2 11.8 1.30 0.08 0.34Molasses 77.9 6.6 1.20 0.12 0.02
Soybean meal(solvent extracted) 100.0 54.0 1.70 0.29 0.71
Wheat Bran 89.0 15.4 1.33 0.13 1.13
Table 7: MineralsDry Matter % Calcium % Phosphorous % Sodium
Dicalcium Phosphate (dical) 97 22.00 19.03 0.05Limestone (calcperfium carbonate) 100 39.39 0.04 0.06Monocalcium Phosphate 97 16.40 21.60 0.06Monosodium or Disodium Phosphate 97 — 22.50 16.68(XP-4)

CHAPTER 5: FEEDING HORSES
40
Horse Ration Analysis Worksheet:Show your project horse’s feeding program
(complete this page and the following four pages; then to balance your horse’s ration, seeAppendix III)
Junior and intermediate members should not attempt to complete this worksheet without adultassistance. Senior members should be able to complete this worksheet on their own. In the boxesbelow, show your project horse’s record of rations. Adjust feed to the usage of the horse andrecord feed amounts in pounds.
What is the age, weight and physical activity (riding, work or pregnancy) of your project horse.
Turn to Table 5, Daily Nutrient Requirement of Horses, and select the description that best fitsyour horse under the column Animal.
Fill in the box below with the numbers to the right of your selection. These are nutrient valuesyour horse needs.
If you feed cubes or pellets, weigh three buckets for the average weight. List the type of food andresults in the box below.
What type of salt do you offer your horse(s)?
Trace mineralsBlocks Calcium and phosphorus added
Digestible Crude Calcium PhosphorusEnergy Protein
(DE) (Mcal) (CP) (g) Ca (g) P (g)
Pellets
Cubes
Average weightof full bucket lbs.
Age Weight Work Body Condition Scoreyrs. lbs. hours/avg. per day 1=poor, 9=extremely fat

CHAPTER 5: FEEDING HORSES
41
Show your project horse’s roughage feeding program
If you feed longstem hay, weigh three flakes of hay for an average flake weight. Do this for eachdifferent type of hay you have and every time you buy new hay. List the results in the box below.
Calculate the dry matter (DM) of the hay you are feeding (see Table 6 for DM percentages). Drymatter is the part of feed that is not water and is used to calculate nutrients in feed. For pasturedry matter percentage, use .40 average.
Turn to Table 6, Nutrients in Common Horse Feeds, and find Hay under the Type column. Usethe numbers corresponding to the type of hay you usually feed to complete the boxes below. Useyour actual weight, as fed, because dry matter is already calculated. (Remember, .02% = .0002;move the decimal over two places.) If you are feeding more than one hay type, you will need tocopy this page and repeat the calculations for each hay source. Then you will need to add thenutrients together to give you the total megacalories or pounds per day.
Average flake weightlbs./day
Types of hay
lbs./day
pounds of forage per day
X .90 DM% (avg) =
(forage of dry matter)
lbs.lbs.
Crude Protein in poundsper day
(pounds of hay per day)
(pounds of hay per day)
(% Calcium)
(% Phosphorous)
(% Crude Protein)
(Digestible Energy inMcal per pound)
Calcium in poundsper day
(Digestible Energy inMcal per day)
Phosphorous in poundsper day
You feed:(pounds of hay per day) X
X
X
X
X
X
X
X
=
=
=
=
=
=
=
=
lbs.
lbs.
lbs.
mcal/lbs.
(converted to decimal)
(converted to decimal)
(converted to decimal)
mcal/lbs.
lbs./day
lbs./day
lbs./day
(pounds of hay per day)
lbs.

CHAPTER 5: FEEDING HORSES
42
If you feed your project horse a commercially-prepared grain mix, concentrate, completethis page.
Weigh three full buckets of your grain mix concentrate and calculate the average weight of a fullbucket. List the results in the box below.
If you feed a grain mix concentrate, fill in the boxes below for the nutrients shown on the feedbag tag. (DE, CP, Ca, and P) or see Table 6, Nutrients in Common Horse Feeds.
Do you need to feed any supplements? If so, what kind and how much?
Note: The nutrient values given for feed in this manual are approximate. Actual values can bedetermined by laboratory analysis. A Cooperative Extension 4-H or agricultural educator canassist with an analysis.
AmountSupplementoz./day
Average weight of bucket fullGrain mix (3-way, etc.)lbs./day
mcal/lbs.
lbs.
lbs.lbs.
X
X
X
X
X
X
X
X
=
=
=
=
=
=
=
=
Calcium in pounds per day
(Digestible Energy in Mcal per pound)
Crude Protein in poundsper day
Phosphorous in pounds per day
lbs./day
lbs./day
mcal/lbs.
lbs./day
(% Calcium)
(% Phosphorous)
(% Crude Protein)
(Digestible Energy in Mcal per pound)
(converted to decimal)
(converted to decimal)
(converted to decimal)
lbs.
(pounds of mixconcentrate per day)
(pounds of mixconcentrate per day)
lbs.
(pounds of mixconcentrate per day)
(pounds of mixconcentrate per day)
You feed:
lbs.
lbs.
mcal/lbs

CHAPTER 5: FEEDING HORSES
43
If you feed your project horse a straight grain concentrate, complete this page.
In Table 6: Nutrients in Common Horse Feeds, look under the Type column and findConcentrates. Find the concentrate or grain type or information on the feed bag that is most likewhat you usually feed. Use the numbers from the table to fill in the boxes below.
Remember, the percent amounts (example: 20% = .20 or .20% = .002) must be converted todecimal form before you can use them in these calculations.
Average weight of bucket fullGrain type (oats, etc.)
lbs.lbs.
X
X
X
X
X
X
X
X
=
=
=
=
=
=
=
=
Calcium in pounds per day
(Digestible Energy in Mcal per pound)
Crude Protein in poundsper day
Phosphorous in pounds per day
lbs./day
lbs./day
mcal/lbs.
lbs./day
(% Calcium)
(% Phosphorous)
(% Crude Protein)
(Digestible Energy in Mcal per pound)
(converted to decimal)
(converted to decimal)
(converted to decimal)
lbs.
(pounds of concentrate perday)
(pounds of concentrateper day)
(pounds of concentrate perday)
(pounds of concentrateper day)
You feed:
lbs.
lbs.
mcal/lb.lbs.
CHAPTER 5: FEEDING HORSES
44
Show your project horse’s nutrient total
Your totals should match as close as possible to the requirements for your horse in Table 5.Digestible energy should match, but make sure the other nutrients are at least as high as needed.
Your Calcium:Phosphorus ratio should range from 1.5:1 to 3:1 (divide Ca by P; example: 68grams÷22 grams = 3 oz. or 3:1 ratio)
Totals
Phosphorous inpounds per day
Digestible Energy in Mcal per day
mcal/day
Calcium in pounds per day
lbs./day
Crude Protein inpounds per day
lbs./day
grams/day
X 454 to get:
X 454 to get:
grams/day
Phosphorous in poundsper day
Digestible Energy in Mcal per day
mcal/day
Calcium in pounds per day
lbs./day
Digestible Energy in Mcal per day
mcal/day
Crude Protein in poundsper day
lbs./day
Crude Protein inpounds per day
lbs./day
Calcium in pounds per day
lbs./day
Phosphorous inpounds per day
lbs./day
Hay
lbs.day
Concentrates
CHAPTER 5: FEEDING HORSES
45
Table 8: Common poisonous plants of New Hampshire that Affect Horses
emaNtnalP sitahttnalPfotraPsuonosioP smotpmyS
kcalBedahsthgiN
tiurFsevaeL
noitategeV
otytilibani,ssenkaewydoblareneg,tsrihtdekram,aehrraid,etiteppafossoLyamhtaeD.ssensuoicsnocnu:smotpmySdecnavdA.niaplanimodba,dnats
.syad3ro2,1niwollof
nreFnekcarB rohserf(tnalperitnE)deird
,seyednagninilhtuomfonoitarolocthgil,noitanidroocni,ssenkaewlareneGrolasanydoolb,aimena,revef:smotpmySdecnavdA.aimena,ssensuovren
.htaed,segrahcsidlatcer
pucrettuB hserf,sevaelhserFtnalpdeird(srewolftonsiyahnilairetam
)suonosiop
sretsilbhtuom,laminaehtdehcuoteciujtnalperehwsretsilbdnanoitammalfnI.eslupwols,aehrraid,ciloc,noitatirrihcamots,etiteppafossol,gniloordesuac,ssendnilb,stekcosriehtniseyefogniknis,snoisluvnoC:smotpmySdecnavdA
.htaednidneyam
yrrehCyrrehCkcalByrrehCekohC
yrrehCdliW
sevaeLsgiwT
kraB)deeS/enotS(tiP
,snoisluvnoc,gnihtaerbderobaldnadipar,nwodgnillaf,gnireggats,yteixnA.slipupdetalid,noitasnesfossol,htuomfotuognignaheugnot,seyefognillor
.noitsegnifosruohwefanihtiwseid,staolb,teiuq:smotpmySdecnavdA
nommoCdeewkliM
tnalperitnE fossol,erutarepmetdesaercni,seruzies,gnireggats,ssenkaew,noisserpeDdecnavdA.gnihtaerbytluciffid,eslupkaewdipar,elbaticxe,etiteppa
.htaed,amoc,snoisluvnoc,slipupdetalid:smotpmyS
liatesroHdleiF roneerg(strapllA)deird
fodneehtraenlitnulamronsniameretiteppa;polevedotwolserasmotpmyS:smotpmySdecnavdA.ytilibaticxe,tiaggnireggats,ssenkaew,ssenlli
ydob,snekaewdnasesaercnietareslup,digirselcsum,sisylarap,detatipitsnoc.esotamocdnamlacsemoceblamina,htaederofebdlocemocebseitimertxe
deeWnosmiJ yllaicepse(strapllAni)sevaeldnasdees
niargnisdees,yah
ssol,aesuan,eslupkaewtsaf,noisivderiapmi,tsriht:emitniyravsmotpmySfonoitsegnI.gnilbmert,roivahebevisserggatneloiv,noitanidroocralucsumfo
.htaed:stnuomaregral;smotpmyssecudorpstnuomallams
retrauqsbmaL egailoF ,gnihtaerbderobal,noitpmusnocretfasruoh4ot1nihtiwraeppasmotpmyS,kaewsemoceb,sromertelcsum:smotpmySdecnavdA.eslupkaew,dipar
.seiddnaetartsorp
dlogiraMhsraM erutamfostrapllAstnalpgnuoY.stnalp
deird(cixotsselebyamdetropersiyahni
)sselmrah
,gnitimov,tcartlanitsetniortsagehtfonoitammalfnietuca,tespuhcamotSydoolb,sdileyefognihctiwt,noitaticxesuovren,noisserped,ciloc,ssensseltser
ssenkaew,gnihtaerbwols,eslupkaew:smotpmySdecnavdA.aehrraid,eniru.htaeddna

CHAPTER 5: FEEDING HORSES
46
For more information, or for help in identifying poisonous plants, contact your localCooperative Extension county office.
Table 8: Common poisonous plants of New Hampshire that Affect Horses (continued)
emaNtnalP sitahttnalPfotraPsuonosioP smotpmyS
leruaLniatnuoM srewolFsgiwT
straPtnalPneerG
,gniwollawsdetaeper,etiteppafossol;sruoh6segarevasmotpmysfoecnaraeppAdoolbwol,eslupwols,esondnaseye,htuomfogniretaw,noitavilasesuforp.noitacefedtneuqerf,gnitimov,noisserped,ssenllud,noitanidroocni,erusserp
.htaed,amoc,gnihtaerbniytluffid,kaew:smotpmySdecnavdA
deewgiP egailoF retfasyad01ot5noitanidroocnidnagnilbmert,ssenkaewfotesnodipaR.lamronsniamererutarepmetydob,noitsegni
kcolmeHnosioP strapllA ,niap,gnilbmert,ssensuovren;noitsegniretfaruohnanihtiwruccosmotpmyS,gnitimov,aesuan,ssenisword,taebtraehwolsdnadenekaew,slipupdetalid
aehrraid,gnitaolb,gnihtaerbderobal,ydoberitneehtroseitimertxenissendloc.seitimertxerewolrodnihehtninigebyllaususmotpmyS.)ydoolbebyam(
denekaew,noitaripserdenekaew,noitaripsrep,snoisluvnoc:smotpmySdecnavdA.tluseryamhtaed,noisivderiapmi,noitavilas,eslup
deewekoPyrrebekoP
yrrebknI
strapllA)stooryllaicepse(
,spmarclanitsetniortsaG.netaeerastnalpretfasruoheromro2ruccosmotpmyS,snoisluvnoc:smotpmySdecnavdA.aehrraid,gnitimov,smsapsgnihcter
.noisivderiapmi,noitavilas,eslupdenekaew,noitaripserdenekaew,noitaripsrep.tluseryamhtaeD
skaO snrocAyllaicepse(stoohsgnuoY
)ytitnauqninetae
.aehrraidotgnissap)stelleplacefkrad,drah(noitapitsnoclaitini,etiteppafossoLehtdnahcamotsehtfonoitammalfni:sevillaminafI.htaed:smotpmySdecnavdA
.noitaniruevissecxe,tsriht,senitsetni
nordnedodohRsaelazA
siseicepsemosfoegailoFseicepsllaredisnoC.cixot
suonosiopyllaitnetop
lasan,seyefogniraet,noitavilasesuforp,gniwollawsdetaeper,etiteppafossoL,noisserped,ssenllud,noitanidroocni,erusserpdoolbwol,eslupwols,egrahcsid
,snoisluvnoc,gnihtaerbniytluciffid,kaew:smotpmySdecnavdA.gnitimov.htaed,amoc,sisylarap
trowsnhoJtniaS cixotsi(straptnalpllA)yahninehw
noitammalfni,sititamredspolevednikS.thgilnusfoecneserpehtniytivitisnesotohPdnadenedderdnaerossemocebaeradetceffA.niksehtfonoitropdetnemgipnufo
yamslamina,ylwolslaehsdnuoW.detceffaebyamhtuomdnaeugnoT.leepyamdnanoitcefnimorftluseryamhtaed:smotpmySdecnavdA.sracssselriahecudorp
.energnag
ssargnaduSmuhgroSxnaduS
sdirbyh
ehtfonoitropevitategeVthguordgnirudtnalp
ton;tsorfretfarosnoitidnocniargeht
derobal,noitpmusnocretfasruoh4ot1nihtiwneessmotpmyS.gninosiopetartiNlareneg,sromertelcsum:smotpmySdecnavdA.eslupkaew,dipar,gnihtaerb
.htaed,etartsorp,gninekaew
kcolmeHretaW roneerg(straptnalpllA)deird
elcsum,noitavilasevissecxE.noitpmusnocretfasruoh4ot1nihtiwneessmotpmySslipup,serutarepmetdesaercni,niaplanimodba,snoisluvnoccidomsaps,sromert
.seitilamronbalairovaheb,etartraehdnaeslupralugerri,aehrraid,detalid.htaed,eruliafyrotaripser,sisylarapetelpmoc:smotpmySdecnavdA
ylimaFweY tnalperitnE ,seitluciiffidgnihtaerb,slipupdetalid,sromert,gnitimov,aehrraid,ssertsidcirtsaGtraehwols,amoc,snoisluvnoc:smotpmySdecnavdA.espalloc,eugitaf,ssenkaew.raeppasmotpmysweftahtdiparosebnachtaeD.htaed,eruliafyrotalucric,etar

CHAPTER 6: HOUSING AND FENCING
47
Shelter for most 4-H horses should provide protection from hot sun, wind or stormy weather. Thetype of shelter depends on the facilities available to each member. This varies from a three-sidedloafing shed in the pasture to a barn with box stalls and a tack room. The stable need not befancy, but it should be well-constructed for safety and arranged well so it can be kept clean.Listed below are some standard dimensions.
Your stable or shelter may not fit thelisted dimensions exactly. Be certainthere is room and plenty of light andventilation with no drafts. The horseshould have access to clean water at alltimes, either automatic waterers orbuckets. Hang water buckets highenough so your horse cannot get its hoofin the bucket.
Arrange the grain box so your horsecannot get its hoof in the box and so the box can be cleaned easily. Construct the hay mangerwith an open space at the bottom for chaff, dirt and trash to fall out or so that it can be cleanedeasily. Don’t feed hay or grain on the ground because the horse will pick up dirt and sand withthe feed. This may cause colic.
If you board your horse, there are several options: stabled (box stall), corral and pasture board.When selecting a boarding stable, ask what they provide for stabled horses. If you pay full board,the boarding stable should provide feed, cleaning and turn-out. Partial board arrangements vary,so check out what is included with your boarding arrangements.
If your horse is kept in a corral or pasture with a loafing shed, it is important that the shed andcorral have enough room for the number of horses running together. Horses are herd animals andthey establish social orders. Dominant horses bite and kick those horses who are in a lower socialorder. Be certain the loafing shed has enough room so the horses avoid being trapped by thedominant horse; this will help prevent injuries.
Regardless of where you keep your horse, always be alert for loose boards, nails and anyprojections that could cause injuries. Keep all wire and hay-bale twine picked up so horses don’tget caught in it, resulting in injury, or eat it which causes health problems.
Construct fences of poles, boards, plastic (PVC pipe) or wire. The important thing is that thefence be visible to the horse to keep it from running through the fence. Wire fence should besmooth — not barbed wire. Barbed wire will increase the severity of injuries to horses. Constructelectric fences of smooth wire. Check electric fence with a fence tester to be sure it works.
Shelter Space RequirementsBox Stall 10' x 10' to 12' x 12'Tie Stall 5' x 12' including mangerCeiling Height 8' minimumDoors 4' wide x 8' highHay Manger 28" sides, 38" high top edgeGrain Box 24" to 30" long, 8" to 10" deep
38" to 42" from floor to top

CHAPTER 6: HOUSING AND FENCING
48
Most electric chargers have a light that shows when the fence is not working or if the circuit isincomplete. Remove overgrown weeds from fence lines. Check all fences regularly and keepwire fences tight.
Disposal or composting manure
Develop a plan for manure disposal or use. Consider converting manure and yard waste into auseful product for gardening and landscaping. Composted manure returns needed nutrients backinto the soil. Ask your County Extension Agent for the publication called Good Neighbor Guidefor Horse-keeping: Manure Management.

CHAPTER 7: YOUR HORSE’S HEALTH
49
Evaluate your horse’s health often. You control many factors that affect your horse’s health. It’simportant to sanitize stables and feeding equipment; provide clean, quality feed; protection fromdisease and properly fitting equipment. Be sure to eliminate hazards around stables and pasture,and watch your horse for injuries or signs of disease, and the way you use your horse.
Proper treatment of diseases, injuries and parasites depends on two very important factors:correct diagnosis and knowledge of the proper medication. Your veterinarian knows what healthand first-aid measures you can safely handle, and he or she will teach you the proper procedures.
This includes:
• recognizing health problems,• what to do in case of sickness or injury before help can arrive, and• simple treatments and remedies that are safe to follow under certain conditions.
It helps to become familiar with common diseases, parasites, injuries and health problems horsesmay encounter.
General
Cleanliness is very important. Clean feeders and water containers often. Bedding should be dryand clean, and manure should be removed regularly. The stable area should be level and welldrained.
Stabled horses should have proper ventilation. Fresh air is needed even in winter, but avoid colddrafts. Urea in horse urine forms ammonia which can cause respiratory problems. If you smellammonia in your horse stable, it’s not cleaned well enough or the stable needs more ventilation.Keep stable temperature and atmosphere as close as possible to outside climates. Horses do notneed to be kept in a heated barn.
First aid
First aid is the immediate and temporary care given to a horse until a veterinarian arrives.
First aid includes preventing your horse from further injuring itself. Horses are creatures of frightand flight. Their instinct is to bolt and run when they experience a trauma and this can oftencause more harm. First-aid includes keeping the horse calm. For example, if the horse is caughtin barbed wire or a feeder, calm and soothe the horse until it can be freed. Take care that you donot become injured while helping the horse. If the horse begins to shake and quiver after aninjury, cover it with a blanket, it may be going into shock.
CHAPTER 7: YOUR HORSE’S HEALTH
50
Bleeding
The average volume of blood in a 1,000-pound horse is 36 liters or 8 gallons, about 6 to 10percent of its body weight. A horse can tolerate losing of up to 25 percent of its blood — about 9to 11 liters or 2.25 to 2.75 gallons. Because the horse is such a large animal, it can lose whatlooks like a lot of blood from an injury or laceration. However, blood loss is serious and shouldbe controlled even if it may not be life-threatening.
To control a horse’s bleeding, use a pressure bandage over the injury until a veterinarian arrives.Elastic bandages make good pressure bandages. It is important to be careful when you apply thebandage so the horse does not injure you. Many times a serious laceration of the limbs includessevered nerves which are sensitive to touch. Apply the bandage tight enough to dramatically slowthe bleeding. If the bandage is applied excessively tight, it could work as a tourniquet that cutsoff the blood supply to the limb beyond the bandage. The injured limb needs blood circulation.
Before treating a laceration, remember home remedies can contaminate the wound and make itmore difficult for the veterinarian to treat. Do not use lanolin or petroleum-based products in oraround a wound because they are not water-soluble and are impossible to remove from thewound. Clean dirt and manure out of an injury with water and organic iodine solutions (not thestrong tincture of iodine) or scrubs. This is the only first aid you should administer without aveterinarian. A veterinarian should examine lacerations and sutures as soon as possible. Do notexceed 24 hours before (stitches) suturing.
Vital signs
What is normal? Closely observe your horse’s eating habits, gaits, activities and attitudes todetermine what is normal. Changes in these habits indicate a problem. Measure temperature,pulse and respiration rate, to determine if you notice changes and think your horse is ill.
TemperatureTake the horse’s temperature with a rectal thermometer. Lubricate the thermometer andshake the mercury below 95 degrees Fahrenheit before inserting into the rectum. The normaltemperature of a horse can range from 99.5 degrees to 101.5 degrees, with an average of 100degrees. A fever is classified as mild at 102 degrees and excessive at 106 degrees. Exercise,excitement and hot weather raise normal body temperature.
Respiration rateTo measure the breathing or respiration rate, watch the flank and rib movements with eachbreath. Count the number of these in-out movements in a minute or for 15 seconds andmultiply by four. An adult horse at rest breathing rate should range from eight to 16 breathsper minute. The rate increases with exercise. Younger and smaller horses have a more rapidrate.

CHAPTER 7: YOUR HORSE’S HEALTH
51
PulseA horse’s normal pulse rate averages 35 beats per minute. Lower rates are normal for larger,older horses at rest. Younger, smaller horses have a higher pulse rate. A yearling has a normalrate of 40 to 58 beats per minute.
A horse’s pulse can be felt in several places: the inner surface of the lower jaw, the back edgeof the jaw or cheek, under the tail, or inside the left elbow (see figure 18). Usually the pulseis taken from the artery on the inside lower jaw. It is in front of the large, round jaw musclesand found by moving your fingers up and down on the inside and underside of the jaw bone.The artery feels like a flat, soft cord. By pressing the artery against the jaw bone, you can feelthe pulse. As blood flows through the artery, it pulses against your finger. If you have troublefinding the artery, ask your veterinarian to help.
Capillary Refill TimeCapillary Refill Time (CRT) measures the time it takes for capillaries to refill with blood. It isan easy test to perform. Press the mucous membrane inside the nostril or the gums to measureCRT. As you press on the membrane, you press blood out of the capillaries. When youremove your finger the membrane appears pale. You can see the blood return as themembrane regains its pink color. It should take 1 to 2 seconds for the membrane to return to
Figure 18. Points at which the horse’s pulse can be felt andtaken.
1. The inner surface of the groove underthe lower jaw (external maxillaryartery)
2. The back edge of the lower jaw (thecheek), 4 inches below the eye (facialartery)
3. Under the tail, close to the body(medial coccygeal artery)
4. Point where heartbeat can bemonitored with stethoscope
5. Inside the left elbow, up and forward,against the chest wall (heart)
6. The inside of the foreleg (medianartery)
7. Behind the carpus, or knee (digitalartery)
8. Medial or lateral pastern (digitalartery)

CHAPTER 7: YOUR HORSE’S HEALTH
52
the color of the surrounding area. If it takes longer than 1 to 2 seconds, your horse’scirculation is poor, or it may be in shock. Use yourself as a comparison. Squeeze your thumb.Watch the color under your thumb nail. It will be pale pink when you release it, but the colorwill return rapidly.
Colic
Colic, acute stomach pain, is the number-one killer of horses and can be a serious problem. Call aveterinarian immediately when you suspect colic and begin emergency first aid.
Horses with colic have a faster heart rate and higher body temperature than normal. The horsewill sweat, become restless, paw the ground, try to roll, get up and down several times, bite at itssides, kick at its belly, show a change in its manure, or fail to defecate. The pain may be causedby several intestinal problems such as an impacted or plugged intestine, sand in the cecum,increased activity of the intestine, inflammation of the intestinal membrane lining, blockage ofblood supply to the intestine, or stretched digestive tract due to gas or undigested feed.
Colic is caused by a variety of circumstances including an abrupt change in feeding practices,overfeeding, parasites, poor feed quality, dehydration, eating sand, a twisted intestine orpregnancy.
To prevent further complications if your horse becomes colicy, keep the horse calm. Call aveterinarian immediately and keep the horse quiet to protect it from self-inflicted injury. Theseverity of pain is not a good indication of how serious the problem may be. Pulse rates over 50to 60 beats per minute, slow capillary refill time and blue mucous membranes indicate the seriousnature of the problem.
The risk of colic can be reduced by carefully using a good parasite control program and reducingstress on your horse. Be sure to provide plenty of fresh, clean water.
Other health problems
An elevated or below-normal temperature, rapid pulse, lack of appetite, very loose or waterystool, coughing, listlessness, dull eyes, and rapid, labored respiration with flared nostrils areindications of a problem.
Influenza (flu)Influenza, a respiratory infection caused by a virus, commonly affects 2- and 3-year-olds.However, older horses can develop the disease if they are susceptible. The virus spreads rapidlybetween susceptible horses. The flu is common among horses that are concentrated together, suchas at sales, shows and race tracks. Crowding and stress may make your horse more likely to getthis disease. It may be prevented with semiannual vaccinations. However, horses at high riskshould receive vaccinations every three to four months.

CHAPTER 7: YOUR HORSE’S HEALTH
53
Horses usually develop signs of influenza two to ten days after exposure. These signs includehigh fever, depression, shivering, inflamed throat, muscle stiffness and soreness, loss of appetite,increased pulse and respiratory rates, and fatigue. A dry, hacking cough later develops into amoist cough. Nasal secretions will be clear and mucous-like in the early stages. Complete rest isnecessary for up to 30 days after these signs occur. Horses worked when they have temperaturesoften develop a bronchopneumonia complication. Horses that don’t develop complicationsusually recover in one to two weeks.
RhinopneumonitisA herpes virus causes rhinopneumonitis. With flu-like symptoms, the disease has three distinctforms: respiratory, abortion-causing and neurologic.
• Respiratory form. This form occurs most frequently in young horses. Signs include a highfever (106 degrees), which may last one to seven days, and a clear to yellowish mucus-likedischarge from the nostrils. It will remain fairly bright and alert with little depression.Coughing is uncommon unless the horse develops a secondary bacterial infection. Older horsesinfected with the virus have mild symptoms, but this form can be life threatening to youngerhorses.
• Abortion-causing form. This form occurs in pregnant mares three weeks to four months afterinfection or after the respiratory form infects horses on the premises. The virus causes the mareto deliver a dead foal during the last three months of pregnancy or to deliver a weakened foalthat dies soon after birth.
• Neurologic form. The neurologic form usually occurs in horses more than one year of age Thisform may follow respiratory or abortion-causing forms or may occur without prior signs ofrhinopneumonitis. Uncoordination or paralysis of the hind legs is one sign of this form.
Vaccination prevents rhinopneumonitis, but does not produce lasting protection. Consult yourveterinarian about a proper vaccination schedule.
Equine Infectious AnemiaA virus causes Equine Infectious Anemia (EIA), also known as Swamp Fever. Symptoms includea recurring fever, noticeable depression, increasing weakness, loss of muscle and weight,swelling in legs and underside caused by fluid accumulation, and anemia (lower than normalnumber of red blood cells). A test known as the Coggins test identifies this disease.
EIA has no specific treatments and cannot be prevented by vaccination. In many states, horseshows and races require a negative Coggins test for the disease on the horses before they mayenter the state or the grounds. Most states require horses that test positive for this disease be keptin a permanent, lifetime quarantine or, because they are a lifetime carrier of the virus and are athreat to the total horse population, be put to sleep. Travel on interstate highways also requires anegative Coggins test.

CHAPTER 7: YOUR HORSE’S HEALTH
54
StranglesEquine Distemper, Shipping Fever or Strangles, is a severe, contagious disease that primarilyaffects the upper respiratory tract. Several strains of streptococcus bacteria cause the disease.Symptoms develop two to six days after the horse has been exposed to the bacteria. Symptomsinclude a high temperature (103 to 104 degrees), nasal discharge, depression, an increasedrespiratory rate and a dry cough. Lymph nodes in the throat are swollen and painful.
Because of pain in the throat area, the horse has trouble swallowing and loses its appetite. Painalso causes the horse to stand with its neck stretched and head down. Swelling can be seen wherethe head and neck join. Swollen lymph nodes can become abscessed (filled with a creamy yellow,pus) and break open. Sometimes bacteria spreads to other lymph nodes in the chest andabdomen, causing serious complications for the horse. Nasal discharge is usually yellow orwhite.
Direct contact between an infected horse and a susceptible one transmits the disease. Bacteriaalso can be transmitted on buckets, feeders, fences, clothing, shoes and waterers. Rely on yourveterinarian for vaccination recommendations and treatment.
Tetanus (lockjaw)A neurotoxin produced by the bacteria clostridium tetani causes tetanus. It infects animalsthrough deep puncture wounds from nails or splinters. Vaccinating your horse every yearprevents tetanus. Booster vaccinations should be given when your horse is injured. The bacteriaalso can infect the navel of newborn foals. Tincture of Iodine or Betadine should be used on thefoal’s navel to prevent tetanus.
Symptoms usually occur within one to two weeks after injury. Tetany is the severe tightening of amuscle, muscle twitch or muscle cramp. Jaw muscles are some of the first to tighten and, sincethey are much stronger than muscles that open the mouth, the horse is unable to open its mouth.Lockjaw is the common name for tetanus.
Other signs include tetany of the muscles in the hind legs, or the horse holds its tail up, ears erect,head and nose high with its head extended; tightening of muscles in the body causing legs toassume a sawhorse stance is a symptom. The horse has trouble moving because all of its musclesare tight or crampy. They overreact to loud noises and fast movements. Inability to eat or drink,rapid breathing, rapid heart rate, constipation, elevated temperature, and excessive sweating alsoare common signs of tetanus.
Sleeping sicknessThere are three types of sleeping sickness, or Equine Encephalomyelitis, named for the differentviruses that cause them: Eastern Equine Encephalomyelitis, Western Equine Encephalomyelitisand Venezuelan Equine Encephalomyelitis. The three diseases transmitted by mosquitoes aredifficult to tell apart since they produce similar symptoms.
CHAPTER 7: YOUR HORSE’S HEALTH
55
• Eastern Equine Encephalomyelitis (EEE) EEE is a severe disease of horses and humans and isoften fatal. It doesn’t occur as frequently as western equine encephalomyelitis, but it is moreserious. Symptoms in the horse include fever, loss of appetite, depression, sleeping sickness,circling, head pressing, blindness, intense itching, paralysis of face muscles, difficulty chewingand swallowing, weakness, uncoordination, seizures, respiratory arrest, and death in up to 90percent of the horses affected.
• Western Equine Encephalomyelitis (WEE) WEE received its name because it occurs primarilywest of the Mississippi River and in western Canada. It is the mildest but most frequent of thethree types of sleeping sickness. Symptoms develop several weeks after the horse is infected.They are similar to those of EEE and last for two weeks or more.
• Venezuelan Equine Encephalomyelitis (VEE) VEE is found in Central and South America.There was an outbreak of VEE in the United States in the 1970s. However, it has beeneradicated here. It causes high death rates among humans, and horses serve as a reservoir forviruses that infect humans. Vaccinations for VEE are not used currently except for horsesentering North Carolina and Texas.
Sleeping sickness can be prevented through vaccination. EEE, WEE and VEE vaccinations arecombined with tetanus and influenza in one dose.
Potomac Horse FeverPotomac Horse Fever is caused by an organism, Ehrlichia risticii, and is transmitted by insectbites. Symptoms include mild depression, refusal to eat, mild temperature, colic and profusediarrhea 24 to 48 hours after onset that lasts for up to 10 days. Laminitis develops in one of fourhorses stricken with the disease. Treatment of severe symptoms usually is not successful, and thehorse dies. Horses should be vaccinated in regions where the problem occurs most frequently.
Equine Protozoal MyeloencephalitisEPM is a debilitating neurologic disease caused by a protozoal organism (Sarcocystis falcatula)which settles in horses’ spinal cords. Affected horses generally lose coordination of their hindlegs; the disease affects a horse’s balance and mobility. Horses get EPM by eating sporocysts-infected feed. Sarcocystis falcatula is carried by birds which are eaten by opossums which shedthe organism into horse feed, water and pasture. Horses cannot transmit the disease to anotheranimal. A test for EPM has been developed.
HeavesHeaves and broken wind are common terms that refer to chronic pulmonary alveolaremphysema. It affects the lungs and is most commonly caused by feeding dusty or moldy hay.
Symptoms of this disease relate to changes in the horse’s lungs. Chronic coughing marks thebeginning of the disease process. As changes in the lungs become more severe, the horse loses itsstamina, nostrils flare and the horse suffers shortness of breath. In normal breathing when the

CHAPTER 7: YOUR HORSE’S HEALTH
56
diaphragm relaxes, the elasticity of the lungs forces air out. CPAE destroys this elasticity. Thehorse compensates by contracting its abdominal muscles to force abdominal organs toward thechest, pushing air out of the lungs. This looks as if the bottom of the abdomen is lifting up andoccurs at the end of the normal shriveling of the chest during breathing. Because abdominalmuscles become larger with this extra work, a line that defines them (heave line) develops alongthe bottom of the abdomen.
These changes in the lungs are permanent, and only the symptoms can be treated. Heaves cantypically be prevented by feeding good quality, dust-free hay.
Laminitis (founder)Laminitis means inflammation of laminae in the hoof of the horse. The white line in the hoof isthe laminae, which are sensitive tissues inside the hoof wall that keep it attached to the thirdphalanx, a bone inside the hoof (coffin bone). Structures under the back of the third phalanx holdthe hoof up. With this inflammation, attachments break down. After the break down, the front tipof the bone rotates or falls onto the sole and causes intense pain. The horse tries to reduce thepain by walking with its feet out in front and moving in a manner to keep pressure off its toes.Laminitis most often affects the front feet but may affect all four feet.
Laminitis can be caused by overeating grain, eating lush grass, drinking water before coolingdown, infections, stress, and trotting or running on hard surfaces which cause a concussion. Ahorse that has laminitis has rough rings around the hoof wall. Horses with laminitis may be lamefor the rest of their lives.
Hyperkalemic Periodic ParalysisSome diseases are caused by genetics that can be passed on from parent to offspring.Hyperkalemic Periodic Paralysis is an inherited disease of quarter horses and other stock horses.HyPP is characterized by seizure attacks of muscles, including muscle tremors, weakness orconvulsions. Muscle fibers leak potassium into the horse’s blood, making blood serum potassiumlevels increase. High serum potassium levels can cause cardiac arrest and death. Because thedisease is genetic, there is no cure; however, diet or medication may prevent seizures. Genetictesting can be used to select breeding stock that are not carriers of the HyPP gene.
Teeth wearAlthough tooth wear isn’t a disease, tooth care helps keep your horse healthy. A horse eatsfibrous materials that require a lot of chewing. This process causes the horse’s grinding teeth(premolars and molars) to wear down. Because the upper teeth are set slightly wider than thelower teeth, sharp points develop on the outside of the upper teeth and on the inside of the lowerteeth. These sharp points cause the horse to bite its cheeks and tongue as it chews food. It’sharder for a horse with bad teeth to grind its food once it’s taken in, which can lead to weight lossor a blockage in the intestines. Horses 5 years and older should have these sharp points groundoff every year by a veterinarian using a dental float.

CHAPTER 7: YOUR HORSE’S HEALTH
57
Internal parasites
Internal parasite control is vital for your horse’s health from birth to old age. A parasite is a livingorganism that spends all or part of its life in or on another organism and at that organism’sexpense. In general, the horse ingests parasite larvae while grazing or feeding from the ground.The larvae migrate through the horse’s internal systems. Larvae eventually settle in or near theintestines, where they rob the horse of nutrients. When mature, they lay eggs which pass out ofthe horse’s system in its manure. New larvae crawl up grass blades to be eaten by other horses.
A horse infected with internal parasites often shows a dull and rough coat, weakness, stuntedgrowth, weight loss, colic, diarrhea (sometimes bloody) or tail rubbing. Horses can die fromheavy infections and occasionally, healthy looking horses die from internal parasite damage.Regularly deworm your horse regardless of whether it looks like it has parasites or not.
Horses kept in confined areas with several other horses are constantly reinfested, especially ifthey feed off the ground. Owners must take extra precaution against parasites. Keep the area freefrom accumulated manure, do not feed on the ground and use deworming medications atfrequent, regular intervals.
Ascarids (large roundworms), bots and strongyles (bloodworms) are the three most seriousinternal parasites. Deworming medications vary depending on the type of worm. Check with yourveterinarian to plan an annual deworming program.
In general, parasites interfere with normal growth and development, cause poor performance inworking horses, lower horses’ resistance to disease and transmit diseases.
Roundworms or NematodesRoundworms are non-segmented, cylinder-shaped worms and are one of the most serious internalparasites.
• Horse ascarid (Parascaris equorum) is an internal parasite found primarily in young horses. Inthe life cycle of roundworms, females lay eggs in the horse’s intestinal tract. Feces pass theeggs from the horse. Outside, larva develops within the egg. This is first stage larva.
In the environment, second-stage larvae are in the infective stage (ready to infect the horse)and form while still in the egg. After the horse eats these eggs, they hatch in the small intestine,burrow through intestinal walls, get into veins and drain blood. They then travel to the liver,where they burrow around the liver tissue and drain blood from the liver before moving on tothe lungs. Here they burrow through lung tissue until they get into the air passages. They moltto a worm and migrate into air passages, causing a tickling sensation. The horse coughs themup and swallows them, and they go back to the small intestines where they molt to adults.Migration takes one to two weeks. These large worms can cause blockages in the intestinaltract, bleeding, and secondary pneumonia in the lungs.
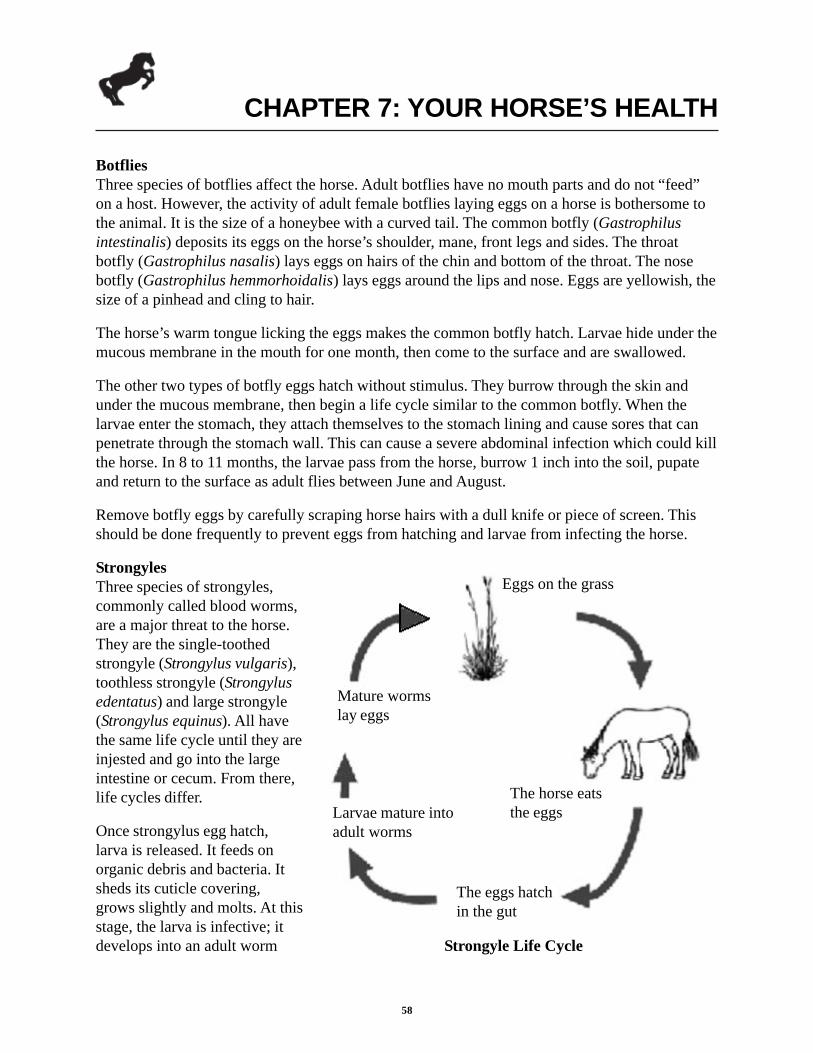
CHAPTER 7: YOUR HORSE’S HEALTH
58
BotfliesThree species of botflies affect the horse. Adult botflies have no mouth parts and do not “feed”on a host. However, the activity of adult female botflies laying eggs on a horse is bothersome tothe animal. It is the size of a honeybee with a curved tail. The common botfly (Gastrophilusintestinalis) deposits its eggs on the horse’s shoulder, mane, front legs and sides. The throatbotfly (Gastrophilus nasalis) lays eggs on hairs of the chin and bottom of the throat. The nosebotfly (Gastrophilus hemmorhoidalis) lays eggs around the lips and nose. Eggs are yellowish, thesize of a pinhead and cling to hair.
The horse’s warm tongue licking the eggs makes the common botfly hatch. Larvae hide under themucous membrane in the mouth for one month, then come to the surface and are swallowed.
The other two types of botfly eggs hatch without stimulus. They burrow through the skin andunder the mucous membrane, then begin a life cycle similar to the common botfly. When thelarvae enter the stomach, they attach themselves to the stomach lining and cause sores that canpenetrate through the stomach wall. This can cause a severe abdominal infection which could killthe horse. In 8 to 11 months, the larvae pass from the horse, burrow 1 inch into the soil, pupateand return to the surface as adult flies between June and August.
Remove botfly eggs by carefully scraping horse hairs with a dull knife or piece of screen. Thisshould be done frequently to prevent eggs from hatching and larvae from infecting the horse.
StrongylesThree species of strongyles,commonly called blood worms,are a major threat to the horse.They are the single-toothedstrongyle (Strongylus vulgaris),toothless strongyle (Strongylusedentatus) and large strongyle(Strongylus equinus). All havethe same life cycle until they areinjested and go into the largeintestine or cecum. From there,life cycles differ.
Once strongylus egg hatch,larva is released. It feeds onorganic debris and bacteria. Itsheds its cuticle covering,grows slightly and molts. At thisstage, the larva is infective; itdevelops into an adult worm
Eggs on the grass
The horse eatsthe eggs
The eggs hatchin the gut
Larvae mature intoadult worms
Mature wormslay eggs
Strongyle Life Cycle

CHAPTER 7: YOUR HORSE’S HEALTH
59
when it returns to the digestive tract of the horse. Once in the digestive tract, the larva molts intoan adult parasitic worm. Under good environmentalconditions, the first stages take three days to a week.After the larva finds a host, it takes 21 to 30 days tobecome an adult worm.
• Single-Toothed Strongyle. The most serious of thethree, it burrows through the intestine wall and getsinto the arteries. It prefers the artery that suppliesblood to the intestinal tract (anterior mesentericartery). When they burrow into the arterial wall, thewall weakens so that the artery balloons — calledan aneurysm. This weakened area can rupture andcause the horse to bleed to death. The larvae alsocause body tissues to become inflamed, which canplug the artery — called a thrombus — or some ofthe material can break off and flow with the bloodthrough the artery until it reaches a smaller arterythat it plugs — called an embolus. The flow ofblood stops — called an infarct — when arteriesplug. The tissue not receiving blood dies, in thiscase part of the intestines. This causes severe colic.In most cases, the horse will die without surgery.Eventually larvae go back to the intestines andform adult worms. This process can take sixmonths or longer. There are no effectivemedications to treat single-tooth migrating larvae.
• Toothless Strongyle. It leaves the intestines, goes tothe liver, then to the tissue around the kidneys andback to the large intestine. This journey causesdamage to the liver and signs of colic. Because thelarvae can carry bacteria, they can cause seriousinfections in any of the tissues they travel through.They also can rupture blood vessels, especiallyaround the kidneys, causing hemorrhaging sosevere that the horse could die. Their trip cantake as long as 300 days.
• Large Strongyle. It leaves the large intestine and goesto the liver and pancreas. Its burrowing damages these organs, and they can cause infectionsbefore returning to the large intestine. It takes about 240 days for the journey.
Figure 19. Strongyles (actual size).
Thread Worm
Large blood orpalisade wormswith strongyyles
Large stomachworms
Ascarids

CHAPTER 7: YOUR HORSE’S HEALTH
60
At least 12 species of small strongyles do not cause disease but lay eggs that look like thosepreviously discussed. This complicates diagnosis of the serious strongyles when feces areexamined for eggs.
Some roundworm eggs are very resistant to the environment and can survive as long as fiveyears. Advanced stages of larvae have two cuticles, or coverings, and can survive up to a yearin the environment. Environmental factors that favor egg and larva survival are moderatetemperatures, adequate moisture and shade. The most potent weapons to control internalparasites in horses are extreme temperatures, drying and sunlight. Favorable environmentalfactors for parasite survival also stimulate the infective-stage larva to move up blades of grassto gain access to a horse. Conditions are more favorable at dawn and dusk. Running horses onpasture during hot, sunlit days and removing them at dusk through dawn will decrease theirexposure to larvae. Since it takes three days to a week for the infective-stage larva to form,removal of fresh horse manure from the stall or paddock every two days will decreaseexposure to parasites.
PinwormPinworm females crawl out of the anus and lay eggs that stickto the skin around the anal opening. These drop off in aboutthree days. The larva develop inside the egg shell and are eatenby the horse. Then, the larva molts to the adult stages andpasses through the large intestine and completes its life cycle.The activity of the female as it crawls in and out of the analopening and the cementing substance that holds the eggsto the skin cause intense itching. The horse scratchesitself by backing up to and rubbing its tail against a solidobject like a fence post or barn. This causes an unkempt, ragged appearance to the tail. Thehorse may lose weight and muscle because it spends more time scratching than eating.
HabronemaHabronema are stomach worms. Several species affect horses: however, horses rarely haveheavy infestations. Fly larvae eat these eggs and, as the fly develops the larvae develops. Thehorse eats infected dead flies in feed and water. One habronema species causes benign tumorsin the stomach wall. Occasionally, infected flies release habronema larvae into skin wounds.These larvae do not become adults because they must be eaten. They cause intense itching andopen, oozing sores called Jack-sores or summer sores.
OthersLungworms, tapeworms, liver flukes and roundworms also infect horses, but are rare. Manycompounds are available to treat internal parasites. Some are powders fed with grain, others arepastes or gels squirted in the horse’s mouth, and some can be given through a stomach tube.These compounds have varying degrees of effectiveness against each of the internal parasites. Aveterinarian should be consulted to develop a control program that will fit your management.

CHAPTER 7: YOUR HORSE’S HEALTH
61
In general, horses should be dewormed every two months, but develop a parasite control programwith the help of your veterinarian. Horses should be dewormed before being released into a newpasture or a cleaned corral to prevent contamination of the new area with parasite eggs.Treatment for botfly larvae in the stomach should be delayed until at least one month after thefirst fly-killing frost.
Removing manure from corrals can remove eggs and larvae and allow the ground to dry.Mowing tall pastures increases the amount of sunlight on the ground and allows it to dry.Sanitation plays an important role in preventing parasites.
External parasites
FliesA number of flies cause problems in horses. Not only do they irritate the horse, they also transmitdiseases.
• Stable flies suck blood from horses and other animals. The female lays its eggs in manure, urineand straw. This fly can carry the internal parasite larvae of Habronema, which cause summersores. Cleaning destroys fly breeding sites.
• House flies do not suck blood but can transmit many serious diseases including the Habronemalarvae. This fly lays its eggs in manure and straw.
• Face flies irritate the eyes. The fly is quite similar to the house fly.
• The horse fly is a large, black fly. Its bite is painful and may leave a bleeding wound. The deerfly is smaller and lighter in color with dark bands across its wings. Both flies can transmitdiseases to horses. Larvae form from eggs deposited in muddy, wet areas. They burrow into themud, emerging as adult flies 10 to 11 months later.
• Decaying and dead tissue attracts blow flies. They deposit eggs in infected wounds. Their eggsdevelop into fly larvae called maggots. Keeping wounds clean and uninfected along with usingfly repellents around injuries will prevent blowfly maggots.
• Wohlfarthia flies larvae which penetrate skin, forming abscess-like bumps containing thelarvae. Maggots must be removed before the condition improves.
MitesThree types of mites (mange or scabies) parasitize horses. They produce a condition similar tolice that cause large areas of skin to become bald, reddened and inflamed. Intense itching causesthe horse to rub or scratch the infected areas and makes the injury to the skin worse. Mites aresmall (1/40 inch) and can’t be seen without a microscope. Because they burrow into the skin,some skin layers must be scraped off and examined with a magnifying lens or a microscope tosee mites.

CHAPTER 7: YOUR HORSE’S HEALTH
62
Horse liceHorse lice are uncommon but can become a problem. Two primary kinds of lice parasitize thehorse; a chafing or biting louse and a sucking louse. Both cause intense itching so that the horserubs against solid objects and bites or gnaws at affected areas. As a result, large areas on theneck, shoulders, flanks and hips lose hair and become red and inflamed. These symptoms areworse in the winter and early spring when lice populations peak. Adult lice are about one-tenth ofan inch long, chestnut brown in color and clearly visible. Their eggs (nits) appear as whitish,small structures attached to fine hairs on the horse’s body.
FungusesFunguses also parasitize the skin and produce a condition commonly called ringworm. It is notcaused by a worm, but some of the sores caused by the funguses appear ring-shaped withreddened patches covered with scabs. A better name for fungal infections of the skin isdermatomycosis. These sores can be small to fairly large. They are hairless and inflamed withcrusts. The funguses can be highly contagious, not only to other horses but also to humans. Careshould be taken when handling horses with this problem. The funguses can be transmitted oninfected tack and brushes to uninfected areas and to different horses.

CHAPTER 7: YOUR HORSE’S HEALTH
63
esaesiD
tcudorPerudecorP
retsooB
stnem
moC
)wajkcoL(
sunateTro
evissap(nixotitn
A)ytinu
mmi
yraropmet
saero
mrostinu
000,51roirp
nehw
detacidnisi
sutatsnoitaniccav
nwonknu
enodtonyllaus
Usunatet
htiw
noitcnujnocni
nevigeb
naC
.dioxot
dioxoT2:noitazinu
mmi
yramirP
trapaskee
w4,sesod
esodelgniS
yllaunna
rehtiehti
wnoitanib
mocni
netfO
eniccavazneulfniro
sitileymolahpecne
.stcudorp
eniuqEsitiley
molahpecnE)ssenkciS
gnipeelS(nretsaEnretse
WnaleuzeneV
.elbaliavastcudorp
suoremu
Nnetfotso
M.surivdellik
erallA
.denibmoc
eraseicepslla
2:noitazinum
miyra
mirP4-2,ralucsu
martni,sesodtrapa
skeew
esodel gniS
yllaunnatcesni
erofebgnirps
nidetaniccavfitse
B.nosaes
suriv2)ulF(
azneulfnIsniarts
.elbaliavastcudorp
s uoremu
Nevahlla,suriv
dellikerall
A.tneserp
sniartslarivhtob
2:noitazinum
miyra
mirP4-2,ralucsu
martni,sesodtrapa
skeew
shtnom
21-2yrevE
ybdetacidni
sanoitautis
nognidneped
ycneuqerfretsoobyraV
nom
mocyreV.erusopxelaitn etop
s'esroh.esaesid
sitinomuenponihR
,surivsepre
HeniuqE(
)noitrobalariv.suriv
dellik,surivevil
deifidoM
2:noitazinum
miyra
mirP4-2,ralucsu
martni,sesodrehtie
htiwtrapa
skeew
tcudorp
shtnom
21-2yrevE
ybdetacidni
sanoitautis
,sesaesidyrotaripserreppu
sesuacsuriV
ro,esaesidmetsys
suovrenlartnec.ycnangerp
etalot
dim
nisnoitroba
iuqesuccocotpertS
)selgnartS(
rehtieera
elbaliavastcudorP
cificepsroniretcab
dellik.lla
wllecmorf
nietorp
nacn oitazinu
mmi
yramirP
tasesod
elpitlum
ebslavretni
gniyravtcaxe
nognidneped
desutcudorp
shtnom
21-3yrevE
detacidnisa
fossenevitceffe
otsa
ysrevortnoC
niylno
desuyllarene
G.stcudorpsuoirav
.secnatsmucric
cificeps
seibaRdevorppa
ylnoeniccav
delliK
.sesrohni
esurof
2:noitazinum
miyra
mirP4-2,ralucsu
martni,sesodtrapa
skeew
yllaunnA
,nom
mocwon
eraesurof
snoitacidnI.snoiger
cimedne
niyllaicepse
Tabl
e 9.
Equ
ine
Imm
uniz
atio
n Pr
ogra
m

CHAPTER 8: GROOMING
64
Grooming and care
Regular grooming of your horse will:• give it a clean, shiny coat and skin;• stimulate muscle tone;• gentle most horses; and• provide an opportunity to examine the horse closely.
Basic grooming tools include a rubber currycomb or rubber groom-mitt, a coarse-bristle dandybrush, a fine-bristle body brush, a wool cloth or cotton towel rub rag, a hoof pick, electricclippers, a coarse-toothed mane and tail comb, and a shedding or scrape stick. Metal spring, orbar-type currycombs, are not recommended for show horses because they pull and break the hair.The shedding blade, bent double with the two ends fastened, is a handy tool to use during thespring when the horse sheds its winter hair. It can be turned over and used as a sweat scraper inthe summer. A sponge can be used to clean muddy legs and other dirty areas. Keep your toolsclean. Remembering how you use the tools, not their quality, determines the results.
Groom your horse before and after you ride. If you follow a definite system, you will thoroughlyclean the horse each time, and it will require less work. Comb in the direction of hair growth.Begin brushing the horse with a rubber curry comb or rubber groom-mitt at the head and workback on the near side including the legs; then go to the off side and work back from head to tail.Don’t neglect the head (be gentle here) and the area around the tail. Do not use a metal currycomb around the head or below the knees and hocks. There is no fat or muscle in these areas tocushion the comb’s hard edges. Use a wet sponge or soft brush to remove dirt from the horse’shead, knees or hocks. Use a rubber curry comb to remove caked dirt from below the knees andhocks.
When brushing, start with the coarse-bristle dandybrush and brush in short, brisk strokes. Flick thebristle up at the end of each stroke so it throws dirtaway from the hair. Brush with the lay of the hair. Itchanges direction at different points on the body, sowatch for these changes. Use the dandy brush on thebody and legs, but not the head.
Use the fine-bristle body brush on the head, bodyand legs. Again, brush in the direction the hairgrows. Rub the horse from head to tail with a woolcloth or cotton towel rub rag to remove dust.
Many old-time grooms use their hands and fingers to rub and massage hair and muscles. Whentraining a young foal, use your hands to rub, scratch and massage every part of its body.
Figure 22. Curry comb.

CHAPTER 8: GROOMING
65
Trimming and clipping
Clippers and shears are additional tools used for grooming.Use clippers for cutting bridle paths and leg hair to trimaround the head, ears and lower jaw, and to remove whiskersfrom the muzzle. Use shears in place of clippers for horsesthat are clipper shy. Clipping a horse can be dangerous;always have experienced people around to provide assistance.
Mane and tail styles vary with breed preferences. Contact your breed association for groomingstyles.
Regardless of style, keep the foretop, mane and tail neat.Work out tangles in the mane and tail with your fingersand brush with a dandy brush. Use caution when using acomb. Over a period of time, a coarse-toothed comb orcurrycomb will pull out hair and leave it thin. Never try topull tangles out; they just become tighter. Pick at them toloosen snarls. Watch for burrs and sticks caught in themane and tail; remove them carefully. When grooming thetail, stand at the horse’s side and never directly behind therear of the horse.
Hoof care
Proper cleaning of hooves requires you to pick up each hoof. Teach every foal to allow its feet tobe picked up and handled. Begin when it is young so it gets accustomed to the feel of your hands.If you trim the foal’s feet as it grows, you should have no trouble when the horse becomes fullgrown. Figures 25-28 shows how to properly pick up your horse’s feet.
Clean the hoof from heel to toe. Pay particular attention to the area around the frog. Clean thedepressions thoroughly between the frog and the bars to prevent thrush and other foot infections.Watch for rocks, nails, injuries and loose shoes. Check the growth of the hoof periodically; trimand change shoes when necessary.
Proper hoof trimming is very important because it keeps your horse standing squarely andmoving straight. Trim hooves every six to eight weeks, depending on the rate of growth. Thehooves of young horses should be watched closely as they grow. Keep feet trimmed regularly sothat the muscles and bones of the feet and legs will develop correctly. A healthy hoof grows about3/8 to 1/2 inch a month and the fastest growth is at the toe of the hoof. Do not let hooves growlong during winter months or when you are not using your horse. Keep hooves trimmed. If yourhorse is idle during winter months, it should be left unshod so its hooves have a chance toexpand without being limited by shoes. This will prevent contracted heels.
Figure 24. Body brush.
Figure 23. Dandy brush.

CHAPTER 8: GROOMING
66
Corrective trimming and shoeing on some horses improves or corrects inherited faults inconformation. The work should be done only by a person fully experienced in the structure of thefoot and leg who has the knowledge of corrective measures. Ask your farrier for the shoe sizeyour horse wears on the front and back, and if he did corrective work on your horse. If so, askwhat correction was needed and exactly what was done. Learn the basic points of proper shoeingso you will know when your horse is shod correctly. A poor job of shoeing can cripple your horsefor long periods of time. Know what is correct and insist the job be done right.
The hooves of a horse will dry out rapidly in a dry climate and soils of the west. Keep yourhorse’s hooves moist. A dry hoof will become brittle and crack; the frog will lose its elasticity. Ifa hoof is left dry too long, the frog will shrink and the heel will contract. Hoof dressing may beapplied. One of the best preventions is to have some moist ground, possibly around the wateringfacilities, where the horse will stand long enough for moisture to go into the hooves. However, donot keep the hooves too moist because thrush infections grow in wet, manure-packed feet. If yourhorse gets thrush, apply a commercial germicidal preparation or a 7 percent iodine solution to thefrog area of the hoof.
Fitting and training for show
Competition when showing horses, either halter or saddle, is keen. If you intend to compete, youmust plan on spending many months training and fitting your horse.
Proper fitting is time-consuming and requires a good worming program, proper feeding, abalanced exercise schedule, grooming and training. You cannot fit a horse properly in a day, aweek or a month. Start early.

CHAPTER 8: GROOMING
67
Figure 26. For a quick cleaning, hold thehoof in your free hand. When shoeing orduring a long cleaning job, it will help toplace the horse’s foreleg between yourlegs. Hold your knees together to helpsupport the weight of the horse’s leg.
Figure 25. Near forefoot: Slide your left handdown the cannon to the fetlock. Lean with yourleft shoulder against the horse’s shoulder.Reverse for picking up the off forefoot. Whenthe horse shifts weight and relaxes on the foot,pick it up.
Figure 28. When the horse is settled,move to the rear, keeping the leg straightand swing your left leg underneath thefetlock to help support the horse’s leg.Never pull the foot to the side - yourhorse will resist. Reverse sides forpicking up the off leg.
Figure 27. Near hindfoot: Stand forward of thehindquarter and stroke with your right handfrom the point of the hip down the hip and legto the middle of the cannon. As you move theright hand down, place the left hand on the hipand press to force the horse’s weight to theopposite leg. Grasp the hock and lift the legforward slightly, slide your hand down to thefetlock and lift the foot forward.

CHAPTER 9: TRAINING
68
Good, consistent training is essential for your 4-H horse project. Every time you handle yourhorse, you are training it and reinforcing its previous experiences. All 4-H horse project membersshould take lessons, attend clinics and carefully observe other horse owners. Developing yourselfinto a competent horseman requires a dedicated and concerted effort.
Training methods vary with the trainer and the individual horse. A good trainer knows manymethods and when to use them. This takes experience as you never stop learning. Do not attemptto handle and train a foal or yearling until you are old enough, large enough and have thematurity and experience to properly manage all situations.
The secret is to make what you want the horse to do easy for him to do, while at the same timemaking undesirable behavior difficult. The horse learns good behavior and responds to cuesthrough repetition. Some learn faster than others, but in either case you, as a trainer, must know -what you want and ask for it in exactly the same way each time. Reward and stopping a cue atthe correct moment is as important as giving the correct cue. Be patient, and remember one ofyour best aids is your voice. Talk to your horse with a soft, reassuring tone. Don’t confuse yourhorse by asking too much too soon. Start out slow and be consistent with your training andcommands.
Separate training into two parts, ground training and saddle training. This manual covers basicground training. Saddle training requires experience and knowledge beyond the beginner orintermediate 4-H skill level, therefore only ground work is discussed here.
An untrained or improperly trained horse is a nuisance at the least, and some behavior can bedangerous. The cute little tricks a foal learns will soon become bad habits, and even dangerousones, when the foal grows up. Don’t “baby” your horse, young or old. Be firm about what youwant it to do. Use discipline when needed, but don’t be harsh or cruel.
Ground work refers to working with the horse while the handler is on the ground. Ground workis best started when the horse is still very young. Halter the foal when it is a few days old andbegin to train it to lead and stand quietly tied. These lessons should be short and frequent. Thefoal must learn to respect this equipment and the handler. This is important since you will use alead rope, tie-ropes and reins to communicate with your horse for the rest of its life. Use largediameter cotton rope (3/8- or 7/16-inch diameter) during early training. This rope is soft and willnot give rope burns to your horse. This size is much easier to grip and hold.
Many trainers tie the haltered foal near its dam for short periods of time. Others halter-break byleading the foal separately when the dam is led. Still others will tie the foal to a stout fence orpole for a short time and let it learn to respect the halter and tie. To prevent injury to neckmuscles, tie a nonslip loop around the foal’s body immediately behind the withers and elbows,with the end between the front legs. Tie the end through the halter ring and back to the post, orwrap it around the post, and run it back through the halter ring. When the foal pulls back, thepressure of the body loop will increase and the foal will stop.

CHAPTER 9: TRAINING
69
Figure 30. Loop lariat over foal’s rump.
This is not cruel as long as you watch the foal toensure that it does not become entangled andinjure itself. A good trainer will keep watch butwill leave the foal alone to learn by itself. Thefoal must learn to respect the rope and halter ifyou want control and obedience later.
The foal should be taught to respond willingly to the lead rope.This is easier if it has learned to respect the halter. A goodpractice is to make a loop with your lariat and drop the loopover the rump of the foal (see figure 30). The loop should liejust ahead of the point of the hip and drop back to the rumpunder the buttocks. The rest of the lariat is held so aslight pull will give pressure at the loop if the foalholds back. Never jerk or pull at the head if thefoal balks. This will cause the foal to fight backharder. Take it easy, and pet the foal when it responds correctly.
A horse taught to lead properly will move with you in any direction and at any speed. It will keepits head about even with your shoulder, or slightly in front, so you are about halfway between itshead and shoulder. The horse should not crowd you or stay far away. It should keep a moderatedistance away from you and work on a loose lead line. When you wish to stop, apply a slightresistance on the lead rope by making your hand passive, but do not pull back. The horse shouldstop when it feels this resistance. When it stops, it should stand straight and quietly, again on aloose lead. These points are very important for correct halter showing.
Don’t forget to praise your horse with your voice and give him a pat when he responds correctlyto training. While teaching a horse to lead, you should also teach the horse to respect your spaceand to move away from pressure. Your horse should quietly and immediately be willing to moveany part of its body away from or toward the handler. A step or two at first is good enough. Lateron, you can ask for more steps. Practice your ground work on both sides to keep your horseflexible and responsive.
Lunge line (ground training)
Many trainers use a lunge line for both training and conditioning horses. You will find a lungeline useful, especially for early training of young horses and exercising older horses.
A lunge line may be a lariat of light nylon or cotton rope at least 25-feet long. Fasten one end toa well fitted halter or lunging cavesson. The rest of the lunge line is held in the hand. Stand in asmall area and drive the horse in a circle around you. Walk forward in a small circle as your horsemoves in a larger circle. Keep the lunge line loose, but not dangling. A tight lunge line can spoil anatural gait. Do not attempt to use small diameter ropes since they do not coil properly andtangle. This is dangerous.

CHAPTER 9: TRAINING
70
Stand in position from hip asshown (“behind” the horse)to keep the horse moving.
Step “forward” to get “ahead”of the horse to signal a stop.Note the angles formed by the lunge line and dotted lines at the two positions.
Figure 31. Lunge line or ground training.
It takes patience to teach a horse to work on a lunge line. Up to this time, your horse was trainedto walk by your shoulder. Start to train your horse to circle by teaching it to walk in a smallcircle around you. As the horse learns and responds, increase the size of the circle by increasingthe amount of line you let out. A long, light whip may be used as an extension of your hand tomake your horse move out, but never strike hard. The snap of the whip behind its fetlock, or atouch of the whip or light flick on its hindquarters will give all the signal needed. Soon you willnot need the whip.
Figure 31 shows your position to keep thehorse moving around you in a circle. It ispossible to train your horse to stop whenyou step forward from this position.
After your horse has learned to circlefreely at a walk and stop when youstep forward and say “whoa,” youcan begin training it to trot andcanter slowly. Always circle bothdirections equally so your horse willdevelop muscles and skill to work inboth directions of the circle. This isan excellent way for your horse tolearn and use the correct leads at thecanter and develop its natural balanceand grace without the weight of a rider.
Do not work the horse at excessivespeed for a long length of time in smallcircles. This can cause stress andlameness in your horse’s legs. Keep thecircle large; a tight circle is hard on a young horse’s joints.
Always use the same voice commands. Soon your horse will respond to these words.
Use a lunge line for regular exercise and training periods. Also, this is a good way to exerciseyour horse at a show. Both young and older horses should be trained to respond to the lunge line.In addition to lunging, you can ground drive your horse. This prepares a young horse for directreining when put under saddle.
You’ll find that it is fun to train and work your horse from the ground. You will experience adifference in the way your horse responds when you ride.
Breaking a horse to saddle and saddle training is beyond the scope of this manual. Referencematerial about saddle breaking is available elsewhere.

CHAPTER 10: SHOWMANSHIP AT HALTER
71
Showmanship
The presentation of your horse to a judge isknown as showmanship, and thispresentation follows a pattern. A pattern is awritten description of a group of maneuversthat the judge wishes to see and how hescores you on your skill in performing thispattern. A single maneuver is known aswalk, or trot, or back, or pivot. A typicalpattern for showmanship is to lead, walk,trot, back, set up or pivot the horse, in anycombination. See the NH 4-H HorseRulebook for suggested patterns, rulesand explanation of scoring.
Presentation of the horse has two parts.Part one is the appearance of theexhibitor and condition and grooming of the horse. The exhibitor should be dressed in clean,fitted clothes, with polished boots and a brushed hat. The exhibitor’s hair should be neatlyarranged away from his or her face. The horse is required to be clean and brushed, with a combedmane and tail. Hair that has been clipped or trimmed should have a neat, tidy appearance. Thehalter and lead should fit well, and be clean and in good repair (see figure 32).
The second part of presentation is the actual performing of the pattern. The exhibitor shoulddisplay confidence and poise when showing. The horse needs to be responsive to the exhibitor’scues when performing the pattern.
In the Show Ring
Be on time when the class is called. If an individual pattern is used, the show management willnormally post the pattern. If no pattern is posted, enter the ring at the direction of the ringsteward and watch the ring steward for instructions on where to go. Remember, even though thering officials may be checking entries, the judge may be sizing up contestants as they come in, sostay awake.
When instructed to line up, enter the line from the rear in the position indicated. Line up evenlywith the others and stand up your horse. Stand your horse quickly, then watch the judge. Do notcrowd the other horses. Allow room between your horse and those on either side. When the classis lined up or leading head to tail, do not crowd the horse in front. The horse should set upquickly, stand squarely and move forward or backward freely. Pose the horse according to yourbreed standards.
Figure 32. Note the clean, well-fitted horse andcompetitor on the left.

CHAPTER 10: SHOWMANSHIP AT HALTER
72
Training
There is never a substitute for training. No shiny halter, pretty new shirt or colorful hat will makeyou as competitive as the youth who has consistently schooled his or her horse. Training doesnot describe any particular way of teaching. As all horses think and act individually, trainingmethods need to suit the individual’s ability. A training method is generally acceptable as long assafety rules and humane treatment of the horse are practiced. See Chapter 16, Horse SafetyGuidelines, for basic safety rules.
Three basic training rules
1. Patience2. Consistency3. Practice
Train at home until the signals you give are understood by the horse.
Note the safe zone areas in figure 34. These are the safe areas for someone who handles a strangeor unschooled horse. When using the safe areas, you are out of the direct line of a sudden lunge,strike from the front legs or a kick from a back leg. Since a horse uses its head and neck tobalance its body, the safe areas are the positions where maximum control can be exerted bypulling the horse’s head to the side. This forces the horse off balance in hope of preventingfurther action if the horse becomes unruly.
Halter showing and showmanship customs today, especially in showmanship classes, encouragethe exhibitor to move to either side of the horse. This is safe only if the horse is properly trainedbefore entering the show ring. A horse acts independently on each side; therefore, you must trainit to lead, stand and show from each side. Always handle a strange or untrained horse from thenear (left) side since the majority of horses are started and handled from this side.
Figure 33. Be in control of your horse, hold the lead in your right hand and lead from the near(left) side. Note how the exhibitor on the left is not in control and the exhibitor on the right isclinching too tightly on the horse’s head.

CHAPTER 10: SHOWMANSHIP AT HALTER
73
As a trainer, you must give your horse the chance to do the work right. If you do not work yourhorse with patience and consistency, he can become confused. This often leads to a cranky,stubborn horse. Practice makes you confident and the horse trustworthy.
To begin training for showmanship, your horse must do two things: lead willingly and standquietly.
The most important part of any showmanship pattern is the set up for inspection. The set up is aposed position of the horse for inspection by the judge. To achieve this pose, the exhibitor mustteach the horse to stand squarely on each leg and stay posed until asked to change.
Bring your horse into the set up with the foot fall of the right hind foot. When you bring yourhorse from a walk to halt, the right hind becomes the base of your set up. Do not move that foot.Next is the placement of the left hind foot. Setting the hind feet is generally the most difficultchore in the beginning of training. Work only with the hind feet until you get a response.Response is movement of the foot or shift in weight when you pull or push on the lead shank.This beginning movement probably will not be correct in its placement, but once your horseunderstands he is to move a foot when you cue him, you can keep asking him to move his footuntil he places it correctly, or anywhere you wish it to be. At first, you may have to pull very hardas the tendency of a standing horse is not to move. Once he moves, relax the lead. This is hisreward.
The front feet are treated a little differently. The foot most out of position, or not square, ismoved first. Moving the front feet is generally done with side to side motion of the lead, with thelead held under the chin. Again, when a front foot moves, release the tug. With patience, the
Figure 34. The shaded areas indicate safezones for showing a horse from either side.Note the danger zone directly in front of thehorse. Stand toward the front, not in thedanger zone, and out of the direct line ofaction of a strike or lunge. It is permissibleto cross the danger zone to get from one sideof your horse to the other. Remaining in thedanger zone is considered a fault. Usepositions within the safe zones where boththe horse and the judge can be observed.
SafeZoneif horseis properlyschooledto handlefrom right
SafeZone
DangerZone

CHAPTER 10: SHOWMANSHIP AT HALTER
74
horse will become sensitive to any movement of the lead shank. In time, a slight tug on the leadwill cause the horse to move a foot. Eventually, the horse will anticipate your cues and standhimself correctly.
To demonstrate your horse’s natural movement and soundness, the judge often asks you to trotyour horse. If your horse does not trot beside you, he must be taught to do so. Begin teaching thetrot from the walk. Your body position at the walk and trot should be midway between the horse’shead and shoulder. Once you and your horse can walk together in this position without anypulling on the lead shank, pick up the pace of the walk. Vary your speed at the walk to test yourtraining. The horse should adjust his speed to match yours, if it does not, continue practicing thewalk. When you ask for the trot, ask with the same sound or cue you use when riding or lunging.Walk briskly and cue him to trot just as you begin to trot yourself. If he does not trot, return to thebrisk walk and ask again. Continue this routine until he trots. Never pull or drag your horse.Making your horse trot is a good test of your skill. Having a friend stand behind the horse andcluck or wave his arms is not.
Patterns quite often require a pivot or turn on the haunches. The pivot is usually described as aquarter or half turn, or 90 or 180 degree turn, and sometimes a full or 360 degree turn is askedfor. The turn is always to the right or away from you when a quarter or more. To begin thetraining, you must start with the right hind foot. This is called the pivot foot. Position your lefthand at the corner of the horse’s mouth and your body midway between the head and shoulder.Holding the lead in your left hand, gently push against the face with your fingers whilesimultaneously pushing against the rib and shoulder with your right hand and stepping forward.The rib and shoulder must move before the head. If you turn the head or push too hard with yourleft hand, the horse will bend in the neck. To help move the rib and shoulders, cautiously use acrop or tapper. Try to keep the horse as straight as possible. This movement is difficult for theuntrained horse. To move his rib and shoulder, begin the pivot. He must step around with hisfront legs and cross the left over the right, while keeping his right hind foot, the pivot foot, inplace. He will most likely take a step back, or take a step out to the right with the pivot foot. If hedoes, simply pull him back around to the start position and begin again. When you begin yourtraining, ask only for one step, and reward the horse by stopping. Training the pivot is achallenge, so one small step done correctly is great progress. You may need the help of a friend tokeep track of the pivot foot’s position, as it can be difficult to see when standing at the front ofthe horse.
Finally, after all the training and practice, it is time to meet the judge and perform the pattern.The function of showing with the quarter system is to allow the judge an unobstructed view ofyour horse to evaluate conformation, fitness and soundness. To keep the judge’s view clear, theexhibitor must move from one side of the horse to the other. The showman chooses his sidedepending on the position of the judge. The following examples of the quarter system willexplain the movements.

CHAPTER 10: SHOWMANSHIP AT HALTER
75
Figure 35. First, theexhibitor is in thebasic position - safezone at horse’s left -and the judge at thehorse’s right front orin the right frontquarter.
Figure 36. Second, asthe judge movesacross the imaginaryline to the right rearquarter, the exhibitorsteps across to thehorse’s right side.
Figure 37. Third, thejudge moves into theleft rear quarter, andthe exhibitor stepsback to the left to beon the same side asthe judge.
Figure 38. Fourth, asthe judge moves tothe left front, theexhibitor steps backto the right to avoidblocking the judge’sview.
X = Exhibitor Position
The Quarter system
The four quarters can be visualized by an imaginary line drawn down the center of the horse’sbody extending from front and rear to divide the horse into left and right sides. Another linedrawn across the horse at the base of the withers, extending out from both sides at right angles tothe first line, divides the horse front and rear. This is shown by the dotted lines in figures 35 to38. Visualize the judge moving in a clockwise direction around the horse or around the class ofhorses as you move from figure 35 through figure 38.
The exhibitor should stand angled toward the horse in a position between the horse’s muzzle andeye, holding the lead with enough slack to allow movement under the chin as the handler changesposition when the judge moves. The lead should be held flatly between the thumb and forefingerof the right hand, near the muzzle, but not touching the horse. The excess lead is held in the lefthand in a manner comfortable for the exhibitor. Arms should be relaxed and the elbows slightlybent. Different positions are often required allowing for the height of the exhibitor.
A minimum number of steps should be taken when changing sides. You can limit your steps andmake a smoother change by stepping off with the inside foot, placing it on the other side of thehorse, turning on the foot as you place your other foot along side. The hand should follow thefoot, moving quietly under the chin of the horse.
X X XX

CHAPTER 11: EQUIPMENT (Tack)
76
Good equipment is a basic necessity. Equipment should be well made and fit both you and yourhorse. Fancy equipment is not necessary for your 4-H project.
Western
You will need a saddle, saddle pad or blanket, bridle with a good bit, halter and lead rope foryour 4-H project. Other equipment, such as a chaps, splint boots, spurs or lariat may be needed,depending on the type of riding you do. Do not use spurs until you can use them correctly, asaids, not punishment.
BridleThe bridle consists of three parts: the headstall, bit and reins. Western headstalls usually come inseveral styles: browband and split-ear are examples. Western reins come in three varieties: split,romal and mecate. The headstall should be of strong, narrow leather. The bit should be as lightand as mild as necessary while still allowing you to maintain control of your horse. Too oftensevere bits are used as a substitute for good training. Do everything possible to keep your horse’smouth soft and responsive.
The bit is used to communicate with the horse, not control it. Western bits fall into three maincategories: snaffle, curb and spade. A snaffle bit is a non-leverage bit while curb and spadebits are leverage bits. The bit should fit the width of the horse’s mouth and be properlyadjusted to the horse’s teeth, lips and tongue. Snaffle bits are usually correctly adjusted if theymake one or two wrinkles in the corners of the horse’s lips. Curb bits are usually fitted withone wrinkle or just moderate contact with the corners of the horse’s mouth. Consult with yourleader or riding instructor to learn more about proper bitting.
Figure 39. Three main styles of bits. A) a spade bit with spoon port,
braces, roller, slobber chains andrein chains;
B) a sweetwater copper mouth piececurb bit;
C) shanked sweet iron snaffle withtwo rein rings;
D) high copper covered port withcricket roller, decorative silvershanks;
E) medium port sweet iron curb bit;F) low port grazing shank curb bit.

CHAPTER 11: EQUIPMENT (Tack)
77
The hackamore is a bridle without a bit. Hackamores come in two styles, bosal andmechanical. A bosal is made of braided leather or rawhide and can be a valuable training tool.Mechanical hackamores are a leverage device that creates pressure on the bridge of the noseand on the chin. Mechanical hackamores are not acceptable in western performance classes,but are often used in timed events and trail riding.
Curb straps are necessary on all leverage bits and mechanical hackamores. Some curb strapsare made of leather and some include a flat chain. All curb straps must be at least ½ inchwide to lay flat against the horse’s chin. Adjust the curb strap so it is tight when the bitshanks are a 45–50 degree angle to the mouth.
Headstall
Bosal
Fiador
Crown-pieceBrowband
Throat Latch
Check piece
Curb strapBit
ReinsBRIDLEHACKAMORE
Figure 40. Browband headstall with curb bit on left; hackamore headstall with a rawhide bosalon right. This is an excellent training tool that eliminates pulling on the mouth of the horse beingtrained.
SaddlesThe western saddle was developed for working cattle and riding long distances. It has a horn,cinch, wide-stirrup leathers called fenders and often a rear cinch. Designs are often tooled intothe leather to decorate western saddles. The rear cinch helps keep the saddle in place whenroping and working cattle. Wide fenders protect the rider’s legs from horse sweat and thorns. Awestern saddle is designed for use with thick saddle blankets or pads.
Saddles that receive proper care will last a lifetime. Store them in a manner that supports thecorrect shape. Clean the saddle regularly with a leather cleaner and conditioner and use a saddle

CHAPTER 11: EQUIPMENT (Tack)
78
oil to keep the leather pliable. Replace worn or broken parts before they affect the function of thesaddle. Always use a clean and dry saddle pad on your horse. There should be enough padthickness to keep the gullet of the saddle above the withers. You should be able to place yourfingers between the withers and the saddle gullet.
Store your equipment properly. Keep it out of the dirt and weather. A saddle rack will help yoursaddle keep its shape during storage.
ForkSwells
Seat
CantleRear Housing
Skirts
Rear Cinch Bullet
FenderStirrupLeatherKeeperStirrup
Cinch
Long Latigo
Short Latigo orOffside Latigo
Tread Cover
Latigo KeeperGullet
Pommel
Seat JockeyDee Ring
Horn
Figure 41. Western Saddle
Saddle Strings
Figure 42. Saddle rack.

CHAPTER 11: EQUIPMENT (Tack)
79
English
The English riding styles are the hunt seat, saddle seat and dressage.
Hunt seatAcceptable bits include snaffles, pelhams, kimberwicks or full bridles. All bridles must be fittedwith cavesson nose bands. Martingales, either running or standing, are permitted in classes overfences. Martingales are training equipment not allowed in flat under saddle classes. Correctlyadjust the bit to the horse’s mouth. Snaffle bits are usually correctly adjusted if they make one ortwo wrinkles in the corners of the horse’s lips. Consult with your leader or riding instructor tolearn more about proper bridle fitting.
The snaffle bridle uses a non-leverage bit and is the most commonly used bridle in hunt seatand dressage riding. The bridle is made of plain leather (raised or flat) with a browband,cavesson, throat latch and a single set of closed reins. A dropped noseband, figure eightnoseband and flash noseband are all training devices that fit below the snaffle bit and keep thehorse’s mouth closed.
The pelham bridle uses a leverage bit, called a pelham. This bridle is different from thesnaffle because it has two sets of closed reins attached to the curb bit. The pelham also has acurb chain. When the top rein, or snaffle rein, is pulled, it puts pressure on the corners of thehorse’s mouth, lips and gums. The curb rein, or lower rein, puts pressure on the poll, mouthand chin groove. Correctly adjust the bit to the horse’s mouth. Pelham bits are usually fittedwith one wrinkle or just moderate contact with the corners of the horse’s mouth. Adjust thecurb strap so that it comes tight when the bit shanks are a 45 to 50 degree angle to the mouth.Consult with your 4-H leader or riding instructor to learn more about proper bridle fitting.
Figure 43. Snaffle bits:
A) full cheek snaffle 41/2 inch mouth;
B) eggbutt snaffle 5 inch mouth with aslow twist;
C) D-ring snaffle with copper rollers;
D) mullen mouth spoon cheek snaffle;
E) fulmer snaffle;
F) eggbutt bridoon;
G) O-ring snaffle large diameterhollow mouth piece;
H) western D-ring, decorative rings.

CHAPTER 11: EQUIPMENT (Tack)
80
The full bridle, or weymouth bridle has two bits (a snaffle and a curb), two reins, two cheekpieces, a browband, cavesson, throatlatch and a curb chain. The curb rein puts pressure on thepoll, mouth and chin groove. The curbshould fit just below the corners of thehorse’s mouth without pinching. Thesnaffle puts pressure on the corners of themouth and should rest just above the curbon the corners of the mouth. The curb chainmust be twisted flat and rest below thesnaffle. The curb chain should be loose atrest and tighten when the curb rein ispulled. There is a lip strap attached to the bitshanks and through the curb chain (seefigure 44, E). The lip strap keeps the curbchain in place.
The browband of the bridle keeps theheadstall in place and should not pinch theears. The cavesson encourages the horse tokeep his mouth closed. It fits between thecheek pieces and the horse’s cheek. Thecavesson should be adjusted to fit so that itlays approximately two fingers below thecheek bone and be neither too tight nor tooloose. The throat latch adjustment shouldallow two to three fingers between it and thethroat of the horse to permit the horse to flexits neck.
Saddle seatFull bridles are required in saddle seat. Martingalesare not allowed. A flat English-type saddle is required.
DressageSnaffle bridles are used in all lower levels and training while full bridles are used in upper levels.
SaddlesThe English saddle is made in many styles. The girth is attached to two or three billet strapswhich are under the flaps. English saddles are designed to conform to the horse’s back and fitvery closely with a minimal amount of padding. It has metal stirrups and is lightweight. The flapsprotect the rider from the horse’s sweat. Some saddles have knee rolls to help riders keep theirlegs in place. The skirt of the saddle protects the thighs of the rider from the stirrup bars andbuckles.
Figure 44. The pelham bit has both non-leverage and leverage functions: A) pelhamwith medium port; B) rubber mullen mouthpelham; C) kimberwick, medium port; D)weymouth low port, smooth bridoon; and E)curb with tongue relief, lipstrap and smoothbridoon.

CHAPTER 11: EQUIPMENT (Tack)
81
Panel
Flap
Sweat FlapBillets
Figure 46.English Saddles.
Saddle Seat Hunt Seat Dressage Seat
Skirt
CantleSeat
Pommel
StirrupIron
Tread ofStirrup Iron
Stirrup Leather
Flap
Snaffle Bit
A
Crown Pieceor Headstall
Browband
Cheek Piece
Throat Latch
Cavesson orNoseband
Curb ChainWeymouth Curb Bit
Curb ReinSnaffle Rein B
Crown Pieceor Headstall
Cheek Piece
Browband
Throat Latch
Cavesson orNoseband
Lip StrapCurb Chain
Headstall
Cheek Piece
Curb ChainCurb Bit
CFigure 45. Three types of bridles: A) Full or Double bridle; B) Pelham, double-reined bridle;and C) Split-eared western bridle with curb bit.
Pelham Curb Bit
Lip Strap
When you purchase a new saddle, whether English or western, make sure the seat fits your body.The length and depth must be suitable to the rider; you cannot ride well if the saddle does not fitproperly. The saddle also must fit the horse properly.

CHAPTER 11: EQUIPMENT (Tack)
82
Knots
Proper knots are important to your safety and appearance of your gear. Knot tying and braiding isfun to learn, does not take long and makes your equipment look neater.
Develop safe habits when saddling and bridling your horse, and always consider the horse’sbehavior and reactions.
Figure 47. A variety of knots are used with horse equipment: the cinch knot on a western cinch; amanger tie to tie your horse; and the bowline as an emergency made harness that won’t slip.
Cinch Knot Manger Tie (slip knot)
Bowline
CHAPTER 12: SADDLING AND BRIDLING
83
Develop safe habits when saddling and bridling your horse and always consider the horse’sbehavior and reactions.
When you catch your horse, it is best to use a halter rather than a bridle. Let the horse know ofyour presence by speaking softly to him and gently touching him on the shoulder. Alwaysapproach from the left side and slip the lead rope around the horse’s neck. This gives you controlof the horse until you have the halter in place. After you catch and halter the horse, give the horsea small reward — a pat on the neck or some rubbing will do.
Tie the horse with a quick release knot or cross ties with panic snaps and give him a thoroughgrooming before you saddle and bridle him. Pay extra attention to cleaning the areas covered bythe bridle, saddle and cinches or girth. Check his feet.
Many people leave the horse tied while they saddle, but it is preferable to untie the horse andhave someone hold it by the lead shank while you saddle it. This gives you control of the horse.
If the horse is tied and you move from one side to another, walk behind the horse a safe distanceaway from his back legs. Never cross under the lead rope between the tied horse and a fence orpost. If you untie the horse and hold the lead rope as you saddle, get a short, light hold of hishead as you cross back and forth.
When you are ready to saddle up, make sure the saddle blanket is free of burs, straw or debris.Lay the saddle blanket or pad on the horse’s back. Be sure it is even on each side. Always lay theblanket or pad several inches forward and slide it back into place. This makes the hair under theblanket or pad lie smooth. Remove all wrinkles.
Tacking up the western saddle
Fold the off stirrup, cinches and saddle strings over the seat of the saddle. If the stirrups are short,hook the stirrup tread over the horn. Slip your right hand into the hole formed by the fork in frontof the seat and lift the saddle over the horse’s back. Lift just enough to clear the withers and holdthe saddle steady at the top of the lift so it will settle easily on the horse’s back. You can steadythe saddle at the top of the lift by placing your left hand on the edge of the front skirt. Smallerriders will find it necessary to use both hands and hold the saddle under the gullet with the lefthand while grasping the rear skirts or cantle with the right hand. Many western riders have thehabit of swinging the saddle up with the off stirrup and cinches flying. Stirrups are heavy andcinch rings are hard; a horse flinches to absorb these hard knocks when stirrups hit (see figure48). Do not get into this habit. Instead, lift the saddle and settle it on the horse’s back. Next easethe off stirrup and cinches from the seat or go to the off-side to let them down. In either case,you must move to the off-side to check the stirrup, cinches, saddle strings and blanket to ensurethey are straight and a correct length. Return to the near side. Check the position of the saddle,raise the blanket edge where it lays over the withers to allow air space, swing the near stirrupover the seat and thread the latigo through the cinch.

CHAPTER 12: SADDLING AND BRIDLING
84
Several safety precautions should be followed when cinching. As you reach for the front cinch,watch both ends of your horse. Fasten the front cinch first. Pull it up smoothly and slowly — donot jerk it tight. Fasten it snugly but not tight. Then fasten the rear cinch. Finally, fasten the buckleand breast collar, or martingale straps. Remember on double-rigged saddles, saddle the front cinchfirst, then the back cinch; unsaddle the back cinch first, then the front cinch.
Tighten the front cinch just enough to allow your hand, with the fingers held flat, between thehorse’s body and the cinch. The rear cinch should not be tight but should be against the skin orjust an inch or two below the horse’s belly.
Tacking up the English saddle
Lift the saddle and the attached pad up and over onto the horse’s back. Attach girth to the off sidebillet straps. Slide girth through the martingale loop if you use one, and pull the girth up andattach it to the near side billet straps. Do not pull up tight. Recheck the girth after you walk yourhorse to the mounting area. Pull stirrups down just before you mount. Always put stirrups up afterdismounting. Remove the girth from both sides of the saddle when untacking.
Bridling
When bridling a horse with a western bridle, untie the halter from the tie rail, fasten thecrownpiece around the horse’s neck, or loop the bridle reins over its neck so you can hold them ifthe horse pulls away. Loop the reins over his neck to keep them off the ground and from beingstepped on by the horse. Follow the steps shown in figure 49.
When you bridle for English riding, put the reins over the horse’s head onto the neck. Place theheadstall or crownpiece in your right hand.Continue as shown in figure 49. Whenbridling, the rider must stand close to thehorse’s neck, just behind its head. Thisposition is safe since the horse cannotthrow his head and hit your face. Holdingyour right arm over his neck and poll willhelp keep his head down and may bedropped around the neck to help hold thehorse. Work firmly but gently. With yourright hand, pull the headstall up so themouthpiece of the bit is pressing against thehorse’s teeth. When bridling with acavesson, hold the cavesson in your righthand with the crownpiece. Use your lefthand to guide the bit between the horse’slips. When his jaw relaxes and the mouth
Figure 48. Do not throw the saddle onto thehorse’s back. Loose cinches can hit the horse’slegs and startle it.

CHAPTER 12: SADDLING AND BRIDLING
85
opens slightly, pull up with your right hand. The bit will slide smoothly between the teeth. If thehorse is stubborn about opening its mouth, press the lip against the jaw bone with your leftthumb at the gap between the incisors and molars. Do not jerk or pry at the mouth with the bit.Move your left hand to hold the crownpiece of the headstall above and in front of the horse’sears (see figure 49). Now you can lower the cavesson with your left hand. Be gentle as you bringthe headstall over its ears. Use your right hand to protect and guide the ears under thecrownpiece. Use caution when bridling horses, especially those you are not familiar with, sincesome are extremely shy about their ears and will resist by slinging their head.
After one more step, you are ready to ride. Lead your horse for a few steps. Then check yourfront cinch or girth again. You may be able to tighten it a few more notches. Check the frontcinch or girth again after riding a short distance.
Untacking your horse
When your ride is over and you are ready to unbridle, fasten the loose halter around the horse’sneck first. Undo the bridle throatlatch and cavesson, remove the bridle, taking care not to hit thehorse’s teeth. To properly remove the bridle, slide the crownpiece forward over the ears with yourleft hand. When free of the ears, hold the headstall loosely for the horse to spit out the bit. Thenlower the headstall to allow the bit and curb strap to fall freely from the mouth and chin.Continue holding the horse and rub its head and poll where the headstall rested. Your horse willsoon learn to expect this rubbing and will wait patiently instead of trying to break away. Halterthe horse and hold the lead rope as you unsaddle.
Figure 49. Be safe when bridling the horse.

CHAPTER 12: SADDLING AND BRIDLING
86
Be sure to tie up the cinches and breast collar before pulling the saddle off. When unsaddling, liftthe saddle slightly before pulling it off. This loosens the grip of the sweaty leather and blanket onthe horse’s hide.
Wet saddle blankets should be placed in the open, or on top of the saddle to allow them to drycompletely before the next use. The bit should be rinsed to remove slobber and feed particles. Aquick wipe down with a damp cloth will remove mud and sweat from your tack.

CHAPTER 13: THE RIDING AIDS AND GAITS
87
Natural aids
Your voice, hands, legs and weight can control your horse if your horse is trained to respond tothem. Begin using these tools in a very definite manner in the early stages of training. As youprogress, your horse will respond to very light applications of these aids.
The following discussion of specific aids for different responses indicates how you cancommunicate with your horse.
Voice
Your voice is a very important aid when working your horse. Certain words such as whoa, easyand back are readily understood by a horse. Many show horses have learned the words walk, trot,lope and canter from hearing them repeatedly during lunging, training and in the showring. Someriders do not use complete words, but instead develop voice sounds (e.g. clicking or kissing) tomean something to their horses. Be consistent and use the same word or cue each time. Repeat itoften to teach your horse what you mean. Make your sounds distinct from each other. Forexample, whoa and go sound too similar to be effective. Many showring judges do not like tohear voice commands, so use them very softly when showing or avoid using them in the showarena.
Your tone of voice means as much to your horse as actual words. It indicates pleasure ordispleasure. Learn to always use a low, soft voice when working around your horse. Screamingand yelling will only frighten the horse.
Hands
Your hands control the forehand (forequarter) of your horse directly by use of the reins. Inadvanced riding, your actions on the reins have an indirect influence on the hindquarters. Relaxyour hands and arms, hold your shoulders back and down, and keep your upper arm in a straightline with your body. Your forearm forms a straight line from the elbow to the horse’s mouth asyou hold the reins. Some movement of the arm is permissible, but excessive movement will bepenalized by a judge.
Good hands are steady, light, soft and firm in their actions. You can achieve this only if your bodyis in balance and rhythm with your horse.
As you begin reining and rein cues, remember the importance of relaxing your arms, elbows,wrists, hands and fingers. Allow a small amount of slack in the reins to relieve pressure on the bitbut hold the reins firmly enough to maintain light contact with the horse’s mouth. When riding ayoung horse (4 years or younger), you are allowed to hold the reins with both hands when using asnaffle (non-leverage) bit or a bosal.

CHAPTER 13: THE RIDING AIDS AND GAITS
88
Learn to signal or cue with your reins (a give and take action) by slightly flexing your hands.Simply opening and closing your fingers is cue enough for a trained horse if you have the correctdegree of contact with your horse’s mouth. It is especially important to learn to use both hands onthe reins when schooling or polishing the performance of your horse. The proper use of twohands to guide and set the horse until it learns to respond to cues is the mark of a goodequestrian. As your horse responds, you may gradually switch to the use of a single hand on thereins when riding Western. But remember, that at any time outside the show ring when yourhorse isn’t handling as smoothly as you desire, it is wise to use two hands.
If you plan to show your horse, study the rules on how to hold the reins and use the rein thatallows you to have the softest hand on your horse’s mouth. When using all of the aids providerelease when the horse responds to pressure.
Legs
Your legs control the forward motion of your horse and its shoulders, barrel and hindquarters.When you squeeze your legs, your horse should learn that this is a signal to shift its weight to itshindquarters, lighten its weight on its forequarters and get ready to move out. Getting a responseto this cue is very important; you will need it every time you move your horse, ask for collectionor a change of gait, or correct misbehavior.
Pressure from your calves and heels controls the horse’s shoulders, barrel and hindquarters. Asyou press with one leg or the other, your horse responds by moving away from the pressure or bymoving against the pressure (see maneuvers in all figures in this chapter). When your horseresponds to leg cues, less cueing is required by your reins. Balance pressure on the horse by usingcontact in the seat of your saddle and your thighs. Maintain only light contact with your knees soyour lower legs can be used for cueing.
Seat/Weight
Although horses are trained to move away from pressure, they move under weight. Your bodyweight becomes a cue when you shift position in the saddle. This does not mean that you throwyour weight by leaning excessively, you can give a weight cue by placing more pressure on onestirrup than the other by shifting to press more firmly on one seat bone. As you train your horse,you will find responses come from very slight weight shifts. Learning to be a good equestrianinvolves learning the effects of the aids, combining them to make your horse perform and usingthem in training and showing. The art is in developing a feel for when to apply the aids and whento release them.
Artificial aids
Spurs, whips, bats and cropsArtificial aids should be used only to reinforce natural aids. First, press the horse with the calvesof your legs. If your horse doesn’t respond, tap the horse with your heel. Finally, it may become

CHAPTER 13: THE RIDING AIDS AND GAITS
89
necessary to tap the horse with your bator touch it with a spur. Always tap thehorse in the spot where your leg willtouch. Give the lightest cue first. If yourhorse doesn’t respond, use increasinglystronger cues. In this way, you tell yourhorse to respond or light discipline willfollow. Remember, however, to give thehorse time to learn what the cue meansbefore using negative reinforcement.
Body position and aids in motion
General pointersThe rider should maintain a natural position during all gaits. Practice proper cueing until yourhorse moves into any of the gaits lightly and smoothly. This will help keep your balance andavoid punishing your horse’s mouth and side(s), which occurs if you lose balance. Get lightcontrol of your horse with the reins before cueing it with your legs so the horse does not rush outand has to be pulled back.
The horse’s head should always be carried at an angle that is natural and suitable to the horse’sconformation and breed at all gaits.
Forward motionBefore your horse can make any kind of move, there must be forward motion. Think of forwardmotion as the thrust of the horse’s hind legs with all of their power going through the horse’sspine, moving the body straight from the point of impulsion. Study figure 50. The stick can bemoved forward, backward or turned, but the rope cannot. Keep your horse moving straight andtrue from the impulsion of its hindquarters. If you don’t, it will be like trying to guide a rope.
WalkThe walk is a four-beat gait in which your horse should stride out freely and willingly. It is anatural, flatfooted, forward working gait. Encourage your horse to walk out by using your seatand legs to drive the horse forward. (See Figure 51).
Jog or Sitting trot
Figure 50.Visualize the thrust ofthe stick on the left. Itdemonstrates theforward motion of ahorse, while the rope onthe right cannot moveforward, backward or beturned.
Figure 51. The walk is a four-beat gait.
1 11 12 2 2233 3 34 4 44

CHAPTER 13: THE RIDING AIDS AND GAITS
90
The jog or trot is a smooth, ground-covering, two-beat, diagonal gait. The horse works from onepair of diagonals (left front and right hind) to the other (right front and left hind). The jog or trotshould be square and relaxed with a straight, forward movement of the feet. Horses that walkwith back feet and trot with the front are not performing the required gait. When asked to extendthe jog, the horse moves out lengthening the stride with the same smooth action.
The rider should sit when the horses is jogging and not post. Generally the western rider sits inthe saddle when the horse is moving at the extended jog. However, posting is a very usefultraining tool and it is good for the Western rider to be able to post properly. Apply more legpressure, gently pull the horses and allow the horse to move forward.
Posting or rising trotEnglish riders will use posting diagonals at the trot. In the rising trot, your upper body is inclinedslightly forward from the hips so you remain in balance with the horse’s movements. Your bodyrises by the movement of the horse and your seat returns to the saddle without any loss ofbalance. The rule for correct diagonal is to post with the outside diagonal pair. This means thatthe rider rises out of the saddle when the horse’s outside front leg (in relation to the rail) andinside hind leg reach forward (off the ground) and sits when these legs touch the ground. Forexample, if riding on the right rein (clockwise), the rider will rise and sit with the left foreleg andright hind leg. Conversely, when riding on the left rein (counterclockwise), the rider rises and sitswith the right foreleg and left hind leg. To change the diagonal, the rider sits for one extra beat ofthe two-beat trot. (See Figure 52).
Lope or canterThe lope, or canter, is an easy, rhythmical three-beat gait. The footfall pattern for the lope is asfollows: beat 1 — outside hind; leg beat 2 — inside hind leg and outside fore leg togetherfollowed by beat 3 — inside fore leg. Horses traveling at a four-beat gait are not performing thegait properly. The horse should canter with a natural stride that appears relaxed and smooth.(SeeFigure 53).
To signal a canter, collect your horse, shift your weight back to the horse’s outside hind leg andapplying sufficient pressure with your outside leg to instruct the horse to strike out in the properlead. The horse should be bent in the intended direction of travel. Train your horse to assume alope from a standstill, walk or trot. You will learn the proper cueing under the sections on leads.
1 12 2 1 12 2 2 21 1 2 21 1
Figure 52. Trot - a two beat diagonal gait.

CHAPTER 13: THE RIDING AIDS AND GAITS
91
Hand gallop or extended lopeThe hand gallop is similar to the lope, but with a lengthened stride.
Leads
The correct leadWhen your horse lopes or hand-gallops, its body is bent in the direction it is traveling becauseone pair of legs, one foreleg and one hind leg, on the same side of the horse’s body lead, or reachfarther ahead than, the pair on the other side of its body. The horse is on the correct lead when itis leading with the inside pair. Leading with the opposite fore and hindleg is known as cross-firing, which is an uncomfortable gait because the horse is unbalanced.
The correct lead (canter/lope) is very important when your horse circles or makes tight turns. Ahorse will naturally take the proper lead or change leads when it runs free, but it may not do thiswhen it carries a saddle and rider. Show ring rules place a great deal of emphasis on proper leads.A well-trained horse will change leads at the will of the rider. You should learn which lead yourhorse is on from the feel of its motion. Your inside leg should feel slightly further forward thanthe outside leg. Do not get into a habit of looking at the horse’s shoulders or leaning forward tosee the horse’s legs.
Training your horse to depart on the lead you want requires patience and practice. Most horsesfavor one lead over the other. Work on getting the horse comfortable with either lead, but spend alittle more time on the weaker lead by loping in a circle that requires that lead. Keep the canterslow and easy when training the horse so you can cue it properly.
Figure 53. The lope or canter is an easy, rhythmical three-beat gait.
132
21 22 3 2 31 2 1 32 2
Lope, left lead3
12 3
21
2 23
123
2 12
221
Lope, right lead

CHAPTER 13: THE RIDING AIDS AND GAITS
92
Your horse should be trained to assume the correct lead at the lope/canter directly from the stop,walk and trot. At any time the horse does not lead correctly, slow it to a walk or trot and tryagain.
The following paragraphs describe the aids for using either lead. Study and learn these aids anduse them until they become habit. Have control of your horse’s head and be sure it is listeningbefore cueing it with your leg otherwise your horse will move too quickly, throw you off balanceand disrupt your cues. Train your horse to move smoothly into a lope. This will make it easier toapply your cues with proper timing.
AidsTo ask for the lead, bend your horsein the direction of travel, tipping thenose using the rein. With yourweight to the outside, squeeze withthe outside leg behind the girth and,with the inside leg, at the girth. Forexample, for the left lead, tip thenose to the left, shift your weightslightly to the right and squeeze withthe right leg, using the left leg to askfor the bend. For the right lead, tipthe nose to the right, shift yourweight slightly to the left and squeeze with the left leg, using the right leg to ask for the bend.
When your cues and timing are correct and your horse is working willingly, you will feel a slightlifting of your horse’s body on the lead side as it takes off. This is the result of the horse shiftingits weight back to the rear leg, ready to lightly spring forward and reach out with the leading hindleg. This gives a smooth, gliding sensation and you are loping with the correct lead.
In early training, apply cues more firmly. But as your horse learns, it will respond to lighter cues.When cued properly, a horse will improve in riding circles, figure eights, serpentines, quadrillesor just plain turning.
Changing leadsChanging leads is required when changing the direction of travel. The simple change is executedat the walk or trot and the flying change is executed through the lope. The change must occurduring the moment of suspension, as illustrated in the footfalls.
AidsWhen executing a change of leads, the rider will straighten the horse from its direction oftravel and cue it into the new direction of travel. This will require changing the bend of thehorse’s body and moving your weight to the outside while changing leg pressure from the
Figure 54. Noteforeleg and hind legon the same sidereach farther ahead.
Left Lead Right Lead

CHAPTER 13: THE RIDING AIDS AND GAITS
93
Figure 55. The horse in this figure is stoppingtoo hard. A proper stop includes the voicecommand whoa, a light flex of your reins, asqueeze of your legs and increased pressure orrider’s seat to cause the horse to halt and standsquare and quiet.
outside leg of the initial direction to the outside leg of the new direction. It is common for ahorse to change in the front and not in the rear (i.e. cross-firing). Should this occur,exaggerate the change of your weight and leg pressure to move the horse’s hips into the newlead (see footfalls for the timing of this maneuver).
Counter canterThe counter canter is when the horse leads opposite of its direction of travel.
AidsThe aids for the counter-canter are the same as cueing for a lead. However, upon departureinto the counter-canter, it is essential that the rider’s weight remain centered and balanced toensure that the horse does not change leads out of the counter-canter.
BackingGrip the horse with your thighs. Squeeze with your legs to collect the horse while you maintainlight rein pressure to prevent the horse from moving forward. When your horse is collected, usethe word back. Flex your reins gently, continue to squeeze with your legs, apply pressure andprovide release with each step. You are asking for forward motion but in reverse. Control thedirection of backing by varying the degree of pressure of one leg or the other.
Backing is unnatural and hard for a horse. Be patient and ask for a step at a time. Graduallyincrease the number of steps that your horse will back and reward your horse by stepping itforward and releasing pressure. Proper backing is smooth and performed easily without excessivejawing or resistance by the horse (for footfall patterns of backing, see figure 51).
StopsA good stop is not necessarily a sliding stop. A good stop isbalanced and smoothly executed. The horse’s hindquartersare well under its body to balance its weight. Theforequarters, neck and head are kept light. The horse isbalanced and ready to do what is required next.
Timing is important when you ask for a stop,especially from a lope. You should use somepreliminary cue to alert your horse that a stop iscoming which will allow it time to adjust itsbalance in preparation.
To cue for a stop, sit deep in the saddle, say whoaand then reinforce it by asking with the reins. Donot get into the bad habit of thrusting your feetforward, throwing your weight back and yankingon the reins.

CHAPTER 13: THE RIDING AIDS AND GAITS
94
School your horse to stop easily on the cues at a walk, then a trot, and finally, at a slow lope. Thiswill allow you time to perfect your cueing and give your horse time to learn what the cues mean.You will work more softly on the horse’s mouth by going slowly at first. When stopping atslower gaits, always make your horse stop completely and stand, preferably with a slacked rein.Do not let the horse walk. It is wise to vary the time of standing so your horse will not anticipatea short stop and begin to move.
Don’t rush your training. You are making progress when you feel the horse’s hindquarters sinkunder you slightly when you stop. Keep working for a light response and don’t overdo thenumber of times you ask for stops. As you work, be sure to vary the places where you ask yourhorse to stop so it will not begin to anticipate stops at certain points. It is good to allow a horse tostop and then catch his air as a reward after an extended time of cantering or trotting. Thisteaches the horse that stopping is a pleasant thing.
Turn on the forehandYour horse should be taught to move or hold itshindquarters in response to pressure from yourheel or the calf of your leg behind the front cinchor girth. This control is very important inbacking, side-passing, twotracking, holding thehindquarters on pivots and roll-backs, and forcorrect leads. Turning on the forehand is not aforward movement. The horse pivots on theinside foreleg while the hips move away frompressure in the opposite direction of the nose.
AidsBend the horse in the direction of the turn(e.g. to the right, horse bent to the right).Apply inside leg on the barrel or girth untilhips move away from pressure (e.g. right leg behind girth and left leg balances at the girth).Your inside hand asks for the bend while your outside hand balances and prevents forwardmotion.
Turn on the hindquartersWith the turn on the hindquarter, the inside hind foot remains stationary. The forehand movesaround the pivot foot with the front legs crossing over with each step. The turn on thehindquarters is the basic movement for controlled, smooth, fast turns in pivots, roll-backs, pole-bending, barrel racing and working cattle. The horse learns to roll back over its hocks.
AidsThe inside hand leads the horse into a bend into forward motion, while the outside handcontrols the bend. Bend the horse’s nose slightly in the direction of the turn. Apply outside
Rein Steadies HeadRein Turns Head
Right TurnLeft Turn
Figure 56. Note the position of the reins andthe foot used to cue for turn on the forehand.

CHAPTER 13: THE RIDING AIDS AND GAITS
95
leg pressure at the girth or just infront of the girth and inside legpressure at the girth. The rider’sweight should be focused on thehorse’s hips and the outside seatbone used to encourage thehorse’s hips to remain stationary(do not tip or lean your body).
This movement requires time andpatience to execute exactly. Donot except a 360 degree turnimmediately but work one stepat a time, applying pressure andrelease with each step. It is also important that your horse maintain impulsion, which isaccomplished by driving the horse’s motion with your seat and legs.
You should be able to stop the swing of the hindquarters by pressing with your outside leg. Thisleg cue may not be enough to stop some horses. If this happens, you will need to add anothercue. When you feel the horse beginning to shift its hindquarters, apply pressure with your outsideleg. You must learn to feel the movements of your horse through your seat to know what ishappening and how to correct any problems. When your horse is willing to execute thismovement slowly, then you can progress to more advanced movements such as a roll back.
Side-passThe side-pass is a sideways lateral movement of your horse by stepping to the right or left withboth the forequarters and hindquartersmoving evenly together. The horse’s legsshould cross in front of the oppositesupporting legs.
Side-passing is necessary for the smoothopening and closing of gates and is anexcellent training tool. Figure 58 shows thecues used to side-pass. To side-pass to theright, use the left rein to turn your horse’shead slightly to the left. Hold light contactwith the right rein to make the horse moveto the right. At the same time, shift yourbody weight to the left, away from thedirection of the sidepass, and use your leftleg and heel to move the horse’s shoulders,barrel and hindquarters to the right.
Heel HoldsHindquarter from
Moving
WeightWeight
Figure 57. Note the position of the reins and the foot usedto cue for turn on the hindquarters.
Inside Pivot Leg
Inside Pivot Leg
Figure 58. Note the position of the reins and thefoot used to cue for left and right side-passes.
Just enough reinpressure to keep
horse frommoving forward
Weight Weight
Left SidePass
Right SidePass

CHAPTER 13: THE RIDING AIDS AND GAITS
96
Reverse the cues to side-pass to theleft. The right rein tucks the noseto the right slightly. Your weightis shifted to the right. You useyour right leg and heel to movethe shoulders, barrel andhindquarters to the left.
You will need practice tolearn the feel of the correctrein tension and leg pressurenecessary to move the horse tothe side without backing ormoving forward. At first, it maybe helpful to face a fence tokeep the horse from movingforward. If the horse backs,simply relax tension on the reinsand use your legs to move it upinto the bit again.
You may need to begin by moving the horse’s shoulders, first then the hips, until your horsebegins to learn what you are asking. Side- passing, as with all movements, should be practiced inmoderation. After the horse performs a few correct steps, do something else.
Two-tracking or leg yieldTwo-tracking or leg yielding is a lateralmovement in which your horse movesforward in a diagonal direction. This may beused as a training tool for lead departures orlead changes. Begin at the walk and then goto the sitting trot and lope.
Two-tracking aidsCueing for the two-track is the same ascueing for a side-pass. However, reintension must be lighter and you will needmore leg contact to move your horseforward. You want your horse to move atan angle so more forward motion is needed.This is accomplished by holding the rein inthe same positions but much lighter. Pushyour horse forward, as well as sideways,with your seat and leg.
Figure 60. Legyielding. Note the horseis bent in the oppositedirection of travel. Theleft leg is near the girth,moving the horse over.
Lefttwo-track
Figure 59. Note the position of the reins and thefoot used to cue for left and right two-track.
WeightRighttwo-track
Weight

CHAPTER 13: THE RIDING AIDS AND GAITS
97
Leg yielding aidsLeg yielding is a forward and sideways movementwith the horse is bent in opposite direction of travel(e.g. the horse is bent slightly to the right but movingforward and to the left). The forehand slightly leadsthe quarters. The aids for leg yield to the right are asfollows: the horse is moving forward at the walk orsitting trot. The left leg is near the girth cueing thehorse to move over. The right leg keeps the horsemoving forward and is behind the girth, controllingthe amount of sideways movement. The left handleads a slight bend to the left. The right hand may beslightly open and leading the horse to the left. Therider must be sitting straight and even.
Shoulder inThe shoulder in is a bending exercise. The horse willmove on three tracks (see diagram). The aids forshoulder in to the right are as follows: position thehorse’s forehand at approximately a 30-degrees anglefrom the rail. The right, or inside leg, is behind thegirth to prevent the quarters from swinging out to the left. The right rein, or inside hand, keepsthe horse’s forehand to the right and maintains the degree of bend. The left, or outside hand,controls the pace and the degree of the bend.
Travers (or haunches in)The travers is a bending exercise with theforehand on the rail and the haunches movedto the inside. The travers is a four-trackmovement. The aids for travers to the rightare as follows: the right, or inside leg, is at thegirth to create the bend. The left, or outsideleg, is behind the girth to move the haunchesoff the track to the inside. The right, or insiderein, creates the bend to the inside while theleft, or outside rein, controls the degree ofbend to the right.
Figure 61. Shoulder in. To the right,note the leg at the girth creates the bendand pushes the horse forward.
Fenc
e
Figure 62.Haunches in.Note the reinpressure and thefoot used to cuethe haunches inand the left legbends the horse.Fe
nce

CHAPTER 14: BASICS: WESTERNHORSEMANSHIP
98
Horsemanship, or equitation, is the art of riding in a balanced and graceful manner. This takestime and patience and can only be achieved if you and your horse work together as a team.
The following suggestions will help you become a better rider. This basic information can beapplied to every type of riding with slight modification.
Mounting
There are two positions considered proper for mounting. In the first position, as shown in figure63, the rider stands by the horse’s left shoulder with his body facing a quarter turn to the rear ofthe horse. The rider’s head is turned so both ends of the horse can be watched. This is the safestposition to use when you mount.
It is easier to place your left foot into the stirrup from this position, but be careful not to rake thetoe of your boot along the horse’s side as you swing up. Brace your knee against the horse forsupport to keep your foot away from its side. When you use this position, take one hop on theright leg and go into the second position briefly as you swing into the saddle.
The second position, shown in figure 64, is used when you are tall enough to stand and placeyour left foot in the stirrup without moving back to the rear of the horse. You should facesquarely across the seat of the saddle. Turn your left foot so the toe of your boot is pointedforward or into the cinch.
In both positions, hold the reins in your left hand with the left rein slightly shorter to give enoughtension to steady your horse. Place your left hand on the horse’s neck just in front of his withers.
Figure 63. First position. Use this method tomount green-broke horses, or horsesunfamiliar to you.
Figure 64. Second position. Use this methodwhen you are tall enough to place your leftfoot in the stirrup without moving back tothe rear of the horse.

CHAPTER 14: BASICS: WESTERNHORSEMANSHIP
99
Steady the stirrup with your right hand until your left foot is in the stirrup. Then place your righthand on the saddle horn and your left knee against the horse. Swing up and into the saddle with aspring by pushing with your right leg. Your body will be balanced by the triangular base ofsupport formed by your hands and knee.
Spring hard enough with your right leg to carry you up and over the saddle with a minimum ofweight on the left stirrup. Lower yourself smoothly and lightly into the seat of the saddle. Do notswing too high and plop into the saddle.
If you consistently pull the saddle to the side, you are not springing up hard enough. Withpractice, you will mount in a smooth, easy motion.
Dismounting
When you dismount, use the same hand position. Take the slack out of the reins to steady thehorse. While holding the reins, place your left hand on the neck of the horse, grasp the saddlehorn with your right hand, shift your body weight slightly to your left leg and keep your left kneein close to the horse. Your right foot should be free of the stirrup.
Swing out of the saddle and keep your right leg as close to the horse as possible without hittingthe cantle of the saddle or the horse’s rump. Do not swing your right leg in a wide arc. Keep itclose to the near side of the horse so you will face slightly forward when your right foot touchesthe ground.
Push down on your left heel to allow your foot to slip out of the stirrup. Do not roll your left footon its side to slip it out of the stirrup. If you are not tall enough to reach the ground with yourright foot, slide both feet out of the stirrups. Swing your right leg over the rear of the saddlewhile rolling your belly to the saddle seat, and land with both feet on the ground.
Seat position
Your position in the saddle is important to maintain balance and rhythm for ease of riding, and tocarefully use aids.
Sit tall in the saddle in a balanced, relaxed manner. Keep your back erect and flex with the horse.Do not slump in the saddle and never sit back on the cantle with your feet shoved forward. Youwill find it necessary to change your seat slightly for different types of riding, but the basicprinciples remain the same. You should sit where the horse can be controlled with aids in acomfortable riding position. Keep your body weight where it will help rather than hinder yourhorse’s movements.

CHAPTER 14: BASICS: WESTERNHORSEMANSHIP
100
Note how the rider in figure 65 sits erect and squarely in the center of the saddle. The rider sitsdeep in the seat of the saddle and not on the cantle. The rider should not be tipped forward orbackward on the his or her pelvis. The ball of his or her feet should be the contact point with thestirrup. The rider should push down on the heels and pull up with the toes.
Train the stirrup leathers on your saddle to turn at right angles to the horse’s body to preventpressure on your feet and help you hold your stirrups more securely. When you store your saddle,twist the stirrups one and one-half turns inward and insert a broomstick in both stirrups.
In any style of riding, when the rider sits in the saddle his legs form a straight, vertical linethrough his ear, center of shoulder, center of hip and back of heel (see figure 66). Stirrups shouldbe long enough to allow the rider’s heels to be lower than his toes, with his knees bent slightlyand his toes directly under them. The body should always appear comfortable, relaxed andflexible. The back should be nearly flat. The rider’s body should be supple, poised and balancedin rhythm with the horse’s motion.
Figure 65. Correct seat position is necessaryfor control and comfortable riding.
Figure 66. Correct hunt seat position.

CHAPTER 15: BASICS: ENGLISH EQUITATION
101
The skills required for English riding are similar to those used for western riding. The rider mustsit in a balanced position that does not interfere with the horse’s own balance or ability toperform.
Mounting
Mounting and dismounting for English equitation is very similar to western style. Place the reinsover the horse’s head. Hold the reins in your left hand against the horse’s neck, make contactwith horse’s mouth slightly to prevent the horse from moving. The rider should stand on the leftside of the horse facing the horse’s quarters. The rider’s head is turned so both the horse’s headand quarters can be observed. From this position, place your left foot in the stirrup, being carefulnot to push the toe into the side of the horse. Put your right hand on the center of the saddle. Thentake one hop, and push up from your right leg and gently swing into the saddle, being careful notto brush the horse’s side or quarters with the right leg. Then sit gently into the saddle.
Dismount
To dismount, place both reins in the left hand and place it on the neck of the horse. Take both feetout of the stirrups and place your right hand on the pommel. Lean slightly forward and swingyour right leg over the back of the horse, being careful not to brush the horse’s quarters, and landon both feet on the left side of the horse. Take the reins over the horse’s head and run up thestirrup irons.
General position
The position in the saddle for English riding is basically sitting in the center of the saddle on theseatbones, sitting deep and tall with your head set squarely on the shoulders and eyes lookingforward. Shoulders should be directly over the hips, keeping weight evenly distributed over theseatbones. Legs should be underneath with the inside of the calves on the horse’s side and feetshould be directly under the knees with the stirrup on the ball of the foot. Heels should be downwith toes facing forward at a slight angle. A general rule to measure correct stirrup length is thatwhen the leg hangs loosely (out of the stirrup), the bottom of the stirrup should line up to thebottom of the ankle bone. Relax shoulders, elbows at the side of the rider’s body and the handsjust over the horse’s withers.

CHAPTER 15: BASICS: ENGLISH EQUITATION
102
Saddleseat
Basic position. Sit comfortably in the saddle. Find thehorse’s center of gravity by sitting with a slight bend at theknees without the use of the stirrup irons. While in thisposition, adjust the leathers to fit. Place irons under the ballof the foot and the foot should be natural. The body shouldfollow a vertical straight line from the shoulder through thehip to the heel.
Hands. The distance of the hands from the withers is amatter of how and where the horse carries its head. Thereshould be a straight line from the rider’s elbow, hands andreins to the horse’s mouth. Hold reins according to theequipment used, but use both hands to hold all reins at thesame time. The bite of the reins (excess rein) should be onthe right side of the horse.
Dressage seat
Basic position. The rider sits deep, erect and supple in thesaddle. The rider’s calves should be in contact with thehorse at the girth. The stirrups should be carried on the ballof the foot with a straight line from the shoulder throughthe hip to the heel.
Hands. There should be a straight line from the rider’selbow, hands and reins, carried just above the withers, tothe horse’s mouth.
Hunt seat
Basic position. The rider’s eyes should look forward andshoulders should be back. His head should be square on hisshoulders, and his weight should be distributed evenly overthe seat bones. The rider’s toes should be at an angle bestsuited to his conformation and his heels should be downand his calves should be in contact with the horse slightlybehind the girth. The ball of the foot should rest on thestirrup iron, and a straight line from the shoulder throughthe hip to the heel should be formed. Figure 69. Hunt seat.
Figure 67. Saddleseat.
Figure 68. Dressage seat.

CHAPTER 15: BASICS: ENGLISH EQUITATION
103
Hands. Hands should be over and in front of the horse’s withers with his knuckles 30 degreesinside the vertical and hands slightly apart. Reins may be held in various positions. Excess reinmay fall on either side of the horse. However, all reins must be picked up at the same time. Astraight line from the elbow through the hands and reins to the horse’s mouth should be formed.
Position and motion
The rider’s body should be vertical when the horse is at the walk and sitting trot, but inclinedslightly forward when the horse is at posting trot, canter and gallop, with no more than 20degrees in front of the vertical.
Jumping position
The purpose of the two-point/jumping position is to adjust the rider’s balance to match the horseduring jumping and galloping. This allows the horse freedom of movement through his back.The rider should remember to shorten the stirrup one to two holes from the flat length. When thehorse is jumping, a straight line from the rider’s shoulder, knee and toes should be formed. Therider’s shoulders are slightly forward and his hips are moved slightly back, hovering over thesaddle. The rider’s angle closes at the hip. The rider’s weight is pushed down into the lower legand heel, with the ankle acting as a shock absorber. His eyes look forward, and his hands followthe horse’s mouth while it jumps.
Figure 70. Jumping position.
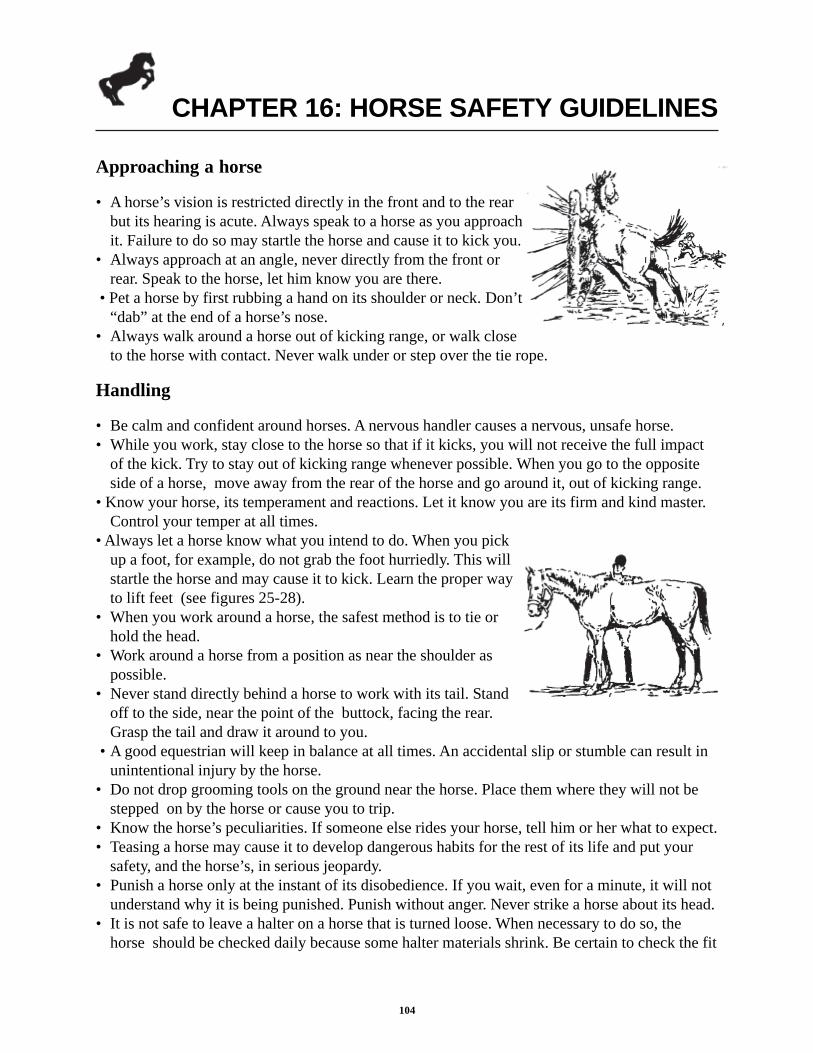
CHAPTER 16: HORSE SAFETY GUIDELINES
104
Approaching a horse
• A horse’s vision is restricted directly in the front and to the rearbut its hearing is acute. Always speak to a horse as you approachit. Failure to do so may startle the horse and cause it to kick you.
• Always approach at an angle, never directly from the front orrear. Speak to the horse, let him know you are there.
• Pet a horse by first rubbing a hand on its shoulder or neck. Don’t“dab” at the end of a horse’s nose.
• Always walk around a horse out of kicking range, or walk closeto the horse with contact. Never walk under or step over the tie rope.
Handling
• Be calm and confident around horses. A nervous handler causes a nervous, unsafe horse.• While you work, stay close to the horse so that if it kicks, you will not receive the full impact
of the kick. Try to stay out of kicking range whenever possible. When you go to the oppositeside of a horse, move away from the rear of the horse and go around it, out of kicking range.
• Know your horse, its temperament and reactions. Let it know you are its firm and kind master.Control your temper at all times.
• Always let a horse know what you intend to do. When you pickup a foot, for example, do not grab the foot hurriedly. This willstartle the horse and may cause it to kick. Learn the proper wayto lift feet (see figures 25-28).
• When you work around a horse, the safest method is to tie orhold the head.
• Work around a horse from a position as near the shoulder aspossible.
• Never stand directly behind a horse to work with its tail. Standoff to the side, near the point of the buttock, facing the rear.Grasp the tail and draw it around to you.
• A good equestrian will keep in balance at all times. An accidental slip or stumble can result inunintentional injury by the horse.
• Do not drop grooming tools on the ground near the horse. Place them where they will not bestepped on by the horse or cause you to trip.
• Know the horse’s peculiarities. If someone else rides your horse, tell him or her what to expect.• Teasing a horse may cause it to develop dangerous habits for the rest of its life and put your
safety, and the horse’s, in serious jeopardy.• Punish a horse only at the instant of its disobedience. If you wait, even for a minute, it will not
understand why it is being punished. Punish without anger. Never strike a horse about its head.• It is not safe to leave a halter on a horse that is turned loose. When necessary to do so, the
horse should be checked daily because some halter materials shrink. Be certain to check the fit

CHAPTER 16: HORSE SAFETY GUIDELINES
105
and make sure the horse can’t catch a foot in the halter strap. A halter might catch on posts orother objects causing injury.
• Wear footgear that will protect your feet from being stepped on or from stepping on nailsaround the stable and barnyard. Riding boots are best. Never go barefooted.
Leading
• Make the horse walk beside you, not run ahead or lag behind, when leading. A position evenwith the horse’s head or halfway between the horse’s head and its shoulder is safest.
• When changing direction, it is safer to turn the horse to the right and walk around it.• Use a long lead strap and fold the excess strap in a figure-eight style in your left hand when
leading. It is customary to lead from the horse’s left, or near side, by using the right hand tohold the lead near the halter. Extend your right elbow slightly toward the horse. If the horsemakes contact with you, its shoulder will hit your elbow first and move you away from it.Your elbow also can be used on the horse’s neck to keep its head and neck straight andcontrolled, and to prevent the horse from crowding you. Train the horse to be led from bothsides.
• Your horse is larger and stronger than you. If it resists, do not getin front of it and try to pull. (See Figure 34 for more informationon safe areas.)
• Never wrap the lead strap, halter shank or reins around yourhand, wrist or body. A knot at the end of the lead shank aids inmaintaining a secure hand grip when needed for control.
• When leading, tying or untying a horse, avoid getting your handsor fingers entangled. Use caution to prevent catching a finger indangerous positions such as in halter and bridle hardware thatincludes snaps, bits, rings and loops.
• Be extremely cautious when leading a horse through narrowopenings such as a door. Be certain you have firm control and step through first. Step throughquickly and get to one side to avoid being crowded.
• Any time you are dismounted or leading the horse, the stirrup irons on an English saddleshould be run up, or dressed (slip the stirrups up the leathers). Also, be cautious of stirrupscatching on objects when using a western saddle.
• Use judgment when turning a horse loose. It generally is safest to lead a horse completelythrough the gate or door and turn the horse about, facing the direction from which you justentered. Then release the lead strap or remove the halter or bridle. Make the horse standquietly while you pet it. Avoid letting a horse bolt away from you when released. Good habitsprevent accidents.
• Avoid use of excessively long lead ropes which can become accidentally entangled. Watch thecoils when using lariats or lunge lines.

CHAPTER 16: HORSE SAFETY GUIDELINES
106
Tying
• Know and use the proper knots for tying and restraining a horse.• Tie your horse far enough away from strange horses so they cannot fight.• Always untie the horse before removing its halter.• Avoid use of excessively long lead ropes to prevent the horse from
becoming accidentally entangled; length of lead rope depends on the size ofthe horse.
• Always tie a horse in a safe place. Use the halter rope, not the bridle reins.• Tie your horse a safe distance from other horses, tree limbs or brush where it
may become entangled.• Be certain to tie the horse to an object that is strong and secure and won’t break or loosen if
the horse pulls back. Never tie below the level of the horse’s withers.
Bridling
• Protect your head from the horse’s head when bridling. Stand close,just behind and to one side (preferably on the left side) of the horse’shead. Use caution when handling the horse’s ears.
• Keep control of the horse when bridling by re-fastening the halteraround its neck.
• Be certain the bridle is properly adjusted to fit the horse before youride. Three points to check are placement of the bit, adjustment of the curb strapand adjustment of the throatlatch.
Saddling
• Check your saddle blanket and all other equipment for foreign objects. Be certain the horse’sback and the cinch or girth areas are clean.
• When using a western double-rigged saddle, remember to fasten the front cinch first and rearcinch last. Unfasten the rear cinch first and front cinch last when unsaddling. Be certain thestrap connecting the front and back cinches (along the horse’s belly) is secure.
• Fasten accessory straps (tie-downs, breast collars, martingales) after the saddle is cinched.Unfasten them before loosening the cinch. On English equipment, it is sometimes necessaryto thread the girth through the martingale loop before the girth is secured.
• The back cinch should not be so loose that your horse can get a hind leg caught between thecinch and its belly.
• When saddling, it is safest to keep the off cinches and stirrup secured over the saddle seat andease them down when the saddle is on. Do not let them swing wide and hit the horse on theoff knee or belly.
• Swing the western saddle into position easily, not suddenly. Dropping the saddle down tooquickly or hard may scare the horse. An English saddle is much lighter than a stock saddle. Donot swing the saddle into position. Just lift it and place it into position.

CHAPTER 16: HORSE SAFETY GUIDELINES
107
• Pull up slowly to tighten the cinch. Check the cinch three times:— after saddling,— after walking a few steps (before riding), and— after mounting and riding a short distance.
Mounting and dismounting
General• Never mount or dismount a horse in a barn, or near fences, trees or
overhanging projections. You may be injured if a horse sidesteps or rears.• A horse should stand quietly for mounting and dismounting. Control its head through the reins.
If your horse will not stand, ask someone who can handle horses to help you.Using English equipment• Immediately upon dismounting, the rider should “run up” the stirrups. A dangling stirrup may
startle or annoy the horse. It is possible for the horse to catch a cheek of the bit or even a hindfoot in a dangling stirrup iron when he is going for a fly. The dangling stirrup also can becaught on doorways and other projections while the horse is being led.
• After running up the stirrups, the reins should immediately be brought forward over the horse’shead. In this position, they can be used for leading.
Using western equipment• Closed reins, or a romal, should be brought forward over the horse’s head after dismounting.
Riding
• Keep your horse under control and maintain a secure seat at all times. Horses are easilyfrightened by unusual objects and noises.
• Until you know your horse, confine your riding to an arena or otherenclosed area. Ride in open spaces or unconfined areas after youare familiar with your horse.
• If your horse becomes frightened, remain calm, speak to itquietly, steady it and give it time to overcome its fear. Then rideor lead the horse past the obstacle. Do not hit the horse.
• Hold your horse to a walk when you go up or down a hill.• Allow the horse to pick its way at a walk when riding on rough
ground or in sand, mud, ice or snow where there is danger of thehorse slipping or falling.
• Do not fool around. It is dangerous for you and others who maybe nearby.
• When riding on roads:— never ride bareback,— always bridle the horse (riding with just a halter does not give you control),— use judgment when riding in pairs or in groups allowing sufficient space between horses,— avoid paved or other hard-surfaced roads and walk the horse when crossing such roads,

CHAPTER 16: HORSE SAFETY GUIDELINES
108
— in areas of heavy traffic, it is safest to dismount and lead the horse across, and— ride on the shoulders or in barrow pits, but watch for junk that can injure a horse.
• Never rush past riders who are proceeding at a slower gait. It startles both horses and ridersand can cause accidents. Instead approach slowly, indicate a desire to pass and proceedcautiously on the left.
• Never ride off until all riders are mounted.• Ride abreast or stay a full horse’s length from the horse in front to avoid the possibility of
being kicked.• Walk your horse when you approach and pass through underpasses or ride over bridges.• When your horse is full of energy, lunge it or ride it in an enclosed area until it is settled.• Do not let a horse run to and from the stables. Walk the last mile home.• Know the proper use and purpose of spurs before wearing them.• Dogs and horses are both good companions, but they may not mix. Keep your dog under
control at all times around horses.• Wear protective headgear when riding. This should be strictly adhered to in any form of riding.
Riding at night
• Riding at night can be a pleasure, but it can be more hazardous than daytime riding. Walk thehorse; fast gaits are dangerous.
• If necessary to ride at night on roads or highways, follow the same rules as for pedestrians.State laws vary regarding which side of the road you should ride. Wear light-colored clothingand carry a flashlight and reflectors. Check your state regulations for details.
• Select a location with care. Choose controlled bridle paths or familiar, safe, open areas.
Equipment and clothing
• Learn to handle a rope before carrying one on a horse. Always usecaution when working with a rope if the horse is not ropebroke.Never tie the rope hard and fast to a saddle horn while roping offa green horse.
• Bridle reins, stirrup leathers, headstalls, curbstraps and cinchstraps should be kept in the best possible condition; your safetydepends on these straps. Replace any of the straps when theybegin to show signs of wear such as cracking.
• Be sure all tack fits the horse. Adjust your tie-downs to a safe length that will not hinder thehorse’s balance.
• Spurs can trip you when you work on the ground. Take them off when you are not mounted.• Wear neat, well-fitting clothing that will not become snagged on equipment. Belts, jackets and
front chap straps can become hooked over the saddle horn.• Wear boots or shoes with heels as a safeguard against your foot slipping through the stirrup.• Keep the horse’s feet properly trimmed or shod. Have the horse’s teeth checked for any mouth
problems.

CHAPTER 16: HORSE SAFETY GUIDELINES
109
• Gloves are a safeguard against cuts, scratches, splinters and rope burns.• Do not wear rings or dangling jewelry around horses. They can catch on the halters and other
equipment.
Wear a helmet
• Wear a safety approved (ASTM-SEI) helmet. There are many helmet designs available, bothwestern and English.
• More than 17 percent of all horse-related injuries are head injuries. Head injuries areassociated with more than 60 percent of all equestrian related deaths.
• Riding helmets are not child’s play. Adults, aged 25 and older, account for 53 percent ofhospital-treated rider injuries.
• Injuries occur most frequently around or near the home or ranch (60 percent). Wear a helmetand make sure it is fastened securely on your head.
Trailering or other hauling
• Always have at least one person help you when trailering.• Always stand to one side, never directly behind, when loading or unloading a horse from a
trailer or truck.• Circumstances involved in loading a horse will vary, but the following methods are given in
order of preference:— Train the horse so it can be sent or led into the trailer.— Lead the horse into the left side of a two horse trailer while you stand on the right side of the
center divider, or vice versa.— With a front loading trailer, it is least desirable to get in front and lead the horse in (never do
this without an escape door or front exit; even with a door, use caution; most are awkwardto get through) Also, horses have been known to follow the handler out.
• Be certain the ground area behind and around the truck or trailer affords safe footing beforeloading or unloading.
• It is safest to remove all equipment (bridles, saddles and so forth) before loading. Use yourhalter.
• Always speak to a horse in a truck or trailer before youattempt to handle it.
• If you have trouble loading or unloading, get experiencedhelp.
• Secure the butt bar or chain before you tie the horse. Usecare when you reach for it. Ease it down when youunfasten it to avoid bumping the horse’s legs.
• Always untie a horse before opening the gate or door.• Avoid slick floors. Use matting or some type of bedding
for secure footing.

CHAPTER 16: HORSE SAFETY GUIDELINES
110
• Check your trailer regularly for the following:— rotting or weakened floor boards.— rusted and weakened door hinges.— broken hitch welds.—when serviced, have a competent mechanic check the spring shackles and wheel bearings.
• Be certain the trailer is of adequate construction and meets state requirements for brakes andlights.
• The trailer should have sufficient height to afford a horse ample neck and head room. Removeor cover any protruding objects.
• When you (or an adult) drive, always observe the following:— Double-check all connections (lights, brakes, hitch and safety chains).— Close and secure all doors.— Drive carefully. Make slow and steady turns; make slow and steady stops.— Drive defensively and look ahead to avoid emergencies.— When hauling a stallion with other horses, it is safer to load the stallion first and to unload
him last.• Distribute the weight of the load evenly. When hauling one horse, it is safest to load it on the
left side of the trailer.• Never throw lighted cigarettes or matches from a car or truck window because of the danger of
fire or of the wind sucking them into the trailer.• Check the horse and the trailer hitch at every stop before you continue on.• Opinions vary on whether to haul a horse tied or loose. If you tie it, allow sufficient length of
rope so the horse can move its head for balance. Use a safety release or a quick-release knot.• If hauling in a truck or other open carrier, protect the horse’s eyes from wind and foreign
objects. Use goggles or some type of wind shield. Do not let the horse put its head out awindow.
• Horses are like people; some get motion sickness. Adjust the horse’s feeding schedule to avoidtravel when the horse is full of feed and water. Feed smaller amounts or avoid feeding grainbefore the trip.
Trail riding
• If you plan to ride alone, tell someone where you are going and when you expect to return.• Ride a well-mannered horse.• Do not play practical jokes and indulge in horseplay.• Watch where you ride — avoid dangerous ground. Note landmarks. Study the country and
view behind you so you will know how it looks when you ride out.• Courtesy is the best safety on the trail.• Think of your horse first. Watch its condition, avoid injuries and care for it properly.• Carry a good pocket knife to cut ropes in case of entanglement.• Ride balanced and erect to avoid tiring the horse or causing a sore back and legs.• Check the equipment.— Have a halter and rope. Hobbles are fine if the horse is trained to them.
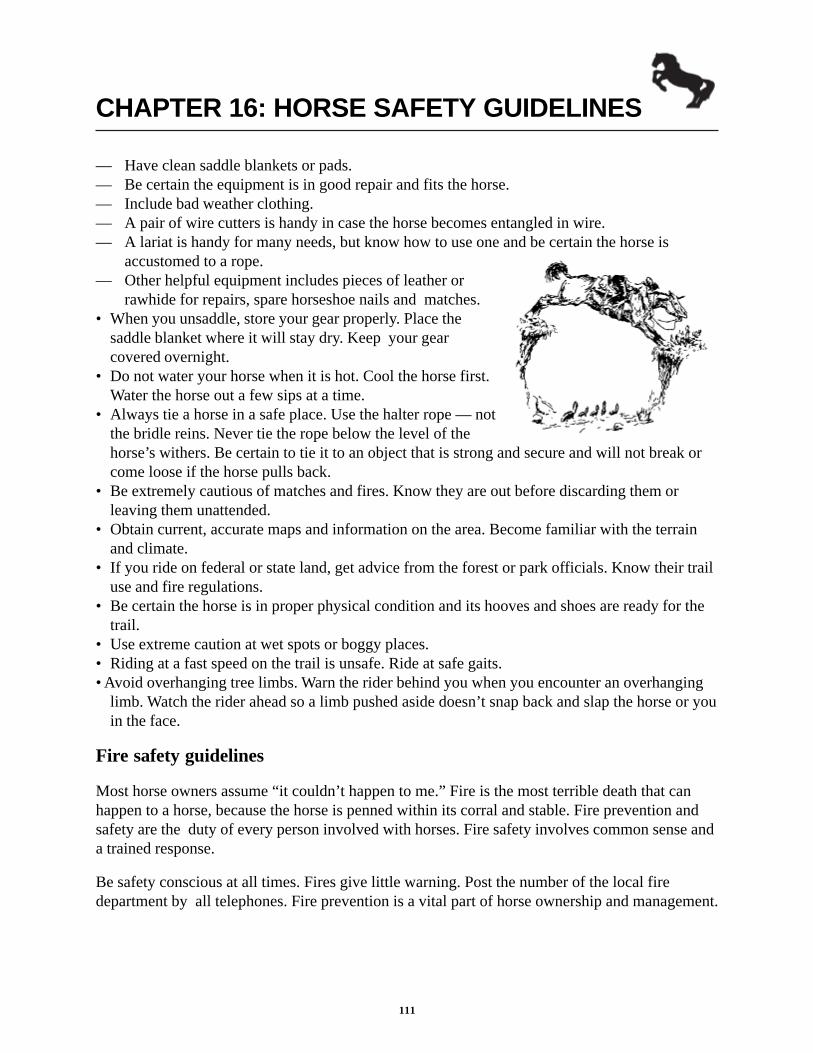
CHAPTER 16: HORSE SAFETY GUIDELINES
111
— Have clean saddle blankets or pads.— Be certain the equipment is in good repair and fits the horse.— Include bad weather clothing.— A pair of wire cutters is handy in case the horse becomes entangled in wire.— A lariat is handy for many needs, but know how to use one and be certain the horse is
accustomed to a rope.— Other helpful equipment includes pieces of leather or
rawhide for repairs, spare horseshoe nails and matches.• When you unsaddle, store your gear properly. Place the
saddle blanket where it will stay dry. Keep your gearcovered overnight.
• Do not water your horse when it is hot. Cool the horse first.Water the horse out a few sips at a time.
• Always tie a horse in a safe place. Use the halter rope — notthe bridle reins. Never tie the rope below the level of thehorse’s withers. Be certain to tie it to an object that is strong and secure and will not break orcome loose if the horse pulls back.
• Be extremely cautious of matches and fires. Know they are out before discarding them orleaving them unattended.
• Obtain current, accurate maps and information on the area. Become familiar with the terrainand climate.
• If you ride on federal or state land, get advice from the forest or park officials. Know their trailuse and fire regulations.
• Be certain the horse is in proper physical condition and its hooves and shoes are ready for thetrail.
• Use extreme caution at wet spots or boggy places.• Riding at a fast speed on the trail is unsafe. Ride at safe gaits.• Avoid overhanging tree limbs. Warn the rider behind you when you encounter an overhanging
limb. Watch the rider ahead so a limb pushed aside doesn’t snap back and slap the horse or youin the face.
Fire safety guidelines
Most horse owners assume “it couldn’t happen to me.” Fire is the most terrible death that canhappen to a horse, because the horse is penned within its corral and stable. Fire prevention andsafety are the duty of every person involved with horses. Fire safety involves common sense anda trained response.
Be safety conscious at all times. Fires give little warning. Post the number of the local firedepartment by all telephones. Fire prevention is a vital part of horse ownership and management.

CHAPTER 16: HORSE SAFETY GUIDELINES
112
Stable fires
Almost all horse barns are made of or contain these flammable materials: wood; bedding straw orwood shavings; highly combustible materials (leather, blankets, ropes, oils, etc.) Hay, beddingstraw or wood shavings are also stored close to barns.
A horse standing in a bed of straw might just as well be standing in a pool of gasoline should afire occur. The burning rate of loose straw is approximately three times that of the burning rate ofgasoline. The horse in a stall where fire originates has only 30 seconds to escape. The flamesspread and heat is so rapid that a fire, once started, is out of control in a matter of minutes.
Automatic sprinkler systems are advocated for facilities such as racetracks, large breedingestablishments and other commercial-type enterprises. However, from a monetary point of view,automatic sprinkler systems generally are not included in the smaller scale operations. Water-typefire extinguishers are effective if used within the first minute. Since stable fires develop rapidlydue to the abundance of combustible materials, fire extinguishers are of little or no use once thefire has burned for 60 seconds or more.
Fire spreads rapidly, as does panic. Quick action is necessary to save the life of a horse. Trainers,organizations and parents should teach fire prevention and safety. As schools have fire drills forstudents, so should barn managers and trainers instruct students as to the course of action tofollow in case of a fire.
30 seconds is all your horse may have
Plan now
• Know where fire alarms are located.• Know where fire equipment is located.• Know where water is located.• Know how to use fire extinguishing equipment.
Post the fire department number in a prominent place
Plan of action
• Call the fire department.• Begin evacuating horses.• Open all outside access gates to the stable area.• Keep roads clear for fire equipment access.• Use first aid fire fighting equipment (hand extinguishers, buckets and so forth).• Meet the fire fighters and direct them to the fire.

CHAPTER 16: HORSE SAFETY GUIDELINES
113
The following procedures, with individual modifications, could be used.
Procedures to be followed in the event of fire:
• Call the fire department.• Evacuate horses.
— Use halters and lead ropes.— Blindfold, if necessary, using scarves, handkerchiefs or gunny sacks.— Move to holding area away from barn site such as an adjacent riding arena, and out of the
way of fire fighting equipment.• Open all access gates to the barn area.• Until help arrives, use available fire fighting equipment.
— extinguishers,— hoses,— wet gunny sacks and— shovels, dirt.
• Keep roads clear for fire equipment.
Fire prevention measures
In the general barn area:
• Clean and dispose of debris.• Provide adequate water outlets with hoses attached.• Install an outside phone with a prominent display of fire department number.• Store feed, bedding straw or wood shavings at a safe distance from barns, and• Spray for weeds surrounding general area.Within the barn:• ensure no smoking is allowed in the barn,• have adequate water outlets with hoses attached,• dispose of oily rags immediately after use, and• check all electrical wiring periodically for frayed ends, doubled-up extension cords and so forth.
In the event of a wildfire in the area, don’t wait until the last possible moment to move yourhorses. Brush fires travel with alarming speed and can cover many miles in a matter of minutes.Winds fan flames and can carry firebrands that cause the fire to jump ridges and spread todifferent areas within minutes.

CHAPTER 16: HORSE SAFETY GUIDELINES
114
Other possible fire situations
Trail riding in the mountains
• Absolutely no smoking on the trail.• Advise a responsible party of your route and estimated time of return, whether you ride in a
group or by yourself.• Familiarize yourself with the terrain.• Any organized ride, as a safety rule, should have an alternate escape route planned.• In the event you come upon a fire, the personal safety of you and your horse is your primary
concern.— Assess the situation and use your best judgment.— Under normal conditions, try to get away from the fire area.— Proceed to a safe area.
Horse shows
• Follow proper parking procedures. Do not block street entrances or fire hydrants.• Never padlock your horse in a stall.
Horse safety commandments
• Buy or ride a safe horse.• Don’t be overmounted.• Know your horse.• Don’t surprise your horse.• Check your tack.• Watch small children.• Tie your horse with care.• Know trailer safety.• Don’t crowd others.• No clowning, please.

APPENDIX I: TERMS AND DEFINITIONS
115
Action - The manner in which a horse travels and moves.
Aids, artificial - Spurs, whips, martingales and so forth.
Aids, natural - Legs, hands, seat, weight and voice, as used to control a horse.
Appointments - Equipment and clothing used in showing horses.
Artificial gaits - Taught rather than natural. Includes the running walk, slow gait, rack, and insome instances, the pace. All are modifications of the walk.
Balance - Refers to the overall appearance of the horse. All parts of the body are in correctproportion to each other and result in a pleasing, balanced appearance.
Bearing Rein - Rein pushed against the neck in direction of the turn, neck rein.
Bits - The bit is the most important part of the bridle; the chief use of the other parts of the bridleis to hold the bit in place in the horse’s mouth. The bit provides communication between therider or driver and the horse.
Bloom - A condition of the hair and coat. They appear clean, healthy and fine textured with adistinct, clear shine. Healthy appearance.
Bosal (boh-zal) - Noseband of the hackamore, usually made of braided rawhide.
Bowed tendon - An inflammation and enlargement of the flexor tendon at the back of thecannon (most often found on the front legs).
Brace bandages - Resilient bandages on the leg of horses worn in some cases to support lamelegs, and worn in other cases to protect a horse from cutting and skinning its legs whileracing.
Brand - A mark of identification. A private registered mark burned, frozen or tattooed on thehorse.
Buck-kneed - Knees bent forward.
By or sired by - The male parent of a horse.
Calf-kneed - Opposite of buck-kneed. Knees angled backward.
Cast - To lie down or roll close to a wall so it is impossible or difficult to get up withoutassistance.
Catch rope - Working rope or lariat.

APPENDIX I: TERMS AND DEFINITIONS
116
Cavesson - A noseband on a bridle.
Coarse - Used to express a lack of quality or a rough, harsh appearance.
Coggins test - An agar gel-immunal diffusion test to determine Equine Infectious Anemia(known as Swamp Fever).
Colic - Various conditions of the digestive tract in which abdominal pain is the chief symptom.
Collected - Controlled gait, a correct, coordinated action.
Colt - A young, male horse under four years of age.
Conformation - The build of a horse — the structure, form and symmetrical arrangements ofparts.
Contracted heels - Occurs most often in the fore feet, characterized by a drawing or contractingof the heels.
Cribbing - Biting or setting teeth against the manger or some other object, arching the neck andgulping or swallowing air into the stomach, not the lungs.
Crossbreed - The result of breeding two different breeds of horse to produce an individual thatpossesses the characteristics of both breeds.
Cryptorchid - A male horse whose testicles have not descended into the scrotum.
Dental star - A star-shaped or circle-like structure near the center of the wearing surface of thepermanent incisors.
Direct rein - Using one hand on each rein with a snaffle bit or bosal, teaching the horse to turnand give to the pressure caused by the pull of the rein.
Disunited or cross firing - When a horse is on the right front lead and left hind lead at the sametime or vice versa.
Dressage - Exercise and training that develops the physique and ability of the horse.
Equine - Of or pertaining to horse.
Equitation - Art of riding horseback.
Farrier - A horseshoer.
Filly - A young female horse under four years old.
Float teeth - Filing off the sharp edges of a horse’s teeth.

APPENDIX I: TERMS AND DEFINITIONS
117
Foal - A young horse of either sex up to yearling age.
Founder - See laminitis.
Gait - Describes a specific foot fall pattern or beat, i.e., walk, trot, canter.
Gelding - An altered or castrated horse.
Grooming - Removal of dirt and other irritants from the horse; massages muscles.
Gymkhana - A program of competitive games on horseback.
Hackamore - A type of western headstall or bridle without a bit, commonly used in breakinghorses and teaching them to neck rein.
Hand - The unit by which the height of a horse is measured. A hand equals 4 inches.
Hand gallop - Three beat gait, similar to a lope or canter but the stride is lengthened.
Handy - Describes a horse that moves quickly and willingly. Always in conrol of its movementsin a balanced, rhythmic, alert manner.
Headstall - Part of a bridle or hackamore that fits over the horse’s head.
Heaves - Pulmonary Emphysema. A condition in which the lungs do not work efficiently.Reduced elastic recoil reduces the amount of air that can be forced out of the lungs. A “heaveline” may develop due to this condition.
Hinny - Cross between a jenny and a stallion.
Hobbles - Straps fastened to the front legs of a horse to prevent him from straying.
Honda - Eye on the working end of a lariat or riata through which the rope passes to form a loopor noose.
Jack - Male donkey.
Jenny - Female donkey.
Junior horse - Any horse four years old or younger.
Laminitis - Founder. Noninfectious inflammation of the sensitive laminae of one or more of thehooves.
Lead - In canter or lope, the horse is on the right or left lead as indicated by the inside or leadingforeleg; also the third beat in the stride.

APPENDIX I: TERMS AND DEFINITIONS
118
Lunge - A long line, about 20 to 30 feet, used to train and exercise a horse.
Mare - A mature female horse four years of age and older.
Martingales - Two types: standing and running. The martingale prevents the elevation of thehorse’s head beyond a certain level without cramping the horse. The standing martingaleconsists of a strap which extends from around the girth, between the forelegs, to thenoseband. The running martingale is not attached to the horse’s head, but terminates in tworings through which the reins pass. It permits more freedom of movement than the standingmartingale.
Mecate - A hackamore rein and lead rope. Also called a McCarty rein.
Monkey mouth -Opposite of parrot mouth, the lower jaw protrudes in front of the upper jaw.
Mule - A cross between a mare and a jack.
Natural gaits - Walk, trot, canter and gallop and, in some horses, pace and running walk.
Near side - The horse’s left side.
Neck rein - A signal to the horse with the weight of the rein against the neck.
Off side or far side - The horse’s right side.
Open class - A show class in which any horse of a specified breed may compete.
Out of or dam of - Refers to the female parent of a horse.
Parasite - A small organism that lives on or in and at the expense of a larger organism called thehost.
Parrot mouth - Opposite of monkey mouth, the upper jaw overhangs the lower jaw, the incisorsdo not properly meet and cause uneven wear and growth.
Parturition - The act of giving birth.
Piebald - The black and white coat color of the Pinto horse.
Posting - The rising and lowering of a rider with the rhythm of the trot.
Purebred - Bred from members of a recognized breed without mixture of blood from otherbreeds.
Quality - Fineness of feature, fine hair and lack of coarseness.

APPENDIX I: TERMS AND DEFINITIONS
119
Rein chains - Light weight chains attached from the bit to the rein. Used to counterbalance theweight of the spade bit.
Reins - The reins afford direct contact between the hands and horse’s mouth. They regulateimpulsion: slowing, stopping or backing the horse. The reins, acting through the mouth andthe neck, are also used to change direction of travel or to turn the horse to either the right orleft.
Restraint - Usually tying, to prevent escape or injury.
Riata - Braided rawhide rope.
Ribbon colors - First place — blue; second — red; third — yellow; fourth — white; fifth —pink; sixth — green; seventh — purple; eighth — brown.
Roached - A mane that has been cut short.
Roached back - A convex back, one that forms an outward arc.
Roller - A surcingle, or form of girth, used to hold a blanket in place.
Romal - A braided rawhide terminating in a single or double tapered strap, usually between 3 and4 feet long, and attached to the end of closed, braided rawhide reins.
Saddlebred - Breed originated in the United States. Developed as an easy-riding, generalpurpose horse historically for plantation use. Used today as a show horse. Can be three- orfive-gaited.
Seat and hands - A term that refers to the ability of a rider to sit in the saddle with grace andcontrol the mount.
Senior horse - Any horse five years old or older.
Short-coupled - Describes a horse having a short distance (not more than four-fingers width)between the last rib and the point of the hip.
Skewbald - Coat color other than black, such as bay, brown or chestnut, combined with white ofthe Pinto horse.
Slicker - A raincoat made of oiled canvas or plastic.
Slobber chains - Light weight chains attached between the shanks of a curb bit. Sometimes it isa solid metal bar called a slobber bar.
Smooth mouth - Refers to the smooth, biting surface of the upper and lower teeth after the cupshave disappeared at 12 years of age.

APPENDIX I: TERMS AND DEFINITIONS
120
Sound - A term that means the horse is physically fit and shows no signs of weakness or illnesswhich interfere with its usefulness.
Splitear headstall - A western headstall with a slot for only one ear to go through.
Spoon - The port mouthpiece for exerting pressure on the mouth which rises from the center ofthe mouthpiece of a curb bit, much like the port of the Weymouth curb bit. The spoon mayvary from less than an inch to 2 or more inches in length.
Stallion - A mature, uncastrated male.
Stud - Refers to a horse-breeding farm or ranch; corrupted in common usage to mean stallion.
Stylish - To have a pleasing, graceful, alert general appearance.
Suppleness - The ability of the horse to bend and flex its entire body.
Sway-back - A concave or sagging back that forms an inward arc.
Tack - Riding equipment or gear for the horse such as saddle, bridle, halter, and so forth.
Tapaderos or taps - Leather covering or shield over the front of the stirrups.
Thrush - A disease of the frog in which a black discharge and foul smell are emitted.
Type - The arrangement of body parts into distinct recognizable patterns. All horses have thesame basic conformation, but each breed has distinct conformation types that make it differ fromother breeds.
Vice - A bad habit that may affect a horse’s usefulness, dependability or health.
War bridle - An emergency bridle made of rope for use in leading unruly horses.
Warm-blood - Result of crossing heavy horses with fine thoroughbreds, mainly used for pullingcarriages. Today used in dressage, show jumping and eventing.
Weanling - A foal, colt or filly under one year old, that has been taken away from its mother thatis no longer nursing.
Wolf teeth - Small pointed teeth that sometimes appear at the base of the first premolar tooth.
Yearling - A foal that is between one and two years of age. A foal is considered one year of ageon January 1, regardless of what month in the year it was born.

APPENDIX II: BREED ASSOCIATIONS
121
Akhal Teke Registry of America21314 129th Avenue, SESnohomish, WA 98296(425) 485-4970 FAX: (360) 668-4302
American White and American CremeHorse Registry
Rt.1, Box 20Naper, NE 68755-2020(402) 832-5560
International Andalusian and LusitanoHorse Association
101 Carnoustie North, Box 200Birmingham, AL 35242(205) 995-8900 FAX: (205) 995-8966
Appaloosa Horse Club, Inc.P.O. Box 8403Moscow, ID 83843-0903(208) 882-5578 FAX: (208) 882-8150
Arabian Horse Registry of America, Inc.P.O. Box 173886Denver, CO 80217-3886(303) 450-4748 FAX: (303) 450-284
International Arabian Horse Association10805 E. Bethany Dr.Aurora, CO 80014-2605(303) 696-4500 FAX: (303) 696-4599
North American Shagya-Arabian Society9797 South Rangeline RoadClinton, IN 47842(765) 665-3851
American Buckskin Registry Association,Inc.
P.O. Box 3850Redding, CA 96049-3850(916) 223-1420 FAX: (916) 223-1420
International Buckskin Horse AssociationP.O. Box 268Shelby, IN 46377-0268(219) 552-1013 FAX: (219) 552-1013
Cleveland Bay Horse Society of NorthAmerica
P.O. Box 221South Windham, CT 06266-0221(860) 423-9457 FAX: (860) 439-1731
Clydesdale Breeders of the U.S.A.17346 Kelly Rd.Pecatonica, IL 61063(815) 247-8780 FAX: (815) 247-8337
Colorado Ranger Horse Association, Inc.Rd. 1, Box 1290Wampum, PA 16157-9610(415) 535-4841 FAX: (412) 535-4841
American Connemara Pony Society2360 Hunting Ridge RoadWinchester, VA 22603(540) 662-5953 FAX: (540) 722-2277
The American Donkey and Mule Society,Inc.
2901 N. Elm St.Denton, TX 76201-7631(940) 382-6845 FAX: (940) 484-8417
The Friesian Horse Association of NorthAmerica
P.O. Box 11217Lexington, KY 40574(541) 549-4272 FAX: (541) 549-4770
American Hackney Horse Society4059 Iron Works Pkwy., Suite 3Lexington, KY 40511-8462(606) 255-8694 FAX: (606) 255-0177

APPENDIX II: BREED ASSOCIATIONS
122
Haflinger Association of America14570 Gratiot Rd.Hemlock, MI 48626-9416(517) 642-5307 FAX: (517) 642-5358
American Haflinger Registry4078 Broadview RoadRichfield, OH(330) 659-2950 FAX: (330) 659-2942
American Hanoverian Society, Inc.4059 Iron Works Pike, Bldg. CLexington, KY 40511(606) 255-4141 FAX: (606) 255-8467
The American Holsteiner Horse Association222 E. Main St., #1Georgetown, KY 40324-1712(502) 863-4239 FAX: (502) 868-0722
Icelandic Horse Association of America andGaited International Association
507 N. Sullivan Rd.Veradale, CA 99037(509) 928-5690 FAX: (509) 928-2392
Lipizzan Association of North AmericaP.O. Box 1133Anderson, IN 46015-1133(765) 644-3904 FAX: (765) 641-1205
United States Lipizzan Registry707 13th St., SE, Ste. 275Salem, OR 97301(503) 589-3172 FAX: (503) 362-6393
American Miniature Horse Association, Inc.5601 South IH 35 WAlvarado, TX 76009(817) 783-5600 FAX: (817) 783-6403
Missouri Fox Trotting Horse BreedAssociation, Inc.
P.O. Box 1027Ava, MO 65608-1027(417) 683-2468 FAX: (417) 683-6144
American Morgan Horse Association, Inc.P.O. Box 960Shelburne, VT 05482-0960(802) 985-4944 FAX: (802) 985-8897
American Mustang and Burro AssociationP.O. Box 788Lincoln, CA 95648(530) 633-927 FAX: (916) 632-1855
National Native American Gaited HorseRegistry
P.O. Box 4326North Ft. Myers, FL 33917(941) 543-5252 FAX: (941) 543-2489
Norwegian Fjord Horse Registry8539 13 Mile RoadMarshall, MI 49068(616) 781-4970
International Sporthorse Registry andOldenburg Registry North America
939 Merchandise Mart200 World Trade CenterChicago, IL 60654(312) 527-6544 FAX: (312) 527-6573
American Paint Horse AssociationP.O. Box 961023Fort Worth, TX 76161-0023(817) 439-3400FAX: (817) 439-3484

APPENDIX II: BREED ASSOCIATIONS
123
Palomino Horse AssociationHC 63, Box 24Dornsife, PA 17823(717) 758-3067
Palomino Horse Breeders of America, Inc.15253 E. Skelly DriveTulsa, OK 74116-2637(918) 438-1234 FAX: (918) 438-1232
Paso Fino Horse Association, Inc101 North Collins, St.Plant City, FL 33566-3311(813) 719-7777 FAX: (813) 719-7872
Percheron Horse Association of AmericaP.O. Box 141Fredricktown, OH 43019-0141(614) 694-3602 FAX: (614) 694-3604
Peruvian Paso Horse Registry of NorthAmerica
3077 Wiljan Court, Suite ASanta Rosa, CA 95407-5702(707) 579-4394 FAX: (707) 579-1038
Pinto Horse Association of America , Inc.1900 Samuels Ave.Ft. Worth, TX 76102-1141(817) 336-7842 FAX: (817) 336-7416
Pony of the Americas Club, Inc.5240 Elmwood Ave.Indianapolis, IN 46203-5990(317) 788-0107 FAX: (317) 788-8974
Foundation for the Preservation andProtection of the Przewalski Horse
Dept. Of Animal & Dairy Science Univ. Of Georgia322 Livestock-Poultry BuildingAthens, GA 30602-2771(404) 542-0976 FAX (404) 542-0399
American Quarter Horse AssociationP.O. Box 200Amarillo, TX 79168-0001(806) 376-4811 FAX: (806) 349-6401
Foundation Quarter Horse RegistryBox 230Sterling, CO 80751(970) 522-7822 FAX: (970) 522-7822
National Foundation Quarter HorseAssociation
P.O. Box PJoseph, OR 97846(541) 426-4403 FAX: (541) 426-4206
Racking Horse Breeders Association ofAmerica
Rt.2, Box 72-ADecatur, AL 35603-9735(205) 353-7225 or (800) 558-7225FAX: (205) 353-7266
Rocky Mountain Horse Association2805 Lancaster Rd.Danville, KY 40422(606) 238-7754 FAX: (606) 238-7754
American Saddlebred Horse Association4093 Iron Works Pkwy.Lexington, KY 40511-8434(606) 259-2742 FAX: (606) 259-1628

APPENDIX II: BREED ASSOCIATIONS
124
American Shetland Pony Club81-B E. QueenwoodMorton, IL 61550(309) 263-4044 FAX: (309) 263-5113
American Shire Horse Association35380 County Rd. 31Davis, CA 95616-9430(916) 757-2742 FAX: (916) 758-2742
National Show Horse Registry11700 Commonwealth Dr. #200Louisville, KY 40299-2344(502) 266-5100 FAX: (502) 266-5806
International Trotting and PacingAssociation, Inc.
P.O. Box 751Moravia, NY 13118-0751(315) 497-3960 FAX: (315) 497-0828
United States Trotting Association750 Michigan Ave.Columbus, OH 43215-1191(614) 224-2291 FAX: (614) 224-4575
American Suffolk Horse Association4240 Goehring RoadLedbetter, TX 78946-9707(409) 249-5795
Tennessee Walking Horse Breeders’ andExhibitors’ Association
P.O. Box 286Lewisburg, TN 37091-0286(615) 359-1574 FAX: (615) 359-2539
The Jockey Club821 Corporate Dr.Lexington, KY 40503-2794(606) 224-2700 or (800) 444-8521FAX: (606) 224-2710
American Trakehner Association, Inc.1520 W. Church St.Newark, OH 43055(614) 344-1111
Walking Horse Owners’ Association ofAmerica
1535 W. Northfield Blvd., #3AMurfreesboro, TN 37129(615) 890-9120 FAX: (615) 890-2070
American Warmblood Registry, Inc.P.O. Box 15167Tallahassee, FL 32317-5167(904) 893-4089 FAX: (904) 893-8255
American Warmblood Society6801 W. Romley Ave.Phoenix, AZ 85043-6906(602) 936-6621 FAX: (602) 936-4790
North American Department of the RoyalDutch Warmblood Studbook of theNetherlands
609 E. CentralP.O. Box 0Sutherlin, OR 97479(541) 459-3232 FAX: (541) 459-2967
Welsh Pony and Cob Society of America,Inc.
P.O. Box 2977Winchester, VA 22604-2977(540) 667-6195

APPENDIX III: BALANCE YOUR HORSE’SFEED
125
Digestible Crude Calcium PhosphorusEnergy Protein
(DE) (Meal) (CP) (g) Ca (g) P (g)
repdeeF)sbl(yaD
elbitsegiDygrenE)lacM(
edurCnietorP
)yad/smarg(
muiclaC)yad/smarg(
suorohpsohP)yad/smarg(
egahguoR
sniarG
tnemelppuS
latoT
repdeeF)sbl(yaD
elbitsegiDygrenE)lacM(
edurCnietorP
)yad/smarg(
muiclaC)yad/smarg(
suorohpsohP)yad/smarg(
noitardeeFskcal/ssecxe
tcartbus/ddAehtmorf/ot
noitar
decnalaBnoitar
Differences (+/-) or balanced if close to requirements.