helpful guidelines for setting up a video meeting space. · 2019-10-10 · 6 setting up a video...
TRANSCRIPT

Helpful guidelines for
SETTING UP A VIDEO MEETING SPACE.

2
SETTING UP A VIDEO MEETING SPACE
CONTENTS
CONTENTSINTRODUCTION 3 CONFERENCECAMS 4
Huddle Rooms/Small Meeting Spaces 4
Medium/Large Meeting Spaces 4ENVIRONMENT 5
Room Selection 5Lighting 5Color 5Background 6Furniture 6
CONFIGURATION 7Connections 7Display 7Camera 8Audio 9Compute 10
LAYOUT EXAMPLES 12

3
SETTING UP A VIDEO MEETING SPACE
INTRODUCTIONVideo meetings are increasingly pervasive in organizations of every size and type due to compelling improvements in AV quality, flexibility, ease of use, and affordability—plus the simple fact that face-to-face collaboration through video conferencing is the next best thing to being there in person.
As adoption steadily increases, so do expectations about the overall video meeting experience. The key to achieving professional results is a combination of:
Tools and TechnologyMatching the right video conferencing equipment to the physical meeting space
Furnishings and SettingsOptimizing environmental factors such as lighting, background, and furniture
People and WorkPlacing and configuring equipment within the designated space to produce the best possible meeting experience
This guide will help you understand—and be able to proactively control—these essential variables for producing consistently awesome video meetings with confidence and ease.

4
SETTING UP A VIDEO MEETING SPACE
CONFERENCECAMSBegin by matching the right video conferencing equipment to the physical meeting space. Logitech offers four baseline ConferenceCams optimized per the number of meeting participants and specific room types, from huddle rooms and small meeting spaces to medium- and large-size conference rooms.
Huddle Rooms/Small Meeting SpacesMeetUp is Logitech’s primary ConferenceCam solution for huddle rooms and small conference rooms—anywhere space is at a premium. With a super-wide, low-distortion 120° field of view, even those closest to the camera can be seen while the integrated audio bar provides an exceptional sound experience for all meeting participants.
ConferenceCam Connect is a portable, all-in-one solution designed for small groups and huddle rooms, from 1 to 6 people. With a rechargeable battery, the Connect is compact and mobile so you can take it from room to room.
ConferenceCam BCC950 is ideal for personal use or small ad hoc meetings. ConferenceCam BCC950 is an all-in-one device with HD 1080p video and professional audio optimized for workgroups of 1 to 4 people.
Medium/Large Meeting SpacesLogitech GROUP is the amazingly affordable ConferenceCam for larger-sized conference rooms. The base system is designed for meetings with up to 14 people in one room. Optional expansion mics allow up to 20 people to collaborate.
Every Logitech ConferenceCam is designed to provide plug-and-play simplicity and the flexibility to work from your own computer or opt for the predictable convenience of an in-room solution. Connect, MeetUp, and GROUP each offer a Kit option that includes an Intel® NUC, UC Workspace’s Quicklaunch, and the content-sharing capabilities enabled by Intel Unite™ combined with a Logitech wireless keyboard to navigate the system.
Or choose Logitech SmartDock, an AV control console that revolutionizes the Skype Room System collaboration experience. Designed in partnership with Microsoft®, SmartDock enables expanded I/O for Surface® Pro that connects to Logitech ConferenceCams and enables users to simply walk into a conference room and start a meeting with one-touch join.

5
SETTING UP A VIDEO MEETING SPACE
ENVIRONMENTThe meeting room environment provides a visual context that can enhance (or diminish) the overall quality of video meetings. To create the best possible user experience, follow these guidelines to achieve professional-quality results:
Room SelectionIf possible, choose a meeting space with a minimum of reflective surfaces, especially exterior windows and other large glass surfaces. Note that some surfaces that appear matte to the eye can create glare seen by remote users that may not be visible in the physical space itself. Meeting room selection should also be informed by the ability to influence lighting, room color, background variables, furniture, and room size/shape.
LightingAn evenly-lit meeting space helps the camera capture the most accurate color, contrast and video definition. With color temperatures typically in the 3000K to 4500K range, the diffused fluorescent fixtures found in many office spaces work well for this purpose.
Any strong light source behind a meeting participant tends to darken the subject and produce an undesirable silhouette, so avoid pointing the camera towards exterior windows or other harsh lighting (like directional spotlights). Bright sunlight can also create sharp contrasts that are challenging for a video camera to render, even when the camera isn’t pointed directly towards an exterior window. To help remediate this issue, consider installing blinds or curtains to block out or otherwise control direct sunlight.
Figure 1 Positioning a subject between the camera and an exterior window (or other harsh light source) can cause an undesirable silhouette that degrades video quality.
ColorRoom color can affect the visual quality of a video meeting. Best option: a solid gray or other neutral color on the walls.
Avoid bright colors (such as pure red, blue, and green) which can cause the camera to make adjustments for the background that unintentionally skew flesh tones and other hues. Also avoid bold patterns in the background (and on clothing) whenever possible. Patterns often don’t render well on video calls, causing visual distraction and reduced quality.
If energizing the room with color is important for branding, display, or other purposes, use it sparingly and on the wall behind the camera field of view. Even objects out of the cameras view, such as low seating, can produce color bounce if reflected off nearby walls.
6
SETTING UP A VIDEO MEETING SPACE
BackgroundTo the extent possible, avoid visual clutter in the camera’s line of sight. Examples include unnecessary furniture, ornate plants, busy artwork, framed prints with reflective glass, and moving objects (like curtains in a draft).
Transparent walls or windows can also be a source of distraction if colleagues on the far end of the call are able to see movement or activity outside the meeting room. Plus, anyone outside can look into the room and watch your meeting. Possible solutions include blinds or curtains, a privacy screen, or frosted glass.
In addition, try to avoid unnecessary clutter on the meeting table, which can appear messy and visually distracting.
FurnitureRegardless of room size, a suitable conference table and appropriate number of chairs help anchor and define the meeting space.
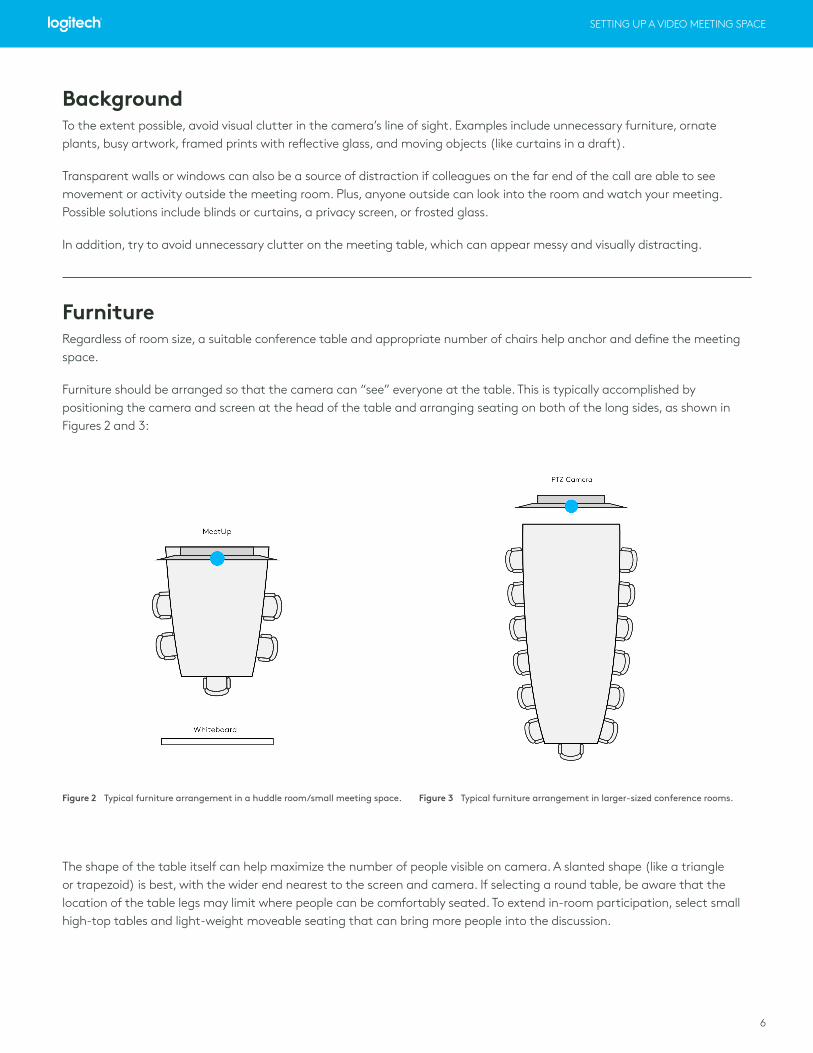
Furniture should be arranged so that the camera can “see” everyone at the table. This is typically accomplished by positioning the camera and screen at the head of the table and arranging seating on both of the long sides, as shown in Figures 2 and 3:
Figure 2 Typical furniture arrangement in a huddle room/small meeting space. Figure 3 Typical furniture arrangement in larger-sized conference rooms.
The shape of the table itself can help maximize the number of people visible on camera. A slanted shape (like a triangle or trapezoid) is best, with the wider end nearest to the screen and camera. If selecting a round table, be aware that the location of the table legs may limit where people can be comfortably seated. To extend in-room participation, select small high-top tables and light-weight moveable seating that can bring more people into the discussion.

7
SETTING UP A VIDEO MEETING SPACE
Here’s an example of a basic huddle room connection configuration using MeetUp:
For GROUP deployments in larger conference rooms, additional connections are required between the hub, camera, speakerphone, and optional expansion mics as shown here:
CONFIGURATIONWith the ConferenceCam selected and physical meeting space organized, the final step is to place and configure the equipment to produce the best possible meeting experience. Here are the key considerations and best practices:
ConnectionsAt the most basic level, you’ll need to provide power to the ConferenceCam, a display, and, often, the compute source. A single surge protector power strip can support adequate power access. Connection requirements may vary depending on which ConferenceCam is deployed.
Other cables and connections include a USB cable between the ConferenceCam and compute source, an HDMI cable between the compute source and display, and an Ethernet connection for Internet access. Take note of how cable lengths and proximity to power outlets will inform your possible set-up options in any given room.
Figure 4 Basic connection configuration for MeetUp. Figure 5 Basic connection configuration for GROUP.
For super-clean meeting room installations, consider routing connection cables through a conduit or under-the-table wire tray to keep cables organized, mitigate visual clutter, and reduce potential tripping hazards.
DisplayThe screen on a laptop may suffice for 1:1 video calls, but an HD display can substantially enhance face-to-face collaboration in video meetings for groups of any size.
HDMI Cable
USB Cable (16 ft / 5m)
Power Cables
HDMI Cable
Camera Cable (16 ft / 5m)
Power Cables
USB Cable (6 ft/2m)
Speakerphone Cable (16 ft/5m)
Expansion mics1
2
3
4

8
SETTING UP A VIDEO MEETING SPACE
Single, Dual DisplaysHuddle rooms and small meeting spaces can be adequately provisioned with a single flat-panel display. If there’s room for an additional screen, one can be used to display the remote participants while the other can be dedicated to shared content. This is particularly helpful in larger rooms so people furthest from the screens can easily see the shared content.
An additional advantage of dual displays is it allows the camera to be placed at eye level between the two screens. With a single display, the camera is typically situated just below or above the screen.
Figure 6 Camera position with dual displays.
Display SizeIdeally, the display should be large enough for everyone in the meeting to easily see the shared content on the screen while also in proportion to the conference table and overall meeting space.
Mounting OptionsSelect a display mounting option based on the constraints and preferences for the meeting space. One alternative is to simply place the display on a stand at the end of the meeting table. A common choice for larger conference rooms is to mount the display(s) on a wall for a professional appearance and increased visibility for everyone at the table.
When a single display is mounted on a wall, the center of the display should align with the center of the wall and the table. Dual display installations can be positioned either horizontally or vertically. For horizontal mounting, place the displays such that the center of the table aligns with the gap between the two displays. For vertical installations, follow the same rules as with a single display.
Settings Display settings determine important attributes of the video you see on screen, including display resolution, color saturation, and brightness/contrast. Settings should be reviewed and adjusted as needed during installation, in advance of the first live video meeting.
CameraThe core of any ConferenceCam is the camera itself. The camera should be positioned at an optimal height, distance, and viewing angle in order to see everyone in the room.
Field of view (FOV) determines the side-to-side viewing capacity of the camera lens, and this specification varies among Logitech video conference solutions: BCC950 features a 78° FOV, Connect and GROUP provide a 90° FOV. With a super-wide 120° field of view—the widest FOV Logitech offers—MeetUp makes every seat at the table clearly visible, even those nearest the camera in huddle rooms and space-constrained meeting spaces.

9
SETTING UP A VIDEO MEETING SPACE
Figure 7 Connect provides a 90° FOV. Figure 8 MeetUp features a 120° FOV, which is ideal for huddle rooms where space is at a premium.
Figure 9 GROUP provides a 90° FOV with mechanical 260° pan and 130° tilt to enhance collaboration by making it easy to see everyone in the room.
AudioIn addition to outstanding video, the ability to hear and be heard with lifelike sound that’s crisp, clear, and highly intelligible is essential to successful video conferencing. Every Logitech video conference solution provides both.
MeetUp, Connect, and BCC950 are all-in-one systems that include both a speaker and microphones. BCC950 features an omnidirectional speakerphone with an 4’ radius mic range: Connect offers a 50% wider range with a 6’ radius. MeetUp provides an 8’ radius range out of the box, which can be extended with an expansion mic an additional 6’ diameter from where the expansion mic is placed.
GROUP enables conference participants to converse within a 20’ diameter around the speakerphone and be heard so clearly by remote participants that it seems like conversations are happening in the same room. Optional expansion mics extend the conversation area from 20’ to 28’ so anyone seated further away from the speakerphone can be clearly heard.
Microphone PlacementWith a 6’ radius range, Connect delivers the best audio results when meeting participants are seated within a 6’ radius of the device—ideal for huddle rooms and smaller meeting spaces. In comparison, BCC950 users experience the best audio performance when seated within a 4’ radius. Omnidirectional microphones enable Connect and BCC950 to be heard from all directions, but should be placed directly beneath the display since people tend to speak to the screen.
AngleThe ideal camera position is eye level, which provides the most natural orientation for face-to-face collaboration. Visual performance can be diminished if a camera is positioned too high (or too low) relative to meeting participants.
An eye-level camera position may be difficult to accomplish when a single display is used and the camera must be positioned just above or below the screen. To help address this issue, MeetUp and GROUP provide a motorized pan and tilt that can help adjust and fine-tune the viewing angle.
DistanceTo take full advantage of a camera’s FOV, a certain amount of distance is required. As shown in the diagrams below, the trick is to situate seating in locations that enable the camera to deliver its full potential. Meeting tables designed with one end wider than the other (like a triangle or trapezoid shape) can help include more people within the camera’s view.

10
SETTING UP A VIDEO MEETING SPACE
Acoustical SupportFrom bright reverb to muffled sound, every physical space manifests acoustic qualities, many of which can be managed. Try to avoid rooms with abundant reflective surfaces such as glass or similarly hard materials, which tend to increase reverberations and compromise audio quality. Glass windows can allow outside noise to leak in as well, which can also be distracting.
Acoustic ceiling tiles can be helpful for absorbing sounds and reducing echoes and reverb. Acoustic ceiling clouds, which are basically acoustic panels that hang from the ceiling, are an effective alternative.
Carpet is an ideal flooring material because it absorbs sound well and effectively reduces reverb. Generally, softer and loftier materials absorb sound best.
These panels are easy to mount and are designed specifically to absorb sound and reduce unwanted reverb. In general, the more surface area covered the better. Supplement the sound absorption of acoustic panels with bass traps in the corners of the room for even better results.
ComputeAll Logitech ConferenceCams are USB peripherals with plug-and-play connectivity to a compute source. The most common options are a personal laptop (sometimes referred to in terms of BYOD, or Bring Your Own Device) or a dedicated computer of some type permanently installed in the meeting room.
PlacementThe primary locations for the compute source are either on the meeting table (as with a personal laptop) or mounted above or below the table near the display wall. Whatever the location, the computer requires proximity to the camera to connect through the USB cable, which varies in length from 6.5’ to 16’ depending on which Logitech solution is selected. In all cases, a good Internet signal is also required for video calls so wired Ethernet is recommended.
MeetUp features three beam-forming mics with an 8’ radius that collect sound in the direction it faces. MeetUp can’t hear sound from behind it, so it should be positioned to face the people in the room. The optional, omnidirectional expansion mic provides a 6’ diameter range from where it is placed, as shown here:
Figure 10 MeetUp offers the flexibility to expand its audio range with an expansion mic.
Figure 11 Optional expansion mics extend the conversation area for GROUP from 20’ to 28’.

11
AppAgnostic
Logitech ConferenceCam
Performance & Quality
Plug and Play
Easy & Quick Access to Content
Familiar Desktop UI
Use Any VC App Running on Your PC
Native, Immediate Content Sharing
Predictable Connection
Standardized Experience
Tidy and Neat Cabling
Customized Identity for Each Room
Always Ready,Nothing to Bring
BRING YOUR OWN LAPTOP
DEDICATED PC
Your Meeting, Your Stu�
SETTING UP A VIDEO MEETING SPACE
Figure 12 BYOD or dedicated compute: each has multiple advantages.
BYOD vs. Dedicated ComputeWith USB plug-and-play simplicity, all Logitech video conference solutions work right away without additional software once everything is plugged in. This provides liberating flexibility for BYOD users to set up ad hoc meetings in any video-enabled meeting space and have full access to everything on their own laptop.
Alternatively, many organizations prefer the consistency and convenience of provisioning video meeting spaces with dedicated compute sources. With this scenario, all connections are already made and tested so that everything is always set up and ready to launch a meeting. Users encounter the same experience every time, share screens wirelessly, and enjoy the reliability of pre-configuration.
In addition to the option of installing a dedicated laptop or desktop in a meeting room, Logitech offers SmartDock and ConferenceCam Kit options. Logitech SmartDock is a secure meeting room console designed for Skype Room Systems. The SmartDock AV control console provides a powered, secure mount for a Surface® Pro 4 tablet that offers convenience for meeting organizers and peace of mind for IT.
Logitech also offers ConferenceCam Kit options that include an Intel® NUC as the dedicated compute. The high-performance Intel NUC with Intel Unite wireless screen sharing delivers a robust collaboration experience with a small footprint. Connect, MeetUp, and GROUP Kits include everything you need: ConferenceCam, compute, and software are pre-configured and validated to provide the same great experience every time. Single SKUs also make Kits easy to buy with no hassles or guessing involved.

12
SETTING UP A VIDEO MEETING SPACE
LAYOUT EXAMPLESPulling it all together, here are some visual examples of best-practice layouts for various types of video meeting spaces:
Figure 13 Huddle room layout example with Connect.
HDMI Cable USB Cable Power Cables Under the Table or Behind the wall
Figure 14 3D perspective of huddle room layout example with Connect
HDMI Cable USB Cable Power Cables Under the Table or Behind the Wall

13
SETTING UP A VIDEO MEETING SPACE
LAYOUT EXAMPLESPulling it all together, here are some visual examples of best-practice layouts for various types of video meeting spaces:
Figure 16 3D perspective of huddle room layout example with MeetUp.
HDMI Cable USB Cable Power Cables Under the Table or Behind the Wall
Figure 15 Conference room layout example with GROUP and BYOD compute.
HDMI Cable USB Cable Power Cables Under the Table or Behind the Wall

14
SETTING UP A VIDEO MEETING SPACE
Figure 17 Conference room layout example with GROUP and dedicated compute, such as the Intel® NUC bundled in the Kit option.
Cords run from their respective devices into the back of the credenza to plug into the Intel NUC or hub.
HDMI Cable USB Cable Power Cables Under the Table or thre Credenza

15
SETTING UP A VIDEO MEETING SPACE
Figure 18 3D perspective of conference room layout with GROUP.
HDMI Cable USB Cable Power Cables Under the Table or Behind the Wall

16
SETTING UP A VIDEO MEETING SPACE
Logitech Inc. 7700 Gateway Blvd., Newark, CA 94560
© 2017 Logitech. Logitech, the Logitech logo and other Logitech marks are owned by Logitech and may be registered. All other trademarks are the property of their respective owners. Logitech assumes no responsibility for any errors that may appear in this publication. Product, pricing and feature information contained herein is subject to change without notice.
Published December, 2017
About Logitech Video Collaboration
WE ARE CHAMPIONS OF COLLABORATIONLogitech has tapped into new workplace trends and transformed the video conferencing industry with enterprise-quality tools priced for businesses of all sizes. We have brought HD-quality video communications to the huddle room, a space where colleagues can hold meetings within the open-layout workspace. Logitech HD webcams, like Logitech BRIO, outperform embedded cameras and enable face-to-face meetings anywhere, anytime. From huddle rooms to conference rooms, Logitech provides complete collaboration solutions with a line-up of ConferenceCams, webcams, and presentation devices. And for personal work spaces we also offer a range of high performance headsets and webcams. All these products are engineered for exceptional performance, yet so intuitive, people love to use them.