handy tips to help you when working ... - sage city community
TRANSCRIPT

6HANDY TIPS TO HELP YOU WHEN WORKING WITH THE SAGE INTELLIGENCE REPORT MANAGER

TABLE OF CONTENTSINTRODUCTION 3
01 How to save a report to a file 4
02 Learn the various Report Manager menu ribbon functions 6
03 How to view the Source Container 7
04 How to back up metadata 8
05 How to schedule your reports to distribute automatically 9
06 Learn how to add additional fields to a report in Report Manager 13
ADDITIONAL LEARNING AND RESOURCES 15

3
INTRODUCTIONThe Sage Intelligence Reporting Report Manager allows you to run out relevant reports, author new reports (organizing, creating, and editing), filter and aggregate data, as well as create new reports with the standard data tables available. This tool also allows you to set permissions and security for reports.
Note: While a few of these tips may use an example from a specific Sage solution, they are applicable across all integrations that Intelligence Reporting is available in.

4
HOW TO SAVE A REPORT TO A FILE01
Apart from just running out a report, Sage Intelligence allows you to automatically save the generated workbook to a file during run-time. This is useful, for example, if you run a monthly sales report that needs to be saved to a central location for others to view. In this tip, we'll to show you how this can be done.
1. In the Report Manager, select the report you wish to save to file.2. Then, display the advanced properties for it by selecting the Show Advanced checkbox
in the Properties tab.
3. Scroll down until you get to the Generate Output File option and click the ellipses to the right of it.
4. A dialogue will appear allowing you to specify the location you would like the workbook saved to. I have chosen to save mine to a ‘Monthly reports’ folder on my desktop, but this could also be a shared network location. If you have a cloud file storage service like OneDrive set up on your machine, you can even save the workbook to a OneDrive folder, making it accessible in the cloud.
5. You will need to give the workbook a name, and take note that you can use system variables in the name. Using system variables is helpful to give the name more meaning and ensures that previous instances of the workbook aren’t overwritten with the current one. I’ve used the @MONTHNAME@ system variable which will add the name of the month that I run the report out in to the file name.
Note: If you would like to view the system variables that are available to you, you can do so by selecting System Variables from the Tools menu in the Report Manager.

5
6. Although the default file type for the report is .xls, it’s a good idea to save the workbook in an .xlsx format. You can do this by typing .xlsx as the extension in the file name. If you would like the file saved as a macro enabled workbook, then you can use .xlsm.
7. Once done, click Save, and the dialogue will close. You can then run the report. As you can see on doing so, in my case, a copy of the workbook is saved to the location I specified, along with the current month included in the name, and in the format I entered.
Tip: If all you’re interested in is the saved workbook, and you have no need for the report to be generated to Excel, then you can use the Close Workbook on Completion option under the report’s properties to have the Excel workbook closed automatically after it is run out.
TIP 1: HOW TO SAVE A REPORT TO A FILE

6
02 LEARN THE VARIOUS REPORT MANAGER MENU RIBBON FUNCTIONS
When you use the Sage Intelligence Report Manager module, you will see an array of icons on the menu ribbon. Here is a quick tip on their functionality.
Note: Icons will activate / deactivate based on your selection in the object window. These icons are available on software using Sage Intelligence Core 7.3 and above.

7
03 HOW TO VIEW THE SOURCE CONTAINER
Although this tip references the Connector Module you may not have or use the Connector. However, it is good to know where the report source is in case you or the person who created your report needs to know.
The Source Container can be found in the Connector. A Container is a set of metadata which will allow users access to the report data using the Report Manager module. The source of this data can be a database table, view, SQL query, stored procedure or a custom join based on two or more tables/views. A report writer may want to add a field to the report and this information can help them.
This tip explains how to find the report Container name using the Report Manager. 1. In the Report Manager, double-click on the report.2. Double-click on Source Container. The Container name will then be displayed
beneath the source container line.
If you want to go to the Container you must have the Connector module. To do so, right-click on Source Container and select Go to Container in Connector. Doing this will open the Connector and take you directly to the source container for the report you are highlighting.
8
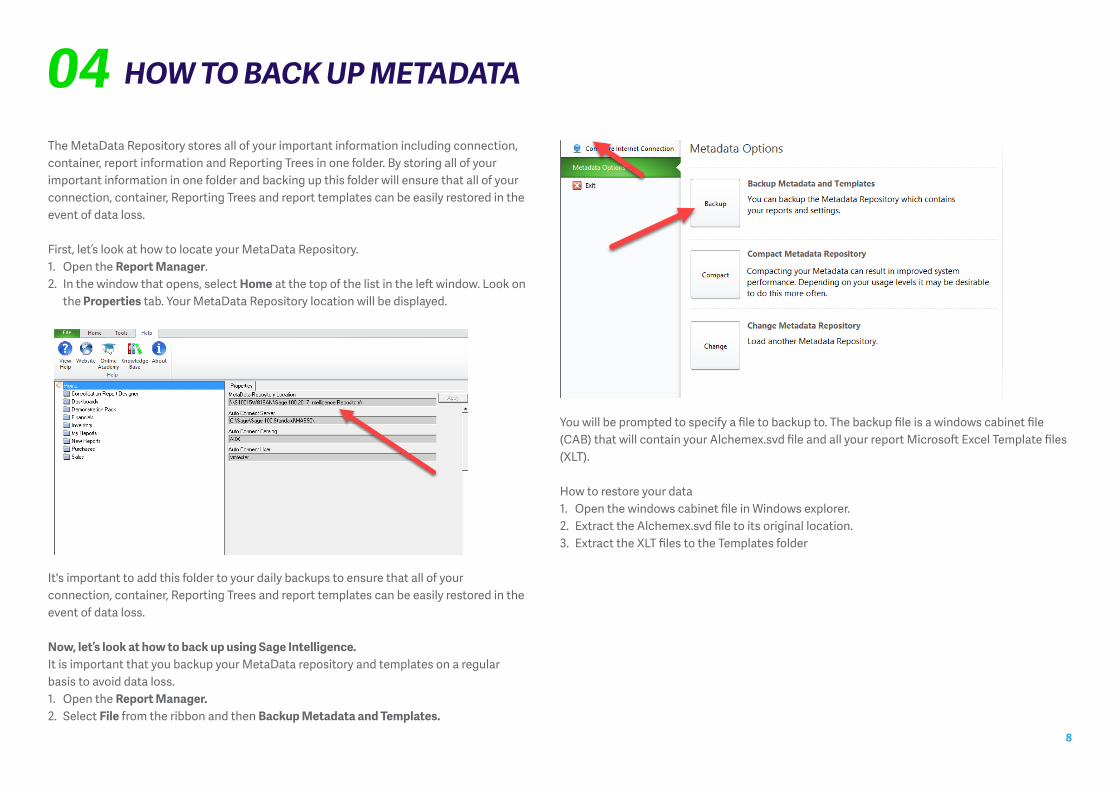
HOW TO BACK UP METADATA04The MetaData Repository stores all of your important information including connection, container, report information and Reporting Trees in one folder. By storing all of your important information in one folder and backing up this folder will ensure that all of your connection, container, Reporting Trees and report templates can be easily restored in the event of data loss.
First, let’s look at how to locate your MetaData Repository.1. Open the Report Manager.2. In the window that opens, select Home at the top of the list in the left window. Look on
the Properties tab. Your MetaData Repository location will be displayed.
It's important to add this folder to your daily backups to ensure that all of your connection, container, Reporting Trees and report templates can be easily restored in the event of data loss.
Now, let’s look at how to back up using Sage Intelligence. It is important that you backup your MetaData repository and templates on a regular basis to avoid data loss.1. Open the Report Manager.2. Select File from the ribbon and then Backup Metadata and Templates.
You will be prompted to specify a file to backup to. The backup file is a windows cabinet file (CAB) that will contain your Alchemex.svd file and all your report Microsoft Excel Template files (XLT).
How to restore your data1. Open the windows cabinet file in Windows explorer.2. Extract the Alchemex.svd file to its original location.3. Extract the XLT files to the Templates folder

9
Stop manually distributing your reports and start saving time by scheduling your reports to automatically distribute. In this tip, we’ll show you how to quickly set up your automatic report distribution with your existing Sage Intelligence Report Manager and your Windows Task Scheduler.
This process is made up of 3 easy steps:
1. Decide where you’re going to save your report.2. Create the Scheduler Command.3. Set up the Windows Scheduler Task.
It’s important to remember that the workstation where you create the scheduled task, must be turned ON at the scheduled time.
Also, when using the Task Scheduler, your user name must be a valid account on the domain or your local machine, with sufficient privileges to run the reports. You must also have sufficient permissions to access all the necessary resources to run the reports.
Step 1: Decide where you’re going to save your report
1. In the Report Manager window, select the report you’re going to distribute.2. Then, in the Properties window, tick the Show Advanced box found at the bottom of
the window.3. Click the Generate Output File ellipsis button and browse to the location you want the
report to be saved to when it runs out.
HOW TO SCHEDULE YOUR REPORTS TO DISTRIBUTE AUTOMATICALLY
05

10
Step 2: Create the Scheduler Command
1. From the Object window, right-click on your report, then select Generate Scheduler Command.
2. If the report expects parameters, you will be prompted to enter them before continuing.
When you’re done, a message box displays and you’ll see that it shows the syntax for running the report. Don’t worry about trying to copy the syntax from this message, because it has been simultaneously placed in the Windows clipboard, so that you can paste it into the Scheduler Task Command field.
TIP 5: HOW TO SCHEDULE YOUR REPORTS TO DISTRIBUTE AUTOMATICALLY
Step 3: Set up the Windows Scheduler Task
1. Next, open the Windows Task Scheduler.2. From the Action drop down menu, select Create Task.
The Create Task window displays.

11
3. In the Name field, give your task a meaningful name. For example, Current Period Income Statement.
4. Then click on the Triggers tab and select New.
5. You can schedule your report run on a specific day, at a specific time and you can also set it to stop running on a specific day. Go through the options and find the ones that would best suit your needs.
TIP 5: HOW TO SCHEDULE YOUR REPORTS TO DISTRIBUTE AUTOMATICALLY
6. Now, click on the Actions tab and select New.7. In the Program/script field, paste the command from your clipboard and then select OK.
8. Click Yes to confirm and continue.

12
9. Now, click on the Settings tab and set up your Task Schedule options.
10. Then click OK.11. The report you chose to run via the schedule, will now appear as an Active Task in Task
Scheduler.
TIP 5: HOW TO SCHEDULE YOUR REPORTS TO DISTRIBUTE AUTOMATICALLY
13
LEARN HOW TO ADD ADDITIONAL FIELDS TO A REPORT
Did you know that whether you are using a standard or a customised Sage Intelligence report, you’re free to add additional fields to it in the Sage Intelligence Report Manager? There are a couple of reasons why you might want to do this. For example, perhaps the report doesn’t have a particular field you want to report on. Often the container of a report includes additional fields that aren’t added to it in the Report Manager, so it’s always a good idea to check the available fields first to see if the one you want is there. You may also want to make use of the same field twice, for example in a Pivot Table, both as a filter and as a row or value field, and this can be achieved by adding it again in the source data.
Working from Sage 300 with the standard Sales Master report, in this example, I’m going to add the ‘Salesperson Name’ field a second time so that I can use it both as a filter and as a column in the report’s Pivot Table.
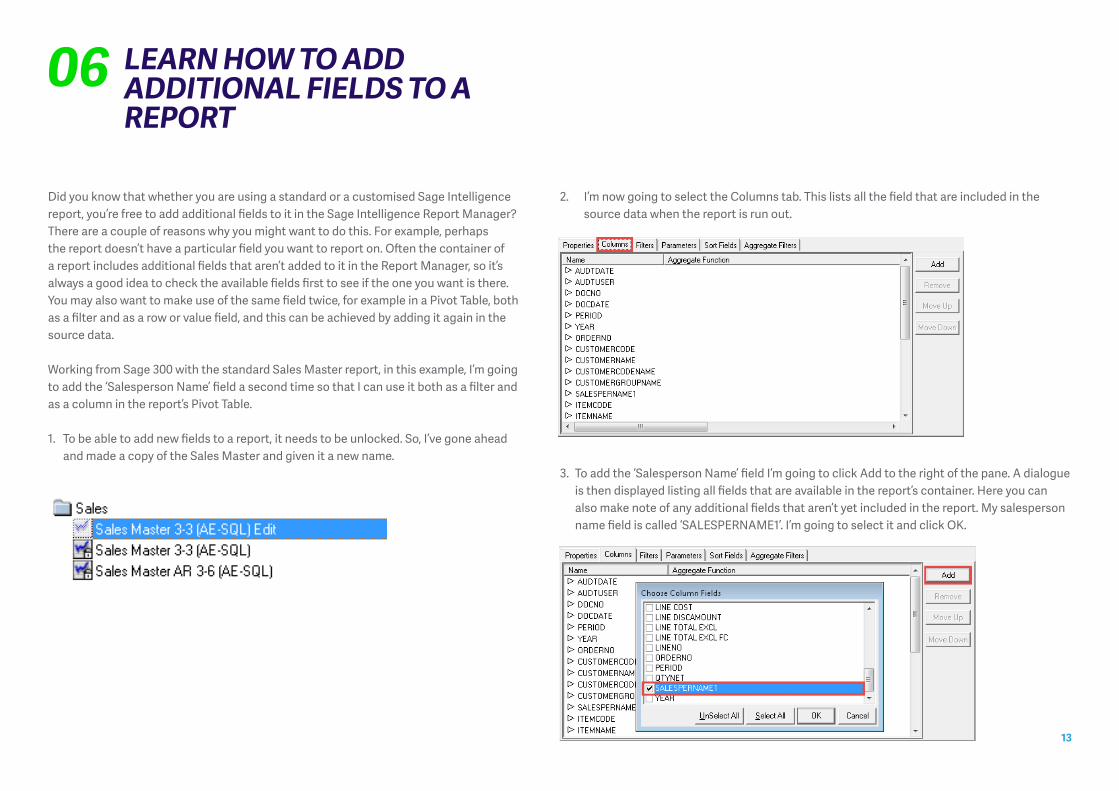
1. To be able to add new fields to a report, it needs to be unlocked. So, I’ve gone ahead and made a copy of the Sales Master and given it a new name.
06
2. I’m now going to select the Columns tab. This lists all the field that are included in the source data when the report is run out.
3. To add the ‘Salesperson Name’ field I’m going to click Add to the right of the pane. A dialogue is then displayed listing all fields that are available in the report’s container. Here you can also make note of any additional fields that aren’t yet included in the report. My salesperson name field is called ‘SALESPERNAME1’. I’m going to select it and click OK.

14
4. The field is added a second time, shown at the bottom of the list. I can now run the report out.
5. To add the field to my Pivot Table, I’m going to select a cell in the table and then from the Analyze tab on the Ribbon, click Field List.
TIP 6: LEARN HOW TO ADD ADDITIONAL FIELDS TO A REPORT
6. The list will contain the new field and I can drag it into the desired quadrant of the Pivot Table. I’m going to add it to the rows area. The field is now included as both a filter and as a column in my table.
If you want to add a field and find that it isn’t available in the container, you will have to add it to the container in the Connector module. This is a subject for a more advanced discussion. If you would like more information on the connector then take a look at the following webcast: Getting in touch with the Connector Module

15
ADDITIONAL LEARNING AND RESOURCES
ENJOYED THE HANDY TIPS AND TRICKS IN THIS E-BOOK?This e-book is a just taste of how we can help you to maximize your investment in Sage Intelligence Reporting so you can gain meaningful
insights into your data to give your company a competitive edge. Check out the following learning and resources to help you better report on your business's financials.
Get FREE additional reports. Have reports to create, but no time to create them? We’ve got you covered! With a suite of additional reports available for you to access at anytime from anywhere, you’ll have more time to run and manage your business and do what you love!
Find out more
Sage Intelligence Learning PortalYour personal library of learning resources that suits your knowledge level, and then guides you towards mastering your solution!
Visit the Sage Intelligence Learning Portal
Subscribe to our Tips and Tricks NewsletterJoin over 20 000 subscribers to our popular Sage Intelligence and Excel tips and tricks and get a handy tip delivered monthly straight to your inbox!
Subscribe to Excel tips & tricksSubscribe to Sage Intelligence tips & tricks
www.sageintelligence.com

©2019 Sage Software, Inc. All rights reserved. Sage, the Sage logos, and the Sage product and service names mentioned herein are registered trademarks or trademarks of Sage Software, Inc., or its affiliated entities. All other trademarks are the property of their respective owners.