hand held pulse oximeter instruction manual · • single-use accessories should never be reused....
TRANSCRIPT

HAND HELD PULSE OXIMETER
INSTRUCTION MANUAL
Reorder No. 7089

Oximeter SerieSOximeter SerieS PULSE OXIMETER INSTRUCTION MANUAL
2

Oximeter SerieSOximeter SerieS PULSE OXIMETER INSTRUCTION MANUAL
3
All information contained in this publication is believed to be correct. We shall not be liable for errors contained herein nor for incidental or consequential damages in connection with the furnishing, performance, or use of this material. The information this publication refers to is protected by copyrights or patents and does not convey any license under the patent rights of our company, nor the rights of others. We do not assume any liability arising out of any infringements or patents or other rights of third parties.
Copyright © 2013. All rights reserved.
Contents of this material are subject to change without prior notice.
r0

Oximeter SerieSOximeter SerieS PULSE OXIMETER INSTRUCTION MANUAL
4
Contents
1 Introduction ..................................................................................... 6 1.1 Brief Introduction .......................................................... 6 1.2 Safety Information ........................................................ 6 1.3 Equipment Symbols ....................................................11 1.4 Equipment Classification .......................................... 12 1.5 Package Contents ........................................................ 122 General Descriptions ................................................................. 13
2.1 Front Panel ................................................................... 132.2 Rear Panel ..................................................................... 152.3 Product Features ........................................................ 172.4 Intended Use ............................................................... 17
3 Getting Started ............................................................................ 18 3.1 Unpacking and Checking ......................................... 18 3.2 Environmental Requirements ................................. 18 3.3 Connect the Sensor .................................................... 19 3.4 Starting or Shutting Off the Oximeter ................. 204 Setting ID, Date and Time ........................................................ 20 4.1 Date & Time Setting ................................................... 21 4.2 ID Number Setting ...................................................... 225 Take a Measurement ................................................................. 22 5.1 Factors That May Affect The Measurement ....... 23
Oximeter SerieSOximeter SerieS PULSE OXIMETER INSTRUCTION MANUAL
5
6 History Data Reviewing ............................................................ 26 6.1 Character Definition ................................................... 26 6.2 Reviewing Operation ................................................. 267 Alarm Setting ............................................................................... 27 7.1 Alarm Priority ................................................................ 27 7.2 Character Definition ................................................... 28 7.3 SpO2 Alarm Setting ........................................... 28 7.4 PR Alarm Setting ......................................................... 29 7.5 Alarm on/off .................................................................. 29 7.6 Alarm Activation .......................................................... 308 Beep on/off ................................................................................... 319 Maintain and Cleaning ..............................................................32 9.1 Safety Checks ............................................................... 32 9.2 Calibration and Verification .................................... 35
9.3 Trouble Shooting ........................................................ 369.4 Warranty .........................................................................37
APPENDIX A Specifications ..................................................... 39APPENDIX B .....................................................................................42

Oximeter SerieSOximeter SerieS PULSE OXIMETER INSTRUCTION MANUAL
6
1 Introduction
1.1 Brief IntroductionThank you for purchasing the Hand Held Pulse Oximeter. The device is designed to measure SpO2 and PR, delivering visual and audio alarm, sensor off alarm, data storage and review etc. Please read this manual carefully before using it.
1.2 Safety InformationConception of Warning, Precaution and Notice
The Warning, Precaution and Notice in this document means:
Ø Warning - Indicates a potential hazard or unsafe practice that, if not avoided, will result in death or serious injury.
Ø Caution - Indicates a potential hazard or unsafe practice that, if not avoided, could result in minor personal injury or product/ property damage.
Ø Notice - Provides application tips or other useful information to ensure that you get the most from your product.
WARNINGS
• Before putting the system into operation, verify that the equipment, connecting cables and accessories are in correct working order and operating condition.
• To avoid explosion hazard, do not use the Oximeter in the presence of flammable anesthetics, vapors or liquids.
• Do not open the equipment housings; electric shock

Oximeter SerieSOximeter SerieS PULSE OXIMETER INSTRUCTION MANUAL
7
hazard may exist. All servicing and future upgrades must be carried out by trained personnel and authorized by our company only.
• The Pulse Oximeter is specified for use by medical professionals only.
• Prolonged use of the probe/sensor or the patient’s condition may require changing the sensor site periodically. Change the sensor site and check skin integrity, circulatory status, and correct alignment at least every 4 hours. Prolonged use may cause blisters, skin deterioration, and discomfort.
• When connecting this Oximeter to any instrument, verify proper operation before clinical use. Refer to the instrument’s user manual for full instructions. The equipment connected to the Pulse Oximeter’s data interface must be certified according to the respective IEC standards, i.e., IEC950 for data processing equipment or IEC 601-1 for medical electrical equipment. All combinations of equipment must be in compliance with IEC601-1-1 systems requirements.
• Sensor malfunction may cause inaccurate data, possibly resulting in patient injury or death, so pay close attention to the sensor and inspect it often.
• The physiological data and alarm messages displayed on the equipment are for reference only and cannot be directly used for diagnostic interpretation.
• Do not rely exclusively on the audible alarm system for patient monitoring. Adjustment of alarm volume to off may result in a hazard to the patient. Remember that alarm settings should be customized according

Oximeter SerieSOximeter SerieS PULSE OXIMETER INSTRUCTION MANUAL
8
to different patient situations and always keeping the patient under close surveillance is the most reliable way for safe patient monitoring.
• Worn-out data cables may also cause inaccurate data, so if the data is used as a reference to treat a patient, pay special attention to the data cable and check it more frequently.
• When using the equipment with electrosurgical units (ESU), make sure the patient is safe.
• Do not come into contact with the patient during defibrillation. Otherwise serious injury or death could result.
• Single-use accessories should never be reused. To avoid inadvertent disconnection, route all cables in a way to prevent a stumbling hazard. Wrap and secure excess cabling to avoid risk of entanglement or strangulation by patients or personnel.
CAUTIONS• Autoclaving, ethylene oxide sterilizing, or immersing the
sensors in liquid may cause inaccurate readings.
• To ensure patient safety, use only parts specified in this manual.
• The operator must be thoroughly familiar with the information in this manual before using the device.
• Magnetic and electrical fields are capable of interfering with the proper performance of the equipment. For this reason make sure that all external devices operated in the vicinity of the equipment comply with the relevant

Oximeter SerieSOximeter SerieS PULSE OXIMETER INSTRUCTION MANUAL
9
EMC requirements. Mobile phones, X-ray equipment or MRI devices are a possible source of interference as they may emit higher levels of electromagnetic radiation.
• Unplug the sensor from the Oximeter before cleaning or disinfecting it. If liquid is accidentally spilled on the unit, clean and dry thoroughly before reuse.
• Do not try to use the SpO2 and NIBP measurement on the same arm at the same time. This could potentially affect measurement accuracy.
• At the end of its service life, the equipment must be disposed of in compliance with the guidelines regulating the disposal of such products. If you have any questions concerning disposal of the equipment, please contact your distributor.
• Always install or carry the equipment properly to avoid damage caused by drop, impact, strong vibration or other mechanical force.
NOTES• Put the equipment in a location where you can easily see
the screen and access the operating controls.
• Keep this manual in the vicinity of the equipment so that it can be obtained conveniently when needed.
• The software was developed in compliance with IEC60601-1-4. The possibility of hazards arising from software errors is minimized.
• SpO2 measurements may be influenced by high ambient light, especially sunlight. Shield the sensor area if necessary.

Oximeter SerieSOximeter SerieS PULSE OXIMETER INSTRUCTION MANUAL
10
• Dyes introduced into the bloodstream, such as methylene blue, indocyanine green, indigo carmine, and fluorescein, may influence the accuracy of the SpO2 reading.
• Any condition that restricts blood flow, such as use of a blood pressure cuff or extremes in systemic vascular resistance, may cause a failure to determine accurate pulse rate and SpO2 readings.
• Remove fingernail polish or artificial fingernails before applying SpO2 sensors. Fingernail polish or artificial fingernails may cause inaccurate SpO2 readings.
• Optical cross-talk can occur when two or more sensors are located in adjoining areas. It can be eliminated by covering each site with opaque material. Optical cross-talk may adversely affect the accuracy of the SpO2 readings.
• Obstructions or dirt on the sensor’s red light or detector may cause a sensor failure. Make sure there are no obstructions and the sensor is clean.
• For routine equipment maintenance, please refer to the service procedures at the associated section as indicated in the manual.
• As to the other concerns for attention, please carefully look through the specific chapter in enclosed instructions.
• This manual describes all features and options. This model may not have all accessories mentioned in this manual.
• Federal Law restricts this device to sale by or on the order of a physician.

Oximeter SerieSOximeter SerieS PULSE OXIMETER INSTRUCTION MANUAL
11
Symbols Definitions
Attention! Refer to the relevant information. Read operator’s manual carefully before using the Oximeter.
: Type BF applied part
Production date
Manufacturer’s address
Low power indicator
Serial Number
1.3 Equipment Symbols

Oximeter SerieSOximeter SerieS PULSE OXIMETER INSTRUCTION MANUAL
12
1.4 Equipment Classification
Classification according to IEC-60601
According to the type of protection against
electrical shock
Internal electrical power source equipment
According to the degree of protection against
electrical shockType B equipment
According to the degree of protection against harmful
ingress of water
Ordinary equipment (enclosed equipment
without protection against ingress of water)
According to the methods of sterilization or
disinfection
Non-sterilizable: Use of liquid surface
disinfectants only.
According to the mode of operation continuous operation
Equipment not suitable for use in the presence of a flammable anesthetic mixture,
air or with oxygen or nitrous oxide.
1.5 Package Contents
1. Pulse Oximeter manual
2. Sensor manual
3. Finger Sensor w/ cable
4. USB cable
5. Software Disk

Oximeter SerieSOximeter SerieS PULSE OXIMETER INSTRUCTION MANUAL
13
2 General Descriptions
The Hand Held Pulse Oximeter has 8-segment digital LED for displaying data. It can display the SpO2 and pulse rate value, time & date, ID number, pulse bar as well as battery status etc.
2.1 Front PanelPlease refer to Fig. 1. The display in Fig. 1 is a normal screen.
Instruction of Fig. 1:1. SpO2: SpO2 value
2. PR: Pulse rate
Fig. 1 Front panel

Oximeter SerieSOximeter SerieS PULSE OXIMETER INSTRUCTION MANUAL
14
3. Low power indicator. When the power is lower than 2.4V, the lamp indicated will be lighted, and the Oximeter will power off automatically when the power is lower than 2.3V.
4. Alarm Indicator: When technical alarm or physiolog-ical alarm occurs, the lamp indicated will turn red.
5. Power button
6. Navigation buttons: you can select and set the different parameters. These three buttons below are also used as shortcut buttons:
a) Press the up button, the unit will display the ID number.
b) Press the right or left button, the unit will display the Error Code.
7. Menu button: You can return to the measurement screen or switch the main menu item by this button.
8. Reserved function.
9. Beep off/on Indicator: When beep is off, the lamp indicated by it is on.
10. Alarm light: When there is an alarm, the associated lamp will be lighted.
11. Pulse bar: The pulse bar is in proportion to the pulse volume.
Note: This manual describes all features and options. However equipment may not have all accessories.

Oximeter SerieSOximeter SerieS PULSE OXIMETER INSTRUCTION MANUAL
15
Rear panel introduction:
1. Battery compartment – Uses 2 AA-size alkaline batteries (not included)
2. Fixing hole
3. Fixing screw
4. Battery cover
2.2 Rear Panel
Fig. 2 Rear panel

Oximeter SerieSOximeter SerieS PULSE OXIMETER INSTRUCTION MANUAL
16
Battery Installation (Batteries Not Included):
1) Open the battery cover: Rotate the fixing screw slightly in the rear panel to the up position which is marked with “ “ and then open the cover.
2) Install 2 batteries as indicated by the polarity sign.Note: Be sure to insert the batteries in the correct polarity, as indicated by polarity markings (+ and -) inside the battery cover.
3) Close battery cover: Close the battery cover and rotate the screw to the position, and the batteries are locked.
Make sure that the polarity of the batteries is correct, otherwise the unit cannot operate normally.
Battery Life And ReplacementWhen the low-power indication lamp is lighted, please replace the batteries with new ones as needed.
t Always turn the unit off before replacing the batteries.
t Dispose of the used batteries according to the applicable local regulations.
Warnings!
If battery contents should get into your eyes, immediately rinse with plenty of clean water. Consult a doctor immediately.
Cautions!
t Do not use batteries not specified for this unit.

Oximeter SerieSOximeter SerieS PULSE OXIMETER INSTRUCTION MANUAL
17
t Do not insert the batteries with the polarities in the wrong direction.
t Do not dispose of batteries in fire.
t If battery contents should get on your skin or clothing, immediately rinse with plenty of clean water.
t Remove the batteries from this unit when you are not going to use it for a long period of time (approximately three months or more).
t Do not use batteries of different types together.
t Do not use new and used batteries together.
2.3 Product Featurest Rubber grip design offers special protection.
t Compact, light-weight design for simple, one-hand operation.
t High brightness LED displays SpO2, pulse rate and pulse bar.
t Up to 99 patients’ ID and 72-hour record storage.
t Visual & audio alarm, low battery alarm.
t Data transfer to PC for storage or printing.
t Convenient 2 AA-size alkaline batteries (not included).
2.4 Intended UseThe Hand Held Pulse Oximeter is intended for continuous monitoring, spot-checking of functional pulse oxygen saturation (%SpO2) and pulse rate (PR) of single adults, pediatric patients in hospitals and home care.

Oximeter SerieSOximeter SerieS PULSE OXIMETER INSTRUCTION MANUAL
18
3. Getting Started
3.1 Unpacking and CheckingBefore unpacking, examine the packing case carefully for damage. If any damage is detected, contact your distributor. Open the package and remove the equipment and accessories carefully. Check all materials as per the packing list and check for any mechanical damage.
NOTESave the packing case and packaging material as they can be used if the equipment must be reshipped.
WARNINGS
• Keep the packing material out of children’s reach. Disposal of the packaging material should observe the applicable waste control regulations.
• Before use, please verify whether the packages, especially the package is intact. In case of any damage, do not apply the Pulse Oximeter to the patient.
3.2 Environmental RequirementsThe operating environment of the equipment must meet the requirements specified in this manual.
When the equipment is moved from one place to another, condensation may occur as a result of temperature or humidity difference. In this case, never start the system before the condensation disappears.
Oximeter SerieSOximeter SerieS PULSE OXIMETER INSTRUCTION MANUAL
19
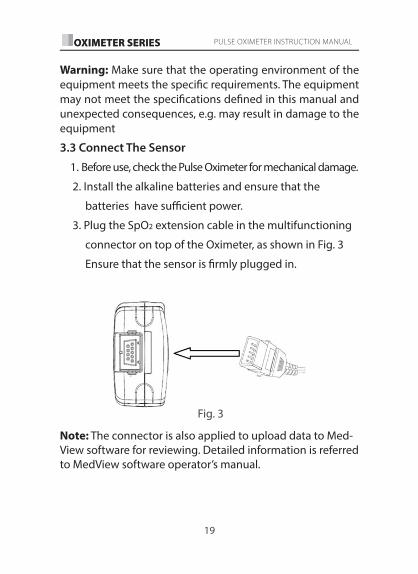
Warning: Make sure that the operating environment of the equipment meets the specific requirements. The equipment may not meet the specifications defined in this manual and unexpected consequences, e.g. may result in damage to the equipment
3.3 Connect The Sensor
1. Before use, check the Pulse Oximeter for mechanical damage.
2. Install the alkaline batteries and ensure that the
batteries have sufficient power.
3. Plug the SpO2 extension cable in the multifunctioning
connector on top of the Oximeter, as shown in Fig. 3
Ensure that the sensor is firmly plugged in.
Note: The connector is also applied to upload data to Med-View software for reviewing. Detailed information is referred to MedView software operator’s manual.
Fig. 3

Oximeter SerieSOximeter SerieS PULSE OXIMETER INSTRUCTION MANUAL
20
3.4 Starting or Shutting Off the Oximeter
To start the Pulse Oximeter:
1. Press and hold the Power button for about 3 seconds. The LED and alarm lamp flashes, and then goes out. The system gives a beep and displays the startup screen. The startup screen displays the version number of software.
2. The startup screen disappears and normal screen appears.
To shut off the Pulse Oximeter:
1. Confirm that the patient measurement is finished.
2. Disconnect the SpO2 extension cable from the Pulse Oximeter.
3. Press and hold the Power button for 4 seconds.
WARNING Do not use the Pulse Oximeter if you suspect it is not working properly, or if it is mechanically damaged. Contact your distrib-utor immediately.
4 Setting ID, Date and Time
Always set the date and time before using the unit for the first time. Set different ID numbers for different users.
Check and make sure the date and time are correct

Oximeter SerieSOximeter SerieS PULSE OXIMETER INSTRUCTION MANUAL
21
before using the unit. Reset them if necessary. The date and time are important indicators when a measurement is taken.
4.1 Date & Time SettingPress the menu button four times under the screen to enter time setup.
Character Definitions:
: Is the minute. The setting range is: 0-59
: Is the hour. The setting range is: 0-23
: Is the date. The setting range is: 1-31
: Is the month. The setting range is: 1-12
: Is the year. The setting range is: 0-20
Press the left or the right button to select different date & time parameters; Press the up or down button to set your suitable time & date.
Year setting for example:
1) Press the power button for 3 seconds to turn on the unit.
2) Hit the menu button four times to enter into the time setting screen shown as Fig. 4. Press the up or down button to set the suitable year, and then press the left or right button to enter into the other date and time parameter setting pictures.
Oximeter SerieSOximeter SerieS PULSE OXIMETER INSTRUCTION MANUAL
22
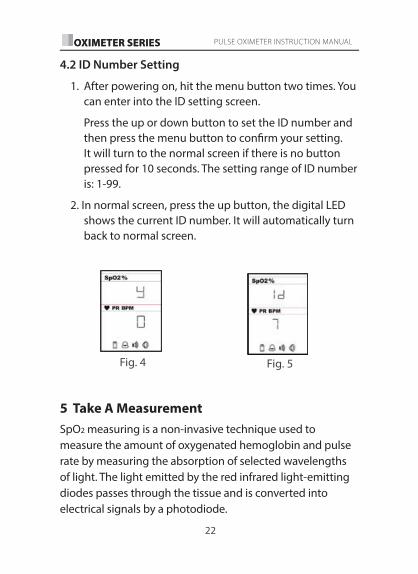
4.2 ID Number Setting
1. After powering on, hit the menu button two times. You can enter into the ID setting screen.
Press the up or down button to set the ID number and then press the menu button to confirm your setting. It will turn to the normal screen if there is no button pressed for 10 seconds. The setting range of ID number is: 1-99.
2. In normal screen, press the up button, the digital LED shows the current ID number. It will automatically turn back to normal screen.
5 Take A MeasurementSpO2 measuring is a non-invasive technique used to measure the amount of oxygenated hemoglobin and pulse rate by measuring the absorption of selected wavelengths of light. The light emitted by the red infrared light-emitting diodes passes through the tissue and is converted into electrical signals by a photodiode.
Fig. 4 Fig. 5

Oximeter SerieSOximeter SerieS PULSE OXIMETER INSTRUCTION MANUAL
23
After finishing the time and the ID number setting, plug your finger into the sensor as indicated in the picture below:
Select the suitable sensor in terms of type and dimension.
Clip the sensor in the right position of the patient finger and ensure that the patient’s nail surface is facing upward.
Plug sensor into SpO2 port on top panel of Pulse Oximeter.
Note: To maintain the highest degree of accuracy, it is recommended that the finger and the Oximeter sensor/probe is kept as still as possible.
Description of Fig. 7: SpO2: SpO2 value (displayed value is 98% )
PR: Pulse rate (displayed value is 67 bpm)
5.1 Factors That May Affect The Measurement
During operation, the accuracy of oximetry readings can be affected by the following factors:
Fig. 7
Fig. 6 placement of the sensor

Oximeter SerieSOximeter SerieS PULSE OXIMETER INSTRUCTION MANUAL
24
5.1.1Instrument performance depends on the pulsatile character of the artery. The display would not be considered reliable and accurate if the following conditions are present during measurement.
• Shock or cardiac arrest
• Temperature of the unit
• After the administration of a cardiovascular drug
• Anemia
• Evidence of ventilation-perfusion mismatch
5.1.2Instrument performance depends on the wavelength absorption for oxyhemoglobin and deoxyhemoglobin. If there are substances absorbing the same wavelength, this would induce false or low SpO2 values. The following may affect these values:
• carboxyhemoglobin
• methemoglobin
• methylene blue
• Indigo carmine
5.1.3Extremely high illumination could affect the SpO2 measurement. Use a semi-translucent or opaque cover to shield the sensor.

Oximeter SerieSOximeter SerieS PULSE OXIMETER INSTRUCTION MANUAL
25
5.1.4 Other factors
a) High-frequency electrosurgical interference from exter-nal devices, including defibrillators.
b) Placement of a sensor on an extremity that currently has installed a blood pressure cuff, arterial catheter, or intravascular line;
c) The patient has hypotension, severe vasoconstriction, severe anemia, or hypothermia;
d) An arterial occlusion proximal to the sensor.
WARNING!• Use only SpO2 sensors provided by manufacturer.
Other SpO2 sensors may cause improper performance.
• Do not use an SpO2 sensor with exposed optical components.
• Excessive patient movement may cause inaccurate measurements.
• Tissue damage can be caused by incorrect operation or misusing sensor. Inspect the sensor site to ensure the skin’s integrity and the adhesion position of the sensor is correct. More frequent inspection should be taken if necessary.
• Loss of pulse signal can occur in any of the following:
a) The sensor is too tight.
b) There is excessive illumination from light sources such as a surgical lamp, a bilirubin lamp, or sunlight.
c) A blood pressure cuff is inflated on the same extremity as the one to which an SpO2 sensor is attached.

Oximeter SerieSOximeter SerieS PULSE OXIMETER INSTRUCTION MANUAL
26
NOTES:
Pulse sensor should obviate the light source, e.g. radial lamp or infrared lamp.
Set the upper limit of SpO2 alarm to 100% means cut off the upper alarm. High density of oxygen will cause adverse affection to the neonate. So the upper limit of SpO2 alarm must be selected prudently according to the 6 History Data Reviewing.
6 History Data Reviewing
6.1 Character Definition:
: The user’s SpO2. : The user’s pulse rate. : The user’s ID number. : The minute of the history data. : The hour of the history data. : The date of the history data.
: The month of the history data.
: The year of the history data.
6.2 Reviewing Operation:On normal screen, after hitting the menu button one time, you can enter the data reviewing screen shown as the Fig 8.By the up or down button, you can review the new measure of a single group of data including SpO2, pulse rate, ID number, data and time. Fig.8

Oximeter SerieSOximeter SerieS PULSE OXIMETER INSTRUCTION MANUAL
27
By the right or down button, you can review the next or last group of measured data.
If ”S” displays on the screen after pressing the left button continuously, it means the last group is the newly measured data. And, if “E” displays on the screen after pressing the right button continuously, it means the last group is the previous measured data .
7 Alarm Setting
7.1 Alarm Priority There are three-level priorities for selection.
High priority: the highest level alarm, indicates the patient is in a very dangerous situation.
Medium priority: indicates the warning should be paid
attention to.
Low priority: indicates the technical alarm caused by the
device itself.
Alarm of this Oximeter includes technical and physiological alarm.
All three priorities are divided by a built-in module and can not be changed by a user.
Visual Alarm Indicators:
If the alarm is activated through over limitation of physiological alarm, corresponding data area is flashing. If the alarm is activated by more than one physiological alarm, each parameter will be displayed when flashing.

Oximeter SerieSOximeter SerieS PULSE OXIMETER INSTRUCTION MANUAL
28
Audible Alarm Indicators:
Audible alarms can be heard in a quiet environment. The audible alarm has different tone pitch and on-off beep patterns for each alarm priority.
• High priority: SpO2 alarm “du-du-du ---------- du-du”, beeps every 8 seconds.
• Medium priority: PR alarm “du-du-du”. beeps every 8 seconds.
• Low priority: Sensor off or finger out “du-”, beeps every 20 seconds.
7.2 Character Definition: : High alarm of SpO2
: Low alarm of SpO2
: High alarm of pulse rate
: Low alarm of pulse rate
: Turn on or turn off the Alarm
7.3 SpO2 Alarm Setting: SpO2 high alarm: Turn on the Pulse Oximeter and hit
the menu button three times, and you will see the screen showing high alarm of SpO2 (refer to Fig. 9). Press the up or down button to increase or decrease the number. Press the right button to select other alarms for setting or press menu button save the alarm setting(s) and enter into another parameter item. The high alarm (SpO2) setting range is: 71-100(%)
Fig. 9

Oximeter SerieSOximeter SerieS PULSE OXIMETER INSTRUCTION MANUAL
29
SpO2 Low alarm: After finishing the high alarm setting, press the right button and you will see on the screen the low alarm of SpO2 setting (refer to Fig. 10). Press the up or down button to adjust the number. The low alarm (SpO2) setting range is 70-99(%).
7.4 PR Alarm Setting:After SpO2 low alarm setting, press the right button, and you will see the screen shown as Fig. 11 for setting PR high alarm. The high alarm (PR) setting range is: 31-254 (bpm).
Press the up or down button to adjust the number. Then press the right button for setting the low PR alarm (refer to Fig. 12). The low alarm (PR) setting range is: 30-253(bpm).
7.5 Alarm on/offAfter PR alarm setting, press the right button, you will see the alarm on/off setting screen. Press the up or down button to set the alarm on or off.
Fig. 11 Fig. 12
Fig. 10

Oximeter SerieSOximeter SerieS PULSE OXIMETER INSTRUCTION MANUAL
30
7.6 Alarm Activation
Alarm will be activated with the following conditions:
Physiological alarm:• The alarm will work when the SpO2 value or pulse rate
gets beyond the high-limit or goes below the low-limit. The difference is their priority; the SpO2 has the high priority while the pulse rate has the medium.
• Technical alarm (error code):
a) Error Definitions
E 1: Program memory is damaged.
E 2: Data memory is damaged.
E 3: Signal strength is too weak to be detected.
E 4: Sensor is unplugged.
E 5: No finger is inserted or sensor goes wrong.
E 6: The Oximeter can not detect for pulse.
E 7: It takes too long to search for pulse.
E 8: Pulse alarm is malfunctioning.
Fig. 13 Fig. 14

Oximeter SerieSOximeter SerieS PULSE OXIMETER INSTRUCTION MANUAL
31
E 9: The SpO2 value is lower than the low limit.
E 10: The SpO2 value is higher than the high limit.
E 11: The value of pulse rate is lower than the low limit.
E 12: The value of pulse rate is higher than the high limit.
E 13: Power supply is insufficient.
When E9, E10, E11 or E12 occurs, the value of parameter will flash.
• Check the error code.
• Press the right key under normal screen, it will indicate an error code. To return to normal screen please press menu button again.
WARNING! When alarm occurs, DO as follows:
• Check which type of alarm is on.
• Check patient’s condition if parameter alarm is on.
• Make the alarm mute if necessary.
• Check whether the alarm is in proper condition in case of no warning.
8 Beep on/off
Press the menu key five times under the normal screen to enter access to this function, the associated screen will be displayed. Press up or down key to set the pulse beep on/off.

Oximeter SerieSOximeter SerieS PULSE OXIMETER INSTRUCTION MANUAL
32
9 Maintain and Cleaning
Use only the substances approved and methods listed in this chapter to clean or disinfect your equipment. Warranty does not cover damage caused by unapproved substances or methods. We make no claims regarding the efficacy of the listed chemicals or methods as a means for controlling infection. For methods to control infection, consult your hospital’s Infection Control Officer or Epidemiologist. Keep your equipment free of dust and dirt. To avoid damage to the equipment, follow these rules:
• Always dilute according to the manufacturer’s instructions or use lowest possible concentration.
• Do not immerse any part of the equipment into liquid.
• Do not pour liquid onto the equipment or any accessories.
• Do not allow liquid to enter the case.
• Never use abrasive materials (such as steel wool or silver polish), or erosive cleaners (such as acetone or acetone-based cleaners).
CAUTION:
If you spill liquid on the equipment or accessories, contact the manufacturer.Note: To clean or disinfect reusable accessories, refer to the instructions provided.
9.1 Safety ChecksBefore every use, or after your Pulse Oximeter has been used for 6 to 12 months, or whenever your Pulse Oximeter

Oximeter SerieSOximeter SerieS PULSE OXIMETER INSTRUCTION MANUAL
33
is repaired or upgraded, a thorough inspection should be performed by qualified service personnel to ensure its reliability. Follow these guidelines when inspecting the equipment:
• Make sure that the environment and power supply meet the requirements.
• Inspect the equipment and its accessories for mechanical damage.
• Make sure that only specified accessories are applied.
• Inspect if the alarm system functions correctly.
• Make sure that the batteries meet the performance requirements.
• Make sure that the Pulse Oximeter is in good working condition.
In case of any damage or abnormality, do not use the Pulse Oximeter. Contact your hospital’s biomedical engineers or your service personnel immediately.
CleaningYour equipment should be cleaned on a regular basis. If there is heavy pollution or lots of dust and sand in your location, the equipment should be cleaned more frequently. Before cleaning the equipment, consult your hospital’s regulations for cleaning the equipment.
Recommended cleaning agents are:
• Mild soap (diluted)
• Ammonia (diluted)
• Sodium hypochlorite bleach (diluted)

Oximeter SerieSOximeter SerieS PULSE OXIMETER INSTRUCTION MANUAL
34
• Hydrogen peroxide (3%)
• Ethanol (70%)
• Isopropanol (70%)
To clean your equipment, follow these instructions:
1. Shut down the Pulse Oximeter and take the batteries out of the battery cover.
2. Clean the display screen with soft, clean cloth damp-ened with a glass cleaner.
3. Clean the exterior surface of the equipment with soft cloth dampened with proper cleaner.
4. Wipe off all the cleaning solution with a dry cloth after cleaning if necessary.
5. Dry your equipment in a ventilated, cool place.
DisinfectingDisinfection may cause damage to the equipment and is therefore not recommended for this Pulse Oximeter unless otherwise indicated in your hospital’s servicing schedule.
Clean the Pulse Oximeter before disinfecting it.
The recommended disinfectants include: ethanol 70%, isopropanol 70%, glutaraldehyde-type 2% liquid disinfectants.
CAUTION: Never use autoclaving, EtO or formaldehyde for disinfection.
Oximeter SerieSOximeter SerieS PULSE OXIMETER INSTRUCTION MANUAL
35
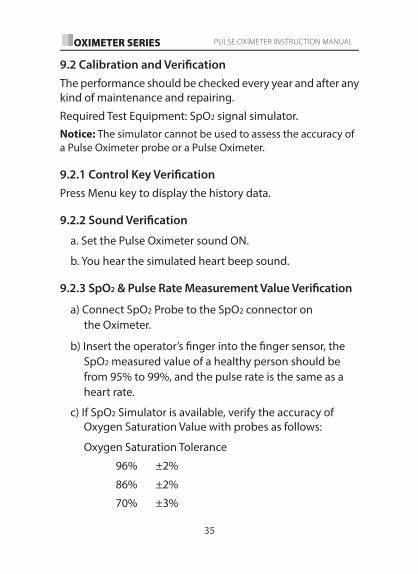
9.2 Calibration and VerificationThe performance should be checked every year and after any kind of maintenance and repairing.
Required Test Equipment: SpO2 signal simulator.Notice: The simulator cannot be used to assess the accuracy of a Pulse Oximeter probe or a Pulse Oximeter.
9.2.1 Control Key VerificationPress Menu key to display the history data.
9.2.2 Sound Verification
a. Set the Pulse Oximeter sound ON.
b. You hear the simulated heart beep sound.
9.2.3 SpO2 & Pulse Rate Measurement Value Verification
a) Connect SpO2 Probe to the SpO2 connector on the Oximeter.
b) Insert the operator’s finger into the finger sensor, the SpO2 measured value of a healthy person should be from 95% to 99%, and the pulse rate is the same as a heart rate.
c) If SpO2 Simulator is available, verify the accuracy of Oxygen Saturation Value with probes as follows:
Oxygen Saturation Tolerance
96% ±2%
86% ±2%
70% ±3%

Oximeter SerieSOximeter SerieS PULSE OXIMETER INSTRUCTION MANUAL
36
9.2.4 SpO2 & Pulse Rate Alarm Verification
a) Connect SpO2 Probe to the SpO2 connector on the Oximeter.
b) Insert the operators finger into the finger sensor, the SpO2 measured value of a healthy person should be more than 96%.
c) Set the SpO2 high limit as 90 and low limit as 80.
d) Verify the SpO2 visual and auditory alarms, the back-ground color of the SpO2 data should be red and “du-du” voice should be heard.
9.3 Trouble Shooting
• Can’t power on the Oximeter
Please check the batteries voltage.
• “SEn oFF” alarm
Please check if the probe was connected with the Pulse Oximeter correctly or the finger is inserted fully. If the sensor is with extension cable please check if the extension cable is connected with the sensor correctly.
• “E1, E2, E8, E14” alarm
Please contact our service department.
•“E3, E6, E7” alarm
Check the patient’s condition. For other please contact our service department.

Oximeter SerieSOximeter SerieS PULSE OXIMETER INSTRUCTION MANUAL
37
9.4 Warranty
9.4.1 Exempt and Limitations (one year warranty):
a) Dynarex isn’t responsible for such damage caused by a force of nature. For example: fire, thunder flash, flood, cyclone, hail, earthquake, house collapse, commotion, plane falling and traffic accident, deliberate damage, lack of fuel or water, labor and capital bother, strike and stop-working etc.
b) No-service offer
• The cost and insurance charge of disassembling, refurbishing, repackaging and conveying of the Pulse Oximeter or the part of it.
• Damage or loss sustained due to inspected or repaired by other institutions that is not covered.
• The damage and failure caused by user or its representative who isn’t authorized to use the device according to the operator’s manual.
c) The damage or loss sustained due to connection to peripheral equipment (such as printer, computer etc.), that are not provided by our company are not covered by the warranty.
d) Responsibility limitation: In the duration of the one year warranty, if user changes the parts manufactured by other manufacturers without our company permis-sion, the warranty is null and void.

Oximeter SerieSOximeter SerieS PULSE OXIMETER INSTRUCTION MANUAL
38
9.4.2 User Guaranteesa) Please read user manual carefully before operation.
b) Please operate and make daily maintenance as requested by the manual and warranty.
c) Power supply and environment must be maintained under manual specifications.
9.4.3 What’s not Covered by Warranty• The device does not remain in original condition.
• The shell of the device is broken or cracked.
• Evidence of water damage.
• Accessories or appearance of unit is physically abused.
• Evidence of crushing damage to the probe.
• Original package is not used during transportation.
• Non authorized service is performed on Oximeter.
• Damage to a product as a result of not conforming to manual specifications.
• The work environment is not eligible.
• Any smear or marks that do not belong to the instrument and cannot be removed from the outside surface of the instrument.
• The circuit is shorted and damaged due to liquid or other substances in the instrument or its fittings.
• All Probe and its accessories are not eligible for free replacement.
• If any code label of parts are damaged or missing, this warranty shall become null and void.

Oximeter SerieSOximeter SerieS PULSE OXIMETER INSTRUCTION MANUAL
39
• Damage of probe caused by mechanical force doesn’t apply for free replacement.
• During measurement of SpO2, principle leads to measuring value difficultly or inaccurate measurement.
• Maintenance seal of Pulse Oximeter is not opened.
9.4.4 User’s Special Request for WarrantyAs indicated, according to the relevant electronic regulation of country, the warranty period is one year, limited warranty. The sensor’s warranty period is three months.
Storage and Transportation
Storage: Storage Temperature -20°C~55°C (-4°F~131°F). Relative Humidity ≤ 90%, no condensation.
Transportation: Transport by airline, train or vessel after packing according to request.
APPENDIX A Specifications
DisplayData: SpO2%, PROthers: connection status of probe and other alarm information.
AlarmAlarm: SpO2% and pulse rate value, probe off, battery exhausted
Alarm mode: audio alarm, visual alarm and error code
Alarm limits range: 70%-100%
Default limits: High 99%: low 90%
Oximeter SerieSOximeter SerieS PULSE OXIMETER INSTRUCTION MANUAL
40
SpO2
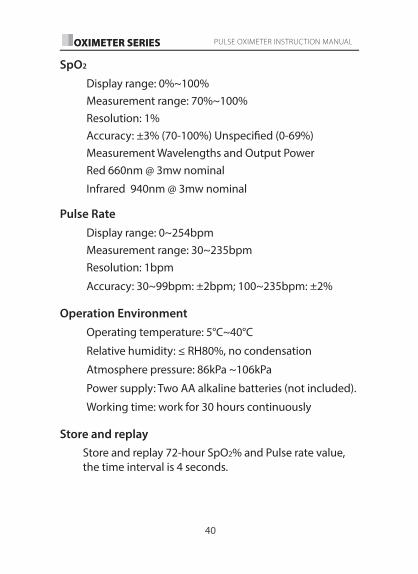
Display range: 0%~100%Measurement range: 70%~100% Resolution: 1%Accuracy: ±3% (70-100%) Unspecified (0-69%)Measurement Wavelengths and Output PowerRed 660nm @ 3mw nominal
Infrared 940nm @ 3mw nominal
Pulse RateDisplay range: 0~254bpm Measurement range: 30~235bpm Resolution: 1bpm
Accuracy: 30~99bpm: ±2bpm; 100~235bpm: ±2%
Operation EnvironmentOperating temperature: 5°C~40°C
Relative humidity: ≤ RH80%, no condensation
Atmosphere pressure: 86kPa ~106kPa
Power supply: Two AA alkaline batteries (not included).
Working time: work for 30 hours continuously
Store and replayStore and replay 72-hour SpO2% and Pulse rate value, the time interval is 4 seconds.

Oximeter SerieSOximeter SerieS PULSE OXIMETER INSTRUCTION MANUAL
41
Abbreviations
CISPR International Special Committee on Radio Interference
EEC European Economic Community EMC Electromagnetic Compatibility ID IdentificationIEC International Electrotechnical Commission LED Light Emitting Diode PR Pulse Rate RF Radio Frequency
SpO2 Arterial Oxygen Saturation from Pulse Oximeter
Units
A ampere bpm beats per minute°C centigrade g gramkHz kilohertz MHz megahertzGHz Gigahertz h hourHz hertz K kilokg kilogram kPa kilopascalm meter, minute M megamin minute mm millimetersmW milliwatt s secondnm nanometer V volt

Oximeter SerieSOximeter SerieS PULSE OXIMETER INSTRUCTION MANUAL
42
Symbols
– minus; negative © copyright% percent / per; divide; or+ plus = equal to< less than > greater than≤ less than or equal to ≥ greater than or equal to± plus or minus × multiply
APPENDIX B
Guidance and manufacturer’s declaration - electromagnetic immunity
The Hand Held Pulse Oximeter is intended for use in an electromagnetic environment specified below. The
customer or the user of the Pulse Oximeter should assure that it is used in such an environment.
ImmunityTest
IEC60601
Testlevel
ComplianceLevel
Electromagnetic environment
guidance
Electro-static
Discharge(ESD)
IEC61004-2
6kVcontact8kV air
6kVcontact8kV air
Floors should be wood, concrete or ceramic tile. If floor are convert-ed with Synthetic
material, the relative humidity
should be at least 30%

Oximeter SerieSOximeter SerieS PULSE OXIMETER INSTRUCTION MANUAL
43
Guidance and manufacture’s declaration - Electromagnetic Immunity for Equipment and Systems that are not Life-Supporting
61000-4-6
Radiated
RF IEC
61000-4-3
3V/m
80Hz
to 2.5 GHzWhere P is the maximum output power rating of the transmitter in Watts (W) according to the
transmitter manufacture and d is the recommended separation distance in meters (m). Field strengths from fixed RF transmitters, as determined by an electromagnetic site survey, should be less than the compliance level in each frequency range. Interference may occur in the vicinity of equipment marked with the following symbol.
NOTE1 At 80MHz and 800MHz, the higher frequency range applies.
NOTE2 These guideline may not apply in all situations. Electromagnetic propagation is affected by absorption and reflection from structures, objects and people.
Field strengths from fixed transmitters, such as base situation for radio (cellular/cordless) telephones and land/mobile radios, amateur radio, AM and FM radio broadcast and TV broadcast cannot be predicted theoretical-ly with accuracy. To assess the electromagnetic environment due to fixed RF transmitters, an electromagnetic site survey should be considered. If the measured field strength in the location in which the Hand Held Pulse Oximeter is used exceeds the applicable RF compliance level above, the Hand Held Pulse Oximeter should be observed.

Oximeter SerieSOximeter SerieS PULSE OXIMETER INSTRUCTION MANUAL
44
Recommended separation distances between portable and mobile RF communications equipment and the
Hand Held Pulse Oximeter
The Pulse Oximeter is intended for use in an electromagnetic
environment in which radiated RF disturbance are controlled. The
customer or the user of the Hand Held Pulse Oximeter can help
prevent electromagnetic interference by maintaining a minimum
distance between portable and mobile RF communication equipment
(transmitters) and the Pulse Oximeter as recommended below, according
to the maximum output power of the communications equipment.
Rated maximum output power of transmitter (W)
Separation distance according to frequency of transmitter (m)
0.01 0.1167 0.1167 0.2334
0.1 0.3689 0.3689 0.7378
1 1.1667 1.1667 2.3334
10 3.6893 3.6893 7.3786
100 11.6667 11.6667 23.3334For transmitters rated at a maximum output power not list-ed above, the recommended separation distance in meters (m) can be estimated using the equation applicable to the frequency of the transmitter, where P is the maximum out-put power rating of the transmitter in watts (W) according to the transmitter manufacturer.
NOTE1: At 80MHz and 800MHz, the separation distance for the higher frequency range applies.

Oximeter SerieSOximeter SerieS PULSE OXIMETER INSTRUCTION MANUAL
45
NOTE2: These guidelines may not apply in all situations. Electromagnetic interference is affected by absorption and reflection from structures, objects and people.

Oximeter SerieSOximeter SerieS PULSE OXIMETER INSTRUCTION MANUAL
46

Oximeter SerieSOximeter SerieS PULSE OXIMETER INSTRUCTION MANUAL
47

Manufactured for: Dynarex Corporation Orangeburg, NY 10962 www.dynarex.comMade in China