fingertip pulse ﻊﺒﺻﻻﺎﺑ ﻲﻀﺒﻨﻠا ﺞﺳﻜٔ ﺘﻠا سﺎﻴﻗﻤ...
TRANSCRIPT
GB
Fingertip PulseOximeter
INSTRUCTION FOR USE Please read carefully before using
GT-300C203
كسج النبضي باالصبع مقياس الت
دليل االستخدام يرجى قراءته بعناية قبل االستخدام
Oxy BA.indd 15 24.09.2013 11:31:35
15
GB
General DescriptionPrecautionsApplication of the product and intended useHow to replace the batteryDescription of DisplayHow to operateEvaluation of the measured valuesSpecificationsPossible problems and solutionsCleaning InstructionsDisposalWarrantySymbol IndexAppendix
Oxygen Saturation is a percentage of Oxyhemoglobin (HbO2) capacity, compounded with oxygen, by all combinative hemo-globin (Hb) capacity in blood. In other words, it is consistency of Oxyhemoglobin in blood. It is a very important parameter for the Respiratory Circulation System. Many respiratory disea-ses can result in oxygen saturation being lowered in human blood. Additionally, the following factors can reduce oxygen saturation: Automatic regulation of organ dysfunction caused by Anesthesia, Intensive Postoperative Trauma, injuries caused by some medical examinations. That situation might result in light-headedness, asthenia, and vomiting. Therefore, it is very important to know the oxygen saturation of a patient so that doctors can find problems in a timely manner.
The fingertip pulse oximeter features low power consumption, convenient operation and portability. Place one fingertip into the photoelectric sensor for diagnosis and the pulse rate and oxygen saturation will appear on the display. It has been pro-ven in clinical experiments that it also features high precision and repeatability.
1617171818181920212222222223
TABLE OF CONTENTS
GENERAL DESCRIPTIONS
Oxy BA.indd 16 24.09.2013 11:31:35
16
Do not use the pulse oximeter in an MRI or CT environment.The pulse oximeter must be kept out of reach of children. Small parts can be detached from the device. These can be swallo-wed by children or cause suffocation by inhalation of the parts.Operating Geratherm oxy control can be influenced by the use of an electrosurgical unit (ESU).Do not use the pulse oximeter in situations where alarms are required. The device has no alarm. It is not suitable for con-tinuous monitoring. Explosion Hazard: Do not use the pulse oximeter in an explosive atmosphere.Do not use the device if it has damaged partsExplosion hazard: Do not use the pulse oximeter in an explosive atmosphere.The pulse oximeter is provided only as an aid for patient dia-gnosis. It must be used in conjunction with other methods of assessing clinical signs and symptoms.Prolonged use or the patient‘s condition may require changing the sensor site periodically. Change the sensor site and check skin integrity, circulatory status, and correct alignment every 4 hours.Inaccurate measurements by autoclaving, sterilizing with ethyl oxide or immersing the sensors in liquid may cause inaccurate readings.Keep the oximeter in a dry environment.The following factors can affect the SpO2 measurements and lead to inaccurate values:
Significant levels of dysfunctional hemoglobin (such as carboplatin hemoglobin or methemoglobin)Intravascular dyes such as indocyanine green or methy-lene blueHigh ambient light (the sensor area protected from direct sunlight)Excessive patient movementVenous pulsationsPlacement of a sensor on an extremity with a blood pres-sure cuff, an arterial catheter or intravascular linePatient has hypotension, severe vasoconstriction, severe anemia, or hypothermiaPatient has a cardiac arrest or is in shockNail polish or artificial fingernailsToo cold or dirty fingers
1.2.
3.
4.
5.
6.
7.
8.
9.10.
•
•
•
•••
•
•••
PRECAUTIONS!
GB
Geratherm® pulse oximeter is a portable non-invasive device intended for spot-checking of oxygen saturation of arterial he-moglobin (SpO2) and pulse rate of adult and pediatric patients in hospitals, hospital-type facilities, and home environments. It is not for continuous monitoring.
APPLICATION OF THE PRODUCT AND INTENDED USE
Oxy BA.indd 17 24.09.2013 11:31:35
17
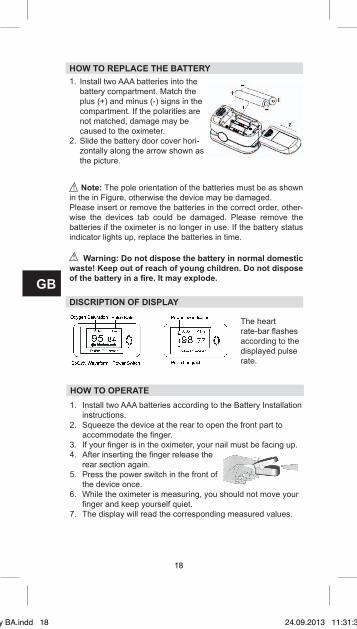
Note: The pole orientation of the batteries must be as shown in the in Figure, otherwise the device may be damaged.Please insert or remove the batteries in the correct order, other-wise the devices tab could be damaged. Please remove the batteries if the oximeter is no longer in use. If the battery status indicator lights up, replace the batteries in time.
Warning: Do not dispose the battery in normal domestic waste! Keep out of reach of young children. Do not dispose of the battery in a fire. It may explode.
The heart rate-bar flashes according to the displayed pulse rate.
Install two AAA batteries into the battery compartment. Match the plus (+) and minus (-) signs in the compartment. If the polarities are not matched, damage may be caused to the oximeter.Slide the battery door cover hori-zontally along the arrow shown as the picture.
HOW TO REPLACE THE BATTERY
DISCRIPTION OF DISPLAY
1.
2.
verwendet werden. Der Einsatz während einer sportlichen Betätigung wird nicht empfohlen.)
Einlegen der Batterien 1. Schieben Sie die Abdeckung des Pulsoximeters herunter wie die Abbildung zeigt 2. Die beiden AAA-Batterien mit der richtigen Polausrichtung
in das Batteriefach einlegen. 3. Die Batterieabdeckung, wie gezeigt, in Pfeilrichtung
waagerecht daraufschieben.
Achtung: Die Polausrichtung der Batterien muss wie in der Abbildung gekennzeichnet, erfolgen, andernfalls kann das Gerät beschädigt werden.
Die Batterien bitte in der richtigen Reihenfolge einlegen oder entfernen, sonst könnte die Gerätelasche beschädigt werden. Die Batterien bitte entnehmen, wenn das Oximeter längere Zeit nicht benutzt wird. Wenn der Batterieanzeigestatus leuchtet, rechtzeitig die Batterien auswechseln.
Halten Sie die Batterien von Kleinkindern fern. Die Batterien nicht ins Feuer werfen, sie könnte explodieren.
Beschreibung des Displays
Der Pulsfrequenz-Balken blinkt entsprechend der angezeigten Pulsrate.
Anwendung 1 Zwei AAA-Batterien in das Batteriefach einlegen, bevor die Abdeckung angebracht wird. 2 Das Gerät am hinteren Teil zusammendrücken, um
den vorderen Teil zur Aufnahme des Fingers zu öffnen. 3 Wenn sich Ihr Finger im Oximeter befindet, muss
die Nageloberfläche nach oben zeigen. 4 Nach Einlegen des Fingers den hinteren Teil wieder loslassen. 5 Den Schaltknopf an der Frontseite einmal drücken. 6 Während das Oximeter arbeitet, sollten Sie Ihren Finger nicht bewegen und sich selbst
ruhig verhalten. 7 Auf der Anzeige die entsprechenden Messwerte ablesen. Nach dem Einschalten wechselt das Oximeter jedes Mal, wenn Sie den Einschaltknopf drücken, zu einem anderen Anzeigemodus. Es erscheinen folgende 6 Anzeigemodi:
1. 2. 3.
4. 5. 6.
Drücken Sie den Einschaltknopf längere Zeit (länger als eine Sekunde), um die Helligkeit des Displays einzustellen. Durch Halten des Einschaltknopfes ändert sich stufenweise die Helligkeit des Oximeters. Es gibt 10 Helligkeitsstufen. Stufe 4 ist die Standardhelligkeit. Das Pulsoximeter wird mit einer Schutzhülle geliefert, um es vor Schmutz und Stoß zu schützen.
Bewertung der gemessenen Werte Bei einem gesunden Patienten liegt die Sauerstoffsättigung zwischen 96 und 98 %. Werte unterhalb von 95 % können schon einen Krankheitswert anzeigen und eine medizinische Behandlung erforderlich machen. Wenn Ihr Sauerstoff-Sättigungswert unter 95 % liegt, konsultieren Sie bitte Ihren Arzt. Normale Pulswerte hängen vom Alter und dem Fitness-Level einer Person ab. Im Folgenden ein paar Referenzwerte für eine normale Pulsrate: • Kinder unter 1 Jahr: 100 - 160 bpm • Kinder zwischen 1 und 10 Jahren: 70 - 120 bpm • Personen über 10 Jahre: 60 - 100 bpm • Trainierte Personen/ Athleten: 40 - 60 bpm
Spezifikation 1. Model-Nummer: GT-300C203 2. Anzeigetyp: 1-farbige OLED-Anzeige 3. SpO2:
Displaybereich:0% bis 99% Messbereich: 70% bis 99 % Genauigkeit: 70% bis 99%: ±3%; 0% bis 69% nicht definiert Auflösung : 1%
4. Pulsfrequenz: Displaybreich: 0 bis 254 bpm Messbereich: 30 bis 235 bpm Genauigkeit: 30 bis 99bpm, ±2bpm; 100 bis 235bpm, ±2% Auflösung 1 bpm Pulsintensität: Pulsfrequenz-Balken
5.
Wellenlänge Strahlungsleistung RED 660±2nm 1.8mW IR 940±10nm 2.0mW HINWEIS: Die Informationen über Wellenlängenbereiche kann besonders für Ärzte
Pulsfrequenz-Balken
SpO2/ Sauerstoff-Sättigung
Pulsfrequenz Ein/Aus- Schalter
Batterieanzeigestatus
grafische Darstellung von SpO2
!
!
GB
Install two AAA batteries according to the Battery Installation instructions.Squeeze the device at the rear to open the front part to accommodate the finger.If your finger is in the oximeter, your nail must be facing up.After inserting the finger release the rear section again.Press the power switch in the front of the device once.While the oximeter is measuring, you should not move your finger and keep yourself quiet.The display will read the corresponding measured values.
1.
2.
3.4.
5.
6.
7.
HOW TO OPERATE
verwendet werden. Der Einsatz während einer sportlichen Betätigung wird nicht empfohlen.)
Einlegen der Batterien 1. Schieben Sie die Abdeckung des Pulsoximeters herunter wie die Abbildung zeigt 2. Die beiden AAA-Batterien mit der richtigen Polausrichtung
in das Batteriefach einlegen. 3. Die Batterieabdeckung, wie gezeigt, in Pfeilrichtung
waagerecht daraufschieben.
Achtung: Die Polausrichtung der Batterien muss wie in der Abbildung gekennzeichnet, erfolgen, andernfalls kann das Gerät beschädigt werden.
Die Batterien bitte in der richtigen Reihenfolge einlegen oder entfernen, sonst könnte die Gerätelasche beschädigt werden. Die Batterien bitte entnehmen, wenn das Oximeter längere Zeit nicht benutzt wird. Wenn der Batterieanzeigestatus leuchtet, rechtzeitig die Batterien auswechseln.
Halten Sie die Batterien von Kleinkindern fern. Die Batterien nicht ins Feuer werfen, sie könnte explodieren.
Beschreibung des Displays
Der Pulsfrequenz-Balken blinkt entsprechend der angezeigten Pulsrate.
Anwendung 1 Zwei AAA-Batterien in das Batteriefach einlegen, bevor die Abdeckung angebracht wird. 2 Das Gerät am hinteren Teil zusammendrücken, um
den vorderen Teil zur Aufnahme des Fingers zu öffnen. 3 Wenn sich Ihr Finger im Oximeter befindet, muss
die Nageloberfläche nach oben zeigen. 4 Nach Einlegen des Fingers den hinteren Teil wieder loslassen. 5 Den Schaltknopf an der Frontseite einmal drücken. 6 Während das Oximeter arbeitet, sollten Sie Ihren Finger nicht bewegen und sich selbst
ruhig verhalten. 7 Auf der Anzeige die entsprechenden Messwerte ablesen. Nach dem Einschalten wechselt das Oximeter jedes Mal, wenn Sie den Einschaltknopf drücken, zu einem anderen Anzeigemodus. Es erscheinen folgende 6 Anzeigemodi:
1. 2. 3.
4. 5. 6.
Drücken Sie den Einschaltknopf längere Zeit (länger als eine Sekunde), um die Helligkeit des Displays einzustellen. Durch Halten des Einschaltknopfes ändert sich stufenweise die Helligkeit des Oximeters. Es gibt 10 Helligkeitsstufen. Stufe 4 ist die Standardhelligkeit. Das Pulsoximeter wird mit einer Schutzhülle geliefert, um es vor Schmutz und Stoß zu schützen.
Bewertung der gemessenen Werte Bei einem gesunden Patienten liegt die Sauerstoffsättigung zwischen 96 und 98 %. Werte unterhalb von 95 % können schon einen Krankheitswert anzeigen und eine medizinische Behandlung erforderlich machen. Wenn Ihr Sauerstoff-Sättigungswert unter 95 % liegt, konsultieren Sie bitte Ihren Arzt. Normale Pulswerte hängen vom Alter und dem Fitness-Level einer Person ab. Im Folgenden ein paar Referenzwerte für eine normale Pulsrate: • Kinder unter 1 Jahr: 100 - 160 bpm • Kinder zwischen 1 und 10 Jahren: 70 - 120 bpm • Personen über 10 Jahre: 60 - 100 bpm • Trainierte Personen/ Athleten: 40 - 60 bpm
Spezifikation 1. Model-Nummer: GT-300C203 2. Anzeigetyp: 1-farbige OLED-Anzeige 3. SpO2:
Displaybereich:0% bis 99% Messbereich: 70% bis 99 % Genauigkeit: 70% bis 99%: ±3%; 0% bis 69% nicht definiert Auflösung : 1%
4. Pulsfrequenz: Displaybreich: 0 bis 254 bpm Messbereich: 30 bis 235 bpm Genauigkeit: 30 bis 99bpm, ±2bpm; 100 bis 235bpm, ±2% Auflösung 1 bpm Pulsintensität: Pulsfrequenz-Balken
5.
Wellenlänge Strahlungsleistung RED 660±2nm 1.8mW IR 940±10nm 2.0mW HINWEIS: Die Informationen über Wellenlängenbereiche kann besonders für Ärzte
Pulsfrequenz-Balken
SpO2/ Sauerstoff-Sättigung
Pulsfrequenz Ein/Aus- Schalter
Batterieanzeigestatus
grafische Darstellung von SpO2
Oxy BA.indd 18 24.09.2013 11:31:36
18
GBEVALUATION OF THE MEASURED VALUES
verwendet werden. Der Einsatz während einer sportlichen Betätigung wird nicht empfohlen.)
Einlegen der Batterien 1. Schieben Sie die Abdeckung des Pulsoximeters herunter wie die Abbildung zeigt 2. Die beiden AAA-Batterien mit der richtigen Polausrichtung
in das Batteriefach einlegen. 3. Die Batterieabdeckung, wie gezeigt, in Pfeilrichtung
waagerecht daraufschieben.
Achtung: Die Polausrichtung der Batterien muss wie in der Abbildung gekennzeichnet, erfolgen, andernfalls kann das Gerät beschädigt werden.
Die Batterien bitte in der richtigen Reihenfolge einlegen oder entfernen, sonst könnte die Gerätelasche beschädigt werden. Die Batterien bitte entnehmen, wenn das Oximeter längere Zeit nicht benutzt wird. Wenn der Batterieanzeigestatus leuchtet, rechtzeitig die Batterien auswechseln.
Halten Sie die Batterien von Kleinkindern fern. Die Batterien nicht ins Feuer werfen, sie könnte explodieren.
Beschreibung des Displays
Der Pulsfrequenz-Balken blinkt entsprechend der angezeigten Pulsrate.
Anwendung 1 Zwei AAA-Batterien in das Batteriefach einlegen, bevor die Abdeckung angebracht wird. 2 Das Gerät am hinteren Teil zusammendrücken, um
den vorderen Teil zur Aufnahme des Fingers zu öffnen. 3 Wenn sich Ihr Finger im Oximeter befindet, muss
die Nageloberfläche nach oben zeigen. 4 Nach Einlegen des Fingers den hinteren Teil wieder loslassen. 5 Den Schaltknopf an der Frontseite einmal drücken. 6 Während das Oximeter arbeitet, sollten Sie Ihren Finger nicht bewegen und sich selbst
ruhig verhalten. 7 Auf der Anzeige die entsprechenden Messwerte ablesen. Nach dem Einschalten wechselt das Oximeter jedes Mal, wenn Sie den Einschaltknopf drücken, zu einem anderen Anzeigemodus. Es erscheinen folgende 6 Anzeigemodi:
1. 2. 3.
4. 5. 6.
Drücken Sie den Einschaltknopf längere Zeit (länger als eine Sekunde), um die Helligkeit des Displays einzustellen. Durch Halten des Einschaltknopfes ändert sich stufenweise die Helligkeit des Oximeters. Es gibt 10 Helligkeitsstufen. Stufe 4 ist die Standardhelligkeit. Das Pulsoximeter wird mit einer Schutzhülle geliefert, um es vor Schmutz und Stoß zu schützen.
Bewertung der gemessenen Werte Bei einem gesunden Patienten liegt die Sauerstoffsättigung zwischen 96 und 98 %. Werte unterhalb von 95 % können schon einen Krankheitswert anzeigen und eine medizinische Behandlung erforderlich machen. Wenn Ihr Sauerstoff-Sättigungswert unter 95 % liegt, konsultieren Sie bitte Ihren Arzt. Normale Pulswerte hängen vom Alter und dem Fitness-Level einer Person ab. Im Folgenden ein paar Referenzwerte für eine normale Pulsrate: • Kinder unter 1 Jahr: 100 - 160 bpm • Kinder zwischen 1 und 10 Jahren: 70 - 120 bpm • Personen über 10 Jahre: 60 - 100 bpm • Trainierte Personen/ Athleten: 40 - 60 bpm
Spezifikation 1. Model-Nummer: GT-300C203 2. Anzeigetyp: 1-farbige OLED-Anzeige 3. SpO2:
Displaybereich:0% bis 99% Messbereich: 70% bis 99 % Genauigkeit: 70% bis 99%: ±3%; 0% bis 69% nicht definiert Auflösung : 1%
4. Pulsfrequenz: Displaybreich: 0 bis 254 bpm Messbereich: 30 bis 235 bpm Genauigkeit: 30 bis 99bpm, ±2bpm; 100 bis 235bpm, ±2% Auflösung 1 bpm Pulsintensität: Pulsfrequenz-Balken
5.
Wellenlänge Strahlungsleistung RED 660±2nm 1.8mW IR 940±10nm 2.0mW HINWEIS: Die Informationen über Wellenlängenbereiche kann besonders für Ärzte
Pulsfrequenz-Balken
SpO2/ Sauerstoff-Sättigung
Pulsfrequenz Ein/Aus- Schalter
Batterieanzeigestatus
grafische Darstellung von SpO2
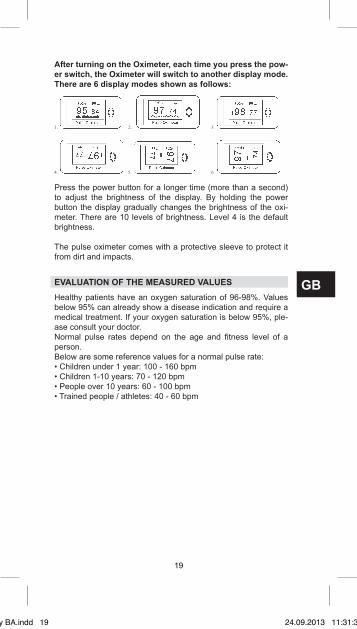
After turning on the Oximeter, each time you press the pow-er switch, the Oximeter will switch to another display mode. There are 6 display modes shown as follows:
Press the power button for a longer time (more than a second) to adjust the brightness of the display. By holding the power button the display gradually changes the brightness of the oxi-meter. There are 10 levels of brightness. Level 4 is the default brightness.
The pulse oximeter comes with a protective sleeve to protect it from dirt and impacts.
Healthy patients have an oxygen saturation of 96-98%. Values below 95% can already show a disease indication and require a medical treatment. If your oxygen saturation is below 95%, ple-ase consult your doctor.Normal pulse rates depend on the age and fitness level of a person.Below are some reference values for a normal pulse rate:• Children under 1 year: 100 - 160 bpm• Children 1-10 years: 70 - 120 bpm• People over 10 years: 60 - 100 bpm• Trained people / athletes: 40 - 60 bpm
Oxy BA.indd 19 24.09.2013 11:31:36
19
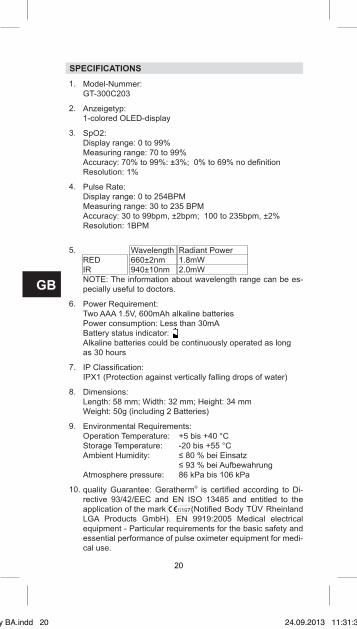
SPECIFICATIONS
Model-Nummer:GT-300C203
Anzeigetyp:1-colored OLED-display
SpO2: Display range: 0 to 99%Measuring range: 70 to 99% Accuracy: 70% to 99%: ±3%; 0% to 69% no definitionResolution: 1%
Pulse Rate:Display range: 0 to 254BPMMeasuring range: 30 to 235 BPMAccuracy: 30 to 99bpm, ±2bpm; 100 to 235bpm, ±2%Resolution: 1BPM
Wavelength Radiant PowerRED 660±2nm 1.8mWIR 940±10nm 2.0mWNOTE: The information about wavelength range can be es-pecially useful to doctors.
Power Requirement: Two AAA 1.5V, 600mAh alkaline batteriesPower consumption: Less than 30mA Battery status indicator:Alkaline batteries could be continuously operated as long as 30 hours IP Classification:IPX1 (Protection against vertically falling drops of water)
Dimensions:Length: 58 mm; Width: 32 mm; Height: 34 mmWeight: 50g (including 2 Batteries)
Environmental Requirements:Operation Temperature: +5 bis +40 °CStorage Temperature: -20 bis +55 °CAmbient Humidity: ≤ 80 % bei Einsatz ≤ 93 % bei AufbewahrungAtmosphere pressure: 86 kPa bis 106 kPa
quality Guarantee: Geratherm® is certified according to Di-rective 93/42/EEC and EN ISO 13485 and entitled to the application of the mark (Notified Body TÜV Rheinland LGA Products GmbH). EN 9919:2005 Medical electrical equipment - Particular requirements for the basic safety and essential performance of pulse oximeter equipment for medi-cal use.
1.
2.
3.
4.
5.
6.
7.
8.
9.
10.
GB
Oxy BA.indd 20 24.09.2013 11:31:36
20
GB
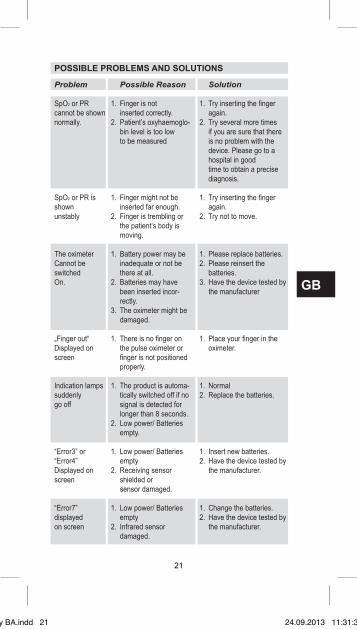
POSSIBLE PROBLEMS AND SOLUTIONS
Problem
SpO2 or PR cannot be shown normally.
SpO2 or PR is shownunstably
The oximeterCannot be switchedOn.
„Finger out“Displayed on screen
Indication lamps suddenlygo off
“Error3” or “Error4”Displayed on screen
“Error7” displayedon screen
Possible Reason
Finger is notinserted correctly.Patient’s oxyhaemoglo-bin level is too lowto be measured
Finger might not be inserted far enough.Finger is trembling or the patient’s body is moving.
Battery power may be inadequate or not be there at all.Batteries may have been inserted incor-rectly.The oximeter might be damaged.
There is no finger on the pulse oximeter or finger is not positioned properly.
The product is automa-tically switched off if no signal is detected for longer than 8 seconds.Low power/ Batteries empty.
Low power/ Batteries emptyReceiving sensor shielded orsensor damaged.
Low power/ Batteries emptyInfrared sensor damaged.
Solution
Try inserting the finger again.Try several more times if you are sure that there is no problem with the device. Please go to a hospital in goodtime to obtain a precise diagnosis.
Try inserting the finger again.Try not to move.
Please replace batteries.Please reinsert the batteries.Have the device tested by the manufacturer
Place your finger in the oximeter.
NormalReplace the batteries.
Insert new batteries.Have the device tested by the manufacturer.
Change the batteries.Have the device tested by the manufacturer.
1.
2.
1.
2.
1.
2.
3.
1.
1.
2.
1.
2.
1.
2.
1.
2.
1.
2.
1. 2.
3.
1.
1.2.
1.2.
1.2.
Oxy BA.indd 21 24.09.2013 11:31:36
21
GB
CLEANING INSTRUCTIONS
DISPOSAL
WARRANTY
SYMBOL INDEX
Please use medical alcohol to clean the synthetic material tou-ching the finger inside the oximeter, and clean the test finger before and after using. Please clean the surface of pulse oxime-ter for every use.
Observe the applicable regulations when disposing of the device and batteries. This product must not be disposed of together with domestic waste.All users are obliged to hand in all electrical or electronic devices, regardless of whether or not they contain toxic substan-ces, at a municipal or commercial collection point so that they can be disposed of in an environmentally acceptable manner.Please remove the batteries before disposing of the device/unit. Do not dispose of old batteries with your household waste, but at a battery collection station at a recycling site or in a shop.
This pulse oximeter is guaranteed for 2 years from the date of purchase against manufacturer’s defect under conditions of nor-mal use. Following the instructions precisely will ensure that the device functions reliably for many years.If your pulse oximeter does not function properly due to defective parts or assembly we will repair it free of charge.All parts are covered by this warranty. The warranty does not co-ver damage to your unit due to improper handling. The manufac-turer recommends that the accuracy of the device be checked by an authorized laboratory every 2 years. Adhere to the applicable regulations when disposing of the device.
= Attention, consult accompanying documents
= Type BF applied part
= No SPO2 Alarm
= Keep dry
= The device must not be disposed of with household waste
= Store between 10 % and 93 % R.H.
= Store between -20 °C and +55 °C
= Batch code (mm/yyyy; month/year)= Serial numberSN= Manufacturer= Date of Manufacture
!
Geratherm Medical AGFahrenheitstraße 198716 GeschwendaGermanywww.geratherm.com
Oxy BA.indd 22 24.09.2013 11:31:47
22
GB
Information on electromagnetic compatibility (EMC)
Electronic devices such as PCs and mobile phones can lead to the exposure of medical devices in operation to electromagnetic interference from other devices. This can lead to malfunction of the medical device and create a potentially unsafe situation.Medical devices should also not interfere with any other devices.
The EN 60601-1-2 standard regulates the requirements for EMC (electromagnetic compatibility) and defines the levels of immuni-ty to electromagneticinterference and the maximum electromagnetic emission levels for medical devices.
This pulse oximeter, which is manufactured by Geratherm Medi-cal AG, complies with the EN 60601-1-2:2007 standard in relati-on to both immunity and emissions.However, special precautions should be observed:
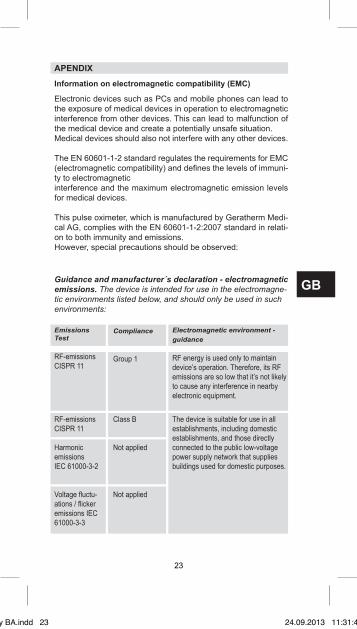
Guidance and manufacturer´s declaration - electromagnetic emissions. The device is intended for use in the electromagne-tic environments listed below, and should only be used in such environments:
APENDIX
EmissionsTest
RF-emissions CISPR 11
RF-emissions CISPR 11
Harmonic emissions IEC 61000-3-2
Voltage fluctu-ations / flicker emissions IEC 61000-3-3
Compliance
Group 1
Class B
Not applied
Not applied
Electromagnetic environment - guidance
RF energy is used only to maintain device’s operation. Therefore, its RF emissions are so low that it’s not likely to cause any interference in nearby electronic equipment.
The device is suitable for use in all establishments, including domesticestablishments, and those directly connected to the public low-voltage power supply network that supplies buildings used for domestic purposes.
Oxy BA.indd 23 24.09.2013 11:31:48
23
GB
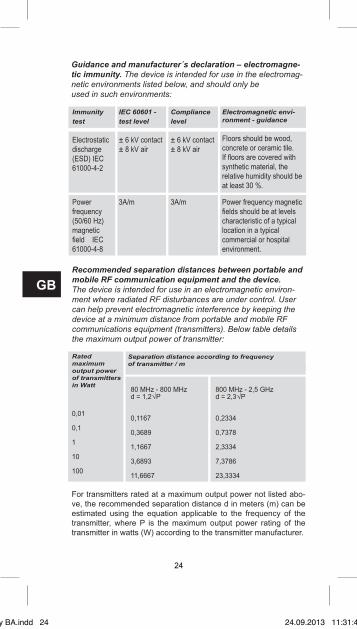
Guidance and manufacturer´s declaration – electromagne-tic immunity. The device is intended for use in the electromag-netic environments listed below, and should only beused in such environments:
Immunitytest
Electrostatic discharge (ESD) IEC 61000-4-2
Power frequency(50/60 Hz) magnetic field IEC 61000-4-8
IEC 60601 - test level
± 6 kV contact ± 8 kV air
3A/m
Compliance level
± 6 kV contact ± 8 kV air
3A/m
Electromagnetic envi-ronment - guidance
Floors should be wood, concrete or ceramic tile. If floors are covered with synthetic material, the relative humidity should be at least 30 %.
Power frequency magnetic fields should be at levels characteristic of a typical location in a typicalcommercial or hospital environment.
Recommended separation distances between portable and mobile RF communication equipment and the device.The device is intended for use in an electromagnetic environ-ment where radiated RF disturbances are under control. User can help prevent electromagnetic interference by keeping the device at a minimum distance from portable and mobile RF communications equipment (transmitters). Below table details the maximum output power of transmitter:
Rated maximum output power of transmitters in Watt
0,01
0,1
1
10
100
80 MHz - 800 MHzd = 1,2√P
0,1167
0,3689
1,1667
3,6893
11,6667
Separation distance according to frequency of transmitter / m
800 MHz - 2,5 GHz d = 2,3√P
0,2334
0,7378
2,3334
7,3786
23,3334
For transmitters rated at a maximum output power not listed abo-ve, the recommended separation distance d in meters (m) can be estimated using the equation applicable to the frequency of the transmitter, where P is the maximum output power rating of the transmitter in watts (W) according to the transmitter manufacturer.
Oxy BA.indd 24 24.09.2013 11:31:48
24
GB
NOTE 1: At 80 MHz and 800 MHz, the separation distance for the higher frequency range applies.NOTE 2: These guidelines may not apply in all situations. Electro-magnetic propagation is affected by absorption and reflection from structures, objects and people.
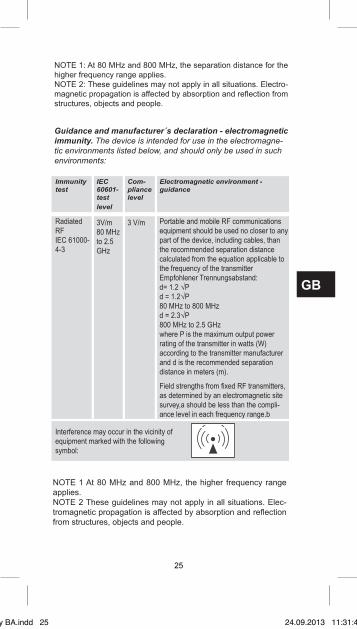
Guidance and manufacturer´s declaration - electromagnetic immunity. The device is intended for use in the electromagne-tic environments listed below, and should only be used in such environments:
Immunity test
Radiated RF IEC 61000-4-3
IEC 60601-testlevel
3V/m 80 MHz to 2.5 GHz
Com-pliance level
3 V/m
Electromagnetic environment - guidance
Portable and mobile RF communications equipment should be used no closer to any part of the device, including cables, than the recommended separation distance calculated from the equation applicable to the frequency of the transmitterEmpfohlener Trennungsabstand:d= 1.2 √P d = 1.2√P 80 MHz to 800 MHz d = 2.3√P 800 MHz to 2.5 GHzwhere P is the maximum output power rating of the transmitter in watts (W) according to the transmitter manufacturer and d is the recommended separation distance in meters (m).
Field strengths from fixed RF transmitters, as determined by an electromagnetic site survey,a should be less than the compli-ance level in each frequency range.b Interference may occur in the vicinity of
equipment marked with the following symbol:
NOTE 1 At 80 MHz and 800 MHz, the higher frequency range applies.NOTE 2 These guidelines may not apply in all situations. Elec-tromagnetic propagation is affected by absorption and reflection from structures, objects and people.
Oxy BA.indd 25 24.09.2013 11:31:48
25
GUIDANCE AND MANUFACTURER´S DECLARATI-ON – ELECTROMAGNETIC IMMUNITY
a) Field strengths from fixed transmitters, such as base stations for radio (cellular/cordless) telephones and land mobile radios, amateur radio, AM and FM radio broadcast and TV broadcast cannot be predicted theoretically with accuracy. To assess the electromagnetic environment due to fixed RF transmitters, an electromagnetic site survey should be considered. If the mea-sured field strength in the location in which the device is used exceeds the applicable RF compliance level above, the device should be observed to verify normal operation. If abnormal per-formance is observed, additional measures may be necessary, such as reorienting or relocating the device.b) Over the frequency range 150 kHz to 80 MHz, field strengths should be less than 3 V/m.
GB
Geratherm Medical AGFahrenheitstraße 198716 GeschwendaGermanywww.geratherm.com
Oxy BA.indd 26 24.09.2013 11:31:49
26