frontline insurance portal user guide user guide tips & tricks key terms/icons as you interact...
TRANSCRIPT

FRONTLINE INSURANCEPORTAL USER GUIDE
Summer 2017, Version 1.0

TABLE OF CONTENTS
General
03 User Guide: Tips & Tricks
04 Quick Start Guide: Quote
05 Quick Start Guide: POS2 Policies
06 Quote
08 Side by side
09 App/Bind/Print/Upload
12 Policy Documents
13 Policy Service
19 In-line Policy Change
20 Policy Change (Full)
22 Activities
Step-by-step
25 Quote
26 Quote Comparison
27 App/Bind/Print/Upload
28 Policy Documents
29 Policy Service
30 Policy Change (In-Line)
32 Policy Change (Full)
33 Activities
Contact List
34 Sales Rep. Contact List
Click on the sections below to go directly to the section you’d like.

3
USER GUIDE TIPS & TRICKSKEY TERMS/ICONS
As you interact with Frontline Pro there are a few key terms, and associated icons, which will help you get the most out of this user guide.
TilesTiles appear at the top your main screens such as when you log-in to Frontline Pro, or pull up a policy.
Tabs:Tabs are depicted as either the top of a traditional file folder (shown at the right) or as simple separated areas (shown at far-right). In either form, when selected in Frontline Pro, they will expand to provide additional information.
Buttons:Tiles appear at the top of main screens such as when you log-in to Frontline Pro, or pull up a policy.
NAVIGATION:
At the bottom left of each page, you will see the following icons:
By selecting the arrow pointing left, you will go to the previous page. By selecting the icon with dashes you will navigate to the Table of Contents. By selecting the right facing arrow, you will go to the next page.
PORTAL TRAINING HELP: 407-444-0481
STEPS:
At the back of this Guide you will find detailed steps to perform specific actions. You can go directly to these areas by either selecting the section from the Table of Contents or by clicking a hyper-link (if available) on a page.
4
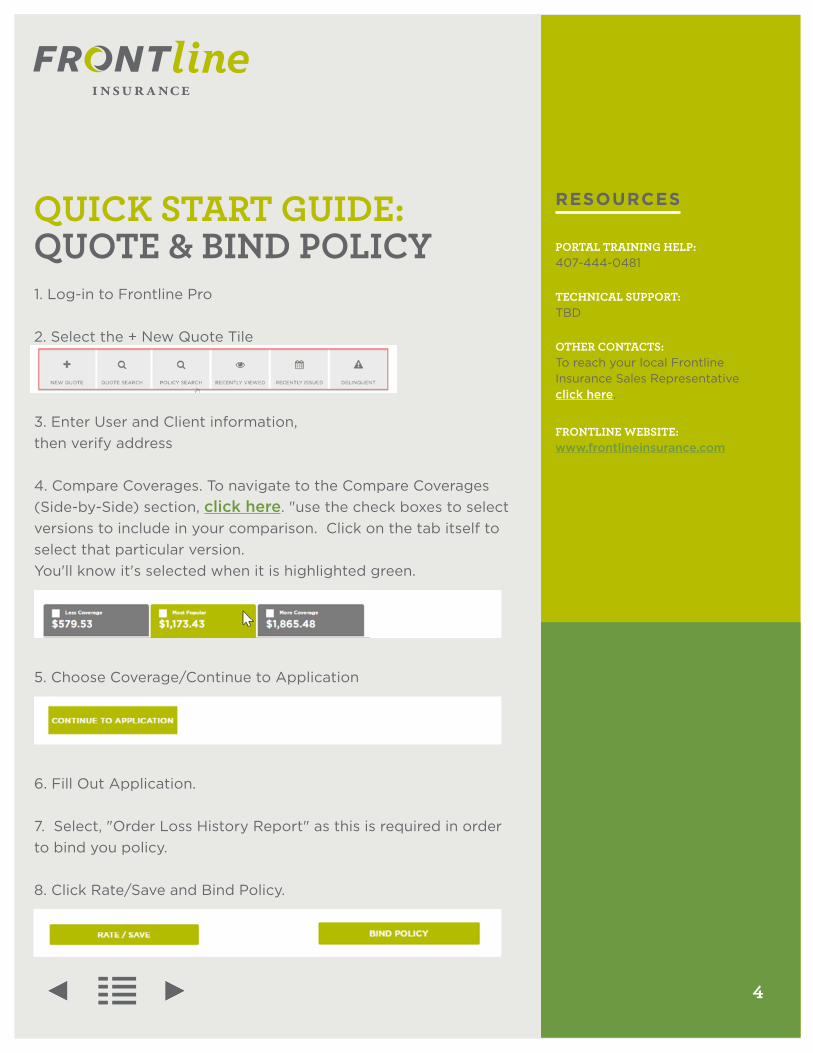
QUICK START GUIDE: QUOTE & BIND POLICY
RESOURCES
PORTAL TRAINING HELP: 407-444-0481
TECHNICAL SUPPORT: TBD
OTHER CONTACTS: To reach your local Frontline Insurance Sales Representative click here.
FRONTLINE WEBSITE: www.frontlineinsurance.com
1. Log-in to Frontline Pro
2. Select the + New Quote Tile
3. Enter User and Client information, then verify address
4. Compare Coverages. To navigate to the Compare Coverages (Side-by-Side) section, click here. "use the check boxes to select versions to include in your comparison. Click on the tab itself to select that particular version. You'll know it's selected when it is highlighted green.
5. Choose Coverage/Continue to Application
6. Fill Out Application.
7. Select, "Order Loss History Report" as this is required in order to bind you policy. 8. Click Rate/Save and Bind Policy.
5
RESOURCES
PORTAL TRAINING HELP: 407-444-0481
TECHNICAL SUPPORT: TBD
OTHER CONTACTS: To reach your local Frontline Insurance Sales Representative click here.
FRONTLINE WEBSITE: www.frontlineinsurance.com
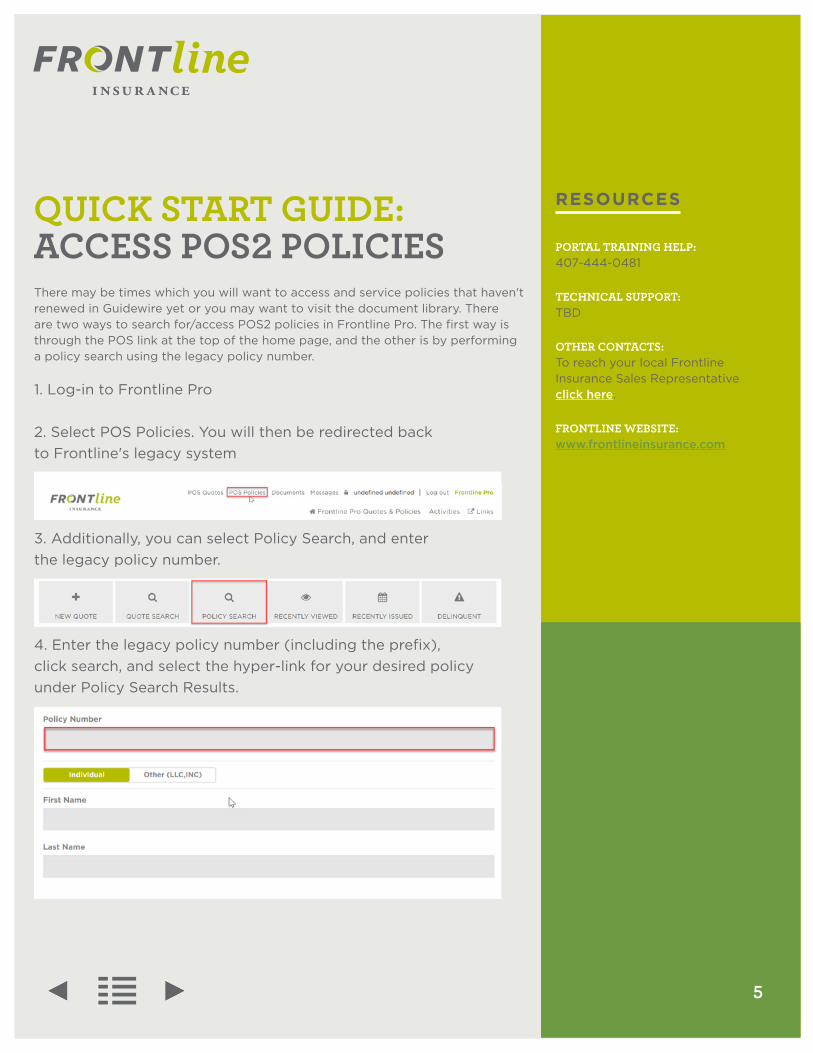
QUICK START GUIDE: ACCESS POS2 POLICIESThere may be times which you will want to access and service policies that haven't renewed in Guidewire yet or you may want to visit the document library. There are two ways to search for/access POS2 policies in Frontline Pro. The first way is through the POS link at the top of the home page, and the other is by performing a policy search using the legacy policy number.
1. Log-in to Frontline Pro
2. Select POS Policies. You will then be redirected back to Frontline's legacy system
3. Additionally, you can select Policy Search, and enter the legacy policy number.
4. Enter the legacy policy number (including the prefix), click search, and select the hyper-link for your desired policy under Policy Search Results.

6
NEW QUOTE Log-in to your Frontline account. Once logged-in, you will arrive at the Policies Dashboard. This is your main page when working with your current and future clients. Select the "+ New Quote" tile.
PRODUCER CODESYou are now on the New Quote Details page. The first field you come to is the Pro-ducer Code. This can be your current branch location or a different branch within your organization. Your Producer Code will easily allow policies and commissions to be associated with the proper branch.
RISK STATESRisk States are associated with the selected Producer Code, and will appear in a drop-down list to choose from. Select the applicable State in which you are plac-ing your new business. If you don’t see the State you wish to write in, check your Producer Code to ensure it is correct.
POLICY TYPE:Select an appropriate policy type on which you'd like to receive a quote. Note, you will only have access to policies available to they Risk State you've previously chosen.
FEATURES
SUPPORTS MULTI-AGENCY CODES Frontline Pro allows you to choose which branch your quote will be as-signed.
QUOTE IN MULTIPLE STATES Frontline Pro allows you to create a quote for any approved State ap-proved for your Agency.
RESOURCES
PORTAL TRAINING HELP: 407-444-0481
QUOTE: GET A NEW QUOTE

7
NEW QUOTENext, select the Policy Writer, the agent of record generating the quote.
PRODUCER CODESComplete the open fields which remain. Verify the address and proceed to the next page by selecting the “Next” button.
RISK STATESOn the Home Details page, select the MSB button. A new page opens which populates the replacement cost estimate automatically. Once you have verified that the information is accurate, select finish, then Save, and then close this additional browser window to return to Frontline Pro.
IMPORTANT: Without hitting Retrieve RCE the replacement cost value will not appear in your application.
POLICY TYPE:Now, continue with your quote by providing the necessary information in the editable fields or by selecting information from the corresponding drop-down
boxes. Now you can either compare your quotes (See Side-by-Side section) or, if you know which coverage you'd like, click Continue to Application” to proceed.
FEATURES
INTEGRATED MSB RCE will populate in Frontline Pro based on the results from MSB.
DON'T FORGET TO SELECT RETRIEVE RCE
RESOURCES
PORTAL TRAINING HELP: 407-444-0481
QUOTE:

8
QUOTE: COMPARE QUOTESFrontline Pro will generate a Good, Better, and Best set of coverage options automatically (for certain policies), which can be viewed and printed side-by-side. Additionally, your customized quote can also be used in the side-by-side comparison.
FEATURES
COMPARE TWO OR THREE DIFFERENT QUOTES View side-by-side comparisons of auto-generated, and customized quotes!
PRINT COMPARISONS Easily print side-by-side comparisons for your client to review.
THE TAB THAT'S GREEN WILL BE SEEN! The Quote with the Green tab is the one which is selected. To change, just click on another tab.
RESOURCES
PORTAL TRAINING HELP: 407-444-0481
Automatic quotesOn the New Quote screen, select the Coverages tab. When the section ex-pands, you will see three tabs “Less Coverage,” “Most Popular,” and “More Coverage.”
Select your quotesWith no inputs required, you will be able to show your client three choices of cov-erage! Showing a side-by-side comparison is simple. Take your mouse and select the white square in the top-left corner of each tab you’d like to compare. The result will be a “Check” mark. You can select two or three versions to compare side-by-side. Any more or less will result in an error.
Display/print quotes:With either two or three versions select-ed, move your cursor to the “Compare Versions” button at the middle of the page. A pop-up window appears showing the different coverage options placed conveniently beside each other with the differences identified with an asterisk. You can print this comparison by select-ing either the top-left printer icon, or at the bottom of the page by selecting the “Print” button.
You can also customize a quote for your client, by selecting “Custom.” A new tab will appear where Coverage fields will be editable. Customize your quote to fit your cli-ent’s needs, and if you wish compare this version once your client has decided which coverage package they want, simply click “Continue to Application”

9
FEATURES
COMPLETE APPLICATION QUICKLY Move through the application quickly using drop-downs and editable fields
PRINT DECLARATIONS PAGE Immediately print the Dec page for your recently bound policy
UPLOAD TRAILING DOCUMENTS Easily upload the necessary documents required by underwriting.
RESOURCES
PORTAL TRAINING HELP: 407-444-0481
APPLICATION/BIND: HOW TO APPLY & BINDThis page will introduce you to the application process, binding of the policy, as well as printing and uploading Trailing Documents. On the previous page, you finished your Quote and selected Coverages for your client. Now, you’ll need to continue to the application before binding the policy.
Complete the ApplicationThe application consists of multiple sections which you can access by selecting the appropriate tab which will expand to complete. Complete the application fields by either entering information in the editable fields or by selecting information from the corre-sponding drop-down lists.
Order loss report with one click:The application sections will be familiar to you, but there are some areas we want to point out. First, notice that when you make changes in the Coverages section that the associated coverages will update accordingly. Also, note that you can both enter prior losses and, with one click of the mouse, pull a loss report and add it to the application.

10
FEATURES
PRINT INVOICES You can now print invoices for current premium due.
RESOURCES
PORTAL TRAINING HELP: 407-444-0481
APPLICATION/BIND:
As long as there are no Underwriting Issues generated in your application you will arrive at the Bind Confirmation page. This is where you will be able to print the decelerations page for your newly bound policy, among other important documents.

11
FEATURES
PRINT POLICY DOCUMENTS EASILY AND AT YOUR CONVENIENCE Including newly bound Declarations page!
UPLOAD DOCUMENTS QUICKLY AND EASILY Upload Trailing Documents for new policies, and Claims Documents di-rectly to Frontline.
RESOURCES
PORTAL TRAINING HELP: 407-444-0481
POLICY DOCUMENTS WORK WITH DOCUMENTSThe “Policy Documents” section will show you how to quickly locate, print, and/or upload documents associated with your client’s policy.
Locate your policyStart by logging-in to your Frontline account. Once logged in, you will arrive at the Policy Dashboard where you can choose your policy.
If you recently issued or viewed the policy, you can simply select “Recently Issued” or “Recently Viewed” and select the associated “Policy Number” hyper-link. Otherwise, select the “Policy Search” button and enter the policy number you wish to view, then click “Search.”
Policy Summary pageOnce your policy has been located, select the hyper-link under “Policy Number” to view the policy Summary. You have now arrived at the Policy Summary page.
Policy Documents pageClick on the Policy Documents tab. You will see this section expand, and a list of all associated documents, in PDF format, will be shown. To view the document, simply click on the hyper link and the document will open in a new browser window.

12
FEATURES
PRINT POLICY DOCUMENTS EASILY AND AT YOUR CONVENIENCE Including newly bound Declarations page!
UPLOAD DOCUMENTS QUICKLY AND EASILY Upload Trailing Documents for new policies, and Claims Documents di-rectly to Frontline.
RESOURCES
PORTAL TRAINING HELP: 407-444-0481
POLICY DOCUMENTS UPLOADING DOCUMENTSYou will have the ability to upload documents at various time in Frontline Pro including, but not limited to; Bind Confirmation screen (which immediately follows selecting “Bind” in the application), Trailing Documents tab (In the Documents tile), Policy Documents (In the Documents tile), and in the Claims Documents tab.
You can upload documents by either selecting the "+ ADD DOC" button or the "Select Documents to Upload." You will be prompted to select a document to upload, and once selected simply click "Upload" and your documents will be uploaded to Frontline's system.

13
POLICY SERVICE HOW TO: NAVIGATE POLICY SERVICE PAGEThere are a lot of great features in Frontline Pro, and many are contained right here, on the Policy Service Dashboard. The Policy Service Dashboard will be your main page when assisting and servicing your client’s needs. You will have all the tools to provide exceptional service and to interact with Frontline. Next, we'll discuss the “Tiles” shown at the top of the page and discuss some of the features contained in each.
QUICK ACCESS TO:
Summary TilePolicy Details TileActivities TileDocuments TileClaims TileBilling Tile
RESOURCES
PORTAL TRAINING HELP: 407-444-0481

14
POLICY SERVICE: SUMMARY TILEIn the Summary tile, you will see a high-level overview of your clients policy including policy inception, cancellation information (if applicable), producer information, and premium associated with the policy. Additionally, at the bottom of the page you will see “Policy Transactions” where you can select the associated hyper-links to find out additional information pertaining to the transaction(s). Also, there are buttons which allow quick access to common policy transactions such as Change Policy, Cancel Policy, New/Update RCE, Make A Payment, and File a Claim. Additionally, you can create a Flood Application/View Flood Application.
RESOURCES
PORTAL TRAINING HELP: 407-444-0481

15
POLICY SERVICE: POLICY DETAILS TILEThe next tile is the Policy Details page. Let’s select it and see what information is available here. This page will show the current and past versions of the policy, and the details within. Select the version of the policy you wish to view by the choosing the appropriate tab (such as “Original Policy Effective…, Change Effective…, etc.). You can edit areas of the policy, add/remove/edit a mortgage, view/print/upload documents, file a claim, and get a details snapshot of your clients policy with a click of a button.
BE SURE TO CHECK THE POLICY SNAPSHOT WHICH SHOWS YOU ALL THE VALUES YOU ENTERED IN THE APPLICATION
FEATURES
POLICY DETAILS PROVIDES QUICK ACCESS TO YOUR CLIENTS POLICY INFORMATION
THE STAR: If you have made changes to the pol-icy multiple tabs will appear on the page. The current active policy will be designated by the white star.
POLICY SNAPSHOT: Located at the bottom of the page, this tab will show you all the values you entered in the application.
RESOURCES
PORTAL TRAINING HELP: 407-444-0481

16
POLICY SERVICE: ACTIVITIES TILEThe Activities section is the next tile, and will be your direct line to Front-line’s underwriting department. You can view current, past, and future activ-ities. You can create, edit, and complete Activities as well. Activities will be a huge part of your interaction with Frontline and as such we have devoted an entire training module to them. Click here to go there.
FEATURES
STAY ORGANIZED AND UP-TO-DATE ON ANY OUTSTANDING ITEMS REQUIRED BY UNDERWRITING.
RESOURCES
PORTAL TRAINING HELP: 407-444-0481

17
POLICY SERVICE: DOCUMENTS TILEThe Documents tile shows you view all of the current documents and upload any outstanding (such as Trailing documents if applicable) documents associated with the policy. You can easily find and print copies as you need throughout the life of the policy. An entire training module has been devoted to this area as well.
FEATURES
PRINT/UPLOAD DOCUMENTS FAST DIRECTLY TO FRONTLINE
RESOURCES
PORTAL TRAINING HELP: 407-444-0481
18
FEATURES
FILE CLAIMS QUICKLY FOR YOUR CLIENT
RESOURCES
PORTAL TRAINING HELP: 407-444-0481
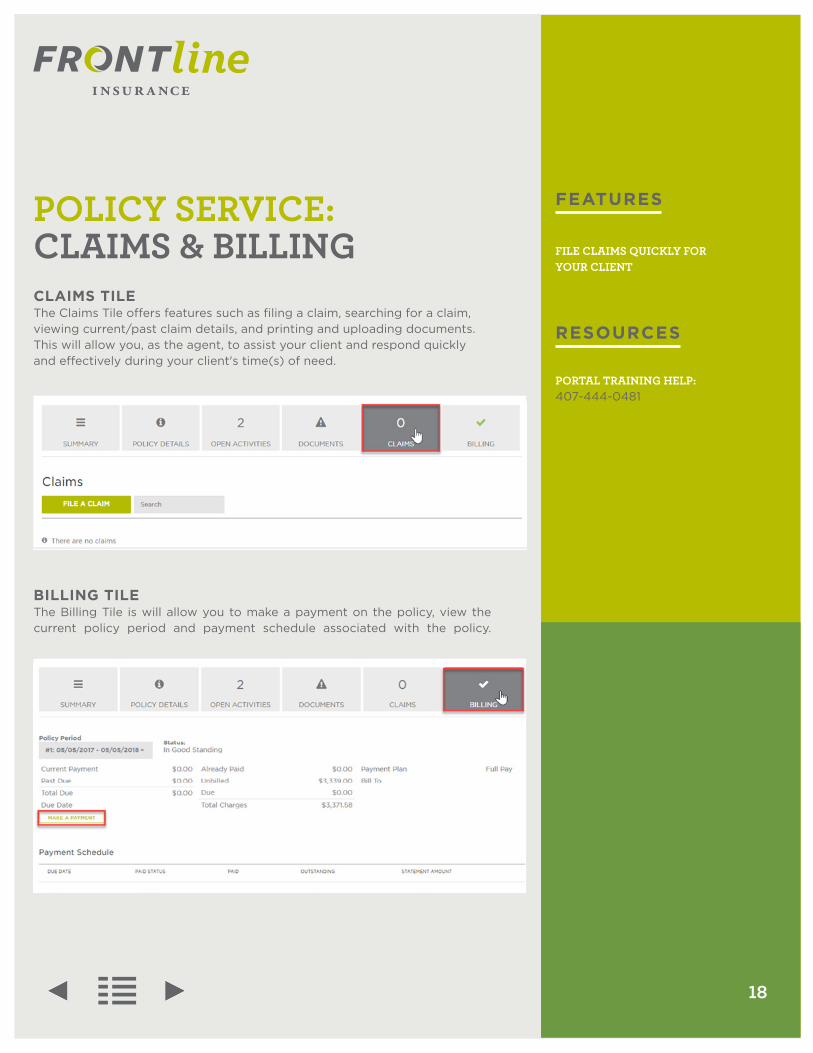
POLICY SERVICE: CLAIMS & BILLINGCLAIMS TILE The Claims Tile offers features such as filing a claim, searching for a claim, viewing current/past claim details, and printing and uploading documents. This will allow you, as the agent, to assist your client and respond quickly and effectively during your client's time(s) of need.
BILLING TILE The Billing Tile is will allow you to make a payment on the policy, view the current policy period and payment schedule associated with the policy.
19
FEATURES
MAKE CHANGES FAST! Changes can be made to: o Policy Mailing Addresso Primary Contact Phone Numbero Email Addresso Paperless Document Deliveryo Add/Remove/Edit Mortgage & Additional Interest Information
LIMITED UNDERWRITING APPROVAL
RESOURCES
PORTAL TRAINING HELP: 407-444-0481
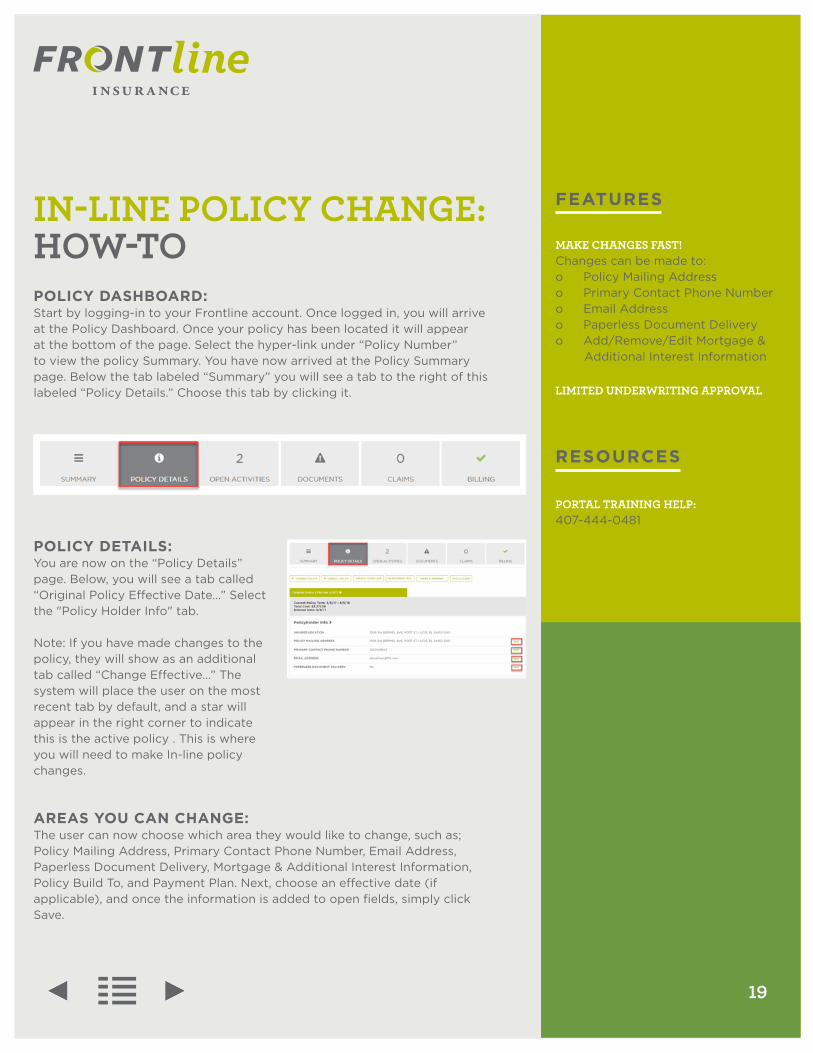
IN-LINE POLICY CHANGE: HOW-TOPOLICY DASHBOARD: Start by logging-in to your Frontline account. Once logged in, you will arrive at the Policy Dashboard. Once your policy has been located it will appear at the bottom of the page. Select the hyper-link under “Policy Number” to view the policy Summary. You have now arrived at the Policy Summary page. Below the tab labeled “Summary” you will see a tab to the right of this labeled “Policy Details.” Choose this tab by clicking it.
AREAS YOU CAN CHANGE: The user can now choose which area they would like to change, such as; Policy Mailing Address, Primary Contact Phone Number, Email Address, Paperless Document Delivery, Mortgage & Additional Interest Information, Policy Build To, and Payment Plan. Next, choose an effective date (if applicable), and once the information is added to open fields, simply click Save.
POLICY DETAILS: You are now on the “Policy Details” page. Below, you will see a tab called “Original Policy Effective Date…” Select the "Policy Holder Info" tab.
Note: If you have made changes to the policy, they will show as an additional tab called “Change Effective…” The system will place the user on the most recent tab by default, and a star will appear in the right corner to indicate this is the active policy . This is where you will need to make In-line policy changes.

20
FEATURES
FULL ACCESS TO NUMEROUS AREAS OF THE POLICY! Including: o Coverages o Additional Interestso Discounts/Surchargeso Occupancyo Mitigation detailso Applicant Contact information
RESOURCES
PORTAL TRAINING HELP: 407-444-0481
FULL POLICY CHANGE: HOW-TOLOG-IN: Start by logging-in to your Frontline account. Once you have located the policy you wish to work with select the hyper-link under “Policy Number” to view the policy Summary.
CHOOSE AN EFFECTIVE DATE: You are now on the “Change Policy” page. Enter an effective date and an endorsement type you wish to change. Note: You will not be able to select a date prior to today’s date.
SELECT CHANGE POLICY: You have now arrived at the Policy Summary page. Below the tab labeled “Summary” you will see a button labeled “Change Policy.” Choose this button by clicking it.

21
FEATURES
FULL ACCESS TO NUMEROUS AREAS OF THE POLICY! Including: o Coverages o Additional Interestso Discounts/Surchargeso Occupancyo Mitigation detailso Applicant Contact information
RESOURCES
PORTAL TRAINING HELP: 407-444-0481
FULL POLICY CHANGE: HOW-TOEDITABLE AREAS: You can change many different areas in Policy Change including; Coverages, Additional Interests, Discounts/Surcharges, Occupancy, Mitigation details, and Applicant Contact information. Once your changes are complete, simply click Rate/Save to recalculate the rate. Then click the Bind button to pro-ceed. That’s all there is to it!
NOTE: If your changes trigger an Underwriting Issue, a pop-up window will appear with a brief description. Select “Submit to Underwriter,” and you will be directed to the Policy Change Summary page. We’ll discuss more about working with Underwriting Issues/ Activities in another video.
22
FEATURES
MANAGE YOUR ACTIVITIES
SEND AND RECEIVE ACTIVITIES USING ACTIVITY ASSIGNMENTS Communicate directly with Frontline regarding your client's policy
RESOURCES
PORTAL TRAINING HELP: 407-444-0481
ACTIVITIES
The Activities section of Frontline Pro is how you interact and communicate with underwriting and other agents on pending issues regarding your client’s policy. Each agency will have its own queue (associated with its unique producer code) which is called the Agency Queue, and this is where Activities will arrive for handling. Frontline recommends that these Activities be assigned by an Administrator, but this unique role is not required. If you are designated an Administrator, there will be a separate guide to discuss your tasks and role. Once received by the user, Activities can be completed or they can be assigned to other users or queues for handling/action.
HOW TO: MANAGE YOUR ACTIVITIESAn Activity could be a reminder, note, or task that can either be system generated (such as the need for an outstanding form), or it could be created by an agent, underwriter, or administrator to communicate with one another regarding a specific policy.
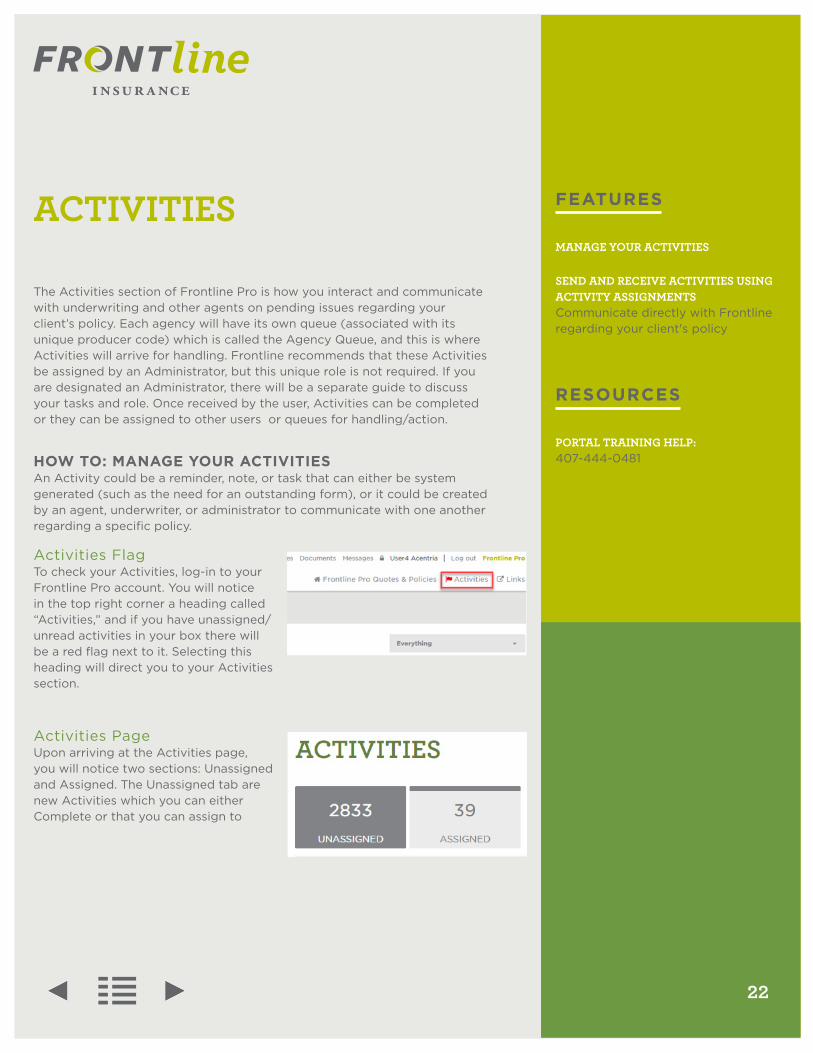
Activities FlagTo check your Activities, log-in to your Frontline Pro account. You will notice in the top right corner a heading called “Activities,” and if you have unassigned/unread activities in your box there will be a red flag next to it. Selecting this heading will direct you to your Activities section.
Activities PageUpon arriving at the Activities page, you will notice two sections: Unassigned and Assigned. The Unassigned tab are new Activities which you can either Complete or that you can assign to
23
FEATURES
VIEW/COMPLETE YOUR MOST IMPORTANT (OLDEST) ACTIVITIES FIRST Activities Due Today show first on your screen
RESOURCES
PORTAL TRAINING HELP: 407-444-0481
ACTIVITIES
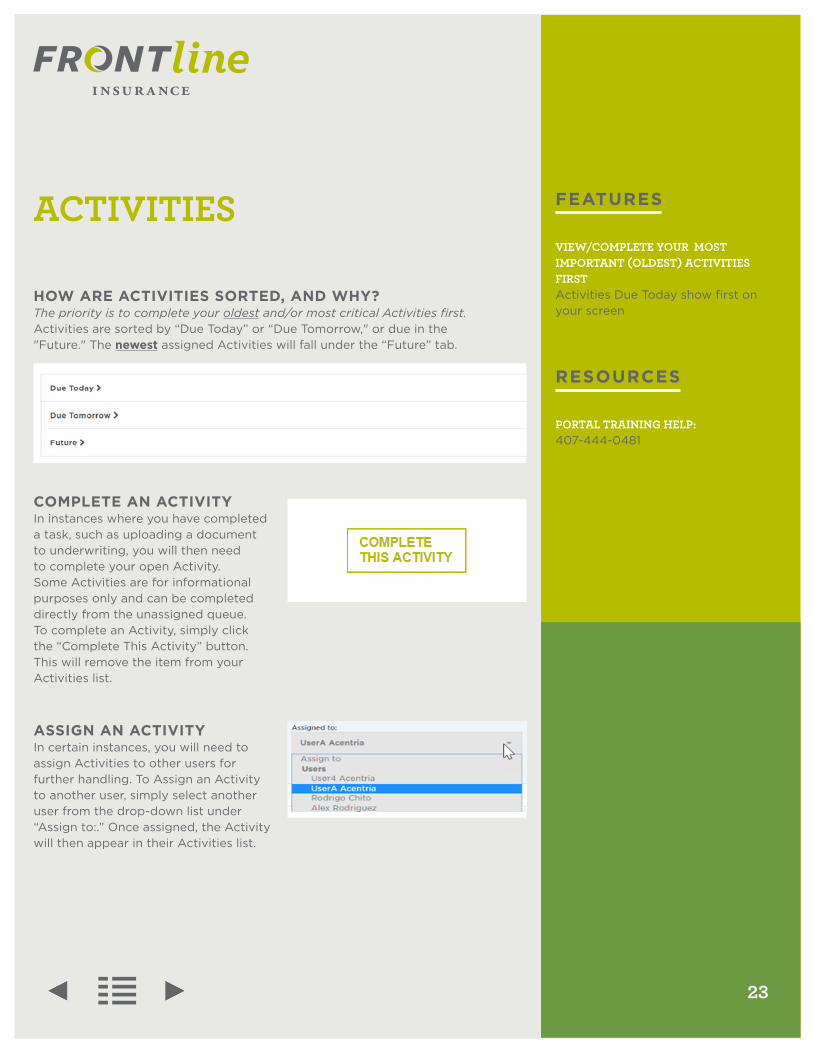
HOW ARE ACTIVITIES SORTED, AND WHY?The priority is to complete your oldest and/or most critical Activities first. Activities are sorted by “Due Today” or “Due Tomorrow," or due in the "Future." The newest assigned Activities will fall under the “Future” tab.
COMPLETE AN ACTIVITYIn instances where you have completed a task, such as uploading a document to underwriting, you will then need to complete your open Activity. Some Activities are for informational purposes only and can be completed directly from the unassigned queue. To complete an Activity, simply click the “Complete This Activity” button. This will remove the item from your Activities list.
ASSIGN AN ACTIVITYIn certain instances, you will need to assign Activities to other users for further handling. To Assign an Activity to another user, simply select another user from the drop-down list under “Assign to:.” Once assigned, the Activity will then appear in their Activities list.
24
TIPS
NEED TO FOLLOW UP ON A POLICY CHANGE? Be sure to select "Customer Service Inquiry" as the Activity Type
OTHER INQUIRIES TO UNDERWRITING? Use "Underwriting Inquiry" as the Activity Type
RESOURCES
PORTAL TRAINING HELP: 407-444-0481
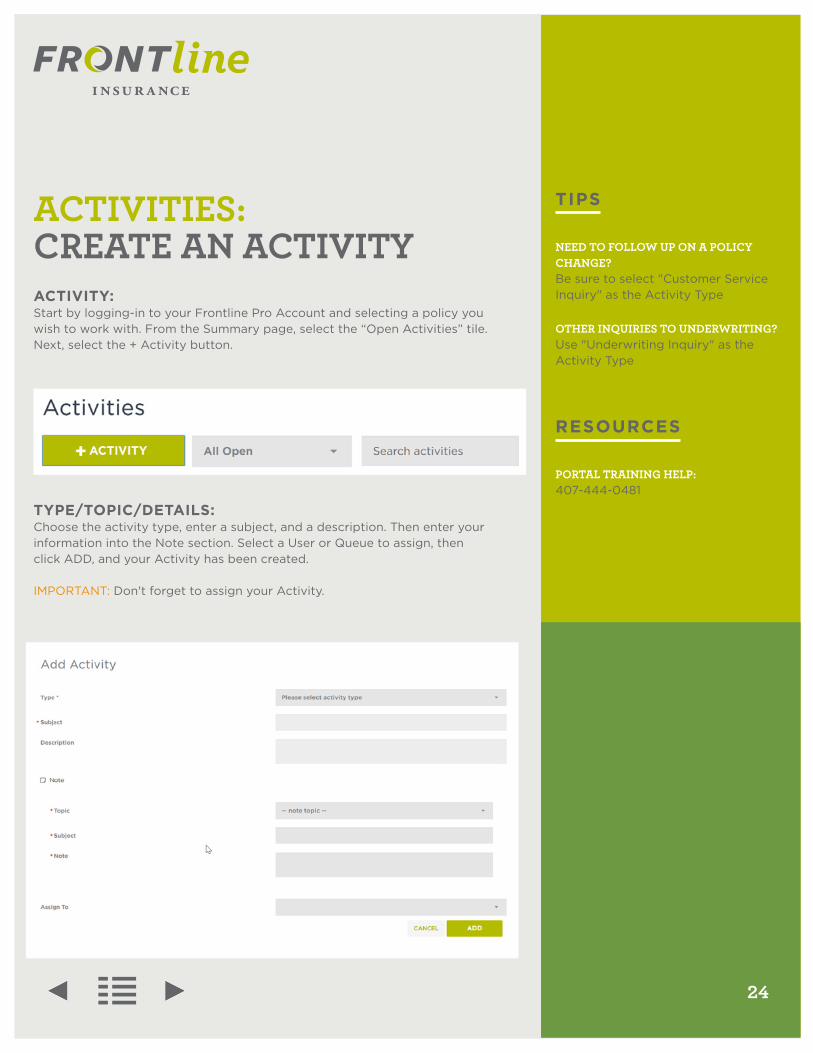
ACTIVITIES: CREATE AN ACTIVITYACTIVITY: Start by logging-in to your Frontline Pro Account and selecting a policy you wish to work with. From the Summary page, select the “Open Activities” tile. Next, select the + Activity button.
TYPE/TOPIC/DETAILS:Choose the activity type, enter a subject, and a description. Then enter your information into the Note section. Select a User or Queue to assign, then click ADD, and your Activity has been created.
IMPORTANT: Don't forget to assign your Activity.

25
QUOTE: STEP-BY-STEP
REMEMBER
YOU CAN ACCESS OTHER BRANCH LOCATIONS BY CHOOSING A DIFFERENT, ASSOCIATED, PRODUCER CODE
RISK STATES ARE ASSOCIATED WITH YOUR PRODUCER CODE
RESOURCES
PORTAL TRAINING HELP: 407-444-0481
1. Log-in to your account2. Select “+ New Quote”3. Select a Producer Code4. Select a Risk State5. Select a Policy Type6. Choose a Policy Writer7. Enter your client’s information8. Select “Verify Address”9. Enter a Dwelling Limit10. Select the MSB button11. In the new window which has opened,
review, select “Finish” providing the
RCE details on the page are correct12. Select “Save” in the pop-up window
which appears, and return to your Quote page
13. Select, Retrieve RCE14. Continue your quote by filling out the
necessary information 15. Choose a Coverage option (See Quote
Comparison)
16. Select “Continue to Application”
26
QUOTE COMPARISON: STEP-BY-STEP
REMEMBER
THE COMPARE FEATURE REQUIRES THE FOLLOWING:
1. Two -or- Three Quotes selected2. Check Boxes marked: Make sure you have marked the check boxes on each tab you wish to compare.
TO CHOOSE A QUOTE, AND CONTINUE TO APPLICATION, MAKE SURE THE TAB FOR YOUR DESIRED QUOTE IS GREEN
RESOURCES
PORTAL TRAINING HELP: 407-444-0481
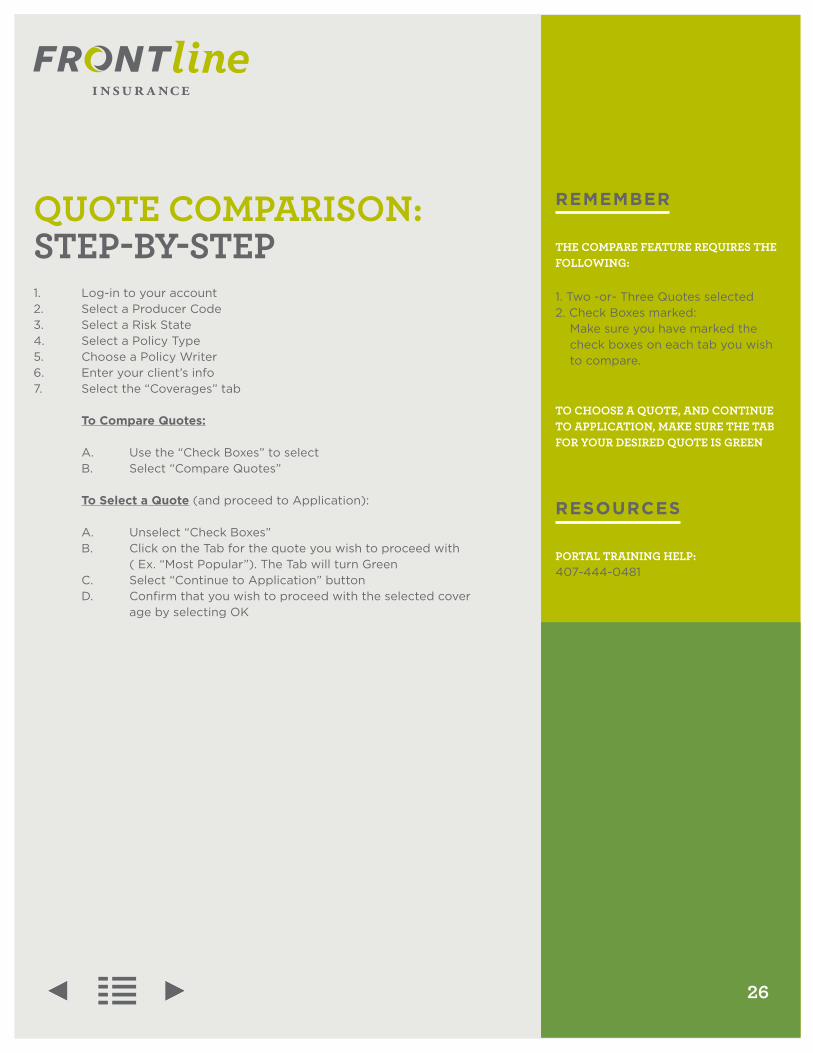
1. Log-in to your account2. Select a Producer Code3. Select a Risk State4. Select a Policy Type5. Choose a Policy Writer6. Enter your client’s info7. Select the “Coverages” tab
To Compare Quotes:
A. Use the “Check Boxes” to select B. Select “Compare Quotes”
To Select a Quote (and proceed to Application):
A. Unselect “Check Boxes” B. Click on the Tab for the quote you wish to proceed with ( Ex. “Most Popular”). The Tab will turn Green C. Select “Continue to Application” button D. Confirm that you wish to proceed with the selected cover age by selecting OK

27
APP/BIND/PRINT/UPLOAD: STEP-BY-STEP
REMEMBER
YOU CAN IMMEDIATELY PRINT THE DECLARATION PAGE FOR YOUR NEWLY BOUND POLICY
YOU CAN IMMEDIATELY UPLOAD TRAILING DOCUMENTS ON YOUR NEWLY BOUND POLICY
RESOURCES
PORTAL TRAINING HELP: 407-444-0481
1. Log-in to your account2. Select New Quote
Quote3. Select a Producer Code4. Select a Risk State5. Select a Policy Type6. Choose a Policy Writer7. Enter your client’s info8. Verify Address9. Select Next10. Select the “Coverages” tab
To Compare Quotes:
A. Use the “Check Boxes” to select B. Select “Compare Quotes”
To Select a Quote (and proceed to Application):
A. Unselect “Check Boxes” B. Click on the Tab for the quote you wish to proceed with ( Ex. “Most Popular”). The Tab will turn Green C. Select “Continue to Application” button
Application 11. Complete Application fields 12. Once complete, select Rate/Save13. Select Bind Print14. Select document(s) you wish to print (such as the declarations page)
Upload Documents15. Under Trailing Documents, select "+ Add Doc" under the document type you'd like to upload.16. Select a document to upload from your computers local drive17. Select Upload
28
POLICY DOCUMENTS: STEP-BY-STEP
RESOURCES
PORTAL TRAINING HELP: 407-444-0481
1. Log-in to your Frontline Pro account2. Select a Policy to work with by:
Using a Recent Policy on Dashboard: A. At the middle of your screen you will see Recently Viewed Policies. Select a policy you wish to work with, by choosing the associated “Policy Number” hyper-link Access by searching for policy number: A. Select “Policy Search” B. Enter “Policy Number” and click “Search” C. Scroll down to the Policy Search Results, and select the hyper-link for the policy you wish to view.
3. Upon arriving at the policy Summary page, select “Documents”4. You will now see additional tabs which include the following: - Trailing Documents (If you were unable to upload them in the bind confirmation page. See Uploading Documents for more detail) - Policy Documents - Billing Documents - Print Documents.5. To view/print a document in any of the above tabs complete the following: A. Select a tab B. Select a document by using the associated hyper-link or PDF icon C. A new window will open D. Right-click in the center of the page, and select Print
29
POLICY SERVICE: STEP-BY-STEP1. Log-in to your Frontline Pro account2. Select a Policy to work with by:
Using a Recent Policy on Dashboard: A. At the middle of your screen you will see Recently Viewed Policies. Select a policy you wish to work with, by choosing the associated “Policy Number” hyper-link
Access by searching for policy number: A. Select “Policy Search” B. Enter “Policy Number” and click “Search” C. Scroll down to the Policy Search Results, and select the hyper-link for the policy you wish to view.
3. You are now on the “Summary” page of the Policy Service Dashboard4. Select a “Tile” that you wish to work with by clicking on it
RESOURCES
PORTAL TRAINING HELP: 407-444-0481

30
POLICY CHANGE(IN-LINE): STEP-BY-STEP1. Log-in to your account
With recent policy showing on Dashboard: A. Select a policy you wish to work with, by choosing the associated “Policy Number”
Access by searching for policy number: A. Select “Policy Search” and enter policy number or name B. Scroll down to the Policy Search Results, and select the hyper-link for the policy you wish to view. The policy you wish to view.
2. Upon arriving at the policy Summary page, select “Policy Details”3. Choose either the Original/Change Effective Date tab 4. Select Policy Holder Info to change any of the following: - Policy Mailing Address - Primary Contact Phone Number - Email Address - Paperless Document Delivery
To Change one of the above fields: A. Select “Edit” B. Chose an “Effective Date” (any date other than one in the past) C. Select “OK” D. Complete the editable fields E. Once complete, click “Save”
5. Select Mortgage & Additional Interest Information tab
To Add a Company: A. Select Add B. Choose an “Effective Date” (any date other than one in the past) C. Select Company as the Contact Type D. Complete the required information E. Search for matches a. If none are found, you will need to add the company information. b. If a match is found, select it c. If you choose a person, you will need to verify the
address
RESOURCES
PORTAL TRAINING HELP: 407-444-0481

31
POLICY CHANGE(IN-LINE): STEP-BY-STEP To Add a Person: A. Select Add B. Choose an “Effective Date” (any date other than one in the past) C. Select Person as the Contact Type D. Select the “Type” from the drop-down list E. Complete the required information F. Verify Address G. Select “Yes” or “No” regarding “Bill This Contact?” H. Click “Save” I. If none are found, you will need to add the company information. ii. If a match is found, select it iii. If you choose a person, you will need to verify the address6. Select Billing Details To Change who the policy is billed to: A. Select the “Edit” button to the right of “Policy Billed To” B. Choose an “Effective Date” (any date other than one in the past) C. Select a name from the drop down list D. Click “Save” To Change the Payment Plan: A. Select the “Edit” button to the right of “Payment Plan” B. Select a payment option from the “Payment Plan” drop- down list C. Click Save
RESOURCES
PORTAL TRAINING HELP: 407-444-0481
32
POLICY CHANGE(FULL): STEP-BY-STEP1. Log-in to your account
With recent policy showing on Dashboard: A. Select a policy you wish to work with, by choosing the associated “Policy Number” Access by searching for policy number: A. Select “Policy Search” and enter policy number or name B. Scroll down to the Policy Search Results, and select the hyper-link for the policy you wish to view.
2. Upon arriving at the policy Summary page, select “Change Policy”3. Choose an Effective Date 4. Select and Endorsement Type5. Select an area of the policy you wish to change6. Once complete, select Rate/Save7. Select Bind Policy Change8. Once bound, you can select “Print Amended Declaration Page” to immediately print a copy of the new Dec page.
RESOURCES
PORTAL TRAINING HELP: 407-444-0481

33
ACTIVITIES: STEP-BY-STEP
REMEMBER
"FUTURE" ACTIVITIES ARE THE MOST RECENTLY CREATED. ACTIVITIES "DUE TODAY" ARE YOUR OLDEST ACTIVITIES
RESOURCES
PORTAL TRAINING HELP: 407-444-0481
To View Activities:
1. Log-in to your Frontline Pro account2. At the top-right of the page you will see a heading called “Activities” which has a flag next to it. Select the word “Activities3. You will see two Tiles, “Unassigned” and “Assigned” as well as tabs for activities which are either: a. Due Today b. Due Tomorrow c. Due this week d. Due in the Future
4. Select an appropriate tab such as “Future”5. Scroll to the bottom of the page, and your most recently created Activity will be at the bottom
To Create an Activity:
1. Log-in to your Frontline Pro account2. Select a policy to work with by choosing the associated hyper-link. 3. Upon arriving at the Summary page, select the Open Activities Tile. 4. Select "+ Activity" button5. Choose the activity type6. Enter a subject, and a description. 7. Then enter your information into the Note section. Click ADD, and your Activity has been created.

34
SALES REPRESENTATIVE CONTACT LISTflorida
North East Rebecca Like – (904) [email protected]
Central East Christina Dahn – (407) [email protected]
South EastGysell Villa – (305) [email protected]
South WestDarren Porter – (813) [email protected]
Central WestDarren Porter – (813) [email protected]
florida panhandle
Debbie Rhody (850)[email protected]
alabama
Debbie Rhody (850)[email protected]
south carolina
Susan Miley – (843) [email protected]
north carolina
Rick Williams (910) [email protected]
Anne Morin (910) [email protected]
RESOURCES
PORTAL TRAINING HELP: 407-444-0481
FRONTLINE WEBSITE: www.frontlineinsurance.com