food families
TRANSCRIPT

Food Families
COLLECTIVE KITCHEN(S) MODULE 6
This module was developed in collaboration with
2 FOOD FAMILIES – COLLECTIVE KITCHEN(S)
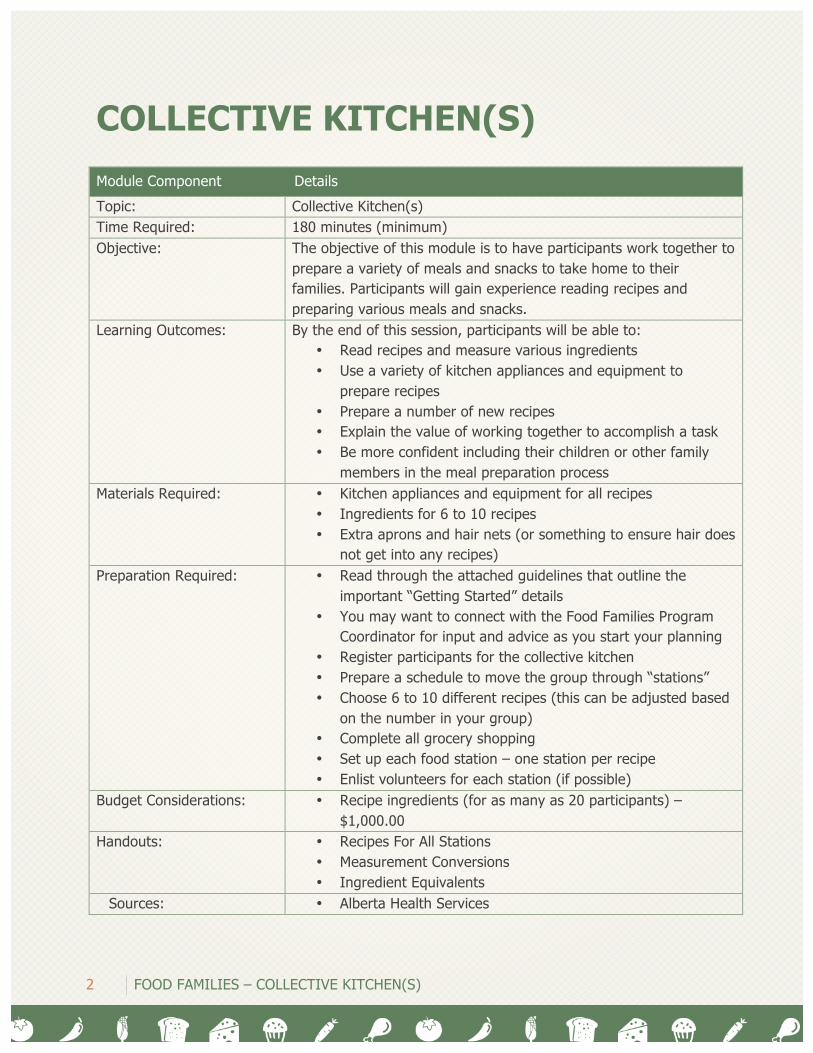
COLLECTIVE KITCHEN(S)
Module Component Details
Topic: Collective Kitchen(s) Time Required: 180 minutes (minimum) Objective: The objective of this module is to have participants work together to
prepare a variety of meals and snacks to take home to their families. Participants will gain experience reading recipes and preparing various meals and snacks.
Learning Outcomes: By the end of this session, participants will be able to: • Read recipes and measure various ingredients • Use a variety of kitchen appliances and equipment to
prepare recipes • Prepare a number of new recipes • Explain the value of working together to accomplish a task • Be more confident including their children or other family
members in the meal preparation process Materials Required: • Kitchen appliances and equipment for all recipes
• Ingredients for 6 to 10 recipes • Extra aprons and hair nets (or something to ensure hair does
not get into any recipes) Preparation Required: • Read through the attached guidelines that outline the
important “Getting Started” details • You may want to connect with the Food Families Program
Coordinator for input and advice as you start your planning • Register participants for the collective kitchen • Prepare a schedule to move the group through “stations” • Choose 6 to 10 different recipes (this can be adjusted based
on the number in your group) • Complete all grocery shopping • Set up each food station – one station per recipe • Enlist volunteers for each station (if possible)
Budget Considerations: • Recipe ingredients (for as many as 20 participants) – $1,000.00
Handouts: • Recipes For All Stations • Measurement Conversions • Ingredient Equivalents
Sources: • Alberta Health Services
FOOD FAMILIES – COLLECTIVE KITCHEN(S) 3
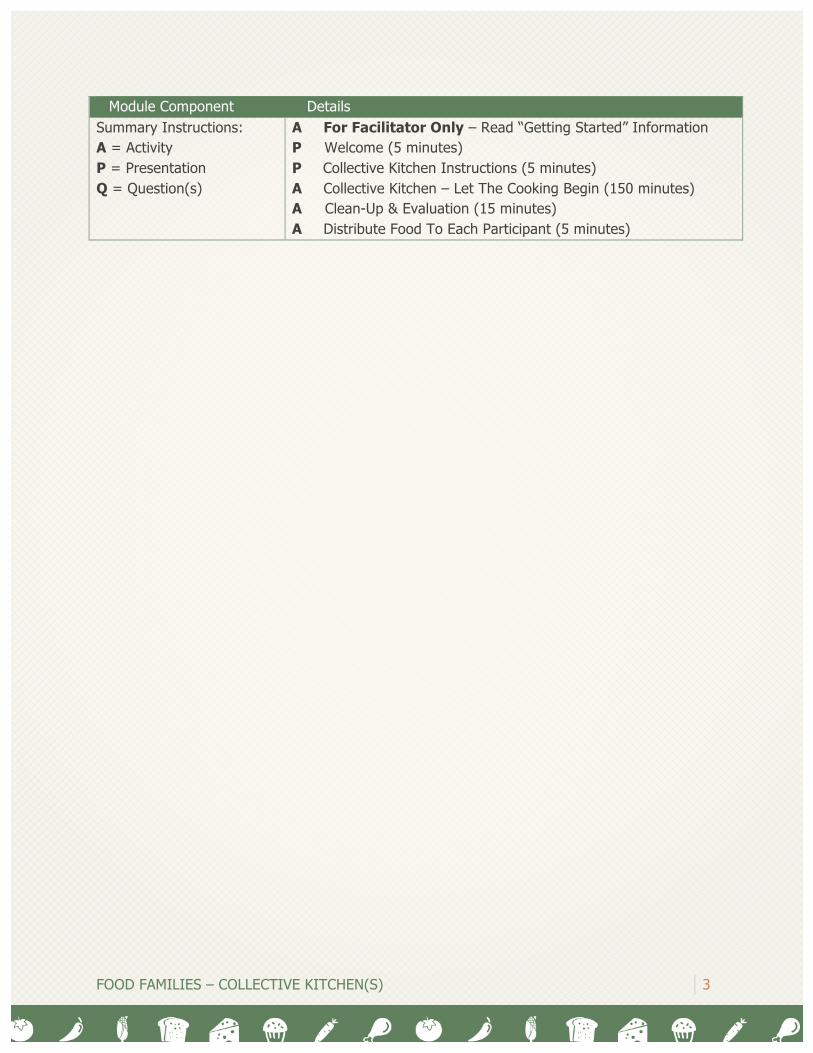
Module Component Details Summary Instructions: A = Activity P = Presentation Q = Question(s)
A For Facilitator Only – Read “Getting Started” Information P Welcome (5 minutes) P Collective Kitchen Instructions (5 minutes) A Collective Kitchen – Let The Cooking Begin (150 minutes) A Clean-Up & Evaluation (15 minutes) A Distribute Food To Each Participant (5 minutes)

MODULE CONTENT Part 1 – Activity: Getting Started – FOR FACILITATOR INFORMATION ONLY Instruction: The following information will lay the foundation for the collective kitchen preparation process. Read this in the weeks leading up to your collective kitchen event in order to properly prepare. You may wish to access the guest facilitator list to connect with local individuals who have experience in leading a collective kitchen. What Is A Collective Kitchen? The term “collective kitchen” can be used in a number of different ways. Some groups may consider cooking classes or clubs as a collective kitchen. For Food Families, a collective kitchen is used to describe a module where a group of people share tasks and cook food together. At the end of a collective kitchen, the goal would be that the participants are able to take home a number of snacks and meals for the coming week. What You Must Do To Prepare Below are some key steps to take to prepare for the Collective Kitchens module.
1. Setting A Date a. Very early in the Food Families program, the leadership group will want to work
with the participants to make a decision regarding a date for the collective kitchen. The group may want to meet on a day that is different from the typical Food Families session in order to be able to take more time than usual and to include children in the session as well.
b. Find dates that work with your facility/kitchen and then present a couple of options to the group.
c. You may not be able to please everyone’s schedule, so make a decision based on what most of the group can attend.
d. If wanting to include children in the collective kitchen, you will want to consider times outside of regular school hours (Saturdays or PD days are options to explore).
2. Registering Participants
a. The registration process doesn’t need to be overly formal, but the facilitator will want to know prior to planning the recipes and doing the grocery shopping how many people will be attending.

FOOD FAMILIES – COLLECTIVE KITCHEN(S) 5
b. Get a breakdown of the number of children who will be attending, and their corresponding ages, so there are appropriate recipes and tasks ready for a variety of ages.
c. Let the group understand the importance of following through with their commitment to attend, while also letting others know it will be difficult to include them at the last minute if they have not registered by the deadline.
d. You may want to set a cap, or maximum, on how many can attend based on your space and/or budget. Families with multiple children may not be able to bring every child in order to leave room for others.
3. Child-Minding Considerations
a. Depending on the nature of the group and the age of the children, you may want to consider having a volunteer (or two) available and prepared to run some activities for the children outside of the collective kitchen.
b. Some children may get distracted part way through the event and will need to be safe and cared for while their parent participates in the collective kitchen activities.
c. It may also be helpful to have child-minding options so participants can attend without having to endure additional cost.
d. Include the children in as much of the collective kitchen as possible with tasks that are age-specific (see handout in “Cooking With And For Your Kids” module for ideas).
4. Choosing Recipes
a. It will be helpful to choose recipes that are more basic to ensure each participant can confidently participate in the preparation process.
b. Attempt to have a variety of meals and snacks. c. Consider recipes based on themes or seasons that relate to the time of year or
demographic make-up of your group. If it is near Christmas, the collective kitchen may be related to the holiday season. If you have many newcomers to Canada in your group, you might choose to do a number of very Canadian recipes, or may choose to have recipes that represent the various parts of the world from which your participants have come.
d. Consider your budget as you choose recipes. You may only be able to have one with meat, and may want to choose recipes based on the sales occurring that week in your community.
e. You will need to consider any food allergies or special diets that may be represented by the group.
f. Make a decision about how many recipes you will make at the collective kitchen. This may be dependent on time, budget, number of people attending, number of volunteers available, kitchen equipment, facility space, or the capacity and skills of the group.

6 FOOD FAMILIES – COLLECTIVE KITCHEN(S)
g. When choosing recipes, consider if they will freeze or store well as the participants will not be able to eat everything right away.
h. Keep taste and healthy eating in mind as you choose your recipes. i. Canadian cookbooks and websites will typically have ingredients that are familiar,
available, and have metric measures.
5. Calculating How Much Food You Will Need a. Make decisions about how many portions will need to be prepared based on your
registration numbers. b. Most household recipes will need to be doubled or tripled to make enough
portions for your group. c. See the “Ingredient Equivalents” handout to assist in calculating how much food
you will need to be purchased for each recipe. d. You may want to speak with someone who has experience in overseeing a
collective kitchen. Use the guest facilitator list and connect with the Food Families Program Coordinator to identify an appropriate resource for information and guidance.
6. Making Your Shopping List
a. Prepare a grocery list of what you will need to purchase at the store. b. Have someone else double check that all ingredients are on your list. c. Check your local flyers or price matching apps to see what items you can
purchase at reduced prices. d. Check for any coupons that may also help reduce the cost. e. Shop as close to the collective kitchen date as possible (day before is best) to
ensure the food is fresh. f. Some grocery stores may provide discounts to collective kitchen programs, so it
may be worth having a conversation with a manager a week or two prior to shopping to see if they can assist financially in any way.
g. Have a few participants or volunteers join in the process of grocery shopping. h. Keep in mind additional supplies such as kitchen equipment, cleaning supplies,
and bags or boxes for transporting the food home at the end of the day. Borrow, or have donated, as many of these items as possible in order to keep the cost of the collective kitchen as low as possible.
7. Food And Kitchen Safety
a. Ask participants to bring clean aprons from home (if they have one) and have a few extras available.
b. Encourage participants to use hair elastics or hair coverings. Have some available for the group.
c. Sanitize all surfaces, including counters and cutting boards, prior to use.

FOOD FAMILIES – COLLECTIVE KITCHEN(S) 7
d. Have each participant wash their hands prior to starting and have hand sanitizer or gloves available as they rotate through the various stations.
e. Clean all knives and kitchen equipment prior to starting.
8. Setting Up The Stations a. Each station should be linked to one recipe and should have all supplies available
at the station. b. Have a separate table for each recipe, and a space big enough for a group of 3
or 4 to get around. c. Participants will likely not sit during this process, but you may want to have a
few chairs out and available should they need one at some point. d. Be aware of recipes that need appliances as part of the preparation process. Be
sure to locate those stations as close to outlets in the room as possible. e. Post a recipe with the full instructions at each station and have extra recipe
sheets available in case one gets dirty or destroyed in some way. f. Have a station or storage type area where the prepared meals can cool prior to
being divided up among the group. g. Keep every dish/meal that is prepared out for everyone to see so the group can
understand how much they have accomplished by cooking together. h. By keeping the completed recipes out and visible, it ensures that no one person
takes more than the allotment of food.
9. Rotating Through the Stations a. The event will be even more successful if participants have the opportunity to try
preparing as many of the recipes as possible. b. Prepare a rotation schedule in advance to try and get as many people as possible
through each of the stations so they can experience a variety of recipes, kitchen skills, appliances, and people.
c. The object of the rotation is to have participants experience and work with each of the recipes while also working with most, if not all, the other members of the group.
d. If it is possible, have volunteers at each station to provide input, instruction, and overall guidance to each recipe.
e. If possible, have one leader available to rotate throughout the room to ensure the groups are functioning well and keeping on time. This person should be capable of troubleshooting any issues that may arise.
f. You may want to keep the children at one or two stations throughout the entire time so they feel comfortable with the process and are responsible for tasks that are reasonable for their age.
8 FOOD FAMILIES – COLLECTIVE KITCHEN(S)
10. Dividing The Cooked Dishes a. Have members of the group each bring their own containers to get the food
safely home. b. The leader may need to help decide what represents one portion so others can
divide everything among the group evenly.
11. Cleaning Up a. Encourage each member to stay to participate in the clean-up process. b. Have a list of tasks prepared and assign duties based on skill level and attitude. c. Involve the children in the clean-up as much as possible. d. Leave the kitchen and work areas cleaner than when you arrived. Try and take
note at the beginning of the day where various equipment, tools, and appliances were located before the session begins.
Part 2 – Presentation – Welcome (5 minutes) Instruction: Welcome the group, especially any children who may have joined this session. Introduce your volunteers to the group. Part 3 – Presentation – Collective Kitchen Instructions (5 minutes) Instruction: Outline the recipes for the collective kitchen and describe how the small group rotation process will work. Assign each group to a station and begin the process of preparing recipes. Part 4 – Activity – Let The Cooking Begin! (150 minutes) Instruction: Continue to keep track of the time and whether or not the group is getting through the recipes in a timely manner. Be sure to rotate the group through the various stations at the appropriate time intervals (you will want to prepare this in advance). The timing of the rotation may be a bit chaotic as participants might be in the middle of completing a certain part of the recipe at their station. Be sure to give them a 2-minute warning so they can finish what they are working on and move to the next station to get started on the new recipe. Encourage the volunteers at each of the tables to assist with the rotation process and providing the participants with instructions for which station they should go to next.

FOOD FAMILIES – COLLECTIVE KITCHEN(S) 9
Part 5 – Clean-Up & Evaluation (15 minutes) Instruction: Involve as many of the participants as possible in the cleaning process. Dishes will need to be done, as well as sweeping floors, collecting garbage, and putting tables and chairs back where they belong. It may be helpful to assign tasks to individuals within the group to ensure everyone participates and everything gets cleaned. Depending on the number of volunteers available to assist with the collective kitchen, you may be able to have some cleaning taking place as the main recipe preparation process is taking place. The more clean-up that can be done during the activity, the better. Once clean-up is complete, handout the evaluation and encourage the participants to fill it out before they leave. Part 6 – Distribution Of Food (5 minutes) Instruction: As recipes are being prepared, they should be stored and organized in one central location in the facility where everyone can see everything that has been made. You may want to take a picture or two before the food starts to be divided among the participants. Encourage the participants to have their bags and boxes ready and begin to evenly divide the food among the group. NOTE: Have one or two of the facilitators/leaders distribute the food. Refrain from letting individual participants get their own food as it brings a higher level of chaos and may result in some food not to be distributed as intended.