flowchart to generate user-id’s & passwords and filing of returns...
TRANSCRIPT
Page 1 of 15
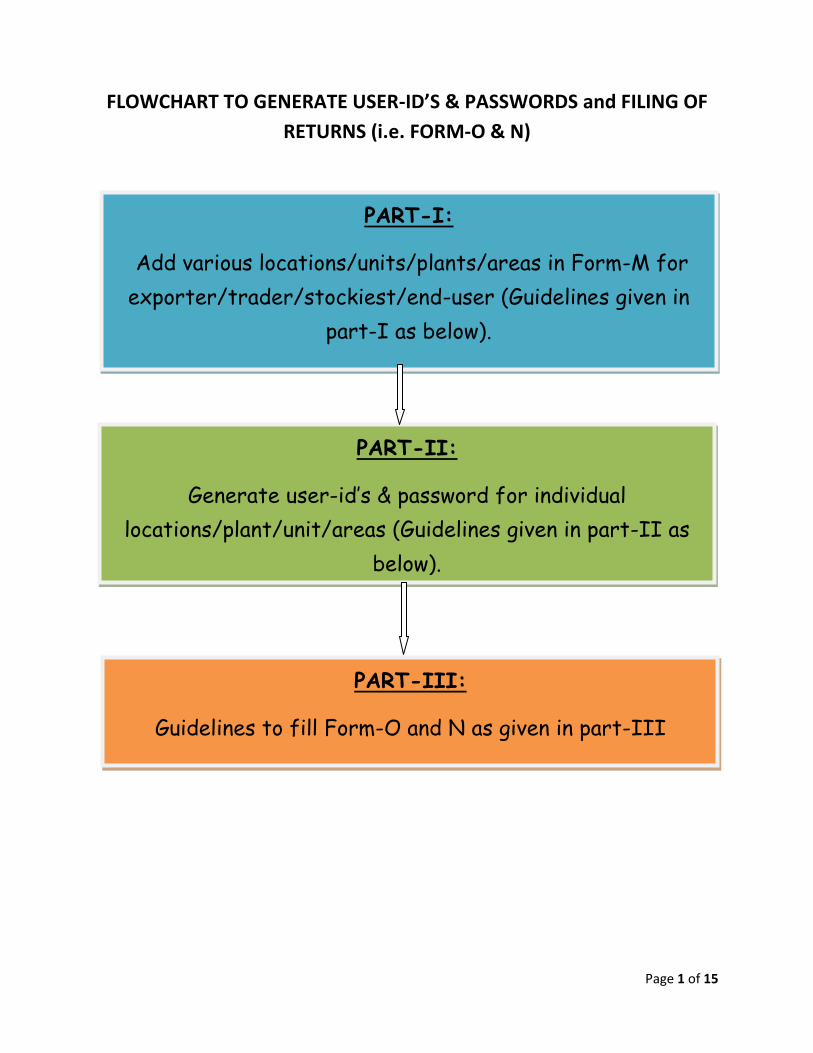
FLOWCHART TO GENERATE USER-ID’S & PASSWORDS and FILING OF
RETURNS (i.e. FORM-O & N)
PART-I:
Add various locations/units/plants/areas in Form-M for
exporter/trader/stockiest/end-user (Guidelines given in
part-I as below).
PART-II:
Generate user-id’s & password for individual
locations/plant/unit/areas (Guidelines given in part-II as
below).
PART-III:
Guidelines to fill Form-O and N as given in part-III
Page 2 of 15
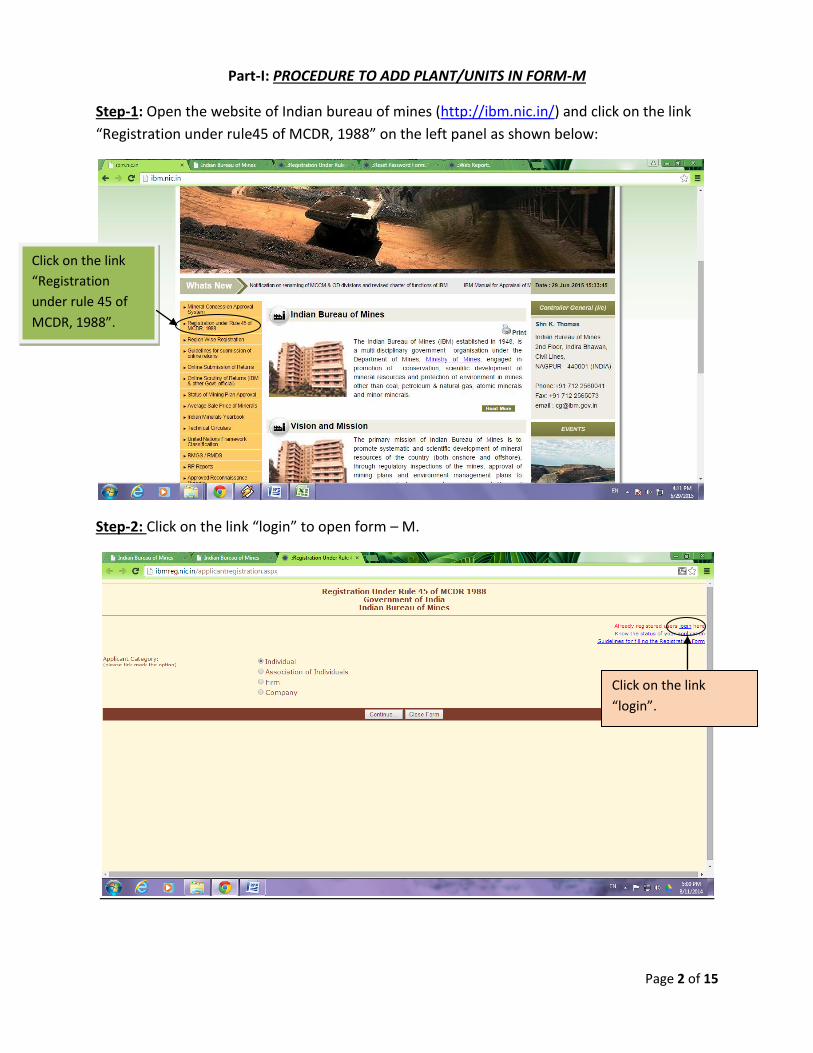
Part-I: PROCEDURE TO ADD PLANT/UNITS IN FORM-M
Step-1: Open the website of Indian bureau of mines (http://ibm.nic.in/) and click on the link
“Registration under rule45 of MCDR, 1988” on the left panel as shown below:
Step-2: Click on the link “login” to open form – M.
Click on the link
“Registration
under rule 45 of
MCDR, 1988”.
Click on the link
“login”.
Page 3 of 15
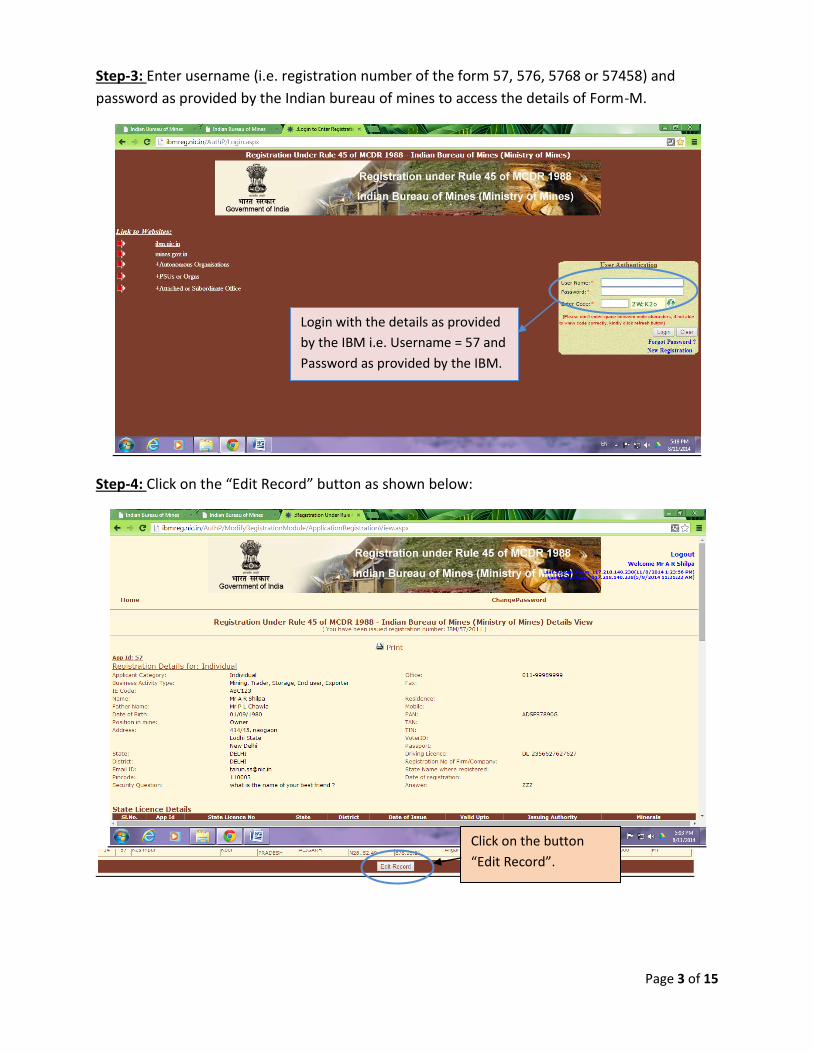
Step-3: Enter username (i.e. registration number of the form 57, 576, 5768 or 57458) and
password as provided by the Indian bureau of mines to access the details of Form-M.
Step-4: Click on the “Edit Record” button as shown below:
Click on the button
“Edit Record”.
Login with the details as provided
by the IBM i.e. Username = 57 and
Password as provided by the IBM.
Page 4 of 15
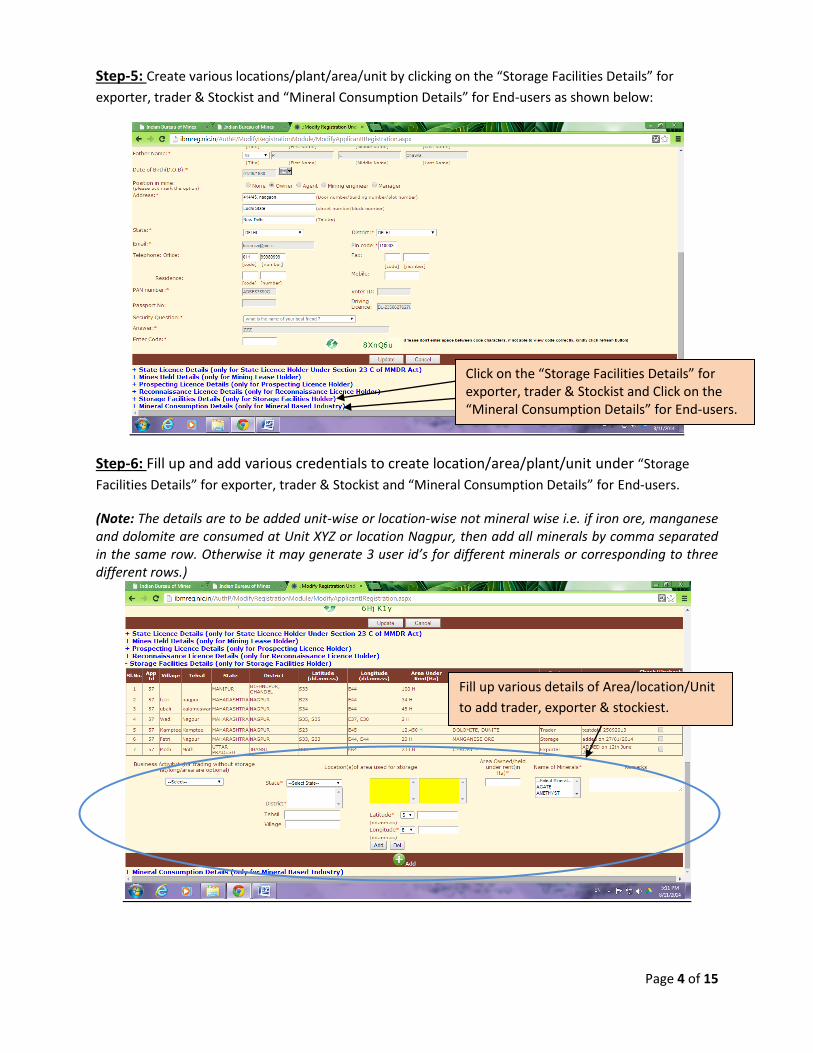
Step-5: Create various locations/plant/area/unit by clicking on the “Storage Facilities Details” for
exporter, trader & Stockist and “Mineral Consumption Details” for End-users as shown below:
Step-6: Fill up and add various credentials to create location/area/plant/unit under “Storage
Facilities Details” for exporter, trader & Stockist and “Mineral Consumption Details” for End-users.
(Note: The details are to be added unit-wise or location-wise not mineral wise i.e. if iron ore, manganese and dolomite are consumed at Unit XYZ or location Nagpur, then add all minerals by comma separated in the same row. Otherwise it may generate 3 user id’s for different minerals or corresponding to three different rows.)
Click on the “Storage Facilities Details” for exporter, trader & Stockist and Click on the “Mineral Consumption Details” for End-users.
Fill up various details of Area/location/Unit
to add trader, exporter & stockiest.

Page 5 of 15
Step7: This completes the process of addition of various location/area/plant/unit for exporter,
trader & Stockist and for End-users, to further create username and password for individual
locations/area/plant/unit.
Fill up various details of Plant/Unit (Location-
wise not Mineral-wise) to add trader, exporter
& stockiest.

Page 6 of 15
Part-II: PROCEDURE TO GENERATE USERID’s and PASSWORDS TO FILE FORM-O/ FORM-N
Step-1: Open the website of Indian bureau of mines (http://ibm.nic.in/) and click on the link
“Online submission of Returns” on the left panel as shown below:
Step-2: Enter username (i.e. registration number of the form 57, 576, 5768 or 57458) and
password as provided by the Indian bureau of mines to generate username/ password for
various locations/units/area/plant as entered in Form-M.
Click on the link “Online
submission of Returns”
Login with the details as provided
by the IBM i.e. Username = 57 and
Password as provided by the IBM.

Page 7 of 15
Step-3: Click on “manage users” to create login id and password for individual locations i.e.
enduser/exporter/storage/trader as details provided in Form-M (as shown in screen shot).
Step 4: click on “generate/regenerate” to create login id’s and passwords for individual
enduser/trader/storage/exporter locations, individual user id’s/ password will be received to you on the
registered email address as per from-M (as shown in screen shot).
Click on Generate/regenerate to
create individual user id/ password
Click on Manage Users
Page 8 of 15
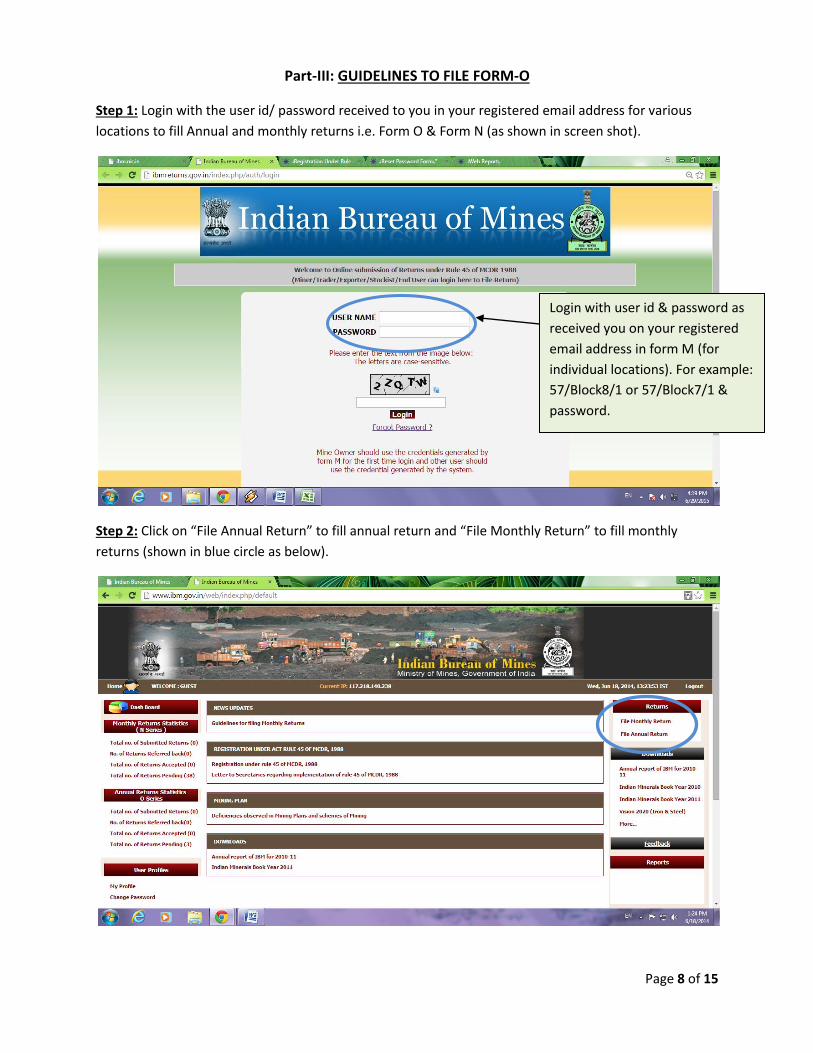
Part-III: GUIDELINES TO FILE FORM-O
Step 1: Login with the user id/ password received to you in your registered email address for various
locations to fill Annual and monthly returns i.e. Form O & Form N (as shown in screen shot).
Step 2: Click on “File Annual Return” to fill annual return and “File Monthly Return” to fill monthly
returns (shown in blue circle as below).
Login with user id & password as
received you on your registered
email address in form M (for
individual locations). For example:
57/Block8/1 or 57/Block7/1 &
password.
Page 9 of 15
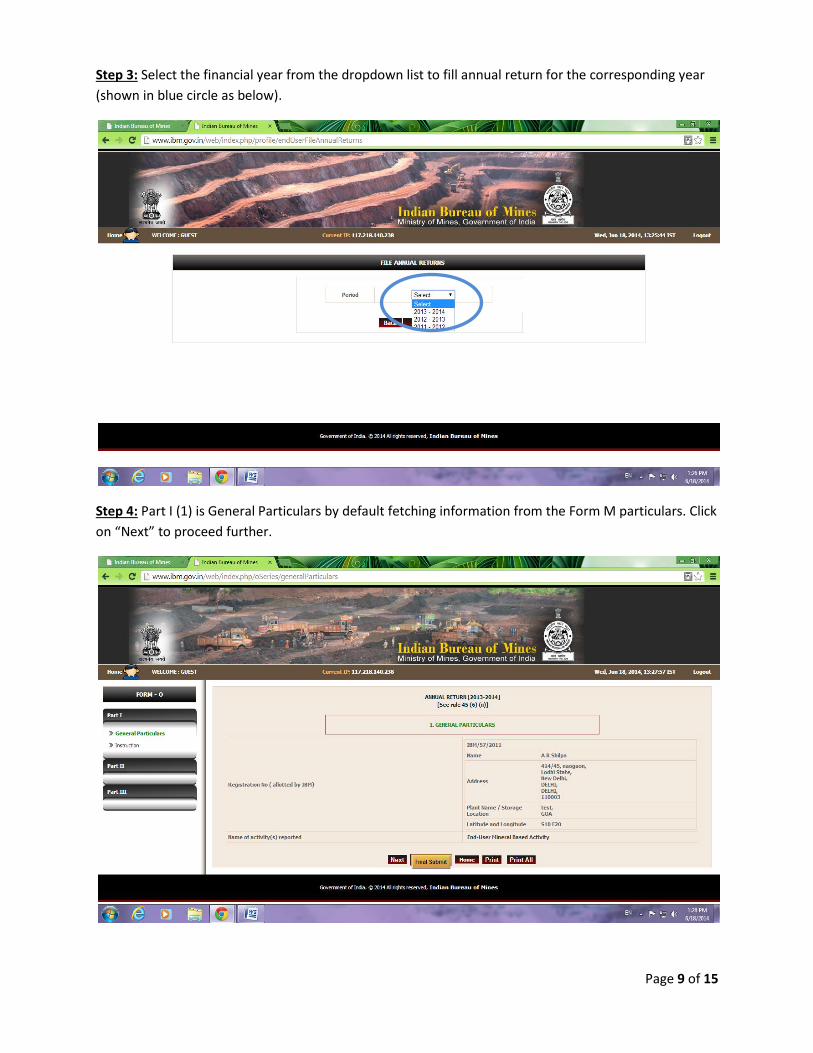
Step 3: Select the financial year from the dropdown list to fill annual return for the corresponding year
(shown in blue circle as below).
Step 4: Part I (1) is General Particulars by default fetching information from the Form M particulars. Click
on “Next” to proceed further.

Page 10 of 15
Step 5: Read instructions to fill Form O, Click on “Next” to proceed further.
Step 6: Part II (i) Fill details regarding ore/mineral, grade, opening stock, ore purchased, ore imported,
ore dispatched and closing stock. You may use “Add More” button to add more than one particular in
any column. This part is must for trading activity; others may select “Nil” option in ore/mineral cell, it
will deactivate the remaining columns. Click on “Save & Next” to proceed further.
Page 11 of 15
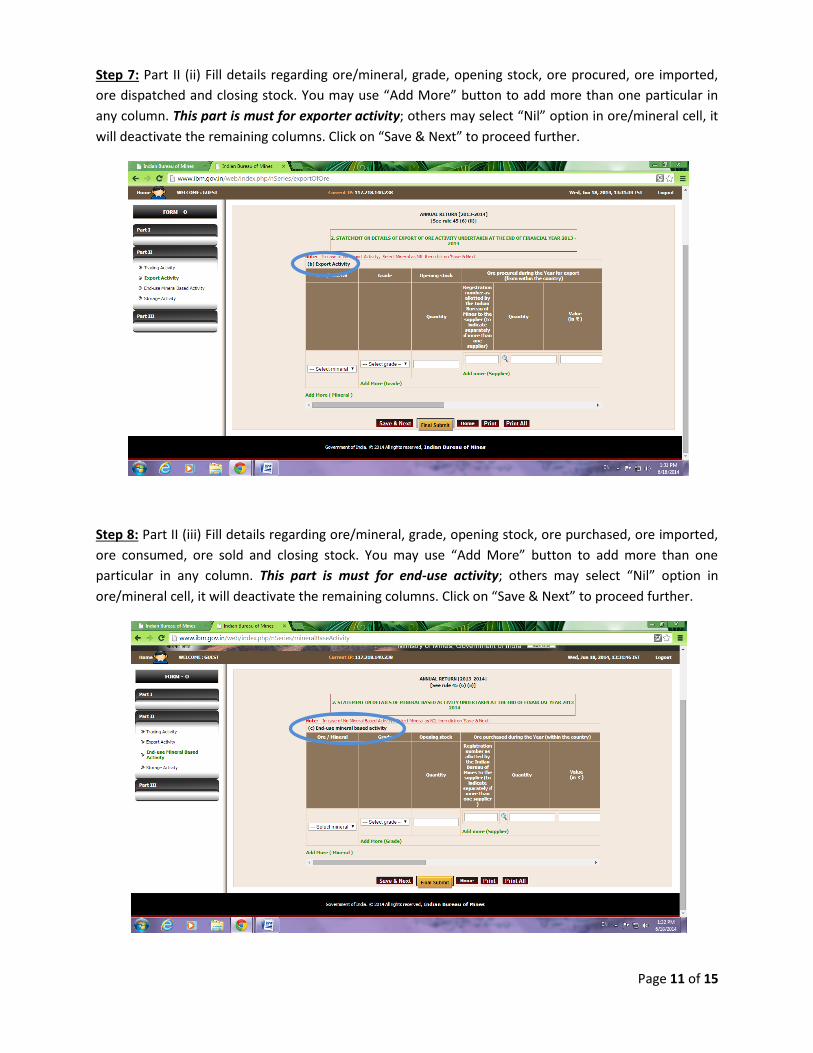
Step 7: Part II (ii) Fill details regarding ore/mineral, grade, opening stock, ore procured, ore imported,
ore dispatched and closing stock. You may use “Add More” button to add more than one particular in
any column. This part is must for exporter activity; others may select “Nil” option in ore/mineral cell, it
will deactivate the remaining columns. Click on “Save & Next” to proceed further.
Step 8: Part II (iii) Fill details regarding ore/mineral, grade, opening stock, ore purchased, ore imported,
ore consumed, ore sold and closing stock. You may use “Add More” button to add more than one
particular in any column. This part is must for end-use activity; others may select “Nil” option in
ore/mineral cell, it will deactivate the remaining columns. Click on “Save & Next” to proceed further.

Page 12 of 15
Step 9: Part II (iv) Fill details regarding ore/mineral, grade, opening stock, ore received, ore imported,
ore despatched and closing stock. You may use “Add More” button to add more than one particular in
any column. This part is must for storage activity; others may select “Nil” option in ore/mineral cell, it
will deactivate the remaining columns. Click on “Save & Next” to proceed further.
Step 10: Part III (3) Select name of industry from the list, if others than specify in blank text box. Click on
“Save & Next” to proceed further (as mentioned in blue circle below).

Page 13 of 15
Step 11: Part III (3) Fill details like annual installed capacity (product-wise), production (year under
review and previous year) of finished/intermediate/by-products. This section is must for other than Iron
& Steel industry. You may use “Add More” button to add more than one product. Click on “Save & Next”
to proceed further.
Step 12: Part III (4) Fill details regarding annual installed capacity, production (year under review and
previous year) of various products. This section is must for Iron & Steel industry. Click on “Save & Next”
to proceed further.

Page 14 of 15
Step 13: Part III (5) Provide information regarding raw material consumed, actual consumption (present
& previous year individually for indigenous & imported) and estimated requirement (next & next to next
FY) for individual ore/mineral/metal/scrape/electricity etc. This section is must for all industries. You
may use “Add More” button to add more than one raw material. Click on “Save & Next” to proceed
further.
Step 14: Part III (6) Provide information regarding source of supply for raw materials mentioned in
PartIII(5). The details includes type (indigenous & imported), mineral/metal/ore/scrape, name & address
of supplier, distance, transportation cost, quantity, price. This section is must for all industries. You may
use “Add More” button to add more than one raw material. Click on “Save & Next” to proceed further.
Page 15 of 15
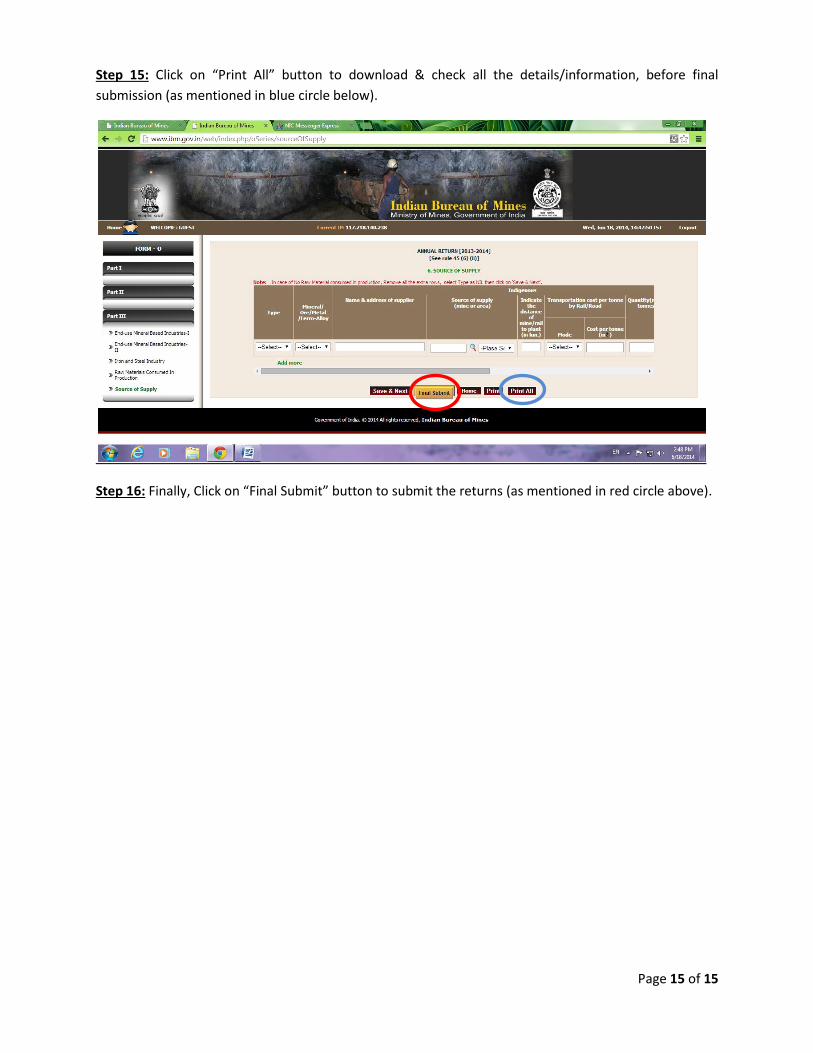
Step 15: Click on “Print All” button to download & check all the details/information, before final
submission (as mentioned in blue circle below).
Step 16: Finally, Click on “Final Submit” button to submit the returns (as mentioned in red circle above).