efolder bdr for quest rapid recovery / vmware continuity ... · efolder bdr for quest vmware...
TRANSCRIPT
eFolder BDR for Quest Rapid Recovery VMware Continuity Cloud Guide
eFolder BDR Guide for Veeam Page 1 of 36
eFolder BDR for Quest Rapid Recovery / VMware Continuity Cloud Guide Accessing Continuity Cloud via VSphere Restore Your VM/Point in time restore Setting up Virtual Standby
eFolder BDR for Quest VMware Continuity Cloud Guide Page 2 of 28
eFolder BDR for Quest Rapid Recovery VMware Continuity Cloud Guide
INTRODUCTION Thank you for choosing the eFolder Continuity Cloud for Quest. Using the eFolder Continuity Cloud for Quest, you can access fast, off-site virtualization of your replicated VMware servers.
This guide describes how to:
• Connect your Continuity Cloud Node to your Quest target core • Export a recovery point to a VM • Enable Virtual Standby of your VM’s to the efolder Continuity Cloud environment, using
Quest Rapid Recovery Backup & Replication software.
System Requirements The following 32-bit and 64-bit operating systems are supported:
• Microsoft Windows Server 2012 R2 • Microsoft Windows Server 2012 • Microsoft Windows Server 2008 R2 SP1 • Microsoft Windows Server 2008 SP2 • Microsoft Windows Server 2003 SP2 • Microsoft Windows 8.x • Microsoft Windows 7 SP1
Customer Support At eFolder, we value feedback from our customers. Not only do we want to help you quickly resolve your technical issues, but we value your input and build products that incorporate your suggestions. To contact eFolder Technical Support, call 678-373-0109/1-800-352-0248 or submit a ticket via the eFolder Portal site.
For known problem resolutions, open a browser and navigate to:
Knowledgebase: https://support.efolder.net/hc/en-us/categories/115001614807-eFolder-for-AppAsure-Rapid-Recovery
Quest Support: https://www.quest.com/products/rapid-recovery/
Copyright © 2017 eFolder Inc. All rights reserved. All trademarks are the property of their respective owners. eFolder and the eFolder logo are trademarks of eFolder Inc. Quest and the Quest logo are trademarks of the Quest Software. eFOLDER MAKES NO WARRANTIES, EXPRESSED OR IMPLIED, IN THIS DOCUMENT.
eFolder BDR for Quest VMware Continuity Cloud Guide Page 3 of 28
eFolder BDR for Quest Rapid Recovery VMware Continuity Cloud Guide
SECTION 1: eFOLDER CONTINUITY CLOUD SETUP
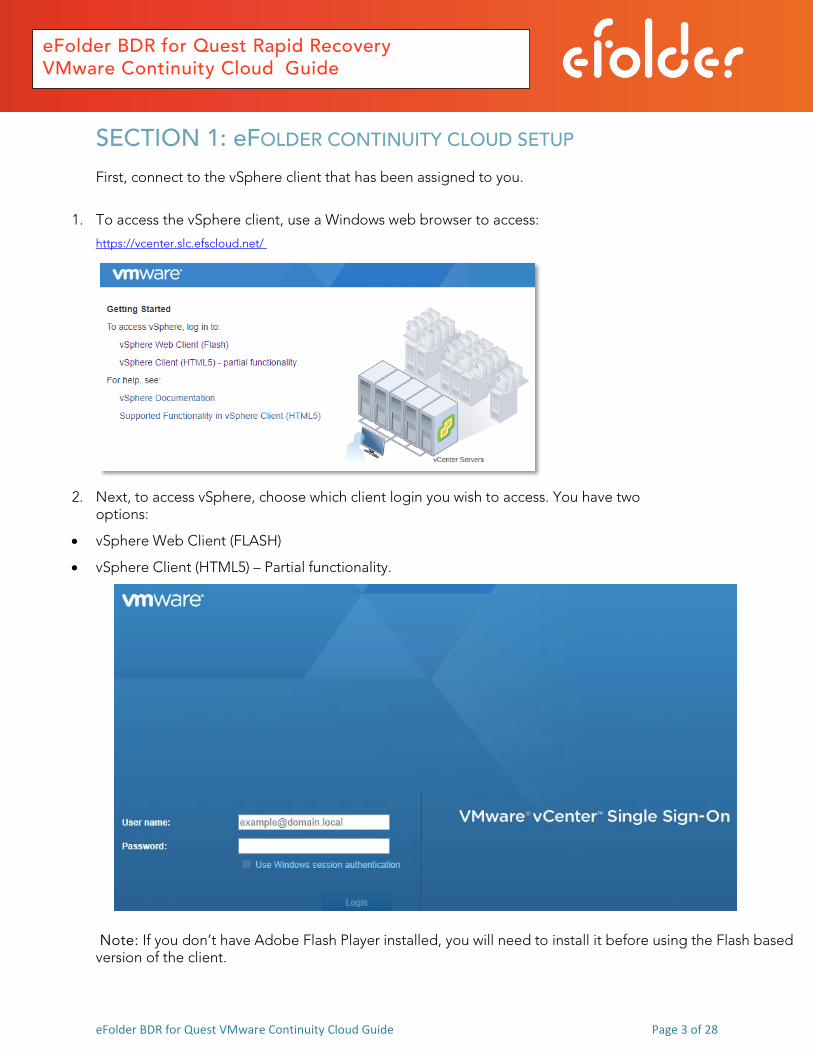
First, connect to the vSphere client that has been assigned to you.
1. To access the vSphere client, use a Windows web browser to access:
https://vcenter.slc.efscloud.net/
2. Next, to access vSphere, choose which client login you wish to access. You have two options:
• vSphere Web Client (FLASH)
• vSphere Client (HTML5) – Partial functionality.
Note: If you don’t have Adobe Flash Player installed, you will need to install it before using the Flash based version of the client.
eFolder BDR for Quest VMware Continuity Cloud Guide Page 4 of 28
eFolder BDR for Quest Rapid Recovery VMware Continuity Cloud Guide
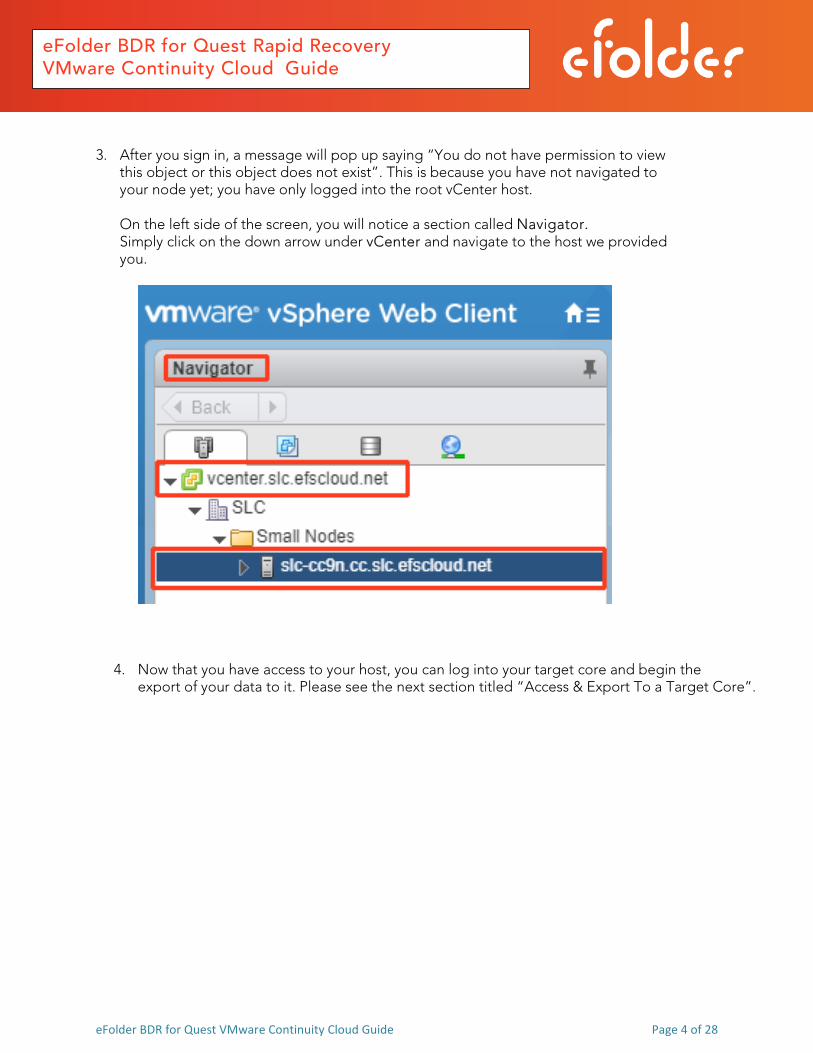
3. After you sign in, a message will pop up saying “You do not have permission to view this object or this object does not exist”. This is because you have not navigated to your node yet; you have only logged into the root vCenter host. On the left side of the screen, you will notice a section called Navigator. Simply click on the down arrow under vCenter and navigate to the host we provided you.
4. Now that you have access to your host, you can log into your target core and begin the export of your data to it. Please see the next section titled “Access & Export To a Target Core”.
eFolder BDR for Quest VMware Continuity Cloud Guide Page 5 of 28
eFolder BDR for Quest Rapid Recovery VMware Continuity Cloud Guide
SECTION 2: ACCESS & EXPORT TO A TARGET CORE
1. To begin, login to the target core you wish to export your data from. Do this by navigating to your target core via a web browser like Chrome. (Note that IE and Edge both have limited functionality.)
2. After you have connected to your target core, you have two options for exporting your data over to a VM
from the Rapid Recovery Software:
• Option #1 is a one-time, point-in-time restore. Select the agent in question and choose a recovery point from a particular desired time and day. This is only a one-time export.
• Option #2 involves using the Virtual Standby feature. This feature allows you to set up an agent to export the latest incremental data to a VM. As new data comes into the target core, this approach will update the virtual standby created by this process, using the latest data sent over to the target core.
We have documented both export steps below in two sections.
ONE-TIME EXPORT (Point-in-time export)
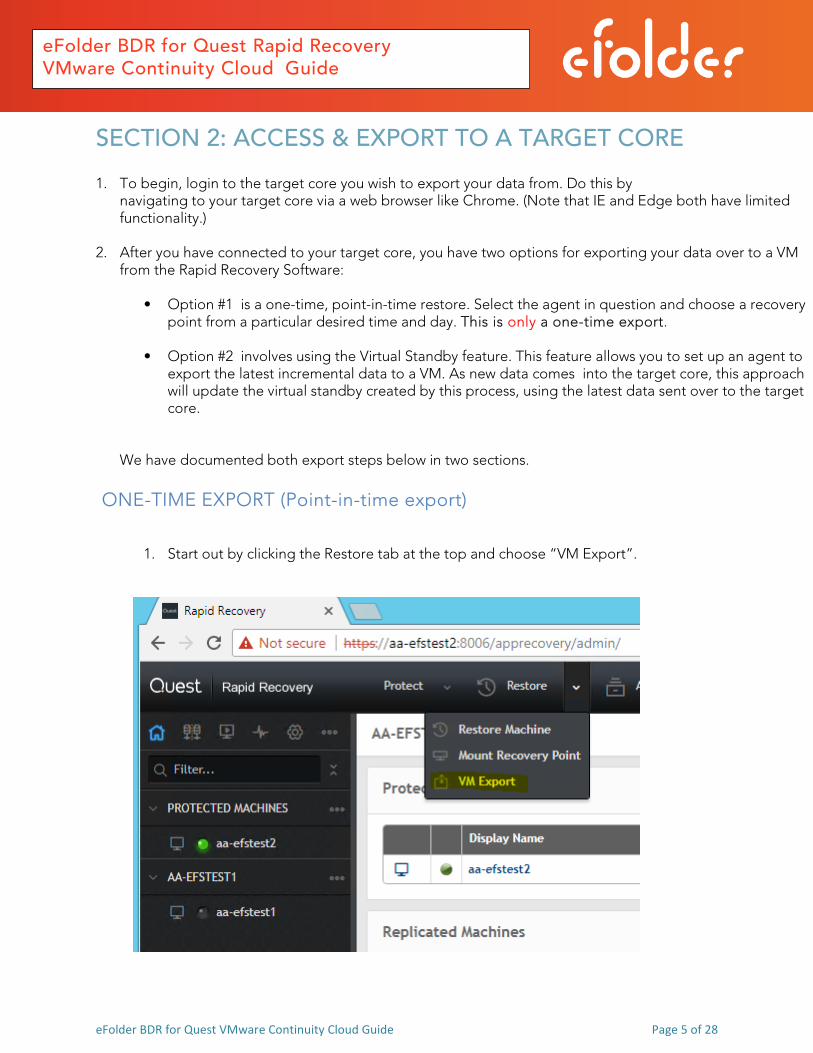
1. Start out by clicking the Restore tab at the top and choose “VM Export”.

eFolder BDR for Quest VMware Continuity Cloud Guide Page 6 of 28
eFolder BDR for Quest Rapid Recovery VMware Continuity Cloud Guide
2. The Virtual Machine Export Wizard Box will pop up as seen below. Choose One-time Export and then click Next.
3. Next, choose the agent you wish to use for the one-time-export. In this case, we will choose
AA-EFSTEST2.

eFolder BDR for Quest VMware Continuity Cloud Guide Page 7 of 28
eFolder BDR for Quest Rapid Recovery VMware Continuity Cloud Guide
4. Now you will need to select the desired Recovery Point.
In our test, we will be choosing page 3, with the date of 12/11/2017 @ 3:00:03 AM:.
Click Next to continue.
eFolder BDR for Quest VMware Continuity Cloud Guide Page 8 of 28
eFolder BDR for Quest Rapid Recovery VMware Continuity Cloud Guide
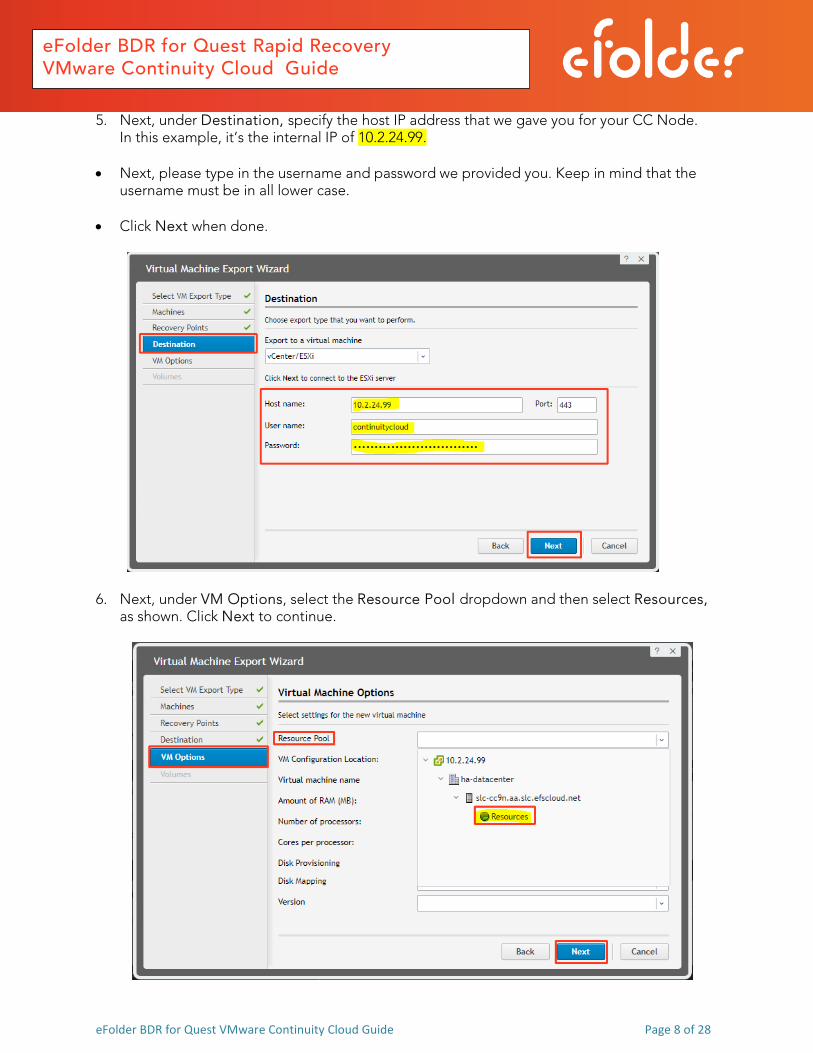
5. Next, under Destination, specify the host IP address that we gave you for your CC Node. In this example, it’s the internal IP of 10.2.24.99.
• Next, please type in the username and password we provided you. Keep in mind that the username must be in all lower case.
• Click Next when done.
6. Next, under VM Options, select the Resource Pool dropdown and then select Resources, as shown. Click Next to continue.
eFolder BDR for Quest VMware Continuity Cloud Guide Page 9 of 28
eFolder BDR for Quest Rapid Recovery VMware Continuity Cloud Guide
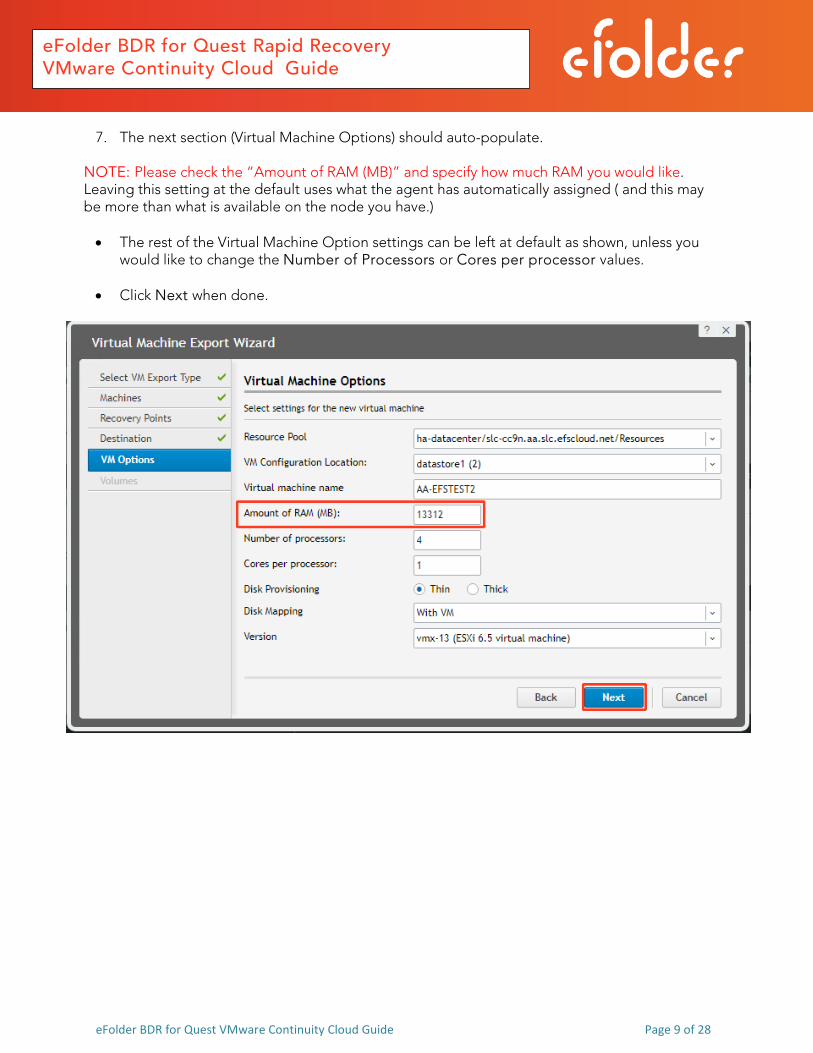
7. The next section (Virtual Machine Options) should auto-populate.
NOTE: Please check the “Amount of RAM (MB)” and specify how much RAM you would like. Leaving this setting at the default uses what the agent has automatically assigned ( and this may be more than what is available on the node you have.)
• The rest of the Virtual Machine Option settings can be left at default as shown, unless you
would like to change the Number of Processors or Cores per processor values.
• Click Next when done.

eFolder BDR for Quest VMware Continuity Cloud Guide Page 10 of 28
eFolder BDR for Quest Rapid Recovery VMware Continuity Cloud Guide
8. Next, select the Volumes you want restored.
In this case, we will be checking all. When done, click Finish.
This concludes the section for a point-in-time virtual restore.
eFolder BDR for Quest VMware Continuity Cloud Guide Page 11 of 28
eFolder BDR for Quest Rapid Recovery VMware Continuity Cloud Guide
SECTION 3: VIRTUAL STANDBY SET UP
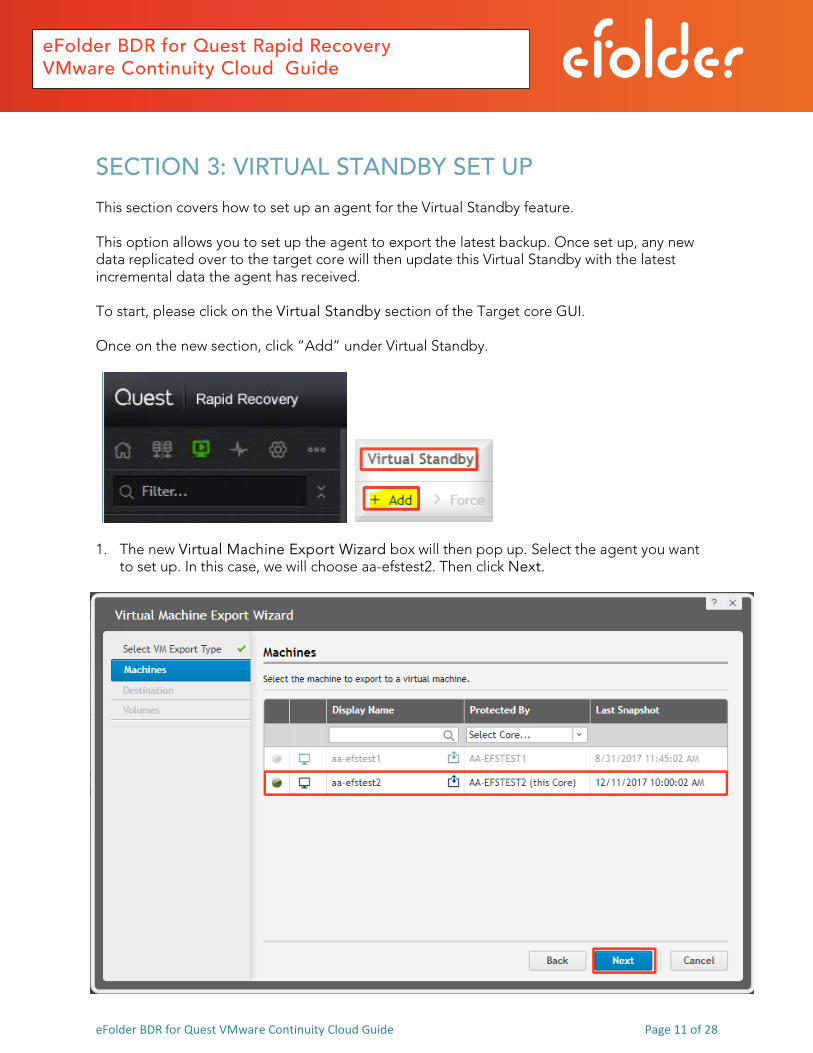
This section covers how to set up an agent for the Virtual Standby feature. This option allows you to set up the agent to export the latest backup. Once set up, any new data replicated over to the target core will then update this Virtual Standby with the latest incremental data the agent has received. To start, please click on the Virtual Standby section of the Target core GUI. Once on the new section, click “Add” under Virtual Standby.
1. The new Virtual Machine Export Wizard box will then pop up. Select the agent you want to set up. In this case, we will choose aa-efstest2. Then click Next.
eFolder BDR for Quest VMware Continuity Cloud Guide Page 12 of 28
eFolder BDR for Quest Rapid Recovery VMware Continuity Cloud Guide
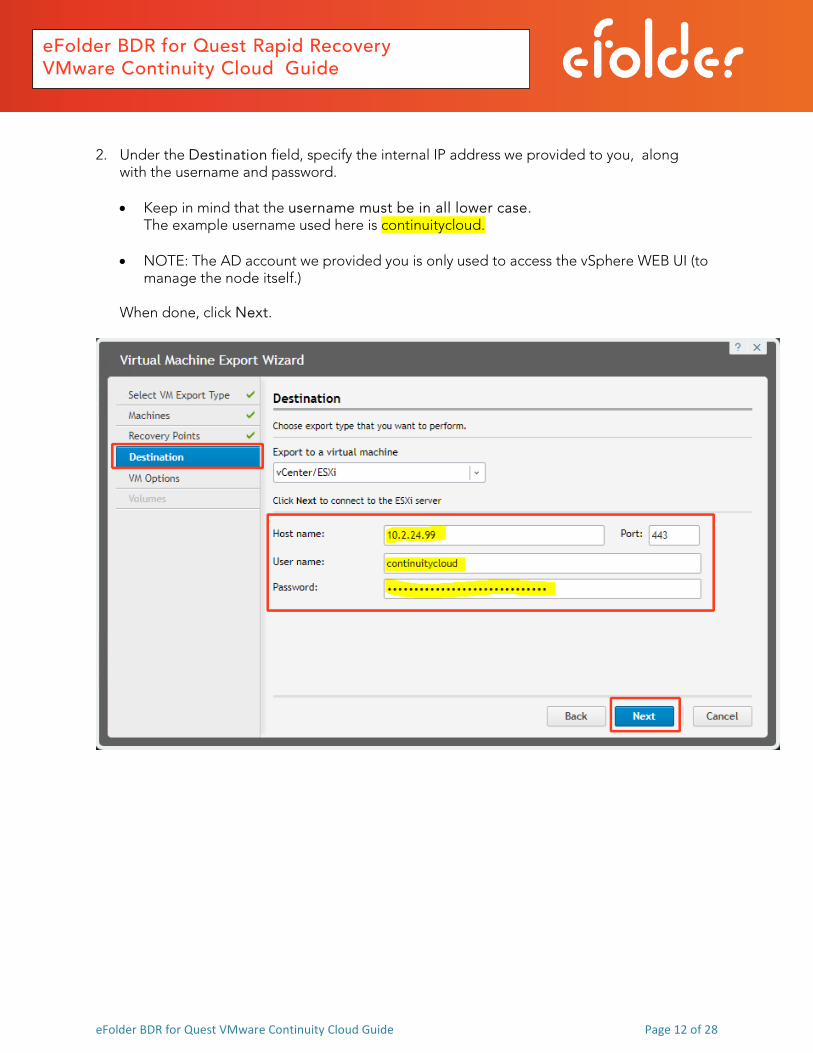
2. Under the Destination field, specify the internal IP address we provided to you, along with the username and password. • Keep in mind that the username must be in all lower case.
The example username used here is continuitycloud.
• NOTE: The AD account we provided you is only used to access the vSphere WEB UI (to manage the node itself.)
When done, click Next.
eFolder BDR for Quest VMware Continuity Cloud Guide Page 13 of 28
eFolder BDR for Quest Rapid Recovery VMware Continuity Cloud Guide
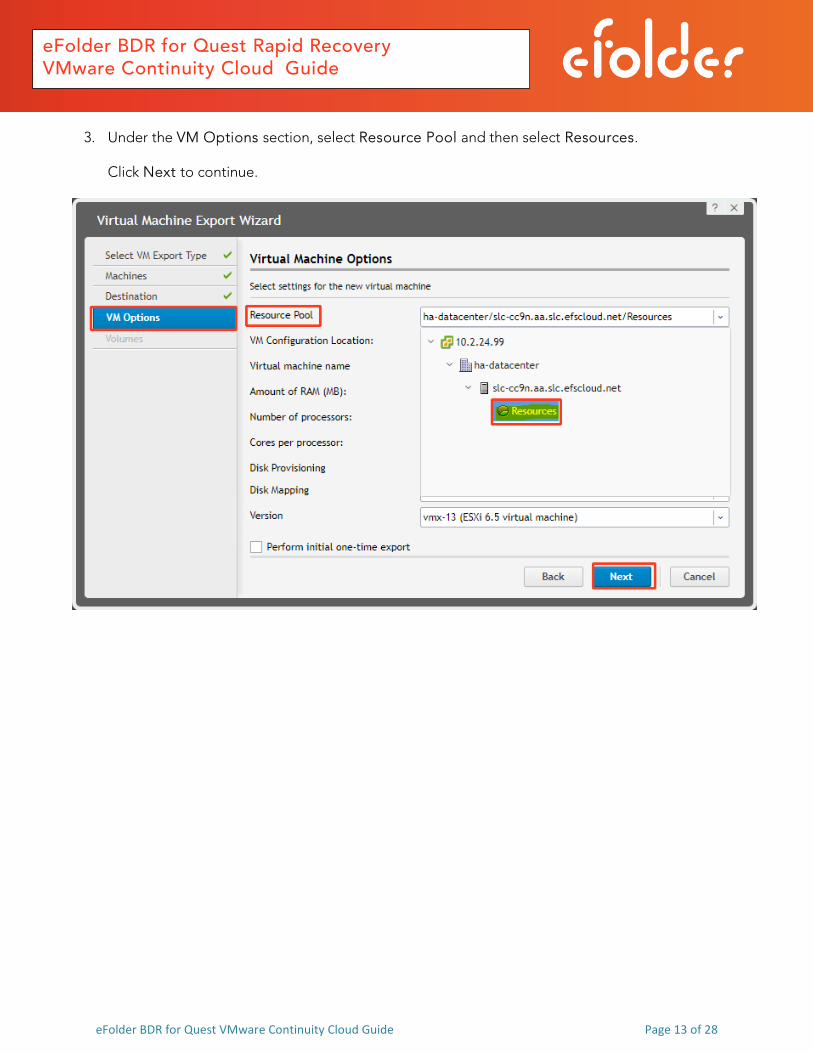
3. Under the VM Options section, select Resource Pool and then select Resources.
Click Next to continue.

eFolder BDR for Quest VMware Continuity Cloud Guide Page 14 of 28
eFolder BDR for Quest Rapid Recovery VMware Continuity Cloud Guide
4. The next section should auto populate.
• Please check the “Amount of RAM (MB)” section and specify how much RAM you would like.
Leaving it at default will utilize what the agent has assigned to it, which may be more than what is available on the node you have.
• Please make sure to check mark the box “Perform initial one-time export”. This allows the Virtual Standby job to start right away. If this box is not checked, not, it will not start until the next incremental is received on the core.
The rest of the items can be left at default unless you would like to change the “Number of Processors” or “Cores per processor” value. Click Next when done.

eFolder BDR for Quest VMware Continuity Cloud Guide Page 15 of 28
eFolder BDR for Quest Rapid Recovery VMware Continuity Cloud Guide
5. Under the next section, Volumes, check all volumes then click Finish.
This concludes Section 3 on Virtual Standby.
eFolder BDR for Quest VMware Continuity Cloud Guide Page 16 of 28
eFolder BDR for Quest Rapid Recovery VMware Continuity Cloud Guide
SECTION 4: TROUBLESHOOTING
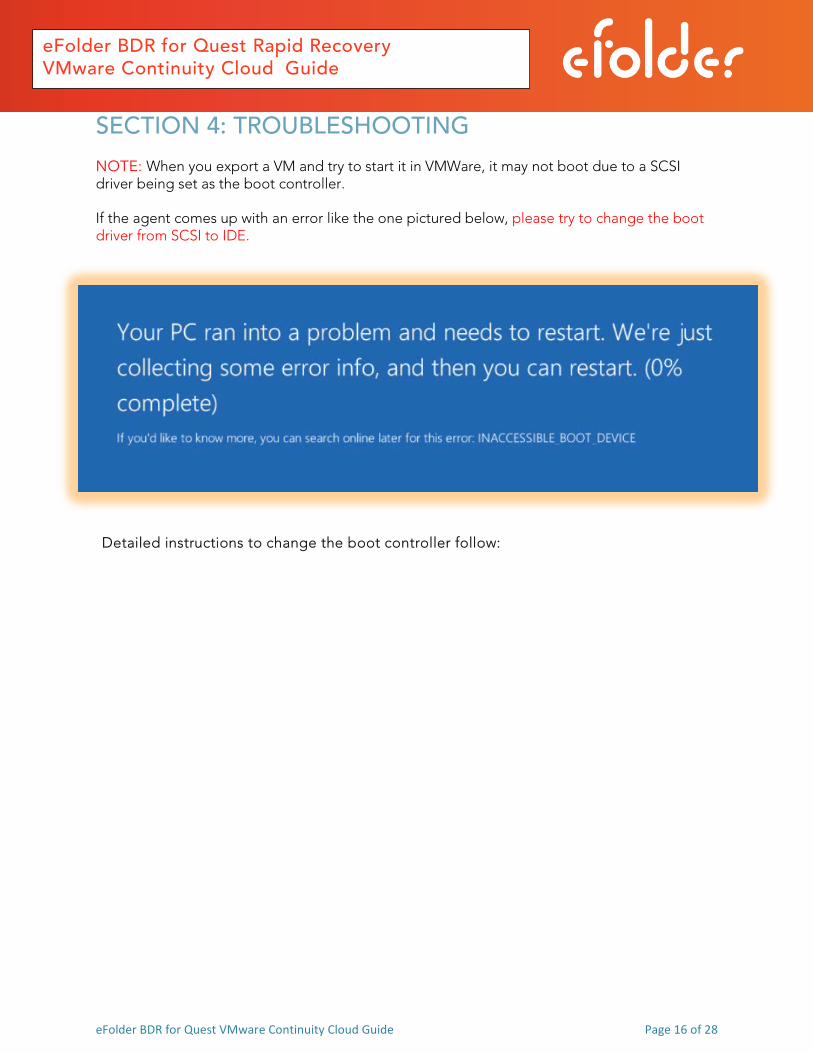
NOTE: When you export a VM and try to start it in VMWare, it may not boot due to a SCSI driver being set as the boot controller. If the agent comes up with an error like the one pictured below, please try to change the boot driver from SCSI to IDE.
Detailed instructions to change the boot controller follow:
eFolder BDR for Quest VMware Continuity Cloud Guide Page 17 of 28
eFolder BDR for Quest Rapid Recovery VMware Continuity Cloud Guide
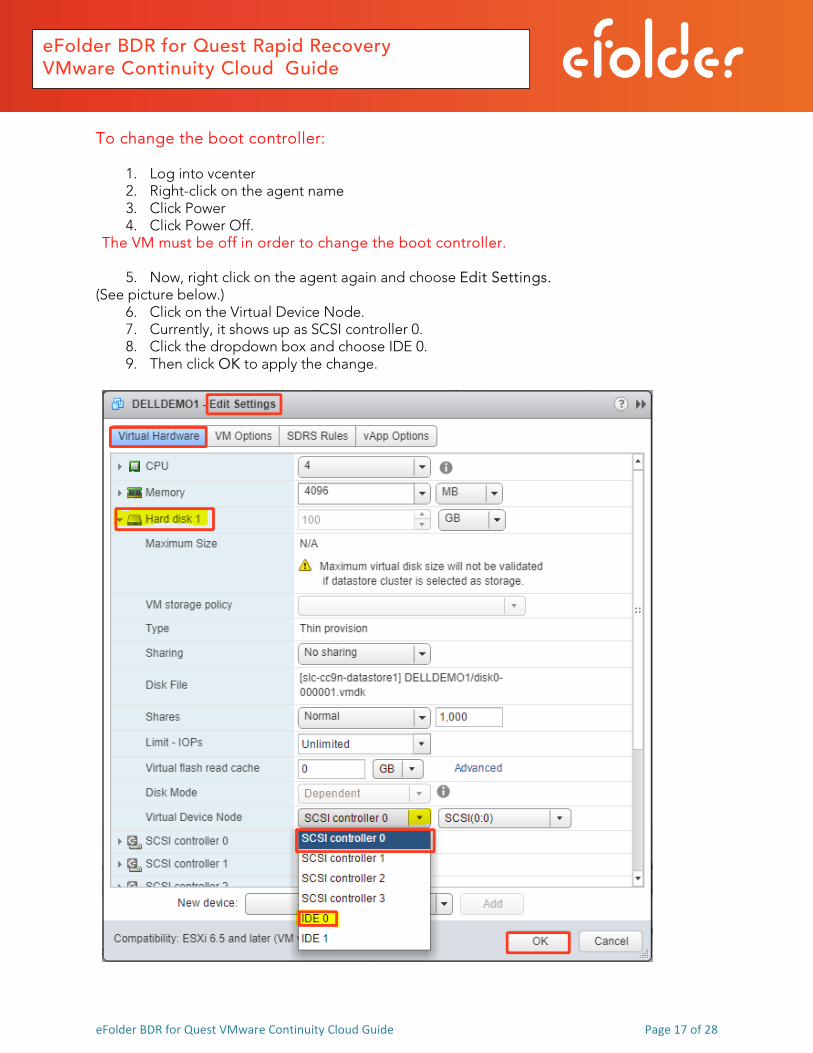
To change the boot controller:
1. Log into vcenter 2. Right-click on the agent name 3. Click Power 4. Click Power Off.
The VM must be off in order to change the boot controller.
5. Now, right click on the agent again and choose Edit Settings. (See picture below.)
6. Click on the Virtual Device Node. 7. Currently, it shows up as SCSI controller 0. 8. Click the dropdown box and choose IDE 0. 9. Then click OK to apply the change.
eFolder BDR for Quest VMware Continuity Cloud Guide Page 18 of 28
eFolder BDR for Quest Rapid Recovery VMware Continuity Cloud Guide
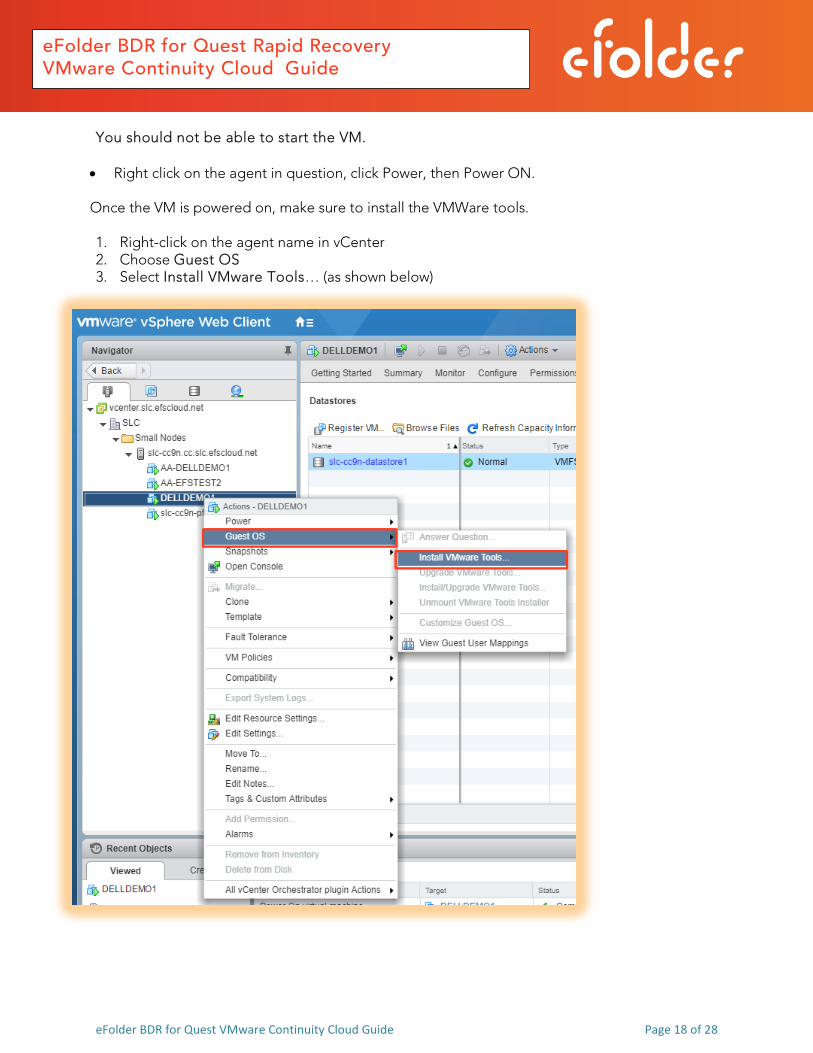
You should not be able to start the VM. • Right click on the agent in question, click Power, then Power ON.
Once the VM is powered on, make sure to install the VMWare tools.
1. Right-click on the agent name in vCenter 2. Choose Guest OS 3. Select Install VMware Tools… (as shown below)

eFolder BDR for Quest VMware Continuity Cloud Guide Page 19 of 28
eFolder BDR for Quest Rapid Recovery VMware Continuity Cloud Guide
4. A box will pop up like the one below.
5. Click Mount to the disk image with VMware Tools on the virtual CD/DVD drive of the virtual machine.
6. Then, go to the console to run the VMWare Tools install wizard from the virtual CD/DVD.
This completes Accessing Continuity Cloud via VSphere Restoring Your VM/Point in time restore Setting up Virtual Standby
If you have any problems during this procedure or any errors: Please call efolder Technical Support at 678-373-0109 Or 1-800-352-0248 Or submit a ticket via the efolder Portal.