dspicdem mc1 motor control development board user's guide · ds70098a-page ii 2003 microchip...
TRANSCRIPT

2003 Microchip Technology Inc. DS70098A
dsPICDEM™MC1 Motor ControlDevelopment Board
User’s Guide
Note the following details of the code protection feature on Microchip devices:
• Microchip products meet the specification contained in their particular Microchip Data Sheet.
• Microchip believes that its family of products is one of the most secure families of its kind on the market today, when used in the intended manner and under normal conditions.
• There are dishonest and possibly illegal methods used to breach the code protection feature. All of these methods, to our knowledge, require using the Microchip products in a manner outside the operating specifications contained in Microchip's Data Sheets. Most likely, the person doing so is engaged in theft of intellectual property.
• Microchip is willing to work with the customer who is concerned about the integrity of their code.
• Neither Microchip nor any other semiconductor manufacturer can guarantee the security of their code. Code protection does not mean that we are guaranteeing the product as “unbreakable.”
Code protection is constantly evolving. We at Microchip are committed to continuously improving the code protection features of ourproducts. Attempts to break microchip’s code protection feature may be a violation of the Digital Millennium Copyright Act. If such actsallow unauthorized access to your software or other copyrighted work, you may have a right to sue for relief under that Act.
Information contained in this publication regarding deviceapplications and the like is intended through suggestion onlyand may be superseded by updates. It is your responsibility toensure that your application meets with your specifications.No representation or warranty is given and no liability isassumed by Microchip Technology Incorporated with respectto the accuracy or use of such information, or infringement ofpatents or other intellectual property rights arising from suchuse or otherwise. Use of Microchip’s products as criticalcomponents in life support systems is not authorized exceptwith express written approval by Microchip. No licenses areconveyed, implicitly or otherwise, under any intellectualproperty rights.
DS70098A-page ii
Trademarks
The Microchip name and logo, the Microchip logo, dsPIC, KEELOQ, MPLAB, PIC, PICmicro, PICSTART, PRO MATE and PowerSmart are registered trademarks of Microchip Technology Incorporated in the U.S.A. and other countries.
FilterLab, microID, MXDEV, MXLAB, PICMASTER, SEEVAL and The Embedded Control Solutions Company are registered trademarks of Microchip Technology Incorporated in the U.S.A.
Accuron, Application Maestro, dsPICDEM, dsPICDEM.net, ECONOMONITOR, FanSense, FlexROM, fuzzyLAB, In-Circuit Serial Programming, ICSP, ICEPIC, microPort, Migratable Memory, MPASM, MPLIB, MPLINK, MPSIM, PICC, PICkit, PICDEM, PICDEM.net, PowerCal, PowerInfo, PowerMate, PowerTool, rfLAB, rfPIC, Select Mode, SmartSensor, SmartShunt, SmartTel and Total Endurance are trademarks of Microchip Technology Incorporated in the U.S.A. and other countries.
Serialized Quick Turn Programming (SQTP) is a service markof Microchip Technology Incorporated in the U.S.A.
All other trademarks mentioned herein are property of theirrespective companies.
© 2003, Microchip Technology Incorporated, Printed in theU.S.A., All Rights Reserved.
Printed on recycled paper.
2003 Microchip Technology Inc.
Microchip received QS-9000 quality system certification for its worldwide headquarters, design and wafer fabrication facilities in Chandler and Tempe, Arizona in July 1999 and Mountain View, California in March 2002. The Company’s quality system processes and procedures are QS-9000 compliant for its PICmicro® 8-bit MCUs, KEELOQ® code hopping devices, Serial EEPROMs, microperipherals, non-volatile memory and analog products. In addition, Microchip’s quality system for the design and manufacture of development systems is ISO 9001 certified.

dsPICDEM™ MC1 MOTOR CONTROLDEVELOPMENT BOARD
Table of Contents
PrefaceHighlights......................................................................... 1
About This Guide............................................................. 1
Warranty Registration...................................................... 2
Recommended Reading.................................................. 2
The Microchip Web Site .................................................. 2
Development Systems Customer Notification Service .... 3
Customer Support ........................................................... 3
Chapter 1. Setup and Operation
1.1 Introduction .......................................................... 5
1.2 About The System ............................................... 6
1.3 Interface via the 37-Pin Connector - J1 ............... 9
1.4 Port Allocations .................................................. 12
1.5 Test Points ......................................................... 14
1.6 Power Module Connector Pinout (j1) ................. 15
1.7 Errata ................................................................. 16
Appendix A. Circuit Diagrams
Worldwide Sales and Service...........................................22
© 2003 Microchip Technology Inc. DS70098A-page iii

dsPICDEM™ MC1 Motor Control Development Board
NOTES:
DS70098A-page iv © 2003 Microchip Technology Inc.

dsPICDEM™ MC1 MOTOR CONTROLDEVELOPMENT BOARD
Preface
This chapter contains general information about this manual and contacting customer support.
HIGHLIGHTS
Topics covered in this chapter:
• About this Guide• Warranty Registration• Recommended Reading• The Microchip Web Site• Development Systems Customer Notification Service• Customer Support
ABOUT THIS GUIDE
Document Layout
This document describes how to use the Microchip dsPICDEM™ MC1 Motor Control Development Board. The manual layout is as follows:
• Chapter 1: Introduction – This chapter introduces the dsPICDEM™ MC1 Motor Control Development Board and provides a brief description of the hardware.
• Appendix A: Circuit Diagrams – This Appendix illustrates the dsPICDEM™ MC1 Motor Control Development Board layout and hardware schematic diagrams.
• Worldwide Sales and Service – Lists Microchip sales and service locations and telephone numbers worldwide.
Documentation Updates
All documentation becomes dated and this user’s guide is no exception. Since MPLAB® IDE, MPLAB C1X and other Microchip tools are constantly evolving to meet customer needs, some actual dialogs and/or tool descriptions may differ from those in this document. Please refer to our web site to obtain the latest documentation available.
Documentation Numbering Conventions
Documents are numbered with a “DS” number. The number is located on the bottom of each page, in front of the page number. The numbering convention for the DS Number is: DSXXXXXA;
where:
XXXXX = The document number.
A = The revision level of the document.
© 2003 Microchip Technology Inc. DS70098A-page 1

dsPICDEM™ MC1 Motor Control Development Board
WARRANTY REGISTRATION
Please complete the enclosed Warranty Registration Card and mail it promptly. Sending in your Warranty Registration Card entitles you to receive new product updates. Interim software releases are available at the Microchip web site.
RECOMMENDED READING
This user’s guide describes how to use the dsPICDEM™ MC1 Motor Control Development Board. The data sheets contain current information on programming the specific microcontroller devices.
THE MICROCHIP WEB SITE
Microchip provides online support on the Microchip World Wide Web (WWW) site. The web site is used by Microchip as a means to make files and information easily available to customers. To view the site, you must have access to the Internet and a web browser such as Netscape Navigator® or Microsoft® Internet Explorer.
The Microchip web site is available by using your favorite internet browser to attach to:
http://www.microchip.com
The web site provides a variety of services. Users may download files for the latest development tools, data sheets, application notes, user guides, articles and sample programs. A variety of information specific to the business of Microchip is also available, including listings of Microchip sales offices, distributors and factory representatives.
Technical Support
• Frequently Asked Questions (FAQ)• Online Discussion Groups - Conferences for products, Development Systems,
technical information and more• Microchip Consultant Program Member Listing• Links to other useful web sites related to Microchip products
Engineer's Toolbox
• Design Tips• Device Errata
Other Available Information
• Latest Microchip Press Releases• Listing of Seminars and Events• Job Postings
DS70098A-page 2 © 2003 Microchip Technology Inc.

Preface
DEVELOPMENT SYSTEMS CUSTOMER NOTIFICATION SERVICE
Microchip started the customer notification service to help our customers keep current on Microchip products with the least amount of effort. Once you subscribe, you will receive email notification whenever we change, update, revise or have errata related to your specified product family or development tool of interest.
Go to the Microchip web site at (http://www.microchip.com) and click on Customer Change Notification. Follow the instructions to register.
The Development Systems product group categories are:
• Compilers• Emulators• In-Circuit Debuggers• MPLAB® IDE• Programmers
Here is a description of these categories:
Compilers – The latest information on Microchip C compilers and other language tools. These include the MPLAB C17, MPLAB C18 and MPLAB C30 C compilers; MPASM™ and MPLAB ASM30 assemblers; MPLINK™ and MPLAB LINK30 object linkers; MPLIB™ and MPLAB LIB30 object librarians.
Emulators – The latest information on Microchip in-circuit emulators. This includes the MPLAB® ICE 2000 and MPLAB® ICE 4000.
In-Circuit Debuggers – The latest information on Microchip in-circuit debuggers. These include the MPLAB® ICD and MPLAB ICD 2.
MPLAB IDE – The latest information on Microchip MPLAB® IDE, the Windows® Integrated Development Environment for development systems tools. This list is focused on the MPLAB® IDE, MPLAB SIM and MPLAB SIM30 simulators, MPLAB IDE Project Manager and general editing and debugging features.
Programmers – The latest information on Microchip device programmers. These include the PRO MATE® II device programmer and PICSTART® Plus development programmer.
CUSTOMER SUPPORT
Users of Microchip products can receive assistance through several channels:
• Distributor or Representative• Local Sales Office• Field Application Engineer (FAE)• Corporate Applications Engineer (CAE)• Hotline
Customers should call their distributor, representative or field application engineer (FAE) for support. Local sales offices are also available to help customers. See the back cover for a list of sales offices and locations.
Corporate Applications Engineers (CAEs) may be contacted at (480) 792-7627.
In addition, there is a Systems Information and Upgrade Line. This line provides system users a list of the latest versions of all of Microchip's development systems software products. Plus, this line provides information on how customers can receive any currently available upgrade kits.
The Hotline Numbers are:
1-800-755-2345 for U.S. and most of Canada.
1-480-792-7302 for the rest of the world.
© 2003 Microchip Technology Inc. DS70098A-page 3

dsPICDEM™ MC1 Motor Control Development Board
NOTES:
DS70098A-page 4 © 2003 Microchip Technology Inc.

dsPICDEM™ MC1 MOTOR CONTROLDEVELOPMENT BOARD
Chapter 1. Setup and Operation
1.1 INTRODUCTION
The Microchip dsPIC30F Motor Control Development Board has been designed to aid the user in the rapid evaluation and development of motor control applications using the Motor Control parts of the dsPIC® family. To maximize flexibility, the largest device variant in the dsPIC family has been designed in.
The board may be used in two different ways. First is to interface to one of the custom power modules that have been developed to complement the control board. The interface is via the 37-pin, D-type connector J1. In this way, all the user has to supply is a motor and they are ready to go without having to worry about the power stage and signal conditioning. The power module has its own FAULT protection and signal isola-tion circuitry. There are many different feedback signals that the user can select between to customize the system to their intended application. These are selected internally within the power module.
The second use of the board is for customers who already have their own power stage but are interested in evaluating the dsPIC MCU in their application. In this instance, the user can easily interface to their own system via the connectors provided on the board.
Although targeted primarily at motor control applications, the board is also well suited to static power conversion applications, such as Uninterruptible Power Supplies (UPS), Power Factor Correctors (PFC) and Switch Mode Power Supplies (SMPS).
FIGURE 1-1: MOTOR CONTROL DEVELOPMENT BOARD WITH ATTACHED POWER MODULE (SOLD SEPARATELY)
© 2003 Microchip Technology Inc. DS70098A-page 5

dsPICDEM™ MC1 Motor Control Development Board
1.2 ABOUT THE SYSTEM
1.2.1 Introduction
This chapter describes the features of the system.
1.2.2 Processor
The system has the dsPIC30F6010 80-pin TQFP part fitted as standard (U4).
An array of pins around the device allows the appropriate MPLAB ICE device adapter to plug directly into the board without the need for the transition socket.
1.2.3 Power Supply
The main supply input to the system is via J2. Any power supply with a 2.1 mm plug capable of delivering 9V, up to 1A with an unregulated AC or DC output, may be used. After rectification and filtering, the digital +5V is created by U1, a 1A 2% tolerance linear regulator. The tighter than standard tolerance is used to ensure correct optoisolator drive and FAULT trip levels when using one of the power modules. The digital +5V is available in the prototyping area (VDD) as well as on several of the interface connectors.
A low current analog supply (AVDD) is created from the digital supply via a passive RC filter. This is used for the ADC in the dsPIC® device and for the analog feedback signals via J1. It is also available in the prototyping area.
1.2.4 In-Circuit Debugging and In-Circuit Serial Programming™ (ICSP™)
In-circuit debugging and serial programming of the FLASH memory contained within the dsPIC device is supported via J4. This allows direct connection to the MPLAB® ICD 2 or the PRO MATE® II via the appropriate ICSP module.
The default pins used for dsPIC emulator communication and device programming are AN1 and AN0. In order to maximize the number of ADC channels for use in motor control, provision has been made to switch the emulator and programming pins to the alternative pins of 59 and 60. These pins are shared with the low power secondary oscillator module that is not used in the design. Switching between the two sets of pro-gramming pins should be done using S2 and the appropriate configuration bit settings within the MPLAB environment. See the MPLAB IDE User's Guide (DS51025) for details.
When S2 is switched to the ‘ICD’ position, the analog feedback signals are discon-nected from the AN0 and AN1 pins. The programming lines on J4 are connected. When S2 is switched to the ‘Analog’ position, the programming lines are disconnected and the analog signals are connected to AN0 and AN1.
DS70098A-page 6 © 2003 Microchip Technology Inc.

Setup and Operation
1.2.5 Motor Position Feedback Interface
Interface to two different types of commonly used motor position feedback devices is provided.
Note that no electrical isolation is provided on the board. The user must ensure that the motor frame is correctly earthed (grounded) and that the position feedback devices are isolated from the motor windings.
J3 (Halls) is intended for electrical commutation signals from (typically) Hall effect devices. These signals are used for BLDC and SR motors and have edge transitions aligned to the electrical cycle of the motor phases. The three inputs (A, B, C) are connected to 3 input capture channels (IC1 - IC3) of the dsPIC device. Pull-up resistors and a small amount of filtering are provided on the board. The inputs are therefore, suitable for either open-collector or driven use. Clearly, the inputs can be used for any input capture or I/O requirements the user may have.
J5 (QEI) is intended for a Quadrature (or Incremental) Encoder Interface. These devices produce two position related pulse train outputs, 90° apart (A and B) and an optionally index output (Z) that pulses once per revolution. A typical device will produce many hundreds of pulses per revolution allowing high resolution position feedback and high bandwidth speed measurement. The inputs have a very small amount of filtering. Weak pull-down resistors are also fitted. The three inputs are connected through to the dedicated inputs of the QEI module of the dsPIC device.
The digital power supply (+5V and 0V-"G") is brought out to the connectors for power-ing the transducers. Series inductors are used to reduce electrical noise entering the board. The user should ensure there is adequate local decoupling of the power supply at the position transducer end of the cable. The maximum current that may be drawn from the +5V supply is 200 mA. If the user wishes to use a transducer that requires more current, then an external power supply should be used with a common connection between the grounds made on the G pin.
To minimize electrical noise, a shielded cable should be used.
1.2.6 Oscillator
A 7.3728 MHz, low profile crystal (Y1) is provided on the board. In combination with the internal PLL and programmable postscaler of the dsPIC device, this allows a wide range of system clock frequencies to be generated. A low profile component is used to clear the emulator device adapter.
1.2.7 RS-232 Serial Port
One of the dsPIC UARTs is connected to J8 via an RS-232 level shifting interface implemented by U5 (MAX232A). Using RG2 and RG3 as port pins also provides optional hardware handshaking using CTS and RTS. To use the handshaking, the user must install links LK6 and LK7. As RG2 and RG3 are multiplexed with the I2C™ clock and data lines available on the digital prototyping header J7, both features can not be used at once.
1.2.8 RS-485 Serial Bus
The second dsPIC UART is connected to J10 via an RS-485 level shifting interface implemented by U8 (MAX485). A 120R terminating resistor may be connected across the bus lines (A, B) by installing LK9. The user may (optionally) control the RX and TX enable lines by driving RG0 and RG1. Pull-down resistors are used to ensure the RX is enabled and the TX is disabled by default.
© 2003 Microchip Technology Inc. DS70098A-page 7

dsPICDEM™ MC1 Motor Control Development Board
1.2.9 CAN bus
One of the CAN modules is connected to J9 via a Microchip MCP2551 CAN Transceiver IC. A 120R terminating resistor may be connected across the bus lines by installing LK8. A pull-down resistor ensures the TX stays inactive during RESET or if the CAN module is not being used.
The second CAN module is available on the digital prototyping header on RG0 and RG1. As these pins are used for the RS-485 RX and TX control, the RS-485 and the second CAN module may not be used at the same time.
1.2.10 LCD Display
A 16x2 LCD display (U7) is included on the board. Communication to the display is via the standard 4-bit interface method based on the well known Hitachi style communication standard.
• The LCD data lines are on RD0-RD3.• The Enable line is on RD13.• The Read/Write is on RC1.• The Data/Command Select (LCDRS) is on RC3.
1.2.11 LEDs
Four general purpose LEDs (D6-D9) are provided on the board. These are connected to RA9, RA10, RA14 and RA15, respectively.
A single LED (D2) is provided to indicate the +5V supply is on.
A single LED (D5) is provided to indicate direction of rotation. This is connected to RD7. When using a quadrature encoder via J5, RD7 may be automatically driven by the QEI module to indicate direction. Otherwise, this line must be driven as a port pin.
1.2.12 Push Button Switches
Four general purpose push button switches are provided (S4-S7). These are connected to RG6-RG9, respectively.
A RESET switch is also provided (S1) and connected to the MCLR line of the dsPIC device.
A TRIP switch (S3) is provided which is wire ORed with an active low FAULT signal from J1. The resulting signal (FAULT) is connected to the FLTA input of the PWM mod-ule and the OCFB input of the Output Compare module. When correctly configured in software, the TRIP switch will therefore, cause all the PWM channels to be driven to their inactive state and OC channels 5-8 to be tri-stated. Thus, the power stage may be shut down independent of software intervention. To configure the OC channels to use this feature, the OCM bits of OCxCON (x = 5-8) should all be set. To configure the PWM module to use this feature, the appropriate bits in the FLTACON register should be set.
1.2.13 Potentiometers
Two potentiometers (VR1 and VR2) are provided on the board.
VR2 is permanently connected to the AN7 input of the ADC.
VR1 is only brought to the analog prototyping header J6 as POT1 owing to analog channel constraints. If the user is not using the VPH_#1 analog feedback signal from J1, then VR2 may be easily connected to AN12 by placing a 0.1" jumper across J6. Alternatively, VR2 may be connected to any other spare analog channel by soldering a wire link between the appropriate pins of J6.
DS70098A-page 8 © 2003 Microchip Technology Inc.

Setup and Operation
1.2.14 Prototyping Area
A 0.1" pitch prototyping area is provided on the board.
Digital (VDD/VSS) and analog (AVDD/AVSS) power supplies are provided in the four corners.
J6 provides access to all the ADC channels as well as having unassigned analog signals on it.
J7 provides access to any optional or unassigned digital I/O pins.
1.3 INTERFACE VIA THE 37-PIN CONNECTOR - J1
1.3.1 Introduction
The 37-pin, D-type connector (J1) and the associated signal routing and circuitry have been designed to directly interface with one of the custom power modules that are available. These complement this board by removing the need for the user to have their own power stage. The power modules contain all the necessary driving circuitry, have robust FAULT protection and many different feedback signals. For details as to the interfacing requirements, feedback scaling and power capabilities for the particular power module, the user should consult the power module documentation.
Due to the finite number of ADC channels and the fact that some of the pins are shared with other modules, it is not possible to connect all of the power module feedback signals to the ADC module at the same time.
In general, up to four phase motors have been allowed for in terms of firing signals and feedback information. Given that 4-phase motors are not all that common, where compromises were needed owing to ADC or input pin restriction, 3-phase motors have been given preference.
A small amount of RC filtering is used on all the analog feedback signals for ESD protection and noise suppression. The resistors have been chosen to have minimal impact on ADC acquisition time.
1.3.2 Switch Firing Commands
A total of ten PWM signals are routed to the 37-pin connector via high current 74AC244 buffers. The output of the buffers directly drives the LEDs of the optocouplers, as well as LEDs that are visible through the front of the enclosure of the power module.
In order to ensure correct operation of the firing signal outputs via J1 when the inputs to the buffers are tri-stated, an overall active low FIRE_ENABLE control line is used via RD11. The FIRE_ENABLE line is pulled up via R14 and must be pulled low by the user's software to enable the buffers.
Eight of the firing commands come from the Motor Control PWM module. Of these eight, two are optional owing to the limited number of pins on the connector. These are the Phase#4 firing commands. They are shared with two of the back EMF crossing signals. As delivered, the board is configured to use the back EMF crossing signals – LK4 and LK5 are fitted in position 2-3.
Two of the firing commands used for the brake chopper and PFC come from output compare channels 5 and 6. These channels should be configured in the PWM mode with the FAULT pin enabled.
Note: The 74AC244 buffers are not required in most designs. The dsPIC PWM pins can drive most gate drive circuitry directly. Refer to the device data sheet for further details. The buffers provide protection of the dsPIC I/O pins in a development environment and provide drive strength for the loads presented by the power module interface circuitry.
© 2003 Microchip Technology Inc. DS70098A-page 9

dsPICDEM™ MC1 Motor Control Development Board
1.3.3 Current Feedback from the Power Modules
1.3.3.1 PFC
When an active power factor corrector is used, a Hall effect isolated current transducer is included on the power module design to measure the input current. This signal is assigned to AN6.
1.3.3.2 BRAKE CHOPPER
Although not strictly required for correct control of a brake chopper, feedback of the amplified shunt voltage is provided. This signal is brought to the analog prototyping header J6 as BR_SHUNT. If AN14 is not already in use, then a 0.1" jumper may be used to easily connect BR_SHUNT to AN14. Alternatively, a wire link may be soldered into J6 to assign BR_SHUNT to any other available channel.
1.3.3.3 MOTOR POWER STAGE
Owing to phase symmetry of motors and the connection to their phases, a separate cur-rent transducer is not necessarily required per phase. This has been taken advantage of to reduce the number of feedback signals as is done in commercial applications.
Two alternative sets of current feedback signals have been allowed. The two sets represent signals from transducers measuring output current to the motor or those measuring switch currents referenced to the -DC bus. A given application tends to use one type or the other depending on isolation, accuracy and cost requirements.
A maximum of 3 output transducers is allowed along with up to 4 switch shunts.
LK1-LK3 are used to change over between the two sets of signals for Phase#1-Phase#3. In this instance, the isolated signals come from Hall effect transducers. As delivered, the isolated signals are selected to match the (default) isolated configuration of the power module. The Phase#1-Phase#3 current feedback signals are allocated to AN0, AN1 and AN2. This has been done so that simultaneous sampling may be carried out on all three phases. This is especially important for certain motor control algorithms.
The fourth shunt (if used) is allocated to AN10.
Note that the ICD/ICSP data and clock lines must be reallocated before the Phase#1 and Phase#2 current feedback channels may be used. See Section 1.2.4 for details.
1.3.3.4 DC BUS SHUNT FEEDBACK
Feedback of the current in the -DC bus shunt is provided.
This signal (BUS_SHUNT) is assigned to AN8
1.3.4 Voltage Feedback
1.3.4.1 ISOLATED VOLTAGE FEEDBACK
Isolated voltage feedback signals are accommodated through the use of a PIC12C671 located within the power module. This device has its own ADC and communicates with the dsPIC device via a simple 2-wire (clock and data) serial communications interface. These signals are assigned to SCLK1 and SDI1 via RF6 and RF7.
Re-synchronization of the serial link is achieved by asserting the FAULT_RESET line on RE9 for a minimum of 2 µs provided a FAULT does not already exist. For details of the serial communication protocol, refer to the power module documentation.
The two signals passed back are the DC bus voltage and, for AC input power modules with PFC, the rectified AC voltage.
A small amount of passive filtering is used on the clock and data lines to remove noise spikes.
DS70098A-page 10 © 2003 Microchip Technology Inc.

Setup and Operation
1.3.4.2 POWER MODULE OUTPUT VOLTAGE FEEDBACK
Up to 4 power module output voltage feedback signals are accommodated. These signals may be useful for detection of position or speed (i.e., so called sensorless operation). Alternatively, they may be used to correct for output voltage distortion which occurs due to power device voltage drops and dead-time.
The signals are referred to as VPH_#1 - VPH_#4. VPH_#1 - VPH_#3 are assigned to AN12-AN14, respectively. VPH_#4 is only brought to the analog prototyping header J6 and must be manually assigned if required.
1.3.4.3 DC BUS VOLTAGE AND RECTIFIED AC VOLTAGE FEEDBACK
The DC bus voltage and, for AC input power modules with PFC, the rectified AC voltage is accommodated.
The DC bus voltage is assigned to AN11.
The rectified AC voltage, if used, is assigned to AN9.
1.3.5 Back EMF Crossing Detection
One method of operating a brushless DC motor without a position sensor has been included in the design of certain power modules. This method relies on detecting when the voltage of an inactive phase's output lead, due to it's back EMF, crosses the nomi-nal center point of the DC bus. Comparators are included within the power module which detect the crossover points.
Three such crossover signals are accommodated in the design. Two of these signals can not be used at the same time as the Phase#4 firing signals (which are not required by the power modules that provide the back EMF crossing signals).
If the user wishes to use the back EMF crossing signals then they must do the following:
• Make sure LK4 and LK5 are in position 2-3.• Make sure that no Hall commutation transducer is connected to J3. This is
because the three input capture channels are common.
© 2003 Microchip Technology Inc. DS70098A-page 11

dsPICDEM™ MC1 Motor Control Development Board
1.4 PORT ALLOCATIONS
The following table shows the primary port allocations for the dsPIC30F6010 as required for interfacing to one of the custom power modules via J1. Where a primary assignment and use is not shown, the pin is available on one of the prototyping headers.
The pin headers give access to all pins. In addition, certain other pins are routed to the analog (J6) and digital (J7) prototyping headers.
Pin No. Port Port No.Pri
AssignmentPri Use Suggested Alternative Use
23 A 9 RA9 LED1 (D6) VREF- via J6 (RA9) (D6–NF)
25 A 10 RA10 LED2 (D7) VREF+ via J6 (R10) (D7–NF)
52 A 14 RA14 LED3 (D8) —
53 A 15 RA15 LED4 (D9) —
20 B 0 AN0 PHASE#1_I_F/B via J1 ICSP™ Data if S2 in PRI Position
19 B 1 AN1 PHASE#2_I_F/B via J1 ICSP Clock is S2 in PRI Position
18 B 2 AN2 PHASE#3_I_F/B via J1 ADC input via J6 (AN2) (LK3-NF)
17 B 3 INDX INDEX for QEI via J5 (Z) ADC input via J6 (AN3) or Pin5 J5
16 B 4 QEA QEI Channel A via J5 (A) ADC input via J6 (AN4) or Pin3 J5
15 B 5 QEB QEI Channel B via J5 (B) ADC input via J6 (AN5) or Pin4 J5
21 B 6 AN6 PFC HALL via J1 ADC input via J6 (AN6)
22 B 7 — — AN7/RB7 via J6 (AN7)
27 B 8 AN8 BUS_SHUNT via J1 ADC input via J6 (AN8)
28 B 9 AN9 VAC_SENSE ADC input via J6 (AN9)
29 B 10 AN10 PHASE#4_SHUNT ADC input via J6 (AN10)
30 B 11 AN11 VLINK_SENSE ADC input via J6 (AN11)
33 B 12 AN12 VPH_#1 ADC input via J6 (AN12)
34 B 13 AN13 VPH_#2 ADC input via J6 (AN13)
35 B 14 AN14 VPH_#3 ADC input via J6 (AN14)
36 B 15 OCFB Active Low FAULT from power module of TRIP switch
—
4 C 1 RC1 LCD R/W Line —
5 C 3 RC3 LCD RS Line —
59 C 13 — ICSP Data if S2 in ALT Position —
60 C 14 — ICSP Clock if S2 in ALT Position —
58 D 0 RD0 LCD0 (LSB) —
61 D 1 RD1 LCD1 —
62 D 2 RD2 LCD2 —
63 D 3 RD3 LCD3 (MSB) —
66 D 4 OC5 BRAKE_FIRE via J1 —
67 D 5 OC6 PFC_FIRE via J1 —
68 D 6 — — OC7/CN15/RD6 via J7 (RD6)
69 D 7 UPDN QEI UP/DOWN Output to Direction LED (D5)
RD7 output to Direction LED (D5)
54 D 8 IC1 Phase A Position Hall via J3 (A) Back EMF Crossing #1 via J1 if LK4 in Position 2-3
55 D 9 IC2 Phase B Position Hall via J3 (B) Back EMF Crossing #2 via J1 if LK5 in Position 2-3
56 D 10 IC3 Phase C Position Hall via J3 (B) Back EMF Crossing #3 via J1
57 D 11 RD11 Active Low FIRE_ENABLE —
64 D 12 — — IC5/RD12 via J7 (RD12)
65 D 13 RD13 LCDENA —
DS70098A-page 12 © 2003 Microchip Technology Inc.

Setup and Operation
37 D 14 — — IC7/CN20/RD14 via J7 (RD14)
38 D 15 — — IC8/CN21/RD15 via J7 (RD15)
76 E 0 PWM0 PHASE#1_LOW_FIRE via J1 —
77 E 1 PWM1 PHASE#1_HIGH_FIRE via J1 —
78 E 2 PWM2 PHASE#2_LOW_FIRE via J1 —
79 E 3 PWM3 PHASE#2_HIGH_FIRE via J1 —
80 E 4 PWM4 PHASE#3_LOW_FIRE via J1 —
1 E 5 PWM5 PHASE#3_HIGH_FIRE via J1 —
2 E 6 PWM6 PHASE#4_LOW_FIRE via J1 if LK4 Fitted 1-2
—
3 E 7 PWM7 PHASE#4_HIGH_FIRE via J1 if LK5 Fitted 1-2
—
13 E 8 FLTA Active Low FAULT from power module or TRIP switch
—
14 E 9 RE9 FAULT_RESET —
72 F 0 C1RX CAN_RX via J9 —
73 F 1 C1TX CAN_TX via J9 —
42 F 2 U1RX RS232_RX via J8 —
41 F 3 U1TX RS232_TX via J8 —
39 F 4 U2RX RS485_RX via J10 U2RX/CN17/RF4 via J7 (RF4)
40 F 5 U2TX RS485-TX via J10 U2TX/CN18/RF5 via J7 (RF5)
45 F 6 SCLK1 ISO_VFB_CLK via J1 SCLK1/INT0/RF6 via J7 (RF6) if isolated voltage f/b from power
module not required
44 F 7 SDI1 ISO_VFB_DATA via J1 SDI1/RF7 via J7 (RF7) if isolated voltage f/b from power module not
required
43 F 8 — — SD01/RF8 via J7 (RF8)
75 G 0 RG0 RS485_RXENA C2RX/RG0 via J7 (RG0)
74 G 1 RG1 RS485_TXENA C2TX/RG1 via J7 (RG1)
47 G 2 RG2 RS232 RTS SCL/RG2 via J7 (RG2)
46 G 3 RG3 RS232 CTS SDA/RG3 via J7 (RG3)
6 G 6 CN8 Push Button S4 —
7 G 7 CN9 Push Button S5 —
8 G 8 CN10 Push Button S6 —
10 G 9 CN11 Push Button S7 —
49 — — OSC1 7.3728 MHz Crystal —
50 C 15 OSC2 7.3728 MHz Crystal —
9 — — MCLR RESET via S1 ICD/ICSP via J8
25 — — AVDD Analog +5V —
26 — — AVDD Analog GND —
12 — — VDD Digital +5V —
32 — — VDD Digital +5V —
48 — — VDD Digital +5V —
71 — — VDD Digital +5V —
11 — — VSS Digital GND —
31 — — VSS Digital GND —
51 — — VSS Digital GND —
70 — — VSS Digital GND —
Pin No. Port Port No.Pri
AssignmentPri Use Suggested Alternative Use
© 2003 Microchip Technology Inc. DS70098A-page 13

dsPICDEM™ MC1 Motor Control Development Board
1.5 TEST POINTS
The following test points are all located on the topside of the PCB. See Appendix A.1 for references to the net names on the schematics.
Test Point Signal Function Net Name
TP 1 Brake Chopper Shunt Feedback BR_SHUNT
TP 2 Phase#2 Shunt Feedback PHASE#2_SHUNT
TP 3 Phase#1 Shunt Feedback PHASE#1_SHUNT
TP 4 Phase#4 Low Side Firing Signal PHASE#4_LOW_FIRE
TP 5 Brake Chopper Firing Signal BRAKE_FIRE
TP 6 Phase#3 Low Side Firing Signal PHASE#3_LOW_FIRE
TP 7 Phase#2 Low Side Firing Signal PHASE#2_LOW_FIRE
TP 8 Phase#1 Low Side Firing Signal PHASE#1_LOW_FIRE
TP 9 Isolated Serial Interface Data Line ISO_VFB_DATA
TP 10 Active Low FAULT Line FAULT
TP 11 Phase#2 Hall Current Feedback PHASE#2_HALL
TP 12 Phase#4 Shunt Feedback PHASE#4_SHUNT
TP 13 Phase#3 Shunt Feedback PHASE#3_SHUNT
TP 14 Phase#4 High Side Firing Signal PHASE#4_HIGH_FIRE
TP 15 Power Factor Corrector Firing Signal PFC_FIRE
TP 16 Phase#3 High Side Firing Signal PHASE#3_HIGH_FIRE
TP 17 Phase#2 High Side Firing Signal PHASE#2_HIGH_FIRE
TP 18 Phase#1 High Side Firing Signal PHASE#1_HIGH_FIRE
TP 19 Isolated Serial Interface Clock Line ISO_VFB_CLK
TP 20 Phase#3 Hall Current Feedback PHASE#3_HALL
TP 21 Phase#2 Hall Current Feedback PHASE#1_HALL
TP 22 PFC Hall Current Feedback PFC_HALL
TP 23 RS-232 Transmit Data Line RS232_TX
TP 24 RS-232 Receive Data Line RS232_RX
TP 25 CAN Receive Data Line CAN_RX
TP 26 CAN Transmit Data Line CAN_TX
TP 27 RS-485 Transmit Data Line RS485_TX
TP 28 RS-485 Receive Data Line RS485_RX
DS70098A-page 14 © 2003 Microchip Technology Inc.

Setup and Operation
1.6 POWER MODULE CONNECTOR PINOUT (J1)
Pin Function Net Name Input/Output Analog/Digital
1 Phase#4 Shunt Current Feedback PHASE#4_SHUNT Input Analog
2 Phase#2 Shunt Current Feedback PHASE#2_SHUNT Input Analog
3 DC Bus Shunt Current Feedback BUS_SHUNT Input Analog
4 Phase#4 Voltage Feedback VPH_#4 Input Analog
5 Phase#2 Voltage Feedback VPH_#2 Input Analog
6 Phase#3 Back EMF Crossing CAPTURE#3 Input Digital
7 Phase#1 Back EMF Crossing or Phase#4 Top Switch Firing Command depending
on LK4
CAPTURE#1PHASE#4_HIGH_FIRE
Input or Output Digital
8 Rectifier Output Voltage (VAC) Feedback
VAC_SENSE Input Analog
9 +5V (±2%) Analog PSU ISO_A+5V Input Analog
10 PFC Switch Firing Command PFC_FIRE Output Digital
11 Phase#3 Top Switch Firing Command PHASE#3_HIGH_FIRE Output Digital
12 Phase#2 Top Switch Firing Command PHASE#2_HIGH_FIRE Output Digital
13 Phase#1 Top Switch Firing Command PHASE#1_HIGH_FIRE Output Digital
14 Isolated Voltage Feedback Serial Clock ISO_VFB_CLK Input Digital
15 Active Low FAULT Signal FAULT Input Digital
16 Phase#2 Hall Current Feedback PHASE#2_HALL Input Analog
17 PFC Hall Current Feedback PFC_HALL Input Analog
18 Digital PSU 0V Return — Output Analog
19 +5V (±2%) Digital PSU — Output Analog
20 Phase#3 Shunt Current Feedback PHASE#3_SHUNT Input Analog
21 Phase#1 Shunt Current Feedback PHASE#1_SHUNT Input Analog
22 Brake Chopper Switch Shunt Current Feedback
BRAKE_SHUNT Input Analog
23 Phase#3 Voltage Feedback VPH_#3 Input Analog
24 Phase#1 Voltage Feedback VPH_#1 Input Analog
25 Phase#2 Back EMF Crossing or Phase#4 Bottom Switch Firing Command
depending on LK5
CAPTURE#2PHASE#4_LOW_FIRE
Input or Output Digital
26 DC Bus Voltage Feedback BUS_SENSE Input Analog
27 Analog PSU 0V Return ISO_AGND Input Analog
28 Brake Chopper Switch Firing Command BRAKE_FIRE Output Digital
29 Phase#3 Bottom Switch Firing Command PHASE#3_LOW_FIRE Output Digital
30 Phase#2 Bottom Switch Firing Command PHASE#2_LOW_FIRE Output Digital
31 Phase#1 Bottom Switch Firing Command PHASE#1_LOW_FIRE Output Digital
32 Isolated Voltage Feedback Serial Data ISO_VFB_DATA Input Digital
33 Fault Reset Command FAULT_RESET Output Digital
34 Phase#3 Hall Current Feedback PHASE#3_HALL Input Analog
35 Phase#1 Hall Current Feedback PHASE#1_HALL Input Analog
36 Digital PSU 0V Return — Input Analog
37 +5V (±2%) Digital PSU — Input Analog
© 2003 Microchip Technology Inc. DS70098A-page 15

dsPICDEM™ MC1 Motor Control Development Board
1.7 ERRATA
On the REVA version of the PCB (identified as 04-01648 REVA near the TRIP switch), the following issues should be noted:
• The pin marked as "D_SHUNT" on J6 is connected to the "BR_SHUNT" net. Therefore, the label "D_SHUNT" should read "BR_SHUNT" to match the schematics.
• The pin marked as "POT2" on J6 is connected to the "POT1" net and thus to VR1. Therefore, the label "POT2" on J6 should read "POT1" to match the schematics.
• S2 has switch positions marked ‘ALT’ and ‘PRI’ on the PCB. These two positions are marked ‘analog’ and ‘ICD’ on newer versions of the PCB. The switch function is identical.
On REVA and REVB versions of the board, the following component values should be changed for correct operation of the isolated voltage feedback:
• R23 and R24 should be 470Ω.• C24 and C25 should be 33 pF.
DS70098A-page 16 © 2003 Microchip Technology Inc.
dsPICDEM™ MC1 MOTOR CONTROLDEVELOPMENT BOARD
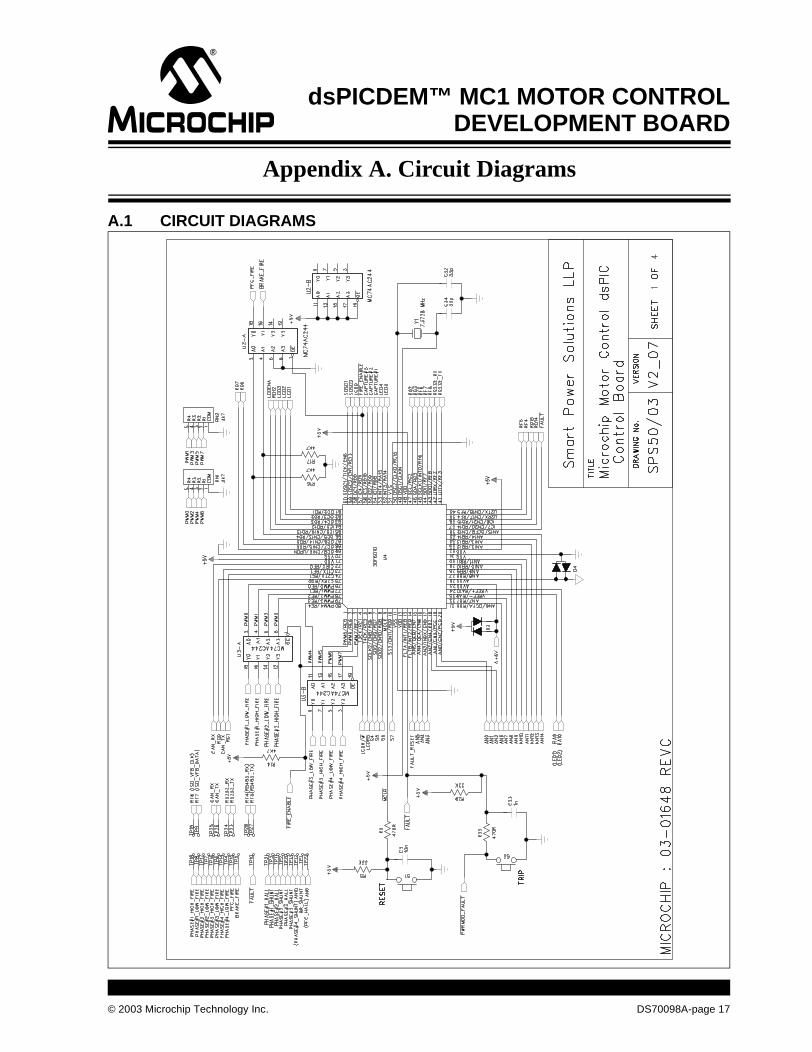
Appendix A. Circuit Diagrams
A.1 CIRCUIT DIAGRAMS
© 2003 Microchip Technology Inc. DS70098A-page 17

dsPICDEM™ MC1 Motor Control Development Board
DS70098A-page 18 © 2003 Microchip Technology Inc.
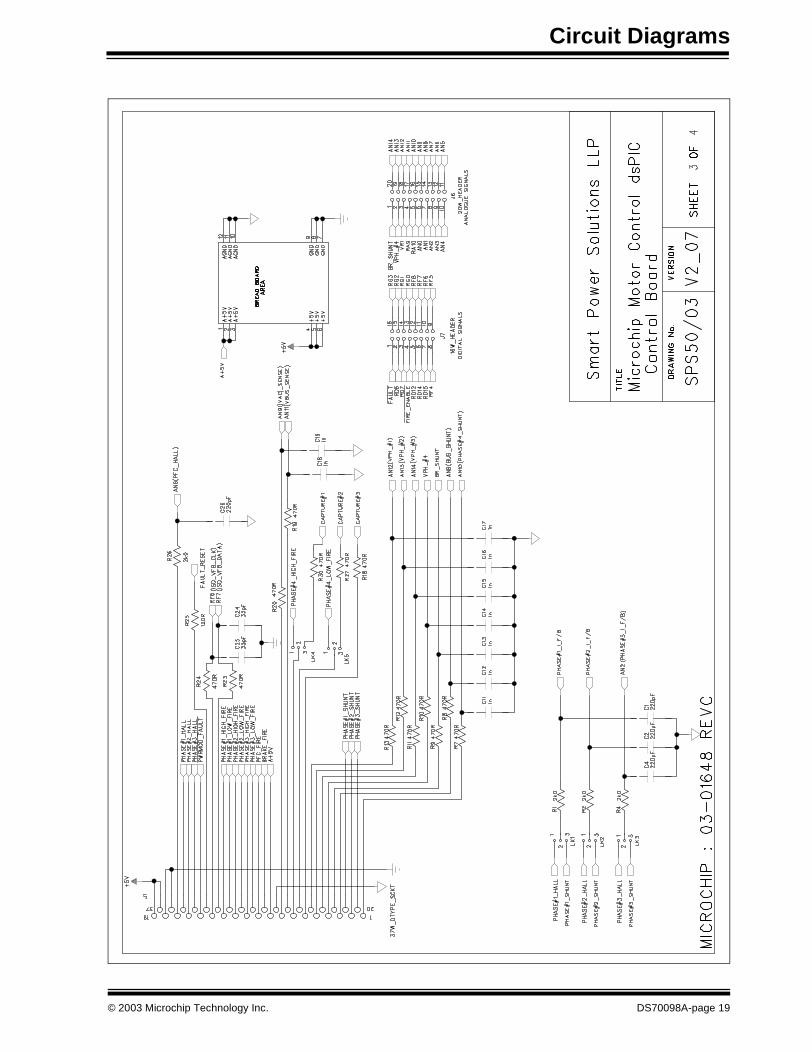
Circuit Diagrams
© 2003 Microchip Technology Inc. DS70098A-page 19

dsPICDEM™ MC1 Motor Control Development Board
DS70098A-page 20 © 2003 Microchip Technology Inc.

Circuit Diagrams
NOTES:
© 2003 Microchip Technology Inc. DS70098A-page 21

DS70098A-page 22 2003 Microchip Technology Inc.
AMERICASCorporate Office2355 West Chandler Blvd.Chandler, AZ 85224-6199Tel: 480-792-7200 Fax: 480-792-7277Technical Support: 480-792-7627Web Address: http://www.microchip.com
Atlanta3780 Mansell Road, Suite 130Alpharetta, GA 30022Tel: 770-640-0034 Fax: 770-640-0307
Boston2 Lan Drive, Suite 120Westford, MA 01886Tel: 978-692-3848 Fax: 978-692-3821
Chicago333 Pierce Road, Suite 180Itasca, IL 60143Tel: 630-285-0071 Fax: 630-285-0075
Dallas4570 Westgrove Drive, Suite 160Addison, TX 75001Tel: 972-818-7423 Fax: 972-818-2924
DetroitTri-Atria Office Building 32255 Northwestern Highway, Suite 190Farmington Hills, MI 48334Tel: 248-538-2250 Fax: 248-538-2260
Kokomo2767 S. Albright Road Kokomo, IN 46902Tel: 765-864-8360 Fax: 765-864-8387
Los Angeles18201 Von Karman, Suite 1090Irvine, CA 92612Tel: 949-263-1888 Fax: 949-263-1338
Phoenix2355 West Chandler Blvd.Chandler, AZ 85224-6199Tel: 480-792-7966 Fax: 480-792-4338
San JoseMicrochip Technology Inc.2107 North First Street, Suite 590San Jose, CA 95131Tel: 408-436-7950 Fax: 408-436-7955
Toronto6285 Northam Drive, Suite 108Mississauga, Ontario L4V 1X5, CanadaTel: 905-673-0699 Fax: 905-673-6509
ASIA/PACIFICAustraliaMicrochip Technology Australia Pty LtdMarketing Support DivisionSuite 22, 41 Rawson StreetEpping 2121, NSWAustraliaTel: 61-2-9868-6733 Fax: 61-2-9868-6755China - BeijingMicrochip Technology Consulting (Shanghai)Co., Ltd., Beijing Liaison OfficeUnit 915Bei Hai Wan Tai Bldg.No. 6 Chaoyangmen Beidajie Beijing, 100027, No. ChinaTel: 86-10-85282100 Fax: 86-10-85282104China - ChengduMicrochip Technology Consulting (Shanghai)Co., Ltd., Chengdu Liaison OfficeRm. 2401-2402, 24th Floor, Ming Xing Financial TowerNo. 88 TIDU StreetChengdu 610016, ChinaTel: 86-28-86766200 Fax: 86-28-86766599China - FuzhouMicrochip Technology Consulting (Shanghai)Co., Ltd., Fuzhou Liaison OfficeUnit 28F, World Trade PlazaNo. 71 Wusi RoadFuzhou 350001, ChinaTel: 86-591-7503506 Fax: 86-591-7503521China - Hong Kong SARMicrochip Technology Hongkong Ltd.Unit 901-6, Tower 2, Metroplaza223 Hing Fong RoadKwai Fong, N.T., Hong KongTel: 852-2401-1200 Fax: 852-2401-3431China - ShanghaiMicrochip Technology Consulting (Shanghai)Co., Ltd.Room 701, Bldg. BFar East International PlazaNo. 317 Xian Xia RoadShanghai, 200051Tel: 86-21-6275-5700 Fax: 86-21-6275-5060China - ShenzhenMicrochip Technology Consulting (Shanghai)Co., Ltd., Shenzhen Liaison OfficeRm. 1812, 18/F, Building A, United PlazaNo. 5022 Binhe Road, Futian DistrictShenzhen 518033, ChinaTel: 86-755-82901380 Fax: 86-755-8295-1393China - QingdaoRm. B505A, Fullhope Plaza,No. 12 Hong Kong Central Rd.Qingdao 266071, ChinaTel: 86-532-5027355 Fax: 86-532-5027205IndiaMicrochip Technology Inc.India Liaison OfficeMarketing Support DivisionDivyasree Chambers1 Floor, Wing A (A3/A4)No. 11, O’Shaugnessey RoadBangalore, 560 025, IndiaTel: 91-80-2290061 Fax: 91-80-2290062
JapanMicrochip Technology Japan K.K.Benex S-1 6F3-18-20, ShinyokohamaKohoku-Ku, Yokohama-shiKanagawa, 222-0033, JapanTel: 81-45-471- 6166 Fax: 81-45-471-6122KoreaMicrochip Technology Korea168-1, Youngbo Bldg. 3 FloorSamsung-Dong, Kangnam-KuSeoul, Korea 135-882Tel: 82-2-554-7200 Fax: 82-2-558-5934SingaporeMicrochip Technology Singapore Pte Ltd.200 Middle Road#07-02 Prime CentreSingapore, 188980Tel: 65-6334-8870 Fax: 65-6334-8850TaiwanMicrochip Technology (Barbados) Inc., Taiwan Branch11F-3, No. 207Tung Hua North RoadTaipei, 105, TaiwanTel: 886-2-2717-7175 Fax: 886-2-2545-0139
EUROPEAustriaMicrochip Technology Austria GmbHDurisolstrasse 2A-4600 WelsAustriaTel: 43-7242-2244-399Fax: 43-7242-2244-393DenmarkMicrochip Technology Nordic ApSRegus Business CentreLautrup hoj 1-3Ballerup DK-2750 DenmarkTel: 45-4420-9895 Fax: 45-4420-9910FranceMicrochip Technology SARLParc d’Activite du Moulin de Massy43 Rue du Saule TrapuBatiment A - ler Etage91300 Massy, FranceTel: 33-1-69-53-63-20 Fax: 33-1-69-30-90-79GermanyMicrochip Technology GmbHSteinheilstrasse 10D-85737 Ismaning, GermanyTel: 49-89-627-144-0 Fax: 49-89-627-144-44ItalyMicrochip Technology SRLVia Quasimodo, 1220025 Legnano (MI)Milan, Italy Tel: 39-0331-742611 Fax: 39-0331-466781United KingdomMicrochip Ltd.505 Eskdale RoadWinnersh TriangleWokingham Berkshire, England RG41 5TUTel: 44-118-921-5869 Fax: 44-118-921-5820
05/30/03
WORLDWIDE SALES AND SERVICE