
Product Lifecycle Management
Product Portfolio Management User Guide
May 2007
v9.2.2
Part No. E11109-01

Product Portfolio Management User Guide
ii Product Lifecycle Management
Copyright and Trademarks Copyright © 1995, 2007, Oracle. All rights reserved.
The Programs (which include both the software and documentation) contain proprietary information; they are provided under a license agreement containing restrictions on use and disclosure and are also protected by copyright, patent, and other intellectual and industrial property laws. Reverse engineering, disassembly, or decompilation of the Programs, except to the extent required to obtain interoperability with other independently created software or as specified by law, is prohibited.
The information contained in this document is subject to change without notice. If you find any problems in the documentation, please report them to us in writing. This document is not warranted to be error-free. Except as may be expressly permitted in your license agreement for these Programs, no part of these Programs may be reproduced or transmitted in any form or by any means, electronic or mechanical, for any purpose.
If the Programs are delivered to the United States Government or anyone licensing or using the Programs on behalf of the United States Government, the following notice is applicable:
U.S. GOVERNMENT RIGHTS Programs, software, databases, and related documentation and technical data delivered to U.S. Government customers are "commercial computer software" or "commercial technical data" pursuant to the applicable Federal Acquisition Regulation and agency-specific supplemental regulations. As such, use, duplication, disclosure, modification, and adaptation of the Programs, including documentation and technical data, shall be subject to the licensing restrictions set forth in the applicable Oracle license agreement, and, to the extent applicable, the additional rights set forth in FAR 52.227-19, Commercial Computer Software--Restricted Rights (June 1987). Oracle USA, Inc., 500 Oracle Parkway, Redwood City, CA 94065.
The Programs are not intended for use in any nuclear, aviation, mass transit, medical, or other inherently dangerous applications. It shall be the licensee's responsibility to take all appropriate fail-safe, backup, redundancy and other measures to ensure the safe use of such applications if the Programs are used for such purposes, and we disclaim liability for any damages caused by such use of the Programs.
Oracle and Agile are registered trademarks of Oracle Corporation and/or its affiliates. Other names may be trademarks of their respective owners.
The Programs may provide links to Web sites and access to content, products, and services from third parties. Oracle is not responsible for the availability of, or any content provided on, third-party Web sites. You bear all risks associated with the use of such content. If you choose to purchase any products or services from a third party, the relationship is directly between you and the third party. Oracle is not responsible for: (a) the quality of third-party products or services; or (b) fulfilling any of the terms of the agreement with the third party, including delivery of products or services and warranty obligations related to purchased products or services. Oracle is not responsible for any loss or damage of any sort that you may incur from dealing with any third party.

iii
CONTENTS Copyright and Trademarks................................................................................................................... ii
Introduction...................................................................................................................... 1 Agile Program Management.................................................................................................................1 Program Management Objects ............................................................................................................2 Program Navigation..............................................................................................................................4 Tracking Project Status ........................................................................................................................5
How Status Roll-Up works..................................................................................................................................................5 Health Status......................................................................................................................................................................6 Workflow Status .................................................................................................................................................................7
Program Costing ..................................................................................................................................8 How Total Cost is Determined............................................................................................................................................9 Cost Status.........................................................................................................................................................................9 Costs Included in Baselines .............................................................................................................................................10 Labor Costs ......................................................................................................................................................................10
Home Page...................................................................................................................... 11 Viewing the Home Page.....................................................................................................................11 Quick Links .........................................................................................................................................12 Home Page Inbox Tabs......................................................................................................................12 Notifications ........................................................................................................................................13 Workflow Routings .............................................................................................................................13 My Assignments .................................................................................................................................14
Program Assignments ......................................................................................................................................................15 My Assignments Table .....................................................................................................................................................15 My Assignments Tab Tools ..............................................................................................................................................16 Using the View Options to Sort your Assignment List ......................................................................................................18 Using the Filter to Sort your Assignment List ...................................................................................................................19 Accepting Assignments ....................................................................................................................................................19 Declining Assignments .....................................................................................................................................................20 Editing Assignments.........................................................................................................................................................20 Mark Assignments Complete ...........................................................................................................................................20 Flagging Assignments ......................................................................................................................................................21 Hiding and Unhiding Assignments....................................................................................................................................21 Using the Show Details Dialog .........................................................................................................................................22

Product Portfolio Management User Guide
iv Product Lifecycle Management
Printing the Assignment Table .........................................................................................................................................22
Dashboard....................................................................................................................... 25 Starting the Dashboard ......................................................................................................................25 Manipulating the Dashboard Windows...............................................................................................25 Dashboard View .................................................................................................................................26 Configuring Dashboard Views............................................................................................................26
Chart Display....................................................................................................................................................................27 Executive View ...................................................................................................................................28
Viewing Program Status...................................................................................................................................................28 Viewing Resource Allocation............................................................................................................................................28 Viewing Financial Data.....................................................................................................................................................29
Programs View ...................................................................................................................................29 Programs..........................................................................................................................................................................29 Gate Progress ..................................................................................................................................................................29 Top Priority Issues............................................................................................................................................................30
Resources View..................................................................................................................................30 Resources ........................................................................................................................................................................30 My Pool Members Top Priority Issues..............................................................................................................................31 My Pool Members Off Track Activities..............................................................................................................................31 Resource Pool Utilization by Program..............................................................................................................................31
Financial View ....................................................................................................................................32 My Activities View...............................................................................................................................32
My Assignments ...............................................................................................................................................................32 My Documents .................................................................................................................................................................32 My Action Items................................................................................................................................................................32 My Issues .........................................................................................................................................................................33 Notifications......................................................................................................................................................................33
Dashboard Management Administration Tasks .................................................................................33 PPM Reports ......................................................................................................................................34
About Agile Standard Reports..........................................................................................................................................34 Agile Standard Reports for PPM ......................................................................................................................................34
Creating and Managing Programs .................................................................................. 37 About Programs..................................................................................................................................37
Setting Up a Program Structure .......................................................................................................................................37 Creating Program-related Objects......................................................................................................38
Using the Create Menu ....................................................................................................................................................39 Using the Save As Command ..........................................................................................................................................40 Creating and Using Gates ................................................................................................................................................40

Product Portfolio Management User Guide Product Lifecycle Management
v
Editing Program Objects Concurrently...............................................................................................41 Editing Multiple Tasks in the Same Project Tree..............................................................................................................41 Multiple Users Editing the Same Task .............................................................................................................................42
Creating a Project Environment: The Actions Menu ..........................................................................43 Subscribing to Events.......................................................................................................................................................43 Using Save As to Create a Template ...............................................................................................................................44 Delegating Ownership ......................................................................................................................................................44 Substituting Resources ....................................................................................................................................................46 Changing the Parent ........................................................................................................................................................46 Archiving Programs ..........................................................................................................................................................46 Reports.............................................................................................................................................................................47 Changing Workflow Status ...............................................................................................................................................48
Working with Program-related Objects.......................................................................... 49 Accessing Program Objects ...............................................................................................................49 Viewing Project Summary ..................................................................................................................50
Summary Page Actions....................................................................................................................................................51 Viewing General Information ..............................................................................................................53
Dates ................................................................................................................................................................................55 Duration............................................................................................................................................................................55 Audit Values .....................................................................................................................................................................56
Managing Schedules..........................................................................................................................56 Deleting a Program Element ............................................................................................................................................57 Establishing Dependencies ..............................................................................................................................................57 Editing Display Order .......................................................................................................................................................57 Rescheduling a Program..................................................................................................................................................58 Adding a Team .................................................................................................................................................................58 Creating a Baseline ..........................................................................................................................................................59
Managing Dependencies....................................................................................................................59 Types of Dependencies....................................................................................................................................................60 Dependency Time Buffer..................................................................................................................................................61 Creating and Editing Dependencies.................................................................................................................................61
Managing Teams................................................................................................................................62 Adding Team Members ....................................................................................................................................................62 Editing Team Member Attributes......................................................................................................................................63 Assigning Team Members from a Resource Pool Placeholder ........................................................................................64 Reviewing Resource Utilization........................................................................................................................................65 Bulk Assigning Tasks to a Resource................................................................................................................................66 Splitting a Task Among Several Resources .....................................................................................................................66

Product Portfolio Management User Guide
vi Product Lifecycle Management
Removing Team Members ...............................................................................................................................................66 Managing Content ..............................................................................................................................67
Viewing Content ...............................................................................................................................................................67 Adding Content.................................................................................................................................................................68 Cloning Deliverables ........................................................................................................................................................70
Managing Workflows ..........................................................................................................................72 Rules for Parent Status ....................................................................................................................................................72
Managing Discussions .......................................................................................................................73 Discussions Table ............................................................................................................................................................73 Adding Discussions ..........................................................................................................................................................73 Replying to Discussions ...................................................................................................................................................74 Viewing Discussion Replies .............................................................................................................................................75 Removing Discussions .....................................................................................................................................................76 Viewing Action Items ........................................................................................................................................................76
Managing Attachments.......................................................................................................................76 Viewing History...................................................................................................................................76
Gantt Chart ..................................................................................................................... 79 Overview.............................................................................................................................................79 Prerequisites.......................................................................................................................................80 Launching Gantt .................................................................................................................................80 Gantt Toolbar Icons............................................................................................................................81 Views in Gantt ....................................................................................................................................82
Gantt.................................................................................................................................................................................82 Task Assignment..............................................................................................................................................................83 Calendar...........................................................................................................................................................................83 Critical Path ......................................................................................................................................................................83 Comparative Gantt ...........................................................................................................................................................83 Resource ..........................................................................................................................................................................84 Resource Sheet................................................................................................................................................................84 Resource Utilization .........................................................................................................................................................84
Using the Gantt Chart.........................................................................................................................85 Adding Activities ...............................................................................................................................................................85 Adding Gates....................................................................................................................................................................86 Editing Data......................................................................................................................................................................86 Creating and Editing Dependencies in Gantt ...................................................................................................................86 Entering or Changing Dates .............................................................................................................................................87 Deleting Objects in Gantt .................................................................................................................................................87 Printing a Gantt Chart.......................................................................................................................................................87
Resource Management ......................................................................................................................88

Product Portfolio Management User Guide Product Lifecycle Management
vii
Assigning Resources........................................................................................................................................................88 Viewing Resource Utilization............................................................................................................................................89 Removing Resources .......................................................................................................................................................89 Delegating Owners...........................................................................................................................................................90
Customizing the Gantt Chart ..............................................................................................................90 Customizing Columns for Tabular View ...........................................................................................................................90 Appearance and Style ......................................................................................................................................................91 Bar Labels ........................................................................................................................................................................91 Grids.................................................................................................................................................................................91 View Bar ...........................................................................................................................................................................92
Working with Microsoft Project ...................................................................................... 93 Before You Begin ...............................................................................................................................93 Working with Imported Microsoft Project Files ...................................................................................93
Setting Up Microsoft Project Synchronization ..................................................................................................................93 Creating a PPM Program from an Existing Microsoft Project File ....................................................................................94 Launching a PPM Project in Microsoft Project .................................................................................................................94 Read Only and Edit Modes ..............................................................................................................................................95 Working Offline on a PPM Program .................................................................................................................................95
Microsoft Project Troubleshooting Tips..............................................................................................96 Deleting Objects in Microsoft Project ...............................................................................................................................97 Transferring Microsoft Project Work Values to PPM ........................................................................................................97
Import and Export .......................................................................................................... 99 Overview.............................................................................................................................................99 Before You Begin .............................................................................................................................100
Persistence of Import Settings .......................................................................................................................................100 Importing Large Data Files .............................................................................................................................................101
Supported File Formats....................................................................................................................101 Importing Data ..................................................................................................................................101
Define Import Preferences .............................................................................................................................................102 Select Import Source......................................................................................................................................................102 Select Product Content ..................................................................................................................................................104 Map Import Data.............................................................................................................................................................104 Select Transformation File .............................................................................................................................................105 Review Settings and Begin Import .................................................................................................................................106
Exporting Data..................................................................................................................................106
Agile e5.1 Integration................................................................................................... 109 Adding Agile e5.1 Objects as Deliverables ......................................................................................109

Product Portfolio Management User Guide
viii Product Lifecycle Management
Modifying the Trigger Event and Result ...........................................................................................110 Updating a Program to Agile e5.1 ....................................................................................................110 Modifying Objects in Agile e5.1 ........................................................................................................110 Additional Information.......................................................................................................................111
Creating Programs: A "Real World" Example ............................................................... 113 Step 1: Create a Program Template ................................................................................................113 Step 2: Create a Schedule ...............................................................................................................114
Create a Gate.................................................................................................................................................................115 Step 3: Create the Root Program.....................................................................................................116 Step 4: Activate the Program ...........................................................................................................116
Installation Notes ......................................................................................................... 119 Product Portfolio Management User Licenses.................................................................................119 Configuration ....................................................................................................................................119 Upgrade............................................................................................................................................119

ix
Preface The Oracle|Agile documentation set includes Adobe® Acrobat™ PDF files. The Oracle Technology Network (OTN) Web site (http://www.oracle.com/technology/documentation/agile.html) contains the latest versions of the Oracle|Agile PLM PDF files. You can view or download these manuals from the Web site, or you can ask your Agile administrator if there is an Oracle|Agile Documentation folder available on your network from which you can access the Oracle|Agile documentation (PDF) files.
Note To read the PDF files, you must use the free Adobe Acrobat Reader™ version 7.0 or later. This program can be downloaded from the Adobe Web site (http://www.adobe.com).
The Oracle Technology Network (OTN) Web site (http://www.oracle.com/technology/documentation/agile.html) can be accessed through Help > Manuals in both the Agile Web Client and the Agile Java Client. If you need additional assistance or information, please contact support (http://www.oracle.com/agile/support.html) (http://www.oracle.com/agile/support.html) for assistance.
Note Before calling Agile Support about a problem with an Oracle|Agile PLM manual, please have ready the full part number, which is located on the title page.
TTY Access to Oracle Support Services
Oracle provides dedicated Text Telephone (TTY) access to Oracle Support Services within the United States of America 24 hours a day, 7 days a week. For TTY support, call 800.446.2398. Outside the United States, call +1.407.458.2479.
Documentation Accessibility
Our goal is to make Oracle products, services, and supporting documentation accessible, with good usability, to the disabled community. To that end, our documentation includes features that make information available to users of assistive technology. This documentation is available in HTML format, and contains markup to facilitate access by the disabled community. Accessibility standards will continue to evolve over time, and Oracle is actively engaged with other market-leading technology vendors to address technical obstacles so that our documentation can be accessible to all of our customers. For more information, visit the Oracle Accessibility Program Web site at http://www.oracle.com/accessibility/ http://www.oracle.com/accessibility/.
Readme
Any last-minute information about Oracle|Agile PLM can be found in the Readme file on the Oracle Technology Network (OTN) Web site (http://www.oracle.com/technology/documentation/agile.html).
Agile Training Aids
Go to the Oracle University Web page (http://www.oracle.com/education/chooser/selectcountry_new.html) for more information on Agile Training offerings.

x Product Lifecycle Management
Accessibility of Code Examples in Documentation
Screen readers may not always correctly read the code examples in this document. The conventions for writing code require that closing braces should appear on an otherwise empty line; however, some screen readers may not always read a line of text that consists solely of a bracket or brace.
Accessibility of Links to External Web Sites in Documentation
This documentation may contain links to Web sites of other companies or organizations that Oracle does not own or control. Oracle neither evaluates nor makes any representations regarding the accessibility of these Web sites.

Product Lifecycle Management Page - 1
Chapter 1
Introduction
This chapter includes the following:
Agile Program Management ................................................................................................................................ 1 Program Management Objects............................................................................................................................ 2 Program Navigation ............................................................................................................................................. 4 Tracking Project Status........................................................................................................................................ 5 Program Costing.................................................................................................................................................. 8
Agile Product Portfolio Management (PPM) gives you powerful capabilities to define, analyze, and manage all aspects of a project or program.
Executives use the PPM Dashboard to view portfolio data for all programs being monitored, including risks to program health caused by schedule slips, lack of resources, and program cost.
Program Managers use PPM to create and manage program tasks, resources, documents, and schedules; make program assignments; conduct program discussions; and track program health and budget.
Program participants use PPM to report on the completion of program tasks, update program documents, manage any resource pools they own, manage program activities they own, and participate in program discussions.
Tasks can be placed on a timeline and dependencies can be defined where one task cannot begin before the start or completion date of another. You can also define Milestones or Gates that represent critical deliverables or decision points in the development process and track areas that could impact the defined schedule.
The program can be managed with an iterative approach based on changing needs. You can adjust start dates and durations of tasks to meet the overall timing goals. Downstream activities are dynamically updated when dates or dependencies are adjusted.
Powerful filtering and summarizing tools let you find trouble spots quickly and drill down to study the details. The program objects of PPM provide detailed control over all aspects of program management, from high level overview to individual employee activities.
Agile PPM objects and functionality are accessed using the Agile Web Client.
Agile Program Management The program management objects and features in Agile enable Program Managers to:
Define a program in terms of its schedules, tasks, resources, and deliverables
Plan, execute, and manage multiple related program/phase/gate processes
Associate product deliverables with program objects

Product Portfolio Management User Guide
Page - 2 Product Lifecycle Management
Establish templates that can be used to generate other programs
View resource workload by user and resource pool
Categorize programs according to organizational, product, and program types
View portfolio-level dashboards and reports
Program Managers schedule and execute programs in Agile PPM using program objects. Each program object contains not only schedule information, but also the attachments, discussions and actions items, resources and roles, and history of actions related to the program.
Agile PPM provides the means to “roll up” data from child objects to higher levels by rules and relationships, to provide management with an executive-level view of program progress.
You can track program progress against schedules, cost, resources and quality by tracking each child object in your program. See (“Tracking Project Status (on page 5)”.) You can view project progress via the tables in the Agile Dashboard. (See "Dashboard (on page 25)".) Or view a Gantt Chart that shows project progress visually (See "Gantt Chart (on page 79)" ).
Once an activity (program) has been created, you can add the following elements to it:
Programs
Phases
Tasks
Gates
We introduce these objects in “Program Management Objects (on page 2)” below, and describe their use in detail in "Creating and Managing Programs (on page 37)".
To quickly learn the basics of program creation, try out the steps defined in the real-life scenario described in "Creating Programs: A "Real World" Example (on page 113)".
Program Management Objects The program management process involves management of scheduling, tasks, status, discussions, documents, phases/gates, and resources.
At a minimum, a typical Agile PPM program consists of:
A root-level program
A series of child objects - such as phases, tasks, gates, or other programs.
The table below describes the objects that can comprise an Agile PPM program.
I con Ob jec t Descr ip t ion
Program A program is a set of related activities and gates (milestones) that is created to monitor and manage progress on a specific project.
A program is the top-level object, but a program can also be a child of another program.

Chapter 1
Page - 3
I con Ob jec t Descr ip t ion
Phase A phase, sometimes called a stage, is a segment of a program.
Phases are often used to define the activities required to create a set of deliverables. When phases end, program managers may hold a phase exit or gate review to examine the completion status of each phase element.
Phases usually derive their dates and status information from the program elements that report to them.
Task A task is a segment of work that one or more resources can complete over a period of time. Progress or status reported in a task is rolled up to higher levels of the program.
Tasks may be embedded in programs, phases, or other tasks.
Gate A gate (or milestone) is a specific point in time that denotes the completion of a set of related activities, such as a phase.
Gate status is frequently controlled by deliverables. A gate’s status is closed until all its deliverables are complete, at which time it opens so work can go forward (“through the gate”). The change in the gate’s workflow status can be automatically triggered by the status of deliverables, so that when all deliverables reach a certain status, the gate goes into review or it opens.
Deliverable An Agile PLM object whose state change can trigger a state change in the program element that contains it. When the deliverable changes to a predefined target workflow status, the event triggers a change of status in the activity to a predetermined new status.
Deliverables are often used to control the status of gates.
Discussion Informal conversations relating to a specific program activity, found on the program object’s Discussions tab.
Action Items Unplanned tasks, with owners and due dates, found on the program object’s Discussions tab. Action items can be attached to discussions or to the program object.

Product Portfolio Management User Guide
Page - 4 Product Lifecycle Management
The figure below shows how Agile PPM objects are employed.
Note Programs, phases, tasks and gates are fully customizable. For further information, see your site’s Agile administrator.
Program Navigation In Agile Web Client, the left pane, called the navigation pane, provides access to searches and Analytics and Reports. As you perform certain actions in Web Client, such as stepping through wizards, the navigation pane provides tools for navigating the process.
In Agile PPM, the navigation pane also includes navigation tools that allow you to view an entire program tree structure and to keep that program tree visible and accessible as you work in Web Client. For example, you may open and view other types of Agile objects, run searches, and view attachments, then return to the most recently viewed program tree view in the navigation pane.
When you open any Agile PPM object, the root program tree for that object appears in the navigation pane, and the Program Tree navigation control becomes available.

Chapter 1
Page - 5
Act ion or bu t ton : Descr ip t ion :
Expand All
Collapse All
Expands all levels of the program tree.
Collapses all levels of the program tree so that only the root parent activity is displayed.
You can also click + or - in the program tree to expand or collapse one level at a time.
Click an activity in the program tree navigation pane
The activity is displayed in the right pane with the most recently viewed tab in front.
For example, if you display the Discussions tab in the right pane, when you click another activity in the program tree navigation pane, that activity is displayed in the right pane with the Discussions tab in front.
As you click through the program tree in the left pane, the same tab is always displayed in the right pane until you select a different tab.
Program Tree If the program tree is not currently displayed in the navigation
pane, clicking Program Tree returns the navigation pane view to the most recently viewed expansion of the program tree.
If the program tree is currently displayed in the navigation pane, clicking Program Tree collapses the navigation pane.
You may perform a number of actions (including running searches, opening and viewing other Agile objects, opening your Inboxes) during which the Program Tree button remains visible. Click Program Tree at any time to return to the most recently viewed expansion of the program tree.
If the program tree is not currently displayed in the navigation pane and the Program Tree button is visible, you may also click the Refresh button in the main toolbar to return to the program tree in the navigation pane.
Note: The Program Tree button is removed if you use Show BOM Tree when viewing an Agile item or if you perform an action that displays wizard steps in the navigation pane. However, if you select and display an activity in the root program (for example, by using the Recently Viewed list), the most recently viewed expansion of the program tree is displayed in the navigation pane and the Program Tree button is visible.
Navigate to (by any means) a different root program
The navigation pane program tree is updated with the program tree of the newly selected root program.
Tracking Project Status Agile PPM enables Executives and Program Managers to track the status of each activity, and overall “health” of the project (on track, needs attention, and off track).
How Status Roll-Up works
A number of attributes are passed upward from child objects to parents, in a process called rolling up.

Product Portfolio Management User Guide
Page - 6 Product Lifecycle Management
The attributes that are rolled up include:
Activity workflow status
Health statuses
Scheduled dates and scheduled duration
Actual start/end dates and actual duration
Estimated start/end dates and estimated duration
Days effort
Percent complete
The rolling up of values starts with leaf nodes (child objects that have no children) that are not either Complete or Canceled, and moves upward to parent objects. If any leaf node object is determined to be Off Track, the parent object is considered to be Off Track.
Parent object fields that reflect rolled-up status of child objects, such as Days Effort or Scheduled Dates, cannot be edited because it is automatically rolled up from lower levels in the hierarchy. Status can only be edited at the lowest levels (leaf nodes).
Note The only way you can change the status of a parent object at the program level is to cancel the program using the Actions > Change to Canceled menu command. Once canceled, a program can be reset to the Not Started state, using Actions > Change to Not Started.
Health Status
Health Status values are rolled up for all objects that are configured to report health status. This configuration is done in the Java Client by setting the Rollup Health Status attribute to Yes in that object’s General Info tab. The following status elements are rolled upward:
Overall
Schedule
Cost
Resource
Quality
If any one child of a program object is Off Track, the parent program is set to Off Track. If the Quality Status of a child is Below Quality, the parent is set to Below Quality.
Health attribute values are maintained in administrator settings, and each value has an associated activation period or value.
The activity Health Status indicators appear in the upper right of the activity window. Colors indicating stages of the health are:
On Track (green)
Needs Attention (yellow)

Chapter 1
Page - 7
Off Track (red)
Default Health Statuses
The following table shows default schedule, cost, resource, and quality health statuses.
Sta tus Va lues What t r iggers change?
Schedule On Track (green), Needs Attention (yellow), Off Track (red)
Within the Java Client you can create a setting to trigger a health status change if there is schedule slippage of a certain number of days. The default setting for the Health Status to change from Not Started or On Track to Needs Attention is 1-5 days. If the task is overdue for more than 5 days, the status changes to Off Track. To learn how to configure these settings, see the Agile Administrator Guide.
Cost On Budget (green), Off Budget (yellow), Over Budget (red)
The cost status is calculated based on the %deviation (Percentage property) from the original cost.
Resource Staffed (green), Understaffed (yellow), Not Staffed (red)
Quality Meets (green), Below (yellow), Poor (red)
Overall Corresponds to the most severe (red) setting of the four health statuses for any project.
Reason fields
When you update an object’s status in its General Info tab, use the Reason field to specify a reason for the status. For example, if you set the Cost Status field to Off Budget, you might specify “high shipping costs” as the reason.
Workflow Status
Agile Web Client uses a workflow stamp in the upper right of the General Info tab to indicate the workflow status of an activity (see the figure below). The Agile administrator defines the name of each status in each workflow.
The default program workflow statuses are:
Not Started

Product Portfolio Management User Guide
Page - 8 Product Lifecycle Management
In Process
Complete
Canceled
Your company may have its own customized workflows and status stamps, as displayed in the Workflow tab. For further information see "Workflow Routings".
If a user has the appropriate privileges, they can use the Change Status button to change an activity’s status, promoting it to the next lifecycle state.
Important Since lifecycle status of parent objects is rolled up from lower levels, you can only use the Change Status button to change status on individual leaf node objects (objects with no children). You cannot promote an activity whose Template field setting is Template or Proposed.
Program Costing Program costing information is rolled up through the project structure the same way status and health are rolled up. By default, cost information for each field is rolled up automatically, such that a summary or parent task is a summation of the values of its child objects. However, there are 'Calculate' attributes that can be enabled within Java Client to let a particular summary task’s values be calculated automatically (rolled up) or edited manually. For more information on enabling the calculate attribute, see the Agile PLM Administrator Guide.

Chapter 1
Page - 9
Program cost calculations generally occur as shown in the figure below.
Program
Phase 1
Phase 3
Phase 2
Task 1
Task 2
Total Cost = $25 + $30 + $15 = $70
Cost = $25
Cost = $20 + $10 = $30
Cost = $20
Cost = $10
Cost = $15
How Total Cost is Determined
Total Cost fields that appear on the General Info tab are calculated values and cannot be edited. Total Cost is the sum of the four cost types: Labor Cost, Capital Expenses, Fixed Cost and Flex Cost.
For example, Total Actual Cost is the sum of:
Actual Labor Cost
Actual Capital Expenses
Actual Fixed Cost
Actual Flex Cost
In the same manner, Total Estimated Cost is the sum of Estimated Labor Cost, Estimated Capital Expenses, Estimated Fixed Cost, and Estimated Flex Cost. Total Budgeted Cost is the sum of Budgeted Labor Cost, Budgeted Capital Expenses, Budgeted Fixed Cost, and Budgeted Flex Cost.
Cost Status
The cost status is calculated based on the % deviation (Percentage property) defined in the cost status node in Agile Administrator, under System Settings->Product Portfolio Management. For

Product Portfolio Management User Guide
Page - 10 Product Lifecycle Management
information about Agile system settings, see the Agile PLM Administrator Guide.
Costs Included in Baselines
All Cost fields are part of the baseline. The cost fields are Labor Cost, Capital Expenses, Fixed Cost and Flex Cost. Each of these costs have Actual, Budgeted and Estimated categories. There are 12 cost fields in total. Ten Calculate flags are also baselined. Budgeted and Actual Labor costs do not have the calculate/roll-up flags as they are always calculated and rolled up.
Use the Baseline Comparison Report in the Agile Standard Reports to compare these values.
Labor Costs
Actual and Budgeted Labor costs are automatically calculated. Budgeted Labor Cost uses scheduled duration, % allocation, and the users' resource pool rate, and man hours (8 hours per day) to calculate a labor cost per resource assignment. These are summed for multiple resources assigned to an activity. If an activity has a resource assigned, and has lower-level objects with Labor costs, then it is summed at the parent level and not replaced. Budgeted and Actual Labor Costs are always calculated in this way. However, Estimated Labor Cost can be editable at all levels. If not edited, it will be rolled up by default. Capital and Fixed Costs (Actual, Budgeted and Estimated) can be both rolled up as well as edited values, depending on whether the Agile administrator has enabled the Calculate/Roll-up flag on each cost field.
Note If a Resource is not assigned to a Resource Pool, the user’s individual Labor Rate is used.

Product Lifecycle Management Page - 11
Chapter 2
Home Page
This chapter includes the following:
Viewing the Home Page ...................................................................................................................................... 11 Quick Links .......................................................................................................................................................... 12 Home Page Inbox Tabs ....................................................................................................................................... 12 Notifications ......................................................................................................................................................... 13 Workflow Routings............................................................................................................................................... 13 My Assignments .................................................................................................................................................. 14
Viewing the Home Page The Agile Home page provides access to Dashboard, Notifications, Workflow Routings, and My Assignments. Dashboard features are documented separately, see "Dashboard (on page 25)".
To access the Home Page, click the icon. The page that displays when you first open Web Client can be changed, as described in the Getting Started with Agile PLM Guide. If you choose a Dashboard page as your Preferred Start Page, that Dashboard page will be displayed when you click the Home button in the main menu.
To view your Inbox tabs in Web Client:
You can open and view the Home page using any of the following methods:
At any time while you are using Web Client, click the small down-arrow next to the Home button
and select an inbox view: My Assignments, Notifications, or Workflow Routings.
If your preferred start page is a Home page tab, it is displayed when you login to Agile Web Client.
If your preferred start page is a Home page tab:
a. In the menu bar, click the Home button .
The Home page is displayed with your preferred inbox view tab on top. b. To view a different inbox view, click the Home page tab you want to view.
Note If your preferred start page is a Dashboard tab, you will not see the Home page tabs when
you click the Home button . Click the small down-arrow next to the Home button and select a non-Dashboard inbox view: My Assignments, Notifications, or Workflow Routings.

Product Portfolio Management User Guide
Page - 12 Product Lifecycle Management
Quick Links Quick Links, at the top of the Home page, is a list of up to ten links that you use frequently. You define your own Quick Links list and you can edit and modify your Quick Links list at any time. Your Quick Links list can include predefined system links, saved searches in your Personal Searches folder, or bookmarks in your Bookmarks folder.
To edit your Quick Links list:
1. Click the Edit link next to the Quick Links: heading at the top of the Home page. The editable list appears at the top of the page.
2. From the drop-down list choose the type of link you want to use.
The three types of available links are: Links – predefined Agile system links including My User Profile, Change Password,
Analytics and Reports, and Dashboard. Bookmarks – available values are all the bookmarks in your Bookmarks folders, listed
individually. Searches – available values are all the searches in your Personal Searches folders, listed
individually.
3. Use the arrow buttons to move links from the Available Values list to the Selected Values list.
Or, double-click to move links from one list to the other list.
4. You may include more than ten links in the Selected Values list, but only the first ten links in the list will be displayed in your Quick Links list. Reorder the list by selecting one or more links and using the up and down arrow buttons to move them up or down in the list.
5. When you are finished, click the Save button.
Home Page Inbox Tabs As information passes through the Agile system, users receive news of status changes, requests, and other notifications through email. Users with different roles and privileges receive different notifications. When you first start Web Client, it is a good idea to view the information collected for you on the Home page.
Notifications tab – Notifications inform you of some action or process that has taken place or a notification can let you know that you have a request to accept or decline ownership of an action item or activity. Delete notifications after you have read them.
Workflow Routings tab – lists routable objects that require your review or action. Click the object number in the table to open it.
My Assignments tab – lists program leaf node objects assigned to you which are not yet complete and action items assigned to you which are not yet complete.

Chapter 2
Page - 13
Notifications The Home page Notifications tab lists notifications that have been sent to you. Notifications inform you of some action or process that has taken place, such as subscriptions, RFQs, and project invitations. A notification can also let you know that you have a request that requires your attention in the My Assignments tab. Requests ask you to accept or decline ownership of an action item or activity.
Note To accept or decline a request, use the My Assignments tab.
You can view or delete a notification.
To view a notification, click the Subject link.
To delete a notification, select its row and click Delete.
I con o r But ton Descr ip t ion
Delete Deletes the selected notifications.
Select one or more rows in the Notifications table, and click this button to delete them from the table.
New Notification
Icon in Notifications table row. Indicates that you have not yet opened this notification.
Read Notification
Icon in Notifications table row. Indicates that you have previously opened this notification.
Workflow Routings The Workflow Routings section of the Inbox lists routable objects that require your review or action. For example, your Inbox may contain changes for which you are an approver. The out-of-box workflow routings are a combination of base classes and actions that define the kind of review, as in the table below.
Base c lass. . . . . . i nc ludes rou tab le ob jec ts f rom these c lasses . . .
. . . combined w i th these act ions o f rev iew
Change Change Orders, Change Requests, Site Change Orders, Price Change Orders, Deviations, and Stop Ships
... That Require My Approval
... That I Am An Observer Of
... That Were Returned To Me
... Transferred to Me
... Escalated to Me

Product Portfolio Management User Guide
Page - 14 Product Lifecycle Management
Base c lass. . . . . . i nc ludes rou tab le ob jec ts f rom these c lasses . . .
. . . combined w i th these act ions o f rev iew
Quality Change Request (QCR)
Corrective and Preventive Actions and Audits
Problem Service Request (PSR)
Non-Conformance Requests and Problem Reports
Package Packages
Program Activities and Gates
Transfer Order Content Transfer Orders and Automated Transfer Orders
Declarations Substance Declarations, Part Declarations, JGPSSI Declarations, Homogeneous Material Declarations, Supplier Declarations of Conformance, IPC 1752-1 Declarations, and IPC 1752-2 Declarations
To open a workflow routing in the table, double-click its number.
To export objects to a text or PDX file (if you have privileges), select the row and choose Tools > Export.
The Print button prints the entire Inbox table.
My Assignments The Home page My Assignments tab lists Activities and Action Items for which you are responsible. The My Assignments tab provides a set of tools that allow you to efficiently work with your assignments. You can sort the assignments table rows, or select one or more assignment rows in the table, and then perform an action on the selected assignments. For example, you can accept or decline a program activity assignment, or flag an assignment for easier tracking.
The Home page My Assignments tab table includes:
Activity objects where: The activity is In Process. The workflow status type is not Complete or Canceled. The activity’s Template attribute is set to Active. Proposed or Template activities are not
included. The activity is a leaf node. Activities with children are not included. You are the owner of the activity and the Delegated Owner field is blank. If you have
delegated ownership, the Delegated Owner field contains the name of the delegated owner until the activity is accepted or declined.
You are the delegated owner of the activity. You are a resource on the Team tab of the activity and your allocation is greater than 0%.
Action Items where:

Chapter 2
Page - 15
The action item is assigned to you and it is not Complete or Cancelled. The action item is assigned to you and it has been accepted. The action item is assigned to you and it has not been declined. You are the creator of the action item and it has been declined by the assignee.
Program Assignments
Programs that display in your My Assignments tab are: Active root-level programs that have no child objects, for which you are the owner. Leaf-level programs for which you are the owner. Programs that you have delegated to a resource from the Actions > Delegate menu.
Note The program is displayed till the assigned resource accepts the action item. Once the resource accepts the action item, it disappears from your My Assignments list and you receive a notification in the Notifications tab.
Program Activity Assignment Request
If a user adds you as a resource with a percent allocation greater than zero in a program’s Team tab, you receive a Program Activity Assignment Request in My Assignments. You can open the request and accept or decline the request.
Note You also receive a notification in the Notifications tab.
My Assignments Table
Your Agile administrator determines which columns appear in the My Assignments table. If you have questions about the My Assignments tab, contact your Agile administrator.
By default, the My Assignments tab includes the following columns:
Column name Descr ip t ion
Flag Flag icon which you can set to manage your assignments. For more information, see Flagging Assignments (on page 21).
Name The name of the activity or action item.
Click this link to open the activity or action item.
Status Workflow status of the activity or action item. For example, an activity can be Not Started or In Process and an action item can be Not Accepted or Accepted.
If you have the appropriate privileges, you can edit the Status column. For more information, see Editing Assignments (on page 20).
Due Date The date the activity or action item is due.
You can sort the assignment list by due dates. For more information, see Using the View Options to Sort your Assignment List (on page 18).
If you have the appropriate privileges, you can edit the Due Date column. For more information, see Editing Assignments (on page 20).

Product Portfolio Management User Guide
Page - 16 Product Lifecycle Management
Column name Descr ip t ion
% Complete For activities, the percentage of the task that has been completed.
If you have the appropriate privileges, you can edit the % Complete column. For more information, see Editing Assignments (on page 20).
Related To For activities, the Related To column lists the parent activity and root parent activity.
For action items, the Related To column lists the activity or discussion object to which the action item is associated.
Click the links in this column to open the related activities or discussions.
Actual Hours For activities, the number of hours expended on the activity.
If you have the appropriate privileges, you can edit the Actual Hours column. For more information, see Editing Assignments (on page 20).
My Assignments Tab Tools
The My Assignments tab tools include:
Too l Descr ip t ion
View View drop-down list.
Use the list to sort your assignments by pre-defined views, for example, pending requests, flagged assignments, due dates, action items, or activities where you are a resource.
For more information, see Using the View Options to Sort your Assignment List (on page 18).
Edit Edit the selected row objects.
Allows you to edit object fields displayed in the table, based on your privileges.
For example, you can modify the Status, Due Date, and Actual Hours fields.
For more information, see Editing Assignments (on page 20).
Accept Accept the selected activities, program activity assignments, or action items.
For activities, accept the ownership when you are the designated owner.
For program activity assignments, accept the assignment as a resource for the activity.
For action items, accept the action item when you are the assignee and the action item has not yet been accepted.
For more information, see Accepting Assignments (on page 19).

Chapter 2
Page - 17
Too l Descr ip t ion
Decline Decline the selected activities, program activity assignments, or action items.
For activities, decline the ownership when you are the designated owner.
For program activity assignments, decline the assignment as a resource for the activity.
For action items, decline the action item when you are the assignee and the action item has not yet been accepted.
For more information, see Declining Assignments (on page 20).
Mark Complete Mark as complete the selected activities or action items.
For activities, sets the Complete field to 100% and changes the workflow status to Complete.
For action items, changes their status to complete and removes them from your assignment list.
For more information, see Mark Assignments Complete (on page 20).
Show Filter
Hide Filter
Displays or hides the filter definition fields.
For detailed information about using the filter, see Using the Filter to Sort your Assignment List (on page 19).
Print Prints the table sorted table.
Allows you to print the assignment table that is currently displayed.
For more information, see Printing the Assignment Table (on page 22).
More Actions... Add to Flagged View
Sets the flag for all the selected table rows.
Allows you to flag multiple rows at one time.
To display flagged rows, in the View drop-down list, choose Flagged.
For more information, see Flagging Assignments (on page 21).
More Actions... Add to Hidden Assignments View
Allows you to hide assignments.
Hidden assignments do not appear in the assignments table.
For more information see Hiding and Unhiding Assignments (on page 21).
More Actions... Remove From View
Remove assignments from the Hidden view.
When displaying the hidden assignment view, allows you to remove (unhide) the selected assignment rows.
See also Hiding and Unhiding Assignments (on page 21) and Flagging Assignments (on page 21).
Flag not set Flag set
Flag icon appears in each row of the assignment table.
Set or unset the flag by clicking it.
The flag helps you to organize your assignments and flag the ones you want to track.
For more information, see Flagging Assignments (on page 21).

Product Portfolio Management User Guide
Page - 18 Product Lifecycle Management
Too l Descr ip t ion
View Details View Details icon button.
Appears in each activity row next to the activity name.
Opens a popup window that displays important details about the object and allows you to edit, accept, or decline the object. The content of this window can be configured in Java Client Administrator.
For more information, see Using the Show Details Dialog (on page 22).
Using the View Options to Sort your Assignment List
Use the Home page My Assignments tab View drop-down list to sort you assignments and quickly find the assignments with which you want to work. For example, you can sort for pending requests or for overdue assignments.
Agile provides the following pre-defined view categories.
View Descr ip t ion
All Displays all assignments, except hidden assignments.
Pending Requests Displays only pending requests.
Flagged Displays only the flagged assignment rows.
You set or clear flags in order to manage your assignments. This View list choice displays only the rows that you have flagged.
Due Today or Overdue
Due this Week
Due in Two Days
Due in 30 Days
Due in 90 Days
These View list choices display assignment table rows according to due dates.
Hidden Assignments Displays only hidden assignments.
You decide which assignments you want to hide on your assignments list.
For more information, see Hiding and Unhiding Assignments (on page 21).
Activities where I am a Resource Displays activities where you have been assigned as a resource on the Team tab.
Action Items Displays action items assigned to you.
Action items are generated and assigned from activities and discussions.

Chapter 2
Page - 19
Using the Filter to Sort your Assignment List
On the Home page My Assignments tab, the Show Filter and Hide Filter button toggles the display of the table filter. The table filter allows you to define filter criteria based on any column in the table. You can define multiple filter criteria, which are combined in an AND search of the table rows.
For example, you can filter for assignments whose Related To column includes the word marketing and the % Complete column is less than 50.
The format of each filter criteria row is similar to an Agile search criteria:
<attribute> is <Match If Operator> <value to match>
To use the My Assignments tab filter:
1. Use the Home button drop-down list and choose My Assignments to display your list of assignments.
2. Click Show Filter to display the Filter: criteria.
3. In the first filter drop-down list, labeled --Select an Attribute--, choose from a list of the columns in the assignments table.
4. In the next drop-down list, choose a Match If operator. The list of available Match If operators depends on the attribute type you chose as the --Select an Attribute-- drop-down list.
5. In the remaining field, enter the filter values.
To add a filter criteria row, click Add Row at the end of the row. A filter criteria row is added to the display.
To delete a filter criteria row, click Delete Row at the end of the row. The row is deleted.
6. Click Apply to filter the assignments table. Only assignments that match your filter criteria are displayed.
7. To define different set of filter criteria, click Clear to clear the criteria and begin again.
Accepting Assignments
You can use the Home page My Assignments tab Accept function to accept multiple activities or action items at one time. The accept action applies to activities where you are the delegated owner, program activities assigned to you, and action items whose status is Not Accepted and you are the assignee.
To accept assignments on the My Assignment tab:
1. Use the Home button drop-down list and choose My Assignments to display your list of assignments.
2. Select one or more rows in the table.
3. Click the Accept button.
The selected objects are accepted.

Product Portfolio Management User Guide
Page - 20 Product Lifecycle Management
Declining Assignments
You can use the Home page My Assignments tab Decline function to decline multiple activities or action items at one time. The decline action applies to activities where you are the delegated owner and action items whose status is Not Accepted and you are the assignee.
Note When you decline an activity, you must enter a reason.
To decline assignments on the My Assignment tab:
1. Use the Home button drop-down list and choose My Assignments to display your list of assignments.
2. Select one or more rows in the table.
3. Click the Decline button.
4. If one or more of the selected rows are activities, you must enter a reason why you are declining. Enter your reason in the popup dialog and click Send.
Editing Assignments
You can use the Home page My Assignments tab Edit function to edit assignment attributes in the table. You must have the appropriate Modify privileges for the editable fields.
For example, depending on your privileges, for an activity, you can edit the Status, the Percent Complete, Actual Hours, and Due Date.
To edit My Assignment table rows:
1. Use the Home button drop-down list and choose My Assignments to display your list of assignments.
2. Select one or more rows in the table.
3. Click the Edit button.
4. Make the desired modifications.
Note The editable fields are determined by which fields your Agile administrator has included in the assignments table and your modify privileges.
5. When you are finished, click Save.
Mark Assignments Complete
You can use the Home page My Assignments tab Mark Complete function to mark as complete multiple activities or action items at one time.
Note If you have not accepted an action item, you cannot mark it as complete. Accept the action item first, then mark it as complete.
When you mark an activity as complete, the Percent Complete field is automatically set to 100%.

Chapter 2
Page - 21
To mark assignments as complete on the My Assignments tab:
1. Use the Home button drop-down list and choose My Assignments to display your list of assignments.
2. Select one or more rows in the table.
3. Click the Mark Complete button.
Action items in status Not Accepted cannot be marked complete and an error message is displayed.
Flagging Assignments
On the Home page My Assignments tab, the flag icon included in each row is a useful assignment management tool. Because you can sort assignments according to whether or not they are flagged, you can use the flag to indicate assignments that you want to track differently from other assignments. The flags on your assignment table appear only on your My Assignments tab, so you can decide how you wish to use them.
To set or unset the flag in a single assignments table row:
1. Use the Home button drop-down list and choose My Assignments to display your list of assignments.
2. Click the flag icon in the row you want. If the flag is not set , clicking it toggles the flag to set: . If the flag is set , clicking it toggles the flag to not set: .
To set the flags in multiple assignments table rows:
1. Use the Home button drop-down list and choose My Assignments to display your list of assignments.
2. If desired, use the View drop-down list or the filter to sort which assignment rows are displayed.
3. Select the rows you want to flag.
4. Choose More Actions... > Add to Flagged View.
To unset the flags in multiple assignments table rows in the flagged view:
1. Use the Home button drop-down list and choose My Assignments to display your list of assignments.
2. In the View drop-down list, choose Flagged.
3. In the flagged assignments view, select the rows you want.
4. Choose More Actions... > Remove from View.
Hiding and Unhiding Assignments
On the Home page My Assignments tab, the More Actions...Add to Hidden Assignments View command allows you to hide assignment rows that you do not want to see. The assignments are still part of your assignment list, but they are displayed only when you choose Hidden Assignments in the View

Product Portfolio Management User Guide
Page - 22 Product Lifecycle Management
drop-down list.
Hiding assignments can be a useful assignment management tool. For example, suppose you are assigned as a resource for an activity, but you are not the activity owner. You have completed your portion of the task, but other resources have not yet completed their portions of the task. Therefore, the assignment still appears on your My Assignments tab because it has not been marked as Complete. You can hide this assignment so it no longer appears on your assignments list, however, it will still appear on the assignment lists of other resources.
Hiding an assignment removes it from all your My Assignments tab views except your Hidden Assignments view. Your Hidden Assignments view has no effect on the assignment lists of other users. You can hide assignments (add them to your hidden view), display your hidden assignments, and unhide hidden assignments (remove them from your hidden view).
To add assignment rows to your Hidden View:
1. Use the Home button drop-down list and choose My Assignments to display your list of assignments.
2. If desired, use the View drop-down list or the filter to sort which assignment rows are displayed.
3. Select one or more rows in the table.
4. Choose More Actions... > Add to Hidden Assignments View.
To view your hidden assignments:
1. Use the Home button drop-down list and choose My Assignments to display your list of assignments.
2. In the View drop-down list, choose Hidden Assignments.
To remove assignment rows from your Hidden View:
1. Use the Home button drop-down list and choose My Assignments to display your list of assignments.
2. In the View drop-down list, choose Hidden Assignments.
3. In the hidden assignments view, select the rows you want.
4. Choose More Actions... > Remove from View.
Using the Show Details Dialog
On the Home page My Assignments tab, the Show Details icon (in each row next to the name of activity objects) opens a details dialog that displays additional information about the object and allows you to perform actions on that object, for example, edit and bookmark. Your Agile administrator determines which attributes and actions are available in the details dialog of each object type.
Printing the Assignment Table
You can use the Home page My Assignments tab Print function to print the currently displayed assignments table. Use the View drop-down list or the Filter to sort the table, then print the displayed

Chapter 2
Page - 23
table rows.
To print the My Assignment table:
1. Use the Home button drop-down list and choose My Assignments to display your list of assignments.
2. Use the View drop-down list or the Filter to sort the table to display the assignments you want.
3. Click the Print button.
A printable version of table is displayed in a new browser window and the Print dialog appears.
4. Click Print in the Print dialog.
5. Close the new browser window when you are finished.


Product Lifecycle Management Page - 25
Chapter 3
Dashboard
This chapter includes the following:
Starting the Dashboard........................................................................................................................................ 25 Manipulating the Dashboard Windows ................................................................................................................ 25 Dashboard View .................................................................................................................................................. 26 Configuring Dashboard Views ............................................................................................................................. 26 Executive View .................................................................................................................................................... 28 Programs View .................................................................................................................................................... 29 Resources View................................................................................................................................................... 30 Financial View...................................................................................................................................................... 32 My Activities View................................................................................................................................................ 32 Dashboard Management Administration Tasks................................................................................................... 33 PPM Reports ....................................................................................................................................................... 34
The Dashboard enables you to view and manage information across all your programs. Depending on your roles and privileges, you can use the Dashboard to get an executive-level view of key information for all your programs, and user-level information about your own activities and tasks. All users can use the Dashboard to access reports and view consolidated information. See also "Reports (on page 47)“.
Starting the Dashboard You can make the Dashboard your default start page when you log into Web Client. To do this, go to Tools > My Settings > User Profile and select the Preferences tab. Click Edit, and select the Dashboard tab you want as your Preferred Start Page. Most users open on My Activities, but an executive might prefer to open on the Executive tab.
To start the Dashboard, choose Home > Dashboard.
Manipulating the Dashboard Windows The Dashboard windows can be manipulated by the icons described in the table below.
But ton Descr ip t ion
Export Exports data in comma-separated value (.CSV) format for use in a spreadsheet (available in all tables).
Maximize/Restore Original Size Expands the window to full size or reduces it to the size it was previously.
Refresh Table Refreshes the table view to show latest changes to content.

Product Portfolio Management User Guide
Page - 26 Product Lifecycle Management
But ton Descr ip t ion
Remove Content From View Closes the window.
To reopen the window, refresh your browser view. Or select the content object from the Add Content drop-down list at the bottom of the page and click Add.
In the windows that display a table, you can click column headings of most tables to change the sort order. Depending on your privileges, you can click on data in most tables to “drill down” to a view of the individual object.
Dashboard View The Dashboard comprises:
Default Tabs that enable you to select the view: Executive, Programs, Resources, Financial, My Activities, Optional Tab 1, and Optional Tab 2.
User-configured tabs that display customized information in tabular or chart formats, based on preferences set up by an administrator.
Note To view user-configured tabs, you must have the Dashboard Tab View privilege assigned to you, and this privilege must be applied to these tabs within the Agile Java Client.
Windows within each tab that present information relevant to that view. For example, in the My Activities tab the windows represent the current user’s program activities: My Assignments, My Documents, My Action Items, My Issues, and Notifications.
The Configuration panel in the upper right, which enables you to filter data for all the Dashboard tabs and windows, to create a customized view.
The only information you can view in the Executive, Programs, and Financial tabs comes from root programs that you are privileged to read and discover.
If you are an Executive, you have global privileges. You can view all root-level programs that contain matching values for the dashboard category fields. By default, these fields are labeled Program Type, Region, Division, Customer, Launch Year, Product Line, Category 7, Category 8, Category 9, and Category 10. These are multi-select list fields that can be relabeled and configured within the Administration > General Info tab in the Agile Java Client.
For information on how to configure optional dashboard tabs, see the Agile Administrator Guide.
Configuring Dashboard Views The Configuration panel in the upper right lets you filter the data in the dashboard views to show only the information that’s most relevant to you. The notation on the Configuration panel shows which filters are currently in place.
For example, a functional manager who owns a number of resource pools might want to view only off-track tasks assigned to people in certain pools. An executive might set the dashboard to show all the programs, issues, gates, financial summaries, and resources that apply to a division and

Chapter 3
Page - 27
region, or view a specified subset. Once the dashboard settings are entered, you only see information that satisfies the specified settings.
You can use the dashboard category fields to rapidly classify tasks and to slice data for reporting purposes. The values that you set at the root project level are applied down the hierarchy. For example, if you set a particular value for Division at the root project level, all the tasks within the hierarchy are also set to the same value. These fields are ideally used for Customer, Market and other attributes that are relevant at the top level of the project.
Note If a root program has a value set to “All,” then, by design, it will show up in all views no matter what value is selected in the configuration view for that field. “All” is interpreted as including the specific value.
Chart Display
Within a Dashboard table, you can select a chart display type from the Type drop-down list to view data in different formats. When you select an option, consider the number of labels that need to be

Product Portfolio Management User Guide
Page - 28 Product Lifecycle Management
displayed within the chart. Label display within the chart can be affected by the number of values retrieved and by the way labels are formatted.
To optimize display when the list of data labels is long:
Choose Pie, Table, or Polar formats as the display type.
Maximize the dashboard table.
Maximize your browser window.
Note If the number of labels exceeds the screen area available to accommodate the labels, an automatic mechanism computes the number of steps to skip between each label, to prevent overlapping. The skipped labels do not display in your view.
Executive View The Executive tab provides portfolio data for the executive who needs to monitor programs and see information rollups by type of program. It provides a cross-section of information on programs where you can see the major risks in terms of schedule, resources, and cost.
Note The Executive tab contains data only if you have the Executive role, or have Read privilege for root-level programs.
Windows in the Executive tab include:
Program Management
Resources
Financial
Viewing Program Status
The Program Management window provides a graph of all active programs the user has configured to view, showing their overall status (i.e., On Time, Needs Attention, Off Track). For each type of status displayed, the window shows the percentage of programs that have that status.
To display the number of programs that comprise a segment, pass the mouse pointer over that segment of the chart.
To display the Programs tab with a particular segment of programs selected in all windows, click on that segment.
Note The data in this window does not include programs that are in the Completed or Canceled states, programs with a Template field setting of Proposed or Template, or programs that are archived or soft deleted.
Viewing Resource Allocation
The Resources window displays a table showing the names of available resource pools and associated data, filtered by the settings in the Configuration panel.

Chapter 3
Page - 29
Pool members who have no current assignments are not counted.
Resources who are not assigned to any resource pool do not appear on the Dashboard.
To view the Pool Utilization Summary report, click the Report button beside the pool name.
To view the user profile of the pool owner, click the owner’s name from the Owner column. If you have the required privileges, you can edit information about the user and create a Resource Utilization report for them.
Note The data in this window does not include programs that are in the Completed or Canceled states, programs with a Template field setting of Proposed or Template, or programs that are archived or soft-deleted.
Viewing Financial Data
The Financial window displays a table showing cost rollups for the root programs you are configured to view. The Financial tab in the Executive view also shows the same table that is presented in the Financial window. See "Financial View (on page 32)".
Programs View The Programs tab displays information about all programs that you are involved in, including status, gate progress, and top priority issues.
Windows in the Programs tab include:
Programs
Gate Progress
Top Priority Issues
Resource Pool Utilization by Program
Programs
The Programs window displays all programs to which you have access (subject to the filters in the Configuration panel). It includes the root program name, owner, status, start date and end date.
To change the sort order, click a column heading.
To open a program object, click its name. The icon next to the program name indicates the status of the program, such as On Track or Needs Attention.
Gate Progress
The Gate Progress window shows the gates for each active program, and their status; also, the number of deliverables/activities required and completed for each gate thus far. (The number required is derived from the number of deliverables listed on the Content tab plus the number of dependencies to the gate.)
To open a program object, click its name.

Product Portfolio Management User Guide
Page - 30 Product Lifecycle Management
Top Priority Issues
The Top Priority Issues window shows issues arranged in order of priority. If an Action Item icon appears in the row, it means there is an associated Action Item. Click the icon to open the Action Item.
To view a program’s associated issues, click the program name to open its object, then open its Discussions tab. (For further information on the Discussions tab, see "Discussion Table Details (see "Discussions Table" on page 73)".)
To sort issues by a different priority, or view all priorities, use the selection list.
Note The data in this window does not include programs that are in the Completed or Canceled states, programs with a Template field setting of Proposed or Template, or programs that are archived or soft-deleted.
Resources View The Resources tab provides several views on resource utilization and issues for resource pools that you own or for pools that match your privileges.
To select the resource pools to be considered in this tab, use the category fields in the Configuration panel or use the Resource Pools field at the top of the page.
You can minimize, maximize or close tables and charts in the tab view. When a table is closed, the Add Content list appears. Use this list to re-open any table or chart you have closed.
Windows in the Resources tab include:
Resources
My Pool Members Top Priority Issues
My Pool Members Off Track Activities
Resource Pool Utilization by Program
Resources
The Resources window shows each resource pool’s programs and status, noting items that are pending, assigned, or overdue. It also notes resources that are over allocated.
A pending activity or gate is one that has been delegated to a resource pool but it has not yet been assigned to a user in that pool.
The number of overdue items is a count of all activities or gates that are past the due date, whether or not they are assigned to users.
To edit status for a resource pool (add or remove resources, or create a report), click its name.
To create a Pool Utilization report, click the icon to the left of the pool name, or click the pool name and click Report.

Chapter 3
Page - 31
Note The data in this window does not include programs that are in the Completed or Canceled states, programs with a Template field setting of Proposed or Template, or programs that are archived or soft deleted.
My Pool Members Top Priority Issues
This window shows the highest priority discussions for each Resource Pool, but you can select other priorities to display from the Priority list. An icon shows the program status, and an Action Items icon appears at the right if there are Action Items. Click a program name to open it. Once the program object is open you can go its Discussions tab, and view associated issues. (For further information on the Discussions tab, see "Discussion Table Details (see "Discussions Table" on page 73)".)
If there is a discussion thread, only the top level issue is displayed. Click the + symbol to expand the display.
Note The data in this window does not include programs that are in the Completed or Canceled states, programs with a Template field setting of Proposed or Template, or programs that are archived or soft-deleted.
My Pool Members Off Track Activities
This window displays Off Track items assigned to pool members of pools that you own, noting scheduled due date, actual date, and percent completed.
To view and update off-track resource pool activities, click the resource pool name.
Note The data in this window does not include programs that are in the Completed or Canceled states, programs with a Template field setting of Proposed, or programs that are archived or soft deleted.
Resource Pool Utilization by Program
This window shows a graph of the resource pool utilization by program, enabling a program manager to see where resources are allocated or over-allocated.
To view program name and percent utilization of resources, pass the mouse pointer over each chart segment.
To view team data, click the chart segment of interest. This opens the corresponding program object in the Team tab.
To view and change report settings, click the Show Report Options link at the top. You can specify the chart type, date range, programs to include, and time intervals used in the graph. Every time you change field selections, click Refresh to refresh the chart.
Note The data in this window does not include programs that are in the Completed or Canceled states, programs with a Template field setting of Proposed, or programs that are archived or soft-deleted.

Product Portfolio Management User Guide
Page - 32 Product Lifecycle Management
Financial View The Financial tab shows charts of capital expense, labor cost, and fixed cost for each root program available. The Financial tab also shows the same table that is presented in the Financial window.
To select the programs to be considered in this tab, use the category and status fields in the Configuration panel.
You can minimize, maximize or close charts in the tab view. When a chart is closed, the Add Content list appears. Use this list to re-open any chart you have closed.
My Activities View The My Activities tab displays activities that you own or are participating in.
To select the activities to be considered in this tab, use the category and status fields in the Configuration panel.
You can minimize, maximize or close tables and charts in the tab view. When a table is closed, the Add Content list appears. Use this list to re-open any table or chart you have closed.
Windows in the My Activities tab include:
My Assignments
My Documents
My Action Items
My Issues
Notifications
My Assignments
The My Assignments window lists the programs, phases, tasks, and gates that you either own or are an assigned resource thereof.
To change the sort order (view assignments alphabetically, sort by start or end date), click on the heading of the desired column.
My Documents
The My Documents window lists all program-related documents that you own, with the document description, size, and other data.
To open a file, click the file name.
My Action Items
The My Action Items window displays all your action items, along with status and due date.

Chapter 3
Page - 33
If the action item is associated with a program object or discussion object, these appear in the Belongs To column with iconic indicators. Click the link in the Belongs To column to open the associated object.
Click the name of the action item in the Subject column to open the action item.
To see details of your issues, click the name of the program of interest, then select its Discussions tab.
My Issues
The My Issues window includes all discussions you have created for the selected set of programs (not just your top priority discussions). The data includes the program name, issue number, and issue title.
To see details of your issues, click the name of the program of interest, then select its Discussions tab.
Notifications
The Notifications window displays your notifications, including the type and description, sender, and date received. Agile PLM can be configured to automatically send notifications to users either when the user is required to take action or to notify the user that an action has taken place.
Note Notification settings must be configured and enabled in Java Client by an administrator.
To see details of your notifications, click the link in the Subject field.
Important If an action triggers multiple notifications to the same user, the user will receive only one notification. For example, if the triggering action is the status promotion of a routable object, and Bob is an approver, and Bob is added to the Notify list when the object is promoted, Bob is now specified as a recipient of notifications as both an approver and as a person on the notify list. However, Bob will receive only one notification related to this triggering action.
Dashboard Management Administration Tasks If your Agile administrator has given you Administrator privilege applied to Dashboard Management, you can use the Tools menu (Tools > Administration) to modify system-wide settings that determine which available tables to display on each tab and the order in which they are displayed.
Caution Any Dashboard Management modifications you make affects every Agile PLM user. If you display a particular table, then every user can see that table in their dashboard. If you hide a particular table, then no one can see that table in their dashboard.
Note In order to make Dashboard Management modifications, you must have the appropriate Administrator privilege. For more information, see the Agile PLM Administrator Guide.
Product Portfolio Management User Guide
Page - 34 Product Lifecycle Management
PPM Reports Agile PPM includes a set of standard reports for use in analyzing program health. PPM reports are not part of the Dashboard. You can select the PPM report you want to use in the navigation pane of the Agile PLM window.
About Agile Standard Reports
Reports allow you to display the values of your Agile programs and product records. By accessing this information and summarizing it in a meaningful way, reports provide insight into your business processes and can help guide better-informed decisions. Agile PLM provides a robust reporting platform that allows you to:
Measure and monitor business performance using standard out-of-the-box reports. These standard reports capture the best practices in product lifecycle management business processes.
Configure reports with Agile’s custom reporting to obtain the specific information you need.
Use a single point of access to all relevant reports—even those developed outside of the Agile PLM application— through Agile’s external reporting capability.
For detailed information about using all types of Agile reports, see the Getting Started with Agile PLM Guide, which includes information about:
How your roles and privileges affect reports
Report object tabs
Creating and modifying report layouts
Creating custom and external reports
Running, scheduling, saving, and deleting reports
Report output window
Note Your browser may have default security settings that compromise report display. If you are using Internet Explorer with Windows XP, add the Agile site URL as a trusted site within the Tools > Internet Options > Security tab to enable proper downloading of reports.
Agile Standard Reports for PPM
This section discusses the Agile standard reports that are included as part of Agile Product Portfolio Management.
To access program reports: 1. Open the Navigation Pane to the left of the Dashboard, and select Analytics and Reports, or in
the main toolbar, select Tools > Reports to display the Reports navigation pane.
Note The analytics option is only available for licensed Analytics users.
2. Expand the report tree and navigate to Standard Reports > Program & Portfolio Reports. Agile PPM

Chapter 3
Page - 35
standard reports are organized into subfolders under the Program and Portfolio Reports folder.
3. Click on the report you wish to view. Available reports are listed here for your reference. For details on selecting report parameters, using searches, and executing reports, see the Getting Started with Agile PLM Guide.
Note Programs that are Complete or Canceled are not listed for selection.
PPM Repor t Fo lder Repor t Descr ip t ion
End User Reports My Open Action Items All the open action items associated with issues and tasks that are assigned to you.
My Activities and Utilization All your task assignments.
My Discussions All open discussions owned by you with the priority selected when you execute the report.
My Documents All the documents for which you are the Creator or Checkout User.
User Time All the programs where the specified user has entered Actual Time.
Portfolio Reports Portfolio Cost Cost report of all the root programs to which you have access.
Portfolio Cross Program De-pendency
Report of all the activities that have external dependencies.
Portfolio Deliverable Gate Report of all the Gates and their dependent tasks and deliverables in the portfolio of root programs.
Portfolio Priority Discussions Report of all the open discussions in your portfolio of programs.
Portfolio Status Status report of all the root programs to which you have access.
Program Reports Program Open Action Items Report of all the open action items associated with discussions and tasks of the selected root program.
Program Deliverable Gate Report of all the Gates and their dependent tasks and deliverables in the selected Root Programs.
Program Documents Report of all the documents of the selected Root Program.
Program Off Track Activities Report of all the activities based on the selected health status within the selected root program.
Program Schedule The schedule report of all the activities of the selected root program.
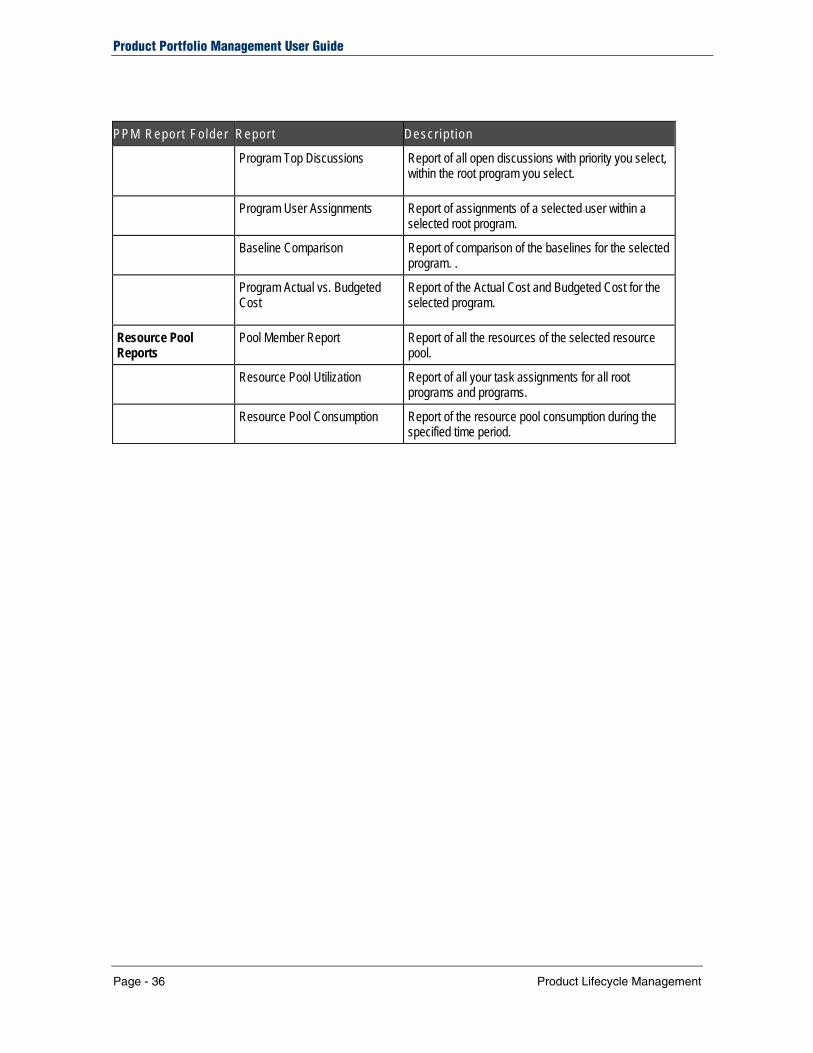
Product Portfolio Management User Guide
Page - 36 Product Lifecycle Management
PPM Repor t Fo lder Repor t Descr ip t ion Program Top Discussions Report of all open discussions with priority you select,
within the root program you select.
Program User Assignments Report of assignments of a selected user within a selected root program.
Baseline Comparison Report of comparison of the baselines for the selected program. .
Program Actual vs. Budgeted Cost
Report of the Actual Cost and Budgeted Cost for the selected program.
Resource Pool Reports
Pool Member Report Report of all the resources of the selected resource pool.
Resource Pool Utilization Report of all your task assignments for all root programs and programs.
Resource Pool Consumption Report of the resource pool consumption during the specified time period.

Product Lifecycle Management Page - 37
Chapter 4
Creating and Managing Programs
This chapter includes the following:
About Programs................................................................................................................................................... 37 Creating Program-related Objects ....................................................................................................................... 38 Editing Program Objects Concurrently ................................................................................................................ 41 Creating a Project Environment: The Actions Menu............................................................................................ 43
About Programs Agile Product Portfolio Management provides many tools a Program Manager can use to schedule and track a program, including the means to send automatic reminders to team members when they have tasks due, maintain a record of project-related discussions, or let team members know when aspects of the projects have changed.
You can start “from scratch” by creating a new program structure in PPM, or import an existing Microsoft Project file. For detailed examples showing this process in action, see "Creating Programs: A "Real World" Example (on page 113)".
Setting Up a Program Structure
When creating a new program, the easiest way to build the structure is to start at the top and work down. At a minimum, you need:
Parent program object
Child activity objects
Designated program “gates”
Pool of resources (project team members)
You can store program specifications and requirements documents with the parent program object, to make it easy for program members to locate them.
The general procedure is to create the root-level program first and then create the child objects.
The table below shows the general workflow for creating a program structure.

Product Portfolio Management User Guide
Page - 38 Product Lifecycle Management
Star t ing “ f rom scra tch” in Ag i le PPM Por t ing an Ex is t ing Program f rom Microso f t P ro jec t
1.Create the root-level program object using one of the methods described in “Creating Program-related Objects.” Be sure to specify Program as the object type.
1. Publish the program’s Microsoft Project file into Agile PPM, as described in "Creating a program in PPM from an existing Microsoft Project file (see "Creating a PPM Program from an Existing Microsoft Project File" on page 94)."
2. Create the first child object. Go to the Schedule tab of the new program object, and click Add. Create the first child object. All objects created from the Schedule tab are children of the current object.
3. Repeat the process to create additional children, as needed.
4. Open each child object and create its children, as needed.
5. Set gates to delineate the completion of key program goals.
6. Map existing dependencies between program objects.
2. Re-set any dependencies that were not originally entered as “Finish to Start” dates.
Once you have the structure in place, you may want to save it as a template, to make it easier to create future programs; see "Using Save As to Create a Template (on page 44)“.
Note You can also create program objects working from the project Gantt Chart. For further information, see "Gantt Chart (on page 79)".
Creating Program-related Objects You can create a number of program-related objects in Agile PPM. A program-related object can be the parent program itself, a gate, phase, or task.
The PLM user interface gives you four different ways to create a program-related object:
Use the Create menu to define the program object “from scratch”, or from a template.
Open an existing program object and choose Save As.
Open the project Gantt Chart and click Add Activity, as described in "Adding Activities (on page 85)".
Import an existing program from Microsoft Project, as described in "Working with Microsoft Project (on page 93)".
Open the Schedule tab of a program and click Add, to add an activity using the Add Activity wizard.
Chapter 4
Page - 39
Using the Create Menu
You can create new programs from the Create menu, either directly or using a template. If you choose to create a program that is based on an existing program template, be sure to read the considerations listed in “Cloning Deliverables (on page 70)” before you begin.
To create a new program object or template:
1. Launch Agile Web Client.
2. Go to the main toolbar and click the Create menu.
3. Select Programs > New. The Create Project_Activities Wizard appears.
4. Click the Activities Type drop-down list, and select the desired activity type.
5. Fill in the required fields, such as Name, Schedule Start Date, and Schedule End Date. Click the icon next to date fields to select the appropriate dates.
To continue using the Create wizard to enter information on each tab of the program, check the Continue Creation in Wizard checkbox, and click Continue. Follow the onscreen instructions to complete the wizard as described in step 6 below
To create and display the program immediately, clear the Continue Creation in Wizard checkbox and click Finish. The new program appears with its General Info tab displayed. Fill in information on program tabs, as desired.
6. On the General Info page, enter information for the following: Rollup Health Status -- If you want this information rolled up to parent objects, select Yes. For
more information, see “How Status Roll-Up works (on page 5)”. Template -- If you are creating a new template (not saving an existing template with a new
name), select Template in this field.
Note You cannot change the status of objects which have the Template value set to Proposed or Template.
7. If you want to add an attachment to the object, click Next. Otherwise, click Finish. The General Info tab of the new object appears.
If you create a new template type program, you can edit the owner field on the General Info tab and change the owner for that activity.
When you create a program from a template, the owners of all activities are copied from the template. If an Active program is created from the template, notifications are sent to the respective owners of the activities.
To create a new program object from an existing template:
1. Launch Agile Web Client.
2. Go to the main toolbar and click the Create menu.
3. Select Programs > From Template. The Program Creation Wizard appears.
4. In the Select Template page, select the template you want to use to create the program and click Next.
5. In the Details page: a. Enter a name and description for the program.

Product Portfolio Management User Guide
Page - 40 Product Lifecycle Management
b. Specify the new owner of the program. The default owner of any activity in the program is the owner specified for that activity in the template. Select the Apply to All Levels checkbox if you want this user to own all the child program-objects as well.
c. In the Schedule field, select a start date or end date for the program. If you provide a duration, PPM will automatically calculate dates based on the start or end date provided.
d. In the Template field, select Proposed. You can change the status to Active when you are ready to roll out the program. Your selection here can have implications on the Autonumber attributes of the new program. For more details, see “Cloning Deliverables (on page 70)".
e. Select the optional components of the template that you want to have in the new program. For more details on program objects that are cloned when you select the Content checkbox, see “Cloning Deliverables (on page 70)".
6. Click Finish to complete program creation. If the program that you are using as a template has a large list of deliverables, select the Run as a background process check box. You can then continue working on other programs while the new program is being created. A notification is sent to your Inbox when the process completes. You can open the program directly from the notification link.
Using the Save As Command
You can use the Save As command to duplicate an activity and all its information, including schedule, structure, team, dependencies, deliverables, attachments, and general information.
To use Save As to create a new activity:
1. Choose Actions > Save As to save the current activity under a new name.
2. Select which components to copy.
3. Click Finish when done. The General Info tab of the new activity appears.
Creating and Using Gates
A gate is a special PPM object representing a point in time that denotes the completion of a set of related activities, such as a phase or some other set of tasks. Gates usually change state based on the state change of one or more deliverables. A gate is a leaf node, meaning it has no children.
The status of a gate can be Closed or Open. The default is the Closed state. A gate is closed until all its deliverables have been met. At that point, it becomes Open, which means that the program can now proceed through the gate.
A gate is created as the child of another program element.
To create a gate:
1. Go to the parent activity.
2. On the Schedule tab of the parent object, click Add and specify Gate as the object type. The Add Activity wizard appears.
3. Fill in the information for the gate.
4. Click Finish. The General Info tab of the new gate appears.
You can add deliverable objects to the gate, which can be used to control the status of the gate.

Chapter 4
Page - 41
The Content tab displays objects and deliverables that are required for the review and approval process of the Gate object. See "Adding Content (on page 68)".
You can also add dependencies to a gate, as with other activities. The dependencies are accounted for in the rescheduling of the project plan.
Editing Program Objects Concurrently The Agile PPM solution is designed to manage large programs with hundreds of activities and numerous team members. It is possible for multiple users to edit the following:
Multiple tasks in the same project tree structure at the same time.
The same task at the same time.
Editing Multiple Tasks in the Same Project Tree
When multiple tasks in the same project tree are edited at the same time, the edit modifications may have affects on objects higher in the program tree (rollup) or lower in the program tree (rolldown).
Editing Tasks with a Predecessor and Successor Relationship
When a parent task is rescheduled to a specific end date, that end date rolls down to the child objects. You can also edit a child object end date, which then extends the bounds of the parent object (by rollup to the parent object). As each user makes and saves his modifications, the necessary rollup or rolldown takes place. In this scenario, it is possible for a user to enter a specific date on the edit page, yet see a different date upon save because of the rollup or rolldown caused by another user’s edits. However, the schedule remains accurate.
Examples
Task B (owned by Bob) is a predecessor to task A (owned by Mark). Bob and Mark are editing the schedule dates of their tasks at the same time, and save their edits one right after the other. If the new edited dates of the first saved task cause the dates of the second saved task to change, the person saving the second task is presented with a message explaining that the dates he entered will be changed and he can accept the change or cancel.
Mary is editing a parent activity and several other users are editing several child activities at the same time. Mary reschedules the specific end date of the parent activity. At the same time, some of the child activities have been modified in such a way that the end date of the parent activity is extended. As each edited activity is saved, the dates for the parent or child activity are updated correctly for schedule accuracy. It is possible that a user may save his activity and see a different date than the one he entered on the edit page, but the schedule is accurate.
New roll-up data overwrites a common parent or root activity.
Susan owns task C and Fred owns task D. Both task C and task D have a common parent, task M, thus they are both in the same tree structure. Both Susan and Fred are editing their tasks, modifying data that rolls up to parent task M (percent complete, cost, or status data). Fred saves task D and task M is rescheduled according to Fred’s edits. Then Susan saves task C, and task M is again rescheduled, this time according to Susan’s edits.

Product Portfolio Management User Guide
Page - 42 Product Lifecycle Management
Multiple Users Editing the Same Task
To keep other users from editing roll-up or roll-down attributes of the object you want to edit, use the Lock feature. Locking an object means that only you can edit roll-up and roll-down attributes and other users who edit the object are “locked out.” Although they can edit attributes that do not rollup and rolldown, they cannot edit roll-up and roll-down attributes until you have finished your edits and you have unlocked the object.
Note When you use Launch in Microsoft Project or Gantt Chart, Agile automatically locks the project. When you update from Gantt Chart or Microsoft Project, Agile automatically unlocks the project.
In contrast, when you use Edit on the Cover Page, you must click Lock before you click Edit if you want to lock the object. The differences between locked editing and unlocked editing are explained below.
Locking Tasks for Editing
When a user (Mary) locks the task before entering edit mode, Agile provides the following safeguards when a second user (Carl) edits the same task:
Carl sees a message “This activity is currently locked by another user. For this reason some fields will not be editable.”
While in edit mode, Carl can edit only non-rollup attributes on the Cover Page, Page Two, and Page Three. Carl can save his edits. When Mary saves her edits, Carl’s edits may be overwritten. The most recent update of non-rollup attributes overwrites the others.
The Name attribute on the Cover Page is an exception. Even though it is not a rollup attribute, when the task is locked, only the lock user may edit this attribute.
Note When you lock an object, its dependencies (both external and internal) are locked; the successors and their children are locked.
To lock and edit an activity object:
1. Open the object you want to edit.
2. Click Lock.
3. Click Edit on the Cover Page tab.
4. Make your desired edits.
5. Click Save on the Cover Page tab.
6. Click Unlock.
Editing Unlocked Tasks
If you do not lock a task before editing it, the same safeguards do not apply.
For example, let's assume we have two users, Joe and Carl. When Joe enters edit mode for a task first, and Carl then enters edit mode, the following applies:

Chapter 4
Page - 43
The second user, Carl, does not see a warning that another user is in edit mode.
Regardless of who entered edit mode first, the user who saves first will update the Agile database with his modified data. The second user who saves receives the following error message: “The current object has been modified by another user, please try again. If you want to ensure that your changes are saved, please lock the object prior to editing.”
If the unlocked parent object has been rescheduled to a specific end date, and any child objects have been modified in a manner that extends the bounds of the parent, no messages are presented, and each modification is saved. The appropriate roll-up or roll-down date modifications are performed. It is possible that the date information that a user saves might not match the date he entered (due to edits made by a different user), but the schedule information is correct.
The exception to the above behavior is when two users edit the task status (use the Change Status button) or two users add to the Schedule at the same time. Multiple status changes and schedule additions are accepted and saved when done in parallel.
Creating a Project Environment: The Actions Menu The Actions menu has the following commands:
Bookmark
Subscribe
Save As
Delete
Send
Sharing
View workflows
Delegate
Substitute resource
Change parent
Change archive status
Reports
Some of the above commands, such as Bookmark and Subscribe, are useful with all Agile objects; they are described in detail in the Getting Started with Agile PLM Guide.
Other commands are discussed in the following sections.
Subscribing to Events
The events you can subscribe to vary per object. Product Portfolio Management has the following Activity-specific subscription events that do not apply to other objects:

Product Portfolio Management User Guide
Page - 44 Product Lifecycle Management
Add Discussion
Reply to Discussion
Add News
Add Action Item
Modify Schedule
The Apply to Children checkbox in activities and gates “push” a subscription to all child objects. If you subscribe to an activity that has a schedule and select this checkbox, you will automatically subscribe to all of the activity’s programs, phases, and tasks (that is, any object created in the out-of-box subclasses of Activities class). Because Page Two and Page Three fields can be defined differently for programs, phases, and tasks, any of the attributes that do not apply are ignored.
Using Save As to Create a Template
You can use Save As to duplicate values and other dependencies of existing objects in new objects or templates. The Save As command will replace the creator of the new program as owner of all activities for the newly created program.
To create a template:
1. Open the program you want to save as a template. Choose Actions > Save As.
2. Select the components you want to include.
3. Select Template in the Template drop-down list. Click Finish.
The General Info tab of the new template appears.
Note Discussions, action items, and history are not included in the template.
Once saved as a template, a program does not appear on active program lists. However, documents continue to be stored for the program on the Attachments tab. The template is available to create new programs using the Create > Program > From Template command.
Delegating Ownership
When you create a program element, you are made its owner by default. The Delegate command enables you to change ownership of a program element.
Note An owner of a higher-level program element retains ownership of lower level items reporting to it, even when ownership of the lower level is delegated to another team member.
To delegate ownership of a program, phase, task, deliverable, or gate:
1. Open the activity you want to assign to a new owner.
2. Choose Actions > Delegate. 3. Select a new owner from the team list.
4. If the intended new owner is not listed, add him or her to the team at this time. Click the Add button on the Delegate Ownership page, then select the user in the Select Delegate list.
Chapter 4
Page - 45
A gray icon appears beside the General Info tab link. It remains until the delegated owner has accepted the delegation, thereby becoming the owner of the activity. In the Delegated Owner field, the
icon displays next to the delegated user’s name.
When the delegated user logs in to Agile PLM, he or she receives a delegation notification in the Notifications tab, and a corresponding request in the My Assignments tab. Once the delegation is accepted, the icon is cleared.
If the delegated owner has not yet accepted the delegation, you can use Actions > Delegate to choose a different user as the delegated owner.
Note To cancel the delegation, use Actions > Delegate and select the original owner as the delegate.
Act ion or cond i t ion Resu l ts or consequences
The program is not active (the Template field setting on the General Info tab is not equal to Active).
Or
The program is active, but its status is Not Started.
Note: To start a program (move it to the In Process status), change the status of one of its leaf activities. You cannot directly change the status of an activity if it has subordinate activities.
No delegations are sent to the delegated owners. Delegations are sent only when the program is Active.
A current team member is selected as the new owner, but has not yet accepted.
The new owner’s name appears in the Delegated Owner field on the General Info tab.
The gray icon appears beside the General Info tab name indicating that the program has been delegated, but the delegation has not been accepted.
A user who is not a current team member is selected as the new owner, but has not yet accepted.
The new owner’s name appears in the Delegated Owner field on the General Info tab.
The gray icon appears beside the General Info tab name indicating that the program has been delegated, but the delegation has not been accepted.
Because the delegation has not yet been accepted, the new owner does not appear on the Team tab.
The delegated user accepts the delegation in the My Assignments tab.
The gray icon beside the General Info tab name is removed. If the delegated owner was not a current team member, he is
added as a team member on the Team tab. On the Team tab, the Agile PPM default owner role is
automatically added to the delegated owner’s assigned roles. By default, the default owner role is the Program Manager role, however, your Agile administrator may set a different role. For more information, see the Agile PLM Administrator Guide.

Product Portfolio Management User Guide
Page - 46 Product Lifecycle Management
Act ion or cond i t ion Resu l ts or consequences
The delegated user rejects the delegation. The icon beside the General Info tab name is removed. The Delegated Owner field on the General Info tab is empty.
Substituting Resources
You can use the Actions > Substitute Resource command to substitute one resource for another.
To substitute one resource for another:
1. Choose Actions > Substitute Resource.
2. Select a resource to be replaced in the From Resource drop-down list. The list contains all team members including those assigned to child activities.
3. Click the To Resource field and use the button to select the substituted resource. If you want to substitute the resource in all the child activities, select the Apply to Children checkbox.
4. Click Substitute. The replaced resource’s role is assigned to the substituted resource.
Note You can substitute a resource on a completed activity only if the % allocation is zero.
Changing the Parent
You can change the parent of a program element. For example, you can change the parent of Gate A, so that it reports to Task A instead of Task B, or have Phase A report to Program 2 instead of Program 1.
To change the parent of an activity:
1. Open the activity.
2. Select the Actions > Change Parent command.
3. Use one of the search options to locate the new parent.
4. Select the new parent object, and click Change.
Changing the reporting relationship of a program element also changes the rollup status, dates, and progress to those of the new parent.
Note You cannot change the parent of an activity that is in Completed status.
Archiving Programs
Programs are archived by changing the root-level program’s archive status.
You can change the archive status of a root-level program from the Actions menu. Archiving old data can improve system performance.
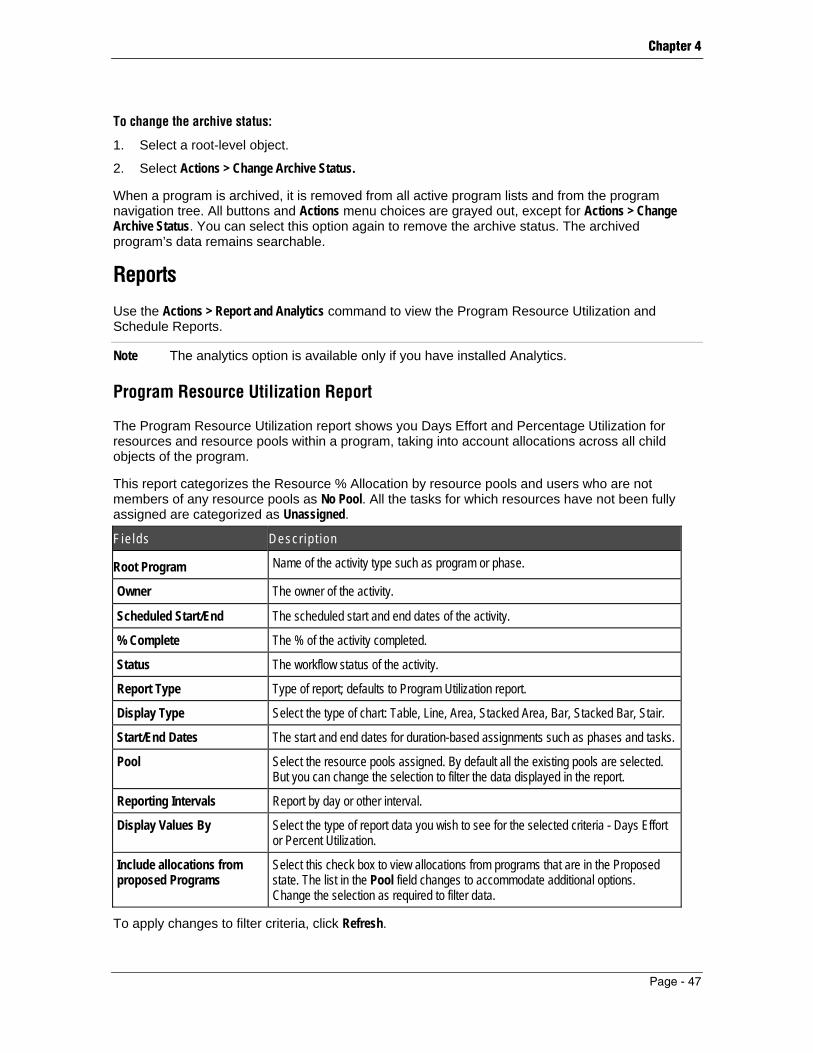
Chapter 4
Page - 47
To change the archive status:
1. Select a root-level object.
2. Select Actions > Change Archive Status.
When a program is archived, it is removed from all active program lists and from the program navigation tree. All buttons and Actions menu choices are grayed out, except for Actions > Change Archive Status. You can select this option again to remove the archive status. The archived program’s data remains searchable.
Reports
Use the Actions > Report and Analytics command to view the Program Resource Utilization and Schedule Reports.
Note The analytics option is available only if you have installed Analytics.
Program Resource Utilization Report
The Program Resource Utilization report shows you Days Effort and Percentage Utilization for resources and resource pools within a program, taking into account allocations across all child objects of the program.
This report categorizes the Resource % Allocation by resource pools and users who are not members of any resource pools as No Pool. All the tasks for which resources have not been fully assigned are categorized as Unassigned.
Fie lds Descr ip t ion
Root Program Name of the activity type such as program or phase.
Owner The owner of the activity.
Scheduled Start/End The scheduled start and end dates of the activity.
% Complete The % of the activity completed.
Status The workflow status of the activity.
Report Type Type of report; defaults to Program Utilization report.
Display Type Select the type of chart: Table, Line, Area, Stacked Area, Bar, Stacked Bar, Stair.
Start/End Dates The start and end dates for duration-based assignments such as phases and tasks.
Pool Select the resource pools assigned. By default all the existing pools are selected. But you can change the selection to filter the data displayed in the report.
Reporting Intervals Report by day or other interval.
Display Values By Select the type of report data you wish to see for the selected criteria - Days Effort or Percent Utilization.
Include allocations from proposed Programs
Select this check box to view allocations from programs that are in the Proposed state. The list in the Pool field changes to accommodate additional options. Change the selection as required to filter data.
To apply changes to filter criteria, click Refresh.

Product Portfolio Management User Guide
Page - 48 Product Lifecycle Management
To print the report, click the Print button.
To export the report, click the Export to CSV button. The report will be exported into the comma-separated value format (.CSV), which can be opened in Microsoft Excel.
Schedule Reports
The Actions > Report and Analytics > Schedule option opens the Schedule Reports page. Schedule reports provide a complete view of the schedule. Values for status and ownership can be selected to apply filters to the list of activities.
You can customize the report by selecting values in the Owner, Status, and Health fields.
The schedule report has the following fields:
Fie ld Descr ip t ion
Name The number of the program.
Description The schedule description.
Owner The program owner.
Schedule Contains information that enables you to quickly track Program progress. Tells you the targeted start and finish dates as well as the duration remaining until Program completion. The Complete subfield tells you to what percent the Program is complete.
Actual Actual varies from Schedule in so far as you are ahead or behind targeted Program dates. It tracks actual time spent on a Program.
Click the Print button to print the report.
For descriptions of other reports, see “PPM Reports (on page 34)”.
Changing Workflow Status
The Change Status button lets you change the workflow status of leaf objects (objects that have no children). The status of parent objects cannot be changed directly, since it is changed by rolling up the status from leaf-level objects. You must have the appropriate privileges; by default, the Program Manager and Program Administrator roles have the required privileges.
The Change Status button is only available for objects whose Template field is Active in the General Info tab. You cannot change the status of objects whose Template field is Proposed or Template. Changing the Template field must be done at the parent level, and child objects are automatically moved to the Template value of the parent.

Product Lifecycle Management Page - 49
Chapter 5
Working with Program-related Objects
This chapter includes the following:
Accessing Program Objects ................................................................................................................................ 49 Viewing Project Summary.................................................................................................................................... 50 Viewing General Information ............................................................................................................................... 53 Managing Schedules ........................................................................................................................................... 56 Managing Dependencies ..................................................................................................................................... 59 Managing Teams................................................................................................................................................. 62 Managing Content ............................................................................................................................................... 67 Managing Workflows ........................................................................................................................................... 72 Managing Discussions......................................................................................................................................... 73 Managing Attachments ........................................................................................................................................ 76 Viewing History .................................................................................................................................................... 76
Accessing Program Objects You can manage program-related objects from the following tabs or pages:
Tab/Page Tasks
Summary View overall program information, perform actions on or navigate quickly to selected activities. See “Viewing Project Summary (on page 50)”.
General Info View and edit general information about the program, including activities, status, and other attributes configured in Administration. See “Viewing General Information (on page 53)".
Schedule Manage the schedule of individual activities within the program, create baselines, and analyze the impact of changes. See “Managing Schedules (on page 56)”.
Dependencies Create and manage dependencies between various program-related activities. See “Managing Dependencies (on page 59)”.
Team Manage resources for a program. See “Managing Teams (on page 62)”.
Content View and manage all program-related content, including deliverables. See “Managing Content (on page 67)”.
Workflow View workflows and sign-offs, and assign approvers, observers, and notifiers as necessary. See “Managing Workflows (on page 72)”.
Discussions Create or join program-related discussions and view action items. See “Managing Discussions (on page 73)”.
News Share news and information.
Attachments View, edit, and manage attachments that are required for program execution. See “Managing Attachments (on page 76)”.
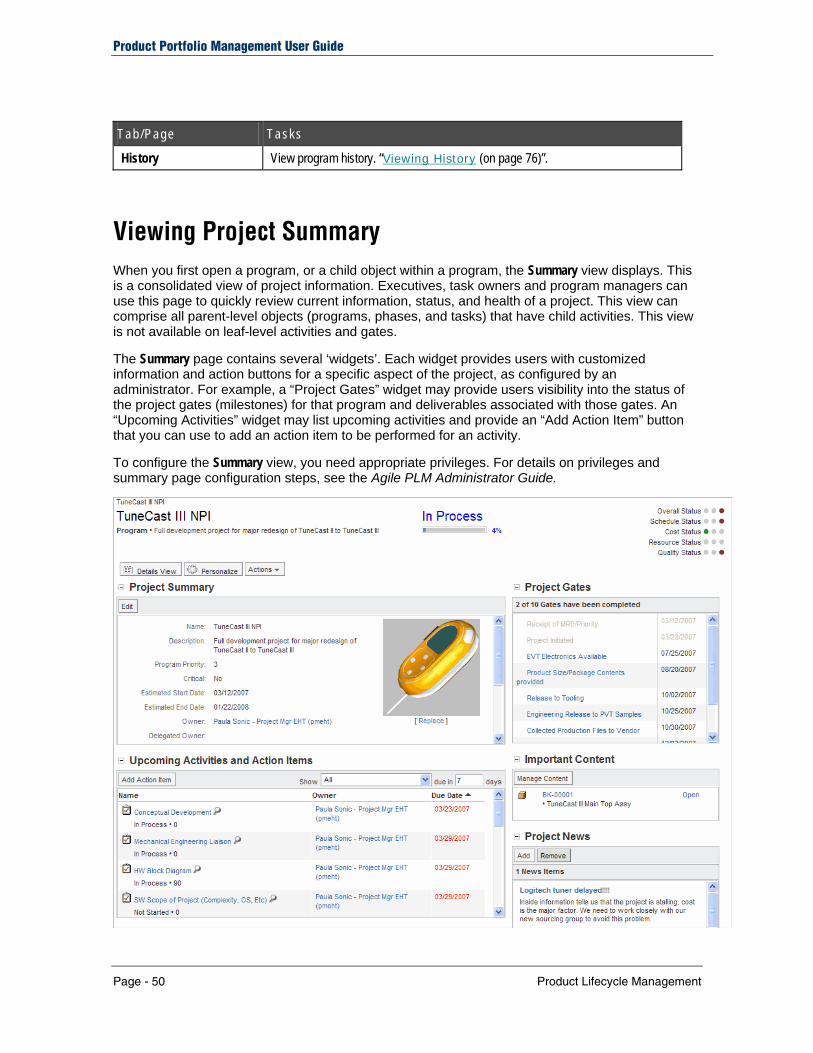
Product Portfolio Management User Guide
Page - 50 Product Lifecycle Management
Tab/Page Tasks
History View program history. “Viewing History (on page 76)”.
Viewing Project Summary When you first open a program, or a child object within a program, the Summary view displays. This is a consolidated view of project information. Executives, task owners and program managers can use this page to quickly review current information, status, and health of a project. This view can comprise all parent-level objects (programs, phases, and tasks) that have child activities. This view is not available on leaf-level activities and gates.
The Summary page contains several ‘widgets’. Each widget provides users with customized information and action buttons for a specific aspect of the project, as configured by an administrator. For example, a “Project Gates” widget may provide users visibility into the status of the project gates (milestones) for that program and deliverables associated with those gates. An “Upcoming Activities” widget may list upcoming activities and provide an “Add Action Item” button that you can use to add an action item to be performed for an activity.
To configure the Summary view, you need appropriate privileges. For details on privileges and summary page configuration steps, see the Agile PLM Administrator Guide.
Chapter 5
Page - 51
Summary Page Actions
You can perform the primary actions required on the program directly from the Summary view.
Most widgets contain action buttons that you can use to navigate to the relevant tab to perform necessary actions on a selected program object. For example, in the Important Content widget, you can click Manage Content to take you directly to the Content tab in the Details View.
Some objects have a icon next to them. You can click this icon to view details and perform actions on that object as configured by an administrator. For details on how to configure the fields that display in the Show Details dialog, see the section “UI Configuration Data” in the Agile PLM Administrator Guide.
The contents of each widget and the actions that you can perform within each are explained in the table below.
Widge t Descr ip t ion Ac t ions Ava i lab le
Project Summary
A quick overview of the project. Displays data for attributes associated to project activities, as configured by an administrator. For example, Project Priority, Project Manager, Project Objectives, Current Phase, and so on.
Add image - Insert an image file from your local drive. Click Add Image to browse and select an image file from your local drive. The image file is automatically resized if it exceeds the allotted space and resolution.
Replace Image - Replace the current image file with another.
Image editing options are available only to root program managers, and only on the root program.
Edit -Edit the attribute values displayed within the widget. The attributes that display here are configured by an administrator within the Tools > Administration page. You must have Modify privilege to edit these values. For details, see the Agile Administrator Guide.
Upcoming Activities and Action Items
Helps you keep track of immediate requirements. Lists project activities and action items that are either overdue, or will be due within a specified timeframe. You can view leaf-level program objects (including gate sub-classes) that are in Not Started or In Progress states, and Open Action Items associated to the Activity being viewed and its child activities. Table columns are sortable; by default these are sorted by Due Date.
Add Action Item - Create a new Action Item for the activity being viewed currently. Click Add Action Item to open a dialog where you can create the new action item.
Filter -Filter the list using the options within the Show drop-down list to display upcoming action items and activities, or items that need your immediate attention. For example, you can use the My Activities and Action Items option to filter the list by items for which you are the assigned owner. After selecting an option, you can additionally narrow down the results by entering a number in the due in — days field. The default value in this field is 7 (days).
Show Details - View Details of the activity or action item. Click the icon next to the activity or action item to open a dialog where you can view details and optionally perform additional actions on that object, as configured by an administrator.

Product Portfolio Management User Guide
Page - 52 Product Lifecycle Management
Widge t Descr ip t ion Ac t ions Ava i lab le
Recent Discussions
Displays a list of recent, open discussions that occurred within a specified time frame. When you select a particular discussion, the thread of that discussion displays in the bottom pane of the window as a preview.
Add - Create a new discussion to be associated with the current Activity. Click Add to open the Add Discussion wizard and enter discussion details. You can select the list of users you wish to include in the discussion and notify them.
Join - Join an existing discussion. Select the row of the discussion you wish to join and click Join to join the discussion.
Reply - Reply to a discussion message. Click Reply on the right-hand side of the selected discussion row to open a dialog where you can enter your response. You can edit the subject of the message if you want. By default, the response will be sent to all users currently included in the discussion. You can edit the Notify List field in the dialog to change the list of users who will receive the response.
Project Gates
Displays the following: A list of Gates and their due dates. A list of deliverables and their status for a
given Gate. If you have created multiple Gate subclasses to establish milestones, you can configure this widget to display the Gate subclasses you wish to view. For details, see the Agile Administrator Guide.
Quick Navigation - Click the name of a listed gate to navigate directly to the General Info tab view of that gate.
Expand or Collapse - Expand or collapse the view of the Gate Deliverables table. Click on the + sign next to a gate to view deliverables associated with it. This action may take some time, depending on the number of deliverables defined.
Important Content
Displays a list of content objects that were added to the Important Content view from the Content tab. See “Viewing Content (on page 67)”.
Quick Navigation - Click the content object name to navigate directly to that General Info tab for that object.
Manage Content - Click Manage Content to navigate to the Content tab of the activity being viewed.
Open files - Click Open to open or download a content object that has a file attachment.
Project News Displays project-related news to keep team members and resources informed about project information.
Add - Click Add to open a dialog where you can create a news item related to the activity currently being viewed. You can add a subject and news text.
Remove - Select a news item and click Remove to remove it from the widget. You can multi-select items in the list to remove them.

Chapter 5
Page - 53
Widge t Descr ip t ion Ac t ions Ava i lab le
Team Contact Info.
Displays the team member associated with the selected activity and provides contact information for those team members.
Manage Team - Click Manage Team to navigate directly to the Team tab of the current activity.
Send Email - Send an Email to a team member whose name appears as an attribute within the widget. Click the Email icon next to the username to open a comments dialog box, where you can enter comments and then send these as an email to the team member.
To toggle between the summary view and a detailed view of the program, click Summary or Details View as appropriate.
Viewing General Information The General Info tab contains Activity and Status information, and displays information for the fields listed in the table. Fields which contain information that is compiled or rolled up from other fields are not editable. To edit fields, click the Edit button. You can make changes in the editable fields, and click Save to save the changes, or click Cancel to exit without saving.
Fie ld Conta ins . . .
Schedule Contains information that enables you to quickly track program progress. Tells you the targeted start and finish dates as well as the duration remaining until program completion.
Estimated Contains information that enables you to track when overdue items will be delivered. See also "Estimated Dates (on page 55)".
Actual Actual varies from schedule if you are ahead of or behind targeted program dates.
Work Days Variance
Calendar Days Variance
Start Variance, Finish Variance, and Duration Variance are displayed for Estimated, and Actual dates, compared with Scheduled dates. Variances can be displayed in either Work Days or Calendar Days, or both Work and Calendar days.
Note: Your Agile administrator determines which information is displayed in the summary table on the General Info tab.
Duration Type
Days Effort % Complete
Duration Type influences how Days Effort is determined. For more information about duration type and days effort, see “Duration (on page 55)”.
The % Complete field tells you to what percent of the program is complete.
Activities Type Displays whether the activity is a program, phase, or task.
Owner The program owner.
Delegated Owner The user who has been assigned the activity. Becomes the owner once he/she accepts the delegated object. If a user has been delegated ownership but has not accepted the request, they are listed as the Delegated Owner.
Name The name of the activity.
Description Text that describes the program. The maximum length is set by the Agile administrator.

Product Portfolio Management User Guide
Page - 54 Product Lifecycle Management
Fie ld Conta ins . . .
Root Parent A link to the root parent object.
Parent A link to the parent object.
Template Indicates the type: Active, Proposed, Template. Only an Active program can undergo changes in workflow status.
Audit Score The audit score for the activity. See “Audit Values (on page 56)”.
Weight Weight assigned to the activity. See “Audit Values (on page 56)”.
Weighted Score A calculated score based on the audit score times the weight. See “Audit Values (on page 56)”.
Status Indicates the workflow status of the program.
Rollup Health Status Indicates whether the health status rollup is selected or not.
Schedule Status Reason Describes the schedule status for the program object.
Cost Status Denotes the cost status for the activity. This value is a selected value for the leaf object and a rolled-up value for a parent object.
Cost Status Reason Describes the cost status for the program object.
Resource Status Denotes the resource status for the activity. This value is a selected value for the leaf object and a rolled-up value for a parent object.
Resource Status Reason Describes the resource status for the program object.
Quality Status Denotes the quality status for the activity. This value is a selected value for the leaf object and a rolled-up value for a parent object.
Quality Status Reason Describes the quality status for the program object.
Lock User Name of the user who is currently using Gantt Chart or Microsoft Project to modify the program. When a user launches either Gantt Chart or Microsoft Project, the activity is automatically locked to prevent any other user from editing the program in PPM.
Workflow Identifies the object’s assigned workflow.
Schedule Status The schedule status of the activity.
Overall Status An overall status of the activity. This value is calculated based on either selected or rolled up-values for cost, resource, quality, and schedule. It denotes the worst of these status values (cost, resource, quality, and schedule).
Program Type Dashboard field. May be renamed during implementation.
Region Dashboard field. May be renamed during implementation.
Division Dashboard field. May be renamed during implementation.
Product Line Dashboard field. May be renamed during implementation.
Customer Dashboard field. May be renamed during implementation.
Launch Year Dashboard field. May be renamed during implementation.
Global Controls whether the program is available to all executives or not.

Chapter 5
Page - 55
Fie ld Conta ins . . .
Schedule Editor Indicates the source of schedule editing for this program: PPM or MSP (Microsoft Project). This is automatically set to MSP when you launch a project into Microsoft Project. When set to MSP, the PPM project does not roll up dates, durations and % complete. This ensures that when the project is published in PPM from Microsoft Project the project dates are correct in PPM.
Cost fields Monetary fields that are used in the dashboard and reports. These fields track program level costs.
Time Fields Data for these fields is manually entered using Edit.
Critical Indicates whether the activity is on the critical path.
Custom fields Fields that can be configured by the administrator.
Dates
Within Agile PPM, dates are displayed in your preferred date format, but there is no time zone conversion applied for dates such as Schedule Start Date, Schedule End Date, Actual Start Date, Actual End Date, Estimated Start Date and Estimated End Date.
Date values that you enter are stored in Greenwich Mean Time (GMT) and displayed without the time zone. For example, if you enter a date value of 10/10/2007, the system stores the date in the database as 10/10/2007 00:00:00 GMT.
Note Page Two, Page Three, Workflow, and History dates are displayed in user-preferred time zones.
Estimated Dates
Estimated dates for a child object are calculated on the following basis:
If estimated dates are specified for all leaf-level tasks, the system considers the earliest estimated start date and the latest estimated end date.
If estimated dates are specified only for some leaf-level tasks, the system considers the earliest estimated start date or the earliest scheduled start date, whichever is earlier, and the latest estimated end date or the latest scheduled end date, whichever is later.
If estimated dates are not specified for any leaf-level tasks, the system considers the earliest scheduled start date and the latest scheduled end date.
Duration
Objects within a program can have different duration types such as:
Fixed duration — The object takes a defined period of time (for example, five days). For Fixed duration type, the Days Effort is calculated as the Scheduled Duration times the sum of the % allocation of all resources. You can also create a zero-effort activity by selecting Fixed duration and setting zero as the Days Effort. A zero-effort activity can have any scheduled duration

Product Portfolio Management User Guide
Page - 56 Product Lifecycle Management
(such as six months), but the Days Effort is zero. Gates and milestones are examples of objects that require zero effort.
Effort driven — The objects’ Days Effort is fixed, but the number of resources assigned affects the scheduled duration. For Effort Driven Duration Type, the Scheduled Duration is calculated as the Days Effort divided by the sum of % allocation of all resources.
Calculated — This applies to parent objects and is set by the system. You cannot edit this duration type.
Note If a parent changes to a leaf node object (an activity with no children) then the duration type changes from calculated to fixed. The duration remains the same as it was when it was the parent. If the parent object had resources, Days Effort is calculated based on the % allocation of the Resource/Groups assigned to the Team tab. If there are no resources, days effort is the same as the scheduled duration. A zero duration parent changes to a zero-duration child node.
Audit Values
The General Info tab of activities contains the following audit values:
Audit Score - The value assigned to each object in a program by an auditor during an audit, based on performance indicators.
Weight - A value that reflects the importance of the individual object compared to other objects, in the context of the entire program.
Weighted Score - A value calculated by multiplying the values in the Weight and Audit Score fields.
Managing Schedules The Schedule tab displays the activities and schedule of the current activity and its children in a hierarchical fashion. For a root program, it contains all the child objects required to complete the program. If anything about your program changes after you create your schedule, you can update the activities and resources, and Agile adjusts the schedule for you. You must have the appropriate privileges to work within the Schedule tab. For details, see the Agile PLM Administrator Guide.
To open a program, click the link in the name field.
The Schedule tab contains the following buttons:
But ton Descr ip t ion
Expand Enables you to see all child objects associated with the selected activity.
Delete Enables you to delete the selected child object.

Chapter 5
Page - 57
But ton Descr ip t ion
Edit Enables you to : Edit dependencies between the child tasks within the parent program. Change display order of child activities. Reschedule the current activity. Add a team member or a resource.
A checkbox in the menu indicates that you must select an item before using the menu choice.
Add Enables you to add a new child object (program, phase, task, gate) to the program schedule using the Add Activity wizard.
Create Baseline Enables you to create baseline. See “Creating a Baseline (on page 59)”.
Remove Baseline Enables you to remove a baseline.
Deleting a Program Element
To delete a program element:
1. Select the row of the object you want to remove.
2. Click the Delete button. A warning message appears asking you to confirm that you want to delete this program object. Choose OK in the confirmation message if you want to delete the program element from the database.
Alternatively, you can also use the Actions > Delete menu command to delete a selected program element.
Note You need appropriate privileges to delete a program. An owner may delete a phase, task, deliverable, or gate. Discussions and File Folders are not deleted from the system; they are removed from the program and become stand-alone objects in Agile when the activity is deleted.
Establishing Dependencies
You can establish dependencies between activities within your program schedule. A dependency between activities mandates that one activity's schedule is driven by the predecessor's schedule. See “Managing Dependencies (on page 59)”.
You can also establish and change dependencies using the Gantt Chart. See "Gantt Chart (on page 79)".
Editing Display Order
You can change the order in which tasks or phases appear on the Schedule Page tab.
To edit the sequence of the Program elements on the Schedule tab:
1. On the Schedule tab, select Edit > Display Order. The Display Order page appears.
Product Portfolio Management User Guide
Page - 58 Product Lifecycle Management
2. In the boxes in the Line # column, enter a number that represents the order in which you want the corresponding program elements to appear on the Schedule tab.
3. Click Save when done.
Rescheduling a Program
While other Schedule tab edit functions allow you to select and modify rows in the schedule table, the Edit > Move Back/Forward function acts on the currently displayed object only, not on the rows in the schedule table.
To reschedule your Program:
1. From the Schedule tab, select Edit > Move Back / Forward. The Move Back/Forward page opens.
2. To move the scheduled dates of a program element forward or backward, do one of the following:
1. Select the Start Date or End Date options and use the calendar to select new dates.
2. Select the Move Forward or Move Back options as appropriate and specify the number of days by which the schedule should move.
For more field and button information on this page, see “Managing Schedules (on page 56)”.
3. Click Save to reschedule the program.
When you move the end date of a program to reschedule it, errors can occur if there is slack between the activities. To avoid this, you can do either of the following:
Quantify the slack in the Time Buffer field. See "Dependency Time Buffer".
Remove slack. The quickest way to do this is to launch the Gantt Chart for the program and use the Edit > Remove Slack command. This action adjusts program dates to give you a 'best fit' schedule.
Note This error can also occur if you reschedule a parent program by moving the end date and the end dates of any child activities fall on weekend dates
Adding a Team
You can select single or multiple activities and add team members or resources (the default allocation is 100%).
See also “Managing Teams (on page 62)”.
To add members to a team from the Schedule tab:
1. Select one or more activities and select Edit > Add Team.
2. Search for a name by typing the Search Name and clicking Find. Or view all available users by leaving the Search Name box empty and clicking Find.
3. Select individual team members from the Available Users list, and click the arrow to move them to the Selected Users list. You can use Ctrl+click and Shift+click to select multiple users.
4. To add the selected users as resources (with a % allocation):

Chapter 5
Page - 59
1. Clear the Add as Team Member Only checkbox. By default, the checkbox is selected, and this will add the selected users as team members with zero % allocation.
2. In the % Allocation field, the default allocation is 100%. You can accept the default or you can enter the desired allocation.
5. Click Next. 6. Select the appropriate roles for these users from the Available Roles list, and click the right arrow
to move them to the Selected Roles list.
7. Select Apply to Children if you want the settings to apply to the current object and child objects.
8. Click Finish.
Creating a Baseline
Baselines are used for comparing actual progress with your original plans. A baseline is essential for tracking progress. The original estimates it contains are permanent reference points against which you can compare the updated task structure, schedule and actual dates.
You create baselines only for the root program object so you can take a snapshot of the schedule.
To create a baseline:
1. From the Schedule tab of a root program, click the Create Baseline button.
2. Enter a description for the baseline, and click Save.
Once you save a baseline, you can compare the current schedule with any baseline by selecting the baseline from the Version list.
Note You can use the Baseline Comparison report to compare baselines. In the navigation pane, click Analytics and Reports navigation button, then navigate to Standard Reports > Program & Portfolio Reports > Program Reports > Baseline Comparison Report.
If you need to take snapshots of extensive program data during the planning phase, save multiple baselines. For example, you may want to do this at major planning milestones.
To remove a baseline:
1. Selecting the baseline in the Version list.
2. Click Remove Baseline.
When you remove a baseline, the references to the baseline for all objects in the tree are also removed.
Managing Dependencies Activities (Programs, Phases, Tasks) and Gates can be linked to each other as dependencies. Agile PLM supports four types of dependencies - Finish to Start (FS), Start to Start (SS), Finish to Finish (FF), and Start to Finish (SF). For more information about dependency types, see “Types of Dependencies (on page 60)”.
Once you have identified the activities that will be dependent on each other, you need to identify one task as the predecessor and another task as the successor. A Predecessor is a task whose
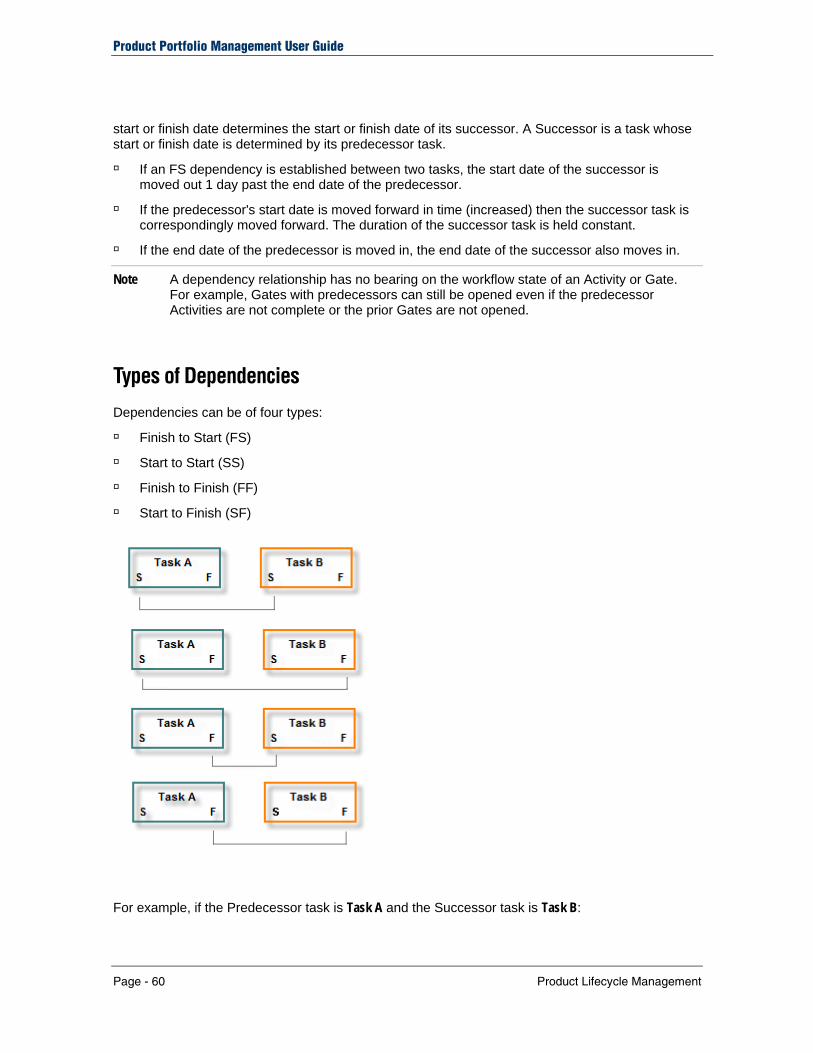
Product Portfolio Management User Guide
Page - 60 Product Lifecycle Management
start or finish date determines the start or finish date of its successor. A Successor is a task whose start or finish date is determined by its predecessor task.
If an FS dependency is established between two tasks, the start date of the successor is moved out 1 day past the end date of the predecessor.
If the predecessor's start date is moved forward in time (increased) then the successor task is correspondingly moved forward. The duration of the successor task is held constant.
If the end date of the predecessor is moved in, the end date of the successor also moves in.
Note A dependency relationship has no bearing on the workflow state of an Activity or Gate. For example, Gates with predecessors can still be opened even if the predecessor Activities are not complete or the prior Gates are not opened.
Types of Dependencies
Dependencies can be of four types:
Finish to Start (FS)
Start to Start (SS)
Finish to Finish (FF)
Start to Finish (SF)
For example, if the Predecessor task is Task A and the Successor task is Task B:

Chapter 5
Page - 61
Finish to Start: In an FS scenario, Task A is scheduled to finish before the start of Task B.
Start to Start: In an SS scenario, the work of Task B cannot start until Task A starts.
Note In an actual scenario, SS dependencies generally occur when you want the work of two tasks to overlap. When two tasks have an FS dependency, but the work can overlap or be done in parallel, consider changing their dependency to SS to reduce the overall duration of your project. Overlapping work also helps to reduce the overall duration of a project.
Finish to Finish: In an FF scenario, the finish date of Task A determines the finish date of Task B.
Start to Finish: In an SF scenario, the start date of Task A determines the finish date of Task B.
In a program, you can specify the SF dependency to create a just-in-time scheduling. For example, if a related task needs to finish before a Gate or program finish date, but it does not matter exactly when and you do not want a late finish to affect the just-in-time task, you can create an SF dependency between the task you want scheduled just in time (Task A) and its related task (Task B).
Dependency Time Buffer
A buffer can be inserted to maintain a gap between a predecessor and its successors. Either positive values or negative values are accepted for the buffer.
When creating or editing a dependency, you can enter a value in the Time Buffer field that represents “slack time” between the end of the predecessor activity and the start of the successor.
You can also create and change dependencies from the Gantt Chart view. See “Creating and Editing Dependencies in Gantt (on page 86)".
Creating and Editing Dependencies
The Dependencies tab displays a list of all the predecessor (Dependent Upon) and successor (Required for) information of the program. If you have established dependencies to other activities outside the program (external dependencies), links to these are also shown.
This tab presents the following action buttons:
Edit - lets you edit dependencies between tasks. The Edit button affects only the checked items on the current page.
Remove - deletes the selected object. The Remove button affects only the selected activities in the current page.
Add - lets you add a dependency to the selected activity. Dependencies can be made between activities in the same program or other programs.
To open an activity, click its name.
To create dependencies:
1. Select at least two activities in the list of child objects, and choose Edit > Dependencies. The window that opens lets you create or edit dependencies between selected activities. You can define the dependency for each line in its Dependent Upon Line # field.
For example, if you want to specify that Line 2 is dependent on Line 1:

Product Portfolio Management User Guide
Page - 62 Product Lifecycle Management
In the Line 2 row, under Dependent Upon Line #, enter 1SS2. Where 1 is the Line # of the predecessor activity, SS (Start-to-Start is the dependency type, and 2 is the Time Buffer value.
2. After you finish editing dependencies, click Save to save your changes.
For quick editing of dependencies, use the Gantt Chart view. See also "Creating and Editing Dependencies in Gantt (on page 86)".
Creating Dependency Chains
When creating a dependency chain between tasks using different dependency types, certain considerations apply. The start date of a successor task can be scheduled one day after the end date of a predecessor task or gate, only if certain criteria are met. If these criteria are not met, the start or end date of the successor can be the same as that of the predecessor.
For a simple dependency chain such as Task1 - Gate1 - Task2, the start date of Task2 will be one day after the end date of Gate1, only if the following conditions are met:
There is a Finish-to-Start (FS) dependency between Task1 and Gate1, and between Gate1 and Task2, with no time buffers specified.
There is no slack between Task1 and Gate1.
For a longer dependency chain such as Task 1 - Gate1 - Gate2 - Gate 3 ... GateN - Task2, the start date of Task2 will be one day after the end date of Gate1, only if the following conditions are met:
There are dependencies (FS, SS, FF, or SF) between the gates and no time buffers are specified.
There is no slack between the gates.
The first dependency - the dependency between Task1 and Gate1 - is FS, with no slack or time buffer.
The last dependency - the dependency between GateN and Task2 - is FS, with no slack or time buffer.
Note These rules apply even if zero duration tasks exist instead of gates in the dependency chain.
Managing Teams You can manage resource assignments to program activities from the Team tab. Within this tab, you can add or remove team members or resources, change team members’ roles, and change their allocation. You must have the appropriate privileges to work within the Team tab.
Adding Team Members
To add team members and apply roles:
1. Within the Team tab of the program, Click Add.
2. To find a resource, type a name in the Name(s) field and click Find. To view all available users,

Chapter 5
Page - 63
leave the Name(s) field empty and click Find. To assign a resource pool as a placeholder (if you do not know the specific names of the resources), select All Groups.
3. Select individual team members from the Available Users list, and click the right arrow to move them to the Selected Users list. You can use Ctrl+click and Shift+click to select multiple users.
Before you select a resource or user group, you can review resource utilization details. To do this, click the Report button. This opens a window where you can review resource utilization details based on query criteria. See also "Reviewing Resource Utilization (on page 65)".
4. When you finish selecting resources, Click Next. 5. To add a person as a team member but not as a resource with a % allocation, select the Add As
Team Member Only checkbox.
To allocate a person as a resource for the task, clear the checkbox. In the % Allocation field, fill in the percentage of the time that this resource will dedicate to this task. The default maximum value allowed in this field is 400. This maximum value setting can be configured in the Java Client
6. Assign one or more roles to the resource. To do this, select the required roles from the Available Roles list on the left and click the right arrow to move them to the Selected Roles list on the right.
7. If you want the team member to be included for all child objects, select the Apply to Children box.
8. Click Finish.
The selected resources and assigned roles are displayed in the Team tab. People added as resources are also added as team members automatically.
When you complete the Add action, each of the selected resources receives a notification in their Notifications tab. If you add a resource pool, the pool owner receives a notification. The request also appears in their My Assignments tab. Each resource can accept or reject the request. When the resource accepts or rejects the request, the Resource Pool owner receives a notification to that effect.
Editing Team Member Attributes
To edit a team member’s resource pool, roles, and % allocation:
1. Select the rows you want to affect. Click Edit.
2. Enter the changes you want in the Resource Pool and % Allocation fields. Click the button in the Roles column to edit roles.
3. Click Save.
Fie ld Descr ip t ion
Click this icon to view the Resource Pool Utilization Report. The Resource Pool Utilization report provides a user’s utilization based on the % allocation for the selected user.
Name Name of team member or group.

Product Portfolio Management User Guide
Page - 64 Product Lifecycle Management
Fie ld Descr ip t ion
Assigned From The name of the pool from which the resource is assigned. If the resource is assigned to multiple pools, the appropriate pool can be selected.
Note Note: For best results in managing resource utilization, Agile recommends that a user be assigned as a member of only one resource pool.
Roles Program-specific roles assigned to team member for this activity.
Days Effort Days effort corresponds to the total sum for the resource or group.
Is Resource Identifies the user as a resource or just a team member with no time allocated to the activity. This Information is dependent on % allocation of Resource/Team Member / User Group. If % allocation is greater than 0, it is Yes, otherwise No.
Rejected flag This indicates that the resource or pool has rejected the Inbox Request.
% Allocation For both Fixed and Effort Driven duration type, this value determines utilization of a resource or group.
Pool Owner Name of the resource pool owner, if there is one.
Actual Hours The number of actual hours (duration) the team member has worked.
Reported Actual Hours are rolled up and compared to Estimated Duration and Scheduled Duration.
Actual hours are also used to determine the labor cost per activity. Actual hours are multiplied by the resource rate to determine the current applied cost of each resource. These totals by resource are added up to determine the applied cost per activity, and are then rolled up to the top to create labor costs for all parent objects.
Assigning Team Members from a Resource Pool Placeholder
If you added a resource pool to the Team tab as a placeholder, you can easily select the specific users you want to assign.
Note You must have Team.Name as an AppliedTo property within the Modify privilege to be able to assign members from a resource pool.
To assign team members from a resource pool:
1. Open the activity and click the Team tab to display it.
2. In the Name column, click the button next to the resource pool you want. The Assign User From User Group wizard appears.
3. Select individual team members from the Available Users list, and click the arrow to move them to the Selected Users list. You can use Ctrl+click and Shift+click to select multiple users.
4. To apply the team member assignments to children of the current activity, select the Apply to Children check box.

Chapter 5
Page - 65
5. Click Finish.
Note The % Allocation will be divided among the selected users. If there is a fraction of a percent, the percentage will be rounded down to the next lowest whole number; the fractions of a percent are discarded.
For example, if the resource pool was assigned at 100% allocation, and you select three users, each user will be assigned 33%. If you remove the three users and reassign the % Allocation back to the resource pool, the % Allocation for the pool will be 99% – the fractions of a percent are discarded. However, you can select the appropriate rows in the table and click Edit to adjust the percentages for the users assigned from the resource pool, or (if you have assigned allocation back to the resource pool) adjust the percentage for the resource pool.
Reviewing Resource Utilization
Before you add or assign resources to a program, you can review their current utilization details to ascertain how much time and effort they will be able to allocate to the activity in question. You can view a Resource Utilization Report for a selected user or user group to determine the following:
Utilization within the current program.
Utilization across all programs.
To view a Resource Utilization report, do any of the following:
From the Details view of a program, choose Actions > Reports & Analytics > Program Resource Utilization. This opens a report window that displays a selected user's or user group's utilization within that program.
From the Team tab, click Add. Select a user or user group as described in "Adding a team (on page 58)", and click Report. This opens a report window where you can run a query to view details of a selected user's or group's utilization across all programs.
From any tab, click the name of a user or user group to view more detailed information. In the page that opens, within the Assignments tab, click User Group Utilization Report or simply click the icon next to the user or group name.
From the Gantt Chart view of a program, select an activity row and choose Resources > Manage Resources in the main toolbar. In the Manage Resources dialog, select a user or group and click to open the Resource Utilization Summary.
Within the Resource Utilization dialog, you can edit field values to filter report results as described in the following table. See also "Program Resource Utilization Report (on page 47)".
Fie lds Descr ip t ion
Report Type Type of report; defaults to Resource Utilization Summary.
Display Type Select the type of chart: Table, Line, Area, Stacked Area, Bar, Stacked Bar, Stair.
Start / End Dates The start and end dates of the duration for which you want to check utilization.
Pool Select the resources or pools for which you want to check utilization. By default all resources that were selected in the Add Team page are selected. You can change the selection to filter the data displayed in the report.
Reporting Intervals Report by day or other interval.

Product Portfolio Management User Guide
Page - 66 Product Lifecycle Management
Fie lds Descr ip t ion
Include allocations from proposed Programs
Select this check box to view allocations to programs that are in the Proposed state. The list in the Pool field changes to accommodate additional options. Change the selection as required to filter data.
Bulk Assigning Tasks to a Resource
You can bulk assign several tasks to a single resource if necessary. For example, a Program Manager can bulk assign a set of tasks to a particular resource pool owner. This resource pool owner can then assign these tasks to members of the resource pool.
To bulk assign tasks to a resource:
1. From any tab, click the name of the resource to view resource information. You can use the Search options to search for a particular user by name.
2. In the page that opens, within the Assignments tab, click Show Filter to view the Filter options.
3. Filter the assignments list by any attribute, for example, a root program.
4. Select the pending assignments that you wish to bulk assign and click Assign.
5. In the Activity Assignments dialog that opens, select the user to whom you wish to assign the tasks.
6. Click OK.
Note Before you assign tasks to a resource or user group, you can review their existing assignments and resource utilization details. To do this, use the Assignments List Report or User Group Utilization Report buttons. When you finish assigning tasks, you can use the same reports to verify that the specified resource is identified for that program.
Splitting a Task Among Several Resources
As a resource pool owner, you have more visibility into the utilization status of each resource in your pool. Once a task has been assigned to your resource pool, you can split the % Allocation of the task across several resources.
To split a task across several users:
1. In the Assignments tab, select the task and click Assign.
2. In the Activity Assignments dialog that opens, enter the percentage allocation for each resource.
3. Click OK.
Removing Team Members
Use the Team tab to remove a team member, resource, or pool from the activity. When you remove, you can choose one of the following options.
Delete only if resource has no percent allocation
Chapter 5
Page - 67
Removes the selected resources only if the resource has no allocation. If the selected resource does have allocations, it will not be removed.
Delete resource and re-assign percent allocation to pools (if applicable)
If the resource is assigned from a pool, the resource is removed and the resource’s allocation is reassigned to the pool. If the resource is not in a pool, the resource is removed and the allocation is discarded.
Delete resource and discard percent allocations
The resource (whether assigned from a pool or not) is removed and the allocation is discarded.
Note For an effort-driven task, removing the resource and discarding the allocation changes the schedule duration of the task and affects roll-ups to parent activities.
Managing Content The Contents tab displays all program-related objects and enables you to take required actions on these objects.
Within this tab you can:
Organize documentation and other Agile objects related to a PPM program.
View the status, due date, relationship, and rule of each object. You can also view selected revisions and other information about each object.
Add new content, add or edit relationship rules, manage file attachments, create change orders, and so on.
Deliverables
Content objects that have a rule assigned to them are called ‘deliverables’. A deliverable is an Agile PLM object that can be linked to a Program, Phase, or Task. Product deliverables, or items, are generally placed under Change Control and managed in the Agile database.
Deliverables must be in a specified workflow status or lifecycle before the current PPM object can change status. Deliverables enable you to add any Agile PLM object to PPM objects as triggers to enable cross-business process automation.
Viewing Content
You can manipulate the Content tab view in several ways to display the objects you wish to focus on:
Include all Levels: Select this option from the top right corner of the page to ensure that your view displays objects at all levels of the project hierarchy.
View: You can use the options in the View drop-down list to filter the view by attributes that you configure. By default, the list includes options such as All Content, All Deliverables, Pending Deliverables, Completed Deliverables and Important Content. A Pending Deliverable is an object which has not yet met the specified rule criteria, and a Completed Deliverable is an object that has met the rule criteria. To change the name of any of these views, click the last item in the list, Manage Views. You
Product Portfolio Management User Guide
Page - 68 Product Lifecycle Management
can edit the name of the view in the dialog that opens.
Note A view can be deleted only by the owner of the root program. To add objects to a view, select the objects, go to More Actions > Add to View, and click the
view name. Content that you add to the Important Content view will also display in the Project Summary page.
To add more views, go to More Actions > Add to View and click New View. Provide a name for the new view and click OK. The newly created view appears in the Add to View list.
Note Only the program owner can create a new view. Program team members can add content to existing views.
To bookmark a selected content object, use the More Actions > Bookmark option. To subscribe to notifications on attribute changes for a selected item, use the More Actions >
Subscribe option. To create a change order for an item, select the item and use the More Actions > Create
Change option.
Filter: You can click Show Filter to filter the rows in the table by the attributes listed in the Filter drop-down list. Additional selection options display based on the attribute you specify, to help you narrow down your query. To apply several filters successively, click the icon and select other filter attributes. Click Apply to apply your changes.
Preview: You can click on the row of an object to see details of that object in a preview pane at the bottom of the page. Within this preview pane, you can take several actions on the object, such as: View a selected revision. View, add, edit, or remove a rule, to ensure hard dependencies. Add, remove, check out, or view a file attachment in multiple formats. Create a change for an item. Subscribe to notifications for attribute changes on selected items.
Adding Content
Any program object that has a lifecycle phase or a workflow assigned to it can be added as a deliverable. Discussions, users, and user groups are the only objects that cannot be added as deliverables.
You can add Activities and Gates as deliverables on other Activities and Gates. You can also set rules to ensure the completion of one activity before another. For example, if you want to ensure the completion of an activity before a Gate is opened, you can add that activity as a deliverable for the Gate to open. You can even restrict one Gate from opening before another Gate is opened - by adding the prior Gate as a deliverable for the subsequent Gate to open.
When adding Programs as deliverables to other programs, they can be Proposed or Active.
Templates can also be deliverables. For a program that has its own copies of deliverables, a template can be a deliverable on tasks.
If an external root program is a deliverable for a template, it should also be of type Template.
You cannot add an object that causes a circular relationship as a deliverable. For example, you

Chapter 5
Page - 69
cannot mandate that Task1 is a deliverable for Task2 to reach completion, and Task2 is a deliverable for Task1 to reach completion.
In order to add an object, you must have Create privilege for that object, as well as Modify privilege on the Relationships.Name attribute for that object.
Adding a Deliverable
To add a deliverable:
1. In the Content tab toolbar, go to Add > Create New.
2. Select the object you wish to add and enter details as appropriate.
Note While adding an Item object, you can add a rule to the object. To do this, select the Add Rule option at the bottom right corner of the dialog. In the Relationship Rule dialog, specify the rule for this deliverable. You can also add a rule from the preview pane of that object within the Content tab.
3. Click OK. The selected object displays in the Content tab.
Searching for Content
To search for content:
1. In the Content tab toolbar, go to Add > Search. You can perform a simple search by selecting a base class from the Search for drop-down list. You can also conduct more specific searches using the additional search options provided: Search Folders, Bookmarks, Recently Visited, Advanced Search, and Parametric Search. For detailed information on searches, see the Getting Started with Agile PLM Guide.
2. Within the search results, select the objects you wish to add and click Add Selected. You can sort selected search results by column heading.
3. To edit the object attributes, select Edit rows after adding.
4. Click OK. The Edit newly added rows dialog opens.
If a single object was selected, this object appears selected automatically. If several objects were selected, the first object is displayed at the bottom of the table in the dialog. Within this dialog, you can: Change the Mandatory attribute of each selected object to Yes or No as appropriate. Specify a relationship rule for the object.
5. Click OK to apply your changes.
The selected objects display in the Content tab.
Adding a File
To add files:
1. In the Content tab toolbar, go to Add > Files.
2. Browse and select files from your hard drive. You can add a description and specify whether the files need to be unzipped.
3. Click Options to view additional options. You can choose to add all selected files to a single

Product Portfolio Management User Guide
Page - 70 Product Lifecycle Management
folder if you want. You can also provide a description for the folder.
4. Click OK. The selected files display in the Content tab.
Adding a URL
To add URLs:
1. In the Content tab toolbar, go to Add > URLs.
2. Enter the URLs which you wish to add. To preview the HTML pages, click Preview.
3. Click Options to view additional options. You can choose to add all selected URLs to a single folder if you want. You can also provide a description for the folder.
4. Click OK.
The selected URLs display in the Content tab.
Cloning Deliverables
There are certain considerations you should bear in mind before you create a program from a template as described in "Using the Create Menu (on page 39)". These are provided here for your reference.
Content Objects
While creating a program from a template, you can opt to duplicate or clone the content objects from the template program. To do this, you select the Content checkbox in the program creation wizard.
If the content check box is selected, copies are created for all deliverables in the template. The program and all its child activities will reference the newly created copies and not the original deliverables in the template. For example, a content object such as a Marketing Requirements Document that was available in the template is duplicated in the new project, with the file attached from the template.
If the content check box is not selected, there are no copies of deliverables created, and no links are provided to any deliverables on the template.
If the content object does not have a Rule, only the link is copied and this link will point to the same object as in the template. For example, a content object such as a Standard Operating Procedure (SOP) document, where it is not necessary to create a new object, and only a link to the controlled document is necessary.
In general, copies are not created for all objects that do not have a Save as functionality. All deliverable objects for which copies cannot be automatically created are listed in the error log window.
Autonumbers
If multiple autonumbers exist on a Content object and the system does not know which one to use, content is not created and an error is reported.
Within the template, ensure that an autonumber is set for each deliverable. Deliverable autonumbers for the created program are automatically selected based on the autonumber

Chapter 5
Page - 71
chosen for the original deliverable in the template. The Autonumber attribute on the Content tab for templates allows you to specify the autonumber used.
The Autonumbers attribute is not filled in Proposed or Active Type Programs. If such programs are saved as templates, you need to fill in the autonumber attribute in the template again.
Copies are not created for deliverables where the Autonumber field is left blank.
For all classes, if the same object is a deliverable for multiple activities and/or gates in the template, the copy of the object is created for the first activity / gate that it is a deliverable for, and a link to this copy is provided for all other subsequent activities / gates that the same object is a deliverable for.
For example, let’s say that a document DOC00341 is a deliverable that is referenced twice in a template, on Task1 and Task2. When a program is created from this template, a new copy of the original deliverable in the template is created - DOC00982 for Task1. This document will be a deliverable for Task2 as well, following the same pattern as in the template that the program is created from.
Required Fields
All required fields are copied from the original deliverable to the new copy created.
Tabs
For all subclasses, Cover Page, Page Two, Page Three and Attachments tabs are copied.
For example, if an assembly is a deliverable on one of the tasks, the only tabs that are copied are Page 1, Page 2, Page 3 and Attachments. The BOM tab is NOT copied over.
Activities and Gates
When internal activities and gates in the template are used as deliverables, corresponding copies are created in the newly created program tree and referenced as deliverables in the other activities and gates as defined in the template.
When activities and gates within a template or source program are added as deliverables to later activities and gates in the template, the deliverables on a program created from the template will also reference corresponding activities on the newly created program.
For example, if Task1 is a deliverable of Task2 in the template, then for any program that is created from the template, Task1 in the program will be a deliverable of Task2 in the program. This is one approach of implementing hard exit on gates that is, ensuring certain activities are completed or certain gates are opened before another specific activity is completed or gate is opened.
Root Programs
Only external root programs of template type are allowed as deliverables of activities and gates within a template. In other words, root programs of Proposed and Active type are not allowed as deliverables for activities and gates within a template.
If an external root template is a deliverable on a task of a template, a new program deliverable is created as a copy of the original template deliverable. This copy of the original program deliverable has the program tree structure in place, but no deliverables. When creating copies of external root templates, only General Info, Page 2, Page 3, Attachments, Dependencies and

Product Portfolio Management User Guide
Page - 72 Product Lifecycle Management
Schedule tabs are copied. Team and Content tabs are NOT copied. External root templates, if used as deliverables multiple times, are cloned only once similar to internal activities and gates.
Templates
If the user chooses to create a Proposed program from a Template, all templates that are deliverables of this template are created as Proposed programs that are deliverables of the newly created Proposed program. (The same applies if you choose to create an Active program from a Template. For the copies, only the name of the root program is changed; the names of the activities and gates remain the same. The activities and gates numbers, however, are system generated and unique.
Copies of external activity deliverables that are not root templates are not created due to the fact that non-root activities cannot exist by themselves. In this case, the deliverables on the program created from the template will reference the original deliverables on the template for such objects.
Managing Workflows The Workflow tab shows where the program object is in the assigned workflow and lists past signoff information. If you have the necessary privileges, you can add or remove approvers and observers on this tab, or you can move the object to another status in the workflow.
Programs, phases, and tasks roll up their statuses as described in “How Status Roll-Up Works (on page 5)”). Default workflows for programs contains the following statuses:
Default Activities Workflow
Not Started —> In Process —> Complete
Default Gates Workflow
Closed —> In Review —> Open
Default workflows also include a Canceled status. If you have the appropriate privileges, you can move the program object to the Canceled status from any current workflow status.
Note If your company uses custom workflows, your list of statuses may be different and your ability to move from one status to another status may controlled differently.
Rules for Parent Status
The following rules apply for parent object status change:
Parent object workflows are affected when any of the related child workflows start. For example, if one child activity is in the In Process state, then Parent status is In Process.
Parent object workflows are affected when all of the related child object workflows complete. For example, if all activities are Complete, then parent status is Complete.
When custom workflows are used, the roll up is governed by the transition between the Status Type, not necessarily a change in the step. For example, a workflow with seven steps can roll up to a parent with three steps because each has only one transition between the “Pending” and “Review” type (Pending, Review, Complete, and Cancel are the Status Types).

Chapter 5
Page - 73
For leaf-node objects, you can click the Change Status button to change the workflow status (provided you have the required role).
To change the workflow status of the parent activity, open a leaf-level child activity and click the Change Status button to change the workflow status of the leaf-level activity.
Note You cannot use the Change Status button to change the workflow status of an activity that has children (subordinate activities).
For more information about workflows, see Getting Started with Agile PLM and the Agile PLM Administrator Guide.
Managing Discussions The Discussions tab contains both discussions and action items. Users can post and reply to discussions that arise in the course of managing programs. High priority discussions appear on the Agile dashboard as Issues. Action items may be used in conjunction with discussions to ensure that the loop is always closed so that discussions do not go unattended. Action items can also be tracked at each activity level independent of any discussion or issue, and can be used to track and measure activity follow-up, meeting to-dos, and so forth.
Subscriptions are often set up by the team members to get notified as discussions are raised. This promotes a collaborative thread of replies and captures the decision-making and history of a program.
Discussions Table
The Discussions table displays important information about each discussion. An action item icon indicates there are action items associated with the discussion. Click the icon or click the discussion name to open the discussion.
Adding Discussions
You can add a new discussion or reply to an existing discussion.
To add a new discussion:
1. Open the activity, and click the Discussions tab.
2. Click the Add drop-down menu button and choose the Create New option.
The Add Discussion wizard appears.
3. Select Discussion from the Type drop-down list.
4. Enter a subject for the discussion.
5. Type the message you want to send.
6. From the Priority drop-down list, set the discussion priority.
7. Click the Notify List field to add users who should receive notification of this discussion in their Notifications inboxes.
8. Click Finish.

Product Portfolio Management User Guide
Page - 74 Product Lifecycle Management
To search for an existing discussion to add:
1. Open the activity, and click the Discussions tab.
2. Click the Add drop-down menu button and choose the Search option.
The Add Objects dialog box appears.
3. Search for one or more existing discussions. In the Add Objects dialog box, select a search method. If you choose to perform a simple search, enter the value to search for and click Search. You can also define an advanced search, run a saved search, or select a bookmarked or recently visited item (Shortcuts). (For more information about searches, see Getting Started with Agile PLM.)
4. In the search results, select the discussions you want by moving them into the Selected Objects list.
You can run multiple searches to find and select additional discussions.
5. Click OK.
Replying to Discussions
You or your team members or notified users can reply to discussions.
To reply to discussions:
1. Open the activity, and click the Discussions tab.
2. Click the discussion name to open it.
In the root program object, you can see which activities have discussions by looking for the symbol in the discussions column on the Schedule tab.
3. On the Discussions tab, select the discussion you want to reply to.
Note You can use the Preview Message checkbox to quickly preview the message text of all the discussions in the Discussion table when selecting the discussion you want to reply to.
4. Click the Reply button. Enter your message and the list of people to notify, and click Save.
To add a comment to an existing reply:
1. Open the activity, and click the Discussions tab.
2. Click the + symbol next to a discussion in the Subject column.
The list of replies is displayed.
3. If a reply has subordinate replies or comments, click the + symbol in the Subject column next to the reply to expand the list.
Each + symbol indicates that the reply has subordinate replies. Click the + symbol on each successive level until you have displayed the reply to which you want to add a comment.
4. Select the row to which you want to add a reply.
5. Click the Reply button. The Discussion Reply wizard appears.
6. If desired, enter a subject for the reply. Or, use the default subject provided for you.

Chapter 5
Page - 75
7. Enter your message and the list of people to notify, and click Save.
Your reply is added to the discussion thread below the reply row you selected in step 4 above.
Replying to Discussions from your Inbox
When a discussion appears in your Notifications Inbox, you can open the discussion object and either add a reply or add a comment to an existing reply.
To reply to Discussions from your Inbox:
1. In your Notifications inbox, click the Regarding field (not the Subject field) of the discussion to open the discussion item.
2. Select the button for the row you want to reply to.
3. Click Reply. The Discussion Reply wizard appears.
4. Add the reply message and the list of people to notify, and click Save.
To add a comment to an existing reply:
1. In your Notifications inbox, click the Regarding field (not the Subject field) of the discussion to open the discussion item.
2. Select a row in the replies table to add a comment to that row.
3. Or, if a reply row has subordinate replies or comments, click the + symbol in the Subject column next to the reply to expand the list.
Each + symbol indicates that the reply has subordinate replies. Click the + symbol on each successive level until you have displayed the reply to which you want to add a comment.
4. Select the button for the row to which you want to add a reply.
5. Click Reply. The Discussion Reply wizard appears.
6. If desired, enter a subject for the reply. Or, use the default subject provided for you.
7. Add the reply message and the list of people to notify, and click Save.
8. Click the Notify List field to add users who should receive notification of this discussion in their Notifications inboxes.
9. Click Save.
Your reply is added to the discussion thread below the reply row you selected in step 4 above.
Viewing Discussion Replies
To see a list of replies to a discussion:
1. Click the + symbol next to a discussion in the Subject column to expand the list of replies.
2. Click a discussion subject to open the discussion object.
3. Click the + symbol in the Subject column of the Message Thread table to view all the replies related to this discussion.
Note You can use the Preview Message checkbox to quickly preview the message text of all the discussions in the Discussion table.
Product Portfolio Management User Guide
Page - 76 Product Lifecycle Management
Removing Discussions
After you finish all your discussions, you can remove the discussion objects.
To remove discussions:
1. Open the activity, and click the Discussions tab.
2. Select the button for the discussion you want to remove.
3. Click Remove.
Viewing Action Items
You can access action item details from the Discussions tab by clicking the name of the action item. Action Items appear separately below discussions in the Action Item table in the lower part of the page.
The list of action items in the table is a combined list of the action items associated with the program and the action items associated with the listed discussions.
The Belongs To column and icon indicate whether the action item is associated with a discussion object or with a program object. Click the link in the Belongs To column to open the object.
Click the name of the action item in the Subject column to open the action item.
To add an Action Item:
1. Open the activity and click the Discussions tab
2. In the Action Item section, click the Create button.
3. Fill in the action item information. Fields that are in boldface are required.
4. Click Save.
The action item will appear in the Notifications and My Assignments tabs of the person to whom it is assigned.
Managing Attachments The Attachments tab enables you to attach files and URLs that are helpful or needed for your and your team members’ work. If there are items on the Attachments tab, a paper clip icon appears on the tab.
Note You must have at least edit permissions to add an attachment to a program element.
Refer to the Agile PLM Getting Started Guide for details about the Attachments tab.
Viewing History The History tab records all actions taken, such as editing the General Info tab or changing activities or
Chapter 5
Page - 77
team members.
Note If you do not have the appropriate read privileges, you cannot view the fields on the History tab. If you have questions about your privileges, see your Agile administrator.


Product Lifecycle Management Page - 79
Chapter 6
Gantt Chart
This chapter includes the following:
Overview.............................................................................................................................................................. 79 Prerequisites........................................................................................................................................................ 80 Launching Gantt .................................................................................................................................................. 80 Gantt Toolbar Icons ............................................................................................................................................. 81 Views in Gantt...................................................................................................................................................... 82 Using the Gantt Chart .......................................................................................................................................... 85 Resource Management ....................................................................................................................................... 88 Customizing the Gantt Chart ............................................................................................................................... 90
Overview The Gantt Chart feature is a powerful program management tool that helps Program Managers plan, administer, and track programs from start to finish. With Gantt, you can create a new program and then plan the work breakdown structure for this program, which includes defining activities and tasks, creating dependencies between tasks, and performing resource management.
The Gantt Chart offers rich user-friendly features (such as Excel-like data editing) to manipulate and view data in graphical or tabular formats. Multiple view options enable you to focus on discrete program aspects, and right-click menus help you to quickly take actions on selected program objects.

Product Portfolio Management User Guide
Page - 80 Product Lifecycle Management
The default Gantt view consists of a menu bar, standard toolbar, a tabular activity pane and a graphical activity pane. The tabular activity pane provides a hierarchical tree structure representation of all activities and the graphical pane provides a graphical representation of activities with color and iconic indicators.
Prerequisites Make sure you have the appropriate privileges to perform program management activities within the Gantt Chart. If you have questions about your assigned roles and privileges, contact your Agile administrator.
The Gantt chart uses Java Web Start technology and requires JRE 1.5 (Java Runtime Environment) to be installed on your computer. If the recommended JRE does not exist on your system or if you have a lower version installed, you are prompted to install the latest JRE version.
Note If certain firewalls prevent this automatic download, you can download and install JRE 1.5 from the URL: http://www.sun.com.
Launching Gantt To launch the Gantt Chart for a program, open the program and select Details View > Gantt Chart. If

Chapter 6
Page - 81
your program has sub-activities, you can also select Actions > Gantt Chart from the Summary view. When you start the Gantt Chart, Java JAR files are downloaded into your computer’s temporary files folder. Once these have been loaded, the Gantt Chart appears.
Gantt Toolbar Icons Most actions on the Gantt chart can be performed using the icons on the toolbar or corresponding shortcut keys. When you place your mouse pointer over an icon, the shortcut key appears next to the name of the icon.
I con Name Shor tcu t Keys Descr ip t ion
Cut Ctrl+X Cuts a selected cell value, activity or gate.
Copy Ctrl+C Copies a selected cell value, activity or gate.
Paste Ctrl+V Pastes the cut or copied cell value, activity or gate.
Save Ctrl+S Saves changed information in the Gantt.
Activity Insert Inserts an activity below the selected activity, at the same indent level.
Gate Alt+G Inserts a gate below the selected activity, at the same indent level.
Delete Delete Deletes the selected item from the Gantt Chart.
To select an activity for deletion, highlight or select the whole row.
Create Dependency Alt+C Adds a dependency.
Edit Dependency Alt+D Opens the Edit Dependency dialog for the selected dependency.
Go To Selected Task Ctrl+G Brings the corresponding graphic into view.
Outdent or Move Left Alt+Shift+Left Outdents an item, so that a program element no longer reports to the higher-level element.
Moves the selected item or items to the left.
Indent or Move Right Alt+Shift+Right Indents an item, making a program element report to another item.
Moves the selected item or items to the right.
Move Up Alt+Shift+Up Moves an item up to change the order of the listed items at the same level. If program elements report to that item, these move along with it.

Product Portfolio Management User Guide
Page - 82 Product Lifecycle Management
I con Name Shor tcu t Keys Descr ip t ion
Move Down Alt+Shift+Down Moves an item down to change the order of the listed items at the same level. If program elements report to the item, these move along with it.
Zoom In Ctrl+Plus (NumPad)
Enlarges the graphical pane view.
Zoom Out Ctrl+Minus Reduces the graphical pane view.
Zoom To Fit Ctrl+0 Changes the size of the graphical pane to show the entire program within the visible area.
Manage Resources Alt+F10 Allows you to select and manage resources for the selected activities.
Delegate Owner Alt+F12 Allows you to delegate the ownership of the selected activities.
Views in Gantt Views help you see your program in different aspects and formats. Views are a subset of the information you enter in PPM. These subsets of information get stored in Gantt and can be displayed in different views.
PPM provides various views, for example, you can view the resource allocation information either in a graph format or in a table format. Combination views are split views that contain more than two views at a time. You can use Views to enter, edit, and display information on activities and resources.
To change your view, select any of the view options listed here from the View menu or the View Bar, or use the shortcut keys provided to access the view.
Gantt (Ctrl+1)
Task Assignment (Ctrl+2)
Calendar (Ctrl+3)
Critical Path (Ctrl+4)
Comparative Gantt (Ctrl+5)
Resource (Ctrl+6)
Resource Sheet (Ctrl+7)
Resource Utilization (Ctrl+8)
Gantt
The Gantt view is the default view. This view displays the program activities and schedules in a

Chapter 6
Page - 83
combination pane. One pane displays a tabular view of activities in a hierarchical tree structure. The other displays a graphical view of activities in a bar graph format.
Task Assignment
The Task Assignment view is a combination view of the Gantt Chart in the top pane and the Manage Resources sheet and Resource Utilization chart in the bottom pane. When you select an activity in the Gantt view, resource information about the task appears in the Manage Resource view. You can simultaneously view the resource utilization of each resource in a graph format in the Resource Utilization pane.
Calendar
The Calendar view allows you to create, edit, and review your project tasks in a calendar format. The Calendar view consists of two tabs, Month and Day. The Month tab displays a monthly view with all the days in the month. The Day tab displays a day view with all the hours in the day.
The Calendar view is helpful to easily view tasks that are scheduled on a particular day, week or month. It shows tasks schedules for a specific week or range of weeks. You can create a program by entering a task and the duration of a program using the calendar format.
Critical Path
Critical path view helps you plan all activities that directly affect the completion date of a program. Critical Path is determined by identifying all the activities that have slack, below a pre-determined number of days.
Critical path activities act as the basis for creating a schedule and planning resource allocation. It helps you analyze where a remedial action is required to get a program back on track. Critical path can be viewed at activity and sub-activity level. The critical task is the current activity on the critical path.
Note If a schedule is on a critical path, the schedule bar on the graphical pane appears red.
Comparative Gantt
The Comparative Gantt view helps you compare the current program schedule against estimated or actual schedules, or against a saved baseline. To view a comparison, select an option from the drop-down list in the main toolbar. The default comparison value is Estimated. All saved baselines display in this list for selection.
In the graphical view:
The Current schedule of a parent displays in orange.
The Current schedule of a child activity displays in pink.
The Estimated, Actual, or Baseline schedule of the parent activity displays in white.
The Estimated, Actual, or Baseline schedule of selected child activities displays in gray.
In the tabular view, you can view baseline schedule information (start and end dates) in columns

Product Portfolio Management User Guide
Page - 84 Product Lifecycle Management
alongside current schedule information.
Resource
The Resource view displays a list of all users for a particular program and their task allocation as per the schedule, in a calendar format. If you assign an allocation to a user, you will be able to view a bar graph in the pane below displaying the percentage of allocation. You can also select the topmost row - All Users - to view a bar graph of all resources simultaneously.
Resource Sheet
The Resource Sheet allows you to view available resources and add selected resources to your program. The Resource Sheet contains a set of users who are associated with the activities within a program. Adding resources to a Resource Sheet reduces duplication and maintenance of resources. You can access the Resource Sheet from View > Resource Sheet.
The Resource Sheet view contains fields with relevant user information such as Title, Business Phone, Email, Status, Assigned from Pool and so on. You can review, add, or edit information on each resource. You can quickly create a resource list for your project by adding the name of each resource and their related information. A resource can be an individual, a company or department, a piece of equipment, a room, or any other resource that you are using for your program.
Note Simultaneous updates to the Resource Sheet by different users is not supported. Updates to the resource sheet are saved independently of Gantt chart updates.
Resource Utilization
The Resource Utilization view displays all the resources and the tasks assigned to each resource. It displays the tasks and task allocations from other programs in PPM as well. You can view the following information for each resource or resource group in this table:
Name Pool Name % Allocation Schedule Start Schedule End
To format columns in the report:
1. Choose Format > Preferences.
2. Within the Preferences dialog that opens, in the Columns tab, select the columns you want to display.
3. Use the arrow buttons to move selected column names from the Available Columns list to the Selected Columns list.
4. To rearrange the order in which the columns display, move them up or down in the list using the up and down arrows.
5. To hide or show gridlines, select the appropriate check boxes for Horizontal and Vertical.
Chapter 6
Page - 85
6. Click OK to apply your changes.
Using the Gantt Chart To start using the Gantt Chart you must first create a Program. A Program is a high-level activity which can consist of sub-activities. Sub-activities can be programs, phases, tasks and gates. A Program is equivalent to a project name and all sub-activities are created under the main program.
A Program can have multiple programs, phases and tasks within itself. A Phase is a distinct stage of development and a Task is the actual activity within a Program. The duration of each sub-activity is rolled-up to its parent activity. For example, the duration of tasks within a phase can summarize the start and end date of a Phase. Similarly, the duration of all phases within a Program can summarize the total duration of a Program.
Adding Activities
You can add activities to a program from the Gantt Chart using the Insert Activity options on the main toolbar or the right-click menu. Or you can use the quicker options listed below.
To add an activity:
1. Select the row under which you want to add an activity.
2. Press the Insert key on your keyboard. This inserts a new row below the row currently selected.
3. Type the name of the activity in the newly created blank row.
The activity created will belong to the Task subclass. To add an activity of a specific subclass, use the shortcut key Ctrl+Alt+A.
4. In the Activity dialog that opens, select a subclass for the activity.
5. Specify the Start Date and End Date. The Schedule Duration field will automatically display the number of days based on the start and end date. You can also specify the start date and enter the total number of days of your program in the Schedule Duration field; the end date is automatically calculated.
6. Click OK to add the activity.
Viewing Activity Information
Activity Status - Status icons indicate the status of each activity in the tabular activity pane. The icons are displayed next to the activity name of a program, phase, task or gate.
The activity status is indicated by the following icons: Not Started —The program has not started. Complete —The program is complete. Canceled —The program has been canceled.
On Track —The program object is on schedule.
Needs Attention —The program or child objects are off schedule or overdue.
Off Track —The program or its child objects are more than 5 days overdue.

Product Portfolio Management User Guide
Page - 86 Product Lifecycle Management
Note The exact time period to elapse before the yellow and green indicators should display can be configured in Administration. Please refer to the Agile Administrator Guide for details on configuring this setting.
Activity Information - You can view an activity’s general information, P1, and P2 details from the Gantt Chart.
To view program information, right-click a program activity and select Properties.
Adding Gates
A Gate is a zero duration activity which signifies completion of a major activity similar to a milestone. A Gate can be added in the Gantt Chart to enable checks or control for completing tasks on schedule before a new task can start. A dependency should be created to achieve this. See “Creating and Editing Dependencies in Gantt (on page 86)”.
To add a Gate:
1. Select an activity on the tabular view pane.
2. From the right-click menu, click Insert Gate. Or simply click the Gate icon on the toolbar. You can also use the shortcut key Alt+G.
3. In the dialog that opens, enter a name for the Gate and specify the End Date.
4. Click OK to add the Gate.
Editing Data
You can use the Gantt toolbar icons to edit and move data around quickly. Most menu commands and icons have shortcut commands that you can use to save time. The shortcut command for each menu item appears next to it or becomes visible when you place your mouse pointer over it. Data editing actions that you can perform are listed here.
Important After making changes in the Gantt Chart, you must use the Gantt Chart Save option to save changes to the database. Save overwrites any changes others may have made to the PPM program while Gantt was open. You must be the program owner of the program you are working on to be able to save changes.
Creating and Editing Dependencies in Gantt
You can create a dependency between two activities in the Gantt Chart. By default, all program schedules begin on the start date of the first task and finish based on date of the last task to complete. When dependencies are created, the Gantt Chart adjusts the schedule to assign more accurate dates to each task. Dependencies can change the program’s finish date to be more accurate.
To create a dependency:
1. Click the Create Dependency icon on the toolbar. The cursor turns into a cross-hair pointer.
2. Drag the cross-hair pointer from the start point of the task to its end point. The direction you drag and the start point or end point of the task you select determines the dependency type.

Chapter 6
Page - 87
Note If you need to create a dependency between two tasks that are not close to each other, you can type the dependency directly into the predecessor column. Type the predecessor’s task ID no. (shown on the right-hand side of the tabular view) in the Predecessor column in the tabular view pane.
You can also create a Dependency using the Edit > Create Dependency menu command.
To edit a dependency:
1. Double-click the dependency arrow link on the graphical view of the Gantt Chart or select Edit > Edit Dependency.
2. Select the type of dependency from the Types drop-down menu.
Entering or Changing Dates
To enter dates in the date fields, type in the dates or click the Calendar icon to select a date from the calendar.
In the graphical view, you can simply click and drag the activity task; the dates are automatically readjusted in the Schedule Start and Schedule End columns.
To change the start or end date and the duration of an activity, drag the marker at the ends of each bar on the Gantt Chart. You can also click anywhere on the bar and drag the entire bar backwards or forwards to change dates.
Deleting Objects in Gantt
You can delete programs, phases, tasks, and gates in the Gantt Chart by selecting the activity you want to delete and clicking on the Delete icon on the toolbar. You can also use the Edit > Delete option or the keyboard shortcut Ctrl+Delete.
To delete any activity in the Gantt Chart, you need the appropriate Delete privilege assigned to your role. If you do not have this privilege, deletions that you make in the Gantt Chart are not applied within Agile PLM. An error message indicates that you do not have the appropriate privilege to delete activities.
Contact your Agile PPM Administrator to ensure that you have the appropriate Delete privileges.
Note If the update fails because you do not have the appropriate Delete privileges, you will not be able to go back to the original program tree in the Gantt Chart. You must go back to Agile PPM and start the Gantt Chart again.
Printing a Gantt Chart
You can print any view of the Gantt Chart using the Print option in the File menu.
Within the Print window, or the Print Preview window, you can manually change Page Setup
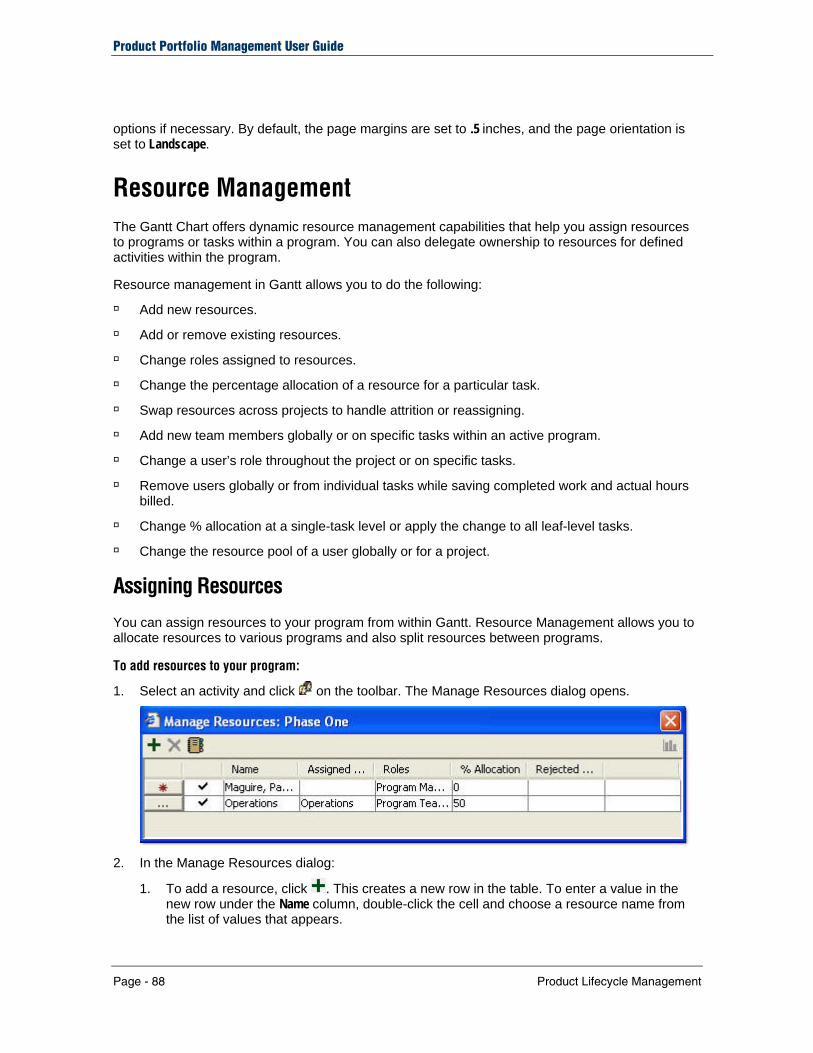
Product Portfolio Management User Guide
Page - 88 Product Lifecycle Management
options if necessary. By default, the page margins are set to .5 inches, and the page orientation is set to Landscape.
Resource Management The Gantt Chart offers dynamic resource management capabilities that help you assign resources to programs or tasks within a program. You can also delegate ownership to resources for defined activities within the program.
Resource management in Gantt allows you to do the following:
Add new resources.
Add or remove existing resources.
Change roles assigned to resources.
Change the percentage allocation of a resource for a particular task.
Swap resources across projects to handle attrition or reassigning.
Add new team members globally or on specific tasks within an active program.
Change a user’s role throughout the project or on specific tasks.
Remove users globally or from individual tasks while saving completed work and actual hours billed.
Change % allocation at a single-task level or apply the change to all leaf-level tasks.
Change the resource pool of a user globally or for a project.
Assigning Resources
You can assign resources to your program from within Gantt. Resource Management allows you to allocate resources to various programs and also split resources between programs.
To add resources to your program:
1. Select an activity and click on the toolbar. The Manage Resources dialog opens.
2. In the Manage Resources dialog:
1. To add a resource, click . This creates a new row in the table. To enter a value in the new row under the Name column, double-click the cell and choose a resource name from the list of values that appears.

Chapter 6
Page - 89
To add resources from a resource address book, click . Click Find to view all the resources from the selected resource list. Use the Find From drop-down list to select a resource list from your existing resource sheets, for example, an existing resource pool or resource sheet list. Resources or resource pools that have already been added do not appear in the search results.
Depending upon your selection, more options become available. Click Options to perform a parametric search to find resources. For more information on Parametric Search, see the Agile PLM Getting Started Guide.
2. Click OK. Selected resources appear in the Manage Resources table.
3. In the Roles column, specify the role for each resource. To change cell values, double-click the cell and click . In the dialog that opens, select a role from the Available Roles column, move it to the Selected Roles column, and click OK.
4. In the % Allocation column, enter the percentage of the resource's time that you want to allocate for this activity. If the resource rejects the activity assignment, an icon is displayed in the Rejected column.
Note The percentage (%) allocation for a full-time resource who is assigned to only one activity is 100%. If the resource is being shared across multiple programs, the percentage allocated would vary depending on the time allocation towards each program or activity.
3. To assign a resource, select the row and click Apply.
Before you assign resources, you can confirm availability of each resource. See "Viewing Resource Utilization (on page 89)".
Viewing Resource Utilization
To view resource utilization data, click at the top right corner of the Manage Resources dialog. This opens the Resource Utilization chart.
The Resource Utilization chart helps you to view resource availability before you assign a resource to a particular activity.
Removing Resources
To remove assigned resources:
1. In the Manage Resource dialog, select a resource or multiple resources to delete.
2. Click . A message prompts you to confirm deletion.
3. Click Yes to confirm.
4. In the dialog that opens, select either of the following: Delete resource and re-assign % allocation to pools (if applicable) - Select this option if you want
to delete the resource and re-assign the resource allocation percentage to other resources in the program resource pool.
Delete resource and discard % allocation - Select this option if you do not want to re-assign the resource allocation percentage.
The selected resources are removed as per your specification.

Product Portfolio Management User Guide
Page - 90 Product Lifecycle Management
Note In the Manage Resource dialog, a black check mark next to the resource name indicates that the resource is allocated to all selected tasks. If the resource is allocated to at least one task, but not all tasks, the check mark will be grey.
Delegating Owners
You can delegate ownership of an activity to a selected resource. In this way, you can assign an owner to each task in your program. When you delegate an owner to a task, a request is sent to the owner for approval. See also: "My Assignments (on page 32)".
Once the delegated owner accepts the request, that resource owns the task and the delegated field becomes blank.
To delegate ownership:
1. Select the activity or task. The Delegate Owner icon is enabled.
2. Click . A list of default resources is displayed.
3. Select the resource from the list, or click to select resources from the Address Book.
4. Click OK to delegate ownership.
Customizing the Gantt Chart The graphical and tabular display of data within the Gantt Chart can be customized based on your preferences. You can configure the display of columns, grids, bar labels, appearance, and styles using the options in the Format menu.
The columns can be configured to display Page One attributes - the options that are made available in these fields are configured in the Java Client General Info attribute settings.
Customizing Columns for Tabular View
You can customize which columns should display, the order in which these should display, and define which of the selected columns should be frozen or non-frozen.
To customize column display:
1. Select Format > Columns from the menu bar.
2. Within the Table Options dialog that opens, select the columns you want to display.
3. Use the arrow buttons to move selected column names from the Available columns list to the Frozen or Non-Frozen columns as desired. The Non-Frozen column displays all the visible columns in the tabular activity pane.
You can also freeze the visible columns in the tabular view pane by right-clicking the column within the Gantt Chart and selecting Freeze Column. This will freeze the selected columns while you are scrolling across the tabular view pane. The columns that you freeze are displayed in the Frozen column field. The Up and Down arrow buttons on the screen allow you to sort the displayed columns

Chapter 6
Page - 91
in the order that is listed in the Non-Frozen columns.
Appearance and Style
To customize the appearance of your Gantt Chart, choose Format > Appearance and choose from the following themes.
Metal CDE Motif Windows Windows Classic Kunststoff Office
To change the graphical view style, choose Format > Styles and choose any of the following styles: Agile Activity Completion Critical Path Custom Time Scale Level Coloring Standard
Bar Labels
You can select the text to be displayed on the bar graphs on the graphical view pane. The information will be displayed in relation to the task, program or phase corresponding to the bar graph. Choose Format > Bar Labels and select an option from the following labels:
Name Start Date End Date Status % Completed None
Grids
You can choose the way you would like the grids in your graphical view to be displayed and customize the color of the grids and rows. You can select from the following options:
Show Vertical Grid Vertical Grid Color Show Weekends Weekends Color Show Horizontal Grid Horizontal Grid Color

Product Portfolio Management User Guide
Page - 92 Product Lifecycle Management
Color Rows Even Row Color Odd Row Color
Once you have made changes to any of the format settings, select Format > Save Settings from the menu bar to save changes.
Note The Save Settings command does not save changes to the Grid.
View Bar
The View Bar is a pane that is displayed on the left of the Gantt Chart and allows you easy access to view the different type of Gantt views. The Gantt view types are displayed as icons and you can click on the icon to display the view. The View Bar is enabled by default. To disable it for a particular session, select View > View Bar.
Note A check mark next to the View Bar option indicates that the view bar is enabled.

Product Lifecycle Management Page - 93
Chapter 7
Working with Microsoft Project
This chapter includes the following:
Before You Begin................................................................................................................................................. 93 Working with Imported Microsoft Project Files..................................................................................................... 93 Microsoft Project Troubleshooting Tips ............................................................................................................... 96
If you use Microsoft Project 2002 or 2003, you can import your project file to Agile PPM, and continue managing your project from there.
For detailed information about how Agile works with Microsoft Project files, see the Agile 9 Import Export Guide.
Note Certain complex dependency and constraint types supported in Microsoft Project are not yet supported in Agile PPM. For further information see “Microsoft Project Troubleshooting Tips (on page 96)”.
Before You Begin Make sure all your Microsoft Project team members exist in the Agile database
If your work site has previously used PPM 8.5 or 9.0, uninstall the 8.5 or 9.0 macros.
Make sure you have the Microsoft Privilege assigned to you by your Agile administrator.
To uninstall the Agile PPM 8.5 or 9.0 macros: 1. Open Microsoft Project.
2. Select Tools > Organizer > Modules.
3. Open Global.mpt and delete the Get File and XML macros.
Working with Imported Microsoft Project Files In Agile PLM 9.2.2, integration with Microsoft Project 98 and 2000 project files is not supported. If you have Microsoft Project 98 or 2000 project files with which you would like to work, open them in Microsoft Project 2002 or 2003 to automatically convert the project files to the appropriate format. For more information, select Help > Microsoft Project Help in the Microsoft Project menu.
Setting Up Microsoft Project Synchronization
To install the plug-in:
1. Choose Tools > Microsoft Project Synchronization Setup.

Product Portfolio Management User Guide
Page - 94 Product Lifecycle Management
2. Agile displays a warning-security message. Click Yes.
3. Close the Setup window.
4. Do either of the following: Open Microsoft Project and make sure the Agile Menu appears on the menu bar. Click the Microsoft Project button from any Agile program, then select Launch in Microsoft
Project. This starts Microsoft Project and installs the Agile menu.
The figure below shows the Agile Menu item on the Microsoft Project menu.
Creating a PPM Program from an Existing Microsoft Project File
You can use an existing Microsoft Project plan that contains only one Level 1 task, as the basis for an Agile PPM project object. (All tasks must be rolled up under a single project; PPM transforms that project into the root program object.)
To create a PPM program from an existing Microsoft Project file:
1. Open the target file in Microsoft Project.
2. Choose Agile > Publish to PPM. The Agile PLM Publish page appears.
Alternatively, you can save the Microsoft project file as an .xml file and use this file to publish the project.
To create a PPM program from an existing Microsoft Project file saved as an .xml file:
1. Open the target file in Microsoft Project.
2. In the Microsoft Project menu, select File > Save As to save the project file as an .xml file.
3. Move to the Agile Tools menu and select Tools > Microsoft Project Publish.
4. Navigate to the Microsoft Project .xml file you want to publish.
5. Click Next.
Launching a PPM Project in Microsoft Project
You can launch a PPM program in Microsoft Project if you have the appropriate privileges. For details of required privileges, see the Agile Administrator Guide.
To launch a PPM project in Microsoft Project:
1. Open the program you wish to launch.
2. From the Actions menu, choose Microsoft Project > Launch as Read Only or choose Microsoft Project > Launch in Edit Mode. Microsoft Project opens.
3. Specify that the file should be launched As a New Project. 4. Click Finish.

Chapter 7
Page - 95
Read Only and Edit Modes
You can launch or save a PPM program in Read Only or Edit mode. The mode you choose can affect program data.
Read Only Mode
When you launch a PPM project in Microsoft Project using Launch as Read Only, it allows you to view, print, or analyze a PPM project in Microsoft Project without altering the project data in Agile PPM. In Microsoft Project you can perform any edit, modification, or analysis actions you choose. You can save the Microsoft Project file in any local or network directory to which you have access.
However, you cannot publish the launched-as-read-only program back into Agile PPM. When you launch as read-only, the PPM project is not locked, the Lock User field remains empty, and the Schedule Editor field remains set to PPM. It is therefore possible for another user to modify the PPM project by using any of the available Agile PPM edit methods: edit in PPM, edit in Microsoft Project (Launch in Edit Mode), or edit in Gantt Chart.
The Microsoft Project file that you create when you use Launch as Read Only is not updated or affected by any subsequent edits or modifications made to the PPM program file.
Edit Mode
When you launch a PPM project in Microsoft Project using Launch in Edit Mode, the PPM program is automatically locked so that no other user can modify it. Your name appears in the Lock User field, and the Schedule Editor field is set to Microsoft Project.
You are able to publish the launched-in-edit-mode program back into Agile PPM.
The same considerations apply when you save a PPM program using the Save As XML menu commands.
For more information about locking programs, see “Multiple Users Editing the Same Task (on page 42)”.
Working Offline on a PPM Program
If you do not have Microsoft Project installed on your computer, you can save your PPM program to your local drive as an XML file, and work on it offline. You can access this file from a machine on your network which has Microsoft Project installed, view or edit it offline, and then publish your changes back to PPM when you are online again.
You can use either of the following commands to save your program as an XML file:
Save as XML - Read Only
Save as XML - Edit Mode
For considerations that you should be aware of before you choose Read Only or Edit mode, see "Read Only and Edit Modes (on page 95)".
To save your program as an XML file:
1. Open the program you wish to save.
2. From the Actions menu, choose Microsoft Project > Save as XML - Read only or Save as XML - Edit. 3. Download the file to your local drive.

Product Portfolio Management User Guide
Page - 96 Product Lifecycle Management
Note If you are using Windows XP with Internet Explorer 7, default security settings for file downloads may result in duplication of History records during the Save as XML - Read only operation. To prevent this: Ensure that the Web Client URL is added under Tools > Internet Options > Trusted Sites > Sites. Under Custom Level settings, select Enable for "Automatic prompting for file downloads".
Microsoft Project Troubleshooting Tips If Microsoft Project sync does not work, you may want to reinstall the Agile PPM menu. To do so, you need to manually remove the pre-existing Agile menu by doing the following:
To see a list of active COM add-ins for Microsoft Project: 1. Go to Tools > Customize > Toolbars. The “Customize” window opens.
2. From the Commands tab, within the left-hand list, select Tools.
3. Locate “COM Add-Ins” in the right-hand list.
4. Drag and drop “COM Add-Ins” from the list onto the menu bar.
5. Close the Customize window.
6. Click the newly added COM Add-Ins menu. A list of all the installed add-ins is displayed.
To manually uninstall a COM Add-In from Microsoft Project: 7. Click the COM Add-Ins menu to see a list of COM Add-Ins.
8. Select the add-in you wish to uninstall.
9. Click the Remove button to uninstall the selected add-in.
Other things that might cause difficulty with integration:
Split-task resource assignments
Use of actual dates vs. scheduled dates
Customized calendars and working days
Constraint types such as Must Finish On are not maintained in the Agile system after you Publish from Microsoft Project. Therefore, launching the plan back into Microsoft Project will result in different dates than those in the initial Microsoft Project plan.
Microsoft Project allows duration to be entered in hours. PPM uses days as the lowest unit of time. Therefore, accuracy issues are compounded with heavy usage of tasks that are less than one day's duration.
The Agile PPM project name must be at outline level one in Microsoft Project. All Agile PPM subtasks, phases, and gates must be indented under level one in Microsoft Project.
Within Microsoft Project, each resource for your program needs to be assigned a certain % allocation within the Resource tab of the relevant Task. The maximum value you can enter for

Chapter 7
Page - 97
this field is configured in Java Client. The default setting is 400. If you enter a value greater than the maximum value setting, errors result when you publish to PPM. This maximum value for % allocation can be reset in Java Client (Team attributes) if required.
Note Microsoft Project outline numbers are not imported into Agile PPM.
Deleting Objects in Microsoft Project
You can delete programs, phases or tasks in Microsoft Project by using the Microsoft Project features.
When you update Agile PPM with the changes you have made in Microsoft Project, Agile PPM checks your assigned Delete privileges to ensure that you are allowed to delete programs, phases, or gates in Agile PPM. If you have deleted activities in Microsoft Project that you are not allowed to delete in Agile PPM, none of your Microsoft Project changes are written to the Agile database, and you will see an error message telling you that you do not have the appropriate privileges.
Note If the publish to PPM fails because you do not have the appropriate Delete privileges, you will not be able to go back to the original program tree in Microsoft Project. However, you can go back to Agile PPM and launch Microsoft Project again.
If you are not able to delete specific types of PPM objects in Agile PPM, you will also not be able to delete them in Microsoft Project and update the Agile database.
Transferring Microsoft Project Work Values to PPM
To ensure the accurate mapping of work values from Microsoft Project to a PPM program, some data manipulation is required.
Days Effort - In Agile PPM, days effort is always calculated based on the % allocation and duration. Unlike in Microsoft Project, Agile PPM requires an allocation to a resource or resource pool in order for days effort to be populated. To ensure that effort data values without resource or resource pool allocation are not lost while publishing tasks from Microsoft Project, your Agile administrator can set up and define a generic resource pool to hold the work/days effort values. If your Agile administrator has defined the generic resource pool, you will notice that tasks which satisfy these conditions have a generic resource pool associated to them on the Team tab.
Custom Subclasses - While creating new tasks in MSP for a PPM program, you can override the default subclass values in the Text29 column with custom subclass values specified in the Java Client.
Page Two Attributes - To ensure the correct mapping of Page Two attributes, you must edit the appropriate values in the MSP/Agile PPM mapping file (MSPSyncMapping.properties on the Agile server) provided by Agile. Page Three attributes cannot be mapped.
Caution Data in the Text30 column should not be tampered with, as this could interfere with the synchronization process and cause errors.
For detailed information on any of the above, see the topic on Product Portfolio Management settings in the Agile PLM Administrator Guide.

Product Portfolio Management User Guide
Page - 98 Product Lifecycle Management
Note Within Microsoft Project, the % allocation for a resource should be a value between 0 and 400 to ensure error-free data mapping. The default maximum value for the corresponding field in PPM is 400. If you wish to assign a higher value, you can change the default configuration for the Team attributes in Java Client as appropriate. To learn how to modify attributes, see the Agile PLM Administrator Guide

Product Lifecycle Management Page - 99
Chapter 8
Import and Export
This chapter includes the following:
Overview.............................................................................................................................................................. 99 Before You Begin................................................................................................................................................. 100 Supported File Formats ....................................................................................................................................... 101 Importing Data ..................................................................................................................................................... 101 Exporting Data ..................................................................................................................................................... 106
Overview The Import wizard enables you to add and update large files (product content) from other formats into Agile PPM. Import not only brings in legacy data that is required to start your business processes within Agile, but also enables you to update product content periodically. The Import process must be implemented appropriately to reap the value of Agile solutions.
You can create large data source files and quickly upload them in bulk into Agile through the import procedures described here. Prior to import, you can set preferences to specify the conditions for import.
The Import Wizard allows you to import the following objects into Agile PPM, in addition to importing standard program information from previous Agile releases.
Discussions and Action Items
Discussions are chat type notifications relating to a program and Activities are unplanned tasks, with owners and due dates, found on the program object’s Discussions tab. When importing discussions, the relevant program information must also be included in the Import Discussion data file.
Note Discussion and Action items can only be created and not updated. You cannot update or modify existing data.
The figure below shows a sample of the data file for importing Discussions. The file must contain values for Number, Name, Discussion Type, Subject, Message, Status, Priority and Notify List fields.
Number Name Discuss ion
type
Sub jec t Message Sta tus Pr io r i t y Not i f y L is t
D00123 Shopper, Henry
Discussion Quote Questions
Please post all questions here for quick resolution.
Open 3 - Low Agile, Acme03

Product Portfolio Management User Guide
Page - 100 Product Lifecycle Management
Number Name Discuss ion
type
Sub jec t Message Sta tus Pr io r i t y Not i f y L is t
D00021 Maguire, Paul
Discussion Need for multiple English Versions
To get 99% accuracy, different versions needed.
Open 1- High Hage - QA Manager, Joe, Tom, Smith
D00101 Maguire, Paul
Discussion Regulator The manufacturer for Regulator is on hold.
Open 2 - Medium Salesy-Quanta ODM, Roy, Jones
Users and User Groups
User and User Group information is often changed and updated. Importing Users and User Groups provides a quick way to update the information in your Agile system.
Root Programs (Updates only) You can import Root programs with PI, P2 and P3 fields. You can export data, make modifications to P1, P2 and P3 fields in it, and import it back into Agile.
Before You Begin Before you import data from source files into Agile PPM:
Make sure you have the appropriate Agile PPM user license and privileges. To import Agile data, you must have Create, Discover, Read, and Modify and Import privileges for each type of Agile object you are importing. You also need to have the Import privilege options enabled in Java Client. If you have questions about privileges, contact your Agile PPM administrator or refer to the Agile PPM Administrator Guide. To launch Import, you must have the My User Profile role, Read User privilege and Import privilege.
Make sure you understand the specifications for each field. Certain fields are mandatory, therefore you need to map them in the Import wizard fields. Fields also have data types, which determine how the data should be formatted, and maximum lengths, which the Agile PPM system validates on import. These are set in the Import Wizard Preferences.
Make sure that your data is in the correct file format. If you are importing data from text files, check your source data to make sure that it is in a supported file format, and matches the Import Preferences settings. For details, see “Supported File Formats (on page 101)”. To create aXML files, use Agile Content Service (ACS), Agile Integration Services (AIS), or create an aXML file from the Export command. You can view aXML files in any XML viewer, including Internet Explorer.
Make sure the Agile PPM system has sufficient hard disk space for importing large data files or create an aXML file from Export Wizard.
Persistence of Import Settings
When you use the Import Wizard in Web Client, the data stays as long as you maintain the session.

Chapter 8
Page - 101
The settings that persist include:
Import preference settings
Source file configuration
Selected content to import
Selected mapping file
Selected transformation file
Selected change number
When you choose a different source file, the selected content, mapping file, and transformation file are reset.
Importing Large Data Files
Before importing a large file, clear the Log Transformations preference checkbox for faster results. If you are importing large amounts of data during one import session, you should perform the session during non-business hours - when system usage is low. After the import session is finished, you can view the log file in a browser or save it to a file.
For more information, see the Import and Export Guide.
Supported File Formats You can import and export data in several file formats. The following file formats are supported:
Use F i le Type Descr ip t ion To Impor t
Delimited Text File (.dtf) A standard flat text file where each field data is delimited by a special character, such as a comma or a tab.
Any object.
Excel Workbook (.txt,.csv) Microsoft Excel workbook files. The import wizard supports files created from MS Excel 2000, 2002, 2003, and Win XP.
Users, User Groups, Root Programs, and Action Items.
Agile XML (.axml) Agile’s proprietary XML format that includes data not supported by PDX.
Users, User Groups, and Discussions
MS Project Export File (.xml) XML data exported from Microsoft Project for import to Agile. For more information about this format, see the Agile Import and Export Guide.
Programs and program objects created in Microsoft Project.
Importing Data To launch the Import function, click Tools > Import. This opens the Import Wizard that guides you through the import procedure. Importing is done in five steps:

Product Portfolio Management User Guide
Page - 102 Product Lifecycle Management
1. Define import preferences.
2. Select the source file to be imported and specify file type.
3. Select the content from the list of contents that can be imported.
4. Map source fields to target solution fields to store the imported data.
5. Transform source field data into the Agile format.
6. Review the information that you have entered and start the import.
An Import log records the process, and logs the results and errors.
Each step of the import procedure is described in detail in the following sections.
Define Import Preferences
Preference settings allow you to set different conditions to run the import. The Import wizard has several preference settings that you can set from any step in the wizard. These settings persist during the current Agile PLM client session, but they are not permanently saved with each user’s profile.
Note These settings are optional; you can complete the import without specifying preferences.
To set import preferences:
1. Click the Preferences button at the bottom left corner of the Import wizard. The Specify Preference Settings window appears.
2. Select one of the following from the list: Parsing and Validation Options Business Rule Options Default Types AutoNumber Sources
Depending on the option you choose, the wizard displays a list of values that you can define. For complete details on the impact of each setting you define, see the Agile Import and Export Guide.
3. Select preference settings and click OK.
Select Import Source
The Import Source page in the Import Wizard lets you select the source file to be imported and configure it for import.
To select the source file for the import:
1. From the Import Source page, select the File option.
2. Specify the file name. Type in the file name or path or click Browse to select the file from your local drive. See also “Supported File Formats (on page 101)” before you choose the type of file.
3. Select one of the File type options:
Chapter 8
Page - 103
Delimited Text file(.dtf): Text files where each field of data is delimited by a specified character such as a comma or tab. They must have a file name extension .csv or .txt.
Excel Workbook: Spreadsheets with rows and columns that allow you to format data. These must have a filename extension .xls.
Product Data eXchange (PDX) package: Standardized XML format containing product content. You can import from a PDX package. Attachments are imported along with their associated objects in PDX format and must have a .pdx extension. The PDX package does not support any PPM objects, Users, and User groups.
Agile XML (aXML) Package: An XML format that contains all product content managed in Agile PLM. aXML files must have an .axml extension.
Note With the Delimited Text file and Excel file you can select only one object type to import, while with the aXML and PDX files you can select multiple objects to import.
4. Click Configure. Depending on the file type that is chosen, configuration options appear. Select the appropriate options for your import and click Next.
Fie ld Name Opt ions Ac t ion
Template Type Standard, no template Parent-child Template Level Template
Select the template type of your import file.
Field Delimiter Comma (,) Tab Vertical Bar (|)
Select the appropriate field delimiter which will separate figures or text within the file.
Text Qualifier Apostrophe (‘) Double quotation mark (“)
Select the symbol which will qualify the data as text and not figures.
Location of Header Row (any row number) Specify the row number within the worksheet which contains the text to be used as the header row.
Location of Last Row (any row number) Specify the row number in the worksheet to be taken as the last row to import data.
This can be used if you want to import a table format file which may contain multiple object types. Import will only load specified data based on header row and last row specified.
File Encoding Japanese (EUC) Japanese (Shift-JIS) Simplified Chinese (GB2312) Traditional Chinese (Big5) Unicode (UFT-8) Western European (ISO)
Specify File encoding.
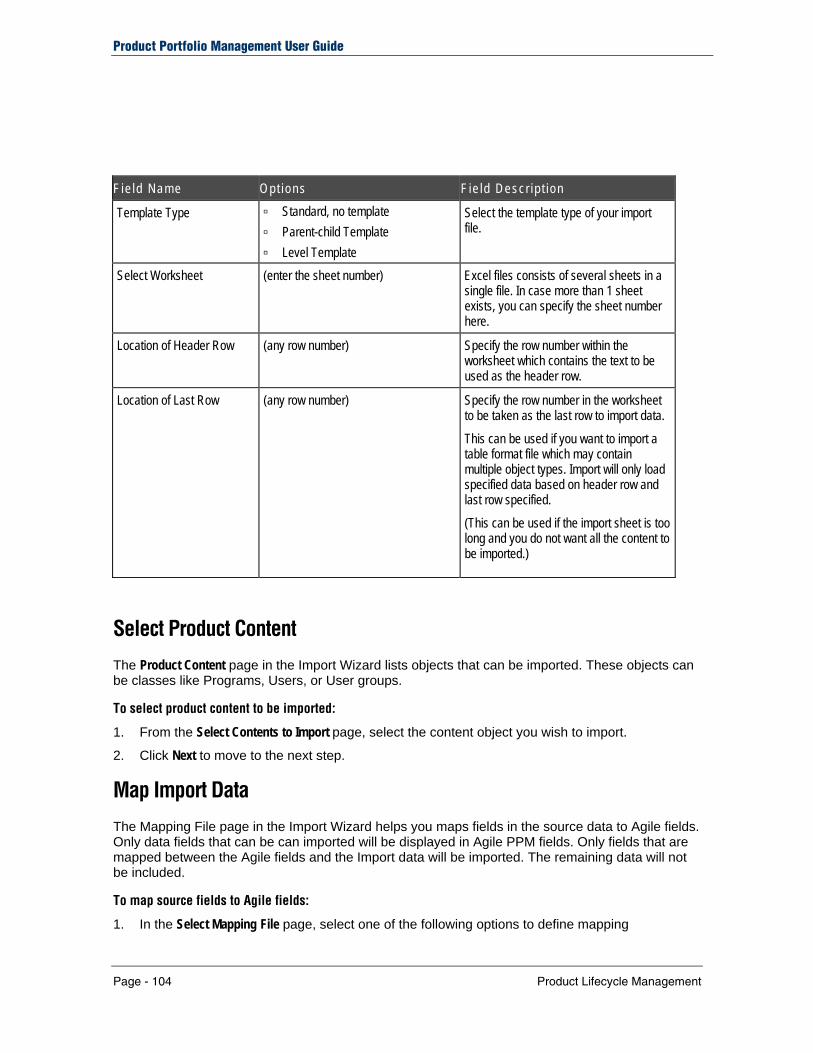
Product Portfolio Management User Guide
Page - 104 Product Lifecycle Management
Fie ld Name Opt ions F ie ld Descr ip t ion
Template Type Standard, no template Parent-child Template Level Template
Select the template type of your import file.
Select Worksheet (enter the sheet number) Excel files consists of several sheets in a single file. In case more than 1 sheet exists, you can specify the sheet number here.
Location of Header Row (any row number) Specify the row number within the worksheet which contains the text to be used as the header row.
Location of Last Row (any row number) Specify the row number in the worksheet to be taken as the last row to import data.
This can be used if you want to import a table format file which may contain multiple object types. Import will only load specified data based on header row and last row specified.
(This can be used if the import sheet is too long and you do not want all the content to be imported.)
Select Product Content
The Product Content page in the Import Wizard lists objects that can be imported. These objects can be classes like Programs, Users, or User groups.
To select product content to be imported:
1. From the Select Contents to Import page, select the content object you wish to import.
2. Click Next to move to the next step.
Map Import Data
The Mapping File page in the Import Wizard helps you maps fields in the source data to Agile fields. Only data fields that can be can imported will be displayed in Agile PPM fields. Only fields that are mapped between the Agile fields and the Import data will be imported. The remaining data will not be included.
To map source fields to Agile fields:
1. In the Select Mapping File page, select one of the following options to define mapping

Chapter 8
Page - 105
specifications. Use an existing mapping file - If you already have an existing mapping file which corresponds
to the file which is being imported, select this option. Create a new mapping file - If you wish to map the fields manually, select this option. Use currently defined mapping definition - This option becomes available only if a mapping
definition already exists. If you wish to use the last mapping definition that was created, select this option.
Default mapping definition - If you wish to use default settings to map fields, select this option.
Note When you select Use an existing mapping file and the file is mapped, the Use currently defined mapping definition option gets automatically selected, that is, the mapping that was created last is used.
To change any of the fields that are already mapped, click Edit Chosen Mapping.
2. In the Edit Chosen Mapping dialog: a. Under Import fields in the left column, select the source field to import. b. Click Expand All to view all the fields listed under Agile fields. c. Navigate to the corresponding Agile fields in the right column and select these fields.
Ensure that all Required fields are selected. d. Mandatory fields for creating a program are displayed in bold in the Mapping dialog.
Required fields appear in green. e. After mapping source fields to Agile fields, click Finished.
You can save this mapping file for future use if you wish, using the Save As option.
3. Click Next to move to the next step.
Select Transformation File
Before you import data, you may need to transform the values in some fields to make them compatible with the Agile system. You can use a Transformation Definition file to perform this transformation. Transformation definition files are especially helpful for importing data from PDX or aXML packages. Generally, PDX or aXML packages are read-only. You cannot change the values contained in an archived file. If there are data inconsistencies in a PDX or aXML package, you must try to correct them using a transformation definition file.
A transformation definition file is a comma-delimited text file. Optionally, you can qualify text strings in the file using double-quotes ("). The file must contain a set of required fields needed to transform import data.
Note The Import wizard does not support transformation definition files created with previous Agile Product Cost Management or Agile Product Collaboration releases.
Transformation definition files are optional for importing data. If the source data does not need to be modified you can skip the Transformation Definition File step. Transformation file step is used only in case of aXML data as it cannot be modified in any other tool.
To transform source field data into the Agile format:
1. In the Select Transformation Definition File page: a. If you are not importing an aXML file, then select Do not Perform any Transformations and click
Next.

Product Portfolio Management User Guide
Page - 106 Product Lifecycle Management
b. If you are importing an aXML file, select Apply Transformation and do either of the following: Browse and select a Transformation Definition file from your directory. Or click Download Transformation Template to download a template file that you can use as a
Transformation definition file.
Note All transformation that occurs during an import session are recorded in the Import Log file.
2. Click Next to move to the next step.
Review Settings and Begin Import
The Review Settings and Begin Import page displays the import and preferences settings that you have defined.
To begin the import process:
1. Review the import settings to make sure all the fields that you wish to import are covered.
2. To begin import, click Import. The source data is imported into Agile PPM. To cancel the process, click Cancel. An Import Summary Report generates a log report with the following: Time information - States the time import started and the time of completion of import. Processed Records Summary - Provides the details of objects that have been accepted,
rejected or ignored. Message Summary - Provides a summary of the errors in the imported data.
To redo the import process, click Restart.
To save imported data, click Save Log.
To return to Agile Web Client, click Done.
Exporting Data The Export Wizard enables the extraction of programs and objects from Agile PLM into other formats such as Microsoft Excel worksheets, comma-delimited text, PDX Package or aXML Package formats, for distributing or sending the content to customers or vendors.
You can also export the following types of objects from Agile PPM:
Discussions
Root Programs
Users and User Groups
You can export PPM program or objects from Agile in Excel, Text (CSV) or aXML formats.
To start the Export wizard from Agile Web Client:
1. Open an object to export.
2. Choose Tools > Export.

Chapter 8
Page - 107
To start the Export wizard from Agile Java Client:
1. Open an object to export.
2. Choose Actions > Export. 3. Search for objects that can be exported, and select one or more objects in the Search Results
page.
4. Choose Tools > Export.
To export a Program or PPM object:
1. In the Objects to Extract page, from the Export to drop-down list, select the format to which you want to export data.
2. In the Site field, select a site. To export data for all sites, select All.
Note The Site field is only available if your Agile system includes the Sites server license.
3. To add programs or Agile objects, click . An Add Objects dialog opens, where you can search for objects. Use the Search tab to search for users, user groups, discussions or programs. Select the
Search Attachments Contents checkbox if you want to search through attachments as well. Click the Advanced Search link to search using parametric search criteria.
Use the Saved Searches tab to browse through your saved searches in the PPM Search Folders.
Use the Shortcuts tab to view the most recently used programs or objects, for faster selection.
4. Select the objects you wish to export and move them to the Selected area using the right arrow button.
5. To restrict the export to Page 1, Page 2 and Page 3 fields, select the Table Format check box.
6. Click Export. Specify a directory or location to save your export data when prompted.


Product Lifecycle Management Page - 109
Chapter 9
Agile e5.1 Integration
This chapter includes the following:
Adding Agile e5.1 Objects as Deliverables.......................................................................................................... 109 Modifying the Trigger Event and Result............................................................................................................... 110 Updating a Program to Agile e5.1........................................................................................................................ 110 Modifying Objects in Agile e5.1 ........................................................................................................................... 110 Additional Information .......................................................................................................................................... 111
Objects in Agile e5.1 can be added to Agile PPM activities and gates as deliverables. This capability enables a change of state in an Agile e5.1 object to trigger a change in workflow status of an Agile object. You can also copy Agile programs to Agile e5.1 as new projects, duplicate deliverables into Agile e5.1, and launch the Agile e5.1 object in the Agile e5.1 web client directly from Agile PPM.
Adding Agile e5.1 Objects as Deliverables Once the Agile e5.1 connection has been established, you can add Agile e5.1 objects as deliverables to a PPM activity such as a program or task.
To add Agile e5.1 objects to a PPM activity:
1. From the Content tab of the PPM object, choose Add > Create New. 2. In the Add Related Content wizard:
1. Enter the object type, and provide a name and number. All fields are mandatory.
2. Click Finish to add the object to PPM.
If you need to add multiple objects, use the search option to locate and add several objects at the same time.
To locate and add existing Agile e5.1 objects:
1. From the Content tab of the PPM object, choose Add > Search. 2. In the Add Related Content wizard:
1. Use the search options under Search From Existing Agile-e Entities to search for the object by type. Select an object type, enter details as appropriate, and click Next.
2. In the search results, select all the objects you want to add as deliverables.
3. To add another type of Agile e5.1 object, Click Add More. Specify the object type, and repeat the procedure.
4. When you are finished selecting all the required objects, click Finish to add the selected objects to the PPM activity.

Product Portfolio Management User Guide
Page - 110 Product Lifecycle Management
Modifying the Trigger Event and Result Once the Agile e5.1 entity has been added, you can change the status-change trigger and result.
To change the trigger event and result:
1. Open the Content tab of the activity.
2. Select the deliverable you want to modify. Click Add Rule.
3. In the Relationship Rule dialog, specify the status change rule for this deliverable.
4. Click Save to save the changes in Agile PPM.
Updating a Program to Agile e5.1 Once you have created a program in PPM, you can send the program structure, deliverables, links and roles on the Team tab to the Agile e5.1 system as a new Agile e5.1 project.
You can copy this PPM program structure into Agile e5.1 from the Agile PPM root program. A flag is set at each Agile object to indicate whether or not it will be updated to Agile e5.1.
Users who have access to the program in PPM are given access to the corresponding objects in Agile e5.1 through a role mapping that is set up by the administrator. Users must also have the necessary permissions to log into the Agile e5.1 web client.
To update the Agile e5.1 database with an Agile program:
1. Open the program.
2. Verify that the Update to Agile e5.1 field on the General Info tab is set to Yes for all levels of the hierarchy that you want to copy into Agile e5.1 as Agile e5.1 project objects. If it is not, click the Edit button, and set the field to Yes.
3. From the Actions menu, choose Update Program to Agile e5.1. 4. Select the Agile e5.1 project into which you want to copy the PPM program. The new Agile e5.1
project will be placed within the selected project.
5. Select options to copy the deliverables, links, and roles of team members to Agile e5.1.
You now can view the new project in Agile e5.1. You can select the In Projects tab within the Agile e5.1 web client to see the higher level project that was selected.
Within Agile PPM, the root level program will now appear in the Content tab. You can click on the link to navigate directly to this project in Agile e5.1.
Modifying Objects in Agile e5.1 Agile e5.1 objects that appear on the Content tab can be modified in the Agile e5.1 web client.
Note You must have the appropriate permission to log into the Agile e5.1 web client in order to add objects.

Chapter 9
Page - 111
To modify an Agile e5.1 object on the Content tab:
1. Click the object name. Then object opens in the Agile e5.1 web client. Separate login is not required.
2. Make your modifications in the web client and save.
If you make a change to the status of the object in Agile e5.1 (to promote it to its event or target status), then the corresponding activity in Agile PPM is updated when the page is refreshed. For more information about modifying objects in Agile e5.1 web client, refer to the Agile e5.1 web client documentation.
Additional Information Additional information about the integration between Agile PPM and Agile e5.1:
A new user or user group added to the Agile e5.1 system is updated to Agile PPM during a periodic resource sync process. These users and user groups are not available for adding as resources in PPM immediately, but they are available after the next periodic system resource sync. Users in Agile e5.1 that have person information, including first name, last name, and email, are automatically copied to the Agile PPM user list.
User Groups that have an owner and department are automatically populated as Resource Pools within Agile PPM. The manager attribute specifies the owner of the resource pool in PPM.

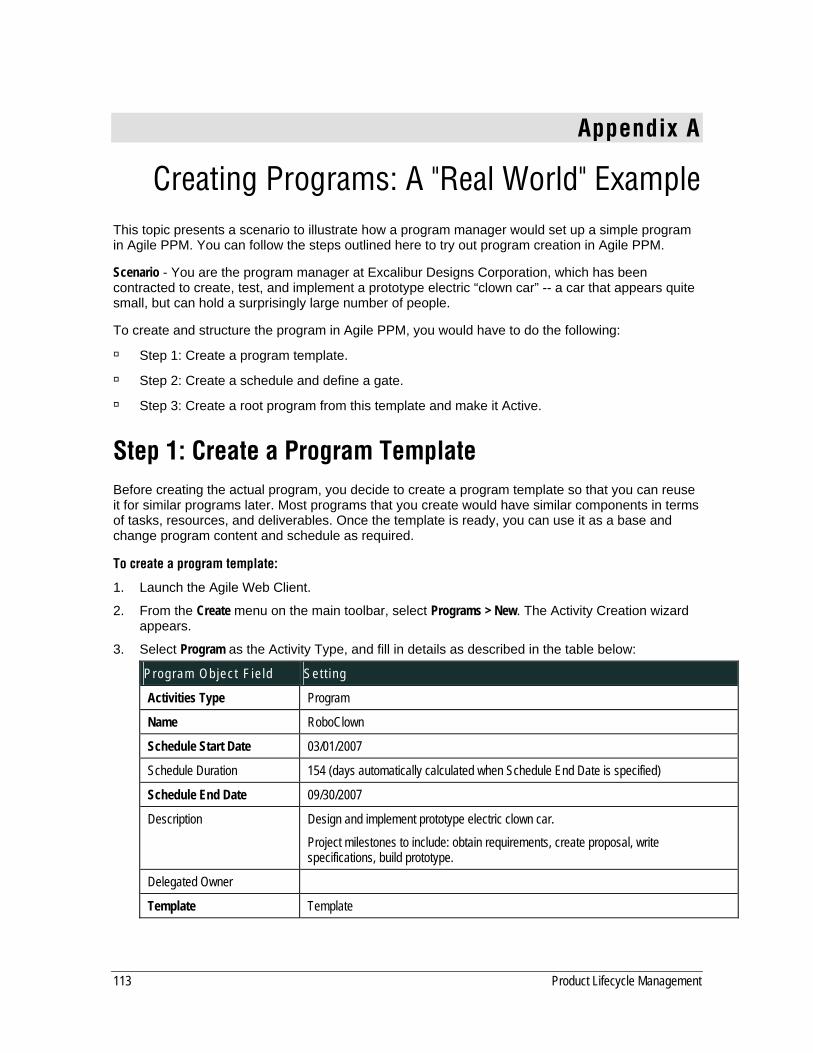
113 Product Lifecycle Management
Appendix A
Creating Programs: A "Real World" Example This topic presents a scenario to illustrate how a program manager would set up a simple program in Agile PPM. You can follow the steps outlined here to try out program creation in Agile PPM.
Scenario - You are the program manager at Excalibur Designs Corporation, which has been contracted to create, test, and implement a prototype electric “clown car” -- a car that appears quite small, but can hold a surprisingly large number of people.
To create and structure the program in Agile PPM, you would have to do the following:
Step 1: Create a program template.
Step 2: Create a schedule and define a gate.
Step 3: Create a root program from this template and make it Active.
Step 1: Create a Program Template Before creating the actual program, you decide to create a program template so that you can reuse it for similar programs later. Most programs that you create would have similar components in terms of tasks, resources, and deliverables. Once the template is ready, you can use it as a base and change program content and schedule as required.
To create a program template:
1. Launch the Agile Web Client.
2. From the Create menu on the main toolbar, select Programs > New. The Activity Creation wizard appears.
3. Select Program as the Activity Type, and fill in details as described in the table below:
Program Ob jec t F ie ld Se t t ing
Activities Type Program
Name RoboClown
Schedule Start Date 03/01/2007
Schedule Duration 154 (days automatically calculated when Schedule End Date is specified)
Schedule End Date 09/30/2007
Description Design and implement prototype electric clown car.
Project milestones to include: obtain requirements, create proposal, write specifications, build prototype.
Delegated Owner
Template Template

114 Product Lifecycle Management
Program Ob jec t F ie ld Se t t ing
Duration Type Fixed
Days Effort
1. After filling in the fields, click Continue. The Activity Creation wizard displays the project cover page.
At this point most of the fields in the cover page are not filled in. Schedule and status fields displayed here draw information from child objects of this program, and cannot be populated until information can be compiled and rolled up.
2. Click Finish. RoboClown is now present in the Agile database as a program template.
Step 2: Create a Schedule Let's assume that your project deliverables are as follows:
Obtain requirements (14 days)
Create proposal (15 days)
Write specifications (110 days)
Build prototype (110 days)
Each deliverable becomes a phase in the RoboClown program.
To add these phases to the program:
1. Open the RoboClown program's Schedule tab.
2. Click Add to add an activity to the schedule. PPM displays the Add Activity wizard.
3. Specify Phase as the Activity type, then create each phase one by one.
Tip: While creating phases, if you are sure that the phases in your program are sequential, you can simply specify the duration of each phase in number of days. Once you do this, you can add a Finish-to-Start dependency between each predecessor and successor phase. Adding dependencies between phases ensures that a successor phase does not start until the predecessor phase is completed. The default start date for each phase is the start date of the root program. Once dependencies are established, start and end dates are automatically adjusted to honor these dependencies.
Note As the program manager, you are the default owner of all the phases. To change ownership of a phase to another Team Member, you can delegate ownership during phase creation.
Given a start date of March 1, and the expected duration of each phase, the phases are scheduled to start as follows:
Obtain Requirements: March1 - March 18 Create Proposal: March 21 - April 8 Write Specifications: April 11 - April 29 Build Prototype: May 23 - September 30

115
Within three of the phases, define various tasks as described in the table below.
Phase Task Dates
Create Proposal Preliminary draft Mar 21-25 Core Executive review Mar 28-29 Incorporate comments, expand Mar 30-Apr 1 Final review Apr 4-7 Produce and distribute Apr 8
Write Specifications Assign team members Apr 11-12 Preliminary draft Apr11-22 Engineering review Apr25-28 Incorporate comments, polish Apr 27-29
Build Prototype Fabrication May 2-27 Initial test (lab) May 31-Jun7 Refine design June 8-July1 Track test July 5-8 Optimization and tuning July11-Aug5 Road test Aug 8-19 Acceptance test Aug 22-Sept 22 Demonstration Sept 26
To add tasks to each phase within the program:
1. Open the Schedule tab for the selected phase.
2. Click Add to add an activity to the schedule. PPM displays the Add Activity wizard.
3. Specify Task as the activity type, then create each task.
Note You can also carry out the steps described here using the Gantt chart.
Create a Gate
Let's say you want to make it mandatory that RoboClown passes the Acceptance test before a demonstration can be scheduled. According to the planned schedule, there is a short time window between the end of the Acceptance test and the demonstration. You can use that period to accommodate a “gate” for the project.

116 Product Lifecycle Management
To create a gate on “Acceptance Test":
1. Open the Schedule tab of the Acceptance Test task.
2. Click Add and specify Gate as the object type. The Add Activity wizard appears.
3. Fill in the information for the gate.
4. Click Finish. The General Info tab of the new gate appears.
Once the program is made active, you can add this gate as an activity that needs to be monitored during a gate review by defined approvers or observers.
Step 3: Create the Root Program Now that you have a template, you can create a root program from it.
To create the root program:
1. From the Create menu on the main toolbar, select Programs > From Template. 2. In the Select Template page, select RoboClown V 0.1.
3. In the Details page, fill in details as appropriate:
1. In the Template field, select Proposed. Once you complete program creation and are ready to roll out the program, you can make it Active.
2. In the Optional Components field, select Page One, Page Two, Page Three, and Content. This means that you can reuse the information you filled in for these components in the new program.
4. Click Finish. Your new program is ready. The Project Summary page of the RoboClown V 0.1 program appears.
You can now edit program attributes further as you wish, adding dependencies between phases and tasks, adding team members and so on, using the options in the appropriate program tabs. For detailed information, see "Creating and Managing Programs (on page 37)".
Step 4: Activate the Program The new RoboClown V 0.1 program is now ready to be rolled out. To activate the program, or move it out of the Not Started status, do either of the following:
Change the Template setting.
Change the workflow status.
To change the Template setting:
1. In the Program Navigation Pane on the left, select the root program - RoboClown V 0.1.
2. Within the General Info tab of the program, click Edit to make the fields editable.
3. Change the Template field setting from Proposed to Active. (You cannot change the workflow status of Proposed or Template programs.)
When the root parent activity is changed to Active, the Active setting rolls down to all children activities.

117
To change the workflow status of the root parent activity:
1. Open a leaf-level activity and click its Workflow tab.
2. Change the status of the leaf activity to In Process. The workflow status change rolls up to the root parent activity, changing the workflow status of the program to In Process.
RoboClown V 0.1 is now active.


119 Product Lifecycle Management
Appendix B
Installation Notes
Product Portfolio Management User Licenses The PPM server license is required with a predetermined number of concurrent and power user licenses. Users are assigned as either a concurrent or power user by the Agile administrator using the Java Client.
Once the PPM system is activated and users are designated as concurrent or power, the Agile administrator assigns roles that govern system-level access and functionality. For example, a user must typically be assigned a system-level Program Manager role to be able to Create new programs from the Create menu.
However, on specific programs, an owner of a task or program can add users to the team and assign an object-specific role. The potential roles that are assigned are all the roles related to the program object, not just the system-level roles defined for that user by the Agile administrator.
For more details on licenses, see the Agile PLM Administrator Guide.
Configuration For Japanese and Chinese OS, an Agile PPM database instance can only be configured to use
UTF-8 language encoding. Agile PPM sets the browser’s character encoding to UTF-8, and it is not recommended to change the character encoding setting in the browser.
The Agile PPM Gantt application requires the International JRE 1.5 (Java Runtime Environment) on client systems. Higher versions such as JRE 1.6, and Japanese or Chinese JRE versions are not supported.
Upgrade During an upgrade from a previous version of PPM, data migration is necessary in order for the existing data to comply with new or changed business rules.
To facilitate the data migration, a post upgrade utility is available. For information on using this utility, see the Installing Agile PLM with BEA WebLogic Guide.
Note The PPM post upgrade utility is NOT supported on WebSphere Application Server.

120 Product Lifecycle Management


