# of sts to cast on
stitch placement (on 3 needles)
heel stitch placement (on 3 needles)
24 28 32 36 40 44 48 52 56 60 64 68 A
B
# of heel sts C
# of heel rows 12 14 16 18 20 22 24 26 28 30 32 34
12 14 16 18 20 22 24 26 28 30 32 34
E
turn heel (row 1): p __sts, p2tog, p1, turn
8 9 10 11 12 13 14 15 16 17 18 19 F
turn heel (row 2): sl 1, k__ sts, k2tog, k 1, turn
5 5 5 5 5 5 5 5 5 5 5 5 G
# of sts remainingafter heel shaping
8 10 10 12 12 14 14 16 16 18 18 20 H
# of sts remainingafter gusset shaping
24 28 32 36 40 44 48 52 56 60 64 68 N
suggested # of rowsfrom last gusset dec to
toe shaping10-12 10-14 10-16 20 24 28-32 32 36 36-40 40-44 44 48 Q
suggestedneedle sizes*
3-6 3 3-6 6-8 6-8 7 3 3 3 1-2 0-1 0-1 V
suggested gauges( ___ sts = 1")
5.5-6 6 6-7 4-5 4-6 5 6 7 7 8 9 9baby baby baby/child child/woman all woman woman woman woman woman man man U
# of sts for body of sock 24 28 32 36 40 44 48 52 56 60 64 68 P
# of toe decrease rows 4 4 5 5 6 6 7 8 8 9 10 10 R
# of sts after toe shaping 8 12 12 16 16 20 20 20 24 24 24 28 T
pick up and knit __ stson sides of heel flap
6 7 8 9 10 11 12 13 14 15 16 17 I
total # of sts 32 38 42 48 52 58 62 68 72 78 82 88 K
# of gusset dec. rows 4 5 5 6 6 7 7 8 8 9 9 10 M
8
8
8 10
8
10 10
12
10 12
12
12 14
12
14 14
16
14 16
16
16 18
16
18 18
20
18 20
20
20 22
20
22 22
24
22
D6
12
6 7
14
7 8
16
8 9
18
9 10
20
10 11
22
11 12
24
12 13
26
13 14
28
14 15
30
15 16
32
16 17
34
17
stitch placement aftergusset shaping O
6
12
6 7
14
7 8
16
8 9
18
9 10
20
10 11
22
11 12
24
12 13
26
13 14
28
14 15
30
15 16
32
16 17
34
17
stitch placement aftertoe shaping S
2
4
2 3
6
3 3
6
3 4
8
4 4
8
4 5
10
5 5
10
5 5
10
5 6
12
6 6
12
6 6
12
6 7
14
7
stitch placementbefore gusset shaping L
10
12
10 12
14
12 13
16
13 15
18
15 16
20
16 18
22
18 19
24
19 21
26
21 22
28
22 24
30
24 25
32
25 27
34
27
stitch placement afterpicking up gusset sts J6
8
6
6 6
7
10
7
7 7
8
10
8
8 8
9
12
9
9 9
10
12
10
10 10
11
14
11
11 11
12
14
12
12 12
13
16
13
13 13
14
16
14
14 14
15
18
15
15 15
16
18
16
16 16
17
20
17
17 17
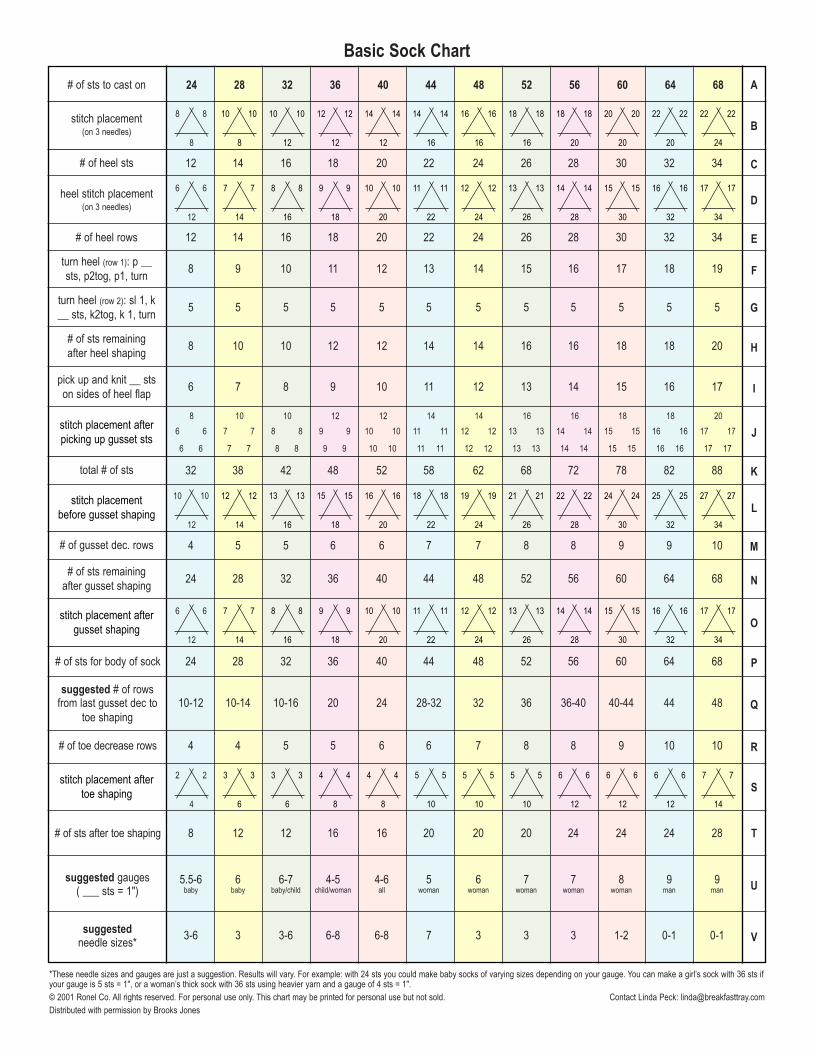
Basic Sock Chart
*These needle sizes and gauges are just a suggestion. Results will vary. For example: with 24 sts you could make baby socks of varying sizes depending on your gauge. You can make a girl’s sock with 36 sts ifyour gauge is 5 sts = 1", or a woman’s thick sock with 36 sts using heavier yarn and a gauge of 4 sts = 1".© 2001 Ronel Co. All rights reserved. For personal use only. This chart may be printed for personal use but not sold. Contact Linda Peck: [email protected] with permission by Brooks Jones

Instructions for Basic Sock Chart
These instructions go with the attached “Basic Sock Chart.” Your gauge will vary, depending on the type of yarn you use. For suggested gauges,see Column U. Refer to Column V for suggested needle sizes.
You should be able to make any size sock with any size yarn.
You may copy these instructions and fill in the blanks with the size you are making to help follow the instructions. However, you may not reproducethese documents in any form except for your own personal use. You may not sell or give out copies of these documents.
Cuff: Choose the total number of stitches that you will use for your sock from Column A. You will be following that line down for numbers. Cast onthe number of stitches shown ______ (A), placing the stitches as shown in Column B. Work your cuff in any ribbing, or pattern, for any desiredlength. Be creative! Do stripes, cables, a color pattern, or an openwork pattern. Do several inches of ribbing for a ‘fold-down’ cuff.
Heel: When the cuff is the desired length to the ankle, begin heel. Arrange stitches on the needles as in Column D, so that the center back ______(C) stitches are ready on one needle. Work ______ (C) heel stitches for _______ (E) rows. End with a completed right side row.
Turn heel:Row 1: P _______ (F), P2tog, P1, turn.Row 2: Sl 1, K _______ (G), K2tog, K1, turn.Row 3: Sl 1, P across to one stitch before the ‘gap’ (where you turned on the last row), P2tog, P1, turn.Row 4: Sl 1, K across to one st before the ‘gap,’ K2tog, K1, turn.
Continue in the same manner repeating rows 3 & 4 until _______ (H) stitches remain, ending with a completed knit row.
Gusset: You will now be going around the entire sock. Go down the left side of the heel flap just worked. Pick up and knit _______ (I) stitches withone needle. With another needle, knit across the two needles holding the instep (top of the sock) stitches (this should be the same number asColumn C: _______). With the next needle, pick up and knit _______ (I) stitches along the other side of the heel flap. Now knit across half of theheel stitches with the same needle, and slip the other half of the heel stitches onto the first needle. Arrange the stitches as in Column L, with theround beginning at the center back of the heel.
Begin gusset decreases as follows:Starting at center back of heel, work across first needle to last 3 sts. K2tog, K1. On needle 2, work across evenly. On needle 3, K1, Sl1, K1, psso,then work across to the end of the needle. You should be back at the center back of the heel.
Next round: work even.
Continue to decrease in this manner, every other round on needles 1 and 3 until _______ (M) decreases have been worked on each side._______ (N) stitches remaining total. See Column O.
Foot: Now that you have _______ (P) stitches, continue in knit (or desired stitch) until _______ (Q) rows have been worked. This number (Q) isonly a suggested amount. The sock needs to be about 1.5 inches less than the desired finished length (for an adult sock) before starting the toeshaping.
Toe: Starting at the center back of the heel, work across the first needle to the last three stitches and K2tog, K1. On the next needle (instep) K1,Sl1, K1, psso, then knit across to the last three stitches and K2tog, K1. On the last needle, K1, Sl1, K1, psso, knit across. Next round, knit aroundevenly. Continue decreasing in this manner, decreasing 2 stitches at each side of the sock, every other row, for _______ (R) rows, until _______(T) stitches remain. See Column S.
Knit across the first needle with the third needle so that all the heel stitches are on one needle and all the instep stitches are on another. The yarnshould be at the side of the sock. Cut the yarn, leaving a piece long enough to weave the remaining stitches together. You may bind them off andseam the toe, but it is worth the work to learn to weave them and have a seamless toe. Tuck in ends.
Abbreviations used:K = knitP = purltog = togetherSl = slip (move the next stitch to the next needle without working it)st(s) = stitch(es)psso = pass the slipped stitch over (over the stitch just knitted)Letters in Boldface refer to the column in the Basic Sock Chart.


