documentation otrs business solution™ 5...
TRANSCRIPT

Documentation
OTRS BusinessSolution™ 5 Manual
Build Date:
2015-10-26

OTRS Business Solution™ 5 ManualCopyright © 2015 OTRS AG
This work is copyrighted by OTRS AG.
You may copy it in whole or in part as long as the copies retain this copyright statement.
All trade names are used without the guarantee for their free use and are possibly registered trade marks. Allproducts mentioned in this manual may be trade marks of the respective manufacturer.
The source code of this document can be found at github, in the repository doc-otrsbusiness. Contributions aremore than welcome. You can also help translating it to your language at Transifex.

Table of Contents1. Introduction ................................................................................................................ 12. Upgrading to OTRS Business Solution™ ............................................................... 23. Features of OTRS Business Solution™ .................................................................. 3
1. The Chat ............................................................................................................. 31.1. Description ............................................................................................... 31.2. Configuration ............................................................................................ 31.3. Setup ........................................................................................................ 51.4. General Usage ......................................................................................... 7
2. Video and Audio Calls ...................................................................................... 132.1. Description ............................................................................................. 132.2. Configuration .......................................................................................... 132.3. Setup ...................................................................................................... 132.4. Usage ..................................................................................................... 142.5. Connection ............................................................................................. 21
3. The Dynamic Field "Contact with Data" ........................................................... 213.1. Description ............................................................................................. 223.2. Configuration .......................................................................................... 223.3. Usage ..................................................................................................... 23
4. The Dynamic Field "Database" ......................................................................... 234.1. Description ............................................................................................. 244.2. Configuration .......................................................................................... 244.3. Usage ..................................................................................................... 28
5. Import ready-to-run process ............................................................................. 295.1. Import .................................................................................................... 29
6. Import ready-to-run Web Services ................................................................... 306.1. Import .................................................................................................... 30
7. SMS Notifications and Notification Web View ................................................... 317.1. Description ............................................................................................. 317.2. Setting up SMS Notifications ................................................................. 327.3. Setting up and Using the Notification Web View ................................... 34
8. The Report Generator ...................................................................................... 358.1. Description ............................................................................................. 358.2. Configuration .......................................................................................... 358.3. Usage ..................................................................................................... 35
9. Resource Planning ............................................................................................ 399.1. Description ............................................................................................. 399.2. Configuration .......................................................................................... 399.3. Usage ..................................................................................................... 39
10. The SLA Field Selection Dialog ....................................................................... 4410.1. Description ........................................................................................... 4410.2. Configuration ........................................................................................ 4410.3. Usage ................................................................................................... 45
11. The Article Attachment Overview .................................................................. 4611.1. Description ........................................................................................... 4611.2. Configuration ........................................................................................ 4611.3. Usage ................................................................................................... 46
12. The Ticket Timeline View ............................................................................... 4712.1. Description ........................................................................................... 4712.2. Configuration ........................................................................................ 4712.3. Usage ................................................................................................... 47
A. Additional Resources ................................................................................................ 49
iii

List of Figures2.1. Upgrading Screen ................................................................................................... 22.2. Upgrade Successful ................................................................................................. 23.1. Setting up preferred chat channels ........................................................................ 63.2. Setting up Chat Availability .................................................................................... 63.3. The Chat Managing Screen ..................................................................................... 73.4. Starting an A2C chat from ticket zoom .................................................................. 83.5. Starting an A2C chat from dashboard .................................................................... 93.6. Starting a C2A chat ................................................................................................ 93.7. An Open Chat Request ........................................................................................... 93.8. Open Chat Request Details ................................................................................... 103.9. The chat widget .................................................................................................... 103.10. Monitor a chat .................................................................................................... 113.11. Advanced chat actions ........................................................................................ 113.12. The chat widget .................................................................................................. 123.13. Setting up the Online widget on Dashboard ....................................................... 143.14. Making a call inside the chat .............................................................................. 153.15. Media Permission Request .................................................................................. 153.16. Waiting for the other party ................................................................................. 163.17. Established Connection ....................................................................................... 163.18. Mute Buttons ....................................................................................................... 173.19. Audio Only .......................................................................................................... 173.20. Call Invitation ...................................................................................................... 183.21. Notification Permission Request .......................................................................... 183.22. Online widget on the Dashboard ........................................................................ 193.23. Calling other agents from Ticket Zoom .............................................................. 193.24. Making a call from Customer Information Center ............................................... 203.25. Making a call from Ticket Zoom ......................................................................... 203.26. Starting a Video Call from Customer interface ................................................... 203.27. DynamicField Database Admin screen ................................................................ 253.28. DynamicField Database - Historical data settings ............................................... 273.29. DynamicField Database - Test field ..................................................................... 283.30. DynamicField Database - Autocomplete feature ................................................. 283.31. DynamicField Database - Selected items ............................................................ 283.32. DynamicField Database - Detailed search .......................................................... 293.33. DynamicField Database - Detailed search result ................................................ 293.34. Import ready-to-run process widget ................................................................... 303.35. Add web service ................................................................................................. 313.36. Import ready-to-run Web Service ........................................................................ 313.37. Admin Cloud Service SMS Screen ....................................................................... 323.38. Enabling SMS Notifications ................................................................................. 333.39. Agent Preferences SMS Notification Settings ...................................................... 333.40. Enabling the Notification Web View .................................................................... 343.41. Notification Web View Icon on the Toolbar ......................................................... 343.42. Notification Web View Overview ......................................................................... 343.43. Notification Web View Detail .............................................................................. 353.44. Automatic generation settings ............................................................................ 353.45. Automatic generation settings ............................................................................ 363.46. Output settings ................................................................................................... 363.47. Report: Front page .............................................................................................. 373.48. Report: Table of contents .................................................................................... 373.49. Report: Preamble ................................................................................................ 383.50. Report: Statistics ................................................................................................. 383.51. Team Management Add and Import .................................................................... 393.52. Team Management Add and Import .................................................................... 403.53. Team Agent Management ................................................................................... 40
iv

3.54. Team Agent Relations ......................................................................................... 403.55. Assigning team and agent to an appointment ................................................... 413.56. Assigning multiple teams and agents to an appointment ................................... 423.57. Resource Overview ............................................................................................. 423.58. Resource Overview ............................................................................................. 433.59. Resource Overview Settings ............................................................................... 433.60. Resource Overview Filter Delete ......................................................................... 443.61. SLA configuration ................................................................................................ 453.62. SLA message ...................................................................................................... 463.63. Switching to the article attachment overview .................................................... 463.64. Using the article attachment overview ............................................................... 473.65. Switching to the Ticket Timeline View ................................................................ 473.66. Using the Ticket Timeline View ........................................................................... 48
v

Chapter 1. IntroductionWith the OTRS Business Solution™ you can enjoy all benefits of professional servicesand exclusive Business Features offered by the OTRS Group. Optimize your internal &external communication for more service quality – flexibly adjustable to your operatingscenario.
The sleek and fast framework of OTRS 5 is the base for the OTRS Business Solution™.On top are available for you additionally an exclusive set of features. These include theintegrated Cloud Services of the OTRS Business Solution™ that you can flexibly acti-vate or deactivate according to your deployment scenarios.
Additionally you have the choice between 3, 7 or an unlimited number of various freelyselectable OTRS Business Solution™ Features - depending on you contract level. Profitalso from regular, free updates, the best OTRS security and support as well as installationand configuration carried out by our consultants.
1

Chapter 2. Upgrading to OTRSBusiness Solution™
In order to upgrade to OTRS Business Solution™, you need a valid contract with theOTRS group. If you already have a contract, you can upgrade to OTRS Business Solu-tion™ by visiting the OTRS Business Solution™ administration screen in your OTRSinstance. You can find the link to this screen in the "System Administration" section of theadmin area of your OTRS Free instance. Please note that you first have to register yoursystem using the system registration mechanism.
Figure 2.1. Upgrading Screen
If you're entitled to upgrade, you will (as an admin user) also see a notification bar whichguides you to the upgrade screen. The upgrade itself is done automatically by just press-ing the upgrade button. Please note that you don't need to confirm the upgrade again.Pressing the upgrade button immediately starts the upgrading process.
If the upgrade was successful, you will see a confirmation on the OTRS Business Solu-tion™ administration screen.
Figure 2.2. Upgrade Successful
If you have any questions regarding your entitlement for the OTRS Business Solution™or technical questions, please contact [email protected].
2

Chapter 3. Features of OTRSBusiness Solution™1. The Chat1.1. Description
The chat feature of OTRS Business Solution™ allows for chats between agents andcustomers using the OTRS frontend. Once enabled, customers (or public users) can startchats with agents and vice versa. Finished chats can be archived and attached to tickets,or can be downloaded as PDF by agents, customers and public users.
Each chat is assigned to a chat channel. Chat channels are like chat rooms. Each chatchannel is assigned to a certain group which controls the permissions for this channel. Ifno chat channel is selected when a chat is created, this chat will be created in a defaultchannel (which is automatically created if it doesn't exist).
1.2. ConfigurationThe following SysConfig configuration options are relevant for this feature. Please notethat you can also define a list of fixed texts which are being displayed to public usersand customers in the chat module. For more information on which texts can be changed,please have a look at the module configuration (OTRSBusiness → Core::Chat).
ChatEngine::Active
Controls whether or not the chat feature is enabled.
ChatEngine::ChatDirection::PublicToAgent
Controls whether or not public users should be able to start chats (please note that thefrontend module configuration for the public chat frontend in PublicFrontend::Mod-ule###PublicChat has to be enabled, too).
ChatEngine::ChatDirection::CustomerToAgent
Controls whether or not customers should be able to start chats (please note thatthe frontend module configuration for the customer chat frontend in CustomerFron-tend::Module###CustomerChat has to be enabled, too).
ChatEngine::ChatDirection::AgentToCustomer
Controls whether or not agents should be able to start chats with customers directly.
ChatEngine::ChatDirection::AgentToAgent
Controls whether or not agents should be able chat with each other.
ChatEngine::PermissionGroup::ChatReceivingAgents, ChatEngine::Permission-Group::ChatNotificationAgents, ChatEngine::PermissionGroup::ChatStartingA-gents
Defines groups for the certain features. Receiving: Groups which can receive and ac-cept chat requests. Notification: Groups which can receive notifications about new/pending chat requests. Starting: Groups which are allowed to start new chats at all.
3

ChatEngine::DefaultAgentName
A default name which should be displayed to customers and public users instead ofthe real name of the chatting agents. If empty or disabled, the real agent name willbe shown.
ChatEngine::DefaultAgentNameNumbers
Controls whether or not numbers should be added to the agents default name in casemore than one agent is in a chat to allow customers/public users to distinguish be-tween the different agents (e.g. "Support Agent 1", "Support Agent 2" etc.).
ChatEngine::PublicInterface::AllowChatChannels
Defines, if chat channel selection should be enabled for public users. If set to "no",chats from public users will go to the default channel automatically (ChatEngine::De-faultChatChannel).
ChatEngine::PublicInterface::AvailabilityCheck
Defines, if chat channels should only be selectable in the public interface if at leastone agent with sufficient permissions is available in this channel.
ChatEngine::CustomerInterface::AllowChatChannels
Defines, if chat channel selection should be enabled for customer users. If setto "no", chats from customer users will go to the default channel automatically(ChatEngine::DefaultChatChannel).
ChatEngine::CustomerInterface::AvailabilityCheck
Defines, if chat channels should only be selectable in the customer interface if at leastone agent with sufficient permissions is available in this channel.
ChatEngine::CustomerThreshold
Amount of minutes which need to pass before a "no agent is available" mes-sage is being displayed to the customer/public user who started the chat re-quest. The message can be configured using ChatEngine::Texts::CustomerFron-tend::NoAgentsAvailable::NewTicket or ChatEngine::Texts::CustomerFrontend::NoA-gentsAvailable::AddToExisiting (customer interface) and ChatEngine::Texts::Pub-licFrontend::NoAgentsAvailable (public interface).
ChatEngine::AgentOnlineThreshold
If an agent is not active in OTRS within this threshold, they will be automatically setto "unavailable for chat" (see "Agents: Set up availability").
ChatEngine::DefaultChatChannel
Name of the default chat channel. This channel must not be created manually andcan't be deleted. This channel is taken as target chat channel in case chat channelselection is disabled for any interface.
ChatEngine::ChatTTL
After how many hours a closed chat should be deleted from the database. Closedchats can still be viewed and downloaded by customers. After a chat has been deletedfrom the database, it will no longer be possible for customers to view or download it.
4

ChatEngine::ChatDecayTime
After how many days chats which are not closed should be deleted from the databaseautomatically in order to keep the database clean. Please note that this setting canpossibly delete chats which are still in use if they are older than the configured amountof days.
ChatEngine::ChatOrder
Defines, if new chats should be prepended or appended to the list of active chats inthe active chats widget in the chat manager.
1.3. SetupIn order to be able to create your first chat, you need to setup certain things in your OTRSinstance.
1.3.1. Admin: Create chat channels and assign permis-sions
In the admin area in OTRS, you'll find a new entry "Chat Channel" (AdminChatChannel).Use this screen to add new channels. You'll need to assign an existing agent group to eachchannel you'll create. You can use the screens "Agents <-> Groups" or "Agents <-> Roles"to assign permissions. There are new chat-specific permissions which are described below.
Available Chat Permissions
CHAT_OBSERVER
Users with this permission type will only be able to observe chats in this channel afterthey have been invited to them. They will not be able to accept or observe chats inthis channel on their own and if they are the only agents currently available in thischannel, customers/public users will not be able to create a new chat in this channel.Observers can still invite other agents to a chat they currently observe.
CHAT_PARTICIPANT
Users with this permission type will be able to take part in a chat, but only after theyget invited to it. After they're in a chat, they can change the chat channel, discardthe chat etc. They will not be able to accept a customer/public user chat request ontheir own.
CHAT_OWNER
Users with this permission type will be able to accept chat customer/public requestsand do all kinds of observer and participant actions on a chat.
NoteTo use the chat in general, agents still need to have at least ro permissionsto the groups set up in ChatEngine::PermissionGroup::ChatReceivingAgents andChatEngine::PermissionGroup::ChatStartingAgents.
5

1.3.2. Agents: Select Active Chat Channels
Figure 3.1. Setting up preferred chat channels
As an agent, you'll need to select in which chat channels you want to be available. Cus-tomers will only be able to create a new chat request on a certain channel if at least oneagent with owner permissions has selected this channel in their preferences and is set asavailable for external chats (see next section).
1.3.3. Agents: Set up Availability
Figure 3.2. Setting up Chat Availability
To be available for any chats, you'll need to use the chat toolbar switch. It's a three-way switch with these states: unavailable for chats (empty circle), available for internal(agent-to-agent) chats (empty circle with tick sign), available for internal and external(customer-to-agent, public-to-agent) chats (filled circle with tick sign). Just click the togglein order to change your availability.
NoteYour availability will be reset to "internal chats only" each time you log in to OTRSagain.
6

1.4. General Usage1.4.1. The Chat Manager
Figure 3.3. The Chat Managing Screen
The chat manager is the central point of the chat feature. As an agent, here you canmanage your chats and see and accept open requests. The chat manager provides a list ofchat requests from customers, public users and other agents, as well as an overview overall active chats. Open the chat manager by using "Chat" in the main navigation of OTRS.
1.4.2. Starting New Chats• Agent to agent
To start a chat with another agent, you can use the user online widget from the dash-board. Agents who are able to use the chat, will have a chat icon next to their namewhich you can click on. Once clicked, a chat form will open which you can use to enteryour first chat message to this agent. After the chat request has been sent to the otheragent, you can watch the chat in the chat manager.
• Agent to customer
To start a chat with a customer, you can use the customer user widget from the customerinformation center when viewing a certain customer. Online customers will have a chaticon next to their name which you can click on. Once clicked, a chat form will openwhich you can use to enter your first chat message to this customer user. After the chatrequest has been sent to the customer, you can watch the chat in the chat manager.
Another possibility is to create a chat from the ticket zoom. If the customer user who isselected in this ticket is currently online, you'll be able to use a chat icon next to theirusername in the customer information box in right sidebar (see figure below).
7

Figure 3.4. Starting an A2C chat from ticket zoom
Additionally, you will be able to start chat with customer users by clicking on chat iconsnext to their name in the user online widget on the dashboard.
8

Figure 3.5. Starting an A2C chat from dashboard
• Customer to agent
Customers are not able to start a chat directly with a certain agent, but only to creategeneric chat requests. To do this, customers can use the item Chats → Create new chatfrom the customer interface main navigation.
Figure 3.6. Starting a C2A chat
• Public to agent
Users of the public interface are also not able to start a chat directly with a certain agent,but only to create generic chat requests using the public chat module (public.pl?Ac-tion=PublicChat). If you would like to integrate the public chat module into your website,you can use the IsIframe parameter. The OTRS header and footer will then be removedfrom the view (public.pl?Action=PublicChat;IsIframe=1).
1.4.3. Handling Chat RequestsIf there is a new chat request in one of the channels you (as an agent) have permissionsfor, you'll receive a browser notification which allows you to go directly to the chat man-ager. After you've opened the chat manager, you can see a list of open requests of alltypes (see figure below).
Figure 3.7. An Open Chat Request
Use the "open chat" button from the list to see the details of the request. Clicking thebutton will open an overlay which provides several actions on this request. Given thatyou've got sufficient permissions, you can accept the request or change the channel forthis request. Changing the channel will follow the same rules as creating new request:you can only move the request to a channel which has active agents in it.
9

Changing the chat channel without accepting the request could be used to dispatch chatsto the right department for example.
Figure 3.8. Open Chat Request Details
If you want to enter a chat, you can use the Accept button from the chat detail overlay box.The chat will then be removed from the list of requests, added to the list of your activechats and the customer/public user will receive a message that you've entered the chat.
1.4.4. The Chat Widget
Figure 3.9. The chat widget
The chat widget is the main component you'll use when chatting with other people. Itprovides a history of all messages in the chat as well as list of possible actions (dependingon your permission level).
To send messages, you can use the text field in the chat widget in your list of active chats.Once you are done with typing your message, submit it by either clicking the send iconnext to the text field, or using tab and enter (consecutively). When the message has beensent, the cursor will jump back to the text field to allow for easily continuing to type.
Following you'll find a list of possible actions in the chat widget.
10

• Action: Monitor & close
From the chat widget head top right hand side, you can close the chat by clicking the"x" icon. Clicking the circle icon right next to the close icon, allows you to set up apersonal monitoring for this chat, which is again a three-way switch (no monitoring =empty circle, only monitor customer activity = empty circle with tick icon, monitor allactions = filled circle with tick icon). When monitoring a chat, browser notifications willshow up each time there is a new action in this chat.
Also from the header, you can expand a toolbar of advanced chat actions for this chatusing the triangle icon. The toolbar also shows you the channel this chat takes place inand which role you have in this chat (e.g. Owner).
Figure 3.10. Monitor a chat
Figure 3.11. Advanced chat actions
• Action: Phone ticket
Using the "Phone ticket" link from the advanced toolbar, allows you to create a phoneticket to which the current chat will be appended to as an article. After you've success-fully created the ticket, the chat will get closed automatically.
• Action: Append
Allows you to append this chat as an article to a selected ticket. After the article hasbeen created, the chat will get closed automatically.
• Action: Invite
Allows you to invite another agent to this chat. You can select from a list of availableagents who you want to invite. Once you've invited the agent, a new agent-to-agentchat request will be sent to this agent. After the request has accepted, a new internalchat will be established between you and the invited agent. In this internal chat, theinvited agent has two more actions available in the advanced actions toolbar: "Observ-er" and "Participant".
• Action: Channel change
Using this link, you can change the channel for this chat. For the selection of the targetchannel the same rules apply as for initially selecting a chat channel.
• Action: Download
Lets you download the complete history of this chat as PDF.
• Action: New window11

Opens this chat in a separate popup window. You can use this window in the same wayas the chat widget and both the widget and the popup can be used at the same time.
• Action: Observer
When you have been invited to a chat by another agent, you can decide if you want tojoin the chat as observer or participant (depending on your permission level). Once youclick the action from your toolbar, a new chat widget will be added to the list of youractive chats which is the chat you have been invited to. If you join the chat as observer,you will only be able to read what others are contributing to the chat and you will beinvisible to customers or public users. Agents will still receive a message that you joinedthe chat as observer. As an observer, you have the possibility to become a participantanytime by using the advanced action toolbar in your chat widget (depending on yourpermission level).
• Action: Participant
If you want to contribute something to the chat you have been invited to, you can joinit as a participant. Customers/public users and agents will receive a message that youhave entered the chat. As a participant, you can become an observer anytime by usingthe advanced action toolbar in your chat widget.
1.4.5. User availability
Figure 3.12. The chat widget
Every chat participant has colored icon (circle) before his/her name in the Chat widgetheader, which represents participant availability. Icon color represents participant stateas follows:
• Active - participant is active (available and online).
• Away - participant is away (available, but there was no request sent to the server fromthis user for some time - default 5 minutes, see ChatEngine::AgentOnlineThreshold).
• Inactive - participant is inactive (chat request is not accepted yet or participant leftthe chat).
• Unavailable - participant is unavailable (set via Availability button).
• Offline - participant has logout or session has expired.
12

2. Video and Audio Calls2.1. Description
The video and audio calls feature of the OTRS Business Solution™ provides real-timecalls between two users right from the comfort of the OTRS frontend. The calls will beprovided over a direct peer-to-peer connection established between two users, wherepossible. This feature depends heavily on the chat, which must be active for video andaudio calls to be possible.
NoteVideo and audio calls are based on a quite young technology called WebRTC. Theimplementation of WebRTC APIs in modern browsers is an ongoing effort. Currently,OTRS video and audio calls are supported only in the latest versions of MozillaFirefox and Google Chrome (for Chrome a HTTPS Enabled Web Server is required).
2.2. ConfigurationThe following SysConfig configuration options are relevant for this feature.
ChatEngine::Active
Controls whether or not the video and audio calling feature is enabled. Please notethat the same switch will control the chat feature too.
ChatEngine::PermissionGroup::VideoChatAgents
Defines the group for the video and audio calling features. Only agents with permissionin this group will be able to make video and audio calls.
2.3. SetupIn order to be able to start video and audio calls, you need to setup certain things in yourOTRS instance.
2.3.1. Chat SetupYou need a working chat setup in your system. Make sure to carefully read the Setupsection of the chat feature.
2.3.2. HTTPS Enabled Web ServerCurrently, Google Chrome will allow access to a user's media streams only to web appli-cations served over the HTTPS protocol (SSL) with valid signed certificates. Make sureyou have set the HttpType config option to https, too. Setting up a web server to beaccessible via HTTPS is outside of the scope of this manual.
2.3.3. Availability for callsTo be available for video and audio calls, you have to make sure you are available for chatstoo. Please refer to the instructions in Agents: Set up Availability for more information.
2.3.4. Online User Dashboard WidgetFor a convenient way to start the calls, please activate the Online widget on the Dash-board.
13

1. Go to the Dashboard and expand the Settings widget.
2. Check the Online widget and make sure to click Save settings.
Figure 3.13. Setting up the Online widget on Dashboard
2.4. Usage2.4.1. Chat Requirement
Video and audio calls are tied to existing chats. As an agent, you will be able to initiatecalls inside and outside of chats. Customer users will be able to initiate calls only froman active chat.
If a chat does not yet exist, it will be created when the call is initiated. In these "ad-hoc"chats, the chat parties are joined automatically. When a call is terminated, these chatswill remain active until they are closed manually.
2.4.2. Making the Video CallsTo make a call inside of an active chat, simply click on the small video camera button inthe chat header.
14

Figure 3.14. Making a call inside the chat
A popup window will open, and depending on your browser, you will be asked to shareyour video and audio streams. On systems with several cameras and microphones, youwill be able to choose exactly the one you would like to use from the drop down list.
Figure 3.15. Media Permission Request
Once you confirm your choice, an invitation will be sent to the other party asking themto join. You will be notified of the progress via a message in the center of the screen.
15

Figure 3.16. Waiting for the other party
Please just wait a little while until the connection is established. Then you will be able tosee and hear the other party.
Figure 3.17. Established Connection
16

To control your streams, simply toggle the mute buttons on the left side.
Figure 3.18. Mute Buttons
To leave a call, simply click on the big red Close button. The other party will be notified.
2.4.3. Audio CallsThe only difference between video and audio calls is that audio calls will mute your videostream initially (which you will be able to turn on later in the call). The video stream willbe muted for both parties by default, but they will be able to control it.
If the other party has muted their video stream, instead of the video you will see a largemicrophone icon in the center, along with their name. The icon will reflect the state oftheir audio stream, and if they mute it too, it will be crossed.
Figure 3.19. Audio Only
2.4.4. Call InvitationsIf you have made yourself available for chats (either internal or external), video and audiocall invitations are received automatically by one of the active tabs in the same usersession. When you receive an invitation, a modal dialog will be displayed on your screen,allowing you to accept or decline the invitation.
17

Figure 3.20. Call Invitation
Your browser may also present you a notification with sound. This heavily depends onthe used browser and operating system settings, and if permission has been granted toOTRS to trigger such notifications. A permission request will be displayed the first timeyou change your chat availability.
Figure 3.21. Notification Permission Request
2.4.5. Other ways to start Video and Audio Calls• Agent to Agent
To start a video or audio call with another agent, with whom you do not have an activechat, you can use the Online widget on the dashboard.
18

Figure 3.22. Online widget on the Dashboard
Agents who are able to receive calls will have a video camera and microphone icon nextto their name which you can click on. Once clicked, a popup window will open, askingyou to share your media streams. The connection will be established afterwards.
Calling other agents is possible also via Owner and Responsible fields in ticket zoom.In this case, check will also be done to make sure the other agent is available, beforeallowing the call to be initiated.
Figure 3.23. Calling other agents from Ticket Zoom
• Agent to Customer
To start a video or audio call with a customer, with whom you do not have an activechat, you can use the customer user widget in the Customer Information Center whenviewing a certain customer. Available customers will have call icons next to their namewhich you can click on. Once clicked, a popup window will open asking you to shareyour media streams. The connection will be established afterwards.
19

Figure 3.24. Making a call from Customer Information Center
Another possibility is to make a call directly from the ticket zoom. If the customer userwho is assigned to this ticket is currently online, you'll be able to use call buttons nextto their username in customer information box in right sidebar.
Figure 3.25. Making a call from Ticket Zoom
• Customer to Agent
Customer users will be able to initiate calls from an active chat only. To do this, cus-tomers can use the video and audio call links in the header of an active chat to initiatecalls.
Figure 3.26. Starting a Video Call from Customer interface
When customers click on a link, they will be asked for permission to their media streams,similar to agents. An invitation will be sent and the connection will be established if theagent on the other side accepts the request.
20

The difference between video and audio calls in the customer interface compared tothe agent interface is minimal. Customers will see their calls inside the same windowas the chat. Only one additional button is provided: Fullscreen. It will resize the video tothe extent of the browser window. Other than that, everything as in the agent interfaceapplies.
• Public to Agent
Users of the public interface are not able to make audio and video calls.
2.5. ConnectionIn the best case scenario, video and audio calls will be streamed over a direct peer-to-peerconnection between users' browsers. The requirement is that the user's network allowsconnection over a high port that WebRTC uses, and can advertise this to the other party.To this end, there are several mechanisms in place to aid in connecting.
• STUN (Session Traversal Utilities for NAT)
STUN is a standardized set of methods and a network protocol to allow an end host todiscover its public IP address if it is located behind a NAT. OTRS provides a cloud servicewith STUN to all users of the OTRS Business Solution™, and this data is shared withthe other party to allow the connection to be established.
In case of a connection via STUN, only the connection data is stored on the OTRS servers,the connection itself is still directly between two users.
• TURN (Traversal Using Relays around NAT) over UDP
TURN is a protocol that assists in traversal of network address translators or firewalls formultimedia applications. OTRS also provides TURN cloud service which can help clientson networks masqueraded by symmetric NAT devices and it supports the connectionof a user behind a NAT.
In case of a connection established via TURN server, media streams will be routedthrough the server (like a proxy). In this situation, all packets are securely transmittedto the other side. The access to the TURN server is encrypted and secured by oftenchanged credentials, which are provided automatically.
• TURN over TCP
In case all UDP traffic is blocked between two users, the TURN server over TCP is a lastresort for a successful connection. While TCP is not an ideal protocol for transmittingmedia packets, it's a last resort in an effort to connect two users and share their streams.
Same as with TURN over UDP, media streams will be routed through the server and sentto the other side. The infrastructure for all STUN and TURN services is highly scalablebased on demand and can even be provided for different geographic locations, in orderto provide the best possible throughput.
3. The Dynamic Field "Contact withData"
This feature allows to add contacts with data to tickets.
21

3.1. Description3.1.1. Definition of Data Sources
The data sources for this feature reside on the Dynamic Fields of the new 'Contact withdata' type, this mean that each Dynamic Field of this type is a new data source. The nameof the dynamic field will become the name of the data source, as they are both the same.
For each data source (Dynamic Field) a list of contact attributes can be defined (eachattribute can contain only one text based value). The contact attributes can be set asmandatory and searchable if needed. The sort order of the attributes can be also defined.
Contact attributes for each data source could contain any information about the contactas needed, such as different addresses, telephone, birthday, anniversaries, favorite food,hobbies, etc.
NoteThe attributes 'Name' and 'ValidID' are always mandatory and they are not au-tomatically added, so for each new data source these attributes must be addedmanually.
Within the data source definition (or Dynamic Field configuration) they must berepresented by the keys 'Name' and 'ValidID' respectively while the values couldbe 'Name' and 'Validity' for example.
3.1.2. Contact ManagementAfter having at least one data source (Contact with data Dynamic Field) defined, contactsinformation can be added to the source to populate it.
Apart from the 'Name' and the 'ValidID', each data source could contain different contactinformation as defined by the data source (e.g. a data source could have an E-mail fieldwhile another could contain Telephone and/or Mobile fields).
The management (adding or updating) contact for the data sources is done by an specialscreen that can be called form the Ticket menu (Edit contacts with data) in the mainnavigation bar.
3.1.3. Adding Contacts to TicketsFor each configured contact with data dynamic field, a contact created specifically forthis dynamic field (or data source) can be chosen from any ticket create or ticket actionscreen where the dynamic filed has been previously configured.
The contact attributes will be shown in the ticket zoom screen.
3.1.4. Usage of Contacts in Search and StatisticsTickets can be found in search and statistics via the required attribute 'Name'.
The 'Name' can also be returned as a field value.
3.2. ConfigurationSysConfigAdminContactWithData::RunInitialWildcardSearch
Group: OTRSBusiness, Subgroup: Frontend::Admin::AdminContactWithData
22

Defines if a search with placeholder should be executed when initially calling the con-tact management.
Frontend::Module###AdminContactWithData
Group: OTRSBusiness, Subgroup: Frontend::Agent::ModuleRegistration
Allows to distribute contact and contact detail management permissions via groupdefinition.
3.3. UsageAn exemplary usage of contacts with data is as follows:
1. Create a new dynamic field of type 'Contact with data'.
2. Set the possible contact attributes (possible values). 'Name' and 'ValidID' are requiredfor any Contact with data Dynamic Field.
• Add 'Name' attribute (Key: Name, Value: 'Name').
• Add 'ValidID' attribute (Key: ValidID, Value: 'Validity').
• Add any other attribute such as 'Telephone' attribute (Key: Telephone, Value: 'Phone').
3. Add the list of mandatory attribute keys comma separated ('Name' and 'ValidID' arenot needed).
4. Set the attribute key order list comma separated as: Name,Telephone,ValidID.
5. Add the list of searchable attribute keys comma separated ('Name' is not needed).
6. Populate the data source by adding at least one contact in the newly created datasource by using 'Tickets' → 'Edit contacts with data' screen from the main navigationbar.
7. Add the new dynamic field to the screen's configuration where it should be shown. Forexample in New Phone Ticket screen by updating the SysConfig setting: Ticket::Fron-tend::AgentTicketPhone###DynamicField and do the same for Ticket::Frontend::A-gentTicketZoom###DynamicField.
8. Go to New phone ticket screen, and notice that the new field is there. Add all ticketneeded information.
9. Select an existing contact using autocomplete and choosing a contact.
10.The assigned contact and its attributes will be shown in the ticket zoom screen.
11.It is possible to update the attributes of the contact by clicking the 'Edit contact data'button that appears in the right side of the title of the contact data box (if the currentuser is a member of the groups defined in SysConfig setting Frontend::Module###Ad-minDynamicFieldContactWithData).
12.If is necessary to change the contact for this ticket, it can be done via any other ticketaction where the dynamic field is configured for display.
4. The Dynamic Field "Database"This feature implements a dynamic field of the type "Database".
23

4.1. DescriptionThis feature implements a generic dynamic field type, which offers the possibility to gath-er data from external databases. Such connected datasets can be searched and filteredusing additional masks.
Related found and marked datasets can be saved to the particular tickets through thedynamic field.
'Database' dynamic fields can be created the same way, as the default dynamic fieldsare created.
4.2. ConfigurationThe following list of configuration options can be used for this feature.
4.2.1. Adding a 'Database' Dynamic FieldThis feature implements a configuration interface to create dynamic fields of the type'Database'.
'Database' dynamic fields can be created the same way, as the default dynamic fieldsare created. For this switch to the Admin → Ticket Settings → Dynamic Fields view. In thismask you can select the 'Database' field from the ticket drop down box on the left side.Currently it's not possible to use the 'Database' dynamic field in the article context.
• Configuration "General - Name":
Dynamic fields of the type 'Database' need a unique name just like other dynamic fields,too. This name has to contain only alphanumeric values. This name will be used forinternal handling of the field but will not be displayed.
• Configuration "General - Label":
The label can be individually set and can contain white spaces etc. It will be used asthe field label in the different views.
• Configuration "General - Field order":
The field order allows a administrator to change the order of created dynamic fields.If this configuration get changed the general field order will be adjusted and other dy-namic fields will be moved one position back.
• Configuration "General - Valid":
To use the dynamic field in the configured OTRS 'views' it has to be set as valid. If thefield is set to 'invalid' it will disappear from all the configured views but no data willbe lost.
4.2.2. Configuration of the External Data SourceBefore an external database can be searched and the results be saved at the ticketthrough the dynamic field, the credentials have to be stored in the configuration of thedynamic field.
24

Figure 3.27. DynamicField Database Admin screen
Type: The type of the desired database can be selected here. The field supports the defaultOTRS database types: MySQL, Oracle, PostgreSQL or MSSQL.
• SID: This option is only available for Oracle connections and will be shown or hiddenautomatically. Within this option you have to enter the SID of your Oracle connection.
• Driver: This option is only available for ODBC connections and will be shown or hiddenautomatically. Within this option you have to enter in the hostsystem previously config-ured ODBC driver to connect to the desired MSSQL database.
• Server: The database host (hostname or IP-Address).
• Port: The port of the database server.
• Database: Defines the desired target database of the DBMS. This database will be usedfor queries.
• Table / View: This table or view will be used for the queries.
• User: The username for the database connection.
• Password: The user password for the database connection.
• Identifier: This select box will be automatically filled through "Possible Values (descrip-tion below)". This field represents the value which will be stored in the dynamic field.
• Multiselect: If this field is selected, it will be possible to store more than one value tothe dynamic field. Those values will be stored comma separated.
• CacheTTL: This value defines the period of validity of the database cache in seconds.Equal queries to the database will be answered through the cache (local filesystem)within this period instead of asking the database again.
25

• Searchprefix: This value will be put in the front of every search term while using theautocompletion to search the database. Wildcard characters are supported as well. Thesearchprefix will be ignored during the detailed search, but it is still possible to usewildcard characters in those masks.
• Searchsuffix: This value will be put in the end of every search term while using theautocompletion to search the database. Wildcard characters are supported as well. Thesearchsuffix will be ignored during the detailed search, but it is still possible to usewildcard characters in those masks.
• Result-Limit: The entered integer value defines the maximum amount of allowed resultsduring a database search. This includes the autocompletion search as well as the de-tailed search.
• Case Sensitive: If this field is selected, case-sensitivity will take effect on searches.
• Possible values: As already explained the possible values will fill up the identifier fieldautomatically, which defines the value that will be stored in the dynamic field. Possiblevalues can be created as much as needed (or at least as many table columns as thedatabase table has). The possible values defines the database columns to search in.It is possible to set the column name, a description (label) the field should have, theneeded data type and if the field should be a search- or listfield.
• Name: The exact name of the database column which will be requested through thedatabase queries.
• Description: The label of the field which will be displayed in the detailed search.
• Datatype: The data type which will be stored in the dynamic field. Possible values: TEXT,INTEGER or DATE.
• Filter: With the filter field, it is possible to choose a ticket attribute or a dynamic fieldas a filter for the related column. If the dynamic field is bound to a related ticket, theattributes will be used for the filter mechanism, otherwise the filters will be ignored. Iffilter will be configured to a table column, only search results matching to the searchterm and the related ticket attribute on exactly the configured column will be displayed.
• Searchfield: Indicates if a field should be included in the search requests.
• Listfield: Indicates if a field should be displayed in the results.
4.2.3. Screen ConfigurationDynamic fields of type 'Database' have to be activated for the several masks in whichthey should be displayed like the other types of dynamic fields.
This can be done through Admin → System Administration → SysConfig, in which "Ticket"must be selected on the left hand side.
For every interface area (Frontend), in which the dynamic field of type 'Database' shouldbe displayed, the admin has to configure it to fit his needs. Examples:
• Frontend::Agent::Ticket::ViewZoom for the ticket zoom view.
• Frontend::Agent::Ticket::ViewPhoneNew for new phone tickets.
• Frontend::Agent::Ticket::ViewEmailNew for new email tickets.
• In each of these view configurations is an entry called "Ticket::Frontend::AgentTick-et*###DynamicField". This configuration defines which dynamic field(s) should get dis-played in this view. To add a dynamic field, the internal name of the field has to be filled
26

in the 'Key' field. The field 'Value' can take the values 0 (deactivated), 1 (active) and2 (active and mandatory).
4.2.4. Storage of Historical DataThis feature offers a functionality to store historical data. For this to work it´s necessaryto activate and set SysConfig options, as visibly in the following screenshot:
Figure 3.28. DynamicField Database - Historical data settings
In the configuration option for the "SourceDynamicField" it´s needed to fill in the alreadycreated dynamic (Database) field name, which will be used to gather the historical data. Inthe related option "TargetDynamicField" the field(s) "Key" have to be filled with the tablecolumns of the connected external database, which will be readout. For every column therelated target dynamic field has to be configured in the field "content". The gathered datawill be saved in these dynamic fields.
If the configuration is ready and active, the configured fields will be readout from theexternal database, since the source field gets a new value via the configured masks. Thedata will be searched by it´s stored identifier via an event module and the found valueswill be stored in the target dynamic fields.
4.2.5. Sysconfig SettingsAutoComplete::Agent###DynamicFieldDatabaseSearch
Group: Framework, Subgroup: Frontend::Agent
Defines the config options for the autocompletion feature.
Ticket::EventModulePost###950-StoreHistoricalData
Group: Ticket, Subgroup: Core::Ticket
Updates dynamic fields, if configured ones will be updated.
DynamicFieldDatabase::StoreHistoricalData###1-SourceDynamicField1
Group: OTRSBusiness, Subgroup: Core
Defines the source dynamic field for storing historical data.
DynamicFieldDatabase::StoreHistoricalData###2-TargetDynamicFields1
Group: OTRSBusiness, Subgroup: Core
Defines the target dynamic fields for storing historical data.
DynamicFieldDatabase::StoreHistoricalData###3-SourceDynamicField2
Group: OTRSBusiness, Subgroup: Core
Defines the source dynamic field for storing historical data.
27

DynamicFieldDatabase::StoreHistoricalData###4-TargetDynamicFields2
Group: OTRSBusiness, Subgroup: Core
Defines the target dynamic fields for storing historical data.
4.3. UsageAn exemplary usage of DynamicField Database is as follows:
4.3.1. Searching and Saving Datasets - AutocompletionAfter the created dynamic fields are activated in the well known masks (like ViewPhone-New, ViewEmailNew) a new text field appears with the name, the dynamic field got inthe configuration. In this field it is possible to input searchterms and therefore executea search over all configured database fields. Otherwise do a click on the link 'Detailedsearch' and start a detailed search in which the fields to search in are selected explicitly.
Figure 3.29. DynamicField Database - Test field
Since search terms are typed in into the text field, a database search will be started overthe configured columns and the result will displayed via an autocompletion below the textfield. The more exact the search term is, the more exact will be the result (less resultentries).
Figure 3.30. DynamicField Database - Autocomplete feature
If the wished value will be displayed in the results, it can be selected via a mouse click orvia the keyboard and therefore be added to the dynamic field results.
Figure 3.31. DynamicField Database - Selected items
Via the link 'Details' a popup screen can be accessed, which offers detailed informationabout the whole result row. This information includes the line headers and the data. Thisinformation can be used to get an overview about the rest (of the not configured) columnsor to compare data.
The added result entries can be removed via the minus button.
4.3.2. Searching and Saving Datasets - Detailed SearchThe link 'Detailed search' opens a new modal dialog to start a new database search. Inthis mask it is possible to select the fields to search on explicitly.
28
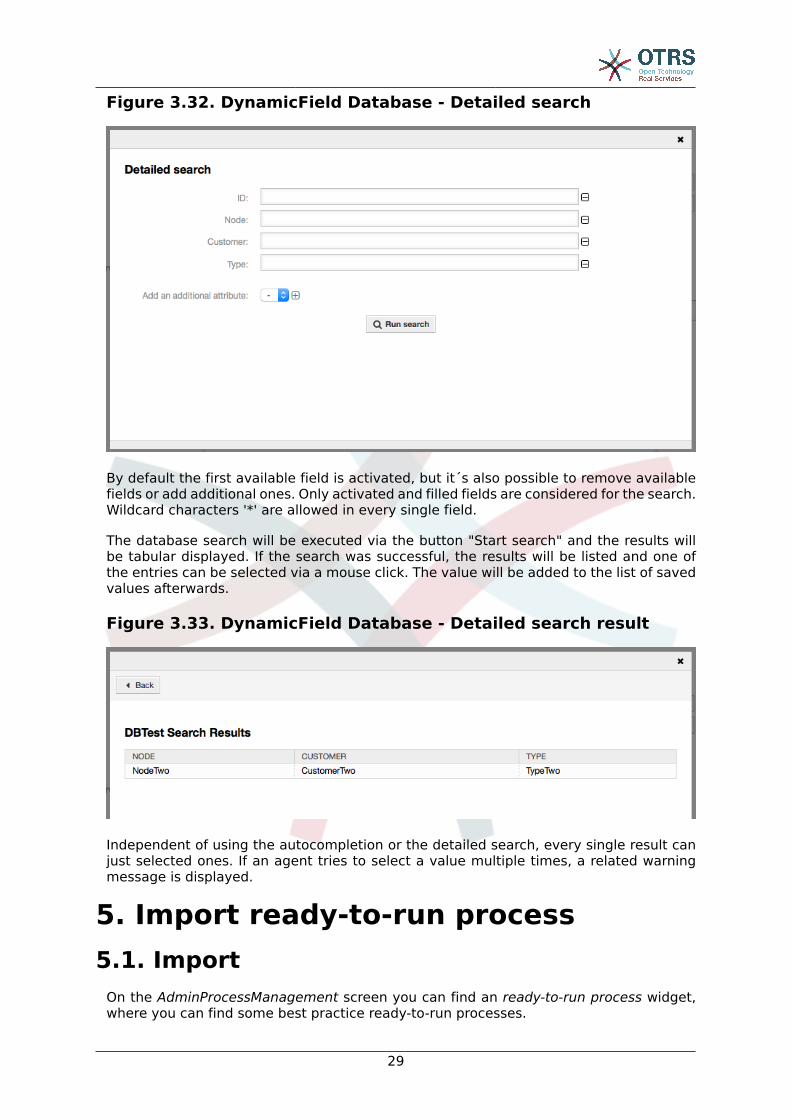
Figure 3.32. DynamicField Database - Detailed search
By default the first available field is activated, but it´s also possible to remove availablefields or add additional ones. Only activated and filled fields are considered for the search.Wildcard characters '*' are allowed in every single field.
The database search will be executed via the button "Start search" and the results willbe tabular displayed. If the search was successful, the results will be listed and one ofthe entries can be selected via a mouse click. The value will be added to the list of savedvalues afterwards.
Figure 3.33. DynamicField Database - Detailed search result
Independent of using the autocompletion or the detailed search, every single result canjust selected ones. If an agent tries to select a value multiple times, a related warningmessage is displayed.
5. Import ready-to-run process5.1. Import
On the AdminProcessManagement screen you can find an ready-to-run process widget,where you can find some best practice ready-to-run processes.
29

The following ready-to-run processes are available in the OTRS Business Solution™:
• Conference Room Reservation
• ITIL Incident Management
• Office Materials Procurement
• Order Request Management
• Release And Deployment Management
• Request For Leave Management
• Start RMA
• Travel Expense
Figure 3.34. Import ready-to-run process widget
To install a ready-to-run process, just select the desired process from the drop-down menuin the Ready-to-run process widget and click the Import ready-to-run process button.
During the import process, OTRS takes care of creating the needed dynamic fields and/or any needed updates to the system configuration.
6. Import ready-to-run Web Services6.1. Import
There are three ready-to-run Web Services available in the OTRS Business Solution™:
• BugzillaConnector
• JIRAConnector
• OTRSConnector
To install one of these web services, go to the GenericInterface Web Service Managementpage and click on the Add web service button.
30

Figure 3.35. Add web service
Locate the Ready-to-run Web Services widget, select one of the provided web servicesfrom the drop-down menu, and click the Import ready-to-run Web Service button.
Figure 3.36. Import ready-to-run Web Service
During the import process, OTRS takes care of creating the needed dynamic fields and/or any needed updates to the system configuration.
NoteThe ready-to-run Web Services may require additional feature add-ons to be in-stalled (OTRSGenericInterfaceInvokerTicket and OTRSGenericInterfaceIn-vokerEventFilter).
7. SMS Notifications and NotificationWeb View7.1. Description
The OTRS Business Solution™ comes with two new notification features: SMS notifi-cations and the notification web view. Both of them are technically notification methodsbesides the existing email method and can be activated for each notification (e.g. "Tick-
31

et new note notification" or "Ticket create notification") on the AdminNotificationEventscreen.
7.2. Setting up SMS NotificationsIn order to use SMS as a way of notification for admins and customers, you have to buy aSMS unit package. Please get in touch with [email protected] on this matter. Once you'vebought a package, you will be able to look up your current contingent of remaining SMSunits on the admin screen for the SMS cloud service (AdminCloudServiceSMS).
Figure 3.37. Admin Cloud Service SMS Screen
On this screen, you can also set up some more parameters of the SMS feature, e.g. thesender string which should be used for the SMS text messages or the agent/customerpreference field which should be used to take the mobile phone number from.
To make SMS available for notifications, you have to enable it for the notifications of yourchoice in AdminNotificationEvent. Besides the existing "Email" notification method, youcan enable SMS notifications by enabling the checkbox as to be seen in the screenshotbelow.
NotePlease be careful using the "Send by default" checkbox on SMS notifications. En-abling this checkbox will cause this notification to be sent by SMS to all agentswith a phone number stored in the configured field. This could cause a high usageof your available SMS units!
On this screen, you can also add more generic phone numbers (e.g. for archiving purpos-es) which will receive all of the relevant notifications (besides the addressed agents).
32

Figure 3.38. Enabling SMS Notifications
If you configured a notification to be visible in the agent preferences, agents will now beable to enable/disable SMS notifications manually on their own for this notification.
Figure 3.39. Agent Preferences SMS Notification Settings
33

7.3. Setting up and Using the NotificationWeb View
Setting up the notification web view for agents is similar to the setup for SMS notificationsas described above.
Figure 3.40. Enabling the Notification Web View
Once you've enabled the notification web view for a certain notification, agents will see anew icon on top of their screen in OTRS (within the toolbar) each time a new notificationarrives.
Figure 3.41. Notification Web View Icon on the Toolbar
Clicking this icon, agents will get an overview of all of their notifications and can read anddismiss them from here.
Figure 3.42. Notification Web View Overview
34

Figure 3.43. Notification Web View Detail
8. The Report Generator8.1. Description
The report generator allows to combine multiple statistics for sending/downloading. Re-ports can be configured to be sent automatically on specified times or run manually.
8.2. ConfigurationNo further configuration needed.
8.3. Usage8.3.1. Creating Reports
After you've entered title and description for your report in the first step, you'll be ableto set up your report.
8.3.1.1. General Settings
Set up title, description and validity of the report. This information will not be visible inthe report.
Figure 3.44. Automatic generation settings
35

8.3.1.2. Automatic Generation Settings
If the report should be generated automatically (e.g. once per day), you can set up subject,text and recipients for the email which is going to be sent and which will contain thereport as an attachment. You'll also need to add information on how often the reportshould be sent. The data format is taken from the cron mechanism of unix-based operatingsystems. For more information on which settings are possible, please refer to official crondocumentation sources or wikipedia.
Figure 3.45. Automatic generation settings
8.3.1.3. Output Settings
In this section, you can set up additional information which should be contained in thereport (e.g. a preamble or epilogue). This could e.g. be used for adding copyright or dataprotection information.
Figure 3.46. Output settings
8.3.2. Manually Generating ReportsTo generate a report, you can use the "Run now" button from the reports overview. You'llbe asked for confirmation and afterwards the report will be created and sent immediately.Please find screenshots of a generated report below.
36

Figure 3.47. Report: Front page
Figure 3.48. Report: Table of contents
37

Figure 3.49. Report: Preamble
Figure 3.50. Report: Statistics
38

9. Resource Planning9.1. Description
Resource planning feature in OTRS Business Solution™ complements built-in calendarfeature of OTRS. It enhances original calendar implementation by introducing resourceallocation for appointments. Furthermore, resources can be assigned to separate teams,which in turn can be used to filter resource overview and availability.
9.2. ConfigurationNo further configuration needed.
9.3. Usage9.3.1. Team Management
In order to be able to assign appointments to resources, you must first define teams forthose resources.
Figure 3.51. Team Management Add and Import
Teams can be added or imported from Manage Teams screen accessible via top navigationmenu. In order to import a team, you must have an exported YML configuration file of theteam from an existing OTRS installation.
39

Adding new team is easy: just define a team name and permission group. Full access tothis group is required for anyone to be able to manage the team, its agents and assignthem as resources to appointments.
Figure 3.52. Team Management Add and Import
9.3.2. Team Agent ManagementOnce you have teams set up, you must define which agents belong to which teams. Thisis done via dedicated screen where you can adjust relations of agents and teams verymuch like you can do it for agents and groups.
NotePlease note that in order to see agents in this screen, you must define them firstvia Admin > Agents screen.
Figure 3.53. Team Agent Management
By choosing a team from this screen, you can assign agents to it, and vice-versa.
Figure 3.54. Team Agent Relations
9.3.3. Assigning Appointments to ResourcesFinally, once you have both teams and their agents set up, you can proceed to a calendaroverview and start assigning appointments to teams and agents.
Simply add or edit an appointment, and choose both team and agent from the lists underresource. You can do this via any calendar overview, as appointment edit dialog is thesame for all of them.
40

Figure 3.55. Assigning team and agent to an appointment
You can assign multiple teams and agents to a single appointment, but you must alwayschoose a team first. Resulting list of agents is an aggregate of all selected teams, withoutany duplicates. Choosing an agent from the list is also optional, so you can leave anappointment assigned only to a team.
41

Figure 3.56. Assigning multiple teams and agents to anappointment
NoteOnce you assign an appointment to a team and/or agent, make sure to save it soyour changes are applied.
9.3.4. Resource OverviewWhile it's possible to assign resources to an appointment in any calendar overview,one screen is designed exclusively for allocating resources to appointments: ResourceOverview. This screen looks very much like a regular calendar overview, except it has afilter for teams on top and a list of agents for that team (available only in timeline views).
By choosing a team from the top filter, you will be presented with all appointments as-signed to it.
Figure 3.57. Resource Overview
By simply dragging an appointment to a row line with an agent's name in timeline view,it's possible to assign an appointment to this resource. If an appointment does not havean agent assigned to it, it will appear in the unassigned area of the screen.
Appointment with multiple agents will be displayed as duplicated, but it most certainly isnot. Dragging one instance of this appointment will move all them in the same fashion.
42

Figure 3.58. Resource Overview
NotePlease note that appointments with unassigned teams or assigned different teamthan currently selected, will not show up in the resource overview. You will have toswitch to a different overview to see these appointments, so make sure to assignthem to a correct team first.
By editing settings of the resource overview (via gear icon in top right corner), you canchoose which team agents are displayed within the overview.
Figure 3.59. Resource Overview Settings
This setting is user and team specific, and if you have defined an agent filter in this way,a trash icon will be displayed on top of the list of agents so you can remove it easily.
43
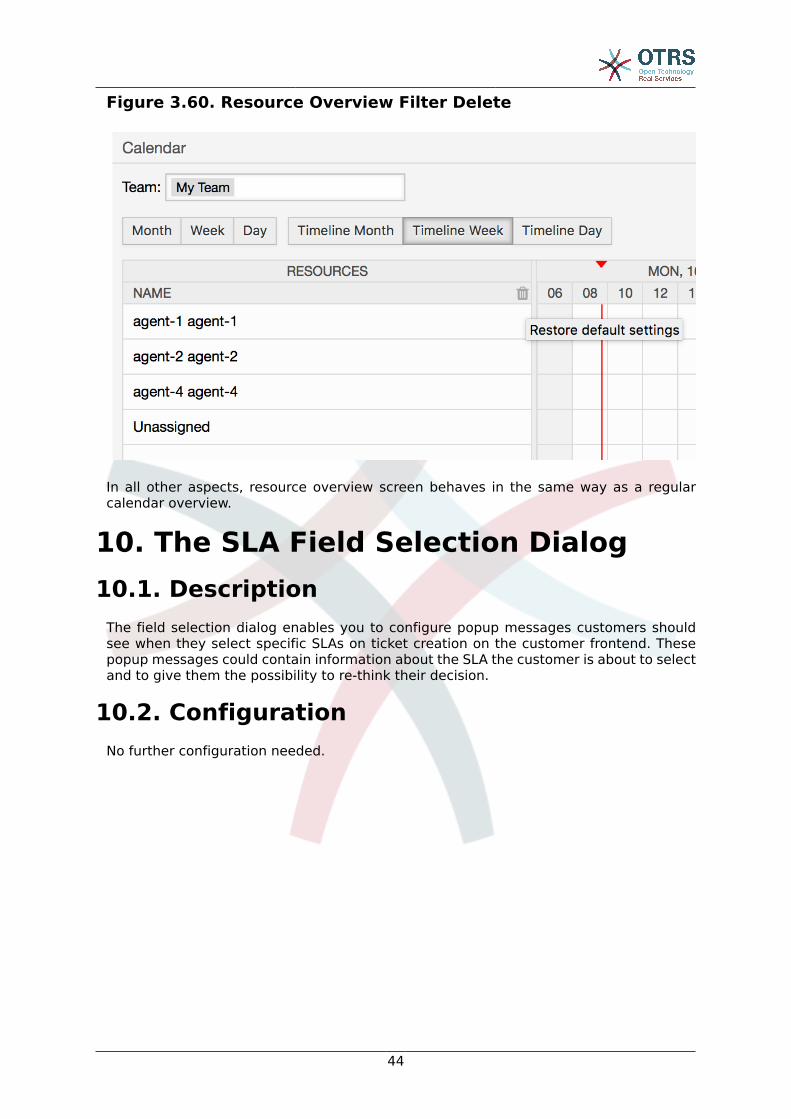
Figure 3.60. Resource Overview Filter Delete
In all other aspects, resource overview screen behaves in the same way as a regularcalendar overview.
10. The SLA Field Selection Dialog10.1. Description
The field selection dialog enables you to configure popup messages customers shouldsee when they select specific SLAs on ticket creation on the customer frontend. Thesepopup messages could contain information about the SLA the customer is about to selectand to give them the possibility to re-think their decision.
10.2. ConfigurationNo further configuration needed.
44

10.3. Usage10.3.1. Configuring the SLA message
Figure 3.61. SLA configuration
You can configure the message on each SLA by using the SLA administration screen.
45
10.3.2. How the message looks in the customer fron-tend
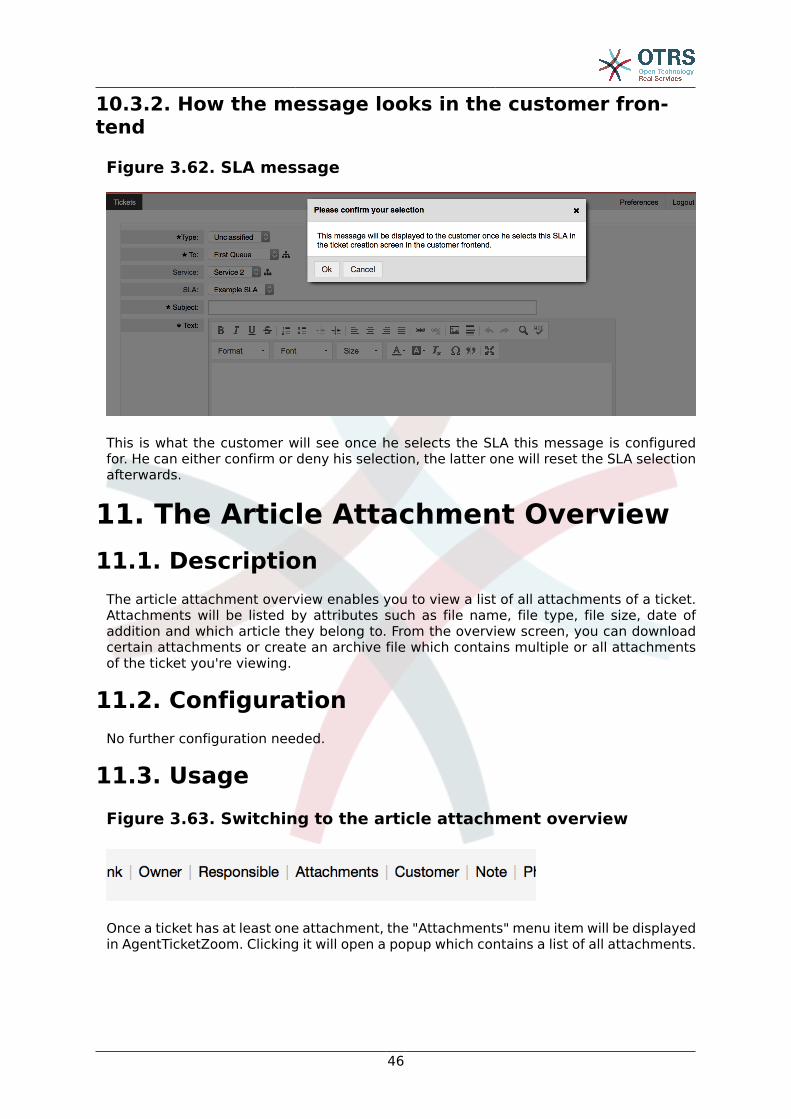
Figure 3.62. SLA message
This is what the customer will see once he selects the SLA this message is configuredfor. He can either confirm or deny his selection, the latter one will reset the SLA selectionafterwards.
11. The Article Attachment Overview11.1. Description
The article attachment overview enables you to view a list of all attachments of a ticket.Attachments will be listed by attributes such as file name, file type, file size, date ofaddition and which article they belong to. From the overview screen, you can downloadcertain attachments or create an archive file which contains multiple or all attachmentsof the ticket you're viewing.
11.2. ConfigurationNo further configuration needed.
11.3. UsageFigure 3.63. Switching to the article attachment overview
Once a ticket has at least one attachment, the "Attachments" menu item will be displayedin AgentTicketZoom. Clicking it will open a popup which contains a list of all attachments.
46

Figure 3.64. Using the article attachment overview
12. The Ticket Timeline View12.1. Description
The ticket timeline view provides a chronological view of all actions which happened ona ticket (which includes articles, owner changes, incoming mails, etc.). With the tickettimeline view, agents are able to get a good overview of a ticket in less time.
12.2. ConfigurationSysConfig
ChronicalViewEnabled
Group: OTRSBusiness, Subgroup: Frontend::Agent
Controls whether or not the ticket timeline view is enabled.
12.3. UsageFigure 3.65. Switching to the Ticket Timeline View
To access the ticket timeline view, use the clock icon on the top right corner of the articlewidget in AgentTicketZoom. You will be redirected to the timeline view and this view willbe kept as preference until you change back to another view.
In the ticket timeline view, you can work on the ticket as you're used to. You can inspectthe time of each event in the timeline by hovering the little square next to each eventwith your mouse cursor. You can view the full content of articles by using the zoom iconon top of the certain articles box, where you will find all common article actions such asreply, split, forward, etc.
47
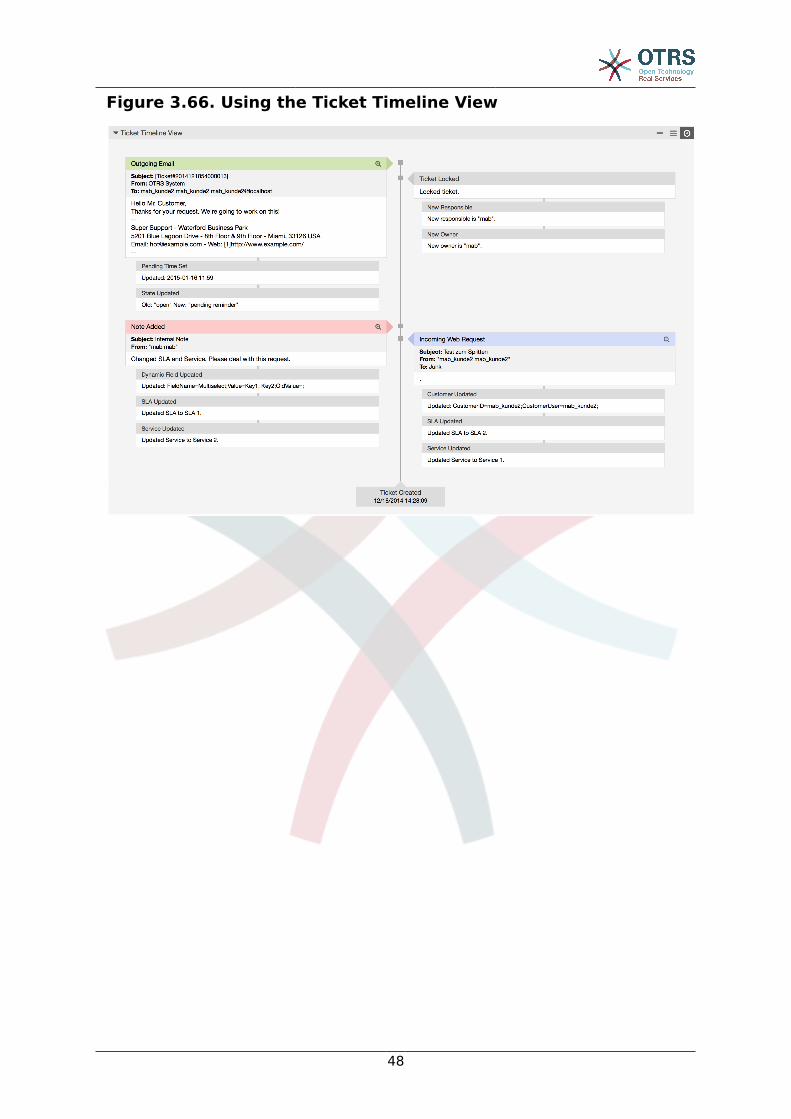
Figure 3.66. Using the Ticket Timeline View
48

Appendix A. AdditionalResources
otrs.com
The OTRS website with source code, documentation and news is available atwww.otrs.com. Here you can also find information about professional services andOTRS Administrator training seminars from OTRS Group, the creator of OTRS.
Translations
You can help translate OTRS to your language at Transifex.
49