zx50 ip pbx user's manual - national business solutions
TRANSCRIPT
ZX50ZX50ZX50ZX50 IPIPIPIP PBXPBXPBXPBXUser'sUser'sUser'sUser's ManualManualManualManual
The information contained in this document is subject to change at any time without
prior notification.Specifications of the product are subject to change at any time
without notice.If you want to learn more info about our product,please visit our web
www.zycoo.com.
ZX50ZX50ZX50ZX50 SeriesSeriesSeriesSeries IPIPIPIP PBXPBXPBXPBX
V1.1 Editor:Yu 4th,June,2010 1
TABLETABLETABLETABLE OFOFOFOF CONTENTSCONTENTSCONTENTSCONTENTS
ChapterChapterChapterChapter1111 BriefBriefBriefBrief IntroductionIntroductionIntroductionIntroduction................................................................................................................................................................................................................................................................................................................................................................................................................3333ChapterChapterChapterChapter2222 SafetySafetySafetySafety NoticeNoticeNoticeNotice................................................................................................................................................................................................................................................................................................................................................................................................................................................4444ChapterChapterChapterChapter3333 ZX50ZX50ZX50ZX50 SpecificationSpecificationSpecificationSpecification........................................................................................................................................................................................................................................................................................................................................................................................................5555
3.1 Apearance&Model........................................................................................................... 53.2 System Features..............................................................................................................53.3 Interface&Panel................................................................................................................63.4 Default configuration....................................................................................................... 73.5 Default Feature Key........................................................................................................ 7
Chapter4Chapter4Chapter4Chapter4 LoginLoginLoginLogin inininin HomeHomeHomeHome PagePagePagePage............................................................................................................................................................................................................................................................................................................................................................................................8888ChapterChapterChapterChapter5555 BasicBasicBasicBasic ConfigurationConfigurationConfigurationConfiguration....................................................................................................................................................................................................................................................................................................................................................................................10101010
5.1 Configure Extensions....................................................................................................105.2 Trunk................................................................................................................................115.3 Outbound Routers.........................................................................................................13
ChapterChapterChapterChapter6666 InboundInboundInboundInbound ControlControlControlControl................................................................................................................................................................................................................................................................................................................................................................................................................151515156.1 Inbound Routers............................................................................................................ 156.2 IVR (Interactive Voice Response)...............................................................................156.3 IVR Prompts...................................................................................................................166.4 Ring Groups................................................................................................................... 17
ChapterChapterChapterChapter7777 AdvancedAdvancedAdvancedAdvanced ConfigurationConfigurationConfigurationConfiguration....................................................................................................................................................................................................................................................................................................................................................191919197.1 Options............................................................................................................................197.2 Voice mail....................................................................................................................... 19
7.2.1 General Settings..............................................................................................207.2.2 SMTP settings..................................................................................................217.2.3 Email settings...................................................................................................22
7.3 Conferencing..................................................................................................................227.4 Music On Hold................................................................................................................237.5 Music On Ringback.......................................................................................................247.6 Call Parking.................................................................................................................... 247.7 DISA Settings.................................................................................................................257.8 Follow Me....................................................................................................................... 267.9 Paging and Intercom.....................................................................................................277.10 Monitor.......................................................................................................................... 287.11 Time Based Rules.......................................................................................................29
ChapterChapterChapterChapter8888 StatusStatusStatusStatus DisplayDisplayDisplayDisplay................................................................................................................................................................................................................................................................................................................................................................................................................................303030308.1 Monitor List.....................................................................................................................308.2 Call Logs.........................................................................................................................308.3 Register Status.............................................................................................................. 318.4 System Info.....................................................................................................................31
ChapterChapterChapterChapter9999 SystemSystemSystemSystem ManagementManagementManagementManagement............................................................................................................................................................................................................................................................................................................................................................................ 32323232

ZX50ZX50ZX50ZX50 SeriesSeriesSeriesSeries IPIPIPIP PBXPBXPBXPBX
V1.1 Editor:Yu 4th,June,2010 2
9.1 Network and Country.................................................................................................... 329.2 DDNS&VPN....................................................................................................................32
9.2.1 DDNS Settings.................................................................................................329.2.2 VPN Settings....................................................................................................33
9.3Time Settings.................................................................................................................. 339.3.1 NTP Settings.................................................................................................... 349.3.2 Manual Time Setings......................................................................................34
9.4 Management.................................................................................................................. 349.5 Backup............................................................................................................................ 359.6 Upgrade.......................................................................................................................... 35
ChapterChapterChapterChapter10101010 OperatingOperatingOperatingOperating InstructionInstructionInstructionInstruction................................................................................................................................................................................................................................................................................................................................................................ 3737373710.1 How to link the ZX50 IP PBX to the interwork......................................................37
10.1.1 IP PBX behind the Router............................................................................3710.1.2 IP PBX behind the Modem...........................................................................37
10.2 How to log in the IP PBX system........................................................................... 3810.3 How to make a internal call........................................................................................3910.4 How to make an outbound call..................................................................................40
10.4.1 Make call via GSM trunk..............................................................................4010.4.2 Make call via VoIP trunk...............................................................................42
10.5 How to make an incoming call...................................................................................4410.6 How to Set an incoming call to IVR based time rule..............................................4410.7 How to link two ZX50 IPPBX in the same network.................................................4810.8 How to link two IPPBX in different network.............................................................5110.9 How to resolve problems about hearing only on one side....................................53
ChapterChapterChapterChapter11111111 HowHowHowHow totototo useuseuseuse SkypeSkypeSkypeSkype accountaccountaccountaccount inininin ZX50ZX50ZX50ZX50........................................................................................................................................................................................................................................................................5555555511.1 Register for Skype Manager......................................................................................5511.2 Create a SIP Profile and buy a Channel Subscription...........................................5511.3 Allocate Skype Credit to the SIP Profile.................................................................. 5611.4 Configure your Skype for SIP certified PBX for outbound calls........................... 5711.5 Make an outbound call............................................................................................... 5811.6 Configure your Skype for SIP certified PBX for inbound calling.......................... 5811.7 Set up a business account to test inbound calls from people with Skype..........5811.8 Make a test inbound call from Skype....................................................................... 5911.9 Assign an Online Number to receive calls from landlines and mobile phones..5911.10 Make a test inbound call from a landline or mobile phone................................. 59
ZX50ZX50ZX50ZX50 SeriesSeriesSeriesSeries IPIPIPIP PBXPBXPBXPBX
V1.1 Editor:Yu 4th,June,2010 3
ChapterChapterChapterChapter1111 BriefBriefBriefBrief IntroductionIntroductionIntroductionIntroduction
Thank you for your purchasing the ZX50 series of IP PBX.The all-in-one ZX50 IP PBXcan not only provide the traditional basic PBX features(call hold,call forwarding,callwaiting and so on)as well as enhanced features such as visual voice mail,music onhold ,and auto attendant.In addition,the ZX50 IP PBX supports innovative functionality likeprivate VoIP networking,remote access,superior VoIP voice quality with advanced audioprocessing,and the revolutionary ability to traverse a NAT and firewall.With Zycoo VoIPsolutions,SMEs can quickly deploy VoIP networks to connect multiple branch locationsover the Internet without the need to change the current equipment or dial plan.By usingthe ZX50 IP PBX,an SME can take advantage of the VoIP services provided by theITSPs(Internet Telephony Service Providers)or traditional telephony services,reduceintra-company telephony expenses,and allow VoIP remote access anywhere via theinternet.
ZX50ZX50ZX50ZX50 SeriesSeriesSeriesSeries IPIPIPIP PBXPBXPBXPBX
V1.1 Editor:Yu 4th,June,2010 4
ChapterChapterChapterChapter2222 SafetySafetySafetySafety NoticeNoticeNoticeNotice
Please read the following safety notices before installing or using this IP PBX. They arecrucial for a safe and reliable operation of the device.� Please use the external power supply which is included in the package. Other power
supplies may cause damage to the device, affect the performance or induce noise.� Before using the external power supply in the package, please check with residential
power voltage. Inaccurate power voltage may cause fire and damage.� Please do not damage the power cord. If power cord or plug is impaired, do not use it,
otherwise, it may cause fire or electric shock.� The plug-socket combination must be accessible at all times because it serves as the
main disconnecting device.� Do not drop, knock or shake it. Rough handling can break internal circuit boards.� Do not install the device in places where there is direct sunlight. Also do not place the
device on carpets or cushions. It may cause fire or breakdown.� Avoid exposing the device to high temperature, below -10°C or high humidity. Avoid
wetting the unit with any liquid.� Do not attempt to open it. Non-expert handling to the device could damage it. Consult
your authorized dealer for help, or else it may cause fire, electric shock or breakdown.� Do not use harsh chemicals, cleaning solvents, or strong detergents to clean it. Wipe
it with soft cloth that has been slightly dampened in a mild soap and water solution.� When lightning, do not touch power plug or phone line, it may cause an electric
shock.� Do not install this device in an ill-ventilated place.� You are in a situation that could cause bodily injury. Before you work on any
equipment, be aware of the hazards involved with electrical circuitry and be familiarwith standard practices for preventing accidents.
ZX50ZX50ZX50ZX50 SeriesSeriesSeriesSeries IPIPIPIP PBXPBXPBXPBX
V1.1 Editor:Yu 4th,June,2010 5
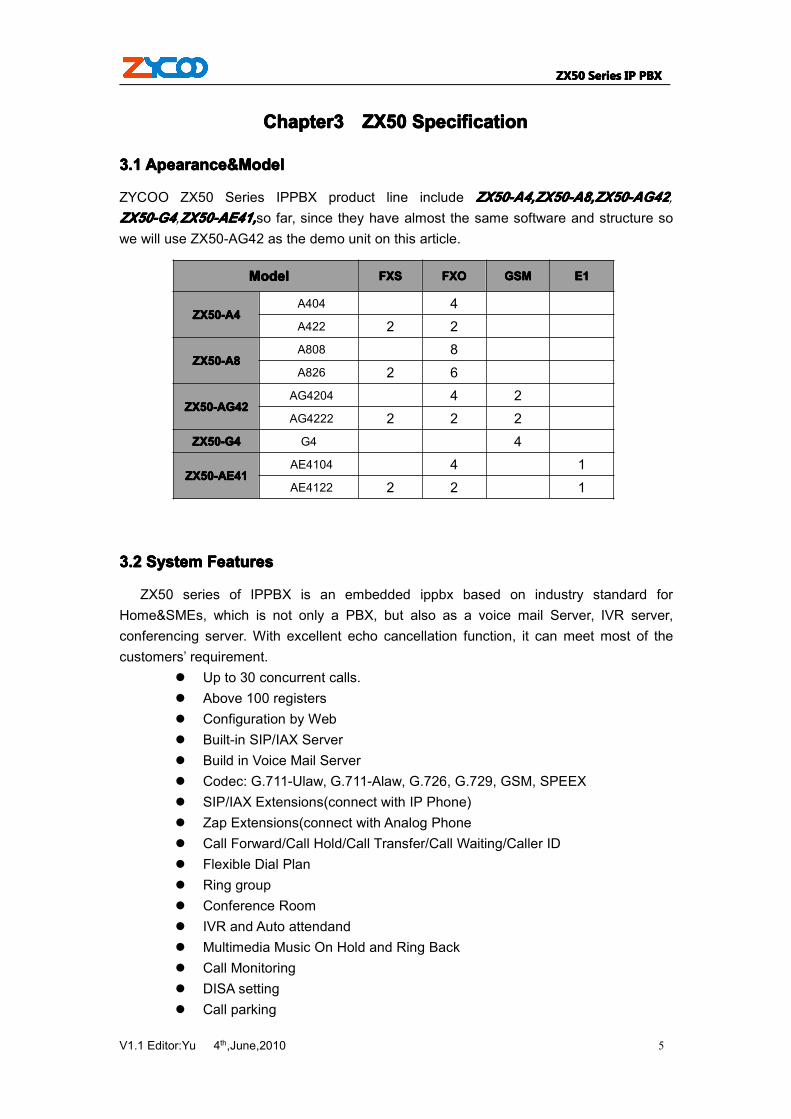
ChapterChapterChapterChapter3333 ZX50ZX50ZX50ZX50 SpecificationSpecificationSpecificationSpecification
3333.1.1.1.1 Apearance&ModelApearance&ModelApearance&ModelApearance&Model
ZYCOO ZX50 Series IPPBX product line include ZX50-A4,ZX50-A8,ZX50-A4,ZX50-A8,ZX50-A4,ZX50-A8,ZX50-A4,ZX50-A8,ZXZXZXZX50-AG4250-AG4250-AG4250-AG42,ZXZXZXZX50-G50-G50-G50-G4444,ZX50-AE41,ZX50-AE41,ZX50-AE41,ZX50-AE41,so far, since they have almost the same software and structure sowe will use ZX50-AG42 as the demo unit on this article.
3.23.23.23.2 SystemSystemSystemSystem FeaturesFeaturesFeaturesFeatures
ZX50 series of IPPBX is an embedded ippbx based on industry standard forHome&SMEs, which is not only a PBX, but also as a voice mail Server, IVR server,conferencing server. With excellent echo cancellation function, it can meet most of thecustomers’ requirement.
� Up to 30 concurrent calls.� Above 100 registers� Configuration by Web� Built-in SIP/IAX Server� Build in Voice Mail Server� Codec: G.711-Ulaw, G.711-Alaw, G.726, G.729, GSM, SPEEX� SIP/IAX Extensions(connect with IP Phone)� Zap Extensions(connect with Analog Phone� Call Forward/Call Hold/Call Transfer/Call Waiting/Caller ID� Flexible Dial Plan� Ring group� Conference Room� IVR and Auto attendand� Multimedia Music On Hold and Ring Back� Call Monitoring� DISA setting� Call parking
ModelModelModelModel FXSFXSFXSFXS FXOFXOFXOFXO GSMGSMGSMGSM E1E1E1E1
ZX50-A4ZX50-A4ZX50-A4ZX50-A4A404 4A422 2 2
ZX50-A8ZX50-A8ZX50-A8ZX50-A8A808 8A826 2 6
ZX50-AG42ZX50-AG42ZX50-AG42ZX50-AG42AG4204 4 2AG4222 2 2 2
ZX50-G4ZX50-G4ZX50-G4ZX50-G4 G4 4
ZX50-AE41ZX50-AE41ZX50-AE41ZX50-AE41AE4104 4 1AE4122 2 2 1
ZX50ZX50ZX50ZX50 SeriesSeriesSeriesSeries IPIPIPIP PBXPBXPBXPBX
V1.1 Editor:Yu 4th,June,2010 6
� Call Paging and intercom� Follow me Setting� Call Logs check and download� Support IP Phone with Key function� BLF(Busy Lamp Field)� Static/DHCP/PPPoE network access� System backup and store� Set system time manually� VPN Client (support N2N)� DDNS Client (support Dyndns.org)� Codec Negotiation/Echo cancelation/VAD.etc� FAX T.38
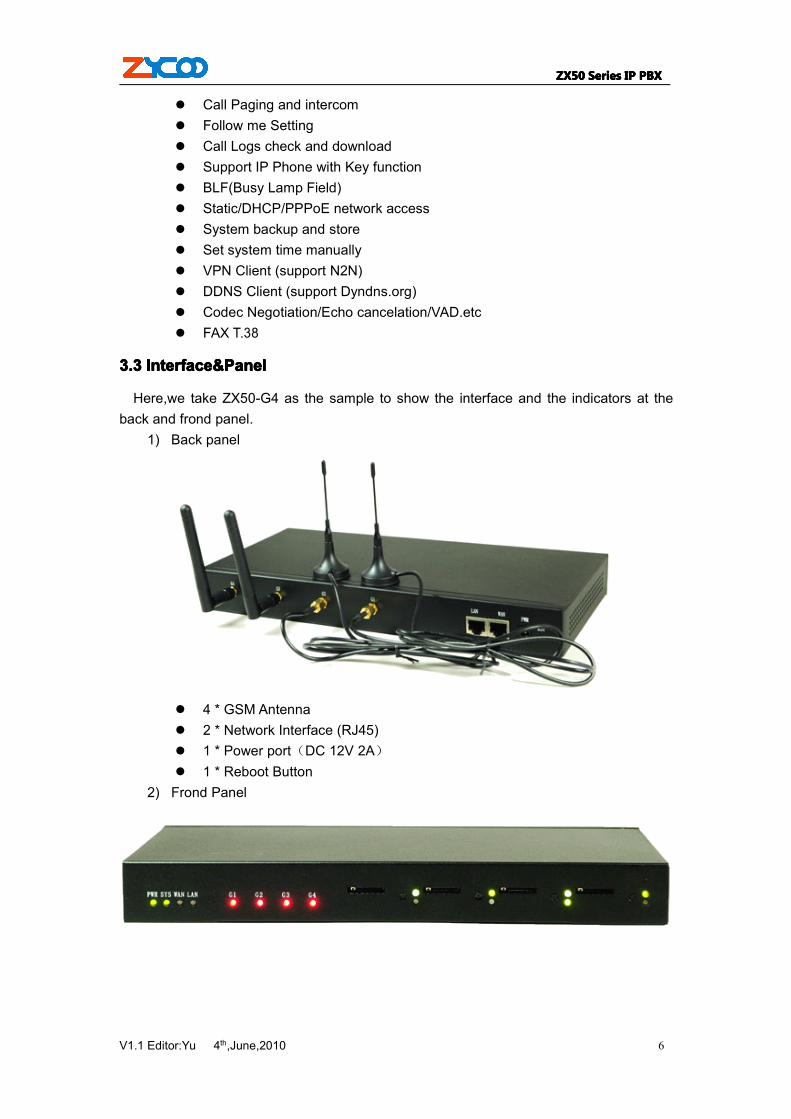
3.33.33.33.3 Interface&PanelInterface&PanelInterface&PanelInterface&Panel
Here,we take ZX50-G4 as the sample to show the interface and the indicators at theback and frond panel.
1) Back panel
� 4 * GSM Antenna� 2 * Network Interface (RJ45)� 1 * Power port(DC 12V 2A)� 1 * Reboot Button
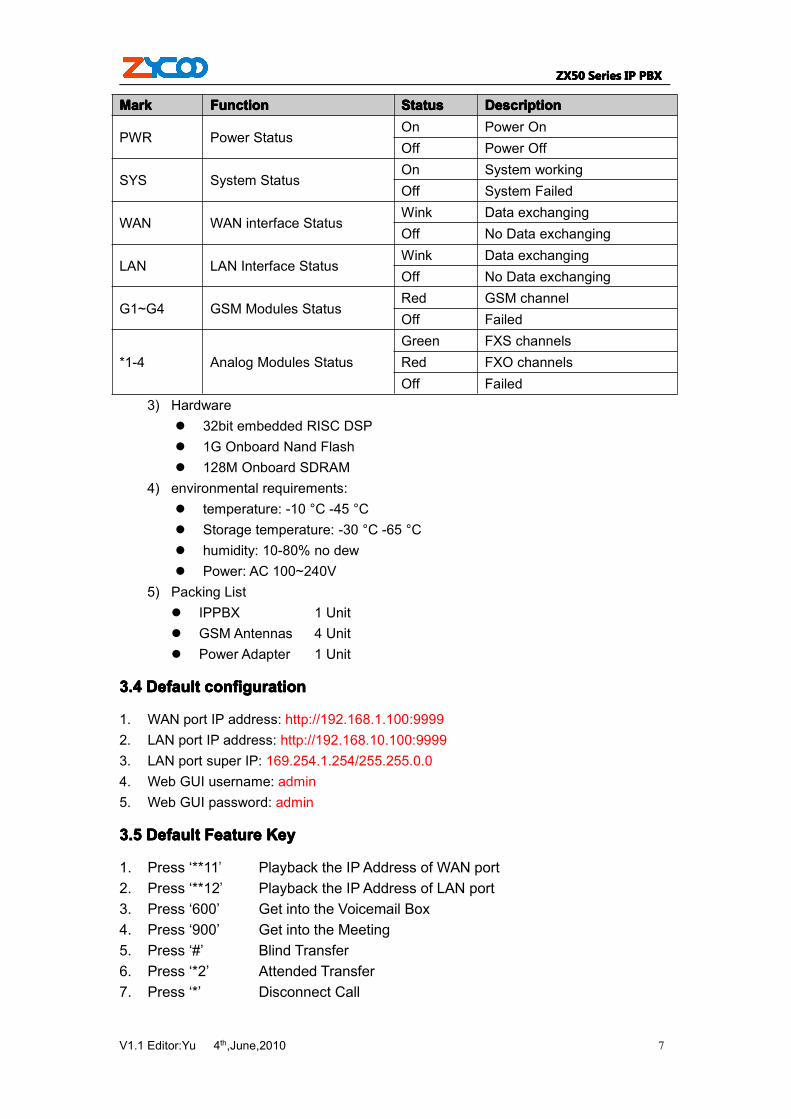
2) Frond Panel
ZX50ZX50ZX50ZX50 SeriesSeriesSeriesSeries IPIPIPIP PBXPBXPBXPBX
V1.1 Editor:Yu 4th,June,2010 7
MarkMarkMarkMark FunctionFunctionFunctionFunction StatusStatusStatusStatus DescriptionDescriptionDescriptionDescription
PWR Power StatusOn Power OnOff Power Off
SYS System StatusOn System workingOff System Failed
WAN WAN interface StatusWink Data exchangingOff No Data exchanging
LAN LAN Interface StatusWink Data exchangingOff No Data exchanging
G1~G4 GSM Modules StatusRed GSM channelOff Failed
*1-4 Analog Modules StatusGreen FXS channelsRed FXO channelsOff Failed
3) Hardware� 32bit embedded RISC DSP� 1G Onboard Nand Flash� 128M Onboard SDRAM
4) environmental requirements:� temperature: -10 °C -45 °C� Storage temperature: -30 °C -65 °C� humidity: 10-80% no dew� Power: AC 100~240V
5) Packing List� IPPBX 1 Unit� GSM Antennas 4 Unit� Power Adapter 1 Unit
3.43.43.43.4 DefaultDefaultDefaultDefault configurationconfigurationconfigurationconfiguration
1. WAN port IP address: http://192.168.1.100:99992. LAN port IP address: http://192.168.10.100:99993. LAN port super IP: 169.254.1.254/255.255.0.04. Web GUI username: admin5. Web GUI password: admin
3.53.53.53.5 DefaultDefaultDefaultDefault FeatureFeatureFeatureFeature KeyKeyKeyKey
1. Press ‘**11’ Playback the IP Address of WAN port2. Press ‘**12’ Playback the IP Address of LAN port3. Press ‘600’ Get into the Voicemail Box4. Press ‘900’ Get into the Meeting5. Press ‘#’ Blind Transfer6. Press ‘*2’ Attended Transfer7. Press ‘*’ Disconnect Call

ZX50ZX50ZX50ZX50 SeriesSeriesSeriesSeries IPIPIPIP PBXPBXPBXPBX
V1.1 Editor:Yu 4th,June,2010 8
Chapter4Chapter4Chapter4Chapter4 LoginLoginLoginLogin inininin HomeHomeHomeHome PagePagePagePage
After connecting the IP PBX to the local area network. Launch the web browser on acomputer which is in this local area network. Enter the IP address for the system (WANport IP address http://http://http://http://192.168.1.100192.168.1.100192.168.1.100192.168.1.100:9999:9999:9999:9999,,,, LAN port IP address http://http://http://http://192.168.10.100192.168.10.100192.168.10.100192.168.10.100::::9999999999999999). The start web page will appear like this:
Enter Username and password (default username is adminadminadminadmin, password is adminadminadminadmin), thenclick “login”. Once the login is successful, the home page will be display:Noted:Noted:Noted:Noted: you have to add a network segment same with the WAN ports if your PC is not at192.168.1.XXX.
With the zycoo GUI, you can configure extensions, conference, voicemail, Dial Plan andetc. Each page of the GUI has three columns:

ZX50ZX50ZX50ZX50 SeriesSeriesSeriesSeries IPIPIPIP PBXPBXPBXPBX
V1.1 Editor:Yu 4th,June,2010 9
The left column present all the options tab that you can program the system. Click thetab to go to setting page of different options.
The middle column contains the primary content for each page.The right column of the user interface contains Tooltips. This area provides brief
description for any options of the GUI
The home page is used for logout, Reboot and Factory Defaults.� Logout: To log out the zycoo GUI.� Reboot: Reboot the IP PBX system� Factory Defaults: Restore all settings to factory default.� Activate change: Made the change active for the current configuration after you
make a configuration on some page.
ZX50ZX50ZX50ZX50 SeriesSeriesSeriesSeries IPIPIPIP PBXPBXPBXPBX
V1.1 Editor:Yu 4th,June,2010 10
ChapterChapterChapterChapter5555 BasicBasicBasicBasic ConfigurationConfigurationConfigurationConfiguration
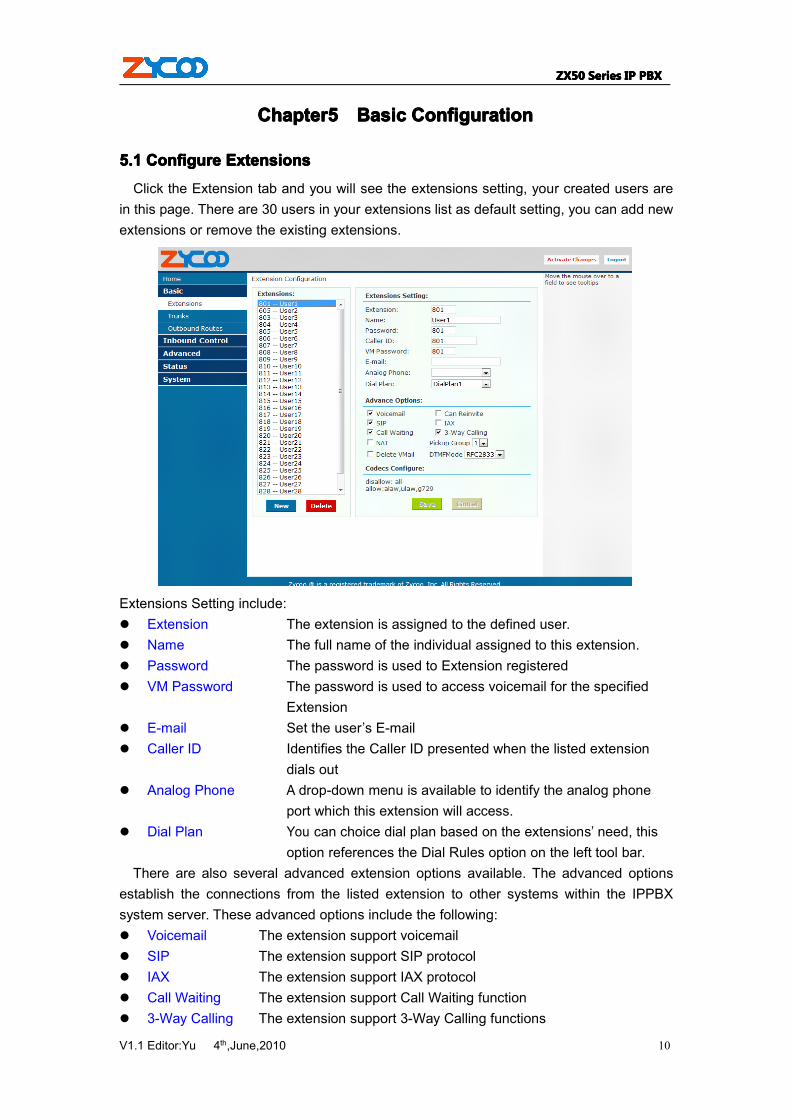
5.15.15.15.1 ConfigureConfigureConfigureConfigure ExtensionsExtensionsExtensionsExtensions
Click the Extension tab and you will see the extensions setting, your created users arein this page. There are 30 users in your extensions list as default setting, you can add newextensions or remove the existing extensions.
Extensions Setting include:� Extension The extension is assigned to the defined user.� Name The full name of the individual assigned to this extension.� Password The password is used to Extension registered� VM Password The password is used to access voicemail for the specified
Extension� E-mail Set the user’s E-mail� Caller ID Identifies the Caller ID presented when the listed extension
dials out� Analog Phone A drop-down menu is available to identify the analog phone
port which this extension will access.� Dial Plan You can choice dial plan based on the extensions’ need, this
option references the Dial Rules option on the left tool bar.There are also several advanced extension options available. The advanced options
establish the connections from the listed extension to other systems within the IPPBXsystem server. These advanced options include the following:� Voicemail The extension support voicemail� SIP The extension support SIP protocol� IAX The extension support IAX protocol� Call Waiting The extension support Call Waiting function� 3-Way Calling The extension support 3-Way Calling functions
ZX50ZX50ZX50ZX50 SeriesSeriesSeriesSeries IPIPIPIP PBXPBXPBXPBX
V1.1 Editor:Yu 4th,June,2010 11
� Pickup Group Select pickup group of the extension� Delete VMail If this option is set, then voicemails will not be checkable using a
Phone. Messages will be sent via e-mail, only. Note: You need tohave an smtp server configured for this functionality.
� Codecs Click here, you can set the extension’s codec (default support:alaw, ulaw and G.729).
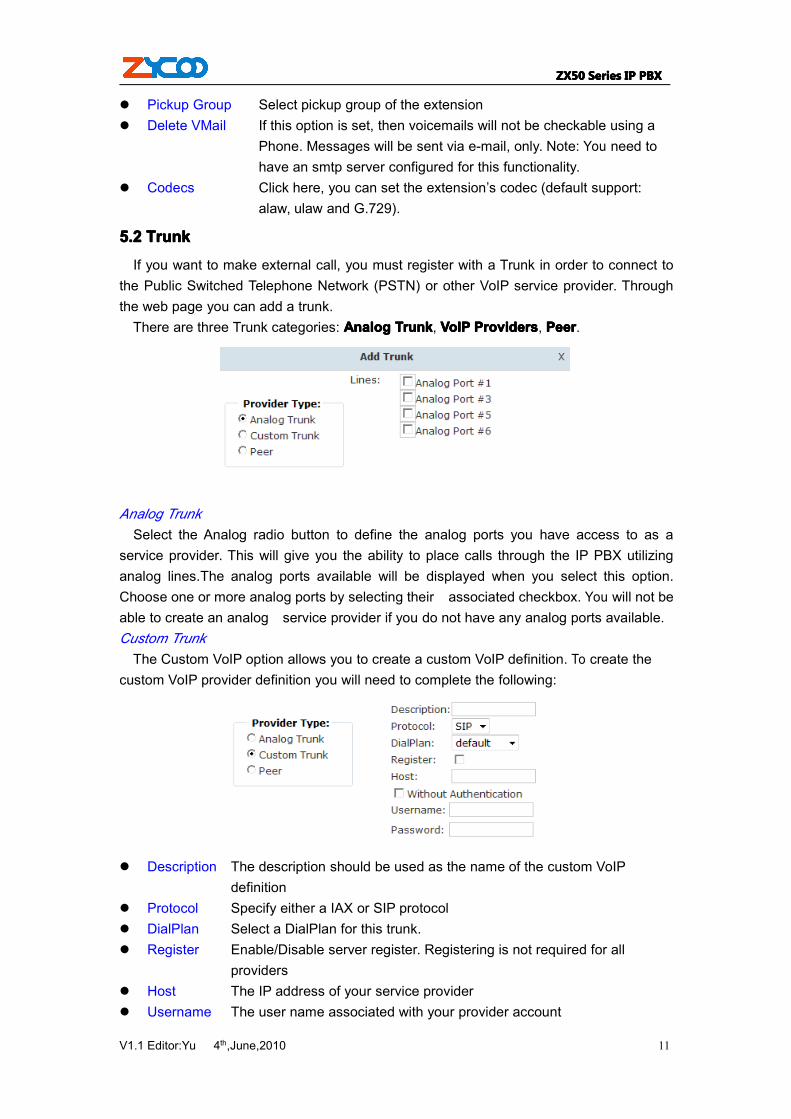
5.25.25.25.2 TrunkTrunkTrunkTrunk
If you want to make external call, you must register with a Trunk in order to connect tothe Public Switched Telephone Network (PSTN) or other VoIP service provider. Throughthe web page you can add a trunk.
There are three Trunk categories: AnalogAnalogAnalogAnalog TrunkTrunkTrunkTrunk, VoIPVoIPVoIPVoIP ProvidersProvidersProvidersProviders, PeerPeerPeerPeer.
Analog TrunkSelect the Analog radio button to define the analog ports you have access to as a
service provider. This will give you the ability to place calls through the IP PBX utilizinganalog lines.The analog ports available will be displayed when you select this option.Choose one or more analog ports by selecting their associated checkbox. You will not beable to create an analog service provider if you do not have any analog ports available.Custom Trunk
The Custom VoIP option allows you to create a custom VoIP definition. To create thecustom VoIP provider definition you will need to complete the following:
� Description The description should be used as the name of the custom VoIPdefinition
� Protocol Specify either a IAX or SIP protocol� DialPlan Select a DialPlan for this trunk.� Register Enable/Disable server register. Registering is not required for all
providers� Host The IP address of your service provider� Username The user name associated with your provider account
ZX50ZX50ZX50ZX50 SeriesSeriesSeriesSeries IPIPIPIP PBXPBXPBXPBX
V1.1 Editor:Yu 4th,June,2010 12
� Password The password associated with your provider account� Without Authentication if you connect to Voip server without Authentication, pls
selected this.Peer
The Peer option allows you to create a custom VoIP Peer.
� Peer Name Defines a peer name for this peer.� Protocol Specify either a IAX or SIP protocol� DialPlan Select a DialPlan for this peer� Host dynamic | hostname | IP Address� NAT Disable/Enable the NAT function� Without Authentication if you connect to the PBX without Authentication, pls
selected� Username Defines the peer username� Password Defines the peer password
Once you have added a VoIP Trunk it will appear on the list of Trunk on the Trunk page.There is an Options drop-down list associated with each Trunk listing. The Optionsdrop-down list allows you to edit or delete the Trunk definition, as well as further refine thedefinition by choosing several advance options. Select either Codecs or Advanced tofurther refine the definition.� Edit Edit you select the trunk.� Codecs Codecs provide the ability for your voice to be converted to a digital
signal and transmitted across the internet.� Advanced The following advanced options are available to further refine your
trunk.
� Trunkname Specify a trunk name if you want to refer to the service providerdefinition as something other than specified in Comment
� Insecure This option specifies how connects to a service provider (host)
ZX50ZX50ZX50ZX50 SeriesSeriesSeriesSeries IPIPIPIP PBXPBXPBXPBX
V1.1 Editor:Yu 4th,June,2010 13
should be handled. Valid options are very/yes/no/invite/port. (Default is“very”)
� Port The register request is sent through the port. (Default isSIP:5060,IAX:4569)
� Caller ID The caller ID will be set to the value specified in this field� Fromdomain Sets default from: domain in SIP messages when acting as a SIP client.� Fromuser Sets default from: user in SIP messages when acting as a SIP client� Contact Specifies a primary extension for call routing
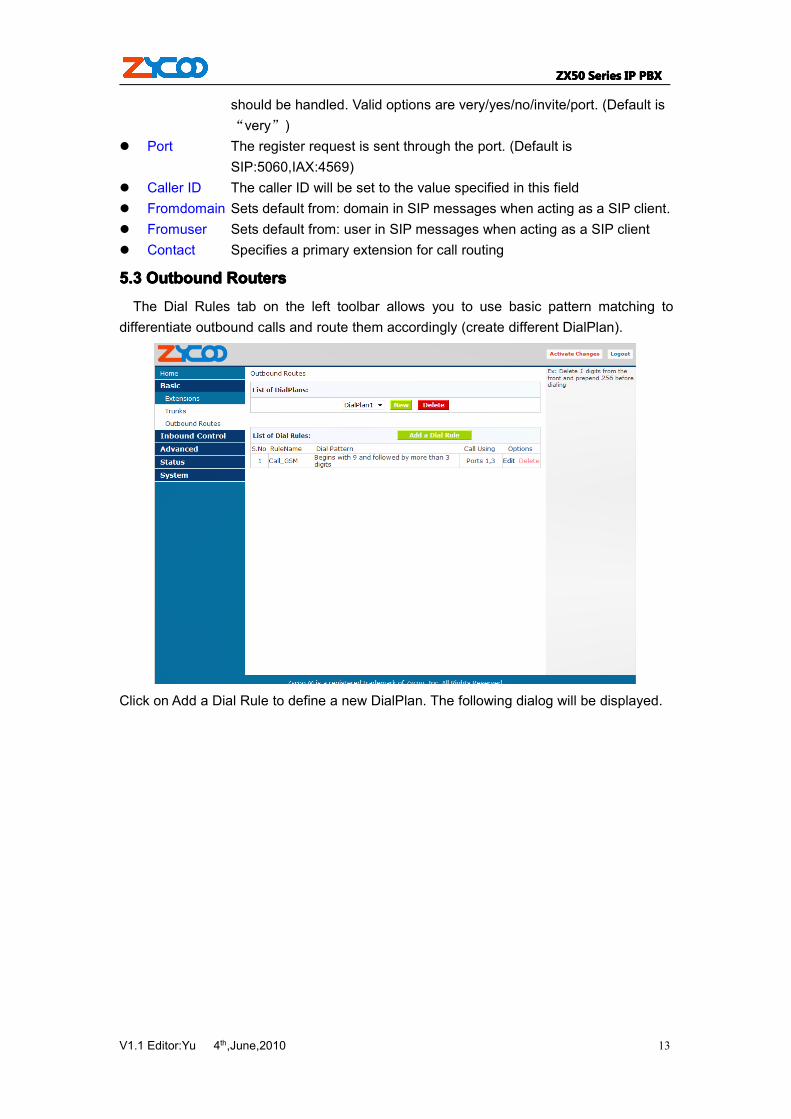
5.35.35.35.3 OutboundOutboundOutboundOutbound RoutersRoutersRoutersRouters
The Dial Rules tab on the left toolbar allows you to use basic pattern matching todifferentiate outbound calls and route them accordingly (create different DialPlan).
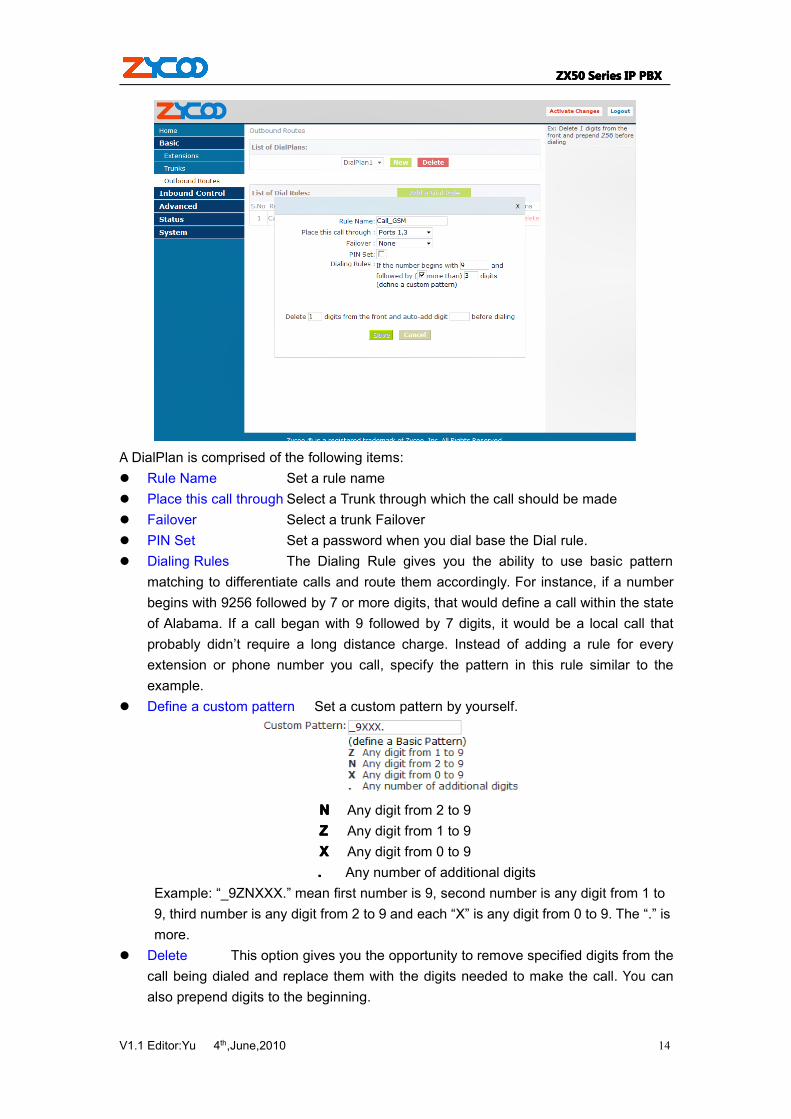
Click on Add a Dial Rule to define a new DialPlan. The following dialog will be displayed.
ZX50ZX50ZX50ZX50 SeriesSeriesSeriesSeries IPIPIPIP PBXPBXPBXPBX
V1.1 Editor:Yu 4th,June,2010 14
A DialPlan is comprised of the following items:� Rule Name Set a rule name� Place this call through Select a Trunk through which the call should be made� Failover Select a trunk Failover� PIN Set Set a password when you dial base the Dial rule.� Dialing Rules The Dialing Rule gives you the ability to use basic pattern
matching to differentiate calls and route them accordingly. For instance, if a numberbegins with 9256 followed by 7 or more digits, that would define a call within the stateof Alabama. If a call began with 9 followed by 7 digits, it would be a local call thatprobably didn’t require a long distance charge. Instead of adding a rule for everyextension or phone number you call, specify the pattern in this rule similar to theexample.
� Define a custom pattern Set a custom pattern by yourself.
NNNN Any digit from 2 to 9ZZZZ Any digit from 1 to 9XXXX Any digit from 0 to 9.... Any number of additional digits
Example: “_9ZNXXX.” mean first number is 9, second number is any digit from 1 to9, third number is any digit from 2 to 9 and each “X” is any digit from 0 to 9. The “.” ismore.
� Delete This option gives you the opportunity to remove specified digits from thecall being dialed and replace them with the digits needed to make the call. You canalso prepend digits to the beginning.
ZX50ZX50ZX50ZX50 SeriesSeriesSeriesSeries IPIPIPIP PBXPBXPBXPBX
V1.1 Editor:Yu 4th,June,2010 15
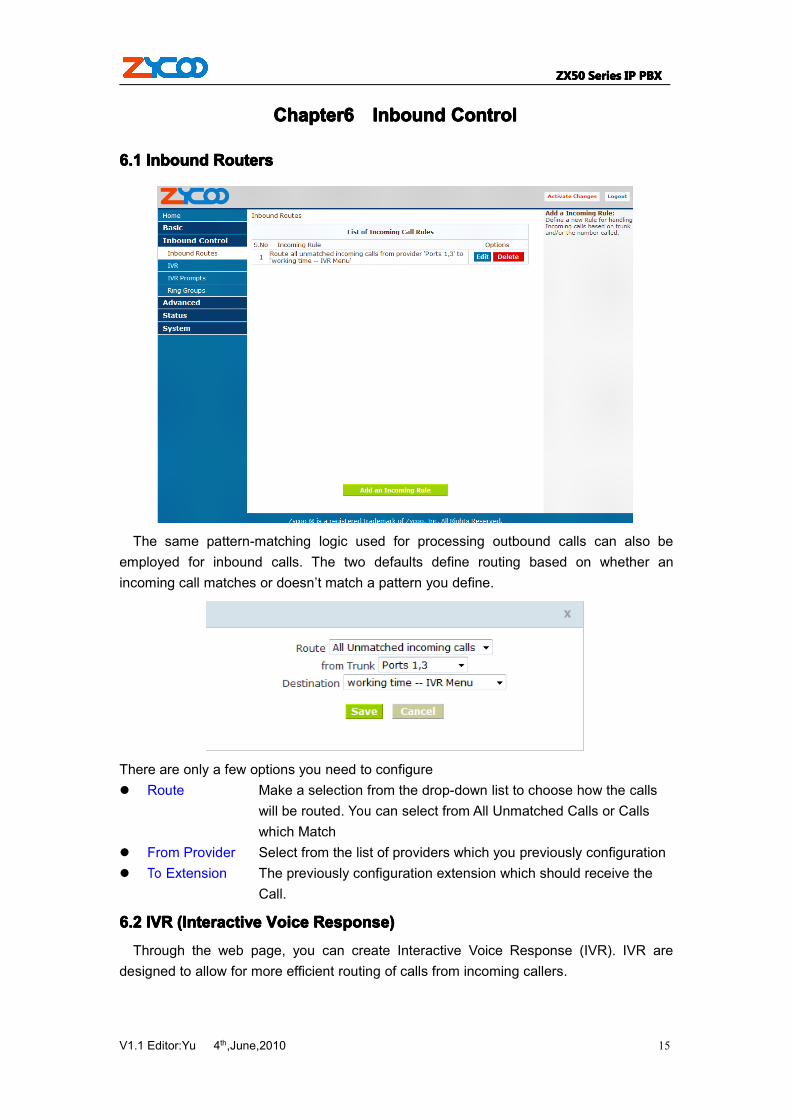
ChapterChapterChapterChapter6666 InboundInboundInboundInbound ControlControlControlControl
6.16.16.16.1 InboundInboundInboundInbound RoutersRoutersRoutersRouters
The same pattern-matching logic used for processing outbound calls can also beemployed for inbound calls. The two defaults define routing based on whether anincoming call matches or doesn’t match a pattern you define.
There are only a few options you need to configure� Route Make a selection from the drop-down list to choose how the calls
will be routed. You can select from All Unmatched Calls or Callswhich Match
� From Provider Select from the list of providers which you previously configuration� To Extension The previously configuration extension which should receive the
Call.
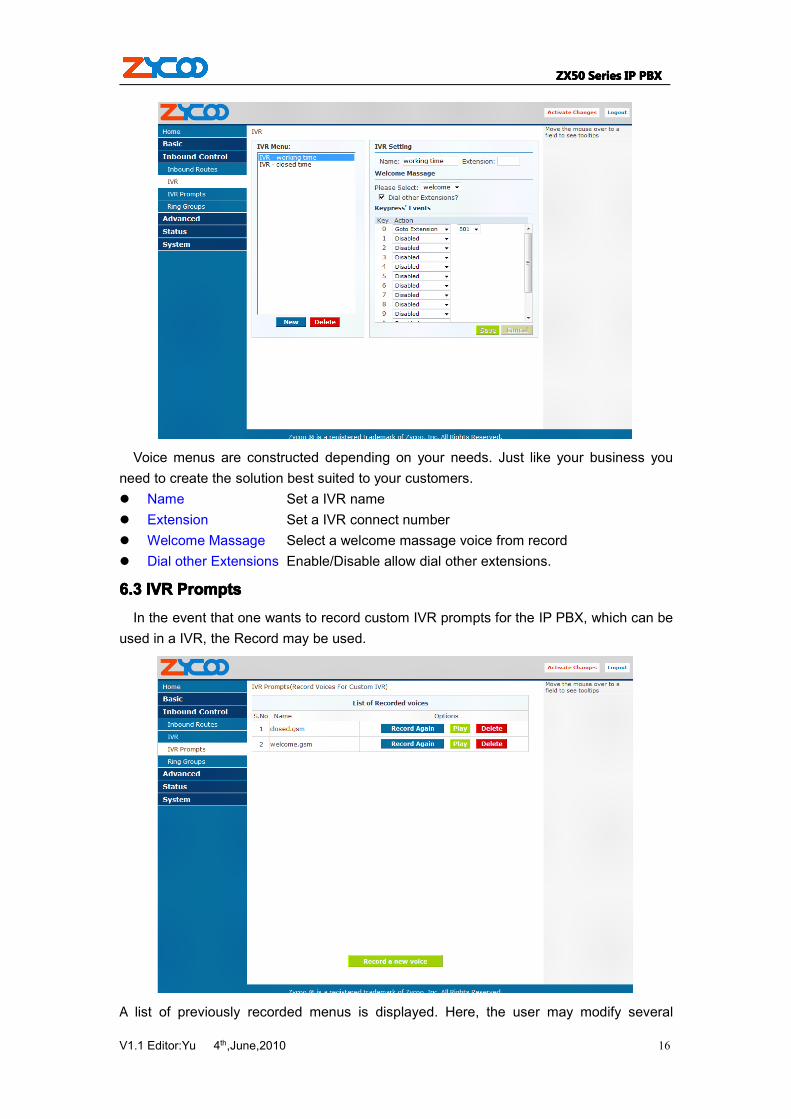
6.26.26.26.2 IVRIVRIVRIVR (Interactive(Interactive(Interactive(Interactive VoiceVoiceVoiceVoice Response)Response)Response)Response)
Through the web page, you can create Interactive Voice Response (IVR). IVR aredesigned to allow for more efficient routing of calls from incoming callers.
ZX50ZX50ZX50ZX50 SeriesSeriesSeriesSeries IPIPIPIP PBXPBXPBXPBX
V1.1 Editor:Yu 4th,June,2010 16
Voice menus are constructed depending on your needs. Just like your business youneed to create the solution best suited to your customers.� Name Set a IVR name� Extension Set a IVR connect number� Welcome Massage Select a welcome massage voice from record� Dial other Extensions Enable/Disable allow dial other extensions.
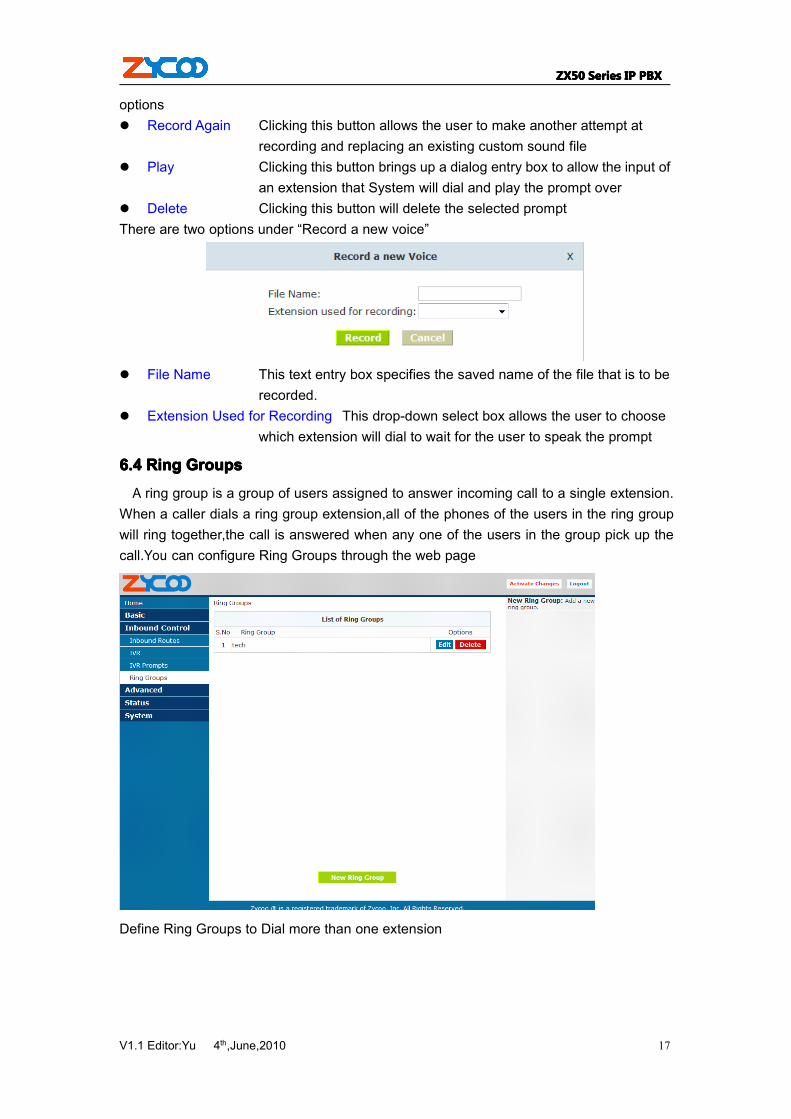
6.36.36.36.3 IVRIVRIVRIVR PromptsPromptsPromptsPrompts
In the event that one wants to record custom IVR prompts for the IP PBX, which can beused in a IVR, the Record may be used.
A list of previously recorded menus is displayed. Here, the user may modify several
ZX50ZX50ZX50ZX50 SeriesSeriesSeriesSeries IPIPIPIP PBXPBXPBXPBX
V1.1 Editor:Yu 4th,June,2010 17
options� Record Again Clicking this button allows the user to make another attempt at
recording and replacing an existing custom sound file� Play Clicking this button brings up a dialog entry box to allow the input of
an extension that System will dial and play the prompt over� Delete Clicking this button will delete the selected promptThere are two options under “Record a new voice”
� File Name This text entry box specifies the saved name of the file that is to berecorded.
� Extension Used for Recording This drop-down select box allows the user to choosewhich extension will dial to wait for the user to speak the prompt
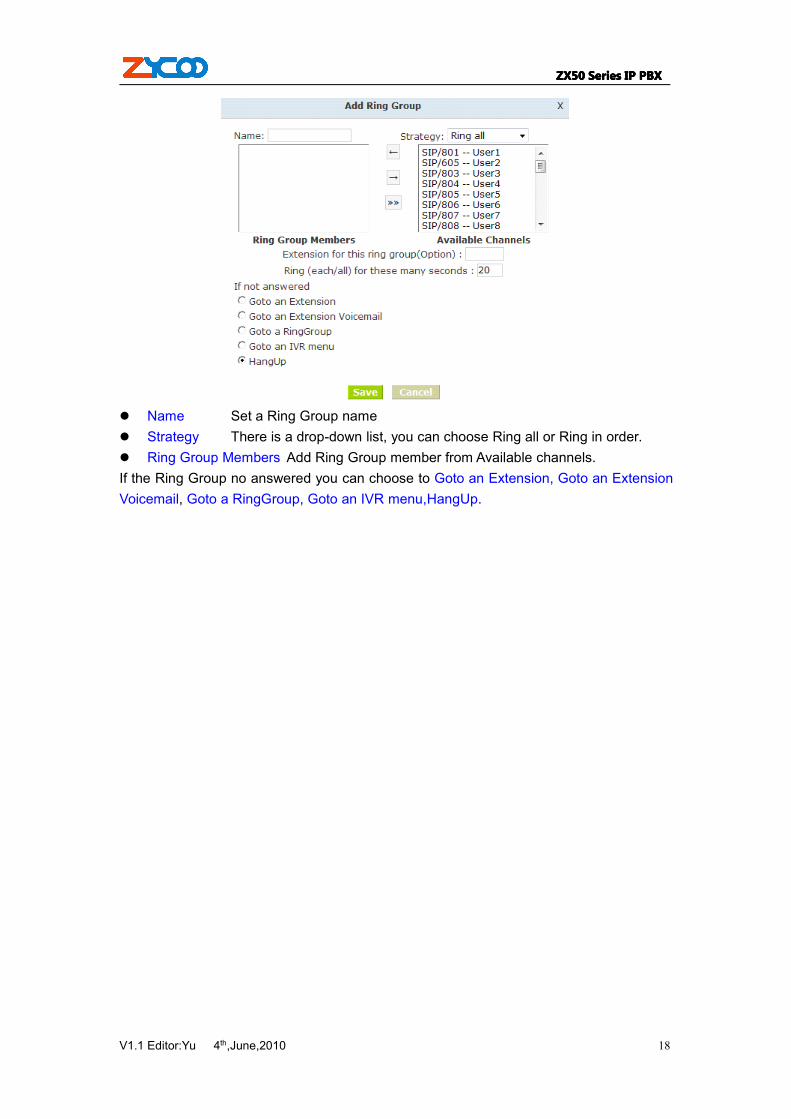
6.46.46.46.4 RingRingRingRing GroupsGroupsGroupsGroups
A ring group is a group of users assigned to answer incoming call to a single extension.When a caller dials a ring group extension,all of the phones of the users in the ring groupwill ring together,the call is answered when any one of the users in the group pick up thecall.You can configure Ring Groups through the web page
Define Ring Groups to Dial more than one extension
ZX50ZX50ZX50ZX50 SeriesSeriesSeriesSeries IPIPIPIP PBXPBXPBXPBX
V1.1 Editor:Yu 4th,June,2010 18
� Name Set a Ring Group name� Strategy There is a drop-down list, you can choose Ring all or Ring in order.� Ring Group Members Add Ring Group member from Available channels.If the Ring Group no answered you can choose to Goto an Extension, Goto an ExtensionVoicemail, Goto a RingGroup, Goto an IVR menu,HangUp.
ZX50ZX50ZX50ZX50 SeriesSeriesSeriesSeries IPIPIPIP PBXPBXPBXPBX
V1.1 Editor:Yu 4th,June,2010 19
ChapterChapterChapterChapter7777 AdvancedAdvancedAdvancedAdvanced ConfigurationConfigurationConfigurationConfiguration
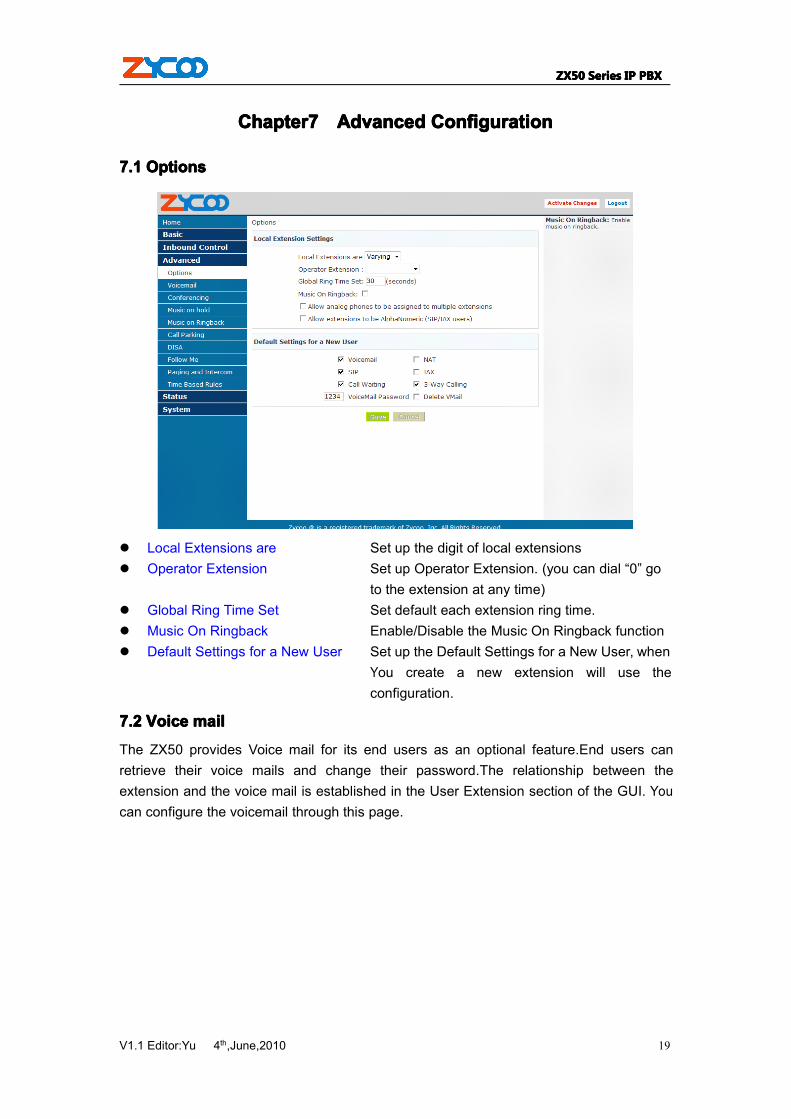
7.17.17.17.1 OptionsOptionsOptionsOptions
� Local Extensions are Set up the digit of local extensions� Operator Extension Set up Operator Extension. (you can dial “0” go
to the extension at any time)� Global Ring Time Set Set default each extension ring time.� Music On Ringback Enable/Disable the Music On Ringback function� Default Settings for a New User Set up the Default Settings for a New User, when
You create a new extension will use theconfiguration.
7.27.27.27.2 VoiceVoiceVoiceVoice mailmailmailmail
The ZX50 provides Voice mail for its end users as an optional feature.End users canretrieve their voice mails and change their password.The relationship between theextension and the voice mail is established in the User Extension section of the GUI. Youcan configure the voicemail through this page.
ZX50ZX50ZX50ZX50 SeriesSeriesSeriesSeries IPIPIPIP PBXPBXPBXPBX
V1.1 Editor:Yu 4th,June,2010 20
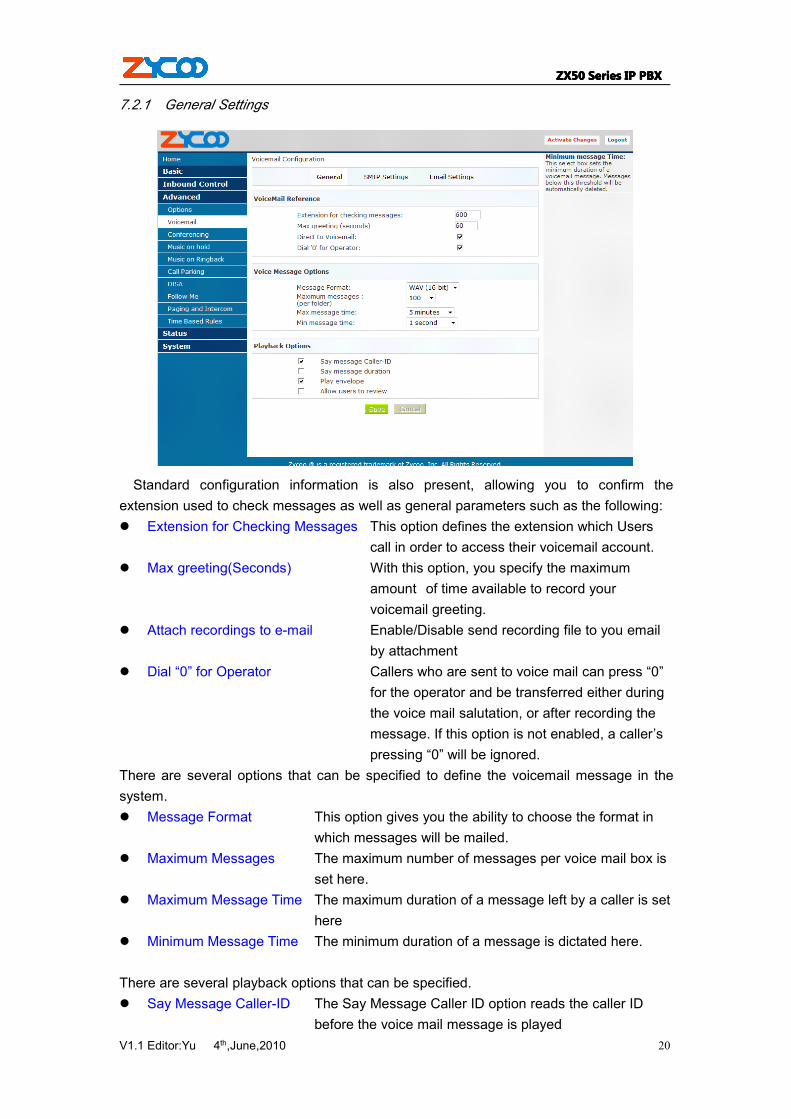
7.2.1 General Settings
Standard configuration information is also present, allowing you to confirm theextension used to check messages as well as general parameters such as the following:� Extension for Checking Messages This option defines the extension which Users
call in order to access their voicemail account.� Max greeting(Seconds) With this option, you specify the maximum
amount of time available to record yourvoicemail greeting.
� Attach recordings to e-mail Enable/Disable send recording file to you emailby attachment
� Dial “0” for Operator Callers who are sent to voice mail can press “0”for the operator and be transferred either duringthe voice mail salutation, or after recording themessage. If this option is not enabled, a caller’spressing “0” will be ignored.
There are several options that can be specified to define the voicemail message in thesystem.� Message Format This option gives you the ability to choose the format in
which messages will be mailed.� Maximum Messages The maximum number of messages per voice mail box is
set here.� Maximum Message Time The maximum duration of a message left by a caller is set
here� Minimum Message Time The minimum duration of a message is dictated here.
There are several playback options that can be specified.� Say Message Caller-ID The Say Message Caller ID option reads the caller ID
before the voice mail message is played
ZX50ZX50ZX50ZX50 SeriesSeriesSeriesSeries IPIPIPIP PBXPBXPBXPBX
V1.1 Editor:Yu 4th,June,2010 21
� Say Message Duration This option identifies exactly how long the messagelasted.
� Play Envelop The envelope provides the date, time, and caller IDrelated to a voice mail.
� Allow Users to Review This option provides incoming callers the option to reviewtheir message before it is saved and can be played backby the owner of the voice mail extension. Standardoptions are presented to you, allowing you to discard themessage or re-record it if you aren’t happy with it.
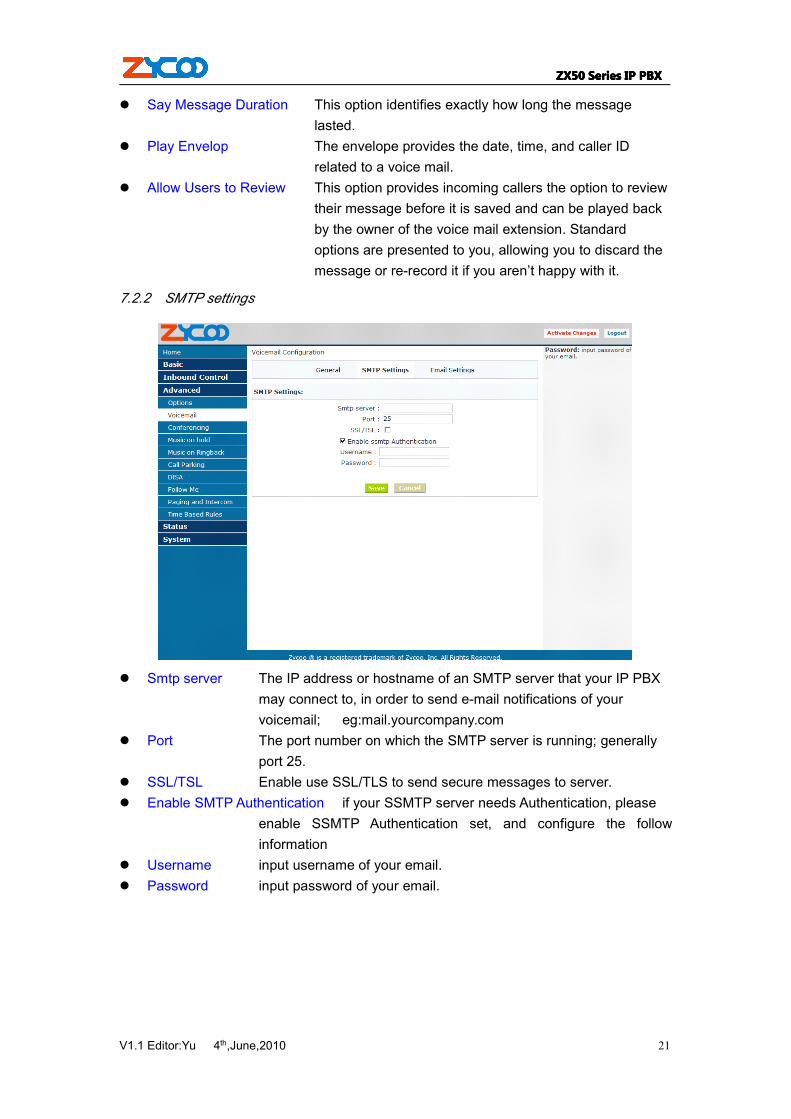
7.2.2 SMTP settings
� Smtp server The IP address or hostname of an SMTP server that your IP PBXmay connect to, in order to send e-mail notifications of yourvoicemail; eg:mail.yourcompany.com
� Port The port number on which the SMTP server is running; generallyport 25.
� SSL/TSL Enable use SSL/TLS to send secure messages to server.� Enable SMTP Authentication if your SSMTP server needs Authentication, please
enable SSMTP Authentication set, and configure the followinformation
� Username input username of your email.� Password input password of your email.
ZX50ZX50ZX50ZX50 SeriesSeriesSeriesSeries IPIPIPIP PBXPBXPBXPBX
V1.1 Editor:Yu 4th,June,2010 22
7.2.3 Email settings
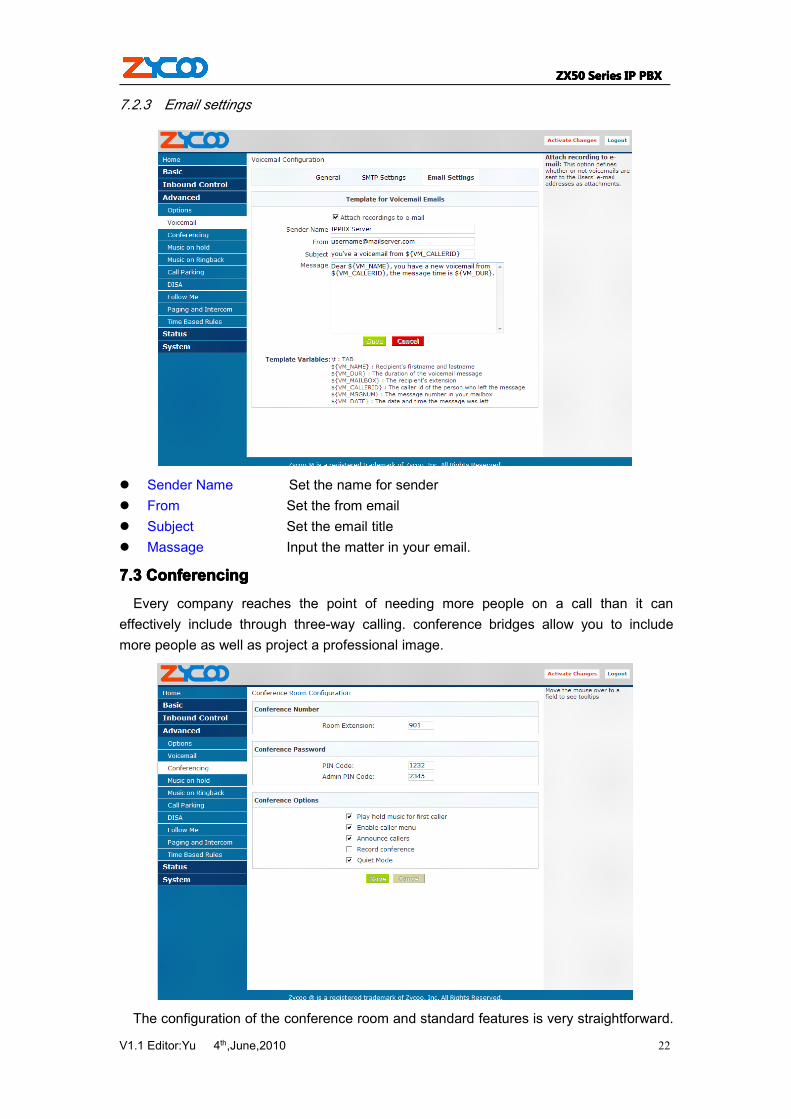
� Sender Name Set the name for sender� From Set the from email� Subject Set the email title� Massage Input the matter in your email.
7.37.37.37.3 ConferencingConferencingConferencingConferencing
Every company reaches the point of needing more people on a call than it caneffectively include through three-way calling. conference bridges allow you to includemore people as well as project a professional image.
The configuration of the conference room and standard features is very straightforward.
ZX50ZX50ZX50ZX50 SeriesSeriesSeriesSeries IPIPIPIP PBXPBXPBXPBX
V1.1 Editor:Yu 4th,June,2010 23
The conference room use default extension 900 , but you can always change it to anyextension number you want. After establishing the extension for the room, you need tospecify the password settings for the conference. Assign the PIN Code used byparticipants to enter the conference as well as the Administrator PIN Code used by themoderator of the conference to open the conference room.
7.47.47.47.4 MusicMusicMusicMusic OnOnOnOn HoldHoldHoldHold
� List of Music On Hold Display Music On Hold class list� Class Set Music On Hold class name� Music Select music. (you can replace music file through the
update page.)� Enter The Music File Name Set you want upgrade music file name� TFTP Server IP address Set the TFTP server IP� Select Music directory Select directory that you want saved music file.
ZX50ZX50ZX50ZX50 SeriesSeriesSeriesSeries IPIPIPIP PBXPBXPBXPBX
V1.1 Editor:Yu 4th,June,2010 24
7.57.57.57.5 MusicMusicMusicMusic OnOnOnOn RingbackRingbackRingbackRingback
� Music Select a music for Music On RingbackNotice: You must enable Music On Ringback function.(In Options Page)
7.67.67.67.6 CallCallCallCall ParkingParkingParkingParking
� Extension to Dial for Parking Calls: Set Call Parking number� What extensions to park call on: Set the Call Parking get number (eg:701-720)� Number of seconds a call can be parked for: Set the second call time� Pickup Extension: Set Pickup Extension� Pickup Specified Extension Set Pickup Specified Extension� Blind Transfer allows unattended or blind transfers. It works like this:
ZX50ZX50ZX50ZX50 SeriesSeriesSeriesSeries IPIPIPIP PBXPBXPBXPBX
V1.1 Editor:Yu 4th,June,2010 25
While on a conversation with another party, you dial the blindxfer sequence. thesystem says "Transfer" then gives you a dial tone, while putting the other party onhold. You dial the transferee number and the caller is put through to that numberimmediately. Your line drops. The caller ID displayed to the person receiving thetransferred call is exactly the same as the caller ID presented to you.
� Attended Transfer allows attended transfer or supervised transfer. It workslike this: While on conversation with another party, you dial the atxfer key sequence.the system says "Transfer" then gives you a dial tone, while putting the other party onhold. You dial the transferee number and talk with the transferee to introduce the call,then you can hang up and the other party will be connected with the transferee. Incase the transferee does not want to answer the call, he/she simply hangs up andyou will be back to your original conversation. Press the disonnect key sequence, setto * by default, to return yourself to the original caller.
� Disconnect Call Disconnect the current transfer call(for Attended transfer).� Timeout for answer on attended transfer: Set the answer timeout value.
7.77.77.77.7 DISADISADISADISA SettingsSettingsSettingsSettings
� List of DISA DISA name are listed in the table.� New DISA Create a new DISA.
ZX50ZX50ZX50ZX50 SeriesSeriesSeriesSeries IPIPIPIP PBXPBXPBXPBX
V1.1 Editor:Yu 4th,June,2010 26
� DISA Name Set a name for DISA� PIN Set a password for DISA� Response Timeout(s) Set effective time for inputing a password� Digit Timeout(s) After you input the right password, the interval
between digits that you need dial.Extension for this DISA(Option) Set a number connect DISASelect DialPlan Select your DialPlan for calling out
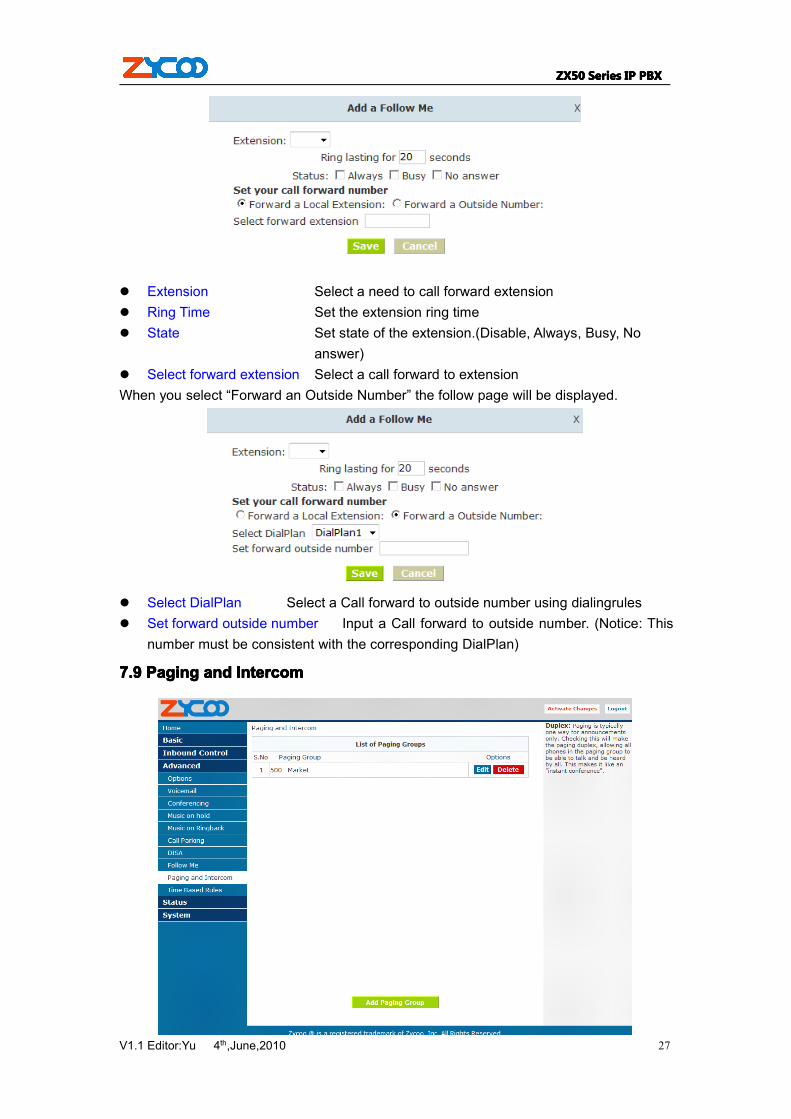
7.87.87.87.8 FollowFollowFollowFollow MeMeMeMe
� List of Follow Me Call Forward extensions are listed in the table.� New Follow Me Create a new Call Forward
ZX50ZX50ZX50ZX50 SeriesSeriesSeriesSeries IPIPIPIP PBXPBXPBXPBX
V1.1 Editor:Yu 4th,June,2010 27
� Extension Select a need to call forward extension� Ring Time Set the extension ring time� State Set state of the extension.(Disable, Always, Busy, No
answer)� Select forward extension Select a call forward to extensionWhen you select “Forward an Outside Number” the follow page will be displayed.
� Select DialPlan Select a Call forward to outside number using dialingrules� Set forward outside number Input a Call forward to outside number. (Notice: This
number must be consistent with the corresponding DialPlan)
7.97.97.97.9 PagingPagingPagingPaging andandandand IntercomIntercomIntercomIntercom
ZX50ZX50ZX50ZX50 SeriesSeriesSeriesSeries IPIPIPIP PBXPBXPBXPBX
V1.1 Editor:Yu 4th,June,2010 28
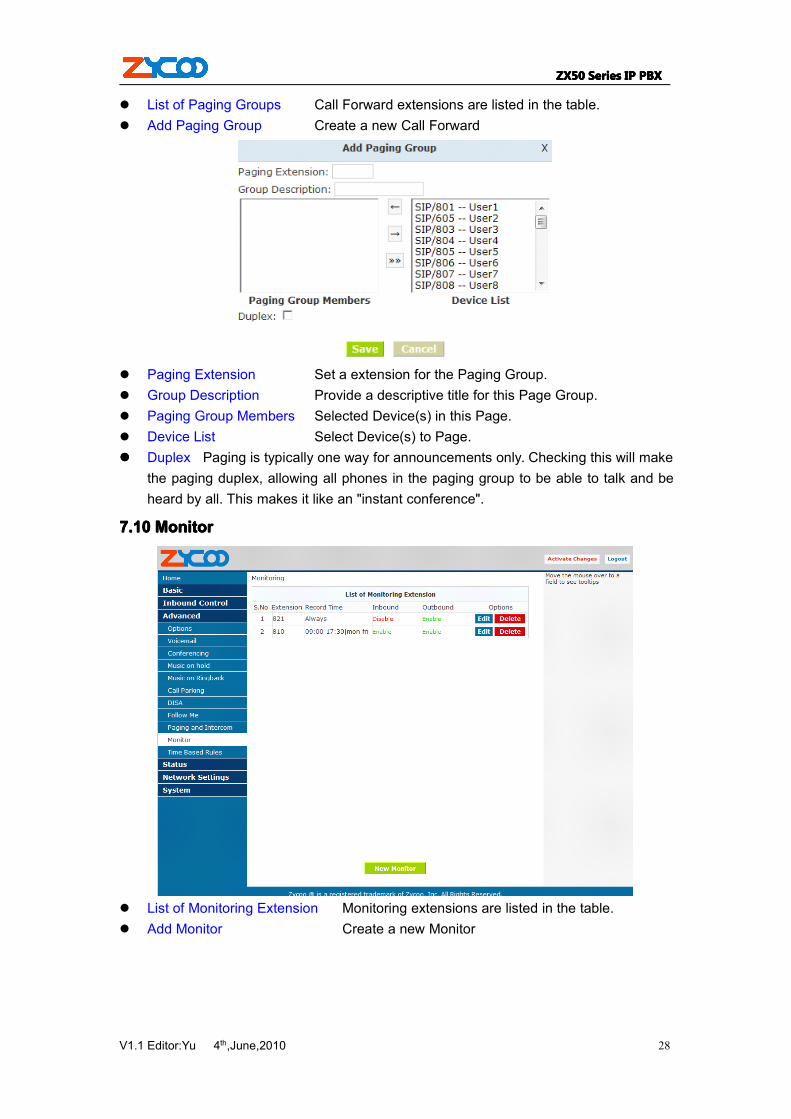
� List of Paging Groups Call Forward extensions are listed in the table.� Add Paging Group Create a new Call Forward
� Paging Extension Set a extension for the Paging Group.� Group Description Provide a descriptive title for this Page Group.� Paging Group Members Selected Device(s) in this Page.� Device List Select Device(s) to Page.���� Duplex Paging is typically one way for announcements only. Checking this will make
the paging duplex, allowing all phones in the paging group to be able to talk and beheard by all. This makes it like an "instant conference".
7.107.107.107.10 MonitorMonitorMonitorMonitor
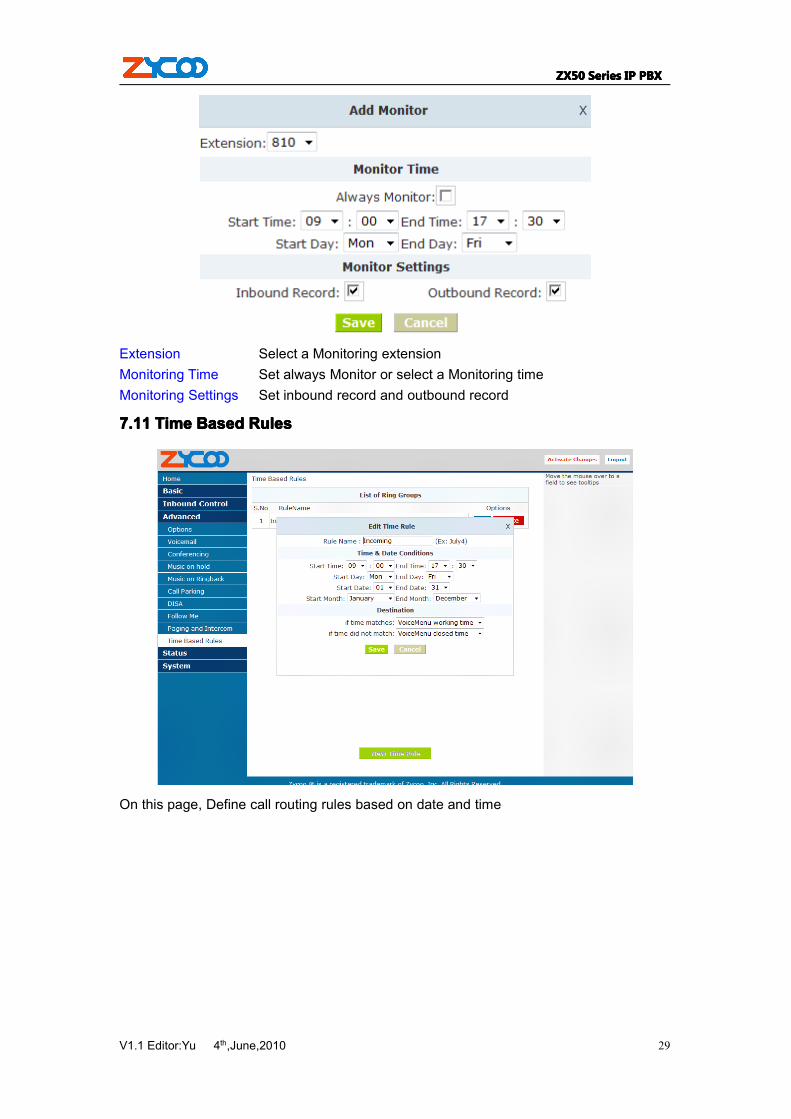
� List of Monitoring Extension Monitoring extensions are listed in the table.� Add Monitor Create a new Monitor
ZX50ZX50ZX50ZX50 SeriesSeriesSeriesSeries IPIPIPIP PBXPBXPBXPBX
V1.1 Editor:Yu 4th,June,2010 29
Extension Select a Monitoring extensionMonitoring Time Set always Monitor or select a Monitoring timeMonitoring Settings Set inbound record and outbound record
7.117.117.117.11 TimeTimeTimeTime BasedBasedBasedBased RulesRulesRulesRules
On this page, Define call routing rules based on date and time
ZX50ZX50ZX50ZX50 SeriesSeriesSeriesSeries IPIPIPIP PBXPBXPBXPBX
V1.1 Editor:Yu 4th,June,2010 30
ChapterChapterChapterChapter8888 StatusStatusStatusStatus DisplayDisplayDisplayDisplay
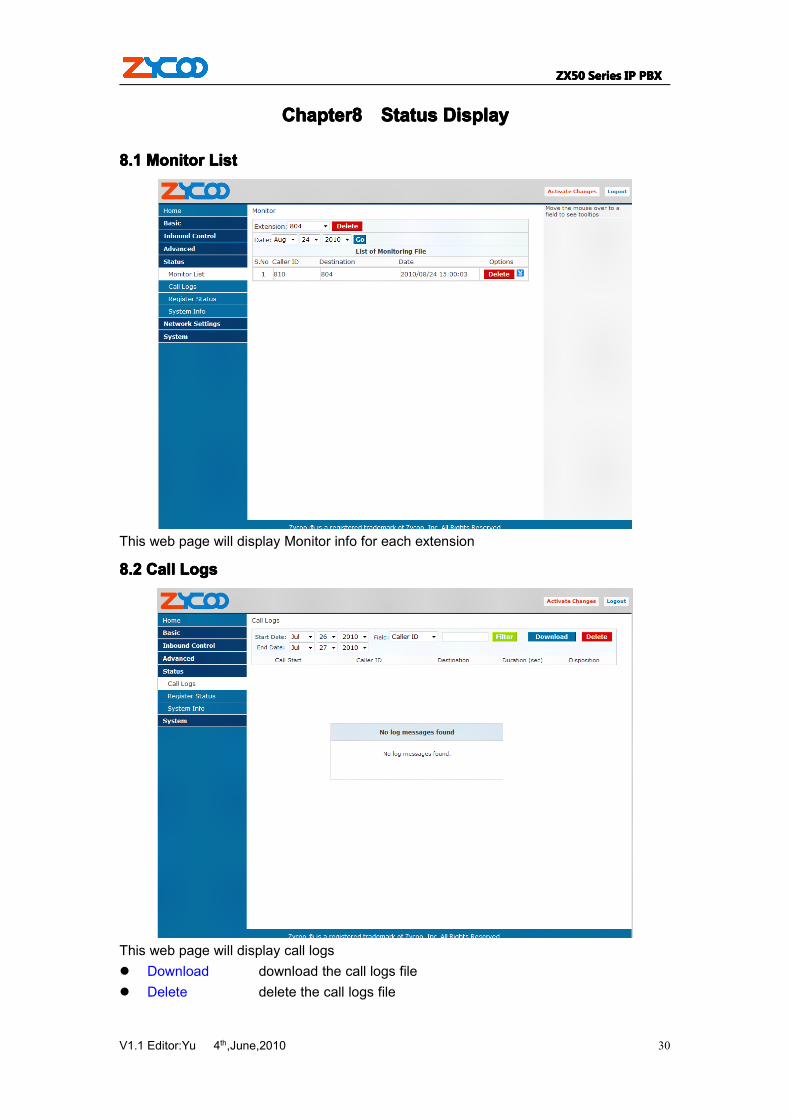
8.18.18.18.1 MonitorMonitorMonitorMonitor ListListListList
This web page will display Monitor info for each extension
8.28.28.28.2 CallCallCallCall LogsLogsLogsLogs
This web page will display call logs� Download download the call logs file� Delete delete the call logs file
ZX50ZX50ZX50ZX50 SeriesSeriesSeriesSeries IPIPIPIP PBXPBXPBXPBX
V1.1 Editor:Yu 4th,June,2010 31
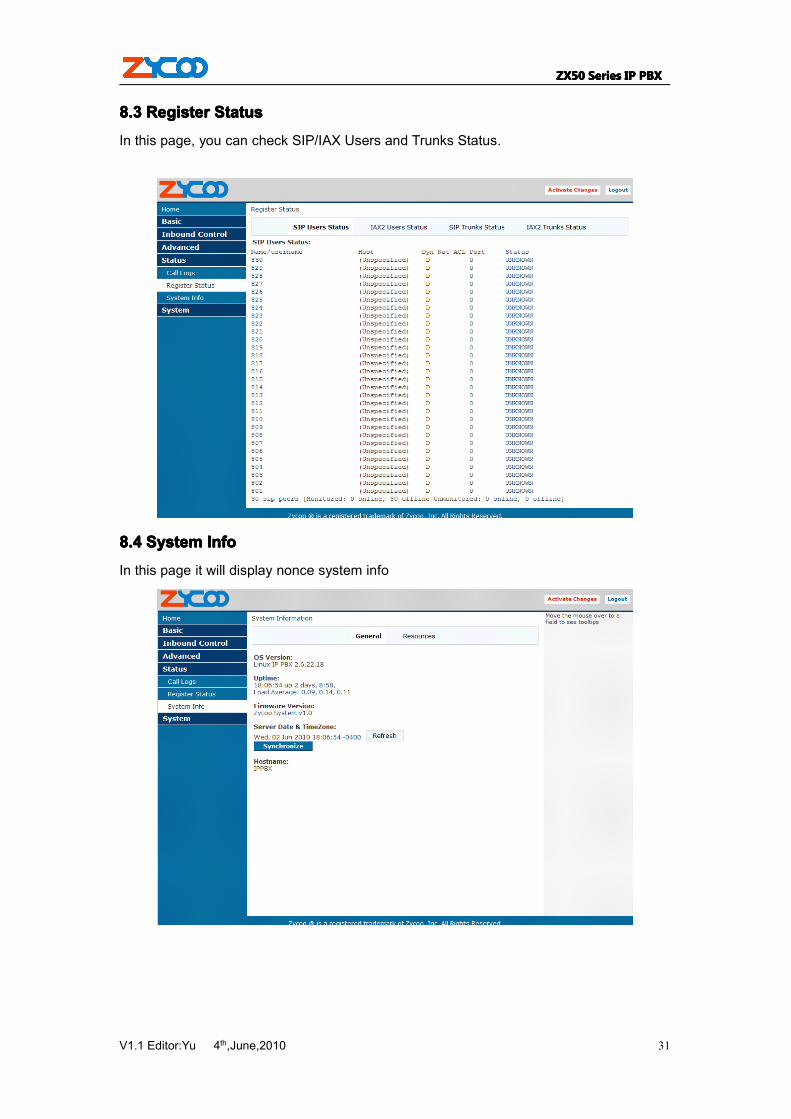
8.38.38.38.3 RegisterRegisterRegisterRegister StatusStatusStatusStatus
In this page, you can check SIP/IAX Users and Trunks Status.
8.48.48.48.4 SystemSystemSystemSystem InfoInfoInfoInfo
In this page it will display nonce system info
ZX50ZX50ZX50ZX50 SeriesSeriesSeriesSeries IPIPIPIP PBXPBXPBXPBX
V1.1 Editor:Yu 4th,June,2010 32
ChapterChapterChapterChapter9999 SystemSystemSystemSystem ManagementManagementManagementManagement
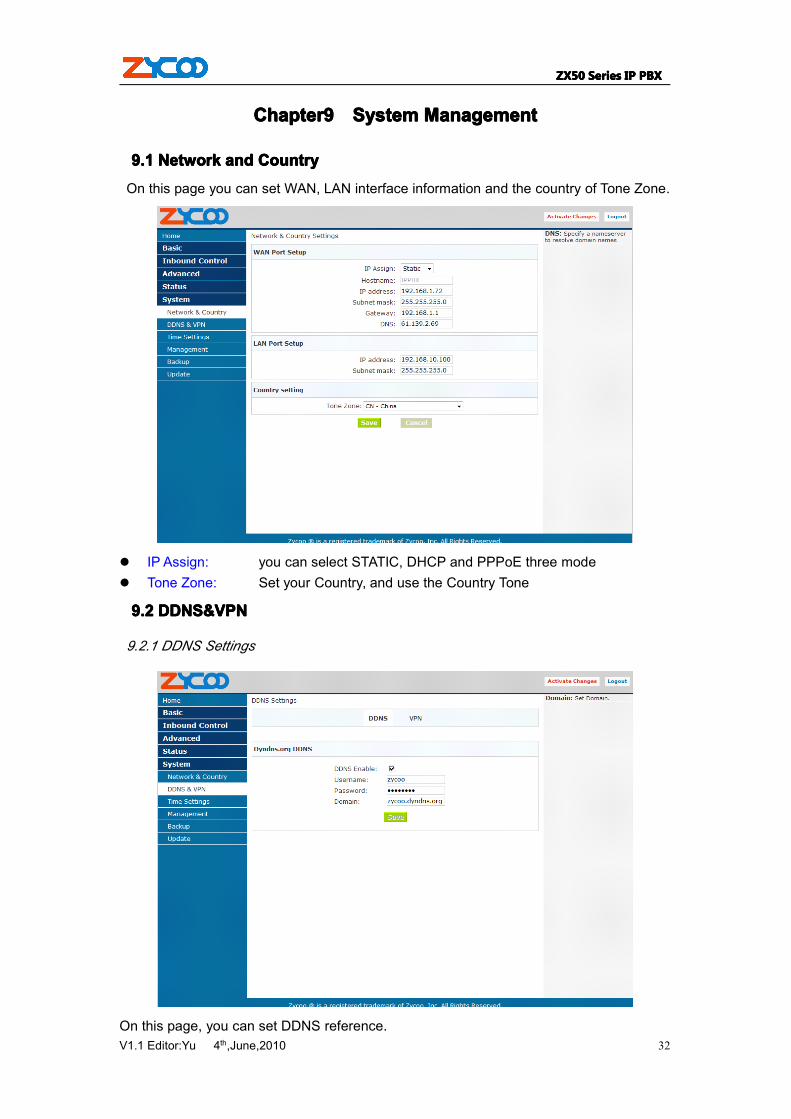
9.19.19.19.1 NetworkNetworkNetworkNetwork andandandand CountryCountryCountryCountry
On this page you can set WAN, LAN interface information and the country of Tone Zone.
� IP Assign: you can select STATIC, DHCP and PPPoE three mode� Tone Zone: Set your Country, and use the Country Tone
9.29.29.29.2 DDNS&VPNDDNS&VPNDDNS&VPNDDNS&VPN
9.2.1 DDNS Settings
On this page, you can set DDNS reference.

ZX50ZX50ZX50ZX50 SeriesSeriesSeriesSeries IPIPIPIP PBXPBXPBXPBX
V1.1 Editor:Yu 4th,June,2010 33
Notice: Now, it only supports Dyndns.org server. More other servers, you can customizebased on your requirement
9.2.2 VPN Settings
On this page, you can set VPN reference.Notice: Now, it only supports N2N VPN. More other VPN, you can customize based onyour requirement.
9.3Time9.3Time9.3Time9.3Time SettingsSettingsSettingsSettings
ZX50ZX50ZX50ZX50 SeriesSeriesSeriesSeries IPIPIPIP PBXPBXPBXPBX
V1.1 Editor:Yu 4th,June,2010 34
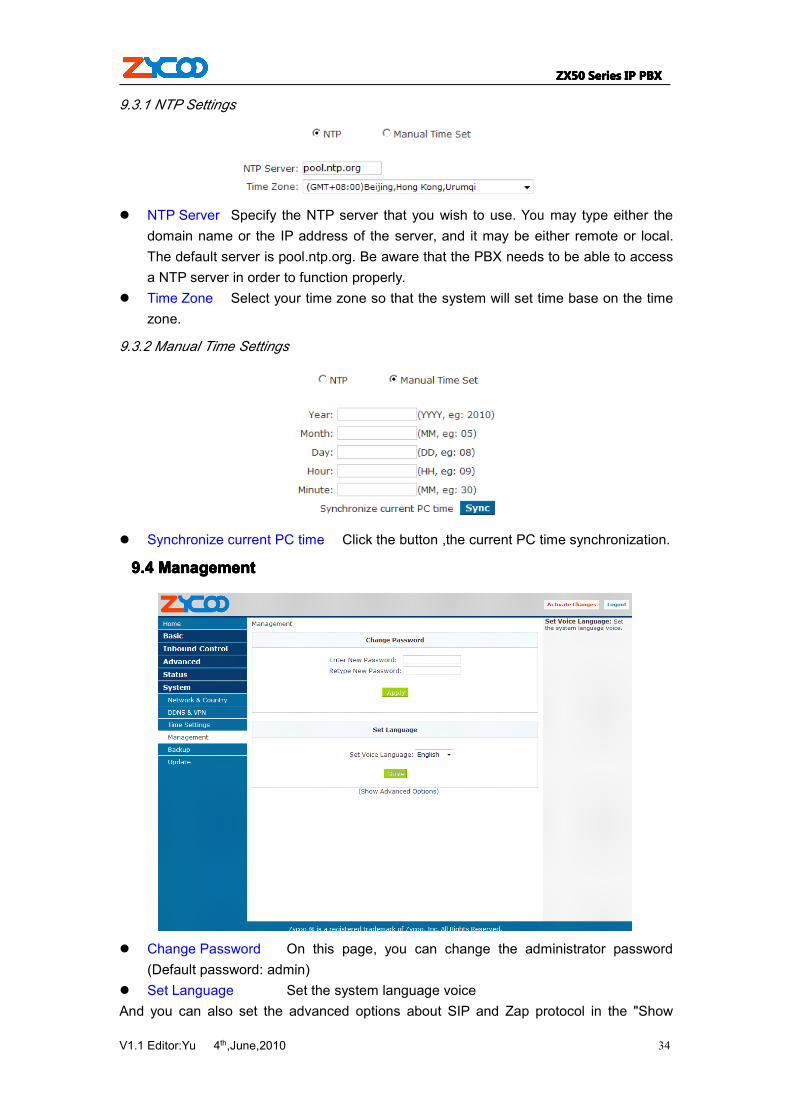
9.3.1 NTP Settings
� NTP Server Specify the NTP server that you wish to use. You may type either thedomain name or the IP address of the server, and it may be either remote or local.The default server is pool.ntp.org. Be aware that the PBX needs to be able to accessa NTP server in order to function properly.
� Time Zone Select your time zone so that the system will set time base on the timezone.
9.3.2 Manual Time Settings
� Synchronize current PC time Click the button ,the current PC time synchronization.
9.49.49.49.4 ManagementManagementManagementManagement
� Change Password On this page, you can change the administrator password(Default password: admin)
� Set Language Set the system language voiceAnd you can also set the advanced options about SIP and Zap protocol in the "Show

ZX50ZX50ZX50ZX50 SeriesSeriesSeriesSeries IPIPIPIP PBXPBXPBXPBX
V1.1 Editor:Yu 4th,June,2010 35
Advanced Options" list, that is useful when you set connect two ippbx in different network.
9.59.59.59.5 BackupBackupBackupBackup
On this page, clicking the “Take a Backup” button, you can backup once configuration
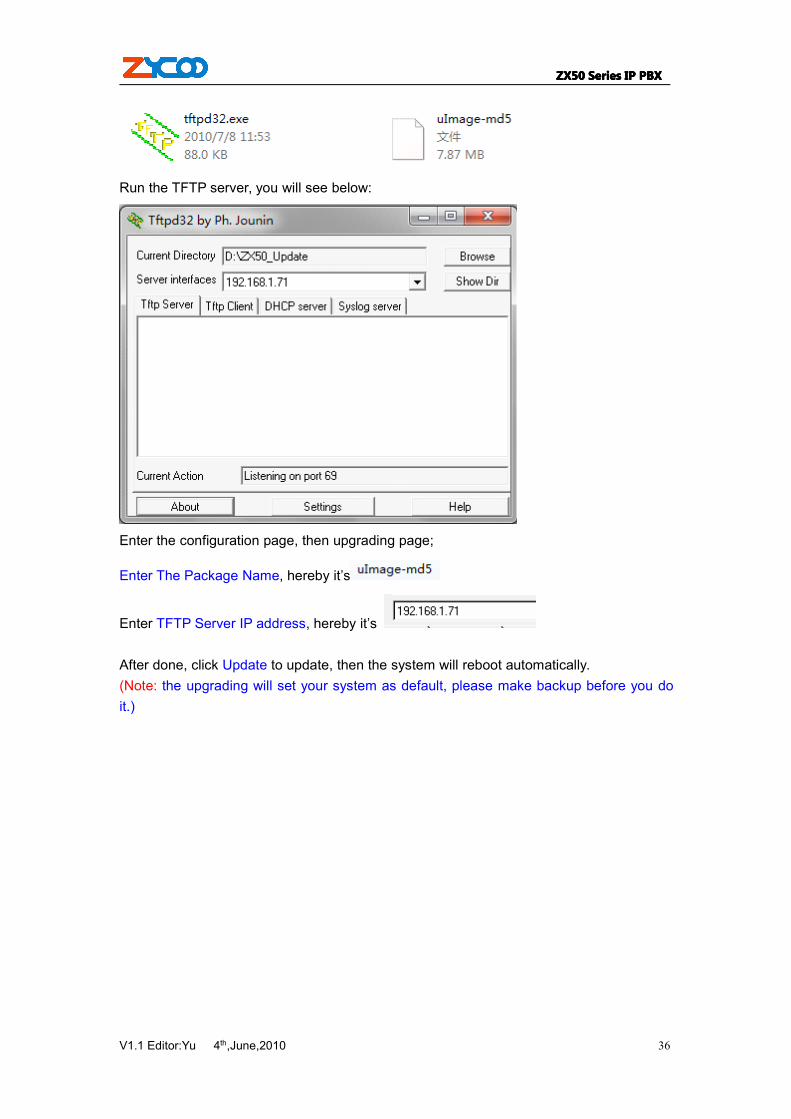
9.69.69.69.6 UpgradeUpgradeUpgradeUpgrade
In this page you can upgrade system package� Enter The Package Name Set system package name� TFTP Server IP address Set TFTP server IPUnzip the file you download, you will get a TFTP server and an upgrading packet.
ZX50ZX50ZX50ZX50 SeriesSeriesSeriesSeries IPIPIPIP PBXPBXPBXPBX
V1.1 Editor:Yu 4th,June,2010 36
Run the TFTP server, you will see below:
Enter the configuration page, then upgrading page;
Enter The Package Name, hereby it’s
Enter TFTP Server IP address, hereby it’s
After done, click Update to update, then the system will reboot automatically.(Note: the upgrading will set your system as default, please make backup before you doit.)
ZX50ZX50ZX50ZX50 SeriesSeriesSeriesSeries IPIPIPIP PBXPBXPBXPBX
V1.1 Editor:Yu 4th,June,2010 37
ChapterChapterChapterChapter10101010 OperatingOperatingOperatingOperating InstructionInstructionInstructionInstruction
10.110.110.110.1 HowHowHowHow totototo linklinklinklink thethethethe ZX50ZX50ZX50ZX50 IPIPIPIP PBXPBXPBXPBX totototo thethethethe interworkinterworkinterworkinterwork
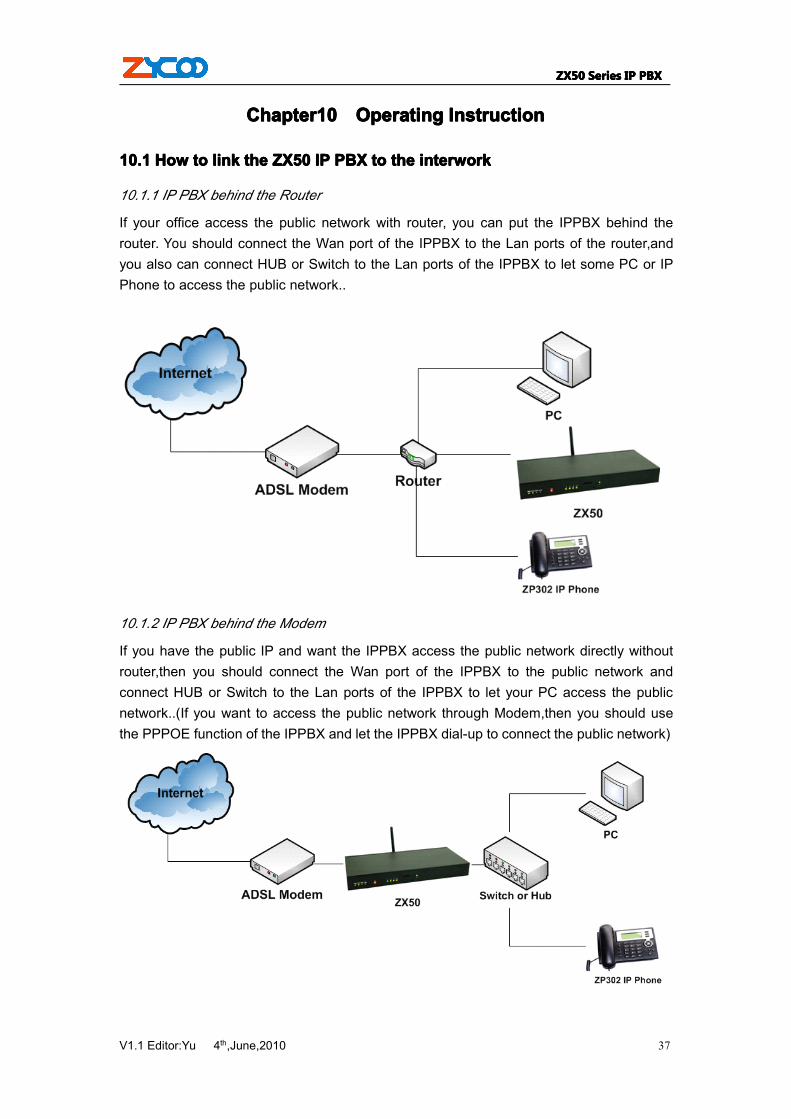
10.1.1 IP PBX behind the Router
If your office access the public network with router, you can put the IPPBX behind therouter. You should connect the Wan port of the IPPBX to the Lan ports of the router,andyou also can connect HUB or Switch to the Lan ports of the IPPBX to let some PC or IPPhone to access the public network..
10.1.2 IP PBX behind the Modem
If you have the public IP and want the IPPBX access the public network directly withoutrouter,then you should connect the Wan port of the IPPBX to the public network andconnect HUB or Switch to the Lan ports of the IPPBX to let your PC access the publicnetwork..(If you want to access the public network through Modem,then you should usethe PPPOE function of the IPPBX and let the IPPBX dial-up to connect the public network)
ZX50ZX50ZX50ZX50 SeriesSeriesSeriesSeries IPIPIPIP PBXPBXPBXPBX
V1.1 Editor:Yu 4th,June,2010 38
10.210.210.210.2 HowHowHowHow totototo loglogloglog inininin thethethethe IPIPIPIP PBXPBXPBXPBX systemsystemsystemsystem
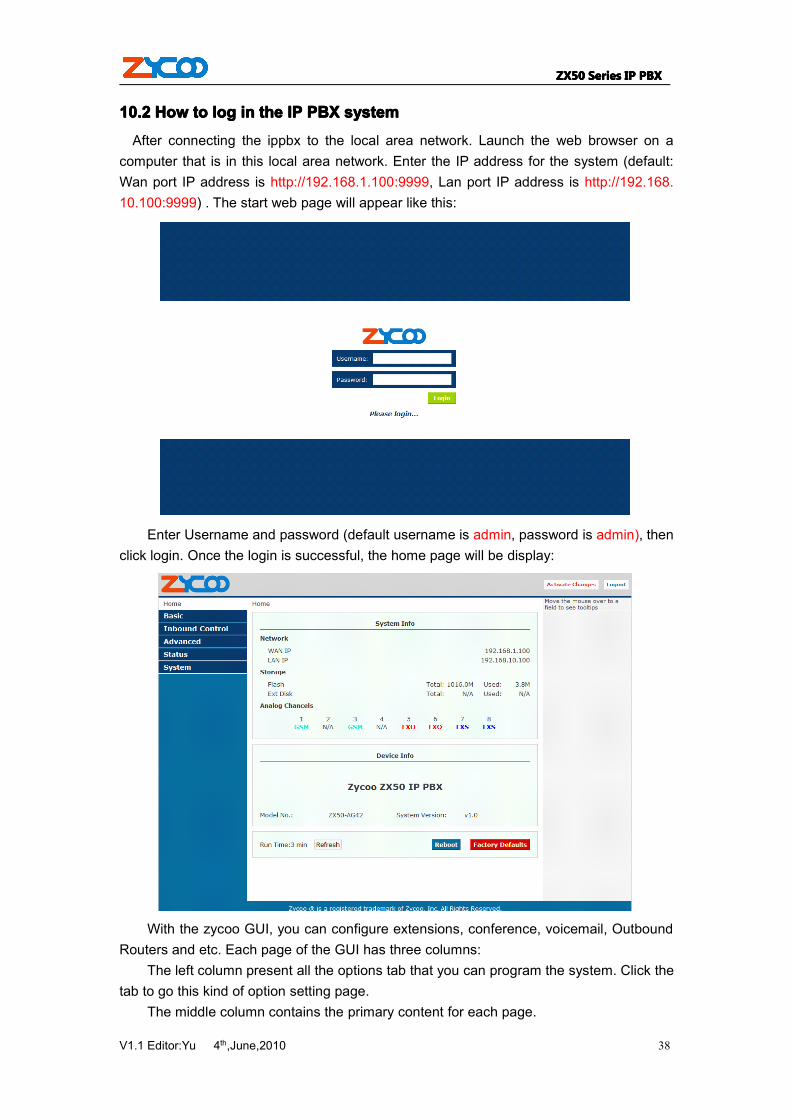
After connecting the ippbx to the local area network. Launch the web browser on acomputer that is in this local area network. Enter the IP address for the system (default:Wan port IP address is http://192.168.1.100:9999, Lan port IP address is http://192.168.10.100:9999) . The start web page will appear like this:
Enter Username and password (default username is admin, password is admin), thenclick login. Once the login is successful, the home page will be display:
With the zycoo GUI, you can configure extensions, conference, voicemail, OutboundRouters and etc. Each page of the GUI has three columns:
The left column present all the options tab that you can program the system. Click thetab to go this kind of option setting page.
The middle column contains the primary content for each page.
ZX50ZX50ZX50ZX50 SeriesSeriesSeriesSeries IPIPIPIP PBXPBXPBXPBX
V1.1 Editor:Yu 4th,June,2010 39
The right column of the user interface contains Tooltips. This area provides briefdescription for any options of the GUI
The home page is used for logoff, Reboot and Factory Defaults.� Logout: To log out the zycoo GUI.� Reboot: Reboot the ZX50 system� Factory Defaults: Restore all settings to factory default.� Activate change: Made the change active for the current configuration after you
make a configuration change on some page.
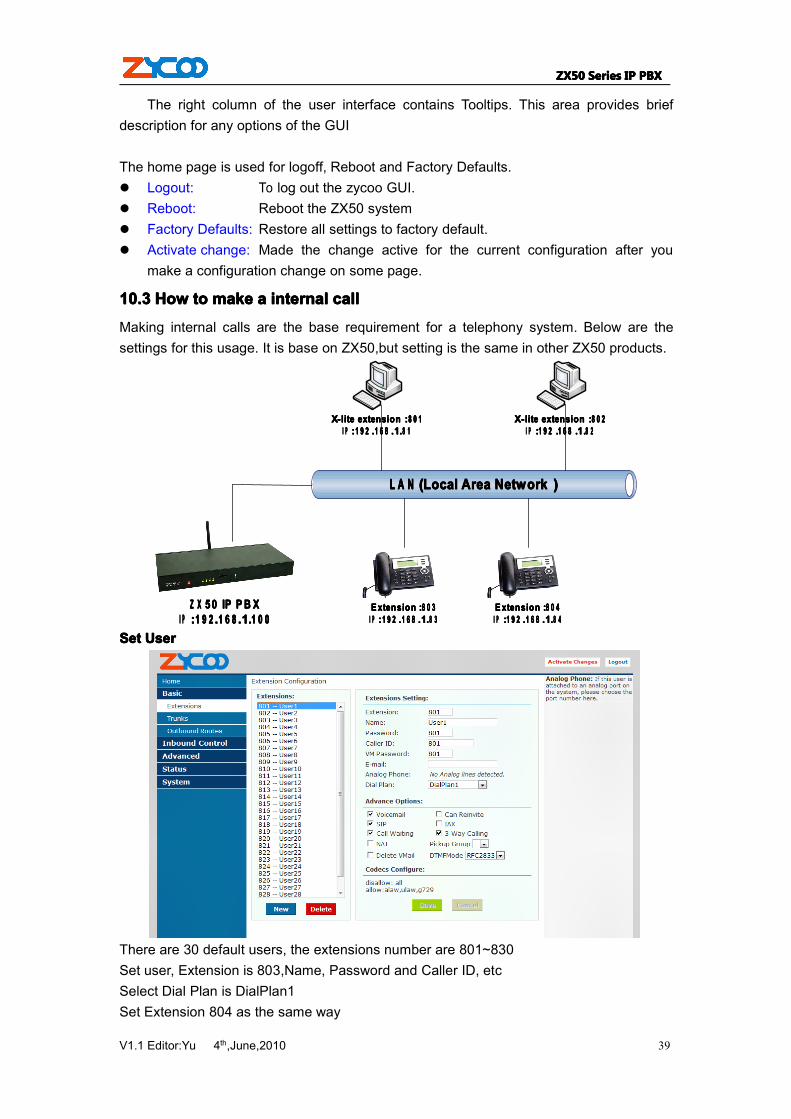
10.310.310.310.3 HowHowHowHow totototo makemakemakemake aaaa internalinternalinternalinternal callcallcallcall
Making internal calls are the base requirement for a telephony system. Below are thesettings for this usage. It is base on ZX50,but setting is the same in other ZX50 products.
L A NL A NL A NL A N ((((Local Area NetworkLocal Area NetworkLocal Area NetworkLocal Area Network ))))
XXXX----lite extensionlite extensionlite extensionlite extension ::::8 0 18 0 18 0 18 0 1I PI PI PI P ::::1 9 21 9 21 9 21 9 2 ....1 6 81 6 81 6 81 6 8 ....1111....8 18 18 18 1
XXXX----lite extensionlite extensionlite extensionlite extension ::::8 0 28 0 28 0 28 0 2I PI PI PI P ::::1 9 21 9 21 9 21 9 2 ....1 6 81 6 81 6 81 6 8 ....1111....8 28 28 28 2
E xtensionE xtensionE xtensionE xtension ::::8 0 38 0 38 0 38 0 3I PI PI PI P ::::1 9 21 9 21 9 21 9 2 ....1 6 81 6 81 6 81 6 8 ....1111....8 38 38 38 3
E xtensionE xtensionE xtensionE xtension ::::8 0 48 0 48 0 48 0 4I PI PI PI P ::::1 9 21 9 21 9 21 9 2 ....1 6 81 6 81 6 81 6 8 ....1111....8 48 48 48 4
Z XZ XZ XZ X 5 0 5 0 5 0 5 0 IP P B XIP P B XIP P B XIP P B XI PI PI PI P ::::1 9 21 9 21 9 21 9 2....1 6 81 6 81 6 81 6 8 ....1111....1 0 01 0 01 0 01 0 0
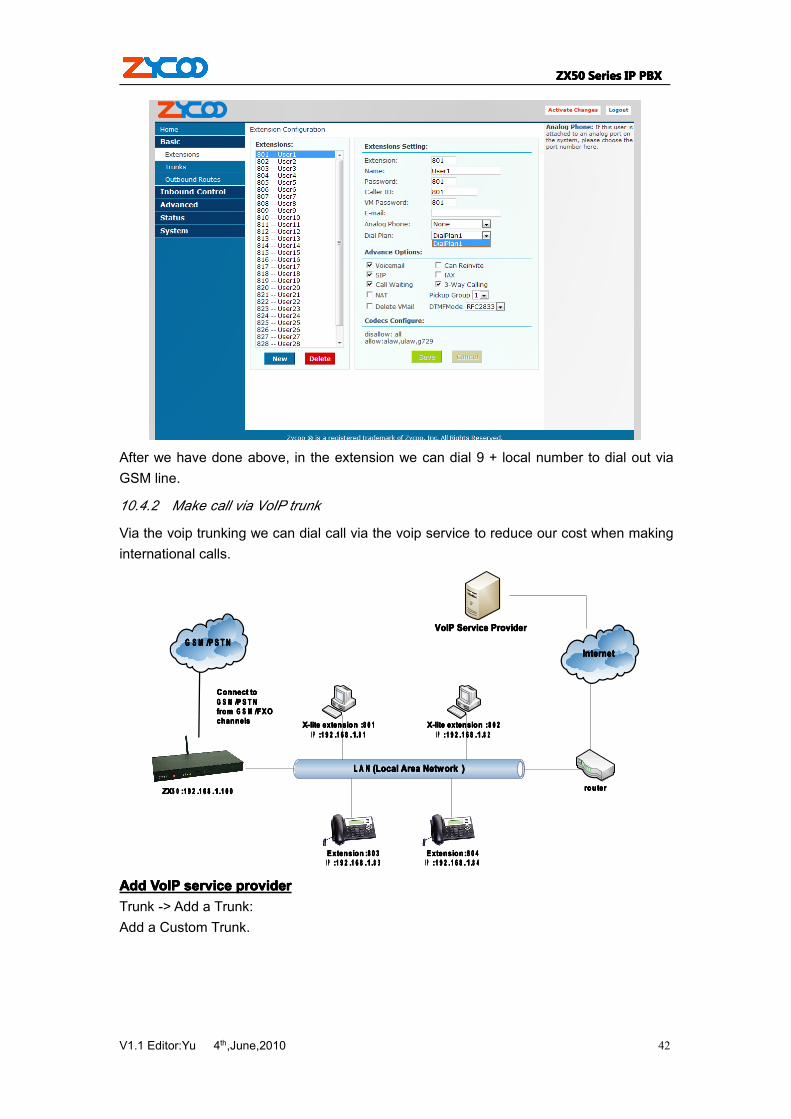
SetSetSetSet UserUserUserUser
There are 30 default users, the extensions number are 801~830Set user, Extension is 803,Name, Password and Caller ID, etcSelect Dial Plan is DialPlan1Set Extension 804 as the same way
ZX50ZX50ZX50ZX50 SeriesSeriesSeriesSeries IPIPIPIP PBXPBXPBXPBX
V1.1 Editor:Yu 4th,June,2010 40
Use a IP Phone based SIP protocol registered with the user.Then you can use 803 call 804 successfully.
10101010.4.4.4.4 HowHowHowHow totototo makemakemakemake aaaannnn outboundoutboundoutboundoutbound callcallcallcall
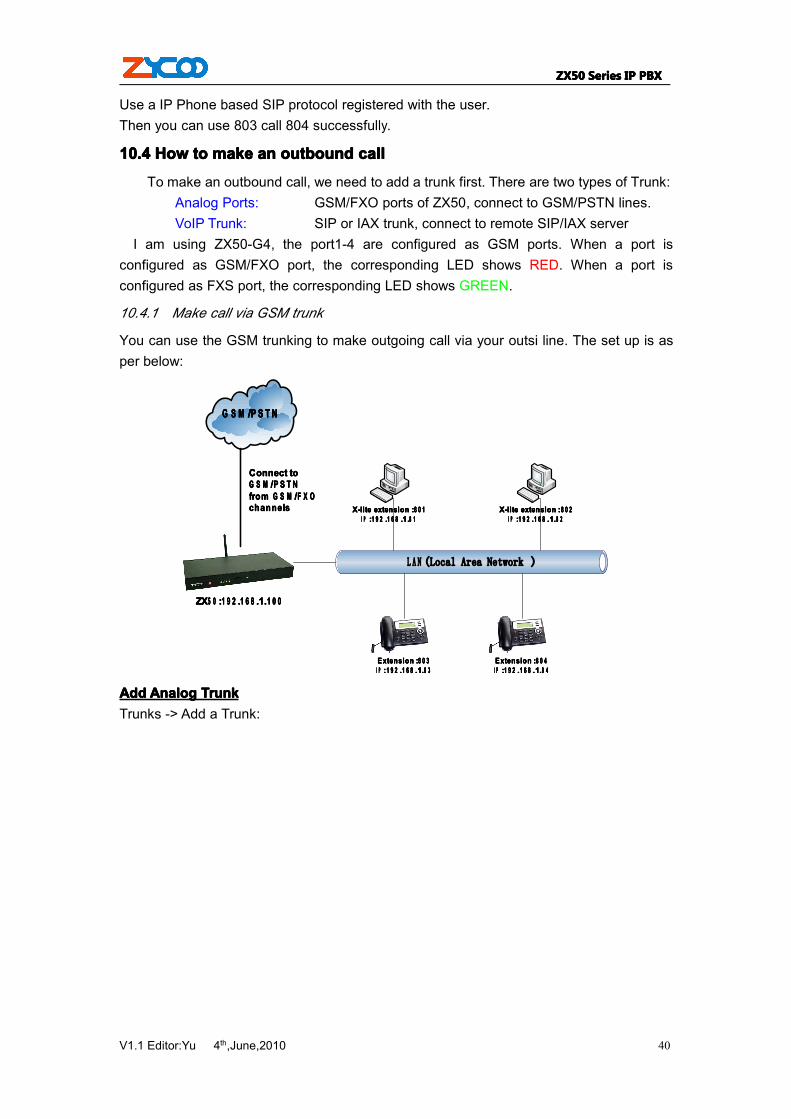
To make an outbound call, we need to add a trunk first. There are two types of Trunk:Analog Ports: GSM/FXO ports of ZX50, connect to GSM/PSTN lines.VoIP Trunk: SIP or IAX trunk, connect to remote SIP/IAX server
I am using ZX50-G4, the port1-4 are configured as GSM ports. When a port isconfigured as GSM/FXO port, the corresponding LED shows RED. When a port isconfigured as FXS port, the corresponding LED shows GREEN.
10.4.1 Make call via GSM trunk
You can use the GSM trunking to make outgoing call via your outsi line. The set up is asper below:
ZZZZXXXX5 05 05 05 0 ::::1 9 21 9 21 9 21 9 2 ....1 6 81 6 81 6 81 6 8 ....1111....1 0 01 0 01 0 01 0 0
G S MG S MG S MG S M ////P S T NP S T NP S T NP S T N
L A N (Local Area Network )
XXXX----lite extensionlite extensionlite extensionlite extension ::::8 0 18 0 18 0 18 0 1I PI PI PI P ::::1 9 21 9 21 9 21 9 2 ....1 6 81 6 81 6 81 6 8 ....1111....8 18 18 18 1
XXXX----lite extensionlite extensionlite extensionlite extension ::::8 0 28 0 28 0 28 0 2I PI PI PI P ::::1 9 21 9 21 9 21 9 2 ....1 6 81 6 81 6 81 6 8 ....1111....8 28 28 28 2
ExtensionExtensionExtensionExtension ::::8 0 38 0 38 0 38 0 3I PI PI PI P ::::1 9 21 9 21 9 21 9 2 ....1 6 81 6 81 6 81 6 8 ....1111....8 38 38 38 3
ExtensionExtensionExtensionExtension ::::8 0 48 0 48 0 48 0 4I PI PI PI P ::::1 9 21 9 21 9 21 9 2 ....1 6 81 6 81 6 81 6 8 ....1111....8 48 48 48 4
Connect to Connect to Connect to Connect to G S MG S MG S MG S M ////P S T NP S T NP S T NP S T Nfrom from from from G S MG S MG S MG S M ////F X OF X OF X OF X Ochannelschannelschannelschannels
AddAddAddAdd AnalogAnalogAnalogAnalog TrunkTrunkTrunkTrunkTrunks -> Add a Trunk:
ZX50ZX50ZX50ZX50 SeriesSeriesSeriesSeries IPIPIPIP PBXPBXPBXPBX
V1.1 Editor:Yu 4th,June,2010 41
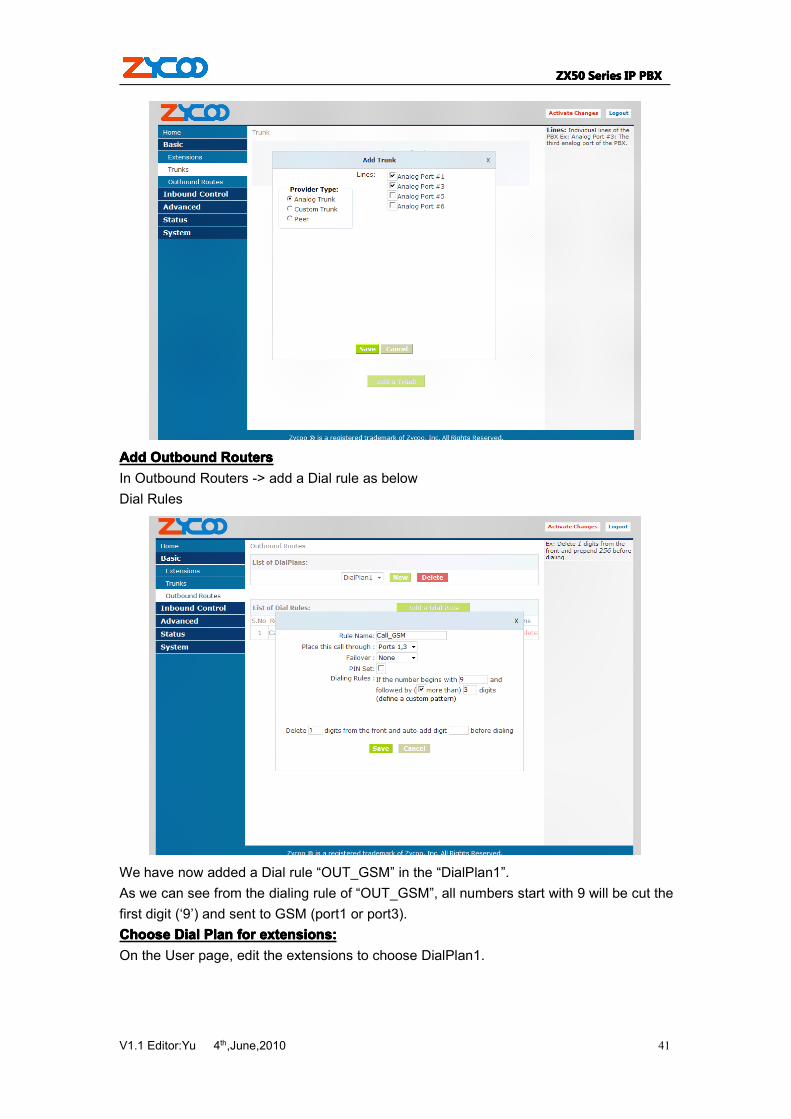
AddAddAddAdd OutboundOutboundOutboundOutbound RoutersRoutersRoutersRoutersIn Outbound Routers -> add a Dial rule as belowDial Rules
We have now added a Dial rule “OUT_GSM” in the “DialPlan1”.As we can see from the dialing rule of “OUT_GSM”, all numbers start with 9 will be cut thefirst digit (‘9’) and sent to GSM (port1 or port3).ChooseChooseChooseChoose DialDialDialDial PlanPlanPlanPlan forforforfor extensions:extensions:extensions:extensions:On the User page, edit the extensions to choose DialPlan1.
ZX50ZX50ZX50ZX50 SeriesSeriesSeriesSeries IPIPIPIP PBXPBXPBXPBX
V1.1 Editor:Yu 4th,June,2010 42
After we have done above, in the extension we can dial 9 + local number to dial out viaGSM line.
10.4.2 Make call via VoIP trunk
Via the voip trunking we can dial call via the voip service to reduce our cost when makinginternational calls.
ZZZZXXXX5 05 05 05 0 ::::1 9 21 9 21 9 21 9 2 ....1 6 81 6 81 6 81 6 8 ....1111....1 0 01 0 01 0 01 0 0
InternetInternetInternetInternetG S MG S MG S MG S M ////P S T NP S T NP S T NP S T N
L A NL A NL A NL A N ((((Local Area NetworkLocal Area NetworkLocal Area NetworkLocal Area Network ))))
XXXX----lite extensionlite extensionlite extensionlite extension ::::8 0 18 0 18 0 18 0 1I PI PI PI P ::::1 9 21 9 21 9 21 9 2 ....1 6 81 6 81 6 81 6 8 ....1111....8 18 18 18 1
XXXX----lite extensionlite extensionlite extensionlite extension ::::8 0 28 0 28 0 28 0 2I PI PI PI P ::::1 9 21 9 21 9 21 9 2 ....1 6 81 6 81 6 81 6 8 ....1111....8 28 28 28 2
ExtensionExtensionExtensionExtension ::::8 0 38 0 38 0 38 0 3I PI PI PI P ::::1 9 21 9 21 9 21 9 2 ....1 6 81 6 81 6 81 6 8 ....1111....8 38 38 38 3
ExtensionExtensionExtensionExtension::::8 0 48 0 48 0 48 0 4I PI PI PI P ::::1 9 21 9 21 9 21 9 2 ....1 6 81 6 81 6 81 6 8 ....1111....8 48 48 48 4
Connect to Connect to Connect to Connect to G S MG S MG S MG S M ////P S T NP S T NP S T NP S T Nfrom from from from G S MG S MG S MG S M ////FXO FXO FXO FXO channelschannelschannelschannels
routerrouterrouterrouter
VoIP Service Provider VoIP Service Provider VoIP Service Provider VoIP Service Provider
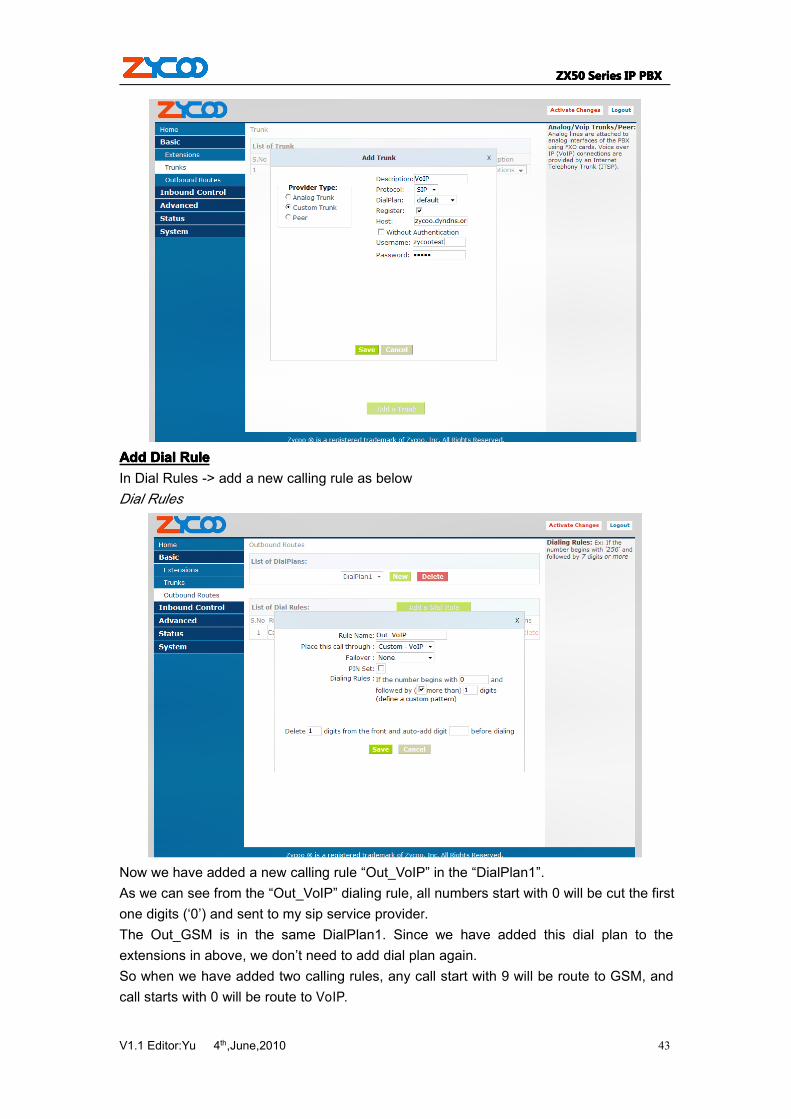
AddAddAddAdd VoIPVoIPVoIPVoIP serviceserviceserviceservice providerproviderproviderproviderTrunk -> Add a Trunk:Add a Custom Trunk.
ZX50ZX50ZX50ZX50 SeriesSeriesSeriesSeries IPIPIPIP PBXPBXPBXPBX
V1.1 Editor:Yu 4th,June,2010 43
AddAddAddAdd DialDialDialDial RuleRuleRuleRuleIn Dial Rules -> add a new calling rule as belowDial Rules
Now we have added a new calling rule “Out_VoIP” in the “DialPlan1”.As we can see from the “Out_VoIP” dialing rule, all numbers start with 0 will be cut the firstone digits (‘0’) and sent to my sip service provider.The Out_GSM is in the same DialPlan1. Since we have added this dial plan to theextensions in above, we don’t need to add dial plan again.So when we have added two calling rules, any call start with 9 will be route to GSM, andcall starts with 0 will be route to VoIP.
ZX50ZX50ZX50ZX50 SeriesSeriesSeriesSeries IPIPIPIP PBXPBXPBXPBX
V1.1 Editor:Yu 4th,June,2010 44
10101010.5.5.5.5 HowHowHowHow totototo makemakemakemake aaaannnn incomingincomingincomingincoming callcallcallcall
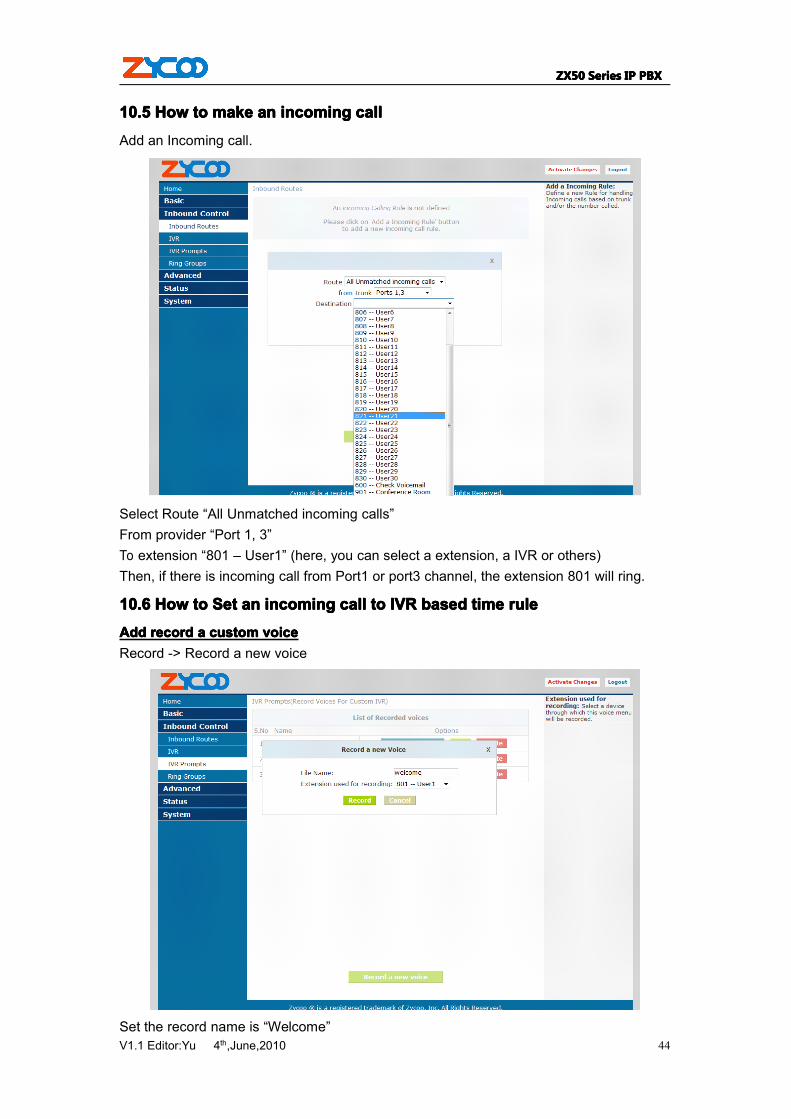
Add an Incoming call.
Select Route “All Unmatched incoming calls”From provider “Port 1, 3”To extension “801 – User1” (here, you can select a extension, a IVR or others)Then, if there is incoming call from Port1 or port3 channel, the extension 801 will ring.
10101010.6.6.6.6 HowHowHowHow totototo SetSetSetSet anananan incomingincomingincomingincoming callcallcallcall totototo IVRIVRIVRIVR basedbasedbasedbased timetimetimetime rulerulerulerule
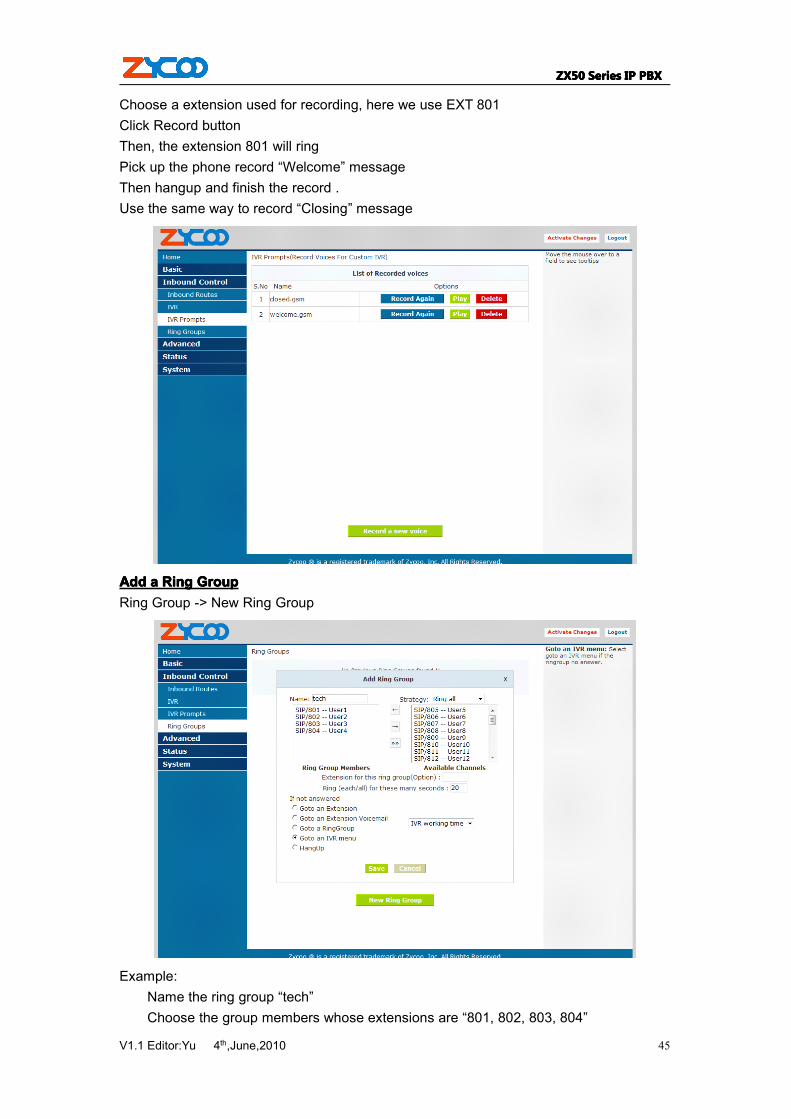
AAAAdddddddd recordrecordrecordrecord aaaa customcustomcustomcustom voicevoicevoicevoiceRecord -> Record a new voice
Set the record name is “Welcome”
ZX50ZX50ZX50ZX50 SeriesSeriesSeriesSeries IPIPIPIP PBXPBXPBXPBX
V1.1 Editor:Yu 4th,June,2010 45
Choose a extension used for recording, here we use EXT 801Click Record buttonThen, the extension 801 will ringPick up the phone record “Welcome” messageThen hangup and finish the record .Use the same way to record “Closing” message
AddAddAddAdd aaaa RingRingRingRing GroupGroupGroupGroupRing Group -> New Ring Group
Example:Name the ring group “tech”Choose the group members whose extensions are “801, 802, 803, 804”

ZX50ZX50ZX50ZX50 SeriesSeriesSeriesSeries IPIPIPIP PBXPBXPBXPBX
V1.1 Editor:Yu 4th,June,2010 46
“if no answered”, choose “goto IVR”-- “working time”Click “Save” button
SetSetSetSet IVRIVRIVRIVRIVR
Select IVR-working time, Set welcome massage is “Welcome”Set keypress’ Events
Dial “0” go to extension 805Dial “1” go to extension 806Dial “2” go to ringgroup tech
Click Save button
Then set IVR-closed time
ZX50ZX50ZX50ZX50 SeriesSeriesSeriesSeries IPIPIPIP PBXPBXPBXPBX
V1.1 Editor:Yu 4th,June,2010 47
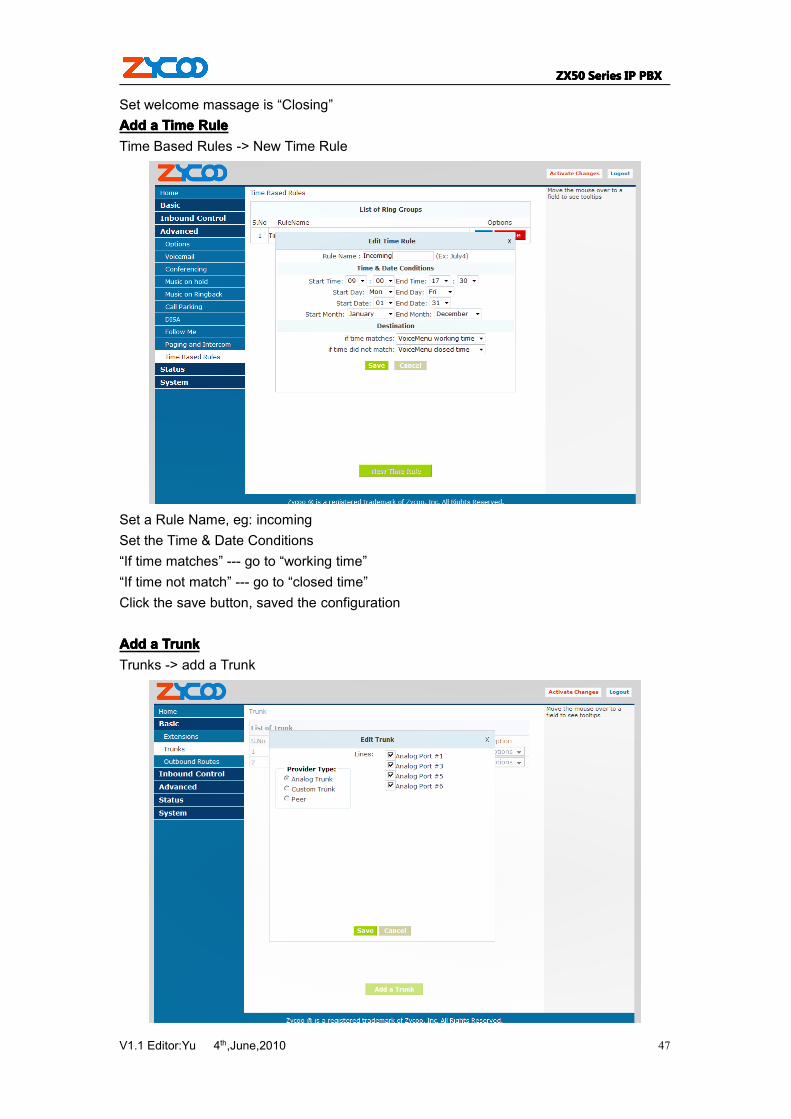
Set welcome massage is “Closing”AddAddAddAdd aaaa TimeTimeTimeTime RuleRuleRuleRuleTime Based Rules -> New Time Rule
Set a Rule Name, eg: incomingSet the Time & Date Conditions“If time matches” --- go to “working time”“If time not match” --- go to “closed time”Click the save button, saved the configuration
AAAAdddddddd aaaa TrunkTrunkTrunkTrunkTrunks -> add a Trunk
ZX50ZX50ZX50ZX50 SeriesSeriesSeriesSeries IPIPIPIP PBXPBXPBXPBX
V1.1 Editor:Yu 4th,June,2010 48
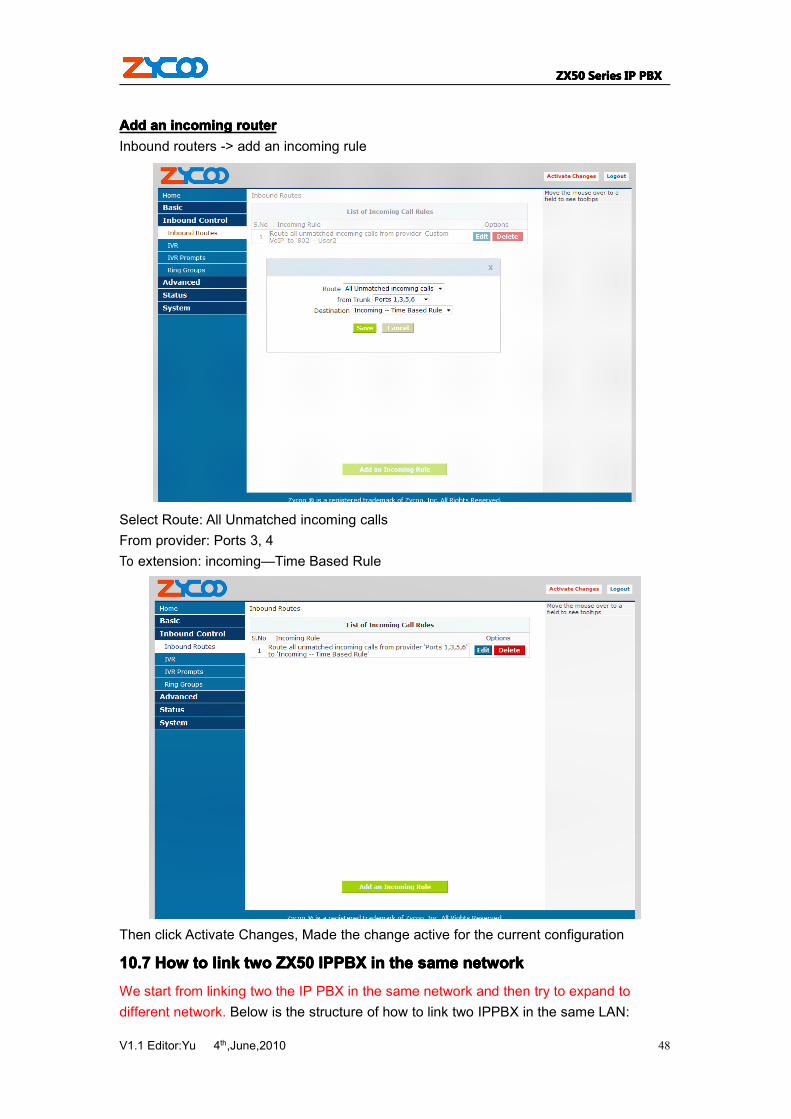
AAAAdddddddd anananan incomingincomingincomingincoming routerrouterrouterrouterInbound routers -> add an incoming rule
Select Route: All Unmatched incoming callsFrom provider: Ports 3, 4To extension: incoming—Time Based Rule
Then click Activate Changes, Made the change active for the current configuration
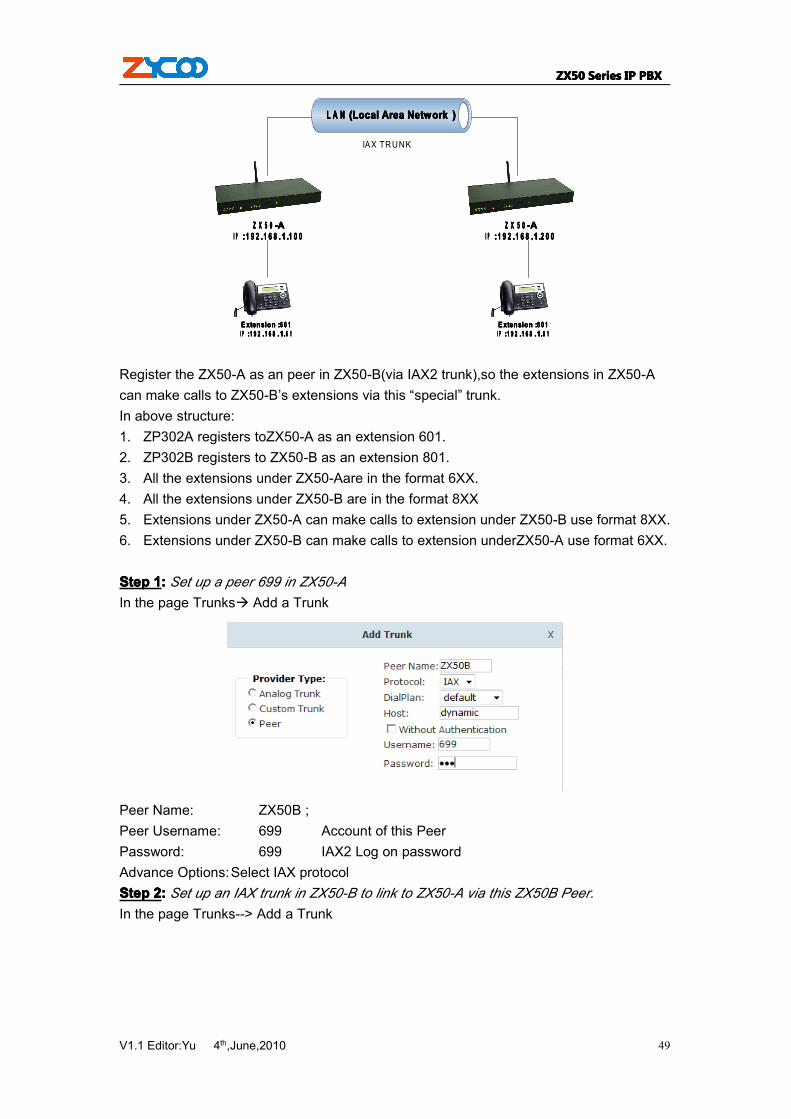
10.710.710.710.7 HowHowHowHow totototo linklinklinklink twotwotwotwo ZX50ZX50ZX50ZX50 IPPBXIPPBXIPPBXIPPBX inininin thethethethe samesamesamesame networknetworknetworknetwork
We start from linking two the IP PBX in the same network and then try to expand todifferent network. Below is the structure of how to link two IPPBX in the same LAN:
ZX50ZX50ZX50ZX50 SeriesSeriesSeriesSeries IPIPIPIP PBXPBXPBXPBX
V1.1 Editor:Yu 4th,June,2010 49
Z XZ XZ XZ X 5 05 05 05 0 ----AAAAI PI PI PI P ::::1 9 21 9 21 9 21 9 2 ....1 6 81 6 81 6 81 6 8 ....1111....2 0 02 0 02 0 02 0 0
Z XZ XZ XZ X 5 05 05 05 0 ----AAAAI PI PI PI P ::::1 9 21 9 21 9 21 9 2 ....1 6 81 6 81 6 81 6 8 ....1111....1 0 01 0 01 0 01 0 0
L A NL A NL A NL A N ((((Local Area NetworkLocal Area NetworkLocal Area NetworkLocal Area Network ))))
E xtensionE xtensionE xtensionE xtension ::::6 0 16 0 16 0 16 0 1I PI PI PI P ::::1 9 21 9 21 9 21 9 2 ....1 6 81 6 81 6 81 6 8 ....1111....6 16 16 16 1
E xtensionE xtensionE xtensionE xtension ::::8 0 18 0 18 0 18 0 1I PI PI PI P ::::1 9 21 9 21 9 21 9 2 ....1 6 81 6 81 6 81 6 8 ....1111....8 18 18 18 1
IAX TRUNK
Register the ZX50-A as an peer in ZX50-B(via IAX2 trunk),so the extensions in ZX50-Acan make calls to ZX50-B’s extensions via this “special” trunk.In above structure:1. ZP302A registers toZX50-A as an extension 601.2. ZP302B registers to ZX50-B as an extension 801.3. All the extensions under ZX50-Aare in the format 6XX.4. All the extensions under ZX50-B are in the format 8XX5. Extensions under ZX50-A can make calls to extension under ZX50-B use format 8XX.6. Extensions under ZX50-B can make calls to extension underZX50-A use format 6XX.
StepStepStepStep 1111:::: Set up a peer 699 in ZX50-AIn the page Trunks� Add a Trunk
Peer Name: ZX50B ;Peer Username: 699 Account of this PeerPassword: 699 IAX2 Log on passwordAdvance Options:Select IAX protocolStepStepStepStep 2222:::: Set up an IAX trunk in ZX50-B to link to ZX50-A via this ZX50B Peer.In the page Trunks--> Add a Trunk
ZX50ZX50ZX50ZX50 SeriesSeriesSeriesSeries IPIPIPIP PBXPBXPBXPBX
V1.1 Editor:Yu 4th,June,2010 50
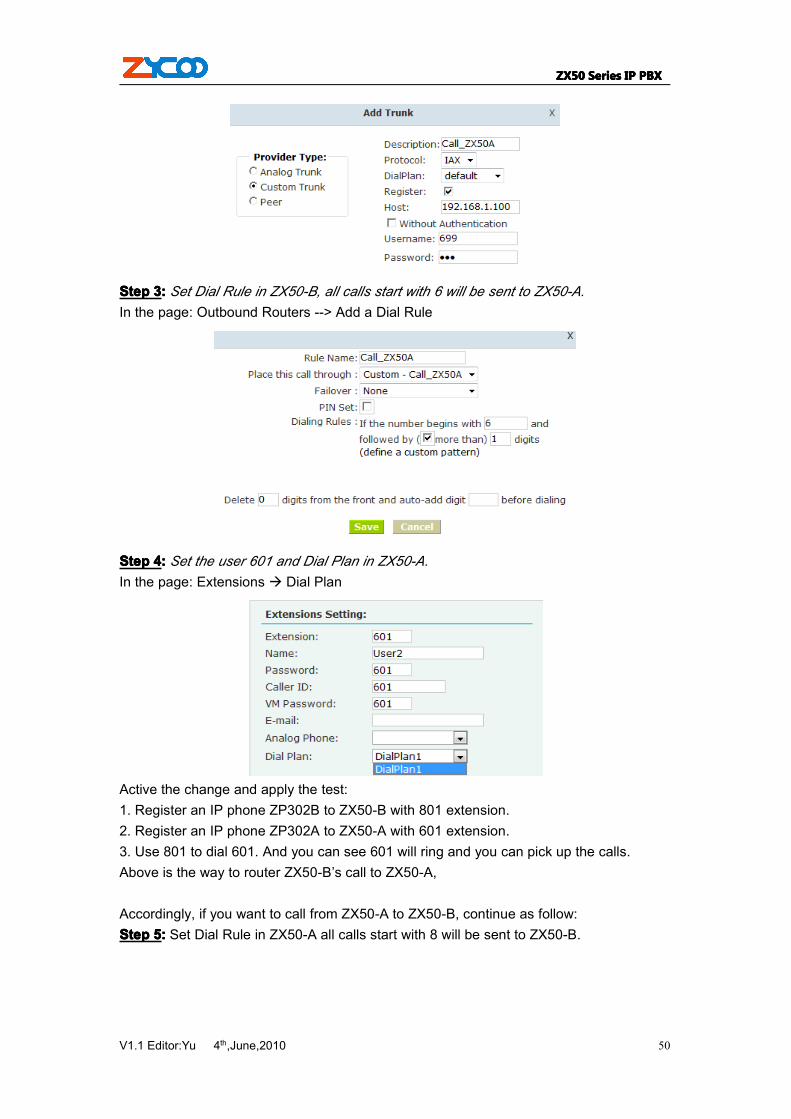
StepStepStepStep 3333:::: Set Dial Rule in ZX50-B, all calls start with 6 will be sent to ZX50-A.In the page: Outbound Routers --> Add a Dial Rule
StepStepStepStep 4444:::: Set the user 601 and Dial Plan in ZX50-A.In the page: Extensions � Dial Plan
Active the change and apply the test:1. Register an IP phone ZP302B to ZX50-B with 801 extension.2. Register an IP phone ZP302A to ZX50-A with 601 extension.3. Use 801 to dial 601. And you can see 601 will ring and you can pick up the calls.Above is the way to router ZX50-B’s call to ZX50-A,
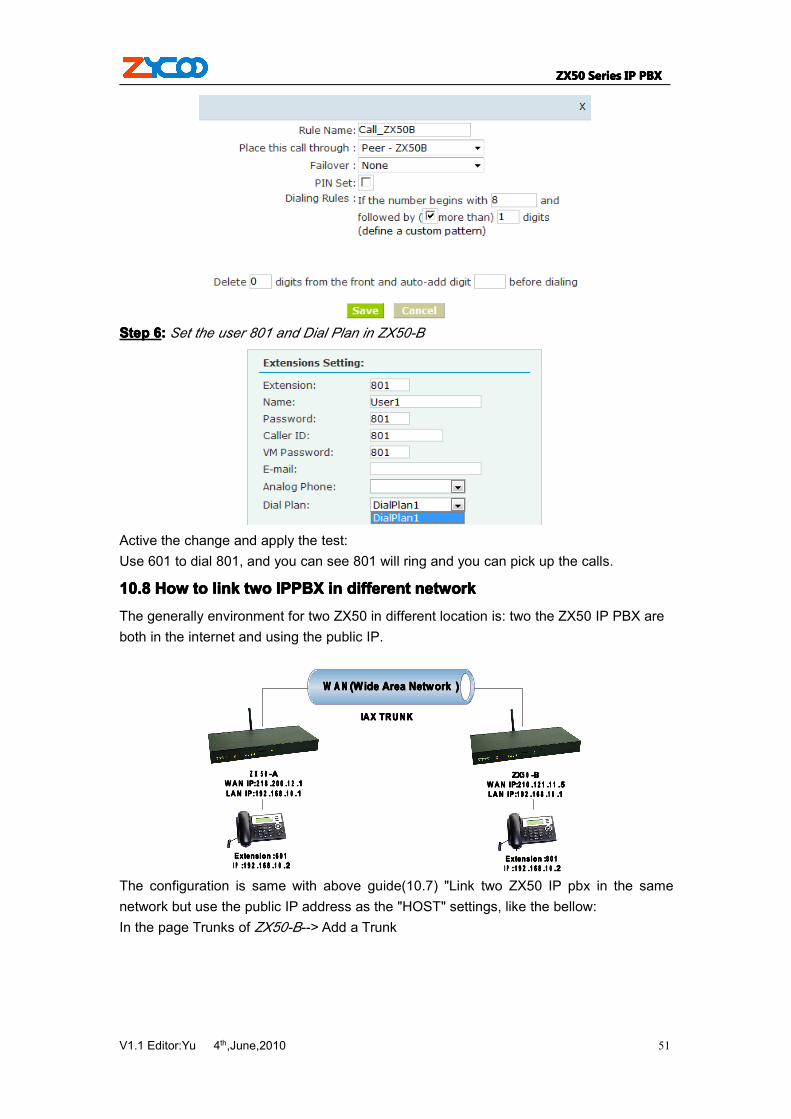
Accordingly, if you want to call from ZX50-A to ZX50-B, continue as follow:StepStepStepStep 5555:::: Set Dial Rule in ZX50-A all calls start with 8 will be sent to ZX50-B.
ZX50ZX50ZX50ZX50 SeriesSeriesSeriesSeries IPIPIPIP PBXPBXPBXPBX
V1.1 Editor:Yu 4th,June,2010 51
StepStepStepStep 6666:::: Set the user 801 and Dial Plan in ZX50-B
Active the change and apply the test:Use 601 to dial 801, and you can see 801 will ring and you can pick up the calls.
10.810.810.810.8 HowHowHowHow totototo linklinklinklink twotwotwotwo IPPBXIPPBXIPPBXIPPBX inininin differentdifferentdifferentdifferent networknetworknetworknetworkThe generally environment for two ZX50 in different location is: two the ZX50 IP PBX areboth in the internet and using the public IP.
ZZZZXXXX5 05 05 05 0 ----BBBBW A N IPW A N IPW A N IPW A N IP::::2 1 02 1 02 1 02 1 0 ....1 2 11 2 11 2 11 2 1 ....1 11 11 11 1 ....5555LA N IPLA N IPLA N IPLA N IP::::1 9 21 9 21 9 21 9 2 ....1 6 81 6 81 6 81 6 8 ....1 01 01 01 0 ....1111
Z XZ XZ XZ X 5 05 05 05 0 ----AAAAW A N IPW A N IPW A N IPW A N IP::::2 1 82 1 82 1 82 1 8 ....2 0 02 0 02 0 02 0 0 ....1 21 21 21 2 ....1111LA N IPLA N IPLA N IPLA N IP::::1 9 21 9 21 9 21 9 2 ....1 6 81 6 81 6 81 6 8 ....1 01 01 01 0 ....1111
W A NW A NW A NW A N ((((Wide Area NetworkWide Area NetworkWide Area NetworkWide Area Network ))))
ExtensionExtensionExtensionExtension ::::6 0 16 0 16 0 16 0 1I PI PI PI P ::::1 9 21 9 21 9 21 9 2 ....1 6 81 6 81 6 81 6 8 ....1 01 01 01 0 ....2222
ExtensionExtensionExtensionExtension ::::8 0 18 0 18 0 18 0 1I PI PI PI P ::::1 9 21 9 21 9 21 9 2 ....1 6 81 6 81 6 81 6 8 ....1 01 01 01 0 ....2222
IAX TRUNKIAX TRUNKIAX TRUNKIAX TRUNK
The configuration is same with above guide(10.7) "Link two ZX50 IP pbx in the samenetwork but use the public IP address as the "HOST" settings, like the bellow:In the page Trunks of ZX50-B--> Add a Trunk
ZX50ZX50ZX50ZX50 SeriesSeriesSeriesSeries IPIPIPIP PBXPBXPBXPBX
V1.1 Editor:Yu 4th,June,2010 52
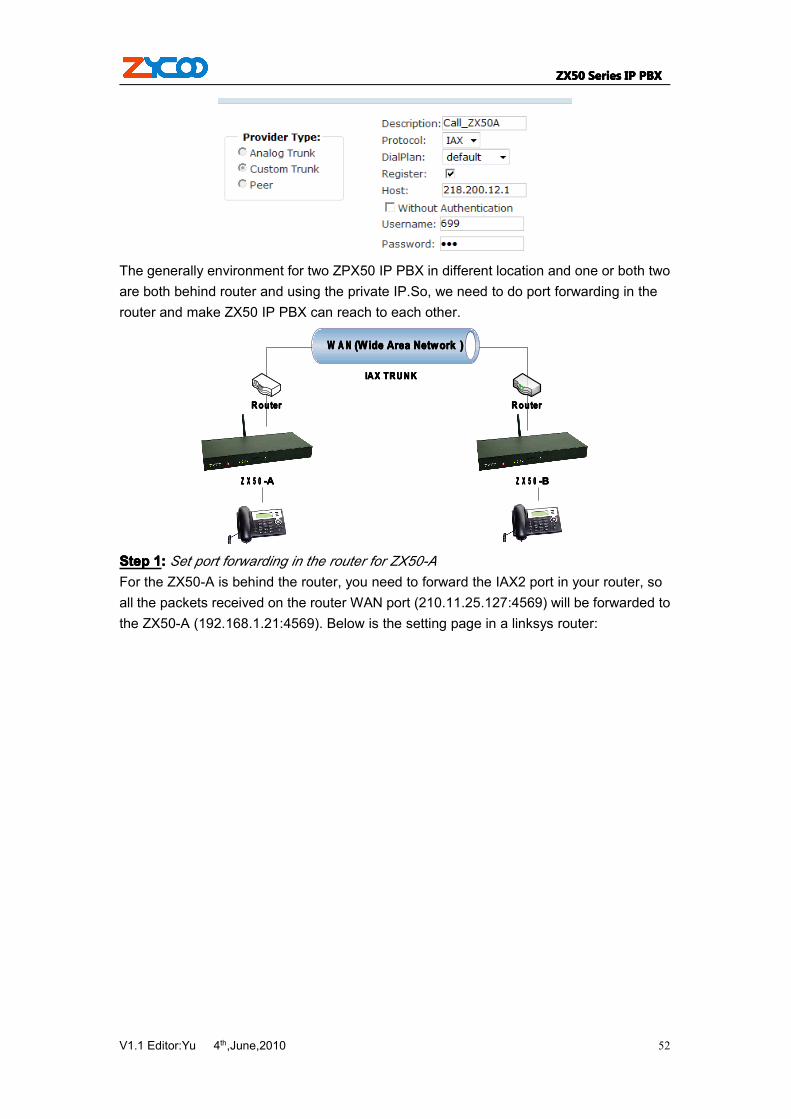
The generally environment for two ZPX50 IP PBX in different location and one or both twoare both behind router and using the private IP.So, we need to do port forwarding in therouter and make ZX50 IP PBX can reach to each other.
Z XZ XZ XZ X 5 05 05 05 0 ----BBBBZ XZ XZ XZ X 5 05 05 05 0 ----AAAA
W A NW A NW A NW A N ((((Wide Area NetworkWide Area NetworkWide Area NetworkWide Area Network ))))
IAX TRUNKIAX TRUNKIAX TRUNKIAX TRUNK
RouterRouterRouterRouter RouterRouterRouterRouter
StepStepStepStep 1111:::: Set port forwarding in the router for ZX50-AFor the ZX50-A is behind the router, you need to forward the IAX2 port in your router, soall the packets received on the router WAN port (210.11.25.127:4569) will be forwarded tothe ZX50-A (192.168.1.21:4569). Below is the setting page in a linksys router:

ZX50ZX50ZX50ZX50 SeriesSeriesSeriesSeries IPIPIPIP PBXPBXPBXPBX
V1.1 Editor:Yu 4th,June,2010 53
StepStepStepStep 2222:::: Set up the Provider Host in ZX50-BSet up the service provider and calling rule in ZX50-B to make it register to ZX50-A. Thismethod is almost the same as above, EXCEPT you need to use the 210.11.25.127 as theservice provider instead of 192.168.1.21.
StepStepStepStep 3333:::: Set port forwarding in the router for ZX50-BUse the same method as Step 1 do port forwarding in router-B for ZX50-B as above.
Setp4:Setp4:Setp4:Setp4:Link two ZX50 and make callsAccordingly, set the 601 users in ZX50-A and 801 users in ZX50-B, and build the correctdial rules as above, you can make calls between two the ZX50 IP PBX.Noted:Noted:Noted:Noted: You can also apply a DDNS to get one fixed domain for both ZX50 IP PBX andconnect to each other rather than use the Port Forwarding in the router.
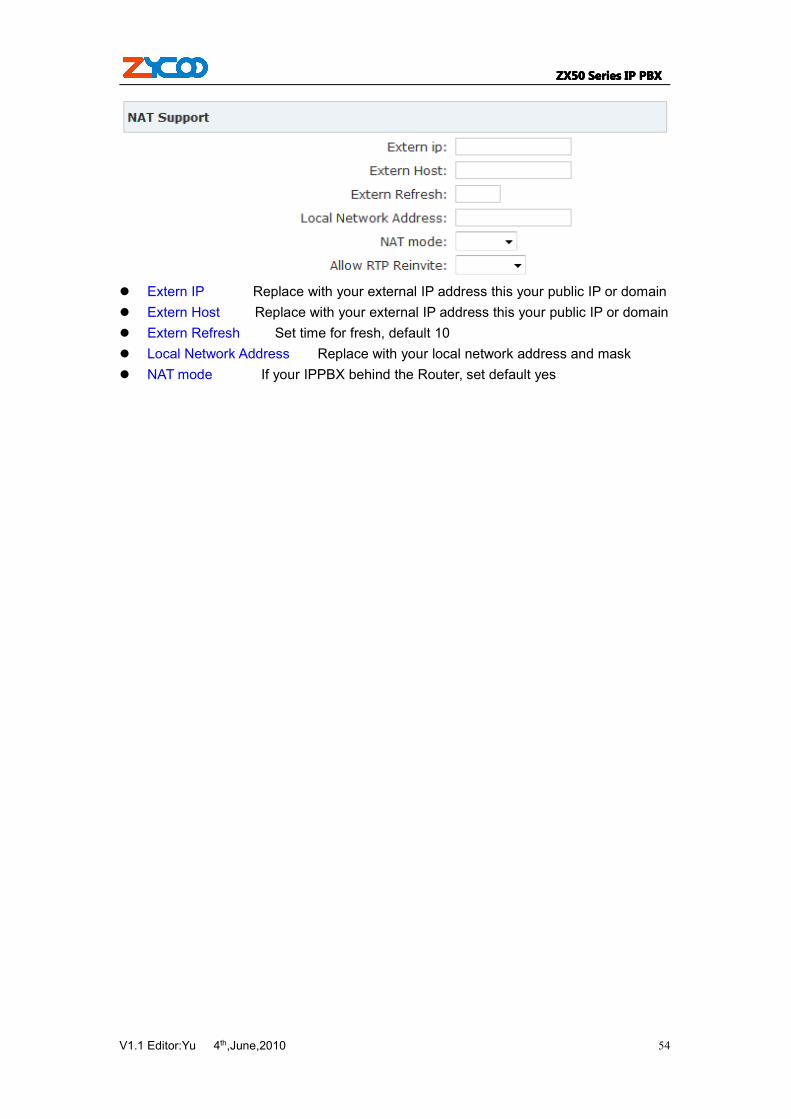
10.910.910.910.9 HowHowHowHow totototo resolveresolveresolveresolve problemsproblemsproblemsproblems aboutaboutaboutabout hearinghearinghearinghearing onlyonlyonlyonly onononon oneoneoneone sidesidesidesideIf your IPPBX behind the Router, you should build a IP Address Map to resolve thisproblem as follow:Management---->Show Advanced Options ----> Global SIP Settings
--->NAT Support
ZX50ZX50ZX50ZX50 SeriesSeriesSeriesSeries IPIPIPIP PBXPBXPBXPBX
V1.1 Editor:Yu 4th,June,2010 54
� Extern IP Replace with your external IP address this your public IP or domain� Extern Host Replace with your external IP address this your public IP or domain� Extern Refresh Set time for fresh, default 10� Local Network Address Replace with your local network address and mask� NAT mode If your IPPBX behind the Router, set default yes
ZX50ZX50ZX50ZX50 SeriesSeriesSeriesSeries IPIPIPIP PBXPBXPBXPBX
V1.1 Editor:Yu 4th,June,2010 55
ChapterChapterChapterChapter11111111 HowHowHowHow totototo useuseuseuse SkypeSkypeSkypeSkype accountaccountaccountaccount inininin ZX50ZX50ZX50ZX50
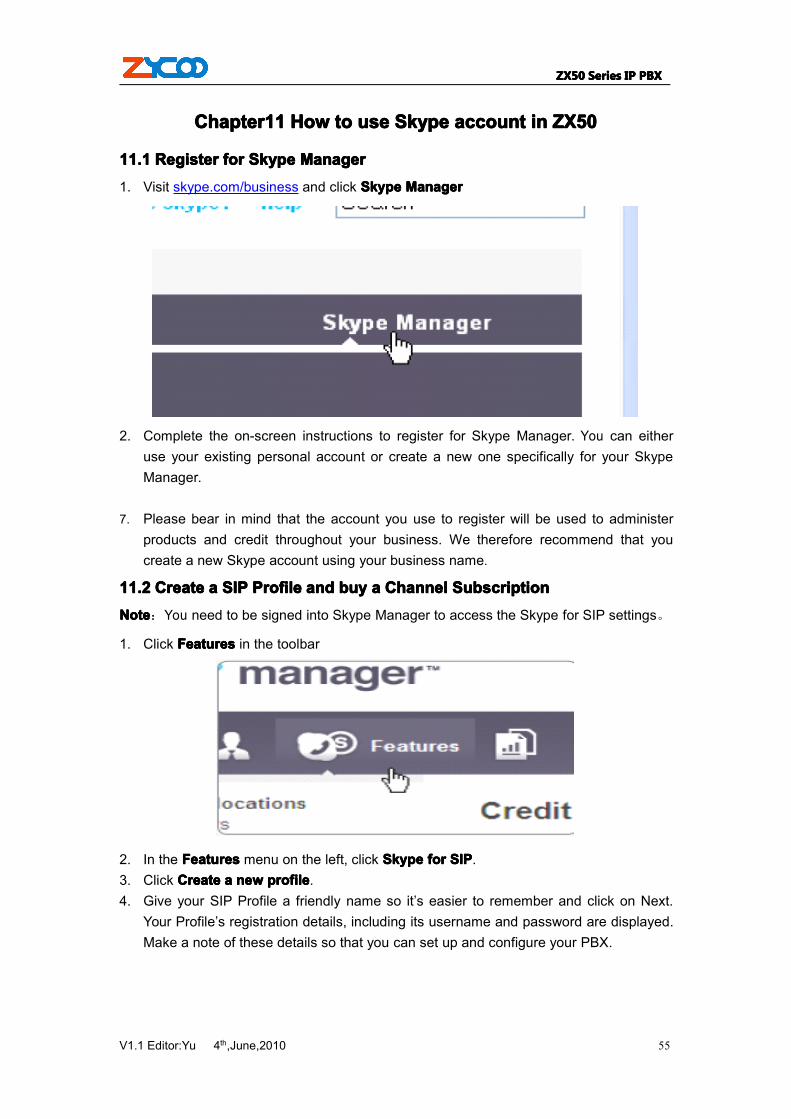
11.111.111.111.1 RegisterRegisterRegisterRegister forforforfor SkypeSkypeSkypeSkype ManagerManagerManagerManager1. Visit skype.com/business and click SkypeSkypeSkypeSkype ManagerManagerManagerManager
2. Complete the on-screen instructions to register for Skype Manager. You can eitheruse your existing personal account or create a new one specifically for your SkypeManager.
7. Please bear in mind that the account you use to register will be used to administerproducts and credit throughout your business. We therefore recommend that youcreate a new Skype account using your business name.
11.211.211.211.2 CreateCreateCreateCreate aaaa SIPSIPSIPSIP ProfileProfileProfileProfile andandandand buybuybuybuy aaaa ChannelChannelChannelChannel SubscriptionSubscriptionSubscriptionSubscriptionNoteNoteNoteNote:You need to be signed into Skype Manager to access the Skype for SIP settings。
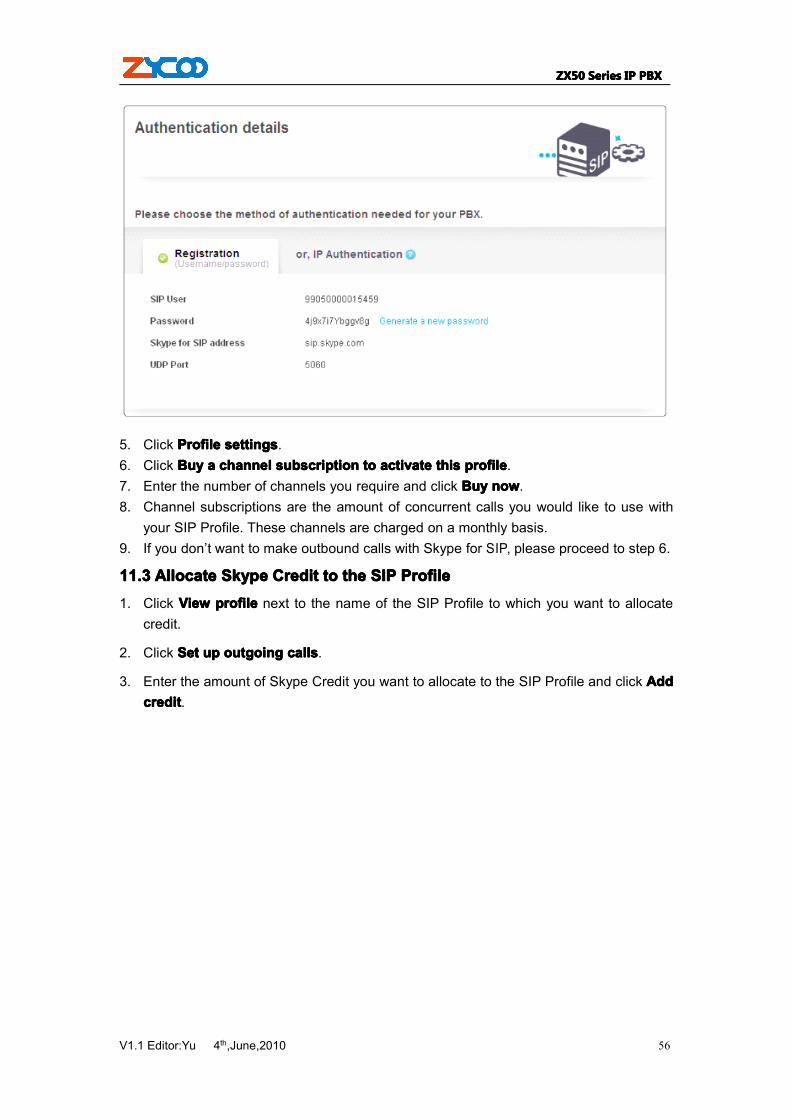
1. Click FeaturesFeaturesFeaturesFeatures in the toolbar
2. In the FeaturesFeaturesFeaturesFeatures menu on the left, click SkypeSkypeSkypeSkype forforforfor SIPSIPSIPSIP.3. Click CreateCreateCreateCreate aaaa newnewnewnew profileprofileprofileprofile.4. Give your SIP Profile a friendly name so it’s easier to remember and click on Next.
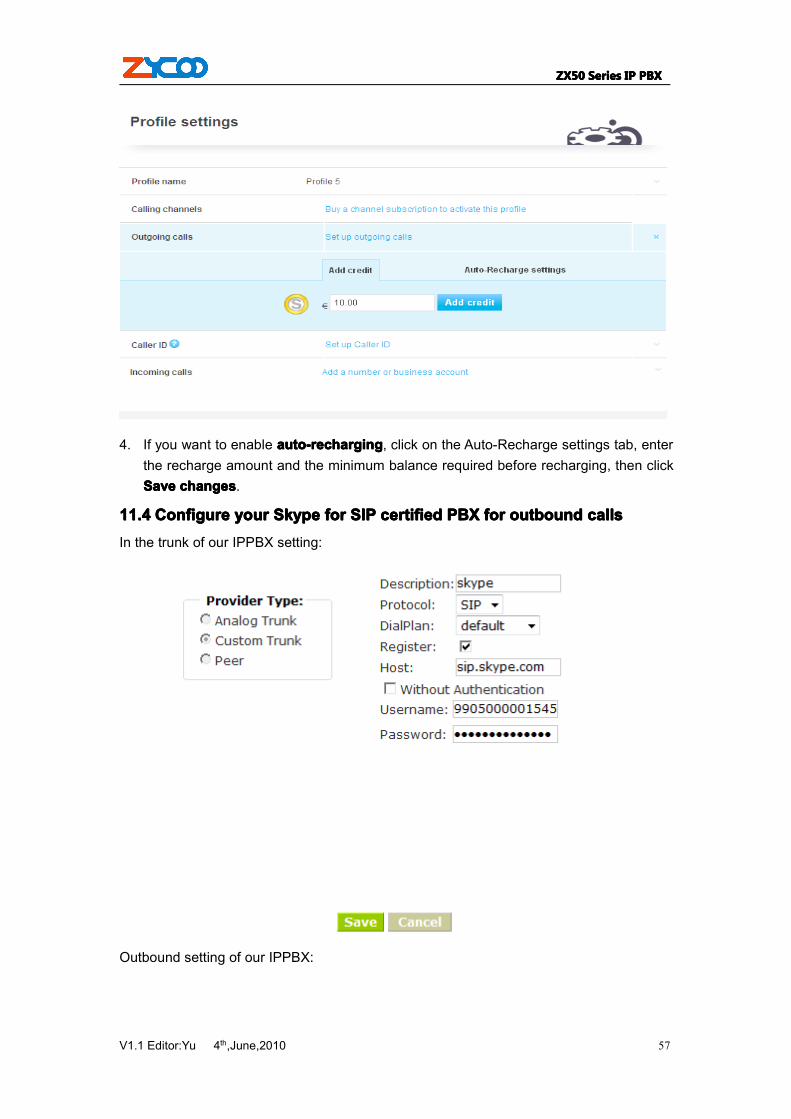
Your Profile’s registration details, including its username and password are displayed.Make a note of these details so that you can set up and configure your PBX.
ZX50ZX50ZX50ZX50 SeriesSeriesSeriesSeries IPIPIPIP PBXPBXPBXPBX
V1.1 Editor:Yu 4th,June,2010 56
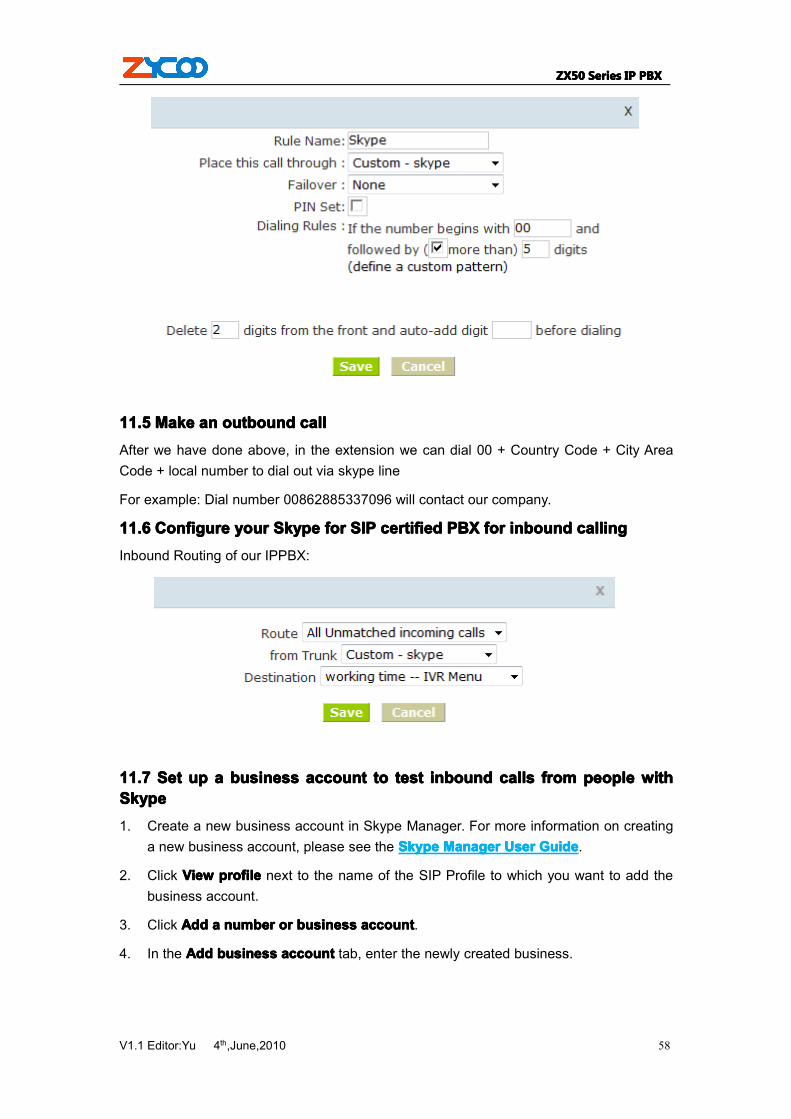
5. Click ProfileProfileProfileProfile settingssettingssettingssettings.6. Click BuyBuyBuyBuy aaaa channelchannelchannelchannel subscriptionsubscriptionsubscriptionsubscription totototo activateactivateactivateactivate thisthisthisthis profileprofileprofileprofile.7. Enter the number of channels you require and click BuyBuyBuyBuy nownownownow.8. Channel subscriptions are the amount of concurrent calls you would like to use with
your SIP Profile. These channels are charged on a monthly basis.9. If you don’t want to make outbound calls with Skype for SIP, please proceed to step 6.
11.311.311.311.3 AllocateAllocateAllocateAllocate SkypeSkypeSkypeSkype CreditCreditCreditCredit totototo thethethethe SIPSIPSIPSIP ProfileProfileProfileProfile1. Click ViewViewViewView profileprofileprofileprofile next to the name of the SIP Profile to which you want to allocate
credit.
2. Click SetSetSetSet upupupup outgoingoutgoingoutgoingoutgoing callscallscallscalls.
3. Enter the amount of Skype Credit you want to allocate to the SIP Profile and click AddAddAddAddcreditcreditcreditcredit.
ZX50ZX50ZX50ZX50 SeriesSeriesSeriesSeries IPIPIPIP PBXPBXPBXPBX
V1.1 Editor:Yu 4th,June,2010 57
4. If you want to enable auto-rechargingauto-rechargingauto-rechargingauto-recharging, click on the Auto-Recharge settings tab, enterthe recharge amount and the minimum balance required before recharging, then clickSaveSaveSaveSave changeschangeschangeschanges.
11.411.411.411.4 ConfigureConfigureConfigureConfigure youryouryouryour SkypeSkypeSkypeSkype forforforfor SIPSIPSIPSIP certifiedcertifiedcertifiedcertified PBXPBXPBXPBX forforforfor outboundoutboundoutboundoutbound callscallscallscallsIn the trunk of our IPPBX setting:
Outbound setting of our IPPBX:
ZX50ZX50ZX50ZX50 SeriesSeriesSeriesSeries IPIPIPIP PBXPBXPBXPBX
V1.1 Editor:Yu 4th,June,2010 58
11.511.511.511.5 MakeMakeMakeMake aaaannnn outboundoutboundoutboundoutbound callcallcallcallAfter we have done above, in the extension we can dial 00 + Country Code + City AreaCode + local number to dial out via skype line
For example: Dial number 00862885337096 will contact our company.
11.611.611.611.6 ConfigureConfigureConfigureConfigure youryouryouryour SkypeSkypeSkypeSkype forforforfor SIPSIPSIPSIP certifiedcertifiedcertifiedcertified PBXPBXPBXPBX forforforfor inboundinboundinboundinbound callingcallingcallingcallingInbound Routing of our IPPBX:
11.711.711.711.7 SetSetSetSet upupupup aaaa businessbusinessbusinessbusiness accountaccountaccountaccount totototo testtesttesttest inboundinboundinboundinbound callscallscallscalls fromfromfromfrom peoplepeoplepeoplepeople withwithwithwithSkypeSkypeSkypeSkype1. Create a new business account in Skype Manager. For more information on creating
a new business account, please see the SkypeSkypeSkypeSkype ManagerManagerManagerManager UserUserUserUser GuideGuideGuideGuide.
2. Click ViewViewViewView profileprofileprofileprofile next to the name of the SIP Profile to which you want to add thebusiness account.
3. Click AddAddAddAdd aaaa numbernumbernumbernumber orororor businessbusinessbusinessbusiness accountaccountaccountaccount.
4. In the AddAddAddAdd businessbusinessbusinessbusiness accountaccountaccountaccount tab, enter the newly created business.
ZX50ZX50ZX50ZX50 SeriesSeriesSeriesSeries IPIPIPIP PBXPBXPBXPBX
V1.1 Editor:Yu 4th,June,2010 59
5. Click Confirm.
11.811.811.811.8 MakeMakeMakeMake aaaa testtesttesttest inboundinboundinboundinbound callcallcallcall fromfromfromfrom SkypeSkypeSkypeSkypeCall the business account’s Skype Name you created in step 7 from Skype.
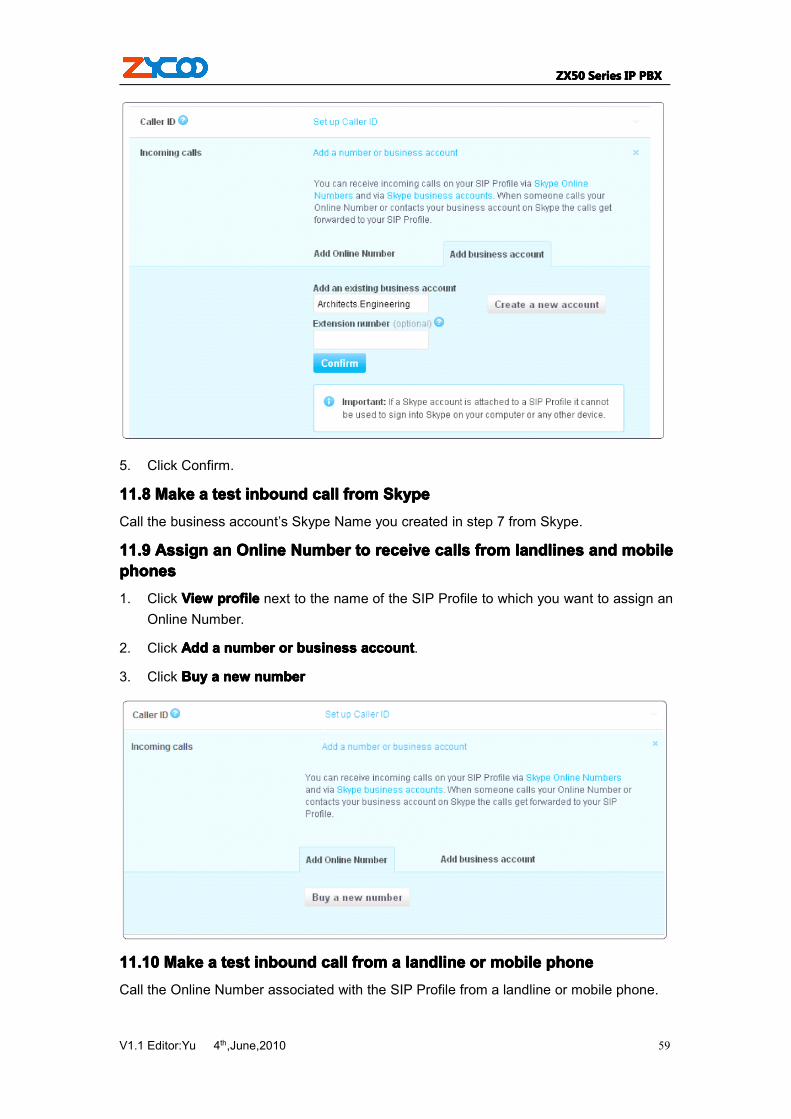
11.911.911.911.9 AssignAssignAssignAssign anananan OnlineOnlineOnlineOnline NumberNumberNumberNumber totototo receivereceivereceivereceive callscallscallscalls fromfromfromfrom landlineslandlineslandlineslandlines andandandand mobilemobilemobilemobilephonesphonesphonesphones1. Click ViewViewViewView profileprofileprofileprofile next to the name of the SIP Profile to which you want to assign an
Online Number.
2. Click AddAddAddAdd aaaa numbernumbernumbernumber orororor businessbusinessbusinessbusiness accountaccountaccountaccount.
3. Click BuyBuyBuyBuy aaaa newnewnewnew numbernumbernumbernumber
11.11.11.11.10101010 MakeMakeMakeMake aaaa testtesttesttest inboundinboundinboundinbound callcallcallcall fromfromfromfrom aaaa landlinelandlinelandlinelandline orororor mobilemobilemobilemobile phonephonephonephoneCall the Online Number associated with the SIP Profile from a landline or mobile phone.
ZX50ZX50ZX50ZX50 SeriesSeriesSeriesSeries IPIPIPIP PBXPBXPBXPBX
V1.1 Editor:Yu 4th,June,2010 60
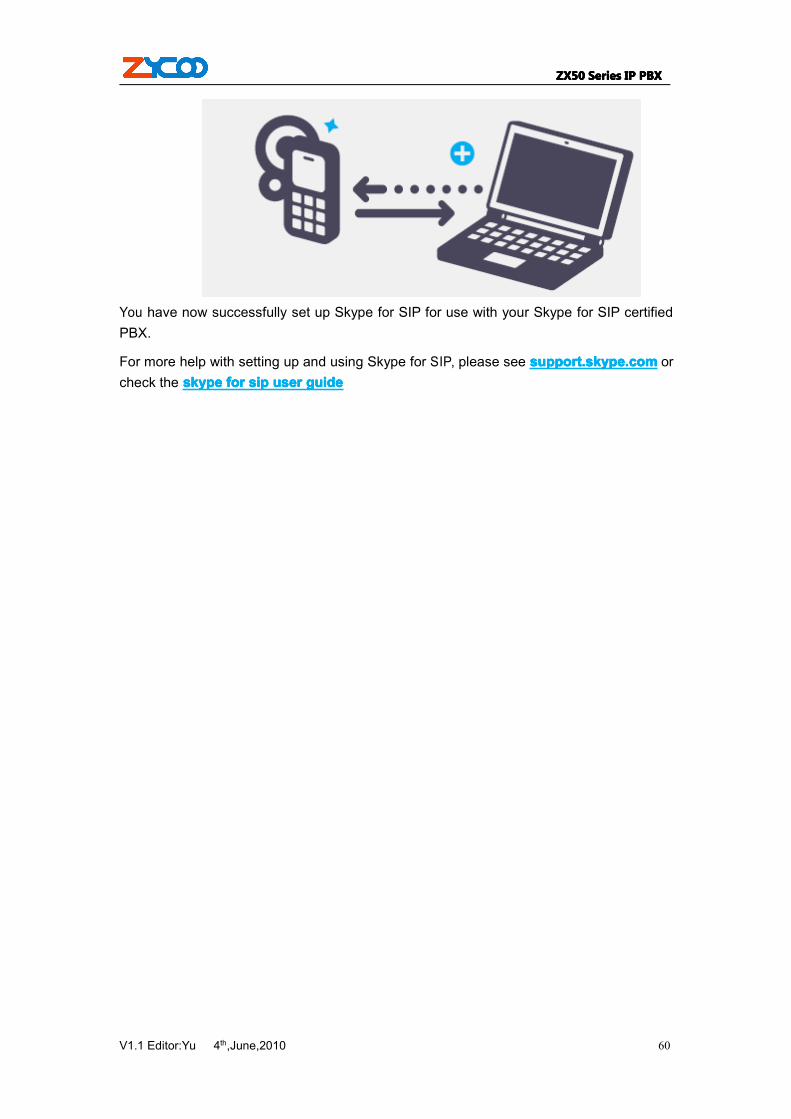
You have now successfully set up Skype for SIP for use with your Skype for SIP certifiedPBX.
For more help with setting up and using Skype for SIP, please see support.skype.comsupport.skype.comsupport.skype.comsupport.skype.com orcheck the skypeskypeskypeskype forforforfor sipsipsipsip useruseruseruser guideguideguideguide