internet telephony pbx system ipx-2200/ipx-2500
TRANSCRIPT

Internet Telephony PBX System IPX-2200/IPX-2500
Internet Telephony PBX
System
IPX-2200
IPX-2500
1

Internet Telephony PBX System IPX-2200/IPX-2500
Copyright
Copyright (C) 2016 PLANET Technology Corp. All rights reserved.
The products and programs described in this User’s Manual are licensed products of PLANET
Technology. This User’s Manual contains proprietary information protected by copyright, and
this User’s Manual and all accompanying hardware, software, and documentation are
copyrighted.
No part of this User’s Manual may be copied, photocopied, reproduced, translated, or reduced
to any electronic medium or machine-readable form by any means by electronic or mechanical
including photocopying, recording, or information storage and retrieval systems, for any
purpose other than the purchaser's personal use, and without the prior written permission of
PLANET Technology. Disclaimer
PLANET Technology does not warrant that the hardware will work properly in all environments
and applications, and makes no warranty and representation, either implied or expressed, with
respect to the quality, performance, merchantability, or fitness for a particular purpose.
PLANET has made every effort to ensure that this User’s Manual is accurate; PLANET
disclaims liability for any inaccuracies or omissions that may have occurred.
Information in this User’s Manual is subject to change without notice and does not represent a
commitment on the part of PLANET. PLANET assumes no responsibility for any inaccuracies
that may be contained in this User’s Manual. PLANET makes no commitment to update or
keep current the information in this User’s Manual, and reserves the right to make
improvements to this User’s Manual and/or to the products described in this User’s Manual, at
any time without notice.
If user finds information in this manual that is incorrect, misleading, or incomplete, we would
appreciate user comments and suggestions. CE Mark Warning
This is a class B device. In a domestic environment, this product may cause radio interference,
in which case the user may be required to take adequate measures. Energy Saving Note of the Device
This power required device does not support Standby mode operation. For energy saving,
please remove the DC-plug or push the hardware Power Switch to OFF position to disconnect
the device from the power circuit.
2

Internet Telephony PBX System IPX-2200/IPX-2500
Without removing the DC-plug or switching off the device, the device will still consume power
from the power circuit. In view of Saving the Energy and reducing the unnecessary power
consumption, it is strongly suggested to switch off or remove the DC-plug from the device if
this device is not intended to be active. WEEE Warning
To avoid the potential effects on the environment and human health as a result of
the presence of hazardous substances in electrical and electronic equipment, end
users of electrical and electronic equipment should understand the meaning of the
crossed-out wheeled bin symbol. Do not dispose of WEEE as unsorted municipal
waste and have to collect such WEEE separately.
Trademarks
The PLANET logo is a trademark of PLANET Technology. This documentation may refer to
numerous hardware and software products by their trade names. In most, if not all cases, their
respective companies claim these designations as trademarks or registered trademarks.
Revision
User’s Manual of PLANET Internet Telephony PBX System
Model: IPX-2200/IPX-2500
Rev: 1.0 (Jul., 2016)
3

Internet Telephony PBX System IPX-2200/IPX-2500
TABLE OF CONTENTS Chapter 1. Introduction........................................................................................... 8
1.1 Features ...................................................................................................... 10 1.2 Package Contents ....................................................................................... 13
1.2.1 Physical Specifications of IPX-2200.................................................. 13 1.2.2 Physical Specifications of IPX-2500.................................................. 15
1.3 Specifications .............................................................................................. 17 Chapter 2. Installation Procedure........................................................................ 19
2.1 Web Login ................................................................................................... 19 2.2 Configuring the Network Setting.................................................................. 20
Chapter 3. Basic Configuration ........................................................................... 22 3.1 Preparation Before Operation ..................................................................... 22 3.2 Before Making a Call ................................................................................... 22
3.2.1 System Information ........................................................................... 22 3.2.2 Operator ............................................................................................ 24 3.2.3 Basic Configuration........................................................................... 25
3.3 Outbound Call ............................................................................................. 31 3.3.1 Trunks ............................................................................................... 31 3.3.2 Outbound Routes.............................................................................. 35
3.4 Inbound Call ................................................................................................ 39 3.4.1 Inbound Routes................................................................................. 39 3.4.2 IVR .................................................................................................... 41 3.4.3 IVR Prompts...................................................................................... 43 3.4.4 Call Queue ........................................................................................ 44 3.4.5 Ring Groups ...................................................................................... 48 3.4.6 Black List........................................................................................... 49 3.4.7 Do Not Disturb................................................................................... 50 3.4.8 Time-based Rules ............................................................................. 50
3.5 Advanced .................................................................................................... 51 3.5.1 Options.............................................................................................. 51 3.5.2 Virtual Fax ......................................................................................... 59 3.5.3 Voicemail........................................................................................... 60 3.5.4 SMTP Setting .................................................................................... 61 3.5.5 Conference ....................................................................................... 62 3.5.6 Music Settings................................................................................... 65 3.5.7 DISA.................................................................................................. 66 3.5.8 Follow Me.......................................................................................... 67
4

Internet Telephony PBX System IPX-2200/IPX-2500
3.5.9 Call Forward...................................................................................... 68 3.5.10 One Number Stations........................................................................ 71 3.5.11 Paging And Intercom......................................................................... 72 3.5.12 Web Extensions ................................................................................ 73 3.5.13 PIN Set.............................................................................................. 74 3.5.14 Call Recording................................................................................... 75 3.5.15 Smart DID ......................................................................................... 76 3.5.16 Call Back........................................................................................... 78 3.5.17 Phone Book ...................................................................................... 79 3.5.18 LDAP Server ..................................................................................... 80 3.5.19 Feature Codes .................................................................................. 82 3.5.20 Phone Provision................................................................................ 84
Chapter 4. Network Settings ................................................................................ 86 4.1 Network ....................................................................................................... 86
4.1.1 IPv4 Settings..................................................................................... 86 4.1.2 IPv6 Settings..................................................................................... 88 4.1.3 VLAN Settings................................................................................... 89
4.2 Static Routing .............................................................................................. 90 4.3 VPN Server ................................................................................................. 91
4.3.1 L2TP VPN ......................................................................................... 93 4.3.2 PPTP VPN ........................................................................................ 94 4.3.3 OpenVPN.......................................................................................... 96 4.3.4 IPSec VPN ........................................................................................ 98
4.4 VPN Client................................................................................................. 100 4.4.1 L2TP VPN Client ............................................................................. 100 4.4.2 PPTP VPN Client ............................................................................ 101 4.4.3 N2N VPN Client .............................................................................. 101 4.4.4 IPSec VPN Client (Tunnel mode).................................................... 102
4.5 DHCP server ............................................................................................. 103 4.5.1 DHCP Service ................................................................................. 103 4.5.2 DHCP Client List ............................................................................. 104 4.5.3 Static MAC ...................................................................................... 104
4.6 DDNS Settings .......................................................................................... 105 4.7 SNMPv2 Settings ...................................................................................... 107 4.8 TR069........................................................................................................ 107
Chapter 5. Security ............................................................................................. 109 5.1 Firewall ...................................................................................................... 109 5.2 Service ....................................................................................................... 111
5

Internet Telephony PBX System IPX-2200/IPX-2500
5.3 Fail2Ban .....................................................................................................112 Chapter 6. Report .................................................................................................115
6.1 Record Status.............................................................................................115 6.1.1 SIP User Status................................................................................115 6.1.2 IAX2 User Status..............................................................................115 6.1.3 SIP Trunk Status ..............................................................................116 6.1.4 IAX2 Trunk Status ............................................................................116
6.2 Fax List.......................................................................................................117 6.3 Record List .................................................................................................117
6.3.1 Call Recording..................................................................................117 6.3.2 Conferences.....................................................................................118 6.3.3 One Touch Recording ......................................................................119 6.3.4 Call Recording Playback..................................................................119
6.4 Call Logs ................................................................................................... 120 6.5 System logs............................................................................................... 121
Chapter 7. System............................................................................................... 123 7.1 Time Settings............................................................................................. 123
7.1.1 NTP................................................................................................. 123 7.1.2 Manual Time Set ............................................................................. 124
7.2 Module Settings......................................................................................... 124 7.3 Data Storage ............................................................................................. 125
7.3.1 Data Storage ................................................................................... 125 7.4 Management ............................................................................................. 127
7.4.1 Change Password........................................................................... 127 7.4.2 Set System Voice Prompts.............................................................. 127
7.5 Backup ...................................................................................................... 128 7.5.1 Take a Backup ................................................................................ 128 7.5.2 Upload Backup File ......................................................................... 129
7.6 Troubleshooting......................................................................................... 129 7.6.1 Ping................................................................................................. 129 7.6.2 Traceroute....................................................................................... 130 7.6.3 Tcpdump ......................................................................................... 130 7.6.4 Channel Monitor.............................................................................. 131
7.7 Reset & Reboot ......................................................................................... 132 7.7.1 Reset............................................................................................... 133 7.7.2 Reboot ............................................................................................ 133
7.8 Upgrade..................................................................................................... 133 7.8.1 Web Upgrade .................................................................................. 133
6

Internet Telephony PBX System IPX-2200/IPX-2500
7.8.2 TFTP Upgrade ................................................................................ 134 Chapter 8. Operating Instructions..................................................................... 136
8.1 How to connect the IP PBX to the Internet ................................................ 136 8.2 How to combine two IP PBXs in a different network ................................. 137 8.3 How to resolve the problem about hearing one side only ......................... 139 8.4 How to use soft phone in IPX-2200 or IPX-2500....................................... 140
8.4.1 Softphone on Windows PC ............................................................. 140 8.4.2 Softphone on Android Phone, iPhone or iPad................................. 141
8.5 How to use Skype account in IPX-2200 or IPX-2500................................ 142
7

Internet Telephony PBX System IPX-2200/IPX-2500
Chapter 1. Introduction
Intuitive, Ease-of-Use IP PBX Machine Management
PLANET IPX-2200/IPX-2500 IP PBX telephony system is SIP-based for optimizing
communications among the small and medium businesses. The IPX-2200 and IPX-2500 are
able to accept 200/500 user registrations, and easy to manage a full voice over IP system with
the convenience and cost advantages.
Off-net Calling Capability, Call Restriction, Call Access Control
The IPX-2200/IPX-2500 integrates up to 8 calls via the IPX-21FO (4 FXO) and IPX-21GS (4
GSM) modules to form a feature-rich PBX system that supports seamless communications
between the existing PSTN calls, analog, IP phones and SIP-based endpoints.
Replacing Old PBX Easily without New Wiring
Cost-effective, easy-to-install and simple-to-use, the IPX-2200/IPX-2500 converts standard
telephones to IP-based networks. It enables the service providers and enterprises to offer
users traditional and enhanced telephony communication services via the existing broadband
connection to the Internet or corporation network.
With the IPX-2200/IPX-2500, home users and companies are able to save the installation cost
and extend their past investments in telephones, conferences and speakerphones. The
IPX-2200/IPX-2500 can be the bridge between traditional analog systems and IP network with
an extremely affordable investment.
Distributed VoIP Network Infrastructure
For the new-generation communication age, the IPX-2200/IPX-2500 supports IPv6 and VPN
(client/server) connection to provide users with more flexible and advantageous
8

Internet Telephony PBX System IPX-2200/IPX-2500
communications products. With PLANET DDNS function, the IPX-2200/IPX-2500 also helps
users to apply and remember the login information easier. Moreover, its multiple language
feature helps user to quickly and friendly manage the system. The IPX-2200/IPX-2500
supports Lync server to which smart phone (using third-party app) and analog phone are
connected via its communication with other devices of Lync server.
Standard Compliance
Compliant with the Session Initiation Protocol 2.0 (RFC 3261), the IPX-2200/IPX-2500 are
able to broadly interoperate with equipment provided by VoIP infrastructure providers, thus
enabling them to provide their customers with better multi-media exchange services.
Green IP Office
Virtual fax functionality on IPX-2200/IPX-2500 system allow faxes to be sent and received
without requiring a fax machine. This useful feature will allow businesses to demonstrate their
green credentials while at the same time reduce fax related costs across the enterprise.
Inbound faxes can be automatically received and converted to TIF files and saved in the
IPX-2200/IPX-2500 system. It is also possible to configure the IPX-2200/IPX-2500 system to
send the TIF files to a user’s email box. Sending outbound faxes is as easy as uploading a file
from the extension user web portal, thus creating a paperless or green office.
Full Security with VPN Support
The IPX-2200/IPX-2500 VPN securely and cost-effectively connects geographically disparate
offices of an organization, creating one cohesive virtual network. The IPX-2200/IPX-2500 VPN
technology is also used by ordinary Internet users to connect to proxy servers for the purpose
of protecting one's identity. They include VPN server and client function that can support users
full security login.
9
Internet Telephony PBX System IPX-2200/IPX-2500
1.1 Features
System Highlights
60 concurrent calls and up to 200 registers (For IPX-2200)
100 concurrent calls and up to 500 registers (For IPX-2500)
HD voice codec G.722 for perfect voice quality
Virtual Fax for green office
Voicemail to Email for not missing any important message
Paging and intercom function strengthens work efficiency.
Built-in SIP Proxy Server following RFC 3261
Multiple Languages of GUI for international business
Web-based Control Panel for easy configuration and management of the system.
Hardware Echo Cancellation module for great and smooth communication.
Strong security features protect your system from hacking.
Supports maximum 8 ports for FXO/GSM (on 2 slots)
Records voice and voicemail to external USB disk
Supports Lync server
Codec and Protocol
SIP 2.0 (RFC 3261), IAX2 compliant
Audio Codec: G.722/G.711-Ulaw/G.711-Alaw/G.726/G.729/GSM/SPEEX
Video Codec: H.261/H.263/H.263+/H.264
DTMF: RFC 2833, SIP info, in-band
Network and Security Features
DDNS Client (PLANET DDNS, Dyndns.org, No-ip.com, zoneedit.com,
freedns.afraid.org, www.oray.com, 3322.org)
DHCP Server/SNMP v1/v2
IEEE 802.1Q of VLAN
IPv4/IPv6, SIP over IPv6
Manual Configuration of Static Route Table
Troubleshooting (Ping, Traceroute)
VPN Server (L2TP/PPTP/OpenVPN/IPSec, up to 20 connections for VPN clients)
VPN Client (L2TP/PPTP/OpenVPN/N2N/IPSec)
Refuse SIP Register DoS
Refuse Abort Invite Dos
10

Internet Telephony PBX System IPX-2200/IPX-2500
Refuse SSH Login DoS
Firewall/SRTP
Enhances HTTPS connection
PBX Features
Auto-Provision (PLANET/Cisco IP Phone)
Black List
BLF (Busy Lamp Field), Speed Dial
CDR (Call Detailed Record) (20000 records)
Conference Room (36 rooms)
Call Queue Record, Ring Group Record
DoD (Direct Outward Dialing) and DID (Direct Inward Dialing) numbers
DISA (Direct Inward System Access)
DND (Do Not Disturb)
Feature Codes, Flash Operation Panel
Flexible Dial Plan, Follow Me
IVR (Interactive Voice Responses)
LDAP Server for phonebook
Multi-language System Prompt
Multiple Languages of GUI
One Number Stations
Phone Book/PIN Set
Phonebook/LDAP (5000 contacts)
Record Files Download
Ring Group, SIP Trunk
Skype for SIP/Smart DID/System Log/System Backup
T.38 fax (pass-through)/time-based rule
Virtual Fax/Voicemail & Voicemail to Email
WebRTC
Call Features
Attend Transfer, Call Waiting
Call Back, Call Forward, Call Group
Call Hold, Call Paging and Intercom
Call Park, Call Pickup, Callback
Call Center Queues (36)
Call Record, Call Route, Blind Transfer
11

Internet Telephony PBX System IPX-2200/IPX-2500
Caller ID, Dial by Name
Customized IVR, On-hold Music, Transfer
Three-way Conferencing, Video Call
12

Internet Telephony PBX System IPX-2200/IPX-2500
1.2 Package Contents
Thank you for purchasing PLANET Internet Telephony PBX system, IPX-2200 and IPX-2500.
Open the box of the Internet Telephony PBX system and carefully unpack it. The box should
contain the following items:
Internet Telephony PBX system unit x 1
Quick Installation Guide x 1
User’s Manual CD x 1
Power Cord x 1
RJ45 x 1
Bracket x 2
If any of the above items are damaged or missing, please contact your dealer immediately.
1.2.1 Physical Specifications of IPX-2200 Dimensions
Dimensions (W x D x H) 343 x 154 x 35 mm
Weight 1.4 kg (gross weight), 1.8 kg (with package)
Front Panel
Rear Panel
LED definitions
Front Panel LED Status Description
PWR Steady Green
Off
PBX Power ON
PBX Power OFF
SYS
Blinking Green
On
Off
System is working
System doesn’t boot
System failure
13

Internet Telephony PBX System IPX-2200/IPX-2500
Front Panel LED Status Description
WAN
Blinking Green
On
Off
Data transfer
PBX network connection is established
Waiting for network connection
LAN
Blinking Green
On
Off
Data transfer
PBX network connection is established
Waiting for network connection
FXO
Steady Red
Flashing
Off
Ready/Standby
Ringing
Module not available
Physical interfaces description
1 Power Switch Switch the power on or off
2 Power Cord AC 100~240V, 50/60Hz, 1.5A max
3 WAN/LAN
The WAN/LAN port supports auto negotiating Fast Ethernet
10/100BASE-TX networks. The WAN port allows your IP PBX to
be connected to an Internet Access device, e.g., router, cable
modem or ADSL modem through a Cat5 twisted-pair Ethernet
cable.
4 HDMI Port For video output (factory use)
5 USB For external store device to store voice and voicemail
6 Audio In/Out For external paging
7 Module
Slot 1/Slot 2
2 external slots with compliant FXO/FXS/GSM module
-FXO module is connected to PBX or CO line with RJ11 analog
line. FXO port is connected to the extension port of a PBX or
directly connected to a PSTN line of carrier
-GSM module is connected to Global System for Mobile
Communications (GSM) with SIM card
Supporting 2 slots, user can buy expansion module like IPX-21FO (4FXO) or
IPX-21GS (4GSM) for extending port service.
14

Internet Telephony PBX System IPX-2200/IPX-2500
1.2.2 Physical Specifications of IPX-2500 Dimensions
Dimensions (W x D x H) 343 x 154 x 35 mm
Net Weight 1.4 kg (gross weight), 1.8 kg (with package)
Front Panel
Rear Panel
LED definitions
Front Panel LED Status Description
PWR Steady Green
Off
PBX Power ON
PBX Power OFF
SYS
Blinking Green
On
Off
System is working
System doesn’t boot
System failure
WAN
Blinking Green
On
Off
Data transfer
PBX network connection is established
Waiting for network connection
LAN
Blinking Green
On
Off
Data transfer
PBX network connection is established
Waiting for network connection
FXO
Steady Red
Flashing
Off
Ready/Standby
Ringing
Module not available
GSM
Steady Red
Flashing
Off
Ready/Standby (SIM card inserted)
Ringing
No SIM card inserted
FXS
Steady Green
Flashing
Off
Ready/Standby
Ringing
Module not available
15

Internet Telephony PBX System IPX-2200/IPX-2500
Physical interfaces description
1 Power Switch Switch the power on or off
2 Power Cord AC 100~240V, 50/60Hz, 1.5A max
3 WAN/LAN
The WAN/LAN port support auto negotiating Fast Ethernet
10/100BASE-TX networks. The WAN port allows your IP PBX to
be connected to an Internet Access device, e.g., router, cable
modem or ADSL modem through a Cat5 twisted-pair Ethernet
cable
4 HDMI Port For video output (factory use)
5 USB For external store device to store voice and voicemail
6 Audio In/Out For external paging
7 Module
Slot 1/Slot 2
2 external slots with compliant FXO/FXS/GSM module
-FXO module is connected to PBX or CO line with RJ11 analog
line. FXO port is connected to the extension port of a PBX or
directly connected to a PSTN line of carrier
-GSM module is connected to Global System for Mobile
Communications (GSM) with SIM card
Supporting 2 slots, user can buy expansion module like IPX-21FO (4FXO) or
IPX-21GS (4GSM) for extending port service.
16

Internet Telephony PBX System IPX-2200/IPX-2500
1.3 Specifications
Product
IPX-2200
Internet Telephony PBX system
(200 SIP Users registrations)
IPX-2500
Internet Telephony PBX system
(500 SIP Users registrations)
Hardware Specifications
WAN 1 x 100BASE-TX RJ45 for WAN, connecting to broadband modem or a WAN router
LAN 1 x 100BASE-TX RJ45 for LAN, connecting to a LAN switch
HDMI Port For video output (factory use)
USB For external store device to store voice and voicemail
Audio In/Out For external paging
2 Slots Supports maximum 8 ports (FXO/GSM) USB Store data for external disk
LED Indications
PWR: 1, LNK/Off SYS: 1, LNK/Off WAN: 1, LNK/Off LAN: 1, LNK/Off SLOT: 2, FXO/GSM (Red), FXS (Green)
Dimensions (W x D x H) 343 x 154 x 35 mm
Power Requirements 100 - 240 VAC 100V - 240 VAC
EMC/EMI CE, FCC Class B, RoHS
Protocols and Standard Standard SIP 2.0 (RFC3261), IAX2
Protocols
RFC 793 TCP RFC 826 ARP RFC 1034, 1035 DNS RFC 2068 HTTP RFC 2131 DHCP RFC 2516 PPPoE RFC 3261, RFC 3311, RFC 3515 RFC 3265, RFC 3892, RFC 3361 RFC 3842, RFC 3389, RFC 3489 RFC 3428, RFC 2327, RFC 2833 RFC 2976, RFC 3263
Voice Codec G.722, G.711-Ulaw, G.711-Alaw, G.726, G.729, GSM, SPEEX Video Codec H.261, H.263, H.263+, H.264
Fax over IP
T.38 Fax (pass-through)
T.38 support is dependent on fax machine, SIP provider and network/transport resilience.
Voice Processing DTMF detection and generation In-band and RFC 2833, SIP info
17

Internet Telephony PBX System IPX-2200/IPX-2500
Protocols SIP 2.0 (RFC-3261), TCP/IP, UDP/RTP/RTCP, HTTP/HTTPS, ICMP, ARP, DNS, DHCP, NTP/SNTP, PPP, PPPoE
System Capacity
System Capacity
60 concurrent call legs Up to 200 IP phone
registers/extensions Recording and Voicemail
(GSM/default): 1500 hours Wav: 150 hours
100 concurrent call legs Up to 500 IP phone
registers/extensions Recording and Voicemail
(GSM/default): 75000 hours Wav: 7500 hours
Network and Configuration Access Mode Static IP, PPPoE, DHCP Environment
Operating Environment 0~40 degrees C 5~95% humidity
18

Internet Telephony PBX System IPX-2200/IPX-2500
Chapter 2. Installation Procedure
2.1 Web Login
Step 1. Connect a computer to a LAN port on the IPX-2200 or IPX-2500. Your PC must be set
up to the same domain of 192.168.0.X as that of the IPX-2200 or IPX-2500.
Step 2. Start a web browser. To use the user interface, you need a PC with Internet Explorer
(version 8 and higher), Firefox, or Safari (for Mac).
Step 3. Enter the default IP address of the IPX-2200 or IPX-2500: https://192.168.0.1 in the
URL address box.
Step 4. Enter the default user name admin and the default password admin, and then click
Login to enter Web-based user interface.
(Default IP)
Default LAN IP: https://192.168.0.1
Default WAN IP: https://172.16.0.1
Default User Name: admin
Default Password: admin
Figure 2-1. Login page of the IPX-2200/IPX-2500
For security reason, please change and memorize the new password after this first
setup.
19

Internet Telephony PBX System IPX-2200/IPX-2500
2.2 Configuring the Network Setting
Step 1. Go to Network Settings → Network
20
Internet Telephony PBX System IPX-2200/IPX-2500
Step 2. Edit your WAN port IP information.
There are three types of Ethernet port connection. They are Static IP, DHCP and PPPoE
(Point-to-Point Protocol over Ethernet). You can find detailed setting process in the user
manual.
Figure 2-4. Selection of IP Connection Type
21

Internet Telephony PBX System IPX-2200/IPX-2500
Chapter 3. Basic Configuration
3.1 Preparation Before Operation
What kind of IP phone can be used with the IP PBX IPX-2200 and IPX-2500?
Our IPX-2200 and IPX-2500 is based on SIP 2.0 (RFC 3261); any IP phone model based
on the same protocol can work with the IPX-2200 and IPX-2500.
3.2 Before Making a Call
3.2.1 System Information
1. To login to the IPX-2200 or IPX-2500, your PC must use the same domain as the
LAN IP address of the IPX-2200 or IPX-2500.
2. For security reason, please modify the user name and password after you login.
You can modify it on this page: “System”---“Management”
Default LAN IP: https://192.168.0.1
Default WAN IP: https://172.16.0.1
Default User Name: admin
Default Password: admin
22

Internet Telephony PBX System IPX-2200/IPX-2500
3. Every time after saving the change, please press “Activate Changes” to make
modification effective.
If user name and password are right, this following page will be displayed:
1 Network WAN/LAN IP and MAC will be displayed
2 Storage Total storage and used storage will be displayed
3 Slots Info Channel information will be based on the product model
4 Device Info Product Model and System Version will be displayed
1. If FXO is connected, the slot color and the front panel LED will be red and steady
red, respectively.
2. If FXS is connected, the slot color and the front panel LED will be green and
steady green, respectively.
23

Internet Telephony PBX System IPX-2200/IPX-2500
Commonly Used Button
On the home page, besides the system info, there are other function buttons as shown below:
1 Logout Logout the Web panel
2 Activate Change Activate the changes for your current configuration
System Menu
System Menu includes the following sub menu:
1 Home Display device information
2 Operator Extension/Trunk/Channel Status
3 Basic Basic configuration on extension, trunks, etc
4 Inbound Control Configuration of Inbound Route, IVR and Black List, etc
5 Advanced Configuration of extension's default information,
Conference Call, Call Transfer, Function Key, etc.
6 Network
Settings
Configuration of Routing, Network, VPN, DHCP and other
related network parameters
7 Security Configuration of Firewall, SSH, FTP.
8 Report Record List, Call Logs and System Logs.
9 System Time Settings, Management, Back Up and Upgrade, etc.
3.2.2 Operator
24

Internet Telephony PBX System IPX-2200/IPX-2500
Display all the Extension, VoIP Trunk and Slot information.
About extension:
1 Idle
2 Ringing
3 In use
4 Hold
5 Unavailable
3.2.3 Basic Configuration Add new extensions
You can add more extensions one by one by clicking the “New User” button or bulk add extensions by clicking the “Batch Add” button.
25

Internet Telephony PBX System IPX-2200/IPX-2500
Field description
Item Explanation
Extension
Start/Extension End
These two fields define the new extension range to be generated.
Dial Plan Select a same dial plan for these new extensions.
Password Can be different random passwords consisting of numbers, letters
and special characters (suggested) by checking the “Random”
checkbox. Or you can specify the same password for all new
extensions.
Other Extension Ranges
In Planet IP PBX system, we limited the user extension range within 800 and 899. If you want
more extensions or you want the extensions in other ranges you need to change the extension
range before you can add new extensions.
Please navigate to web menu Advanced->Options->General.
In the “Extension Preferences” section you can change the user extension range.
26

Internet Telephony PBX System IPX-2200/IPX-2500
Configure Extensions
Planet IP PBX supports SIP/IAX2 and analog extension; configure extension on this page:
【Basic】----【Extensions】
By default, 10 existing extension numbers have already been given. They are from 800 to 809.
27

Internet Telephony PBX System IPX-2200/IPX-2500
Click【New User】to see the extension configuration interface as shown below:
Extension Settings
Item Explanation
SIP/IAX2 Choose extension protocol.
Name Extension Name (English Character Only), e.g. Tom.
Extension Extension Number connected to the phone, e.g. 888.
Password Random password. (6-16 digits, e.g.123456)
Outbound CID Override the caller ID when dialing out with a trunk.
Dial Plan Please choose the Dial Plan which is defined in the menu “Outbound
Routes”.
Analog Phone Please select the related FXS port for your analog phone.
28

Internet Telephony PBX System IPX-2200/IPX-2500
Item Explanation
Voicemail Select this option to open the voicemail account
VM Password Set password for Voicemail, e.g. "1234"
Delete VMail Check this option to delete voicemail from system after it’s sent to
mail box.
(Fax/Voicemail)
Extension user’s mail box, which is used for receiving fax or
voicemail (you need to open the function to fax to email/voicemail),
e.g. [email protected]
Web Manager It’s allowed to login Extension Management Panel to manage
extension like voicemail, call recording, call transfer, etc. when you
select this option.
Agent Check this option to set this extension user as agent.
Call Waiting Enable call waiting
Allowing Being Spied Check this option to allow being spied.
NAT Check this option if extension user or the phone is located after the
NAT (Network Address Translation) available gateway.
Pickup Group Select the Pickup Group which the extension user belongs to.
Mobility Extension After checking this option, you must set mobility extension number.
User can make calls to the IP PBX server with this mobility number,
and have all rights of this extension, e.g. Outbound Call, Internal Call,
Listen to the voicemail.
Transport Select the Transport Protocol: UDP, TCP, TLS
SRTP Enable SRTP
DTMF Mode Default DTMF is rfc2833. It can be changed if necessary.
Video Call Check to enable video call for this extension. And select the audio
codecs you need to use.
Permit IP Set computer permitted IP to visit this IP PBX, e.g.,192.168.1.77 or
192.168.10.0/255.255.255.0. Computer with other IPs is not allowed
to visit this IP PBX.
Audio Codec Select what audio codec you need to use.
1. There are a few default extensions whose number starts with "8XX". You can add
or delete extension as required
2. Maximum extensions: 500 on IPX-2500; 200 on IPX-2200.
3. For security reason, the default password consists of random characters or
numbers, e.g., BjCnWsNJ-d, and every time when you reset to default system, it
will randomly have a new password again
29
Internet Telephony PBX System IPX-2200/IPX-2500
Upload/Download Extensions
Click【Upload/Download Extensions】to add extensions as shown below:
Upload Extensions: Here you can upload .csv or .txt file to generate extensions.
Download Extensions Template: Here you can download a template file in .csv or .txt
format. Inside there are examples given, you can follow the examples to add your desired
new extensions in the same format, and the new file can be used to upload to IP PBX
system to generate new extensions.
Download Extensions (.csv): Here you can download the existing extensions in the
system for backup. The downloaded CSV file can be used for extension list recovery.
30

Internet Telephony PBX System IPX-2200/IPX-2500
3.3 Outbound Call
3.3.1 Trunks If you want to set up outbound call to connect to PSTN (Public Switch Telephone Network),
GSM (Global System for Mobile Communications) or VoIP provider, please configure on this
page: 【Basic】->【Trunks】
Planet IP PBX supports 3 kinds of trunks: VoIP Trunks, FXO Trunks and GSM Trunk.
VoIP Trunks
1.Click【VoIP Trunk】->【New VoIP Trunk】:
31

Internet Telephony PBX System IPX-2200/IPX-2500
Planet IP PBX can register as a SIP user agent to a SIP proxy (provider). If you have
subscribed VoIP service from ITSP, then with the account details given by them you can setup
a VoIP trunk on Planet IP PBX system for the user extensions to share this trunk to make
outbound phone calls.
Item Explanation
Description Define the VoIP (figure or character).
Protocol Select protocol for outbound route, SIP or IAX2.
Host Set host address (provided by VoIP Provider).
Maximum Channels Set maximum channels for simultaneous call. (Only for outbound call;
“0” = no limitation).
Prefix The prefix will be added in front of your dialed number automatically
when the trunk is in use.
Caller ID This Caller ID will be displayed when user makes an outbound call.
Note: This function must be supported by local provider.
Without
Authentication
If you don’t need the Authentication when connecting the IP PBX,
please check this option.
User Name User Name provided by VoIP Provider.
Authuser The optional authorization user for the SIP server
Password Password provided by VoIP Provider.
Advanced Options Advanced options for this trunk, e.g., codec, dial plan, etc.
Domain The domain is where you register your username.
Insecure Default value is “port, invite”; “port”-- Allow matching of peer by IP
address without matching port number; “invite”-- Do not require
authentication of incoming INVITEs.
From User Fromuser = yourusername; Many SIP providers requires this.
Qualify (sec) Asterisk sends a SIP OPTIONS command regularly to check that the
device is still online. Default value is 2 (sec).
DID number Self defined, it can be used to set up number DID.
Transport Default transport type for SIP messages
DTMF Mode Used to tell the system how to detect the DTMF (Dual Tone Multi
Frequency) key press. Choices are inband, rfc2833, or info. By
default, we use RFC2833.
NAT With this option enabled Asterisk may override the address/port
information specified in the SIP/SDP messages, and use the
information (sender address) supplied by the network stack instead.
32

Internet Telephony PBX System IPX-2200/IPX-2500
Item Explanation
Context Custom dial plan for this trunk, by default it’s using the “default” dial
plan. Configure only if this trunk is for branch office integration, so the
calls coming from the other side can dial out from this IPPBX trunk
directly. DO NOT change it unless you know how exactly this option
works.
Language You can choose a language here; the system will indicate the
incoming calls from this trunk with the voice prompts you selected.
Audio Codecs Select the audio codec/codecs the provider can support.
Video Codecs If the ITSP supports video call, you can enable compatible video
codecs here for video phone calls.
Except the configuration options related to the service provider and your account
details, please do not change the trunk advanced parameters if you are not familiar
with. After the SIP trunk is successfully added you can see it’s listed here on this
page
You can configure the Analog/GSM line through PLANET IP PBX. The same analog line can’t
be used in multiple trunks. If you don't have available analog/GSM trunk, you can't set up
trunk.
2) FXO/GSM Trunk
Click【FXO/GSM Trunk】->【New FXO/GSM Trunk】:
On the IPPBX front panel, red LED indicates the RJ11 interface is FXO. You should attach the
telephone wire from your telecom to the FXO ports. Once connected you should be able to see
the connection status on the Operator page in the “FXO/FXS/GSM Ports” section.
To be able to use these lines connected on FXO ports to make phone calls, you have to use
them to create trunk/trunks first. Navigate to web menu Basic->Trunks->FXO/GSM Trunks.
33

Internet Telephony PBX System IPX-2200/IPX-2500
Click the “New FXO/GSM Trunk” button and you’ll see available port numbers that can be
used.
Item Explanation
Description Define the description for this trunk (figure or character).
Lines Available FXO and GSM ports.
Prefix The numbers you dialed will first be manipulated by the dial rules,
while the manipulated numbers reached the trunk before finally
sending out to this prefix, which will be added to the numbers and
then send out through this trunk. Usually you don’t need this prefix.
Please leave this field blank.
Call Method If in this trunk you have more than 1 FXO/GSM port selected, then
this parameter defines how to use these ports for outbound phone
calls.
Busy Detection Enable busy tone detection; it is also possible to specify how many
busy tones to wait for before hanging up.
Busy Count Specify how many busy tones to wait for before hanging up,
configurable only if Busy Detection is enabled.
Input Volume The volume of the calls from FXO channel/channels which have
been received.
Output Volume The volume of the calls from FXO channel/channels which have
been made.
Call Progress If turned on, call progress attempts to determine answer, busy, and
ringing on phone lines. This feature is HIGHLY EXPERIMENTAL and
can easily detect false answers so don't count on it being very
accurate.
34

Internet Telephony PBX System IPX-2200/IPX-2500
Item Explanation
Progress Zone Progress zone also affects the pattern used for busy detection, only
effective when Call Progress is turned on.
Busy Pattern If busy detect is enabled, it is also possible to specify the cadence of
your busy signal.
Language You can choose a language here; the system will indicate the
incoming calls from this trunk with the voice prompts you selected.
Answer on Polarity
Switch
For FXO (FXS signal) ports watch for a polarity reversal to mark
when an outgoing call is answered by the remote party.
Hang up on Polarity
Switch
In some countries, a polarity reversal is used to signal disconnect of
a phone line. If the hang up polarity switch option is selected, the call
will be considered "hung up" on a polarity reversal.
3) GSM Trunk
If you have ordered GSM modules for your IP PBX, the user extensions will be able to make
and receive phone calls from the mobile network. You have to insert the SIM cards into the
SIM slots of the GSM modules (Called IPX-21GS) and then install the modules to the IP PBX
module slots. Antennas should be properly installed and placed in the open space for better
signal reception. After this, power on the IP PBX and you’ll be able to configure GSM trunks
the same as you configure FXO trunks.
GSM Specifications
Module Working Frequencies
IPX-21GS GSM/GPRS 850/900/1800/1900MHz
3.3.2 Outbound Routes Outbound Routes enable you to tell Planet IP PBX which Trunks (phone lines) to use when
people dial external telephone numbers. A simple installation will direct Planet IP PBX to send
all calls to a single trunk. However, a complex setup could have an outbound route for
emergency calls, another outbound route for local calls, another for long distance calls, and
perhaps even another for international calls.
With the above mentioned possibilities, you may already have several trunks configured in the
Planet IP PBX system. To be able to use different trunks for outbound phone calls, you’ll have
to configure several dial rules and maybe also several dial plans.
35
Internet Telephony PBX System IPX-2200/IPX-2500
Please configure on this page: 【Basic】->【Outbound Routes】
Dial rules
On this page, user can configure the basic match pattern of the outbound routes and create
different dial plans. Please configure by clicking【Add a Dial Rule】
Item Explanation
Rule Name A name for this dial rule
PIN set A collection of PIN codes for granting outbound phone calls.
Record in CDR Record the PIN codes used for outbound phone calls along with the
user extension number and the dialed numbers.
Call Duration Limit Specify how long the calls can be made using this dial rule.
Time Rule Set a time condition when this dial rule can be used.
36

Internet Telephony PBX System IPX-2200/IPX-2500
Item Explanation
Available Trunks All existing trunks in the IPPBX system.
Selected Trunks Trunk/Trunks can be used by this dial rule.
Custom Pattern Dial patterns act like a filter for matching numbers dialed with trunks.
The various patterns you can enter are similar to Asterisk's definition
of them:
X — Refers to any digit between 0 and 9
N — Refers to any digit between 2 and 9
Z — Any digit that is not zero. (e.g. 1 to 9)
. — Wildcard. Match any number of anything. Must match
*something*.
Delete ____ digits
prefix from the front
and auto-add
________ digit
before dialing
The first blank is to strip some digit/digits before dialing out. Here you
need to fill in a count of number. The second blank is to prepend
some digit/digits before dialing out. Here you need to fill in the exact
number to be added in front of the dialed number. For example a
user dialed 912345678 using the dial rule introduced above, the
prefix 9 at the first digit will be removed, and 00 will be added, so
eventually the user will call the number 0012345678.
Dial plans
There’s a default dial plan already existed in the IP PBX system. Normally you just have to
click the “Edit” button on the default dial plan “DialPlan1” and tick on all dial rules to enable to
the extension users to call any destinations using the trunk lines of the IP PBX system.
37

Internet Telephony PBX System IPX-2200/IPX-2500
User can create dial rule for dial plan on this page:
The calling rules in the left column are for external calls and calling rules in the right column
are for internal calling. If you want to restrict some uses from calling out through some trunk
lines or you don’t want them to be able to call some internal destinations, you can create new
dial plan by clicking the “New DialPlan” button.
In the new dial plan you disable the rules you don’t want others to use and save. After this on
the extension configure page give them different dial plans; then they have different dial
permissions.
38

Internet Telephony PBX System IPX-2200/IPX-2500
3.4 Inbound Call
3.4.1 Inbound Routes When a call is made from outside, you want to forward this call to an extension or IVR. This
Chapter will introduce you how to deal with the inbound calls. The Inbound Control section is
where you define how IP PBX system handles incoming calls. Typically, you determine the
phone number that outside callers have called (DID Number) and then indicate which
extension, Ring Group, Voicemail, or other destination to which the call should be directed.
Please configure it on this page:【Inbound Routes】
General
Distinctive Ring Tone: Mapping the custom ring tone file, e.g., set distinctive ring tone as
“External”, the phone will play this ring tone when receiving the call. Note: The phone must
support such feature as well.
When incoming calls come from outbound line (FXO/GSM, VoIP), the calls can be accessed to
Extension User, Call Queue, Conference, IVR, etc. You can choose freely based on your
condition.
Port DIDs
If user wants to make the incoming call from the outbound line (FXO/GSM trunk) access to the
specified extension user, call queue, conference or IVR, please configure it here:
39

Internet Telephony PBX System IPX-2200/IPX-2500
Click【Port DIDs】->【New Port DIDs】:
Item Explanation
Port Select the port for outbound line.
Label Set a label for this port. When incoming calls are from this port,
the label will be displayed.
Destination Incoming calls will access directly to this destination (extension user,
call queue, conference, or IVR).
Number DIDs
If user wants to make an outbound line (VoIP Trunk) access to the specified
extension/queue/conference/IVR, please use this feature:
Click【Number DID】->【New Number DID】:
Item Explanation
DID Number DID number calling into VoIP (This number is configured in the
advance option of VoIP trunk).
Destination Choose a specified extension, call queue, conference or IVR to be
directed to call.
40

Internet Telephony PBX System IPX-2200/IPX-2500
DOD Settings
If user wants to make the outbound call directly to the specified extension user, call queue,
conference, IVR, please configure it here. Click【DOD Settings】->【New DOD】
Item Explanation
DOD Number Set the DOD number, and use it to match the Caller ID.
If matched, the call will access to the defined destination.
Destination Outbound calls will access directly to this destination (extension user,
call queue, conference, or IVR).
3.4.2 IVR IVR will improve office efficiency based on your requirement.
Please configure on this page【Inbound Control】->【IVR】:
41

Internet Telephony PBX System IPX-2200/IPX-2500
Click【New IVR】to create a new IVR:
Item Explanation
Name Set a name for the IVR
Extension Extension number for the IVR, by calling this number can
access the IVR menu.
Please Select Select a voice prompt for this IVR menu.
Custom Prompts Click this button to navigate to Inbound Control->IVR Prompts
page for new voice prompts.
Repeat Loops Define how many times to play the IVR menu to the caller.
Timeout Timeout for key pressing of each IVR loop.
Dial Other Extensions If enabled, the caller can dial extension number directly on IVR.
Custom By clicking “Custom” you can set dial plan for this IVR menu.
The callers on IVR would be able to dial some other
destinations the dial plan allows.(Not recommended)
Key Press Events Define which destination to go by pressing a key on the phone
keypad. If the undefined keys is pressed, then it will be handled
by the “i” parameter; “i” means invalid. And “t” stands for
42

Internet Telephony PBX System IPX-2200/IPX-2500
Item Explanation
timeout, after all IVR loops played completely without pressing
any key the incoming call will be handled by “t” parameter.
3.4.3 IVR Prompts To configure IVR menu on IP PBX system you’ll first need to record the IVR prompts. The IVR
prompts will indicate the callers how to place their calls
Click【IVR Prompts】----【New Voice】to create new IVR prompt:
Item Explanation
File Name Define a name for this voice file.
Format Select the voice format, GSM/WAV (16bit) supported only.
Extension used for
recording:
Select the extension which is used for recording the IVR
prompt. Click【Record】, this extension will ring, and then you
can pick up the phone and record.
43

Internet Telephony PBX System IPX-2200/IPX-2500
If you want to hear the prompt, please click【Play】:
Select the extension, click【Play】, the selected extension will ring, and you will hear the
recorded prompt after picking up the phone.
Upload IVR prompt
Uploading customized audio file must be in the mp3, wav, gsm, ulaw, alaw format, and size must be less than 15MB.
3.4.4 Call Queue A call queue places incoming calls in line to be answered while extension users are busy with
other calls. The queued calls are distributed to the next available extension user in the order
received. After they have been created, they can be assigned to specific extensions and
configured to feature greetings, messages, and hold music.
44

Internet Telephony PBX System IPX-2200/IPX-2500
There are 3 existing call queues. All you have to do is click the “Edit” button to configure them.
If you want more call queues, you can click “New Call Queue” to add more queues.
Here we can see in the “Agents” field there’re no available agents to be assigned to the call
queues. Click “click here” you’ll be redirected to the extension page to determine which
extensions will be employed as call queue agents.
Tick the checkbox of the extension numbers which will be employed as call queue agents, then
click the “Edit Selected” button and tick the “Agent” option in “Other Options” section.
45

Internet Telephony PBX System IPX-2200/IPX-2500
Save and go back to Inbound Control->Call Queues page again and configure the existing call
queues and add new call queues with available agents.
Item Explanation
Queue Number Define an extension number to identify the queue.
Label Define the label for the queue. A user can be agent of multiple
queues, by giving a label for the call queue; if an incoming call
is distributed to an agent the label will be displayed on the
phone screen along with the caller ID. So a call queue agent
can tell from which call queue the call is coming from.
RingAll Ring all available agents until one answers (default).
RoundRobin Starting with the first agent, ring the extension of each agent in
turn until the call is answered.
LeastRecent Ring the extension of the Agent who has least recently received
a call
FewestCalls Ring the extension of the Agent who has taken the fewest
number of calls.
Random Ring the extension of a random Agent.
RRmemory RoundRobin with Memory, like RoundRobin above, except
instead of the next call starting with the first agent, the system
46

Internet Telephony PBX System IPX-2200/IPX-2500
Item Explanation
remembers which extension was called last and begins the
round robin with the next agent.
Agent Check each agent that is to be a member of this specific Call
Center Queue.
Agent TimeOut (sec) Specify the number of seconds to ring an agent’s extension
before sending the call to the next Agent (based on Ring
Strategy)
Auto Pause If an Agent’s extension rings and the Agent fails to answer the
call, automatically pause that agent so the stop receiving calls
from the queue.
Wrap-Up-Time (sec) This is the amount of time in seconds that an agent has to
complete work on a call after the call is disconnected. (Default
is 0, which means no wrap-up time.)
Max Wait Time (sec) Calls that have been waiting in the queue for this number of
seconds will be sent to the “If not answered” destination.
Max Callers Max number of the callers who are allowed to wait in the queue.
(Default is 0, which means no limitation.) With this number of
callers in the queue already, subsequent callers will be sent to
the “If not answered” destination.
Join Empty Allow callers to enter the Queue when no Agents are available.
If this option is not defined, callers will not be able to enter
Queues with no available agents - callers will be sent to the “If
not answered” destination.
Leave When Empty If this option is selected and calls are still in the queue when the
last agent logs out, the remaining callers in the Queue will be
transferred to ”If not answered” destination. This option cannot
be used with Join Empty simultaneously.
Auto Fill Callers will be distributed to Agent automatically.
Report Hold Time Report the hold time of the next caller for Agent when the Agent
is answering the call.
Frequency(sec) Repeat frequency to announce the hold time for callers in the
Queue.(“0” means no announcement).
Announce Hold Time Announce the hold time. Announce (yes), do not announce (no)
or announce once (once), it will not be announced when the
hold time is less than 1 minute.
Repeat Frequency(sec) Interval time to play the voice menu for callers.(“0” mean not to
47

Internet Telephony PBX System IPX-2200/IPX-2500
Item Explanation
play).
Announcement Prompt Select a prompt as the Announcements Prompt from the IVR
Prompts.
3.4.5 Ring Groups Ring Group is a collection of extensions. When a call to a ring group is made, all extensions in
this ring group will ring in different ways based on their different configurations. If ring time
exceeds a defined time, the call will be directed to IVR or others based on your configuration.
There isn't any data in the factory default 【Ring Groups】, please configure it here.
Click【Inbound Control】-> 【Ring Groups】->【New Ring Group】:
Item Explanation
Name Define a name for the Ring Group.
Strategy Define how to ring the group members; select “RingAll” will ring
all the member extensions at the same time, select “Ring In
Order” will ring the member extensions one by one.
Ring Group Members The extensions selected to be the members of the ring group.
Available Channels All available extensions/channels can be added to the ring
group.
Label The extensions can be members of multiple ring groups, by
48

Internet Telephony PBX System IPX-2200/IPX-2500
Item Explanation
giving each ring group a different label, if an incoming call rings
a ring group the label will be displayed on the phone screen
along with the caller ID. So a ring group member can tell from
which ring group the call is coming in.
Extension for this ring
group
By calling this extension can reach the ring group members
Ring(each/all) for lasting
time(sec)
Ring duration of the group members.
If not answered Setup a destination to redirect the incoming calls to, if no one
answers.
3.4.6 Black List Before call spy can work, you have to make sure the extensions to be spied on have the “Allow
Being Spied” option enabled on extension settings page.
If some numbers need to be blocked, you can use this functionality. Please configure it here:
Click【Inbound Control】->【Blacklist】->【New Blacklist】
Input caller's number in the blank, then this caller's number will be blocked when the call
comes again. Meanwhile, extension user can add or delete the blacklisted number by function
key on the phone. Please operate according to the following diagram:
49
Internet Telephony PBX System IPX-2200/IPX-2500
Reference Parameters and Explanation of the Blacklist:
Item Explanation
*75 When the registered extension user inputs *75 + blacklisted number,
this number will be added in the list of Blacklist Number.
*075 When the registered extension user inputs *075+blacklist number,
this number will be deleted in the list of Blacklisted Number.
3.4.7 Do Not Disturb
With Do Not Disturb (DND) feature enabled, an extension can make phone calls but others
cannot call this extension. An extension user of the IP PBX system dials *74 from their phone,
system will play a beep sound to indicate DND has been activated. To disable DND, just dial
*074, another beep sound will be played and DND has been deactivated.
3.4.8 Time-based Rules For the companies and shops, they all have their own business hours and non-business hours.
Routing the incoming calls by proper time conditions is much more reasonable.
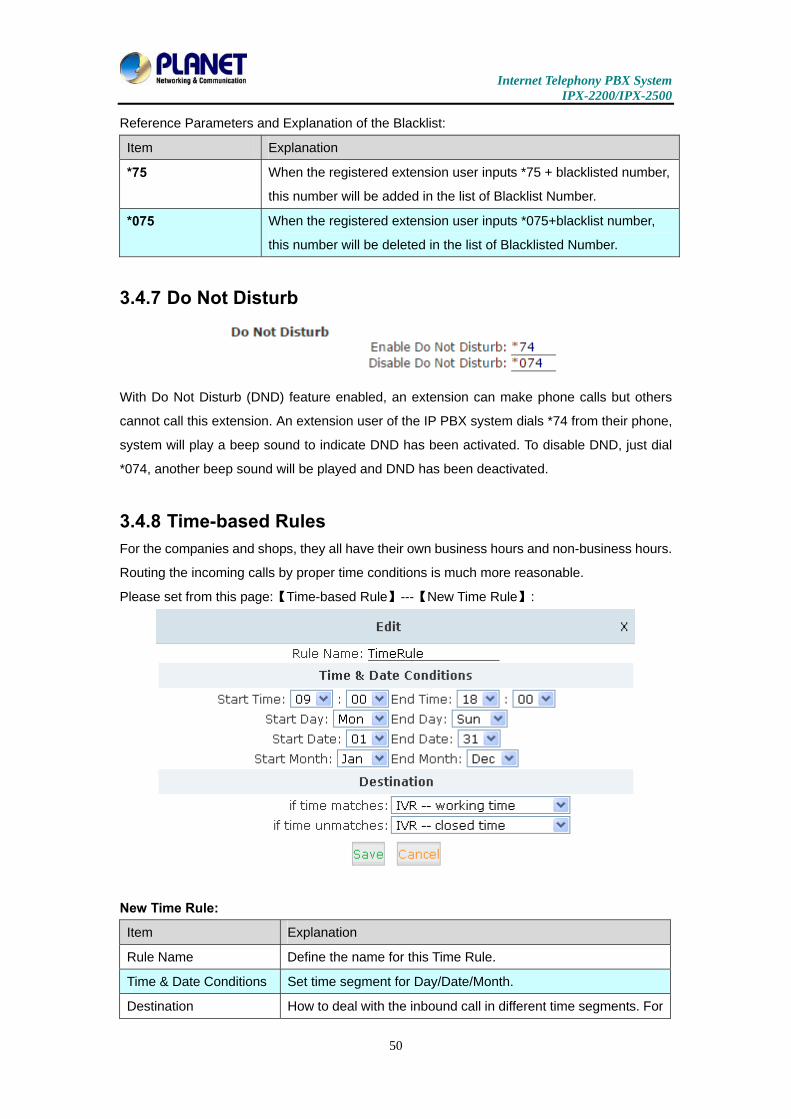
Please set from this page:【Time-based Rule】---【New Time Rule】:
New Time Rule:
Item Explanation
Rule Name Define the name for this Time Rule.
Time & Date Conditions Set time segment for Day/Date/Month.
Destination How to deal with the inbound call in different time segments. For
50

Internet Telephony PBX System IPX-2200/IPX-2500
Item Explanation
example, inbound call can be directed to operator in working
time.
3.5 Advanced
3.5.1 Options
3.5.1.1 General Here on this page you can configure some global options for all the user extensions. In the
“Local Extension Settings” section you have the options shown below that can be configured.
Item Explanation
Operator Extension Choose an extension to be operator extension. While an
incoming call had been directed to voicemail, by pressing ‘0’ the
caller can get to operator extension.
Global Ring Time
Set(sec)
If not specifically configured, the incoming call will ring the
extension for the time given here.
Enable Transfer If enabled, the extension users will be able to do call transfer.
Enable Attended Transfer
Caller ID
Normally if you use feature code *2 to transfer a call to another
extension, the extension user only sees your extension number
as caller ID but not the actual caller ID, by enabling this option
the real caller will be passed to the user extension.
51

Internet Telephony PBX System IPX-2200/IPX-2500
Item Explanation
Enable Music On
Ringback
If enabled this option, callers will hear music instead of ringback
tone while calling other extensions.
Auto-Answer Auto answer enables the IPPBX to automatically answer the
inbound calls from analog ports.
Fax Detect Time If auto answer enabled, you are able to configure the fax auto
detection time here.
Web Dial Auto-Answer Enable/disable auto answer of the extension numbers while
dialing from Web GUI.
Record Format Choose GSM or WAV as the call recording format.
Call Forward CID Allow passing the real caller ID to the forwarded number.
P-Preferred-Identity The P-Preferred-Identity header is used among trusted SIP
entities (typically intermediaries) to carry the identity of the user
sending a SIP message as it was verified by authentication.
Default Settings for New User
In this section the options are for new extensions. If you have one of the options enabled, then
the newly created extensions will all have this option enabled.
Extension Preferences
The user extension number and system extension number ranges are defined here to avoid
confusion of the numbers in the IP PBX system. You can modify these number ranges
52

Internet Telephony PBX System IPX-2200/IPX-2500
according to your real applications.
3.5.1.2 Analog Settings Analog Settings are used for configuring the IP PBX system working seamlessly with your
telephone lines from the telecom.
Caller ID Detect
These options are used to teach the IP PBX system how to detect caller identity (caller ID)
from the PSTN lines on FXO ports.
Item Explanation
Caller ID Detection Enable/Disable Caller ID Detection
Caller ID Signaling The signaling type applied on the PSTN lines to pass caller ID.
Bell-US—Also known as BellcoreFSK. Used in the Canada,
China, Hong Kong and US.
DTMF—Dual Tone Multi-Frequency. Used in Denmark, Finland
and Sweden.
V23—Mostly used in UK.
V23-Japan—Mostly used in Japan.
Caller ID Start When the caller ID starts.
Ring—Caller ID starts when a ring received.
Polarity—Caller ID starts when polarity reversal starts.
Polarity (India)—Can be used in India.
Before Ring—Caller ID starts before a ring received
CID Buffer Length The buffer length can be used to store caller ID info.
53

Internet Telephony PBX System IPX-2200/IPX-2500
General
Item Explanation
Opermode Set the Opermode for FXO Ports
ToneZone Select the tone zone of your country.
Ring Timeout(s) FXO (FXS signaled) devices must have a timeout to determine
if there was a hangup before the line was answered. This value
can be tweaked to shorten how long it takes before DAHDI
considers a non-ringing line to have hung up.
Relax DTMF Relax DTMF
Send Caller ID After Some countries (UK) have ring tones with different ring tones
(ring-ring), which means the caller ID needs to be set later on,
and not just after the first ring, as per the default (1).
Echo Cancel Enable/Disable software Echo Cancel algorithm.
Echo Training Enabling echo training will cause the PBX system to mute the
channel, send an impulse, and use the impulse response to
pre-train the echo canceller so it can start out with a much
closer idea of the actual echo. Value may be "yes", "no", or a
number of milliseconds to delay before training (default = 400).
This option does not apply to hardware echo cancellers.
3.5.1.3 SIP Settings 【Global SIP Settings】is appropriate for professionals. If anything needs to be modified,
please contact our tech-support people.
54

Internet Telephony PBX System IPX-2200/IPX-2500
Item Explanation
UDP Port to bind to SIP standard port is 5060
TCP Port Default TCP port is 5060
TLS Port Default TLS port is 5061
Start RTP Port RTP port range
End RTP Port RTP port range
DTMF Mode Set default DTMF mode for sending DTMF, support auto,
RFC2833, inband, info. Default: RFC 2833
Allow Guest This setting determines if anonymous callers are
permitted to place calls to the IP PBX system. For
security precautions please do not enable this option.
Max Registration/Subscription
Time
Maximum duration (in seconds) of incoming
registrations/subscriptions is 3600 seconds by default
Min Registration/Subscription
Time
Minimum duration (in seconds) of
registrations/subscriptions is 60 seconds by default
Default Incoming/Outgoing
Registration Time
Default duration (in seconds) of incoming/outgoing
registration
55

Internet Telephony PBX System IPX-2200/IPX-2500
Item Explanation
External IP Address that we're going to put in outbound SIP
messages if we're behind a NAT
External Host Alternatively, you can specify an external host, and
Asterisk will perform DNS queries periodically. Not
recommended for production environments! Use external
IP instead
External Refresh How often to refresh external host if used. You may
specify a local network in the field below
Local Network Address 192.168.1.0/255.255.255.0' : All RFC 1918 addresses are
local networks, '10.0.0.0/255.0.0.0' : Also RFC1918,
'172.16.0.0/12' : Another RFC1918 with CIDR notation,
'169.254.0.0/255.255.0.0' : Zero conf local network
Item Explanation
T.38 fax (UDPTL) Passthrough Enables T.38 fax (UDPTL) passthrough on SIP to SIP
calls
56

Internet Telephony PBX System IPX-2200/IPX-2500
Item Explanation
TOS for Signaling packets Sets Type of Service for SIP packets
TOS for RTP audio packets Sets Type of Service for RTP audio packets
TOS for RTP video packets Sets Type of Service for RTP video packets
COS Priority for Signaling
packets
Sets 802.1p priority for SIP packets.
COS Priority for RTP audio
packets
Sets 802.1p priority for RTP audio packets.
COS Priority for RTP video
packets
Sets 802.1p priority for RTP video packets.
DNS SRV Look Up Enable DNS SRV lookups on outbound calls.
Relax DTMF Relax DTMF handling.
RTP TimeOut(sec) Terminate call if there is 60 seconds of no RTP or RTCP
activity on the audio channel when we're not on hold. This
feature enables the ability to hangup a call in the case of
a phone disappearing from the network, for instance if the
phone loses power.
RTP Hold TimeOut(sec) Terminate call if 300 seconds of no RTP or RTCP activity
on the audio channel when on hold.
Add ‘user=phone’ to URI Enable this option if the SIP provider requires
57

Internet Telephony PBX System IPX-2200/IPX-2500
Item Explanation
";user=phone" on URI.
UserAgent Allows you to change the user agent string. The default
user agent string also contains the Asterisk version. If you
don't want to expose this, change the user agent string
here.
Item Explanation
Register Time Out Retry registration calls at every 'x' seconds (default 20)
Register Attempts Number of registration attempts before we give up; 0 =
continue forever
In the extension “Audio Codecs Configure” the priority is higher than “Allowed
Codec” items, “Allowed Codec” items are the default codec setting, if user marks the
extension “Audio Codecs Configure”, then system will use it first, if not system will
let the “Allowed Codecs” define what codec can be used in extension.
3.5.1.4 IAX2 Settings
Item Explanation
UDP Port IAX2 signaling and media port, default is 4569.
58

Internet Telephony PBX System IPX-2200/IPX-2500
Item Explanation
Bandwidth Specify bandwidth of low, medium, or high to control
which codecs are used in general.
Max Registration/Subscription
Time (sec)
Maximum amounts of time that IAX peers can request as
a registration expiration interval (in seconds).
Min Registration/Subscription
Time (sec)
Minimum amounts of time that IAX peers can request as
a registration expiration interval (in seconds).
3.5.2 Virtual Fax
Item Explanation
Enable Enable the following settings for outbound fax.
Country Code Enter your country code here. (Optional).
Area Code Enter your Area Code here. (Optional)
Outbound CID Only works if the outbound fax goes out through VoIP
trunks. The other side receives your fax with this number.
Label Some custom information to be printed to the header of
the fax pages.
Fax sent Defines how many users can send fax at the same time.
DialPlan A proper dial plan to send faxes.
59

Internet Telephony PBX System IPX-2200/IPX-2500
3.5.3 Voicemail Details configuration on Voicemail: Voicemail Reference/Voice Message Options/Playback
Options. If you need to send message by mail to your defined mailbox, you must configure
SMTP and Email model. Click【Voicemail】to display the dialog as shown below:
Item Explanation
Max Greeting Time(sec) Maximum Greeting Time
Dial "0" for Operator Dial "0" to cancel the voicemail and forward to Operator.
Message Format Save the voice message as this format, WAV (16-bit) or Raw GSM.
Maximum Messages Maximum messages to be allowed to leave.
Max Message Time(min) Maximum Time for each message to be allowed to leave.
Min Message Time(sec) Minimum Time for each message. The message will be deleted
automatically if the time is less than the minimum message time.
Say Message Caller ID Checking this option, Caller ID will be played when user login email to
receive the voice message.
Say Message Duration Checking this option, the message duration will be played before playing
the voice message.
Play Envelop Envelop includes date, time and caller ID.
60

Internet Telephony PBX System IPX-2200/IPX-2500
Item Explanation
Allow Users to Review Check this option to allow users to review the voice message.
3.5.4 SMTP Setting
Item Explanation
SMTP Server In order to send e-mail notifications of your voicemail, set the IP address
or domain name of a SMTP server that your IP PBX may connect to.
e.g. mail.yourcompany.com
Port The port number the SMTP server runs is generally port 25. If SSL is
encrypted, please use port 465 instead.
SSL/TSL Enable SSL/TLS to send secure messages to server.
Enable SMTP
Authentication
If your SMTP server needs Authentication, please enable SMTP
Authentication, and configure the following information.
User Name Input user name of your email box.
Password Input password of your email box.
Click【Send Test】after configuration, the following diagram will be displayed to ask you to input
the Email for receiving.
61

Internet Telephony PBX System IPX-2200/IPX-2500
Input the Email and click【Send】 to send the test email. Login your Email to check;
configuration is successful if you receive the test email; otherwise, it fails. Please check your
email settings.
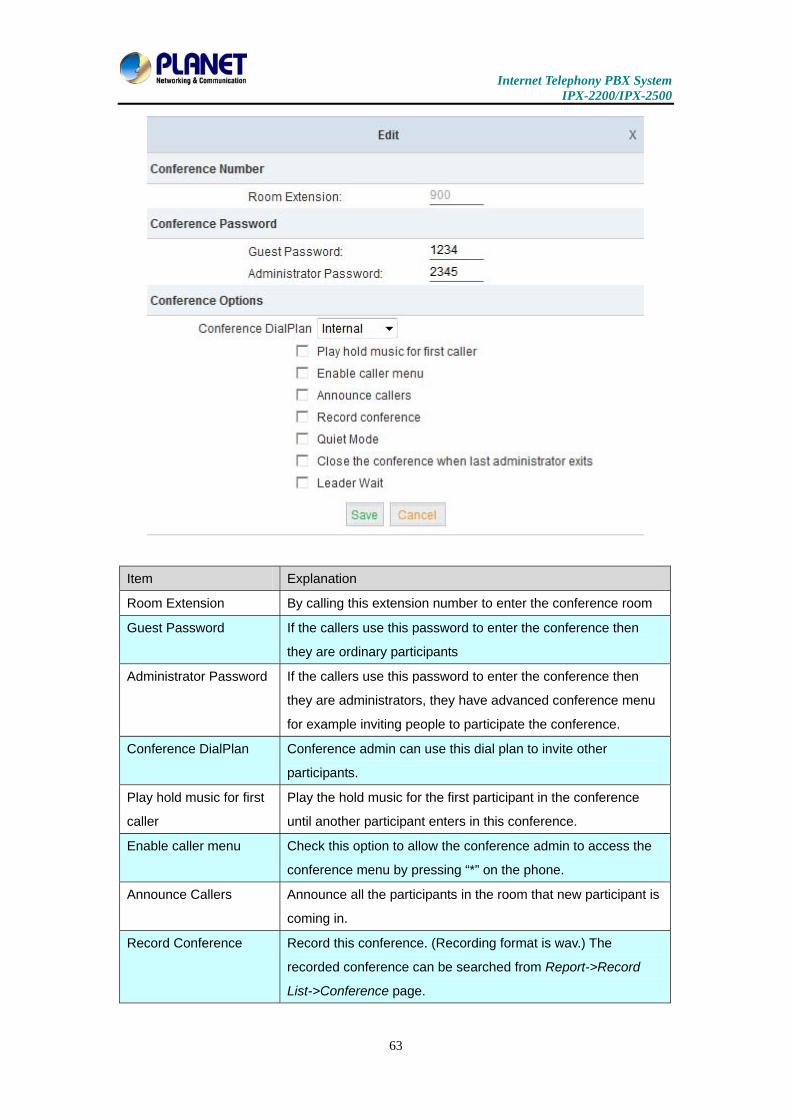
3.5.5 Conference If you want to create a conference room for some extension users or with external lines, you
can input conference room number 900, input conference room password 1234 (Admin's
password is 2345), then enter the conference room. IPX-2200 and IPX-2500 support 3
conference rooms. Please configure it on this page【Conference】:
62
Internet Telephony PBX System IPX-2200/IPX-2500
Item Explanation
Room Extension By calling this extension number to enter the conference room
Guest Password If the callers use this password to enter the conference then
they are ordinary participants
Administrator Password If the callers use this password to enter the conference then
they are administrators, they have advanced conference menu
for example inviting people to participate the conference.
Conference DialPlan Conference admin can use this dial plan to invite other
participants.
Play hold music for first
caller
Play the hold music for the first participant in the conference
until another participant enters in this conference.
Enable caller menu Check this option to allow the conference admin to access the
conference menu by pressing “*” on the phone.
Announce Callers Announce all the participants in the room that new participant is
coming in.
Record Conference Record this conference. (Recording format is wav.) The
recorded conference can be searched from Report->Record
List->Conference page.
63

Internet Telephony PBX System IPX-2200/IPX-2500
Item Explanation
Quiet Mode If check this option, system will not give any announcement
when the participants enter or leave the conference
Close the conference
when last administrator
exits
If checked this option, the conference will be terminated when
the last administrator exits
Leader Wait Wait until the conference leader(administrator) enters the
conference before starting the conference
Please check the following diagram to learn:
Go to conference:
In the conference, admin can add new participant (extension user or external number) to the
conference.
In the conference, the administrator can invite new guest (extension user or external number)
to the conference. (Default password for admin is 2345)
Learn how to invite new guest to the conference as the diagram is shown below:
64

Internet Telephony PBX System IPX-2200/IPX-2500
3.5.6 Music Settings Management for music on hold, music on ring back, music on call queue…
Click【Music Settings】 to display the dialog shown below:
Music Settings:
Please define different music files for different music folders.
Music Management:
65

Internet Telephony PBX System IPX-2200/IPX-2500
Item Explanation
Select Music Directory Load music in the music file.
File Display music name under the music file. You can delete it.
Select Music Directory Select the file where you want to save your uploaded music.
Please choose file to upload Select the music you want to upload. Note: music file must be
MP3, WAV (16bit/8000Hz/Mono), GSM, ulaw or alaw, and less
than 15MB.
The sound file must be MP3, wav (16bit, 8000Hz, mono), gsm, ulaw and alaw audio
file format. The size is limited to 15MB.
3.5.7 DISA A trunk call is made to the PBX, and call is made to another trunk through outbound route of
the PBX. This trunk can make international calls. You are out of the office and want to contact
your customer in a foreign country. Now you can dial DISA number after PIN authentication.
You are now connected to your customer, and you can speak to your customer now.
Click【DISA】---【New DISA】to display the dialog as shown below:
Item Explanation
Name Define a name for DISA.
PIN Set A set of PIN codes to authorize the callers using the system
features and facilities.
Without PIN If enabled, the callers will not be required to enter any PIN code
to be able to use the system features can facilities (Not
recommended).
Record in CDR The PIN code that has been used will be stored into call logs
66

Internet Telephony PBX System IPX-2200/IPX-2500
Item Explanation
which can be traced on Report->Call Logs page.
Response Timeout (sec) The maximum time for waiting before hanging up if the dialed
number is incomplete or invalid. Default is 10 seconds
Digit Timeout (sec) The maximum interval time between digits when typing extension
number is 5 seconds by default.
Extension for this DISA
(optional)
If you want to access DISA by dialing an extension, you can
define an extension number for this DISA.
Select Dial Plan Select a dial plan for this DISA so the callers will be able to make
outbound phone calls using the trunks on the IP PBX system.
3.5.8 Follow Me The Follow Me feature allows you to create a more specialized method of routing calls that are
sent to a specific extension. Using this module, you can cause a call to an extension to ring
several other extensions, or even external phone numbers. So the inbound calls can ring all
the numbers which can possibly find you.
Navigate to web menu Advanced->Follow Me. Click on “New Follow Me” to configure follow
me for an extension.
Item Explanation
Extension Select the extension number which will be configured with follow
me.
Ring lasting for _20_ seconds Define how long to ring the extension before the call is forwarded
out. By default 20 seconds.
Follow Me List The list of numbers to forward the calls to. Each line is written
with the format “number,time”, “number” is one of the number to
forward the calls to, “time” defines how long to ring this number,
they are separated with a comma without space. The order of
67

Internet Telephony PBX System IPX-2200/IPX-2500
ringing these numbers are the order you writing in this column.
3.5.9 Call Forward 3.5.9.1 Configure From the Web This feature allows calls to an extension to be automatically forwarded to a specific internal
extension or external phone number. Before configuring call forward you can enable the IP
PBX system to play a voice prompts before the call was forwarded out. This voice prompts can
be recorded or uploaded from the Inbound Control->IVR Prompts page. Once the voice
prompts file is ready you can navigate to web menu Advanced->Call Forward. And enable the
system to play back the voice prompts before the incoming call was forward out.
68

Internet Telephony PBX System IPX-2200/IPX-2500
After the voice prompt is set, you can click the “New Forward” button to set call forward for an
extension.
Item Explanation
Always Unconditionally forward the incoming calls.
Busy Forward the incoming calls only if the extension is busy.
No Answer Forward the incoming call only if the extension didn’t answer.
Ring lasting for ____ seconds Only is call forward on “No Answer” this option is available to be
configured. It defines how long to ring the extension before
forwarding.
1. If you forward a call to an external phone number please make sure to add a prefix in
front of the number if your system requires prefix to dial out.
2. The forward condition “Always” is mutually exclusive to “Busy” and “No Answer”.
3.5.9.2 Configure From the Phone Navigate to web menu Advanced->Feature Codes.
You’ll see feature codes for call forward as follows:
With these feature codes, you can activate or deactivate call forward directly from your phones
without the need to configure on the Web GUI. For example, the IP PBX requires prefix 9 to
call outbound, and the number you want to forward the calls to is 86547096.
Activate always call forward: Dial *71986547096, press 1 to confirm.
Deactivate always call forward: Dial *071.
69
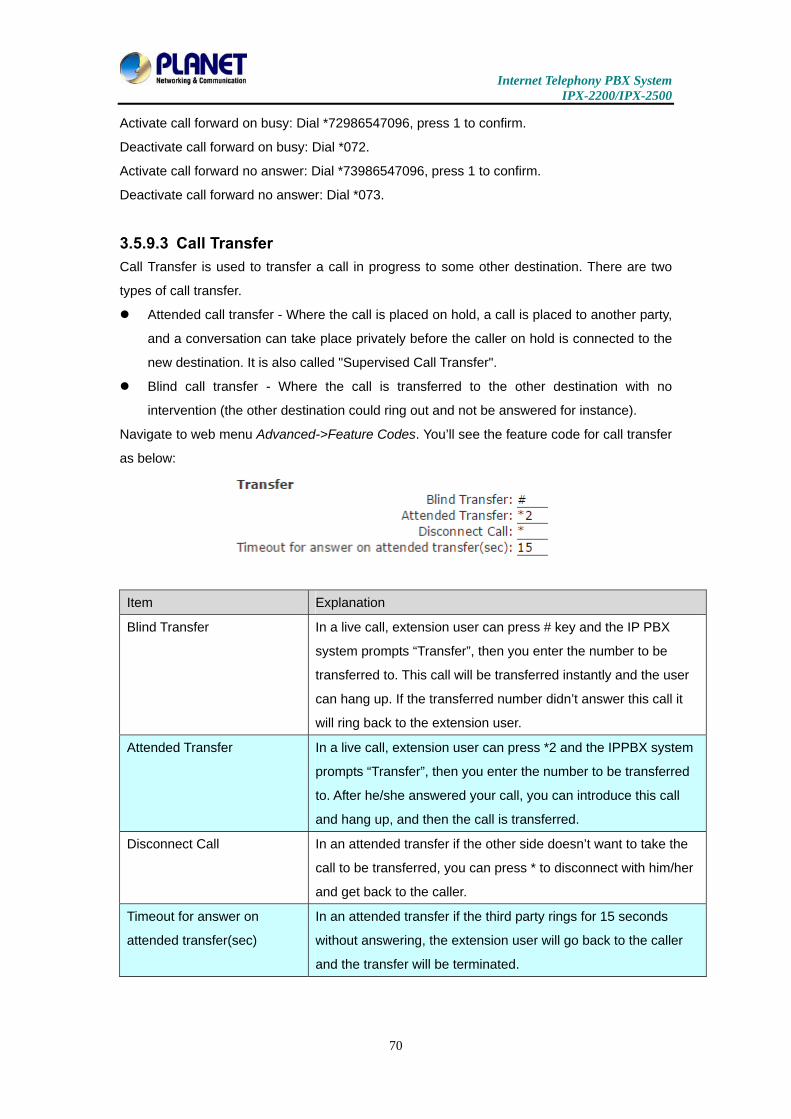
Internet Telephony PBX System IPX-2200/IPX-2500
Activate call forward on busy: Dial *72986547096, press 1 to confirm.
Deactivate call forward on busy: Dial *072.
Activate call forward no answer: Dial *73986547096, press 1 to confirm.
Deactivate call forward no answer: Dial *073.
3.5.9.3 Call Transfer Call Transfer is used to transfer a call in progress to some other destination. There are two
types of call transfer.
Attended call transfer - Where the call is placed on hold, a call is placed to another party,
and a conversation can take place privately before the caller on hold is connected to the
new destination. It is also called "Supervised Call Transfer".
Blind call transfer - Where the call is transferred to the other destination with no
intervention (the other destination could ring out and not be answered for instance).
Navigate to web menu Advanced->Feature Codes. You’ll see the feature code for call transfer
as below:
Item Explanation
Blind Transfer In a live call, extension user can press # key and the IP PBX
system prompts “Transfer”, then you enter the number to be
transferred to. This call will be transferred instantly and the user
can hang up. If the transferred number didn’t answer this call it
will ring back to the extension user.
Attended Transfer In a live call, extension user can press *2 and the IPPBX system
prompts “Transfer”, then you enter the number to be transferred
to. After he/she answered your call, you can introduce this call
and hang up, and then the call is transferred.
Disconnect Call In an attended transfer if the other side doesn’t want to take the
call to be transferred, you can press * to disconnect with him/her
and get back to the caller.
Timeout for answer on
attended transfer(sec)
In an attended transfer if the third party rings for 15 seconds
without answering, the extension user will go back to the caller
and the transfer will be terminated.
70

Internet Telephony PBX System IPX-2200/IPX-2500
3.5.10 One Number Stations One number stations is an innovative IPPBX feature provided by Planet only. With one number
stations feature, you can have the same extension number in several different locations.
One number stations feature can put several extension numbers in the same “group”, a main
number can be selected from the members, when there’s an incoming call to the main number
it will ring all the member extensions including the main number. Any extension call other
extensions will display only the main number.
Navigate to web menu Advanced->One Number Stations. Click “New One Number Stations”
button to create a one number stations group.
Select the extensions from the “Extensions” column to the “ONS Group Members” column. In
the “Main Extension” dropdown list select an extension to be the main extension number. And
click on “Save” you’ll have a new one number stations group.
In this case, no matter what extension -- 407, 408 or 409, if they call other extensions, others
only see it is extension 407 calling. Others call 407, all these 3 extensions will ring.
As you can see on this page there’s a feature code Switch Station available.
This feature code is used to switch extension during a phone call. For example, an inbound
call called extension 407, the one number stations member 408 answered this call, you can
press *1 from extension 407 or 409 to switch this live call to 407 or 409, 408 will be
disconnected.
71

Internet Telephony PBX System IPX-2200/IPX-2500
3.5.11 Paging and Intercom The Paging and Intercom feature allows you to use your phone system as an intercom system,
provided that your endpoints (phone devices) support this functionality. The Paging and
Intercom feature allows you to define a number (just like an extension or Ring Group number)
that will simultaneously page a group of devices. For example, in a small office, you might
define a paging group that allows any user to dial 699, allowing them to page the entire office.
You can also use the feature code *50/*51 to page/intercom a single extension, by dialing
*50/*51 followed by the extension number..
Click【Advanced】->【Paging and Intercom】->【New Paging Group】:
Item Explanation
Paging Extension The extension number for this paging group, by calling this extension
number you can reach the group members.
Description Provide a descriptive title for this Page Group.
Paging Group Members Selected device(s) on this page
Device List Select Device(s) to page.
Duplex
If enabled the group members can talk to the caller.
By calling the paging extension number, all the group member phones
will auto answer in speaker mode (requires the IP phones support auto
answer feature), the caller can now make a brief announcement to the
group members.
For Paging/Intercom function extension (IP phone), enable Auto Answer.
72

Internet Telephony PBX System IPX-2200/IPX-2500
3.5.12 Web Extensions Web Extensions is simply understanding of WebRTC. You can use your web browser to
register an extension number to the IP PBX system without any plugins.
Click on the “New User” button to add a new web extension.
To register the first Web extensions, please follow the steps below:
Step 1:
Create a Web Extension
To create a web extension, navigate to web menu Advanced->Web Extensions. Click on the
“New User” button to add a new web extension.
Item Explanation
Name User name of this web extension.
Extension Extension number of this web extension.
Password Password for registration of this web extension.
Outbound CID Only works if the call was placed out through VoIP trunks.
DialPlan Defines which type of numbers the web extension can dial.
Transport WS or WSS
WS WS (WebSocket) Protocol is an independent TCP-based protocol
providing full-duplex communication channels over a single TCP
connection. The WebSocket protocol was standardized by the IETF as
RFC 6455 in 2011, and the WebSocket API in Web IDL is being
standardized by the W3C.
WSS WSS (WebSockets over SSL/TLS), like HTTPS, WSS is encrypted and
we strongly recommend the secure wss:// protocol over the insecure
ws:// transport. A variety of attacks against WebSockets are almost
impossible if the transport is secured.
73

Internet Telephony PBX System IPX-2200/IPX-2500
Step 2:
Upgrade Web extension patch
As you can see, web extensions use different protocols for signaling and media (WS/WSS)
and they are not ordinary SIP/IAX2 extension that can use IP phones or softphones to register
so must be treated differently.
Step 3:
Register a Web Extension
After completing the upgrade process you can access the WebRTC extension register
interface. Open your web browser and enter URL https://192.168.1.197/webrtc (192.168.1.197
should be your IP PBX IP address) you will see the web extension register interface. Please
complete the register credentials as shown below:
Next, press Enter and the web extension will be registered and is ready for phone calls just like
any other standard extension. WebRTC can even be adapted to the enterprise website which
can help an enterprise serve their customers with direct voice communication via their website.
3.5.13 PIN Set Pin sets can be used to secure your IP PBX system phone services. For example outbound
dial rules and DISA.
74

Internet Telephony PBX System IPX-2200/IPX-2500
.Click【Advanced】---【PIN Sets】, Click on the “New Pin Set” button to create a collection of
PIN codes.
Each line is a PIN code. Press Enter to write down the next PIN code without any symbols.
3.5.14 Call Recording IPPBX system has built-in ability to record calls. No additional software is required for
recording calls. When IP PBX system records a call, both sides of the call are recorded and
written out to a file for playback on a computer. Call recording can be used to ensure call
quality, or to keep calls for later review. The IP PBX provides the ability to record all of the calls,
or to selectively record calls.
Click【Advanced】->【Call Recording】->【New Call Recording】:
75

Internet Telephony PBX System IPX-2200/IPX-2500
Reference:
Item Explanation
Extension Select the extensions which you want all their calls to be
recorded.
Always Recording If enabled all calls of the above selected extension will be
recorded no matter when the calls have been made and
received.
Start Time, End Time, Start
Day, End Day
If Always Recording is unnecessary you can specify which time
durations in a week to record all calls of the above selected
extensions.
Inbound Record Enable to record all inbound calls.
Outbound Record Enable to record all outbound calls.
The recordings can be searched out on Report->Record List->Call Recording page.
3.5.15 Smart DID The IPPBX system has the ability to route an inbound call directly to an extension if previously
the extension called this number without answering. It is convenient for the called party to
make a call back and finds the extension user directly without going through the IVR menu or
any other improper call destination.
Click【Advanced】->【Smart DID】:
There’s a default Smart DID rule, which enables all outbound calls to be monitored by Smart
DID feature. If the call is not answered by the called party, then the called number will be
stored into Asterisk database with the extension number which made this call. While the called
party is calling back, the IP PBX system can automatically direct this call to the extension
76

Internet Telephony PBX System IPX-2200/IPX-2500
number directly.
If you don’t want all outbound calls to be monitored by Smart DID, you can modify the existing
rule or click “New Smart DID Rule” to add you custom rule/rules. An example is shown below:
Item Explanation
Pattern Defines the number format which would be dialed.
Strip Remove some digits from the front of the dialed number.
Prepend Prepend some digits in front of the dialed number after being
manipulated by the “Strip” option.
The numbers to be dialed will start with prefix 17951 and if they call back, the expected
numbers will have +886 in front of them instead of the 5-digit prefix 17951. In such a situation,
the outbound and inbound numbers are not the same, you’ll need the “Strip” and “Prepend”
options to manipulate the dialed numbers to make sure it can match the “same” number when
it calls back. If the numbers to be called and the numbers to be received are the same, then
you don’t have to configure these 2 options. Or you can configure only one of these 2 options,
it will all depend on the real applications.
For example the extension user 401 wants to call 86547096, and the carrier requires a prefix
17951 so the rate is much cheaper. The user would dial 1795186547096 to place this call. If
the called party missed this call, IPPBX system will store this number +88686547096 with
extension number 401 into its database. Later on, if the called party tried to call back, the
IPPBX system gets +88686547096 as the caller ID and matches from it database, once
successfully matched, this call will be automatically directed to extension 401.
1. The records of Smart DID functionality in the system database will be erased
every day at midnight. Which means this is a dynamic effective feature.
2. In the “Pattern” field, patterns that can be used are the same as the patterns
used to manipulate dialed number in the dial rules.
3. Due to the mechanism of how asterisk works. For now Smart DID only works
77

Internet Telephony PBX System IPX-2200/IPX-2500
with VoIP trunks but not with FXO or GSM trunks.
3.5.16 Call Back Call Back is a basic service on an IPPBX system for saving on international calls and reducing
company phone costs. Ideal for SMB and Corporate business, this PBX feature is designed for
users who are making calls from any international destination back to their home country.
Please configure it as shown below:
Item Explanation
Enable Check the checkbox to enable call back feature.
Strip The receive caller ID might have some additional digits in front of
it and it’s improper for you to call back directly, you can specify
here to remove some digits before calling back.
Prepend After the number had been manipulated by the “Strip” option, you
can still add some extra digits in front of it before calling back.
DialPlan Choose a proper dial plan to make sure the IPPBX system has
the permissions for outbound calling.
Click【Advanced】->【Callback】:
At first, enable this function. Select Dial Plan, and define the callback rule (strip digits or
prepend prefix). Click【New Callback Number】to add callback number.
Input callback number and define the destination.
78

Internet Telephony PBX System IPX-2200/IPX-2500
Item Explanation
Callback Number The number which calling in to the IPPBX system will be handled
by Callback.
Destination An extension or another call destination which will be used to call
the callback number.
Here in this case, if the caller 13880424687 calling in the IPPBX system, IPPBX will
disconnect this call and make a call back to this number using extension 800.
3.5.17 Phone Book When incoming call matches the number in the phone book, the name of the matched number
will be displayed. Please configure it as shown below:
Click【Advanced】->【Phone Book】:
Item Explanation
Import You can import contact list from .txt or .csv files.
Export Export the current contact list as .csv file.
Delete All Delete all contacts.
Sync LDAP Synchronize the contacts to the LDAP server.
The prefix for speed dial Using this feature code with the speed dial code of a contact you
can call the contact without knowing the exact number.
Filter Search contacts by contact name, phone number or speed dial
code.
Create Contact Create a new contact record.
Delete Selected Delete the selected contacts.
Call Assign an extension to call this contact.
Edit Edit the information of this contact.
Delete Delete this contact.
79

Internet Telephony PBX System IPX-2200/IPX-2500
Click【Create Contact】to see the following diagram:
Item Explanation
Name Input contact’s name. (Letter or figure only).
Phone Number Input Phone Number of contact.
Speed Dial Speed dial number which can be used to call this contact from
the extensions.
After the contacts have been created they will be listed here on
this page.
3.5.18 LDAP Server 3.5.18.1 LDAP Server Settings LDAP (Lightweight Directory Access Protocol) is an open, vendor-neutral, industry standard
application protocol for accessing and maintaining distributed directory information services
over an IP network. LDAP server has been embedded to IP PBX which is mainly used to
centralize manage the phonebook. LDAP server has generated the phonebook based on the
created extensions by default.
80

Internet Telephony PBX System IPX-2200/IPX-2500
Item Explanation
Enable Enable/Disable LDAP Service.
Username Define the username of the server administrator (e.g.: manager).
This setting will be used on the IP Phone.
Password Define the password of the server administrator. This setting will
be used on the IP Phone.
Domain Define a domain for the LDAP server (e.g.: ldapdomain.com).
This setting will be used on the IP Phone.
Organization Define an organization to describe the members recorded by
LDAP (e.g.: planet.ltd). This setting will be used on the IP Phone.
Port LDAP service port, default number 389.
3.5.18.2 Synchronize Contacts with LDAP Server Navigate to web menu Advanced->Phone Book. Click on the “Sync LDAP” button to
synchronize contacts with LDAP server.
81

Internet Telephony PBX System IPX-2200/IPX-2500
3.5.19 Feature Codes Click【Feature Codes】to display the dialog as shown below. You can define relevant
parameter.
Item Explanation
Extension to Dial for
Parking Calls
Define an extension for parking calls.
Extension Range to Park
Calls
Define the extension range for parking calls. (e.g. 701-720)
Call Parking Time (sec) Define the time for parking calls. Planet IP PBX will call the extension
again if parking is over time.
Pickup Extension Define an extension for pickup.
82

Internet Telephony PBX System IPX-2200/IPX-2500
Item Explanation
Pickup Specified
Extension
Pick up the specified extension. Default: Dial**+extension number to
pick up the specified extension
Blind Transfer Allow unattended or blind transfers. It works like this: While on a
conversation with A, you dial the blind transfer key sequence. The
system says "Transfer" then gives you a dial tone, while A is on hold.
You dial the transferee number (B's number) and A is put through to
B immediately. Your line is off. The caller ID displayed to B is exactly
the same as the caller ID presented to you.
Attended Transfer Allow attended transfer or supervised transfer. It works like this:
While on conversation with A, you dial the Attended Transfer key
sequence. The system says "Transfer" then gives you a dial tone,
while A is on hold. You dial the transferee number (B's number) and
talk with B to introduce the call, then you can hang up and A will be
connected with B. In case B does not want to answer the call, he/she
simply hangs up and you will be back to your original conversation.
Disconnect Call Disconnect the current transfer call (for Attended transfer).
Timeout for answer on
attended transfer(sec)
Set the timeout value
One Touch Recording Configure the function key for One Touch Recording
Call Forward Enable/Disable Call Forward and the settings of function keys for
different forward modes.
Do Not Disturb Enable/Disable “Do Not Disturb”
Spy Configure the function keys for spy modes.
Blacklist Add/Delete blacklisted number.
Voicemail Configure the function keys for entering voicemail and check
extension voicemail.
Invite Participant In conference, the administrator can invite people into the
conference by dialing “0”. After pressing “0”, you will get dial tone,
and you can dial to invite people. After the call is connected, please
press ** to direct the people into the conference, or *# to hang up the
current call and return to the conference.
Create Conference During the call, you can dial *0 to forward to the conference with the
callee.
Return to conference with
participant
In conference, the administrator can dial “0” to invite people into the
conference. After pressing “0”, you will get dial tone, and you can dial
to invite the participant; when the call is connected, dial “**” to return
83

Internet Telephony PBX System IPX-2200/IPX-2500
Item Explanation
to the conference with invited participant.
Return to conference
without participant
In conference, the administrator can dial “0” to invite people into the
conference. After pressing “0”, you will get dial tone, and you can dial
to invite the participant. When the call is connected, you can dial “*#”
to hang up and return the conference yourself.
Pause Queue Member
Extension
Pause the agent, and the agent cannot receive the call.
Unpause Queue Member
Extension
Unpause the agent, and the agent can receive the call.
Others Function key for Intercom/ Paging/ Directory
3.5.20 Phone Provision When you need many IP Phones, please record the MAC, extension number, and user name
of each phone according to the format (please take reference of the auto provision script file
model for details). Then import the format file. Once the phone is connected to the local
network, it will get the extension number and password automatically.
There are two operation methods to fulfill this function. Please see details shown below:
Enable DHCP service
Click【Network Settings】->【DHCP Server】, enable DHCP Server in the dialog as shown
below:
84

Internet Telephony PBX System IPX-2200/IPX-2500
Then Click【Advanced】->【Phone Provisioning】->【New Phone】:
Enable Phone Provisioning in【Basic】, select the IP Phone manufacture, input MAC of the
phone, and select the extension for provisioning.
85

Internet Telephony PBX System IPX-2200/IPX-2500
Chapter 4. Network Settings
4.1 Network
IPPBX system supports static IP, DHCP and PPPoE as WAN connection options, and on LAN
port only static IP is supported. If you are configuring WAN connection as static IP or DHCP,
make sure WAN and LAN IP addresses are not in the same network.
4.1.1 IPv4 Settings Click【Network Settings】->【Network】->【IPv4 Settings】
Reference
Item Explanation
IP Assign Static/ DHCP/PPOE supported.
LAN Interface Define the LAN interface.
By default IP PBX has been preconfigured with static IP 172.16.0.1 and 192.168.0.1 on WAN
and LAN interfaces. If you want to use a static IP, just configure here with the address,
netmask, gateway and DNS given to be the ISP or the network admin.
86

Internet Telephony PBX System IPX-2200/IPX-2500
And the LAN interface you can specify 2 additional virtual IP addresses. It can be used to
access some other networks from the LAN port.
4.1.1.1 DHCP If your Internet connection automatically provides you with a usable IP address, you can select
“DHCP” on WAN interface.
If DHCP is selected, WAN interface will not be configurable; it obtains all network parameters
from the DHCP server. DHCP should be used cautiously. If all the IP extensions subscribe to
the IPPBX system through WAN, you’d better make sure WAN gets a Static DHCP.
87

Internet Telephony PBX System IPX-2200/IPX-2500
4.1.1.2 PPPoE If PPPoE IPPBX will be connected to the network via ADSL modem by means of Point-to-Point
Protocol over Ethernet (PPPoE) dial-up. In such a situation, extensions will subscribe to the
IPPBX system through LAN, WAN port can be used for remote extensions.
If PPPoE is set, you just have to specify the username and password given by your ISP and
the IPPBX system will dial-up to the ISP and you have Internet access on WAN. LAN port
connects to your local network for internal IP extensions to register. If needed, you can change
LAN IP to fit your local network.
4.1.2 IPv6 Settings IPv6 (Internet Protocol Version 6) has been in development for nearly two decades. Now the
next-generation protocol is ready to replace IPv4 and assume its place as the backbone of the
Internet.
Today, major Internet service providers (ISPs), home networking equipment manufacturers,
and web companies around the world are permanently enabling IPv6 for their products and
services. Many organizations, institutions and universities have deployed their own networks
on IPv6.
To be able to deliver VoIP calls over IPv6 (SIP over IPv6), you can configure IP PBX system
88

Internet Telephony PBX System IPX-2200/IPX-2500
with IPv6 addresses to be able to deploy it in your IPv6 network infrastructure.
Click【Network Settings】->【Network】->【IPv6 Settings】
IPv6 Reference:
Item Explanation
Enable Enable IPv6, define the IPv6 address, gateway, and DNS.
4.1.3 VLAN Settings With a layer-3 switch you can configure VLAN on IP PBX system to divide the VoIP and data
traffic. Voice VLAN can keep the phones working even when the data network is congested.
You can see here on this page. You are able to configure 4 VLANs, 2 for each WAN or LAN
port.
89

Internet Telephony PBX System IPX-2200/IPX-2500
Click【Network Settings】->【Network】->【VLAN Settings】:
VLAN Reference:
Item Explanation
Enable Enable VLAN to define the VLAN address and VLAN ID.
Make sure VLAN IPs for VLAN1 and VLAN2 of WAN and LAN interfaces are in
several different network segments.
4.2 Static Routing
Static Routing is a form of routing that occurs when a router uses a manually-configured
routing entry, rather than information from a dynamic routing protocol to forward traffic.
90

Internet Telephony PBX System IPX-2200/IPX-2500
Click【Network Settings】->【Static Routing】:
Item Explanation
Destination Set the IP address of destination host or network address.
E.g.222.209.4.1, 192.168.10.0.
Subnet Mask Set subnet mask of the destination network.
Gateway Define the gateway accessing the destination network.
Click【Network Settings】->【Static Routing】->【Routing Table】, and the current routing
information will be displayed below:
4.3 VPN Server
VPN (Virtual Private Network) is mostly used for setting up long-distance and/or secured
network connections. While it's been used on IP PBX, all the phone calls sending and
receiving are encrypted so it secures your remote offices/extensions' phone services. Built-in
VPN Server on Planet IP PBX series is an easy way to set up such secured connectivity
between other Planet series IP PBXs or IP phones. You don't need to build a dedicated VPN
server or buy a VPN router. This is also a workaround to avoid a firewall issue when
configuring remote VoIP client as SIP protocol is notoriously to pass through a firewall due to
its random numbers to establish connection.
91

Internet Telephony PBX System IPX-2200/IPX-2500
The IP PBX supports four kinds of VPN variety: L2TP/PPTP/OpenVPN/IPSec. Click【Network
Settings】->【VPN Server】:
92

Internet Telephony PBX System IPX-2200/IPX-2500
4.3.1 L2TP VPN
Reference:
Item Explanation
Enable Tick the checkbox to enable L2TP VPN server.
Tick the checkbox
to enable L2TP
VPN server.
L2TP VPN remote network IP range, between start IP and end IP
there must be less than 10 available IP addresses.
Local IP L2TP VPN local server IP address.
Primary DNS Primary DNS for VPN connection.
Alternate DNS Alternative DNS for VPN connection.
Authentication
Method
Select the authentication method: chap or pap.
pap: Password Authenticate Protocol PAP works like a standard
login procedure; it uses static user name and password to
authenticate the remote system.
chap: Challenge Handshake Authentication Protocol
CHAP takes a more sophisticated and secure approach to
authentication by creating a unique challenge phrase (a randomly
generated string) for each authentication.
Debug Tick to enable debug for L2TP VPN connection, debug info will be
93
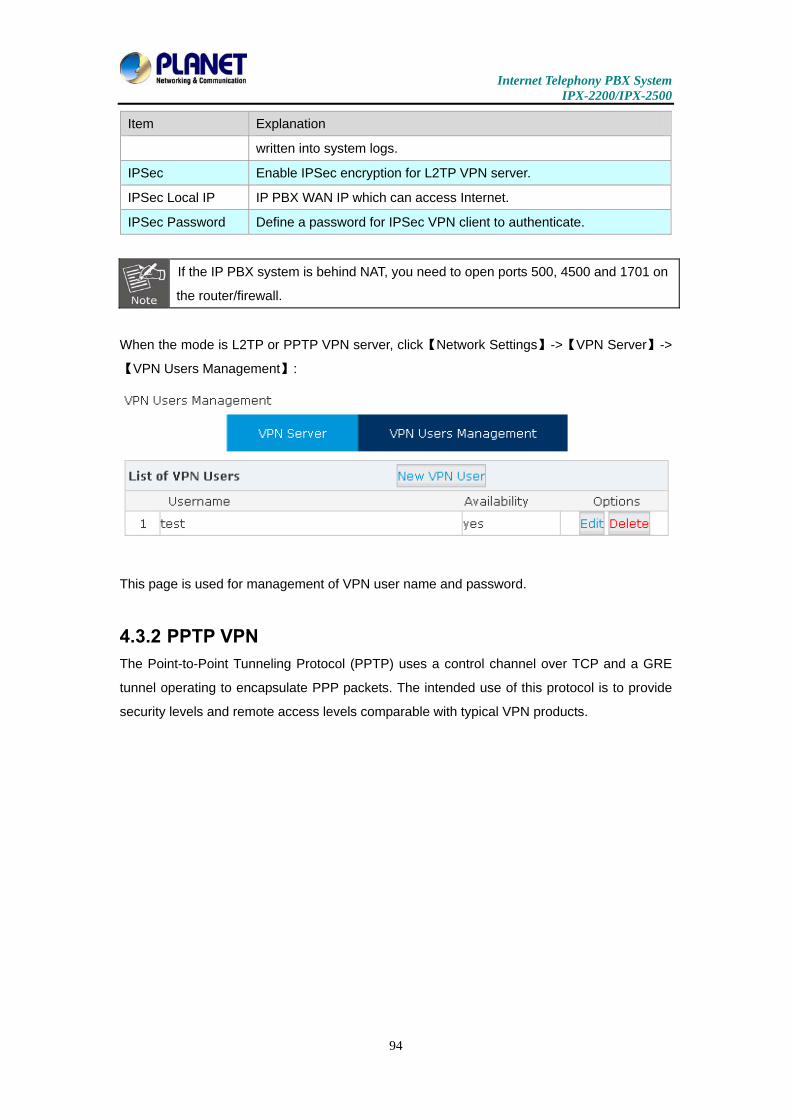
Internet Telephony PBX System IPX-2200/IPX-2500
Item Explanation
written into system logs.
IPSec Enable IPSec encryption for L2TP VPN server.
IPSec Local IP IP PBX WAN IP which can access Internet.
IPSec Password Define a password for IPSec VPN client to authenticate.
If the IP PBX system is behind NAT, you need to open ports 500, 4500 and 1701 on
the router/firewall.
When the mode is L2TP or PPTP VPN server, click【Network Settings】->【VPN Server】->
【VPN Users Management】:
This page is used for management of VPN user name and password.
4.3.2 PPTP VPN The Point-to-Point Tunneling Protocol (PPTP) uses a control channel over TCP and a GRE
tunnel operating to encapsulate PPP packets. The intended use of this protocol is to provide
security levels and remote access levels comparable with typical VPN products.
94

Internet Telephony PBX System IPX-2200/IPX-2500
4.3.2.1 PPTP VPN Server Navigate to web menu Network Settings->VPN Server. Check the radio button of PPTP to
configure PPTP VPN server.
Item Explanation
Enable Tick the checkbox to enable PPTP VPN server.
Remote IP PPTP VPN remote network IP range, between start IP and end IP
there must be less than 10 available IP addresses.
Local IP PPTP VPN local server IP address.
Primary DNS Primary DNS for VPN connection.
Alternative DNS Secondary DNS for VPN connection.
Timeout (sec) Session timeout for PPTP tunnels.
Authentication
Method
Choose method/methods for the authentication of the VPN clients.
chap: Challenge Handshake Authentication Protocol
CHAP takes a more sophisticated and secure approach to
authentication by creating a unique challenge phrase (a randomly
generated string) for each authentication.
pap: Password Authenticate Protocol PAP works like a standard
login procedure; it uses static user name and password to
authenticate the remote system.
mschap: MS-CHAP is the Microsoft version of the
Challenge-Handshake Authentication Protocol.
95

Internet Telephony PBX System IPX-2200/IPX-2500
Item Explanation
mschap-v2: Microsoft Challenge Handshake Authentication
Protocol version 2 (MS-CHAP v2), it provides stronger security for
remote access connections.
Enable mppe128 Microsoft Point-to-Point Encryption (MPPE) encrypts data in
Point-to-Point Protocol (PPP)-based dial-up connections or
Point-to-Point Tunneling Protocol (PPTP) virtual private network
(VPN) connections with 128-bit key.
Debug Tick to enable debug for PPTP VPN connection, debug info will be
written into system logs.
For the VPN client to connect you’ll need to create a VPN user account. Click the “VPN User
Management” tab and click the “New VPN User” button to add a VPN user account.
If the IPPBX system is behind NAT, you need to open ports 1723 on the
router/firewall.
4.3.3 OpenVPN OpenVPN is an open-source software application that implements virtual private network (VPN)
techniques for creating secure point-to-point or site-to-site connections in routed or bridged
configurations and remote access facilities. It uses a custom security protocol [3] that utilizes
SSL/TLS for key exchange. It is capable of traversing network address translators (NATs) and
firewalls. It was written by James Yonan and is published under the GNU General Public
License (GPL).
OpenVPN allows peers to authenticate each other using a pre-shared secret key, certificates,
or username/password. When used in a multiclient-server configuration, it allows the server to
release an authentication certificate for every client, using signature and Certificate authority. It
uses the OpenSSL encryption library extensively, as well as the SSLv3/TLSv1 protocol, and
contains many security and control features.
96

Internet Telephony PBX System IPX-2200/IPX-2500
Check the radio button of OpenVPN to configure OpenVPN server.
Item Explanation
Enable Tick to enable OpenVPN server
Stealth Some deep packet inspection firewalls might not allow OpenVPN
traffic, stealth SSL tunneling can disguises your OpenVPN traffic
under the HTTPS traffic which is often seen as HTTPS traffic by the
DPI.
Certificate Certificate is one of the client authentication methods of OpenVPN.
Port OpenVPN service port, default is 1194.
Stealth Port Stealth service port, default is 443.
Protocol You can choose from UDP or TCP. As stealth requires TCP only so if
with stealth enabled, this options is not configurable and will use TCP
by default.
Device Node TUN or TAP; A TAP device is a virtual Ethernet adapter, while a TUN
device is a virtual point-to-point IP link.
Cipher Cipher (or cypher) is an algorithm for performing encryption or
decryption.
Compress LZO LZO is an efficient data compression library which is suitable for data
de-/compression in real time.
TLS-Server TLS is an excellent choice for the authentication and key exchange
mechanism of OpenVPN.
Remote Network OpenVPN remote network.
Route The route entries adjust the local routing table, telling it which network
to route over the VPN.
Client-to-Client Client-to-Client can enable the intercommunication between clients.
97

Internet Telephony PBX System IPX-2200/IPX-2500
4.3.4 IPSec VPN Internet Protocol Security (IPsec) is a protocol suite for secure Internet Protocol (IP)
communications by authenticating and encrypting each IP packet of a communication session.
IPSec can be configured to operate in two different modes, Tunnel and Transport mode. Use
of each mode depends on the requirements and implementation of IPSec.
4.3.4.1 IPSec VPN Server (Tunnel mode) Tunnel mode is used to encrypt all traffic between secure IPSec Gateways, for example two IP
PBX's, each acts as an IPSec Gateway for the hosts/IP phones behind it. The WAN ports will
be used to connect to each other to establish IPSec VPN connection; the PCs or IP phones on
the LAN ports can communicate with each other on both sides via secured IPSec tunnel.
Check the IPSec radio button to configure IPSec VPN server.
Item Explanation
Enable Tick the checkbox to enable IPSec VPN server.
Type Default Tunnel mode.
IPSec Local IP IP PBX WAN IP, which can be used to connect to the client network.
IPSec Password Define a password for authentication of the IPSec client.
IPSec Remote IP IPSec VPN client IP. The client uses this IP to connect to IPSec
server.
98
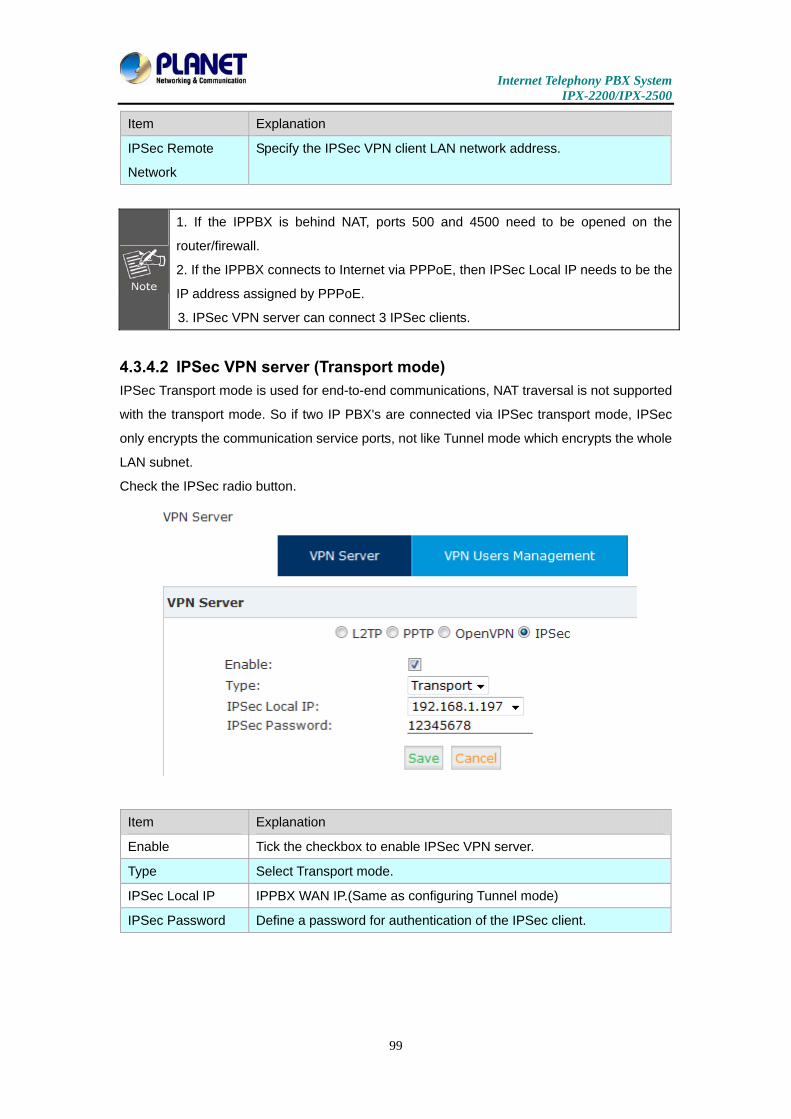
Internet Telephony PBX System IPX-2200/IPX-2500
Item Explanation
IPSec Remote
Network
Specify the IPSec VPN client LAN network address.
1. If the IPPBX is behind NAT, ports 500 and 4500 need to be opened on the
router/firewall.
2. If the IPPBX connects to Internet via PPPoE, then IPSec Local IP needs to be the
IP address assigned by PPPoE.
3. IPSec VPN server can connect 3 IPSec clients.
4.3.4.2 IPSec VPN server (Transport mode) IPSec Transport mode is used for end-to-end communications, NAT traversal is not supported
with the transport mode. So if two IP PBX's are connected via IPSec transport mode, IPSec
only encrypts the communication service ports, not like Tunnel mode which encrypts the whole
LAN subnet.
Check the IPSec radio button.
Item Explanation
Enable Tick the checkbox to enable IPSec VPN server.
Type Select Transport mode.
IPSec Local IP IPPBX WAN IP.(Same as configuring Tunnel mode)
IPSec Password Define a password for authentication of the IPSec client.
99

Internet Telephony PBX System IPX-2200/IPX-2500
4.4 VPN Client
Planet IP PBX supports four kinds of VPN Clients: L2TP, PPTP, OpenVPN and N2N.
Click【Network Settings】->【VPN Client】:
4.4.1 L2TP VPN Client
Reference:
Item Explanation
Enable Tick to enable L2TP VPN client
Server Address L2TP server public IP.
Username L2TP VPN user name given by the VPN server.
Password L2TP VPN user password given by the VPN server.
IPSec Enable IPSec support.
IPSec Local IP IPPBX WAN IP which can access Internet.
IPSec Password Accordingly as the password specified on the server.
Default Gateway All traffic goes through the L2TP VPN connection.
100

Internet Telephony PBX System IPX-2200/IPX-2500
4.4.2 PPTP VPN Client On the branch office site, check the radio button of PPTP to configure PPTP VPN client.
Item Explanation
Enable Tick to enable PPTP VPN client.
Enable 40/148-bit
encryption for
MPPE
Tick to enable 40-bit key (standard) or 128-bit key (strong) MPPE
encryption schemes.
Server Address PPTP VPN server public IP.
Username PPTP VPN user name given by the VPN server.
Password PPTP VPN user password given by the VPN server.
Default Gateway All traffic goes through the L2TP VPN connection.
4.4.3 N2N VPN Client N2N is an open source Layer 2 over Layer 3 VPN application which utilizes a peer-to-peer
architecture for network membership and routing.
101

Internet Telephony PBX System IPX-2200/IPX-2500
On IP PBX system we support N2N VPN client. Check the radio button of N2N VPN and
configure the client info.
Item Explanation
Enable Tick this checkbox to enable N2N VPN client
Server Address N2N server(supernode) IP address.
Port N2N service port number. 82 by default.
Local IP VPN local IP.
Subnet Mask Netmask of the VPN network.
Local Port N2N local service port.
Username/Password Used for the N2N server to authorize the connection.
4.4.4 IPSec VPN Client (Tunnel mode) On the remote site, open the web GUI of another Planet IPPBX system and navigate to web
menu Network Settings->VPN Client.
On the VPN Client page, choose IPSec and tick “Enable” option to enable IPSec client.
Item Explanation
Enable Tick the checkbox to enable IPSec client.
Type Accordingly as the IPSec server.
102

Internet Telephony PBX System IPX-2200/IPX-2500
Item Explanation
IPSec Local IP WAN port IP which can connect to the IPSec server.
Server Address Specify the IPSec server IP.
IPSec Password Specify the IPSec VPN password defined previously on the server.
IPSec Remote
Network
The IPSec VPN server LAN network address.
4.5 DHCP server
DHCP (Dynamic Host Configuration Protocol) is a standardized network protocol used on
Internet Protocol (IP) networks for dynamically distributing network configuration parameters,
such as IP addresses for interfaces and services.
With DHCP, computers/IP phones request IP addresses and networking parameters
automatically from IP PBX WAN/LAN port; it saves a lot of time for administrator to configure
these settings manually.
Click【Network Settings】->【DHCP Server】:
4.5.1 DHCP Service
Item Explanation
Enable Enable DHCP service.
103

Internet Telephony PBX System IPX-2200/IPX-2500
Item Explanation
Interface Choose the network port to implement DHCP service.
Start IP, End IP Specify the DHCP IP address pool.
Subnet Mask Netmask to be assigned to the client devices.
Gateway Gateway address to be assigned to the client devices
Primary DNS DNS to be assigned to the client devices.
Lease Time(min) DHCP server leases an address to a new device for a period of time.
When the lease expires, the DHCP server might assign the IP
address to a different device. Default value is 1440 minutes.
TFTP Server Point out the TFTP server address which may be used to auto
provision the IP phones.
4.5.2 DHCP Client List You’ll have all the devices that are getting IP address from the IP PBX system.
Click【Network Settings】->【DHCP Server】->【DHCP Client List】:
This page is used to display DHCP Client address and related information.
When DHCP Server distributes address, the Client’s MAC address is associated with the IP
address, and then the device will get the same IP address every time.
4.5.3 Static MAC Static MAC is a useful feature which makes the DHCP service on IP PBX always assigns the
same IP address to a specific computer or IP phone on your LAN. To be more specifically, the
DHCP service assigns this static IP to a unique MAC address assigned to each NIC on your
LAN.
104

Internet Telephony PBX System IPX-2200/IPX-2500
Click “New Static MAC” to add a record to the IP PBX system.
4.6 DDNS Settings
Unlike DNS that only works with static IP addresses, DDNS (Dynamic Domain Name Server)
is designed to also support dynamic IP addresses, such as those assigned by a DHCP server.
Built-in DDNS feature on IP PBX system only needs a simply signs up with a Dynamic DNS
provider, with the domain name they gave which maps your IP address on the Internet, you
can access IP PBX and also other services within your LAN via the domain name without
getting to know Dynamic public IP.
After setting DDNS, IP PBX phone services can be accessed from remote site via the domain
name which DDNS provider gave. Also remote management is possible even without a static
public IP.
Click【Network Settings】->【DDNS Settings】:
Item Explanation
Enable Tick to enable DDNS service
DDNS Server Select the DDNS service provider which you subscribed the DDNS
service.
Username Username you subscribed to the service provider.
Password Password you used to sign up to the service provider.
105

Internet Telephony PBX System IPX-2200/IPX-2500
Item Explanation
Domain Your domain name.
IP PBX supports DDNS provided by Planet DDNS, Dyndns.org, No-ip.com and zoneedit.com.
106

Internet Telephony PBX System IPX-2200/IPX-2500
4.7 SNMPv2 Settings
SNMP (Simple Network Management Protocol) is used for remote management.
Click【Network Settings】->【SNMPv2 Settings】:
Reference
Item Explanation
Enable Enable “Read Only” of SNMP
RO Community Define the name of RO Community of SNMP
RO Network Define network of RO
4.8 TR069
TR069 (Technical Report 069) is a Broadband Forum (formerly known as DSL Forum)
technical specification entitled CPE WAN Management Protocol (CWMP). It defines an
application layer protocol for remote management of end-user devices.
107

Internet Telephony PBX System IPX-2200/IPX-2500
Item Explanation
Enable Enable TR069 service.
CPE to ACS URL Input URL to visit ACS, which is used by PBX to connect ACS via
CPE WAN management protocol (CWMP).
ACS
Authentication
Mode
Select ACS Authentication Mode: NONE/BASIC/DIGEST.
ACS Username When PBX sends request to ACS, ACS will provide username to the
authorized PBX.
ACS Password When PBX sends request to ACS, ACS will provide password to the
authorized PBX.
CPE Inform
Interval (sec)
Interval for CPE to connect ACS.
ACS to CPE URL Input URL to visit CPE. Format: http://IP:port(7547).
108

Internet Telephony PBX System IPX-2200/IPX-2500
Chapter 5. Security This chapter will introduce you how to configure the Security of PLANET IP PBX.
5.1 Firewall
The IP PBX system has been preconfigured with a built-in firewall which prevents your IP
phone system from unauthorized accessing, phone calls and some other attacks.
General
Item Explanation
Enable Firewall By default, firewall is enabled. You may disable the built-in firewall by
unchecking “Enable Firewall” checkbox, only if your IP PBX is behind
a router/firewall without port forwarding to the Internet.
Disable Ping Ignore ping request. If enabled, you cannot ping the IPPBX system.
Drop All Drop all packets sent to the IP PBX system, this will cause IP PBX
system blocking all communication with the outside world. So the
system will prompt to add at least one grant rule on port 22 (SSH) or
9999 (Web) to make sure the IPPBX system is totally unreachable.
The rule/rules can be created in the “Common Rules” section.
Common Rules
In Common Rules section, you can configure the firewall to grant or deny an IP address or a
network from communicating with the IPPBX system. Even the service port number can be
specified so it can grant or deny a specific IP or network to access a specific service.
109

Internet Telephony PBX System IPX-2200/IPX-2500
By clicking the “Add Rule” button you can add a custom rule for rejecting or accepting an IP
address or network address.
Item Explanation
Name A name for this rule.
Description Optional, you may describe why this rule is created.
Protocol Transmission protocol, UDP, TCP or UDP with TCP.
Port Service port number.
IP Can be an IP address or a network address.
MAC Action to be taken according to the Mac address of a device instead
of IP. Only works with the devices within the same local network
because Mac address cannot transport on Internet.
Action Select “Drop” to block and “Accept” to grant.
Auto Defense
The IPPBX system uses Fail2Ban to do intrusion detection, iptables is used for blocking the
attack attempts. Fail2Ban is an intrusion prevention framework written in the Python
programming language. It works by reading Asterisk logs and some other logs in the IP PBX
system, and uses iptables profiles to block brute-force attempts.
110

Internet Telephony PBX System IPX-2200/IPX-2500
In Auto Defense section you can define some custom rules to help the IP PBX system
determine brute-force attempts.
Click the “Add Rule” button to add a new custom rule.
In this case, it will block the IP which will send more than 10 packets to the port 9999 within 30
seconds. This rule will prevent brute-force attempts of the web login.
Rejected IP
Any IP address that is banned will be shown in the table of “Rejected IP”. The table will show
the IP address of the banned host, as well as what kind of service was detected as to the
intrusion.
If a host appears incorrectly in the list of rejected IP, you can click on the "Delete" button to
remove it from the list.
5.2 Service
As we can see here on this page, you are able to configure the SSH and HTTPS services.
111

Internet Telephony PBX System IPX-2200/IPX-2500
Click【Security】->【Service】:
Item Explanation
Enable SSH With this option you can enable or disable SSH access to the IPPBX
system. It’s not enabled (unchecked) by default.
Port By default SSH service port number is 22. You can change it to any
other available port number.
Remote SSH
Administration
If this option is checked, remote SSH access will be enabled.
HTTPS Port Web GUI service port number, by default, is 9999. You can change to
any other port number if needed.
Remote HTTPS
Administration
If this option is checked, remote web access will be enabled.
If you want remote access to SSH and web GUI of the IPPBX system, you can
forward the corresponding ports on your router. Before doing this please make sure
you have set strong password words for root user and web admin user.
5.3 Fail2Ban
Planet IPPBX system uses Fail2Ban to perform intrusion detection; iptables is used for
blocking any attack attempts. Fail2Ban is an intrusion prevention framework written in the
Python programming language. It works by reading Asterisk logs and some other logs in the
IPPBX system, and uses iptables profiles to block brute-force attempts. In the Auto Defense
section you can define some custom rules to help the IPPBX system determine brute-force
attempts.
Allowed address allows you to add IP addresses and network addresses to the IPPBX system
112

Internet Telephony PBX System IPX-2200/IPX-2500
as a whitelist. The IPs in the whitelist will be always treated as trusted IP and will not be filtered
by the firewall rules.
Click the “Add New IP” button to add a trusted IP or network to the system IP whitelist.
Item Explanation
Description A name for this entry.
Protocol Select protocols this IP/network can access.
Allowed IP IP address or network to be trusted.
Subnet Mask Netmask for this IP or network.
Availability Choose “Yes” to activate this entry; choose “No” to deactivate.
113

Internet Telephony PBX System IPX-2200/IPX-2500
These options are actually for Fail2Ban, the “Max Retry” limits the authentication attempts.
“Find Time” defines the time duration from the first attempt to the last attempt which reaches
the “Max Retry” limitation. “Ban Time” is the time in seconds the IPPBX system will block the IP
which exceeded max retry. These settings also don’t effect on the allowed addresses.
114

Internet Telephony PBX System IPX-2200/IPX-2500
Chapter 6. Report
6.1 Record Status
On register status page you are able to check the extension and SIP/IAX2 trunk status
intuitively. You can see from which IP the extension is registered and also you can see the
connection state, for example how much delay is there between the IPPBX system and the
end point.
6.1.1 SIP User Status
Here on this page you can see the SIP/IAX2 extensions, web extensions and also the register
status of the trunk users. Only the trunk is configured as peer mode which will be listed here.
Status and Description
Registered: Registration success.
Unregistered: Registration failure or unapplied.
Unreachable: Network delay.
Timeout: Network timeout.
6.1.2 IAX2 User Status
115

Internet Telephony PBX System IPX-2200/IPX-2500
Status and Description
Registered: Registration success.
Unregistered: Registration failure or unapplied.
Unreachable: Network delay.
Timeout: Network timeout.
6.1.3 SIP Trunk Status
Here you can see all your outbound SIP trunks’ status.
Status and Description
Registered: Successfully registered to the service provider and ready for phone calls.
Request Sent: If this status, it’s most probably the network is totally unreachable to the
SIP server. Please make sure network setting on the IPPBX system is correct.
Waiting for Authentication: If “Waiting for Authentication” then most probably the register
request has already been received by the server side but cannot authenticate the register
request due to credentials incorrect. Please double check your inputted credentials.
Failed: After trying to register within certain time period without success, you get “Failed”
on the trunk status.
6.1.4 IAX2 Trunk Status
Here you can see all your outbound IAX2 trunks’ status.
Status and Description
Registered: Successfully registered to the service provider and ready for phone calls.
Request Sent: If this status, it’s most probably the network is totally unreachable to the
service provider. Please make sure network setting on the IPPBX system is correct.
Waiting for Authentication: If “Waiting for Authentication” then most probably the register
request has already been received by the server side but cannot authenticate the register
request due to credentials incorrect. Please double check your inputted credentials.
Failed: After trying to register within certain time period without success, you get “Failed”
on the trunk status.
116

Internet Telephony PBX System IPX-2200/IPX-2500
6.2 Fax List
You can search any fax received by the IPPBX system.
In the “Start Date” and “End Date” fields specify a time duration, and click “Filter” to get all
faxes received during this period. If you specify a “Caller ID” or “Destination ID” in the field, you
can get the fax sent/received by a specific number in this period.
The faxes can be downloaded to your PC hard drive by clicking the button.
6.3 Record List
6.3.1 Call Recording You are able to search all recorded call conversations if you have configured the extension
always to be recorded.
Item Explanation
Extension Select an extension number to search the recordings of this
extension.
Delete Delete all recordings of the selected extension number.
117

Internet Telephony PBX System IPX-2200/IPX-2500
Item Explanation
Field Filter the recordings by specifying caller ID or destination ID. For
example, if you select “Caller ID” and specify number 301, you get the
recordings of the calls made by extension 301; if you select
“Destination ID” and specify number 301, you get the recordings of
the calls which called extension 301.
Start Date/End
Date
Search the recordings during this time period.
Delete Selected Delete the select recording items.
Caller ID Caller ID of this recorded call.
Destination ID The number the caller called.
Date Exact time when this call recording began.
Duration (sec) Duration of the recording.
Options Playback, delete and download options of the recording files.
Play You can play back the recordings directly on the web page or play
back on a specific phone.
6.3.2 Conferences All recorded conferences can be found here on the Report->Record List->Conference page.
Item Explanation
Start Date/End
Date
Specify a time duration to search the recorded conferences.
Delete Selected Delete the selected searched results.
Delete All Delete all searched results.
Conference Room The number of the recorded conference.
Date Exact time when the conference began.
Options Playback, delete or download the recording file.
Play Playback the recordings directly on the web page or playback on a
specific phone.
Delete Delete the recorded audio file.
118

Internet Telephony PBX System IPX-2200/IPX-2500
6.3.3 One Touch Recording Call recordings recorded by one touch recording feature code *1 can be found on the Report->
Record List->One Touch Recording page.
Item Explanation
Extension Extensions that use one touch recording to record calls would be
listed here.
Delete Delete all recordings of the selected extension number.
Start Date/End
Date
Search the recordings during this time period.
Delete Selected Delete the select recording items.
Caller ID Caller ID of this recorded call.
Destination ID The number the caller called.
Date The time when exactly this call began.
Play Playback, delete and download options of the recording files.
Delete Delete the recorded audio file.
6.3.4 Call Recording Playback On IP PBX system, you have two ways to play back the recording files.
Play back on the web interface
Play back on a specific phone
119

Internet Telephony PBX System IPX-2200/IPX-2500
By clicking the “Play” button on a call recording file, you’ll see a dialog like below:
With “Type 1”, you can click the button to play back the recording directly on the web
interface.
With “Type 2”, you can specify an extension number and click on “Play” to enable the
extension to ring and the extension is answered that will play on the phone.
6.4 Call Logs
Call log is also known as CDR (Call Detailed Records). On the call logs page you can check
any call records that go through the IPPBX system. Navigate to web menu Report->Call Logs.
By specifying the time duration and/or Caller ID/Destination ID/Account, you can find out the
logs you want.
Item Explanation
Start Date/End
Date
Define the searching time period by “Start Date” and “End Date”.
Field Search criteria.
120

Internet Telephony PBX System IPX-2200/IPX-2500
Item Explanation
Caller ID Searching by the caller number.
Destination ID Searching by the called number.
Account Code Searching with the pin code had been used for outbound dialing.
Download Download the searching results.
Delete Delete the searching results.
Call Start The time when exactly this call began.
Caller ID The number of the caller.(By clicking on the number you can add this
number to the IPPBX system phone book.)
Destination ID The number which has been called. (By clicking on the number you
can add this number to the IPPBX system phone book.)
Account Code The pin code had been used for outbound dialing.
Duration The duration of this phone call.
Disposition How the calls been handled. Answered, No Answer and Failed.
6.5 System logs
These logs are IPPBX journals which store all system activities. They can be used for debug
purpose if the system is running into exception. Please do not enable these logs if the system
is functioning properly, because there is a lot of data being generated and wrote into the logs
files about every details of the system activities.
In the IP PBX system, there are 4 kinds of log files.
Item Explanation
System Log System Logs store all the system events.
PBX Log PBX Logs store all the Asterisk events.
PBX Debug Log Asterisk debug logs.
Access Log Web and SSH access logs.
To enable these logs for the IPPBX system, please Navigate to web menu Report->System
Logs. And enable the logs by ticking the corresponding checkboxes.
After checking the checkboxes, please click “Save”. The log files will be generated.
121

Internet Telephony PBX System IPX-2200/IPX-2500
Each day there will be a new log file generated for each of the log types. Enable them only if
you are familiar with these logs for troubleshooting.
122
Internet Telephony PBX System IPX-2200/IPX-2500
Chapter 7. System
7.1 Time Settings
System time is very important for the IP PBX system. If the IP PBX system handles the
inbound phone calls using time rule, then only the system time will correct the calls that can be
handled properly. Beside call logs and debug logs, they record the system events using
system time as well. The IPPBX system supports NTP (Network Time Protocol) and manual
time set.
7.1.1 NTP Navigate to web menu System->Time Settings.
By default, IP PBX system uses NTP to obtain time from Internet time servers. All you have to
do is tell the IP PBX system where to find the server by specifying its domain or IP address.
And also don’t forget to select the correct time zone you are in.
Once done, click the “Sync” button to enable IPPBX system to try to synchronize the current
time from the Internet. It might take a while depending on the network conditions. After the
process is done, you’ll get notice “Sync Failed!” or “Sync Success!”. If failed please check if the
123
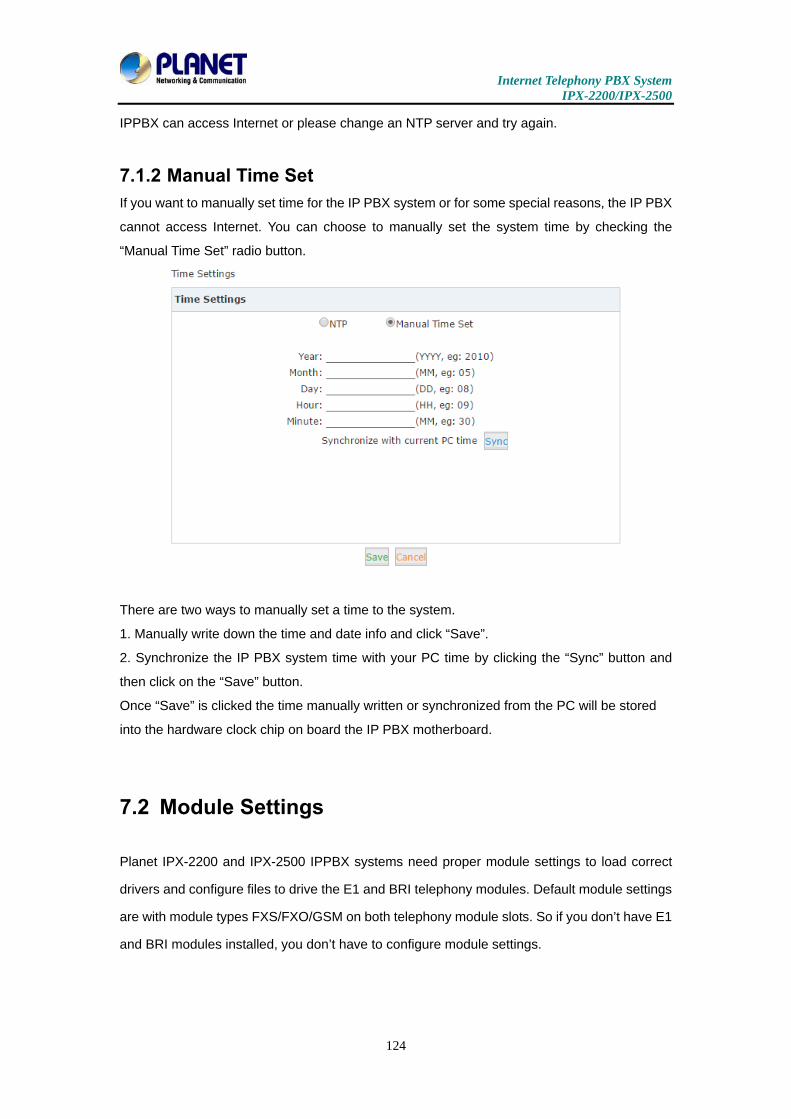
Internet Telephony PBX System IPX-2200/IPX-2500
IPPBX can access Internet or please change an NTP server and try again.
7.1.2 Manual Time Set If you want to manually set time for the IP PBX system or for some special reasons, the IP PBX
cannot access Internet. You can choose to manually set the system time by checking the
“Manual Time Set” radio button.
There are two ways to manually set a time to the system.
1. Manually write down the time and date info and click “Save”.
2. Synchronize the IP PBX system time with your PC time by clicking the “Sync” button and
then click on the “Save” button.
Once “Save” is clicked the time manually written or synchronized from the PC will be stored
into the hardware clock chip on board the IP PBX motherboard.
7.2 Module Settings
Planet IPX-2200 and IPX-2500 IPPBX systems need proper module settings to load correct
drivers and configure files to drive the E1 and BRI telephony modules. Default module settings
are with module types FXS/FXO/GSM on both telephony module slots. So if you don’t have E1
and BRI modules installed, you don’t have to configure module settings.
124

Internet Telephony PBX System IPX-2200/IPX-2500
7.3 Data Storage
Data storage allows you to upload the recorded files, log files and voicemail messages to an
FTP server through the Ethernet.
7.3.1 Data Storage With your existing FTP server you can configure the IP PBX to upload the call recordings,
voicemails and call log files to your FTP server. If you don’t have one you can even use your
Windows PC to set up an FTP server for the IPPBX system to connect. Just make sure your
PC is always turned on or at least by the time IPPBX is going to upload files you have to turn
on your Windows PC.
After these settings click “Save” to see the status “Successfully connect to FTP Server.” You
can click “Upload Now” to instantly upload a data.
125

Internet Telephony PBX System IPX-2200/IPX-2500
Click on the “Data Storage Log” tab to enable the logs of each automatic data to upload as
shown below.
After each upload, you’ll get a new folder on your FTP server directory named by the date and
time of this uploading.
After each upload except the call logs (Master.csv inside cdr-custom folder), other
files will be removed from the IP PBX system, including the call recordings (files
inside monitor folder) and voice messages (files inside voicemail folder). So after
each upload, you will get only the newly-generated audio files.
126
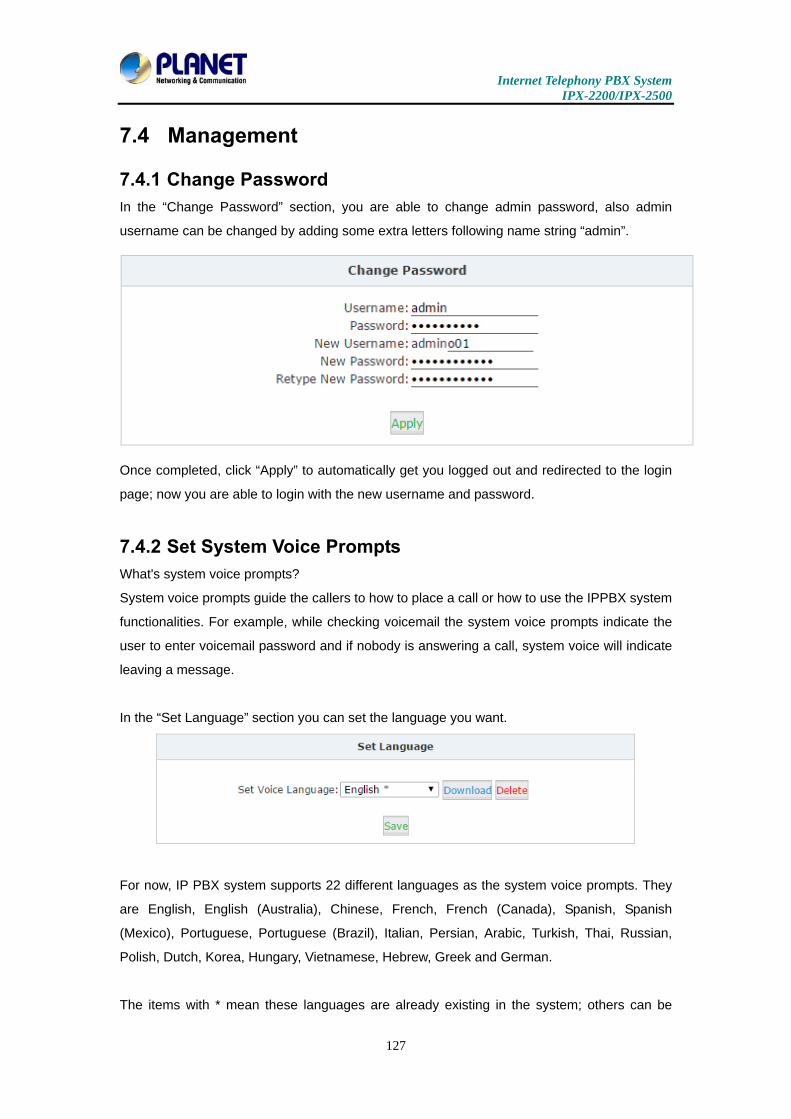
Internet Telephony PBX System IPX-2200/IPX-2500
7.4 Management
7.4.1 Change Password In the “Change Password” section, you are able to change admin password, also admin
username can be changed by adding some extra letters following name string “admin”.
Once completed, click “Apply” to automatically get you logged out and redirected to the login
page; now you are able to login with the new username and password.
7.4.2 Set System Voice Prompts What's system voice prompts?
System voice prompts guide the callers to how to place a call or how to use the IPPBX system
functionalities. For example, while checking voicemail the system voice prompts indicate the
user to enter voicemail password and if nobody is answering a call, system voice will indicate
leaving a message.
In the “Set Language” section you can set the language you want.
For now, IP PBX system supports 22 different languages as the system voice prompts. They
are English, English (Australia), Chinese, French, French (Canada), Spanish, Spanish
(Mexico), Portuguese, Portuguese (Brazil), Italian, Persian, Arabic, Turkish, Thai, Russian,
Polish, Dutch, Korea, Hungary, Vietnamese, Hebrew, Greek and German.
The items with * mean these languages are already existing in the system; others can be
127

Internet Telephony PBX System IPX-2200/IPX-2500
downloaded here by clicking the “Download” button.
7.5 Backup
7.5.1 Take a Backup Taking a backup on IP PBX system is the same as you create a recovery point on your
Windows system. By restoring the backup you can recover the IP PBX system configurations
to the time point when it’s still functioning well.
Normally the first backup should be taken when you finish configuring the IPPBX to work for
the very first time. And maybe later you’ll apply new changes to the configurations in which you
can take new backups as well.
Navigate to web menu System->Backup. Click the “Take a Backup” button to create a backup
file which will contain all current system configurations.
Once done, you get the backup file listed on this page. And the file is stored in the file system.
Any time, by clicking the “Restore” button you can restore the configurations. By clicking the
“Delete” button you can delete this backup. And you can also download the backup to your
computer hard disk drive by clicking the button.
If you are downloading the backup to your computer hard drive, please keep this file
confidential, because this file contains web admin password, user extension
password and many other sensitive information which may compromise your IP PBX
system.
128

Internet Telephony PBX System IPX-2200/IPX-2500
7.5.2 Upload Backup File Click on the “Upload Backup File” tab to enable to upload a backup file from your computer
hard drive.
If you are uploading a backup from another IP PBX system, please make sure they
have the exact same hardware configurations. It’s not recommended to upload
backup files to different IP PBX systems, unless you are pretty comprehensive with
IP PBX systems
7.6 Troubleshooting
Troubleshooting includes two tools for you to check the network reachability, ping and
traceroute. With these tools you'll get an outside view of your network response time and
network topology, which allows you to track down possible errors more easily
Click【Network Settings】->【Troubleshooting】:
7.6.1 Ping The ping command is a very common method for troubleshooting the accessibility of devices.
It uses a series of Internet Control Message Protocol (ICMP) Echo messages to determine:
Whether a remote host is active or inactive.
The round-trip delay in communicating with the host.
Packet loss.
129

Internet Telephony PBX System IPX-2200/IPX-2500
By specifying the domain or IP of the host and how many packets to be sent, click the “Run”
button to enable the command to begin the process. You'll get results indicating the
reachability of the destination.
7.6.2 Traceroute The traceroute command is used to discover the routes that packets actually take when
traveling to their destination. Click the “Traceroute” tab and specify the domain or IP address
you want to look up and then click the “Run” button to start the process.
After the process, system will notice “Trace Complete” and you can see which routes the
packets being taken before reaching the final destination.
7.6.3 Tcpdump
TCPDUMP is a common pocket analyzer that allows users to capture TCP/IP and other
130

Internet Telephony PBX System IPX-2200/IPX-2500
packets being transmitted or received over a network to which the Planet IPPBX is attached.
The captured packets can be downloaded from the IPPBX system and been analyzed on your
Windows PC to display the SIP traffic details. It can be used to debug a VoIP call problem.
On the 【System】->【Troubleshooting】->【TCPDUMP】page, you can do a capture on one
of Planet IPPBX Ethernet interfaces.
Select an interface and specify the duration of this capture and then click on “Start”. The
process will begin and now you can make a call to recur the problem. Once the time is up, the
captured packets will be displayed in the “List of Files” section. You can download it to analyze
the SIP packets for troubleshooting purposes.
7.6.4 Channel Monitor
Channel Monitor is technically a DAHDI Monitor that allows you to monitor signal level on
analog channel and record the output to a file. Recorded audio files are by default raw signed
linear PCM. You can play it to the speaker to listen to the phone call signaling on the analog
channel. Or you can use a sound editor to visually display the audio level at both the Rx (audio
Received by Asterisk) and Tx (audio Transmitted by Asterisk).
Usually Channel Monitor can be used to capture the caller ID signaling of an FXO channel. If
you are experiencing caller ID problem, you can perform channel monitor on the FXO port and
then analyze the captured packets.
131

Internet Telephony PBX System IPX-2200/IPX-2500
In the “Monitor on channel” field, you should select a channel to be monitored. And then you
have to specify the duration to monitor. Then click on “Start” to enable the capture to begin.
Now you should make a call in from this channel (port). After the capture is done, you’ll get the
file listed in the “List of Files” section.
7.7 Reset & Reboot
Navigate to web menu System->Reset & Reboot.
As you can see here on this page, you are able to reset and reboot the IPPBX system directly
via web GUI.
132

Internet Telephony PBX System IPX-2200/IPX-2500
7.7.1 Reset By clicking the “Factory Defaults” button, you can reset all configurations of the IP PBX system.
Except the configurations to be reset, the recording files, voicemail messages and call logs will
also be erased. So please make sure you have backed up the files you need before resetting.
The whole resetting process will be done in 2 minutes. If you choose to reset network settings
also, then you need to login with the default URL https://172.16.0.1 on WAN. Username and
password will all be reset to admin.
7.7.2 Reboot By clicking “Reboot” you can restart the IPPBX system. The whole process will be done in 2
minutes.
7.8 Upgrade
Planet will update the IPPBX firmware irregularly for new features and bug fixes. You can visit
our office website www.planet.com.tw to check the updates for your IP PBX system. The
downloaded firmware package should be in .zip format. Please extract the package first and
upgrade with the uImage-md5.xxx file to upgrade your IP PBX system. You can see there are
two methods – Web upgrade and TFTP upgrade -- to upgrade the IPPBX firmware.
7.8.1 Web Upgrade
Check the “Web Upgrade” radio button and click the “Browse” button to locate the new
firmware in your PC hard drive. Click “Upload” and it will ask you to confirm if restarting the IP
PBX system to complete the upgrading process. You can click “Yes” to continue upgrading.
The “Restore Default Set” option is used to reset the IP PBX system configurations
while upgrading; if not otherwise specified you don’t have to enable this option to
133

Internet Telephony PBX System IPX-2200/IPX-2500
reset the IP PBX system. If you want to reset, it will reset all system configurations
including the network profiles.
7.8.2 TFTP Upgrade If you don’t have a TFTP server, you can Google tftpd32 and download this application to set
up a lightweight TFTP server on your Windows.
Please click “Browse” on the TFTP application window to locate the new firmware. And in the
“Server Interface” dropdown list, it’s a list of your PC network interfaces. Please select a
correct interface (in the same network) which can access the IP PBX system. On the IPPBX
web GUI please check the “TFTP Upgrade” radio button, and specify the exact firmware file
name on the “Enter The Package Name” blank, and in the “TFTP Server IP address” blank
please specify the IP address displayed on the TFTP application window.
Please double-check the file name and TFTP server IP address and then click “Apply” to
enable to upgrade the firmware just like web upgrade.
134

Internet Telephony PBX System IPX-2200/IPX-2500
135

Internet Telephony PBX System IPX-2200/IPX-2500
Chapter 8. Operating Instructions This chapter will introduce you how to use PLANET IP PBX by example.
8.1 How to connect the IP PBX to the Internet
If your office accesses the public network through router, you can put Planet IP PBX behind
the router. You should connect the WAN port of the IP PBX to the LAN port of the router.
136

Internet Telephony PBX System IPX-2200/IPX-2500
8.2 How to combine two IP PBXs in a different
network
Normally, two sets of the IPX-2500 are located in different places with different IP addresses
for Internet access.
For external line configuration, you must use public IP address.
Take the following instructions as an example:
Register IPX-2500-B IP to a trunk of IPX-2500-A with authentication.
Configuration Rule:
1. IP Phone registers on IPX-2500-A as extension 601.
1. Another IP Phone registers on IPX-2500-B as extension 801.
2. IPX-2500-A IP: 192.168.1.100.
3. IPX-2500-B IP: 192.168.1.200.
4. Extension format of IPX-2500-A: 6XX.
5. Extension format of IPX-2500-B: 8XX
6. Create an extension 888 with password 123456 on IPX-2500-B.
7. All extensions on IPX-2500-A can call extensions on IPX-2500-B with format 8XX.
8. All extensions on IPX-2500-B can call extensions on IPX-2500-A with format 6XX.
For detailed steps, please take Chapter 8.2 as reference.
137

Internet Telephony PBX System IPX-2200/IPX-2500
Two sets of IPX-2500 behind router
Sometimes the IPX-2500 doesn’t have a public IP address, and you have to configure port
mapping for your router.
Step 1: Configure the mapping rule of IPX-2500-A on the router.
The IPX-2500-B is connected behind the router, and registers on IPX-2500-A through internet.
You need to configure the port mapping of IAX2 port (4569) on the router. Then, all data
received from RJ11 port of router (192.168.1.100:4569) will be sent to IPX-2500-A
Now, take the web management panel of ADN-4102 router as an example.
138

Internet Telephony PBX System IPX-2200/IPX-2500
In here both UTP and TCP must open for IP PBX.
Step 2: IPX-2500 Configuration
Configure the trunk and dial plan on IPX-2500-B, and register IPX-2500-B IP to IPX-2500-A.
The configuration is the same as the above, but you have to replace the public IP address with
the internal IP: 192.168.1.21.
Step 3: Configure port mapping rule of IPX-2500-B on the router
Configure port mapping of IPX-2500-B on the router according to Step 1.
Step 4: Connect two sets of the IPX-2500 and make the call
Create extension 601 on IPX-2500-A, extension 801 on IPX-2500-B, and create the correct
outbound rule.
Public IP must be provided by network provider. It could be dynamic IP address, and
easy to change; you can resolve this problem by using DDNS.
8.3 How to resolve the problem about hearing one
side only
If the IPX-2500 is behind router, to resolve the problem, please set up IP address as shown
below:
Click【Advanced】->【Option】->【Global SIP Settings】:
139

Internet Telephony PBX System IPX-2200/IPX-2500
Item Explanation
External IP External IP or domain to replace the device IP
External Host External domain to replace the device IP.
External Refresh(sec) Refresh time, default is 10 seconds
Local Network Address IP address and subnet mask needed to be converted.
e.g. 192.168.1.100/255.255.255.0
8.4 How to use soft phone in IPX-2200 or IPX-2500
8.4.1 Softphone on Windows PC The softphones 3CX, Bria, Zoiper and many other softphone Apps all can work with IP PBX.
Below is an example of registering Zoiper to IP PBX system as an extension from your
Windows PC.
Step 1:
Dowload Zoiper from http://www.zoiper.com/.
Step 2:
Install and run Zoiper on your Windows.
Step 3:
Click menu “Settings” and select “Create a new account” and select “SIP” protocol and click
Next.
140

Internet Telephony PBX System IPX-2200/IPX-2500
Step 4:
Fill in the register credentials shown below.
Step 5:
Click Next to complete registering.
8.4.2 Softphone on Android Phone, iPhone or iPad Most of the softphones mentioned previously have mobile editions for both Android
and iOS platforms. You can download to install from your mobile phone App Store.
Below is how you register Zoiper softphone to IP PBX as an extension from your iPhone:
Step 1:
Run Zoiper on your iPhone and tap menu.
Step 2:
Tap menu. Step 3:
Tap to create a new account. Step 4:
It asks “Do you already have an account (username and password)?” Tap “Yes” and then tap
“Manual configuration” to continue.
141

Internet Telephony PBX System IPX-2200/IPX-2500
Step 5:
Tap to configure the account shown below:
Step 6:
After entering the register credentials, tap Register to register to IP PBX system as an
extension.
8.5 How to use Skype account in IPX-2200 or
IPX-2500
The fee of your business account is much more than €50 when you use the account
for the first time.
142

Internet Telephony PBX System IPX-2200/IPX-2500
1 https://login.skype.com
Sign in with the business account.
2 When you have signed in, at the end of this page, you will find the Skype Manager,
Please click it.
143

Internet Telephony PBX System IPX-2200/IPX-2500
3 Please click the Skype connect
144

Internet Telephony PBX System IPX-2200/IPX-2500
4 Create a SIP profile
Then you can create one SIP account. You need to pay € 4.95 for one channel as monthly rent
and you need to input the registration information in our VoIP trunk blank. Then you can
register with Skype server. And then you need to assign money for outgoing calls, and then
you can call out.
145

Internet Telephony PBX System IPX-2200/IPX-2500
Then you can see the SIP account information, and please click the Authentications details.
5 Settings on IP PBX
5.1 Build one SIP trunk with Skype for SIP account
Provider Type: Custom Trunk
Host: sip.skybe.com
User name: the user name you defined in Authentication detail
Password: the password you defined in Authentication detail
146

Internet Telephony PBX System IPX-2200/IPX-2500
5.2 Set one outbound rule
5.3 Make an outbound call
After we have done the above, in the extension we can dial 00 + Country Code + City Area
code + local number to dial out via Skype line
For example, dialing number 00 (outbound prefix number) + 001 (International Code) + 886
147

Internet Telephony PBX System IPX-2200/IPX-2500
(Country code) + 2 (city Area code without 0) + 22199518 (local phone number) will enable
you to contact Taiwan Planet Company
5.4 Set inbound rule
148