workforce management 8.0 administrator's guide
TRANSCRIPT

Workforce Management 8.0
Administrator’s Guide
The information contained herein is proprietary and confidential and cannot be disclosed or duplicated without the prior written consent of Genesys Telecommunications Laboratories, Inc.
Copyright © 2004–2010 Genesys Telecommunications Laboratories, Inc. All rights reserved.
About GenesysAlcatel-Lucent's Genesys solutions feature leading software that manages customer interactions over phone, Web, and mobile devices. The Genesys software suite handles customer conversations across multiple channels and resources—self-service, assisted-service, and proactive outreach—fulfilling customer requests and optimizing customer care goals while efficiently using resources. Genesys software directs more than 100 million customer interactions every day for 4000 companies and government agencies in 80 countries. These companies and agencies leverage their entire organization, from the contact center to the back office, while dynamically engaging their customers. Go to www.genesyslab.com for more information.Each product has its own documentation for online viewing at the Genesys Technical Support website or on the Documentation Library DVD, which is available from Genesys upon request. For more information, contact your sales representative.
NoticeAlthough reasonable effort is made to ensure that the information in this document is complete and accurate at the time of release, Genesys Telecommunications Laboratories, Inc., cannot assume responsibility for any existing errors. Changes and/or corrections to the information contained in this document may be incorporated in future versions.
Your Responsibility for Your System’s SecurityYou are responsible for the security of your system. Product administration to prevent unauthorized use is your responsibility. Your system administrator should read all documents provided with this product to fully understand the features available that reduce your risk of incurring charges for unlicensed use of Genesys products.
TrademarksGenesys, the Genesys logo, and T-Server are registered trademarks of Genesys Telecommunications Laboratories, Inc. All other trademarks and trade names referred to in this document are the property of other companies. The Crystal monospace font is used by permission of Software Renovation Corporation, www.SoftwareRenovation.com.
Technical Support from VARsIf you have purchased support from a value-added reseller (VAR), please contact the VAR for technical support.
Technical Support from GenesysIf you have purchased support directly from Genesys, please contact Genesys Technical Support at the regional numbers provided on page 17. For complete contact information and procedures, refer to the Genesys Technical Support Guide.
Ordering and Licensing InformationComplete information on ordering and licensing Genesys products can be found in the Genesys Licensing Guide.
Released by
Genesys Telecommunications Laboratories, Inc. www.genesyslab.comDocument Version: 80wm_ad_09-2010_v8.0.002.00
Administrator’s Guide 3
Table of ContentsList ofProcedures ................................................................................................................. 13
Preface ................................................................................................................. 15
About Workforce Management................................................................ 16Intended Audience................................................................................... 16Making Comments on This Document .................................................... 16Contacting Genesys Technical Support................................................... 17Document Change History ...................................................................... 17
Chapter 1 Overview................................................................................................ 19
About Genesys Workforce Management................................................. 19High Availability ....................................................................................... 20Integration with Other Genesys Solutions ............................................... 20
Configuration Layer Integration .......................................................... 21Management Layer Integration........................................................... 21Enterprise-Routing Integration............................................................ 21
User Security Settings ............................................................................. 22Pending Schedule Changes ............................................................... 22
Calendar Management ............................................................................ 22Planning and Scheduling Meetings .................................................... 22Time Off .............................................................................................. 23Schedule Exceptions .......................................................................... 24
Forecasting.............................................................................................. 25Using Historical Data .......................................................................... 26Using Forecasting Events................................................................... 26Setting Service Objectives.................................................................. 26Flexible Forecasting............................................................................ 26Deferred-Work Forecasting ................................................................ 27Multi-Skill Support............................................................................... 27
Scheduling............................................................................................... 28Maximum Agents by Length of Schedule Period................................ 28Profile Scheduling............................................................................... 29Multi-Site Planning ............................................................................. 30
Table of Contents
4 Workforce Management 8.0
Agent Preferences .............................................................................. 30Flexible Shifts...................................................................................... 30Task Sequences ................................................................................. 31Schedule Trading................................................................................ 32Marked Time ....................................................................................... 32Intra-Day Scheduling .......................................................................... 32Pending Schedule Changes ............................................................... 33
Notifications ............................................................................................. 34WFM Daemon..................................................................................... 34
Performance ............................................................................................ 36Adherence ............................................................................................... 36
Using Reason Codes.......................................................................... 36Reports .................................................................................................... 37The WFM Integration API ........................................................................ 37New Features in 8.0 ................................................................................ 38
Time Off Management Report ............................................................ 38Overtime Management ....................................................................... 38Shrinkage Tracking ............................................................................. 38Multi-Site Scheduling .......................................................................... 39Multi-Site Meeting Scheduling ............................................................ 39Split Meeting Scheduling .................................................................... 39Configuration of WFM Objects at Business Unit Level ....................... 40Agent-Team History Tracking.............................................................. 40Configuration Audit ............................................................................. 40System Requirements......................................................................... 40
Chapter 2 Architecture .......................................................................................... 43
Workforce Management Components ..................................................... 43Workforce Management Data Flow ......................................................... 47
Component Connections .................................................................... 48
Chapter 3 Deployment Planning........................................................................... 51
Predeployment Overview ........................................................................ 52Using the WFM Configuration Utility ................................................... 52Using WFM Web................................................................................. 52
About the WFM Configuration Objects .................................................... 52User Security ...................................................................................... 53Organization ....................................................................................... 54Activities.............................................................................................. 55Skills ................................................................................................... 58Schedule-State Groups....................................................................... 59Events ................................................................................................. 59
Administrator’s Guide 5
Table of Contents
Time Zones ......................................................................................... 60Synchronization .................................................................................. 60
About the WFM Policies Objects ............................................................. 60Time-Off Rules.................................................................................... 60Activity Policies ................................................................................... 61Contracts............................................................................................. 61Shifts ................................................................................................... 62Exception Types ................................................................................. 63Meetings ............................................................................................. 63Time Off Types.................................................................................... 63Marked Time ....................................................................................... 63Rotating Patterns ................................................................................ 64
Forecasting Considerations..................................................................... 64Factors and Events ............................................................................. 65
Scheduling Considerations...................................................................... 65Creating Blank Schedules .................................................................. 65Managing Schedule Bidding ............................................................... 66
About Performance Monitoring................................................................ 66About Adherence Monitoring ................................................................... 69
Chapter 4 Installing and Configuring Workforce Management ......................... 71
Preliminary Preparation ........................................................................... 72Software Requirements ...................................................................... 72Management Layer System Requirements......................................... 72Register the Server Host Computers.................................................. 73Create Your WFM Database............................................................... 74Create a Database Access Point ........................................................ 74
Import the WFM Templates ..................................................................... 75Import the WFM Solution Template .................................................... 77
Install and Run the Configuration Wizards .............................................. 77Running the Configuration Wizards .................................................... 79
Manually Create and Configure the Applications .................................... 87WFM Daemon Setup .......................................................................... 88Manually Create the WFM Solution Object......................................... 89
Manually Change Configuration Server Host and Port............................ 90Install and Run the WFM Database Utility ............................................... 91
Running the WFM Database Utility..................................................... 91Install the WFM Components .................................................................. 92
Install WFM Server ............................................................................. 92Install WFM Builder............................................................................. 93Install WFM Data Aggregator.............................................................. 94Install WFM Configuration Utility......................................................... 94Install WFM Web................................................................................. 95
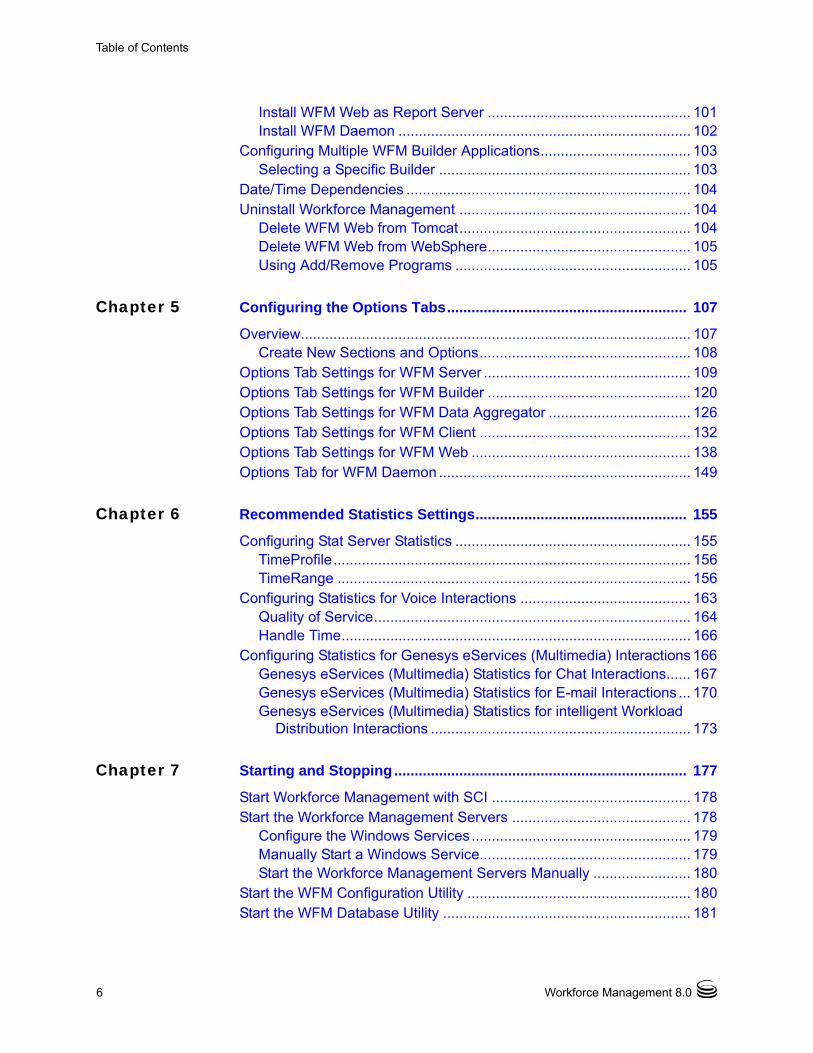
Table of Contents
6 Workforce Management 8.0
Install WFM Web as Report Server .................................................. 101Install WFM Daemon ........................................................................ 102
Configuring Multiple WFM Builder Applications..................................... 103Selecting a Specific Builder .............................................................. 103
Date/Time Dependencies ...................................................................... 104Uninstall Workforce Management ......................................................... 104
Delete WFM Web from Tomcat......................................................... 104Delete WFM Web from WebSphere.................................................. 105Using Add/Remove Programs .......................................................... 105
Chapter 5 Configuring the Options Tabs........................................................... 107
Overview................................................................................................ 107Create New Sections and Options.................................................... 108
Options Tab Settings for WFM Server ................................................... 109Options Tab Settings for WFM Builder .................................................. 120Options Tab Settings for WFM Data Aggregator ................................... 126Options Tab Settings for WFM Client .................................................... 132Options Tab Settings for WFM Web ...................................................... 138Options Tab for WFM Daemon .............................................................. 149
Chapter 6 Recommended Statistics Settings.................................................... 155
Configuring Stat Server Statistics .......................................................... 155TimeProfile........................................................................................ 156TimeRange ....................................................................................... 156
Configuring Statistics for Voice Interactions .......................................... 163Quality of Service.............................................................................. 164Handle Time...................................................................................... 166
Configuring Statistics for Genesys eServices (Multimedia) Interactions 166Genesys eServices (Multimedia) Statistics for Chat Interactions...... 167Genesys eServices (Multimedia) Statistics for E-mail Interactions ... 170Genesys eServices (Multimedia) Statistics for intelligent Workload
Distribution Interactions ................................................................ 173
Chapter 7 Starting and Stopping ........................................................................ 177
Start Workforce Management with SCI ................................................. 178Start the Workforce Management Servers ............................................ 178
Configure the Windows Services...................................................... 179Manually Start a Windows Service.................................................... 179Start the Workforce Management Servers Manually ........................ 180
Start the WFM Configuration Utility ....................................................... 180Start the WFM Database Utility ............................................................. 181
Administrator’s Guide 7
Table of Contents
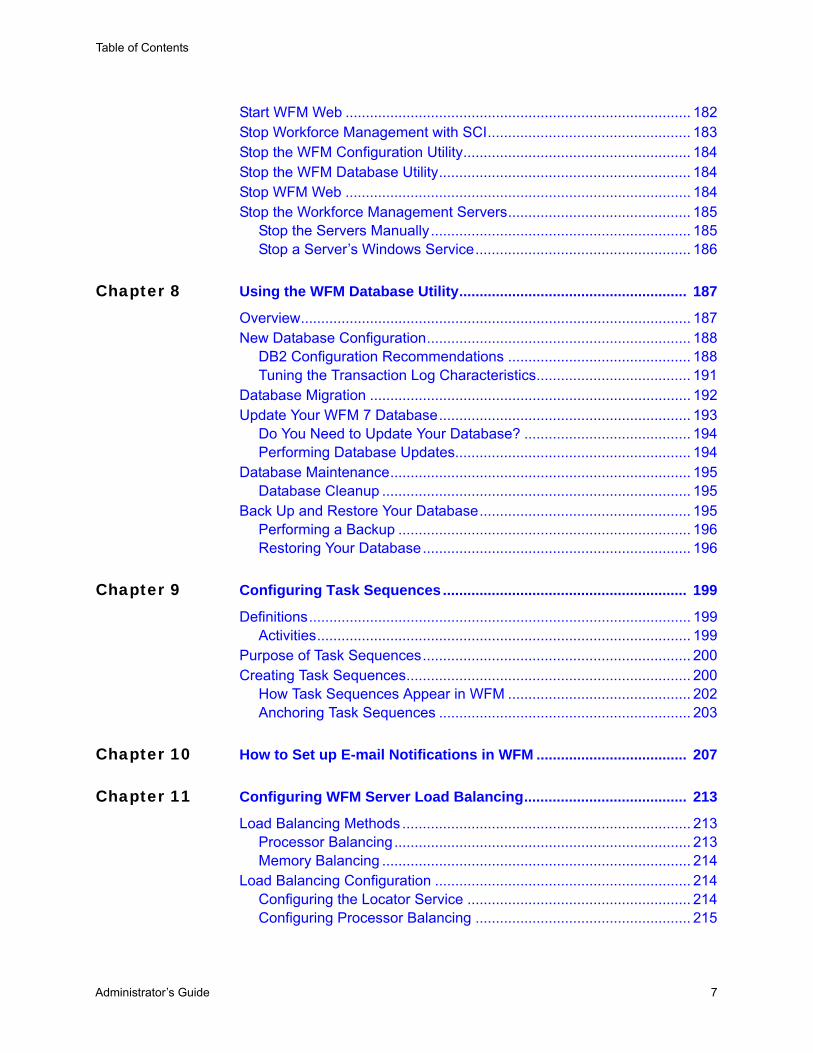
Start WFM Web ..................................................................................... 182Stop Workforce Management with SCI.................................................. 183Stop the WFM Configuration Utility........................................................ 184Stop the WFM Database Utility.............................................................. 184Stop WFM Web ..................................................................................... 184Stop the Workforce Management Servers............................................. 185
Stop the Servers Manually................................................................ 185Stop a Server’s Windows Service..................................................... 186
Chapter 8 Using the WFM Database Utility........................................................ 187
Overview................................................................................................ 187New Database Configuration................................................................. 188
DB2 Configuration Recommendations ............................................. 188Tuning the Transaction Log Characteristics...................................... 191
Database Migration ............................................................................... 192Update Your WFM 7 Database.............................................................. 193
Do You Need to Update Your Database? ......................................... 194Performing Database Updates.......................................................... 194
Database Maintenance.......................................................................... 195Database Cleanup ............................................................................ 195
Back Up and Restore Your Database.................................................... 195Performing a Backup ........................................................................ 196Restoring Your Database.................................................................. 196
Chapter 9 Configuring Task Sequences ............................................................ 199
Definitions.............................................................................................. 199Activities............................................................................................ 199
Purpose of Task Sequences.................................................................. 200Creating Task Sequences...................................................................... 200
How Task Sequences Appear in WFM ............................................. 202Anchoring Task Sequences .............................................................. 203
Chapter 10 How to Set up E-mail Notifications in WFM ..................................... 207
Chapter 11 Configuring WFM Server Load Balancing........................................ 213
Load Balancing Methods ....................................................................... 213Processor Balancing......................................................................... 213Memory Balancing ............................................................................ 214
Load Balancing Configuration ............................................................... 214Configuring the Locator Service ....................................................... 214Configuring Processor Balancing ..................................................... 215
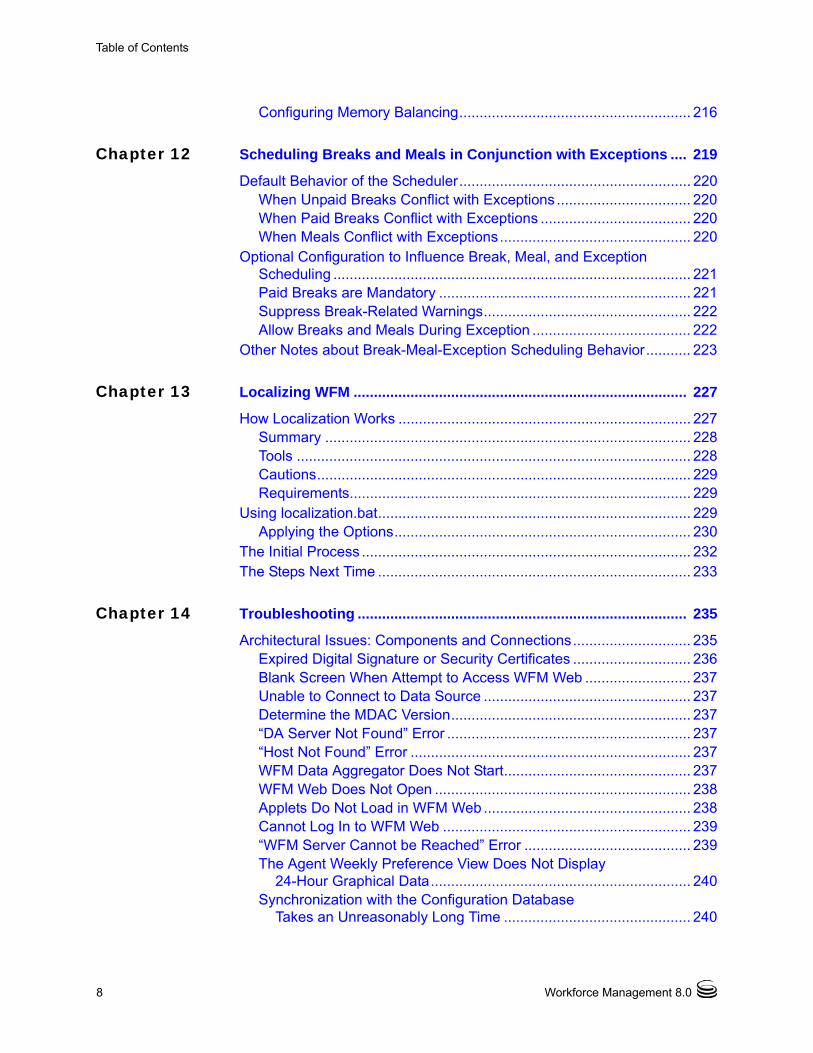
Table of Contents
8 Workforce Management 8.0
Configuring Memory Balancing......................................................... 216
Chapter 12 Scheduling Breaks and Meals in Conjunction with Exceptions .... 219
Default Behavior of the Scheduler......................................................... 220When Unpaid Breaks Conflict with Exceptions ................................. 220When Paid Breaks Conflict with Exceptions ..................................... 220When Meals Conflict with Exceptions............................................... 220
Optional Configuration to Influence Break, Meal, and Exception Scheduling ........................................................................................ 221Paid Breaks are Mandatory .............................................................. 221Suppress Break-Related Warnings................................................... 222Allow Breaks and Meals During Exception ....................................... 222
Other Notes about Break-Meal-Exception Scheduling Behavior........... 223
Chapter 13 Localizing WFM .................................................................................. 227
How Localization Works ........................................................................ 227Summary .......................................................................................... 228Tools ................................................................................................. 228Cautions............................................................................................ 229Requirements.................................................................................... 229
Using localization.bat............................................................................. 229Applying the Options......................................................................... 230
The Initial Process ................................................................................. 232The Steps Next Time ............................................................................. 233
Chapter 14 Troubleshooting ................................................................................. 235
Architectural Issues: Components and Connections............................. 235Expired Digital Signature or Security Certificates ............................. 236Blank Screen When Attempt to Access WFM Web .......................... 237Unable to Connect to Data Source ................................................... 237Determine the MDAC Version........................................................... 237“DA Server Not Found” Error ............................................................ 237“Host Not Found” Error ..................................................................... 237WFM Data Aggregator Does Not Start.............................................. 237WFM Web Does Not Open ............................................................... 238Applets Do Not Load in WFM Web ................................................... 238Cannot Log In to WFM Web ............................................................. 239“WFM Server Cannot be Reached” Error ......................................... 239The Agent Weekly Preference View Does Not Display
24-Hour Graphical Data................................................................ 240Synchronization with the Configuration Database
Takes an Unreasonably Long Time .............................................. 240
Administrator’s Guide 9
Table of Contents
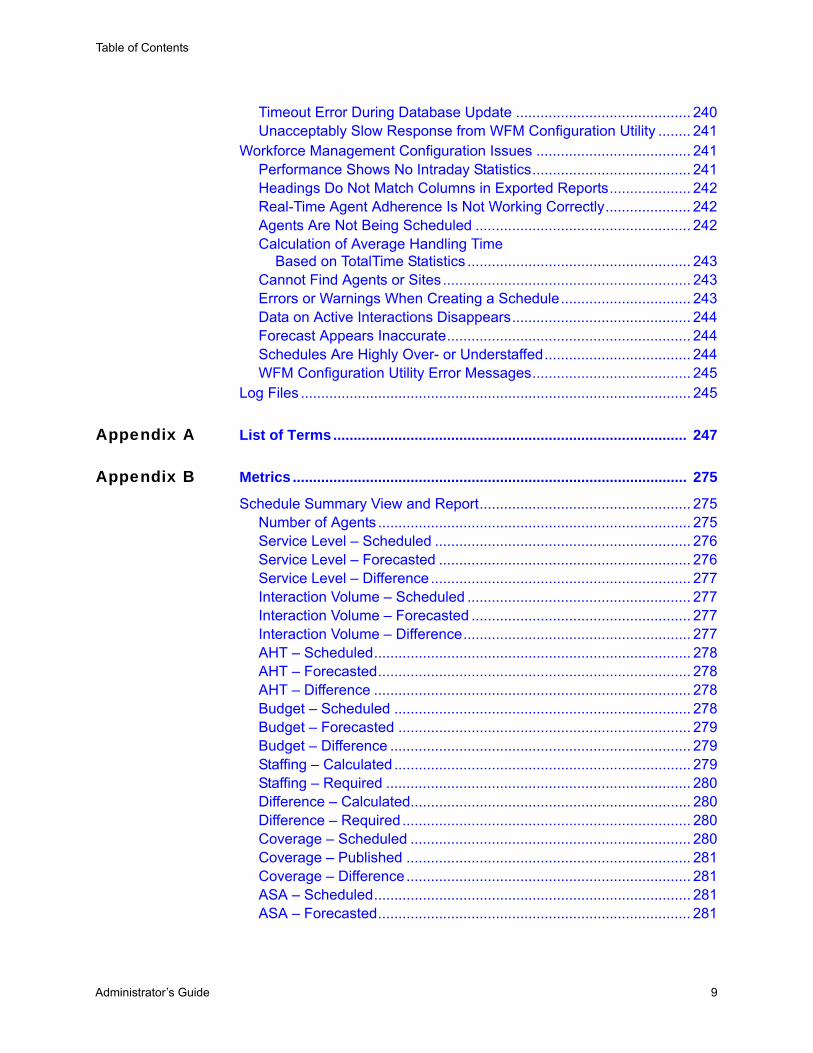
Timeout Error During Database Update ........................................... 240Unacceptably Slow Response from WFM Configuration Utility ........ 241
Workforce Management Configuration Issues ...................................... 241Performance Shows No Intraday Statistics....................................... 241Headings Do Not Match Columns in Exported Reports.................... 242Real-Time Agent Adherence Is Not Working Correctly..................... 242Agents Are Not Being Scheduled ..................................................... 242Calculation of Average Handling Time
Based on TotalTime Statistics ....................................................... 243Cannot Find Agents or Sites............................................................. 243Errors or Warnings When Creating a Schedule................................ 243Data on Active Interactions Disappears............................................ 244Forecast Appears Inaccurate............................................................ 244Schedules Are Highly Over- or Understaffed.................................... 244WFM Configuration Utility Error Messages....................................... 245
Log Files ................................................................................................ 245
Appendix A List of Terms....................................................................................... 247
Appendix B Metrics ................................................................................................. 275
Schedule Summary View and Report.................................................... 275Number of Agents ............................................................................. 275Service Level – Scheduled ............................................................... 276Service Level – Forecasted .............................................................. 276Service Level – Difference ................................................................ 277Interaction Volume – Scheduled ....................................................... 277Interaction Volume – Forecasted ...................................................... 277Interaction Volume – Difference........................................................ 277AHT – Scheduled.............................................................................. 278AHT – Forecasted............................................................................. 278AHT – Difference .............................................................................. 278Budget – Scheduled ......................................................................... 278Budget – Forecasted ........................................................................ 279Budget – Difference .......................................................................... 279Staffing – Calculated ......................................................................... 279Staffing – Required ........................................................................... 280Difference – Calculated..................................................................... 280Difference – Required....................................................................... 280Coverage – Scheduled ..................................................................... 280Coverage – Published ...................................................................... 281Coverage – Difference...................................................................... 281ASA – Scheduled.............................................................................. 281ASA – Forecasted............................................................................. 281
Table of Contents
10 Workforce Management 8.0
ASA – Difference .............................................................................. 282Occupancy – Scheduled................................................................... 282Occupancy – Forecasted.................................................................. 282Occupancy – Difference.................................................................... 283
Contact Center Performance Report ..................................................... 283Coverage – Scheduled ..................................................................... 283Coverage – Optimal .......................................................................... 284Coverage – Difference...................................................................... 284Coverage – Percentage.................................................................... 284Number of Agents – Scheduled........................................................ 284Number of Agents – Actual ............................................................... 284Number of Agents – Difference......................................................... 285Number of Agents – Percentage of Difference ................................. 285Interaction Volume – Forecasted ...................................................... 285Interaction Volume – Actual .............................................................. 285Interaction Volume – Difference........................................................ 285Interaction Volume – %..................................................................... 286AHT – Forecasted............................................................................. 286AHT – Actual..................................................................................... 286AHT – Difference .............................................................................. 286AHT – % ........................................................................................... 287Service Level – Scheduled ............................................................... 287Service Level – Actual ...................................................................... 287ASA – Scheduled.............................................................................. 288ASA – Actual..................................................................................... 288Abandons Factor – Scheduled ......................................................... 288Abandons Factor – Actual ................................................................ 289
Agent Adherence Report ....................................................................... 289% Adherence Per Day ...................................................................... 289
Endnotes ............................................................................................... 290Endnote 1 ......................................................................................... 290Endnote 2 ......................................................................................... 290
Appendix C Multi Forecasting Primer ................................................................... 293
Multi-Site Forecasting............................................................................ 293Multi-Skill Forecasting ........................................................................... 298
How WFM Supports Multi-Skilled Agents ......................................... 298Enabling Multi-Skill Support .............................................................. 298Calculating Multi-Skill Equivalents .................................................... 299
Appendix D Time Off Primer................................................................................... 303
Time Off Types and Time Off Rules....................................................... 303
Administrator’s Guide 11
Table of Contents
Exceptions Used as Time Off ........................................................... 305When Time-Off Types No Longer Apply ........................................... 306
Time Off Limits....................................................................................... 306Time Off Request and Approval Process .............................................. 307
Planning for time off in the future ...................................................... 307Agent Time Off Planner ......................................................................... 310
Appendix E Overlays Primer .................................................................................. 313
Impact of Overlay Events on Prediction Data ........................................ 313Multiplicative Overlays ...................................................................... 314Overriding Overlays .......................................................................... 314
Impact of Overlay Events on Historical Data ......................................... 315Calculating an Overlay’s Impact ............................................................ 316
Calculating the Impact of Multiplicative Overlays.............................. 316Calculating the Impact of Overriding Overlays.................................. 316
Appendix F Recommended Stats in Copy-and-Paste Format ............................ 317
Copy-and-Paste Format ........................................................................ 317WFM Multimedia Statistics for E-mail Interactions ................................ 318WFM Statistics for Chat Interactions ..................................................... 318WFM Statistics for intelligent Workload Distribution Interactions........... 319WFM Statistics for Voice Interactions .................................................... 320
Supplements Related Documentation Resources ................................................... 323
Document Conventions ...................................................................... 325
Index ............................................................................................................... 327

Table of Contents
12 Workforce Management 8.0
Administrator’s Guide 13
List of ProceduresDefining the Default Security Role . . . . . . . . . . . . . . . . . . . . . . . . . . . . . 53Creating a New Business Unit . . . . . . . . . . . . . . . . . . . . . . . . . . . . . . . . 55Setting the ReasonCodeKeyName option in the WFM Data Aggregator
application object to ReasonCode . . . . . . . . . . . . . . . . . . . . . . . . . . 57Specifying a path and file name for the DBDumpFile option on the Options
tab of the Data Aggregator Application Object . . . . . . . . . . . . . . . . 58Registering a host computer . . . . . . . . . . . . . . . . . . . . . . . . . . . . . . . . . 73Creating a Database Access Point . . . . . . . . . . . . . . . . . . . . . . . . . . . . 75Importing WFM Application Templates . . . . . . . . . . . . . . . . . . . . . . . . . 75Importing WFM Solution Template . . . . . . . . . . . . . . . . . . . . . . . . . . . . 77Installing WFM Configuration Wizards . . . . . . . . . . . . . . . . . . . . . . . . . 78Starting the WFM Configuration Wizards . . . . . . . . . . . . . . . . . . . . . . . 79Creating a new section . . . . . . . . . . . . . . . . . . . . . . . . . . . . . . . . . . . . 108Creating a new option . . . . . . . . . . . . . . . . . . . . . . . . . . . . . . . . . . . . . 108Locating Preconfigured Stat Server Statistics
in Configuration Manager . . . . . . . . . . . . . . . . . . . . . . . . . . . . . . . 157Creating New Stat Server Statistics . . . . . . . . . . . . . . . . . . . . . . . . . . 158Entering Settings for New Statistics . . . . . . . . . . . . . . . . . . . . . . . . . . 159Starting Workforce Management with SCI . . . . . . . . . . . . . . . . . . . . . 178Configuring the Windows Services . . . . . . . . . . . . . . . . . . . . . . . . . . . 179Starting a Windows Service Manually . . . . . . . . . . . . . . . . . . . . . . . . . 179Starting the Workforce Management Servers Manually . . . . . . . . . . . 180Starting the WFM Configuration Utility . . . . . . . . . . . . . . . . . . . . . . . . 180Starting the WFM Database Utility . . . . . . . . . . . . . . . . . . . . . . . . . . . 181Starting WFM Web . . . . . . . . . . . . . . . . . . . . . . . . . . . . . . . . . . . . . . . 182Stopping Workforce Management from Inside SCI . . . . . . . . . . . . . . . 183Stopping the WFM Configuration Utility . . . . . . . . . . . . . . . . . . . . . . . . 184Stopping the WFM Database Utility . . . . . . . . . . . . . . . . . . . . . . . . . . . 184Stopping a Server Manually . . . . . . . . . . . . . . . . . . . . . . . . . . . . . . . . 185Stopping a Server from a Command Prompt . . . . . . . . . . . . . . . . . . . 186

List of Procedures
14 Workforce Management 8.0
Stopping a Server’s Windows Service . . . . . . . . . . . . . . . . . . . . . . . . . 186Configuring the DB2 Database . . . . . . . . . . . . . . . . . . . . . . . . . . . . . . 191Migrating Data . . . . . . . . . . . . . . . . . . . . . . . . . . . . . . . . . . . . . . . . . . . 192Determining if your Database is Up-to-date . . . . . . . . . . . . . . . . . . . . 194Performing a Database Update . . . . . . . . . . . . . . . . . . . . . . . . . . . . . . 194Performing a Database Cleanup . . . . . . . . . . . . . . . . . . . . . . . . . . . . . 195Performing a Backup . . . . . . . . . . . . . . . . . . . . . . . . . . . . . . . . . . . . . . 196Restoring Your Database . . . . . . . . . . . . . . . . . . . . . . . . . . . . . . . . . . 196Creating a Task Sequence . . . . . . . . . . . . . . . . . . . . . . . . . . . . . . . . . 200Setting up E-mail Notifications in WFM . . . . . . . . . . . . . . . . . . . . . . . . 207Configuring the Locator Service . . . . . . . . . . . . . . . . . . . . . . . . . . . . . 214Configuring Processor Balancing . . . . . . . . . . . . . . . . . . . . . . . . . . . . 215Configuring Memory Balancing . . . . . . . . . . . . . . . . . . . . . . . . . . . . . . 216Localizing WFM the first time . . . . . . . . . . . . . . . . . . . . . . . . . . . . . . . 232Localizing WFM the first time . . . . . . . . . . . . . . . . . . . . . . . . . . . . . . . 234Closing an incorrect connection between WFM Data Aggregator
connection to Configuration Server . . . . . . . . . . . . . . . . . . . . . . . . 238Correcting ConfigServer.properties Configuration . . . . . . . . . . . . . . . . 241
Administrator’s Guide 15
PrefaceWelcome to the Workforce Management 8.0 Administrator’s Guide. This document introduces you to the concepts, terminology, and procedures relevant to Genesys Workforce Management.
This document:
• Introduces the product, lists new features, and presents the WFM architecture.
• Offers deployment-planning recommendations and considerations.
• Explains how to configure and install the Workforce Management (WFM) components.
• Explains how to start and stop all components.
• Explains how to use the WFM Database Utility.
• Provides troubleshooting suggestions.
• Includes a list of WFM-specific terms and their definitions.
This document is valid only for the 8.0 release(s) of this product.
Note: For versions of this document created for other releases of this product, please visit the Genesys Technical Support website, or request the Documentation Library DVD, which you can order by e-mail from Genesys Order Management at [email protected].
This preface provides an overview of this document, identifies the primary audience, introduces document conventions, and lists related reference information: About Workforce Management, page 16 Intended Audience, page 16 Making Comments on This Document, page 16 Contacting Genesys Technical Support, page 17 Document Change History, page 17
For information about related resources and about the conventions that are used in this document, see the supplementary material starting on page 323.
16 Workforce Management 8.0
Preface About Workforce Management
About Workforce ManagementGenesys Workforce Management is designed to provide contact center managers with the tools they need to better manage their workforce. The product offers the ability to create accurate staffing plans that take into account not only projected contact volumes and average handle times, but also the various skills and skill levels of their agent population. This is achieved through advanced forecasting, scheduling, contact-center performance monitoring, and real-time agent adherence capabilities.
Genesys Workforce Management has been designed to integrate tightly with the Framework components of the Genesys Customer Interaction Management Platform. Agents and their skill sets are entered and maintained in Genesys Configuration Manager, so there is no need to re-enter this information in a stand-alone workforce management application. This integration also allows contact centers to leverage real-time statistics, contact-center performance, and agent adherence data across all communication channels.
Designed for the true multi-media, multi-site environment, Genesys Workforce Management provides optimal schedules for multi-skilled agents who may handle customer interactions of different media types. Agent preferences, skills, proficiency, customer segmentation, historical trends such as e-mail response times, and outbound call lengths are all considered within the forecast, schedule and adherence components.
Intended AudienceThis document, primarily intended for contact center managers and system administrators, assumes that you have a basic understanding of:
• Computer-telephony integration (CTI) concepts, processes, terminology, and applications.
• Network design and operation.
• Your own network configurations.
You should also be familiar with:
• Genesys Framework architecture and functions
• Industry-standard workforce management terms and practices.
Making Comments on This DocumentIf you especially like or dislike anything about this document, feel free to e-mail your comments to [email protected].
You can comment on what you regard as specific errors or omissions, and on the accuracy, organization, subject matter, or completeness of this document.

Administrator’s Guide 17
Preface Contacting Genesys Technical Support
Please limit your comments to the scope of this document only and to the way in which the information is presented. Contact your Genesys Account Representative or Genesys Technical Support if you have suggestions about the product itself.
When you send us comments, you grant Genesys a nonexclusive right to use or distribute your comments in any way it believes appropriate, without incurring any obligation to you.
Contacting Genesys Technical SupportIf you have purchased support directly from Genesys, contact Genesys Technical Support at the following regional numbers:
Document Change HistoryThis document has been updated for new and changed functionality in the initial 8.0 release of Workforce Management (WFM), as described in the Release Notes and online help for WFM components.
Region Telephone E-Mail
North America and Latin America
+888-369-5555 (toll-free)+506-674-6767
Europe, Middle East, and Africa
+44-(0)-1276-45-7002 [email protected]
Asia Pacific +61-7-3368-6868 [email protected]
Malaysia 1-800-814-472 (toll-free)+61-7-3368-6868
India 000-800-100-7136 (toll-free)+91-(022)-3918-0537
Japan +81-3-6361-8950 [email protected]
Before contacting technical support, refer to the Genesys Technical Support Guide for complete contact information and procedures.

18 Workforce Management 8.0
Preface Document Change History
Administrator’s Guide 19
Chapter
1 OverviewGenesys Workforce Management unifies forecasting, employee scheduling and calendar management, monitoring of real-time agent-adherence and intra-day contact-center performance, and historical reporting into a robust contact-center resource-planning application.
This chapter discusses these topics: About Genesys Workforce Management, page 19 High Availability, page 20 Integration with Other Genesys Solutions, page 20 User Security Settings, page 22 Calendar Management, page 22 Forecasting, page 25 Scheduling, page 28 Notifications, page 34 Performance, page 36 Adherence, page 36 Reports, page 37 The WFM Integration API, page 37 New Features in 8.0, page 38
About Genesys Workforce ManagementGenesys Workforce Management (WFM) provides a sophisticated package of contact-center management tools. It provides additional value through its tight integration with Genesys Framework and Genesys Routing. Key functionality is presented through a web interface, which increases its accessibility and flexibility.
WFM is a strategic asset in advancing your goals of providing the highest-quality customer service for the best value. In today’s contact center,
20 Workforce Management 8.0
Chapter 1: Overview High Availability
interactions take a multitude of forms, and agents may have a broad variety of skills. WFM creates forecasts and schedules for multi-skilled agents who are handling interactions in a variety of media, as well as for a more traditional single-skilled agent pool handling mostly voice interactions.
WFM enables Supervisors to create proposed future schedules, Agents to bid on those schedules, and Supervisors to integrate the bids into real schedules.
WFM enables agents to request time off and specific working hours, and also to trade schedules with other agents, without sacrificing optimal staffing levels. Flexible agent scheduling can help improve agent retention, resulting in fewer new hires who require training before they can become effective promoters of your business.
WFM provides real-time contact-center performance and agent-adherence monitoring. You can immediately adjust the number of agents working on a specific activity if you see that the service-level statistics for that activity have fallen out of the acceptable range. Or, if the service levels are more than satisfactory, you can encourage agents to spend additional time upselling new products, move them to another activity, or even give them time off.
The sections in this chapter give a high-level overview of the Genesys WFM features and functions. The final section, “New Features in 8.0” on page 38, presents recent additions and changes to WFM functionality that may be of particular interest to those migrating from an earlier release of Genesys WFM.
High AvailabilityData Aggregator supports Hot-Standby high availability. You can install a second Data Aggregator server as a backup and configure it to take over automatically in case the primary server goes down.
The backup reads the same information as the primary Data Aggregator, so if it is necessary to switch to the backup, there is no delay or loss of data. At the transition, the backup Data Aggregator simply starts writing to the database starting from the point when the primary Data Aggregator left off.
Because the failure of other WFM servers does not result in critical data loss, they do not support Hot- or Warm-Standby high availability. However, if you are using Management Layer, you can configure the Local Control Agents running on the server computers to restart the WFM processes and re-establish their connections.
Integration with Other Genesys SolutionsWorkforce Management 8.0 is tightly integrated with the Genesys Customer Interaction Management (CIM) environment.
Administrator’s Guide 21
Chapter 1: Overview Integration with Other Genesys Solutions
Configuration Layer Integration
WFM can automatically retrieve agent and skills information from the Genesys unified configuration environment, reducing the effort needed to maintain the WFM system and removing the chance of human errors caused by redundant data entry. You can configure WFM to place agents within a site automatically, based on their switch logins, if the switch is used to represent a site in WFM. Also, you can easily configure WFM to retrieve statistics from Routing objects (queues, routing points, virtual queues, and so on) within the Genesys platform, reducing the effort needed to support changes in routing strategies.
Management Layer Integration
Management Layer delivers powerful solution-wide control of Genesys solutions from a single access point. Through Solution Control Interface (SCI), Management Layer provides control and monitoring functions that allow a user to start or shut down single applications, or an entire solution, in a single operation and to monitor current runtime status of applications and entire solutions.
Workforce Management 8.0 is integrated with the Genesys Management Layer, enabling easy solution-wide configuration, overview of Workforce Management status, and automatic switching to backup servers if necessary.
If you use Management Layer to control and monitor WFM, each computer on which a Workforce Management server is installed also runs a Local Control Agent that constantly checks that server’s status. If a server goes down, SCI signals the user, enabling a prompt response.
Problems are centrally logged for convenient access. For more information on the Management Layer, see the Framework 8.0 Management Layer User’s Guide. Management Layer installation and configuration are described in Genesys Framework documentation.
Enterprise-Routing Integration
You can configure Genesys Enterprise Routing (ER) to route calls based on WFM schedules. Doing so can help ensure a more-balanced multiskill workload for agents and improved schedule adherence.
Routing strategies can route based on the anticipated availability of an agent. For example, interactions are not routed to agents immediately before they are scheduled for a break. This improves agent adherence and leads to better customer service and worker efficiency. Schedules are created in WFM Web for Supervisors and stored in the WFM database. You configure WFM routing strategies in Interaction Routing Designer, a user interface provided with ER to create routing strategies.
22 Workforce Management 8.0
Chapter 1: Overview User Security Settings
User Security SettingsThe WFM Configuration Utility User Security module enables you to fine-tune the precise access each user has to WFM objects and functions. For example, you can:
• Limit certain users so that they can view only certain sites or teams.
• Limit certain users so that they can read the schedule but not change it.
• Limit access to reports.
• Limit access to WFM configuration settings modules, such as Contracts and Time Off Types.
Pending Schedule Changes
User Security enables you to control who can make changes to schedule scenarios and to the Master Schedule. Users may be able to enter changes to the Master Schedule, but unable to commit or approve changes. Such changes are in pending status. An authorized user can then review the changes, and either commit/approve them or roll back/delete the changes.
This enables contact center managers to provide Master Schedule access to certain users who might not ordinarily have access. For example, supervisors who manage teams of agents, but who don’t normally have any scheduling responsibility, can enter team meetings or other exceptions into the schedule. Workforce-scheduling professionals can then review these to ensure that coverage is not adversely affected.
Calendar ManagementWFM’s unique agent-based scheduling approach enables robust agent-calendar management prior to scheduling. WFM can incorporate known obligations into agent schedules to ensure that agents can keep appointments and request adjusted shifts or working hours while WFM maximizes contact-center efficiency. By more accurately planning for known obligations, WFM can take the guesswork out of forecasting for staffing overheads, leading to more efficient use of the agent pool.
Planning and Scheduling Meetings
The Meeting Planner provides great flexibility when planning meetings. You select the meeting participants, define the range of time in which the meeting should occur, and set the duration of the meeting. You can configure recurring meetings, specifying either the number of occurrences or the start and end dates of the meeting series and the interval (weekly, for example).

Administrator’s Guide 23
Chapter 1: Overview Calendar Management
The Meeting Scheduler builds the meeting into the work schedules of the participants during the scheduling process, finding the optimal times for agents’ shifts and the meeting at the same time.
The meeting is included as an exception in all attendees’ schedules. WFM displays the meeting exception in the Schedule views using the meeting short name, so you can find it easily when looking at schedules. If a sufficient percentage of participating agents is unavailable, then the meeting is not scheduled, and you receive a warning.
Additional Functionality
Use the Meeting Scheduler...
• to insert meetings directly into multiple agent schedules as an exception after building the schedule.
• to create optimally-scheduled meetings within an existing schedule.
Use the Meeting Planner...
• to configure meetings that are pre-planned, such as recurring team meetings.
Play ‘what if’...
You can add a meeting to a schedule that has already been built, and WFM will insert the meeting into the most optimal time slot, based on the list of participants.
Supervisors can use this feature to better determine the optimal meeting times that otherwise required manual calculation or guesswork.
Time Off
You can use the WFM Configuration Utility Time Off Types module to configure multiple types of time off. Doing so enables you to set different characteristics for each type, define different rules for the accumulation of accrued time off and distribution of awarded time off, and fine-tune your record-keeping using the Time Off Report.
Note: In releases prior to WFM 7.1.2, Time Off was called Vacation and was the only time off type. No additional Time Off Types could be created.
Time off can be accrued or awarded. The settings for these differ slightly, but both are configured in the WFM Configuration Utility’s Time-Off Rules module. You can configure separate time-off rules for each time-off type.
You can associate multiple time-off rules with one time-off type. For example, you might want to have different accrual rules for agents with more seniority

24 Workforce Management 8.0
Chapter 1: Overview Calendar Management
than for those who are recent hires. By assigning the appropriate time-off rule to each agent who receives time off of that type, you can determine the rate at which each agent accrues the time off.
Use the Calendar module in WFM Web for Supervisors to set time-off limits. You can set time-off limits for an activity, for a team, or for an entire site. You can also set different time-off limits for a specified period. For example, you might want to further limit time off because of special circumstances.
You can also set different time-off limits for various periods during the day. For example, you might permit more time off in the evening than in the busier morning.
Agents can view their balances for each time-off type and request time off in WFM Web for Agents. Agents can request both full-day and part-day time off. Supervisors can enter time-off requests into the WFM Web for Supervisors Calendar module.
Requested time off may be manually approved by the supervisor or automatically approved by WFM Web, based on agent time-off balances and the limits set on the number of agents with time off per activity, team, or site.
When the Scheduler runs, all time off that has been granted is scheduled. Additional time off may be scheduled, depending on whether it meets time-off limits and scheduling optimization constraints. Once time off is scheduled, agents can no longer edit or remove the time-off assignment using WFM Web for Agents.
Time Off Wait List
When a time-off request is made, but time off limits have already been reached, if the agent asks for the request to be wait-listed, the request now remain in the WFM Calendar in a Preferred status, rather than being declined. Supervisors can view this “wait list” in the Calendar, sorting the time off requests by timestamp, and selectively grant time off requests.
Supervisors can grant agent time off for future periods, if the time off limits are raised, or if other agents cancel their existing requests. This enhances supervisor productivity by no longer requiring them to track these requests with a paper-based system.
Schedule Exceptions
Exceptions are additions to a schedule that are not work but which must be taken into account to allocate agent time correctly. Examples of exceptions include meetings, training, and special projects.

Administrator’s Guide 25
Chapter 1: Overview Forecasting
Exception Types
You create exception types based on the needs of your contact center. These types can be extremely flexible and you can link them to other WFM scheduling features. For example, you can specify that some exception types are used in meeting planning, and that some can be converted to a day off, if necessary.
Exceptions can be full-day or part-day. You can assign multiple part-day exceptions, assuming they do not overlap or otherwise violate internal WFM consistency checks.
Exception and Preference Hierarchy
Exceptions and preferences are ranked in a hierarchy. This means that, if multiple exceptions and preferences are assigned for an agent on a single day, Calendar Management analyzes the assignments and immediately selects the highest-priority exception for assignment, noting the others as declined.
However, declined exceptions and preferences are stored in the WFM database, in case of later changes to calendar information. If, for example, a training session is canceled, an agent’s previously overridden day-off preference might then change status and be available for scheduling.
ForecastingUse this tool to predict contact-center workload and staffing requirements based on historical data or user-defined templates. WFM provides multiple methods of forecasting the workload and staffing requirements for work activities. You start by creating one or multiple forecast scenarios. Creating multiple scenarios enables you to see the effects of changes to forecasting parameters, such as service objectives and predicted interaction volume. When you have determined the most satisfactory forecast, you publish it, making it the Master Forecast on which schedule scenarios, and eventually the Master Schedule, are based.
If you choose to, you can derive workload forecasts from historical information that is either collected automatically by WFM from the Genesys system or imported from .csv files using the WFM Configuration Utility. You can also create workload and staffing forecasts as reusable templates. Once you have generated a workload prediction, WFM determines the staffing requirements needed to service the workload, taking into account any applicable service objectives.
26 Workforce Management 8.0
Chapter 1: Overview Forecasting
Using Historical Data
WFM automatically collects historical data from Stat Server for all work activities handled by the Genesys platform encompassing all media, contact segments, and service types. Using Genesys Stat Server, rather than automatic call distribution (ACD) reports, provides you with far greater flexibility in defining and gathering statistics that provide an appropriate measure of contact center performance over time.
WFM analyzes interaction volumes and average handling time (AHT) in order to predict future trends for each work activity. This data enables WFM to build accurate forecasts for the anticipated workload, and to calculate the staffing required to meet that workload.
Using the WFM API, you can also develop a custom application that will enable Interaction Volume and Average Handle Time data from a 3rd-party system to be imported directly into the WFM database. This is useful if you want to use WFM to forecast and schedule a type of work that is not being routed by Genesys.
Using Forecasting Events
WFM can track events that may affect interaction volume. A sales promotion or marketing campaign, for example, may cause a predictable peak in interaction volume. Such events are entered in WFM Web for Supervisors and used by the advanced WFM algorithms. If an event recurs, the forecasting algorithms learn the impact of that event and account for its impact in future forecasts.
Setting Service Objectives
With WFM forecasting, you can set specific service objectives. You can also adjust these objectives and then rebuild the forecast, which provides a detailed “what-if” analysis of the potential impact of staffing or service-objective changes. WFM forecasting uses parameters such as interaction volumes, average handling time (AHT), average speed of answer (ASA), desired percentage of interactions handled within a target time (service level), occupancy, and maximum percentage of abandoned interactions to determine effects of different service objective settings.
Flexible Forecasting
WFM supports an unlimited number of forecasting scenarios. With them, you can create multiple forecasts and evaluate how changes in the parameters or the forecasting method that you use affect expected service objectives. Resource planners can then easily create reliable forecasts, fine-tuning the results in tabular and graphical data views. You can also save forecast workforce data as templates for use in subsequent forecast building.
Administrator’s Guide 27
Chapter 1: Overview Forecasting
WFM offers several different forecasting methods of varying complexity:
Template-Based—Good for work activities with little historical information or for activities with very predictable interaction traffic.
Expert Average Engine—Good for work activities that have a reasonable amount of historical data or those that fluctuate more dramatically because of unknown factors.
Universal Modeling Engine—Good for work activities with more than one year of historical data and accurate forecasting event information.
Copy Historical Data—Good for work activities when you have some historical data, but not enough to use the Expert Average Engine or the Universal Modeling Engine. You can combine the historical data with overlap templates, which fill in gaps in the historical data.
Use Value—Good for work activities if your site activity load is very regular. Applies a specific interaction volume or AHT to each time interval in the scenario.
Deferred-Work Forecasting
WFM is designed to consider deferrable work activities, such as e-mail, as inherently different from “immediate” work, such as a phone call. WFM uses a proprietary algorithm designed to distribute the backlog of deferrable interactions across the day in order to satisfy your service goal, which is expressed in minutes, hours, or days. Spreading out the deferred work enables you to avoid spikes in workload forecasts when a contact center opens for the day, or during brief periods of high volume.
Multi-Skill Support
A multi-skilled contact center presents an opportunity for increased productivity.
An agent might be idle in a single-skill environment, because she cannot answer calls that are queuing for a particular activity/skill that she possesses—because the schedule prevents her from using that skill.
In a multi-skilled environment, the agent can use her additional skills to answer calls. A multi-skilled agent is qualified to work on multiple activities, and therefore he or she can perform different types of work during a shift.
In a multi-skill environment, an agent may be available for multiple activities during any timestep. The agent can be scheduled to work on an activity for only part of a timestep, and only the fraction of the time period during which she or she works is counted.
Because of this, the value for staffing can be expressed as a fraction. For details, see Appendix C, “Multi Forecasting Primer,” on page 293.
28 Workforce Management 8.0
Chapter 1: Overview Scheduling
SchedulingWFM uses the published Master Forecast to create agent schedules that comply with user-defined business constraints. Or you can create “empty” schedules to which you can then assign agents. Schedule constraints include available personnel with required skills, staffing requirements, employment contracts, business policies, and agent preferences.
The staffing requirements act as a target for schedule generation. An optimized schedule ensures the least amount of over- and understaffing while still meeting contractual obligations. WFM uses each agent’s individual skills, contracted working rules, and calendar items as guides to help identify when each agent can work, and what he or she will work on.
WFM aids compliance with regional working rules by helping to apply the following aspects of Contract rules:
• User-defined weekend days
• Schedule synchronization based on specific days of the week
• Maximum number of consecutive weekends an agent may work
You can schedule agents to be available to perform multiple types of work at once or you can schedule them to work on specific types of work for periods of time within their day. You can also combine these, to create schedules in which some periods are set aside for specific types of work while at other times agents perform any work that arrives for which they are qualified.
Once you finalize your schedule, you can publish it to the Master Schedule, where it immediately becomes available for agents to view through WFM Web for Agents. Agents may then trade their schedules as needed, if the schedule trade complies with trading rules and is either auto-approved or is approved by a qualified supervisor.
Maximum Agents by Length of Schedule Period
You can build schedules for up to 5,000 agents and 6 weeks. Memory requirements are decreased, and contiguous memory is not necessary for scheduling. If you have 1.5 GB of virtual memory available, you can now build large schedules (5,000 agents). Generally, for schedules with 2,000 or fewer agents, 600 MB of virtual memory is enough.
Warning! Consider the preceding limits to be rough estimates; scheduling duration varies depending on your configuration. There is no way to provide a general estimate for schedule build time, based on just a few simple parameters such as the number of schedule weeks and the number of agents. The maximum schedule size must be determined uniquely by each user, based on specific performance requirements.
Administrator’s Guide 29
Chapter 1: Overview Scheduling
Profile Scheduling
Although agent-based scheduling offers a multitude of advantages, in some cases you must build schedules without agents assigned to them. To do so, you create a schedule composed of empty schedule slots that are appropriate for the contract types or agent skill sets you currently have, or for which you anticipate hiring. WFM offers several methods for creating blank schedules to which you can assign agents:
Scheduling Using Profiles—Profiles are based on contracts and include a skill set. They are used to represent a typical kind of agent or a proposed new agent classification. For example, you can create a new flexible full-time profile to enable planners to evaluate the adoption of a 4-day, 10-hours-per-day work week. Each profile has a skill set with assigned skill levels. Scheduler uses either a user-specified number of each profile type or a blend of profiles based on the current staff, to create blank schedules to which you can assign qualified agents.
Mixed Scheduling—You can build schedules using a combination of profiles and actual agents. This can enable planners to create additional optimized schedules for expected new hires or for outsourced agents to use.
Schedule Bidding—Supervisors create an optimal set of schedules with no agent names, authorize a set of agents to participate in the bidding process, and open the schedules for bidding. Agents review the schedules on which they are qualified to work, and bid by numbering the most desirable and least desirable schedules 1, 2, 3, and so on. The Supervisor can then have WFM assign the schedules to the agents automatically, based on the agents’ bids as well as their seniority and/or rank.”
Automated Schedule Bidding
Automated Schedule Bidding allows supervisors to create schedules with no agent names associated, and then distribute them to agents via the Web. The agents can view, filter, and sort these schedules, and bid on their favorite schedules over a preconfigured period of time. An automated assignment engine then assigns schedules to agents, based on their bids and their seniority and/or rank. When possible, preplanned Calendar items such as granted time off, days off, and exceptions are integrated into agent schedules when the schedules are published to the Master.
This new and powerful feature helps contact centers to comply with union regulations requiring that agents be assigned their desired schedules based on their seniority or rank. It also enhances supervisor productivity by automating the process. Even in nonunionized contact centers, automated schedule bidding improves agent satisfaction by giving agents more control over their future schedules.
30 Workforce Management 8.0
Chapter 1: Overview Scheduling
Multi-Site Planning
Using a familiar tree structure, you can configure WFM’s objects to correspond exactly to your Enterprise organization. For centralized, multi-site contact centers, WFM enables forecasting and building of schedules for work activities spanning all sites.
For decentralized, multi-site contact centers, WFM supports two main models.
• For multi-site contact centers that distribute calls based on percentage allocation, WFM enables you to forecast interaction volumes centrally and distribute the workload to each site for further planning efforts. Each site can set parameters such as service objectives and staffing requirements, and can build schedules.
• For multi-site contact centers that are virtualized and distribute calls based on agent availability, skill set, and so on, WFM enables you to forecast staffing centrally and then split the staffing requirements to each site. Schedules may then be built for each site. By building staffing requirements centrally, WFM can account for the efficiencies of scale that are seen in a true virtual contact center environment.
The browser-based capabilities provided by WFM ensure that in any multi-site environment users across the enterprise can participate in the planning process.
Also see Appendix C, “Multi Forecasting Primer,” on page 293.
Agent Preferences
The Scheduler can optionally consider agent preferences when building schedules. Agents can enter preferences for shifts, days off, availability, and time off using WFM Web for Agents. Supervisors can enter agent preferences in WFM Web for Supervisors and, with the appropriate security permissions, can grant or reject preferences. If a supervisor grants a preference, the calendar algorithm considers that agent’s preference when building the schedule, along with various other criteria such as seniority.
Preference Fulfillment and Schedule Optimization
Contact center administrators can also specify whether preference fulfillment or schedule optimization is the more important goal. This adds another layer of control over preference scheduling.
Flexible Shifts
The method WFM uses to create shifts enables you to configure flexible shift durations and start and end times. Additionally, WFM schedules use flexible break and meal parameters.

Administrator’s Guide 31
Chapter 1: Overview Scheduling
In a sense a WFM shift is an abstraction, representing countless possible working times. This is true even if the shift is configured to produce very regular, fixed, agent schedules. This is in contrast to the conventional notion of a shift with a mandatory fixed weekly start time, fixed duration, and set breaks.
A single WFM shift can incorporate hundreds of possible start times and durations as long as they fall within the parameters of the associated contract. However, through synchronicity constraints and use of more-rigid shift configuration settings, you can fix agent start times and workday durations. This combination of flexibility and structure makes the WFM shift a tremendously powerful scheduling mechanism. In fact, in some cases, you can configure an entire contact center using only a few WFM shifts.
The WFM Shift
For example, consider a contact center with a standard full-time shift of 8 hours a day, 5 days a week, and an alternative full-time shift of 10 hours a day, 4 days a week. You can schedule both types of agents using a single shift with a flexible duration of 8 to 10 hours per day. In either case, the agents are contracted to receive 40 hours work each week and to work 4 or 5 days. You can configure WFM to guarantee that specific agents work 4 days a week and others 5 days, or let the WFM Scheduler determine how many agents of each full-time type to use to provide the most effective schedule.
Task Sequences
WFM task-based scheduling enables you to configure sequences of work activities to be used in shifts. These task sequences guarantee that a specific period of time is spent on a specified activity or set of work activities.
Using task sequences, multimedia contact centers can generate agent-friendly schedules that build in extended periods of time set aside for handling specific tasks. Agents are thus able to focus on a single media or skill set, enabling them to complete their tasks more effectively, without the confusing effects of frequently switching media. Contact center planners can ensure that task time is equitably distributed among all qualified agents. And WFM can optimize the assignment of task times based on forecasted staffing requirements.
For example, you can guarantee that all appropriately skilled agents receive exactly 2 hours of outbound work for every shift, or you can allow WFM to determine how much outbound work to distribute to each agent. You can configure Genesys Routing to use WFM schedule information as input for routing decisions. In this way, you can use task-based scheduling to provide a closed-loop routing system that complements an agent-based approach to contact center management.
For more information on task sequences, see Appendix A, “Configuring Task Sequences” on page 199.

32 Workforce Management 8.0
Chapter 1: Overview Scheduling
Schedule Trading
WFM schedule trading enables agents to trade schedules among themselves. They can do so either through a trade with a specified agent or through a trade open to any qualified agents within their community.
Contact center planners no longer need to spend an excessive amount of time managing and processing agent schedule-trade requests. Agents feel that they have flexibility when they need to change their usual schedule and that they have more proactive control over the times they work. In some cases, schedule trades can be approved without supervisor intervention, enabling managers to focus on trades that may affect service levels or violate company policies.
Marked Time
Use marked time to distinguish any periods of time that are not otherwise tracked and reported on in an existing WFM category. For example, you can create a marked-time type for a particular project. Or you can use marked time to identify overtime periods that you want to appear in a report.
You configure marked-time types using the WFM Configuration Utility. You can specify marked time in WFM Web for Supervisors and view periods of marked time in its Intra-Day schedule view. You can report on marked time using the Schedule Marked Time Report and the Schedule Marked Time Totals Report.
Intra-Day Scheduling
The WFM Web for Supervisors Intra-Day schedule views enable you to make real-time adjustments to schedule scenarios or to the Master Schedule. You can insert exceptions, edit or change shift start and end times, assign meetings, enter time off for an agent who has suddenly gone home ill, change the activities agents are working on, or make other changes to the schedule to improve contact center performance and to make the schedule reflect actual contact center circumstances.
You can make changes one at a time or use one of the Schedule wizards to make changes to multiple agents’ schedules at once.
Intra-day Schedule Re-Optimization
When you build a schedule in WFM, the scheduling algorithm minimizes the over and under-staffing of agents against the forecasted staffing requirements, while meeting the configured working rules. Since schedules may be built several weeks in advance, a variety of circumstances may cause the schedule to become suboptimal by the time a particular schedule day arrives. Some examples:
Administrator’s Guide 33
Chapter 1: Overview Scheduling
• Contact center management may have re-forecasted volumes and staffing for the day.
• Agents may have called in sick or been granted time off.
• Existing agent schedules may have been manually adjusted.
• Additional agents may have been added into the schedule.
• Meetings or other types of exceptions may have been added to the schedule.
It does not make sense to re-optimize schedule items for days or hours that have already passed. For most contact centers, it is also not practical to re-optimize the current hour. Any changes to meals, breaks, and/or work activities may be difficult to communicate to the affected agents. For these reasons, a re-optimization wizard allows you to select the date, start time, affected agents, and the set of schedule items to be re-optimized.
For example, you have the option to re-optimize the placement of:
a. Breaks only.
b. Meals and breaks only.
c. Activity sets/task sequences/activities only.
d. Breaks/meals/activity sets/task sequences/activities without affecting shift start/end times.
e. Breaks/meals/activity sets/task sequences/activities, and shift start/end times.
This gives some flexibility if you do not wish to change certain shift items or work activities because it may be difficult for your agents to adjust to those changes. For example, if agents use their meal breaks to go out of the office and go to appointments, you may not want to change these times once they have been published.
Similarly, you can decide whether shift durations should be allowed to change or not. In some contact centers, this may be done in order to offer additional work hours to certain agents. In other contact centers, this is not a desired practice.
Additionally, you may choose to exclude from this re-optimization any agents whose schedules have already been manually edited. You may have already spent time manually adjusting shift items or work activities for an agent (for example, you moved meals or breaks based on a particular request from an agent) and you don’t want to lose those changes.
Pending Schedule Changes
Users who do not have the Approve Changes security permission enabled can make only pending changes to the Master Schedule. Pending changes do not affect the official version of the Master Schedule.

34 Workforce Management 8.0
Chapter 1: Overview Notifications
A user with the Approve Changes security permission enabled must commit pending changes before they are incorporated into the official schedule. Discarded changes are rolled back.
Alternatively, such a user can go to the Master Schedule Changes Approval module (invisible to users without the Approve Changes security permission enabled). There, she or he can review the pending changes to the Master Schedule made by any user, and approve or reject them.
You can also enter pending changes into a schedule scenario. Such pending changes are visible only to the user who entered them. You can later review your pending changes, and either commit them or roll them back. Once committed, the changes are visible to all users with access to the schedule scenario.
Note: If a scenario with pending changes is published to the Master Schedule, the pending changes are not included.
Schedule State Group Totals View
This view provides intra-day totals of the number of agents in each schedule state group (Meetings, Lunch, Breaks, and more).
It helps managers and supervisors understand how many agents are scheduled for each type of activity during a particular time period, and provides a snapshot view of productive vs. nonproductive time on an intra-day basis.
NotificationsThe Notifications module in WFM Web for Supervisors allows you to configure e-mail notifications by site for the following types of events:
• Schedule trade status changes. This type of notification can be received by both agents and supervisors who are affected by a schedule trade proposal or response.
• Time off request status changes. This type of notification can be received by both agents and supervisors who are affected by a time off request.
• Schedule modifications. This type of notification can be received by the agent who is affected by the schedule change.
See also: Chapter 10, “How to Set up E-mail Notifications in WFM,” on page 207.
WFM Daemon
A standalone server component, WFM Daemon, sends out notifications to agents and supervisors.
Administrator’s Guide 35
Chapter 1: Overview Notifications
Note: By default, WFM does not send notifications. In order to send notifications, you must select at least one site to send notifications of given type in the Targets tab of the Notifications module and save. Agents and supervisor users who are to receive e-mail notifications must have e-mail addresses configured. These e-mail addresses are stored as part of the Person object in the Genesys Configuration Database and are (optionally) synchronized into WFM using the WFM Configuration Utility. Additionally, WFM must be set up properly and connected to a customer-supplied SMTP server. (See “Options Tab for WFM Daemon” on page 149 for details on configuring the WFM Daemon to send notifications.) Once you have performed these steps, notifications of the selected type(s) are sent.
Schedule Trade Status Changes
WFM Daemon uses the following rules when sending schedule trade status change notifications:
• Both the proposing agent (creating the trade request) and responding agent (receiving the trade proposal) associated with the selected site(s) get notified when a trade status is User-declined, User-approved, Auto-declined, Auto-approved, or Cancelled.
• Supervisor(s) associated with the selected site(s) get notified when a trade status is Pending.
• The responding agent gets notified when the status of a trade proposal is In Review or Open.
• The proposing agent gets notified when the response status of a trade proposal is Accepted, In Review, or Cancelled.
Time Off Request Status Changes
WFM Daemon uses the following rules when sending time off status change notifications:
• When a supervisor manually changes agent time off in the Calendar module, the affected agent receives a notification.
• When an agent time off request is saved in a Preferred status, any supervisors with access to the agent’s team, are notified.
Schedule Modifications
When a supervisor changes one or more schedule days, WFM sends a schedule modification notification to the configured site's affected agent.
36 Workforce Management 8.0
Chapter 1: Overview Performance
PerformanceThe Performance modules compare the forecast and schedule to what is actually happening in the contact center. WFM shows intra-day statistics, such as interaction volume, average handling time (AHT), agents logged in, service level, average speed of answer (ASA), and abandons, and compares them to the planned values.
Intra-day contact-center performance data is displayed in an informative and easy-to-read format, enabling efficient performance monitoring and quick response to unanticipated interaction flow or agent-staffing situations.
WFM also provides a “what-if” calculator as an aid to decision making. You can enter new values for staffing, interaction volume, and/or other performance statistics into the What-If window. The What-If calculator then supplies the results to be expected if the values change as you project.
AdherenceWorkforce Management provides real-time agent-adherence data, which compares the current agent status to the scheduled status.
Agents who are not adhering to their schedules (within user-defined thresholds) are highlighted in yellow if they are nonadherent or in red if they are severely nonadherent. WFM also displays the amount of time, in minutes, that the agent’s current status has differed from the scheduled status. This running total is continually updated.
Using Reason Codes
WFM enables you to enter reason (aux) codes when you configure agent-adherence rules. The reason codes are linked to Genesys Agent States and add additional details to the state information. The Genesys state + reason code combination is mapped to WFM Scheduled State Groups and is displayed in Adherence views.
Note: When you filter on user-defined reason codes in the Adherence Filter dialog box, the reason code that you specify must not contain any spaces within or at the end of the key value.
For example, an agent might signal that she is in a NotReady state. By adding a reason code, she can specify that she is doing after-call work or answering e-mail. This detailed information then appears in the WFM Web Adherence Details view and agent-adherence reports.
Administrator’s Guide 37
Chapter 1: Overview Reports
Note: To use reason codes, your switch must support them. See your T-Server documentation to find out whether your switch can include reason codes when it sends Genesys TEvents.
ReportsWFM Web for Supervisors provides access to a variety of reports designed to present key contact-center data in a flexible and accessible format. The report types are:
• Configuration Reports—Present information on work activity configuration.
• Policies Reports—Present information on agents, contracts, shifts, and rotating patterns.
• Calendar Reports—Present information on time off and agent calendar items.
• Forecast Reports—Display forecast interaction volumes, AHT, and staffing requirements in tabular and graph formats.
• Schedule Reports—Display schedule data for agents, activities, teams, sites, multi-site activities, and business units at various granularities. Also present budget information and schedule validation warnings and errors.
• Performance Reports—Present various types of contact-center performance statistics in detailed and summary formats.
• Adherence Reports—Present agent-adherence information for agents, teams, sites, business units, and the enterprise.
• Audit Reports—Offers the ability for users to audit a history of changes made within the Calendar subsystem and a history of changes made to the Master Schedule.
The WFM Integration APIThe WFM Integration API enables you to create a client application that, in turn, enables you to retrieve some WFM information and to make certain changes to WFM objects.
For example:
• The WFM Schedule includes planned meetings, trainings, time-off, and so on for all agents. You can use the WFM Integration API to facilitate integration of this WFM data with third-party human resources applications and PIMs such as Outlook.
• You can take information from third-party applications and incorporate it in WFM without having to manually re-enter each update into WFM.

38 Workforce Management 8.0
Chapter 1: Overview New Features in 8.0
• You can retrieve WFM data and use it to generate custom reports using your preferred reporting tool.
• You can read agent schedule information, such as the total number of paid hours an agent worked during a particular day, and automatically feed this information into a payroll system.
Note: Not all WFM functionality is available through the WFM Integration API.
For detailed information about the WFM Integration API, see the Workforce Management 8.0 WFM API Developer’s Guide and the Workforce Management 8.0 WFM API Reference (JavaDoc).
New Features in 8.0New features were added to WFM 8.0. This section summarizes the most significant additions and changes.
Time Off Management Report
A new report within the WFM Web Supervisor application displays an Agent’s Time Off Balance. You can see the history of all Time Off rules assigned to an Agent, and if or when bonus hours were granted. Supervisors can view the Time Off view for a specified Agent, including the Time Off balance.
Benefits Users can easily manage Time Off disputes in one central view; there is no need to navigate multiple applications.
Who is Affected All users.
Overtime Management
Users can publish available overtime opportunities for agents to take on a first-come, first-serve basis, if they are skilled to work on that particular activity.
Benefits Users can easily address understaffing situations and quickly publish overtime opportunities for agents.
Who is Affected All users.
Shrinkage Tracking
Users can select and apply multiple Overhead Templates that contain percentages of individual shrinkages, which can then be applied to a Forecast.
Administrator’s Guide 39
Chapter 1: Overview New Features in 8.0
These values are displayed in the Schedule State Totals view as a total percentage, and each Scheduled State is displayed individually so users can see the total impact of shrinkage on the day.
Benefits Improves the accuracy of Forecasting, so a supervisor can schedule the proper number of staff. Users can see the impact of shrinkage on an actual day.
Who is Affected All users.
Multi-Site Scheduling
Users can build schedules for multiple sites. Each individual site is taken into account when building the subsequent Schedules; meals, breaks, meetings and task sequences are accounted for as a whole, rather than on a site-by-site basis. This functionality also applies to the intra-day rebuild of schedules.
Benefits Contact centers can manage their business virtually and better optimize work activities in WFM.
Who is Affected Customers who have multiple sites in their business unit.
Multi-Site Meeting Scheduling
Users can select participants from any site within a single business unit when using the meeting scheduler. To select participants from multiple sites, you must select the exception type from the business unit level (a site exception type cannot be used). WFM configures the earliest start and latest end time in the time zone of the user.
Benefits Improves ease of use and efficiency when users create team meetings since not all contact centers have agents that are co-located.
Who is Affected Customers who have multiple sites in their business unit.
Split Meeting Scheduling
Users can define a split meeting, and if necessary WFM will schedule non-overlapping meeting instances so that all selected participants are scheduled for a single meeting instance.
Benefits You can schedule multiple instances of the same meeting if all participants cannot be scheduled for a single meeting.
Who is Affected All users.
40 Workforce Management 8.0
Chapter 1: Overview New Features in 8.0
Configuration of WFM Objects at Business Unit Level
You can configure the WFM objects at the business unit level: exception types, time off types, marked time types and activities.
Benefits Multiple Sites can use the same configuration objects; users do not need to add them at each individual site.
Who is Affected Customers who have multiple sites within their business unit.
Agent-Team History Tracking
WFM now stores the historical association of Agent to Team. Prior to WFM 8.0, if an agent was moved from one Team to another, no record was kept, which rendered some Team-based reports inaccurate.
Benefits Allows correct reporting of metrics that are team-based and can change over time.
Who is Affected All customers who build teams.
Configuration Audit
Users can track which WFM configuration object (such as a “Full Time Contract”) was changed along with the specific parameter of the objects (i.e., “Maximum Paid Hours per Day”). Additionally, the “out of the box” audit report displays which user made the change and the timestamp.
Benefits Allows customers to better understand who made changes that may have resulted in problems and, if necessary, how to restore the configuration to its previous state.
Who is Affected All customers, particularly in large contact centers where more than one person has access to configuration objects.
System Requirements
OS: Support added for IBM AIX 64 bit versions, version 6.1, Microsoft MS Windows Server versions Windows 2003 x64 and Windows Server 2008.
Support discontinued for Windows Server 2000 x32.
Databases: Support added for Oracle 11g and Microsoft SQL Server 2008.
Web Browsers: Support added for Firefox 3.
Virtual Platforms: Support added for IBM Power VM and Sun Solaris containers.

Administrator’s Guide 41
Chapter 1: Overview New Features in 8.0
Benefits Increased customer flexibility.
Who is Affected All users.

42 Workforce Management 8.0
Chapter 1: Overview New Features in 8.0
Administrator’s Guide 43
Chapter
2 ArchitectureThis chapter explains the interconnections among the various components of Genesys Workforce Management (WFM) and how WFM interacts with the Genesys Framework. This chapter has these sections: Workforce Management Components, page 43 Workforce Management Data Flow, page 47
Workforce Management ComponentsWorkforce Management (WFM) functionality is presented via four graphical user interface (GUI) applications and four servers.
See Figure 1 on page 47 for a layout of all the components and their connections.
The user-facing applications are:
• WFM Database Utility (client application)
• WFM Configuration Utility (client application)
• WFM Web for Supervisors (browser-based)
• WFM Web for Agents (browser-based)
These applications are supported by these servers:
• WFM Server
• WFM Data Aggregator
• WFM Builder
• WFM Web
• WFM Daemon (server/background process)
In addition, you need to use a web server as a container for the WFM Web server. Genesys WFM supports Tomcat and WebSphere. WFM does not

44 Workforce Management 8.0
Chapter 2: Architecture Workforce Management Components
include Tomcat in its installation package. You must obtain and install it separately.
Note: For supported versions of WebSphere and Tomcat, see the Genesys Supported Operating Environment Reference Manual, which you can find on the Genesys Technical Support web site.
WFM Database Utility
Use this application to create and format a new database (for new users or those migrating from a pre-7.0 release of WFM), to migrate your existing data to the new database, and to perform database maintenance and cleanup.
You also use the WFM Database Utility to update the WFM database, which is a common task that must be done as part of an upgrade to a newer WFM release. If you are upgrading from WFM 7.x to the most recent 8.0 release, you will need to perform a database update.
Note: If you are migrating from an earlier release to WFM 8.0, see the procedures provided in the “Workforce Management Migration Procedures” chapter of the Genesys Migration Guide for important advisories about the database migration process.
WFM Configuration Utility
Use this application to configure sites, business units, shifts, task sequences, and most other Workforce Management database objects. Also use it to set constraints such as site rules, working hours, and time-off accrual rules; to define contracts; and to set the week start day and the default time zone.
WFM Web
WFM Web is a server application that is hosted on a servlet container and provides content for two Web browser-based user interfaces, one for Supervisors and one for Agents. The appropriate interface opens after login, depending on the login information you enter.
WFM Web for Supervisors
WFM Web for Supervisors includes calendar management, forecasting, scheduling, real-time agent adherence, contact-center performance statistics, configuration of e-mail notifications, and reporting. These functions are all entirely accessible through any computer with a supported browser and network access.
Administrator’s Guide 45
Chapter 2: Architecture Workforce Management Components
When you open WFM Web for the first time in your browser, it installs a Java applet on your machine. This applet provides WFM functionality and is presented in the user’s web browser. An updated version of this applet is downloaded to each user’s machine each time a more recent version of WFM Web is installed on the web application server.
Note: There is an increased demand on the web server where WFM Web is deployed because it now provides almost all client user-interface functionality. In addition, starting with WFM 7.2, WFM Web is also the server component responsible for generating reports. Please refer to the Genesys Hardware Sizing Guide for sizing recommendations on the WFM Web server.
Configuration The Notifications module in WFM Web for Supervisors allows you to configure e-mail notifications by site for the following types of events: schedule trade status changes, time off request status changes, and schedule modifications.
The Colors module in WFM Web for Supervisors allow you to configure colors for a Supervisor's schedule views. Two tabs control the colors to apply to schedule items:
• Default colors can be chosen for: Work, Days Off, Meals, Breaks, Activity Sets, Exceptions, Time Off, and Marked Times.
• Specific individual colors can be chosen for these object Types: Activity Set, Exception, Time Off, and Marked Time.
CalendarManagement
Enables planners to enter known obligations, such as time-off, meetings, and training sessions, into agent calendars prior to scheduling.
The unique agent-based scheduling approach that WFM provides enables robust agent-calendar management prior to scheduling. You can use WFM to incorporate known obligations into agent schedules to ensure that agent appointments are kept while maximizing contact center efficiency. By enabling more accurate planning for known obligations, WFM enables you to take the guesswork out of forecasting for staffing overheads, leading to more-efficient resource utilization. See “Calendar Management” on page 22 for more information.
Forecasting Enables contact-center managers to predict workload and staffing requirements based on historical data or user-defined templates. See “Forecasting” on page 25 for more information.
Scheduling Uses the forecast to create agent schedules within user-defined business constraints, to create empty schedules to which you can assign agents, and to create and control bidding schedules. See “Scheduling” on page 28 for more information.
Adherence When you use Genesys WFM scheduling to control the delivery of work to agents, you can monitor agents to see their current activity as well as what they
46 Workforce Management 8.0
Chapter 2: Architecture Workforce Management Components
are scheduled for. WFM will automatically identify agents who are not adhering to their schedules for durations longer than the acceptable configured limit. See “Adherence” on page 36 for more information.
Performance Statistical views reveal how closely actual events match the forecast and schedule. See “Performance” on page 36 for more information.
Reporting Enables you to create reports on contact center operations. See “Reports” on page 37 for more information.
WFM Web for Agents
Enables contact center managers to easily distribute schedule information to their employees and provides agents with proactive scheduling capabilities, such as entering schedule preferences, planning time off, schedule bidding, and trading schedules.
WFM 8.0 Servers
The GUI applications are supported by the following servers:
• WFM Server—Acts as the main data and application services source and locator for WFM clients.
• WFM Data Aggregator—Automatically synchronizes configuration data, collects historical data, and provides real-time agent-adherence information to users of WFM Web for Supervisors.
• WFM Builder—Builds WFM schedules.
• WFM Web Server—Serves content for the Web browser-based GUI applications and generates reports upon request from users of WFM Web for Supervisors.
• WFM Daemon—can be configured to send (through a customer-supplied SMTP server) e-mail notifications to agents and supervisors.
Database
WFM also requires a database to store all the relevant configuration, forecasting, scheduling, agent adherence, performance, and historical data.
Note: If you have been using WFM 6.x, you must migrate your existing data into a new database using the WFM Database Utility before starting to use WFM 8.0. See the “Workforce Management Migration Procedures” chapter in the Genesys Migration Guide for details.
Connections to the Genesys Framework
Genesys WFM connects to:
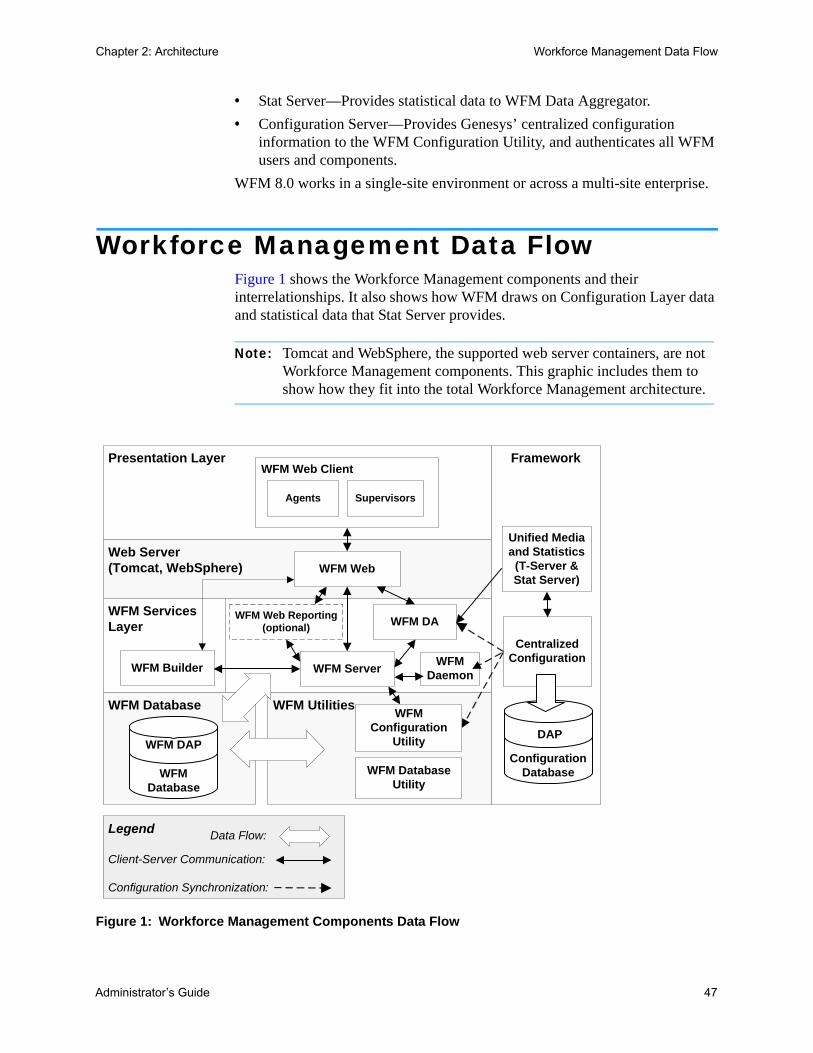
Administrator’s Guide 47
Chapter 2: Architecture Workforce Management Data Flow
• Stat Server—Provides statistical data to WFM Data Aggregator.
• Configuration Server—Provides Genesys’ centralized configuration information to the WFM Configuration Utility, and authenticates all WFM users and components.
WFM 8.0 works in a single-site environment or across a multi-site enterprise.
Workforce Management Data FlowFigure 1 shows the Workforce Management components and their interrelationships. It also shows how WFM draws on Configuration Layer data and statistical data that Stat Server provides.
Note: Tomcat and WebSphere, the supported web server containers, are not Workforce Management components. This graphic includes them to show how they fit into the total Workforce Management architecture.
Figure 1: Workforce Management Components Data Flow
Legend
Client-Server Communication:
Configuration Synchronization:
Presentation LayerWFM Web Client
Agents Supervisors
Web Server(Tomcat, WebSphere) WFM Web
WFM ServicesLayer
WFM Builder
WFM Web Reporting (optional) WFM DA
WFM Server
WFM Database
WFM Database
WFM DAP
WFM UtilitiesWFM
Configuration Utility
WFM Database Utility
Framework
Unified Media and Statistics(T-Server & Stat Server)
Centralized Configuration
Configuration Database
DAP
Data Flow:
WFM Daemon

48 Workforce Management 8.0
Chapter 2: Architecture Workforce Management Data Flow
Component Connections
Table 1 on page 49 shows the connections that are configured on the Connections tab of each component’s Application object. These connections offer an alternative, but complementary, way of understanding the Workforce Management architecture.
• As you can see, WFM Server acts as a hub, connecting to, and being connected to, every component.
• The WFM database (represented in the table by its Data Access Point (DAP) as described on page 74) forms a different sort of central hub, with many of the components connecting directly to it. Others connect indirectly, through WFM Server.
• Through its connection to Stat Server, WFM Data Aggregator provides one point of interaction between Workforce Management and the Genesys Framework. All components are connected to the Configuration Layer in the sense that they exist as objects in the Configuration Database. The WFM Configuration Utility draws actively on this connection to import configuration objects, such as agents, agent skills, and time zones, into the WFM database during synchronization.
Note: The WFM Configuration Utility accesses large amounts of data from the WFM Database during its normal operation. As a result, users of the WFM Configuration Utility who are not co-located on the same LAN as the WFM Database will experience slow response times when accessing certain parts of the software.
Therefore, Genesys recommends that the WFM Configuration Utility be deployed over Citrix or Windows Terminal Services for those remote users. Users of the WFM Configuration Utility who are on the same LAN as the WFM Database should not see this issue with application response time.
• If you are using Management Layer, the Message Server connections and the WFM Solution object specification of the instance of SCI used to control the solution also connect Workforce Management with the Genesys Framework.

Administrator’s Guide 49
Chapter 2: Architecture Workforce Management Data Flow
Legend:
X—single connection X+—one or more connections (X)—optional connection
Footnotes to Table 1
1. Configure the Message Server connections if you are using Management Layer to run Workforce Management.
2. WFM Server may connect to other instances of WFM Server if you are using an environment with a number of WFM Servers and want to create schedules for all the sites they serve. See “Configure Multiple WFM Servers” on page 81 for information about how to create this configuration, and Appendix C, “Multi Forecasting Primer,” on page 293.
3. You can configure and connect to multiple instance of WFM Builder. See “Configuring Multiple WFM Builder Applications” on page 103.
Note: The WFM Daemon background process connects to Genesys Configuration Server for authentication, configuration and connection to other Genesys servers’ information. It retrieves all data required for its work from WFM Server.
Table 1: WFM Component Connections
Component Name
Connections
WFM Server
WFM Builder
WFM Dae-mon
WFM Data Aggreg.
WFM Web
DAP Stat Server
Msg.Server1
WFM Server (X+) 2 X+3 X X (X)
WFM Builder X (X)
WFM Daemon
X (X) (X)
WFM Data Aggregator
X X X (X)
WFM Web X (X) (X)
WFM Cfg and DB Utilities
X X

50 Workforce Management 8.0
Chapter 2: Architecture Workforce Management Data Flow

Administrator’s Guide 51
Chapter
3 Deployment PlanningA successful Workforce Management (WFM) deployment requires more than installing and setting up the software. You must design effective strategies for translating corporate business rules into WFM objects and constraints. For this reason, it is important to understand key WFM concepts before configuring and using the application.
This chapter introduces the WFM features and functions you must understand to effectively deploy this product in your enterprise. It includes the following sections: Predeployment Overview, page 52 About the WFM Configuration Objects, page 52 About the WFM Policies Objects, page 60 Forecasting Considerations, page 64 Scheduling Considerations, page 65 About Performance Monitoring, page 66 About Adherence Monitoring, page 69
Use the information in this chapter to achieve an efficient, precisely customized deployment.
Note: This chapter provides a conceptual overview of WFM objects and settings. For software and hardware prerequisites, see the Genesys Supported Operating Environment Reference Manual, and the Genesys Hardware Sizing Guide, both of which are available on the Genesys Technical Support web site.
52 Workforce Management 8.0
Chapter 3: Deployment Planning Predeployment Overview
Predeployment OverviewPlan a detailed, suitable combination of Configuration Manager objects and WFM activities before configuring WFM. This information is the basis for all subsequent workforce planning and should not be changed. Any changes to the WFM activity configuration may compromise the usefulness of historical data.
Agents, users, time zones, and skills are defined as objects in Configuration Manager. These objects are brought into WFM through synchronization with the Configuration Database performed by the WFM Configuration Utility. Carefully consider the relationships among these objects when using them for enterprise planning. The relationship between skills, configured in Configuration Manager, and activities, created in the WFM Configuration Utility, is especially important.
Using the WFM Configuration Utility
You configure WFM objects and working rules in the Configuration and Policies sections of the application. Configuration objects include user security settings, organizations, activities, schedule-state groups, skills, time zones, and events. Organization rules, contracts, shifts, task sequences, time-off types, time-off accrual rules, exception types, meetings, marked-time types, and rotating patterns are set up in Policies.
The WFM Configuration Utility also includes a module that enables you to import and export historical data.
Using WFM Web
WFM Web for Supervisors provides calendar management, forecasting, scheduling, performance monitoring, real-time agent-adherence monitoring, and reporting capabilities. The success of your forecasts and schedules depends considerably on the accuracy and completeness of your configuration of WFM objects and working rules.
About the WFM Configuration ObjectsThe Configuration module of the WFM Configuration Utility enables you to configure a number of object types. The following sections briefly describe each object type and offer some considerations to assist you in planning your configuration.
Administrator’s Guide 53
Chapter 3: Deployment Planning About the WFM Configuration Objects
Note: The following sections provide only brief introductions to these objects and focus on aspects relevant to deployment planning. For a full description, refer to Workforce Management 8.0 Configuration Utility Help.
User Security
The User Security module enables you to configure security settings for all supervisors (that is, all non-agents who use WFM). It groups security settings into the following categories: General, Configuration, Policies, Calendar, Forecast, Schedule, Trading, Performance, Adherence, reports, and Data Import/Export. Under each category are various options.
For example, Notifications is an option under Configuration. If a user is assigned Notifications permission, that user can then access the Notifications module in WFM Web for Supervisors. Users without this permission cannot access and therefore cannot modify the configuration of e-mail notifications.
The user security settings allow for a great deal of flexibility. You can specify which sites and business units, teams, and so on, the user can access. You can configure no calendar, forecast, and schedule access; read-only access; or full access.
In addition, you can enable users to make only pending schedule changes—that is, schedule changes that require approval from a qualified user before they are incorporated into the Master Schedule.
To configure user security settings efficiently, determine the access levels appropriate for all users. You can change settings at any time, as necessary. You may also use Security Roles to more easily configure security settings for users, by creating a Security Role, assigning permissions to it, and then assigning one or more WFM users to that Security Role.
An administrator can configure a security role as the default. All new users added to the WFM system will be assigned to this default security role—and will be limited to its access permissions.
Procedure:Defining the Default Security Role
Purpose: To specify the access permissions that will be assigned to all new users who are added to the WFM system.
Prerequisites
• You installed WFM Configuration Utility. See the procedure “Install WFM Configuration Utility” on page 94.
54 Workforce Management 8.0
Chapter 3: Deployment Planning About the WFM Configuration Objects
Start of procedure
1. Open WFM Configuration Utility.
2. In the Modules pane, select User Security.
3. In the Objects pane, select Security Roles/Users.
4. (Optional): In the Objects pane, create a new security role.
5. In the Data pane, select a security role from the Default Security Role drop-down list.
6. Click Apply.
The selected role becomes the Default Security Role.
End of procedure
Note: The default security role has a special icon; its upper left corner is red.
Organization
Use this module to configure sites and business units (formerly called virtual PABXs), teams, and agents. To configure this module, determine the sites that belong to business units. Decide on the site properties, the maximum seats, the Data Aggregator and WFM Server the site uses, the switch you will use to collect statistics (if you want to use one different from the one automatically associated with the site during synchronization), and so on. Collect information about agent team and site associations, as well as agent settings, such as rotating pattern (if any), contracts, and rules for the accrual of accrued time off.
Keep in mind that there are many WFM configuration objects which are associated with a site, including Rotating Patterns, Contracts, Activities, Time Off Types, Time Off Rules, Exception Types, and more. When you move an agent from one site to another, you must reassign that agent to a new Contract, Time Off Rules, and new Rotating Patterns—if these were previously assigned. You must take this action to correctly schedule the moved agent under the new site.
Creating a New Business Unit
You may need to create a new business unit during database synchronization.
Procedure:Creating a New Business Unit
Purpose: To create a new business unit.
Administrator’s Guide 55
Chapter 3: Deployment Planning About the WFM Configuration Objects
Prerequisites
• You installed WFM Configuration Utility. See the procedure “Install WFM Configuration Utility” on page 94.
Start of procedure
1. Open WFM Configuration Utility.
2. In the Modules pane, select Organization.
3. In the Objects pane, right-click an empty area (or on an existing business unit).
4. Select New BU from the shortcut menu, or from the Actions menu.
The New BU Attributes window opens.
5. Select a time zone for the new business unit.
6. In the Data pane, select a security role from the Default Security Role drop-down list.
7. Click OK.
End of procedure
A new business unit appears with the default name New BU. For help with configuration of your new business unit, see the Configuration Utility help topic Configuration > Organization > Business Units > Business Unit Properties.
Activities
Activities are defined as different categories of work that comprise the total workload for a contact center. Workload and staffing forecasts are created for each activity. Each site configures its own activities, to take into account of local conditions. All agent work that is forecast and scheduled must be assigned to an activity.
Activities can take various forms. They might describe types of work, such as inbound calls or e-mail; groups of customers served, such as preferred customer care; or work times, such as overnight. You can also use activities for non-CTI work. Each activity is then associated with one or more preconfigured skills. Because activities are a fundamental unit for forecasts and schedules, it is critical that you configure them accurately.
Maximum Simultaneous Users for Activities
The Maximum Simultaneous Users feature limits the number of agents that can be scheduled for an activity, even if the workload requires more. Maximum Simultaneous Users can be understood as a way to prevent
56 Workforce Management 8.0
Chapter 3: Deployment Planning About the WFM Configuration Objects
excessive staffing for some activities so that the agents can be moved to more important activities, even if it leaves some less-important activities understaffed. This feature is best used when the contact center is understaffed as a whole. As the Maximum Simultaneous Users value is reached, agents are then assigned to other activities.
Note: Only use the Maximum Simultaneous Users feature in a multiskilled environment.
Multi-site Activities
Multi-site activities, formerly called virtual activities, are performed at multiple physical sites. They enable you to view several local activities as a single WFM object. The performance information is split among the sites that perform the activity. You can build an interaction volume forecast and view contact center performance for multi-site activities.
Multi-site activities, formerly called virtual activities, are performed at multiple physical sites. They enable you to view several local activities as a single WFM object. The performance information is split among the sites that perform the activity. You can build interaction volume forecasts, staffing forecasts, and view contact center performance for multi-site activities.”
Configuring Statistics
WFM uses the WFM Data Aggregator to track four statistical categories: Interaction Volume, Abandonment Percentage, Quality of Service, and Handle Time. These statistics are written to the WFM database, providing the historical data necessary for WFM Forecasting, Scheduling, Performance monitoring, and Adherence monitoring.
Because WFM Data Aggregator receives its statistics from the Genesys Stat Server, it supports a very flexible configuration. In the WFM Configuration Utility you associate Stat Server statistics with activities. These Stat Server statistics may be ones that are provided out-of-the-box, or they can be customized statistics.
For example, you can sum up values from any set of statistics you want, such as totalTalkTime + totalHoldTime + totalAfterCallWorkTime. This type of flexible configuration overcomes the limitations of ACD switch reports and integration, allowing you to choose the statistics that best represent the work associated with servicing each customer interaction.
Adding Reason Codes
When associating agent schedule states provided by WFM with Genesys events, you can configure reason codes with Genesys events. This allows you

Administrator’s Guide 57
Chapter 3: Deployment Planning About the WFM Configuration Objects
to refine the Genesys agent-state information that WFM uses to track agent compliance with their scheduled states.
WFM Data Aggregator can process reason codes that come from hard and/or soft phones. To receive reason codes from hard phones, or in a mixed hard/soft phone environment, set the ReasonCodeKeyName option in the WFM Data Aggregator application object to ReasonCode:
Procedure:Setting the ReasonCodeKeyName option in the WFM Data Aggregator application object to ReasonCode
Purpose: To enable Data Aggregator to process Reason Codes.
Prerequisites
• You created a WFM Data Aggregator application object for the current installation in Configuration Manager.
Start of procedure
1. Open Configuration Manager (a Management Framework component).
2. Open the WFM Data Aggregator application object.
3. On the Options tab, create an option named ReasonCodeKeyName, if it does not already exist.
4. Set the value of ReasonCodeKeyName to ReasonCode.
5. Save the change.
Note: You can use reason codes only if your CTI environment supports them.
End of procedure
Using Hot-Standby Backup for WFM Data Aggregator
You can configure a hot-standby backup WFM Data Aggregator for each primary WFM Data Aggregator server: see Step 5 on page 82. The backup reads the same information as the primary WFM Data Aggregator, so if it is necessary to switch to the backup, there is no delay or loss of data. At the transition, the backup WFM Data Aggregator simply starts writing to the database starting from where the primary WFM Data Aggregator left off.
If configured properly, WFM Data Aggregator also backs up data in the event of a disconnect from the database and the subsequent WFM Data Aggregator shutdown. It first writes all current data to a local “dump” file. You must

58 Workforce Management 8.0
Chapter 3: Deployment Planning About the WFM Configuration Objects
specify a path and file name for the DBDumpFile option on the Options tab of the WFM Data Aggregator Application object.
Procedure:Specifying a path and file name for the DBDumpFile option on the Options tab of the Data Aggregator Application Object
Purpose: To enable an emergency Data Aggregator info dump.
Start of procedure
1. Open Configuration Manager.
2. Open the WFM Data Aggregator Application object.
3. On the Options tab, create an option named DBDumpFile, if it does not already exist.
4. Set the value of DBDumpFile to a path and file name—for example: C:\DAEmergency\DBDumpFile.txt.
5. Save the change.
If WFM Data Aggregator loses its connection to the database, before closing down it writes all current data to the local file (the so-called dump file). After restart and reconnection to the database, WFM Data Aggregator reads the dump file, writes the data to the database, and deletes the dump file.
Note: The dump file does not prevent data loss during the period that WFM Data Aggregator is shut down.
End of procedure
Skills
You can configure interactions to be routed to specific agents within a contact center, based on skill definitions.
For example, you may want to have incoming interactions go first to an agent at the highest level of a certain skill. If no agent with that skill level for that activity is available, then the interaction can be routed to an agent with the next highest level of that skill. If no agent is available at that level, then the interaction can be routed to the next available agent, regardless of the agent’s skill level for the activity.
The contact center manager can decide whether to staff for the higher skill levels, or whether to staff so that any agent can handle the interaction.
Administrator’s Guide 59
Chapter 3: Deployment Planning About the WFM Configuration Objects
Skills are defined and assigned to agents in Configuration Manager. To learn how to import Configuration Manager skills into the WFM Utility Skills list, see the “Configuration > Skills” topic in Configuration Utility Help.
Matching Skills and Activities
Activities often correspond to skills but may also correspond to agent skill levels. Choosing an appropriate strategy for a contact center’s activities allows for improved staffing decisions.
For example, in a simple scenario, the relationship among the queue, skills, and activities is a 1-1-1 correspondence. As things get more complex, the relationships get more complex. Activities consist of multiple skills, and each site has many activities associated with it. The goal is to find the best combination of relationships to meet staffing requirements.
Schedule-State Groups
A schedule-state group is a collection of schedule states that is linked to a site. These include breaks, meals, exceptions, activities, time off, and so on. You can group these, and then associate the group with one or more Genesys states.
Additionally, you can configure adherence thresholds for this schedule state group, which define when an agent should be considered to be non-adherent to the schedule states contained in the group.
To configure schedule-state groups, determine what schedule states you are using, what are the most logical groupings, and which Genesys state(s) best corresponds to each group.
To learn how to configure Schedule State Groups and Adherence Rules for them, see the “Configuration > Schedule State Groups” topic in Configuration Utility Help.
Events
Events are specific instances of occurrences that affect scheduling requirements. For example, a catalog drop might increase demand for agents handling inbound interactions. By configuring an event, you can forecast and schedule to incorporate its effects, ensuring appropriate staffing levels throughout the period that the event affects.
To learn how to create and configure Events and Factors (Events are instances of Factors), see the “Configuration > Events” topic in Configuration Utility Help.
60 Workforce Management 8.0
Chapter 3: Deployment Planning About the WFM Policies Objects
Time Zones
Time zones are set up in Configuration Manager and imported into WFM during synchronization. You can assign time zones to sites and business units. You can also configure a default time zone, for efficiency in configuring new objects, and a user time zone, which is used as the alternative time zone in WFM Web Performance views. All newly created sites and business units use the default time zone, unless specified otherwise.
To learn how to configure and work with Time Zones, see the “Configuration > Time Zones” topic in Configuration Utility Help.
Synchronization
Synchronization brings Configuration Database objects, such as agents, agent skills, time zones, and users into WFM. You can configure security settings to determine the users who are able to perform synchronizations.
To learn about synchronization, see the “Configuration Utility Interface > Synchronizing” topic in Configuration Utility Help.
Note: To avoid errors during synchronization and further work, your configuration should not contain duplicate names for switches, time zones, or skills—not under different tenants, and not in different Configuration Manager instances that access the same WFM database.
About the WFM Policies ObjectsContractual obligations, legal requirements, and business practices comprise constraints under which a contact center operates. WFM enables you to specify constraints in great detail, resulting in forecasts and schedules that comply with constraints while optimizing staffing levels.
Time-Off Rules
This module enables you to set allocation parameters for both accrued and awarded time-off types. Constraints include the number of hours that are assigned per year or that accumulate per working period, and the carry-over date for each time-off type you use, and whether time-off requests can be auto-approved.
Each type of time off can be associated with one or more time-off rules. Because you can configure a number of time-off types (using the WFM Configuration Utility Time-Off Types module), you can have time off accumulate at different rates, providing more flexibility in managing contact-center staff.
Administrator’s Guide 61
Chapter 3: Deployment Planning About the WFM Policies Objects
You also use this module to assign time-off rules to specific agents. Agents can have multiple time-off rules assigned, each with its own time-off type.
Configure Time Off Rules
To learn how to create and configure Time Off rules, see the “Policies > Time Off Rules” topic in Configuration Utility Help.
Activity Policies
This module enables you to set activity open hours and staffing constraints. You can also use it to create activity sets (previously called exclusivity sets).
Activity sets provide a means to combine activities into groups for multiskilled scheduling. Activity sets are associated with sites. Any agent can work on an activity set if that agent has the skills required for the activities included in the activity set. When performing activity set work, agents must perform only the activities included in the set for a specified period of time.
When planning your deployment, consider which activities could logically be grouped into activity sets.
Contracts
Contracts are sets of rules that describe the contact center’s contractual obligations to agents. The maximum working hours for a contract should include allowances for meetings, training, overtime, and other planned, paid activities. You can configure an unlimited number of contracts. In some cases a unique contract might be necessary for each agent.
Use contracts to describe a single agent’s availability. For example, a student might prefer to work Monday, Wednesday, and Friday evenings, any time Tuesday and Thursday, and have weekends off for study and fun. You could configure this student’s contract to enable these availability parameters.
A contract is not the same as a shift. A shift indicates the hours an agent will work, whereas a contract describes how many hours an agent should work. For further details on shifts, see “Shifts” on page 62.
Constraints for Working Days, Hours, and Days Off
You can set the numbers of working days and hours and days off for one of several scheduling periods, depending on which best suit your enterprise’s business practices and any applicable legal requirements. You can set these parameters per week, per month, or per any period of 2 to 6 weeks.
For example, you can ensure that employees always receive 2 weekends off per month or work an exactly specified number of hours per 6-week period.
62 Workforce Management 8.0
Chapter 3: Deployment Planning About the WFM Policies Objects
Configuring Profiles
A profile is an abstract or hypothetical agent constructed from user-defined contract data. You can create multiple profile types, which you can use to construct schedules containing empty schedule slots appropriate for the contracts you have or intend to hire for. You can insert actual agents into the schedule slots after you build the schedule.
Shifts
The method used to create WFM shifts allows for a flexible description of shift durations and of start and end times. Additionally, WFM schedules use flexible break and meal parameters.
In a sense, a WFM shift is an abstraction, representing countless possible working times, even though you can configure a shift to produce very regular, fixed, agent schedules.
A single WFM shift can incorporate hundreds of possible start times and durations as long as they fall within the parameters of the contract. However, through more rigid shift configuration, agent start times and workday durations can be fixed. This combination of flexibility and structure makes the WFM shift a tremendously powerful scheduling mechanism. In fact, in some cases, you can configure an entire contact center using only a few WFM shifts.
Taking Advantage of the WFM Shift
The WFM shift contrasts sharply with the conventional notion of a shift, with fixed weekly start time, fixed duration, and set breaks. You can configure shifts to work in tandem with contracts, which efficiently and effectively controls the placement of working times.
For example, consider a contact center with a standard full-time shift of 8 hours a day, 5 days a week, and an alternative full-time shift of 10 hours a day, 4 days a week. Both types of agents can use a single shift with a flexible duration of 8–10 hours per day. In either case, the agents are contracted to receive 40 hours work each week and to work 4 or 5 days. You can configure WFM to guarantee that specific agents work 4 or 5 days a week, or you can leave it to the WFM Scheduler to determine how many agents of each full-time type should be used to provide the least costly schedule.
Such an efficient method of shift allocation allows you to take into account the effect of complex scheduling requirements and agent-centric considerations, while making the best possible use of multiskilled agents.
If you have a need in your contact center for more precise control over when an agent works and the duration of his workday, you may consider using Rotating Patterns. This is a way to lock in specific types of schedules for an agent without creating a unique shift for him.
Administrator’s Guide 63
Chapter 3: Deployment Planning About the WFM Policies Objects
Exception Types
Exception types define periods of time when agents are engaged in non-work activities, such as training or meetings. Each site configures its own set of exception types based on its business requirements. You can configure exceptions to be considered during Meeting Planner use, to be convertible to a day off, and so on. You can assign agents to multiple partial-day exceptions if the exceptions do not overlap.
Because you can group agents into teams, you can assign exceptions to large groups of agents at one time.
Note: Prior to WFM 7.1.2, time-off types, particularly part-day time-off types, were configured using exception types. Genesys recommends that you make use of the new time-off capabilities rather than configuring time off using exception types.
Meetings
Use this module to create meetings and assign them to agents. You can set up a series of recurring meetings that must meet your constraints for frequency, number of occurrences, and so on.
Use the Meeting Planner in the WFM Configuration Utility to configure pre-planned meetings such as team meetings that recur weekly or monthly. If you need to create an ad hoc meeting, use the Meeting Scheduler within the WFM Web Supervisor application.
Time Off Types
Use this module to create time-off types for each type of time off that you want to be able to track.
Time-off types can be accrued (time off accumulates over time) or awarded (the total amount of time off for the year is assigned at a single time). For example, you might want personal time off to accumulate, whereas holidays—since there is a fixed number during the year—can be awarded.
You can associate multiple time-off rules with a single time-off type. This enables you to have different time-off types accumulate at different rates. For example, you can set different time-off rules for different levels of seniority.
Marked Time
By configuring marked-time types, you can specify periods of time that you want to monitor and report on that are not already labeled using an existing category. For example, you might want to mark the periods that agents worked on a particular project. Or you can mark overtime so that you can report on it.
64 Workforce Management 8.0
Chapter 3: Deployment Planning Forecasting Considerations
You can insert and view marked time in the Schedule Intra-Day views. Two new reports, the Schedule Marked Time Report and the Schedule Marked Time Totals Report, display marked time statistics.
Rotating Patterns
Rotating patterns increase scheduling flexibility and control. A rotating pattern is a series of weekly patterns arranged in a repeating sequence. You construct each weekly pattern from a combination of shift assignments, agent availability times, days off, and so on, depending on what constraint is most important for any specific day.
Rotating patterns include availability times as options for weekly pattern days. If used, these availability settings override the availability settings that you configured in the Contract module for that day. Rotating pattern assignments are displayed in the Calendar along with all other pre-planned data.
Forecasting ConsiderationsYou can create forecasts based on various kinds of data. Ideally, you already have a substantial quantity of good-quality historical data on contact center interactions that you can import into the WFM database. If you have historical data, you can use either of two forecasting algorithms depending on the amount of quality historical data available. The Expert Average Engine requires a full week of historical data with no missing timesteps. To use the Universal Modeling Engine, you must have at least a full year of historical data to create forecasts.
If historical data is unavailable or of poor quality, you can create forecasts based on templates. Templates reflect estimated interaction levels for different days and times and can be constructed for each activity.
When you do not have enough historical data to use the Expert Average Engine or the Universal Modeling Engine, you can combine the historical data with overlap templates, which fill in gaps in the historical data.
Creating optimal forecasts depends not only on whether historical data is available, but also on usual workflow. Contact centers with very regular interaction volumes require different forecasting considerations than contact centers that experience frequent or marked variations of interaction levels.
If your site activity load is highly predictable, you can apply a specific interaction volume or AHT to each time interval in the scenario.
Forecasting also incorporates figures such as staffing overheads, service objectives, and occupancy into the staffing calculations, allowing precise regulation of forecasting levels. You can create a variety of forecast scenarios using different service objectives or staffing parameters to help you create realistic contact center strategies for varying circumstances. After you decide which scenario best fits your environment, you publish it to the WFM
Administrator’s Guide 65
Chapter 3: Deployment Planning Scheduling Considerations
database, where it becomes a part of your Master Forecast, upon which schedules are built.
Factors and Events
WFM can track events that may affect interaction volume. These events are based on factors, which are event types upon which events are built. When planning your forecasting, consider what factors and events may affect forecasts so you can configure them before creating forecasts. A sales promotion or marketing campaign, for example, may cause a predictable peak in interaction volume. Such events are entered in WFM Web and used by the advanced WFM algorithms. If an event recurs, the forecasting algorithms learn the impact of that event and account for its impact in future forecasts.
Scheduling ConsiderationsWFM schedules each agent individually, building schedules that allow for intra-day overhead. Therefore, you do not need to inflate staffing requirements to accommodate overhead. The only overhead additions that you need to account for are intangibles, such as starting up agent desktop applications, bathroom breaks, and so forth, and unplanned overhead, such as training or meetings that are not yet scheduled (or sick days, which, presumably, are always unplanned).
Note: The schedule is only as accurate as the forecast. If you do not build the forecast carefully, the schedule will not necessarily provide adequate coverage.
Because each site is different, some planners might choose to fully configure meetings and training. Others might opt to build these into the schedule after it is generated. WFM supports both strategies. However, a good rule of thumb says that if the meeting or training must occur at a specific time, it should be configured beforehand. Otherwise, you can add meetings and training after building the schedule.
Creating Blank Schedules
Because agent-based scheduling may not always be appropriate for your contact center, you can also create schedules using profile agents. Profile agents are user-defined, hypothetical agents, based on contract data. Using profile agents results in blank schedules that contain an appropriate number and assortment of schedule slots for the agents to be hired.
66 Workforce Management 8.0
Chapter 3: Deployment Planning About Performance Monitoring
Note: You can combine profile agents with actual agents when creating a schedule.
Managing Schedule Bidding
Supervisors can create a profile schedule which authorized Agents then bid against, for the schedule slots that they prefer. The Supervisor can automate the resolution of conflicting bids according to stated Agent preferences as well as their Seniority and Rank, and then tweak it manually before publishing the official schedule. Such a schedule can be designed to repeat over an entire quarter.
About Performance Monitoring The Performance module of WFM Web for Supervisors enables you to view how closely your service objectives are being met at the site, business unit, and activity level. You can also configure alerts to appear when service objective statistics fall outside of an acceptable range. You need to consider what your target service objectives are. To help you determine the most effective way to resolve unacceptable performance, the Performance module includes What-If capabilities, where you can see the potential effect of changing some parameter in your environment.
Table 2 lists the statistics shown on the Performance Intra-Day window and explains how each is calculated. For more on statistics configuration, see “Locating Preconfigured Stat Server Statistics in Configuration Manager” on page 157 and the “Activities” section in Workforce Management 8.0 WFM Configuration Utility Help.
Table 2: Performance Intra-day Statistics
Statistic Definition
Interaction Volume—Forecast Taken from the Master Forecast Interaction Volume. For sites, business units, and the enterprise, this is the sum of the associated local activities.
Interaction Volume—Actual The Interaction Volume collected by WFM Data Aggregator. The specifics of the statistic being monitored is determined by the Interaction Volume statistic defined for this activity in the WFM Configuration Utility. For sites, business units, and the enterprise, this is the sum of the associated local activities.
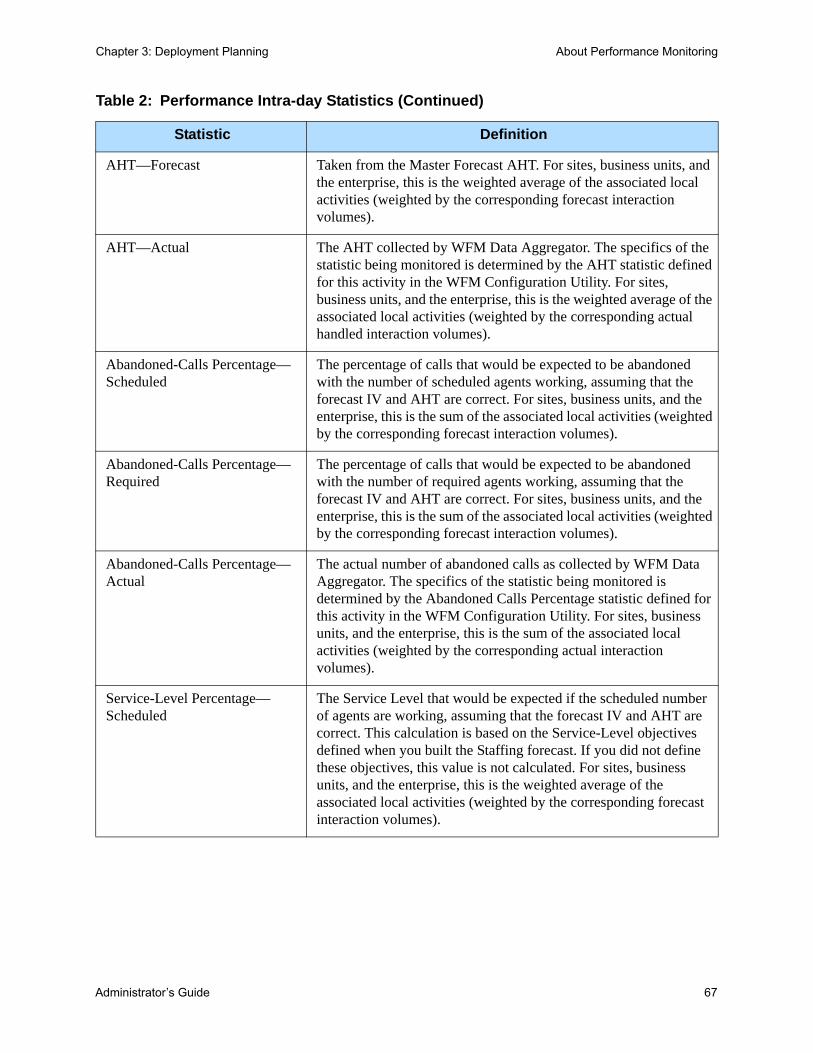
Administrator’s Guide 67
Chapter 3: Deployment Planning About Performance Monitoring
AHT—Forecast Taken from the Master Forecast AHT. For sites, business units, and the enterprise, this is the weighted average of the associated local activities (weighted by the corresponding forecast interaction volumes).
AHT—Actual The AHT collected by WFM Data Aggregator. The specifics of the statistic being monitored is determined by the AHT statistic defined for this activity in the WFM Configuration Utility. For sites, business units, and the enterprise, this is the weighted average of the associated local activities (weighted by the corresponding actual handled interaction volumes).
Abandoned-Calls Percentage—Scheduled
The percentage of calls that would be expected to be abandoned with the number of scheduled agents working, assuming that the forecast IV and AHT are correct. For sites, business units, and the enterprise, this is the sum of the associated local activities (weighted by the corresponding forecast interaction volumes).
Abandoned-Calls Percentage—Required
The percentage of calls that would be expected to be abandoned with the number of required agents working, assuming that the forecast IV and AHT are correct. For sites, business units, and the enterprise, this is the sum of the associated local activities (weighted by the corresponding forecast interaction volumes).
Abandoned-Calls Percentage—Actual
The actual number of abandoned calls as collected by WFM Data Aggregator. The specifics of the statistic being monitored is determined by the Abandoned Calls Percentage statistic defined for this activity in the WFM Configuration Utility. For sites, business units, and the enterprise, this is the sum of the associated local activities (weighted by the corresponding actual interaction volumes).
Service-Level Percentage—Scheduled
The Service Level that would be expected if the scheduled number of agents are working, assuming that the forecast IV and AHT are correct. This calculation is based on the Service-Level objectives defined when you built the Staffing forecast. If you did not define these objectives, this value is not calculated. For sites, business units, and the enterprise, this is the weighted average of the associated local activities (weighted by the corresponding forecast interaction volumes).
Table 2: Performance Intra-day Statistics (Continued)
Statistic Definition

68 Workforce Management 8.0
Chapter 3: Deployment Planning About Performance Monitoring
Service-Level Percentage—Required
The Service Level that would be expected if the required number of agents are working, assuming that the forecast IV and AHT are correct. This calculation is based on the Service-Level objectives defined when you built the Staffing forecast. If you did not define these objectives, this value is not calculated. For sites, business units, and the enterprise, this is the weighted average of the associated local activities (weighted by the corresponding forecast interaction volumes).
Service-Level Percentage—Actual
The actual Service-Level percentage collected by WFM Data Aggregator. The specifics of the statistic being monitored is determined by the Service Level Percentage statistic defined for this activity in the WFM Configuration Utility. For sites, business units, and the enterprise, this is the weighted average of the associated local activities (weighted by the corresponding actual distributed interaction volumes).
ASA—Scheduled The ASA that would be expected with the number of scheduled agents, assuming that the forecast IV and AHT are correct. For sites, business units, and the enterprise, this is the weighted average of the associated local activities (weighted by the corresponding forecast interaction volumes).
ASA—Required The ASA that would be expect with the number of required agents, assuming that the forecast IV and AHT are correct. For sites, business units, and the enterprise, this is the weighted average of the associated local activities (weighted by the corresponding forecast interaction volumes).
ASA—Actual The ASA collected by WFM Data Aggregator. The specifics of the statistic being monitored is determined by the ASA statistic defined for this activity in the WFM Configuration Utility. For sites, business units, and the enterprise, this is the weighted average of the associated local activities (weighted by the corresponding actual interaction volumes).
Staffing—Scheduled The number of agents per timestep for each activity. Taken from the Master Schedule.
In a multi-skill environment, an agent may be available for multiple activities but will only be scheduled for one activity in any timestep.
If an agent is scheduled to work only part of a time interval, only the fraction of the time period during which she or he works is counted. Therefore, the value for staffing may be expressed as a fraction.
For example, if an agent is scheduled to work for 10 minutes of a 15-minute timestep, she is counted as 2/3 (or .667) of an agent.
Table 2: Performance Intra-day Statistics (Continued)
Statistic Definition

Administrator’s Guide 69
Chapter 3: Deployment Planning About Adherence Monitoring
About Adherence Monitoring WFM Adherence monitors real-time agent status using statistical information that Data Aggregator draws from Stat Server. Agent adherence to schedule states is evaluated based on user-defined adherence thresholds. To enable Adherence features such as real-time monitoring, you must configure Stat Server and WFM Data Aggregator to collect and store the appropriate interaction information.
See “Configuring Stat Server Statistics” on page 155 for more a detailed explanation of the setup required for accurate adherence monitoring.
Staffing—Required Required number of agents per timestep scheduled for each activity. Taken from the Master Forecast.
Variance—Scheduled Staffing Difference
The value obtained by subtracting the scheduled number of agents working during a timestep from the optimal staffing for that timestep.
Optimal staffing is a calculation based on actual interaction volume, actual AHT, and the service objectives specified in the forecast. This value is not displayed but is used in calculating Variance values.
Variance—Required Staffing Difference
The value obtained by subtracting the required number of agents working during a timestep from the optimal staffing for that timestep.
Optimal staffing is a calculation based on actual interaction volume, actual AHT, and the service objectives specified in the forecast. This value is not displayed but is used in calculating Variance values.
Number Of Agents—Scheduled The number of agents scheduled for each timestep.
Multi-skilled agents are counted once for each activity they can potentially work on for each timestep. If a multiskilled agent has the skills to work on two activities that are both open during a particular timestep, she or he is counted twice.
As a result, in a multiskilled environment the total number of agents for a timestep may be larger than the total number of agents.
Number Of Agents—Actual The actual number of agents working on an activity during each timestep. This value may be a fraction because an agent may work on the activity for only part of a timestep.
Table 2: Performance Intra-day Statistics (Continued)
Statistic Definition

70 Workforce Management 8.0
Chapter 3: Deployment Planning About Adherence Monitoring
Administrator’s Guide 71
Chapter
4 Installing and Configuring Workforce ManagementThis chapter provides step-by-step instructions for installing and configuring Workforce Management (WFM), including creating your WFM database.
Note: If you are migrating from a previous version of WFM, read the instructions in the “Workforce Management Migration Procedures” chapter of the Genesys Migration Guide before beginning your installation. In particular, WFM 8.0 requires a new, separate database into which your existing data is imported.
This chapter includes the following sections: Preliminary Preparation, page 72 Import the WFM Templates, page 75 Install and Run the Configuration Wizards, page 77 Manually Create and Configure the Applications, page 87 Manually Change Configuration Server Host and Port, page 90 Install and Run the WFM Database Utility, page 91 Install the WFM Components, page 92 Configuring Multiple WFM Builder Applications, page 103 Date/Time Dependencies, page 104 Uninstall Workforce Management, page 104
You can install create and configure WFM using the Configuration Wizards or manually. The procedures are the same through the section “Import the WFM Templates” on page 75. For instructions on performing a manual setup of your Application objects, see “Manually Create and Configure the Applications” on page 87.
72 Workforce Management 8.0
Chapter 4: Installing and Configuring Workforce Management Preliminary Preparation
Note: Genesys does not recommend installation of its components via a Microsoft Remote Desktop connection. The installation should be performed locally.
Before running Workforce Management Setup or the Installation and Configuration Wizards:
• Review the predeployment topics in Chapter 3, “Deployment Planning,” on page 51.
• Verify that you have set up the computers that will be running WFM as described in “Preliminary Preparation,” which follows.
Preliminary PreparationWFM 8.0 works in conjunction with a number of software components. Before installing WFM, set up Genesys Framework. The installation should include at least the following components:
• Configuration Manager
• Configuration Server
• DB Server
• T-Server
• Stat Server
Note: WFM 8.0 is compatible with Genesys Framework 7.x and 6.5. However, for full interoperability with WFM 8.0, the Genesys components must be release 7.0 or later. Using WFM 8.0 with earlier releases of these components limits use of the Configuration Wizards, Management Layer support, and Reason Code support. For example, the WFM Daemon wizard will work only with Genesys Framework 7.6 or greater, because it uses new the WFM Daemon application type, which was introduced in Configuration Manager 7.6.
Software Requirements
For complete and up-to-date information on software requirements, review the Genesys Supported Operating Environment Reference Manual, which is located on the Technical Support web site. You will need a Genesys-supplied login and password to access certain documents there.
Management Layer System Requirements
The Management Layer of Genesys Framework enables administrators to start, stop, and monitor the status of entire solutions from a centralized location. To
Administrator’s Guide 73
Chapter 4: Installing and Configuring Workforce Management Preliminary Preparation
use Management Layer, you must also have the following Genesys Framework components installed:
• DB Server
• Configuration Server
• Message Server
• Log Database
• Solution Control Server (SCS)
• Solution Control Interface (SCI)
• Local Control Agents (LCAs)
For more information on installing any of these components, see the documentation for Genesys Framework.
To use Management Layer, you must install LCA on the servers running WFM Builder, WFM Server, WFM Data Aggregator, and WFM Daemon.
Register the Server Host Computers
You must register each host computer that runs one or more of the servers.
Procedure:Registering a host computer
Purpose: To enable the computer to run one or more servers required by WFM.
Prerequisites
• Prerequisite. The computer to register must be on the same networked as the computer you are using to register it.
Start of procedure
1. Identify the host computer’s assigned name on the network.
2. Open Configuration Manager and select Environment > Hosts.
3. Right-click Hosts and select New > Host from the shortcut menu that appears.
4. On the dialog box that opens, enter the host name of a computer on which you are installing a WFM server.
Note: Host names must be lowercase. They are case sensitive.

74 Workforce Management 8.0
Chapter 4: Installing and Configuring Workforce Management Preliminary Preparation
5. Enter the host computer’s operating system and version and its IP address. Accept the default port number. Make sure that the State Enabled check box is selected.
6. Click Apply.
Repeat the process for all computers that are to run a WFM server.
End of procedure
Create Your WFM Database
If you are updating from WFM 7.x to WFM 8.0, you do not need to create a new database. Simply update your current database as described on page 193.
If you are installing WFM for the first time or migrating from version 6.x, you must create a new database.
Note: If you are migrating from WFM 6.x, see the “Workforce Management Migration Procedures” chapter in the Genesys Migration Guide for how to transfer your data from your current database to the new one.
Your database should:
• Be of an appropriate size.
• Have a user configured with database-owner (DBO) privileges.
• Allow room for expansion.
• Be configured to be case insensitive.
Note: For an Oracle database, the database server name that the client application uses to access the database is actually an alias. If you use different database aliases on the various client computers, you cannot use the same Database Access Point (DAP) for data from each client.
The procedure required to create your WFM Database depends on which database type you are using. A qualified database administrator should perform this procedure.
Warning! In order for the Configuration Utility to work properly, you must set Microsoft SQL and Oracle database management systems to be case-insensitive.
Create a Database Access Point
Many of the WFM Application objects require a connection to a Database Access Point (DAP), which specifies the name and location of the WFM Database.
Administrator’s Guide 75
Chapter 4: Installing and Configuring Workforce Management Import the WFM Templates
Procedure:Creating a Database Access Point
Purpose: To enable the Configuration Utility, the Database Utility, and WFM Server to specify the DAP on their Application object Connections tab.
Prerequisites
• You must know the name of your new WFM Database, its location, its type, and the login name and password for a user with DBO privileges.
Start of procedure
1. In Configuration Manager, open Environment and then right-click Applications.
2. Select New Application from the shortcut menu that appears.
3. Choose your DAP Application template from the Templates list and then click OK.
4. Enter a unique DAP name on the General tab.
Note: You do not need to select a DB Server. WFM does not use DB Server to access its database.
5. On the Server Info tab, enter any valid host name and port number. WFM does not use them, but you cannot save the DAP Application object unless these fields are filled in.
6. Enter the appropriate information on the remaining Application object tabs. For assistance with this step, see “Configuring Database Access Points” in the Framework 8.0 DB Server User’s Guide.
7. Click OK to save the new Application object.
End of procedure
Import the WFM Templates
Procedure:Importing WFM Application Templates
Purpose: To enable WFM installation., which requires the current Application templates.
76 Workforce Management 8.0
Chapter 4: Installing and Configuring Workforce Management Import the WFM Templates
Start of procedure
1. In Configuration Manager, select Environment > Application Templates.
2. Right-click Application Templates and select Import Application Template from the shortcut menu.
A dialog box opens that enables you to browse to the Application templates on your Workforce Management release disk.
3. Select a template and then click Open. These are the template names: WFM_Builder.apd WFM_Client.apd
(used for both the Database Utility and the Configuration Utility) WFM_Data_Aggregator.apd WFM_Daemon_Genesys_Server.apd WFM_Server.apd WFM_Web.apd
Note: Beginning with release 7.6, these template names no longer contain a version number.
4. If you want to, enter a name for the template in the Name text box on the General tab.
Note: Do not make any other changes to the template. When you create Application objects using the imported templates, you configure them as explained in the following sections.
5. Click OK to save the template.
6. Repeat Steps 1–5 to import all of the Application templates.
End of procedure
Next Steps
• Configure new Application objects based on the imported Application templates, as described in the various sections that follow.
Templates for WFM 6.5
If you are installing WFM in a Framework 6.x environment, you must import these templates instead:
• WFM_Builder_3rd_Party.apd
• WFM_Daemon_3rd_Party.apd
• WFM_Server_3rd_Party.apd
• WFM_Web_3rd_Party.apd
Administrator’s Guide 77
Chapter 4: Installing and Configuring Workforce Management Install and Run the Configuration Wizards
These components did not exist in the 6.x releases. Therefore, you must set the Application types for these servers to ThirdPartyServer. WFM Data Aggregator does not require this modification because Framework 6.x recognizes WFM Data Aggregator.
Import the WFM Solution Template
Procedure:Importing WFM Solution Template
Purpose: To enable the WFM Configuration Wizards., which require the current Solution template.
Start of procedure
1. In Configuration Manager, select Environment > Solutions.
2. Right-click Solutions and select Import Solution Template from the shortcut menu.
A dialog box opens that enables you to browse to the solution template on your Workforce Management release disk.
3. Select the template and then click Open. The template name is WFM_Solution_3rd_Party.sd.
4. Enter a name for the template in the Name text box on the General tab, if desired.
Note: Do not make any other changes to the template. When you run the WFM Configuration Wizard, it configures the solution for you.
5. Click OK to save the template.
End of procedure
Next Steps
• Link to next procedure. Optional for Phase 1.
Install and Run the Configuration WizardsThe Workforce Management Configuration Wizards guide you through the process of creating the Application objects for the WFM components. It is run from the Genesys Wizard Manager.
78 Workforce Management 8.0
Chapter 4: Installing and Configuring Workforce Management Install and Run the Configuration Wizards
You can also create and configure the component Application objects manually. For instructions, see “Manually Create and Configure the Applications” on page 87.
Note: All users must manually configure the Options tab. For a list of the options on the Options tab, with default settings and descriptions, see Chapter 5, “Configuring the Options Tabs,” on page 107.
You must install the wizards before you can run them. To do so:
Procedure:Installing WFM Configuration Wizards
Purpose: To enable running the wizards.
Start of procedure
1. Open the root directory or navigate to the configuration_wizard directory on the Workforce Management release disk.
2. Double-click Setup.exe.
The Welcome window opens.
Note: If you have already installed the Wizards, the window offers a Remove option.
3. Click Next. The Choose Solution Destination window opens, displaying a default directory, for example:C:\Program Files\Common Files\GCTI\CFG Wizards 8.0.
4. Click Default to accept the default directory, or click Browse to select a different directory.
5. Click Next. The Ready to Install window opens.
6. Click Install to start the installation process.A progress bar appears as the Wizard files are copied.
7. Click Finish to exit the setup after all files have been copied.
End of procedure

Administrator’s Guide 79
Chapter 4: Installing and Configuring Workforce Management Install and Run the Configuration Wizards
Running the Configuration Wizards
Procedure:Starting the WFM Configuration Wizards
Purpose: To start the WFM Configuration Wizards
Start of procedure
1. Select Start > Programs > Genesys Solutions > Workforce Management > Workforce Management Configuration Wizards > Start Wizard Manager.Then, click the log into the Configuration Layer link.
2. Enter the login information for your Configuration Server in the LogIn window that appears.
3. From the list of solutions at the left side of the Main Genesys Wizard Manager window, click Workforce Management.
4. Click the Deploy Workforce Management link that appears in the right-hand pane of the Set Up Your Solutions window.
The Workforce Management Wizard Welcome window opens.
Note: If you already have a WFM solution set up, it appears instead of the Deploy Workforce Management link. You can edit your existing solution by clicking Properties or delete it and configure a new one.
5. Click Next. The General window opens.
6. Enter a name for your WFM solution and select a Solution Control Server. This is the Solution Control Server that Management Layer uses to start, stop, and monitor your WFM solution.
7. Click Next.
End of procedure
Next Steps
If you have already created any WFM Server Application objects, they are listed in this window. At this point you can:
• Select an already-created Application object and click Next to proceed to the next wizard.
• Select an already-created Application object and then click Properties to edit it before proceeding.
• Click Add to create a new Application object.
80 Workforce Management 8.0
Chapter 4: Installing and Configuring Workforce Management Install and Run the Configuration Wizards
The WFM Server Wizard
Clicking the Add button opens the Browse for Application (WFM Server) window, which shows the contents of your Configuration Manager Applications folder.
1. To create your WFM Server Application object click the New Application icon. It is the left-most icon at the top of the window and looks like this:
The WFM Server Wizard Welcome window opens.
2. Click Next. The WFM Server Name window opens.
3. Enter a name for your WFM Server Application object, and then click Next. The Server Info window opens.
4. Select or adjust the host name and port number of the computer where you want to install this application. Then click Next.
Note: This is the information for the computer where WFM Server will run, not the host and port for the Configuration Server computer.
5. On the Installation Package window, specify the Source and Destination directories for copying the Installation Package, and then click Next.
6. On the Installation Ready window, click Next.
7. On the Connections window, select from the drop-down list or browse to the DAP Application object you created previously. See “Create a Database Access Point” on page 74 for this procedure.
Notes: The Connections window also asks for the WFM Builder Application option. This procedure assumes that you have not yet created this Application object. If you already have created, select the object here.
If you do not have a WFM Builder Application object, leave the Connections field empty for now. You will add connections to this Application object later. See “Edit the WFM Server Connections” on page 85 for instructions.
8. Click Next to open the Log Configuration window. You can click Run Log Wizard to customize your log settings or click Next to accept the default log settings.
Note: You can change these settings at any point by using the Wizard to edit your WFM Server Application object or by editing the Log section on the Options tab of the WFM Server Application object. Procedures for editing Options tab settings are described in Chapter 5.
Administrator’s Guide 81
Chapter 4: Installing and Configuring Workforce Management Install and Run the Configuration Wizards
9. Click Finish to close the WFM Server Wizard. The Application object appears in your Configuration Manager Applications folder.
10. Select your new WFM Server Application object and click OK.
The new Application object now appears in the Solution Components list.
11. Click Next to continue.
Configure Multiple WFM Servers
If you are planning to schedule for multiple sites served by multiple WFM Servers, you must configure the correct connections. To do so:
1. Configure a WFM Server Application object for each WFM Server and install the WFM Servers as instructed in this section and in “Install WFM Server” on page 92. Decide which of the WFM Servers will act as the main WFM Server and which are to be configured as subordinate.
2. Open the main WFM Server Application object’s Connections tab and add all the subordinate WFM Servers.
3. When your entire installation is complete, open the WFM Configuration Utility and specify which WFM Server is associated with each site using the Site Properties window.
4. Start all the WFM Servers. Assuming that the objects in the WFM Configuration Utility are fully configured, you should be able to use WFM Web for Supervisors to create schedules for activities on all sites specified in any WFM Server Application object.
The WFM Data Aggregator Wizard
The WFM Solution Wizard now looks for a Data Aggregator Application object. If you have already created any WFM Data Aggregator Application objects, they are listed in this window. At this point you can:
• Select an already-created Application object and click Next to proceed to the next wizard.
• Select an already-created Application object and then click Properties to edit it before proceeding.
• Click Add to create a new Application object.
Clicking the Add button opens the Browse for Application (WFM Data Aggregator) window, which shows the contents of your Configuration Manager Applications folder.
1. To create your WFM Data Aggregator Application object, click the New Application icon. It is the left-most icon at the top of the window and looks like this:
The WFM Data Aggregator Wizard opens.
2. Click Next. The WFM Data Aggregator Name window opens.
82 Workforce Management 8.0
Chapter 4: Installing and Configuring Workforce Management Install and Run the Configuration Wizards
3. Enter a name for your WFM Data Aggregator Application object, and then click Next. The Server Info window opens.
4. Select or adjust the host name and port number for the computer where you want to install this application.
Note: This is the information for the computer where WFM Data Aggregator will run, not the host and port for the Configuration Server computer.
5. Select a backup WFM Data Aggregator if you are planning to use a redundant architecture such as Hot-Standby or Warm-Standby. If you have not yet created another Data Aggregator Application object, skip this step. You can add a connection to the backup WFM Data Aggregator after you create its Application object. To do so, edit the Application object from the Solution Components list in the WFM Solution Wizard.
6. Click Next to continue.
7. On the Installation Package window, select the source and destination directories for copying the Installation Package, and then click Next.
8. On the Installation Ready page, click Next.
9. On the Connections window, select from the drop-down list or browse to your WFM Server Application object, the DAP Application object you created previously (see “Create a Database Access Point” on page 74 for this procedure), and your Stat Server Application object.
10. Click Add WFM Statistics to have the Wizard add preconfigured WFM-specific statistics to your Stat Server.
Note: See “Configuring Stat Server Statistics” on page 155 for a list of all the preconfigured statistics that the Wizard adds if you select this option and explanations of how to configure these statistics manually, if necessary.
11. Click Next to open the Log Configuration window. You can click Run Log Wizard to customize your log settings or click Next to accept the default log settings.
Note: You can change these settings at any point by using the Wizard to edit your WFM Data Aggregator Application object or by editing the Log section on the Options tab of the WFM Data Aggregator Application object. Procedures for editing Options tab settings are described in Chapter 5.
12. Click Finish to close the WFM Data Aggregator Wizard. The Application object appears in the Browse for Application (WFM Builder) window.
13. Select your new WFM Data Aggregator Application object and click OK.
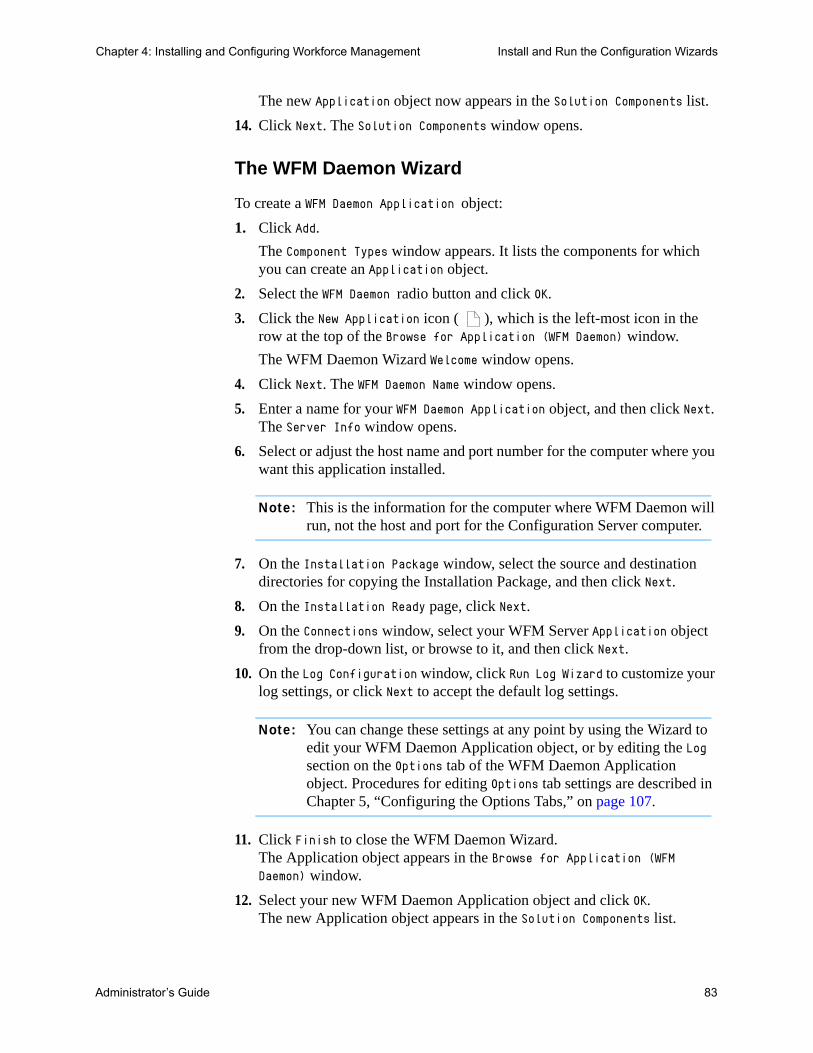
Administrator’s Guide 83
Chapter 4: Installing and Configuring Workforce Management Install and Run the Configuration Wizards
The new Application object now appears in the Solution Components list.
14. Click Next. The Solution Components window opens.
The WFM Daemon Wizard
To create a WFM Daemon Application object:
1. Click Add.
The Component Types window appears. It lists the components for which you can create an Application object.
2. Select the WFM Daemon radio button and click OK.
3. Click the New Application icon ( ), which is the left-most icon in the row at the top of the Browse for Application (WFM Daemon) window.
The WFM Daemon Wizard Welcome window opens.
4. Click Next. The WFM Daemon Name window opens.
5. Enter a name for your WFM Daemon Application object, and then click Next. The Server Info window opens.
6. Select or adjust the host name and port number for the computer where you want this application installed.
Note: This is the information for the computer where WFM Daemon will run, not the host and port for the Configuration Server computer.
7. On the Installation Package window, select the source and destination directories for copying the Installation Package, and then click Next.
8. On the Installation Ready page, click Next.
9. On the Connections window, select your WFM Server Application object from the drop-down list, or browse to it, and then click Next.
10. On the Log Configuration window, click Run Log Wizard to customize your log settings, or click Next to accept the default log settings.
Note: You can change these settings at any point by using the Wizard to edit your WFM Daemon Application object, or by editing the Log section on the Options tab of the WFM Daemon Application object. Procedures for editing Options tab settings are described in Chapter 5, “Configuring the Options Tabs,” on page 107.
11. Click Finish to close the WFM Daemon Wizard. The Application object appears in the Browse for Application (WFM Daemon) window.
12. Select your new WFM Daemon Application object and click OK.The new Application object appears in the Solution Components list.

84 Workforce Management 8.0
Chapter 4: Installing and Configuring Workforce Management Install and Run the Configuration Wizards
The WFM Solution Wizard now indicates:The following components will be part of your solution. If you need to set up client applications for your solution, click Next. To complete this wizard, click Finish.
Note: For information on setting up WFM Daemon, see page 88.
The WFM Builder Wizard
To create a WFM Builder Application object:
1. Click Add.
The Component Types window appears. It lists components for which you can create an Application object.
2. Select the WFM Builder radio button and then click OK.
3. Click the New Application icon ( ), which is the left-most icon in the row at the top of the Browse for Application (WFM Builder) window.
The WFM Builder Wizard opens.
4. Click Next. The WFM Builder Name window opens.
5. Enter a name for your WFM Builder Application object, and then click Next. The Server Info window opens.
6. Select or adjust the host name and port number for the computer where you want this application installed.
Note: This is the information for computer where WFM Builder will run, not the host and port for the Configuration Server computer.
7. On the Connections window, select from the drop-down list or browse to your WFM Server Application object, and then click Next.
8. Click Next to open the Log Configuration window. You can click Run Log Wizard to customize your log settings or click Next to accept the default log settings.
Note: You can change these settings at any point by using the Wizard to edit your WFM Builder Application object or by editing the Log section on the Options tab of the WFM Builder Application object. Procedures for editing Options tab settings are described in Chapter 5.
9. Click Finish to close the WFM Builder Wizard. The Application object appears in the Browse for Application (WFM Builder) window.
10. Select your new WFM Builder Application object and click OK.
The new Application object now appears in the Solution Components list.

Administrator’s Guide 85
Chapter 4: Installing and Configuring Workforce Management Install and Run the Configuration Wizards
11. Click Next to continue.
Edit the WFM Server Connections
If the WFM Builder Application object was not indicated when you created your WFM Server Application object (because the object did not exist or had not been specified), you could not add connections to this component at that time.
Add those connections now.
Warning! If you omit this procedure, Workforce Management will not function correctly.
1. Select your WFM Server Application object from the Solution Components list and then click Properties.
The Properties dialog box of the WFM Server Application object opens.
2. Click the Connections tab. Enter or browse to your WFM Builder Application object. After you have specified the WFM Builder Application object, click OK.
The Application objects are now configured for the four solution components in the Solution Components list.
You must now create Application objects for the client components:
• WFM Configuration Utility/WFM Database Utility—See “The WFM Client Application Wizard (Configuration Utility and Database Utility)” on page 85.
• WFM Web—See “The WFM Web Wizard” on page 86.
3. To begin client Application object configuration, click Next.
The WFM Client Application Wizard (Configuration Utility and Database Utility)
The Configuration Utility and the Database Utility use the same Application object. To create it, Start at the WFM Solution Wizard WFM Client window.
1. Click New.
2. Click the New Application icon ( ).The WFM Client Application Wizard Welcome window opens.
3. Click Next. The WFM Application Name window opens.
4. Enter a name for your WFM Client Application object, and then click Next. The Installation Package window opens.
5. Select or adjust the source and destination directories for copying the Installation Package, and then click Next.

86 Workforce Management 8.0
Chapter 4: Installing and Configuring Workforce Management Install and Run the Configuration Wizards
6. On the Installation Ready window, click Next.
7. On the Connections window, select a DAP Application object from the drop-down list, or browse to it, and then click Next.
8. On the Log Configuration window, click Run Log Wizard to customize your log settings, or click Next to accept the default log settings.
Note: You can change these settings at any point by using the Wizard to edit your WFM Client Application object or by editing the Log section on the Options tab of the WFM Client Application object. Procedures for editing Options tab settings are described in Chapter 5.
9. Click Finish to close the WFM Client Application Wizard. The new Application object appears in your Configuration Manager Applications folder.
10. Select your new WFM Client Application object and then click OK.
The new Application object now appears in the Solution Components list.
11. Click Next to continue.
Note: Genesys recommends that you add a connection to WFM Server. To do so, open the WFM Client Application object after you finish the sequence of Configuration Wizards and add a connection to WFM Server on the Connections tab.
The WFM Web Wizard
To create the WFM Web Client application object, start at the WFM Solution Wizard WFM Web window, which appears after the WFM Application Wizard closes.
1. Click New.
2. Click the New Application icon ( ).The WFM Web Wizard opens.
3. Click Next to start using the WFM Web Wizard.
4. Enter a name for your WFM Web Application object, and then click Next. The Server Info window opens.
5. Select the host name and port number for the computer where you want this application installed, and then click Next. The Installation Package window opens.
6. Adjust the source and destination directories for copying the Installation Package, and then click Next.
7. On the Installation Ready page, click Next.
Administrator’s Guide 87
Chapter 4: Installing and Configuring Workforce Management Manually Create and Configure the Applications
8. Select from the drop-down list or browse to your WFM Server Application object, and then click Next.
9. Click Next.
10. On the Log Configuration window, click Run Log Wizard to customize your log settings, or click Next to accept the default log settings.
Note: You can change these settings at any point by using the Wizard to edit your WFM Web Application object or by editing the Log section on the Options tab of the WFM Web Application object. Procedures for editing Options tab settings are described in Chapter 5.
11. Click Finish to close the WFM Web Wizard. The new Application object appears in your Configuration Manager Applications folder.
12. Select your new WFM Web Application object and then click OK.
The new Application object now appears in the Solution Components list.
13. Click Next to continue.
This step completes the WFM Solution Wizard.
14. Click Finish to close the wizard.
Your new WFM Solution appears on the Genesys Wizard Manager Workforce Management window.
Manually Create and Configure the Applications
If you are familiar with Configuration Manager, you may choose to create and configure the component Application objects manually rather than using the wizards. To do so:
1. In Configuration Manager, open the Environment > Applications folder.
2. Right-click in the folder and select New Application from the shortcut menu that appears.
3. Browse to and select the appropriate application template from those you previously imported. If necessary, see “Import the WFM Templates” on page 75 for instructions.
4. Enter the appropriate information in each tab of the Application object. If you need guidance, check the description for that component in “Install and Run the Configuration Wizards” on page 77.
88 Workforce Management 8.0
Chapter 4: Installing and Configuring Workforce Management Manually Create and Configure the Applications
Note: The information on most of these tabs is familiar to regular users of Configuration Manager. All users should check for correct settings for the Connections tab of each Application object. See Table 1 on page 49 for the complete set of required connections.
All users must manually configure the Options tab settings. For a list of the Options tab options, with default settings and descriptions, see Chapter 5.
WFM Daemon Setup
For information on this component, see “Notifications” on page 34.
To successfully run WFM Daemon, you must set the correct SMTP server host and port. Depending on your configuration, you may also need to set the user name and password. For information on setting these options, see “Options Tab for WFM Daemon”, “SMTP Section” on page 153.
To support automatic report creation, perform these configurations using Configuration Manager:
• In the WFM Web application, set the Reports section variable ServerURL. See “Install WFM Web as Report Server” on page 101.
• In the WFM Web application, set the Reports section variable PathToAutoGeneratedReports to the network path for storing generated reports. See “PathToAutoGeneratedReports” on page 146.
• In the WFM Daemon application, add a connection to the WFM Web application that you installed as the report server in “Install WFM Web as Report Server” on page 101.
For notifications to work successfully:
• Each agent and supervisor must have the proper e-mail set. As described in Configuration Utility Help, e-mail addresses are initially defined in Configuration Manager as part of the Person object. Once e-mail addresses exist in the Configuration Database, you have the option of importing them into the WFM Database.
• The supplied SMTP server must be configured accept e-mails for those addresses.
• Before anything can be sent, you must first configure notifications in WFM Web for Supervisors, Configuration module, as described in Supervisors Help.
• A Supervisor’s ability to receive notifications depends on their security settings (see “User Security Settings” on page 22). As described in Workforce Management 8.0 Configuration Utility Help, supervisors must be granted rights to receive notifications for each notification type and have access to the agent teams for which they want to receive notifications.
Administrator’s Guide 89
Chapter 4: Installing and Configuring Workforce Management Manually Create and Configure the Applications
Manually Create the WFM Solution Object
If you are using Management Layer, you must create the WFM Solution object and add the necessary components. If you have not yet imported the solution template and created the solution Application object, see “Import the WFM Solution Template” on page 77.
To configure the solution:
1. Double-click the Workforce Management solution to open its Properties dialog box.
2. On the Components tab, add the servers that Workforce Management needs to run (see Table 3 on page 89).
Note: The Components Definition tab displays the preset component types that the solution connects with. The actual connections are configured on the Components tab, but you can use the Components Definition tab as a guide to correct settings.
Application is the name of the application that the Workforce Management solution runs.
Optional is the requirement status. False means that the application must run successfully for WFM to run. True means that the application is optional for WFM to run.
Startup Priority is the order in which to start the servers.
Note: You cannot revise Startup Priority after you have configured it.
3. Click OK.
Table 3: Definitions Tab Settings for the Workforce Management Solution Components
Application Optional Startup Priority
Message Server(s) True 1
WFM Server False 2
WFM Data Aggregator False 3
WFM Builder False 3
WFM Daemon True 3
90 Workforce Management 8.0
Chapter 4: Installing and Configuring Workforce Management Manually Change Configuration Server Host and Port
Manually Change Configuration Server Host and Port
When you run the Configuration Wizards, you enter Configuration Server host and port information for the servers. However, you may need to change this information after installing WFM. To update this information manually, you must change the information.
Note: Editing a startServer.bat file is effective only if the server is started by using the .bat file. If you start the server manually from the control panel, or if it is started automatically as a Windows service, you must unregister the server and then re-register it.
If you start the server using Solution Control Interface, you must change the settings for the server in the server’s application object using Configuration Manager.
You can do so by:
• Editing the startServer.bat file for each affected server.
• Unregistering the servers and then reregistering them using the updated host, port, and application name information.
This section describes both methods.
The startServer.bat files for each server are located in the same directory as the executable for that server.
To edit the startServer.bat files:
1. Stop the server.
2. Open the startServer.bat file in a text editor, such as WordPad.
3. Change the host and port information.
4. Save the edited file.
5. Restart the server.
You can also change the host and port information for the servers by unregistering them as services and then reregistering them using the new host and port.
To change the host and port for a server:
1. Execute the following command from the command line to unregister the installed service.<server .exe filename> -remove
For example, WFMServer.exe -remove
2. Register the service with new host and port information.<server .exe filename> -install -host “<hostname>” -port “<portnumber>” -app <applicationname>
Administrator’s Guide 91
Chapter 4: Installing and Configuring Workforce Management Install and Run the WFM Database Utility
For example, WFMServer.exe -install -host "Siamese" -port 4000 -app WFMServer_76
Install and Run the WFM Database UtilityThe WFM Database Utility configures the database you created (see “Create Your WFM Database” on page 74) to receive WFM data. If you are migrating from a previous version of Genesys WFM, the WFM Database Utility also transfers your existing data into the new database.
Note: If you are migrating, see the “Workforce Management Migration Procedures” chapter in the Genesys Migration Guide for instructions. The procedures in this Administrator’s Guide assume that this is a new installation and do not describe steps necessary for migration.
To install the WFM Database Utility:
1. Check that Microsoft .NET Framework Version 1.1 or higher is installed (see the Genesys Supported Operating Environment Reference Manual).
2. Navigate to the solution_specific\WFMDatabaseUtility\windows directory on your Workforce Management release disk.
3. Double-click Setup.exe.
The Database Utility Installation Wizard opens.
4. Click Next to start using the Database Utility Installation Wizard.
5. Select the directory into which you want the WFM Database Utility installed and then click Next.
6. On the Ready to Install window, click Install.
A progress bar shows the setup status.
7. Click Finish to close the Installation Wizard.
Note: You must restart your computer before you can use the WFM Database Utility.
Running the WFM Database Utility
When you start the 8.0 WFM Database Utility for the first time, the available options depend on whether the WFM Database Utility finds a 7.x database. If you have only a blank database, you can choose one of three actions:
• Restore Database from .MDB File—Use this option to restore your database from a backup file. Restoring creates a database with the same version number as the database you backed up and restores your data from the backup file to the new database.
92 Workforce Management 8.0
Chapter 4: Installing and Configuring Workforce Management Install the WFM Components
Note: In some cases, after restoring your database, you must run the WFM Database Utility again and select Update Database to update your database to the latest 8.0 version.
• Create Database—Use this option to create your 8.0 database if this is your first WFM installation.
• Migrate Database—Use this option to migrate data from a release 6.x database.
If you have been running WFM 7.x, select Update Database, which updates the database to the latest version.
Note: You must configure your database to be case insensitive.
Install the WFM ComponentsBefore you begin, determine whether to install more than one component on a single machine, and, if so, which components should be installed together.
Note: See Chapter 3, for some general deployment guidelines and recommendations. See the Genesys Hardware Sizing Guide for more extensive recommendations.
By default, all the servers are installed as Windows Services. For instructions on using Windows services, see your Windows Help file.
This section contains detailed step-by-step instructions for these procedures:
• Install WFM Server
• Install WFM Builder
• Install WFM Data Aggregator
• Install WFM Configuration Utility
• Install WFM Web
• Install WFM Daemon
Install WFM Server
1. Navigate to the solution_specific\WFMServer\windows directory on your Workforce Management release disk.
2. Double-click Setup.exe. This opens the WFM Server Installation Wizard.
3. Click Next to begin using the Wizard.
4. Enter your Configuration Server host name, port number, user name, and password. Then click Next.
Administrator’s Guide 93
Chapter 4: Installing and Configuring Workforce Management Install the WFM Components
5. A list of WFM Server Application objects appears. Select the correct one and then click Next. The properties for each WFM Server Application object appear in the Application Properties list when that Application object is selected.
Note: If you are running a Framework 6.x environment, your WFM Server’s Application type must be Third Party Server.
6. Specify the destination directory into which you want WFM Server installed. Then click Next.
7. On the Ready to Install window, click Install.
A progress bar shows the setup status.
8. Select whether to restart your computer now or later and then click Finish to close the Installation Wizard.
Note: You must restart your computer before starting WFM Server. However, if you are installing multiple components on one machine, you may install them all before restarting. Please note that it is not possible to install multiple instances of the same component on the same host.
Install WFM Builder
1. Navigate to the solution_specific\WFMBuilder\windows directory on your Workforce Management release disk.
2. Double-click Setup.exe. This opens the WFM Builder Installation Wizard.
3. Click Next to begin using the Wizard.
4. Enter this information for your Configuration Server: host name, port number, user name, and password. Then click Next.
5. A list of WFM Builder Application objects appears. Select the correct one and then click Next. The properties for each WFM Builder Application object appear in the Application Properties list when that Application object is selected.
Note: If you are running a Framework 6.x environment, your WFM Builder’s Application type must be Third Party Server.
6. Specify the destination directory into which you want WFM Builder installed. Then click Next.
7. On the Ready to Install window, click Install.
A progress bar shows the setup status.
8. Click Finish to close the Installation Wizard.
94 Workforce Management 8.0
Chapter 4: Installing and Configuring Workforce Management Install the WFM Components
Install WFM Data Aggregator
Note: A restriction limits the number of clients to about 8 if WFM Data Aggregator and WFM Web are installed on the same computer. For full details, see See “TCP/IP Connection Settings” on page 96.
1. Navigate to the solution_specific\WFMDataAggregator\windows directory on your Workforce Management release disk.
2. Double-click Setup.exe. This opens the WFM Data Aggregator Installation Wizard.
3. Click Next to begin using the Wizard.
4. Enter this information for your Configuration Server: host name, port number, user name, and password. Then click Next.
5. A list of WFM Data Aggregator Application objects appears. Select the correct one and then click Next. The properties for each WFM Data Aggregator Application object appear in the Application Properties list when that Application object is selected.
Note: If you are running a Framework 6.x environment, your WFM Data Aggregator’s Application type must be Third Party Server.
6. Specify the destination directory into which you want WFM Data Aggregator installed. Then click Next.
7. On the Ready to Install window, click Install.
A progress bar shows the setup status.
8. Select whether to restart your computer now or later and then click Finish to close the Installation Wizard.
Note: You must restart your computer before starting WFM Data Aggregator. However, if you are installing multiple components on one machine, you may install them all before restarting. Please note that it is not possible to install multiple instances of the same component on the same host.
Install WFM Configuration Utility
1. Navigate to the solution_specific\WFMConfigurationUtility\windows directory on your Workforce Management release disk.
2. Double-click Setup.exe. This opens the WFM Configuration Utility Installation Wizard.
3. Click Next to begin using the Wizard.

Administrator’s Guide 95
Chapter 4: Installing and Configuring Workforce Management Install the WFM Components
4. Specify the destination directory into which you want the WFM Configuration Utility installed. Then click Next.
5. On the Ready to Install window, click Install.
A progress bar shows the setup status.
6. Click Finish to close the Installation Wizard.
Install WFM Web
1. Install and configure Jakarta Tomcat or IBM WebSphere. For installation and configuration instructions specific to Genesys Workforce Management, see: For Tomcat—“Configure Tomcat for WFM Web” on page 97. For WebSphere—“Configure WebSphere for WFM Web” on page 99.
2. Install the WFM Web application, as described in “Installation Procedures for WFM Web” on page 100.
3. Install a supported browser on each workstation that will access WFM Web.
For WFM Web for Supervisors, the browser installation must include the appropriate Java plug-in. If this plug-in was not installed with the browser, you can download the plug-in from http://java.sun.com/j2se/. To learn which version of Java is required, consult the WFM section at the end of “Table 10: Product Prerequisites” in the book Genesys Supported Operating Environment Reference Manual.
Notes: If the computers that will be accessing WFM Web for Supervisors have pop-up blockers installed, they must be configured to allow pop-ups from the WFM Web URL. Otherwise, pop-up blockers prevent WFM Web for Supervisors from opening.
The Java that you install must include the latest time zones update (TZ/Olson database). See http://java.sun.com/javase/timezones/ for details and use the Java version that is specified there.
4. Check that your browser settings are configured to run WFM Web for Supervisors correctly. See “Browser Security Considerations”
5. For non-Windows environments such as Unix and Linux, install some form of X Server (X11 Server or X Windows server) and point the DISPLAY environment variable to the machine running X. For best performance, Genesys recommends that you run X on the same machine as the web server.
If your Unix server does not have X Server installed, or you have not set the DISPLAY environment variable, the WFM Web Agent Weekly Preferences window, the view is presented without 24-hour graphical information.
96 Workforce Management 8.0
Chapter 4: Installing and Configuring Workforce Management Install the WFM Components
6. Verify that your window resolution has been set to display WFM Web correctly. WFM Web is optimized for a window resolution of at least 1024 x 768. At lower resolutions, some elements (such as table headers) might not display correctly.
Browser Security Considerations
WFM Web uses technical approaches that may be affected by web browser security settings.
• WFM Web uses signed Java applets on Supervisors’ workstations.
• On Supervisors’ workstations, WFM Web uses Java applets that are run by Sun’s Java Plug-in. On Windows operating systems, the Java Plug-in is running as ActiveX, which means that supervisors must have rights to run ActiveX controls.
• WFM Web uses non-encrypted form data in the login page for all users.
• WFM Web relies on active scripting for all users.
• When running WFM Web in an AIX or Solaris operating system environment, if the X Server software is not installed, reports might not be generated or might not be generated correctly. In the case of WFM Web, X Server provides fonts and related functionality.
TCP/IP Connection Settings
In environments with higher loads (more than 100 total supervisors or 50+ supervisors running agent real-time adherence views) you may need to change the default TCP settings on computers running the WFM servers: WFM Web, WFM Data Aggregator, and WFM Server. You can determine whether you need to adjust your settings by monitoring the number of TCP sockets in the TIMED_WAIT mode. If the number exceeds 2000 on one computer or if WFM Web with servers start to report TCP socket errors, tweak the settings to make TCP release port resources faster.
Note: Genesys has identified this issue on Windows-based machines. Similar changes are probably required for other operating systems. However, Genesys has not determined recommended adjustments to other operating systems.
To resolve this issue, you must make changes to the HKEY_LOCAL_MACHINE\SYSTEM\CurrentControlSet\Services\Tcpip\Parameters\ section in the registry of the host computers.
• You can find a reference for this registry modification in the Microsoft TCP/IP Implementation Details document for the appropriate operating system at http://www.microsoft.com.
Genesys recommends these values:
• Increase MaxFreeTcbs from 2000 to 9000.
Administrator’s Guide 97
Chapter 4: Installing and Configuring Workforce Management Install the WFM Components
• Increase MaxFreeTWTcbs from 1000 to 8000.
• Increase MaxHashTableSize from 512 to 2048.
• Increase MaxUserPort from 5000 to 65534.
• Reduce TcpTimedWaitDelay from 240 to 60.
Configure Tomcat for WFM Web
After installing WFM Web, you must manually copy the .war file (by default, located in the WFM7\Web directory) to the Tomcat webapps directory.
Note: Tomcat is available for download at http://jakarta.apache.org/tomcat/index.html. There is no charge for this program.
For basic installation and configuration instructions, see the Tomcat documentation, available at the same website as the program.
Warning! Genesys developed and tested supported servlet containers using the default settings as configured for each particular servlet runner during installation time. Any changes in default settings are described in this document. If you use custom settings for servlet containers and experience issues while configuring and/or running WFM Web, Genesys recommends that you evaluate the impact of those custom settings. You may need to re-adjust them in order not to interfere with the operation of WFM Web.
This section lists specific configuration procedures that enable Tomcat to support WFM Web.
Set Environment Variables
When configuring Tomcat, add the variables JAVA_HOME and CATALINA_HOME to the Windows Start > Settings > Control Panel > System > Environment > System Variables list. As the values for these variables, enter the full path to each home directory. CATALINA_HOME is the folder in which Tomcat is installed.
JVM Command-Line Settings
Tomcat’s default settings are not suitable for production sites that experience moderate or heavy load. To support Web Services, Genesys recommends entering the settings in Table 4 for the Java Virtual Machine (JVM) that runs Tomcat.

98 Workforce Management 8.0
Chapter 4: Installing and Configuring Workforce Management Install the WFM Components
Note: You enter Tomcat settings in different ways depending on your Tomcat version and configuration. Please refer to your Tomcat documentation for details.
WFM 8.0 requires settings changes to the Apache Tomcat Properties dialog, accessible by opening the file C:\Apache\Tomcat6.0\bintomcat6w.exe (its location on your computer may be different). Select the Java tab.
Optimizing Thread Settings
If Web Services is experiencing a large number of concurrent users (20 or more) and is providing slow responses, Genesys recommends providing it with more execution threads, as follows:
1. Back up and edit the Tomcat configuration file server.xml, which is located in the %CATALINA_HOME%\conf directory.
2. Within this file, locate the configuration section for the http connection service.
Table 4: Recommended Tomcat JVM Settings
Setting Purpose
-server Instructs the JVM to work in Server mode
-Xms128m Instructs JVM to initially allocate 128 MB of memory for its own needs
-Xmxnm Determines the maximum amount of memory the JVM can allocate for its own needs. For example, -Xmx256m would allocate a maximum of 256 MB.
If you are experiencing OutOfMemory exceptions with Tomcat, increase this setting’s n parameter to provide Tomcat more memory. Make sure that enough physical memory is available to support the parameter that you choose.
-Xrs If you set up Tomcat to run as a Windows NT Service, include this setting to ensure that it runs continuously. Otherwise, when the user logs off the server, Tomcat shuts down.
Table 5: Recommended Tomcat Java Settings
Item Recommended Setting
Initial memory pool 256
Maximum memory pool 512

Administrator’s Guide 99
Chapter 4: Installing and Configuring Workforce Management Install the WFM Components
3. Increase the number of execution threads. Genesys recommends the following settings: maxProcessors="300" or more, depending on the load in your
environment minProcessors="25"
Experiment with changing these numbers to achieve optimum performance.
Configure WebSphere for WFM Web
Note: See warning on page 97, which applies to configuring both Tomcat and WebSphere.
The libraries that WebSphere provides by default for web services are older than, and incompatible with, the libraries that WFM Web requires. If you do not set the Classloader Mode option to PARENT_LAST, the WebSphere libraries are loaded first, causing WFM Web not to run. After you set PARENT_LAST, the WFM Web libraries are loaded first, which enables WFM Web to run correctly.
Note: Configuring the Classloader Mode option to PARENT_LAST in no way affects other applications running in WebSphere at the same time.
To configure WebSphere:
1. Log in to the WebSphere Administration Console.
2. Navigate to Applications > Enterprise Applications.
3. Install the WFM application from the wfm_war directory and save it to the master configuration.
4. Locate the newly-installed WFM WebApp and click its link to drill down into the configuration.
5. On the Configuration tab, locate the Related Items group.
Note: The Classloader Mode setting, located on Configuration tab, is not the correct place to set the classloader option. It will not give desired effect if set only in that tab.
6. Click the Web Modules link to open the WebModuleDeployment page.
7. Click the *.war link to open Web Module configuration properties.
8. Locate the Classloader Mode row and change the control value to PARENT_LAST.
9. Save the changes.
You can now start the WFM application.
100 Workforce Management 8.0
Chapter 4: Installing and Configuring Workforce Management Install the WFM Components
Note: Genesys recommends that you adjust memory and processing thread settings for Websphere to similar values as specified for Tomcat (see Table 4 on page 98) and “Optimizing Thread Settings” on page 98. For the exact location of those settings, consult Websphere documentation
Installation Procedures for WFM Web
You can install WFM Web on either a Windows or a Unix-based platform.
• For instructions on how to install on Unix-based platforms, see “Installing WFM Web on Unix”.
• For instructions on how to install on Windows platforms, see “Installing WFM Web on Windows”.
Installing WFM Web on Unix
1. Navigate to the appropriate subdirectory in the solution_specific\WFMWeb directory on your Workforce Management release disk. Your choice of subdirectory depends on which platform you are installing WFM Web. The choices are AIX and Solaris.
2. Launch install.sh.
3. Enter this information for your Configuration Server: host name, port number, user name, and password.
4. Enter the name of your WFM Web Application object.
5. Specify the destination directory into which you want WFM Web installed.
6. Click Finish to close the Installation Wizard.
7. Locate the WFM .war file using the Tomcat or WebSphere administrative console. Move it to the appropriate directory for the web server you are using. For example, if you are using Tomcat, deploy the .war file in the webapps directory. For the location if you are using WebSphere, see your WebSphere documentation.
Installing WFM Web on Windows
1. Navigate to the windows subdirectory in the solution_specific\WFMWeb directory on your Workforce Management release disk.
2. Double-click Setup.exe. This opens the WFM Web Installation Wizard.
3. Click Next to begin using the Wizard.
4. Enter this information for your Configuration Server: host name, port number, user name, and password. Then click Next.
Administrator’s Guide 101
Chapter 4: Installing and Configuring Workforce Management Install the WFM Components
5. A list of WFM Web Application objects appears. Select the correct one and then click Next. The properties for each WFM Web Application object appear in the Application Properties list when that Application object is selected.
Note: If you are running a Framework 6.x environment, your WFM Web’s Application type must be Third Party Server.
6. Specify the destination directory into which you want WFM Web installed. Then click Next.
7. On the Ready to Install window, click Install.
A progress bar shows the setup status.
8. Click Finish to close the Installation Wizard.
9. Locate the wfm.war file using the Tomcat or WebSphere administrative console. Move it to the appropriate directory for the web server you are using. For example, if you are using Tomcat, deploy the wfm.war file in the webapps directory. For the location if you are using WebSphere, see your WebSphere documentation.
Install WFM Web as Report Server
Beginning with release 7.2, Workforce Management does not use the WFM Reports server component found in previous WFM versions to generate reports. Instead, Workforce Management uses the WFM Web component to generate reports.
Note: By default, in addition to functioning as a reports server, WFM Web 8.0 continues to perform all its usual WFM Web functions.
Because report generation has same or greater hardware requirements as other WFM Web functions, Genesys recommends that medium or large sites (as described in the Genesys Hardware Sizing Guide) install a separate WFM Web to function as a report server. If upgrading, you can and should use the same hardware previously used for the 7.1 WFM Reports component to set up 8.0 WFM Web as the report server.
To install/configure a separate instance of WFM Web as the reports server:
1. Install WFM Web using the previously described steps (see “Install WFM Web” on page 95).
2. In the Configuration Manager, WFM Web Application object, set the value for option ServerURL in the Reports section. For information on this option, see page 147. Enter the complete URL used to installed WFM Web.
Example: http://host:port/appname.

102 Workforce Management 8.0
Chapter 4: Installing and Configuring Workforce Management Install the WFM Components
In this example: The host and port refer to where the servlet container for WFM Web
(the one that will function as the report server) is running. The appname is the name used while deploying WFM Web.
Note: You must be able to use this URL to login to the WFM Web that will function as the report server.
3. In the Connections tab of the WFM Web that will perform all the usual WFM Web functions except report generating, include the Application name of the WFM Web that will function as the report server.
Install WFM Daemon
For information on this component, see “Notifications” on page 34.
Requires Framework 6.5.1 or higher and either Java SDK or the Java Runtime Environment. To learn which version of Java is required, consult the WFM section at the end of “Table 10: Product Prerequisites” in the book Genesys Supported Operating Environment Reference Manual.
Note: The Java to be installed must include the <specifier> time zones update. See http://java.sun.com/javase/timezones/ for details and use the Java version that is specified there.
1. Navigate to the solution_specific\WFMDaemon\windows directory on your Workforce Management release disk.
2. Double-click Setup.exe. This opens the WFM Daemon Installation Wizard.
3. Click Next to begin using the Wizard.
4. Enter this information for your Configuration Server: host name, port number, user name, and password. Then click Next.
5. A list of WFM Daemon Application objects appears. Select the correct one and then click Next. The properties for each WFM Daemon Application object appear in the Application Properties list when that Application object is selected.
Notes: If you are using Genesys Configuration Server 7.1 or earlier, then your WFM Daemon’s Application type must be Third Party Server.
If you are using Genesys Configuration Server releases later than 7.1 but earlier than7.5, then your WFM Daemon’s Application type must be Genesys Generic Server.
If you are using Genesys Configuration Server 7.5 or later, then your WFM Daemon’s Application type must be WFM Daemon.

Administrator’s Guide 103
Chapter 4: Installing and Configuring Workforce Management Configuring Multiple WFM Builder Applications
6. Specify the destination directory into which you want WFM Daemon installed. Then click Next.
7. On the Ready to Install window, click Install.
A progress bar shows the setup status.
8. Select whether to restart your computer now or later and then click Finish to close the Installation Wizard.
Note: You must restart your computer before starting WFM Daemon. However, if you are installing multiple components on one machine, you may install them all before restarting. Please note that it is not possible to install multiple instances of the same component on the same host.
Configuring Multiple WFM Builder Applications
If multiple WFM Builders are connected to the WFM Server, you can configure WFM Server to select the Builder with the shortest queue.
Go to the Configuration > User Security > User_name > Modules tab and select None (the default) from the drop-down list box WFM Builder. The result: For each supervisor request to build a schedule, WFM Web asks WFM Server to locate an instance of WFM Builder. To do so, WFM Web goes to an original locator—although not to the WFM Server in its current session.
WFM Server selects a WFM Builder instance from its Configuration Server application connection list. (WFM Server periodically polls all Builders specified in its connection list, to get information about their current request queue and to make sure the connections remain active.) In response to the request from WFM Web to locate a WFM Builder instance, WFM Server returns the active WFM Builder with the shortest queue.
Selecting a Specific Builder
For each user defined in WFM, you can select a specific WFM Builder (one that is installed on a user's workstation or dedicated to a group of users) that would serve all schedule building requests initiated by that user.
Go to the Configuration > User Security > User_name > Modules tab and select an item (not the default None) from the drop-down list box WFM Builder.
However, you do not need to select a specific WFM Builder if you want all users to share the same WFM Builder server. You can specify None as described above.
104 Workforce Management 8.0
Chapter 4: Installing and Configuring Workforce Management Date/Time Dependencies
Date/Time DependenciesThe following are the sources of the Date/Time setting for WFM applications:
• In WFM Web Supervisor, the Date/Time format depends on the locale of the supervisor’s workstations.
• In WFM Web Agent, the Date/Time format depends on the locale of Web Server and is identical for all agents connected to the same server.
• In WFM Configuration Utility, the Date/Time format depends on the locale of the Configuration Utility workstation.
Uninstall Workforce Management You can uninstall WFM at any time. To do so:
1. Stop all components, including any running as Windows Services.
2. Delete WFM from Tomcat if you are using Tomcat. See “Delete WFM Web from Tomcat” for instructions.
3. Delete WFM from WebSphere if you are using WebSphere. See “Delete WFM Web from WebSphere” on page 105 and your WebSphere documentation for instructions.
4. Use Add/Remove Programs to uninstall the WFM components from a Windows platform. See “Using Add/Remove Programs” on page 105 for instructions.
5. If you are using a Unix-based platform, delete all files in the relevant folders.
Delete WFM Web from Tomcat
1. Open the <CATALINA_HOME>\webapps directory (see “Set Environment Variables” on page 97).
2. Delete the WFM .war file and the WFM directory from the webapps folder.
Note: Uninstalling WFM Web does not remove the .war file or the WFM directory from the webapps folder. Genesys recommends that you remove the .war file and WFM directory prior to reinstalling or updating WFM Web.
If you reinstall or update WFM Web, before clients can access the software, you must remove the old file and replace the .war file with the new version of the file.
The default file name is wfm.war and the default directory name is wfm.

Administrator’s Guide 105
Chapter 4: Installing and Configuring Workforce Management Uninstall Workforce Management
Note: If you reinstall WFM Web without first manually deleting these files, the files are not updated. WFM Web will not run if you install a later version of WFM Web over an earlier one without first deleting these files.
Delete WFM Web from WebSphere◆ Delete WFM Web using your WebSphere Administrative Console. For the
procedure, see your WebSphere documentation.
Note: After completing the uninstall, you can then deploy a new version of WFM Web, again using the WebSphere Administrative Console to do so.
Using Add/Remove Programs
If you are running a Windows platform, you can use Add/Remove Programs to uninstall WFM components. To do so:
1. Select Start > Settings > Control Panel. Open Add/Remove Software.
2. Scroll through the list of programs to locate the one you intend to uninstall.
3. Click Change/Remove.
4. Follow the prompts in the UninstallShield Wizard that opens.
Although you may not be prompted to restart you computer after removing a WFM component, it is a good practice to do so.

106 Workforce Management 8.0
Chapter 4: Installing and Configuring Workforce Management Uninstall Workforce Management
Administrator’s Guide 107
Chapter
5 Configuring the Options TabsWhen you initially create and configure your component Application objects, either manually or using the Configuration Wizards, the Options tab is created with default settings.
To customize your applications, open the Application objects in Configuration Manager and adjust the settings as desired, using the descriptions in this chapter for guidance.
This chapter includes the following sections: Overview, page 107 Options Tab Settings for WFM Server, page 109 Options Tab Settings for WFM Builder, page 120 Options Tab Settings for WFM Data Aggregator, page 126 Options Tab Settings for WFM Client, page 132 Options Tab Settings for WFM Web, page 138 Options Tab for WFM Daemon, page 149
Note: Perform the complete set of configuration and installation procedures as described in Chapter 4, before configuring the Options tab settings for the various applications.
OverviewThe settings you can configure on the Options tab control various features, such as logging, font styles and sizes for some applications, security settings such as whether to show agent salary information, whether to use reason codes, and many others. In many cases, the default setting may be the most appropriate for your environment. However, Genesys recommends that you
108 Workforce Management 8.0
Chapter 5: Configuring the Options Tabs Overview
review the available options to determine where customization might benefit your enterprise.
Note: When the Valid Values for an option are listed as true or false, you can also enter alternate values to achieve the same result. You can also enter the value true as yes or 1, and you can also enter the value false as no or 0.
Create New Sections and Options
In some cases, sections and options documented here are not included in the shipped version of the templates. Many users will not need these sections or options but if you do, create them using these steps:
Procedure:Creating a new section
Purpose: To add a new section, which will contain at least one option, to the WFM database.
Prerequisites
• The WFM software application template and database must allow this section.
Start of procedure
1. On the Options tab, click the New icon or right-click in an empty area and select New.
The Add Section dialog box appears.
2. Enter the appropriate section name.
3. Click OK.
4. Save your work.
The new section is now ready for creating new options.
End of procedure
Procedure:Creating a new option
Purpose: To add a new option to the WFM database.
Administrator’s Guide 109
Chapter 5: Configuring the Options Tabs Options Tab Settings for WFM Server
Prerequisites
• The WFM software application template and database must allow this option.
Start of procedure
1. On the appropriate section pane, click the New icon or right-click in an empty spot and select New.
The Edit Option dialog box appears.
2. Enter the option name and the value for the new option.
3. Click OK.
4. Save your work.
5. Perform the actions (if any) that are required to activate the option.
End of procedure
Options Tab Settings for WFM Server From the Options tab you can modify the default WFM Server configuration settings. The tab contains seven sections. The options in each of these sections are described below.
Client Section
CfgServerRequestTimeoutType: MandatoryDefault Value: 15Valid Value: Any positive integerDependencies: None
Specifies the number of seconds to wait for a response from Configuration Server before timing out. This key is used when requesting the list of objects from Configuration Server for synchronization purposes. The value should be increased in configurations with a high number of objects or slow network connections.
SOAPTimeoutType: MandatoryDefault Value: 60Valid Value: Any positive integerDependencies: None
Specifies the number of seconds to wait for the response from WFM Server before timing out.
110 Workforce Management 8.0
Chapter 5: Configuring the Options Tabs Options Tab Settings for WFM Server
ConfigService Section
MaxCacheSizeType: OptionalDefault Value: No default valueValid Value: Any positive integerDependencies: None
The maximum size, in MB, of the Configuration cache.
MinCacheSizeType: OptionalDefault Value: No default valueValid Value: Any positive integerDependencies: None
The minimum size, in MB, of the Configuration cache. The cache is preloaded up to the minimum size.
CacheLifespanType: OptionalDefault Value: No default value (null value means the size is unlimited)Valid Value: Any positive integerDependencies: None
The amount of time, in hours, that data remains in the Configuration cache without being accessed. After this duration, the data is dropped from the cache.
CachePreloadTimeoutType: OptionalDefault Value: No default value (null value means 120 minutes)Valid Value: Any positive integerDependencies: None
The time, in minutes, for preloading data in the cache. Data is preloaded up to the amount specified in MinCacheSize.
CalendarService Section
CalendarOverScheduleDataType: OptionalDefault Value: 0Valid Values: 0, 1, 2Dependencies: None
This option enables the resolution of conflicts between granted / preferred time-off items and schedule data. Previously, when schedule data overlapped
Administrator’s Guide 111
Chapter 5: Configuring the Options Tabs Options Tab Settings for WFM Server
calendar data, unscheduled time off items were not considered when WFM Server checked agent time-off limits and balances.
0 — Disables the resolution functionality (default value).
1 — Enables resolution between granted calendar time-off items and overlapping schedule data.
2 — Adds resolution of preferred time-off items to option 1 functionality.
DetermineFullDayTimeOffStartEndPaidHoursType: OptionalDefault Value: falseValid Values: true, falseDependencies: NoneIf set to true when a user adds a Full-Day Time Off with the Start/End times not specified, WFM Server resolves the Start/End times.
MaxAuditReportsType: OptionalDefault Value: NoneValid Values: Any positive integerDependencies: NoneSpecifies how many audit reports can be built at one time. Recommended value: 1. If you request a greater number than is specified, the additional reports go into a queue.
HideMessagesForNotWorkingAgentsType: OptionalDefault Value: falseValid Value: true, falseDependencies: None
Specifies whether to prevent WFM Web from displaying error messages when Calendar items are set for agents who have been terminated or have not yet been hired, set this value to true. If you want to view error messages when Calendar items are set for agents who have been terminated or have not yet been hired, set this option to false.
Note: This section and option are not included in the template by default. You must create them yourself. See “Create New Sections and Options” on page 108 for instructions.
ForecastService Section
ForecastTimestepType: Optional

112 Workforce Management 8.0
Chapter 5: Configuring the Options Tabs Options Tab Settings for WFM Server
Default Value: 15Valid Values: 15, 30, 60 (Expert Average Engine) OR 15, 60 (Universal Modeling Engine)Dependencies: None
Specifies the step used in the Expert Average. If the step is 60, then all values (that is, four values, each representing a 15-minute timestep value) in the 60-minute interval will be filled with the same predicted value.
MaxScenarioCacheSizeType: Optional Default Value: No default value (null value means the size is unlimited)Valid Value: Any positive integerDependencies: None
The maximum size of the Forecast Scenario cache expressed in MB.
ServiceLevelMethodType: OptionalDefault Value: 0Valid Value: 0, 1Dependencies: None
Specifies whether Service Level should be calculated from the number of interactions distributed (as in Workforce Management 6.5) or from the number of interactions offered, which takes abandoned interactions into account. The default value, 0, indicates that Service Level is calculated based on the number of interactions distributed. To include abandoned interactions, set the value to 1.
Note: This option is not included in the template by default. You must create it yourself. Create this option if you want to include abandoned interactions (to set the value to 1). If you do not create this option, WFM functions as though you set the value to 0. See “Create New Sections and Options” on page 108 for how to create this option.
PerformanceService Section
MaxActivityDaysType: OptionalDefault Value: 25,000Valid Value: Any positive integerDependencies: None
This option controls the maximum cost of performance-related and forecast-related data that can be returned by WFM Server. It prevents very large requests from overloading WFM Server. The value represents Activity Days.
Administrator’s Guide 113
Chapter 5: Configuring the Options Tabs Options Tab Settings for WFM Server
For example, a request for 50 activities over a 31-day period would require 1550 Activity Days.
If the request requirement exceeds the MaxActivityDays limit, then the server returns this message:
Specified date range is too long for selected target. Please select different target or a shorter date range.
The default value is based on a typical customer configuration. You may need to adjust it, depending on your installed hardware, user work pattern, or if the server is too slow or short of memory when handling certain requests.
NoCallsServiceLevelType: OptionalDefault Value: 0Valid Values: 0, 100Dependencies: None
Specifies whether the Performance window shows service level as 0% or 100% when there are no incoming interactions.
Note: This section and option are not included in the template by default. You must create them yourself. See “Create New Sections and Options” on page 108 for instructions.
Identity Section
ApplicationTypeType: Mandatory in a Framework 6.x environment. Optional in a Framework 7.x environment.Default Value: WFMServerValid Value: WFMServerDependencies: None
Used only if you are using an application of the type ThirdPartyServer. If so, this option specifies which Workforce Management component this application is for.
Log Section
verboseType: MandatoryDefault Value: allValid Values: all, trace, standard, none, yes (= all), no (= none)Dependencies: None

114 Workforce Management 8.0
Chapter 5: Configuring the Options Tabs Options Tab Settings for WFM Server
Filters output of log messages based on their assigned priority. All enables output of all messages to the log file. Trace enables informational and error messages and disables debug messages. Standard enables error messages only and disables informational and debug messages. None disables all messages.
bufferingType: MandatoryDefault Value: falseValid Values: true, falseDependencies: None
Turns system file buffering on (yes) or off (false).
segmentType: MandatoryDefault Value: falseValid Values: false, <number>, <number>KB, <number>MB, <number>HrDependencies: None
Sets the maximum size (in KB, MB, or hours) of the log file segment, after which a new segment is created. The default size is in KB. The number cannot be less than 100 KB or less than one hour. No indicates no segmentation of the log file.
expireType: MandatoryDefault Value: falseValid Values: false, <number>, <number> file, <number> dayDependencies: None
Sets the Expiration mode for old segments. The number to be stored cannot be less than 1 file or 1 day or more than 100 files or 100 days. No indicates that files do not expire.
messagefileType: MandatoryDefault Value: wfmserver.lmsValid Value: wfmserver.lmsDependencies: None
Sets the name of the file that stores application-specific log messages. The only valid value is wfmserver.lms.
multithreadedType: MandatoryDefault Value: falseValid Values: yes, falseDependencies: None

Administrator’s Guide 115
Chapter 5: Configuring the Options Tabs Options Tab Settings for WFM Server
Sets whether the logging subsystem creates a special logging thread to process log messages. This option is available only for a multithread-enabled log library.
standardType: MandatoryDefault Value: stdoutValid Values (log output types): stdout, stderr, syslog, network, <filename>
Dependencies: None
Specifies that log events of the Standard level are to be sent to the listed outputs. For centralized logging, use network. You can use a local file name or stdout as well as network.
traceType: MandatoryDefault Value: stdoutValid Values (log output types): stdout, stderr, syslog, network, <filename>
Dependencies: None
Specifies that log events of the Trace level are to be sent to the listed outputs. For centralized logging, use network. You can use a local file name or stdout as well as network.
debugType: MandatoryDefault Value: stdoutValid Values (log output types): stdout, stderr, syslog, network, <filename>
Dependencies: None
Specifies that log events of the Debug level are to be sent to the listed outputs. Do not use network unless requested by Genesys Professional Services because it generates extremely heavy message loads that can degrade system performance.
allType: MandatoryDefault Value: stdoutValid Values (log output types): stdout, stderr, syslog, network, <filename>
Dependencies: None
Specifies that log events of all levels, Standard, Trace, and Debug, are to be sent to the listed outputs. Do not use network unless requested by Genesys
116 Workforce Management 8.0
Chapter 5: Configuring the Options Tabs Options Tab Settings for WFM Server
Professional Services because it generates extremely heavy message loads that can degrade system performance.
ScheduleService Section
MaxAuditReportsType: OptionalDefault Value: NoneValid Values: Any positive integerDependencies: NoneSpecifies how many audit reports can be built at one time. Recommended value: 1. If you request a greater number than is specified, the additional reports go into a queue.
SplitCoverageType: OptionalDefault Value: true or 1Valid Values: true or 1, false or 0Dependencies: SplitMode and SplitMS
Specifies whether schedule coverage should be reported in fractional units in views and reports which include this metric. The possible values are:
• false—Split coverage is not reported in fractional units, and the SplitMode option is ignored.
• true—Split coverage is reported in fractional units, and the SplitMode option is applied. For example, if an agent is scheduled to cover three activities during a 15-minute interval, he will count 0.33 toward the coverage of each activity.
SplitModeType: OptionalDefault Value: 0Valid Values: 0, 1, 2Dependencies: SplitCoverage and SplitMS
The three possible values and their characteristics are as follows:
• 0—The coverage split is calculated when the schedule is built, and is stored along with the schedule. This is the fastest mode (apart from SplitCoverage= false), because the coverage split is calculated only once, at the time when the schedule is built or modified. Fractional coverage is not available for legacy schedules.
• 1—The coverage split is calculated when the schedule is built, and is stored along with the schedule. Fractional coverage is calculated dynamically for legacy schedules.
Administrator’s Guide 117
Chapter 5: Configuring the Options Tabs Options Tab Settings for WFM Server
• 2—The coverage split is calculated dynamically for all new and legacy schedules. This is the slowest mode, because the coverage split is dynamically calculated every time that coverage is presented.
SplitMSType: OptionalDefault Value: falseValid Values: true, falseDependencies: SplitMode and SplitCoverage. If SplitCoverage is false then SplitMS is ignored.
Enables and disables multi-skill splitting of Schedule Coverage.
AutoCleanupTimeoutType: OptionalDefault Value: 0 (disabled)Valid Values: Any positive integer (minutes) or 0 (zero) (default; disables the option)Dependencies: None
This option enables WFM Server to perform automatic schedule cleanup for terminated agents, and specifies the time interval, in minutes, at which it does this. For example, setting the value to 60 specifies that WFM Server should automatically clean up the schedules of terminated agents every 60 minutes. Setting the value to 0 disables automatic schedule cleanup by WFM Server.
Special Handling for Terminated Agents
• The schedules of terminated agents will be deleted from the Master Schedule only for dates that occur on or after the agents’ termination dates.
• Also, each running WFM Server will clean up terminated agent schedules only for those sites that are assigned to this particular server under Organization > Sites > Properties in the Configuration Utility. If the server has no specific sites assigned to it, it will clean up all sites when automatic cleanup is enabled.
MaxCacheSizeType: OptionalDefault Value: No default valueValid Value: Any positive integerDependencies: None
Specifies the maximum size, in MB, of the Schedule cache.
MinCacheSizeType: OptionalDefault Value: No default valueValid Value: Any positive integer
118 Workforce Management 8.0
Chapter 5: Configuring the Options Tabs Options Tab Settings for WFM Server
Dependencies: None
Specifies the minimum size, in MB, of the Schedule cache. The cache is preloaded up to the minimum size.
MaxScenarioCacheSizeType: OptionalDefault Value: No default value Valid Value: Any positive integerDependencies: None
Specifies the maximum size, in MB, of the Schedule Scenario cache.
CachePreloadDayChunksType: OptionalDefault Value: No default value (null value means 14 days)Valid Value: Any positive integerDependencies: MinCacheSize
Specifies the chunk of days to load when performing a schedule cache preload.
CachePreloadMaxDaysType: OptionalDefault Value: No default value (null value means 365 days)Valid Value: Any positive integerDependencies: MinCacheSize
Specifies the number of days to preload starting from the current date. The preload stops if the MinCacheSize is reached.
CachePreloadTimeoutType: OptionalDefault Value: No default value (null value means 180 minutes)Valid Value: Any positive integerDependencies: None
The time, in minutes, for preloading data in the cache. Data is preloaded up to the amount specified in MinCacheSize.
CacheLifespanType: OptionalDefault Value: No default value (null value means the size is unlimited)Valid Value: Any positive integerDependencies: None
The amount of time, in hours, that data remains in the Schedule cache without being accessed. After this duration, the data is dropped from the cache.
Administrator’s Guide 119
Chapter 5: Configuring the Options Tabs Options Tab Settings for WFM Server
Server Section
MaxThreadPoolSizeType: MandatoryDefault Value: 80Valid Value: Any positive integerDependencies: None
This option specifies the maximum number of threads in the thread pool.
MinThreadPoolSizeType: MandatoryDefault Value: 8Valid Value: Any positive integerDependencies: None
This option specifies the minimum number of threads in the thread pool.
ProxyType: OptionalDefault Value: No default valueValid Value: <proxyservername>:<port>Dependencies: None
This option specifies a proxy server.
SessionTimeoutType: MandatoryDefault Value: 10Valid Value: Any positive integerDependencies: None
This option specifies the timeout, in minutes, for any client session with this WFM Server.
ThreadPoolDownsizeTimeoutType: MandatoryDefault Value: 15mValid Value: Any positive integer. Dependencies: None
This option specifies how long a thread stays idle before it is removed from the thread pool. Follow the number with s to indicate seconds or m to indicate minutes. By default, the value is in minutes.
ThreadPoolUpsizeTimeoutType: MandatoryDefault Value: 10s

120 Workforce Management 8.0
Chapter 5: Configuring the Options Tabs Options Tab Settings for WFM Builder
Valid Value: Any positive integerDependencies: None
This option specifies how long a request stays in queue before the thread pool size is increased. Follow the number with s to indicate seconds or m to indicate minutes. By default, the value is in seconds.
VirtualDirectoryType: Not applicableDefault Value: No default valueValid Value: Not applicableDependencies: None
For future use.
Options Tab Settings for WFM Builder From the Options tab you can modify the default WFM Builder configuration settings. The tab contains four sections. The options in each of these sections are described below.
Client Section
CfgServerRequestTimeoutType: MandatoryDefault Value: 15Valid Value: Any positive integerDependencies: None
Specifies the number of seconds to wait for a response from Configuration Server before timing out. This key is used when requesting the list of objects from Configuration Server for synchronization purposes. The value should be increased in configurations with a high number of objects or slow network connections.
SOAPTimeoutType: MandatoryDefault Value: 120Valid Value: Any positive integerDependencies: None
The SOAP connection timeout, in seconds.

Administrator’s Guide 121
Chapter 5: Configuring the Options Tabs Options Tab Settings for WFM Builder
Identity Section
ApplicationTypeType: Mandatory in a Framework 6.x environment. Optional in a Framework 7.x environment.Default Value: WFMBuilderValid Value: WFMBuilderDependencies: None
Used only if you are using an application of the type ThirdPartyServer. If so, this option specifies which Workforce Management component this application is for.
Log Section
verboseType: MandatoryDefault Value: allValid Values: all, trace, standard, none, yes (= all), no (= none)Dependencies: None
Filters output of log messages based on their assigned priority. All enables output of all messages to the log file. Trace enables informational and error messages and disables debug messages. Standard enables error messages only and disables informational and debug messages. None disables all messages.
buffering Type: MandatoryDefault Value: noValid Values: yes, noDependencies: None
Turns system file buffering on (yes) or off (no).
segmentType: MandatoryDefault Value: noValid Values: no, <number>, <number>KB, <number>MB, <number>HrDependencies: None
Sets the maximum size (in KB, MB, or hours) of the log file segment, after which a new segment is created. The default size is in KB. The number cannot be less than 100 KB or less than one hour. No indicates no segmentation of the log file.
expireType: Mandatory
122 Workforce Management 8.0
Chapter 5: Configuring the Options Tabs Options Tab Settings for WFM Builder
Default Value: noValid Values: no, <number>, <number> file, <number> dayDependencies: None
Sets the Expiration mode for old segments. The number to be stored cannot be less than 1 file or 1 day or more than 100 files or 100 days. No indicates that files do not expire.
messagefileType: MandatoryDefault Value: wfmbuilder.lmsValid Value: wfmbuilder.lmsDependencies: None
Sets the name of the file that stores application-specific log messages. The only valid value is wfmbuilder.lms.
multithreadedType: MandatoryDefault Value: noValid Values: yes, noDependencies: None
Sets whether the logging subsystem creates a special logging thread to process log messages. This option is available only for a multithread-enabled log library.
standardType: MandatoryDefault Value: stdoutValid Values (log output types): stdout, stderr, syslog, network, <filename>
Dependencies: None
Specifies that log events of the Standard level are to be sent to the listed outputs. For centralized logging, use network. You can use a local file name or stdout as well as network.
traceType: MandatoryDefault Value: stdoutValid Values (log output types): stdout, stderr, syslog, network, <filename>
Dependencies: None
Specifies that log events of the Trace level are to be sent to the listed outputs. For centralized logging, use network. You can use a local file name or stdout as well as network.
Administrator’s Guide 123
Chapter 5: Configuring the Options Tabs Options Tab Settings for WFM Builder
debugType: MandatoryDefault Value: stdoutValid Values (log output types): stdout, stderr, syslog, network, <filename>
Dependencies: None
Specifies that log events of the Debug level are to be sent to the listed outputs. Do not use network unless requested by Genesys Professional Services because it generates extremely heavy message loads that can degrade system performance.
allType: MandatoryDefault Value: stdoutValid Values (log output types): stdout, stderr, syslog, network, <filename>
Dependencies: None
Specifies that log events of all levels, Standard, Trace, and Debug, are to be sent to the listed outputs. Do not use network unless requested by Genesys Professional Services because it generates extremely heavy message loads that can degrade system performance.
x-ScheduleBuilderProgressTraceType: OptionalDefault Value: No default valueValid Values: true, falseDependencies: None
This option enables or disables reporting of schedule progress in the log file.
x-ScheduleBuilderTraceType: OptionalDefault Value: No default valueValid Values: true, falseDependencies: “x-ScheduleLogPath”
Indicates that WFM Builder should write scheduling data, output data, and messages to the Schedule log file. To use this option, you must specify a Schedule log path. One log file is created for every schedule build. For Schedule debugging only.
x-ScheduleLogPathType: OptionalDefault Value: No default valueValid Value: Path to the Schedule log directory.Dependencies: None

124 Workforce Management 8.0
Chapter 5: Configuring the Options Tabs Options Tab Settings for WFM Builder
For Schedule debugging only. Indicates where WFM Builder should write the file containing Schedule log data and messages.
x-ScheduleMaxLogsType: OptionalDefault Value: No default valueValid Values: 1-1000Dependencies: “x-ScheduleLogPath”
Specifies the maximum number of Schedule log files (or pairs, if x-SwordTrace is also set to yes) to keep in the folder specified in the x-ScheduleLogPath option. If you reach the maximum number of files, WFM Builder deletes files as necessary to stay within the limit, starting with the oldest file.
x-SwordTraceType: OptionalDefault Value: No default valueValid Values: yes, noDependencies: “x-ScheduleLogPath”
Indicates that scheduling algorithm output messages should be written to the Schedule log. For Schedule debugging only.
Options Section
IncreaseMemory1Type: OptionalDefault Value: No default valueValid Values: -2, -1, 0, 1, 2Dependencies: NoneRecommended Value: 0
Allows the memory increase necessary to build complex schedules. The default setting allocates a typical amount of memory for use during scheduling. If your constraints contain contradictions that require Scheduler to hold large amounts of data in memory during scheduling, increase the memory by entering 1 or 2. Larger numbers result in greater memory allocation. Negative numbers decrease memory allocation from the default setting.
If you require additional memory allocation for scheduling but do not have enough total memory to accommodate such an increase, you can also enter a value in the IncreaseMemory2 option. This increases memory only for some aspects of Scheduler activities. Contact Genesys Technical Support for assistance if you need to use this feature.
IncreaseMemory2Type: OptionalDefault Value: No default value
Administrator’s Guide 125
Chapter 5: Configuring the Options Tabs Options Tab Settings for WFM Builder
Valid Values: -2, -1, 0, 1, 2Dependencies: “IncreaseMemory1”
Enables additional memory allocation for scheduling when you do not have enough total memory to accommodate such an increase. This increases memory only for some aspects of Scheduler activities. Contact Genesys Technical Support for assistance if you need to use this feature.
MultiSiteActivitiesEnabledType: OptionalDefault Value: falseValid Values: true, falseDependencies: None
Use this option when multi-site activities are configured, to specify that Builder will use multi-site staffing requirements when building multi-site schedule scenarios.
True - Use the staffing requirements of multi-site activities.
False (or omit this option) - Use the staffing requirements of related-site activities.
NameOrderType: MandatoryDefault Value: 1Valid Values: 1, 2, 3Dependencies: None
Determines how names are presented in warning messages.
1 - first name is presented first.
2 - last name is presented first.
3 - last name is presented first and is separated from first name with a comma.
PreserveMarkedTimeType: OptionalDefault Value: falseValid Values: true, falseDependencies: None
True - Agent days that have marked time will be excluded from intra-day reoptimization.
False (or empty) - does not exclude Agent days that have marked time from intra-day reoptimization.
Special100ShiftCheckType: OptionalDefault Value: falseValid Values: true, false
126 Workforce Management 8.0
Chapter 5: Configuring the Options Tabs Options Tab Settings for WFM Data Aggregator
Dependencies: None
True sets the Builder shift limit to 100 shifts.
False (or empty) sets the Builder shift limit to 500 shifts.
Note: Error 43 appears if your configuration violates the current shift limit.
Options Tab Settings for WFM Data Aggregator
From the Options tab you can modify the default WFM Data Aggregator configuration settings. The tab contains four sections. The options in each of these sections are described below.
Client Section
CfgServerRequestTimeoutType: MandatoryDefault Value: 10Valid Values: Any positive integerDependencies: None
Specifies the number of seconds to wait for a response from Configuration Server before timing out. This key is used when requesting the list of objects from Configuration Server for synchronization purposes. The value should be increased in configurations with a high number of objects or slow network connections.
SOAPTimeoutType: MandatoryDefault Value: 90Valid Value: Any positive integerDependencies: None
The SOAP connection timeout, in seconds.
Identity Section
ApplicationTypeType: Mandatory in a Framework 6.x environment. Optional in a Framework 7.x environment.Default Value: WFMDataAggregatorValid Value: WFMDataAggregatorDependencies: None
Administrator’s Guide 127
Chapter 5: Configuring the Options Tabs Options Tab Settings for WFM Data Aggregator
Used only if you are using an application of the type ThirdPartyServer. If so, this option specifies which Workforce Management component this application is for.
Log Section
verboseType: MandatoryDefault Value: allValid Values: all, trace, standard, none, yes (= all), no (= none)Dependencies: None
Filters output of log messages based on their assigned priority. All enables output of all messages to the log file. Trace enables informational and error messages and disables debug messages. Standard enables error messages only and disables informational and debug messages. None disables all messages.
buffering Type: MandatoryDefault Value: noValid Values: yes, noDependencies: None
Turns system file buffering on (yes) or off (no).
segmentType: MandatoryDefault Value: noValid Values: no, <number>, <number>KB, <number>MB, <number>HrDependencies: None
Sets the maximum size (in KB, MB, or hours) of the log file segment, after which a new segment is created. The default size is in KB. The number cannot be less than 100 KB or less than one hour. No indicates no segmentation of the log file.
expireType: MandatoryDefault Value: noValid Values: no, <number>, <number> file, <number> dayDependencies: None
Sets the Expiration mode for old segments. The number to be stored cannot be less than 1 file or 1 day or more than 100 files or 100 days. No indicates that files do not expire.
messagefileType: Mandatory
128 Workforce Management 8.0
Chapter 5: Configuring the Options Tabs Options Tab Settings for WFM Data Aggregator
Default Value: wfmdataaggregator.lmsValid Value: wfmdataaggregator.lmsDependencies: None
Sets the name of the file that stores application-specific log messages. The only valid value is wfmdataaggregator.lms.
multithreadedType: MandatoryDefault Value: noValid Values: yes, noDependencies: None
Sets whether the logging subsystem creates a special logging thread to process log messages. This option is available only for a multithread-enabled log library.
standardType: MandatoryDefault Value: stdoutValid Values (log output types): stdout, stderr, syslog, network, <filename>
Dependencies: None
Specifies that log events of the Standard level are to be sent to the listed outputs. For centralized logging, use network. You can use a local file name or stdout as well as network.
traceType: MandatoryDefault Value: stdoutValid Values (log output types): stdout, stderr, syslog, network, <filename>
Dependencies: None
Specifies that log events of the Trace level are to be sent to the listed outputs. For centralized logging, use network. You can use a local file name or stdout as well as network.
debugType: MandatoryDefault Value: stdoutValid Values (log output types): stdout, stderr, syslog, network, <filename>
Dependencies: None
Specifies that log events of the Debug level are to be sent to the listed outputs. Do not use network unless requested by Genesys Professional Services because
Administrator’s Guide 129
Chapter 5: Configuring the Options Tabs Options Tab Settings for WFM Data Aggregator
it generates extremely heavy message loads that can degrade system performance.
allType: MandatoryDefault Value: stdoutValid Values (log output types): stdout, stderr, syslog, network, <filename>
Dependencies: None
Specifies that log events of all levels, Standard, Trace, and Debug, are to be sent to the listed outputs. Do not use network unless requested by Genesys Professional Services because it generates extremely heavy message loads that can degrade system performance.
x-DBWriterTraceType: OptionalDefault Value: No default valueValid Values: yes, noDependencies: None
When set to yes (or true or 1), this option enables an additional logging option that is used by Data Aggregator to record how a statistic's records are being stored in the database.
x-LogAgentEventTraceType: OptionalDefault Value: No default valueValid Values: yes, noDependencies: None
Indicates whether Data Aggregator should write agent event data to a log file. Used for debugging only.
x-LogConfigServerConnectionTraceType: OptionalDefault Value: No default valueValid Values: yes, noDependencies: None
Indicates whether Data Aggregator should write Configuration Server connection data to a log file. Used for debugging only.
x-LogConfigServerTraceType: OptionalDefault Value: No default valueValid Values: yes, noDependencies: None
130 Workforce Management 8.0
Chapter 5: Configuring the Options Tabs Options Tab Settings for WFM Data Aggregator
Indicates whether Data Aggregator should write Configuration Server process data to a log file. Used for debugging only.
x-LogSynchronizationTraceType: OptionalDefault Value: No default valueValid Values: yes, noDependencies: None
Indicates whether Data Aggregator should write Configuration Server synchronization data to a log file. Used for debugging only.
x-LogWFMServerTraceType: OptionalDefault Value: No default valueValid Values: yes, noDependencies: None
Indicates whether Data Aggregator should write WFM Server process data to a log file. Used for debugging only.
Options Section
AcceptZeroSkillLevelType: OptionalDefault Value: falseValid Value: true or falseDependencies: None
Set to true to enable WFM Data Aggregator's ability to set an agent skill level to 0.
Set to false to disable WFM Data Aggregator's ability to set an agent skill level to 0.
DBDumpFileType: OptionalDefault Value: No default valueValid Value: Any valid file nameDependencies: None
Specifies a file to which WFM Data Aggregator writes its current data if it loses its connection to the database. When Data Aggregator is restarted or the connection to the database is restored, it locates the dump file, retrieves the data, writes it to the database, and then deletes the dump file. If you do not specify a file name, the file is DBdump.dat located in \\...\Workforce Management\Data Aggregator.
Administrator’s Guide 131
Chapter 5: Configuring the Options Tabs Options Tab Settings for WFM Data Aggregator
HandleTimeWriteBackType: OptionalDefault Value: No default valueValid Value: 1-12Dependencies: None
Allows you to add average handling time (AHT) to a prior timestep if no calls were handled in the current timestep. This option prevents WFM Data Aggregator from setting AHT to zero for timesteps in which agents performed after call/contact work (ACW) for calls that had occurred in a prior timestep.
If this key is present and has an integer value between 1 and 12, WFM Data Aggregator searches for a prior timestep in which at least one call was handled. If it finds such a timestep, it updates that timestep’s statistics to incorporate ACW performed in the current timestep.
This key’s value determines the number of timesteps that WFM Data Aggregator searches back. Therefore, the ACW must occur within 12 timesteps, or 3 hours, after the call’s completion. A value of 0 (zero) disables this option.
Note: Some calls are brief enough to be considered short-abandoned calls, but they begin and end in different timesteps and thus require special handling to avoid skewing Call Center data. WFM Data Aggregator can identify a call like this because the timestep where it ends has an associated HandleTime statistic but no HandleVolume statistic.
WFM Data Aggregator uses the value of the HandleTimeWriteBack option when searching for the beginning of a short-abandoned call like this, to adjust the prior timestep where that call began. See the topic “Configuration > Activities > Statistics Configuration for Activities” in Configuration Utility help.
ReasonCodeKeyNameType: OptionalDefault Value: ReasonCodeValid Value: Any valid reason-code key nameDependencies: None
Specifies the reason (aux)-code key used in the enterprise. It is not necessary to configure this option if you do not use reason codes.
Data Aggregator can process reason codes that come from hard and/or soft phones. To receive reason codes from hard phones, or in a mixed hard/soft phone environment, the Data Aggregator application’s ReasonCodeKeyName option in Configuration Manager should be set to ReasonCode.
Note: You can only use reason codes from hard phones if you are using Stat Server 7.x.
132 Workforce Management 8.0
Chapter 5: Configuring the Options Tabs Options Tab Settings for WFM Client
ReasonCodeWaitTimeType: OptionalDefault Value: 15Valid Value: 2–600Dependencies: None
Necessary only if you are using a pre-6.5 release of Stat Server and are using reason codes. It specifies how long, in seconds, Data Aggregator delays processing information during a timestep while waiting for reason code information. This parameter is useful when Stat Server and/or the network are busy enough to delay reason code data.
ScheduleLookAheadMinutesType: OptionalDefault Value: No default valueValid Value: 0-1440Dependencies: None
Specifies how many additional minutes of agent schedules should be loaded from WFM Server for adherence calculations. Should be used only in environment where agent schedules and configuration are updated infrequently.
SynchronizeUnassignedAgentsType: OptionalDefault Value: true or yesValid Value: true or yes, false or noDependencies: None
Indicates whether WFM Data Aggregator should synchronize agents who are not assigned to any site. If more than one WFM Data Aggregator is configured to perform synchronization on the same database, then Genesys recommends that you set this option to yes for only one WFM Data Aggregator.
Options Tab Settings for WFM Client From the Options tab you can modify the default WFM Configuration Utility and WFM Database Utility configuration settings.
Note: This Application object is used both by the WFM Configuration Utility and the WFM Database Utility.
The tab contains two sections. The options in each of these sections are described below. If you choose to use a user-created option, you can create an OptionalSettings section. See “OptionalSettings Section” on page 138 for instructions.
Administrator’s Guide 133
Chapter 5: Configuring the Options Tabs Options Tab Settings for WFM Client
Log Section
allType: MandatoryDefault Value: stdoutValid Values (log output types): stdout, stderr, syslog, network, <filename>
Dependencies: None
Specifies that log events of all levels, Standard, Trace, and Debug, are to be sent to the listed outputs. Do not use network unless requested by Genesys Professional Services because it generates extremely heavy message loads that can degrade system performance.
buffering Type: MandatoryDefault Value: noValid Values: yes, noDependencies: None
Turns system file buffering on (yes) or off (no).
CSynchFileType: OptionalDefault Value: No default valueValid Value: Any file name and path used for WindowsDependencies: None
Provides the file name used to output the progress of synchronization. As described in Workforce Management 8.0 Configuration Utility Help, you can synchronize the content of the WFM Database with that of the Configuration Database.
debugType: MandatoryDefault Value: stdoutValid Values (log output types): stdout, stderr, syslog, network, <filename>
Dependencies: None
Specifies that log events of the Debug level are to be sent to the listed outputs. Do not use network unless requested by Genesys Professional Services because it generates extremely heavy message loads that can degrade system performance.
expireType: MandatoryDefault Value: no

134 Workforce Management 8.0
Chapter 5: Configuring the Options Tabs Options Tab Settings for WFM Client
Valid Values: no, <number>, <number> file, <number> dayDependencies: None
Sets the Expiration mode for old segments. The number to be stored cannot be less than 1 file or 1 day or more than 100 files or 100 days. No indicates that files do not expire.
messagefileType: MandatoryDefault Value: No default valueValid Value: Any character stringDependencies: None
Sets the name of the file that stores application-specific log messages.
multithreadedType: MandatoryDefault Value: noValid Values: yes, noDependencies: None
Sets whether the logging subsystem creates a special logging thread to process log messages. This option is available only for a multithread-enabled log library.
segmentType: MandatoryDefault Value: noValid Values: no, <number>, <number>KB, <number>MB, <number>HrDependencies: None
Sets the maximum size (in KB, MB, or hours) of the log file segment, after which a new segment is created. The default size is in KB. The number cannot be less than 100 KB or less than one hour. No indicates no segmentation of the log file.
standardType: MandatoryDefault Value: stdoutValid Values (log output types): stdout, stderr, syslog, network, <filename>
Dependencies: None
Specifies that log events of the Standard level are to be sent to the listed outputs. For centralized logging, use network. You can use a local file name or stdout as well as network.
traceType: Mandatory
Administrator’s Guide 135
Chapter 5: Configuring the Options Tabs Options Tab Settings for WFM Client
Default Value: stdoutValid Values (log output types): stdout, stderr, syslog, network, <filename>
Dependencies: None
Specifies that log events of the Trace level are to be sent to the listed outputs. For centralized logging, use network. You can use a local file name or stdout as well as network.
verboseType: MandatoryDefault Value: allValid Values: all, trace, standard, none, yes (= all), no (= none)Dependencies: None
Filters output of log messages based on their assigned priority. All enables output of all messages to the log file. Trace enables informational and error messages and disables debug messages. Standard enables error messages only and disables informational and debug messages. None disables all messages.
Options Section
AllowLessUpdates
Type: OptionalDefault Value: 0Valid Value: 0, 1Dependencies: None
Controls whether the Update Database to Version drop-down text box appears in the WFM Database Utility after you choose to update your database. In normal use, you would only update to the latest database version. However, in some circumstances, you might need to choose to update to a database version other than the most recent one. In this case, you need to use the Update Database to Version drop-down text box.
To have the WFM Database Utility display the Update Database to Version drop-down text box, set this value to 1. To remove this drop-down text box from the WFM Database Utility interface, set this option to 0.
AllowMigratePerformanceType: OptionalDefault Value: 0Valid Values: 0, 1Dependencies: None
Specifies whether to enable the Performance Data Migration option in the WFM Database Utility wizard. To enable it, set this option to 1. This means

136 Workforce Management 8.0
Chapter 5: Configuring the Options Tabs Options Tab Settings for WFM Client
that you can choose to migrate performance data from your 6.5 database to your new WFM 7.x database.
HelpFileType: MandatoryDefault Value: wm_config-help.chm Valid Value: wm_config-help.chm Dependencies: None
Specifies the name of Workforce Management Configuration Utility Help.
HideTerminatedAgentsType: OptionalDefault Value: falseValid Value: true, falseDependencies: None
If set to true, shows only currently-working agents. Excludes from view agents whose termination date has passed and those whose hire date is after the current date. If you want to view terminated agents and those whose hire date is in the future, set this option to false.
NameOrderType: OptionalDefault Value: 1Valid Values: 1, 2, 3Dependencies: None
Enables you to set the way the WFM Configuration Utility presents agent names in the Object pane tree view.
The possible values are:
1—First name is presented first.
2—Last name is presented first.
3—Last name is presented first and is separated from first name with comma.
CommandTimeout
Note: This option applies to WFM 7.1.1 releases only. WFM 7.1.0, 7.1.2, 7.2, 7.6 and greater do not require this option.
Type: OptionalDefault Value: 7200Valid Values: positive integersDependencies: None
Specifies the timeout, in seconds, after which the WFM Database Utility disconnects from the database during a database update. For an average-sized
Administrator’s Guide 137
Chapter 5: Configuring the Options Tabs Options Tab Settings for WFM Client
database, 600 seconds is sufficient to perform a full update. For unusually large databases, you will need to set this value higher.
LocalTimezonesType: OptionalDefault Value: falseValid Values: true, falseDependencies: None
This option specifies the time configuration that Configuration Utility assumes for each time zone affected during synchronization: GMT or local time. Choose the value that matches the values in Configuration Utility's Time Zone settings Daylight Saving time information dialog: they reflect either a GMT offset, or local time.
• false—WFM Configuration Utility will assume GMT time zone settings for each time zone affected during synchronization.
• true—WFM Configuration Utility will assume local time zone settings for each time zone affected during synchronization.
Note: To apply the new setting: open Configuration Utility, delete the current timezone configuration, and run Synchronization.
Client Section
CfgServerRequestTimeoutType: MandatoryDefault Value: 15Valid Values: Any positive integerDependencies: None
Specifies the number of seconds to wait for a response from Configuration Server before timing out. This key is used when requesting the list of objects from Configuration Server for synchronization purposes. The value should be increased in configurations with a high number of objects or slow network connections.
SOAPTimeoutType: MandatoryDefault Value: 60 Valid Value: Any positive integerDependencies: None
The number of seconds to wait for the response from WFM Server before timing out.
138 Workforce Management 8.0
Chapter 5: Configuring the Options Tabs Options Tab Settings for WFM Web
OptionalSettings Section
Note: This section is optional. You must create this section if you need a different font or a larger font size on the labels and text boxes in the WFM Configuration Utility. This option is intended particularly for users of the Chinese, Korean, and Japanese localized versions of the application.
See “Create New Sections and Options” on page 108 for how to create the new section and its new options.
FontSizeType: OptionalDefault Value: 8 pt.Valid Values: 8, 9, or 10 pt.Dependencies: None
Intended for users of the Chinese, Korean, or Japanese version of the WFM Configuration Utility. It enables you to adjust the point size of the typeface to accommodate the 9 pt. default size of these characters.
FontType: OptionalDefault Value: No default valueValid Value: Any valid font nameDependencies: None
Specifies the font used in the WFM Configuration Utility and/or the WFM Database Utility interfaces. Either or both of the Utilities could point to the Application object you are configuring.
Options Tab Settings for WFM Web From the Options tab you can modify the default WFM Web configuration settings. The tab contains six sections. The options in each of these sections are described below.
Adherence Section
RefreshTimeType: MandatoryDefault Value: 10Valid Value: Any positive integerDependencies: None
Administrator’s Guide 139
Chapter 5: Configuring the Options Tabs Options Tab Settings for WFM Web
Specifies the amount of time, in seconds, between updates to the real-time agent adherence data displayed in WFM Web.
AgentBidding Section
AllowBiddingType: MandatoryDefault Value: trueValid Value: true or falseDependencies: None
Enables agent bidding as part of Schedule Bidding. See WFM Web Supervisor help for details.
AgentPreferences Section
AllowPreferencesType: MandatoryDefault Value: trueValid Value: true or falseDependencies: NoneControls whether or not Preferences will appear in the agent part.
AgentSchedule Section
AccessLevelType: OptionalDefault Value: 2Valid Values: 1, 2, 3 Dependencies: None
This option controls which filtering options appear in the Other Schedules view and how much data an agent can see. (The option People I work with is always present.) Enter a valid value to specify which other options are available:
1 - My Team
2 - My Team and My Site
3 - My Team, My Site and My Business Unit
AllowAccessToOthersScheduleType: OptionalDefault Value: trueValid Values: true, falseDependencies: None
140 Workforce Management 8.0
Chapter 5: Configuring the Options Tabs Options Tab Settings for WFM Web
If set to true, agents can see other agents’ schedules in the Other Schedule tab of the WFM Web for Agents Schedule view.
AllowInsertExceptionsType: OptionalDefault Value: falseValid Values: true, falseDependencies: None
If set to true, agents can access the Add Exception button—and the underlying functionality—in the WFM Web for Agents My Schedule tab.
CommitAgentInsertedExceptionsType: OptionalDefault Value: falseValid Values: true, falseDependencies: Enabled only if AllowInsertExceptions is set to true
If set to true, exceptions inserted by an agent are committed to the schedule or inserted pending approval by a supervisor.
AgentTimeOff Section
AllowEnterFullDayStartEndType: OptionalDefault Value: trueValid Values: true, falseDependencies: None
Set this option to false to disable an agent’s ability to specify the start and end of a full-day time off. Omit this option or set it to true to enable that ability.
AllowEnterPaidTimeType: OptionalDefault Value: falseValid Values: true, falseDependencies: None
Controls whether an Agent can specify a the number of paid hours to deduct, when creating or editing a full-day time-off request in the Time Off Request view.
AllowTimeOffPlannerType: MandatoryDefault Value: trueValid Value: true or falseDependencies: None
Administrator’s Guide 141
Chapter 5: Configuring the Options Tabs Options Tab Settings for WFM Web
Controls whether or not the time off planner will appear in the agent part.
AllowWaitListType: MandatoryDefault Value: trueValid Values: true, falseDependencies: None
Controls whether the Wait-List check box—and the option that it represents—will appear in the Inserting New Time Off Items dialog box when an Agent is requesting time off.
Note: Even when this option is set to false, a supervisor may wait-list a time-off request when adding or editing the item through the WFM Calendar. However, if the agent subsequently edits such a wait-listed time-off item, the status changes, and the item is no longer wait-listed.
SeparateStartEndForEachDayType: OptionalDefault Value: falseValid Values: true, falseDependencies: None
If this option is set to true, an agent can define a separate (and different) start and end times for each full day in a new time-off request that spans multiple days. If this option is omitted or set to false, an agent can define only identical start and end times for all full days in a new time-off request that spans multiple days.
Client Section
SOAPTimeoutType: MandatoryDefault Value: 60 Valid Value: Any positive integerDependencies: None
Specifies the number of seconds to wait for the response from WFM Server before timing out.
Identity Section
ApplicationTypeType: Mandatory in a Framework 6.x environment. Optional in a Framework 7.x environment.Default Value: WFMWeb

142 Workforce Management 8.0
Chapter 5: Configuring the Options Tabs Options Tab Settings for WFM Web
Valid Value: WFMWebDependencies: None
Used only if you are using an application of the type ThirdPartyServer. If so, this option specifies which Workforce Management component this application is for.
Log Section
allType: MandatoryDefault Value: stdoutValid Values (log output types): stdout, stderr, syslog, network, <filename>
Dependencies: None
Specifies that log events of all levels, Standard, Trace, and Debug, are to be sent to the listed outputs. Do not use network unless requested by Genesys Professional Services because it generates extremely heavy message loads that can degrade system performance.
buffering Type: MandatoryDefault Value: noValid Values: yes, noDependencies: None
Turns system file buffering on (yes) or off (no).
debugType: MandatoryDefault Value: stdoutValid Values (log output types): stdout, stderr, syslog, network, <filename>
Dependencies: None
Specifies that log events of the Debug level are to be sent to the listed outputs. Do not use network unless requested by Genesys Professional Services because it generates extremely heavy message loads that can degrade system performance.
expireType: MandatoryDefault Value: noValid Values: no, <number>, <number> file, <number> dayDependencies: None
Administrator’s Guide 143
Chapter 5: Configuring the Options Tabs Options Tab Settings for WFM Web
Sets the Expiration mode for old segments. The number to be stored cannot be less than 1 file or 1 day or more than 100 files or 100 days. No indicates that files do not expire.
multithreadType: MandatoryDefault Value: noValid Values: yes, noDependencies: None
Sets whether the logging subsystem creates a special logging thread to process log messages. This option is available only for a multithread-enabled log library.
segmentType: MandatoryDefault Value: noValid Values: no, <number>, <number>KB, <number>MB, <number>HrDependencies: None
Sets the maximum size (in KB, MB, or hours) of the log file segment, after which a new segment is created. The default size is in KB. The number cannot be less than 100 KB or less than one hour. No indicates no segmentation of the log file.
standardType: MandatoryDefault Value: stdoutValid Values (log output types): stdout, stderr, syslog, network, <filename>
Dependencies: None
Specifies that log events of the Standard level are to be sent to the listed outputs. For centralized logging, use network. You can use a local file name or stdout as well as network.
traceType: MandatoryDefault Value: stdoutValid Values (log output types): stdout, stderr, syslog, network, <filename>
Dependencies: None
Specifies that log events of the Trace level are to be sent to the listed outputs. For centralized logging, use network. You can use a local file name or stdout as well as network.
144 Workforce Management 8.0
Chapter 5: Configuring the Options Tabs Options Tab Settings for WFM Web
verboseType: MandatoryDefault Value: stdoutValid Values: all, trace, stdout, none, yes (= all), no (= none)Dependencies: None
Filters output of log messages based on their assigned priority. All enables output of all messages to the log file. Trace enables informational and error messages and disables debug messages. Standard enables error messages only and disables informational and debug messages. None disables all messages.
Options Section
HideNamesType: MandatoryDefault Value: falseValid Value: true, falseDependencies: None
Specifies whether agent names are displayed in Adherence views.
HideTerminatedAgentsType: OptionalDefault Value: falseValid Value: true, falseDependencies: None
Specifies whether WFM Web should exclude agents whose termination date has passed. To exclude these agents, set this value to true. If you want to view terminated agents, set this option to false.
NameOrderType: MandatoryDefault Value: 1Valid Value: 1, 2, 3Dependencies: None
Determines how WFM Web presents agent names.
1 - first name is presented first.
2 - last name is presented first.
3 - last name is presented first and is separated from first name with a comma.
NoPerformanceInScheduleType: MandatoryDefault Value: falseValid Value: true or false
Administrator’s Guide 145
Chapter 5: Configuring the Options Tabs Options Tab Settings for WFM Web
Dependencies: None
This option controls whether or not target selection and performance data retrieval is automatic in the schedule intra-day view. It can be useful in improving the WFM performance in some situations.
If false (the default), target selection and performance data retrieval is automatic.
If true, the user must explicitly select a target for performance data, or no performance data is retrieved.
OpenHoursCellColorType: OptionalDefault Value: FFCC00 (hot yellow)Valid Value: Any standard hex code value for a color. For example, D3D3D3 is light gray.Dependencies: None
Use this option to change the color of the background in the opening hours cells of Forecast views. The default value applies if you omit this option.
PageCharSetType: OptionalDefault Value: No default valueValid Value: Any standard character set value. For example, enter x-sjis for the Japanese character set.Dependencies: None
Specifies the character set that every page in WFM Web employs. If empty, no character set is specified.
ShowAllActivitiesType: OptionalDefault Value: falseValid Values: true, falseDependencies: None
Specifies how the Daily Schedule window is displayed in WFM Web for Agents. Select false to have only the agent’s scheduled activities displayed. Select true to create a display containing all possible activities for that agent, whether scheduled or not.
Reports Section
Charset Type: OptionalDefault Value: No default value
146 Workforce Management 8.0
Chapter 5: Configuring the Options Tabs Options Tab Settings for WFM Web
Valid Values: Any standard code page value. For example, enter cp1257 for a Baltic code page.Dependencies: None
Specifies the code page to be used for fonts in generated reports. If empty, code page 1252, Latin 1, is used.
FontType: OptionalDefault Value: No default valueValid Value: Any font name that exists on the computer used to generate reports.Dependencies: None
Specifies the font name to be used in on the computer used to generated WFM reports.
x-FontPathType: Optional
Default Value: No default value
Valid Value: Physical path
Dependencies: None
Physical directory path where the font resides (as specified above in Reports/Font).
OwnerCaptionType: MandatoryDefault Value: No default valueValid Value: Any stringDependencies: None
Provides the default value for the report header. You can change this value in the Header field on the first window of any Report Wizard.
OwnerVisibleType: MandatoryDefault Value: falseValid Value: true, falseDependencies: None
Provides the default value for the Show Header check box in the first page of all Report Wizards.
PathToAutoGeneratedReportsType: MandatoryDefault Value: NoneValid Value: a valid and accessible network path

Administrator’s Guide 147
Chapter 5: Configuring the Options Tabs Options Tab Settings for WFM Web
Dependencies: None
Specifies the network path for storing generated reports. If this value is not set, then generated reports are lost (not stored at all).
RevertDiffCalculationType: MandatoryDefault Value: 0 or false or noValid Value: 0 or false or no, 1 or true or yesDependencies: None
By default, the Difference column in the Contact Center Performance and Workforce Performance reports is calculated as the Scheduled or Forecasted value minus the Actual value. Set this option to 1 (true) if you want the Difference column to be calculated as the Actual value minus the Scheduled or Forecasted value.
ServerURLType: OptionalDefault Value: No default valueValid Value: URL Dependencies: None
URL for the location of the WFM Web used as the reports server. For more information, see “Install WFM Web as Report Server” on page 101.
ShowActualHeadcountType: MandatoryDefault Value: falseValid Values: true or false
This option applies to the Contact Center Performance Report and the Workforce Performance Report.
If false, fractional values in Staffing Coverage are rounded to whole numbers for the report display.
If true, fractional values in Staffing Coverage are not rounded to whole numbers. This coincides with how coverage is displayed in the Performance view.Dependencies: None
Note: For CCPR, this condition is executed only for Actual data; for Planning Data EPerfInfoItems.PERF_ITEM_SCH_HEADCOUNT is always shown as Number of Agents.
ShowSSGonFirstPageOnlyType: Optional
Default Value: false
148 Workforce Management 8.0
Chapter 5: Configuring the Options Tabs Options Tab Settings for WFM Web
Valid Value: true or false
Set this option to true to disable repetition of the Selected Schedule State Groups and Schedule States section on each page of all reports. Instead, the report will display the complete list once, and then never repeat it.
Dependencies: None
AgentTrading Section
AllowNoCommentsType: OptionalDefault Value: falseValid Value: true, falseDependencies: None
If set to true, agents do not have the ability to enter comments while working with trades.
AllowAccesstoOthersScheduleType: MandatoryDefault Value: trueValid Value: true, falseDependencies: “AllowScheduleTrading”
If set to true, agents can see other agents’ schedules in the Schedule tab of the WFM Web for Agents Trading view.
AllowScheduleTradingType: MandatoryDefault Value: trueValid Value: true, falseDependencies: None
If set to true, trading functionality is enabled for agents. If set to false, trading functionality is disabled and Trading is not available in the WFM Web for Agents menu.
TradeOnlyInsideTeamType: MandatoryDefault Value: trueValid Value: true, falseDependencies: “AllowScheduleTrading”, “AllowAccesstoOthersSchedule”
Controls what kind of schedules agent can see. If set to true, agents see schedules only of other agents who are in the same team. If set to false, agents see schedules of all agents who belong to the same site.
Administrator’s Guide 149
Chapter 5: Configuring the Options Tabs Options Tab for WFM Daemon
Options Tab for WFM DaemonFrom the Options tab you can modify the default WFM Daemon configuration settings (see “Notifications” on page 34). The tab contains four sections. The options in each section are described below.
Log Section
allType: MandatoryDefault Value: stdoutValid Values (log output types): stdout, stderr, syslog, network, <filename>
Dependencies: None
Specifies that log events of all levels, Standard, Trace, and Debug, are to be sent to the listed outputs. Do not use network unless requested by Genesys Professional Services because it generates extremely heavy message loads that can degrade system performance.
buffering Type: MandatoryDefault Value: noValid Values: yes, noDependencies: None
Turns system file buffering on (yes) or off (no).
debugType: MandatoryDefault Value: stdoutValid Values (log output types): stdout, stderr, syslog, network, <filename>
Dependencies: None
Specifies that log events of the Debug level are to be sent to the listed outputs. Do not use network unless requested by Genesys Professional Services because it generates extremely heavy message loads that can degrade system performance.
expireType: MandatoryDefault Value: noValid Values: no, <number>, <number> file, <number> dayDependencies: None

150 Workforce Management 8.0
Chapter 5: Configuring the Options Tabs Options Tab for WFM Daemon
Sets the Expiration mode for old segments. The number to be stored cannot be less than 1 file or 1 day or more than 100 files or 100 days. No indicates that files do not expire.
multithreadType: MandatoryDefault Value: noValid Values: yes, noDependencies: None
Sets whether the logging subsystem creates a special logging thread to process log messages. This option is available only for a multithread-enabled log library.
segmentType: MandatoryDefault Value: noValid Values: no, <number>, <number>KB, <number>MB, <number>HrDependencies: None
Sets the maximum size (in KB, MB, or hours) of the log file segment, after which a new segment is created. The default size is in KB. The number cannot be less than 100 KB or less than one hour. No indicates no segmentation of the log file.
standardType: MandatoryDefault Value: stdoutValid Values (log output types): stdout, stderr, syslog, network, <filename>
Dependencies: None
Specifies that log events of the Standard level are to be sent to the listed outputs. For centralized logging, use network. You can use a local file name or stdout as well as network.
traceType: MandatoryDefault Value: stdoutValid Values (log output types): stdout, stderr, syslog, network, <filename>
Dependencies: None
Specifies that log events of the Trace level are to be sent to the listed outputs. For centralized logging, use network. You can use a local file name or stdout as well as network.
Administrator’s Guide 151
Chapter 5: Configuring the Options Tabs Options Tab for WFM Daemon
verboseType: MandatoryDefault Value: allValid Values: all, trace, standard, none, yes (= all), no (= none)Dependencies: None
Filters output of log messages based on their assigned priority. All enables output of all messages to the log file. Trace enables informational and error messages and disables debug messages. Standard enables error messages only and disables informational and debug messages. None disables all messages.
Options Section
CharSetType: OptionalDefault Value: No default valueValid Values: Any standard character set value. For example, enter x-sjis for the Japanese character set.Dependencies: NoneSpecifies the character set of notification messages sent. Must be specified if messages contain specific locale characters and they are not presented correctly in the received message.
NameOrderType: MandatoryDefault Value: 1Valid Values: 1, 2, 3Dependencies: None
Specifies first and last name order when sending e-mail notifications.
1 - first name is presented first.
2 - last name is presented first.
3 - last name is presented first and is separated from first name with a comma.
pollTimerType: MandatoryDefault Value: 1Valid Value: Any positive integerDependencies: None
Specifies how often WFM Daemon must verify for data updates, value specified in minutes.
ReportGenerationTimeoutType: OptionalDefault Value: 120
152 Workforce Management 8.0
Chapter 5: Configuring the Options Tabs Options Tab for WFM Daemon
Valid Value: 1-1440Dependencies: None
Specifies the time (in minutes) after which a scheduled report task will be terminated, whether or not report is finished. Use this option to control how long scheduled report tasks can run.
TrackAheadType: MandatoryDefault Value: 10Valid Value: Any positive integerDependencies: None
Specifies how many days in advance WFM Daemon should request data from WFM Server counting from current date. Relevant for any type of notification (see “Notifications” on page 34). Value specified in days.
TrackBackType: MandatoryDefault Value: -1Valid Values: Any minus integerDependencies: None
How many days back WFM Daemon should request data from WFM Server counting from current date. Relevant for any type of notification (see “Notifications” on page 34). Value specified in days as a negative number.
Identity Section
ApplicationTypeType: Mandatory in a Framework 6.x environment. Optional in a Framework 7.x environment.Default Value: WFMDaemonValid Value: WFMDaemonDependencies: None
Identifies WFM Daemon application.
Client Section
SOAPTimeoutType: MandatoryDefault Value: 60Valid Values: Any positive integerDependencies: None
Connection timeout, in seconds, to WFM Server.

Administrator’s Guide 153
Chapter 5: Configuring the Options Tabs Options Tab for WFM Daemon
SMTP Section
AnonymousAccessType: OptionalDefault Value: falseValid Values: true or falseDependencies: None
Set to true to enable WFM Daemon’s ability to send anonymous emails.
Set to false to disable WFM Daemon’s ability to send anonymous emails.
fromAddressType: OptionalDefault Value: No default valueValid Values: Any valid e-mail addressDependencies: None
FROM e-mail address presented to users receiving notifications.
HostType: MandatoryDefault Value: No default valueValid Values: Not applicableDependencies: None
Host name of machine where SMTP server is located.
PasswordType: OptionalDefault Value: No default valueValid Values: Any valid passwordDependencies: None
Password for connection to SMTP server. Needs to be specified only if SMTP server requires connection authorization.
PortType: MandatoryDefault Value: 25Valid Values: Any positive integerDependencies: None
Port of SMTP server.
UserType: OptionalDefault Value: No default valueValid Values: Any valid username

154 Workforce Management 8.0
Chapter 5: Configuring the Options Tabs Options Tab for WFM Daemon
Dependencies: None
Username for connection to SMTP server. Needs to be specified only if SMTP server requires connection authorization.
Administrator’s Guide 155
Chapter
6 Recommended Statistics SettingsThis chapter includes the following sections: Configuring Stat Server Statistics, page 155 Configuring Statistics for Voice Interactions, page 163 Configuring Statistics for Genesys eServices (Multimedia) Interactions,
page 166
Configuring Stat Server StatisticsYou configure the Stat Server statistics that WFM Data Aggregator tracks and records using the WFM Configuration Utility. Therefore, you must configure certain Stat Server settings required by WFM before launching the WFM Configuration Utility and completing the WFM Data Aggregator configuration.
If you use the WFM Data Aggregator Configuration Wizard (instead of performing a manual installation and configuration) and you select the Wizard’s Add WFM Statistics option, the Wizard completes all the necessary Stat Server configuration. In this case, the statistics have the variant names (starting with WFM) listed in parentheses in the Statistic Name rows of the Stat Server Statistics Settings tables beginning on page 163.
Note: The Wizard only adds the “voice” statistics described in tables 6-12, not the Genesys eServices (Multimedia) statistics. You must configure most eServices statistics manually in Stat Server. See details in tables 13-27.
In addition, you must locate or configure in Configuration Manager the necessary Stat Server statistics for tracking WFM activities, so they will be
156 Workforce Management 8.0
Chapter 6: Recommended Statistics Settings Configuring Stat Server Statistics
available when configuring WFM Data Aggregator statistics in the WFM Configuration Utility.
Warning! You must restart Stat Server after configuration changes.
You must configure two parameters in Stat Server: TimeProfile and TimeRange.
TimeProfile
WFM Data Aggregator uses TimeProfile to order statistics for WFM activities from Stat Server based on a specific interval of time. This time interval is configured in Stat Server as TimeProfile.
Note: If you use the WFM Data Aggregator Configuration Wizard instead of performing a manual installation and configuration, and select the Wizard’s Add WFM Statistics option, the Wizard completes all the necessary time profile configuration. In this case, the time profiles have these variant names (starting with WFM):
WFMProfile,Growing=0:00+0:15WFMTimeProfile,Growing=0:00+0:15
To configure the time profile, check the TimeProfiles section on the Options tab of the Stat Server Application object. If it doesn’t exist, create this section.
After locating or creating this section, add the options:
• WFMProfile,Growing=0:00+0:15
• TimeProfileName,Growing=0:00+0:15
TimeProfileName indicates the name of the time profile to be used. The 0:15 indicates that the request statistics are based on 15-minute intervals.
Note: A 15-minute interval is the only timestep currently supported.
TimeRange
WFM Data Aggregator uses TimeRange to request that the service-factor statistics be calculated based on the specified time interval. Usually, service factor is calculated as “X% of calls answered in Y seconds.” The “Y seconds” must be configured as the TimeRange parameter. After you configure the time range, Stat Server uses it by default and returns the value for any service-factor statistic as “X% of calls answered in [TimeRange] seconds.” To configure the time range, check for the TimeRanges section of the Stat Server Application object. If it doesn’t exist, create this section.
Administrator’s Guide 157
Chapter 6: Recommended Statistics Settings Configuring Stat Server Statistics
Note: If you use the WFM Data Aggregator Configuration Wizard instead of performing a manual installation and configuration, and select the Wizard’s Add WFM Statistics option, the Wizard creates the necessary time range configuration. In this case, the time ranges have these variant names (starting with WFM):WFMTimeRange10=0-10
WFMTimeRange15=0-15
WFMTimeRange20=0-20
WFMTimeRange30=0-30
WFMTimeRange60=0-60
WFMTimeRange90=0-90
After locating or creating this section, add these options:
• TimeRange10=0-10
• TimeRange15=0-15
• TimeRange20=0-20
• TimeRange30=0-30
• TimeRange60=0-60
• TimeRange90=0-90
In this case, 10, 15, 20, and so on, represent the “Y seconds” portion of the service factor calculation described above.
You can configure multiple time ranges for multiple service-level goals. A Customer Service goal of 80 percent of calls answered in 30 seconds and a Corporate Customer Service goal of 90 percent of calls answered in 10 seconds is configured as follows:
• CustTimeRange '0-30'
• CorpTimeRange '0-10'
After you configure TimeRange, use this option when configuring the Stat Server request in the WFM Configuration Utility.
Warning! After restarting Stat Server, be certain that during initialization the TimeProfile and TimeRange statistics proceed successfully. See the Stat Server documentation for more details.
Procedure:Locating Preconfigured Stat Server Statistics in Configuration Manager
Purpose: To locate preconfigured Stat Server statistics.

158 Workforce Management 8.0
Chapter 6: Recommended Statistics Settings Configuring Stat Server Statistics
Start of procedure
1. Click the plus sign (+) next to Environment in the Configuration Manager tree view.
2. Click Applications.
3. The list of available Applications appears in the right-hand pane of the window.
4. Double-click the Stat Server Application object.
5. A Properties window containing several tabs appears.
6. Click the Options tab.
7. The preset statistics are listed on the Options tab.
8. Scroll through the list to determine which statistics that are listed in this chapter are available, and which you will need to create.
End of procedure
Next Steps
• Execute the procedure, “Creating New Stat Server Statistics” on page 158 for each “missing” statistic.
• Execute the procedure, “Entering Settings for New Statistics” on page 159 for each new statistic.
Procedure:Creating New Stat Server Statistics
Purpose: To create new stat server statistics.
Prerequisites
• The statistics that WFM requires are not in the preset list.
Start of procedure
1. Click the Create New Section/Option icon on the Stat Server Option tab.
The Add Statistic window appears.
2. Enter a statistic name from the Stat Server Statistics Settings tables beginning on page 163.
3. Click OK.
The new statistic appears in the Option tab Statistics list.
End of procedure
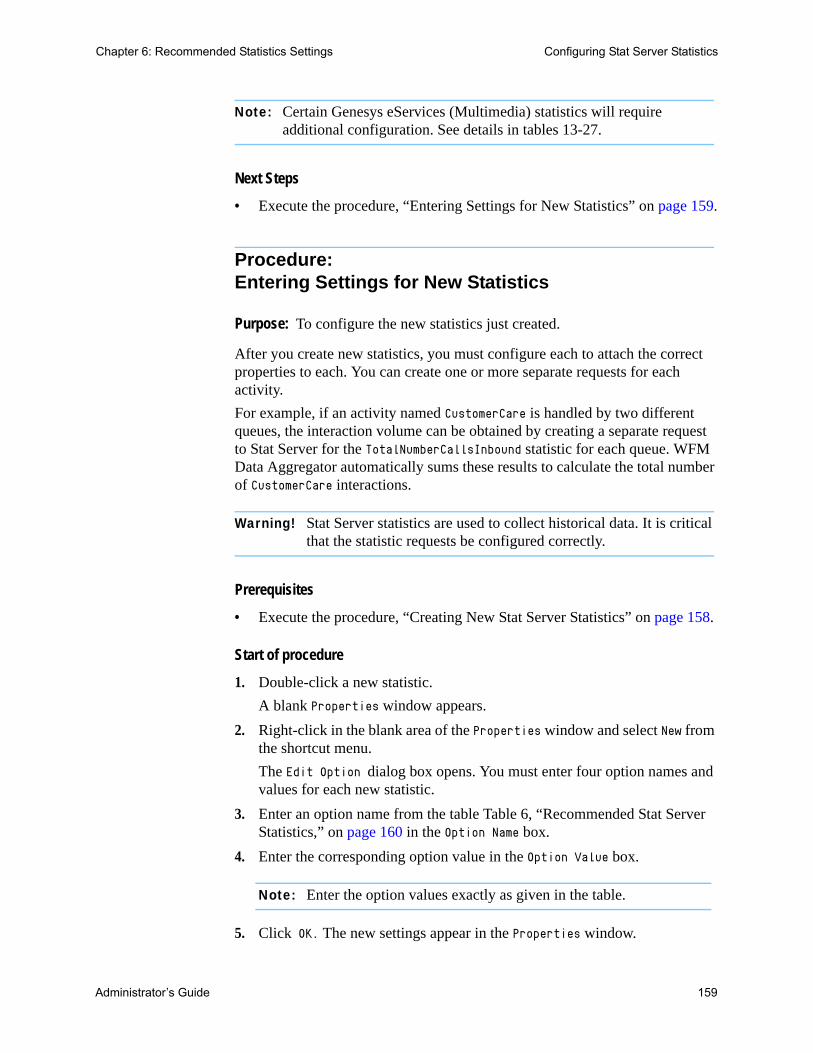
Administrator’s Guide 159
Chapter 6: Recommended Statistics Settings Configuring Stat Server Statistics
Note: Certain Genesys eServices (Multimedia) statistics will require additional configuration. See details in tables 13-27.
Next Steps
• Execute the procedure, “Entering Settings for New Statistics” on page 159.
Procedure:Entering Settings for New Statistics
Purpose: To configure the new statistics just created.
After you create new statistics, you must configure each to attach the correct properties to each. You can create one or more separate requests for each activity.
For example, if an activity named CustomerCare is handled by two different queues, the interaction volume can be obtained by creating a separate request to Stat Server for the TotalNumberCallsInbound statistic for each queue. WFM Data Aggregator automatically sums these results to calculate the total number of CustomerCare interactions.
Warning! Stat Server statistics are used to collect historical data. It is critical that the statistic requests be configured correctly.
Prerequisites
• Execute the procedure, “Creating New Stat Server Statistics” on page 158.
Start of procedure
1. Double-click a new statistic.
A blank Properties window appears.
2. Right-click in the blank area of the Properties window and select New from the shortcut menu.
The Edit Option dialog box opens. You must enter four option names and values for each new statistic.
3. Enter an option name from the table Table 6, “Recommended Stat Server Statistics,” on page 160 in the Option Name box.
4. Enter the corresponding option value in the Option Value box.
Note: Enter the option values exactly as given in the table.
5. Click OK. The new settings appear in the Properties window.
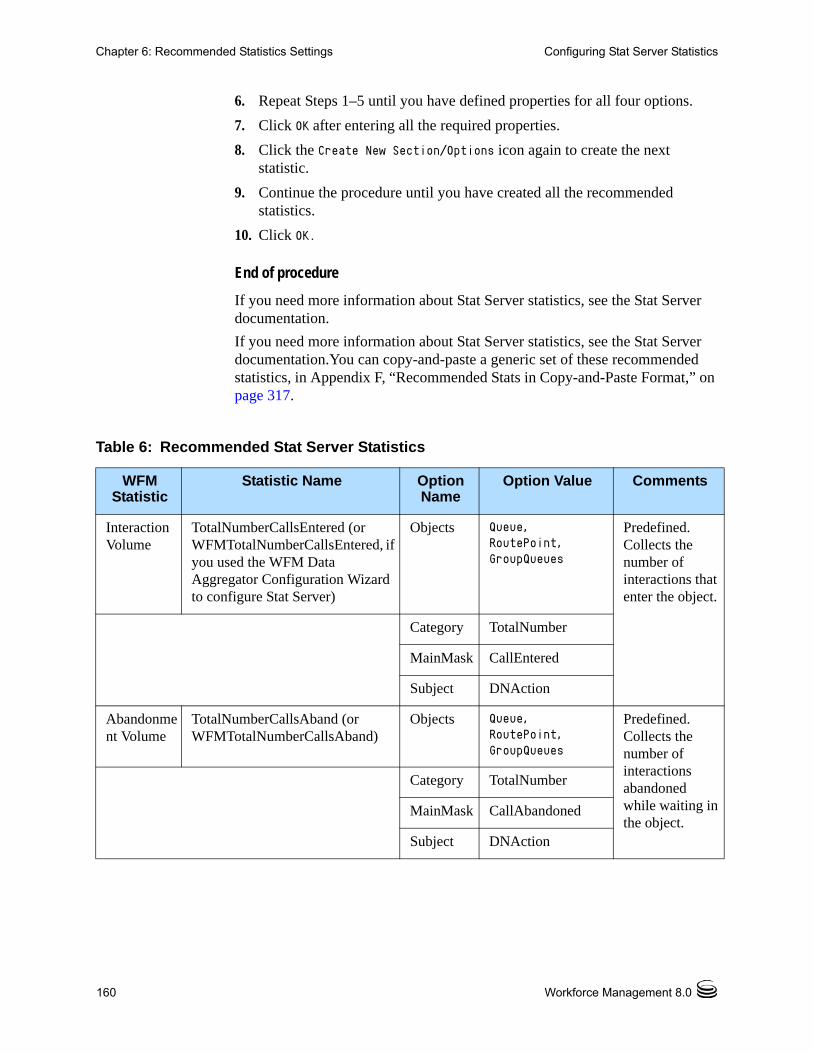
160 Workforce Management 8.0
Chapter 6: Recommended Statistics Settings Configuring Stat Server Statistics
6. Repeat Steps 1–5 until you have defined properties for all four options.
7. Click OK after entering all the required properties.
8. Click the Create New Section/Options icon again to create the next statistic.
9. Continue the procedure until you have created all the recommended statistics.
10. Click OK.
End of procedure
If you need more information about Stat Server statistics, see the Stat Server documentation.
If you need more information about Stat Server statistics, see the Stat Server documentation.You can copy-and-paste a generic set of these recommended statistics, in Appendix F, “Recommended Stats in Copy-and-Paste Format,” on page 317.
Table 6: Recommended Stat Server Statistics
WFM Statistic
Statistic Name OptionName
Option Value Comments
Interaction Volume
TotalNumberCallsEntered (or WFMTotalNumberCallsEntered, if you used the WFM Data Aggregator Configuration Wizard to configure Stat Server)
Objects Queue, RoutePoint, GroupQueues
Predefined. Collects the number of interactions that enter the object.
Category TotalNumber
MainMask CallEntered
Subject DNAction
Abandonment Volume
TotalNumberCallsAband (or WFMTotalNumberCallsAband)
Objects Queue, RoutePoint, GroupQueues
Predefined. Collects the number of interactions abandoned while waiting in the object.
Category TotalNumber
MainMask CallAbandoned
Subject DNAction
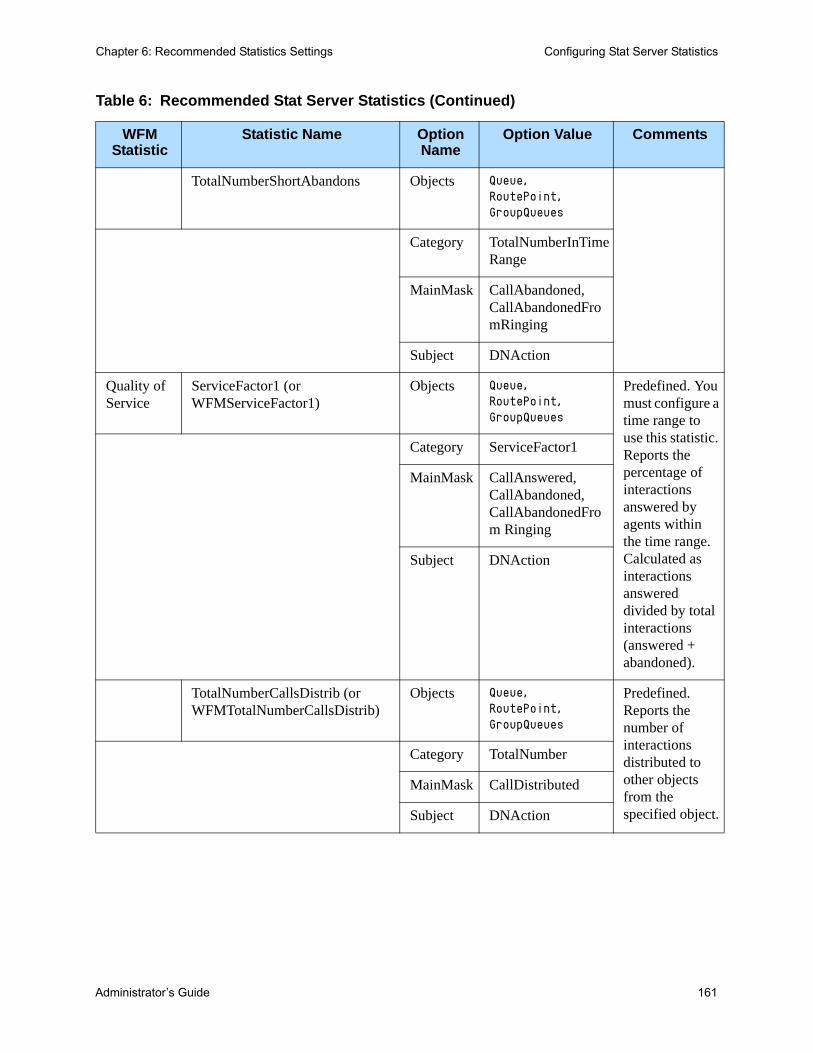
Administrator’s Guide 161
Chapter 6: Recommended Statistics Settings Configuring Stat Server Statistics
TotalNumberShortAbandons Objects Queue, RoutePoint, GroupQueues
Category TotalNumberInTimeRange
MainMask CallAbandoned, CallAbandonedFromRinging
Subject DNAction
Quality of Service
ServiceFactor1 (or WFMServiceFactor1)
Objects Queue, RoutePoint, GroupQueues
Predefined. You must configure a time range to use this statistic. Reports the percentage of interactions answered by agents within the time range. Calculated as interactions answered divided by total interactions (answered + abandoned).
Category ServiceFactor1
MainMask CallAnswered, CallAbandoned, CallAbandonedFrom Ringing
Subject DNAction
TotalNumberCallsDistrib (or WFMTotalNumberCallsDistrib)
Objects Queue, RoutePoint, GroupQueues
Predefined. Reports the number of interactions distributed to other objects from the specified object.
Category TotalNumber
MainMask CallDistributed
Subject DNAction
Table 6: Recommended Stat Server Statistics (Continued)
WFM Statistic
Statistic Name OptionName
Option Value Comments
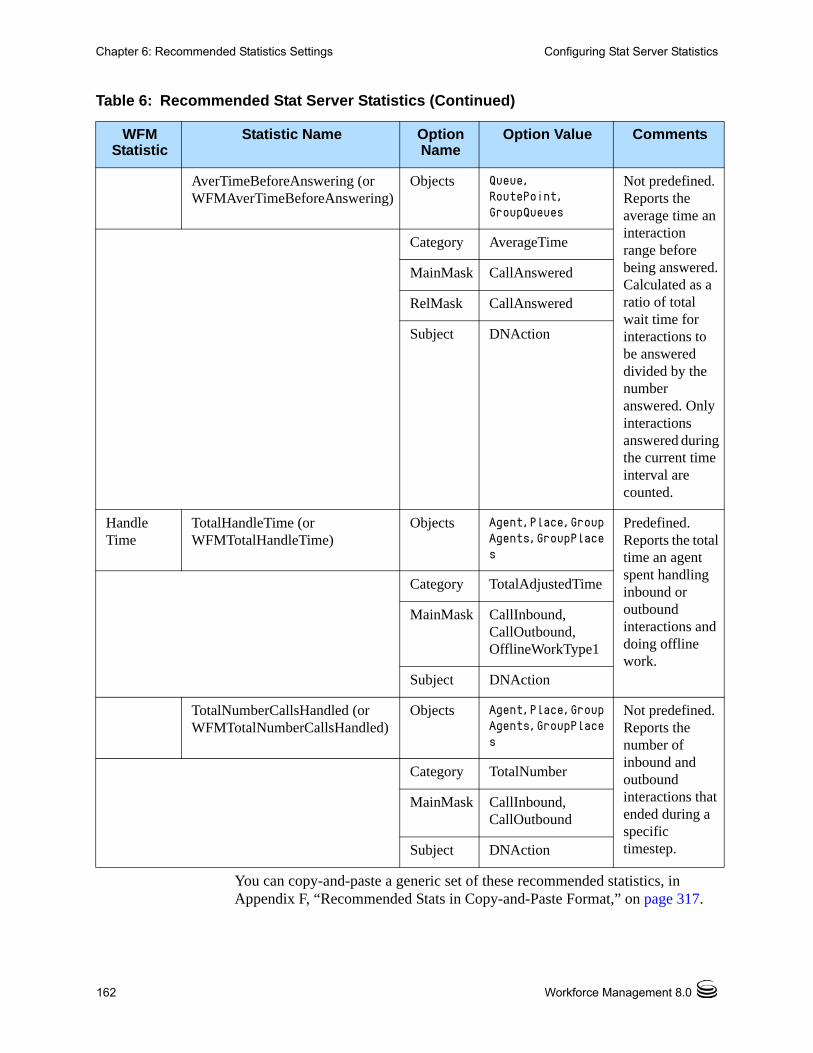
162 Workforce Management 8.0
Chapter 6: Recommended Statistics Settings Configuring Stat Server Statistics
You can copy-and-paste a generic set of these recommended statistics, in Appendix F, “Recommended Stats in Copy-and-Paste Format,” on page 317.
AverTimeBeforeAnswering (or WFMAverTimeBeforeAnswering)
Objects Queue, RoutePoint, GroupQueues
Not predefined. Reports the average time an interaction range before being answered. Calculated as a ratio of total wait time for interactions to be answered divided by the number answered. Only interactions answered during the current time interval are counted.
Category AverageTime
MainMask CallAnswered
RelMask CallAnswered
Subject DNAction
Handle Time
TotalHandleTime (or WFMTotalHandleTime)
Objects Agent,Place,GroupAgents,GroupPlaces
Predefined. Reports the total time an agent spent handling inbound or outbound interactions and doing offline work.
Category TotalAdjustedTime
MainMask CallInbound, CallOutbound, OfflineWorkType1
Subject DNAction
TotalNumberCallsHandled (or WFMTotalNumberCallsHandled)
Objects Agent,Place,GroupAgents,GroupPlaces
Not predefined. Reports the number of inbound and outbound interactions that ended during a specific timestep.
Category TotalNumber
MainMask CallInbound, CallOutbound
Subject DNAction
Table 6: Recommended Stat Server Statistics (Continued)
WFM Statistic
Statistic Name OptionName
Option Value Comments
Administrator’s Guide 163
Chapter 6: Recommended Statistics Settings Configuring Statistics for Voice Interactions
Configuring Statistics for Voice Interactions
You can copy-and-paste a generic set of these recommended statistics, in Appendix F, “Recommended Stats in Copy-and-Paste Format,” on page 317.
Table 7: Interaction Volume
Item Description
Statistic Name TotalNumberCallsEntered
or
WFMTotalNumberCallsEntered (if you used the WFM Data Aggregator Configuration Wizard to configure Stat Server)
Statistic ConfigurationOption / Value pairs
Objects = Queue, QueuePoint, RoutePoint
Category = TotalNumber
MainMask = CallEntered
Subject = DNAction
Comments Predefined. Collects the number of interactions that enter the object.
Table 8: Abandonment Volume
Item Description
Statistic Name TotalNumberCallsAband
or
WFMTotalNumberCallsAband
Statistic ConfigurationOption / Value pairs
Objects = Queue, RoutePoint, GroupQueues
Category = TotalNumber
MainMask = CallAbandoned
Subject = DNAction
Comments Predefined. Collects the number of interactions abandoned while waiting in the object.
164 Workforce Management 8.0
Chapter 6: Recommended Statistics Settings Configuring Statistics for Voice Interactions
Quality of Service
Table 9: Short Abandonment Volume
Item Description
Statistic Name TotalNumberShortAbandons
Statistic ConfigurationOption / Value pairs
Objects = GroupQueues,Queue,RoutePoint
Category = TotalNumberInTimeRange
MainMask = CallAbandoned,CallAbandonedFromRinging
Subject=DNAction
Comments Predefined. Collects the number of interactions abandoned within a configurable time period—typically a few seconds—while waiting in the object. Short Abandons are usually considered to be wrong numbers or similar, and are typically excluded when computing statistics.
Table 10: Distributed Interactions
Item Description
Statistic Name TotalNumberCallsDistrib
or
WFMTotalNumberCallsDistrib
Statistic ConfigurationOption / Value pairs
Objects = Queue, RoutePoint, GroupQueues
Category = TotalNumber
MainMask = CallDistributed
Subject = DNAction
Comments Predefined. Reports the number of interactions distributed to other objects from the specified object.

Administrator’s Guide 165
Chapter 6: Recommended Statistics Settings Configuring Statistics for Voice Interactions
Table 11: Service Factor
Item Description
Statistic Name ServiceFactor1
or
WFMServiceFactor1
Statistic ConfigurationOption / Value pairs
Objects = Queue, RoutePoint, GroupQueues
Category = ServiceFactor1
MainMask = CallAnswered, CallAbandoned, CallAbandonedFromRinging
Subject = DNAction
Comments Predefined. You must configure a time range to use this statistic. Reports the percentage of interactions answered by agents within the time range. Calculated as interactions answered divided by total interactions (answered + abandoned).
Table 12: Average Speed of Answer
Item Description
Statistic Name AverTimeBeforeAnswering
or
WFMAverTimeBeforeAnswering
Statistic ConfigurationOption / Value pairs
Objects = Queue, RoutePoint, GroupQueues
Category = AverageTime
MainMask = CallAnswered
RelMask = CallAnswered
Subject = DNAction
Comments Not predefined. Reports the average time an interaction rang before being answered. Calculated as a ratio of total wait time for interactions to be answered divided by the number answered. Only interactions answered during the current time interval are counted.

166 Workforce Management 8.0
Chapter 6: Recommended Statistics Settings Configuring Statistics for Genesys eServices (Multimedia) Interactions
Handle Time
Configuring Statistics for Genesys eServices (Multimedia) Interactions
These recommendations only describe how to configure statistics based on Interaction Queues.
Table 13: Total Handle Time
Item Description
Statistic Name TotalHandleTime
or
WFMTotalHandleTime
Statistic ConfigurationOption / Value pairs
Objects = Agent, Place, GroupAgents, GroupPlaces
Category = TotalAdjustedTime
MainMask = CallInbound, CallOutbound, OfflineWorkType1
Subject = DNAction
Comments Predefined. Reports the total time an agent spent handling inbound or outbound interactions and doing offline work.
Table 14: Interactions Handled
Item Description
Statistic Name TotalNumberCallsHandled
or
WFMTotalNumberCallsHandled
Statistic ConfigurationOption / Value pairs
Objects = Agent, Place, GroupAgents, GroupPlaces
Category = TotalNumber
MainMask = CallInbound, CallOutbound
Subject = DNAction
Comments Not predefined. Reports the number of inbound and outbound interactions that ended during a specific timestep.
Administrator’s Guide 167
Chapter 6: Recommended Statistics Settings Configuring Statistics for Genesys eServices (Multimedia) Interactions
You can copy-and-paste a generic set of these recommended statistics, in Appendix F, “Recommended Stats in Copy-and-Paste Format,” on page 317.
Note: Using statistics for Genesys eServices interactions routed through Virtual Queues is not currently supported.
Genesys eServices (Multimedia) Statistics for Chat Interactions
Table 15: Interaction Volume
Item Description
WFM Statistic Object Type
Interaction queue
ConfigServer Object Type
Script
Statistic Name <name is user-definable>
Statistic ConfigurationOption / Value pairs
AggregationType = Total
Category = JavaCategory
Description = The total number of interactions of the specified media type that entered this staging area during the specified period.
JavaSubCategory = eServiceInteractionStat.jar:OMQ Total Entered
MediaType = chat
Objects = StagingArea
Statistic created by
Must be configured manually.
Table 16: Abandonment Volume
Item Description
WFM statistic object type
Interaction Queue
ConfigServer object type
Script
Statistic name Chat_Total_Abandoned_From_Queue

168 Workforce Management 8.0
Chapter 6: Recommended Statistics Settings Configuring Statistics for Genesys eServices (Multimedia) Interactions
Quality of Service
Statistic ConfigurationOption / Value pairs
AggregationType = Total
Category = JavaCategory
Description = Total number of e-mail interactions abandoned.
JavaSubCategory = eServiceInteractionStat.jar:OMQ Total Abandoned
MediaType = chat
Objects = StagingArea
Statistic created by
Must be configured manually.
Table 17: Average Speed of Answer
Item Description
WFM statistic object type
Interaction Queue
ConfigServer object type
Script
Statistic name <name is user-definable>
Statistic ConfigurationOption / Value pairs
AggregationType = Total
Category = JavaCategory
JavaSubCategory = eServiceInteractionStat.jar:OMQ Average Waiting Time
MediaType = chat
Objects = StagingArea
Statistic created by
Must be configured manually.
Table 16: Abandonment Volume (Continued)
Item Description
Administrator’s Guide 169
Chapter 6: Recommended Statistics Settings Configuring Statistics for Genesys eServices (Multimedia) Interactions
Handle Time
Table 18: Distributed Interactions
Item Description
WFM statistic object type
Interaction Queue
ConfigServer object type
Script
Statistic name <name is user-definable>
Statistic ConfigurationOption / Value pairs
AggregationTime = Total
Category = JavaCategory
JavaSubCategory = eServiceInteractionStat.jar:OMQ Total Distributed
MediaType = chat
Objects = StagingArea
Statistic created by
Must be configured manually.
Table 19: Total Handle Time
Item Description
WFM statistic object type
GroupAgents, GroupPlaces
ConfigServer object type
GroupAgents, GroupPlaces
Statistic name Interactions_Processing_Time
Statistic ConfigurationOption / Value pairs
Category = TotalTime
Description = The total amount of time that this resource spent handling interactions during the specified period.
MainMask = InteractionHandling
Objects = Agent, GroupAgents, GroupPlaces, Place
Subject = AgentStatus
Statistic created by
Genesys eServices (Multimedia) Wizard
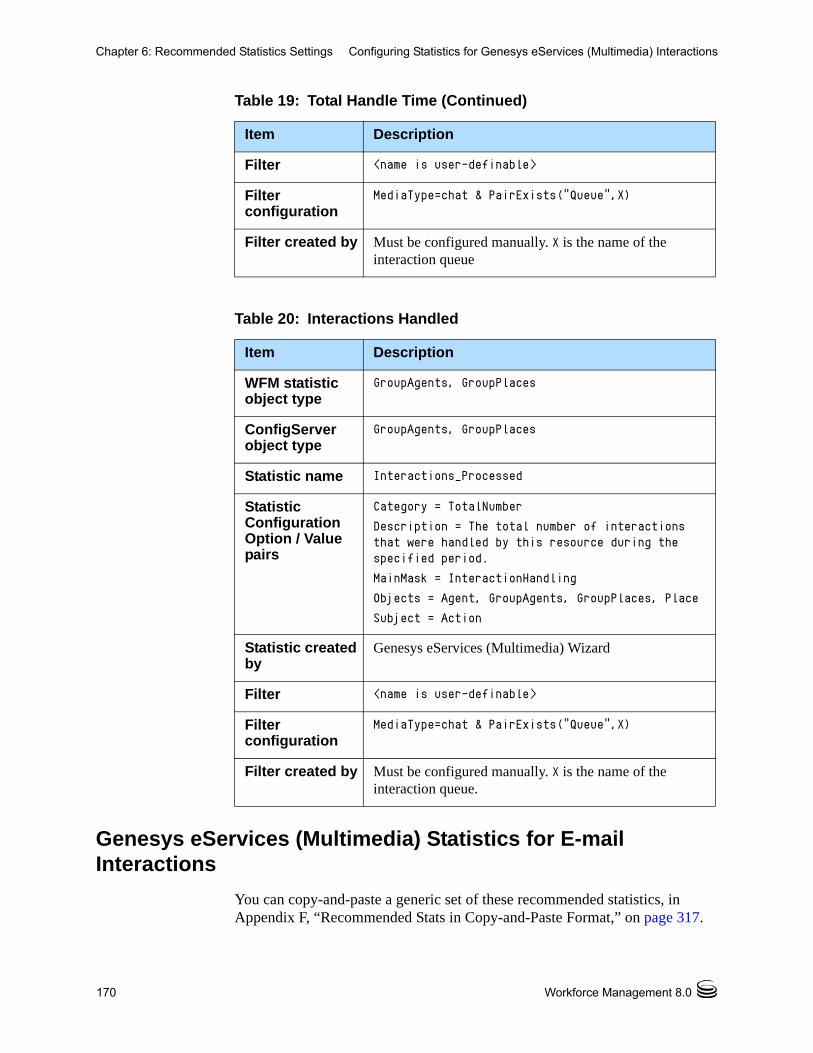
170 Workforce Management 8.0
Chapter 6: Recommended Statistics Settings Configuring Statistics for Genesys eServices (Multimedia) Interactions
Genesys eServices (Multimedia) Statistics for E-mail Interactions
You can copy-and-paste a generic set of these recommended statistics, in Appendix F, “Recommended Stats in Copy-and-Paste Format,” on page 317.
Filter <name is user-definable>
Filter configuration
MediaType=chat & PairExists(“Queue”,X)
Filter created by Must be configured manually. X is the name of the interaction queue
Table 20: Interactions Handled
Item Description
WFM statistic object type
GroupAgents, GroupPlaces
ConfigServer object type
GroupAgents, GroupPlaces
Statistic name Interactions_Processed
Statistic ConfigurationOption / Value pairs
Category = TotalNumber
Description = The total number of interactions that were handled by this resource during the specified period.
MainMask = InteractionHandling
Objects = Agent, GroupAgents, GroupPlaces, Place
Subject = Action
Statistic created by
Genesys eServices (Multimedia) Wizard
Filter <name is user-definable>
Filter configuration
MediaType=chat & PairExists(“Queue”,X)
Filter created by Must be configured manually. X is the name of the interaction queue.
Table 19: Total Handle Time (Continued)
Item Description
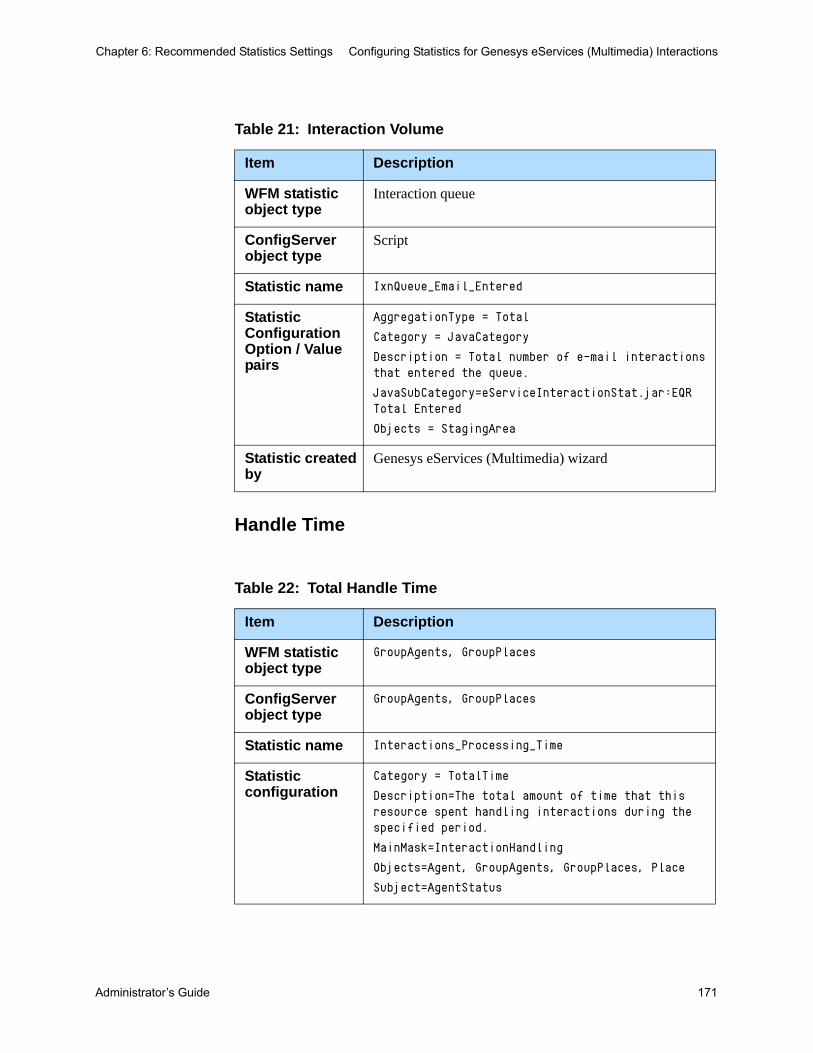
Administrator’s Guide 171
Chapter 6: Recommended Statistics Settings Configuring Statistics for Genesys eServices (Multimedia) Interactions
Handle Time
Table 21: Interaction Volume
Item Description
WFM statistic object type
Interaction queue
ConfigServer object type
Script
Statistic name IxnQueue_Email_Entered
Statistic ConfigurationOption / Value pairs
AggregationType = Total
Category = JavaCategory
Description = Total number of e-mail interactions that entered the queue.
JavaSubCategory=eServiceInteractionStat.jar:EQR Total Entered
Objects = StagingArea
Statistic created by
Genesys eServices (Multimedia) wizard
Table 22: Total Handle Time
Item Description
WFM statistic object type
GroupAgents, GroupPlaces
ConfigServer object type
GroupAgents, GroupPlaces
Statistic name Interactions_Processing_Time
Statistic configuration
Category = TotalTime
Description=The total amount of time that this resource spent handling interactions during the specified period.
MainMask=InteractionHandling
Objects=Agent, GroupAgents, GroupPlaces, Place
Subject=AgentStatus
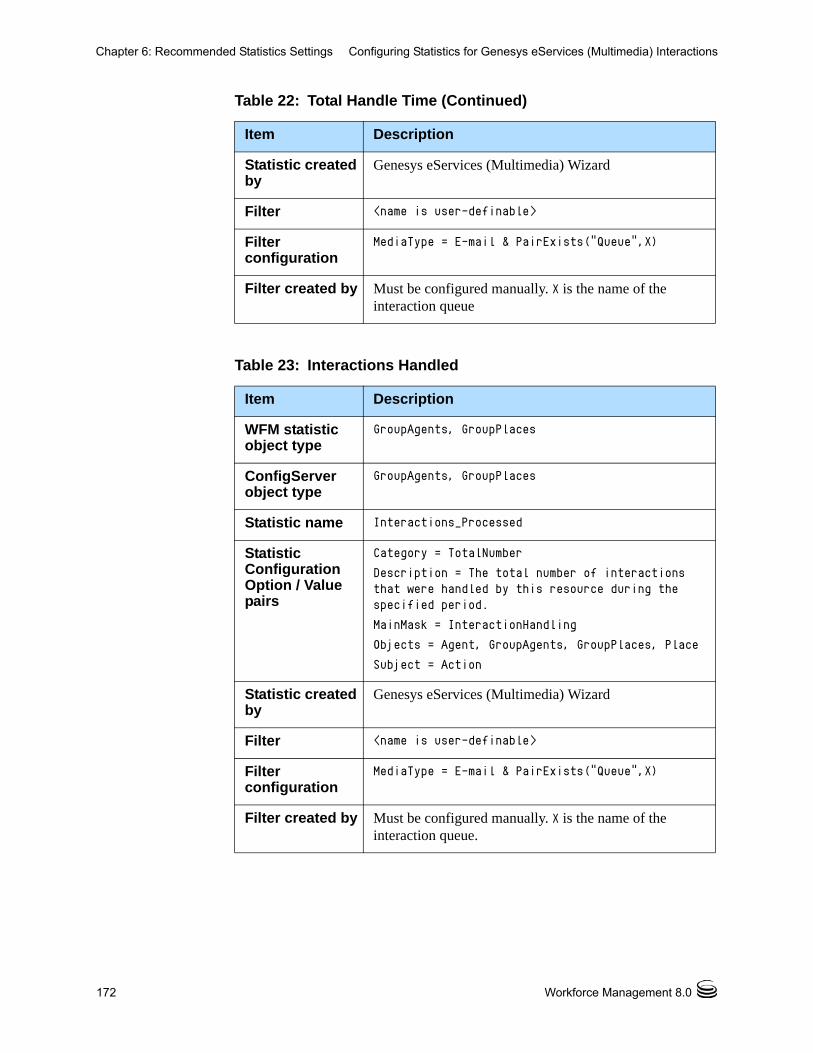
172 Workforce Management 8.0
Chapter 6: Recommended Statistics Settings Configuring Statistics for Genesys eServices (Multimedia) Interactions
Statistic created by
Genesys eServices (Multimedia) Wizard
Filter <name is user-definable>
Filter configuration
MediaType = E-mail & PairExists(“Queue”,X)
Filter created by Must be configured manually. X is the name of the interaction queue
Table 23: Interactions Handled
Item Description
WFM statistic object type
GroupAgents, GroupPlaces
ConfigServer object type
GroupAgents, GroupPlaces
Statistic name Interactions_Processed
Statistic ConfigurationOption / Value pairs
Category = TotalNumber
Description = The total number of interactions that were handled by this resource during the specified period.
MainMask = InteractionHandling
Objects = Agent, GroupAgents, GroupPlaces, Place
Subject = Action
Statistic created by
Genesys eServices (Multimedia) Wizard
Filter <name is user-definable>
Filter configuration
MediaType = E-mail & PairExists(“Queue”,X)
Filter created by Must be configured manually. X is the name of the interaction queue.
Table 22: Total Handle Time (Continued)
Item Description

Administrator’s Guide 173
Chapter 6: Recommended Statistics Settings Configuring Statistics for Genesys eServices (Multimedia) Interactions
Genesys eServices (Multimedia) Statistics for intelligent Workload Distribution Interactions
You can copy-and-paste a generic set of these recommended statistics, in Appendix F, “Recommended Stats in Copy-and-Paste Format,” on page 317.
Table 24: Interaction Volume
Item Description
ConfigServer object type
Script
Statistic name <name is user-definable>
Statistic ConfigurationOption / Value pairs
AggregationType = Total
Category = JavaCategory
Description = The total number of interactions of the specified media type that entered this staging area during the specified period.
JavaSubCategory = eServiceInteractionStat.jar:OMQ Total Entered
MediaType = MediaX
Objects = StagingArea
Statistic created by
Must be configured manually. MediaX is the Mediatype for corresponding intelligent Workload Distribution (iWD, formerly intelligent Workload Distribution).
Table 25: Abandonment Volume
Item Description
WFM statistic object type
Interaction Queue
ConfigServer object type
Script
Statistic name <name is user-definable>
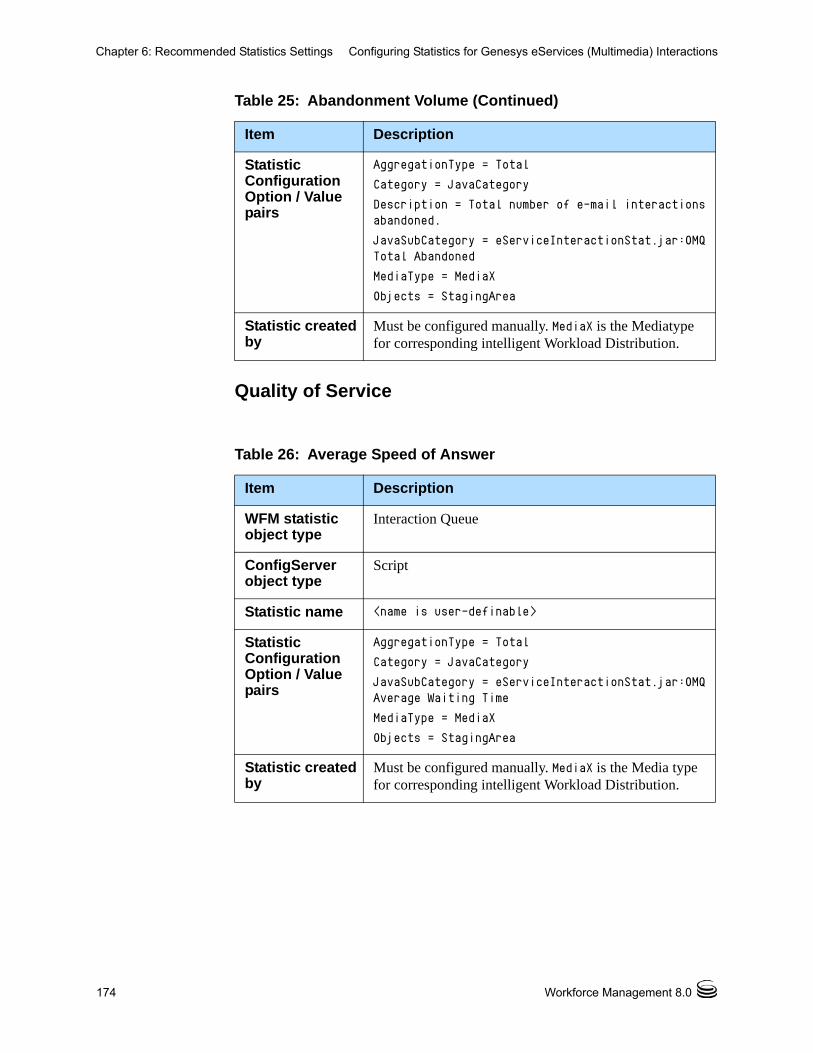
174 Workforce Management 8.0
Chapter 6: Recommended Statistics Settings Configuring Statistics for Genesys eServices (Multimedia) Interactions
Quality of Service
Statistic ConfigurationOption / Value pairs
AggregationType = Total
Category = JavaCategory
Description = Total number of e-mail interactions abandoned.
JavaSubCategory = eServiceInteractionStat.jar:OMQ Total Abandoned
MediaType = MediaX
Objects = StagingArea
Statistic created by
Must be configured manually. MediaX is the Mediatype for corresponding intelligent Workload Distribution.
Table 26: Average Speed of Answer
Item Description
WFM statistic object type
Interaction Queue
ConfigServer object type
Script
Statistic name <name is user-definable>
Statistic ConfigurationOption / Value pairs
AggregationType = Total
Category = JavaCategory
JavaSubCategory = eServiceInteractionStat.jar:OMQ Average Waiting Time
MediaType = MediaX
Objects = StagingArea
Statistic created by
Must be configured manually. MediaX is the Media type for corresponding intelligent Workload Distribution.
Table 25: Abandonment Volume (Continued)
Item Description
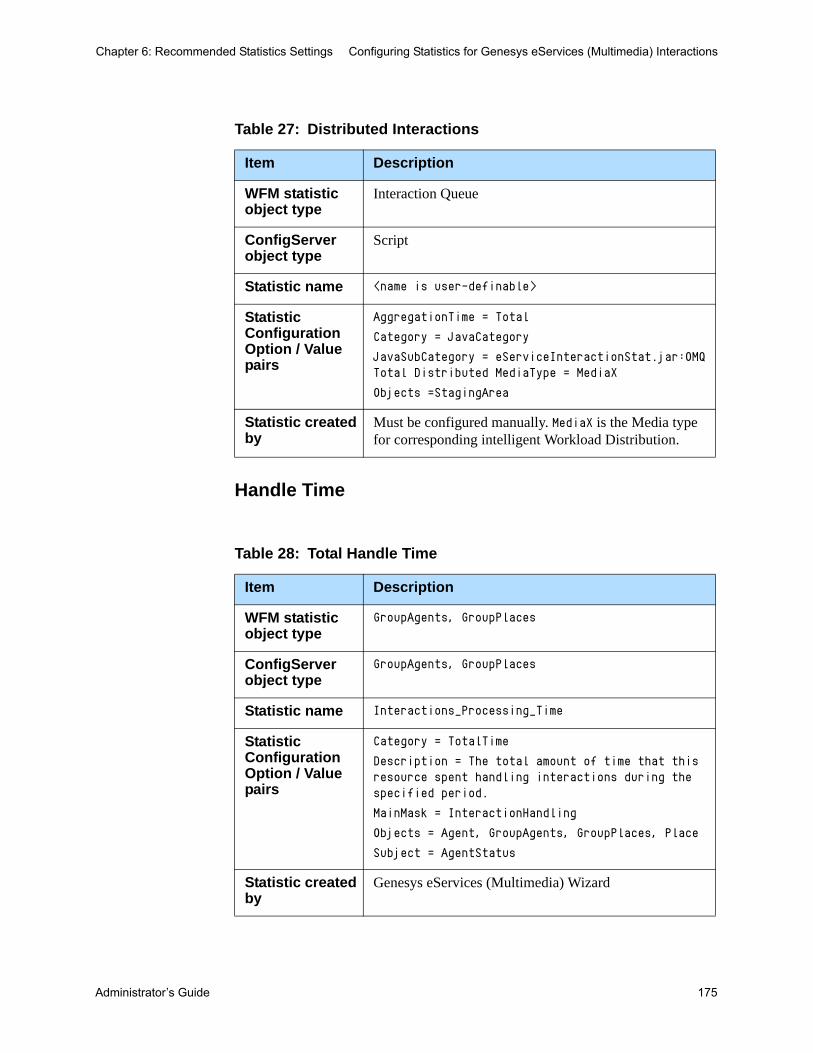
Administrator’s Guide 175
Chapter 6: Recommended Statistics Settings Configuring Statistics for Genesys eServices (Multimedia) Interactions
Handle Time
Table 27: Distributed Interactions
Item Description
WFM statistic object type
Interaction Queue
ConfigServer object type
Script
Statistic name <name is user-definable>
Statistic ConfigurationOption / Value pairs
AggregationTime = Total
Category = JavaCategory
JavaSubCategory = eServiceInteractionStat.jar:OMQ Total Distributed MediaType = MediaX
Objects =StagingArea
Statistic created by
Must be configured manually. MediaX is the Media type for corresponding intelligent Workload Distribution.
Table 28: Total Handle Time
Item Description
WFM statistic object type
GroupAgents, GroupPlaces
ConfigServer object type
GroupAgents, GroupPlaces
Statistic name Interactions_Processing_Time
Statistic ConfigurationOption / Value pairs
Category = TotalTime
Description = The total amount of time that this resource spent handling interactions during the specified period.
MainMask = InteractionHandling
Objects = Agent, GroupAgents, GroupPlaces, Place
Subject = AgentStatus
Statistic created by
Genesys eServices (Multimedia) Wizard
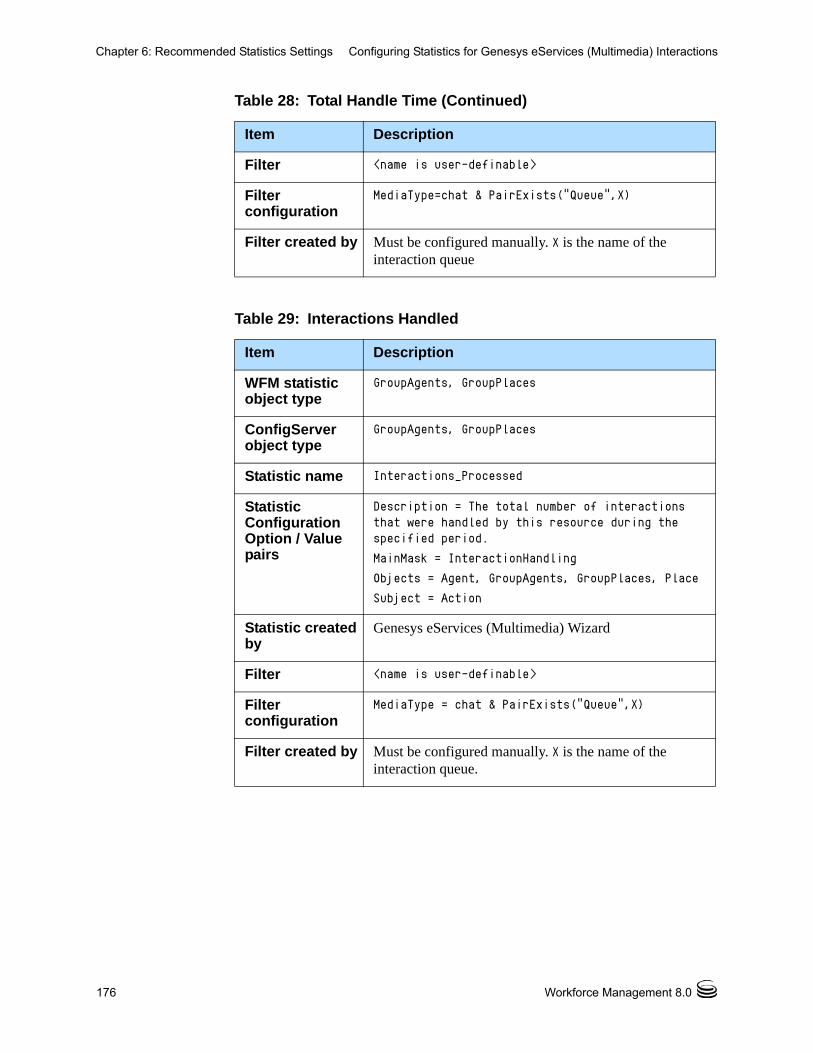
176 Workforce Management 8.0
Chapter 6: Recommended Statistics Settings Configuring Statistics for Genesys eServices (Multimedia) Interactions
Filter <name is user-definable>
Filter configuration
MediaType=chat & PairExists(“Queue”,X)
Filter created by Must be configured manually. X is the name of the interaction queue
Table 29: Interactions Handled
Item Description
WFM statistic object type
GroupAgents, GroupPlaces
ConfigServer object type
GroupAgents, GroupPlaces
Statistic name Interactions_Processed
Statistic ConfigurationOption / Value pairs
Description = The total number of interactions that were handled by this resource during the specified period.
MainMask = InteractionHandling
Objects = Agent, GroupAgents, GroupPlaces, Place
Subject = Action
Statistic created by
Genesys eServices (Multimedia) Wizard
Filter <name is user-definable>
Filter configuration
MediaType = chat & PairExists(“Queue”,X)
Filter created by Must be configured manually. X is the name of the interaction queue.
Table 28: Total Handle Time (Continued)
Item Description

Administrator’s Guide 177
Chapter
7 Starting and StoppingYou can start and stop the WFM servers using Management Layer or you can start and stop all components manually. When using Management Layer, you start WFM Server, WFM Builder, WFM Data Aggregator, and WFM Daemon from Solution Control Interface (SCI).
You must start WFM Web, the WFM Configuration Utility, and the WFM Database Utility manually, even when you are using Management Layer.
Note: When starting WFM, confirm that all servers are running before starting WFM Web, the WFM Configuration Utility, and the WFM Database Utility.
This chapter contains these sections: Start Workforce Management with SCI, page 178 Start the Workforce Management Servers, page 178 Start the WFM Configuration Utility, page 180 Start the WFM Database Utility, page 181 Start WFM Web, page 182 Stop Workforce Management with SCI, page 183 Stop the WFM Configuration Utility, page 184 Stop the WFM Database Utility, page 184 Stop WFM Web, page 184 Stop the Workforce Management Servers, page 185

178 Workforce Management 8.0
Chapter 7: Starting and Stopping Start Workforce Management with SCI
Start Workforce Management with SCI
Procedure:Starting Workforce Management with SCI
Purpose: To start Workforce Management with SCI.
Prerequisites
• You are running the Management Layer.
Start of procedure
1. Start the SCI.
2. Go to the Solutions view.
3. Right-click the desired solution and select Start from the shortcut menu.-or-Select the desired solution and choose Action > Start on the menu bar.
The command to start WFM is sent to Solution Control Server (SCS), which uses Local Control Agents to activate the WFM solution components in the order established during solution configuration.
SCI reports a successful start of WFM after all solution components display Running status within the configured timeout. When all servers are started, the solution status changes from Stopped to Started.
Note: Because many components are shared by a number of solutions, some WFM components display Running status before WFM is started.
SCI reports a successful start of WFM unless a required WFM component could not be started. For more information, see Framework 8 Solution Control Interface Help. To view Help, open SCI, and click Help.
End of procedure
For more information on Management Layer topics, see the Framework 8 Management Layer User’s Guide.
Start the Workforce Management ServersThere are several ways to start the WFM servers (WFM Server, WFM Builder, WFM Data Aggregator, and WFM Daemon).
Administrator’s Guide 179
Chapter 7: Starting and Stopping Start the Workforce Management Servers
Note: By default, the servers are installed on Windows platforms as Windows Services.
Configure the Windows Services
Procedure:Configuring the Windows Services
Purpose: To open and configure each WFM Windows Service.
Note: You can configure a Windows Service to start automatically or manually.
Start of procedure
1. In Windows, select Start > Programs > Settings > Control Panel > Services.
The Services window appears. Each Service has status settings showing whether it starts manually or automatically and whether it is currently running.
2. Highlight the service you want to configure and then click Startup.
3. Select automatic or manual.
4. Click OK. In the Services window, click Close.
The settings are saved.
End of procedure
Manually Start a Windows Service
Procedure:Starting a Windows Service Manually
Purpose: To start a Windows service manually.
Note: If a Windows Service is configured to start automatically, it will start whenever the computer is started. No further action is required.
180 Workforce Management 8.0
Chapter 7: Starting and Stopping Start the WFM Configuration Utility
Prerequisites
• This Windows service is configured to start manually.
Start of procedure
1. In Windows, select Start > Programs > Settings > Control Panel > Services.
The Services window appears.
2. Highlight the Service to start.
3. Click Start.
End of procedure
Start the Workforce Management Servers Manually
Procedure:Starting the Workforce Management Servers Manually
Purpose: To start the Workforce Management servers manually.
Start of procedure
1. In Windows, select Start > Programs > Genesys Solutions > Workforce Management > <server name>.
The server console window opens and the server begins its initialization routine.
2. If desired, right-click the window title bar to change server display settings.
3. Minimize the window after the server has started.
End of procedure
Start the WFM Configuration Utility
Procedure:Starting the WFM Configuration Utility
Purpose: To start the WFM Configuration Utility.
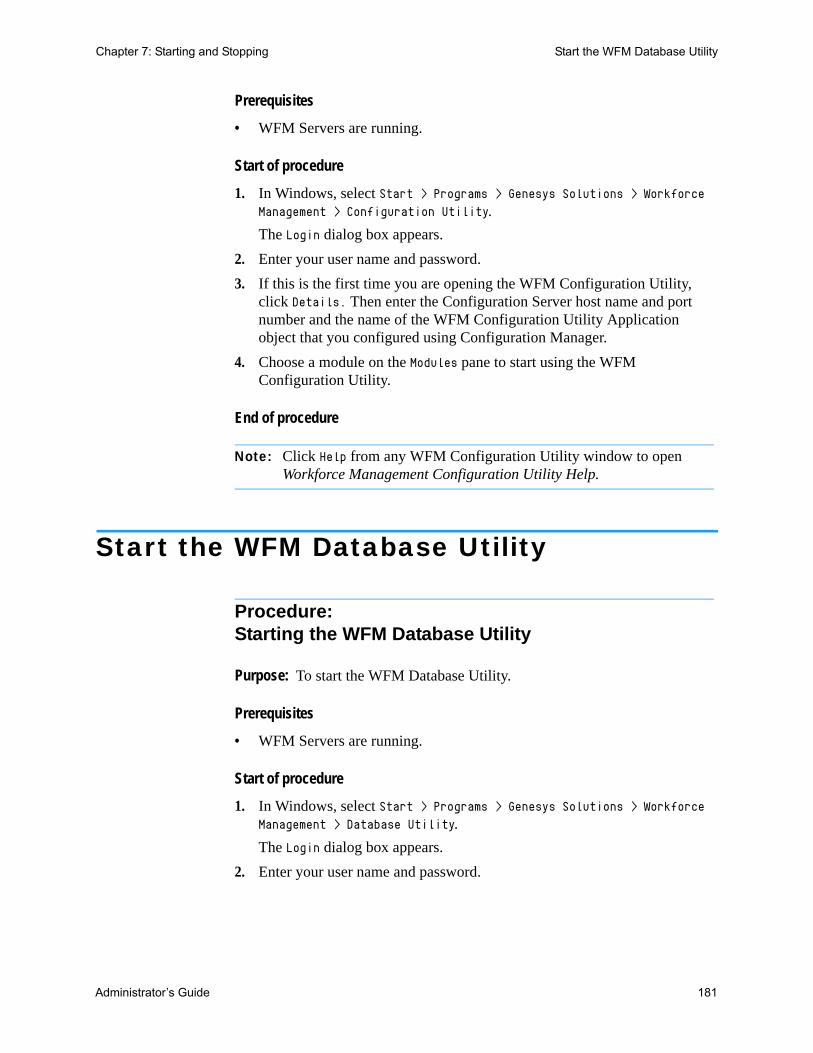
Administrator’s Guide 181
Chapter 7: Starting and Stopping Start the WFM Database Utility
Prerequisites
• WFM Servers are running.
Start of procedure
1. In Windows, select Start > Programs > Genesys Solutions > Workforce Management > Configuration Utility.
The Login dialog box appears.
2. Enter your user name and password.
3. If this is the first time you are opening the WFM Configuration Utility, click Details. Then enter the Configuration Server host name and port number and the name of the WFM Configuration Utility Application object that you configured using Configuration Manager.
4. Choose a module on the Modules pane to start using the WFM Configuration Utility.
End of procedure
Note: Click Help from any WFM Configuration Utility window to open Workforce Management Configuration Utility Help.
Start the WFM Database Utility
Procedure:Starting the WFM Database Utility
Purpose: To start the WFM Database Utility.
Prerequisites
• WFM Servers are running.
Start of procedure
1. In Windows, select Start > Programs > Genesys Solutions > Workforce Management > Database Utility.
The Login dialog box appears.
2. Enter your user name and password.
182 Workforce Management 8.0
Chapter 7: Starting and Stopping Start WFM Web
3. If this is the first time you are opening the WFM Database Utility, click Details. Then enter the Configuration Server host name and port number and the name of the WFM Database Utility Application object that you configured using Configuration Manager (this is the same as the WFM Configuration Utility Application object).
4. Select the appropriate radio button on the first window to start using the WFM Database Utility.
End of procedure
Note: For more information on using the WFM Database Utility, see Chapter 8.
Start WFM Web
Procedure:Starting WFM Web
Purpose: To start WFM Web.
Prerequisites
• WFM Servers are running.
Start of procedure
1. Start your web server (for example, Tomcat).
Note: See the documentation for your web server for starting, stopping, and other configuration instructions.
2. Open a web browser.
3. Type or paste the WFM Web URL into the address line of the browser and press the Enter key. The User Login dialog box appears.
Note: Contact your system administrator for the URL. The URL is case-sensitive. Follow the capitalization settings exactly.
4. Enter your user name and password.
5. Click OK.
Administrator’s Guide 183
Chapter 7: Starting and Stopping Stop Workforce Management with SCI
Those whose logins identify them as Supervisors will see the WFM Web for Supervisors GUI. Agents will see the WFM Web for Agents interface.
End of procedure
Stop Workforce Management with SCI
Procedure:Stopping Workforce Management from Inside SCI
Purpose: To stop WFM while running SCI.
Prerequisites
• You are using Management Layer.
Start of procedure
1. Start SCI.
2. Go to the Solutions view.
3. Right-click the desired solution and select Stop from the shortcut menu.orSelect the desired solution and choose Action > Stop on the menu bar.
The command to stop WFM is sent to Solution Control Server, which uses Local Control Agents to shut down the WFM solution components in the order established during solution configuration. When all components and servers are stopped, the solution status changes from Started to Stopped.
Note: Because many components are shared by a number of solutions, some WFM components display Running status after WFM is stopped.
For assistance, see Framework Solution Control Interface Help. To view Help, open SCI, and click Help.
End of procedure
184 Workforce Management 8.0
Chapter 7: Starting and Stopping Stop the WFM Configuration Utility
Stop the WFM Configuration Utility
Procedure:Stopping the WFM Configuration Utility
Purpose: To stop the WFM Configuration Utility.
Start of procedure
1. Select File > Exit from the menu.orClick the X button in the upper-right corner of the application window.
End of procedure
Stop the WFM Database Utility
Procedure:Stopping the WFM Database Utility
Purpose: To stop the WFM Database Utility.
Start of procedure
1. Click the X button in the upper-right corner of the application window.orClick the Close button in the main window.
End of procedure
Stop WFM Web
Procedure:Stopping the WFM Database Utility
Purpose: To log out of WFM Web.

Administrator’s Guide 185
Chapter 7: Starting and Stopping Stop the Workforce Management Servers
Start of procedure
1. Click Log off from any window in WFM Web.
End of procedure
Stop the Workforce Management ServersYou can stop the WFM servers in several ways, depending on whether you are using Management Layer and whether the servers are installed as Windows Services.
Warning! If you terminate a server using the Windows Task Manager, you will lose all data on currently active interactions because Windows does not allow enough time for the servers to save the active data.
Stop the Servers Manually
Procedure:Stopping a Server Manually
Purpose: To terminate a server that is running in a console window rather than as a Service, without using the Windows Task Manager.
Start of procedure
1. Enter [Ctrl+Break] or [Ctrl+C].
End of procedure
The method for stopping a server manually depends on whether you installed it as a Windows Service.
If the server is running in a console window rather than as a Service, shut it down using the following method:
Note: You cannot close a server by clicking the Close button (X) or selecting File > Close from the console menu bar. This prevents abnormal shutdown and data loss.
186 Workforce Management 8.0
Chapter 7: Starting and Stopping Stop the Workforce Management Servers
Procedure:Stopping a Server from a Command Prompt
Note: This procedure does not apply to WFM Daemon.
Purpose: To stop a server’s Windows Service from the command prompt.
Start of procedure
1. In Windows, select Start > Programs > Command Prompt.
2. Change to the directory in which the server’s .exe file is located.
3. At the prompt, enter <servername>.exe -sstop.
If you are using SCI in the Management Layer:
1. Select the server application.
2. Click Stop.
End of procedure
Stop a Server’s Windows Service
Procedure:Stopping a Server’s Windows Service
Purpose: To stop a Service from the Services window.
Start of procedure
1. In Windows, select Start > Programs > Settings > Control Panel > Services in Windows.
2. Select the appropriate Service.
3. Click Stop.
4. Click Close.
If you are using SCI in the Management Layer:
1. Select the server application.
2. Click Stop.
End of procedure

Administrator’s Guide 187
Chapter
8 Using the WFM Database UtilityThe WFM Database Utility provides a number of database-related functions in a single interface, which are described in these sections: Overview, page 187 New Database Configuration, page 188 Database Migration, page 192 Update Your WFM 7 Database, page 193 Database Maintenance, page 195 Back Up and Restore Your Database, page 195
OverviewUse the Workforce Management Database Utility to:
• Create and configure a new database.
• Migrate data from previous Workforce Management versions to a Workforce Management 8.0 database.
• Update your database to release 8.0.
• Perform other database updates as needed.
• Perform regular maintenance, such as cleanup of obsolete data.
Warning! In order for the Configuration Utility to work properly, you must set Microsoft SQL and Oracle database management systems to be case-insensitive.
Note: The WFM Database Utility and the WFM Configuration Utility use the same Application object.

188 Workforce Management 8.0
Chapter 8: Using the WFM Database Utility New Database Configuration
New Database ConfigurationIf Workforce Management 7.6 (or higher) is your first release of the product, or if you are migrating from release 6.x, then you will be using a new database. The WFM Database Utility creates and configures the new database for you, setting up the necessary tables, views, indexes, and so on. For instructions, see “Install and Run the WFM Database Utility” on page 91.
Note: If you are already using WFM 7.x, simply perform a database update to transition your database to release 8.0. You do not need a new database.
DB2 Configuration Recommendations
These settings are required when you create the WFM database, and will optimize its performance. See “Configuring the DB2 Database” on page 191.
LOGFILSIZ
Default value LOGFILSIZ = 1000
Recommended LOGFILSIZ = 1000
Update with thisCommand
UPDATE DATABASE CONFIGURATION FOR db_name USING LOGFILSIZ 1000;
LOGPRIMARY
Default value LOGPRIMARY = 3
Recommended LOGPRIMARY = 10
Use thisCommand
UPDATE DATABASE CONFIGURATION FOR db_name USING LOGPRIMARY 10;
LOGSECOND
Default value LOGSECOND = 2
Recommended LOGSECOND = 2
Use thisCommand
UPDATE DATABASE CONFIGURATION FOR db_name USING LOGSECOND 2;
STMTHEAP
SQL statement heap (4KB)
The statement heap is used as a work space for the SQL compiler during compilation of an SQL statement. This parameter specifies the size of this work space.
Administrator’s Guide 189
Chapter 8: Using the WFM Database Utility New Database Configuration
IBM’s description In most cases the default value of this parameter will be acceptable. If you have very large SQL statements and the database manager issues an error (that the statement is too complex) when it attempts to optimize a statement, you should increase the value of this parameter in regular increments (such as 256 or 1024) until the error situation is resolved.
Default value (STMTHEAP) = 2048
Recommended (STMTHEAP) = 65535
Use thisCommand
UPDATE DATABASE CONFIGURATION FOR db_name USING STMTHEAP 65535;
APPLHEAPSZ
SQL statement heap (4KB)
This parameter defines the number of private memory pages available to be used by the database manager on behalf of a specific agent or subagent.
IBM’s description Increase the value of this parameter if your applications receive an error indicating that there is not enough storage in the application heap.
Default value (APPLHEAPSZ) = 256
Recommended (APPLHEAPSZ) = 1000
Use thisCommand
UPDATE DATABASE CONFIGURATION FOR db_name USING APPLHEAPSZ 1000;
MON_HEAP_SZ
Database system monitor heap size configuration parameter
IBM’s description The amount of memory required for monitoring activity depends on the number of monitoring applications (applications taking snapshots or event monitors), which switches are set, and the level of database activity.
Default value (MON_HEAP_SZ) = 66
Recommended (MON_HEAP_SZ) = 90
Use thisCommand
UPDATE DATABASE CONFIGURATION FOR db_name USING MON_HEAP_SZ 90;
SHEAPTHRES
IBM’s description Ideally, you should set this parameter to a reasonable multiple of the largest sortheap parameter you have in your database manager instance. This parameter should be at least two times the largest sortheap defined for any database within the instance.
Default value SHEAPTHRES = 16130
Recommended SHEAPTHRES = 20000
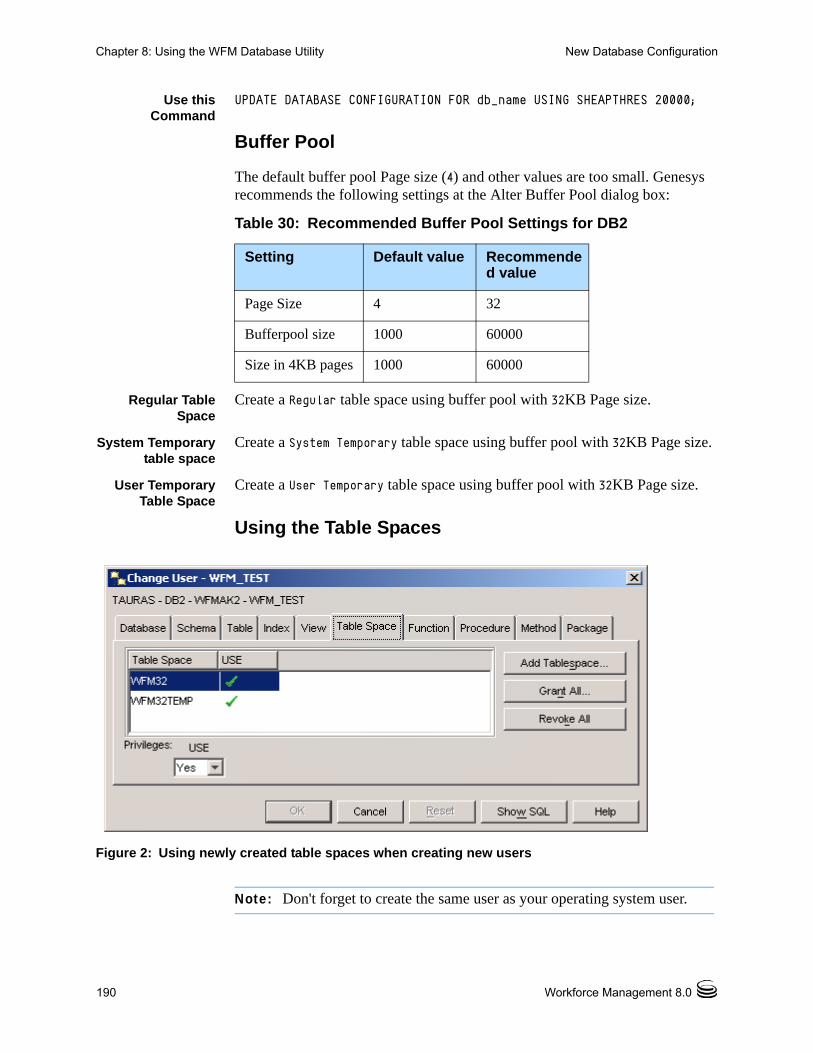
190 Workforce Management 8.0
Chapter 8: Using the WFM Database Utility New Database Configuration
Use thisCommand
UPDATE DATABASE CONFIGURATION FOR db_name USING SHEAPTHRES 20000;
Buffer Pool
The default buffer pool Page size (4) and other values are too small. Genesys recommends the following settings at the Alter Buffer Pool dialog box:
Regular TableSpace
Create a Regular table space using buffer pool with 32KB Page size.
System Temporarytable space
Create a System Temporary table space using buffer pool with 32KB Page size.
User TemporaryTable Space
Create a User Temporary table space using buffer pool with 32KB Page size.
Using the Table Spaces
Figure 2: Using newly created table spaces when creating new users
Note: Don't forget to create the same user as your operating system user.
Table 30: Recommended Buffer Pool Settings for DB2
Setting Default value Recommended value
Page Size 4 32
Bufferpool size 1000 60000
Size in 4KB pages 1000 60000

Administrator’s Guide 191
Chapter 8: Using the WFM Database Utility New Database Configuration
Tuning the Transaction Log Characteristics
Before you enable a database for spatial operations, ensure that you have enough transaction log capacity. The default values for the transaction log configuration parameters do not provide sufficient transaction log capacity if your plans include:
• enabling a database for spatial operations in a Windows environment
• using the ST_import_shape stored procedure to import from shape files
• using geocoding with a large commit scope
• running concurrent transactions
If your plans include any of these uses now or in the future, you need to increase the capacity of your transaction log for the database by increasing one or more of the transaction log configuration parameters. Otherwise, you can use the default characteristics. In this case, proceed to Tuning the application heap size.
Recommendation Refer to the table below for the recommended minimum values for the three transaction log configuration parameters.
If the capacity of your transaction log is inadequate, the following error message is issued when you try to enable a database for spatial operations: GSE0010N Not enough log space is available to DB2.
Procedure:Configuring the DB2 Database
Purpose: To modify the value of one or more configuration parameters.
Prerequisites
• System administration and installation experience and skill with the associated tools.
• An installed DB2 database.
Table 31: Recommended minimum values for transaction configuration parameters
Parameter Description Default value
Recommended minimum value
LOGFILSIZ Specifies the log file size as a number of 4-KB blocks
1000 1000
LOGPRIMARY Specifies how many primary log files are to be preallocated to the recovery log files
3 10
LOGSECOND Specifies the number of secondary log files 2 2
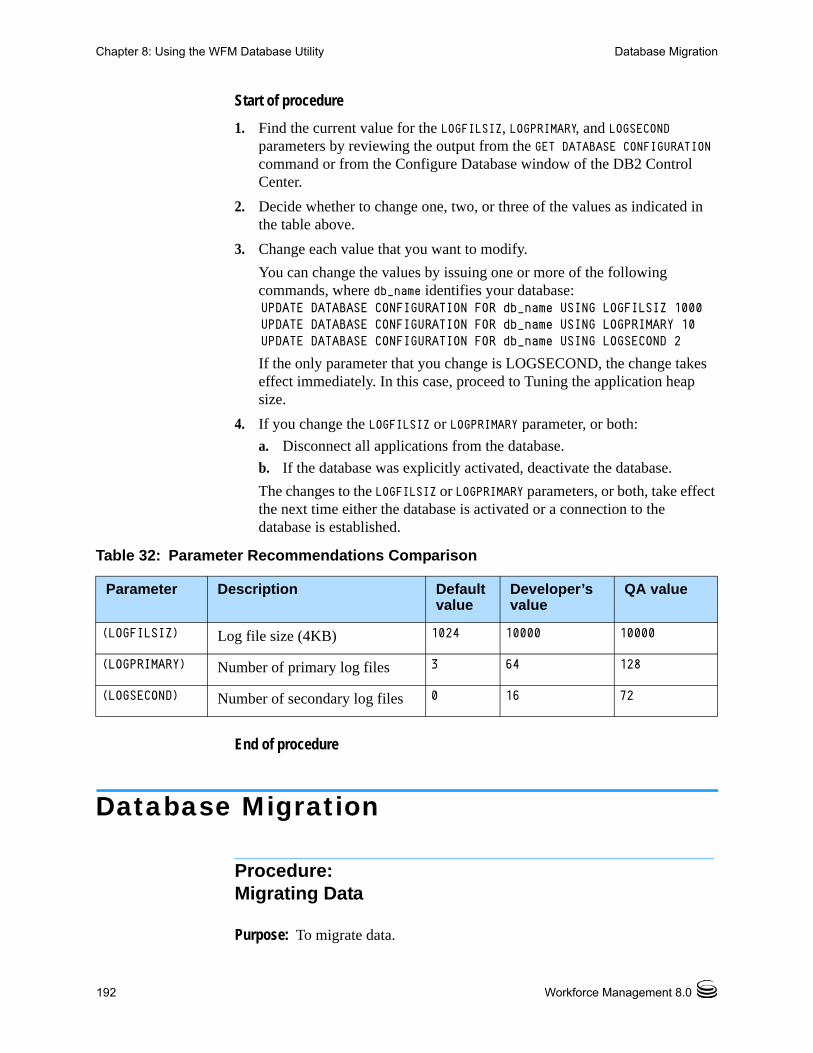
192 Workforce Management 8.0
Chapter 8: Using the WFM Database Utility Database Migration
Start of procedure
1. Find the current value for the LOGFILSIZ, LOGPRIMARY, and LOGSECOND parameters by reviewing the output from the GET DATABASE CONFIGURATION command or from the Configure Database window of the DB2 Control Center.
2. Decide whether to change one, two, or three of the values as indicated in the table above.
3. Change each value that you want to modify.
You can change the values by issuing one or more of the following commands, where db_name identifies your database: UPDATE DATABASE CONFIGURATION FOR db_name USING LOGFILSIZ 1000 UPDATE DATABASE CONFIGURATION FOR db_name USING LOGPRIMARY 10 UPDATE DATABASE CONFIGURATION FOR db_name USING LOGSECOND 2
If the only parameter that you change is LOGSECOND, the change takes effect immediately. In this case, proceed to Tuning the application heap size.
4. If you change the LOGFILSIZ or LOGPRIMARY parameter, or both:
a. Disconnect all applications from the database.
b. If the database was explicitly activated, deactivate the database.
The changes to the LOGFILSIZ or LOGPRIMARY parameters, or both, take effect the next time either the database is activated or a connection to the database is established.
End of procedure
Database Migration
Procedure:Migrating Data
Purpose: To migrate data.
Table 32: Parameter Recommendations Comparison
Parameter Description Default value
Developer’svalue
QA value
(LOGFILSIZ) Log file size (4KB) 1024 10000 10000
(LOGPRIMARY) Number of primary log files 3 64 128
(LOGSECOND) Number of secondary log files 0 16 72
Administrator’s Guide 193
Chapter 8: Using the WFM Database Utility Update Your WFM 7 Database
Prerequisites
If you are migrating from a previous release, use the WFM Database Utility to transfer your existing data into the new database.
• If you are migrating from release 7.x to 8.0, simply use the Update Database feature of the Database Utility.
Note: To migrate data into an in-use WFM 8.0 database, you must update the database to the latest version required by the WFM Database Utility you are using. To do this, use the Update Database feature of the WFM Database Utility.
• If you are migrating from release 6.x to 8.0, you must migrate your 6.5 data to a new 8.0 database, which the migration utility creates for you.
For migration instructions, see the “Workforce Management Migration Procedures” chapter in the Genesys Migration Guide.
Note: You can migrate performance data from a WFM 6.5. database to your WFM 8.0 database after you have started using WFM 8.0. This enables you to bring performance data into your database that was collected during the database migration.
Start of procedure
1. Open the WFM Database Utility.
2. Select the Migrate Performance Data radio button.
3. Follow the prompts in the Database Migration Wizard that opens.
Warning! If you are migrating from release 6.x to 8.0, and you enabled the AllowMigratePerformance option in the WFM Client Application object, the Wizard prompts you to transfer performance data from your 6.x database to your new WFM database. When you migrate data after you start using the WFM database, all performance data of the type(s) you select is overwritten by the performance data from the 6.x database.
End of procedure
Update Your WFM 7 DatabaseFrom time to time, Genesys issues Maintenance Releases of its products. Some of the Workforce Management updates require database updates. If so, you can perform them using the WFM Database Utility.
194 Workforce Management 8.0
Chapter 8: Using the WFM Database Utility Update Your WFM 7 Database
Note: If you are migrating from WFM 7.x to 8.0, all you need to do to your database is to update it. You do not need to create a new database.
Do You Need to Update Your Database?
Procedure:Determining if your Database is Up-to-date
Purpose: To determine whether your database is up-to-date.
Start of procedure
1. Open the WFM Database Utility.
2. Check the lower right of the main window to see whether it indicates that your database is up-to-date. The database version number should correspond to the version number of the WFM Database Utility you are running.
End of procedure
Performing Database Updates
Procedure:Performing a Database Update
Purpose: To update a database.
Start of procedure
1. Open the WFM Database Utility.
2. Select the Database Update radio button.
3. Click Next.
4. If you enabled the AllowLessUpdates option in the WFM Client Application object, you can choose the database version to which you wish to update from the drop-down list. If not, your database is updated to the latest available version.
In some cases you may not choose the most recent version, for example if you need to restore from a backup. You must select the same version as the database in the backup file. After restoring, you can then update your database version.
Administrator’s Guide 195
Chapter 8: Using the WFM Database Utility Database Maintenance
5. Click Finish.
The WFM Database Utility runs the appropriate scripts and then displays a message indicating the results of the update.
End of procedure
Database Maintenance
Database Cleanup
Procedure:Performing a Database Cleanup
Purpose: To remove obsolete data from your database.
Start of procedure
1. Open the WFM Database Utility.
2. Select the Cleanup Database radio button and then click Next.
Note: Your database must be up-to-date to perform a database cleanup.
3. Select a date from the drop-down list. Data up to (but not including) this date will be deleted.
4. In the dialog box that appears, select the items you want to remove.
Warning! Double-check your choices before you click Finish. You cannot retrieve deleted data.
5. Click Finish.
The WFM Database Utility removes all data up to the date you selected in the Wizard. Data for the selected day is not deleted.
End of procedure
Back Up and Restore Your DatabaseYou can use the WFM Database Utility to back up the data in your Workforce Management database to a local file and then restore it if necessary. The local files are in Microsoft Access format.
196 Workforce Management 8.0
Chapter 8: Using the WFM Database Utility Back Up and Restore Your Database
Note: An Access 2002 .MDB file has a maximum database size of about 2 GB.
Performing a Backup
Procedure:Performing a Backup
Purpose: To back up your data.
Start of procedure
1. Open the WFM Database Utility.
2. Select the Backup Database to .MDB File radio button.
3. Specify the file name and location of the file into which data is to be written.
4. Select what type(s) of data to back up. By default, all data types (except Audit Data) are selected. You must always back up Core data. In addition, you can choose to back up all data (by selecting Entire Database) or select from Audit Data, Performance, Forecast, or Schedule data.
5. Click Next.
6. The next dialog box shows that tables that are to be backed up. Click Finish to complete the process or Back to change your selections.
The WFM Database Utility performs the backup and presents a results message at the end.
End of procedure
Restoring Your Database
Procedure:Restoring Your Database
Purpose: To restore your data.
Start of procedure
1. Open the WFM Database Utility.
2. Select the Restore Database from .MDB File radio button.
Administrator’s Guide 197
Chapter 8: Using the WFM Database Utility Back Up and Restore Your Database
3. Specify the file name and location of the file from which data should be retrieved and then click Next.
4. Click Next to create the database into which files are to be restored.
Note: You do not need to create a database ahead of time. The restore utility creates the correct database version for your data restoration.
5. Select the type(s) of data to restore. By default, all data types that were backed up in the selected backup file are selected, and you cannot select data types that were not backed up. You must always restore Core data. In addition, you can choose to restore all data (by selecting Entire Database) or select from Audit Data, Performance, Forecast, or Schedule data.
6. Click Next.
7. The next dialog box shows that tables that are to be backed up or restored. Click Finish to complete the process or Back to change your selections.
Warning! You have the alternative to Cancel a database restoration in progress. However, if you do so, your database is corrupted and you must clear up the affected sections or create a new database.
The WFM Database Utility performs the restoration and presents a results message at the end.
End of procedure

198 Workforce Management 8.0
Chapter 8: Using the WFM Database Utility Back Up and Restore Your Database

Administrator’s Guide 199
Chapter
9 Configuring Task SequencesThis chapter presents information on configuring task sequences. It supplements the information found in Workforce Management 8.0 Configuration Utility Help. It includes the following sections: Definitions, page 199 Purpose of Task Sequences, page 200 Creating Task Sequences, page 200
DefinitionsWithin Genesys Workforce Management, a task sequence is a defined period of time during which agents can work only on one task or a specified set of tasks—called an activity set. You could also think of a task sequence as an “activity sequence.”
Activities
Activities (tasks) are work that is tracked and managed using Genesys Workforce Management. For example, a business might define the following activities in WFM Configuration Utility for product A:
• Answering inbound calls
• Responding to e-mail
• Completing after-call work
• Performing scheduled callbacks
• Participating in chat sessions
These same activities might also be defined for products B and C.
200 Workforce Management 8.0
Chapter 9: Configuring Task Sequences Purpose of Task Sequences
Purpose of Task SequencesTask sequences enable you to control how much the nature of an agent’s work changes during part of a day. You can avoid agents being asked to jump constantly from activity to activity, a situation that can result in agent confusion and fatigue and lower productivity. You do this by configuring task sequences. Once configured, you can assign a task sequence to any compatible shift in the same site.
Creating Task SequencesYou create task sequences in the WFM Configuration Utility, Shifts window, Task Sequence dialog box. The Task Sequence dialog box is also where you will use the information given in this appendix.
In order to give context to the examples presented later on, this section presents a quick overview of task sequence configuration steps.
Procedure:Creating a Task Sequence
Purpose: To open the dialog box for creating a task sequence.
Start of procedure
1. Click Shifts on the Modules pane in Configuration Utility and then select a shift on the Objects pane.
2. Click the Task Sequences tab.
3. To create a new task sequence, click Add. The Task Sequence (Add) dialog box opens (see Figure 3).
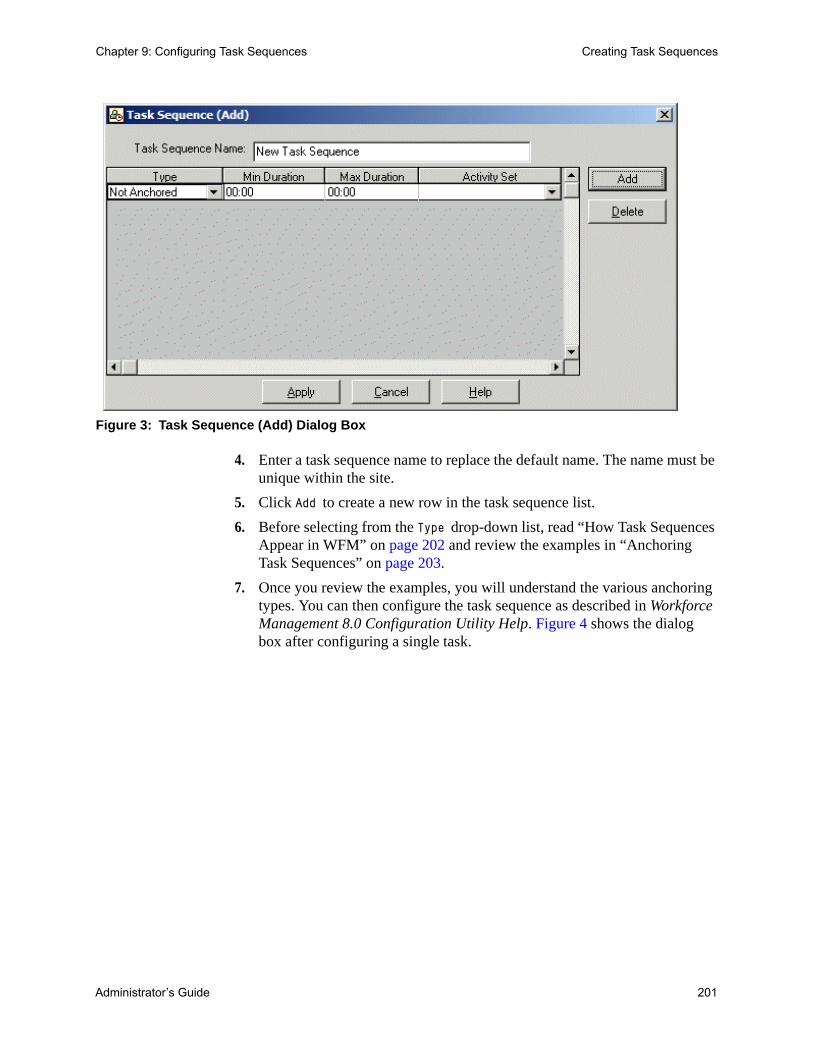
Administrator’s Guide 201
Chapter 9: Configuring Task Sequences Creating Task Sequences
Figure 3: Task Sequence (Add) Dialog Box
4. Enter a task sequence name to replace the default name. The name must be unique within the site.
5. Click Add to create a new row in the task sequence list.
6. Before selecting from the Type drop-down list, read “How Task Sequences Appear in WFM” on page 202 and review the examples in “Anchoring Task Sequences” on page 203.
7. Once you review the examples, you will understand the various anchoring types. You can then configure the task sequence as described in Workforce Management 8.0 Configuration Utility Help. Figure 4 shows the dialog box after configuring a single task.
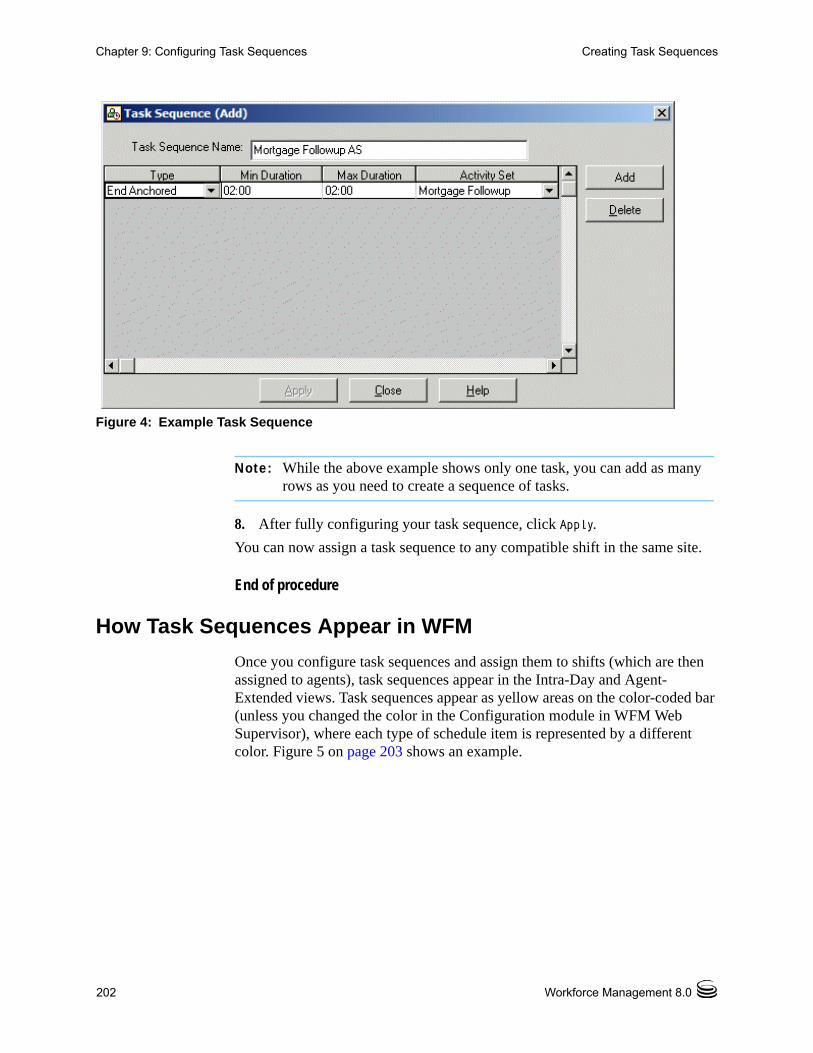
202 Workforce Management 8.0
Chapter 9: Configuring Task Sequences Creating Task Sequences
Figure 4: Example Task Sequence
Note: While the above example shows only one task, you can add as many rows as you need to create a sequence of tasks.
8. After fully configuring your task sequence, click Apply.
You can now assign a task sequence to any compatible shift in the same site.
End of procedure
How Task Sequences Appear in WFM
Once you configure task sequences and assign them to shifts (which are then assigned to agents), task sequences appear in the Intra-Day and Agent-Extended views. Task sequences appear as yellow areas on the color-coded bar (unless you changed the color in the Configuration module in WFM Web Supervisor), where each type of schedule item is represented by a different color. Figure 5 on page 203 shows an example.

Administrator’s Guide 203
Chapter 9: Configuring Task Sequences Creating Task Sequences
Figure 5: End-Anchored Task in Schedule
In the above example, the task is anchored to the end of the shift, but the Task Sequence (Add) dialog box, Type drop-down menu (see Figure 4 on page 202) gives various anchoring choices: • Not Anchored
• Start Anchored
• End Anchored
• Start/End Anchored
The anchoring type selected indicates when a task can happen during the day.
Anchoring Task Sequences
This section describes when to use the various anchoring types available from the Type drop-down menu in Figure 3 on page 201. Assume that the shift and meals are flexible.
Task A ends the day.
Task Sequence (Add) dialog box (Figure 3 on page 201) configuration: Only Task A is configured. Task Type is End Anchored (see Figure 6).
Figure 6: End-Anchored Task
task sequence
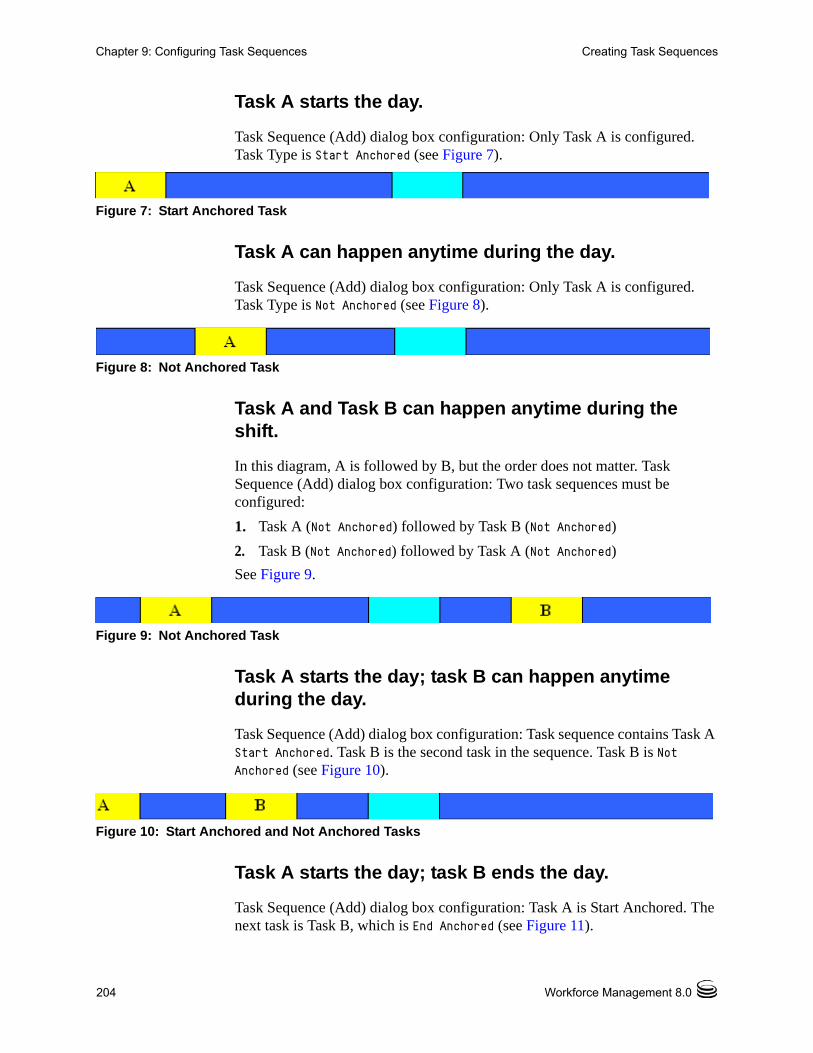
204 Workforce Management 8.0
Chapter 9: Configuring Task Sequences Creating Task Sequences
Task A starts the day.
Task Sequence (Add) dialog box configuration: Only Task A is configured. Task Type is Start Anchored (see Figure 7).
Figure 7: Start Anchored Task
Task A can happen anytime during the day.
Task Sequence (Add) dialog box configuration: Only Task A is configured. Task Type is Not Anchored (see Figure 8).
Figure 8: Not Anchored Task
Task A and Task B can happen anytime during the shift.
In this diagram, A is followed by B, but the order does not matter. Task Sequence (Add) dialog box configuration: Two task sequences must be configured:
1. Task A (Not Anchored) followed by Task B (Not Anchored)
2. Task B (Not Anchored) followed by Task A (Not Anchored)
See Figure 9.
Figure 9: Not Anchored Task
Task A starts the day; task B can happen anytime during the day.
Task Sequence (Add) dialog box configuration: Task sequence contains Task A Start Anchored. Task B is the second task in the sequence. Task B is Not Anchored (see Figure 10).
Figure 10: Start Anchored and Not Anchored Tasks
Task A starts the day; task B ends the day.
Task Sequence (Add) dialog box configuration: Task A is Start Anchored. The next task is Task B, which is End Anchored (see Figure 11).
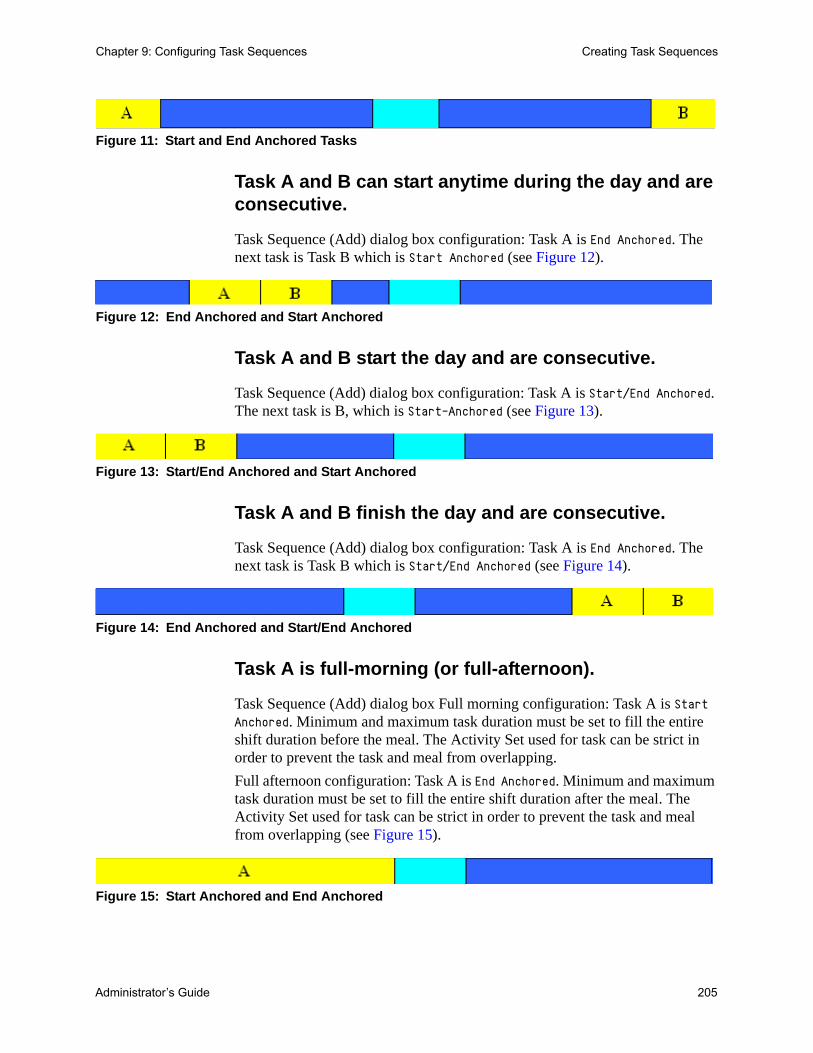
Administrator’s Guide 205
Chapter 9: Configuring Task Sequences Creating Task Sequences
Figure 11: Start and End Anchored Tasks
Task A and B can start anytime during the day and are consecutive.
Task Sequence (Add) dialog box configuration: Task A is End Anchored. The next task is Task B which is Start Anchored (see Figure 12).
Figure 12: End Anchored and Start Anchored
Task A and B start the day and are consecutive.
Task Sequence (Add) dialog box configuration: Task A is Start/End Anchored. The next task is B, which is Start-Anchored (see Figure 13).
Figure 13: Start/End Anchored and Start Anchored
Task A and B finish the day and are consecutive.
Task Sequence (Add) dialog box configuration: Task A is End Anchored. The next task is Task B which is Start/End Anchored (see Figure 14).
Figure 14: End Anchored and Start/End Anchored
Task A is full-morning (or full-afternoon).
Task Sequence (Add) dialog box Full morning configuration: Task A is Start Anchored. Minimum and maximum task duration must be set to fill the entire shift duration before the meal. The Activity Set used for task can be strict in order to prevent the task and meal from overlapping.
Full afternoon configuration: Task A is End Anchored. Minimum and maximum task duration must be set to fill the entire shift duration after the meal. The Activity Set used for task can be strict in order to prevent the task and meal from overlapping (see Figure 15).
Figure 15: Start Anchored and End Anchored
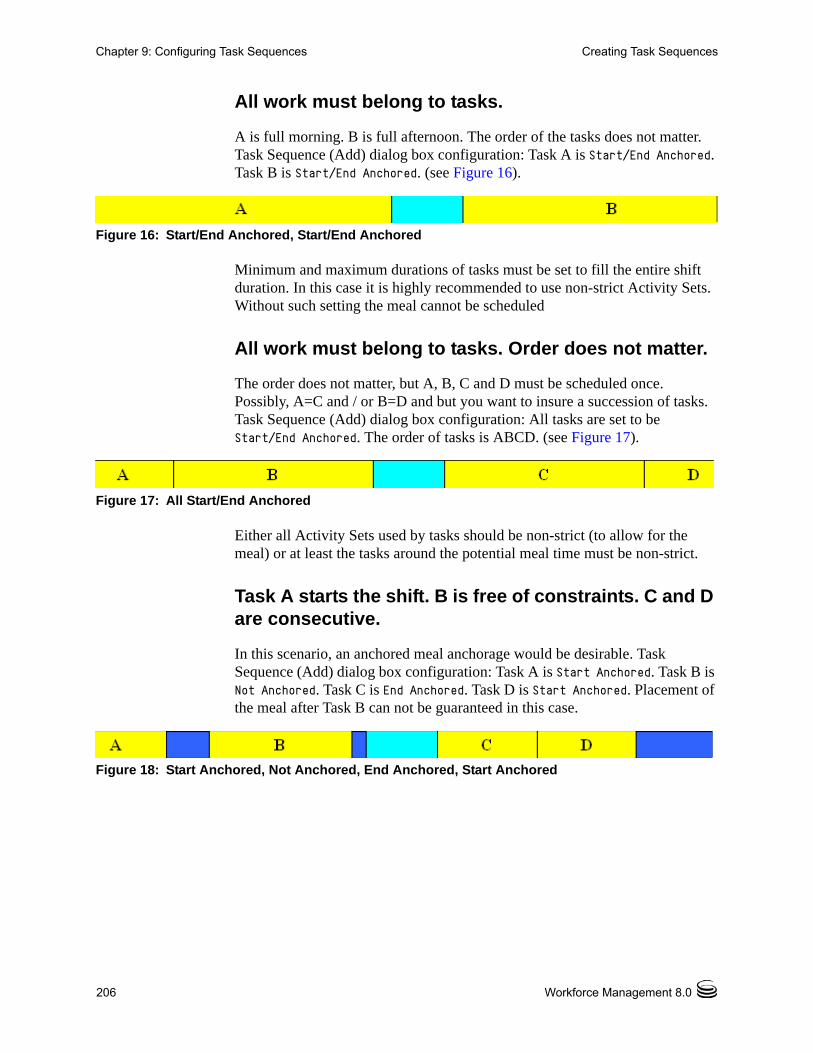
206 Workforce Management 8.0
Chapter 9: Configuring Task Sequences Creating Task Sequences
All work must belong to tasks.
A is full morning. B is full afternoon. The order of the tasks does not matter. Task Sequence (Add) dialog box configuration: Task A is Start/End Anchored. Task B is Start/End Anchored. (see Figure 16).
Figure 16: Start/End Anchored, Start/End Anchored
Minimum and maximum durations of tasks must be set to fill the entire shift duration. In this case it is highly recommended to use non-strict Activity Sets. Without such setting the meal cannot be scheduled
All work must belong to tasks. Order does not matter.
The order does not matter, but A, B, C and D must be scheduled once. Possibly, A=C and / or B=D and but you want to insure a succession of tasks. Task Sequence (Add) dialog box configuration: All tasks are set to be Start/End Anchored. The order of tasks is ABCD. (see Figure 17).
Figure 17: All Start/End Anchored
Either all Activity Sets used by tasks should be non-strict (to allow for the meal) or at least the tasks around the potential meal time must be non-strict.
Task A starts the shift. B is free of constraints. C and D are consecutive.
In this scenario, an anchored meal anchorage would be desirable. Task Sequence (Add) dialog box configuration: Task A is Start Anchored. Task B is Not Anchored. Task C is End Anchored. Task D is Start Anchored. Placement of the meal after Task B can not be guaranteed in this case.
Figure 18: Start Anchored, Not Anchored, End Anchored, Start Anchored
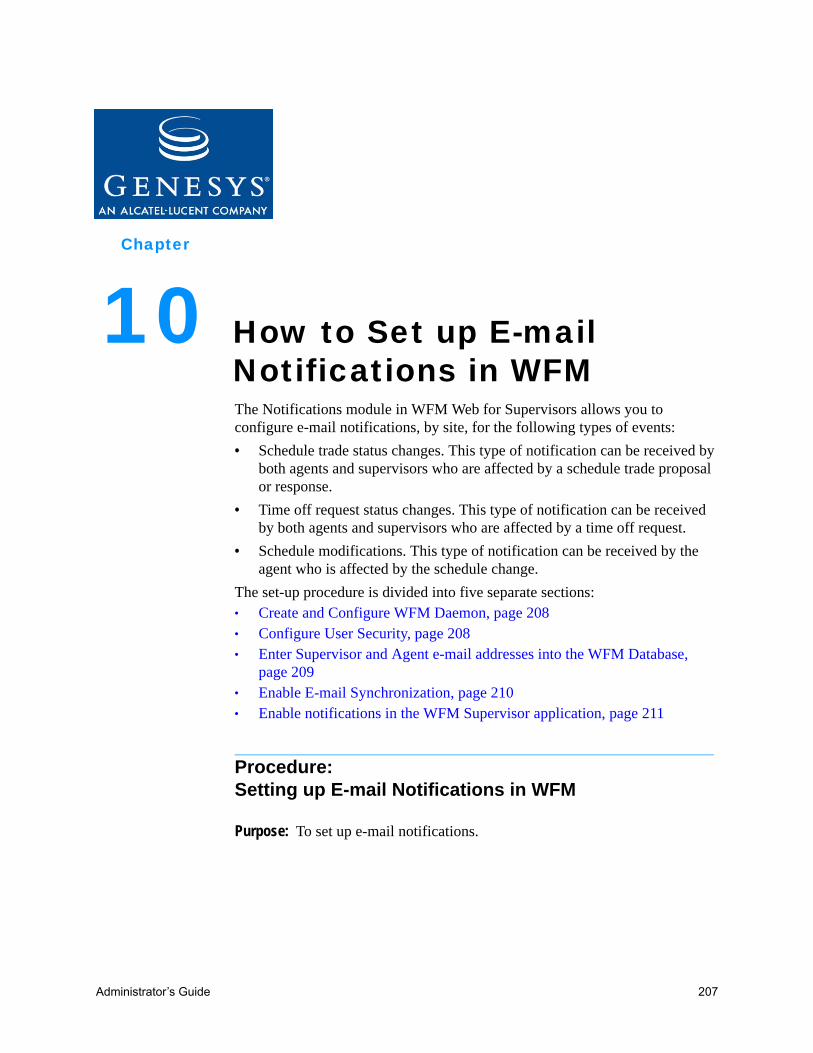
Administrator’s Guide 207
Chapter
10 How to Set up E-mail Notifications in WFMThe Notifications module in WFM Web for Supervisors allows you to configure e-mail notifications, by site, for the following types of events:
• Schedule trade status changes. This type of notification can be received by both agents and supervisors who are affected by a schedule trade proposal or response.
• Time off request status changes. This type of notification can be received by both agents and supervisors who are affected by a time off request.
• Schedule modifications. This type of notification can be received by the agent who is affected by the schedule change.
The set-up procedure is divided into five separate sections: Create and Configure WFM Daemon, page 208 Configure User Security, page 208 Enter Supervisor and Agent e-mail addresses into the WFM Database,
page 209 Enable E-mail Synchronization, page 210 Enable notifications in the WFM Supervisor application, page 211
Procedure:Setting up E-mail Notifications in WFM
Purpose: To set up e-mail notifications.
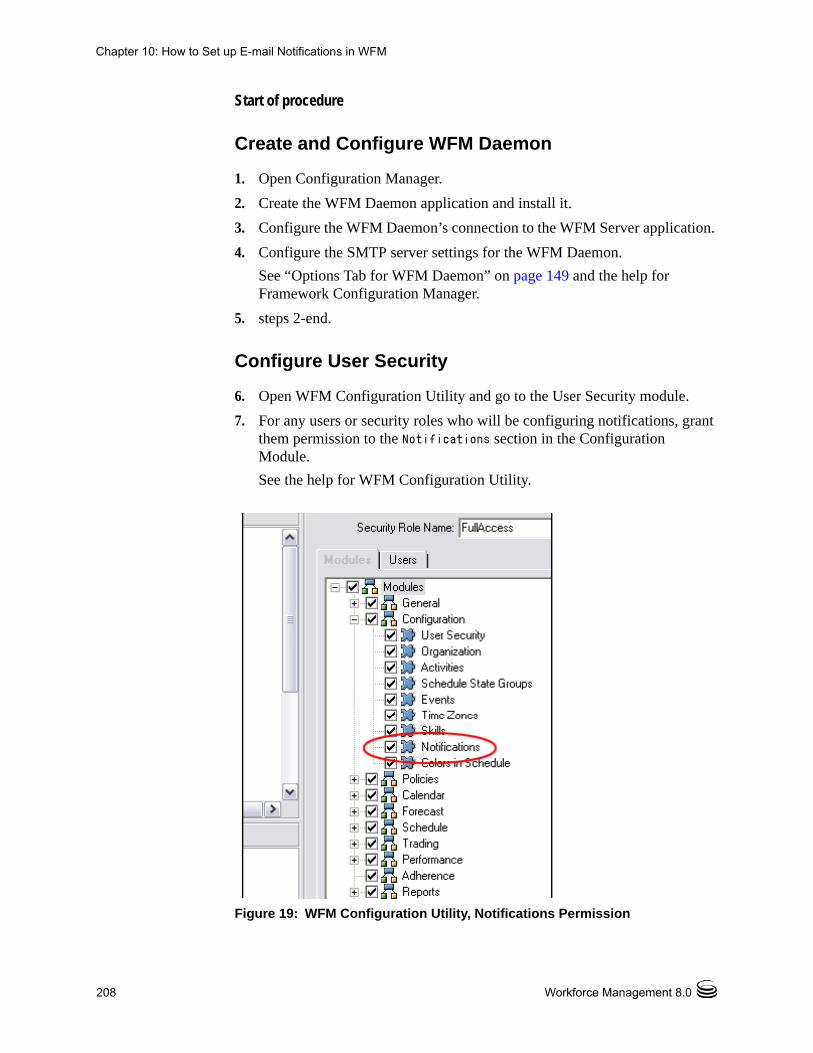
208 Workforce Management 8.0
Chapter 10: How to Set up E-mail Notifications in WFM
Start of procedure
Create and Configure WFM Daemon
1. Open Configuration Manager.
2. Create the WFM Daemon application and install it.
3. Configure the WFM Daemon’s connection to the WFM Server application.
4. Configure the SMTP server settings for the WFM Daemon.
See “Options Tab for WFM Daemon” on page 149 and the help for Framework Configuration Manager.
5. steps 2-end.
Configure User Security
6. Open WFM Configuration Utility and go to the User Security module.
7. For any users or security roles who will be configuring notifications, grant them permission to the Notifications section in the Configuration Module.
See the help for WFM Configuration Utility.
Figure 19: WFM Configuration Utility, Notifications Permission
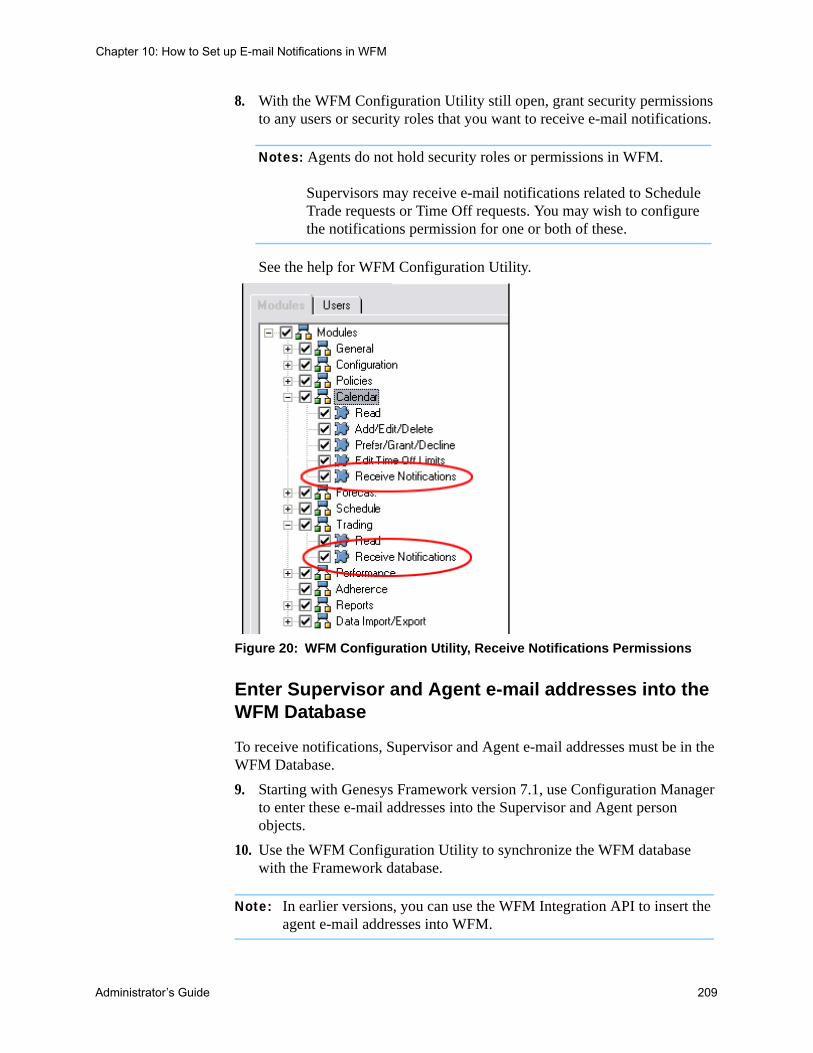
Administrator’s Guide 209
Chapter 10: How to Set up E-mail Notifications in WFM
8. With the WFM Configuration Utility still open, grant security permissions to any users or security roles that you want to receive e-mail notifications.
Notes: Agents do not hold security roles or permissions in WFM.
Supervisors may receive e-mail notifications related to Schedule Trade requests or Time Off requests. You may wish to configure the notifications permission for one or both of these.
See the help for WFM Configuration Utility.
Figure 20: WFM Configuration Utility, Receive Notifications Permissions
Enter Supervisor and Agent e-mail addresses into the WFM Database
To receive notifications, Supervisor and Agent e-mail addresses must be in the WFM Database.
9. Starting with Genesys Framework version 7.1, use Configuration Manager to enter these e-mail addresses into the Supervisor and Agent person objects.
10. Use the WFM Configuration Utility to synchronize the WFM database with the Framework database.
Note: In earlier versions, you can use the WFM Integration API to insert the agent e-mail addresses into WFM.
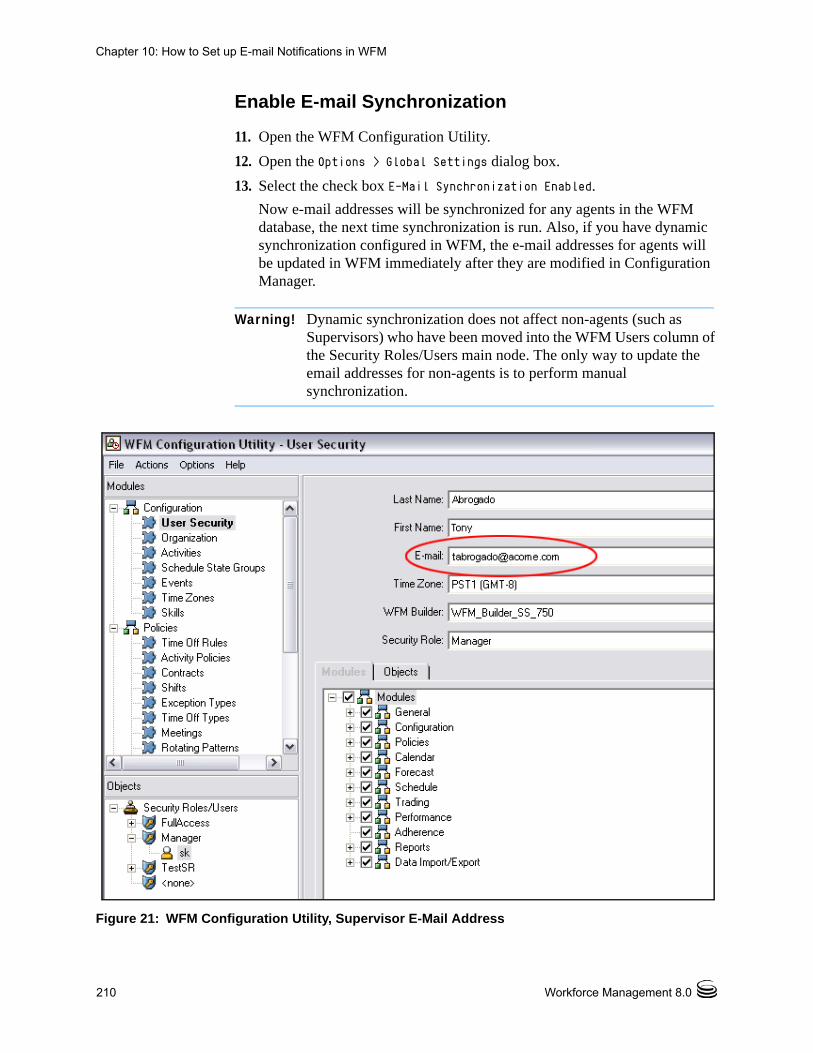
210 Workforce Management 8.0
Chapter 10: How to Set up E-mail Notifications in WFM
Enable E-mail Synchronization
11. Open the WFM Configuration Utility.
12. Open the Options > Global Settings dialog box.
13. Select the check box E-Mail Synchronization Enabled.
Now e-mail addresses will be synchronized for any agents in the WFM database, the next time synchronization is run. Also, if you have dynamic synchronization configured in WFM, the e-mail addresses for agents will be updated in WFM immediately after they are modified in Configuration Manager.
Warning! Dynamic synchronization does not affect non-agents (such as Supervisors) who have been moved into the WFM Users column of the Security Roles/Users main node. The only way to update the email addresses for non-agents is to perform manual synchronization.
Figure 21: WFM Configuration Utility, Supervisor E-Mail Address
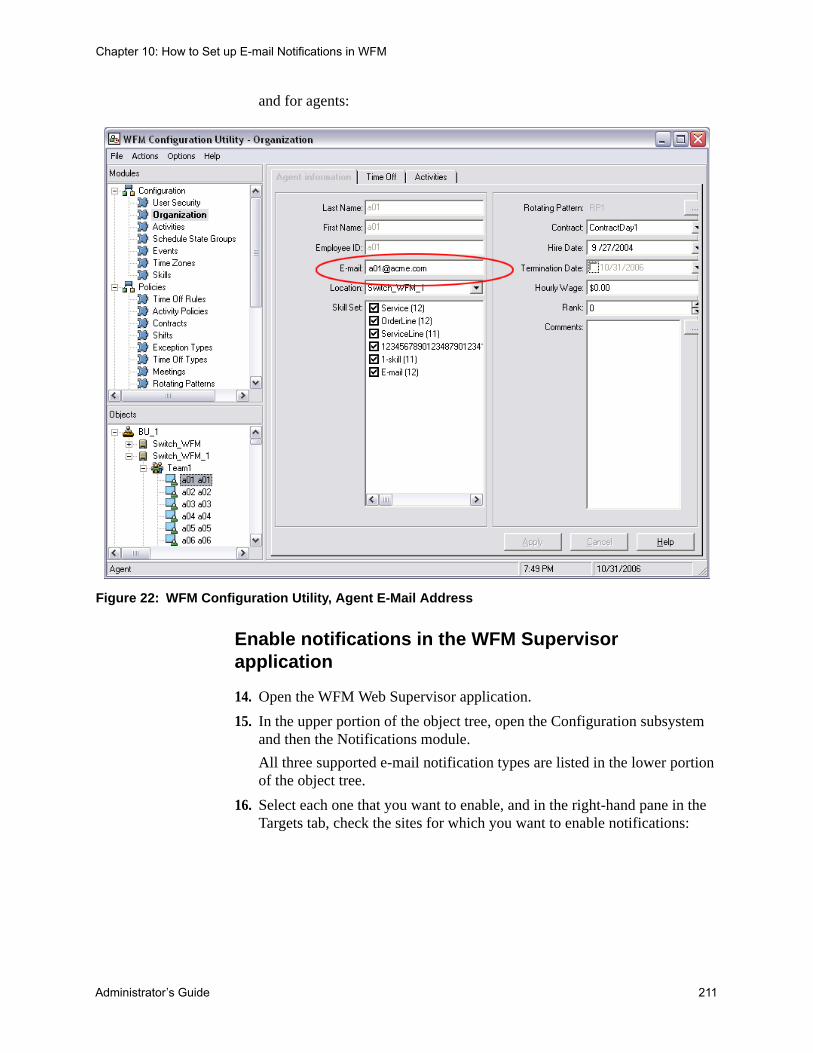
Administrator’s Guide 211
Chapter 10: How to Set up E-mail Notifications in WFM
and for agents:
Figure 22: WFM Configuration Utility, Agent E-Mail Address
Enable notifications in the WFM Supervisor application
14. Open the WFM Web Supervisor application.
15. In the upper portion of the object tree, open the Configuration subsystem and then the Notifications module.
All three supported e-mail notification types are listed in the lower portion of the object tree.
16. Select each one that you want to enable, and in the right-hand pane in the Targets tab, check the sites for which you want to enable notifications:

212 Workforce Management 8.0
Chapter 10: How to Set up E-mail Notifications in WFM
Figure 23: WFM Web Supervisor, with Notifications Selected
17. Use the Messages tab to configure the e-mail Subject and Message for all e-mail notifications of this type. You can change the text or keep the default.
If the WFM Daemon is running and properly connected to a running SMTP server, you can now use the feature. (You can check WFM Daemon’s status in the Windows Services Control Panel or through Solution Control Interface)
For additional information, including descriptions of the rules that generate notifications, see “Notifications” on page 34.
End of procedure
Administrator’s Guide 213
Chapter
11Configuring WFM Server Load BalancingUse load balancing when you have multiple computers available, and one computer alone cannot handle the work load. This appendix describes the two main methods of load balancing: Processor and Memory. WFM Server supports both types. Load Balancing Methods, page 213 Load Balancing Configuration, page 214
Load Balancing Methods
Processor Balancing
Processor Balancing support is based on assigning a session to the best-qualified processor.
This is the more common type of balancing required—needed when one computer does not have enough processor power to handle a large number of simultaneous users. WFM accomplishes it by balancing WFM Server requests between several different WFM Server instances running on different computers. Each server/computer instance is known as a location.
WFM Server's built-in load balancing service is called Locator Service. Every time you open a new user session, Locator Service identifies the location that is best suited to serve the new session. Usually that is the location which is currently handling the fewest requests. From then on, all requests from that particular session are handled exclusively by the assigned location.
214 Workforce Management 8.0
Chapter 11: Configuring WFM Server Load Balancing Load Balancing Configuration
Memory Balancing
Memory Balancing support is based on reconfiguring at the site level. As you create multiple WFM Servers, you can assign each to a different site as required.
Here is an example application of Memory Balancing: if your configuration has 50,000 agents, you will likely need more than 2-3GB of RAM (the limit on 32-bit Windows applications). One computer alone does not have enough memory to handle this huge configuration.
In Memory Balancing, as you start each new session, you associate it with a site. The session is then directed to the WFM Server instance that is assigned to that site. This allows different servers to work with different subsets of data—thus reducing the amount of memory needed per server.
Note: You can also create a configuration that uses both types of load balancing.
Load Balancing Configuration
Configuring the Locator Service
Procedure:Configuring the Locator Service
As noted previously, WFM Server's built-in load balancing service is called Locator Service. Normally, one WFM Server instance is designated as Locator. Any client that wants to open a user session with WFM Server must first ask Locator for the URL of the WFM Server that is best suited to serve the new session, from a load-balancing point of view. Usually that is the location which is currently handling the fewest requests. The URL is obtained and the client opens the new session on that server.
Note: All WFM Servers run the Locator Service and any server can act as Locator.
Purpose: To enable load balancing correctly.
Start of procedure
1. Open Configuration Manager.
2. Open the WFM Server application that will be the Locator.
Administrator’s Guide 215
Chapter 11: Configuring WFM Server Load Balancing Load Balancing Configuration
3. Add all other WFM Servers (except the Locator) to the Connections list.
4. Save and close the Locator.
5. Open the WFM Web application.
6. Add the WFM Server that will be the Locator to the Connections list.
7. Save and close the WFM Web application.
End of procedure
Note: Advanced users can add cross-references in the Connections lists between all configured WFM Servers, so that any of them could act as Locator. For example, if you are running two instances of WFM Web, you may wish to assign a different WFM Server to each WFM Web instance, to act as Locator—but still have load balancing enabled.
Configuring Processor Balancing
Processor Balancing is the default method.
Procedure:Configuring Processor Balancing
Purpose: To configure processor balancing.
Prerequisites
• Execute the procedure “Configuring the Locator Service” on page 214.
Start of procedure
1. Open Configuration Manager.
2. Open the Connections list of the WFM Server application that you have designated to act as Locator.
3. Add a reference to each WFM Server that you want to balance.
End of procedure
The result: Locator regularly checks the number of open sessions on the servers that it finds in its Connections list, and then directs new sessions to the server with the least number of open sessions. That way connected users are balanced across the servers.

216 Workforce Management 8.0
Chapter 11: Configuring WFM Server Load Balancing Load Balancing Configuration
Figure 24: WFM Server Properties dialog
Configuring Memory Balancing
Procedure:Configuring Memory Balancing
Purpose: To enable Memory Balancing.
Prerequisites
• Execute the procedure “Configuring the Locator Service” on page 214.
You must assign WFM Servers to specific site(s). For each site:
Start of procedure
1. Open WFM Configuration Utility.
2. Go to Configuration > Organization.
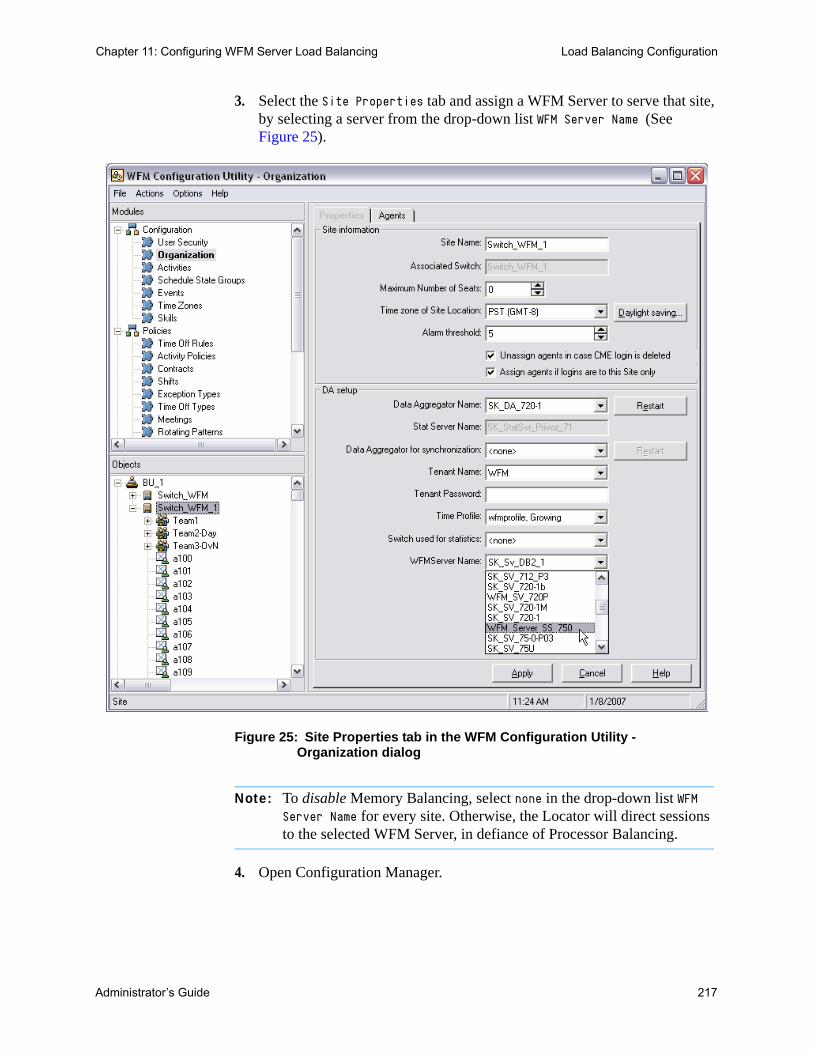
Administrator’s Guide 217
Chapter 11: Configuring WFM Server Load Balancing Load Balancing Configuration
3. Select the Site Properties tab and assign a WFM Server to serve that site, by selecting a server from the drop-down list WFM Server Name (See Figure 25).
Figure 25: Site Properties tab in the WFM Configuration Utility - Organization dialog
Note: To disable Memory Balancing, select none in the drop-down list WFM Server Name for every site. Otherwise, the Locator will direct sessions to the selected WFM Server, in defiance of Processor Balancing.
4. Open Configuration Manager.

218 Workforce Management 8.0
Chapter 11: Configuring WFM Server Load Balancing Load Balancing Configuration
5. Add all WFM Servers to the Connections list of the WFM Server application that you designate to act as Locator.
End of procedure
The result: when you open a new session and identify it with a site, the session is automatically directed to the WFM Server that is assigned to that site.
Administrator’s Guide 219
Chapter
12Scheduling Breaks and Meals in Conjunction with ExceptionsThis chapter contains these sections: Default Behavior of the Scheduler, page 220 Optional Configuration to Influence Break, Meal, and Exception
Scheduling, page 221 Other Notes about Break-Meal-Exception Scheduling Behavior, page 223
Workforce Management allows you to pre-plan the breaks and meals that should be scheduled during a particular shift. These are called “shift items,” and you can define several parameters of these items, such as the “time window” during which they should be scheduled, and whether they are paid or unpaid.
For example, say that you set up a shift called 8-Hour Full-Time. As part of the shift item configuration, you have specified that there should be a 15- minute paid break in the shift. The Min Length from Shift Start parameter is set to 2:00 (2 hours) and the Max Length from Shift Start is set to 4:00.
Additionally, your shift item configuration specifies that there should be an unpaid meal in the middle of the shift, with both the Min Time Before This Meal and Min Time After This Meal set to 3:00.
You have configured a rotating pattern for a particular agent that specifies that the agent should work the “8 Hour Full-Time” shift every day, starting at 8:00 a.m.
Due to the shift item configuration, when WFM builds a schedule scenario that includes this agent, it will try to schedule the break and meal in the following time windows:

220 Workforce Management 8.0
Chapter 12: Scheduling Breaks and Meals in Conjunction with Exceptions Default Behavior of the Scheduler
• It will try to schedule the break in the time window between 10:00 a.m. and 12:00 p.m.
• It will try to schedule the meal in the time window between 11:00 a.m. and 1:30 p.m.
Sometimes the configured time windows for breaks and/or meals will conflict with planned exceptions, such as meetings, training sessions, or administrative time, that have been entered through the WFM Calendar. In those cases, the behavior of the Scheduler will vary depending on the particular type of shift item and its properties:
Default Behavior of the Scheduler
When Unpaid Breaks Conflict with Exceptions
When the time window of an unpaid break is covered by a planned exception, the Scheduler will “relax” the constraints of the break, in order to schedule it. That is, the time window will be widened in both directions (if possible) so that the break can be scheduled adjacent to the exception—either immediately before the exception or immediately after the exception.
This relaxation of the break constraints occurs because unpaid breaks are considered mandatory by the Scheduler due to their effect on the paid time of the shift.
There will be instances when one or more unpaid break(s) cannot be scheduled, even though they are considered mandatory. For example, if a shift has a paid duration of 8 hours, and there is a granted exception in the Calendar that also has a paid duration of 8 hours, that would not leave any time remaining for the Scheduler to place an unpaid break. As a result, the unpaid break would not be scheduled and a warning would be generated when the scenario is built.
When Paid Breaks Conflict with Exceptions
Unlike unpaid breaks, by default paid breaks are not considered mandatory. Thus, if there is a conflict between a planned exception and a paid break, so that the time window of the paid break is covered by the exception, by default the paid break will not be scheduled when the scenario is built.
When Meals Conflict with Exceptions
Meals are considered a mandatory part of a shift, if the shift has a meal configured. If there is a conflict between a planned exception and a meal, so that the time window of the meal is covered by the planned time for the exception, either one of two things will happen when the scenario is built:
Administrator’s Guide 221
Chapter 12: Scheduling Breaks and Meals in Conjunction with Exceptions Optional Configuration to Influence Break,
• WFM will look for, and find, another shift that is compatible with the agent’s contract which allows the exception to be scheduled, or
• When WFM resolves the conflicting items in the Calendar (prior to the schedule being built), it will decline the exception unless it can find another shift that is compatible with the agent's contract that allows the exception to be scheduled. In that case, the exception will not be scheduled and a warning will be generated.
Optional Configuration to Influence Break, Meal, and Exception Scheduling
Starting with WFM 7.6, some new configuration options are available to change the default behavior of the Scheduler when breaks and/or meal time windows conflict with planned exceptions. These options are: Paid Breaks are Mandatory, page 221 Suppress Break-Related Warnings, page 222 Allow Breaks and Meals During Exception, page 222
Paid Breaks are Mandatory
This is an optional setting that controls whether a paid break will be scheduled even when the time window of the break is covered by an exception. As described above, this is always the behavior of the Scheduler with unpaid breaks. But if this setting is turned on, the same behavior will occur with paid breaks; if the time window of the paid break is covered by an exception, the paid break will be scheduled adjacent to the exception—either immediately before the exception or immediately after it. Of course there still may be times when some breaks cannot be scheduled, even if this setting is turned on, because there is not enough room in the shift to accommodate the exception and all the configured breaks. In this case, a warning will be generated when the scenario is built. Here are some examples when WFM would not be able to schedule a break (paid or unpaid), regardless of whether the user defines this as being mandatory or not:
Example 1
There is a shift with an 8-hour duration but which is 7.5 paid hours. The user grants a paid exception that is 7.5 hours, right in the middle of the shift, leaving 15 minutes on either side of the exception in which to schedule any breaks. If there is a 30-minute unpaid break to schedule, it cannot be scheduled unless the user wishes to allow breaks to be scheduled “during the exception” (see below for more information about that optional setting).

222 Workforce Management 8.0
Chapter 12: Scheduling Breaks and Meals in Conjunction with Exceptions Optional Configuration to Influence Break,
Example 2
There is an 8-hour shift from 8:00 a.m. to 4:00 p.m. The configuration of Break 1 (15-min) allows the break to be scheduled in a time window between 9:00 A.M -10:30 a.m. The configuration of Break 2 (15-min) allows the break to be scheduled within a time window between 2:00 p.m. - 4:00 p.m. The user grants an exception in the Calendar from 8:00 a.m. - 3:45 p.m. Unless the user wishes to allow break(s) to be scheduled “during the exception,” one of the breaks cannot be scheduled because there are only 15 minutes within the shift that is not already covered by the exception, and two 15-minute breaks to schedule.
Example 3
There is an 8-hour shift from 8:00 a.m. - 4:00 p.m. The user grants an exception in the Calendar from 8:00 a.m. - 11:45 a.m. and another exception from 12:00 p.m. - 4:00 p.m. This leaves only 15 minutes between the two exceptions in which to schedule any breaks. Unless the user wishes to allow break(s) to be scheduled “during the exception,” it is likely that one or more breaks would not be scheduled.
Example 4
Assume a shift from 8:00 a.m. - 1:00 p.m., one exception from 8:30 a.m. - 11:30 a.m., and two 1-hour breaks (the first one with configured window from 9:00 a.m. - 11:00 a.m., and the second one from 12:00 p.m. - 1:00 p.m.). Because the exception covers the first break, the break should be placed after the exception (because there is no room before it), from 11:30 a.m. - 12:30 p.m. Because of the scheduling of the first break, there is no room for the second break at all (but not because of the exception). In this case, one of the breaks would not be scheduled.
Suppress Break-Related Warnings
This is an optional setting to control whether schedule warnings that describe issues with break scheduling will be hidden from the user. If you are scheduling a lot of long exceptions that you know will make it impossible for the Scheduler to fit in most of the breaks you have configured, you may want to check this setting so that the break-related warnings are suppressed. This will let you focus on the other schedule warnings that you will want to resolve.
Allow Breaks and Meals During Exception
For each Exception Type, this setting may be turned on. If this option is configured, then if a planned exception of this type is being scheduled and it covers the time window of a break, the Scheduler will try to schedule the break
Administrator’s Guide 223
Chapter 12: Scheduling Breaks and Meals in Conjunction with Exceptions Other Notes about Break-Meal-Exception
during the exception, preserving the original configured time window. It may not always be possible for the Scheduler to accomplish this, so if it cannot schedule one or more breaks during the exception, it will next try to schedule them adjacent to the exception. This setting will always affect the scheduling of unpaid breaks. This setting will only affect the scheduling of paid breaks if paid break scheduling is configured as mandatory.
This setting also controls whether the Scheduler will try to schedule meals during an exception, in cases when the configured time window of the meal is covered by the exception. However, if the Scheduler is unable to schedule the meal during the exception for some reason, it will not be scheduled adjacent to the exception as it will try to do with breaks.
It is important to note that when the user configures an exception type such that break(s) and meal(s) could be scheduled during the exception, it does not mean that all of these shift items will be scheduled during the exception. For example, the user has configured a 15-minute break with a 5-minute start step. The break configuration permits the break to be scheduled somewhere between 8:45 a.m. and 10:15 a.m. There is an exception from 9:00 a.m. - 10:00 a.m. The break could be scheduled in many possible places, including:8:45 a.m. - 9:00 a.m.9:00 a.m. - 9:15 a.m.9:05 a.m. - 9:20 a.m.9:10 a.m. - 9:25 a.m.. . .9:45 a.m. - 10:00 a.m.
Also note that although the absolute start and end times of the exception shall not be changed, it is possible that, for example, the start of the exception could be covered by a break (e.g. both the break and the exception start at the same time)
Other Notes about Break-Meal-Exception Scheduling Behavior
When there is no conflict between an exception and some break(s), but yet the exception makes it impossible for WFM to schedule the breaks according to all of their configured constraints, WFM will continue its default software behavior, which is to relax the break constraints so that they can be scheduled.
Example: There is a 15-minute break that could be scheduled between 9:00 a.m. - 1:00 p.m., and a second 15-minute break that could be scheduled between 10:00 a.m. - 2:00 p.m. The user has configured that the minimum distance between these breaks must be 3 hours. The user has granted an exception that goes from 11:00 a.m. - 3:00 p.m. It is impossible to meet the minimum distance constraint and also schedule these two breaks within their configured time windows. Therefore, it is possible that, in order to meet the minimum distance constraint, WFM would relax the break constraints and one

224 Workforce Management 8.0
Chapter 12: Scheduling Breaks and Meals in Conjunction with Exceptions Other Notes about Break-Meal-Exception
break would be scheduled prior to the exception, and the other break would be scheduled after the exception.
As described above, when relaxing break constraints to accommodate planned exceptions, WFM will attempt to schedule the break immediately adjacent to the exception. However, it is not always possible to do this, and thus sometimes there will be a small duration of activity work scheduled between the break and the exception.
Example 1
The user has granted an exception from 12:00 p.m. - 1:05 p.m., and the configured time window for a particular 15-minute break specifies that the break must be scheduled somewhere between 1:15 p.m. - 2:15 p.m. It's possible that, based on schedule coverage, WFM will place that break at 1:15 p.m., leaving just 10 minutes of activity work in between the exception and the break.
Example 2
The user has granted an exception from 12:00 p.m. - 2:00 p.m., and the configured time window for a particular 15-minute break specifies that the break must be scheduled somewhere between 1:00 p.m. - 2:16 p.m. WFM would only have between 2:00 p.m. - 2:16 p.m. in which to schedule the break. It's possible that it would schedule the break from 2:01 p.m. - 2:16 p.m., leaving 1 minute of work between the exception and the break.
Also note that the features described in this section only address partial-day exceptions, not full-day exceptions. Therefore, if the user needs to schedule a working or non-working exception that covers a worker's entire shift, then they should consider using a full-day exception type.
Example 3
The user wants to grant an exception (type: meeting) after the Schedule has been built. In the Calendar, the user creates the Calendar Item and rebuilds the schedule. The meeting is reflected in the updated schedule and in some cases takes place during a paid break/meal or is adjacent to it.
Note: If the user attempts to schedule the meeting via the Meeting Planner (after the schedule has been built), then the meeting will not be scheduled, nor will the warning messages be suppressed (assuming that the system is configured in this way).
Administrator’s Guide 225
Chapter 12: Scheduling Breaks and Meals in Conjunction with Exceptions Other Notes about Break-Meal-Exception
Hierarchy of constraints
If breaks cannot be scheduled according to all of their configured constraints, then WFM will try to satisfy the constraints in the following order:
1. Time window
2. Start step & start offset
3. Minimum distance between shift items
4. Maximum distance between shift items

226 Workforce Management 8.0
Chapter 12: Scheduling Breaks and Meals in Conjunction with Exceptions Other Notes about Break-Meal-Exception
Administrator’s Guide 227
Chapter
13Localizing WFMGenesys localizes (translates) WFM into a number of languages. Please contact your Genesys sales representative to inquire about specific localized versions.
If Genesys does not localize into your language, you may be able do it yourself. This appendix describes how.
You can localize the GUIs for WFM Web Supervisor and WFM Web Agent without having to obtain localized software through Genesys. This will allow Genesys partners and customers to deploy translated versions of these user interfaces, in cases where Genesys does not provide localized versions of WFM. This appendix contains these sections: How Localization Works, page 227 Using localization.bat, page 229 The Initial Process, page 232 The Steps Next Time, page 233
How Localization WorksThe Agent and Supervisor components of WFM each draw the text of their GUIs from a properties file, which you can modify. You can translate the text inside these files and thus localize WFM to any language that you wish.
Of course you should perform this localization carefully, first making backups that you can use to undo mistakes, and then using text which captures the precise meaning of the words and phrases that you are translating. And you must recognize that Genesys cannot assume responsibility for work which was not performed by Genesys.
228 Workforce Management 8.0
Chapter 13: Localizing WFM How Localization Works
Note: This localization does not affect all text in WFM Web. the text of some messages (such as the resolution of Calendar items, Schedule Build Validation messages, and others) does not reside in the wfm.war properties files.
Summary
These steps summarize the localization process.
1. Extract the two properties files from inside wfm.war.
2. Localize the properties files.
3. Update wfm.war with the localized properties files.
4. Deploy the new wfm.war on the web application server.
First Localization
The procedure to follow when you first localize WFM is here: The Initial Process, page 232.
All Subsequent Localizations
The procedure to follow when you are planning to install a WFM Web patch, and you have already localized WFM, is here: The Steps Next Time, page 233.
Tools
Use these tools to localize your installation of WFM:
Table 29: Localization Tools
Tool Description
localization.bat Use this batch file to extract the properties file from (and update then back into) wfm.war. See “Using localization.bat” on page 229.
wfm.war This Web ARchive file contains the WFM properties files agent.properties and supervisor.properties.
agent.properties Edit the text inside this properties file, to localize the WFM Agent web GUI.
supervisor.properties Edit the text inside this properties file, to localize the WFM Supervisor web GUI.
Administrator’s Guide 229
Chapter 13: Localizing WFM Using localization.bat
Cautions
Back up wfm.war before you make your changes. You may need to replace the modified file if your changes have unexpected results.
Back up the properties files before you make your changes, for the same reason that you back up wfm.war.
Back up wfm.war, as well as the properties files, after you make your changes too. When you install a WFM Web patch, you also install a new (non-localized) wfm.war file. The backup allows you to restore your changes accurately and with a minimum of effort.
With that backup, you can restore your changes accurately and with a minimum of effort after installing a WFM Web patch, which includes a new (non-localized) wfm.war file.
Wait for the extraction and updating processes to finish; they do not display status.
Requirements
• JDK (the Java Development Kit, same version as required by WFM Web) must be located in the path JAVA_HOME.
Using localization.batThe batch file localization.bat is installed in the same directory where WFM Web was initially installed. Use localization.bat to:
• Extract the properties files agent.properties and supervisor.properties from wfm.war.
• Update wfm.war by reinserting the two WFM properties files.
Text editor Use a non-formatting text editor (such as Notepad or Wordpad) to edit the properties files.
Windows system tools Use the appropriate system tools to stop and restart the web application server, and to copy the localized wfm.war to its appropriate location.
Web Application Server This appendix uses Tomcat as the default device that enables access to WFM, but depending on your configuration and version of WFM, it could instead be WebSphere.
Table 29: Localization Tools (Continued)
Tool Description
230 Workforce Management 8.0
Chapter 13: Localizing WFM Using localization.bat
Run localization.bat from the Windows command line interface. For example, enter:C:\Program Files\GCTI\WFM76\Web>localization -h
...to display this help message, which summarizes all functionality:
USAGE: localization -{xu} [wfm-war-file] OR -{eh} [-a [agent-properties-file]] [-s [supervisor-
properties-file]]
-------------------------------------------------------------------
Options:
-xextract properties from WFM war
-uupdate WFM war with new properties
-adefine path to agent properties file
-sdefine path to supervisor properties file
-eshow examples
-h, /?show this message
-------------------------------------------------------------------
Parameters:
[wfm-war-file] path to WFM war
[agent-properties-file] path to agent properties file
[supervisor-properties-file] path to supervisor properties file
-------------------------------------------------------------------
Additional Info:
If you do not define the properties file names the default names will be used.
For agent it is 'agent.properties'
For supervisor it is 'supervisor.properties'
-------------------------------------------------------------------
CAUTION: Please backup the original properties to the safe place already after extraction.
You may use them for restoring if something goes wrong.
Applying the Options
This section describes how to use the options, and provides examples.
Specifying the Defaults
Each file used by localization.bat has a default name and a default location. To use these defaults, enter the command line in its simplest format:
localization -x
This command line applies all the defaults:
• The web archive is named wfm.war and is located in the current directory.
• The properties files that are extracted from wfm.war are named agent.properties and supervisor.properties and are saved to the current directory.
localization -u
This command line also applies all the defaults:
• The web archive is named wfm.war and is located in the current directory.

Administrator’s Guide 231
Chapter 13: Localizing WFM Using localization.bat
• The properties files that are used to update wfm.war are named agent.properties and supervisor.properties, and are located in the current directory.
Specifying Directories
You can specify absolute paths or relative paths to the directories that hold the files. Here are some examples:
localization -x “C:\Program Files\GCTI\WFM76\Web\wfm.war”
wfm.war is in the absolute directory C:\Program Files\GCTI\WFM76\Web\. You can specify absolute directories for the properties files, too:
localization -u -a “\Program Files\GCTI\WFM76\Web\propfiles\agent.properties”localization -x -s “\Program Files\GCTI\WFM76\Web\propfiles\supervisor.properties”
localization -x “..\safe\wfm.war”
wfm.war is in the directory \safe\, whose position is relative to the current directory (they share the same parent directory). You can specify relative directories for the properties files, too:
localization -x -a “..\propfiles\agent.properties”localization -u -s “..\propfiles\supervisor.properties”
Specifying Filenames
You can specify different filenames for any of the files. Here are some examples:
localization -u “wfmLOCALIZED.war”
The web archive is named wfmLOCALIZED.war. You can specify names for the properties files, too:
localization -x -a “agentORIGINAL.txt”localization -u -s “supervisorREVISED.txt”
Combining Options
You can of course combine any or all of these options. This example occupies a single command line, and has been wrapped in arbitrary places for readability:
localization -u “C:\Program Files\GCTI\WFM76\Web\wfmLOCALIZED.war” -a “C:\Program Files\GCTI\WFM76\Web\propfiles\agentORIGINAL.txt” -s “..\propfiles\supervisorREVISED.txt”
Help
To see usage examples, enter this command line:localization -e
232 Workforce Management 8.0
Chapter 13: Localizing WFM The Initial Process
The Initial ProcessWhen you localize the text in your wfm web archive, you are changing the program’s software—the messages, menus and other elements of the screen display. By doing this yourself, you accept must accept responsibility for any possible errors you may make, and ensure that you can recover from any possible errors.
• Accept responsibility by following these instructions closely. Do not take shortcuts.
• Ensure error recovery by backing up your files before and after every change.
Procedure:Localize WFM the First Time
Purpose: To localize WFM the first time.
Start of procedure
Prepare
1. Make a backup copy of the existing wfm.war file and save it in a safe place (in a different directory, with a different name, or both). The wfm.war file is an important WFM software component, and you may need to replace a broken version.
You should make a backup of wfm.war before and after you make changes. The reason that you should back up these changes is: when patches come out, you can update the new, unlocalized wfm.war file that arrives with the patch.
Note: In a worst-case scenario, you can always reinstall WFM Web from the original software release disk or FTP download that you received from Genesys.
Extract
2. Extract the Properties files supervisor.properties and agent.properties. from wfm.war. Use the software tool localization.bat. Click Start>run to open a command window. Then enter:localization -x
...where -x extracts the properties files. See “Using localization.bat” on page 229 for ways to specify file locations and names.
Administrator’s Guide 233
Chapter 13: Localizing WFM The Steps Next Time
3. Make a backup copy of the properties files before you change them, and rename them something descriptive (for example, agent.properties.english.v8.0.000.10) and store them in a safe place. You will need these in the future to compare with newer properties files when software updates to WFM Web are released.
Localize
4. Using a text editor, update the two properties files by changing the English text strings to the language you wish.
To help identify the text strings in context, you may wish to run WFM in another window while you do this work.
5. Make a backup copy of these localized properties files, renaming them something descriptive (for example, agent.properties.czech.v8.0.000.10) and store them in a safe place.
Update
6. Use the localization.bat file to update the wfm.war file with the new properties files.localization -u
...where -u inserts the changed properties files back into wfm.war. See “Using localization.bat” on page 229 for ways to specify file locations and names.
Back up the changed wfm.war file.
Deploy
Deploy wfm.war to the WFM Web Server in this way:
7. Stop Tomcat.
8. Copy the edited war wfm.war and then paste it into the Tomcat folder.
9. Restart Tomcat.
End of procedure
The Steps Next TimeIn the future, if there is an update version of WFM Web that you need to deploy (for example, a patch or software update), perform these steps:
234 Workforce Management 8.0
Chapter 13: Localizing WFM The Steps Next Time
Procedure:Localizing WFM each Subsequent Time
Purpose: To localize WFM each subsequent time.
Prerequisites
• You must have localized WFM at least once before. See “Localize WFM the First Time” on page 232.
Start of procedure
1. Extract (see Extract, page 232)Use the localization.bat file to extract the two properties files (one for the WFM Web Agent GUI and one for the WFM Web Supervisor GUI) from the wfm.war file.
2. CompareUse windif or a text editor that provides comparison capabilities, to compare the new versions of the properties files with the original ones. This will pinpoint any new or changed strings that require localization.
3. Localize (see Localize, page 233)Using the text editor, update the two localized properties files that you created in step 3 above, adding in any new string resources in the appropriate place. Make a new backup copy of the properties files; if you make a mistake, you will have the backup you created in step 4, to work from.
4. Update (see Update, page 233)Use the localization.bat file to update the wfm.war file with the updated properties files.
5. Deploy (see Deploy, page 233)Deploy the updated wfm.war file on the Web application server. See instructions for deleting the war file from Tomcat.
End of procedure
Administrator’s Guide 235
Chapter
14 TroubleshootingThis troubleshooting chapter is divided into the following sections: Architectural Issues: Components and Connections, page 235 Workforce Management Configuration Issues, page 241 Log Files, page 245
It presents solutions for common problems. It covers: architectural issues, such as the configuration of the WFM components and connections between them.
• Configuration conflicts in WFM that result in forecasting and scheduling errors.
• When to use log files for error tracking.
Note: If, after working through the suggestions in this chapter, your configuration appears to be correct, but WFM still does not function properly, contact Genesys Technical Support for further assistance.chitectural Issues: Components and Connections
Architectural Issues: Components and Connections
Issues addressed in this section can also affect WFM Web functionality such as forecasting and scheduling. Be sure to review all possible sources of errors during your troubleshooting process.
This section covers the following situations:
• Expired Digital Signature or Security Certificates, page 236
• Blank Screen When Attempt to Access WFM Web, page 237
• Unable to Connect to Data Source, page 237
• Determine the MDAC Version, page 237

236 Workforce Management 8.0
Chapter 14: Troubleshooting Architectural Issues: Components and Connections
• “DA Server Not Found” Error, page 237
• “Host Not Found” Error, page 237
• WFM Data Aggregator Does Not Start, page 237
• WFM Web Does Not Open, page 238
• Applets Do Not Load in WFM Web, page 238
• “WFM Server Cannot be Reached” Error, page 239
• The Agent Weekly Preference View Does Not Display 24-Hour Graphical Data, page 240
• Synchronization with the Configuration Database Takes an Unreasonably Long Time, page 240
• Timeout Error During Database Update, page 240
• Unacceptably Slow Response from WFM Configuration Utility, page 241
Expired Digital Signature or Security Certificates
Even if you set up Genesys (or Sun) as a trusted publisher in your browser, you may see a message such as these:The digital signature was generated with a trusted certificate but has expired or is not yet valid.
The security certificate has expired or is not yet valid.
As a common practice, Genesys renews its certificates once a year. Sun does not provide certificate renewal for javahelp, so it's expired in year of 2004.
Here is how to respond to that warning message:
• During your first access of WFM Web, check the always trust option in both warning messages. This will mark certificates as trusted and the user will not ever see these warnings again.
• Import the certificates to the Java plug-in manually for each new user. Certificates for import could be exported from any workstation where WFM Web has been already accessed and certificates where confirmed with the always trust option check.
An applet that is signed with a certificate that has expired is still safe to download or use ...as long as the applet was signed when the certificate issued by the CA (Certificate Authority) was still valid, then the applet is valid according to the specification for signing Java applets. Also, according to the specification, it is the responsibility of the JVM or JRE to warn the user if an applet has been modified after it was digitally signed with a certificate issued by a CA.
As long as the JVM or JRE does not return an error stating that the applet has been modified since it was signed, the applet is still valid and safe to run.

Administrator’s Guide 237
Chapter 14: Troubleshooting Architectural Issues: Components and Connections
Blank Screen When Attempt to Access WFM Web
If you are using Tomcat, the issue may be that you don’t have Sun’s JDK software installed, but just the JRE. Tomcat 5.0.x requires the JDK. If you look at the Tomcat logs, you should see an error saying that java compiler was not found. If you don’t want to install the JDK, then the other option is to use Tomcat 5.5.x, which only requires the JRE.
Unable to Connect to Data Source
If you cannot connect to your database, verify the following:
• That the correct versions of MDAC and Jet are installed on your computer. See “Determine the MDAC Version”.
• You have added the Database Access Point (DAP) on the Connections tab of the Application object of the component you are using.
• You have configured the DAP correctly.
• Your database is set to be case insensitive.
Determine the MDAC Version
Microsoft supplies a free diagnostic program, MDAC Configuration Checker, that scans your computer to establish whether you are running the correct version of MDAC. You can download the program from the Microsoft web site. See Genesys Supported Operating Environment Reference Manual for the current MDAC requirements.
“DA Server Not Found” Error
Data Aggregator is not running. Start it manually, under Windows Services.
“Host Not Found” Error
The host names you configure in Configuration Manager must be lowercase. They are case sensitive. ◆ Rename the host and try the procedure again.
WFM Data Aggregator Does Not Start
When a host computer on which WFM Data Aggregator is running as a Windows Service is shut down and restarted, WFM Data Aggregator leaves an open connection to Configuration Server. This causes WFM Data Aggregator to fail to start after rebooting. In particular, Service Manager indicates Starting status for the WFM Data Aggregator service for a long time after you try to start it.
238 Workforce Management 8.0
Chapter 14: Troubleshooting Architectural Issues: Components and Connections
Procedure:Closing an incorrect connection between WFM Data Aggregator and Configuration Server
Purpose: To enable WFM Data Aggregator to restart.
Start of procedure
1. In Configuration Manager, rename the WFM Data Aggregator Application object, and then click OK to close the Properties window.
2. Reopen the Properties window and change the Application object name back to the original and then click OK again. Doing this clears the connection.
End of procedure
After this, WFM Data Aggregator should immediately connect to Configuration Server. To prevent this problem, stop the WFM Data Aggregator Service using the Services window before shutting down and/or rebooting the host computer.
If WFM Data Aggregator fails to start, it writes a message to the daerror.log file, which is located in the WFM Data Aggregator working directory. Use this log file to diagnose the problem that prevented WFM Data Aggregator from starting correctly.
WFM Web Does Not Open
Pop-up blockers interfere with WFM Web for Supervisors operation. If you are running a pop-up blocker on your computer, disable it before trying to open WFM Web for Supervisors.
Applets Do Not Load in WFM Web
WFM Web uses Java Server pages (JSPs) to create its dynamic web pages. To use WFM Web, your browser must have Java support. If the necessary plug-in was not installed with the browser, you can download the plug-in from http://java.sun.com/j2se/. To learn which version of Java is required, consult the WFM section at the end of “Table 10: Product Prerequisites” in the book Genesys Supported Operating Environment Reference Manual.
On Supervisors’ workstations, WFM Web uses Java applets that are run by Sun’s Java Plug-in. On Windows operating systems the Java Plug-in is running as ActiveX, which means that supervisors must have rights to run ActiveX controls.

Administrator’s Guide 239
Chapter 14: Troubleshooting Architectural Issues: Components and Connections
Cannot Log In to WFM Web
The ConfigServer.properties file may be configured incorrectly. This could happen if you installed WFM Web without being connected to Configuration Server or if you manually entered incorrect values when you were configuring the WFM Web Application object.
Procedure:Correct ConfigServer.properties Configuration
Purpose: To correct an incorrect configuration of the ConfigServer.properties file.
Start of procedure
1. Remove the incorrectly configured application from the servlet runner.
2. Reinstall WFM Web, providing correct values during the installation.
3. Deploy the newly installed application.
4. If reinstalling WFM Web does not resolve the issue, check that you have entered the correct URL for WFM Web. The URL is case sensitive. Do not include login.asp or login.jsp in the URL. The URL should
simply point to the application virtual directory.
End of procedure
“WFM Server Cannot be Reached” Error
There are two different issues that may be responsible for this error message. If you receive this message sporadically, you may have too few TCP sockets (see “Scenario 1”). If it occurs every time you open WFM Web, the cause is probably a misconfiguration (see “Scenario 2”).
Scenario 1
This error message may occur because there are too few TCP sockets for the number of WFM Web for Supervisors connections you are trying to establish. To improve performance:
• Install WFM Web on a separate computer.
• Increase the refresh rate from the default value (2 seconds) to 5 seconds. This should increase the number of supervisors able simultaneously to access Adherence views by approximately 100 percent.

240 Workforce Management 8.0
Chapter 14: Troubleshooting Architectural Issues: Components and Connections
Scenario 2
You may have specified the wrong application type when you installed WFM Web. If so, uninstall and reinstall WFM Web, entering the correct values in the Installation Wizard screens.
• If you are running WFM in a Framework 6.x environment, the WFM Web application type must be ThirdPartyServer.
• If you are running in a 7.x environment, the application type should be WFM Web.
The Agent Weekly Preference View Does Not Display24-Hour Graphical Data
Note: Applies to UNIX environments only.
If your Unix server does not have an X Server installed or you have not set the DISPLAY environment variable, the WFM Web Agent Weekly Preferences window is presented without 24-hour graphical information.
For non-Windows environments (such as Unix and Linux), you must have X or some form of X (X11 Server or X Windows server) running and point the DISPLAY environment variable to the machine running X.
Synchronization with the Configuration Database Takes an Unreasonably Long Time
If you are using Microsoft SQL, to reduce synchronization time, make sure that the database AutoShrink feature is turned on.
Timeout Error During Database Update
Note: This applies to the WFM 7.1.1 release only.
Set the CommandTimeout option in the WFM Client Application object to a higher number. The default value is 600 seconds, which is sufficient for most databases. If you are running an update on a large database, set the value to 1200 seconds or higher.
Note: If you received a timeout error message when you initially tried to update your database, you may receive a number of error messages when you rerun the database update. Error messages that indicate that a column or field was already created simply indicate that the object was
Administrator’s Guide 241
Chapter 14: Troubleshooting Workforce Management Configuration Issues
created during the first, incomplete database update attempt. You can safely ignore these errors.
However, other error messages may indicate issues that must be resolved before your database will work properly.
Unacceptably Slow Response from WFM Configuration Utility
If your WFM Configuration Utility is not located on the same LAN as the WFM Database, you may see very long response times when the WFM Configuration Utility updates database information.
If you experience this issue, Genesys recommends that you deploy the WFM Configuration Utility over Citrix or Windows Terminal Services.
This issue should not affect users on the same LAN as the WFM Database.
Workforce Management Configuration Issues
The following is a list of potential problems that might occur when you are using WFM Web. Because connection faults and other situations covered in the preceding section can cause some of these errors, review all possible solutions during your troubleshooting process.
This section covers the following:
• Performance Shows No Intraday Statistics, page 241
• Headings Do Not Match Columns in Exported Reports, page 242
• Real-Time Agent Adherence Is Not Working Correctly, page 242
• Agents Are Not Being Scheduled, page 242
• Calculation of Average Handling Time Based on TotalTime Statistics, page 243
• Cannot Find Agents or Sites, page 243
• Errors or Warnings When Creating a Schedule, page 243
• Data on Active Interactions Disappears, page 244
• Forecast Appears Inaccurate, page 244
• Schedules Are Highly Over- or Understaffed, page 244
Performance Shows No Intraday Statistics
If the WFM Web Performance subsystem does not display statistics for Interaction Volume, Average Handling Time, Service Level, and other key intraday statistics, verify that:

242 Workforce Management 8.0
Chapter 14: Troubleshooting Workforce Management Configuration Issues
• WFM Data Aggregator has initialized successfully; has made successful connections to Configuration Server, Stat Server, and the WFM database; and has been running for 30 minutes.
• A schedule has been published for the current time interval.
• The correct Stat Server name appears in the Site Properties window in the Configuration > Organization module of the WFM Configuration Utility.
• The necessary statistics are configured in the Statistics window in Configuration > Activities module of the WFM Configuration Utility.
• Time zones are configured correctly for the business unit or site.
• The statistics are monitoring the correct Genesys objects, such as queues, routing points, and so on.
• The TimeProfile parameter is correctly configured in Stat Server.
Headings Do Not Match Columns in Exported Reports
When you export the reports, select the MS Excel Tabular option.
Real-Time Agent Adherence Is Not Working Correctly
If the Real-Time Agent Adherence window is empty, then verify that:
• A schedule has been published for the current time interval.
• You have associated the correct WFM Data Aggregator name with the site that contains the agents you are looking at in the WFM Configuration Utility.
• You have configured a connection to the appropriate Stat Server in the WFM Data Aggregator Application object.
• Your WFM Data Aggregator Application object specifies a connection to your WFM Server on the Connections tab.
• T-Server, Stat Server, and WFM Data Aggregator are running properly.
• Stat Server is configured to connect to the appropriate T-Server.
Note: If no agent names are visible in the Real-Time Agent Adherence window, publish a schedule for the current day.
Agents Are Not Being Scheduled
Verify that:
• The agents’ hire dates are not the same as the current date and come before the start of the schedule period.
• The agents are associated with a Contract that can be scheduled.
Administrator’s Guide 243
Chapter 14: Troubleshooting Workforce Management Configuration Issues
• The agents’ Contract is not associated with shifts that are incorrectly configured, preventing the agents in that Contract from being given any shifts.
• The agents have skills configured.
• The agents have skills that qualify for at least one of the activities you are scheduling.
Calculation of Average Handling TimeBased on TotalTime Statistics
Average Handling Time (AHT) is calculated by taking the total duration of all interactions that are completed during a timestep, divided by the total number of interactions handled during that timestep.
In cases where Total Handle Time is collected for an interval but no interactions have been handled in that interval, WFM can optionally associate the Handle Time with the previous interval. To enable this option, use the “HandleTimeWriteBack” configuration key.
Cannot Find Agents or Sites
Verify that:
• WFM is synchronized with Configuration Manager.
• The WFM user experiencing this issue has permissions to view the site, agents, and logins for the missing sites and/or agents.
Errors or Warnings When Creating a Schedule
In most cases, when schedule results are not as expected, a configuration error is the cause. With a valid configuration, you rarely see errors.
If the configuration settings lead to a disparity between the staffing requirements and the actual schedule, the Schedule Validation window records the problems. Sometimes it indicates which parameters you must change to correct the disparity.
When schedule validation warnings appear, it is essential to begin narrowing down the scope of the scheduling problem by isolating a single agent, team, contract, shift, or other object until the problematic configuration point is identified and resolved. The most frequent causes of schedule errors and warnings include:
• Incompatibility between day-off constraints and constraints set for weekly hours or schedule planning period hours.
• Incorrectly configured meal and shifts constraints.
• Exceptions inconsistent with contract or rotating pattern constraints.
244 Workforce Management 8.0
Chapter 14: Troubleshooting Workforce Management Configuration Issues
If you are unsure how to troubleshoot the schedule results or are reluctant to change WFM configuration data, contact Genesys Technical Support.
Data on Active Interactions Disappears
If you close WFM Data Aggregator using the Windows NT Task Manager, you will lose all data on currently active interactions because Windows NT does not allow enough time for WFM Data Aggregator to save the active data.
Forecast Appears Inaccurate
Verify that:
• The statistics being used to collect data for each activity are appropriate.
• The Genesys objects (queues, routing points, and so on) used to monitor statistics are appropriate.
• The Genesys objects are not combining data for interactions that should be associated with different activities. For example, if multiple interaction types are coming through a single routing point, then attached data must be used to filter statistics by interaction type.
• There is no historical data with null values in the WFM historical data table wm_perf_activities.wm_callvol. You can verify this by exporting the historical data to a local file using the WFM Configuration Utility.
• You have a sufficient quantity of historical data for the forecasting method you are using. The Expert Average Engine requires one full week of historical data and the Universal Modeling Engine requires at least one year of historical data.
Schedules Are Highly Over- or Understaffed
Verify that:
• The schedule was built after a forecast was published.
• There is sufficient flexibility in the working hours constraints for the agents’ weekly and schedule-planning periods, configured in the Contracts module.
• There is sufficient flexibility in the working days constraints.
• There is sufficient flexibility in the weekend day-off rules for the schedule-planning period.
• The agents’ contract availability is flexible enough to cover the open hours for the desired activities.
• Team constraints are not enabled or are configured with enough flexibility to adequately cover the entire day’s interaction volumes.
• All shifts have valid configurations.
Administrator’s Guide 245
Chapter 14: Troubleshooting Log Files
• All scheduled agents have received the correct number of weekly and/or schedule-planning period hours. If they haven’t, this indicates a configuration error.
WFM Configuration Utility Error Messages
• Database Access Point is not found!
Verify that your DAP is selected on the Connections tab of the WFM Configuration Utility Application object.
• Too many Database Access Points are specified!
Verify that only one DAP is selected on the Connections tab of the WFM Configuration Utility Application object.
• Server does not exist or access denied.
Verify that the correct database server name is entered in the DBMS Name field of the DAP Application object’s DB Info section.
• Could not resolve service name.
Verify that the correct database server type is selected in the DBMS Type field of the DAP Application object’s DB Info section.
• Cannot open database requested in login <database name>. Login
fails.
Verify that the correct database name is entered in the Database Name field of the DAP Application object’s DB Info section.
• Login failed for user <user name>.
Verify that the correct user name is entered in the User Name field of the DAP Application object’s DB Info section.
Log FilesWFM log files are intended to be used for diagnosis of configuration and program errors. They should not be used in normal day-to-day operation because they slow WFM performance.
If you contact Genesys Technical Support for assistance with WFM, you might be instructed to turn on logging and attempt to re-create the problem. The logs can provide Technical Support with important information on the nature of the malfunction.
Each component of WFM uses its own log file. For information on configuring logs, see the Log option information for each component’s Options tab.
By default, the WFM log files are stored in \\<Workforce Management directory>\Logs.
You can view WFM log files with any ASCII viewer, such as Notepad.

246 Workforce Management 8.0
Chapter 14: Troubleshooting Log Files
If WFM Data Aggregator fails to start, it writes a message to the daerror.log file, which is located in the WFM Data Aggregator working directory. Use this log file to diagnose the problem that prevented WFM Data Aggregator from starting correctly.
Administrator’s Guide 247
Appendix
A List of TermsMany important terms are used throughout the Workforce Management (WFM) application and documentation. This appendix lists these terms and their definitions in alphabetical order.
A
Abandonment Percentage
The percentage of interactions in which the customer ends the interaction before an agent begins handling it. You can set a value for this service objective in the Forecast module’s Staffing Build Wizard in WFM Web.
Accrual Rule
See Time-Off Rule.
Activities Groups
Activities Groups are lists that you create. They contain more than one activity, but can be manipulated like a single activity, to avoid repetitive tasks such as configuring a dozen activities for the same agent.
Activity
WFM database objects that represent contact center tasks in which agents can be engaged. You can track and manage these activities through the WFM Web Forecast, Schedule, and Performance modules. You can schedule up to 100 Activity objects simultaneously for each site, depending on your specific needs.
There are three types of activities: immediate work, deferred work, and fixed-staff work. These were formerly called phone activity, multimedia activity, and exclusive activity, respectively.

248 Workforce Management 8.0
Appendix A: List of Terms
See also Multi-Site Activity and Activities Groups.
Activity Set
An activity or group of activities that you can assign to multi-skilled agents for a specified period of time. During that time, the agents can work on no other activities. If the Activity Set was created with strict checked selected, then Scheduler cannot schedule meals at times that would interrupt the activity set.
Adherence
A WFM function that enables you to view agent real-time adherence. After you have created the forecast and schedule, adherence shows how closely the actual agent behavior matches (complies with) the schedule. You can configure the length of time that an agent can deviate from the schedule and continue to comply with it. See also Performance.
Agent
A database object imported from the Configuration Database that represents a contact center employee. In the WFM Configuration Utility, you can assign Agent objects a number of additional properties that pertain specifically to the WFM environment.
Agent State
See Schedule State Group.
Agents Logged In
See Working Agents.
Alert
A Performance module function indicating that administrator action may be necessary. For example, too many calls are being abandoned, or too few agents are logged in.
The Alert function uses Master Forecast and Master Schedule data as a baseline for performance levels. The alert appears when current performance statistics deviate from the forecasted or scheduled levels by an amount that you specify.
Alternative Break
Not used in WFM 7.0 or later.
Alternative Time Zone
See User Time Zone.
Administrator’s Guide 249
Appendix A: List of Terms
Application Template
An object in Configuration Manager that contains the default configuration information for an application. WFM requires the following application templates: WFM Client (for the WFM Configuration Utility and the WFM Database Utility), WFM Server, WFM Data Aggregator, WFM Web, WFM Builder, and WFM Daemon. Application templates are used only in Configuration Manager, when installing applications.
Aux Code
See Reason Code.
Availability
A contract parameter that indicates the time period during which an agent is prepared to work. Shifts should fall within the availability period.
Agents can also make personal availability preferences. These personal preferences, if granted, override the agent’s contract availability settings.
Availability Pattern
A one-week set of preferred availability, with start times and durations specified for each day. Each agent creates his or her own availability by using WFM Web for Agents.
Availability Preference
A Preference that enables an agent to request specific hours during which they are available to work for single or multiple days. Supervisors grant or decline availability preferences for the whole request period or day-by-day. If they are not granted, availability preferences are treated similarly to shift and day-off preferences. If they are granted, they override the agent’s Contract availability settings.
Average Handling Time
Also known as AHT. The average amount of time it takes incoming interactions to be distributed to agents. You can configure this statistic in the Configuration Utility to include noninteraction time, such as After-Call Work, as a part of the AHT.
Average Speed of Answer
Also known as ASA. The average amount of time agents take to respond to incoming interactions. WFM uses this statistic to calculate staffing forecasts, and as a basis for contact center performance values.
250 Workforce Management 8.0
Appendix A: List of Terms
Average Time to Abandonment
Also known as ATA. The average amount of time that callers wait in the queue before abandonment. The calculation considers only the calls that are abandoned.
B
Backup/Restore Utility
See WFM Database Utility.
Bonus Time-Off Hours
Extra time off that is assigned to an agent in addition to regularly accrued or awarded time off. Bonus time off is included in time-off hours carried over, if the allowable number of hours carried over is large enough to accommodate it. You configure time-off rules by using the Time-Off Rules module in the WFM Configuration Utility.
Break
A short rest period during an agent’s scheduled work time. Breaks can be paid or unpaid.
Budget
An estimated budget based on working hours and the hourly rate of the contact center staffing forecast. The budget is calculated in the staffing forecast, using an average of the number of working hours and the average hourly wage for each contract, multiplied by the number of agents of each contract type. The budget is also displayed in the Schedule Summary view as the estimated cost of a schedule.
Business Unit
A database object that represents activities performed at multiple sites. You create business units in the WFM Configuration Utility and assign already existing sites to them. A site can belong to only one business unit. Formerly called virtual PABX, virtual switch, or virtual contact center.
Business Unit Staffing
The total staffing requirements for a business unit. Staffing requirements are different for each activity within the business unit. A staffing requirement forecast may be calculated at the business unit level and then split to the individual sites that handle the activities. Or, you can build staffing requirement forecasts separately for each site included within the business unit.
Administrator’s Guide 251
Appendix A: List of Terms
The approach that you take will depend on the type of routing used within the business unit.
C
Calculated Staffing
A staffing forecast based on an interaction volume/AHT forecast, using service-objective criteria that you specify while building the staffing forecast.
Calendar
A WFM feature located in WFM Web for Supervisors that enables supervisors with appropriate security access to view, add, modify, and delete availability, exceptions, working hours, shifts, and time off for a site, team, or agent. You can view and modify preference statuses by using the Calendar. You also set time-off limits in the Calendar module. Formerly called Planner.
Calendar Item
Each shift, exception, preference, and so on that appears on the Calendar. You can add and edit Calendar items and, when appropriate, change their status.
Calendar Logic
The hierarchical ranking of exceptions, preferences, shifts, working hours, time off, and availability used in the Calendar and by Scheduler. This ranking indicates to Scheduler which items must be incorporated and, among those that can be either incorporated or denied, which should be allotted first. Granted items are incorporated into schedules; Preferred items might be incorporated, depending on other scheduling constraints. The hierarchy determines which item takes priority when more than one is entered for the same agent at the same time.
Call Volume
See Interaction Volume.
Carry-Over
A date that you define, on which a specified number of each agent’s total time-off hours (unused time-off hours plus any bonus time-off hours) are transferred forward to the new year. You must set the number of hours that can be transferred for each agent. See also Time-Off Rule.
Comments
Information about agents, workload forecasts, staffing forecasts, and schedules that you enter in special dialog boxes within WFM Web.
252 Workforce Management 8.0
Appendix A: List of Terms
Compliance
See Adherence.
Configuration Component
A set of objects created in Configuration Manager and the WFM Configuration Utility that defines some aspect of the WFM environment.
Configuration Manager
A Genesys Framework tool that you use to set up the database environment during installation of any Genesys product, release 6 or later. You use Configuration Manager to configure WFM application settings, and connections between WFM and other Genesys components, such as Stat Server and Configuration Server.
Consistency Check
An automatic assessment for some user-entered settings that enables WFM to identify some incompatible constraints. For example, WFM checks part-day exceptions to determine whether they are valid or invalid, and it checks contract working hour and working day settings for internal consistency.
Contact Center
See Site.
Contract
Describes categories of employees for scheduling and tracking purposes—for example, full-time, part-time, seasonal, contractor, salaried, and commissioned. Contract parameters include working hours, settings for required days off, overtime settings, and profile agent configuration. Formerly called employment type.
D
Data Aggregator
See WFM Data Aggregator.
Daylight Saving Information
Time offsets that you configure to ensure that WFM takes daylight saving time into account when creating forecasts, schedules, adherence and performance monitoring, and reports. Formerly called PABX time offset information.
Administrator’s Guide 253
Appendix A: List of Terms
E
Employee
See Agent.
Employment Type
See Contract.
Error
See Schedule Validation Error.
Event
A specific instance when a factor is in effect. You define an event by specifying the appropriate factor and the dates when it will affect site operations. Examples of events include advertising campaigns, catalog mailings, and holidays that affect interaction volume. You do not have to specify events for forecasting, but events provide a useful tool for fine-tuning an interaction volume forecast. See also Factor.
Exception
Any time during an agent’s schedule when the agent is not performing activity work. Examples of exceptions include long lunches, meetings, training, and child care. See also Exception Type.
Exception Type
A category, that you define, of time off or nonactivity work that affects scheduling. Exception types are created to fit the business rules for a site. Exception types include information on compensation, whether the exception is a working or nonworking exception, and whether the exception type should be used when scheduling meetings. See also Exception.
Exclusivity Set
See Activity Set.
Expert Average Engine
A forecasting method that uses statistical analysis of historical data to produce day-of-week, weekly, and (if sufficient historical data exists) yearly trend patterns. At least one full week of historical data is required in order to use the Expert Average Engine; at least six weeks is recommended for high-quality daily and weekly results. The impact of events, such as marketing campaigns, is applied directly to the forecast day-of-week and weekly curves. For this reason, this engine is best suited to sites with fairly stable interaction patterns.
254 Workforce Management 8.0
Appendix A: List of Terms
Exporting
Enables you to save forecast and historical data to files that you specify. You perform exports by using the Import/Export Data module in the WFM Configuration Utility. See also Importing.
Extracting
Enables you to extract the forecast and schedule information in the Master Forecast and in the Master Schedule in the Workforce Management database to scenarios that you specify. You extract data by using the Publish Forecast or Publish Schedule functions in WFM Web. See also Master Forecast and Master Schedule.
F
Factor
Anything that is expected to affect the interaction volume for particular activities, and therefore staff and schedule requirements. For example, a special promotion or a new advertising campaign may require additional staff. WFM takes such factors into consideration as it forecasts agent requirements and creates schedules. Events are built based on factors. See also Event.
Filter
An option for changing the view settings of a WFM Web for Supervisors window.
Forecast
A prediction of interaction volume and average handling time for a future period, based on historical information for similar periods. If sufficient historical data is unavailable, WFM creates forecasts from templates or numbers that you enter.
Historical data is collected automatically from Stat Server for all types of transactions by using computer-telephony integration (CTI), an event-based technology, rather than automatic call distribution (ACD) sampled data. This makes it possible to forecast for any media type.
Full-Time Equivalent
Also known as an FTE. An abstract term used to quantify a forecast and budget in tangible, human terms. For information about how WFM calculates an FTE, see “Endnote 1” on page 290.
Administrator’s Guide 255
Appendix A: List of Terms
H
Headcount
The number of agents scheduled for a certain timestep. For more information, see “Number of Agents – Scheduled” on page 284.
Historical Data
Records of previous contact center performance stored in the WFM database. You can import historical data that was collected prior to installation of WFM if it is in the form of comma-delimited text files (CSV format). Large amounts of reliable historical data are the most accurate basis for forecasting.
Hot Standby
A high-availability architecture that includes a second WFM Data Aggregator server that is initialized and ready to take over if the primary server terminates unexpectedly. The second server is synchronized with the first, so there is no loss of data during the transition.
I
Importing
Enables you to apply previously collected historical data to new forecasts by using the Import/Export Data module in the WFM Configuration Utility to import the historical data. Importing historical data is usually part of the initial WFM configuration. Afterward, WFM Data Aggregator collects historical data automatically as it runs, or, if you prefer, you can import historical data manually on a regular basis. See also Exporting.
Indirectly Occupied Time
The percentage of time that agents are scheduled for work but are not directly interacting with customers. For example, agents might be starting their computers, or they might be away from their desks.
Interaction Volume
The number of interactions per a specific unit, such as timestep, day, month, and so on. Interactions may include not only calls, but also e-mail, faxes, Web-based chats, and so on.
Intra-Day Schedule
A section of the Schedule module that displays the schedule for the selected day(s).
256 Workforce Management 8.0
Appendix A: List of Terms
Intra-Day Views
Schedule and performance information displayed in WFM Web.
The Schedule Intra-Day windows show agent schedules for the current day and enable you to make immediate adjustments to the schedule when necessary—for example, moving or cancelling breaks during an unexpectedly busy period.
Through graphs and tables, the Performance Intra-Day window displays the current day’s actual versus scheduled status.
L
Log Files
Files that contain information about what a component does and how it is performing. You (or Genesys Technical Support) can use log files for error tracking. Each WFM component uses its own log file, which is usually stored in the Workforce\Logs directory. If you are using the Framework Management Layer, you can send status information for WFM Server, WFM Builder, WFM Daemon, and WFM Data Aggregator to the Centralized Logging console.
Long Period
See Schedule Planning Period.
M
Marked Time
A period that you have indicated in one of the Schedule Intra-Day views as belonging to one of the marked-time types configured in the WFM Configuration Utility Marked Time module. You can configure as many marked-time types as you want.
Marked time is extremely flexible. It can be used to distinguish any period that you want to view and report on as belonging to a specific category. For example, you might use marked time to indicate overtime hours, so that you can view them in the Schedule Marked Time Report or the Schedule Marked Time Totals Report.
Master Forecast
A forecast published to the WFM database that is available to any authorized user at any time. If you want, you can extract forecast data from the Master Forecast to a scenario of your choosing. See also Extracting.
Administrator’s Guide 257
Appendix A: List of Terms
Master Schedule
A schedule published to the WFM database that is available to any authorized user at any time. If you want, you can extract schedule data from the Master Schedule to a scenario of your choosing. You must have data published to the Master Forecast for a particular time range in order to build useful schedule scenarios. Otherwise, the Scheduler will have no target staffing requirements against which to build the schedule. See also Extracting.
Maximum Occupancy
The maximum percentage of time that an agent is working while logged in. This is a service objective that can be specified when building a staffing forecast.
Meal
A specific break period during an agent’s scheduled work time, usually paid.
Meeting
An exception type that you configure using the Meeting Planner or the Meeting Scheduler. Scheduler sets the time for meetings after you specify all attendees and meeting parameters (possible dates and time, recurrence rules, and so on). The scheduling algorithm finds the optimum time to schedule the meeting while it builds agent schedules, and it adds a Meeting exception to each attendee’s schedule. You can also manually assign meetings to agents at any time.
Modules Pane
A section of the WFM Web for Supervisors and WFM Configuration Utility interfaces. You use this pane to select the module that you want to use on the working pane of the interface. The modules that are available depend on your security permissions. See also User Security.
Multi-Site Activity
A collection of activities performed at multiple physical sites. Multi-site activities enable you to view several local activities as one WFM object. The performance information is split among the sites that perform the activity. You can build interaction volume forecasts, staffing forecasts, and view contact center performance for multi-site activities. Formerly called virtual activity. See also Activity and Multi-Site Activity Forecast.
Multi-Site Activity Forecast
A forecast for an activity that is composed of various single-site activities at multiple local sites. Creating forecasts for multi-site activities is slightly different than for single-site activities. Because multi-site activities are split
258 Workforce Management 8.0
Appendix A: List of Terms
among different sites, you must also split the forecast interaction volume and staffing requirements. Formerly call virtual forecast. See also Multi-Site Activity.
Multi-Skilled Agent
An agent who is qualified to work on multiple activities, and who may therefore be performing various different types of work during a shift. Multi-skilled agents can greatly increase contact center efficiency. However, if multi-skilled agents are receiving too many interaction types to handle productively, you can control the types of activities they do during set parts of the day, using task sequences. See also Task Sequence.
Multi-Skilled Equivalent (MSE)
A WFM calculation of the number of agents required in order to handle the forecast workload, which includes and accounts for agents who have multiple skills. An agent can be scheduled to work only part of a time interval, and only the fraction of the time period during which she works is counted—and the value for staffing is expressed as a fraction.
The Multi-Skilled forecasting algorithm takes into account how many agents (with their various skill sets) could be available to work on each Activity, as well as how the occupancy of an average agent would be divided among this Activity and the other Activities on which the agent could work.
When building a schedule, WFM can optionally create the staffing forecast in MSEs while taking into account those agents for whom the schedule is being built, as well as those agents for whom schedules have already been built.
N
Number of Agents
The headcount scheduled for a certain timestep. Also known as Agents in Seats. For more information, see “Number of Agents – Scheduled” on page 284.
O
Objects Pane
A section of the WFM Web for Supervisors and WFM Configuration Utility interfaces. You use this pane to select the specific object or objects to configure, or about which to view data, on the working pane of the interface. The objects that are available for selection on the Objects pane vary, depending on your selection on the Modules pane and your security permissions. See also Modules Pane and User Security.
Administrator’s Guide 259
Appendix A: List of Terms
Optimization
The degree to which a schedule precisely correlates staffing levels with staffing requirements. Optimization is always a goal, but you can set it to be a higher or lower priority, depending on how many agent preferences should be fulfilled. Configuring optimization allows a balance between agent satisfaction levels and workload demands.
Overlap Template
A type of forecast template that you can use to replace historical data in a forecast. For example, if you have no historical data for a certain time period, apply an overlap template to fill in the gap.
Overstaffing
More agents have been scheduled than are required for the workload.
Overtime
Hours worked over and above the standard working hours. You configure overtime rules in the Contract Overtime window in the WFM Configuration Utility.
P
PABX
See Site.
Paid Hours
The total number of hours that an agent works, including meals and paid breaks. This number may not correspond to the total number of hours the agent spends at work, because it does not include unpaid time, such as unpaid breaks.
Pending Schedule Changes
Changes to the Master Schedule or a schedule scenario made by a user who does not have the Approve Changes security permission enabled. Pending changes are visible only to the user who created them, and to the qualified user who reviews them and decides whether they should be included in the official version of the schedule.
Performance
A measure of the extent to which actual site indicators, such as average speed of answer, service level, interaction volume, and so on, correspond with the
260 Workforce Management 8.0
Appendix A: List of Terms
forecast and scheduled values. You can track performance by using the Performance module in WFM Web for Supervisors.
Planned Overhead
The percentage of time that agents are not handling interactions or performing direct contact center work. For example, an agent might be taking a break, participating in a training session, or meeting with peers or supervisors.
Formerly named Working Overhead.
Planner
See Calendar.
Planner Logic
See Calendar Logic.
Policies Object
A configuration object that defines a rule governing the work schedules of agents. Policies objects include agent work times, break times, available shifts, and any other constraints that affect scheduling, whether set by the company, labor unions, country or local laws, or any other source. You define these policies as WFM objects by using the WFM Configuration Utility. WFM then considers them when making forecasts and creating schedules.
Preference Fulfillment
The percentage of schedule variations requested by agents, such as days off, specific shift times, and availability, that were assigned in the schedule. Because having preferences scheduled is important for agent satisfaction, WFM enables specified levels of preference fulfillment to be included in the schedule building process. You can also set priorities for which agents’ preferences are most likely to be fulfilled, based on rank, seniority, or both.
Preferences
Agent requests for particular shifts, days off, availability, and time off.
Profile
An agent type that you define, composed of a contract plus a skill set, or based on an actual agent. Scheduler uses profiles to create a type of generic schedule called a Profile Schedule to which you can then assign actual agents. See also Profile Schedule and Scheduling, Profile-B based.
Administrator’s Guide 261
Appendix A: List of Terms
Profile Schedule
A schedule created using profiles. You can create a schedule by using only profiles, or by using a combination of profiles and actual agents. You can assign to profile schedule slots agents who are not already incorporated into the schedule as real agents.
Publishing
Publishing saves a forecast scenario to the database, which means that you can use the forecast to create agent schedules. A published forecast is available to any authorized user at any time. This forecast is called the Master Forecast.
Publishing a schedule saves schedule scenario data to the Master Schedule in the WFM database. Until you publish a schedule, it is not available for tracking in the Adherence and Performance modules.
Q
Quality of Service
One or more statistics that WFM uses to compare the actual values with the service objectives projected in the schedule for each activity. This includes statistics that track service level and average speed of answer. It is used for immediate activities.
R
Real-Time Agent Adherence
A WFM feature that shows monitors how well agents are complying with their schedules.
Reason Code
Information entered by an agent that supplements real-time agent states. A reason helps define the precise nature of the agent state to which it is attached. In order to use reasons, you must have either a switch that supports the inclusion of reason codes with Genesys TEvents or a custom agent desktop that adds reason codes. Formerly called aux code.
Report Viewer
A WFM module that displays all information contained in reports, prints the reports, or exports them to files in various formats.
262 Workforce Management 8.0
Appendix A: List of Terms
Required Staffing
Staffing requirements that you set, in contrast to those established by WFM. You can set these requirements well in advance for hiring and budgeting purposes, and then compare these requirements to the staffing forecast generated using historical data or templates. Use of required staffing is optional. You can enter required staffing information in the Staffing Intraday window or load it from the appropriate template. You can also copy it from calculated staffing forecast data.
Rescheduling
The process of rebuilding a schedule after the schedule has been modified.
Rotating Pattern
A set of weekly schedule patterns that you can have Scheduler assign to agents. The weekly pattern can include a combination of shifts, days off, specified working hours, and availability periods. For example, you can define a weekly pattern called Weekends Off (WOff) and one called Monday and Tuesday Off (MTOff), and then create a rotating pattern consisting of a 4-week sequence of three WOff shifts followed by one MTOff shift. This ability to create rotating shift sequences permits enormous scheduling control.
Rotating Schedule
See Rotating Pattern.
S
Schedule
An arrangement of shifts, breaks, meals, exceptions, and so on, based on the predicted workload and the available agent pool. WFM builds schedules that are optimized within the site’s business constraints. Constraints include available people with required skills, service-objective requirements, employment contracts, business policies, and agent preferences. An optimized schedule ensures the least-possible overstaffing while still meeting service objectives.
Schedule Coverage
How well a schedule covers the forecasted staffing requirements.
Schedule Planning Period
A period of time that you set, from two to six weeks or a calendar month, which Scheduler then uses when assigning working hours and required days off. The schedule planning period enables supervisors to ensure that agents

Administrator’s Guide 263
Appendix A: List of Terms
receive the number of hours and days off specified in their contracts. WFM runs a consistency check to identify cases in which the settings for weekly working hours are inconsistent with those assigned for the schedule planning period.
Note: Although the consistency checks are designed to eliminate as many inconsistencies as possible, some configuration discrepancies may not appear until after you build a schedule.
See also Consistency Check.
Schedule Server
A component that no longer exists in Genesys WFM 7.0 and later. See WFM Builder.
Schedule State Group
A collection of schedule states that is linked to a site. Schedule State Group configuration is very important in order to correctly track adherence. You can include the following schedule states in schedule state groups: breaks, meals, exception types, and activities configured for the site, Day Off, Time Off, and No Activity. You associate each schedule state group with one or more Genesys events, such as CallRinging or WaitForNextCall, and you can also include an additional reason code (formerly an aux code) that further identifies what the agent is doing. See also Reason Code.
Schedule Summary
Both a view and a report in WFM that display a schedule’s service objectives, interaction volume, average handling time, budget, and number of agents.
Schedule Validation Error
A scheduling problem severe enough to terminate the schedule building process. Errors are usually caused by incorrect configuration information, but some are more serious and must be reported to Genesys Technical Support. For a complete list of errors, see the “Schedule Validation Errors” topic in WFM Web for Supervisors Help. See also Validation.
Schedule Validation Warning
A warning issued during scheduling. The scheduling algorithm ignores the encountered problem and goes on. When the scheduling process generates (and stacks) too many warnings, memory management problems can yield unrecoverable errors. See also Validation.
264 Workforce Management 8.0
Appendix A: List of Terms
Scheduling, Profile-Based
A scheduling method that enables the creation of blank schedules—that is, schedules that are constructed from empty shift slots rather than by assigning actual agents to the specific shifts. Agents are assigned to the schedule slots after the schedule is built. Using blank schedules, you can construct schedules before hiring employees, or have agents bid on desirable schedule slots. See also Profile Schedule and Profile.
Security Access
Limitations for certain users on access to information about some sites or objects. You configure security settings in the User Security module in the WFM Configuration Utility. You can customize user security so that only sites and objects for which the user has security authorization appear in WFM tree views. See also User Security.
Service Level
A customer service goal that you define as the percentage of interactions handled within a time limit. Service Level is one of the service objectives that you can set when building a staffing forecast. WFM will receive actual Service Level statistics from Stat Server, and several views and reports within WFM allow you to compare actual vs. forecasted and scheduled Service Levels.
Service Objective
The customer service goals that you set for Service Level, Occupancy, Average Speed of Answer, Abandonment%, and so on. You set values for these goals in the Forecast Staffing Build Wizard in WFM Web for Supervisors. See also Service Level, Maximum Occupancy, Average Speed of Answer (ASA), and Abandonment Percentage.
Shift
The possible work times at a site. Shifts are defined by time of day, duration, days of the week, and so on. For example, you might have first, second, swing, night, front-of-week, or back-of-week shifts.
Single-Skill Equivalent (SSE)
A WFM calculation of the number of agents required in order to handle the forecast workload, with the assumption that each agent has only one skill. Because multi-skilled agents are more efficient than single-skilled agents, WFM factors in an efficiency constant to reflect accurately the equivalence between single-skill equivalents and the actual agents who are being scheduled. See also Multi-Skilled Equivalent.
Administrator’s Guide 265
Appendix A: List of Terms
Site
The locations associated with an enterprise. Sites may correspond to switches in Configuration Manager. Users must have appropriate security access to view and make changes for sites. You can associate multiple sites to form a business unit. Formerly called contact center or location. See also Business Unit.
Site Rule
Defines a site-specific parameter. You can set the Minimum Duration Between the End of the Day and Start of Next Working Day, Maximum Start Time Difference for Members of the Same Team, and Schedule Planning Period Type parameters on the Contracts General tab.
Skill
A work-related expertise, such as Billing or Spanish. Each work activity in WFM has a set of one or more skills and skill levels associated with it, and an agent must possess those skills in order to be scheduled to work on that activity. You define skills in Configuration Manager, and they become available in WFM after you synchronize the WFM database with the Configuration Database in the WFM Configuration Utility. Skill updates appear in WFM immediately, through automatic synchronization that WFM Data Aggregator performs. If a skill is required for an activity, all agents scheduled for that activity must have that skill.
Soft Restart
A feature that enables WFM Data Aggregator to accommodate configuration changes without requiring a restart.
Split Interaction Volume
Division of the interaction volume forecast for a multi-site activity among the single-site activities that make up the multi-site activity. If several single-site activities are open, WFM splits the volume by using the ratio of the number of agents available to work each single-site activity, as determined by their skill-sets, whether they are multi-skilled, and their availability at a given timestep. You lose coverage for the predicted interaction volume if none of the single-site activities is open during a particular timestep when the multi-site activity is open and has a forecast interaction volume. See also Multi-Site Activity and Multi-Site Activity Forecast.
Split Staffing
A division of staffing from the staffing forecast scenario of a multi-site activity. If a multi-site activity has one or more associated activities, you can use the Staffing Split Wizard to split the result between associated activities after building the calculated and required staffing. This functionality is
266 Workforce Management 8.0
Appendix A: List of Terms
available only within a forecast scenario. See the Forecast > Forecast Scenarios > Staffing Split Wizard topic in Supervisor Help.
Staffing
The number of agents with certain skills required in order to meet a certain interaction volume at a certain time.
Statistic
WFM Data Aggregator collects, from Stat Server, information about statistics that are specific to WFM, such as Interaction Volume, Handle Time, and Quality of Service. Use these statistics to assess contact center performance and agent-adherence levels, as well as to build historical data for future forecasting.
Suitability
The extent to which a schedule minimizes occasions when the number of agents working is greater (overstaffed) or less (understaffed) than the number necessary to handle the actual workload.
Swapping
A feature that enables contact center managers to go into a published schedule and manually exchange agent schedule assignments. This feature enables customized preference fulfillment in cases where an agent with less seniority or a lower rank has had a preference granted in place of a more senior or highly ranked agent.
Synchronization Constraint
A WFM parameter that you can set to ensure that an agent starts each workday at the same time for a specified number of weeks, or for an entire schedule period. This feature enables more fixed, predictable schedules. Synchronization includes a Flexibility option, which allows Scheduler to vary the schedule start and end times within a specified range. Allowing some flexibility optimizes schedules.
Synchronization with Configuration Manager
A process that brings the data in the WFM database into correspondence with the data in the Configuration Database. Synchronization enables changes made to agent, site, users (supervisors or managers), time zone, or skill information in Configuration Manager to appear in WFM. You can use the WFM Configuration Utility to manually perform a complete synchronization or to synchronize only certain object types. In addition, WFM Data Aggregator automatically updates certain agent information and agent skills settings without the need for manual synchronization.
Administrator’s Guide 267
Appendix A: List of Terms
T
Task
An activity that is selected as part of a task sequence. See also Task Sequence.
Task Sequence
A defined period of time during which agents can work only on a specified set of tasks (called an activity set). Task sequences enable you to control how much the nature of an agent’s work changes during part of a day. You can prevent agents from being asked to jump constantly from activity to activity, a situation that can result in agent confusion and fatigue, and lower productivity. You configure task sequences for shifts. After a task sequence is configured, you can assign it to any compatible shift in the same site. See also Activity Set.
Team
A group of agents that is defined to suit scheduling and business requirements. You can organize teams by agent skill sets, schedule, sales targets, achievements, geographies, or any other factor—for example, tax-exempt bond fund specialists, e-mail agents, Christmas sales drive, and platinum customer care. An agent can belong to only one team.
Template
A set of data that you configure as a basis for forecasting, typically for sites that have little or no historical activity, or those with historical data that is incomplete because of outages. Template types include: Interaction Volume, Average Handling Time, Service Level, Interaction Volume Data Overlap,
Planned Overhead, Indirectly Occupied Time, Maximum Occupancy, and AHT Overlap. Use the Staffing template to set intra-day staffing requirements.
Threshold
The amount of time before an agent is supposed to enter a particular schedule state; or, after the schedule state ends, the amount of time that the agent can be in that state and still be considered to be adhering to the schedule. For example, suppose that an agent is scheduled to start a shift at 12:00 PM, and the Start Before threshold is set to 5 minutes. If the agent starts the shift at 11:54 AM, which is beyond the 5-minute threshold, this appears on the adherence reports as a nonadherent event.
Time Off
Formerly called vacation and of only one type. Now, you can configure multiple types, with different parameters and different time-off rules. In WFM Web for Agents, agents use the Time Off module to view, request, and remove time off. See also Time-Off Type, Time-Off Limit, and Time-Off Rule.
268 Workforce Management 8.0
Appendix A: List of Terms
Time-Off Limit
A feature located in the Calendar module of WFM Web for Supervisors. Use it to set the maximum number of agents in each category (Activity, Team, and Site) who may have time off during a particular timestep. You can set only one time-off limit for each time-off type. Formerly called vacation limit.
Time-Off Rule
Parameters that define the accumulation of accrued time off, the allocation of awarded time off, when and how many time-off hours can be carried over from year to year, the granting of time-off requests, and so on. You create these rules and associate them with agents in the Time-Off Rules module of the WFM Configuration Utility. Formerly called accrual rule.
Time-Off Type
A module in the WFM Configuration Utility that you use to create the different time-off types that you want to assign to agents and track using reports. You can configure one or more time-off rules for each time-off type. See also Time-Off Rule.
TimeProfile
A Stat Server parameter that WFM Data Aggregator uses to order statistics for WFM activities based on a specific interval of time. This time interval is configured in Stat Server as the TimeProfile parameter.
TimeRange
A Stat Server parameter that WFM Data Aggregator uses to request that service-level statistics be calculated based on the specified time interval. Usually, service level is calculated as X% of calls answered in Y seconds. The Y seconds must be configured as the TimeRange parameter.
Trading
Enables agents with compatible schedules to trade them. Agents can do this by using the WFM Web for Agents interface. Supervisors can view, approve, and decline trades by using the WFM Web for Supervisors interface. Agents can propose trades to all agents with compatible schedules, or they can send trade invitations only to specific individuals. Agent trades that fulfill all constraints are automatically accepted, reducing the time needed for supervisors to review trades.
Tree View
The lower-left pane (the Objects pane) of the WFM Configuration Utility and WFM Web interfaces contains a tree structure that displays some objects. The top level in the hierarchy represents the enterprise, and under this level you

Administrator’s Guide 269
Appendix A: List of Terms
will see objects associated with whichever module is selected on the Modules pane, which is located above the Objects pane.
U
Understaffing
Fewer agents have been scheduled than are required for the workload.
Universal Modeling Engine
A forecasting method that uses a complex algorithm to identify trends and patterns in historical data, and then creates a forecast based on these trends and patterns. The Universal Modeling Engine requires more than one year’s worth of historical data. The engine is configured to disregard days in the historical data that contain special events if no such events occur during the forecast period. This eliminates some misleading “noise” from the forecasts. If an event occurs in the forecast, the impact is extracted from historical data and applied to the baseline forecast. The Universal Modeling Engine is best suited to sites with a large quantity of high-quality historical data.
Unplanned Overhead
The percentage of agents who are being paid, but who are not working. For example, an agent may be on time off, out sick, or on a company-sponsored holiday. You can provide an estimate for unplanned overhead when building a staffing forecast, and then compare this to the actual unplanned overhead in the Actual Overheads Report. The unplanned overhead percentage is also used as part of the Estimated Budget calculation.
Note that unplanned overhead percentages do not affect the staffing requirement forecast.
Formerly named Nonworking Overhead.
User Security
A module in the WFM Configuration Utility that you use to set security access limitations for all nonagent users. You can limit access to specific sites, teams, activities, and so on. In some cases, you can configure some users to have view-only access to WFM objects, and others to have full access. You can also grant permission to edit the schedule without having the changes incorporated into the official version of the schedule. See also Security Access, Pending Schedule Changes, and Modules Pane.
User Time Zone
A time zone other than the local one. You can choose to have the timesteps in the Performance Intra-Day and Graphs windows labeled with the time in the
270 Workforce Management 8.0
Appendix A: List of Terms
user time zone. You do this by selecting the User Time Zone button on the Actions toolbar or selecting User Time Zone from the Actions menu.
For example, suppose that your local contact center is in Pacific time, and the current time is 1:00 PM. Furthermore, suppose that the user time zone is eastern standard time, and the current time is 4:00 PM. If you select User Time Zone, the labels for the current timestep in the Performance Intra-Day and Graphs windows change to 4:00 PM. The performance data does not change.
Additionally, reports that you view after selecting User Time Zone display timesteps that correspond to the time at which the events reported on happened in the user time zone.
Formerly called alternative time zone.
V
Vacation
See Time Off.
Validation
The process that Scheduler uses to check schedule settings against various constraints, such as activity open hours and agent availability, when you build a schedule. If there are inconsistencies that might cause the schedule you have configured to be unworkable, Scheduler generates warnings or errors.
If there are only warnings, Scheduler builds the schedule and displays the warnings in the Schedule Validation window. These short warnings indicate what you should do to correct the problem. For a list of schedule validation warnings, with explanations of their meanings, see the “Schedule Validation” topic in Supervisors Help. See also Schedule Validation Warning.
More serious inconsistencies result in schedule errors, which prevent Scheduler from publishing the schedule at all. For a list of schedule validation errors, with explanations of their meanings, see the “Schedule Validation” topic in Supervisors Help. See also Schedule Validation Error.
Version
Information about the release number and database version of the instance of the WFM Configuration Utility, WFM Database Utility, or WFM Web you are running. To see this information, click About on the main toolbar in any of these applications. The About window displays the program release number, database version, database update status, data source, and user name. If the WFM database has not been updated and therefore is not compatible with the current release of WFM, the Database Update field in the Configuration Utility About window appears in red.

Administrator’s Guide 271
Appendix A: List of Terms
Virtual Activity
See Multi-Site Activity.
Virtual Agent
Not used in Workforce Management 7.1 and later.
Virtual Contact Center
See Business Unit.
Virtual Forecast
See Multi-Site Activity Forecast.
See also Split Interaction Volume.
Virtual Switch
See Business Unit.
Virtual Team
Not used in Workforce Management 7.1 and later.
Virtual Workforce
Not used in Workforce Management 7.1 and later. See Business Unit Staffing.
W
Warning
See Schedule Validation Warning.
Weekly Pattern
A sequence of days configured to be part of a rotating pattern. Weekly pattern settings include days off, shifts, start times, and paid hours.
WFM Builder
A WFM server that builds the WFM schedules. This functionality was formerly provided by Schedule Server.
WFM Configuration Utility
A WFM application that you can use to configure enterprise objects such as Agents, Activities, and Rotating Patterns; Policies objects such as working hours, activity open hours, and time-off rules; and user security settings; and
272 Workforce Management 8.0
Appendix A: List of Terms
that you can use to import and export historical data. This functionality was formerly provided in the Workforce Manager application.
WFM Data Aggregator
A WFM server that collects data for each activity, such as the number of interactions or the average handling time. The data is compared to planned values in the Adherence and Performance modules.
WFM Database Utility
A utility that includes various database-related functionality, including database creation, backup/restore, updating, and maintenance. The backup feature copies all of the WFM database tables into a local file in Microsoft Access database (.MDB) format. The restore feature saves the data from the .MDB file to the WFM database.
WFM Reports Server
A WFM server dedicated to creating the WFM reports. Starting with Workforce Management 7.2, a separate WFM Web application is used as the dedicated reports server. In pre 7.2 releases, WFM contained a WFM Reports Server component.
WFM Server
A server that manages all the requests from the WFM Web application—for example, retrieving agent schedules upon request and providing them to WFM Web. WFM Server manages the requests and responses from WFM Web applications, from the WFM database, and from all the other WFM components (such as WFM Builder).
WFM Server also writes to the WFM database any changes made in the WFM Web Schedule window.
WFM Web
The WFM component that enables agents and supervisors to harness the power and convenience of the Web to access and use WFM. WFM Web makes real-time and past performance data available whenever it is needed. WFM Web has two parts: Supervisor and Agent.
Supervisors can use WFM Web to create forecasts, create and monitor schedules, make schedule changes, view and approve or deny schedule trade requests, view contact center performance, monitor real-time agent adherence, and view reports.
Agents can use WFM Web to check scheduled activities and working hours; communicate preferred shift, working hours, and time-off requests to administrators; and make schedule trades with other agents.
Administrator’s Guide 273
Appendix A: List of Terms
What-If Scenario
A feature within the WFM Web Performance module that you can use to create a model of intra-day contact center performance under different conditions that you configure. With the What-If Scenario feature, you can modify several performance values and then recalculate the service-objective impact based on the modified data. For example, you can use a what-if scenario to assess the potential impact of a change in site staff attendance, or the effect of a higher call volume on service objectives.
Workforce
See Staffing.
Workforce Access Group
Not used in Workforce Management 7.1 and later. See User Security.
Working Agents
Those agents who are logged in.

274 Workforce Management 8.0
Appendix A: List of Terms
Administrator’s Guide 275
Appendix
BMetricsThis appendix describes metrics for: Schedule Summary View and Report, page 275 Contact Center Performance Report, page 283 Agent Adherence Report, page 289 Endnotes, page 290
Note: A period in these metrics refers to the specific granularity of the report being run. For Intra-day granularity a period is 15 minutes; for Daily granularity a period is 1 day; and so on.
Schedule Summary View and Report
Number of Agents
Number of Agents is also called Headcount or Agents in Seats. If an agent is multi-skilled and is scheduled for more than one activity for a given period, he will actually count as 1 headcount for each of the activities for which he is scheduled. Thus, in comparison with Coverage, Headcount can double count an agent if he is multi-skilled and is scheduled for more than one activity during a particular period.
For example, if an agent is scheduled for two activities in a particular 15-minute timestep, he might count as 0.5 towards the Coverage of each of those activities, but he would count as 1 Headcount towards each of those activities. Unlike Coverage, where an agent could count towards partial coverage if he’s scheduled for something other than activity work for part of a 15-minute

276 Workforce Management 8.0
Appendix B: Metrics Schedule Summary View and Report
timestep, for Headcount it is all or nothing. This means that as long as an agent is scheduled for at least 1 minute of work on an activity during a given 15-minute timestep, he will count as 1 Headcount towards that activity.
How the Total / Average is Calculated
The value for Headcount in the totals/averages row at the top of this view (or bottom of the report) is a simple average of all the values for all the timesteps of the selected time period (which can be: Intra-day, Daily, nWeeks, or Monthly).
Service Level – Scheduled
The Service Level that you should achieve on this activity, with the number of agents currently scheduled for this activity. Due to agent rounding, this value may differ from the original service level objective that was stated when the staffing forecast was built.
For example, WFM may forecast a staffing requirement of 12 agents to meet a service level objective of 80% of interactions answered within 20 seconds. But a Service Level Percentage Forecast may report a higher number, such as 83.48%. This is because 12 was the minimum number of agents required to meet the 80% service level objective but, with that number of agents, the contact center can be expected to achieve a slightly better service level than 80%. With one less agent (11 agents), the contact center would not be expected to achieve the 80% service level.
How the Total / Average is Calculated
A weighted average, calculated across the open hours:
AVG SL Scheduled = S (Scheduled SLi * Forecasted IVi) / S (Forecasted IVi)
Where:
Service Level – Forecasted
The Service Level Percentage objective that you should be able to achieve when staffing with the number of agents from the staffing forecast (a.k.a. “Budget – Difference”).
Scheduled SLi = Calculated Service Level based on the number of scheduled agents for timestepi
Forecasted IVi = Forecasted Interaction Volume for timestepi
timestepi = timestep number over the open hours
Administrator’s Guide 277
Appendix B: Metrics Schedule Summary View and Report
How the Total / Average is Calculated
A weighted average, weighted by Forecasted IV:
AVG SL Forecasted = (Forecasted SLi * Forecasted IVi) / (Forecasted IVi)
Where:
Service Level – Difference
“Service Level – Scheduled” minus “Service Level – Forecasted”.
Interaction Volume – Scheduled
The number of interactions that can be handled based on the schedule coverage. Calculated by using the inverse of the WFM’s staffing forecast algorithm.
WFM uses a modified Erlang algorithm to derive Calculated Staffing based on the IV, the AHT, and service objectives stated when building the forecast. Therefore, to calculate the scheduled interaction volume, WFM uses that formula in reverse.
How the Total / Average is Calculated
The sum is across the entire report time range.
Interaction Volume – Forecasted
The interaction volume taken from the Master Forecast.
How the Total / Average is Calculated
The sum across the entire report time range.
Interaction Volume – Difference
“Interaction Volume – Scheduled” minus “Interaction Volume – Forecasted”.
Forecasted SLi = Forecasted Service Level for timestepi
Forecasted IVi = Forecasted Interaction Volume for timestepi
timestepi = timestep number over the open hours

278 Workforce Management 8.0
Appendix B: Metrics Schedule Summary View and Report
AHT – Scheduled
The Average Handling Time (AHT) per interaction that you should achieve, based on the schedule coverage. Calculated by using the inverse of the WFM’s staffing forecast algorithm.
WFM uses a modified Erlang algorithm to derive Calculated Staffing, based on the IV, AHT, and service objectives stated when building the forecast. Therefore, to calculated the scheduled AHT, it uses that formula in reverse.
How the Total / Average is Calculated
A weighted average, weighted by Forecasted IV:
AVG AHT Scheduled = (Scheduled AHTi * Forecasted IVi) / (Forecasted IVi)
Where:
AHT – Forecasted
Average Handling Time of interactions, taken from the Master Forecast.
How the Total / Average is Calculated
A weighted average, weighted by Forecasted IV:
AVG AHT Forecasted = (Forecasted AHTi * Forecasted IVi) / (Forecasted IVi)
Where:
AHT – Difference
“AHT – Scheduled” minus “AHT – Forecasted”.
Budget – Scheduled
The budget for this schedule based on the number of agents from the “Coverage – Scheduled” column. The calculation is based on a full-time equivalent’s hourly wage, as well as on the Planned Overhead % and
Scheduled AHTi = Scheduled Average Handling Time for timestepi
Forecasted IVi = Forecasted Interaction Volume for timestepi
timestepi = timestep number over the open hours
Forecasted AHTi = Forecasted Average Handling Time for timestepi
Forecasted IVi = Forecasted Interaction Volume for timestepi
timestepi = timestep number over the open hours
Administrator’s Guide 279
Appendix B: Metrics Schedule Summary View and Report
Unplanned Overhead % (which were specified when the staffing forecast was built).
For a 15-minute timestep, the formula is:
(Coverage/4)*((100/(100-Planned Overhead))*(100/100-Unplanned Overhead)* Hourly Wage)
The unit of measure is in whatever monetary unit was used when the “Hourly Wage” was specified while building the forecast.
How the Total / Average is Calculated
This figure is in the sum across the entire report time range.
Budget – Forecasted
The budget for the schedule based on the number of agents from the “Staffing – Calculated” column, based on a full-time equivalent’s hourly wage, as well as the Planned Overhead % and Unplanned Overhead % (specified when the staffing forecast was built).
For a 15-minute timestep, the formula is:
(Staffing/4)*((100/(100-Planned Overhead))*(100/100-Unplanned Overhead)* Hourly Wage)
The unit of measure is in whatever monetary unit was used when the “Hourly Wage” was specified when building the forecast.
How the Total / Average is Calculated
This figure is in the sum across the entire report time range.
Budget – Difference
“Budget – Scheduled” minus “Budget – Forecasted”.
Staffing – Calculated
A value taken directly from the staffing forecast, for the particular timestep.
How the Total / Average is Calculated
The value in the column footer is calculated based on the same approach as what is described for “Coverage – Scheduled”.
280 Workforce Management 8.0
Appendix B: Metrics Schedule Summary View and Report
Staffing – Required
A value taken directly from the staffing forecast, for the particular timestep. It will be populated only if you put some values in the optional Required Staffing column in your staffing forecast.
How the Total / Average is Calculated
The value in the column footer is calculated based on the same approach as what is described for “Coverage – Scheduled”.
Difference – Calculated
“Coverage – Scheduled” minus “Staffing – Calculated”.
How the Total / Average is Calculated
The value in the column footer is calculated based on the same approach as what is described for “Coverage – Scheduled”.
Difference – Required
“Coverage – Scheduled” minus “Staffing – Required”.
Coverage – Scheduled
The actual amount of time that an agent should count towards coverage of the work in this time period. If an agent is multi-skilled and is scheduled for multiple activities during a given period, he may count fractionally towards the coverage of each activity (for example, as 0.5 toward each of two activities for which he’s scheduled).
If an agent has something other than activity work scheduled for part of a period, that will be subtracted from the amount of time he’s counted towards the coverage of that activity work. For example, an agent who is scheduled for an activity for a given 15-minute timestep but has a break for the first 5 minutes of that timestep, would count as 0.67 towards the coverage of that activity for that period.
How the Total / Average is Calculated
This figure is in FTEs. For the calculation, see “Endnote 1” on page 290.
The value in the totals/averages row at the top of this view (or bottom of the report) is calculated as follows:

Administrator’s Guide 281
Appendix B: Metrics Schedule Summary View and Report
1. WFM calculates the sum of the agents which are covering this activity within each timestep during the day.
2. The value calculated in step 1 is multiplied by 15 minutes in order to get the total time of activity work.
3. The value calculated in step 2 is divided by the value set for Paid Hours a Day, which was entered while building staffing forecast for this activity
Coverage – Published
The original values from the “Coverage – Scheduled” column the last time a schedule scenario was published to the Master Schedule.
How the Total / Average is Calculated
The value in the column footer is calculated based on the same approach as what is described for “Coverage – Scheduled”.
Coverage – Difference
“Coverage – Scheduled” minus “Coverage – Published”.
ASA – Scheduled
The Average Speed of Answer that you should achieve on this activity, with the number of agents currently scheduled for this activity.
The totals/average row for ASA Scheduled reports a weighted average, calculated across the open hours and weighted by Forecasted IV (exactly as for “Service Level – Scheduled”):
AVG ASA Scheduled = S (Scheduled ASAi * Forecasted IVi) / S (Forecasted IVi)
Where:
ASA – Forecasted
The totals/average row for ASA Forecasted reports a weighted average, calculated across the open hours and weighted by Forecasted IV (exactly like for “Service Level – Forecasted”):
A weighted average, weighted by Forecasted IV
AVG ASA Forecasted = S (Forecasted ASAi * Forecasted IVi) / S (Forecasted IVi)
Scheduled ASAi = Calculated Average Speed of Answer based on the number of scheduled agents for timestepi
Forecasted IVi = Forecasted Interaction Volume for timestepi
timestepi = timestep number over the open hours
282 Workforce Management 8.0
Appendix B: Metrics Schedule Summary View and Report
Where:
ASA – Difference
“ASA – Scheduled” minus “ASA – Forecasted”.
Occupancy – Scheduled
The Occupancy that you should achieve on this activity, with the number of agents currently scheduled.
How the Total / Average is Calculated
The totals/average row for Occupancy reports a weighted average, calculated across the open hours and weighted by Forecasted IV (exactly as for “Service Level – Scheduled”):
A weighted average, calculated across the open hours and weighted by Forecasted IV:
AVG Occupancy Scheduled = S (Scheduled Occi * Forecasted IVi) / S (Forecasted IVi)
Where:
Occupancy – Forecasted
The Occupancy objective that you should be able to achieve when staffing with the number of agents from the staffing forecast (“Staffing – Calculated”).
How the Total / Average is Calculated
The totals/average row for Occupancy reports a weighted average, calculated across the open hours and weighted by Forecasted IV (exactly as for “Service Level – Forecasted”):
Forecasted ASAi = Calculated Average Speed of Answer based on the number of scheduled agents for timestepi
Forecasted IVi = Forecasted Interaction Volume for timestepi
timestepi = timestep number over the open hours
Scheduled Occi = Calculated Occupancy based on the number of scheduled agents for timestepi
Forecasted IVi = Forecasted Interaction Volume for timestepi
timestepi = timestep number over the open hours
Administrator’s Guide 283
Appendix B: Metrics Contact Center Performance Report
A weighted average, weighted by Forecasted IV:
AVG Occupancy Forecasted = S (Forecasted Occi * Forecasted IVi) / S (Forecasted IVi)
Where:
Occupancy – Difference
“Occupancy – Scheduled” minus “Occupancy – Forecasted”.
Contact Center Performance ReportNote: The Difference calculation is controlled by the WFM Web Application
option RevertDiffCalculation in Framework’s Configuration Manager. false (default): Scheduled or Forecasted minus Actualtrue: Actual minus Scheduled or Forecasted
This document will use the default value.
Coverage – Scheduled
The actual amount of time that an agent should count toward coverage of the work in this time period. If an agent is multi-skilled and is scheduled for multiple activities during a given period, he may count fractional amounts of time toward the coverage of each activity (for example, 0.5 toward each of two activities for which he is scheduled).
If an agent has something other than activity work scheduled for part of a period, that will be subtracted from the amount of time counted toward the coverage of that activity work. For example, an agent who is scheduled for an activity for a given 15-minute timestep, but who has a break for the first five minutes of that timestep, would count as 0.67 toward the coverage of that activity for that period.
How the Total / Average Is Calculated
This figure is in FTEs. For the calculation, see “Endnote 1” on page 290.
The value in the totals/averages row at the top of this view (or at the bottom of the report) is calculated as follows:
Forecasted Occi = Forecasted Occupancy for timestepi
Forecasted IVi = Forecasted Interaction Volume for timestepi
timestepi = timestep number over the open hours
284 Workforce Management 8.0
Appendix B: Metrics Contact Center Performance Report
1. WFM calculates the sum of the agents who are covering this activity within each timestep during the day.
2. The value calculated in Step 1 is multiplied by 15 minutes in order to get the total time of activity work.
3. The value calculated in Step 2 is divided by the value set for Paid Hours a Day, which was entered while building the staffing forecast for this activity
Coverage – Optimal
The coverage that would have been required in order to meet the original service objectives, based on the actual IV and AHT.
Coverage – Difference
“Coverage – Optimal” minus “Coverage – Scheduled”.
Coverage – Percentage
“Coverage – Optimal”
——————————————————————————“Coverage – Optimal” minus “Coverage – Scheduled”
in concept: Optimal / (Optimal - Scheduled)
Number of Agents – Scheduled
The number of agents scheduled for this period, also known as headcount.
How the Total / Average is Calculated
A simple average across the entire report time range. Thus, even if activity is only open for a portion of the day, if this report were run for a intra-day period, the average would be calculated over 96 timesteps.
Number of Agents – Actual
The number of agents who were actually logged in during this period, also known as headcount.
How the Total / Average is Calculated
A simple average of the number of time steps when agents were logged in.
(Agentsi) / Number of time steps
Administrator’s Guide 285
Appendix B: Metrics Contact Center Performance Report
Where Agentsi is the number of agents logged in (as reported by Stat Server) during timestepi
Number of Agents – Difference
“Number of Agents – Scheduled” minus “Number of Agents – Actual”.
Number of Agents – Percentage of Difference
(“Number of Agents – Scheduled” minus “Number of Agents – Actual”)——————————————————————————
“Number of Agents – Scheduled”
in concept: (Scheduled - Actual) / Scheduled
Interaction Volume – Forecasted
The number of interactions forecasted for this period (taken directly from the Master Forecast).
How the Total / Average is Calculated
This Sum is spread across the entire report time range.
Interaction Volume – Actual
The number of interactions actually received. The exact nature of this metric will depend on what Stat Server statistic is configured for Interaction Volume. For example, for voice interactions, normally this is based on Number of Calls Entered.
How the Total / Average is Calculated
The sum is of Interaction Volume for each time step within the report time range.
(IVi)
Where:
IVi is the Interaction Volume recorded by Stat Server during timestepi
Interaction Volume – Difference
“Interaction Volume – Forecasted” minus “Interaction Volume – Actual”.
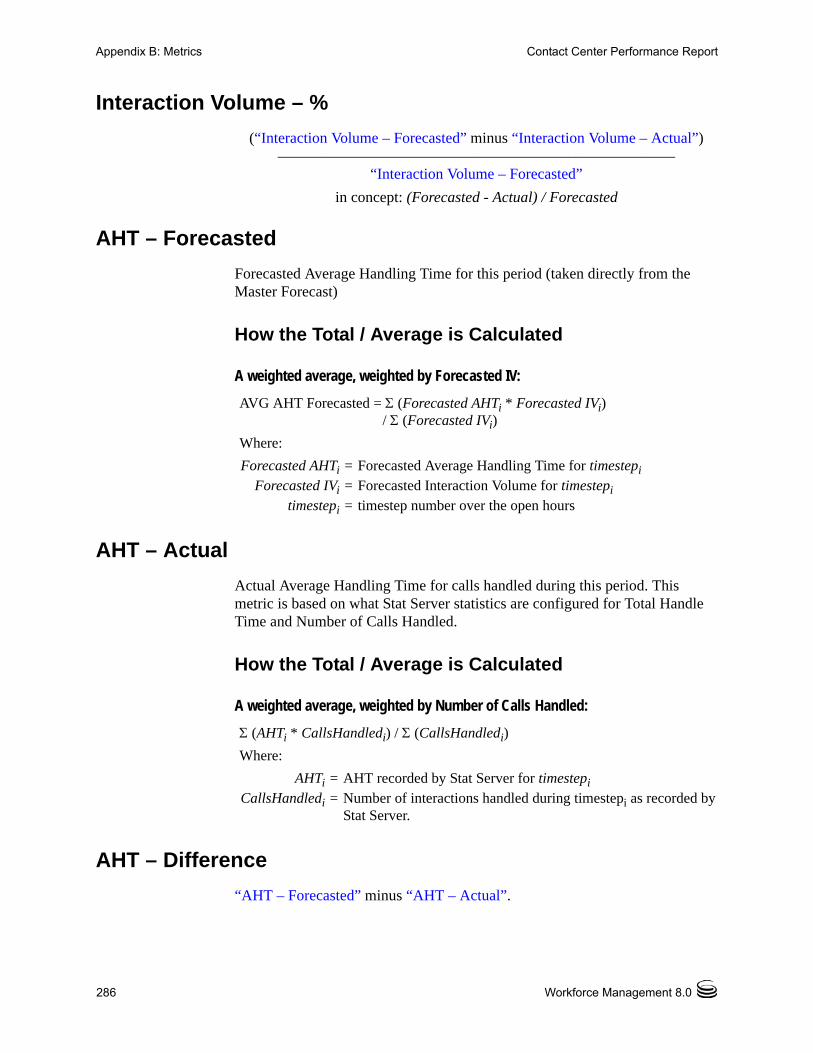
286 Workforce Management 8.0
Appendix B: Metrics Contact Center Performance Report
Interaction Volume – %
(“Interaction Volume – Forecasted” minus “Interaction Volume – Actual”)——————————————————————————
“Interaction Volume – Forecasted”
in concept: (Forecasted - Actual) / Forecasted
AHT – Forecasted
Forecasted Average Handling Time for this period (taken directly from the Master Forecast)
How the Total / Average is Calculated
A weighted average, weighted by Forecasted IV:
AVG AHT Forecasted = (Forecasted AHTi * Forecasted IVi) / (Forecasted IVi)
Where:
AHT – Actual
Actual Average Handling Time for calls handled during this period. This metric is based on what Stat Server statistics are configured for Total Handle Time and Number of Calls Handled.
How the Total / Average is Calculated
A weighted average, weighted by Number of Calls Handled:
(AHTi * CallsHandledi) / (CallsHandledi)
Where:
AHT – Difference
“AHT – Forecasted” minus “AHT – Actual”.
Forecasted AHTi = Forecasted Average Handling Time for timestepi
Forecasted IVi = Forecasted Interaction Volume for timestepi
timestepi = timestep number over the open hours
AHTi = AHT recorded by Stat Server for timestepi
CallsHandledi = Number of interactions handled during timestepi as recorded by Stat Server.
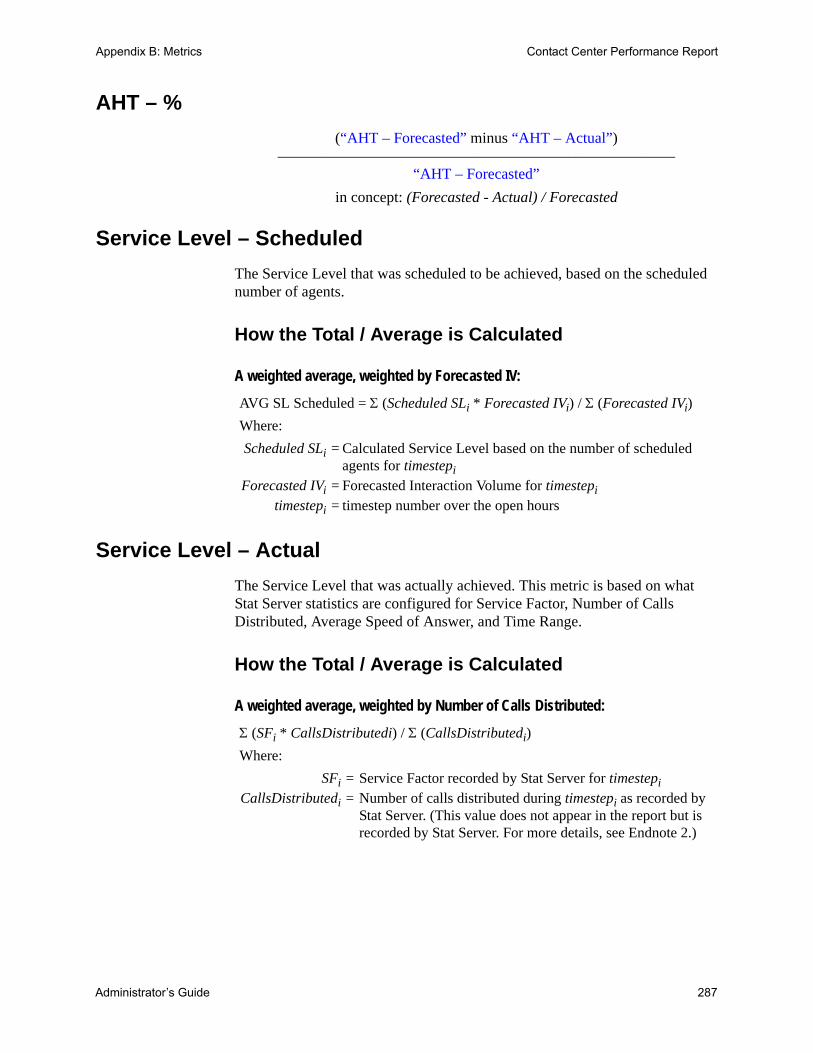
Administrator’s Guide 287
Appendix B: Metrics Contact Center Performance Report
AHT – %
(“AHT – Forecasted” minus “AHT – Actual”)——————————————————————————
“AHT – Forecasted”
in concept: (Forecasted - Actual) / Forecasted
Service Level – Scheduled
The Service Level that was scheduled to be achieved, based on the scheduled number of agents.
How the Total / Average is Calculated
A weighted average, weighted by Forecasted IV:
AVG SL Scheduled = (Scheduled SLi * Forecasted IVi) / (Forecasted IVi)
Where:
Service Level – Actual
The Service Level that was actually achieved. This metric is based on what Stat Server statistics are configured for Service Factor, Number of Calls Distributed, Average Speed of Answer, and Time Range.
How the Total / Average is Calculated
A weighted average, weighted by Number of Calls Distributed:
(SFi * CallsDistributedi) / (CallsDistributedi)
Where:
Scheduled SLi = Calculated Service Level based on the number of scheduled agents for timestepi
Forecasted IVi = Forecasted Interaction Volume for timestepi
timestepi = timestep number over the open hours
SFi = Service Factor recorded by Stat Server for timestepi
CallsDistributedi = Number of calls distributed during timestepi as recorded by Stat Server. (This value does not appear in the report but is recorded by Stat Server. For more details, see Endnote 2.)

288 Workforce Management 8.0
Appendix B: Metrics Contact Center Performance Report
ASA – Scheduled
The Average Speed of Answer that was scheduled to be achieved, based on the scheduled number of agents. Calculated by using the inverse of the WFM’s staffing forecast algorithm.
WFM uses a modified Erlang algorithm to derive Calculated Staffing, based on the IV, AHT, and service objectives such as ASA that were stated when building the forecast. Therefore, to calculated the Scheduled ASA it uses that formula in reverse.
How the Total / Average is Calculated
A weighted average, weighted by Forecasted IV:
AVG ASA Scheduled = (Scheduled ASAi * Forecasted IVi) / (Forecasted IVi)
Where:
ASA – Actual
The Average Speed of Answer that was actually achieved. This metric is based on what Stat Server statistics are configured for ASA.
How the Total / Average is Calculated
A weighted average, weighted by Number of Calls Distributed:
(ASAi x CallsDistributedi) / (CallsDistributedi)
Where:
Abandons Factor – Scheduled
The expected number of abandoned interactions based on the scheduled number of agents. Calculated by using the inverse of the WFM’s staffing forecast algorithm.
WFM uses a modified Erlang algorithm to derive Calculated Staffing, based on the IV, AHT, and service objectives such as Abandonment percentage that
Scheduled ASAi = Calculated ASA based on the number of scheduled agents for timestepi
Forecasted IVi = Forecasted Interaction Volume for timestepi
timestepi = timestep number over the open hours
ASAi = Average Speed of Answer for timestepi as recorded by Stat Server
CallsDistributedi = Number of calls distributed during timestepi as recorded by Stat Server
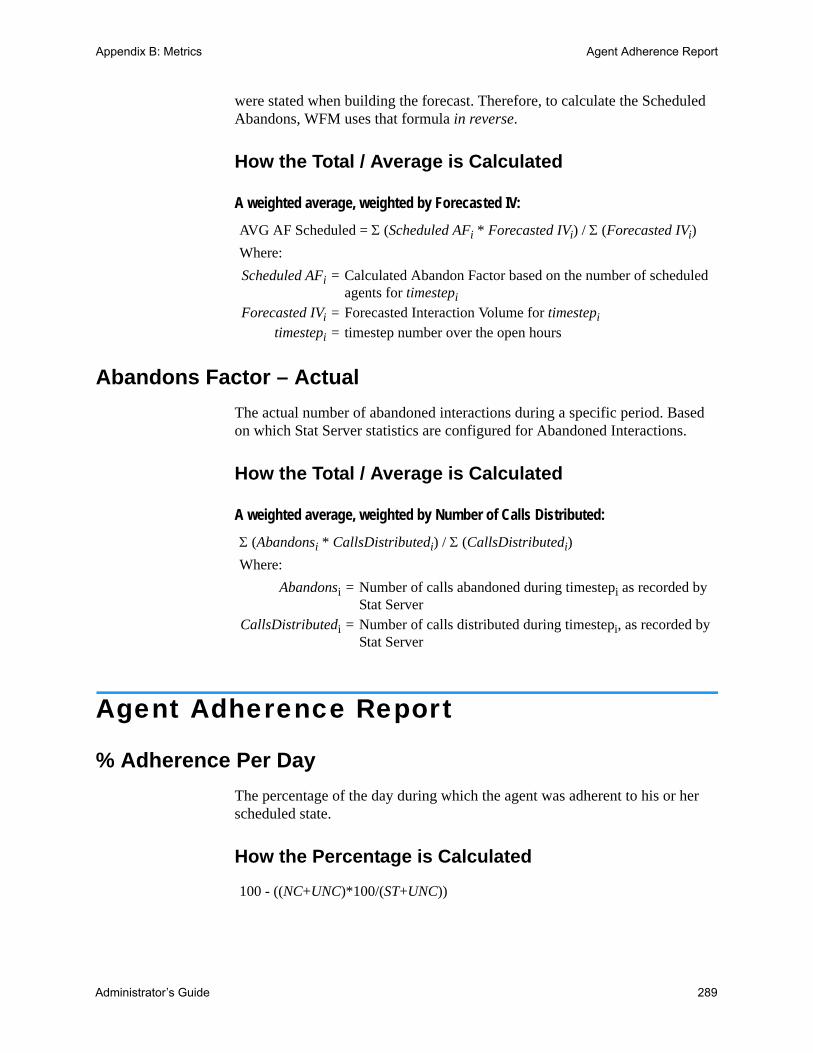
Administrator’s Guide 289
Appendix B: Metrics Agent Adherence Report
were stated when building the forecast. Therefore, to calculate the Scheduled Abandons, WFM uses that formula in reverse.
How the Total / Average is Calculated
A weighted average, weighted by Forecasted IV:
AVG AF Scheduled = (Scheduled AFi * Forecasted IVi) / (Forecasted IVi)
Where:
Abandons Factor – Actual
The actual number of abandoned interactions during a specific period. Based on which Stat Server statistics are configured for Abandoned Interactions.
How the Total / Average is Calculated
A weighted average, weighted by Number of Calls Distributed:
(Abandonsi * CallsDistributedi) / (CallsDistributedi)
Where:
Agent Adherence Report
% Adherence Per Day
The percentage of the day during which the agent was adherent to his or her scheduled state.
How the Percentage is Calculated
100 - ((NC+UNC)*100/(ST+UNC))
Scheduled AFi = Calculated Abandon Factor based on the number of scheduled agents for timestepi
Forecasted IVi = Forecasted Interaction Volume for timestepi
timestepi = timestep number over the open hours
Abandonsi = Number of calls abandoned during timestepi as recorded by Stat Server
CallsDistributedi = Number of calls distributed during timestepi, as recorded by Stat Server
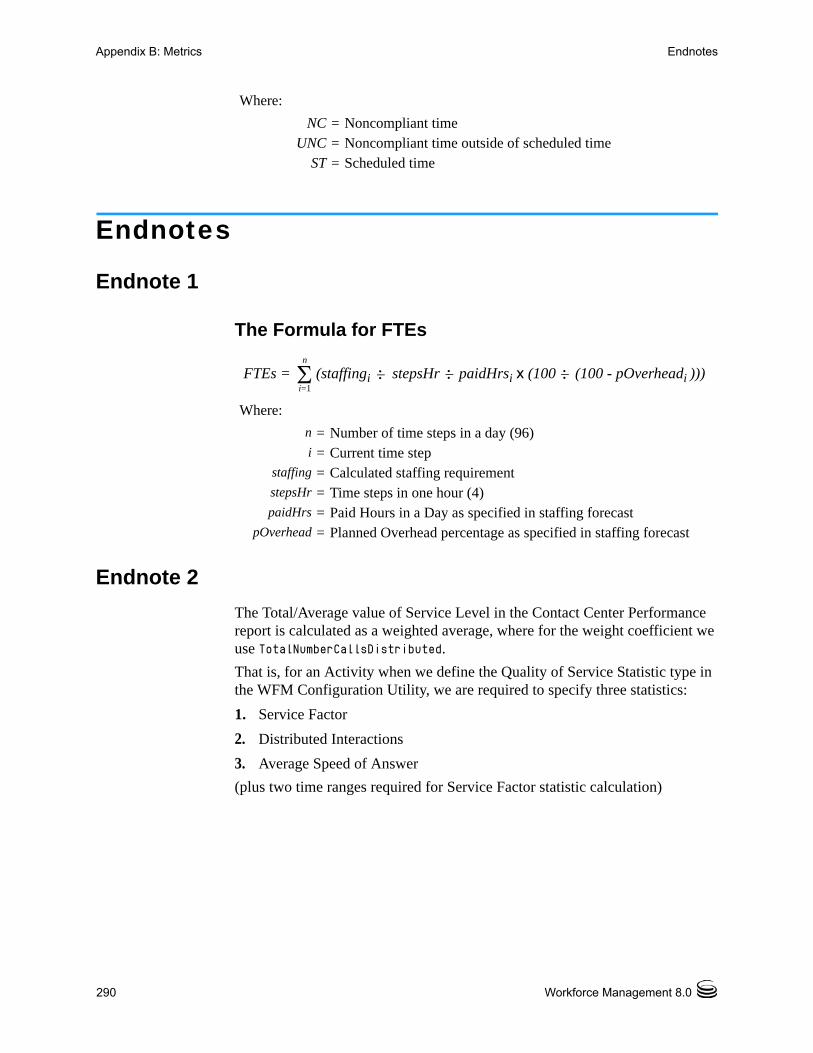
290 Workforce Management 8.0
Appendix B: Metrics Endnotes
Where:
Endnotes
Endnote 1
The Formula for FTEs
Where:
Endnote 2
The Total/Average value of Service Level in the Contact Center Performance report is calculated as a weighted average, where for the weight coefficient we use TotalNumberCallsDistributed.
That is, for an Activity when we define the Quality of Service Statistic type in the WFM Configuration Utility, we are required to specify three statistics:
1. Service Factor
2. Distributed Interactions
3. Average Speed of Answer
(plus two time ranges required for Service Factor statistic calculation)
NC = Noncompliant timeUNC = Noncompliant time outside of scheduled time
ST = Scheduled time
n = Number of time steps in a day (96)i = Current time step
staffing = Calculated staffing requirementstepsHr = Time steps in one hour (4)paidHrs = Paid Hours in a Day as specified in staffing forecast
pOverhead = Planned Overhead percentage as specified in staffing forecast
FTEs = (staffingi stepsHr paidHrsi x (100 (100 - pOverheadi )))n
i=1:– :– :–
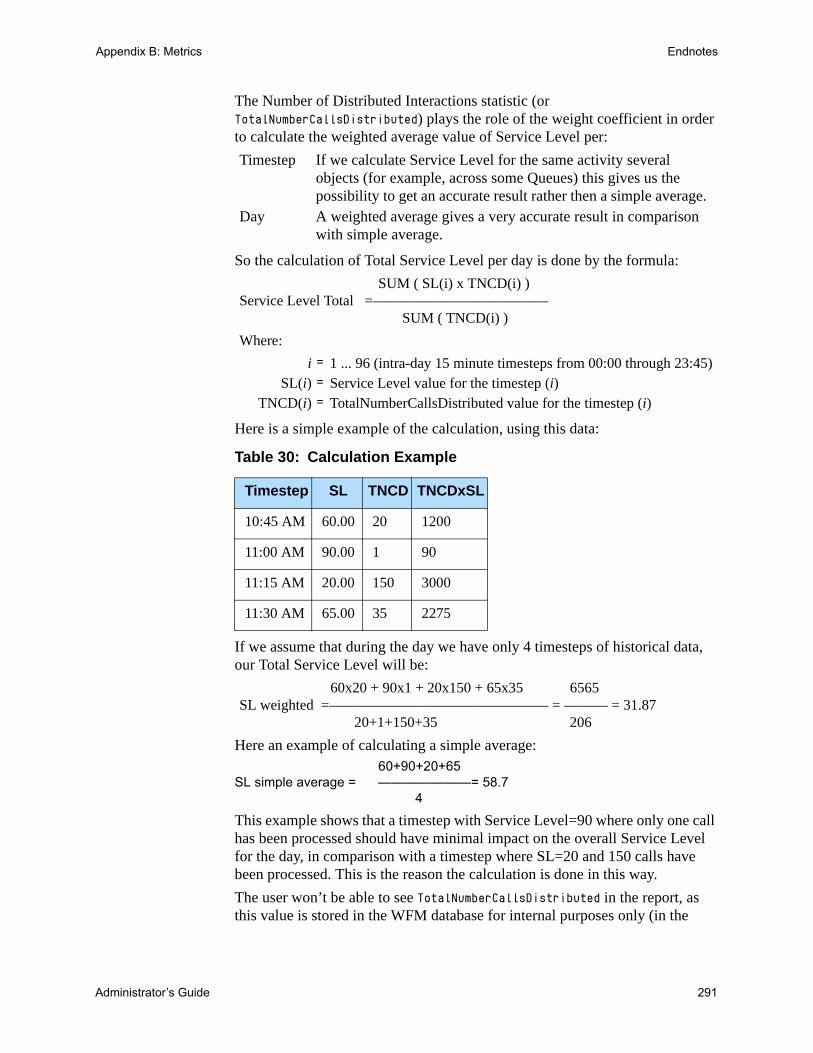
Administrator’s Guide 291
Appendix B: Metrics Endnotes
The Number of Distributed Interactions statistic (or TotalNumberCallsDistributed) plays the role of the weight coefficient in order to calculate the weighted average value of Service Level per:
So the calculation of Total Service Level per day is done by the formula:
SUM ( SL(i) x TNCD(i) )Service Level Total =————————————
SUM ( TNCD(i) )
Where:
Here is a simple example of the calculation, using this data:
If we assume that during the day we have only 4 timesteps of historical data, our Total Service Level will be:
60x20 + 90x1 + 20x150 + 65x35 6565SL weighted =——————————————— = ——— = 31.87
20+1+150+35 206
Here an example of calculating a simple average:60+90+20+65
SL simple average = ———————= 58.74
This example shows that a timestep with Service Level=90 where only one call has been processed should have minimal impact on the overall Service Level for the day, in comparison with a timestep where SL=20 and 150 calls have been processed. This is the reason the calculation is done in this way.
The user won’t be able to see TotalNumberCallsDistributed in the report, as this value is stored in the WFM database for internal purposes only (in the
Timestep If we calculate Service Level for the same activity several objects (for example, across some Queues) this gives us the possibility to get an accurate result rather then a simple average.
Day A weighted average gives a very accurate result in comparison with simple average.
i = 1 ... 96 (intra-day 15 minute timesteps from 00:00 through 23:45)SL(i) = Service Level value for the timestep (i)
TNCD(i) = TotalNumberCallsDistributed value for the timestep (i)
Table 30: Calculation Example
Timestep SL TNCD TNCDxSL
10:45 AM 60.00 20 1200
11:00 AM 90.00 1 90
11:15 AM 20.00 150 3000
11:30 AM 65.00 35 2275

292 Workforce Management 8.0
Appendix B: Metrics Endnotes
table WM_perf_activities in the field WM_distrib_calls, for each activity and for each timestep).
Also keep in mind that TotalNumberCallsDistributed is not the same as Interaction Volume, since in general Interaction Volume is configured as TotalNumberCallsEntered (Answered + Abandoned), while TotalNumberCallsDistributed is the number of calls which are being distributed from the Queue.
Administrator’s Guide 293
Appendix
CMulti Forecasting PrimerThis appendix describes the Genesys approach to multi-site forecasting in a networked contact center, where some call types and activities are distributed to agents working across multiple sites. It also describes the Genesys approach to multi-skill forecasting, where agents with multiple skills can increase the center’s efficiency by performing multiple tasks within a single timestep.
This appendix contains the following sections: Multi-Site Forecasting, page 293 Multi-Skill Forecasting, page 298
Multi-Site ForecastingBeginning with release 7.2, a contact center analyst can use Genesys WFM to model a networked contact center, where some call types and activities are distributed to agents working across multiple sites. To model a multi-site environment, follow these steps/guidelines:
Set Up Multi-Site Activities
These multi-site activities are work activities that are handled at the site (child) level, and in the object tree they appear higher in the hierarchy.
Determine the Total Demand
To configure Multi-Site Forecasting (MSF) properly, you need data to inform your choices. To gather that data, you can configure WFM to collect:
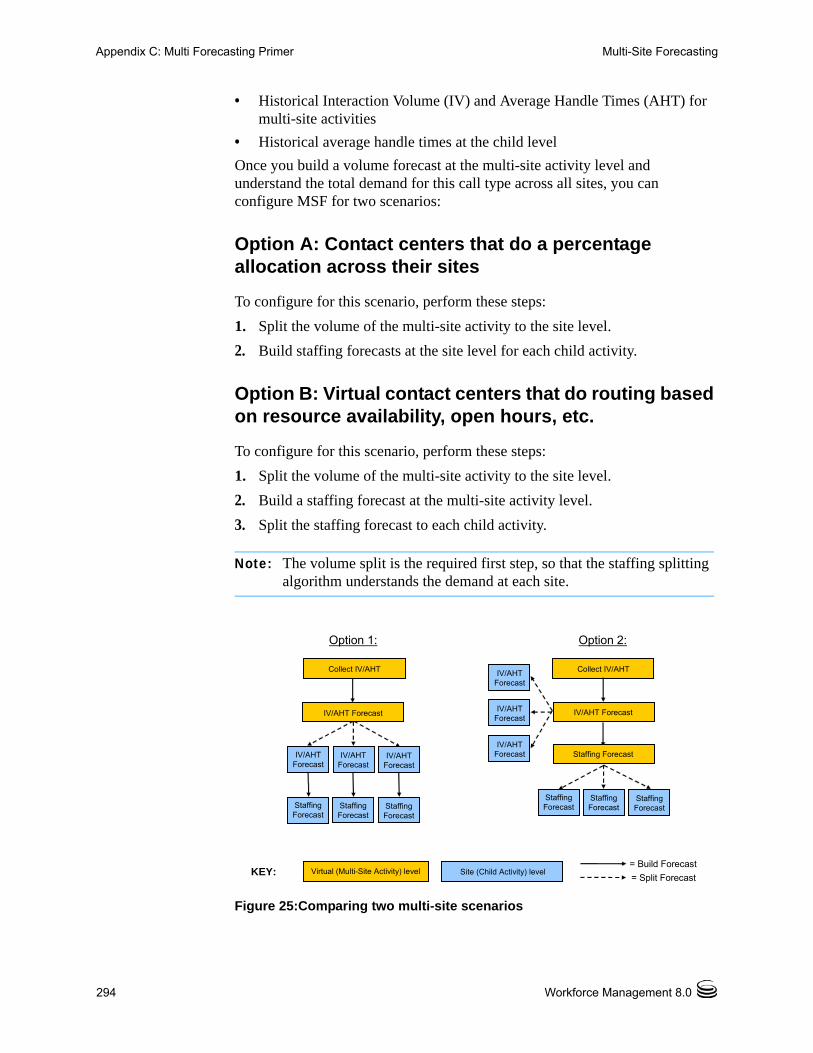
294 Workforce Management 8.0
Appendix C: Multi Forecasting Primer Multi-Site Forecasting
• Historical Interaction Volume (IV) and Average Handle Times (AHT) for multi-site activities
• Historical average handle times at the child level
Once you build a volume forecast at the multi-site activity level and understand the total demand for this call type across all sites, you can configure MSF for two scenarios:
Option A: Contact centers that do a percentage allocation across their sites
To configure for this scenario, perform these steps:
1. Split the volume of the multi-site activity to the site level.
2. Build staffing forecasts at the site level for each child activity.
Option B: Virtual contact centers that do routing based on resource availability, open hours, etc.
To configure for this scenario, perform these steps:
1. Split the volume of the multi-site activity to the site level.
2. Build a staffing forecast at the multi-site activity level.
3. Split the staffing forecast to each child activity.
Note: The volume split is the required first step, so that the staffing splitting algorithm understands the demand at each site.
Figure 25:Comparing two multi-site scenarios
Collect IV/AHT
IV/AHT Forecast
Collect IV/AHT
Virtual (Multi-Site Activity) level Site (Child Activity) levelKEY:
IV/AHT Forecast
IV/AHT Forecast
Staffing Forecast
Staffing Forecast
Staffing Forecast
IV/AHT Forecast
= Build Forecast= Split Forecast
IV/AHT Forecast
Staffing Forecast
Staffing Forecast
Staffing Forecast
Option 1: Option 2:
Staffing Forecast
IV/AHT Forecast
IV/AHT Forecast
IV/AHT Forecast
Administrator’s Guide 295
Appendix C: Multi Forecasting Primer Multi-Site Forecasting
Volume Splitting
In a multi-site enterprise, when you split the volume of multi-site activity interaction to the child sites, you must decide which Average Handling Time (AHT) to use:
• AHT collected at the multi-site activity level
• AHT collected at the child activity level
To inform your decision, determine if there is a measurable difference in AHT at the various sites in the enterprise. For example, if one site consists of many less-skilled agents (perhaps they are new to their jobs), you may expect to see a longer AHT at this site for some activities. In this case, you would do well to use the child AHT rather than the multi-site AHT.
Once the volume is split to the child sites, decide if you want to:
• Build staffing forecasts for each activity, at the site level
• Build staffing forecast at the multi-site activity level and then split that forecast to the site level
Note that when WFM splits the interaction volume to the child sites, the forecast splitting algorithm considers:
• Agent skills
• Contract availability
• Activity open hours
• Time zones
• Agent hire/termination dates
• Granted, pre-planned items from the WFM Calendar (days off, time off, shifts, working hours, availability, exceptions, and rotating patterns)
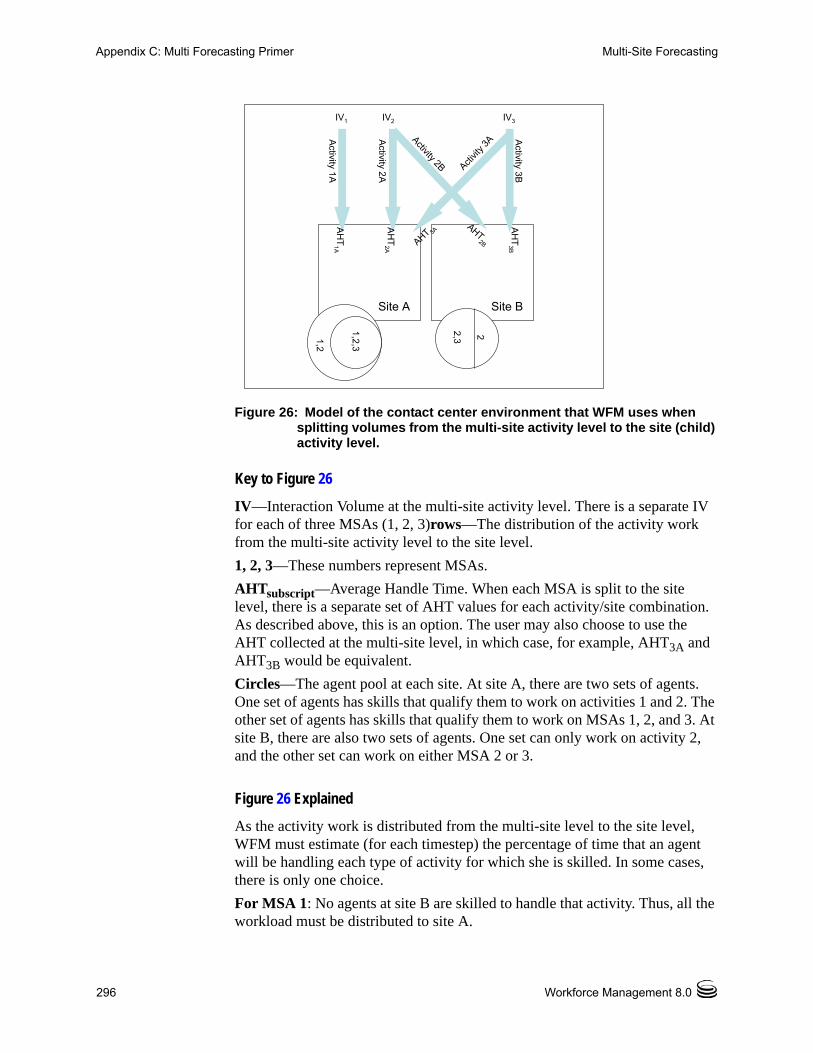
296 Workforce Management 8.0
Appendix C: Multi Forecasting Primer Multi-Site Forecasting
Figure 26: Model of the contact center environment that WFM uses when splitting volumes from the multi-site activity level to the site (child) activity level.
Key to Figure 26
IV—Interaction Volume at the multi-site activity level. There is a separate IV for each of three MSAs (1, 2, 3)rows—The distribution of the activity work from the multi-site activity level to the site level.
1, 2, 3—These numbers represent MSAs.
AHTsubscript—Average Handle Time. When each MSA is split to the site level, there is a separate set of AHT values for each activity/site combination. As described above, this is an option. The user may also choose to use the AHT collected at the multi-site level, in which case, for example, AHT3A and AHT3B would be equivalent.
Circles—The agent pool at each site. At site A, there are two sets of agents. One set of agents has skills that qualify them to work on activities 1 and 2. The other set of agents has skills that qualify them to work on MSAs 1, 2, and 3. At site B, there are also two sets of agents. One set can only work on activity 2, and the other set can work on either MSA 2 or 3.
Figure 26 Explained
As the activity work is distributed from the multi-site level to the site level, WFM must estimate (for each timestep) the percentage of time that an agent will be handling each type of activity for which she is skilled. In some cases, there is only one choice.
For MSA 1: No agents at site B are skilled to handle that activity. Thus, all the workload must be distributed to site A.
Site A Site B
Activity 1A
Activity 2A
Activity 3B
Activity 2B Activit
y 3A
IV1 IV2 IV3
AH
T1A
AH
T2A
AH
T3BAHT 3A
AHT2B
1,2
1,2,3
2,3 2
Administrator’s Guide 297
Appendix C: Multi Forecasting Primer Multi-Site Forecasting
For MSA 3: Agents at both site A and site B who can handle this activity. But the diagram shows other factors to consider in distributing activity 3 work:
• Not every agent at every site can handle activity 3.
• Some of the agents who can handle activity 3 can also handle other activities.
Therefore, when WFM estimates for each agent how much of each timestep should be allocated to a certain type of work, WFM will consider:
• the demand for the activity
• the number of agents who can handle that activity across all sites
• the work allocation of these other agents
Staffing Splitting
As described above in Scenario B, for virtual contact centers, you can build a staffing forecast at the multi-site activity level and then split that staffing forecast across the child activities. This allows the enterprise to more accurately model a virtual routing environment where there is an efficiency gain in the way that calls are handled. WFM recalculates service objectives at this multi-site level and makes these calculations available in the Performance and Schedule views, and in reports.
When building the staffing forecast at the MSA level, you may specify the indirectly occupied time (IOT) and service objectives.
However, you cannot specify the hourly wage or paid hours a day when building the MSA staffing forecast. Instead, you specify those values during the splitting process, when you split the calculated staffing from the MSA level to the child activity level.
Notes: Before you split the staffing forecast from the MSA level to the child activity level, you must first split the volume forecast so that the staffing splitting algorithm knows the resource demand at each site.
The staffing splitting wizard gives you the option to consider the AHT values of the child activities. You can use it to better estimate how to distribute staffing requirements across child activities.
Although the staffing splitting wizard splits calculated staffing by default, it offers you the option to split required staffing.
Once the staffing split is accomplished, you can view results data for calculated staffing (and optionally, required staffing) at the child activity level. You can examine this data at the MSA level or as the sum or weighted average of the child activities, in these views:
• Schedule Coverage

298 Workforce Management 8.0
Appendix C: Multi Forecasting Primer Multi-Skill Forecasting
• Intra-day Schedule
• Schedule Summary
• Performance views
You can manipulate the MSA staffing results in the same way that you can manipulate child activity staffing. Forecast graphs are also available for MSA staffing.
Multi-Skill ForecastingA multi-skilled contact center presents an opportunity for increased productivity.
An agent might be idle in a single-skill environment because she cannot answer calls that are queuing for an activity/skill which she may posses—but a skill that the schedule prevents her from using.
In a multi-skilled environment, she can use her additional skills to answer those calls.
Note: A high-load environment does not present much opportunity for increased efficiency, because the agents have very little idle time. But in an overstaffed environment, agents have more idle time and can use their multiple skills to increase efficiency.
How WFM Supports Multi-Skilled Agents
A multi-skilled agent is qualified to work on multiple activities, and therefore may perform different types of work during a shift.
In a multi-skill environment, an agent may be available for multiple activities during any timestep. That agent can be scheduled to work for an activity for only part of a time interval, and only the fraction of the time period during which she or he works is counted.
Because of this, the value for staffing can be expressed as a fraction. For example, consider this 15-minute timestep:
An agent is scheduled to work on Activity A for 10 minutes and for 5 minutes on Activity B. She is counted as 2/3 (or .667) of an agent for Activity A, and as 1/3 (or .333) of an agent for Activity B.
Enabling Multi-Skill Support
To enable Multi-Skill Support, follow these steps:
1. Open Configuration Manager.
2. Open the WFM Server application.
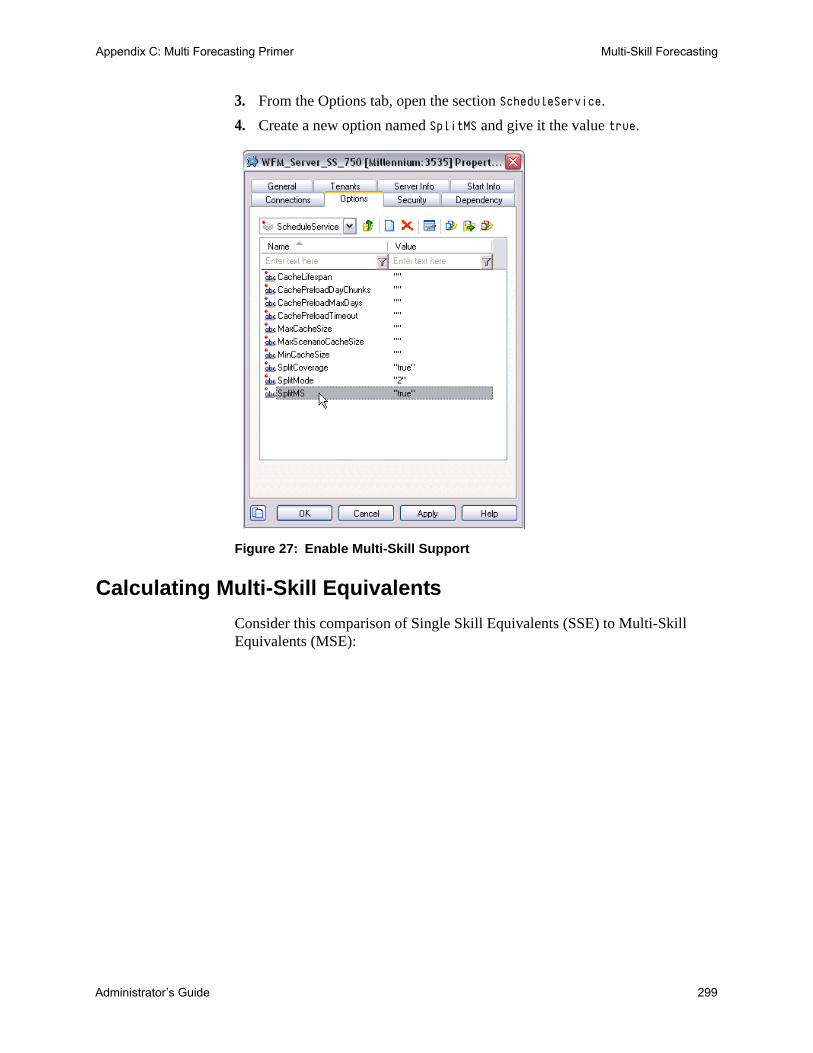
Administrator’s Guide 299
Appendix C: Multi Forecasting Primer Multi-Skill Forecasting
3. From the Options tab, open the section ScheduleService.
4. Create a new option named SplitMS and give it the value true.
Figure 27: Enable Multi-Skill Support
Calculating Multi-Skill Equivalents
Consider this comparison of Single Skill Equivalents (SSE) to Multi-Skill Equivalents (MSE):
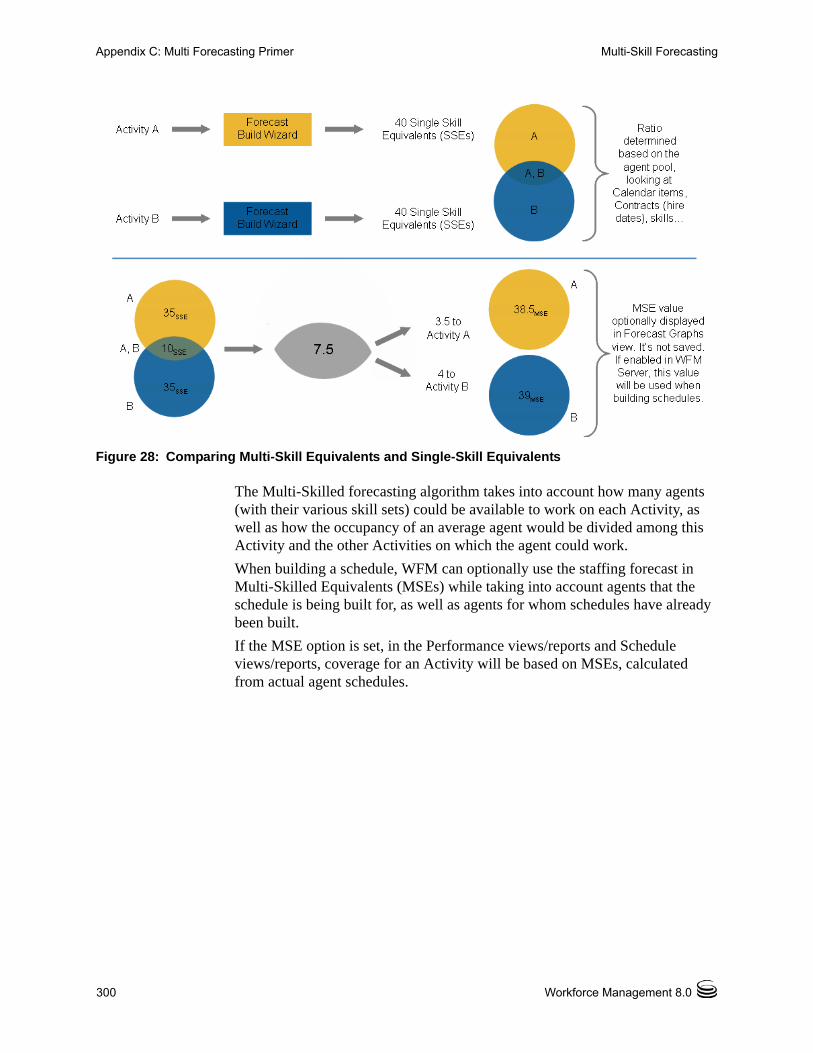
300 Workforce Management 8.0
Appendix C: Multi Forecasting Primer Multi-Skill Forecasting
Figure 28: Comparing Multi-Skill Equivalents and Single-Skill Equivalents
The Multi-Skilled forecasting algorithm takes into account how many agents (with their various skill sets) could be available to work on each Activity, as well as how the occupancy of an average agent would be divided among this Activity and the other Activities on which the agent could work.
When building a schedule, WFM can optionally use the staffing forecast in Multi-Skilled Equivalents (MSEs) while taking into account agents that the schedule is being built for, as well as agents for whom schedules have already been built.
If the MSE option is set, in the Performance views/reports and Schedule views/reports, coverage for an Activity will be based on MSEs, calculated from actual agent schedules.
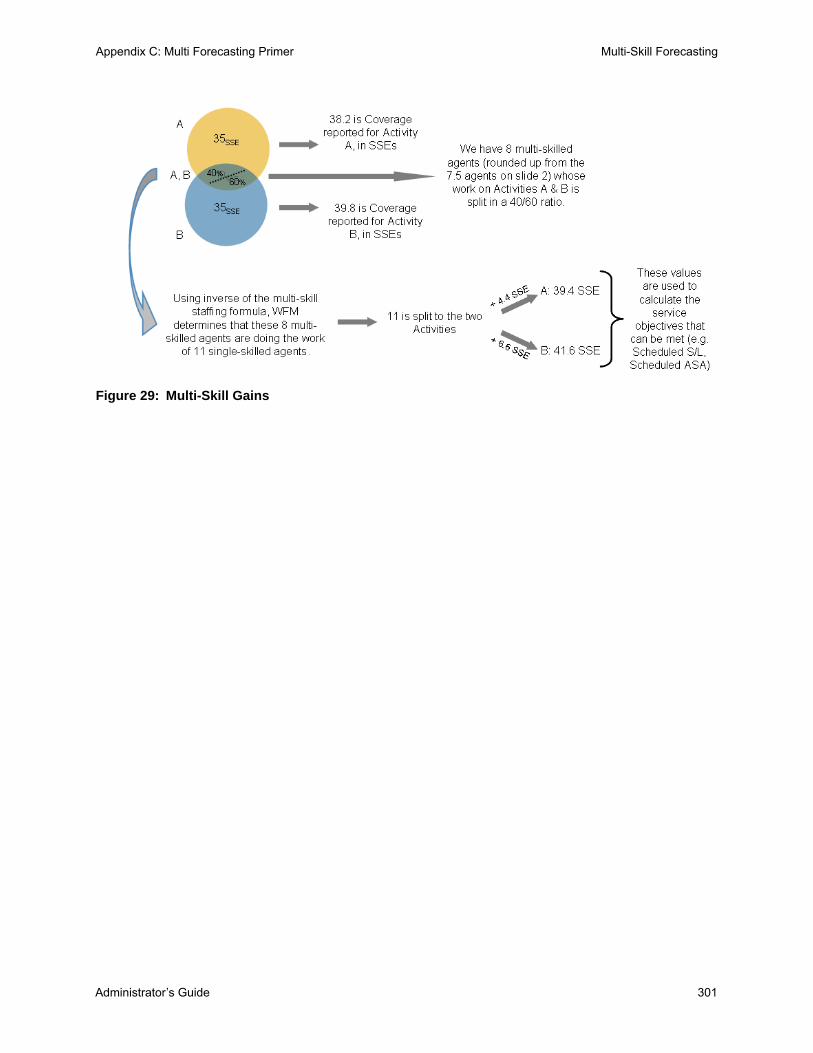
Administrator’s Guide 301
Appendix C: Multi Forecasting Primer Multi-Skill Forecasting
Figure 29: Multi-Skill Gains

302 Workforce Management 8.0
Appendix C: Multi Forecasting Primer Multi-Skill Forecasting
Administrator’s Guide 303
Appendix
DTime Off PrimerUse the information in this appendix in conjunction with the details about Time Off which are in the WFM Web Supervisor and WFM Web Agent online help topics concerning time off.
This appendix contains the following sections: Time Off Types and Time Off Rules, page 303 Time Off Limits, page 306 Time Off Request and Approval Process, page 307 Agent Time Off Planner, page 310
Time Off Types and Time Off RulesTo use the time off features in WFM correctly and efficiently, you must understand the basics. First, you must configure these objects before time off can be used:
• Time off types
• Time off rules
Time Off Types may be the simpler of the two objects, because each time off type is simply a container. You add time off to, or remove time off from, each container. You can create and arbitrarily name an unlimited number of Time Off Types.
You create time off types for each individual site. You can use time off to track anything that your Agents request, or maintain a balance of, on a regular basis. This includes time off types such as vacation, personal time off, flexible time off, paid sick days, floating holidays, and more.
Time off Rules are each associated with a specific Time Off Type. The rules define:
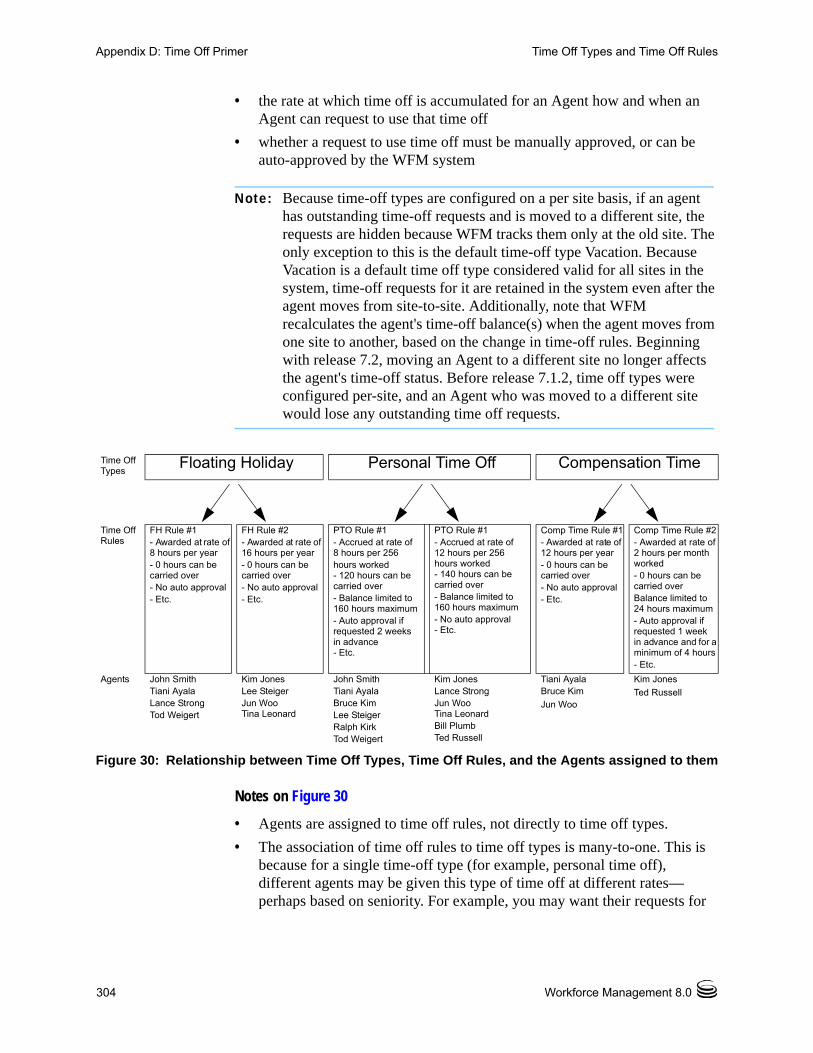
304 Workforce Management 8.0
Appendix D: Time Off Primer Time Off Types and Time Off Rules
• the rate at which time off is accumulated for an Agent how and when an Agent can request to use that time off
• whether a request to use time off must be manually approved, or can be auto-approved by the WFM system
Note: Because time-off types are configured on a per site basis, if an agent has outstanding time-off requests and is moved to a different site, the requests are hidden because WFM tracks them only at the old site. The only exception to this is the default time-off type Vacation. Because Vacation is a default time off type considered valid for all sites in the system, time-off requests for it are retained in the system even after the agent moves from site-to-site. Additionally, note that WFM recalculates the agent's time-off balance(s) when the agent moves from one site to another, based on the change in time-off rules. Beginning with release 7.2, moving an Agent to a different site no longer affects the agent's time-off status. Before release 7.1.2, time off types were configured per-site, and an Agent who was moved to a different site would lose any outstanding time off requests.
Figure 30: Relationship between Time Off Types, Time Off Rules, and the Agents assigned to them
Notes on Figure 30
• Agents are assigned to time off rules, not directly to time off types.
• The association of time off rules to time off types is many-to-one. This is because for a single time-off type (for example, personal time off), different agents may be given this type of time off at different rates—perhaps based on seniority. For example, you may want their requests for
Time Off Types Floating Holiday Personal Time Off Compensation Time
Time Off Rules
FH Rule #1- Awarded at rate of 8 hours per year - 0 hours can be carried over - No auto approval - Etc.
FH Rule #2- Awarded at rate of 16 hours per year - 0 hours can be carried over - No auto approval - Etc.
PTO Rule #1- Accrued at rate of 8 hours per 256 hours worked- 120 hours can be carried over- Balance limited to 160 hours maximum - Auto approval if requested 2 weeks in advance - Etc.
PTO Rule #1- Accrued at rate of 12 hours per 256 hours worked - 140 hours can be carried over- Balance limited to 160 hours maximum - No auto approval - Etc.
Comp Time Rule #1- Awarded at rate of 12 hours per year - 0 hours can be carried over - No auto approval - Etc.
Comp Time Rule #2- Awarded at rate of 2 hours per month worked- 0 hours can be carried overBalance limited to 24 hours maximum - Auto approval if requested 1 week in advance and for a minimum of 4 hours - Etc.
Agents John SmithTiani AyalaLance StrongTod Weigert
Kim JonesLee SteigerJun WooTina Leonard
John SmithTiani AyalaBruce KimLee SteigerRalph KirkTod Weigert
Kim JonesLance StrongJun WooTina LeonardBill PlumbTed Russell
Tiani AyalaBruce KimJun Woo
Kim JonesTed Russell
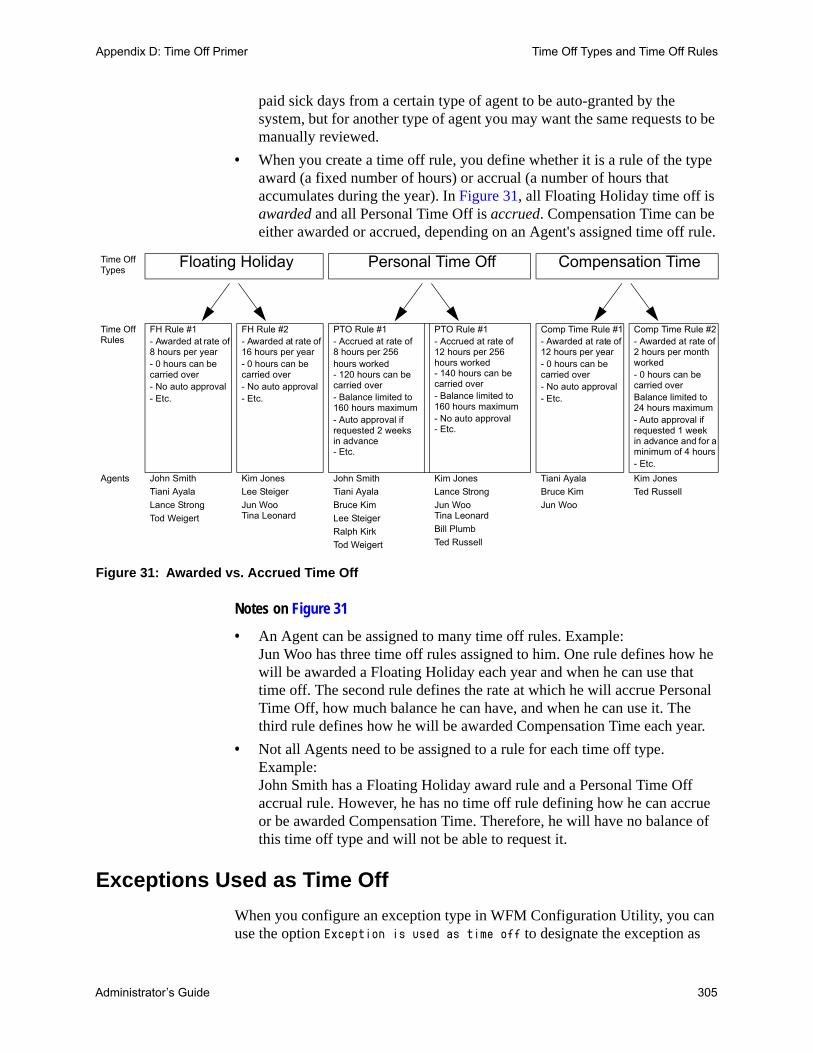
Administrator’s Guide 305
Appendix D: Time Off Primer Time Off Types and Time Off Rules
paid sick days from a certain type of agent to be auto-granted by the system, but for another type of agent you may want the same requests to be manually reviewed.
• When you create a time off rule, you define whether it is a rule of the type award (a fixed number of hours) or accrual (a number of hours that accumulates during the year). In Figure 31, all Floating Holiday time off is awarded and all Personal Time Off is accrued. Compensation Time can be either awarded or accrued, depending on an Agent's assigned time off rule.
Figure 31: Awarded vs. Accrued Time Off
Notes on Figure 31
• An Agent can be assigned to many time off rules. Example:Jun Woo has three time off rules assigned to him. One rule defines how he will be awarded a Floating Holiday each year and when he can use that time off. The second rule defines the rate at which he will accrue Personal Time Off, how much balance he can have, and when he can use it. The third rule defines how he will be awarded Compensation Time each year.
• Not all Agents need to be assigned to a rule for each time off type. Example:John Smith has a Floating Holiday award rule and a Personal Time Off accrual rule. However, he has no time off rule defining how he can accrue or be awarded Compensation Time. Therefore, he will have no balance of this time off type and will not be able to request it.
Exceptions Used as Time Off
When you configure an exception type in WFM Configuration Utility, you can use the option Exception is used as time off to designate the exception as
Time Off Types
Floating Holiday Personal Time Off Compensation Time
Time Off Rules
FH Rule #1- Awarded at rate of 8 hours per year - 0 hours can be carried over - No auto approval - Etc.
FH Rule #2- Awarded at rate of 16 hours per year - 0 hours can be carried over - No auto approval - Etc.
PTO Rule #1- Accrued at rate of 8 hours per 256 hours worked- 120 hours can be carried over- Balance limited to 160 hours maximum - Auto approval if requested 2 weeks in advance - Etc.
PTO Rule #1- Accrued at rate of 12 hours per 256 hours worked - 140 hours can be carried over- Balance limited to 160 hours maximum - No auto approval - Etc.
Comp Time Rule #1- Awarded at rate of 12 hours per year - 0 hours can be carried over - No auto approval - Etc.
Comp Time Rule #2- Awarded at rate of 2 hours per month worked - 0 hours can be carried overBalance limited to 24 hours maximum - Auto approval if requested 1 week in advance and for a minimum of 4 hours - Etc.
Agents John SmithTiani AyalaLance StrongTod Weigert
Kim JonesLee SteigerJun WooTina Leonard
John SmithTiani AyalaBruce KimLee SteigerRalph KirkTod Weigert
Kim JonesLance StrongJun WooTina LeonardBill PlumbTed Russell
Tiani AyalaBruce KimJun Woo
Kim JonesTed Russell
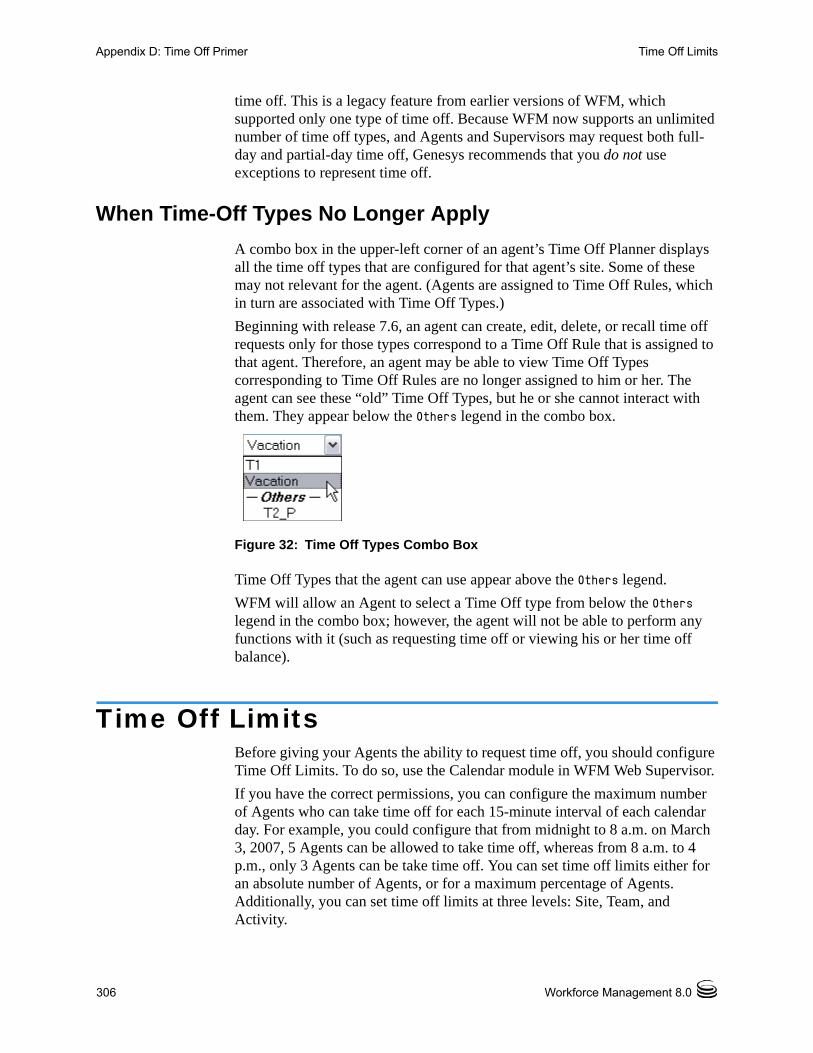
306 Workforce Management 8.0
Appendix D: Time Off Primer Time Off Limits
time off. This is a legacy feature from earlier versions of WFM, which supported only one type of time off. Because WFM now supports an unlimited number of time off types, and Agents and Supervisors may request both full-day and partial-day time off, Genesys recommends that you do not use exceptions to represent time off.
When Time-Off Types No Longer Apply
A combo box in the upper-left corner of an agent’s Time Off Planner displays all the time off types that are configured for that agent’s site. Some of these may not relevant for the agent. (Agents are assigned to Time Off Rules, which in turn are associated with Time Off Types.)
Beginning with release 7.6, an agent can create, edit, delete, or recall time off requests only for those types correspond to a Time Off Rule that is assigned to that agent. Therefore, an agent may be able to view Time Off Types corresponding to Time Off Rules are no longer assigned to him or her. The agent can see these “old” Time Off Types, but he or she cannot interact with them. They appear below the Others legend in the combo box.
Figure 32: Time Off Types Combo Box
Time Off Types that the agent can use appear above the Others legend.
WFM will allow an Agent to select a Time Off type from below the Others legend in the combo box; however, the agent will not be able to perform any functions with it (such as requesting time off or viewing his or her time off balance).
Time Off LimitsBefore giving your Agents the ability to request time off, you should configure Time Off Limits. To do so, use the Calendar module in WFM Web Supervisor.
If you have the correct permissions, you can configure the maximum number of Agents who can take time off for each 15-minute interval of each calendar day. For example, you could configure that from midnight to 8 a.m. on March 3, 2007, 5 Agents can be allowed to take time off, whereas from 8 a.m. to 4 p.m., only 3 Agents can be take time off. You can set time off limits either for an absolute number of Agents, or for a maximum percentage of Agents. Additionally, you can set time off limits at three levels: Site, Team, and Activity.
Administrator’s Guide 307
Appendix D: Time Off Primer Time Off Request and Approval Process
Note: You cannot set different time off limits for different time off types. A single set of time off limits governs the total amount of time off of all types that can be granted for a particular time of day, for a particular date.
Time Off Request and Approval ProcessThere are two different processes for scheduling time off for agents. The process that is used depends on whether the user is planning for a future schedule period (see “Planning for time off in the future” on page 307), or working within a schedule period that has already been published to the Master Schedule (see “Planning for time off for the current schedule period” on page 309).
Planning for time off in the future
For future time periods (schedule days which are not yet published to the Master Schedule), the process works as shown in Figure 33 on page 308.
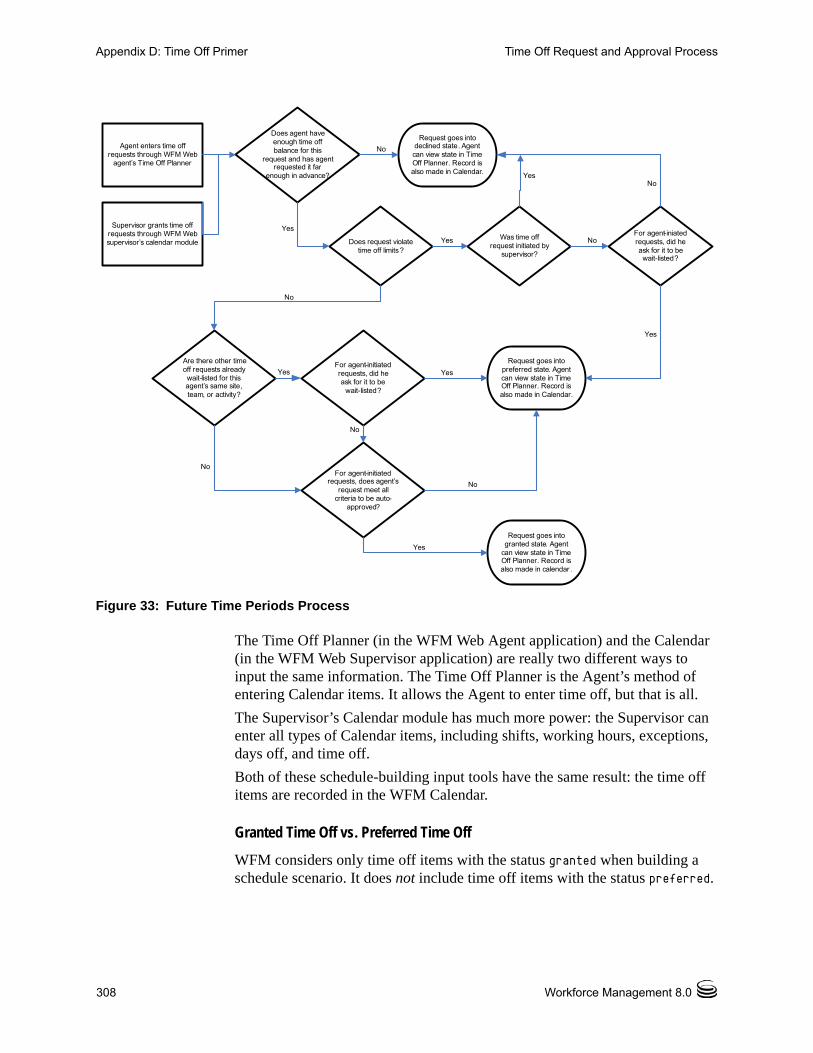
308 Workforce Management 8.0
Appendix D: Time Off Primer Time Off Request and Approval Process
Figure 33: Future Time Periods Process
The Time Off Planner (in the WFM Web Agent application) and the Calendar (in the WFM Web Supervisor application) are really two different ways to input the same information. The Time Off Planner is the Agent’s method of entering Calendar items. It allows the Agent to enter time off, but that is all.
The Supervisor’s Calendar module has much more power: the Supervisor can enter all types of Calendar items, including shifts, working hours, exceptions, days off, and time off.
Both of these schedule-building input tools have the same result: the time off items are recorded in the WFM Calendar.
Granted Time Off vs. Preferred Time Off
WFM considers only time off items with the status granted when building a schedule scenario. It does not include time off items with the status preferred.
Agent enters time offrequests through WFM Web
agent’s Time Off Planner
Does agent haveenough time offbalance for this
request and has agentrequested it far
enough in advance?
Request goes intodeclined state. Agentcan view state in TimeOff Planner. Record isalso made in Calendar.
Does request violatetime off limits?
Was time offrequest initiated by
supervisor?
For agent-iniatedrequests, did heask for it to be wait-listed?
Are there other timeoff requests alreadywait-listed for thisagent’s same site,team, or activity?
For agent-initiatedrequests, did heask for it to be
wait-listed?
For agent-initiatedrequests, does agent’s
request meet allcriteria to be auto-
approved?
Request goes intopreferred state. Agentcan view state in TimeOff Planner. Record isalso made in Calendar.
Request goes intogranted state. Agent
can view state in TimeOff Planner. Record isalso made in calendar .
No
No
No
No
No
No
No
YesYes
Yes
Yes
YesYes
Yes
Supervisor grants time off requests through WFM Web supervisor’s calendar module
Administrator’s Guide 309
Appendix D: Time Off Primer Time Off Request and Approval Process
Note: WFM allows a Supervisor to consider Agent preferences when building schedules. These preferences include: day off, availability, and shift preferences; but not time off preferences.
Time Off Items in the Calendar Hierarchy
When you enter multiple types of Calendar items for the same Agent on the same day, WFM uses its internal hierarchy to resolve their status.
Example: Full-DayTime Off vs.
Rotating ScheduleDay In
An Agent is assigned a Rotating Pattern for the week starting September 17, 2006, and for the date of September 19 his Rotating Pattern assignment states he should be on a Day In.
But a Supervisor grants a full-day time off for September 19. Now this Agent has two conflicting Calendar items for the same day: a working day according to the Rotating Pattern assignment, and a full-day time off according to the Calendar.
The Calendar hierarchy specifies that the full-day time off item should be granted and this should cause the rotating pattern assignment for that day should be declined. The statuses are reflected in the Calendar and the Supervisor can read the reasons there.
Some items in the Calendar do have a higher priority that full-day time off items.
Example: Full-DayException vs. Full-
Day Time Off
A full-day exception is granted for an Agent in the Calendar for the same day as a full-day time off. The Calendar hierarchy specifies that the full-day exception should take priority and the full-day time off item should be declined.
The hierarchy of the WFM Calendar is described in the WFM Web Supervisor online help, in the topic Calendar Items Overview.
Using the Calendar to understand the status of time off items
You can view the Actual Status of any item in the Calendar; a status of Granted or Preferred or Declined confirms that no schedule has been published for this Agent for this date. In a built and published schedule, the Actual Status of an item will be either Scheduled or Not Scheduled. If a Calendar item was not scheduled, you can view a Reason field which will describe why it was not scheduled (in the Reason column).
Planning for time off for the current schedule period
To enter Agent time off items for days that have already been published to the Master Schedule, use either of these methods:
1. Enter time off directly into the Master Schedule.
310 Workforce Management 8.0
Appendix D: Time Off Primer Agent Time Off Planner
Notes: The Agent will see this time off entry in his schedule that he can view in the WFM Web Agent.
The Agent will see a change to his time off balance in the WFM Web Agent Time Off Planner.
The Agent will see that time off for this day is scheduled, when he views his Time Off Planner.
However, no entry for this time off will be made in the WFM Calendar, because the Calendar is a planning tool, and is meant for entering items such as exceptions, time off, days off, etc., that are to be considered when building a schedule scenario.
2. Enter the granted time off request into the WFM Calendar.
Notes: Since the Calendar is a planning tool that is an input to building a schedule scenario, you must also:
Rebuild the schedule scenario for this Agent, for the days that you granted time off.
Republish the schedule day(s) for the affected Agent.
Agent Time Off PlannerAgents request time off and see the status of these requests through WFM Web Agent’s Time Off Planner. If you do not want your agents to have access to the Time Off Planner, you can disable this through the Time Off Planner Enabled setting. In Configuration Manager, for your WFM Web application object, open Options > AgentTimeOff, and set the variable AllowTimeOffPlanner to false.
Time Off balance in Agent’s Time Off Planner
The Time Off Planner displays the balances for an Agent's time off, in this way: the Agent selects a time off type and clicks on a date in the yearly planning calendar to view balances for that type, up to that date.
The Agent can also view the types of Time Off hours prior to the selected date: already granted, preferred, declined and scheduled, bonus, advance and carried-over.
When an Agent’s Time Off rule is changed, his time off is recalculated based on the new rules.
Administrator’s Guide 311
Appendix D: Time Off Primer Agent Time Off Planner
Some examples:
• If a Time Off rule is assigned to an Agent and you change any of the rule's properties.
• If a Time Off rule is assigned to an Agent and you use the Time Off tab under Configuration>Organization>Agent properties to change the rule.
• If a Time Off rule is assigned to an Agent and you use the Assignments tab under Policies>Time Off Rules>Time Off rule properties to remove the assignment.
In each case, the user is asked to approve the calculation before it is performed.
Warning! Moving to a different site can affect an Agent’s time-off balance.
An agent who moves to a different site may appear to lose a portion of her existing time-off balance, because WFM tracks that time off only at the old site. To preserve the time-off hours that the Agent earned at the previous site, her Supervisor must enter these hours as a bonus to the new Agent Rule under the new site. For details, see the “Agent Time Off > Bonus Time Off Hours” topic in Configuration Utility Help.
Recalling Time Off Requests
An Agent can recall a time off request that is in preferred or granted status, as long as the time off item has not been scheduled. Use the WFM Web Agent Time Off Planner; see the topic Requesting Time Off.
Once an Agent’s time off request has been granted, scheduled, and published to the Master Schedule, the Agent cannot recall the time off.
Only the Supervisor can do that, by manually changing the Agent’s schedule for that date, through the Master Schedule. And only the Supervisor can schedule a different activity for the Agent for that date, in lieu of the time off.
Wait Listed Time Off Requests
When an Agent makes a time-off request, he may optionally ask for it to be wait-listed.
(See step 7 in the WFM Web Agent help topic Requesting Time Off: If you want your request to be wait-listed, click the Wait-list check box.)
Note: Wait-listing means that if a time-off request is denied because the time off limits have been reached, the request stays in a preferred status in case an opening becomes available. The request could eventually be granted by a supervisor, although this is not guaranteed.
312 Workforce Management 8.0
Appendix D: Time Off Primer Agent Time Off Planner
In detail, this means that if the time off request would be declined because the time off limits have already been reached, wait listing gives it a preferred status. If some time off slots become available for certain dates due to cancellations, or if the Supervisor decides to raise the time off limits for a certain date, the Supervisor user can review all of these preferred time off items in the Calendar and grant some of them. There is a field in the Calendar which displays the date and time that the Agent or Supervisor submitted each time off item, to help the supervisor manage the wait list. Agents’ time off requests are not pulled automatically from this wait list; these requests must be manually granted by the supervisor.
Viewing the Status of Time Off Requests
Agents can view the status of any time off request, for any calendar date, with some limitations.
If an Agent requests time off for a date on a schedule that is already been published to the Master Schedule:
• This request will not be scheduled.
• The Agent can view the reason it was not scheduled, in the Reason column.
• The request, with the same status and reason, will appear in the WFM Calendar, where Supervisors can see it.
However, the Supervisor will not know to look for the request unless the Agent tells him to look for it.
Therefore, if an Agent sees time off requests with status Not Scheduled in the Time Off Planner, she should alert her supervisor. The Supervisor can then either:
• Grant the time off through the WFM Calendar and rebuild/republish the Agent’s schedule for the affected date(s)
or
• Manually add the time off to the Master Schedule.
The Time Off Planner gives Agents a limited view into their time off status in the WFM Calendar. Therefore, when a Supervisor adds or deletes time off in the WFM Calendar, he must rebuild and republish the schedule for the affected date(s).
Administrator’s Guide 313
Appendix
EOverlays PrimerThis appendix presents a primer about overlays.
Overlays are events designed to indicate the abnormalities in historical data or anticipated ones in the future. By abnormalities we mean fluctuation of interaction volume or AHT, other than usual seasonal, intraweek and intraday trends. If events point to the same kind of abnormality, which happened multiple times during the history or can happen in the future, then overlay events can by arranged into overlay groups further called simply as Overlays. The examples of Overlays can be billing, promotion, catalog drop and etc.
This appendix contains the following sections: Impact of Overlay Events on Prediction Data, page 313 Impact of Overlay Events on Historical Data, page 315 Calculating an Overlay’s Impact, page 316
Impact of Overlay Events on Prediction Data
The overlay is impacting the prediction data directly, when an event of a particular overlay is situated over prediction interval.
There are two types of overlays based on how the impact on prediction data is calculated
Multiplicative increases (or decreases) every step of a predicted data by a percentage. The percentage is defined by overlay impact distribution multiplied by event “strength.” The total of interval affected by event changes.

314 Workforce Management 8.0
Appendix E: Overlays Primer Impact of Overlay Events on Prediction Data
Overriding re-distributes (but does not change) the volume of an event’s interval. The total volume does not change, but it may be moved from one event-step to another.
Multiplicative Overlays
This type of overlay factor has existed in WFM since early versions and was called Factor. Each step (daily or hourly) of prediction data covered by the event is adjusted by a certain percentage, which is also multiplied by event strength.
Overriding Overlays
This was new in the 7.6.1 release.
This type of overlay is designed to keep the predicted total of the affected period and adjust the distribution of the volumes within the period. The events of this overlay type are applied as the last step of prediction. The seasonal components (intraday, daily, yearly) and multiplicative overlays are applied before overriding overlays are calculated.
The overriding overlay distributes the volumes according to the weight (or the percentage) of each event-step (daily or hourly). It adjusts the volume of each event-step, so the event-step receives its part of the total of whole event period according to its weight.
For example overriding overlay has three event-steps with the weights 20, 30, 50. The predicted total of the whole interval is 1000. Then the first event step will get 200, the second 300 and the last one 500. Note that initially predicted total of the event-step is not taken into account while calculating an impact of this overlay type. Weight of event-step determined by overlay itself and the predicted total of the whole interval affected by the event are taken into account.
When the event-step (daily or hourly) is calculated, its total is distributed to 15 min timesteps proportionally to a volume of each timestep before the event was applied. So, intraday or intra-hour pattern is preserved.
The event of overriding overlay type cannot be calculated, when it overlaps with the other event of the same type, even if both belong to different overlays. However, it can overlap with events of multiplicative overlays.
Event impact distribution
There are three ways to determine what is the impact of each event-step:
• By start-end.
• By keeping the whole detailed distribution.
• By calculating every time during the prediction.
Administrator’s Guide 315
Appendix E: Overlays Primer Impact of Overlay Events on Historical Data
These three methods of determining impact distribution are applicable to both overlay types: multiplicative and overriding.
For each overlay it is specified how its impact distribution will be determined and it is applicable to all events of the overlay.
Start-end
The impact distribution of overlay is determined by specified start and end impact values. The impact is gradually changing by the same amount every event step from start value to end value. For example, if starting value is 100 and ending value is 200 hundred and it is daily overlay with a length of 6 days, then the impact on the first day is 100, on the second day is 120, then 140, 160, 180 and 200 on the last day.
Distribution
The overlay saves the impact of each event-step separately. It can be either pre-calculated or entered by the user or mixed.
Always calculating
The impact of overlay is always calculated during the prediction. For successful calculation the historical period should have one or more events of the same overlay. The impact of the overlay will be determined by the prediction algorithm according to a historical data and then it will be used in prediction.
Impact of Overlay Events on Historical Data
Every event under any overlay type may have a flag “ignore historical data”. If such flag is set for an event, then historical data interval data covered by the event will not be taken for calculation of neither volume prediction or impact of overlays (see below).
If an event does not have a flag “ignore historical data” set, then the data covered by the event is considered for prediction.
In 7.6.1 there is no additional processing of historical data affected by the event other than ignoring it or simply using it.

316 Workforce Management 8.0
Appendix E: Overlays Primer Calculating an Overlay’s Impact
Calculating an Overlay’s ImpactThe impact of overlay can be determined by analyzing historical data. It is done by prediction algorithm. The algorithm analyzes the period of historical data, which contains one or more events of overlay to be calculated.
Overlays can be pre-calculated before starting volume forecasting or during volume forecasting (see: Event impact distribution). Given the same historical data and using the same method, the results should be identical.
Calculating the Impact of Multiplicative Overlays
Multiplicative overlays are calculated by separating seasonal component (yearly, daily, intraday) from event impact for each event of the overlay in the given historical data. Then the impact is divided by event “strength” and averaged.
When the impact is applied for an event on prediction interval, it is multiplied by the “strength” of that event.
Calculating the Impact of Overriding Overlays
The percentage of each event-step in the total of the whole event period is calculated for each event and then averaged. For example, historical period has two events of daily overlay, which is 3 days long. The days of the first event are 150, 200, 150 (that is 30%. 40%, 30% of the total correspondingly) and the days of the second event are 150, 150, 200. Then the overlay will be calculated as 30%, 35%, 35%.

Administrator’s Guide 317
Appendix
FRecommended Stats in Copy-and-Paste FormatThis appendix presents four listings of the stats that are defined in Chapter 6, “Recommended Statistics Settings,” on page 155. Use them only as generic starting points for your configuration, making the modifications necessary to function properly within your environment.
These stats do not include any of the required filters or timeranges; those items are specific to your installation. You should add these filters only if they are missing from the relevant section(s) of your configuration.
This appendix contains the following sections: Copy-and-Paste Format, page 317 WFM Multimedia Statistics for E-mail Interactions, page 318 WFM Statistics for Chat Interactions, page 318 WFM Statistics for intelligent Workload Distribution Interactions,
page 319 WFM Statistics for Voice Interactions, page 320
Copy-and-Paste FormatAll stats in this appendix appear in this format:[WFMTotalNumberCallsEntered]Category=TotalNumberMainMask=CallEnteredDescription=The total number of interactionsSubject=DNActionObjects=Queue,RoutePoint,GroupQueues
318 Workforce Management 8.0
Appendix F: Recommended Stats in Copy-and-Paste Format WFM Multimedia Statistics for E-mail Interactions
You can amend the text within the square brackets (use underscores rather than spaces) and the description line. For example, you could change the above example to this:[Special_Call_Entered_Stat_4_Steve]Category=TotalNumberMainMask=CallEnteredDescription=This reflects the number of inbound calls receivedthrough a queueSubject=DNActionObjects=Queue,RoutePoint,GroupQueues
WFM Multimedia Statistics for E-mail Interactions[WFM_Email_Entered]AggregationType=TotalCategory=JavaCategoryDescription=The total number of interactionsJavaSubCategory=eServiceInteractionStat.jar:EQR Total EnteredObjects=StagingArea[WFM_Email_Handle_Time]Category=TotalTimeMainMask=InteractionHandlingDescription=Total time spent handling interactionsObjects=Agent,GroupAgents,GroupPlaces,PlaceSubject=AgentStatus[WFM_Email_Handled]Category=TotalNumberMainMask=InteractionHandlingDescription=Total number of interactions handledObjects=Agent,GroupAgents,GroupPlaces,PlaceSubject=DNAction
WFM Statistics for Chat Interactions[WFM_Chat_Entered]AggregationType=TotalCategory=JavaCategoryDescription=The total number of interactionsJavaSubCategory=eServiceInteractionStat.jar:OMQ Total EnteredObjects=StagingAreaMediaType=chat[WFM_Chat_Abandoned]AggregationType=TotalCategory=JavaCategoryDescription=The total abandoned from queueJavaSubCategory=eServiceInteractionStat.jar:OMQ Total Abandoned
Administrator’s Guide 319
Appendix F: Recommended Stats in Copy-and-Paste Format WFM Statistics for intelligent Workload Distribution
Objects=StagingAreaMediaType=chat[WFM_Chat_Average_Speed_Answer]AggregationType=TotalCategory=JavaCategoryDescription=Average time taken to answerJavaSubCategory=eServiceInteractionStat.jar:OMQ Average Waiting TimeObjects=StagingAreaMediaType=chat[WFM_Chat_Total_Distributed]AggregationType=TotalCategory=JavaCategoryDescription=Total DistributedJavaSubCategory=eServiceInteractionStat.jar:OMQ Total DistributedObjects=StagingAreaMediaType=chat[WFM_Chat_Handle_Time]Category=TotalTimeMainMask=InteractionHandlingDescription=Total time spent handling interactionsObjects=Agent,GroupAgents,GroupPlaces,PlaceSubject=AgentStatus[WFM_Chat_Handled]Category=TotalNumberMainMask=InteractionHandlingDescription=Total number of interactions handledObjects=Agent,GroupAgents,GroupPlaces,PlaceSubject=DNAction
WFM Statistics for intelligent Workload Distribution Interactions[WFM_OMedia_Entered]AggregationType=TotalCategory=JavaCategoryDescription=The total number of interactionsJavaSubCategory=eServiceInteractionStat.jar:OMQ Total EnteredObjects=StagingAreaMediaType=MediaX[WFM_OMedia_Abandoned]AggregationType=TotalCategory=JavaCategoryDescription=The total abandoned from queueJavaSubCategory=eServiceInteractionStat.jar:OMQ Total AbandonedObjects=StagingAreaMediaType=MediaX[WFM_OMedia_Average_Speed_Answer]AggregationType=Total
320 Workforce Management 8.0
Appendix F: Recommended Stats in Copy-and-Paste Format WFM Statistics for Voice Interactions
Category=JavaCategoryDescription=Average time taken to answerJavaSubCategory=eServiceInteractionStat.jar:OMQ Average Waiting TimeObjects=StagingAreaMediaType=MediaX[WFM_OMedia_Total_Distributed]AggregationType=TotalCategory=JavaCategoryDescription=Total DistributedJavaSubCategory=eServiceInteractionStat.jar:OMQ Total DistributedObjects=StagingAreaMediaType=MediaX[WFM_OMedia_Handle_Time]Category=TotalTimeMainMask=InteractionHandlingDescription=Total time spent handling interactionsObjects=Agent,GroupAgents,GroupPlaces,PlaceSubject=AgentStatus[WFM_OMedia_Handled]Category=TotalNumberMainMask=InteractionHandlingDescription=Total number of interactions handledObjects=Agent,GroupAgents,GroupPlaces,PlaceSubject=DNAction
WFM Statistics for Voice Interactions[WFMTotalNumberCallsEntered]Category=TotalNumberMainMask=CallEnteredSubject=DNActionObjects=Queue,RoutePoint,GroupQueues[WFMTotalNumberCallsAband]Category=TotalNumberMainMask=CallAbandoned, CallAbandonedFromRingingSubject=DNActionObjects=Queue,RoutePoint,GroupQueues[WFMTotalNumberCallsDistrib]Category=TotalNumberMainMask=CallDistributedSubject=DNActionObjects=Queue,RoutePoint,GroupQueues[WFMServiceFactor1]Category=ServiceFactor1MainMask=CallAnswered,CallAbandoned,CallAbandonedFromRingingSubject=DNActionObjects=Queue, RoutePoint, GroupQueues[WFMAverTimeBeforeAnswering]Category=AverageTime

Administrator’s Guide 321
Appendix F: Recommended Stats in Copy-and-Paste Format WFM Statistics for Voice Interactions
MainMask=CallAnsweredRelMask=CallAnsweredSubject=DNActionObjects=Queue, RoutePoint, GroupQueues[WFMTotalHandleTime]Category=TotalAdjustedTimeMainMask=CallInbound, CallOutbound, OfflineWorkType1Subject=DNActionObjects=Agent, Place,GroupAgents,GroupPlaces[WFMTotalNumberCallsHandled]Category=TotalNumberMainMask=CallInbound,CallOutboundSubject=DNActionObjects=Agent,Place,GroupAgents,GroupPlaces

322 Workforce Management 8.0
Appendix F: Recommended Stats in Copy-and-Paste Format WFM Statistics for Voice Interactions
Administrator’s Guide 323
Supplements
Related Documentation ResourcesThe following resources provide additional information that is relevant to this software. Consult these additional resources as necessary.
Genesys Workforce Management
• Workforce Management 8.0 Configuration Utility Help, which explains how to use the WFM Configuration Utility to set up WFM objects (such as sites, time zones, and Agents) and constraints (such as security settings, working hours, and time-off rules).
• Workforce Management 8.0 Web for Supervisors Help, which explains how to use the Supervisor web interface to create forecasts and schedules, make schedule and staffing changes, and to track Agent real-time adherence and contact center performance. WFM Web for Supervisors also contains the WFM reporting functions.
• Workforce Management 8.0 Web for Agents Help, which instructs Agents on how to check their schedules, request time off and working hours, adjust other preferences, and make schedule trades with other Agents.
• Workforce Management 8.0 WFM Integration API Developer's Guide, which gives an overview of the Application Programming Interface (API)'s functions and architecture, and explains the functions that each service provides. This Guide includes short code examples that demonstrate how to use the methods included in each service.
• Workforce Management 8.0 WFM Integration API Reference (JavaDoc), which provides a complete reference to the publicly exposed portion of the WFM Integration API.
Management Framework
• Framework 8.0 Stat Server User’s Guide, particularly those sections that explain how statistics are configured.
324 Workforce Management 8.0
Related Documentation Resources
Genesys
• Genesys Technical Publications Glossary, which ships on the Genesys Documentation Library DVD and which provides a comprehensive list of the Genesys and computer-telephony integration (CTI) terminology and acronyms used in this document.
• Genesys Migration Guide, which ships on the Genesys Documentation Library DVD, and which provides documented migration strategies for Genesys product releases. Contact Genesys Technical Support for more information.
• Release Notes and Product Advisories for this product, which are available on the Genesys Technical Support website at http://genesyslab.com/support.
Information about supported hardware and third-party software is available on the Genesys Technical Support website in the following documents:
• Genesys Supported Operating Environment Reference Manual
• Genesys Supported Media Interfaces Reference Manual
Consult these additional resources as necessary:
• Genesys Hardware Sizing Guide, which provides information about Genesys hardware sizing guidelines for the Genesys 7.x and 8.x releases.
• Genesys Interoperability Guide, which provides information on the compatibility of Genesys products with various Configuration Layer Environments; Interoperability of Reporting Templates and Solutions; and Gplus Adapters Interoperability.
For additional system-wide planning tools and information, see the release-specific listings of System Level Documents on the Genesys Technical Support website, accessible from the system level documents by release tab in the Knowledge Base Browse Documents Section.
Genesys product documentation is available on the:
• Genesys Technical Support website at http://genesyslab.com/support.
• Genesys Documentation Library DVD, which you can order by e-mail from Genesys Order Management at [email protected].

Administrator’s Guide 325
Related Documentation Resources
Document ConventionsThis document uses certain stylistic and typographical conventions—introduced here—that serve as shorthands for particular kinds of information.
Document Version Number
A version number appears at the bottom of the inside front cover of this document. Version numbers change as new information is added to this document. Here is a sample version number:
80fr_ref_06-2008_v8.0.001.00
You will need this number when you are talking with Genesys Technical Support about this product.
Screen Captures Used in This Document
Screen captures from the product graphical user interface (GUI), as used in this document, may sometimes contain minor spelling, capitalization, or grammatical errors. The text accompanying and explaining the screen captures corrects such errors except when such a correction would prevent you from installing, configuring, or successfully using the product. For example, if the name of an option contains a usage error, the name would be presented exactly as it appears in the product GUI; the error would not be corrected in any accompanying text.
Type Styles
Table 31 describes and illustrates the type conventions that are used in this document.
Table 31: Type Styles
Type Style Used For Examples
Italic • Document titles
• Emphasis
• Definitions of (or first references to) unfamiliar terms
• Mathematical variables
Also used to indicate placeholder text within code samples or commands, in the special case where angle brackets are a required part of the syntax (see the note about angle brackets on page 326).
Please consult the Genesys Migration Guide for more information.
Do not use this value for this option.
A customary and usual practice is one that is widely accepted and used within a particular industry or profession.
The formula, x +1 = 7 where x stands for . . .
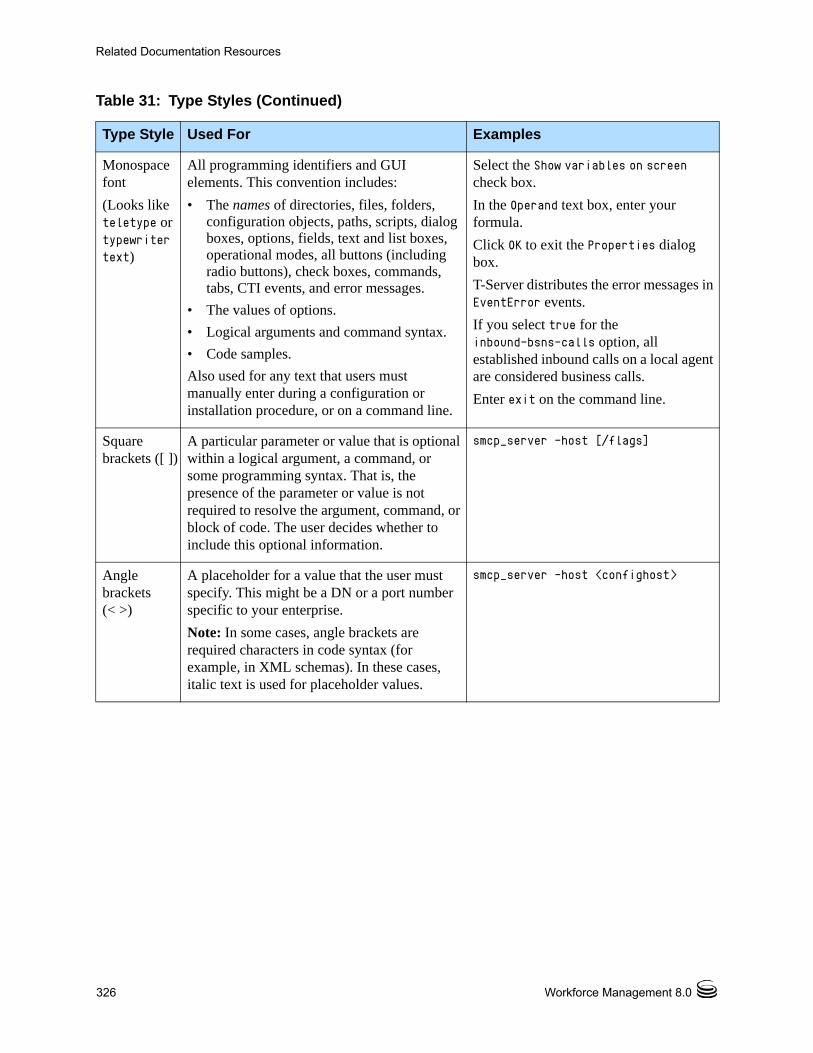
326 Workforce Management 8.0
Related Documentation Resources
Monospace font
(Looks like teletype or typewriter text)
All programming identifiers and GUI elements. This convention includes:
• The names of directories, files, folders, configuration objects, paths, scripts, dialog boxes, options, fields, text and list boxes, operational modes, all buttons (including radio buttons), check boxes, commands, tabs, CTI events, and error messages.
• The values of options.
• Logical arguments and command syntax.
• Code samples.
Also used for any text that users must manually enter during a configuration or installation procedure, or on a command line.
Select the Show variables on screen check box.
In the Operand text box, enter your formula.
Click OK to exit the Properties dialog box.
T-Server distributes the error messages in EventError events.
If you select true for the inbound-bsns-calls option, all established inbound calls on a local agent are considered business calls.
Enter exit on the command line.
Square brackets ([ ])
A particular parameter or value that is optional within a logical argument, a command, or some programming syntax. That is, the presence of the parameter or value is not required to resolve the argument, command, or block of code. The user decides whether to include this optional information.
smcp_server -host [/flags]
Angle brackets (< >)
A placeholder for a value that the user must specify. This might be a DN or a port number specific to your enterprise.
Note: In some cases, angle brackets are required characters in code syntax (for example, in XML schemas). In these cases, italic text is used for placeholder values.
smcp_server -host <confighost>
Table 31: Type Styles (Continued)
Type Style Used For Examples

Administrator’s Guide 327
Index
Symbols.bat Files
configuring. . . . . . . . . . . . . . . . . . 90[] (square brackets). . . . . . . . . . . . . . 326< > (angle brackets) . . . . . . . . . . . . . 326
AAbandonment Statistic
settings for. . . . . . . . . . . . 160, 163, 164Abandons Factor - Scheduled metric . . . . 288Activities
deployment planning for . . . . . . . . . . . 55matching to skills . . . . . . . . . . . . . . 59maximum simultaneous users. . . . . . . . 55setting staffing rules . . . . . . . . . . . . . 61setting working hours . . . . . . . . . . . . 61
Activity Policiesdeployment planning . . . . . . . . . . . . 61
Activity Setsdeployment planning . . . . . . . . . . . . 61
Adherencedeployment planning . . . . . . . . . . . . 69real-time agent states . . . . . . . . . . . . 36troubleshooting for. . . . . . . . . . . . . 241using reason codes . . . . . . . . . . . . . 36
Adherence Per Day metric . . . . . . . . . . 289Agents
agent-centric scheduling . . . . . . . . . . 62configuring. . . . . . . . . . . . . . . . . . 52contracts for . . . . . . . . . . . . . . . . . 61deployment planning for . . . . . . . . . . . 54no 24-hour preferences graph. . . . . . . 240scheduling preferences . . . . . . . . . . . 30troubleshooting missing . . . . . . . . . . 243troubleshooting scheduling for . . . . . . 242
Agents in Seats metric . . . . . . . . . . . . 275AHT
troubleshooting calculation of . . . . . . . 243AHT - % metric . . . . . . . . . . . . . . . . 287
always trust option . . . . . . . . . . . . . . 236angle brackets . . . . . . . . . . . . . . . . 326Applications
creating manually . . . . . . . . . . . . . . 87importing templates . . . . . . . . . . . . . 75
ApplicationType . . . . . . . . . . . . . . . 126Architecture
data flow . . . . . . . . . . . . . . . . . . 47database . . . . . . . . . . . . . . . . . . 46presentation layer . . . . . . . . . . . . . . 43web server . . . . . . . . . . . . . . . . . 43WFM Configuration Utility . . . . . . . . . . 43WFM connections to Configuration Server . 47WFM connections to Stat Server . . . . . . 47WFM Database Utility . . . . . . . . . . . . 43WFM servers . . . . . . . . . . . . . . . . 46
ASAconfiguring statistic . . . . . . . . . . 162, 165
audiencedefining . . . . . . . . . . . . . . . . . . . 16
Average Time before Answeringconfiguring statistic . . . . . . . . . . 162, 165
BBacking Up
your database. . . . . . . . . . . . . . . 195Blank Schedules
creating . . . . . . . . . . . . . . . . . . . 65brackets
angle . . . . . . . . . . . . . . . . . . . 326square. . . . . . . . . . . . . . . . . . . 326
Business Constraintsplanning within . . . . . . . . . . . . . . . 60
Business Unitsdeployment planning for . . . . . . . . . . 54
CCalendar Management
Index
328 Workforce Management 8.0
Meeting Planner . . . . . . . . . . . . . . . 22Meeting Scheduler . . . . . . . . . . . . . 22overview . . . . . . . . . . . . . . . . . . . 22Time Off . . . . . . . . . . . . . . . . . . . 23
case-insensitive . . . . . . . . . . . . . 74, 187chapter summaries
defining . . . . . . . . . . . . . . . . . . . 16Cleaning Up
your database . . . . . . . . . . . . . . . 195commenting on this document . . . . . . . . 16Configuration
WFM Solution . . . . . . . . . . . . . . . . 89Configuration Layer Integration . . . . . . . 21Configuration Manager
registering host computers . . . . . . . . . 73system requirements . . . . . . . . . . . . 72
Configuration Servermanually change host and port . . . . . . . 90system requirements . . . . . . . . . . . . 72WFM connections to. . . . . . . . . . . . . 47
Configuring.bat files . . . . . . . . . . . . . . . . . . . 90agents . . . . . . . . . . . . . . . . . . . . 52applications manually . . . . . . . . . . . . 87contracts. . . . . . . . . . . . . . . . . . . 61Data Aggregator logging . . . . . . . . . 127marked time . . . . . . . . . . . . . . . . . 63Reports . . . . . . . . . . . . . . . . . . 102reports with WFM Web . . . . . . . . . . 101server startup priority . . . . . . . . . . . . 89skills . . . . . . . . . . . . . . . . . . . . . 52Stat Server in Configuration Manager . . . 157Stat Server statistics. . . . . . . . . . . . 155Stat Server TimeProfile . . . . . . . . . . 156Stat Server TimeRange . . . . . . . . . . 156statistics . . . . . . . . . . . . . . . . . . . 56time zones . . . . . . . . . . . . . . . . . . 52time-off types . . . . . . . . . . . . . . . . 63users. . . . . . . . . . . . . . . . . . . . . 52using the Configuration Wizards . . . . . . 77WebSphere for WFM Web . . . . . . . . . 99WFM Application Wizard . . . . . . . . . . 85WFM Builder logging . . . . . . . . . . . 121WFM Builder Wizard . . . . . . . . . . . . 84WFM Configuration Utility . . . . . . . . . . 85WFM Configuration Utility logging . . . . . 133WFM Daemon . . . . . . . . . . . . . . . 102WFM Data Aggregator Wizard . . . . . . . 81WFM Database Utility . . . . . . . . . . . . 85WFM Server logging. . . . . . . . . . . . 113WFM Server Wizard . . . . . . . . . . . . . 80WFM Web logging. . . . . . . . . . . . . 142WFM Web Wizard . . . . . . . . . . . . . . 86your new database . . . . . . . . . . . . . 91
Contractsavailability in . . . . . . . . . . . . . . . . . 61
configuring . . . . . . . . . . . . . . . . . 61contrasted with shifts . . . . . . . . . . . . 61defined . . . . . . . . . . . . . . . . . . . 61deployment planning . . . . . . . . . . . . 61setting time off . . . . . . . . . . . . . . . 61working hours settings . . . . . . . . . . . 61
conventionsin document . . . . . . . . . . . . . . . . 325type styles. . . . . . . . . . . . . . . . . 325
Creatingdatabase . . . . . . . . . . . . . . . 74, 188Database Access Point . . . . . . . . . . . 74new Stat Server statistics . . . . . . . . . 158
DDA Server Name Not Found. . . . . . . . . 237Data Aggregator . . . . . . . . . . . . . . . .46
Abandonment statistic . . . . . 160, 163, 164configuring Stat Server statistics . . . 155, 157creating new statistics. . . . . . . . . . . 158dump file . . . . . . . . . . . . . . . . . . 58Handle Time statistic . . . . . . . . . . . 162high availability for . . . . . . . . . . . . . 57high availability support . . . . . . . . . . . 20hot standby mode for . . . . . . . . . . . . 57hot standby support . . . . . . . . . . . . . 20installing as Windows NT service . . . . . 104Interaction Volume statistic . . . . . . . . 160Quality of Service statistic. . . . . . . . . 161recommended Stat Server statistics . . . 160tracking statistics using . . . . . . . . . . . 56
Data Aggregator Options TabClient section . . . . . . . . . . . . . . . 126Identity section . . . . . . . . . . . . . . 126Log section . . . . . . . . . . . . . . . . 127Options section . . . . . . . . . . . . . . 130
Data FlowWFM architecture . . . . . . . . . . . . . . 47
Databasearchitecture . . . . . . . . . . . . . . . . . 46backing up . . . . . . . . . . . . . . . . 195configuring new . . . . . . . . . . . . . . . 91creating . . . . . . . . . . . . . . . . 74, 188creating Database Access Point for. . . . . 74migrating . . . . . . . . . . . . . . . . . 192performing cleanup . . . . . . . . . . . . 195restoring. . . . . . . . . . . . . . . . . . 195updating version . . . . . . . . . . . . . 193using the WFM Database Utility . . . . . . 91
Database Access Pointcreating . . . . . . . . . . . . . . . . . . . 74
Database Updatetroubleshooting timeout errors . . . . . . 240
DB Serversystem requirements . . . . . . . . . . . . 72
Index
Administrator’s Guide 329
Deferred Work Forecasting . . . . . . . . . 27Deployment
planning overview . . . . . . . . . . . . . . 52Deployment Planning
activities . . . . . . . . . . . . . . . . . . . 55activity policies . . . . . . . . . . . . . . . 61activity sets . . . . . . . . . . . . . . . . . 61adherence considerations . . . . . . . . . . 69agents . . . . . . . . . . . . . . . . . . . . 54business units . . . . . . . . . . . . . . . . 54contracts. . . . . . . . . . . . . . . . . . . 61events . . . . . . . . . . . . . . . . . . . . 59exception types . . . . . . . . . . . . . . . 63intra-day overhead . . . . . . . . . . . . . 65meetings. . . . . . . . . . . . . . . . . . . 63performance monitoring . . . . . . . . . . . 66profiles. . . . . . . . . . . . . . . . . . . . 62reason codes . . . . . . . . . . . . . . . . 56rotating patterns . . . . . . . . . . . . . . . 64schedule state groups . . . . . . . . . . . . 59service objectives . . . . . . . . . . . . . . 64shifts . . . . . . . . . . . . . . . . . . . . . 62sites . . . . . . . . . . . . . . . . . . . . . 54skills . . . . . . . . . . . . . . . . . . . . . 58staffing. . . . . . . . . . . . . . . . . . . . 64statistics . . . . . . . . . . . . . . . . . . . 55synchronization . . . . . . . . . . . . . . . 60teams . . . . . . . . . . . . . . . . . . . . 54time zones . . . . . . . . . . . . . . . . . . 60time-off rules. . . . . . . . . . . . . . . . . 60time-off types . . . . . . . . . . . . . . . . 63user security . . . . . . . . . . . . . . . . . 53
digital signature,expired . . . . . . . . . . . 236document
change history . . . . . . . . . . . . . . . . 17conventions . . . . . . . . . . . . . . . . 325errors, commenting on . . . . . . . . . . . 16version number . . . . . . . . . . . . . . 325
double counting an agent . . . . . . . . . . 275Dump File
defined. . . . . . . . . . . . . . . . . . . . 58
EE-Mail
forecasting for . . . . . . . . . . . . . . . . 27e-mail notifications
permission . . . . . . . . . . . . . . . . . . 53e-mail notifications set up . . . . . . . . . . 207Enterprise Routing
overview . . . . . . . . . . . . . . . . . . . 21environment variables . . . . . . . . . . . . 95environmental variables . . . . . . . . . . . 97ER
See Enterprise RoutingErrors
WFM Configuration Utility error messages 245Events
deployment planning . . . . . . . . . . . . 59forecasting using . . . . . . . . . . . . 26, 65
Exception and Preference Hierarchyoverview . . . . . . . . . . . . . . . . . . 25
Exception Typesdeployment planning . . . . . . . . . . . . 63
Exceptionsusing in schedules . . . . . . . . . . . . . 24
expiration of trusted certificate . . . . . . . . 236expired digital signature . . . . . . . . . . . 236expired security certificates . . . . . . . . . 236
FFlexible Shifts
deployment planning . . . . . . . . . . . . 62scheduling using . . . . . . . . . . . . . . 30
Font . . . . . . . . . . . . . . . . . . . . . 146font styles
italic . . . . . . . . . . . . . . . . . . . . 325monospace . . . . . . . . . . . . . . . . 326
Forecastingconsiderations . . . . . . . . . . . . . . . 64data needed. . . . . . . . . . . . . . . . . 64flexible forecasting . . . . . . . . . . . . . 26for deferred work . . . . . . . . . . . . . . 27overview . . . . . . . . . . . . . . . . . . 25scenarios . . . . . . . . . . . . . . . . . . 26service objectives . . . . . . . . . . . . . . 64setting service objectives . . . . . . . . . . 26staffing calculation . . . . . . . . . . . . . 64using events. . . . . . . . . . . . . . . 26, 65using historical data . . . . . . . . . . . . . 26using Stat Server . . . . . . . . . . . . . . 26using templates . . . . . . . . . . . . . . . 64
Forecaststroubleshooting inaccuracies in . . . . . . 244
Formula for Full Time Exceptions (FTE) . . . 290Framework
connections to . . . . . . . . . . . . . . . 46
GGenesys Framework
compatible versions . . . . . . . . . . . . . 72components required . . . . . . . . . . . . 72
HHandle Time Statistic
settings for . . . . . . . . . . . . . . . . 162Headcount . . . . . . . . . . . . . . . . . . 275
Index
330 Workforce Management 8.0
Headcount, how to calculate . . . . . . . . . 276High Availability . . . . . . . . . . . . . . . 20
for Data Aggregator . . . . . . . . . . . . . 57Historical Data
forecasting using . . . . . . . . . . . . 26, 64Host Computers
registering . . . . . . . . . . . . . . . . . . 73Host Name
changing manually . . . . . . . . . . . . . 90Host Not Found . . . . . . . . . . . . . . . 237Hot Standby
for Data Aggregator . . . . . . . . . . . 20, 57
IImporting
application templates . . . . . . . . . . . . 75IncreaseMemory1 . . . . . . . . . . . . . . 124Installing
Data Aggregator as service . . . . . . . . 104the Configuration Wizards . . . . . . . . . . 78using the Configuration Wizards . . . . . . 77WFM Builder. . . . . . . . . . . . . . . . . 93WFM Configuration Utility . . . . . . . . . . 94WFM Data Aggregator . . . . . . . . . . . 94WFM Server . . . . . . . . . . . . . . . . . 92WFM Web . . . . . . . . . . . . . . . . . . 95Workforce Management . . . . . . . . . . . 92
IntegratingEnterprise Routing. . . . . . . . . . . . . . 21
Interaction Volume Statisticsettings for. . . . . . . . . . . . . . . . . 160
Intra-day Overheaddeployment planning . . . . . . . . . . . . 65
Intra-Day Schedulingoverview . . . . . . . . . . . . . . . . . . . 32
italics . . . . . . . . . . . . . . . . . . . . . 325
LLCA
See Local Control AgentLocal Control Agent
Management Layer requirements . . . . . . 73overview . . . . . . . . . . . . . . . . . . . 21starting Workforce Management using . . 178stopping Workforce Management using. . 183
Locator Service on WFM Server . . . . . . . 214Log Files
using in troubleshooting . . . . . . . . . . 245Logging
Data Aggregator configuration . . . . . . 127troubleshooting using log files . . . . . . . 245WFM Builder configuration . . . . . . . . 121WFM Configuration Utility configuration . . 133
WFM Server configuration . . . . . . . . 113WFM Web configuration . . . . . . . . . 142
Logging inWFM Web. . . . . . . . . . . . . . . . . . 44
MManagement Layer
additional documentation . . . . . . . 178, 183configuring WFM Solution . . . . . . . . . 89Local Control Agent . . . . . . . . . . . 21, 73server startup priority . . . . . . . . . . . . 89Solution Control Interface . . . . . . . . . . 21starting Workforce Management with . . . 178system requirements . . . . . . . . . . . . 72using Workforce Management with . . . . . 21
Marked Timeconfiguring . . . . . . . . . . . . . . . . . 63in schedules. . . . . . . . . . . . . . . . . 32
MaxThreadPoolSize . . . . . . . . . . . . . 119MDAC Version
determining . . . . . . . . . . . . . . . . 237Meeting Planner
overview . . . . . . . . . . . . . . . . . . 22Meeting Scheduler
overview . . . . . . . . . . . . . . . . . . 22Meetings
deployment planning . . . . . . . . . . . . 63Memory Balancing, configuration . . . . . . 216Memory Balancing, support . . . . . . . . . 214metric
% Adherence Per Day . . . . . . . . . . 289Abandons Factor – Actual . . . . . . . . 289Abandons Factor – Scheduled . . . . . . 288AHT – Actual . . . . . . . . . . . . . . . 286AHT – Forecast . . . . . . . . . . . . . . 286AHT – Forecasted . . . . . . . . . . . . 278AHT – Scheduled . . . . . . . . . . . . . 278ASA – Actual . . . . . . . . . . . . . . . 288ASA – Scheduled . . . . . . . . . . . . . 288Budget – Forecasted . . . . . . . . . . . 279Budget – Scheduled . . . . . . . . . . . 278Coverage – Scheduled . . . 280, 281, 283, 284Difference – Calculated . . . . . . . . . . 280Difference – Coverage – Published Coverage .
281, 284Difference – Required. . . . . . . . . . . 280Interaction Volume – Actual . . . . . . 285, 286Interaction Volume – Forecast . . . . . . 285Interaction Volume – Forecasted . . . . . 277Interaction Volume – Scheduled . . . . . 277Number of Agents – Actual . . . . . . 284, 285Number of Agents – Scheduled. . . . . . 284Optimal Coverage. . . . . . . . . . . . . 284Published Coverage . . . . . . . . . . . 281Service Level – Actual . . . . . . . . . . 287
Index
Administrator’s Guide 331
Service Level – Scheduled . . . . . . . . 287Service Level Percentage – Forecasted . 276,
277Service Level Percentage – Scheduled . . 276Staffing – Calculated . . . . . . . . . . . 279Staffing – Required . . . . . . . . . . . . 280
Migratingyour database . . . . . . . . . . . . . . . 192
Monitoringcontact center performance . . . . . . . . . 36
monospace font . . . . . . . . . . . . . . . 326Multisite Scheduling . . . . . . . . . . . . . 30
Nnonworking overhead . . . . . . . . . . . . 269Notifications
permission to configure . . . . . . . . . . . 53WFM Daemon . . . . . . . . . . . . . . . . 88WFM Daemon Wizard . . . . . . . . . . . . 83
notifications, set up e-mail . . . . . . . . . . 207Number of Agents metric . . . . . . . . . . . 275
OOptimization
of schedules . . . . . . . . . . . . . . . . . 30option
AccessLevel . . . . . . . . . . . . . . . . 139all . . . . . . . . 115, 123, 129, 133, 142, 149AllowAccessToOthersSchedule . . . . . . 139AllowAccesstoOthersSchedule . . . . . . 148AllowBidding. . . . . . . . . . . . . . . . 139AllowEnterFullDayStartEnd . . . . . . . . 140AllowEnterPaidTime . . . . . . . . . . . . 140AllowInsertExceptions . . . . . . . . . . . 140AllowLessUpdates. . . . . . . . . . . . . 135AllowMigratePerformance . . . . . . . . . 135AllowNoComments . . . . . . . . . . . . 148AllowScheduleTrading. . . . . . . . . . . 148AllowTimeOffPlanner . . . . . . . . . . . 140AllowWaitList . . . . . . . . . . . . . . . 141ApplicationType . . . . . . .113, 121, 141, 152AutoCleanupTimeout . . . . . . . . . . . 117buffering . . . . . 114, 121, 127, 133, 142, 149CacheLifespan . . . . . . . . . . . . 110, 118CachePreloadDayChunks . . . . . . . . . 118CachePreloadMaxDays . . . . . . . . . . 118CachePreloadTimeout. . . . . . . . . 110, 118CalendarOverScheduleData . . . . . . . 110CfgServerRequestTimeout 109, 120, 126, 137CharSet . . . . . . . . . . . . . . . . . . 151Charset . . . . . . . . . . . . . . . . . . 145CommandTimeout . . . . . . . . . . . . . 136CommitAgentInsertedExceptions . . . . . 140
CSynchFile . . . . . . . . . . . . . . . . 133DBDumpFile . . . . . . . . . . . . . . . 130debug . . . . . . . 115, 123, 128, 133, 142, 149DetermineFullDayTimeOffStartEndPaidHours .
111expire . . . . . . . 114, 121, 127, 133, 142, 149FontSize . . . . . . . . . . . . . . . . . 138ForecastTimestep . . . . . . . . . . . . . 111fromAddress . . . . . . . . . . . . . . . 153HelpFile . . . . . . . . . . . . . . . . . . 136HideMessagesForNotWorkingAgents. . . 111HideNames . . . . . . . . . . . . . . . . 144HideTerminatedAgents . . . . . . . . 136, 144Host . . . . . . . . . . . . . . . . . . . . 153IncreaseMemory2. . . . . . . . . . . . . 124LocalTimezones. . . . . . . . . . . . . . 137MaxAuditReports . . . . . . . . . . . 111, 116MaxCacheSize . . . . . . . . . . . . 110, 117MaxScenarioCacheSize . . . . . . . 112, 118messagefile . . . . . . . . . 114, 122, 127, 134MinCacheSize . . . . . . . . . . . . 110, 117MinThreadPoolSize . . . . . . . . . . . . 119MultiSiteActivitiesEnabled . . . . . . . . 125multithread . . . . . . . . . . . . . . 143, 150multithreaded . . . . . . . . 114, 122, 128, 134NameOrder . . . . . . . . . 125, 136, 144, 151NoCallsServiceLevel . . . . . . . . . . . 113NoPerformanceInSchedule . . . . . . . . 144OwnerCaption. . . . . . . . . . . . . . . 146OwnerVisible . . . . . . . . . . . . . . . 146PageCharSet . . . . . . . . . . . . . . . 145Password . . . . . . . . . . . . . . . . . 153pollTimer . . . . . . . . . . . . . . . . . 151Port . . . . . . . . . . . . . . . . . . . . 153Proxy . . . . . . . . . . . . . . . . . . . 119ReasonCodeKeyName . . . . . . . . . . 131ReasonCodeWaitTime . . . . . . . . . . 132RefreshTime . . . . . . . . . . . . . . . 138RevertDiffCalculation . . . . . . . . . . . 147ScheduleLookAheadMinutes . . . . . . . 132segment. . . . . . 114, 121, 127, 134, 143, 150SeparateStartEndForEachDay . . . . . . 141ServerURL . . . . . . . . . . . . . . . . 147ServiceLevelMethod . . . . . . . . . . . 112SessionTimeout . . . . . . . . . . . . . . 119ShowActualHeadcount . . . . . . . . . . 147ShowAllActivities . . . . . . . . . . . . . 145SOAPTimeout. . .109, 120, 126, 137, 141, 152SplitCoverage . . . . . . . . . . . . . . . 116SplitMode . . . . . . . . . . . . . . . . . 116SplitMS . . . . . . . . . . . . . . . . . . 117standard. . . . . . 115, 122, 128, 134, 143, 150SynchronizeUnassignedAgents. . . . . . 132ThreadPoolDownsizeTimeout. . . . . . . 119ThreadPoolUpsizeTimeout . . . . . . . . 119trace. . . . . . . . . . 115, 128, 134, 143, 150
Index
332 Workforce Management 8.0
TrackAhead . . . . . . . . . . . . . . . . 152TrackBack . . . . . . . . . . . . . . . . . 152TradeOnlyInsideTeam . . . . . . . . . . . 148User . . . . . . . . . . . . . . . . . . . . 153valid values . . . . . . . . . . . . . . . . 108
false = no = 0 . . . . . . . . . . . . . 108true = yes = 1 . . . . . . . . . . . . . 108
verbose . . . . . 113, 121, 127, 135, 144, 151VirtualDirectory . . . . . . . . . . . . . . 120x-FontPath. . . . . . . . . . . . . . . . . 146x-LogAgentEventTrace . . . . . . . . . . 129x-LogConfigServerConnectionTrace . . . 129x-LogConfigServerTrace . . . . . . . . . 129x-LogSynchronizationTrace . . . . . . . . 130x-LogWFMServerTrace . . . . . . . . . . 130x-ScheduleLogPath . . . . . . . . . . . . 123x-ScheduleMaxLogs. . . . . . . . . . . . 124x-SwordTrace . . . . . . . . . . . . . . . 124
Options tab . . . . . . . . . . . . . . . . . . 107overhead, nonworking . . . . . . . . . . . . 269overhead, planned . . . . . . . . . . . . . . 260overhead, unplanned. . . . . . . . . . . . . 269overhead, working . . . . . . . . . . . . . . 260
PPerformance
deployment planning . . . . . . . . . . . . 66intraday statistics . . . . . . . . . . . . . . 36monitoring for contact center . . . . . . . . 36setting alerts . . . . . . . . . . . . . . . . . 66What-If calculator . . . . . . . . . . . . . . 36what-ifs . . . . . . . . . . . . . . . . . . . 66
planned overhead . . . . . . . . . . . . . . 260Planner
using the WFM calendar . . . . . . . . . . 22Planning
your deployment. . . . . . . . . . . . . . . 52Policies
overview . . . . . . . . . . . . . . . . . . . 60Port Number
changing manually . . . . . . . . . . . . . 90Preferences
in scheduling . . . . . . . . . . . . . . . . 30Presentation Layer . . . . . . . . . . . . . . 43Processor Balancing, configuration . . . . . 215Processor Balancing, support . . . . . . . . 213Profiles
defined. . . . . . . . . . . . . . . . . . . . 62deployment planning . . . . . . . . . . . . 62using in schedules. . . . . . . . . . . . 29, 65
QQuality of Service Statistic
settings for . . . . . . . . . . . . . . . . 161
RReal-Time Adherence
deployment planning . . . . . . . . . . . . 69tracking for agents . . . . . . . . . . . . . 36troubleshooting . . . . . . . . . . . . . . 242
Reason Codesusing . . . . . . . . . . . . . . . . . . . . 56using with Workforce Management . . . . . 36
Registeringserver host computers . . . . . . . . . . . 73
ReportGenerationTimeout . . . . . . . . . . 151Reports
format for exported reports . . . . . . . . 242in WFM Web . . . . . . . . . . . . . . . . 37Reports Server no longer used . . . . . . 101
Restoringyour database. . . . . . . . . . . . . . . 195
Rotating Patternsdeployment planning . . . . . . . . . . . . 64
SScenarios
using in forecasts . . . . . . . . . . . . . . 26Schedule State Groups
deployment planning . . . . . . . . . . . . 59Schedule Trading
overview . . . . . . . . . . . . . . . . . . 32Schedule Validation Overview . . . . . . . . 243Schedules . . . . . . . . . . . . . . . . . . 243
checking for problems . . . . . . . . . . 243optimizing . . . . . . . . . . . . . . . . . . 28pending changes . . . . . . . . . . . . . . 22troubleshooting errors and warnings . . . 243troubleshooting for . . . . . . . . . . . . 242troubleshooting over- and understaffing . 244validating . . . . . . . . . . . . . . . . . 243
Schedulingagent preferences. . . . . . . . . . . . . . 30agent-centric . . . . . . . . . . . . . . . . 62centralized for multiple sites . . . . . . . . 30considerations . . . . . . . . . . . . . . . 65creating blank schedules . . . . . . . . 29, 65exceptions . . . . . . . . . . . . . . . . . 24flexible shifts . . . . . . . . . . . . . . . . 30intra-day scheduling . . . . . . . . . . . . 32marked time. . . . . . . . . . . . . . . . . 32multisite . . . . . . . . . . . . . . . . . . . 30optimization . . . . . . . . . . . . . . . . . 30overview . . . . . . . . . . . . . . . . . . 28profile . . . . . . . . . . . . . . . . . . . . 65profile schedules . . . . . . . . . . . . . . 29
Index
Administrator’s Guide 333
schedule trading . . . . . . . . . . . . . . . 32setting fixed start times . . . . . . . . . . . 31using task sequences . . . . . . . . . . . . 31
SCISee Solution Control Interface
Securityoverview . . . . . . . . . . . . . . . . . . . 22schedule changes . . . . . . . . . . . . . . 22
security certificates,expired . . . . . . . . . 236Service Factor
configuring statistic . . . . . . . . . .161, 165Service Level - Scheduled metric . . . 276, 287Service Objectives
forecasting staffing . . . . . . . . . . . . . 64setting in forecasts . . . . . . . . . . . . . 26
Services Layerarchitecture . . . . . . . . . . . . . . . . . 46
set up e-mail notifications . . . . . . . . . . 207Shifts
defined. . . . . . . . . . . . . . . . . . 31, 62deployment planning . . . . . . . . . . . . 62scheduling flexible . . . . . . . . . . . . . . 30
Sitesdeployment planning for . . . . . . . . . . . 54troubleshooting missing . . . . . . . . . . 243
Skillsconfiguring. . . . . . . . . . . . . . . . . . 52deployment planning . . . . . . . . . . . . 58matching to activities . . . . . . . . . . . . 59maximum simultaneous users. . . . . . . . 55
Software Requirements . . . . . . . . . . . 72Genesys Framework . . . . . . . . . . . . 72
Solution Control Interfacecontrolling Workforce Management using . . 21starting with . . . . . . . . . . . . . . . . 178starting Workforce Management using . . 178stopping Workforce Management using. . 183
square brackets . . . . . . . . . . . . . . . 326Staffing
calculating . . . . . . . . . . . . . . . . . . 64Starting
WFM Builder. . . . . . . . . . . . . . . . 178WFM Configuration Utility . . . . . . . . . 180WFM Data Aggregator . . . . . . . . . . 178WFM Database Utility . . . . . . . . . . . 181WFM Reports Server . . . . . . . . . . . 178WFM Server . . . . . . . . . . . . . . . . 178WFM Web . . . . . . . . . . . . . . . . . 182with Solution Control Interface . . . . . . 178
Startup PrioritySolution object configuration . . . . . . . . 89
Stat ServerAbandonment statistic . . . . . . 160, 163, 164configuring in Configuration Manager . . . 157configuring statistics . . . . . . . . . . . . 155creating new statistics . . . . . . . . . . . 158
Handle Time statistic . . . . . . . . . . . 162Interaction Volume statistic . . . . . . . . 160Quality of Service statistic. . . . . . . . . 161recommended statistics . . . . . . . . . . 160system requirements . . . . . . . . . . . . 72TimeProfile configuration . . . . . . . . . 156TimeRange configuration . . . . . . . . . 156using for forecasting . . . . . . . . . . . . 26WFM connections to . . . . . . . . . . . . 47
Statisticsconfiguring AverTimeBeforeAnswering . . 162,
165configuring Service Factor . . . . . . 161, 165configuring TotalNumberCallsDistrib . 161, 164deployment planning for . . . . . . . . . . 55tracking with Data Aggregator . . . . . . . 56
StoppingWFM Builder . . . . . . . . . . . . . . . 185WFM Configuration Utility . . . . . . . . . 184WFM Data Aggregator . . . . . . . . . . 185WFM Database Utility . . . . . . . . . . . 184WFM Reports Server . . . . . . . . . . . 185WFM Server . . . . . . . . . . . . . . . 185Windows Services . . . . . . . . . . . . 186Windows services. . . . . . . . . . . . . 104
Synchronizationdeployment planning . . . . . . . . . . . . 60troubleshooting . . . . . . . . . . . . . . 240
System RequirementsConfiguration Manager . . . . . . . . . . . 72Configuration Server . . . . . . . . . . . . 72DB Server . . . . . . . . . . . . . . . . . . 72Genesys Framework components . . . . . 72Management Layer . . . . . . . . . . . . . 72software . . . . . . . . . . . . . . . . . . . 72Stat Server . . . . . . . . . . . . . . . . . 72T-Server. . . . . . . . . . . . . . . . . . . 72
TTask
Enable Emergency Data Aggregator Info Dump . . . . . . . . . . . . . . . . . . . 58
Task Sequencesoverview . . . . . . . . . . . . . . . . . . 31
Teamsdeployment planning for . . . . . . . . . . 54
Templatesimporting . . . . . . . . . . . . . . . . . . 75using in forecasts . . . . . . . . . . . . . . 64
third party software required . . . . . . . . . .72Time Off
configuring types . . . . . . . . . . . . . . 63overview . . . . . . . . . . . . . . . . . . 23planning time-off rules . . . . . . . . . . . 60setting for contracts . . . . . . . . . . . . . 61

Index
334 Workforce Management 8.0
Time Zonesconfiguring. . . . . . . . . . . . . . . . . . 52deployment planning . . . . . . . . . . . . 60
Time-Off Rulesdeployment planning . . . . . . . . . . . . 60
TimeProfileconfiguring Stat Server . . . . . . . . . . 156
TimeRangeconfiguring Stat Server . . . . . . . . . . 156
Tomcatas part of WFM architecture . . . . . . . . . 47configuring for WFM Web . . . . . . . . . . 97download information . . . . . . . . . . . . 97installing . . . . . . . . . . . . . . . . . . . 95troubleshooting . . . . . . . . . . . . . . 237versions . . . . . . . . . . . . . . . . . . . 44web server as container . . . . . . . . . . . 43
Total Calls Distributedconfiguring statistic . . . . . . . . . .161, 164
Troubleshootingactive interaction data disappears. . . . . 244agents not scheduled . . . . . . . . . . . 242AHT calculation . . . . . . . . . . . . . . 243applets do not load in WFM Web . . . . . 238Blank screen when attempt to open WFM Web
237cannot log in to WFM Web . . . . . . . . 239DA server name not found . . . . . . . . 237exported reports format . . . . . . . . . . 242host not found . . . . . . . . . . . . . . . 237inaccurate forecasts . . . . . . . . . . . . 244log files . . . . . . . . . . . . . . . . . . 245long WFM Configuration Utility response times
241MDAC version . . . . . . . . . . . . . . . 237missing agents or sites . . . . . . . . . . 243missing Intraday statistics . . . . . . . . . 241no 24-hour schedule graph display . . . . 240no data source connection . . . . . . . . 237real-time adherence . . . . . . . . . . . . 242schedule errors and warnings . . . . . . . 243schedule over- and understaffing . . . . . 244synchronization takes too long . . . . . . 240timeout during database update. . . . . . 240using log files . . . . . . . . . . . . . . . 245WFM Configuration Utility error messages 24 5WFM Data Aggregator does not start . . . 237WFM Server cannot be reached . . . . . 239WFM Web does not open . . . . . . .238, 239
trusted certificate expiration . . . . . . . . . 236T-Server
system requirements . . . . . . . . . . . . 72type styles
conventions . . . . . . . . . . . . . . . . 325italic . . . . . . . . . . . . . . . . . . . . 325monospace . . . . . . . . . . . . . . . . 326
typographical styles . . . . . . . . . . . . . 325
UUnable to Connect to Data Source . . . . . 237Uninstalling
stopping Windows services . . . . . . . . 104Workforce Management . . . . . . . . . 104
unplanned overhead . . . . . . . . . . . . . 269Updating
your database. . . . . . . . . . . . . . . 193URL
obtaining for WFM Web . . . . . . . . . . 182User Security
deployment planning for . . . . . . . . . . 53overview . . . . . . . . . . . . . . . . . . 22
Usersconfiguring . . . . . . . . . . . . . . . . . 52
Utilitiesarchitecture . . . . . . . . . . . . . . . . . 43
VVacation
see Time Offvalid values for an option . . . . . . . . . . 108Validating
Schedules. . . . . . . . . . . . . . . . . 243Validating Schedules. . . . . . . . . . . . . 243version numbering, document . . . . . . . . 325
WWAR file
installing for WFM Web . . . . . . . . . . . 97Web Servers . . . . . . . . . . . . . . . . . .43WebSphere
configuring for WFM Web. . . . . . . . . . 99WFM
configuration layer integration . . . . . . . 21configuring Tomcat for . . . . . . . . . . . 97
WFM Application Wizardconfiguring using . . . . . . . . . . . . . . 85
WFM Builder . . . . . . . . . . . . . . . . . .46configuring Windows Service . . . . . . . 179installing. . . . . . . . . . . . . . . . . . . 93starting . . . . . . . . . . . . . . . . . . 178stopping . . . . . . . . . . . . . . . . . . 185stopping service. . . . . . . . . . . . . . 186
WFM Builder Options TabClient section . . . . . . . . . . . . . . . 120Identity section . . . . . . . . . . . . . . 121Log section . . . . . . . . . . . . . . . . 121Options section . . . . . . . . . . . . . . 124
Index
Administrator’s Guide 335
WFM Builder Wizardconfiguring using . . . . . . . . . . . . . . 84
WFM Configuration Utilityconfiguring. . . . . . . . . . . . . . . . . . 85installing . . . . . . . . . . . . . . . . . . . 94overview . . . . . . . . . . . . . . . . . 44, 52slow response times. . . . . . . . . . . . 241starting. . . . . . . . . . . . . . . . . . . 180stopping . . . . . . . . . . . . . . . . . . 184troubleshooting . . . . . . . . . . . . . . 245
WFM Configuration Utility Options TabLog section . . . . . . . . . . . . . . . . 133OptionalSettings section. . . . . . . . . . 138Options section . . . . . . . . . . . . . . 135
WFM Daemoninstallation . . . . . . . . . . . . . . . . . 102Notifications . . . . . . . . . . . . . . . . . 34setup. . . . . . . . . . . . . . . . . . . . . 88Wizard . . . . . . . . . . . . . . . . . . . . 83
WFM Daemon Wizardconfiguring using . . . . . . . . . . . . . . 83
WFM Data Aggregator . . . . . . . . . . . . 46configuring Windows Service . . . . . . . 179installing . . . . . . . . . . . . . . . . . . . 94starting. . . . . . . . . . . . . . . . . . . 178stopping . . . . . . . . . . . . . . . . . . 185stopping service . . . . . . . . . . . . . . 186troubleshooting . . . . . . . . . . . .237, 244
WFM Data Aggregator Options TabClient section . . . . . . . . . . . . . . . 126Identity section . . . . . . . . . . . . . . 126Log section . . . . . . . . . . . . . . . . 127Options section . . . . . . . . . . . . . . 130
WFM Data Aggregator Wizardconfiguring using . . . . . . . . . . . . . . 81
WFM Database Utilitybacking up . . . . . . . . . . . . . . . . . 195cleaning up your data . . . . . . . . . . . 195configuring. . . . . . . . . . . . . . . . . . 85configuring new database . . . . . . . . . . 91creating database . . . . . . . . . . . . . 188installing . . . . . . . . . . . . . . . . . . . 91migrating your data . . . . . . . . . . . . 192overview . . . . . . . . . . . . . . . . 44, 187restoring . . . . . . . . . . . . . . . . . . 195running . . . . . . . . . . . . . . . . . . . 91starting. . . . . . . . . . . . . . . . . . . 181stopping . . . . . . . . . . . . . . . . . . 184updating database version . . . . . . . . 193
WFM Reports Server. . . . . . . . . . . . . 46configuring Windows Service . . . . . . . 179starting. . . . . . . . . . . . . . . . . . . 178stopping . . . . . . . . . . . . . . . . . . 185stopping service . . . . . . . . . . . . . . 186
WFM Server . . . . . . . . . . . . . . . . . 46configuring Windows Service . . . . . . . 179
installing. . . . . . . . . . . . . . . . . . . 92starting . . . . . . . . . . . . . . . . . . 178stopping . . . . . . . . . . . . . . . . . . 185stopping service. . . . . . . . . . . . . . 186troubleshooting . . . . . . . . . . . . . . 239
WFM Server Options TabCalendarService section . . . . . . . . . 110Client section . . . . . . . . . . . . . . . 109ConfigService section. . . . . . . . . . . 110ForecastService section . . . . . . . 110, 111Identity section . . . . . . . . . . . . . . 113Log section . . . . . . . . . . . . . . . . 113PerformanceService section . . . . . . . 112ScheduleService section . . . . . . . . . 116Server section. . . . . . . . . . . . . . . 119
WFM Server Wizardconfiguring using . . . . . . . . . . . . . . 80
WFM Solutionconfiguring . . . . . . . . . . . . . . . . . 89
WFM Webinstalling. . . . . . . . . . . . . . . . . . . 95obtaining URL. . . . . . . . . . . . . . . 182reports in . . . . . . . . . . . . . . . . . . 37starting . . . . . . . . . . . . . . . . . . 182troubleshooting . . . . . . . . . . . . 238, 239WAR file. . . . . . . . . . . . . . . . . . . 97WebSphere configuration . . . . . . . . . . 99
WFM Web for Agentsoverview . . . . . . . . . . . . . . . . . . 46
WFM Web for Supervisorsoverview . . . . . . . . . . . . . . . . 44, 52
WFM Web Options TabAdherence section . . . . . . . . . . 138, 139Client section . . . . . . . . . . . . . . . 141Identity section . . . . . . . . . . . . . . 141Log section . . . . . . . . . . . . . . . . 142Options section . . . . . . . . . . . . . . 144Trading section . . . . . . . . . . . . . . 148
WFM Web Wizardconfiguring using . . . . . . . . . . . . . . 86
What-Iffor performance calculation . . . . . . . . . 36
Windows NT Serviceinstalling Data Aggregator . . . . . . . . 104
Windows Serviceconfiguring servers as . . . . . . . . . . 179stopping . . . . . . . . . . . . . . . . 104, 186
Workforce Managementand Management Layer. . . . . . . . . . . 21components overview. . . . . . . . . . . . 43connections to the Genesys Framework . . 46forecasting considerations . . . . . . . . . 64integration with the Genesys solution. . . . 20overview . . . . . . . . . . . . . . . . . . 19reports in . . . . . . . . . . . . . . . . . . 37scheduling considerations . . . . . . . . . 65
Index
336 Workforce Management 8.0
server startup priority . . . . . . . . . . . . 89uninstalling . . . . . . . . . . . . . . . . 104using reason codes with. . . . . . . . . . . 36
Workforce Management Configuration Wizards . 77
installing . . . . . . . . . . . . . . . . . . . 77Working Hours
planning for activities . . . . . . . . . . . . 61setting for contracts . . . . . . . . . . . . . 61
working overhead . . . . . . . . . . . . . . 260
XX Server . . . . . . . . . . . . . . . . . .95, 96x-ScheduleLogPath . . . . . . . . . . . . . 123x-ScheduleMaxLogs . . . . . . . . . . . . . 124